Page 1
• E-MU Proteus X LE
• Steinberg Cubase LE
• Steinberg WaveLab Lite
• Cakewalk Sonar LE
• Ableton Live Lite 4 for E-MU
• E-MU Proteus X LE
• Steinberg Cubase LE
• Steinberg WaveLab Lite
• Cakewalk Sonar LE
• Ableton Live Lite 4 for E-MU
TutorialsTutorials
Page 2

E-MU 1616/1616m/1212m PCI
Digital Audio System
Tutorials
• E-MU Proteus X LE
• Steinberg Cubase LE
• Steinberg WaveLab Lite
• Cakewalk Sonar LE
• Ableton Live Lite 4 for E-MU
© 2006 E-MU Systems
All Rights Reserved
Software Version: 1.8
E-MU World Headquarters
E-MU Systems
1500 Green Hills Road
Scotts Valley, CA 95066
USA
Asia Pacific, Africa, Middle East
Creative Technology Ltd
31 International Business Park
Creative Resource. Singapore 609921
SINGAPORE
Europe
Creative Labs
Ballycoolin Business Park
Blanchardstown
Dublin 15
IRELAND
E-MU Japan
Creative Media K K
Kanda Eight Bldg., 3F
4-6-7 Soto-Kanda
Chiyoda-ku, Tokyo 101-0021
JAPAN
2 Creative Professional
Page 3

Table of Contents
Introduction ..................................................................... 5
Before you Begin ................................................................................................................. 5
The Product Default Session ............................................................................................... 5
To Open PatchMix .................................................................................................... 5
Steinberg Cubase LE ......................................................... 6
1 - Setting up Cubase LE ..................................................................................................... 6
2 - Basic Multitrack Recording ............................................................................................ 7
Recording Path Block Diagram .......................................................................................... 9
Recording Mono Inputs as Stereo ...................................................................................... 9
3 - Export Audio Mixdown to Stereo ............................................................................... 10
4 - Running Proteus X LE VSTi from Cubase LE .............................................................. 12
To Record a MIDI Track ..........................................................................................14
To Record a MIDI Track on another MIDI Channel ............................................. 14
Steinberg WaveLab Lite .................................................. 15
1 - Setting up WaveLab Lite .............................................................................................. 15
2 - Turning on the PatchMix WAVE Send ........................................................................16
3 - Recording ..................................................................................................................... 17
Cakewalk Sonar LE ......................................................... 19
1 - Setting up Sonar LE ...................................................................................................... 19
2 - Basic Multitrack Recording .......................................................................................... 21
Record Path Block Diagram .............................................................................................. 23
3 - Export Audio to Stereo ................................................................................................ 24
4 - Running Proteus X LE VSTi from Sonar LE ................................................................ 26
To Record a MIDI Track ..........................................................................................29
To Record a MIDI Track on another MIDI Channel ............................................. 29
Ableton Live Lite 4 for E-MU ........................................... 30
1 - Setting up the Preferences ........................................................................................... 30
2 - Running Proteus X LE VSTi from Ableton Live Lite 4 ................................................ 33
3 - Recording Audio into Ableton Live Lite 4 ..................................................................38
E-MU 1616/1616
m
/1212
m
PCI Digital Audio System 3
Page 4

Recording & Monitoring with Effects .............................. 39
The Order of Effects .......................................................................................................... 39
Creating a Headphone Submix ........................................................................................ 40
To Create a Headphone Submix: ...........................................................................40
About PatchMix DSP ......................................................................................................... 41
About ASIO ........................................................................................................................ 41
IMPORTANT -> Activating ASIO ...................................................................................... 41
An Example: ............................................................................................................ 41
ASIO Channels are STEREO! ............................................................................................ 41
4 Creative Professional
Page 5
f Verify that both Aux 1
Insert slots are filled
with Send Inserts as
shown.
Tutorials
Introduction
This guide contains step-by-step walk-throughs of basic recording operations using
PatchMix DSP and a variety of popular software applications. We encourage you to
perform the steps on your computer as you read so that you become familiar with the
process. The first tutorial only takes about half an hour to complete, by which time you
should be comfortable with multitrack recording using your new Digital Audio System.
Once you’re up and recording, you can find detailed information on all aspects of
PatchMix DSP and your E-MU interface hardware in the pdf Owner’s Manual.
Before you Begin
•You should have already installed the E-MU hardware and software on your
computer according to the instructions in your printed “Getting Started” manual.
•You should hear the computer sounds coming out of the E-MU hardware and your
speakers when you play a CD or an MP3 using Windows Media Player. If not, make
sure your E-MU hardware is properly connected according to the diagrams in the
“Getting Started” and “Owner’s Manual”.
•A source of audio should be connected to the inputs (instr./tape/cd/MP3 player).
Tutorials
Introduction
Important Note:
E
If you need additional
help with the bundled
applications, please see
the “Technical Support
Information” pdf located
in the “Creative
Professional, Documents”
folder.
The Product Default Session
Before we begin, you should verify that the Product Default session is selected. This
session has everything connected for you. A Session is a stored connection/mixer setup.
You can create your own custom Sessions later on if you wish.
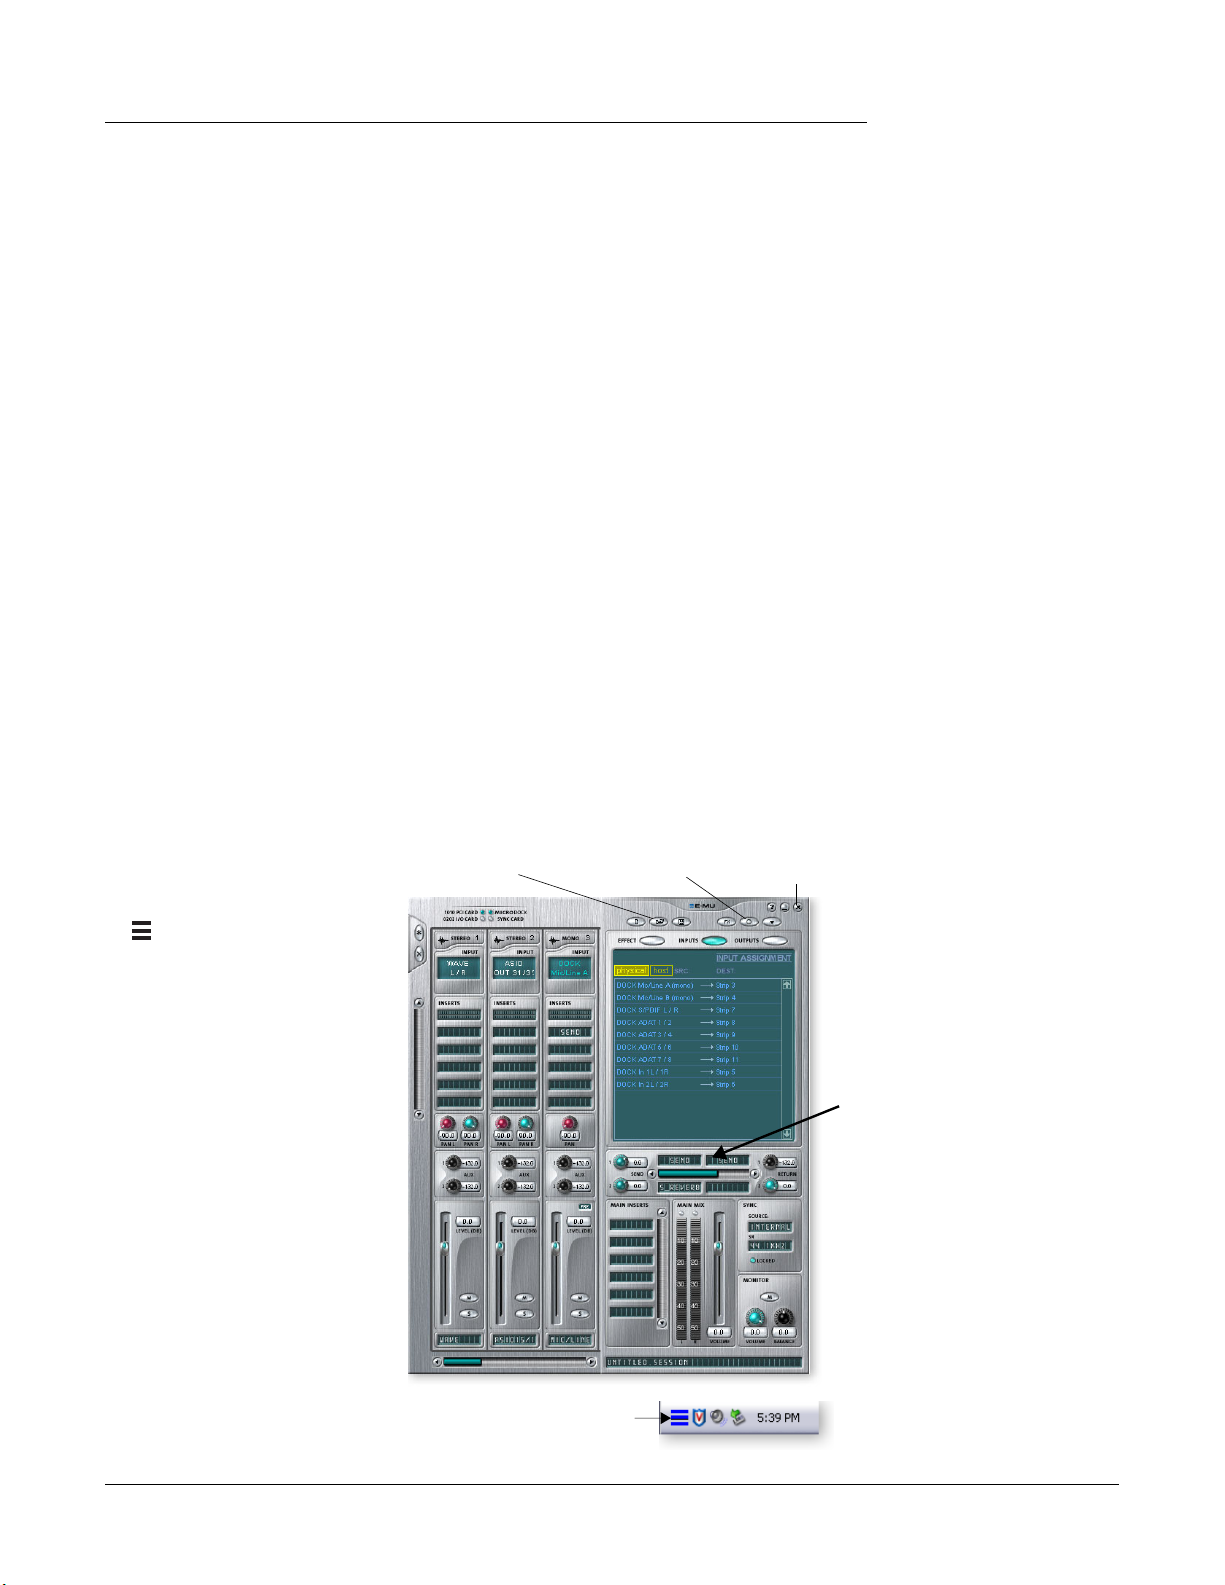
To Open PatchMix
1.
Left-click once on the E-MU
icon on the Windows
System Tray.
2.
The PatchMix DSP mixer
window appears.
The Product Default session
3.
contains two Aux 1 Sends as
shown at right. If you’re not
sure the Product Default
session is loaded, see the
“Comment” box in the
“Session Settings”.
4.
If the Product Default
session is NOT selected, click
once on the Open Session
button and select “Product
Default” from the list.
5.
Close PatchMix by clicking
the “X” in the upper right
corner.
OK, now we’re ready to
6.
proceed!
Open Session Close PatchMix
Click Here to Open PatchMix
Session Settings
E-MU 1616/1616
m
/1212
m
PCI Digital Audio System 5
Page 6
Tutorials
Steinberg Cubase LE
Steinberg Cubase LE
Steinberg Cubase LE is a 24-bit/96kHz multi-track audio/MIDI recorder with highquality effects, automation, virtual instruments (VSTi) and many other professional
features.
The following step-by-step tutorials are designed to get you recording as quickly as
possible. After you have finished the tutorial we encourage you to read the Cubase LE
pdf manual in order to learn about the many features of this powerful program. We
have provided a PatchMix DSP Session, as well as a special Cubase LE Project to go
along with the following tutorials.
1 - Setting up Cubase LE
Follow these instructions carefully to ensure that Cubase LE runs smoothly the first
time. Cubase LE will remember these settings, so you’ll only have to do this once.
1.
Open Cubase LE from the Start menu or by double-clicking the desktop icon. An
ASIO multimedia driver test dialog box will pop up to ask if you want to run the
ASIO test. Choose No, because you won’t be using the driver anyway.
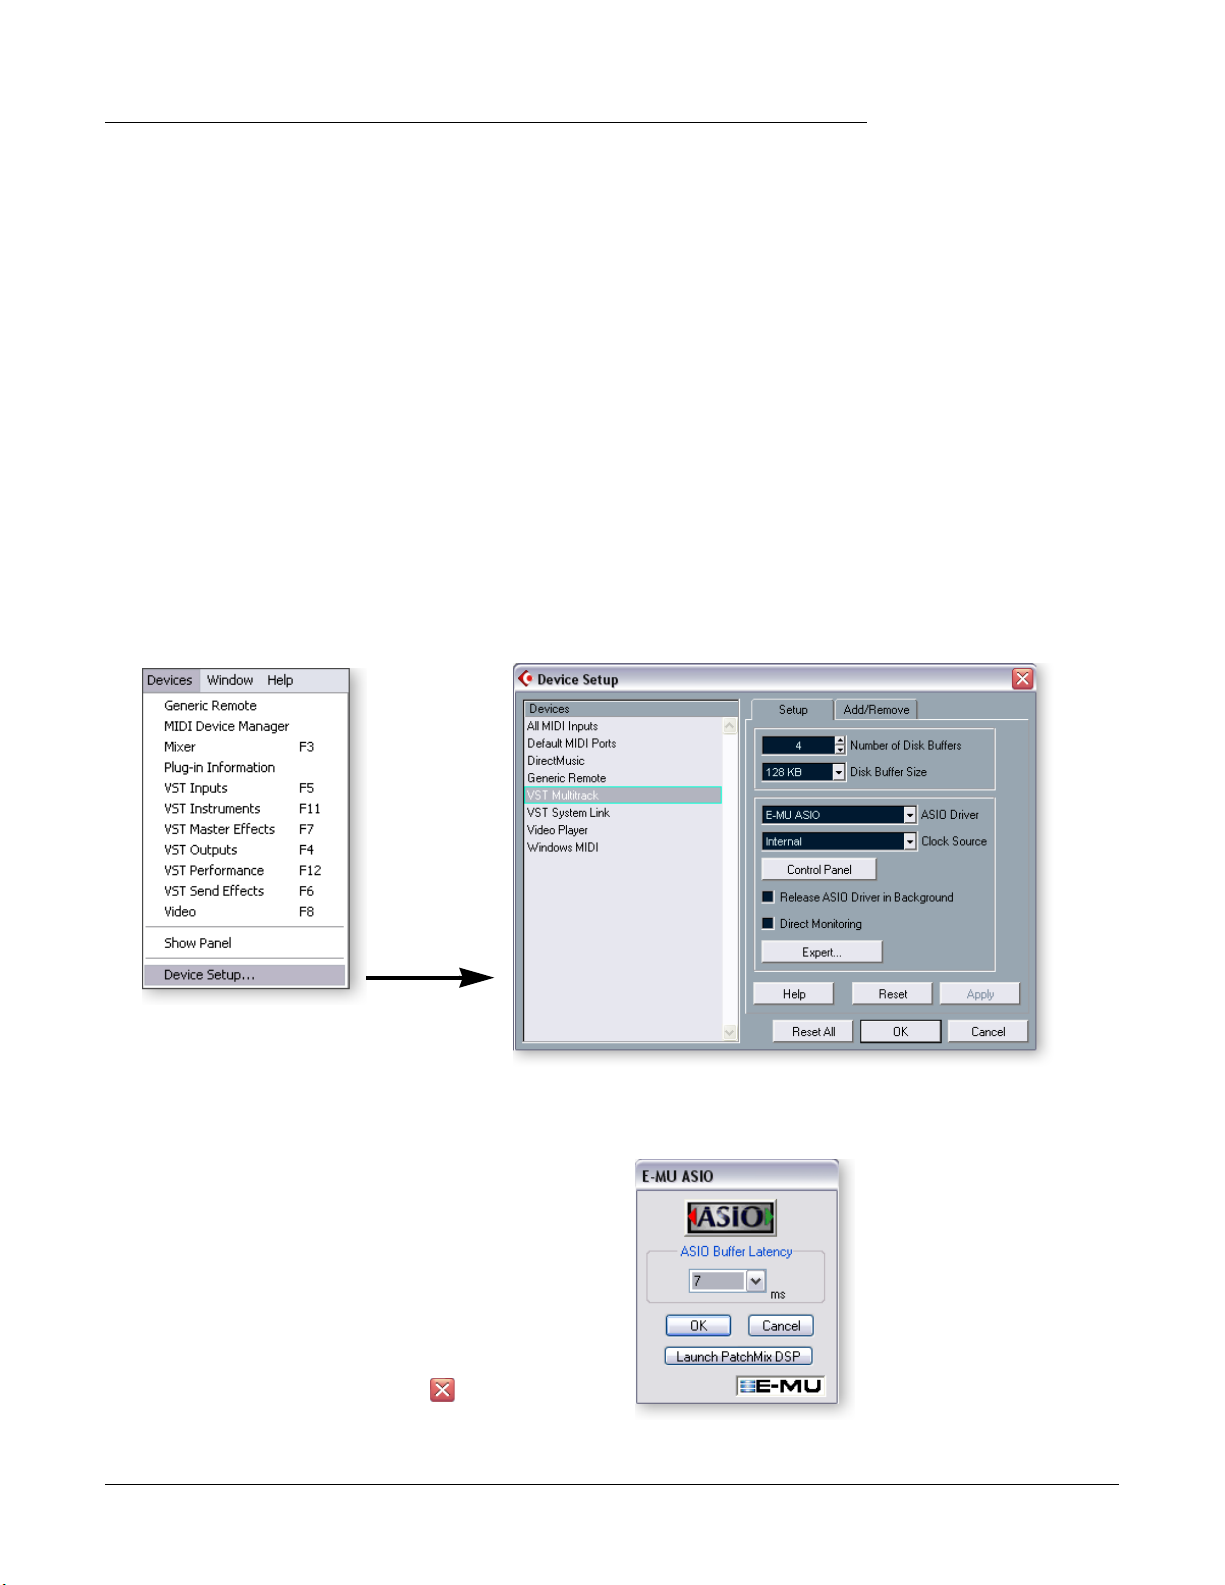
Select Device Setup… from the Devices menu.
2.
3.
Select VST Multitrack from the list and the following screen appears.
In the Setup section of the dialog box, select E-MU ASIO as the ASIO Driver. A pop
4.
up dialog box asks, “Do you want to switch the ASIO driver?” Select Switch .
Click the Control Panel button. The pop-up dialog
5.
box shown at right appears.
Set the ASIO Buffer Latency to 10 ms or less. A low
6.
latency setting is important to assure fast MIDI
response time and to minimize delay when
monitoring through Cubase. Click OK .
7.
Make sure the Direct Monitoring box is Unchecked .
8.
Close the Device Setup screen by selecting OK .
Close Cubase LE by clicking the button. (Close
9.
the application even if you’re going to continue with
the tutorials, in order to “lock-in” your Preference
settings.)
6 Creative Professional
Page 7
2 - Basic Multitrack Recording
In this tutorial, we’ll assume you’re using a single input or pair of inputs. For more
advanced recording, refer to the Cubase LE manual.
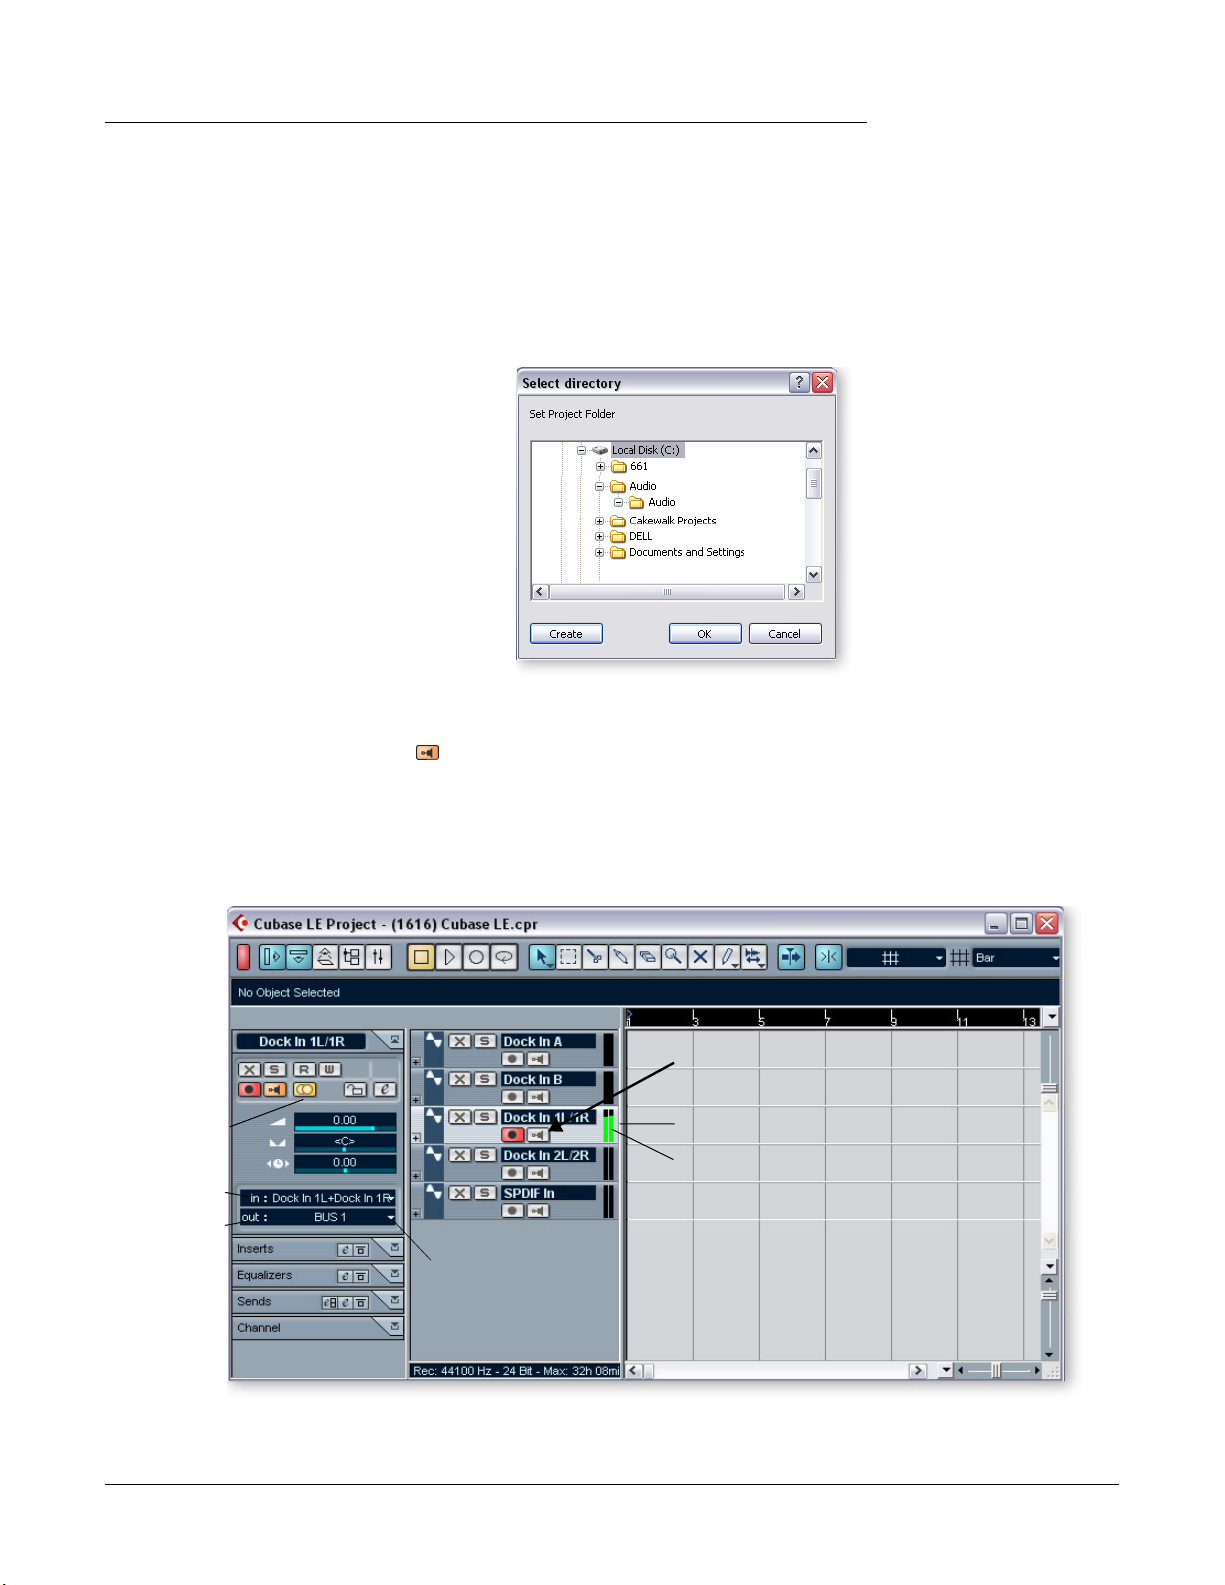
Select the Cubase LE Recording Template
Choose (1616) Cubase LE or (1212) Cubase LE from the Start -> Programs menu.
1.
The path is: (Program Files\Creative Professional\E-MU PatchMix
DSP\VST\Recording Templates). Cubase LE will launch and load the Project.
2.
A pop-up dialog box will appear, asking
you to Select Directory . Choose a
location on your hard disk where you
wish to store your audio files, then click
.
3.
The Cubase LE Project window shown
below appears. Five empty tracks are
ready to record. Each track is already
connected to an input or pair of inputs
in PatchMix.
4.
Select the Track that matches the inputs
you’ve connected to the Digital Audio
System by clicking on it. Note that the
selected track brightens as you select it.
In the example below, we are using Line Inputs 1L/1R.
Turn the Monitor button OFF for the track. You will be monitoring the input
5.
through PatchMix DSP which has zero-latency.
If you want to record in mono, set the track to mono by clicking the Mono/Stereo
6.
Selector button. Use the Left input of the stereo pair for mono recording.
OK
Tutorials
Steinberg Cubase LE
Tip: If you have two
f
or more hard disks, it’s
better to store audio files
on a disk that isn’t
running your OS.
The Cubase LE Project Window
Turn Monitor OFF
Mono/Stereo
Track Select
Track Input
Track Output
(
Bus 1 is routed to ASIO
15/16 in VST Outputs.)
You should see activity on the Track Input Meter when feeding a signal into the
7.
Digital Audio System. If not, open PatchMix to verify meter activity on the input
Selected Track
Track Input Meters
E-MU 1616/1616
m
/1212
m
PCI Digital Audio System 7
Page 8
Tutorials
Steinberg Cubase LE
channel (strip). Make sure the PatchMix input channel (strip) matches the Cubase
LE Track Input.
If your input signal is either too weak or too strong, adjust your input source or the
8.
Digital Audio System gain controls.
If you are using the front panel Mic/Line inputs, adjust the input gain knobs as
follows. If you can’t get a proper level from the line inputs, open the PatchMix DSP,
Session Settings by clicking the O button above the TV screen, then select I/O . If
your input signal is too strong, use +4 . If your input signal is too weak, use -10 .
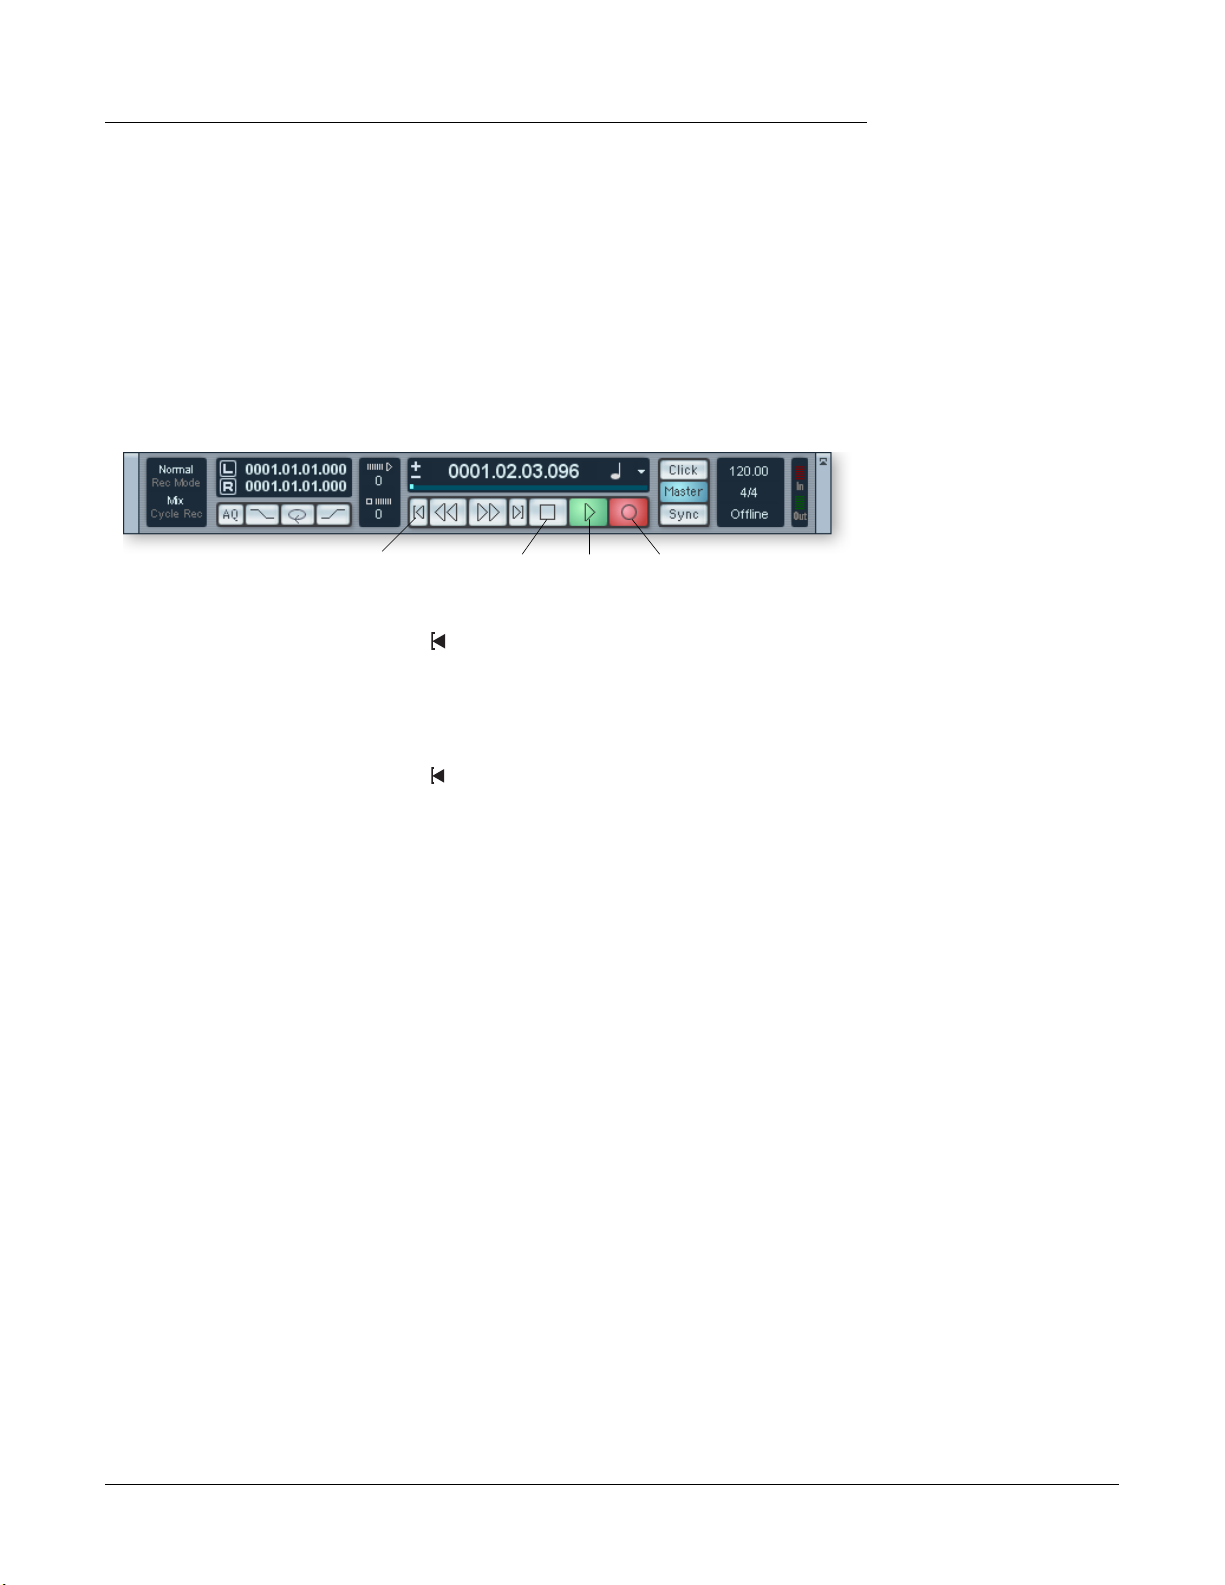
Record a Track
9.
Press Record on the Cubase LE Transport control and start playing.
RecordPlayStopReturn-To-Zero
10.
Press Stop when you’re finished recording the first track.
Press the R eturn-to-Zero button on the Cubase Transport.
11.
Press Play on the Cubase Transport to play back your track. The audio from Cubase
12.
comes back into PatchMix on the ASIO Out 15/16 Strip.
Record Another Track
Press the Return to Zero button on the Cubase Transport.
13.
Add another track by selecting Add Track , from the Project menu. Select Audio .
14.
A new audio track is added. Notice that the red Record Enable button has been
15.
automatically turned on in the new track. (If you wish to record multiple tracks
simultaneously, simply turn Record Enable on for each track you wish to record.)
16.
Again, set up the track to be either mono or stereo , then choose the
Track Input
routing. The input can be the same one you used for the first track or you can
choose a different input.
Save your Project
Choose
17.
name and location that will make the project easy to find later.
To record into Cubase LE, you must have a PatchMix session containing these 4 basic
components:
a) a
b) an
c) an
d) an
Save As…
from the Cubase LE file menu to save your project. Choose a
physical input strip
ASIO Send
on the physical input strip (so that Cubase can receive your input).
ASIO output strip
output assigned
to any physical output (to your monitor speakers).
for your input source.
for Cubase to output its audio back through PatchMix.
f
A quick way to record
additional tracks using
the same input is to
simply drag the Part
(audio region) you just
recorded down to
another location in the
Cubase Arrange window,
then hit Record again
and go.
8 Creative Professional
Page 9
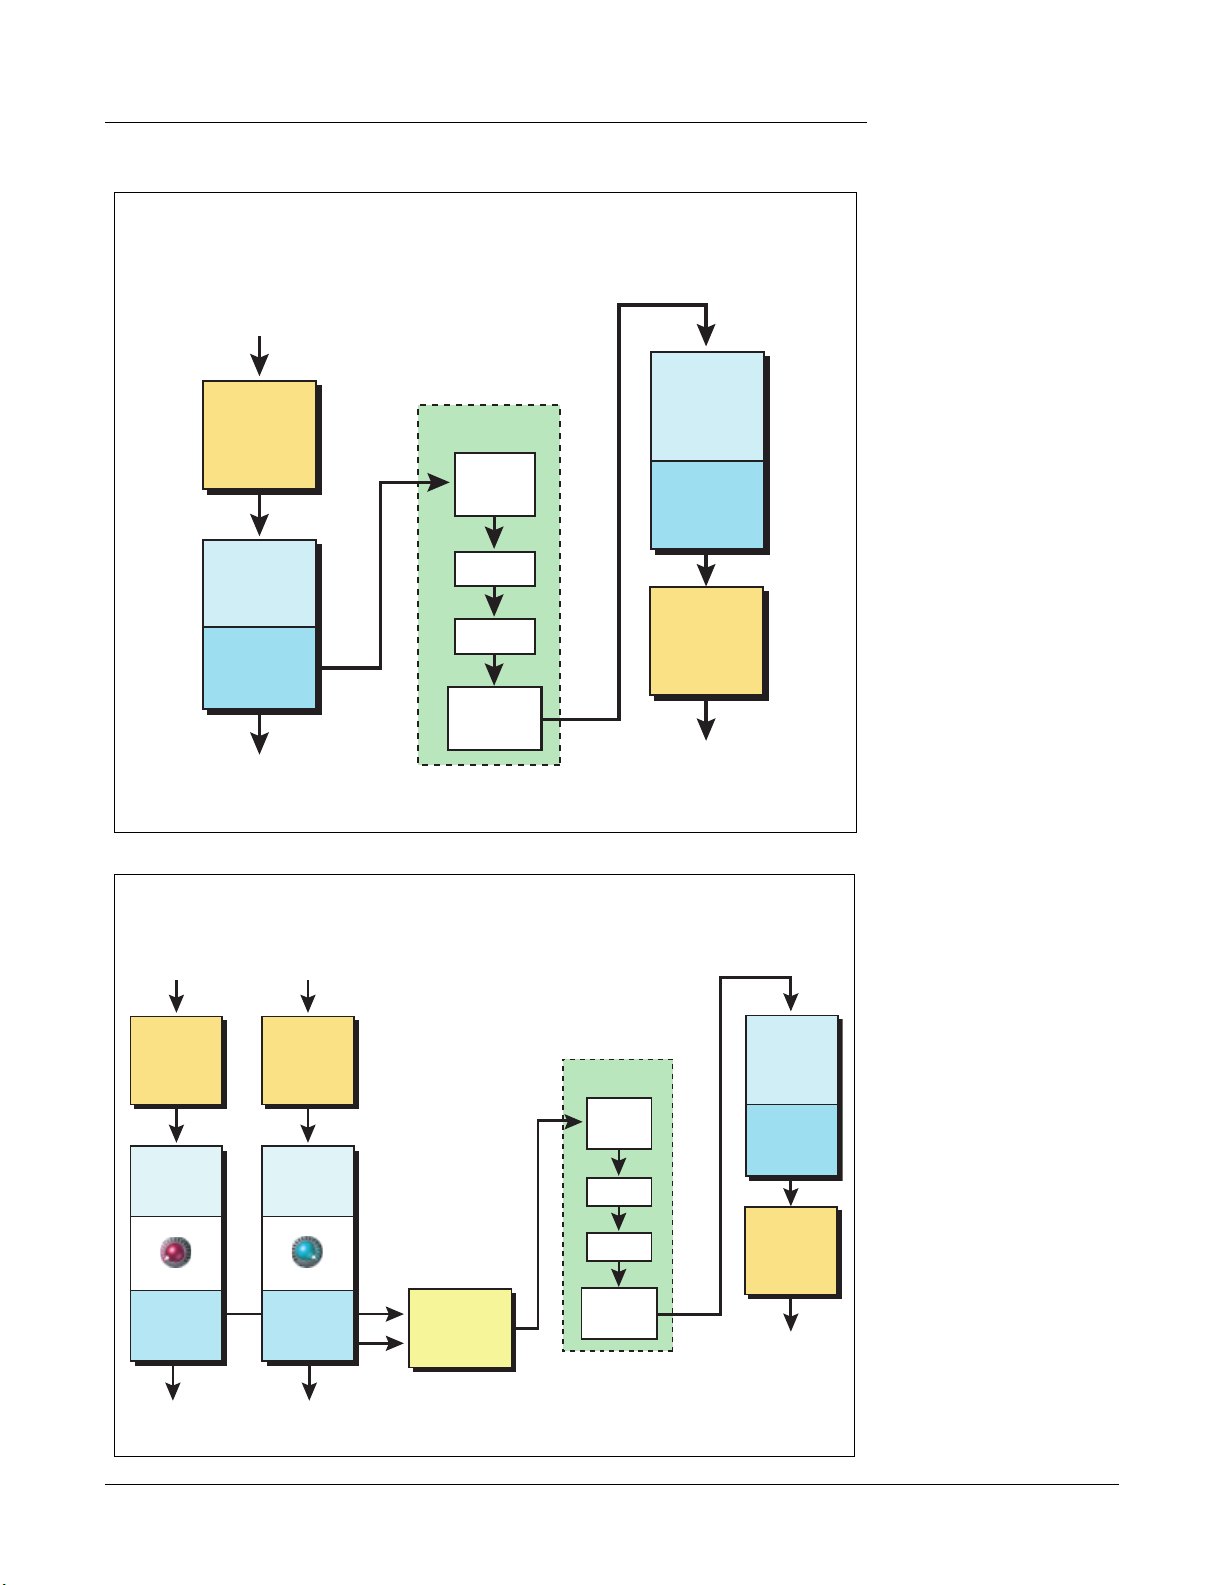
These diagrams may be helpful to visualize the signal routing path.
Recording Path Block Diagram
Tutorials
Steinberg Cubase LE
Mic or Line
Input
Digital
Audio
System
Hardware
PatchMix
Input
Strip
ASIO
Send
1/2
PatchMix
Main Mix
Cubase LE
VST
Inputs
Mixer
Track
VST
Outputs
ASIO
15/16
Monitor
PatchMix
Strip
ASIO Out
15/16
PatchMix
Main
Mix
Digital
Audio
System
Hardware
Monitor
Speakers
Recording Mono Inputs as Stereo
Hardware
PatchMix
Full RightFull Left
L
Aux Send 1
Mono
Input
Digital
Audio
System
Input
Strip
PanPan
Amount
Full
PatchMix
Main Mix
L
R
Combined
into Stereo
Aux Bus 1
ASIO Send
9/10
Cubase LE
Inputs
Stereo
Outputs
Mono
Input
Digital
Audio
System
Hardware
PatchMix
Input
Strip
Aux Send 1
Amount
Full
PatchMix
Main Mix
VST
Mixer
Track
VST
ASIO
15/16
Monitor
PatchMix
Strip
ASIO Out
15/16
PatchMix
Main
Mix
Digital
Audio
System
Hardware
Monitor
Speakers
E-MU 1616/1616m/1212m PCI Digital Audio System 9
Page 10
Tutorials
Steinberg Cubase LE
3 - Export Audio Mixdown to Stereo
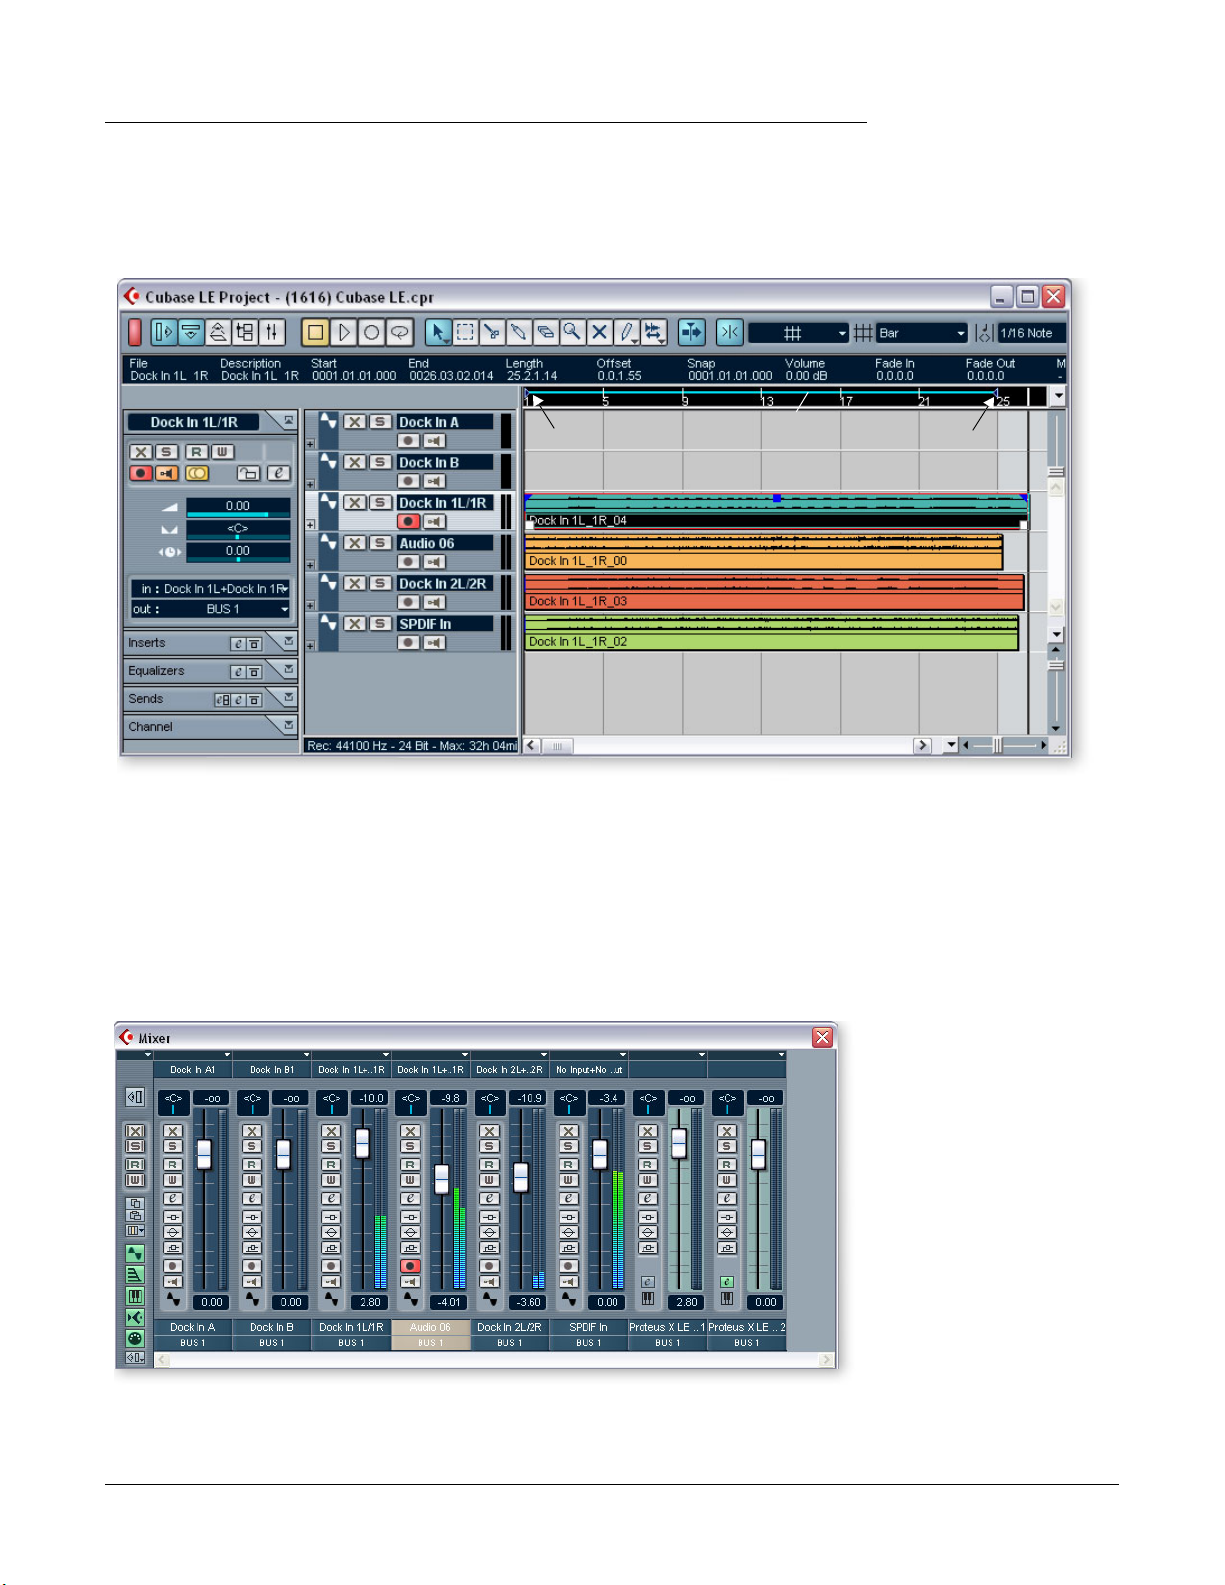
At some point, you’ll want to mix down your multitrack project to stereo. Cubase LE has
a special function (Audio Mixdown) that makes this job a breeze. The Cubase LE Project
window below shows a short song with 4 stereo tracks recorded.
Locator
1. Drag the Right Locator (little blue triangle) to the right. Keep dragging until the blue
Locator Bar encompasses the entire song or section you want to mix down. See
above.
Mix your Song
2. From the Cubase LE Project window, select Mixer from the Devices menu (or press
F3). The Cubase LE Track Mixer appears.
…to hereDrag from here…
3. Play your song and use the Faders to set the levels of each part. (Note: These moves
can be automated in Cubase LE. See the online documentation for details.)
10 Creative Professional
Page 11
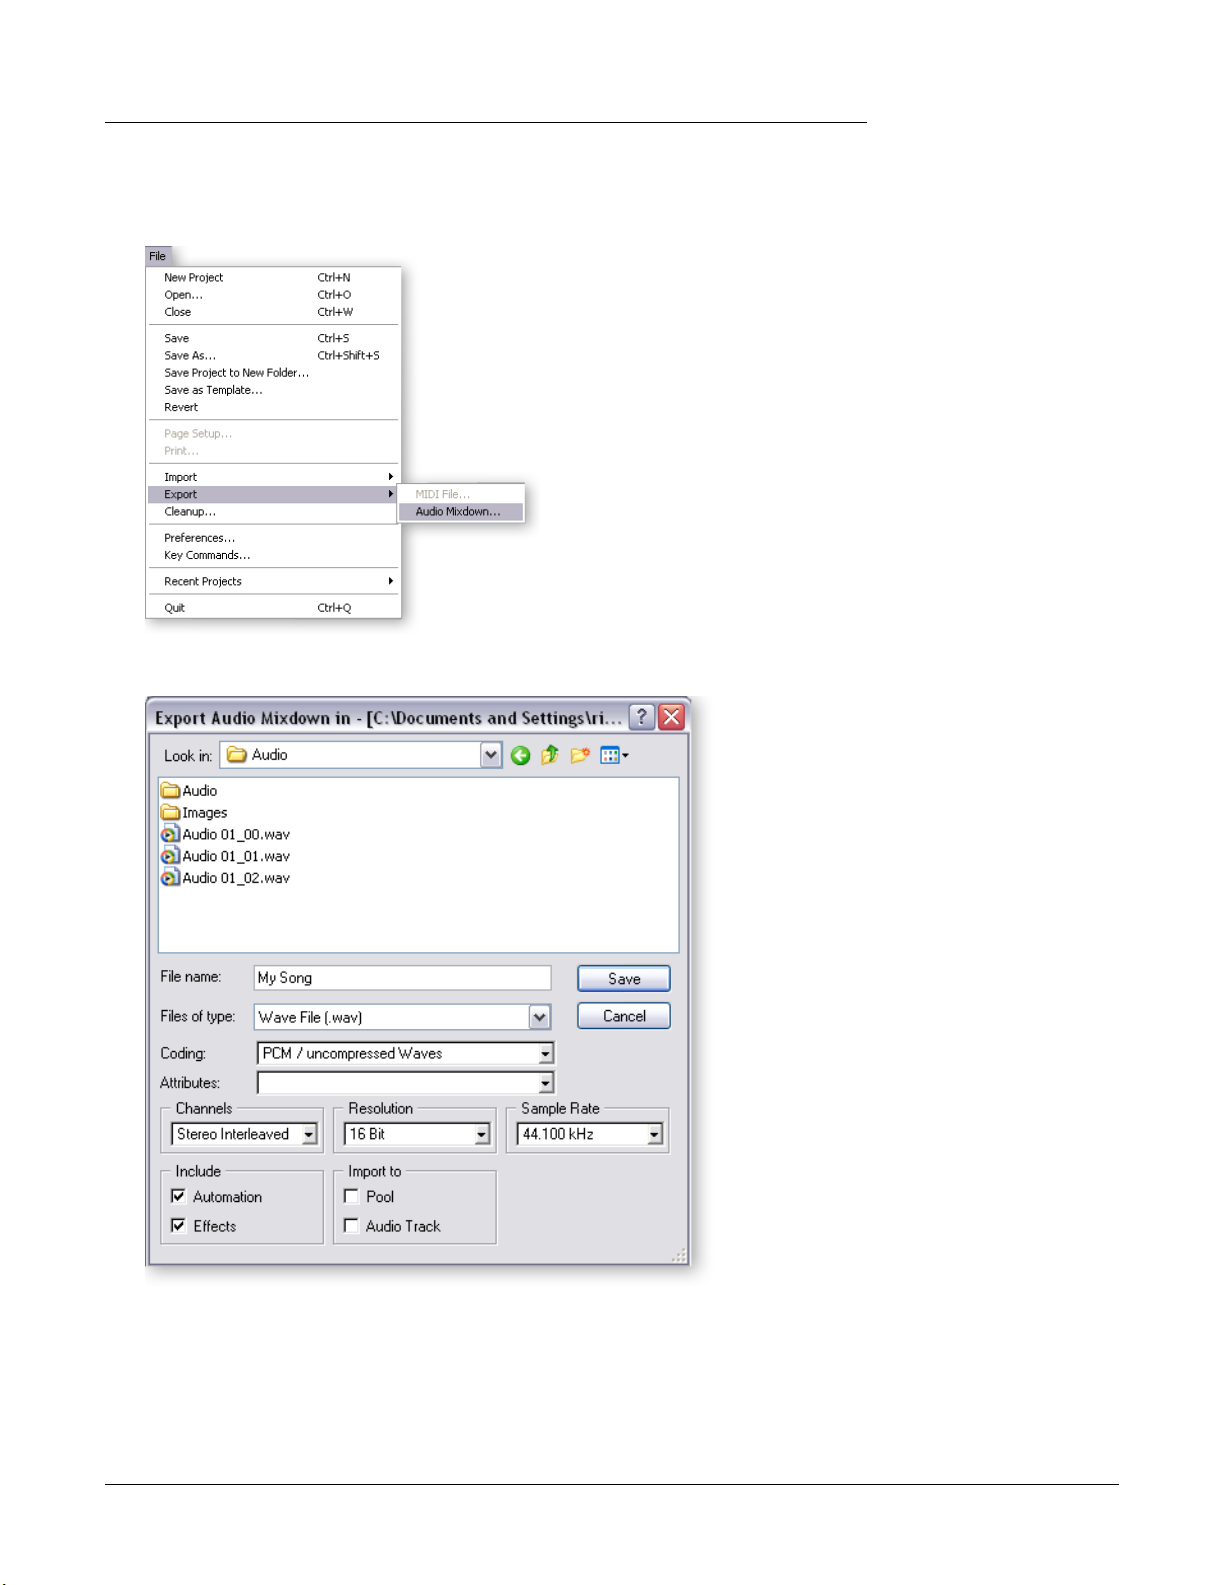
Export Audio
4. From the Cubase LE Project window, select Export from the File menu and choose
Audio Mixdown.
Tutorials
Steinberg Cubase LE
5. The following screen appears. First choose a location for your file.
6. Next choose the file type. Cubase LE can export as: WAVE (.wav), AIFF (.aif), MPEG
Layer 3 (.mp3), RealAudio G2 (.rm), or Windows Media Audio (.wma).
WAVE is a good choice for a master file since it is an uncompressed format. “Stereo
Interleaved” creates a single stereo file.
7. Select the desired Sample Rate and bit Resolution.
8. Press Save to process your Audio Mixdown.
E-MU 1616/1616m/1212m PCI Digital Audio System 11
Page 12
Tutorials
Steinberg Cubase LE
4 - Running Proteus X LE VSTi from Cubase LE
These instructions explain how to start Proteus X LE from within Cubase LE. If you have
a MIDI keyboard, you should connect it now using the setup diagrams and instructions
that came with your E-MU Digital Audio System. Without a keyboard, you will only be
able to play one note at a time using the mini keyboard on Proteus X LE.
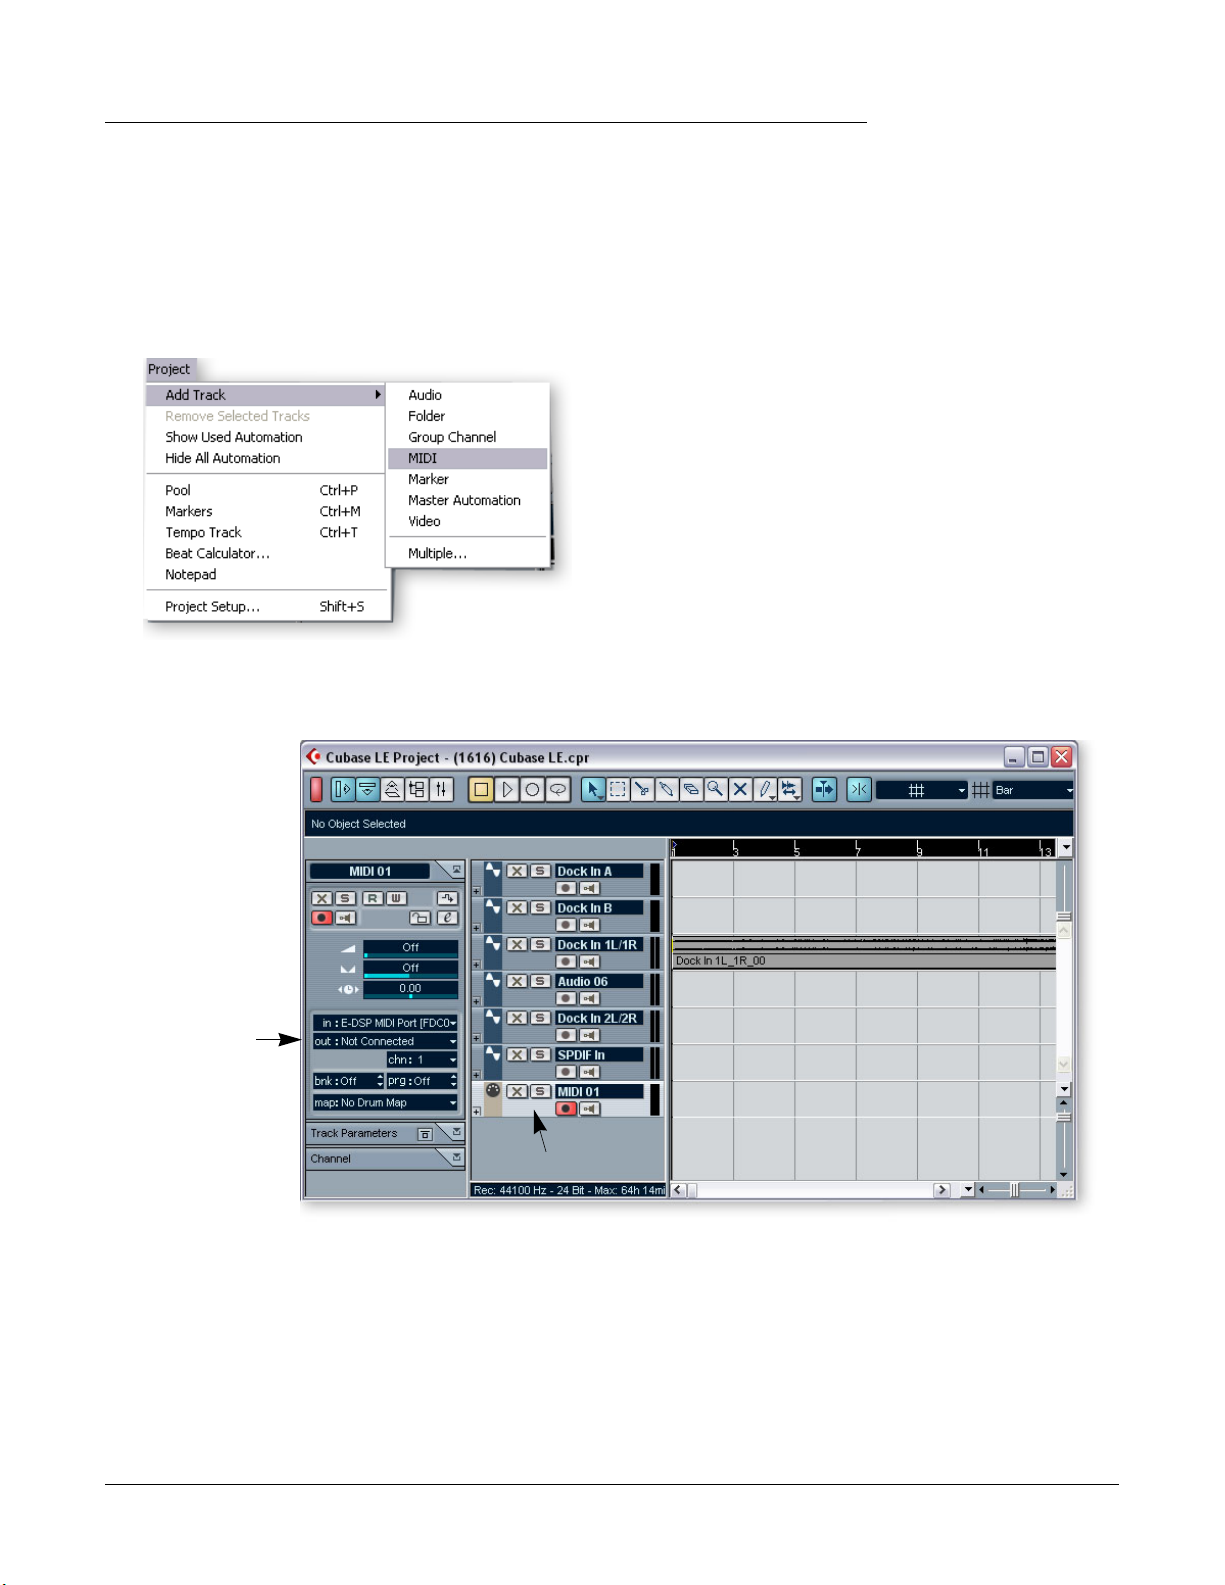
1. From the Cubase LE Project window, select Add Track from the Project menu and
choose MIDI Track.
E These instructions also
apply to Proteus X or
Emulator X.
2. The Cubase Project Window should now look like this with one MIDI track.
Select
ProteusXLE
MIDI Track
Inspector Area
3. Click on the Devices menu pull-down and select VST Instruments (or press F11).
12 Creative Professional
Page 13
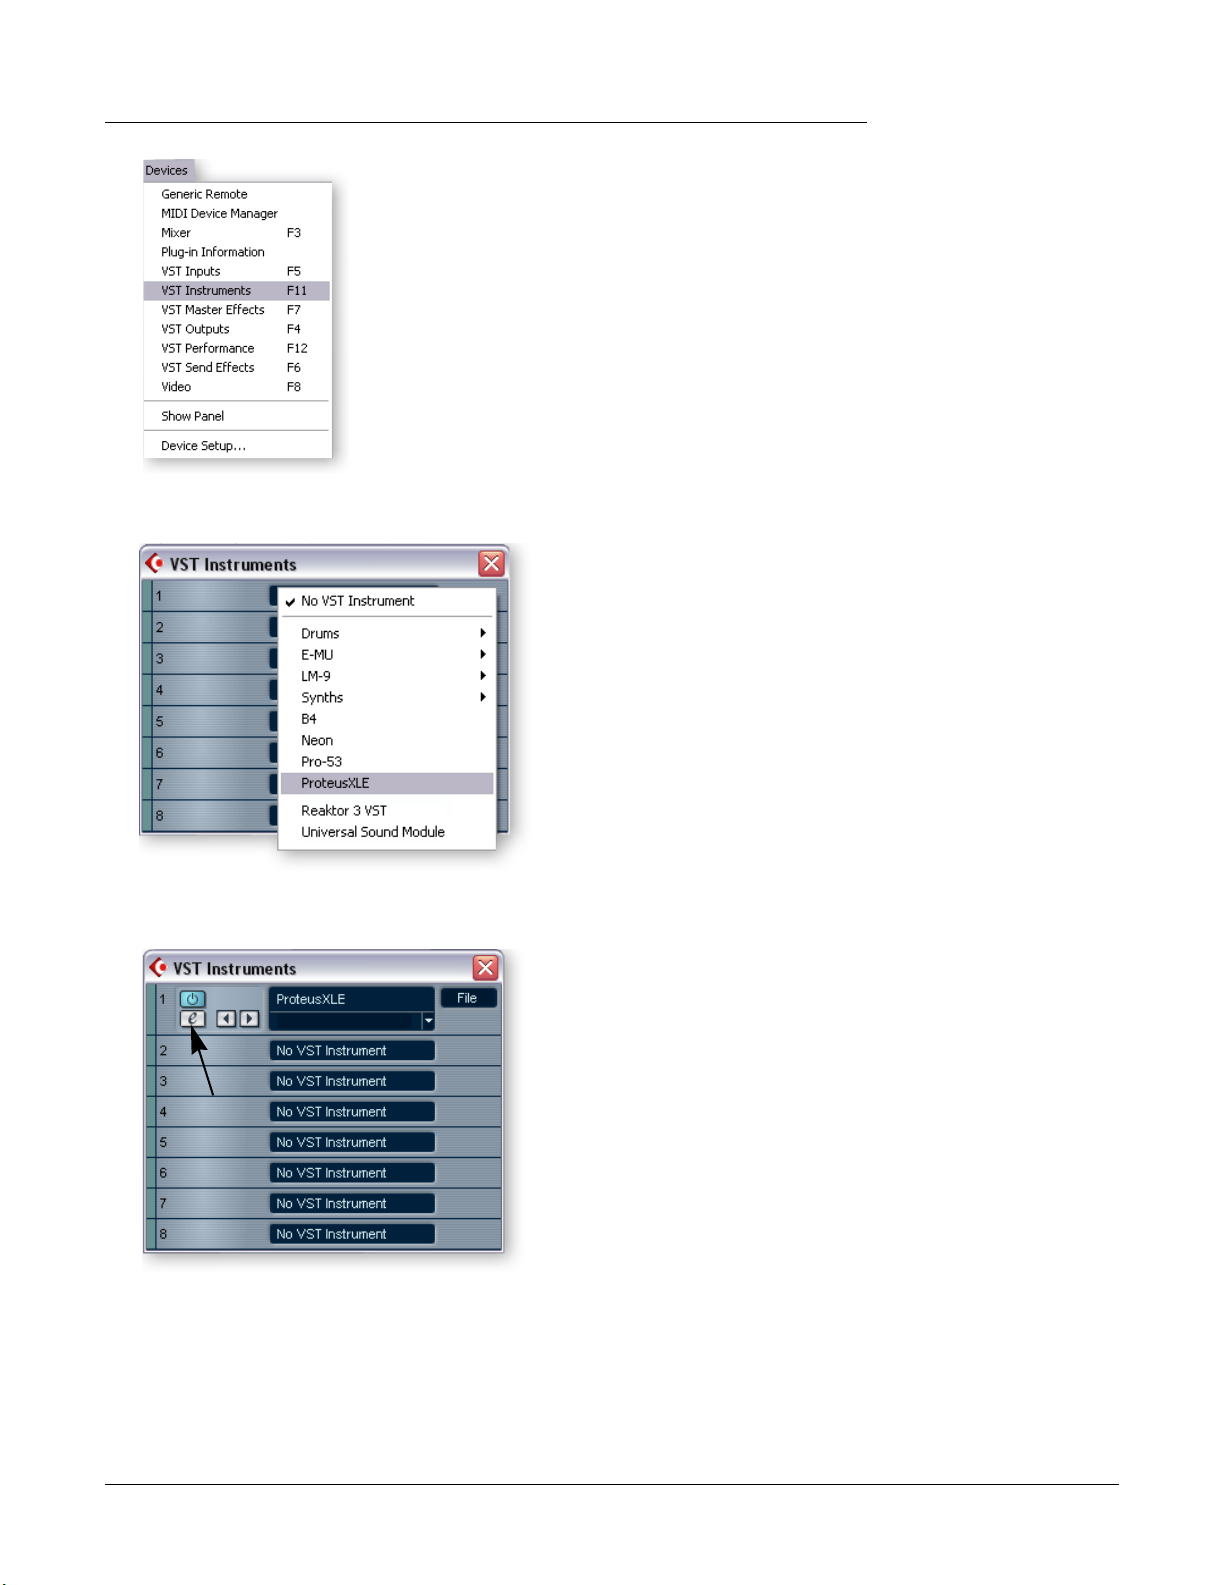
4. The VST Instruments window appears. Select ProteusXLE.
Tutorials
Steinberg Cubase LE
5. The VST Instruments window now looks like this.
Edit Button
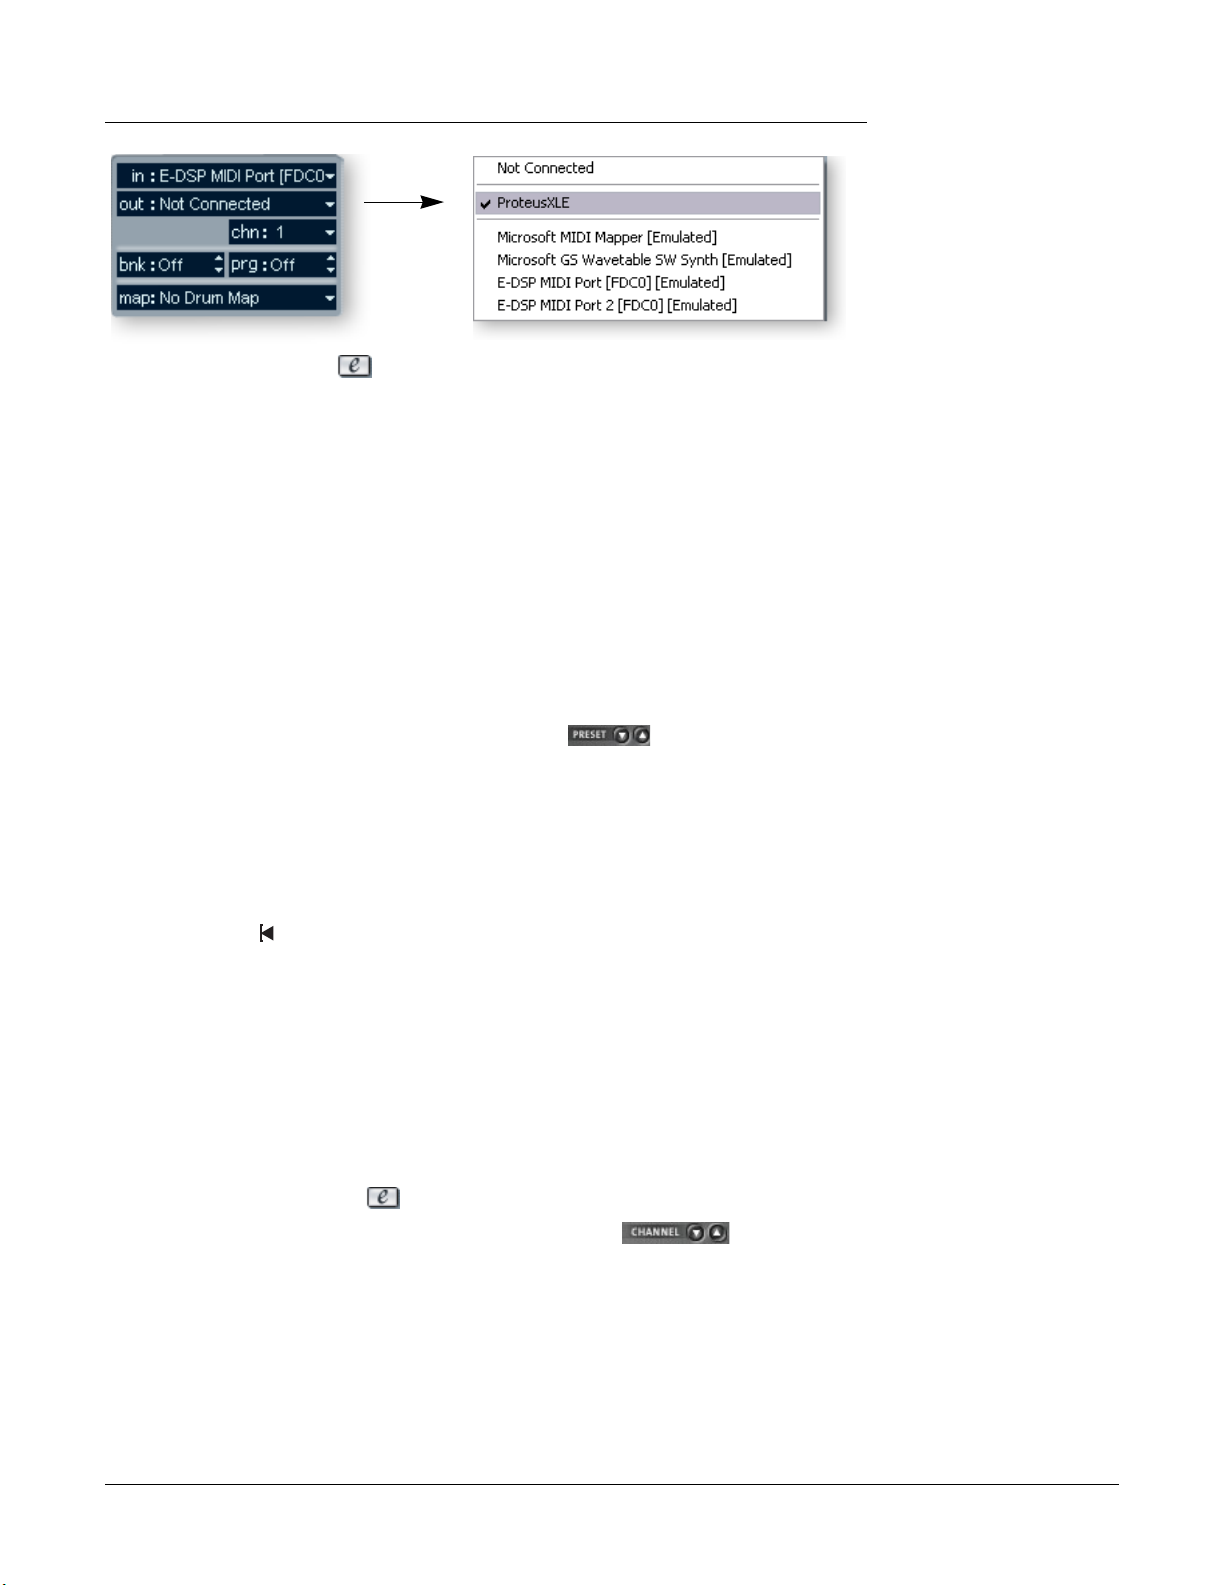
6. Take a look at the Inspector area on the left side of the Cubase LE project window
(diagram on following page). The input to the MIDI track is connected to E-DSP
MIDI Port, but the Output is not yet connected to anything. Click on the Output
and select ProteusXLE. Now you’re ready to play.
f Tip: Unlike some
VSTi’s, Proteus X LE is
multitimbral, and able to
play up to 16 MIDI
channels at once.
It’s far more CPU-efficient
to have multiple MIDI
channels playing on one
instance of Proteus X LE,
rather than to have
multiple VSTi’s running.
E-MU 1616/1616m/1212m PCI Digital Audio System 13
Page 14
Tutorials
Steinberg Cubase LE
7. Click the Edit button of the VST Instruments window to open Proteus X LE.
You can also click on the Edit button of the track Inspector to open Proteus X LE.
Load the Proteus X Composer Bank
8. Proteus X LE is now running, but you need to load a bank of sounds.
9. Choose Open from the File menu on Proteus X LE. Locate and load the Proteus X
Composer bank, which is located here: (“Program Files/Creative Professional/
E-MU Sound Central”) The bank takes a few seconds to load.
Play the Proteus X Composer Bank
10. Click on the mini keyboard at the bottom of the window. You should be hearing
sound. If not, close Cubase LE, and verify that you have the PatchMix DSP Product
Default session loaded. Then close and restart Cubase LE.
11. Play your MIDI keyboard (if connected) and verify that it plays Proteus X LE.
12. Change the Preset using the preset inc/dec keys.
13. Feel free to play around for awhile and don’t worry about losing anything. Nothing
is made permanent until you Save the bank, so have fun.
To Record a MIDI Track
14. Just hit Record on the Cubase LE Transport control and start playing.
15. Press Stop when you’re finished recording the first track and press the Return-to-
Zero button .
16. Press Play on the Cubase Transport to play back your track.
To Record a MIDI Track on another MIDI Channel
Proteus X LE VSTi can play back up to 16 MIDI tracks at once. It’s much better to use
several channels on one VSTi than to use multiple VSTi’s with one channel each.
17. Select Add Track from the Project menu and choose MIDI Track. Notice that the
channel number in the Inspector section is now set to chn:2.
18. Select Proteus XLE as the Output destination in the Inspector section.
19. Click on the Edit button of the track Inspector to open Proteus X.
20. Select MIDI Channel 2 using the channel inc/dec keys .
21. Select a Preset on Channel 2. Place the cursor in the preset number field and use
the up/down arrow keys on your computer keyboard to scroll through the list.
22. When you’re ready, hit Record on the Cubase LE Transport and start playing.
23. Press Stop when you’re finished recording, then RTZ (return-to-zero), then Play.
Proteus X LE now plays both MIDI channels.
f There are several ways
to select presets. See the
Proteus X LE Operation
manual for details.
On Your Own
Cubase LE includes excellent online documentation and help files. Take the time to
learn all the features of this powerful program, and most of all have fun.
14 Creative Professional
Page 15

Steinberg WaveLab Lite
Steinberg Wavelab Lite is an easy-to-use, stereo digital audio recorder and editor. You
can use it to record and edit audio from the Digital Audio System or import tracks from
CDs. Audio recorded in WaveLab can be saved in WAVE or AIFF formats.
In this tutorial you’ll learn how to use WDM drivers (E-DSP WAVE) to transfer digital
audio between the Digital Audio System and Wavelab Lite. WDM works well for stereo
recordings, but ASIO is best for low-latency, multi-track recording.
After you have finished the tutorial we encourage you to read the WaveLab Lite pdf
manual in order to learn about all the features of this powerful program.
1 - Setting up WaveLab Lite
Follow these instructions carefully to ensure that Wavelab Lite runs smoothly the first
time. WaveLab Lite will remember these settings, so you’ll only have to do this once.
1. Open Wavelab Lite from the Start menu or by double-clicking the desktop icon.
2. Select Preferences… from the Options menu. The Preferences window appears.
3. Select the Audio Card tab to display the following screen.
Tutorials
Steinberg WaveLab Lite
4. In the Playback and Recording selection boxes, select E-DSP Wave.
5. Save your settings and close the Preferences window by selecting OK.
E-MU 1616/1616m/1212m PCI Digital Audio System 15
Page 16

Tutorials
Steinberg WaveLab Lite
2 - Turning on the PatchMix WAVE Send
WaveLab Lite interfaces with PatchMix DSP using WAVE audio instead of ASIO. A WAVE
Send is included in the PatchMix Product Default session. You just have to turn it on.
This is the setup you’ll use with any application that uses WAVE instead of ASIO.
Open PatchMix
1. Left-click once on the E-MU icon on the Windows System Tray. The PatchMix
DSP mixer window appears.
2. Make sure that the Product Default session is loaded. This session is easily recog-
nized by the presence of TWO Sends in the Aux 1 section (yellow box below).
• If the Product Default session is NOT selected, click once on the Open Session
button and select “Product Default” from the list.
f The TV screen shows
the details of whichever
insert you click on. In the
example at left, the Insert
Send highlighted in
yellow is shown is the TV
screen.
Supply Audio to PatchMix
3. Connect your audio source to any mono or stereo input on the Digital Audio
System. Verify that you have meter activity on the channel.
Turn up the Aux Send 1 Amount
4. Turn up the Aux Send 1 Amount on the input channel you are using. In the
screen above, signal is coming in on Dock Inputs 1L/1R, and the Aux 1 Amount is
turned up all the way to 0.0dB, as shown by the arrow.
5. Notice the Send highlighted above in yellow. The TV screen shows this to be a
WAVE Send. By turning up the Aux 1 Amount, you routed the signal to the Aux 1
bus and then out the WAVE Send.
16 Creative Professional
Page 17

Using the Mono Inputs as a Stereo Pair
6. Notice that the mono input channels are panned hard left and hard right. This has
been done so that the two mono inputs can be used as a stereo pair. The two mono
channels will be combined into one stereo signal in the Aux Bus.
7. If you wish to use the two mono inputs as a stereo pair, simply turn up the Aux 1
Sends for both mono channels. (To record in mono, just turn up one channel.)
3 - Recording
1. Click the red Record button on the
WaveLab Lite transport controls. The
Record Window shown below appears.
2. You should see meter activity on these
meters when your input signal is being fed
into the Digital Audio System.
Tutorials
Steinberg WaveLab Lite
Click here for:
Audio File Format
Properties
3. Click on the bar to open the Audio File Format properties. The dialog box shown
below appears.
4. Set the recording properties as desired, then click OK.
E-MU 1616/1616m/1212m PCI Digital Audio System 17
Page 18

Tutorials
Steinberg WaveLab Lite
Important Note when using WDM
When using WAVE applications, avoid mismatched sample rates. The sample rate of
your application MUST match the sample rate of the Digital Audio System. If the
Windows WDM drivers detect different sample rates, they will automatically perform a
sample rate conversion to correct the mismatch. You might not hear the difference, but
you might as well go for the best possible audio quality.
Record
5. Click the red Record button on the record dialog box. Recording begins.
6. Click the Stop button to stop recording. A new untitled window appears with your
recording.
Normalize?
7. Many people will Normalize the recording at this time. Normalization increases the
gain until the loudest peak reaches a preset level (usually 0dB). Normalization is
located in the Process menu. (You have to select the audio region first.)
Save your Audio File
8. Choose Save As… from the File menu. Normally you will choose WAVE. The Save
dialog box allows you to save in either WAVE (.wav) or AIFF (.aif, .aiff, .snd)
formats.
9. Name your new file and click Save.
18 Creative Professional
Page 19

Cakewalk Sonar LE
Sonar LE is a professional tool for authoring sound and music on your computer. Sonar
supports Wave, AIFF, ASIO, MP3, ACIDized waves, WMA and other audio formats.
The following step by step tutorials are designed to get you recording on Sonar LE. After
you have finished the tutorial we encourage you to read the Sonar LE pdf manual in
order to learn about the many features of this comprehensive program.
We have provided a special PatchMix DSP Session, as well as a Sonar LE Recording
Project to go along with the following tutorial.
Tutorials
Cakewalk Sonar LE
1 - Setting up Sonar LE
Follow these instructions carefully to ensure that Sonar LE runs smoothly the first time.
Sonar LE will remember these settings, so you’ll only have to do this once.
Setup the Audio Options
1. Choose the (1616) Sonar LE or (1212) Sonar LE session from the Start ->
Programs menu. The path is: (Program Files\Creative Professional\E-MU PatchMix
DSP\VST\Recording Templates). Sonar LE will launch and load the Project.
2. Select Audio… from the Options menu. The following dialog box appears.
1. Click on the
Advanced Tab
to access the
next window.
2. Set the
Driver Mode
to ASIO.
E Note: A PatchMix
Session containing ASIO
Sends and Returns must
be loaded BEFORE you
launch Sonar LE.
3. Set the
ASIO Buffer
Latency.
3. Set the Audio Settings as shown in the dialog boxes above. Select E-MU ASIO.
4. In the General section of the dialog box, select ASIO Panel. The pop-up dialog box
shown at right appears.
5. Set the ASIO Buffer Latency to 10 ms or less. A low latency setting is important to
assure fast MIDI response time and to minimize delay when monitoring through
Sonar. Click OK.
6. Close the Audio Options screen by selecting OK.
Note: If the Sonar LE application crashes for any reason, it is recommended that you
reboot the computer
E-MU 1616/1616m/1212m PCI Digital Audio System 19
Page 20

Tutorials
Cakewalk Sonar LE
Setup the MIDI Options
7. Select MIDI Devices… from the Options menu. The following screen appears.
8. Select the E-DSP MIDI Ports for inputs and outputs, then click OK to close the
window.
9.
OK, that’s all. Close Sonar LE by clicking the button. (Do this even if you’re
going to continue with the tutorials.)
E To Set the Location of
your Audio Files:
1. Select Global… from
the Options menu, then
2. Select Audio Data.
20 Creative Professional
Page 21

2 - Basic Multitrack Recording
In this tutorial, we’ll assume you’re using a single input or pair of inputs. For more
advanced recording, refer to the Sonar LE manual.
Select the Sonar LE Recording Template
1. Choose (1616) Sonar LE or (1212) Sonar LE from the Start -> Programs menu.
The path is: (Program Files\Creative Professional\E-MU PatchMix
DSP\VST\Recording Templates). Sonar LE will launch and load the Project.
2. The Sonar LE Project window appears. Six empty tracks are ready to record. Each
track is already connected to an input or pair of inputs in PatchMix.
3. Click the Zoom In Vertical button repeatedly to enlarge the tracks as in the
Project Window below.
4. Select the Track which matches the input you want to use on the Digital Audio
System by clicking on it. Note that the selected track heading brightens as you select
it. In the example below, we are using Track 3, fed from Line Inputs 1L/1R.
5. Change the input setting if you want to use the line inputs to record in mono. Click
on the little triangle on the right side of the track Input box to see the list of all
the PatchMix DSP inputs.
Tutorials
Cakewalk Sonar LE
The Sonar Project Window
Track Record Enable
Track Input Meters
Input
Output
E-MU 1616/1616m/1212m PCI Digital Audio System 21
(Master is routed to ASIO 15/16)
Click the Vertical Zoom to Enlarge the Tracks
Page 22

Tutorials
Cakewalk Sonar LE
6. Press the Track Record Enable button for the Track that you want to use. The
track turns a dull red color to indicate that it is record-enabled. You should now see
activity on the Track Input Meter when feeding a signal into the Digital Audio
System.
• If you don’t see meter activity on the track, try record enabling all the other tracks to
see if any of the meters move (you may have record enabled the wrong track). If you
still don’t see meter activity, open PatchMix DSP to verify meter activity on the input
channel. Next, make sure the input channel on PatchMix matches your Track Input
in Sonar LE.
7. If your input signal is either too weak or too strong, adjust your input source. If you
still can’t get a proper level, open the PatchMix DSP, Session Settings and click I/O.
Record a Track
8. Press Record on the Sonar LE Transport control and start playing.
f Tip: I/O Settings:
Input too strong: Use +4
Input too weak: Use -10
Stop
Return-To-Zero
9. Press Stop when you’re finished recording the first track.
10. Press the Return-to-Zero button on the Sonar Transport.
11. Press Play on the Sonar LE Transport to play back your track. The audio from Sonar
Record
Play
comes back into PatchMix on the ASIO Out 15/16 Strip. (Go look and see.)
12. If you want to dump the track and start over, Right-click over the waveform display
in the track and choose Delete.
Record Another Track
13. Press the Return to Zero button on the Sonar LE Transport.
14. Add another track by selecting Audio Track, from the Insert menu. A new audio
track is added to the bottom of the list.
15. The new track is very narrow because it is “minimized”. Click on the Restore Strip
Size icon to make the track parameters visible.
16. Now you have to connect an input to the Track.
Click on the little triangle on the right side of the track Input box.
(If you wish to record multiple tracks simultaneously, simply turn Record Enable on
for each track you wish to record.)
17. Again, set up the track to be either mono or stereo, then choose the Track Input
routing. The input can be the same one you used for the first track or you can
choose a different input.
Hot Tip: A quick way to record additional tracks using the same input is to simply drag
the Part (audio region) you just recorded up or down to another track in the Sonar
Project Window, then just hit Record again and go. (Choose “Slide Over Old to Make
Room” when asked in the Drag & Drop Options.)
Save your Project
18. Choose Save As… from the Sonar LE file menu to save your project. Choose a name
and location that will make the project easy to find later.
22 Creative Professional
Page 23

The following diagram may be helpful to visualize the signal routing path.
Record Path Block Diagram
Tutorials
Cakewalk Sonar LE
Mic or Line
Monitor
Input
PatchMix
Digital
Audio
System
Hardware
Sonar LE
Input
Drivers
(Options,
Audio)
Strip
ASIO Out
15/16
PatchMix
Main
Mix
PatchMix
Input
Strip
Track
Digital
Audio
ASIO
Send
Master
Strip
ASIO
System
Hardware
15/16
Monitor
PatchMix
Speakers
Main Mix
To record into Sonar LE, you must have a PatchMix session containing these 4 basic
components:
a) a physical input strip for your input source
b) a send from this strip to an ASIO input so that Sonar LE can receive your input
c) an ASIO output strip for Sonar LE to output its audio back through PatchMix
d) an output assigned to any physical output (to your monitors)
E-MU 1616/1616m/1212m PCI Digital Audio System 23
Page 24

Tutorials
Cakewalk Sonar LE
3 - Export Audio to Stereo
At some point, you’ll want to mix down your multitrack project to stereo. Sonar LE has a
special function (Export Audio) that makes this a simple job. The Sonar LE Project
window below shows a short song with 3 stereo tracks recorded.
Mix your Song
1. From the Sonar LE Project window, select Console from the View menu (or press
Alt+3). The Sonar LE Track Mixer appears.
2. Play your song and use the Faders to set the levels of each part. (Note: These moves
can be automated in Sonar LE. See the Sonar LE pdf manual for details.)
f To go back to the
Track display, select
“Track” in the Window
menu.
24 Creative Professional
Page 25

Export Audio
3. From the Sonar LE Project window, select Export from the File menu and choose
Audio.
4. The following screen appears. First choose a location for your file.
Tutorials
Cakewalk Sonar LE
5. Next choose the file type. RIFF Wave or Broadcast Wave are good choices for a
master file since they can be read by most other audio applications.
6. Select the desired Sample Rate, Channel Format and Bit Depth.
7. Press Export to process your Audio Mixdown.
E-MU 1616/1616m/1212m PCI Digital Audio System 25
Page 26

Tutorials
Cakewalk Sonar LE
4 - Running Proteus X LE VSTi from Sonar LE
These instructions explain how to start Proteus X LE from within Sonar LE. If you have a
MIDI keyboard, you should connect it now using the setup diagrams and instructions
that came with your E-MU Digital Audio System. Without a keyboard, you will only be
able to play one note at a time using the mini keyboard on Proteus X LE.
Select the Virtual Instrument
1. From the Sonar LE Project window, select Synth Rack from the View menu. The
following window appears.
Click Here
Important: If Sonar
was installed BEFORE
Proteus X LE, you will
have to run the
Cakewalk VST Adapter
before Sonar can use the
VSTi. (Start, Programs,
Cakewalk, Cakewalk VST
Adapter)
2. Click on the + symbol to add an instrument. Follow the path shown above and
select Proteus X LE from the list or VST instruments. The following pop-up dialog
box appears.
E These instructions also
apply to Proteus X or
Emulator X.
3. Select the default options (MIDI Source Track & First Synth Output) as shown. Click
OK to continue. (This may a take a few seconds.)
26 Creative Professional
Page 27

4. Proteus X LE now appears in the Synth rack and two new tracks have been added to
the bottom of the track list. (You may have to scroll down to see the new tracks.)
New Proteus X LE Tracks
Audio Output from Proteus XLE
MIDI input to Proteus XLE
Click Here to view the strip controls.
Make the MIDI Connection
5. Select the blue MIDI Input track by clicking on it. The MIDI Input connection
appears in the strip to the left of the MIDI tracks.
MIDI Input Select
Tutorials
Cakewalk Sonar LE
6. Select E-DSP MIDI Port as the MIDI input and select MIDI Omni as shown at right.
“MIDI Omni” allows Proteus X LE to receive all 16 MIDI channels. (Proteus X LE is
“multitimbral” and can assign a different preset to each of the 16 MIDI channels.)
Open Proteus X LE
7. Double-click on the number (or on the ProteusXLE name) to open the Proteus X LE
editor.
Synth Rack with Proteus X LE
Double-Click Here
to Open Proteus X LE
E-MU 1616/1616m/1212m PCI Digital Audio System 27
Page 28

Tutorials
Cakewalk Sonar LE
8. The Proteus X LE editor screen shown below appears.
Load the Proteus X Composer Bank
9. Proteus X LE is now running, but you need to load a bank of sounds.
10. Choose Open from the File menu on Proteus X LE. Locate and load the Proteus X
Composer bank, which is located here: (“Program Files/Creative Professional/E-MU
Sound Central”) The bank takes a few seconds to load.
Play the Proteus X Composer Bank
11. Click on the mini keyboard at the bottom of the window. You should be hearing
sound. If not, close Sonar LE, and verify that you have the PatchMix DSP Product
Default session loaded. Then close and restart Sonar LE.
12. Play your MIDI keyboard (if connected) and verify that it plays Proteus X LE.
13. Change the Preset using the preset inc/dec keys.
14. Feel free to play around for awhile and don’t worry about losing anything. Nothing
is made permanent until you Save the bank, so have fun.
28 Creative Professional
Page 29

To Record a MIDI Track
15. Minimize the Proteus X LE window by pressing the minimize button .
16. Record-Enable the MIDI Track by pressing the track Record button. The track turns
a dull red color to indicate that it is record-enabled.
17. Press Record on the Sonar LE Transport control and start playing.
18. Press Stop when you’re finished recording the first track and press the Return-to-
Zero button.
19. Press Play on the Sonar LE Transport to play back your track.
To Record a MIDI Track on another MIDI Channel
Proteus X LE VSTi can play back up to 16 MIDI tracks at once. It’s much better to use
several channels on one VSTi than to use multiple VSTi’s with one channel each.
Tutorials
Cakewalk Sonar LE
20. Select MIDI Track from the Insert menu.
21. Select E-DSP MIDI Port as the MIDI input for the new MIDI track. Select MIDI
Omni as you did before.
22. Select Proteus XLE as the Output destination for the track.
23. Bring up Proteus X LE again and select MIDI Channel 2 using the channel inc/dec
keys .
24. Select a Preset on Channel 2. Place the cursor in the preset number field and use
the up/down arrow keys on your computer keyboard to scroll through the list.
25. When you’re ready, Record-Enable the track, then hit Record on the Sonar LE
Transport and start playing.
26. Press Stop when you’re finished recording, then RTZ (return-to-zero), then Play.
Proteus X LE now plays both MIDI channels.
On Your Own
Now that you’ve had a taste of what Proteus X LE can do, please read the Proteus X LE
Operation Manual pdf to learn all about this exceptional instrument.
Sonar LE also includes useful online documentation and help files to help you learn
about the features of this powerful program.
f There are several ways
to select presets. See the
Proteus X LE Operation
Manual for details.
E-MU 1616/1616m/1212m PCI Digital Audio System 29
Page 30

Tutorials
Ableton Live Lite 4 for E-MU
Ableton Live Lite 4 for E-MU
Ableton Live Lite 4 is an innovative composition and performance tool. Ableton Live
combines digital recording, virtual instruments, digital effects with an original interface
design that many people find more intuitive than traditional designs.
The following step by step tutorials are designed to get you recording as quickly as
possible. After you have finished the tutorial we encourage you to follow Ableton Live’s
excellent interactive Lessons and read the Ableton Live reference manual pdf in order to
learn more about the program.
1 - Setting up the Preferences
Follow these instructions carefully to ensure that Ableton Live Lite 4 runs smoothly the
first time. Ableton Live Lite 4 will remember these settings, so you’ll only have to do this
once.
1. Open Ableton Live Lite 4 from the Start menu or by double-clicking its desktop
icon.
2. Select Preferences… from the Options menu. The following screen appears.
3. In the Driver Type section of the dialog box, select ASIO.
4. In the Audio Device section of the dialog box, select E-MU ASIO.
5. Click the Hardware Setup button. The pop-up dialog box shown at right appears.
6. Set the ASIO Buffer Latency to 10 ms or less. A low latency setting is important to
assure fast MIDI response time and to minimize delay when monitoring. Click OK.
Setup the Channel Configuration
7. The Output Configuration is already selected and doesn’t need to be changed.
8. Click on the Input Configuration button in the Audio Preferences. The following
dialog box appears.
30 Creative Professional
Page 31

Tutorials
Ableton Live Lite 4 for E-MU
9.
Select the ASIO channels that you might use to input audio into Ableton Live Lite 4.
These numbers correspond to the ASIO Send Inserts in PatchMix DSP. For example,
choose a stereo or mono input in PatchMix DSP, then click on the SEND in that
strip. The ASIO Channels will be displayed in the PatchMix TV screen.
10. After you have made your selections, click OK to close the dialog box.
Set up Plug-ins
The following steps allow Ableton Live Lite 4 to find the Proteus X LE and PatchMix DSP
VST plug-ins.
11. Click on the Plug-ins tab of the Preferences dialog box. The following screen
appears.
E Note: You can only
select two input channels
in this special version of
Ableton Live.
Locate:
12. Press the Browse button, then locate VST Plugins located in the Steinberg folder.
13. After selecting the VST plug-ins folder, press OK. (You may have to wait a few
Steinberg\VSTplugins
seconds while Ableton locates the plug-ins.)
E-MU 1616/1616m/1212m PCI Digital Audio System 31
Page 32

Tutorials
Ableton Live Lite 4 for E-MU
Set up the MIDI Parameters
14. Click on the MIDI/Sync tab of the Preferences dialog box. The MIDI screen appears.
Select E-DSP
MIDI Port to use
a MIDI keyboard.
Select E-MU
MIDI-USB if
you have an
E-MU X Board
connected.
E Live enables every
MIDI input by default
15. Select one of the E-DSP MIDI Ports if you want to connect a MIDI keyboard.
16. Select E-MU-USB Device if you have an E-MU X Board.
Set up the Miscellaneous Parameters
17. Click on the Misc tab of the Preferences dialog box. The following screen appears.
Select Wav
Select 24 bits
Select a sample editor
i.e. WaveLab Lite.
18. Select Wav as the File Type, in the Audio Recording section of the dialog box.
19. Select 24 as the Bit Depth, in the Audio Recording section of the dialog box.
20. Select your favorite sample editor to be associated with Ableton Live Lite 4 for loop
editing. Choose WaveLab Lite if you don’t have another wave editor.
21. Close the Preferences dialog box by clicking the close box .
32 Creative Professional
Page 33

2 - Running Proteus X LE VSTi from Ableton Live Lite 4
Tutorials
Ableton Live Lite 4 for E-MU
These instructions explain how to run Proteus X LE from within Ableton Live Lite 4.
Ableton Live’s forte is making it easy to combine pre-recorded audio and MIDI clips in
new and exciting ways. In this tutorial, you’ll learn how to use a MIDI keyboard or the
excellent pre-recorded MIDI loops that come with Ableton Live Lite 4 to play
Proteus X LE.
Select the Virtual Instrument
1. If you began with Tutorial 1- Setting up the Preferences, you should have a new set
open with two audio tracks and two MIDI tracks such as the one shown below. (If
you have another set open select New Live Set (Ctrl+N) from the File menu.)
3. Drop Here
1. Click
Here
to open
Plug-ins
2. Drag
Proteus X LE
E These instructions also
apply to Proteus X or
Emulator X.
2. Click on the Plug-in Device Browser button on the left side of the window.
The list of Ableton Plug-ins appears at the left side of the window.
3. Select Proteus X LE from the Plug-ins list and drag it over the MIDI Track heading
as shown above. Wait a second or two, then you’ll see the Proteus X LE VSTi appear
in the MIDI Track View area below the mixer.
Load the Proteus X LE Bank
4. Click on the wrench icon on Proteus X LE in the MIDI
Track View area.
E-MU 1616/1616m/1212m PCI Digital Audio System 33
Page 34

Tutorials
Ableton Live Lite 4 for E-MU
5. The Proteus X LE editor screen shown below appears.
Load the Proteus X Composer Bank
6. Proteus X LE is now running, but you need to load a bank of sounds.
7. Choose Open from the File menu on Proteus X LE. Locate and load the Proteus X
Composer bank, which is located here: (“Program Files/Creative Professional/E-MU
Sound Central”) The bank takes a few seconds to load.
Play the Proteus X Composer Bank
8. Click on the mini keyboard at the bottom of the window. You should be hearing
sound. If not, close Ableton Live Lite 4, and verify that you have the PatchMix DSP
Product Default session loaded. Then close and restart Ableton Live Lite 4.
9. Change the Preset using the preset inc/dec keys.
10. Feel free to play around for awhile—turn some knobs, change presets. Don’t worry
about losing anything. Nothing is made permanent until you Save the bank.
11. When you’re ready to move on, select preset, P0004 A KuStq, then close the Proteus
X LE editor by clicking on the close box .
Play MIDI Clips
12. Locate MIDI Loops by Keyfax in the Factory Content section of the Ableton Live
Lite 4 Browser.
13. Click on the folder to open it. You’ll see a bunch of other folders.
34 Creative Professional
Page 35

14. The first folder, BRK_120 contains a nice bass riff. Open it, then open the next
folder BRK-Bass.mid. Now, you’ll see a MIDI file named BRK-Bass.
15. Click and drag BRK-Bass over one of the clip slots in the 3 MIDI strip as shown
below.
Stop
Tutorials
Ableton Live Lite 4 for E-MU
Show/Hide In/Out Section
16. Now click on the Clip Launch Button (little triangle) on the MIDI clip you just
dragged over. The MIDI bass loop begins playing the bass preset on Proteus X LE. To
stop playing, press the Stop button.
17. Find some other MIDI loops and drop them into the other slots of the track. Hint:
look in different folders. Click on the Clip Launch Buttons to switch between clips.
Add Another MIDI Track
Ableton Live Lite 4 allows two MIDI tracks, so let’s play a different MIDI loop and sound
on track 4 MIDI.
18. Choose a different MIDI loop such as House-Lead, (located in the HOUSE-120
folder) and drop it onto one of the 4 MIDI clip slots.
19. Click on the Show/Hide In/Out Section button shown above. The Input/Output
options now appear in the track strips.
20. Currently, the MIDI To box reads “No Output”. Instead, select 3-MIDI. Another
option box labeled “Track In” now appears beneath 3-MIDI.
E-MU 1616/1616m/1212m PCI Digital Audio System 35
Select
3-MIDI
Page 36

Tutorials
Ableton Live Lite 4 for E-MU
21. Click on the Track In box to see the list of MIDI channels.
22. Select MIDI Channel 2 as shown at right.
23. Click on the Clip Launch Button on the 4 MIDI clip to get it started. You won’t
hear anything because you haven’t yet assigned a preset to MIDI channel 2 on
Proteus X LE.
Choose a Sound for MIDI Channel 2
24. Click on the 3 MIDI heading to show the Proteus X LE VSTi. Next, click on the
wrench icon again (in the MIDI Track View) to open Proteus X LE.
25. Select MIDI Channel 2 using the channel inc/dec keys .
26. Select a Preset on Channel 2. Place the cursor in the preset number field and use
the up/down arrow keys on your computer keyboard to scroll through the list.
• Note: There are several ways to select presets. See the Proteus X LE Operation
manual for details.
27. Now you should be hearing the beat. If not, check to make sure both clips are
playing (green triangle). Each clip plays a different preset.
Add MIDI Clips
28. Drop a few more MIDI clips into both MIDI channel slots. Play around with the
Clip Launch buttons.
Preset Change
Here’s another way to change the MIDI Program (Preset in E-MU speak) without going
into the Proteus X LE editor.
29. Double-click on one of the currently playing MIDI clips. The Clip View appears at
the bottom of the window.
E Proteus X LE sounds
are called Presets or
Programs. Ableton Live
Programs are offset by +1
from Proteus X LE.
30. Select the Show/Hide Notes Box located in the lower left corner of the
Clip View window. The Notes box appears in the Clip View section.
31. Select a Program number. You’ll hear the Proteus X LE sound change. Keep
selecting until you find one you like.
• Hint: Use the Up/Down Arrow keys to select Programs. Use Sub-Bank to select
presets higher than 128.
32. As an added bonus, the program (sound) you selected is now associated with the
MIDI clip. Whenever you select this MIDI clip, the sound will also be selected.
33. Select another clip and assign a different program number. Notice that the Preset
changes when you switch back and forth between clips.
Save the Set
34. Save your work by selecting Save Live Set As… from the File menu. The next time
you load the set, the Proteus X LE bank will automatically load as well.
Setup to Record a MIDI Track
Now let’s record a MIDI track using a USB keyboard such as the E-MU X Board or an
external MIDI keyboard. Connect your MIDI keyboard now if it isn’t already connected.
If you’re using a USB keyboard and it isn’t connected, you’ll have to quit Ableton Live
Lite 4, connect the USB keyboard, then restart Ableton Live Lite 4 before continuing.
35. You can use the MIDI Track you set up on MIDI channel 2. Make sure there is at
least one empty slot in the MIDI track. (Select and hit backspace to delete a clip.)
Select
Preset
36 Creative Professional
Page 37

36. Click on the Show/Hide In/Out Section button if it’s not already selected.
a
b
c
d
e
f
The Input/Output options now appear in the track strips.
37. Set up the MIDI track as shown at right.
a. Select either E-DSP MIDI for a MIDI keyboard or USB Device for a USB
keyboard.
b. Set the input to listen to MIDI channel 2.
c. Monitor should be On (for now).
d. This routes the MIDI data to track 3 (which contains Proteus X LE).
e. Set the output to MIDI channel 2.
f. Turn record On (red).
38. Set your keyboard to transmit on MIDI channel 2.
39. Play the keyboard. You should hear Proteus X LE playing the last sound you
selected on channel 2. Go ahead and change the sound if you wish. (Double-click
the top of Track 3, then click the Wrench icon on the Device Title Bar. Make sure
you’re changing the sound on channel 2.)
Ready to Record
40. Start up the bass line on track 3 MIDI and practice playing along with it.
41. Optional: You can set the Global Quantization value to time correct your playing.
Set it to anything other than “None”.
Tutorials
Ableton Live Lite 4 for E-MU
Quantize
42. Click on any of the MIDI Clip Record buttons to begin recording.
43. Click the Clip Launch button, the Clip Stop button, or the Spacebar to stop
recording.
On Your Own
Now you’ve had a taste of what Proteus X LE and Ableton Live Lite 4 can do. But don’t
stop now! Read the Proteus X LE Operation Manual pdf to learn all about this exceptional instrument.
Ableton Live Lite 4 for E-MU includes several excellent hands-on tutorials to help you
learn all the features of this ground breaking music application.
Note: The “Assignable X-Y Controls” are not enabled in this version of Proteus X LE.
E-MU 1616/1616m/1212m PCI Digital Audio System 37
Page 38

Tutorials
1. Ext. In
2. Select
input
3. Monitor
On
Meter
Ableton Live Lite 4 for E-MU
3 - Recording Audio into Ableton Live Lite 4
These instructions explain how to record your own audio loops into Ableton Live Lite 4.
Clean the Slate
1. Choose New Live Set (Ctrl+N) from the Ableton Live Lite 4 File menu.
Setup Ableton Live Lite 4
2. Click on the Show/Hide In/Out Section button shown on page 35. The Input/
Output options now appear in the track strips
3. Set up the 1 Audio Track as shown at right with Ext In, the ASIO input selected and
Monitor On.
4. You should now see meter activity and hear audio when you feed a signal into
PatchMix DSP. If not, you may have the wrong input channels selected (#2 in the
diagram at right).
If you still don’t have audio, verify meter activity on PatchMix DSP and make sure
ASIO Send on PatchMix DSP matches the Ableton Input select. (Ableton inputs are
selected on the Preferences menu. See “Setup the Channel Configuration” on
page 30.
Ready to Record
5. Click the Record button to record-enable the track.
The record button and the channel meters turn red.
6. When you’re ready to record, click the circle on the
clip you want to record into. Recording begins
immediately. The circle turns into a green triangle.
7. To stop recording, press the spacebar, and turn
off the red Record-Enable button.
8. Set the Monitor to Auto to and click the triangle on
the clip playback the audio you recorded.
9. If you’re not happy with the recording, select the
clip, then hit the Backspace button to dump it.
10. Double-click on the clip to display the sample
parameters below the mixer.
11. If you need to edit your loop, Ableton provides a
host of loop editing features. See the pdf manual
and Lessons.
12. Depending on how accurately you pressed recod
and stop buttons, you might have to trim the start
and end points of the loop with an editor. The Edit
button in the Sample parameters calls the selected
wave editor (normally WaveLab Lite).
13. When you’re finished editing the loop, simply close
(quit) the wave editor and Save selected over
without changing the name when prompted. The
clip will now contain your edited wave.
Step 6
Click here
to begin
recording.
Step 5
Record
Enable
Continue On
Ableton Live Lite 4 for E-MU is a powerful music creation tool that’s really fun to use.
Now that you know how to get audio in and out and how to run Proteus X LE, continue
on by following the excellent hands-on Lessons provided with the Ableton software.
38 Creative Professional
Page 39

Recording & Monitoring with Effects
Recording & Monitoring with Effects
The Order of Effects
PatchMix DSP allows you to record your tracks without effects (dry) and monitor with
effects enabled (wet). It works like this: If the effect is inserted BEFORE the ASIO send in
the signal path, it will get recorded; if the effect is inserted AFTER the ASIO send, it will
not be recorded.
Recording dry allows you to hear your performance with effect (to get the proper feel),
but gives you the flexibility to add or modify effects later during mixdown. This way if
you don’t like the way the effect sounds, you can change or modify the effect without
having to perform the part again.
The basic session setup for this is shown below.
Input
1L/1R
If you want Effects
to be recorded,
insert them Above
the ASIO Send.
Tutorials
ASIO
Direct
Send
To ASIO
From ASIO
Panning
Fader
Aux 1 Bus
Main Output Bus
To monitor Effects,
but not record them,
insert them Below
the ASIO Send or
in a Sidechain.
Send
Amount
Reverb
Return
Amount
Output
To Monitor
Speakers
E-MU 1616/1616m/1212m PCI Digital Audio System 39
Page 40

Tutorials
Recording & Monitoring with Effects
Creating a Headphone Submix
A headphone submix allows you to create a special mix for the musician while
recording. In the example below, a headphone submix has been created from the first
three strips in the mixer using the Aux 2 bus. The three strips are muted to prevent the
audio from going straight through to the main mix—the submix send amounts now act
as the level faders. A reverb effect has been inserted into Aux bus 2 before the Send to
the headphone out.
E 1212
Although the 1212 only
has 2 analog outputs,
you can stll create a
headphone mix using
these instruction and
send it to the S/PDIF or
ADAT digital outputs.
m
Owners...
These three strips are being submixed to Aux Bus 2 which feeds output 2L/2R. The strips are
all muted and the output of Aux 2 is turned all the way down to block the audio from the
main output.
To Create a Headphone Submix:
1. Create Pre-fader strips for the inputs you want to feed the headphone submix.
(Otherwise the Mute button will mute the Aux Send.)
2. Turn up the Aux Sends (for this example we’ll use Aux 2) on the strips feeding the
headphone submix and mute the channel outputs as shown above.
3. Turn the Input Send Level Up on Aux Bus 2 (0 dB or higher).
4. Turn the Output Return Level Down on Aux Bus 2 (-132 dB).
5. Right-click on one of the Aux 2 insert locations and choose “Insert Send (Output to
ASIO/WAVE or Physical Out)” from the popup list.
6. Choose the desired Send Output from the list. Choose a pair of outputs for your
headphone submix such as “DOCK Out 2L/2R”
7. Click the Output button at the top of the TV screen to view the output assignments.
8. Disconnect the submix from the main or monitor mix if connected.
40 Creative Professional
Page 41

Recording & Monitoring with Effects
About PatchMix DSP
PatchMix = Patchbay + Mixer
It’s a simple concept. PatchMix is a patchbay for your computer, where any physical
input or output (analog, S/PDIF, ADAT) can be connected to any HOST input or output
(ASIO, WDM, WAVE). Strips = Inputs and Insert Sends = Outputs. That’s the “Patch”
part of the name. Now add a simple mixer with two auxiliary sends and a bunch of
effects. This lets you hear zero-latency effects while recording, a feat that no plug-in
effect can match. It’s a super-flexible patchbay first and a mixer second—PatchMix.
Too Much Power?
We included the PatchMix DSP mixer and powered effects because they allow you to do
things that you can’t do with any other sound card. However…please do not be intimidated by PatchMix, because you DON’T HAVE TO USE IT unless you want to. The
Product Default Session connects every input and output for you. Once this session is
selected, you can forget about PatchMix and use the Digital Audio System like any other
sound card without the hardware effects and flexible routing features. PatchMix was
never meant to replace the mixer of your recording application. It’s forte is allowing you
to connect your hardware inputs and outputs to your software applications in a number
of useful ways. You may not need this additional power right away. Use PatchMix in the
background if you prefer, and come back to it whenever you’re ready.
Tutorials
About ASIO
ASIO stands for Audio Stream In/Out and is a standard communication protocol
between audio software and a piece of audio hardware. The low latency made possible
by ASIO, for example, allows you to sing into a microphone and hear your voice going
through software and hardware effects with virtually no delay in the signal. The effects
of a low-latency ASIO driver make it ideal for use with Virtual Studio Technology (VST)
instruments, plug-ins, and all other software-based synthesizers.
IMPORTANT -> Activating ASIO
It is important to understand that ASIO inputs do not appear in Cubase or other host
applications until they are CREATED in PatchMix DSP. This allows you to dynamically
assign the 32 available ASIO channels according to your specific needs.
An Example:
1. Create a new strip from a physical source such as S/PDIF L/R.
2. Next, right-click on the new strip’s insert chain and select the Insert Send option.
3. Choose an available host ASIO input.
4. This S/PDIF L/R input should now be available to record in your ASIO application.
ASIO Channels are STEREO!
ASIO channels are stereo, period. Even when you are recording a mono source such as a
microphone, the ASIO stream is stereo (with the mono signal on both channels). To
record a mono input, you simply set up a sequencer track as a mono track and use either
the left or right ASIO channel from PatchMix as the input for the track.
E-MU 1616/1616m/1212m PCI Digital Audio System 41
Page 42

Tutorials
Recording & Monitoring with Effects
42 Creative Professional
Page 43

Index
A
Index
A
Ableton Live Lite 4 for E-MU
changing presets 36
playing MIDI clips 34
recording audio into 38
running Proteus X LE in 33
setting up 30
Add Track, Cubase LE 12
AIFF Export
Cubase LE 11
WaveLab Lite 18
ASIO
activating 41
definition 41
ASIO Buffer Latency 6, 19, 30
ASIO Send Inserts, setup in Ableton Live Lite 31
Audio File Format, WaveLab Lite 17
Audio Recording Prefs, Ableton Live Lite 32
Audio Settings, Sonar LE 19
B
Basic Recording Components 8, 23
Block Diagram
Cubase LE record path 9
recording mono inputs as stereo 9
Sonar LE record path 23
C
Control Panel 6
Creating a Headphone Submix 40
Cubase LE
project window 7
recording template 7
running Proteus X LE in 12
setting up 6
tutorial 6
D
Device Setup, Cubase LE 6
Devices 12
menu, Cubase LE 6
Sonar MIDI 20
Direct Monitoring box 6
E
E-DSP MIDI Ports, Sonar LE 20
E-DSP Wave, WaveLab Lite 15
Effects, order of 39
E-MU ASIO
Ableton Live Lite 4 30
Cubase LE 6
Sonar LE 19
Export Audio
Cubase LE 10
Sonar LE 24
Export Formats
Cubase LE 11
Sonar LE 25
H
Hardware Setup, Ableton Live Lite 30
Headphone Submix, creating a 40
I
Inspector, Cubase LE 13
M
MIDI Channels, using multiple 14, 29, 36
MIDI Clips
adding in Ableton Live Lite 36
playing in Ableton Live Lite 34
MIDI Connection
Cubase LE 13
Sonar LE 27
MIDI Devices, Sonar LE 20
MIDI Track
adding in Ableton Live Lite 35
recording in Cubase LE 14
recording in Sonar LE 29
Mixdown to Stereo
Cubase LE 10
Sonar LE 24
Monitor Button, Cubase LE 7
Monitor with Effects 39
Mono Inputs, recording as stereo 17
Multitrack Recording
Cubase LE 7
Sonar LE 21
N
Normalize 18
E-MU 1616/1616m/1212m PCI Digital Audio System 43
Page 44

Index
O
O
Options Menu
Ableton Live Lite 30
Sonar LE 19
Order of Effects 39
P
PatchMix, opening 5
Preferences
Ableton Live Lite 4 30
WaveLab Lite 15
Preset Changes, Ableton Live Lite 36
Product Default Session 5
Project Window, Cubase LE 7
Proteus X Composer Bank, loading 14, 28, 34
Proteus X LE
editor screen 28
using with Ableton Live Lite 33
using with Cubase LE 12
using with Sonar LE 26
R
Record a Track
Cubase LE 8
Sonar LE 22
Record Window, WaveLab Lite 17
Recording
into Ableton Live Lite 38
into Cubase LE 7
into Sonar LE 21
into WaveLab Lite 18
Recording Effects or Recording Dry 39
Recording Mono Inputs as Stereo
Cubase LE 9
WaveLab Lite 17
T
Track Input Meter, Cubase LE 7
Track Record Enable Button
Ableton Live Lite 38
Sonar LE 22
V
VST Instruments 12
VST Multitrack 6
VST Plug-ins, locating in Ableton Live Lite 31
W
WAV Export
Cubase LE 11
Sonar LE 25
WAVE Send, enabling in PatchMix 16
WaveLab Lite 15
normalizing 18
recording 17
setting up 15
WDM Drivers 15
WDM, important note 18
S
Save Audio File, WaveLab Lite 18
Save Live Set, Ableton Live Lite 36
Save Project
Cubase LE 8
Sonar LE 22
Select Directory 7
Sonar LE 19
multitrack recording 21
project window 21
record path diagram 23
running Proteus X LE in 26
setting up 19
Sub-Bank, Ableton Live Lite 36
Submix, headphone 40
44 Creative Professional
 Loading...