


 Loading...
SMART
Simplify your communication.®
Congratulations on the purchase of your emporiaSMART!
The emporiaSMART was developed in cooperation with our customers. It is aimed primarily at people who have been using a basic mobile phone until now and now want to use more functions such as email. The emporiaSMART is also suitable for anyone for whom using email and the Internet on a tablet or a PC is part
of everyday life and who now wants to be able to do this on a smartphone as well.
It is the perfect smartphone for beginners!
For information on simply placing calls, go to www.emporia.eu
We hope your emporiaSMART brings you plenty of joy. Sincerely,
Eveline Pupeter emporia Telecom

Your mobile phone at a glance
›› YOUR MOBILE PHONE AT A GLANCE
1 Earphone port
2Micro USB port
(See page 16)
3On/Off button
(See page 24)
4LED
(See page 26)
5Speaker
6Front camera
7Touchscreen
(See page 31)
8Green button
(See page 25)
9Home button
(See page 24)
10Red button
(See page 25)
11Microphone
1 |
2 |
|
3 |
12 |
|
|
|
|
|
|
|
4 |
5 |
6 |
|
13 |
14 |
|
|
|
|
|
16
15
17 18
7
19 |
20 |
|
|
|
|
|
|
|
8 |
9 |
10 |
11 |
21 |

Your mobile phone at a glance
12Camera microphone
13Torch/flash
14Camera lens
15Volume buttons
(See page 26)
16Camera button
(See page 25)
17Emergency button
(See page 25)
18Torch button
(See page 25)
19Stylus holder (optional)
(See page 12)
20Battery cover
21Speaker
Notes on this user guide
•This guide contains helpful notes and tips, which are indicated as such by this symbol:
•Warnings are indicated as such by this symbol:
03

Contents
|
YOUR MOBILE PHONE AT A GLANCE |
02 |
1. |
Preparation |
06 |
1.1 |
Scope of delivery . . . . . . . . . . . . . |
. . . . 06 |
1.2Inserting a SIM card and an SD card . . . . . . . . . . . 08
1.3 Attaching emporia accessories . . . . . . . . . . . . . 12
2. |
Putting the phone into operation |
19 |
2.1Charging the battery . . . . . . . . . . . . . . . . . 19
2.2Turning on the phone . . . . . . . . . . . . . . . . . 21
2.3 Entering a PIN code . . . . . . . . . . . . . . . . . 21
2.4Battery-saving mode and locking the screen . . . . . . 22
2.5Configuring the phone when you first put it into operation 23
3. |
Using the phone |
24 |
3.1Buttons on the phone . . . . . . . . . . . . . . . . . 24
3.2 LED indicators . . . . . . . . . . . . . . . . . 26
3.3Buttons on the emporia keypad display cover . . . . . . 27
3.4 |
Using the touchscreen . . |
. |
. |
. |
. . . . . . . |
|
. . . . . 31 |
|
3.5 |
Home screen . . . . . . . |
. |
. |
. |
. . . . . . |
. 33 |
||
3.6 |
Personal screen . . . . . . |
. |
. |
. |
. . . . . . |
. |
. |
37 |
3.7 |
App screen . . . . . . . . |
. |
. |
. |
. . . . . . |
|
|
39 |
04
|
|
Contents |
4. |
Establishing connections |
40 |
4.1 |
Setting up a Wi-Fi connection |
. . . . . . . . . . . . . 40 |
4.2Setting up a data connection . . . . . . . . . . . . . . 40
4.3Setting up an email connection . . . . . . . . . . . . . 40
4.4 |
Transferring contacts . . . . . . . . . . . . . |
. |
. . |
. |
42 |
4.5 |
Bluetooth . . . . . . . . . . . . . . . . . |
|
|
|
43 |
4.6Connecting to a PC to transfer data . . . . . . . . . . . 44
4.7 |
Software updates . . . . . . . . . . . . |
. . |
. |
. |
. |
|
45 |
||
4.8 |
Downloading apps . . . . . . . . . . . |
. . |
. |
. |
. . |
|
|
46 |
|
5. |
Basic functions |
|
|
|
|
|
|
|
47 |
5.1 |
Calls and contacts . . . . . . . . . . . . |
. . |
. |
. |
. |
|
47 |
||
5.2 |
Messages . . . . . . . . . . . . . . . . |
. |
|
|
|
|
|
53 |
|
5.3 |
Photos . . . . . . . . . . . . . . . . . |
|
|
|
|
|
55 |
||
5.4 |
Info centre . . . . . . . . . . . . . . . . |
. |
|
57 |
|||||
6. |
Quick settings in detail |
|
|
|
|
|
|
|
58 |
7. |
Emergency call function |
|
|
|
|
|
|
|
66 |
|
SAFETY INFORMATION |
|
|
|
|
|
|
|
72 |
8.1 |
Guarantee . . . . . . . . . . . . . . . . |
. |
|
75 |
|||||
8.2 |
Support . . . . . . . . . . . . . . . . . |
|
75 |
||||||
8.3 |
Disposal . . . . . . . . . . . . . . . . . |
|
76 |
||||||
8.4 |
Technical product details . . . . . . . . |
. . |
. . . . . . 77 |
||||||
8.5 |
Declaration of conformity (DOC) . . . . . |
. . |
. |
. |
. |
. |
|
. 78 |
|
05
Preparation
1. PREPARATION
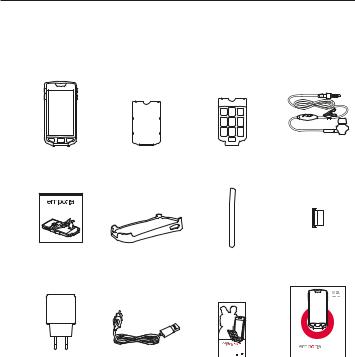
1.1 Scope of delivery
Smartphone |
Battery cover |
Battery cover with |
Earphones |
||
|
|
keypad display cover |
|
||
|
|
|
|
|
|
|
|
|
|
|
|
|
|
|
|
|
|
Battery |
Charging unit |
emporiaSTYLUS |
emporiaHOLDER |
||||||
|
|
|
|
|
|
|
|
|
|
|
|
|
|
|
|
|
|
|
|
|
|
|
|
|
|
|
|
|
|
|
|
|
|
|
|
|
|
|
|
|
|
|
|
|
SMART |
|
|
|
|
|
|
Mains plug |
USB charging |
"Nine Little Steps" |
User guide |
||
|
cable |
start assistant |
|
||
 The contents of this package are not suitable for young children and include small parts that can be swallowed.
06

Preparation
›› Not included in the scope of delivery
•SIM card
The SIM card is a chip card that you need to insert into the phone. You will only be able to place calls once you have done this. Your network operator will provide you with the card and the codes belonging to it (PIN and PUK) when you buy
a mobile contract. You can also purchase a prepaid SIM card from specialist retailers.
•microSD card
A microSD memory card is a chip card that will increase your smartphone's storage space. Inserting one will enable you to store more photos and install more apps. You can purchase these cards from electronics stores.
›› What to do if a part is defective or missing
Please call the emporia hotline on +43 · 732 · 77 77 17 · 446.
07
Preparation
1.2 Inserting a SIM card and an SD card
 Always disconnect the phone from the charger and turn the phone off before removing the battery cover.
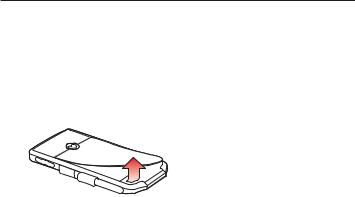
›› Take off the battery cover.
Begin with bottom left-hand corner of the cover.
 Watch your fingernails when removing the battery cover.
 Avoid bending the cover too much, as doing that can damage it.
08

Preparation
›› Insert the SIM card.
The SIM card slot is on the left above the battery cavity. Slide the card in with the contacts facing down.
 Always use a tariff with a data package when using a smartphone. This will save you additional costs when transferring data while using the Internet.
 Only use standard SIM cards for this phone. If your SIM card is a different size, your network operator can exchange it for you or you can buy an adapter from a specialist retailer.
Standard Mini SIM 15mm x 25mm, suitable
Micro SIM
12mm x 15mm, unsuitable
Nano SIM
8.8mm x 12.3mm, unsuitable
09

Preparation
›› Insert a microSD memory card (optional).
The memory card slot is located to the right of the SIM card slot. Slide your microSD card into the slot with the gold contact facing down.
 Only use a memory card that is compatible with this phone, such as a microSD or a microSDHC card.
 To take the memory card out again, press it further into the slot until you hear a click. The card will then jump out a few millimetres, making it easy to remove.
 If you use an incompatible SIM card or memory card, the phone, the card or the data on the card can be damaged.
10
Preparation
›› Insert the battery.
Insert the battery, making sure the gold contacts of the battery
and the phone are touching
each other.
Press the battery cover down onto the phone until it clicks into place on each side. Begin
with the top edge of the phone.
 Only use batteries, chargers and accessories that are permitted for this phone. If you don't, the guarantee for the phone will no longer be valid.
 If you change the SIM card or SD card, disconnect the charger, turn the phone off and take out the battery.
11
Preparation
1.3Attaching emporia accessories
It is important to emporia that you are able to use your phone easily and safely, which is why the emporiaSMART comes with accessories that enhance phone.
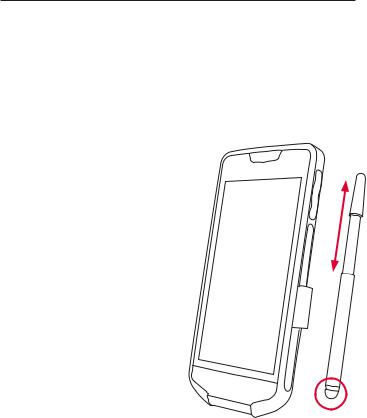
›› emporiaSTYLUS
If you find it difficult to operate the screen with your finger, you can use the pen-like device
provided, the emporiaSTYLUS,
instead. When you tap on the screen with
the soft end of the stylus and the phone will respond the same way it does when you tap on screen with your finger.
12
Preparation
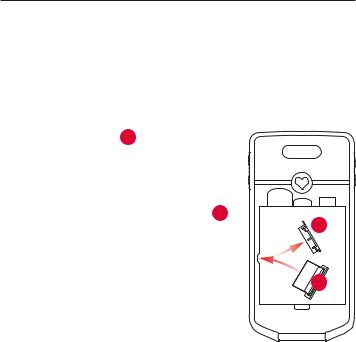
In order to be able to carry the phone around with the emporiaSTYLUS attached to it, you can affix the emporiaHOLDER, a loop that will hold the stylus.
•Turn the phone off and, if the charger is connected, disconnect it from the charger.
•Remove the battery cover and take out the battery.
•Remove the cover 1 over the stylus
holder slot with your fingernail.
•Thread the holder loop through the slot from the inside to the outside. Make sure
the flat side of the emporiaHOLDER 2 is
resting against the housing and that the |
1 |
|
|
||
slope of the plastic part of the holder runs |
|
|
upwards along the plastic plate. |
2 |
|
• Reinsert the battery and put the cover |
||
|
||
back on. |
|
 If the holder loop is threaded through
incorrectly, the battery cannot be reinserted properly.
 Only use the soft foam head of the stylus to operate the screen. Do not use the metal tip, as this can leave residue on the screen and is only intended to make it easier to slip the stylus into the holder.
13
Preparation
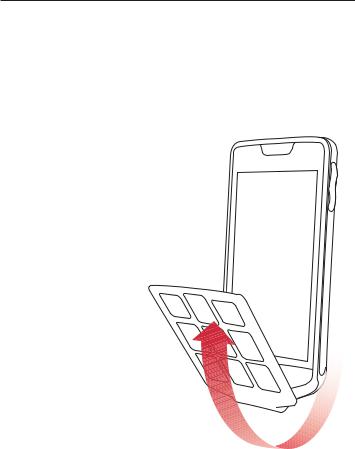
›› emporia keypad display cover
The emporia keypad display cover is a unique accessory that enables you to add real function keys to your smartphone. The keypad can make it easier to place calls and write messages. You can fold it out the way and operate the phone via the touchscreen any time, however.
14

Preparation
•Turn the phone off and, if the charger is connected, disconnect it from the charger.
•Take off the battery cover.
•Now replace the battery cover with the emporia keypad display cover.
•Press the battery cover, which is connected to the keypad display cover, down onto the phone until it clicks into place on each side. Begin with the top edge of the phone.
•Finally, pull the keypad display cover forward and fold it over the bottom edge of the phone to cover the screen.
 Protect the keypad display cover from moisture and dirt, which can prevent the keys from working properly. Also make sure that the touchscreen is clean before you place the keypad cover over it. Only use a soft cloth such as a spectacle cleaning cloth to clean the cover and screen.
 The keypad display cover will work in temperatures ranging from 0 to 40° C.
15
Preparation
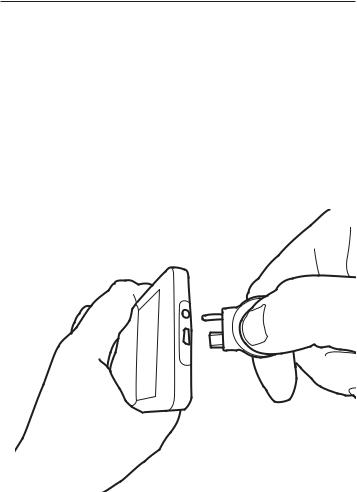
›› emporia charging cable with emporiaCONNECTOR
The charging cable has the very user-friendly emporiaCONNECTOR, a combination of an ergonomically shaped part that you grip, a guide plate and the industrystandard Micro USB connector.
When you grip the emporiaCONNECTOR, you will know whether you are holding it the right way round when you feel the curve. The guide plate makes it easier to plug the cable into the phone.
16

Preparation
›› emporia charging unit
The charging unit allows you to charge your phone easily and also gives you a fixed place where you can leave your phone when you're at home.
To charge the phone, plug the charging cable into the port on the back of the charging unit, holding the
emporiaCONNECTOR, and place the phone in the charging unit. If you intend to use this method to charge your phone every time, you can leave the charging cable plugged into the charging unit permanently.
17

Preparation
›› emporia earphones
The earphones meet the 3.5 mm CTIA standard and are equipped with a microphone and a PTT button. You can accept or end calls by pressing this button briefly.
If you listen to the radio, the earphones act as an aerial as well and can improve radio reception.
 Do not use the earphones on a high volume, as this can cause hearing impairments. You should therefore always check the volume of the earphones you are using.
›› Other accessories for the emporiaSMART
You can find more accessories for the emporiaSMART
at www.emporia.co.uk/products/accessories and purchase them from specialist stores good product ranges.
18

Putting the phone into operation
2. PUTTING THE PHONE INTO OPERATION
2.1 Charging the battery
 Before you use the phone for the first time, charge the battery for at least four hours. If you don't charge the phone for this period of time, the battery life could be reduced.
 Never connect the phone to the charger, the charging unit or a PC if a battery has not been inserted. Do not attempt to operate the phone without a battery inserted. Doing this can damage the phone.
›› Using the charging cable
•Plug the charging cable's guide plate into the earphone port and the USB connector into the USB port on the top of the phone.
•Then plug the cable's mains plug into a wall socket.
›› Using the charging unit
•Plug the charging cable into the USB port on the charging unit.
•Then plug the cable's mains plug into a wall socket
•and place the phone in the charging unit.
 It will take longer to charge the battery with the charging unit than via the charging cable.
19

Putting the phone into operation
›› Using a computer
•Plug the phone into a USB port on your computer. If necessary, disconnect the USB cable from the mains plug to do this.
 Only use the USB charging cable supplied with the phone. Do not attempt to plug a charging cable with a jack plug into the earphone port. Doing this can damage the phone.
›› Battery indicators on the phone
•When the battery is empty:
The phone will beep and a warning will appear on the screen. The battery icon is red and the LED flashes red.
•When the battery is being charged: The battery icon is shown filling up,
while the LED is red and briefly flashes green.
•When the battery is fully charged:
The battery icon is full and the LED is green.
You can now disconnect the charging cable from the phone and then unplug the cable from the wall socket.
 In Settings - Battery, you can view the remaining battery run time and current charge level, and can close applications to extend the battery run time.
20
Putting the phone into operation
2.2 Turning on the phone
•Before you use your phone for the first time, remove the protective film from the screen.
•Hold down the  button for at least two seconds.
•You will feel the phone vibrate. The emporia logotype will appear on the screen and you will hear a short melody.
 When you turn your phone on the first time, the start-up process can take up to two minutes. The emporia logo will be on the screen when this is happening. Please do not interrupt this process.
2.3Entering a PIN code
Enter the four-digit PIN code for your SIM card when asked to do so and confirm the code.
 Your PIN code (personal identification number) will be a four-digit number combination and is intended to protect your SIM card and therefore your phone from misuse. It is your secret number and will prevent others from being able to turn your phone on. You can change or turn off your PIN code in Settings – Security – Set up SIM card lock.
 You can make a note of your personal PIN code here:
__________________
 You have a maximum of three attempts to enter your PIN code correctly. If you enter the wrong number three times in a row, you
21

Putting the phone into operation
will only be able to unblock your SIM card with your PUK code. You will find your PIN code and PUK code in the documents supplied with your SIM card by your network operator.
2.4Battery-saving mode and locking the screen
If you don't use your phone for a certain period of time, the screen will switch to battery-saving mode and go black.
You can reactivate the screen by pressing the  button or pressing the
  button briefly.
Locking the screen can also protect your phone from unintentional input on the touchscreen.
›› Locking the screen manually
•Press the  button briefly.
•The screen will go black and lock and the phone will beep.
›› Setting the screen to lock automatically
In Settings – Security – Screen lock, you can choose from the following types of screen lock:
•None
•Slide
•PIN: Enter a code of your own that you would like to protect your phone with.
22

Putting the phone into operation
›› Unlocking the screen
•If the screen is black,
press the  button or the
  button briefly.
•If the screen is locked with the Slide function, swipe the Unlock field on the locked screen to the right. The symbol will then change to an open padlock and the phone will beep.
•If the screen is locked with your PIN,
type in the code using the screen keypad or the keypad display cover and confirm it by pressing OK or the  button.
•You can now use the screen again,
and it will respond to your touches again.
2.5Configuring the phone when you first put it into operation
When you first put the phone into operation, you need to select a number of settings.
You can also carry out this configuration later in Settings if you wish, but we recommend doing it now.
The start assistant »Nine Little Steps« provides detailed instructions on configuring the phone when setting it up and is supplied as a separate folder.
23

Using the phone
3. USING THE PHONE
3.1 Buttons on the phone
›› On/Off button 
•Hold the  button down for at least two seconds to turn the phone on or off.
•Press this button briefly to turn battery-saving mode on or off.
›› Home button 
•This button will take you back to the home screen any time.
•If the phone is in battery-saving mode, pressing it will activate the screen and take you to the home screen at the same time.
•If you hold this button down for a long time,
all the applications currently running will be listed. You now have the following options:
·You can select an app by tapping on it briefly.
·You can close the app by sliding the image of the app to the left or right edge of the screen to dismiss it.
·If you hold your finger down on the image of the app for several seconds, a list of options will appear. You can select an action from the list by tapping on it.
 You can also press the
 button through the closed emporia keypad display cover to return to the home screen.
24
Loading...