

Page 1

PRECAUTIONS TO AVOID POSSIBLE EXPOSURE
TO EXCESSIVE MICROWAVE ENERGY
(a) Do not attempt to operate this oven with the door open since open-door operation can result in
harmful exposure to microwave energy.
It is important not to defeat or tamper with the safety interlocks.
(b) Do not place any object between the oven front face and the door or allow soil or cleaner residue
to accumulate on sealing surfaces.
(c) Do not operate the oven if it is damaged.
It is particularly important that the oven door closes properly and that there is no damage to the
following: (1) door (bent), (2) hinges and latches (broken or loosened), (3) door seals and sealing
surfaces.
(d) The oven should not be adjusted or repaired by anyone except properly qualified service
personnel.
CONTENTS
Precautions to Avoid Possible Exposure to
Excessive Microwave Energy..............................1
Important Safety Instructions...............................2
Safety Precautions ..............................................3
Grounding Instructions ........................................5
Installation ...........................................................5
Care of Your Microwave Oven ............................6
How to Use Your Microwave Oven Safely ..........6
Location of Controls ............................................7
Operation.............................................................8
Setting the Clock ..........................................8
Defrost By Weight ........................................8
Speed Defrost ..............................................9
Cooking In One Stage ..................................9
2 Stage or 3 Stage Time Cooking ................9
Start/Stop Pad ..............................................9
Cook By Weight..........................................10
Baked Potato Quick Cook Pad...................11
Pizza Quick Cook Pad
Popcorn Quick Cook Pad ...........................12
Setting Popcorn Quick Pad to a
Different Time.............................................12
Beverage Quick Cook Pad .........................13
Frozen Dinner Quick Cook Pad
Reheat Quick Cook Pad
Child Lock...................................................14
Setting the Timer
................................11
..................
.............................
........................................15
13
14
To Stop the Oven While it is Operating.............15
Cooking Guide...................................................16
The Principles of Microwave Cooking ........16
Food Characteristics ..................................16
Microwave Techniques...............................16
Hot Snacks and Appetizers ........................17
Meats..........................................................18
Poultry ........................................................19
Seafood ......................................................19
Eggs & Cheese ..........................................20
Vegetables and Soup .................................21
Sauces .......................................................22
Casseroles .................................................22
Sandwiches ................................................23
Pasta and Grains........................................23
Cereals .......................................................24
Convenience Foods ...................................24
Desserts .....................................................25
Weight & Measure Conversion Chart
Specifications ....................................................26
Before You Call for Service...............................26
Limited Warranty ...............................................27
................25
1
Page 2

IMPORTANT SAFETY INSTRUCTIONS
When using electrical appliances, basic safety precautions should be followed, including the following:
Read all instructions before using this appliance.
1
Read and follow the specific "PRECAUTIONS TO AVOID
2
3
4
5
6
7
8
POSSIBLE EXPOSURE TO EXCESSIVE MICROWAVE
ENERGY
This appliance must be grounded. Connect only to a
roperly grounded outlet. See "
p
INSTRUCTIONS
Install or locate this appliance only in accordance with the
provided installation instructions.
Some products such as whole eggs and sealed
containers, for example, closed glass jars, may explode
and should not be heated in this oven.
Use this appliance only for its intended use as described in
this manual. Do not use corrosive chemicals or vapors in
this appliance. This type of oven is specifically designed to
heat, cook, or dry food. It is not designed for industrial or
laboratory use.
As with any appliance, close supervision is necessary
when used by children.
Do not operate this appliance if it has a damaged cord or
plug, if it is not working properly, or if it has been damaged
or dropped.
" found on page 1.
" found on page 5.
ROUNDING
G
When cleaning surfaces of door and oven that come
15
together when closing the door, use only mild, nonabrasive soaps or detergents applied with a sponge or soft
cloth.
To reduce the risk of fire in the oven cavity:
16
(a) Do not overcook food. Carefully attend appliance if
aper, plastic, or other combustible materials are
p
placed inside the oven to facilitate cooking.
(b) Remove wire twist-ties from paper or plastic bags
before placing bag in oven.
(c) If materials inside the oven should ignite, keep oven
door closed, turn oven off, and disconnect the power
cord, or shut off power at the fuse or circuit breaker
panel.
(d) Do not use the cavity for storage purposes. Do not
leave paper products, cooking utensils, or food in the
cavity when not in use.
Do not use this microwave oven to heat corrosive
17
18
chemicals (for example, sulfides and chlorides). Vapors
from such corrosive chemicals may interact with the
contact and springs of the safety interlock switches
thereby rendering them inoperable.
Keep the waveguide cover clean at all times. Wipe the
oven interior with a soft damp cloth after each use. If you
leave grease or fat anywhere in the cavity it may lead to
overheating and fire.
9
10
11
12
13
14
This appliance should be serviced only by qualified service
personnel. Contact the nearest authorized service facility
for examination, repair or adjustment.
Do not cover or block any openings on this appliance.
Do not store or use this appliance outdoors. Do not use
this product near water, for example, near a kitchen sink,
in a wet basement, or near a swimming pool, and the like.
Do not immerse cord or plug in water.
Keep cord away from heated surfaces.
Do not let cord hang over edge of table or counter.
SAVE THESE INSTRUCTIONS
Never heat oil or fat for deep frying as you cannot control
19
20
the temperature and doing so may lead to overheating and
fire.
Liquids, such as water, coffee, or tea are able to be
overheated beyond the boiling point without appearing to
be boiling due to surface tension of the liquid. Visible
bubbling or boiling when container is removed from the
over is not always present. THIS COULD RESULT IN
VERY HOT LIQUIDS SUDDENLY BOILING OVER WHEN
A SPOON OR OTHER UTENSIL IS INSERTED INTO
THE LIQUID. To reduce the risk of injury to persons:
1. Do not overheat the liquid.
2.
Stir the liquid both before and halfway through heating it.
3. Do not use straight-sided containers with narrow necks.
4. After heating, allow the container to stand in the
microwave oven for a short time before removing the
container.
Use extreme care when inserting a spoon or other utensil
5.
into the container.
2
Page 3

SAFETY PRECAUTIONS
General Use
Do NOT attempt to tamper with or make any adjustments
or repairs to door, control panel or any other part of the
1
oven. Do NOT remove outer panel from oven. Repairs
should only be done by qualified service personnel.
Do NOT operate the oven empty. The microwave energy
2
will reflect continuously throughout the oven if no food or
water is present to absorb energy.
If a fire occurs in the oven, touch the Start/Stop pad and
3
LEAVE THE DOOR CLOSED. Disconnect the power
cord, or shut off power at the fuse or circuit breaker
panel.
Do NOT attempt to dry clothes, newspapers or other materials
in the oven. They may catch on fire.
4
Do NOT use recycled paper products. Recycled paper
towels, napkins and waxed paper can contain metal
5
flecks which may cause arcing or ignite. Paper products
containing nylon or nylon filaments should be avoided, as
they may ignite.
Some styrofoam trays (like those that meat is packaged
on) have a thin strip of metal embedded on the bottom.
6
When microwaved, the metal can burn the floor of the
oven or ignite a paper towel.
Avoid inserting nails, wire, etc. through any holes in the
7
unit during operation. Never insert a wire, nail or any
other metal objects through the holes on the cavity or any
other holes or gaps, because such objects may cause
electric shock and microwave leakage.
Remove PLASTIC STORE WRAPS before cooking or
5
defrosting foods in the oven.
For FURTHER INFORMATION on proper cooking
6
utensils, refer to the COOKING
Food
Never use your microwave oven for HOME CANNING.
1
The oven is not designed to permit proper canning.
Improperly canned food may spoil and be dangerous to
consume.
COOKING TIMES given in the cooking guide are
approximate. Factors that may affect cooking are starting
2
temperature, altitude, volume, size and shape of food
and utensils used. As you become familiar with the oven,
you will be able to adjust for these factors.
It is better to UNDERCOOK RATHER THAN OVERCOOK
foods. If food is undercooked, it can always be returned to
3
the oven for further cooking. If food is overcooked, nothing
can be done. Always start with minimum cooking times.
SMALL QUANTITIES of food or foods with LOW
MOISTURE content can burn, dry out or catch on fire if
4
cooked too long.
Do NOT boil eggs in their shell. Pressure may build up
and the eggs may explode.
5
Potatoes, apples, egg yolks, whole acorn squash and
sausage are some examples of food with NONPOROUS
6
SKINS. These must be pierced before cooking to prevent
bursting.
GUIDE on page 16.
Utensils
METAL CONTAINERS or dishes with metallic rims should
1
not be used. Arcing may occur.
METAL TWIST-TIES may not be used in the microwave
oven.
2
Do NOT use SEALED JARS or NARROW NECK bottles
for cooking or reheating. They may shatter.
3
Do NOT use CONVENTIONAL THERMO-METERS in
the microwave oven. They may cause arcing.
4
SAVE THESE INSTRUCTIONS
POPCORN must be popped in a microwave corn popper.
7
Microwave popped corn produces a lower yield than
conventional popping. Do not use oven for popcorn unless
popped in a microwave approved popcorn utensil or unless
it’s commercially packaged and recommended especially
for microwave ovens. Do not use oil unless specified by the
manufacturer.
Do NOT attempt to deep fat fry in your oven.
8
HEATED LIQUIDS can ERUPT if not mixed with air. Do
9
not heat liquids in your microwave oven without first
stirring.
3
Page 4

SAFETY PRECAUTIONS
FEDERAL COMMUNICATIONS COMMISSION RADIO
FREQUENCY INTERFERENCE STATEMENT
WARNING:
This equipment generates and uses ISM frequency energy and if not installed and used properly,
that is in strict accordance with the manufacturer’s instructions, may cause interference to radio
and television reception.
It has been type-tested and found to comply with limits for an ISM Equipment pursuant to part 18 of
FCC Rules, which are designed to provide reasonable protection against such interference in a
residential installation.
However, there is no guarantee that interference will not occur in a particular installation. If this
equipment does cause interference to radio or television reception, which can be determined by
turning the equipment off and on, the user is encouraged to try to correct the interference by one
or more of the following.
• Reorient the receiving antenna of radio or television.
• Relocate the Microwave oven with respect to the receiver.
• Move the microwave oven away from the receiver.
• Plug the microwave oven into a different outlet so that microwave oven and receiver are on
different branch circuits.
THE MANUFACTURER is not responsible for any radio or TV interference caused by
UNAUTHORIZED MODIFICATION to this microwave oven. It is the responsibility of the user to
correct such interference.
ARCING
If you see arcing, press START/STOP button and correct the problem.
Arcing is the microwave term for sparks in the oven.
Arcing is caused by:
• Metal or foil touching the side of the oven.
• Foil not molded to food (upturned edges act like antennas).
• Metal, such as twist-ties, poultry pins, or gold rimmed dishes, in the microwave.
• Recycled paper towels containing small metal pieces being used in the microwave.
DO NOT LEAVE OVEN UNATTENDED WHILE COOKING!
SAVE THESE INSTRUCTIONS
4
Page 5

3-pronged
Receptacle
Receptacle
Box Cover
3-pronged
plug
When using a 3-pronged plug
Receptacle
Receptacle
Box Cover
Grounding
Adapter
Grounding Lead
Screw
GROUNDING INSTRUCTIONS
his appliance must be grounded. In the event of an electrical short circuit, grounding reduces the risk of
T
electric shock by providing an escape wire for the electric current. This appliance is equipped with a cord having
grounding wire with a grounding plug. The plug must be inserted into an outlet that is properly installed and
a
grounded.
WARNING: Improper use of the grounding plug can result in a risk of electric shock. Consult a qualified electrician or service
person if the grounding instructions are not completely understood, or if doubt exists as to whether the appliance
is properly grounded.
If it is necessary to use an extension cord, use only a three wire extension cord that has a three blade grounding
plug, and a three slot receptacle that will accept the plug on the appliance. The marked rating of the extension
cord should be equal to or greater than the electrical rating of the appliance.
INSTALLATION
1. Steady, flat location:
When positioning the microwave oven, it should be set on a steady, flat surface.
2. Ventilation: Do not block air vents. If they are blocked during operation, the oven may overheat and eventually cause
oven failure. For proper ventilation, keep three inches of space between the oven’s top, sides, rear and the area
where the unit is to be installed.
3. Radio and TV reception: Poor television reception and radio interference may result if the oven is located close to a
TV, radio, antenna, or antenna wire. Position the oven as far from them as possible.
4. Temperature and moisture: Keep the oven away from hot air, steam or splashing liquids when choosing a place to
locate it, otherwise, the unit’s operation may be adversely affected, causing it to break down.
5. Power supply:
• Check your local power source. This microwave oven requires a 120V, 60Hz power supply.
• Use a receptacle that will accept the ground prong.
A. A short power supply cord is provided to reduce the risks resulting from becoming entangled in or tripping over a
longer cord.
B. Longer cord sets or extension cords are available and may be used if care is exercised in their use.
C. If a long cord or extension cord is used, (1) the marked electrical rating of the cord set or extension cord should be
at least as great as the electrical rating of the appliance, (2) the extension cord must be a grounding-type 3-wire
cord, and (3) the longer cord should be arranged so that it will not drape over the counter top or tabletop where it
can be pulled on by children or tripped over unintentionally.
6. Examine the oven for any damage such as: Dents, a misaligned door, broken door or a dent in the cavity. If any of
the above are visible, DO NOT INSTALL THE UNIT. Notify the dealer immediately.
When using a grounding adapter, make sure
the receptacle box is fully grounded.
5
Page 6
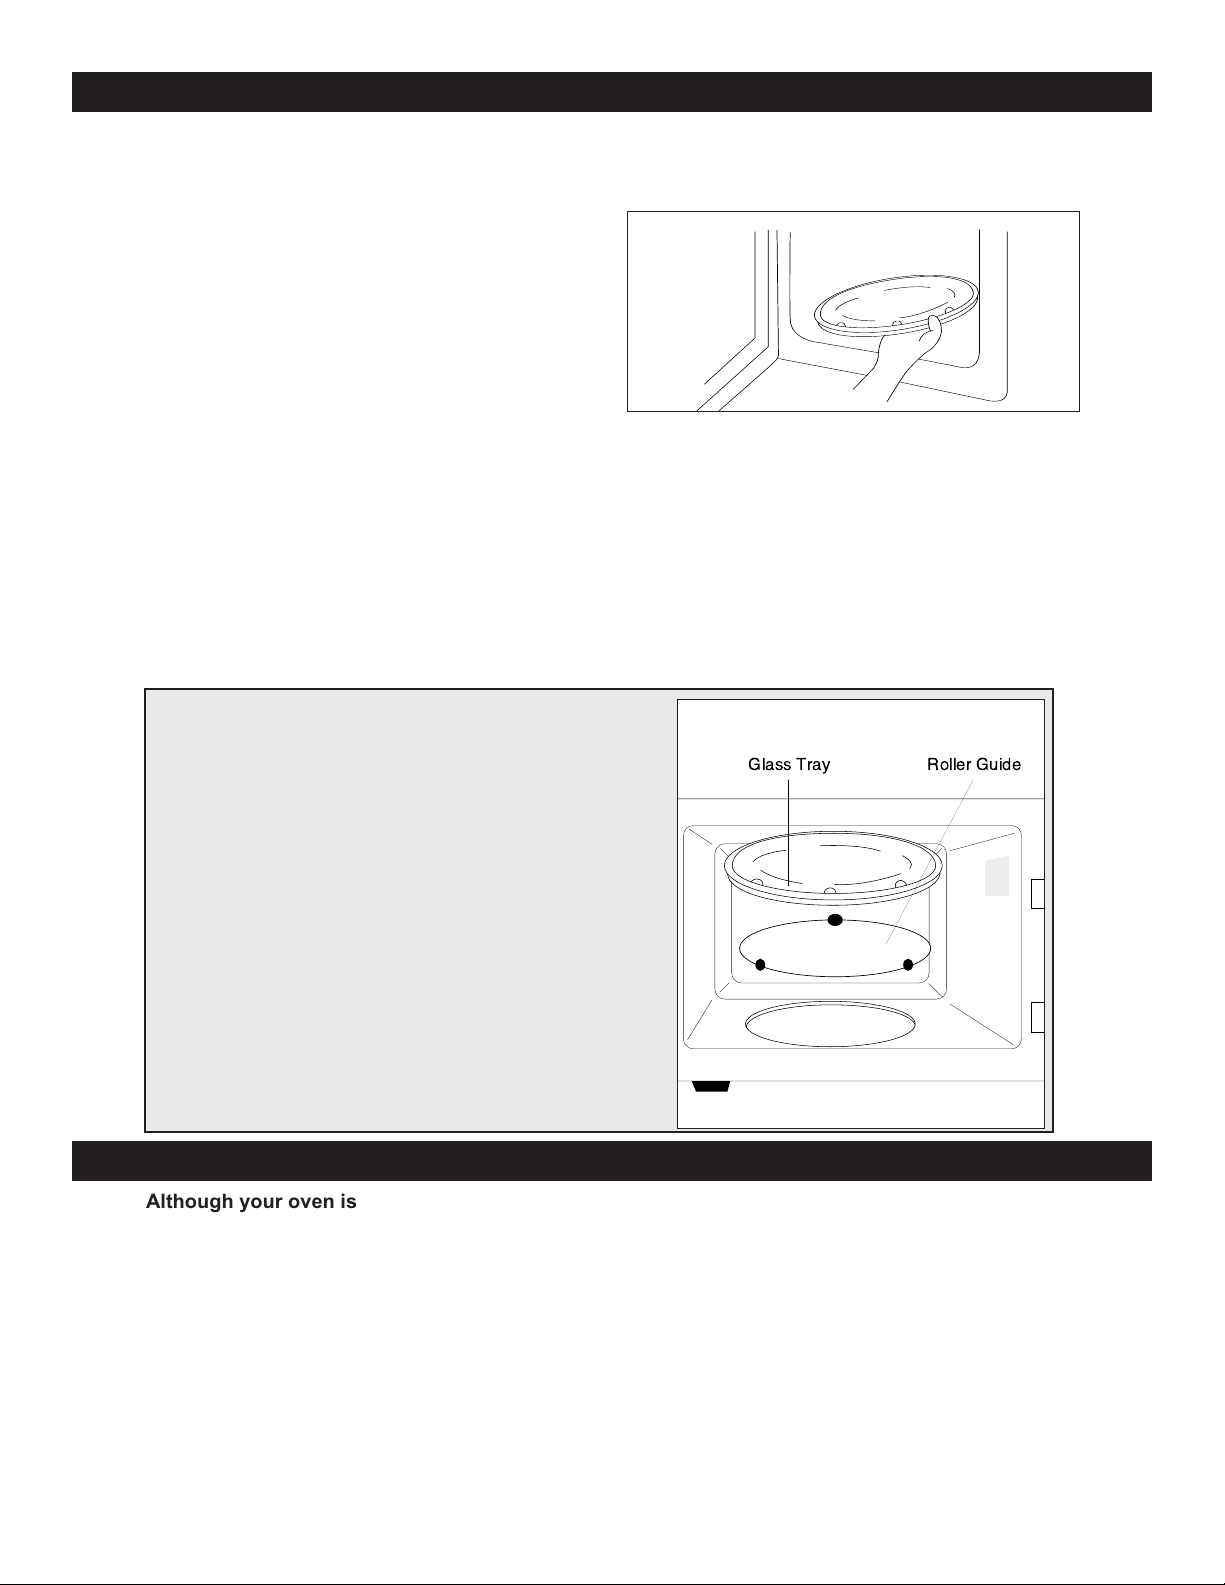
Glass Tray Roller Guide
CARE OF YOUR MICROWAVE OVEN
Disconnect the AC plug from the outlet before
cleaning.
1
eep the inside of the oven clean. When food
K
2
spatters or spilled liquids adhere to oven
walls, wipe with a damp cloth. Mild detergent
may be used if the oven gets very dirty. The
se of harsh detergent or abrasives is not
u
recommended.
The outside oven surface should be cleaned
3
with soap and water, rinsed and dried with a
soft cloth. To prevent damage to the operating parts inside the oven, water should not be
allowed to seep into the ventilation slots.
If the Control Panel becomes dirty or wet,
4
clean with a soft, dry cloth. Do not use harsh
detergents or abrasive on Control Panel.
If steam accumulates on both sides of the
5
oven door, wipe with a soft cloth. This may
occur when the microwave oven is operated
under high humidity conditions and this is not
an indication of a malfunction in the unit.
It is occasionally necessary to remove the
glass tray for cleaning. Wash the tray in warm,
6
udsy water or in a dishwasher.
s
The roller guide and oven cavity floor should
7
be cleaned regularly to avoid excessive noise.
Simply wipe the bottom surface of the oven
with mild detergent water or window cleaner
and dry. The roller guide may be washed in
mild, sudsy water or the dishwater.
Roller Guide
The ROLLER GUIDE and oven floor should be
1
cleaned frequently to prevent excessive noise.
The ROLLER GUIDE MUST ALWAYS be used for
2
cooking together with the Glass Tray.
Glass Tray
Do NOT operate the oven without the Glass Tray
in place.
1
Do NOT use any other Glass Tray with this oven.
2
If the Glass Tray is hot, ALLOW IT TO COOL
3
before cleaning it or placing it in water.
Do NOT cook directly on the Glass Tray.
4
HOW TO USE YOUR MICROWAVE OVEN SAFELY
Although your oven is provided with safety features, it is important to observe the following:
It is important not to defeat or tamper with safety interlocks.
a)
b) Do not place any object between the oven face and the door or allow residue to accumulate on
sealing surfaces. Wipe the sealing area frequently with a mild detergent, rinse and wipe dry. Never
use abrasive powders or pads.
c) When opened, the door must not be subjected to strain, for example, a child hanging on an open
door or any load which could cause the oven to fall forward and cause injury and damage to the
door. Do not operate the oven if it is damaged, until it has been repaired by a qualified person. It is
particularly important that the oven door close properly and that there is no damage to the following:
i) Door (bent), ii) Hinges and Latches (broken or loosened), iii) Door seals and sealing surfaces.
The oven should not be adjusted or repaired by anyone except properly qualified service personnel.
d)
6
Page 7
12 3 5
6
4
9
7
8
Popcorn Baked Potato Pizza
Beverage
Power
Cook By
Weight
Defrost By
Weight
Speed
Defrost
Timer Cook
Frozen Dinner Reheat
1
23
456
789
Clock0Reset
S
tart
Stop
Popcorn Baked Potato Pizza
Beverage
Power
C
ook By
Weight
D
efrost By
Weight
S
peed
Defrost
Timer Cook
Frozen Dinner Reheat
123
456
789
Clock
0
Reset
Start
Stop
10
12
11
14
13
16
15
18
19 26
25
24
23
22
21
20
17
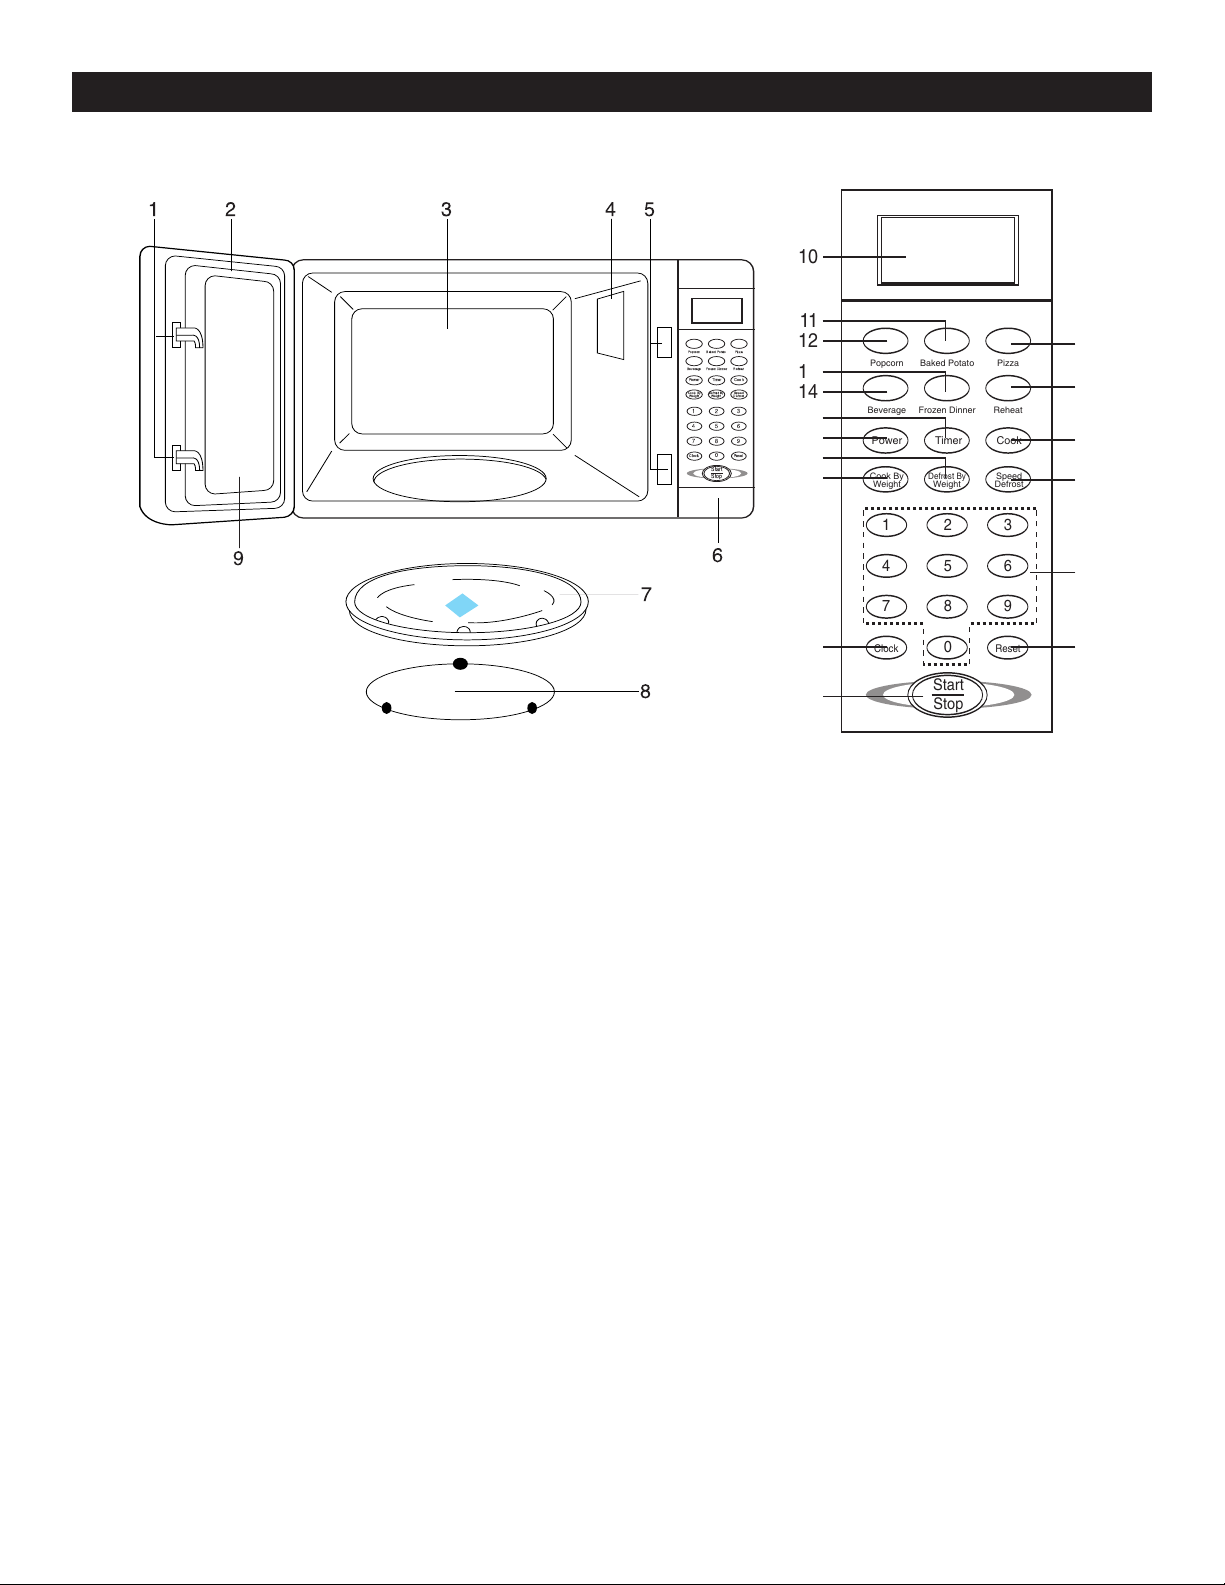
LOCATION OF CONTROLS
1. Door latch – When the door is closed, it will
automatically lock shut. If the door is opened while
the oven is operating, the magnetron will
automatically shut off.
2. Door seal – The door seal maintains the
microwaves within the oven cavity and prevents
microwave leakage.
3. Oven cavity
4. Spatter shield – Protects the microwave outlet
from splashes of cooking foods.
Safety interlock system – Prevents the oven from
5.
operating while the door is opened.
Door Open button – Press to open the door and
6.
stop oven operation.
7. Glass cooking tray – Made of special heat
resistant glass. The tray must always be in proper
position before operating the oven. Do not cook
food directly on the tray.
8. Roller guide – Supports the glass cooking tray.
9. Door screen – Allows viewing of food. The screen
Must always be in proper position before operating
the oven.
is designed so that light can pass through, but not
the microwaves.
10. Display – Cooking time, power level, function
indicators and the present time are displayed.
11. Baked Potato pad – Touch to cook potatoes.
12. Popcorn pad – Touch to cook popcorn.
13. Frozen Dinner pad – Used to cook frozen dinners.
14. Beverage pad – Used to heat beverages.
15. Timer pad – Used to allow the display to operate
as a kitchen timer.
16. Power pad – Used to set the desired cooking
power level.
17. Defrost By Weight pad – Used to set the oven to
estimate the defrosting time by weight entered.
Cook By Weight pad – Used to set the oven to
18.
estimate the cooking time by weight entered.
Clock pad – Touch to set the present time.
19.
Start/Stop pad – Used to start or stop a selected
20.
operation.
Pizza pad – Touch to reheat precooked or cook
21.
frozen pizza.
22. Reheat pad –- Used to reheat plated foods.
23. Cook pad – Touch to set any desired cook setting.
Speed Defrost pad – Automatically divides the
24.
defrosting times into periods of alternating defrost
and standing times for even defrosting.
25. 10 key pads – Used to select the desired power
level, cooking time, etc.
26. Reset pad – Used to reset the cooking data if
pressed before cooking starts.
7
Page 8
OPERATION
Baked Potato Popcorn Pizza
Beverage
Power
C
ook By
Weight
D
efrost By
Weight
S
peed
Defrost
Timer Cook
Frozen Dinner Reheat
123
456
789
Clock
0
Reset
Start
Stop
E
NTER TIME
C
LOCK
B
aked Potato Popcorn Pizza
B
everage
Power
C
ook By
Weight
D
efrost By
Weight
S
peed
Defrost
Timer Cook
F
rozen Dinner Reheat
123
456
789
E
NTER TIME
C
LOCK
B
aked Potato Popcorn Pizza
B
everage
P
ower
C
ook By
W
eight
D
efrost By
W
eight
S
peed
D
efrost
T
imer Cook
F
rozen Dinner Reheat
123
456
789
Clock
0
Reset
Start
Stop
CLOCK
Baked Potato Popcorn Pizza
B
everage
Power
C
ook By
W
eight
D
efrost By
W
eight
S
peed
D
efrost
Timer Cook
F
rozen Dinner Reheat
123
456
ENTER
LB
Baked Potato Popcorn Pizza
B
everage
Power
C
ook By
W
eight
D
efrost By
W
eight
S
peed
D
efrost
Timer Cook
F
rozen Dinner Reheat
123
456
789
ENTER
LB OZ
Baked Potato Popcorn Pizza
Beverage
Power
Cook By
Weight
Defrost By
Weight
Speed
Defrost
Timer Cook
Frozen Dinner Reheat
123
456
789
Clock
0
Reset
Start
Stop
DEF
CODE
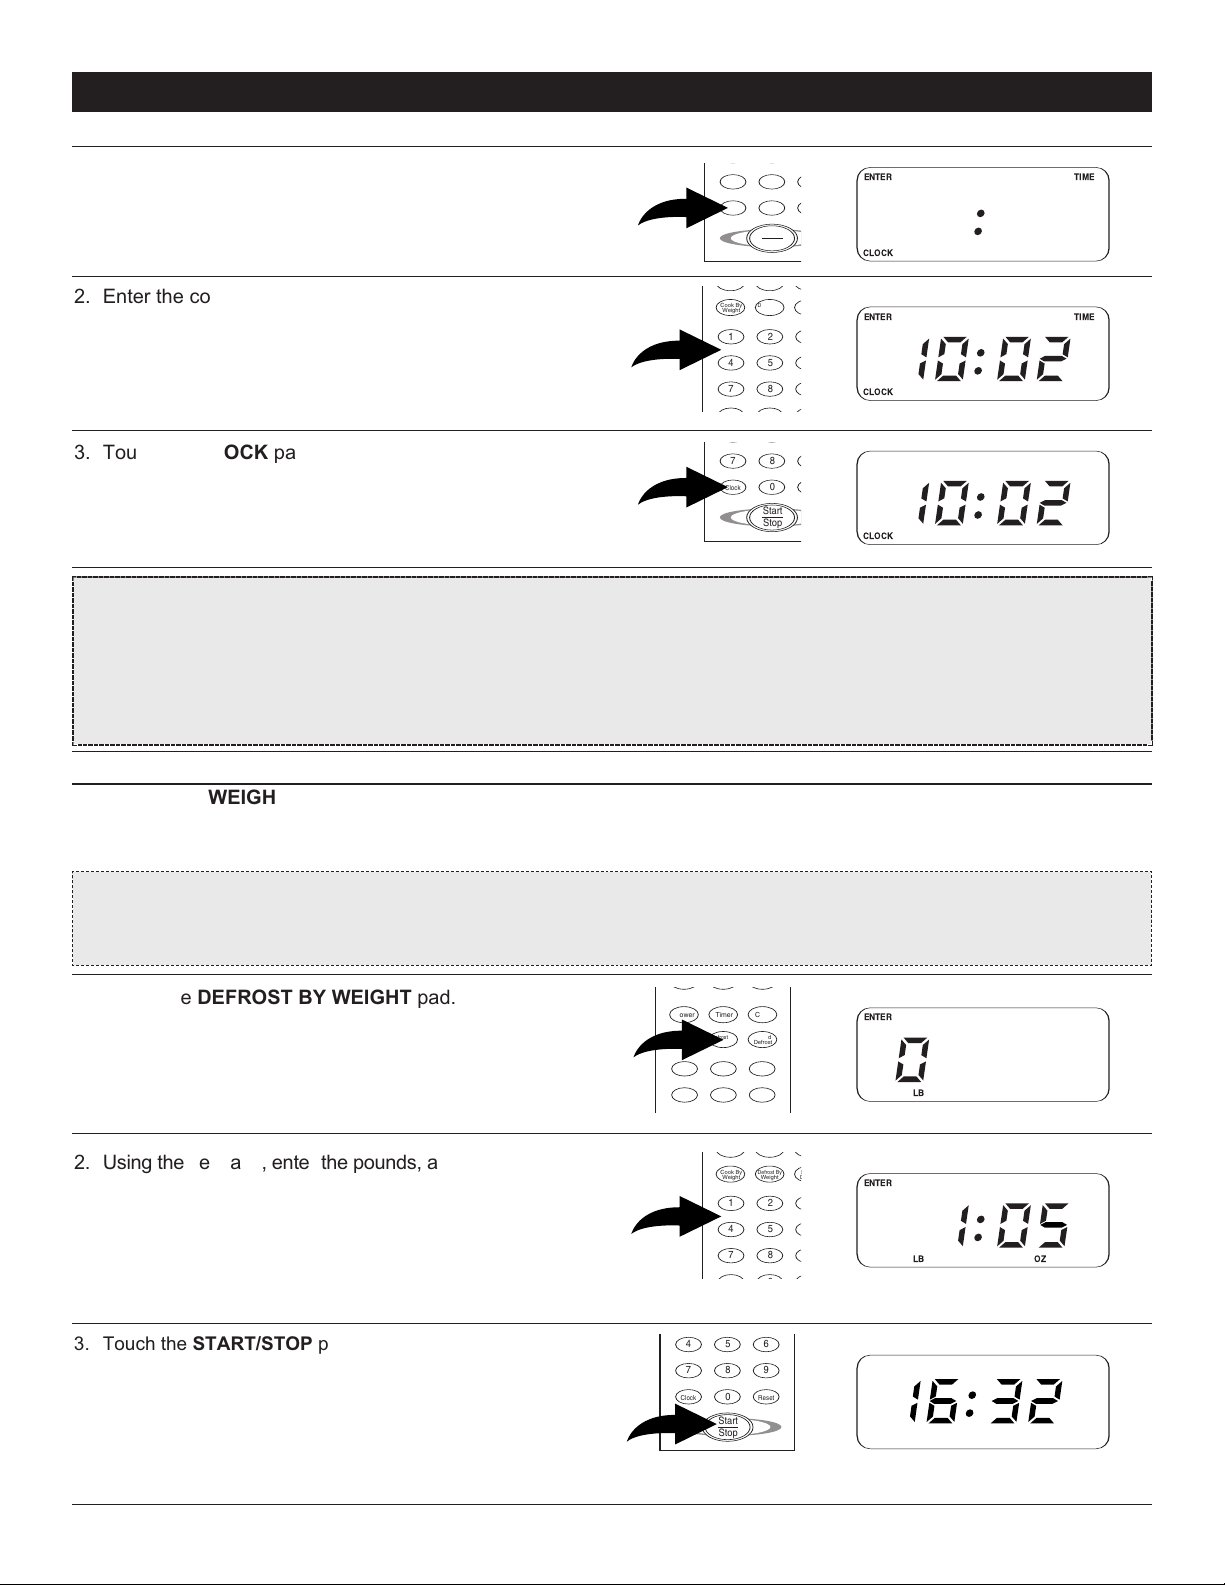
SETTING THE CLOCK
. Touch the CLOCKpad.
1
The display will show “ENTER CLOCK TIME”.
OTE: When the unit is first plugged in, it will temporarily
N
be in the clock set mode.
. Enter the correct time of day.
2
EXAMPLE: To set the time to “10:02”, touch “1”, “0”, “0”,
“2” in sequence.
The display will show the numbers pressed in the order
in which you pressed them.
3. Touch the CLOCK pad.
The display will show the present time and the colon will
stop blinking. After the clock has been set, the time will
appear unless the oven is cooking or defrosting.
NOTES:
• To reset present time in the display window when the oven is off, touch the CLOCK pad and reset.
• A pad must be touched within 15 seconds when setting the clock, or entering cooking information.
• If you make a mistake when setting the time, touch the
• To recall the actual time while the oven is cooking or defrosting, simply touch the
show the actual time for three seconds.
RESET pad.
CLOCK pad and the display will
DEFROST BY WEIGHT
DEFROST BY WEIGHT lets you easily defrost foods by eliminating guesswork in determining defrosting time.
The minimum weight for Auto Weight Defrost is 1oz. The maximum weight is 6.0 lbs (entered as 5lbs, 16oz).
Follow the steps below for easy defrosting.
IMPORTANT NOTE: After partial defrosting, the oven will stop defrosting and beep two times, but the time will remain
on the display. This pause is to allow you to turn and rearrange the food for even defrosting. After the food is turned and
rearranged, press the
1. Touch the DEFROST BY WEIGHT pad.
2. Using the keypads, enter the pounds, and then enter the
ounces.
For example, for 1 pound 5 ounces, touch “1”, “0”, “5”.
(Maximum weight that can be entered is 5lbs, 16oz.)
Touch the
3.
and “DEF” and count down the remaining defrosting time in
minutes and seconds. It will beep four times and show “End”
when defrosting is completed (refer to
above
before starting another operation.
START/STOP pad. The display will show “CODE”
). Touch the RESET pad or open the door to clear
START/STOP pad again.
Important Note
8
Page 9
OPERATION (CONTINUED)
B
aked Potato Popcorn Pizza
Beverage
Power
C
ook By
W
eight
D
efrost By
W
eight
S
peed
D
efrost
Timer Cook
Frozen Dinner Reheat
123
ENTER TIME
D
EF
Baked Potato Popcorn Pizza
B
everage
Power
Cook By
W
eight
Defrost By
W
eight
Speed
D
efrost
Timer Cook
F
rozen Dinner Reheat
123
456
DEF
Baked Potato Popcorn Pizza
Beverage
Power
Cook By
Weight
Defrost By
Weight
Speed
Defrost
Timer Cook
Frozen Dinner Reheat
123
456
789
Clock
0
Reset
Start
Stop
DEF
Baked Potato Popcorn Pizza
Beverage
Power
C
ook By
Weight
D
efrost By
Weight
S
peed
Defrost
Timer Cook
Frozen Dinner Reheat
123
456
789
ENTER COOK TIME
Baked Potato Popcorn Pizza
Beverage
Power
Cook By
Weight
Defrost By
Weight
Speed
Defrost
Timer Cook
Frozen Dinner Reheat
123
456
COOK
Baked Potato Popcorn Pizza
Beverage
Power
C
ook By
W
eight
D
efrost By
W
eight
S
peed
D
efrost
Timer Cook
Frozen Dinner Reheat
123
456
789
Clock
0
Reset
Start
Stop
COOK
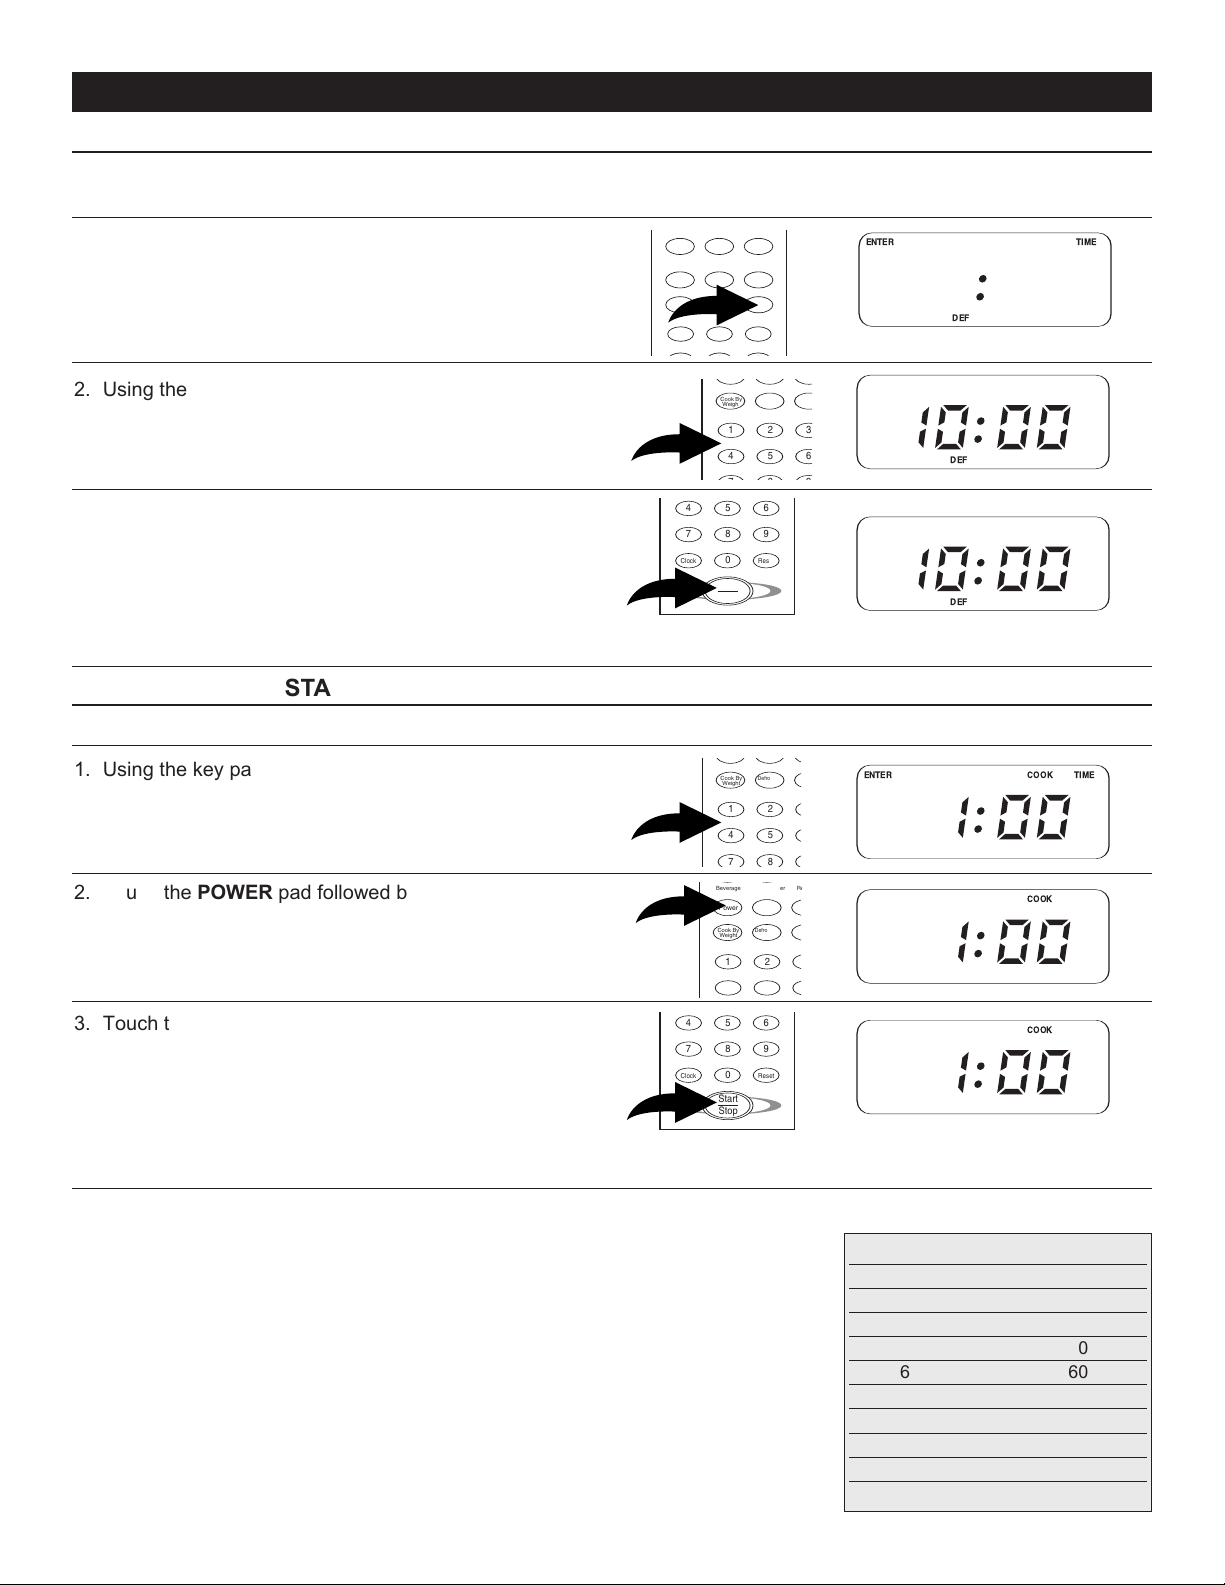
SPEED DEFROST
SPEED DEFROST will automatically set the oven to defrost at a time set by the user. This method provides the
quickest thawing of small to medium size foods.
1. Touch the SPEED DEFROST pad.
2. Using the key pads, enter the desired defrosting time (up
to 99 minutes, 99 seconds).
3. Touch the START/STOP pad. The display will show
“DEF” and count down the remaining defrosting time in
minutes and seconds. It will beep four times and show
“End” when defrosting is completed.
pad or open the door to clear before starting another
operation.
Touch the RESET
COOKING IN ONE STAGE
Set a cooking or other operational time/power as follows:
1. Using the key pads, enter the desired cooking time (up to
99 minutes, 99 seconds).
2. Touch the POWER pad followed by a key pad to enter
the power level (skip if cooking at 100%); see below.
The display will show the percentage you chose.
Touch the
3.
START/STOP pad. The display will show
“COOK” and count down the remaining cooking time in
minutes and seconds. It will beep four times and show
“End” when cooking is completed
Touch the RESET pad or open the door to clear before
starting another operation.
2 STAGE OR 3 STAGE TIME COOKING
For two stage cooking, instead of performing step 3, press the COOK pad and
repeat steps 1 and 2 and then press the START/STOP pad; “MEM” will appear
in the display.
If desired, after setting two-stage cooking, press the SPEED DEFROST pad and
enter the desired defrosting time, then press the START/STOP pad.
When all stages have completed, four beeps will sound.
START/STOP PAD
To add a minute while the oven is cooking, simply press the START/STOP pad.
(Woks only in Time Cooking and Speed Defrost.)
9
WATTAGE OUTPUT CHART
Number Pad % of Power
None 100
990
880
770
660
550
440
330
2
110
20
Page 10

OPERATION (CONTINUED)
Baked Potato Popcorn Pizza
Beverage
Power
Cook By
W
eight
Defrost By
W
eight
Speed
D
efrost
Timer Cook
Frozen Dinner Reheat
123
456
E
NTER CODE
B
aked Potato Popcorn Pizza
B
everage
P
ower
C
ook By
Weight
D
efrost By
Weight
S
peed
Defrost
T
imer Cook
F
rozen Dinner Reheat
123
456
789
ENTER
LB OZ
B
aked Potato Popcorn Pizza
Beverage
Power
C
ook By
Weight
D
efrost By
Weight
S
peed
Defrost
Timer Cook
Frozen Dinner Reheat
123
456
789
Clock
0
Reset
Start
Stop
CODE COOK
COOK BY WEIGHT
COOK BY WEIGHT lets you easily roast meats in the oven as it will automatically set the times and power levels
to give better results than one power only cooking. Meat must be defrosted and at refrigerated temperature.
eat Roasts approximately three to five pounds work best.
M
1. Touch the COOK BY WEIGHT pad.
The display will show “ENTER CODE”.
2. Using the key pads, select the desired code that
corresponds to the type of food you are cooking
according to the chart at the right.
Code Roast Type Int. Temp after Recommended
Standing Max Weight
1 Roast Beef Rare 140° 5lb, 16oz
2 Beef or Lamb Medium 160° 5lb, 16oz
3 Pork Well Done 170° 5lb, 4oz
3. Using the key pads, enter the pounds, then enter the
ounces. For example, for 1 pound 5 ounces, touch “1”, “0”,
“5”. (Maximum ounces that can be entered is 16.)
The cooking time will appear.
4. Touch the START/STOP pad.
The display will show “CODE” and “COOK” and will
count down the remaining cooking time in minutes and
seconds and will beep four times when cooking is
completed.
Touch the RESET pad or open the door to clear
before starting another operation.
NOTES:
•
After partial cooking, the oven will stop cooking and beep two times, but the time will remain on the display. This
pause is to allow you to turn and rearrange the food for even cooking. After the food is turned and rearranged, press
START/STOP pad again.
the
• Let the roast stand a few minutes to finish cooking before serving
10
Page 11

Popcorn Baked Potato Pizza
Beverage
Power
C
ook By
Weight
D
efrost By
Weight
S
peed
Defrost
Timer Cook
Frozen Dinner Reheat
ENTER AMT
Baked Potato Popcorn Pizza
Beverage
Power
C
ook By
Weight
D
efrost By
Weight
S
peed
Defrost
Timer Cook
Frozen Dinner Reheat
123
456
789
Clock
0
Reset
Start
Stop
CODE COOK
OPERATION (CONTINUED)
P
opcorn Baked Potato Pizza
Beverage
P
owerTimer Cook
Frozen Dinner Reheat
C
ODE
Baked Potato Popcorn Pizza
Beverage
Power
Cook By
Weight
Defrost By
Weight
Speed
Defrost
Timer Cook
Frozen Dinner Reheat
123
456
789
Clock
0
Reset
Start
Stop
CODE
COOK
BAKED POTATO QUICK COOK PAD
Use this feature and the oven will automatically set the cooking time based on the quantity of potatoes. A built-in
standing time will help equalize the temperature. Cook potatoes as follows:
. For four to five ounce potatoes, touch the BAKED
1
POTATO pad once. For a eight to 10 ounce potato,
touch the BAKED POTATO pad twice.
The display will show “ENTER AMT”.
* Pierce skins before cooking.
2. Enter the amount of four to five ounce potatoes (up to
four) and the cooking time will appear. Touch the
START/STOP pad. The display will show “CODE” and
“COOK” and will count down the remaining cooking time
in minutes and seconds and will beep four times when
cooking is completed.
NOTE: Up to four baked potatoes can be cooked as follows:
Qty 4-5 Oz Times 6-8 Oz Times
1 Potato 3 minutes, 20 seconds 5 minutes, 00 seconds
2 Potatoes 6 minutes, 20 seconds 9 minutes, 00 seconds
3 Potatoes 9 minutes, 20 seconds 13 minutes, 00 seconds
4 Potatoes 12 minutes, 20 seconds 17 minutes, 00 seconds
PIZZA QUICK COOK PAD
Use this feature and the oven will automatically set the cooking time based on the the type of pizza (reheated or
frozen). Cook pizza as follows:
1. To reheat a thick slice or two smaller slices, touch the
PIZZA pad once (total cooking time is 1 minute). For a
whole frozen pizza, touch the PIZZA pad twice (total
cooking time is 5 minutes).
The display will show “CODE”.
2. Touch the START/STOP pad. The display will show
“CODE” and “COOK” and will count down the remaining
cooking time in minutes and seconds and will beep four
times when cooking is completed.
11
Page 12

OPERATION (CONTINUED)
Popcorn Baked Potato Pizza
Beverage
Power
C
ook By
Weight
D
efrost By
Weight
S
peed
Defrost
Timer Cook
Frozen Dinner Reheat
CODE
B
aked Potato Popcorn Pizza
Beverage
Power
Cook By
W
eight
Defrost By
W
eight
Speed
D
efrost
Timer Cook
Frozen Dinner Reheat
123
456
789
Clock
0
Reset
Start
Stop
CODE COOK
Popcorn Baked Potato Pizza
Beverage
Power
C
ook By
Weight
D
efrost By
Weight
S
peed
Defrost
Timer Cook
Frozen Dinner Reheat
E
NTER TIME
Baked Potato Popcorn Pizza
B
everage
Power
C
ook By
Weight
D
efrost By
Weight
S
peed
Defrost
Timer Cook
F
rozen Dinner Reheat
123
456
789
Clock
0
Reset
Start
Stop
ENTER TIME
POPCORN QUICK COOK PAD
se this feature and the oven will automatically set the cooking time. Cook popcorn as follows:
U
1. To cook a standard 3 to 3-1/2 oz bag, touch the
OPCORNpad (total cooking time is 2 minutes, 15
P
seconds).
The display will show “CODE”.
2. Touch the START/STOP pad. The display will show
“CODE” and “COOK” and will count down the remaining
cooking time in minutes and seconds and will beep four
times when cooking is completed.
SETTING POPCORN QUICK COOK PAD TO A DIFFERENT TIME
If using a smaller or larger popcorn package, you can automatically set this oven to a different preset popcorn
time. If you do change the popcorn time, the oven will continue using the new time each time the POPCORN pad
is touched. Change the popcorn cooking time as follows:
1. Touch the POPCORN pad twice.
The display will show “ENTER TIME”.
2. Enter a new popcorn time using the Key pads. Touch the
START/STOP pad to cook the popcorn using the new
time.
NOTES:1. To avoid discoloration of the glass tray, set the popcorn packages on a microwaveable plate.
2. Use only a microwaveable popcorn package in the microwave oven.
3. Do not try to pop unpopped kernels.
4. Do not leave the oven unattended while popping popcorn. If the popcorn does not pop sufficiently, do not
press the
POPCORN pad again as the popcorn may burn. Check the popcorn bag for cooking instructions.
5. When opening the package, face it away from you to avoid contact with any steam released.
12
Page 13

Popcorn Baked Potato Pizza
B
everage
Power
Cook By
W
eight
Defrost By
W
eight
Speed
D
efrost
Timer Cook
F
rozen Dinner Reheat
123
ENTER AMT
Baked Potato Popcorn Pizza
Beverage
Power
Cook By
W
eight
Defrost By
W
eight
Speed
D
efrost
Timer Cook
Frozen Dinner Reheat
123
456
789
Clock
0
Reset
Start
Stop
CODE
Popcorn Baked Potato Pizza
B
everage
P
ower
Cook By
Weight
Defrost By
Weight
Speed
Defrost
T
imer Cook
F
rozen Dinner Reheat
123
ENTER AMT
Baked Potato Popcorn Pizza
Beverage
Power
Cook By
Weight
Defrost By
Weight
Speed
Defrost
Timer Cook
Frozen Dinner Reheat
123
456
789
Clock
0
Reset
Start
Stop
CODE COOK
OPERATION (CONTINUED)
BEVERAGE QUICK COOK PAD
Use this feature and the oven will automatically set the cooking time based on the the size and quantity of the
everage. Cook beverage as follows:
b
. To heat four to six ounce beverage(s), touch the
1
BEVERAGE pad once. To heat seven to nine ounce
beverage(s), touch the
The display will show “ENTER AMT”.
2. Enter the amount of cups (up to four) and the cooking
time will appear. Touch the START/STOP pad. The
display will show “CODE” AND “COOK” and will count
down the remaining cooking time in minutes and
seconds and will beep four times when cooking is
completed.
NOTE: Up to four cups can be reheated as follows:
Qty 4-6 Oz Times 7-9 Oz Times
1 Cup 1 minute, 10 seconds 2 minutes, 00 seconds
2 Cups 2 minutes, 10 seconds 3 minutes, 30 seconds
3 Cups 3 minutes, 10 seconds 5 minutes, 00 seconds
4 Cups 4 minutes, 10 seconds 6 minutes, 30 seconds
BEVERAGE pad twice.
FROZEN DINNER QUICK COOK PAD
Use this feature and the oven will automatically set the cooking time based on the size and quantity of the frozen
dinners. A built-in standing time will help equalize the temperature. Cook frozen dinners as follows:
1. To heat five to seven ounce frozen dinner(s), touch the
FROZEN DINNER pad once. To heat eight to 10 ounce
frozen dinner(s), touch the
The display will show “ENTER AMT”.
2. Enter the amount of frozen dinners (up to two) and the
cooking time will appear. Touch the
The display will show “CODE” and “COOK” and will
count down the remaining cooking time in minutes and
seconds and will beep four times when cooking is
completed.
NOTE: Up to two dinners can be reheated as follows:
Qty 5-7 Oz Times 8-10 Oz Times
1 Entree 4 minutes, 35 seconds 9 minutes, 00 seconds
2 Entrees
FROZEN DINNER pad twice.
START/STOP pad.
8 minutes, 15 seconds
15 minutes, 30 seconds
13
Page 14

OPERATION (CONTINUED)
P
opcorn Baked Potato Pizza
Beverage
Power
C
ook By
Weight
D
efrost By
Weight
S
peed
Defrost
Timer Cook
Frozen Dinner Reheat
CODE
B
aked Potato Popcorn Pizza
B
everage
Power
C
ook By
Weight
D
efrost By
Weight
S
peed
Defrost
Timer Cook
F
rozen Dinner Reheat
123
456
7
89
C
lock
0
R
eset
Start
Stop
CODE
COOK
Baked Potato Popcorn Pizza
Beverage
Power
Cook By
W
eight
Defrost By
W
eight
Speed
D
efrost
Timer Cook
Frozen Dinner Reheat
123
456
789
C
lock
0
R
eset
Start
Stop
CLOCK
LOCK
B
aked Potato Popcorn Pizza
B
everage
Power
C
ook By
W
eight
D
efrost By
W
eight
S
peed
D
efrost
Timer Cook
F
rozen Dinner Reheat
123
456
789
Clock
0
Reset
Start
Stop
CLOCK
REHEAT QUICK COOK PAD
Use this feature and the oven will automatically set the cooking time. Reheat as follows:
1. To reheat a standard plate, touch the REHEAT pad (total
reheat time is 3 minutes, 15 seconds).
he display will show “CODE”.
T
2. Touch the START/STOP pad. The display will show
“CODE” and “COOK” and will count down the remaining
cooking time in minutes and seconds and will beep four
times when cooking is completed.
Arranging the foods on the plate will determine how evenly they cook. Dense foods (such as meat) and compact
vegetables (such as mashed potatoes) should be placed around the edges and spread out as much as possible to
expose them to the microwave energy. Large amounts of food should be spread out to receive more energy than smaller
ones. Covering dry meat slices with gravy will help speed the heating. Light, airy foods (such as rice, delicate seafood,
etc.) absorb energy quickly. Place them in the center of the plate.
CHILD LOCK
The Child Lock prevents unwanted oven operation by small children. The oven can be set so that the control
panel is deactivated or locked.
1. To activate, press and hold the RESET pad for three
seconds, “LOCK” will appear and no buttons can be
pressed.
To deactivate, press and hold the
2.
seconds, “LOCK” will disappear.
RESET pad for three
14
Page 15

OPERATION (CONTINUED)
B
aked Potato Popcorn Pizza
Beverage
Power
C
ook By
Weight
D
efrost By
Weight
S
peed
Defrost
Timer Cook
Frozen Dinner Reheat
123
ENTER TIMER TIME
Baked Potato Popcorn Pizza
B
everage
P
ower
Cook By
W
eight
Defrost By
W
eight
Speed
D
efrost
T
imer Cook
F
rozen Dinner Reheat
123
456
789
C
lock
0
R
eset
Start
E
NTER TIMER TIME
B
aked Potato Popcorn Pizza
Beverage
Power
Cook By
W
eight
Defrost By
W
eight
Speed
D
efrost
Timer Cook
Frozen Dinner Reheat
123
456
789
Clock
0
Reset
Start
Stop
TIMER
SETTING THE TIMER
. Touch the TIMERpad.
1
The display will show “ENTER TIMER TIME”.
2. Enter the desired timer time.
EXAMPLE: To set the time to “10:02”, touch “1”, “0”, “0”,
“2” in sequence.
The display will show the numbers pressed in the order
in which you pressed them.
3. Touch the START/STOP pad.
The display will count down the timer time and emit one
long beep.
NOTES:
• The clock will appear in the display when the timer is counting down. To view the time left on the timer, simply press
the
TIMER pad once.
• You can set the Timer while the oven is cooking. This is useful to set the timer to go off when you need to turn or
rearrange cooking/defrosting foods.
• Touch the TIMER pad followed by the RESET pad to cancel the timer.
TO STOP THE OVEN WHILE IT IS OPERATING
1. Press the START/STOP pad.
• The oven can be restarted by pressing the START/STOP pad.
• Touch the RESET pad to erase all instructions.
• You must then enter new instructions if needed.
Open the door.
2.
15
Page 16

COOKING GUIDE
THE PRINCIPLES OF MICROWAVE COOKING
Microwaves are a form of high frequency radio waves similar to those used by a radio including AM, FM and CB.
Electricity is converted into microwave energy by the magnetron tube. From the magnetron tube, microwave
energy is transmitted to the oven where it is reflected, transmitted, and absorbed by the food.
Reflection
icrowaves are reflected by metal just as a ball is bounced off of a wall. For this reason, metal utensils are not
M
suitable for use in the microwave. A combination of stationary interior walls and a rotating metal turntable or stirrer fan
helps assure that the microwaves are well distributed within the oven cavity to produce even cooking.
Transmission
Microwaves pass through some materials such as paper, glass and plastic much like sunlight shining through a
window. Because these substances do not absorb or reflect the microwave energy, they are ideal materials for
microwave oven cooking containers.
Absorption
During cooking, microwaves will be absorbed by food. They penetrate to a depth of about 3/4 to 1 1/2 inches.
Microwave energy activates the molecules in the food (especially water, fat and sugar), and heat is produced. If you
vigorously rub your hands together, you will feel heat produced by friction. The internal cooking of larger foods is done
by conduction as the heat which is produced by friction is conducted to the middle of the food. Foods also continue to
cook by conduction during standing time.
FOOD CHARACTERISTICS
Quantity: The amount of food placed in a microwave oven has a direct effect on the cooking time. Small amounts of food
or liquid require less cooking time than larger amounts of the same substance. As quantity increases, concentration
decreases.
Size: Small pieces cook faster than large ones. To speed cooking, cut pieces smaller than two inches (5 cm), so microwaves
can penetrate to the middle from all sides. Pieces which are similar in size and shape cook more evenly.
Shape: Many foods are uneven, like a chicken, ribs or broccoli. The thin parts will cook faster than the thick parts, while
uniformly thick foods cook evenly. To compensate for irregular shapes, place thin pieces toward the center of the dish
and thicker pieces toward the edge of the dish.
Starting Temperature: Frozen or refrigerated foods take longer to cook than foods at room temperature.
Bone and Fat: Because bones conduct heat, the side of the meat the bone is on will cook first, while boneless cuts cook
slower but more evenly. Fat attracts microwaves. The middle of these foods are cooked by heat conduction.
Moisture Content: Microwaves are attracted by moisture. Naturally moist foods absorb microwaves better than dry ones.
Add a minimum of liquid to moist foods, as excess water slows cooking.
Density: The density of food determines how easily the microwaves can penetrate and how quickly it will cook. Porous
foods, like chopped beef or mashed potatoes, microwave faster than dense ones like steak or whole potatoes.
Piercing: Steam builds up pressure in foods which are tightly covered by a skin or membrane. Pierce potatoes, egg yolks
and chicken livers to prevent bursting.
MICROWAVE TECHNIQUES
Stirring: Stir foods from outside to center of dish once or twice during cooking to equalize heat and speed microwaving.
Foods will not burn or stick, so there’s no need to stir constantly as you do in conventional cooking.
Arrangement: Arrange foods with thin or delicate ends, Iike drumsticks or asparagus spears with the thick or tougher portions
to the outside of the dish. The parts which need more cooking will receive more energy, so food will microwave evenly.
Spacing: Individual foods, such as baked potatoes and cupcakes will cook more evenly if placed in the oven an equal
distance apart. When possible, arrange foods in a circular pattern. Similarly, when placing foods in a baking dish, arrange
around the outside of dish, not lined up next to each other. Food should not be stacked on top of each other.
Rearrangement: Rearrange overlapping areas, Iike tails of long fish fillets, from top to bottom, and closely packed pieces, like
meatballs, from the outside to the center of the dish.
16
Page 17

COOKING GUIDE (CONTINUED)
Standing Time: Standing time is especially important in microwave cooking. Microwave energy creates heat in the outer
layers of the food. As a result of normal conduction, the food continues to cook for a few minutes after removal from the oven.
Letting roasts, large whole vegetables, casseroles and cakes stand to finish cooking allows the middles to cook completely
without overcooking, drying or toughening the outsides.
overIng:Covering speeds cooking time, retains moisture, tenderizes, insures even cooking and prevents spattering.
C
Casserole lids or plastic wrap are used for a tighter seal. Vent plastic by turning back one edge at the side of dish to form a
narrow slot where excess steam can escape. Various degrees of moisture retention are also obtained by using wax paper or
paper towels.
Browning: Microwave energy cooks some foods so quickly that the fats and sugars within the food do not have time to
caramelize and give a "browned" appearance. Browning agents do not affect the quality of microwaved foods, but can add
color and flavor. For meats and poultry, use bouquet sauce diluted with water or melted butter, soy, Worcestershire, barbecue
or steak sauce, a sprinkling of paprika or dry gravy mix; jelly glaze or crumb coating. Frosting and topping finish cakes and
breads. Top casseroles at the end of microwaving with grated cheese or crumbs.
Some Foods do not Microwave Well
Eggs in Shells
Pancakes do not crust, but they reheat well. Fully-prepared, frozen pancakes are available for microwaving.
Deep Fat Frying can cause burns.
Bottles with narrow necks may shatter if heated.
Pop Popcorn only in special microwave poppers. Do not use oil unless specified by the manufacturer, or heat longer
than recommended. Never pop popcorn in paper bags or glass utensils or directly on the glass tray.
and hard boiled eggs can burst.
HOT SNACKS AND APPETIZERS
Hot hors d'oeuvres and appetizers can be prepared very quickly in the oven by the hostess, or individual servings may be
prepared by guests.
Many appetizers may be cooked on the serving platter, provided the platter does not have metal trim. A time saver tip prepare these foods ahead of time, refrigerate or freeze and refresh in the oven at serving time. A plate of appetizers will
take only seconds to prepare or refresh.
Cheese melts very rapidly and will toughen if overcooked, so watch foods combined with cheese closely so that
overcooking will not occur. As soon as cheese starts to bubble, cooking is completed.
Appetizers that have a crisp pastry exterior are best prepared in a conventional oven.
To prepare appetizers wrapped in bacon, it will be necessary to precook the bacon and then wrap around the foods.
Oysters wrapped in bacon are easier to prepare in the broiler of your conventional range.
Seafood mixtures can be prepared in serving shells as microwave energy will pass through the seafood shells without
heating. Aluminum foil should not be used for shells.
If spreads are placed on crackers, care should be taken not to overcook as moisture from the food will cause crackers to
become soggy. Crackers used for spreads should be very dry and crisp. This helps avoid sogginess. Heat only until
spread is at serving temperature.
The time required to heat all appetizers will depend on the amount of food, and the number and the type of dish selected.
Remember the food will become very hot even if the dish is cool. Cheese mixtures retain heat longer when heated with
microwave energy.
17
Page 18

COOKING GUIDE (CONTINUED)
MEATS
Guide for Cooking Meats
Roasts, chops, hamburgers and small cuts of tender meat cook beautifully in the microwave oven. Most
roasts can be cooked rare, medium rare or even well done in less than one hour. Less tender cuts of
meat such as pot roast can be simmered fork tender in a sauce or gravy. Tough cuts that require slow
ooking will do better in the conventional range or oven. A large piece of meat, especially if the shape is
c
uneven, should be turned over occasionally for uniform roasting.
Meat Power Cooking Time Standing Special Notes
Level (per lb) Time
Beef Roast
Rare 80 7 - 9 min. 5 - 7 min.
Medium 80 8 - 11 min. 10 - 15 min. Turn over after half the time.
Well 80 11 - 13 min. 10 - 15 min.
Pork Roast
Bone-in 80 11 - 15 min. 10 min. Cover with plastic wrap.
Boneless 80 15 - 18 min. 10 - 15 min. Turn over after half the time.
Lamb Roast
Bone-in Medium 80 7 - 9 min. 10 - 12 min.
Well 80 9 - 12 min. 10 - 15 min. Turn over after half the time.
Boneless Medium 80 9 - 12 min. 10 - 12 min.
Well 80 10 - 14 min. 10 - 15 min.
Beef Patties (3 1/2 oz) each
2 patties 100 2-1/2 - 3 min. 5 - 7 min. Turn over and rearrange
4 patties 100 4 - 6 min. 5 - 7 min. after half the time.
Meat Loaf
(2lbs) 100 15 - 18 min. 10 - 12 min. Cover with wax paper.
Bacon
Slices (4 strips) 100 5 - 7 min. —
(1 slice; weight: 1 oz, Cover with a microwaveable
length: 11 in.) plastic cover.
Ham
Slices (1 in. thick) 50
4 slices
7 - 9 min. 5 - 7 min. Cover with plastic wrap.
18
Page 19

COOKING GUIDE (CONTINUED)
POULTRY
Guide for Cooking Poultry
Chicken is one of the most popular foods and microwaving chicken is one of the best uses of your
microwave oven. Chicken stays juicy and tender in the microwave oven. However, juiciness prevents
rowning because chicken crisps and browns only when the skin dries out enough to change color.
b
tanding time is important, because it allows the interior to finish cooking without toughening the delicate
S
breast meat.
Food Power Cooking Time Standing Special Notes
Level (per lb) Time
Roast
Chicken whole 100 6 - 8 min. 10 - 15 min. Place breast side up on
Chicken cut up 100 6 - 8 min. 7 - 10 min. roasting rack. Let stand,
Turkey
Cornish Hens
Turkey Breast 60 8 - 10 min. 5 - 7 min. Rearrange once during
SEAFOOD
Guide for Cooking Seafood
Microwaving is one of the easiest and most efficient ways of preparing fish and seafood, which stay
delicate and tender with quick, moist cooking. Overcooking dries out and toughens seafood, so you
should check it after the minimum time. If thick pieces like fish steaks or lobster tails are done on the
outside, but still slightly translucent in the middle, let them stand for a few minutes; internal heat will
complete the cooking.
80 6 - 8 min. 10 -15 min. covered, before serving.
100 6 - 8 min. 7 - 10 min.
cooking. Cover with wax paper.
Food Power Cooking Time Standing Special Notes
Level Time
Whole Fish 100 6 - 7-1/2 min. 5 min. Turn over after half the time.
(1 lb to 1 1/2 lbs)
Fish Fillet 100 6 - 7-1/2 min. 4 - 5 min. Turn over after half the time.
(1 lb)
Fish Steak 100 4 - 6 min. 5 - 6 min. Turn over after half the time.
1 inch thick Cover with wax paper.
(1 lb)
Shrimp
(1 lb) Cover with plastic wrap.
Sea Scallops 80 6 - 7-1/2 min min.
(1 lb)
100
3 - 4-1/2 min. 5 min. Rearrange once during cooking.
5 min. Rearrange once during cooking.
Cover with plastic wrap.
19
Page 20

COOKING GUIDE (CONTINUED)
EGGS & CHEESE
Guide for Cooking Eggs & Cheese
• CHEESE
Cheese melts quickly and smoothly. When serving cheese as an appetizer, flavor is at peak when served
at room temperature. Use a low power level for melting. Cheese melts best when shredded and heated
with milk or other liquids. Stir cheese mixtures several times for even heating.
GGS
E
•
Eggs cook differently by microwave. The high fat content of egg yolks absorb energy, so yolks cook faster
than whites. It's easy to poach eggs in a microwave oven, but if you want soft yolks, remove eggs from the
oven before whites are completely cooked. A brief standing time allows whites to set without overcooking
yolks. Check eggs for completion of cooking early, they toughen when overcooked.
When eggs and yolks are mixed together for omelets, scrambled eggs or custards, they cook evenly and
need less stirring than the conventional cooking methods.
Do not try to cook eggs in the shell. Steam can build up inside the shells, causing them to burst.
Scrambled Eggs
Eggs Butter Milk or Cook on Procedure
Water Power 10
2 1 Tbsp 2 Tbsp 1 - 2-1/2 min.
4 1 Tbsp 2 Tbsp 2 - 3-1/2 min.
6 2 Tbsp 4 Tbsp 3 - 5 min.
Place butter in small casserole and melt.
Add eggs and milk, scrambling with fork.
Cook as directed in chart, breaking up
and stirring eggs twice. Let stand,
covered, before serving.
Poached Eggs
Eggs Water Cook Water Cook Eggs Standing Procedure
on Power 10 on Power 8 Time
1 1 1/2 cups 3 - 5 min. 1-1/2 min. 2 min.
2 1 1/2 cups 3 - 5 min. 2 - 3 min. 2 min.
4 2 cups 5 - 6 min. 3 - 5 min. 2 min.
Place water into medium casserole. Cook at
High until boiling. Break eggs, one at a time,
into separate dish, pierce yolk once with
wooden pick and slip egg carefully into hot
water, cook as directed in chart.
20
Page 21

COOKING GUIDE (CONTINUED)
VEGETABLES
Guide for Cooking Fresh Vegetables
Nutrition research indicates that many microwaved vegetables and fruits lose less water soluble vitamin C
than when cooked conventionally. This is due to shorter cooking time and to the fact that less cooking water is
eeded when microwaving fruits and vegetables. Best of all, vegetables keep their fresh color, texture and
n
flavor. Vegetables should be microwaved covered with vented plastic wrap or a casserole lid. Vegetables
cooked in their skins, such as potatoes, are already so tightly covered that they should be pricked with a fork
before cooking in order to release excess steam. To assure even cooking, vegetables should be cut in
uniform pieces and stirred during the cooking time. Always add salt to water before adding vegetables.
Reduce time a minute or two for crisp-tender texture. Increase time for very soft texture. Remember to allow
standing time of two to five minutes after cooking, because as most foods do, vegetables will continue to cook
after they are removed from the microwave oven.
Food Water Cook on Standing Special Notes
Amount Power 10 Time
Asparagus
Spears (1lb) 1/4 cup 5 - 7 min. 2 min. Medium Casserole. ReCuts (1lb)1/2 cup 5 - 6 min. 2-1/2 min. arrange once.
Beans
Fresh green (1/2lb) 1/4 cup 5 - 7 min. 2 min. Stir twice.
Frozen green (1/2lb) 2 Tbsp 6 - 7 min. 2 min. Stir twice.
Green Peas (2 cups) 1/4 cup 4 - 6-1/2 min. 2 min. Small casserole. Stir twice.
Broccoli (2 cups) 1/4 cup 4 - 6-1/2 min. 2 min. Medium casserole.
Rearrange once during cooking.
Brussels Sprouts (1lb) 1/4 cup 7 - 8 min. 2 - 3 min. Medium casserole. Stir once.
Cabbage (1lb) 1/4 cup 6 - 7-1/2 min. 2 - 5 min. Rearrange once during cooking.
Cauliflower pieces (1 head) 1/4 cup 6 - 7-1/2 min. 2 - 5 min. Wrap in plastic wrap.
Stir once.
Mushroom slices (1/2lb) 2 Tbsp 4 - 6- min. 2 - 3 min. Small casserole. Stir once.
SOUPS
Guide for Cooking Soups
Satisfy appetites with savory soups prepared in your microwave oven. Follow our recipes for homemade
soups and stews or adapt your favorites by using similar cooking times and techniques.
Food Power Cooking Time Standing Special Notes
Level Time
Canned Condensed
Cream style, Bean, Pea
or Mushroom (10 1/2 11 1/2 oz)
With Water 100 5 -6 min. 2 - 3 min. Stir halfway through
With Milk 80 5 - 7-1/2 min. 2 - 3 min. cooking time. Cover.
Dry Soup Mix
1 envelope (10 1/2 oz)
Broth (10 1/2 oz) 100 4 - 5-1/2 min. 2 - 3 min. Stir twice. Cover
100 5 - 8min. 2 - 3 min. Add water.
then
60
2-1/2 - 4 min.
Cover with lid.
Stir twice.
21
Page 22

COOKING GUIDE (CONTINUED)
SAUCES
Guide for Cooking Sauces
Sauces boil over rapidly, especially those that contain milk. As soon as the door is opened, cooking stops.
If ingredients are not taken directly from the refrigerator, cooking time will be less than given in the recipe.
Stir sauce quickly, about every 30 seconds to eliminate lumps. Be sure to use a container twice the size of
the amount of liquid to prevent boiling over.
A wooden spoon may be left in the dish while sauce is cooking for easy stirring. If sauce is stirred slowly,
cooking time may require about 15 seconds longer. If desired, a 1 quart glass measure may be used to
prepare some sauces.
White Sauce
Amount Butter Flour Milk Cook Cook Special Notes
Butter Sauce
1 cup, thin 1 Tbsp 1 Tbsp 1 cup 45 sec. 1-1/2 - 4 min.
med. 2 Tbsp 2 Tbsp 1 cup 1 min. 1-1/2 - 4 min.
thick 3 Tbsp 3 Tbsp 1 cup 1 min. 3 - 4-1/2 min.
Cook on Full power as directed
or until thickened, stirring once.
Let stand, covered, before
serving.
Brown Gravy
Amount Fat from Flour Liquid or Cook on Special Notes
Drippings Drippings Power 10
1 cup, thin 1 Tbsp 1 Tbsp 1 cup 2 - 4 min.
med. 1 Tbsp 1 Tbsp 1 cup 3 - 5 min.
thick 1 Tbsp 1 Tbsp 1 cup 3 - 5 min.
Cook on Full power as directed
or until thickened, stirring once.
Let stand, covered, before
serving.
CASSEROLES
Casseroles may require occasional stirring to distribute heat. They cook more evenly when made with
ingredients of similar size and shape. Because of their shorter cooking time, casseroles cooked in the
microwave oven generally need less liquid. Casseroles with cream and cheese sauces, or meats which
need slower cooking to tenderize, cook best on power level 4.
When cooking a favorite casserole, make two and freeze the second for future use. Line a casserole or
baking dish with plastic wrap. Transfer the cooked food to the lined container and freeze. As soon as the
food is frozen in the shape of the dish, remove it and wrap with freezer paper. Later it can be unwrapped
and returned to the container for defrosting and heating.
Dry Casserole Mixtures
Many prepared box type casseroles are available on the grocery shelves. Many have freeze dried foods or
evaporated foods included. Cooking periods are so short there may not be time for the foods to absorb the
moisture sufficiently and reconstitute the foods. To prepare this type, boil the amount of water recommended
on the package. Add the noodles (when included), cover and cook for approximately 10 minutes. Allow
noodles to stand covered for an additional 10 minutes, rinse with warm water and drain. Then follow
package directions for preparing the mix. Reheat four to six minutes before serving.
22
Page 23

COOKING GUIDE (CONTINUED)
SANDWICHES, INCLUDING HAMBURGERS AND HOT DOGS
Guide for Heating Sandwiches
Sandwiches heat very quickly because, being porous, they have a low density. Since the filling is usually
more dense than the bread or rolls, the filling determines the heating time. Surprisingly, the filling will
always be hotter than the bread feels. Care must be taken not to overcook as the bread will become
tough. Use several thin slices of meat. Thin slices heat more quickly and are better than one thick slice.
The slow heating thick slice often causes the bread to overcook before the meat is hot. Sandwiches may
be placed on a paper plate, napkin or paper towel to be warmed. The sandwich should be covered with a
paper towel. Remove wrapping immediately after warming. Already-baked frozen breads and rolls may be
used for sandwiches. The filling, however, should be thawed first. Toasted bread is fine for sandwiches
and provides a firm base. The toast is warmed only; no further browning occurs.
Food Amount Cook Special Notes
on Power 10
Sandwich 1 1 min.
(6 oz) 2 2 - 3 min. Place on paper towels.
4 3 - 5 min.
Hamburger 1 1 min. Cover with paper towel.
(4 oz) 4 3 - 5 min.
Hot Dogs 4 2 - 2-1/2 min. Cover with paper towel.
(2 oz)
Sloppy Joes 4 4-1/2 min. Place on microwaveable plate.
PASTA & GRAINS
Guide for Cooking Pasta and Grains
Raw long grain rice takes time to rehydrate. Microwaving time is a little shorter than conventional, but the
greatest advantage is the ease with which you can prepare fluffy rice without sticking or burning. Cooked
rice and pasta reheat easily in the microwave oven without loss of flavor or texture. No extra water is
needed to prevent sticking or drying, so there's no danger of overcooking rice and pasta or thinning
sauces.
Food Hot Salt Oil or Power Cooking Standing
Water Butter Level Time Time
Pasta (8 oz)
Egg Noodles 4 cups 1 tsp. 1 Tbsp. 100 6 - 8 min. 2 - 5 min.
Macaroni 4 cups 1 tsp. 1 Tbsp. 100 7-1/2 - 10 min. 2 - 5 min.
Spaghetti 4 cups 1 tsp. 1 Tbsp. 100 8 - 11 min. 2 - 5 min.
Lasagna Noodles 4 cups 1 tsp. 1 Tbsp. 100 11 - 14 min. 2 - 5 min.
Rice, Long Grain
100 5 - 7 min.
White Rice (1 cup) 2 cups 1 tsp. 1 tsp. then 5 - 7 min.
80 9 - 12 min.
100 5 - 7 min.
Brown Rice (1 cup)
2 cups 1/2 tsp. 1 tsp. then 5 - 7 min.
80
20 - 27 min.
23
Page 24

COOKING GUIDE (CONTINUED)
CEREALS
Microwaved hot cereals can be cooked directly in the cereal bowl and make cleaning up easy.
CONVENIENCE FOODS
Frozen Foods
A large variety of frozen foods, special dishes and dinners are available and the selections continue to increase. The
market is changing rapidly, therefore it is impossible to list the foods and types available and recommend cooking
procedures. In this book we can only give general directions to assist you.
T.V. Dinners
To prepare a T.V. dinner, follow the maker’s instructions for use with microwave ovens. To cook a T.V. dinner will require
approximately four to seven minutes for the food to thaw and heat to serving temperature (depending on the types of
food). Allow plastic wrap to remain over the dish for two minutes to allow heat to equalize. Dinners that contain mashed
potatoes have presented a bit of a problem due to the large compact mass of this particular food. You may want to
remove about half the mashed potatoes after defrosting is started, then spread the remaining potatoes over the individual
section of the tray. Heat the removed mashed potatoes in an individual dish. For foods that should be crisp when cooking
is completed, remove the plastic wrap and use the broiler of a conventional range to crisp the food.
Individual Frozen Foods
These may be commercially prepared or frozen at home. Place the container of frozen food in the oven and heat only
until the food starts to defrost and can be removed easily. Empty contents into a casserole or serving dish and continue to
defrost and heat. Do not heat foods in deep foil containers. To crisp and brown special toppings, use the broiler of a
conventional range. If allowed to heat to serving temperature in a plastic container, the container will warp or melt from
the high heat of food.
Frozen Foods in Cooking Pouches or Boilable Bags
To prepare these foods, slit the plastic bag. An X-type cut will help remove the food at the end of cooking time. Place the
cut side down on a serving dish (with no metal trim). Heat foods other than vegetables for about three minutes. Frozen
vegetables require about nine to 10 minutes of cooking time. Allow the pouch bag to remain over the food for about two
minutes to allow time for the heat to equalize. Foods prepared in cheese or white sauce should be removed from the
pouch and placed in a glass casserole dish and stirred to prevent overcooking of the sauce around the edges of the dish.
Complete Meals from Table Leftovers
Complete meals from leftovers can be prepared in advance. Foods can be frozen and ready for quick heating in the oven
at any time. Choose foods suitable for freezing and put serving portions on paper, glass or china (no metal trim) plates.
Wrap with recommended freezer paper and freeze quickly. When apportioning the servings of food on the plate, use
approximately the same amount of each kind of food for more even heating. Mashed potatoes will heat quicker if spread
slightly and hollowed, with a pat of butter in the center. To prevent small pieces of vegetables, corn, peas, etc., from
dehydrating during heating, mound well near the center of the plate.
24
Page 25

COOKING GUIDE (CONTINUED)
ESSERTS
D
There's always time to make dessert with a microwave oven. Fruit desserts have a remarkably fresh
flavor and texture. Microwaved cakes are higher and more tender than conventionally baked; since
cakes are usually frosted, browning is unimportant. Microwaved pie crusts are exceptionally tender and
laky, while delicate custards and puddings are easy to prepare.
f
Guide for Cooking Cakes
Food Power Cooking Time Standing Special Notes
Level Time
Cake, round 100 3 - 5 min. 2 - 5 min. Pour into greased and wax
(Mixed 9 inch) 80 4 - 6 min. paper lined cake dishes.
Ring or Angel Food Cake 80 5 - 6 min. 2 - 5 min. Cover with wax paper.
Muffin (6 muffins) 60 4 - 6 min. 2 - 5 min. Rearrange once.
Custard (6 servings) 60 8 - 11 min. 5 - 7 min. Rearrange once.
Baking
• Bar cookies work best. Greasing or lining of the microwaveable baking dish is optional.
• If insufficient browning disturbs you, frost, glaze or add food coloring to white or yellow batters.
• A serviceable microwaveable cookie sheet can be made by covering cardboard with waxed paper.
• Round glass baking dishes, and fluted or smooth microwaveable ring molds work best for cakes. You
can make a microwaveable ring mold of your own by placing a medium-size glass in the center of a
round glass baking dish.
• Because your cakes will rise higher in microwave cooking, never fill microwaveable cake pans more
than half full.
• Reduce baking powder and soda by approximately one-fourth when converting a conventional recipe.
• Fill paper-lined muffin cups to only half full which allows for muffins to rise more than normal.
• You can prepare your own "brown 'n serve" breads and rolls by baking them ahead of time in the
microwave oven. Then, place them in a conventional oven to brown prior to serving.
• Breads and rolls should be reheated to the point where they are warm to the touch. Overheating or
overcooking makes bread tough and rubbery.
• When making yeast bread in a microwave oven, choose a recipe with cornmeal, whole wheat flour, or
rye flour to achieve a richer color.
WEIGHT & MEASURE CONVERSION CHART
• POUNDS & OUNCES TO GRAMS
POUNDS (lbs)
1/4
1/2
3/4
1
2
3
4
5
6
7
8
9
10
11
GRAMS (g)
114
227
341
454
907
1361
1814
2268
2722
3175
3629
4082
4536
4990
OUNCES (oz)
1
2
3
4
5
6
7
8
GRAMS (g)
28
57
85
113
142
170
198
227
OUNCES (oz)
9
10
11
12
13
14
15
16
• FLUID MEASUREMENTS
1 Cup = 8 fluid ounces = 240 ml
1 Pint =
16 fluid ounces =
1 Quart = 32 fluid ounces = 960 ml
1 Gallon = 128 fluid ounces = 3840 ml
25
GRAMS (g)
255
284
312
340
369
397
425
454
480 ml
Page 26

SPECIFICATIONS
TO FIND THE LOCATION AND PHONE
NUMBER OF YOUR NEAREST SERVICE
CENTER PERMITTED TO PERFORM
WARRANTY...
CALL TOLL FREE:
1-800-695-0098
SERVICE
FOR CUSTOMER SERVICE, PLEASE WRITE TO:
Emerson Radio Corp.,
Consumer Affairs Dept.,
5101 Statesman Drive,
Irving, TX 75063.
FOR ADDITIONAL SET-UP OR OPERATING ASSISTANCE
PLEASE CALL:
1-800-898-9020
R
Item Rating Specification
Power Supply 120V 15A single phase with grounding 60Hz AC
Microwave Output Power 900W
Microwave Frequency 2450MHz
Outside Dimensions 12 (H) x 20 (W) x 16.2 (D) inches (305 x 508 x 413mm)
Cavity Dimensions 8.5 (H) x 13.8 (W) x 13 (D) inches (215 x 350 x 330mm)
Weight 35 Lbs (Approx) (15.9kg)
Timer Digital 99 minutes, 99 seconds
BEFORE YOU CALL FOR SERVICE
Refer to the following checklist before you call for service:
The oven does not work:
1. Check that the power cord is securely plugged in.
2. Check that the door is firmly closed.
3. Check that the cooking time is set.
4. Check for a blown circuit fuse or tripped main circuit breaker in your house.
5. Check that the Child Lock feature is not engaged.
Sparking in the cavity:
1. Check the containers, dishes or utensils in the oven and make sure they are not metal or have metal trim.
26
Page 27

LIMITED WARRANTY
MICROWAVE OVENS
merson Radio Corp. Warrants this product to be free from manufacturing defects in original material, including original parts, and
E
workmanship under normal use and conditions (“manufacturing defect”) for a period of one (1) year from date of original purchase in,
nd if used in, the United States (“warranty”). Should service be necessary under this warranty, Emerson will provide the following at
a
an Independent Service Center or Regional Repair Facility permitted by Emerson to perform repairs, provided the manufacturing defect
s verified along with the date of purchase:
i
* Repair service for one (1) year from date of original purchase at no charge for labor and parts.
Replacement of a defective magnetron for seven (7) year from date of original purchase (labor not included after initial twelve (12)
*
months).
There are Independent Service Center and Regional Repair Facilities located through out the country. For one nearest you, DIAL TOLL
FREE: 1-800-695-0098. In the event the product must be mailed to a Regional Repair Facility which is permitted by Emerson to
perform repairs:
* Pack the unit in a well-padded heavy corrugated box.
* Enclose your check or money order payable to the REGIONAL REPAIR FACILITY in the amount of $ 15.00 to cover return
shipping and handling costs.
* Enclose a copy of your proof of purchase (warranty service will not be provided without dated proof of purchase).
* Ship the unit prepaid via UPS or parcel post (insured).
NOTE: This warranty does not cover:
(a) Damage to equipment not properly connected to the product.
(b) Cost incurred in the shipping of the product to and from a Regional Repair Facility permitted by Emerson to perform warranty
repairs.
(c) Damage or improper operation of unit caused by customer abuse, misuse, negligence, or failure to follow operating instructions
provided with the product.
(d) Ordinary adjustments to the product which can be performed by customer as outlined in the owner’s manual.
(e) Signal reception problems caused by external antenna or cable systems.
(f) Products not purchased in the United States.
(g) Damage to product if used outside the United States.
THIS WARRANTY IS NON-TRANSFERABLE AND APPLIES ONLY TO THE ORIGINAL PURCHASER AND DOES NOT EXTEND TO
SUBSEQUENT OWNERS OF THE PRODUCT. ANY APPLICABLE IMPLIED WARRANTIES, INCLUDING THE WARRANTY OF
MERCHANTABILITY, ARE LIMITED IN DURATION TO A PERIOD OF THE EXPRESSED WARRANTY AS PROVIDED HEREIN
BEGINNING WITH THE DATE OF ORIGINAL PURCHASE AT RETAIL AND NO WARRANTIES, WHETHER EXPRESSED OR
IMPLIED, SHALL APPLY TO THE PRODUCT THEREAFTER. EMERSON MAKES NO WARRANTY AS TO THE FITNESS OF THE
PRODUCT FOR ANY PARTICULAR PURPOSE OR USE.
THE EXTENT OF EMERSON RADIO CORP’S LIABILITY UNDER THIS LIMITED WARRANTY IS THE REPAIR OR REPLACEMENT
PROVIDED ABOVE AND, IN NO EVENT, SHALL EMERSON RADIO CORP’S LIABILITY EXCEED THE PURCHASE PRICE PAID BY
THE PURCHASER OF THE PRODUCT. UNDER NO CIRCUMSTANCES SHALL EMERSON RADIO CORP. BE LIABLE FOR ANY
LOSS, DIRECT, INDIRECT, INCIDENTAL, SPECIAL, OR CONSEQUENTIAL DAMAGE ARISING OUT OF OR IN CONNECTION
WITH THE USE OF THIS PRODUCT. THIS WARRANTY IS VALID ONLY IN THE UNITED STATES OF AMERICA.
THIS WARRANTY GIVES YOU SPECIFIC LEGAL RIGHTS. HOWEVER, YOU MAY HAVE OTHER RIGHTS WHICH MAY VARY
FROM STATE TO STATE. SOME STATES DO NOT ALLOW LIMITATION ON IMPLIED WARRANTIES OR EXCLUSION OF
CONSEQUENTIAL DAMAGE, THEREFORE THESE RESTRICTIONS MAY NOT APPLY TO YOU.
The serial number can be found on the back cabinet. We suggest that you record the serial number of your unit in the space below for
future reference.
Model Numer: MW9090SS
Serial Number:_____________________________________________________________
MV1094F
27
Page 28

®
900W MICROWAVE OVEN
OWNER’S MANUAL
MW9090SS
Visit our web site at www.emersonradio.com
Page 29

EMERSON
®
PART NO. 80-5121
509-01 Printed in China
 Loading...