

Page 1

0.9 Cubic Foot
Microwave Oven
With Computerized Touchpad Control
OWNER’S MANUAL
AND
COOKING GUIDE
MW8993WC/BC
Page 2

PRECAUTIONS TO AVOID POSSIBLE
EXPOSURE TO EXCESSIVE MICROWAVE ENERGY
(a) Do not attempt to operate this oven with the door open since open-door operation can result in harmful
exposure to microwave energy. It is important not to defeat or tamper with the safety interlocks.
(b) Do not place any object between the oven front face and the door or allow soil or cleaner residue to accumulate
on sealing surfaces.
(c) Do not operate the oven if it is damaged. It is particularly important that the oven door close properly and that
there is no damage to the: (1) door (bent), (2) hinges and latches (broken or loosened), (3) door seals and
sealing surfaces.
(d) The oven should not be adjusted or repaired by anyone except properly qualified service personnel.
CONTENTS
Precautions to avoid possible exposure to
excessive microwave energy.........................................1
Important safety instructions.........................................2
Safety precautions .........................................................3
Federal Communications Commission Radio
Frequency Interference Statement................................4
Grounding instructions..................................................4
Installation .....................................................................5
Care of your microwave oven.......................................6
How to use your microwave oven safely .....................7
Omniwave Cooking SystemTM......................................8
Features diagram ...........................................................9
Operation procedure....................................................11
How to set the oven controls.......................................12
Setting the clock.....................................................12
Time defrosting ......................................................12
Auto defrosting.......................................................13
Cooking in one stage..............................................14
Cooking in two stages............................................14
Kitchen timer mode................................................15
Quick cook..............................................................16
One touch cooking (6 menu) .................................16
Popcorn ................................................................16
Frozen pizza.........................................................16
Beverage...............................................................17
Dinner plate..........................................................17
Fresh vegetable....................................................17
Frozen vegetable..................................................17
More/Less ............................................................18
Child safety lock..................................................18
To stop the oven while the oven is operating.....18
Cooking guide .............................................................19
The principles of microwave cooking....................19
Microwave utensils.................................................19
Food characteristics ................................................21
Microwave techniques............................................22
Auto defrosting............................................................23
General Information................................................23
Fish..........................................................................24
Pork .........................................................................25
Beef..........................................................................26
Lamb........................................................................27
Poultry.....................................................................28
Eggs and cheese...........................................................29
Vegetables ...................................................................29
Cooking fresh vegetables............................................30
Fish and Seafood.........................................................34
Cooking fish and seafood............................................34
Poultry..........................................................................35
Cooking poultry...........................................................35
Meats............................................................................36
Cooking pork...............................................................37
Cooking beef ...............................................................38
Cooking lamb..............................................................39
Soups............................................................................39
Sauces and gravies.......................................................40
Desserts........................................................................40
Weight & measure conversion chart ..........................41
Specifications...............................................................42
Before you call for service..........................................42
1
Page 3

IMPOR TANT SAFETY INSTRUCTIONS
When using electrical appliances, basic safety precautions should be followed, including the following:
WARNING-To reduce the risk of burns, electric shock, fire, injury to persons or exposure to excessive
microwave energy:
Read all instructions before using the appliance.
1
Read and follow the specific “PRECAUTIONS TO
2
AVOID POSSIBLE EXPOSURE TO
EXCESSIVE MICROWAVE ENERGY” found on
page 1.
This appliance must be grounded. Connect only to
3
properly grounded outlet.
See “GROUNDING INSTRUCTIONS” found on
page 4.
Install or locate this appliance only in accordance with
4
the provided installation instructions.
Some products such as whole eggs and sealed
5
containers - for example, closed glass jars-may
explode and should not be heated in this oven.
Use this appliance only for its intended use as
6
described in this manual.
As with any appliance, close supervision is necessary
7
when used by children.
Do not operate this appliance if it has a damaged cord
8
or plug, if it is not working properly, or if it has been
damaged or dropped.
This appliance should be serviced only by qualified
9
service personnel.
Contact nearest authorized service facility for
examination, repair or adjustment.
Do not cover or block any openings on the appliance.
10
Do not use outdoors.
11
Do not immerse cord or plug in water.
12
Keep cord away from heated surfaces.
13
Do not let cord hang over edge of table or counter.
14
When cleaning surfaces of door and oven that come
15
together when closing the door, use only mild, nonabrasive soap or detegents applied with a sponge or
soft cloth.
To reduce the risk of fire in the oven cavity:
16
a) Do not overcook food. Carefully attend appliance if
paper, plastic, or other com-bustible materials are
placed inside the oven to facilitate cooking.
b) Remove wire twist-ties from paper or plastic bags
before placing bag in oven.
c) If materials inside the oven should ignite, keep oven
door closed, turn oven off, and disconnect the
power cord, or shut off power at the fuse or circuit
breaker panel.
d) Do not use the cavity for storage purposes. Do not
leave paper products, cooking utensils, or food in
the cavity when not in use.
Do not use this microwave oven to heat corrosive
17
chemicals (for example, sulfides and chlorides).
Vapours from such corrosive chemicals may interact
with the contacts and springs of the safety interlock
switches thereby rendering them inoperable.
Keep the waveguide cover clean at all times.
18
Wipe the oven interior with a soft damp cloth
after each use. If you leave grease or fat anywhere in
the cavity it may overheat,
smoke or even catch fire when next using
the oven.
Never heat oil or fat for deep frying as you cannot
19
control the temperature and doing so may lead to
overheating and fire.
Liquids, such as water, coffee, or tea are able to be
20
overheated beyond the boiling point without appearing
to be boiling due to surface tension of the liquid.
Visible bubbling or boiling when the container is
removed from the microwave oven is not always
present. THIS COULD RESULT IN VERY HOT
LIQUIDS SUDDENLY BOILING OVER WHEN A
SPOON OR OTHER UTENSIL IS INSERTED
INTO THE LIQUID. To reduce the risk of injury to
persons:
a) Do not overheat the liquid.
b) Stir the liquid both before and halfway through
heating it
c) Do not use straight-sided containers with narrow
necks.
d) After heating, allow the container to stand in the
microwave oven for a short time before removing
the container.
e) Use extreme care when inserting a spoon or other
utensil into the container.
SAVE THESE INSTRUCTIONS
2
Page 4

SAFETY PRECAUTIONS
GENERAL USE FOOD
DO NOT attempt to tamper with or make any adjust-
1
ments or repairs to door, control panel or any other
part of the oven. DO NOT remove outer case from
oven. Repairs should only be done by a qualified
service person.
DO NOT operate the oven empty. The microwave
2
energy will reflect continuously throughout the oven
if no food or water is present to absorb energy.
If a fire occurs in the oven, touch the STOP/CLEAR
3
pad and LEAVE THE DOOR CLOSED.
Disconnect the power cord, or shut off power at the
fuse or circuit breaker panel.
DO NOT attempt to dry clothes, newspaper or other
4
materials in oven. They may catch on fire.
DO NOT use recycled paper products as they may
5
contain impurities which may cause sparks and/or
fires when used.
DO NOT hit or strike control panel, damage to
6
controls may occur.
AVOID inserting nails, wire, etc. through any holes
7
in the unit while operating the oven. Never insert a
wire, nail or any other metal object through the holes
on the cavity or any other holes or gaps because such
objects may cause electric shock and microwave
leakage.
UTENSILS
METAL CONTAINERS or dishes with metallic
1
rims should not be used. Arcing may occur.
Never use your microwave oven for HOME
1
CANNING. The oven is not designed to permit
proper canning. Improperly canned food may spoil
and be dangerous to consume.
COOKING TIMES given in the cooking guide are
2
APPROXIMATE. Factors that may affect cooking
are: starting temperature, altitude, volume, size and
shape of foods and utensils used. As you become
familiar with the oven, you will be able to adjust for
these factors.
It is better to UNDERCOOK RATHER THAN
3
OVERCOOK foods. If food is undercooked, it can
always be returned to the oven for further cooking. If
food is overcooked, nothing can be done. Always
start with minimum cooking times.
SMALL QUANTITIES of food or foods with LOW
4
MOISTURE content can burn, dry out or catch on
fire if cooked too long.
DO NOT boil eggs in their shell. Pressure may build
5
up and the eggs will explode.
Potatoes, apples, egg yolks, whole acorn squash and
6
sausage are examples of food with NONPOROUS
SKINS. These must be pierced before cooking to
prevent bursting.
POPCORN must be popped in a microwave corn
7
popper. Microwave popped corn produces a lower
yield than conventiolal popping. Do not pop popcorn
unless popped in a microwave approved popcorn
utensil or unless it’s commercially packaged and
recommended especially for microwave ovens. Do
not use oil unless specifed by the manufacturer.
METAL TWIST-TIES must not be used in the
2
microwave oven.
DO NOT use SEALED JARS or NARROW NECK
3
bottles for cooking or reheating. They may shatter.
DO NOT use CONVENTIONAL THERMOME-
4
TERS in the microwave oven. They may cause arcing.
Remove PLASTIC STORE WRAPS before cooking
5
or defrosting in the oven.
For FURTHER INFORMATION on proper cooking
6
utensils, refer to the Introduction in the Microwave
cooking guide.
DO NOT attempt to deep fat fry in your oven.
8
HEATED LIQUIDS can ERUPT if not mixed with
9
air. Do not heat liquids in your microwave oven
without first stirring.
3
Page 5

FEDERAL COMMUNICATIONS COMMISSION
RADIO FREQUENCY INTERFERENCE
STA TEMENT
WARNING:
This equipment generates and uses ISM frequency energy and if not installed and used properly,
that is in strict accordance with the manufacturer’s instructions, may cause interference to radio
and television reception.
It has been type-tested and found to comply with limits for an ISM Equipment pursuant to part 18
of FCC Rules, which are designed to provide reasonable protection against such interference in
a residential installation.
However, there is no guarantee that interference will not occur in a particular installation.
If this equipment does cause interference to radio or television reception, which can be
determined by turning the equipment off and on, the user is encouraged to try to correct
the interference by one or more of the followings.
• Reorient the receiving antenna of radio or television.
• Relocate the Microwave oven with respect to the receiver.
• Move the microwave oven away from the receiver.
• Plug the microwave oven into a different outlet so that microwave oven
and receiver are on different branch circuits.
THE MANUFACTURER is not responsible for any radio or TV interference caused by
UNAUTHORIZED MODIFICATION to this microwave oven. It is the responsibility of
the user to correct such interference.
GROUNDING INSTRUCTIONS
This appliance must be grounded. In the event of an electrical short circuit, the grounding plug reduces
the risk of electric shock by providing an escape wire for electric current. This appliance is equipped
with a cord having a grounding wire with a grounding plug. The plug must be plugged into an outlet
that is properly installed and grounded.
WARNING: Improper use of the grounding plug can result in a risk of electric shock.
Consult a qualified electrician or serviceman if the grounding instructions are not
completely understood, or if doubt exists as to whether the appliance is properly
grounded.
(1) If it is necessary to use an extension cord, use only a 3-wire extension cord that has a
3-blade grounding plug, and a 3-slot receptacle that will accept the plug on the appliance.
The marked rating of the extension cord shall be equal to or greater than the electrical rating
of the appliance.
(2) Do not use an extension cord, if the power supply cord is too short, have a qualified
electrician or serviceman install an outlet near the appliance.
4
Page 6
INSTALLA TION
Steady, flat location
1
This microwave oven should be set on a steady, flat surface.
Ventilation
2
Do not block air vents. If they are blocked during operation, the oven may overheat and eventually cause oven
failure. For proper ventilation, keep 3 inches of space between oven’s top, sides, rear and area where the unit is to be
installed.
Away from radio and TV sets
3
Poor television reception and radio interference may result if the oven is located close to a TV, Radio, antenna, feed,
etc. Place the oven as far from them as possible.
Away from heating appliances and water taps
4
Keep the oven away from hot air, steam or splashing liquids when choosing a place to position it, otherwise the
insulation might be adversely affected and breakdowns may occur.
Power supply
5
• Check your local power source.
This microwave oven requires a current of approximately 15 amperes, 120 Volts, 60Hz grounded outlet.
• Power supply cord is about 1.0 meters long.
1. A short power-supply cord is provided to reduce the risks resulting from becoming entangled in or tripping over a
longer cord.
2. Longer cord sets or extension cords are avaliable and may be used if care is exercised in their use.
3. If a long cord or extension cord is used, (1) the marked electrical rating of the cord set or extension cord should be
at least as great as the electrical rating of the appliance, (2) the extension cord must be a grounding-type 3-wire
cord, and (3) the longer cord should be arranged so that will not drape over the countertop or tabletop where it
can be pulled on by children or tripped over unintentionally.
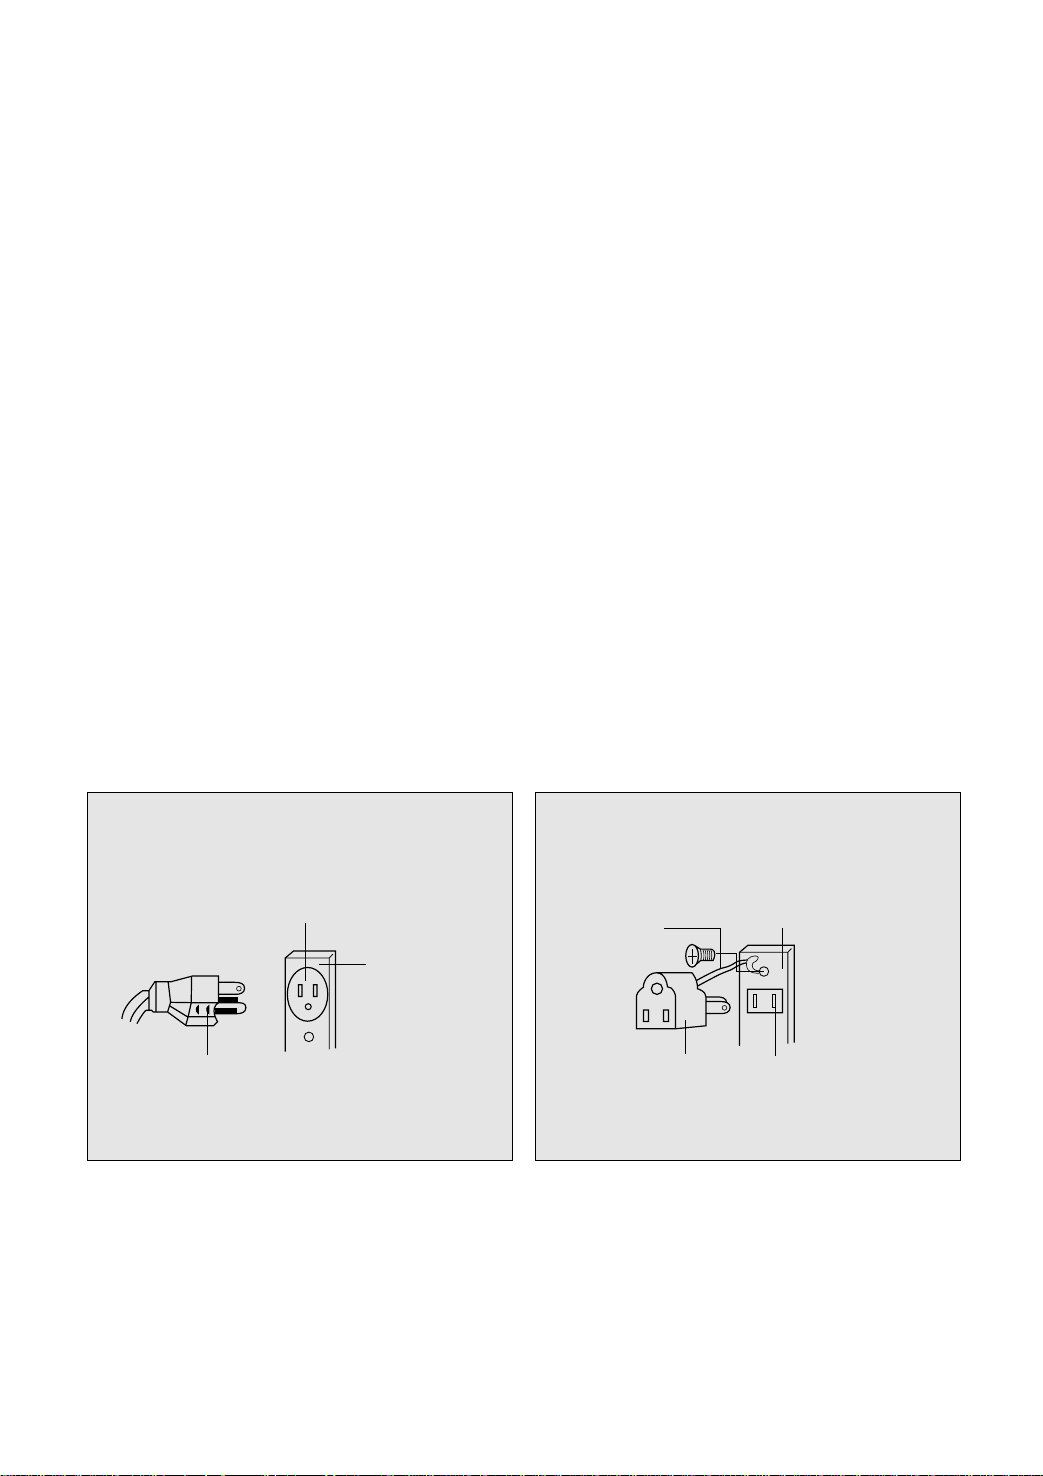
When using a 3-pronged plug When using grounding adaptor, make sure the
receptacle box is fully grounded
3-prong Receptacle
Receptacle
Box cover
3-prong plug
Examine the oven after unpacking for any damage such as:
6
Dents, a misaligned door, broken door, a dent in the cavity.
If any or the above are visible, DO NOT INSTALL and notify dealer immediately.
Grounding
Lead
Grounding
Adaptor
Receptacle Box Cover
Receptacle
5
Page 7
CARE OF YOUR MICROWAVE OVEN
Turn the oven off before cleaning.
1
Keep the inside of the oven clean. When food
2
spatters or spilled liquids adhere to oven walls, wipe
with a damp cloth. Mild detergent may be used if
the oven gets very dirty. The use of harsh detergent
or abrasives is not recommended.
The outside oven surface should be cleaned with
3
soap and water, rinsed and dried with a soft cloth.
To prevent damage to the operating parts inside the
oven, water should not be allowed to seep into the
ventilation openings.
If the Control Panel becomes wet, clean with a soft,
4
dry cloth. Do not use harsh detergents or abrasives
on Control Panel.
If steam accumulates inside or around the outside of
5
the oven door, wipe with a soft cloth. This may
occur when the microwave oven is operated under
high humidity conditions and in no way indicates
malfunction of the unit.
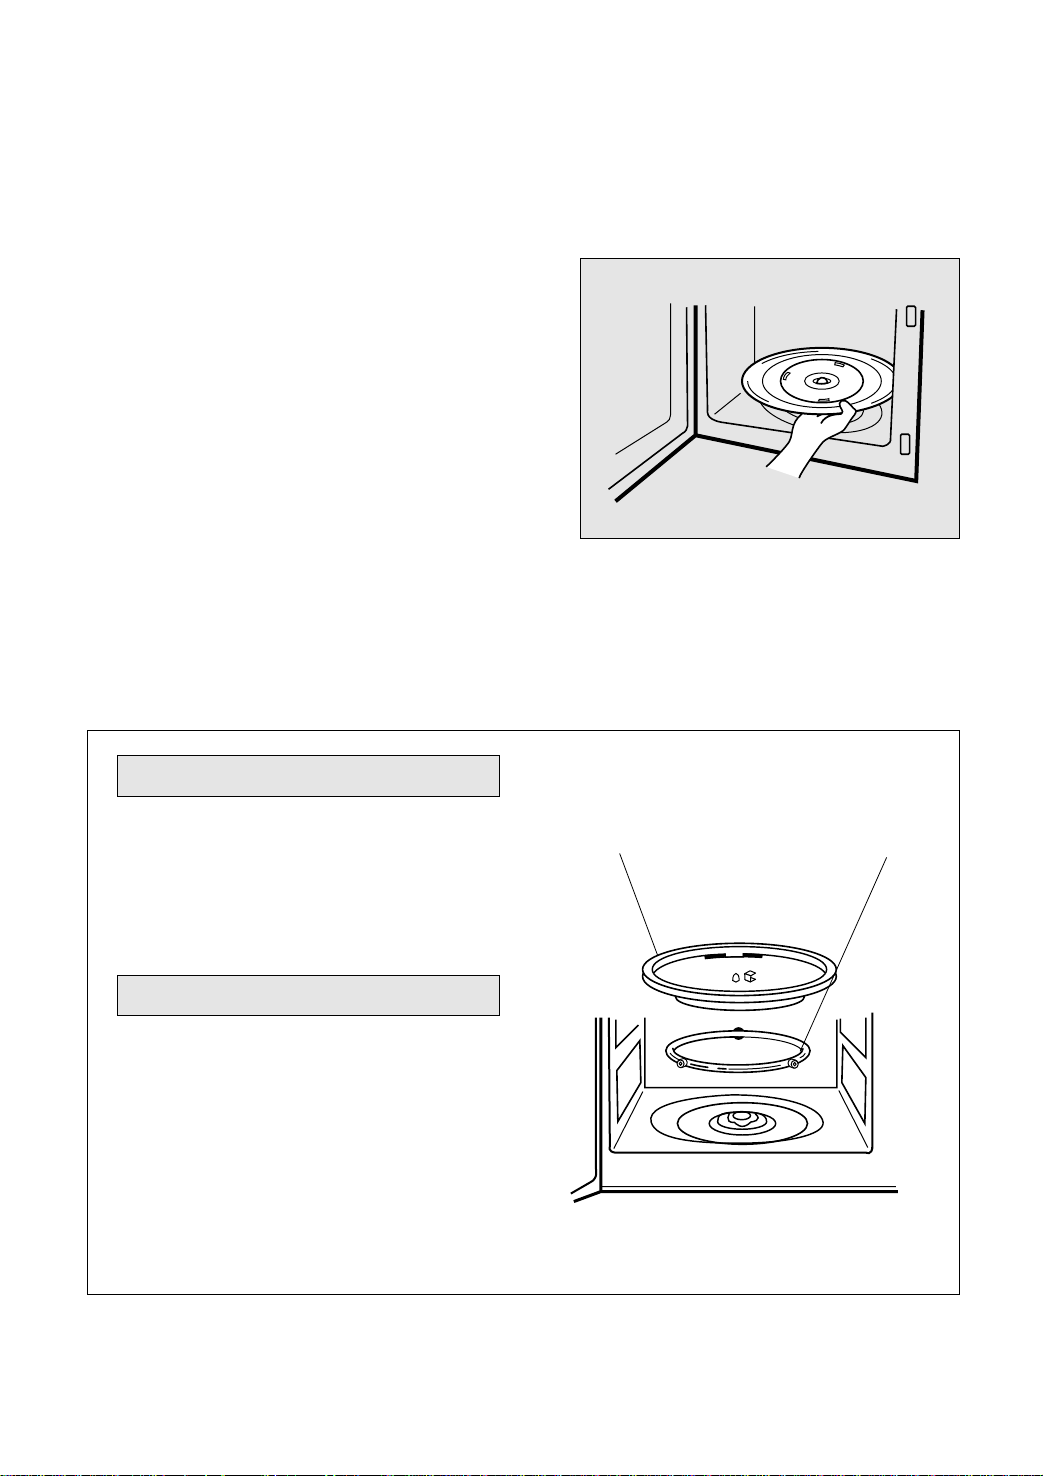
It is occasionally necessary to remove the glass tray
6
for cleaning. Wash the tray in warm sudsy water or
in a dishwasher.
The roller guide and oven cavity floor should be
7
cleaned regularly to avoid excessive noise.
Simply wipe the bottom surface of the oven with
mild detergent water or window cleaner and dry.
The roller guide may be washed in mild sudsy water.
ROLLER GUIDE
The ROLLER GUIDE and oven floor should
1
be cleaned frequently to prevent excessive
noise.
The ROLLER GUIDE MUST ALWAYS be
2
used for cooking together with the Glass Tray.
GLASS TRAY
DO NOT operate the oven without the Glass
1
Tray in place.
DO NOT use any other Glass Tray with this
2
oven.
If Glass Tray is hot, ALLOW IT TO COOL
3
before cleaning or placing it in water.
DO NOT cook directly on the Glass Tray.
4
Glass Tray
Roller Guide
6
Page 8

HOW TO USE YOUR MICROWAVE OVEN SAFELY
Although your oven is provided with safety features, it is important to observe the following:
a) It is important not to defeat or tamper with safety interlocks.
b) Do not place any object between the front face and the door or allow residue to accymulate on sealing surfaces.
Wipe the sealing area frequently with a mild detergent, rinse and wipe dry. Never use abrasive powders or pads.
c) When opened, the door must not be subjected to strain, for example, a child hanging on an opened door or any load
could cause the oven to fall forward to cause injury and also damage the door. Do not operate the oven if it is damaged,
until it has been repaired by a qualified service engineer. It is particularly important that the oven door closes properly
and that there is no damage to the:
i) Door (bent)
ii) Hinges and Latches (broken or loosened)
iii) Door seals and Sealing surfaces
d) The oven should not be adjusted or repaired by anyone except properly qualified service personnel.
NOTE: It is quite normal for steam to be emitted around the door during the cooking cycle.
The door is not intended to seal the oven cavity completely, but its special design contributes to the complete
safety of the appliance.
CAUTION:
1. Do not attempt to operate the oven while empty as this will cause damage.
2. As an exhaust is located in the rear of the oven, install the oven so as not to block the outlet.
7
Page 9
OMNI WAVE COOKING SYSTEM
TM
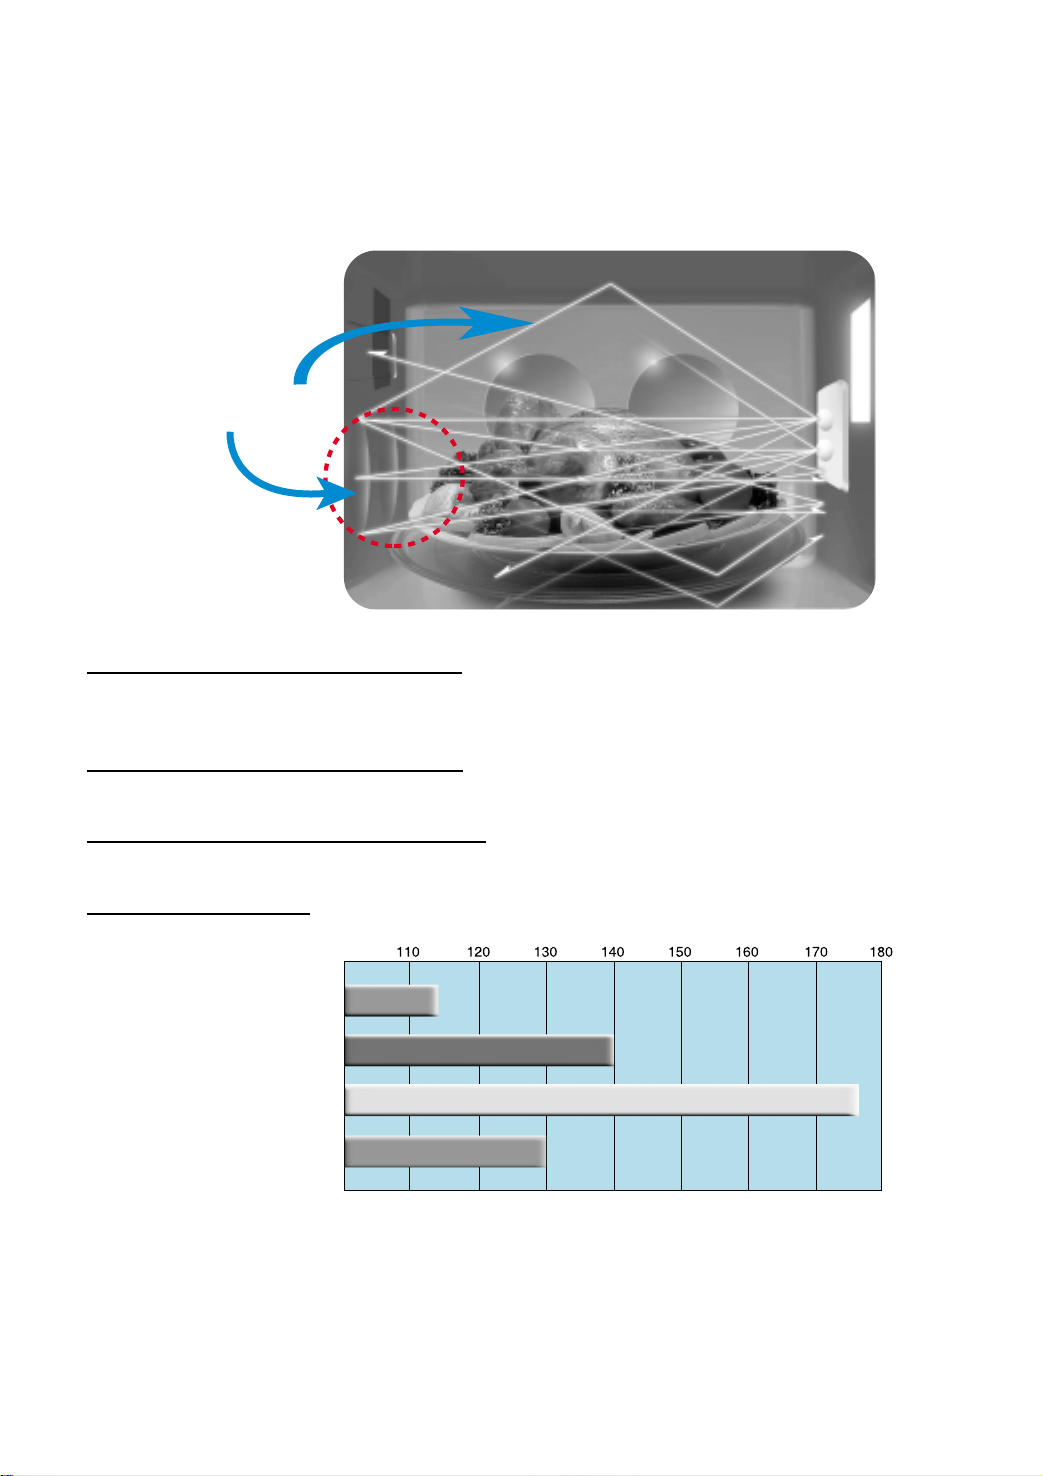
The Omni Wave Cooking SystemTMis a new technology from Emerson aimed at cooking food evenly and quickly.
REFLECTOR
What is the Omni Wave Cooking SystemTM? The Omni Wave Cooking SystemTMconcentrates the waves
equally on all areas of the food item. The dual wave system distributes waves evenly into the cavity from
two points, one above the item and one below.
Minimized Vertical Temperature Variation: The Omni Wave Cooking SystemTMemits microwaves on to
a reflector which concentrates them on the food, resulting in even cooking. No more hot or cold spots!
Minimized Horizontal Temperature Variation: The Omni Wave Cooking SystemTMminimizes
discrepancy in the temperature of each cooking area by emitting microwaves on the entire tray.
Minimized Cooking Time:
Time
(Sec.)
Omni Wave Cooking System
Emerson Current Model
A Company
B Company
TM
[Cooking test on a 3.5oz (99g) bag of popcorn]
The Omni Wave Cooking SystemTMachieves quick cooking by emitting microwaves to all sides of the food.
8
Page 10

FEATURES DIAGRAM
54321
876
1 Door latch-When the door is closed, it will
automatically lock shut. If the door is opened
while the oven is operating, the magnetron will
automatically shut off.
2 Door seal-The door seal maintains the microwave
within the oven cavity and prevents microwave
leakage.
3 Oven cavity
4 Spatter shield-Protects the microwave outlet from
splashes of cooking foods.
5 Safety interlock system-Prevents the oven from
operating while the door is opened.
6 Glass cooking tray-Made of special heat resistant
glass. The tray must always be in proper position
before operating.
Do not cook food directly on the tray.
7 Roller guide-Supports the glass cooking tray.
8 Door screen-Allows viewing of food.
The screen is designed so that light can pass
through, but not the microwaves.
9
Page 11
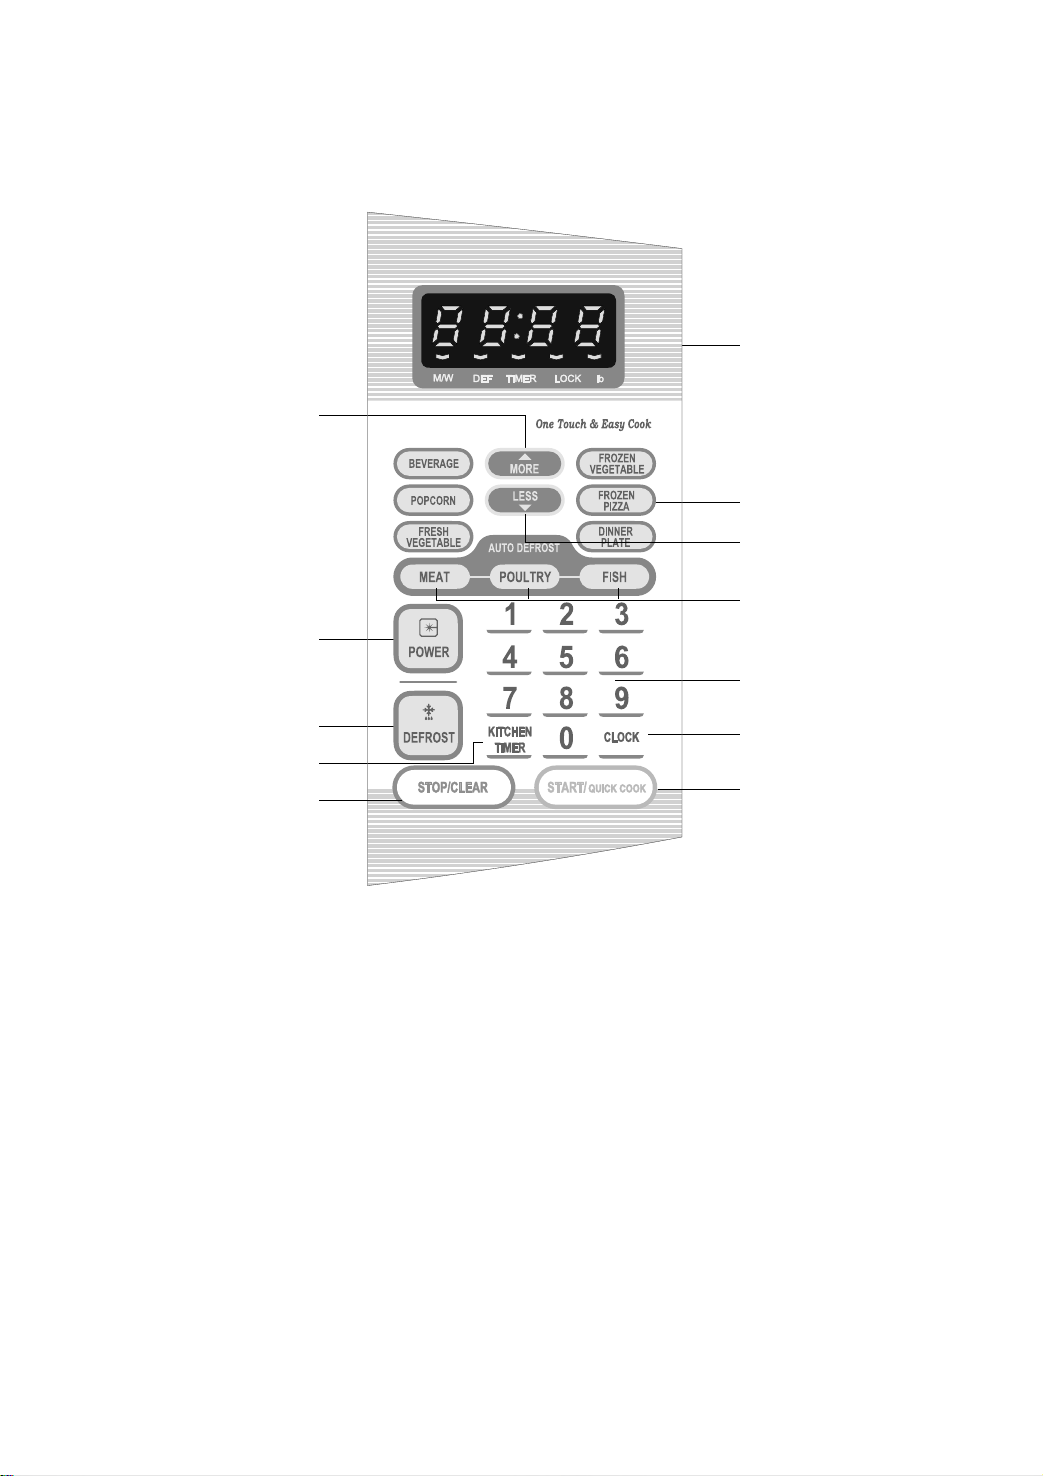
FEATURES DIAGRAM
0
q
9
i
p
o
y
t
w
u
e
r
9
Number pads-Used to set the cooking time
and the present time.
0
Display-Cooking time, power level indicators and
present time are displayed.
q
One touch-Used to cook or reheat specific
quantities of food.
w
More-Used to add time to cooking.
e
Less-Used to remove time from cooking.
r
Auto Defrost-Used to defrost foods.(for weight)
t
Power-Used to set power level.
y
Def.-Used to defrost foods.(for time)
u
Kitchen Timer-Used as a minute timer, to delay the
start of cooking, or to set a holding time after cooking.
i
Clock-Used to set clock.
o
Stop/Clear-Used to stop the oven operation
or to delete the cooking data.
p
Start/Quick cook-Used to start the oven
and also used to set a reheat time.
10
Page 12

OPERATION PROCEDURE
This section includes useful information about oven operation.
1. Plug power supply cord into a standard 3-pronged 15 Amp, 120V AC 60Hz power outlet socket.
2. After placing the food in a suitable container, open the oven door and put it on the glass tray.
The glass tray and roller guide must always be in place during cooking.
3. Shut the door. Make sure that it is firmly closed.
When the oven door is opened, the light turns off.
1
The oven door can be opened at any time during
2
operation by pressing the door release button on the
control panel. The oven will automatically shut off.
To restart the oven, close the door and then touch
START.
Each time a pad is touched, a BEEP will sound to
3
acknowledge the touch.
The oven automatically cooks on full power unless
4
set to a lower power level.
The display will show “ : 0” when the oven is
5
plugged in.
Time clock returns to the present time when the
6
cooking time ends.
When the STOP/CLEAR pad is touched during the
7
oven operation, the oven stops cooking and all
information retained. To erase all
information(except the present time), touch the
STOP/CLEAR pad once more. If the oven door is
opened during the oven operation, all information is
retained.
If the START pad is touched and the oven does not
8
operate, check the area between the door and door
seal for obstructions and make sure the door is
closed securely. The oven will not start cooking
until the door is completely closed or the program
has been reset.
Make sure the oven is properly installed and
plugged into the electrical outlet.
WATTAGE OUTPUT CHART
• The power-level is set by pressing the POWER pad. The chart shows the display, the power level and the percentage of power.
Touch POWER pad
once P-HI 100%
twice P-90 90%
3 times P-80 80%
4 times P-70 70%
5 times P-60 60%
6 times P-50 50%
7 times P-40 40%
8 times P-30 30%
9 times P-20 20%
10 times P-10 10%
11 times P-00 0%
Power level (Display) Approximate Percentage of Power
11
Page 13
HOW TO SET THE OVEN CONTROLS
SETTING THE CLOCK
When the oven is first plugged in, the display will flash “ : 0” and a tone will sound. If the AC power
ever goes off, the display shows “ : 0” when the power comes back on.
1. Touch CLOCK pad.
This is a 12 hour clock system.
2. Touch CLOCK pad once more.
This is a 24 hour clock system.
3. Enter the correct time of day by touching the numbers
in sequence.
4. Touch CLOCK pad.
NOTE: If you attempt to enter an incorrect time, the time will not be set and an error signal tone will
sound. Touch the CLOCK pad and re-enter the time.
NOTE : This oven has multiple clock
systems. If you want 12 hour
clock system, omit this step.
The display stops blinking, and the colon starts
blinking. If you selected 12 hour clock system, this
digital clock allows you to set from 1:00 to 12:59.
If you selected 24 hour clock system, this digital
clock allows you to set from 0:00 to 23:59.
TIME DEFROSTING
When DEFROST is selected, the automatic cycle divides the defrosting time into periods of alternating
defrost and stand times by cycling on and off.
1. Touch DEF. pad.
2. Touch number pads for the
desired defrosting time.
3. Touch START pad.
When you touch START pad, the Def. indicator starts blinking to show the oven is in the DEFROST mode. The
display counts down the time to show you how much defrosting time is left in the DEFROST mode.
The oven beeps during the defrosting cycle to signal that the food needs to be turned or rearranged. When the
defrosting time ends, you will hear 3 beeps.
12
The Def. indicator lights and “ : 0” is displayed.
The display will show what you touched.
Note : Your oven can be programmed for
59 minutes 99 seconds. ( 59 : 99 )
Page 14

AUTO DEFROSTING
AUTO DEFROST lets you easily defrost food by eliminating guesswork in determining defrosting time. The
minimum weight for Auto Defrost is 0.5 pounds. The maximum weight for Auto Defrost is 3.0 pounds.
Follow the steps below for easy defrosting.
1. Touch MEAT pad.
2. Select the desired defrosting weight.
(Refer to the auto defrost chart below.)
3. Touch START pad.
1. Touch POULTRY pad.
2. Select the desired defrosting weight.
(Refer to the auto defrost chart below.)
3. Touch START pad.
1. Touch FISH pad.
2. Select the desired defrosting weight.
(Refer to the auto defrost chart below.)
3. Touch START pad.
The lb indicator light and “ 1.0 ” is displayed.
The display will show what you touched.
MEAT DEFROSTING begins.
The lb indicator light and “ 1.5 ” is displayed.
The display will show what you touched.
POULTRY DEFROSTING begins.
The lb indicator light and “ 0.5 ” is displayed.
The display will show what you touched.
FISH DEFROSTING begins.
* AUTO DEFROST CHART
Touch pad MEAT POULTRY FISH
once 1.0 lb 1.5 lb 0.5 lb
twice 1.5 lb 2.0 lb 1.0 lb
3 times 2.0 lb 2.5 lb 1.5 lb
4 times 2.5 lb 3.0 lb 2.0 lb
The defrosting time is automatically determined by the weight selected.
When you touch START pad, the lb indicator goes off and the Def. indicator blinks and the defrosting time counts
down in the display window. The oven beeps during the defrosting cycle to signal that the food needs to be turned
or rearranged. When the defrosting time ends, you will hear 3 beeps.
13
Page 15

COOKING IN ONE STAGE
1. Touch POWER pad.
(Select the desired power level.)
X 6
2. Touch number pads for the cooking time.
3. Touch START pad.
When you touch START pad, the M/W indicator starts blinking to show the oven is cooking.
The display counts down the time to show how much cooking time is left. When the cooking time ends, you will
hear 3 beeps.
NOTE: Using lower power levels increases the cooking time which is recommended for foods such as
cheese, milk and slow cooking of meats.
The M/W indicator lights.
The display will show what you touched.
This example shows power level 5.
Note : If steps 1 is omitted, the oven will
cook at full power.
The display will show what you touched.
Note : Your oven can be programmed for
59 minutes 99 seconds. ( 59 : 99 )
COOKING IN TWO STAGES
All recipes require the frozen foods to be defrosted fully before cooking.
This oven can be programmed to automatically defrost foods before cooking.
1. Touch DEF. pad.
2. Touch number pads for the defrosting time you want.
3.Touch POWER pad.
(Select the desired power level. )
X 6
4. Touch number pads for the desired cooking time.
5. Touch START pad.
When you touch START pad, the Def. and M/W indicators come on to confirm the power levels
selected. The Def. indicator starts blinking to show you that the oven is in DEFROST mode.
The display counts down the time remaining in DEFROST mode. When the oven beeps, turn over,break apart
and/or redistribute the food. At the end of DEFROST mode, the oven will beep and start M/W cook. The Def.
indicator goes off and the M/W indicator starts blinking. The display counts down the time remaining in M/W
mode. When M/W cook ends, you will hear 3 beeps.
The Def. indicator lights and “ : 0” is displayed.
The display will show what you touched.
The M/W indicator lights and “P-HI” is displayed.
The display will show what you touched.
This example shows power level 5.
The display will show what you touched.
14
Page 16
KITCHEN TIMER MODE
KITCHEN TIMER operates as a minute timer, can be set to delay cooking and used to set a holding time after cooking.
However delay cooking can not be programmed for defrost. KITCHEN TIMER operates without microwave energy.
HOW TO USE AS A MINUTE TIMER
1. Touch KITCHEN TIMER pad.
2. Press the amount of time you want to count down.
3. Touch START pad.
The Timer indicator starts blinking and the display counts down the time remaining in KITCHEN TIMER mode.
When KITCHEN TIMER mode ends, you will hear 3 beeps.
The Timer indicator lights and “ : 0” is
displayed.
The display will show what you touched.
HOW TO DELAY THE START OF COOKING
1. Touch KITCHEN TIMER pad.
2. Press the amount of time you want to delay.
3. Program the desired power level and cooking time for
food to be cooked.
4. Touch START pad.
When you touch START pad, the Timer indicator starts blinking and the display counts down the time
remaining in KITCHEN TIMER mode. When KITCHEN TIMER mode ends, the oven will beep. The Timer
indicator goes off and M/W indicator starts blinking. The display counts down the time remaining in M/W
mode. When M/W cook ends, you will hear 3 beeps.
The Timer indicator lights and “ : 0 ” is
displayed.
The display will show what you touched.
The M/W indicator lights and the selected
power level & cooking time are displayed.
HOW TO SET HOLDING TIME
1. Program the desired cooking time.
2. Touch KITCHEN TIMER pad.
3. Press the amount of time you want the oven to hold.
4. Touch START pad.
The M/W indicator starts blinking and the display counts down the time remaining in M/W mode. When the
M/W cook ends, the oven will beep. The M/W indicator goes off and Timer indicator starts blinking. The
display counts down the time remaining in KITCHEN TIMER mode. When the KITCHEN TIMER mode
ends, you will hear 3 beeps.
Note : Your oven can be programmed for 59 minutes 99 seconds. ( 59 : 99 )
15
The M/W indicator lights and the selected time
is displayed.
The Timer indicator lights and “ : 0” is
displayed.
The display will show what you touched.
Page 17
QUICK COOK
QUICK COOK allows you to reheat for 30 seconds at 100% (full power) by simply touching the QUICK COOK pad.
By repeatedly touching the QUICK COOK pad, you can also extend reheating time to 5 minutes by 30 second
increments.
1. Touch
QUICK
COOK pad. When you touch
displayed.
After 1.5 seconds, the oven starts reheating.
QUICK
COOK, " : 30" is
ONE TOUCH COOKING
One touch cooking allows you to cook or reheat many of your favorite foods by touching just one pad.
To increase quantity, touch the chosen pad until number in display is same as the desired quantity to cook
(except for POPCORN).
1. Touch POPCORN pad once for
3.5 oz bag.
NOTE: 1. Use prepackaged room-temperature microwave popcorn.
2. Place bag in oven according to manufacturer’s directions.
3. Pop only one bag at a time.
4. After popping, open bag carefully: popcorn and steam are extremely hot.
5. Do not reheat unpopped kernels or reuse bag.
6. Do not leave oven unattended while popping popcorn.
CAUTION: If prepackaged popcorn is a different weight than the recommended weight, do not use the
popcorn pad. Follow the manufacturer instruction.
When you touch POPCORN pad once,
“ 3.5 ” is displayed.
After 1.5 seconds, the display is changed into
cooking time and the oven starts cooking.
1. Touch FROZEN PIZZA pad
once for 7 oz pizza or
twice for 14 oz pizza.
* FROZEN PIZZA *
• 7 oz : Touch FROZEN PIZZA once.
• 14 oz : Touch FROZEN PIZZA twice within 1.5 seconds.
NOTE: 1. Use only one frozen pizza at a time.
2. Use only frozen pizza made for microwave ovens.
3. If the cheese of frozen pizza does not melt sufficiently, cook a few seconds longer.
4. Some brands of frozen pizza may require more or less cooking time.
16
When you touch FROZEN PIZZA pad once,
“ 7 ” is displayed.
After 1.5 seconds, the display is changed into
the cooking time and the oven starts cooking.
Page 18
ONE TOUCH COOKING (continued)
1. Touch BEVERAGE pad once for
1 cup, twice for 2 cups or
three times for 3 cups.
* BEVERAGE * (200ml/cup)
• 1 cup (mug) : Touch BEVERAGE once.
• 2 cups (mugs) : Touch BEVERAGE twice within 1.5 seconds.
• 3 cups (mugs) : Touch BEVERAGE three times within 1.5 seconds.
1. Touch DINNER PLATE pad once
for 12 oz of dinner plate or twice
for 15 oz of dinner plate.
* DINNER PLATE *
• 12 oz : Touch DINNER PLATE once.
• 15 oz : Touch DINNER PLATE twice within 1.5 seconds.
1. Touch FRESH VEGETABLE pad
once for 7 oz of fresh vegetable or
twice for 14 oz of fresh vegetable.
When you touch BEVERAGE pad once, “ 1 ” is
displayed.
After 1.5 seconds, the display is changed into
cooking time and the oven starts cooking.
When you touch DINNER PLATE pad once,
“12” is displayed.
After 1.5 seconds, the display is changed into
cooking time and the oven starts cooking.
When you touch FRESH VEGETABLE pad
once, “7” is displayed.
After 1.5 seconds, the display is changed into
cooking time and the oven starts cooking.
* FRESH VEGETABLE *
• 7 oz : Touch FRESH VEGETABLE once.
• 14 oz : Touch FRESH VEGETABLE twice within 1.5 seconds.
1. Touch FROZEN VEGETABLE
pad once for 7 oz of frozen
vegetable or twice for 14 oz of
frozen vegetable.
* FROZEN VEGETABLE *
• 7 oz : Touch FROZEN VEGETABLE once.
• 14 oz : Touch FROZEN VEGETABLE twice within 1.5 seconds.
17
When you touch FROZEN VEGETABLE
pad once, “7” is displayed.
After 1.5 seconds, the display is changed into
cooking time and the oven starts cooking.
Page 19

MORE/LESS
To alter one touch cooking or cooking time whilst oven is in operation, use MORE or LESS.(except for
defrosting)
Press MORE/LESS to increase/decrease the one touch cooking time in multiples of 10 seconds.
The overall one touch cooking time can be increased to a maximum of 59 minutes 50 seconds.
Press MORE/LESS to increase/decrease the cooking time in multiples of 1 minute.
The overall cooking time can be increased to a maximum of 59 minutes.
CHILD SAFETY LOCK
The safety lock prevents unwanted oven operation such as by small children.
To set, press and hold STOP/CLEAR for 3 seconds, a beep sounds and Lock indicator lights.
To cancel, press and hold STOP/CLEAR for 3 seconds, a beep sounds and Lock indicator goes off.
TO STOP THE OVEN WHILE THE OVEN IS OPERATING
1. Press STOP/CLEAR pad.
• You can restart the oven by touching START pad.
• Touch STOP/CLEAR once more to erase all instructions.
• You must enter in new instructions.
2. Open the door.
• You can restart the oven by closing the door and touching START.
NOTE: Oven stops operating when door is opened.
18
Page 20

COOKING GUIDE
THE PRINCIPLES OF MICROWAVE COOKING
Microwaves are a form of high frequency radio waves similar to those used by a radio including AM, FM
and CB. They are, however, much shorter than radio waves; approximately four to six inches long with a
diameter of about 0.6cm (1/4
From the magnetron tube, microwave energy is transmitted to the oven cavity where it is reflected,
transmitted and absorbed.
Reflection
Microwaves are reflected by metal just as a ball is bounced off a wall. A combination of stationary (interior
walls) and rotating metal (turntable or stirrer fan) helps assure that the microwaves are well distributed within the
oven cavity to produce even cooking.
Transmission
Microwaves pass through some materials such as paper, glass and plastic much like sunlight shining through a
window. Because these substances do not absorb or reflect the microwave energy, they are ideal materials for
microwave oven cooking containers.
Absorption
During cooking, microwaves will be absorbed by food. They penetrate to a depth of about 1.8 to 3.7cm (3
inches). Microwave energy excites the molecules in the food (especially water, fat and sugar molecules), and causes
them to vibrate at a rate of 2,450,000,000 times per second. This vibration causes friction, and heat is produced. If you
vigorously rub your hands together, you will feel heat produced by friction. The internal cooking of larger foods is done
by conduction. The heat which is produced by friction is conducted to the center of food.
Foods also continue to cook by conduction during standing time.
Because microwaves dissipate, much like sunlight as it reaches the Earth's surface, they cannot be stored in food.
inch). Electricity is converted into microwave energy by the magnetron tube.
/4 to 1
1/2
MICROWAVE UTENSILS
Glass, Ceramic and China
Ovenproof glass or ceramic baking dishes are the most-used microwave utensils. Many of these items are readily
available in most homes: glass measures, custard cups, mixing bowls, covered casserole, oblong baking dishes, pie
dishes and round or square cake dishes.
Tableware can be used for microwave cooking. If tableware is marked ovenproof, it is frequently safe to use in the
microwave oven.
Jars and bottles can be used to warm food to serving temperature, if the lid is removed first. Cooking should not
be done in these containers since most are not heat resistant and during extended cooking times, heat from the food
would cause cracking or breaking.
Do not use dishes with silver, gold, platinum or other metal trim. Arcing may occur and/or the dish may break.
Do not use delicate glassware. Although the glassware may be transparent to microwave energy, the heat from the
food may cause the glassware to crack.
19
Page 21

Plastics
Plastic dishes, picnic ware, thermal cups, mugs and bowls may be used in the oven for short period of time. But
none of these should be used in the oven for prolonged period because distortion and melting may occur. Check
manufacturer's recommendations concerning microwave safety.
Plastic wrap can be used to cover dishes in most recipes. Use plastic warp as a tight covering, but pierce it before
removing to prevent steam burns.
Plastic cooking bags should be slit before cooking so excess steam can escape, Do not wire twist-ties to close bag.
They can act as an antenna and cause arcing (blue sparks). Wire twist-ties could damage the oven.
Paper
Paper cups, wax paper, napkins, paper towels, plates and paper cartons may be used for cooking. Prolonged
time in the oven can cause paper to burn, Wax paper is suitable to use to prevent spatter.
Do not use recycled paper products, such as brown paper bags, since they contain impurities. which may cause
arcing and damage the oven.
Straw, W icker and Wood
Straw and wicker baskets may be used in the oven for the very short time it takes to heat rolls. Large wooden
utensils, such as bowls or cutting boards should not be used for prolonged cooking as the microwave energy may
cause the wood to become dry and brittle. However, wooden spoons or wood-handled rubber spatulas can be left in
the oven for short periods of time.
Metal
Metal utensils should not be used in the oven. Since microwave energy is reflected by metal, foods in metal
containers will not cook evenly with the possibility of "arcing". Arcing may cause damage to the oven walls.
Special Microwave Accessories
Browning dishes can be used for searing, browning and frying during microwave cooking. Browning dish has a
special coating on the bottem that attracts microwave energy when the dish is preheated in a microwave oven. Do
not preheat the browning dish longer than the manufacturer's recommendation.
Roasting rack to hold the food away from the liquid which accumulates as meat cooks. It is ideal for bacon and
assists in reheating pastry and other dry items.
Cake dishes-cupcakers, ring molds and cake pans are designed to ensure even results when cooking cakes in a
variety of shapes and sizes.
20
Page 22

FOOD CHARACTERISTICS
The speed and evenness of microwave cooking is affected by the foods themselves. Microwaves penetrate foods
to a depth of 1.8 to 3.7cm (3/4 to 11/2 inches) on all surfaces; top, bottom and sides. The interior of foods greater
than 5cm(2-inches) in diameter heats by conduction, as it does in conventional cooking. Foods with high water,
fat or sugar content respond quickly to microwave energy. Understanding the way food characteristics influence
cooking will help you enjoy the benefits of microwave cooking.
Quantity: The amount of food placed in a microwave oven has a direct effect on the cooking time. Small amounts
of food or liquid require less cooking time than larger amounts of the same substance. That’s because small
quantities receive concentrated amounts of microwaves. As the quantity increases, concentration decreases.
Size: Small pieces cook faster than large ones. To the speed cooking, cut pieces smaller than 5cm (2-inches), so
microwaves can penetrate to the middle from all sides. Pieces which are similar in size and shape will cook more
evenly.
Shape: Many foods are uneven-like chicken, ribs or broccoli. The thin parts will cook faster than the thick parts
while uniformly thick foods cook evenly.
To compensate for irregular shapes, place thin pieces toward the center of the dish and thicker pieces toward the
edge of the dish.
Round shaped foods cook faster than square or oblong shapes.
Starting Temperature: Frozen or refrigerated food will takes longer to cook than food at room temperature. Room
temperatures vary with the time of year, therefore cooking times may be longer on cold winter days.
Bone and Fat: Because bones conduct heat, the side of meat with the bone will cook first, while boneless cuts cook
slower but more evenly. Fat attracts microwaves.
Large roasts, turkeys and chickens brown during prolonged cooking as their natural fats are drawn to the surface.
The centers of these foods are cooked by heat conduction.
Moisture Content: Microwave are attracted by moisture. Naturally moist foods microwave better than dry foods.
Add a minimum of liquid to moist foods, as excess water slows cooking. Prick foods with skins like those on
potatoes or squash allowing internal steam to escape.
Density: The density of food determines how easily the microwaves can penetrate and how quickly it will cook.
Porous foods, like ground beef or mashed potatoes, microwave faster than dense ones like steak or whole
potatoes.
Piercing: Steam builds up pressure in foods which are tightly covered by a skin or membrane Pierce potatoes, egg
yolks and chicken livers to prevent bursting.
21
Page 23

MICROWAVE TECHNIQUES
Many of the techiques of microwave cooking are similar to those used in conventional cooking. They help
equalize energy in the food to allow even cooking. Some techniques also shorten cooking time, resulting in the
full benefit of microwave speed.
Stirring: Stir foods from outside to center of dish once or twice during cooking to equalize heat and speed
microwave cooking. Foods will not burn or stick, therefore there is no need to stir continuously as you do in
conventional cooking.
Turning: This helps food heat evenly and is done once during the cooking time of large, dense foods such as roasts
or whole poultry. When cooking hamburgers without a cover, turning is often required.
Arrangement: Arrange foods with thin or delicate ends, like drumsticks or asparagus spears, with the thick or
tougher portions to the outside of the dish. The parts which need more cooking will receive more energy,
therefore food will microwave evenly.
Spacing: Individual foods, such as baked potatoes and cupcakes will cook more evenly if placed in the oven an
equal distance apart. If possible, arrange foods in a circular pattern. Similarly, when placing foods in a baking
dish, arrange around the ouside of dish, not lined up next to each other. Food should not be stacked on top of each
other.
Rearrangement: Rearrange overlapping areas, like tails of long fish fillets, from top to bottom, and closely packed
pieces, like meat balls, from outside to the center of the dish.
Standing Time: Standing time is especially important in microwave cooking, Microwave energy creates heat in
the outer layers of the food. As a result of normal conduction, the food continues to cook for a few minutes after
removal from the oven. Letting roasts, large whole vegetables, casseroles and cakes stand to finish cooking
allows the centers to cook completely without overcooking, drying or toughening the outsides.
Covering: Covering speeds cooking time, retains moisture, tenderizes, insures even cooking and prevents
spattering. Casserole lids or plastic wrap are used for a tighter seal. Vent plastic by turning back one edge at the
side of dish to form a narrow slot where excess steam can escape. Various degrees of moisture retention are also
obtained by using wax paper or paper towels.
Browning: Microwave energy cooks some foods so quickly that the fats and sugars within the food do not have
time to caramelize and give a "browned" appearance. Browning agents do not affect the quality of microwaved
foods, but can add color and flavor. For meats and poultry, use bouquet sauce diluted with water or melted butter;
soy, Worcestershire, barbecue or steak sauce ; a sprinkling of paprika or dry gravy mix; jelly glaze or crumb
coating. Frostings and toppings finish cakes and breads. Top casseroles at the end of microwaving with grated
cheese or crumbs.
22
Page 24

AUTO DEFROSTING
Defrosting in the microwave oven is a great time saver. The AUTO DEFROST pad simplifies the process greatly.
Items can be defrosted with appropriate power settings which adjust automatically during the defrosting cycle.
Consult charts in this chapter for directions on how to use this helpful feature.
GENERAL INFORMATION
➪ Put the food in a microwave casserole (small pieces such as cubes or strips).
➪ To determine the weight of the food items, use the weight on the package as purchased or weigh at home
on a kitchen scale. Round the number to the nearest tenth of a ‘kg’ and select that desired defrosting
werght.
➪ The shape of food items, especially larger ones, will vary and affect the way they defrost. On the
defrosting charts, note that large items require a 2+1 touch for more effective defrosting. Always check
the status after the standing time. Fish, seafood and poultry should still be somewhat icy in the center then
held under cold running water to finish defrosting. If more time is needed, use DEFROST by time to add
time in small increments.
➪ Halfway through the defrosting process, a series of beeps will indicate that it is time to change the
position of the item being defrosted. This includes turning over the item, rotating the item, separating
defrosted pieces or sections or shielding.
➪ Shielding means to use a 5cm strip of aluminum foil to protect thinner or unevenly shaped parts from
beginning to cook. Microwave energy will not penetrate the foil. Some rules apply to the use of foil:
• Never cover more than one-third of any item.
• Do not let the foil pieces touch each other or the sides of the microwave oven.
• Be sure that all ends are tucked under and lie flat to the food. Remember to adjust foil when item is
turned over and cover with wax paper.
➪ To prepare food for freezer storage (and later defrosting), wrap tightly in moisture proof packaging. If
using freezer plastic bags, be sure to let all the air out to prevent freezer burn on the food. Package so
food is as evenly shaped as possible for ease in defrosting.
23
Page 25

FISH-AUTO DEFROSTING
Refer to page 13 of this cookbook for general information on the AUTO DEFROST pad.
AUTO DEFROST BY WEIGHT : Press AUTO DEFROST to defrost by weight. Enter the weight with each
item pad. (MEAT, POULTRY, and FISH); press START. When several beeps sound halfway through defrosting,
follow the "Special Instructions" in the chart below. Press START again to continue defrosting.
DEFROST by TIME : Press DEF. pad to defrost by time. Check time per pound in chart below and multiply
by the weight of the item. Enter time with number pads; press START. When several beeps sound halfway
through defrosting, follow "Special Instructions" in the chart below. Press START again to continue defrosting.
ITEM SPECIAL INSTRUCTIONS BY TIME
Fish Fillets frozen in block Place fillets on a microwave plate.
At beeps, turn over block of fish. Separate fillets,
if possible. Press START to continue defrosting. 5 minutes per pound
Let stand 10 minutes then finish with cold running
water (about 5 minutes).
Individual Fish Fillets or Place fish on a microwave plate.
Fish Steaks At beeps, turn fish over. Press START to continue
defrosting. Let stand 5 minutes then finish with cold
running water (about 5 minutes).
5 minutes per 1 pound
Shrimp Place shrimp in a glass casserole.
At beeps, separate any defrosted shrimp and
rearrange. Press START to continue defrosting. Let 4 minutes per 1 pound
stand 5 minutes then finish with cold running water
(about 5 minutes).
Lobster Tail (0.5 lb. each) Place lobster on a microwave plate.
At beeps, rearrange tails. Shield thinner end
with 2-inch strip of foil; tuck all ends under. Press
START to continue defrosting. If defrosting more 4 minutes per 1 pound
than 1 lobster tail, arrange in circle. Let stand 5
minutes then finish with cold running water
(about 5 minutes).
24
Page 26

PORK-AUTO DEFROSTING
Refer to page 13 of this cookbook for general information on the AUTO DEFROST pad.
DEFROST by TIME : Press DEF. pad to defrost by time. Check time per pound in chart below and multiply
by the weight of the item. Enter time with number pads; press START. When several beeps sound halfway
through defrosting, follow the "Special Instructions" in the chart below. Press START again to continue
defrosting.
ITEM SPECIAL INSTRUCTIONS BY TIME
Pork Strips Place pork strips on a microwave plate.
At beeps, separate and turn over. Press START to 8 minutes per pound
continue defrosting. Let stand 20 minutes.
Pork Cubes Place pork cubes in a microwave plate.
At beeps, separate and rearrange. Press START to 8 minutes per pound
continue defrosting. Let stand 20 minutes.
Pork Loin Roast, boneless Place roast on a microwave plate.
Press MEAT pad of AUTO DEFROST and select the
weight. Press START. At beeps, turn over and shield
before continuing. After first set DEF. pad
enter half of the original time. Press START to
continue defrosting. Let stand 30 minutes.
10 minutes per pound
Bulk Pork Sausage Cut metal holders off both ends of sausage. Place
on a microwave plate. At beeps, remove defrosted 7 minutes per pound
meat. Let stand 10 minutes.
Pork Chops Place on a microwave plate. At beeps, separate,
turn over and shield bone or outer edge if boneless. 7 minutes per pound
Let stand 20 minutes.
25
Page 27

BEEF-AUTO DEFROSTING
Refer to page 13 of this cookbook for general information on the AUTO DEF pad.
AUTO DEFROST BY WEIGHT: Press AUTO DEFROST to defrost by weight. Enter the weight with each
items pads. (MEAT, POULTRY and FISH); press START. When several beeps sound halfway through defrosting,
follow the "Special Instructions" in the chart below. Press START again to continue defrosting.
DEFROST by TIME : Press DEF. to defrost by time. Check time per pound in chart below and multiply by
the weight of the item. Enter time with number pads; press START. When several beeps sound halfway
through defrosting, follow the "Special Instructions" in the chart below. Press START again to continue
defrosting.
ITEM SPECIAL INSTRUCTIONS BY TIME
Beef Rolled Rump Roast,
boneless -- or -Beef Round Sirloin Tip
Roast, boneless -- or -Beef Eye of Round -- or -Beef Flank Steak
Ground Beef
Beef Hamburger Patties Stack hamburgers on a microwave plate.
Beef Strips, boneless Place beef strips on a microwave plate.
Beef Cubes, boneless Place beef cubes a microwave plate.
Beef Short Ribs Arrange ribs on a microwave plate. At beeps, turn over
(up to 2.5 pounds) and rearrange. Press START to continue defrosting. 8 minutes per pound
Place roast (up to 2.5 pounds) on a microwave plate.
Press the weight you want with MEAT pad. Press
START. At beeps, turn over and shield before
continuing. After first cycle, reset DEF. and enter half
of the first time. Press START to continue defrosting.
Let stand 30 minutes.
Place beef on a microwave plate; At beeps, remove any
defrosted meat. Press START to continue defrosting.
Let stand 15 minutes.
At beeps, turn patties over. 8 minutes per pound
Let stand 10 minutes.
At beeps, separate and turn over.
Press START to continue defrosting.
Let stand 20 minutes.
At beeps, separate and rearrange. Press START 8 minutes per pound
to continue. Let stand 20 minutes.
Let stand 20 minutes
10 minutes per pound
8 minutes per pound
7 minutes per pound
26
Page 28

LAMB-AUTO DEFROSTING
Refer to page 13 of this book for general information on the AUTO DEFROST pad.
AUTO DEFROST BY WEIGHT : Press AUTO DEFROST to defrost by weight. Enter the weight with each
items pad.(MEAT, POULTRY and FISH); press START. When several beeps sound halfway through defrosting,
follow the "Special Instructions" in the chart below. Press START again to continue defrosting.
DEFROST by TIME : Press DEF. to defrost by time. Check time per pound in chart below and multiply by
the weight of the item. Enter time with number pads; press START. When several beeps sound halfway
through defrosting, follow the "Special Instructions" in the chart below. Press START again to continue
defrosting.
ITEM SPECIAL INSTRUCTIONS BY TIME
Lamb Chops
Place lamb chops on a microwave plate in a circle.
At beeps, turn over and shield bones. Press START to
continue defrosting. Let stand 20 minutes.
7 minutes per pound
Lamb Leg,
boneless, rolled
Lamb Cubes
Place lamb on a microwave plate.
Press MEAT pad and select weight. Press START.
At beeps, turn over and shield before continuing.
After first cycle, press DEF. pad and enter half of the
original time. Press START to continue defrosting.
Let stand 30 minutes.
Place lamb cubes on a microwave plate.
At beeps, separate and rearrange. Press START to
continue defrosting. Let stand 20 minutes.
7 minutes per pound
8 minutes per pound
27
Page 29

POULTRY-AUTO DEFROSTING
Refer to page 13 of this book for general information on the AUTO DEFROST pad.
AUTO DEFROST BY WEIGHT : Press AUTO DEFROST to defrost by weight. Enter the weight with each
item pad (MEAT, POULTRY and FISH); press START. When several beeps sound halfway through defrosting,
follow the “Special Instructions” in the chart below. Press START again to continue defrosting.
DEFROST by TIME : Press DEF. to defrost by time. Check time per pound in chart below and multiply by the
weight of the item. Enter time with number pads; press START. When several beeps sound halfway through
defrosting, follow the "Special Instructions" in the chart below. Press START again to continue defrosting.
ITEM SPECIAL INSTRUCTIONS BY TIME
Whole Chicken
-- or -Cornish Hen
Place chicken, breast side down, on a microwave plate.
Press POULTRY pad and select weight.
Press START. At beeps, turn over and shield before
continuing. Let stand 20 minutes.
If needed, finish defrosting under cold running water.
10 minutes per pound
Whole Chicken, cut up
-- or --
Chicken Pieces, bone-in
Chicken Wings
Chicken Breasts, boneless
-- or --
Chicken Thighs, boneless
Place chicken on a microwave plate.
Press POULTRY pad and select weight.
Press START. At beeps, turn over, separate and
rearrange; shield bones. Let stand 15 minutes.
If needed, finish defrosting under cold running water.
Place wings on a microwave plate.
Press POULTRY pad and select weight.
At beeps, separate and turn over.
Press START to continue defrosting.
Let stand 20 minutes.
If needed, finish defrosting under cold running water.
Place them on a microwave plate.
Press POULTRY pad and select weight.
At beeps, separate and turn over.
Press START to continue defrosting.
Let stand 15 minutes.
10 minutes per pound
7 minutes per pound
7 minutes per
pound
28
Page 30

EGGS AND CHEESE
Eggs and cheese are delicate foods requiring care in microwave
cooking. Piercing the yolks of eggs helps to release steam during
cooking. Stirring egg mixtures frequently helps distribute the
heat evenly. Because the microwave energy cooks so quickly,
always check to see if the eggs are done to your satisfaction after
the standing time. At this time, stir, rearrange or turn over. If
needed, add additional time gradually. To cook only one egg, try
a lower Power setting until you get satisfactory results.
Shredded soft cheeses and grated hard cheeses melt well if stirred
VEGETABLES
Vegetables are favorite foods when cooked in the
microwave. Because they cook for a shorter time and
require less water than conventional cooking, vegetables
cooked by microwave energy retain more vitamins than
when cooked by other methods.
To cook better in the microwave, vegetables should be cut
into evenly sized pieces. Baked potatoes, squash, or
vegetables with skins can be pierced with a fork and
arranged in a circle for the best cooking results. Uneven
vegetables such as asparagus or broccoli, can be arranged in
the dish alternating thick and thin ends. Stirring, rearranging,
turning over and rotating are effective techniques to
into a hot mixture. Cheese may not look melted so always stir
before determining if cheese is melted enough. Sprinkle cheese
over a hot casserole in a thicker layer at the edges. Microwave
energy cooks from the outside in, so the outer edges will melt
faster than the center.
For cheese melt sandwiches, heat filling where possible before
adding it to the bread. Top each sandwich with a slice of cheese
and cook on P-HI for about 15 to 20 seconds for one sandwich,
about 30 seconds for two sandwiches and about 1 minute for four
sandwiches or until cheese is melted.
maximize the way microwave energy cooks vegetables.
Consult the “COOKING FRESH VEGETABLES” chart
on page 33-36 of this cookbook for preparation and stand
time suggestions and for directions to use the automatic
FRESH VEGETABLE pad. See this chart for suggested
times for 4 ounce single serving of vegetables.
Use care in removing lid to prevent steam burn. Standing
time is an important element in successful cooking
because additional cooking will take place then. Make a
decision about desired doneness after the standing time
then add more time, if needed.
29
Page 31

COOKING FRESH VEGETABLES
Fresh vegetables retain nutrients when cooked in the microwave. Use this chart and the convenient ONE TOUCH
COOK pad to prepare vegetables easily according to the chart. After cooking, let stand, covered, for 3 to 5 minutes.
If more time is needed to finish cooking, add time slowly to prevent overcooking.
BY WEIGHT ONE TOUCH COOKING
7oz. of any vegetable Check preparation instructions in chart below.
(2 servings) Press FRESH VEGETABLE pad once.
14oz. of any vegetable Check preparation instructions in chart below.
(4 servings) Press FRESH VEGETABLE pad twice; turn over, stir or rearrange.
ITEM PREPARATION BY TIME STAND
Acorn Squash See chart on page 36.
Artichokes See chart on page 36.
Asparagus Spears Wash; arrange in a glass pie plate. Add 2 3 minutes 2 minutes
(4 oz.) tablespoons water. Cover with vented plastic
1 serving wrap.
Beets, small whole Wash, trim ends and pierce with a fork. 4 minutes 2 minutes
(4 oz.) Arrangein a glass pie plate; add 1/4 cup water.
1 serving Cover with vented plastic wrap.
Beet tops Wash and trim. Put in 1-quart glass casserole; 4 minutes 2 minutes
(4 oz.) add 2 tablespoons water. Cover with vented
1 serving plastic wrap.
30
Page 32

ITEM PREP ARATION BY TIME ST AND
Beet stems Wash and trim. Put in a glass pie plate; add 2 3 minutes 2 minutes
(4 oz.) tablespoons water. Cover with vented plastic
1 serving wrap.
Broccoli Wash; cut into even pieces. Arrange in a glass 2 minutes 2 minutes
(4 oz.) pie plate; add 1/4 cup water. Cover with
1 serving vented plastic wrap.
Brussels sprouts Wash and trim. Cut an X in the bottom of 4 minutes 2 minutes
(4 oz.) each piece. Arrange in a glass pie plate; add 1/4
1 serving cup water. Cover with vented plastic wrap.
Cabbage Wash; cut into wedges. Arrange in a glass pie 4 minutes 5 minutes
(4 oz.) plate; add 1/4 cup water. Cover with vented
1 serving plastic wrap.
Cauliflower Wash; cut into bite size pieces. Arrange in a 2 minutes 2 minutes
(4 oz.) glass pie plate; add 2 tablespoons water.
1 serving Cover with vented plastic wrap.
Carrots, baby Wash. Arrange in a 1-quart glass casserole; 3 minutes 2 minutes
(4 oz.) add 2 tablespoons water. Cover with lid or
1 serving vented plastic wrap.
Celery Wash; cut into bite size pieces. Arrange in a 2 minutes 2 minutes
(4 oz.) glass pie plate; add 2 tablespoons water.
1 serving Cover with vented plastic wrap.
Eggplant Wash; cut into 1 inch cubes. Arrange in a glass 4 minutes 2 minutes
(4 oz.) pie plate; add 2 tablespoons water.
1 serving Cover with vented plastic wrap
Green beans Wash; place in a glass pie plate; add 2 4 minutes 2 minutes
(4 oz.) tablespoons water. Cover with vented plastic
1 serving wrap.
31
Page 33

ITEM PREP ARATION BY TIME STAND
Green bell pepper Wash; cut into strips. Arrange in a glass pie 4 minutes 2 minutes
strips (4 oz.) plate; add 2 tablespoons water. Cover with
1 serving vented plastic wrap.
Mushrooms Wash; cut into a bite of pieces. Arrange in a 4 minutes 2 minutes
(4 oz.) glass pie plate; add 2 tablespoons water.
1 serving Cover with vented plastic wrap.
Okra Wash; cut into a bite of pieces. Arrange in a 4 minutes 2 minutes
(4 oz.) glass pie plate; add 1/4 cup water. Cover with
1 serving vented plastic wrap.
Onion, chopped Peel skin and chop onion. Place in a glass pie 4 minutes 2minutes
(4 oz.) plate; add 1/4 cup water. Cover with vented
1 serving plastic wrap.
Parsnips Wash; cut into a bite of pieces. Arrange in a 4 minutes 5 minutes
(4 oz.) glass pie plate; add 2 tablespoons water.
1 serving Cover with vented plastic wrap.
Rutabagas See chart on page 36
Spinach leaves Wash. Place in a 11/2-quart casserole; 4 minutes 2 minutes
(4 oz.) add 2 tablespoons water. Cover with lid or
1 serving vented plastic wrap.
Squash, butternut Peel and cut into cubes. Place in a glass 4 minutes 5 minutes
(4 oz.) casserole; add 1/4 cup water. Cover with lid or
1 serving vented plastic wrap.
Zucchini, sliced Wash. Place in a 11/2-quart glass casserole; 4 minutes 2 minutes
(4 oz.) add 2 tablespoons water. Cover with lid or
1 serving vented plastic wrap.
32
Page 34

The vegetables cook differently than those in the previous chart. Follow the methods below for these
paricular foods.
ITEM PREP ARATION BY TIME ST AND
Acorn Squash Wash; pierce with a fork.
Place it on a glass cooking tray.
1 (about 1 lb.) Turn over halfway through cooking. Cut in half 7 minutes 2 minutes
and remove seeds.
2 (about 2 lbs.) Turn over halfway through cooking. 12 minutes 4 minutes
Cut in half and remove seeds.
Artichokes Wash and trim edges.
Arrange in a circle in a glass pie plate.
Add 1 inch of water to dish.
Cover with vented plastic wrap.
1 (8 oz.) Rotate halfway through cooking. 9 minutes 2 minutes
2(about 1 lb.) Rotate halfway through cooking. 15 minutes 3 minutes
Rutabagas Wash; pierce with a fork.
Place it on a glass cooking tray.
1 (12 oz.) Turn over halfway through cooking. 7 minutes 2 minutes
Cut in half and remove seeds.
2 (1 1/4 1bs.) Turn over and press pad twice more. 9 minutes 4 minutes
Cut in half and remove seeds.
33
Page 35

FISH AND SEAFOOD
Delicate, tender fish is the result when cooked in the
microwave. Because it is moist cooking, the finished fish
and seafood, if cooked for the appropriate time, will be
opaque and flake with a fork with no signs of dryness.
Because fish is unevenly shaped, the arrangement is critical
to success. To arrange several fillets in a deep glass pie
plate, put thicker edges to the outside and thinner edges to
the inside. Try to create a circle for best results, even overlap
thin ends where necessary to achieve overall even thickness.
Single items may do better if the thin ends are shielded
with a foil. Some rules apply to the use of foil never cover
more than one-third of any item; do not let the foil pieces
touch each other or the sides of the microwave oven, and
be sure that all ends are tucked under and lie flat to the
food. Cover with wax paper to prevent spattering.
Seafood cooks very quickly in the microwave-about 3 to 4
minutes per pound. Wait for stand time, then proceed carefully
with extra time, to finish cooking without overcooking.
Cooked seafood will be opaque and firm, but not tough.
Frozen fish and seafood are convenient to keep on hand.
See the "FISH-AUTO DEFROSTING" chart on page 24
of this cookbook for defrosting details.
COOKING FISH AND SEAFOOD
1. Arrange fish and seafood on a microwave rack (fillets, steaks, lobster) or in an appropriate glass casserole (scallops).
2. Cover with wax paper and set on glass turntable in a microwave.
3. Calculate cooking time by multiplying weight of the fish or seafood by the time recommended per pound.
4. The microwave will cook on P-HI unless another power level is entered at the time of cooking. To choose another
power level, and begin cooking, press Power continuously to program the recommended power level. Press the
number pad to program the calculated time. Press START.
5. Check progress about halfway through the cooking time; turn over, rearrange or shield, as needed.
6. Within several minutes before the end of cooking check fish or seafood to determine if time needs adjusting. Wait until
the stand time before making the final decision.
ITEM POWER COOK STAND
Fish Fillets--or-- P-HI 5-7 minutes per pound 2 minutes
Fish Steaks
Shrimp--or-- P-HI 3-4 minutes per pound 2 minutes
Scallops
Lobster Tail P-HI 6-8 minutes per pound 2 minutes
34
Page 36

POULTRY
Juicy and moist describes poultry cooked by microwave energy. It is
a superior method for cooking chicken to be used in casseroles,
salads, or to have for sandwiches. See Poached Chicken recipe.
Arrangement is very important with poultry and its uneven shapes.
Try to arrange pieces in a circular pattern wherever possible for the
most even defrosting or cooking. The rounded part of the drumstick
should go at the outer edge, for example, while the thinner end goes
to the middle of the dish. Continue with other pieces until the overall
layer is fairly even. Cover with wax paper to prevent spattering.
Poultry defrosts well with our AUTO DEFROST feature
(see page 13). Be sure that all poultry is completely defrosted before
cooking. Check for doneness after stand time is over.
Remember that more cooking will take place during standing time.
Poultry must be cooked to an internal temperature of 160°F for boneless
pieces, to 170°F for bone-in pieces and to 185°F for whole birds.
Poultry is done when the meat is no longer pink and the juices are the
color of chicken broth with no traces of pink. Be sure to check for
these signs by cutting into the inner thigh. You may also check for the
internal temperature with an instant-read thermometer. Occasionally
the bones will show red spots, but this does not affect the doneness.
COOKING POULTRY
1. Arrange poultry on a microwave rack (boneless breasts and thighs, whole broilerfryers, cornish hens, wings with crumb
coating) or in as appropriate glass casserole baking dish or deep glass pie plate (wings, cut up or bone-in chicken)
2. Cover with wax paper and set on glass turntable in the microwave.
3. Calculate cooking time by multiplying weight of the poultry by the time recommended per pound
4. The microwave will cook on P-HI unless another power level is entered at the time of cooking. To choose another
power level, and begin cooking, press Power continuously to program the recommended power level. Press the
number pad to program the calculated time. Press START.
5. Check progress about halfway through the cooking time; turn over, rearrange or shield as needed.
6. Within several minutes before the end of cooking check poultry to determine if time needs adjusting. Wait until after
the stand time before making the final decision.4 servings
ITEM POWER COOK STAND
Chicken Breast, boneless
--or-- P-HI 8-10 minutes per pound 3 minutes
Chicken Thighs, boneless
Chicken Wings
--or-- P-HI 8-9 minutes per pound 2 minutes
Chicken Wings, pieces
Whole Fryer
--or-- P-HI 12-15 minutes per pound 5 minutes
Bone-in Chicken
Cornish Hen P-HI 7-9 minutes per pound 5 minutes
35
Page 37

MEATS
Tender cuts of meat do well in the microwave, especially
when cooked at lower power levels. Be sure meat is fully
defrosted before cooking. Consult the meat cooking charts
(pages 43~45) for details.
The exact time to cook each piece of meat will depend on
the shape of the meat, the weight, the starting temperature of
the meat and the desired doneness. Our timings assume the
meat is taken from the proper storage (refrigerated). The
lower number in the time range reflects time suggested for
TIP
Thin pieces of meat are no longer pink when fully cooked. Take meat from the microwave
while slightly pink to prevent overcooking during standing time.
medium meat; the higher number for well done. It is always
possible to add time if needed, so it is best to start with the
lower number for calculating the time.
Stand time after cooking is an important aspect of
microwave cooking since more cooking will take place
then. The residual heat in the food will equalize and finish
the cooking process. Always check for doneness after the
stand time.
36
Page 38

COOKING PORK
1. Arrange meat on a microwave rack (roast, chops, bacon) in an appropriate glass casserole (cubes, strips, sausage).
2. Cover with wax paper and set on glass turntable in the microwave.
3. Calculate cooking time by multiplying weight of the meat by the time recommended per pound.
4. The microwave will cook on P-HI unless another power level is entered at the time of cooking. To choose another power
level and begin cooking, press Power continuously to program the recommended power level shown below. Press the
number pad to program the calculated time. Press START.
5. Check progress about halfway through the cooking time; turn over, rearrange or shield, as needed.
6. Within several minutes before the end of cooking check meat to determine if time needs adjusting. Wait after the stand
time before making the final decision.
ITEM POWER COOK STAND
Pork Cubes P-HI 7-8 minutes per pound 2 minutes
Pork Loin Roast P-70 15-17 minutes per pound 10 minutes
Bulk Pork Sausage P-HI 5-6 minutes for 12 oz.; 2 minutes
cover with paper towels
Pork Chops, boneless P-70 8-10 minutes per pound 2 minutes
Pork Chops, bone-in
Pork Strips P-HI 5-6 minutes per pound 2 minutes
Bacon P-HI 1 minute per slice; 30 seconds
cover with paper towel
37
Page 39

COOKING BEEF
1. Arrange meat on a microwave rack (roast, hamburger patties) or in an appropriate glass casserole (cubes, strips, ground
beef, meatballs).
2. Cover with wax paper and set on glass turntable in the microwave.
3. Calculate cooking time by multiplying weight of the meat by the time recommended per pound.
4. The microwave will cook on P-HI unless another power level is entered at the time of cooking. To choose another
power level and begin cooking, press Power continuously to program the recommended power level shown below.
Press the number pad to program the calculated time. Press START.
5. Check progress about halfway through the cooking time; turn over, rearrange or shield, as needed.
6. Within several minutes before the end of cooking check meat to determine if time needs adjusting. Wait until after the
standing time before making the final decision.
ITEM POWER COOK STAND
Beef Rolled Rump Roast P-50 17-20 minutes per 10 minutes
--or-- pound (recommended for
Beef Round Sirloin meats up to 3 pounds)
Tip Roast, Boneless
--or--
Beef Eye of Round
--or--
Beef Flank Steak
Beef Strips, boneless P-70 8-10 minutes per pound 2 minutes
--or-- Beef Cubes
Ground Beef P-HI 7 minutes per pound 5 minutes
Beef Hamburger Patties P-HI 7 minutes per pound 2 minutes
Meatballs P-HI 8-10 minutes per pound 2 minutes
38
Page 40

COOKING LAMB
1. Arrange meat on a microwave rack (leg, roast, chops) or in an appropriate glass casserole (cubes).
2. Cover with wax paper and set on glass turntable in the microwave.
3. Calculate cooking time by multiplying weight of the meat by the time recommended per pound.
4. The microwave will cook on P-HI unless another power level is entered at the time of cooking. To choose another
power level and begin cooking, press Power continuously to program the recommended power level shown below.
Press the number pad to program the calculated time. Press START.
5. Check progress about halfway through the cooking time; turn over, rearrange or shield, as needed.
6. Within several minutes before the end of cooking check meat to determine if time needs adjusting. Wait until after the
stand time before making the final decision.
ITEM POWER COOK STAND
Lamb Chops, P-70 8-10 minutes per pound 2 minutes
boneless
Lamb Chops,
bone-in
Lamb Cubes P-HI 7 minutes per pound 2 minutes
Boneless Leg, rolled P-70 12 minutes per pound 10 minutes, covered
SOUPS
Making homemade soups is easier than ever in the microwave oven. Use leftover vegetables, chicken and meats to create
your own specialty. Freeze small amounts of leftovers until you have enough to try a new soup.
An efficient microwave method of soup making is to cook the vegetables first with just a little oil or butter, then add the
stock or broth and heat as desired. If you have no stock or broth, heat 1 cup of water and 1 bouillon cube (or 1 teaspoon
bouillon granules) in a 2-cup glass measure on P-HI for 3 minutes. Season as desired.
Canned condensed soups are convenient to add to homemade vegetables for a quick but tasty soup. Our recipes for
mushroom and onion sauces can be used as soup bases with additional milk. Watch for package directions to heat
purchased soups in the microwave.
Once you have made some soup of your choice, freeze leftovers in 12-ounce portions. Then defrost on Def. and reheat on
P-HI for 3 minutes. Always stir several times during the heating cycle and before serving.
39
Page 41

SAUCES AND GRAVIES
Sauces and gravies are foolproof when made in the
microwave oven. Scorching, sticking, overcooking are no
longer problems when the sauces are cooked in a glass
measure with a handle. The sauce cooks more evenly, but it
is pourable. Select a sizable utensil that is double the size of
the recipe to allow for bubbling up and prevent spilling
over.
It is important to stir frequently to prevent lumps, especially
after mixture has boiled. A whisk is helpful to stir cooked
areas into those that are not yet thickened. Stir before
serving as well.
Sauces add a nice touch of variety to menus. They can be
made ahead and stored covered in the refrigerator until
ready to reheat and serve. If you wish to add a sauce or
gravy to cooked meats, it is best to heat the sauce fully first,
then add the meat and cook for 1 to 2 minutes to heat
thoroughly. This method prevents overcooking the meat.
Our versatile collection of sauces will enhance your main
dishes and even desserts for creative menu planning.
DESSER TS
A sweet ending to a meal is a lot easier in the microwave oven. Quick to make, delicious to eat, these desserts offer
something for everyone. We have selected those that do well in the microwave oven. Candies, for example, are
excellent when prepared the microwave way.
To get the most even cooking, plan to make desserts in a deep glass pie plate where possible. Use a paper towel as a
cover for bar cookies to equalize the cooking process. It peels off easily when done. Appearances are not what we
are accustomed to seeing, but frosting or a dusting of confectioner's sugar helps create eye appeal.
Crumb pie shells do quite well in the microwave, as do most fruit desserts. To get a head start on pie fillings, simply
heat in a large glass measure; stir well to distribute the heat, then pour into the prepared pie shell.
High sugar mixtures get very hot in the microwave so use great care(and hot pads) when handling.
40
Page 42

WEIGHT & MEASURE CONVERSION CHART
■
POUNDS & OUNCES TO GRAMS
POUNDS(lb.) GRAMS(g)
1
/4 114
1
/2 227
3
/4 341
1 454
2 907
3 1361
4 1814
5 2268
6 2722
7 3175
8 3629
9 4082
10 4526
11 4990
■
WEIGHT DEFROST AND COOK CONVERSION CHART
Ounces Hundredths of a Pound Tenths of a Pound Grams
1-2 .06-.15 0.1 50
3-4 .16-.25 0.2 100
5-6 .26-.35 0.3 150
7 .36-.45 0.4 200
8-9 .46-.55 0.5 250
10-11 .56-.65 0.6 300
12-13 .66-.75 0.7 350
14 .76-.85 0.8 400
15-16 .86-.95 0.9 450
OUNCES(oz.) GRAMS(g)
128
257
385
4 113
5 142
6 170
7 198
8 227
■
FLUID MEASUREMENTS
1 Cup = 8 fluid ounces = 240 ml.
1 Pint = 16 fluid ounces = 480 ml.
1 Quart = 32 fluid ounces = 960 ml.
1 Gallon = 128 fluid ounces = 3840 ml.
OUNCES(oz.) GRAMS(g)
9 255
10 284
11 312
12 340
13 369
14 397
15 425
16 454
41
Page 43

SPECIFICATIONS
Item Rating Specification
Power Supply 120V, 15A Single phase with grounding 60Hz, AC.
Power Consumption 1350 W
Microwave Output Power 900 W, Full Microwave power
Microwave Frequency 2,450 MHz
Unit Dimensions W 495 (19.5) X D 395 (15.5) X H 293 (11.5) mm (inch)
Cavity Dimensions W 320 (12.6) X D 338 (13.3) X H 238 (9.4) mm (inch)
Cavity Volume 0.9 Cu. Ft.
Net Weight Approx. 27.5 lbs (12.5 kg)
Timer Digital, 59 minutes 99 seconds
495 395
293
BEFORE YOU CALL FOR SER VICE
Refer to the following checklist, you may prevent an unnecessary service call.
• The oven doesn’t work :
1. Check that the power cord is securely plugged in.
2. Check that the door is firmly closed.
3. Check that the cooking time is set.
4. Check for a blown circuit fuse or tripped main circuit breaker in your house.
• Sparking in the cavity;
1. Check utensils. Metal containers or dishes with metal trim should not be used.
2. Check that metal skewers or foil does not touch the interior walls.
If there is still a problem, contact the service station.
DO NOT ATTEMPT TO SERVICE THE OVEN YOURSELF !
42
Page 44

EMERSON MICROWAVE OVEN WARRANTY
We appreciate your purchase of a EMERSON Microwave. We take pride in the quality of our products and have manufactured your
new Microwave unit to exacting quality standards. We feel confident that in normal use, it will provide you with satisfactory
performance. However, should you experience difficulty, you are protected under the provisions of this warranty.
EMERSON Microwave Oven are warranted against manufacturing defects in materials and workmanship in normal use for the
following periods from the date of purchase by the original user, and is conditional upon the unit being installed and used as directed in
the instruction manual.
WARRANTY PERIOD
Domestic Microwave Ovens – Carry-in Service :
One (1) year parts and labour : Seven (7) years on Magnetron – labour not included after initial Twelve (12) months.
EMERSON's obligation under this warranty should be limited to the repair, including all necessary parts and the labour connected
therewith, or at our option the exchange of any Microwave Oven which shows evidence of a manufacturing defect within the warranty
period. Replacement parts, furnished in connection with this warranty shall be warranted for a period equal to the unexpired portion of
the original equipment warranty.
CUSTOMER OBLIGATIONS
This warranty applies to the product from the original date of purchase at retail. Therefore, the owner must provide a copy of the
original, dated bill of sale. No warranty service will be performed without a bill of sale. Transportation to and from the service depot is
the responsibility of the owner.
WARRANTY EXCLUSIONS
This warranty is extended to EMERSON Microwave Ovens purchased and used in Canada. This warranty shall not apply to
appearance or accessory items including but not limited to: glass tray, cabinet, cabinet parts, knobs. This warranty shall, in addition, not
apply to damages due to handling, transportation, unpacking, set-up, installation, customer adjustments that are covered in the
instruction book, repair or replacement of parts supplied by other than the EMERSON authorized service depot, any malfunction or
failure caused by or resulting from abnormal environmental conditions, improper unauthorized service, improper maintenance,
modifications or repair by the consumer, abuse, misuse, neglect, accident, fire, flood, or other Acts of God, and incorrect line voltage.
This Appliance product is only warranted to the original retail purchaser. This warranty becomes void in the event of commercial or
rental use. This warranty becomes void in the event serial numbers are altered, defaced or removed.
EMERSON reserves the right to make changes in design or to make additions to or improvements upon this product without incurring
any obligation to install the same on products previously manufactured. The foregoing is in lieu of all other warranties expressed or
implied and EMERSON neither assumes nor authorizes any person to assume for it any other obligation or liability in connection with
the sale or service of this product. In no event shall EMERSON or its EMERSON dealers be liable for special or consequential
damage arising from the use of this product, or for any delay in the performance of this warranty due to cause beyond our control.
The purchaser may have other rights under existing provincial or federal laws, and where any terms of this warranty are prohibited by
such laws, they are deemed null and void, but the remainder of the warranty shall remain in effect.
HOW TO OBTAIN SERVICE
Should this product require service, you may obtain specific information on how to obtain service by contacting the EMERSON Dealer
from whom this product was purchased, or by contacting us directly:
SONIGEM SERVICE
300 Alden Road
Markham, Ontario
L3R 4C1
PHONE: (905) 940-5089 FAX: (905) 940-2303
TOLL FREE: 1-800-287-4871
Page 45

FOUR A MICRO-ONDES
MODELE de 0,9 pi. cu.
Avec commandes tactiles informatisees
GUIDE D'UTILISATION
ET LIVRE DE RECETTES
MW8993WC/BC
Page 46

MESURES PRÉVENTIVES À SUIVRE POUR
ÉVITER TOUTE SUREXPOSITION AUX
MICRO-ONDES
(a) Ne faites jamais fonctionner le four à micro-ondes lorsque la porte est ouverte car vous pourriez être
exposé(e) à des ondes néfastes. Il est important de ne pas tenter d'altérer ni d'annuler le système de
verrouillage du four.
(b) Ne laissez aucun objet ni de matières (résidus de nettoyeurs ou de graisse) s'infiltrer entre la devanture du
four et la porte elle-même et ne laissez pas de saletés s'accumuler sur les surfaces scellantes.
(c) Ne faites pas fonctionner le four s'il est endommagé. Portez une attention particulière à la porte qui doit se
refermer parfaitement et vérifiez s'il y a des dommages aux endroits suivants: (1) la porte (tordue), (2) les
charnières et loquets (lâches ou desserrés) et (3) les surfaces scellantes de la porte (sales).
(d) Ne tentez pas d'ajuster ni de réparer le four à micro-ondes vous-même. Seul un technicien qualifié peut
effectuer le service de ce four.
TABLE DES MA TIÈRES
MESURES PRÉVENTIVES À SUIVRE POUR
ÉVITER TOUTE SUREXPOSITION AUX
MICRO-ONDES..............................................................1
MESURES DE SECURITE IMPORTANTES.............2
PRÉCAUTIONS IMPORTANTES...............................3
ENONCE DU CONSEIL SUPERIEUR DE
L'AUDIOVISUEL (FCC) SE RAPPORTANT AUX
INTERFERENCES CAUSEES PAR LES
FREQUENCES RADIO.................................................4
INSTRUCTIONS DE MISE A LA TERRE .................4
INSTALLATION............................................................5
ENTRETIEN DE VOTRE FOUR À
MICRO-ONDES..............................................................6
UTILISATION SÉCURITAIRE DU FOUR À
MICRO-ONDES..............................................................7
SYSTÈME DE CUISSON OMNI WAVEmc..............8
SCHÉMA DES CARACTÉRISTIQUES......................9
SCHÉMA DES CARACTÉRISTIQUES (suite)........10
PROCÉDURE DE FONCTIONNEMENT.................11
COMMENT RÉGLER LES COMMANDES DU
FOUR..............................................................................12
RÉGLAGE DE L’HORLOGE...............................12
DÉCONGÉLATION CHRONOMÉTRÉE..........12
DÉCONGÉLATION AUTOMATIQUE..............13
CUISSON À UNE ÉTAPE....................................14
CUISSON À DEUX ÉTAPES...............................15
MODE DE MINUTERIE.......................................15
CUISSON RAPIDE................................................17
CUISSON À UNE TOUCHE................................17
CUISSON À UNE TOUCHE (suite).....................18
AJUSTEMENT DE LA CUISSON "PLUS" ou
"MOINS" (MORE/LESS)......................................19
VERROUILLAGE À L'ÉPREUVE DES
ENFANTS "CHILD SAFETY LOCK"................19
ARRÊTER LE FOUR PENDANT LE
FONCTIONNEMENT...........................................19
GUIDE DE CUISSON..................................................20
DÉCONGÉLATION AUTOMATIQUE "AUTO
DEFROST" ....................................................................24
POISSONS ET FRUITS DE MER -
DÉCONGÉLATION AUTOMATIQUE....................25
PORC - DÉCONGÉLATION AUTOMATIQUE......26
BOEUF - DÉCONGÉLATION AUTOMATIQUE...27
AGNEAU -
DÉCONGÉLATION AUTOMATIQUE....................28
VOLAILLE -
DÉCONGÉLATION AUTOMATIQUE....................29
OEUFS ET FROMAGE ...............................................30
LÉGUMES.....................................................................30
CUIRE LES LÉGUMES FRAIS..................................31
POISSONS ET FRUITS DE MER..............................35
CUISSON DU POISSON ET DES
FRUITS DE MER..........................................................35
VOLAILLES..................................................................36
CUISSON DE LA VOLAILLE ..................................37
VIANDES ......................................................................37
CUISSON DU PORC....................................................38
CUISSON DU BOEUF.................................................39
CUISSON DE L'AGNEAU..........................................40
SOUPES.........................................................................40
SAUCES ET JUS DE VIANDE ..................................41
DESSERTS....................................................................41
TABLEAU DE CONVERSION DES POIDS ET
MESURES .....................................................................42
SPÉCIFICATIONS .......................................................43
AVANT DE PLACER UN APPEL DE SERVICE ...43
1
Page 47

MESURES DE SECURITE IMPOR TANTES
Vous devez, lors de l'utilisation d'appareils électriques, suivre certaines mesures de prévention, dont celles qui suivent:
MISE EN GARDE— Afin de réduire les risques de brûlure, électrocution, incendie ou tout type de blessure corporelle, ainsi
qu'une exposition dangereuse aux micro-ondes;
11. Lire toutes les instructions contenues dans ce guide avant
d'utiliser votre four à micro-ondes.
12. Lire et suivre les instructions spécifiques contenues à la
section : "MESURES PRÉVENTIVES À SUIVRE POUR
ÉVITER TOUTE SUREXPOSITION AUX MICROONDES", que l'on peut trouver à la page 1.
13. Cet appareil doit être mis à la terre. Ne raccordez qu'à une
prise de courant munie d'une prise de terre adéquate.
Référez-vous à la section "INSTRUCTIONS DE MISE À
LA TERRE" que vous trouverez à la page 3.
14. Assurez-vous de respecter les instructions comprises dans
ce guide avant de procéder à l'installation ou au placement
de cet appareil.
15. Certains produits tels que les oeufs entiers et les contenants
scellés par exemple, les contenants de verre fermés peuvent
exploser et ne doivent jamais être chauffés dans ce four.
16. N'utilisez cet appareil que pour son usage prescrit dans ce
guide. Ne faites pas chauffer ni réchauffer de produits
chimiques, dissolvants ou autres car les vapeurs qui s'en
dégageraient pourraient être corrosives. Ce type de four a
été conçu spécifiquement pour réchauffer, cuire et sécher
des aliments. Il n'a pas été conçu à des fins commerciales ni
industrielles (usage en laboratoire).
17. Comme pour tout appareil électrique, vous devez
superviser le fonctionnement de près lorsque des enfants se
servent du four à micro-ondes.
18. Ne faites jamais fonctionner l'appareil si son cordon
d'alimentation (ou sa fiche) a été endommagé, si celui-ci ne
fonctionne pas adéquatement ou s'il a été endommagé,
échappé ou immergé dans l'eau.
19. Cet appareil ne doit être réparé que par un technicien
qualifié. Communiquez avec le centre de service le plus
près de chez vous afin de le faire inspecter, réparer ou
ajuster.
10. Ne recouvrez pas et n'obstruez pas les ouvertures de cet
appareil.
11. N’entreposez pas cet électroménager à l’extérieur.
N’utilisez pas cet appareil près de l’eau—par exemple, près
d’un évier de cuisine, dans un sous-sol humide ou près
d’une piscine, ou tout endroit similaire.
12. N'immergez pas le cordon d'alimentation ni sa fiche dans
l'eau.
13. Éloignez le cordon des sources de chauffage.
14. Ne laissez pas le cordon pendre sur le rebord d'une table ou
d'un comptoir.
15. Lorsque vous nettoyez les surfaces de la porte et du four
qui se touchent en refermant la porte, n'utilisez qu'un savon
doux n'utilisez pas de laine d'acier ni de savon abrasif- que
vous appliquerez avec une éponge ou un chiffon doux.
16. Afin de réduire les risques d’incendie à l’intérieur de la
cavité du four :
(a) Ne surcuisez pas les aliments. Surveillez la cuisson de
près lorsque vous utilisez du papier, du plastique ou
autre matériau combustible dans le four à micro-ondes,
pour faciliter la cuisson.
(b) Enlevez toujours les attaches de métal ou de plastique
(pouvant contenir une broche de métal au centre) des
sacs de plastique ou de papier avant de les placer dans
le four.
(c) Si les matériaux à l’intérieur du four s’enflamment,
gardez la porte de four fermée, mettez le four hors
fonction et débranchez le cordon d’alimentation ou
mettez le fusible hors fonction dans la boîte électrique.
(d) N'utilisez pas la cavité du four pour ranger des objets
divers. N'y laissez pas du papier, des ustensiles de
cuisson ou de la nourriture, surtout lorsque vous ne
l'utilisez pas.
17. N'utilisez pas ce four à micro-ondes pour réchauffer ou
chauffer des produits chimiques (tels que des sulfites et des
chlorites). Les vapeurs nocives que dégageraient ces
produits pourraient altérer les contacts et les ressorts de
l'interrupteur de verrouillage et les rendre inopérants.
18. Maintenez la grille anti-éclaboussures propre en tout temps.
Essuyez l’intérieur du four avec un chiffon humide après
chaque usage. Si vous laissez de la graisse à l’intérieur de la
cavité, celle-ci risquerait de surchauffer ou s’enflammer
lorsque vous faites fonctionner le fours.
19. Ne chauffer jamais d’huile ou de graisse pour la friture
dans le four à micro-ondes car vous ne pourrez contrôler la
température et risquerait de provoquer un incendie.
20. Les liquides tels que l’eau, le café ou le thé peuvent
surchauffer au point de dépasser le degré d’ébullition sans
que vous vous en rendiez compte à cause de la tension de
surface du liquide. L’ébullition lorsque vous sortez le
contenant du four n’estpas toujours visible. CECI
POURRAIT PROVOQUER UN DÉBORDEMENT
LORSQU’UN CUILLER OU AUTRE USTENSILE EST
INTRODUIT DANS LE LIQUIDE CHAUD. Afin de
réduire les risques de blessures :
a) Ne surchauffez pas le liquide.
b) Brassez le liquide avant et à la mi-temps.
c) N’utilisez pas de contenant aux rebords droits qui se
referment vers le haut.
d) Après le réchauffage, permettez au contenant de reposer
dans le four à micro-ondes pendant un court moment
avant de le retirer.
e) Faites preuve d’une attention extrême lorsque vous
introduisez une cuiller ou autre ustensile dans le
contenant.
CONSER VEZ CES INSTRUCTIONS.
2
Page 48

PRÉCAUTIONS IMPOR TANTES
Utilisation générale
1.Vous ne devriez, EN AUCUN CAS, tenter d'altérer,
d'ajuster ou de réparer le loquet d'ouverture de la porte
ni toute autre partie du four. NE RETIREZ PAS le
panneau extérieur du boîtier du four. Référez toutes les
réparations à un technicien qualifié.
2. NE FAITES PAS FONCTIONNER le four lorsqu'il est
vide. Les micro-ondes pourraient se propager partout à
l'intérieur du four s'il n'y a pas de nourriture pour
absorber les micro-ondes.
3. S'il survient un feu à l'intérieur du four, appuyez sur la
touche d'arrêt/annulation "STOP/CLEAR" et
LAISSEZ LA PORTE FERMÉE. Débranchez le
cordon d'alimentation ou coupez le courant au niveau
du disjoncteur.
4. Ne FAITES JAMAIS sécher des vêtements, journaux
ou tout autre matériau dans le four à micro-ondes. Ils
peuvent prendre feu.
5. N'utilisez pas de produits de papier recyclé car ils
peuvent contenir des impuretés et être à l'origine
d'étincelles ou d'un incendie.
6. Ne FRAPPEZ PAS le panneau des commandes. Vous
pourriez endommager les touches.
7. ÉVITEZ d'insérer des clous, vis, fils, etc. à travers les
trous de l'appareil pendant son utilisation. N'insérez
jamais d'objets en métal dans les trous de la cavité
intérieure du four ou toute autre ouverture présente sur
le four car ils pourraient causer des électrocutions ou
des fuites de micro-ondes.
Accessoires de cuisson; plats et ustensiles
1. Vous ne devriez pas utiliser de CONTENANTS en
MÉTAL ni de PLATS aux rebords de MÉTAL. Vous
pouvez causer un amorçage d'arc.
2. Les ATTACHES de MÉTAL ne doivent pas être
utilisées dans le four à micro-ondes.
3. N'utilisez pas de POTS SCELLÉS ni de bouteilles dont
le GOULOT est TROP PETIT lors de la cuisson ou du
réchauffage car ils peuvent éclater.
4.Ne vous servez pas de THERMOMÈTRES
CONVENTIONNELS dans le four à micro-ondes car
ils peuvent causer un amorçage d'arc.
5.Retirez les EMBALLAGES DE PLASTIQUE avant
de débuter la cuisson ou la décongélation des aliments
dans le four à micro-ondes.
6. Pour PLUS DE RENSEIGNEMENTS sur les bons
accessoires (ustensiles et plats) à utiliser pour la cuisson
au four à micro-ondes, référez-vous au guide de
cuisson par micro-ondes.
Utilisation générale
1.N'utilisez jamais votre four à micro-ondes pour faire
vos CONSERVES MAISON. Ce four n'a pas été
conçu pour permettre une stérilisation adéquate. Les
conserves qui n'ont pas été suffisamment cuites
peuvent se gaspiller et être impropres à la
consommation.
2. Les DURÉES DE CUISSON données dans le guide de
cuisson ne sont qu'approximatives. Les facteurs
pouvant affecter la cuisson sont la température des
aliments au début de la cuisson, l'altitude, le volume et
la taille des aliments, ainsi que les ustensiles utilisés.
Au fur et à mesure que vous vous familiariserez avec
votre four, vous apprendrez à tenir compte de ces
facteurs et à les calibrer.
3. Il est préférable de CUIRE MOINS que de TROP
CUIRE les aliments. Si la nourriture n'est pas assez
cuite, vous pouvez toujours la remettre dans le four
pour une cuisson additionnelle. Par contre, si elle est
trop cuite, vous ne pourrez rien y changer. Débutez
toujours la cuisson avec une durée moins longue.
4. De PETITES QUANTITÉS de nourriture ou des
nourritures ne CONTENANT PAS BEAUCOUP
D'HUMIDITÉ peuvent brûler, s'assécher ou prendre
feu si vous les cuisez trop longtemps.
5. Ne FAITES PAS BOUILLIR les oeufs dans leur
coquille. La pression peut s'accumuler et faire éclater
l'oeuf.
6. Les pommes de terre, pommes, jaunes d'oeuf, courges
entières et les saucisses sont des exemples d'aliments
dont la PEAU n'est pas POREUSE. Pour éviter qu'ils
éclatent, vous devez les percer avant de les cuire.
7. Vous devez faire éclater le MAÏS SOUFFLÉ dans un
plat conçu spécialement à cet effet. Les grains de maïs
éclatés dans un four à micro-ondes éclatent en moins
grande quantité que les grains éclatés de façon
conventionnelle. Ne faites pas éclater des grains de
maïs dans ce four à moins d'utiliser des accessoires
conçus spécialement pour le four à micro-ondes ou que
les grains soient emballés dans un paquet approprié.
N'utilisez pas d'huile à moins que cela ne soit spécifié
par le fabricant.
8. N'ESSAYEZ PAS de faire de la friture dans votre four
à micro-ondes.
9. Les LIQUIDES RÉCHAUFFÉS ou BOUILLIS dans le
four à micro-ondes peuvent DÉBORDER si vous ne
les mélangez pas avec de l'air. Ne réchauffez pas les
liquides dans votre four avant de les brasser d'abord.
3
Page 49

ENONCE DU CONSEIL SUPERIEUR DE
L'AUDIOVISUEL (FCC) SE RAPPOR TANT AUX
INTERFERENCES CAUSEES PAR LES
FREQUENCES RADIO
MISE EN GARDE :
Cet appareil génère, utilise et peut émettre des fréquences de type ISM et s'il n'est pas installé selon les
instructions et aux normes strictes du fabricant, peut nuire aux radiocommunications et à la réception des
télédiffusions.
Cet appareil a été testé et s'avère conforme aux restrictions relatives aux équipements de type ISM, d'après
l'article 18 des règlements de la FCC. Ces restrictions ont été instaurées pour offrir une protection
raisonnable contre les interférences nuisibles au sein d'une installation résidentielle.
Toutefois, rien ne garantit que des parasites ne surviendront pas dans une installation particulière. Si cet
appareil cause des interférences nuisibles à la réception du téléviseur ou de la radio, ce que vous pouvez
déterminer en ouvrant et en fermant votre appareil, nous vous invitons à essayer l'une des mesures
correctives suivantes:
• Réorientez l'antenne de réception de la radio ou du téléviseur.
• Placez le micro-ondes à un endroit différent par rapport au récepteur.
• Éloignez le four à micro-ondes du récepteur.
• Branchez le four à micro-ondes dans une prise de courant CA différente de celle du composant qui
reçoit les ondes.
LE FABRICANT n'est pas responsable des interférences causées aux radios et téléviseurs par des
MODIFICATIONS NON AUTORISÉES à ce four à micro-ondes. L'utilisateur a la responsabilité de
corriger de telles interférences.
INSTRUCTIONS DE MISE A LA TERRE
Vous devez effectuer la mise à la terre de cet appareil. S'il devait survenir un court-circuit, la prise de terre réduirait
les risques d'électrocution en permettant au courant électrique de suivre une route alternative. Le cordon de cet
appareil est muni d'un fil et d'une fiche possédant une prise de terre. Cette fiche doit être insérée dans une prise de
courant bien installée et mise à la terre de façon réglementaire.
MISE EN GARDE:
Toute mauvaise utilisation de la prise de terre peut occasionner des risques d'électrocution. Consultez un
électricien ou un technicien qualifié si vous ne comprenez pas entièrement les instructions de mise à la terre
ou si vous soupçonnez que la mise à la terre de l'appareil soit inadéquate. Suivez l'une ou l'autre des
directives suivantes :
(1) Si vous devez absolument vous servir d'un cordon d'extension, utilisez uniquement un cordon
d'extension à trois fils muni d'une fiche à trois broches avec prise de terre, que vous ne brancherez que
dans une prise de courant à trois ouvertures qui recevra complètement la fiche du four à micro-ondes.
La capacité électrique du cordon d'extension devrait être égale ou supérieure à celle de l'appareil; ou
(2) Il serait préférable de ne pas utiliser de cordon d'extension. Si le cordon d'alimentation de l'appareil est
trop court, demandez à un électricien qualifié d'installer une prise près de l'appareil.
4
Page 50

INSTALLA TION
1. Emplacement stable et plat
Placez le four à micro-ondes sur une surface plate et stable.
2. Aération
N'obstruez pas les fentes d'aération. Si elles sont bloquées pendant le fonctionnement du four, celui-ci peut surchauffer
et éventuellement se briser. Pour obtenir une aération adéquate, libérez au moins un espace de trois pouces au-dessus,
sur les côtés et à l'arrière du four.
3. Éloignement de la radio et du téléviseur
Il se peut que la réception d'un téléviseur ou d'une radio soit mauvaise si le four est placé trop près de l'antenne ou du fil
d'antenne. Éloignez le four le plus possible de ces sources d'interférence.
4. Éloignement des appareils électriques de chauffage et des robinets
Lorsque vous choisissez un emplacement pour le four, gardez celui-ci éloigné des sources d'air chaud, de vapeur ou des
éclaboussures, sinon il pourrait en résulter des dommages.
5. Alimentation:
Le four à micro-ondes nécessite une tension d’environ 15 ampères, 120 V, 60 Hz avec mise à la terre.
• Utilisez une prise de courant avec prise de terre.
1. Le four est muni d'un cordon d'alimentation court visant à réduire les risques d'enchevêtrement ou de trébuchement
que pourrait causer un cordon plus long.
2. Vous pouvez installer un cordon d'extension plus long mais vous devez user de prudence en l'utilisant.
3. Si vous utilisez un cordon d'extension ou un cordon plus long, (1) la capacité électrique du cordon ou de la rallonge
devrait être égale ou supérieure à la capacité électrique de l’appareil, (2) le cordon d'extension doit être muni d'une
fiche à trois broches avec prise de terre. (3) Les cordons plus longs doivent être acheminés de façon à ne pas
dépasser par-dessus la table ou le comptoir, là où les enfants pourraient les tirer; de plus, ne placez pas le fil aux
endroits où ceux-ci pourraient trébucher dessus.
Utilisation d'une fiche à 3 broches Si vous utilisez un adaptateur de prise de terre,
assurez-vous que la boîte électrique soit bien mise
Prise de courant à trois fentes
Plaque de
finition de la
boîte électrique
Fiche à 3 broches
à la terre.
Fil de la prise
de terre
Adaptateur de
la prise de terre
Plaque de finition de la
boîte électrique
Réceptacle
6. Examinez le four à micro-ondes: Vérifiez qu’il n’y ait pas de bosses, que la porte ne soit pas brisée ou qu’il n’y ait
pas de bosses dans la cavité du four. Si vous remarquez l’un de ces dommages, N’INSTALLEZ PAS L’APPAREIL.
Prévenez le marchand immédiatement.
5
Page 51

ENTRETIEN DE VOTRE FOUR À MICRO-ONDES
Avant de procéder au nettoyage du four, débranchez
1
la fiche d'alimentation CA de la prise de courant.
Gardez l'intérieur du four propre en tout temps.
2
Lorsque les aliments ou les liquides éclaboussent la
cavité intérieure du four, essuyez-les immédiatement
avec un linge humide. Vous pouvez utiliser un
savon doux si le four est très sale. N'utilisez pas de
solutions de nettoyage abrasives.
Nettoyez la surface extérieure du four avec de l'eau
3
et du savon, rinsez et essuyez avec un linge doux.
Pour éviter d'endommager les composants internes
du four, évitez de faire pénétrer l'eau dans les fentes
d'aération.
Si le panneau des touches est humide, nettoyez-le
4
avec un linge doux et sec. N'utilisez pas de savon
abrasif sur le panneau.
S'il y a accumulation de vapeur sur les deux côtés de
5
la porte du four, essuyez avec un linge doux. Ceci
peut survenir lorsque vous utilisez le four dans des
conditions très humides et ne signifie pas que le four
est défectueux.
À l'occasion, il peut être nécessaire d'enlever le
6
plateau en verre pour le nettoyer. Nettoyez le plateau
dans de l'eau savonneuse tiède ou dans le lavevaisselle.
7.
Vous devriez nettoyer les roulettes guide du plateau
7
et le plancher de la cavité intérieure afin de réduire
les bruits de rotation. Essuyez simplement le fond du
four avec une solution savonneuse ou un nettoyeur à
vitre, puis essuyez. Les roulettes guide peuvent être
lavées dans un savon doux ou l'eau de la vaisselle.
Roulettes guide
Nettoyez régulièrement les ROULETTES GUIDE et
1
le plancher de la cavité du four afin de réduire au
maximum les bruits de roulement dérangeants.
Les ROULETTES GUIDES DOIVENT TOUJOURS
2
être utilisées conjointement avec le plateau de verre
lors de la cuisson.
GLASS TRAY
Ne FAITES PAS FONCTIONNER le four sans la
1
table tournante.
N'UTILISEZ PAS d'autre type de plateau de verre
2
dans ce four.
Si le plateau en verre est chaud, LAISSEZ-LE SE
3
REFROIDIR avant de le nettoyer ou de l'immerger
dans l'eau.
Ne CUISEZ PAS directement sur le plateau de verre.
4
Plateau de verre
Roulettes guides
6
Page 52

UTILISATION SÉCURITAIRE DU FOUR À MICRO-ONDES
Quoique votre four à micro-ondes possède de nombreuses mesures de sécurité, il est important de respecter ce qui suit:
(a) Ne tentez pas d'annuler ni de modifier l'interrupteur de verrouillage.
(b) Ne placez aucun objet entre la porte et la devanture du four et ne laissez aucun résidu s'accumuler sur les surfaces
scellantes. Nettoyez régulièrement le sceau de la porte avec une solution de nettoyage douce; rinsez et essuyez.
N'utilisez jamais de poudres de récurage ni de détergents abrasifs.
(c) Ne forcez pas la porte, par exemple, en laissant un enfant se pendre après celle-ci ou en imposant au four toute charge
qui le ferait basculer en avant, ce qui pourrait causer des blessures corporelles ou endommager la porte.
Ne faites pas fonctionner le four s'il est endommagé; faites-le réparer par un technicien qualifié. Il est impératif que la
porte du four puisse se refermer parfaitement et veillez plus particulièrement à ce qu'il n'y ait pas de dommage aux
parties suivantes :
i) la porte (tordue)
ii) les charnières et loquets (brisés ou desserrés)
iii) les sceaux de la porte et les surfaces scellantes (sales).
(d) Le four ne doit pas être ajusté ni réparé par une personne autre qu'un technicien qualifié.
REMARQUE :
Il est normal que de la vapeur s'échappe des côtés de la porte pendant le cycle de cuisson. La porte n'a pas pour
fonction de sceller complètement la cavité du four mais sa conception spéciale contribue à la sécurité du four.
MISE EN GARDE :
1. Ne faites pas fonctionner le four s'il est vide car cela risquerait de l'endommager.
2. L'appareil est doté d'une prise d'échappement à l'arrière; ne bloquez pas cette prise lors de l'installation du
four.
7
Page 53

SYSTÈME DE CUISSON OMNI WAVE
mc
Le système de cuisson Omni Wavemcreprésente une nouvelle technologie révolutionnaire d’Emerson qui cuit les
aliments plus rapidement et plus uniformément.
RÉFLECTEURS
Qu’est-ce que le système de cuisson Omni Wavemc? Le système de cuisson Omni Wavemc concentre les
ondes uniformément sur toutes les parties de l’aliment. Le système à double répartition des ondes distribue
plus également les ondes dans la cavité du four à partir de deux sources; l’une située au-dessus de l’aliment
et l’autre, sous celui-ci.
Un minimum de variation de température à la verticale : Le système de cuisson Omni Wavemc émet des
micro-ondes sur un réflecteur qui les concentre ensuite sur la nourriture, ce qui produit une cuisson plus
uniforme. Finis les endroits froids ou trop chauds!
Un minimum de variation de température à l’horizontale : Le système de cuisson Omni Wavemc réduit
considérablement les différences de température dans chaque zone de cuisson en émettant des micro-ondes
sur toute la surface du plateau.
Durée de cuisson réduite :
Durée de
cuisson
Le système de cuisson Omni Wave
Modèle courant d’Emerson
Compagnie A
Compagnie B
mc
(sec.)
Test de cuisson effectué sur un sac de maïs souflé de 3,5 oz (99 g)
Le système de cuisson Omni Wavemcpermet d’obtenir une cuisson plus rapide en émettant des micro-ondes sur tous
les côtés des aliments.
8
Page 54

SCHÉMA DES CARACTÉRISTIQUES
54321
876
11
Crochets de la porte - Les crochets se
verrouillent automatiquement lorsque vous
fermez la porte. Si vous ouvrez la porte en cours
de fonctionnement, le magnétron se mettra
automatiquement hors fonction.
22
Joint d’étanchéité de la porte - Le joint
d’étanchéité de la porte conserve les micro-ondes
à l’intérieur de la cavité interne du four et
empêche la fuite des ondes.
33
Cavité interne du four
44
Guide anti-claboussures - Protège la prise de
sortie des micro-ondes contre les éclaboussures
des aliments.
55
Système de verrouillage sécuritaire - Empêche
le four de fonctionner lorsque la porte est ouverte.
66
Plateau de cuisson en verre - Fait de matériau
spécial à l’épreuve de la chaleur. Le plateau doit
toujours être bien installé avant de pouvoir faire
fonctionner le four. Ne cuisez pas les aliments
directement sur le plateau.
77
Roulettes-guide - Servent à supporter le plateau
de cuisson en verre.
88
Hublot de la porte - Vous permet de voir les
aliments. Le hublot est conçu pour laisser passer
la lumière mais pas les micro-ondes.
9
Page 55

SCHÉMA DES CARACTÉRISTIQUES (suite)
0
q
9
i
p
o
y
t
w
u
e
r
99
Clavier du réglage chronométrique - Sert à régler
la durée de la cuisson et à ajuster l’heure.
00
Affichage - Indique la durée et le niveau de
puissance de la cuisson et l’heure actuelle.
qq
Cuisson à une touche - Sert à cuire ou réchauffer
des quantités spécifiques de nourriture.
ww
Touche “Plus” - Ajoute plus de temps à la cuisson.
ee
Touche “Moins” - Sert à diminuer la durée de la
cuisson.
rr
Décongélation automatique - Permet de décongeler
les aliments (par le poids).
tt
Niveaux de puissance - Cette touche sert à
programmer les niveaux de puissance de la cuisson.
yy
Décongélation - Sert à décongeler les aliments (par
le temps).
uu
Minuterie - Sert de minuterie pratique pour
programmer la mise en marche différée ou un temps
de repos après la cuisson.
ii
Horloge - Sert à régler l’horloge.
oo
Arrêt/Annulation - Sert à arrêter le fonctionnement
du four ou annuler les données de cuisson.
pp
Départ/Cuisson rapide - Sert à débuter la cuisson
et à régler une durée de réchauffage.
10
Page 56

PROCÉDURE DE FONCTIONNEMENT
Cette section contient des renseignements utiles sur le fonctionnement du four.
1.Branchez le cordon d'alimentation dans une prise de courant standard de 120V CA, 60 Hz de 15 ampères à trois
broches.
2.Après avoir mis la nourriture dans un plat à l'épreuve des micro-ondes, ouvrez la porte du four et déposez celui-ci
sur le plateau de verre. Le plateau de verre et les rouleaux-guide doivent toujours être en place lorsque vous
utilisez le four à micro-ondes.
3.Refermez la porte. Assurez-vous qu'elle soit bien fermée.
La lumière est allumée uniquement lorsque le
1
four à micro-ondes est en cours de
fonctionnement.
Vous pouvez ouvrir la porte du four en tout temps
2
pendant le fonctionnement en appuyant sur la
manette d’ouverture de la porte sur le panneau
des commandes. Le four se mettra
automatiquement hors fonction.
À chaque pression d'une touche, un BIP se fera
3
entendre afin de vous signaler l'action effectuée.
Le four cuira automatiquement à la puissance
4
maximale, à moins de le régler à un niveau de
puissance inférieur.
Vous verrez ": 0" apparaître à l'affichage en
5
branchant le four.
L'affichage revient à l'heure actuelle lorsque la
6
durée de cuisson est terminée.
Lorsque vous appuyez sur la touche
7
d'arrêt/annulation “STOP/CLEAR” pendant le
fonctionnement du four, celui-ci arrête sa cuisson
et conserve toutes ses données. Pour effacer ces
données de cuisson (à l'exception de l'heure
actuelle), appuyez une fois de plus sur la touche
“STOP/CLEAR”. Si la porte du four est ouverte
pendant le fonctionnement, l'appareil conservera
toutes ses données.
Si vous appuyez sur la touche de mise en marche
8
"START" mais que le four ne fonctionne pas,
vérifiez l'espace entre la porte et son joint
d'étanchéité au cas où il y aurait des obstructions,
puis assurez-vous que la porte soit bien refermée.
Le four ne fonctionnera pas à moins que la porte
soit complètement fermée et la programmation,
refaite.
Assurez-vous que le four soit solidement
installé et que sa fiche d'alimentation, bien
insérée dans la prise de courant.
T ABLEAU DES NIVEAUX DE PUISSANCE
• Vous réglez le niveau de puissance en appuyant sur la touche "POWER". Le tableau ci-dessous vous indique le
niveau. le voyant affiché et le pourcentage de la puissance.
Appuyez sur la touche "POWER"
Une fois P-HI 100%
Deux fois P-90 90%
3 fois P-80 80%
4 fois P-70 70%
5 fois P-60 60%
6 fois P-50 50%
7 fois P-40 40%
8 fois P-30 30%
9 fois P-20 20%
10 fois P-10 10%
11 fois P-00 0%
Niveau de puissance (affichage)
11
Pourcentage approximatif de la
puissance
Page 57

COMMENT RÉGLER LES COMMANDES DU FOUR
RÉGLAGE DE L’HORLOGE
Lorsque le four est branché pour la première fois, l’affichage indiquera “:0” et une tonalité se fera entendre.
Si l’alimentation Ca est interrompu, l’affichage iniquera “: 0” lorsque l’alimentation sera rétablie.
1. Appuyez sur la touche “CLOCK”.
L’horloge sera réglée en mode 12
heures.
2. Appuyez de nouveau sur la touche “CLOCK”.
L’horloge sera réglée en mode 24 heures.
3. Entrez l’heure correcte en appuyant sur les touches
numériques dans l’ordre.
REMARQUE :
Ce four à micro-ondes est doté de
plusieurs systèmes d’horloge.
Si vous désirez le mode 12 heures, omettez
cette étape.
4. Appuyez sur la touche “CLOCK”.
REMARQUE : Si vous tentez d’entrer une heure erronée, l’heure ne sera pas réglée et une tonalité
d’erreur se fera entendre. Appuyez sur la touche ‘CLOCK’ et ré-entrez l’heure.
L’affichage cessera de clignoter et les deux
points commenceront à clignoter. Si vous avec
sélectionné l’horloge à 12 heures, les heures
seront affichées de 1:00 à 12:59. Si vous avez
sélectionné l’horloge à 24 heures, l’horloge
numérique vous permet de régler l’heure de 0:00
à 23:59.
DÉCONGÉLATION CHRONOMÉTRÉE
Lorsque la fonction de décongélation est sélectionnée, le cycle automatique divise le temps de décongélation
en périodes alternatives de décongélation et de temps de repos.
1. Appuyez sur la touche ‘DEFROST’.
2. Appuyez sur les touches numériques
pour sélectionner la durée de
décongélation.
L’indication DEF s’allumera et “:0” est affichée.
L’affichage indiquera ce que vous avez
sélectionné.
REMARQUE :
Votre four à micro-ondes peut être
programmé pour 59 minutes 99 secondes.
(59:59)
3.Appuyez sur la touche ‘START’.
Lorsque vous appuyez sur la touche ‘START’, le voyant ‘DEFROST’ commence à clignoter pour vous indiquer que
le four est en mode de décongélation. Le compte à rebours débute et vous indique la durée résiduelle du mode de
décongélation.
Le four à micro-ondes émet des bips pendant le cycle de décongélation pour vous indiquer qu’il est temps de
retourner ou redistribuer les aliments. Lorsque la décongélation est terminée, vous entendrez trois bips.
12
Page 58

DÉCONGÉLATION AUTOMATIQUE
La DÉCONGÉLATION AUTOMATIQUE vous permet d'éliminer les devinettes lorsque vous désirez
décongeler les aliments sans en connaître la durée.
Pour une décongélation simplifiée, suivez les étapes ci-dessous:
1. Appuyez sur la touche des viandes
“MEAT”.
2. Choisissez le poids de décongélation désiré. (Référez-vous
au tableau de la décongélation automatique par le poids cidessous.)
3. Appuyez sur la touche “START”.
1. Appuyez sur la touche des volailles
“POULTRY”.
2. Choisissez le poids de décongélation désiré. (Référez-vous
au tableau de la décongélation par le poids ci-dessous.)
3. Appuyez sur la touche “START”.
1. Appuyez sur la touche du
poisson “FISH”.
2. Choisissez le poids de décongélation désiré.
(Référez-vous au tableau de la décongélation automatique
par le poids ci-dessous.)
3. Appuyez sur la touche “START”.
Le voyant des livres "lb" s’allume et “1.0”
apparaît à l’affichage.
L’affichage vous indiquera les touches sur
lesquelles vous avez appuyé.
La décongélation de la viande commence.
Le voyant des livres s’allume et “1.5” apparaît
à l’affichage.
L’affichage vous indiquera les touches sur
lesquelles vous avez appuyé.
La décongélation de la volaille commence.
Le voyant des livres "lb" s’allume et “0.5”
apparaît à l’affichage.
L’affichage vous indiquera les touches sur
lesquelles vous avez appuyé.
La décongélation du poisson commence.
*TABLEAU DE DÉCONGÉLATION PAR LE POIDS
Appuyez sur la touche VIANDES VOLAILLES POISSONS
une fois 1,0 lb 1,5 lb 0,5 lb
deux fois 1,5 lb 2,0 lbs 1,0 lb
trois fois 2,0 lbs 2,5 lbs 1,5 lb
quatre fois 2,5 lbs 3,0 lbs 2,0 lbs
La durée de la décongélation est automatiquement déterminée par le poids sélectionné.
Lorsque vous appuyez sur la touche “START”, le voyant des livres "lb" s'éteint et le voyant "Def," clignote,
puis la minuterie débute son compte à rebours, affichant le temps qu’il reste pour compléter la décongélation.
Pendant la décongélation, le four émettra des bips pour vous signaler que les aliments doivent être retournés ou
réorganisés. Lorsque la décongélation sera complétée, vous entendrez trois bips.
13
Page 59

CUISSON À UNE ÉTAPE
1. Appuyez sur la touche “POWER”.
X6
2.Appuyez sur les touches numériques afin de déterminer la
durée de la cuisson.
3.Appuyez sur la touche “START”.
Lorsque vous appuyez sur la touche “START”, le voyant “M/W” commence à clignoter, ce qui vous indique
que le four débute sa cuisson. La minuterie débute son compte à rebours, affichant ainsi le temps qu’il reste
pour compléter la cuisson. Lorsque la décongélation sera complétée, vous entendrez trois bips.
REMARQUE : Il est recommandé d’utiliser des niveaux de cuisson plus faibles pour certains aliments tels
(Choisissez le niveau de puissance
désirée.)
que le fromage ou le lait et la cuisson de certaines viandes.
Le voyant “M/W” s’allume.
L’affichage vous indiquera les touches sur
lesquelles vous avez appuyé.
L’exemple ci-contre indique le niveau de
puissance 5.
REMARQUE :
Si vous omettez l'étape 1, le four cuira à la
puissance maximale.
L’affichage vous indiquera les touches sur
lesquelles vous avez appuyé.
REMARQUE :
Vous pouvez programmer votre four pour
qu’il fonctionne pendant 59 minutes et 99
secondes (59:99).
14
Page 60

CUISSON À DEUX ÉTAPES
Selon toutes les recettes pour fours à micro-ondes, vous devez décongeler les mets congelés avant de procéder à leur
cuisson. Vous pouvez programmer votre four pour qu’il décongèle automatiquement les aliments avant de les cuire.
1. Appuyez sur la touche “DEF.”.
2. Appuyez sur les touches numériques pour entrer la durée
de décongélation désirée.
3. Appuyez sur la touche “POWER”.
X6
4. Appuyez sur les touches numériques afin de déterminer la
durée de la cuisson.
5. Appuyez sur la touche “START”.
Lorsque vous appuyez sur la touche “START”, les voyants “DEF” et “M/W” apparaissent pour confirmer les
niveaux de puissance choisis. Le voyant “DEF” commence à clignoter, ce qui vous indique que le four est en
mode de décongélation. La minuterie débute son compte à rebours, affichant ainsi le temps qu’il reste pour
compléter la décongélation. Au son des bips, retournez, séparez ou réorganisez la nourriture. À la fin du mode
de décongélation, le four émettra des bips et débutera le mode de cuisson du four “M/W”. Le voyant “DEF”
s’éteint et le voyant “M/W” commence à clignoter. Le four débute son compte à rebours du temps qu’il reste
pour le mode “M/W”. Lorsque la cuisson sera complétée, vous entendrez trois bips.
(Choisissez le niveau de puissance
désirée.)
Le voyant “DEF.” s’allume et “ : 0” apparaît à
l’affichage.
L’affichage vous indiquera les touches sur
lesquelles vous avez appuyé.
Le voyant “M/W” s’allume et “P-HI” apparaît
à l’affichage. L’exemple ci-contre indique le
niveau de puissance 5.
L’affichage vous indiquera les touches sur
lesquelles vous avez appuyé.
MODE DE MINUTERIE
La minuterie peut servir de compteur des minutes, effectuer la mise en marche automatique et servir à
programmer un temps de pause après la cuisson (temps de repos). Toutefois, vous ne pourrez pas programmer
la mise en marche automatique pour la décongélation. Le four ne dégage aucune énergie par micro-ondes
lorsque la minuterie est en fonction.
COMMENT UTILISER LA MINUTERIE
1. Appuyez sur la touche “KITCHEN
TIMER”.
2. Entrez le nombre de minutes du compte à rebours.
3. Appuyez sur la touche “START”.
Le voyant “TIMER” commence à clignoter et la minuterie débute son compte à rebours. L’affichage indiquera
le temps écoulé en mode “KITCHEN TIMER”. Lorsque le temps sera écoulé, vous entendrez trois bips.
15
Le voyant “TIMER” s’allume et “ : 0” apparaît
à l’affichage.
L’affichage vous indiquera les touches sur
lesquelles vous avez appuyé.
Page 61

COMMENT UTILISER LA MISE EN MARCHE AUTOMATIQUE
1. Appuyez sur la touche “KITCHEN
TIMER”.
2. Entrez la durée d’attente désirée avant que ne s'active
automatiquement le four à micro-ondes.
3. Programmez le niveau de puissance et la durée de cuisson
désirés.
4. Appuyez sur la touche “START”.
Lorsque vous appuyez sur “START”, le voyant “TIMER” commence à clignoter et la minuterie débute son
compte à rebours. Lorsque le décompte est fini, le four émet des bips. Le voyant “TIMER” s’éteint et le voyant
“M/W” commence à clignoter. Le four débute son compte à rebours du temps qu’il reste pour le mode “M/W”.
Lorsque la cuisson sera complétée, vous entendrez trois bips.
Le voyant “TIMER” s’allume et “ : 0” apparaît
à l’affichage.
L’affichage vous indiquera les touches sur
lesquelles vous avez appuyé.
Le voyant “M/W” s’allume et le niveau de
puissance, ainsi que la durée de la cuisson
seront affichés.
COMMENT RÉGLER LE TEMPS DE REPOS
1. Entrez la durée de cuisson désirée.
2. Appuyez sur la touche “KITCHEN
TIMER”.
3. Entrez la durée de repos désirée.
Le voyant “M/W” s’allume et la durée
sélectionnée apparaît à l’affichage.
Le voyant “TIMER” s’allume et “ : 0” apparaît
à l’affichage.
L’affichage vous indiquera les touches sur
lesquelles vous avez appuyé.
4. Appuyez sur la touche “START”.
Le voyant “M/W” commence à clignoter et la minuterie de cuisson débute son compte à rebours. Lorsque la
cuisson est terminée, le voyant “M/W” s’éteint et le voyant de la minuterie commence à clignoter. Le four
débute son compte à rebours du temps qu’il reste pour le mode de la minuterie. Lorsque le décompte du mode
de minuterie sera terminé, vous entendrez trois bips.
REMARQUE : Vous pouvez programmer votre four pour qu’il fonctionne pendant 59 minutes et 99
secondes (59:99).
16
Page 62

CUISSON RAPIDE
La cuisson rapide vous permet de réchauffer des aliments pendant 30 secondes à 100% de la puissance
(puissance maximale), à la simple pression de la touche “QUICK COOK”.
En appuyant successivement sur la touche “QUICK COOK”, vous pouvez prolonger la cuisson jusqu’à une
durée maximale de 5 minutes, par intervalles de 30 secondes.
1. Appuyez sur la touche “QUICK
COOK”.
En appuyant sur “QUICK COOK”, “ : 30”
apparaîtra à l’affichage.
Après 1,5 secondes, le four débute le
réchauffage.
CUISSON À UNE TOUCHE
La cuisson à une touche vous permet de cuire ou réchauffer la plupart de vos mets préférés en n'appuyant que
sur une touche. Pour augmenter la quantité, appuyez sur les touches numériques correspondant à la quantité de
nourriture désirée (à l’exception du maïs à éclater).
1. Appuyez une fois sur la touche
"POPCORN", ce qui correspond à
un sac de 3,5 oz.
REMARQUES:
1. N'utilisez que les emballages préparés de maïs à éclater pour micro-ondes à température de la pièce.
2. Placez l'emballage dans le four selon les directives du manufacturier.
3. Ne faites éclater qu'un seul sac à la fois.
4. Après avoir fait éclater le maïs, ouvrez le sac soigneusement car la vapeur est extrêmement chaude.
5. Ne réchauffez pas les grains de maïs qui n'ont pas éclaté et ne réutilisez pas les sacs.
6. Ne faites jamais éclater du maïs sans une supervision constante.
Lorsque vous appuyez une fois sur la touche
"POPCORN", "3.5" apparaîtra à l'affichage.
Après une seconde et demie, le four indiquera
à l'affichage la durée de la cuisson selon la
quantité et débutera la cuisson.
MISE EN GARDE: si le poids du maïs à éclater ne correspond pas au poids recommandé par le four, ne
vous servez pas du réglage car le maïs peut être trop cuit ou prendre feu. Suivez les recommandations du
manufacturier.
1. Appuyez une fois sur la touche "
FROZEN PIZZA" pour une pizza de
7 oz et deux fois pour une pizza de
14 oz.
* PIZZA CONGELÉE *
• 7 oz : appuyez une fois sur "FROZEN PIZZA".
• 14 oz : appuyez deux fois sur "FROZEN PIZZA" dans un délai d'une seconde et demie.
REMARQUES:
1. Ne faites cuire qu'une seule pizza à la fois.
2. N'utilisez que des pizzas congelées préparées pour les fours à micro-ondes.
3. Si le fromage de la pizza ne fond pas suffisamment, cuisez celle-ci quelques secondes de plus.
4. Certaines marques de pizzas peuvent nécessiter plus ou moins de temps de cuisson.
17
Lorsque vous appuyez une fos sur la touche
"FROZEN PIZZA", "7" apparaîtra à
l'affichage.
Après une seconde et demie, le four indiquera
à l'affichage la durée de la cuisson selon la
quantité et commencera à cuire.
Page 63

CUISSON À UNE TOUCHE (suite)
1. Appuyez une fois sur la touche
“BEVERAGE” pour une quantité
d’une tasse, deux fois pour deux
tasses et trois fois pour trois tasses.
* BREUVAGE * (200 ml/tasse)
• 1 tasse (cup): appuyez une fois sur "BEVERAGE".
• 2 tasses: appuyez deux fois sur "BEVERAGE" dans un délai d'une seconde et demie.
• 3 tasses: appuyez trois fois sur "BEVERAGE" dans un délai d'une seconde et demie.
1. Appuyez une fois sur la touche
"DINNER PLATE" pour une assiette
de 12 oz et deux fois pour une
assiette de 15 oz.
* ASSIETTE D’ALIMENTS *
• 12 oz : Appuyez une fois sur la touche “DINNER PLATE”.
• 15 oz : Appuyez deux fois sur la touche “DINNER PLATE” dans un délai d'une seconde et demie.
Lorsque vous appuyez sur la touche
"BEVERAGE", "1" (1 tasse) apparaîtra à
l'affichage.
Après une seconde et demie, le four indiquera
à l'affichage la durée de la cuisson selon la
quantité et commencera à cuire.
Lorsque vous appuyez une fois sur la touche
"DINNER PLATE", "12" (12 oz) apparaîtra à
l'affichage.
Après une seconde et demie, le four indiquera
à l'affichage la durée de la cuisson selon la
quantité et débutera la cuisson.
1. Appuyez une fois sur la touche
"FRESH VEGETABLE" pour une
quantié de 7 oz de légumes frais et
deux fois pour une quantité de 14 oz.
* LÉGUMES FRAIS *
• 7 oz : Appuyez une fois sur la touche “FRESH VEGETABLE”.
• 14 oz : Appuyez deux fois sur la touche “FRESH VEGETABLE" dans un délai d'une seconde et demie.
1. Appuyez une fois sur la touche
"FROZEN VEGETABLE" pour une
quantié de 7 oz de légumes surgelés
ou deux fois pour une quantité de 14
oz.
* LÉGUMES SURGELÉS *
• 7 oz : Appuyez une fois sur la touche “FROZEN VEGETABLE”.
• 14 oz : Appuyez deux fois sur la touche “FROZEN VEGETABLE" dans un délai d'une seconde et
demie.
Lorsque vous appuyez une fois sur la touche
"FRESH VEGETABLE", "7" apparaîtra à
l'affichage.
Après une seconde et demie, le four indiquera
à l'affichage la durée de la cuisson selon la
quantité et débutera la cuisson.
Lorsque vous appuyez une fois sur la touche
"FROZEN VEGETABLE", "7" apparaîtra à
l'affichage.
Après une seconde et demie, le four indiquera
à l'affichage la durée de la cuisson selon la
quantité et débutera la cuisson.
18
Page 64

AJUSTEMENT DE LA CUISSON "PLUS" ou "MOINS" (MORE/LESS)
Cette touche permet de prolonger ou diminuer la durée de la cuisson à une touche ou de la cuisson
chronométrique pendant que le four est en fonction (à l’exception du mode de décongélation).
Appuyez sur la touche “LESS/MORE” afin de prolonger ou diminuer la durée de la cuisson à une touche, par
intervalles de 10 secondes, jusqu’à un maximum de 59 minutes, 50 secondes.
En mode de cuisson chronométrique, vous pouvez appuyer sur la touche “LESS/MORE” pour prolonger ou
diminuer la durée de cuisson, par intervalles d’une minute à la fois, jusqu’à un maximum de 59 minutes.
VERROUILLAGE À L'ÉPREUVE DES ENFANTS "CHILD SAFETY LOCK"
Le verrouillage à l'épreuve des enfants prévient toute manipulation indésirable du four par de jeunes enfants.
Pour l'activer, appuyez sur la touche d'arrêt/annulation “STOP/CLEAR” pendant 3 secondes. Un bip se fera
entendre et le voyant de verrouillage "LOCK" s'allumera.
Pour le désactiver, appuyez sur la touche “STOP/CLEAR” et tenez-la enfoncée pendant 3 secondes. Un bip
se fera entendre et le voyant "LOCK" s'éteindra.
ARRÊTER LE FOUR PENDANT LE FONCTIONNEMENT
1. Appuyez sur la touche d'arrêt/annulation “STOP/CLEAR”.
• Vous pouvez redémarrer le four en appuyant sur la touche de mise en marche "START".
• Appuyez une fois de plus sur “STOP/CLEAR” afin d'effacer toutes les instructions préréglées.
• Vous devez entrer de nouvelles instructions dans le four.
2. Ouvrez la porte.
• Vous pouvez redémarrer le four en fermant la porte et en appuyant sur "START".
REMARQUE: le four à micro-ondes cesse son fonctionnement lorsque la porte est ouverte.
19
Page 65

GUIDE DE CUISSON
PRINCIPES DE CUISSON PAR MICRO-ONDES
Les micro-ondes sont des ondes radio de haute fréquence similaires à celles utilisées par une radio AM, FM et
C.B. Elles sont, par contre, beaucoup plus courtes que les ondes radio; environ quatre à six pouces de long,
avec un diamètre d'environ 0,6 cm (1/4 po.). L'électricité est convertie en micro-ondes grâce au tube
magnétron. À partir du tube magnétron, les micro-ondes sont transmises au four où elles sont ensuite
réfléchies, transmises et absorbées par la nourriture.
Réflexion
Les micro-ondes sont réfléchies par le métal, tout comme une balle qui rebondit sur le mur. C'est pourquoi
les ustensiles et plats en métal ne sont pas recommandés pour les fours à micro-ondes. L'union des murs fixes
de la cavité et d'un ventilateur rotatif en métal (ou agitateur d'ondes) garantit une distribution uniforme des
ondes à l'intérieur du four, ce qui produira une cuisson toute aussi uniforme.
Transmission
Les micro-ondes passent à travers des matériaux tels que le papier, le verre et le plastique, un peu à la
manière du soleil qui passe à travers une fenêtre.
Étant donné que ces matériaux n'absorbent pas l'énergie des micro-ondes, ils sont des contenants idéaux pour
la cuisson dans ce type de four.
Absorption
Pendant la cuisson, les micro-ondes sont absorbées par la nourriture. Elles pénètrent à une profondeur
approximative de 1,8 à 3,7 cm (3/4 à 1-1/2 po.). L'énergie des micro-ondes active les molécules de la nourriture
(surtout l'eau, le gras et le sucre) et les fait vibrer à une vitesse de 2,450,000,000 fois à la seconde. La vibration
cause de la friction, ce qui crée de la chaleur. Si vous frottez vigoureusement vos mains ensemble, vous sentirez
une chaleur résultant de la friction. La cuisson interne des plus gros aliments se fait par conductivité, alors que la
chaleur produite par la friction se dirige progressivement au milieu de la nourriture. Par le même principe de
conductivité, les aliments continuent à cuire lorsque vous les laissez reposer après la cuisson. Étant donné que les
micro-ondes se dissipent rapidement, un peu comme les rayons du soleil à la surface de la terre, elles ne peuvent
donc pas s'emmagasiner dans les aliments et y demeurer actives.
USTENSILES À L’ÉPREUVE DES MICRO-ONDES
Verre, céramique et porcelaine
Les plats de cuisson en verre ou en céramique à l’épreuve de la chaleur sont ceux que l’on utilise le plus
pour la cuisson par micro-ondes. La plupart des cuisines sont déjà équipées de ce type de plats : tasses à
mesurer, tasses pour crème anglaise, bols à mélanger, plats avec couvercles, assiettes à tarte et moules à
gâteaux ronds ou carrés.
Les assiettes de service à l’épreuve de la chaleur peuvent également servir dans le four à micro-ondes.
Les bouteilles et les pots en verre peuvent être utilisés pour réchauffer la nourriture, si vous enlevez
préalablement les couvercles. Ne faites pas de cuisson dans ces contenants car ils ne sont pas très résistants à la
chaleur et une cuisson prolongée pourrait faire craquer ou éclater le verre.
N’utilisez pas de plats comportant une bordure en argent, en or, en platine ou tout autre métal. Un amorçage
d’arc peut se produire, ce qui risquerait de briser l’assiette.
N’utilisez pas les verres délicats ni ceux au pied fin. Même si le verre peut laisser passer les micro-ondes, la
chaleur que dégage le contenu peut le faire craquer ou même éclater.
20
Page 66

Les plastiques
Vous pouvez utiliser les plats, tasses et bols de plastique dans le four pendant de très brefs laps de temps.
Vous ne devriez jamais utiliser ces contenants pendant de longues périodes de temps car la chaleur peut les
faire tordre ou fondre. Consultez les recommandations du fabricant en ce qui concerne la compatibilité de leurs
produits avec l’énergie par micro-ondes.
Les pellicules de plastique peuvent recouvrir les aliments dans la plupart des recettes. Percez toujours la
pellicule afin de laisser la vapeur s’échapper et éviter les brûlures.
Les sacs de cuisson en plastique doivent être fendus avant l’utilisation, ce qui permet de laisser la vapeur
s’échapper. N’utilisez jamais d’attaches pour refermer le sac puisque ceux-ci contiennent un petit fil de métal
qui peut causer un amorçage d’arc (étincelles bleues), risquant ainsi d’endommager le four.
Le papier
Les tasses en papier, le papier ciré, serviettes et plats en papier peuvent être utilisés brièvement mais une
utilisation prolongée peut causer un incendie à l’intérieur du four. Le papier ciré est le plus recommandé pour
éviter les éclaboussures dans la cavité du four.
N’utilisez pas de papiers recyclés, tels que les sacs de papier brun. Ces sacs contiennent des impuretés qui
peuvent causer un amorçage d’arc, risquant d’endommager le four.
La paille, l'osier et le bois
Les paniers de paille et d'osier peuvent être utilisés dans le four pendant de très brèves périodes; le temps de
faire réchauffer des petits pains, par exemple. Les grands ustensiles en bois, tels que les bols ou les planches à
découper, ne devraient pas être utilisés car les micro-ondes peuvent sécher le bois et le rendre friable.
Toutefois, vous pouvez laisser les cuillers ou les spatules en caoutchouc à poignée en bois dans le four pendant
de brèves périodes de temps.
Le métal
Les accessoires et plat en métal ne peuvent pas être utilisés dans le four à micro-ondes. Le métal reflète
l’énergie des micro-ondes, ce qui réduit l’uniformité de la cuisson. Le métal peut causer un amorçage d’arc,
risquant d’endommager la cavité interne du four à micro-ondes.
Accessoires spéciaux pour la cuisson par micro-ondes
Les plats à brunir peuvent être utilisés pour saisir et brunir les viandes pendant la cuisson au four à micro-
ondes. Le fond des plats à brunir est doté d'un enduit spécial qui attire les micro-ondes, lorsque celui-ci est
préchauffé dans le four à micro-ondes. Ne faites pas préchauffer le plat à brunir plus longtemps que ne le
recommande le fabricant.
Les grilles et clayettes de rôtissage permettent d'éloigner les aliments du liquide qui s'accumule, dans le cas
d'un rôti, par exemple. Elles sont idéales pour la cuisson du bacon et permettent de réchauffer les pâtisseries et
autres aliments secs.
Gâteaux - Les petits gâteaux, moules à anneau et autres moules à gâteau sont conçus pour conserver
l'uniformité lorsque vous cuisez des gâteaux de forme et de dimension différentes.
21
Page 67

PROPRIÉTÉS DES ALIMENTS
La vitesse à laquelle cuisent les aliments, ainsi que l'uniformité de la cuisson, dépendent largement de la nature
de ces aliments. Les micro-ondes pénètrent les aliments à une profondeur d'environ 1,8 à 3,7 cm (3/4 à 1-1/2
po.) sur toutes les surfaces : le dessus, le dessous et les côtés. L'intérieur des aliments, dont le diamètre est
supérieur à 5 cm (2 po.), cuit par conductivité, de la même manière qu'un four conventionnel. Les aliments qui
contiennent beaucoup d'humidité, de gras ou de sucre, réagissent rapidement à l'excitation des micro-ondes.
Une bonne compréhension des propriétés des aliments vous aidera à maximiser le plaisir que vous éprouverez à
cuire dans votre four à micro-ondes.
Quantité : La durée de la cuisson par micro-ondes est directement reliée à la quantité de nourriture que l'on place
dans le four. Des aliments ou du liquide en petite quantité prennent moins de temps à cuire que les quantités plus
importantes de la même substance. Plus la quantité augmente, plus la concentration des ondes diminue.
Dimension : Des petits morceaux cuisent mieux que les gros. Pour accélérer la cuisson, coupez des morceaux plus
petits que 5 cm (2 po.), de façon à ce que les micro-ondes puissent pénétrer dans le centre, par tous les côtés. Les
morceaux dont la dimension et la forme sont similaires cuisent plus uniformément.
Forme : De nombreux types d'aliments comme le poulet, le brocoli ou les côtelettes ont des formes irrégulières.
Les parties plus minces cuiront plus rapidement que les parties plus épaisses, tandis que les aliments dont l'épaisseur
est égale cuiront plus uniformément.
Pour compenser pour l'irrégularité des aliments, placez les parties plus minces au milieu de l'assiette et les parties
plus épaisses, près des rebords de celle-ci.
Les aliments ronds cuisent plus rapidement que ceux dont la forme est carrée ou rectangulaire.
Température des aliments au début de la cuisson : Les aliments congelés ou réfrigérés prennent plus de temps à
cuire que les aliments à la température de la pièce. La température de la pièce peut varier selon le temps de l'année,
c'est pourquoi la durée de cuisson peut être plus longue lors des jours d'hiver froids.
Les os et le gras : Les os étant conducteurs de chaleur, le côté de l'os sur lequel se trouve la viande cuira en
premier, alors que les pièces de viande sans os cuiront plus lentement mais plus uniformément. Le gras attire les
micro-ondes. Les rôtis de grande dimension, les dindes et les poulets brunissent pendant de longues périodes de
cuisson au fur et à mesure que leurs graisses naturelles remontent à la surface.
Le milieu de ces pièces de viande est cuit par la conductivité de la chaleur.
Facteur d'humidité des aliments : L'humidité attire les micro-ondes. Les aliments contenant beaucoup d'humidité
absorbent les micro-ondes plus efficacement que les aliments secs. Ajoutez un peu de liquide à la nourriture; trop
d'humidité ralentira la cuisson. Percez les aliments qui ont une peau, tels que les pommes de terre et les courges,
afin de permettre à la vapeur interne de s'échapper.
Densité : La facilité avec laquelle les micro-ondes pénètreront les aliments dépend également de la densité des
aliments. Les aliments poreux, tels que le boeuf en morceaux ou les pommes de terre coupées, cuisent plus
rapidement que la nourriture dense, telle que les steaks ou les pommes de terre entières.
Percer les aliments : Les aliments recouverts d'une peau ou d'une membrane serrée accumulent de la vapeur,
créant ainsi une pression à l'intérieur. Percez les pommes de terre, les jaunes d'oeuf et les foies de poulet afin
d'empêcher l'éclatement.
22
Page 68

TECHNIQUES DE CUISSON PAR MICRO-ONDES
De nombreuses techniques de cuisson par micro-ondes ressemblent à celles de la cuisson conventionnelle. Ces
techniques vous aideront à égaliser l'énergie des micro-ondes dans la cavité du four afin de rendre la cuisson
plus uniforme.
Brasser les aliments : Brassez les aliments de l'extérieur vers le centre du plat une ou deux fois pendant la cuisson
afin de disperser également la nourriture et accélérer la cuisson. Les aliments ne brûleront ni ne colleront pas, vous
n'avez donc pas besoin de brasser aussi souvent que la cuisson conventionnelle.
Tourner les aliments : Ceci permettra aux aliments de cuire plus uniformément, surtout lors de la cuisson des
aliments denses tels que les rôtis ou les volailles entières. Lorsque vous cuisez des hamburgers sans couvercle, on
vous demande parfois de les tourner.
Disposition des aliments : Disposez les aliments dont les extrémités sont délicates ou minces, en plaçant les parties
plus épaisses vers les rebords du plat et les parties minces, centrées vers l'intérieur. Les parties qui doivent cuire
d'avantage recevront ainsi plus d'énergie et les aliments cuiront plus uniformément.
Espacer les aliments : Les aliments en portions individuelles, tels que les pommes de terre au four et les petits
gâteaux, cuiront plus uniformément si vous les placez à distance égale dans le four. Si possible, disposez la
nourriture de façon circulaire. Ainsi, lorsque vous placez des aliments dans une assiette à l'épreuve des micro-ondes,
disposez-les autour de l'assiette, vers les rebords. N'alignez pas et n'empilez pas la nourriture dans le plat.
Réorganisation des aliments : Redistribuez les parties qui dépassent telles que les queues de poisson, de haut en
bas, ainsi que les morceaux serrés dans l'emballage, tels que des boulettes de viande, de l'extérieur au centre de
l'assiette.
Temps de repos : Le temps de repos est particulièrement important dans la cuisson par micro-ondes. Les microondes génèrent beaucoup d'énergie dans les parties externes des aliments. Suite à une conductivité normale, les
aliments continuent à cuire pendant quelques minutes après les avoir retirés du four. Il est recommandé de laisser
les rôtis, les légumes entiers, les plats cuisinés et les gâteaux reposer afin de laisser le centre continuer sa cuisson.
Ceci évitera de trop faire cuire, durcir ou assécher les parties extérieures.
Recouvrir les aliments : Recouvrir les aliments aide à accélérer la cuisson, à retenir l'humidité, à attendrir les
viandes et à uniformiser la cuisson, tout en empêchant les éclaboussures. On peut utiliser les couvercles de plats ou
les pellicules de plastique pour sceller d'avantage les contenants. Laissez la vapeur s'échapper en repliant le rebord
de la pellicule de plastique, sur un côté du plat. Vous pouvez également obtenir divers degrés de rétention de
l'humidité en utilisant du papier ciré ou des essuie-tout.
Brunissage des viandes : Les micro-ondes cuisent certains types d'aliments si rapidement que les sucres et les gras
qu'ils contiennent n'ont pas le temps de caraméliser et de donner un aspect "bruni". Les agents de brunissage
n'altèrent pas la qualité des aliments cuits au four à micro-ondes mais peuvent ajouter un peu de couleur et de goût.
Pour les viandes et les volailles, utilisez un peu de sauce à brunir de type "Bouquet" diluée avec de l'eau et du beurre
fondu; de la sauce soya, Worcestershire, barbecue ou sauce à steak; un soupçon de paprika ou de mélange à sauce
en poudre; du nappage en gelée ou de la chapelure. Vous pouvez également finir les gâteaux avec un glaçage et les
pains avec une garniture. Saupoudrez les plats cuisinés de fromage râpé ou de chapelure à la fin de la cuisson.
23
Page 69

DÉCONGÉLATION AUTOMATIQUE "AUTO DEFROST"
La décongélation des mets congelés est l'un des plus grands avantages d'un four à micro-ondes car elle permet
d'économiser beaucoup de temps. La touche de décongélation "DEFROST" simplifie grandement le procédé.
Vous pouvez décongeler les aliments en réglant le niveau de puissance approprié qui s'ajuste automatiquement
pendant le cycle de décongélation. Afin d'obtenir des directives précises sur la décongélation des différents
types d'aliments, référez-vous aux tableaux de ce chapitre
RENSEIGNEMENTS GÉNÉRAUX
➪ Placez les aliments de grande dimension (rôtis, pièces de viande avec l'os) sur une grille à l'épreuve des micro-
ondes ou les petits aliments (cubes ou bandes) dans un plat de cuisson également à l'épreuve des micro-ondes.
Recouvrez de papier ciré.
➪ Afin de déterminer le poids des aliments, consultez l'emballage qui vous donnera le poids ou pesez-les sur une
balance de cuisine. Arrondissez la quantité au dixième de kg le plus près et sélectionnez ce poids de
décongélation sur le panneau des commandes.
➪ La forme des aliments, surtout des aliments de grande dimension, aura une influence importante sur la
décongélation. Vous remarquerez sur les tableaux de décongélation que les items plus grands nécessitent la
pression de la touche 2 + 1 pour une décongélation plus efficace. Vérifiez toujours le statut après le temps de
repos. Les poissons, fruits de mer et la volaille devraient être encore un peu congelé au milieu, ce qui vous
permettra de terminer la décongélation en les tenant sous l'eau froide. Si vous avez besoin de plus de temps,
utilisez la décongélation chronométrique afin de décongeler en petits incréments.
➪ À la moitié de la décongélation, vous entendrez une série de bips vous indiquant que vous devez changer la
disposition des aliments dans la cavité. Ceci signifie tourner, retourner, séparer les aliments en petites sections ou
protéger certaines portions.
➪ "Protéger" une portion des aliments signifie que vous pouvez utiliser une petite quantité de papier d'aluminium
(une bande de 5 cm) afin d'empêcher les parties plus minces ou de forme inégale de surcuire prématurément. Les
micro-ondes ne passeront pas à travers le papier d'aluminium. Par contre, vous devez respecter les quelques
règles suivantes :
➪ Ne recouvrez jamais plus du tiers de l'aliment.
➪ Ne laissez pas les morceaux d'aluminium se toucher et ne les laissez pas entrer en contact avec les côtés de la
cavité interne du four.
➪ Assurez-vous de bien rentrer les extrémités sous l'aliment et d'aplatir le papier sur celui-ci. Rappelez-vous de
replacer le papier d'aluminium lorsque vous retournez les aliments et de recouvrir avec du papier ciré.
➪ Pour préparer les aliments à la congélation (afin de les décongeler ultérieurement), enroulez-les dans un
emballage à l'épreuve de l'humidité et serrez-les. Si vous utilisez des sacs de plastique pour congélateur, assurezvous de sortir l'air afin d'empêcher les brûlures causées par la congélation. Emballez les aliments le plus
uniformément possible afin d'en faciliter la décongélation.
24
Page 70

POISSONS ET FRUITS DE MER - DÉCONGÉLATION
AUTOMATIQUE
Pour plus de détails sur le clavier de décongélation automatique, référez-vous à la page 12 de ce guide.
DÉCONGÉLATION PAR LE POIDS : Appuyez sur la touche AUTO DEFROST pour la décongélation
par le poids. Entrez le poids de chaque item (VIANDE, VOLLAILE et POISSON); appuyez sur la touche
START. Plusieurs bips se font entendre à la mi-temps. Suivez les “instructions spéciales” du tableau cidessous. Appuyez de nouveau sur START pour poursuivre la décongélation.
DÉCONGÉLATION : Appuyez sur le clavier de décongélation DEF. pour décongeler par le temps. Vérifiez
la durée par livre au tableau ci-dessous et multipliez par le poids de l'item. Entrez la durée à l'aide des touches
numériques; appuyez sur START. Lorsque plusieurs bips se font entendre à la moitié du temps de
décongélation, suivez les instructions spéciales ci-dessous, appuyez de nouveau sur START pour poursuivre la
décongélation.
ITEM INSTRUCTIONS SPÉCIALES TEMPS
Déposez les filets dans un plat de cuisson en verre
recouvert d'essuie-tout. Au son du bip, retournez le bloc de
Filets de poisson
congelés en bloc
Filets de poisson
emballés
individuellement ou
steaks de poisson
Crevettes
Queues de homard (0,5
lb chacune)
poisson. Séparez les filets si possible. Appuyez sur START
pour poursuivre la décongélation. Laissez reposer 10
minutes puis terminez la décongélation avec de l'eau froide
courante (pendant 5 minutes environ).
Déposez les filets dans un plat de cuisson en verre
recouvert d'essuie-tout. Au son du bip, retournez le poisson.
Appuyez sur START pour poursuivre la décongélation.
Laissez reposer 5 minutes puis terminez la décongélation
avec de l'eau froide courante (pendant environ 5 minutes).
Déposez les crevettes dans un plat de cuisson en verre
recouvert d'essuie-tout. Au son du bip, retirez les crevettes
décongelées. Appuyez sur START pour poursuivre la
décongélation. Laissez reposer 5 minutes puis terminez la
décongélation avec de l'eau froide courante (pendant
environ 5 minutes).
Déposez les queues de homard dans un plat de cuisson en
verre recouvert d'essuie-tout. Au son du bip, redistribuez les
queues de homard. Recouvrir les bouts les plus petits avec 5
cm de papier d'aluminium. Repliez le papier d'aluminium
en dessous de la queue de homard. Appuyez sur START
pour poursuivre la décongélation. Disposez les queues de
homard en cercle si vous en décongelez plus d'une à la fois.
Laissez reposer 5 minutes puis terminez la décongélation
avec de l'eau froide courante (pendant environ 5 minutes).
5 minutes par livre
5 minutes par livre
4 minutes par livre
4 minutes par livre
25
Page 71

PORC - DÉCONGÉLATION AUTOMATIQUE
Pour plus de détails sur le clavier de décongélation automatique, référez-vous à la page 12 de ce guide.
DÉCONGÉLATION PAR LE TEMPS : Appuyez sur le clavier de décongélation DEF. pour décongeler
par le temps. Vérifiez la durée par livre au tableau ci-dessous et multipliez par le poids de l'item. Entrez la
durée à l'aide des touches numériques; appuyez sur START lorsque plusieurs bips se font entendre à la
moitié du temps de décongélation. Respectez les instructions spéciales ci-dessous, appuyez de nouveau sur
START pour poursuivre la décongélation.
ITEM INSTRUCTIONS SPÉCIALES TEMPS
Déposez les languettes de porc dans un plat de cuisson en
Languettes de porc
Cubes de porc
Longe de porc
désossée
Saucisses de porc en
vrac
Côtelettes de porc
verre recouvert d'essuie-tout. Au son du bip, séparez les
languettes et retournez-les. Appuyez sur START pour
poursuivre la décongélation. Laissez reposer 20 minutes.
Déposez les cubes de porc dans un plat de cuisson en verre
recouvert d'essuie-tout. Au son du bip, séparez les cubes et
disposez-les différemment. Appuyez sur START pour
poursuivre la décongélation. Laissez reposer 20 minutes.
Déposez la longe de porc dans un plat de cuisson en verre
recouvert d'essuie-tout. Sélectionnez MEAT sur le clavier
de décongélation automatique (AUTO DEFOST) et
sélectionnez le poids. Appuyez sur START. Au son des
bips, retournez la longe et recouvrez les parties décongelées
de papier d'aluminium avant de poursuivre. Après la
première étape de décongélation, entrez la moitié du temps
originalement entré puis appuyez sur START pour
poursuivre la décongélation. Laissez reposer 30 minutes.
Coupez les attaches de métal de chaque bout des saucisses.
Déposez-les dans un plat de cuisson en verre recouvert
d'essuie-tout. Au son du bip, retirez les saucisses
décongelées et laissez reposer 20 minutes.
Déposez-les dans un plat de cuisson en verre recouvert
d'essuie-tout. Au son du bip, retournez-les et recouvrez de
papier d'aluminium les os ou les rebords si elles sont
désossées. Laissez reposer 20 minutes.
8 minutes par livre
8 minutes par livre
10 minutes par livre
7 minutes par livre
7 minutes par livre
26
Page 72

BOEUF - DÉCONGÉLATION AUTOMATIQUE
Pour plus de détails sur le clavier de décongélation automatique, référez-vous à la page 12 de ce guide.
DÉCONGÉLATION PAR LE POIDS : Appuyez sur la touche AUTO DEFROST pour la décongélation
par le poids. Entrez le poids de chaque item (VIANDE, VOLLAILE et POISSON); appuyez sur la touche
START. Plusieurs bips se font entendre à la mi-temps. Suivez les “instructions spéciales” du tableau cidessous. Appuyez de nouveau sur START pour poursuivre la décongélation.
DÉCONGÉLATION PAR LE TEMPS : Appuyez deux fois sur le clavier de décongélation DEF. pour
décongeler par le temps. Consultez le tableau afin de connaître la durée de cuisson par livre et multipliez
par le poids de l'item. Entrez la durée à l'aide des touches numériques; appuyez sur START lorsque
plusieurs bips se font entendre à la moitié du temps de décongélation. Respectez les instructions spéciales
ci-dessous, appuyez de nouveau sur START pour poursuivre la décongélation.
ITEM INSTRUCTIONS SPÉCIALES TEMPS
Déposez le rôti (jusqu'à 3 livres) dans un plat de cuisson en
Rôti de croupe, désossé
- ou -
pointe de surlonge, en
rôti ou désossé - ou -
Oeil de ronde
- ou - steak de flanc
Boeuf haché
Croquettes de boeuf
haché
Languettes de boeuf,
désossées
Cubes de boeuf,
désossés
Côtes de boeuf courtes
(pour un total de 2,5 lbs)
verre recouvert d'essuie-tout. Appuyez sur MEAT sur le
clavier de décongélation automatique (AUTO DEFROST).
Appuyez sur "START". Au son du bip, retournez et
recouvrez de papier d'aluminium avant de poursuivre.
Après la première étape de décongélation, entrez la moitié
du temps originalement entré puis appuyez sur START
pour poursuivre la décongélation. Laissez reposer 30
minutes.
Déposez le boeuf haché dans un plat de cuisson en verre
recouvert d'un essuie-tout. Au son du bip, retirez la viande
décongelée. Appuyez sur START pour poursuivre la
décongélation. Laissez reposer 15 minutes.
Déposez les croquettes sur un plat de cuisson en verre
recouvert d'essuie-tout. Au son du bip, retournez les
croquettes. Laissez reposer 10 minutes.
Déposez les languettes dans un plat de cuisson en verre
recouvert d'un essuie-tout. Au son du bip, retournez les
languettes. Appuyez sur START pour poursuivre la
décongélation. Laissez reposer 20 minutes.
Déposez les cubes dans un plat de cuisson en verre
recouvert d'un essuie-tout. Au son du bip, séparez et
disposez-les différemment. Appuyez sur START pour
poursuivre la décongélation. Laissez reposer 20 minutes.
Disposez les côtes de boeuf sur un plat de cuisson en verre.
Au son du bip, retournez et disposez-les différemment.
Appuyez sur START pour poursuivre la décongélation.
Laissez reposer 20 minutes.
10 minutes par livre
8 minutes par livre
8 minutes par livre
7 minutes par livre
8 minutes par livre
8 minutes par livre
27
Page 73

AGNEAU - DÉCONGÉLATION AUTOMATIQUE
Pour plus de détails sur le clavier de décongélation automatique, référez-vous à la page 13 de ce guide.
DÉCONGÉLATION PAR LE POIDS : Appuyez sur la touche AUTO DEFROST pour la décongélation
par le poids. Entrez le poids de chaque item (VIANDE, VOLLAILE et POISSON); appuyez sur la touche
START. Plusieurs bips se font entendre à la mi-temps. Suivez les “instructions spéciales” du tableau cidessous. Appuyez de nouveau sur START pour poursuivre la décongélation.
DÉCONGÉLATION PAR LE TEMPS : Appuyez sur le clavier de décongélation DEF. pour
décongeler par le temps. Vérifiez la durée par livre au tableau ci-dessous et multipliez par le poids de
l'item. Entrez le temps à l'aide des touches numériques; appuyez sur START lorsque plusieurs bips se font
entendre à la moitié du temps de décongélation. Respectez les instructions spéciales ci-dessous, appuyez
de nouveau sur START pour poursuivre la décongélation.
ITEM INSTRUCTIONS SPÉCIALES TEMPS
Déposez les côtelettes d'agneau dans un plat de cuisson en
verre recouvert d'un essuie-tout. Au son du bip, retournez
Côtelettes d'agneau
Gigot d'agneau,
désossé, roulé
Cubes d'agneau
et recouvrez les os de papier d'aluminium avant de
continuer. Appuyez sur START pour poursuivre la
décongélation. Laissez reposer 20 minutes.
Déposez la pièce d'agneau dans un plat de cuisson en verre
recouvert d'un essuie-tout. Appuyez sur MEAT sue le
clavier de décongélation automatique (AUTO DEFROST).
Au son du bip, retournez et recouvrez de papier
d'aluminium avant de continuer. Appuyez sur START pour
poursuivre la décongélation. Laissez reposer 30 minutes.
Déposez les cubes d'agneau dans un plat de cuisson en
verre recouvert d'un essuie-tout. Au son du bip, séparez et
redistribuez. Appuyez sur START pour poursuivre la
décongélation. Laissez reposer 20 minutes.
7 minutes par livre
7 minutes par livre
8 minutes par livre
28
Page 74

VOLAILLE - DÉCONGÉLATION AUTOMATIQUE
Pour plus de détails sur le clavier de décongélation automatique, référez-vous à la page 13 de ce guide.
DÉCONGÉLATION PAR LE POIDS : Appuyez sur la touche AUTO DEFROST pour la décongélation par
le poids. Entrez le poids de chaque item (VIANDE, VOLLAILE et POISSON); appuyez sur la touche
START. Plusieurs bips se font entendre à la mi-temps. Suivez les “instructions spéciales” du tableau cidessous. Appuyez de nouveau sur START pour poursuivre la décongélation.
DÉCONGÉLATION PAR LE TEMPS : Appuyez sur le clavier de décongélation DEF. pour décongeler par le
temps. Vérifiez la durée par livre au tableau ci-dessous et multipliez par le poids de l'item. Entrez la durée à
l'aide des touches numériques; appuyez sur START lorsque plusieurs bips se font entendre à la moitié du temps
de décongélation. Respectez les instructions spéciales ci-dessous, appuyez de nouveau sur START pour
poursuivre la décongélation.
ITEM INSTRUCTIONS SPÉCIALES TEMPS
Déposez le poulet en prenant soin de mettre la poitrine en
dessous dans un plat de cuisson en verre recouvert d'un
essuie-tout. Appuyez sur POULTRY sur le clavier de
Poulet entier
- ou -
poulet de cornouaille
Poulet entier, en
morceaux
- ou -
Morceaux de poulet,
avec les os
Ailes de poulet
Poitrines de poulet,
désossées
- ou -
Cuisses de poulet,
désossées
décongélation automatique et sélectionnez le poids. Au son
du bip, retournez et recouvrez de papier d'aluminium avant
de poursuivre. Après la permière portion de décongélation,
entrez la dernière portion du temps puis, appuyez sur
START pour poursuivre la décongélation. Laissez reposer
20 minutes. Si nécessaire, terminez la décongélation sous
l'eau froide courante.
Déposez le poulet dans un plat de cuisson en verre
recouvert d'un essuie-tout. Appuyez sur POULTRY sue le
clavier de décongélation automatique et sélectionnez le
poids. Appuyez sur "START". Au son du bip, retournez,
séparez et disposez différemment; recouvrez de papier
d'aluminium avant de poursuivre. Après la première portion
de décongélation, entrez la dernière portion du temps puis,
appuyez sur START pour poursuivre la décongélation.
Laissez reposer 15 minutes. Si nécessaire, terminez la
décongélation sous l'eau froide courante.
Déposez les ailes de poulet sur un plat de cuisson en verre
recouvert d'un essuie-tout. Appuyez sur POULTRY et
entrez le poids.*Au son du bip, séparez et retournez.
Appuyez sur START pour poursuivre la décongélation.
Laissez reposer 20 minutes. Si nécessaire, terminez la
décongélation sous l'eau froide courante.
Déposez dans un plat de cuisson en verre recouvert d'un
essuie-tout. Appuyez sur POULTRY et entrez le poids.
*Au son du bip, séparez et retournez. Appuyez sur START
pour poursuivre la décongélation. Laissez reposer 15
minutes.
10 minutes par livre
10 minutes par livre
7 minutes par livre
6 minutes par livre
29
Page 75

OEUFS ET FROMAGE
Les oeufs et le fromage sont des aliments fragiles qui demandent une attention particulière lors de la cuisson par
micro-ondes. Percer le jaune d'oeuf permet à la vapeur de s'échapper lors de la cuisson. Brasser les oeufs lorsqu'ils
cuisent permet de mieux distribuer la chaleur. Étant donné que l'énergie par micro-ondes cuit très rapidement,
vérifiez toujours si les oeufs sont cuits à votre satisfaction après le temps de repos. À ce moment-là, brassez, disposez
différemment ou retournez. Au besoin, prolongez graduellement la durée de cuisson. Pour cuire un seul oeuf,
diminuez la puissance jusqu'à ce que vous obteniez les résultats désirés.
Le fromage mou émietté et le fromage dur râpé fondent bien s'ils sont versés dans un mélange chaud. Le fromage
peut ne pas avoir l'air d'être fondu, il faut donc brasser afin de déterminer s'il est assez fondu. Saupoudrez du
fromage sur le dessus d'un plat en casserole en mettant une plus grande quantiré sur les côtés du plat. Les microondes cuisent de l'extérieur vers l'intérieur alors l'extérieur fondra plus rapidement que le centre.
Pour des sandwiches de fromage fondu, chauffer la garniture si possible avant de la mettre sur le pain. Recouvrez
chaque sandwich avec une tranche de fromage et cuire à puissance élevée (P-HI) de 15 à 20 secondes pour une seule
sandwich, 30 secondes pour deux et 1 minute pour quatre sandwichs ou jusqu'à ce que le fromage soit fondu.
LÉGUMES
Les légumes deviennent des aliments favoris lorsqu'ils sont apprêtés dans le four à micro-ondes. Parce qu'ils
cuisent plus rapidement et demandent moins d'eau que pour la cuisson conventionnelle, les légumes cuits au
micro-ondes retiennent plus de vitamines par rapport à la cuisson conventionnelle.
Afin de cuire les légumes au micro-ondes de façon plus efficace, ceux-ci doivent être coupés en morceaux de
même dimension. Pour obtenir une meilleure cuisson, les pommes de terre, les courges et les légumes qui ont
une peau peuvent être percés avec une fourchette et disposés en cercle. Les légumes de taille différente tels que
le brocoli ou les asperges doient être disposés dans le plat en alternant les extrémités plus petites avec les plus
grandes. Il est nécessaire de brasser, retourner et redistribuer les légumes afin de maximiser la manière dont les
micro-ondes cuisent les légumes.
Consulter le tableau de CUISSON DES LÉGUMES FRAIS aux pages 32 à 35 de ce livre de recette pour vous
familiariser avec la préparation, la durée du temps de repos et certaines suggestions, ainsi que des instructions
sur la cuisson automatique des légumes frais. Consultez le tableau ci-dessous afin de connaître la durée de
cuisson suggérée pour des portions de 4 onces.
Soyez prudents lorsque vous retirez le couvercle afin de ne pas laisser la vapeur vous brûler. Le temps de repos
est essentiel à une bonne cuisson des légumes car la cuisson se poursuit pendant cette période. Lorsque la
période de repos est terminée, déterminez si les légumes devraient être cuits plus longtemps et ajoutez plus de
temps, au besoin.
30
Page 76

CUIRE LES LÉGUMES FRAIS
Les légumes frais retiennent leurs nutriments lorsqu'ils sont cuits au four à micro-ondes. Utilisez ce tableau
ainsi que le clavier de cuisson à une touche "ONE TOUCH" pour cuire adéquatement les légumes. Après la
cuisson, laissez reposer de 3 à 5 minutes. Si les légumes ne sont pas tout-à-fait cuits, prolongez la durée de
cuisson en prenant soin de ne pas trop les cuire.
PAR LE POIDS CUISSON À UNE TOUCHE
7 oz de n'importe quel légume
(une portion)
14 oz de n'importe quel légume
(deux portions)
ITEM PRÉPARATION
Courge
Artichaut
Tiges d'asperges
(4 oz)
Une portion
Petites bettraves,
entières
(4 oz)
Une portion
Bettraves tranchées
(4 oz)
Une portion
Voir le tableau de la page 35.
Voir le tableau de la page 35.
Lavez, disposez dans une assiette à tarte en verre.
Ajoutez deux c. table d'eau. Couvrir avec une
pellicule plastique trouée.
Lavez et parez les bettraves, puis percez-les à l'aide
d'une fourchette. Disposez-les dans une assiette à
tarte en verre et ajoutez 1/4 tasse d'eau. Couvrir de
pellicule plastique trouée.
Lavez et parez les bettraves. Déposez-les dans un
plat en verre d'un litre. Couvrez avec une pellicule
plastique trouée.
Vérifiez la procédure ci-dessous puis appuyez UNE FOIS sur la
touche des légumes frais "FRESH VEGETABLE".
Vérifiez la procédure ci-dessous puis appuyez DEUX FOIS sur la
touche des légumes frais "FRESH VEGETABLE".
PAR LE TEMPS
3 minutes 2 minutes
4 minutes 2 minutes
4 minutes 2 minutes
REPOS
31
Page 77

ITEM PRÉPARATION
Queues de bettraves
(4 oz)
Une portion
Brocoli
(4 oz)
Une portion
Choux de Bruxelles
(4 oz)
Une portion
Chou
(4 oz)
Une portion
Chou-fleur
(4 oz)
Une portion
Petites carottes
(4 oz)
Une portion
Céleri (4 oz)
Une portion
Aubergine (4 oz)
une portion
Fêves vertes
(4 oz)
Une portion
Lavez. Disposez dans une assiette à tarte en verre.
Ajoutez deux c. table d'eau. Couvrir avec une
pellicule plastique trouée.
Lavez, coupez en morceaux égaux. Disposez de
façon égale les morceaux dans une assiette à tarte
en verre; ajoutez 1/4 tasse d'eau. Couvrir avec une
pellicule plastique trouée.
Lavez, coupez en morceaux égaux. Faites une
inscision en "X" dans l'extrémité de chacune des
tiges; ajoutez 1/4 tasse d'eau. Couvrir avec une
pellicule plastique trouée.
Lavez, coupez en quartiers. Disposez de façon
égale les morceaux dans une assiette à tarte en
verre; ajoutez 1/4 tasse d'eau. Couvrir avec une
pellicule plastique trouée.
Lavez, coupez en morceaux égaux. Disposez de
façon égale les morceaux dans une assiette à tarte
en verre; ajoutez 2 c. table d'eau. Couvrir avec une
pellicule plastique trouée.
Lavez. Disposez de façon égale les morceaux dans
une assiette à tarte en verre; ajoutez 2 c. table d'eau.
Couvrir avec une pellicule plastique trouée.
Lavez, coupez en morceaux égaux. Disposez de
façon égale les morceaux dans une assiette à tarte
en verre; ajoutez 2 c. table d'eau. Couvrir avec une
pellicule plastique trouée.
Lavez, coupez en morceaux d'un pouce. Disposez
de façon égale les morceaux dans une assiette à
tarte en verre; ajoutez 2 c. table d'eau. Couvrir avec
une pellicule plastique trouée.
Lavez. Disposez de façon égale les morceaux dans
une assiette à tarte en verre; ajoutez 2 c. table d'eau.
Couvrir avec une pellicule plastique trouée.
PAR LE TEMPS
3 minutes 2 minutes
2 minutes 2 minutes
4 minutes 2 minutes
4 minutes 5 minutes
2 minutes 2 minutes
3 minutes 2 minutes
2 minutes 2 minutes
4 minutes 2 minutes
4 minutes 2 minutes
REPOS
32
Page 78

ITEM PRÉPARATION
Lavez, coupez en languettes. Disposez de façon
Poivron verts (4 oz)
Une portion
Champignons (4 oz)
Une portion
Okra (4 oz)
Une portion
Oignon, haché (4 oz)
Une portion
Panais (4 oz)
Une portion)
Rutabaga
Feuilles d'épinards
(4 oz)
Une portion
Courge d'été (4 oz)
Une portion
Courgette tranchée
(4 oz)
Une portion
égale les morceaux dans une assiette à tarte en
verre; ajoutez 2 c. table d'eau. Couvrir avec une
pellicule plastique trouée.
Lavez, coupez en morceaux. Disposez de façon
égale les morceaux dans une assiette à tarte en
verre; ajoutez 2 c. table d'eau. Couvrir avec une
pellicule plastique trouée.
Lavez, coupez en morceaux. Disposez de façon
égale les morceaux dans une assiette à tarte en
verre; ajoutez 1/4 tasse d'eau. Couvrir avec une
pellicule plastique trouée.
Pelez et hachez les oignons. Disposez de façon
égale les morceaux dans une assiette à tarte en
verre; ajoutez 1/4 tasse d'eau. Couvrir avec une
pellicule plastique trouée.
Lavez, coupez en morceaux. Disposez de façon
égale les morceaux dans une assiette à tarte en
verre; ajoutez 2 c. table d'eau. Couvrir avec une
pellicule plastique trouée.
Voir le tableau à la page 36.
Lavez. Déposez dans un plat de 1 1/2 litre. Ajoutez
2 c, table d'eau. Couvrir avec un couvercle ou une
pellicule plastique trouée.
Lavez, coupez en cubes. Disposez de façon égale
les morceaux dans une assiette à tarte en verre;
ajoutez 1/4 tasse d'eau. Couvrir avec un couvercle
ou une pellicule plastique trouée.
Lavez. Déposez dans un plat de 1 1/2 litre. Ajoutez
2 c, table d'eau. Couvrir avec un couvercle ou une
pellicule plastique trouée.
PAR LE TEMPS
4 minutes 2 minutes
4 minutes 2 minutes
4 minutes 2 minutes
4 minutes 2 minutes
4 minutes 5 minutes
4 minutes 2 minutes
4 minutes 5 minutes
4 minutes 2 minutes
REPOS
33
Page 79

Ces légumes cuisent différemment des légumes figurant aux tableaux de la page précédente. Utilisez la
fonction de cuisson des LÉGUMES FRAIS "FRESH VEGETABLE" et procédez comme suit pour la cuisson
de ces légumes.
ITEM PRÉPARATION
Courge
1 (env. 1 lb)
2 (env. 2 lbs)
Artichaut
1 (8 oz)
2 (env. 1 lb)
Rutabaga
1 (12 oz)
2 (env. 1 1/4 lbs)
Lavez et percez-la avec une fourchette.
Déposez-la sur un plat de verre
Retournez à la mi-temps de cuisson.
Coupez en deux et retirez les graines.
Retournez et appuyez deux fois sur la touche des
légumes frais.
Coupez en deux et retirez les pépins.
Lavez et parez. Disposez en cercle dans une assiette
à tarte en verre. Ajoutez 1 po. d'eau. Couvrez avec
une pellicule plastique trouée.
Tournez d'un demi tour à la mi-temps de cuisson.
Tournez d'un demi tour à la mi-temps de cuisson.
Lavez et percez avec une fourchette.
Déposez sur un plat de verre
Retournez à la mi-temps de cuisson.
Retournez et appuyez deux fois sur le clavier.
PAR LE TEMPS
7 minutes
12 minutes
9 minutes
15 minutes
7 minutes
9 minutes
REPOS
2 minutes
4 minutes
2 minutes
3 minutes
2 minutes
4 minutes
34
Page 80

POISSONS ET FRUITS DE MER
Le poisson cuit au four à micro-ondes est tendre et délicat. Comme la cuisson des poissons et des fruits de mer
se fait à l'aide de beaucoup d'humidité, il en résultera un poisson opaque qui s'effrite à la fourchette ainsi que
des fruits de mer qui n'auront aucun signe de sécheresse et ce, en respectant les durées de cuisson indiquées.
Parce que le poisson est de forme irrégulière, il est promordial de bien le disposer dans le plat de cuisson. Pour
diposer plusieurs filets de poisson dans un plat de verre profond, mettez les extrémités plus épaisses sur les
côtés du plat et les extrémités plus minces, vers l'intérieur. Disposez les filets en cercle, de préférence, même si
vous devez chevaucher les extrémités les plus minces pour produire une épaisseur uniforme.
Si vous cuisez un seul filet, il est préférable d'envelopper l'extrémité la plus mince avec du papier d'aluminium.
Ceertaines règles s'appliquent à l'utilisation du papier d'aluminium; ne couvrez jamais plus du tiers de l'item, ne
laissez pas les morceaux de papier d'aluminium se toucher et assurez-vous que tous les morceaux soient repliés
et que rien ne dépasse. Recouvrez avec du papier ciré afin de prévenir les éclaboussures.
Les fruits de mer cuisent très rapidement au four à micro-ondes— environ 3 à 4 minutes par livre. Arrendez la
fin de la période de repos puis ajustez la cuisson, s'il y a lieu, en prenant soin de ne pas trop les cuire. Les fruits
de mers cuits de la bonne manière seront opaques et fermes, sans être raides.
Les poissons et fruits de mer surgelés sont pratiques à avoir sous la main. Pour plus de renseignements sur la
façon de décongeler les fruits de mer surgelés, référez-vous au tableau de "CUISSON DES POISSONS ET
DES FRUITS DE MER" à la page 24.
CUISSON DU POISSON ET DES FRUITS DE MER
1. Disposez le poisson ou les fruits de mer (filets, steaks, homard) sur une grille à l'épreuve des micro-ondes ou les
pétoncles, dans un plat approprié.
2. Recouvrez d'un papier ciré et déposez sur la table tournante de verre du four à micro-ondes.
3. Calculez la durée de cuisson en multipliant le poids des filets de poisson ou des fruits de mer par le temps
recommandé pour chaque livre.
4. Le four à micro-ondes cuira à HI si aucun autre niveau de puissance n'a été entré. Pour sélectioner un autre niveau
de puissance et débuter la cuisson, appuyez sur POWER et le clavier numérique, tel que démontré ci-dessous.
Appuyez sur le clavier numérique pour entrer la durée de cuisson désirée. Appuyez sur la touche START.
5. Vérifiez la cuisson à la mi-temps; retournez les aliments, redisposez et recouvrez les parties des filets
suffisamment cuites avec du papier d'aluminum, si nécessaire.
6. Vérifiez fréquemment le niveau de cuisson du poisson ou des fruits de mer afin d'ajuster la durée de la cuisson.
Attendez que le temps de repos se soit écoulé avant de décider de poursuivre la cuisson.
ITEM PUISSANCE CUISSON REPOS
Filets de poisson
- ou - P-HI 5-7 minutes par livre 2 minutes
Steaks de poisson
Crevettes
- ou - P-HI 3-4 minutes par livre 2 minutes
Pétoncles
Queues de homard P-HI 6-8 minutes par livre 2 minutes
35
Page 81

VOLAILLES
Tendre et juteuse, voilà ce qui décrit bien la volaille cuite au micro-ondes. C'est la meilleure méthode pour
cuire le poulet dont vous avez besoin pour la préparation de vos plats en casserole, des salades ou simplement
pour des sandwichs. Mettez-vous l'eau à la bouche en regardant simplement la recette de poulet poché.
La disposition du poulet est très importante à cause de ses formes irrégulières. Disposez le poulet en cercle
pour le décongeler ou le cuire plus efficacement. La partie ronde du pilon doit être disposée sur le bord de
l'assiette, par exemple, alors que la partie plus petite sera au centre de l'assiette. Disposez le reste des morceaux
de façon à rendre l'ensemble le plus égal possible. Couvrez de papier ciré afin de prévenir les éclaboussures.
La volaille se décongèle bien à l'aide de la fonction de décongélation automatique AUTO DEFROSTING (voir
à la page 13). Assurez-vous que la volaille soit complètement décongelée avant de la cuire. Vérifiez le degré
de cuisson après la période de repos.
Rappelez-vous que la cuisson se poursuit pendant la période de repos. La volaille est cuite lorsque la
température interne se situe à 160˚C pour les morceaux désossés, à 170˚C pour les morceaux avec les os et à
185˚C pour la volaille entière.
La volaille est cuite lorsque le jus qui s'écoule est de la couleur du bouillon de poulet et qu'il n'est plus rose.
Assurez-vous de vérifier ceci en coupant dans l'intérieur de la cuisse. Vous pouvez également vérifier la
température interne à l'aide d'un thermomètre à lecture instantanée. À l'occasion, l'os sera rose mais cela
n'affectera en rien la cuisson.
36
Page 82

CUISSON DE LA VOLAILLE
1. Disposez la volaille (poitrines désossées, les cuisses, le poulet entier, le poulet de cornouaille et les ailes de
poulet panées) sur une grille à l'épreuve des micro-ondes ou les ailes, les morceaux de poulet avec les os,
dans une assiette en verre profonde.
2. Recouvrez d'un papier ciré et déposez sur la table tournante de verre du micro-ondes.
3. Calculez la durée de cuisson en multipliant le poids de la volaille par le temps recommandé pour chaque
livre.
4. Le four à micro-ondes cuira au niveau P-HI si aucun autre niveau de puissance n'a été entré. Pour
sélectioner un autre niveau de puissance et débuter la cuisson, appuyez sur power et une touche numérique,
tel que démontré ci-dessous. Appuyez sur le clavier numérique pour entrer la durée de cuisson désirée. Puis
appuyez sur la touche START.
5. Vérifiez la cuisson à la mi-temps; retournez les aliments, redistribuez et recouvrez les parties suffisamment
cuites avec du papier d'aluminium, si nécessaire.
6. Vérifiez fréquemment le niveau de cuisson de la volaille pour ajuster la durée de cuisson. Attendez que le
temps de repos se soit écoulé avant de décider si vous poursuivrez la cuisson.
ITEM PUISSANCE CUISSON REPOS
Poitrines de poulet, désossées
- ou - P-HI 8-10 minutes par livre 3 minutes
Cuisses de poulet, désossées
Ailes de poulet
- ou - P-HI 8-9 minutes par livre 2 minutes
Morceaux d'ailes de poulet
Poulet enrier
- ou - P-HI 12-15 minutes par livre 5 minutes
Poulet avec l'os
Poulet de cornouailles P-HI 7-9 minutes par livre 5 minutes
VIANDES
Les coupes de viande tendres se cuisent à merveille au four à micro-ondes, spécialement lorsqu'elles sont cuites à des
niveaux de puissance moins élevés. Assurez-vous que la viande soit bien décongelée avant de la faire cuire. Pour
plus de détails à ce sujet, référez-vous au tableau de la cuisson des viandes, aux pages 43 à 45.
La durée de cuisson de la viande est largement influencée par différents facteurs tels que la forme de la viande, le
poids, la température de départ de la viande et le degré de cuisson désiré. Nous supposons que la viande provient
directement du réfrigérateur. Le chiffre le plus bas dans l'échelle reflète le temps de cuisson suggéré pour une
cuisson médium; le chiffre le plus haut pour une cuisson bien cuite. Il est toujours possible d'ajouter du temps si
nécessaire, il est donc préférable de débuter en utilisant le chiffre le plus bas pour calculer le temps de cuisson.
Le temps de repos est essentiel pour compléter la cuisson par micro-ondes. La chaleur résiduelle dans les aliments se
distribuera et complètera ainsi le processus de cuisson. Vérifiez toujours la cuisson après le temps de repos.
CONSEIL
Les petits morceaux de viande ne sont plus roses lorsqu'ils sont cuits. Retirez la viande du
four à micro-ondes lorsque qu'elle est encore un peu rose pour éviter qu'elle ne surcuise
pendant la période de repos.
37
Page 83

CUISSON DU PORC
1. Disposez la viande (rôti, côtelettes ou bacon) sur une grille à l'épreuve des micro-ondes ou les cubes,
languettes, saucisses, dans une assiette en verre profonde.
2. Recouvrez d'un papier ciré et déposez sur la table tournante de verre du micro-ondes.
3. Calculez la durée de cuisson en multipliant le poids de la viande par le temps recommandé pour chaque
livre.
4. Le four à micro-ondes cuira à puissance élevée P-HI si aucun autre niveau de puissance n'a été entré. Pour
sélectioner un autre niveau de puissance et débuter la cuisson, appuyez sur power et le clavier des chiffres,
tel que démontré ci-dessous. Appuyez sur le clavier numérique pour entrer la durée de cuisson désirée.
Appuyez sur la touche START.
5. Vérifiez la cuisson à la mi-temps; retournez les aliments, redisposez et recouvrez les parties suffisamment
cuites avec du papier d'aluminium, si nécessaire.
6. Vérifiez fréquemment le niveau de cuisson pour ajuster la durée de cuisson. Attendez que le temps de repos
se soit écoulé avant de décider de poursuivre la cuisson.
ITEM PUISSANCE CUISSON REPOS
Cubes de porc P-HI 7 - 8 minutes par livre 2 minutes
Filet de porc P-70 15-17 minutes par livre 10 minutes
5 – 6 minutes par
Saucisses de porc en vrac P-HI 12 oz; couvrez avec 2 minutes
un essuie-tout
Côtelettes de porc, sans
les os - ou - P-70 8 10 minutes par livre 2 minutes
Côtelettes de porc, avec les os
Languettes de porc P-HI 5-6 minutes par livre 2 minutes
Bacon P-HI
1 minute par tranche,
couvrez avec un essuie-tout
30 secondes
38
Page 84

CUISSON DU BOEUF
1. Disposez la viande (rôtis, croquettes de viande hachée) sur une grille à l'épreuve des micro-ondes ou les
cubes, languettes, boulettes de boeuf haché, dans une assiette en verre profonde.
2. Recouvrez d'un papier ciré et déposez sur la table tournante de verre du four à micro-ondes.
3. Calculez la durée de cuisson en multipliant le poids de la viande par le temps recommandé pour chaque
livre.
4. Le four à micro-ondes cuira à puissance élevée P-HI si aucun autre niveau de puissance n'a été entré. Pour
sélectioner un autre niveau de puissance et débuter la cuisson, appuyez sur power et le clavier des chiffres tel
que démontré ci-dessous. Appuyez sur le clavier numérique pour entrer la durée de cuisson désirée.
Appuyez sur la touche START.
5. Vérifiez la cuisson à la mi-temps; retournez les aliments, redisposez et recouvrez les parties suffisamment
cuites avec du papier d'aluminium, si nécessaire.
6. Vérifiez fréquemment le niveau de cuisson pour ajuster la durée de cuisson. Attendez que le temps de repos
se soit écoulé avant de décider de poursuivre la cuisson.
ITEM PUISSANCE CUISSON REPOS
Rôti de croupe roulé
- ou -
Surlonge, boeuf de ronde
- ou -
Oeil de ronde
- ou -
Steak de flanc
Languettes de boeuf,
désossées
- ou -
Cubes de boeuf
Boeuf haché
Croquettes de boeuf haché
Boulettes
P-50
P-70
P-HI
P-HI
P-HI
17-20 minutes par livre
(recommandé pour la
viande pesant jusqu'à 3
livres)
8-10 minutes par
livre
7 minutes par livre
7 minutes par livre
8-10 minutes par livre
10 minutes
2 minutes
5 minutes
2 minutes
2 minutes
39
Page 85

CUISSON DE L'AGNEAU
1. Disposez la viande (gigot, rôti, côtelettes) sur une grille à l'épreuve des micro-ondes ou les cubes, dans une
assiette en verre profonde.
2. Recouvrez d'un papier ciré et déposez sur la table tournante de verre du micro-ondes.
3. Calculez la duré de cuisson en multipliant le poids de la viande par le temps recommandé pour chaque livre.
4. Le four à micro-ondes cuira à puissance élevée P-HI si aucun autre niveau de puissance n'a été entré. Pour
sélectioner un autre niveau de puissance et débuter la cuisson, appuyez sur power et le clavier des chiffres,
tel que démontré ci-dessous. Appuyez sur le clavier numérique pour entrer la durée de cuisson désirée.
Appuyez sur la touche START.
5. Vérifiez la cuisson à la mi-temps; retournez les aliments, redisposez et recouvrez les parties suffisamment
cuites avec du papier d'aluminium, si nécessaire.
6. Vérifiez fréquemment le niveau de cuisson pour ajuster la durée de cuisson. Attendez que le temps de repos
se soit écoulé avant de décider de poursuivre la cuisson.
ITEM PUISSANCE CUISSON REPOS
Côtelettes d'agneau désossées P-70 8-10 minutes par livre 2 minutes
Côtelettes d'agneau avec l'os
Cubes d'agneau P-HI 7 minutes par livre 2 minutes
Cuisse roulée, désossée P-70 12 minutes par livre 10 minutes, couvert
SOUPES
Faire des soupes maison est maintenant plus facile que jamais avec le four à micro-ondes. Conservez vos
restes de légumes et de viandes pour créer vos propres spécialités. Congelez en petites portions les restes que
vous utiliserez ensuite pour inventer une nouvelle recette de soupe.
La méthode la plus efficace pour faire de la soupe au four à micro-ondes consiste à cuire d'abord les légumes
dans un peu de beurre, puis ajoutez le bouillon et faites chauffer. Si vous n'avez pas de bouillon, faites
chauffer 1 tasse d'eau à laquelle vous ajouterez 1 cube de bouillon concentré (ou 1 c. thé de bouillon concentré
en poudre) dans une tasse à mesurer de 2 tasses; cuire à HI pendant 3 minutes. Assaisonnez tel que désiré.
Ajoutez des légumes aux soupes en conserve afin de créer une soupe délicieuse. Nos recettes de sauces à
l'oignon et aux champignons peuvent être utilisées comme bases de soupe en y ajoutant du lait. Surveillez les
directives de cuisson des soupes commerciales dans le four à micro-ondes.
Lorsque vous faites votre propre soupe, vous pourrez la congeler en portions de 12 oz. Pour la
décongeler,utilisez la fonction de décongélation automatique AUTO DEFROST P-HI pendant 3 minuteset
réchauffez. Brassez bien plusieurs fois pendant le cycle de réchauffage et avant de servir.
40
Page 86

SAUCES ET JUS DE VIANDE
Les sauces et les jus de viande sont une réussite assurée lorsqu'elles sont faites au four à micro-ondes. La
cuisson par micro-ondes empêche de coller ou surcuire la sauce. Elles sont maintenant cuites dans une tasse à
mesurer en verre avec une poignée et ce, directement dans le four à micro-ondes. La sauce cuit donc plus
uniformément et il est facile de la verser.
Afin d'empêcher les débordements, chosissez une tasse à mesurer deux fois plus grande que la quantité de
sauce demandée par la recette.
Il est important de brasser fréquemment pour éviter la formation de grumeaux, spécialement après avoir fait
bouillir le mélange. L'usage d'une fouet est tout indiqué pour brasser. Brassez uniformément avant de servir.
Les sauces ajoutent une touche à n'importe quel menu. Elles peuvent être faites à l'avance et gardées au
réfrigérateur jusqu'à leur utilisation. Si vous désirez ajouter la sauce à des viandes déjà cuites, il est préférable
de la réchauffer d'abord, d'ajouter la viande ensuite et cuire pendant 1 à 2 minutes afin de bien réchauffer.
Cette méthode empêche de surcuire la viande.
Notre grand choix de sauces agrémentera de façon créative vos plats principaux, même vos desserts.
DESSER TS
Une touche de sucré après le repas! Rien de plus simple avec le four à micro-ondes. Rapide et délicieux, les
desserts ont quelque chose à offir à tous. Nous avons sélectionné ceux qui se réalisent le mieux au four à
micro-ondes. Les bonbons, par exemple, se réalisent très bien au four à micro-ondes.
Pour obtenir une meilleure uniformité de cuisson, utilisez une assiette à tarte profonde. Utilisez un essuie-tout
pour recouvrir un carré et uniformiser la cuisson. Il s'enlève facilement après la cuisson. L'apparence des
desserts n'est pas ce à quoi nous sommes habitués, mais un glaçage ou une pluie de sucre à glaçer rend le
dessert toujours plus plaisant à regarder.
Les croûtes de tarte aux biscuits se préparent bien au four à micro-ondes, tout comme les desserts aux fruits.
Pour procéder rapidement, réchauffez simplement la garniture de tarte dans une grande tasse à mesurer, en
brassant bien pour distribuer la chaleur et remplir la croûte de tarte.
Les desserts contenant du sucre deviennent extrêmement chauds au micro-ondes; utilisez des gants pour le four
(et des coussins à plats chauds) lorsque vous les manipulez.
41
Page 87

TABLEAU DE CONVERSION DES POIDS ET MESURES
■
À PARTIR DES LIVRES ET DES ONCES AUX GRAMMES
Livres (lbs) Grammes (g)
1
/4 114
1
/2 227
3
/4 341
1 454
2 907
3 1361
4 1814
5 2268
6 2722
7 3175
8 3629
9 4082
10 4526
11 4990
■
TABLEAU DE CONVERSION DE LA DÉCONGÉLATION ET DE LA CUISSON
Onces Centièmes de livre Dixièmes de livre Grammes
1-2 .06-.15 0.1 50
3-4 .16-.25 0.2 100
5-6 .26-.35 0.3 150
7 .36-.45 0.4 200
8-9 .46-.55 0.5 250
10-11 .56-.65 0.6 300
12-13 .66-.75 0.7 350
14 .76-.85 0.8 400
15-16 .86-.95 0.9 450
Onces (oz) Grammes (g)
128
257
385
4 113
5 142
6 170
7 198
8 227
■
MESURES DES LIQUIDES
1 tasse = 8 onces liquides = 240 ml.
1 demi-litre = 16 onces liquides = 480 ml.
1 litre = 32 onces liquides = 960 ml.
1 gallon = 128 onces liquides = 3840 ml.
Onces (oz) Grammes (g)
9 255
10 284
11 312
12 340
13 369
14 397
15 425
16 454
42
Page 88

SPÉCIFICATIONS
Item Spécification
Alimentation 120V 60 Hz CA de 15 A monophasé avec prise de terre
Consommation 1350 W
Capacité de puissance restituée 900 W, puissance maximale
Fréquences 2,450 MHz
Dimensions externes 19,5 (L) x 15,5 (P) x 11,5 (H) pouces
Dimensions de la cavité 12,6 (L) x 13,3 (P) x 9,4 (H) pouces
Cavité 0,9 pi. cu.
Poids 27,5 lbs (approx.)
Durée de cuisson Affichage numérique de 59 minutes, 99 secondes
495 395
293
AVANT DE PLACER UN APPEL DE SERVICE
Vérifiez les points suivants avant de placer un appel de service:
• Le four à micro-ondes ne fonctionne pas;
1. Vérifiez si le cordon d'alimentation est bien branché.
2. Vérifiez si la porte du four est bien fermée.
3. Vérifiez si vous avez programmé la durée de la cuisson.
4. Vérifiez s'il n'y a pas un fusible sauté ou si l'un des disjoncteurs de la boîte électrique n'a pas été déclenché.
Il y a des étincelles dans la cavité;
1. Vérifiez si les contenants, plats ou accessoires que vous utilisez ne comportent pas de métal ni de rebord de
métal.
2. Vérifiez qu’il n’ay ait pas de brochettes métalliques ou de papier d’aluminium touchant les parois internes du
four.
Si vous éprouvez toujours des difficultés, veuillez communiquer avec le centre de service Emerson le plus
près de chez vous.
NE TENTEZ PAS DE RÉPARER LE FOUR VOUS-MÊME!
43
Page 89

GARANTIE D'UN FOUR À MICRO-ONDES EMERSON
Nous vous remercions d'avoir acheté un four à micro-ondes EMERSON. Votre nouvel appareil, comme tous ceux de notre production,
se conforme à de normes de qualité. Dans des conditions normales d'usage, nous sommes certains qu'il vous donnera entière
satisfaction pendant de nombreuses années. Cependant, en cas de problèmes, vous êtes protégé en vertu des clauses de cette garantie.
Les appareils de divertissement EMERSON sont garantis, à l'usage normal, contre tous défauts de matériaux et de fabrication pour les
périodes spécifiées ci-dessous à condition que les dits appareils aient été installés et utilisés tel qu'explique dans le manuel d'instruction
PÉRIODE DE GARANTIE
Fours à micro-ondes domestiques - Réparation au centre de service:
Un (1) an pièces et main-d'oeuvre : Sept (7) ans sur le Magnétron - main-d'oeuvre non incluse arpès les premiers douze (12) mois.
L'obligation de EMERSON, en vertu des clauses de cette garantie, est limitée à la réparation, y compris le remplacement des pièces et
le coût de la main-d'oeuvre pertinente, ou, à notre discrétion, au remplacement de tout fours à micro-ondes qui présente des défauts de
fabrication pendant le période de garantie.
Les pièces remplacées fournies en rapport avec cette garantie, sont couverts pour une période égale à la portion restante de la garantie
de l'équipement original.
OBLIGA TIONS DU CLIENT
L'appareil est couvert par la garantie à partir de la date de l'achat initial au détail. Par conséquent, le propriétaire de l'appareil doit
présenter la facture originale affichant clairement la date. Aucun service ne sera effectué sans présentation de la facture. Le
propriétaire est seul responsable de l'expédition de l'appareil à destination et en provenance du centre de service.
EXCLUSIONS DE LA GARANTIE
Cette garantie ne s'applique qu'aux appareils Fours à Micro-Ondes achetés et utilisés au Canada. Cette garantie ne s'applique ni à
l'apparence ni aux accessoires comprenant mais n'étant pas limités aux plateux en verre, pièces du boîtier, boutons, peu importe la cause
du dommage. En outre, cette garantie ne s'applique pas non plus aux dommages causés par ou survenus lors de la manipulation, le
transport, le déballage, l'installation, les réglages effectués par le client et mentionnés dans le manuel d'instructions, les réparations ou le
remplacement des pièces fournies par un service autre que le Centre de Service et de Réparations de EMERSON, à tout mauvais
fonctionnement ou toute panne causé par ou résultant de conditions environmentales anormales, des réparations inadéquates par un
service non authorisé, un entretien incorrect, des réparations ou modifications effectuées par le client, les mauvais traitements ou un
fonctionnement non approprié la négligence, un accident, un incendie, une inondation ou tout autre cas de force majeure, ou le
branchement à un circuit à tension incorrecte.
La garantie de ce four à micro-ondes ne s'applique qu'à l'acheteur au détail initial. Cette garantie est nulle en cas d'utilisation
commerciale de l'appareil ou à des-fins de location, ou si les numéros de série ont été modifiés, égratignés ou effacés.
EMERSON se réserve le droit de changer le concept, de faire des modifications ou des améliorations aux produits, sans avoir
l'obligation d'effectuer les mêmes changements aux mêmes produits fabriqués auparavant.
Ce qui précède remplace toute autre garantie explicite ou implicite et EMERSON n'assume responsabilité ni autorise quiconque
d'accepter en son nom toute obligation ou responsabilité liée à la vente, à l'entretien ou aux réparations de ce produit. En aucunes
circonstances, EMERSON et ses détaillants EMERSON ne seront responsables des dommages spéciaux ou indirects résultant de
l'utilisation de ce produit ou de tout retard dans l'application de cette garantie attribuable à des causes indépendants de notre volonté.
En vertu de certaines lois provinciales ou fédérales, l'acheteur peut avoir d'autres droits spécifiques, et si certaines clauses de cette
garantie sont interdites en vertu de ces lois, ces clauses seront nulles et non avenues, mais les autres clauses de cette garantie resteront
en vigueur.
COMMENT OBTENIR LES SERVICES OU RÉPARATIONS
En cas de besoin, vous pouvez obtenir tous les renseignements sur les services et réparations en vous adressant au marchand
EMERSON qui vous a vendu cet appareil, ou en communiquant directement avec nous :
SONIGEM SERVICE
300 Alden Road
Markham, Ontario
L3R 4C1
PHONE: (905) 940-5089 FAX: (905) 940-2303
SANS FRAIS: 1-800-287-4871
 Loading...