

Page 1

PERSONAL STEREO
CASSETTE PLAYER WITH
VOICE RECORDER AND
DIGITAL ALARM CLOCK
OWNER’S MANUAL
HK39
HK39.IT.QXD 8/22/02 4:51 PM Page 1
1976,2002 Sanrio Co. Ltd.
Page 2
1
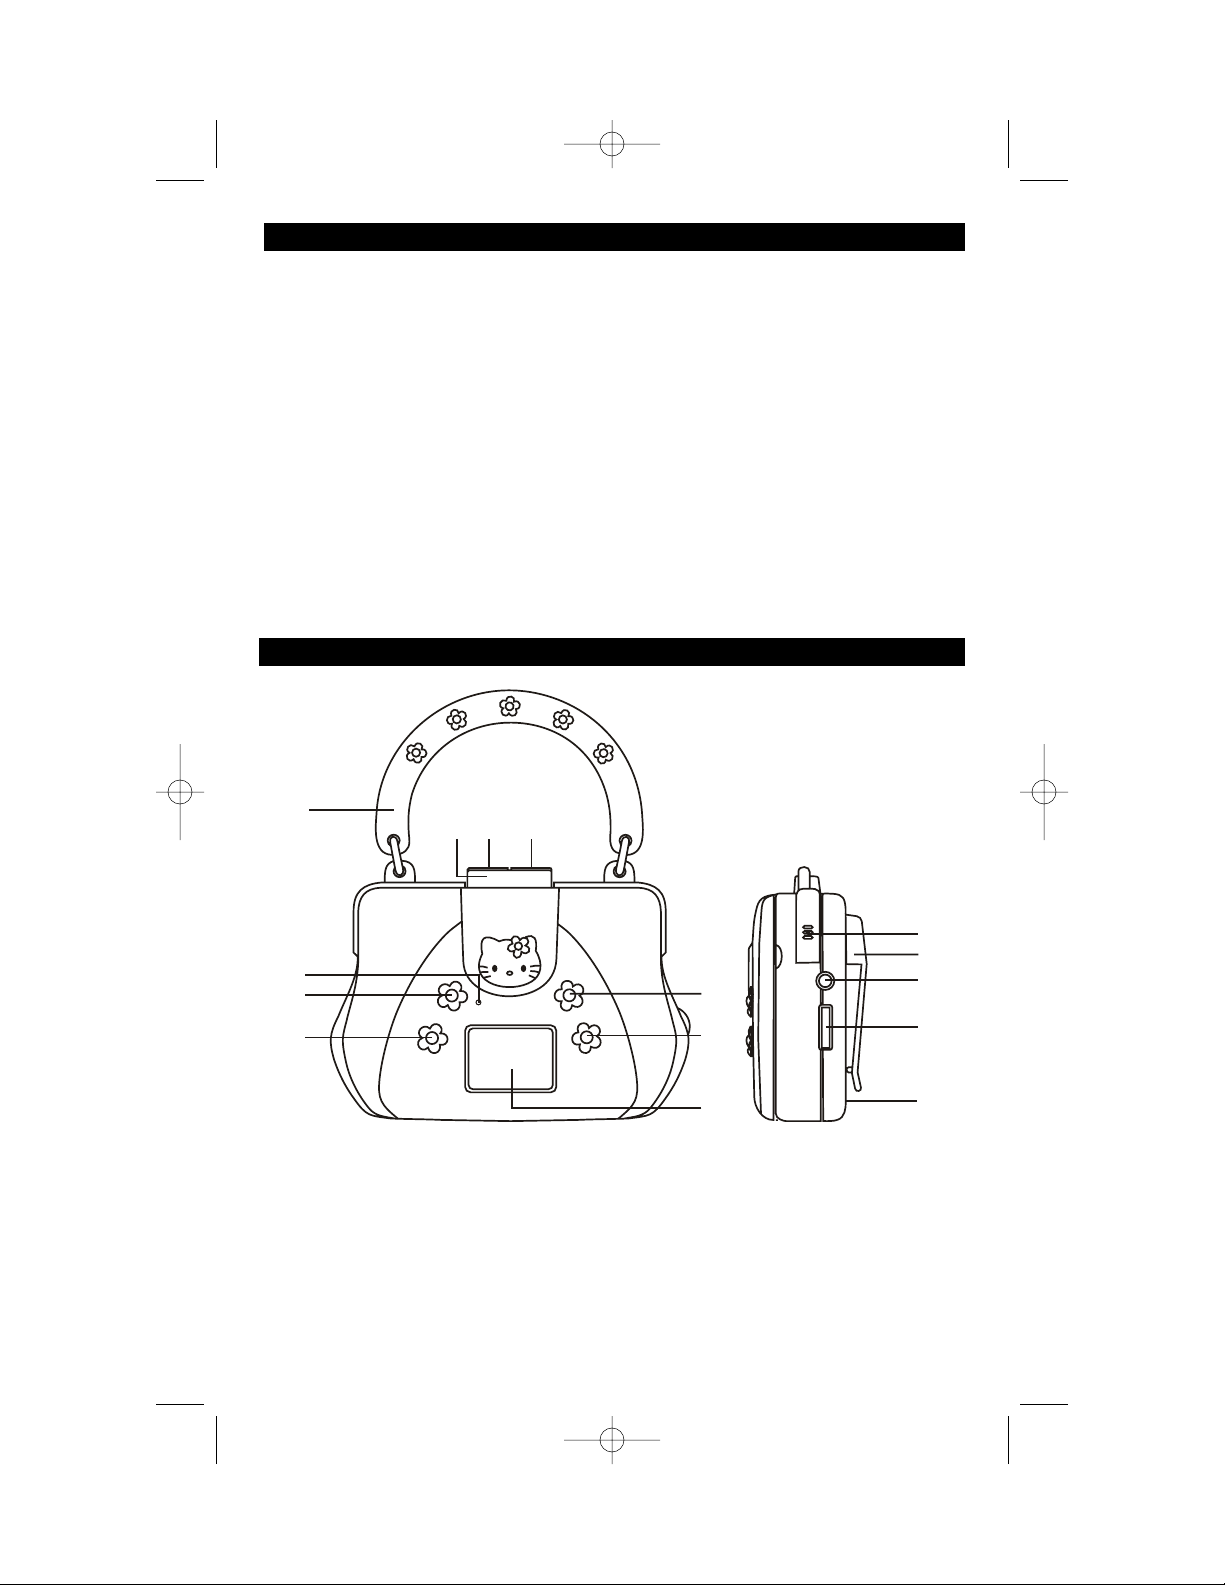
1. Carrying Handle
2. RECORD Indicator
3. VOICE RECORD Button
4. MODE Button
5. PLAY Button
6. STOP Button
7. FAST FORWARD Button
8. VOICE PLAY Button
9. SET Button
10. Display
11. Built-in Microphone
12. Belt Clip
13. Earbud Jack
14. VOLUME Control
15. Battery Compartment (Rear of
Unit)
LOCATION OF CONTROLS
My friends at Emerson Radio Corp. are producing this Personal Stereo
Cassette Player with 10 Second Voice Recorder and Alarm Clock, under license
from Sanrio Company Ltd. We have taken great care to make sure your unit
was in perfect working order when it left our factory. It has been designed to give
you many years of enjoyment and trouble free operation. Read this manual
before operating this unit to become familiar with its features. In the event you
require technical assistance, please contact my friends at the Emerson Radio
Customer Service hotline at 1-800-898-9020. Retain this manual for future
reference.
WELCOME
NOTES:
• Please avoid using this unit in places of high temperature or humidity over
prolonged periods of time as damage may occur.
• Exposure to direct sunlight in places such as car interiors may cause the
unit to become warped and/or lead to malfunctioning.
• Avoid using or storing this unit in dusty or sandy locations.
HK39.IT.QXD 8/22/02 4:51 PM Page 2
1
6 75
2
3
4
8
9
10
11
12
13
14
15
Page 3

2
BATTERY OPERATION
1. Remove the belt clip. Open the battery compartment
by pushing the tab at the center of the cover and lift
it up. The door cannot be removed, so it cannot be
lost.
2. Insert three (3) AA size batteries (not included) into the
Battery Compartment following the diagram inside the
compartment and replace the Battery Compartment
cover.
BATTERY PRECAUTIONS
Follow these precautions when using batteries in this device:
1. Use only the size and type of batteries specified.
2. Be sure to follow the correct polarity when installing the batteries as indicated next to the
battery compartment. Reversed batteries may cause damage to the device.
3. Do not mix different types of batteries together (e.g. Alkaline and Carbon-zinc) or old batteries
with fresh ones.
4. If the device is not to be used for a long period of time, remove the batteries to prevent
damage or injury from possible battery leakage.
5. Do not try to recharge batteries not intended to be recharged; they can overheat and rupture.
(Follow battery manufacturer’s directions.)
POWER SOURCE
OPERATION
Press the SET button ❶
four times; the month will
appear. Press the MODE
button ❷ repeatedly to set
the present month. Repeat
this step to set the date.
1
Press the SET button and
the clock will be set and
running.
3
Press the SET button ❶
again and the present hour
will appear. Press the
MODE button ❷ repeatedly
to set the present hour and
AM/ PM. Repeat this step
to set the minute.
2
SETTING THE DATE AND TIME
FCC INFORMATION:
This device complies with Part 15 of the FCC Rules. Operation is subject to the
following two conditions:
1) This device may not cause harmful interference, and
2) This device must accept any interference received, including interference that may
cause undesired operation.
TO CYCLE THROUGH THE CLOCK MODES:
Press the MODE button once to view the alarm time, twice to view the date and a third
time to view the second’s display. Press once more to revert back to the present time.
HK39.IT.QXD 8/22/02 4:51 PM Page 3
+-
+- +-
For Clock
For Cassette
Player
2
1
2
1
Page 4

3
Press the SET button ❶ once;
the alarm time will blink.
Press the SET button ❶; the
alarm hour and AM/PM will
blink. Press the MODE button
❷ repeatedly to set the alarm
hour and AM/ PM.
1
Press the SET button to
return to the present time
display.
3
Press the SET button ❶
again and the alarm
minute will blink. Press the
MODE button ❷ repeatedly to set the alarm
minute.
2
SETTING THE ALARM TIME
Press the SET button ❶
once; the alarm time will
blink. Press the MODE
button ❷ once to turn the
alarm on, the Alarm
indicator ( ) will appear in
the display.
1
When the actual time
matches the alarm time,
the unit will beep for 30
seconds. To turn the alarm
off, press the MODE
button.
3
Press the MODE button
again to turn the alarm and
chime (see below) on; the
Alarm ( ) and Chime ( )
indicators will appear in the
display. Press the MODE
button once again to turn the
Chime off. Repeat the same
to turn the Alarm off.
2
Press the SET button ❶
once; the alarm time will
blink. Press the MODE
button ❷ twice to turn the
alarm (see above) and
chime on; the Alarm ( )
and Chime ( ) indicators
will appear in the display.
1
Press the MODE button
once again to turn the
Chime off.
3
Press the MODE button
again to turn the chime on,
the Chime indicator ( )
will appear in the display.
2
ACTIVATING THE ALARM
TURNING THE CHIME ON:
When the Chime is activated, a beep will sound every hour.
OPERATION (CONTINUED)
HK39.IT.QXD 8/22/02 4:51 PM Page 4
2
1
2
1
2
1
2
1
Page 5

4
OPERATION (CONTINUED)
Open the cassette door by
lifting the opening tab on
the right of the door and
insert a cassette tape with
the open surface facing up.
Close the Cassette Door
and plug the earbuds into
the Earbud jack.
1
To stop the tape before it
reaches the end, press the
Stop button ❶.
Press the Fast Forward
button ❷ to fast forward the
cassette.
3
Set the VOLUME control ❶
to minimum and press the
PLAY button ❷ to begin
playback. Adjust the
VOLUME control ❸ as
desired.
2
USING THE CASSETTE PLAYER
To record up to 10 seconds
of voice recording, press
and hold the RECORD
button; the RECORD
indicator will light.
1
Press the VOICE PLAY
button to listen to the
digital recording through
the earbuds.
3
Speak into the built-in
microphone. When done
recording, release the
RECORD button; the
RECORD indicator will go
out.
2
USING THE 10 SECOND VOICE RECORDER
HK39.IT.QXD 8/22/02 4:51 PM Page 5
2
1
1
2
Page 6

5
LIMITED WARRANTY
Emerson Radio Corp. warrants manufacturing defects in original material,
including original parts and workmanship, under normal use and conditions,
for a period of ninety (90) days from the date of original purchase in the U.S.
With your dated proof of purchase, we will provide repair service at no charge
for labor and parts at an authorized Depot Repair Facility, or replace the
product at our discretion. For repair or replacement, pack your unit in a
padded box, enclose your check or money order payable to Emerson Radio
Corp. in the amount of $5.00 (not required by California residents) to cover
shipping and handling costs, and enclose a copy of your proof of purchase.
Send your unit to:
Emerson Radio Corp.
1901 Diplomat Drive
Farmers Branch, TX 75234
This warranty does not cover damage from negligence, misuse, abuse,
accident, failure to follow operating instructions, commercial use, rental,
repairs by an unauthorized facility, or products purchased, used, serviced or
damaged outside of the United States.
THIS WARRANTY GIVES YOU SPECIFIC LEGAL RIGHTS, AND YOU MAY
ALSO HAVE OTHER RIGHTS WHICH VARY FROM STATE TO STATE.
AU898H
PART NO.: 21-2041
208-01 Printed in China
HK39.IT.QXD 8/22/02 4:51 PM Page 6
 Loading...