

Emerson Fisher FIELDVUEDVC6200, Fisher FIELDVUEDVC6200f, Fisher FIELDVUEDVC6200p Quick Start Guide
Page 1

Quick Start Guide
D103556X012
DVC6200 Digital Valve Controllers
January 2014
Fisherr FIELDVUE™ DVC6200 Series Digital Valve
Controllers
Contents
Before You Begin 2......................................
Step 1. Install the DVC6200 on the Valve 3...................
Step 2. Connect the Pneumatic Tubing 15...................
Step 3. Connect the Electrical Wires 19......................
Step 4. Configure the DVC6200 29.........................
Special Instructions for Safety Instrumented Systems 31.......
Hazardous Area Approvals and Special Instructions for
“Safe Use”and Installations in Hazardous Locations 39.......
W9713
This quick start guide provides installation and initial setup information for DVC6200 Series digital valve controllers
SIS
www.Fisher.com
Page 2

DVC6200 Digital Valve Controllers
January 2014
Quick Start Guide
D103556X012
SIS
Before You Begin
Do not install, operate, or maintain a DVC6200 digital valve controller without being fully trained and qualified in
valve, actuator, and accessory installation, operation, and maintenance. To avoid personal injury or property damage,
it is important to carefully read, understand, and follow all contents of this quick start guide, including all safety
cautions and warnings. Refer to Hazardous Area Approvals and Special Instructions for “Safe Use” and Installations in
Hazardous Locations, on page 39, for approval specific safe use information. If you have any
questions about these instructions, contact your Emerson Process Management sales office
before proceeding.
WARNING
Avoid personal injury or property damage from sudden release of process pressure or bursting of parts. Before proceeding
with any Installation procedures:
D Always wear protective clothing, gloves, and eyewear to prevent personal injury or property damage.
D Do not remove the actuator from the valve while the valve is still pressurized.
D Disconnect any operating lines providing air pressure, electric power, or a control signal to the actuator. Be sure the
actuator cannot suddenly open or close the valve.
D Use bypass valves or completely shut off the process to isolate the valve from process pressure. Relieve process pressure
from both sides of the valve.
D Use lock‐out procedures to be sure that the above measures stay in effect while you work on the equipment.
D Check with your process or safety engineer for any additional measures that must be taken to protect against process
media.
D Vent the pneumatic actuator loading pressure and relieve any actuator spring precompression so the actuator is not
applying force to the valve stem; this will allow for the safe removal of the stem connector.
WARNING
To avoid static discharge from the plastic cover when flammable gases or dust are present, do not rub or clean the cover
with solvents. To do so could result in a spark that may cause the flammable gases or dust to explode, resulting in personal
injury or property damage. Clean with a mild detergent and water only.
For information on installation and usage of DVC6200 Series digital valve controllers, visit the Fisher channel on YouTube and
search for FIELDVUE.
http://www.youtube.com/user/FisherControlValve
2
Page 3
Quick Start Guide
D103556X012
DVC6200 Digital Valve Controllers
January 2014
SIS
Step 1—Install the DVC6200 on the Valve
If ordered as part of a control valve assembly, the factory will mount the digital valve controller on the actuator and
calibrate the instrument. If you purchased the digital valve controller separately, you will need a mounting kit. The
following procedures are general guidelines. See the instructions that come with the mounting kit for detailed
information on mounting the digital valve controller to a specific actuator model.
CAUTION
The magnet assembly material has been specifically chosen to provide a long‐term stable magnetic field.
However, as with any magnet, care must be taken when handling the magnet assembly. Another high powered magnet
placed in close proximity (less than 25 mm) can cause permanent damage. Potential sources of damaging equipment
include, but are not limited to: transformers, DC motors, stacking magnet assemblies.
General Guidelines for use of High Power Magnets with Positioners
Use of high power magnets in close proximity to any positioner which is operating a process should be avoided. Regardless
of the positioner model, high power magnets can affect the positioner’s ability to control the valve. Technicians should
avoid the use of high power magnets in close proximity with any positioner.
Use of Magnetic Tools with the DVC6200
D Magnetic Tip Screw Drivers – Magnetic tip screw drivers can be used to work on the DVC6200. However, they should
not be brought in close proximity to the magnet assembly (located at the back of the instrument) during process
operations.
D Calibrator Strap Magnets
these calibrators would not be used while an instrument is controlling the process. High power magnets
should be kept at least 15 cm (6 inches) from the DVC6200.
– These are high power magnets used to hold 4-20 mA calibrators. Normally,
Note
The mounting instructions also apply to the DVC6215 remote mount feedback unit.
D
As a general rule, do not use less than 60% of the magnet assembly travel range for full travel measurement. Performance will
D
decrease as the assembly is increasingly subranged.
The linear magnet assemblies have a valid travel range indicated by arrows molded into the piece. This means that the hall
D
sensor (the center point of the channel on the back of the DVC6200 housing) has to remain within this range throughout the
entire valve travel. The linear magnet assemblies are symmetrical. Either end may be up.
The magnet assembly may be referred to as a magnetic array in user interface tools.
D
Mounting the instrument vertically, with the vent at the bottom of the assembly, or horizontally, with the vent pointing down, is
D
recommended to allow drainage of moisture that may be introduced via the instrument air supply.
For sliding‐stem linear actuators up to 210 mm (8.25 inches) travel proceed to page 4
For sliding‐stem linear actuators over 210 mm (8.25 inches) travel proceed to page 6
For GX actuators proceed to page 7
For Fisher rotary actuators proceed to page 11
For quarter‐turn rotary actuators proceed to page 12
3
Page 4
DVC6200 Digital Valve Controllers
January 2014
Quick Start Guide
D103556X012
Sliding‐Stem Linear Actuators Up to 210 mm (8.25 inches) Travel
1. Isolate the control valve from the process line pressure and release pressure from both sides of the valve body. Shut
off all pressure lines to the actuator, releasing all pressure from the actuator. Use lock‐out procedures to be sure
that the above measures stay in effect while you work on the equipment.
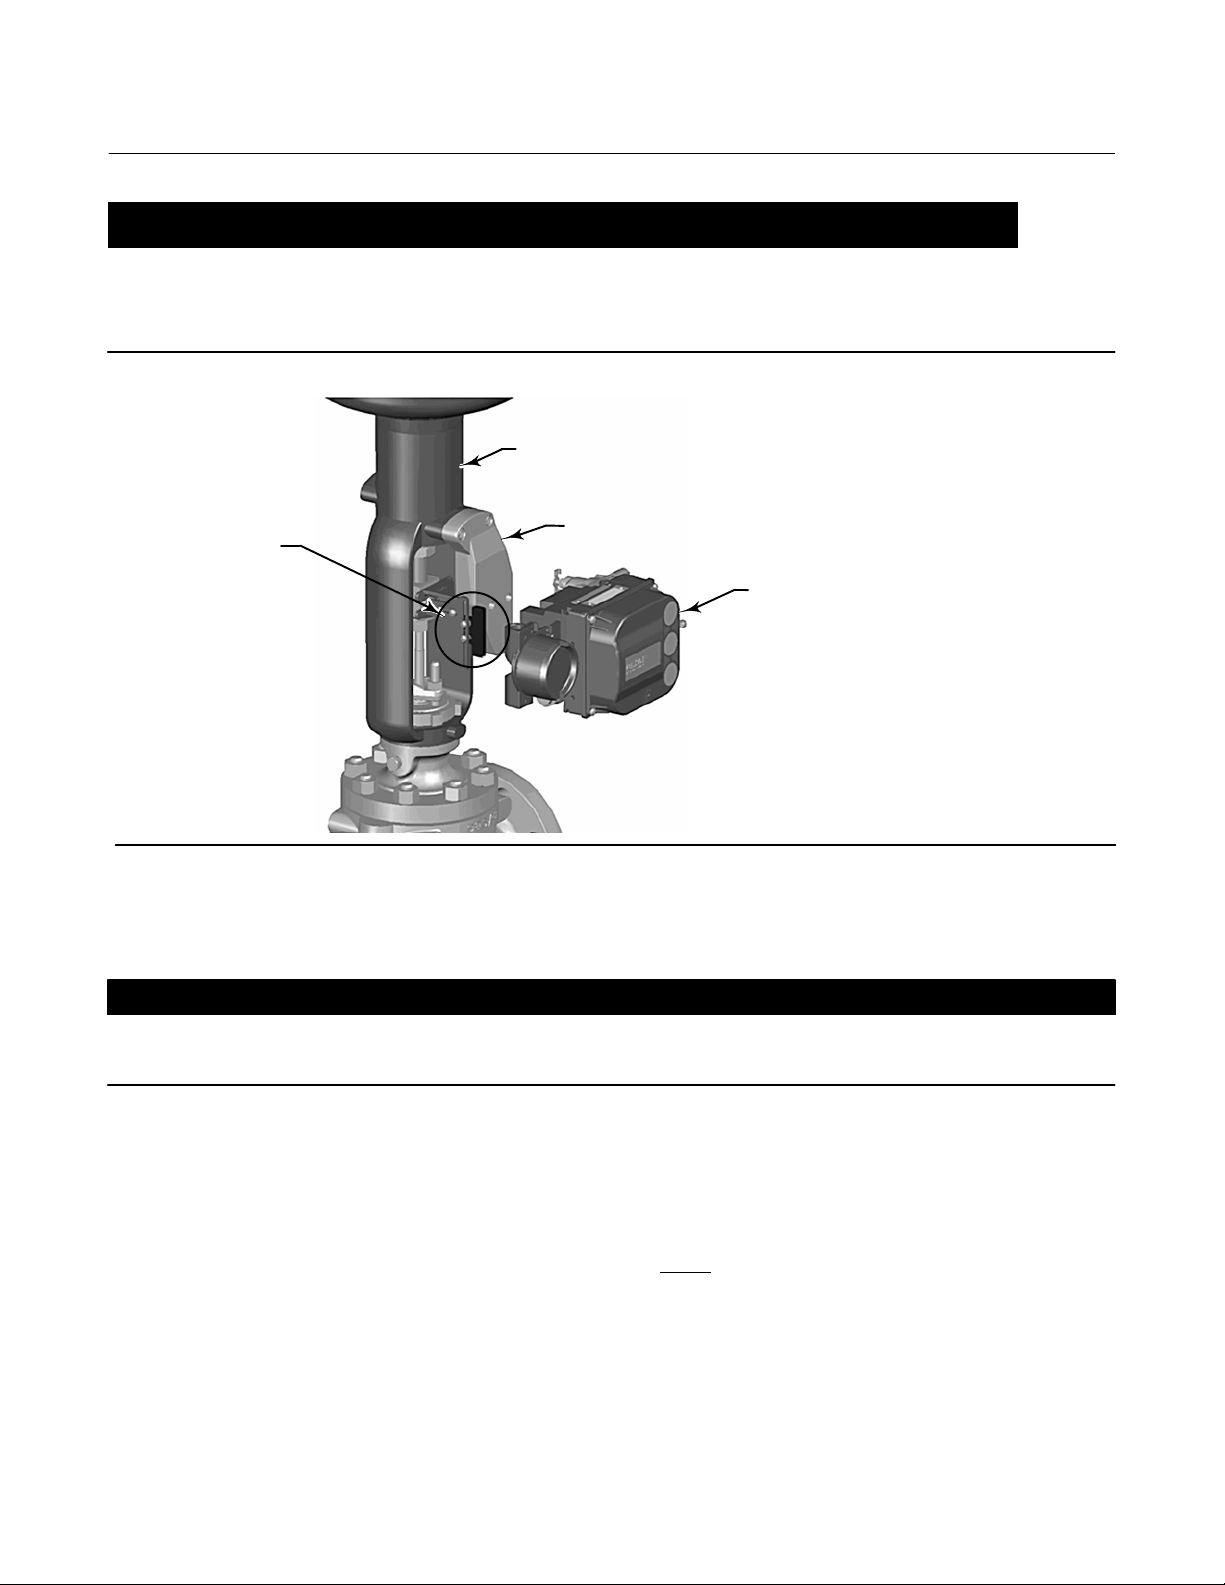
Figure 1. Mounting Parts for Sliding‐Stem Actuator with up to 210 mm (8.25 inches) Travel
ACTUATOR
MOUNTING
FEEDBACK BRACKET
AND MAGNET ASSEMBLY
BRACKET
DIGITAL VALVE
CONTROLLER
X0381-1
2. Attach the mounting bracket to the actuator.
3. Loosely attach the feedback pieces and magnet assembly to the valve stem connector. Do not tighten the fasteners
because fine adjustment is required.
CAUTION
Do not install a magnet assembly that is shorter than the physical travel of the actuator. Loss of control will result from the
magnet assembly moving outside the range of the index mark in the feedback slot of the DVC6200 housing.
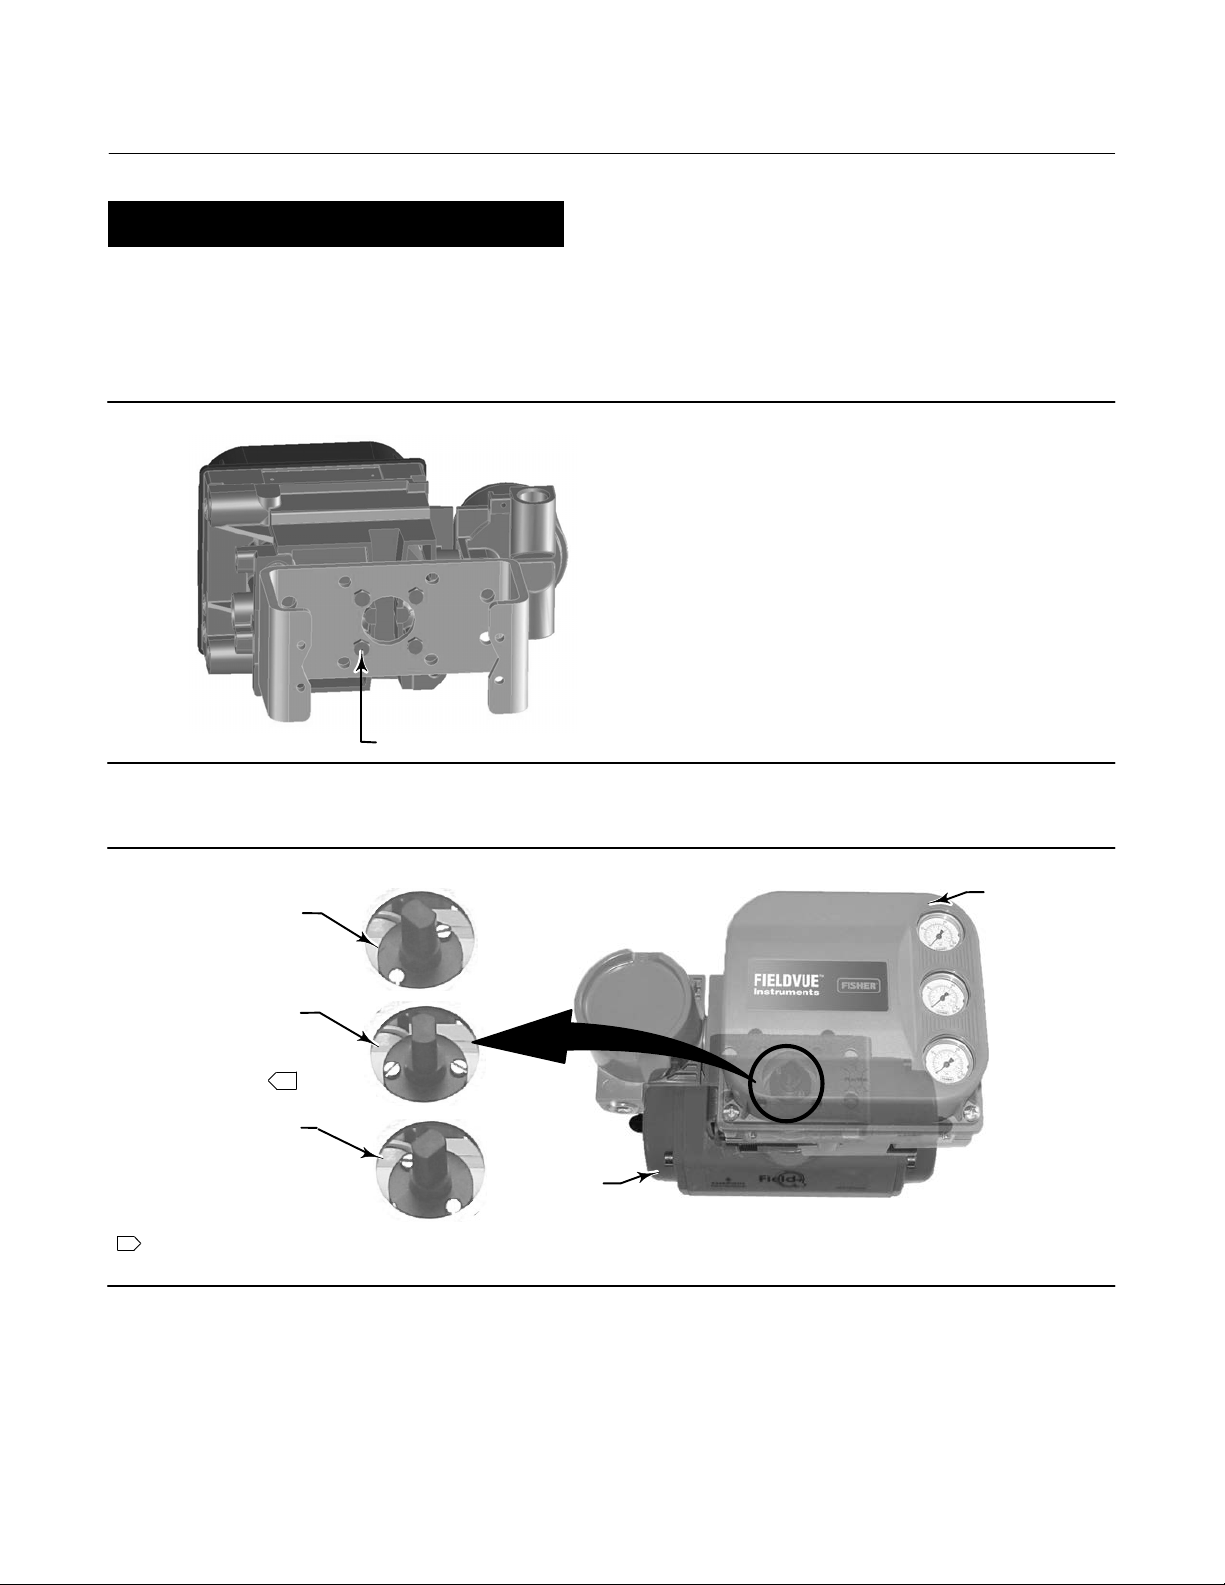
4. Using the alignment template (supplied with the mounting kit), position the magnet assembly inside the retaining
slot.
5. Align the magnet assembly as follows:
D For air‐to‐open actuators (e.g. Fisher 667) vertically align the magnet assembly so that the center line of the
alignment template is lined up as close as possible with the upper
magnet assembly. The magnet assembly should be positioned so that the index mark in the feedback slot of the
DVC6200 housing is within the valid range on the magnet assembly throughout the range of travel. See figure 2.
extreme of the valid travel range on the
4
Page 5
Quick Start Guide
D103556X012
DVC6200 Digital Valve Controllers
D For air‐to‐close actuators (e.g. Fisher 657) vertically align the magnet assembly so that the center line of the
alignment template is lined up as close as possible with the lower
extreme of the valid travel range on the
magnet assembly. The magnet assembly should be positioned so that the index mark in the feedback slot of the
DVC6200 housing is within the valid range on the magnet assembly throughout the range of travel. See figure 3.
January 2014
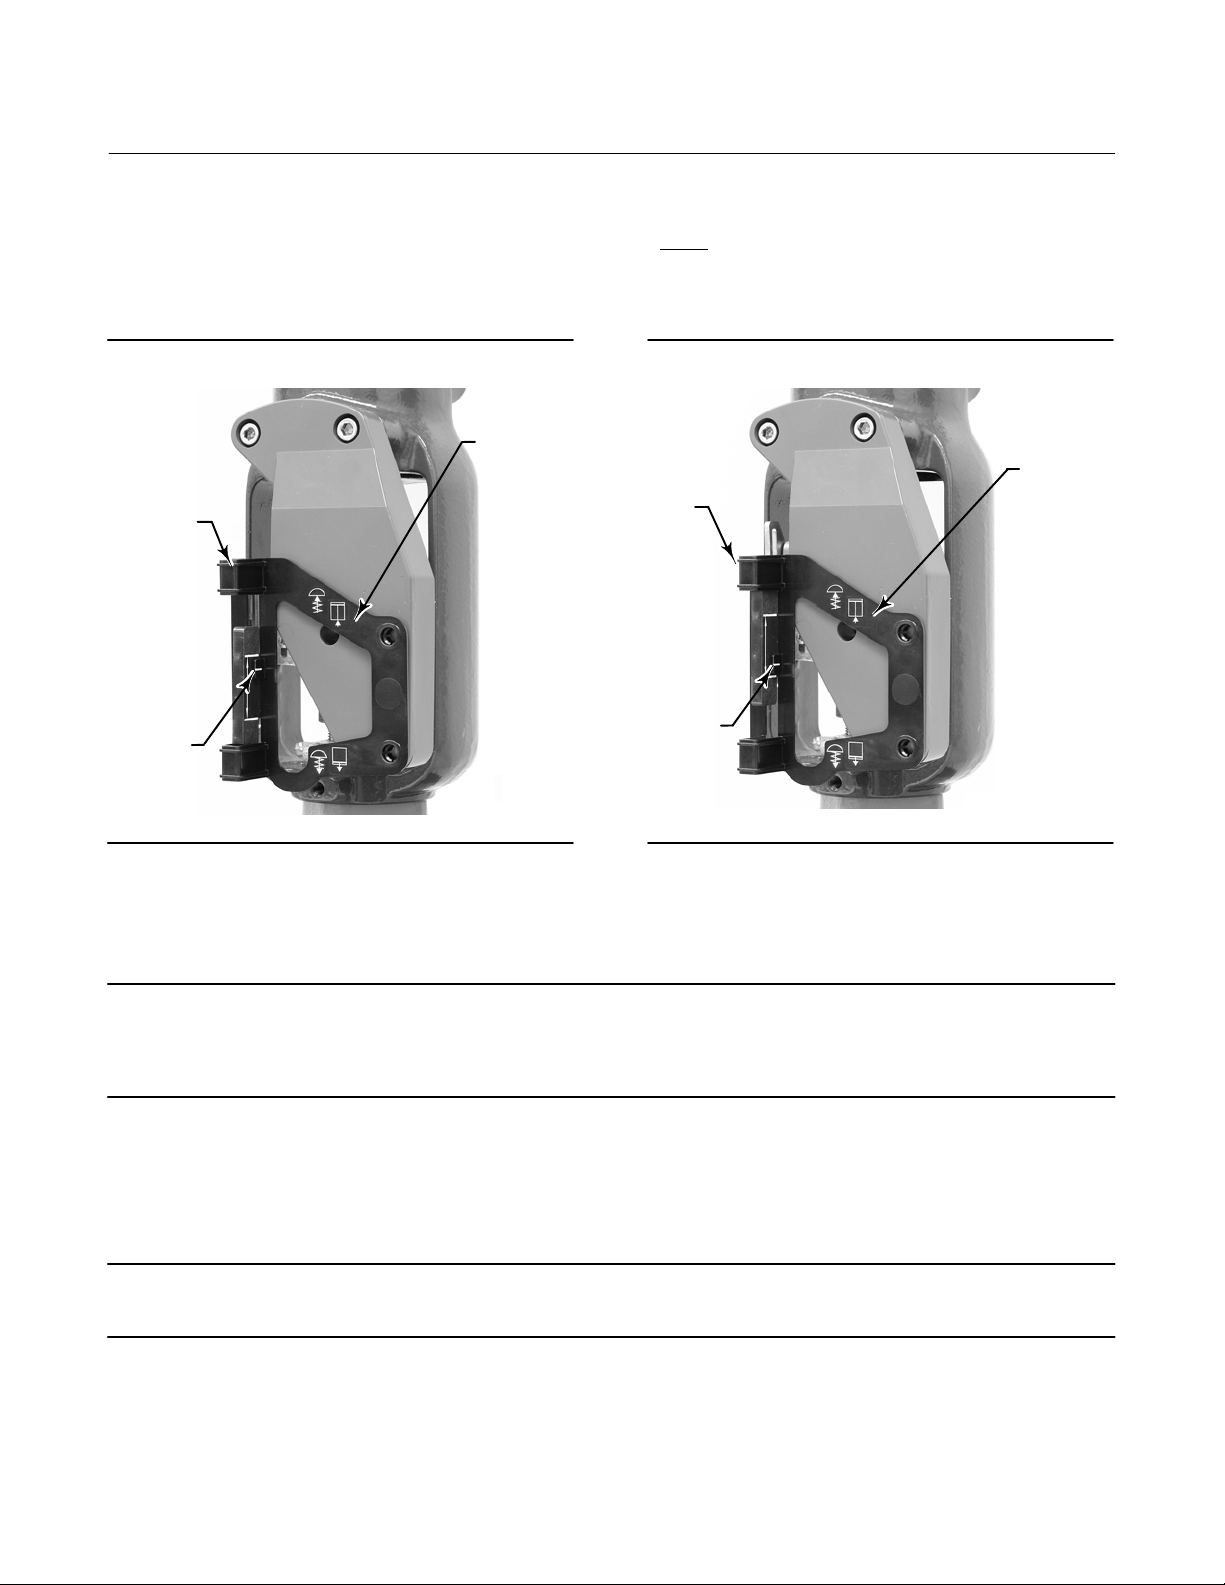
Figure 2. Air‐to‐Open Magnet Assembly Alignment
ALIGNMENT
TEMPLATE
RETAINING
SLOT
INDEX
MARK
W9718
6. Tighten the fasteners and remove the alignment template.
Figure 3. Air‐to‐Close Magnet Assembly Alignment
ALIGNMENT
RETAINING
SLOT
INDEX
MARK
W9719
TEMPLATE
Note
Use a flat end hex key to tighten the mounting assembly fasteners to a torque of 2.37 N•m (21 lbf•in) for 4 mm screws, and
5.08 N•m (45 lbf•in) for 5 mm screws. While tightening the fasteners using the hex key should be sufficient, blue (medium) thread
locker may be used for additional security.
7. Mount the digital valve controller to the mounting bracket, using the mounting bolts.
8. Check for clearance between the magnet assembly and the DVC6200 feedback slot.
Note
Ensure that there is clearance between the magnet assembly and the DVC6200 housing slot throughout the full range of travel.
9. For remote mount applications, proceed to page 13 for DVC6205 base unit mounting. Otherwise, proceed to
Step 2—Connect the Pneumatic Tubing on page 15.
5
Page 6
DVC6200 Digital Valve Controllers
January 2014
Quick Start Guide
D103556X012
Sliding‐Stem Linear Actuators Over 210 mm (8.25 inches) Travel
1. Isolate the control valve from the process line pressure and release pressure from both sides of the valve body. Shut
off all pressure lines to the pneumatic actuator, releasing all pressure from the actuator. Use lock‐out procedures to
be sure that the above measures stay in effect while working on the equipment.
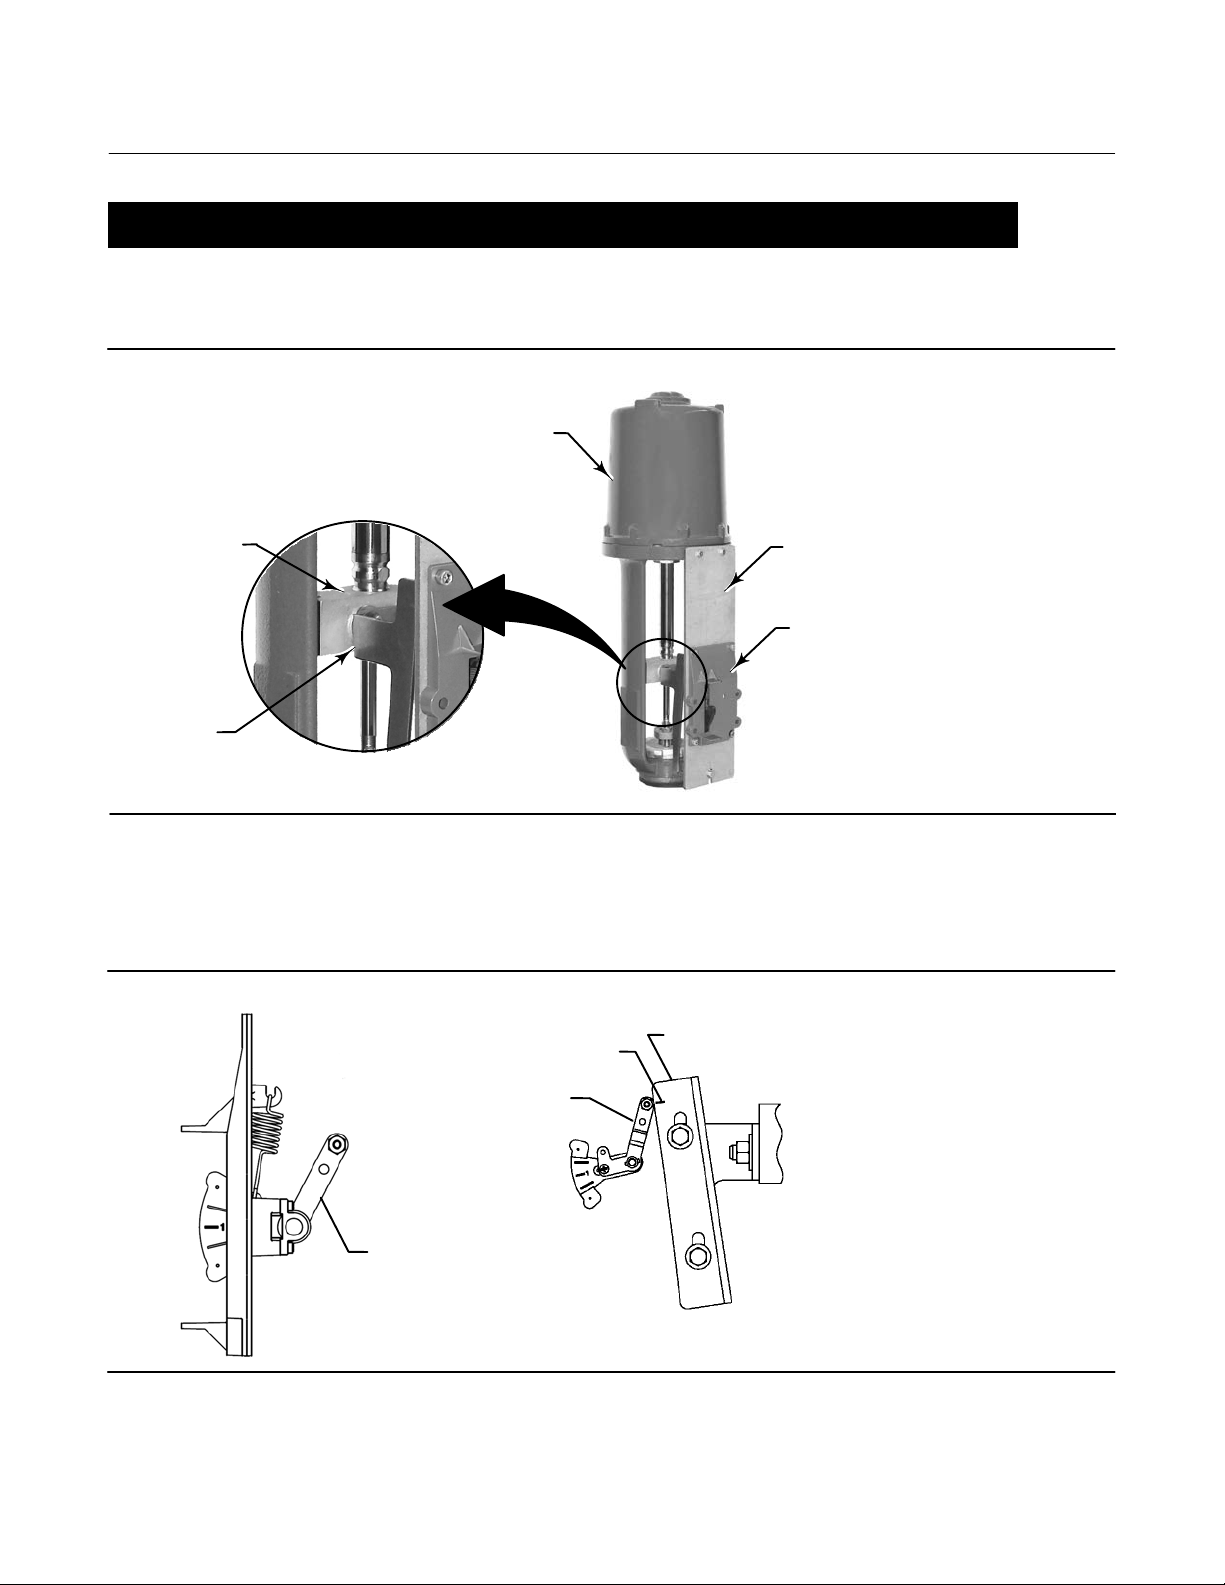
Figure 4. Mounting on Sliding‐Stem (Linear) Actuators over 210 mm (8.25 Inches) Travel
ACTUATOR
VALVE STEM
CONNECTOR
CAM
W9709
MOUNTING ADAPTOR
LONG STROKE MOUNTING KIT
(DVC6200 NOT SHOWN)
2. Install the cam to the valve stem connector as described in the instructions included with the mounting kit.
3. Install the mounting adaptor to the actuator.
4. Attach the digital valve controller and mounting kit assembly to the mounting adaptor. The roller on the digital
valve controller feedback arm will contact the actuator cam as it is being attached.
Figure 5. Roller Arm Variation used for Sliding‐Stem (Linear) Actuators over 210 mm (8.25 Inches) Travel
CAM/ROLLER
POSITION MARK
ROLLER ARM
CAM
ROLLER
ARM
E1543
E1229
ACTUATOR IS FULLY EXTENDED
5. For remote mount applications, proceed to page 13 for DVC6205 base unit mounting. Otherwise, proceed to
Step 2—Connect the Pneumatic Tubing on page 15.
6
Page 7
Quick Start Guide
D103556X012
DVC6200 Digital Valve Controllers
January 2014
Fisher GX Actuators
1. Isolate the control valve from the process line pressure and release pressure from both sides of the valve body. Shut
off all pressure lines to the actuator, releasing all pressure from the actuator. Use lock‐out procedures to be sure
that the above measures stay in effect while you work on the equipment.
2. The DVC6200 digital valve controller mounts directly on the GX actuator without the need for a mounting bracket.
Make sure you have the correct DVC6200 housing, identified by mounting bolt slots (not holes) below the output
press sure port.
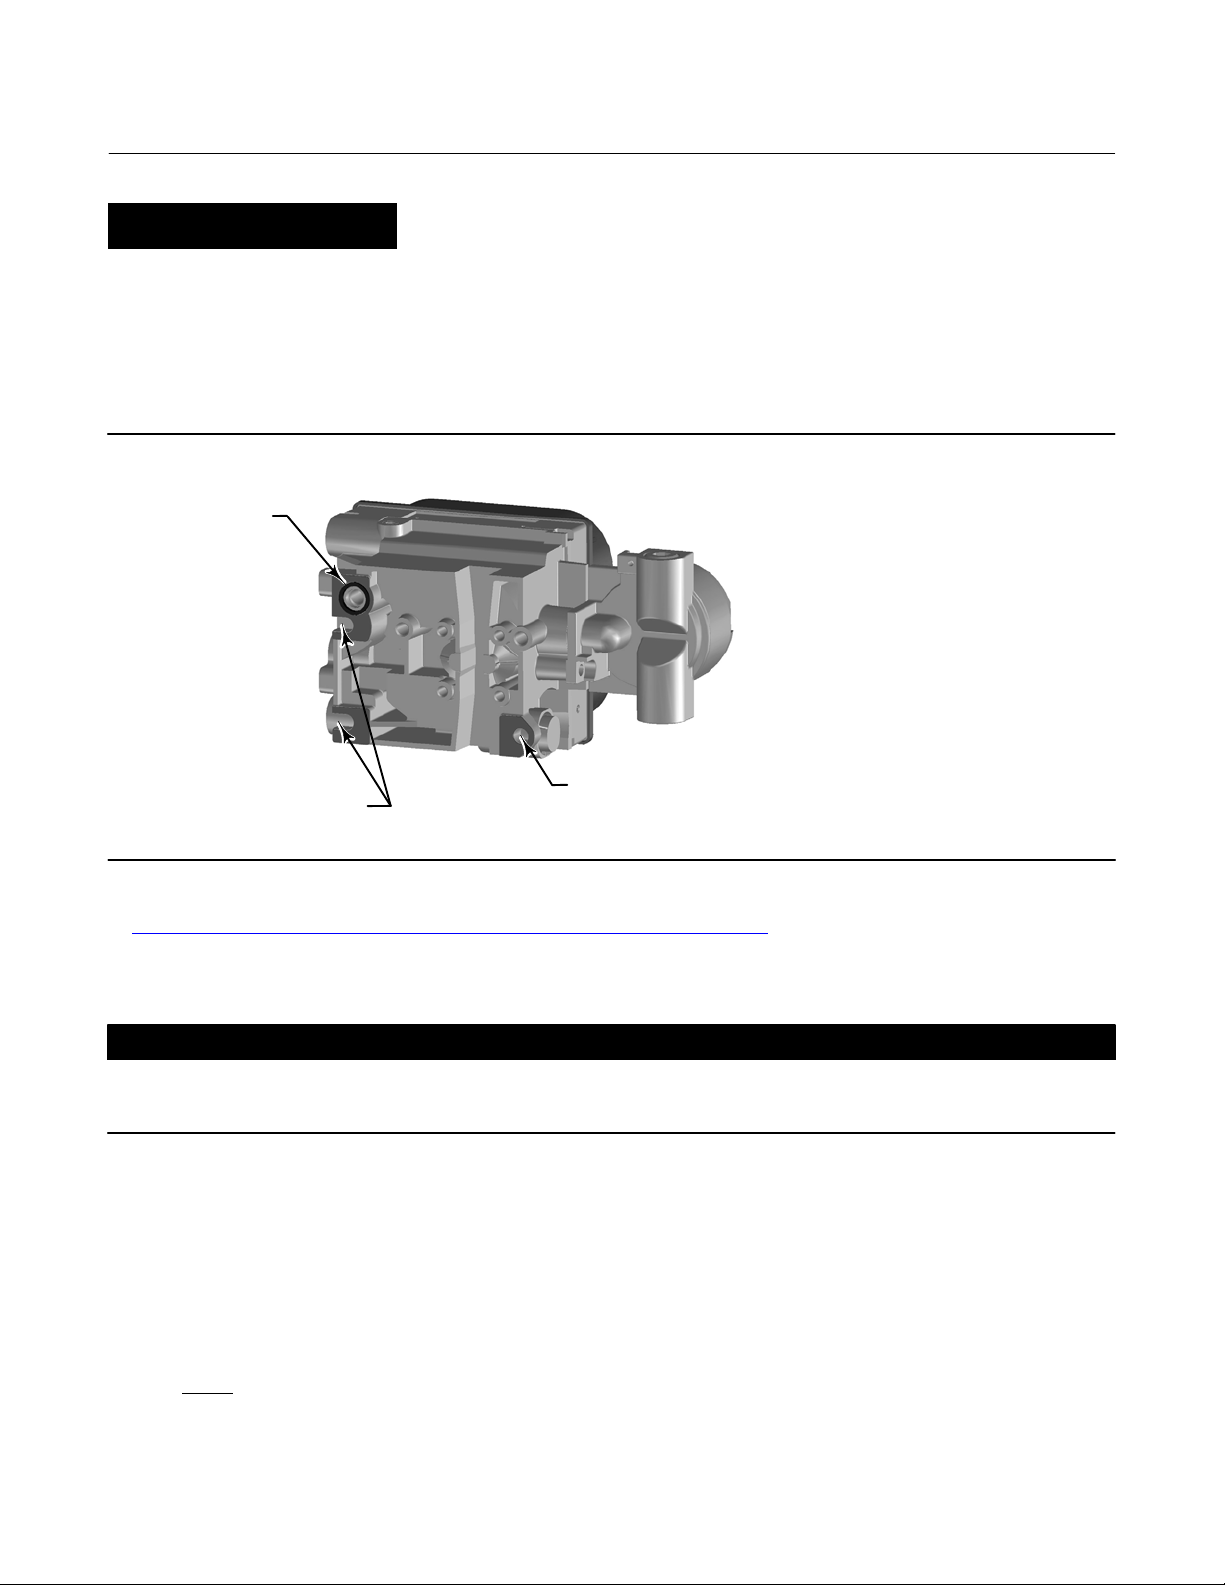
Figure 6. Housing Configuration for Fisher GX Actuators
INTEGRAL OUTPUT
PRESSURE PORT
HOLE FOR
SLOTS FOR
MOUNTING BOLTS
W9704
MOUNTING BOLT
3. Identify the yoke side to mount the DVC6200 digital valve controller based on the actuator fail mode. Refer to the
GX Control Valve and Actuator System instruction manual (D103175X012)
.
4. Loosely attach the feedback pieces and magnet assembly to the valve stem connector. Do not tighten the fasteners
because fine adjustment is required.
CAUTION
Do not install a magnet assembly that is shorter than the physical travel of the actuator. Loss of control will result from the
magnet assembly moving outside the range of the index mark in the feedback slot of the DVC6200 housing.
5. Using the alignment template (supplied with the mounting kit), position the feedback assembly inside the retaining
slot.
6. Align the magnet assembly as follows:
For air‐to‐open GX actuators
Vertically align the magnet assembly so that the center line of the alignment template is lined up as close as possible
with the upper
so that the index mark in the feedback slot of the DVC6200 housing is within the valid range on the magnet assembly
throughout the range of travel. See figure 7.
extreme of the valid travel range on the magnet assembly. The magnet assembly should be positioned
7
Page 8
DVC6200 Digital Valve Controllers
January 2014
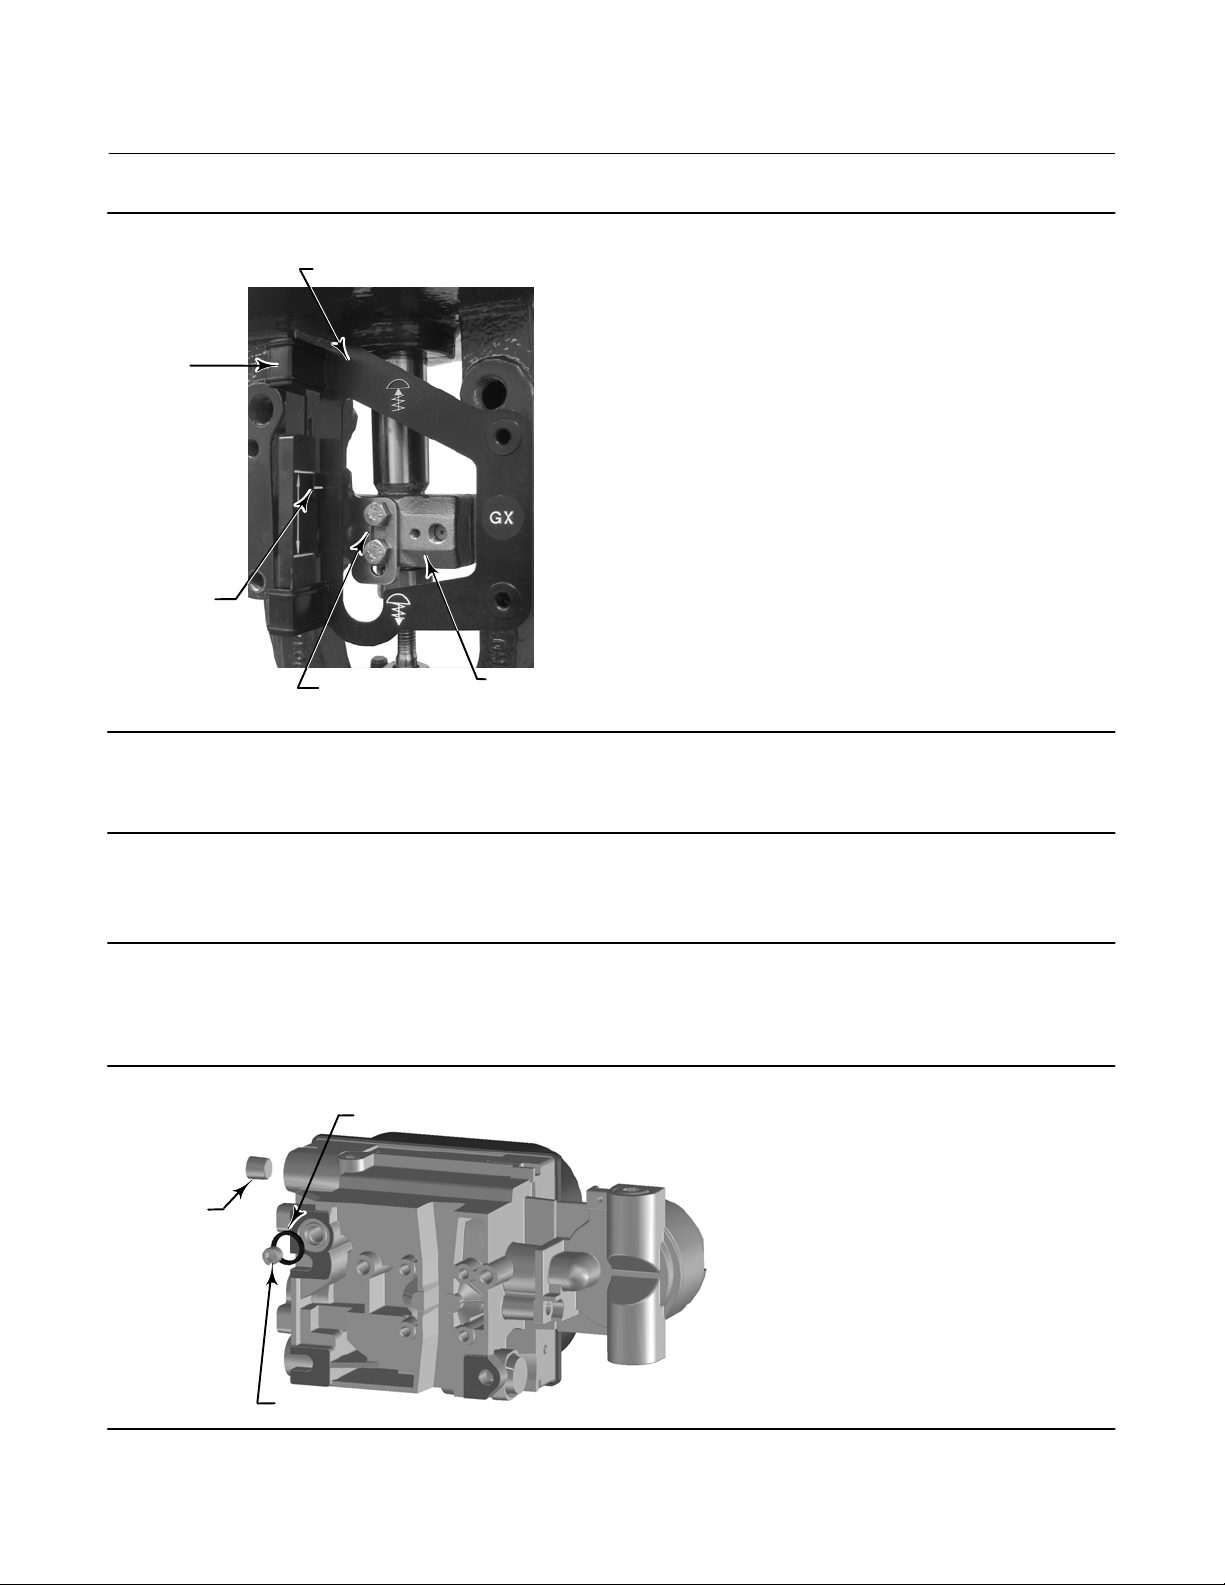
Figure 7. Air‐to‐Open Fisher GX Magnet Assembly Alignment
ALIGNMENT TEMPLATE
RETAINING
SLOT
INDEX
MARK
Quick Start Guide
D103556X012
W9218
FEEDBACK PIECES
VALVE STEM
CONNECTOR
7. Tighten the fasteners and remove the alignment template.
Note
Use a flat end hex key to tighten the mounting assembly fasteners to a torque of 2.37 N•m (21 lbf•in) for 4 mm screws, and
5.08 N•m (45 lbf•in) for 5 mm screws. While tightening the fasteners using the hex key should be sufficient, blue (medium) thread
locker may be used for additional security.
8. Remove the plug (R1/8) from the back of the DVC6200 housing. This pneumatic output port on the DVC6200 lines
up with the integral GX actuator pneumatic port. See figure 8.
Figure 8. Modifications for Fisher GX Actuator; Air‐to‐Open Construction Only
INSTALL O‐RING
INSTALL
1/4 NPT PLUG
W9707
8
REMOVE R1/8 PLUG
Page 9
Quick Start Guide
D103556X012
DVC6200 Digital Valve Controllers
January 2014
9. Install the plug (1/4 NPT, included in the mounting kit) to the external output pneumatic port A.
10. Using a 5 mm hex wrench, attach the digital valve controller to the GX actuator mounting pad on the side that has
the open pneumatic port. Be sure to place the O‐ring between the digital valve controller's pneumatic output and
the actuator mounting pad. Pneumatic tubing is not required because the air passages are internal to the actuator.
11. Check for clearance between the magnet assembly and the DVC6200 feedback slot.
12. If not already installed, install a vent in the port on the upper diaphragm casing's air supply connection on the
actuator yoke leg.
13. For remote mount applications, proceed to page 13 for DVC6205 base unit mounting. Otherwise, proceed to
Step 2—Connect the Pneumatic Tubing on page 15.
For air‐to‐close GX actuators
Vertically align the magnet assembly so that the center line of the alignment template is lined up as close as possible
with the lower
so that the index mark on the pole pieces (back of the DVC6200 housing) is within the valid range on the magnet
assembly throughout the range of travel. See figure 9.
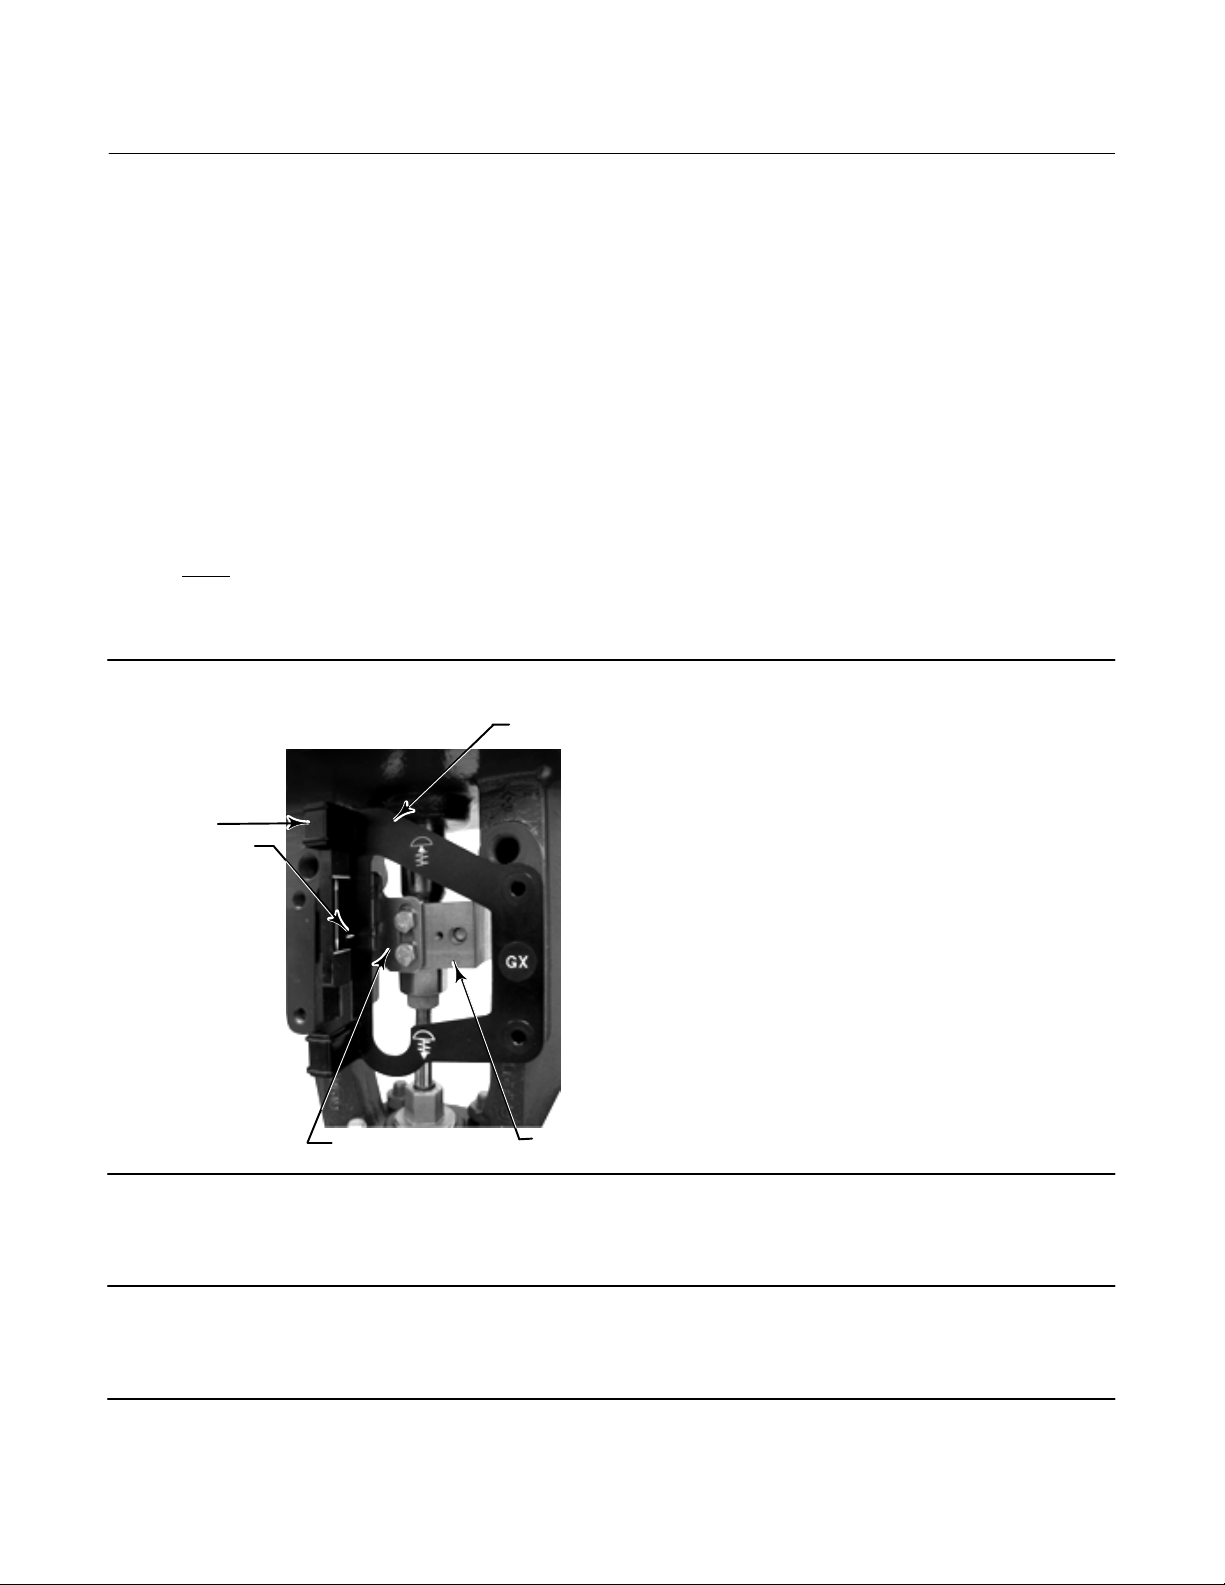
Figure 9. Air‐to‐Close Fisher GX Magnet Assembly Alignment
extreme of the valid travel range on the magnet assembly. The magnet assembly should be positioned
ALIGNMENT
TEMPLATE
RETAINING
SLOT
INDEX MARK
W9219
FEEDBACK PIECES
VALVE STEM
CONNECTOR
7. Tighten the fasteners and remove the alignment template.
Note
Use a flat end hex key to tighten the mounting assembly fasteners to a torque of 2.37 N•m (21 lbf•in) for 4 mm screws, and
5.08 N•m (45 lbf•in) for 5 mm screws. While tightening the fasteners using the hex key should be sufficient, blue (medium) thread
locker may be used for additional security.
9
Page 10

DVC6200 Digital Valve Controllers
January 2014
Quick Start Guide
D103556X012
8. Using a 5 mm hex wrench, attach the digital valve controller to the GX actuator mounting pad.
9. Check for clearance between the magnet assembly and the DVC6200 feedback slot.
10. Install tubing between the actuator casing and the appropriate DVC6200 pneumatic output port.
11. If not already installed, install a vent in the port on the lower diaphragm casing.
12. For remote mount applications, proceed to page 13 for DVC6205 base unit mounting. Otherwise, proceed to
Step 2—Connect the Pneumatic Tubing on page 15.
Note
When field converting a GX actuator from air-to-close to air-to-open (or vice‐versa), you will need to change the plugs for the
pneumatic passages in the DVC6200 housing.
D
To convert to air-to-open, remove the R1/8 pneumatic plug on the back of the DVC6200 housing and install an O‐ring. Plug
the external pneumatic output with a 1/4 NPT plug. Refer to figure 8.
To convert to air-to-close, remove the external pneumatic plug. Install an R1/8 plug on the back of the DVC6200 housing.
D
Install tubing between the pneumatic output connection of the DVC6200 to the pneumatic port on top of the actuator
casing.
10
Page 11
Quick Start Guide
D103556X012
DVC6200 Digital Valve Controllers
January 2014
Fisher Rotary Actuators
1. Isolate the control valve from the process line pressure and release pressure from both sides of the valve body. Shut
off all pressure lines to the pneumatic actuator, releasing all pressure from the actuator. Use lock‐out procedures to
be sure that the above measures stay in effect while working on the equipment.
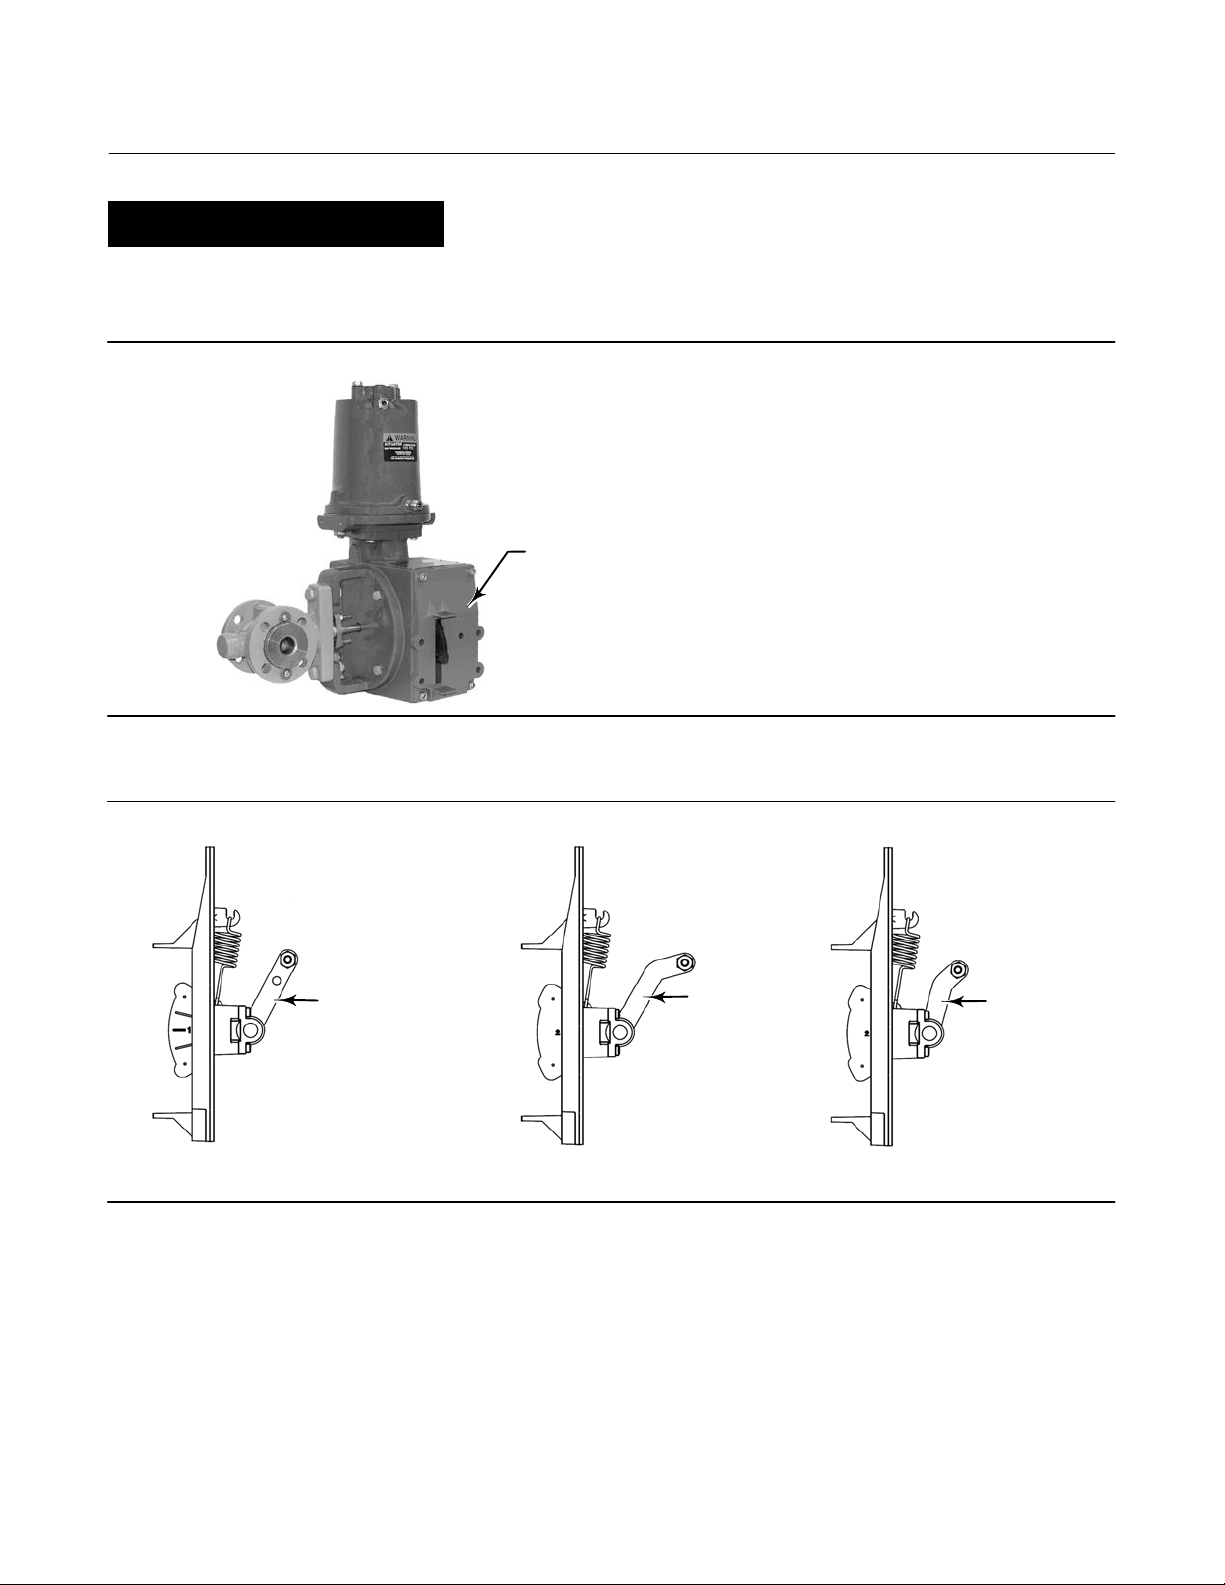
Figure 10. Mounting on Rotary Actuators
ROTARY MOUNTING KIT
(DVC6200 NOT SHOWN)
W9708
2. Verify that the appropriate cam is installed on the actuator as described in the instructions included with the
mounting kit.
Figure 11. Rotary Actuator Mounting Variations
ROLLER ARM
2052 SIZE 2 AND 3
1051/1052 SIZE 40-70
SIZE 1061 SIZE 30-100
NOTE THE DIFFERENCE IN THE SHAPE AND LENGTH OF THE ROLLER ARM
E1229
2052 SIZE 1
ROLLER ARM
1051 SIZE 33
1052 SIZE 20-33
ROLLER ARM
3. Mount the DVC6200 on the actuator as follows:
D If required, a mounting adaptor is included in the mounting kit. Attach the adaptor to the digital valve controller,
then attach the digital valve controller assembly to the actuator. The roller on the digital valve controller
feedback arm will contact the actuator cam as it is being attached.
D If no mounting adaptor is required, attach the digital valve controller and mounting kit assembly to the actuator.
The roller on the digital valve controller feedback arm will contact the actuator cam as it is being attached.
4. For remote mount applications, proceed to page 13 for DVC6205 base unit mounting. Otherwise, proceed to
Step 2—Connect the Pneumatic Tubing on page 15.
11
Page 12
DVC6200 Digital Valve Controllers
January 2014
Quick Start Guide
D103556X012
Quarter‐Turn Rotary Actuators
The DVC6200 digital valve controller can be mounted to any quarter‐turn rotary actuator, as well as those that comply
with the NAMUR guidelines. A mounting bracket and associated hardware are required. Refer to figure 12.
1. Isolate the control valve from the process line pressure and release pressure from both sides of the valve body. Shut
off all pressure lines to the actuator, releasing all pressure from the actuator. Use lock‐out procedures to be sure
that the above measures stay in effect while you work on the equipment.
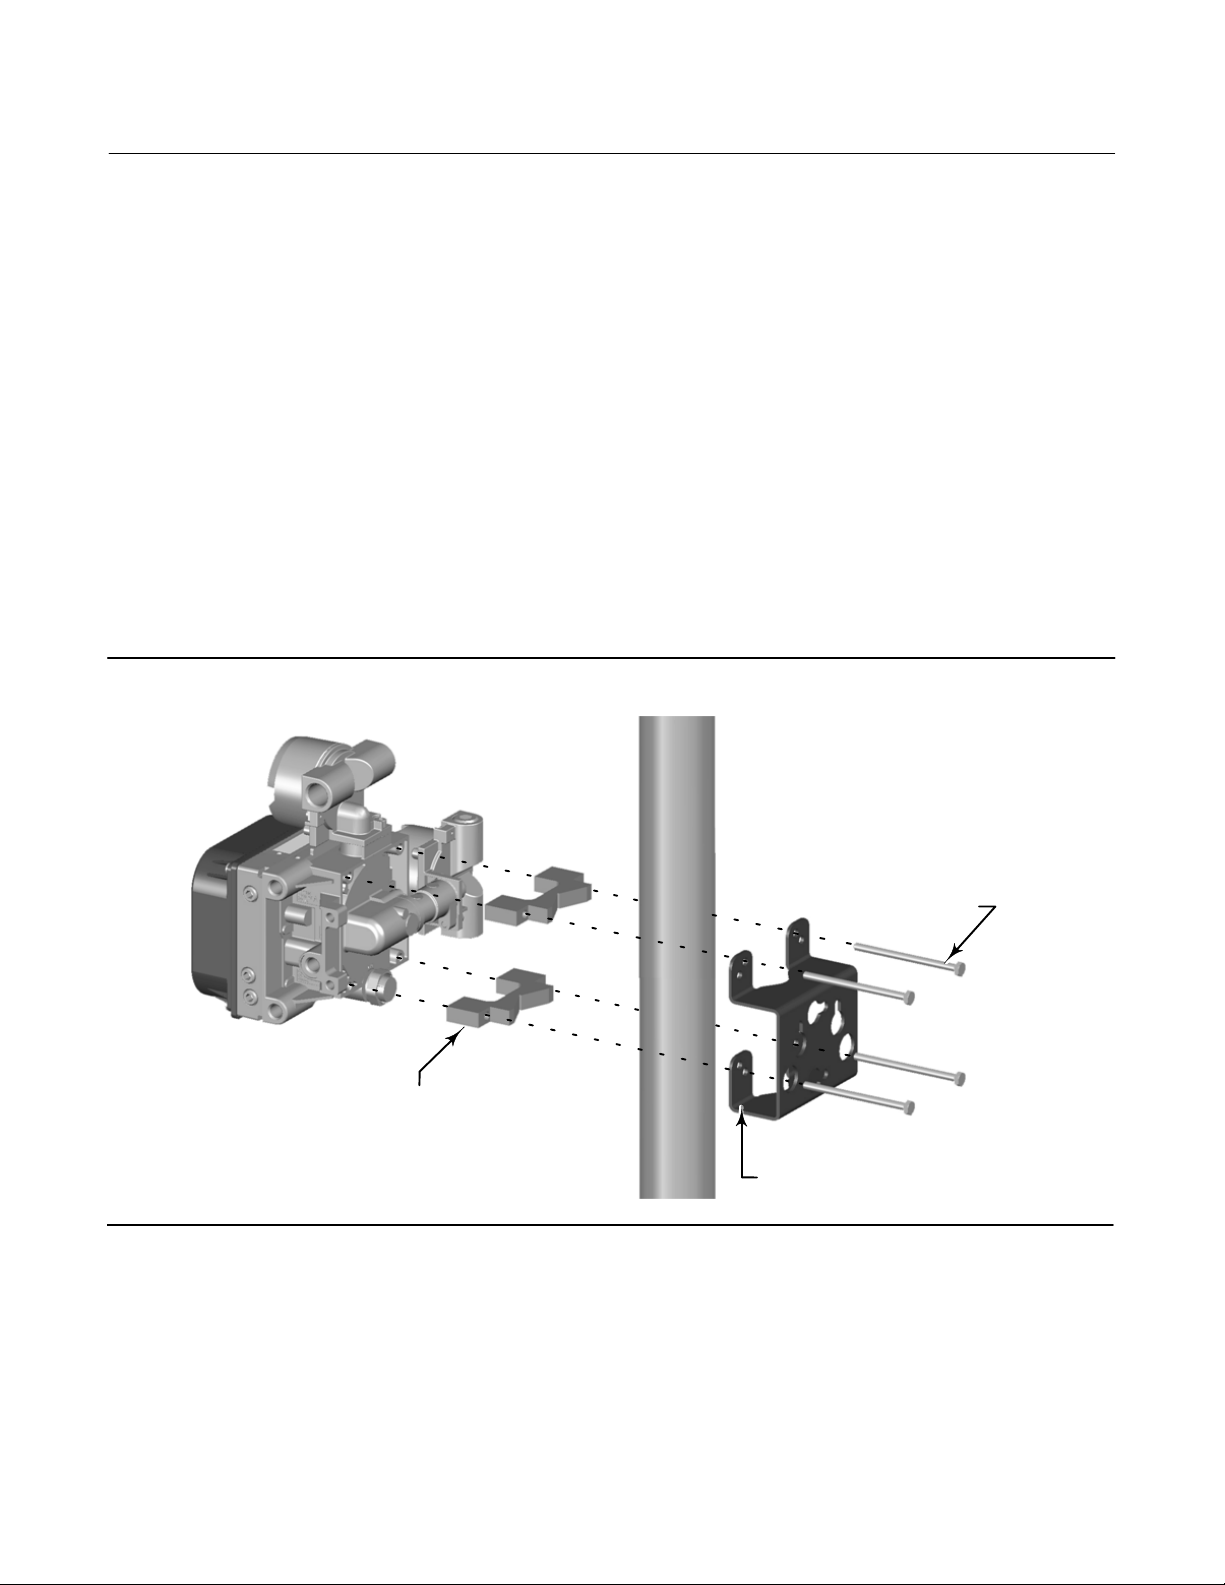
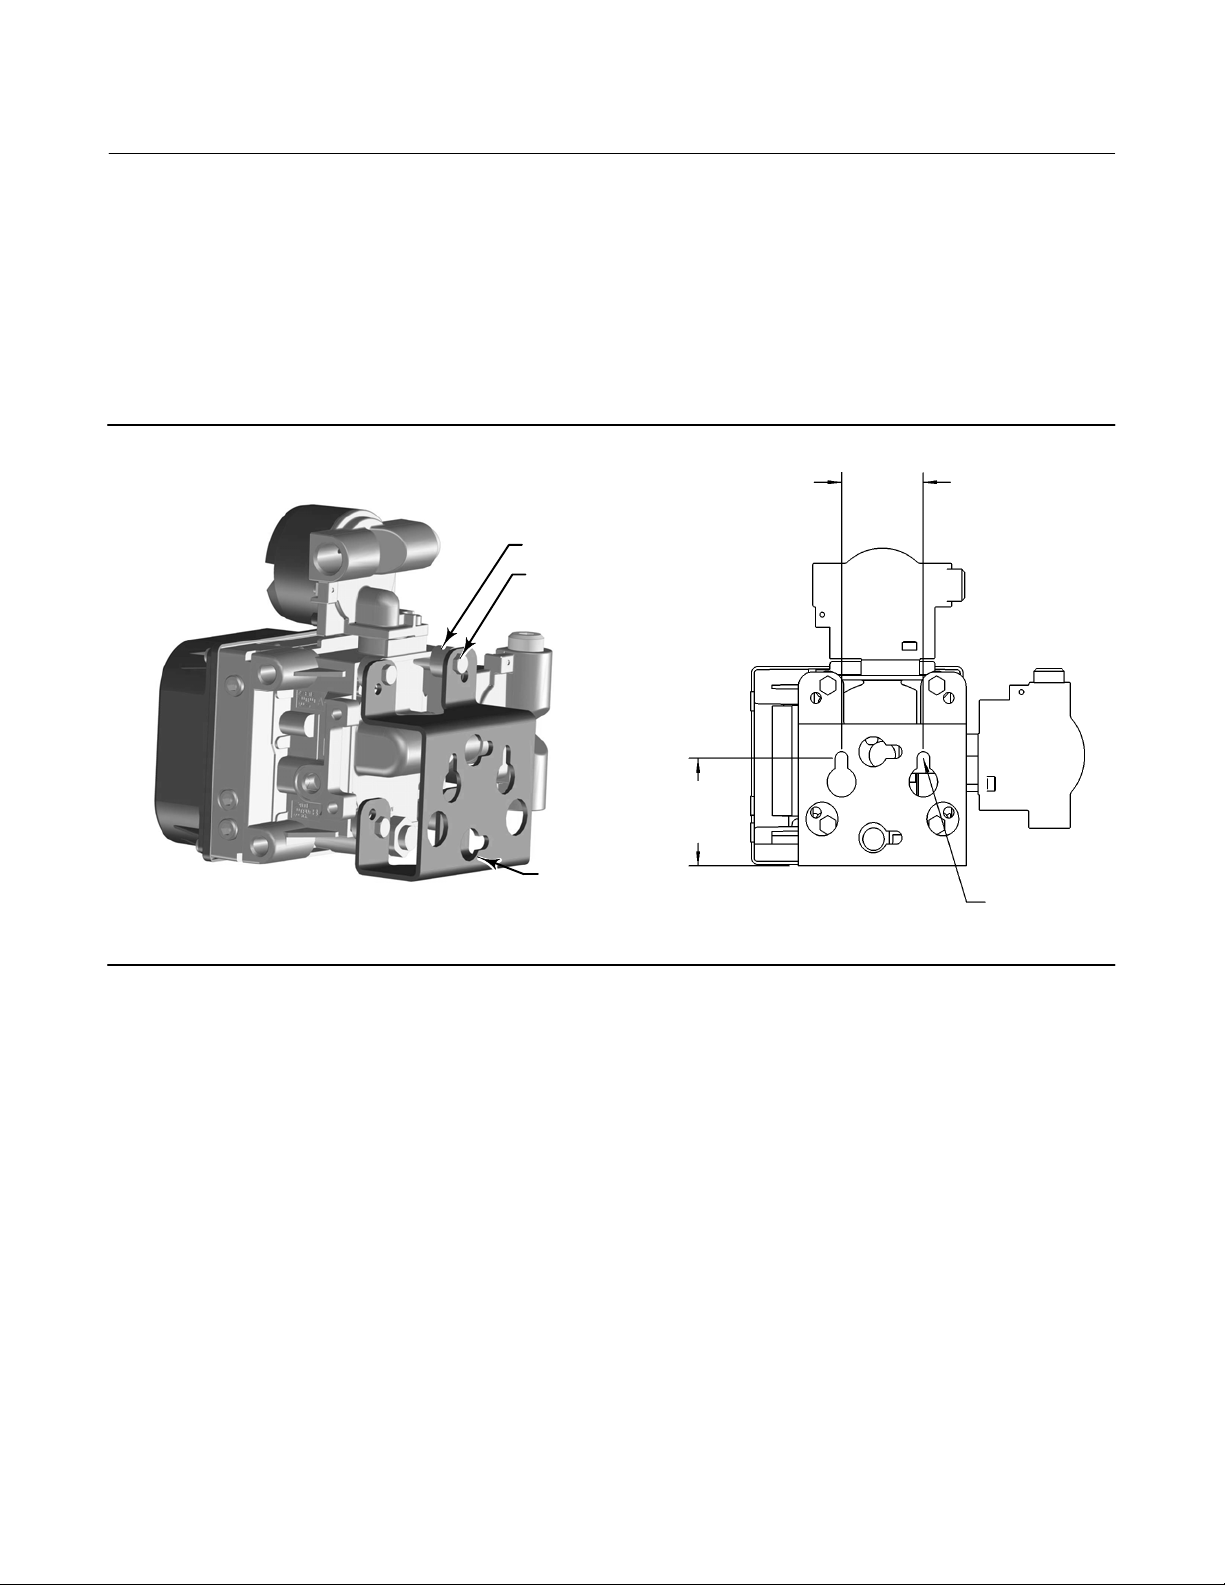
Figure 12. Mounting on Quarter‐Turn Actuators
W9715
M6 MOUNTING BOLTS (4)
2. Attach the magnet assembly to the actuator shaft. At mid‐travel, the flats on the magnet assembly should be
approximately parallel to the channel on the back of the DVC6200 housing, as shown in figure 13.
Figure 13. Magnet Assembly Orientation on Quarter‐Turn Actuators
DVC6200
ORIENTATION
AT ONE TRAVEL
EXTREME
ORIENTATION
AT MID‐TRAVEL
(FLATS PARALLEL
TO DVC6200
CHANNEL)
ORIENTATION
AT THE OTHER
TRAVEL EXTREME
1 THIS EXAMPLE SHOWS AN ACTUATOR WITH 90_ TRAVEL. ON AN ACTUATOR THAT HAS LESS THAN 90_ TRAVEL THE MAGNET ASSEMBLY MAY NOT BE
PARALLEL AT THE MID-TRAVEL POINT. TO VERIFY THE MAGNET ASSEMBLY POSITION IS IN WORKING RANGE, CONFIRM TRAVEL COUNTS ARE WITHIN THE
EXPECTED RANGE OF 175-3800 USING VALVELINK SOFTWARE OR A FIELD COMMUNICATOR.
1
ACTUATOR
W9700
3. Install the mounting bracket on the actuator.
4. Attach the digital valve controller to the mounting bracket using the 4 mounting bolts, as shown in figure 12.
5. Check for clearance between the magnet assembly and the DVC6200 feedback slot.
6. For remote mount applications, proceed to page 13 for DVC6205 base unit mounting. Otherwise, proceed to
Step 2—Connect the Pneumatic Tubing on page 15.
12
Page 13
Quick Start Guide
D103556X012
DVC6200 Digital Valve Controllers
January 2014
DVC6205 Remote Mount Base Unit Mounting
For remote‐mounted digital valve controllers, the DVC6205 base unit ships separately from the control valve and does
not include tubing, fittings or wiring.
Pipestand Mounting
1. Position a standoff on the back of the base unit.
2. Using two 101.6 mm (4‐inch) 1/4‐20 hex head screws loosely attach the base unit to the pipestand with the
mounting bracket.
3. Position the second standoff, then using the remaining 101.6 mm (4‐inch) hex head screws, securely fasten the
base unit to the pipe stand.
4. Tighten all screws.
5. Proceed to Step 2—Connect the Pneumatic Tubing on page 15.
Figure 14. FIELDVUE DVC6205 Pipestand Mounting
X0437
4‐INCH 1/4‐20
HEX HEAD SCREW
STANDOFF
MOUNTING BRACKET
13
Page 14
DVC6200 Digital Valve Controllers
January 2014
Quick Start Guide
D103556X012
Wall Mounting
1. Install the wall mounting screws by using the mounting bracket as a template.
2. Install the mounting bracket to the back of the base unit using the spacers and screws provided in the mounting kit.
3. Slide the assembly on the wall mounting screws and tighten.
4. Proceed to Step 2—Connect the Pneumatic Tubing on page 15.
Figure 15. FIELDVUE DVC6205 Wall Mounting
57
(2.25)
SPACER
1‐INCH 1/4‐20
HEX HEAD
SCREW
X0428
MOUNTING
BRACKET
72
(2.82)
10C1796‐A
2 MOUNTING
HOLES
8.6/0.34
14
Page 15
Quick Start Guide
D103556X012
DVC6200 Digital Valve Controllers
Step 2—Connect the Pneumatic Tubing
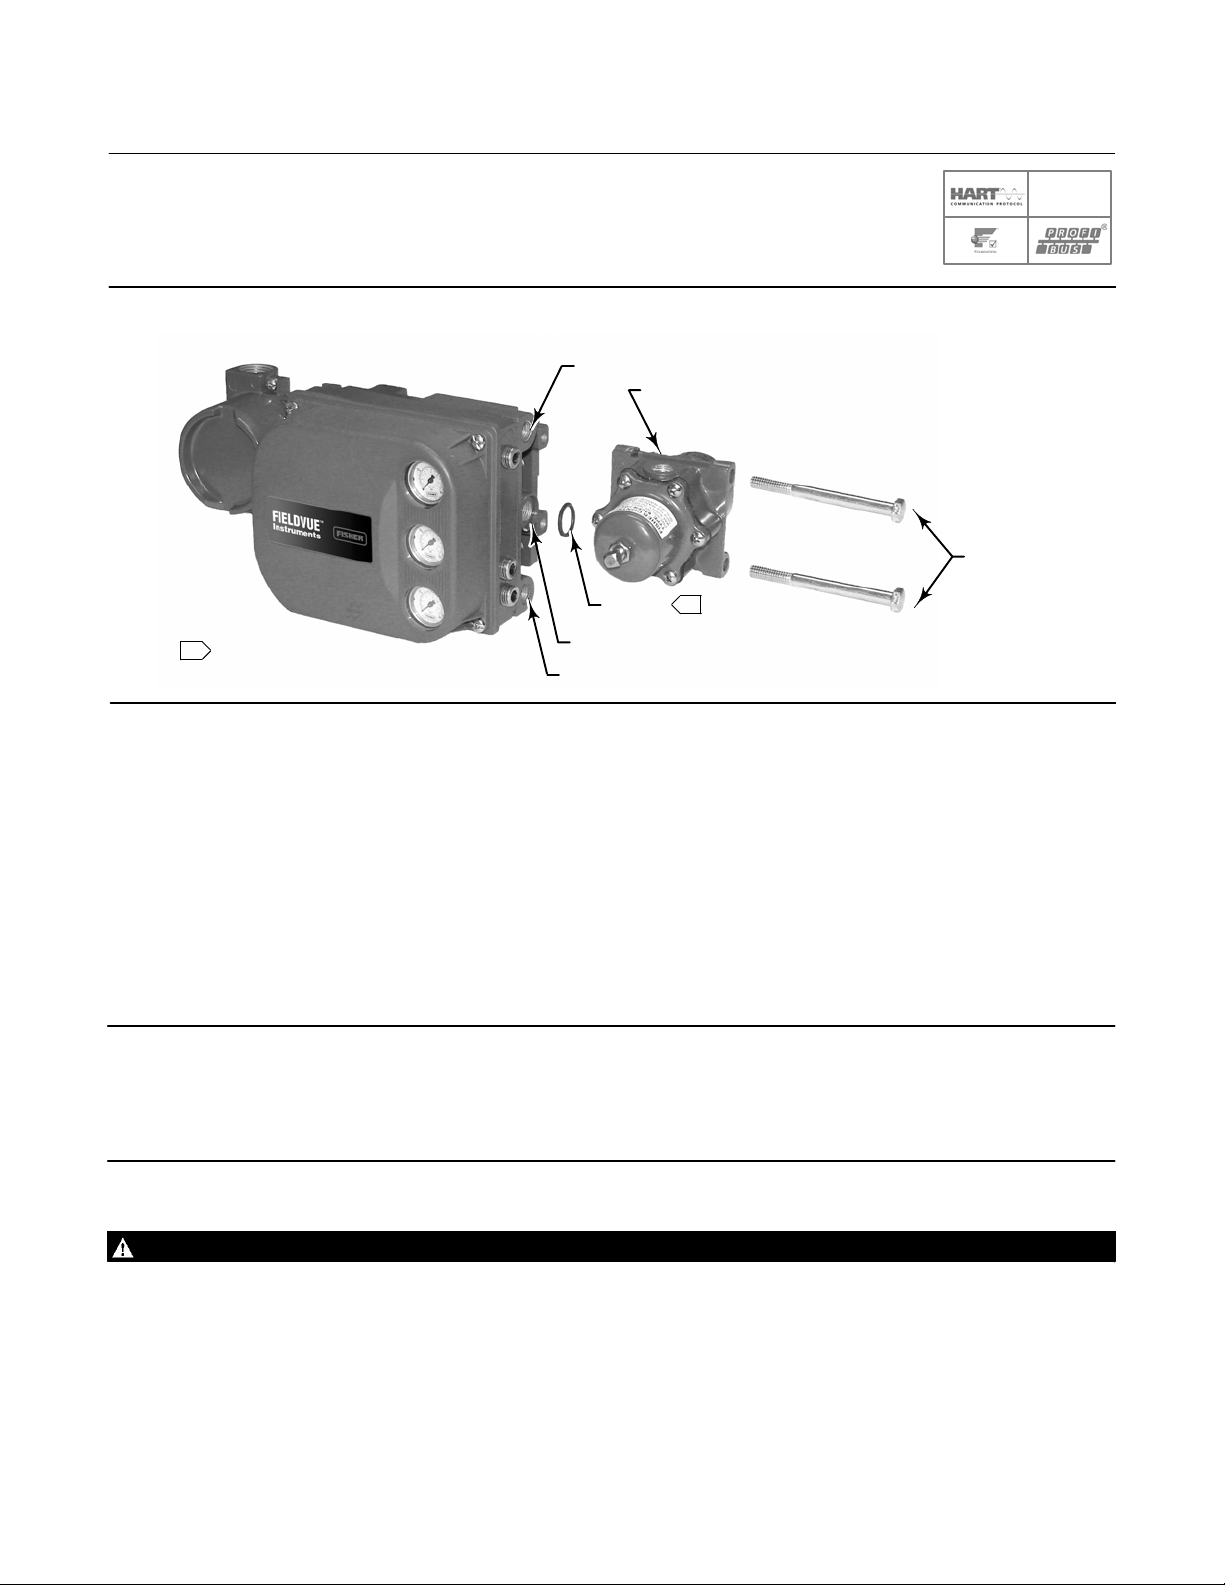
Figure 16. Integral Mounting of a Fisher 67CFR Regulator on a FIELDVUE DVC6200 Digital Valve Controller
OUTPUT A (1/4 NPT)
67CFR
CAP SCREWS
January 2014
SIS
1
NOTE:
1 APPLY LUBRICANT
W9702-1
O‐RING
SUPPLY CONNECTION (1/4 NPT)
OUTPUT B (1/4 NPT)
1. Connect the DVC6200 pneumatic output to the actuator input using at least 10 mm (3/8inch) diameter tubing.
D When using a singleacting direct digital valve controller (relay A or C) on a singleacting actuator, connect
OUTPUT A to the actuator pneumatic input.
D When using a singleacting reverse digital valve controller (relay B) on a singleacting actuator, connect OUTPUT
B to the actuator diaphragm casing.
D When using a doubleacting digital valve controller (relay A) on a doubleacting actuator, connect OUTPUT A and
OUTPUT B to the appropriate actuator pneumatic input. With no input current to the DVC6200, OUTPUT A is at
zero pressure and OUTPUT B is at full supply pressure when the relay is properly adjusted.
Note
To have the actuator stem extend from the cylinder with increasing input signal, connect OUTPUT A to the actuator cylinder
connection farthest from the actuator stem. Connect OUTPUT B to the cylinder connection closest to the actuator stem. To have
the actuator stem retract into the cylinder with increasing input signal, connect OUTPUT A to the actuator cylinder connection
closest to the actuator stem. Connect OUTPUT B to the cylinder connection farthest from the actuator stem.
WARNING
Supply pressure must be clean, dry air that meets the requirements of ISA Standard 7.0.01.
Alternatively, natural gas must be clean, dry, oil‐free, and noncorrosive. H
Severe personal injury or property damage may occur from an uncontrolled process if the instrument supply medium is not
clean, dry, oilfree, and noncorrosive. While use and regular maintenance of a filter that removes particles larger than 40
micrometers in diameter will suffice in most applications, further filtration down to 5 micrometer particle size is
recommended. Lubricant content is not to exceed 1 ppm weight (w/w) or volume (v/v) basis. Condensation in the air
supply should be minimized.
S content should not exceed 20 ppm.
2
15
Page 16

DVC6200 Digital Valve Controllers
January 2014
Check with an Emerson Process Management field office and industry instrument air quality standards for use with
corrosive air or if you are unsure about the amount of air filtration or filter maintenance.
When using natural gas as the supply medium, or for explosion proof applications, the following warnings also apply:
D Remove electrical power before removing the housing cap. Personal injury or property damage from fire or explosion
may result if power is not disconnected before removing the cap.
D Remove electrical power before disconnecting any of the pneumatic connections.
D When disconnecting any of the pneumatic connections or any pressure retaining part, natural gas will seep from the
unit and any connected equipment into the surrounding atmosphere. Personal injury or property damage may result
from fire or explosion if natural gas is used as the supply medium and appropriate preventive measures are not taken.
Preventive measures may include, but are not limited to, one or more of the following: ensuring adequate ventilation
and the removal of any ignition sources.
D Ensure that all caps and covers are correctly installed before putting this unit back into service. Failure to do so could
result in personal injury or property damage from fire or explosion.
Quick Start Guide
D103556X012
2. Connect a filter or filter regulator to the DVC6200 supply input using at least 10 mm (3/8inch) diameter tubing.
D When using an integral mounted 67CFR filter regulator, lubricate an Oring and insert it in the recess around the
SUPPLY connection on the digital valve controller. Attach the filter regulator to the side of the digital valve
controller. Thread a 1/4inch sockethead pipe plug into the unused outlet on the filter regulator. This is the
standard method of mounting the filter regulator. No tubing is required.
D When using a yoke mounted 67CFR filter regulator, mount the filter regulator with two cap screws to the
predrilled and tapped holes in the actuator yoke. Thread a 1/4inch sockethead pipe plug into the unused
outlet on the filter regulator. No Oring is required.
D When using a casing mounted filter regulator, use a separate casing mounting bracket (typically provided with
the filter regulator). Attach the mounting bracket to the filter regulator and then attach this assembly to the
actuator casing. Thread a 1/4inch sockethead pipe plug into the unused outlet on the filter regulator. No Oring
is required.
D If the supply pressure is less than the maximum actuator and instrument pressure rating, a regulator is not
required. However, a filter is always required. Attach the filter securely to the actuator or instrument.
WARNING
Personal injury or property damage can occur from cover failure due to overpressure. Ensure that the housing vent
opening is open and free of debris to prevent pressure buildup under the cover.
This unit vents the supply medium into the surrounding atmosphere. When installing this unit in a nonhazardous
(nonclassified) location in a confined area, with natural gas as the supply medium, you must remotely vent this unit to a
safe location. Failure to do so could result in personal injury or property damage from fire or explosion, and area
reclassification.
When installing this unit in a hazardous (classified) location remote venting of the unit may be required, depending upon
the area classification, and as specified by the requirements of local, regional, and national codes, rules and regulations.
Failure to do so when necessary could result in personal injury or property damage from fire or explosion, and area
reclassification.
In addition to remote venting of the unit, ensure that all caps and covers are correctly installed. Failure to do so could result
in personal injury or property damage from fire or explosion, and area reclassification.
3. If necessary, remove the plastic vent on the DVC6200 and install a pipeaway vent line using at least 12.7 mm
(1/2inch) diameter tubing. The vent line must be as short as possible with a minimum number of bends and elbows
to prevent back pressure buildup.
16
Page 17
Quick Start Guide
D103556X012
Figure 17. Vent Connection
DVC6200 Digital Valve Controllers
January 2014
X0429
PLASTIC EXHAUST VENT (3/8 NPT)
WARNING
To avoid personal injury or property damage resulting from bursting or parts, do not exceed maximum supply pressure.
Personal injury or property damage may result from fire or explosion if natural gas is used as the supply medium and
appropriate preventive measures are not taken. Preventive measures may include, but are not limited to, one or more of
the following: Remote venting of the unit, reevaluating the hazardous area classification, ensuring adequate ventilation,
and the removal of any ignition sources.
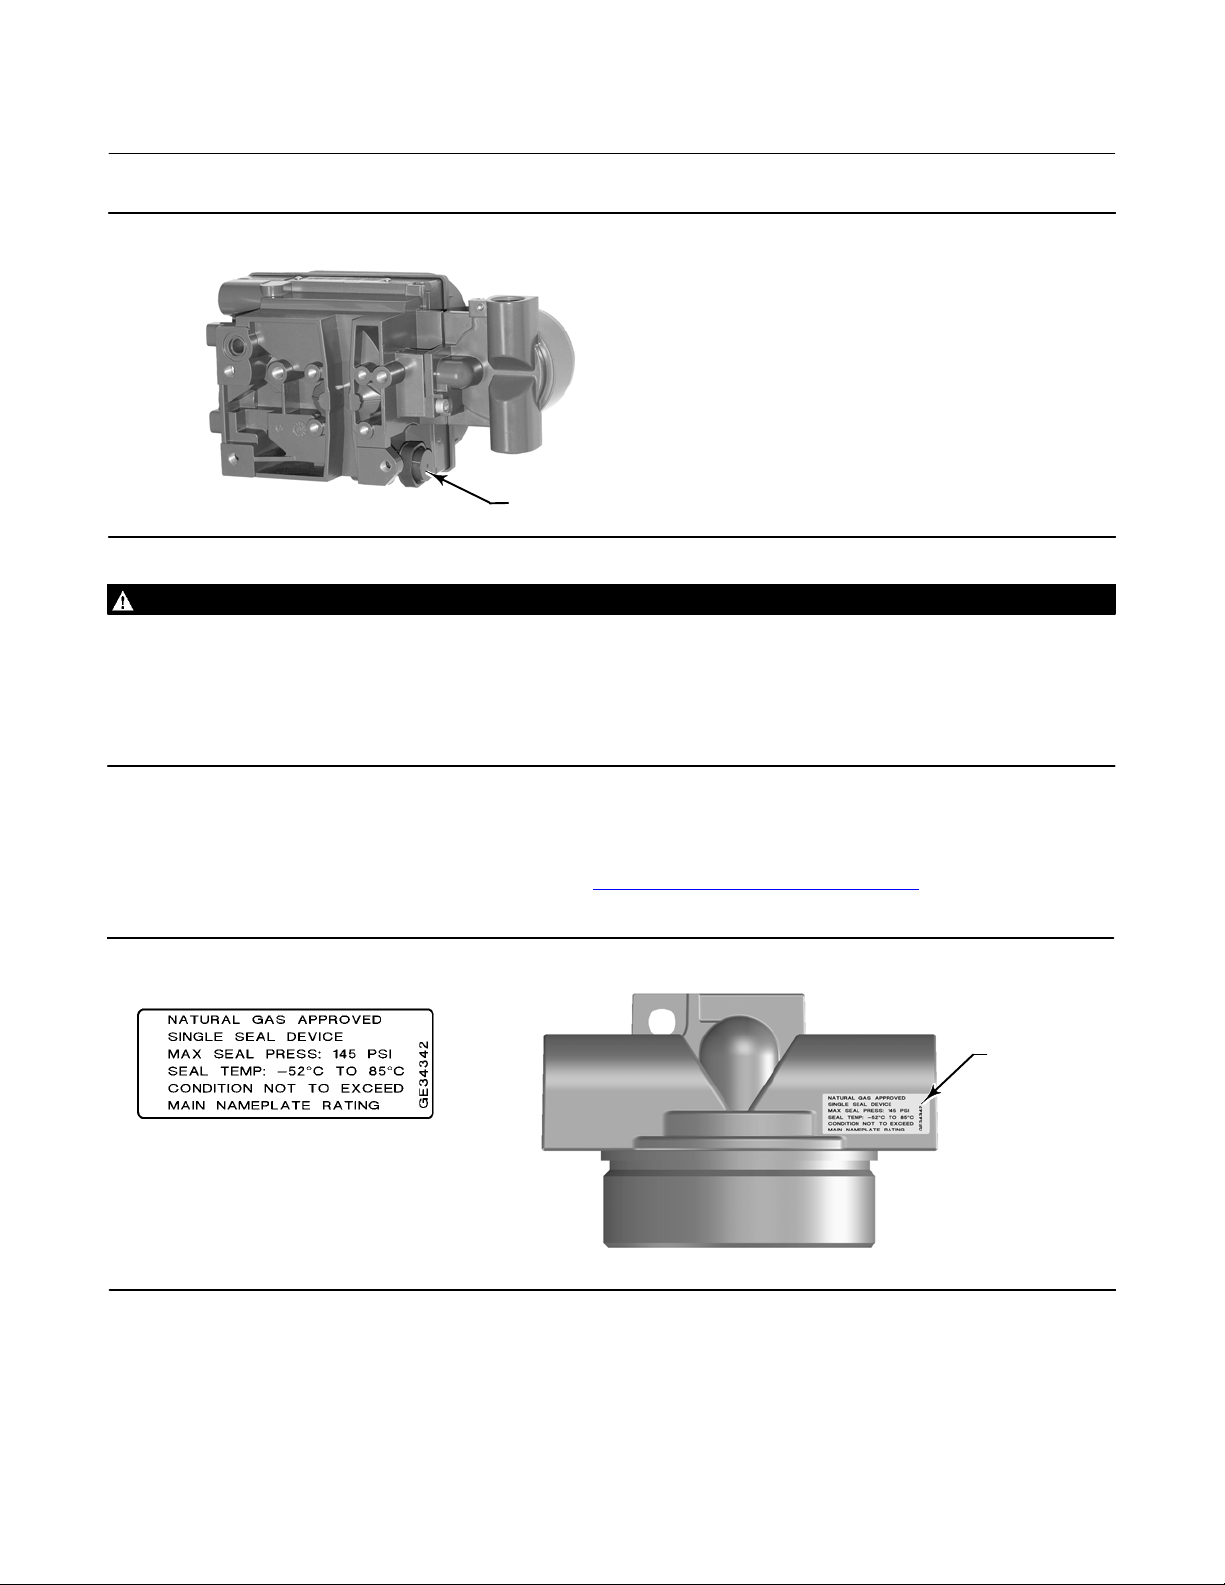
Note
The Natural Gas Certified, Single Seal device option simplifies conduit sealing requirements. Natural Gas Certified, Single Seal
instruments can be identified by the natural gas approval label shown in figure 18. Read and follow all local, regional, and federal
wiring requirements for natural gas installations. Contact your Emerson Process Management sales office
obtaining a Natural Gas Certified, Single Seal DVC6200 digital valve controller.
Figure 18. Label for Natural Gas Certified Terminal Box
for information on
LABEL LOCATED
ON TOP OF
TERMINAL BOX
X0748
4. Connect the pneumatic supply line to the 1/4 NPT IN connection on the filter regulator.
5. Proceed to Step 3—Connect the Electrical Wires on page 19.
17
Page 18

DVC6200 Digital Valve Controllers
January 2014
Quick Start Guide
D103556X012
18
Page 19

Quick Start Guide
D103556X012
DVC6200 Digital Valve Controllers
January 2014
SIS
Step 3—Connect the Electrical Wires
WARNING
Select wiring and/or cable glands that are rated for the environment of use (such as hazardous area, ingress protection and
temperature). Failure to use properly rated wiring and/or cable glands can result in personal injury or property damage
from fire or explosion.
Wiring connections must be in accordance with local, regional, and national codes for any given hazardous area approval.
Failure to follow the local, regional, and national codes could result in personal injury or property damage from fire or
explosion.
To avoid personal injury resulting from electrical shock, do not exceed maximum input voltage specified on the product
nameplate. If the input voltage specified differs, do not exceed the lowest specified maximum input voltage.
Personal injury or property damage caused by fire or explosion may occur if this connection is attempted in a potentially
explosive atmosphere or in an area that has been classified as hazardous. Confirm that area classification and atmosphere
conditions permit the safe removal of the terminal box cover before proceeding.
The valve may move in an unexpected direction when power is applied to the digital valve controller. To avoid personal
injury and property damage caused by moving parts, keep hands, tools, and other objects away from the valve/actuator
assembly when applying power to the instrument.
For FOUNDATION fieldbus™ or PROFIBUS PA devices proceed to page 20
For HARTr devices proceed to page 22
19
Page 20
DVC6200 Digital Valve Controllers
January 2014
Quick Start Guide
D103556X012
FOUNDATION fieldbus or PROFIBUS PA Devices
Refer to the DVC6200f instruction manual (D103412X012) or the DVC6200p instruction manual (D103563X012),
available at www.FIELDVUE.com or from your local Emerson Process Management sales office
information.
for additional
The digital valve controller is normally powered over the bus from a power supply. Refer to the F
OUNDATION fieldbus or
PROFIBUS site planning guide, available from your Emerson Process Management sales office, for proper wire types,
termination, length, grounding practices, etc.
Note
To avoid the valve going to an unknown position when power is applied, the unit digital valve controller is shipped from the factory
with the transducer block mode Out of Service.
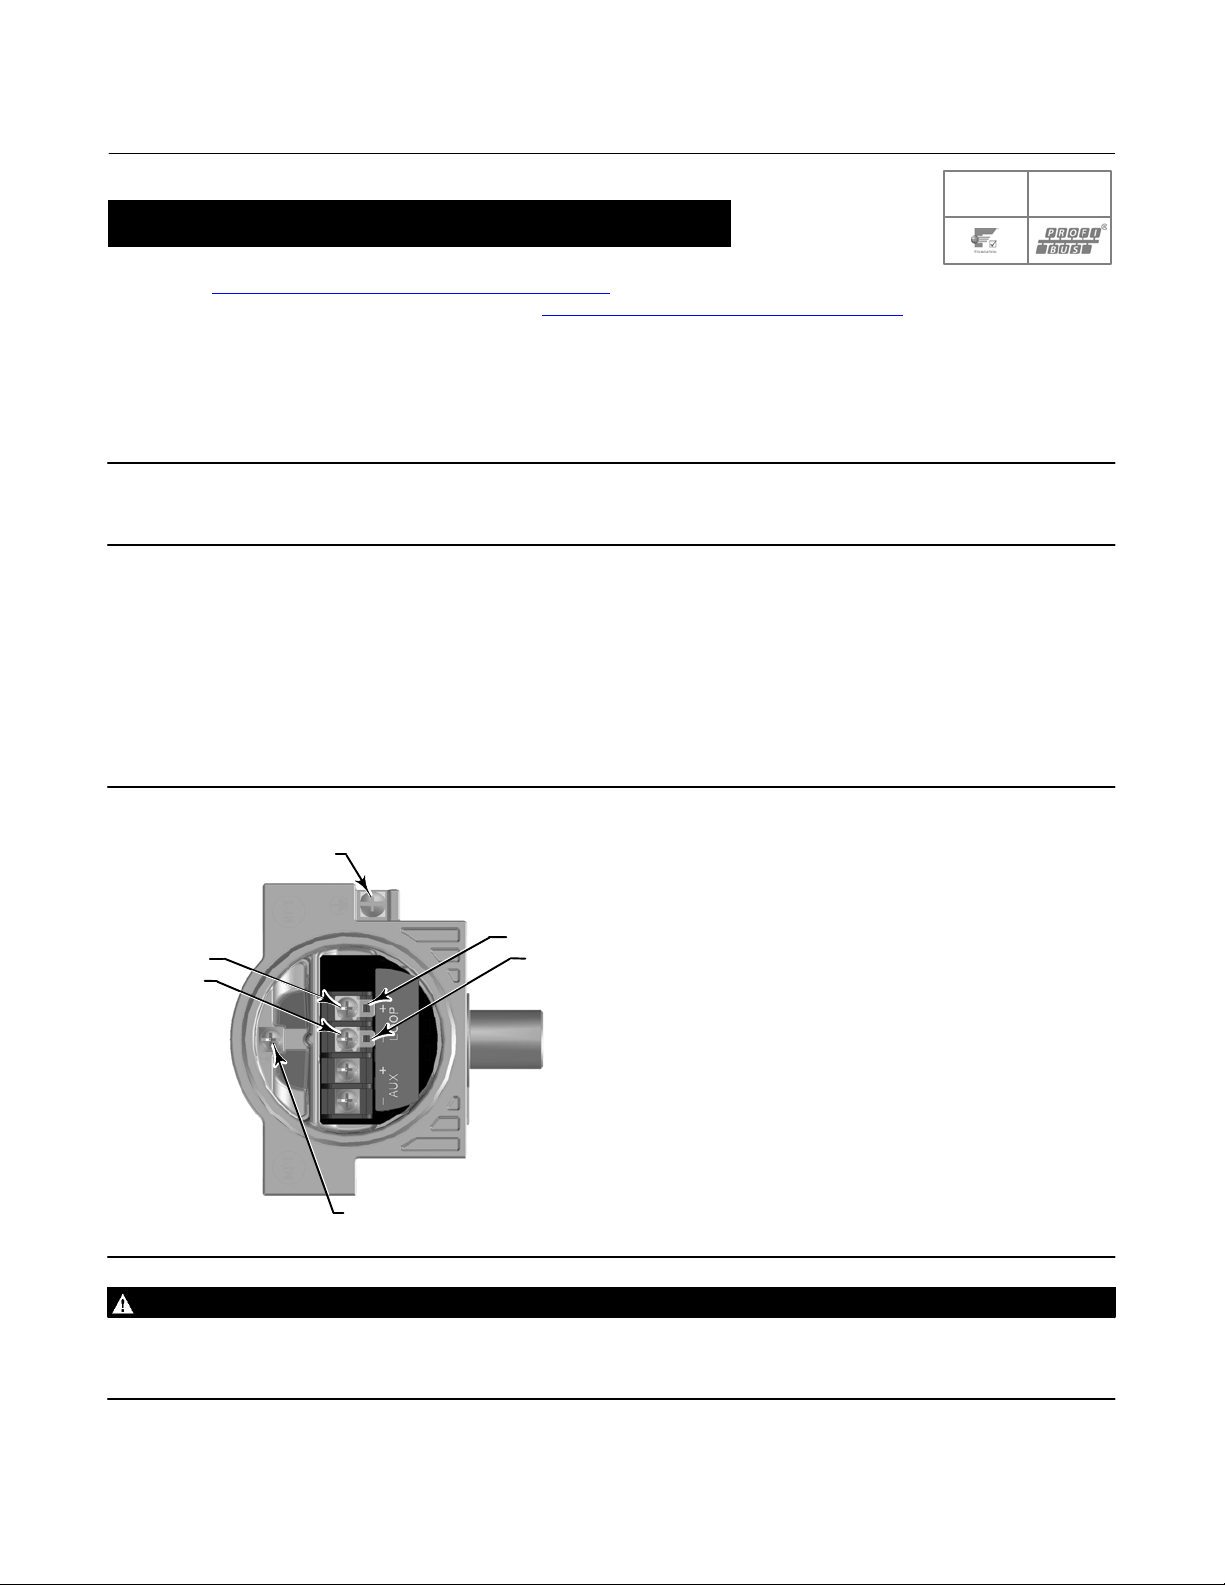
Wire the digital valve controller as follows, refer to figure 19.
1. Remove the wiring terminal box cap.
2. Bring the field wiring into the terminal box. When applicable, install conduit using local and national electrical codes
which apply to the application.
3. The instrument is not polarity sensitive. Connect one wire from the controller output to one of the LOOP screw
terminals in the terminal box shown in figure 19. Connect the other wire from the controller output to the other
LOOP screw terminal in the terminal box.
Figure 19. Loop Connections Terminal Box
EARTH
GROUND
TALK +
LOOP +
LOOP -
TALK -
X0438
SAFETY
GROUND
WARNING
Personal injury or property damage can result from the discharge of static electricity. Connect a 14 AWG (2.08 mm2)
ground strap between the digital valve controller and earth ground when flammable or hazardous gases are present. Refer
to national and local codes and standards for grounding requirements.
20
Page 21
Quick Start Guide
D103556X012
DVC6200 Digital Valve Controllers
January 2014
4. Make connections to the ground terminal(s) following national and local codes and plant standards. As shown in
figure 19, two ground terminals are available for connecting a safety ground, earth ground, or drain wire. The safety
ground terminal is electrically identical to the earth ground.
5. Replace and hand tighten the cover on the terminal box.
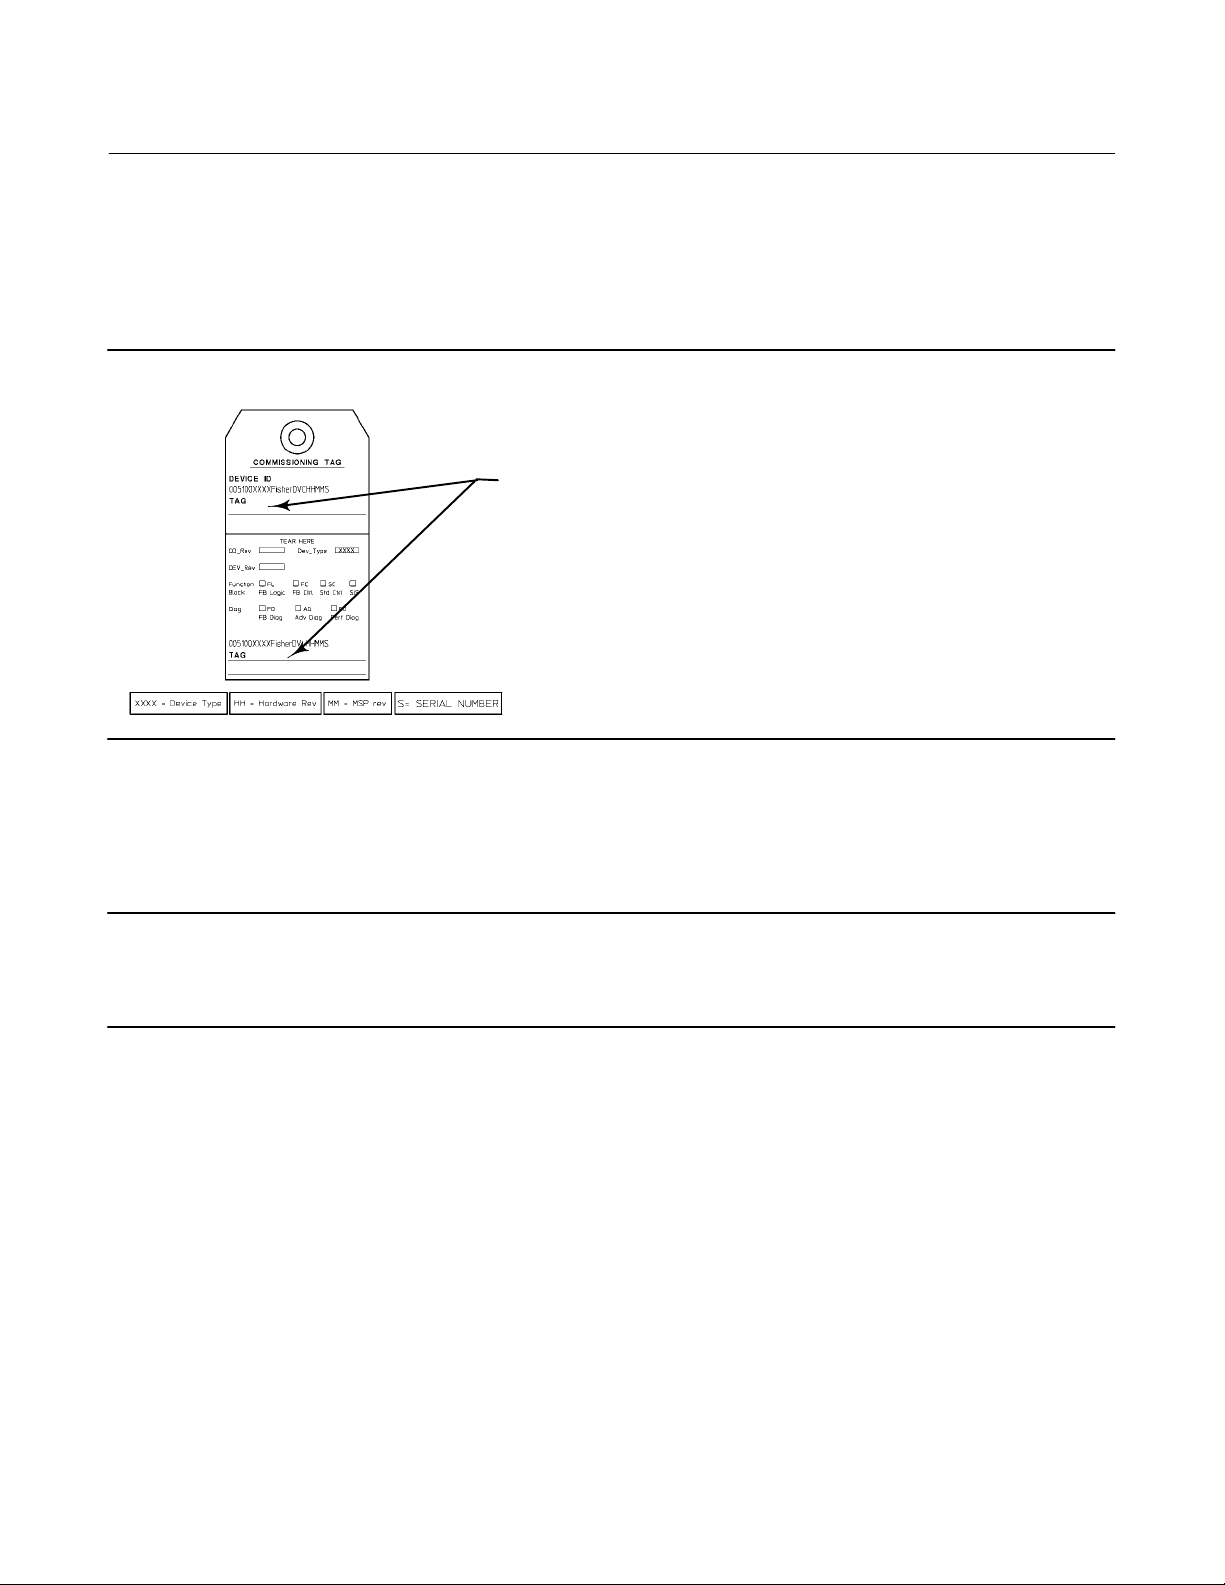
6. Write the valve tag number on the top and bottom of the paper commissioning tag, as shown in figure 20.
Figure 20. Paper Commissioning Tag
WRITE THE VALVE
TAG NUMBER HERE
18B9406‐G
7. Remove the lower half of the paper commissioning tag and deliver it to the control system configurator. With the
piece of paper, the control system configurator will be able to easily change the Device ID placeholder to the actual
valve tag number.
Note
Alternatively, the valve tag number can be entered at the factory when specified at the time of order entry. When the valve tag
number is electronically stored on the DVC6200, the control system will display the valve tag number instead of the Device ID. As a
result, step 6 and 7 will not be required.
8. For Remote Mount applications, proceed to page 26. Otherwise proceed to Step 4—Configure the Digital Valve
Controller on page 29.
21
Page 22

DVC6200 Digital Valve Controllers
January 2014
Quick Start Guide
D103556X012
SIS
HART Devices
Refer to the DVC6200 HW1 instruction manual (D103409X012), the DVC6200 HW2 instruction manual
(D103605X012), or the DVC6200 SIS instruction manual (D103557X012) available at www.FIELDVUE.com or from
your local Emerson Process Management sales office
The digital valve controller is normally powered by a control system output channel. Shielded cable will ensure proper
operation in electrically noisy environments.
Wire the digital valve controller as follows, refer to figure 21:
1. Remove the wiring terminal box cap.
2. Bring the field wiring into the terminal box. When applicable, install conduit using local and national electrical codes
which apply to the application.
3. Connect the control system output channel positive wire to the LOOP + screw terminal in the terminal box. Connect
the control system output channel negative (or return) wire to the LOOP - screw terminal in the terminal box.
for additional information.
WARNING
Personal injury or property damage, caused by fire or explosion, can result from the discharge of static electricity. Connect
a 14 AWG (2.08 mm
gases are present. Refer to national and local codes and standards for grounding requirements.
4. As shown in figure 21, two ground terminals are available for connecting a safety ground, earth ground, or drain
wire. The safety ground is electrically identical to the earth ground. Make connections to these terminals following
national and local codes and plant standards.
Figure 21. Loop and Talk Connections
EARTH
GROUND
2
) ground strap between the digital valve controller and earth ground when flammable or hazardous
TALK +
TALK -
EARTH
GROUND
TALK -
TALK +
EARTH
GROUND
TALK -
TALK +
LOOP LOOP +
22
X0439
SAFETY GROUND
LOOP -
LOOP +
X0431
LOOP -
SAFETY GROUND
LOOP +
X0430
SAFETY GROUND
Page 23

Quick Start Guide
D103556X012
Note
Depending on the control system you are using, an HF340 HART filter may be needed to allow HART communication. The HART
filter is a passive device that is inserted in field wiring from the HART loop. The filter is normally installed near the field wiring
terminals of the control system I/O. Its purpose is to effectively isolate the control system output from modulated HART
communication signals and raise the impedance of the control system to allow HART communication. For more information on
the description and use of the HART filter, refer to the HF340 HART filter instruction manual (D102796X012)
system requires a HART filter refer to the DVC6200 HW1 instruction manual (D103409X012)
manual (D103605X012), or the DVC6200 SIS instruction manual (D103557X012) or contact your Emerson Process Management
sales office.
DVC6200 Digital Valve Controllers
January 2014
. To determine if your
, the DVC6200 HW2 instruction
5. Replace and hand tighten the cover on the terminal box.
6. For applications that require a Position Transmitter or Discrete Switch (page 24), Remote Feedback
Mounting (page 26), and/or THUM
™
Adapter (page 28), proceed to the appropriate page. For DVC6200 SIS
applications proceed to Special Instructions for Safety Instrumented Systems on page 31. Otherwise, proceed
to Step 4—Configure the Digital Valve Controller on page 29.
23
Page 24

DVC6200 Digital Valve Controllers
January 2014
Quick Start Guide
D103556X012
SIS
Position Transmitter or Discrete Switch
The DVC6200 HART communicating device has an optional output circuit that can be configured as a 420 mA
position transmitter or a discrete switch. Configuration of the output circuit requires the proper DIP switch electrical
setting on the main electronics board (figure 22) and also must be enabled with a user interface tool. The DIP switch
electrical setting is preconfigured at the factory when ordered properly.
Figure 22. OUTPUT Connections and Transmitter / Switch Settings
DIP SWITCH FOR
TRANSMITTER/SWITCH
SELECTION
OUTPUT+
X0430
OUTPUT-
X0432
The position transmitter circuit derives its operating power from the control system input channel in the same manner
as a 2wire transmitter. The position transmitter circuit operates independently from the digital valve controller.
The discrete switch is a solid state circuit (1amp maximum) which opens and closes based on a user configurable trip
point. The trip point can be based on valve travel anywhere within the calibrated travel range, or based on a device
alert. In order for the switch output to function, the digital valve controller must be powered. If power is lost, the
switch will always go to the open state. The output circuit, whether operating as a transmitter or switch, is galvanically
isolated from the position control loop circuit such that different ground references between the 2 circuits are
allowed.
Wire the OUTPUT terminals as follows (refer to figure 23):
1. Route the field wiring into the terminal box through the conduit connection.
2. When applicable, install conduit using any local and national electrical codes that apply to the connection.
3. Connect the control system input channel positive wire to the OUT (+) terminal. Connect the control system input
channel negative wire to the OUT () terminal.
4. Replace and hand tighten the cover on the terminal box.
5. For applications that require Remote Feedback Mounting (page 26) and/or a THUM Adapter (page 28), proceed to
the appropriate page. For DVC6200 SIS applications proceed to Special Instructions for Safety Instrumented
Systems on page 31. Otherwise, proceed to Step 4—Configure the Digital Valve Controller on page 29.
24
Page 25

Quick Start Guide
D103556X012
Figure 23. FIELDVUE DVC6200 with Position Transmitter or Discrete Switch, Field Wiring Schematic
DVC6200 Digital Valve Controllers
AO
4 - 20 mA
January 2014
AI
8-30 VDC
POWERED
AO
4 - 20 mA
POSITION TRANSMITTER
GE61668
DI
MAX 30V
DISCRETE SWITCH
25
Page 26

DVC6200 Digital Valve Controllers
January 2014
Quick Start Guide
D103556X012
SIS
Remote Mount Feedback Unit
The DVC6205 base unit is designed to receive a valve travel signal via the DVC6215 feedback unit.
WARNING
Do not place feedback wiring in the same conduit as other power or signal wiring.
Personal injury or property damage, caused by wiring failure, can result if the feedback wiring connecting the base unit
with the remote feedback unit shares a conduit with any other power or signal wiring.
Note
4‐conductor shielded cable, 18 to 22 AWG minimum wire size, in rigid or flexible metal conduit, is required for connection
between base unit and feedback unit. Pneumatic tubing between base unit output connection and actuator has been tested to
91 meters (300 feet). At 15 meters (50 feet) there was no performance degradation. At 91 meters there was minimal pneumatic
lag.
1. Remove the termination caps from both the DVC6215 feedback unit and DVC6205 base unit.
2. Install conduit between the feedback unit and the base unit following applicable local and national electrical codes.
3. Route the 4conductor shielded cable through the conduit.
4. Connect each wire of the 4conductor shielded cable between the corresponding terminals on the feedback unit
and the base unit (refer to figure 24).
WARNING
The cable shield is typically not insulated. It is required that you insulate the cable shield prior to installation.
When connecting the cable shield in step 5 ensure that any exposed shielding does not contact the DVC6215 housing, as
shown in figure 25. Failure to do so can result in ground loop issues.
5. Connect the cable shield between terminal S on the feedback unit and terminal S on the base unit.
CAUTION
Failure to secure the cable wires in the support clips in step 6 can result in broken wires in applications with high levels of
vibration.
6. Secure the cable wires, using the support clips in the DVC6215 feedback unit (as shown in figure 25), to help
prevent shifting and movement of the wires.
7. Replace and hand‐tighten all covers.
8. For applications that require a THUM Adapter proceed to page 28. For DVC6200 SIS applications proceed to Special
Instructions for Safety Instrumented Systems on page 31. Otherwise proceed to Step 4—Configure the Digital Valve
Controller on page 29.
26
Page 27

Quick Start Guide
D103556X012
DVC6200 Digital Valve Controllers
January 2014
Figure 24. Terminal Details for Connecting the Base Unit and Feedback Unit for Remote‐Mounted Digital Valve
Controllers
FEEDBACK
CONNECTIONS
TERMINAL BOX
GROUND
SCREW
FEEDBACK CONNECTIONS
TERMINAL BOX
Figure 25. Wire Clips
X0131
BASE UNIT
TO FEEDBACK UNIT TERMINAL 1
TO FEEDBACK UNIT TERMINAL 2
TO FEEDBACK UNIT TERMINAL 3
TO FEEDBACK UNIT TERMINAL 4
TO FEEDBACK UNIT TERMINAL S
USING CABLE SHIELD
TERMINAL 1
TERMINAL 2
X0132
FEEDBACK UNIT
TERMINAL S
TERMINAL 4
TERMINAL 3
FEEDBACK UNIT
X0434
CLIP TO
SUPPORT THE
INSULATED SHIELD WIRE
CABLE SHIELD
INSULATED WITH
ELECTRICAL TAPE
CLIP TO SUPPORT THE
4-CONDUCTOR WIRES
EXPOSED CABLE SHIELDING
- REQUIRES INSULATION
(e.g. WITH SHRINK TUBING
OR ELECTRICAL TAPE)
X0435
4-CONDUCTOR WIRES WITH SHIELD
27
Page 28

DVC6200 Digital Valve Controllers
January 2014
Quick Start Guide
D103556X012
Smart Wireless THUM Adapter
Refer to the quick installation guide that comes with the Smart Wireless THUM Adapter (0082501004075) for
additional information.
Note
The recommended mounting orientation for the THUM Adapter is vertically up, as shown in figure 26 for optimal wireless
communication range.
Figure 26. THUM Adapter Installed On DVC6200 Digital Valve Controller
TOP CONDUIT
ENTRANCE
X0433
1. Remove the DVC6200 terminal box plug from the top conduit entrance.
2. Thread the THUM Adapter into the top conduit entrance.
3. Using the wire splice included with the THUM Adapter (or other suitable wire splice), connect the wires as shown in
figure 27 below.
Figure 27. Wiring the THUM Adapter
4-20 mA
LOOP +
4-20 mA
LOOP -
SPLICE
CONNECTOR
GG18677
WIRED DEVICE
GROUND
LOOP -
LOOP +
THUM ADAPTER
GREEN
RED
BLACK
WHITE
YELLOW
4. Carefully coil the wires inside the terminal box.
5. Replace and hand tighten the cover on the terminal box.
6. Proceed to Step 4—Configure the Digital Valve Controller on page 29.
28
Page 29

Quick Start Guide
D103556X012
DVC6200 Digital Valve Controllers
January 2014
SIS
Step 4—Configure the Digital Valve Controller
WARNING
D Select wiring and/or cable glands that are rated for the environment of use (such as hazardous area, ingress protection
and temperature). Failure to use properly rated wiring and/or cable glands can result in personal injury or property
damage from fire or explosion.
D Wiring connections must be in accordance with local, regional, and national codes for any given hazardous area
approval. Failure to follow the local, regional, and national codes could result in personal injury or property damage
from fire or explosion.
D To avoid personal injury resulting from electrical shock, do not exceed maximum input voltage specified on the product
nameplate. If the input voltage specified differs, do not exceed the lowest specified maximum input voltage.
D Personal injury or property damage caused by fire or explosion may occur if this connection is attempted in a
potentially explosive atmosphere or in an area that has been classified as hazardous. Confirm that area classification
and atmosphere conditions permit the safe removal of the terminal box cover before proceeding.
D The valve may move in an unexpected direction when power is applied to the digital valve controller. To avoid personal
injury and property damage caused by moving parts, keep hands, tools, and other objects away from the
valve/actuator assembly when applying power to the instrument.
D While configuring the digital valve controller the valve may move, causing process fluid or pressure to be released. To
avoid personal injury and property damage caused by the release of process fluid or pressure, isolate the valve from the
process and equalize pressure on both sides of the valve or bleed off the process fluid.
D Changes to the instrument setup may cause changes in the output pressure or valve travel. Depending on the
application, these changes may upset process control, which may result in personal injury or property damage.
CAUTION
Before proceeding, check that all pressure connections, fasteners, and plugs are installed and tightened.
For remote mount installations, ensure that the Base Unit is wired to the Feedback Unit before providing electrical power.
Failure to do so may cause the DVC6205 to go into "Pressure Control" mode if Pressure Fallback is configured. The unit can
be returned to "Travel Control” mode using Detailed Configuration.
1. Install the latest version of the communication software on the user interface tool. This may include Device
Descriptions (DD, EDD), ValveLink
Contact your local Emerson Process Management sales office
for information on locating the necessary files.
Table 1. User Interface Tools and Software Available for Instrument Configuration and Calibration
475 Field Communicator (DD)
AMS Device Manager (DD)
ValveLink Software
ValveLink Mobile Software
Field Device Type Frame (DTM)
Siemens SIMATIC™ PDM Software (DD, GSD) Ļ
™
software, Device Type Manager (DTM), or GSD. Refer to table 1 below.
to ensure that you have the latest software version or
DVC6200
HART
Ļ Ļ Ļ
Ļ Ļ Ļ
Ļ Ļ Ļ
Ļ Ļ
Ļ Ļ Ļ
DVC6200 SIS
HART
DVC6200f
F
OUNDATION fieldbus
DVC6200p
PROFIBUS PA
29
Page 30

DVC6200 Digital Valve Controllers
January 2014
Quick Start Guide
D103556X012
2. Apply pneumatic supply pressure to the digital valve controller and adjust the supply pressure regulator according
to the actuator requirements and limitations.
3. Apply electrical power to the digital valve controller.
4. Establish communication with the digital valve controller and commission the instrument as described in the host
system documentation.
Note
If the TALK terminals on the digital valve controller are to be used for communication, remove the terminal box cap to access the
terminals.
5. Launch the user interface tool.
6. Perform Device Setup to configure and calibrate the instrument on the control valve assembly.
7. Enter any additional custom configuration items (optional).
Note
On HART devices with the optional transmitter or switch option, you must enable and configure the output terminals. The
configuration is disabled by default from the factory.
8. To enable the digital valve controller to follow set point, place the instrument In Service (HART devices) or place the
transducer block in Auto (fieldbus and PROFIBUS devices).
30
Page 31

Quick Start Guide
D103556X012
DVC6200 Digital Valve Controllers
January 2014
SIS
Special Instructions for Safety Instrumented Systems
DVC6200 SIS instruments are identified by an SIS label on the terminal box cover. Please refer to the Safety Manual
(D103601X012) for further information regarding the design, installation, and operation of the DVC6200 SIS product.
The following section illustrates typical installation scenarios for a DVC6200 SIS. The digital valve controller can be
configured to trip on low current (deenergize to trip, DETT) or high current (energize to trip, ETT). See figure 28 for
the DIP switch configuration of this action on the printed wiring board. This setting is preconfigured at the factory
when ordered properly.
Figure 28. DIP Switch Location
PT-PT/
MULTI-DROP
SELECTION
X0436
Table 2. DIP Switch Configuration
Switch Label Operational Mode DIP Switch Position
PT-PT 420 mA PointtoPoint Loop LEFT
Multi 24 VDC MultiDrop Loop RIGHT
Hardware Shutdown Enabled LEFT
Hardware Shutdown Disabled RIGHT
Trip Current Low (DETT) De-energize to trip LEFT
Trip Current High (ETT) Energize to trip RIGHT
1. Refer to figure 28 for switch location.
BACK OF PWB
ASSEMBLY SUB‐MODULE
DE-ENERGIZE TO TRIP
ENERGIZE TO TRIP
SELECTION
(1)
Note
DVC6200 SIS instruments in PTPT mode require the Hardware Shutdown Switch be Enabled for FMEDA failure rates to be valid for
4-20 mA operation.
WARNING
When Hardware Shutdown is enabled, the instrument will respond to a signal change regardless of instrument mode. The
valve may move in an unexpected direction when power is applied to the digital valve controller. To avoid personal injury
and property damage caused by moving parts, keep hands, tools, and other objects away from the valve/actuator assembly
when applying power to the instrument.
31
Page 32

DVC6200 Digital Valve Controllers
January 2014
Quick Start Guide
D103556X012
An optional local control panel (LCP100), shown in figure 29, can be installed to provide manual operation of the
DVC6200 SIS instrument. Refer to the instruction manual
that comes with the LCP100 for further information
(D103272X012).
Note
If the LCP100 is connected to a DVC6200 SIS in a zone 1 explosion-proof “d” environment, there must be a conduit seal installed
between the DVC6200 SIS and the LCP100 in order to maintain the explosion-proof integrity of the DVC6200 SIS.
The LCP100 cannot be connected to a DVC6200 SIS that is part of a zone 0 or zone 1 intrinsically safe “i” installation.
Figure 29. LCP100 Connected to a DVC6200 SIS Instrument
X0248
For de-energize to trip DVC6200 SIS and de-energize to trip solenoid valve, proceed to page 33
For de-energize to trip DVC6200 SIS, no solenoid valve, proceed to page 35
For DVC6200 SIS for PST only and de-energize to trip solenoid valve, proceed to page 37
For solenoid valve health monitoring installations, proceed to page 38
32
Page 33

Quick Start Guide
D103556X012
DVC6200 Digital Valve Controllers
January 2014
De-Energize to Trip (DETT) DVC6200 SIS and DETT Solenoid Valve
In a typical deenergize to trip application with a solenoid valve, the logic solver (or DCS) trip signal deenergizes the
solenoid valve and also reduces the signal to the digital valve controller to 4 mA (or 0 VDC). This opens the solenoid
valve vent and drives the digital valve controller to the no output pressure condition. As a result, the safety valve
moves to its noair, fail safe position.
Figure 30. FIELDVUE DVC6200 SIS and Solenoid
Valve Powered Separately
LOGIC SOLVER
OR DCS
4-20 mA DETT
OR 0-24 VDC DETT
LOGIC SOLVER
0-24 VDC DETT
1
S
AS
Figure 31. FIELDVUE DVC6200 SIS and Solenoid
Valve Powered Together
LOGIC SOLVER
0-24 VDC DETT
LC340
LINE CONDITIONER
LOW POWER
SOLENOID VALVE
S
AS
1 AN LC340 LINE CONDITIONER IS REQUIRED FOR 0-24 VDC DETT
E1455
E1456
Note
When using an ASCO™
lowpower solenoid valve, model EF8316G303 or EF8316G304 (or an equivalent lowpower solenoid valve)
a separate external air supply for the pilot is required. Ensure that the solenoid valve's “selection gasket” is in the “external
position”. The pilot pressure must be at least 15 psig higher than the solenoid valve line pressure. For more information, refer to
the ASCO catalog or contact your Emerson Process Management sales office
.
1. Install the solenoid valve on the actuator casing or actuator yoke.
2. Install at least 10 mm (3/8inch) diameter tubing such that the solenoid valve is in the pneumatic path between the
DVC6200 SIS output and the actuator input.
33
Page 34

DVC6200 Digital Valve Controllers
January 2014
Quick Start Guide
D103556X012
3. If the DVC6200 SIS and solenoid valve are powered separately:
D Connect the logic solver output card +/ terminals to the corresponding solenoid valve +/ wires.
D Connect the logic solver (or DCS) output card +/ terminals to the corresponding DVC6200 SIS LOOP +/
D terminals.
Note
For the digital valve controller to operate with a 420 mA control signal the DIP switch must be in the pointtopoint loop position,
as shown in table 2. The control mode must be set to analog. This is set at the factory when ordered properly.
4. If the DVC6200 SIS and solenoid valve are powered together:
D Install an LC340 line conditioner to allow HART communication over the segment. Refer to the instruction
D manual that comes with the LC340 (D102797X012) for more information.
D Connect the logic solver output card +/ terminals to the corresponding LC340 SYS +/ terminals.
D Connect the digital valve controller LOOP +/ terminals to the corresponding LC340 FLD +/ terminals.
D Connect the solenoid valve +/ wires to the corresponding LC340 FLD +/ terminals.
Note
For the digital valve controller to operate with a 024 VDC voltage control signal the DIP switches must be in the “Multi” position
and the “Hardware Shutdown Disabled” position, as shown in figure 28 and table 2. The control mode must also be set to digital
with a user interface tool. These are set at the factory when ordered properly.
Ensure that the LC340 Line Conditioner voltage drop, the solenoid valve engagement voltage (at maximum temperature), and the
wiring voltage drop do not exceed the logic solver maximum output voltage. The line conditioner introduces an approximate 2.0
volt drop in the SIS system wiring with a 50 mA load. An ASCO EF8316 solenoid valve requires 18.4 V and 42 mA to trip. The digital
valve controller draws approximately 8 mA. Based on these conditions, table 3 lists the maximum loop wire resistance permitted
for various logic solver output voltages.
Table 3. Maximum Loop Wire Resistance per Logic Solver Output Voltage
Logic Solver Output
Voltage
(VDC)
24.00
23.75
23.50
23.25
23.00
22.75
22.50
1. Maximums in this table assume a line conditioner and a solenoid that requires a minimum of 20.4 V and 42 mA to engage.
2. Wire length includes both wires in a twisted pair.
Maximum Loop
Wire Resistance
(Ohms)
32.0
27.0
22.0
17.0
12.0
7.0
2.0
22 AWG 20 AWG 18 AWG 16 AWG
952
804
655
506
357
208
60
(1)
Maximum Wire Length (feet)
1429
1205
982
759
536
313
89
2381
2009
1637
1265
893
521
149
(2)
3175
2679
2183
1687
1190
694
198
5. Proceed to Step 4—Configure the Digital Valve Controller on page 29.
34
Page 35

Quick Start Guide
D103556X012
DVC6200 Digital Valve Controllers
January 2014
De-Energize to Trip (DETT) DVC6200 SIS, no Solenoid Valve
In a typical deenergize to trip application without a solenoid valve, the logic solver trip signal deenergizes the digital
valve controller to 4 mA (or 0 VDC). This drives the digital valve controller to the no output pressure condition. As a
result, the safety valve moves to its noair, fail safe position.
Figure 32. FIELDVUE DVC6200 SIS Powered
with 4-20 mA
LOGIC SOLVER
4-20 mA DETT
E1457
AS
Figure 33. FIELDVUE DVC6200 SIS Powered
with 0-24 VDC
LOGIC SOLVER
0-24 VDC DETT
LC340
LINE CONDITIONER
AS
E1458
1. If the DVC6200 SIS is powered with 420 mA, connect the logic solver output card +/ terminals to the
corresponding DVC6200 SIS LOOP +/terminals.
Note
For the digital valve controller to operate with a 420 mA control signal the DIP switch must be in the pointtopoint loop position,
as shown in table 2. The control mode must be set to analog. This is set at the factory when ordered properly.
35
Page 36

DVC6200 Digital Valve Controllers
January 2014
Quick Start Guide
D103556X012
2. If the DVC6200 SIS and solenoid valve are powered together:
D Install an LC340 line conditioner to allow HART communication over the segment. Refer to the instruction
D manual that comes with the LC340 (D102797X012) for more information.
D Connect the logic solver output card +/ terminals to the corresponding LC340 SYS +/ terminals.
D Connect the digital valve controller LOOP +/ terminals to the corresponding LC340 FLD +/ terminals.
Note
For the digital valve controller to operate with a 024 VDC voltage control signal the DIP switches must be in the “Multi” position
and the “Hardware Shutdown Disabled” position, as shown in figure 28 and table 2. The control mode must also be set to digital
with a user interface tool. These are set at the factory when ordered properly.
3. Proceed to Step 4—Configure the Digital Valve Controller on page 29.
36
Page 37

Quick Start Guide
D103556X012
DVC6200 Digital Valve Controllers
January 2014
DVC6200 SIS for PST only and De-Energize to Trip (DETT) Solenoid Valve
In this application, the logic solver trip signal deenergizes the solenoid valve, which opens the solenoid vent valve. The
DVC6200 SIS is configured as energize to trip (ETT) and uses a reverse acting relay (Relay B) to drive the digital valve
controller to the no output pressure condition. The energize to trip option provides maximum actuator pressure at
minimum control signal (4 mA). Therefore, loss of the control signal will not cause the safety valve to trip. The safety
valve moves to its noair, fail safe position when the logic solver (or DCS) sets the current to the digital valve controller
to 20 mA. Partial stroke testing occurs at minimum control signal (4 mA).
Figure 34. FIELDVUE DVC6200 SIS and Solenoid Valve Powered Separately
LOGIC SOLVER
OR DCS
4-20 mA ETT
E1459
LOGIC SOLVER
0-24 VDC DETT
S
AS
SINGLE-ACTING, REVERSE (RELAY B)
4 mA = FULL SUPPLY TO ACTUATOR
1. Install the solenoid valve on the actuator casing or actuator yoke.
2. Install at least 10 mm (3/8inch) diameter tubing such that the solenoid valve is in the pneumatic path between the
DVC6200 SIS output and the actuator input.
3. Connect the logic solver output card +/ terminals to the corresponding solenoid valve +/ wires.
4. Connect the logic solver (or DCS) output card +/ terminals to the corresponding DVC6200 SIS LOOP +/ terminals.
5. Proceed to Step 4—Configure the Digital Valve Controller on page 29.
37
Page 38

DVC6200 Digital Valve Controllers
January 2014
Quick Start Guide
D103556X012
Solenoid Valve Health Monitoring
If a solenoid valve is installed between the DVC6200 SIS pressure output and the actuator, the control valve assembly
can be configured to verify the operation of the solenoid valve. This applies to singleacting actuator applications only.
The “unused” output port of the DVC6200 SIS is tubed such that the pressure downstream of the solenoid valve is
measured. When the solenoid valve is pulsed, the DVC6200 SIS senses the momentary pressure drop across the
solenoid valve.
Figure 35. Tubing for Solenoid Valve Health
Monitoring, DeEnergize to Trip DVC6200 SIS
S
AS
E1460
Figure 36. Tubing for Solenoid Valve Health
Monitoring, Energize to Trip DVC6200 SIS
S
AS
SINGLE-ACTING, REVERSE (RELAY B)
4 mA = FULL SUPPLY TO ACTUATOR
E1461
1. For DETT applications (figure 35):
D Install at least 10 mm (3/8inch) diameter tubing between output B (bottom port) of the DVC6200 SIS output and
D the tubing segment between the solenoid valve and safety valve actuator.
2. For ETT DVC6200 SIS applications (figure 36):
D Install at least 10 mm (3/8inch) diameter tubing between output A (top port) of the DVC6200 SIS output and the
D tubing segment between the solenoid valve and safety valve actuator.
3. Proceed to Step 4—Configure the Digital Valve Controller on page 29.
38
Page 39

Quick Start Guide
D103556X012
DVC6200 Digital Valve Controllers
January 2014
SIS
Hazardous Area Approvals and Special Instructions
for “Safe Use” and Installations in Hazardous Locations
Certain nameplates may carry more than one approval, and each approval may have unique installation/wiring
requirements and/or conditions of “safe use”. These special instructions for “safe use” are in addition to, and may
override, the standard installation procedures. Special instructions are listed by approval type.
Note
This information supplements the nameplate markings affixed to the product.
Always refer to the nameplate itself to identify the appropriate certification. Contact your Emerson Process Management sales
office for approval/certification information not listed here.
Approval information is for both aluminum and stainless steel constructions.
WARNING
Failure to follow these conditions of “safe use” could result in personal injury or property damage from fire or explosion, or
area re‐classification.
For CSA Approvals proceed to page 40
For FM Approvals proceed to page 47
For ATEX Approvals proceed to page 54
For IECEx Approvals proceed to page 61
39
Page 40

DVC6200 Digital Valve Controllers
January 2014
CSA
Ordinary Locations Approval
Complies with general electrical safety CAN/CSAC22.2 No. 6101012004
SELV, conduit connected, Enclosure Type 4X, IP66, Installation Category I, Pollution Degree 4
Quick Start Guide
D103556X012
DVC6200 Series (HART HW1, F
OUNDATION fieldbus, PROFIBUS)
Rated Input 9-30 VDC, 4-20 mA
-52_C to + 80_C Ambient
DVC6205 (HART HW1, F
OUNDATION fieldbus, PROFIBUS) DVC6215 Remote Mount
Rated Input 9-30 VDC, 4-20 mA Rated Input 10 VDC max, 3.5 mA max
Outputs 0-9.6 VDC, 0-3.5 mA -52 to 125_C Ambient
-52_C to + 80_C Ambient
Explosion-proof and Dust Ignition-proof
DVC6200 and DVC6205 Series (HART HW1 & HW2, SIS, FOUNDATION FIELDBUS, PROFIBUS)
Class I, Division 1, Groups B,C,D ; Class I, Division 2, Groups A,B,C,D
Class II, Division 1, Groups E,F,G ; Class II, Division 2, Groups F,G
Class III, Division 1
Ex d IIC
Ex nC IIC
Type 4X, IP66
Single Seal Device (HART HW2 and SIS pending)
Rated input 30 Vmax, 20 mA
- 52_C < Ambient < + 80_C
Max inlet pressure 145 psig (air or natural gas)
Temperature Code: T6 (Tamb ≤ 75_C), T5 (Tamb ≤ 80_C)
DVC6215 Remote Mount
Class I, Division 1, Groups A,B,C,D ; Class I, Division 2, Groups A,B,C,D
Class II, Division 1, Groups E,F,G ; Class II, Division 2, Groups F,G
Class III
Ex d IIC
Ex nA IIC
Type 4X, IP66
Rated input 30 Vmax, 20 mA
- 52_C < Ambient < + 125_C
Temperature Code: T6 (Tamb ≤ 75_ C), T5 (Tamb ≤ 90_C), T4 (Tamb ≤ 125_C)
40
Page 41

Quick Start Guide
D103556X012
DVC6200 Digital Valve Controllers
Intrinsically Safe
Class I, Division 1, Groups A,B,C,D
Class II, Division 1, Groups E,F,G
Class III, Division 1
Ex ia IIC
Type 4X, IP66
Single Seal Device (HART HW2 and SIS pending)
Rated input 30 V DC max, 20 mA
- 52 _C < Ambient < + 80_C (-52_C to 125_C for DVC6215)
Max inlet pressure 145 psig (air or natural gas)
Intrinsically safe when connected per installation drawing GE42818, as shown in the following figures
DVC6200 HW1 figure 37 and 42...........................................
DVC6200 HW2 and DVC6200 SIS figure 38 and 42...........................
DVC6205, DVC6205 SIS, and DVC6215 Remote Mount figure 39 and 42........
DVC6200f and DVC6200p figure 40 and 42.................................
DVC6205f, DVC6205p, and DVC6215 Remote Mount figure 41 and 42.........
January 2014
Figure 37. CSA Loop Schematic—FIELDVUE DVC6200 HW1
HAZARDOUS LOCATION
CLASS I, ZONE 0, GROUP IIC
CLASS I, DIV 1, GROUPS ABCD
CLASS II, DIV 1, GROUPS EFG
CLASS III
DVC6200, DVC6200S
Vmax = 30 VDC
Imax = 226 mA
Ci = 5 nF
Li = 0.55 mH
Pi = 1.4 W
1 NOTE 7
T CODE T (amb)
T5 ≤ 80_C
T6 ≤ 75_C
1 SEE NOTES IN FIGURE 42
GE42818 sheet 2, Rev. F
NON‐HAZARDOUS LOCATION
CSA APPROVED BARRIER
1 NOTE 1, 3, 4, 5, 6
41
Page 42

DVC6200 Digital Valve Controllers
January 2014
Figure 38. CSA Loop Schematics—FIELDVUE DVC6200 HW2 and DVC6200 SIS
Quick Start Guide
D103556X012
CLASS I, ZONE 0, GROUP IIC
CLASS I, DIV 1, GROUPS ABCD
CLASS II, DIV 1, GROUPS EFG
CLASS III
HW2 - WITH OR WITHOUT I/O PACKAGE
DVC6200, DVC6200S
LOOP TERMINALS
Vmax = 30 VDC
Imax = 130 mA
Ci = 15 nF
Li = 0.55 mH
Pi = 1.0 W
OUTPUT TERMINALS
Vmax = 28 VDC
Imax = 100 mA
Ci = 15 nF
Li = 0.5 mH
Pi = 1.0 W
HAZARDOUS LOCATION
1 NOTE 7
NON‐HAZARDOUS LOCATION
CSA APPROVED BARRIER
NOTE 1, 3, 4, 5, 6 1
CSA APPROVED BARRIER
NOTE 1, 3, 4, 5, 6 1
POWER MAY BE APPLIED TO
EITHER THE LOOP TERMINALS OR
OUTPUT TERMINALS OR TO BOTH
SETS OF TERMINALS AT THE SAME
TIME
UNITS WITHOUT THE I/O PACKAGE
WILL NOT HAVE “OUTPUT
TERMINALS” AVAILABLE FOR
CONNECTION
T CODE T (amb) T (amb)
T5 ≤ 80_C ≤ 80_C
T6 ≤ 61_C ≤ 74_C
1 SEE NOTES IN FIGURE 42
GE42818 Sheet 11, Rev. C
42
WITH
I/O PACKAGE
WITHOUT
I/O PACKAGE
Page 43

Quick Start Guide
D103556X012
Figure 39. CSA Loop Schematics FIELDVUE DVC6205, DVC6205 SIS, and DVC6215
DVC6200 Digital Valve Controllers
January 2014
CLASS I, ZONE 0, GROUP IIC
CLASS I, DIV 1, GROUPS ABCD
CLASS II, DIV 1, GROUPS EFG
CLASS III
DVC6215
Vmax = 30 VDC
Imax = 226 mA
Ci = 50 nF
Li = 0.55 mH
Pi = 1.4 W
NOTE 1, 3 1
T CODE T (amb)
T4 ≤ 125_C
T5 ≤ 90_C
T6 ≤ 75_C
1 SEE NOTES IN FIGURE 42
GE42818 Sheet 12, Rev. C
HAZARDOUS LOCATION
CLASS I, ZONE 0, GROUP IIC
CLASS I, DIV 1, GROUPS ABCD
CLASS II, DIV 1, GROUPS EFG
CLASS III
HW2 - WITH OR WITHOUT I/O PACKAGE
REMOTE
FIELD WIRING
TERMINAL BOX
Voc = 30 VDC
Isc = 21.2 mA
Ca = 55 nF
La = 78 mH
Po = 160 mW
T CODE T (amb) T (amb)
T5 ≤ 80_C ≤ 80_C
T6 ≤ 61_C ≤ 74_C
DVC6205
WITH
I/O PACKAGE
FIELD WIRING
TERMINAL BOX
LOOP TERMINALS
Vmax = 30 VDC
Imax = 130 mA
Ci = 15 nF
Li = 0.55 mH
Pi = 1.0 W
OUTPUT TERMINALS
Vmax = 28 VDC
Imax = 100 mA
Ci = 15 nF
Li = 0.5 mH
Pi = 1.0 W
WITHOUT
I/O PACKAGE
NON‐HAZARDOUS LOCATION
CSA APPROVED BARRIER
NOTE 1, 3, 4, 5, 6 1
NOTE 7
1
CSA APPROVED BARRIER
NOTE 1, 3, 4, 5, 6 1
POWER MAY BE APPLIED TO EITHER
THE LOOP TERMINALS OR OUTPUT
TERMINALS OR TO BOTH SETS OF
TERMINALS AT THE SAME TIME
UNITS WITHOUT THE I/O PACKAGE
WILL NOT HAVE “OUTPUT TERMINALS”
AVAILABLE FOR CONNECTION
43
Page 44

DVC6200 Digital Valve Controllers
January 2014
Figure 40. CSA Loop Schematics—FIELDVUE DVC6200f and DVC6200p
Quick Start Guide
D103556X012
1 NOTE 7
GE42818 Sheet 3, Rev. F
T CODE T (amb)
T4 ≤ 80_C
T5 ≤ 77_C
T6 ≤ 62_C
CSA APPROVED
ENTITY DEVICE
T CODE T (amb)
T4 ≤ 80_C
T5 ≤ 77_C
T6 ≤ 62_C
NOTE 1, 3 1
HAZARDOUS LOCATION
CLASS I, ZONE 0, GROUP IIC
CLASS I, DIV 1, GROUPS ABCD
CLASS II, DIV 1, GROUPS EFG
CLASS III
DVC6200F, DVC6200FS
DVC6200P, DVC6200PS
Vmax = 24 VDC
Imax = 380 mA
Ci = 5 nF
Li = 0 mH
Pi = 1.4 W
ENTITY FIELDBUS LOOP
HAZARDOUS LOCATION
CLASS I, ZONE 0, GROUP IIC
CLASS I, DIV 1, GROUPS ABCD
CLASS II, DIV 1, GROUPS EFG
CLASS III
DVC6200F, DVC6200FS
DVC6200P, DVC6200PS
NON‐HAZARDOUS LOCATION
CSA APPROVED
BARRIER
1 NOTE 1, 3, 4, 5, 6
NON‐HAZARDOUS LOCATION
CSA APPROVED
FISCO TERMINATOR
GE42818 Sheet 4, Rev. F
1 SEE NOTES IN FIGURE 42
44
CSA APPROVED
FISCO DEVICE
Vmax = 17.5 VDC
Imax = 380 mA
Ci = 5 nF
Li = 0 mH
Pi = 5.32 W
NOTE 2, 3 1
CSA APPROVED
FISCO BARRIER
1 NOTE 2, 3, 4, 5, 6
FISCO LOOP
Page 45

Quick Start Guide
D103556X012
Figure 41. CSA Loop Schematics FIELDVUE DVC6205f, DVC6205p, and DVC6215
DVC6200 Digital Valve Controllers
January 2014
NOTE 7 1
GE42818 Sheet 9, Rev. D
CSA
APPROVED
ENTITY
DEVICE
NOTE 1, 3 1
CSA
APPROVED
FISCO DEVICE
NOTE 2, 3 1
CLASS I, ZONE 0, GROUP IIC
CLASS I, DIV 1, GROUPS ABCD
CLASS II, DIV 1, GROUPS EFG
CLASS III
DVC6215
Vmax = 30 VDC
Imax = 226 mA
Ci = 50 nF
Li = 0.55 mH
Pi = 1.4 W
NOTE 1 1
T CODE T (amb)
T4 ≤ 125_C
T5 ≤ 90C
T6 ≤ 75_C
CLASS I, ZONE 0, GROUP IIC
CLASS I, DIV 1, GROUPS ABCD
CLASS II, DIV 1, GROUPS EFG
CLASS III
DVC6215
Vmax = 30 VDC
Imax = 226 mA
Ci = 50 nF
Li = 0.55 mH
Pi = 1.4 W
NOTE 2 1
CLASS I, ZONE 0, GROUP IIC
CLASS I, DIV 1, GROUPS ABCD
CLASS II, DIV 1, GROUPS EFG
CLASS III
DVC6205f, DVC6205p
Voc = 24 VDC
Isc = 17.5 mA
Ca = 121 nF
La = 100 mH
Po = 105 mW
Vmax = 24 VDC
Imax = 380 mA
Ci = 5 nF
Li = 0 mH
Pi = 1.4 W
T CODE T (amb)
T4 ≤ 80_C
T5 ≤ 77_C
T6 ≤ 62_C
ENTITY FIELDBUS LOOP
CLASS I, ZONE 0, GROUP IIC
CLASS I, DIV 1, GROUPS ABCD
CLASS II, DIV 1, GROUPS EFG
CLASS III
DVC6205f, DVC6205p
Voc = 17.5 VDC
Isc = 17.5 mA
Ca = 121 nF
La = 100 mH
Po = 105 mW
HAZARDOUS LOCATION
HAZARDOUS LOCATION
Vmax = 17.5 VDC
Imax = 380 mA
Ci = 5 nF
Li = 0 mH
Pi = 5.32 W
NON‐HAZARDOUS LOCATION
CSA APPROVED
BARRIER
1 NOTE 1, 3, 4, 5, 6
NON‐HAZARDOUS LOCATION
CSA APPROVED
FISCO
TERMINATOR
GE42818 Sheet 10, Rev. D
1 SEE NOTES IN FIGURE 42
T CODE T (amb)
T4 ≤ 125_C
T5 ≤ 90C
T6 ≤ 75_C
FISCO LOOP
T CODE T (amb)
T4 ≤ 80_C
T5 ≤ 77_C
T6 ≤ 62_C
CSA APPROVED
FISCO BARRIER
1 NOTE 2, 3, 4, 5, 6
45
Page 46

DVC6200 Digital Valve Controllers
January 2014
Quick Start Guide
D103556X012
Figure 42. Notes for CSA Loop Schematics
THE ENTITY CONCEPT ALLOWS INTERCONNECTION OF INTRINSICALLY SAFE APPARATUS TO ASSOCIATED APPARATUS NOT
SPECIFICALLY EXAMINED IN SUCH COMBINATION. THE CRITERIA FOR INTERCONNECTION IS THAT THE VOLTAGE (Vmax or Ui), THE
CURRENT (Imax or Ii), AND THE POWER (Pmax or Pi) OF THE INTRINSICALLY SAFE APPARATUS MUST BE EQUAL TO OR GREATER THAN
THE VOLTAGE (Voc or Uo), AND THE CURRENT (Isc or Io), AND THE POWER(Po) DEFINED BY THE ASSOCIATED APPARATUS. IN
ADDITION, THE SUM OF THE MAX UNPROTECTED CAPACITANCE (Ci) AND MAX UNPROTECTED INDUCTANCE (Li), INCLUDING THE
INTERCONNECTING CABLING CAPACITANCE (Ccable) AND CABLING INDUCTANCE (Lcable) MUST BE LESS THAN THE ALLOWABLE
CAPACITANCE (Ca) AND INDUCTANCE (La) DEFINED BY THE ASSOCIATED APPARATUS. IF THE ABOVE CRITERIA IS MET, THEN THE
COMBINATION MAY BE CONNECTED.
Vmax or Ui . Voc or Uo Imax or Ii . Isc or Io Pmax or Pi . Po Ci + Ccable ≤ Ca Li + Lcable ≤ La
THE FISCO CONCEPT ALLOWS INTERCONNECTION OF INTRINSICALLY SAFE APPARATUS TO ASSOCIATED APPARATUS NOT
SPECIFICALLY EXAMINED IN SUCH COMBINATION. THE CRITERIA FOR THE INTERCONNECTION IS THAT THE VOLTAGE (Vmax or Ui),
CURRENT (Imax or Ii), AND POWER (Pmax or Pi), WHICH AN INTRINSICALLY SAFE APPARATUS CAN RECEIVE AND REMAIN
INTRINSICALLY SAFE, CONSIDERING FAULTS, MUST BE EQUAL TO OR GREATER THAN THE VOLTAGE (Voc or Uo), CURRENT (Isc or Io),
AND POWER (Po) LEVELS WHICH CAN BE DELIVERED BY THE ASSOCIATED APPARATUS, CONSIDERING FAULTS AND APPLICABLE
FACTORS. IN ADDITION THE MAXIMUM UNPROTECTED CAPACITANCE (Ci) AND INDUCTANCE (Li) OF EACH APPARATUS (OTHER THAN
THE TERMINATION) CONNECTED TO THE FIELDBUS MUST BE LESS THAN OR EQUAL TO 5 nF AND 10 uH RESPECTIVELY.
IN EACH SEGMENT ONLY ONE ACTIVE DEVICE, NORMALLY THE ASSOCIATED APPARATUS, IS ALLOWED TO PROVIDE THE NECESSARY
ENERGY FOR THE FIELDBUS SYSTEM. THE VOLTAGE (Uo or Voc or Vt) OF THE ASSOCIATED APPARATUS HAS TO BE LIMITED TO THE
RANGE OF 9 V TO 17.5 VDC. ALL OTHER EQUIPMENT CONNECTED TO THE BUS CABLE HAS TO BE PASSIVE, MEANING THAT THEY ARE NOT
ALLOWED TO PROVIDE ENERGY TO THE SYSTEM, EXCEPT FOR A LEAKAGE CURRENT OF 50 uA FOR EACH CONNECTED DEVICE.
SEPARATELY POWERED EQUIPMENT NEEDS A GALVANIC ISOLATION TO ASSURE THAT THE INTRINSICALLY SAFE FIELDBUS CIRCUIT
REMAINS PASSIVE.
THE CABLE USED TO CONNECT THE DEVICES NEEDS TO HAVE THE PARAMETERS IN THE FOLLOWING RANGE:
LOOP RESISTANCE R': 15 TO 150 ohms/km
INDUCTANCE PER UNIT LENGTH L: 0.4 TO 1 mH/km
CAPACITANCE PER UNIT LENGTH C': 80 TO 200 nF/km
C' = C' LINE/LINE + 0.5' LINE/SCREEN, IF BOTH LINES ARE FLOATING OR
C' = C' LINE/LINE + C' LINE/SCREEN, IF THE SCREEN IS CONNECTED TO ONE LINE.
LENGTH OF SPLICE: < 1 m (T‐BOX MUST ONLY CONTAIN TERMINAL CONNECTIONS WITH NO ENERGY STORAGE CAPABILITY)
LENGTH OF SPUR CABLE: < 30 M
LENGTH OF TRUNK CABLE: < 1 km
AT EACH END OF THE TRUNK CABLE AN APPROVED INFALLIBLE TERMINATION WITH THE FOLLOWING PARAMETERS IS SUITABLE:
R = 90 TO 100 ohms AND C = 0 TO 2.2 uF
NOTE, A BUILT‐IN TERMINATOR IS INCLUDED IN THE FIELD SIDE AND A SELECTABLE TERMINATOR IS AVAILABLE ON THE HOST SIDE.
THE NUMBER OF PASSIVE DEVICES CONNECTED TO THE BUS SEGMENT IS NOT LIMITED IN THE FISCO CONCEPT FOR INTRINSICALLY SAFE
REASONS. IF THE ABOVE RULES ARE RESPECTED, UP TO A TOTAL LENGTH OF 1000 m (SUM OF THE LENGTH OF THE TRUNK CABLE AND
ALL SPUR CABLES), THE INDUCTANCE AND CAPACITANCE OF THE CABLE WILL NOT IMPAIR THE INTRINSIC SAFETY OF THE
INSTALLATION.
INSTALLATION MUST BE IN ACCORDANCE WITH THE CANADIAN ELECTRICAL CODE (CEC) AND ANSI/ISA RP12.6.
MAXIMUM SAFE AREA VOLTAGE SHOULD NOT EXCEED 250 Vrms.
RESISTANCE BETWEEN INTRINSICALLY SAFE GROUND AND EARTH GROUND MUST BE LESS THAN ONE OHM
LOOPS MUST BE CONNECTED ACCORDING TO THE BARRIER MANUFACTURER'S INSTRUCTIONS.
IF HAND‐HELD COMMUNICATOR OR MULTIPLEXER IS USED, IT MUST BE CSA APPROVED WITH ENTITY PARAMETERS AND INSTALLED
PER THE MANUFACTURER'S CONTROL DRAWINGS.
GE42818 Sheet 8, Rev. E
46
Page 47

Quick Start Guide
D103556X012
DVC6200 Digital Valve Controllers
FM
Explosion-proof, Dust-Ignition proof, Non-Incendive, Suitable for Use
DVC6200 and DVC6205 Series (HART HW1 & HW2, SIS, FOUNDATION FIELDBUS, PROFIBUS)
XP: Class I, Division 1, Groups B,C,D
DIP: Class II, III, Division 1, Groups E,F,G
NI: Class I, Division 2, Groups A,B,C,D
S: Class II, III, Division 2, Groups F,G
T5 Ta = 80°C, T6 Ta = 75°C
Type 4X, IP66
DVC6215 Remote Mount
XP: Class I, Division 1, Groups A,B,C,D
DIP: Class II, III, Division 1, Groups E,F,G
NI: Class I, Division 2, Groups A,B,C,D
S: Class II, III, Division 2, Groups F,G
Ta = 125°C, T5 Ta = 90°C, T6 Ta = 75°C
Type 4X, IP66
January 2014
Intrinsically Safe
IS Class I, II, III, Division 1, Groups A,B,C,D,E,F,G
Type 4X, IP66
Intrinsically safe when connected per control drawing GE42819, as shown in the following figures
DVC6200 HW1 figure 43 and 48...........................................
DVC6200 HW2 and DVC6200 SIS figure 44 and 48...........................
DVC6205, DVC6205 SIS, and DVC6215 Remote Mount figure 45 and 48........
DVC6200f and DVC6200p figure 46 and 48.................................
DVC6205f, DVC6205p, and DVC6215 Remote Mount figure 47 and 48.........
Special Conditions of Safe Use
D When product is used with natural gas as the pneumatic medium, the maximum working pressure of the natural
gas supply shall be limited to 145 psi.
D When product is used with natural gas as the pneumatic medium the product shall not be permitted in a Class I,
Division 2, Group A, B, C, D location without the proper venting installation per the manufacturer's instruction
manual.
D The apparatus enclosure contains aluminum and is considered to constitute a potential risk of ignition by impact
or friction. Care must be taken into account during installation and use to prevent impact or friction.
D Part of the enclosure is constructed from plastic. To prevent the risk of electrostatic sparking the plastic surface
should only be cleaned with a damp cloth.
47
Page 48

DVC6200 Digital Valve Controllers
January 2014
Figure 43. FM Loop Schematic—FIELDVUE DVC6200 HW1
Quick Start Guide
D103556X012
I.S. CLASS I,II,III, DIV 1, GROUPS ABCDEFG
N.I. CLASS I, DIV 2, GROUPS ABCD
T CODE T (amb)
T5 ≤ 80_C
T6 ≤ 75_C
1 SEE NOTES IN FIGURE 48
GE42819 sheet 2, Rev. D
HAZARDOUS LOCATION
DVC6200, DVC6200S
Vmax = 30 VDC
Imax = 226 mA
Ci = 5 nF
Li = 0.55 mH
Pi = 1.4 W
NON‐HAZARDOUS LOCATION
FM APPROVED BARRIER
1 NOTE 1, 3, 4, 5, 6
1 NOTE 7
48
Page 49

Quick Start Guide
D103556X012
Figure 44. FM Loop Schematics—FIELDVUE DVC6200 HW2 and DVC6200 SIS
DVC6200 Digital Valve Controllers
January 2014
HAZARDOUS LOCATION
I.S. CLASS I, II, III DIV 1, GROUPS ABCDEFG
N.I. CLASS I, DIV 2, GROUPS ABCD
HW2 - WITH OR WITHOUT I/O PACKAGE
DVC6200, DVC6200S
LOOP TERMINALS
Vmax = 30 VDC
Imax = 130 mA
Ci = 15 nF
Li = 0.55 mH
Pi = 1.0 W
OUTPUT TERMINALS
Vmax = 28 VDC
Imax = 100 mA
Ci = 15 nF
Li = 0.5 mH
Pi = 1.0 W
1 NOTE 7
NON‐HAZARDOUS LOCATION
FM APPROVED BARRIER
NOTE 1, 3, 4, 5, 6 1
FM APPROVED BARRIER
NOTE 1, 3, 4, 5, 6 1
POWER MAY BE APPLIED TO
EITHER THE LOOP TERMINALS OR
OUTPUT TERMINALS OR TO BOTH
SETS OF TERMINALS AT THE SAME
TIME
UNITS WITHOUT THE I/O PACKAGE
WILL NOT HAVE “OUTPUT
TERMINALS” AVAILABLE FOR
CONNECTION
T CODE T (amb) T (amb)
T5 ≤ 80_C ≤ 80_C
T6 ≤ 61_C ≤ 74_C
1 SEE NOTES IN FIGURE 48
GE42819 Sheet 11, Rev. A
WITH
I/O PACKAGE
WITHOUT
I/O PACKAGE
49
Page 50

DVC6200 Digital Valve Controllers
January 2014
Figure 45. FM Loop Schematics FIELDVUE DVC6205, DVC6205 SIS, and DVC6215
Quick Start Guide
D103556X012
I.S. CLASS I, II, III DIV 1, GROUPS ABCDEFG
N.I. CLASS I, DIV 2, GROUPS ABCD
DVC6215
Vmax = 30 VDC
Imax = 226 mA
Ci = 50 nF
Li = 0.55 mH
Pi = 1.4 W
NOTE 1, 3 1
T CODE T (amb)
T4 ≤ 125_C
T5 ≤ 90_C
T6 ≤ 75_C
1 SEE NOTES IN FIGURE 48
GE42819 Sheet 12, Rev. A
HAZARDOUS LOCATION
I.S. CLASS I, II, III DIV 1, GROUPS ABCDEFG
N.I. CLASS I, DIV 2, GROUPS ABCD
HW2 - WITH OR WITHOUT I/O PACKAGE
REMOTE
FIELD WIRING
TERMINAL BOX
Voc = 30 VDC
Isc = 21.2 mA
Ca = 55 nF
La = 78 mH
Po = 160 mW
T CODE T (amb) T (amb)
T5 ≤ 80_C ≤ 80_C
T6 ≤ 61_C ≤ 74_C
DVC6205
WITH
I/O PACKAGE
FIELD WIRING
TERMINAL BOX
LOOP TERMINALS
Vmax = 30 VDC
Imax = 130 mA
Ci = 15 nF
Li = 0.55 mH
Pi = 1.0 W
OUTPUT TERMINALS
Vmax = 28 VDC
Imax = 100 mA
Ci = 15 nF
Li = 0.5 mH
Pi = 1.0 W
WITHOUT
I/O PACKAGE
NON‐HAZARDOUS LOCATION
FM APPROVED BARRIER
NOTE 1, 3, 4, 5, 6 1
NOTE 7
1
FM APPROVED BARRIER
NOTE 1, 3, 4, 5, 6 1
POWER MAY BE APPLIED TO EITHER
THE LOOP TERMINALS OR OUTPUT
TERMINALS OR TO BOTH SETS OF
TERMINALS AT THE SAME TIME
UNITS WITHOUT THE I/O PACKAGE
WILL NOT HAVE “OUTPUT TERMINALS”
AVAILABLE FOR CONNECTION
50
Page 51

Quick Start Guide
D103556X012
Figure 46. FM Loop Schematics—FIELDVUE DVC6200f and DVC6200p
DVC6200 Digital Valve Controllers
January 2014
1 NOTE 7
GE42819 Sheet 3, Rev. D
T CODE T (amb)
T4 ≤ 80_C
T5 ≤ 77_C
T6 ≤ 62_C
FM APPROVED
ENTITY DEVICE
FM APPROVED
FISCO DEVICE
I.S. CLASS I,II,III DIV 1, GROUPS ABCDEFG
N.I. CLASS I, DIV 2, GROUPS ABCD
NOTE 1, 3 1
T CODE T (amb)
T4 ≤ 80_C
T5 ≤ 77_C
T6 ≤ 62_C
HAZARDOUS LOCATION
DVC6200F, DVC6200FS
DVC6200P, DVC6200PS
Vmax = 24 VDC
Imax = 380 mA
Ci = 5 nF
Li = 0 mH
Pi = 1.4 W
ENTITY FIELDBUS LOOP
HAZARDOUS LOCATION
I.S. CLASS I,II,III DIV 1,
GROUPS ABCDEFG
DVC6200F, DVC6200FS
DVC6200P, DVC6200PS
Vmax = 17.5 VDC
Imax = 380 mA
Ci = 5 nF
Li = 0 mH
Pi = 5.32 W
NON‐HAZARDOUS LOCATION
FM APPROVED
BARRIER
1 NOTE 1, 3, 4, 5, 6
NON‐HAZARDOUS LOCATION
FM APPROVED
FISCO TERMINATOR
GE42819 Sheet 4, Rev. D
1 SEE NOTES IN FIGURE 48
NOTE 2, 3 1
FM APPROVED
FISCO BARRIER
1 NOTE 2, 3, 4, 5, 6
FISCO LOOP
51
Page 52

DVC6200 Digital Valve Controllers
January 2014
Figure 47. FM Loop Schematics FIELDVUE DVC6205f, DVC6205p, and DVC6215
Quick Start Guide
D103556X012
NOTE 7 1
GE42819 Sheet 9, Rev. B
FM
APPROVED
ENTITY
DEVICE
I.S. CLASS I, II, III DIV 1, GROUPS ABCDEFG
N.I. CLASS I, DIV 2, GROUPS ABCD
DVC6215
Vmax = 30 VDC
Imax = 226 mA
Ci = 50 nF
Li = 0.55 mH
Pi = 1.4 W
NOTE 1, 3 1
NOTE 1 1
T CODE T (amb)
T4 ≤ 125_C
T5 ≤ 90C
T6 ≤ 75_C
HAZARDOUS LOCATION
I.S. CLASS I, II, III DIV 1, GROUPS ABCDEFG
N.I. CLASS I, DIV 2, GROUPS ABCD
DVC6205f, DVC6205p
Voc = 24 VDC
Isc = 44 mA
Ca = 121 nF
La = 30 mH
Po = 330 mW
Vmax = 24 VDC
Imax = 380 mA
Ci = 5 nF
Li = 0 mH
Pi = 1.4 W
T CODE T (amb)
T4 ≤ 80_C
T5 ≤ 77_C
T6 ≤ 62_C
ENTITY FIELDBUS LOOP
NON‐HAZARDOUS LOCATION
FM APPROVED
BARRIER
1 NOTE 1, 3, 4, 5, 6
FM
APPROVED
FISCO DEVICE
NOTE 2, 3 1
FM APPROVED
FISCO
TERMINATOR
GE42819 Sheet 10, Rev. B
1 SEE NOTES IN FIGURE 48
HAZARDOUS LOCATION
I.S. CLASS I, II, III DIV 1, GROUPS ABCDEFG I.S. CLASS I, II, III DIV 1, GROUPS ABCDEFG
DVC6215
Vmax = 30 VDC
Imax = 226 mA
Ci = 50 uF
Li = 0.55 mH
Pi = 1.4 W
NOTE 2 1
T CODE T (amb)
T4 ≤ 125_C
T5 ≤ 90C
T6 ≤ 75_C
DVC6205f, DVC6205p
Voc = 17.5 VDC
Isc = 44 mA
Ca = 121 nF
La = 30 mH
Po = 330 mW
T CODE T (amb)
T4 ≤ 80_C
T5 ≤ 77_C
T6 ≤ 62_C
Vmax = 17.5 VDC
Imax = 380 mA
Ci = 5 nF
Li = 0 mH
Pi = 5.32 W
FISCO LOOP
NON‐HAZARDOUS LOCATION
FM APPROVED
FISCO BARRIER
1 NOTE 2, 3, 4, 5, 6
52
Page 53

Quick Start Guide
D103556X012
DVC6200 Digital Valve Controllers
January 2014
Figure 48. Notes for FM Loop Schematics
THE ENTITY CONCEPT ALLOWS INTERCONNECTION OF INTRINSICALLY SAFE APPARATUS TO ASSOCIATED APPARATUS NOT
SPECIFICALLY EXAMINED IN SUCH COMBINATION. THE CRITERIA FOR INTERCONNECTION IS THAT THE VOLTAGE (Vmax OR Ui), THE
CURRENT (Imax OR Ii), AND THE POWER (Pmax or Pi) OF THE INTRINSICALLY SAFE APPARATUS MUST BE EQUAL TO OR GREATER THAN
THE VOLTAGE (Voc OR Uo), AND THE CURRENT (Isc OR Io), AND THE POWER(Po) DEFINED BY THE ASSOCIATED APPARATUS. IN
ADDITION, THE SUM OF THE MAX UNPROTECTED CAPACITANCE (Ci) AND MAX UNPROTECTED INDUCTANCE (Li), INCLUDING THE
INTERCONNECTING CABLING CAPACITANCE (Ccable) AND CABLING INDUCTANCE (Lcable) MUST BE LESS THAN THE ALLOWABLE
CAPACITANCE (Ca) AND INDUCTANCE (La) DEFINED BY THE ASSOCIATED APPARATUS. IF THE ABOVE CRITERIA IS MET, THEN THE
COMBINATION MAY BE CONNECTED.
Vmax or Ui . Voc or Uo Imax or Ii . Isc or Io Pmax or Pi . Po Ci + Ccable ≤ Ca Li + Lcable ≤ La
THE FISCO CONCEPT ALLOWS INTERCONNECTION OF INTRINSICALLY SAFE APPARATUS TO ASSOCIATED APPARATUS NOT
SPECIFICALLY EXAMINED IN SUCH COMBINATION. THE CRITERIA FOR THE INTERCONNECTION IS THAT THE VOLTAGE (Vmax OR Ui),
CURRENT (Imax OR Ii), AND POWER (Pmax or Pi), WHICH AN INTRINSICALLY SAFE APPARATUS CAN RECEIVE AND REMAIN
INTRINSICALLY SAFE, CONSIDERING FAULTS, MUST BE EQUAL TO OR GREATER THAN THE VOLTAGE (Voc OR Uo), CURRENT (Isc OR Io),
AND POWER (Po) LEVELS WHICH CAN BE DELIVERED BY THE ASSOCIATED APPARATUS, CONSIDERING FAULTS AND APPLICABLE
FACTORS. IN ADDITION THE MAXIMUM UNPROTECTED CAPACITANCE (Ci) AND INDUCTANCE (Li) OF EACH APPARATUS (OTHER THAN
THE TERMINATION) CONNECTED TO THE FIELDBUS MUST BE LESS THAN OR EQUAL TO 5 nF AND 10 uH RESPECTIVELY.
IN EACH SEGMENT ONLY ONE ACTIVE DEVICE, NORMALLY THE ASSOCIATED APPARATUS, IS ALLOWED TO PROVIDE THE NECESSARY
ENERGY FOR THE FIELDBUS SYSTEM. THE VOLTAGE (Uo OR Voc OR Vt) OF THE ASSOCIATED APPARATUS HAS TO BE LIMITED TO THE
RANGE OF 9 V TO 17.5 VDC. ALL OTHER EQUIPMENT CONNECTED TO THE BUS CABLE HAS TO BE PASSIVE, MEANING THAT THEY ARE
NOT ALLOWED TO PROVIDE ENERGY TO THE SYSTEM, EXCEPT FOR A LEAKAGE CURRENT OF 50 uA FOR EACH CONNECTED DEVICE.
SEPARATELY POWERED EQUIPMENT NEEDS A GALVANIC ISOLATION TO ASSURE THAT THE INTRINSICALLY SAFE FIELDBUS CIRCUIT
REMAINS PASSIVE.
THE CABLE USED TO CONNECT THE DEVICES NEEDS TO HAVE THE PARAMETERS IN THE FOLLOWING RANGE:
LOOP RESISTANCE R': 15 TO 150 ohms/km
INDUCTANCE PER UNIT LENGTH L: 0.4 TO 1 mH/km
CAPACITANCE PER UNIT LENGTH C': 80 TO 200 nF/km
C' = C' LINE/LINE + 0.5' LINE/SCREEN, IF BOTH LINES ARE FLOATING OR
C' = C' LINE/LINE + C' LINE/SCREEN, IF THE SCREEN IS CONNECTED TO ONE LINE.
LENGTH OF SPLICE: < 1 m (T‐BOX MUST ONLY CONTAIN TERMINAL CONNECTIONS WITH NO ENERGY STORAGE CAPABILITY)
LENGTH OF SPUR CABLE: < 30 M
LENGTH OF TRUNK CABLE: < 1 km
AT EACH END OF THE TRUNK CABLE AN APPROVED INFALLIBLE TERMINATION WITH THE FOLLOWING PARAMETERS IS SUITABLE:
R = 90 TO 100 ohms AND C = 0 TO 2.2 uF
NOTE, A BUILT‐IN TERMINATOR IS INCLUDED IN THE FIELD SIDE AND A SELECTABLE TERMINATOR IS AVAILABLE ON THE HOST SIDE.
THE NUMBER OF PASSIVE DEVICES CONNECTED TO THE BUS SEGMENT IS NOT LIMITED IN THE FISCO CONCEPT FOR INTRINSICALLY
SAFE REASONS. IF THE ABOVE RULES ARE RESPECTED, UP TO A TOTAL LENGTH OF 1000 m (SUM OF THE LENGTH OF THE TRUNK CABLE
AND ALL SPUR CABLES), THE INDUCTANCE AND CAPACITANCE OF THE CABLE WILL NOT IMPAIR THE INTRINSIC SAFETY OF THE
INSTALLATION.
INSTALLATION MUST BE IN ACCORDANCE WITH THE NATIONAL ELECTRICAL CODE (NEC) AND ANSI/ISA RP12.6.01.
MAXIMUM SAFE AREA VOLTAGE SHOULD NOT EXCEED 250 Vrms.
RESISTANCE BETWEEN INTRINSICALLY SAFE GROUND AND EARTH GROUND MUST BE LESS THAN ONE OHM
LOOPS MUST BE CONNECTED ACCORDING TO THE BARRIER MANUFACTURER'S INSTRUCTIONS.
IF HAND‐HELD COMMUNICATOR OR MULTIPLEXER IS USED, IT MUST BE FM APPROVED WITH ENTITY PARAMETERS AND INSTALLED
PER THE MANUFACTURER'S CONTROL DRAWINGS.
WARNING
THE APPARATUS ENCLOSURE CONTAINS ALUMINUM AND IS
CONSIDERED TO CONSTITUTE A POTENTIAL RISK OF IGNITION BY
IMPACT AND FRICTION. AVOID IMPACT AND FRICTION DURING
INSTALLATION AND USE TO PREVENT RISK OF IGNITION.
GE42819, Sheet 8, Rev. D
53
Page 54

DVC6200 Digital Valve Controllers
January 2014
ATEX
Flameproof II 2 G
WARNING
Do not open while energized.
Potential electrostatic charging hazard. See warning on page 2.
DVC6200 and DVC6205 Series (HART HW1 & HW2, SIS, FOUNDATION FIELDBUS, PROFIBUS)
Ex d IIC T5 (Ta ≤ 85°C)
Ex d IIC T6 (Ta ≤ 80°C)
Operating ambient temperature
Standard construction -40_C to +85_C,
Extreme temperature construction -52_C to +85_C
Type n II 3 G
Quick Start Guide
D103556X012
WARNING
Do not open while energized.
Potential electrostatic charging hazard. See warning on page 2.
DVC6200 and DVC6205 Series (HART HW1 & HW2, SIS, FOUNDATION FIELDBUS, PROFIBUS)
Ex nC IIC T5 (Ta ≤ 80°C)
Ex nC IIC T6 (Ta ≤ 75°C)
Operating ambient temperature
Standard construction -40_C to +80_C,
Extreme temperature construction -52_C to +80_C
Intrinsically Safe
WARNING
Potential electrostatic charging hazard. See warning on page 2.
DVC6200 and DVC6205 Series (HART HW1 & HW2, SIS, FOUNDATION FIELDBUS, PROFIBUS)
II 1 GD
Operating ambient temperature
Standard construction -40_C to +80_C,
Extreme temperature construction -52_C to +80_C
DVC6215
II 1 G
- 52_C ≤ Ta ≤ + 125_C
54
Page 55

Quick Start Guide
D103556X012
DVC6200 Digital Valve Controllers
January 2014
Intrinsically safe when connected per control drawing GE60771, as shown in the following figures
DVC6200 HW1 figure 49 and 54...........................................
DVC6200 HW2, DVC6200 SIS figure 50 and 54...............................
DVC6205, DVC6205 SIS, and DVC6215 Remote Mount figure 51 and 54........
DVC6200f and DVC6200p figure 52 and 54..................................
DVC6205f, DVC6205p, and DVC6215 Remote Mount figure 53 and 54..........
Special Conditions for Safe Use; Intrinsically Safe Applications
D This apparatus can only be connected to an intrinsically safe certified equipment and this combination must be
compatible as regards the intrinsically safe rules.
D Covered by standards EN 600790 (2009), EN 6007911 (2012), EN 6007926 (2007).
D For the model with aluminum body: the apparatus must not be submitted to frictions or mechanical impacts.
Figure 49. ATEX Loop Schematic—FIELDVUE DVC6200 HW1
ZONE 0, Ex ia IIC
T CODE T AMB
T5 ≤ 80_C
T6 ≤ 75_C
1 SEE NOTES IN FIGURE 54
GE60771 sheet 3, Rev. B
ZONE 0, Ex ia IIC
ZONE 20, Ex ia IIIC
DVC6200, DVC6200S
Ui = 30 VDC
Ii = 226 mA
Ci = 5 nF
Li = 0.55 mH
Pi = 1.4 W
MAX SURFACE
TEMP
T89_C ≤ 80_C
T85_C ≤ 76_C
HAZARDOUS LOCATION
ZONE 20, Ex ia IIIC
T AMB
NON‐HAZARDOUS LOCATION
ATEX APPROVED BARRIER
1 NOTE 1, 3, 4
1 NOTE 5
55
Page 56

DVC6200 Digital Valve Controllers
January 2014
Figure 50. ATEX Loop Schematics—FIELDVUE DVC6200 HW2 and DVC6200 SIS
Quick Start Guide
D103556X012
HAZARDOUS LOCATION
ZONE 0, Ex ia IIC
ZONE 20, Ex ia IIIC
HW2 - WITH OR WITHOUT I/O PACKAGE
DVC6200, DVC6200S
LOOP TERMINALS
Ui = 30 VDC
Ii = 130 mA
Ci = 15 nF
Li = 0.55 mH
Pi = 1.0 W
OUTPUT TERMINALS
Ui = 28 VDC
Ii = 100 mA
Ci = 15 nF
Li = 0.5 mH
Pi = 1.0 W
1 NOTE 5
NON‐HAZARDOUS LOCATION
ATEX APPROVED BARRIER
NOTE 1, 3, 4 1
ATEX APPROVED BARRIER
NOTE 1, 3, 4 1
POWER MAY BE APPLIED TO
EITHER THE LOOP TERMINALS
OR OUTPUT TERMINALS OR TO
BOTH SETS OF TERMINALS AT
THE SAME TIME
UNITS WITHOUT THE I/O
PACKAGE WILL NOT HAVE
“OUTPUT TERMINALS”
AVAILABLE FOR CONNECTION
ZONE 0, Ex ia IIC ZONE 20, Ex ia IIIC
WITHOUT
I/O PACKAGE
T CODE T AMB T CODE T AMB
T5 ≤ 80_C T5 ≤ 80_C
T6 ≤ 74_C T6 ≤ 61_C T85_C ≤ 74_C T85_C ≤ 61_C
1 SEE NOTES IN FIGURE 54
GE60771 Sheet 11, Rev. B
56
WITH
I/O PACKAGE
WITHOUT
I/O PACKAGE
MAX
SURFACE
TEMP
T91_C ≤ 80_C T104_C ≤ 80_C
T AMB
I/O PACKAGE
MAX
SURFACE
TEMP
WITH
T AMB
Page 57

Quick Start Guide
DVC6200 Digital Valve Controllers
D103556X012
Figure 51. ATEX Loop Schematics FIELDVUE DVC6205, DVC6205 SIS, and DVC6215
January 2014
ZONE 0, Ex ia IIC
DVC6215
T CODE T AMB
T4 ≤ 125_C
T5 ≤ 95_C
T6 ≤ 80_C
ZONE 0, Ex ia IIC
DVC6215
Ui = 30 VDC
Ii = 226 mA
Ci = 50 nF
Li = 0.55 mH
Pi = 1.4 W
NOTE 1, 3 1
HAZARDOUS LOCATION
ZONE 0, Ex ia IIC
ZONE 20, Ex ia IIIC
HW2 - WITH OR WITHOUT I/O PACKAGE
REMOTE
FIELD WIRING
TERMINAL BOX
Vo = 30 VDC
Io = 21.2 mA
Ca = 55 nF
La = 78 mH
Po = 160 mW
DVC6205
FIELD WIRING
TERMINAL BOX
LOOP TERMINALS
Ui = 30 VDC
Ii = 130 mA
Ci = 15 nF
Li = 0.55 mH
Pi = 1.0 W
OUTPUT TERMINALS
Ui = 28 VDC
Ii = 100 mA
Ci = 15 nF
Li = 0.5 mH
Pi = 1.0 W
NON‐HAZARDOUS LOCATION
ATEX APPROVED BARRIER
NOTE 1, 3, 4 1
NOTE 5
1
ATEX APPROVED BARRIER
NOTE 1, 3, 4 1
ZONE 0, Ex ia IIC ZONE 20, Ex ia IIIC
WITHOUT
I/O PACKAGE
TYPE
DVC6205
1 SEE NOTES IN FIGURE 54
GE60771 Sheet 12, Rev. B
T CODE T AMB T CODE T AMB
T5 ≤ 80_C
T6 ≤ 74_C
WITH
I/O PACKAGE
T5 ≤ 80_C
T6 ≤ 61_C
WITHOUT
I/O PACKAGE
MAX
SURFACE
TEMP
T91_C ≤ 80_C T104_C ≤ 80_C
T85_C ≤ 74_C T85_C ≤ 61_C
T AMB
WITH
I/O PACKAGE
MAX
SURFACE
TEMP
T AMB
POWER MAY BE APPLIED TO EITHER
THE LOOP TERMINALS OR OUTPUT
TERMINALS OR TO BOTH SETS OF
TERMINALS AT THE SAME TIME
UNITS WITHOUT THE I/O PACKAGE
WILL NOT HAVE “OUTPUT
TERMINALS” AVAILABLE FOR
CONNECTION
57
Page 58

DVC6200 Digital Valve Controllers
January 2014
Figure 52. ATEX Loop Schematics—FIELDVUE DVC6200f and DVC6200p
Quick Start Guide
D103556X012
GE60771 Sheet 4, Rev. B
ZONE 0
Ex ia IIC
T CODE T AMB
T4 ≤ 80_C
T5 ≤ 77_C
T6 ≤ 62_C
1 NOTE 5
ZONE 0
Ex ia IIC
T CODE T AMB
T4 ≤ 80_C
T5 ≤ 77_C
T6 ≤ 62_C
ZONE 20
Ex ia IIIC
MAX
SURFACE
TEMP
T103_C ≤ 80_C
T100_C ≤ 77_C
T85_C ≤ 62_C
ATEX
APPROVED
ENTITY DEVICE
ZONE 20
Ex ia IIIC
MAX
SURFACE
TEMP
T103_C ≤ 80_C
T100_C ≤ 77_C
T85_C ≤ 62_C
ATEX
APPROVED
FISCO DEVICE
T AMB
NOTE 1, 3 1
T AMB
HAZARDOUS LOCATION
ZONE 0, Ex ia IIC
ZONE 20, Ex ia IIIC
DVC6200F, DVC6200FS
DVC6200P, DVC6200PS
Ui = 24 VDC
Ii = 380 mA
Ci = 5 nF
Li = 0 mH
Pi = 1.4 W
ENTITY FIELDBUS LOOP
HAZARDOUS LOCATION
ZONE 0, Ex ia IIC
ZONE 20, Ex ia IIIC
DVC6200F, DVC6200FS
DVC6200P, DVC6200PS
Ui = 17.5 VDC
Ii = 380 mA
Ci = 5 nF
Li = 0 mH
Pi = 5.32 W
NON‐HAZARDOUS LOCATION
ATEX APPROVED
BARRIER
1 NOTE 1, 3, 4
NON‐HAZARDOUS LOCATION
ATEX APPROVED
FISCO TERMINATOR
GE60771 Sheet 5, Rev B.
1 SEE NOTES IN FIGURE 54
58
NOTE 2, 3 1
ATEX APPROVED
FISCO BARRIER
1 NOTE 2, 3, 4
FISCO LOOP
Page 59

Quick Start Guide
D103556X012
Figure 53. ATEX Loop Schematics FIELDVUE DVC6205f, DVC6205p, and DVC6215
DVC6200 Digital Valve Controllers
January 2014
NOTE 5 1
GE42818 Sheet 9, Rev. B
ATEX
APPROVED
ENTITY
DEVICE
NOTE 1, 3 1
ZONE 0, Ex ia IIC
DVC6215
T CODE T (amb)
---- ---T4 ≤ 125_C
T5 ≤ 95_C
T6 ≤ 80_C
ZONE 0, Ex ia IIC
DVC6215
Ui = 30 VDC
Ii = 226 mA
Ci = 50 nF
Li = 0.55 mH
Pi = 1.4 W
NOTE 1, 3 1
DVC6205f
DVC6205p
TYPE
HAZARDOUS LOCATION
ZONE 0, Ex ia IIC
ZONE 20, Ex ia IIIC
DVC6205f, DVC6205p
Uo = 24 VDC
Io = 44 mA
Ca = 121 nF
La = 30 mH
Po = 0.33 W
ZONE 0, Ex ia IIC ZONE 20, Ex ia IIIC
T CODE T (amb)
T4 ≤ 80_C
T5 ≤ 77_C
T6 ≤ 62_C
Ui = 24 VDC
Ii = 380 mA
Ci = 5 nF
Li = 0 mH
Pi = 1.4 W
MAX
SURFACE
TEMP
T103_C ≤ 80_C
T100_C ≤ 77_C
T85_C ≤ 62_C
T(amb)
ENTITY FIELDBUS LOOP
HAZARDOUS LOCATION
NON‐HAZARDOUS LOCATION
ATEX APPROVED
BARRIER
1 NOTE 1, 3, 4
NON‐HAZARDOUS LOCATION
ATEX
APPROVED
FISCO DEVICE
NOTE 2, 3 1
ATEX APPROVED
FISCO
TERMINATOR
GE42818 Sheet 10, Rev. B
1 SEE NOTES IN FIGURE 54
ZONE 0, Ex ia IIC
DVC6215
Ui = 30 VDC
Ii = 226 mA
Ci = 50 nF
Li = 0.55 mH
Pi = 1.4 W
NOTE 2 1
ZONE 0, Ex ia IIC
DVC6215
T CODE T (amb)
---- --- T4 ≤ 125_C
T5 ≤ 95_C
T6 ≤ 80_C
TYPE
DVC6205f
DVC6205p
FISCO LOOP
ZONE 0, Ex ia IIC
ZONE 20, Ex ia IIIC
DVC6205f, DVC6205p
Uo = 17.5 VDC
Io = 44 mA
Ca = 121 nF
La = 30 mH
Po = 0.33 W
ZONE 0, Ex ia IIC
T CODE T (amb)
T4 ≤ 80_C
T5 ≤ 77_C
T6 ≤ 62_C
Ui = 17.5 VDC
Ii = 380 mA
Ci = 5 nF
Li = 0 mH
Pi = 5.32 W
ZONE 20, Ex ia IIIC
MAX
SURFACE
TEMP
T103_C ≤ 80_C
T100_C ≤ 77_C
T85_C ≤ 62_C
ATEX
APPROVED
FISCO BARRIER
1 NOTE 2, 3, 4
T (amb)
59
Page 60

DVC6200 Digital Valve Controllers
January 2014
Quick Start Guide
D103556X012
Figure 54. Notes for ATEX Loop Schematics
THE ENTITY CONCEPT ALLOWS INTERCONNECTION OF INTRINSICALLY SAFE APPARATUS TO ASSOCIATED APPARATUS NOT
SPECIFICALLY EXAMINED IN SUCH COMBINATION. THE CRITERIA FOR INTERCONNECTION IS THAT THE VOLTAGE (Vmax or Ui), THE
CURRENT (Imax or Ii), AND THE POWER (Pmax or Pi) OF THE INTRINSICALLY SAFE APPARATUS MUST BE EQUAL TO OR GREATER THAN
THE VOLTAGE (Voc or Uo), AND THE CURRENT (Isc or Io), AND THE POWER(Po) DEFINED BY THE ASSOCIATED APPARATUS. IN
ADDITION, THE SUM OF THE MAX UNPROTECTED CAPACITANCE (Ci) AND MAX UNPROTECTED INDUCTANCE (Li), INCLUDING THE
INTERCONNECTING CABLING CAPACITANCE (Ccable) AND CABLING INDUCTANCE (Lcable) MUST BE LESS THAN THE ALLOWABLE
CAPACITANCE (Ca) AND INDUCTANCE (La) DEFINED BY THE ASSOCIATED APPARATUS. IF THE ABOVE CRITERIA IS MET, THEN THE
COMBINATION MAY BE CONNECTED.
Vmax or Ui . Voc or Uo Imax or Ii . Isc or Io Pmax or Pi . Po Ci + Ccable ≤ Ca Li + Lcable ≤ La
THE FISCO CONCEPT ALLOWS INTERCONNECTION OF INTRINSICALLY SAFE APPARATUS TO ASSOCIATED APPARATUS NOT
SPECIFICALLY EXAMINED IN SUCH COMBINATION. THE CRITERIA FOR THE INTERCONNECTION IS THAT THE VOLTAGE (Vmax or Ui),
CURRENT (Imax or Ii), AND POWER (Pmax or Pi), WHICH AN INTRINSICALLY SAFE APPARATUS CAN RECEIVE AND REMAIN
INTRINSICALLY SAFE, CONSIDERING FAULTS, MUST BE EQUAL TO OR GREATER THAN THE VOLTAGE (Voc or Uo), CURRENT (Isc or Io),
AND POWER (Po) LEVELS WHICH CAN BE DELIVERED BY THE ASSOCIATED APPARATUS, CONSIDERING FAULTS AND APPLICABLE
FACTORS. IN ADDITION THE MAXIMUM UNPROTECTED CAPACITANCE (Ci) AND INDUCTANCE (Li) OF EACH APPARATUS (OTHER THAN
THE TERMINATION) CONNECTED TO THE FIELDBUS MUST BE LESS THAN OR EQUAL TO 5 nF AND 10 uH RESPECTIVELY.
IN EACH SEGMENT ONLY ONE ACTIVE DEVICE, NORMALLY THE ASSOCIATED APPARATUS, IS ALLOWED TO PROVIDE THE NECESSARY
ENERGY FOR THE FIELDBUS SYSTEM. THE VOLTAGE (Uo or Voc or Vt) OF THE ASSOCIATED APPARATUS HAS TO BE LIMITED TO THE
RANGE OF 9 V TO 17.5 VDC. ALL OTHER EQUIPMENT CONNECTED TO THE BUS CABLE HAS TO BE PASSIVE, MEANING THAT THEY ARE NOT
ALLOWED TO PROVIDE ENERGY TO THE SYSTEM, EXCEPT FOR A LEAKAGE CURRENT OF 50 uA FOR EACH CONNECTED DEVICE.
SEPARATELY POWERED EQUIPMENT NEEDS A GALVANIC ISOLATION TO ASSURE THAT THE INTRINSICALLY SAFE FIELDBUS CIRCUIT
REMAINS PASSIVE.
THE CABLE USED TO CONNECT THE DEVICES NEEDS TO HAVE THE PARAMETERS IN THE FOLLOWING RANGE:
LOOP RESISTANCE R': 15 TO 150 ohms/km
INDUCTANCE PER UNIT LENGTH L: 0.4 TO 1 mH/km
CAPACITANCE PER UNIT LENGTH C': 80 TO 200 nF/km
C' = C' LINE/LINE + 0.5' LINE/SCREEN, IF BOTH LINES ARE FLOATING OR
C' = C' LINE/LINE + C' LINE/SCREEN, IF THE SCREEN IS CONNECTED TO ONE LINE.
LENGTH OF SPLICE: < 1 m (T‐BOX MUST ONLY CONTAIN TERMINAL CONNECTIONS WITH NO ENERGY STORAGE CAPABILITY)
LENGTH OF SPUR CABLE: < 30 M
LENGTH OF TRUNK CABLE: < 1 km
AT EACH END OF THE TRUNK CABLE AN APPROVED INFALLIBLE TERMINATION WITH THE FOLLOWING PARAMETERS IS SUITABLE:
R = 90 TO 100 ohms AND C = 0 TO 2.2 uF
NOTE, A BUILT‐IN TERMINATOR IS INCLUDED IN THE FIELD SIDE AND A SELECTABLE TERMINATOR IS AVAILABLE ON THE HOST SIDE.
THE NUMBER OF PASSIVE DEVICES CONNECTED TO THE BUS SEGMENT IS NOT LIMITED IN THE FISCO CONCEPT FOR INTRINSICALLY SAFE
REASONS. IF THE ABOVE RULES ARE RESPECTED, UP TO A TOTAL LENGTH OF 1000 m (SUM OF THE LENGTH OF THE TRUNK CABLE AND
ALL SPUR CABLES), THE INDUCTANCE AND CAPACITANCE OF THE CABLE WILL NOT IMPAIR THE INTRINSIC SAFETY OF THE
INSTALLATION.
INSTALLATION MUST BE IN ACCORDANCE WITH THE NATIONAL WIRING PRACTICES OF THE COUNTRY IN USE.
LOOPS MUST BE CONNECTED ACCORDING TO THE BARRIER MANUFACTURER'S INSTRUCTIONS.
IF HAND‐HELD COMMUNICATOR OR MULTIPLEXER IS USED, IT MUST BE ATEX APPROVED WITH ENTITY PARAMETERS AND
INSTALLED PER THE MANUFACTURER'S CONTROL DRAWINGS.
GE60771 Sheet 2, Rev. B
60
Page 61

Quick Start Guide
D103556X012
DVC6200 Digital Valve Controllers
IECEx
Flameproof
WARNING
Do not open while energized.
Potential electrostatic charging hazard. See warning on page 2.
DVC6200 and DVC6205 Series (HART HW1 & HW2, SIS, FOUNDATION FIELDBUS, PROFIBUS)
Ex d IIC T5 (Ta ≤ 80°C) / T6 (Ta ≤ 75°C)
30 V max, 20 mA
IP66
DVC6215 Remote Mount
Ex d IIC T4 (Ta ≤ 125_C) / T5 (Ta ≤ 95_C) / T6 (Ta ≤ 80_C)
30 V max, 20 mA
IP66
January 2014
Type n
WARNING
Do not open while energized.
Potential electrostatic charging hazard. See warning on page 2.
DVC6200 and DVC6205 Series (HART HW1 & HW2, SIS, FOUNDATION FIELDBUS, PROFIBUS)
Ex nC IIC T5 (Ta ≤ 80_C) / T6 (Ta ≤ 75_C)
30 V max, 20 mA
IP66
DVC6215 Remote Mount
Ex nA IIC T4 (Ta ≤ 125_C) / T5 (Ta ≤ 95_C) / T6 (Ta ≤ 80_C)
30 V max, 20 mA
IP66
61
Page 62

DVC6200 Digital Valve Controllers
January 2014
Intrinsically Safe
WARNING
Potential electrostatic charging hazard. See warning on page 2.
Ex ia IIC
IP66
Intrinsically safe when connected per drawing GE42990, as shown in the following figures
DVC6200 HW1 figure 55 and 60...........................................
DVC6200 HW2 and DVC6200 SIS figure 56 and 60...........................
DVC6205, DVC6205 SIS, and DVC6215 Remote Mount figure 57 and 60........
DVC6200f and DVC6200p figure 58 and 60..................................
DVC6205f, DVC6205p, and DVC6215 Remote Mount figure 59 and 60..........
Quick Start Guide
D103556X012
Figure 55. IECEx Schematic—FIELDVUE DVC6200 HW1
HAZARDOUS LOCATION
ZONE 0, Ex ia IIC
DVC6200, DVC6200S
Vmax = 30 VDC
Imax = 226 mA
Ci = 5 nF
Li = 0.55 mH
Pi = 1.4 W
1 NOTE 5
T CODE T (amb)
T5 ≤ 80_C
T6 ≤ 75_C
NON‐HAZARDOUS LOCATION
IECEx APPROVED BARRIER
1 NOTE 1, 3, 4
1 SEE NOTES IN FIGURE 60
GE42990 Sheet 2, Rev. E
62
Page 63

Quick Start Guide
D103556X012
Figure 56. IECEx Loop Schematics—FIELDVUE DVC6200 HW2 and DVC6200 SIS
DVC6200 Digital Valve Controllers
January 2014
HAZARDOUS LOCATION
ZONE 0, Ex ia IIC
HW2 - WITH OR WITHOUT I/O PACKAGE
DVC6200, DVC6200S
LOOP TERMINALS
Vmax = 30 VDC
Imax = 130 mA
Ci = 15 nF
Li = 0.55 mH
Pi = 1.0 W
OUTPUT TERMINALS
Vmax = 28 VDC
Imax = 100 mA
Ci = 15 nF
Li = 0.5 mH
Pi = 1.0 W
1 NOTE 5
NON‐HAZARDOUS LOCATION
IECEx APPROVED BARRIER
NOTE 1, 3, 4 1
IECEx APPROVED BARRIER
NOTE 1, 3, 4 1
POWER MAY BE APPLIED TO
EITHER THE LOOP TERMINALS
OR OUTPUT TERMINALS OR TO
BOTH SETS OF TERMINALS AT
THE SAME TIME
UNITS WITHOUT THE I/O
PACKAGE WILL NOT HAVE
“OUTPUT TERMINALS”
AVAILABLE FOR CONNECTION
WITH
I/O PACKAGE
T CODE T (amb) T(amb)
T5 ≤ 80_C ≤ 80_C
T6 ≤ 61_C ≤ 74_C
1 SEE NOTES IN FIGURE 60
GE42990 Sheet 11, Rev. B
WITHOUT
I/O PACKAGE
63
Page 64

DVC6200 Digital Valve Controllers
January 2014
Figure 57. IECEx Loop Schematics FIELDVUE DVC6205, DVC6205 SIS, and DVC6215
Quick Start Guide
D103556X012
ZONE 0, Ex ia IIC
DVC6215
Vmax = 30 VDC
Imax = 226 mA
Ci = 50 nF
Li = 0.55 mH
Pi = 1.4 W
NOTE 1, 3 1
T CODE T (amb)
T4 ≤ 125_C
T5 ≤ 90_C
T6 ≤ 75_C
HAZARDOUS LOCATION
ZONE 0, Ex ia IIC
HW2 - WITH OR WITHOUT I/O PACKAGE
REMOTE
FIELD WIRING
TERMINAL BOX
Voc = 30 VDC
Isc = 21.2 mA
Ca = 55 nF
La = 78 mH
Po = 160 mW
T CODE T (amb) T(amb)
T5 ≤ 80_C ≤ 80_C
T6 ≤ 61_C ≤ 74_C
DVC6205
WITH
I/O PACKAGE
FIELD WIRING
TERMINAL BOX
LOOP TERMINALS
Vmax = 30 VDC
Imax = 130 mA
Ci = 15 nF
Li = 0.55 mH
Pi = 1.0 W
OUTPUT TERMINALS
Vmax = 28 VDC
Imax = 100 mA
Ci = 15 nF
Li = 0.5 mH
Pi = 1.0 W
WITHOUT
I/O PACKAGE
NON‐HAZARDOUS LOCATION
ATEX APPROVED BARRIER
NOTE 1, 3, 4 1
NOTE 5
1
ATEX APPROVED BARRIER
NOTE 1, 3, 4 1
POWER MAY BE APPLIED TO EITHER
THE LOOP TERMINALS OR OUTPUT
TERMINALS OR TO BOTH SETS OF
TERMINALS AT THE SAME TIME
UNITS WITHOUT THE I/O PACKAGE
WILL NOT HAVE “OUTPUT TERMINALS”
AVAILABLE FOR CONNECTION
1 SEE NOTES IN FIGURE 60
GE42990 Sheet 12, Rev. B
64
Page 65

Quick Start Guide
D103556X012
Figure 58. IECEx Loop Schematics—FIELDVUE DVC6200f and DVC6200p
DVC6200 Digital Valve Controllers
January 2014
1 NOTE 5
GE42990 Sheet 3, Rev. E
T CODE T (amb)
T4 ≤ 80_C
T5 ≤ 77_C
T6 ≤ 62_C
IECEx
APPROVED
ENTITY DEVICE
NOTE 1, 3 1
T CODE T (amb)
T4 ≤ 80_C
T5 ≤ 77_C
T6 ≤ 62_C
HAZARDOUS LOCATION
ZONE 0, Ex ia IIC
DVC6200F, DVC6200FS
DVC6200P, DVC6200PS
Ui = 24 VDC
Ii = 380 mA
Ci = 5 nF
Li = 0 mH
Pi = 1.4 W
ENTITY FIELDBUS LOOP
HAZARDOUS LOCATION
ZONE 0, Ex ia IIC
DVC6200F, DVC6200FS
DVC6200P, DVC6200PS
NON‐HAZARDOUS LOCATION
IECEx APPROVED
BARRIER
1 NOTE 1, 3, 4
NON‐HAZARDOUS LOCATION
IECEx APPROVED
FISCO TERMINATOR
GE42990 Sheet 4, Rev. E
1 SEE NOTES IN FIGURE 60
IECEx
APPROVED
FISCO DEVICE
NOTE 2, 3 1
Ui = 17.5 VDC
Ii = 380 mA
Ci = 5 nF
Li = 0 mH
Pi = 5.32 W
IECEx APPROVED
FISCO BARRIER
1 NOTE 2, 3, 4
FISCO LOOP
65
Page 66

DVC6200 Digital Valve Controllers
January 2014
Figure 59. IECEx Loop Schematics FIELDVUE DVC6205f, DVC6205p, and DVC6215
Quick Start Guide
D103556X012
NOTE 5 1
GE42990 Sheet 9, Rev. C
IECEx
APPROVED
ENTITY
DEVICE
NOTE 1, 3 1
IECEx
APPROVED
FISCO DEVICE
NOTE 2, 3 1
ZONE 0, Ex ia IIC
DVC6215
Ui = 30 VDC
Ii = 226 mA
Ci = 50 nF
Li = 0.55 mH
Pi = 1.4 W
NOTE 1 1
T CODE T (amb)
T4 ≤ 125_C
T5 ≤ 90_C
T6 ≤ 75_C
ZONE 0, Ex ia IIC
DVC6215
Ui = 30 VDC
Ii = 226 mA
Ci = 50 nF
Li = 0.55 mH
Pi = 1.4 W
NOTE 2 1
ZONE 0, Ex ia IIC
DVC6205f, DVC6205p
Uo = 24 VDC
Io = 44 mA
Ca = 121 nF
La = 30 mH
Po = 0.33 W
Ui = 24 VDC
Ii = 380 mA
Ci = 5 nF
Li = 0 mH
Pi = 1.4 W
T CODE T (amb)
T4 ≤ 80_C
T5 ≤ 77_C
T6 ≤ 62_C
ENTITY FIELDBUS LOOP
ZONE 0, Ex ia IIC
DVC6205f, DVC6205p
Uo = 17.5 VDC
Io = 44 mA
Ca = 121 nF
La = 30 mH
Po = 0.33 W
HAZARDOUS LOCATION
HAZARDOUS LOCATION
Ui = 17.5 VDC
Ii = 380 mA
Ci = 5 nF
Li = 0 mH
Pi = 5.32 W
NON‐HAZARDOUS LOCATION
IECEx APPROVED
BARRIER
1 NOTE 1, 3, 4
NON‐HAZARDOUS LOCATION
IECEx APPROVED
FISCO TERMINATOR
GE42990 Sheet 10, Rev. C
1 SEE NOTES IN FIGURE 60
66
T CODE T (amb)
T4 ≤ 125_C
T5 ≤ 90_C
T6 ≤ 75_C
FISCO LOOP
T CODE T (amb)
T4 ≤ 80_C
T5 ≤ 77_C
T6 ≤ 62_C
IECEx APPROVED
FISCO BARRIER
1 NOTE 2, 3, 4
Page 67

Quick Start Guide
D103556X012
DVC6200 Digital Valve Controllers
January 2014
Figure 60. Notes for IECEx Loop Schematics
THE ENTITY CONCEPT ALLOWS INTERCONNECTION OF INTRINSICALLY SAFE APPARATUS TO ASSOCIATED APPARATUS NOT
SPECIFICALLY EXAMINED IN SUCH COMBINATION. THE CRITERIA FOR INTERCONNECTION IS THAT THE VOLTAGE (Vmax OR Ui), THE
CURRENT (Imax OR Ii), AND THE POWER (Pmax or Pi) OF THE INTRINSICALLY SAFE APPARATUS MUST BE EQUAL TO OR GREATER THAN
THE VOLTAGE (Voc OR Uo), AND THE CURRENT (Isc OR Io), AND THE POWER (Po) DEFINED BY THE ASSOCIATED APPARATUS. IN
ADDITION, THE SUM OF THE MAX UNPROTECTED CAPACITANCE (Ci) AND MAX UNPROTECTED INDUCTANCE (Li), INCLUDING THE
INTERCONNECTING CABLING CAPACITANCE (Ccable) AND CABLING INDUCTANCE (Lcable) MUST BE LESS THAN THE ALLOWABLE
CAPACITANCE (Ca) AND INDUCTANCE (La) DEFINED BY THE ASSOCIATED APPARATUS. IF THE ABOVE CRITERIA IS MET, THEN THE
COMBINATION MAY BE CONNECTED.
Vmax or Ui ≥ Voc or Uo Imax or Ii ≥ Isc or Io Pmax or Pi ≥ Po Ci + Ccable ≤ Ca Li + Lcable ≤ La
THE FISCO CONCEPT ALLOWS INTERCONNECTION OF INTRINSICALLY SAFE APPARATUS TO ASSOCIATED APPARATUS NOT
SPECIFICALLY EXAMINED IN SUCH COMBINATION. THE CRITERIA FOR THE INTERCONNECTION IS THAT THE VOLTAGE (Vmax OR Ui),
CURRENT (Imax OR Ii), AND POWER (Pmax or Pi), WHICH AN INTRINSICALLY SAFE APPARATUS CAN RECEIVE AND REMAIN
INTRINSICALLY SAFE, CONSIDERING FAULTS, MUST BE EQUAL TO OR GREATER THAN THE VOLTAGE (Voc OR Uo), CURRENT (Isc OR Io),
AND POWER (Po) LEVELS WHICH CAN BE DELIVERED BY THE ASSOCIATED APPARATUS, CONSIDERING FAULTS AND APPLICABLE
FACTORS. IN ADDITION THE MAXIMUM UNPROTECTED CAPACITANCE (Ci) AND INDUCTANCE (Li) OF EACH APPARATUS (OTHER
THAN THE TERMINATION) CONNECTED TO THE FIELDBUS MUST BE LESS THAN OR EQUAL TO 5 nF AND 10 uH RESPECTIVELY.
IN EACH SEGMENT ONLY ONE ACTIVE DEVICE, NORMALLY THE ASSOCIATED APPARATUS, IS ALLOWED TO PROVIDE THE NECESSARY
ENERGY FOR THE FIELDBUS SYSTEM. THE VOLTAGE (Uo OR Voc OR Vt) OF THE ASSOCIATED APPARATUS HAS TO BE LIMITED TO THE
RANGE OF 9 V TO 17.5 VDC. ALL OTHER EQUIPMENT CONNECTED TO THE BUS CABLE HAS TO BE PASSIVE, MEANING THAT THEY ARE
NOT ALLOWED TO PROVIDE ENERGY TO THE SYSTEM, EXCEPT FOR A LEAKAGE CURRENT OF 50 uA FOR EACH CONNECTED DEVICE.
SEPARATELY POWERED EQUIPMENT NEEDS A GALVANIC ISOLATION TO ASSURE THAT THE INTRINSICALLY SAFE FIELDBUS CIRCUIT
REMAINS PASSIVE.
THE CABLE USED TO CONNECT THE DEVICES NEEDS TO HAVE THE PARAMETERS IN THE FOLLOWING RANGE:
LOOP RESISTANCE R': 15 TO 150 ohms/km
INDUCTANCE PER UNIT LENGTH L: 0.4 TO 1 mH/km
CAPACITANCE PER UNIT LENGTH C': 80 TO 200 nF/km
C' = C' LINE/LINE + 0.5' LINE/SCREEN, IF BOTH LINES ARE FLOATING OR
C' = C' LINE/LINE + C' LINE/SCREEN, IF THE SCREEN IS CONNECTED TO ONE LINE.
LENGTH OF SPLICE: < 1 m (T‐BOX MUST ONLY CONTAIN TERMINAL CONNECTIONS WITH NO ENERGY STORAGE CAPABILITY)
LENGTH OF SPUR CABLE: < 30 M
LENGTH OF TRUNK CABLE: < 1 km
AT EACH END OF THE TRUNK CABLE AN APPROVED INFALLIBLE TERMINATION WITH THE FOLLOWING PARAMETERS IS SUITABLE:
R = 90 TO 100 ohms AND C = 0 TO 2.2 uF
NOTE, A BUILT‐IN TERMINATOR IS INCLUDED IN THE FIELD SIDE AND A SELECTABLE TERMINATOR IS AVAILABLE ON THE HOST SIDE.
THE NUMBER OF PASSIVE DEVICES CONNECTED TO THE BUS SEGMENT IS NOT LIMITED IN THE FISCO CONCEPT FOR INTRINSICALLY
SAFE REASONS. IF THE ABOVE RULES ARE RESPECTED, UP TO A TOTAL LENGTH OF 1000 m (SUM OF THE LENGTH OF THE TRUNK CABLE
AND ALL SPUR CABLES), THE INDUCTANCE AND CAPACITANCE OF THE CABLE WILL NOT IMPAIR THE INTRINSIC SAFETY OF THE
INSTALLATION.
INSTALLATION MUST BE IN ACCORDANCE WITH THE NATIONAL WIRING PRACTICES OF THE COUNTRY IN USE.
LOOPS MUST BE CONNECTED ACCORDING TO THE BARRIER MANUFACTURER'S INSTRUCTIONS.
IF HAND‐HELD COMMUNICATOR OR MULTIPLEXER IS USED, IT MUST BE IECEx APPROVED WITH ENTITY PARAMETERS AND
INSTALLED PER THE MANUFACTURER'S CONTROL DRAWINGS.
GE42990 Sheet 8, Rev. D
67
Page 68

DVC6200 Digital Valve Controllers
January 2014
Scan the appropriate QR
code for digital valve
controller field support
Quick Start Guide
D103556X012
Neither Emerson, Emerson Process Management, nor any of their affiliated entities assumes responsibility for the selection, use or maintenance
of any product. Responsibility for proper selection, use, and maintenance of any product remains solely with the purchaser and end user.
Fisher, FIELDVUE, ValveLink, and THUM are marks owned by one of the companies in the Emerson Process Management business unit of Emerson Electric
Co. Emerson Process Management, Emerson, and the Emerson logo are trademarks and service marks of Emerson Electric Co. HART and the HART logo are
marks owned by the HART Communication Foundation. F
PROFIBUS logo is a mark owned by PROFIBUS Nutzerorganisation e.V. All other marks are the property of their respective owners.
The contents of this publication are presented for informational purposes only, and while every effort has been made to ensure their accuracy, they are not
to be construed as warranties or guarantees, express or implied, regarding the products or services described herein or their use or applicability. All sales are
governed by our terms and conditions, which are available upon request. We reserve the right to modify or improve the designs or specifications of such
products at any time without notice.
Emerson Process Management
Marshalltown, Iowa 50158 USA
Sorocaba, 18087 Brazil
Chatham, Kent ME4 4QZ UK
Dubai, United Arab Emirates
Singapore 128461 Singapore
OUNDATION fieldbus and the Fieldbus logo are marks owned by the Fieldbus Foundation. The
www.Fisher.com
68
E 2012, 2014 Fisher Controls International LLC. All rights reserved.
 Loading...