

Page 1
S m a r t S e t C l o c k R a d i o ,
®
With Auto-Time Setting System,
Dual Alarms,
PLL AM/FM Radio
(U.S. Pate nt No . 6,567,344)
OWNER'S MANUAL
CKS1800
Visit ou r web s ite at ww w.em erson rad io. com
PRÉCA UT ION: Da nger d’e xplosion si les piles son t rempla cées de facon incorre ct. Remp lacer
les p il es s eu le ment pa r le m ém e ty pe d e pi le ou l ’é qu iv al en t.
Th an k y ou fo r pu rcha sing th is Em er son S ma rt Set Du al A la rm Cl oc k R ad io .
Th is cl oc k r ad io us es Em er so n's p at en ted S ma rt Set Au toma tic Ti me Se tt in g Sys te m.
Th e fi rst t ime y o u c onn ect t his c l oc k ra di o t o yo ur A C o utl et, a nd a fte re v ery p o wer
in te rr upti on, w it hi n sec on ds th e c lo ck wi ll au to ma tica lly s et i tsel f to t h e co rr e c t Ye ar,
Mo nth , Da te , D ay, a nd T i me . In a d d it ion a ll c han ges f ro m St an da rd Tim e to D ay li gh t
Savin g Tim e, a nd b ac k to Stan da rd Ti me , ar e made au to ma ti ca lly.
Th e re are du al a la rms th a t c an b e s et a nd us ed i nd epe nde n tl y, an d b ot h of t h e a la rms
ca n be pr ogr am me d for e ve ryda y ope ra ti on, w ee kd ays o nl y, or wee ke nd s on ly.
The re i s a lo ng l if e li thium b at te ry i ns talle d in t hi s cl oc k radio w he n yo u bu y it .
Thi s ba tt er y ca n ma intai n th e ti me a nd a larm se tt in gs f or 3 t o 5 years , or e ve n lo ng er.
We ha ve tak e n e ve ry p re cau tio n t o ma ke su re t hi s ra di o was i n p erf e ct wo rki n g o rd er
when it l ef t ou r fa ct ory. If yo u en co unter a ny p ro bl em s with th e se t up o r op era t io n of t his
it e m, pl eas e c all th e Em er s on Con s um er Pro d uc ts Cor p .,
Custo me r Se rv ic e Hotli ne , to ll f re e, at 1 -80 0- 89 8- 90 20.
®
®
IMPORTANT NOTES
• Av oi d i n s t a l l i n g t h i s u n i t i n p l a c e s
ex po s ed to d i re ct su n li ght o r c los e t o
heat radiating appliances such as
ele ctr ic he ate rs, on top of ot her ster eo
eq uipm ent t hat ra diat es t oo muc h
heat, places lacking ventilation or dusty
a r e a s , p l ac e s s ub je c t t o c on s ta n t
vibration and/or humid or moist areas.
FCC In fo rm at io n
Th is eq uip me n t has b e en te st e d and f o un d t o c om ply w i th th e l im its f o r a C la s s B
di gi t al de vi c e, pu rs u an t t o P ar t 1 5 o f the F C C Rul es . T he s e lim it s a re de s ig ned t o
provide reasonable protection against harmful interference in a residen ti a l
ins tal latio n. Thi s equ ipm ent gene rates , uses, and can rad iate rad io fr equ ency ene rgy
and , if not in stall ed and used in acco rdanc e with the instr uct ions, ma y cau se harmf ul
interference to radio communications. However, t h e r e i s n o g u a r a n t e e t h a t
interference will not occur in a particular installation. If this equipment does cause
ha rm f ul in te r fe ren ce to ra di o o r t el e vi sio n r ec ept io n , whi ch ca n b e d et erm ine d b y
tu rnin g th e eq uipm ent o ff a n d on, t h e use r is e n c o ura ged t o tr y to c o r rec t th e
interference by one or more of the following measures:
• Reorient or relocate the receiving antenna.
•
Increase the separation between the equipment and receiver.
•
Con n ect the equ i pme n t i n to a n o u tle t on a c i rcu i t d i ff ere n t f r om t ha t to w h i ch
the receiver is connected.
•
Consult the dealer or an experienced radio/T V te ch ni ci an f or h el p.
• Operate controls and switches as
described in the manual.
•
Be fore t u r n ing o n t he p owe r, m a ke
c er t a i n t h a t th e A C a d ap t er i s
properly installed.
•
When moving the set, be sure to first
disconnect the AC adapter.
2
This radio should be connected to an AC outlet that
is always 'live'. Do not connect it to an outlet that is
co nt r ol led b y a wa ll sw itc h. Wh en th e p owe r t o the
radio is interrupted, the built in lithium battery takes
ov er t o ma inta in t he t ime a nd a lar m se ttin gs. To
max imi ze th e life of the li thi um ba tte ry ke ep the radi o
connected to a 'live' AC outlet at all times.
PREPARATION FOR USE
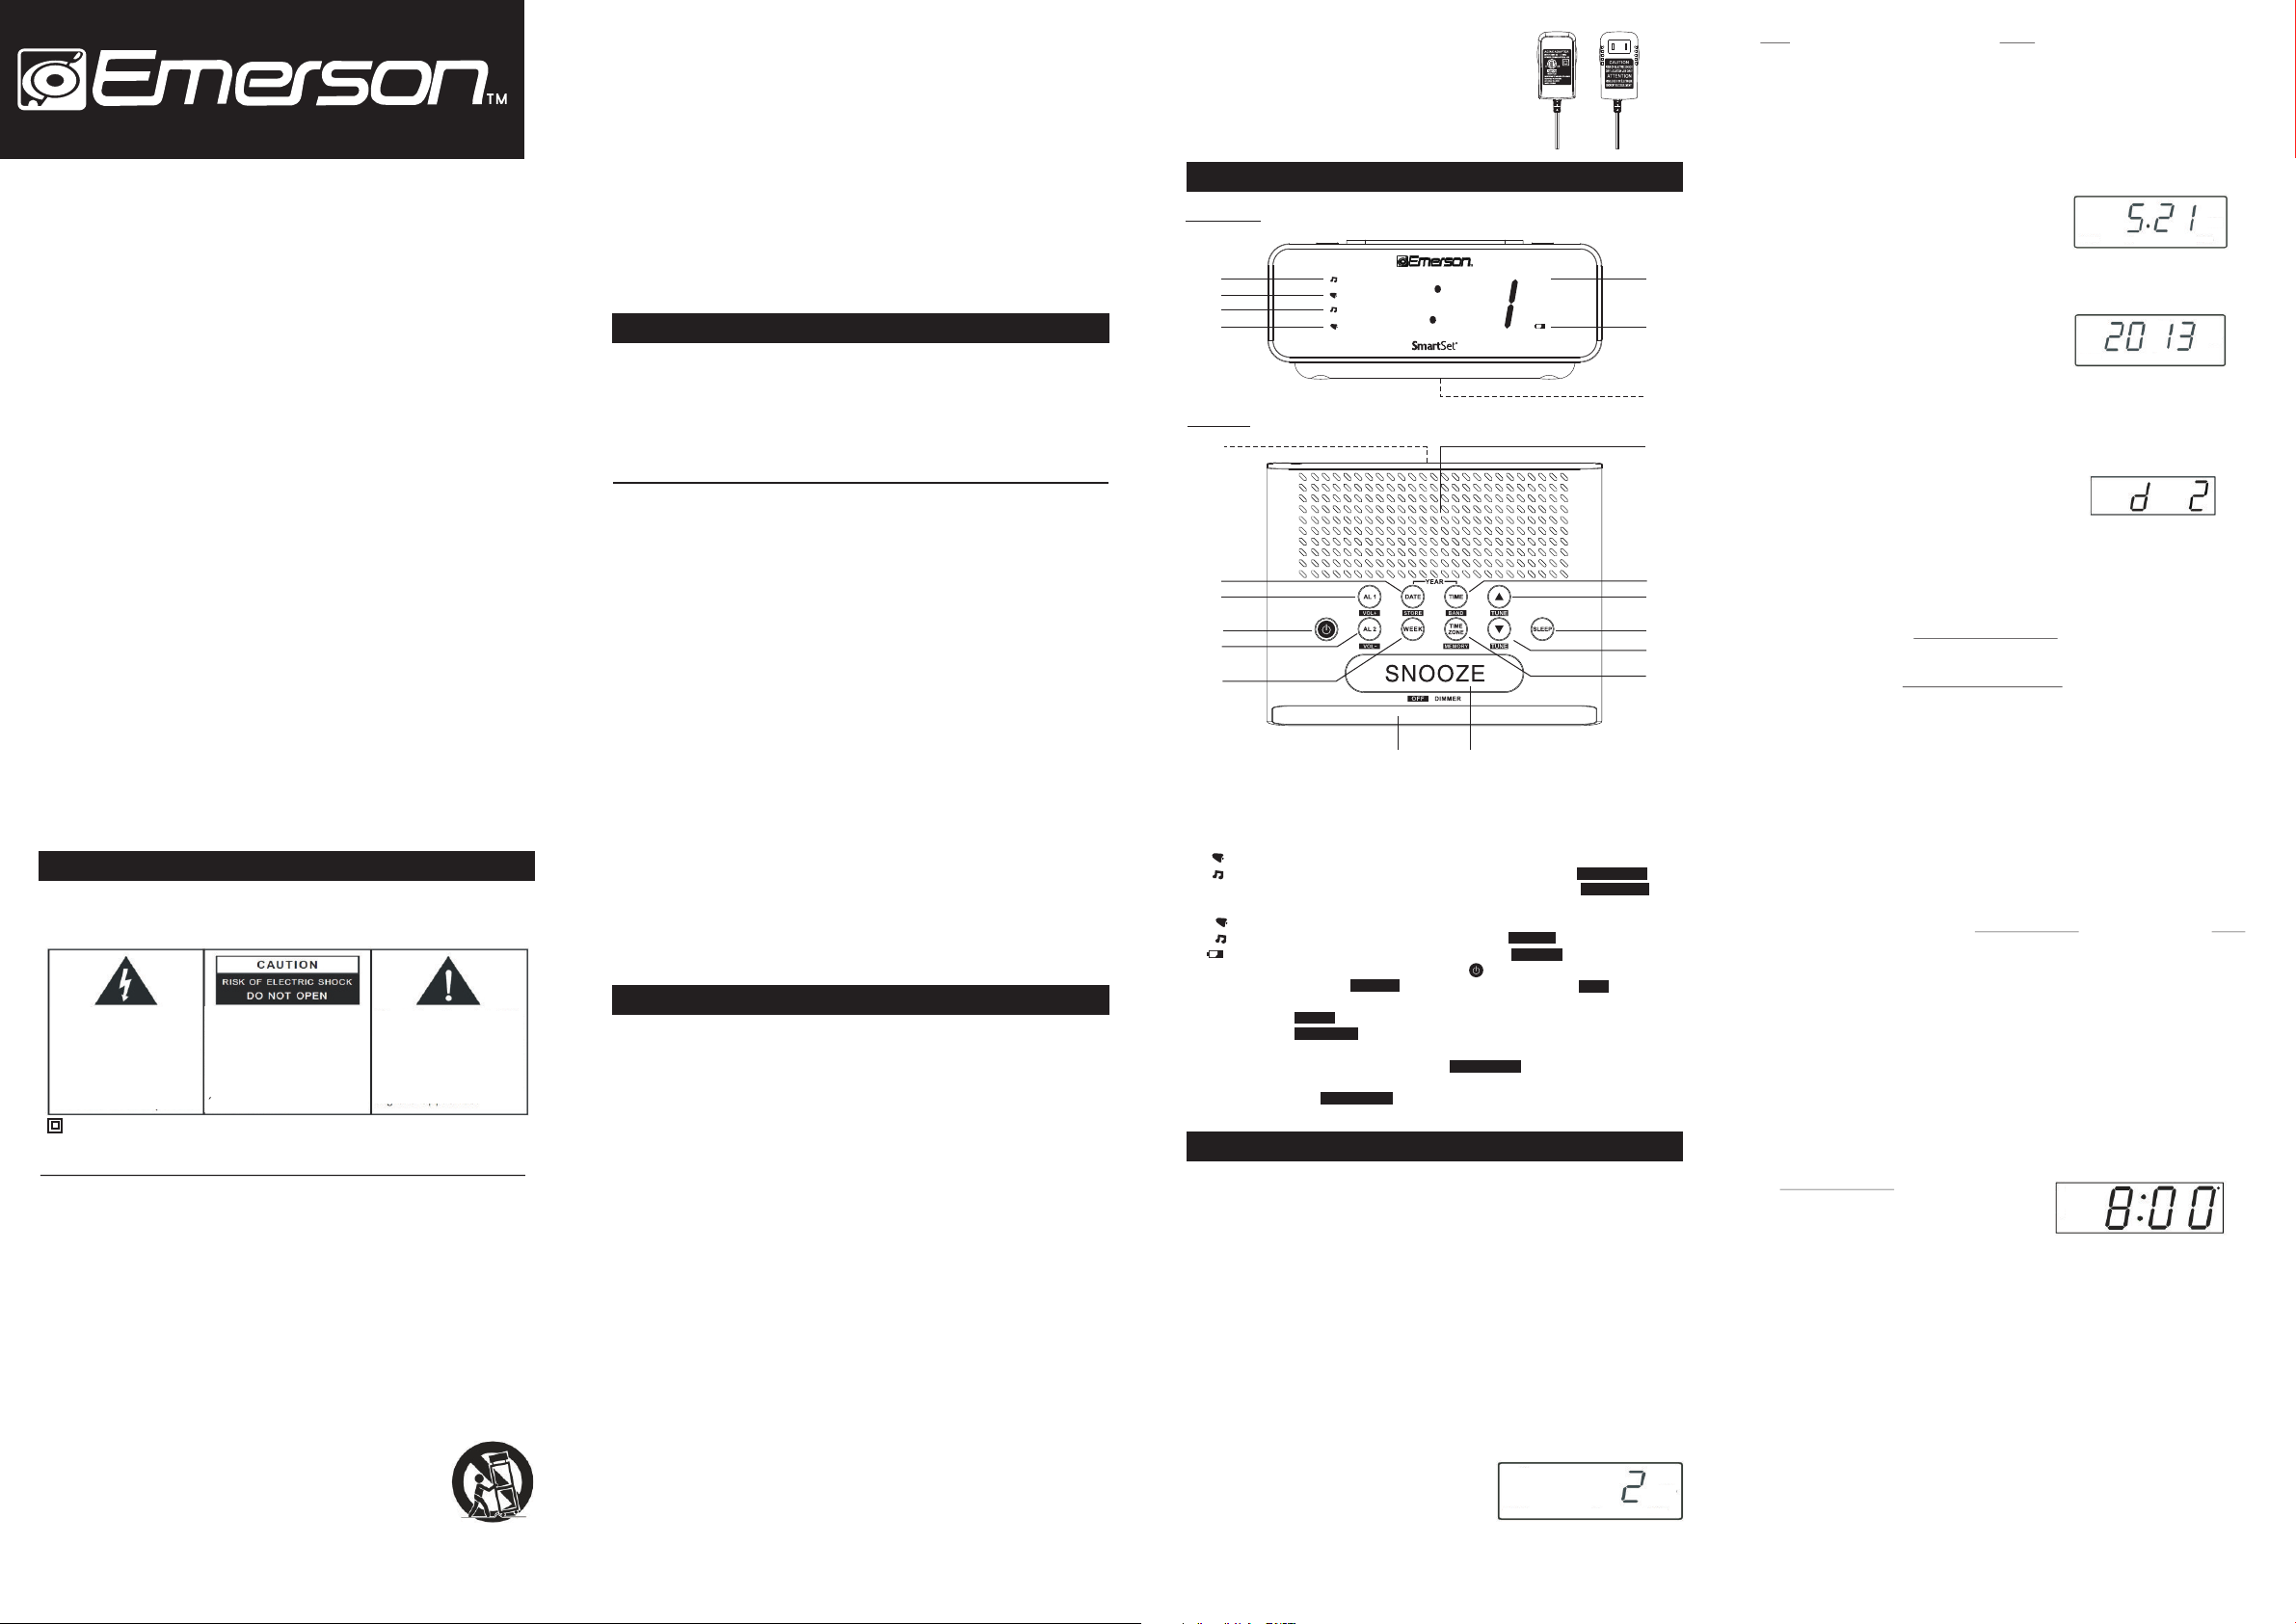
Front Panel
2
1
6
5
Top Pa ne l
8
9
14
19
15
16
1
1
2
2
5 2
4
4
20
AM
kHz
MHz
Ho l d t h e T I ME Z ONE but t on a nd t hen pre s s e i the r th e SE T + ( up) or – (d o wn)
buttons until your own time zone appears on the display, the n re le as e th e bu tt on s.
Th e c lo ck di s pl ay wi l l cha ng e t o t he co rre ct ti me in th e t im e z one y o u sel ec t ed .
The clock will always return to the correct time in the zone you selected after every
power interruption.
If you move to a diff er en t ti me z on e, s im pl y ch an ge t he d ef au lt z on e di sp la y to t he
new zone and the SmartSet will remember that setting for you.
®
Date D is pl ay
To see the correct date at any time, depress the MONTH/DATE bu tt on . Th e di sp la y
Changes from time to Month and Date (MM/DD).
For example, May 21st will appear as “ 5.21” .
When you release the MONTH/DATE bu tt on
the display returns to the correct time.
3
7
21
13
Year Di sp la y
To see the correct year, depress the MONTH/DATE a nd T IM E bu tt on s to ge th er.
The display changes from time to year.
When you release the MONTH/DATE an d
TIME buttons the display returns to the
correct time.
'Day of Week' Di sp la y
If t h e rad io o r bu zzer i s ' Off ' , to v iew t h e cor rect ' D a y of W e ek', d e p r ess t h e
WEEK button. T he d i s p l a y w i l l c h a n g e f r o m Ti me t o “ D a y o f W e e k ” . W h e n
you release the WEEK button the display returns to the correct Time.
If the radio or buzzer is 'On', to view the correct 'Day of We ek ' , p r e s s t h e
RADIO ON/OFF Button first to stop the radio or buzzer,
then depress the WEEK button, display will change
from Time to 'Day of Wee k' . Wh en y ou r el ea se t he
WEEK button the display returns to the correct Time.
Note: From d1,d2 to d7 stand for from Monday ,Tue sd ay t o Su nd ay s ep ar at el y.
Dayl ig ht S av in g and Lea p Year Adj us tm ents
10
18
12
17
11
All Daylight Saving and Leap Year adjustments are made automatical l y b y
the SmartSet internal computer as follows:
• Start of Daylight Saving Ti me :
At " 2: 00 A M " o n t he 2 nd S un d a y i n M ar ch , t he c lo c k w i ll a ut o m at i c al l y
advance to "3:00 AM".
• End of Daylight Saving Ti me :
At '3: 00 A M ' o n th e 1s t Su nday i n N ove mber , th e cl ock w ill a u t o mat ical ly
reset to "2:00 AM".
• Leap Yea r:
At " 1 2 : 0 0 M i d n i g h t " o n F e b r u a r y 2 8 t h , t h e c a l e n d a r d i s p l a y w i l l c h a n g e
to "2.29".
®
6
WAR N I NG
TO PREVEN T FIRE OR SHOCK HAZ ARD, DO NOT USE THIS PLUG WIT H AN
EXTENSION CORD, RECEPTACLE OR OTHER OUTLET UNLESS THE BLA DES
CAN B E FULLY INSE RTED TO PRE VENT BLADE EXPOSURE. TO PREV ENT F IRE
OR SHOCK HAZARD, DO NOT EXPOS E THIS APPLIANC E TO RAIN OR MOISTURE .
Th e li ghtn ing fl ash w ith ar rowhe ad s ymb ol, wit hi n a n eq uila ter al t ria ng le is int en de d to
al ert t he u se r to t he pr ese nce
of uninsulated 'dangerous voltage'
wi thi n t he p rod uct 's en clo sure
t h a t m ay b e o f s u ff i c ie n t
ma gni tu de to co nst itut e a ri sk
of el ect ri c sh oc k to pe rso ns .
Th is i s CL ASS II a ppa rat us w ith dou ble ins ula tio n, a nd n o pr ote cti ve e art h pr ovi ded .
The C autio n Marki ng loca ted at the b ottom e nclos ure of the a ppara tus.
WARN ING :TO RED UCE TH E RISK
OF ELE CTR IC SH OOK DO NO T
REM OVE CO VER ( OR BAC K), NO
USE R SERV ICE ABL E PARTS
INS IDE RE FER S ERVI CIN G TO
QUA LIF IED SE RVI CE PER SONNE L
AVI S:R I SQ UE D E C H OC
ELECTRIQUE-N E PAS O UV RI R
Th e e xcl am ati on poi nt wit hi n
an eq ui la te ral tr ia ng le is int en de d to a le r t t h e u s er t o
t he p re se n ce o f i m po rt a nt
o p er at in g an d m ai nt en an ce
( se rv i ci ng ) in s tr uc t io ns i n
t he l it er a tu re a cc o mp an y i ng t h e a pp li a nc e .
IMPORTANT SAF ETY INSTRUCTIO N S
1.) Re ad the se ins tru cti ons. K eep th ese in str uct ion s. Fol low al l inst ruc tio ns. He ed all wa rni ngs .
2.) Do no t use thi s appa rat us nea r wate r.
3.) Cle an onl y wi th dry cl oth .
4.) Do no t bloc k any ven til ati on ope nin gs. In sta ll in ac cord ance with th e ma nufa cturer 's ins tru cti ons.
5.) Do no t inst all ne ar any he at source s such a s radi ato rs, he at reg ist ers , stov es, or ot her appar atu s
(inclu din g ampl ifi ers ) that pr odu ce hea t.
6.) Do no t defe at the sa fet y purp ose of t he pol ari zed or gr oun din g-t ype pl ug. A polar ize d plug ha s two
blades wi th one w ide r than th e othe r. A gro und ing ty pe plu g ha s two bla des an d a thir d grou ndi ng
prong. Th e wide bl ade or t he thi rd pro ng is pr ovi ded fo r your sa fet y. If the pro vid ed plu g does n ot
fit into you r outl et, co nsu lt an ele ctr ici an for re placem ent of th e obso lete outl et.
7.) Pr otec t the p ow er cor d fro m be ing w al ke d o n or p inch ed pa rt ic ular ly at p lu gs , con ve ni en ce
recept acl es, an d the poi nt where the y ex it fro m the app ara tus .
8.) Onl y use at tac hmen ts / ac ces sor ies sp eci fied b y the man ufa ctu rer.
9.) Unp lug th is appara tus du rin g ligh tni ng sto rms o r when un use d for lon g pe riod s of ti me.
10.) Re fer al l se rvic ing to quali fied serv ice pe rso nne l. Ser vic ing is re quired wh en the a ppa ratu s has
be en dam age d in any wa y, such as po wer -su ppl y cord or pl ug is damage d, liquid ha s bee n sp ille d
or ob jec ts hav e fal len into the a ppa rat us, th e appa rat us has be en exp osed to rain o r mois tur e,
do es not o pera te normal ly, or has be en dro ppe d.
11.) Use on ly wit h the car t, stand, tr ipod, bra cke t, or tab le specif ied by t he man ufa ctu rer, or
so ld wit h the app aratus . When a ca rt is use d, use c auti on when movi ng the
ca rt/a pparat us com bin ati on to avo id inj ury from tip -over.
12.) Th e appa rat us sha ll not b e expo sed to dr ipp ing or s plas hing and tha t no
obj ect s fill ed wi th liq uid s, suc h as vase s, sha ll be placed o n appa rat us.
13.) Ma ins pl ug is used as dis con nec t devi ce and it s hou ld rem ain re adi ly
op era ble du rin g inten ded use. In or der to di sco nne ct the ap paratu s from th e
ma ins co mpl ete ly, the mai ns plu g shou ld be di sco nne cted f rom th e main s
so cke t outl et com ple tel y.
14.) Ba tte ry sha ll not b e expo sed to ex cessiv e heat su ch as su nsh ine , fire or th e lik e.
CAUT ION : Dan ger of ex plo sio n if batt ery is i nco rrec tly repla ced . Repl ace on ly wi th the
sam e or equ ival ent type.
1
Th i s d e vic e co m pli e s w i th P art 15 o f t h e F C C R u les . Op e rat i on i s s u bje c t t o th e
following two conditions:
(1) Thi s de vi ce m ay n ot c au se h ar mf ul i nt er fe re nc e, a nd
(2 ) Thi s d ev ice m u st ac ce p t any i n te rfe re n ce re ce i ve d, in c lu din g i nt erf er e nc e
that may cause undesired operation.
Ch a nge s or mod i fic a tio n s n o t e x pre s sly app r ove d by the par t y r e spo n sib l e f o r
compliance could void the user's authority to operate the equipment.
PREPARATION FOR USE
Unpa ck in g And Set Up
•
Re m ove the rad i o f r om t he c art o n a n d r e mov e al l pa c kin g ma t eri a l f r om t he
radio. We s ug ge st t ha t yo u sa ve t he p ac ki ng m at er ia l, i f po ss ib le , in t he u nl ik el y
event that your radio ever needs to be returned for service. Th e or ig in al c ar to n
an d p ac kin g m at eri al is th e o nl y s af e w ay to pa ck yo u r rad io to pr ot e ct it f r om
damage in transit.
•
Re mo v e any d e sc rip ti v e lab el s o r s ti c ke rs on th e f ro n t or to p o f t he ca bin et . D o
not remove any labels or stickers from the back or bottom of the cabinet.
•
No te th e s er i al nu mb e r on th e b ott om of yo ur ra dio a n d wri te th is nu m be r i n t he
space provided on the War ra nt y pa ge o f th is m an ua l.
•
Pl ac e y our r a di o o n a l eve l s ur fac e s uc h a s a t abl e, de sk or sh elf , c on ven ie n t
to a n AC ou tle t, ou t o f d ir ect s u nl igh t, an d a wa y f rom s o ur ces o f e xce ss he at,
dirt, dust, moisture, humidity, or v ib ra ti on .
•
Un wi n d the L i ne co rd co nne ct i ng th e AC a d ap ter a n d ext en d i t t o i ts fu ll le ngt h.
Th e FM an t en na is bu ilt i n t o t hi s c ord . I t mus t b e ful ly ex ten de d t o p ro v id e t he
best FM reception.
Prot ec t Your Furnit ur e
Th i s m o del is e qui p ped wit h no n -sk i d r u bbe r 'f e et' to p rev e nt t he p rod u ct f rom
mo vi n g whe n y ou op er a te th e c on tro ls . T he s e 'fe et ' a re ma d e fro m n on -mi gr a ti ng
ru bb e r mat er i al sp ec i al ly fo r mu lat ed to av oi d l eav in g a ny ma r ks or st ai ns on yo u r
furniture. However certain types of oil based furniture polishes, wood preservatives,
or cle a nin g sp r ays may cau s e t h e r u bbe r 'f e et' to s oft e n, a nd l eav e ma r ks o r a
rub ber resi due on the furni tur e. To preve nt an y damage to your fu rnitu re we st ron gly
recommend that you purchase small self-adhesive felt pads, available at hardware
st or e s and h o me im pr o ve men t c en ter s e ve ryw he r e, an d a pp ly th e se pa ds to th e
bo tt o m of th e r ubb er 'f eet ' b ef ore y o u pla ce th e p ro d uc t o n f in e w oo d en fu rn i tu re.
Powe r So ur ce
Th i s r a dio is d esi g ned to o per a te o n n o rma l 12 0 V 6 0 Hz AC pow e r o n ly. D o n ot
at te m pt to o p er ate t h e rad io on an y o th er po w er so ur c e. Yo u c ou ld ca u se da mag e
to the radio that is not covered by your warranty.
3
1.) (Alarm 1 'Buzzer') Indicator.
1
2.) (Alarm 1 'Radio') Indicator.
1
3.) AM Indicator.
4.) Time/Date Display.
5.) (Alarm 2 'Buzzer') Indicator.
2
6.) (Alarm 2 'Radio') Indicator.
2
7.) LOW BATT . In di ca to r.
8.) AC adapter (Back Cabinet).
9.) MONTH/DATE S et ti ng /
Station Button.
10.) TIME Setting / Select Button.
11.) T IM E ZO NE / Button.
12.) SLEEP Button (Sleep To Music Timer).
Note: For buttons displayed with additional font or icons,
they have multiple function at different operation mode. Generally, th e
functions displayed in font are for operation when Radio is ON.
STO RE
BAND
MEMORY
INVERSED
13.) Speaker (Back Cabinet).
14. ) ALARM 1 Settin g / B utt on.
15.) ALARM 2 Setting / Button.
16.) WEEK MODE Button. (Wee kd ay s l
Wee ke nd s l Ev er yd ay Al ar m)
17.) SET - / B ut to n.
18.) SET + / Button.
19.) RADIO ON/OFF Button.
20.) SNOOZE / SLEEP / DIMMER
Button.
21.) Back Up Battery Compartment
(Bottom Cabinet).
INVERSED
TUNE -
TUNE +
VOL UME +
VOLUME -
OFF
OPERATING INSTRUCTIONS
Sett in g Th e Ti me , Th e Fi rst Ti me
IM P ORTA NT: Th e fi rs t ti m e y o u c o n ne ct y ou r ne w S m ar tSe t c lo ck r ad io t o t h e
AC out l et t he i nte r nal com p ute r wi l l a u tom a tic a lly set the tim e co r rec t ly f or t he
Ea st e rn Ti me Zo ne , w hic h i s the i n it ial d e fa ult s e tt ing . The d i sp lay w i ll sc an fo r a
fe w s ec ond s a nd th en sh ow th e c orr ec t D ay an d T im e i n t he Ea ste rn zo ne. I f y ou
live in the Eastern Time zone, there's nothing else to do. Your clock is set correctly
and running.
If y o u do n ot l ive i n t he E ast ern T ime z o n e yo u mu st c hang e th e de faul t zo ne
dis pla y to you r own zo ne. You only do this one time an d the Sm art Set will reme mber
th e ne w de f aul t zo n e s e tti n g a n d w i ll a lwa y s r e tur n to tha t se t tin g af t er a po w er
interruption.
Th er e a re 7 t im e z on e s pro gr a mm ed in t o you r S ma rt Se t cl oc k r adi o a s fol lo w s :
ZONE 1 — Atlantic Time ZONE 2 — Eastern Time (Default Setting)
ZONE 3 — Central Time ZONE 4 — Mountain Time
ZONE 5 — Pacific Time ZONE 6 — Yuko n Tim e
ZONE 7 — Hawaiian Time
To c h an ge th e d ef au lt ti me z o ne d i sp la y,
de pres s th e TI ME Z ONE b utt on. T h e num ber
"2 " w il l a pp e ar on t h e dis pl a y ind ic a ti ng th a t the
default zone is ZONE 2, Eastern Time.
.
5
®
®
®
Manual Ti me Adjustments
Some people like to set their clocks 5 to 10 minutes fast to make sure that they will
alw ays be on time. Eve n tho ugh the Sma rtSet sets the time by itse lf, you sti ll ha ve
the option of adjusting the time manually if you wish.
To manually adjust the time display depress and hold the TIME button, and press
ei th e r the S E T + o r - b ut t on s t o a dj ust t h e tim e d is pla y a he ad or ba ck as de sir ed .
Each press of the SET + or - buttons will change the display by one minute. If you
ho ld th e S ET + or - b ut ton s t he di sp l ay wi ll co nti nu e t o c ha n ge . T he di sp l ay wi ll
change slowly at first, one minute at a time. But if you continue holding the SET +or
- buttons the display will change rapidly.
NOTE: If you manually adjust the time, your new setting is entered into the
Sm artS et m e m o ry. If t h e pow er i s in terr upte d, t he d ispl ay w ill r etu rn t o yo ur
new setting, not the original setting, when the power is restored.
Adju st in g Th e Wake U p Time s
You r Sm a rtS e t cl ock ra dio has two sep a rat e al a rms tha t ca n be set and use d
in de p en den tl y. You ma y u se th e a lar ms to wa ke tw o p eo p le at d i ff er e nt ti me s , or
yo u m ay us e o ne al ar m f or we e kd ays a n d the o t he r f or we eke nd wa ke up ti mes .
Th e pr o ced u re f or a dju s tin g th e wa k e u p ti m e i s th e sa m e f o r b o th Al a rm 1 an d
Alarm 2.
1.) De pres s an d ho ld e ithe r th e AL ARM 1 o r
AL ARM 2 s e t tin g bu tton . Th e di spl ay w ill
change from the correct ti m e t o th e A lar m 1
or Al a rm 2 wa k e u p time.
2.) Wh i le h old i ng t he A LAR M 1o r A L ARM 2 s e tti n g b u tto n , d e pre s s e i the r th e
SET + or - but ton to move the displ ay ahead or back to your de sired wa ke up t im e.
3.) Wh en t he d es ir ed w ak e up t im e ap pe ar s on t he d is pl ay, release the SET + or buttons.
NOTE: Be sure that you have set the wake up time correctly by observing the AM
indicator. If t he AM i nd ic at or i s 'O n ' th e wa ke u p ti me i s "A M" . If t he AM indicator is
'Off', the wake up time is "PM".
4.) When the desired wake up time (AM or PM) appears on the display, re le as e t he
ALARM 1 or ALARM 2 setting buttons.
®
®
®
AM
Sele ct in g Th e Alar m Week M od e
Your S ma rt Se t cl oc k ra di o al lo ws y ou t o se le ct f ro m am on g th re e di fferent alarm
operation modes for either alarm. The a la rm m od es a re :
• Everyday ― the alarm will turn on all 7 days.
• Wee kd ay s on ly ― t he a la rm w il l on ly t ur n on M on da y th ro ug h Fr id ay ;
• Wee ke nd s on ly ― t he a la rm w il l on ly t ur n on S at ur da y an d Su nd ay.
To check the Alarm Mode setting for Alarm1, depress the ALARM 1 setting button.
The display will show the Alarm 1 wake up time and the DAY OF W EE K in di ca to rs
will show you the alarm mode which is selected.
®
7
Page 2
• it shows “1-7”, the Everyday mode is selected.
• If it shows “1-5”, the We ek da ys o nl y mo de i s se le ct ed .
• If it shows “6-7”, the We ek en ds o nl y mo de i s se le ct ed .
To cha n ge t he Al a rm M ode set t ing for Al arm 1, h old the AL ARM 1 s e tti n g b u tto n
an d p re ss th e AL A RM MO DE bu tto n u nt il th e D AY O F WEE K i nd ica to r s sho w t he
de s ire d mo d e s e tti n g, W ee kda y s o n ly, Wee k end s on l y, o r Ev er yda y o per a ti on.
Re leas e th e AL A RM M ODE a n d A L A R M 1 s e t t ing b u t t ons a n d the d i s p lay w i l l
return to the correct time.
Fol low the sam e pro ced ure to select th e des ire d Alarm Mode for Alar m 2 if nece ssary.
Chec ki ng T he Wake Up Times An d Alarm Mo de
Wh en e ve r y ou wa nt to ch eck t h e wak e u p tim e o r the a l ar m m od e s ett in g s, si mp l y
pr e ss e ith e r t h e A LA RM 1 o r AL AR M 2 se tti n g b u tt ons . T h e d i spl a y w i ll c han g e
fr om co rre ct ti me to wa ke up ti me an d t he DAY O F W EE K i ndi ca t or s w il l s how y o u
the alarm mode which is currently selected.
Release the ALARM 1 or ALARM 2 setting buttons to return to correct time.
List en in g To Th e Ra di o
1.) Pr es s t he RA D IO ON /O F F but to n t o t ur n t he ra d io 'O n' . T he fr equ en c y of th e
tuning frequency will show for a few seconds on the display.
2.) Set the BAND by pressing button to AM or FM as the desired, it toggles
each time you press the button.
3.) Set the VOLUME by pressing or to a lev el t ha t is n ei th er
too high nor too inaudible.
4.) Select your desired station with the TUNING control.
a) P r ess or sli g htl y, th e re ce ivi n g f r eq uen c y w i ll i nc rem e nt o r
decrement by one step.
b) P re ss an d h old or f or on e s ec ond t h en re le a se , Au to St a ti on
Seeking will be engaged, the receiving frequency will increment or decrement
automatically until a station with acceptable reception is found.
5.) Adjust the VOLUME control to the desired setting.
6.) Wh en yo u a re fi nis he d l ist en i ng , p re s s the R A DI O O N/ O FF bu tt o n to tu r n the
radio 'Off' .
Storing and Recalling Radio Station Memory
When you have a few favorite radio stations to listen to,you may like to save them,
and pick one out of them in a few seconds without needing to search it each time.
Our digital tuning technology allows you to do this easily by following the following
steps:
TU NE + TU N E -
TU NE + T UN E -
BAND
BAND
VOLUME + VOLUME -
8
Radi o And B uzzer Ope ra ti on
You ma y al so s et o ne a la rm f or w ak e to R AD IO a nd t he o th er f or w ak e to B UZ ZE R.
Jus t press the ALAR M 1 and ALA RM 2 but tons to the desi red stat us as sh own on the
ALARM indicators.
Snoo ze /R ep ea t Al ar m
Af te r t he al a rm tu rn s ' On' i n t he mo r ni ng yo u c an SN O OZ E/S LE E P OF F b utt on on
the top cabinet for a few extra minutes sleep. Th e co rr es po nd in g ALA RM i nd ic at or
wil l flash. Th e alarm wil l sto p for ap pro ximat ely 9 mi nut es an d then come s 'On ' again.
The Snooze operation may be repeated several times if desired but after one hour
the alarm will not come on again.
Slee p To Music Timer
You ca n pr og ra m th e sl ee p ti me r to p la y th e ra di o fo r up t o 90 m in ut es a nd t he n sh ut
'Off' a ut om at ic al ly.
1
.) Press the SLEEP button.The display will briefly
show "10" and the radio will begin to play.
After 10 minutes countdown the radio will shut
of f aut om a ti cal ly. Ea ch ti me yo u p res s t he SL EEP b utt on th e s lee p t im er wi l l
start at 10 minutes. Th is i s th e sl ee p ti me r de fa ul t se tt in g.
2.) To i n c rea se o r de crea se t he a moun t of t i m e th at t he r adio w i l l pl ay b efor e
sh ut t in g o ff , h ol d t he SL E EP bu tt o n and p r es s e it h er th e S ET + or - but to n t o
change the display to the desired sleep time, up to a maximum of "90" minutes
or a minimum of "02" minutes.
NOTE: When you change the sleep timer from the 10 minute default setting to a
di ff e re nt se t ti ng, t h e new s e tt ing b e co mes t h e def au l t set ti n g. Wh en e ve r y ou
activate t he sleep ti mer it will begi n wit h your new defau lt setti ng and coun t dow n
to zero fro m th at p oi nt .
3.) To canc el th e s le e p tim er be for e i t cou nt s d own t o ' 00' a n d shu t t he ra di o ' Off '
immediately, pre ss t he S NO OZ E/ SL EE P OF F Ba r.
IM PORT ANT: R e m emb er t hat t he s tat ion a nd v olu me s etti ngs y ou c hoo se f or
th e Sl e ep To M u si c op er ati o n a r e t h e s a me s et tin g s y o u w i ll h ea r if y ou s et t he
alarm for Wak e To Radio the following morning.
DIMM ER C on tr ol
The DIMMER control was set to High position at our factory.
If you fin d th e cl o ck d isp l ay i s t o o b r igh t in a d a rke n ed r oom , se t th e Di m mer by
pressing SNOOZE / SLEEP / DIM ME R Bu tt on .
OFF
Chan gi ng T he L it hium Batt er y
Li ke al l b at t er ies , e ve ntu al l y the b u il t i n l it hiu m b at ter y w il l n eed t o b e r ep lac ed. A
nu mber o f f act ors, s u c h as , th e le ngth o f t ime b e t w een t h e dat e th e ra dio w as
manufactured and the date you plugged it in for the first time determine the amount
of time before replacement. During this initial storage period, the lithium battery is
10
Rese tt in g Th e Cl ock Af te r A Total Memo ry L os s
If y o u do no t c han ge th e b ui l t in li t hi um ba t te ry wi t hi n a r e as ona bl e p eri od of ti me
after you see the warning indicator, the lithium battery may become exhausted
a n d w il l n o l on g er b e a bl e t o s up p ly b a ck u p p ow e r t o t he S m ar t Se t
in te r na l c om p ut er. If th e u nit i s d isc on n ec ted f r om th e AC o u tl et af t er th e b at ter y
is e x ha ust ed or if a po wer i n te rru pt i on oc cu r s, th e S ma rtS et mem or y w ill b e l ost
and the clock will need to be reset when the power is restored.
Be s u re to i n st all a fr esh l i th ium b a tt ery b e fo re yo u r ese t t he cl oc k , oth er w is e t he
clock will need to be reset each time the power is interrupted.
If the lit h ium bat t ery is e xha u ste d an d yo u ex p eri e nce an i nte r rup t ion in t he AC
power supply, th e cl oc k wi ll r es et i ts el f to i ts i ni ti al d ef au lt s et ti ng w he n th e po we r is
restored.
The initial default setting is "12:00 AM, S un da y , Ja nu ar y 1s t (1 . 1) , 20 12 ".
If y o u not ic e t hat t h e tim e o n you r S ma rtS et clo ck ra dio i s c omp le t el y i nc o rr ect ,
and the DAY OF WEEK indicator is also wrong, press the MONTH/DATE bu tt on t o
see the date.
If the date display is showing "1. 1 " (January 1st),
yo u pr obab ly e xper ienc ed a t o t a l m emor y lo ss.
To reset th e clock aft er a tot al me mor y los s, proce ed
as follows:
1 .) Follow the instructions on page 10,11 and i ns ta ll a n ew C R2 03 2 li th iu m ba tt er y
in the battery compartment.
2.) Connect the radio to your AC outlet and let the clock set itself.
3.) Depress the MONTH/DATE a nd T IM E bu tt on s to ge th er. T he d is pl ay w il l ch an ge
from 'Tim e' t o 'Yea r' .
While holding in the MONTH/DAT E a n d T I M E b u t t o n s , p r e s s t h e S E T +
button to set the display to the correct year, then release the buttons.
4.) Depress the MONTH/DAT E b u t t o n . T h e d i s p l a y w i l l c h a n g e f r o m ' Ti me '
t o 'Month/Date' (MM/DD).
While holding in the MONTH/DATE button, pre ss the SET + button to set the displ ay
to the correct Month and Date. The DAY OF WEEK indicator will change automatically
as you adjus t the Mo nth /Date se tting s. When the corr ect Mont h and Da te appea r
o n t he display, rel ea se t he b ut to ns .
5.) Depr es s t he TI M E but to n a nd th e S ET + b ut ton t o s et th e d isp la y t o t he co rre ct
Time . Be sur e to con f irm tha t yo u ha v e s e t t h e t i me c orr e ctl y to 'AM ' or 'PM '
b y ob se rv in g th e AM i nd ic at or.
6.) Afte r yo u se t th e T ime , re c onf i rm t hat the Day, a nd M on th/ D at e di sp lay s a re
s til l correct. Make final adjustments if necessary.
The SmartSet clock memory is now reset and the new lithium battery will maintain
it for the nex t 5 t o 8 yea r s, d epe n din g on the num b er a nd d ura t ion of t he p owe r
ou ta g es y ou e xp er ie nc e.
IMPORTANT NOTE
After resetting the clock, don't forget to reset your wake up times and alarm
mode settings, and sleep timer settings as well.
®
®
12 14
®
®
LI MI T ED WARR AN TY
Emers on R ad io Corp. warran ts m an ufacturing de fe ct s in original mat er ia l, including
orig in al part s and w orkma ns hip, un de r nor ma l use a nd co nditi on s, for a per io d of
ni nety ( 90) d ays f ro m th e da te o f or igin al p urc has e in t he U .S. Wi th y our d ated
pr oof of pur ch ase , w e will pro vi de rep air se rvi ce at n o c harge for la bor an d part s,
or r ep l a ce the p roduct at o ur d iscret io n . For rep ai r o r repla ce m e nt, pack y ou r
uni t i n a padded b ox, encl os e y our che ck o r money o rd er paya bl e t o Emers on
Rad io C o rp. in t he a m ount of $ 9. 0 0 to cove r s h ipping a nd h a ndling c os t s, and
enclo se d a co py of your proo f of p urcha se . Se nd your unit to:
Emerson Returns Facili ty
11500 Philadel phia ST
Mira L oma, CA 91752
ATTN: Re turns Depar tment
This wa rr an ty does not cover d am ag e from negl ig ence, misuse, abu se , ac cident,
failu re t o fo llow operatin g in st ructions, com me rcial use, re nt al , repairs by an
unaut ho rized facility, or prod ucts purc ha sed, used, servic ed o r da maged outside
of the Un it ed S tates.
THIS WARRANTY GIVES YOU SPECIFIC LEGAL RIGHTS, AND YOU MAY
ALSO HAVE OTHER RI GHTS WHICH VARY FR OM STATE T O STATE.
AU 89 8N
The Serial Number can be found on the bottom cabinet. We suggest that you record
the Serial Number of your unit in the space below for future reference.
Model Number: CKS1800
Serial Number: _ _ _ _ ___ _ _ _ _ _ _ _ ___ _ _ _ _ _ _ _ ___ _ _
Storing to the Memory
1.) Make sure the radio is ON and the AM/F M ba nd i s se lected.
2.) Tun e to t he d es ir ed s ta ti on b y th e TU NI NG c on tr ol a s de sc ri be d.
3.) Press , "P X X" b li nk s, i nd ic at in g th e me mo ry l oc at io n to s to re t he
currently listening station.
4.) Whi le "P XX" is blinking, pr ess or can cha nge the mem ory
lo ca t io n f rom 1 thr ou g h 10. Fo r e .g . , " P 0 3" me an s t he cur re n t l is ten in g
station is about to stored into the 3rd location of the memory.
5.) After deciding the memory location, press again, the currently listening
station is stored.
6.) The d is pl ay w il l tu rn t o th e fr eq ue nc y of t he s ta ti on s af te rw ar ds , an d af te r
a few seconds, the correct time shows.
Recalling Station from the Memory
1.) Make sure the radio is ON and the AM/F M ba nd i s se lected.
2.) Press MEMORY , "P XX" shows on the display, and the station according to the
memory location is tuned.
3.) While "P XX" is showing on the display , press or can change
the memory locatio n from 1 through 10, and the station stored in the loc atio n
is tune d on ce t he l ocation is changed to.
4.) The displ ay wil l turn to the fre quenc y of the stati ons af terwa rds , and after a
fe w se co nd s, t he c or re ct t im e sh ow s.
STO RE
TUN E + TUN E –
STORE
TUNE + TU NE –
Ante nn a In fo rm ation
AM - The AM bar antenna is inside the cabinet. If AM reception is weak, change
the position of cabinet until the internal antenna picks up the strongest signal.
FM - The FM antenna is built in to the Line cord connecting the AC adapter.
If FM reception is weak try Varying the position and direction of the Line cord
until you find the strongest signal.
Wak e To BU ZZ ER
NOTE: Alarm 1 and Ala rm 2 h av e di ff er en t bu zz er s ou nd s.
• Alarm l is a Single beep" sound. Alarm 2 is a "Double beep" sound.
You w ill be a ble to t ell whi c h a l arm is g oin g of f by the sou n d t h at i t m a kes .
1 .) R eco n fir m th e wa k e u p ti m e a n d a l arm mod e se t tin g s f o r t h e a l arm you are
using, Alarm 1 , Alarm 2, or both alarms.
2.) Press ALARM 1 or ALARM 2 button slightly, an d re pe at d oi ng s o if n ec es sa ry,
unt il ALARM 1 "BUZZ ER" or ALAR M 2 "BUZ ZER" ind icato r is lit on the dis play.
3.) At th e se l ect e d w a ke u p t i me t he b uzz e r w i ll s oun d . I t w il l c ont in u e for o n e
h o ur an d th en s hu t of f au to ma ti ca ll y.
4.) To stop t h e buz ze r s oon er, pr e ss th e R AD IO ON / OF F b ut t on . T he bu zz e r wil l
st op bu t t he al arm r e ma ins s e t and w i ll tu rn th e b uz z er on a g ai n a t t he sa me
time on the following day (depending on the Alarm Mode setting).
5.) If you do n ot w ant the ala r m t o tu r n t h e r a dio on t he f oll o win g da y, pr ess th e
appropriate ALARM button until the ALARM indicator on the display is OFF.
" •
su pp l yi ng po w er to t h e Sma rt S et co m pu ter m e mo ry. On c e you p l ug th e r ad io in ,
your household outlet supplies the power, and the battery is not being used. A fresh
lit hiu m bat ter y can su pply pow er to th e Sma rtS et com puter fo r at lea st 3 yea rs ev en
if it is never connected to an AC power supply. If yo ur c lo ck r ad io w as c on ne ct ed t o
your AC supply within a few months after it was manufactured, and you experience
onl y the no rma l, nu isa nce type , sho rt durat ion powe r interr upt ions, yo ur ba tte ry ma y
last for up to 5 years or even longer.
When the battery power drops belo w a certain level,the LOW BATT.indicator
will 'Flash'. When you see this indicator, you should change the battery as soon as
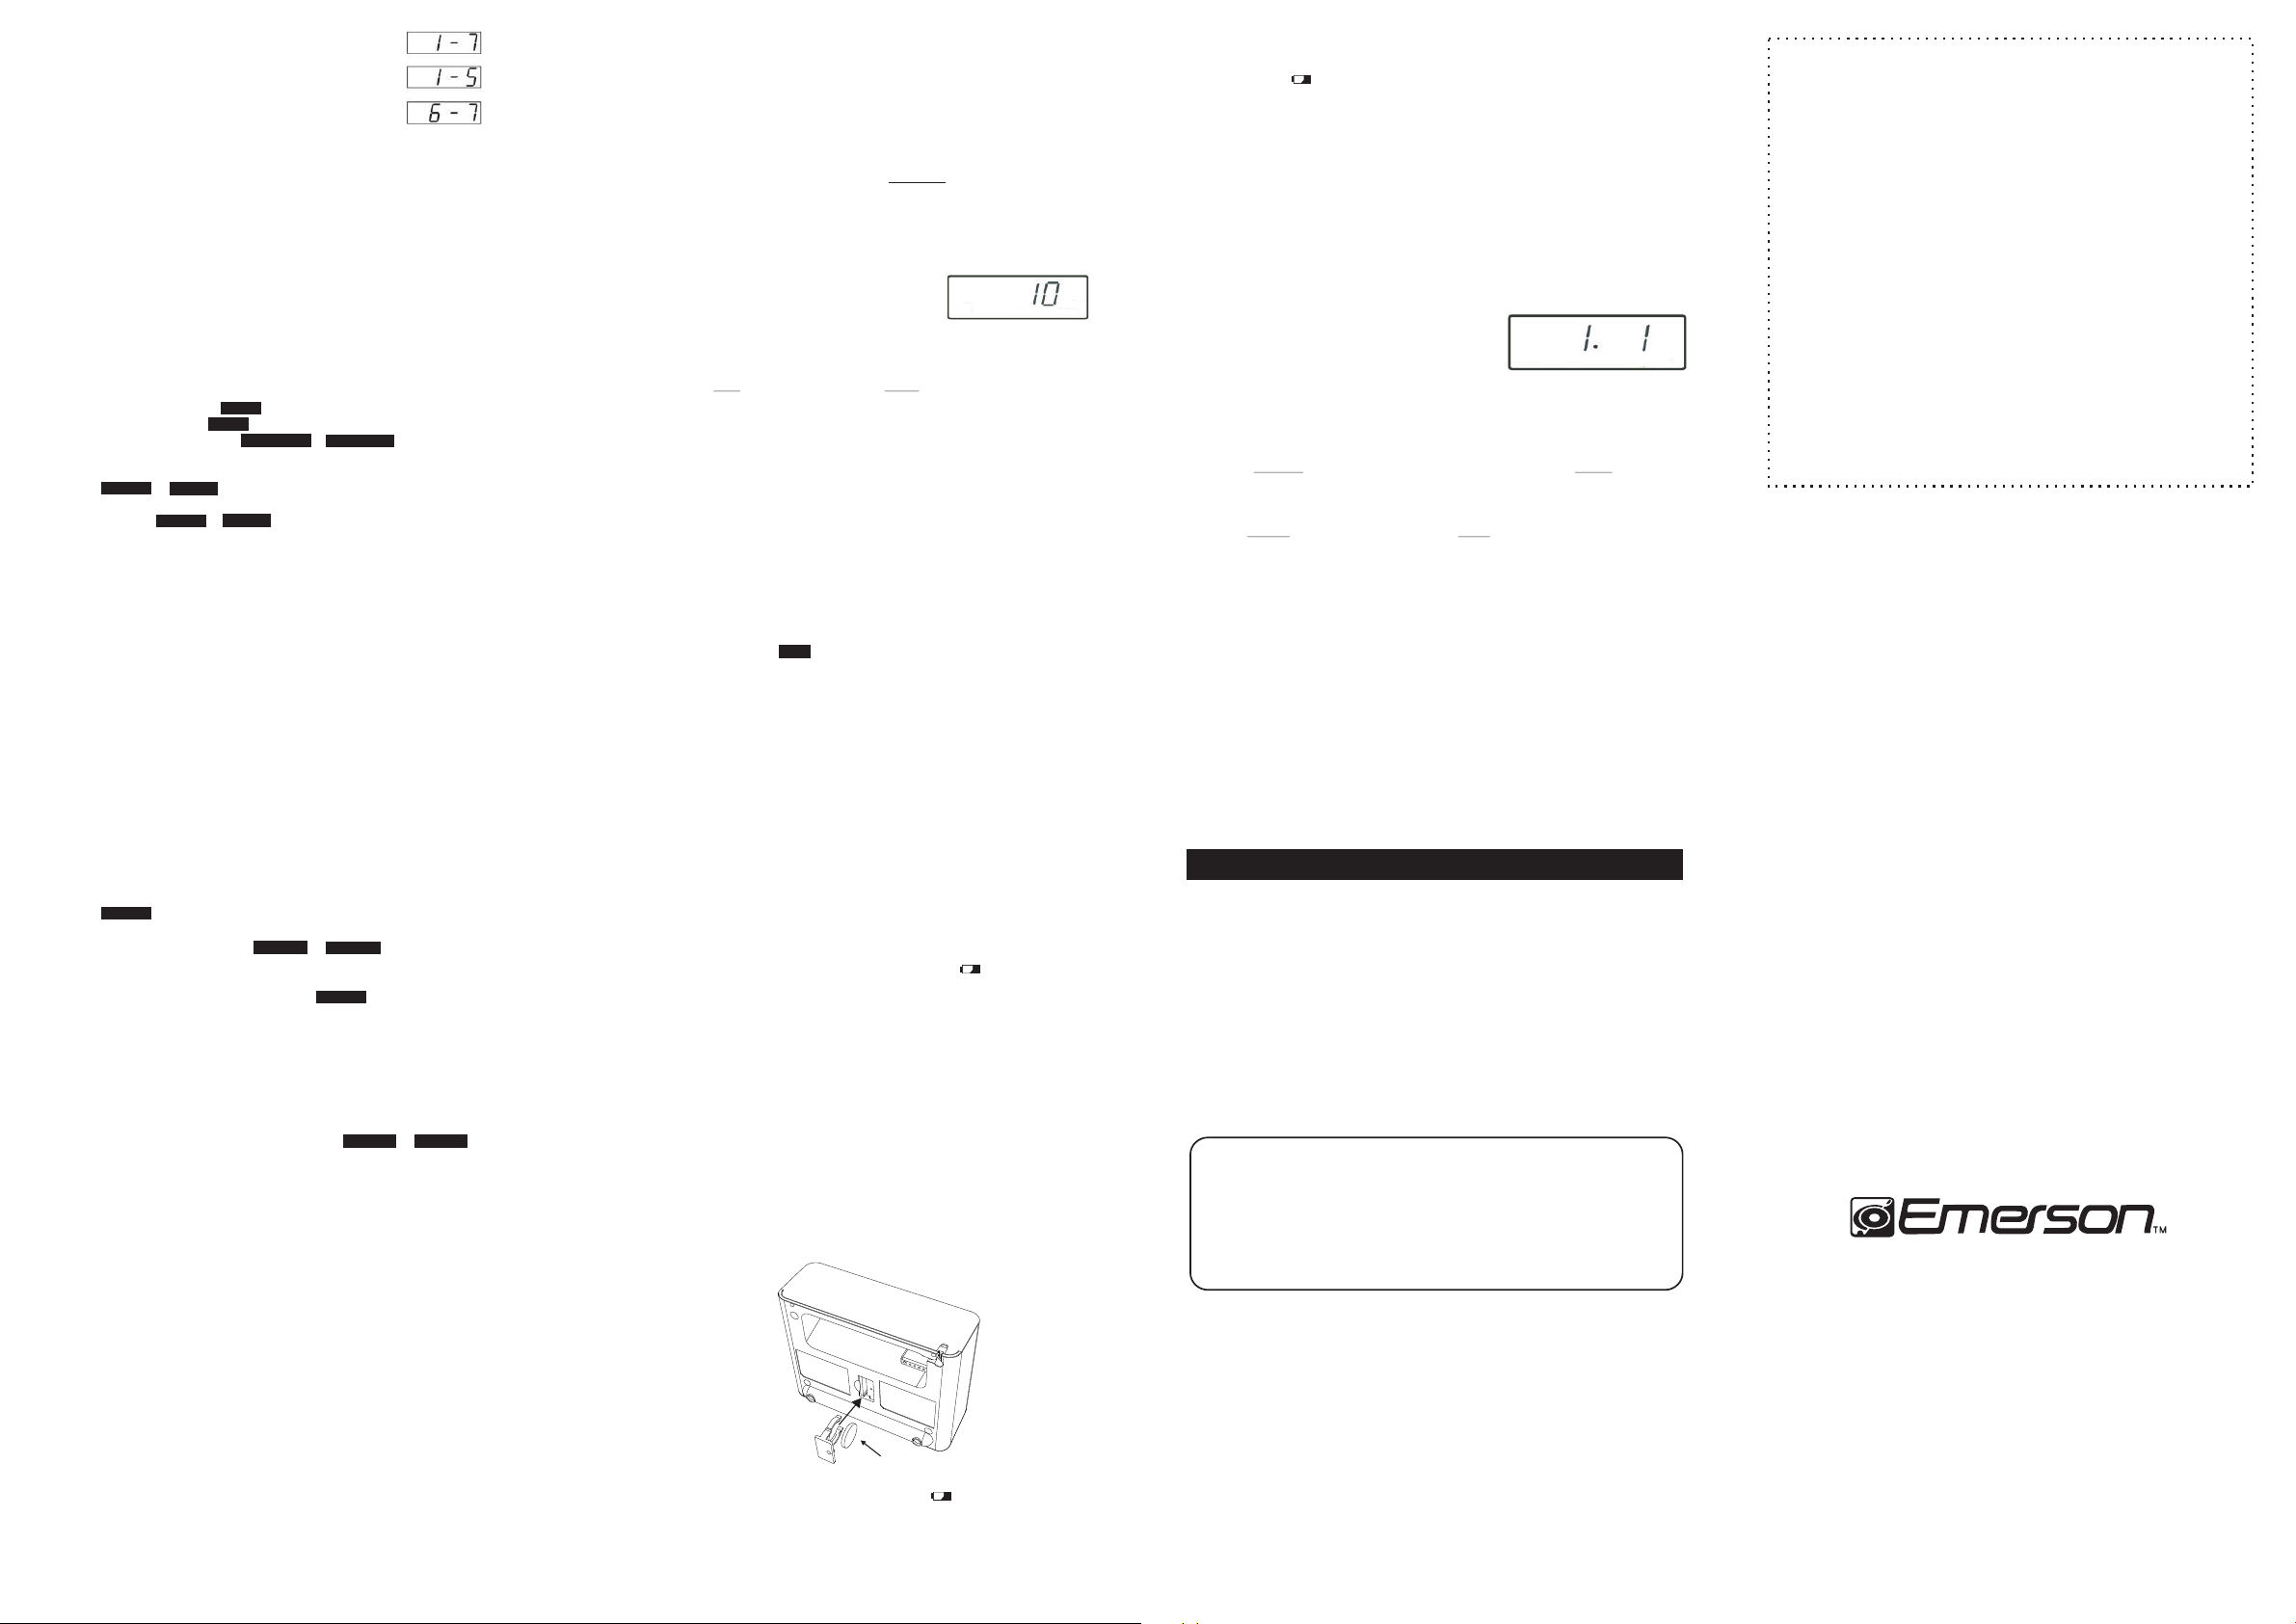
it is convenient for you to do so. To cha ng e th e ba tt er y pr oc ee d as f ol lo ws :
1.) Pu rc h as e a r e pl ace me n t 3V li t hi um ba t te ry wh e re ver b a tt eri es ar e s ol d . T h e
battery type is CR2032 or equivalent.
2.) Remove the battery from its package so it is ready to install.
IMPORTANT: Leave the AC ad ap te r co nn ec te d to y ou r AC ou tl et .
Th i s w i ll p rov i de p owe r to the Sma r tSe t c omp u ter mem o ry w hil e th e or i gin a l
lithium battery is removed.
3.) Turn th e radio fac e up and use a small scr ew dr ive r to rem ove the screw se curin g
the battery holder to the cabinet.
4.) Remove the original battery from the holder and insert the new battery into the
holder the same way, obs er vi ng t he p os it iv e (+ ) di re ct io n. S li de t he h ol de r wi th
the new battery back into the slot in the cabinet.
BE CAREFUL NOT TO L OS E TH IS S MA LL S CR EW !
5.) Replace the screw that secures the battery holder in the cabinet.
6.) Turn the radio right side up and confirm that the LOW BATT indicator is 'Off'.
7.) Save these instructions. You'll have to do this again five to eight years from Now!
WAR NI NG : DA NG ER O F EX PL OS IO N IF B ATTERY I S IN CO RR EC TLY RE PL AC ED .
REPLACE ONLY WIT H THE SAME OR EQUIVALE NT TYPE.
®
®
®
CR2032
POSITIVE(+)
CARE AND MAINTENANCE
Care O f Ca bi ne ts
If t h e cab inet b e c o mes d u s t y, wip e it w i t h a s oft c l o t h. I f th e ca bin et b ecom es
smudged or dirty, cl ea n it w it h a so ft , sl ig ht ly d am pe ne d cl ot h .
N e v er a l l ow w a t er o r a ny l i qu id t o g et i n si de t h e c a b in et . N ev er u s e a ny
ab ra s iv e c le a ne rs or cl ean in g p ads a s t hes e w il l d am a ge th e f in ish of y our ra di o .
Lithium Batt er y Precautions
• Dispose of the old battery properly. D o n o t l e a v e i t l y i n g a r o u n d w h e r e a
yo ung c hil d or p e t cou ld p lay w ith , o r swa llow i t . If t he b att ery i s sw all owed .
contact a physician immediately.
B a tt er y m ay e x pl od e i f m i st re a te d. D o n ot a tt em pt to r ec ha r g e i t o r
•
disassemble it. Do not dispose of the old battery in a fire.
FOR ADDITIONAL SET-UP OR OPERATING ASSISTANCE
1-800-898- 9020 OR
1-800-695- 0098 OR
E-MAIL TO: int ernet@emerson radio.com
PLEASE CALL:
CKS 1800- 30 5-00 P rinte d in Chin a
9
11
13 15
 Loading...