


CKD9905 O/M.QXD 5/29/03 1:38 PM Page 1
SAFETY PRECAUTIONS
CAUTION
RISK OF ELECTRIC SHOCK
DO NOT OPEN
CAUTION: TO REDUCE THE RISK OF ELECTRIC SHOCK, DO NOT REMOVE COVER (OR BACK). NO USER-SERVICEABLE PARTS INSIDE. REFER SERVICING TO QUALIFIED SERVICE PERSONNEL.
DANGEROUS VOLTAGE:
Uninsulated Dangerous Voltage, that may be of sufficient magnitude to constitute a risk of electric shock to persons is present within this product’s enclosure.
ATTENTION:
The Owner’s Manual contains important operating and maintenance instructions.
For your safety, it is necessary to refer to the manual.
DANGER:
Invisible and hazardous laser radiation when open and interlock failed or defeated. Avoid direct exposure to beam.
WARNING: TO PREVENT FIRE OR SHOCK HAZARD, DO NOT EXPOSE THIS UNIT TO RAIN OR MOISTURE.
IMPORTANT SERVICE SAFETY INFORMATION
1.Read these instructions.
2.Keep these instructions.
3.Heed all warnings.
4.Follow all instructions.
5.Do not use this apparatus near water.
6.Clean only with dry cloth.
7.Do not block any ventilation openings. Install in accordance with the manufacturer’s instructions.
8.Do not install near any heat sources such as radiators, heat registers, stoves, or other apparatus (including amplifiers) that produce heat.
9.Do not defeat the safety purpose of the polarized or grounding type plug. A polarized plug has two blades with one wider than the other. A grounding type plug has two blades and a third grounding prong. The wide blade or the third prong are provided for your safety. If the provided plug does not fit into
1
CKD9905 O/M.QXD 5/29/03 1:38 PM Page 2
IMPORTANT SERVICE SAFETY INFORMATION
your outlet, consult an electrician for replacement of the obsolete outlet.
10.Protect the power cord from being walked on or pinched particularly at plugs, convenience receptacles, and the point where they exit from the apparatus.
11.Only use attachments/accessories specified by the manufacturer.
12.Unplug this apparatus during lightning storms or when unused for long periods of time.
13.Refer all servicing to qualified service personnel. Servicing is required when the apparatus has been damaged in any way, such as power-supply cord or plug is damaged, liquid has been spilled or objects have fallen into the apparatus, the apparatus has been exposed to rain or moisture, does not operate normally, has changed its performance, or has been dropped.
14.This appliance shall not be exposed to dripping or splashing water and no object filled with liquids such as vases shall be placed on the apparatus.
15.Do not overload wall outlet. Use only power source as indicated.
16.Use replacement parts as specified by the manufacturer.
17.The product may be mounted to a wall only if recommended by the manufacturer.
18.Upon completion of any service or repairs to this product, ask the service technician to perform safety checks.
Thank You for purchasing this Emerson AM/FM Stereo Clock Radio with Compact Disc Player. In addition to waking to a buzzer alarm, or your favorite AM or FM Stereo stations, you can also wake to the music of your favorite artists on compact disc. There are dual alarms that can be set and used independently, a sleep to music timer that controls both the radio and the CD player, and a battery back up system that will maintain the time and alarm settings in the event of a power interruption. The large green LED display shows the time, alarm settings, and CD track numbers, and it can be seen from anywhere in your room. The two 3” dynamic speakers provide excellent sound for such a compact unit. All major controls are right on the top panel for simple, user-friendly operation.
Please read this manual completely to familiarize yourself with all the features of your new CD clock radio, and save this manual for future reference. Your warranty is on the back page of this manual.
The serial number of your unit can be found on the bottom of the cabinet. We suggest that you record the serial number in the space provided below in case this information is ever needed at a future date.
Model Number: CKD9905
Serial Number: _______________________________________
2
CKD9905 O/M.QXD 5/29/03 1:38 PM Page 3
SAFETY PRECAUTIONS
FCC WARNING:
This equipment may generate or use radio frequency energy. Changes or modifications to this equipment may cause harmful interference unless the modifications are expressly approved in the instruction manual. The user could lose the authority to operate this equipment if an unauthorized change or modification is made.
LASER SAFETY: This unit employs a laser. Only qualified service personnel should attempt to service this device due to possible eye injury.
CAUTION: USE OF CONTROLS, ADJUSTMENTS OR PERFORMANCE PROCEDURE HEREIN MAY RESULT IN HAZARDOUS RADIATION EXPOSURE.
INFORMATION:
This equipment has been tested and found to comply with the limits for a Class B digital device, pursuant to Part 15 of the FCC Rules. These limits are designed to provide reasonable protection against harmful interference in a residential installation. This equipment generates, uses, and can radiate radio frequency energy and, if not installed and used in accordance with instructions, may cause harmful interference to radio communications. However, there is no guarantee that interference will not occur in a particular installation. If this equipment does cause harmful interference to radio or television reception, which can be determined by turning the equipment off and on, the user is encouraged to try to correct the interference by one or more of the following measures:
•Reorient or relocate the receiving antenna.
•Increase the separation between the equipment and receiver.
•Connect the equipment into an outlet on a circuit different from that to which the receiver is connected.
•Consult the dealer or an experienced radio/TV technician for help.
3

CKD9905 O/M.QXD 5/29/03 1:38 PM Page 4
LOCATION OF CONTROLS
FRONT |
1 |
2 |
3 4 5 |
6 |
7 |
8 |
9 10 11 |
|
12 |
13 |
14 |
15 |
|
|
|
16 |
17 |
18 |
19 |
20 |
21 22 23 24 |
||||
1. |
ALM.1 SET Button |
|
|
|
|
|
|
12. |
CLOCK Button |
||||||||
2. |
ALM.2 SET Button |
|
|
|
|
|
|
13. |
SLEEP Indicator |
||||||||
3. |
POWER/ALARM RESET |
|
|
14. |
AM LED Indicator |
||||||||||||
|
Button |
|
|
|
|
|
|
|
|
|
|
|
15. |
ALM.1 Indicator |
|||
4. |
POWER Indicator |
|
|
|
|
|
|
16. |
FM STEREO Indicator |
||||||||
5 |
SLEEP Button |
|
|
|
|
|
|
|
|
|
|
17. |
AM/FM Dial Scale and Pointer |
||||
6. |
CD Compartment Door |
|
|
18. |
SNOOZE Button |
||||||||||||
7. |
CD Door OPEN/CLOSE Area |
19. |
Display |
|
|||||||||||||
8. |
STOP (■) Button |
|
|
|
|
|
|
|
|
|
|
20. |
ALM.2 Indicator |
||||
9. |
PLAY/PAUSE ( |
|
|
|
) Button |
|
21. |
REPEAT Indicator |
|||||||||
|
|
|
|||||||||||||||
|
|
|
|||||||||||||||
10. |
SKIP/Search/MINUTE ( |
|
|
) |
|
22. |
REPEAT Button |
||||||||||
|
|
||||||||||||||||
|
Button |
|
|
|
|
|
|
|
|
|
|
|
23. |
PROG (Program) Indicator |
|||
11. |
SKIP/Search/HOUR ( |
|
) |
|
24. |
PROG (Program) Button |
|||||||||||
|
|
||||||||||||||||
Button
4

CKD9905 O/M.QXD 5/29/03 1:38 PM Page 5
LOCATION OF CONTROLS (CONTINUED)
RIGHT SIDE
1
2
3
4
LEFT SIDE
5
6 |
7 |
1.VOLUME Control
2.FUNCTION (FM/AM/CD) Switch
3.TUNING Control
4.Battery Compartment (Bottom of Unit)
5.WAKE (MUSIC/BUZZER) Switch
6.ALARM2 (OFF/ON) Switch
7.ALARM1 (OFF/ON) Switch
5
CKD9905 O/M.QXD 5/29/03 1:38 PM Page 6
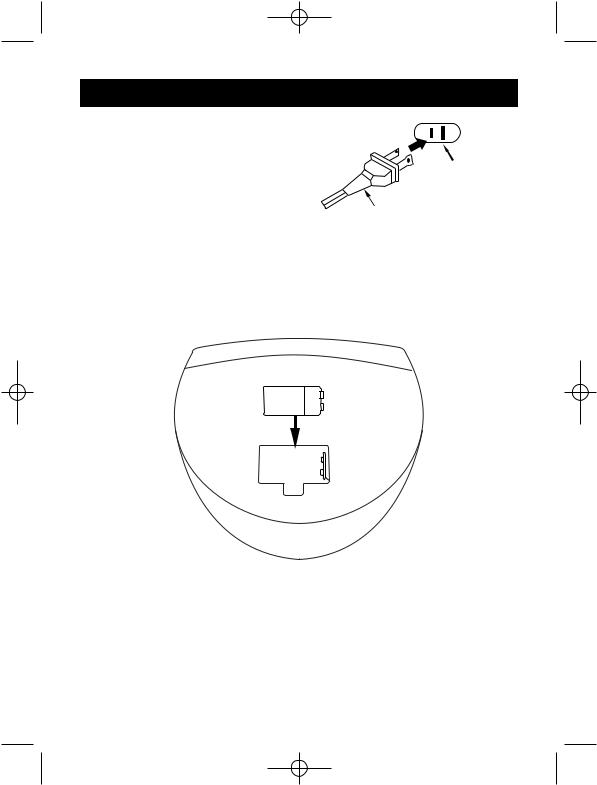
INSTALLATION
Unravel the AC cord and connect it to a |
|
conveniently located AC outlet having |
|
120V and 60Hz only. The Clock Display |
|
will illuminate and “12:00” will appear in the |
|
display. |
|
NOTE: If the AC plug does not fit into a |
|
nonpolarized outlet, do not file or cut the |
|
wide blade. |
|
If the AC cord is disconnected or if there is a power failure, this electronic clock is designed to continue operating internally (without showing the time on the Clock Display) with a 9 volt battery (not included). To install the battery, remove the battery compartment cover and connect the battery to the terminals of the battery snap inside the compartment (use of an alkaline battery is recommended) and install the battery compartment cover back into place.
9V
Be sure to check the condition of the battery periodically by disconnecting the AC cord and connecting it again two to three minutes later. The preset times should continue operating. If the present time resets to “12:00”, it indicates the battery is dead or not connected properly. A fresh 9 volt battery will keep the internal times accurately for approximately 40 hours continuously. If you experience only the normal brief interruptions of AC power, the battery can last much longer. It is recommended to install a new battery every eight to 12 months.
6
CKD9905 O/M.QXD 5/29/03 1:38 PM Page 7
OPERATION
LISTENING TO THE RADIO
1 |
1 |
|
2 |
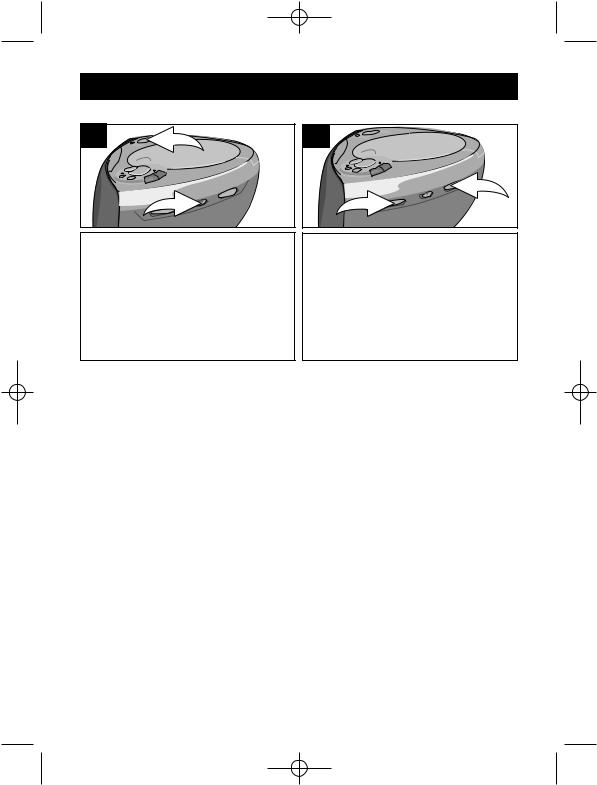
Press the POWER/ALARM RESET button to turn the unit on (the POWER indicator will light). Slide the FUNCTION switch to the desired band (FM or AM).
Hints for Better Reception
2 |
2 |
1 |
Tune a station by turning the TUNING control . When a strong FM stereo signal is received while listening to FM, the FM STEREO indicator will light.
Adjust the VOLUME control as desired.
FM - The FM antenna is built into the AC cord. Fully unravel AC cord for best reception. You may have to vary the direction of the AC cord to find the strongest signal for each FM station.
AM - The AM ferrite bar antenna is located inside the cabinet. It may be necessary to turn the unit slightly so that the internal antenna is pointing in the direction of the AM transmitter. You may have to experiment to find the position that provides the strongest reception for each of your favorite AM stations.
7
 Loading...