emco winnc Compact 5 Operating Manual
Operating
Instruction
EII1CD
COMPACT
Edition
Ref.
No.
90-7
EN2
031
5
PC
Operating
COMPACT
90-7
Instruction
PC
5
EN2
031
This
software
have
who
systems
for
been
many
for
the
working
years.
Foreword
5
Compact
on
PC
software
was
developed
development
by
specialists,
industrial
for
the
With
CAD/CAM
machine
programs
can
You
very
short
if
you
do
should
work
practise
If
you
have
examples
screen
manual).
and
COMPACT
software,
and
set
(software
learn
to
by
time
have
not
through
examples
all
any
CAD
chapter
in
the
operate
operating
software
PC
5
you
but
up
standard
description
computer-controlled
a
reading
any
previous
software
this
directly
listed
knowledge,
by
means
5
the
sheets
emcD
TECHNICAL
wishes
DOCUMENTATION
you
success
you
also
can
(DIN
chapter
respective
programming
on
you
of
the
(the
have
not
like
work
66025
Editor).
6,
manuals
description
PC.
the
can
start
user
good
last
three
only
a
at
ISO
and
machine
yourself,
knowledge.
step
the
with
guidance
pages
efficient
an
normal
1056)
tool
by
step
specimen
of
on
CMC
NC
in
even
You
and
the
this
a
1
CONTENTS
Description
A
Accident
Technical
Technical
supply
of
Scope
Setting-up
Connection
Description
elements
Main
Key
switch
Emergency-off
spindle
Main
Adjusting
spindle
Main
Travelling
Driveofslides
Toolholder
Tailstock
of
Care
prevention
data
machine
data
PC
the
of
the
of
key
switch
speed
the
speed
of
range
machine
machine
of
machine
machine
display
the
slides
10
11
1
12
13
14
14
5
5
6
7
8
8
8
9
9
9
9
9
1
Clamping
Summary
3-Jaw
The
The
The
devices
chuck
collet
independent
clamping
Technological
Cutting
Spindle
Calculation
Finding
Finding
Finding
Service
speed
speed
the
the
the
parts
80
o
chuck
plate
data
of
feed
cutting
spindle
feed
for
workpieces
mm
attachment
chuck
o
mm
90
values
speed
in
speed
mm/min
15
15
16
17
18
18
19
19
19
19
20
20
21
23
2

B Software description
41
1. Vocabulary explanations
2 Software installation, access into program
2.1 Possible PC configuration
2.2 PC with a hard disk and 1 disk drive
installation, access
3. Explanations for the software
3.1 The differences in the input keyboards
3.2 Important key functions
3.3 Coordinate system
3.4 Screen cursor
3.5 Menu structure - menu summary
3.6 Screen display
3.7 Selection / deselection of the menu points
4. Menu points
4.1 Work piece
4.2 Draw
4.2.1 Cursor
4.2.2 Point
4.2.3 Line
4.2.4 Arc
4.2.5 Visible edges
4.2.6 Mirroring
4.2.7 Cleaning
4.2.8 Erasing the geometric element
4.2.9 Erasing all
4.2.10 Hotkeys - draw
Specimen example 1
Specimen example 2
Specimen example 3
4.3 Program
4.3.1 Moving in the rapid
4.3.2 Moving with feed speed
4.3.3 Cycles
Roughing cycle
Back pocket cycle
Follow contour cycle
Cut-in cycle
Threading cycle
4.3.4
4.3.5
4.3.6
4.3.7
4.3.8
4.3.9
4.310
Machining possibilities: CAD/CAM Edit Tool change
Erase the last movement
Erasing the machining program
Entering the feed values
Change feed unit
Entering the finishing offsets
41
42
42
42
46
46
47
48
49
50
52
52
53
54
55
56
59
61
64
68
68
68
69
69
70
71
72
73
74
74
74
74
75
77
79
81
83
90
91
91
91
91
91
91

4.4 Display
4.4.1 Zoom all
Menu summary, hotkeys (for
4.4.2 Zoom window
4.4.3 Zoom work piece
4.4.4 Removing, inserting the head stock
4.4.5 Removing, inserting the work piece
4.4.6 Removing, inserting the tool
4.4.7 Removing, inserting the tool path
4.4.8 Inserting, removing the tail stock
4.4.9 Changing the simulation display
4.4.10 Shift Geometry
Set up 0,0
4.5
Manual
4.6
Machine
4.7
4.7.1 Automatic
4.7.2 Single Step
4.7.3 Fast run (Rapid)
4.7.4 Empty cut step
4.7.5 Repeating the program
4.7.6 Moving the tool to the cursor
4.7.7 Shifting the program
4.7.8 Altering the scale program
4.8 Archive
4.8.1 Storing the program
4.8.2 loading the program
4.8.3 Storing the geometry
4.8.4 loading the geometry
4.9 Print
4.10 End
92
92
92
93
93
93
93
94
94
94
95
96
97
98
98
98
98
98
99
99
99
99
100
100
100
101
101
101
101
5.Specimen examples
6. Edit
7.Notes for the software compilation
Work sheets:
taking out)
102
109
130
133
A
DESCRIPTION
OF
MACHINE
Note:
•
Newton
workpiece
clamping
supported
Therefore
workpiece
the
Read
•
machine
the
Electrical
•
connections
A
grounding
Do
not
•
starting
while
guard!
E-control!
Keep
•
should
not
cannot
Accident
the
(100
could
device
correctly.
use
instruction
connection:
must
alter
the
machine
Never
children
be
storedsothat
acquainted
start
it.
power
feed
kp).
If
when
tailstock
manual
be
receptacle
guards!
machine.
is
running.
work
visitors
and
with
program
be
pressed
it
center
before
carried
must
Close
Never
with
dismanteled
the
Prevention
slides
the
of
is
Don't
away!
children
use
correct,
is
not
out
not
clamped
for
working
The
professionally
out
be
available
guard
belt
open
dismantle
The
and
of
the
supporting
electrical
belt
cover
machine
machine
1000
is
of
and
with
before
guard
chip
visitors
the
the
Safety
Remove
•
Even
chuck
machine
Carry
•
maintenance
standstillofthe
chip
Use
•
Never
•
Never
Instructions
adjusting
when
machine
keys
should
with
chains
measuring,
out
and
machine!
removing
for
hook
running
touch
try
to
stop
keys
and
is
not
never
similar
or
resetting
machine
workpiece
wrenches!
being
attached
be
adjusting,
work
chips.
parts!
chuck
or
only
used.
with
The
the
to
set-up,
during
the
hand.
Do
•
of
lathe
See
Be
•
over
Switch
•
Remove
surpass
not
chuck
maximum
careful
running
machine
plug
and
of
(rotating)
the
independent
capacities
extending
off
before
from
socket
damping
chucks.
chuck!
chucks!
servicing!
capacity
Never
of
reach
the
Always
•
that
while
important
are
Wear
•
caught
Keep
•
benches
wear
some
being
protected.
proper
in
chuck
work
invite
safety
materials
worked
all
that
apparel!
or
area
accidents.
goggles!
(for
persons
Loose
workpiece.
clean!
examp.
on.
near
Cluttered
also
Be
brass)
Therefore,
the
sleeves
could
areas
aware
spray
it
machine
get
and
removed
be
has
cover
The
•
is
by
All
•
(replacing
by
Use
•
title
trained
electrical
trained
original
whatsoever
of
the
service
fuses,
service
spare
E-control
people
service
boards
people
parts,
guarantee!
to
only.
etc.)
only
to
repair
and
have
otherwise
to
there
be
works
done
no
is
5
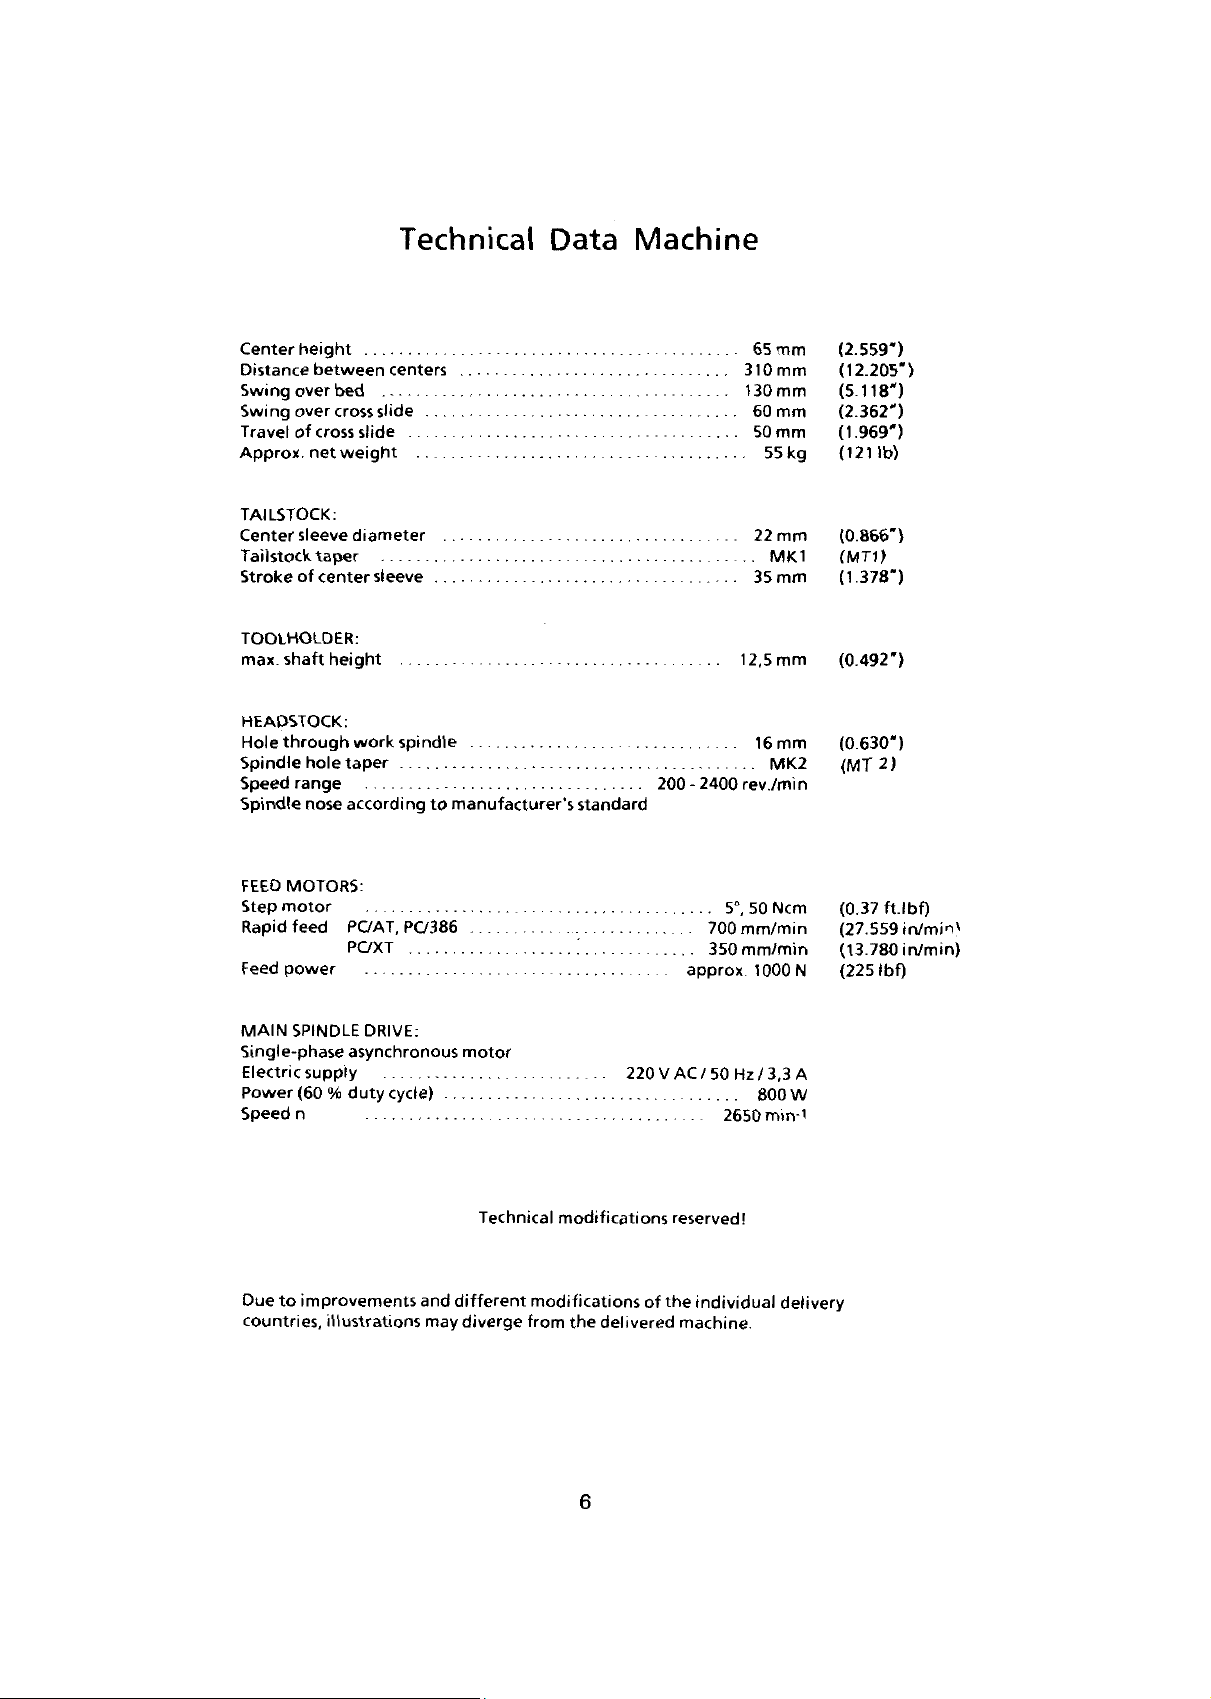
Technical
Data
Machine
height
Center
Distance
Swing
Swing
Travel
Approx,
TAILSTOCK:
Center
Tailstock
Stroke
TOOLHOLDER:
max.
HEADSTOCK:
Hole
Spindle
Speed
Spindle
FEED
Step
Rapid
Feed
between
over
bed
over
cross
of
cross
weight
net
sleeve
taper
of
center
height
shaft
through
hole
range
nose
MOTORS:
motor
feed
power
taper
centers
slide
slide
diameter
sleeve
work
spindle
according
PC/AT,
PC/386
PC/XT
.
.
...
to
manufacturer’s
standard
200-2400
.
700mm/min
350mm/min
approx
65
310
130
60
50
22
35
12,5
16mm
rev./min
5°,
50
1000
mm
mm
mm
mm
mm
55
mm
MK1
mm
mm
MK2
Ncm
kg
N
(2.559*)
(12.205*)
118')
(5
(2.362*)
969*)
(1
lb)
(121
(0.866*)
(MT1)
378*)
(1
(0.492*)
(0.630*)
2)
<MT
(0.37
ft.lbf)
(27.559
(13.780
Ibf)
(225
in/min'
in/min)
MAIN
SPINDLE
Single-phase
Electric
Power
Speed
Due
countries,
supply
(60
n
improvements
to
DRIVE:
asynchronous
duty
cycle)
%
illustrations
and
may
motor
Technical
different
diverge
modifications
modifications
from
the
delivered
6
220
VAC/
50
Hz/
3,3
A
W
800
reserved!
the
individual
machine.
2650
min
delivery
'
........
of
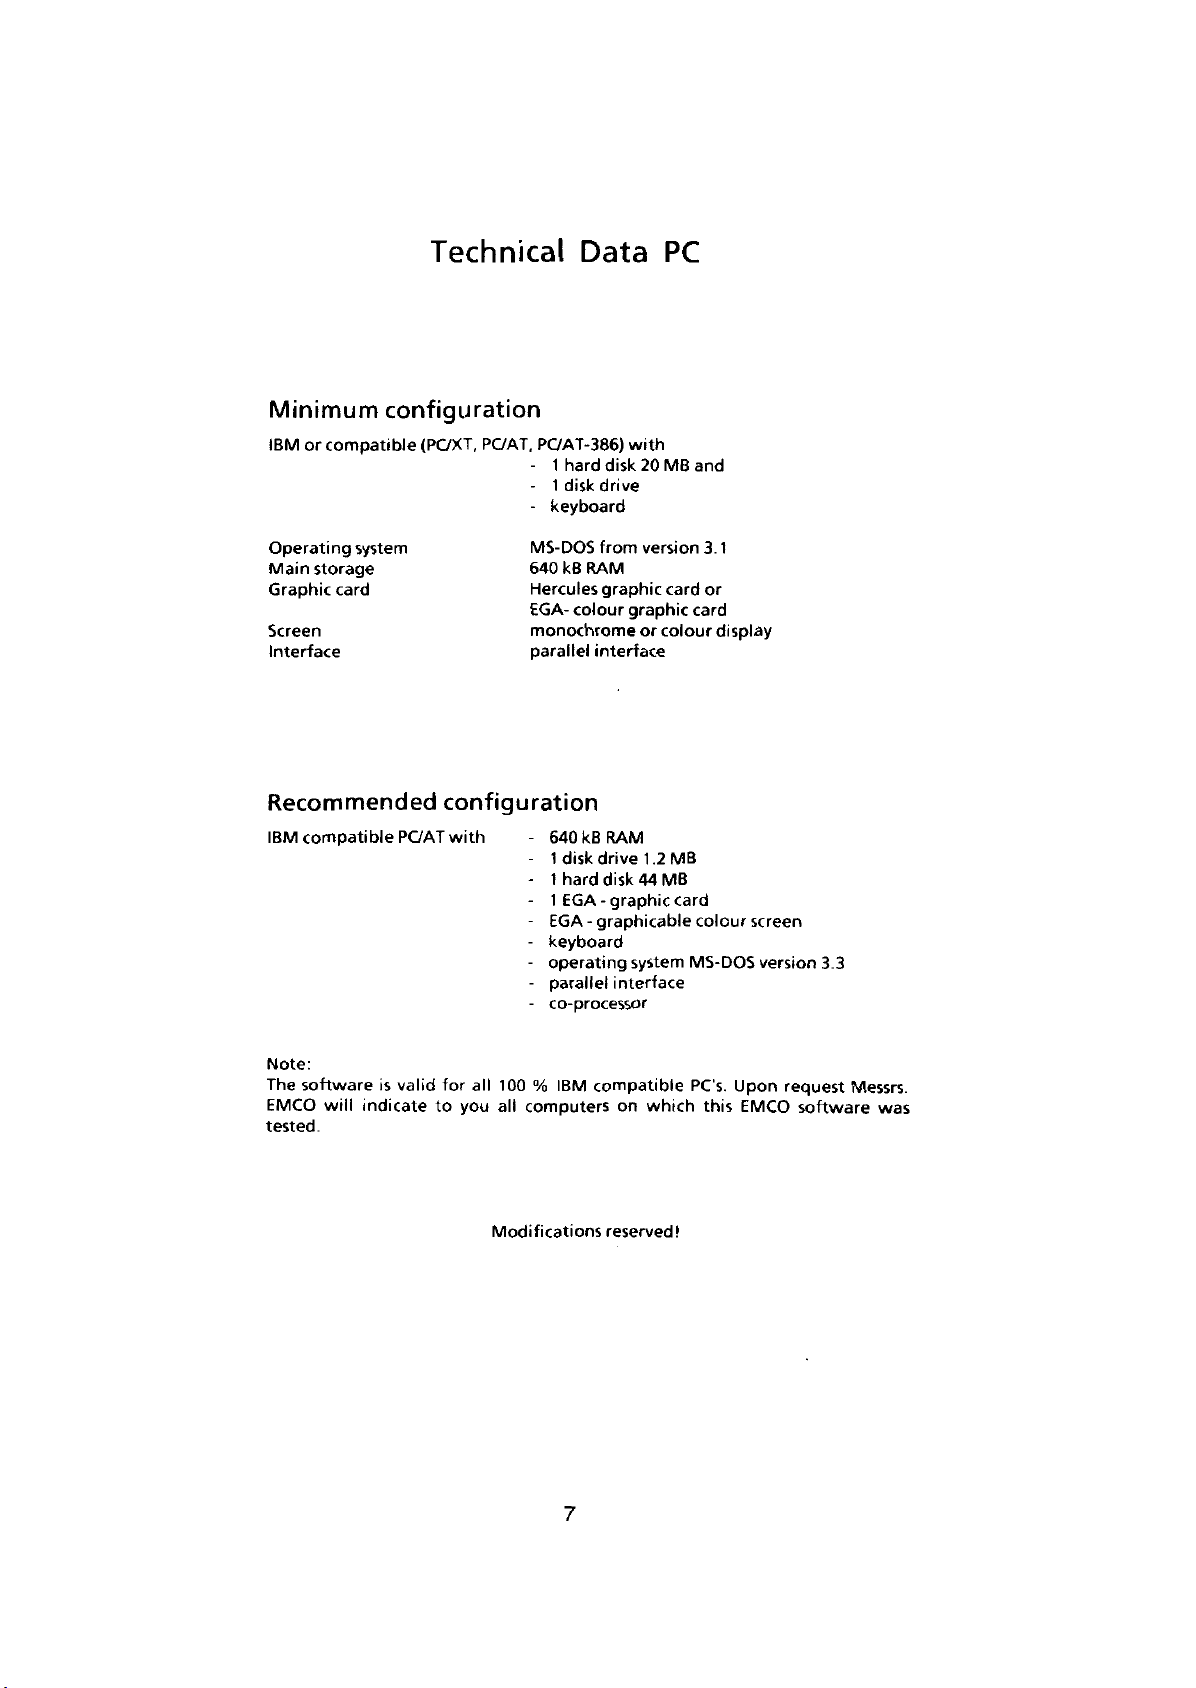
Technical
Data
PC
Minimum
IBM
or
Operating
storage
Main
Graphic
Screen
configuration
compatible
system
card
(PC/XT,
Interface
Recommended
IBM
compatible
PC/AT
PC/AT-386)
PC/AT,
-
1
hard
1
disk
-
keyboard
MS-DOS
kB
640
Hercules
EGA-
monochrome
parallel
configuration
with
640
1
disk
1
hard
1
EGA
EGA
keyboard
operating
parallel
co-processor
disk
drive
from
RAM
graphic
colour
interface
kB
RAM
drive
disk
-
graphic
-
graphicable
interface
with
20
MB
version
card
graphic
or
colour
1
.2
MB
44
MB
system
and
3.
or
card
card
colour
MS-DOS
1
display
screen
version
3.3
Note:
software
The
EMCO
tested.
will
is
valid
indicate
for
you
to
100
%
all
all
computers
Modifications
IBM
7
compatible
on
which
reserved!
PC's.
this
Upon
EMCO
request
software
Messrs.
was
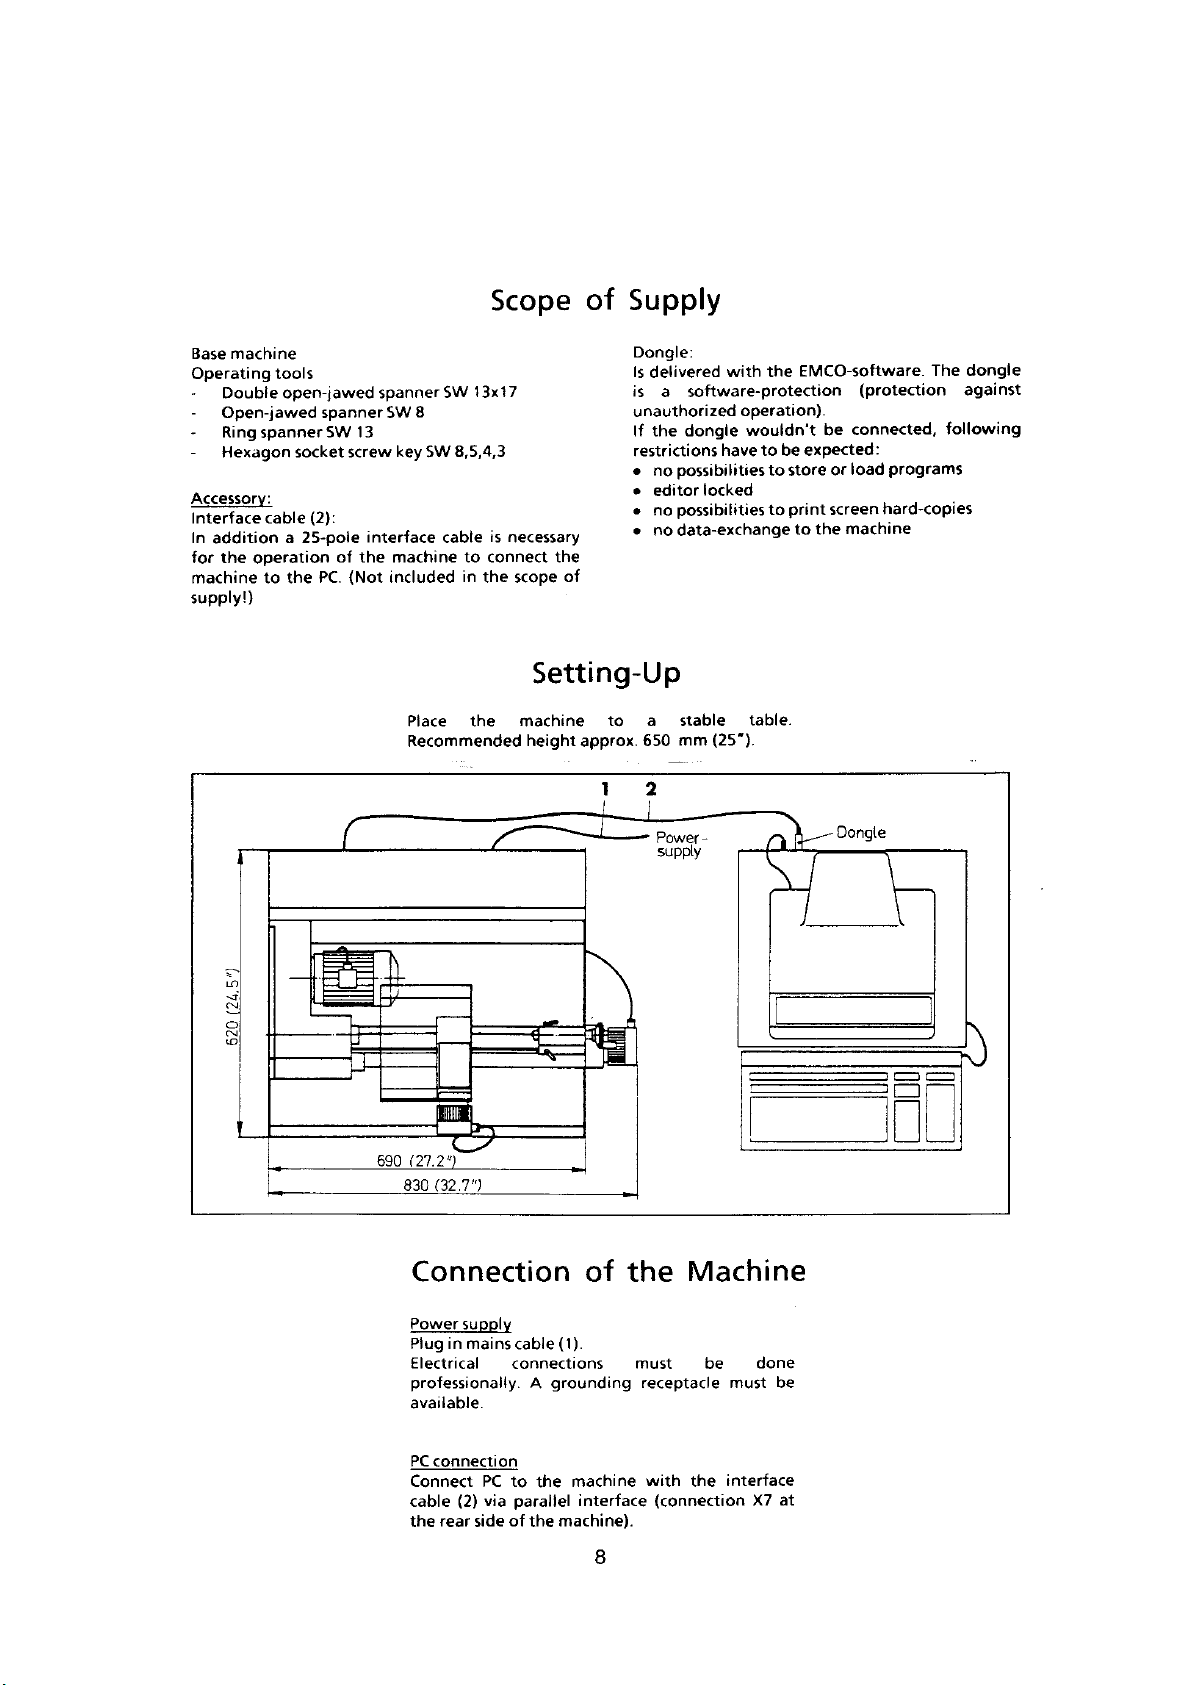
Scope
of
Supply
machine
Base
Operating
Double
Open-jawed
Ring
Hexagon
Accessory:
Interface
In
addition
the
for
machine
supply!)
tools
open-jawed
spanner
socket
(2):
cable
a
25-pole
operation
the
to
spanner
SW
screw
of
(Not
PC.
L
spanner
8
SW
13
key
interface
the
machine
includedinthe
Place
Recommended
SW
SW
8,
cable
to
13x17
4,3
S,
is
connect
the
necessary
the
of
scope
Setting-Up
machine
height
approx.
1
Dongle:
delivered
Is
a
is
unauthorized
the
If
restrictions
no
•
editor
•
no
•
no
•
a
to
650
2
Power
supply
the
with
software-protection
operation).
have
wouldn't
be
to
to
store
dongle
possibilities
locked
print
possibilities
data-exchange
stable
mm
-
to
to
table.
(25").
EMCO-software.
(protection
connected,
be
expected:
programs
load
or
hard-copies
screen
machine
the
Oongle
The
against
following
dongle
r
LO
s'
s
to
1
£
(
2")
27.
690
(32.7")
830
Connection
supply
Power
Plug
in
mains
PC
(2)
via
sideofthe
cable
connections
A
the
to
parallel
Electrical
professionally
available
PC
connection
Connect
cable
the
rear
of
(1).
grounding
machine
interface
machine).
the
must
receptacle
with
(connection
Machine
done
be
the
must
interface
X7
be
at
8
I
li
1
Machine
2
Chip
Longitudinal
3
4
Cross
Headstock
5
6
Tailstock
r
7
l-
2
container
slide
5
bed
slide
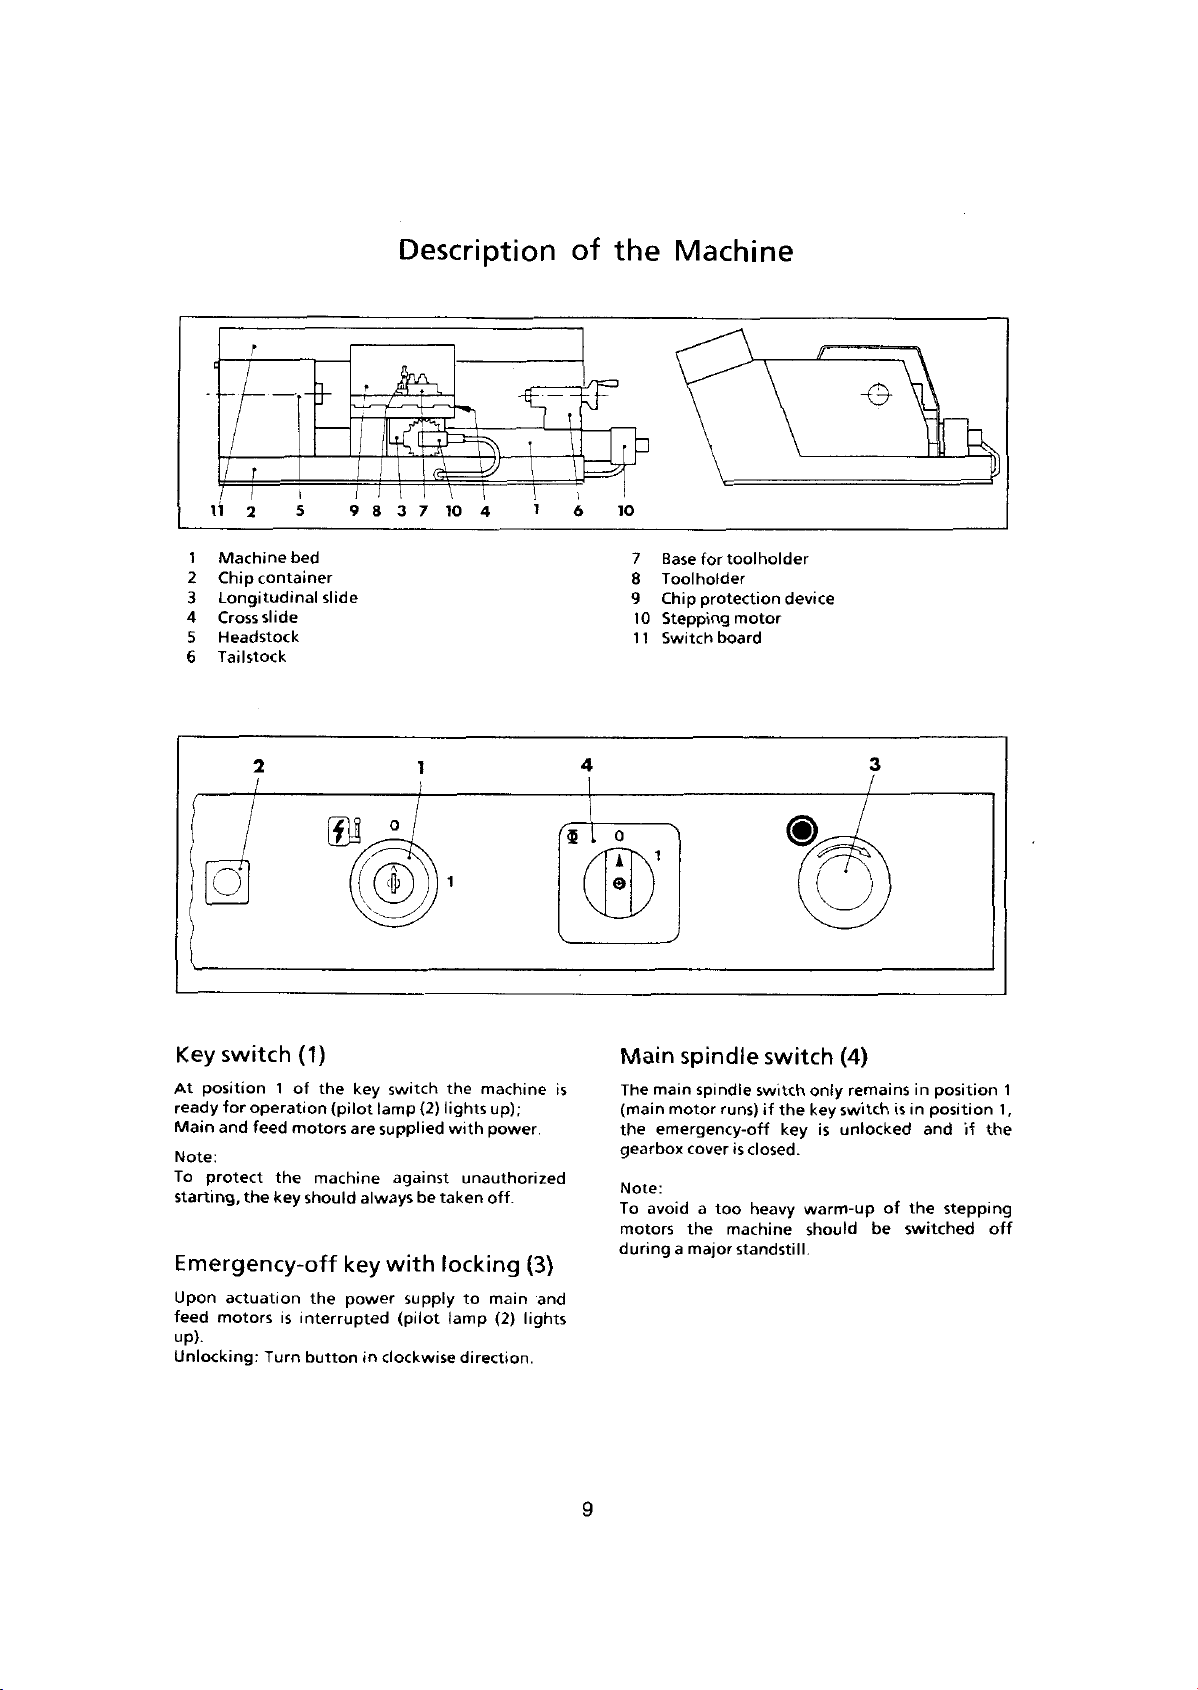
Description
JK
:
9
3
7
8
10
of
the
<F
Machine
-o-
5
:
\
4
T
1
w
,
10
6
7
Base
8
Toolholder
9
Chip
10
Stepping
1
1
Switch
for
toolholder
protection
motor
board
device
2
O
1
operation
feed
the
key
the
is
Turn
(1)
of
motors
should
the
interrupted
button
Key
switch
position
At
ready
for
Main
and
Note:
To
protect
starting,
Emergency-off
Upon
actuation
feed
motors
up).
Unlocking:
an
the
key
(pilot
are
machine
key
power
°
switch
lamp
supplied
against
always
with
in
clockwise
1
(2)
be
supply
(pilot
1
the
machine
lights
up);
power
with
unauthorized
off.
taken
locking
main
to
(2)
lamp
direction.
(3)
and
lights
4
3
/
switch
switch
if
is
closed.
heavy
machine
standstill
<§>
only
key
the
key
warm-up
should
(4)
remains
switch
unlocked
is
of
be
in
position
in
is
position
andifthe
the
switched
stepping
off
1
1
,
0
1
A
©
Main
is
The
(main
the
gearbox
Note:
To
motors
during
spindle
spindle
main
emergency-off
avoid
motor
cover
the
major
a
runs)
a
too
9
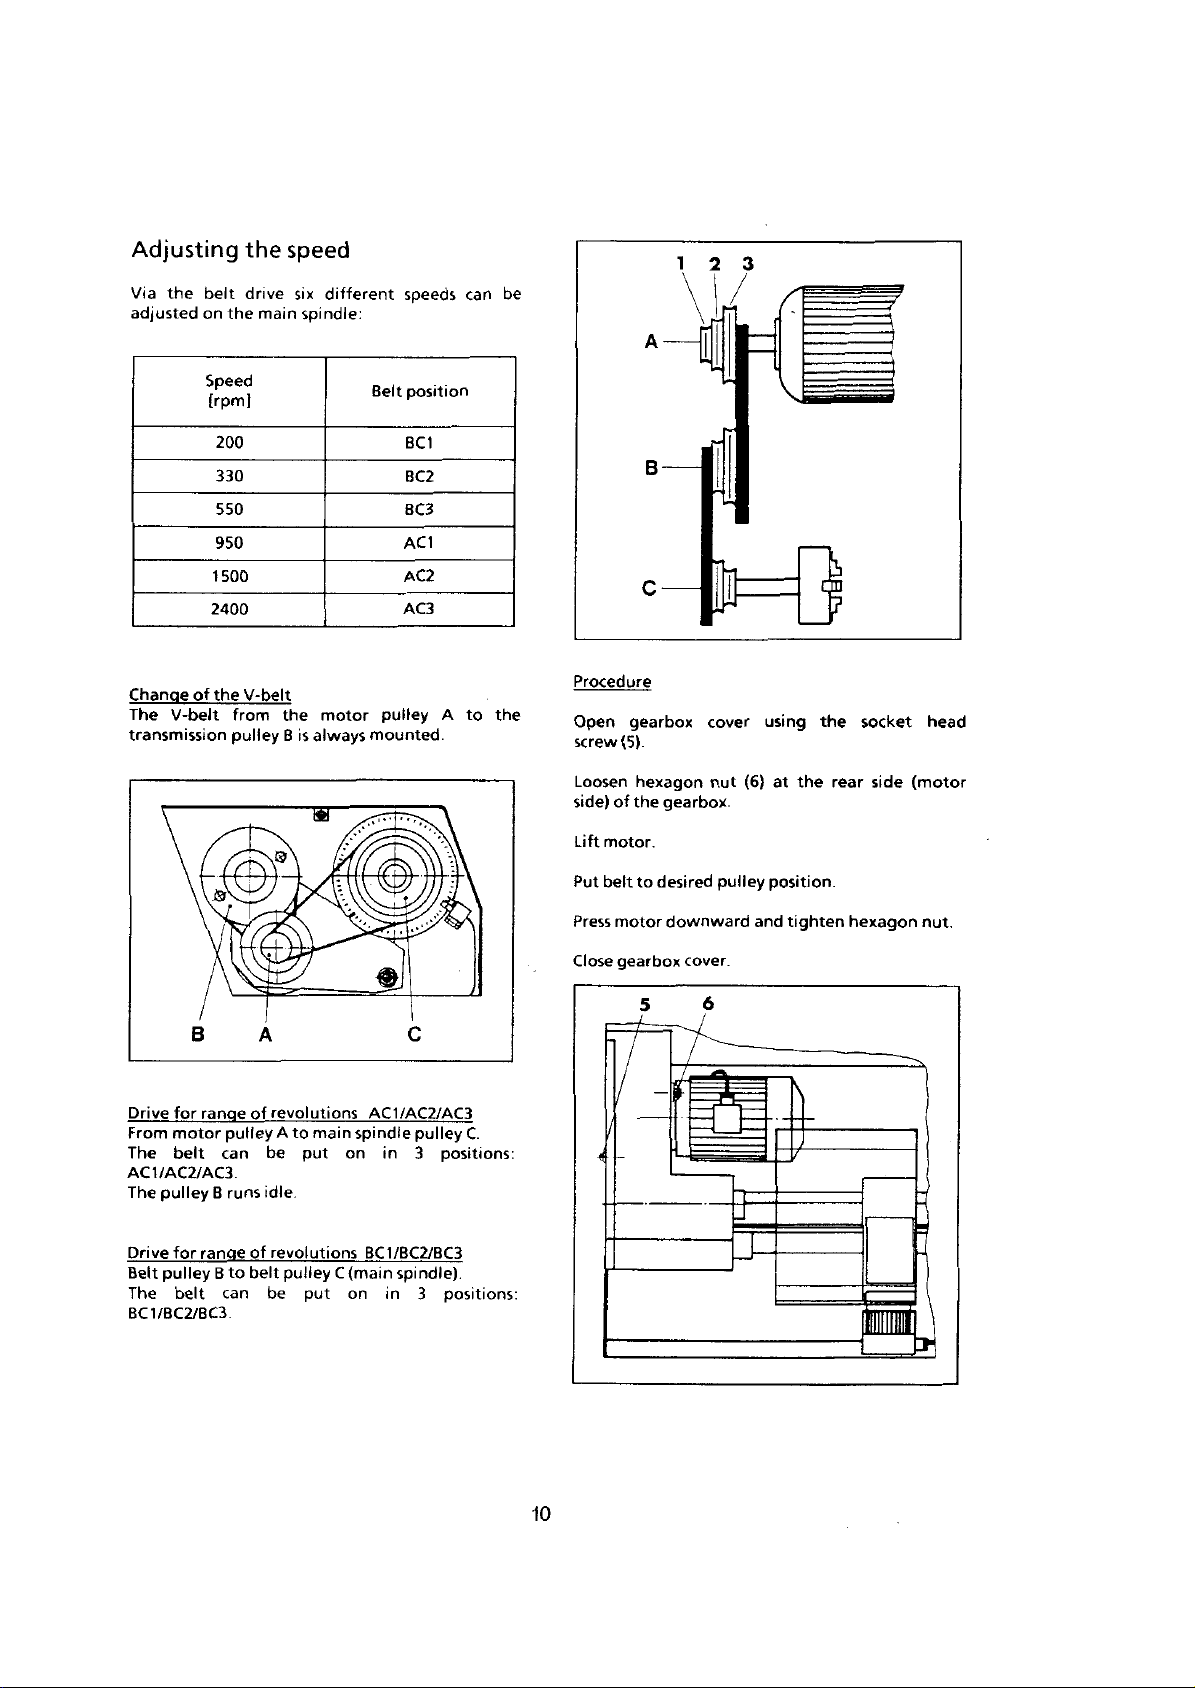
Adjusting
Via
the
adjusted
Change
The
transmission
on
of
V-belt
belt
Speed
[rpm]
200
330
550
950
1500
2400
the
0
the
drive
the
V-belt
from
pulley
main
,3
speed
different
six
spindle:
motor
the
always
B
is
tST
speeds
Belt
position
BC1
BC2
BC3
AC1
AC2
AC3
pulley
mounted.
can
1
be
3
2
A
B
c
Procedure
A
the
to
Open
screw
Loosen
side)
Lift
motor.
Put
belt
Press
gearbox
(5).
hexagon
of
the
to
motor
cover
nut
gearbox.
desired
downward
(6)
pulley
using
at
position
and
the
the
tighten
socket
rear
hexagon
side
head
(motor
nut.
B
range
for
Drive
From
motor
The
belt
for
pulley
belt
can
B
range
B
can
AC1/AC2/AC3.
The
pulley
Drive
Belt
The
BC1/BC2/BC3.
of
pulley
runs
of
belt
to
A
revolutions
A
main
to
be
put
idle
revolutions
pulley
be
put
AC1/AC2/AC3
spindle
on
in
BC1/BC2/BC3
(main
C
on
spindle).
in
C
pulley
3
3
C.
positions:
positions:
10
Close
gearbox
5
cover.
6
/
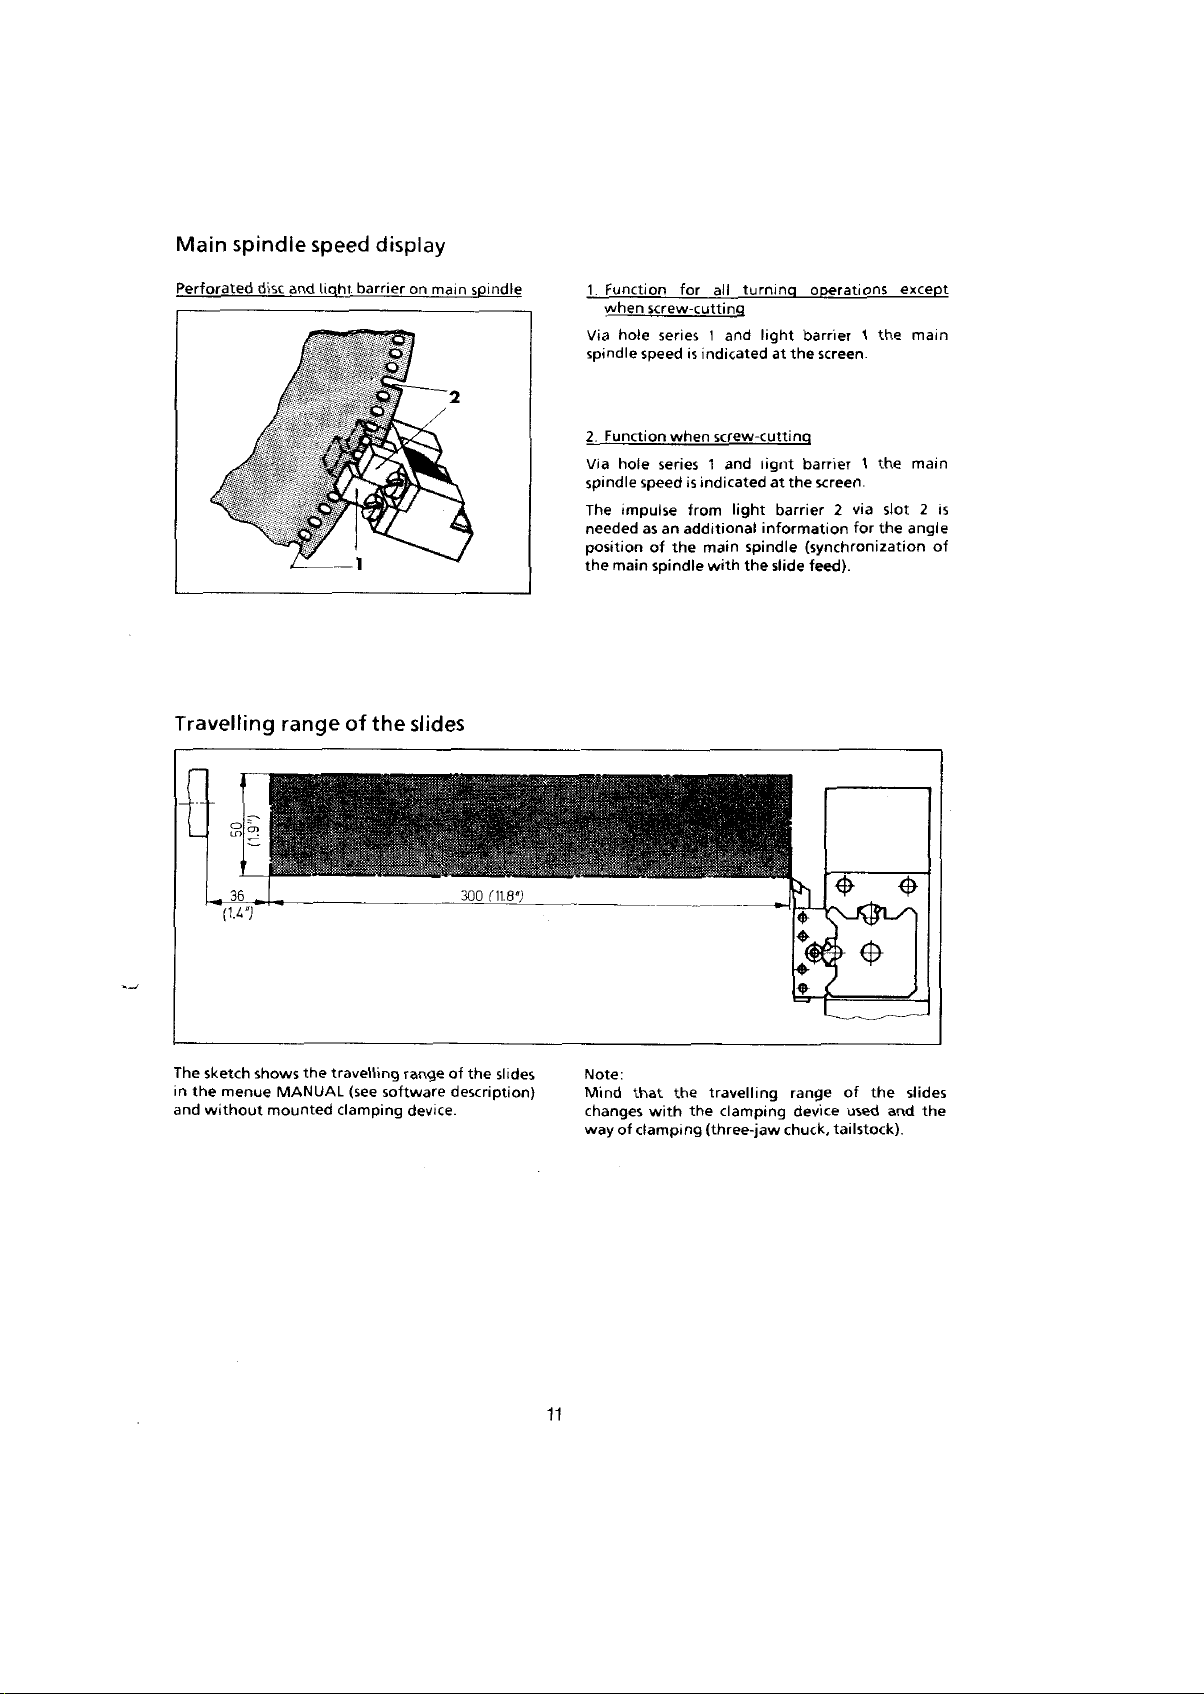
Main
spindle
speed
display
Perforated
Travelling
I
£
s
disc
light
and
%
©
©
range
barrier
of
Q
©
the
8
o
o
on
main
slides
2
spindle
1
Function
when
Via
hole
spindle
2
Function
hole
Via
spindle
impulse
The
needed
position
main
the
m
for
cutting
screw
series
is
speed
indicated
when
series1and
is
speed
indicated
from
as
an
additional
the
of
spindle
m
all
1
screw
main
with
turning
and
light
spindle
the
operations
light
barrier
screen
the
at
cutting
barrier
lignt
screen
the
at
barrier2via
information
(synchronization
feed).
slide
V\
|
for
except
main
1
the
main
1
the
2
is
slot
angle
the
of
The
in
and
,
sketch
the
without
36
)
(U*
shows
menue
the
MANUAL
mounted
travelling
(see
clamping
range
software
device.
ni.8»;
300
the
of
slides
description)
11
Note:
Mind
changes
of
way
that
the
with
clamping
travelling
clamping
the
(three-jaw
ZM'*'
*
range
device
tailstock).
chuck,
0
of
used
the
and
0
slides
the
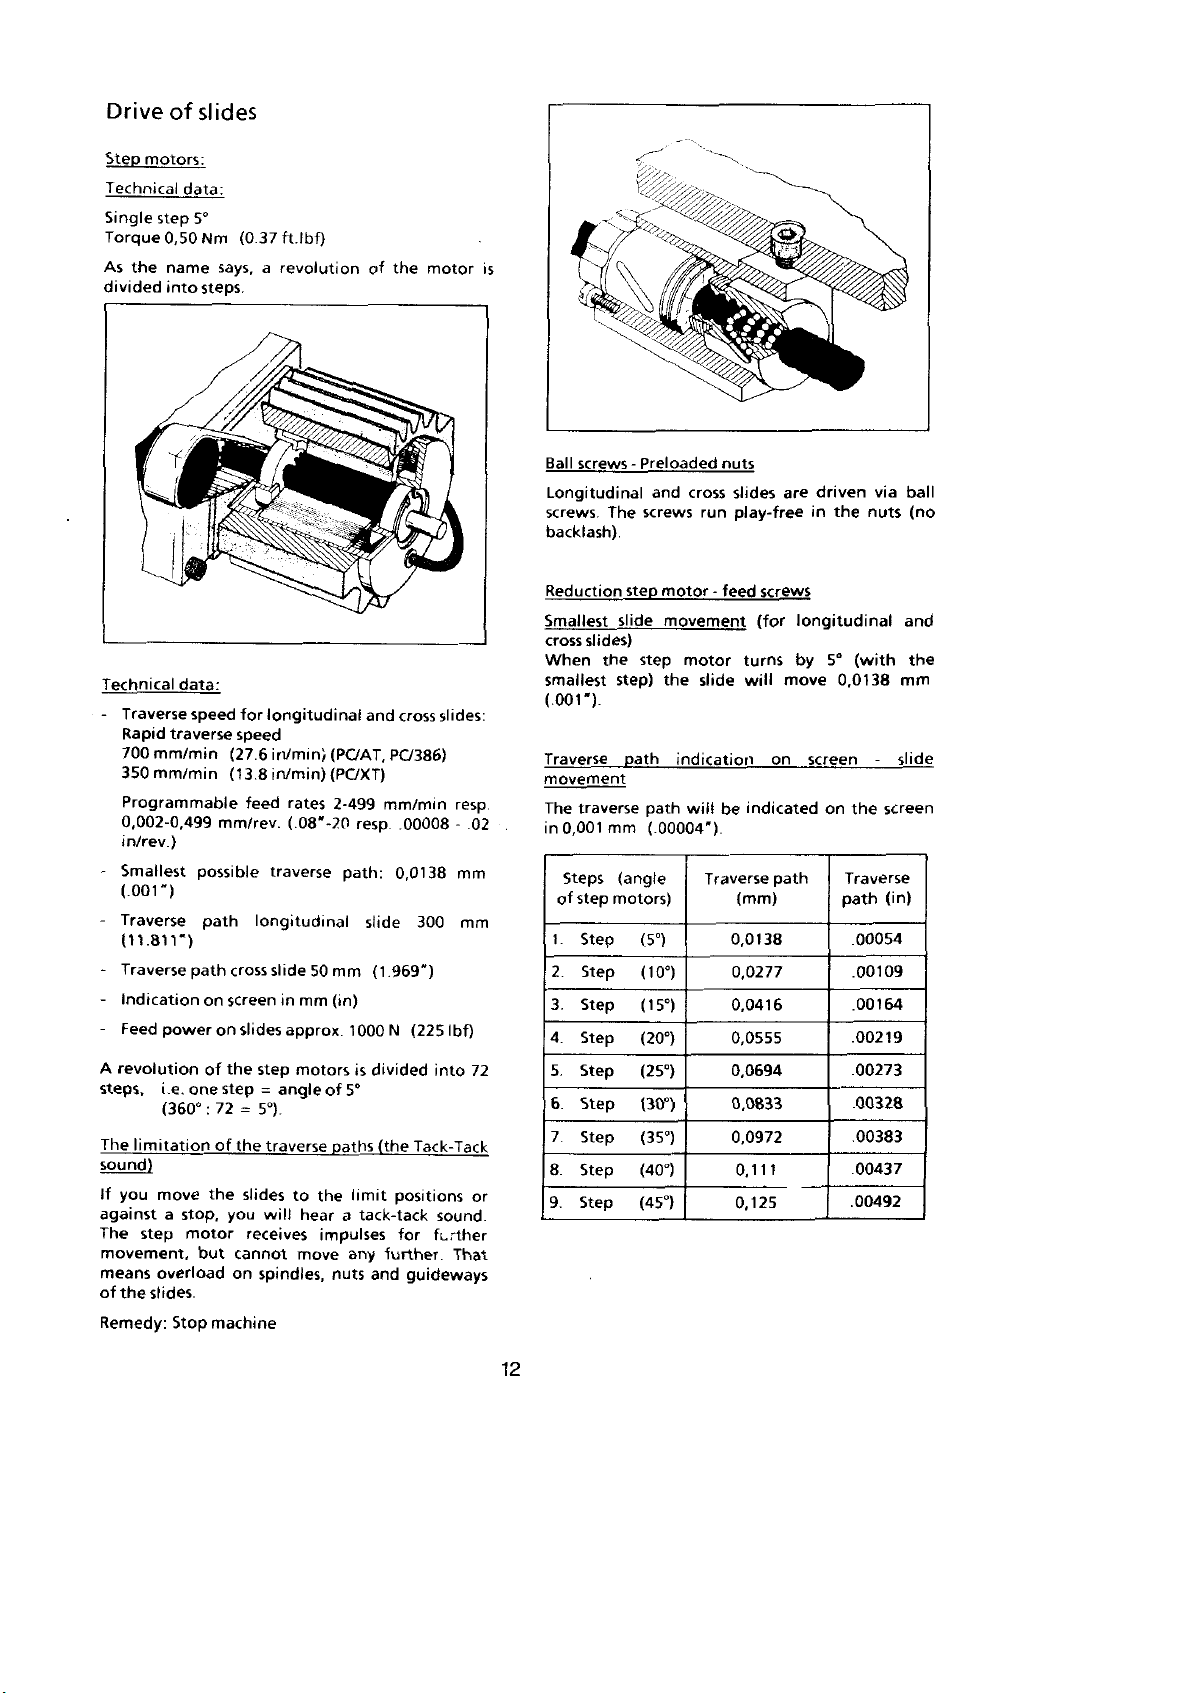
Drive
Step
motors:
Technical
Single
Torque
the
As
divided
of
step
0,50
name
into
slides
data:
5°
Nm
steps
(0
says,
ft.lbf)
37
a
revolution
'M
of
the
motor
is
v
gg
A
ii
Technical
data:
Traverse
Rapid
700
350
Programmable
0,002-0,499
in/rev.)
Smallest
(.001-)
speed
traverse
mm/min
mm/min
possible
Traverse
(11.811*)
Traverse
path
Indication
power
Feed
A
revolutionofthe
i
(360°
limitation
you
move
step
overload
the
slides.
.e.
a
Stop
one
stop,
motor
steps,
The
sound)
If
against
The
movement,
means
of
Remedy:
speed
(27.6
(13.8
mm/rev.
path
cross
on
screen
on
step
:
72
of
the
the
you
but
cannot
on
machine
longitudinal
for
in/min)
in/min)
feed
rates
(
traverse
longitudinal
slide
in
slides
approx.
step
angle
=
5°).
=
traverse
slides
to
will
receives
spindles,
08'-20
50
mm
motors
the
hear
impulses
move
(PC/AT,
(PC/XT)
2-499
resp
path:
mm
(in)
1000N
is
of
5°
paths
limit
a
tack-tack
any
nuts
and
PC/386)
mm/min
0,0138
slide
(1
969")
divided
(the
positions
further.
and
slides:
cross
resp
-
00008
mm
300
(225Ibf)
into
Tack-Tack
sound
for
further
That
guideways
02
mm
72
or
Ball
screws
Longitudinal
screws
backlash).
The
Reduction
slides)
traverse
0,001
Steps
step
Step
Step
Step
Step
Step
Step
Step
Step
Step
slide
the
step)
mm
(angle
motors)
Smallest
cross
When
smallest
(.001').
Traverse
movement
The
in
of
1.
2
3
4.
5.
6.
7
8.
9
-
Preloaded
and
screws
step
motor
movement
step
the
path
path
(.00004')
(5°)
(10“)
(15°)
(20°)
(25°)
(30°)
(35°)
(40°)
(45°)
nuts
cross
run
-
feed
motor
slide
indication
will
be
Traverse
0,0138
0,0277
0,0416
0,0555
0,0694
0,0833
0,0972
slides
play-free
screws
(for
turns
will
on
indicated
path
(mm)
0,111
0,125
driven
are
in
the
longitudinal
by
5°
0,0138
move
screen
on
via
nuts
(with
screen
the
Traverse
(in)
path
.00054
.00109
.00164
.00219
.00273
00328
00383
00437
.00492
ball
(no
and
the
mm
slide
12
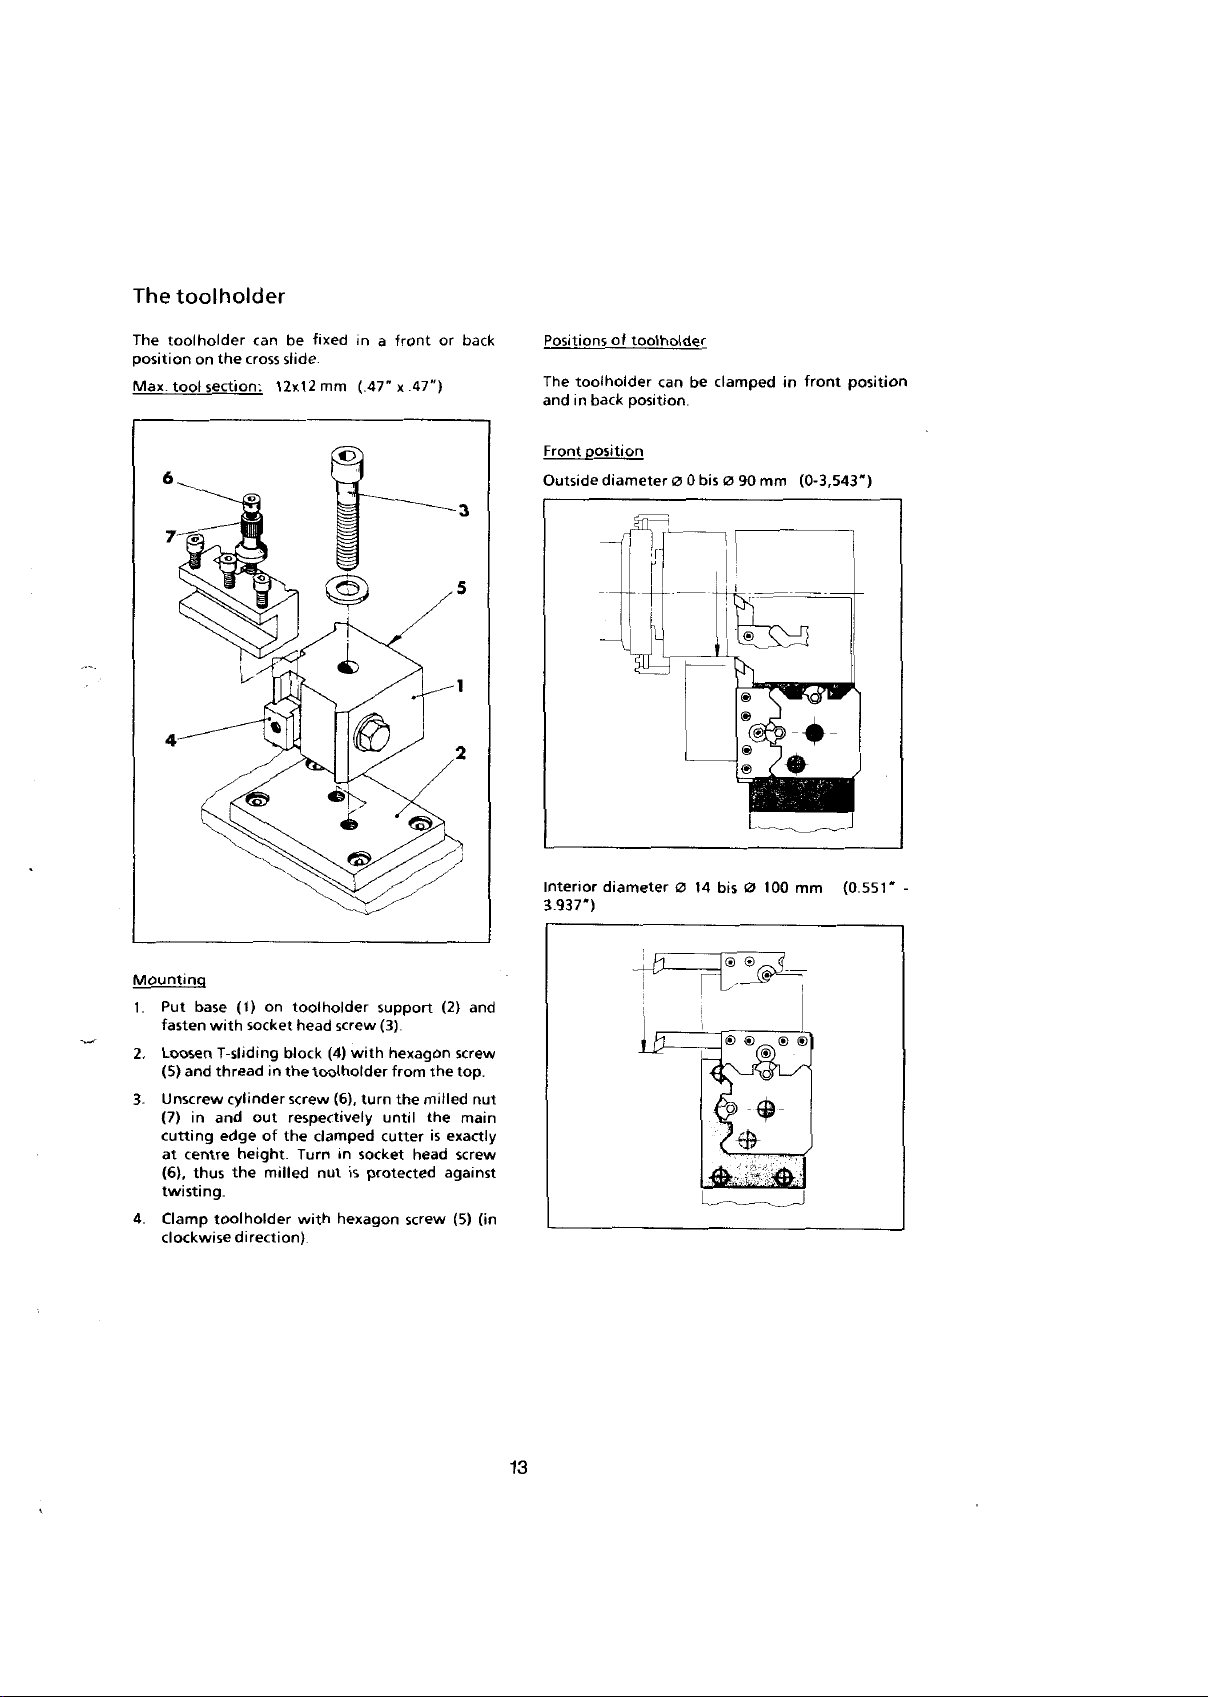
The
toolholder
be
The
toolholder
position
Max
6
tool
the
on
section:
can
cross
slide
12x12
fixed
mm
0
in
front
a
(47"x.47")
back
or
Positions
The
and
Front
Outside
of
toolholder
in
position.
back
position
diameter
toolholder
can
0
0
be
bis
clamped
90
0
mm
in
front
(0-3,543”)
position
3
4
Mounting
Put
1.
fasten
2.
Loosen
(5)
3.
Unscrew
(7)
cutting
at
(6),
twisting.
4.
Clamp
clockwise
o
base
with
T-sliding
and
threadinthe
in
and
edge
centre
thus
toolholder
I
(1)
on
socket
cylinder
out
of
height
the
milled
direction)
l
toolholder
head
screw
(4)
block
toolholder
(6),
screw
respectively
clamped
the
in
Turn
is
nut
hexagon
with
support
(3)
with
turn
until
cutter
socket
protected
hexagon
from
the
milled
the
the
is
head
screw
5
1
2
(2)
and
screw
top.
main
exactly
screw
against
(5)
nut
r
i
L
®
®
*
L
Interior
3.937”)
diameter
0
14
bis
0
100
®
®
mm
(0.551”
-
r
_
1
3
(in
®
®
®
®
13
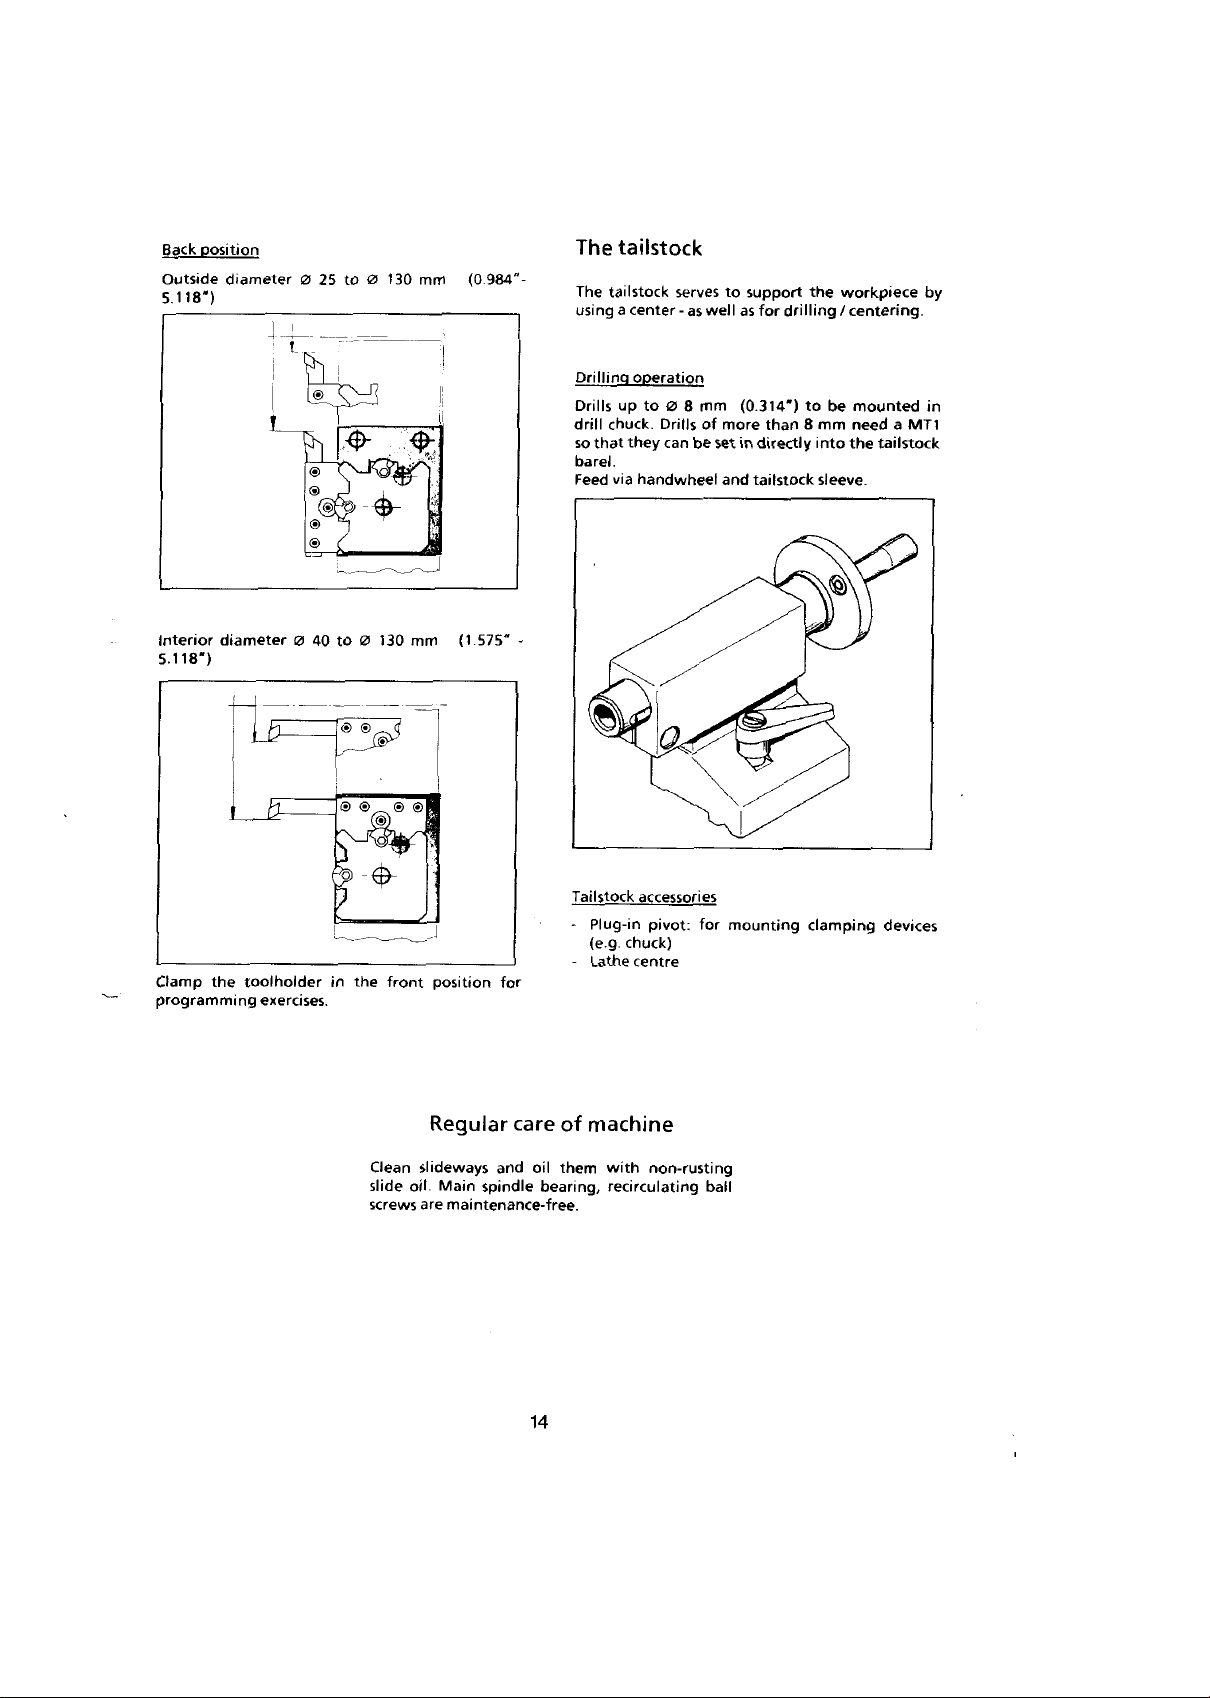
position
Back
Outside
5.118")
diameter
1
0
!~L7-
®
fl
®
®
®
25
to
le..
The
tailstock
mm
(0
984"-
The
using
Drilling
Drills
drill
that
so
barel.
Feed
tailstock
a
center
operation
up
to
chuck.
they
via
handwheel
serves
-
0
Drills
can
a
MT1
tailstock
by
in
workpiece
drilling
for
than
directly
tailstock
the
to
mm
8
into
sleeve.
/
centering.
be
mounted
need
the
to
support
well
as
as
(0.314")
mm
8
of
more
be
in
set
and
i
0
130
$
Interior
5.118")
Clamp
programming
diameter
the
0
toolholder
exercises.
40
0
to
<S>
®
8
V*®!
{ÿ4
~>
in
the
130
front
Clean
slide
screws
(1.575"
mm
position
Regular
slideways
oil
are
spindle
Main
maintenance-free
for
and
-
care
oil
Tailstock
-
-
of
them
bearing,
accessories
pivot:
Plug-in
(e
chuck)
g.
Lathe
centre
machine
with
non-rusting
recirculating
for
ball
mounting
clamping
devices
14
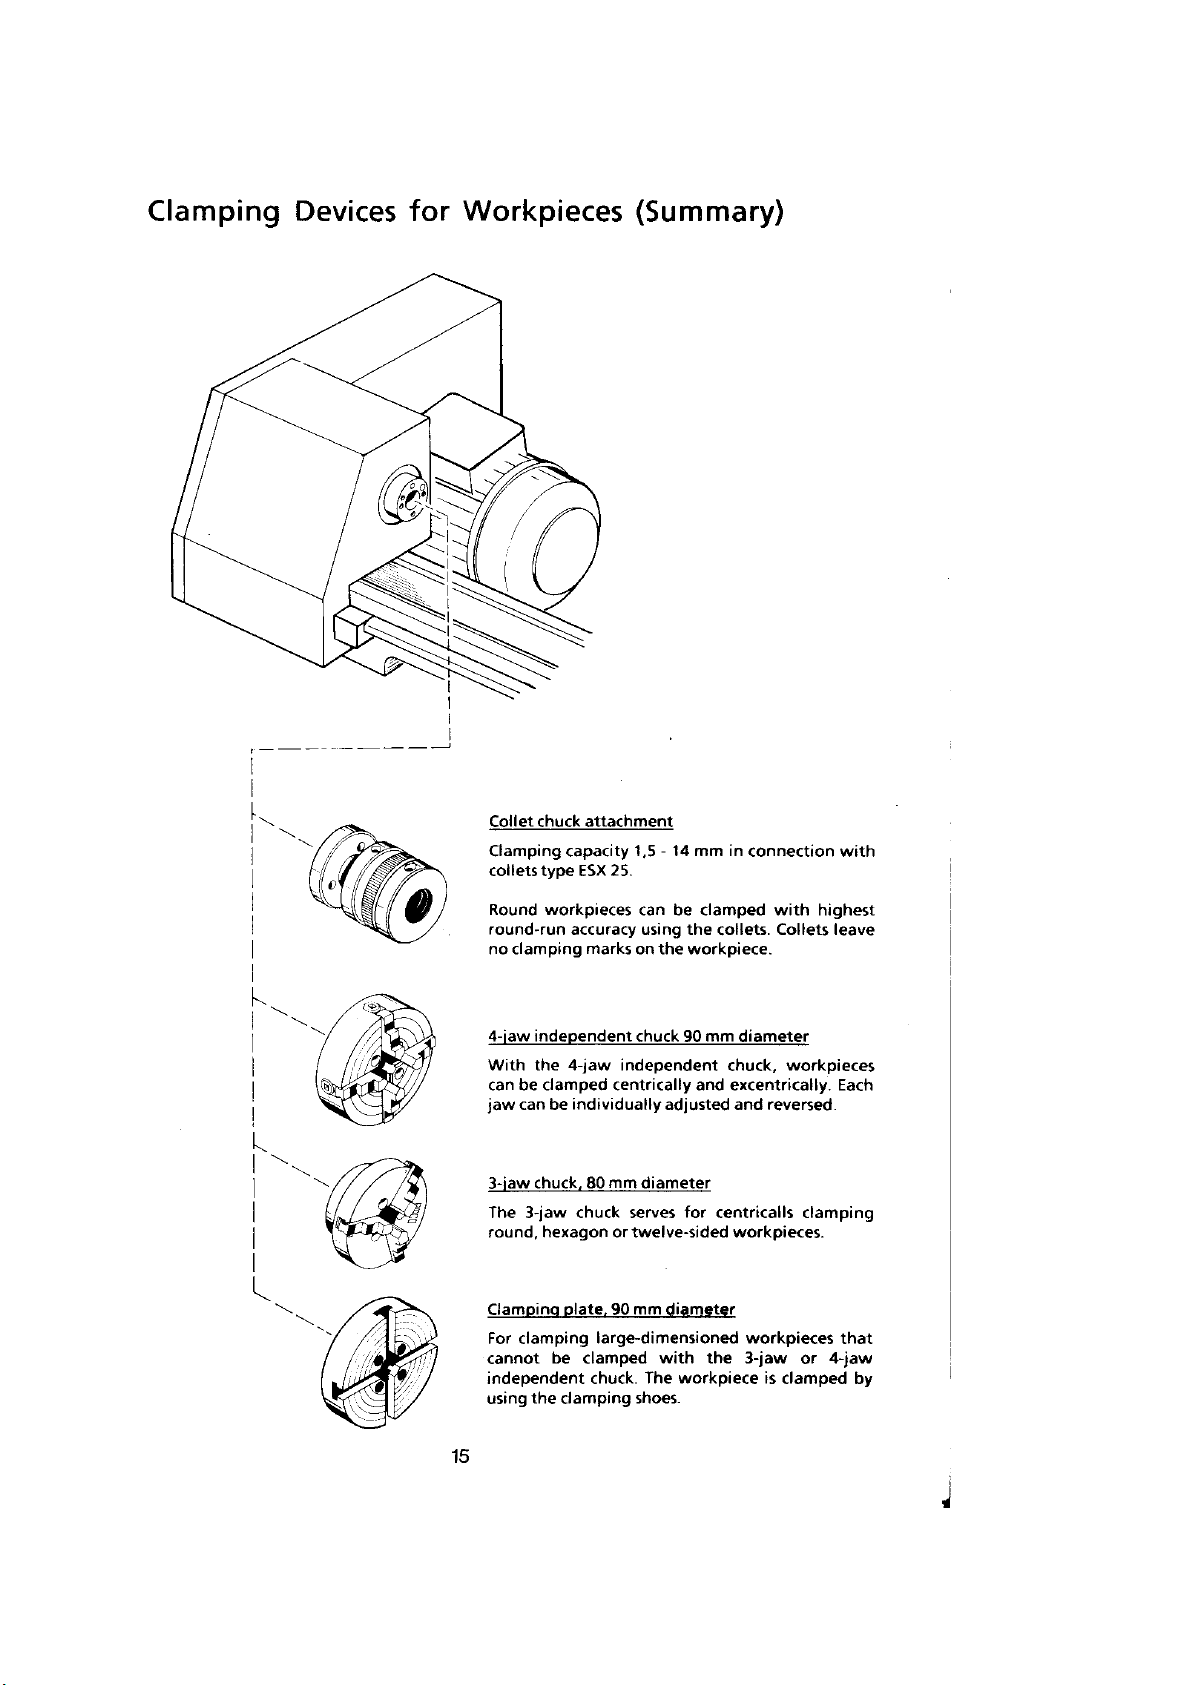
for
Clamping
Devices
£3
Workpieces
:
h'
I
I
(Summary)
I-
h
/,
t’T
k
'•iS
chuck
Collet
Clamping
type
collets
workpieces
Round
round-run
clamping
no
independent
4-iaw
the
With
clamped
be
can
can
jaw
attachment
capacity
ESX
accuracy
marksonthe
4-jaw
be
individually
14
-
1,5
25.
be
can
using
chuck
independent
centrically
adjusted
mm
in
clamped
the
collets.
workpiece.
mm
90
chuck,
and
excentrically.
and
connection
with
Collets
diameter
workpieces
reversed.
with
highest
leave
Each
k
80
diameter
mm
serves
chuck
twelve-sided
or
plate.
be
clamping
mm
90
large-dimensioned
clamped
chuck.
diameter
with
The
shoes.
centricalls
for
workpieces.
the
workpiece
clamping
workpieces
3-jaw
or
clamped
is
that
4-jaw
by
k
3-iaw
chuck.
3-jaw
rjr
The
round,
hexagon
Clamping
clamping
For
cannot
independent
using
the
15
-
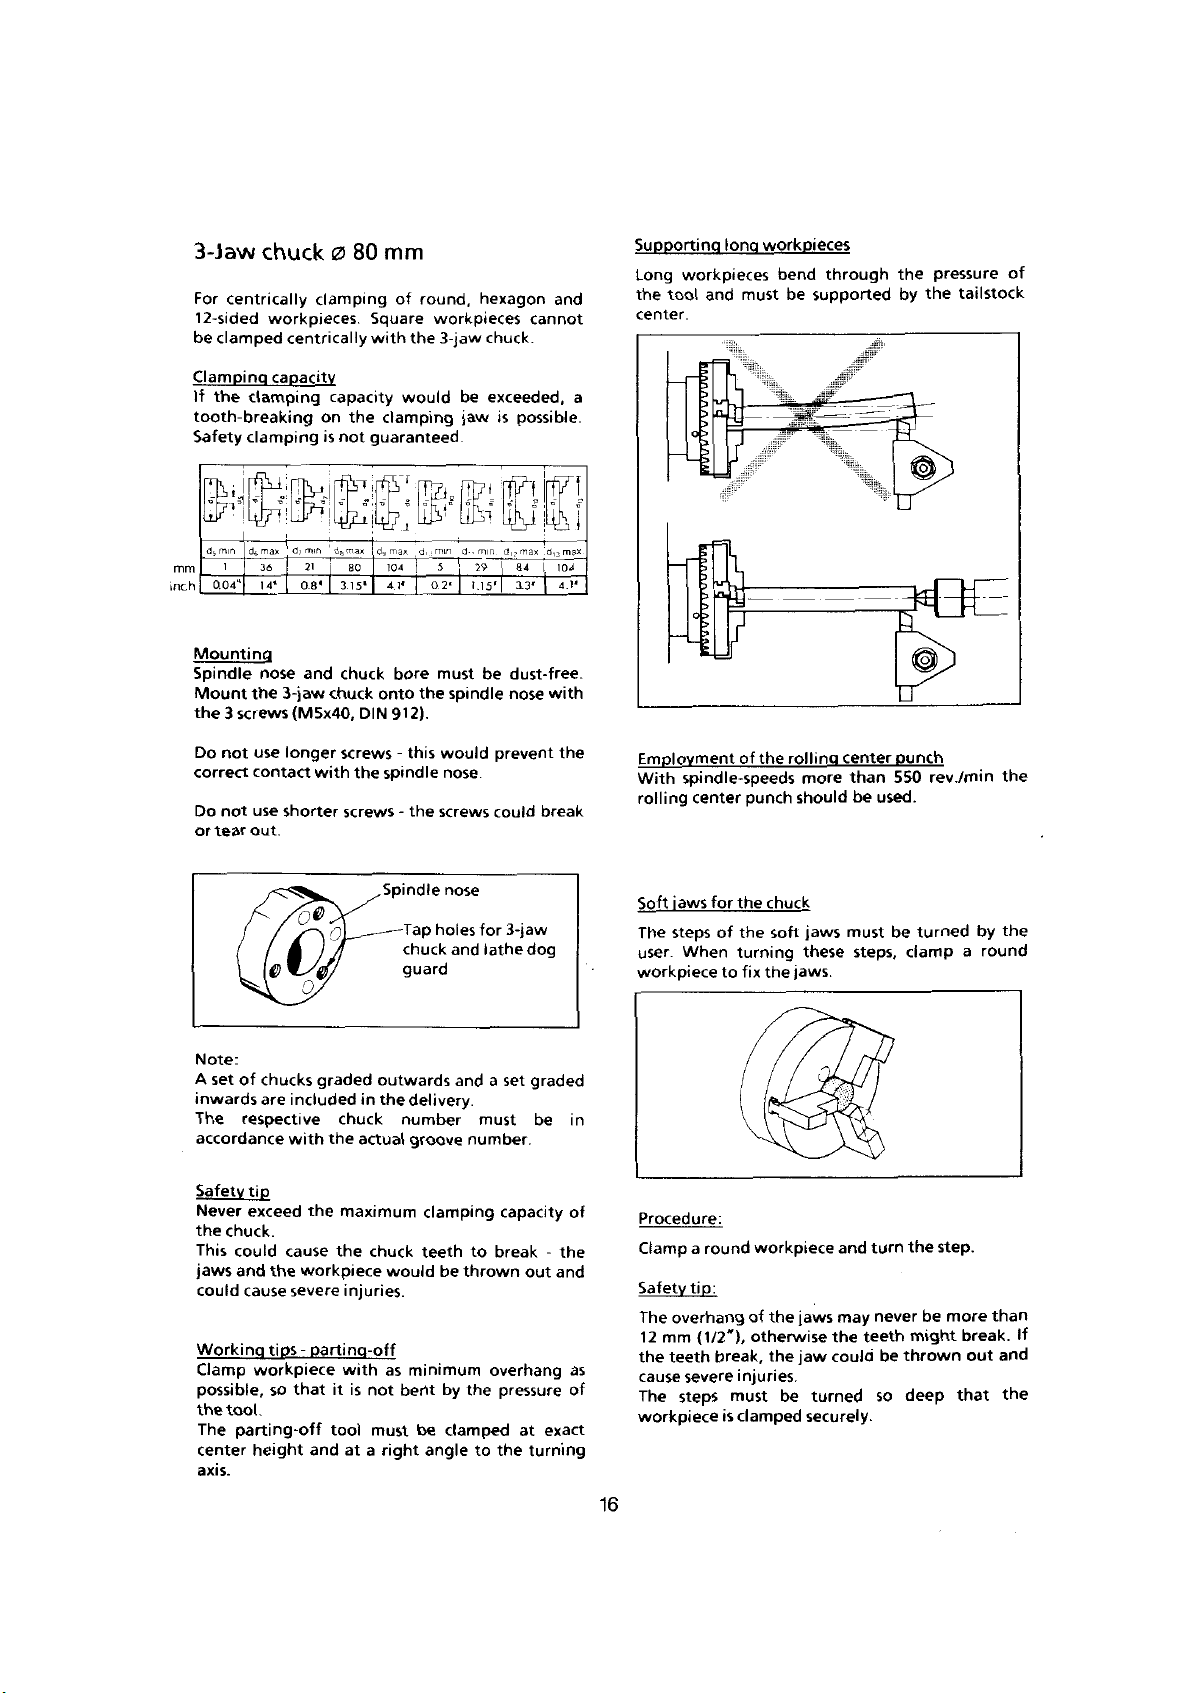
3-Jaw
centrically
For
12-sided
clamped
be
Clamping
the
If
tooth-breaking
Safety
Pip
min
ds
mm
0.04‘l|
inch
Mounting
Spindle
Mount
the
3
screws
chuck
workpieces.
centrically
capacity
clamping
clamping
max
d?
df>
36
M*
nose
3-jaw
the
(M5x40,
0
clamping
capacity
on
is
'
21
[
8*
0
and
chuck
80
the
not
max
d8
80
3.15*
chuck
DIN912).
mm
round,
of
the
would
clamping
dy
max
d',:-
104
4,1*
bore
the
onto
workpieces
3-jaw
5
0.2*
must
Square
with
guaranteed
I
hexagon
chuck.
be
jaw
29
!
1.15'
be
spindle
cannot
exceeded,
is
possible.
T
max
_d,?
|
13*
T
dust-free.
nose
and
4.1*
with
long
and
workpieces
must
bend
be
through
supported
#'
w
.7*
the
by
pressure
tailstock
the
of
Supporting
workpieces
Long
tool
the
center.
a
l
O
>
S3
o
>
-S
©
use
Do
not
correct
contact
Do
use
not
or
tear
out.
Note:
A
set
of
inwards
The
chucks
are
respective
accordance
Safety
tip
Never
exceed
the
chuck.
This
could
jaws
and
could
cause
Working
workpiece
Clamp
possible,
the
tool.
parting-off
The
height
center
axis.
longer
shorter
Cl
included
with
cause
the
severe
tips
that
so
0®
screws
with
the
screws
Q,
graded
chuck
the
actual
the
maximum
the
workpiece
injuries.
parting-off
-
with
it
is
tool
and
at
-
spindle
Spindle
outwards
in
the
chuck
would
as
not
must
right
a
this
would
nose.
-
the
screws
nose
-Tap
holes
chuck
guard
delivery.
number
groove
clamping
teeth
be
minimum
by
bent
be
angle
prevent
could
for
and
lathe
and
a
must
number.
break
to
thrown
overhang
the
clamped
to
break
3-jaw
dog
set
graded
be
capacity
out
pressure
at
the
turning
the
-
the
and
exact
of
of
in
as
Employment
spindle-speeds
With
rolling
center
jaws
Soft
The
steps
When
user.
workpiece
Procedure:
a
tip:
overhang
(1/2'),
mm
teeth
severe
steps
round
Clamp
Safety
The
12
the
cause
The
workpiece
of
the
for
of
the
turning
to
break,
injuries.
must
is
clamped
rolling
the
punch
chuck
soft
fix
the
workpiece
of
the
otherwise
the
be
more
should
jaws
these
jaws.
s
may
jaws
the
could
jaw
turned
securely.
center
than
be
must
steps,
and
used.
turn
never
teeth
be
so
punch
550
be
clamp
the
might
thrown
deep
rev./min
turned
step.
more
be
by
round
a
break.
out
that
the
the
than
If
and
the
16
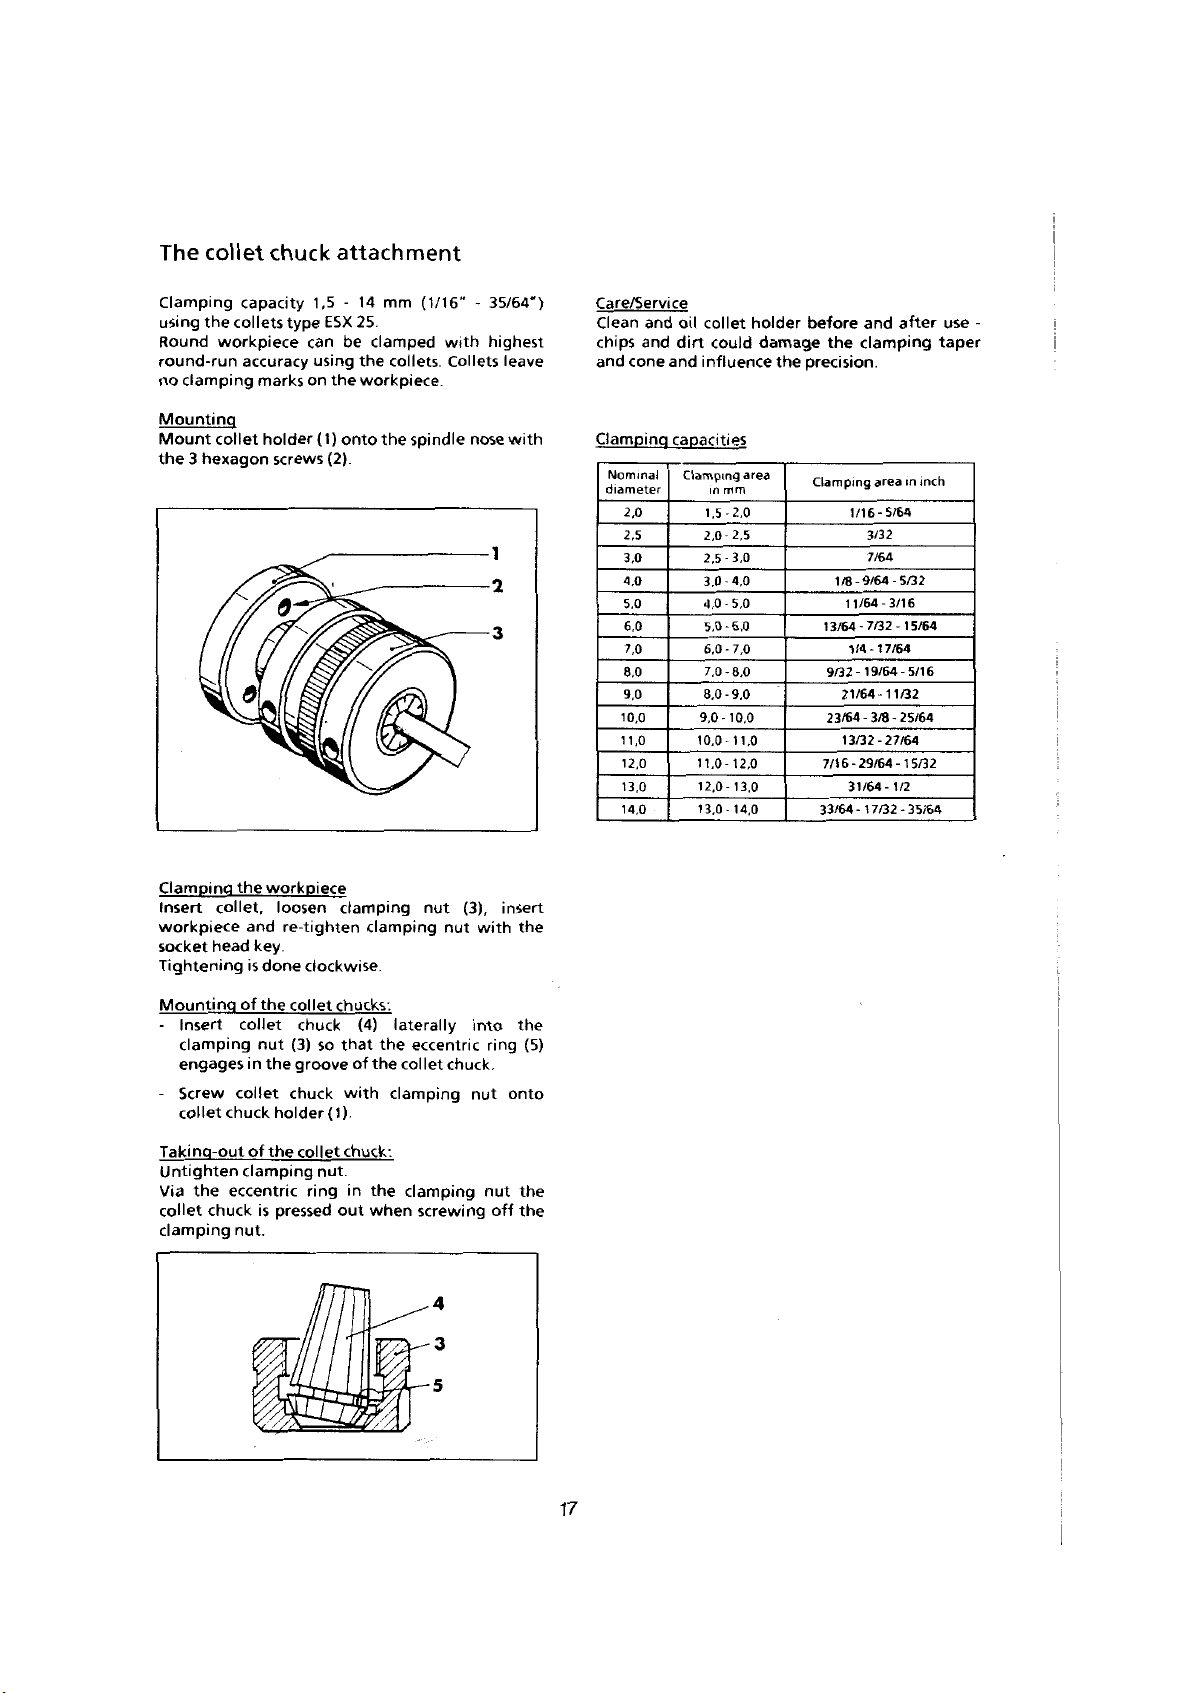
The
collet
chuck
attachment
Clamping
using
the
Round
round-run
no
clamping
Mounting
Mount
hexagon
3
the
capacity
collets
workpiece
accuracy
marks
holder
collet
screws
9
9
type
\
1,5
can
using
on
(1)
-
ESX
be
the
onto
(2).
mm
14
25.
clamped
collets.
the
workpiece
the
(1/16"
with
spindle
-
Collets
nose
35/64")
highest
leave
with
l
3
Care/Service
Clean
and
chips
and
and
Clamping
diameter
cone
Nominal
2,0
2,5
3,0
4.0
5,0
6.0
7.0
8.0
9.0
10.0
11.0
12.0
13,0
14,0
and
capacities
oil
collet
dirt
could
influence
Clamping
in
1,5
2,0
2,5
3,0
4.0
5,0
6,0
7.0
8.0
9,0-10,0
10.0
11.0-12,0
12,0-13.0
13,0-14,0
mm
-2.0
-3,0
-
-6,0
-
-8.0
-
area
2,5
4,0
5.0
7,0
9,0
11.0
holder
damage
the
and
before
clamping
the
precision.
Clamping
area
1/16-5/64
3/32
7/64
1/8-9/64-5/32
11/64-3/16
13/64-7/32-15/64
1/4-17/64
9/32-19/64-5/16
21/64-11/32
-
23/64
3/8
13/32-27/64
7/16-29/64-15/32
31/64-1/2
33/64-17/32
after
in
25/64
-
inch
35/64
use
taper
-
:
Clamping
collet,
Insert
workpiece
socket
head
Tightening
Mounting
Insert
-
clamping
engages
-
Screw
collet
Taking-out
Untighten
the
Via
collet
chuck
clamping
workpiece
the
and
key.
is
done
of
the
collet
nut
in
the
collet
holder(l).
chuck
of
the
clamping
eccentric
is
nut.
loosen
re-tighten
clockwise.
collet
chuck
(3)
so
groove
chuck
collet
nut.
ring
pressed
clamping
clamping
chucks.
(4)
the
that
of
the
with
chuck:
the
in
out
when
nut
laterally
eccentric
collet
clamping
clamping
screwing
4
3
/.
5
(3),
nut
into
chuck.
nut
with
ring
nut
off
insert
the
the
(5)
onto
the
the
17
i
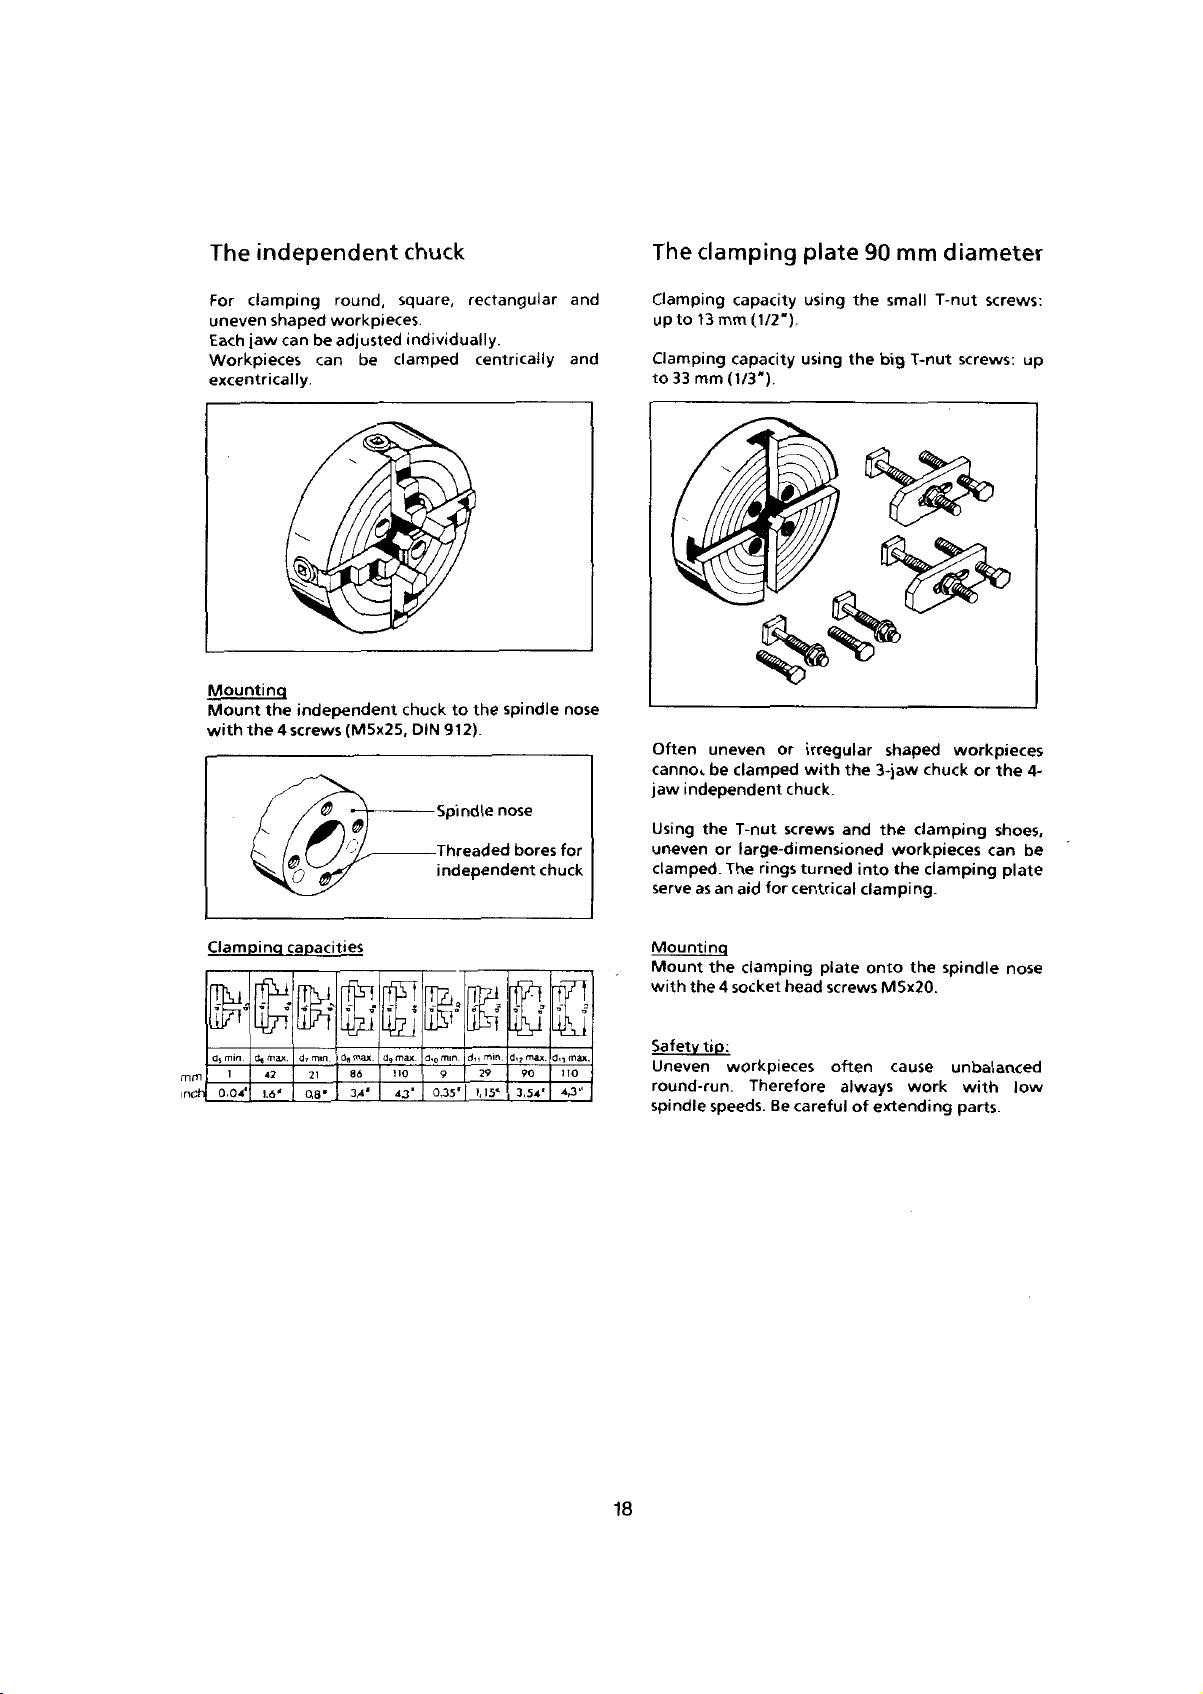
independent
The
chuck
The
clamping
plate
90
mm
diameter
clamping
For
uneven
Each
jaw
shaped
can
Workpieces
excentrically.
Mounting
the
Mount
with
the
4
round,
workpieces.
adjusted
be
can
independent
(M5x25,
screws
9
0.
e
o
be
square,
individually
clamped
chuck
912).
DIN
Spindle
Threaded
independent
rectangular
centrically
the
to
spindle
nose
bores
chuck
and
and
nose
for
Clamping
13
to
up
Clamping
33
to
mm
Often
uneven
cannot
jaw
independent
Using
the
uneven
clamped.
serve
as
capacity
mm
capacity
(1/3').
be
clamped
(1/2").
or
using
using
irregular
with
chuck.
T-nut
screws
large-dimensioned
or
The
rings
turned
for
an
aid
centrical
the
the
3-jaw
the
and
into
clamping.
small
T-nut
big
T-nut
shaped
chuck
the
clamping
workpieces
the
clamping
screws:
screws:
workpieces
the
or
shoes,
can
plate
up
4-
be
mm
nch
Clamping
IK
i
0.04’
d«
max.
42
1.6*
capacities
21
08*
Mounting
the
Mount
with
Safety
Uneven
round-run.
spindle
IU-I
|di?
90
3,54*
I
rrpl
*
*
dn
£
max.
no
Tteippr
i
IM
mm.
max.
da
no
86
43'
diQ
0.35*
min.
dn
29
9
I,
IS*
clamping
the4socket
tip:
workpieces
Therefore
speeds.
Be
head
careful
plate
screws
often
always
onto
M5x20.
of
extending
the
cause
work
spindle
unbalanced
with
parts.
nose
low
18
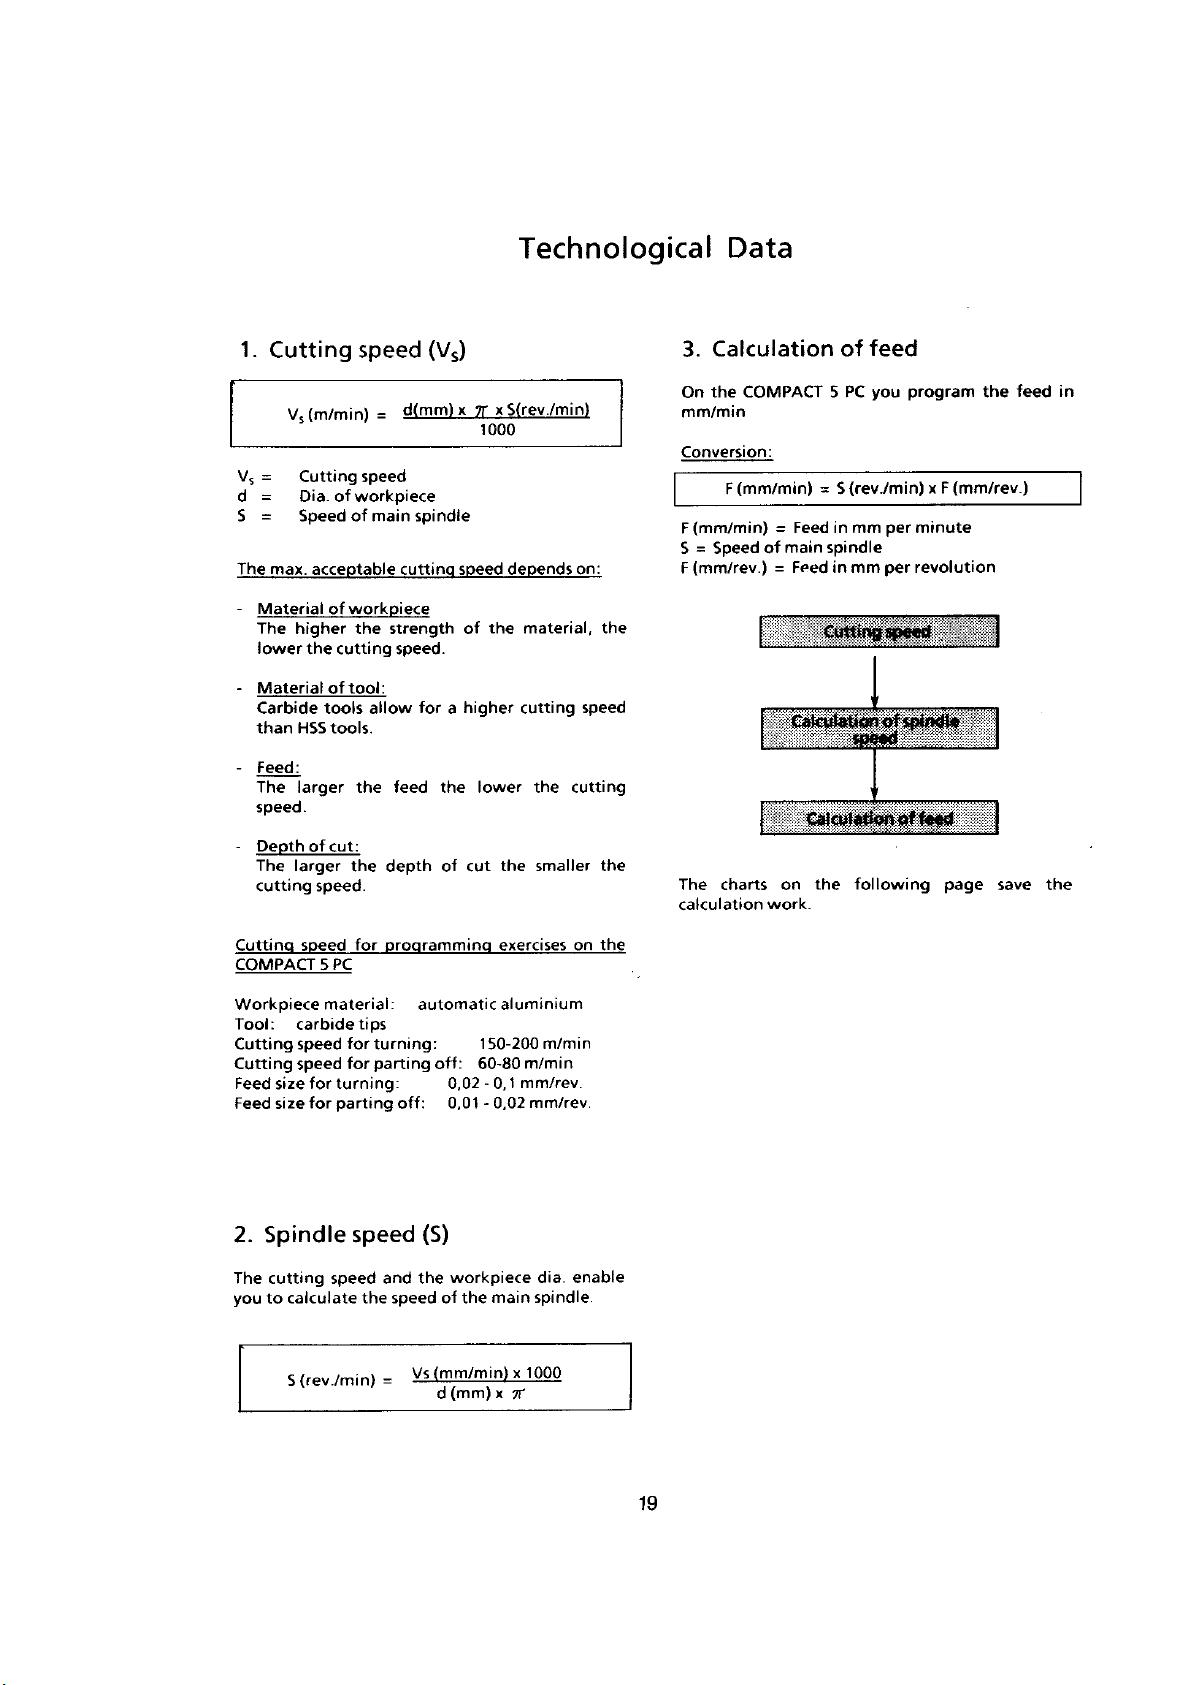
1.
=
Vs
d
=
S
=
The
Material
The
lower
Material
Carbide
than
Feed:
The
speed
Depth
The
cutting
Cutting
(m/min)
Vs
Cutting
Dia.
Speed
acceptable
max,
higher
the
tools
HSS
larger
of
larger
speed.
workpiece
of
of
workpiece
of
the
cutting
of
tool:
tools.
the
cut:
the
speed
d(mm)
=
speed
main
cutting
strength
speed.
allow
feed
depth
(Vs)
spindle
for
a
the
of
Technological
xS(revVmin)
x
r
7
1000
depends
speed
of
higher
lower
cut
the
the
material,
cutting
the
smaller
on:
speed
cutting
the
the
Data
Calculation
3.
the
(mm/min)
F
(mm/min)
Speed
=
(mm/rev.)
charts
COMPACT
On
mm/min
Conversion:
F
S
F
The
calculation
Feed
=
main
of
Feed
=
Calculation
the
on
work.
of
feed
program
you
5
PC
(revÿmin)
S
=
per
minute
in
mm
spindle
per
revolution
mm
in
Cuttlngsjfdafll
spindle
of
*imd
77rrr?-
,;,
following
(mm/rev.)
F
x
page
the
save
feed
in
the
Cutting
COMPACT
Workpiece
Tool:
Cutting
Cutting
Feed
Feed
2.
The
you
carbide
speed
speed
size
size
Spindle
cutting
calculate
to
(rev
S
speed
5
material:
for
for
for
PC
tips
for
for
turning:
parting
speed
speed
the
./min)
programming
automatic
turning:
parting
off:
(S)
and
the
speed
Vs
=
off:
60-80
0,02-0,
0,01-0,02
workpiece
the
of
(mm/min)
(mm)
d
exercises
aluminium
150-200
m/min
mm/rev
1
main
x
x
7T
m/min
mm/rev
dia
spindle
1000
the
on
enable
19
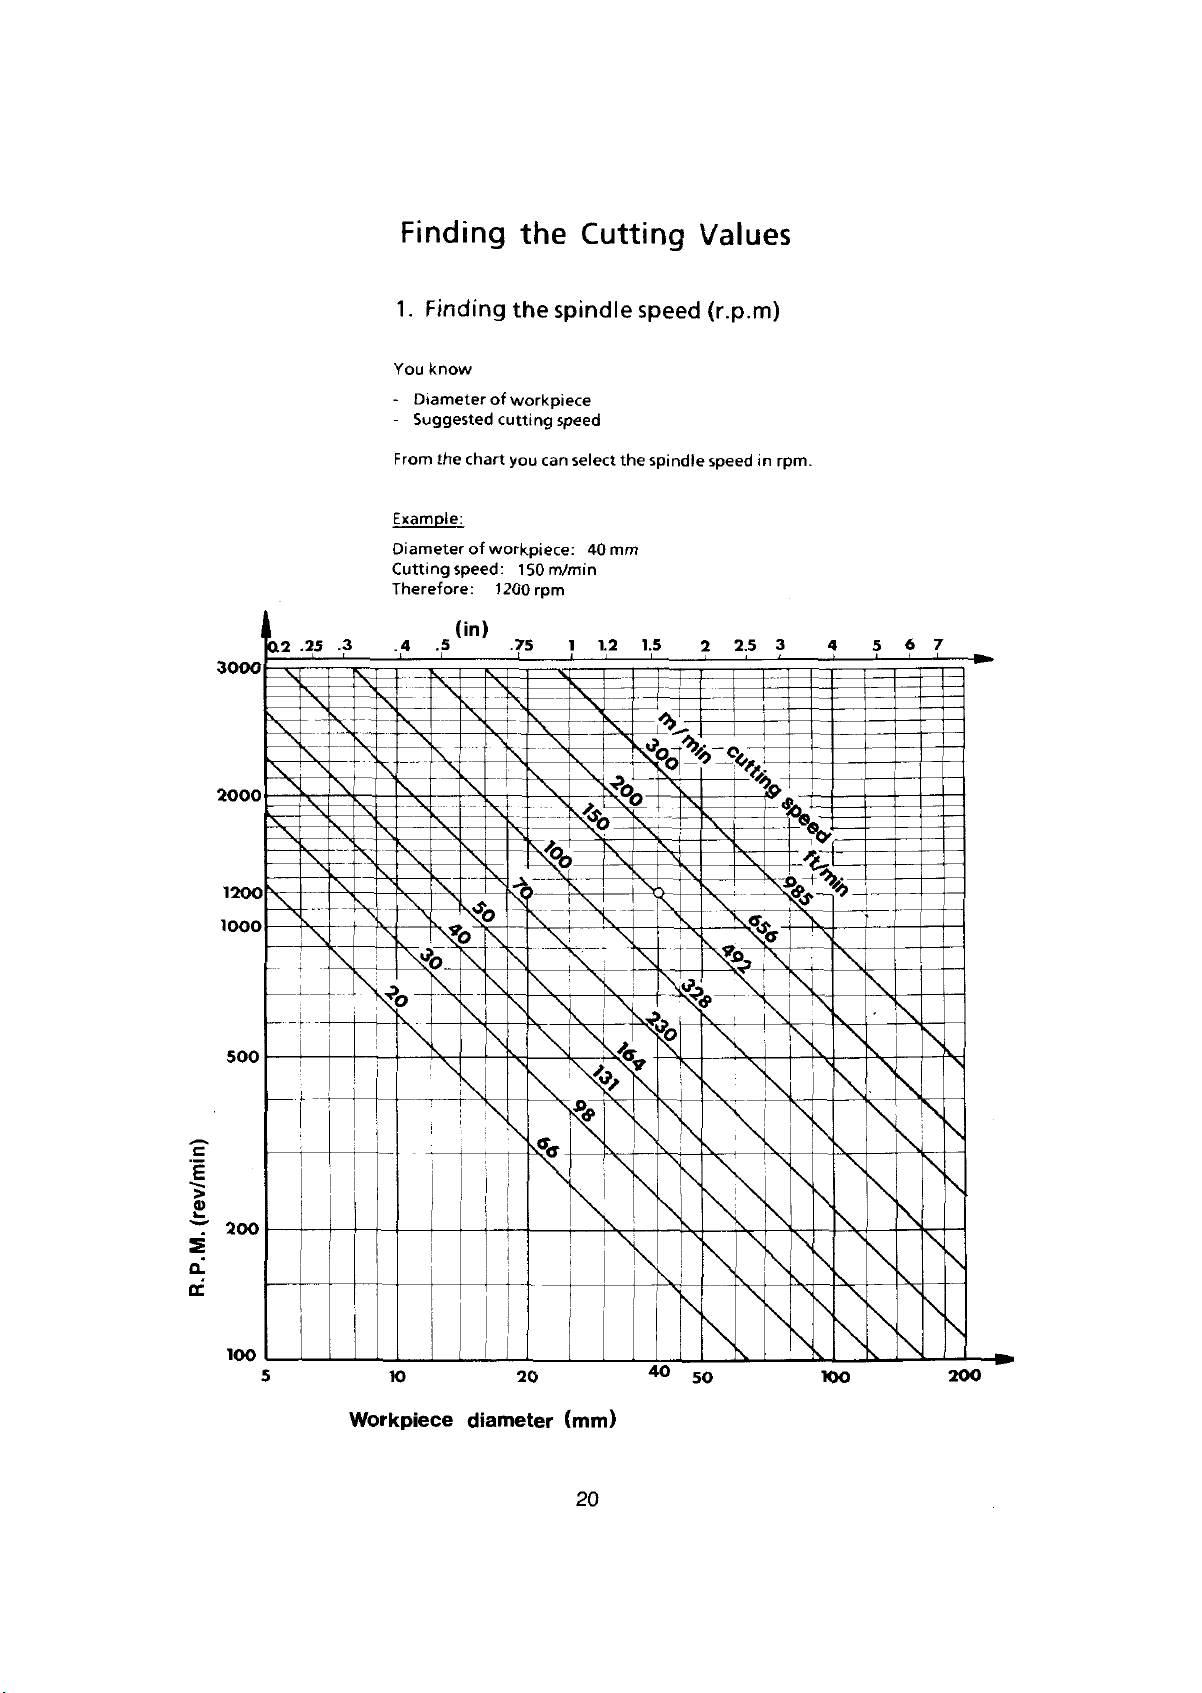
3000
2000
1200
1000
02
.25
j
L
\
-3
sn
Finding
1.
Finding
You
know
-
Diameter
-
Suggested
From
Example:
Diameter
Cutting
Therefore:
\
\
\
X
\
Vo
the
of
chart
of
workpiece:
speed:
(in)
\T
V
\b
\
the
the
workpiece
cutting
you
150
rpm
1200
5
\
Cutting
spindle
speed
can
select
40
in
m/m
1
X-
«
the
mm
&
speed
spindle
15
&
%
X
TX
Values
(r.p.m)
in
speed
2
\
2.5
rpm.
3
sss
V
4
6
5
7
*
\
500
\
At
\
:
Sr
r
I
a>
200
.
\
i
V
\
a!
cc
100
5
K>
Workpiece
20
diameter
(mm)
20
40
\
50
too
\
\
\
,
\
200
Feed
(mm/rev)
2.
know
You
-
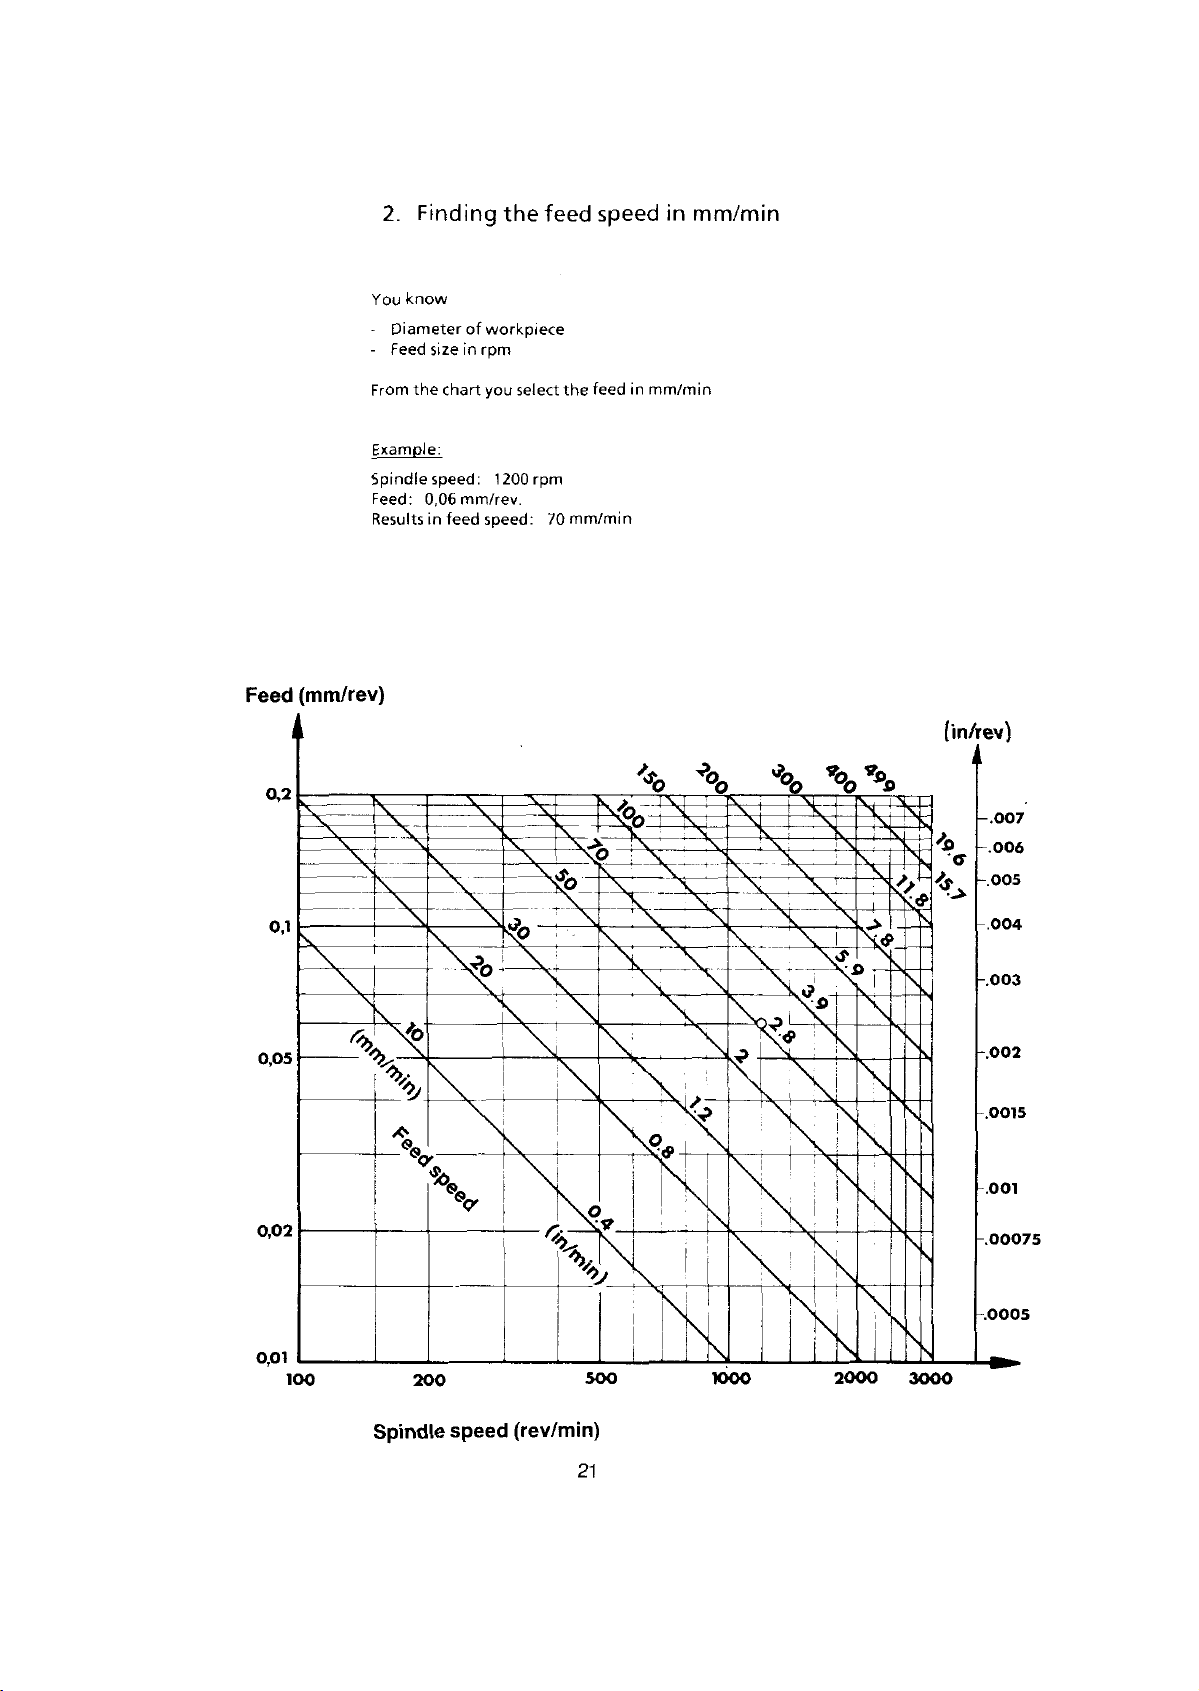
Diameter
-
Feed
the
From
Example:
Spindle
Feed:
Results
Finding
of
in
rpm
size
chart
speed:
0,06
mm/rev
in
feed
the
workpiece
you
select
1200
rpm
speed:
feed
the
mm/min
70
speed
in
feed
in
mm/min
mm/min
(in/rev)
0,2
0,1
0,05
0,02
0,01
100
I
53
i
\
-
\
\
+
Vo
*
»
—
&
X
\
I
x«?
\
V*
&
\
o
v?.
&
T
X
%
I
l
9V
4-
-
i
i
c
-.007
006
005
.004
.003
.002
.0015
.001
-.00075
%
-.0005
\
3000
200
500
\
lOOO
2000
Spindle
speed
(rev/min)
21

22
emcn
Ersatzteilliste
Service
Pieces
de
service
Parts
Ausgabe
for
pour
Edition
Edition
COMPACT
COMPACT
COMPACT
90/04
90/04
90/04
5
PC
PC
5
5
PC
23
Pos.
ZWZ
ZWZ
ZWZ
ZWZ
ZWZ
ZWZ
C6Z
Ref.
11
11
11
11
94
95
180
No.
0300
0400
0500
0800
0800
1713
040
SW3
SW4
SW5
SW8
SW8
17x13
SW1
3
DIN
0IN
DIN
DIN
DIN
DIN
DIN
911
911
911
911
894
095
Benennung
Bedienungswerkzeuge
6kt.
Schraubendreber
Schraubendreher
6kt.
6kt.
Schraubendreher
6kt.
Schraubendreher
nmaul
schl
schl
Lissel
lissel
iissel
Ei
Doppelmaul
ngschl
Ri
Description
Servi
ce
Hexagonal
Hexagonal
Hexagonal
Hexagonal
Spanner
Double
spanner
Ring
tools
key
key
key
key
ended
spanner
Outi
Cl£
C7I
Cl£
Cle
Cle
Cle
Cle
Designation
Is
pans
six
S
pans
a
six
pans
six
a
pans
h
six
deservice
plate
double
polygonale
24
2
1
3
9
O
\
/
<5
N
*
1
.
t
:
'
<©
I
O
/
s?
*v
\
t
t
$>N
•/
'C
S>
#.
X
/
t
I
i
i
8
5
•v
'•x
N
v
sv
S
\
\
\
•v
\
!
:
12
&T"*
13
@
ro)
!
10
i
i
;
11
Pos.
1
2
3
5
8
lo
11
12
13
A6A
A5A
A5A
ZRG
ZSR
A6A
ZSR
A6A
ZSR
Ref.
olo olo
olo
olo
28
12
ooo
63
ooc
12
No.
o2o
o3o
0080
o845
060
o4o8
o4o
o53o
B8
DIN127
M8x45
M4x8
M5x3o
DIN
DIN912-6.9
DIN963-4.8
DIN912-6.9
Benennung
Bett
Spindelstock
tstockgehause
Rei
Federring
Zyl
inderschraube
Abdeckung
Senkschraube
Lagerbock
Zyl
inderschraube
25
Description
Bed
Headstock
Tail
Spring
Socket
Cover
Countersunk
2
Bearing
Socket
stock
housing
washer
head
block
head
screw
screw
screw
Banc
Poupee
de
Corps
Rondel
le
pans
Vis
6
Couvercle
Vis
tete
Palier
6
Vis
pans
Designation
fixe
la
poupee
ressort
creux
fraise
la
roulement
de
creux
36
34
I
35
37
38
;
1
§
32
27
24
26
I
25
23
22
21
I
1
I
20
(
I
.ft
I
<3f’
*
<£>
33
—
19
5
,
6
7
2
3
4
—
$
'tW'
r4
y*
.A
ft
Of
6
-
ft
k',A
ZT
.ÿZf
r'
22
rJB
31
;
28
/»•'
30
29
\>
'
i
8
1
10
9
11
12
13
14
15
.ÿ4
-ÿ
.
;
k
:
k'
\
a
\
s;'
L
16
12
14
15
17
18
26
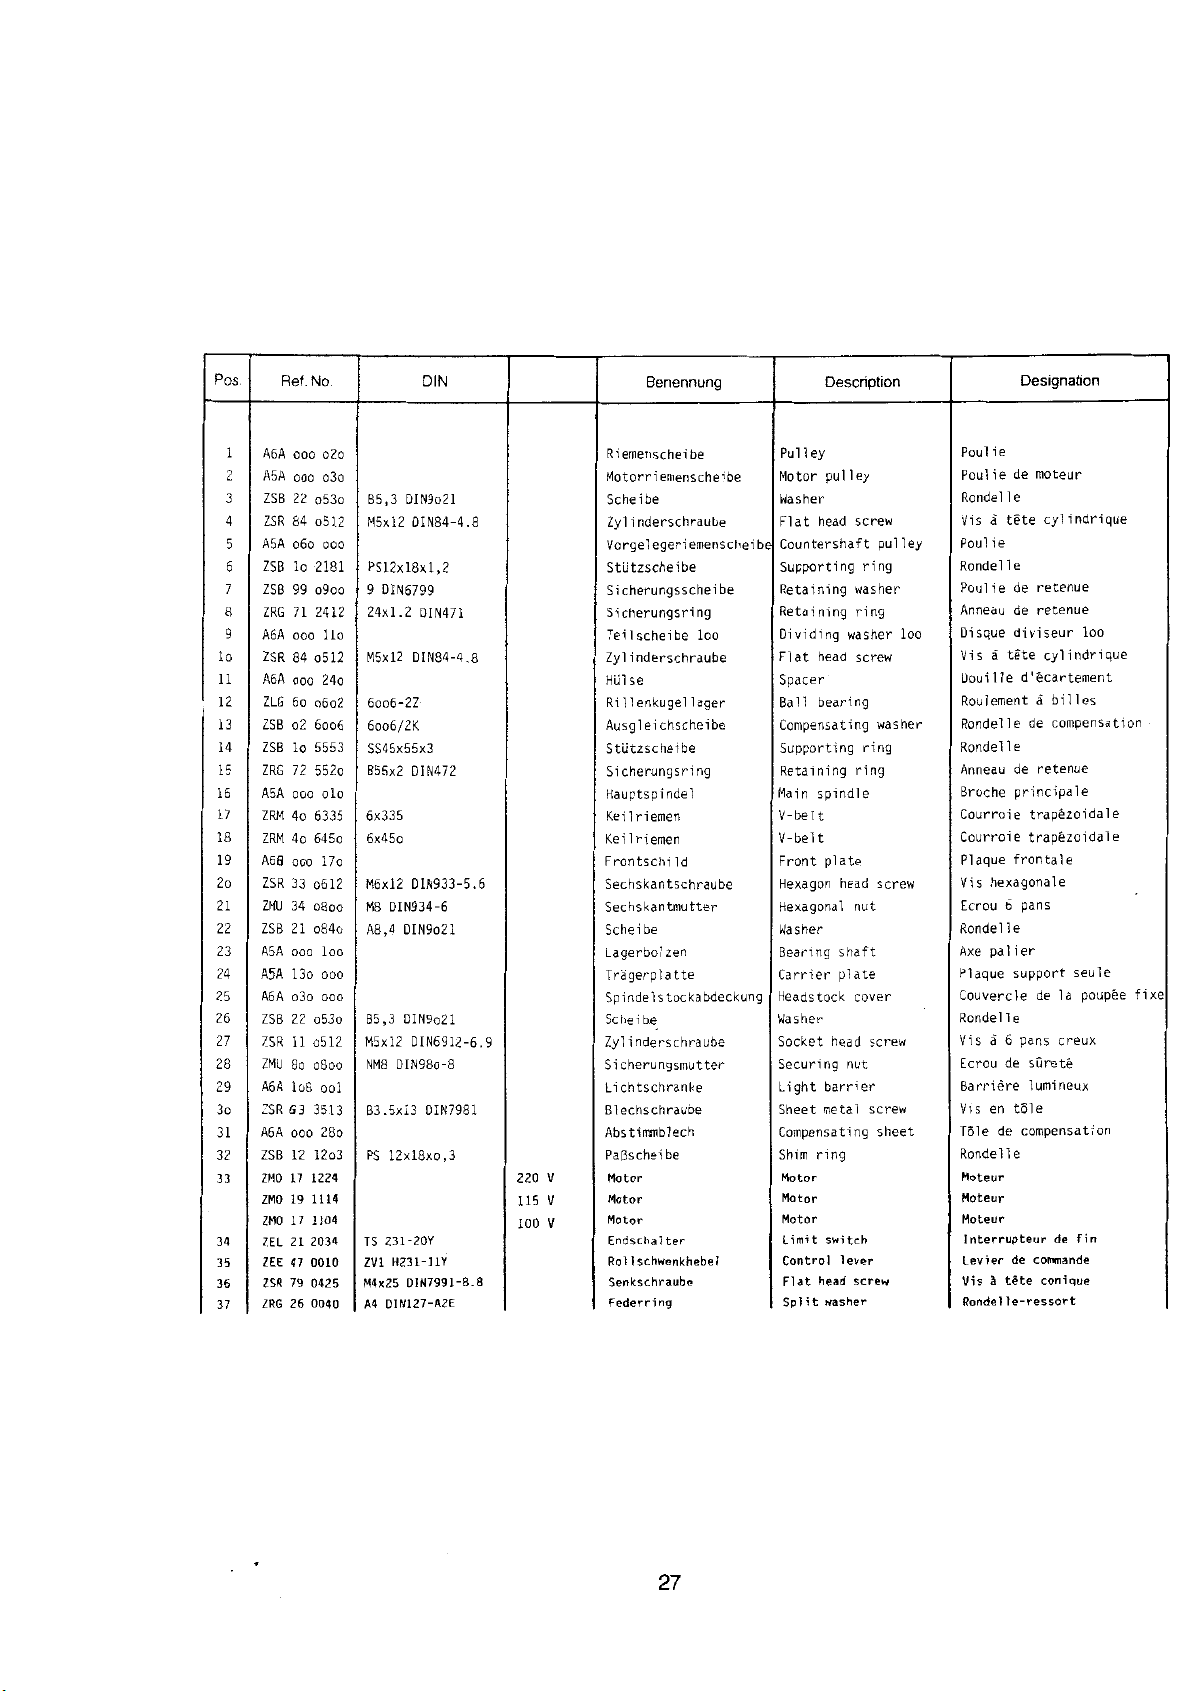
P
11
14
15
16
17
18
19
2o
21
22
23
24
25
26
27
28
29
3o
31
32
33
34
35
36
37
lo
12
13
OS
B5,3
DIN9o21
M5xl2
DIN84-4.8
18x1,2
PS12x
9
DIN6799
24x1.2
DIN471
M5xl2
DIN84-4.8
6oo6-2Z
6oo6/2K
SS45x55x3
B55x2
DIN472
6x335
6x45o
DIN933-5.6
M6xl2
M8
DIN934-6
A8,4
DIN9o21
B5,3
DIN9o21
M5xl2
DIN6912-6.9
NM8
DIN98o-8
PS
12x18x0,3
TS
231-20Y
H231-11Y
ZV1
0IN7991-8.8
M4x25
A4
DIN127-A2E
DIN
DIN7981
220
115
100
Riemenscheibe
Motorriemenscheibe
Scheibe
Zyl
inderschraube
Vorgelegeriemenscheibe
Stiitzscheibe
Sicherungsscheibe
Sicherungsring
Teil
Zyl
inderschraube
Hiilse
Rillenkugel
Ausgleichscheibe
Stiitzscheibe
Sicherungsring
Hauptspindel
Kei
lriemen
Kei
Iriemen
Frontschi
Sechskantschraube
Sechskantmutter
Scheibe
Lagerbol
Tragerplatte
Spindels
Schei
Zyl
inderschraube
Sicherungsmutter
Lichtschranke
Blechschraube
Abstimmblech
Pa(3scheibe
Motor
V
Motor
V
Motor
V
Endschal
Ischwenkhebel
Rol
Senkschraube
Federring
Benennung
scheibe
lager
Id
zen
tockabdeckung
b.e
ter
loo
Description
Pulley
pulley
Motor
Washer
Flat
head
Countershaft
Supporting
Retaining
Retaining
Dividing
Flat
washer
head
Spacer
bearing
Ball
Compensating
Supporting
Retaining
spindle
Main
V-belt
V-belt
plate
Front
Hexagon
Hexagonal
head
nut
Washer
Bearing
Carrier
Headstock
Washer
Socket
Securing
Light
Sheet
Compensating
Shim
Motor
Motor
Motor
limit
Control
Flat
Split
shaft
plate
cover
head
nut
barrier
metal
ring
switch
lever
head
washer
screw
pulley
ring
washer
ring
screw
washer
ring
ring
screw
screw
screw
sheet
screw
loo
Poul
Poul
Rondel
Vis
Poul
Rondel
Poulie
Anneau
Disque
Vis
Douille
Roulement
Rondel!
Rondel
Anneau
Broche
Courroie
Courroie
Plaque
Vis
Ecrou
Rondel
Axe
Plaque
Couvercle
Rondel
Vis
Ecrou
Barriere
Vis
Tole
Rondelle
Moteur
Moteur
Moteur
Ref.
No.
1
A6A
ooo
o2o
A5A
2
3
4
5
A5A
6
ZSB
7
ZSB
8
9
A6A
ZSR
A6A
ZLG
ZSB
ZSB
ZRG
A5A
ZRM
ZRM
A60
ZSR
ZMU
ZSB
A5A
A5A
A6A
ZSB
ZSR
ZMU
A6A
ZSR
A6A
ZSB
ZMO
ZMO
ZMO
ZEL
ZEE
ZSR
ZRG
ZSB
ZSR
ZRG
ooo
22
64
060
lo
99
71
ooo
84
ooo
6o
o2
lo
72
ooo
4o
4o
ooo
33
34
21
ooo
13o
o3o
22
11
8o
lo8
S3
ooo
12
17
19
17
21
47
79
26
o3o
o53o
o512
ooo
2181
o9oo
2412
Ho
o512
24o
o6o2
6006
5553
552o
olo
6335
645o
17o
0612
0800
o84o
loo
OOO
ooo
o53o
0512
0800
ool
3513B3.5x13
28o
12o3
1224
1114
1104
2034
0010
0425
0040
ie
ie
le
a
tete
ie
le
tete
a
le
hexagonal
6
le
palier
le
6
a
de
en
de
Interrupteur
levier
tete
h
Vis
Rondel
le-ressort
Designation
de
moteur
cylindrique
retenue
de
retenue
de
diviseur
cylindrique
d'ecartement
billes
a
compensation
e
de
de
retenue
principale
trapezoidale
trapezoidale
frontale
e
pans
pans
surete
de
seule
la
creux
support
lumineux
tole
compensation
de
fin
de
commande
conique
loo
poupee
fixe
27
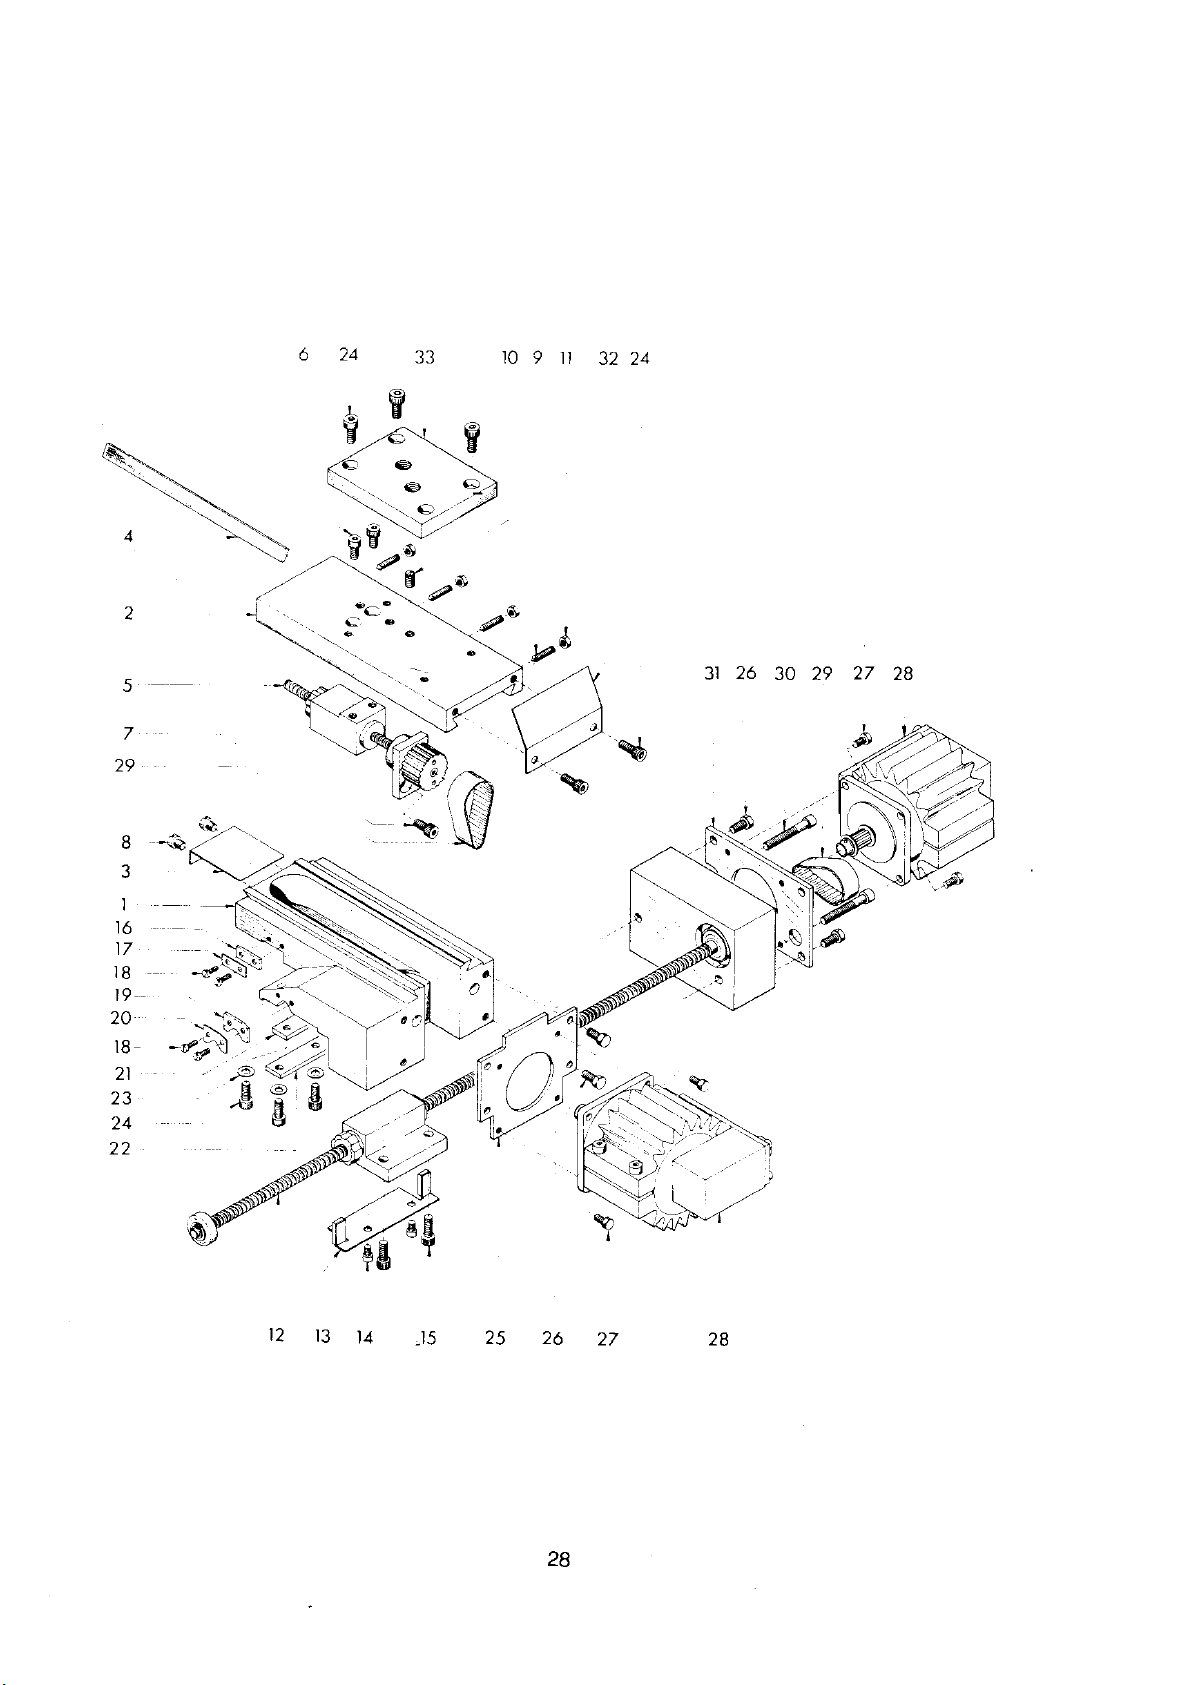
ft?
6
24
33
10
9
11
32
24
i]
"•
<£>/
4
2
5
>X
*>
c
v-.
6
4
26
f
31
30
29
27
28
29
16
17
18
19
20
18-
21
23
24
22
7
Vlfc
8
—ft
\.
3
_*ÿ
%
--
,
v\
tV.
t.
-if!
JS)
If
8
MS
i
-ÿ•
—
•r'
<»
ft
\m
\
*1/
£
t
fa?
o-l
<?
©
.«ÿ
%
%
.A
a
fi.
9
#
/.-
9
k
r<
1/
v
0>
N<
r
\m
I
:>
'/
<
i
....>;
:i
:
W
.X
X>':"
I
Vi
I
v
12
13
14
J5
25
26
28
27
28
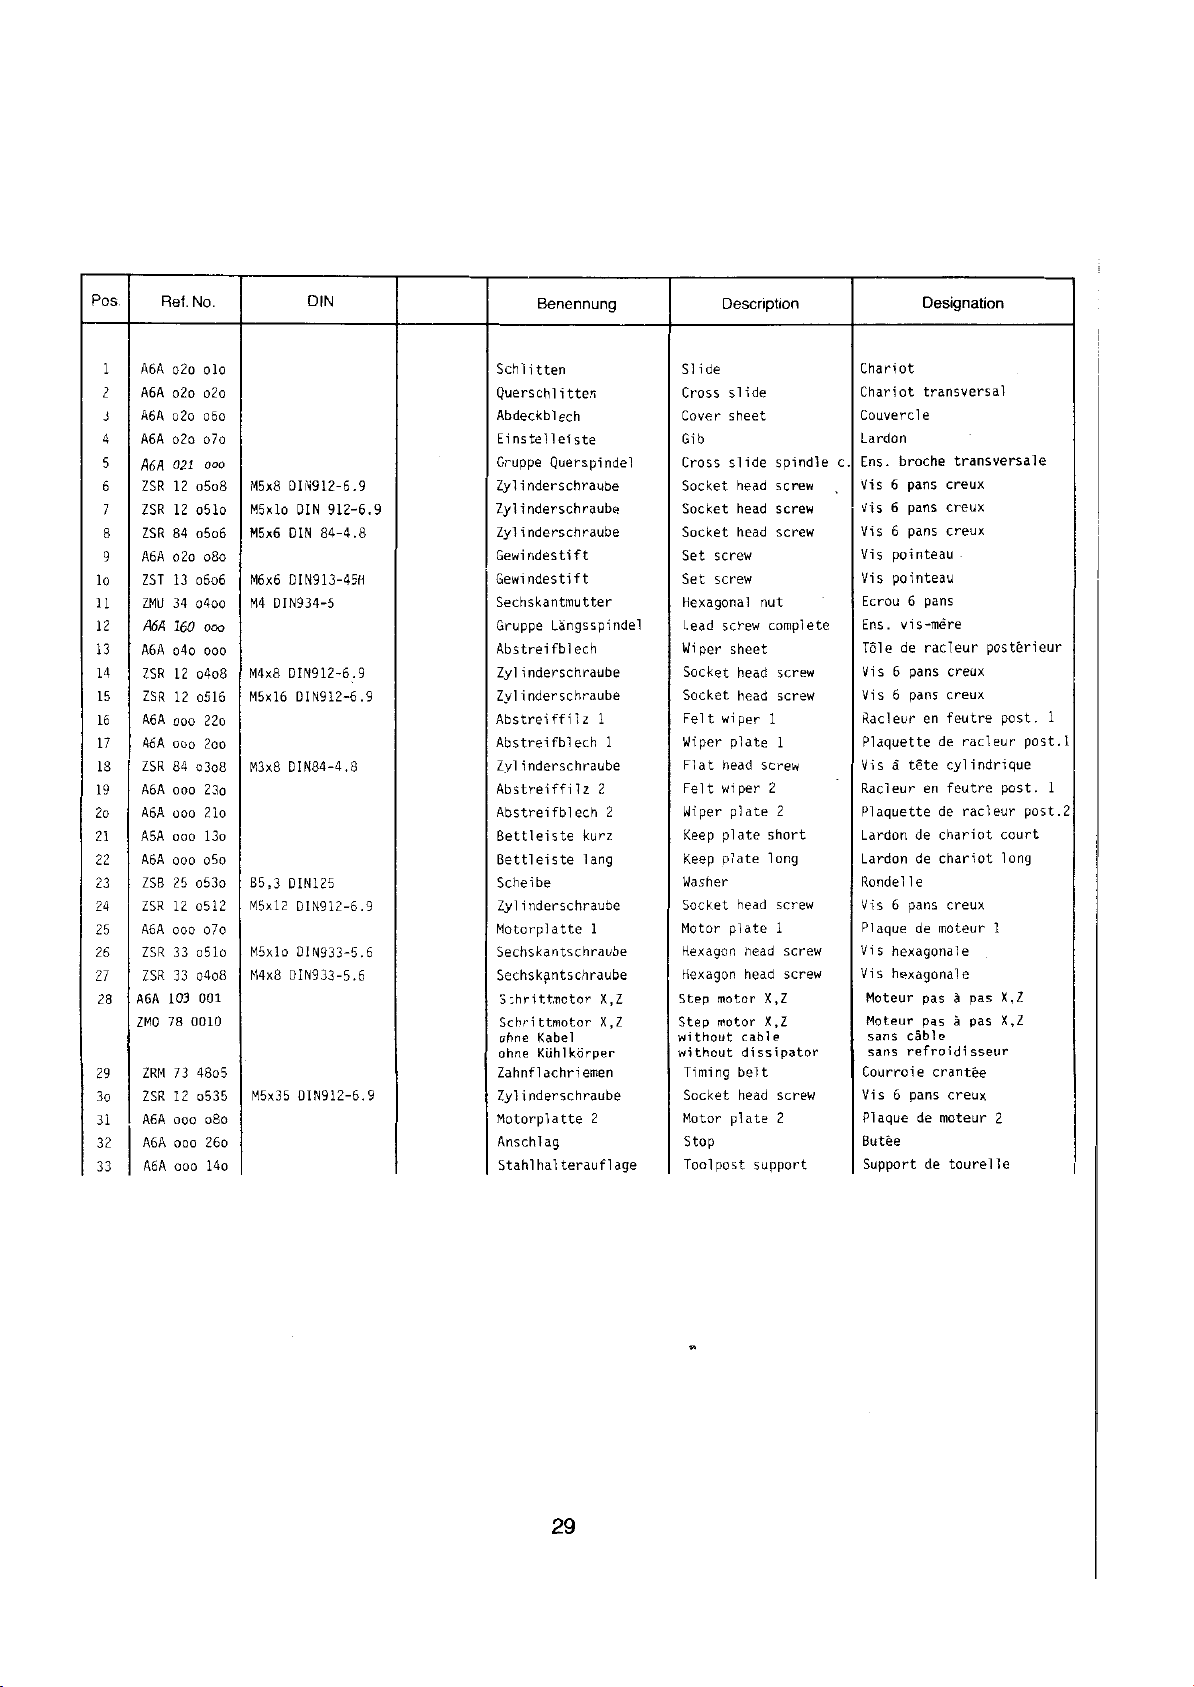
Pos.
1
2
J
4
5
6
7
8
9
lo
11
12
13
14
15
16
17
13
19
2o
21
22
23
24
25
26
27
28
29
3o
31
32
33
A6A
A6A
A6A
A6A
f\6f\
ZSR
ZSR
ZSR
A6A
ZST
ZMU
/T5A
A6A
ZSR
ZSR
A6A
A6A
ZSR
A6A
A6A
A5A
A6A
ZSB
ZSR
A6A
ZSR
ZSR
A6A
ZMO
ZRM
ZSR
A6A
A6A
A6A
Ref.
o2o
o2o
o2o
o2o
o2o
103
78
021
12
12
84
13
34
ISO
o4o
12
12
ooo
ooo
84
ooo
ooo
ooo
ooo
25
12
ooo
33
33
73
12
ooo
ooo
ooo
No.
olo
o2o
060
o7o
ooo
o5o8
o51o
o5o6
080
c6o6
o4oo
Ooo
ooo
o4o8
0516
22o
2oo
o3o8
23o
21o
13o
o5o
o53o
0512
o7o
o51o
o4o8
001
0010
48o5
o535
080
14o
26o
M5x8
M5xlo
M5x6
M6x6
DIN934-5
M4
M4x8
M5xl6
M3x8
B5
,3
M5xl2
M5xlo
M4x8
M5x35
DIN
DIN912-6
DIN
DIN913-45H
DIN912-6.9
DIN84-4
DIN
DIN933-5.6
.9
912-6.9
DIN
84-4.8
DIN912-6
.8
125
DIN912-6
DIN933-5.6
DIN912-6.
broche
6
6
6
pointeau
pointeau
vis
de
6
6
a
6
hexagonal
hexagonale
Moteur
Moteur
sans
sans
6
Support
Designation
transversal
e
transversal
pans
creux
creux
pans
creux
pans
pans
6
-mere
racleur
pans
creux
pans
creux
feutre
en
de
cylindrique
tete
en
feutre
de
de
chariot
de
chariot
e
1
creux
pans
de
moteur
pas
a
a
pas
cable
refroidi
crantee
pans
creux
de
moteur
de
tourelle
posterieur
racleur
racleur
1
e
pas
pas
sseur
2
post.
post.
court
long
X,Z
X,Z
e
post.l
post.
1
1
2
Benennung
Schlitten
tten
Querschl
Abdeckbl
i
ech
Einstelleiste
Querspindel
Gruppe
Zylinderschraube
Zylinderschraube
Zyl
inderschraube
Gewi
ndestift
ndestift
Gewi
Sechskantmutter
Langsspindel
Gruppe
Abstreifblech
Zyl
inderschraube
Zyl
.9
inderschraube
Abstreiffilz
Abstreifblech
Zyl
inderschraube
Abstreiffilz
Abstreifblech
Bettleiste
Bettleiste
1
1
2
2
kurz
lang
Scheibe
Zyl
.9
inderschraube
Motorplatte
1
Sechskantschraube
Sechskantschraube
S:hrit.tmctor
Schrittmotor
Kabel
ohne
KLihlkorper
ohne
X,Z
X,Z
Zahnflachriemen
9
Zylinderschraube
Motorplatte
2
Anschlag
hal
teraufl
Stahl
age
Description
Slide
Cross
Cover
Gib
Cross
Socket
Socket
Socket
screw
Set
screw
Set
Hexagonal
screw
Lead
Wiper
Socket
Socket
wi
Fel
t
Wiper
Flat
head
Fel
t
wi
Wiper
plate
Keep
Keep
plate
Washer
Socket
Motor
Hexagon
Hexagon
Step
motor
Step
motor
without
without
Timing
Socket
Motor
Stop
post
Tool
slide
sheet
slide
head
head
head
sheet
head
head
per
plate
per
plate
head
plate
head
head
cable
dissipator
belt
head
plate
support
spindle
screw
screw
screw
nut
complete
screw
screw
1
1
screw
2
2
short
long
screw
1
screw
screw
X,Z
X,Z
screw
2
Chariot
Chariot
Couvercl
Lardon
c
Ens.
Vis
Vis
Vis
Vis
Vis
Ecrou
Ens.
Tole
Vis
Vis
Racleur
Plaquette
Vis
Racleur
Plaquette
Lardon
Lardon
Rondel
Vis
Plaque
Vis
Vis
Courroie
Vis
Plaque
Butee
29
y>
 Loading...