emco winnc 810 T, 820 T User Manual
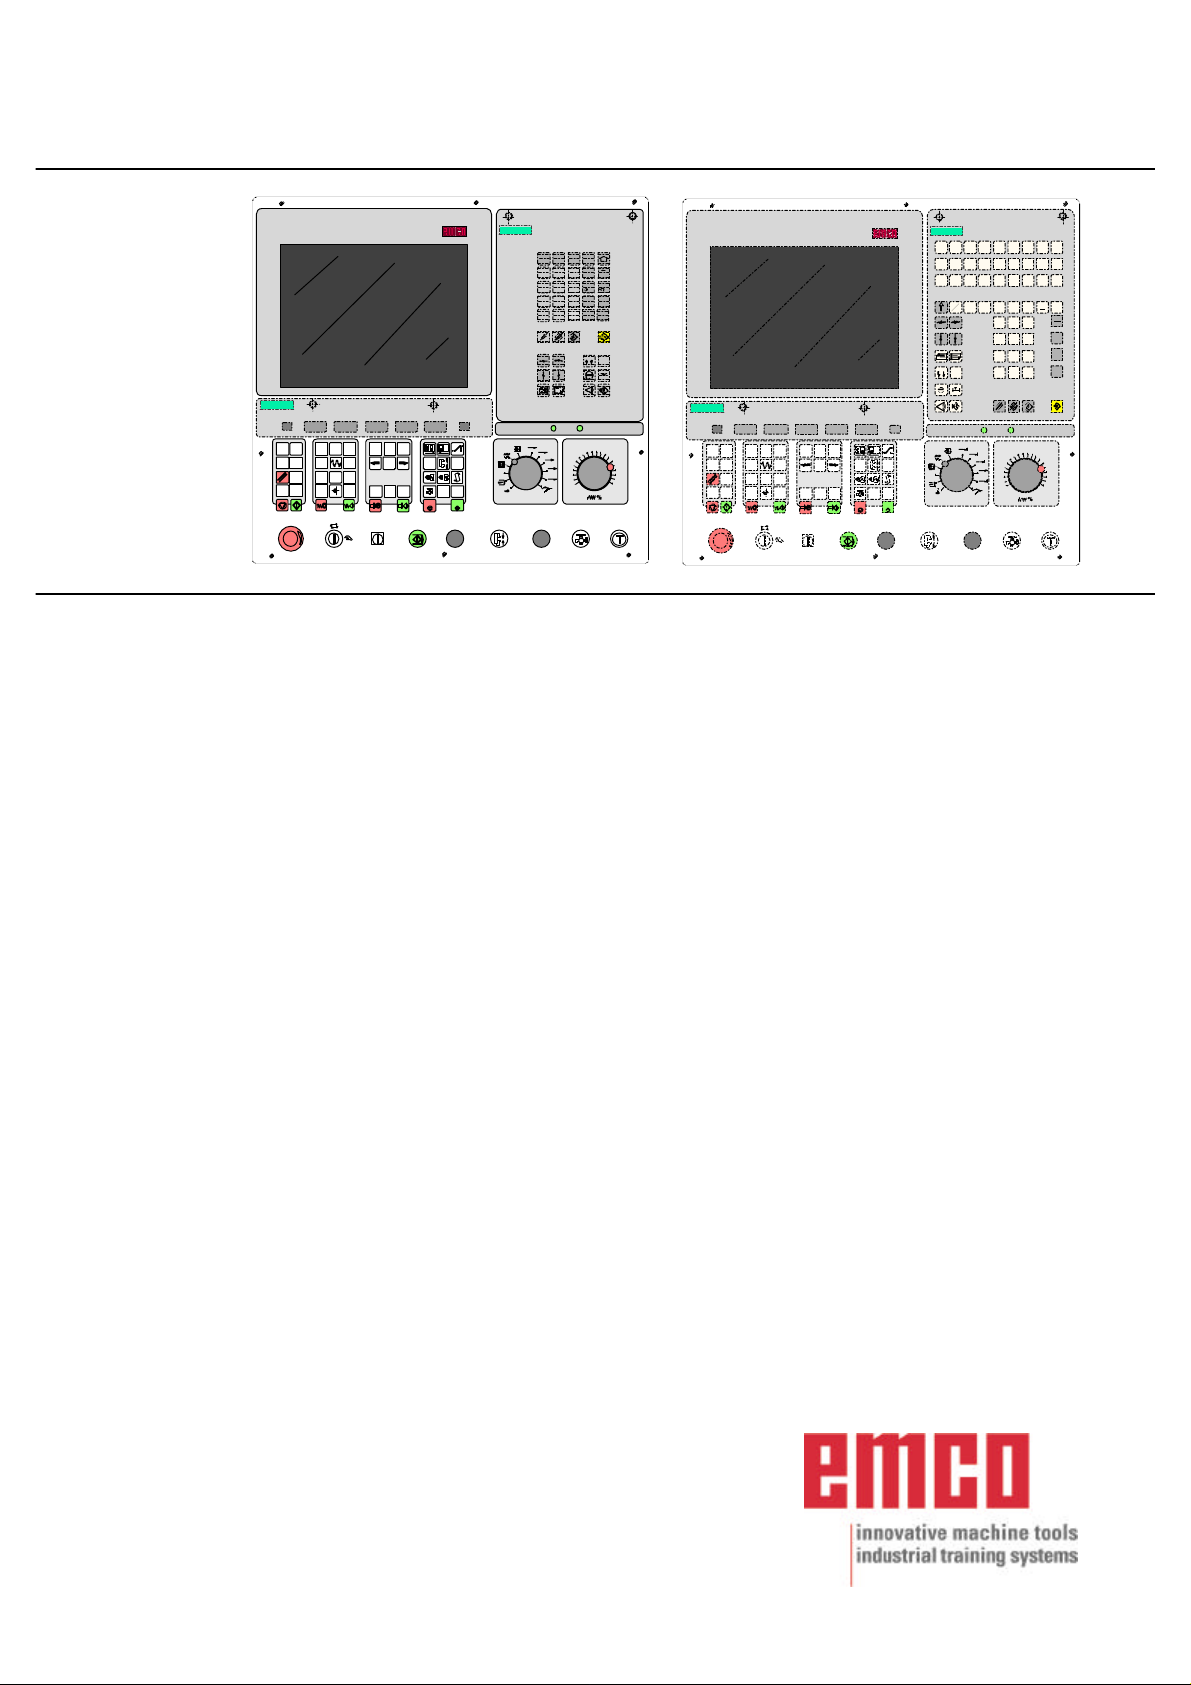
EMCO WinNC SINUMERIK 810/820 T
Software Description/ Software Version from 13.70
SIEMENS
SIEMENS
% /
7 8 9
X Z
4 5
I K
1 2 3
- +
+/ 0
M
SINUMERIK
<
DRY
+X+Z+C
SKIP
RUN
OPT.
-Z
1 x
STOP
-C
SBL
100%
-X
0
1
>
1
10
EDIT
AUX
AUX
SINUMERIK
G
N
@
C
Q
6
*
AB
J
-
R
DF
L
P
=.
S
H
T
FL
1.n
RS232USB
607080
40
100
1000
90
20
100
10
6
110
210000
120
0
Software Description
EMCO WinNC SINUMERIK 810/820 T
Ref.No. EN 1804 Edition I2003-10
SIEMENS
SINUMERIKSIEMENS
@
7 8 9
4 5 6
1 2 3
0+/- .
SINUMERIK
*
-
+
A B C D E F G H
%
I J K L M NOP Q
R S T U V W X Y Z
: = ( ) LF
1...n
SINUMERIK
<
DRY
+X+Z+C
SKIP
RUN
OPT.
-Z
1 x
STOP
-C
SBL
100%
-X
0
1
>
EDIT
AUX
AUX
RS232USB
1
607080
10
40
100
1000
90
20
100
10
6
110
210000
120
0
EMCO Maier Ges.m.b.H.
P.O. Box 131
A-5400 Hallein-Taxach/Austria
Phone ++43-(0)62 45-891-0
Fax ++43-(0)62 45-869 65
Internet: www.emco.at
E-Mail: service@emco.co.at

EMCO WINNC SINUMERIK 810/820 T
The software EMCO WinNC SINUMERIK 810/820 T Turning is a part of the
EMCO education concept on PC basis.
Target of this concept is learning to operate and program the original control at
the PC.
The turning machines of the EMCO PC TURN und CONCEPT TURN series can
be directly controlled via PC by means of the EMCO WinNC for the EMCO
TURN.
The operation is rendered very easy by the use of a digitizer or the control
keyboard with TFT flat panel display (optional accessory), and it is didactically
especially valuable since it remains very close to the original control.
This manual does not include the whole functionality of the control software
SINUMERIK 810/820 T Turning, however emphasis was laid on the simple and
clear illustration of the most important functions so as to achieve a most
comprehensive learning success.
In case any questions or proposals for improving this manual should arise,
please contact us directly:
PREFACE
Preface
EMCO MAIER Gesellschaft m. b. H.
Department Technical Documentation
A-5400 Hallein, Austria
All rights reserved, reproduction only by authorization of Messrs. EMCO MAIER
© EMCO MAIER Gesellschaft m.b.H., Hallein 2003
2

EMCO WINNC SINUMERIK 810/820 T
CONTENTS
Contents
A: Key Description
Control Keyboard, Digitizer Overlay .....................................A1
Key functions .....................................................................A2
Address and Numeric Keyboard .........................................A2
Machine Control Keys ........................................................A4
PC Keyboard .....................................................................A6
Screen with Softkeys ..........................................................A7
B: Basics
Reference Points of the EMCO Lathes ................................B1
Zero Offset ........................................................................B2
Coordinate System .............................................................B2
Coordinate System with Absolute Programming .............B2
Coordinate System with Incremental Programming ........B2
Input of the ........................................................................B3
Zero Offset ........................................................................B3
Tool Data Measuring ..........................................................B4
Input of the Tool Data .........................................................B6
Tool Data Measuring by Scraping........................................B7
Tool Data Measuring with the Optical Presetting Device .......B8
C: Operating Sequences
Survey Modes ................................................................... C1
Approach the Reference Point ........................................... C2
Input of the Gear Position .................................................. C2
Setting of Language and Workpiece directory ..................... C2
Input of Programs ............................................................. C3
Call up an existing or new program .............................. C3
Input of a block ........................................................... C3
Insert Block................................................................. C3
Delete Block ............................................................... C3
Insert Word ................................................................. C3
Alter Word .................................................................. C3
Delete Word ................................................................ C3
Program Input with Guiding Function ............................ C4
Program Input with CAD/CAM Systems ........................ C4
Program Administration ..................................................... C5
Copy Program ............................................................. C5
Rename Program ........................................................ C5
Delete Program........................................................... C5
Data Input-Output ............................................................. C5
Data Input via COM1 / COM2 ...................................... C6
Data Import ................................................................. C6
Data Output ................................................................ C7
Print Data ................................................................... C7
Adjusting the Serial Interface ....................................... C8
Program Run .................................................................... C9
Start of a Part Program ................................................ C9
Messages while program run ....................................... C9
Program Influence ....................................................... C9
Overstore ..................................................................C10
Block Search .............................................................C10
Program Interruption ..................................................C10
Status Display of the PLC ...........................................C10
Display of the Software Versions .................................C10
Graphic simulation ...........................................................C11
D: Programming
Program Structure ............................................................. D1
Addresses ........................................................................ D1
Survey of G Commands .................................................... D2
Survey of M Commands .................................................... D2
Survey of Cycles ............................................................... D2
Description of G Commands .............................................. D3
G00 Positioning (Rapid Traverse) ...................................... D3
G01 Linear Interpolation .................................................... D3
G02 Circular Interpolation Clockwise .................................. D4
G03 Circular Interpolation Counterclockwise ....................... D4
G04 Dwell ......................................................................... D5
G09 Exact Stop ................................................................. D5
G10 - G13 Polar Coordinate Interpolation ........................... D5
G25/G26 Programmable working area limitation ................. D6
G16, G18 Working plane selection ..................................... D6
G33 Thread Cutting ........................................................... D7
Cutter Radius Compensation ............................................. D7
G40 Cancel Cutter Radius Compensation .......................... D9
G41 Cutter Radius Compensation Left ............................... D9
G42 Cutter Radius Compensation Right ............................. D9
G48 Leave as Approached .............................................. D10
G50 Cancel Scale Modification ........................................ D10
G51 Scale Modification .................................................... D10
G53 Cancel Zero Offset Blockwise ....................................D11
G54 - G57 Zero Offset 1 - 4 ..............................................D11
G58/G59 Programmable Zero Offsets ...............................D11
G60 Exact Stop Mode ...................................................... D12
G62, G64 Deselection Exact Stop Mode ........................... D12
G63 Thread tapping with compenstion chuck .................... D12
G70 Measuring in Inches ................................................. D13
G71 Measuring in Millimetre ............................................ D13
G90 Absolute Programming ............................................. D14
G91 Incremental Programming ........................................ D14
G92 Spindle Speed Limit ................................................. D14
G 92 Cylindrical interpolation ........................................... D15
G94 Feed per Minute ...................................................... D17
G95 Feed per Revolution ................................................. D17
G96 Constant Cutting Speed ........................................... D17
G97 Constant Spindle Speed ........................................... D17
G131 Transmit ................................................................ D18
G147 Soft Approach to Contour with Linear ...................... D19
G247 Soft Approach to Contour with Quarter Circle ........... D19
G347 Soft Approach to Contour with Semicircle ................ D19
G148 Soft Leaving with Linear ......................................... D19
G248 Soft Leaving with Quarter Circle .............................. D19
G348 Soft Leaving with Semicircle ................................... D19
Description of M Commands ............................................ D21
M00 Programmed Stop Unconditional .............................. D21
M01 Programmed Stop Conditional .................................. D21
M02 Main Program End................................................... D21
M03 Main Spindle ON Clockwise ...................................... D21
M04 Main Spindle ON Counterclockwise .......................... D21
M05 Main Spindle Off ...................................................... D21
M08 Coolant ON ............................................................. D22
M09 Coolant OFF ........................................................... D22
M17 Subroutine End ....................................................... D22
M20 Tailstock BACK ........................................................ D22
M21 Tailstock FORWARD ................................................ D22
M25 Open Clamping Device ............................................ D22
M26 Close Clamping Device ............................................ D22
M30 Main Program End................................................... D22
M52 C- Axis ON .............................................................. D22
M53 C- Axis OFF ............................................................ D22
M71 Puff Blowing ON ...................................................... D22
M72 Puff Blowing OFF ..................................................... D22
3

EMCO WINNC SINUMERIK 810/820 T
CONTENTS
Description of Cycles........................................................D23
L93 Cut-in Cycle ..............................................................D23
L94 Undercut Cycle..........................................................D24
L95 Stock Removal with Back Pockets ..............................D25
L96 Stock Removal without Back Pockets ..........................D25
L97 Thread Cutting Cycle .................................................D26
L971 Longitudinal Thread .................................................D26
L98 Deep Hole Drilling Cycle ............................................D27
L99 Thread Draft..............................................................D28
Contour definition .............................................................D29
Insert Chamfer ...........................................................D29
Insert Radius .............................................................D29
Line ...........................................................................D29
Arc ............................................................................D29
Line - Line .................................................................D30
Line - Arc (tangential) .................................................D30
Arc - Line (tangential) .................................................D30
.................................................................................D30
.................................................................................D30
Arc - Arc (tangential) ...................................................D30
Subroutines .....................................................................D31
Subroutine Call in Part Program..................................D31
Subroutine End with M17 ............................................D31
Subroutine Nesting .....................................................D31
E: @-Codes
G: Survey Pages
Survey Softkey Explanations .............................................. G1
Softkey Menu Survey ........................................................ G6
Survey Guiding ................................................................. G8
Starting Information
see attachment
H: Alarms and Messages
Startup Alarms .................................................................. H1
Control Alarms .................................................................. H2
Machine Alarms ................................................................ H9
4
EMCO WINNC SINUMERIK 810/820 T
A: Key Description
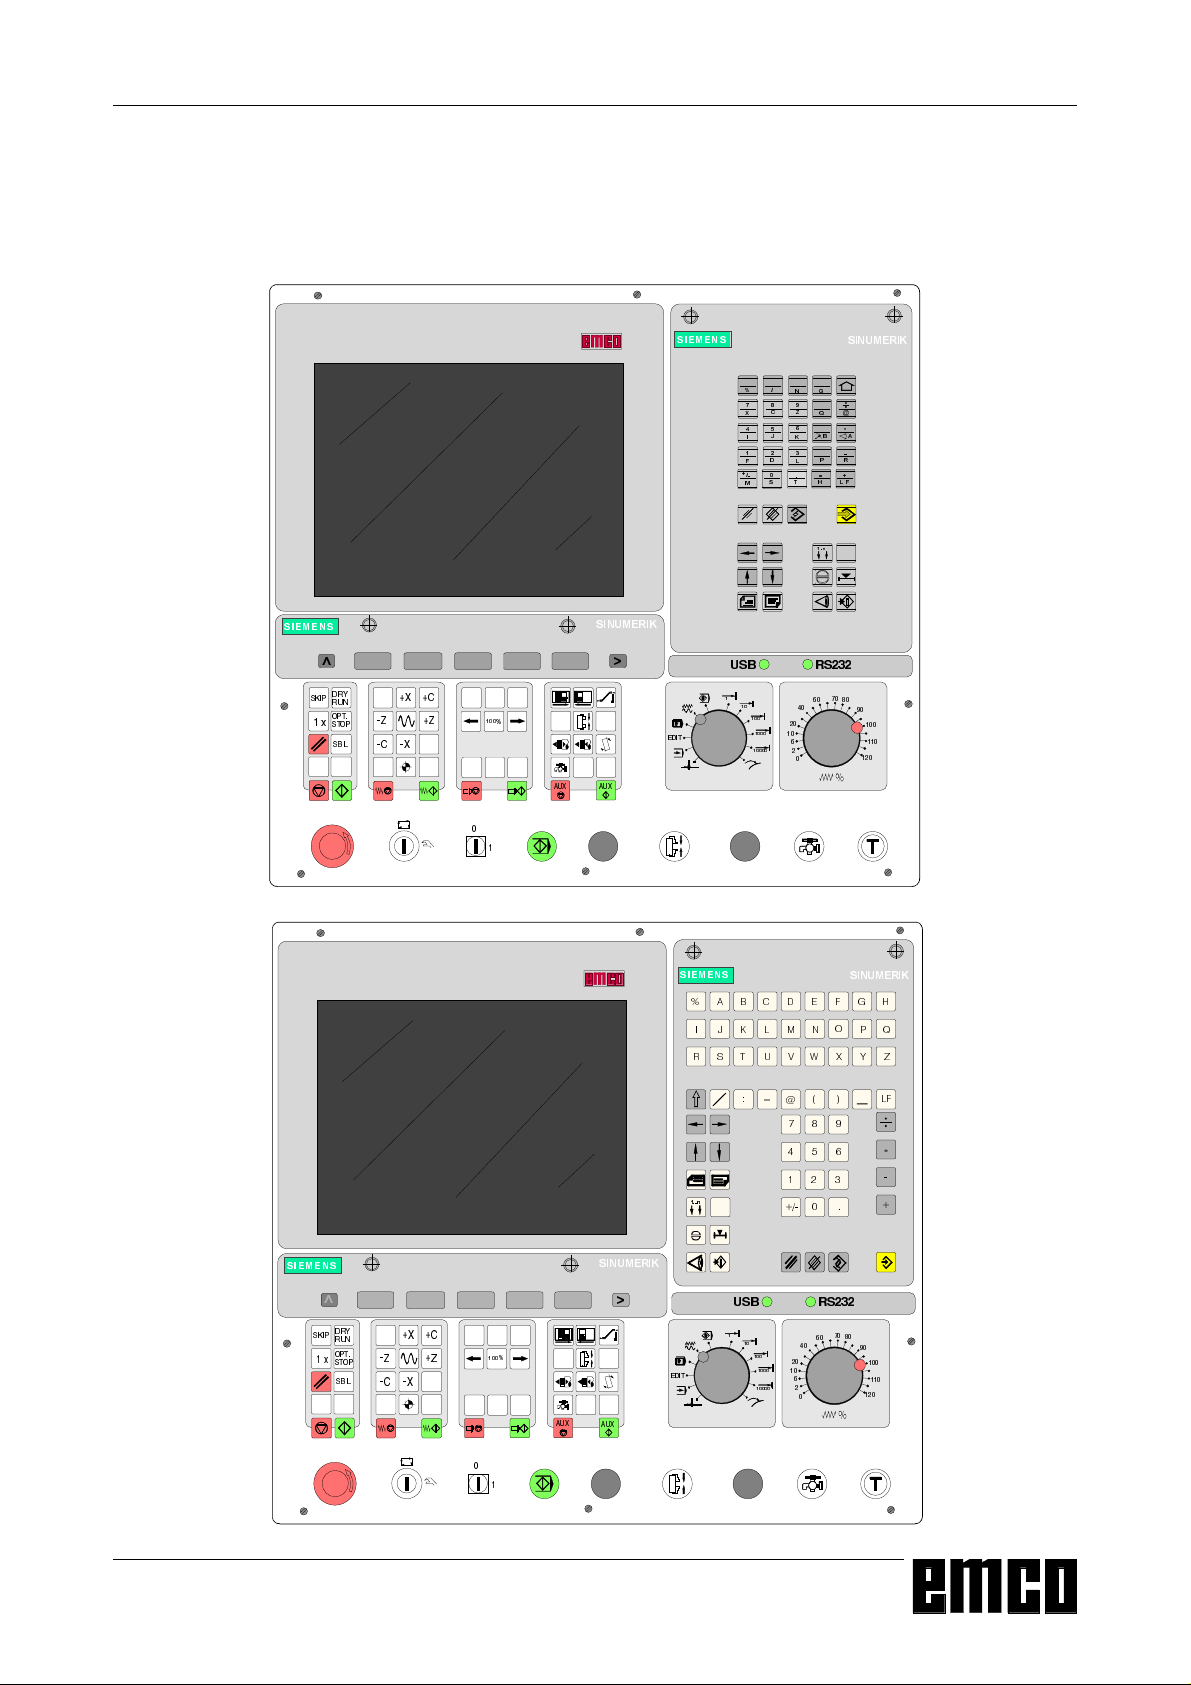
Control Keyboard, Digitizer Overlay
KEY DESCRIPTION
6,(0(1 6
6.,3
[
6,(0(16
&
;
-
,.
'
)
6
0
6,180(5,.
*
1
=
#
$%
345
/
+
7
)/
Q
6,180(5,.
'5<
581
237
6723
6%/
;=&
=
&
;
!
(',7
$8;
$8;
5686%
6,(0(1 6
6.,3
[
6,(0(16
$%&'()*+
6,180(5,.
6,180(5,.
,-./01234
56789:;<=
#
/)
Q
6,180(5,.
'5<
581
237
6723
6%/
;=&
=
&
;
!
(',7
$8;
$8;
5686%
A 1
EMCO WINNC SINUMERIK 810/820 T
KEY DESCRIPTION
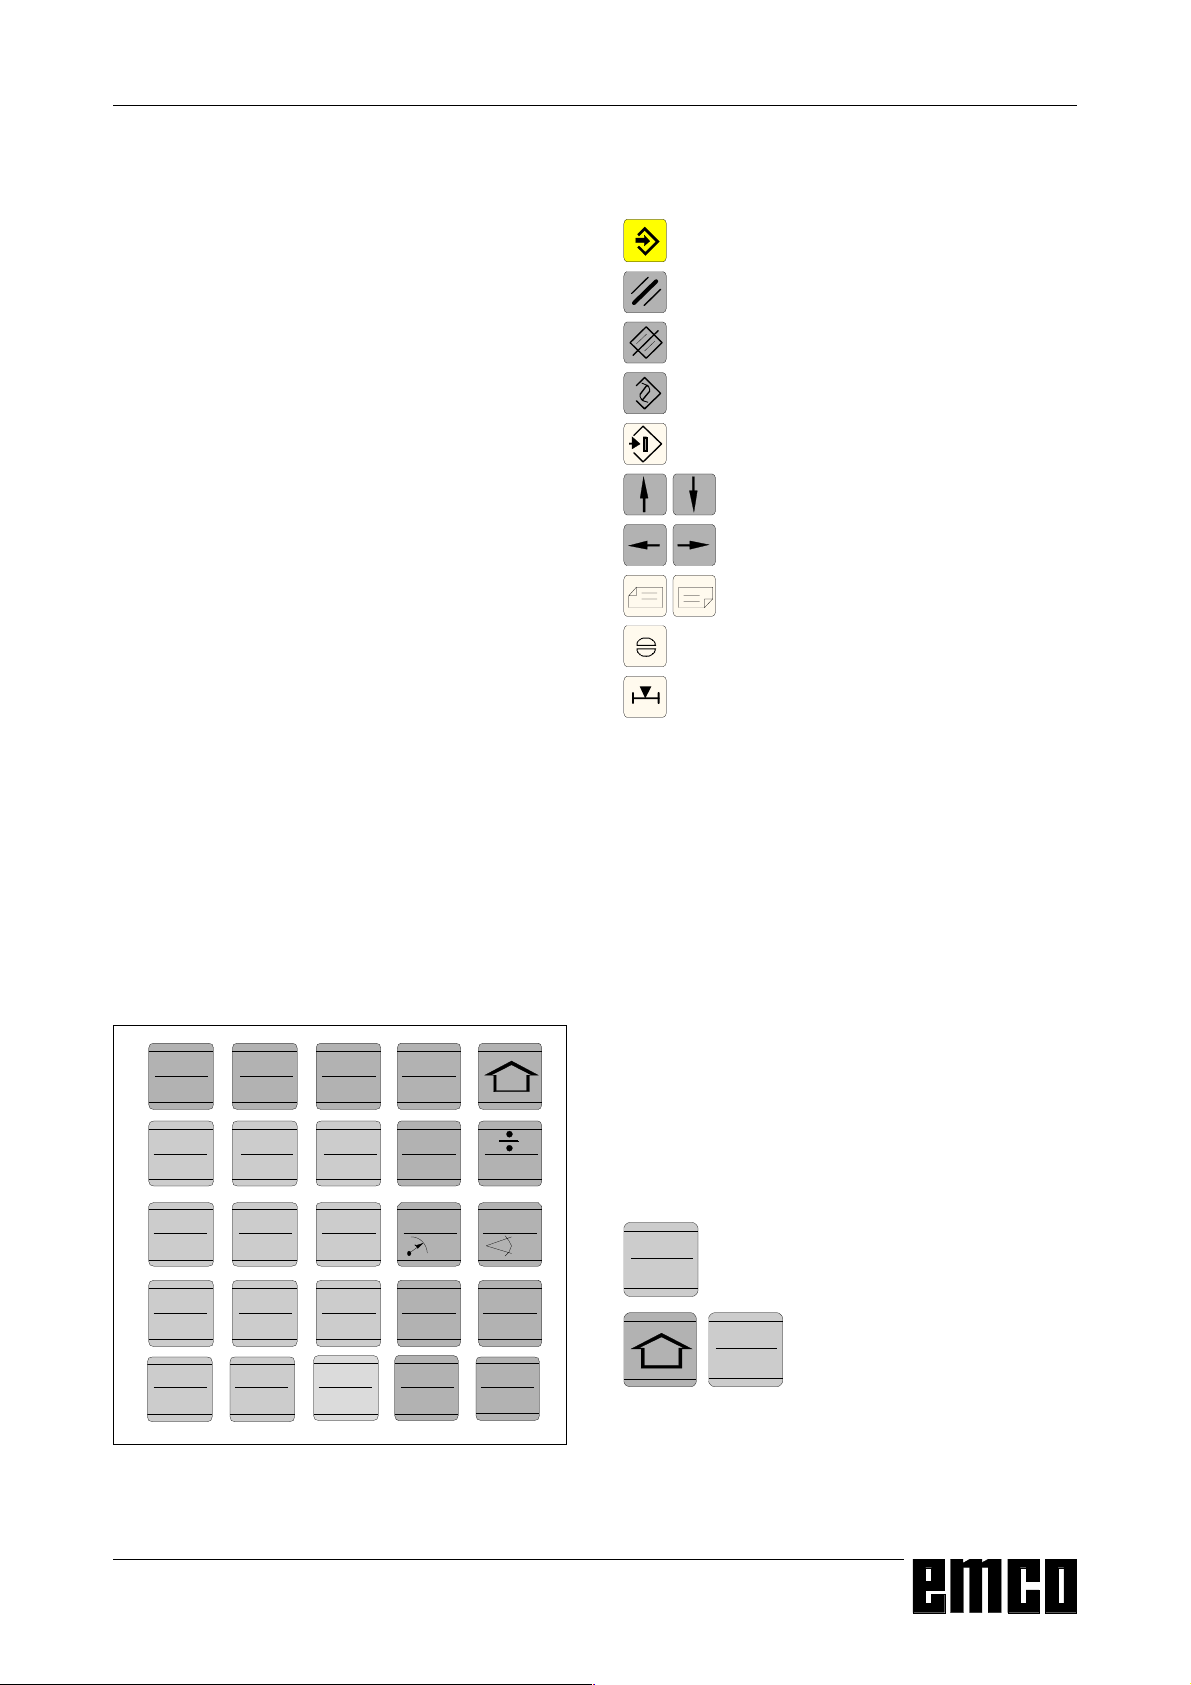
Key functions
Input key
Delete input / operator message
Delete word / block
Alter word
Search address / block / word
Cursor down / up
Cursor left / right
Page up / down
Acknowledge alarm
Actual position in double size letters
Address and Numeric Keyboard
SINUMERIK 810T:
With the SHIFT key (at the top right edge) you can
;
,.
0
&
-
')
6
1
=
*
4
#
$%
/
7
3
+
5
)/
select the second key function.
Pressing again this key selects the first function
again.
After pressing an address key the SHIFT function is
active automatically.
.
.
function K
funkcion 6
Address and numeric keyboard of the
SINUMERIK 810 T
SINUMERIK 820T:
Every address or number has its own key.
A 2

EMCO WINNC SINUMERIK 810/820 T
KEY DESCRIPTION
A 3
EMCO WINNC SINUMERIK 810/820 T
Machine Control Keys
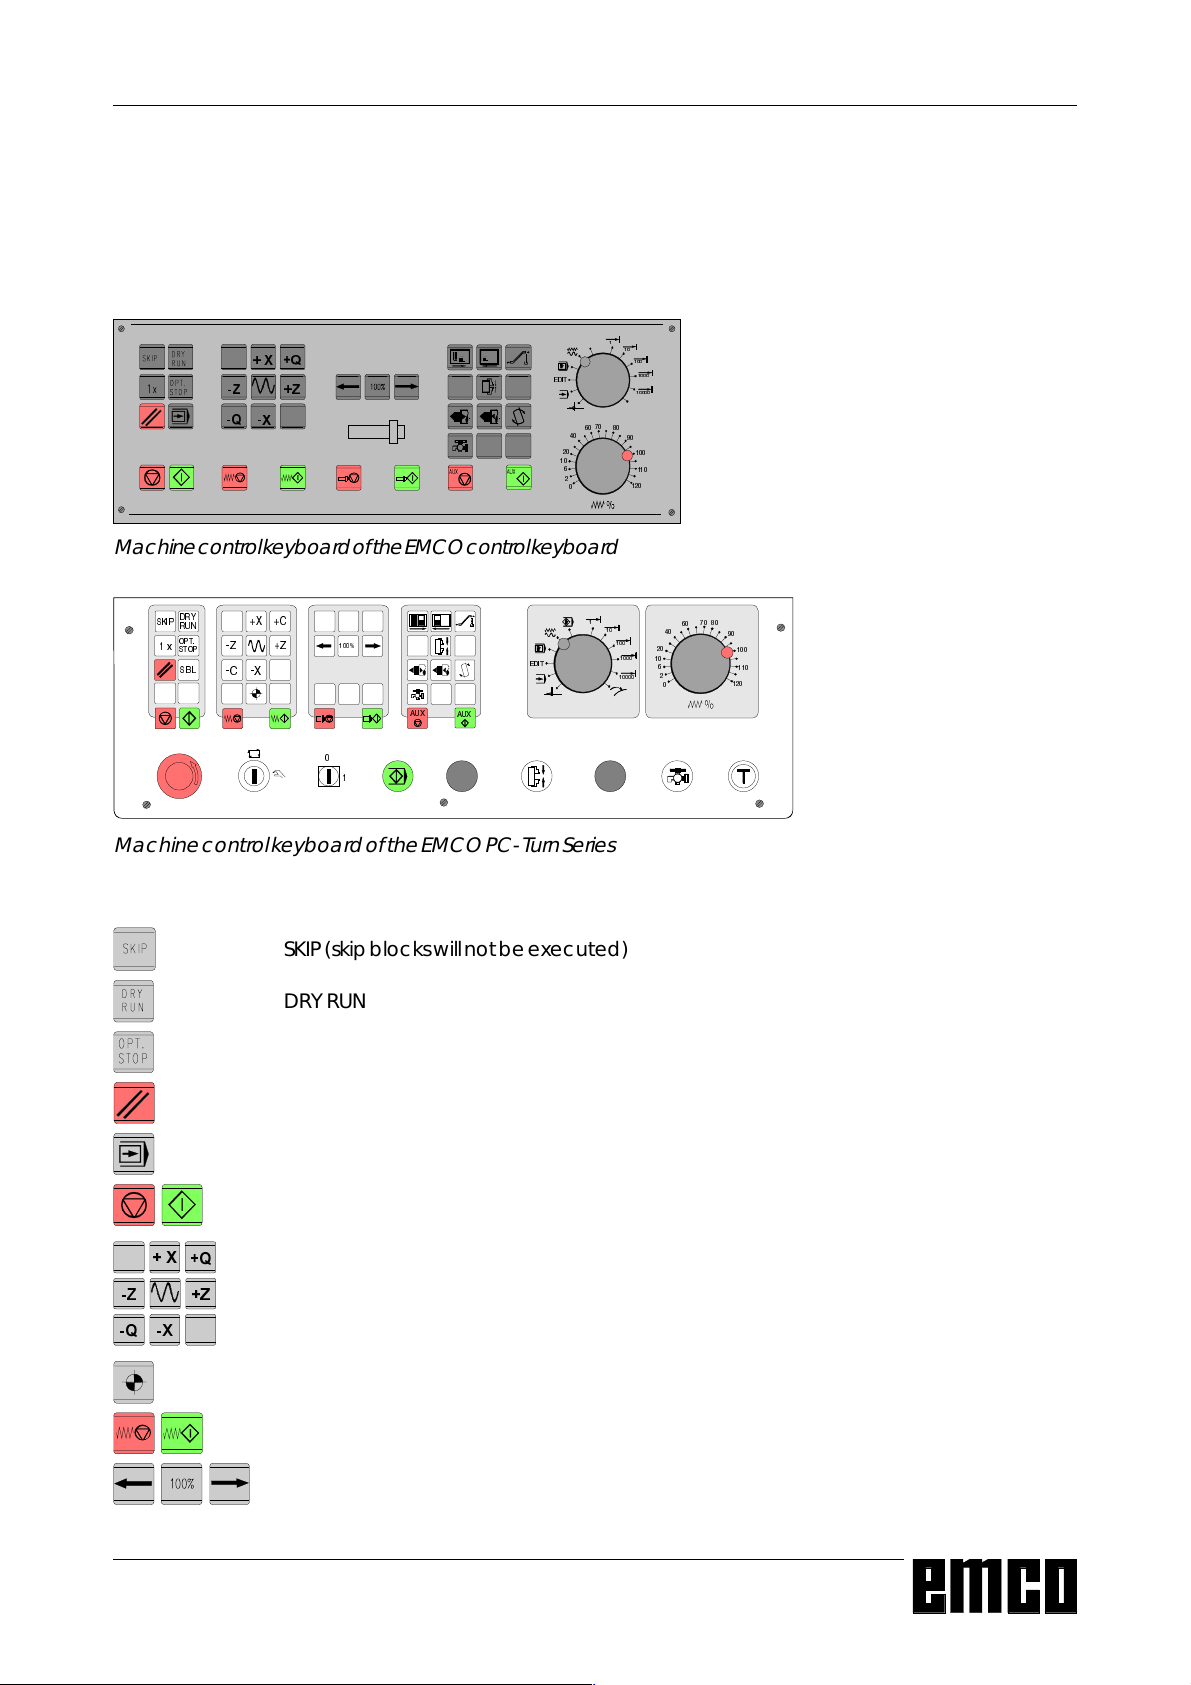
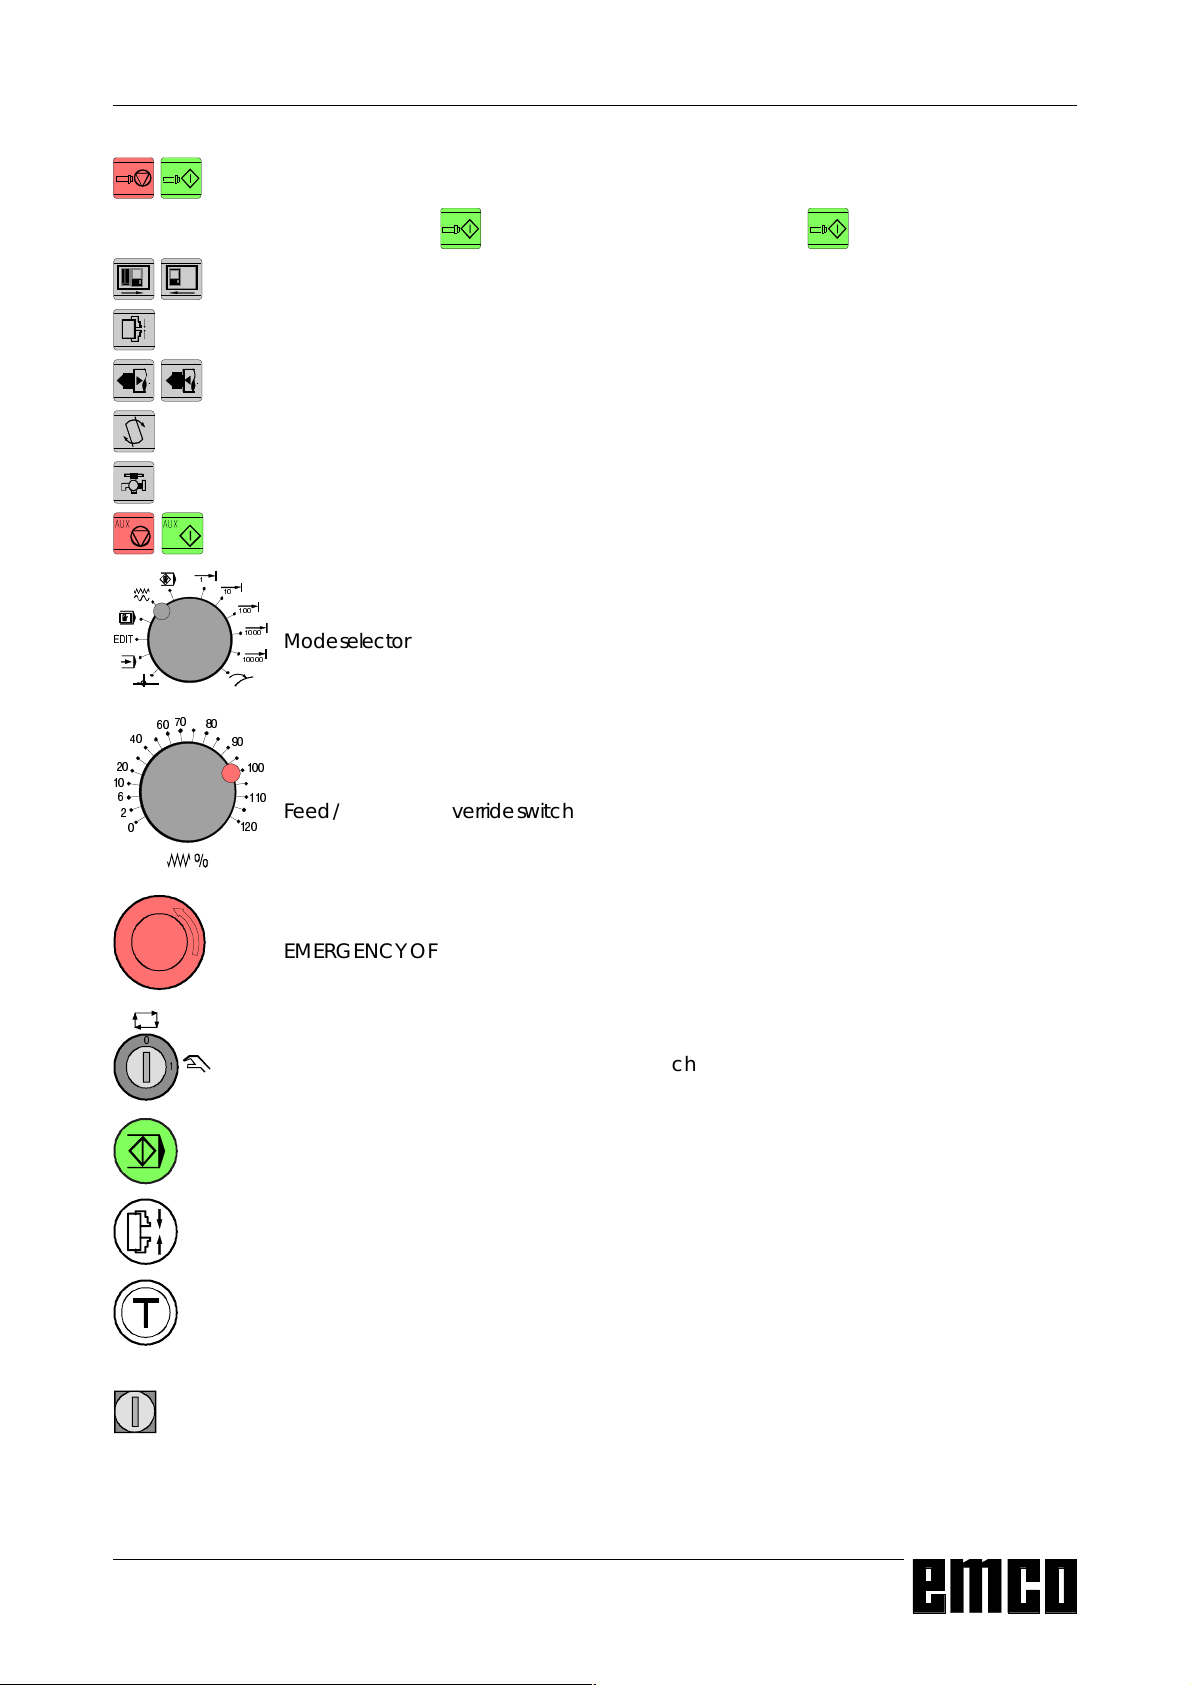
The machine control keys are in the lower block of the
control keyboard resp. the digitizer overlay.
Depending on the used machine and the used
accessories not all functions may be active.
4
;
=
=
4
;
Machine control keyboard of the EMCO control keyboard
(',7
KEY DESCRIPTION
6.,3
'5<
581
237
[
6723
6%/
;=&
=
&
;
$8;
$8;
(',7
Machine control keyboard of the EMCO PC- Turn Series
SKIP (skip blocks will not be executed)
DRY RUN (test run of programs)
OPT STOP (program stop at M01)
RESET
Single block machining
=
4
Program stop / program start
;
4
=
Manual axis movement
;
Approaching the reference point in all axes
Feed stop / feed start
Spindle override lower / 100% / higher
A 4
EMCO WINNC SINUMERIK 810/820 T
Spindel stop / spindle start; spindle start in JOG and INC1...INC10000 mode:
Clockwise: perss key short, Counterclockwise: press min. 1 sec.
Open / close door
Close / open clamping device
Tailstock back / forward
Swivel tool holder
Coolant / puff blowing on / off
AUX OFF / AUX ON (auxiliary drives off / on)
(',7
Mode selector
KEY DESCRIPTION
Feed / rapid feed override switch
EMERGENCY OFF (Unlock: pull out button)
Key switch for special operations (siehe Maschinenbeschreibung)
Additional NC start key
Additional key clamping device
Consent key
No function
A 5
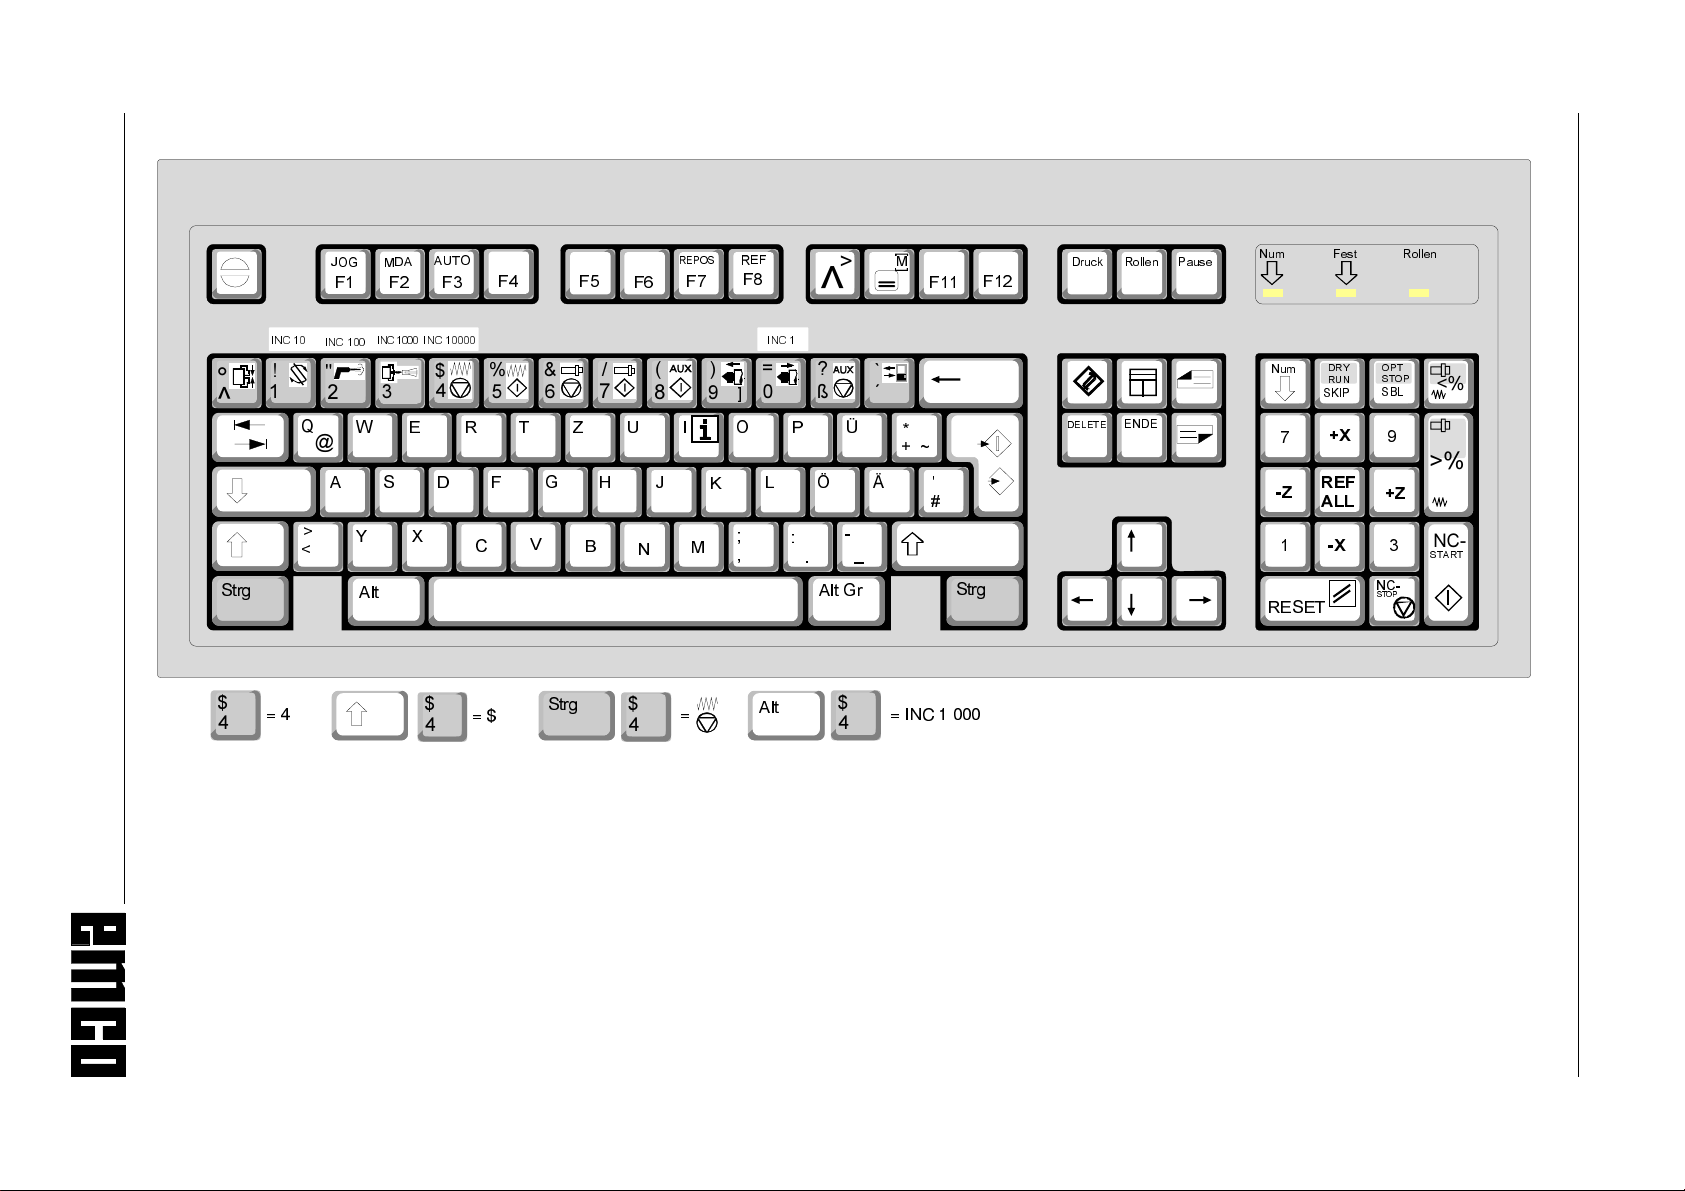
PC Keyboard
EMCO WINNC SINUMERIK 810/820 T
A 6
5(326
)
)
8
,
-
0
1
.
A
6WU
$87
-2*
0'$
)
)
,1&
,1&,1&
:
,1&
4
#
$
6
!
<
J
$OW
2
)
5
)
&
7
)
(
'
;
)
=
*
+
9
%
6WU
J
Some alarms will be acknowledged with the key ESC.
By pressing the key F1 the modes (JOG, AUTOMATIC,...) will be
displayed in the softkey line.
The assignement of the accessory functions is described int the
chapter "Accessory Functions".
5()
)
,1&
@
2
3
/
0
!
"
!
>
)
)
C
h
a
b
g
'UXFN
'(/(7
$OW
$OW*
$OW*
B
U
U
,1&
6WU
J
* With F12 the function keys PRESET;MDI-
AUTOM., JOG, REPOS,AUTOMATIC and
REF-POINT will be displayed in the softkey
line.
3DXVH
5ROOH
Q
(
(1'
(
1XP
1XP
)HV
'5<
581
6.,
3
;
5ROOH
237
672
6%/
Q
3
W
!
5()
=
5(6(7
$//
=
1&
;
1&
672
67$57
3
The machine functions in
the numeric key block are
active only with active NUM
lock.
KEY DESCRIPTION
The meaning of the key combination ctrl 2 depends on the machine:
EMCO PC TURN 50/55: Puff blowing ON/OFF
EMCO PC TURN 100/125/155: coolant ON/OFF
EMCO WINNC SINUMERIK 810/820 T
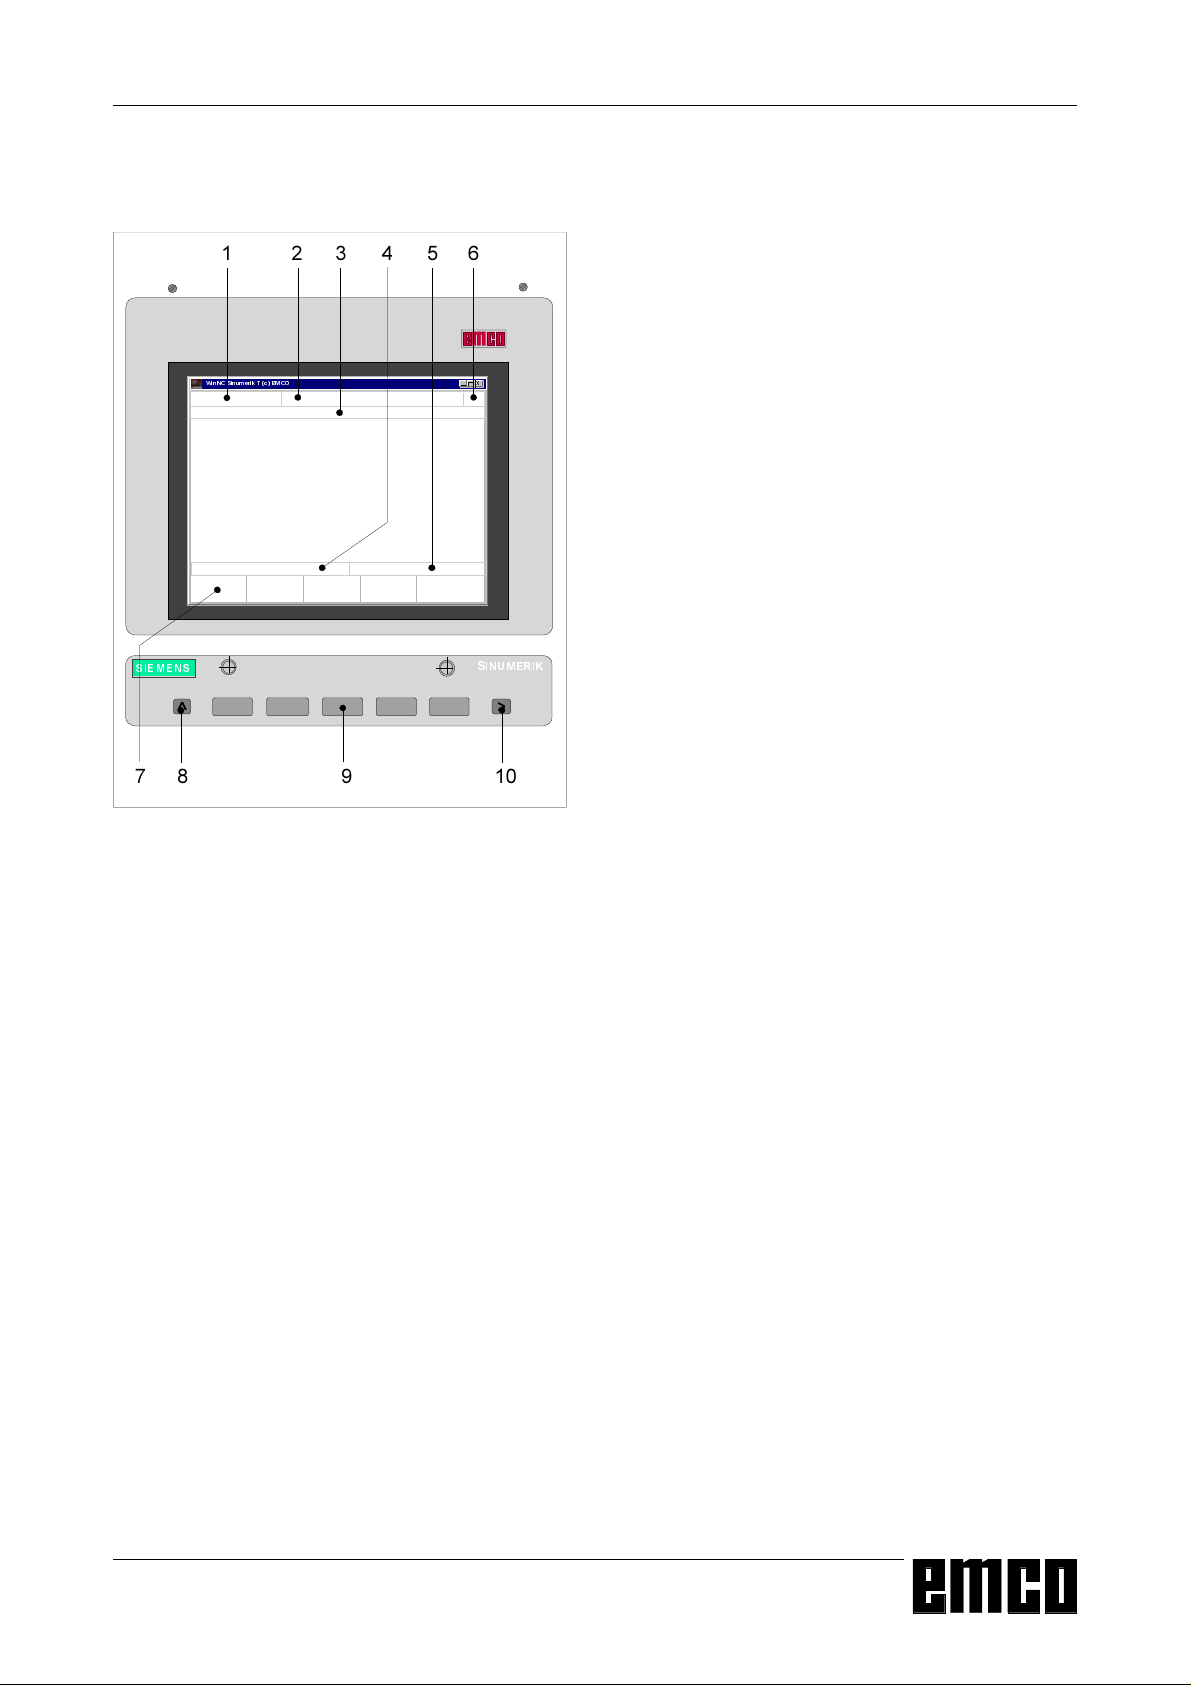
Screen with Softkeys
KEY DESCRIPTION
:LQ1&6LQXPHULN7F(0&2
6,(0(16
[
6,180(5,.
!
At the operating field the following parts are defined:
1 Display of the mode
2 Display of the operating conditions
3 Display of the alarm number, text (comment)
4 Display of the notes to the operator
5 Display of inputs from the keyboard
6 Display of the channel number
7 Display of the softkey functions
8 Key "jump back to a higher level menu" (key F2 at
the PC)
9 Softkeys (keys F3 - F7 at the PC)
10 Key "Further functions in the same menu" (key
F11 at the PC)
Softkeys (9) are keys with multiple meaning. The
valid meaning will be displayed at the bottom line (7)
of the screen.
Screen with Softkeys
A 7

EMCO WINNC SINUMERIK 810/820 T
KEY DESCRIPTION
A 8
EMCO WINNC SINUMERIK 810/820 T
BASICS
B: Basics
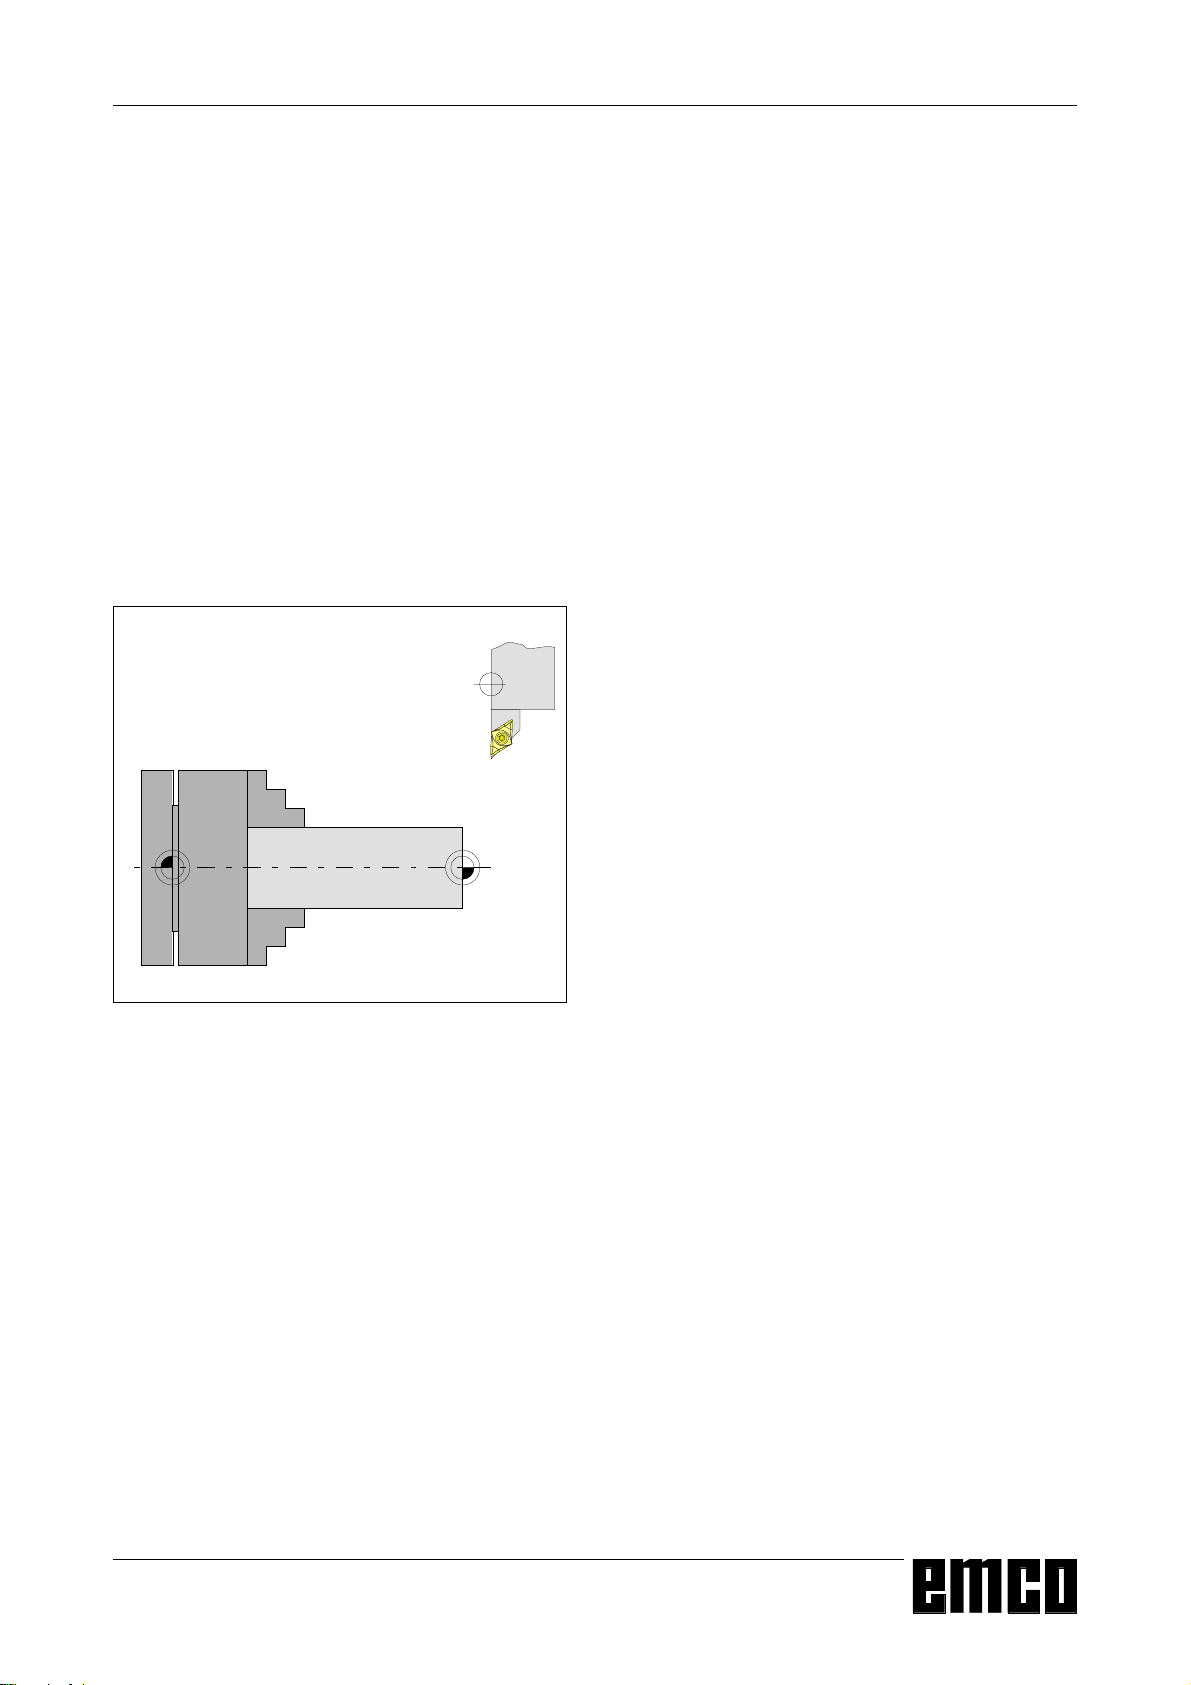
Reference Points of the EMCO
Lathes
M = Machine Zero Point
An unchangeable reference point established by the
machine manufacturer.
Proceeding from this point the entire machine is
measured.
At the same time "M" is the origin of the coordinate
system.
R = Reference Point
1
A position in the machine working area which is
determined exactly by limit switches. The slide
positions are reported to the control by the slides
approaching the "R".
Required after every power failure.
N = Tool Mount Reference Point
0:
Starting point for the measurement of the tools. "N"
lies at a suitable point on the tool holder system and
is established by the machine manufacturer.
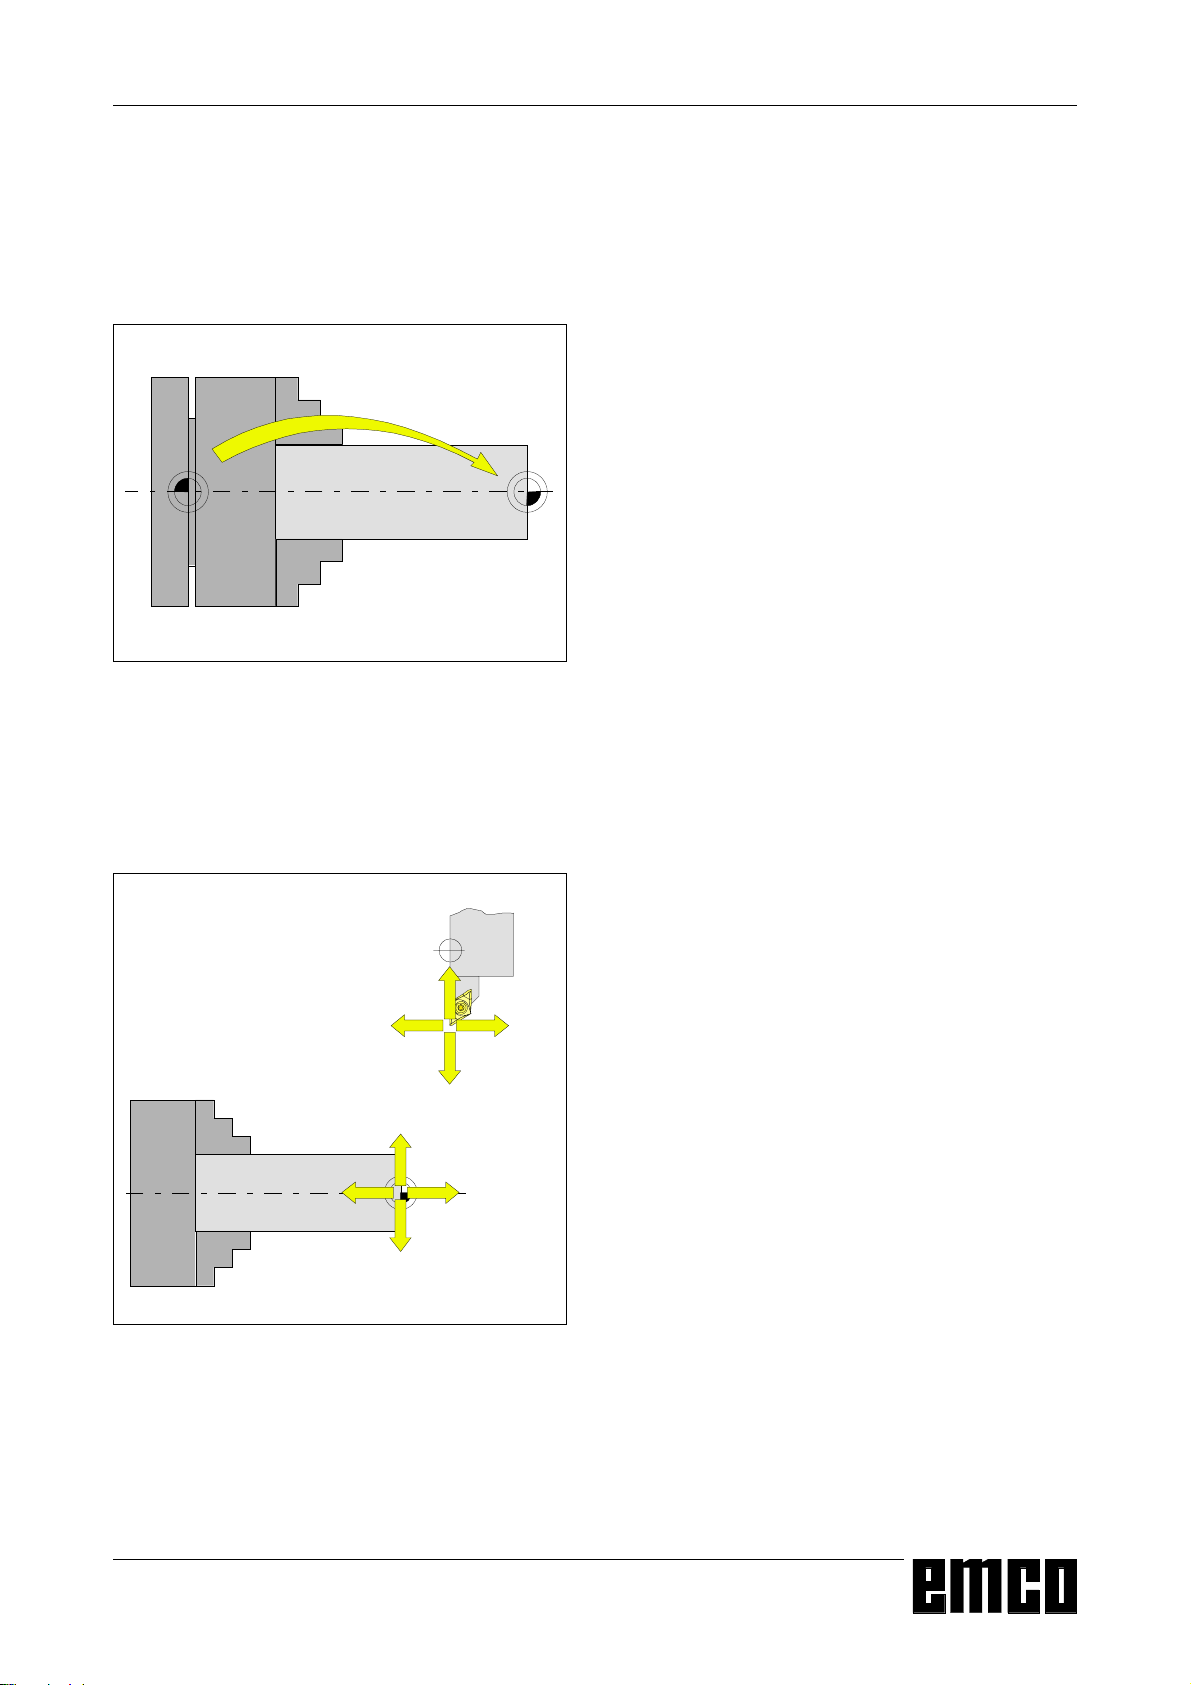
W = Workpiece Zero Point
Reference points in the working area
Starting point for the dimensions in the part program.
Can be freely established by the programmer and
moved as desired within the part program.
B 1
EMCO WINNC SINUMERIK 810/820 T
BASICS
Zero Offset
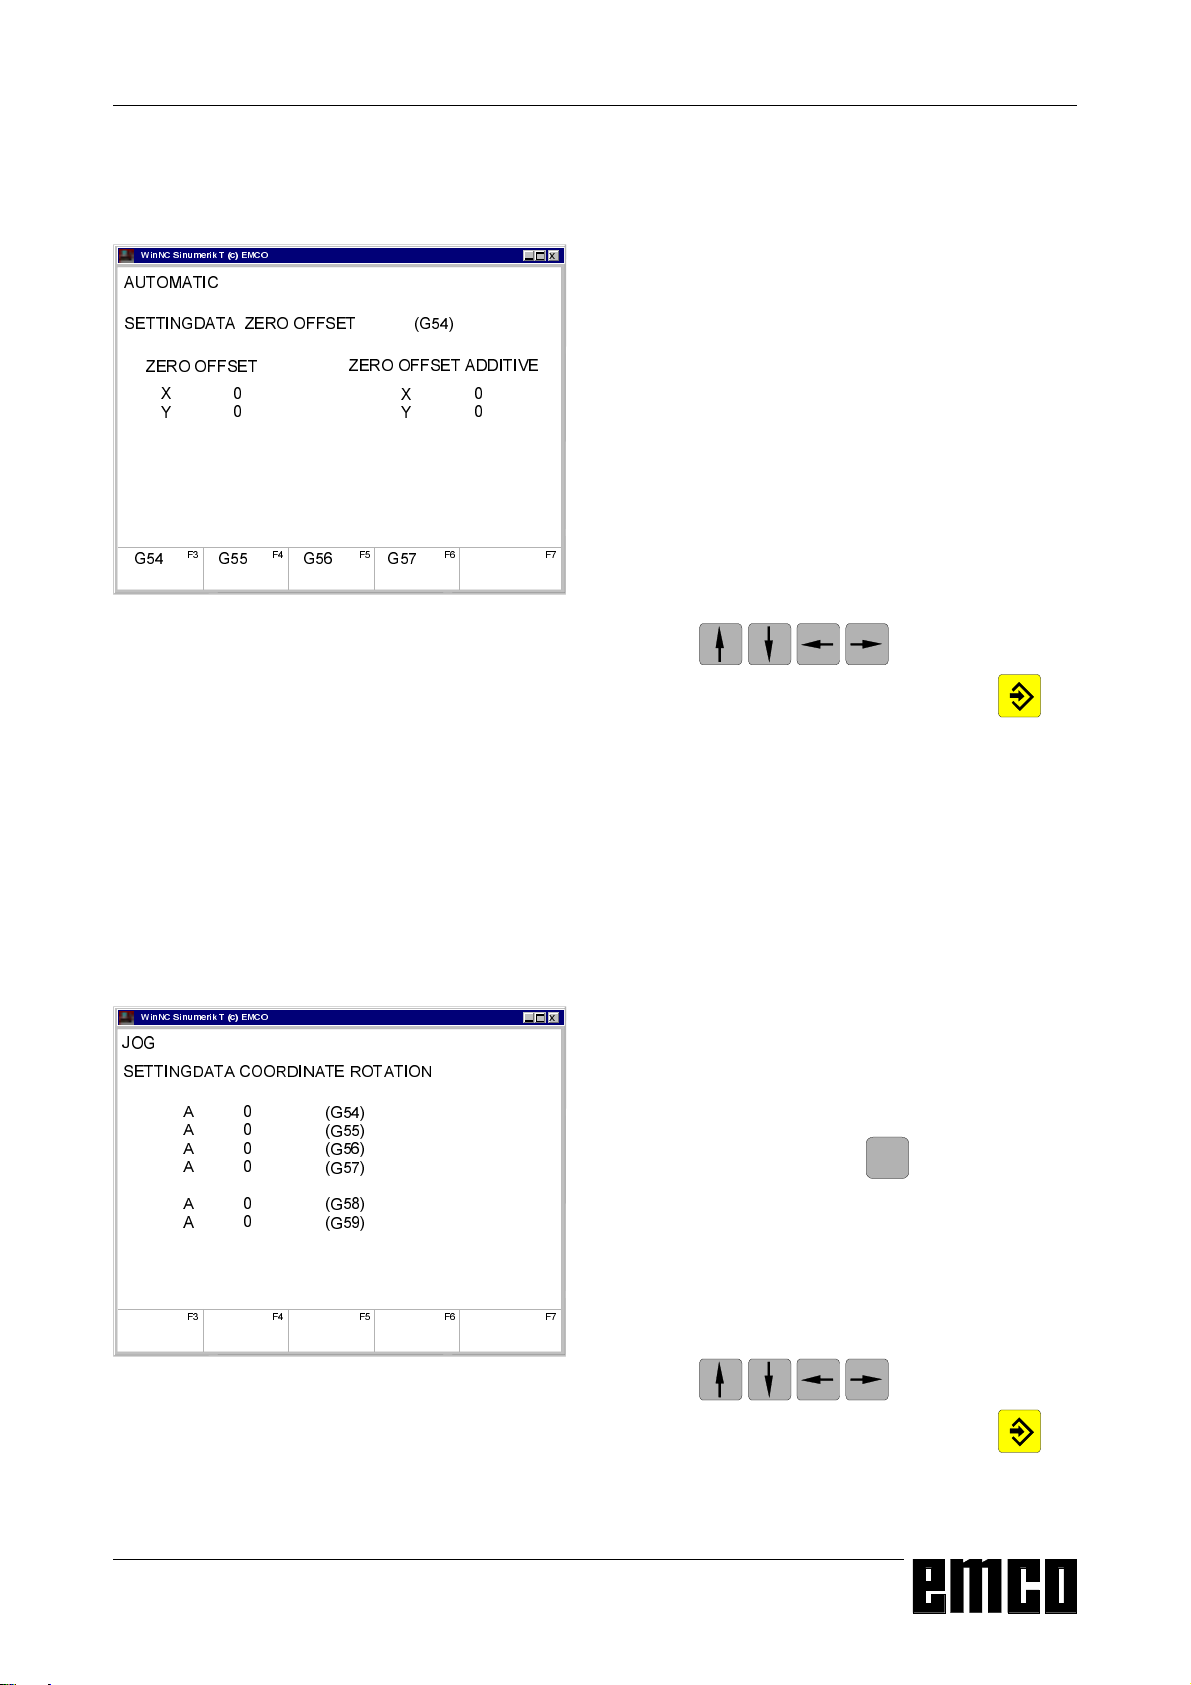
With EMCO lathes the machine zero "M" lies on
the rotating axis and on the end face of the spindle
flange. This position is unsuitable as a starting
point for dimensioning. With the so-called zero
offset the coordinate system can be moved to a
suitable point in the working area of the machine.
In the setting data zero offset are four adjustable zero
offsets available.
0:
Zero offset from the machine zero point to the
workpiece zero point
When you define a value in the offset register, this
value will be considered with call up in program (G54
- G57) and the coordinate zero point will be shifted
from the machine zero M to the workpiece zero W.
The workpiece zero point can be shifted within a
program with "G58, G59 - programmable zero
offset" in any number.
More informations see in command description G58,
G59.
Coordinate System
The X coordinate lies in the direction of the cross
slide, the Z coordinate lies in the direction of the
longitudinal slide.
Incremental
88
:
:
88
;;
=
=
;;
Absolute
Absolute coordinates relate to a fixed position,
incremental coordinates to the tool position.
The X and -X in brackets are valid for the PC
TURN 50/55 because the tool is in front of the
turning centre at this machine.
Coordinate values in minus direction describe
movements of the tool system towards the workpiece,
values in plus direction away from the workpiece.
Coordinate System with Absolute
Programming
The origin of the coordinate system lies at the machine
zero "M" or at the workpiece zero "W" following a
programmed zero offset.
All target points are described from the origin of the
coordinate system by the indication of the respective
X and Z distances.
X distances are indicated as the diameter (as
dimensioned on the drawing)
Coordinate System with Incremental
Programming
The origin of the coordinate system lies at the tool
mount reference point "N" or at the cutting tip after a
tool call-up.
With incremental programming the actual pathes of
the tool (from point to point) are described.
X will be entered as radius.
B 2
EMCO WINNC SINUMERIK 810/820 T
BASICS
Input of the
Zero Offset
:LQ1&6LQXPHULN7F(0&2
$8720$7,&
6(77,1*'$7$=(522))6(7*
=(522))6(7
;
<
* * * *
) ) ) ) )
=(522))6(7$'',7,9(
;
<
Input pattern for Zero Offset G54
[
Four zero offsets can be entered (e.g. for four different clamping devices).
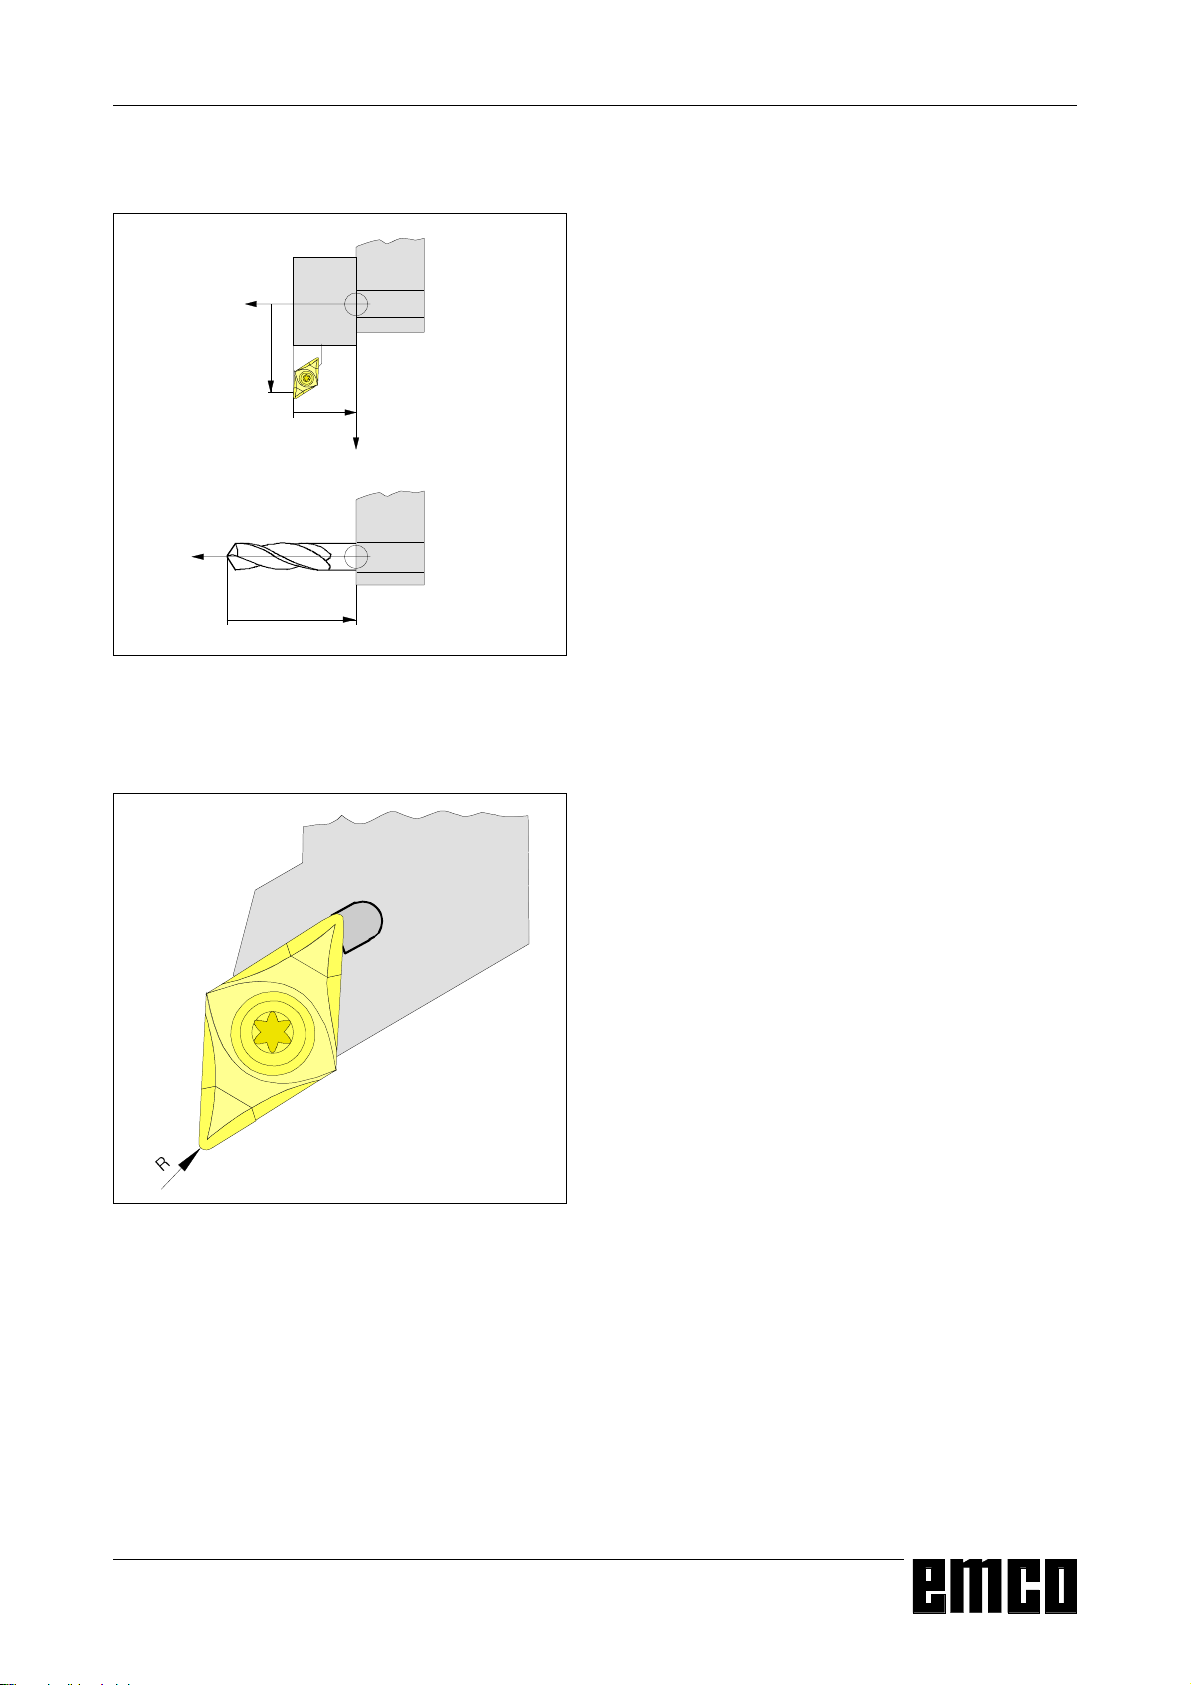
• Press the softkey SETTING DATA in any mode.
• Press the softkey ZERO OFFSET.
• The screen shows the input pattern for the zero
offset G54. The particular offsets G54 - G57 can
be selected with softkeys.
• Below ZERO OFFSET the measured values (e.g.:
X=0, Z=length of chuck) are entered.
• Corrections to this value can be entered below ZO
ADDIT. These corrections will be added.
• Move the cursor to the value to be altered with the
keys .
• Enter the new value and press the key .
• The inverse input mark jumps to the next input
field.
:LQ1&6LQXPHULN7F(0&2
-2*
6(77,1*'$7$&225',1$7(527$7,21
$
$
$
$
$
$
) ) ) ) )
*
*
*
*
*
*
Input pattern for coordinate rotation
Input of the Coordinate Rotation
[
A coordinate rotation can be programmed for every
zero offset. This coordinate rotation becomes active
at the call-up of the zero offset.
• Press the softkey SETTING DATA in any mode.
• Extend softkey line (key
) and press softkey
!
ROTAT. ANGLE.
• The screen shows the input pattern for coordinate
rotation. The single rotations for G54 - G57 can be
entered in this pattern, the rotations for G58 and
G59 are determined in the CNC program.
• Move the cursor to the value to be altered with the
keys .
• Enter the new value and press the key .
• The inverse input mark jumps to the next input
field.
B 3
EMCO WINNC SINUMERIK 810/820 T
1
/
/
1
/
Direction of the length correction for the tool types
7\SH
7\SH
BASICS
Tool Data Measuring
Aim of the tool data measuring:
The CNC should use the tool tip for positioning, not
the tool mount reference point.
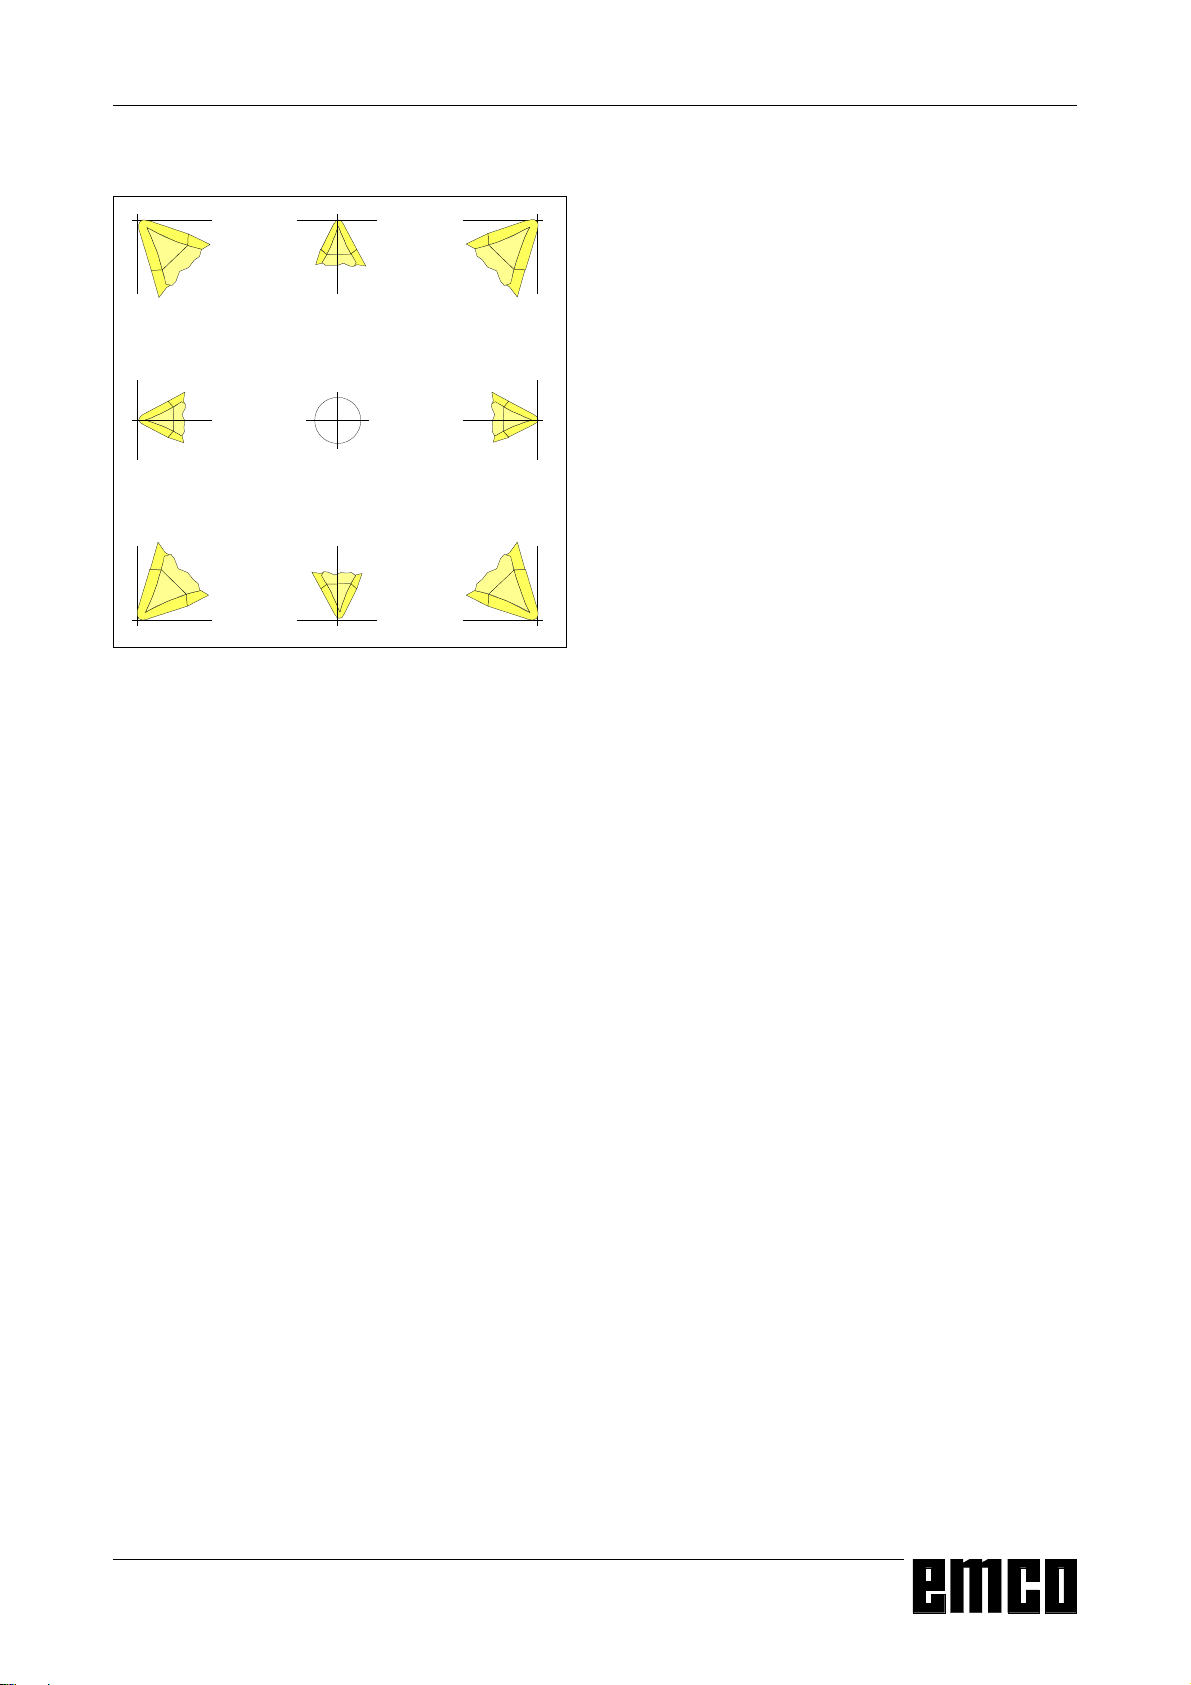
Every tool which is used for machining has to be
measured. The distances in both axis directions
between tool mount reference point and tool tip are to
be measured.
In the so-called tool register the measured length
corrections, the cutter radius and the cutter position
can be stored.
Every tool offset number D1 - D99 is related to a tool.
The correction number can be any register number,
but has to be considered with tool call in program.
Example
The length corrections of a tool in the tool turret
station 4 have been stored as correction number 41.
5
Tool radius R
Tool call in program: T4 D41
The address T marks the position in the tool turret,
the address D marks the correction number belonging
to the tool.
The length corrections can be measured halfautomatically, cutter radius and cutter position have
to be inserted manually.
The cutter position must always be inserted!
Inserting the cutter radius is only necessary for using
the cutter radius compensation with this tool.
The tool data measuring occurs for type 1-9:
L1: in -X direction absolute from point "N"
in radius
L2: in -Z direction absolute from point "N"
R: cutter radius
Type: cutter position (1-9)
The tool data measuring occurs for type 10:
L1: in -Z direction absolute from point "N"
Type: drilling tool (10)
B 4
EMCO WINNC SINUMERIK 810/820 T
BASICS
Cutter position
Cutter position (Type)
Look at the tool like it is clamped at the machine to
determine the tool type.
For machines with the tool below (in front of) the
turning centre (e.g. PC TURN 50/55) the values in
brackets must be used because of the opposite +X
direction of these machines.
With "wear" occurs the correction of not exact
measured tool data or worn tools after several
machining runs. The inserted length corrections will
be added to or subtracted from the geometry of the
tool incrementally.
X+/- .....incremental in diameter
Z+/-......incremental
R+/- .....incremental
B 5
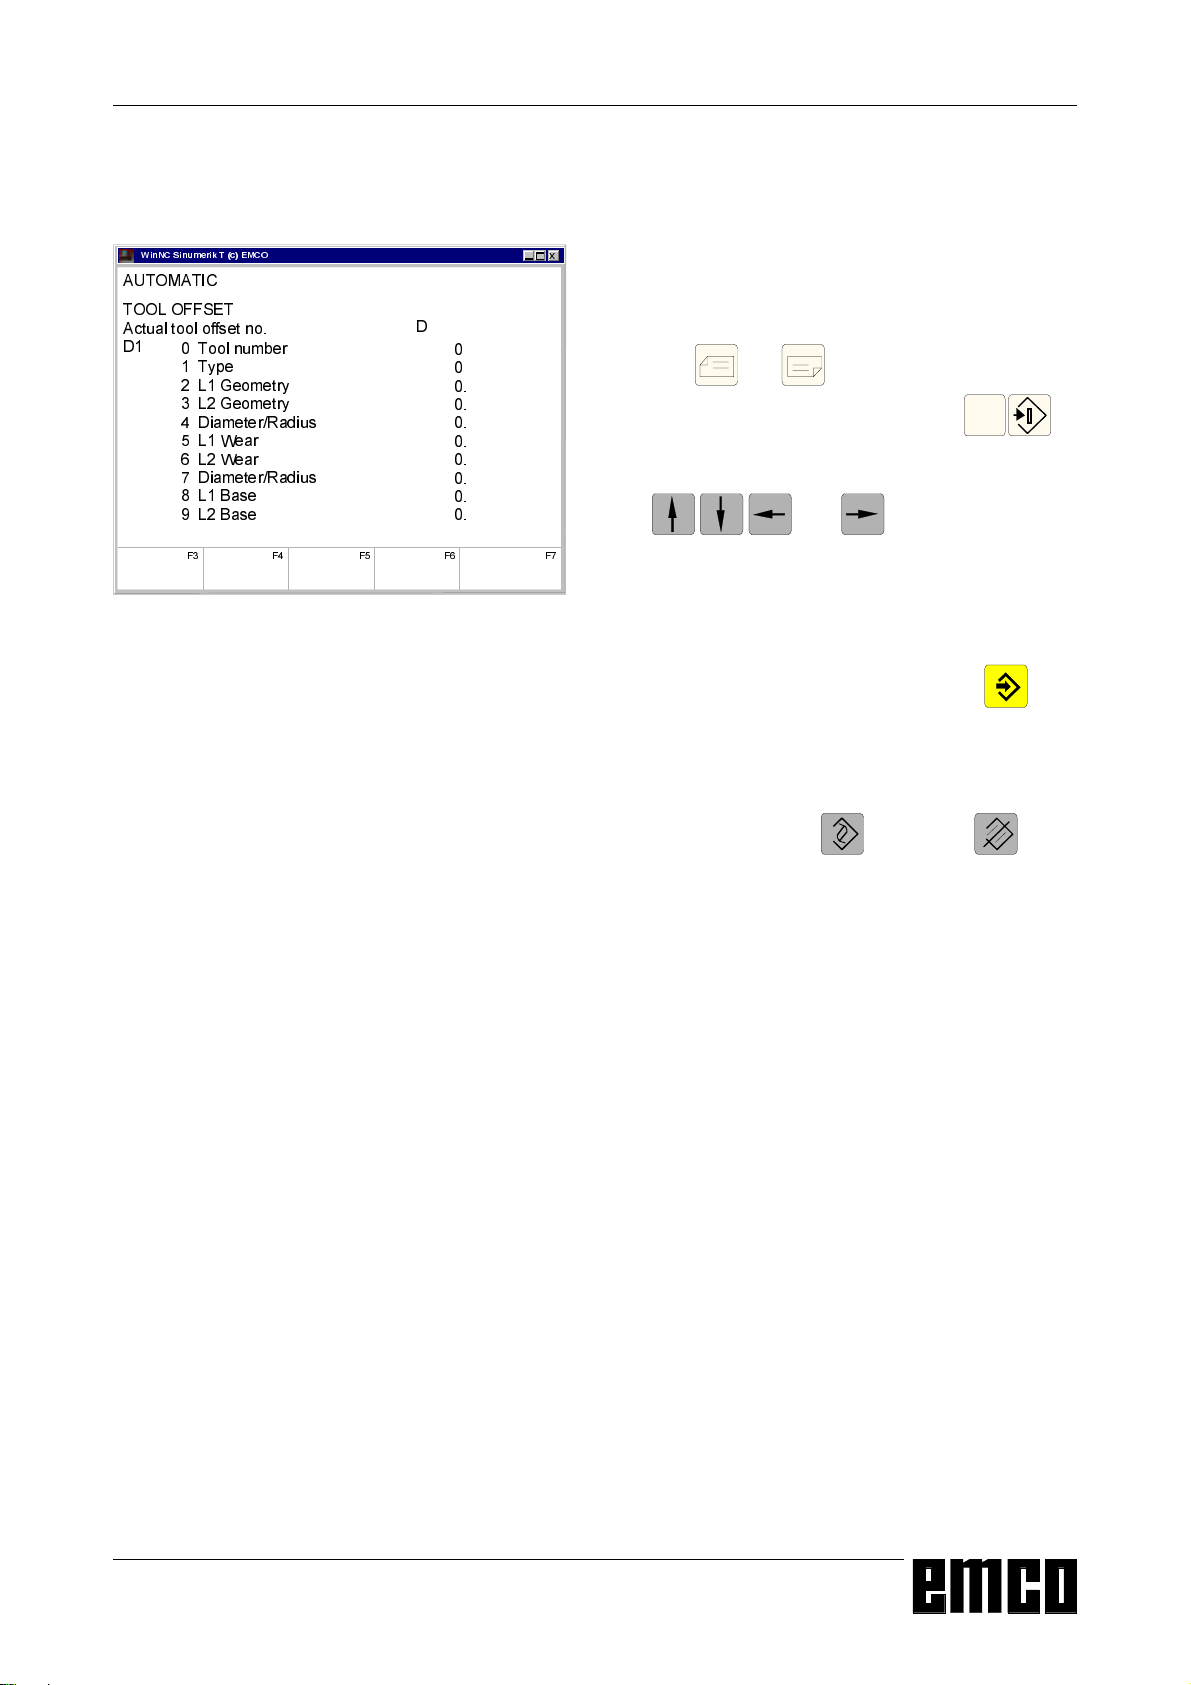
EMCO WINNC SINUMERIK 810/820 T
BASICS
Input of the Tool Data
:LQ1&6LQXPHULN7F(0&2
$8720$7,&
722/2))6(7
$FWXDOWRRORIIVHWQR
'
7RROQXPEHU
7\SH
/*HRPHWU\
/*HRPHWU\
'LDPHWHU5DGLXV
/:HDU
/:HDU
'LDPHWHU5DGLXV
/%DVH
/%DVH
) ) ) ) )
Input pattern for tool data
[
Select the softkey TOOL OFFSET in any mode.
The screen shows the input pattern for tool data.
'
• Select the desired tool offset number with the
keys and or by entry of the correction
number and the key "search" (e.g.
).
• Position the cursor (inverse mark) with the keys
and to the desired input
field.
Enter the desired value with the numeric keyboard.
The entered value will be shown at the input line
of the screen.
• Store the correction value with the key in the
tool offset register.
The cursor jumps to the next input position resp.
after input of the last value to the first value of the
next tool offset number.
Additive input with , delete with .
B 6

EMCO WINNC SINUMERIK 810/820 T
Tool Data Measuring by Scraping
BASICS
Manual Calculation
• Clamp a workpiece with exact measured diameter.
• Select the mode JOG
• Traverse with the tool turret disk onto the workpiece
(standing spindle)
Reduce feed to 1 %
Hold a sheet of paper between workpiece and tool
turret disk and traverse with the tool turret disk (tool
mount reference point) so far onto the workpiece
until the paper stucks.
• Read and note the actual Z position (Z1) of the
slide.
• Move away the tool turret from the workpiece and
swivel in the first tool to be measured.
• Traverse with the tool tip onto the face of the
workpiece, insert paper, reduce feed.
• The difference between old and new Z position is
the tool offset L2 = Z1 - Z.
• Traverse with the tool tip onto the circumference of
the workpiece, insert paper, reduce feed.
• Read and note actual x position (X1) of the slide.
• Slide position X1 and diameter of the workpiece D
are diameters; the tool offset L1 is a radius.
• L1 =
• Enter the values L1 and L2 and the type (cutter
• Repeat this sequence for the following tools.
X1-D
2
position) and the cutter radius for the respective
tool offset..
Automatic Calculation
• Clamp a workpiece with exact measured diameter.
• Select the mode JOG
• Traverse with the tool turret disk onto the workpiece
(standing spindle)
Reduce feed to 1 %
Hold a sheet of paper between workpiece and tool
turret disk and traverse with the tool turret disk (tool
mount reference point) so far onto the workpiece
until the paper stucks.
• Read the actual Z position (Z1) of the slide and key
in this value into the input line.
• Press softkey TO AUTOM.
• Move cursor to the input field "reference Z" and
take over the actual Z position which was put in into
the input line by pressing .
• Enter workpiece radius as "reference X".
• Move away the tool turret from the workpiece and
swivel in the first tool to be measured.
• Traverse with the tool tip onto the face of the
workpiece, insert paper, reduce feed.
• Enter the type (cutter position) and the cutter radius
for the respective tool offset.
• Press softkey TO AUTOM.
• Enter tool offset number, ZO no. = 53 and press the
softkey STORE Z-AXIS.
• Traverse with the tool tip onto the circumference of
the workpiece, insert paper, reduce feed.
• Press softkey STORE X-AXIS.
• Repeat this sequence for the following tools.
Note
With drilling tools (type 10) L1 is the length of the tool
in Z direction.
B 7
EMCO WINNC SINUMERIK 810/820 T
BASICS
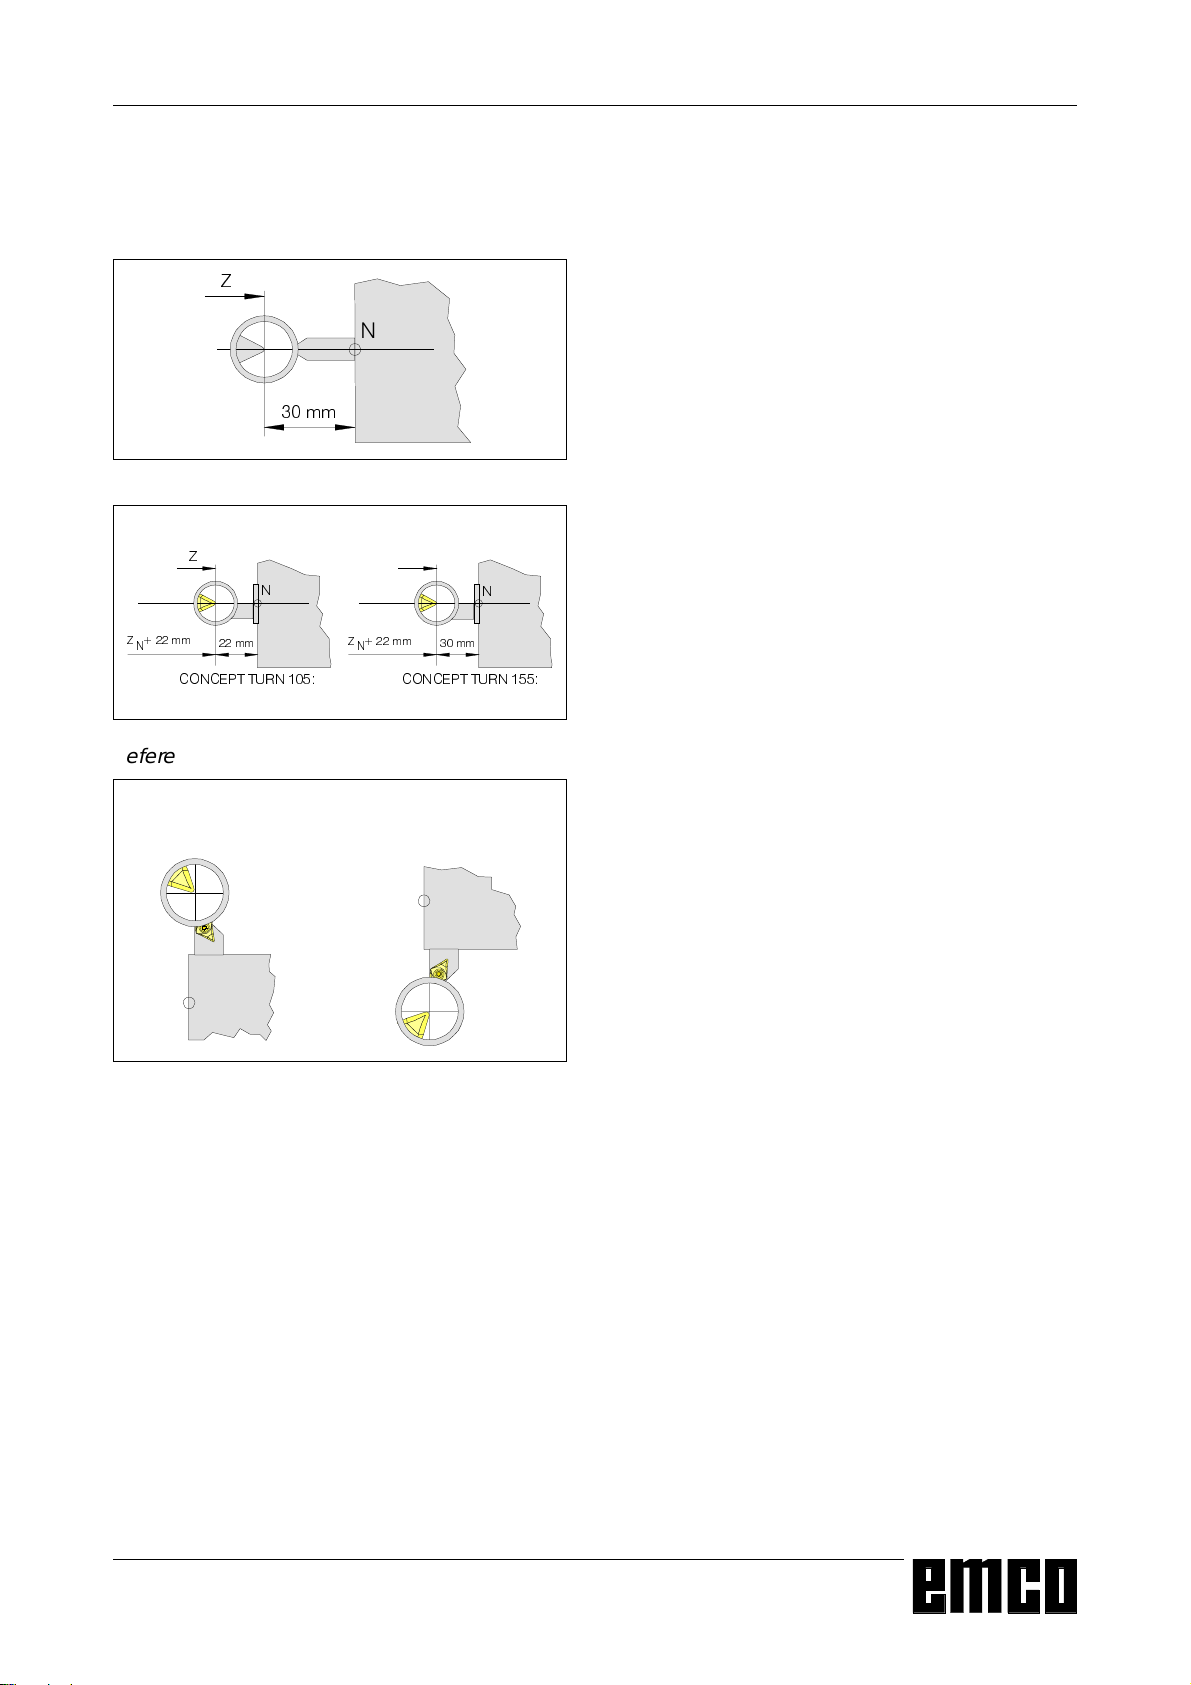
Tool Data Measuring with the
Optical Presetting Device
=
1
PP
Reference tool measuring Concept Turn 50/55
=
=PP
1
&21&(377851
PP
1
=PP
1
&21&(377851
1
PP
Reference tool measuring Concept Turn 105/155
CONCEPT Turn 50/55 CONCEPT Turn 105/155
1
1
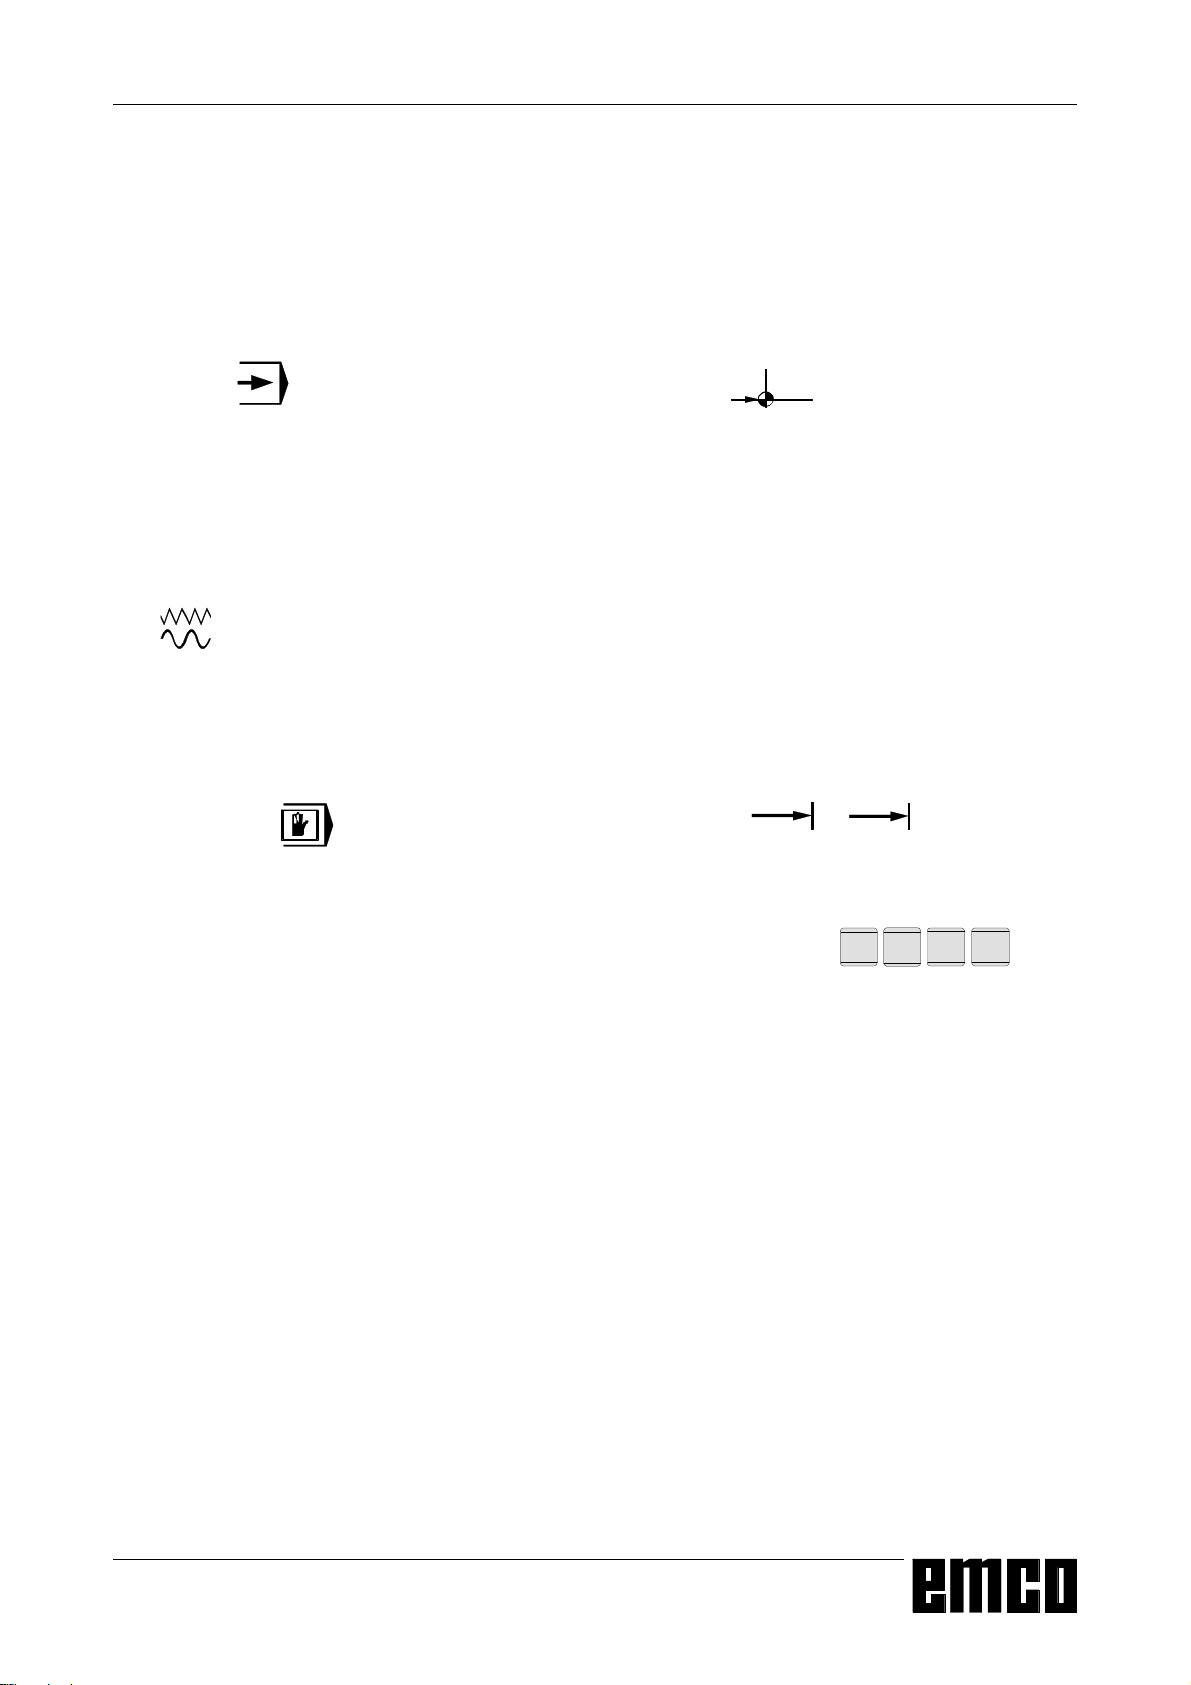
Traverse into the graticule with the tool
Tool data measuring with the optical presetting device
occurs in principle in the same way like with scraping.
The optical way is more precise because touching
will be avoided and the tool is displayed enlarged in
the optics.
Manual Calculation
• Mount the optical presetting device in the working
area in a way, that the measuring point can be
reached with the reference tool and with all tools
to be measured.
• Select the mode JOG
• Mount the reference tool at station 1 of the tool
turret
• Swivel in station 1
• Traverse the tip of the reference tool into the
reticule of the optics.
Note: An object viewed through the optics is
mirrored in the X and Z axis.
• Read and note actual slide position displayed at
the screen..
• The tip of the reference tool is at X height of the
tool mount reference point N and in Z direction
30 mm (PC TURN 50/55/155) or 22 mm (PC
TURN 120/125: 20 mm tool length + 2mm
outstanding length of the holder) in front of N.
ZN = Z-30 or Z-22 XN = X
• Swivel tool turret and traverse with the first tool to
be measured into the reticule.
• The difference between the old position of the tool
mount reference point (XN, ZN) and the new position
are the tool offsets L1, L2.
The X values are in diameter and must be halved
because L1 is a radius value.
Automatic Calculation
• Traverse with the reference tool into the reticule.
• The tip of the reference tool is in X at the position
of the tool mount reference point N, in Z 30 mm
(PC TURN 50) or 22 mm (PC TURN 120: 20 mm
tool length + 2mm outstanding length of the holder)
in front of N.
ZN = Z-30 or Z-20 XN = X
• Store the coordinates XN and ZN in a zero offset
(G54-G57).
• Swivel in the first tool.
• Clamp next tool etc.
• Traverse into the reticule with the first tool.
• Enter the type (cutter position) and the cutter
radius for the respective tool offset.
• Select Softkey TO AUTOM.
• Enter tool offset number, ZO no. = (54-57) (not 53)
and press the softkeys STORE X-AXIS and
STORE Z-AXIS.
• Traverse the next tool into the reticule etc.
Note
With drilling tools (type 10) L1 is the length of the tool
in Z direction.
B 8
EMCO WINNC SINUMERIK 810/820 T
C: Operating Sequences
Survey Modes
OPERATING SEQUENCES
AUTOMATIC
For working off a part program the control calls up
block after block and interprets them.
The interpretation considers all corrections which are
called up by the program.
The so-handled blocks will be worked off one by one.
JOG
With the JOG keys the tool can be traversed manually.
In the submode OVERSTORE (softkey) you can
switch on the spindle and swivel the tool turret.
MDI-AUTOMATIC
You can enter blocks of a part program in the
intermediate store.
The control works off the inserted blocks and deletes
the intermediate store for new entries.
REFPOINT
This mode is used to approach the reference point.
With reaching the reference point the actual position
store is set to the value of the reference point
coordinates. By that the control acknowledges the
position of the tool in the working area.
With the following situations the reference point has
to be approached:
• After switching on the machine
• After mains interruption
• After alarm "Approach reference point" or "Ref.
point not reached".
• After collisions or if the slides stucked because of
overload.
I 1 ... I 10 000
In this mode the slides can be traversed for the
desired increment (1...10000 in µm/10-4 inch) with
means of the JOG keys -X
The selected increment (1, 10, 100, ...) must be
larger than the machine resolution (smallest possible
traverse path), otherwise no movement will occur.
1
...
10000
-Z +Z.
+ X
C 1

EMCO WINNC SINUMERIK 810/820 T
OPERATING SEQUENCES
Approach the Reference Point
By approaching the reference point the control will be
synchronized with the machine.
• Select the mode REFPOINT.
• Press the JOG keys -X or
to approach the reference point in the respective
direction.
• With the key
automatically (PC keyboard).
Danger of Collisions
Take care of obstacles in the working area (chucks,
clamped workpieces etc.).
After reaching the reference point the position of the
reference point will be displayed at the screen as
actual position. Now the control is synchronized with
the machine
REF
both axes will be approached
ALL
resp. -Z or
+ X
+Z
Input of the Gear Position
(only for EMCO PC Turn 50)
For that the control can supervise the correct spindle
speed, the selected gear (belt) position of the machine
must be entered.
• Press the softkey SETTING DATA in any mode.
• Extend the displayed softkey menu with
Setting of Language and
Workpiece directory
• Press the softkey SETTING DATA.
• Extend the softkey line with the key
press the softkey GENERAL DATA
• In the input pattern you can select the language
and the workpiece directory.
Workpiece Directory
In the workpiece directory the CNC programs created
by the operator will be stored.
The workpiece directory is a subdirectory of that
directory in which the software was installed.
Enter the name of the workpiece directory with the
PC keyboard, max. 8 characters, no drives or pathes.
Not existing directories will be created.
Active Language
Selection from installed languages, the selected
language will be activated with restart of the
software.
Input with PC keyboard:
• DT for German
• EN for English
• FR for French
• SP for Spanish
• NL for Netherlands
>
and
the key
• Press the softkey spindle.
• Move the cursor to the input field (Spindle gear
stage" and enter the corresponding gear position..
1 gear position 1 120 - 2000 U/rev
2 gear position 2 280 - 4000 U/rev
>
.
C 2
EMCO WINNC SINUMERIK 810/820 T
N
Block number (not necessary)
5
OPERATING SEQUENCES
Input of Programs
Part programs and subroutines can be entered in the
modes
JOG, AUTOMATIC, INC 1 ... INC 10 000 and
REFPOINT.
Call up an existing or new program
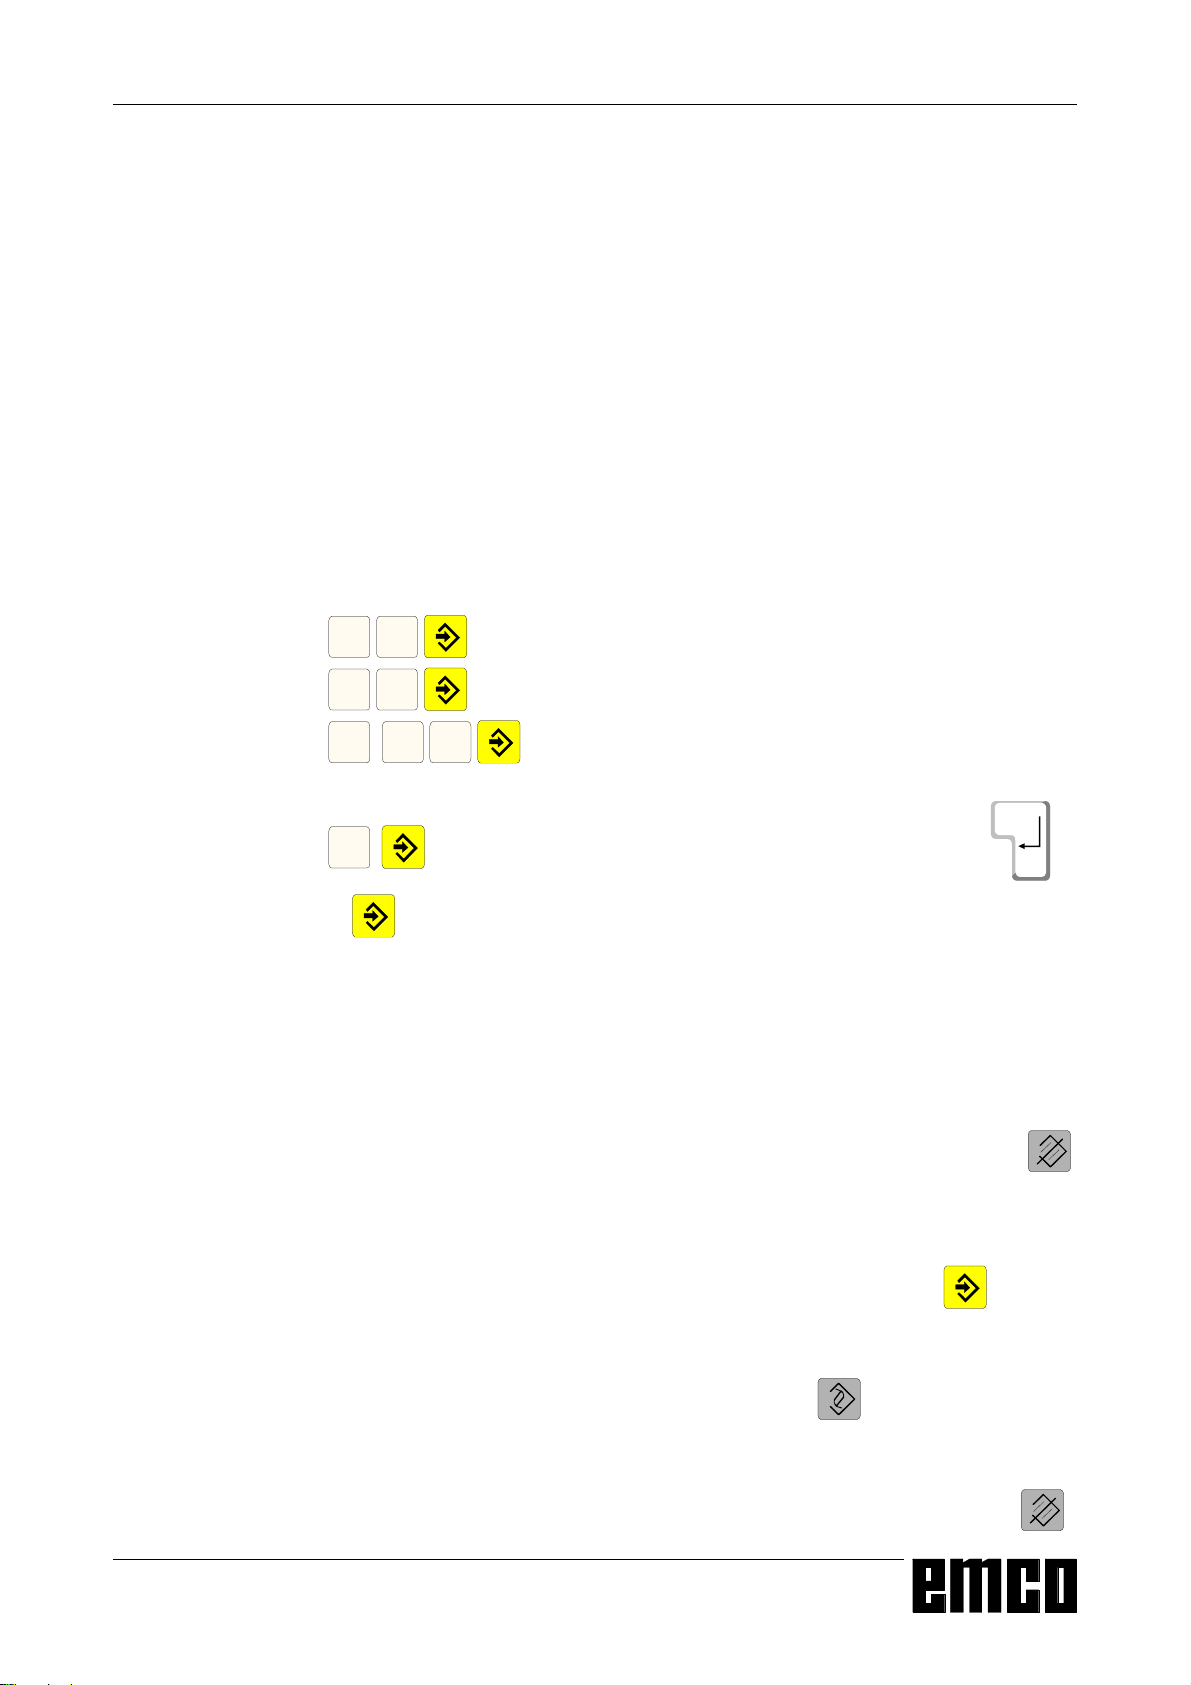
• Press softkey PART PROGRAM
• Press softkey EDIT
• Enter program number %... or L...
• Press softkey SELECT PROGRAM
Blocks in an existing program will be displayed.
Input of a block
Example:
G
1. word
1
X
N
2. word
3
... ... ...
LF
LineFeed - block end (with PC keyboard )
or
Insert Block
Position the cursor before the block, that should
follow the inserted block and enter the block to be
inserted.
Delete Block
Position the cursor before the block, enter block
number (if no block number; N0) and press key .
Insert Word
Position the cursor before the word, that should
follow the inserted word and enter the word (address
and value) to be inserted and press .
Alter Word
Position the cursor before the word to be altered,
enter word and press .
Delete Word
Position the cursor before the word to be deleted,
enter the address (e.g. X) and press the key .
C 3
EMCO WINNC SINUMERIK 810/820 T
WinNC Sinumerik T (c) EMCO
AUTOMATIC
CONTOUR LINE - CIRCLE
G 03
G 02
Ep2
R
Ep1
X
Z
Wa
Wa
R
Ep1
EP2
:
A
:
B
:
Z
:
X
G
OPERATING SEQUENCES
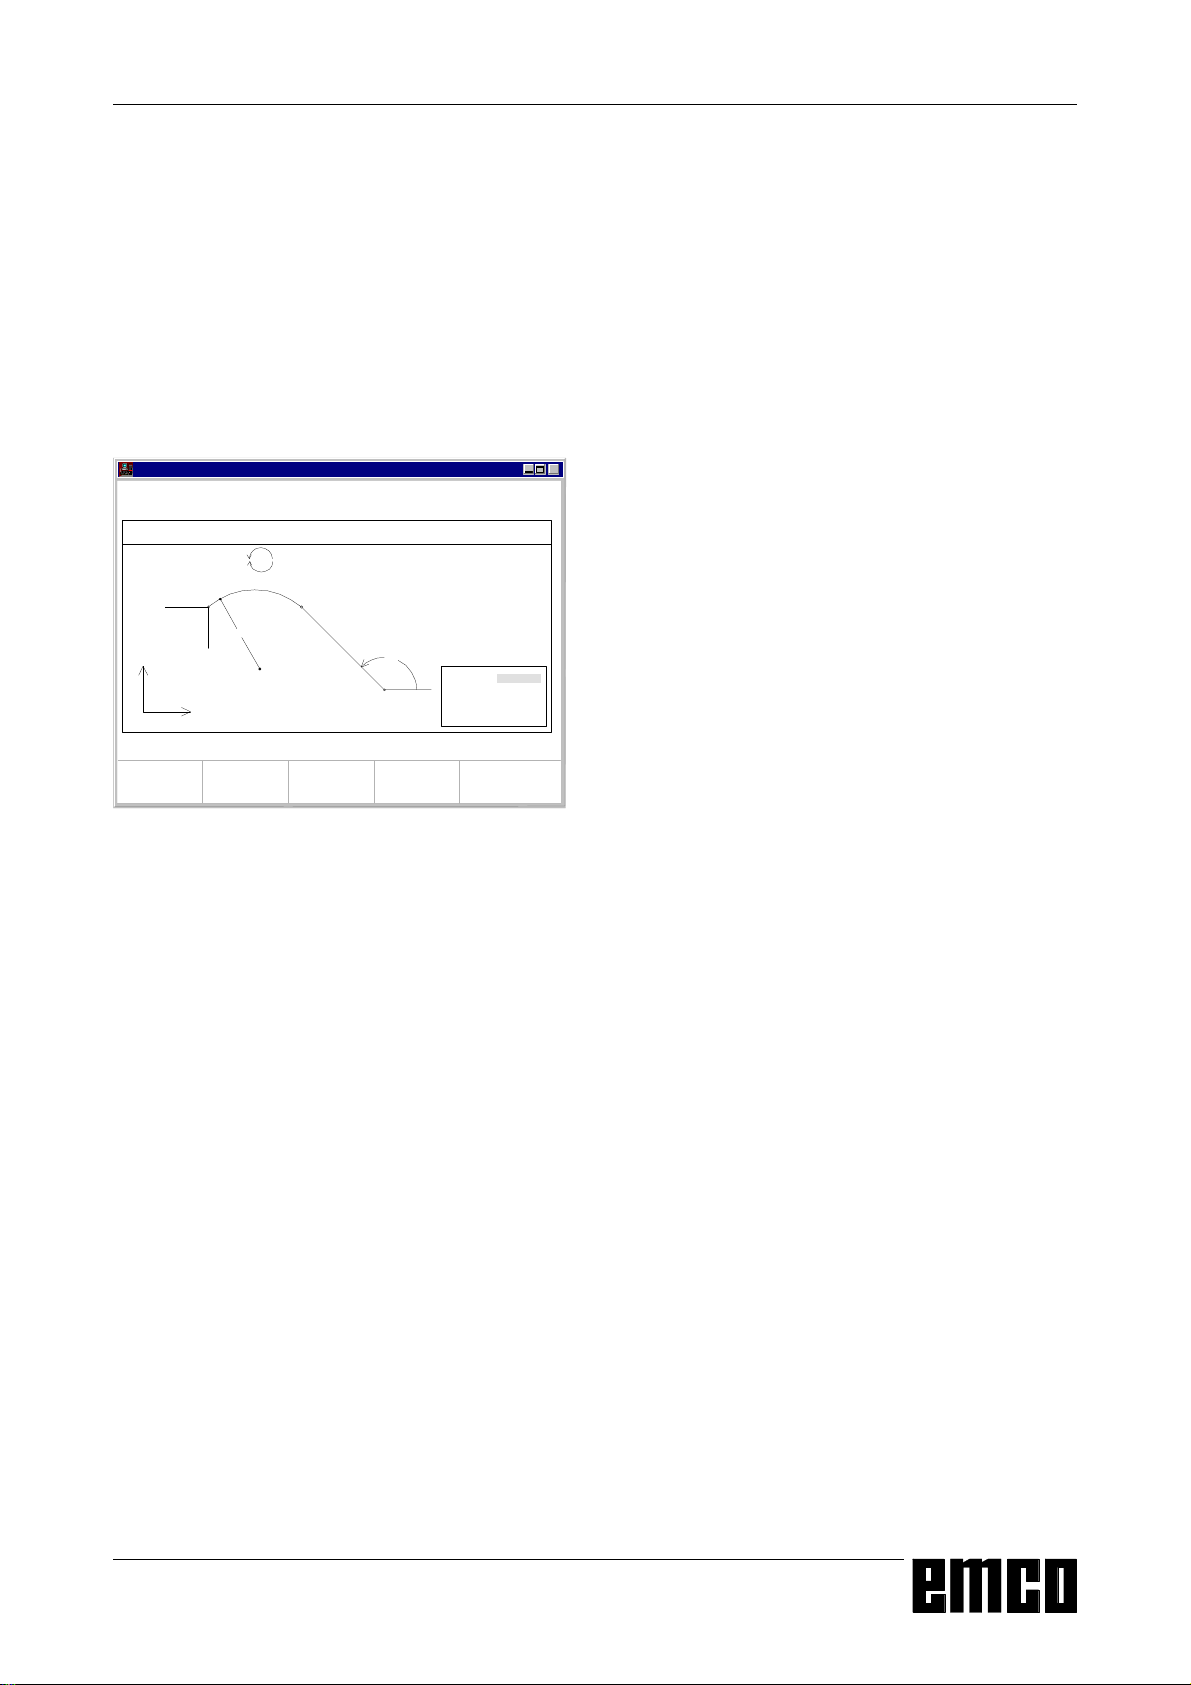
Program Input with Guiding Function
In an opened program you can enter blocks guided by
menus.
Frequently used G and M commands are displayed
as softkey functions.
It is also possible to enter predefined contour drafts
without need to calculate intermediate positions.
Example: Program contour draft line - circle
• Press softkey GUIDING
• Press softkey CONTOUR
x
• Press softkey LINE - CIRCLE
• The input pattern beside will be displayed. The
selected contour draft (line - circle) is displayed
graphically.
• Enter with the keyboard the input values one by
one.
• If in the input fields several values are in curved
brackets only one of this values must be entered.
If you have entered several values, you can delete
the odd values with the softkey PARAM. DELETE.
MEMORY
MENU
F3 F4 F5 F6 F7
SELECT
MEMORY
STORE
Input pattern for guiding line - circle
DELETE
PARAM.
• Press the softkey STORE, SELECT MEMORY or
MEMORY MENU when input is finished.
• Now the contour draft will be stored as block in the
part program with all the entered geometrical
values. The software automatically creates a block
end (LF) and displays the inserted block.
Program Input with CAD/CAM Systems
Pricipially NC programs from CAD/CAM systems
can be read in into EMCO WinNC SINUMERIK 810/
820 T.
Act as following:
• The NC program must be put out in the format of
the SINUMERIK 810/820.
• Rename the file.
The NC programs of WinNC will be stored in the
following way:
%MPFxxxx main program
%SPFxxxx subprogram
(xxxx program number)
e.g. rename with WINDOWS file manager:
from: PART1.81M
to: %MPF123
• Import the program with DATA IMPORT (see
Data Input/Output)
C 4

EMCO WINNC SINUMERIK 810/820 T
OPERATING SEQUENCES
Program Administration
• Press softkey PART PROGRAM
• Press softkey PROGR.-HANDLE
• In the softkey line the functions
COPY
RENAME
DELETE
will be displayed.
Copy Program
Example:
• Enter with keyboard:
%88=%5
• Press the softkey COPY
• The software copies the program %88 and stores
it again with the program number %5.
The program %88 is still existing.
Rename Program
Example:
• Enter with keyboard:
%12=%15
• Press the softkey RENAME
• The software renames the program %12 to %15.
The program % 12 will not be kept.
WinNC Sinumerik T (c) EMCO
AUTOMATIC
DATA INPUT
Available memory: 62589 Zeichen
Data type:
Interface no. for data in:
Interface allocation:
F3 F4 F5 F6 F7
DATA-IN
START
DATAOUT
2
1 = RTS-LINE
2 = RTS-LINE
BTR
START
DATA
IMPORT
STOP
Delete Program
Example:
• Enter with keyboard:
%22
• Press the softkey DELETE
• The software deletes the program %22.
x
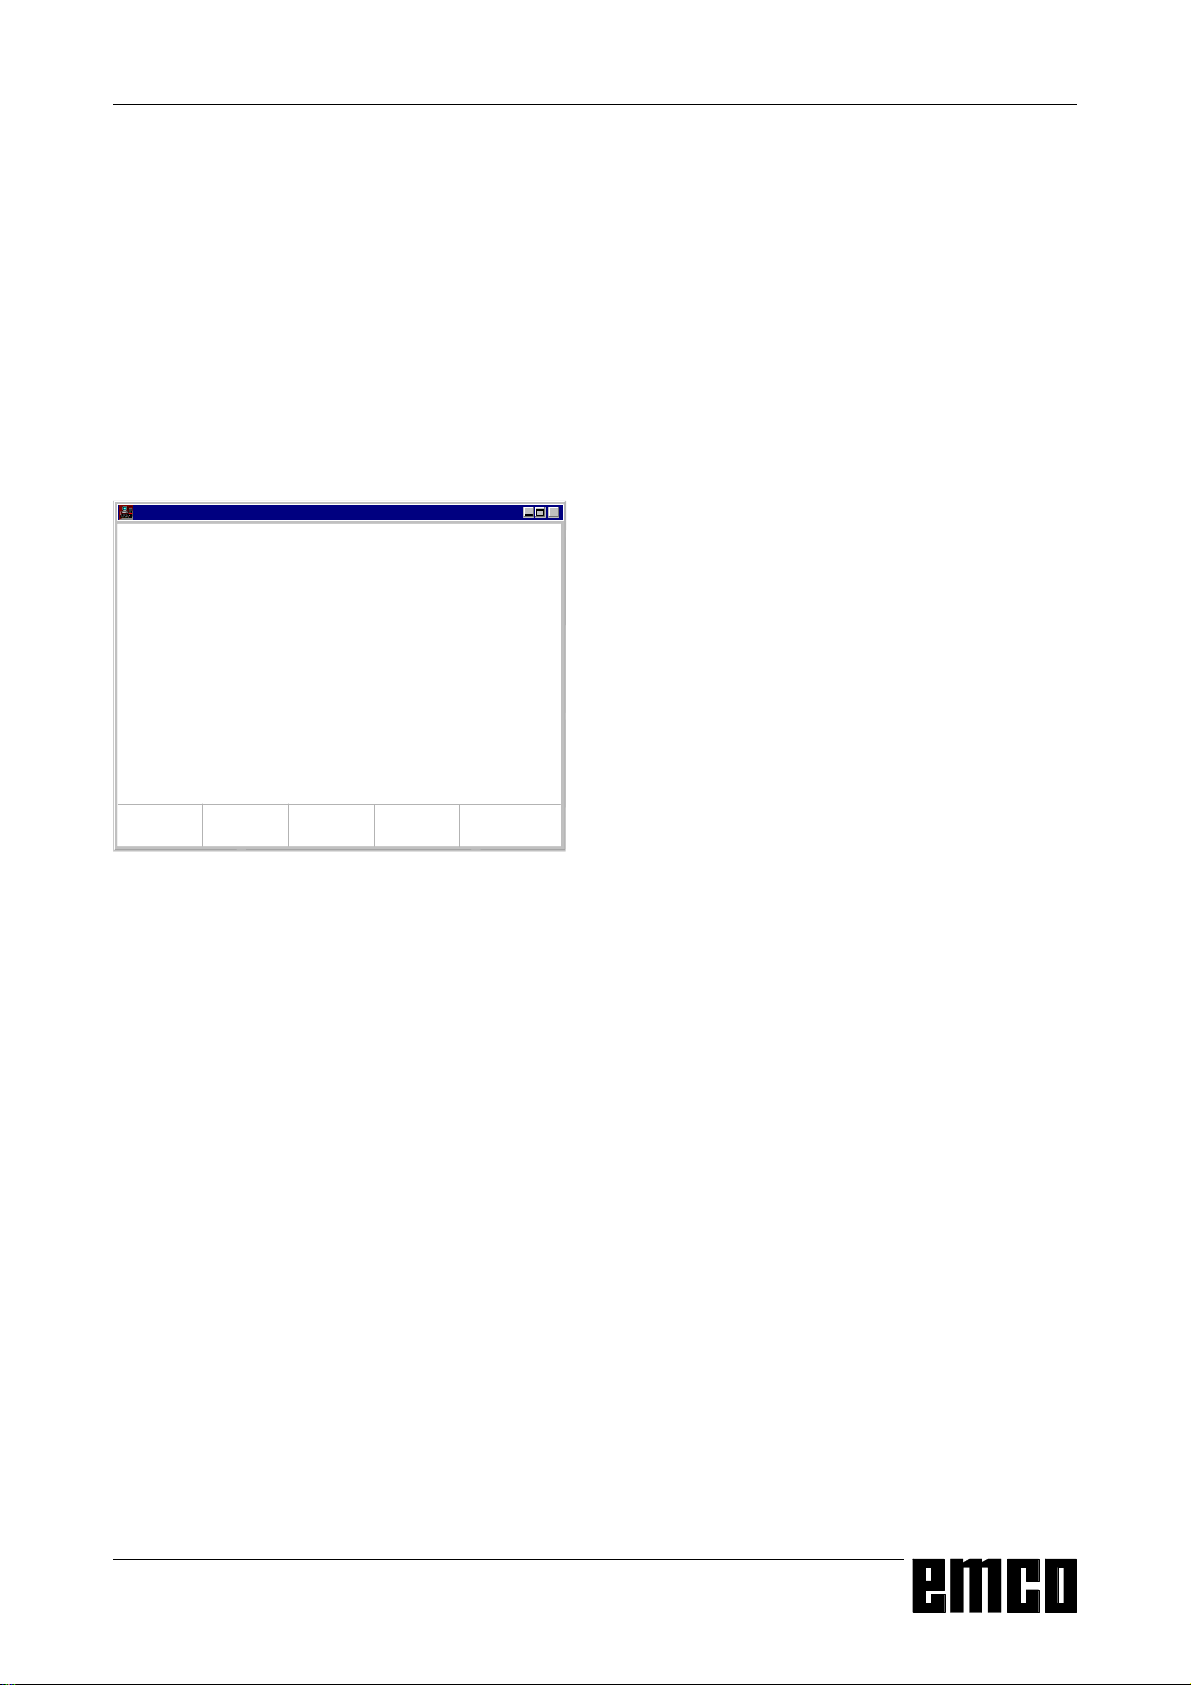
Data Input-Output
• Press softkey DATA IN-OUT
• The input pattern beside will be displayed
• With "Interface no. for data in:" you can select a
serial interface (1 or 2) or a drive (A, B or C).
1 serial interface COM1
2 serial interface COM2
A disk drive A
B disk drive B
C hard disk drive C, workpiece directory (can be
determined with installation or with GENERAL
DATA in SETTING DATA) or import/export
directory (see WinConfig, 4.1 Alter Directories)
Input pattern for data input-output
C 5
EMCO WINNC SINUMERIK 810/820 T
OPERATING SEQUENCES
Data Input via COM1 / COM2
• Press softkey DATA IN START. This will start the
receiving function of the software.
• At the right top edge of the screen DIO (Data
Input/Output) will be displayed. Destination signs
the data from the sender (punched tape drive, ...).
• Start the sender.
• With the softkey STOP you can abort the data
input at any time, with DATA IN START you can
restart data input.
• A direct call-up of certain data by the software is
not possible with data input.
WinNC Sinumerik T (c) EMCO
AUTOMATIC
DATA IMPORT
Main program:
Begin: % 0
End: % 0
Device for data in: 1
Device allocation: A= Drive A:
TOOLOFFSET
F3 F4 F5 F6 F7
ZEROOFFSET
Subroutine:
Begin: L 0
End: L 0
B= Drive B:
C= Program path
MAINPROGRAM
Input pattern for data import
SUBROUTINE
STOP
x
Data Import
With the function data import you can load data from
the drives A, B and C.
• Press softkey DATA IMPORT
• Select drive (device for data in)
• Enter below "Mainprogram" resp "Subprogram"
the following program numbers:
Begin: the first program to read in
End: the last program to read in
• Press the softkey MAINPROGRAM or
SUBROUT INE to start reading in the data.
• Transmission of zero offsets, tool data:
Press the softkey START.
• With the softkey STOP you can interrupt the data
input at any time.
C 6
EMCO WINNC SINUMERIK 810/820 T
OPERATING SEQUENCES
WinNC Sinumerik T (c) EMCO
AUTOMATIC
DATA OUTPUT
Available memory: 63548 Zeichen
Interface no. for data out:
Interface allocation:
TOOLOFFSET
F3 F4 F5 F6 F7
ZEROOFFSET
MACH.
DATA
2
1 = RTS-LINE
2 = RTS-LINE
PARTPROGRAM
PLCM-DATA
Input pattern for data output
WinNC Sinumerik T (c) EMCO
AUTOMATIC
DATA OUTPUT
Main program:
Begin: % 0
End: % 0
Interface no. for data out: 2
Interface allocation: 1=RTS-LINE
F3 F4 F5 F6 F7
EXT
START
MAINPRG
START
Subroutine:
Begin: L 0
End: L 0
2=RTS-LINE
SUBROUT
START
STOP
Input pattern for data output - part program
x
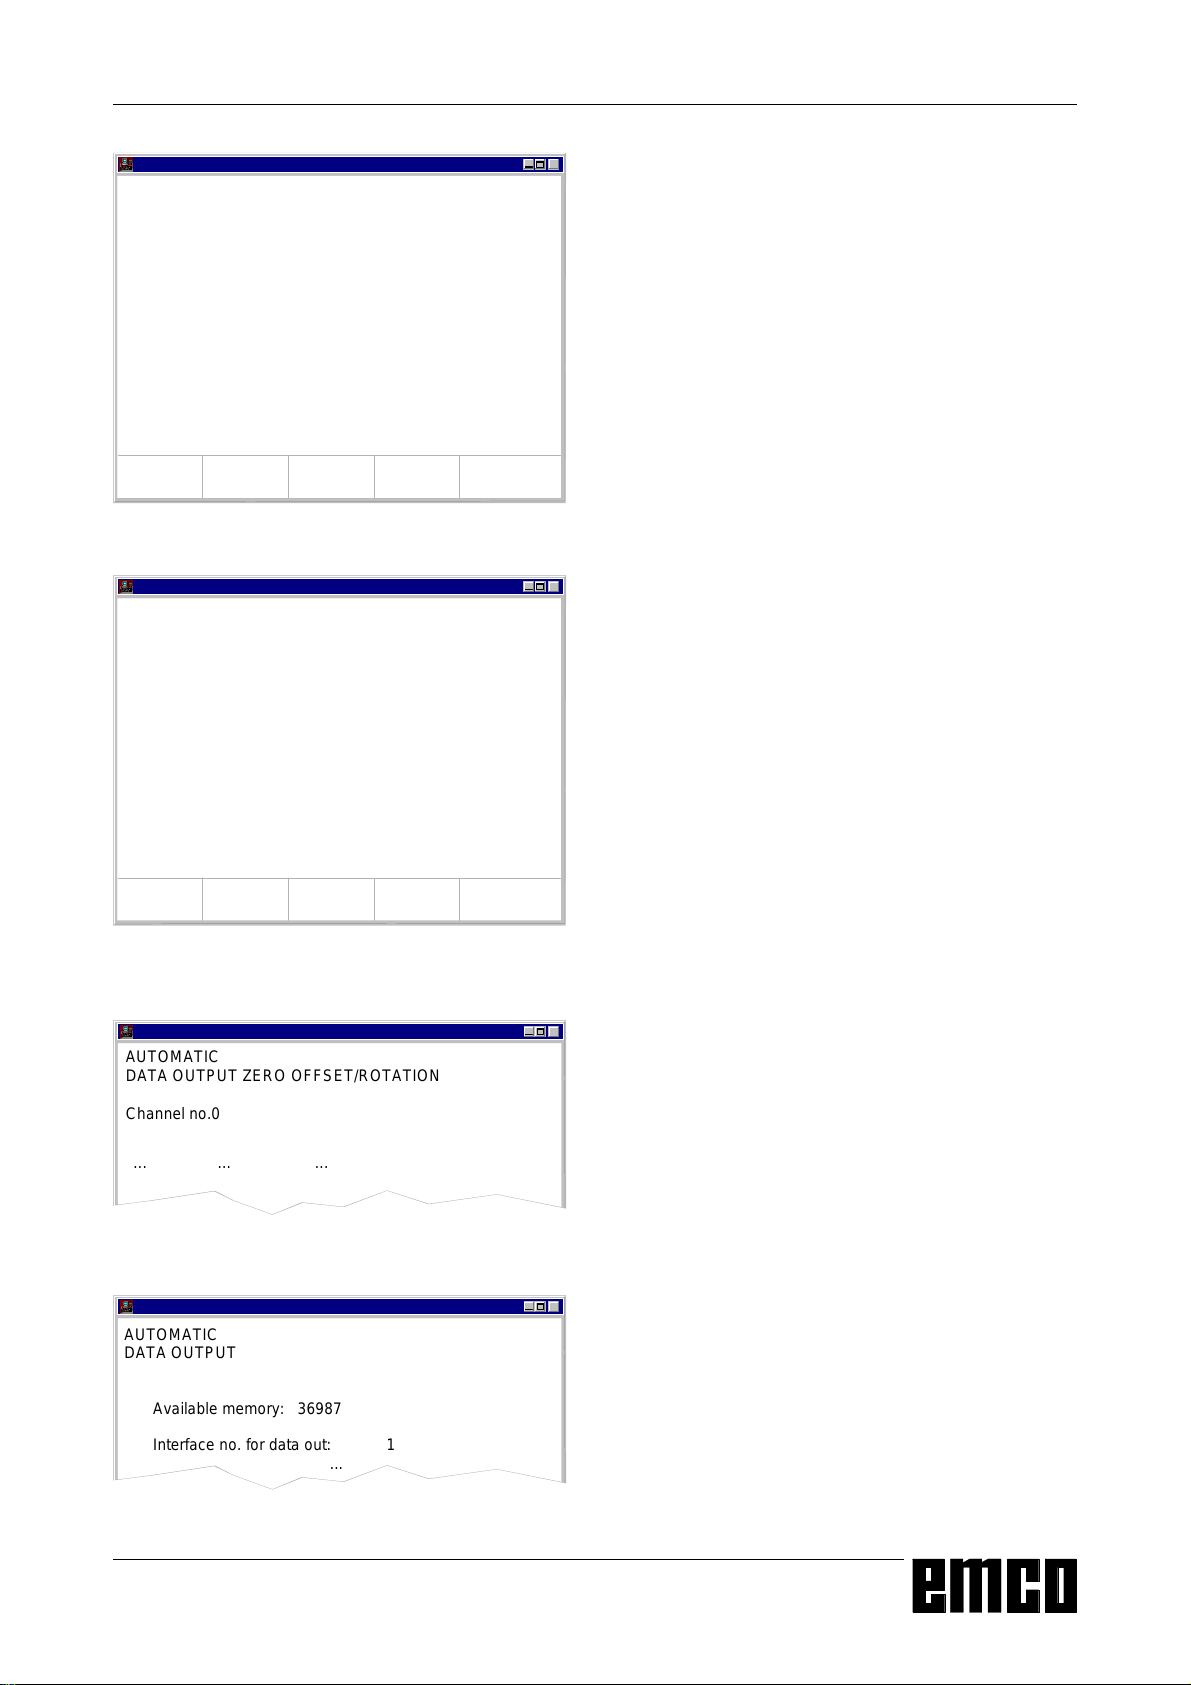
Data Output
• Press softkey DATA OUT.
• The screen shows the input pattern beside.
• With "Interface no. for data out" you can enter a
serial interface (1 or 2) or a drive (A, B or C).
• If you send data to disks, this data will be sent in
the same format as with output to the serial
interface. This data have to be read in with DATA
IMPORT and must not be copied directly into the
workpiece directory.
x
Example: Program output
• Press softkey PART PROGRAM
• The screen shows the input pattern beside
• Enter below mainprogram resp. subprogram the
following numbers:
Begin: the first program to be sent
End: the last program to be sent
• Press softkey MAINPRG START resp. SUBROUT
START. This will start the send function of the
software.
• With the softkey STOP you can interrupt data
output at any time, with MAINPRG START resp.
SUBROUT START you restart data output with
the first program to be sent.
WinNC Sinumerik T (c) EMCO
AUTOMATIC
DATA OUTPUT ZERO OFFSET/ROTATION
Channel no.0
... ... ...
Data output zero offset - rotation
WinNC Sinumerik T (c) EMCO
AUTOMATIC
DATA OUTPUT
Available memory: 36987
Interface no. for data out: 1
...
Input pattern for data output - printer
x
Example: Zero offset output
You can select to put out zero offsets or coordinate
rotations.
Channel-no. 0: Output zero offsets
Channel-no. 1: Output coordinate rotation
x
Print Data
• Press softkey DATA OUT
• The screen shows the input pattern beside.
• With "Interface no. for data out" you can enter P to
select a printer.
• Act like data output
C 7
 Loading...