

Eloma GENIUS Compact, Joker T Operation Manual
Operation Manual
Combi-Steamer
GENIUS Compact
Combi-Steamer
Joker T


Dear customer,
You have chosen an Eloma combi-steamer.
Thank you for your confidence.
This operation manual is for the combi steamer model Genius compact and Joker T.
Please read the installation and operating instructions in full before starting up the appliance and make
sure to pay particular attention to the safety information.
They contain important information on correct installation and operation.
This unit may only be used for preparing food in commercial kitchens. Every other usage is against
definition and therefore dangerous.
For information and tips please contact:
Eloma GmbH . Innovative Koch- & Backtechnik
82216 Maisach / Germany Otto-Hahn-Str. 10. Tel.: +49 (0) 8141 395-0 Fax: +49 (0) 8141 395-130
For our cooking forum and user tips, visit our website at www.eloma.com.
User hotline: +49 (0) 35023 63887
Service
You can reach us practically around the clock, 7 days a week, 365 days a year:
Your service hotline: +49 (0) 35023 63888
For information on liability for material defects and warranty conditions, please consult our
general terms and conditions of business (T&C).
Eloma GmbH D-82216 Maisach
Appliance model:. ...........................
Appliance Nr.:. ................................
Dealer: Installer:
Date:………………… Installed on:……………….

2
Operation Manual
Combi-Steamer Genius compact and Joker T 6-23
Table of contents:
1. Safety information .............................................. 4
2. Control panel and functional description .... 7
2.1 Control panel Joker T, Genius compact .... 7
2.2 Operation with Joker Scout ....................... 8
2.3 Manual operation ....................................... 8
3. Start-up in manual operation .............................. 9
3.1 Manual input . ............................................. 9
3.2 Manual operation – Input of one step . ...... 10
3.3 Manual operation – Input of two steps . ..... 11
3.4 Manual operation – Input of several steps . 12
3.5 Display of the actual situation .................... 12
3.6 Display of actual values ............................. 13
3.7 Additional functions ................................... 14
3.8 Delay start programming – Manual input ... 14
4. Cooking procedures . .......................................... 15
5. Program Storage ................................................ 16
5.1 Save Programs .......................................... 16
5.2 Delete a Program ...................................... 19
5.3 Copy a Program ........................................ 19
5.4 Select and start a Program from the Program
List ............................................................. 20
5.5 Select and start a Program from the
Favourite List . ............................................ 20
5.6 Delayed start in program operation ........... 21
6. Menu groups in fully automatic operation . ........ 22
6.1 Select and start a program
via menu group .......................................... 22
6.2 Picto operation .......................................... 22
7. Special Programs ............................................... 23
7.1 Regenerating . ............................................ 23
7.2. LT-Cooking (Low temperature) ................. 24
7.3 Cook & Hold .............................................. 25
7.4 Delta-T- Cooking ....................................... 26
7.5 Baking ....................................................... 27
8. Combi cooking . .................................................. 28
9. Preheat – Cool Down Active Temp .................. 29
10. HACCP .............................................................. 30
10.1 Serial Interface – Connecting cable .......... 30
10.2 Selection and printing of recorded
cooking processes .................................... 31
11 Special programs ............................................... 32
11.1 Weekly program ........................................ 32
11.2 Setup ......................................................... 32
11.2.1 Time/Date ............................................... 32
11.2.2 Start Sreen ............................................. 33
10.2.3 Language ............................................... 33
11.2.4 Unit parameters ...................................... 33
12 Cleaning the cooking chamber .......................... 34
12.1 Automatic self cleaning Autoclean ............ 34
12.2 Delay start of autoclean ............................. 35
12.3 Selection and printing of recorded autoclean
protocols . .................................................. 35
12.4 Manual Cleaning ....................................... 35
13. Hints on operational safety ................................ 36
14. Communication ProConnect Combi steamer 37
14.1 Start up communication ProConnect
Combi steamer . ......................................... 37
14.2. Connection to Kitchen control systems ..... 37
15. Error ................................................................... 38
15.1 Error display .............................................. 38
15.2 Error Message ........................................... 39
15.3 Trouble Shooting ....................................... 40
15.4 Turn off the combi steamer ....................... 40
16. Cleaning and maintenance ................................ 41
17. EC Declaration of Conformity ............................ 42
Version 1.4 Article
No. EL0501283 07/2013

Pictograms/symbols used
Danger!
Warning! Caution
Indicates a situation presenting an
immediate danger, which, if
Indicates a potentially dangerous
situation, which, if
Indicates a potentially dangerous
situation, which, if
if not avoided, will result in
serious injury or death.
not avoided, could result in
serious
injury.
not avoided, could result in minor or
moderate injury.
Caustic substances
Caution: Risk of burns
Caution: Hot steam
Caution: Hot liquid
Risk of fire
Warning: Dangerous electrical voltage

4
1. Safety information
- Installing the appliance incorrectly, making incorrect settings on it or modifying
it can lead to damage, injury or even death.
- Read the installation and operating instructions for the combi steamer through carefully
before starting it up.
Use for intended purpose
- The appliance shall only be used for its intended purpose, namely the professional preparation of food.
- Eloma combi steamers are designed for use in commercial environments.
Method of operation
- The combi-steamer Genius compact, Joker T offers every possibility to experience modern
professional cooking technology. Use fresh or convenience products and select for every
product the best possible cooking cabinet climate.
- With just a light touch you direct the operating rocker Joker any way you like to determine
cooking temperature and humidity levels for any type of food in up to 20 cooking steps, a
feature we call Steptronic ®.
- Temperatures and humidity levels are displayed in the movable Climatic ® cursor.
Every movement of the Climatic
®
Cursor generates a change of the cooking parameters,
temperature and humidity, one after the other or simultaneously. The interactive monitor displays all
those important points.
- This simple and quick settings facilitate your daily work, leaving you more time for whatever
you like. The settings are automatically monitored guaranteeing perfect cooking results. No
need to control constantly temperature and humidity levels.
- Temperature settings range from 30 to 300°C and the chamber humidity levels from 0° to 100%.
- Many functions offer optimum utilisation for steaming, poaching, baking, roasting, grilling,
stewing, blanching, thawing, preserving, regenerating and a lot more.
-
- The Genius compact, Joker T will certainly become your reliable partner. Extremely easy to
operate, offering unlimited possibilities.
Operation
- Keep this manual in a place where it can be accessed by all users of the appliance at any time.
The combi steamer must only be operated
- By trained staff
- For its intended purpose as outlined in the operating instructions, and whilst in perfect working order.
- To prevent the risk of accidents or damage to the appliance, it is essential that operating staff are
given training and health and safety briefings on a regular basis.
- If the machine is set up outside, it must be ensured that it is adequately protected from rain, thunder
storms and lightening. It must be set up on a solid foundation to ensure stability.
It must also be ensured that the machine is only accessible for qualified personnel.
The appliance must not be operated
- By children or persons with impaired physical, sensory or mental abilities, or by persons who do not
have the requisite experience and/or knowledge, unless they are being supervised by a person who
is responsible for their safety or are receiving instructions in how to use the appliance from this
person
- At an ambient temperature of < +4°C
- In toxic atmospheres or atmospheres where there is a risk of explosion
- With food containing highly flammable ingredients (e.g. alcohol)

5
- Only authorised customer service personnel may open the side wall and carry out
repairs and maintenance work.
Risk of injury
Installation
- Please refer to the installation instructions for precise information on how to install the appliance.
Only authorised customer service personnel may install appliances, put them into operation and
perform maintenance work on them.
When using deep fat fryers or portable stoves next to the appliance, make sure that they are
kept at a suitably safe distance from it (based on the radius of action of the shower head).
There is a serious risk of the operator sustaining burns if water is sprayed into hot fat.
Risk of burns!
- The functional surfaces of the appliance become hot during operation.
Risk of burns!
- Care must be taken when opening the cooking chamber door, as hot air and steam could escape.
Caution! Hot liquid in container
- If containers are filled with liquids or contents that will become liquid during cooking, ensure
that they are inserted at a level which will enable the user to see into them (i.e. the
containers must not be placed too high up in the appliance).
Appliance defects
- If the glass part of the door is damaged, the appliance must not be started up.
Contact customer service.
- If malfunctions occur, disconnect the appliance from the mains and close the water shut-off
valve. Contact customer service.
Hand shower
- Water runs only when the oven is switched on
- The appliance is equipped with a hand shower
- How to work the shower:
- Pull it out.
- Hold the hose with one hand and press the push button with the other hand whilst cleaning.
- How to roll the shower back:
- Let it roll up slowly, it winds up automatically
Cleaning
- In operation and during cleaning there is a risk of burns at the rear drain area.
- The shower head may only be used for cleaning the cooking chamber.
- Do not spray water into the hot cooking chamber.
- Under no circumstances must water jets, steam cleaners or high-pressure cleaners
be used on the exterior of the appliance.
- The door must not be opened whilst Autoclean is running (risk of chemical burns).
- Only use Eloma Multi-Clean special cleaning agents and Eloma Multi-Clean rinse agents.
- Eloma GmbH accepts no liability for damage caused by using non-Eloma cleaning agents or rinse
agents; use of such agents will also invalidate any warranty claims.
- Please observe the instructions for use provided with the cleaning agent and rinse agent.
- Wear appropriate protective gear when carrying out manual cleaning work (gloves, protective goggles).
- Do not breathe in spray mist.
- Make sure that the air baffle and racks are used and locked in place in accordance with regulations.
- When using the Autoclean function, make sure the canisters are connected correctly: red
for the cleaning agent and blue for the rinse agent.
- Before cleaning, make sure that there is sufficient cleaning and rinse agent in the respective canisters.
- Canisters must be positioned below the bottom edge of the combi steamer. They must never be
positioned above this.

6
Notes on maintenance
- To keep the appliance in perfect working order, an authorised service partner should carry out
maintenance work on it at least once a year.
- We recommend that you agree a maintenance contract for this purpose.
- If the appliance is not going to be used for a prolonged period, turn it off, disconnect it from the mains
and close the water tap.
Before turning on
- Before closing the oven door make sure that the pans and grids inside are securely in place to
avoid damages to the door glass.
- When opening and closing the door take care to leave enough space for yourself and other people
to avoid possible injuries.
- Lock the air baffle in place. Never reach behind the air baffle during operation and never
attempt to stop fans manually.
- Lock the rack in place correctly.
Loading/unloading
Risk of burns
- Depending on the selected cooking temperature, the food containers, grids and inside of the door in
particular may reach high temperatures. It is recommended that you wear protective gloves.
- The temperature of the glass part of the door and the casing may reach more than 60°C at
some points during operation.
- Containers with hot liquid foodstuffs must be covered during transportation to prevent the liquid
from spilling over the sides.
- Maximum permissible loading weight:
- Loading capacity 15 kg
Fixing the rack in place (tabletop appliances)
- Hanging in place: Push the rack up and hang it in place.
- Take care not to bend the tracks when doing this, as this will stop grids, trays and containers
from being held securely in place.
Working with core temperature sensors
- Core temperature sensors can become hot! Wear protective gloves.
- Take care not to prick yourself or anyone else with the point of the sensor.
- Before piercing, check the sensor for soiling to prevent cross-contamination between products.
- Do not leave the sensor hanging out of the cooking chamber. It is a sensitive measuring
instrument, so always hang it up in the place provided for it.
- Remove the sensor from the food before taking the batch out.
Condensation hood (option)
- An optional condensation hood is available for Eloma combi steamers.
- The condensation hood is controlled fully automatically via the combi steamer.
- During the cooking process, steam is condensed as it passes over air-cooled plate condensers.
7
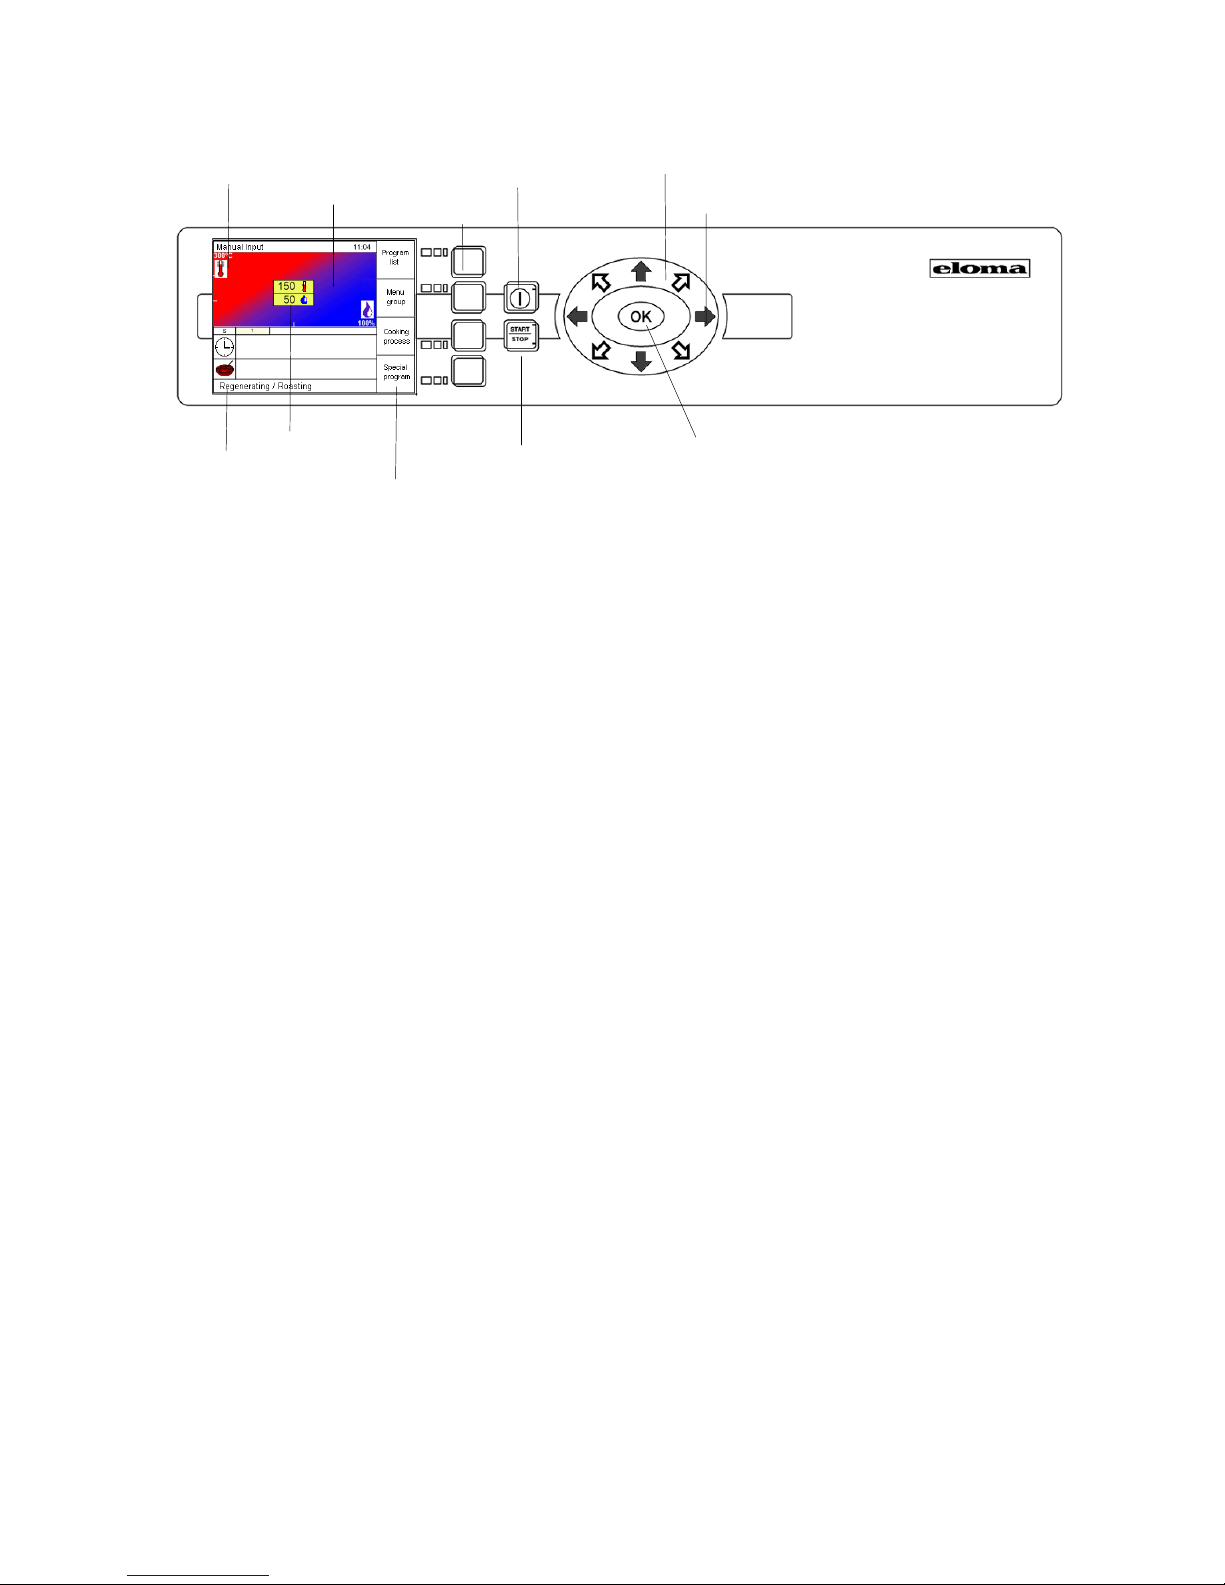
2. Control panel and functional description
2.1 Control panel Genius compact, Joker T
Operation system ON/OFF key Scout
Climatic monitor
Sensor key Joker direction arrows
Climatic cursor
Info line Start/Stop key OK to confirm
Menu selection
8
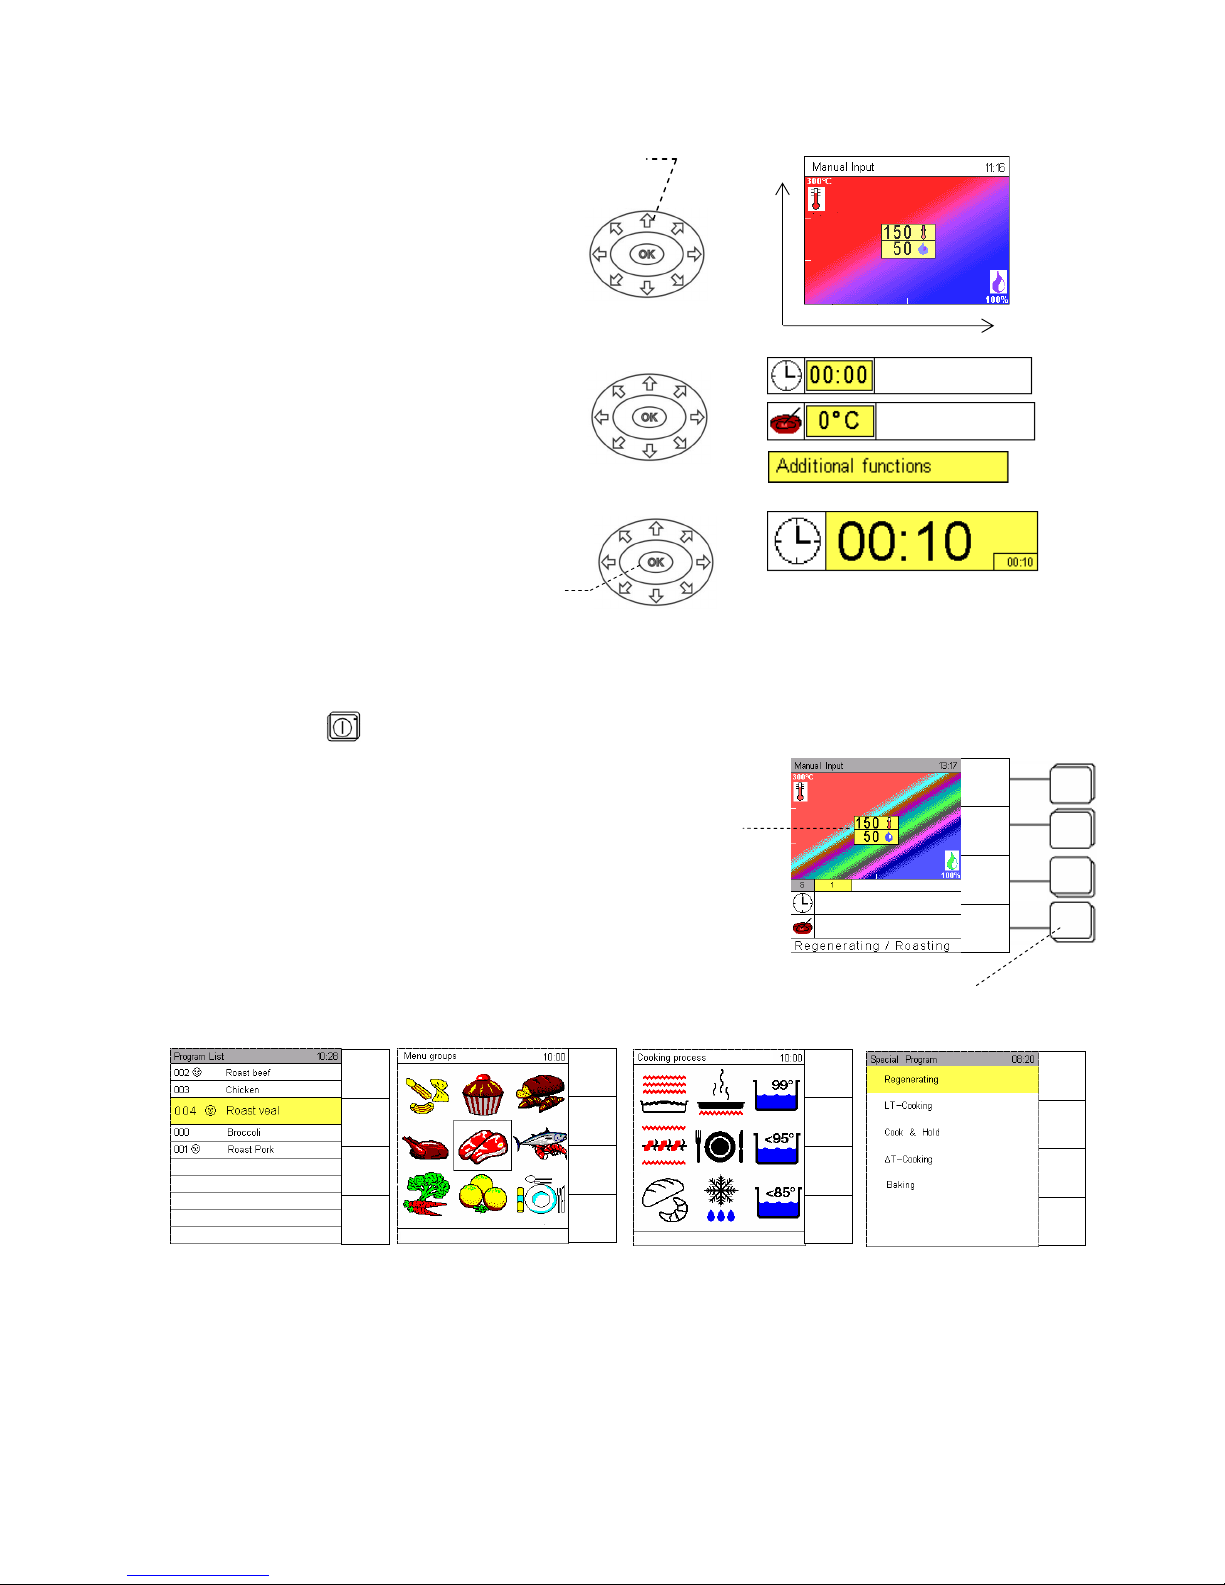
2.2 Operation with Scout
Use the Joker Scout direction arrows to
move the Climatic cursor on the
Climatic monitor, to reach other input
fields and to set data, characters etc.
Whenever a field is yellow, it is ready
for inputs.
A short touch of any arrow changes
inputs step by step. If you keep the arrow
pressed, changes are executed quickly.
Press OK to confirm every input or
setting.
2.3 Manual operation
As soon as the unit is connected to the mains, the Eloma standby screen appears.
Touch master key
to switch on, the start-up screen appears.
The red part of the screen represents dry heat, the blue one
moist heat.
The Climatic® Cursor indicates the temperature in degrees
in relation to the humidity percentage. Move it in all
directions.
Allocation of sensor keys
Press sensor keys to call the different menus.
Examples below
Direction arrows
OK
Climatic
Cursor
Sensor keys
Climatic Monitor
Humidit
y
Temperature
Manual
Input
Menu
group
Favourites
Preheat
OFF
Manual
Input
Program
list
Cooking
process
Special
program
Manual
Input
Autoclean
HACCP
Special
Manual
Input
Program
list
Cooking
process
Special
program
Program
List
Menu
group
Cooking
process
Special

9
3. Start-up in manual operation
Prior to start : Open water tap.
Press key ON/OFF, a start-up screen appears. The appliance is ready for work.
LED is lit.
As standard the operation mode display indicates manual input is set as first start-up screen.
Press sensor key Special program, Special and select Setup with direction arrows and confirm with OK.
Select Start Screen and select the desired startup screen.
Five possibilities are available:
Manual input – Favourites – Program list – Cooking procedure – Menu group.
The basic setting in the Climatic Cursor after ON/OFF is
temperature T = 150° C and humidity H = 50%.
Below in horizontal lines “time” and “core temperature” symbols are displayed.
3.1 Manual input
Use the Scout to select a cooking procedure by adjusting the desired temperature and humidity level.
The Climatic cursor moves accordingly. Confirm with OK.
When moving the Climatic cursor, the „Info line“ indicates the following cooking procedures:
Indication Input
Cooking procedure Temperature range in
°C / °F
Humidity range
in %
Defrosting 30 – 45 86 – 113
50 - 100
Poaching 60 – 90 140 – 194
90 - 100
Stewing 90 – 100 194 – 212
80 - 100
Steaming 95 – 130 203 – 266
60 - 100
Regenerating 90 – 160 194 – 320
25 - 75
Baking 120 – 220 248 – 428
0 - 30
Roasting 150 – 230 302 – 446
0 - 50
Grilling 180 – 275 356 – 527
0 - 10
Gratinating 220 – 300 428 – 572
0 - 5
Eloma Standby-screen
Start-up screen
Program
List
Menu
group
Cooking
process
Special
program
10
After selection of a cooking procedure and OK, you must set – time – or core temperature.
1. Input time 2. Input core temperature 3.Input lines
Four-figure time display from 00:00 to 23:59.
1. Time: Basic setting is 00:00 move arrow to get to = continuous operation.
Time setting is 23:59 move arrow and you get again = continuous op.
Setting is move arrow and you get to 23:59
Setting is move arrow and you get to 00:00
2. Core Temperature Core temperature range from 0° C to 99° C.
3. Use the direction arrows and to change between the input fields for time, core temperature and
the Climatic Cursor for Temperature/Humidity.
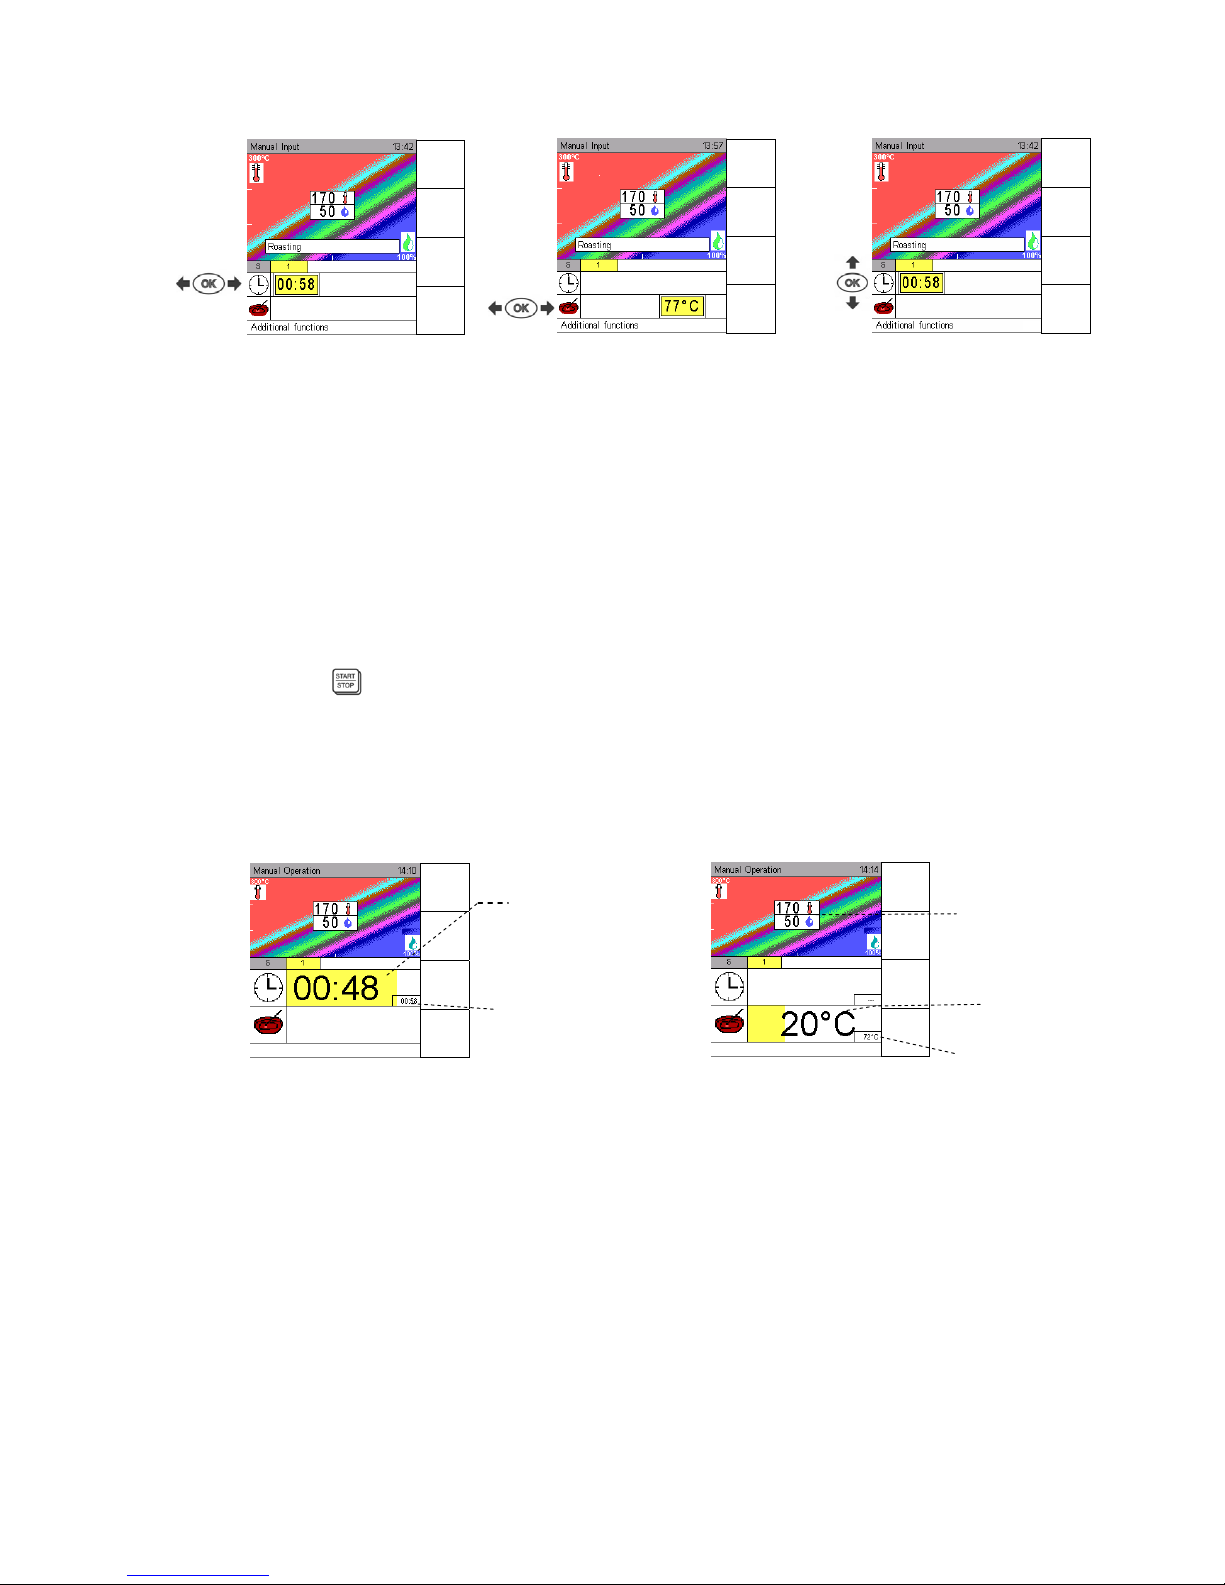
3.2 Manual operation – Input of one step
Input parameters, “temperature/humidity“ and “time“ or “core temperature“ and
start the Joker
LED START is lit.
If desired, you can activate the preheating by pressing the key PreHeat see Sec. 9.
The Climatic Monitor indicates data of the advancing program.
Manual operation Manual operation
with time setting with core temperature
There are yellow bars in the input fields indicating the current state of the program.
Time : Bar is getting shorter to the left, time is running down.
Core temperature: Bar is getting longer to the right until the desired core temperature is reached.
Man. Steam: An additional manual humidification is always possible as long the key “Man. Steam” is
pressed.
A sound signal announces the end of the program.
Remaining
time
Set time
Set temperature
and humidity
Actual core
temperature
Set core
temperature
Manual
steam
Change
Step
Combicooking
Manual
steam
Change
Step
Combicooking
Menu
back
Save
Next
Step
Preheat
OFF
Menu
back
Save
Next
Step
Preheat
OFF
Menu
back
Save
Next
Step
Preheat
OFF
11
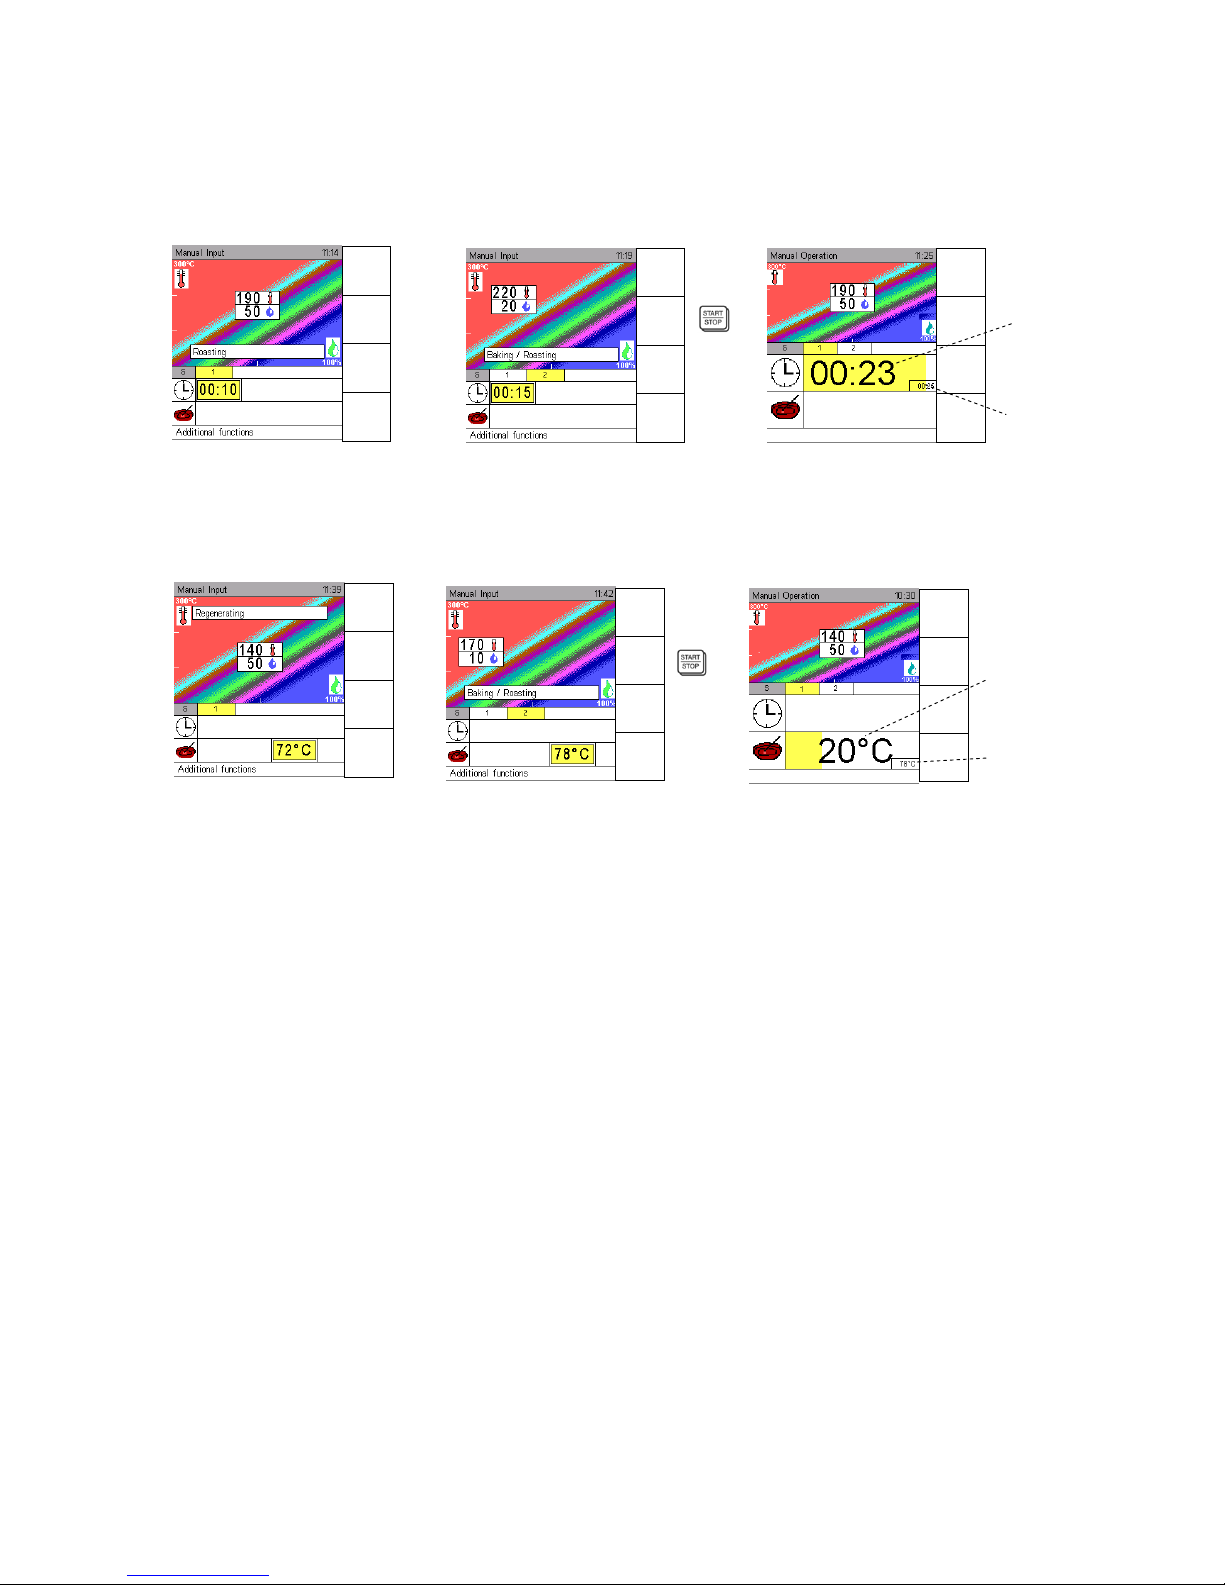
3.3 Manual operation – Input of two steps ( Steptronic ® )
Example 1
1st step Input 190°C, 50%, Time 10 minutes
2nd step Input 220°C, 20%, Time 15 minutes
Input 1st step Input 2nd step Manual operation
Example 2
1st step Input 140°C, 50%, Core temperature 72°C
2nd step Input 170°C, 10%, Core temperature 78°C
Remaining
time
Total time
Step 1+2
Set final
core temperature
ste
p
2
A
ctual
core temp
.
Manual
Steam
Change
Step
Next
Step
Manual
Steam
Change
Step
Next
Step
Menu
back
Save
Next
Step
Preheat
OFF
Menu
back
Save
Next
Step
Preheat
OFF
Menu
back
Save
Next
Step
Preheat
OFF
Menu
back
Save
Next
Step
Preheat
OFF
12
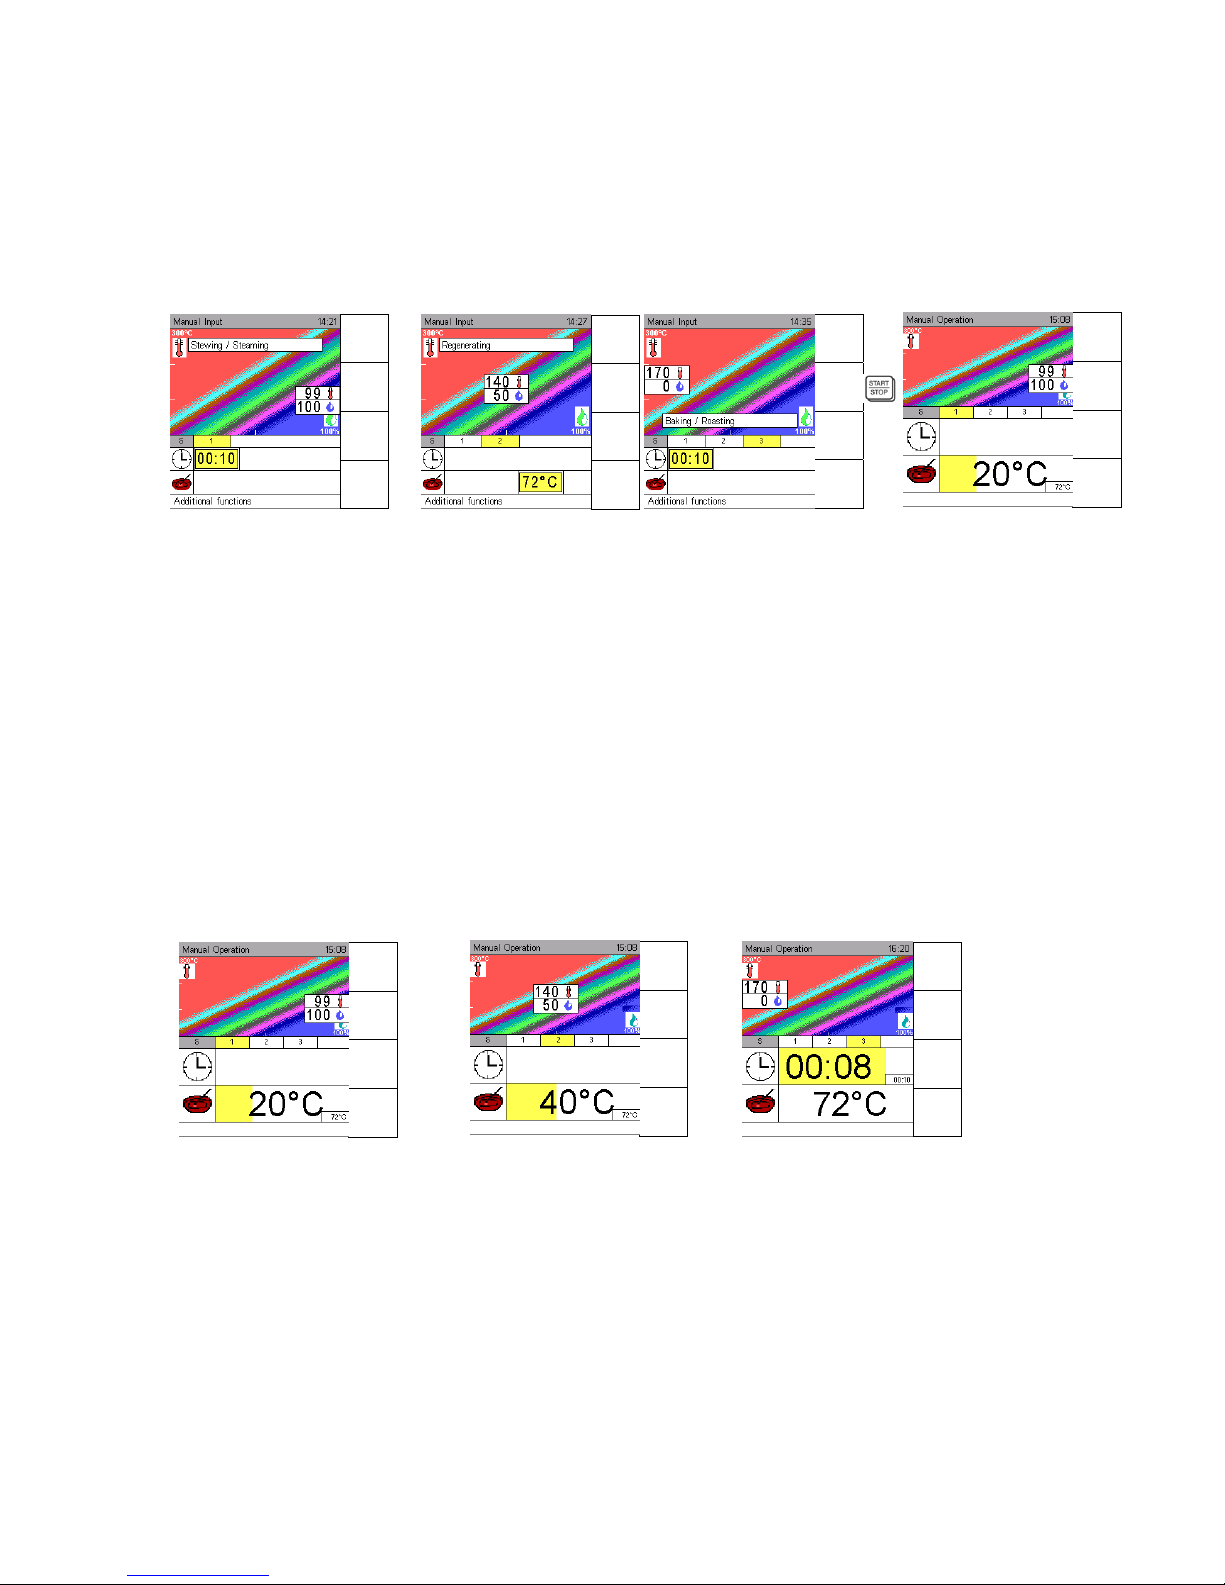
3.4 Manual operation – Input of several steps ( Steptronic ® )
(Steptronic ® allows to combine several steps, also time and core temperature combined.)
Input of the first cooking step as described in Sec. 4.
To proceed to a second step, press touch key Next step and repeat input as described before.
Continue until all desired steps are entered and press START.
The actual situation of the program is displayed step by step.
Up to 20 cooking steps are possible.
Step 1 Step 2 Step 3 etc. Manual operation
The first four steps are indicated, yellow bars with step number, further steps to a program are displayed
once the first four steps have been executed.
To control previous steps, just touch briefly, 1 second, “Menu/back“.
If you keep this touch pressed too long ( 3 seconds), you return to the start-up screen and entered, not
stored data is lost.
3.5 Display of the actual situation ( Steptronic ® )
Exampl:
A program consisting of several steps was entered, the second step including core temperature control
and the third one a time setting.
In this case, the remaining cooking time is only displayed while the third step is running down, the core
temperature has been reached.
1. Step Input: Time 10 min
2. Step Input: CT 72°C
3. Step Input: Time 10 min
Actual situation step 1 Actual situation step 2. Actual situation step 3.
The actual situation of temperature and humidity are displayed for 5 seconds see Sec. 3.6.
If the sensor key manual steam is pressed, water is evaporated in the cooking chamber.
Menu
back
Save
Next
Step
Preheat
OFF
Menu
back
Save
Next
Step
Preheat
OFF
Menu
back
Save
Next
Step
Preheat
OFF
Menu
back
Save
Next
Step
Combicooking
Menual
Steam
Change
Step
Next
Step
Menual
Steam
Change
Step
Next
Step
Menual
Steam
Change
Step
Next
Step
13
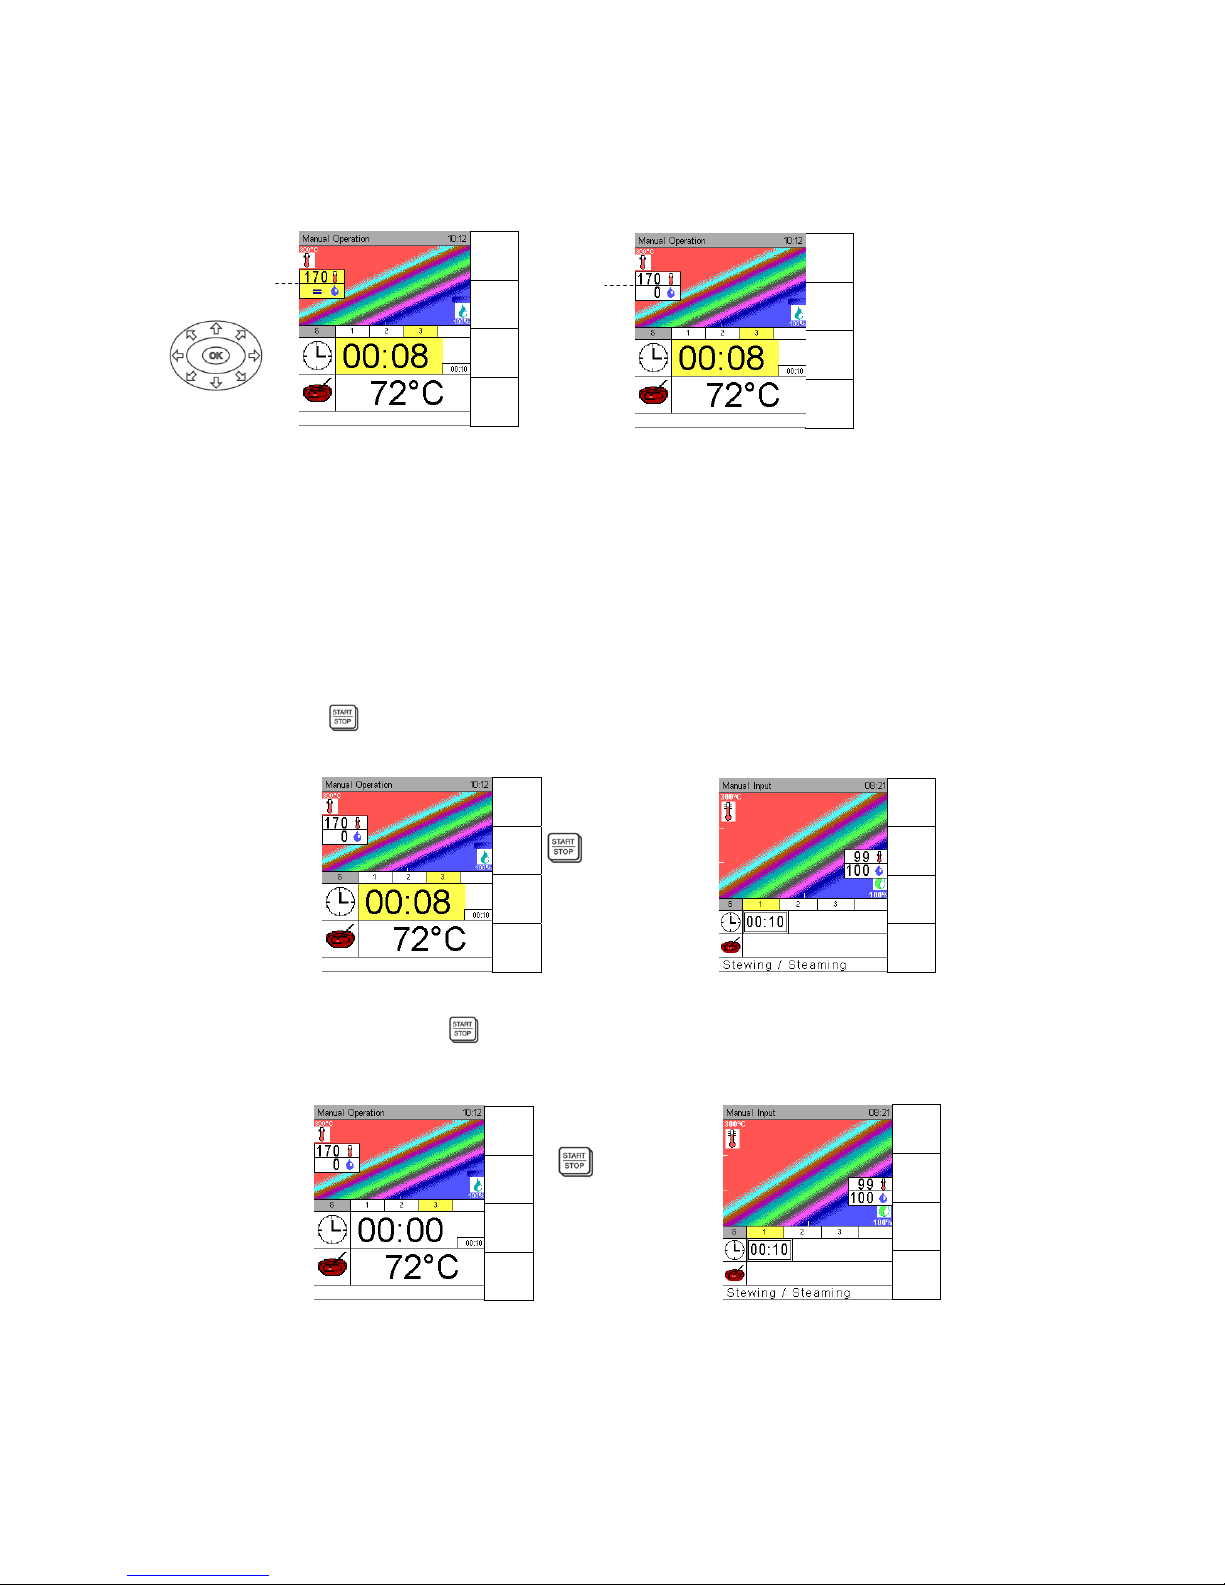
3.6 Display of actual values ( Steptronic ®)
While a program is running down, touch one of the direction arrows and the actual values for
temperature and humidity are displayed for 5 seconds.
Then the display returns to the desired set values.
The core temperature field displays constantly the actual core temperature and at the right corner the
adjusted core temperature.
Basis of the indication is the actual humidity level.
The actual value is considered to be within the tolerance if the humidity level is +/- 10% of the
desired/set value.
Next step
Press the function key Next step to display the next cooking steps while running a cooking programme.
Change step
Press the function key Change step to display and change the settings for a cooking step while running a
cooking programme.
With the function key Save changes, the changes will be active for the running programme.
Abnormal program end
Pressing key
while a program is running down, terminates the program. The monitor display
returns to the initial input screen. All data remain stored.
Program end
The appliances switches off automatically, LED is lit, the sound signal of 30 seconds can be stopped
immediately by pressing key
or by opening the door.
The screen returns to the initial input screen.
Indication while buzzer sounds Indication after Start/Stop
Memory :
After abnormal program stop or program end, data remain stored and the same program can be
started once again.
A
ctual value
Desired
value
Menual
Steam
Change
Step
Next
Step
Menu
back
Save
Preheat
OFF
Menual
Steam
Change
Step
Next
Step
Menual
Steam
Change
Step
Next
Step
Menu
back
Save
Preheat
OFF
Menual
Steam
Change
Step
Next
Step
 Loading...