

Page 1
Pos: 2 /953-Eloma/Deckblatt/Deckblatt_BE T_Titelbild_GeniusT_Genius Compact @ 9\mod_1380200995802_6.doc @ 895 06 @ @ 1
=== Ende der Liste für Textmarke Inhalt = ==
Pos: 4 /953-Eloma/Deckblatt/Deckblatt_Prod uktname: GeniusT und Genius Comp act @ 9\mod_1379664662841_6.doc @ 88375 @ @ 1
GeniusMT
=== Ende der Liste für Textmarke Inhalt1 ===
Pos: 6 /953-Eloma/Deckblatt/Deckblatt_Gr ößen_Energieart @ 9\mod_13795962 62431_6.doc @ 88231 @ @ 1
Sizes: 6-11, 10-11, 20-11, 12-21, 20-21
Type of energy: Gas and electric
=== Ende der Liste für Textmarke Inhalt2 ===
Pos: 8 /953-Eloma/Deckblatt/Deckblatt_Betri ebsanleitung @ 9\mod_1379662625820 _6.doc @ 88304 @ @ 1
Original operating instructions
=== Ende der Liste für Textmarke Inhalt3 ===
Page 2

Appliance type: ……………
Appliance no.: …………….
Dealer:
Installer:
Date: ……………
Installed on: ……………
Pos: 10 /953-Eloma/Standardtexte Dokume ntart unabhängigImpressum @ 10\mod_1 384361530020_6.doc @ 101234 @ 44 4 @ 1
Imprint
Eloma GmbH . Innovative cooking and baking technology
Otto-Hahn-Str. 10
82216 Maisach
Germany
Phone: +49 (0) 8141 395-0
Fax: +49 (0) 8141 395-130
Cooking forum and user tips
Website: www.eloma.com
User hotline: +49 (0) 35023 63887
Service
Service hotline: +49 (0) 35023 63888
=== Ende der Liste für Textmarke Inhalt4 ===
Page 3

Table of Contents
Pos: 12 /953-Eloma/Standardtexte Dokume ntart unabhängig/IHZ @ 10\mod_138 9601392776_6.doc @ 113662 @ @ 1
Table of Contents
1 About this document .................................................................. 6
1.1 Content and target audience ...................................................................6
1.2 Handling this document ...........................................................................6
1.3 Symbols used and layout of warnings .....................................................6
1.4 Use of images .........................................................................................7
1.5 Warranty and disclaimer of liability ..........................................................7
2 Safety ........................................................................................... 8
2.1 Qualifications of operating staff ...............................................................8
2.2 Safety information ...................................................................................8
2.3 Procedure in the event of a gas leak (with gas appliances) .................... 12
3 Description of the appliance .................................................... 13
3.1 Appliance overview ............................................................................... 13
3.2 Use for intended purpose ...................................................................... 15
3.3 Operation modes .................................................................................. 15
3.4 Additional functions ................................ ................................ ............... 15
3.5 Special programs .................................................................................. 16
3.6 HACCP protocol ................................................................................... 17
4 Screen description .................................................................... 18
4.1 Screen layout ........................................................................................ 18
4.2 chef’s arena screen............................................................................... 21
4.3 Cooking settings screens ...................................................................... 23
4.4 Step-insight screen ............................................................................... 30
4.5 Multi cooking screen ............................................................................. 32
4.6 Programs screen ................................ .................................................. 34
4.7 Operational screen................................................................................ 38
4.8 Care screen .......................................................................................... 41
3
Page 4

Table of Contents
4.9 Save screen.......................................................................................... 43
5 Operation ................................................................................... 45
5.1 Switching on the appliance.................................................................... 45
5.2 Switching off the appliance during short cooking intervals ..................... 45
5.3 Switching off the appliance during prolonged cooking intervals .............. 45
5.4 Using appliance components ................................................................ 46
6 chef’s arena ............................................................................... 49
6.1 Selecting an operation mode ................................................................. 49
6.2 Changing the humidity/steam ................................................................ 49
6.3 Changing the temperature..................................................................... 50
6.4 Setting the cooking time or core temperature ........................................ 50
6.5 Setting the additional functions .............................................................. 51
6.6 Adding a cooking step ........................................................................... 51
6.7 Changing a cooking step ....................................................................... 51
6.8 Setting the pre-set timer ................................ ................................ ........ 52
7 Programs ................................................................................... 53
7.1 Selecting a program .............................................................................. 53
7.2 Changing a saved program ................................................................... 53
7.3 Selecting a special program .................................................................. 54
8 Multi cooking ............................................................................. 57
8.1 Setting and starting multi cooking .......................................................... 57
8.2 Changing the list of programs for multi cooking ................................ ..... 57
9 Saving programs ....................................................................... 59
10 Starting and ending cooking programs ................................... 60
10.1 Loading the appliance with food ............................................................ 60
10.2 Starting a program ................................................................................ 61
4
Page 5

Table of Contents
10.3 Changing a program during operation ................................................... 61
10.4 Ending a program ................................................................................. 63
10.5 Removing the foodstuff ......................................................................... 64
11 Cleaning and care ..................................................................... 65
11.1 Notes on manual cleaning ..................................................................... 65
11.2 Cleaning intervals ................................................................................. 66
11.3 Prescribed cleaner and rinse agent ....................................................... 66
11.4 Cleaning the chamber with a manual sprayer pump (manual method) ... 66
11.5 Cleaning the chamber with the autoclean program ................................ 68
11.6 Cleaning the drip channel on the chamber door..................................... 70
11.7 Cleaning the door seal .......................................................................... 71
11.8 Cleaning the glass parts of the door ...................................................... 71
11.9 Changing the water softening unit ......................................................... 72
11.10 Maintenance intervals ........................................................................... 72
12 Unit Settings .............................................................................. 73
13 Trouble Shooting ...................................................................... 75
13.1 Causes of errors and action to take ....................................................... 75
13.2 Error messages .................................................................................... 76
14 Disposal ..................................................................................... 79
=== Ende der Liste für Textmarke Inhalt5 ===
5
Page 6

About this document
Symbol
Explanation
Warning: a warning follows this symbol.
1.
2.
Multi-step instruction: multiple instructions must be followed
in the given order.
Single-step instruction: exactly one instruction must be
followed.
List of several single-step instructions:
Instructions can be followed in any order.
Pos: 14 /953-Eloma/Standardtexte Dokume ntart unabhängig/Zu Diesem Dokument_ [Titel] @ 9\mod_1374831610405_6.d oc @ 78141 @ 1 @ 1
1 About this document
Pos: 15 /953-Eloma/Standardtexte Betriebsa nleitungen/01_ZuDiesemDokument/Zu_Dok ument_Inhalt und Zielgruppe @ 9 \mod_1374832136715_6.doc @ 78243 @ 2 @ 1
1.1 Content and target audience
These original operating instructions describe how to safely operate,
clean and care for the appliance, along with measures for trouble
shooting. The operating instructions are aimed at people who will
operate, clean and care for the appliance.
Pos: 16 /953-Eloma/Standardtexte Betriebsa nleitungen/01_ZuDiesemDokument/Zu_Dok ument_Umgang mit diesem Dokumen t @ 9\mod_1374847406928_6.d oc @ 78283 @ 2 @ 1
1.2 Handling this document
Keep these operating instructions accessible for operating and
cleaning staff.
Keep these operating instructions throughout the appliance's entire
life cycle.
Pass these operating instructions on to subsequent owners.
Pos: 17 /953-Eloma/Standardtexte Dokume ntart unabhängig/Zu_Dokument_Verwen dete Symbole @ 9\mod_1374846264619 _6.doc @ 78203 @ 2 @ 1
1.3 Symbols used and layout of warnings
Tab. 1: Explanation of the symbols used
6
Page 7

About this document
Information
Technical note or tip for operation.
DANGER!
Type and source of the danger!
Consequence: non-compliance will result in death.
Action to avoid the danger.
WARNING!
Type and source of the danger!
Consequence: non-compliance will result in serious injury.
Action to avoid the danger.
CAUTION!
Type and source of the danger!
Consequence: non-compliance will result in minor injury.
Action to avoid the danger.
NOTE!
Type and source of the danger!
Consequence: non-compliance will result in material damage.
Action to avoid the danger.
Pos: 18 /953-Eloma/Standardtexte Dokume ntart unabhängig/Zu_Dokument_Vewend ung von Abbildungen @ 9\mod_13812 99770030_6.doc @ 90091 @ 2 @ 1
1.4 Use of images
Images are provided as examples only and may differ from the appliance
supplied.
Pos: 19 /953-Eloma/Standardtexte Dokume ntart unabhängig/Zu_Dokument_Gewährleist ung und Haftungsauschluss @ 9\mo d_1374846116382_6.doc @ 78183 @ 2 @ 1
1.5 Warranty and disclaimer of liability
You will find information on liability for material defects and warranty
conditions in our general terms and conditions of business (T&C).
Pos: 20 /953-Eloma/Standardtexte Dokume ntart unabhängig/Sicherheit_[Titel] @ 9\m od_1374846566048_6.doc @ 78223 @ 1 @ 1
7
Page 8

Safety
2 Safety
Pos: 21 /953-Eloma/Standardtexte Betriebsa nleitungen/02_Sicherheit/Sicherheit_Qualifik ation des Bedienpersonals @ 9\ mod_1374847682353_6.doc @ 78344 @ 2 @ 1
2.1 Qualifications of operating staff
Make sure that this appliance is only operated and cleaned by
persons who have received instruction, regular training and a health
and safety briefing.
Make sure that this appliance is only operated and cleaned by
persons who have read the entire operating instructions carefully and
have understood the safety information.
Make sure that the following persons only operate the appliance if a
person with the above-named qualifications is supervising or giving
instruction:
– Children
– Persons with impaired physical, sensory or mental abilities
– Persons who do not have the above-named qualifications
Make sure that only an Eloma service partner carries out repairs or
maintenance work on the appliance.
Pos: 22 /953-Eloma/Standardtexte Dokume ntart unabhängig/Sicherheit_Sicherheits hinweise_[Titel] @ 9\mod_137542765 2506_6.doc @ 81001 @ 2 @ 1
2.2 Safety information
Pos: 23 /953-Eloma/BET_Kombidämpfer/Sic herheit/Sicherheit_Vor_Betrieb @ 9\mod_ 1375702023671_6.doc @ 81252 @ 3 @ 4
2.2.1 Prior to operation
Personal injury from electric shock
Only start up fully functional, undamaged appliances.
Do not open the housing.
If a malfunction occurs, disconnect the appliance and close the onsite water tap.
Make sure that only an Eloma service partner carries out repairs.
Risk of injury from parts falling out
Remove loose parts from the chamber.
Pos: 24 /953-Eloma/BET_Kombidämpfer/Sic herheit/Sicherheit_Während_Betrieb @ 9\ mod_1375704323521_6.doc @ 8130 2 @ 3 @ 1
8
Page 9

Safety
2.2.2 During cooking
Risk of bruising from opening and closing the chamber door
Make sure that no persons are within the chamber door's rotation
radius.
Close the chamber door carefully.
Risk of burns from hot surfaces
Wear protective clothing (e.g. long-sleeved clothing and protective
gloves).
Lock the mobile tray rack in place.
Do not touch the hanging rack or mobile tray rack when removing
foodstuffs.
Do not touch the door glass or housing.
Do not touch the pipes for exhaust air and waste water.
For gas appliances: Do not touch the exhaust stack, the gas exhaust
pipe or its cover.
Risk of scalding from hot liquids
Wear protective clothing (e.g. long-sleeved clothing and protective
gloves).
Do not load the appliance above head height.
Close the chamber door carefully so hot water does not escape if the
siphon overflows.
Risk of scalding from hot steam
Wear protective clothing (e.g. long-sleeved clothing and protective
gloves).
Open the chamber door carefully.
Risk of tipping due to top-heavy loading of the appliance
Load the hanging rack or mobile tray rack evenly, working from
bottom to top.
Risk of fire from flammable materials
Do not load the appliance with food containing highly flammable
ingredients (e.g. alcohol).
Do not place any highly flammable materials over the appliance.
Clean the appliance regularly.
9
Page 10

Safety
Do not operate the appliance in toxic or potentially explosive
atmospheres.
If the appliance has been installed under a hood: turn the hood on
during operation.
If the appliance has been installed outdoors: only operate the
appliance in an area protected from the wind.
If the appliance has been connected to a chimney with flow
protection: clean the exhaust line regularly in accordance with
country-specific regulations.
Material damage from improper use
Use accessories correctly in the chamber to prevent the door glass
from cracking.
Make sure that no objects are within the chamber door's radius of
rotation.
Material damage from overheating
Make sure that the supply air opening and the ventilation slots are
unobstructed and not covered.
Keep the area between the appliance feet unobstructed to ensure
sufficient ventilation below the appliance.
Pos: 25 /953-Eloma/BET_Kombidämpfer/Sic herheit/Sicherheit_Reinigung @ 9\m od_1375707412406_6.doc @ 81342 @ 3 @ 4
2.2.3 Cleaning
10
Risk of burns from hot surfaces
Allow the appliance to cool before cleaning it.
Risk of chemical burns from cleaner and rinse agent
Observe the safety information for the prescribed cleaner and rinse
agent (see section 11.3).
For manual cleaning:
Wear protective clothing (e.g. long-sleeved clothing, protective gloves
and glasses).
Allow the appliance to cool before cleaning it.
Do not inhale spray mist from the cleaner and rinse agent.
For appliances with an autoclean program:
Keep the chamber door closed whilst the autoclean program is
running.
Page 11

Safety
When changing the canisters for cleaner or rinse agent:
Wear protective clothing (e.g. long-sleeved clothing, protective gloves
and glasses).
Risk of burns from hot fat
Only install deep fat fryers, portable stoves or similar vessels
containing hot fat outside the radius of action of the hand shower.
Material damage from improper cleaning
Do not clean the housing with the hand shower, water jets, steam
cleaners or high-pressure cleaners.
Only use the prescribed cleaner and rinse agent (see section 11.3).
Observe the cleaning intervals.
Pos: 26 /953-Eloma/BET_Kombidämpfer/Sic herheit/Sicherheit_Hygiene @ 9\mod_13 75705853478_6.doc @ 81322 @ 3 @ 1
2.2.4 Hygiene
Health hazard from insufficient hygiene
Observe the cleaning intervals (see section 11.2).
Clean the core probe before use.
Pos: 27 /953-Eloma/BET_Kombidämpfer/Sic herheit/Sicherheit_Gasaustritt @ 9\ mod_1375708784827_6.doc @ 81382 @ 3 @ 1
2.2.5 Gas leaks (with gas appliances)
Risk of suffocation in the event of a gas leak
Observe the rules of procedure in the event of a gas leak (see
section 2.3).
Observe the maintenance intervals (see section 11.10).
Pos: 28 /953-Eloma/BET_Kombidämpfer/Sic herheit/Sicherheit_Geräte_Rollen @ 9\m od_1375702633401_6.doc @ 81272 @ 3 @ 1
2.2.6 Appliances on castors
Risk of injury from electric shock
Do not move the appliance over electric cables.
Risk of tipping and uncontrolled movements of appliances on
castors due to uneven floors
Only move the appliance on an even floor (max. 10° inclination).
Move the appliance carefully.
Once the appliance has been transported, secure its castors with the
immobilisation brake.
Pos: 29 /953-Eloma/BET_Kombidämpfer/Sic herheit/Sicherheit_Wartung @ 9\mod_1 375708031840_6.doc @ 81362 @ 3 @ 1
11
Page 12

Safety
2.2.7 Maintenance
Risk of fire from improper maintenance
Make sure that only an Eloma service partner carries out
maintenance work.
Observe the maintenance intervals (see section 11.10).
Pos: 30 /953-Eloma/Standardtexte Dokume ntart unabhängig/Sicherheit_Verhaltensre geln_Gasaustritt @ 9\mod_1375709 071611_6.doc @ 81402 @ 2 @ 1
2.3 Procedure in the event of a gas leak (with gas appliances)
1. Shut off the gas supply on site.
2. Do not touch any electrical switches.
3. Ventilate the room well.
4. Avoid creating open flames or sparks.
5. Leave the room.
6. Contact the gas supply company.
Pos: 31 /953-Eloma/Standardtexte Dokume ntart unabhängig/Gerätebeschreibung_[ Titel] @ 9\mod_1374849752498_6.doc @ 78411 @ 1 @ 1
12
Page 13
Description of the appliance
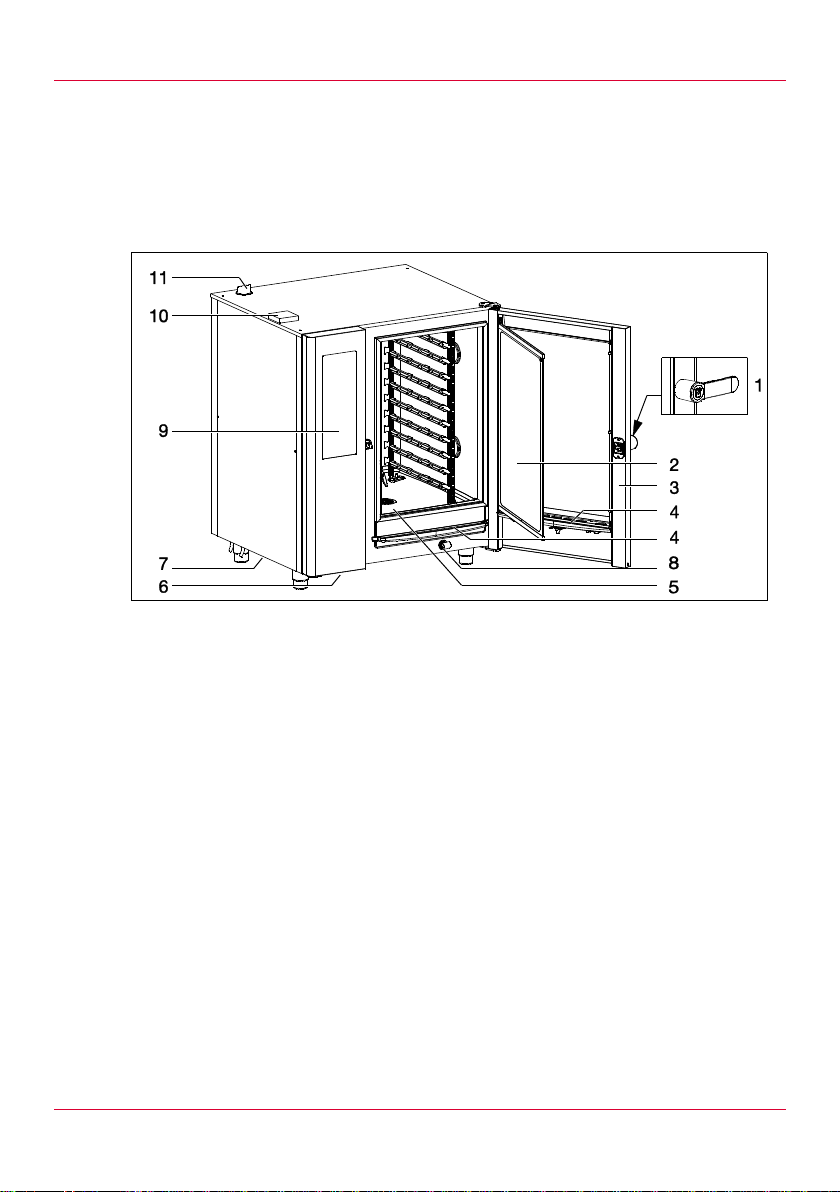
Fig. 1: Appliance overview: Table top unit, electric, right hinged
1. Door handle
2. Inner door
3. Chamber door
4. Drip channel
5. Chamber
6. USB port
7. Ventilation slots
8. Hand shower
9. Control panel with On/Off button
10. Supply air opening
11. Exhaust air pipe
3 Description of the appliance
Pos: 32 /953-Eloma/BET_Kombidämpfer/Ger ätebeschreibung/Gerätebeschreibung_ Geräteübersicht_[Titel] @ 10\mod_138 4421424327_6.doc @ 101396 @ 2 @ 1
3.1 Appliance overview
Pos: 33 /953-Eloma/BET_Kombidämpfer/Ger ätebeschreibung/Gerätebeschreibung_ Geräteübersicht_Tischgerät @ 10\ mod_1384421065885_6.doc @ 101372 @ 3 @ 1
3.1.1 Table top unit
Pos: 34 /953-Eloma/BET_Kombidämpfer/Ger ätebeschreibung/Gerätebeschreibung_ Geräteübersicht_Standgerät @ 9\m od_1375285321059_6.doc @ 80391 @ 3 @ 1
13
Page 14
Description of the appliance
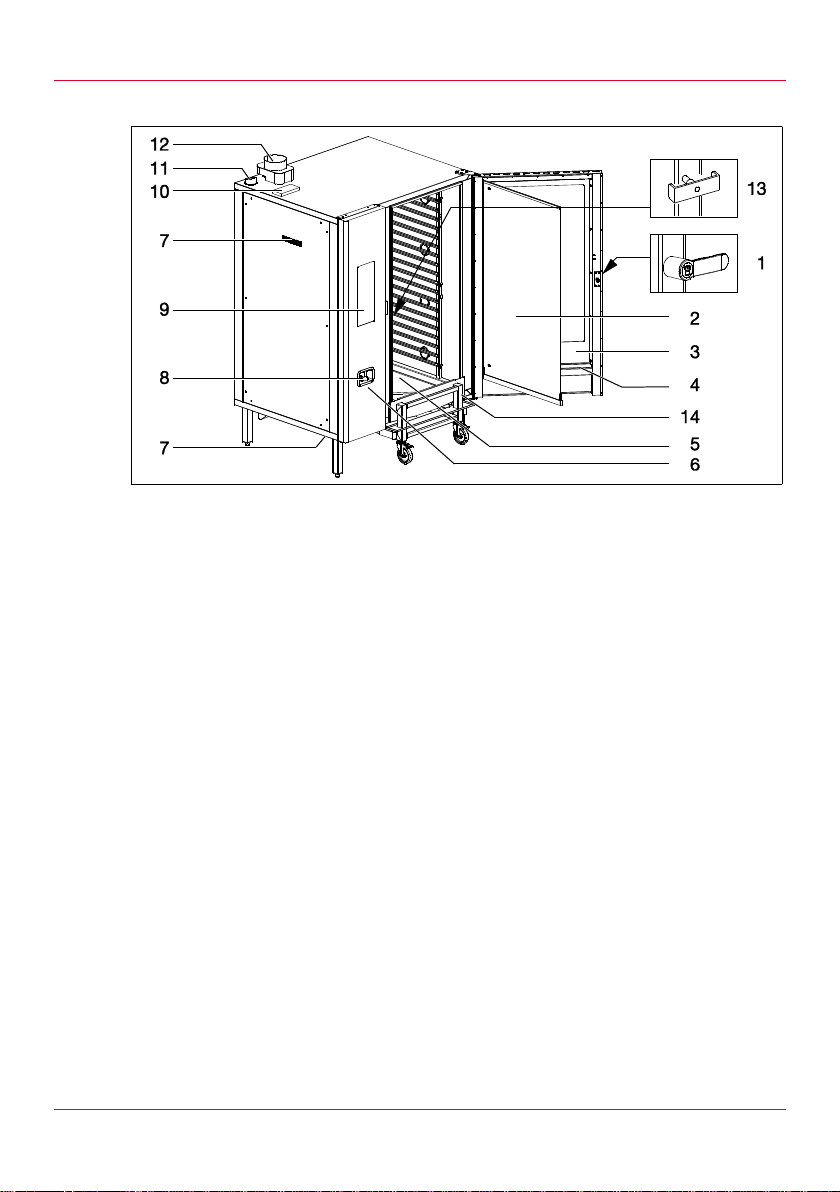
1 Door handle
2 Inner door
3 Chamber door
4 Drip channel
5 Chamber
6 USB port
7 Ventilation slots
8 Hand shower
9 Control panel with On/Off button
10 Supply air opening
11 Exhaust air pipe
12 Exhaust gas pipe draught damper (on gas appliances)
13 Emergency opening handle
14 Mobile tray rack
3.1.2 Floor model
Fig. 2: Appliance overview: Floor model, gas, right hinged
Pos: 35 /953-Eloma/BET_Kombidämpfer/Ger ätebeschreibung/Gerätebeschreibung_Be stimmungsgemäße_Verwendung @ 9 \mod_1375285167313_6.doc @ 8037 1 @ 2 @ 1
14
Page 15

Description of the appliance
3.2 Use for intended purpose
The appliance shall only be used for the thermal preparation of food, with
the exception of food containing highly flammable ingredients (e.g.
alcohol).
The appliance must not be operated without supervision.
The appliance is designed for use in commercial environments.
Pos: 36 /953-Eloma/BET_Kombidämpfer/Ger ätebeschreibung/Gerätebeschreibung_Be triebsarten_[Titel] @ 9\mod_1375276 935399_6.doc @ 80025 @ 2 @ 1
3.3 Operation modes
Pos: 37 /953-Eloma/BET_Kombidämpfer/Ger ätebeschreibung/Gerätebeschreibung_Be triebsarten_Dampf @ 9\mod_1375277 060763_6.doc @ 80046 @ 3 @ 1
3.3.1 Steam
In steam operation mode, food is cooked at a constant temperature in a
high-humidity environment (water vapour).
Pos: 38 /953-Eloma/BET_Kombidämpfer/Ger ätebeschreibung/Gerätebeschreibung_Be triebsarten_Heißluft @ 9\mod_137 5277235921_6.doc @ 80086 @ 3 @ 1
3.3.2 Convection
In convection operation mode, dry air is used to roast and bake food. This
operation mode is suitable for all foods which should be crispy and
browned.
Pos: 39 /953-Eloma/BET_Kombidämpfer/Ger ätebeschreibung/Gerätebeschreibung_Be triebsarten_Kombidämpfen @ 9\mo d_1375277166926_6.doc @ 80066 @ 3 @ 1
3.3.3 Combi steam
In combi steam operation mode, the combination of humidity and
temperature creates an atmosphere in the chamber which prevents the
surface of the foodstuff from drying out and speeds up the passage of
heat through the foodstuff.
Pos: 40 /953-Eloma/BET_Kombidämpfer/Ger ätebeschreibung/Gerätebeschreibung_Be triebsarten_Backen @ 9\mod_13752 77291093_6.doc @ 80106 @ 3 @ 1
3.3.4 Bake
In baking operation mode, the foodstuff is baked using hot air. The dry air
can be humidified through the periodic injection of steam.
Pos: 41 /953-Eloma/BET_Kombidämpfer/Ger ätebeschreibung/Gerätebeschreibung_ Zusatzfunktionen_[Titel] @ 9\mod_1375 277413865_6.doc @ 80126 @ 2 @ 1
3.4 Additional functions
Pos: 42 /953-Eloma/BET_Kombidämpfer/Ger ätebeschreibung/Gerätebeschreibung_ Zusatzfunktionen_VorheizenCoolDown @ 9\ mod_1375277641956_6.doc @ 8 0166 @ 3 @ 1
3.4.1 Preheating/cool down
The preheating/cool down function is used to heat the chamber
temperature up or cool it down to the set nominal temperature.
For appliances with an autoclean function: the cool down function sprays
water into the chamber at certain temperatures in order to cool it down.
Available in all operation modes.
Pos: 43 /953-Eloma/BET_Kombidämpfer/Ger ätebeschreibung/Gerätebeschreibung_ Zusatzfunktionen_Lüftergeschwindigkeit @ 9 \mod_1375277488012_6.doc @ 8 0146 @ 3 @ 1
15
Page 16

Description of the appliance
3.4.2 Fan speed
The fan speed function is used to increase or decrease the speed of the
fan.
Available in all operation modes except steam and baking.
Pos: 44 /953-Eloma/BET_Kombidämpfer/Ger ätebeschreibung/Gerätebeschreibung_ Zusatzfunktionen_Halten @ 9\mod_1 375278507117_6.doc @ 80186 @ 3 @ 1
3.4.3 Holding
The holding function can be used to keep cooked food at a specified
chamber temperature.
Once the other steps have been selected, the holding function is added
as the final cooking step.
Available in all operation modes except baking, if the nominal
temperature of the final cooking step is <140 °C (<284 °F).
Pos: 45 /953-Eloma/BET_Kombidämpfer/Ger ätebeschreibung/Gerätebeschreibung_ Zusatzfunktion_Energiesparmodus @ 9\m od_1375279289755_6.doc @ 802 06 @ 3 @ 1
3.4.4 Energy saving function
The energy saving function is used to operate the appliance in an energysaving mode at half the heating power.
Available in all operation modes except steam.
Pos: 46 /953-Eloma/BET_Kombi_Touch/03_G erätebeschreibung/Gerätebeschreibun g_Zusatzfunktion_Zeitvorwahl @ 9\mo d_1375285214480_6.doc @ 80351 @ 3 @ 1
3.4.5 Pre-set timer
The pre-set timer function can be used to specify a time when the
program should start or end. An end time cannot be set if a cooking step
is controlled via the core temperature.
Available in all operation modes.
Pos: 47 /953-Eloma/BET_Kombidämpfer/Ger ätebeschreibung/Gerätebeschreibung_ Zusatzfunktion_SPS @ 9\mod_137528 0755189_6.doc @ 80226 @ 3 @ 1
3.4.6 Steam protection system
The steam protection system (SPS®) function is used to extract the
steam present in the appliance shortly before the end of the program, so
that only a small amount of steam escapes when the chamber door is
opened.
Available in "steam" operation mode.
Pos: 48 /953-Eloma/BET_Kombidämpfer/Ger ätebeschreibung/Gerätebeschreibung_So nderprogrammme (Definition) @ 9\m od_1375280931609_6.doc @ 80246 @ 2 @ 1
3.5 Special programs
Special programs are semi-automatic programs with pre-set
recommended cooking settings which can be changed.
Pos: 49 /953-Eloma/BET_Kombidämpfer/Ger ätebeschreibung/Gerätebeschreibung_So nderporgramm_Delta_T_Garen @ 9 \mod_1375281308122_6.doc @ 80286 @ 3 @ 1
16
Page 17

Description of the appliance
3.5.1 Delta-T-cooking
The Delta-T-cooking special program is a particular form of low
temperature cooking. Throughout the entire cooking step, the appliance
maintains a set temperature difference (delta T) between the current
actual core temperature and the current actual temperature in the
chamber.
The cooking step ends as soon as the set nominal core temperature is
reached.
Pos: 50 /953-Eloma/BET_Kombidämpfer/Ger ätebeschreibung/Gerätebeschreibung_So nderprogramm_Niedertemperaturga ren @ 9\mod_1375281980002_6.doc @ 80 306 @ 3 @ 1
3.5.2 Low temperature cooking (LT cooking)
The low temperature cooking special program is used to cook food gently
in a low temperature range with reduced fan power.
Pos: 51 /953-Eloma/BET_Kombidämpfer/Ger ätebeschreibung/Gerätebeschreibung_So nderprogramme_CookandHold @ 9\mo d_1375281084113_6.doc @ 802 66 @ 3 @ 1
3.5.3 Cook and hold
The cook and hold special program is used to add the holding function as
the final cooking step once the other steps have been selected. The
holding function can be used to keep cooked food at a specified chamber
temperature.
Pos: 52 /953-Eloma/BET_Kombidämpfer/Ger ätebeschreibung/Gerätebeschreibung_So nderprogramme_Regenerieren @ 9\mod_1375282116390_6.doc @ 803 26 @ 3 @ 1
3.5.4 Regeneration
The regeneration special program can be used to gently reheat food that
has been fully cooked and cooled down.
Pos: 53 /953-Eloma/BET_Kombidämpfer/Ger ätebeschreibung/Gerätebeschreibung_HACCP @ 9\mod_1375427773282_6. doc @ 81021 @ 2 @ 1
3.6 HACCP protocol
During operation, all the cooking data of a program and cleaning program
are saved as an HACCP protocol. The HACCP protocol can be
transferred to a computer via a USB connection.
Pos: 54 /953-Eloma/BET_Kombi_Touch/Bildschi rmbeschreibung/Bildschirmbeschrei bung_Titel @ 9\mod_1375367589674 _6.doc @ 80933 @ 1 @ 1
17
Page 18
Screen description
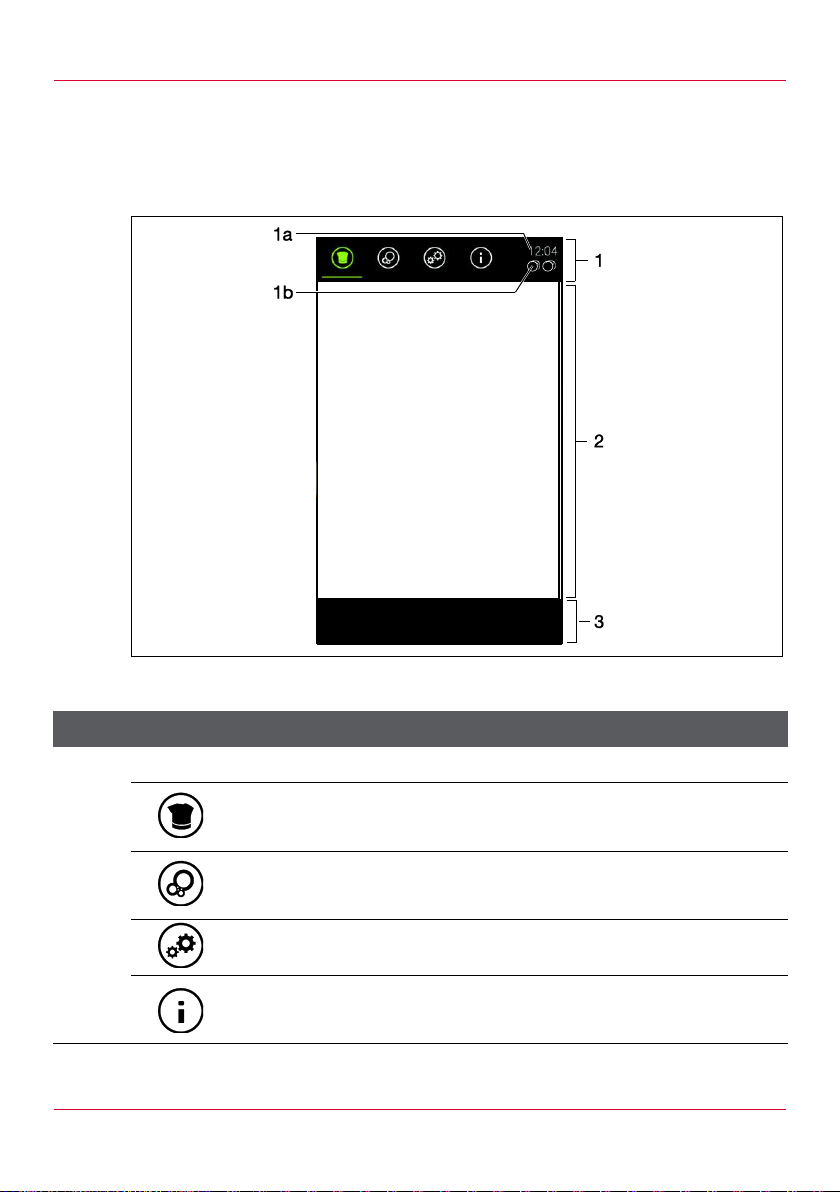
Item
Symbol
Name and function
1
Main menu
chef’s arena field
Switch to the chef’s arena screen
Care field
Switch to the Care screen
Settings field
Switch to the Settings screen
Manual field
Switch to the integrated manual
4 Screen description
Pos: 55 /953-Eloma/BET_Kombi_Touch/Bildschi rmbeschreibung/Bildschirmbeschrei bung_Bildschirmaufbau @ 9\mod_137 5096785217_6.doc @ 78683 @ 23444 44 @ 1
4.1 Screen layout
Fig. 3: Screen layout
18
Page 19
Screen description
Item
Symbol
Name and function
Return field
Switch to the previous screen
1a – Shows the current time
1b
For
example
Status overview field
Shows error messages
2 Functions area
3 Additional menu
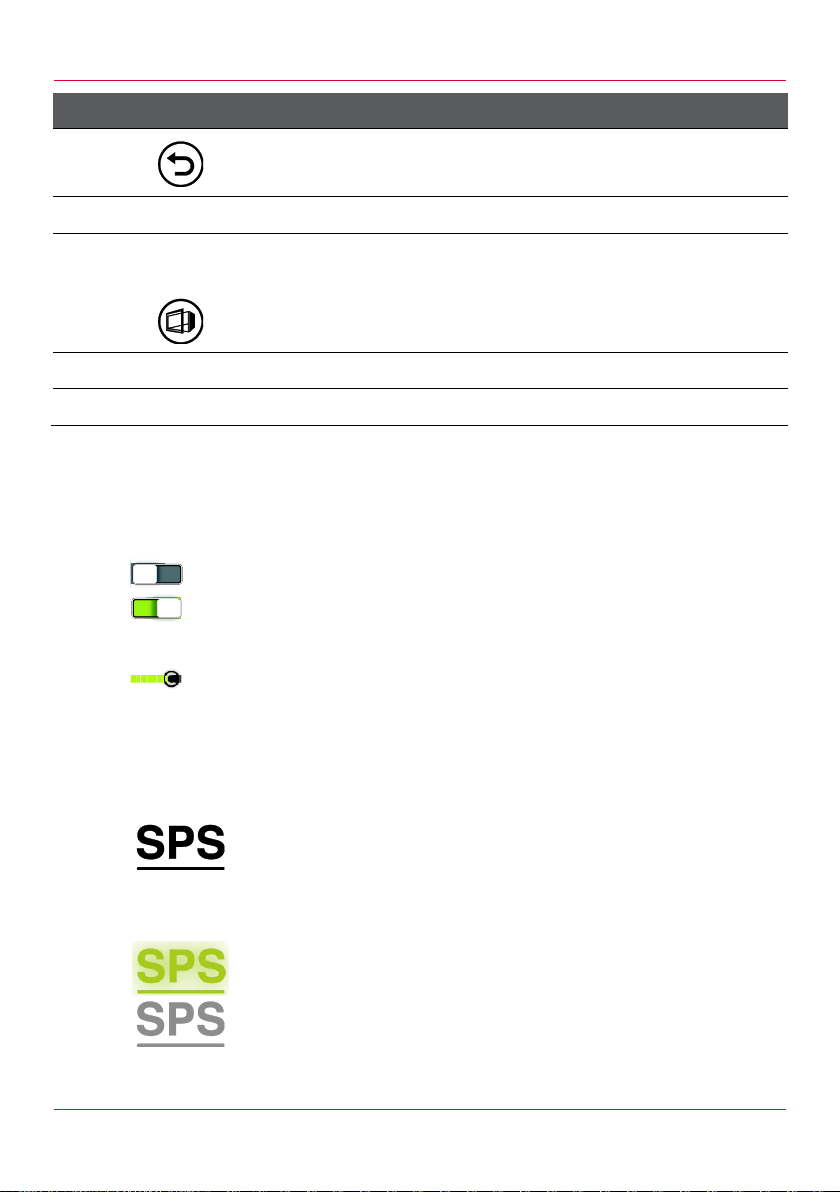
Toggle keys can be in On or Off state.
Touch the toggle key to switch a function on or off.
Sliders can be moved horizontally and, on the Climatic® MT
screen, in all directions.
Move the slider to adjust values.
Example: Settings field
Fields are areas which contain a symbol and call up an
action when touched. Fields are used for navigation, for
setting values or for activating functions. Highlighted fields
indicate which area or function is active.
Highlighted fields indicate which area or function is active.
Greyed-out fields cannot be activated.
Tab. 2: Description of the screen layout
4.1.1 Screen elements
Toogle keys
Sliders
Fields
19
Page 20
Screen description
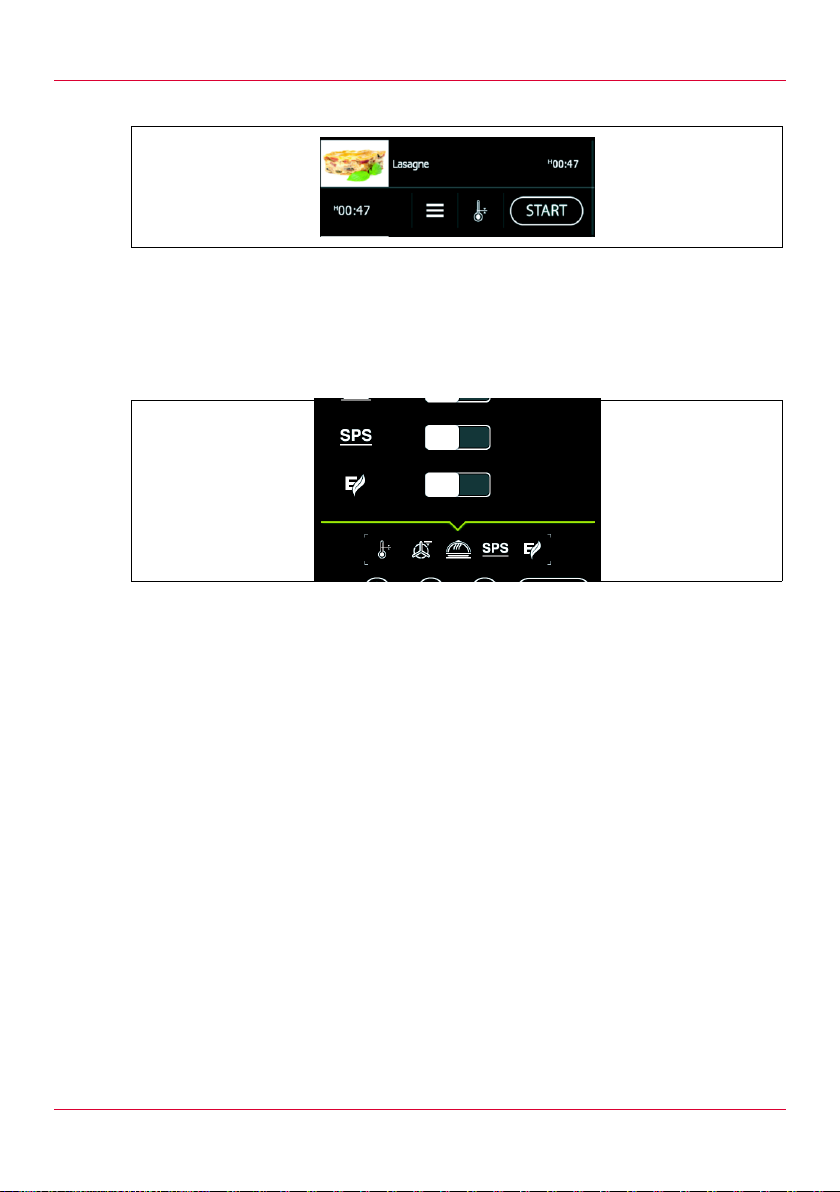
Activation line
Fig. 4: Activation line example
The activation line is displayed when a field in a list is touched. The
activation line is closed when a different field is touched.
Overlays
Fig. 5: Overlay example
20
Overlays appear as a second level over the screen and show extended
setting options. Overlays are opened by touching a field and closed by
touching the same field again or an area outside of the overlay.
Pos: 56 /953-Eloma/BET_Kombi_Touch/Bildschi rmbeschreibung/Bildschirmbeschrei bung_Garmodus @ 9\mod_13750991 04494_6.doc @ 78703 @ 2 @ 1
see section 4.1
Page 21
Screen description
Item
Symbol
Name and function
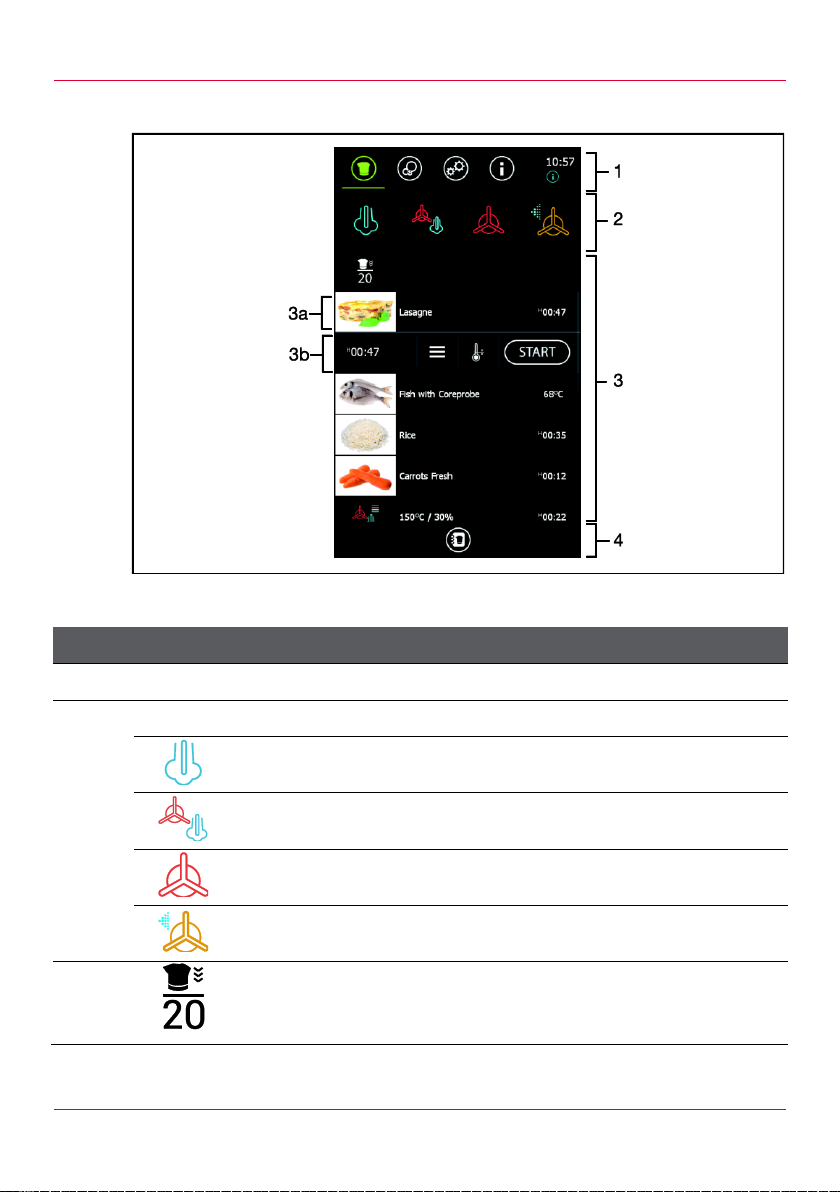
1 Main menu, see section 4.6
2
Modes of operation
Steam field
Switch to steam operation mode
Combi steam field
Switch to combi steam operation mode
Convection field
Switch to convection operation mode
Baking field
Switch to baking operation modes
3
Last20 list
Shows the last 20 programs selected
4.2 chef’s arena screen
Fig. 6: chef’s arena screen
21
Page 22
Screen description
Item
Symbol
Name and function
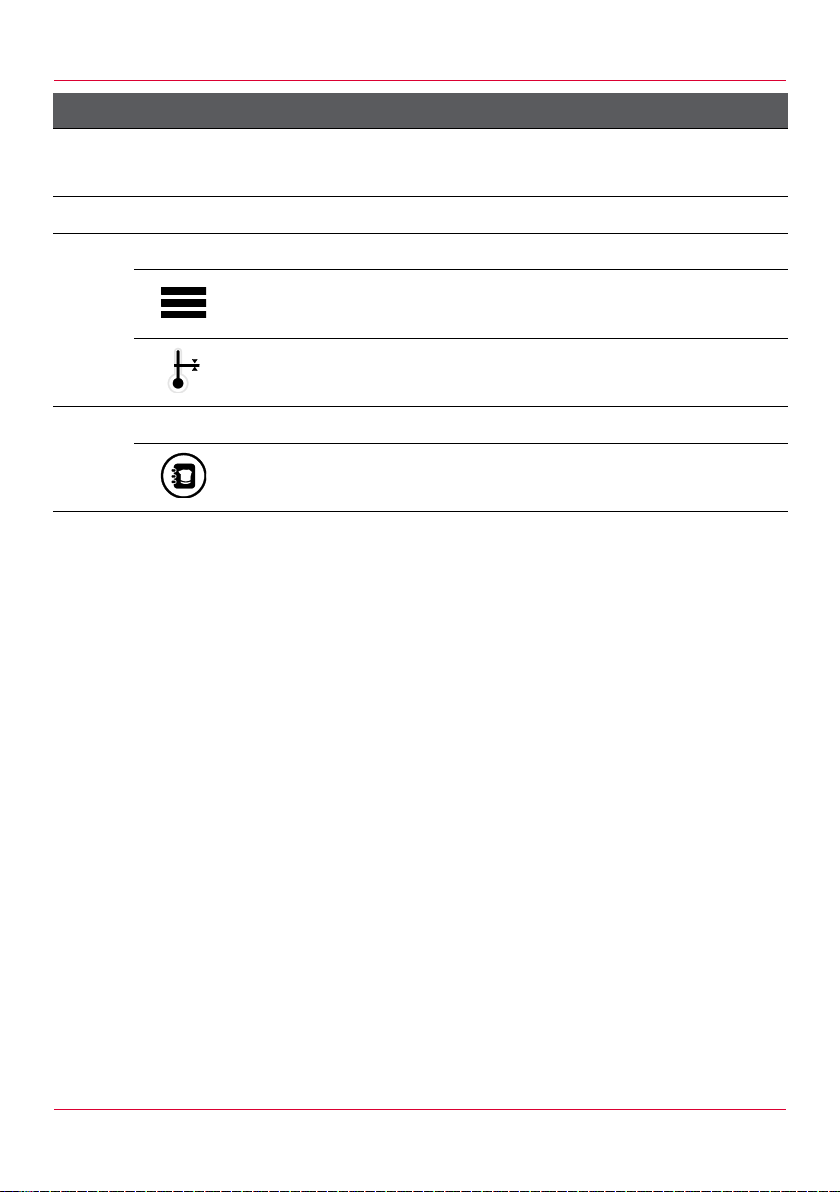
3a
Cooking Program field
Show the activation line
3b
Activation line
Shows the total cooking time of the program
Step-insight field
Switch to the Step-insight screen
Preheating/cool down field
Open the Preheating/cool down overlay
4
Additional menu
Program list field
Switch to the Programs screen
Tab. 3: Description of the chef’s arena screen
Pos: 57 /953-Eloma/BET_Kombi_Touch/Bildschi rmbeschreibung/Bildschirmbeschrei bung_Gareinstellungen_[Titel] @ 10\ mod_1383817716366_6.doc @ 100351 @ 2 @ 1
22
Page 23
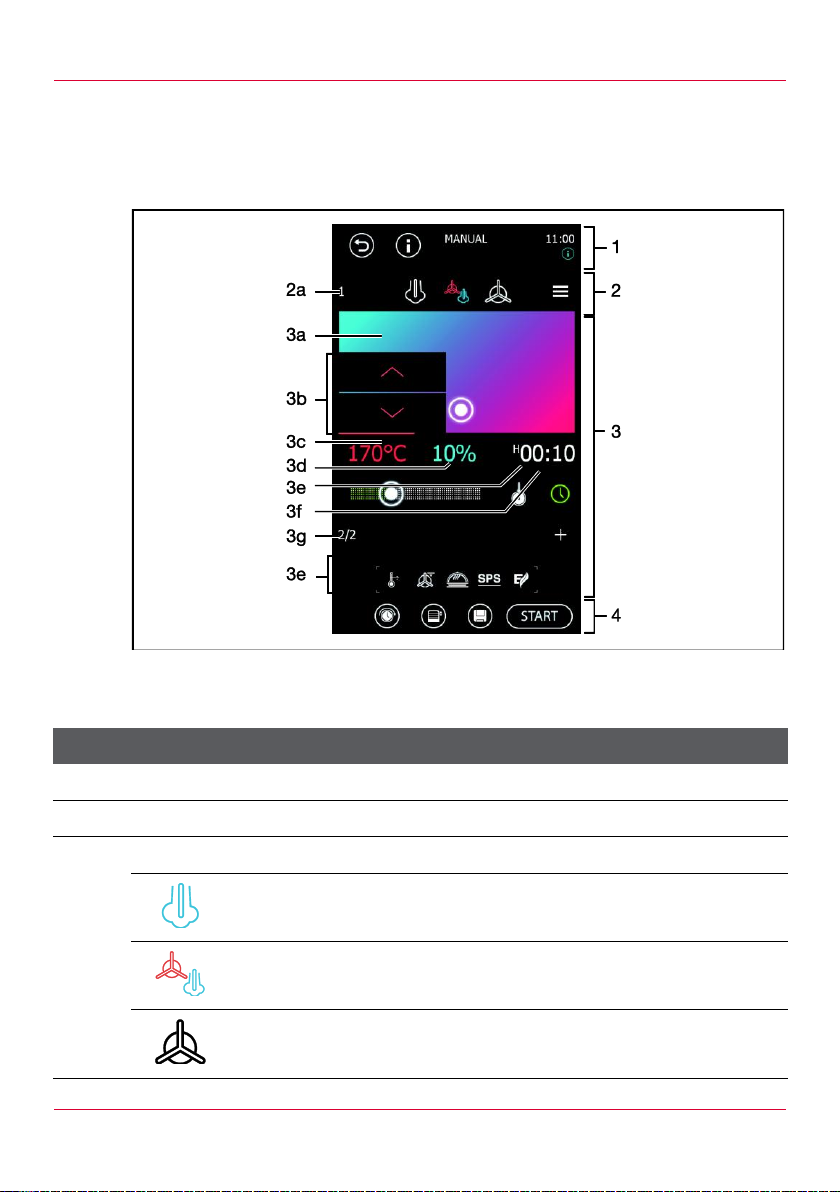
Screen description
Item
Symbol
Name and function
1 Main menu, see section 4.1
2 Modes of operation
2a Current cooking step
Steam field
Switch to steam operation mode
Combi steam field
(In this example, combi steam operation mode is selected)
Convection field
Switch to convection operation mode
4.3 Cooking settings screens
Pos: 58 /953-Eloma/BET_Kombi_Touch/Bildschi rmbeschreibung/Bildschirmbeschrei bung_Gareinstellungen_Dampf_Kombid ampf_Heißluft @ 9\mod_13751011961 57_6.doc @ 78723 @ 3 @ 1
4.3.1 Cooking settings screen in the steam, combi steam and convection
operation modes
Fig. 7: Cooking settings screen in the combi steam operation mode, for
example
23
Page 24
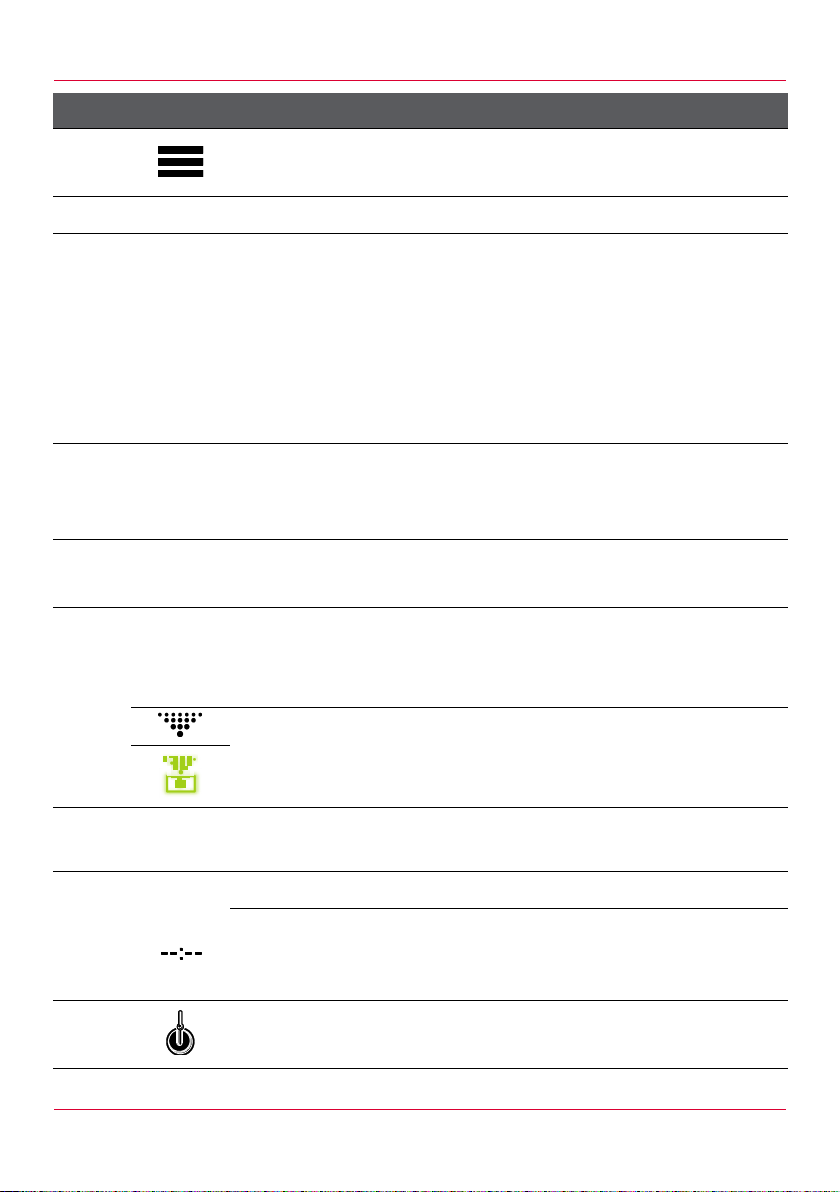
Screen description
Item
Symbol
Name and function
Step-insight field
Switch to the Step-insight screen
3 Cooking settings
3a Climatic® MT screen
Move the slider on the Climatic® MT screen to change the
following settings:
• In steam and convection operation modes: nominal
temperature
• In combi steam operation mode: nominal temperature
and nominal humidity
3b
Up/Down fields
Increase or decrease nominal temperature or nominal
humidity
3c
Temperature field
Set the nominal temperature in °C or °F
3d
Humidity field
(Not available in steam or convection operation mode)
In combi steam operation mode: set the humidity in %
Supply air flap field
(Only available in convection operation mode)
Open or close the supply air flap
3e
Shows the cooking time or the core temperature of the
selected cooking step
3f Shows the total cooking time of all cooking steps
The total cooking time of all cooking steps cannot be
displayed, as at least one cooking step is controlled via the
core temperature
Core temperature field
Control the cooking step via core temperature
24
Page 25
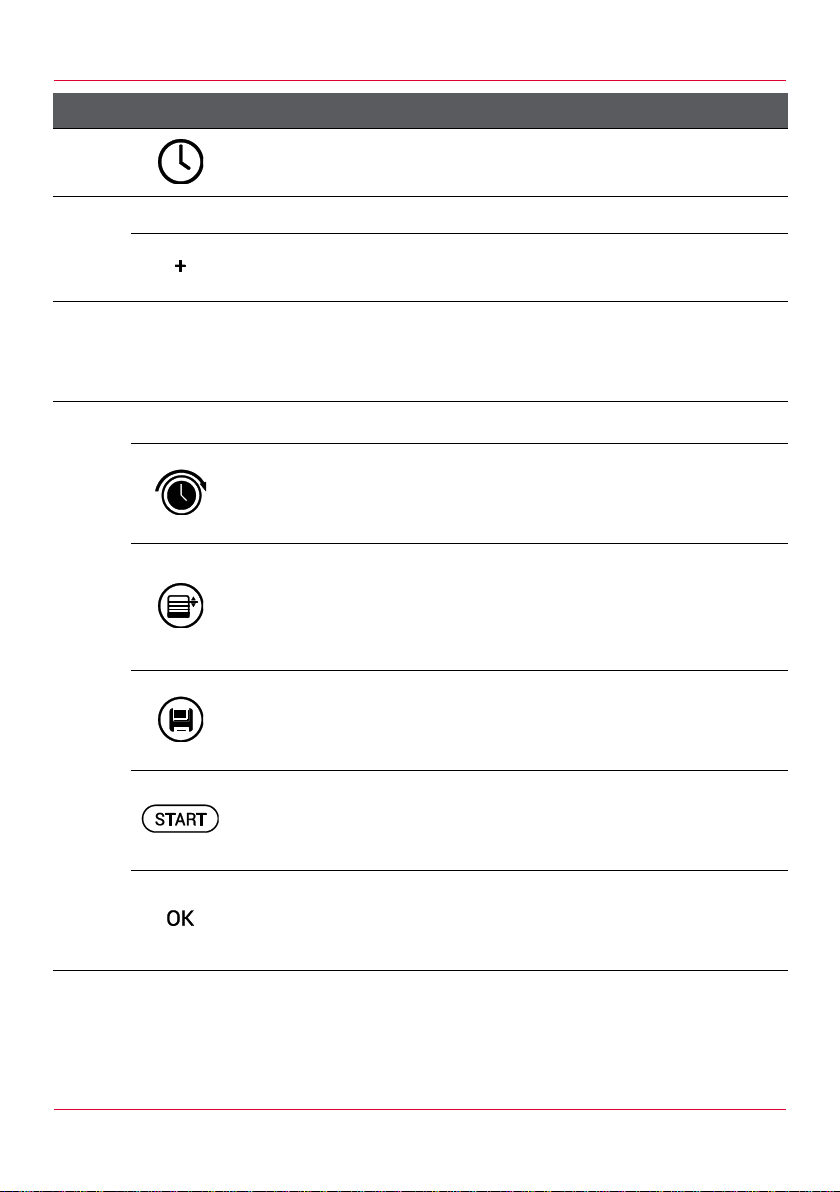
Screen description
Item
Symbol
Name and function
Cooking time field
Control the cooking step via cooking time
3g Next cooking step/total number of cooking steps
Add field
Add a cooking step after the one currently displayed
3h
Additional functions field
Open the Additional functions overlay, see section 4.3.3
Additional functions that have been selected are highlighted
4
Additional menu
Pre-set timer field
(Only available before the program starts)
Open the Pre-set timer overlay
Multi cooking field
(Only available with a single-step program and before the
program starts)
Switch to the Multi cooking screen
Save field
(Only available before the program starts)
Switch to the Save screen
Start field
(Only available before the program starts)
Start the program
OK field
(Only available whilst a program is running)
Accept changes and continue with the cooking procedure
Tab. 4: Description of the Cooking settings screen in the steam, combi steam
and convection operation modes
Pos: 59 /953-Eloma/BET_Kombi_Touch/Bildschi rmbeschreibung/Bildschirmbeschrei bung_Gareinstellungen_Backen @ 9\mo d_1381847078274_6.doc @ 93381 @ 3 @ 1
25
Page 26
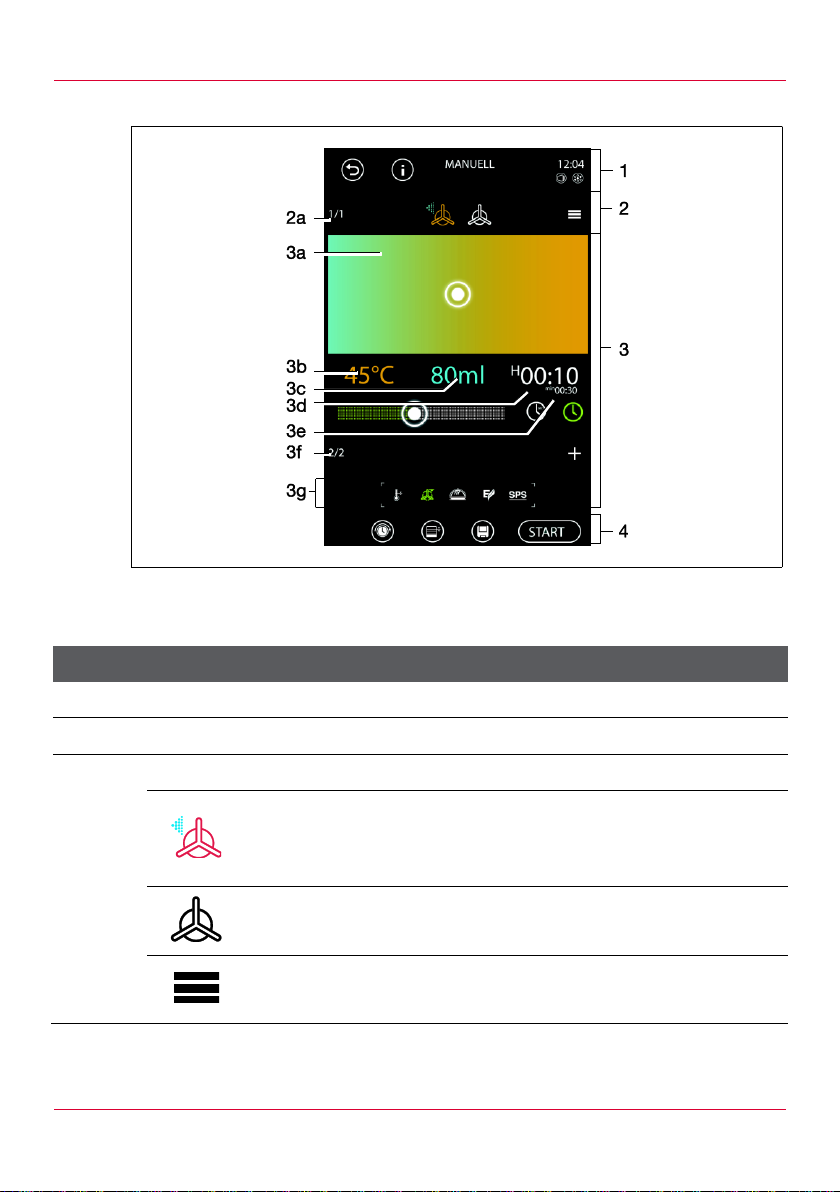
Screen description
Item
Symbol
Name and function
1 Main menu, see section 4.1
2 Modes of operation
2a Current cooking step
Bake with steam field
(In this example, bake with steam operation mode is
selected)
Bake without steam field
Switch to bake without steam operation mode
Step-insight field
Switch to the Step-insight screen
4.3.2 Cooking settings screen in the baking operation modes
Fig. 8: Cooking settings screen in the bake with steam operation mode, for
example
26
Page 27
Screen description
Item
Symbol
Name and function
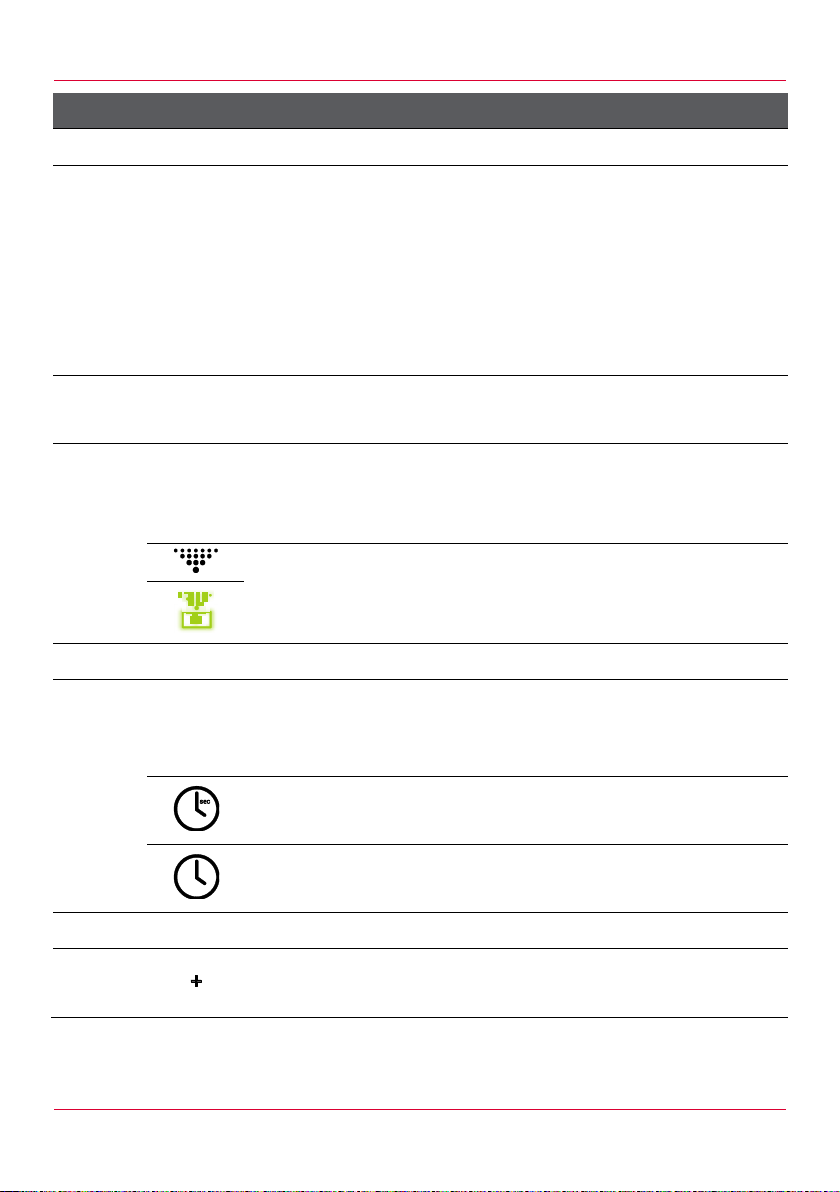
3 Cooking settings
3a Climatic® MT screen
Move the slider on the Climatic® MT screen to change the
following settings:
• In bake with steam operation mode: nominal
temperature and steam
• In bake without steam operation mode: nominal
temperature
3b
Temperature field
Set the nominal temperature in °C or °F
3c
Steam field
(Only available in bake with steam operation mode)
Set the steam in millilitres (ml) or seconds (sec)
Supply air flap field
(Only available in bake without steam operation mode)
Open or close the supply air flap
3d Shows the cooking time of the selected cooking step
3e In bake with steam operation mode: shows the rest period
In bake without steam operation mode: shows the total
cooking time of all cooking steps
Rest period field
Set the rest period in seconds
Cooking time field
Control the cooking step via cooking time
3f Next cooking step/total number of cooking steps
Add field
Add a cooking step after the one currently displayed
27
Page 28
Screen description
Item
Symbol
Name and function
3g
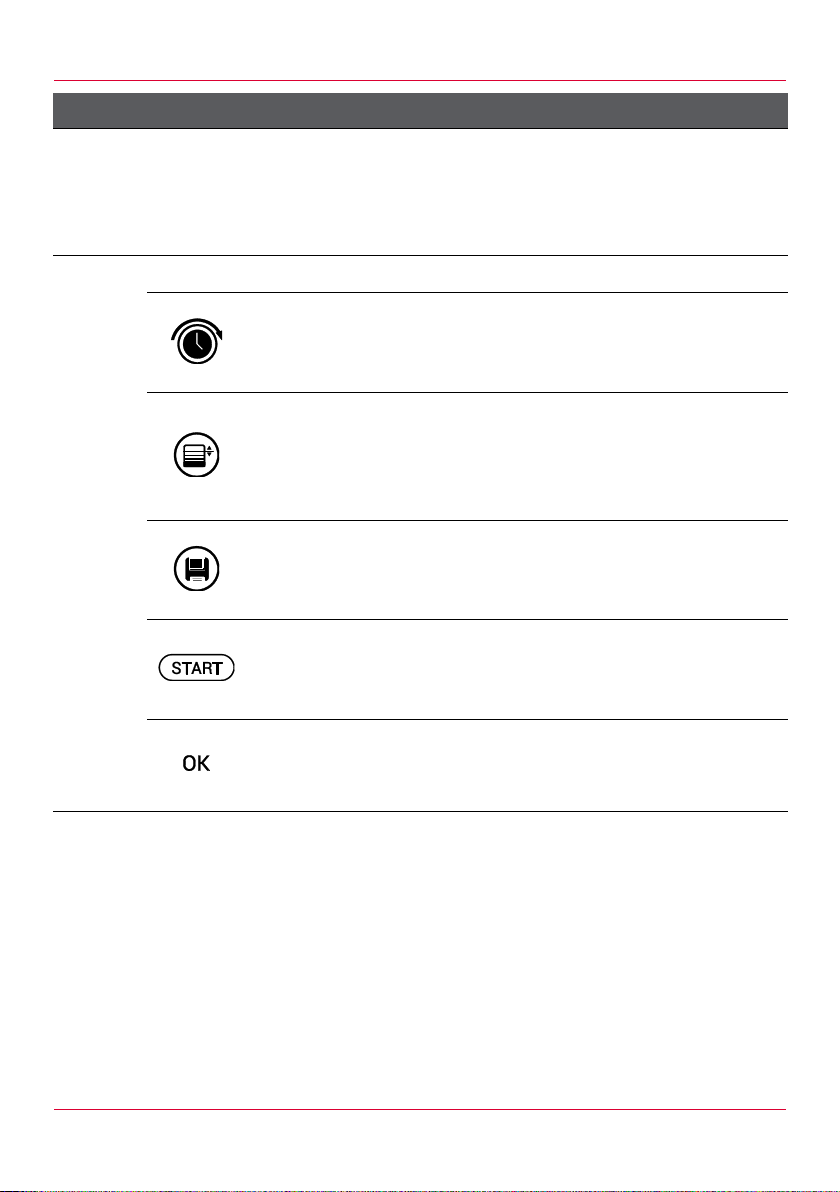
Additional functions field
Open the Additional functions overlay, see section 4.3.3
Additional functions that have been selected are
highlighted
4
Additional menu
Pre-set timer field
(Only available before the program starts)
Open the Pre-set timer overlay
Multi cooking field
(Only available with an individual cooking step and before
the program starts)
Switch to the Multi cooking screen
Save field
(Only available before the program starts)
Switch to the Save screen
Start field
(Only available before the program starts)
Start the program
OK field
(Only available whilst a program is running)
Accept changes and continue with the cooking procedure
Tab. 5: Description of the Cooking settings screen in the baking operation
modes
Pos: 60 /953-Eloma/BET_Kombi_Touch/Bildschi rmbeschreibung/Bildschirmbeschrei bung_Fenster_Zusatzfunktion @ 9\mo d_1375105504134_6.doc @ 78794 @ 3 @ 1
28
Page 29
Screen description
Symbol
Name and function
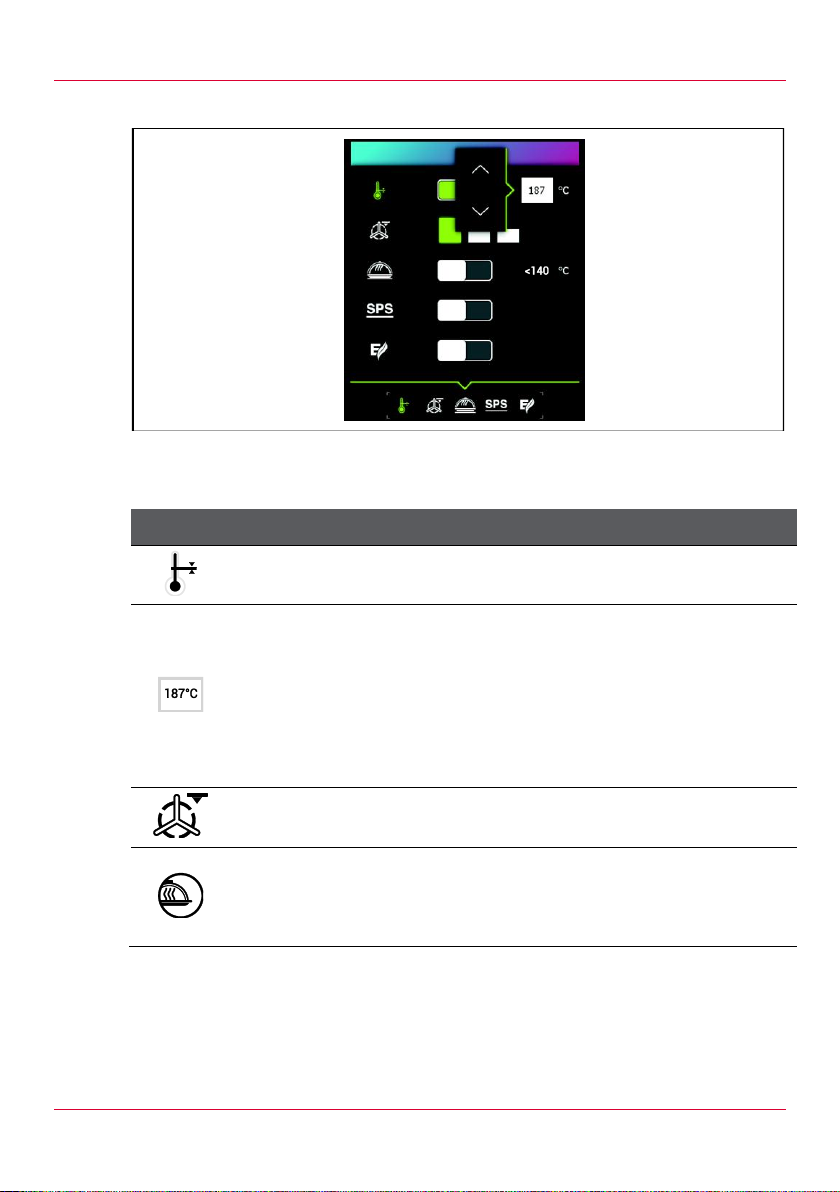
Switch the pre-heating/cool down function on/off
Shows the set pre-heating temperature to which the chamber
will be pre-heated or cooled down
Becomes active when the pre-heating/cool down function is
switched on
Touch the Up/Down fields to change the pre-heating
temperature
Set the fan speed (half/full) and phasing
Switch the holding function on/off
(Only available if nominal temperature <140 °C (<284 °F))
Max. 12 hours
4.3.3 Additional functions overlay
Fig. 9: Additional functions overlay with additional function pre-heating, change
pre-heating temperature, for example
29
Page 30
Screen description
Symbol
Name and function
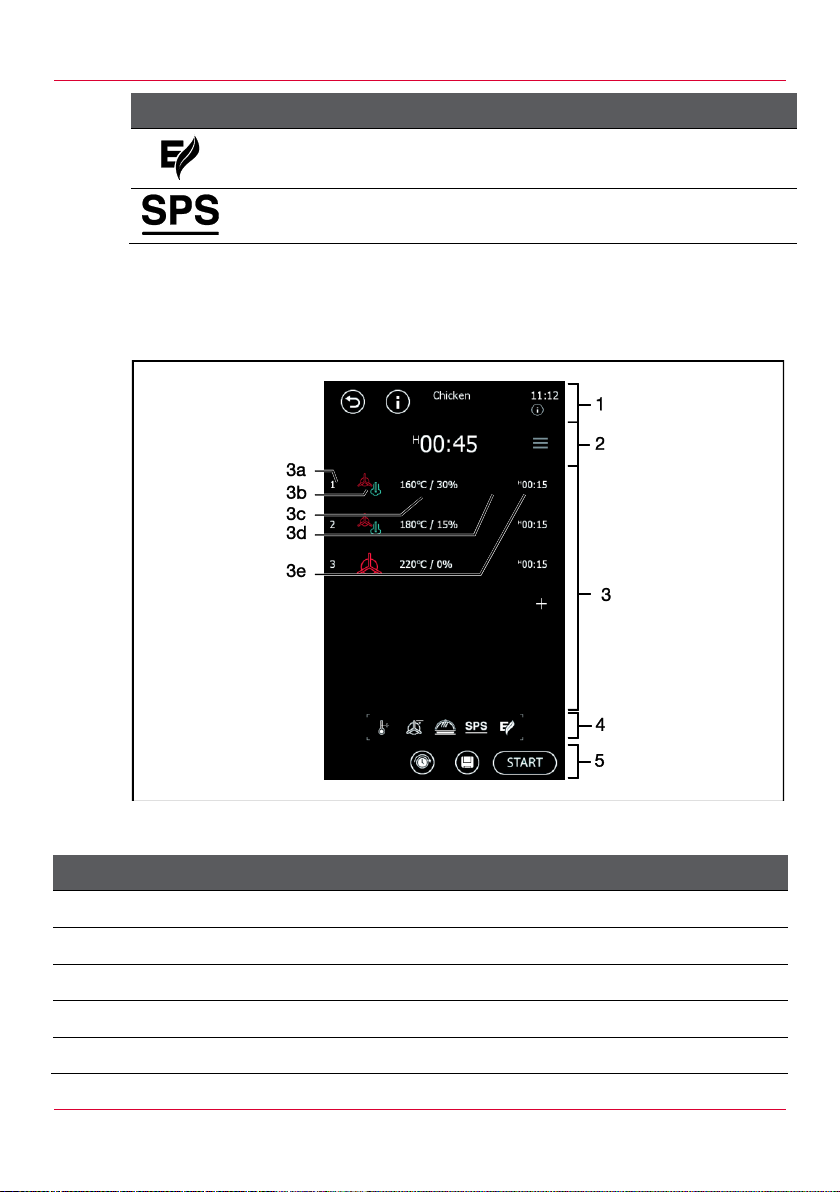
Switch the energy saving function on/off
Switch the steam protection system function on/off
Item
Symbol
Name and function
1 Main menu, see section 4.1
2 Shows the total cooking time of all cooking steps
3 Cooking steps
3a Shows the number of the cooking step
3b Shows the operation mode selected for the cooking step
Tab. 6: Description of the Additional functions overlay
Pos: 61 /953-Eloma/BET_Kombi_Touch/Bildschi rmbeschreibung/Bildschirmbeschrei bung_Übersicht @ 9\mod_1381848 262968_6.doc @ 93404 @ 2 @ 1
4.4 Step-insight screen
Fig. 10: Step-insight screen, with two cooking steps, for example
30
Page 31
Screen description
Item
Symbol
Name and function
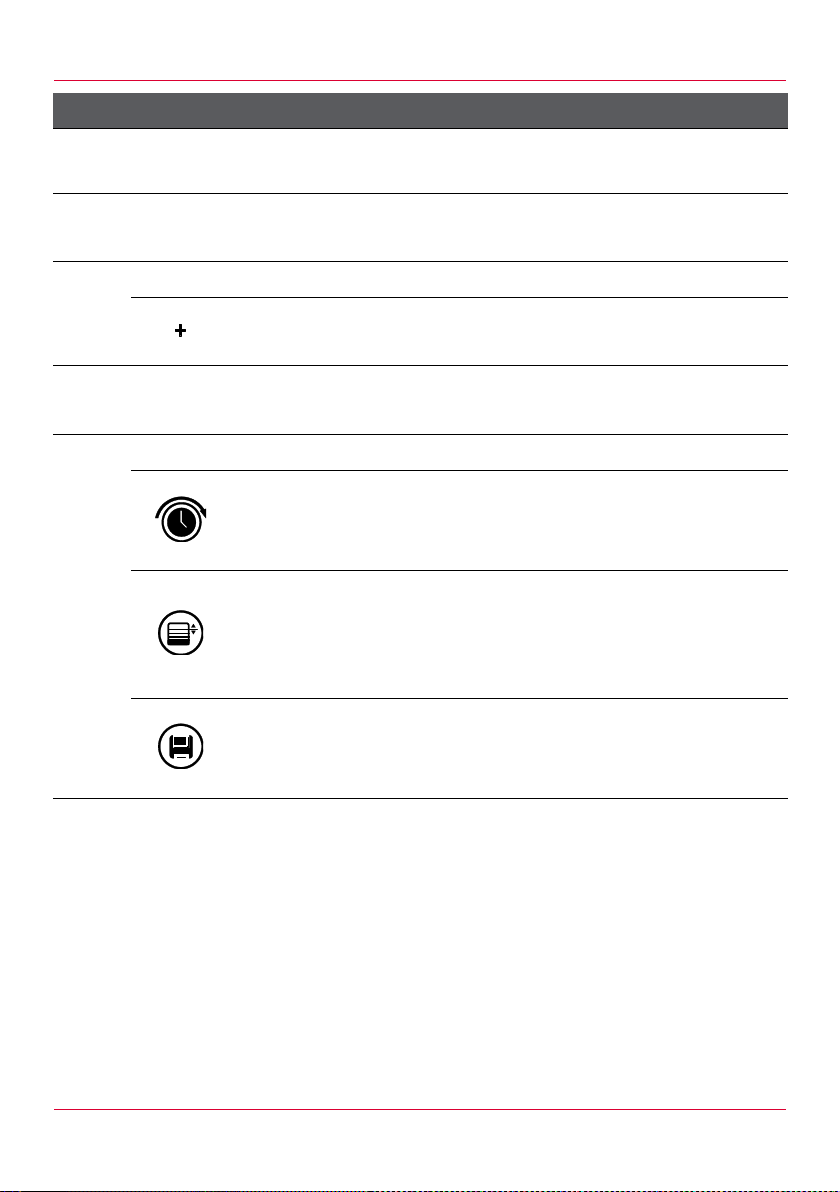
3c
Shows the cooking settings (nominal temperature / nominal
humidity / amount of steam) for the cooking step
3d Shows the set fan speed additional function
In bake with steam operation mode: shows the rest period
3e Shows the cooking time of the cooking step
Add field
Add a cooking step to the end of the list
4
Additional functions field
Additional functions that have been selected are highlighted
5
Additional menu
Pre-set timer field
(Only available before the program starts)
Open the Pre-set timer overlay
Multi cooking field
(Only available with a single-step program and before the
program starts)
Switch to the Multi cooking screen
Save field
(Only available before the program starts)
Switch to the Save screen
Tab. 7: Description of the Step-insight screen
Pos: 62 /953-Eloma/BET_Kombi_Touch/Bildschi rmbeschreibung/Bildschirmbeschrei bung_Multi-Cooking @ 9\mod_13751082 29695_6.doc @ 78834 @ 2 @ 1
31
Page 32
Screen description
Item
Symbol
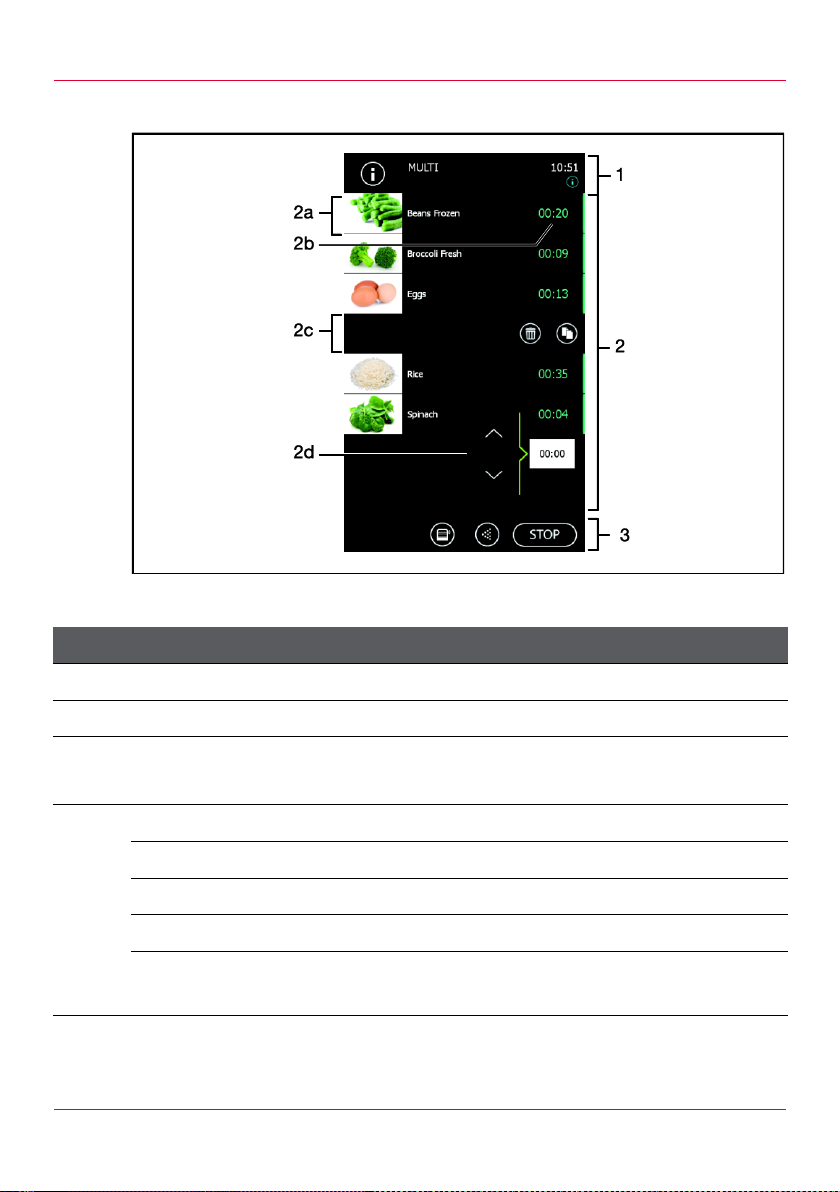
Name and function
1 Main menu, see section 4.1
2 List of programs for multi cooking
2a
Program field
Show the activation line
2b
Shows the cooking time of the cooking step
blue
Remaining cooking time
green
Load the appliance with food
yellow
Remove the foodstuff
grey
Joint end time, appliance does not need to be loaded with
food yet
4.5 Multi cooking screen
Fig. 11: Multi cooking screen whilst a program is running
32
Page 33
Screen description
Item
Symbol
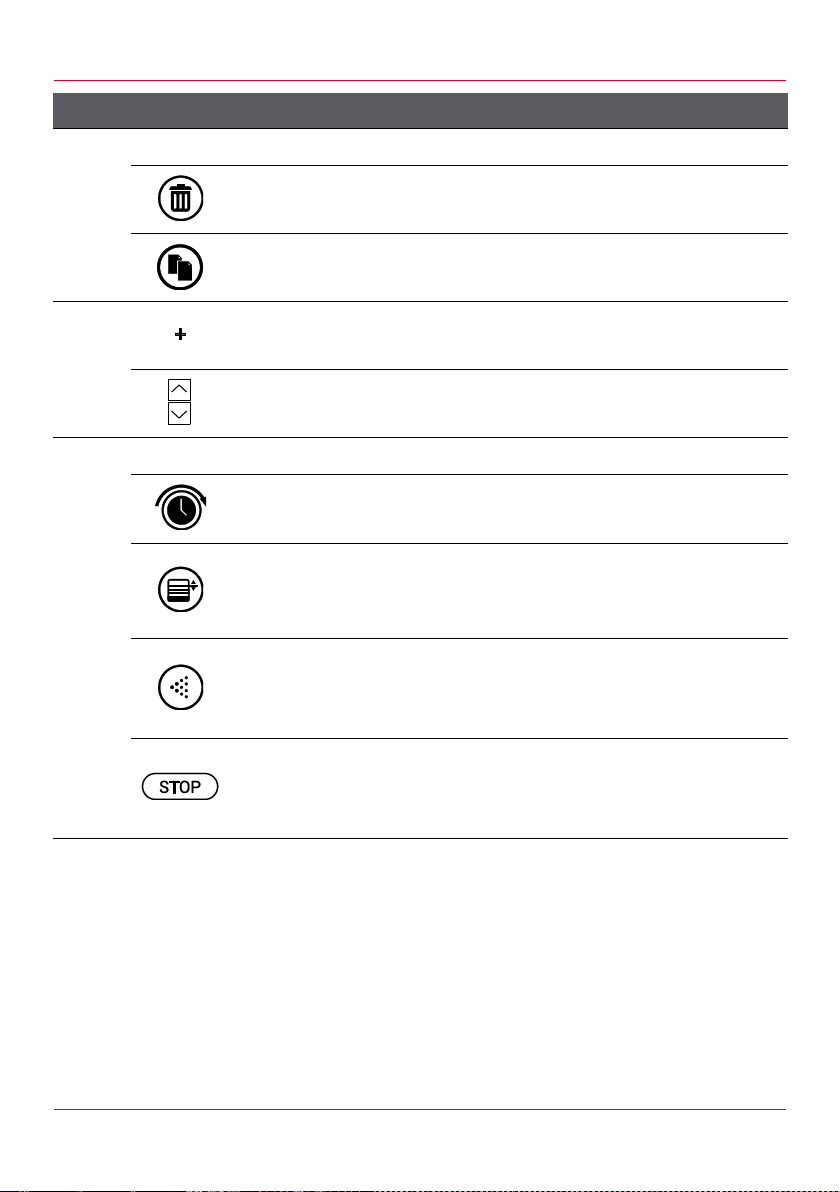
Name and function
2c
Activation line
Delete field
Delete the program
Copy field
Copy the program
2d
Add field
Add the program manually
Up/Down fields
Set the cooking time
3
Additional menu
Pre-set timer field
(Only available before the program starts)
Multi cooking field
Open the Programs overlay to select other programs with
the same cooking settings
Manual humidification field
(Only available whilst a program is running)
Touch the field for as long as steam should be injected
Stop field
(Only available whilst a program is running)
End multi cooking prematurely
Tab. 8: Description of the Multi cooking screen whilst a program is running
Pos: 63 /953-Eloma/BET_Kombi_Touch/Bildschi rmbeschreibung/Bildschirmbeschrei bung_Programm-Modus @ 9\mod_13 75109455477_6.doc @ 78854 @ 2 @ 1
33
Page 34
Screen description
Item
Symbol
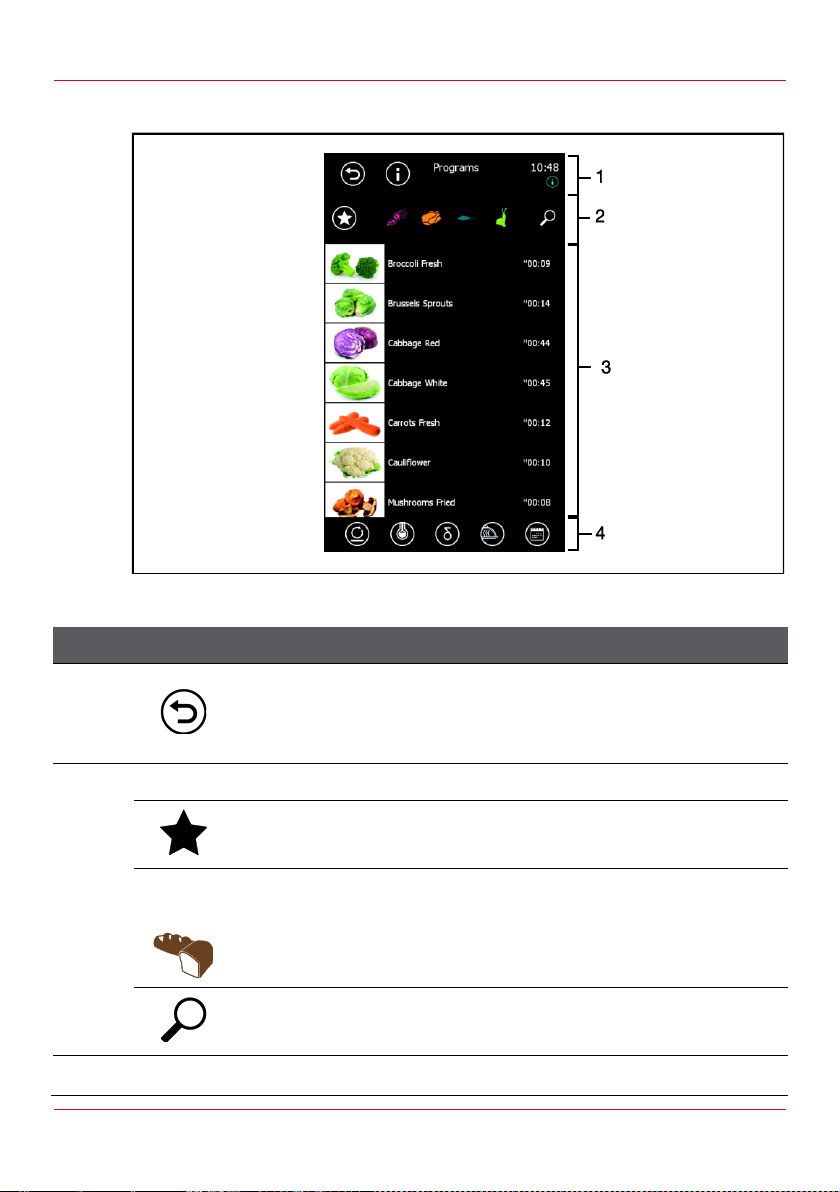
Name and function
1
Return field
(Not available if Programs is set as the start screen)
Switch to the set start screen
2 Filter and search functions
Favourites field
Filter the list of saved programs according to favourites
For
example
Menu group fields
Filter the list of saved programs according to menu groups
Search field
Search for a program by keyword
3 List of saved programs
4.6 Programs screen
Fig. 12: Programs screen with Pre-heating additional function overlay
34
Page 35
Screen description
Item
Symbol
Name and function
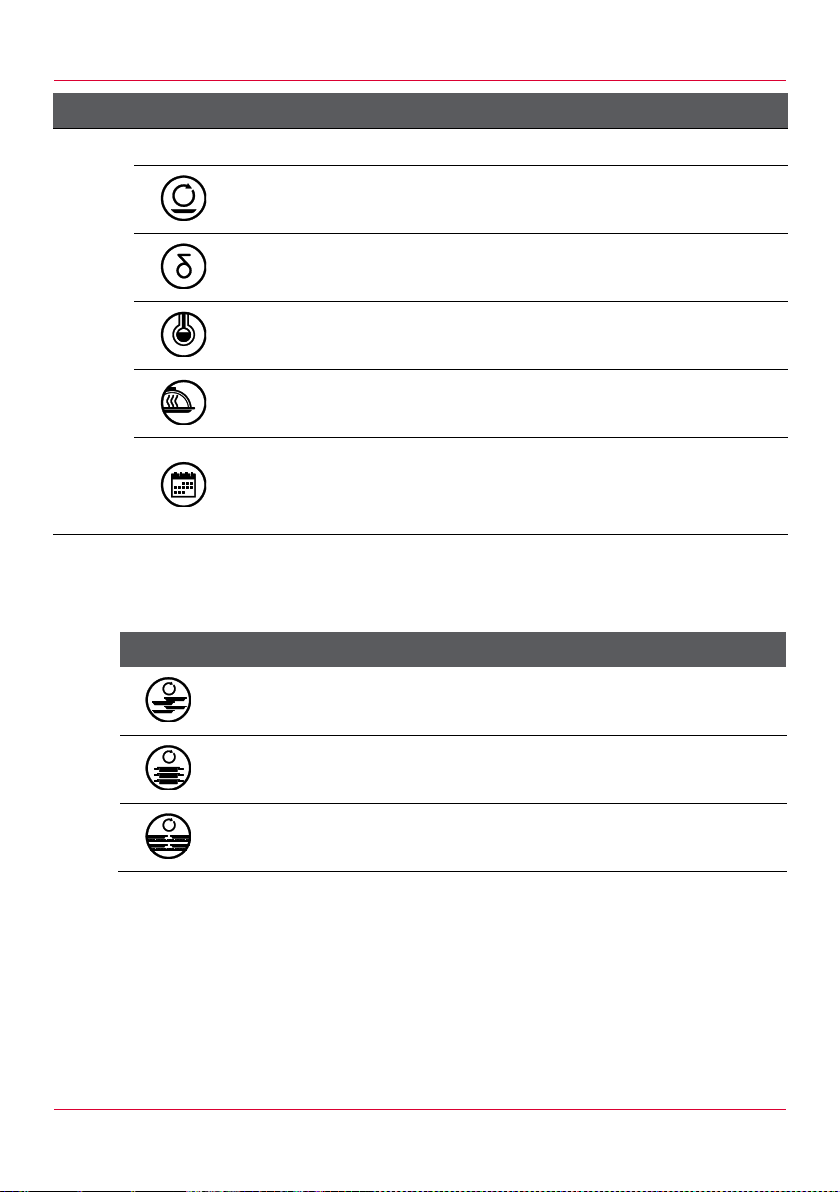
4 Special programs
Regeneration field
Open the Regeneration overlay, see section 4.6.1
Delta-T-cooking field
Open the Delta-T-cooking overlay, see section 4.6.2
Low temperature cooking (LT cooking) field
Open the LT cooking overlay, see section 4.6.3
Cook and hold field
Open the Cook and hold overlay, see section 4.6.4
Weekly pre-scheduled program field
Open the Weekly pre-scheduled program overlay, see
section 4.6.5
Symbol
Name and function
Banquet field
Regenerate the plates in the mobile tray rack
Batches field
Regenerate pans
Plates field
Regenerate the plates on the grid
Tab. 9: Description of the Programs screen
Pos: 64 /953-Eloma/BET_Kombi_Touch/Bildschi rmbeschreibung/Sonderprogramme/Bildsc hirmbeschreibung_Fenster_Rege nerieren @ 9\mod_1375110432106_ 6.doc @ 78874 @ 3 @ 1
4.6.1 Regeneration overlay
Tab. 10: Description of the Regeneration overlay
Pos: 65 /953-Eloma/BET_Kombi_Touch/Bildschi rmbeschreibung/Sonderprogramme/Bildsc hirmbeschreibung_Fenster_Delta T @ 9\mod_1375111047945_ 6.doc @ 78894 @ 3 @ 1
35
Page 36
Screen description
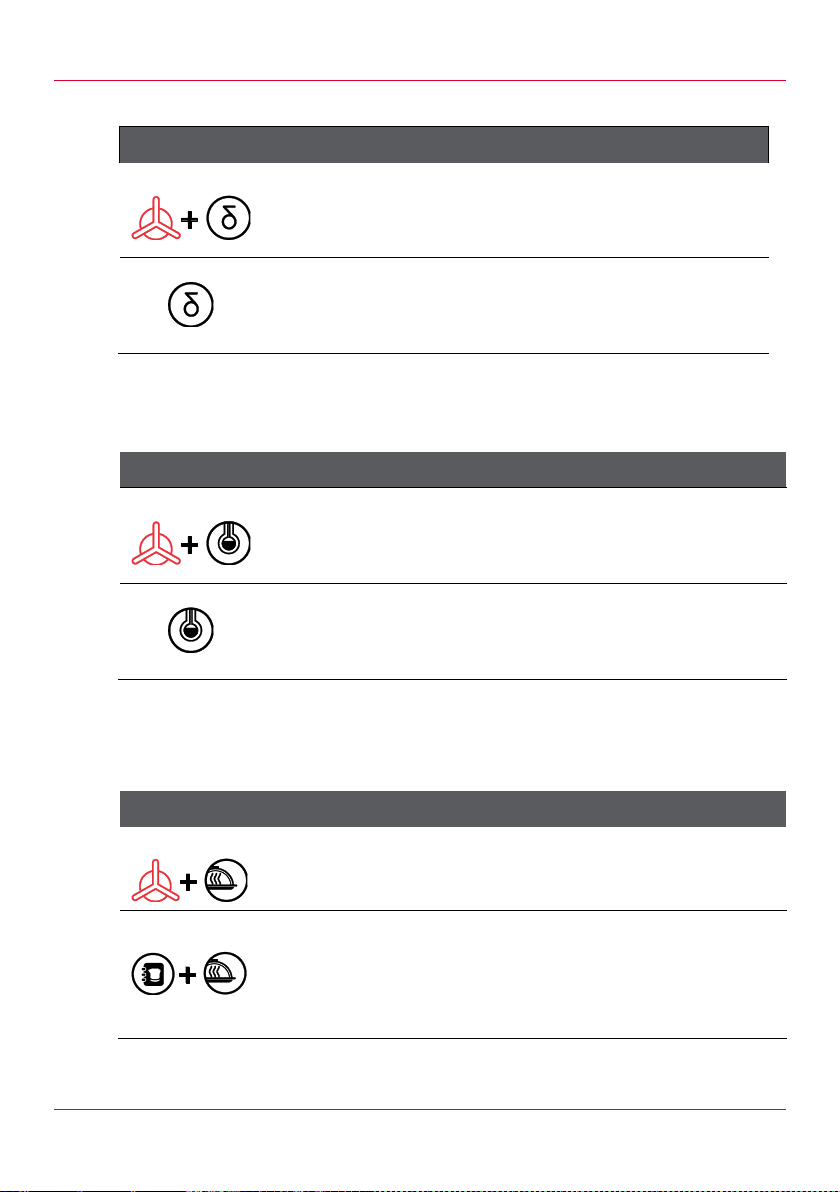
Symbol
Name and function
For example
Convection plus Delta-T-cooking field
Set any operation mode before the Delta-T-cooking
cooking step
Delta-T-cooking field
Cooking settings with Delta-T-cooking as the first
cooking step
Symbol
Name and function
For example
Convection plus LT cooking field
Set any operation mode before the LT cooking cooking
step
LT cooking field
Cooking settings with LT cooking as the first cooking
step
Symbol
Name and function
For example
Convection plus holding field
Set any operation mode before the holding cooking step
Program list plus holding field
Open the program list
Selected program with the holding function as the final
cooking step
4.6.2 Delta-T-cooking overlay
Tab. 11: Description of the Delta-T-cooking overlay
Pos: 66 /953-Eloma/BET_Kombi_Touch/Bildschi rmbeschreibung/Sonderprogramme/Bildsc hirmbeschreibung_Fenster_Niede rtemperatur_Garen @ 9\mod_1375 111324049_6.doc @ 78914 @ 3 @ 1
4.6.3 LT cooking overlay
Tab. 12: Description of the LT cooking overlay
Pos: 67 /953-Eloma/BET_Kombi_Touch/Bildschi rmbeschreibung/Sonderprogramme/Bildsc hirmbeschreibung_Fenster_Cooka ndHold @ 9\mod_1375112773974_ 6.doc @ 78934 @ 3 @ 1
4.6.4 Cook and hold overlay
Tab. 13: Description of the Cook and hold overlay
36
Page 37
Screen description
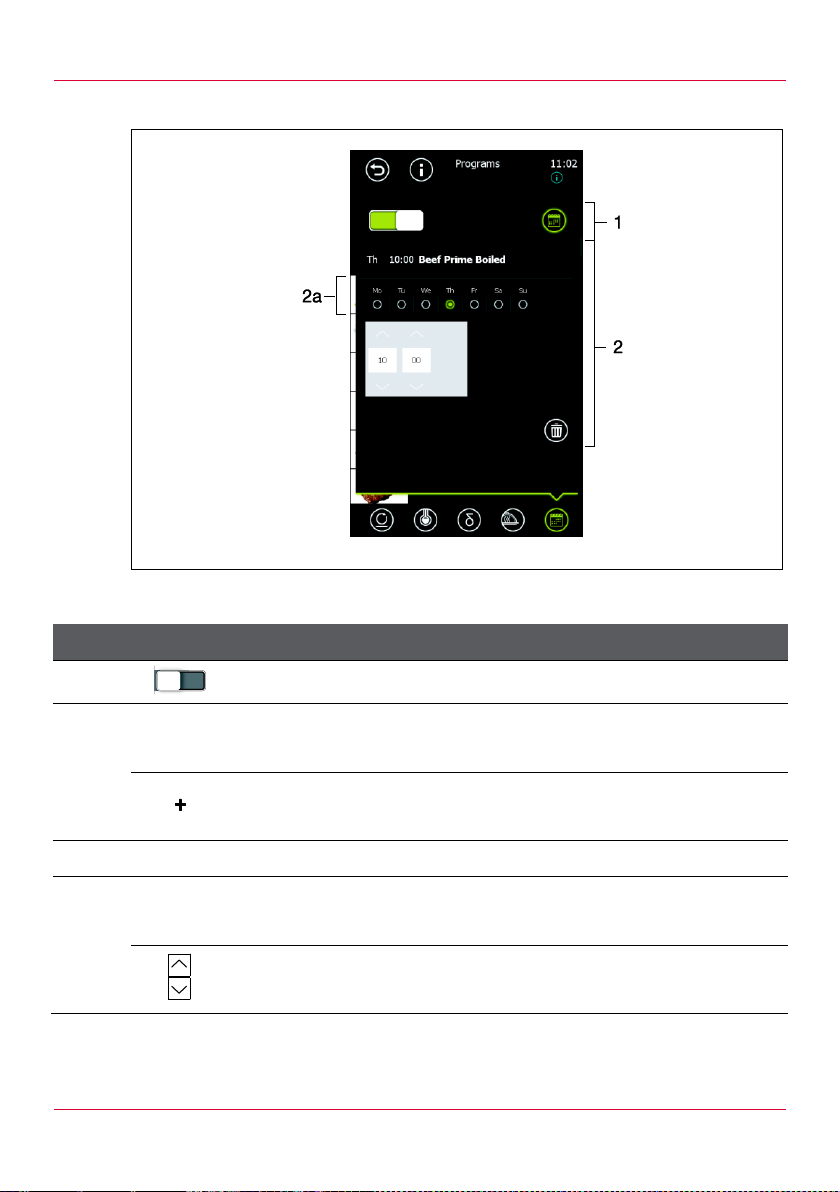
Item
Symbol
Name and function
Switch the weekly pre-scheduled program on/off
1
Program field
Show the weekly pre-scheduled program settings
Add field
Show the weekly pre-scheduled program settings
2 Weekly pre-scheduled program settings
2a
Days of the week field
Set the day(s) of the week
Up/Down fields
Set the hour, minute and time of day
Pos: 68 /953-Eloma/BET_Kombi_Touch/Bildschi rmbeschreibung/Sonderprogramme/Bildsc hirmbeschreibung_Fenster_Woche nprogramm @ 9\mod_13751132679 44_6.doc @ 78954 @ 3 @ 1
4.6.5 Weekly pre-scheduled program overlay
Fig. 13: Weekly pre-scheduled program overlay
37
Page 38
Screen description
Item
Symbol
Name and function
Program list field
(Only available if no program has been selected)
Show the list of saved programs in order to select one as
the weekly pre-scheduled program
Delete field
(Only available if a program has already been selected)
Delete the program from the weekly pre-scheduled program
Item
Symbol
Name and function
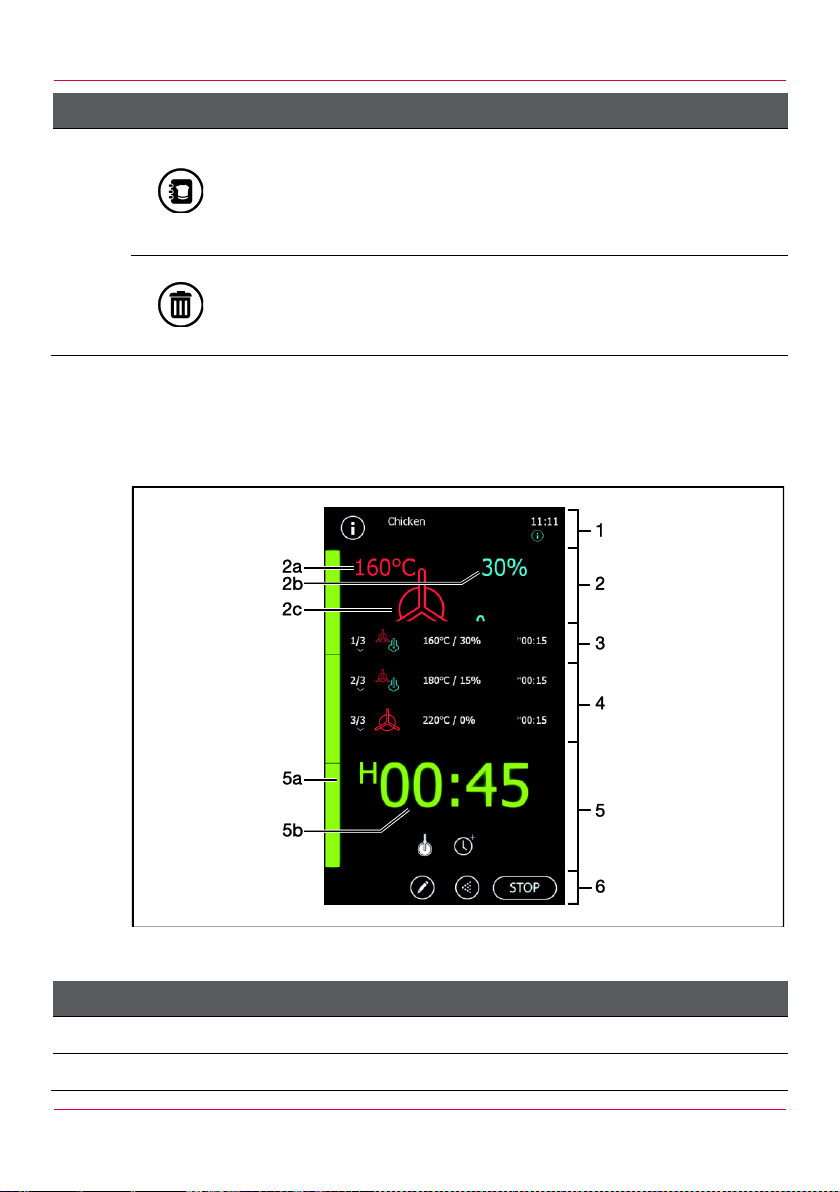
1 Main menu, see section 4.1
2 Information regarding the current cooking step
Tab. 14: Description of the Weekly pre-scheduled program overlay
Pos: 69 /953-Eloma/BET_Kombi_Touch/Bildschi rmbeschreibung/Bildschirmbeschrei bung_Bildschirm_Laufender_Betrieb @ 9\mod_1375106586189_6.doc @ 788 14 @ 2 @ 1
4.7 Operational screen
Fig. 14: Operational screen for a program
38
Page 39

Screen description
Item
Symbol
Name and function
2a
Nominal temperature field
(Only available if no picture is present for the program)
Shows the set nominal temperature
Touch to show the current temperature in the chamber
2b
Nominal humidity field
(Only available if no picture is present for the program)
Shows the set nominal humidity
Touch to show the humidification process
2c Picture relating to the program
(Only available if a picture is present for the program)
3
Cooking step field
Touch to open the step-overview
Touch again to close the step-overview
4 Step-overview
5 Information regarding the program
5a
The time bar provides a visual representation of how a
running cooking or cleaning program is progressing.
The time bar is divided into segments. The size of the
segment corresponds to the cooking time of the cooking
step.
The time bar is blocked if the current or next cooking step is
one controlled via core temperature. The time bar starts
running again as soon as a time-controlled cooking step is
active which is not followed by one controlled via core
temperature.
5b Shows the total cooking time of all cooking steps
Core temperature field
Show the current core temperature
39
Page 40
Screen description
Item
Symbol
Name and function
Extension of cooking time field
Extend the cooking time
6
Additional menu
Change field
Switch to the Cooking settings screen
Change the cooking settings for current or upcoming
cooking steps during operation
Multi cooking field
(Only available with single-step programs or for the final
cooking step)
Switch to the Multi cooking screen
Manual humidification field
Touch the Manual humidification field for as long as steam
should be injected
Save field
(Only available once the program has run)
Switch to the Save screen
Stop field
End the program prematurely
Tab. 15: Description of the Operational screen
Pos: 70 /953-Eloma/BET_Kombi_Touch/Bildschi rmbeschreibung/Bildschirmbeschrei bung_Bildschirm_Reinigung @ 9\mod _1375115111526_6.doc @ 78994 @ 2 @ 1
40
Page 41
Screen description
Item
Symbol
Name and function
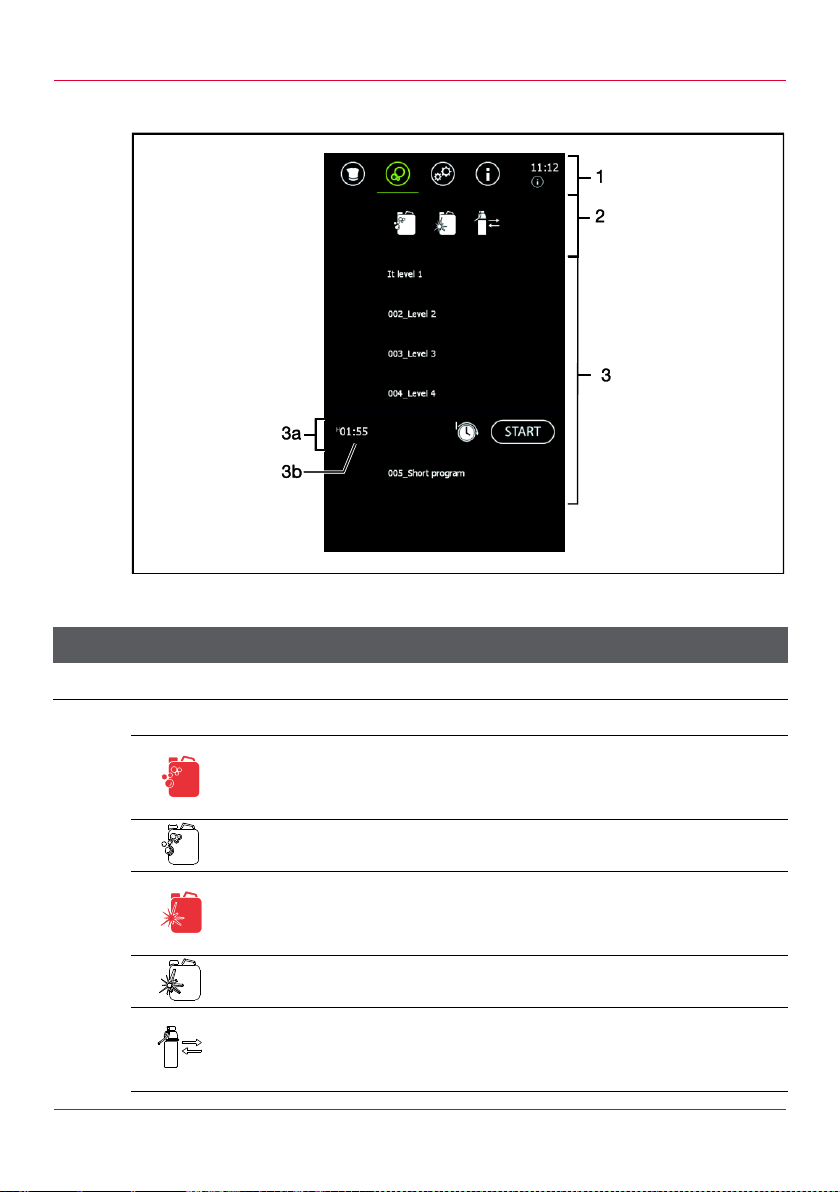
1 Main menu, see section 4.1
2
Counters for cleaning agent, rinse agent, water filter
Cleaning agent field
After the cleaning agent has been changed: reset the
cleaning agent counter
Indicates that the cleaning agent must be changed
Rinse agent field
After the rinse agent has been changed: reset the rinse
agent counter
Indicates that the rinse agent must be changed
Water softening unit field
After the water softening unit has been changed: reset the
water softening unit counter
4.8 Care screen
Fig. 15: Care screen
41
Page 42
Screen description
Item
Symbol
Name and function
Indicates that the water softening unit must be changed
3
Clean and care programs, see section 11.5.1
Show the activation line
3a Activation line
3b Shows the duration of the clean and care program
Pre-set timer field
Set the start time
Start field
Start the clean and care program
Tab. 16: Description of the Care screen
Pos: 71 /953-Eloma/BET_Kombi_Touch/Bildschi rmbeschreibung/Bildschirmbeschrei bung_Bildschirm_Speichern @ 10 \mod_1383750955585_6.doc @ 1003 21 @ 2 @ 1
42
Page 43
Screen description
Item
Symbol
Name and function
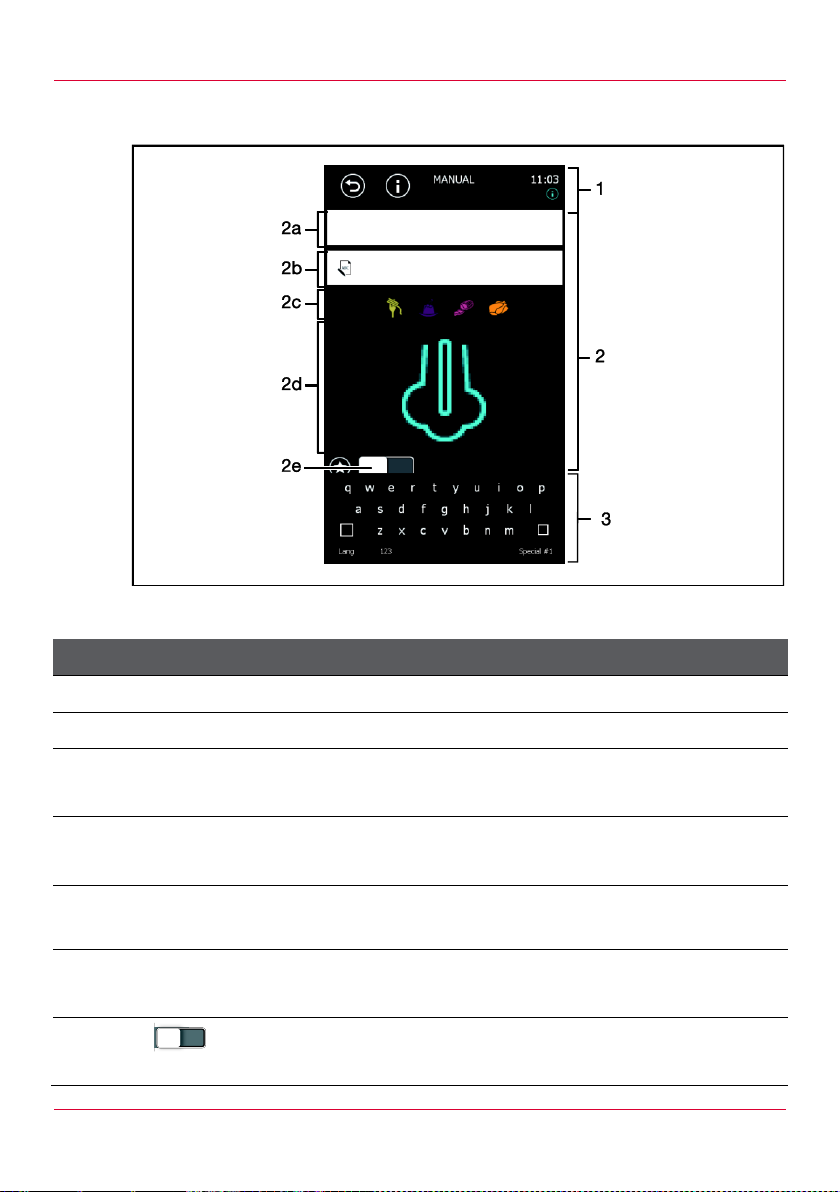
1 Main menu, see section 4.1
2 Information regarding the program
2a
Program name field
Enter the program name with the keyboard
2b
Comment field
Enter a comment with the keyboard
2c
Menu group fields
Assign the program to a menu group
2d
Picture field
Add a picture from the picture archive
2e
On/Off toggle key
Add the program to favourites
4.9 Save screen
Fig. 16: Operational screen for a program with cooking steps
43
Page 44

Screen description
Item
Symbol
Name and function
Save field
3 Keyboard
Tab. 17: Description of the Save screen
Pos: 72 /953-Eloma/Standardtexte Betriebsa nleitungen/Gerät_in_Betrieb_nehmen/Ge rät_in_Betrieb_nehmen_[Titel} @ 9\mo d_1375286258003_6.doc @ 80452 @ 1 @ 1
44
Page 45

Operation
5 Operation
Pos: 73 /953-Eloma/BET_Kombi_Touch/G erät in Betrieb nehmen/Gerät_in_Betrieb_ nehmen_Gerät_Einschalten @ 9\ mod_1375169394746_6.doc @ 79154 @ 2 @ 1
5.1 Switching on the appliance
NOTE!
Condensation forms due to the change in ambient temperature!
Damage to the control module
Make sure that the appliance's ambient temperature is above +4 °C
(+39 °F).
1. Open the on-site water tap.
2. Press the On/Off button.
The start screen appears.
The appliance is ready to use.
Pos: 74 /953-Eloma/BET_Kombi_Touch/G erät in Betrieb nehmen/Gerät_in_Betrieb_ nehmen_Ausschalten_kurze_Pausen @ 9\ mod_1375169660626_6.doc @ 7 9184 @ 2 @ 1
5.2 Switching off the appliance during short cooking intervals
1. Press the On/Off button.
The screen turns off.
2. Close the chamber door in the ventilation position.
Pos: 75 /953-Eloma/BET_Kombi_Touch/G erät in Betrieb nehmen/Gerät_in_Betrieb_ nehmen_Längere_Betriebspausen @ 9\ mod_1375425854976_6.doc @ 8096 1 @ 2 @ 1
5.3 Switching off the appliance during prolonged cooking intervals
1. Press the On/Off button.
The screen turns off.
2. Close the on-site water tap.
3. Open the chamber door.
Pos: 76 /953-Eloma/BET_Kombidämpfer/Ger ät in Betrieb nehmen/Betrieb_Gerätek omponenten_verwenden @ 9\mod_13 75286772889_6.doc @ 80532 @ 2 @ 1
45
Page 46
Operation
Only use the hand shower to clean the chamber.
5.4 Using appliance components
Pos: 77 /953-Eloma/BET_Kombidämpfer/Ger ät in Betrieb nehmen/Gerät_in_Betrieb_ne hmen_Umgang_Schlauchbrause @ 9\mod_1375286326452_6.doc @ 80 472 @ 3 @ 1
5.4.1 Hand shower
WARNING!
Hot steam created by spraying water into the hot chamber!
Scalding
Allow the chamber to cool down before cleaning it with the hand
shower.
1. Pull out the hand shower.
2. Hold the hand shower firmly during use.
3. To retract, allow the hand shower to slide back into its resting position
slowly.
Pos: 78 /953-Eloma/BET_Kombidämpfer/Ger ät in Betrieb nehmen/Gerät_in_Betrieb _nehmen_Umgang_Temperaturfühler @ 9\mod_1375286398933_6.doc @ 80 492 @ 3 @ 1
5.4.2 Core probe
CAUTION!
Risk of burns from hot core probe!
Minor burns on the skin
Wear protective gloves.
CAUTION!
Risk of injury from the point of the core probe!
Stab wound
Be careful not to injure yourself or other persons in the immediate
vicinity.
Do not make fast movements whilst holding the core probe.
1. Clean the core probe before use.
2. Remove the core probe before taking out the foodstuff wearing
protective gloves.
3. Hang up the core probe in the designated place after use.
Pos: 79 /953-Eloma/BET_Kombidämpfer/Ger ät in Betrieb nehmen/Gerät_in_Betrieb_ne hmen_Umgang_Hordengestellwageg en_Hinweise @ 9\mod_137528656 2630_6.doc @ 80512 @ 34 @ 1
46
Page 47
Operation
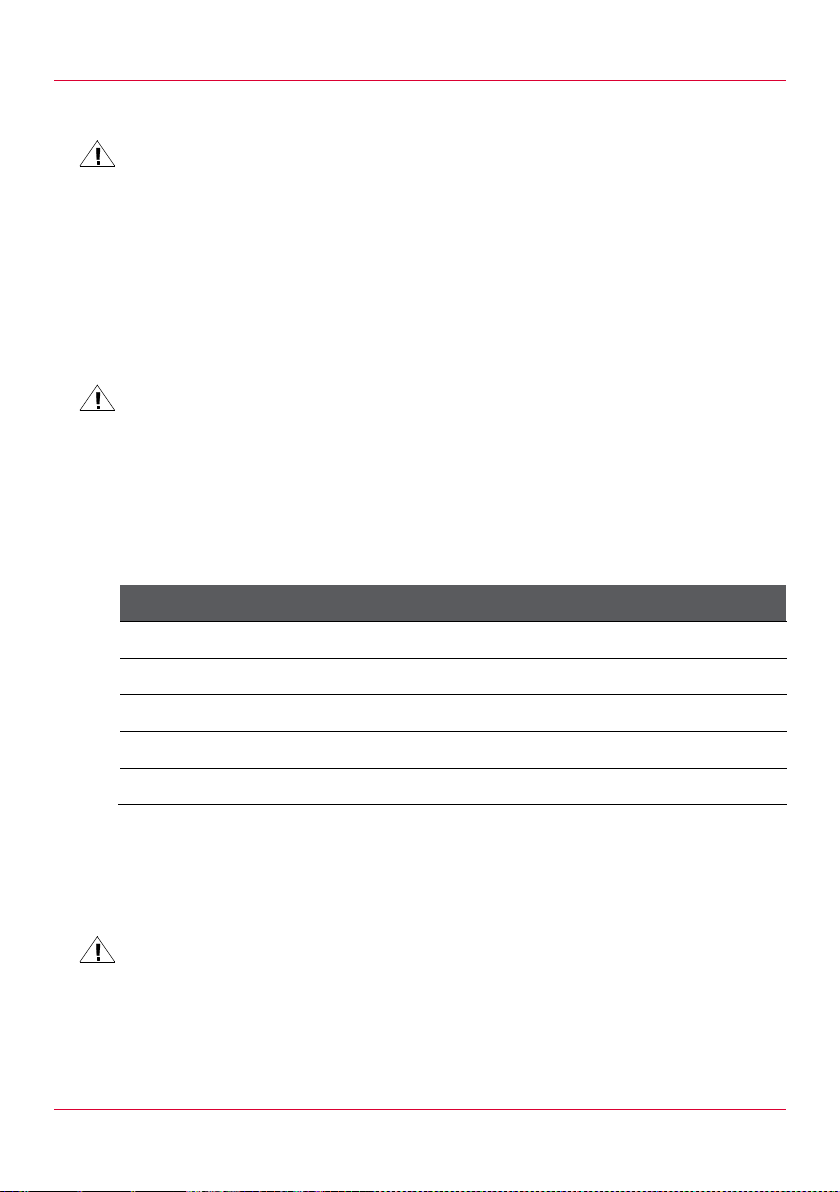
Size
Maximum load
6-11
30 kg (66 lb) (max. 15 kg (33 lb) per level)
10-11
50 kg (110 lb) (max. 15 kg (33 lb) per level)
20-11
150 kg (330 lb) (max. 15 kg (33 lb) per level)
12-21
150 kg (330 lb) (max. 20 kg (44 lb) per level)
20-21
200 kg (441 lb) (max. 20 kg (44 lb) per level)
5.4.3 Mobile tray rack and transport trolley
WARNING!
Risk of tipping and uncontrolled movement of the mobile tray rack
and the transport trolley!
Bruising
Only use the mobile tray rack and the transport trolley on level
ground.
During loading and removing, and when in the resting position,
secure the castors with the immobilisation brake.
WARNING!
Risk of tipping due to top-heavy loading of the mobile tray rack!
Bruising, burns on the skin
Load the mobile tray rack evenly, working from bottom to top.
Observe the maximum load.
Maximum load for mobile tray rack
Tab. 18: Maximum load for mobile tray rack
Pos: 80 /953-Eloma/BET_Kombidämpfer/Ger ät in Betrieb nehmen/Gerät_in_Betrieb_ne hmen_Umgang_Hordengestellwa gen_Griff_montieren @ 9\mod_13752 86924598_6.doc @ 80552 @ 4 @ 1
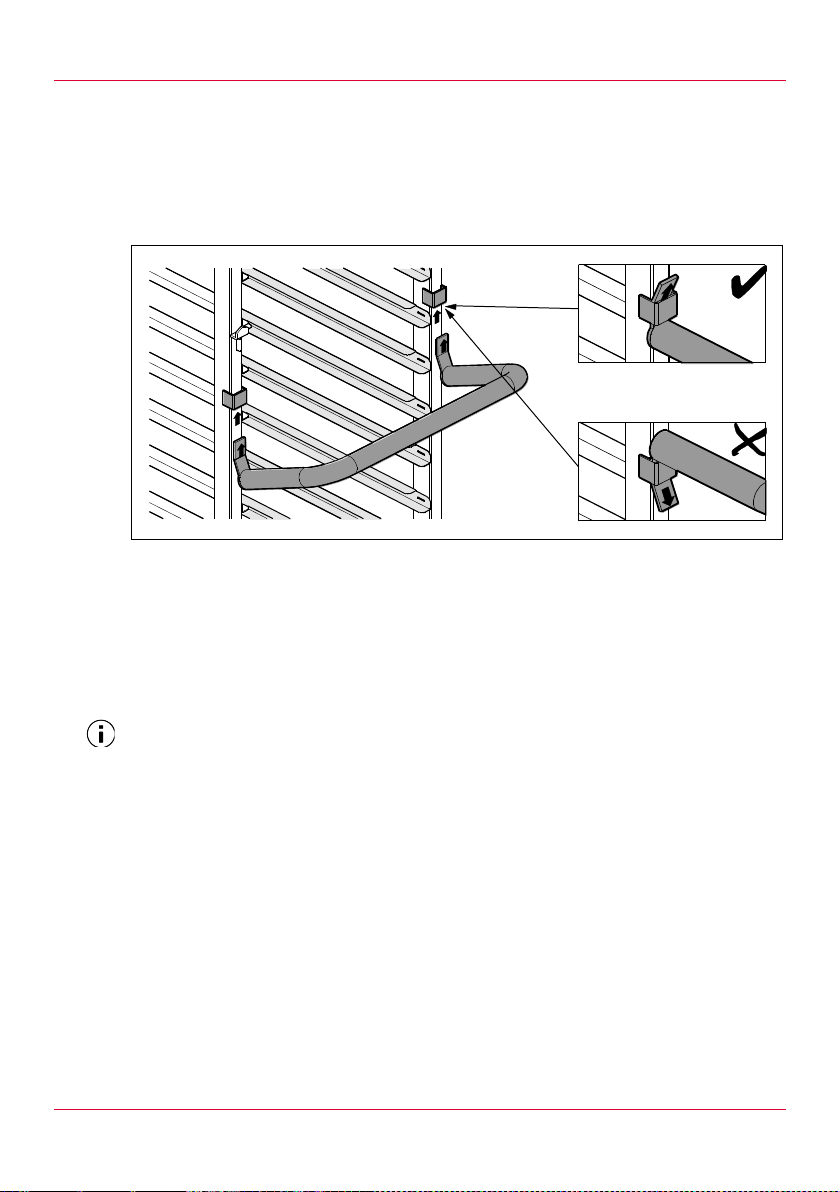
Mounting the handle on the mobile tray rack for floor models
WARNING!
Risk of tipping due to incorrectly mounted handle!
Bruising, burns on the skin
Observe the direction of the arrow on the rack and the handle.
Only use the handle supplied.
47
Page 48
Operation
Only use a transport trolley if the table top unit is positioned on a
support stand, cabinet or thermal cabinet of the same height.
NOTE!
Material damage from protruding handle!
Cracking of the door glass
Remove the handle before closing the chamber door.
Fig. 17: Mounting the handle on the mobile tray rack
1. Slide the handle through the clips from below.
2. Push down on the handle.
Pos: 81 /953-Eloma/BET_Kombidämpfer/Ger ät in Betrieb nehmen/Gerät_in_Betrieb_ne hmen_Umgang_Transportwagen @ 10 \mod_1383825119225_6.doc @ 100381 @ 4 @ 1
Transporting the rack for table top units with a transport trolley
1. Position the transport trolley as close to the table top unit as possible.
2. Secure the castors of the transport trolley with the immobilisation
brake.
3. Push the rack onto the transport trolley via a push-in frame.
4. Secure the rack on the transport trolley.
Pos: 82 /953-Eloma/BET_Kombi_Touch/05_M anueller Modus/Manueller Betriebsm odus_Titel @ 9\mod_1375289449026_ 6.doc @ 80732 @ 1 @ 1
48
Page 49

chef’s arena
Humidity is not available in the steam and convection operation modes.
Steam is not available in the bake without steam operation mode.
Humidity is set as a percentage.
Steam can be set in millilitres (ml) or seconds (sec).
6 chef’s arena
Pos: 83 /953-Eloma/BET_Kombi_Touch/05_M anueller Modus/Manueller_Modus_B etriebsart_wählen @ 9\mod_137517610 4009_6.doc @ 79305 @ 2 @ 1
6.1 Selecting an operation mode
Prerequisite
The chef’s arena screen is displayed.
Touch one of the following fields:
– Steam field
– Combi steam field
– Convection field
– Baking field
The Cooking settings screen appears.
Pos: 84 /953-Eloma/BET_Kombi_Touch/05_M anueller Modus/Manueller_Modus_Fe uchtigkeit_einstellen @ 9\mod_137517 7704533_6.doc @ 79345 @ 233 @ 1
6.2 Changing the humidity/steam
Prerequisite
The Cooking settings screen is displayed.
6.2.1 Changing the humidity/steam using the Climatic® MT screen
Pull the slider on the Climatic® MT screen up or down to change the
humidity/steam.
6.2.2 Changing the humidity/steam using the Humidity field
1. Touch the Humidity field or the Steam field.
The Up/Down fields appear.
2. Touch the Up/Down fields to change the humidity/steam.
Pos: 85 /953-Eloma/BET_Kombi_Touch/05_M anueller Modus/Manueller_Modus_Te mperatur_einstellen @ 9\mod_137517 6417219_6.doc @ 79325 @ 233 @ 1
49
Page 50

chef’s arena
6.3 Changing the temperature
Prerequisite
The Cooking settings screen is displayed.
6.3.1 Changing the temperature using the Climatic® MT screen
Pull the slider on the Climatic® MT screen left or right to change the
nominal temperature.
6.3.2 Changing the temperature using the Temperature field
1. Touch the Temperature field.
2. Touch the Up/Down fields to change the nominal temperature.
Pos: 86 /953-Eloma/BET_Kombi_Touch/05_M anueller Modus/Manueller_Modus_Gar zeit_einstellen @ 9\mod_1375178664 667_6.doc @ 79365 @ 233 @ 1
6.4 Setting the cooking time or core temperature
Prerequisite
The Cooking settings screen is displayed.
The cooking step can be controlled via the cooking time or nominal core
temperature.
6.4.1 Controlling the cooking step via the cooking time
1. Touch the Cooking time field.
2. Pull the slider left or right to adjust the cooking time.
6.4.2 Controlling the cooking step via the core temperature
Prerequisite
The core probe has been inserted into the foodstuff.
1. Touch the Core temperature field.
2. Pull the slider left or right to adjust the nominal core temperature.
Pos: 87 /953-Eloma/BET_Kombi_Touch/05_Manueller Modus/Manueller_Modus_Zusatzfunktio nen_einstellen @ 9\mod_137517977 4041_6.doc @ 79386 @ 2 @ 1
50
Page 51

chef’s arena
A maximum of 20 cooking steps can be defined.
6.5 Setting the additional functions
Prerequisite
The Cooking settings screen is displayed.
1. Touch the Additional functions field.
The Additional functions overlay opens (see section 4.3.3).
2. Activate the additional function with the On/Off toggle key or change
its values.
Additional functions which have been activated or changed are
highlighted in the Additional functions field.
Pos: 88 /953-Eloma/BET_Kombi_Touch/05_M anueller Modus/Manueller_Modus_Gar schritt_hinzufügen @ 9\mod_13751 81982399_6.doc @ 79446 @ 2 @ 1
6.6 Adding a cooking step
Prerequisite
The Cooking settings screen is displayed.
1. Touch the Add field.
The Cooking settings screen for the new cooking step appears.
The total number of cooking steps increases.
2. Select the operation mode and cooking settings.
Pos: 89 /953-Eloma/BET_Kombi_Touch/05_M anueller Modus/Manueller_Modus_Gar schritt_ändern @ 9\mod_1375182533 271_6.doc @ 79466 @ 233 @ 1
6.7 Changing a cooking step
Prerequisite
The Cooking settings screen is displayed.
6.7.1 Changing cooking settings
1. Touch the Step-insight field.
The Step-insight screen appears.
2. Touch the cooking step you wish to change.
The Cooking settings screen appears.
3. Change the cooking settings.
51
Page 52
chef’s arena
The cooking settings made for a cooking step are lost when the
operation mode is changed.
It is only possible to switch from the steam, combi steam or convection
operation modes to the baking operation modes, or vice versa, using the
chef’s arena screen. When such a change is made, all previously set
cooking steps are lost.
An end time cannot be set if a cooking step is controlled via the core
temperature.
6.7.2 Changing the operation mode
Touch the corresponding operation mode field in order to select it.
If the operation mode is not available:
Touch the Return field to switch to the chef’s arena screen.
Touch the Operation mode field.
Pos: 90 /953-Eloma/BET_Kombi_Touch/05_M anueller Modus/Manueller_Modus_Zeit vorwahl_einstellen_abfragen @ 9\mo d_1375186085908_6.doc @ 79506 @ 2 @ 1
6.8 Setting the pre-set timer
Prerequisite
The Cooking settings screen is displayed.
1. Touch the Pre-set timer field.
The Pre-set timer overlay opens.
2. Touch the On/Off toggle key to set the start time or the end time.
The Pre-set timer field is highlighted.
3. Touch the Up/Down field to set the start time or the end time.
Pos: 91 /953-Eloma/BET_Kombi_Touch/06_Aut omatischer Programm Modus/Automa tischer Programm Modus @ 9\mod_ 1375289570714_6.doc @ 80752 @ 1 @ 1
52
Page 53

Programs
7 Programs
Pos: 92 /953-Eloma/BET_Kombi_Touch/06_Aut omatischer Programm Modus/Aut omatikmodus_Garprogramm_wählen @ 9\m od_1375427031364_6.doc @ 80981 @ 2 @ 1
7.1 Selecting a program
Prerequisite
The Programs screen is displayed.
Pos: 93 /953-Eloma/BET_Kombi_Touch/06_Aut omatischer Programm Modus/Automa tikmodus_Suche_Filter @ 9\mod_ 1375190165328_6.doc @ 79647 @ 3 @ 1
7.1.1 Searching for a program using the filter function
7.1.2 Searching for a program by entering a keyword
7.2 Changing a saved program
1. Touch the Favourites field or the Menu group fields.
The list of programs is reduced in accordance with the selected filter.
2. Select the program you were searching for: touch the Program field.
Or
Change the filter.
Pos: 94 /953-Eloma/BET_Kombi_Touch/06_Aut omatischer Programm Modus/Automa tikmodus_Stichwort @ 9\mod_1375 189756248_6.doc @ 79567 @ 3 @ 1
1. Touch the Search field.
The keyboard appears.
2. Enter a keyword with the keyboard.
The list of programs is reduced in accordance with the entered
keyword.
3. Select the program you were searching for: touch the Program field.
Or
Enter a different keyword.
Pos: 95 /953-Eloma/BET_Kombi_Touch/06_Aut omatischer Programm Modus/Automa tikmodus_Garprogramm_Ändern @ 9\ mod_1375195201389_6.doc @ 79607 @ 233 @ 1
Prerequisite
The Programs screen is displayed.
Touch the Program field.
The activation line appears.
53
Page 54

Programs
Changed cooking settings can be saved before or after the program has
been executed.
Touch the Save field to save changes (see section 9).
7.2.1 Changing the pre-heating/cool down function
1. Touch the Pre-heating field in the activation line.
2. If the pre-heating/cool down function is activated:
– Use the slider to adjust the temperature in increments of 1 °C or
1 °F.
Or
– Use the On/Off toggle key to deactivate the pre-heating/cool
down function.
3. If the pre-heating/cool down function is deactivated:
– Use the On/Off toggle key to activate the pre-heating/cool down
function and adjust the temperature in increments of 1 °C or 1 °F
with the slider.
7.2.2 Changing cooking settings
1. Touch the Step-insight field.
The Step-insight screen appears.
2. Touch the cooking step.
The Cooking settings screen appears.
3. Change the cooking settings.
Pos: 96 /953-Eloma/BET_Kombi_Touch/06_Aut omatischer Programm Modus/Automa tikmodus_Sonderprogramm_wählen @ 9\ mod_1375195555547_6.doc @ 7 9627 @ 2 @ 1
7.3 Selecting a special program
Pos: 97 /953-Eloma/BET_Kombi_Touch/06_Aut omatischer Programm Modus/Automa tikmodus_Sonderprogramm_Regenerie ren_NTGaren_DeltaTGaren @ 9\mod_ 1375195621669_6.doc @ 79667 @ 3 @ 1
7.3.1 Starting the regeneration, LT cooking or Delta-T-cooking special
programs
Prerequisite
The Programs screen is displayed.
1. Touch the special program field.
The overlay opens.
2. Touch the required option.
The Cooking settings screen appears with recommended cooking
settings.
54
Page 55

Programs
3. Change the cooking settings if necessary.
4. Touch the Start field.
The special program runs.
5. End the special program prematurely: touch the Stop field.
6. Save the special program if necessary: touch the Save field.
Pos: 98 /953-Eloma/BET_Kombi_Touch/06_Aut omatischer Programm Modus/Automa tikmodus_Sonderprogramme_Cook_and _Hold @ 9\mod_1375200681042_6 .doc @ 79757 @ 3 @ 1
7.3.2 Starting the cook and hold special program
Prerequisite
The Programs screen is displayed.
1. Touch the Cook and hold field.
The Cook and hold overlay opens.
2. Touch the required option.
For an operation mode plus holding: the Cooking settings screen
appears.
For a program plus holding: the list of programs appears.
3. Change the cooking settings or touch the program.
The holding function has been activated.
4. Touch the Start field.
The special program runs.
5. End the special program prematurely: touch the Stop field.
Pos: 99 /953-Eloma/BET_Kombi_Touch/06_Aut omatischer Programm Modus/Automa tikmodus_Sonderprogramm_Wochenpro gramm @ 9\mod_1375201043795_ 6.doc @ 79777 @ 3444 @ 1
7.3.3 Weekly pre-scheduled special program
Prerequisite
The Programs screen is displayed.
Touch the Weekly pre-scheduled program field.
The Weekly pre-scheduled program overlay opens.
The programs which have already been set appear.
55
Page 56

Programs
Adding a weekly pre-scheduled program
1. Touch the Add field.
2. Touch the Days of the week fields to select the day of the week.
3. Touch the Up/Down fields to set the hour, minute and time of day.
4. Touch the Program list field.
5. Touch a program to add it to the weekly pre-scheduled program.
Changing or deleting the weekly pre-scheduled program
1. Touch the program which has already been added.
2. Change the weekly program settings.
Activating/deactivating a weekly pre-scheduled program
1. Touch the On/Off toggle key to activate the weekly pre-scheduled
2. Touch the On/Off toggle key again to deactivate the weekly pre-
Pos: 100 /953-Eloma/BET_Kombi_Touch/Multi -cooking/Muliti_Cooking_[Titel] @ 9\m od_1381849978519_6.doc @ 93431 @ 1 @ 1
The weekly program settings appear.
The list of saved programs appears.
The weekly program settings appear.
Or
Touch the Delete field to delete the program from the weekly pre-
scheduled program.
program.
The Weekly pre-scheduled program field is highlighted.
scheduled program.
56
Page 57

Multi cooking
Multi cooking is only possible with programs consisting of one cooking
step.
The list of programs for multi cooking can also be changed whilst a
program is running. A pre-set timer cannot be set whilst a program is
running.
8 Multi cooking
Pos: 101 /953-Eloma/BET_Kombi_Touch/Multi -cooking/Manueller_Modus_MultiBetrieb _einstellen @ 9\mod_13751868079 61_6.doc @ 79526 @ 2 @ 1
8.1 Setting and starting multi cooking
Prerequisite
The Cooking settings screen is displayed.
1. Touch the Multi cooking field.
The Multi cooking screen appears.
2. Change the list of programs for multi cooking if necessary (see
section 8.2).
3. Touch the Pre-set timer field to set the pre-set timer if necessary
(see section 6.8).
4. Touch the Start field to start multi cooking.
The cooking time of the individual programs counts down.
5. If there is a pre-set timer where the end time is set: load the
appliance with food as prompted.
6. When the cooking time is over, open the chamber door.
7. Take out the corresponding foodstuff (see section 10.5).
8. Close the chamber door.
Multi cooking continues.
9. End multi cooking prematurely: touch the Stop field.
Pos: 102 /953-Eloma/BET_Kombi_Touch/Multi -cooking/Manueller_Modus_Liste_Multi _Betrieb_ändern @ 9\mod_13751 88370332_6.doc @ 79546 @ 244444 @ 1
8.2 Changing the list of programs for multi cooking
Prerequisite
The Multi cooking screen is displayed.
57
Page 58

Multi cooking
Changing the order of programs
1. Touch the Program field and keep your finger on it.
2. Pull the program to the required position in the list.
Deleting a program from the list
1. Touch the Program field.
The activation line appears.
2. Touch the Delete field to delete the program.
Copying a program into the list
1. Touch the Program field.
The activation line appears.
2. Touch the Copy field.
The program is inserted into the list with the same settings.
When copying whilst a program is running: the pre-set timer is not
transferred.
Adding a saved program
1. Touch the Multi cooking field.
The Programs overlay opens.
2. Touch the program(s).
3. Touch the Next field in the Programs overlay to confirm your
selection.
The programs are added to the list.
When adding whilst a program is running: the pre-set timer is not
transferred.
Adding a program manually
1. Touch the Add field.
2. Use the Up/Down fields to set the cooking time.
The program is inserted into the list.
When adding whilst a program is running: the pre-set timer is not
transferred.
Pos: 103 /953-Eloma/BET_Kombi_Touch/Gar programm starten und verwalten/Garpro gramm_speichern @ 9\mod_1381238 876230_6.doc @ 90062 @ 1 @ 1
58
Page 59

Saving programs
The comment is displayed on the Step-insight screen.
9 Saving programs
Prerequisite
Before a program starts:
The Cooking settings screen is displayed.
The cooking settings for one or more cooking steps have been made.
Whilst a program is running:
The program has been executed.
The Stop field has not yet been touched.
1. Touch the Save field.
The Save screen appears.
2. Touch the Program name field.
The keyboard appears.
3. Enter the program name with the keyboard.
4. Touch the Comment field if necessary to add notes regarding the
program, e.g. "dice vegetables".
5. Touch one of the Menu group fields to assign the program to a menu
group.
6. Touch the Picture field if necessary to add a picture from the picture
archive.
7. Touch the On/Off toggle key if necessary to add the program to
favourites.
8. Touch the Save field.
The program is added to the list of programs.
The Programs screen appears.
Pos: 104 /953-Eloma/BET_Kombi_Touch/Akti onen während eines Garprogramms/Wä hrend eines laufenden Garporgramms_ Titel_[Platzhalter] @ 9\mod_13754 28403169_6.doc @ 81062 @ 1 @ 1
59
Page 60

Starting and ending cooking programs
10 Starting and ending cooking programs
Pos: 105 /953-Eloma/BET_Kombidämpfe r/Gerät in Betrieb nehmen/Betrieb_nehm en_beschicken @ 9\mod_137941949848 3_6.doc @ 87747 @ 2 @ 1
10.1 Loading the appliance with food
Prerequisite
If the pre-heating function is set: the pre-heating function has
finished.
CAUTION!
Risk of burns from hot surfaces!
Minor burns on the skin
Wear protective gloves.
Only open the chamber door with the handle.
CAUTION!
Risk of crushing from opening and closing the chamber door!
Crushing and bruising of upper body parts
Make sure that no persons are within the chamber door's radius of
rotation.
Open and close the chamber door carefully.
CAUTION!
Risk of fire from highly flammable ingredients!
Burns on the skin
Do not load the appliance with food containing highly flammable
ingredients (e.g. alcohol).
1. Open the chamber door to the ventilation position to allow steam to
escape before opening it fully.
2. Do not load the appliance above head height.
If using tall pans, only load every second level in order to ensure a
sufficient gap is maintained.
3. Close the chamber door fully.
Pos: 106 /953-Eloma/BET_Kombi_Touch/05_ Manueller Modus/Manueller_Modus_Ga rprogramm_starten_beenden @ 9\mod _1375180171361_6.doc @ 79406 @ 2 @ 1
60
Page 61

Starting and ending cooking programs
If a pre-set timer has been set, once the Start field is touched then the
screen will be blocked for further operation. The set start or end time is
displayed. Touch the Stop field if necessary to change the settings.
The pre-heating function can be ended prematurely.
10.2 Starting a program
Prerequisite
The Cooking settings screen is displayed.
Or
The Programs screen is displayed.
1. Programs screen: touch the Program field in the list of saved
programs.
The activation line appears.
Or
Cooking settings screen: make the cooking settings for one or more
cooking steps.
2. Load the appliance with food (see section 10.1).
3. Touch the Start field to start the program.
The program runs.
The Operational screen appears.
The program is finished as soon as the cooking time of the final
cooking step has elapsed or the nominal core temperature of the final
cooking step has been reached.
Pos: 107 /953-Eloma/BET_Kombi_Touch/Akti onen während eines Garprogramms/Wä hrend_Betrieb_Ist-Temperatur_anz eigen @ 9\mod_1377532545406_6.doc @ 8 3231 @ 23 @ 1
10.3 Changing a program during operation
Prerequisite
The program has been started.
The Operational screen is displayed.
10.3.1 Showing the actual temperature
Touch the Nominal temperature field.
The actual temperature is displayed briefly.
Pos: 108 /953-Eloma/BET_Kombi_Touch/Akti onen während eines Garprogramms/Wä hrend_Betrieb_Aktuelle_Feuchtigkeitsvor gang_anzeigen @ 9\mod_1377532 609361_6.doc @ 83251 @ 3 @ 1
61
Page 62

Starting and ending cooking programs
The actual core temperature of the foodstuff can be displayed too, as
long as the cooking step is not controlled via the core temperature. The
core probe must be used correctly in order to display the actual core
temperature accurately (see section 5.4.2).
The cooking time of the final cooking step is extended in increments of
1 minute by default. The size of the increment can be changed on the
Settings screen.
The cooking time can be extended a maximum of 5 times.
10.3.2 Showing the actual humidity
Touch the Nominal humidity field.
The arrow is displayed briefly.
Arrow pointing up: the chamber is currently being humidified.
Arrow pointing down: the chamber is currently being de-humidified.
Arrow pointing right: the nominal humidity corresponds to the actual
humidity.
Pos: 109 /953-Eloma/BET_Kombi_Touch/Akti onen während eines Garprogramms/Wä hrend_Betrieb_Aktuelle_Kerntemperat ur_anzeigen @ 9\mod_137753267340 9_6.doc @ 83271 @ 3 @ 1
10.3.3 Showing the actual core temperature
Touch the Core temperature field.
The actual core temperature is displayed briefly.
Pos: 110 /953-Eloma/BET_Kombi_Touch/Akti onen während eines Garprogramms/Wä hrend_Betrieb_Garzeit_verlängern @ 9\ mod_1377584247381_6.doc @ 8 3481 @ 3 @ 1
10.3.4 Extending the cooking time
Touch the Extension to cooking time field to extend the cooking
time for the final cooking step.
Pos: 111 /953-Eloma/BET_Kombi_Touch/Akti onen während eines Garprogramms/Wä hrend_Betrieb_Gareinstellungen_änder n @ 9\mod_1377584071084_6.doc @ 83421 @ 3 @ 1
62
Page 63

Starting and ending cooking programs
Whilst a program is running, cooking settings can only be changed for a
cooking step which is already running or has not yet run.
Multi cooking can only be started for single-step programs or in the final
cooking step.
If the holding function has been set, an audible signal rings once the
final cooking step is over and the holding function starts. The screen is
blocked for further operation whilst the holding function is running.
The holding function can be ended prematurely.
10.3.5 Changing cooking settings
1. Touch the Change field.
The Cooking settings screen appears.
The program continues to run.
2. Change the cooking settings.
3. Touch the OK field to confirm the change.
The change is adopted.
Pos: 112 /953-Eloma/BET_Kombi_Touch/Akti onen während eines Garprogramms/Wä hrend_Betrieb_Gargut_beschwaden @ 9\ mod_1377584123690_6.doc @ 8 3441 @ 3 @ 1
10.3.6 Setting the humidifying function
Touch the Manual humidification field for as long as steam should
be injected.
Pos: 113 /953-Eloma/BET_Kombi_Touch/Akti onen während eines Garprogramms/Wä hrend_Betrieb_Multi-Cooking_hinz ufügen @ 9\mod_1377584168847_6.doc @ 83461 @ 3 @ 1
10.3.7 Starting multi cooking
1. Touch the Multi cooking field.
A list of similar programs appears.
2. Select the program(s).
The Multi cooking screen appears.
3. Change the list of programs for multi cooking (see section 8.2).
Pos: 114 /953-Eloma/BET_Kombi_Touch/Akti onen während eines Garprogramms/Wä hrend_Betrieb_Garprogramm_beenden @ 10\mod_1383827056963_6.doc @ 100405 @ 2 @ 1
10.4 Ending a program
63
Page 64

Starting and ending cooking programs
End the program prematurely: touch the Stop field.
Once the program has been executed:
– Touch the Stop field.
– Take out the foodstuff (see section 10.5).
Pos: 115 /953-Eloma/BET_Kombidämpfe r/Gerät in Betrieb nehmen/Betrieb_Gargut_en tnehmen @ 10\mod_138417254130 1_6.doc @ 100521 @ 2 @ 1
10.5 Removing the foodstuff
CAUTION!
Risk of burns from hot surfaces!
Minor burns on the skin
Wear protective gloves.
Only open the chamber door with the handle.
CAUTION!
Risk of crushing from opening and closing the chamber door!
Crushing and bruising of upper body parts
Make sure that no persons are within the chamber door's radius of
rotation.
Open and close the chamber door carefully.
1. Open the chamber door to the ventilation position to allow steam to
escape before opening it fully.
2. Remove the rack or mobile tray rack (see section 5.4.3).
3. After removing the foodstuff: close the chamber door in the ventilation
position.
Pos: 116 /953-Eloma/Standardtexte Betriebs anleitungen/Gerät_reinigen/Gerät_rei nigen_pflegen_Titel @ 9\mod_1375202 343882_6.doc @ 79801 @ 1 @ 1
64
Page 65

Cleaning and care
11 Cleaning and care
Pos: 117 /953-Eloma/BET_Kombidämpfe r/Reinigung/Gerät_reinigen_Reinigung_Hinweis e_Reinigung @ 9\mod_1375287 305962_6.doc @ 80572 @ 2 @ 1
11.1 Notes on manual cleaning
NOTE!
CAUTION!
Risk of burns from hot surfaces!
Burns on the skin
Allow the appliance to cool before cleaning it.
CAUTION!
Risk of scalding from hot steam!
Burns on the skin
Allow the appliance to cool before cleaning it.
CAUTION!
Risk of chemical burns from cleaner and rinse agent!
Chemical burns to the skin and eyes
Allow the appliance to cool before cleaning it.
Wear protective clothing (e.g. long-sleeved clothing, protective gloves
and glasses).
Observe the safety information for the prescribed cleaner and rinse
agent (see section 11.3).
Do not inhale spray mist from the cleaner and rinse agent.
Material damage from incorrect cleaner!
Stains in the chamber
Only use the prescribed cleaner and rinse agent (see section 11.3).
Pos: 118 /953-Eloma/BET_Kombidämpfe r/Reinigung/Gerät_reinigen_Reinigungsinter valle @ 9\mod_1375287512439_6.doc @ 80592 @ 2 @ 1
65
Page 66

Cleaning and care
Interval
What
How
Daily, after
the end of
production
Chamber
see section 11.4
see section 11.5
Glass panel
Mild cleaning agent, soft cloth
Door handle
Mild cleaning agent, soft cloth
Drip channel on the
chamber door (on 6-11
and 10-11)
see section 11.6
Door seal
see section 11.7
Monthly
Air intake filter
In the sink or dishwasher
Ventilation slots
Mild cleaning agent, brush
Glass parts of the door
see section 11.8
External surfaces
Grease solvent or special stainless
steel cleaner, soft cloth
For appliances with an autoclean program: we recommend using the
autoclean program to clean the appliance.
11.2 Cleaning intervals
Tab. 19: Description of cleaning intervals
Pos: 119 /953-Eloma/Standardtexte Betriebs anleitungen/Gerät_reinigen/Gerät_rei nigen_Vorgeschriebene Reiniger @ 10\ mod_1384174860658_6.doc @ 100545 @ 2 @ 1
11.3 Prescribed cleaner and rinse agent
The following cleaner and rinse agent are approved for cleaning the
chamber:
Multi-clean special cleaner
Multi-clean rinse aid
Pos: 120 /953-Eloma/Standardtexte Betriebs anleitungen/Gerät_reinigen/Gerät_rei nigen_Manuelle_Reinigung @ 9\mod_1379 429478304_6.doc @ 87778 @ 2 @ 1
11.4 Cleaning the chamber with a manual sprayer pump (manual method)
66
Page 67

Cleaning and care
Prerequisite
The foodstuff has been removed.
Accessories (e.g. pans) have been removed.
The fat filter has been removed.
For floor models: the mobile tray rack is in the chamber.
The appliance has cooled down.
1. Remove large particles of food and fat residue.
2. Start a program with the following cooking settings to soften any
residue:
– Nominal temperature: 60 °C (140 °F)
– Nominal humidity: 100 %
– Cooking time: 10 minutes
3. Mix the prescribed cleaner with water in the ratio 1:10 in the manual
sprayer pump (see section 11.3).
4. Close the chamber door.
5. Leave the cleaner to work for a maximum of 20 minutes.
6. Flush the chamber thoroughly with the hand shower.
7. Start a program with the following cooking settings to dry the
chamber:
– Nominal temperature: 120 °C (248 °F)
– Nominal humidity: 0 %
– Cooking time: 10 minutes
8. Open the chamber door.
Pos: 121 /953-Eloma/BET_Kombi_Touch/R einigung/Gerät_reinigen_Reinigungsprog ramm_autoclean_titel @ 9\mod_13 75786630694_6.doc @ 81462 @ 2 @ 1
67
Page 68

Cleaning and care
Cleaning
programs
Purpose
Level 1
Minor soiling caused by several instances of preparing
steamed vegetables, meat or fish
Level 2
Average soiling caused by the occasional preparation of
roasted or grilled foods
Level 3
Major soiling caused by several instances of preparing
roasted or grilled foods
Level 4
Extreme soiling caused by the continuous preparation of
roasted or grilled foods with significant burning
Short program
Removal of coarse soiling in day-to-day use
Flushing
For minor soiling or between cooking processes in day-today use
Decontamination
Flushing when a cleaning program is cancelled
Start up
After the cleaner or rinse agent canister has been changed
and on initial start-up in order to fill the suction hoses
11.5 Cleaning the chamber with the autoclean program
Pos: 122 /953-Eloma/BET_Kombi_Touch/R einigung/Gerät_reinigen_Reinigungsst ufen @ 9\mod_1375786722559_6.doc @ 8 1482 @ 3 @ 1
11.5.1 Cleaning and care programs
Tab. 20: Description of the clean and care programs
Pos: 123 /953-Eloma/BET_Kombi_Touch/R einigung/Gerät_reinigen_Reinigungsprog ramm_starten @ 9\mod_137578765 7024_6.doc @ 81512 @ 3 @ 1
11.5.2 Starting the autoclean program
Prerequisite
The foodstuff has been removed.
Accessories (e.g. pans) have been removed.
The fat filter has been removed.
For floor models: the mobile tray rack is in the chamber.
The Care screen is displayed.
68
Page 69

Cleaning and care
If the cleaning program is ended prematurely before the "Drying"
cleaning step, the "Flushing" cleaning program must run before a
cooking process can be started again.
WARNING!
Risk of chemical burns from cleaner!
Chemical burns to the skin and eyes
Do not open the chamber door whilst the autoclean program is
running.
1. Touch the cleaning stage (see section 11.5.1).
The activation line appears.
2. Touch the Pre-set timer field if necessary to set the start time.
3. Touch the Start field.
4. End the cleaning program prematurely: touch the Stop field.
The Care screen appears.
Pos: 124 /953-Eloma/BET_Kombidämpfe r/Reinigung/Gerät_reinigen_ReinigerAustausch en @ 9\mod_1375794893525_6.doc @ 81591 @ 3 @ 1
11.5.3 Changing the canisters for cleaner and rinse agent
WARNING!
Risk of chemical burns from cleaner!
Chemical burns to the skin and eyes
Wear protective clothing (e.g. long-sleeved clothing, protective gloves
and glasses).
Observe the safety information for the cleaner and rinse agent (see
section 11.3).
NOTE!
Material damage from mixing up cleaner and rinse agent!
Observe the connection labels on the appliance.
Attach the cleaner to the red canister connection.
Attach the rinse agent to the blue canister connection.
NOTE!
Material damage from incorrect cleaner and rinse agent!
Only use the prescribed cleaner and rinse agent (see section 11.3).
69
Page 70

Cleaning and care
The connections for the cleaner and rinse agent are labelled on the
appliance.
1. Switch off the appliance.
2. Detach the hoses from the canisters for the cleaner and/or rinse
agent.
3. Place new canisters below the appliance.
4. Observe the connection labels on the appliance:
– Attach the cleaner to the red canister connection.
– Attach the rinse agent to the blue canister connection.
5. Switch on the appliance.
6. Start the "Start up" cleaning program (see section 11.5.4).
Pos: 125 /953-Eloma/BET_Kombi_Touch/R einigung/Gerät_reinigen_Reinigungsprog ramm_Inbetriebnahme @ 9\mod_13 80187284758_6.doc @ 89329 @ 3 @ 1
11.5.4 Starting the "Start up" cleaning program
Prerequisite
The appliance is switched on.
The cleaner and/or rinse agent have been changed.
1. Navigate to the Care screen.
2. Touch "Start up".
3. Touch the Start field.
4. Once the "Start up" cleaning program has run:
– Reset the cleaner counter: touch the Cleaner field.
– Reset the rinse agent counter: touch the Rinse agent field.
Pos: 126 /953-Eloma/BET_Kombidämpfe r/Reinigung/Gerät_reinigen_Abtropfrinne @ 9\ mod_1375289076438_6.doc @ 80652 @ 2 @ 1
11.6 Cleaning the drip channel on the chamber door
Prerequisite
The appliance is switched off.
The appliance has cooled down.
1. Push the fastening clip underneath the drip channel down.
2. Pull the drip channel forwards out of the holder.
3. Clean the drip channel.
4. Press the drip channel into the holder.
5. Push the fastening clip up.
Pos: 127 /953-Eloma/BET_Kombidämpfe r/Reinigung/Gerät_reinigen_Türdichtung @ 9 \mod_1375288778015_6.doc @ 8061 2 @ 2 @ 1
70
Page 71
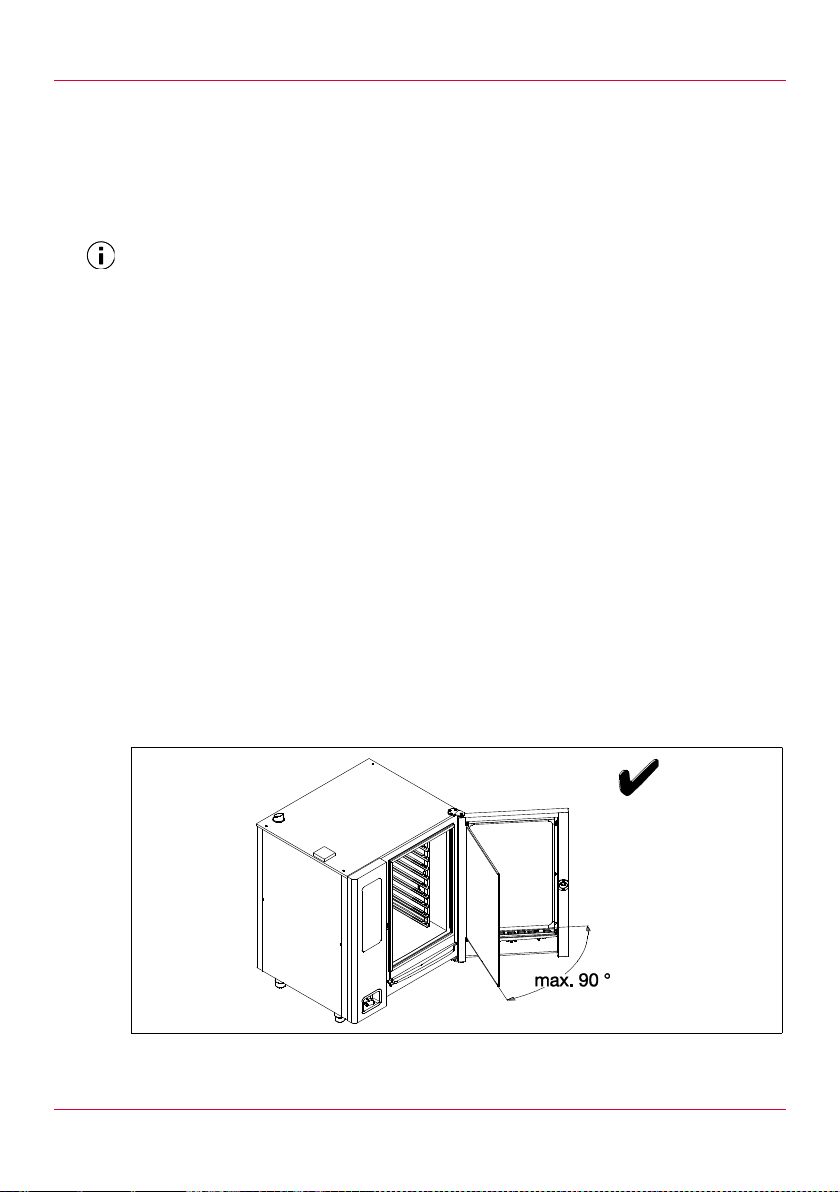
Cleaning and care
Check the door seal for damage on a regular basis.
Replace damaged door seals.
11.7 Cleaning the door seal
Prerequisite
The appliance is switched off.
The appliance has cooled down.
1. Clean the door seal by hand using a cloth and a mild grease solvent.
2. Remove the cleaning agent with fresh water.
Pos: 128 /953-Eloma/BET_Kombidämpfe r/Reinigung/Gerät_reinigen_Türgläser @ 9\ mod_1375288953063_6.doc @ 80632 @ 2 @ 1
11.8 Cleaning the glass parts of the door
Prerequisite
The appliance is switched off.
The appliance has cooled down.
NOTE!
Damage from opening the inner door incorrectly!
Damage to the door hinges
Do not open the inner door wider than 90°.
Hold the inner door firmly during cleaning.
Check the door hinges on a regular basis. Have the door hinges
repaired if necessary.
Fig. 18: Opening the inner door
71
Page 72
Cleaning and care
We recommend that you close a maintenance contract.
Hold the inner door firmly during cleaning.
Clean the panes of glass using a grease solvent and a soft cloth.
Clean stainless steel using a special stainless steel cleaner or a mild
cleaning agent and a soft cloth.
Pos: 129 /953-Eloma/BET_Kombidämpfe r/Reinigung/Gerät_reinigen_Wasserfilte r_tauschen @ 9\mod_1375795171084_6.d oc @ 81611 @ 2 @ 1
11.9 Changing the water softening unit
1. Switch off the appliance.
2. Close the on-site water tap.
3. Change the water softening unit.
4. Open the on-site water tap.
5. Switch on the appliance.
6. Touch the Care field.
The Care screen appears.
7. Touch the Water softening unit field to reset the counter for the
water softening unit.
Pos: 130 /953-Eloma/BET_Kombidämpfe r/Gerät_reinigen_Wartungsintervalle @ 9\ mod_1380280653759_6.doc @ 89741 @ 2 @ 1
11.10 Maintenance intervals
WARNING!
Risk of fire from improper maintenance!
Burns
Make sure that only an Eloma service partner carries out
maintenance work.
Maintain the maintenance intervals.
Have an Eloma service partner perform maintenance at least once a
year.
Pos: 131 /953-Eloma/BET_Kombi_Touch/08_ Gerät konfigurieren/Gerät_konfigurier en_Menübaum_neu @ 9\mod_13754288 14037_6.doc @ 81132 @ 1 @ 1
72
Page 73

Unit Settings
* denotes areas that are password-protected.
** denotes areas that are displayed on the basis of access rights.
Level 1
Level 2
Description
Unit Information
Displays essential information
about the appliance (important if
you are contacting the hotline)
Touch here to zoom in and
display the information in more
detail.
[Date and time]
Set the day of the week, hour
and minute
[Set language]
Select the language
Protocols
HACCP
Displays the HACCP logs for
cooking, baking and cleaning
procedures, sorted by days
Consumption
Displays consumption data for
the logged cooking, baking and
cleaning procedures, sorted by
days
Door Protocol
Displays how often the door has
been opened and closed
Unit Datas
Displays operating data and
consumption data
Error Codes
Displays the error messages and
warnings that have been output,
sorted in order of appearance
12 Unit Settings
Prerequisite
The Settings screen is displayed.
73
Page 74

Unit Settings
Level 1
Level 2
Description
Unit Settings
Service*
Enter password to enable
password-protected areas
Picture Manager**
Delete all or individual
pictures
Save all or individual pictures
on a USB stick
Load all pictures from a USB
stick
Recipe Manager**
Delete all or individual
programs
Save all or individual
programs on a USB stick
Load program from a USB
stick
Sound Manager**
Delete all or individual user
audible signals
Save all or individual user
audible signals on a USB
stick
Load audible signals from a
USB stick
Unit Settings**
Change the settings for the
appliance, e.g. temperature unit
(°C / °F), time format, preheating temperature (%), lighting
mode
Running Settings**
Activate and deactivate various
operating modes, e.g. program
protection
Tab. 21: Settings screen
74
Pos: 132 /953-Eloma/Standardtexte Betriebs anleitungen/Fehler beheben @ 9\mod_13 79408182949_6.doc @ 87681 @ 1 @ 1
Page 75

Trouble Shooting
Error
Possible cause
Action
Nothing
happens when
the appliance is
turned on
External main switch is
turned off.
Turn the main switch on.
Fuse has tripped.
Check the fuses in the
building's distribution
system.
The ambient temperature of
the appliance was below
+4 °C (+39 °F) for a
prolonged period of time.
Heat the chamber to
>20 °C (68 °F).
Only operate the appliance
in frost-proof areas.
Water in the
chamber does
not drain
Drain is blocked.
Clean the drain filter.
Clean the appliance drain.
Make sure that the on-site
drainage system is not
obstructed.
White stains in
the chamber
Water is too hard.
Install a water softening
unit or replace it.
Black stains in
the chamber
Water quality is poor.
Install a water filter or
replace it.
Wrong cleaning agent has
been used.
Use Eloma special
cleaning agents. Damage
caused by incorrect
cleaning agents cannot be
remedied.
Water dripping
from the
appliance door
Door seal is worn or
damaged.
Replace the door seal.
Appliance does
not heat up
Show Mode is activated.
Deactivate Show Mode
(see section 12).
13 Trouble Shooting
Pos: 133 /953-Eloma/BET_Kombidämpfe r/Fehler beheben/Fehlerursachen und Ma ßnahmen @ 9\mod_1379408288284 _6.doc @ 87702 @ 2 @ 1
13.1 Causes of errors and action to take
75
Tab. 22: Description of errors, possible causes and action to take
Page 76
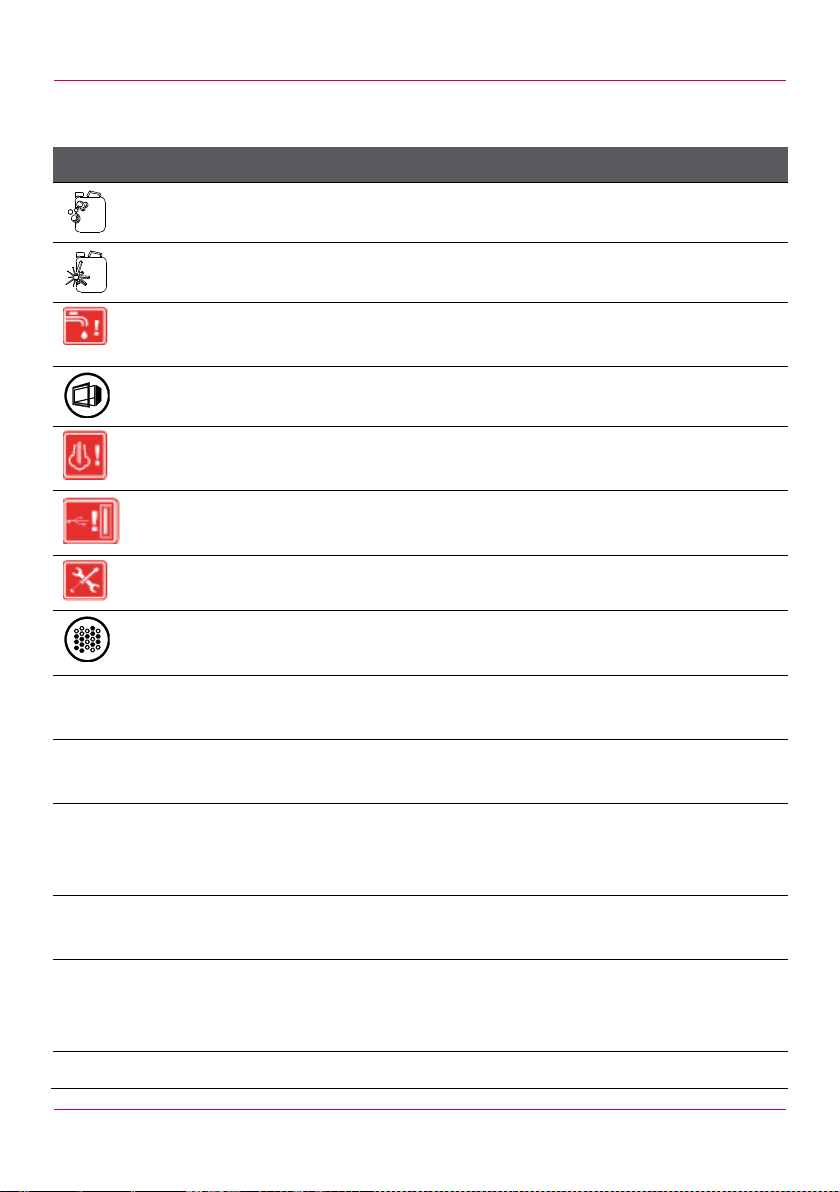
Trouble Shooting
Code
Possible cause
Action
Cleaning agent is empty.
Change the cleaning agent (see
section 11.5.3).
Rinse agent is empty.
Change the rinse agent (see
section 11.5.3).
Water pressure is too
low.
Contact your Eloma service partner.
Chamber door is open.
Close the chamber door.
Insufficient water for
producing steam
Check the water connection.
USB stick is not
inserted.
Insert the USB stick.
Contact your Eloma service partner.
Dirty condensation hood
filter
Replace the condensation hood
filter.
111
Chamber sensor 1 is
defective.
Contact your Eloma service partner.
112
Chamber sensor 2 is
defective.
Contact your Eloma service partner.
113 –
116
Core probe is defective.
Contact your Eloma service partner.
The appliance can be operated with
restrictions.
117/127
Sensor for steam
discharge is defective.
Contact your Eloma service partner.
The appliance can be operated.
211/212
Overheating of the
chamber or overheating
of the drive chamber fan
Contact your Eloma service partner.
213
Motor is not running.
Contact your Eloma service partner.
Pos: 134 /953-Eloma/BET_Kombi_Touch/Fe hler beheben/Fehler_Störungsmeldungen @ 9\mod_1380198669355_6.doc @ 89483 @ 2 @ 1
13.2 Error messages
76
Page 77
Trouble Shooting
Code
Possible cause
Action
311
Water pressure is too
low.
Open the on-site water tap.
Check the on-site water pressure.
The appliance can be operated with
restrictions.
The autoclean program is interrupted
and cannot be run.
Contact your Eloma service partner.
312
Too little water is
available for the steam
operation mode.
Contact your Eloma service partner.
The appliance can be operated with
restrictions.
511 –
513
Overheating of electrical
components
Contact your Eloma service partner.
For gas appliances only
Fault in gas system
Check the gas connection.
Switch on the extraction system.
Touch the symbol with a small
flame.
If the error message appears again:
contact your Eloma service partner.
On-site gas tap closed
Open the on-site gas tap.
Touch the symbol with a small
flame.
If the error message appears again:
contact your Eloma service partner.
Electrical connecting
cable fault
Contact your Eloma service partner.
711
Restart gas system 1.
Touch the symbol with a small
flame.
If the error message appears again:
contact your Eloma service partner.
77
Page 78

Trouble Shooting
Code
Possible cause
Action
712
Restart gas system 2.
Touch the symbol with a small
flame.
If the error message appears again:
contact your Eloma service partner.
Tab. 23: Description of error messages, possible causes and action to take for
Pos: 135 /953-Eloma/Standardtexte Betriebs anleitungen/Gerät entsorgen @ 9\mod _1375289228394_6.doc @ 80692 @ 1 @ 1
gas and electric appliances
78
Page 79

Disposal
Do not dispose of the appliance with
residual waste.
Dispose of the appliance in
accordance with the applicable local
regulations for waste equipment.
Contact the local authorities for
further information.
14 Disposal
=== Ende der Liste für Textmarke Inhalt6 ===
79
Page 80

Eloma GmbH . Innovative Koch- & Backtechnik
 Loading...