

Page 1

Tumbling
Tumbling
AGES
A Science Guide with Supplemental Experiment Kit
8+
A single motor produces
amazing actions!
Robot
Robot
CO-BOT 3 MODES
Amazing and Amusing Walk!
01
Falling and stumbling, Co-Bot will never
give up!
Let's go Forward!
Co-Bot has amazing power and energy.
Let's Go Mode
02
Let's cheer on Co-Bot for neat somersaults!
Never tiring somersault Mode
A single motor produces
A single motor produces
amazing actions!
amazing actions!
THE SECRET OF
THE 3 SENSORS
The 3 sensors at the belly, the back, and the
leg of Co-Bot make it possible. Sensors are
pushed by falling and getting up and change
the internal gears.
© GAKKEN
First published in Japan by Gakken Co.,Ltd., Tokyo
Swinging arms
03
widely, dance
around with great
balance!
Wobbly-funky!?
Dance Mode
Why and how?
Secrets of Co-bot
Co-Bot can walk! No
matter how many
falls and stumbles,
Co-Bot gets up
without any help!
How does Co-Bot
maneuver these
complex motions?
The secret is in its
original mechanism.
Tumbling RobotTumbling Robot
Gears and
Cranks
MADE IN CHINA P38-GK013-81001000
Please purchase 2 AA
You can learn
the basics of the machine!
batteries separately.
Page 2

CONTENTS
04
05
07
08
10
12
14
16
18
20
Let's play with "Co-bot"!
Let's assemble "Co-bot"
Let's operate "Co-bot"
Co-bot 3 modes
Why and how? Secrets of Co-bot
Co-bot's getting up action
Mechanism of machines master class- Gears, Belts, & Chains
Mechanism of machines master class- Crank
Mechanism in state of the art robots
Troubleshooting Q&A
TUMBLING ROBOT
TUMBLING ROBOT
JR. SCIENTIST
2
3
Page 3
FALL, GET UP AND FALL AGAIN
TUMBLING
Complete
ROBOT
LET'S PLAY
WITH "CO-BOT"!
AMAZING AND
AMUSING WALK!
Amazing Actions with a single motor!
Brilliant work of gears and cranks!"
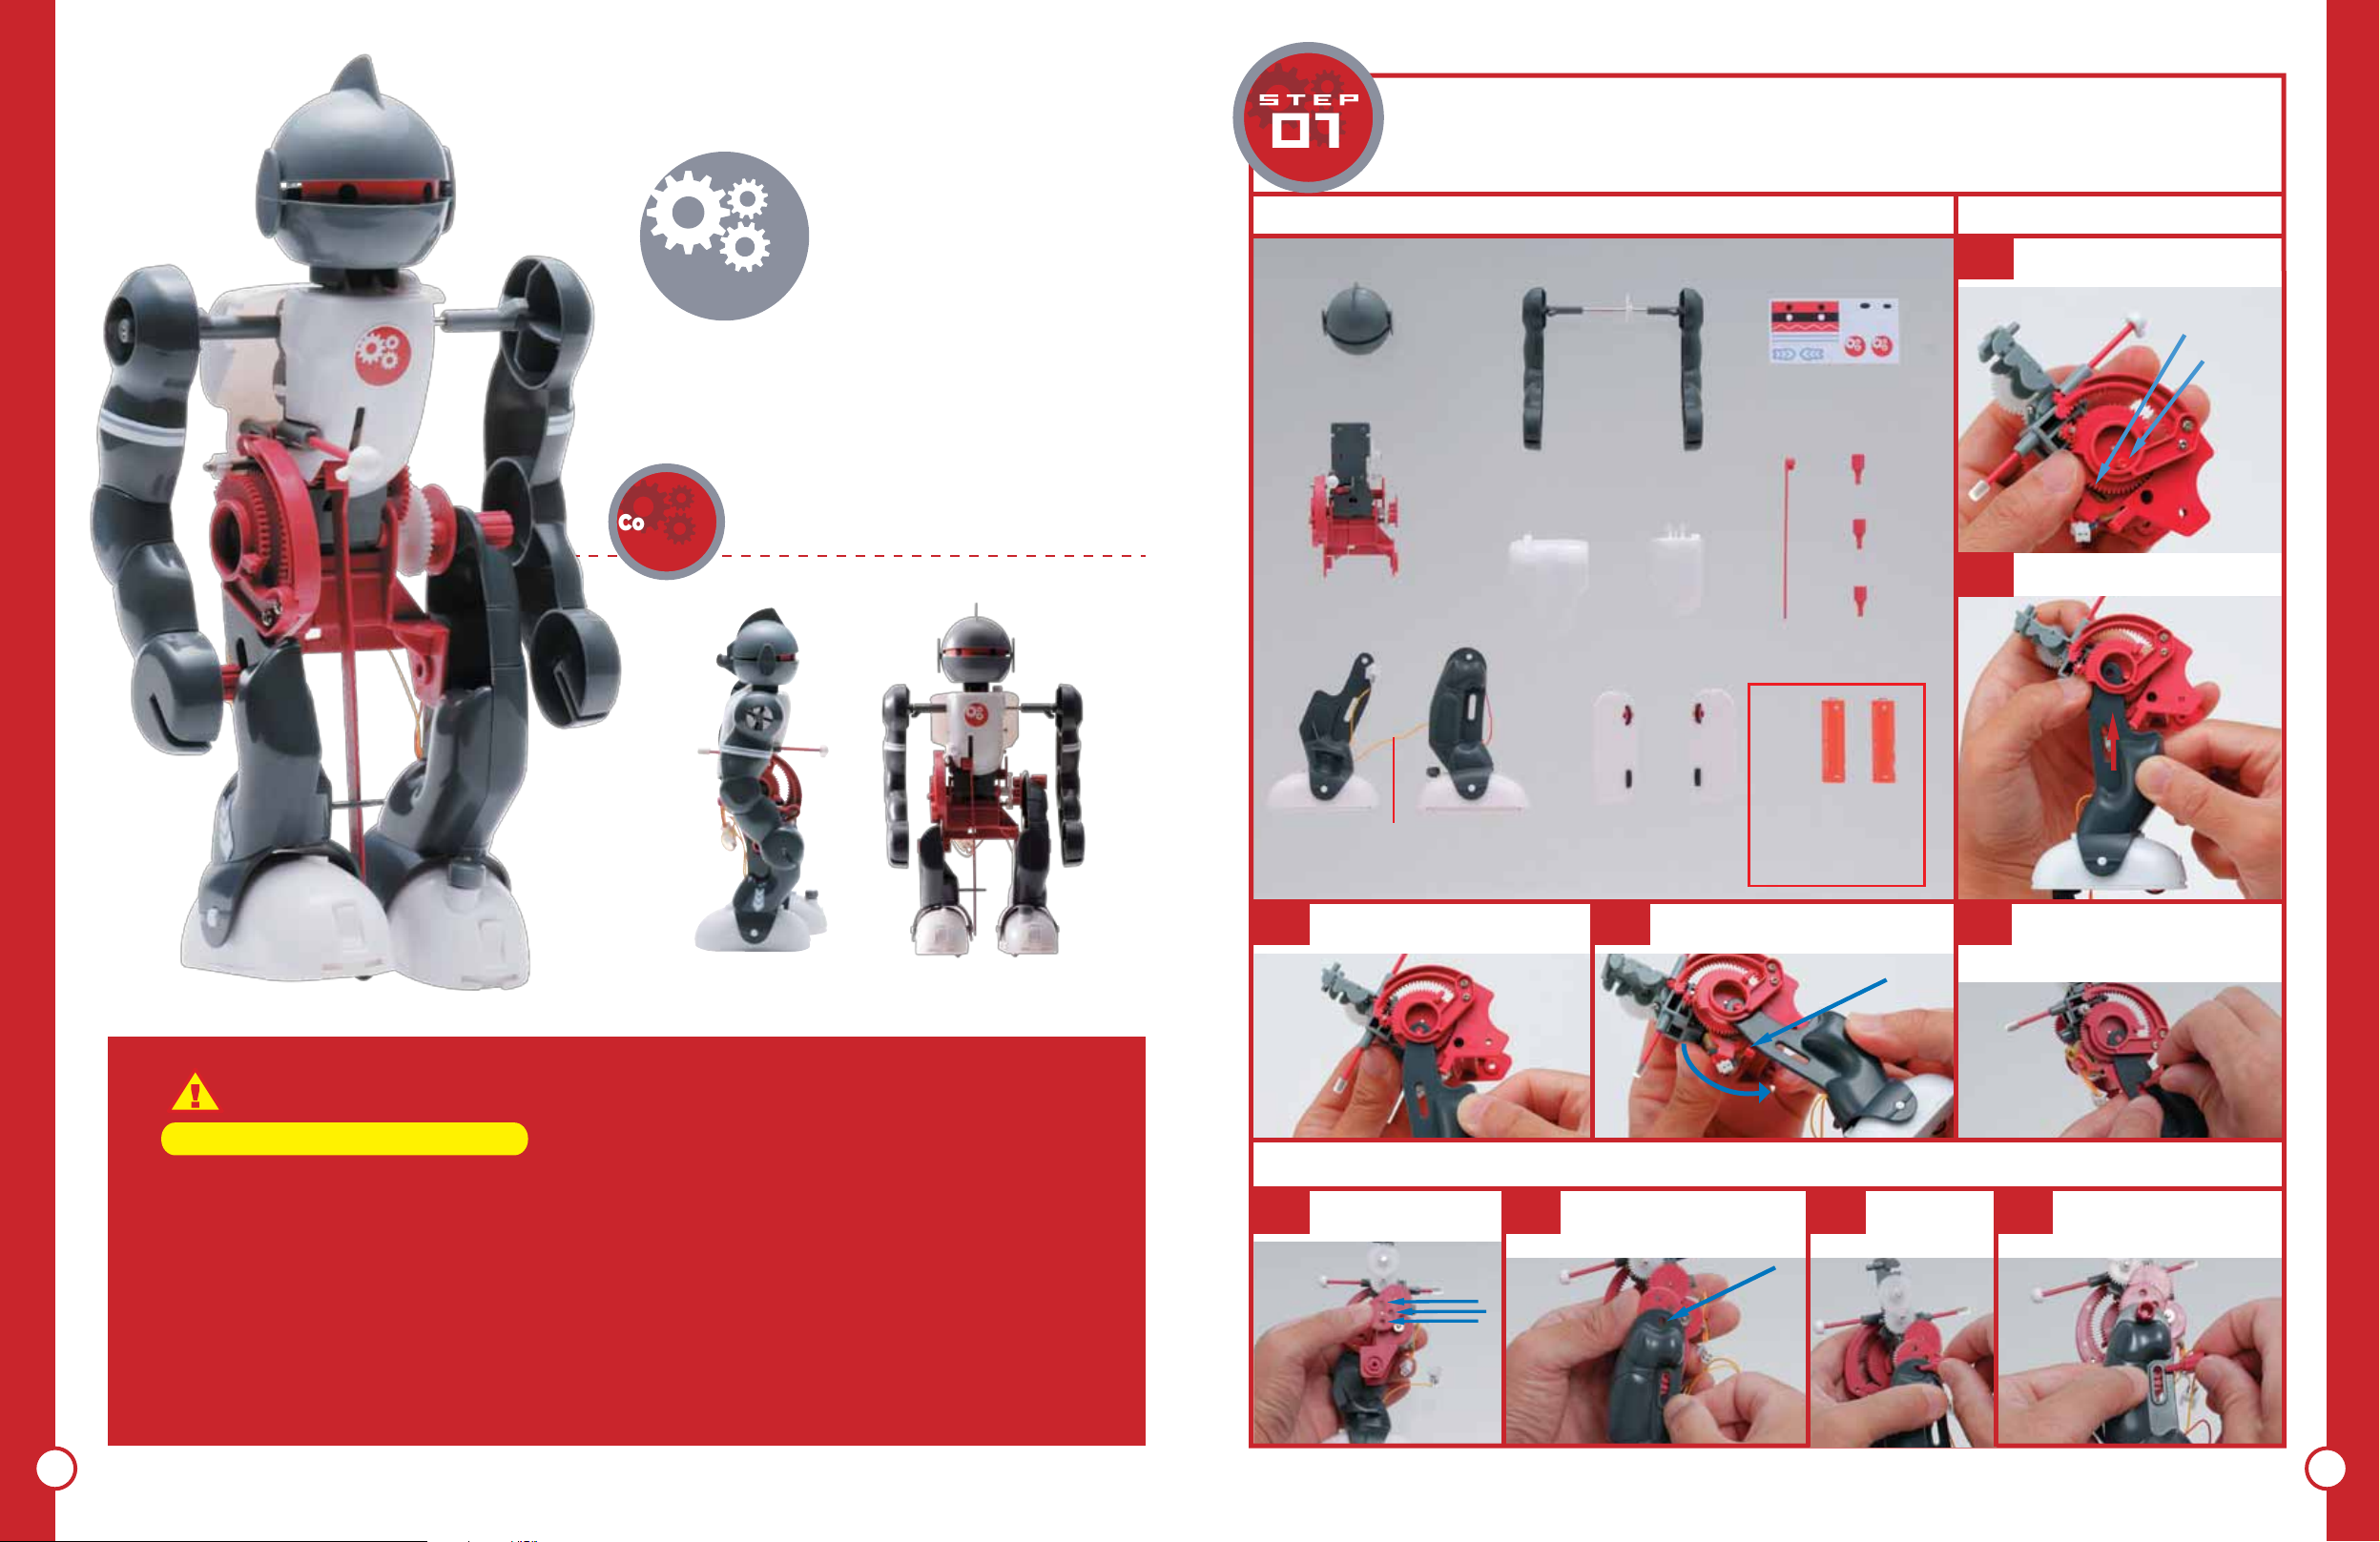
LET'S ASSEMBLE "CO-BOT"
Parts list
Head
Hip assembly
Legs (Left and Right)
Left Right
Arms Decals
Back Chest
Sole of feet
Leg
Sensor
3 pins
Right Leg Assembly
01
02
Turn the gear in the hip so
the peg is positioned down.
gear
Insert right leg from side slit.
peg
CAUTION!
Please read before assembling this product (adults/supervisors must read)
• Follow the instruction manual for assembly and operation of this product for the safety.
• Be cautious with small parts. They are choke hazards.
• Handle sharp corners and pointy parts with caution.
• Do not leave the product on the floor. Injury can occur by stepping on it.
• Do not coil the wires on body parts. This may cause injury.
• Do not touch the gears during the operation. This may cause injury.
• Do not experiment in the road.
• Do not experiment near river or pond.
• Do not experiment outdoor in the evening. It is dangerous due to poor visibility.
• Hard tugging and over stretching of the electrical wires may damage the wire.
• Pulling the arms and legs of the robot in the wrong direction may damage the product.
• Forcing to stop the movement of the robot by hand during the operation may damage the
product and/or cause injury.
• Do not disassemble the robot by unscrewing. It may damage the product.
• Do not use the damaged and deformed parts.
• Store away from toddlers' reach after completing the experiment.
Please purchase 2 AA
Handle with caution! Two legs
are attached by a lead wire.
03
Slightly lift the top gear and
hook the leg hole on the peg.
left Leg Assembly (This is "Let 'Go Mode" in page 9)
Line up the holes as
01
shown in the picture.
02
04
line up the left leg hole and
bottom hole of the gear as
shown in the picture.
Move the leg carefully over the
hip hook and bring the leg down.
batteries separately.
Alkaline batteries are
recommended due to
their weights.
hip hook
03
05
Push the pin
firmly until
it stops.
Push a pin
firmly in until
it stops.
Line up the lower hole of the hip
assembly and the elongated leg
hole. Insert a pin into the two
holes so two parts are joined.
Line up the lower hole of
04
the hip assembly and the
elongated leg hole and
insert a pin.
TUMBLING ROBOT
* Recycle and dispose according local regulation.
* The photo images of the product may vary slightly from
the actual product in colors and/or small details.
JR. SCIENTIST
4 5
Page 4
Chest Assembly
Arms Assembly
Electrical Set Up
Hold hip-leg assembly
01
sideway and attach
the leg sensor.
First, pull
through
the hole.
Next, insert
one end into
the hip hook.
Back Installation
Line the back so the back
sensor should penetrate the
back through the hole and
install the back.
02
Align pegs and
grooves and snap on
the chest.
Head Installation
Align tongues and holes.
Push the head straight down.
Line up the gears as shown in the picture. Snap on the
arm axis rod into the two side grooves (catch) of the
chest. Push the axis rod firmly in until it clicks.
If the foot
detaches…
Insert the foot back into
the bracket by slightly
opening the bracket.
Be careful not to insert
the foot backward.
Orientation of Toes and
heels is crucial for
walking.
* toes have big grooves
bracket
How to use Decals
Be creative and find
your own expressions!
You can use a blank
sticker and draw your
own design, too!
01
05
01
Keep foot button
pushed in.
Foot button pushed
in position switches
the robot off.
Plug the
connectors.
02
batteries.
To exchange
batteries…
LET'S OPERATE
"CO-BOT"
Pulling the foot button up
will turn the switch on.
Be careful with
positive and negative
orientations of the
right
foot
02
Co-Bot starts moving vigorously. Wobbly-funky!?
Attach the soles of
03
feet. Be careful with
right and left soles!
*Wheels are
positioned
inside front.
left
foot
Pry the sole off using
a coin at the grooves
on toes and heel.
04
Twist the yollow lead wire
around the hip hook (one turn).
If the wheels
detach…
Push the
square axle
of the wheel
into the
wider hole.
There are 3 modes of Co-Bot. The
features of 3 modes are illustrated in
the next page.
Dance Mode
Orient the gear
as shown in the
picture, pin the
left leg on the
bottom hole.
Not recommended to operate
the robot on tables and furniture
that can be scratched and
damaged. Operating the robot
on the carpeted floor will make
the robot fall down easier.
IF THE FOOT BUTTON
(SWITCH) DETACH …
Insert the button back into the
hole aligning the pointy side
with the toes.
Replaced with a
head from different
toy figure!
Example of using
moving eye stickers.
(stickers not included.)
Never tiring
Somersault
Mode
Remove leg
sensor from
the chest.
JR. SCIENTIST
6 7
TUMBLING ROBOT
Page 5

Amazing and Amusing Walk!
Falling and stumbling, Co-Bot will never give up!
Let's go Forward!
Co-Bot has amazing power and energy.
Let's Go Mode
Orient the gear as shown
in the picture. Pin the left
leg to the bottom hole.
Wildly
Funny
CO-BOT 3 MODES
You will laugh and enjoy amazing and
unexpected moves of Co-Bot!
Remove leg sensor
from chest.
Swinging arms widely, dance
Let's cheer on Co-Bot for neat somersaults!
JR. SCIENTIST
8 9
Never tiring somersault Mode
around with great balance!
Wobbly-funky!?
Dance Mode
Try This!
Use a rubber band and restrict the belly sensor. Co-Bot
will repeat bend down and stretch.
Fun to watch two Co-Bot interact!
Tie a rubber band
around the belly
sensor and the side
hook of the chest.
* If a rubber band is too tight,
Co-Bot will become in the
Somersault Mode.
Orient the gear
as shown in the
picture, pin the
left leg on the
bottom hole.
TUMBLING ROBOT
Page 6

FALL, GET UP AND FALL AGAIN
WHY AND HOW?
SECRETS OF
CHANGING INTERNAL GEARS
THE SECRET OF THE 3
SENSORS
All the great functions of Co-Bot, such as walking and
getting up, becomes useful only when those functions are
activated at the right moment. The 3 sensors at the belly,
the back, and the leg of Co-Bot make it possible. Sensors
are pushed by falling and getting up and change the
internal gears.
CO-BOT
Co-Bot can walk! No matter how many falls and
stumbles, Co-Bot gets up without any help! How does
Co-Bot maneuver these complex motions? The secret is
in its original mechanism.
CREATING COMPLEX ACTIONS
THE SECRET OF THE GEARS
• 12 GEARS IN ONE CO-BOT!!
Co-Bot uses total of 12 gears.
The most important one is the
red gear at the right hip.
"Kagaku no Tamago" original
design, this gear creates
dynamic stand up action.
This part and the screw like
gear (the worm) work together
and shift one motion to another.
The belly sensor:
Pushed in when
Co-Bot falls
down on its
belly and hit the
ground.
The back sensor: Pushed in
when Co-Bot falls on its back.
The leg sensor: Does
not touch the ground
normally. Activated
during Co-Bot's
getting up rotation,
as the sensor extends
beyond Co-Bot's legs
by falling down.
TRANSFERRING ROTATIONAL MOTION
OF MOTOR TO LINEAR MOTION OF WALK
THE SECRET OF THE CRANK
• HIP GEARS ACTIVATE
DIFFERENT MOTIONS
Gear A (see the right page for detail)
Gear B Gear D
Gear A
Gear C
* Colors of the photographed parts may be different
JR. SCIENTIST
from the actual product.
10 11
works as a crank that command the leg
motion. Gear C makes Co-Bot bend down
and Gear B stretches the body. A small
Gear D will transfer rotational power of
the motor to the other gears. Depending
on which gear is powered, Co-Bot moves
differently.
The end of Co-Bot's leg is pinned to the hip gear. Since it is not glued on, the leg can move freely as
the gear rotates. Co-Bot's leg will lift off the ground and steps forward just like humans and other
animals. This becomes possible because the elongated leg slit limits the motion of the legs within a
certain range. This mechanism, transferring a rotational motion into a linear motion, is called a crank.
TUMBLING ROBOT
Page 7

COMPLETE GUIDE!!
GETTING UP ACTION
CO-BOT'S GETTING
UP ACTION
How does Co-Bot get up? Let's look at the motion step by step!
FALLS BACKWARD!
When Co-Bot sits up,
the body pushes the
leg sensor. The leg
sensor extends
beyond the legs.
*Gear B is omitted
Needle
Worm
Back Sensor
When the back sensor gets
pressed, the needle is lifted
and disengaged from the
worm. The spring on the axis
extends and bring Gear D to
Gear C. Co-Bot is switched to
getting up mode.
Gear A Gear C
Spring
Gear D
COMPLETE!!
As the body gets up, Gear
D engages Gear B (middle
gear) and A (inner gear).
When the body stretches
all the way, gear D leaves
gear B and moves only
gear A. Co-Bot will
continue walking.
THE LEG SENSOR
TOUCHES THE GROUND!
Gear D
CO-BOT SITS UP!
When Gear D engages Gear C,
The upper body of Co-Bot lifts
up. When upper body bend
forward all the way, Gear D
starts idling. It remains idling
until the body starts stretching.
PUSH UP THE BODY
WITH ARMS!
The arm axis rotates. A fin on
the axis meets the fin on the
shoulder and pushes the arms
around.
The Leg sensor pushes the
needle on the worm.
Because the threads of the
worm run diagonal like a
screw, it slides the axis
toward left side of the hip.
LET'S CHECK THE FUNCTION
OF A SENSOR!
Like a screw, rotation
causes the axis to slide in
the direction of the arrow.
Gear A Gear C
WHEN FALLS DOWN ON BELLY, CO-BOT JUMPS
UP SWIFTLY!!
When Co-Bot falls forward, the belly sensor is pushed by the
ground and the body bends in half. The leg sensor
immediately touches the ground and bring the body upright.
It is much quicker motion than getting up by the arms.
• First, the belly sensor gets pushed in.
• The moment the
body folds in half, the
leg sensor touches
JR. SCIENTIST
the ground.
• Instantly, the
body jumps
back up!!
Co-Bot doesn’t have abilities to see things or
make decisions. Co-Bot relies on sensors to
maneuver and switch between the different
motions. Let's check the function of a sensor by
moving the sensor by hand.
• Pick up the walking Co-Bot
and push the back sensor…
• The body bends in half even
though Co-Bot didn't fall down!!
!
Be careful not to drop Co-Bot
TUMBLING ROBOT
12 13
Page 8

MECHANISM OF MACHINES MASTER CLASS
GEARS, BELTS, & CHAINS
GEARS, BELTS, & CHAINS
-TRANSFER ROTATION, CHANGE SPEED AND DIRECTION
OF ROTATION-
Gears, belts, and chains transfer rotational
motion. They are used in many mechanisms
of everyday devices such as bicycles and cars.
Technical consultation: Masahiro Mori, Professor Emeritus, Tokyo University
illustration: Kasyu
Gears, belts, and
chains - Importance
•Transfer rotational motion
When a gear rotates, it rotates adjacent gear. The direction
of the rotation of the second gear becomes opposite to the
first gear. Contrary, the two gears attached by belts or
chains will rotate in the same direction.
Gears joined by
belts rotate in the
same directions
01
Gears attached by
teeth rotate
opposite directions
•Worm Gear
Worm gear is an assembly consists of a
worm and a worm wheel. Worm's screw
like thread rotates the worm wheel. Worm
gear can shift the direction of the rotation
by 90 degree. It is useful to reduce the
rotational speed by large amount.
Pinion
Worm
Mini quiz
Can the robot receive the apple?
Let's trace the direction of the belt!
Answer is at the lower right corner.
•Rack and Pinion
A rack is a linear gear bar. A
circular gear is called pinion.
A pinion rotates on a rack.
This mechanism is used to
transfer a rotational motion
(pinion) to a linear sliding
motion (rack) or vise versa.
Rack
Gears, belts, and
Worm wheel
chains - Importance
•Change the rotational speed
When two gears have same diameter, the rotational speed
of the two gears is the same. On the contrary, when two
gears have different diameters, the two gears have different
rotational speeds. The larger the diameter becomes, the
slower it rotates. The smaller the diameter becomes, the
faster it rotates. Geared bicycles use this mechanism of
gears. The same rules apply to the number of teeth. The
more teeth a gear has, the slower it rotates.
Gear Change of Bicycle
JR. SCIENTIST
The smaller the gear becomes, the faster the
14 15
wheels rotates. The pedals require greater force.
02
When the driving wheel
has a fixed diameter, the
larger the driven wheels
becomes, the slower it
rotates and requires less
force.
Driving wheel
Driven wheel
•Bevel Gear
Bevel gears can change the
direction of rotation by 90
degree.
Gears, belts, and
chains - Importance
•Change rotational directions
Adjacent gears usually rotate opposite directions to each
other. However, choosing right types of gears, the
rotational directions can be changed by 90 degree. By
arranging special gears, one motor's rotation can produce
motion in a variety of directions.
03
Yes, the robot will receive the apple
Answer of the mini quiz:
TUMBLING ROBOT
Page 9

MECHANISM OF MACHINES MASTER CLASS
CRANK
CRANK
-TRANSFER ROTATIONAL MOTION TO LINEAR MOTION-
A crank is a system that change
a rotational motion into a linear
sliding motion. It is widely used
in many equipments just like
gears and belts.
Crank
•Basic structure of a crank
A crank has a circular disk called crank and a straight
rod attached at an off center location of the disk. As
crank rotates, the end of the rod slides linearly.
rod
• Crank of a Car Engine
A gasoline explosion in a
cylinder pushes down the
piston. This motion of the
piston is transferred by
connecting rod to the crank
and to the flywheel
(attached at the end of the
crankshaft, but omitted from
the illustration). The
flywheel keeps the
momentum of the rotation.
The crank keeps rotating
and pushes the piston back
up. The piston moves up
and down and the crank
shifts that motion into
rotational motion.
Piston
Cylinder
Wiper blade
Axis of a motor
Front Windshield
•Windshield Wiper
Windshield wiper of a car
uses a crank to change
rotational power of a motor
to sliding motion so that
the wiper blades move side
to side on a windshield.
Connecting rod
Crank
Crankshaft
Various Linkage
There are various linkage technics to power one part
of the system and move other parts in different
patterns. There are many more technics other than
the examples of windshield wipers and car engines.
Crank Slider Mechanism
Four Bar Linkage with Crank
Four Bar Linkage
Combining a
crank and a four
bar linkage, a
rotational
motion can be
changed into a
side to side
fanning motion
or vice versa.
TUMBLING ROBOT
Combining a crank
Worm
JR. SCIENTIST
Crank Connecting Rod
and a slider, a
rotational motion
can be changed
into linear sliding
motion or vice
versa.
Joining four bars and
form a loop, one side
to side motion can be
changed to another
side to side motion.
16 17
Page 10

Air Pressured Artificial Muscle,
"Muscle Suit"
Mechanism in State-ofthe-Art Robots
Co-Bot uses gears to transfer the rotational power of a motor to arms and legs.
Let's explore some of the mechanism used in the other robots.
KHR-2 HV (A-624 Genex)
Height: appr.34cm / Weight: appr.1.3kg
Robots powered by Servomotor
What is a Servomotor?
A servomotor uses computerized feed
back system so that it provides more
precise control. A servomotor makes it
possible for robots to stop the motion
at a desired position, to produces
quick and compact movements, and
to operate with less noise.
When the weight of the
cup pushes downward, the
servomotor senses the
force and push it up with
equal amount of counter
force. The robot can keep
the posture stable.
Kondo Technology Corporation
This is not a working robot. It was
developed for the purpose of study, play,
and competition entry. It is affordable for
normal people and a very friendly robot.
HRP-3 Promet Mk-II
Height: 160cm / Weight: 68kg
Kawada Industry
This is a robot that can work with humans. He
can walk on slippery surfaces and work in light
rain with no problem. The stylish design is also
attractive. He holds a power tool in his hand.
What is an Air Pressured
Artificial Muscle?
An Air Pressured Artificial
Muscle uses air pressure in
its mechanism. It is made of
rubber tubes encapsulated
inside woven sleeves made
from inflexible material.
When the rubber tube
inflates, the woven sleeve
becomes fatter and shorter.
Its softer material makes it
possible for a wearer to
move with more freedom
compared to a metallic suit.
Relaxed in normal state...
When it's inflated, crates
compression force in the
direction of its length.
Muscle Suit
Tokyo Science
University Dept. of
Mechanical Engineering
Kobayashi Lab
Muscle suit was
developed to assist
people as well. It is light
weight and worn only on
the upper body.
Robotic Suit: HAL-5
Height: 160cm / Weight: 23kg
CYBERDYNE Corporation
A collaboration of a human
and machine, HAL-5 is a type
of cyborg. The suit reads the
neural signal through muscle
system of the wearer. It was
developed to assist the daily
activities of people with
health
problems or injuries.
The weight
supported by HAL-5 itself so
that the wearer do not feel the
weight of the suit.
of the suit is
ASIMO
Height: 130cm / Weight: 54kg
HONDA
One of the well known state-of-the-art
robots. ASIMO has been in TV
commercials and traveled abroad.
ASIMO can recognize human faces,
run, and deliver drinks on a tray.
Hydraulic System "T-53 Enryu"
What is a Hydraulic
System?
A hydraulic system utilizes the
power of fluid (oil) pressure. When
two different size pistons are
connected, the larger diameter
piston will exert a greater force
because of the larger surface area.
The popularity of hydraulic
machinery is due to the substantial
amount of power that can be
transferred through small tubes.
WL-16R III
Height: 128cm
weight: 76kg
Waseda University
Department of
Mechanical Engineering
Atsuo Takanishi Lab
Temzak Corporation
It carries people and
walks with two legs. It
can be operated like a
car as well. Can be
used outdoor and
supports up to 94kg.
JR. SCIENTIST
T-53 Enryu
Height: 2.8m
Weight: 2950kg
Temzak Corporation
TUMBLING ROBOT
Because of its great
power, it works best
for reconnaissance
missions at disaster
sites. It can lift 100kg
with one arm. It also
moves around well
with its caterpillar leg
in rugged terrain.
T-53 demonstrating moving a drum can.
18 19
Page 11

Troubleshooting
If there is any trouble during the operation, turn the power switch off first.
Troubleshooting with power on may cause injury or damage the product.
It does not stand up after falling…
Find a similar symptom from the following.
NOTES
Arms do not move.
The shoulder rod may be dislocated and gears
may not be engaged properly. Remove the back,
fix the problem and re-install the back
Arms stop rotating due to
shoulder axis dislocation
Co-Bot's action sequence does not change from
one motion to another after it falls down.
Sensors may not be pressed all the way. Check the
sensors function by pressing the sensors by hand.
Use thumb and press the
rod firmly in place
Stops moving during getting up sequence.
The lead wire may be caught on the belly sensor.
Take the lead wire off and free the belly sensor.
Re-wire the lead wire around only the hip hook
without excess wire hanging loose.
Lead wire is caught on
belly sensor and sensor
doesn't move properly.
Doesn't stand up but somersaults.
Make sure that the leg sensor is placed properly. If it
is dislocated, re-install properly.
Coil the excess wire on the
right side peg and keep it
away from other moving
parts.
I would like to change modes, but I
cannot take the leg pin o…?
Use a coin
Insert a coin between
the leg junction and hip
part, twist coin and
remove the leg. Be sure
not to loose the pin.
Co-Bot falls down too easily or does
not fall down at all..?
Change batteries
Co-Bot is sensitive to the weight of batteries.
Its likelihood of falling can be varied by that.
Weight of batteries may vary slightly by the
brands. As the batteries get older and their
power gets weaker, the Co-Bot's motion
becomes less vigorous and makes it harder to
fall down.
JR. SCIENTIST
20 21
TUMBLING ROBOT
Page 12

NOTESNOTES
JR. SCIENTIST
22 23
TUMBLING ROBOT
 Loading...