

Page 1

WARNING: Always check your wiring before
urning o n a c ircuit. Never leave a ci rcuit
t
unatte nded while the batteries are i nstalle d.
ever connect additional batteries or any other
N
power sources to your circuits.
Flying Saucer Plus
Model SCP-09
ARNING: SHOCK HAZARD -
W
Never connect Snap Circuits
to the electrical outlets in your
ome in any way!
h
®
Project 1
+
Placement
Level Numbers
Flying Saucer
WARNING: Moving parts. Do not
touch the motor or fan during
!
operation. Do not lean over the
motor. Fan may not rise until
switch is released. Do not launch
fan at people, animals, or objects.
Eye protection is recommended.
Snap Circuits®uses electronic blocks that snap onto a base grid to build different circuits. These blocks
have different colors and numbers on them so that you can easily identify them. Build the circuit shown
by placing all the parts with a black 1 next to them on the clear base grid first. Then, assemble parts
marked with a 2. Install three (3) “AA” batteries (not included) into the battery holder (B3). Place the
glow fan on the motor (M1).
When you press the press switch (S2), the motor will slowly increase in speed. When the motor has
reached maximum rotation, release the press switch. The fan should rise and float through the air like
a flying saucer. Be careful not to look directly down on the fan while it is spinning.
The glow fan will glow in the dark. It will glow best after absorbing sunlight for a while. The glow fan is
made of plastic, so be careful not to let it get hot enough to melt. The glow looks best in a dimly lit room.
In this project, the air is being blown down through the blade and the motor rotation
locks the fan on the shaft. When the motor is turned off, the blade unlocks from the
shaft and is free to act as a propeller and fly through the air. If the speed of rotation
is too slow, the fan will remain on the motor shaft because it does not have enough
lift to propel it. The motor will spin faster when the batteries are new.
The motor converts elecricity into mechanical motion. Electricity is closely related to
magnetism, and an electric current flowing in a wire has a magnetic field similar to
that of a very, very tiny magnet. Inside the motor is are three coils of wire with many
loops. If a large electric current flows through the loops, the magnetic effects become
concentrated enough to move the coils. The motor has a magnet inside so, as the
electricity moves the coils to align them with the permanent magnet, the shaft spins.
The battery voltage is like electrical pressure, pushing electricity through the circuit.
Project 2 Fan
Rebuild the circuit from project #1, but reverse the polarity on the motor so
the positive (+) on the motor goes to the positive (+) on the battery holder
(B3). Place the fan on the motor and press the press switch (S2). Current
flows from the batteries through the motor (M1), making it spin the fan. The
fan blows air up and away from the motor, just like an electric fan in your
home. The fan will not fly off.
Project 3 Hypnotic Pattern
Rebuild the circuit from project #1, but reverse the polarity on the motor (M1)
so the positive (+) on the motor goes to the positive (+) on the battery holder
(B3).
Cut out the printed pattern from the cardboard along the dotted line with
scissors and tape it to the fan blade. Spin the pattern by briefly pressing the
press switch (S2). You will see the most interesting effects when the pattern
is spinning slowly.
Project 4 Spin Draw
Use the circuit from project #3. Using the fan as a guide, draw a circle on a
piece of cardboard or paper. Cut the circle out with scissors and tape it to
the fan blade so it can be easily removed later (you may remove the red
spiral pattern first). Obtain some thin and thick marking pens to use as
drawing tools.
Spin the paper by pressing and holding the press switch (S2) down. Gently
press the marker on the paper to form rings. To make spiral drawings,
release the press switch and as the motor approaches a slow speed, move
the marker from the inside outward quickly.
Change the colors often and avoid using too much black to get hypnotic
effects. Another method is to make colorful shapes on the disc then spin the
disc and watch them blend into each other.
If you have any problems, contact Elenco
®
Copyright © 2014 Elenco®Electronics, Inc. All Rights Reserved. ● 150 Carpenter Ave. ● Wheeling, IL 60090
(800) 533-2441 Fax: (847) 520-0085 ● e-mail: elenco@elenco.com ● Website: www.elenco.com or www.snapcircuits.net
753158
Page 2
Project 5 Strobe the House Lights
You need an old fluorescent light for this project. Use the circuit from
project #4. Using a blank cutout, draw several straight lines from the
edges through the center, evenly spaced like spokes on a bicycle wheel.
Place the cutout on the fan and place atop the motor.
Place the circuit under a fluorescent light in your home and spin the disc
slowly. As the speed changes, you may notice the lines first seem to move
in one direction, then they start moving in another direction. This effect is
because the lights are blinking 120 times a second and the changing
speed of the motor is acting like a strobe light to catch the motion at
certain speeds. This project won’t work with most new fluorescent lights,
because they use an electronic ballast that produces a constant light.
Project 6 Horn
Push the press switch (S2) to hear the
horn (W1).
+
The horn converts electricity into sound by
making mechanical vibrations. These vibrations
create variations in air
pressure which travel
across the room. You
“hear” when your ears
feel these air pressure
variations.
Project 8 Spectrum of Light
Use the circuit from project 7, but look at the lamp
(L4) through the prismatic film. Prismatic film is the
approximately 1.5” x 1” plastic sheet that is included
in this kit. Next, view different light sources in and
around your home through the prismatic film.
Prismatic film
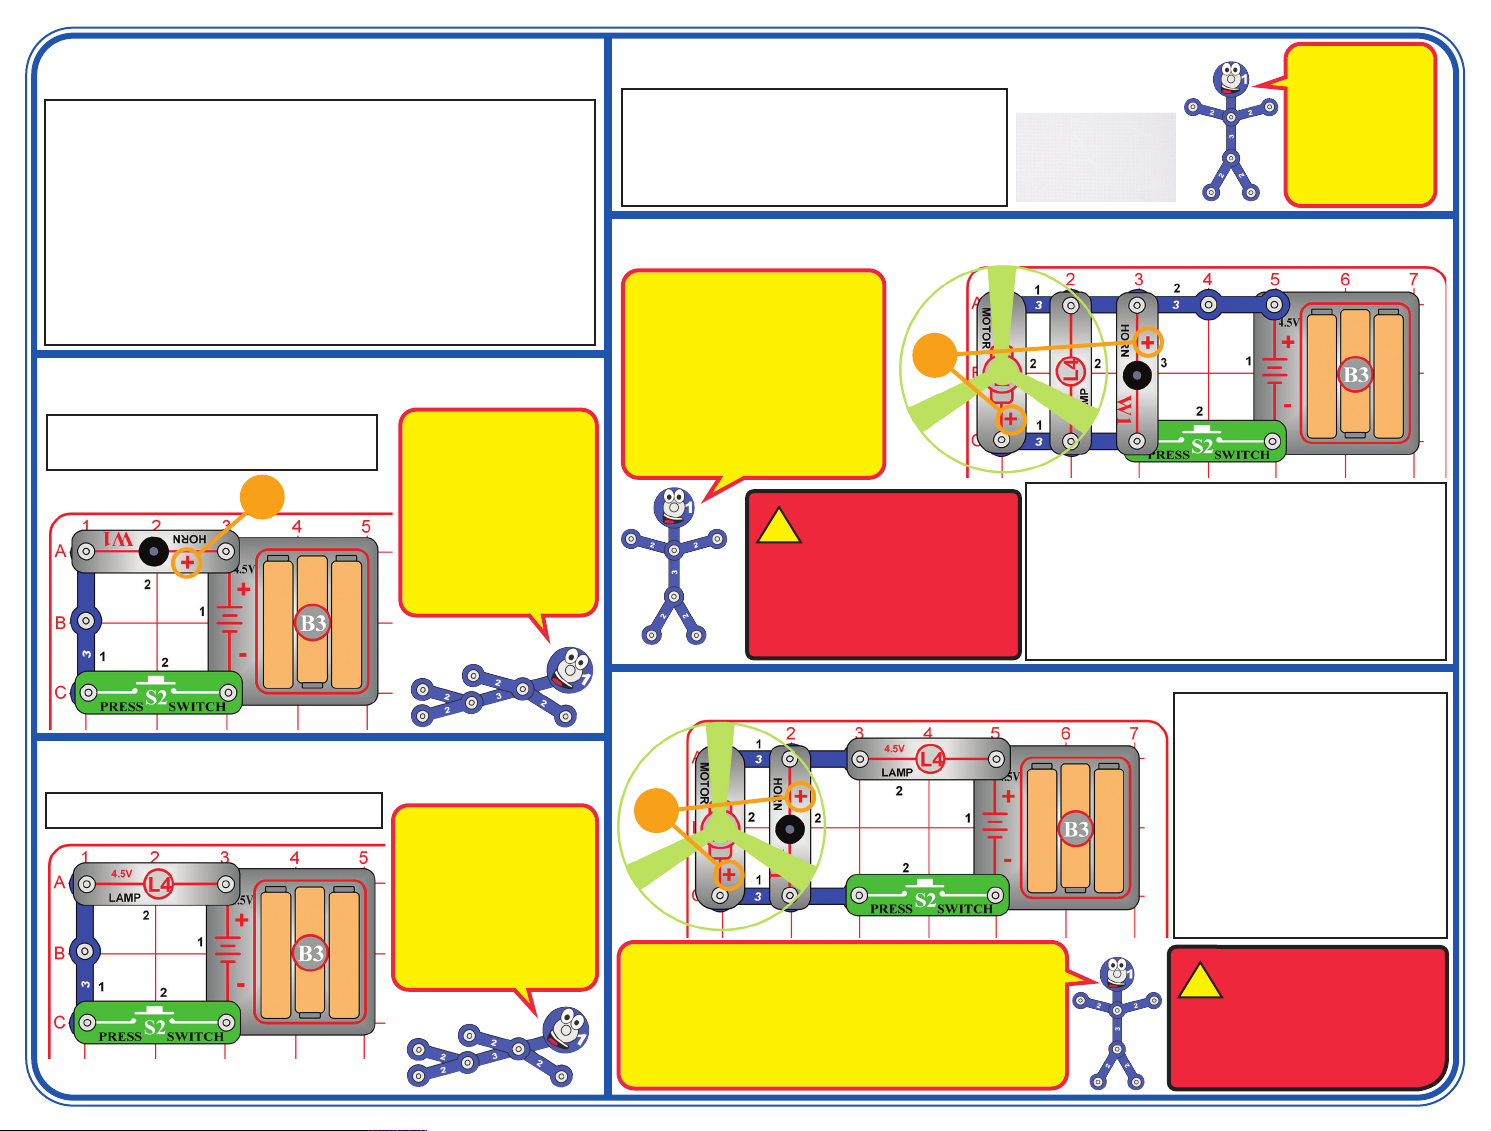
Project 9 Light, Sound, & Motion
Here the motor, horn, and lamp
are connected in parallel; if one or
two of them burn out, the other(s)
will still work. The switch is
connected in series with all of
them; if it breaks, nothing will
work. Electricity flows out of the
batteries, through either the
motor, horn, or lamp, then back to
the batteries through the switch.
WARNING: Moving parts.
Do not touch the motor or
!
fan during operation. Do not
lean over the motor. Fan may not
rise until switch is released. Do not
launch fan at people, animals, or
objects. Eye protection is
recommended.
+
This circuit is the one shown on the box cover, use
that as a guide in building it. Push the press switch
(S2) to light the lamp (L4), sound the horn (W1), and
spin the motor (M1). When you release the switch, the
glow fan may rise into the air if it is spinning fast
enough. If the fan does not fly when released at full
speed then replace your batteries. If you do not want
the fan to fly off then reverse the position of the motor.
Prismatic film
separates light into
different colors,
and can make
interesting light
effects. White light
is a combination of
all colors.
Project 7 Lamp
Push the switch (S2) to light the lamp (L4).
A light bulb, such as in this
lamp, contains a special
then high-resistance wire.
When a lot of electricity
flows through, this wire
gets gets so hot it glows
bright. Voltages above the
bulb’s rating can burn out
the wire.
Project 10 Combination
+
This circuit is similar to project 9, except here all the electricity
from the batteries flows through the lamp, then the motor and
horn, then back to the batteries through the switch. The
battery voltage is split between the lamp, motor, and horn,
making the motor slower, the horn quieter, and the lamp
dimmer. The batteries will last longer now, because electricity
isn’t flowing out of them as fast as in project 9.
Push the press switch (S2) to light
the lamp (L4), sound the horn
(W1), and spin the motor (M1).
The fan probably will not rise into
the air as it did in project 9,
because the motor isn’t spinning it
as fast now.
Now swap the locations of the motor
(M1) and lamp (L4); the motor can
be oriented in either direction.
Compare the performance.
WARNING: Moving parts. Do
not touch the motor or fan
!
during operation. Do not lean
over the motor. Fan may not rise until
switch is released. Do not launch fan
at people, animals, or objects. Eye
protection is recommended.
Page 3

Project 11 Two-Speed Fan
Project 13 Light Dimmer
Install this piece last
The lamp (L4) lights and the motor (M1) starts
spinning when you install the last 3-snap wire.
Push the switch (S2) to bypass the lamp and make
the fan speed up.
You can swap the locations of the lamp and motor to
make a lamp with 2 brightness levels, but be careful
not to touch the fan when pressing the switch.
WARNING: Moving parts.
Do not touch the motor or
!
fan during operation. Do not
lean over the motor. Fan may not
rise until switch is released. Do not
launch fan at people, animals, or
objects. Eye protection is
recommended.
Project 12 Light & Motion
Push the switch (S2) to light the
lamp (L4) and spin the motor (M1).
Notice how the lamp gets a little
less bright as the motor speeds
up.
Use the preceding circuit, but
remove the glow fan from the
motor (M1). Push the switch,
and watch how the lamp
starts out bright, but gets dim
as the motor speeds up.
Next, hold the motor top with
your fingers so it can’t spin,
then push the switch and see
how bright the lamp is.
Project 14 Limiter
The faster the motor is spinning, the
less electricity it needs. The more
electricity flows, the brighter the lamp
gets. The motor needs the most
electricity when it starts up, making
the lamp brightest. Without the fan,
the motor can spin fast and needs
little electricity, making the lamp dim.
WARNING: Moving parts.
Do not touch the motor or
!
fan during operation. Do not
lean over the motor. Fan may not
rise until switch is released. Do not
launch fan at people, animals, or
objects. Eye protection is
recommended.
Push the switch (S2) and you
hear the horn (W1), but the
lamp (L4) will not light and the
motor (M1) will not spin.
The horn doesn’t need much
electricity, but it limits how much
can flow through the circuit, not
allowing enough to light the lamp
or spin start the motor.
Page 4

OTHER SNAP CIRCUITS®PRODUCTS! PARTS LIST
Contact Elenco®to find out where you can purchase these products.
Snap Circuits®Jr. Model SC-100
Build over 100 projects, contains over 30 parts.
Snap Circuits®Green Model SCG-125
Build over 125 projects, contains over 40 parts.
Basic Electricity
Model SCP-10
LED Fun
Model SCP-11
Build over 175 projects, contains over 55 parts.
Snap Circuits®Sound Model SCS-185
Build over 185 projects, contains over 40 parts.
FM Radio
Model SCP-12
Snap Circuits®Light Model SCL-175
Motion Detector
Model SCP-13
Strobe Light & Sound
Model SCP-14
Qty. ID Name Part #
r 3 3 3-snap wire 6SC03
r 1 B3 Battery holder 6SCB3
r 1 Base grid 6SCBGMF
r 1 Prismatic film 6SCFILM
r 1 L4 4.5V Lamp 6SCL4
r 1 M1 Motor 6SCM1
r 1
Cardboard pattern
6SCM1C
r 1 Glow fan 6SCM1FG
r 1 S2 Press switch 6SCS2
r 1 W1 Horn 6SCW1
Important: If any parts are missing or
damaged, DO NOT RETURN TO
RETAILER. Call toll-free (800) 533-2441 or
e-mail us at: help@elenco.com.
Customer Service ● 150 Carpenter Ave. ●
Wheeling, IL 60090 U.S.A.
You may order additional / replacement
parts at our website: www.snapcircuits.net
BATTERIES:
● Use only 1.5V AA type, alkaline
batteries (not included).
● Insert batteries with correct polarity.
● Non-rechargeable batteries should not
be recharged. Rechargeable batteries
should only be charged under adult
supervision, and should not be
recharged while in the product.
● Do not mix alkaline, standard (carbonzinc), or rechargeable (nickelcadmium) batteries.
● Do not mix old and new batteries.
Remove batteries when they are used up.
●
● Do not short circuit the battery
terminals.
● Never throw batteries in a fire or
attempt to open its outer casing.
● Batteries are harmful if swallowed, so
keep away from small children.
 Loading...