

Page 1

Стиральная машина автомат WM-3610M
Инструкция пользователя
Page 2

ВВЕДЕНИЕ
ПРЕДОСТЕРЕЖЕНИЕ
• Cохраните эту инструкцию. Это важно, если вам понадобится в
будущем обратиться к ней.
• Для вашей безопасности вы должны внимательно изучить
инструкцию перед установкой и работой со стиральной
машиной.
• При распаковке и установке стиральной машины, следите за
тем чтобы ничего не было повреждено. Если вы сомневаетесь
в собственных силах, свяжитесь с ближайшим сервисным
центром.
ВНИМАНИЕ (!)
1. Не ставьте тяжелые или горячие предметы на крышку стиральной
машины, чтобы избежать деформации покрытия и пластмассовых
компонентов.
2. Не мойте резиновые и эластичные материалы веществами,
которые содержат растворители.
3. Перед стиркой обязательно застегивайте все молнии и пуговицы
на одежде, чтобы избежать повреждения машины.
4. В течение программы стирки, не открывайте люк дозатора
машины, чтобы избежать выплескивания воды.
5. Люк стиральной машины откроется только по истечении 23 минут после завершения программы стирки и отключения
машины. Не открывайте люк, если уровень воды выше нижней
грани люка.
6. После окончания стирки магистраль подвода воды к машине
должна быть перекрыта, чтобы избежать утечки воды.
Электрический провод должен быть извлечен из розетки.
7. Если машина не используется, люк должен быть приоткрыт
для проветривания. Не закрывайте машину полиэтиленовыми
пакетами.
Вся внутренняя упаковка должна быть удалена перед использованием
стиральной машины. Неудаленная упаковка и транспортировочные
механизмы могут вызвать серьезную поломку машины. См. ниже
параграф «Установка» в инструкции.
ЛЮБЫЕ ЭЛЕКТРИЧЕСКИЕ РАБОТЫ, ДОЛЖНЫ БЫТЬ
ВЫПОЛНЕНЫ КВАЛИФИЦИРОВАННЫМ СПЕЦИАЛИСТОМ-
ЭЛЕКТРИКОМ.
2
Page 3

ИСПОЛЬЗОВАНИЕ
1. Стиральная машина предназначена только для домашнего
использования. Она не должна использоваться для иных
целей.
2. Электрическая розетка должна быть надежно заземлена, а
также должна иметь надежный провод основания, чтобы
гарантировать безопасное использование стиральной
машины.
3. Не перегружайте стиральную машину.
4. Люк стиральной машины может быть открыт только спустя две
минуты после окончания стирки.
5. Стирайте в машине только те ткани, которые предназначены
для стирки в автоматических стиральных машинах. Следуйте
обозначениям на этикетках одежды.
6. Перед загрузкой одежды в бак стиральной машины
удостоверитесь, что все карманы одежды пусты. Посторонние
предметы типа монет, штырей и винтов и т.п., могут серьезно
повредить стиральную машину.
7. Разместите маленькие предметы одежды, типа носков, поясов
и т.д. в мешке для одежды или наволочке. Это предотвратит их
возможное повреждение.
8. Используйте только стиральные порошки для автоматических
стиральных машин, и добавляйте в машину только
рекомендованное количество стирального порошка и
кондиционера (смягчителя). Их чрезмерное количество может
повредить стиральную машину.
9. Оставьте люк слегка приоткрытым, когда стиральная машина не
используется. Это предохранит уплотнитель от деформации, а
также от образования неприятного запаха.
10. Всегда проверяйте отсутствие воды в баке перед открытием
люка стиральной машины.
11. Не размещайте на крышке стиральной машины тяжелые и
горячие предметы. Это может привести к ее деформации.
12. Всегда выключайте стиральную машину из сети после
использования.
3
Page 4
УСТАНОВКА
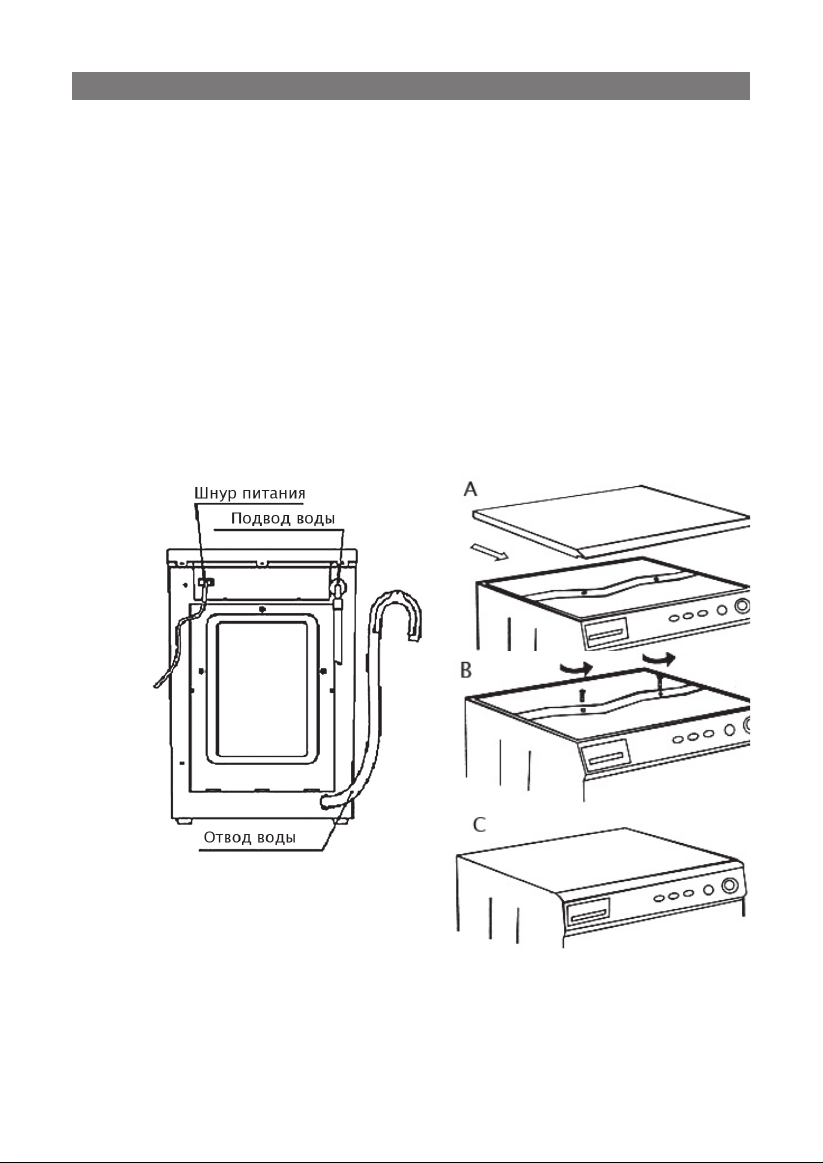
1. Выньте принадлежности
Потяните кнопку открытия люка, откройте люк, и возьмите
принадлежности для установки из барабана.
2. Транспортировочные устройства
Все транспортировочные устройства и упаковка должны быть
удалены перед использованием машины.
Произведите это следующим образом:
Отвинтите и удалите, три винта (A) фиксирующие верхнюю
крышку, затем потяните крышку назад. Используя гаечный
ключ, открутите два болта (B) на подставке, затем извлеките
пенопластовые вкладыши (C), установите верхнюю крышку
обратно.
ПРИМЕЧАНИЕ: Сохраните все транспортировочные устройства,
если вы планируете перевозить стиральную машину.
3. Установка
Установите машину на
ровной твердой поверхности.
Удостоверитесь, чтобы ковры, половики и т.д. не препят-
ствовали циркуляции воздуха вокруг машины.
Тщательно выровняйте машину по уровню, подкручивая
регулировочные ножки. Никогда не подкладывайте картон,
деревянные или подобные материалы под машину, чтобы
4
Page 5

компенсировать любую неровность в полу.
После выравнивания машины закрутите контргайки.
4. Подвод воды
Ослабьте винты и подсоедините шланг к тройнику. Закрутите
винты, затем поверните соединение по часовой стрелке и
удостоверитесь в том, что вода подводится к машине.
Присоедините шланг к входному клапану на обратной стороне
машины и закрутите его настолько, насколько позволяет
резиновая прокладка шланга.
5. Слив воды
Машина использует насос для слива воды, поэтому вы должны
повесить свободный конец сливного шланга. Удостоверитесь,
что его высота не выше 1 м, и ни ниже 0.5 м от пола.
6. Подключение к электросети
Эта машина предназначена для рабы с переменным
напряжением 220v/50Hz. Соедините машину с заземленной
розеткой, допустимая нагрузка которой соответствует
параметрам, указанным для этой модели стиральной машины.
ИЗГОТОВИТЕЛЬ ОТКЛОНЯЕТ ЛЮБУЮ ОТВЕТСТВЕННОСТЬ
ЗА ПОВРЕЖДЕНИЕ ИЛИ УЩЕРБ, ВОЗНИКШИЙ В
СЛЕДСТВИИ НЕВЫПОЛНЕНИИ ВАМИ ЭТОГО ПРАВИЛА.
ПРАВИЛА ИСОЛЬЗОВАНИЯ СТИРАЛЬНОЙ МАШИНЫ
1. Загрузка одежды
Откройте люк машины и положите одежду в барабан, затем
закройте люк.
2. Выбор программы стирки
Выберите программу согласно таблице приложенной к
стиральной машине (в некоторых моделях программы стирки
нанесены на панель управления). Не поворачивайте ручку
программ против часовой стрелки. Указатель ручки выбора
программ должен указать на выбранную программу. Не
устанавливайте ручку программ в промежуточное положение
(между двумя программами).
3. Выбор температуры стирки
Поверните ручку регулирования температуры на значение
выбранной вами температуры. Если вы не любите использовать
горячую воду, вы можете повернуть ручку выбора температуры
5
Page 6

в положение *. Самая высокая температура нагрева для
шерстяной ткани - 400C Ручку регулировки температуры можно
поворачивать в любом направлении от положения * к 600C.
4. Использование кнопок дополнительных функций
С помощью специальных кнопок можно дополнить функции
выбранной программы, если это необходимо.
ВНИМАНИЕ! При неработающей машине все функциональные
кнопки должны быть выключены.
5. Закладывание моющего средства и добавок
беливатель, пятновыводитель, кондиционер и т.п.)
Поместите моющее средство и добавки в различные
отсеки. Отсек 1 - для стирального порошка, отсек 2 - для
кондиционера, отбеливателя или отдушки. Моющее средство
для предварительной стирки добавляйте непосредственно
в барабан. Необходимое количество моющего средства для
стирки – 12г/кг белья для предварительной стирки. Моющие
средство в виде пасты не подходят для стиральной машины.
Пожалуйста, используйте высококачественный стиральный
порошок с малым пенообразованием (ПОМЕЧЕННЫЙ НА
УПАКОВКЕ КАК «Автомат»)
6. Включение стиральной машины
Поверните кран подачи воды и проверьте соединение с
машиной на предмет утечек воды. Нажмите кнопку Вкл\
Выкл, которая включит машину на выполнение выбранной
программы. Стиральная машина выключится, когда ручка
выбора программ достигнет положения «0».
7. Извлечение белья
Отожмите кнопку Вкл\выкл, подождите 2 минуты и нажмите
на кнопку открытия люка. Откройте люк и извлеките одежду.
(от-
6
Page 7
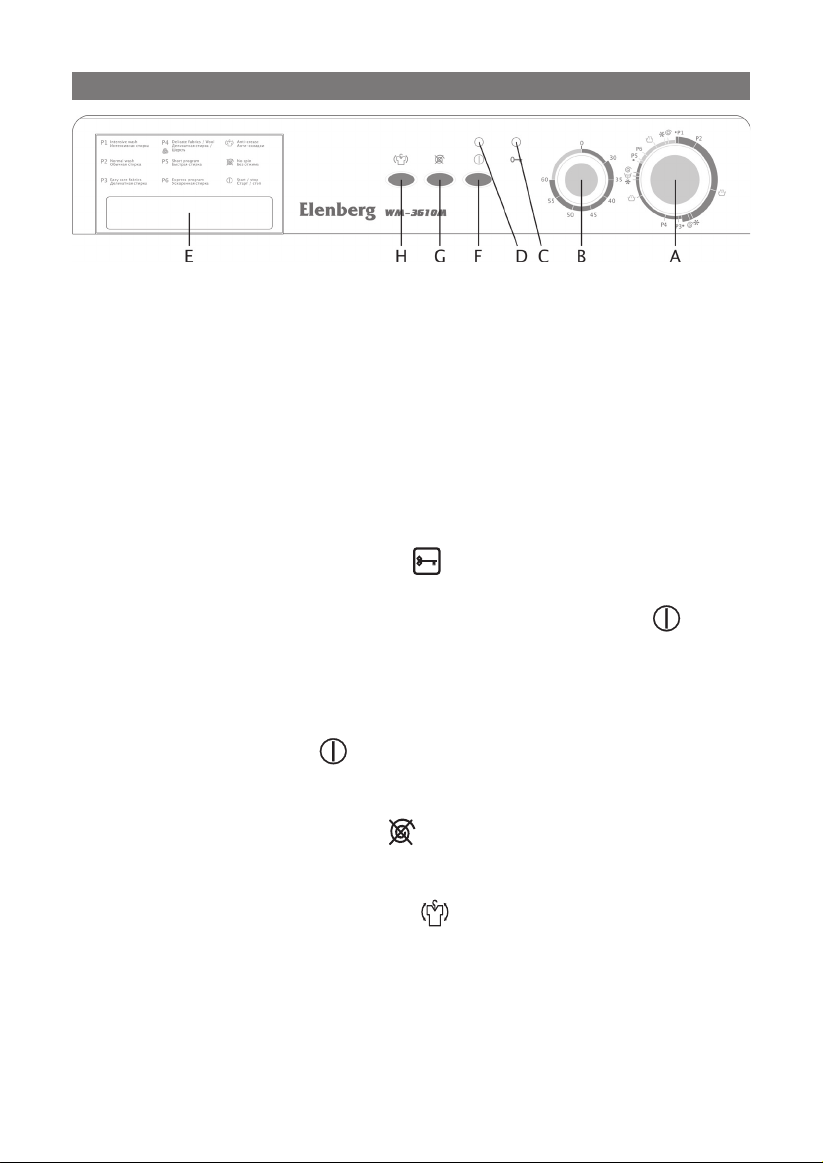
ФУНКЦИИ ПАНЕЛИ УПРАВЛЕНИЯ
A. Ручка выбора программ
Имеются 15 программ. Пожалуйста, выберите подходящую
согласно таблице описания программ.
Предостережение: пожалуйста, проверьте, что стиральная
машина выключена, когда вы производите выбор программ.
Поворачивайте ручку выбора программ только по часовой
стрелке.
B. Рукоятка выбора температуры
Температура нагрева может быть выбрана в пределах от 30 до
60 градусов. 0 градусов означает, что производится стирка в
холодной воде.
C. Индикатор двери люка “ ”
Лампа светится, когда люк стиральной машины закрыт.
D. Индикатор включения стиральной машины “ ”
Лампа светится, когда стиральная машина включена
E. Емкость для моющего средства
Емкость для моющего средства разделена на два отсека 1 и 2,
которые предназначены для моющих средств и добавок.
F. КНОПКА «Сеть» “ ”
Нажмите эту кнопку, чтобы включить электропитание, и
нажмите снова, чтобы отключить электропитание.
G. Кнопка «Без отжима» “ ”
Нажмите эту кнопку, и стиральная машина не будет отжимать
белье в течение и после процесса стирки.
H. Кнопка «Анти-складки» “ ”
Нажмите эту кнопку, чтобы включить функцию «анти-складки».
Применяется для одежды из синтетики, а также для стирки
шерстяных изделий.
7
Page 8

Интенсивная стирка
В основном для
хлопка
Обычная
стирка
В основном для
тонких
тканей
РЕЖИМЫ СТИРКИ
Моющее
Программы стирки
1 интенсив-
ная стирка
2 обычная
стирка
3 полоска-
ние
4 кондици-
онер
5 отжим 7.5 ╳ ╳
стоп Программа стирки завершится и
A обычная
стирка
B деликатная
стирка
C полоскание 10 ╳ ○
D кондицио-
нер
слив При нажатой кнопке, машина
E отжим 5 ╳ ╳
стоп Программа стирки завершится и
Грязное
бельё
Белье
средней
загрязненности
Добавляется
смягчитель
машина остановится
Грязное
бельё
Шерстяные
ткани
Добавляется
смягчитель
остановится, и вода сольется из
машины
машина остановится
Время
20 ● ○
57.5 ● ○
22.5 ╳ ○
5 ╳ ○
20 ● ○
30 ● ○
5 ╳ ○
средство
основ.
отсек
доп.
отсек
8
Page 9

Деликатная стирка
Для
шерсти
Быстрая
стирка
Моющее
Программы стирки
B деликатная
стирка
C полоскание 10 ╳ ○
D кондицио-
нер
слив При нажатой кнопке слива машина
E стоп 5 ╳ ╳
окончание Программа стирки завершится и
I быстрая
стирка
II ускоренная
стирка
III
полоскание 7.5 ╳ ○
IV
кондицио-
нер
V отжим 5 ╳ ╳
стоп Программа стирки завершится и
Шерстяные
ткани
Добавляется
смягчитель
остановится, и вода сольется из
машины
машина остановится
Слегка
загрязненное
бельё
Для не очень
грязного
белья или
шелка
машина остановится
Время
30 ● ○
5 ╳ ○
10 ● ○
10 ● ○
2.5 ╳ ○
средство
основ.
отсек
доп.
отсек
9
Page 10

ВОЗМОЖНЫЕ ПРОБЛЕМЫ И ИХ РЕШЕНИЕ
Стиральная машина не включается:
• Проверить подключение машины к розетке.
• Проверить, закрыт ли люк.
• Проверить, нажата ли кнопка вкл\выкл.
Вода не наполняет стиральную машину:
• Проверить подвод воды.
• Проверить чистоту фильтра в подводящем шланге.
• Проверить, закрыт ли люк.
• Проверить положение ручки выбора программ (программа
должна быть установлена).
• Проверить давление воды (0.5 бар).
Медленный слив воды из машины:
• Проверить, не пережат ли шланг слива воды.
• Проверить, не засорен ли сливной шланг.
Стиральная машина сильно вибрирует:
• Проверить, удалены ли все транзитные устройства.
• Проверить все ли ножки стиральной машины опираются на
твердое основание.
• Проверить загрузку машины (не более 3.6 кг)
Стиральная машина останавливается в процессе
выполнения программы:
• Проверить электропитание и давление воды.
• Проверить, не является ли это функцией работающей
программы.
Стиральная машина не сливает воду течение
программы стирки:
Проверить, не находится ли машина в режиме стирки «анти-
складки».
Пена выходит за пределы дозатора:
• Проверить правильность использования дозатора.
• Проверить тип используемого порошка.
10
Page 11

ТЕХНИЧЕСКИЕ ДАННЫЕ
Рабочее напряжение/рабочая частота
220V/50HZ
переменного тока
Номинальное давление воды 0.5 ~ 10 бар
Номинальная мощность (стирка) 240 Вт
Номинальная мощность (отжим) 570 Вт
Максимальная загрузка бака 3.6 кг
Максимальная скорость отжима 600 об/мин.
Количество программ стирки 15
Габариты, мм 420 х 515 х 760
Вес 50 кг
Изготовитель “ЭЛЕНБЕРГ ЛИМИТЕД”, Великобритания
Адрес: 35 Бромптон Роад, Кнайтсбридж Лондон СВ3 ИДЕ
Сделано в Китае. ”ЭЛЕНБЕРГ ЭЛЕКТРИК КОМПАНИ ЛТД”
А08 Р2-Б4 билдинг, Кеджинан 2 Роад, С энд Т Индастри Парк,
Шензень, Гуандонг Провинс, Китай.
11
Page 12

AUTOMATIC WASHING MACHINE WM-3610M
INSTRUCTION MANUAL
Page 13

IMPORTANT SAFETY MEASURES
All electrical appliances should be handled with care.
Read the instructions through before using this appliance
for the first time.
Certain fundamental safety precautions are essential to
avoid the risk of fire, electric shock or injury. In particular, always observe the following:
1. Do not use the appliance if the mains cable is damaged. If it is
damaged, it must be replaced by a qualified electrician to avoid all
risk of electrical shock.
2. Always shut off the water supply and disconnect the power supply
after using.
3. Always make sure the appliance is disconnected before cleaning.
4. Use a damp cloth or a proprietary window cloth to clean this ap-
pliance. Never use detergent or solvent for cleaning.
5. Use the appliance without a cable extension.
6. To avoid all risk of electrical shock do not use this appliance with
wet hands or with bare feet on a damp surface.
7. Do not use the appliance out of doors or in a damp place.
8. Do not move the appliance when it is full to avoid water slopping
over.
9. The mains cable must be plugged into a correctly earthed socket.
Never tug at the cable to remove the plug. Hold the plug firmly to
pull it out of the socket.
10. Never lift the appliance by the mains lead.
11. Never try to repair, regulate or replace parts of this appliance
yourself. Contact the after sales service at once if anything is not
working properly.
12. This appliance is designed for domestic use, it should on no ac-
count be used professionally.
13. Do not exceed 3.6 kg of washing per wash.
14. The door cannot be opened for 2 to 3 minutes after the end of
each wash. Before opening it is advisable to look through the door
to check that the water has run off completely. If this is not the
case, consult the section V “troubleshooting”.
15. Never wash articles that are not machine washable. Follow the
washing instructions on the label of each item of laundry.
16. Empty any pockets that could contain coins, screws or other ob-
13
Page 14

jects that could damage the washing or the machine.
17. Put small items like socks in a washing bag or a pillow case to en-
sure they cannot get trapped between the tub and the drum.
18. Use a low foaming, high quality detergent. Never exceed the quan-
tity recommended by the detergent manufacturer. Using too much
detergent is not good for your laundry and is hostile to the environment.
19. Leave the door open when the washing machine is not in use to
reduce wear on the seal and prevent mould formation.
20. Do not put anything heavy on the machine that could damage the
top.
NEVER LET CHILDREN PLAY WITH THE APPLIANCE.
INSTALLATION
1. Removing the accessories
Open the door by pulling on the handle and remove the accessories
in the drum prior to installation.
2. Transport grip-safe pieces
All the pieces inserted to hold the drum steady during transport
must be removed before using for the first time.
Proceed as follows:
Unscrew and remove the three
14
Page 15

screws (A) fixed on the top cover, pull it forward and outwards.
Unscrew and remove the two nuts (B), remove the polystyrene then
replace the cover (C).
N.B. It is advisable to keep the packaging and transport holding
pieces in case the machine has to be transported again.
3. Positioning
Install the machine on a firm, flat surface. Make sure that nothing
– carpets, cloths etc., can prevent the air from circulating around
the machine. Make sure that the machine is not touching a wall or
any piece of furniture as this would cause vibrations.
Level the machine by screwing the adjustable feet up or down; nev-
er place a piece of wood or any other object underneath to set off
any difference in height between one side and the other. Once the
machine is level, tighten the counter nuts on the feet.
4. Connecting to the water supply
The appliance may only be connected to the cold tap. Screw one
end of the cold water intake hose to the threaded connection point
at the back of the appliance and connect the other to the cold water
tap. The machine is designed to work with a water pressure of 0.5
to 10 bar. Check that the connections are watertight.
5. Emptying the water
The machine uses a pump to empty the water. The end of the flex-
ible hose must be hung at a maximum height of 1 metre and minimum 0.5 metres so the water can run off properly. Make sure there
are no kinks or snags in the runoff hose.
6. Electric connection
The machine is designed for use with 230V 50Hz. Connect the
machine to an earthed socket that complies with approved safety
standards. The makers refuse all responsibility in the event of damage caused by failure to respect the security provisions.
15
Page 16

USING THE MACHINE
1. Loading the machine
Open the door and place the laundry in the drum, then close the
door firmly; the machine will not start if the door is not closed
properly.
2. Selecting washing programme
Choose the programme according to the type of fabric you are go-
ing to wash by referring to the programme list.
Attention: Never turn the button anticlockwise!
Turn the button so that the arrow points to the programme re-
quired; never point the arrow between two programmes.
3. Selecting washing temperature
Turn the temperature dial to the required position. If you want a
cold wash leave the button in the «0» position.
Do not exceed 40°C in the wool programme.
4. Selecting the function
If necessary, activate the special function button according to the
control pane.
N.B.: ANY FUNCTION BUTTONS THAT ARE NOT ACTIVATED MUST BE
IN THE NEUTRAL POSITION.
5. Dosing and adding washing products
Put the detergent and other products in the correct compartments.
Compartment 1 is used for washing powder, compartment 2 for
fabric softeners, whiteners, stain removers etc. When using programmes 1, 2 and 3, the fabric softener is run in during the first
rinsing cycle to produce an anti-allergenic effect. If you want a
classic fabric softener rinsing cycle, pour the fabric softener into
compartment 2 and start the programme again in position 4. Make
sure you use a good quality detergent to avoid excessive foam.
6. Filling and starting the machine
Turn the water tap on full and check that there is no leaking.
Press the ON/OFF button to start the machine; it will run automati-
cally until the end of the cycle.
The machine will stop when the programme dial reaches the “ЃњЃh
position.
7. Unloading the machine
Press the ON/OFF button to set to the STOP position. Wait for two
minutes then push the button to open the door; remove the garments.
16
Page 17

USING THE MACHINE
A. Choice of programme
The washing machine offers a choice of several programmes; choose
the programme to suit the type of laundry garments you want to
wash by referring to the control panel with the list of programmes.
N.B.: before selecting a programme, make sure that the ON/OFF
button is at OFF. Press the programme selector button so that it
is in the raised position. Now it can be turned clockwise to select;
never use force to turn it anticlockwise.
B. Regulating the temperature
Once the button has moved out of the recess by pressing it with a
finger, the temperature can be regulated on a range of 30° C to 60°
C. Select the “0” symbol for a cold water wash.
C. Door locked pilot light “ ”
The pilot light stays on to show the door is locked.
D. ON pilot light “ ”
The pilot light comes on when the washing machine is started and
stays on until the end of the programme. It does not go out until the
ON/OFF button is pressed again.
E. Detergent drawer
The detergent drawer is divided into two sections, 1 and 2 respec-
tively for the washing powder and the fabric softener.
F. ON/OFF button “ ”
Press this button to start or stop the machine.
G. No spin dry button “ ”
Press this button to eliminate the spin dry cycle for fine fabrics.
H. Anti-crease button “ ”
Press this button to stop the machine before the emptying and spin
dry cycles. This is used when washing fine fabrics or for a wool
wash.
In order to finish the wash programme press the anti-crease button
once more.
17
Page 18

Intensive
washing
Basically
for a clap
Normal
washing
basically
for thin
fabrics
РЕЖИМЫ СТИРКИ
Detergent
powder or
Conditioner
PROGRAMMES
1 Intensive
washing
2 Normal
washing
3 Rinsing 22.5 ╳ ○
4 Conditioner Adds a soft-
5 Spin 7.5 ╳ ╳
Stop The washing program will come to
A Normal
washing
B Delicate
washing
C Rinsing 10 ╳ ○
D Conditioner Adds a soft-
Drain At the pressed button, the machine
E Spin 5 ╳ ╳
Stop The washing program will come to
Very dirty
linen
Dirty linen
ener or the
conditioner
the end, the machine will stop
Dirty linen
Woolen fabrics
ener or the
conditioner
will stop, and water will drain
the end, the machine will stop
Time
20 ● ○
57.5 ● ○
20 ● ○
30 ● ○
basic
com-
partment
5 ╳ ○
5 ╳ ○
Additional
com-
partment
18
Page 19

Delicate
washing
For a wool
Fast washing
Detergent
powder or
Conditioner
PROGRAMMES
B Delicate
washing
C Rinsing 10 ╳ ○
D Conditioner Adds a soft-
Drain At the pressed button, the machine
E Stop 5 ╳ ╳
The termi-
nation of
washing
I Fast wash-
ing
II Accelerated
washing
III
Rinsing 7.5 ╳ ○
IV
Conditioner Adds a soft-
V Spin 5 ╳ ╳
Stop The washing program will come to
Woolen fabrics
ener or the
conditioner
will stop, and water will drain
The washing program will come to
the end, the machine will stop
Slightly soiled
linen or easy
care fabrics
Very lightly
soiled linen
or delicate
fabrics
ener or the
conditioner
the end, the machine will stop
Time
30 ● ○
10 ● ○
10 ● ○
2.5 ╳ ○
basic
com-
partment
5 ╳ ○
Additional
com-
partment
19
Page 20

TROUBLESHOOTING
1. The machine won’t start.
• Check the door is closed properly
• Check that the machine is plugged in and that the electricity is on.
• Check that the programme dial is in the correct position and that
the ON/OFF button is pressed down.
2. The machine won’t fill.
• Check that the tap is turned on.
• Check that there are no kinks in the water intake hose.
• Check that the filter is not blocked.
• Check the door is closed properly.
• Check that the programme dial is in the correct position.
• Check that the water pressure is strong enough (minimum 0.5
bar).
3. The machine fills and empties immediately.
• Check that the runoff hose is not positioned too low.
• Check that the runoff hose is mounted properly.
4. The machine does not empty and/or the drum does not turn.
• Check that there are no kinks or snags in the water intake
hose.
• Check that the runoff hose is installed properly and there re no
blockages.
• Check whether the button for anti-crease is set (the water remains
in the drum after the last rinse for this kind of programme).
5. There is water on the floor.
• Check that there are no kinks or snags in the water intake
hose.
• Check that the runoff hose is not punctured.
• Too much detergent means too much foam: this will run over.
6. The laundry is not washed properly.
• The quantity of detergent was not sufficient or was not up to
standard.
• The temperature setting was not correct for this wash.
• Stubborn stains should be pretreated before each washing.
7. The machine is vibrating a lot or is making a lot of noise.
• Check that the transit screws have been removed.
• Check that the adjustable feet of the machine are all firmly on
the ground and that the counter nut on each one has been tightened properly.
• Check that the washing is well distributed in the drum.
• There is not enough washing in the machine.
20
Page 21

8. The door will not open.
• The programme is not finished.
• There is a delay of 2 to 3 minutes after the end of the cycle, before the door will open.
9. The machine stops before the programme is finished.
• Check that the neither the electricity nor the water have been cut
off.
10. The machine is not working during the washing programme.
• Check whether it is during the anti-crease soaking phase.
11. Foam is running over from the detergent drawer.
• Check the quality of the product used.
• Check the quantity of the product used.
TECHNICAL DETAILS
Power 220V/50Hz
Water pressure 0.5~1 bar
Rated power (washing) 240W
Rated power (spin) 570W
Capacity 3.6 kg
Spin drying 600 t/min
Quantity of programs 15
Dimensions D x W x H, mm 420 x 515 x 760
Net weight 50 kg
21
 Loading...