

Page 1

DVD-ɩɥɟɟɪ DVDP-2448/2450
ɊɍɄɈȼɈȾɋɌȼɈ ɉɈɅɖɁɈȼȺɌȿɅə
Page 2

ɋɈȾȿɊɀȺɇɂȿ
Ɇɟɪɵ ɛɟɡɨɩɚɫɧɨɫɬɢ ………………………………………………………………………….2
Ɉɫɨɛɟɧɧɨɫɬɢ………………...…………………………………………………………………4
ɂɧɮɨɪɦɚɰɢɹ ɨ ɞɢɫɤɚɯ……………………………………………………..………………..5
Ɉɫɧɨɜɧɵɟ ɱɚɫɬɢ …………………………………………………………….……………….7
ɉɨɞɤɥɸɱɟɧɢɟ ɫɢɫɬɟɦɵ ..…………………………………………………………………...12
ȼɨɫɩɪɨɢɡɜɟɞɟɧɢɟ ………………………………………………………….………………..17
ɇɚɫɬɪɨɣɤɚ ɫɢɫɬɟɦɵ .…………………………………………………………………….….23
ȼɨɡɦɨɠɧɵɟ ɧɟɢɫɩɪɚɜɧɨɫɬɢ ………………………………………………………………42
Ɍɟɯɧɢɱɟɫɤɢɟ ɯɚɪɚɤɬɟɪɢɫɬɢɤɢ …………………………………………………………….45
2
Page 3

ȼȺɀɇɕȿ ɆȿɊɕ ȻȿɁɈɉȺɋɇɈɋɌɂ
ɉɊȿȾɍɉɊȿɀȾȿɇɂȿ: ɑɬɨɛɵ ɭɦɟɧɶ-
ɲɢɬɶ ɪɢɫɤ ɜɨɡɧɢɤɧɨɜɟɧɢɹ ɨɝɧɹ ɢɥɢ
ɩɨɪɚɠɟɧɢɹ ɷɥɟɤɬɪɢɱɟɫɤɢɦ ɬɨɤɨɦ.
ɇȿ ɩɨɞɜɟɪɝɚɣɬɟ ɩɪɨɢɝɪɵɜɚɬɟɥɶ
ɜɨɡɞɟɣɫɬɜɢɸ ɜɥɚɝɢ.
ɑɟɪɧɵɣ ɬɪɟɭɝɨɥɶɧɢɤ ɫ ɫɢɦɜɨɥɨɦ, ɢɡɨɛɪɚɠɚɸɳɢɦ ɦɨɥɧɢɸ ɫɨ ɫɬɪɟɥɤɨɣ,
ɩɪɟɞɭɩɪɟɠɞɚɟɬ ɩɨɥɶɡɨɜɚɬɟɥɹ ɨɛ "ɨɩɚɫɧɨɦ ɞɥɹ ɠɢɡɧɢ" ɧɚɩɪɹɠɟɧɢɢ.
ȼɨɫɤɥɢɰɚɬɟɥɶɧɵɣ ɡɧɚɤ ɜ ɬɪɟɭɝɨɥɶɧɢɤɟ ɭɤɚɡɵɜɚɟɬ ɩɨɥɶɡɨɜɚɬɟɥɸ ɧɚ
ɧɟɨɛɯɨɞɢɦɨɫɬɶ ɩɪɨɱɬɟɧɢɹ ɜɚɠɧɨɣ ɢɧɮɨɪɦɚɰɢɢ ɩɨ ɷɤɫɩɥɭɚɬɚɰɢɢ ɢ
ɨɛɫɥɭɠɢɜɚɧɢɸ ɩɪɨɢɝɪɵɜɚɬɟɥɹ.
ɁȺɆȿɑȺɇɂə
1) ɉɪɨɱɬɢɬɟ ɷɬɭ ɢɧɫɬɪɭɤɰɢɸ.
2) ɋɨɯɪɚɧɢɬɟ ɷɬɭ ɢɧɫɬɪɭɤɰɢɸ.
3) Ɉɛɪɚɳɚɣɬɟ ɜɧɢɦɚɧɢɟ ɧɚ ɜɫɟ
ɩɪɟɞɭɩɪɟɠɞɟɧɢɹ.
4) ɋɥɟɞɭɣɬɟ ɜɫɟɦ ɭɤɚɡɚɧɢɹɦ.
5) ɇɟ ɩɨɥɶɡɭɣɬɟɫɶ ɷɬɢɦ
ɩɪɨɢɝɪɵɜɚɬɟɥɟɦ ɨɤɨɥɨ ɜɨɞɵ.
6) ɉɪɨɜɨɞɢɬɟ ɱɢɫɬɤɭ
ɩɪɨɢɝɪɵɜɚɬɟɥɹ ɬɨɥɶɤɨ ɫɭɯɨɣ
ɬɪɹɩɨɱɤɨɣ.
7) ɇɟ ɛɥɨɤɢɪɭɣɬɟ
ɜɟɧɬɢɥɹɰɢɨɧɧɵɟ ɨɬɜɟɪɫɬɢɹ
ɩɪɨɢɝɪɵɜɚɬɟɥɹ.
ɍɫɬɚɧɚɜɥɢɜɚɣɬɟ
ɩɪɨɢɝɪɵɜɚɬɟɥɶ ɜ ɫɨɨɬɜɟɬɫɬɜɢɢ ɫ ɢɧɫɬɪɭɤɰɢɹɦɢ ɩɪɨɢɡɜɨɞɢɬɟɥɹ.
8) ɇɟ ɭɫɬɚɧɚɜɥɢɜɚɣɬɟ ɩɪɨɢɝɪɵɜɚɬɟɥɶ ɜɛɥɢɡɢ ɢɫɬɨɱɧɢɤɨɜ ɬɟɩɥɚ (ɧɚɩɪɢɦɟɪ,
ɨɛɨɝɪɟɜɚɬɟɥɟɣ, ɞɭɯɨɜɨɤ ɢɥɢ ɩɪɨɱɢɯ ɭɫɬɪɨɣɫɬɜ (ɜɤɥɸɱɚɹ ɭɫɢɥɢɬɟɥɢ),
ɝɟɧɟɪɢɪɭɸɳɢɯ ɬɟɩɥɨ).
9) ɇɟ ɥɨɦɚɣɬɟ ɡɚɳɢɬɭ ɲɬɟɤɟɪɨɜ ɩɨɥɹɪɢɡɨɜɚɧɧɨɝɨ ɢɥɢ ɡɚɡɟɦɥɹɸɳɟɝɨ ɬɢɩɚ.
ɉɨɥɹɪɢɡɨɜɚɧɧɵɣ ɲɬɟɤɟɪ ɨɫɧɚɳɟɧ ɞɜɭɦɹ ɤɨɧɬɚɤɬɚɦɢ, ɨɞɢɧ ɢɡ ɤɨɬɨɪɵɯ ɲɢɪɟ
ɞɪɭɝɨɝɨ. ɒɬɟɤɟɪ ɫ ɡɚɡɟɦɥɟɧɢɟɦ ɢɦɟɟɬ ɞɜɚ ɤɨɧɬɚɤɬɚ ɢ ɬɪɟɬɢɣ ɤɨɧɬɚɤɬ
ɡɚɡɟɦɥɟɧɢɹ. ɒɢɪɨɤɢɣ ɤɨɧɬɚɤɬ ɢɥɢ ɤɨɧɬɚɤɬ ɡɚɡɟɦɥɟɧɢɹ ɩɪɟɞɧɚɡɧɚɱɟɧɵ ɞɥɹ
ɨɛɟɫɩɟɱɟɧɢɹ ȼɚɲɟɣ ɛɟɡɨɩɚɫɧɨɫɬɢ. ȿɫɥɢ ɫɟɬɟɜɚɹ ɜɢɥɤɚ ɧɟ ɩɨɞɯɨɞɢɬ ɤ
ɫɟɬɟɜɨɣ ɪɨɡɟɬɤɟ, ɩɪɨɤɨɧɫɭɥɶɬɢɪɭɣɬɟɫɶ ɫ ɷɥɟɤɬɪɢɤɨɦ, ɱɬɨɛɵ ɨɧ ɩɨɞɨɛɪɚɥ
ɪɨɡɟɬɤɭ ɞɥɹ ɡɚɦɟɧɵ.
ȼȺɀɇɈ ȾɅə ɍɋɌɊɈɃɋɌȼ ɋ ɅȺɁȿɊɈɆ
1 CLASS 1 LASER PRODUCT
2 ɈɉȺɋɇɈ: ȼɫɤɪɵɬɢɟ ɤɨɪɩɭɫɚ ɢ
ɭɞɚɥɟɧɢɟ ɫɢɫɬɟɦɵ ɡɚɳɢɬɵ ɦɨɠɟɬ
ɩɪɢɜɟɫɬɢ ɤ ɭɬɟɱɤɟ ɢɡɥɭɱɟɧɢɹ ɥɚɡɟɪɚ.
ɇɟ ɩɨɩɚɞɚɣɬɟ ɩɨɞ ɥɭɱ.
3 ɉɊȿȾɍɉɊȿɀȾȿɇɂȿ: ɇɟ ɜɫɤɪɵɜɚɣɬɟ
ɜɟɪɯɧɸɸ ɤɪɵɲɤɭ ɤɨɪɩɭɫɚ. ȼɧɭɬɪɢ
ɩɪɨɢɝɪɵɜɚɬɟɥɹ ɧɟɬ ɤɨɦɩɨɧɟɧɬɨɜ,
ɤɨɬɨɪɵɟ ȼɵ ɦɨɠɟɬɟ ɪɟɦɨɧɬɢɪɨɜɚɬɶ
ɫɚɦɨɫɬɨɹɬɟɥɶɧɨ. Ⱦɨɜɟɪɶɬɟ ɜɫɟ ɪɚɛɨɬɵ
ɩɨ ɪɟɦɨɧɬɭ ɢ ɨɛɫɥɭɠɢɜɚɧɢɸ
ɤɜɚɥɢɮɢɰɢɪɨɜɚɧɧɵɦ ɫɩɟɰɢɚɥɢɫɬɚɦ.
3
Page 4

ȼȺɀɇɕȿ ɆȿɊɕ ȻȿɁɈɉȺɋɇɈɋɌɂ
10) ɇɟ ɞɨɩɭɫɤɚɣɬɟ ɩɨɜɪɟɠɞɟɧɢɹ ɫɟɬɟɜɨɝɨ ɲɧɭɪɚ (ɧɚɩɪɢɦɟɪ, ɧɚɠɚɬɢɟɦ ɧɚ ɧɟɝɨ)
ɨɫɨɛɟɧɧɨ ɜ ɦɟɫɬɟ ɜɵɯɨɞɚ ɫɟɬɟɜɨɝɨ ɲɧɭɪɚ ɢɡ ɤɨɪɩɭɫɚ ɩɪɨɢɝɪɵɜɚɬɟɥɹ, ɚɬɚɤɠɟ
ɜɛɥɢɡɢ ɫɟɬɟɜɨɣ ɜɢɥɤɢ.
11) ɂɫɩɨɥɶɡɭɣɬɟ ɬɨɥɶɤɨ ɩɪɢɧɚɞɥɟɠɧɨɫɬɢ/ɚɤɫɟɫɫɭɚɪɵ, ɪɟɤɨɦɟɧɞɨɜɚɧɧɵɟ
ɮɢɪɦɨɣ-ɩɪɨɢɡɜɨɞɢɬɟɥɟɦ.
12) ɍɫɬɚɧɚɜɥɢɜɚɣɬɟ ɩɪɨɢɝɪɵɜɚɬɟɥɶ ɧɚ ɦɟɛɟɥɶ, ɫɬɨɣɤɢ, ɤɪɨɧɲɬɟɣɧɵ ɢ ɫɬɨɥɵ,
ɪɟɤɨɦɟɧɞɨɜɚɧɧɵɟ ɩɪɨɢɡɜɨɞɢɬɟɥɟɦ ɢɥɢ ɩɪɨɞɚɜɚɟɦɵɟ ɜɦɟɫɬɟ ɫ
ɩɪɨɢɝɪɵɜɚɬɟɥɟɦ. ȿɫɥɢ ɢɫɩɨɥɶɡɭɟɬɫɹ ɬɭɦɛɚ ɧɚ ɤɨɥɟɫɚɯ, ɜɨ ɜɪɟɦɹ ɩɟɪɟɦɟɳɟɧɢɹ
ɬɭɦɛɵ ɜɦɟɫɬɟ ɫ ɩɪɨɢɝɪɵɜɚɬɟɥɟɦ ɛɭɞɶɬɟ ɱɪɟɡɜɵɱɚɣɧɨ ɨɫɬɨɪɨɠɧɵ, ɧɟ ɩɨɥɭɱɢɬɟ
ɬɪɚɜɦɭ ɜ ɫɥɭɱɚɟ ɩɚɞɟɧɢɹ ɩɪɨɢɝɪɵɜɚɬɟɥɹ.
13) ȼɨ ɜɪɟɦɹ ɦɨɥɧɢɣ ɢ ɜ ɫɥɭɱɚɹɯ, ɤɨɝɞɚ ȼɵ ɧɟ ɩɥɚɧɢɪɭɟɬɟ ɩɨɥɶɡɨɜɚɬɶɫɹ
ɩɪɨɢɝɪɵɜɚɬɟɥɟɦ ɜ ɬɟɱɟɧɢɟ ɞɥɢɬɟɥɶɧɨɝɨ ɜɪɟɦɟɧɢ, ɨɬɤɥɸɱɚɣɬɟ ɩɪɨɢɝɪɵɜɚɬɟɥɶ ɨɬ
ɷɥɟɤɬɪɢɱɟɫɤɨɣ ɫɟɬɢ.
Ⱦɨɜɟɪɶɬɟ ɜɫɟ ɪɚɛɨɬɵ ɩɨ ɨɛɫɥɭɠɢɜɚɧɢɸ ɩɪɨɢɝɪɵɜɚɬɟɥɹ ɤɜɚɥɢɮɢɰɢɪɨɜɚɧɧɨɦɭ
ɩɟɪɫɨɧɚɥɭ. Ɉɛɫɥɭɠɢɜɚɧɢɟ ɬɪɟɛɭɟɬɫɹ, ɟɫɥɢ ɩɪɨɢɝɪɵɜɚɬɟɥɶ ɩɨɜɪɟɠɞɟɧ
ɤɚɤɢɦ-ɥɢɛɨ ɨɛɪɚɡɨɦ, ɧɚɩɪɢɦɟɪ, ɩɨɜɪɟɠɞɟɧ ɫɟɬɟɜɨɣ ɲɧɭɪ ɢɥɢ ɫɟɬɟɜɚɹ ɜɢɥɤɚ,
ɢɥɢ ɜɧɭɬɪɶ ɩɪɨɢɝɪɵɜɚɬɟɥɹ ɩɨɩɚɥɚ ɠɢɞɤɨɫɬɶ ɢɥɢ ɩɨɫɬɨɪɨɧɧɢɟ ɩɪɟɞɦɟɬɵ, ɢɥɢ
ɩɪɨɢɝɪɵɜɚɬɟɥɶ ɩɨɩɚɥ ɩɨɞ ɞɨɠɞɶ, ɢɥɢ ɪɚɛɨɬɚɟɬ ɧɟɩɪɚɜɢɥɶɧɨ ɢɥɢ ȼɵ ɭɪɨɧɢɥɢ
ɩɪɨɢɝɪɵɜɚɬɟɥɶ.
14) ɇɟ ɩɨɞɜɟɪɝɚɣɬɟ ɩɪɨɢɝɪɵɜɚɬɟɥɶ ɜɨɡɞɟɣɫɬɜɢɸ ɜɥɚɝɢ, ɚ ɬɚɤɠɟ ɧɟ ɫɬɚɜɶɬɟ ɧɚ
ɩɪɨɢɝɪɵɜɚɬɟɥɶ ɟɦɤɨɫɬɢ, ɡɚɩɨɥɧɟɧɧɵɟ ɠɢɞɤɨɫɬɹɦɢ, ɧɚɩɪɢɦɟɪ, ɜɚɡɵ ɞɥɹ ɰɜɟɬɨɜ.
4
Page 5

ɈɋɈȻȿɇɇɈɋɌɂ
Ɏɭɧɤɰɢɹ DIVX
DivX ɩɪɟɞɫɬɚɜɥɹɟɬ ɫɨɛɨɣ
ɡɚɩɚɬɟɧɬɨɜɚɧɧɭɸ ɰɢɮɪɨɜɭɸ
ɜɢɞɟɨɬɟɯɧɨɥɨɝɢɸ, ɨɫɧɨɜɚɧɧɭɸ ɧɚ
ɮɨɪɦɚɬɟ MPEG-4 ɢ ɫɨɡɞɚɧɧɭɸ
DivXNetworks, Inc
ɡɚɤɨɞɢɪɨɜɚɧɧɨɟ ɜ ɮɨɪɦɚɬɟ DivX,
ɤɨɞɢɪɭɟɬɫɹ ɚɧɚɥɨɝɢɱɧɨ ɰɢɮɪɨɜɨɦɭ
ɡɜɭɤɭ ɜ ɮɨɪɦɚɬɟ ɆɊ3ˁ
ɏȺɊȺɄɌȿɊɂɋɌɂɄɂ
ȼɕɋɈɄɈȽɈ ɄȺɑȿɋɌȼȺ
1. ȼɕɋɈɄɈȿ ɊȺɁɊȿɒȿɇɂȿ
ȼ ɫɨɨɬɜɟɬɫɬɜɢɢ ɫ ɮɨɪɦɚɬɨɦ
ɞɟɤɨɞɢɪɨɜɚɧɢɹ MPEG4 ɞɨɫɬɢɝɚɟɬɫɹ
ɪɚɡɪɟɲɟɧɢɟ ɛɨɥɟɟ, ɱɟɦ 500 ɥɢɧɢɣ
ɩɨ ɝɨɪɢɡɨɧɬɚɥɢ.
2. ɈɌɅɂɑɇɕɃ ɁȼɍɄ
Ɇɨɠɟɬ ɛɵɬɶ ɜɨɫɩɪɨɢɡɜɟɞɟɧ
ɰɢɮɪɨɜɨɣ ɡɜɭɤ ɮɨɪɦɚɬɚ Dolby AC-3,
ɚ ɬɚɤɠɟ ɦɨɝɭɬ ɛɵɬɶ ɩɨɥɭɱɟɧɵ
ɜɵɫɨɤɨɤɚɱɟɫɬɜɟɧɧɵɟ ɡɜɭɤɨɜɵɟ
ɷɮɮɟɤɬɵ , ɢɦɟɟɬ ɞɟɤɨɞɟɪ DTS.
3. ɗɄɊȺɇ
ɉɨɞɞɟɪɠɢɜɚɟɬɫɹ ɢɡɨɛɪɚɠɟɧɢɟ
ɨɛɵɱɧɨɝɨ (4:3) ɢ ɲɢɪɨɤɨɷɤɪɚɧɧɨɝɨ
(16:9) ɮɨɪɦɚɬɚ.
4. ɋɉȿɐɂȺɅɖɇɕȿ ɎɍɇɄɐɂɂ
ɉɨɞɞɟɪɠɢɜɚɸɬɫɹ ɮɭɧɤɰɢɢ ɜɵɛɨɪɚ
ɭɝɥɚ ɫɴɟɦɤɢ, ɹɡɵɤɚ ɡɜɭɤɨɜɨɣ
ɞɨɪɨɠɤɢ ɢ ɹɡɵɤɚ ɨɬɨɛɪɚɠɟɧɢɹ
ɫɭɛɬɢɬɪɨɜ, ɩɪɢɦɟɧɹɟɦɵɟ ɧɚ
DVD-ɞɢɫɤɚɯ.
5. ȼɂȾȿɈȼɕɏɈȾɕ
ɋɬɚɧɞɚɪɬɧɵɣ ɜɢɞɟɨɜɵɯɨɞ, ɜɵɯɨɞ
S-Video, ɤɨɦɩɨɧɟɧɬɧɵɣ ɜɵɯɨɞ
Y/Pb/Pr, Y/Cb/Cr ɢ ɜɢɞɟɨɜɵɯɨɞ VGA.
6. ȺɍȾɂɈȼɕɏɈȾ
5.1- ɢɥɢ 2-ɤɚɧɚɥɶɧɵɣ ɚɧɚɥɨɝɨɜɵɣ
ɚɭɞɢɨɜɵɯɨɞ, ɰɢɮɪɨɜɨɣ ɨɩɬɢɱɟɫɤɢɣ
ɢ ɤɨɚɤɫɢɚɥɶɧɵɣ ɜɵɯɨɞɵ ɦɨɝɭɬ ɛɵɬɶ
ɩɨɞɤɥɸɱɟɧɵ ɤ ɥɸɛɨɦɭ ɭɫɢɥɢɬɟɥɶ-
. ɂɡɨɛɪɚɠɟɧɢɟ,
ɧɨɦɭ ɭɫɬɪɨɣɫɬɜɭ.
ɉɪɨɝɪɟɫɫɢɜɧɚɹ ɪɚɡɜɟɪɬɤɚ
ȼɫɬɪɨɟɧɧɵɣ ɮɭɧɤɰɢɨɧɚɥɶɧɵɣ
ɞɟɤɨɞɟɪ COMS ɩɨɡɜɨɥɹɟɬ
ɢɫɩɨɥɶɡɨɜɚɬɶ ɤɚɤ ɱɟɪɟɫɫɬɪɨɱɧɭɸ,
ɬɚɤ ɢ ɩɪɨɝɪɟɫɫɢɜɧɭɸ ɪɚɡɜɟɪɬɤɭ.
ɈɋɈȻȿɇɇɈɋɌɂ
1. ɋɈȼɆȿɋɌɂɆɈɋɌɖ ɋ ȾɂɋɄȺɆɂ
ɋɨɜɦɟɫɬɢɦ ɫ ɞɢɫɤɚɦɢ DVD
(ɜɢɞɟɨ/ɚɭɞɢɨ), CD, VCD,MP-3
CD-RW, CD-R,WMA,PICTURE-CD
JPEG ɢ MPEG4.
2. ɎɍɇɄɐɂə ɍȼȿɅɂɑȿɇɂə
ȼɵ ɦɨɠɟɬɟ ɭɜɟɥɢɱɢɬɶ ɨɬɞɟɥɶɧɵɟ
ɮɪɚɝɦɟɧɬɵ ɢɡɨɛɪɚɠɟɧɢɹ.
3. ȼɋȿ ɎɍɇɄɐɂɂ
ȼɈɋɉɊɈɂɁȼȿȾȿɇɂə
ɍɫɤɨɪɟɧɧɵɣ ɩɪɨɫɦɨɬɪ ɜɩɟɪɟɞ ɢ
ɧɚɡɚɞ, ɡɚɦɟɞɥɟɧɧɨɟ
ɜɨɫɩɪɨɢɡɜɟɞɟɧɢɟ, ɩɨɤɚɞɪɨɜɨɟ
ɜɨɫɩɪɨɢɡɜɟɞɟɧɢɟ, ɩɨɜɬɨɪɧɨɟ
ɜɨɫɩɪɨɢɡɜɟɞɟɧɢɟ ɢ
ɜɨɫɩɪɨɢɡɜɟɞɟɧɢɟ ɩɨ ɩɪɨɝɪɚɦɦɟ.
4. ɉɈɂɋɄ ɉɈ ɌȺɃɆ-ɄɈȾɍ
ȼɨɡɦɨɠɧɨɫɬɶ ɩɨɢɫɤɚ ɫɨɞɟɪɠɢɦɨɝɨ
DVD-ɞɢɫɤɚ ɩɨ ɬɚɣɦ-ɤɨɞɭ.
5. Ɏɭɧɤɰɢɹ ɩɚɦɹɬɢ
ȼɨ ɜɪɟɦɹ ɜɨɫɩɪɨɢɡɜɟɞɟɧɢɹ
DVD-ɞɢɫɤɚ ɧɚɠɦɢɬɟ ɤɧɨɩɤɭ POWER,
ɱɬɨɛɵ ɩɟɪɟɤɥɸɱɢɬɶ ɩɪɨɢɝɪɵɜɚɬɟɥɶ
ɜ ɞɟɠɭɪɧɵɣ ɪɟɠɢɦ. ɉɪɢ
ɫɥɟɞɭɸɳɟɦ ɜɤɥɸɱɟɧɢɢ
ɩɪɨɢɝɪɵɜɚɬɟɥɶ ɜɨɡɨɛɧɨɜɢɬ
ɜɨɫɩɪɨɢɡɜɟɞɟɧɢɟ ɫ ɬɨɱɤɢ ɨɫɬɚɧɨɜɤɢ.
6. Ɏɭɧɤɰɢɹ Ʉɚɪɚɨɤɟ
ɗɬɨɬ ɩɪɨɢɝɪɵɜɚɬɟɥɶ ɩɨɞɞɟɪɠɢɜɚɟɬ
ɮɭɧɤɰɢɸ Ʉɚɪɚɨɤɟ ɫ ɷɮɟɤɬɚɦɢ
ɪɟɜɟɪɛɟɪɚɰɢɢ.
7. Ɏɭɧɤɰɢɹ ɢɡɦɟɧɟɧɢɹ ɷɤɪɚɧɚ
ȼɵ ɦɨɠɟɬɟ ɢɡɦɟɧɢɬɶ ɷɤɪɚɧ ɩɨ
ɫɨɛɫɬɜɟɧɧɨɦɭ ɠɟɥɚɧɢɸ.
5
Page 6
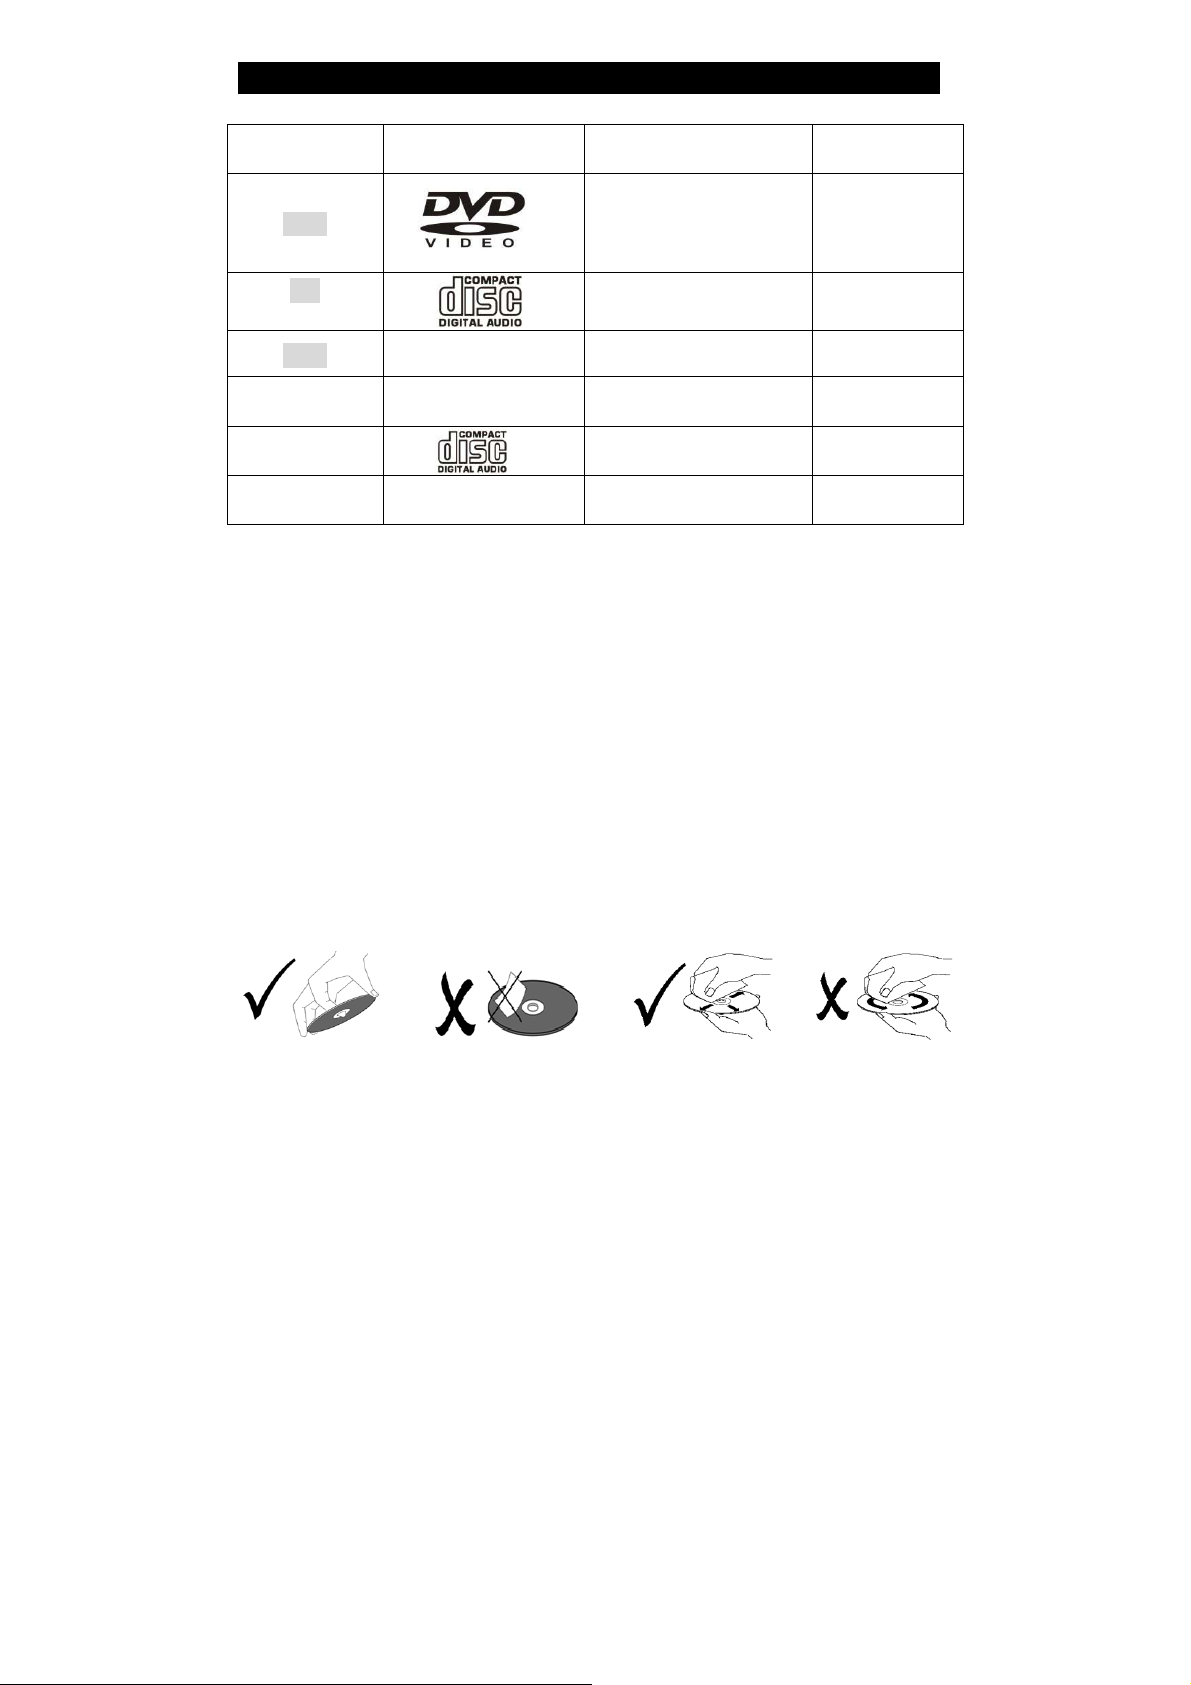
ɂɇɎɈɊɆȺɐɂə Ɉ ȾɂɋɄȺɏ
ɎɈɊɆȺɌɕ ȾɂɋɄɈȼ, ɉɈȾȾȿɊɀɂȼȺȿɆɕɏ ɉɊɈɂȽɊɕȼȺɌȿɅȿɆ
Ɍɂɉ ȾɂɋɄȺ ɅɈȽɈɌɂɉ ɋɈȾȿɊɀɂɆɈȿ ɊȺɁɆȿɊ
Ɂɜɭɤ + ɢɡɨɛɪɚɠɟɧɢɟ
DVD
CD Ɂɜɭɤ
MP3 Ɂɜɭɤ 12 ɫɦ
JPEG
("ɠɢɜɨɟ"
ɢɡɨɛɪɚɠɟɧɢɟ)
ɂɡɨɛɪɚɠɟɧɢɟ
(ɫɬɚɬɢɱɧɨɟ)
12 ɫɦ
12 ɫɦ
8 ɫɦ
12 ɫɦ
VCD
MPEG4
- ɉɪɨɢɡɜɨɞɢɬɟɥɢ ɞɢɫɤɨɜ ɨɩɪɟɞɟɥɹɸɬ ɫɩɨɫɨɛ ɭɩɪɚɜɥɟɧɢɹ ɧɟɤɨɬɨɪɵɦɢ DVD-ɞɢɫɤɚɦɢ.
ɉɨɠɚɥɭɣɫɬɚ, ɨɛɪɚɳɚɣɬɟɫɶ ɤ ɢɧɫɬɪɭɤɰɢɢ ɩɨ ɷɤɫɩɥɭɚɬɚɰɢɢ ɞɢɫɤɚ.
Ɂɜɭɤ + ɢɡɨɛɪɚɠɟɧɢɟ 12 ɫɦ
Ɂɜɭɤ + ɢɡɨɛɪɚɠɟɧɢɟ 12 ɫɦ
ɁȺɆȿɑȺɇɂə
1. ɂɫɩɨɥɶɡɨɜɚɧɢɟ ɞɢɫɤɨɜ
ɇɟ ɩɪɢɤɚɫɚɣɬɟɫɶ ɤ ɡɚɩɢɫɚɧɧɨɣ ɫɬɨɪɨɧɟ
ɤɨɦɩɚɤɬ-ɞɢɫɤɚ.
ɇɟ ɩɪɢɤɥɟɢɜɚɣɬɟ ɧɚ ɞɢɫɤ ɛɭɦɚɝɭ ɢ
ɧɚɤɥɟɣɤɢ.
ɇɟ ɨɫɬɚɜɥɹɣɬɟ ɞɢɫɤɢ ɜ ɦɟɫɬɚɯ
ɩɨɩɚɞɚɧɢɹ ɩɪɹɦɨɝɨ ɫɨɥɧɟɱɧɨɝɨ ɫɜɟɬɚ.
ɇɟ ɨɫɬɚɜɥɹɣɬɟ ɞɢɫɤɢ ɨɤɨɥɨ ɜɨɞɵ ɢɥɢ ɜ
ɦɟɫɬɚɯ ɫ ɩɨɜɵɲɟɧɧɨɣ ɡɚɩɵɥɟɧɧɨɫɬɶɸ.
2. ɑɢɫɬɤɚ ɞɢɫɤɨɜ
ȿɫɥɢ ɧɚ ɞɢɫɤɟ ɩɪɢɫɭɬɫɬɜɭɸɬ ɫɥɟɞɵ
ɩɚɥɶɰɟɜ ɢɥɢ ɩɵɥɶ, ɚɤɤɭɪɚɬɧɨ ɩɪɨɬɪɢɬɟ
ɞɢɫɤ ɦɹɝɤɨɣ ɬɪɹɩɨɱɤɨɣ ɨɬ ɰɟɧɬɪɚ ɤ
ɤɪɚɹɦ (ɧɨ ɧɟ ɤɪɭɝɨɜɵɦɢ ɞɜɢɠɟɧɢɹɦɢ).
ɇɟ ɢɫɩɨɥɶɡɭɣɬɟ ɞɥɹ ɱɢɫɬɤɢ ɞɢɫɤɨɜ
ɱɢɫɬɹɳɢɟ ɫɩɪɟɢ ɞɥɹ ɝɪɚɦɩɥɚɫɬɢɧɨɤ,
ɛɟɧɡɢɧ, ɪɚɫɬɜɨɪɢɬɟɥɶ, ɚɧɬɢɫɬɚɬɢɤɢ ɢ
ɩɪɨɱɢɟ ɯɢɦɢɱɟɫɤɢɟ ɜɟɳɟɫɬɜɚ.
6
Page 7

ɂɇɎɈɊɆȺɐɂə Ɉ ȾɂɋɄȺɏ
Ɍɟɪɦɢɧɵ, ɨɬɧɨɫɹɳɢɟɫɹ ɤ ɞɢɫɤɚɦ
Ʉɨɦɩɨɡɢɰɢɹ
Ɉɛɵɱɧɨ ɢɡɨɛɪɚɠɟɧɢɟ ɢɥɢ ɦɭɡɵɤɚ, ɡɚɩɢɫɚɧɧɚɹ ɧɚ DVD-ɞɢɫɤɢ, ɞɟɥɢɬɫɹ ɧɚ
ɧɟɫɤɨɥɶɤɨ ɱɚɫɬɟɣ, ɤɚɠɞɚɹ ɢɡ ɤɨɬɨɪɵɯ ɧɚɡɵɜɚɟɬɫɹ "ɤɨɦɩɨɡɢɰɢɟɣ".
Ɋɚɡɞɟɥ
Ɇɢɧɢɦɚɥɶɧɵɣ ɮɪɚɝɦɟɧɬ ɢɡɨɛɪɚɠɟɧɢɹ ɢɥɢ ɦɭɡɵɤɢ ɧɚ DVD-ɞɢɫɤɟ ɜ ɩɪɟɞɟɥɚɯ
ɤɨɦɩɨɡɢɰɢɢ, ɨɛɵɱɧɨ ɨɞɧɚ ɤɨɦɩɨɡɢɰɢɹ ɫɨɫɬɨɢɬ ɢɡ ɨɞɧɨɝɨ ɢ ɛɨɥɟɟ ɪɚɡɞɟɥɨɜ,
ɤɨɬɨɪɵɟ ɞɥɹ ɨɛɥɟɝɱɟɧɢɹ ɩɨɢɫɤɚ ɩɪɨɧɭɦɟɪɨɜɚɧɵ. ɇɨ ɧɚ ɧɟɤɨɬɨɪɵɯ ɞɢɫɤɚɯ
ɪɚɡɞɟɥɵ ɦɨɝɭɬ ɨɬɫɭɬɫɬɜɨɜɚɬɶ.
Ɍɪɷɤ
ɑɚɫɬɶ ɢɡɨɛɪɚɠɟɧɢɹ ɢɥɢ ɦɭɡɵɤɢ ɧɚ ɞɢɫɤɟ SVCD, VCD ɢɥɢ CD. Ⱦɥɹ
ɨɛɥɟɝɱɟɧɢɹ ɩɨɢɫɤɚ ɜɫɟ ɬɪɷɤɢ ɩɪɨɧɭɦɟɪɨɜɚɧɵ.
ɋɰɟɧɚ
Ⱦɢɫɤɢ VCD, ɩɨɞɞɟɪɠɢɜɚɸɳɢɟ ɮɭɧɤɰɢɸ ɤɨɧɬɪɨɥɹ ɜɨɫɩɪɨɢɡɜɟɞɟɧɢɹ ɢ
ɫɨɞɟɪɠɚɳɢɟ "ɠɢɜɨɟ" ɢ ɫɬɚɬɢɱɧɨɟ ɢɡɨɛɪɚɠɟɧɢɟ, ɞɟɥɹɬɫɹ ɧɚ ɱɚɫɬɢ,
ɧɚɡɵɜɚɟɦɵɟ ɫɰɟɧɚɦɢ. Ʉɚɠɞɚɹ ɫɰɟɧɚ ɦɨɠɟɬ ɛɵɬɶ ɥɟɝɤɨ ɧɚɣɞɟɧɚ ɩɨ ɧɨɦɟɪɭ ɢ
ɦɨɠɟɬ ɛɵɬɶ ɨɬɨɛɪɚɠɟɧɚ ɧɚ ɷɤɪɚɧɟ. Ɉɞɧɚ ɫɰɟɧɚ ɨɛɵɱɧɨ ɫɨɫɬɨɢɬ ɢɡ ɨɞɧɨɝɨ
ɢɥɢ ɧɟɫɤɨɥɶɤɢɯ ɬɪɷɤɨɜ.
Ɏɭɧɤɰɢɹ PBC (SVCD,VCD)
ȼɨ ɜɪɟɦɹ ɜɨɫɩɪɨɢɡɜɟɞɟɧɢɹ ɞɢɫɤɚ SVCD ɢɥɢ VCD ɧɚ ɷɤɪɚɧɟ ɦɨɠɟɬ ɛɵɬɶ
ɨɬɨɛɪɚɠɟɧɨ ɦɟɧɸ ɫɨɞɟɪɠɢɦɨɝɨ ɞɢɫɤɚ, ɤɨɬɨɪɨɟ ɦɵ ɧɚɡɵɜɚɟɦ ɮɭɧɤɰɢɟɣ
ɤɨɧɬɪɨɥɹ ɜɨɫɩɪɨɢɡɜɟɞɟɧɢɹ ɢɥɢ ɮɭɧɤɰɢɟɣ Ɋȼɋ.
Ɍɢɩ ɞɢɫɤɚ Ɏɭɧɤɰɢɢ
Ⱦɢɫɤɢ VCD, ɧɟ
ɩɨɞɞɟɪɠɢɜɚɸɳɢɟ ɮɭɧɤɰɢɸ
PBC (ɜɟɪɫɢɹ 1.1)
Ⱦɢɫɤɢ SVCD/VCD, ɩɨɞɞɟɪɠɢɜɚɸɳɢɟ ɮɭɧɤɰɢɸ PBC
(ɜɟɪɫɢɹ 2.0
)
ȼɨɫɩɪɨɢɡɜɟɞɟɧɢɟ ɤɚɤ ɦɭɡɵɤɢ (ɡɜɭɤɚ), ɬɚɤ ɢ
ɢɡɨɛɪɚɠɟɧɢɹ.
Ⱦɥɹ ɜɨɫɩɪɨɢɡɜɟɞɟɧɢɹ ɢɡɨɛɪɚɠɟɧɢɹ ɫ VCD ɦɨɠɟɬ
ɢɫɩɨɥɶɡɨɜɚɬɶɫɹ ɦɟɧɸ, ɤɨɬɨɪɨɟ ɨɬɨɛɪɚɠɚɟɬɫɹ ɧɚ
ɷɤɪɚɧɟ.
7
Page 8
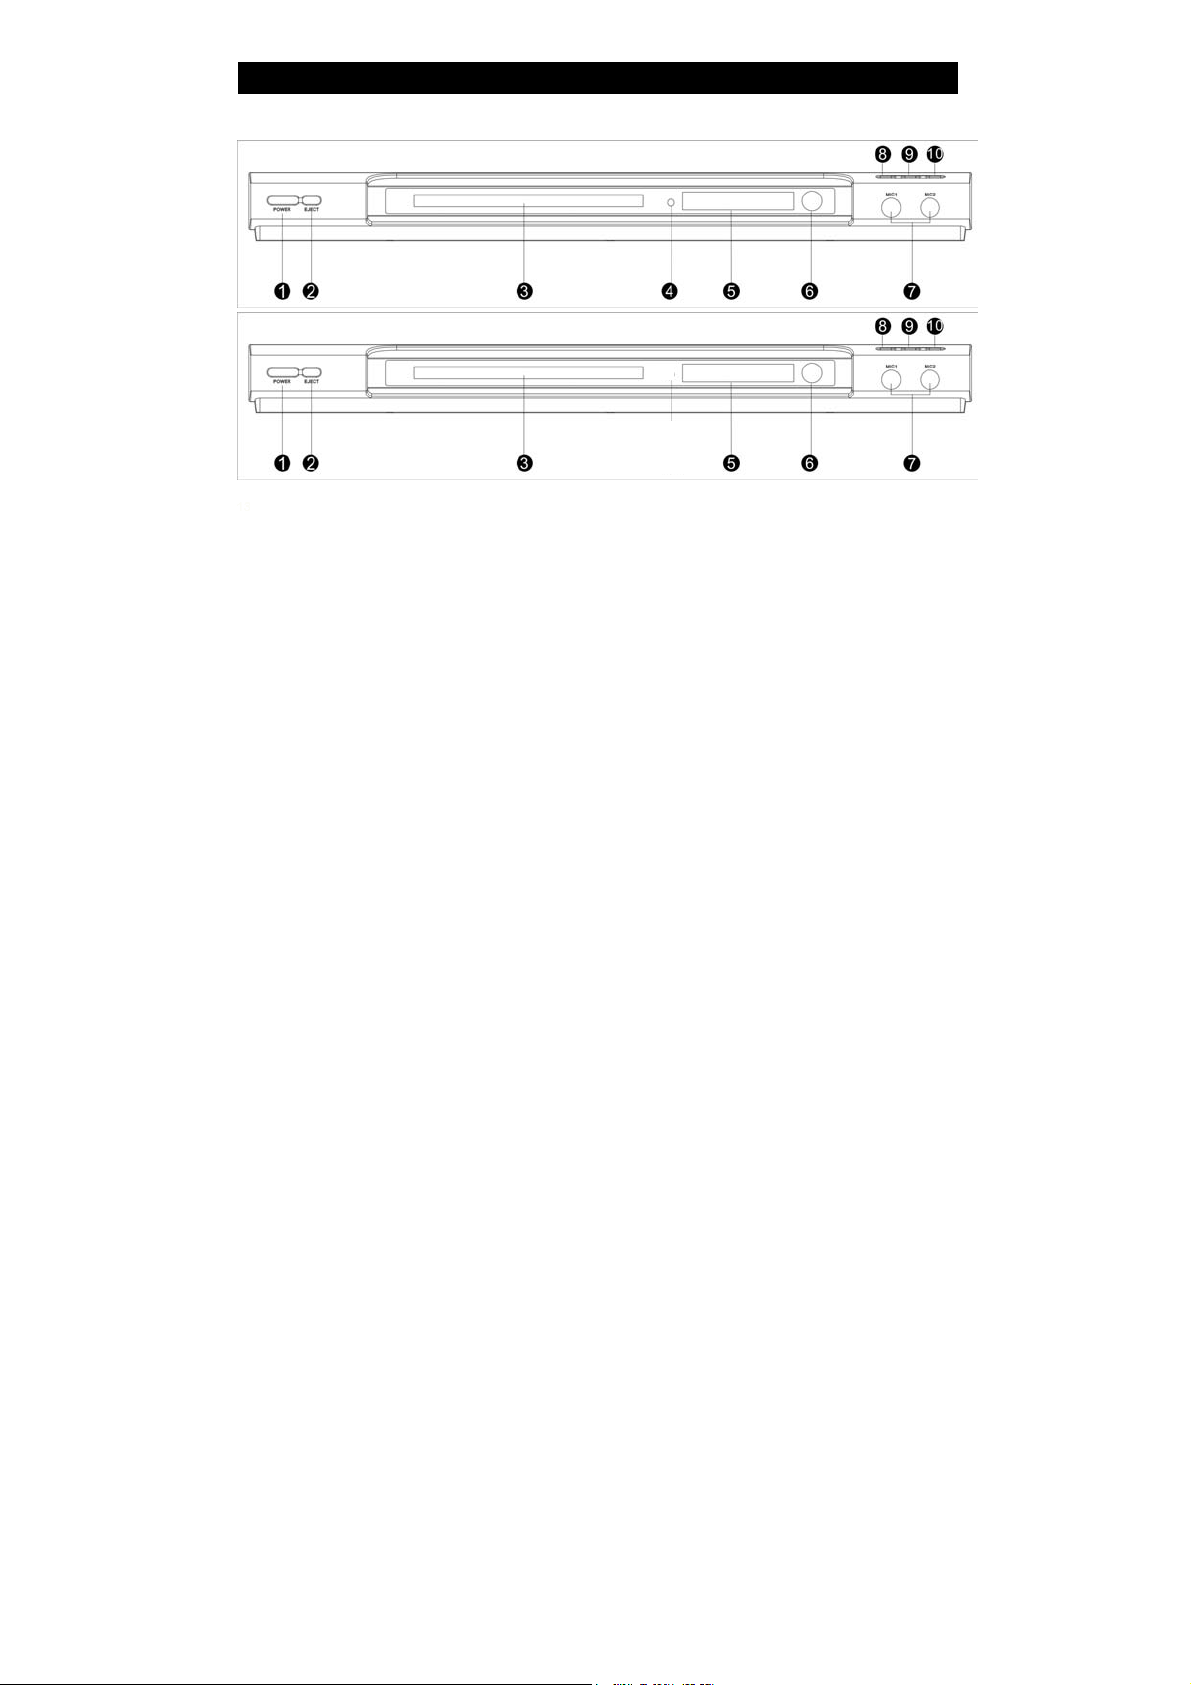
ɈɋɇɈȼɇɕȿ ɑȺɋɌɂ
Ʌɢɰɟɜɚɹ ɩɚɧɟɥɶ
DVDP-2448
DVDP-2450
1. ɋɟɬɟɜɚɹ ɤɧɨɩɤɚ POWER
ɇɚɠɢɦɚɣɬɟ ɷɬɭ ɤɧɨɩɤɭ, ɱɬɨɛɵ ɜɤɥɸ-
ɱɚɬɶ/ɜɵɤɥɸɱɚɬɶ ɩɪɨɢɝɪɵɜɚɬɟɥɶ.
2. Ʉɧɨɩɤɚ ɢɡɜɥɟɱɟɧɢɹ ɞɢɫɤɚ
ɇɚɠɦɢɬɟ ɷɬɭ ɤɧɨɩɤɭ, ɱɬɨɛɵ ɨɬɤɪɵɬɶ
ɢɥɢ ɡɚɤɪɵɬɶ ɞɢɫɤɨɜɨɞ
3. Ⱦɢɫɤɨɜɨɞ
Ⱦɥɹ ɭɫɬɚɧɨɜɤɢ ɞɢɫɤɚ.
4. ɋɟɬɟɜɨɣ ɢɧɞɢɤɚɬɨɪ
5. Ⱦɢɫɩɥɟɣ
Ɉɬɨɛɪɚɠɚɟɬ ɢɧɞɢɤɚɬɨɪɵ ɫɨɫɬɨɹɧɢɹ
ɩɪɨɢɝɪɵɜɚɬɟɥɹ.
6. ɂɧɞɢɤɚɬɨɪ ɫɨɫɬɨɹɧɢɹ
ɜɨɫɩɪɨɢɡɜɟɞɟɧɢɹ
7. Ƚɧɟɡɞɚ MIC 1 MIC 2
ɂɫɩɨɥɶɡɭɟɬɫɹ ɞɥɹ ɩɨɞɤɥɸɱɟɧɢɹ
ɦɢɤɪɨɮɨɧɚ ɢ ɩɟɧɢɹ ɜ ɫɢɫɬɟɦɟ
Ʉɚɪɚɨɤɟ.
8. Ʉɧɨɩɤɚ PLAY
ɇɚɠɦɢɬɟ, ɱɬɨ ɛɵ ɧɚɱɚɬɶ
ɜɨɫɩɪɨɢɡɜɟɞɟɧɢɟ.
9. Ʉɧɨɩɤɚ PAUSE
ɇɚɠɢɦɚɣɬɟ, ɱɬɨɛɵ ɩɟɪɟɣɬɢ ɜ
ɪɟɠɢɦ ɩɚɭɡɵ.
10. Ʉɧɨɩɤɚ STOP
ɇɚɠɦɢɬɟ, ɱɬɨɛɵ ɨɫɬɚɧɨɜɢɬɶ
ɜɨɫɩɪɨɢɡɜɟɞɟɧɢɟ.
8
Page 9
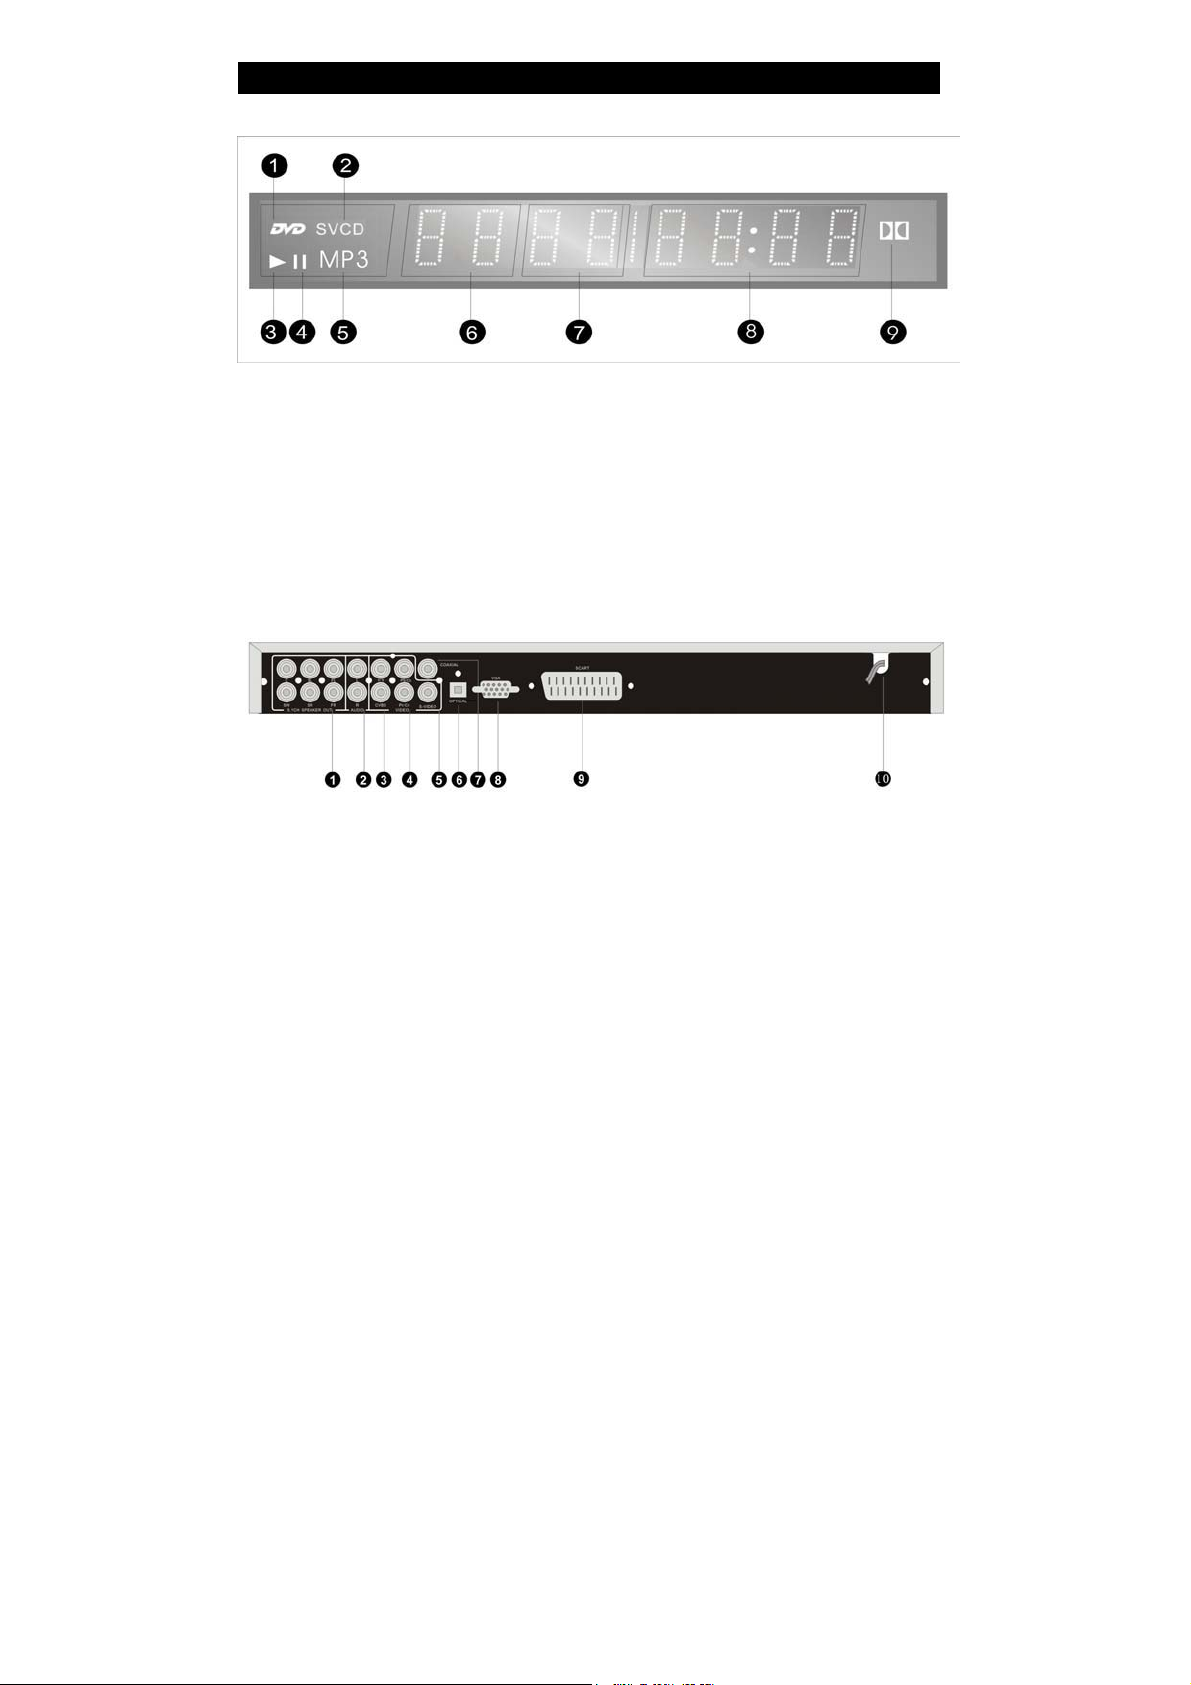
ɈɋɇɈȼɇɕȿ ɑȺɋɌɂ
Ɉɩɢɫɚɧɢɟ ɞɢɫɩɥɟɹ
1. ɂɧɞɢɤɚɬɨɪ DVD-ɞɢɫɤɚ.
2. ɂɧɞɢɤɚɬɨɪ ɞɢɫɤɚ
CD/VCD/SVCD.
3. ɂɧɞɢɤɚɬɨɪ
ɜɨɫɩɪɨɢɡɜɟɞɟɧɢɹ.
4. ɂɧɞɢɤɚɬɨɪ ɩɚɭɡɵ.
5. ɂɧɞɢɤɚɬɨɪ ɞɢɫɤɚ MP3.
Ɉɩɢɫɚɧɢɟ ɡɚɞɧɟɣ ɩɚɧɟɥɢ
1. Ƚɧɟɡɞɚ 5.1-ɤɚɧɚɥɶɧɨɝɨ
ɚɭɞɢɨɜɵɯɨɞɚ
2. Ƚɧɟɡɞɚ ɚɭɞɢɨɜɵɯɨɞɚ
ɥɟɜɨɝɨ/ɩɪɚɜɨɝɨ ɤɚɧɚɥɚ
3. Ƚɧɟɡɞɨ ɤɨɦɩɨɧɟɧɬɧɨɝɨ
ɜɢɞɟɨɜɵɯɨɞɚ
4. Ƚɧɟɡɞɨ ɜɢɞɟɨɜɵɯɨɞɚ
YPbPr/YCbCr Video
6. ɂɧɞɢɤɚɬɨɪ ɧɨɦɟɪɚ
ɬɟɤɭɳɟɣ ɤɨɦɩɨɡɢɰɢɢ
7. ɂɧɞɢɤɚɬɨɪ ɧɨɦɟɪɚ ɬɟɤɭɳɟɝɨ
ɪɚɡɞɟɥɚ/ɬɪɷɤɚ
8. ɂɧɞɢɤɚɬɨɪ ɜɪɟɦɟɧɢ
ɜɨɫɩɪɨɢɡɜɟɞɟɧɢɹ.
9. ɋɢɦɜɨɥ “ɞɜɨɣɧɨɟ D”.
5. Ƚɧɟɡɞɨ ɜɢɞɟɨɜɵɯɨɞɚ
S-video
6. Ƚɧɟɡɞɨ ɰɢɮɪɨɜɨɝɨ
ɨɩɬɢɱɟɫɤɨɝɨ ɜɵɯɨɞɚ
7. Ƚɧɟɡɞɨ ɰɢɮɪɨɜɨɝɨ
ɤɨɚɤɫɢɚɥɶɧɨɝɨ ɜɵɯɨɞɚ
8. ȼɵɯɨɞɧɨɟ ɝɧɟɡɞɨ VGA
9. ȼɵɯɨɞɧɨɣ ɪɚɡɴɟɦ
SCART
10. ɋɟɬɟɜɨɣ ɲɧɭɪ
9
Page 10

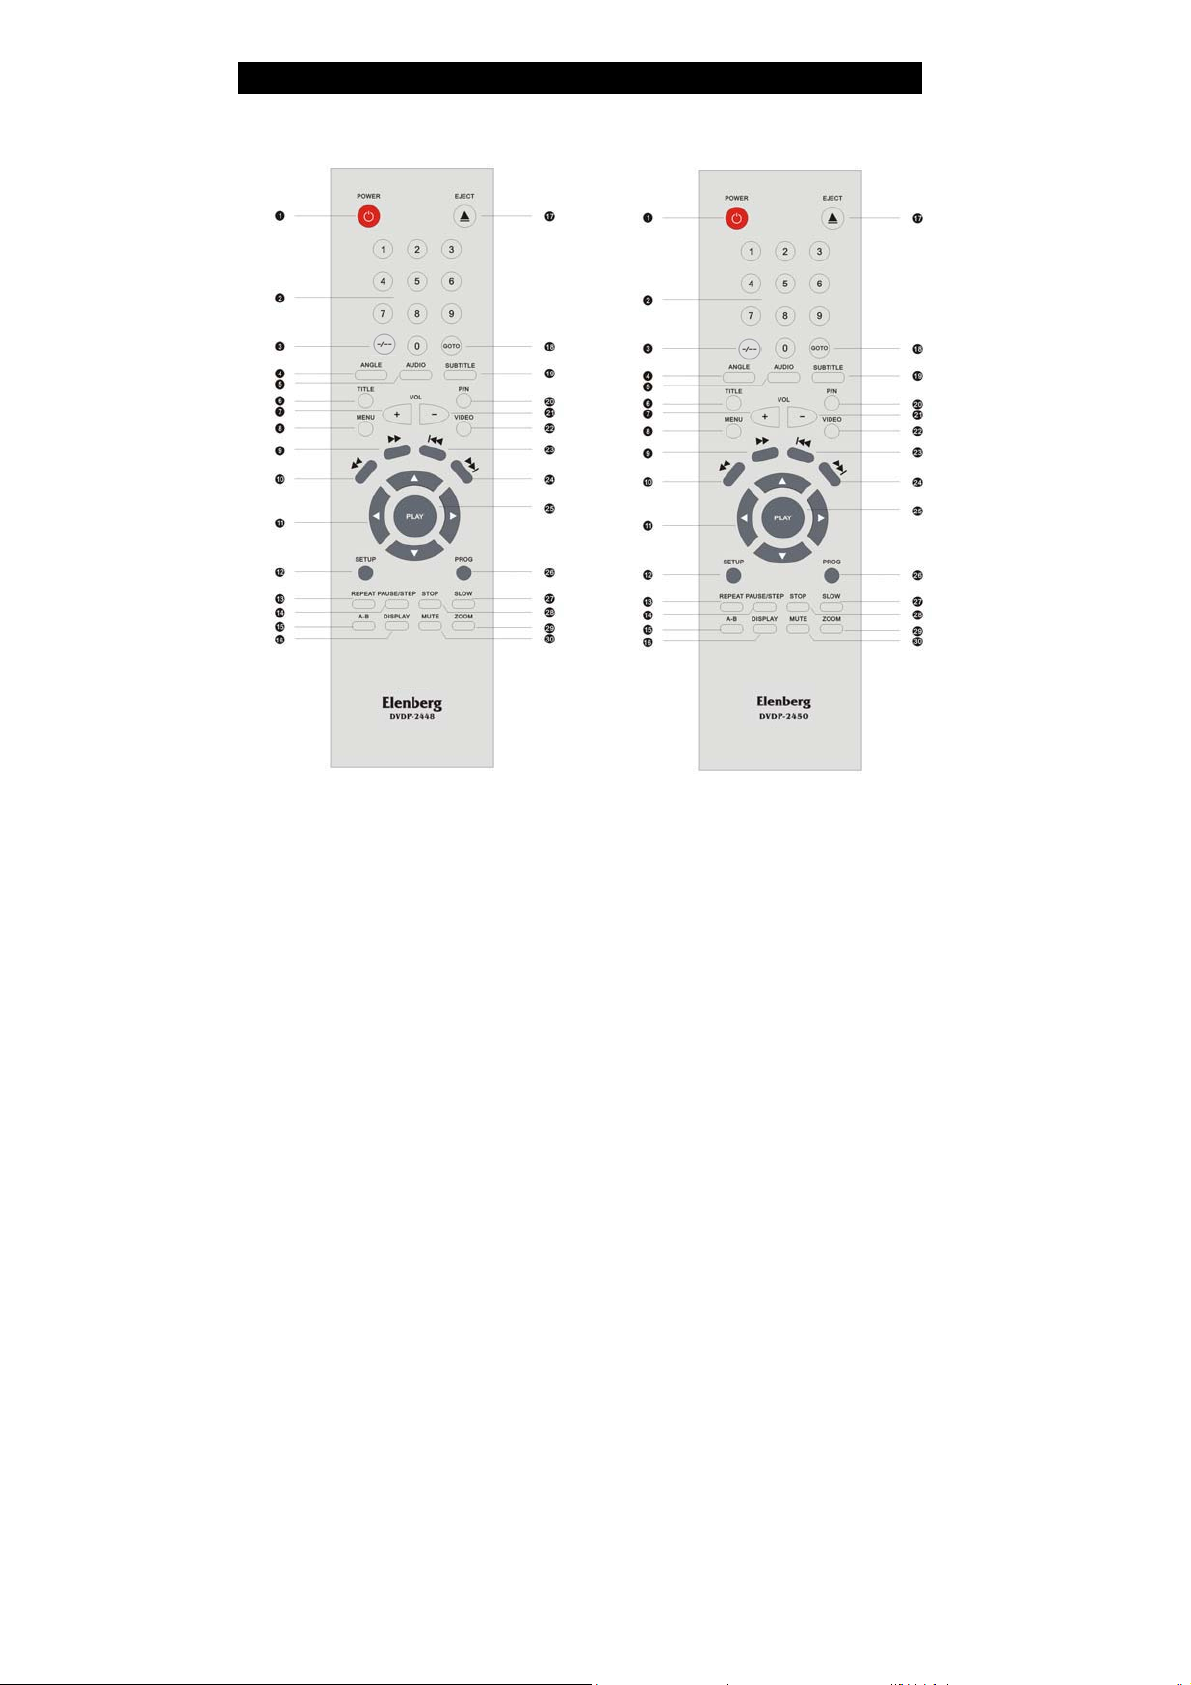
ɉɍɅɖɌ ȾɂɋɌȺɇɐɂɈɇɇɈȽɈ ɍɉɊȺȼɅȿɇɂə
ɍɋɌȺɇɈȼɄȺ ȻȺɌȺɊȿɃ ɉɂɌȺɇɂə
Ɉɬɤɪɨɣɬɟ ɤɪɵɲɤɭ ɛɚɬɚɪɟɣɧɨɝɨ ɨɬɫɟɤɚ ɢ, ɫɨɛɥɸɞɚɹ ɩɨɥɹɪɧɨɫɬɶ ("+" ɢ "-"),
ɩɪɢɜɟɞɟɧɧɭɸ ɜɧɭɬɪɢ ɛɚɬɚɪɟɣɧɨɝɨ ɨɬɫɟɤɚ, ɭɫɬɚɧɨɜɢɬɟ ɞɜɟ ɛɚɬɚɪɟɢ ɩɢɬɚɧɢɹ ɪɚɡɦɟɪɚ
“AAA”.
ɇɚɩɪɚɜɥɹɣɬɟ ɩɭɥɶɬ ɞɢɫɬɚɧɰɢɨɧɧɨɝɨ ɭɩɪɚɜɥɟɧɢɹ ɧɚ ɮɨɬɨɩɪɢɟɦɧɢɤ, ɪɚɫɩɨɥɨɠɟɧɧɵɣ
ɧɚ ɥɢɰɟɜɨɣ ɩɚɧɟɥɢ ɩɪɨɢɝɪɵɜɚɬɟɥɹ, ɜɩɪɟɞɟɥɚɯɭɝɥɚ 60e ɢ ɫ ɪɚɫɫɬɨɹɧɢɹ ɧɟ ɛɨɥɟɟ 7
ɦɟɬɪɨɜ.
Ɉɛɵɱɧɵɣ ɫɪɨɤ ɫɥɭɠɛɵ ɛɚɬɚɪɟɣ ɩɢɬɚɧɢɹ ɫɨɫɬɚɜɥɹɟɬ ɨɤɨɥɨ 6 ɦɟɫɹɰɟɜ. ȿɫɥɢ ɩɭɥɶɬ
ɞɢɫɬɚɧɰɢɨɧɧɨɝɨ ɭɩɪɚɜɥɟɧɢɹ ɧɟ ɪɚɛɨɬɚɟɬ, ɡɚɦɟɧɢɬɟ ɛɚɬɚɪɟɢ ɩɢɬɚɧɢɹ.
ȿɫɥɢ ɩɪɨɢɝɪɵɜɚɬɟɥɶ ɧɟ ɛɭɞɟɬ ɢɫɩɨɥɶɡɨɜɚɬɶɫɹ ɜ ɬɟɱɟɧɢɟ ɞɥɢɬɟɥɶɧɨɝɨ ɜɪɟɦɟɧɢ, ɱɬɨɛɵ
ɩɪɟɞɨɬɜɪɚɬɢɬɶ ɜɵɬɟɤɚɧɢɟ ɷɥɟɤɬɪɨɥɢɬɚ ɢ ɩɨɜɪɟɠɞɟɧɢɟ ɩɭɥɶɬɚ Ⱦɍ, ɢɡɜɥɟɤɢɬɟ ɛɚɬɚɪɟɢ
ɩɢɬɚɧɢɹ ɢɡ ɩɭɥɶɬɚ.
10
Page 11
ɉɍɅɖɌ ȾɂɋɌȺɇɐɂɈɇɇɈȽɈ ɍɉɊȺȼɅȿɇɂə
Ɉɩɢɫɚɧɢɟ ɩɭɥɶɬɚ ɞɢɫɬɚɧɰɢɨɧɧɨɝɨ ɭɩɪɚɜɥɟɧɢɹ
1. POWER - ɇɚɠɢɦɚɣɬɟ, ɱɬɨɛɵ
ɜɤɥɸɱɢɬɶ ɢɥɢ ɜɵɤɥɸɱɢɬɶ
DVD-ɩɪɨɢɝɪɵɜɚɬɟɥɶ.
2. ɐɂɎɊɈȼɕȿ ɄɇɈɉɄɂ -
ɇɚɠɚɬɢɟɦ ɧɚ ɷɬɢ ɤɧɨɩɤɢ
ɜɵɛɟɪɢɬɟ ɧɭɠɧɵɣ ɩɪɨɧɭɦɟɪɨɜɚɧɧɵɣ ɨɛɴɟɤɬ.
3. ɄɇɈɉɄȺ -/-- - ɇɚɠɦɢɬɟ, ɱɬɨɛɵ
ɜɵɛɪɚɬɶ ɬɪɷɤ ɫ ɧɨɦɟɪɨɦ
ɛɨɥɶɲɟ 10.
4. ANGLE - Ⱦɥɹ ɜɵɛɨɪɚ ɭɝɥɚ
ɫɴɟɦɤɢ (ɟɫɥɢ DVD-ɞɢɫɤ
ɫɨɞɟɪɠɢɬ ɫɰɟɧɵ, ɨɬɫɧɹɬɵɟ ɫ
ɪɚɡɧɵɯ ɭɝɥɨɜ ɫɴɟɦɤɢ).
5. AUDIO - Ⱦɥɹ ɜɵɛɨɪɚ ɡɜɭɤɨɜɨɣ
ɞɨɪɨɠɤɢ ɧɚ ɞɪɭɝɨɦ ɹɡɵɤɟ (ɟɫɥɢ
DVD-ɞɢɫɤ ɫɨɞɟɪɠɢɬ ɡɜɭɤɨɜɵɟ
ɞɨɪɨɠɤɢ ɧɚ ɪɚɡɧɵɯ ɹɡɵɤɚɯ)
6. TITLE - ɇɚɠɦɢɬɟ, ɱɬɨɛɵ
ɨɬɨɛɪɚɡɢɬɶ ɫɩɢɫɨɤ ɤɨɦɩɨɡɢɰɢɣ,
ɡɚɩɢɫɚɧɧɵɯ ɧɚ ɞɢɫɤ.
11
Page 12

7. VOLUME UP - ɇɚɠɢɦɚɣɬɟ,
ɱɬɨɛɵ ɭɜɟɥɢɱɢɜɚɬɶ ɝɪɨɦɤɨɫɬɶ
ɡɜɭɱɚɧɢɹ DVD-ɞɢɫɤɚ. Ⱦɢɚɩɚɡɨɧ
ɝɪɨɦɤɨɫɬɟɣ ɦɟɧɶɲɟ ɩɨ
ɫɪɚɜɧɟɧɢɸ ɫ ɞɢɚɩɚɡɨɧɨɦ
ɝɪɨɦɤɨɫɬɟɣ ɬɟɥɟɜɢɡɨɪɚ.
8. MENU - ɇɚɠɦɢɬɟ, ɱɬɨɛɵ ɜ
ɪɟɠɢɦɟ ɜɨɫɩɪɨɢɡɜɟɞɟɧɢɹ
ɨɬɨɛɪɚɡɢɬɶ ɧɚ ɷɤɪɚɧɟ
ɬɟɥɟɜɢɡɨɪɚ ɦɟɧɸ ɞɢɫɤɚ.
9. >> - ɇɚɠɦɢɬɟ, ɱɬɨɛɵ
ɜɵɩɨɥɧɢɬɶ ɭɫɤɨɪɟɧɧɵɣ
ɩɪɨɫɦɨɬɪ ɜɩɟɪɟɞ.
10. << - ɇɚɠɦɢɬɟ, ɱɬɨɛɵ
ɜɵɩɨɥɧɢɬɶ ɭɫɤɨɪɟɧɧɵɣ
ɩɪɨɫɦɨɬɪ ɧɚɡɚɞ.
11. ɄɇɈɉɄɂ ɄɍɊɋɈɊȺ (Ż/ŹŸ/ź)
- Ⱦɥɹ ɜɵɛɨɪɚ ɨɛɴɟɤɬɨɜ ɜ ɦɟɧɸ
ɢɥɢ ɩɚɪɚɦɟɬɪɨɜ.
12. SETUP - ɇɚɠɦɢɬɟ, ɱɬɨɛɵ
ɨɬɨɛɪɚɡɢɬɶ ɦɟɧɸ ɧɚɫɬɪɨɣɤɢ
ɩɚɪɚɦɟɬɪɨɜ ɩɪɨɢɝɪɵɜɚɬɟɥɹ.
13. REPEAT - Ⱦɥɹ ɜɤɥɸɱɟɧɢɹ
ɪɟɠɢɦɚ ɩɨɜɬɨɪɚ ɬɪɷɤɚ, ɪɚɡɞɟɥɚ,
ɤɨɦɩɨɡɢɰɢɢ ɢɥɢ ɜɫɟɝɨ ɞɢɫɤɚ.
14. PAUSE/STEP - ɇɚɠɢɦɚɣɬɟ,
ɱɬɨɛɵ ɜɤɥɸɱɢɬɶ ɪɟɠɢɦ ɩɚɭɡɵ
ɢɥɢ ɩɨɤɚɞɪɨɜɨɝɨ
ɜɨɫɩɪɨɢɡɜɟɞɟɧɢɹ.
15. A-B REPEAT - ɇɚɠɢɦɚɣɬɟ,
ɱɬɨɛɵ ɨɬɦɟɬɢɬɶ ɮɪɚɝɦɟɧɬ Ⱥ-ȼ
ɞɥɹ ɩɨɜɬɨɪɧɨɝɨ ɜɨɫɩɪɨɢɡɜɟɞɟ-
ɧɢɹ.
16. DISPLAY - ɇɚɠɚɬɢɟɦ ɧɚ ɷɬɭ
ɤɧɨɩɤɭ ȼɵ ɦɨɠɟɬɟ ɨɬɨɛɪɚɡɢɬɶ
ɜɨɫɩɪɨɢɡɜɟɞɟɧɧɨɟ ɜɪɟɦɹ ɢɥɢ
ɧɨɦɟɪ ɬɪɷɤɚ. ɇɚɠɦɢɬɟ ɤɧɨɩɤɭ
ɟɳɟ ɪɚɡ, ɱɬɨɛɵ ɨɬɤɥɸɱɢɬɶ
ɷɤɪɚɧɧɵɣ ɞɢɫɩɥɟɣ.
17. EJECT - ɇɚɠɢɦɚɣɬɟ, ɱɬɨɛɵ
ɨɬɤɪɵɬɶ ɢɥɢ ɡɚɤɪɵɬɶ ɞɢɫɤɨɜɨɞ.
18. GOTO - ɉɨɡɜɨɥɹɟɬ ȼɚɦ
ɜɵɛɪɚɬɶ ɧɭɠɧɭɸ ɬɨɱɤɭ ɧɚ ɞɢɫɤɟ,
ɬɪɷɤ ɢɥɢ ɤɨɦɩɨɡɢɰɢɸ, ɱɬɨɛɵ
ɧɚɱɚɬɶ ɜɨɫɩɪɨɢɡɜɟɞɟɧɢɟ.
19. SUBTITLE - ȼɨ ɜɪɟɦɹ
ɜɨɫɩɪɨɢɡɜɟɞɟɧɢɹ DVD-ɞɢɫɤɚ
ɧɚɠɚɬɢɟɦ ɧɚ ɷɬɭ ɤɧɨɩɤɭ ȼɵ
ɦɨɠɟɬɟ ɜɵɛɪɚɬɶ ɫɭɛɬɢɬɪɵ ɧɚ
ɞɪɭɝɨɦ ɹɡɵɤɟ.
20. P/N - ɇɚɠɚɬɢɟɦ ɧɚ ɷɬɭ ɤɧɨɩɤɭ
ȼɵ ɦɨɠɟɬɟ ɜɵɛɪɚɬɶ ɫɢɫɬɟɦɭ
ɤɨɞɢɪɨɜɚɧɢɹ ɰɜɟɬɚ: PAL/AUTO
ɢɥɢ NTSC.
21. VOLUME DOWN - ɇɚɠɢɦɚɣɬɟ,
ɱɬɨɛɵ ɭɦɟɧɶɲɚɬɶ ɝɪɨɦɤɨɫɬɶ
ɡɜɭɱɚɧɢɹ DVD-ɞɢɫɤɚ. Ⱦɢɚɩɚɡɨɧ
ɝɪɨɦɤɨɫɬɟɣ ɦɟɧɶɲɟ ɩɨ
ɫɪɚɜɧɟɧɢɸ ɫ ɞɢɚɩɚɡɨɧɨɦ
ɝɪɨɦɤɨɫɬɟɣ ɬɟɥɟɜɢɡɨɪɚ.
22. VIDEO - ɇɚɠɢɦɚɣɬɟ ɷɬɭ ɤɧɨɩɤɭ,
ɱɬɨɛɵ ɩɟɪɟɤɥɸɱɚɬɶɫɹ ɦɟɠɞɭ
ɪɟɠɢɦɚɦɢ ɱɟɪɟɫɫɬɪɨɱɧɨɣ ɢ
ɩɪɨɝɪɟɫɫɢɜɧɨɣ ɪɚɡɜɟɪɬɤɢ.
23. I<< - ɇɚɠɢɦɚɣɬɟ, ɱɬɨɛɵ
ɩɟɪɟɣɬɢ ɧɚ ɩɪɟɞɵɞɭɳɢɣ
ɪɚɡɞɟɥ.
24. >>I - ɇɚɠɢɦɚɣɬɟ, ɱɬɨɛɵ
ɩɟɪɟɣɬɢ ɧɚ ɫɥɟɞɭɸɳɢɣ ɪɚɡɞɟɥ.
25. PLAY/PLAY - ɇɚɠɦɢɬɟ, ɱɬɨɛɵ
ɜɤɥɸɱɢɬɶ ɜɨɫɩɪɨɢɡɜɟɞɟɧɢɟ ɢɥɢ
ɩɨɞɬɜɟɪɞɢɬɶ ɜɵɛɨɪ ɡɧɚɱɟɧɢɣ
ɩɚɪɚɦɟɬɪɨɜ.
12
Page 13

26. PROG - ɇɚɠɦɢɬɟ, ɱɬɨɛɵ
ɡɚɩɪɨɝɪɚɦɦɢɪɨɜɚɬɶ ɢ ɜɨɫɩɪɨ-
ɢɡɜɟɫɬɢ ɡɚɩɪɨɝɪɚɦɦɢɪɨɜɚɧɧɵɟ
ɬɪɷɤɢ.
27. SLOW - ɇɚɠɦɢɬɟ, ɱɬɨɛɵ
ɜɤɥɸɱɢɬɶ ɪɟɠɢɦ ɡɚɦɟɞɥɟɧɧɨɝɨ
ɜɨɫɩɪɨɢɡɜɟɞɟɧɢɹ.
28. STOP - Ʉɧɨɩɤɚ ɨɫɬɚɧɨɜɤɢ
ɜɨɫɩɪɨɢɡɜɟɞɟɧɢɹ.
29. ZOOM - ɇɚɠɦɢɬɟ ɷɬɭ ɤɧɨɩɤɭ ɜɨ
ɜɪɟɦɹ ɜɨɫɩɪɨɢɡɜɟɞɟɧɢɹ DVD,
ɱɬɨɛɵ ɜɤɥɸɱɢɬɶ ɪɟɠɢɦ ɭɜɟɥɢ-
ɱɟɧɢɹ ɢɡɨɛɪɚɠɟɧɢɹ.
30. MUTE - ɇɚɠɢɦɚɣɬɟ, ɱɬɨɛɵ
ɨɬɤɥɸɱɢɬɶ ɢɥɢ ɜɤɥɸɱɢɬɶ ɡɜɭɤ
ɚɤɭɫɬɢɱɟɫɤɢɯ ɫɢɫɬɟɦ.
13
Page 14
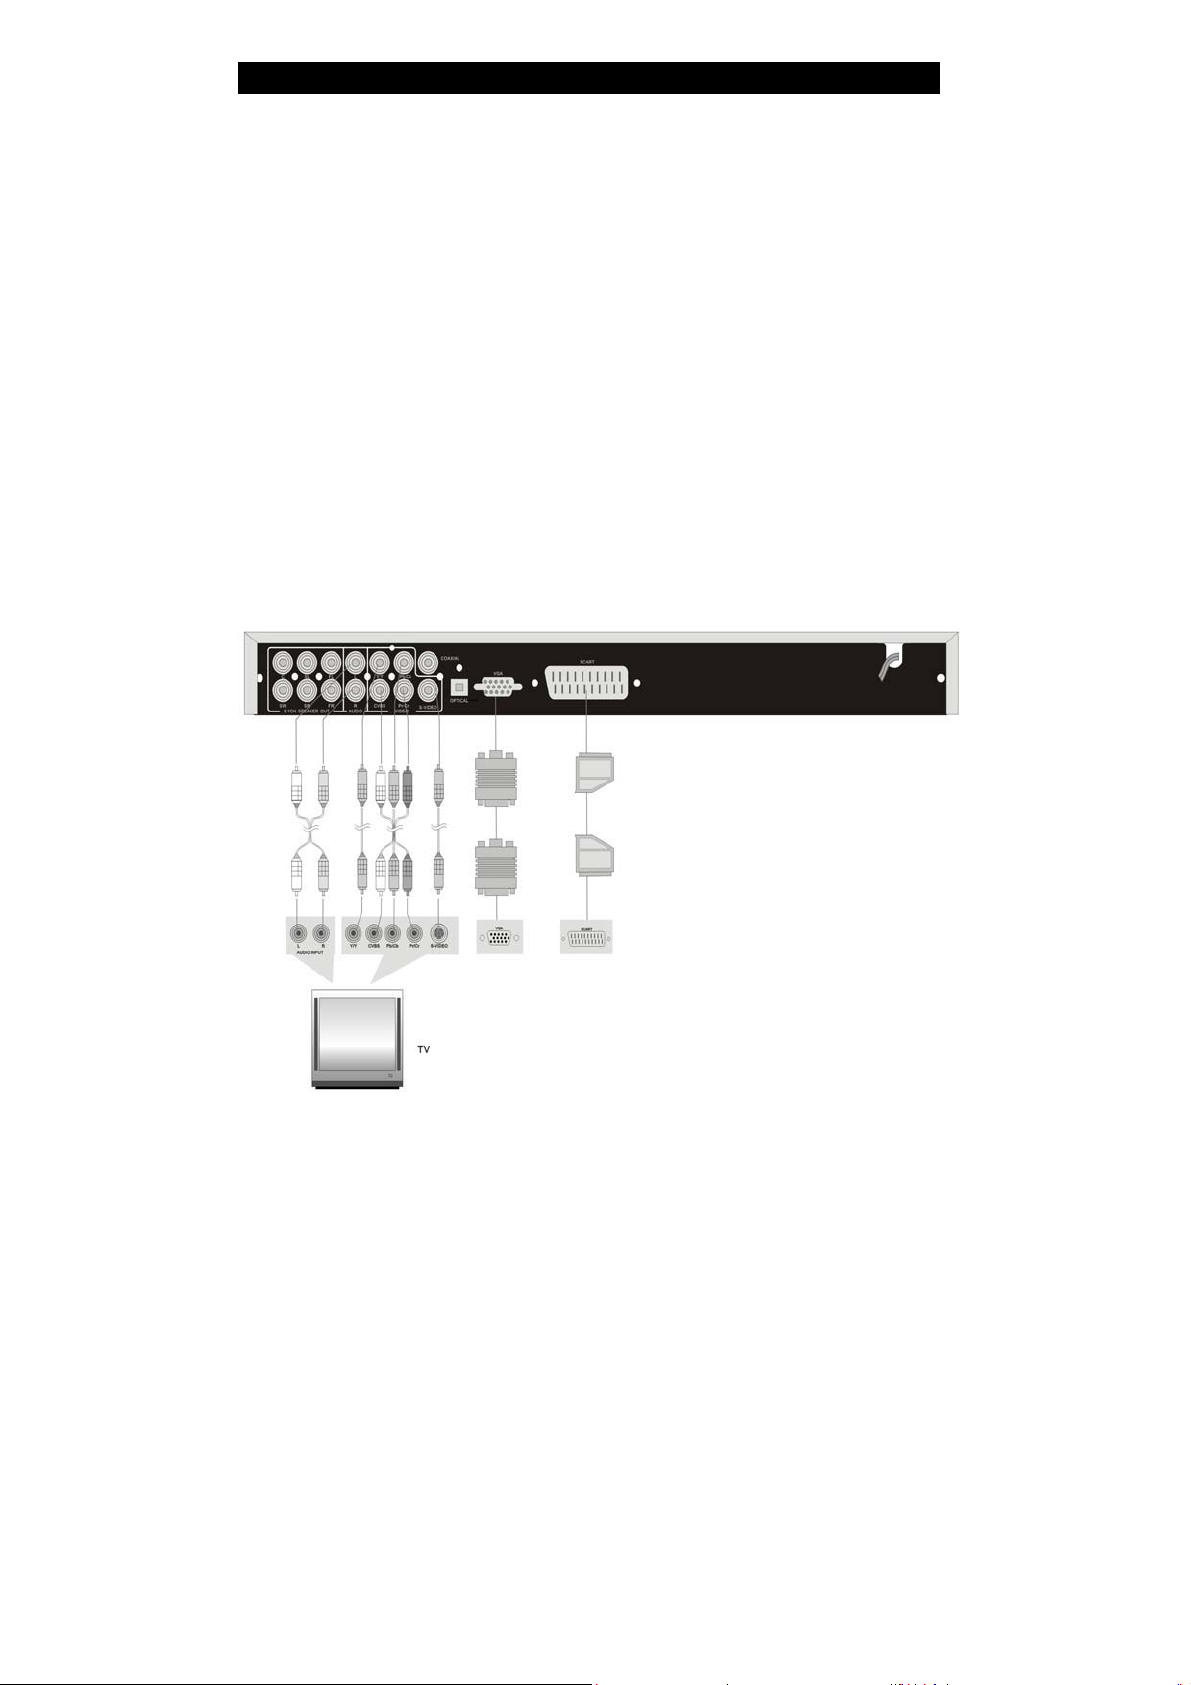
ɉɈȾɄɅɘɑȿɇɂȿ ɋɂɋɌȿɆɕ
- ɇɟ ɩɨɞɤɥɸɱɚɣɬɟ ɫɟɬɟɜɨɣ ɲɧɭɪ ɞɨ ɬɟɯ ɩɨɪ, ɩɨɤɚ ɧɟ ɛɭɞɭɬ ɜɵɩɨɥɧɟɧɵ ɜɫɟ ɨɫɬɚɥɶɧɵɟ
ɩɨɞɤɥɸɱɟɧɢɹ.
- Ⱦɥɹ ɜɨɫɩɪɨɢɡɜɟɞɟɧɢɹ ɡɜɭɤɚ ɞɨɫɬɭɩɧɵ 2-ɤɚɧɚɥɶɧɵɣ ɚɧɚɥɨɝɨɜɵɣ ɚɭɞɢɨɜɵɯɨɞ, ɚ
ɬɚɤɠɟ ɰɢɮɪɨɜɨɣ ɨɩɬɢɱɟɫɤɢɣ ɢ ɤɨɚɤɫɢɚɥɶɧɵɣ ɚɭɞɢɨɜɵɯɨɞɵ. Ⱦɥɹ ɜɨɫɩɪɨɢɡɜɟɞɟɧɢɹ
ɢɡɨɛɪɚɠɟɧɢɹ ɞɨɫɬɭɩɧɵ ɨɛɵɱɧɵɣ ɜɢɞɟɨɜɵɯɨɞ, ɜɢɞɟɨɜɵɯɨɞ S-Video ɢ ɤɨɦɩɨɧɟɧɬɧɵɣ
ɜɢɞɟɨɜɵɯɨɞ. Ⱦɥɹ ɩɨɞɤɥɸɱɟɧɢɹ ȼɵ ɦɨɠɟɬɟ ɜɵɛɪɚɬɶ ɥɸɛɨɣ ɢɡ ɭɤɚɡɚɧɧɵɯ ɜɵɯɨɞɨɜ.
ɉɈȾɄɅɘɑȿɇɂȿ Ʉ ɌȿɅȿȼɂɁɈɊɍ
ɇɚ ɷɬɨɦ ɪɢɫɭɧɤɟ ɩɨɤɚɡɚɧɵ ɜɢɞɟɨɜɵɯɨɞɵ VIDEO OUT, S-VIDEO OUT ɢ COMPONENT
OUTPUT. ȿɫɥɢ ȼɚɲ ɬɟɥɟɜɢɡɨɪ ɨɫɧɚɳɟɧ ɜɯɨɞɚɦɢ S-VIDEO IN ɢ COMPONENT IN,
ɢɫɩɨɥɶɡɭɹ ɩɨɞɤɥɸɱɟɧɢɹ ɤ ɷɬɢɦ ɝɧɟɡɞɚɦ, ȼɵ ɫɦɨɠɟɬɟ ɞɨɛɢɬɶɫɹ ɛɨɥɟɟ ɤɚɱɟɫɬɜɟɧɧɨɝɨ
ɢɡɨɛɪɚɠɟɧɢɹ.
ɇɚɫɬɪɨɣɤɚ DVD-ɩɪɨɢɝɪɵɜɚɬɟɥɹ
ȼ ɡɚɜɢɫɢɦɨɫɬɢ ɨɬ ɩɨɞɤɥɸɱɟɧɧɨɝɨ ɬɟɥɟɜɢɡɨɪɚ ȼɵ ɦɨɠɟɬɟ ɜɵɛɪɚɬɶ ɫɨɨɬɜɟɬɫɬɜɭɸɳɭɸ
ɬɟɥɟɜɢɡɢɨɧɧɭɸ ɫɢɫɬɟɦɭ (ɫɢɫɬɟɦɭ ɤɨɞɢɪɨɜɚɧɢɹ ɰɜɟɬɚ).
ȿɫɥɢ ɬɟɥɟɜɢɡɢɨɧɧɚɹ ɫɢɫɬɟɦɚ ɬɟɥɟɜɢɡɨɪɚ PAL, ɧɚɠɚɬɢɟɦ ɧɚ ɤɧɨɩɤɭ P/N ɧɚ ɩɭɥɶɬɟ Ⱦɍ
ɜɵɛɟɪɢɬɟ ɪɟɠɢɦ PAL. ȿɫɥɢ ɬɟɥɟɜɢɡɢɨɧɧɚɹ ɫɢɫɬɟɦɚ ɬɟɥɟɜɢɡɨɪɚ NTSC, ɧɚɠɚɬɢɟɦ ɧɚ
ɤɧɨɩɤɭ P/N ɧɚ ɩɭɥɶɬɟ Ⱦɍ ɜɵɛɟɪɢɬɟ ɪɟɠɢɦ NTSC. ȿɫɥɢ ɬɟɥɟɜɢɡɢɨɧɧɚɹ ɫɢɫɬɟɦɚ
ɬɟɥɟɜɢɡɨɪɚ AUTO, ɧɚɠɚɬɢɟɦ ɧɚ ɤɧɨɩɤɭ P/N ɧɚ ɩɭɥɶɬɟ Ⱦɍ ɜɵɛɟɪɢɬɟ ɪɟɠɢɦ AUTO.
ȿɫɥɢ ɩɨɞɤɥɸɱɟɧ ɲɢɪɨɤɨɷɤɪɚɧɧɵɣ ɬɟɥɟɜɢɡɨɪ, ɜ ɦɟɧɸ ɧɚɫɬɪɨɣɤɢ ɩɚɪɚɦɟɬɪɨɜ
ɭɫɬɚɧɨɜɢɬɟ ɩɚɪɚɦɟɬɪ “TV TYPE” ɜ ɩɨɥɨɠɟɧɢɟ “16:9”.
ȿɫɥɢ ɩɨɞɤɥɸɱɟɧ ɨɛɵɱɧɵɣ ɬɟɥɟɜɢɡɨɪ, ɭɫɬɚɧɨɜɢɬɟ ɩɚɪɚɦɟɬɪ “TV TYPE” ɜ ɩɨɥɨɠɟɧɢɟ
“4:3 PS” ɢɥɢ “4:3 LB”.
14
Page 15

ɉɈȾɄɅɘɑȿɇɂȿ ɋɂɋɌȿɆɕ
ɉɨɞɤɥɸɱɟɧɢɟ ɤ ɝɧɟɡɞɭ S-Video
ȿɫɥɢ ȼɚɲ ɬɟɥɟɜɢɡɨɪ ɨɫɧɚɳɟɧ ɜɯɨɞɨɦ S-Video, ɩɨɞɤɥɸɱɢɬɟ ɤɚɛɟɥɶ S-Video ɤ
ɜɢɞɟɨɜɵɯɨɞɭ S-Video ɧɚ ɡɚɞɧɟɣ ɩɚɧɟɥɢ DVD-ɩɪɨɢɝɪɵɜɚɬɟɥɹ, ɚ ɞɪɭɝɨɣ ɤɨɧɟɰ ɤɚɛɟɥɹ ɤ ɜɢɞɟɨɜɯɨɞɭ S-Video ȼɚɲɟɝɨ ɬɟɥɟɜɢɡɨɪɚ. ɇɟɬ ɧɟɨɛɯɨɞɢɦɨɫɬɢ ɜ ɧɚɫɬɪɨɣɤɟ
ɩɚɪɚɦɟɬɪɨɜ ɱɟɪɟɡ ɦɟɧɸ.
ȼɵɩɨɥɧɟɧɢɟ ɩɨɞɤɥɸɱɟɧɢɹ ɤ ɝɧɟɡɞɚɦ Y/Cb/Cr
ȿɫɥɢ ȼɚɲ ɬɟɥɟɜɢɡɨɪ ɨɫɧɚɳɟɧ ɜɯɨɞɧɵɦɢ ɝɧɟɡɞɚɦɢ Y/Cb/Cr, ȼɵ ɦɨɠɟɬɟ ɜɵɩɨɥɧɢɬɶ
ɩɨɞɤɥɸɱɟɧɢɟ ɤ ɷɬɢɦ ɝɧɟɡɞɚɦ, ɜɨɫɩɨɥɶɡɨɜɚɜɲɢɫɶ ɤɚɛɟɥɹɦɢ Y/Cb/Cr:
- ɇɚɠɦɢɬɟ ɤɧɨɩɤɭ VIDEO, ɱɬɨɛɵ ɩɟɪɟɤɥɸɱɢɬɶɫɹ ɧɚ ɜɵɯɨɞ YUV ɫ ɱɟɪɟɫɫɬɪɨɱɧɨɣ
ɪɚɡɜɟɪɬɤɨɣ. ɉɟɪɟɤɥɸɱɢɬɟ ɬɟɥɟɜɢɡɨɪ ɧɚ ɜɯɨɞ Y/Cb/Cr.
ȼɵɩɨɥɧɟɧɢɟ ɩɨɞɤɥɸɱɟɧɢɹ ɤ ɝɧɟɡɞɚɦ Y/Pb/Pr
ȿɫɥɢ ȼɚɲ ɬɟɥɟɜɢɡɨɪ ɨɫɧɚɳɟɧ ɜɯɨɞɧɵɦɢ ɝɧɟɡɞɚɦɢ Y/Pb/Pr, ȼɵ ɦɨɠɟɬɟ ɜɵɩɨɥɧɢɬɶ
ɩɨɞɤɥɸɱɟɧɢɹ ɫ ɩɨɦɨɳɶɸ ɤɚɛɟɥɟɣ Y/Pb/Pr:
- ɇɚɠɚɬɢɟɦ ɧɚ ɤɧɨɩɤɭ VIDEO ɩɟɪɟɤɥɸɱɢɬɟɫɶ ɧɚ ɜɢɞɟɨɜɵɯɨɞ YUV ɫ ɩɪɨɝɪɟɫɫɢɜɧɨɣ
ɪɚɡɜɟɪɬɤɨɣ. ɉɨɫɥɟ ɷɬɨɝɨ ɜɵɛɟɪɢɬɟ ɫɨɨɬɜɟɬɫɬɜɭɸɳɢɣ ɜɯɨɞ ɧɚ ɬɟɥɟɜɢɡɨɪɟ.
- ɇɚɠɦɢɬɟ ɤɧɨɩɤɭ VIDEO. ɉɪɢ ɩɟɪɟɤɥɸɱɟɧɢɢ ɢɡ ɪɟɠɢɦɚ ɱɟɪɟɫɫɬɪɨɱɧɨɣ ɪɚɡɜɟɪɬɤɢ ɜ
ɪɟɠɢɦ ɩɪɨɝɪɟɫɫɢɜɧɨɣ ɪɚɡɜɟɪɬɤɢ ɷɤɪɚɧ ɫɬɚɧɟɬ ɱɟɪɧɨɝɨ ɰɜɟɬɚ. ȼɧɨɜɶ ɧɚɠɦɢɬɟ ɤɧɨɩɤɭ
VIDEO, ɱɬɨɛɵ ɜɟɪɧɭɬɶɫɹ ɜ ɧɨɪɦɚɥɶɧɵɣ ɪɟɠɢɦ ɪɚɛɨɬɵ.
ȼɵɩɨɥɧɟɧɢɟ ɩɨɞɤɥɸɱɟɧɢɹ ɤ ɜɵɯɨɞɭ VGA
ȿɫɥɢ ɜɢɞɟɨɜɵɯɨɞ DVD-ɩɪɨɢɝɪɵɜɚɬɟɥɹ ɧɚɯɨɞɢɬɫɹ ɜ ɪɟɠɢɦɟ ɱɟɪɟɫɫɬɪɨɱɧɨɣ ɪɚɡɜɟɪɬɤɢ,
ɜ ɦɟɧɸ ɭɫɬɚɧɨɜɢɬɟ ɩɚɪɚɦɟɬɪ "COMPONENT" ɜ ɩɨɥɨɠɟɧɢɟ ‘VGA’, ɚ ɡɚɬɟɦ ɧɚɠɦɢɬɟ
ɤɧɨɩɤɭ Play.
ȼɵɤɥɸɱɢɬɟ ɢ ɜɤɥɸɱɢɬɟ ɩɪɨɢɝɪɵɜɚɬɟɥɶ, ɜɢɞɟɨɜɵɯɨɞ ɚɜɬɨɦɚɬɢɱɟɫɤɢ ɩɟɪɟɤɥɸɱɢɬɫɹ ɜ
ɪɟɠɢɦ VGA.
ȿɫɥɢ ɜɢɞɟɨɜɵɯɨɞ DVD-ɩɪɨɢɝɪɵɜɚɬɟɥɹ ɧɚɯɨɞɢɬɫɹ ɜ ɪɟɠɢɦɟ Y Pb Pr, ɜ ɦɟɧɸ
ɭɫɬɚɧɨɜɢɬɟ ɩɚɪɚɦɟɬɪ "COMPONENT" ɜ ɩɨɥɨɠɟɧɢɟ ‘VGA’, ɚ ɡɚɬɟɦ ɧɚɠɦɢɬɟ ɤɧɨɩɤɭ
Play, ɱɬɨɛɵ ɩɟɪɟɤɥɸɱɢɬɶ ɜɵɯɨɞ ɜ ɪɟɠɢɦ VGA.
ɉɨɞɤɥɸɱɟɧɢɟ ɤ ɪɚɡɴɟɦɭ SCART
ȿɫɥɢ ɜɢɞɟɨɜɵɯɨɞ DVD-ɩɪɨɢɝɪɵɜɚɬɟɥɹ ɧɚɯɨɞɢɬɫɹ ɜ ɪɟɠɢɦɟ ɱɟɪɟɫɫɬɪɨɱɧɨɣ ɪɚɡɜɟɪɬɤɢ,
ɜ ɦɟɧɸ ɭɫɬɚɧɨɜɢɬɟ ɩɚɪɚɦɟɬɪ "COMPONENT" ɜ ɩɨɥɨɠɟɧɢɟ ‘VGA’, ɚ ɡɚɬɟɦ ɧɚɠɦɢɬɟ
ɤɧɨɩɤɭ Play.
ȼɵɤɥɸɱɢɬɟ ɢ ɜɤɥɸɱɢɬɟ ɩɪɨɢɝɪɵɜɚɬɟɥɶ, ɜɢɞɟɨɜɵɯɨɞ ɚɜɬɨɦɚɬɢɱɟɫɤɢ ɩɟɪɟɤɥɸɱɢɬɫɹ ɜ
ɪɟɠɢɦ VGA.
ȿɫɥɢ ɜɢɞɟɨɜɵɯɨɞ DVD-ɩɪɨɢɝɪɵɜɚɬɟɥɹ ɧɚɯɨɞɢɬɫɹ ɜ ɪɟɠɢɦɟ Y Pb Pr, ɜ ɦɟɧɸ
ɭɫɬɚɧɨɜɢɬɟ ɩɚɪɚɦɟɬɪ "COMPONENT" ɜ ɩɨɥɨɠɟɧɢɟ ‘VGA’, ɚ ɡɚɬɟɦ ɧɚɠɦɢɬɟ ɤɧɨɩɤɭ
Play, ɱɬɨɛɵ ɩɟɪɟɤɥɸɱɢɬɶ ɜɵɯɨɞ ɜ ɪɟɠɢɦ VGA.
15
Page 16
ɉɈȾɄɅɘɑȿɇɂȿ ɋɂɋɌȿɆɕ
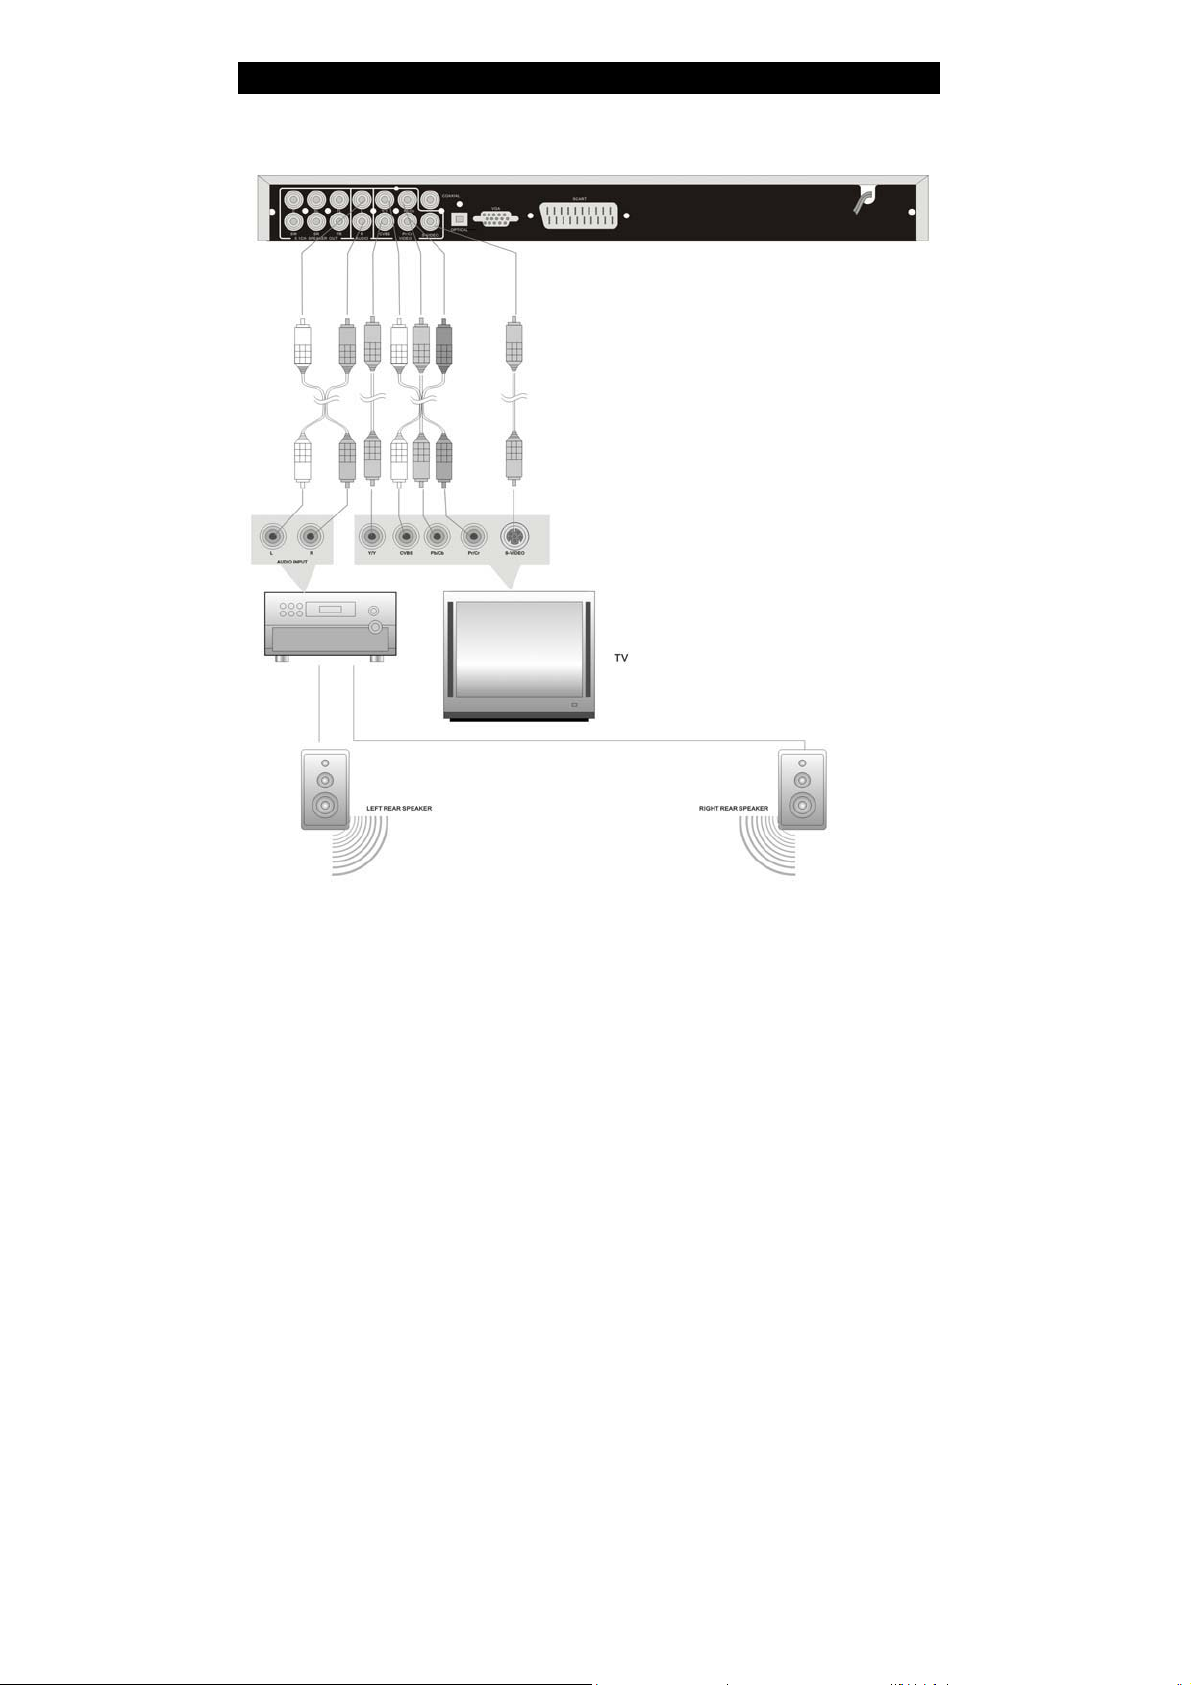
ɉɨɞɤɥɸɱɟɧɢɟ ɤ ɨɛɵɱɧɨɦɭ ɭɫɢɥɢɬɟɥɸ
- Ⱦɥɹ ɜɵɛɨɪɚ 2-ɤɚɧɚɥɶɧɨɝɨ ɜɵɯɨɞɧɨɝɨ ɪɟɠɢɦɚ ɭɫɬɚɧɨɜɢɬɟ ɩɚɪɚɦɟɬɪ "DOWNMIX" ɜ
ɩɨɥɨɠɟɧɢɟ "LT/RT".
16
Page 17
ɉɈȾɄɅɘɑȿɇɂȿ ɋɂɋɌȿɆɕ
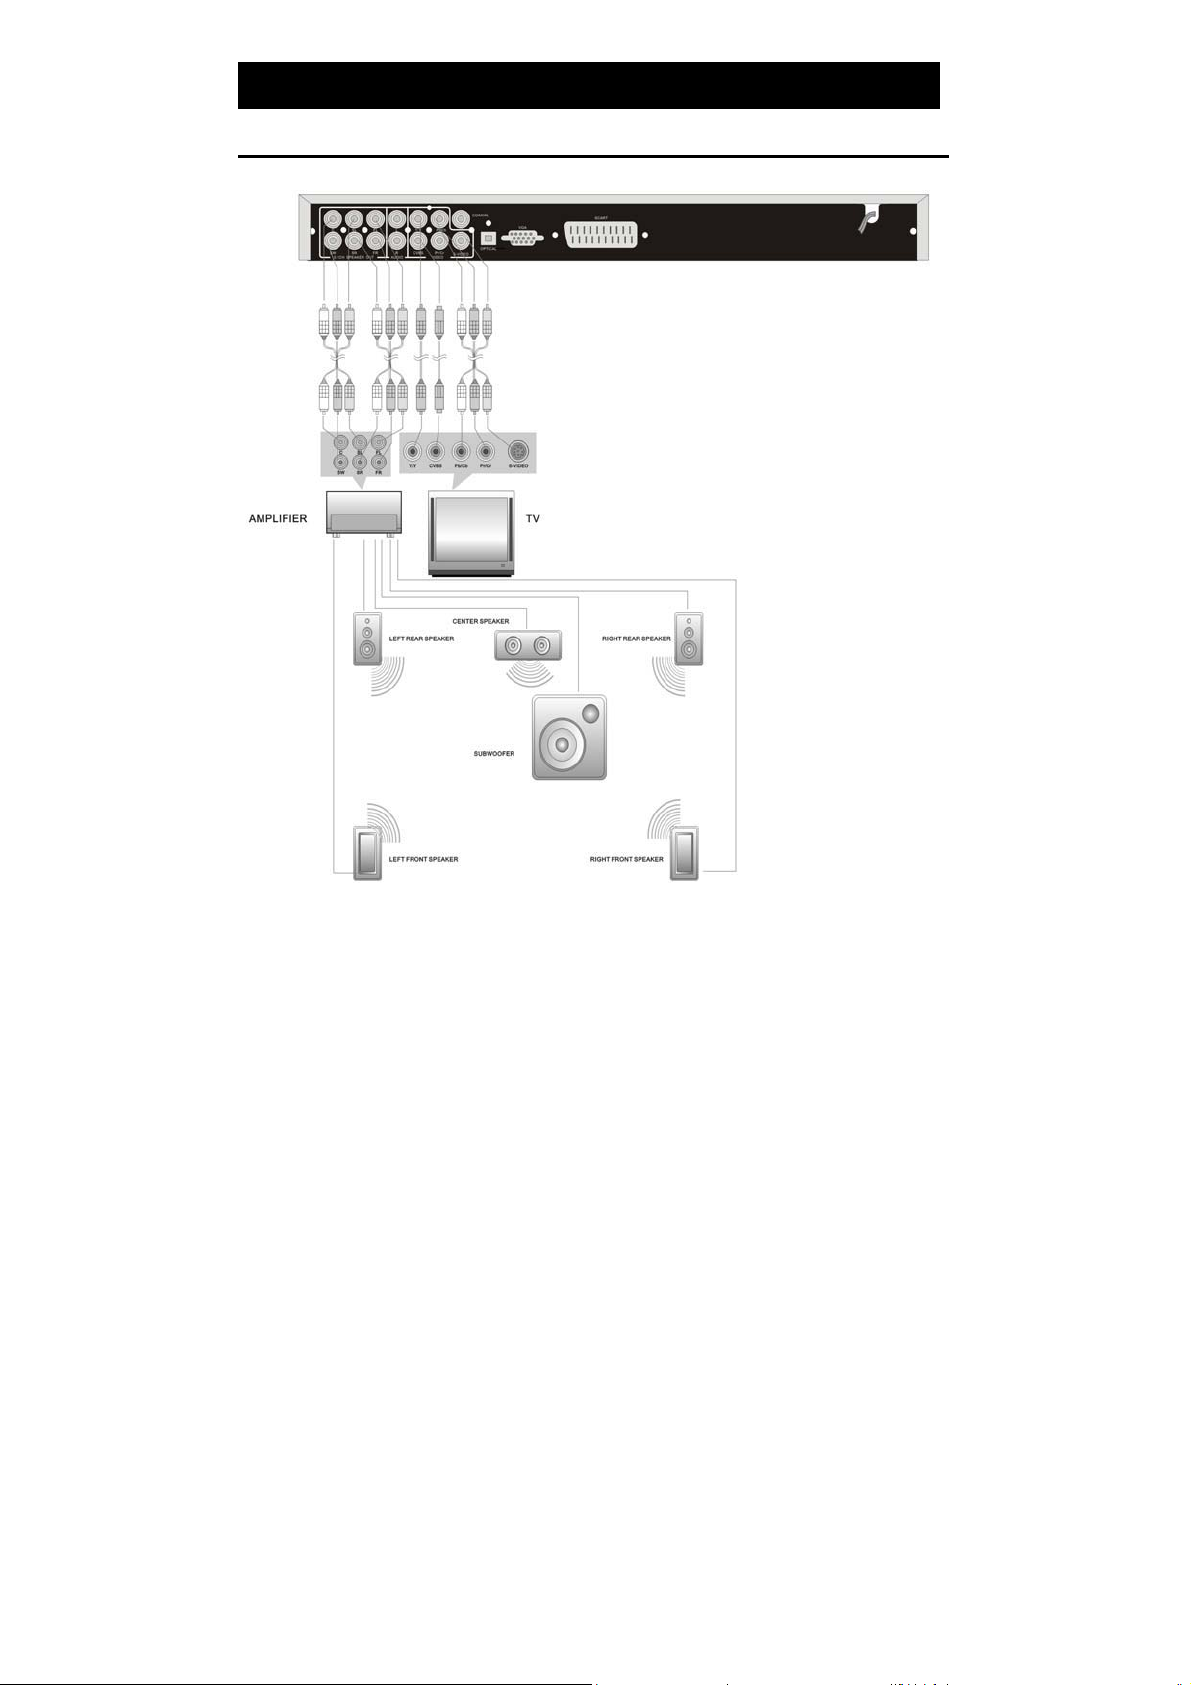
ɉɨɞɤɥɸɱɟɧɢɟ ɤ ɭɫɢɥɢɬɟɥɸ ɫ 5.1-ɤɚɧɚɥɶɧɵɦ ɚɭɞɢɨɜɵɯɨɞɨɦ
- ȿɫɥɢ ɜɵɛɪɚɧ 5.1-ɤɚɧɚɥɶɧɵɣ ɜɵɯɨɞɧɨɣ ɪɟɠɢɦ, ɜ ɦɟɧɸ ɧɚɫɬɪɨɣɤɢ ɩɚɪɚɦɟɬɪɨɜ
ɚɤɭɫɬɢɱɟɫɤɢɯ ɫɢɫɬɟɦ "SPEAKER SETUP" ɭɫɬɚɧɨɜɢɬɟ ɩɚɪɚɦɟɬɪ "DOWNMIX" ɜ
ɩɨɥɨɠɟɧɢɟ "5.1ch".
- ɉɨ ɭɦɨɥɱɚɧɢɸ ɭɫɬɚɧɨɜɥɟɧ ɫɬɟɪɟɨɮɨɧɢɱɟɫɤɢɣ ɜɵɯɨɞɧɨɣ ɪɟɠɢɦ.
17
Page 18
ɉɈȾɄɅɘɑȿɇɂȿ ɋɂɋɌȿɆɕ
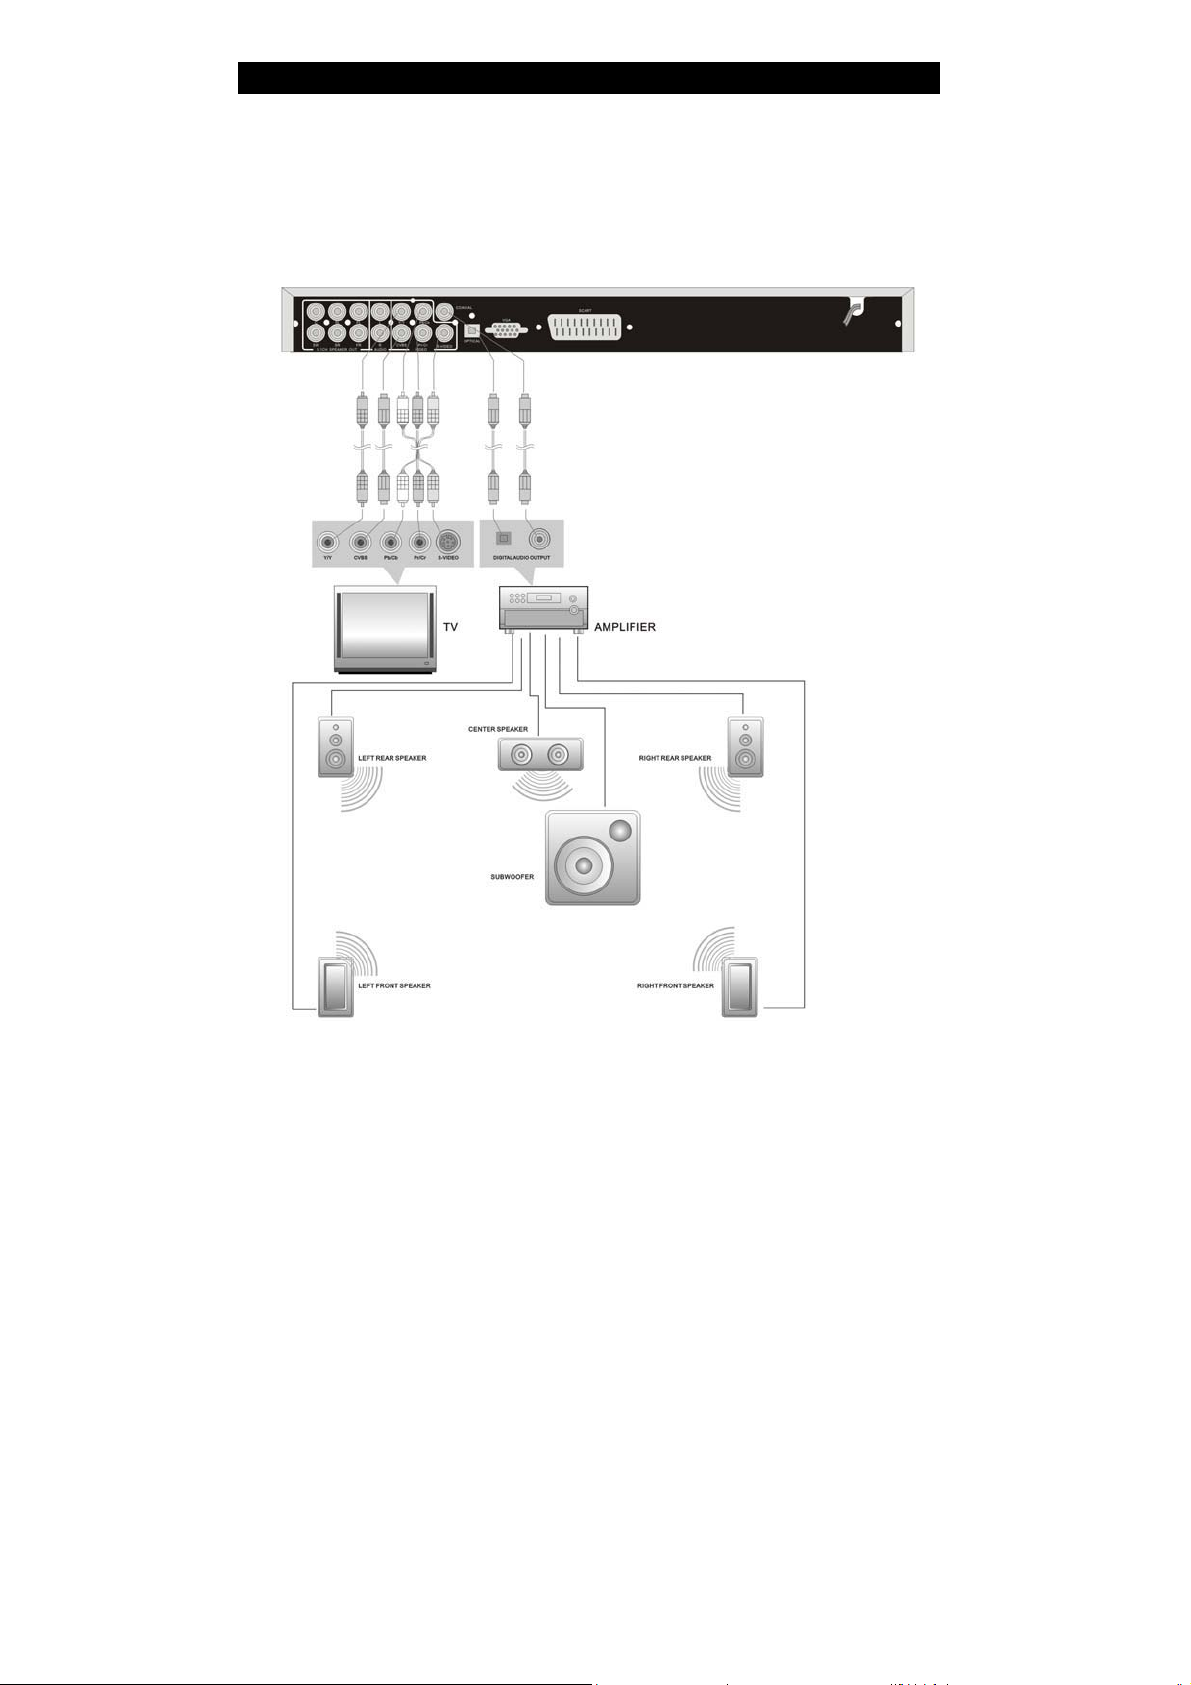
ɉɨɞɤɥɸɱɟɧɢɟ ɤ ɭɫɢɥɢɬɟɥɸ ɫ ɞɟɤɨɞɟɪɨɦ Dolby Digital
ɉɪɨɢɝɪɵɜɚɬɟɥɶ ɨɫɧɚɳɟɧ ɨɩɬɢɱɟɫɤɢɦ ɢ ɤɨɚɤɫɢɚɥɶɧɵɦ ɰɢɮɪɨɜɵɦɢ ɚɭɞɢɨɜɵɯɨɞɚɦɢ.
ȼɵ ɦɨɠɟɬɟ ɫɨɟɞɢɧɢɬɶ ɥɸɛɨɣ ɢɡ ɷɬɢɯ ɜɵɯɨɞɨɜ ɫ ɫɨɨɬɜɟɬɫɬɜɭɸɳɢɦ ɝɧɟɡɞɨɦ ɭɫɢɥɢɬɟɥɹ
ɫ ɰɢɮɪɨɜɵɦ ɜɯɨɞɨɦ.
ɋɨɟɞɢɧɢɬɟ ɰɢɮɪɨɜɨɣ ɨɩɬɢɱɟɫɤɢɣ ɜɵɯɨɞ ɫ ɝɧɟɡɞɨɦ ɰɢɮɪɨɜɨɝɨ ɨɩɬɢɱɟɫɤɨɝɨ ɜɯɨɞɚ
ɭɫɢɥɢɬɟɥɹ. ɋɨɟɞɢɧɢɬɟ ɰɢɮɪɨɜɨɣ ɤɨɚɤɫɢɚɥɶɧɵɣ ɜɵɯɨɞ ɫ ɝɧɟɡɞɨɦ ɰɢɮɪɨɜɨɝɨ
ɤɨɚɤɫɢɚɥɶɧɨɝɨ ɜɯɨɞɚ ɭɫɢɥɢɬɟɥɹ.
- ɉɪɢ ɜɵɛɨɪɟ ɨɩɬɢɱɟɫɤɨɝɨ ɢɥɢ ɤɨɚɤɫɢɚɥɶɧɨɝɨ ɰɢɮɪɨɜɨɝɨ ɚɭɞɢɨɜɵɯɨɞɚ ɭɫɬɚɧɨɜɢɬɟ
ɩɚɪɚɦɟɬɪ "SPDIF Output" ɜ ɩɨɥɨɠɟɧɢɟ "SPDIF/RAW".
18
Page 19
ɗɄɋɉɅɍȺɌȺɐɂə
ɉɨɞɝɨɬɨɜɤɚ: ɉɨɫɥɟ ɜɵɩɨɥɧɟɧɢɹ ɩɨɞɤɥɸɱɟɧɢɣ ɜɤɥɸɱɢɬɟ ɩɢɬɚɧɢɟ
ɫɨɨɬɜɟɬɫɬɜɭɸɳɟɝɨ ɨɛɨɪɭɞɨɜɚɧɢɹ ɢ ɜɵɛɟɪɢɬɟ ɜɢɞɟɨɜɯɨɞ.
1. ȼɤɥɸɱɢɬɟ ɩɪɨɢɝɪɵɜɚɬɟɥɶ
ɇɚɠɦɢɬɟ ɤɧɨɩɤɭ POWER ɧɚ ɥɢɰɟɜɨɣ
ɩɚɧɟɥɢ, ɱɬɨɛɵ ɜɤɥɸɱɢɬɶ ɩɪɨɢɝɪɵɜɚɬɟɥɶ. ɉɪɨɢɝɪɵɜɚɬɟɥɶ ɚɜɬɨɦɚɬɢɱɟɫɤɢ ɧɚɱɧɟɬ ɩɨɢɫɤ ɞɢɫɤɚ. ȿɫɥɢ ɞɢɫɤ
ɭɫɬɚɧɨɜɥɟɧ ɜ ɞɢɫɤɨɜɨɞ,
ɩɪɨɢɝɪɵɜɚɬɟɥɶ ɚɜɬɨɦɚɬɢɱɟɫɤɢ
ɧɚɱɧɟɬ ɟɝɨ ɜɨɫɩɪɨɢɡɜɟɞɟɧɢɟ.
2. ɇɚɠɦɢɬɟ ɤɧɨɩɤɭ EJECT ɧɚ
ɥɢɰɟɜɨɣ ɩɚɧɟɥɢ ɢɥɢ ɩɭɥɶɬɟ Ⱦɍ,
ɱɬɨɛɵ ɨɬɤɪɵɬɶ ɞɢɫɤɨɜɨɞ.
ɁȺɆȿɑȺɇɂȿ: ɇɟ ɜɨɫɩɪɨɢɡɜɨɞɢɬɟ ɞɢɫɤɢ ɩɥɨɯɨɝɨ ɤɚɱɟɫɬɜɚ ɢɥɢ ɩɨɜɪɟɠɞɟɧɧɵɟ ɞɢɫɤɢ, ɬ.ɤ.
ɨɧɢ ɦɨɝɭɬ ɩɨɜɪɟɞɢɬɶ ɥɢɧɡɭ ɩɪɨɢɝɪɵɜɚɬɟɥɹ.
3. ɍɫɬɚɧɨɜɢɬɟ ɞɢɫɤ ɜ ɞɢɫɤɨɜɨɞ
ɍɫɬɚɧɚɜɥɢɜɚɣɬɟ
ɞɢɫɤ, ɤɚɤ
ɩɨɤɚɡɚɧɨ ɧɚ
ɪɢɫɭɧɤɟ, ɱɬɨɛɵ
ɧɟ ɩɨɜɪɟɞɢɬɶ
ɩɪɨɢɝɪɵɜɚɬɟɥɶ
ɢɥɢ ɞɢɫɤ.
4. ɇɚɠɦɢɬɟ ɤɧɨɩɤɭ EJECT, ɱɬɨɛɵ
ɡɚɤɪɵɬɶ ɞɢɫɤɨɜɨɞ ɢ ɧɚɱɚɬɶ
ɜɨɫɩɪɨɢɡɜɟɞɟɧɢɟ.
ȼɈɋɉɊɈɂɁȼȿȾȿɇɂȿ DVD-ȾɂɋɄɈȼ
Ɇȿɇɘ (MENU)
Ɉɛɵɱɧɨ ɷɬɨ ɦɟɧɸ ɜɵɛɨɪɚ ɫɨɞɟɪɠɢɦɨɝɨ DVD-ɞɢɫɤɚ. ȼɵ ɦɨɠɟɬɟ ɢɫɩɨɥɶɡɨɜɚɬɶ
ɤɧɨɩɤɭ MENU ɞɥɹ ɩɪɹɦɨɝɨ ɜɵɛɨɪɚ ɦɟɧɸ ɞɢɫɤɚ. ɋ ɩɨɦɨɳɶɸ ɤɧɨɩɨɤ ɤɭɪɫɨɪɚ ɫɨ
ɫɬɪɟɥɤɚɦɢ ȼɵ ɦɨɠɟɬɟ ɜɵɛɪɚɬɶ ɧɭɠɧɵɣ ɨɛɴɟɤɬ ɦɟɧɸ ɢ ɩɨɞɬɜɟɪɞɢɬɶ ɜɵɛɨɪ, ɧɚɠɚɜ
ɤɧɨɩɤɭ PLAY.
ɄɈɆɉɈɁɂɐɂɂ ɂ ɊȺɁȾȿɅɕ
Ɉɛɵɱɧɨ DVD-ɞɢɫɤ ɫɨɞɟɪɠɢɬ ɧɟɫɤɨɥɶɤɨ ɤɨɦɩɨɡɢɰɢɣ, ɤɚɠɞɚɹ ɢɡ ɤɨɬɨɪɵɯ ɩɨɞɟɥɟɧɚ
ɧɚ ɧɟɫɤɨɥɶɤɨ ɪɚɡɞɟɥɨɜ. ȼɵ ɦɨɠɟɬɟ ɛɵɫɬɪɨ ɜɵɛɪɚɬɶ ɨɞɧɭ ɢɡ ɤɨɦɩɨɡɢɰɢɣ ɢɥɢ
ɨɞɢɧ ɢɡ ɪɚɡɞɟɥɨɜ, ɜɨɫɩɨɥɶɡɨɜɚɜɲɢɫɶ ɰɢɮɪɨɜɵɦɢ ɤɧɨɩɤɚɦɢ.
19
Page 20
ɗɄɋɉɅɍȺɌȺɐɂə
ȼɕȻɈɊ əɁɕɄȺ (LANGUAGE)
DVD-ɞɢɫɤ ɦɨɠɟɬ ɫɨɞɟɪɠɚɬɶ ɡɜɭɤɨɜɵɟ ɞɨɪɨɠɤɢ ɧɚ 8 ɹɡɵɤɚɯ ɦɚɤɫɢɦɭɦ. ȼɨ ɜɪɟɦɹ
ɜɨɫɩɪɨɢɡɜɟɞɟɧɢɹ DVD-ɞɢɫɤɚ, ɫɨɞɟɪɠɚɳɟɝɨ ɦɧɨɝɨ ɡɜɭɤɨɜɵɯ ɞɨɪɨɠɟɤ, ɧɚɠɚɬɢɟɦ ɧɚ
ɤɧɨɩɤɭ AUDIO ɧɚ ɩɭɥɶɬɟ Ⱦɍ ɜɵɛɟɪɢɬɟ ɞɨɪɨɠɤɭ ɧɚ ɧɭɠɧɨɦ ɹɡɵɤɟ.
ɁȺɆȿɑȺɇɂȿ: ɗɬɚ ɮɭɧɤɰɢɹ ɧɟɞɨɫɬɭɩɧɚ ɧɚ ɞɢɫɤɚɯ, ɫɨɞɟɪɠɚɳɢɯ ɧɟɫɤɨɥɶɤɨ
ɩɨɫɥɟɞɨɜɚɬɟɥɶɧɨɫɬɟɣ ɡɜɭɤɨɜɵɯ ɫɢɝɧɚɥɨɜ.
ȼɕȻɈɊ ɋɍȻɌɂɌɊɈȼ ɇȺ ɊȺɁɇɕɏ əɁɕɄȺɏ (SUBTITLE)
DVD-ɩɪɨɢɝɪɵɜɚɬɟɥɶ ɩɨɞɞɟɪɠɢɜɚɟɬ ɫɭɛɬɢɬɪɵ ɧɚ 32 ɹɡɵɤɚɯ (ɦɚɤɫɢɦɭɦ). ȼɨ ɜɪɟɦɹ
ɜɨɫɩɪɨɢɡɜɟɞɟɧɢɹ ɞɢɫɤɨɜ ɧɚɠɚɬɢɟɦ ɧɚ ɤɧɨɩɤɭ SUBTITLE ɧɚ ɩɭɥɶɬɟ Ⱦɍ ɜɵɛɟɪɢɬɟ
ɫɭɛɬɢɬɪɵ ɧɚ ɧɭɠɧɨɦ ɹɡɵɤɟ.
ɁȺɆȿɑȺɇɂȿ: ɗɬɚ ɮɭɧɤɰɢɹ ɧɟɞɨɫɬɭɩɧɚ ɧɚ ɞɢɫɤɚɯ, ɫɨɞɟɪɠɚɳɢɯ ɧɟɫɤɨɥɶɤɨ
ɩɨɫɥɟɞɨɜɚɬɟɥɶɧɨɫɬɟɣ ɡɜɭɤɨɜɵɯ ɫɢɝɧɚɥɨɜ.
ȼɕȻɈɊ ɍȽɅȺ ɋɔȿɆɄɂ (ANGLE)
ɗɬɨɬ DVD-ɩɪɨɢɝɪɵɜɚɬɟɥɶ ɩɨɞɞɟɪɠɢɜɚɟɬ ɮɭɧɤɰɢɸ ɜɵɛɨɪɚ ɭɝɥɚ ɫɴɟɦɤɢ. ɗɬɨ
ɨɡɧɚɱɚɟɬ, ɱɬɨ ȼɵ ɦɨɠɟɬɟ ɩɪɨɫɦɚɬɪɢɜɚɬɶ ɫɰɟɧɵ, ɨɬɫɧɹɬɵɟ ɫ ɪɚɡɧɵɯ ɭɝɥɨɜ ɫɴɟɦɤɢ,
ɫ ɪɚɡɧɵɯ ɬɨɱɟɤ. ɑɬɨɛɵ ɜɵɛɪɚɬɶ ɞɪɭɝɨɣ ɭɝɨɥ ɫɴɟɦɤɢ, ȼɵ ɦɨɠɟɬɟ ɢɫɩɨɥɶɡɨɜɚɬɶ
ɤɧɨɩɤɭ ANGLE. ɇɚɠɚɬɢɟɦ ɧɚ ɤɧɨɩɤɭ ANGLE ɜɵɛɟɪɢɬɟ ɧɭɠɧɵɣ ɭɝɨɥ ɫɴɟɦɤɢ.
ɊȿȽɍɅɂɊɈȼɄȺ ȽɊɈɆɄɈɋɌɂ (VOLUME)
ȼɨ ɜɪɟɦɹ ɜɨɫɩɪɨɢɡɜɟɞɟɧɢɹ ɧɚɠɦɢɬɟ ɤɧɨɩɤɭ VOL+, ɱɬɨɛɵ ɭɜɟɥɢɱɢɬɶ ɝɪɨɦɤɨɫɬɶ,
ɢɥɢ ɤɧɨɩɤɭ VOL-, ɱɬɨɛɵ ɭɦɟɧɶɲɢɬɶ ɝɪɨɦɤɨɫɬɶ.
20
Page 21
ɗɄɋɉɅɍȺɌȺɐɂə
ɤ
ɭ
ȼɈɋɉɊɈɂɁȼȿȾȿɇɂȿ ɎȺɃɅɈȼ MP3
MP3 ɩɪɟɞɫɬɚɜɥɹɟɬ ɫɨɛɨɣ ɬɪɟɬɢɣ ɮɨɪɦɚɬ ɫɠɚɬɢɹ ɡɜɭɤɚ ɦɟɠɞɭɧɚɪɨɞɧɨɝɨ ɫɬɚɧɞɚɪɬɚ
MPEG, ɤɨɬɨɪɵɣ ɫɠɢɦɚɟɬ ɡɜɭɤ ɜ 12 ɪɚɡ. ɂɫɩɨɥɶɡɭɹ ɮɨɪɦɚɬ MP3, ɧɚ ɨɞɢɧ ɞɢɫ
ɦɨɠɟɬ ɛɵɬɶ ɡɚɩɢɫɚɧɨ ɞɨ 600 ɦɢɧɭɬ ɦɭɡɵɤɢ ɫ ɤɚɱɟɫɬɜɨɦ, ɛɥɢɡɤɢɦ ɤ ɤɚɱɟɫɬɜ
ɤɨɦɩɚɤɬ-ɞɢɫɤɨɜ.
Ⱦɨɫɬɭɩɧɨ ɦɧɨɠɟɫɬɜɨ ɪɚɡɥɢɱɧɵɯ ɮɨɪɦɚɬɨɜ ɫɨɯɪɚɧɟɧɢɹ ɩɟɫɟɧ ɮɨɪɦɚɬɚ MP3.
Ɉɛɵɱɧɨ ɨɞɢɧ ɞɢɫɤ MP3 ɫɨɞɟɪɠɢɬ ɧɟɫɤɨɥɶɤɨ ɩɚɩɨɤ, ɚ ɤɚɠɞɚɹ ɩɚɩɤɚ ɫɨɞɟɪɠɢɬ
ɧɟɫɤɨɥɶɤɨ ɮɚɣɥɨɜ (ɩɟɫɟɧ).
ȼ ɪɟɠɢɦɟ ɨɫɬɚɧɨɜɤɢ ɫ ɩɨɦɨɳɶɸ ɤɧɨɩɨɤ ɤɭɪɫɨɪɚ ɫɨ ɫɬɪɟɥɤɚɦɢ ɜɥɟɜɨ/ɜɩɪɚɜɨ
ɜɵɛɟɪɢɬɟ ɤɨɥɨɧɤɭ "PLAY MODE" ɢ ɧɚɠɚɬɢɟɦ ɧɚ ɤɧɨɩɤɢ ɤɭɪɫɨɪɚ ɫɨ ɫɬɪɟɥɤɚɦɢ
ɜɜɟɪɯ/ɜɧɢɡ ɜɵɛɟɪɢɬɟ ɪɟɠɢɦ ɜɨɫɩɪɨɢɡɜɟɞɟɧɢɹ. ɇɚɠɚɜ ɤɧɨɩɤɭ ɤɭɪɫɨɪɚ ɫɨ ɫɬɪɟɥɤɨɣ
ɜɥɟɜɨ ɢɥɢ ɜɩɪɚɜɨ, ɩɨɞɬɜɟɪɞɢɬɟ ɜɵɛɨɪ. Ⱥɧɚɥɨɝɢɱɧɨ, ɧɚɠɚɬɢɟɦ ɧɚ ɤɧɨɩɤɢ ɤɭɪɫɨɪɚ
ɫɨ ɫɬɪɟɥɤɚɦɢ ɜɜɟɪɯ/ɜɧɢɡ ɜɵɛɟɪɢɬɟ ɧɭɠɧɭɸ ɩɚɩɤɭ, ɚ ɡɚɬɟɦ ɧɚɠɦɢɬɟ ɤɧɨɩɤɭ PLAY,
ɱɬɨɛɵ ɜɨɣɬɢ ɜ ɷɬɭ ɩɚɩɤɭ. ɇɚɠɦɢɬɟ ɤɧɨɩɤɭ PLAY, ɱɬɨɛɵ ɜɨɫɩɪɨɢɡɜɟɫɬɢ ɜɵɛɪɚɧɧɭɸ
ɩɟɫɧɸ.
ȼɨ ɜɪɟɦɹ ɜɨɫɩɪɨɢɡɜɟɞɟɧɢɹ ȼɵ ɦɨɠɟɬɟ ɢɫɩɨɥɶɡɨɜɚɬɶ ɤɧɨɩɤɢ ɢ ɞɥɹ ɜɵɛɨɪɚ
ɞɪɭɝɢɯ ɩɟɫɟɧ. ȼɨ ɜɪɟɦɹ ɜɨɫɩɪɨɢɡɜɟɞɟɧɢɹ ɮɚɣɥɨɜ ɆɊ3 ɩɪɨɢɝɪɵɜɚɬɟɥɶ ɦɨɠɟɬ
ɜɨɫɩɪɨɢɡɜɨɞɢɬɶ ɬɨɥɶɤɨ ɫɬɟɪɟɨɮɨɧɢɱɟɫɤɢɣ ɡɜɭɤ. ȼɨ ɜɪɟɦɹ ɜɨɫɩɪɨɢɡɜɟɞɟɧɢɹ
ɮɚɣɥɨɜ ɆɊ3 ɮɭɧɤɰɢɹ ɩɨɢɫɤɚ ɧɟɞɨɫɬɭɩɧɚ. ȼ ɷɬɨɦ ɮɨɪɦɚɬɟ ɧɚ ɞɢɫɤɟ ɦɨɝɭɬ ɛɵɬɶ
ɫɨɯɪɚɧɟɧɵ ɬɵɫɹɱɢ ɮɨɬɨɝɪɚɮɢɣ ɢɥɢ ɮɚɣɥɨɜ MP3.
ȼɈɋɉɊɈɂɁȼȿȾȿɇɂȿ ȾɂɋɄɈȼ HDCD/ɄɈɆɉȺɄɌ-ȾɂɋɄɈȼ
ɉɨ ɭɦɨɥɱɚɧɢɸ ɩɪɨɢɝɪɵɜɚɬɟɥɶ ɛɭɞɟɬ ɩɨɫɥɟɞɨɜɚɬɟɥɶɧɨ ɜɨɫɩɪɨɢɡɜɨɞɢɬɶ ɜɫɟ ɬɪɷɤɢ ɧɚ ɞɢɫɤɟ
HDCD ɢɥɢ CD. ɇɚɠɚɬɢɟɦ ɧɚ ɤɧɨɩɤɢ
ȼɵ ɦɨɠɟɬɟ ɜɵɛɪɚɬɶ ɧɭɠɧɵɣ ɬɪɷɤ.
ɢ (PREV/NEXT SKIP) ɢɥɢ ɰɢɮɪɨɜɵɟ ɤɧɨɩɤɢ
Ɏɭɧɤɰɢɹ Ʉɚɪɚɨɤɟ
ȼɵɩɨɥɧɟɧɢɟ ɮɭɧɤɰɢɢ:
1. ɍɫɬɚɧɨɜɢɬɟ ɞɢɫɤ Ʉɚɪɚɨɤɟ ɢ ɜɤɥɸɱɢɬɟ ɟɝɨ ɧɚ ɜɨɫɩɪɨɢɡɜɟɞɟɧɢɟ. ɍɦɟɧɶɲɢɬɟ
ɝɪɨɦɤɨɫɬɶ.
2. ɉɨɞɤɥɸɱɢɬɟ ɦɢɤɪɨɮɨɧ ɤ ɝɧɟɡɞɭ MIC 1 ɢɥɢ 2. ȼɤɥɸɱɢɬɟ ɦɢɤɪɨɮɨɧ.
3. Ɉɬɪɟɝɭɥɢɪɭɣɬɟ ɭɪɨɜɟɧɶ ɝɪɨɦɤɨɫɬɢ ɧɚ ɥɢɰɟɜɨɣ ɩɚɧɟɥɢ. Ɉɬɪɟɝɭɥɢɪɭɣɬɟ
ɫɬɟɩɟɧɶ ɪɟɜɟɪɛɟɪɚɰɢɢ.
4. ɇɚɠɚɬɢɟɦ ɧɚ ɰɢɮɪɨɜɵɟ ɤɧɨɩɤɢ ɜɵɛɟɪɢɬɟ ɬɪɷɤɢ, ɤɨɬɨɪɵɟ ȼɵ ɯɨɬɢɬɟ
ɜɨɫɩɪɨɢɡɜɟɫɬɢ.
5. ɑɬɨɛɵ ɨɬɤɥɸɱɢɬɶ ɝɨɥɨɫ, ɧɚɠɦɢɬɟ ɤɧɨɩɤɭ CH ɢɧɚɱɧɢɬɟɩɟɬɶ.
6. ɉɨɫɥɟ ɨɤɨɧɱɚɧɢɹ ɩɟɧɢɹ ɜɵɤɥɸɱɢɬɟ ɩɪɨɢɝɪɵɜɚɬɟɥɶ ɢ ɨɬɤɥɸɱɢɬɟ ɦɢɤɪɨɮɨɧ.
- ȿɫɥɢ ɜɨ ɜɪɟɦɹ ɩɟɧɢɹ ɜɨɡɧɢɤɧɟɬ ɮɨɧ, ɩɟɪɟɦɟɫɬɢɬɟ ɦɢɤɪɨɮɨɧ ɩɨɞɚɥɶɲɟ ɨɬ
ɚɤɭɫɬɢɱɟɫɤɢɯ ɫɢɫɬɟɦ ɢɥɢ ɭɦɟɧɶɲɢɬɟ ɝɪɨɦɤɨɫɬɶ ɡɜɭɱɚɧɢɹ.
21
Page 22

ɗɄɋɉɅɍȺɌȺɐɂə
ɤ
ȼɈɋɉɊɈɂɁȼȿȾȿɇɂȿ ȾɂɋɄɈȼ PICTURE CD
ȼɨɫɩɪɨɢɡɜɟɞɟɧɢɟ ɮɚɣɥɨɜ JPEG
1. Ɉɛɵɱɧɨɟ ɜɨɫɩɪɨɢɡɜɟɞɟɧɢɟ
ɍɫɬɚɧɨɜɢɬɟ ɜ ɩɪɨɢɝɪɵɜɚɬɟɥɶ ɞɢɫɤ ɫ ɮɚɣɥɚɦɢ JPEG. ɉɨɫɥɟ ɫɱɢɬɵɜɚɧɢɹ
ɞɢɫɤɚ ɧɚ ɷɤɪɚɧɟ ɛɭɞɭɬ ɨɬɨɛɪɚɠɟɧɵ ɫɨɨɛɳɟɧɢɹ "SMART NAVI" ɢ "ROOT".
Ʌɟɜɚɹ ɤɨɥɨɧɤɚ ɜ ɦɟɧɸ ɩɨɤɚɡɵɜɚɟɬ ɩɨɫɥɟɞɧɢɣ ɭɪɨɜɟɧɶ, ɚ ɩɪɚɜɚɹ - ɦɟɧɸ ɞɥɹ
ɫɥɟɞɭɸɳɟɝɨ ɭɪɨɜɧɹ. ɂɫɩɨɥɶɡɭɹ ɤɧɨɩɤɭ PLAY ɢ ɤɧɨɩɤɢ ɤɭɪɫɨɪɚ ɫɨ ɫɬɪɟɥɤɚɦɢ
ɜɥɟɜɨ/ɜɩɪɚɜɨ, ɜɵɛɟɪɢɬɟ ɩɨɞɦɟɧɸ ɫ ɢɡɨɛɪɚɠɟɧɢɹɦɢ. ɉɪɢ ɩɨɦɨɳɢ ɤɧɨɩɨ
ɤɭɪɫɨɪɚ ɫɨ ɫɬɪɟɥɤɚɦɢ ɜɜɟɪɯ/ɜɧɢɡ ɜɵɛɟɪɢɬɟ ɫɨɞɟɪɠɢɦɨɟ ɦɟɧɸ.
ɇɚɩɪɢɦɟɪ: ɋ ɩɨɦɨɳɶɸ ɤɧɨɩɨɤ ɤɭɪɫɨɪɚ ɜɵɛɟɪɢɬɟ ɢɦɹ ɮɚɣɥɚ-ɢɡɨɛɪɚɠɟɧɢɹ, ɚ
ɡɚɬɟɦ ɧɚɠɦɢɬɟ ɤɧɨɩɤɭ PLAY, ɱɬɨɛɵ ɧɚɱɚɬɶ ɟɝɨ ɜɨɫɩɪɨɢɡɜɟɞɟɧɢɟ. Ɇɧɨɝɢɟ
ɞɢɫɤɢ ɫɨɞɟɪɠɚɬ ɤɪɨɦɟ ɢɡɨɛɪɚɠɟɧɢɣ ɞɪɭɝɭɸ ɢɧɮɨɪɦɚɰɢɸ.
2. ɉɨɜɨɪɨɬ ɢɡɨɛɪɚɠɟɧɢɹ
ɉɨɜɨɪɨɬ ɢɡɨɛɪɚɠɟɧɢɹ ɦɨɠɟɬ ɛɵɬɶ ɜɵɩɨɥɧɟɧ ɜɨ ɜɪɟɦɹ ɨɬɨɛɪɚɠɟɧɢɹ
ɢɡɨɛɪɚɠɟɧɢɹ. ɉɨɫɥɟ ɜɵɛɨɪɚ ɞɪɭɝɨɝɨ ɢɡɨɛɪɚɠɟɧɢɹ ɩɨɜɨɪɨɬ ɛɭɞɟɬ ɨɬɦɟɧɟɧ
ɚɜɬɨɦɚɬɢɱɟɫɤɢ.
Ⱦɨɫɬɭɩɧɵ ɞɜɚ ɪɟɠɢɦɚ ɩɨɜɨɪɨɬɚ: ɉɨɜɨɪɨɬ ɜɥɟɜɨ & ɉɨɜɨɪɨɬ ɜɩɪɚɜɨ. ȼɵ
ɦɨɠɟɬɟ ɢɫɩɨɥɶɡɨɜɚɬɶ ɤɧɨɩɤɢ ɤɭɪɫɨɪɚ ɞɥɹ ɜɵɛɨɪɚ:
“LEFT” ----- ɉɨɜɨɪɨɬ ɜɥɟɜɨ UP ----- ɉɨɜɨɪɨɬ ɜɜɟɪɯ
“RIGHT” ----- ɉɨɜɨɪɨɬ ɜɩɪɚɜɨ DOWN ---- ɉɨɜɨɪɨɬ ɜɧɢɡ
3. ɍɜɟɥɢɱɟɧɢɟ ɢɡɨɛɪɚɠɟɧɢɹ
Ʉɧɨɩɤɚ ZOOM ɢɫɩɨɥɶɡɭɟɬɫɹ ɞɥɹ ɜɤɥɸɱɟɧɢɹ/ɜɵɤɥɸɱɟɧɢɹ ɮɭɧɤɰɢɢ
ɭɜɟɥɢɱɟɧɢɹ ɢɡɨɛɪɚɠɟɧɢɹ ɢ ɜɵɛɨɪɚ ɨɛɥɚɫɬɢ ɭɜɟɥɢɱɟɧɢɹ.
Ʉɨɝɞɚ ɷɬɚ ɮɭɧɤɰɢɹ ɜɤɥɸɱɟɧɚ, ɢɫɩɨɥɶɡɭɣɬɟ ɤɧɨɩɤɢ ɢ ɞɥɹ ɧɚɫɬɪɨɣɤɢ
ɭɜɟɥɢɱɟɧɢɹ ɢɡɨɛɪɚɠɟɧɢɹ. ɂɡɨɛɪɚɠɟɧɢɟ ɧɚ ɷɤɪɚɧɟ ɬɟɥɟɜɢɡɨɪɚ ɛɭɞɟɬ
ɨɬɨɛɪɚɠɚɬɶɫɹ ɜ ɫɨɨɬɜɟɬɫɬɜɭɸɳɟɦ ɮɨɪɦɚɬɟ. ɉɨɫɥɟ ɷɬɨɝɨ ȼɵ ɦɨɠɟɬɟ
ɢɫɩɨɥɶɡɨɜɚɬɶ ɤɧɨɩɤɢ ɤɭɪɫɨɪɚ ɞɥɹ ɜɵɛɨɪɚ ɭɜɟɥɢɱɢɜɚɟɦɨɣ ɨɛɥɚɫɬɢ.
Ʉɨɝɞɚ ȼɵ ɜɵɤɥɸɱɢɬɟ ɷɬɭ ɮɭɧɤɰɢɸ, ɛɭɞɟɬ ɜɨɫɫɬɚɧɨɜɥɟɧ ɨɛɵɱɧɵɣ ɪɚɡɦɟɪ
ɢɡɨɛɪɚɠɟɧɢɹ. ɇɚɠɦɢɬɟ ɤɧɨɩɤɭ MENU, ɱɬɨɛɵ ɜɟɪɧɭɬɶɫɹ ɤ ɝɥɚɜɧɨɦɭ ɦɟɧɸ.
- ȼ ɡɚɜɢɫɢɦɨɫɬɢ ɨɬ ɫɩɨɫɨɛɚ ɩɪɨɢɡɜɨɞɫɬɜɚ ɞɢɫɤɚ ɜɨɫɩɪɨɢɡɜɟɞɟɧɢɟ ɮɚɣɥɨɜ JPEG
ɦɨɠɟɬ ɛɵɬɶ ɜɨɡɦɨɠɧɨ, ɧɨ ɧɟɜɨɡɦɨɠɟɧ ɩɨɜɨɪɨɬ ɢɥɢ ɭɜɟɥɢɱɟɧɢɟ ɢɡɨɛɪɚɠɟɧɢɹ.
22
Page 23
ɎɍɇɄɐɂɂ ȼɈɋɉɊɈɂɁȼȿȾȿɇɂə
ɈɋɌȺɇɈȼɄȺ ȼɈɋɉɊɈɂɁȼȿȾȿɇɂə (STOP)
ȼɨ ɜɪɟɦɹ ɜɨɫɩɪɨɢɡɜɟɞɟɧɢɹ ɧɚɠɦɢɬɟ ɤɧɨɩɤɭ STOP ɧɚ ɩɭɥɶɬɟ Ⱦɍ, ɱɬɨɛɵ ɨɫɬɚɧɨɜɢɬɶ
ɜɨɫɩɪɨɢɡɜɟɞɟɧɢɟ. ɇɚ DVD-ɞɢɫɤɚɯ, ɟɫɥɢ ɩɨɫɥɟ ɨɞɧɨɤɪɚɬɧɨɝɨ ɧɚɠɚɬɢɹ ɧɚ ɤɧɨɩɤɭ
STOP ȼɵ ɧɚɠɦɟɬɟ ɤɧɨɩɤɭ PLAY, ɩɪɨɢɝɪɵɜɚɬɟɥɶ ɜɨɡɨɛɧɨɜɢɬ ɜɨɫɩɪɨɢɡɜɟɞɟɧɢɟ ɫ
ɬɨɱɤɢ ɨɫɬɚɧɨɜɤɢ.
ɉȺɍɁȺ ȼɈɋɉɊɈɂɁȼȿȾȿɇɂə (PAUSE)
ɇɚɠɦɢɬɟ ɤɧɨɩɤɭ PAUSE/STEP ɧɚ ɩɭɥɶɬɟ Ⱦɍ, ɱɬɨɛɵ ɜɤɥɸɱɢɬɶ ɪɟɠɢɦ ɩɚɭɡɵ, ɚɡɚɬɟɦ
ɩɨɫɥɟɞɨɜɚɬɟɥɶɧɨ ɧɚɠɢɦɚɣɬɟ ɤɧɨɩɤɭ, ɱɬɨɛɵ ɜɨɫɩɪɨɢɡɜɨɞɢɬɶ ɞɢɫɤ ɩɨɤɚɞɪɨɜɨ.
ɉɈȼɌɈɊɇɈȿ ȼɈɋɉɊɈɂɁȼȿȾȿɇɂȿ (REPEAT)
1. ɂɫɩɨɥɶɡɭɣɬɟ ɤɧɨɩɤɭ REPEAT ɞɥɹ ɜɵɛɨɪɚ ɪɟɠɢɦɚ ɩɨɜɬɨɪɚ ɤɨɦɩɨɡɢɰɢɢ,
ɪɚɡɞɟɥɚ, ɬɪɷɤɚ ɢ ɞɢɫɤɚ (ɜ ɡɚɜɢɫɢɦɨɫɬɢ ɨɬ ɢɫɩɨɥɶɡɭɟɦɨɝɨ ɞɢɫɤɚ), ɚ ɬɚɤɠɟ ɞɥɹ
ɨɬɦɟɧɵ ɪɟɠɢɦɚ ɩɨɜɬɨɪɚ.
2. ɂɫɩɨɥɶɡɭɣɬɟ ɤɧɨɩɤɭ A-B ɞɥɹ ɜɵɛɨɪɚ ɪɟɠɢɦɚ ɩɨɜɬɨɪɚ ɮɪɚɝɦɟɧɬɚ A-B. ȼ
ɧɚɱɚɥɶɧɨɣ ɬɨɱɤɟ (Ⱥ) ɧɚɠɦɢɬɟ ɤɧɨɩɤɭ ɨɞɢɧ ɪɚɡ, ɚɜɤɨɧɟɱɧɨɣɬɨɱɤɟ (ȼ) ɧɚɠɦɢɬɟ
ɤɧɨɩɤɭ ɞɜɚɠɞɵ. Ɍɪɟɬɶɟ ɧɚɠɚɬɢɟ ɩɪɢɜɨɞɢɬ ɤ ɨɬɤɥɸɱɟɧɢɸ ɪɟɠɢɦɚ ɩɨɜɬɨɪɚ.
- ɇɟɤɨɬɨɪɵɟ ɞɢɫɤɢ ɧɟ
ɩɨɞɞɟɪɠɢɜɚɸɬ ɮɭɧɤɰɢɸ
ɉɈɂɋɄ ɉɈ ȼɊȿɆȿɇɂ
ȼɵ ɦɨɠɟɬɟ ɢɫɩɨɥɶɡɨɜɚɬɶ ɤɧɨɩɤɭ SEARCH ɞɥɹ ɩɨɢɫɤɚ ɩɨ ɜɪɟɦɟɧɢ, ɱɬɨɛɵ ɧɚɱɚɬɶ
ɜɨɫɩɪɨɢɡɜɟɞɟɧɢɟ ɫ ɬɨɱɤɢ ɫ ɨɩɪɟɞɟɥɟɧɧɵɦ ɜɪɟɦɟɧɟɦ.
ȼɨ ɜɪɟɦɹ ɜɨɫɩɪɨɢɡɜɟɞɟɧɢɹ DVD-ɞɢɫɤɚ ɨɞɢɧ ɪɚɡ ɧɚɠɦɢɬɟ ɤɧɨɩɤɭ SEARCH ɢɧɚ
ɷɤɪɚɧɟ ɬɟɥɟɜɢɡɨɪɚ ɛɭɞɟɬ ɨɬɨɛɪɚɠɟɧɚ ɤɨɦɩɨɡɢɰɢɹ ɢɥɢ ɪɚɡɞɟɥ. ɉɨɫɥɟ ɷɬɨɝɨ ɫ
ɩɨɦɨɳɶɸ ɰɢɮɪɨɜɵɯ ɤɧɨɩɨɤ ȼɵ ɦɨɠɟɬɟ ɜɵɛɪɚɬɶ ɧɭɠɧɭɸ ɤɨɦɩɨɡɢɰɢɸ/ɪɚɡɞɟɥ.
Ⱦɜɚɠɞɵ ɧɚɠɦɢɬɟ ɤɧɨɩɤɭ SEARCH, ɬɟɩɟɪɶ ȼɵ ɦɨɠɟɬɟ ɢɫɩɨɥɶɡɨɜɚɬɶ ɰɢɮɪɨɜɵɟ
ɤɧɨɩɤɢ ɞɥɹ ɜɜɨɞɚ ɧɭɠɧɨɝɨ ɜɪɟɦɟɧɢ (ɱɚɫɵ, ɦɢɧɭɬɵ, ɫɟɤɭɧɞɵ) ɢ ɩɪɨɢɝɪɵɜɚɬɟɥɶ
ɧɚɱɧɟɬ ɜɨɫɩɪɨɢɡɜɟɞɟɧɢɟ ɫ ɜɜɟɞɟɧɧɨɝɨ ɜɪɟɦɟɧɢ.
- ɇɟɤɨɬɨɪɵɟ DVD-ɞɢɫɤɢ ɧɟ ɩɨɞɞɟɪɠɢɜɚɸɬ ɮɭɧɤɰɢɸ ɩɨɢɫɤɚ ɩɨ ɜɪɟɦɟɧɢ.
23
Page 24

ɎɍɇɄɐɂɂ ȼɈɋɉɊɈɂɁȼȿȾȿɇɂə|
ɍɋɄɈɊȿɇɇɕɃ ɉɊɈɋɆɈɌɊ (ɉɊɈɋɅɍɒɂȼȺɇɂȿ) ȼɉȿɊȿȾ ɂ ɇȺɁȺȾ
ɇɚɠɚɬɢɟɦ ɧɚ ɤɧɨɩɤɭ ɢɥɢ ɜɤɥɸɱɢɬɟ ɭɫɤɨɪɟɧɧɵɣ ɩɪɨɫɦɨɬɪ ɜɩɟɪɟɞ ɢɥɢ ɧɚɡɚɞ.
ɁȺɆȿȾɅȿɇɇɈȿ ȼɈɋɉɊɈɂɁȼȿȾȿɇɂȿ ȼɉȿɊȿȾ ɂɅɂ ɇȺɁȺȾ
ɇɚɠɚɬɢɟɦ ɧɚ ɤɧɨɩɤɭ SLOW ɜɤɥɸɱɢɬɟ ɪɟɠɢɦ ɡɚɦɟɞɥɟɧɧɨɝɨ ɜɨɫɩɪɨɢɡɜɟɞɟɧɢɹ.
- ɇɚ ɞɢɫɤɚɯ CD ɢ MP3 ɡɚɦɟɞɥɟɧɧɨɟ ɜɨɫɩɪɨɢɡɜɟɞɟɧɢɟ ɧɟɜɨɡɦɨɠɧɨ.
ɂɇɎɈɊɆȺɐɂɈɇɇɕɃ ȾɂɋɉɅȿɃ ȾɂɋɄȺ
ɇɚɠɦɢɬɟ ɤɧɨɩɤɭ DISPLAY ɧɚ ɩɭɥɶɬɟ Ⱦɍ, ɱɬɨɛɵ ɨɬɨɛɪɚɡɢɬɶ ɢɧɮɨɪɦɚɰɢɸ ɨ ɞɢɫɤɟ.
ȼɈɋɉɊɈɂɁȼȿȾȿɇɂȿ (PLAY)
ɇɚɠɦɢɬɟ ɤɧɨɩɤɭ PLAY, ɱɬɨɛɵ ɧɚɱɚɬɶ ɜɨɫɩɪɨɢɡɜɟɞɟɧɢɟ. ɇɚɠɦɢɬɟ ɤɧɨɩɤɭ POWER
ɧɚ ɩɭɥɶɬɟ Ⱦɍ, ɱɬɨɛɵ ɩɟɪɟɤɥɸɱɢɬɶ ɩɪɨɢɝɪɵɜɚɬɟɥɶ ɜ ɞɟɠɭɪɧɵɣ ɪɟɠɢɦ, ɚɡɚɬɟɦ
ɜɧɨɜɶ ɧɚɠɦɢɬɟ ɤɧɨɩɤɭ POWER ɧɚ ɩɭɥɶɬɟ Ⱦɍ, ɱɬɨɛɵ ɜɨɡɨɛɧɨɜɢɬɶ
ɜɨɫɩɪɨɢɡɜɟɞɟɧɢɟ. ȿɫɥɢ ɜ ɬɟɱɟɧɢɟ ɧɟɫɤɨɥɶɤɢɯ ɦɢɧɭɬ ȼɵ ɧɟ ɧɚɠɦɟɬɟ ɧɢ ɨɞɧɨɣ
ɤɧɨɩɤɢ, ɩɪɨɢɝɪɵɜɚɬɟɥɶ ɚɜɬɨɦɚɬɢɱɟɫɤɢ ɜɤɥɸɱɢɬ ɫɤɪɢɧɫɷɣɜɟɪ ɢ ɩɟɪɟɤɥɸɱɢɬɫɹ ɜ
ɞɟɠɭɪɧɵɣ ɪɟɠɢɦ.
ȼɈɋɉɊɈɂɁȼȿȾȿɇɂȿ ɉɈ ɉɊɈȽɊȺɆɆȿ
ɋ ɩɨɦɨɳɶɸ ɤɧɨɩɤɢ PROGRAM ɜɤɥɸɱɢɬɟ ɪɟɠɢɦ ɜɨɫɩɪɨɢɡɜɟɞɟɧɢɹ ɩɨ ɩɪɨɝɪɚɦɦɟ
ɞɢɫɤɨɜ DVD ɢ CD.
ɉɪɨɝɪɚɦɦɢɪɨɜɚɧɢɟ:
1. ȼ ɪɟɠɢɦɟ ɨɫɬɚɧɨɜɤɢ ɧɚɠɦɢɬɟ ɤɧɨɩɤɭ PROGRAM, ɱɬɨɛɵ ɩɟɪɟɤɥɸɱɢɬɶɫɹ ɜ
ɪɟɠɢɦ ɩɪɨɝɪɚɦɦɢɪɨɜɚɧɢɹ.
2. ɋ ɩɨɦɨɳɶɸ ɰɢɮɪɨɜɵɯ ɤɧɨɩɨɤ ɡɚɩɪɨɝɪɚɦɦɢɪɭɣɬɟ ɧɭɠɧɵɣ ɬɪɷɤɢ ɢɥɢ ɪɚɡɞɟɥ.
3. ɉɨɜɬɨɪɢɬɟ ɲɚɝ 2 ɞɥɹ ɩɪɨɝɪɚɦɦɢɪɨɜɚɧɢɹ ɨɫɬɚɥɶɧɵɯ ɬɪɷɤɨɜ ɢɥɢ ɪɚɡɞɟɥɨɜ.
4. ɉɪɢ ɩɨɦɨɳɢ ɤɧɨɩɨɤ ɤɭɪɫɨɪɚ ɫɨ ɫɬɪɟɥɤɚɦɢ ɩɟɪɟɦɟɫɬɢɬɟ ɤɭɪɫɨɪ ɜ ɫɬɪɨɤɭ
"START", ɚ ɡɚɬɟɦ ɧɚɠɦɢɬɟ ɤɧɨɩɤɭ PLAY, ɱɬɨɛɵ ɧɚɱɚɬɶ ɜɨɫɩɪɨɢɡɜɟɞɟɧɢɟ ɩɨ
ɩɪɨɝɪɚɦɦɟ.
24
Page 25

ɇȺɋɌɊɈɃɄȺ ɋɂɋɌȿɆɕ
ɍȼȿɅɂɑȿɇɂȿ ɂɁɈȻɊȺɀȿɇɂə (ZOOM)
ɑɬɨɛɵ ɭɜɟɥɢɱɢɬɶ ɢɥɢ ɭɦɟɧɶɲɢɬɶ ɢɡɨɛɪɚɠɟɧɢɟ, ɧɚɠɢɦɚɣɬɟ ɤɧɨɩɤɭ ZOOM ɧɚ
ɩɭɥɶɬɟ ɞɢɫɬɚɧɰɢɨɧɧɨɝɨ ɭɩɪɚɜɥɟɧɢɹ. Ʉɚɠɞɨɟ ɧɚɠɚɬɢɟ ɩɪɢɜɨɞɢɬ ɤ ɢɡɦɟɧɟɧɢɸ
ɪɟɠɢɦɚ ɜ ɫɥɟɞɭɸɳɟɦ ɩɨɪɹɞɤɟ: ɭɜɟɥɢɱɟɧɢɟ ɜ 2 ɪɚɡɚ, ɭɜɟɥɢɱɟɧɢɟ ɜ 3 ɪɚɡɚ,
ɭɜɟɥɢɱɟɧɢɟ ɜ 4 ɪɚɡɚ ɢɥɢ ɭɦɟɧɶɲɟɧɢɟ ɜ 2 ɪɚɡɚ, ɭɦɟɧɶɲɟɧɢɟ ɜ 3 ɪɚɡɚ, ɭɦɟɧɶɲɟɧɢɟ
ɜ 4 ɪɚɡɚ ɢɥɢ ɜɨɡɜɪɚɬ ɤ ɨɛɵɱɧɨɦɭ ɪɚɡɦɟɪɭ ɢɡɨɛɪɚɠɟɧɢɹ.
Ɇȿɇɘ ɇȺɋɌɊɈɃɄɂ ɉȺɊȺɆȿɌɊɈȼ (SETUP MENU)
ȼ ɪɟɠɢɦɟ ɨɫɬɚɧɨɜɤɢ ɧɚɠɦɢɬɟ ɤɧɨɩɤɭ SETUP ɧɚ ɩɭɥɶɬɟ ɞɢɫɬɚɧɰɢɨɧɧɨɝɨ
ɭɩɪɚɜɥɟɧɢɹ ɢ ɧɚ ɷɤɪɚɧɟ ɩɨɹɜɢɬɫɹ ɝɥɚɜɧɨɟ ɦɟɧɸ. ɗɬɨ ɦɟɧɸ ɫɨɞɟɪɠɢɬ ɫɥɟɞɭɸɳɢɟ
ɩɨɞɦɟɧɸ: GENERAL SETUP, AUDIO SETUP, VIDEO SETUP, Dolby Setup ɢ
PREFERENCE SETUP.
ȼɵɩɨɥɧɟɧɢɟ:
1. ɇɚɠɦɢɬɟ ɤɧɨɩɤɭ SETUP, ɱɬɨɛɵ ɜɨɣɬɢ ɜ ɦɟɧɸ ɧɚɫɬɪɨɣɤɢ ɩɚɪɚɦɟɬɪɨɜ.
2. ɉɪɢ ɩɨɦɨɳɢ ɤɧɨɩɨɤ ɤɭɪɫɨɪɚ ɫɨ ɫɬɪɟɥɤɚɦɢ ɜɥɟɜɨ/ɜɩɪɚɜɨ ɜɵɛɟɪɢɬɟ ɩɚɪɚɦɟɬɪ,
ɤɨɬɨɪɵɣ ȼɵ ɯɨɬɢɬɟ ɧɚɫɬɪɨɢɬɶ.
3. ɇɚɠɦɢɬɟ ɤɧɨɩɤɭ PLAY, ɱɬɨɛɵ ɜɨɣɬɢ ɜ ɩɨɞɦɟɧɸ.
4. ɇɚɠɚɬɢɟɦ ɧɚ ɤɧɨɩɤɢ ɤɭɪɫɨɪɚ ɫɨ ɫɬɪɟɥɤɚɦɢ ɜɜɟɪɯ/ɜɧɢɡ ɜɵɛɟɪɢɬɟ ɩɚɪɚɦɟɬɪ
ɩɨɞɦɟɧɸ, ɚ ɡɚɬɟɦ ɧɚɠɦɢɬɟ ɤɧɨɩɤɭ ɤɭɪɫɨɪɚ ɫɨ ɫɬɪɟɥɤɨɣ ɜɩɪɚɜɨ, ɱɬɨɛɵ ɜɨɣɬɢ ɜ
ɪɟɠɢɦ ɭɫɬɚɧɨɜɤɢ.
5. ɋ ɩɨɦɨɳɶɸ ɤɧɨɩɨɤ ɤɭɪɫɨɪɚ ɫɨ ɫɬɪɟɥɤɚɦɢ ɜɜɟɪɯ/ɜɧɢɡ ɜɵɛɟɪɢɬɟ ɧɭɠɧɵɣ
ɩɚɪɚɦɟɬɪ ɢ ɧɚɠɦɢɬɟ ɤɧɨɩɤɭ PLAY, ɱɬɨɛɵ ɩɨɞɬɜɟɪɞɢɬɶ ɜɵɛɨɪ. ɑɬɨɛɵ
ɜɟɪɧɭɬɶɫɹ ɜ ɩɨɞɦɟɧɸ, ɧɚɠɦɢɬɟ ɤɧɨɩɤɭ ɤɭɪɫɨɪɚ ɫɨ ɫɬɪɟɥɤɨɣ ɜɥɟɜɨ, ɚɡɚɬɟɦ
ɜɵɛɟɪɢɬɟ MAIN PAGE, ɱɬɨɛɵ ɜɟɪɧɭɬɶɫɹ ɜ ɝɥɚɜɧɨɟ ɦɟɧɸ.
6. ɇɚɠɦɢɬɟ ɤɧɨɩɤɭ SETUP, ɱɬɨɛɵ ɜɵɣɬɢ ɢɡ ɦɟɧɸ ɧɚɫɬɪɨɣɤɢ ɩɚɪɚɦɟɬɪɨɜ.
- ɇɚɫɬɪɨɣɤɚ ɩɚɪɚɦɟɬɪɨɜ ɩɨɥɶɡɨɜɚɬɟɥɹ PREFERENCE SETUP ɦɨɠɟɬ ɛɵɬɶ
ɜɵɩɨɥɧɟɧɚ ɬɨɥɶɤɨ ɜ ɪɟɠɢɦɟ ɨɫɬɚɧɨɜɤɢ.
Ƚɥɚɜɧɨɟ ɦɟɧɸ (Main menu)
ȼ ɷɬɨɦ ɦɟɧɸ ȼɵ ɦɨɠɟɬɟ ɜɵɛɪɚɬɶ ɹɡɵɤ, ɬɟɥɟɜɢɡɢɨɧɧɵɣ ɪɟɠɢɦ, ɮɨɪɦɚɬ
ɢɡɨɛɪɚɠɟɧɢɹ ɢ ɮɭɧɤɰɢɢ ɨɝɪɚɧɢɱɟɧɢɹ ɞɨɫɬɭɩɚ, ɚ ɬɚɤɠɟ ɜɵɛɪɚɬɶ ɪɟɠɢɦ
ɪɚɛɨɬɵ ɰɢɮɪɨɜɨɝɨ ɢ ɚɧɚɥɨɝɨɜɨɝɨ ɜɵɯɨɞɨɜ, ɞɢɧɚɦɢɱɟɫɤɨɝɨ ɞɢɚɩɚɡɨɧɚ,
ɬɢɩɵ ɚɤɭɫɬɢɱɟɫɤɢɯ ɫɢɫɬɟɦ ɩɨ ɫɨɛɫɬɜɟɧɧɨɦɭ ɠɟɥɚɧɢɸ ɢɥɢ ɜ ɫɨɨɬɜɟɬɫɬɜɢɢ
ɫ ɜɨɫɩɪɨɢɡɜɨɞɢɦɵɦ ɞɢɫɤɨɦ.
ɇɚɠɦɢɬɟ ɤɧɨɩɤɭ SETUP ɧɚ ɩɭɥɶɬɟ Ⱦɍ. ɇɚ ɷɤɪɚɧɟ ɬɟɥɟɜɢɡɨɪɚ ɛɭɞɟɬ
ɨɬɨɛɪɚɠɟɧɨ ɝɥɚɜɧɨɟ ɦɟɧɸ (ɫɦ.ɧɢɠɟ). ɇɚɠɦɢɬɟ ɤɧɨɩɤɭ Ź, ɱɬɨɛɵ ɜɵɛɪɚɬɶ
ɦɟɧɸ ɧɚɫɬɪɨɣɤɢ ɩɚɪɚɦɟɬɪɨɜ. ɇɚɠɦɢɬɟ ɤɧɨɩɤɭ SETUP, ɱɬɨɛɵ ɜɵɣɬɢ ɢɡ
ɝɥɚɜɧɨɝɨ ɦɟɧɸ.
25
Page 26

ɇȺɋɌɊɈɃɄȺ ɋɂɋɌȿɆɕ
A
- - General Setup Page - -
TV Display
Angle Mark
OSD Lang
Captions
Screen Saver
Last Memory
Logo Type
SHOW KEY LED
Go to General Setup Page
ɋɬɪɚɧɢɰɚ ɧɚɫɬɪɨɣɤɢ ɨɛɳɢɯ ɩɚɪɚɦɟɬɪɨɜ (General Setup)
ɇɚɠɚɬɢɟɦ ɧɚ ɤɧɨɩɤɢ Ÿ/ź ɜɵɛɟɪɢɬɟ ĀTV Displayā ɢ ɩɟɪɟɣɞɢɬɟ ɜ ɦɟɧɸ ɫɩɪɚɜɚ, ɤɚɤ
ɩɨɤɚɡɚɧɨ ɧɢɠɟ, ɚ ɡɚɬɟɦ ɧɚɠɦɢɬɟ ɤɧɨɩɤɭ Ź, ɱɬɨɛɵ ɜɨɣɬɢ ɜ ɦɟɧɸ.
General Audio Dolby Video Preference
LB
On
ENG
On
On
On
DEF
On
- - General Setup Page - -
TVDisplay LB Normal/ PS
ngleMark On Normal/LB
OSD Lang ENG Wide
Captions On
Screen Saver On
Last memory setup On
Display Screen Blue
Set TV Display Mode
26
Page 27

ɇȺɋɌɊɈɃɄȺ ɋɂɋɌȿɆɕ
ɇȺɋɌɊɈɃɄȺ ɈȻɓɂɏ ɉȺɊȺɆȿɌɊɈȼ (GENERAL SETUP)
ɇɚɫɬɪɨɣɤɚ ɨɛɳɢɯ ɩɚɪɚɦɟɬɪɨɜ ɜɵɩɨɥɧɹɟɬɫɹ ɫɥɟɞɭɸɳɢɦ ɨɛɪɚɡɨɦ:
1. TV DISPLAY (ɮɨɪɦɚɬ ɢɡɨɛɪɚɠɟɧɢɹ)
ɗɬɨɬ ɩɪɨɢɝɪɵɜɚɬɟɥɶ ɩɨɞɞɟɪɠɢɜɚɟɬ ɮɨɪɦɚɬɵ ɢɡɨɛɪɚɠɟɧɢɹ NORMAL/PS,
NORMAL/LB ɢ WIDE.
2. ANGLE MARK (ɢɧɞɢɤɚɬɨɪ ɭɝɥɚ ɫɴɟɦɤɢ)
ɇɟɤɨɬɨɪɵɟ ɪɚɡɞɟɥɵ ɧɚ ɧɟɤɨɬɨɪɵɯ DVD-ɞɢɫɤɚɯ ɦɨɝɭɬ ɜɤɥɸɱɚɬɶ ɫɰɟɧɵ,
ɨɬɫɧɹɬɵɟ ɫ ɪɚɡɧɵɯ ɭɝɥɨɜ ɫɴɟɦɤɢ. ȿɫɥɢ ɩɚɪɚɦɟɬɪ Angle Mark ɜɤɥɸɱɟɧ (“ON”),
ɜɨ ɜɪɟɦɹ ɜɨɫɩɪɨɢɡɜɟɞɟɧɢɹ ɷɬɢɯ ɫɰɟɧ ɧɚ ɷɤɪɚɧɟ ɛɭɞɟɬ ɩɨɹɜɥɹɬɶɫɹ ɢɧɞɢɤɚɬɨɪ
ɭɝɥɚ ɫɴɟɦɤɢ. ȼ ɷɬɨɦ ɫɥɭɱɚɟ ȼɵ ɦɨɠɟɬɟ ɢɫɩɨɥɶɡɨɜɚɬɶ ɤɧɨɩɤɭ ANGLE ɞɥɹ
ɜɵɛɨɪɚ ɞɪɭɝɨɝɨ ɭɝɥɚ ɫɴɟɦɤɢ (ɩɪɨɫɦɨɬɪɚ). ȿɫɥɢ ɩɚɪɚɦɟɬɪ Angle Mark
ɜɵɤɥɸɱɟɧ (“OFF”), ɢɧɞɢɤɚɬɨɪ ɭɝɥɚ ɫɴɟɦɤɢ ɧɟ ɛɭɞɟɬ ɨɬɨɛɪɚɠɚɬɶɫɹ ɧɚ ɷɤɪɚɧɟ.
3. OSD LANG (ɹɡɵɤ ɨɬɨɛɪɚɠɟɧɢɹ ɷɤɪɚɧɧɨɝɨ ɞɢɫɩɥɟɹ)
ȼɵ ɦɨɠɟɬɟ ɩɨ ɫɨɛɫɬɜɟɧɧɨɦɭ ɠɟɥɚɧɢɸ ɜɵɛɪɚɬɶ ɪɚɡɥɢɱɧɵɟ ɹɡɵɤɢ
ɨɬɨɛɪɚɠɟɧɢɹ ɷɤɪɚɧɧɨɝɨ ɞɢɫɩɥɟɹ ɧɚ ɷɤɪɚɧɟ ɬɟɥɟɜɢɡɨɪɚ.
4. CAPTIONS (ɫɤɪɵɬɵɟ ɫɭɛɬɢɬɪɵ)
ɇɟɤɨɬɨɪɵɟ DVD-ɞɢɫɤɢ ɫɨɞɟɪɠɚɬ ɫɤɪɵɬɵɟ ɫɭɛɬɢɬɪɵ. ɂɫɩɨɥɶɡɭɹ ɷɬɨɬ
ɩɚɪɚɦɟɬɪ, ȼɵ ɦɨɠɟɬɟ ɜɤɥɸɱɢɬɶ ɢɥɢ ɜɵɤɥɸɱɢɬɶ ɫɤɪɵɬɵɟ ɫɭɛɬɢɬɪɵ.
5. SCREEN SAVER (ɫɤɪɢɧɫɷɣɜɟɪ)
ȼɵɛɟɪɢɬɟ "ON" (ȼɄɅ) ɢ, ɟɫɥɢ ɜ ɬɟɱɟɧɢɟ ɨɩɪɟɞɟɥɟɧɧɨɝɨ ɜɪɟɦɟɧɢ ȼɵ ɧɟ
ɛɭɞɟɬɟ ɧɚɠɢɦɚɬɶ ɧɢ ɨɞɧɨɣ ɤɧɨɩɤɢ, ɩɪɨɢɝɪɵɜɚɬɟɥɶ ɚɜɬɨɦɚɬɢɱɟɫɤɢ ɜɤɥɸɱɢɬ
ɫɤɪɢɧɫɷɣɜɟɪ.
6. LAST MEMORY (ɩɚɦɹɬɶ ɩɨɫɥɟɞɧɟɝɨ ɫɨɫɬɨɹɧɢɹ)
ȼɵ ɦɨɠɟɬɟ ɜɤɥɸɱɢɬɶ (ON) ɢɥɢ ɜɵɤɥɸɱɢɬɶ (OFF) ɮɭɧɤɰɢɸ ɩɚɦɹɬɢ
ɩɨɫɥɟɞɧɟɝɨ ɫɨɫɬɨɹɧɢɹ. ȿɫɥɢ ȼɵ ɜɵɛɟɪɟɬɟ ON, ɩɨɫɥɟ ɜɤɥɸɱɟɧɢɹ
ɩɪɨɢɝɪɵɜɚɬɟɥɹ ɜɨɫɩɪɨɢɡɜɟɞɟɧɢɟ ɛɭɞɟɬ ɜɨɡɨɛɧɨɜɥɟɧɨ ɫ ɩɨɫɥɟɞɧɟɣ ɬɨɱɤɢ
ɨɫɬɚɧɨɜɤɢ.
7. LOGO TYPE (ɥɨɝɨɬɢɩ)
“Default”: Ȼɭɞɟɬ ɨɬɨɛɪɚɠɟɧɨ ɩɟɪɜɨɧɚɱɚɥɶɧɨɟ ɢɡɨɛɪɚɠɟɧɢɟ.
“Jacket”: ȼ ɤɚɱɟɫɬɜɟ ɩɟɪɜɨɧɚɱɚɥɶɧɨɝɨ ɢɡɨɛɪɚɠɟɧɢɹ ɛɭɞɟɬ ɢɫɩɨɥɶɡɨɜɚɧɚ
ɨɛɥɨɠɤɚ. ɇɟɤɨɬɨɪɵɟ DVD-ɞɢɫɤɢ ɫɨɞɟɪɠɚɬ ɨɛɥɨɠɤɭ.
“Captured”: ɢɫɩɨɥɶɡɭɸɬɫɹ ɫɩɟɰɢɚɥɶɧɵɟ ɢɡɨɛɪɚɠɟɧɢɹ.
27
Page 28

ɇȺɋɌɊɈɃɄȺ ɋɂɋɌȿɆɕ
ɋɬɪɚɧɢɰɚ ɧɚɫɬɪɨɣɤɢ ɩɚɪɚɦɟɬɪɨɜ ɡɜɭɤɚ (Audio Setup)
ɉɨɫɥɟ ɧɚɫɬɪɨɣɤɢ ɨɛɳɢɯ ɩɚɪɚɦɟɬɪɨɜ ɩɪɨɢɝɪɵɜɚɬɟɥɹ ɧɚɠɦɢɬɟ ɤɧɨɩɤɭ Ż ɢ ɜɟɪɧɢɬɟɫɶ ɜ
ɝɥɚɜɧɨɟ ɦɟɧɸ, ɚ ɡɚɬɟɦ ɧɚɠɦɢɬɟ ɤɧɨɩɤɭ Ź, ɱɬɨɛɵ ɜɵɛɪɚɬɶ ɩɚɪɚɦɟɬɪɵ ɡɜɭɤɚ. ɑɬɨɛɵ
ɜɨɣɬɢ ɜ ɦɟɧɸ ɧɚɫɬɪɨɣɤɢ ɩɚɪɚɦɟɬɪɨɜ ɡɜɭɤɚ, ɩɨɤɚɡɚɧɧɨɟ ɧɢɠɟ, ɧɚɠɦɢɬɟ ɤɧɨɩɤɭ PLAY
ɢɥɢ ɤɧɨɩɤɭ ź:
- - Audio Setup Page - -
Speaker Setup
SPDIF Setup
Dolby Digital Setup
Channel Delay
Equalizer
3D Processing
HDCD
Karaoke Setup
Go To Audio Setup Page
ɋɬɪɚɧɢɰɚ ɧɚɫɬɪɨɣɤɢ ɚɤɭɫɬɢɱɟɫɤɢɯ ɫɢɫɬɟɦ (Speaker Setup)
ɇɚɠɚɬɢɟɦ ɧɚ ɤɧɨɩɤɢ Ÿ/ź ɧɚ ɫɬɪɚɧɢɰɟ Audio Setup ɜɵɛɟɪɢɬɟ "Speaker
Setup", ɚ ɡɚɬɟɦ ɧɚɠɦɢɬɟ ɤɧɨɩɤɭ Play, ɱɬɨɛɵ ɩɟɪɟɣɬɢ ɧɚ ɫɬɪɚɧɢɰɭ
ɧɚɫɬɪɨɣɤɢ ɚɤɭɫɬɢɱɟɫɤɢɯ ɫɢɫɬɟɦ. ɋ ɩɨɦɨɳɶɸ ɤɧɨɩɨɤ Ÿ/ź ɜɵɛɟɪɢɬɟ
ɪɟɠɢɦ ɡɜɭɱɚɧɢɹ, ɮɪɨɧɬɚɥɶɧɵɟ, ɰɟɧɬɪɚɥɶɧɭɸ ɢ ɬɵɥɨɜɵɟ ɚɤɭɫɬɢɱɟɫɤɢɟ
ɫɢɫɬɟɦɵ, ɫɚɛɜɭɮɟɪ ɢɥɢ ɮɭɧɤɰɢɸ ɤɨɦɩɪɟɫɫɢɢ ɞɢɧɚɦɢɱɟɫɤɨɝɨ ɞɢɚɩɚɡɨɧɚ
ɢɥɢ ɩɪɨɱɢɟ ɮɭɧɤɰɢɢ.
28
Page 29

ɇȺɋɌɊɈɃɄȺ ɋɂɋɌȿɆɕ
- - Speaker Setup Page - -
Downmix
Front Speaker
CPlay Speaker
Rear Speaker
Subwoofer
Tes t To ne
Dialog
Post DRC
Set Downmix Mode
LT/RT
big
small
small
On
off
00
Auto
LT/ RT
Stereo
V SURR
5.1ch
ȼɵɛɨɪ ɪɟɠɢɦɚ ɫɦɟɲɢɜɚɧɢɹ ɤɚɧɚɥɨɜ (Downmix)
“LT/RT”: ɡɜɭɤɨɜɨɣ ɷɮɮɟɤɬ ɥɟɜɨɝɨ ɢ ɩɪɚɜɨɝɨ ɤɚɧɚɥɨɜ.
“Stereo”: ɨɛɵɱɧɨɟ ɫɬɟɪɟɨɮɨɧɢɱɟɫɤɨɟ ɡɜɭɱɚɧɢɟ.
“V SURR”: ɨɛɴɟɦɧɨɟ ɡɜɭɱɚɧɢɟ.
“5.1ch”: 5.1-ɤɚɧɚɥɶɧɵɣ ɡɜɭɤ. OFF: ȼɵɤɥɸɱɟɧɨ
- ȿɫɥɢ ɭɫɢɥɢɬɟɥɶ ɫɨɜɦɟɫɬɢɦ ɬɨɥɶɤɨ ɫ 2-ɤɚɧɚɥɶɧɵɦ ɡɜɭɤɨɦ, ɪɟɠɢɦ
"LT/RT" ɧɟ ɦɨɠɟɬ ɛɵɬɶ ɜɵɛɪɚɧ. ɗɬɨ ɨɡɧɚɱɚɟɬ, ɱɬɨ ɧɚ ɭɫɢɥɢɬɟɥɶ
ɧɟɨɛɯɨɞɢɦɨ ɩɨɞɚɜɚɬɶ 2-ɤɚɧɚɥɶɧɵɣ ɫɢɝɧɚɥ ɞɥɹ ɩɨɫɥɟɞɭɸɳɟɣ ɨɛɪɚɛɨɬɤɢ.
ȼɵɛɨɪ ɪɚɡɦɟɪɚ ɮɪɨɧɬɚɥɶɧɵɯ Ⱥɋ (Front Speaker)
ȼɵɛɟɪɢɬɟ ɪɚɡɦɟɪ ɮɪɨɧɬɚɥɶɧɵɯ Ⱥɋ: “Large (ɛɨɥɶɲɨɣ ɪɚɡɦɟɪ)/Small
(ɦɚɥɟɧɶɤɢɣ ɪɚɡɦɟɪ)”.
ȼɵɛɨɪ ɪɚɡɦɟɪɚ ɰɟɧɬɪɚɥɶɧɨɣ Ⱥɋ (CPlay Speaker)
ȿɫɥɢ ɩɚɪɚɦɟɬɪ “Domnmix” ɭɫɬɚɧɨɜɥɟɧ ɜ ɩɨɥɨɠɟɧɢɟ "Ɉff" (ȼɵɤɥ), ȼɵ
ɦɨɠɟɬɟ ɜɵɛɪɚɬɶ ɪɚɡɦɟɪ ɰɟɧɬɪɚɥɶɧɨɣ Ⱥɋ “Large (ɛɨɥɶɲɚɹ)/Small
(ɦɚɥɟɧɶɤɚɹ)" ɢɥɢ "Off” (ȼɵɤɥ).
29
Page 30

ɇȺɋɌɊɈɃɄȺ ɋɂɋɌȿɆɕ
ȼɵɛɨɪ ɪɚɡɦɟɪɚ ɬɵɥɨɜɵɯ Ⱥɋ (Rear Speaker)
ȿɫɥɢ ɩɚɪɚɦɟɬɪ “Domnmix” ɭɫɬɚɧɨɜɥɟɧ ɜ ɩɨɥɨɠɟɧɢɟ "Ɉff" (ȼɵɤɥ), ȼɵ
ɦɨɠɟɬɟ ɜɵɛɪɚɬɶ ɪɚɡɦɟɪ ɬɵɥɨɜɵɯ Ⱥɋ: “Large (ɛɨɥɶɲɚɹ)/Small
(ɦɚɥɟɧɶɤɚɹ)" ɢɥɢ "Off” (ȼɵɤɥ).
¡ “Large” ɫɨɨɬɜɟɬɫɬɜɭɟɬ ɩɨɥɧɨɞɢɚɩɚɡɨɧɧɨɣ ɚɤɭɫɬɢɱɟɫɤɨɣ ɫɢɫɬɟɦɟ, ɚ
“Small” - ɜɵɫɨɤɨɱɚɫɬɨɬɧɨɣ ɚɤɭɫɬɢɱɟɫɤɨɣ ɫɢɫɬɟɦɟ. Ⱦɥɹ ɬɨɱɧɨɣ ɧɚɫɬɪɨɣɤɢ
ɧɢɡɤɢɯ ɱɚɫɬɨɬ ɢɫɩɨɥɶɡɭɣɬɟ ɪɟɚɥɶɧɭɸ ɤɨɧɮɢɝɭɪɚɰɢɸ ɚɤɭɫɬɢɱɟɫɤɢɯ
ɫɢɫɬɟɦ. ȿɫɥɢ ɩɨɞɤɥɸɱɟɧɵ ɦɚɥɟɧɶɤɢɟ ɚɤɭɫɬɢɱɟɫɤɢɟ ɫɢɫɬɟɦɵ, ɧɟ
ɜɵɛɢɪɚɣɬɟ ɪɟɠɢɦ “Large”. ȼ ɩɪɨɬɢɜɧɨɦ ɫɥɭɱɚɟ ɜɵɫɨɤɢɣ ɭɪɨɜɟɧɶ ɫɢɝɧɚɥɚ
ɦɨɠɟɬ ɩɨɜɪɟɞɢɬɶ ɚɤɭɫɬɢɱɟɫɤɢɟ ɫɢɫɬɟɦɵ.
¡ ɍɫɬɚɧɨɜɤɚ ɩɚɪɚɦɟɬɪɨɜ “CPlay speaker”, “Rear speaker ” ɞɨɥɠɧɚ ɛɵɬɶ
ɜɵɩɨɥɧɟɧɚ, ɤɨɝɞɚ ɩɚɪɚɦɟɬɪ “Downmix” ɭɫɬɚɧɨɜɥɟɧ ɜ ɩɨɥɨɠɟɧɢɟ "OFF".
ȼɤɥɸɱɟɧɢɟ/ɜɵɤɥɸɱɟɧɢɟ ɫɚɛɜɭɮɟɪɚ (Subwoofer)
ȼɵ ɦɨɠɟɬɟ ɜɤɥɸɱɢɬɶ “On" ɢɥɢ ɜɵɤɥɸɱɢɬɶ "Off” ɫɚɛɜɭɮɟɪ.
ȼɤɥɸɱɟɧɢɟ/ɜɵɤɥɸɱɟɧɢɟ ɬɟɫɬɨɜɨɝɨ ɫɢɝɧɚɥɚ (Test Tone)
ȼ ɪɟɠɢɦɟ 5.1-ɤɚɧɚɥɶɧɨɝɨ ɡɜɭɱɚɧɢɹ ɜɵɛɟɪɢɬɟ “On” (ɜɤɥɸɱɢɬɶ ɬɟɫɬɨɜɵɣ
ɫɢɝɧɚɥ). Ɍɟɫɬɨɜɵɣ ɫɢɝɧɚɥ ɛɭɞɟɬ ɩɨɫɥɟɞɨɜɚɬɟɥɶɧɨ ɜɨɫɩɪɨɢɡɜɨɞɢɬɶɫɹ ɜɨ
ɜɫɟɯ 5 ɤɚɧɚɥɚɯ.
¡ ɇɚɫɬɪɨɣɤɚ ɫ ɩɨɦɨɳɶɸ ɬɟɫɬɨɜɨɝɨ ɫɢɝɧɚɥɚ ɞɨɥɠɧɚ ɜɵɩɨɥɧɹɬɶɫɹ, ɤɨɝɞɚ ɜ
ɜ ɞɢɫɤɨɜɨɞ ɧɟ ɭɫɬɚɧɨɜɥɟɧ ɞɢɫɤ ɢ ɩɚɪɚɦɟɬɪ “Downmix” ɭɫɬɚɧɨɜɥɟɧ ɜ
ɩɨɥɨɠɟɧɢɟ “5.1CH”.
¡ ɂɫɩɨɥɶɡɭɣɬɟ ɷɬɭ ɮɭɧɤɰɢɸ, ɱɬɨɛɵ ɩɪɨɜɟɪɢɬɶ ɜɫɟ ɤɚɧɚɥɵ ɡɜɭɱɚɧɢɹ,
ɟɫɥɢ ȼɚɫ ɧɟ ɭɫɬɪɚɢɜɚɟɬ ɤɚɱɟɫɬɜɨ ɡɜɭɱɚɧɢɹ.
ɍɫɬɚɧɨɜɤɚ ɡɧɚɱɟɧɢɹ ɩɚɪɚɦɟɬɪɚ Dialog (ɝɪɨɦɤɨɫɬɶ ɞɢɚɥɨɝɨɜ)
ɇɚ ɫɬɪɚɧɢɰɟ “Speaker Setup Page” ɭɫɬɚɧɨɜɢɬɟ ɩɚɪɚɦɟɬɪ “Downmix” ɜ
ɩɨɥɨɠɟɧɢɟ “LT/RT" ɢɥɢ "Stereo”, ɚ ɡɚɬɟɦ ɜɵɛɟɪɢɬɟ ɩɚɪɚɦɟɬɪ “Dialog” ɢ
ɨɬɪɟɝɭɥɢɪɭɣɬɟ ɝɪɨɦɤɨɫɬɶ ɡɜɭɱɚɧɢɹ.
¡ ȼɨ ɜɪɟɦɹ ɜɨɫɩɪɨɢɡɜɟɞɟɧɢɹ 5.1-ɤɚɧɚɥɶɧɨɝɨ ɞɢɫɤɚ ɫ ɩɨɦɨɳɶɸ
ɩɚɪɚɦɟɬɪɚ “Dialog” ȼɵ ɦɨɠɟɬɟ ɨɬɪɟɝɭɥɢɪɨɜɚɬɶ ɭɪɨɜɧɢ ɡɜɭɱɚɧɢɹ ɤɚɧɚɥɨɜ.
Ʉɨɦɩɪɟɫɫɢɹ ɞɢɧɚɦɢɱɟɫɤɨɝɨ ɞɢɚɩɚɡɨɧɚ (Post DRC)
Ʉɨɦɩɪɟɫɫɢɹ ɞɢɧɚɦɢɱɟɫɤɨɝɨ ɞɢɚɩɚɡɨɧɚ ɩɨɡɜɨɥɹɟɬ ɭɦɟɧɶɲɢɬɶ ɭɪɨɜɟɧɶ
ɝɪɨɦɤɨɫɬɢ ɡɜɭɤɨɜɵɯ ɷɮɮɟɤɬɨɜ ɧɚ ɦɚɤɫɢɦɚɥɶɧɨɣ ɝɪɨɦɤɨɫɬɢ. ȼɵ ɦɨɠɟɬɟ
ɜɤɥɸɱɢɬɶ (On), ɜɵɤɥɸɱɢɬɶ (Off) ɤɨɦɩɪɟɫɫɢɸ ɢɥɢ ɭɫɬɚɧɨɜɢɬɶ
ɚɜɬɨɦɚɬɢɱɟɫɤɢɣ ɪɟɠɢɦ (Auto).
30
Page 31

ɇȺɋɌɊɈɃɄȺ ɋɂɋɌȿɆɕ
ɋɬɪɚɧɢɰɚ ɧɚɫɬɪɨɣɤɢ ɰɢɮɪɨɜɨɝɨ ɡɜɭɤɚ (SPDIF Setup Page)
ɇɚɠɚɬɢɟɦ ɧɚ ɤɧɨɩɤɢ Ÿ/ź ɧɚ ɫɬɪɚɧɢɰɟ Audio Setup ɜɵɛɟɪɢɬɟ “SPDIF
Setup Page” ɢ ɧɚɠɦɢɬɟ ɤɧɨɩɤɭ "Play", ɱɬɨɛɵ ɩɟɪɟɣɬɢ ɧɚ ɫɬɪɚɧɢɰɭ
ɧɚɫɬɪɨɣɤɢ ɰɢɮɪɨɜɨɝɨ ɡɜɭɤɚ. ɉɪɢ ɩɨɦɨɳɢ ɤɧɨɩɨɤ Ÿ/źȼɵɦɨɠɟɬɟ
ɜɵɛɪɚɬɶ ɫɥɟɞɭɸɳɢɟ ɩɚɪɚɦɟɬɪɵ: SPDIF Output, CD, Dolby Digital, DTS,
MPEG, LPCM output ɢɬ.ɞ.
- - SPDIF Setup Page - -
SPDIF Output
CD
Dolby Digital
MPEG
LPCM output
Setup SPDIF
RAW
RAW
RAW
RAW
96K
Off
RAW
PCM
Manual
ȼɵɛɨɪ ɡɜɭɤɚ ɧɚ ɰɢɮɪɨɜɨɦ ɚɭɞɢɨɜɵɯɨɞɟ (SPDIF Output)
“Off”: ɐɢɮɪɨɜɨɣ ɫɢɝɧɚɥ ɧɚ ɭɫɢɥɢɬɟɥɶ ɧɟ ɩɨɞɚɟɬɫɹ.
“RAW”: ɇɚ ɜɯɨɞ ɭɫɢɥɢɬɟɥɹ ɩɨɫɬɭɩɚɟɬ ɧɟɞɟɤɨɞɢɪɨɜɚɧɧɵɣ ɰɢɮɪɨɜɨɣ
ɫɢɝɧɚɥ.
“PCM”: ɍɫɢɥɢɬɟɥɶ ɞɨɥɠɟɧ ɩɨɞɞɟɪɠɢɜɚɬɶ ɮɭɧɤɰɢɸ ɞɟɤɨɞɢɪɨɜɚɧɢɹ
ɫɢɝɧɚɥɨɜ ɮɨɪɦɚɬɚ PCM ɢɥɢ Dolby Digital.
“Manual”: ȼɵ ɦɨɠɟɬɟ ɜɵɛɪɚɬɶ ɪɟɠɢɦ ɞɟɤɨɞɢɪɨɜɚɧɢɹ ɫɚɦɨɫɬɨɹɬɟɥɶɧɨ.
ȼɵɛɨɪ ɪɟɠɢɦɚ ɡɜɭɱɚɧɢɹ ɤɨɦɩɚɤɬ-ɞɢɫɤɚ (CD)
ɉɨɫɥɟ ɜɵɛɨɪɚ ɩɚɪɚɦɟɬɪɚ “SPDIF Output” ɢ ɭɫɬɚɧɨɜɤɢ ɪɟɠɢɦɚ “Manual”ɜ
ɩɨɥɟ “CD” ɜɵɛɟɪɢɬɟ “SPDIF Off/SPDIF RAW/SPDIF/PCM”.
ȼɵɛɨɪ ɪɟɠɢɦɚ Dolby Digital
ɉɨɫɥɟ ɜɵɛɨɪɚ ɩɚɪɚɦɟɬɪɚ “Manual” ɜɩɨɥɟ “Dolby Digital” ȼɵ ɦɨɠɟɬɟ
ɜɵɛɪɚɬɶ ɪɟɠɢɦɵ “SPDIF off" ɢɥɢ "SPDIF RAW" ɢɥɢ "SPDIF/PCM”.
ȼɵɛɨɪ ɪɟɠɢɦ MPEG
ɉɨɫɥɟ ɜɵɛɨɪɚ ɩɚɪɚɦɟɬɪɚ “Manual” ɜɩɨɥɟ “MPEG” ȼɵ ɦɨɠɟɬɟ ɜɵɛɪɚɬɶ
ɪɟɠɢɦɵ “SPDIF off" ɢɥɢ "SPDIF RAW" ɢɥɢ "SPDIF/PCM”.
31
Page 32

ɇȺɋɌɊɈɃɄȺ ɋɂɋɌȿɆɕ
ȼɵɛɨɪ ɱɚɫɬɨɬɵ ɞɢɫɤɪɟɬɢɡɚɰɢɢ ɧɚ ɜɵɯɨɞɟ LPCM Output
ȼɵ ɦɨɠɟɬɟ ɜɵɛɪɚɬɶ ɫɥɟɞɭɸɳɢɟ ɡɧɚɱɟɧɢɹ ɱɚɫɬɨɬɵ ɞɢɫɤɪɟɬɢɡɚɰɢɢ
ɫɢɝɧɚɥɚ LPCM: 48K, 96K ãæã 192k.
ɇɚɫɬɪɨɣɤɚ ɪɟɠɢɦɚ Dolby Digital (Dolby Digital Setup)
ɇɚɠɚɬɢɟɦ ɧɚ ɤɧɨɩɤɭ “W” ɜɟɪɧɢɬɟɫɶ ɧɚ ɫɬɪɚɧɢɰɭ ɧɚɫɬɪɨɣɤɢ ɩɚɪɚɦɟɬɪɨɜ
ɡɜɭɤɚ, ɚ ɡɚɬɟɦ ɩɪɢ ɩɨɦɨɳɢ ɤɧɨɩɨɤ Ÿ/ź ɜɵɛɟɪɢɬɟ "Dolby Digital Setting" ɢ
ɧɚɠɦɢɬɟ ɤɧɨɩɤɭ Play, ɱɬɨɛɵ ɜɨɣɬɢ ɜ ɦɟɧɸ "Dolby Digital Setting".
ɇɚɠɚɬɢɟɦ ɧɚ ɤɧɨɩɤɢ Ÿ/ź ɜɵɛɟɪɢɬɟ ɩɚɪɚɦɟɬɪ Dual Mono ɢɥɢ Dynamic.
- - Dolby Digital Setup - -
Dual Mono
Dynamic
Dual Mono (1 + 1)
Stereo
L-Mono
R-Mono
Mix-Mono
ȼɵɛɨɪ ɪɟɠɢɦɚ Dual Mono
“Stereo”: ɋɬɟɪɟɨɮɨɧɢɱɟɫɤɢɣ ɜɵɯɨɞɧɨɣ ɫɢɝɧɚɥ.
“L-Mono”: ȼɵɯɨɞɧɨɣ ɫɢɝɧɚɥ ɥɟɜɨɝɨ ɤɚɧɚɥɚ.
“R-Mono”: ȼɵɯɨɞɧɨɣ ɫɢɝɧɚɥ ɩɪɚɜɨɝɨ ɤɚɧɚɥɚ.
“Mix-Mono”: ɍɫɪɟɞɧɟɧɧɵɣ ɜɵɯɨɞɧɨɣ ɫɢɝɧɚɥ ɥɟɜɨɝɨ ɢ ɩɪɚɜɨɝɨ ɤɚɧɚɥɨɜ.
ȼɵɛɨɪ ɪɟɠɢɦɚ ɤɨɦɩɪɟɫɫɢɢ ɞɢɧɚɦɢɱɟɫɤɨɝɨ ɞɢɚɩɚɡɨɧɚ
(Dynamic Compression)
ɇɚ ɫɬɪɚɧɢɰɟ “Dolby Digital Setup” ɜɵɛɟɪɢɬɟ ɩɚɪɚɦɟɬɪ “Dynamic” ɢ
ɧɚɠɦɢɬɟ ɤɧɨɩɤɭ “Play”, ɱɬɨɛɵ ɩɟɪɟɣɬɢ ɜ ɪɟɠɢɦ ɧɚɫɬɪɨɣɤɢ ɤɨɦɩɪɟɫɫɢɢ
ɞɢɧɚɦɢɱɟɫɤɨɝɨ ɞɢɚɩɚɡɨɧɚ. ɇɚɠɚɬɢɟɦ ɧɚ ɤɧɨɩɤɢ Ÿ/ź ɜɵɩɨɥɧɢɬɟ
ɪɟɝɭɥɢɪɨɜɤɭ ɤɨɦɩɪɟɫɫɢɢ ɞɢɧɚɦɢɱɟɫɤɨɝɨ ɞɢɚɩɚɡɨɧɚ. ɑɟɦ ɛɨɥɶɲɟ ɫɬɟɩɟɧɶ
ɤɨɦɩɪɟɫɫɢɢ ɞɢɧɚɦɢɱɟɫɤɨɝɨ ɞɢɚɩɚɡɨɧɚ, ɬɟɦ ɦɟɧɶɲɟ ɪɚɡɧɢɰɚ ɦɟɠɞɭ
ɫɚɦɵɦ ɝɪɨɦɤɢɦ ɢ ɫɚɦɵɦ ɬɢɯɢɦ ɡɜɭɤɨɦ. ɗɬɚ ɮɭɧɤɰɢɹ ɞɨɫɬɭɩɧɚ ɬɨɥɶɤɨ
ɜɨ ɜɪɟɦɹ ɜɨɫɩɪɨɢɡɜɟɞɟɧɢɹ ɢɫɬɨɱɧɢɤɨɜ ɡɜɭɤɚ ɜ ɮɨɪɦɚɬɟ Dolby.
32
Page 33

ȼɪɟɦɹ ɡɚɞɟɪɠɤɢ ɡɜɭɱɚɧɢɹ ɤɚɧɚɥɚ (Channel Delay)
ɇɚɠɚɬɢɟɦ ɧɚ ɤɧɨɩɤɭ “W” ɜɟɪɧɢɬɟɫɶ ɧɚ ɫɬɪɚɧɢɰɭ ɧɚɫɬɪɨɣɤɢ ɩɚɪɚɦɟɬɪɨɜ
ɡɜɭɤɚ, ɚ ɡɚɬɟɦ ɩɪɢ ɩɨɦɨɳɢ ɤɧɨɩɨɤ Ÿ/ź ɜɵɛɟɪɢɬɟ “Channel Delay”,
ɩɟɪɟɣɞɢɬɟ ɜ ɩɪɚɜɨɟ ɦɟɧɸ ɢ ɧɚɠɦɢɬɟ ɤɧɨɩɤɭ “Play”.
- - Audio setting page - -
Speaker setup
SPDIF Setup
Dolby Digital Setup
Channel Delay
Equalizer
Sub
Sub
woofer
Su
b
woofer
10
0cm
0CM
0CM
10
3D processing
Karaoke Setup
Go to CH delay setting
ȼ ɫɬɪɨɤɟ “Channel Delay” ȼɵ ɦɨɠɟɬɟ ɭɫɬɚɧɨɜɢɬɶ ɜɪɟɦɹ ɡɚɞɟɪɠɤɢ
ɡɜɭɱɚɧɢɹ ɜɫɟɯ ɚɤɭɫɬɢɱɟɫɤɢɯ ɫɢɫɬɟɦ ɢ ɞɨɛɢɬɶɫɹ ɛɨɥɟɟ ɪɟɚɥɢɫɬɢɱɧɨɝɨ
ɷɮɮɟɤɬɚ ɡɜɭɱɚɧɢɹ.
ɇɚɫɬɪɨɣɤɚ ɷɤɜɚɥɚɣɡɟɪɚ (Equalizer)
ɇɚɠɚɬɢɟɦ ɧɚ ɤɧɨɩɤɭ “W” ɜɟɪɧɢɬɟɫɶ ɧɚ ɫɬɪɚɧɢɰɭ ɧɚɫɬɪɨɣɤɢ ɩɚɪɚɦɟɬɪɨɜ
ɡɜɭɤɚ, ɚ ɡɚɬɟɦ ɩɪɢ ɩɨɦɨɳɢ ɤɧɨɩɨɤ Ÿ/ź ɜɵɛɟɪɢɬɟ “Equalizer Page”, ɢ
ɧɚɠɦɢɬɟ ɤɧɨɩɤɭ Play. ɇɚɠɚɬɢɟɦ ɧɚ ɤɧɨɩɤɢ Ÿ/ź ɜɵɛɟɪɢɬɟ EQ Type
(ɪɟɠɢɦ ɪɚɛɨɬɵ ɷɤɜɚɥɚɣɡɟɪɚ), Bass Boost (ɭɫɢɥɟɧɢɟ ɛɚɫɨɜ), ɫɢɫɬɟɦɚ
Super Bass ɢ Treble Boost (ɭɫɢɥɟɧɢɟ ɜɵɫɨɤɢɯ ɱɚɫɬɨɬ).
33
Page 34

ɇȺɋɌɊɈɃɄȺ ɋɂɋɌȿɆɕ
- - Equalizer Page - -
ÅAdd Classic and soft
EQ Type
Bass Boost
Super Bass
Treble Boost
Select Equalizer Type
None
Off
Off
Off
None
Rock
Pop
Live
Dance
Techno
Classic
Soft
ȼɵɛɨɪ ɪɟɠɢɦɚ ɪɚɛɨɬɵ ɷɤɜɚɥɚɣɡɟɪɚ (EQ Type)
ɑɬɨɛɵ ɞɨɛɢɬɶɫɹ ɛɨɥɟɟ ɤɚɱɟɫɬɜɟɧɧɨɝɨ ɡɜɭɱɚɧɢɹ ɦɭɡɵɤɢ ɜ ɨɩɪɟɞɟɥɟɧɧɨɦ
ɠɚɧɪɟ, ȼɵ ɦɨɠɟɬɟ ɜɵɛɪɚɬɶ ɫɥɟɞɭɸɳɢɟ ɪɟɠɢɦɵ ɪɚɛɨɬɵ ɷɤɜɚɥɚɣɡɟɪɚ:
None (ɇɟɬ), Rock, Pop, Live, Dance, Techno, Classic and Soft.
ɋɢɫɬɟɦɵ Bass Boost, Super Bass ɢɥɢ Treble Boost
“On” ɫɨɨɬɜɟɬɫɬɜɭɟɬ ɭɫɢɥɟɧɢɸ ɫɨɨɬɜɟɬɫɬɜɭɸɳɟɝɨ ɱɚɫɬɨɬɧɨɝɨ ɞɢɚɩɚɡɨɧɚ
ɡɜɭɤɚ.
ɇɚɫɬɪɨɣɤɚ 3-ɦɟɪɧɨɝɨ ɡɜɭɱɚɧɢɹ (3D Processing Page)
ɇɚɠɚɬɢɟɦ ɧɚ ɤɧɨɩɤɭ “W” ɜɟɪɧɢɬɟɫɶ ɧɚ ɫɬɪɚɧɢɰɭ ɧɚɫɬɪɨɣɤɢ ɩɚɪɚɦɟɬɪɨɜ
ɡɜɭɤɚ, ɚ ɡɚɬɟɦ ɩɪɢ ɩɨɦɨɳɢ ɤɧɨɩɨɤ Ÿ/ź ɜɵɛɟɪɢɬɟ Ā3D Processing Page”.
ɇɚɠɦɢɬɟ ɤɧɨɩɤɭ Play, ɱɬɨɛɵ ɜɨɣɬɢ ɜ ɦɟɧɸ 3-ɦɟɪɧɨɝɨ ɡɜɭɱɚɧɢɹ.
ɇɚɠɚɬɢɟɦ ɧɚ ɤɧɨɩɤɢ Ÿ/ź ɜɵɛɟɪɢɬɟ PRO Logic ɢɥɢ Reverb Mode.
34
Page 35

ɇȺɋɌɊɈɃɄȺ ɋɂɋɌȿɆɕ
- - PRO Logic Config - -
PRO Logic
Mode
Panorama
Dimension
PRO Logic
Off
MUS
Off
00
03
On
Off
Auto
ȼɵɛɨɪ ɪɟɠɢɦɚ PRO Logic
“On” ɫɨɨɬɜɟɬɫɬɜɭɟɬ ɜɨɫɩɪɨɢɡɜɟɞɟɧɢɸ 2-ɤɚɧɚɥɶɧɨɝɨ ɡɜɭɤɚ ɜ
5.1-ɤɚɧɚɥɶɧɨɦ ɪɟɠɢɦɟ ɢ ɜɨɫɩɪɨɢɡɜɟɞɟɧɢɟ ɦɨɠɟɬ ɛɵɬɶ ɜɵɩɨɥɧɟɧɨ ɱɟɪɟɡ
ɦɧɨɝɨɤɚɧɚɥɶɧɭɸ ɫɢɫɬɟɦɭ. ȿɫɥɢ ɩɚɪɚɦɟɬɪ PRO Logic ɭɫɬɚɧɨɜɥɟɧ ɜ
ɩɨɥɨɠɟɧɢɟ “Off”, ɷɮɮɟɤɬ ɨɛɴɟɦɧɨɝɨ ɡɜɭɱɚɧɢɹ ɧɟ ɪɚɛɨɬɚɟɬ. ȿɫɥɢ ɞɢɫɤ ɧɟ
ɩɨɞɞɟɪɠɢɜɚɟɬ ɷɬɭ ɮɭɧɤɰɢɸ, ɭɫɬɚɧɚɜɥɢɜɚɣɬɟ ɩɚɪɚɦɟɬɪ PRO Logic ɜ
ɩɨɥɨɠɟɧɢɟ “ Auto”. ȼɨ ɜɪɟɦɹ ɜɨɫɩɪɨɢɡɜɟɞɟɧɢɹ DVD-ɞɢɫɤɨɜ, ɡɚɩɢɫɚɧɧɵɯ
ɜ ɮɨɪɦɚɬɟ Dolby Digital, ɷɬɨɬ ɩɚɪɚɦɟɬɪ ɞɨɥɠɟɧ ɛɵɬɶ ɭɫɬɚɧɨɜɥɟɧ ɜ
ɩɨɥɨɠɟɧɢɟ "On" ɢɥɢ "Auto".
ȼɵɛɨɪ ɪɟɠɢɦɚ (Mode)
Music: ȼɫɟ ɡɜɭɤɢ ɞɨɫɬɢɝɚɸɬ ɩɨɡɢɰɢɢ ɩɪɨɫɥɭɲɢɜɚɧɢɹ ɨɞɧɨɜɪɟɦɟɧɧɨ, ɛɟɡ
ɡɚɞɟɪɠɤɢ.
Film: Ɂɚɞɟɪɠɤɚ ɡɜɭɤɚ ɬɵɥɨɜɨɝɨ ɤɚɧɚɥɚ - 10 ɦɫ.
PRO LOGIC: ɂɦɢɬɚɰɢɹ ɪɟɠɢɦɚ PRO LOGIC.
Auto: Ⱥɜɬɨɦɚɬɢɱɟɫɤɢɣ ɜɵɛɨɪ ɪɟɠɢɦɚ ɜ ɫɨɨɬɜɟɬɫɬɜɢɢ ɫ ɬɢɩɨɦ ɞɢɫɤɚ.
- Ɍɨɥɶɤɨ ɜ ɪɟɠɢɦɟ Ā5.1CH” ɦɨɠɟɬ ɛɵɬɶ ɭɫɬɚɧɨɜɥɟɧ ɪɟɠɢɦ “PRO Logic".
ɇɚɫɬɪɨɣɤɚ ɩɚɪɚɦɟɬɪɚ Panorama
On: ɋɬɟɪɟɨɮɨɧɢɱɟɫɤɢɣ ɮɪɨɧɬɚɥɶɧɵɣ ɤɚɧɚɥ ɜɨɫɩɪɨɢɡɜɨɞɢɬɫɹ ɫ ɨɛɟɢɯ
ɫɬɨɪɨɧ, ɨɛɟɫɩɟɱɢɜɚɹ ɧɚɢɥɭɱɲɢɣ ɷɮɮɟɤɬ ɨɛɴɟɦɧɨɝɨ ɡɜɭɱɚɧɢɹ.
ȼɵɛɨɪ ɪɚɡɦɟɪɚ ɩɨɥɹ ɡɜɭɱɚɧɢɹ (Dimension)
Ⱥɧɚɥɨɝɢɱɧɨ ɪɟɝɭɥɢɪɨɜɤɟ ɛɚɥɚɧɫɚ ɡɜɭɱɚɧɢɹ ɮɪɨɧɬɚɥɶɧɨɝɨ ɢ ɬɵɥɨɜɨɝɨ
ɤɚɧɚɥɨɜ, ȼɵ ɦɨɠɟɬɟ ɜɵɛɪɚɬɶ ɥɸɛɨɣ ɢɡ 7 ɞɨɫɬɭɩɧɵɯ ɪɚɡɦɟɪɨɜ ɩɨɥɹ
ɡɜɭɱɚɧɢɹ.
35
Page 36

ɇȺɋɌɊɈɃɄȺ ɋɂɋɌȿɆɕ
ȼɵɛɨɪ ɲɢɪɢɧɵ ɩɨɥɹ ɰɟɧɬɪɚɥɶɧɨɝɨ ɤɚɧɚɥɚ (CPlay width)
Ɉɬɪɟɝɭɥɢɪɨɜɚɜ ɭɪɨɜɟɧɶ ɫɢɝɧɚɥɚ ɰɟɧɬɪɚɥɶɧɨɝɨ ɤɚɧɚɥɚ ɢ ɪɚɡɞɟɥɢɜ
ɥɟɜɵɣ/ɩɪɚɜɵɣ ɤɚɧɚɥɵ, ȼɵ ɦɨɠɟɬɟ ɞɨɛɢɬɶɫɹ ɩɪɚɜɢɥɶɧɨɝɨ
ɜɨɫɩɪɨɢɡɜɟɞɟɧɢɹ ɡɜɭɤɚ 3 ɮɪɨɧɬɚɥɶɧɵɯ ɚɤɭɫɬɢɱɟɫɤɢɯ ɫɢɫɬɟɦ.
ɋɬɪɚɧɢɰɚ "3D Processing Page"
ɇɚ ɫɬɪɚɧɢɰɟ “Audio Setup Page” ɩɪɢ ɩɨɦɨɳɢ ɤɧɨɩɨɤ Ÿ/ź ɜɵɛɟɪɢɬɟ “3D
Processing” ɢ ɧɚɠɦɢɬɟ ɤɧɨɩɤɭ Play, ɱɬɨɛɵ ɩɟɪɟɣɬɢ ɧɚ ɫɬɪɚɧɢɰɭ “3D
processing Page”. ȼɵɩɨɥɧɢɬɟ ɧɚɫɬɪɨɣɤɭ ɩɚɪɚɦɟɬɪɚ “Reverb Mode”.
- - 3D Processing Page - -
PRO Logic
Reverb Mode Off
Off
Concert
Living Room
Hall
Reverb Mode
36
Bathroom
Cave
Arena
Church
Page 37

ɇȺɋɌɊɈɃɄȺ ɋɂɋɌȿɆɕ
ɋɬɪɚɧɢɰɚ ɧɚɫɬɪɨɣɤɢ HDCD (HDCD Setup Page)
ɇɚɠɦɢɬɟ ɤɧɨɩɤɭ “W ”, ɱɬɨɛɵ ɜɟɪɧɭɬɶɫɹ ɧɚ ɫɬɪɚɧɢɰɭ ɧɚɫɬɪɨɣɤɢ
ɩɚɪɚɦɟɬɪɨɜ ɡɜɭɤɚ, ɢ ɧɚɠɚɬɢɟɦ ɧɚ ɤɧɨɩɤɢ Ÿ/ź ɜɵɛɟɪɢɬɟ “HDCD”, ɚɡɚɬɟɦ
ɧɚɠɦɢɬɟ ɤɧɨɩɤɭ Play, ɱɬɨɛɵ ɩɟɪɟɣɬɢ ɜ ɦɟɧɸ "HDCD Setup Page". ȼ
ɡɚɤɥɸɱɟɧɢɢ ɧɚɠɦɢɬɟ ɤɧɨɩɤɭ “X”, ɱɬɨɛɵ ɜɨɣɬɢ ɜ ɩɪɚɜɨɟ ɩɨɞɦɟɧɸ.
- - HDCD Setup Page - -
Filter 2X Off
1X
2X
Filter
ȼɵɛɨɪ ɮɢɥɶɬɪɚ (Filter)
ɇɚ ɫɬɪɚɧɢɰɟ ɧɚɫɬɪɨɣɤɢ ɩɚɪɚɦɟɬɪɨɜ ɡɜɭɤɚ “Audio Setup Page” ɫ ɩɨɦɨɳɶɸ
ɤɧɨɩɨɤ Ÿ,ź ɩɟɪɟɦɟɫɬɢɬɟ ɤɭɪɫɨɪ ɜ ɫɬɪɨɤɭ “HDCD” ɢ ɧɚɠɦɢɬɟ ɤɧɨɩɤɭ
“Play”, ɱɬɨɛɵ ɩɟɪɟɣɬɢ ɧɚ ɫɬɪɚɧɢɰɭ “HDCD Setup Page”.
ɇɚ ɫɬɪɚɧɢɰɟ “HDCD Setup Page” ɜɵɛɟɪɢɬɟ ɫɨɨɬɜɟɬɫɬɜɭɸɳɭɸ ɱɚɫɬɨɬɭ
ɰɢɮɪɨɜɨɝɨ ɮɢɥɶɬɪɚ.
“Off ” ɨɡɧɚɱɚɟɬ, ɱɬɨ ɢɫɩɨɥɶɡɭɟɬɫɹ ɚɭɞɢɨɤɨɦɩɚɤɬ-ɞɢɫɤ (CD).
37
Page 38

ɇȺɋɌɊɈɃɄȺ ɋɂɋɌȿɆɕ
KARAOKE Setup Page
ȼ ɦɟɧɸ “Audio Setup Page” ɫ ɩɨɦɨɳɶɸ ɤɧɨɩɨɤ Ÿ,ź ɩɟɪɟɦɟɫɬɢɬɟ ɤɭɪɫɨɪ ɜ ɫɬɪɨɤɭ
“KARAOKE SETUP” ɢ ɧɚɠɦɢɬɟ ɤɧɨɩɤɭ Play, ɱɬɨɛɵ ɩɟɪɟɣɬɢ ɜ ɦɟɧɸ "KARAOKE
SETUP". ɇɚɠɦɢɬɟ ɤɧɨɩɤɭ “X”, ɱɬɨɛɵ ɭɫɬɚɧɨɜɢɬɶ ɝɪɨɦɤɨɫɬɶ ɢ ɧɚɫɬɪɨɢɬɶ ɫɢɫɬɟɦɭ
Ʉɚɪɚɨɤɟ.
- Karaoke Setup Page - -
Microphone setup
Microphone prearrange
ɇɚɫɬɪɨɣɤɚ ɩɚɪɚɦɟɬɪɨɜ ɢɡɨɛɪɚɠɟɧɢɹ (Video Setup Page)
ɉɨɫɥɟ ɧɚɫɬɪɨɣɤɢ ɩɚɪɚɦɟɬɪɨɜ ɡɜɭɤɚ ɧɚɠɦɢɬɟ ɤɧɨɩɤɭ Ż, ɱɬɨɛɵ ɜɟɪɧɭɬɶɫɹ ɜ ɝɥɚɜɧɨɟ
ɦɟɧɸ. ɇɚɠɦɢɬɟ ɤɧɨɩɤɭ Ź, ɱɬɨɛɵ ɜɵɛɪɚɬɶ ”Video Setup Page”, ɧɚɠɦɢɬɟ ɤɧɨɩɤɭ Play
ɢɥɢ ɤɧɨɩɤɭ ź, ɱɬɨɛɵ ɩɟɪɟɣɬɢ ɧɚ ɫɬɪɚɧɢɰɭ ɧɚɫɬɪɨɣɤɢ ɩɚɪɚɦɟɬɪɨɜ ɢɡɨɛɪɚɠɟɧɢɹ.
ɇɚɠɚɬɢɟɦ ɧɚ ɤɧɨɩɤɢ Ÿ,ź ɜɵɛɟɪɢɬɟ ɪɟɠɢɦ ɪɚɛɨɬɵ ɜɢɞɟɨɜɵɯɨɞɚ, ɜɤɥɸɱɢɬɟ ɫɢɫɬɟɦɭ
ɩɨɞɚɜɥɟɧɢɹ ɩɨɦɟɯ, ɮɢɥɶɬɪ ɢ ɬ.ɞ. ɇɚɠɚɬɢɟɦ ɧɚ ɤɧɨɩɤɢ Ÿ,ź ȼɵ ɦɨɠɟɬɟ ɜɵɛɪɚɬɶ
Component, VGA, YUV ɢɥɢ RGB. ɇɚɠɦɢɬɟ ɤɧɨɩɤɭ Play, ɱɬɨɛɵ ɩɨɞɬɜɟɪɞɢɬɶ ɜɵɛɨɪ.
General Audio Dolby Video Preference
- - Video Setup Page - -
Component YUV OFF
TV mode YUV
Quality RGB
Denoise Off VGA
WarmthFilter 00
Component
38
Page 39

ɇȺɋɌɊɈɃɄȺ ɋɂɋɌȿɆɕ
Ʉɚɱɟɫɬɜɨ ɢɡɨɛɪɚɠɟɧɢɹ (Quality)
ɇɚɠɦɢɬɟ ɤɧɨɩɤɭ “W”, ɱɬɨɛɵ ɜɟɪɧɭɬɶɫɹ ɜ ɝɥɚɜɧɨɟ ɦɟɧɸ, ɚ ɡɚɬɟɦ ɧɚɠɚɬɢɟɦ
ɧɚ ɤɧɨɩɤɢ Ÿ,ź ɜɵɛɟɪɢɬɟ “Quality” ɢ ɧɚɠɦɢɬɟ ɤɧɨɩɤɭ Play, ɱɬɨɛɵ
ɩɨɞɬɜɟɪɞɢɬɶ ɜɵɛɨɪ.
- - Video Quality Setup - -
ȼ ɦɟɧɸ ɧɚɫɬɪɨɣɤɢ ɩɚɪɚɦɟɬɪɨɜ ɢɡɨɛɪɚɠɟɧɢɹ ɧɚɠɚɬɢɟɦ ɧɚ ɤɧɨɩɤɢ Ÿ/ź
ɜɵɛɟɪɢɬɟ “Quality” ɢ ɧɚɠɦɢɬɟ ɤɧɨɩɤɭ Play. ȼ ɫɥɟɞɭɸɳɟɦ ɦɟɧɸ ȼɵ
ɦɨɠɟɬɟ ɨɬɪɟɝɭɥɢɪɨɜɚɬɶ ɡɧɚɱɟɧɢɹ ɫɥɟɞɭɸɳɢɯ ɩɚɪɚɦɟɬɪɨɜ: Sharpness
(ɱɟɬɤɨɫɬɶ), Brightness (ɹɪɤɨɫɬɶ), Contrast (ɤɨɧɬɪɚɫɬɧɨɫɬɶ), Gamma, Hue
(ɨɬɬɟɧɤɢ), Saturation (ɧɚɫɵɳɟɧɧɨɫɬɶ ɰɜɟɬɚ) ɢ Luma Delay.
Sharpness High High
Brightness 00 Medium
Contrast 00 Low
Gamma
Hue 00
Saturation 00
LumaDelay 0T
Sharpness
None
39
Page 40

ɇȺɋɌɊɈɃɄȺ ɋɂɋɌȿɆɕ
ɉɚɪɚɦɟɬɪ Component (ɤɨɦɩɨɧɟɧɬɧɵɣ ɜɵɯɨɞ)
ȼɵɛɨɪ ɪɟɠɢɦɚ YUV ɫɨɨɬɜɟɬɫɬɜɭɟɬ ɫɢɝɧɚɥɭ YUV; ɜɵɛɨɪ ɪɟɠɢɦɚ RGB
ɫɨɨɬɜɟɬɫɬɜɭɟɬ ɫɢɝɧɚɥɭ RGB; ɜɵɛɨɪ OFF ɨɡɧɚɱɚɟɬ, ɱɬɨ ɤɨɦɩɨɧɟɧɬɧɵɣ
ɜɵɯɨɞ ɜɵɤɥɸɱɟɧ. ɉɪɨɢɝɪɵɜɚɬɟɥɶ ɜɨ ɜɫɟɯ ɭɫɥɨɜɢɹɯ ɩɨɞɚɟɬ ɫɢɝɧɚɥ ɧɚ
ɜɢɞɟɨɜɵɯɨɞ.
ɉɚɪɚɦɟɬɪ TV Mode (ɪɟɠɢɦ)
ȼɨ ɜɪɟɦɹ ɜɨɫɩɪɨɢɡɜɟɞɟɧɢɹ ɜ ɪɟɠɢɦɟ “YUV” ɢɥɢ “RGB” ȼɵ ɦɨɠɟɬɟ
ɜɵɛɪɚɬɶ ɪɟɠɢɦ ɩɪɨɝɪɟɫɫɢɜɧɨɣ ɢɥɢ ɱɟɪɟɫɫɬɪɨɱɧɨɣ ɪɚɡɜɟɪɬɤɢ.
Brightness ……….0
ɑɬɨɛɵ ɨɬɨɛɪɚɡɢɬɶ ɢ ɢɡɦɟɧɢɬɶ ɡɧɚɱɟɧɢɟ
ɩɚɪɚɦɟɬɪɨɜ ɹɪɤɨɫɬɢ, ɤɨɧɬɪɚɫɬɧɨɫɬɢ ɢ ɬ.ɞ.
40
ɇɚɠɚɬɢɟɦ ɧɚ ɤɧɨɩɤɢ Ż/Ź
ɨɬɪɟɝɭɥɢɪɭɣɬɟ ɡɧɚɱɟɧɢɟ ɹɪɤɨɫɬɢ,
ɱɟɬɤɨɫɬɢ, ɨɬɬɟɧɤɨɜ, ɧɚɫɵɳɟɧɧɨɫɬɢ
ɰɜɟɬɚ ɢ ɧɚɠɦɢɬɟ ɤɧɨɩɤɭ PLAY, ɱɬɨɛɵ
ɩɨɞɬɜɟɪɞɢɬɶ ɜɵɛɨɪ ɢ ɜɟɪɧɭɬɶɫɹ ɜ
ɦɟɧɸ. ɇɚɠɦɢɬɟ ɤɧɨɩɤɭ Play, ɱɬɨɛɵ
ɜɵɣɬɢ ɢɡ ɦɟɧɸ.
Page 41

ɇȺɋɌɊɈɃɄȺ ɋɂɋɌȿɆɕ
ɋɬɪɚɧɢɰɚ ɩɚɪɚɦɟɬɪɨɜ ɩɨɥɶɡɨɜɚɬɟɥɹ (Preference Page)
ȼ ɪɟɠɢɦɟ ɩɨɥɧɨɣ ɨɫɬɚɧɨɜɤɢ (ɞɜɚɠɞɵ ɧɚɠɦɢɬɟ ɤɧɨɩɤɭ “Stop”) ɧɚɠɦɢɬɟ
ɤɧɨɩɤɭ “Setup”, ɱɬɨɛɵ ɩɟɪɟɣɬɢ ɜ ɝɥɚɜɧɨɟ ɦɟɧɸ. ɇɚɠɚɬɢɟɦ ɧɚ ɤɧɨɩɤɭ Ź
ɜɵɛɟɪɢɬɟ ”Initial setting page” ɢ ɧɚɠɦɢɬɟ ɤɧɨɩɤɭ Play ɢɥɢ ź, ɱɬɨɛɵ
ɩɟɪɟɣɬɢ ɧɚ ɫɬɪɚɧɢɰɭ ɧɚɫɬɪɨɣɤɢ ɛɚɡɨɜɵɯ ɩɚɪɚɦɟɬɪɨɜ. ɋ ɩɨɦɨɳɶɸ ɤɧɨɩɨɤ
Ÿ/ź ɜɵɛɟɪɢɬɟ ɩɚɪɚɦɟɬɪɵ TV Type, Audio, Subtitle, Disc Menu, Parental,
Password ɢ Default. ɇɚ ɫɬɪɚɧɢɰɟ ɩɚɪɚɦɟɬɪɨɜ ɩɨɥɶɡɨɜɚɬɟɥɹ Preference
Page ɧɚɠɚɬɢɟɦ ɧɚ ɤɧɨɩɤɢ Ÿ/ź ɜɵɛɟɪɢɬɟ ɧɭɠɧɵɣ ɩɚɪɚɦɟɬɪ. ɇɚɠɦɢɬɟ
ɤɧɨɩɤɭ Ź, ɱɬɨɛɵ ɜɨɣɬɢ ɜ ɪɟɠɢɦ ɭɫɬɚɧɨɜɤɢ ɩɚɪɚɦɟɬɪɨɜ.
General Audio Dolby Video Preference
- - Preference Page - -
TVType Auto PAL
Audio ENG Multi
Subtitle ENG NTSC
Disc Menu ENG
Parental
Password
Default
Set TV standard
41
Page 42

ɇȺɋɌɊɈɃɄȺ ɋɂɋɌȿɆɕ
ɇȺɋɌɊɈɃɄȺ ɉȺɊȺɆȿɌɊɈȼ ɉɈɅɖɁɈȼȺɌȿɅə (PREFERENCE SETUP)
ɉɨɫɥɟ ɜɯɨɞɚ ɧɚ ɫɬɪɚɧɢɰɭ PREFERENCE ȼɵ ɦɨɠɟɬɟ ɢɡɦɟɧɢɬɶ ɛɚɡɨɜɵɟ
ɩɚɪɚɦɟɬɪɵ ɫɢɫɬɟɦɵ. ɗɬɚ ɮɭɧɤɰɢɹ ɞɨɫɬɭɩɧɚ ɬɨɥɶɤɨ ɜ ɪɟɠɢɦɟ ɨɫɬɚɧɨɜɤɢ.
TV Mode (ɫɢɫɬɟɦɚ ɤɨɞɢɪɨɜɚɧɢɹ ɰɜɟɬɚ): ȼɵ ɦɨɠɟɬɟ ɜɵɛɪɚɬɶ ɫɥɟɞɭɸɳɢɟ
ɪɟɠɢɦɵ “PAL", "Multi", "NTSC”.
PBC (ɤɨɧɬɪɨɥɶ ɜɨɫɩɪɨɢɡɜɟɞɟɧɢɹ): ȼɵ ɦɨɠɟɬɟ ɜɤɥɸɱɢɬɶ (On) ɢɥɢ ɜɵɤɥɸɱɢɬɶ
(Off) ɮɭɧɤɰɢɸ ɤɨɧɬɪɨɥɹ ɜɨɫɩɪɨɢɡɜɟɞɟɧɢɹ PBC.
Audio (ɡɜɭɤɨɜɚɹ ɞɨɪɨɠɤɚ): ȼɵ ɦɨɠɟɬɟ ɜɵɛɪɚɬɶ ɡɜɭɤɨɜɵɟ ɞɨɪɨɠɤɢ ɧɚ
ɫɥɟɞɭɸɳɢɯ ɹɡɵɤɚɯ: Eng/France/Spanish/Chinese/Japan ɢɞɪɭɝɢɯ.
Subtitle (ɹɡɵɤ ɨɬɨɛɪɚɠɟɧɢɹ ɫɭɛɬɢɬɪɨɜ): ȼɵ ɦɨɠɟɬɟ ɜɵɛɪɚɬɶ ɫɭɛɬɢɬɪɵ ɧɚ
ɫɥɟɞɭɸɳɢɯ ɹɡɵɤɚɯ: Eng/France/Spanish/Chinese/Japan ɢɞɪɭɝɢɯ.
Disc Menu (ɞɢɫɤɨɜɨɟ ɦɟɧɸ): ɉɟɪɟɞ ɜɨɫɩɪɨɢɡɜɟɞɟɧɢɟɦ ȼɵ ɦɨɠɟɬɟ ɜɵɛɪɚɬɶ
ɹɡɵɤ, ɧɚ ɤɨɬɨɪɨɦ ɛɭɞɟɬ ɨɬɨɛɪɚɠɚɬɶɫɹ ɞɢɫɤɨɜɨɟ ɦɟɧɸ - Eng/ France/ Spanish/
Chinese/ Japan ɢɞɪɭɝɢɟ.
Parental (ɪɨɞɢɬɟɥɶɫɤɢɣ ɤɨɧɬɪɨɥɶ): ɇɚ ɫɬɪɚɧɢɰɟ ɜɜɨɞɚ ɩɚɪɨɥɹ ȼɵ ɦɨɠɟɬɟ
ɭɫɬɚɧɨɜɢɬɶ ɭɪɨɜɟɧɶ ɨɝɪɚɧɢɱɟɧɢɹ ɞɨɫɬɭɩɚ. ɗɬɨ ɩɨɡɜɨɥɢɬ ɡɚɩɪɟɬɢɬɶ ɩɪɨɫɦɨɬɪ
ɞɟɬɶɦɢ ɮɢɥɶɦɨɜ, ɞɥɹ ɧɢɯ ɧɟ ɩɪɟɞɧɚɡɧɚɱɟɧɧɵɯ.
Country Region (ɪɟɝɢɨɧ): ȼɵ ɦɨɠɟɬɟ ɜɵɛɪɚɬɶ ɫɬɪɚɧɭ (ɪɟɝɢɨɧ) ɞɥɹ ɭɫɬɚɧɨɜɤɢ
ɫɨɨɬɜɟɬɫɬɜɭɸɳɢɯ ɭɪɨɜɧɟɣ ɨɝɪɚɧɢɱɟɧɢɹ ɞɨɫɬɭɩɚ. ȼɵ ɦɨɠɟɬɟ ɜɵɛɪɚɬɶ: China,
France, Hong Kong, Japan, Taiwan, Eng, USA ɢɬ.ɞ.
Default: ȼɵɛɪɚɜ ɩɚɪɚɦɟɬɪ “Default value”, ȼɵ ɦɨɠɟɬɟ ɜɨɫɫɬɚɧɨɜɢɬɶ
ɫɬɚɧɞɚɪɬɧɵɟ (ɡɚɜɨɞɫɤɢɟ) ɡɧɚɱɟɧɢɹ ɜɫɟɯ ɩɚɪɚɦɟɬɪɨɜ.
ɋɬɪɚɧɢɰɚ ɜɜɨɞɚ ɩɚɪɨɥɹ Password Setup Page
ɉɨɫɥɟ ɨɤɨɧɱɚɧɢɹ ɧɚɫɬɪɨɣɤɢ ɩɚɪɚɦɟɬɪɨɜ ɢɡɨɛɪɚɠɟɧɢɹ ɧɚɠɦɢɬɟ ɤɧɨɩɤɭ Ż, ò
í ɝɥɚɜɧɨɟ çàèù, ɡɚɬɟɦ ɧɚɠɚɬɢɟɦ ɧɚ ɤɧɨɩɤɭ Ź ɜɵɛɟɪɢɬɟ ɫɬɪɚɧɢɰɭ
ɜɜɨɞɚ ɩɚɪɨɥɹ ɢ ɧɚɠɦɢɬɟ ɤɧɨɩɤɭ “Play” ɢɥɢ ź, ɱɬɨɛɵ ɩɟɪɟɣɬɢ ɧɚ ɷɬɭ ɫɬɪɚɧɢɰɭ.
ɋ ɩɨɦɨɳɶɸ ɤɧɨɩɨɤ ɤɭɪɫɨɪɚ ɫɨ ɫɬɪɟɥɤɚɦɢ ɜɜɟɪɯ/ɜɧɢɡ ɜɵɛɟɪɢɬɟ ɩɨɥɟ ɜɜɨɞɚ
ɩɚɪɨɥɹ ĀPassword Setupā ɢ, ɧɚɠɚɜ ɤɧɨɩɤɭ Ź, ɜɨɣɞɢɬɟ ɜ ɩɪɚɜɨɟ ɦɟɧɸ.
42
Page 43

ɇȺɋɌɊɈɃɄȺ ɋɂɋɌȿɆɕ
¡ ɉɨɫɥɟ ɜɜɨɞɚ ɩɚɪɨɥɹ ȼɵ ɦɨɠɟɬɟ ɭɫɬɚɧɨɜɢɬɶ ɨɝɪɚɧɢɱɟɧɢɟ ɩɨ ɜɨɡɪɚɫɬɭ
ɞɥɹ ɩɪɨɫɦɨɬɪɚ ɞɢɫɤɨɜ. ɇɚ ɫɬɪɚɧɢɰɟ ɜɜɨɞɚ ɩɚɪɨɥɹ ɧɚɠɚɬɢɟɦ ɧɚ
ɤɧɨɩɤɢ Ÿ/ź ɜɵɛɟɪɢɬɟ ĀPasswordā ɢ ɩɟɪɟɣɞɢɬɟ ɜ ɩɪɚɜɨɟ ɦɟɧɸ.
ɋɧɚɱɚɥɚ ɧɚɠɦɢɬɟ ɤɧɨɩɤɭ ĀŹā, ɚ ɡɚɬɟɦ ɧɚɠɦɢɬɟ ɤɧɨɩɤɭ Play, ɱɬɨɛɵ
ɢɡɦɟɧɢɬɶ ɩɚɪɨɥɶ.
- - Password Setup Page - -
PasswordMode On
Password Change
Change Password
ɇɚɠɦɢɬɟ ɤɧɨɩɤɭ
OFF, ɱɬɨɛɵ ɜɵɣɬɢ
ɢɡ ɦɟɧɸ.
ɑɬɨɛɵ ɩɟɪɟɣɬɢ ɜ ɦɟɧɸ ɢɡɦɟɧɟɧɢɹ ɩɚɪɨɥɹ Password change, ɧɚɠɦɢɬɟ
ɤɧɨɩɤɭ Play. ɇɚ ɷɤɪɚɧɟ ɛɭɞɟɬ ɨɬɨɛɪɚɠɟɧɨ ɫɥɟɞɭɸɳɟɟ:
ɂɡɦɟɧɟɧɢɟ ɩɚɪɨɥɹ (Change)
ɉɨ ɭɦɨɥɱɚɧɢɸ ɭɫɬɚɧɨɜɥɟɧ ɩɚɪɨɥɶ 136900. ȼɵ ɦɨɠɟɬɟ ɢɡɦɟɧɢɬɶ ɩɚɪɨɥɶ.
ȼɵɩɨɥɧɟɧɢɟ:
ȼɩɨɥɟ "Old Password" ɜɜɟɞɢɬɟ ɫɬɚɪɵɣ 6-ɡɧɚɱɧɵɣ ɩɚɪɨɥɶ. ɉɨɫɥɟ
ɩɪɚɜɢɥɶɧɨɝɨ ɜɜɨɞɚ ɩɚɪɨɥɹ ɤɭɪɫɨɪ ɩɟɪɟɦɟɫɬɢɬɫɹ ɜ ɩɨɥɟ "New Password"
(ɧɨɜɵɣ ɩɚɪɨɥɶ). ȼɜɟɞɢɬɟ ɧɨɜɵɣ 6-ɡɧɚɱɧɵɣ ɩɚɪɨɥɶ.
Ʉɭɪɫɨɪ ɩɟɪɟɦɟɫɬɢɬɫɹ ɜ ɩɨɥɟ CONFIRM PASSWORD (ɩɨɞɬɜɟɪɠɞɟɧɢɟ
ɜɜɨɞɚ ɩɚɪɨɥɹ). ȼɜɟɞɢɬɟ ɧɨɜɵɣ ɩɚɪɨɥɶ ɟɳɟ ɪɚɡ.
ɇɚɠɦɢɬɟ ɤɧɨɩɤɭ PLAY, ɱɬɨɛɵ ɩɨɞɬɜɟɪɞɢɬɶ ɜɜɨɞ ɢ ɜɵɣɬɢ ɢɡ ɦɟɧɸ
ɢɡɦɟɧɟɧɢɹ ɩɚɪɨɥɹ.
Old Password
New Password
Confirm PWD
OK
43
Page 44

ȼɈɁɆɈɀɇɕȿ ɇȿɂɋɉɊȺȼɇɈɋɌɂ
ɋɂɆɉɌɈɆ ɑɌɈ ɉɊɈȼȿɊɂɌɖ
- ɍɫɬɚɧɨɜɥɟɧ ɥɢ ɞɢɫɤ?
- Ɇɨɠɟɬ ɛɵɬɶ, ɞɢɫɤ ɭɫɬɚɧɨɜɥɟɧ "ɜɜɟɪɯ ɧɨɝɚɦɢ"?
- Ɇɨɠɟɬ ɛɵɬɶ, ɞɢɫɤ ɡɚɝɪɹɡɧɟɧ ɢɥɢ ɫɨɝɧɭɬ?
ɇɟɜɨɡɦɨɠɧɨ
ɜɨɫɩɪɨɢɡɜɟɞɟɧɢɟ ɞɢɫɤɚ.
ɇɟɬ ɡɜɭɤɚ.
ɇɟɬ ɢɡɨɛɪɚɠɟɧɢɹ.
ɉɥɨɯɨɟ ɤɚɱɟɫɬɜɨ
ɢɡɨɛɪɚɠɟɧɢɹ ɢ ɡɜɭɤɚ ɧɚ
ɜɵɯɨɞɟ AV.
ɇɟɜɨɡɦɨɠɧɨ ɩɪɨɞɨɥɠɟɧɢɟ
ɜɨɫɩɪɨɢɡɜɟɞɟɧɢɹ ɢ
ɜɵɩɨɥɧɹɟɬɫɹ ɩɨɜɬɨɪɧɨɟ
ɜɨɫɩɪɨɢɡɜɟɞɟɧɢɟ
ɮɪɚɝɦɟɧɬɚ.
ɇɟ ɪɚɛɨɬɚɟɬ ɩɭɥɶɬ
ɞɢɫɬɚɧɰɢɨɧɧɨɝɨ
ɭɩɪɚɜɥɟɧɢɹ.
"Ɏɨɧɢɬ" ɦɢɤɪɨɮɨɧ.
- ɋɨɨɬɜɟɬɫɬɜɭɟɬ ɥɢ ɤɨɞ ɡɨɧɵ ɩɪɨɢɝɪɵɜɚɬɟɥɹ ɤɨɞɭ
ɡɨɧɵ DVD-ɞɢɫɤɚ?
- Ɇɨɠɟɬ ɛɵɬɶ, ɩɪɨɢɡɨɲɥɚ ɤɨɧɞɟɧɫɚɰɢɹ ɜɥɚɝɢ?
- ȿɫɥɢ ɷɬɨ ɩɪɨɢɡɨɣɞɟɬ, ɢɡɜɥɟɤɢɬɟ ɞɢɫɤ ɢ ɨɫɬɚɜɶɬɟ
ɩɪɨɢɝɪɵɜɚɬɟɥɶ ɧɚ ɧɟɫɤɨɥɶɤɨ ɱɚɫɨɜ.
- ɉɪɚɜɢɥɶɧɨ ɥɢ ɜɵɩɨɥɧɟɧɨ ɩɨɞɤɥɸɱɟɧɢɟ ɫɢɫɬɟɦɵ?
- ȼɤɥɸɱɟɧɨ ɥɢ ɩɢɬɚɧɢɟ ɚɤɭɫɬɢɱɟɫɤɢɯ ɫɢɫɬɟɦ?
- ɉɪɚɜɢɥɶɧɨ ɥɢ ɧɚɫɬɪɨɟɧ ɡɜɭɤ ɞɥɹ
ɜɨɫɩɪɨɢɡɜɟɞɟɧɢɹ DVD-ɞɢɫɤɚ?
- Ɇɨɠɟɬ ɛɵɬɶ, ɞɢɫɤ ɡɚɝɪɹɡɧɟɧ ɢɥɢ ɫɨɝɧɭɬ? ȼɷɬɨɦ
ɫɥɭɱɚɟ ɩɪɨɜɟɞɢɬɟ ɱɢɫɬɤɭ ɞɢɫɤɚ ɢɥɢ ɡɚɦɟɧɢɬɟ ɞɢɫɤ.
- ɉɪɨɜɟɪɶɬɟ, ɜɤɥɸɱɟɧ ɥɢ ɬɟɥɟɜɢɡɨɪ ɢ ɩɪɚɜɢɥɶɧɨ ɥɢ
ɜɵɛɪɚɧ ɧɚ ɧɟɦ ɜɢɞɟɨɜɯɨɞ.
- ɉɪɚɜɢɥɶɧɨ ɥɢ ɜɵɩɨɥɧɟɧɨ ɩɨɞɤɥɸɱɟɧɢɟ ɫɢɫɬɟɦɵ?
- Ɇɨɠɟɬ ɛɵɬɶ, ɞɢɫɤ ɡɚɝɪɹɡɧɟɧ, ɫɨɝɧɭɬ ɢɥɢ
ɩɨɜɪɟɠɞɟɧ?
- Ɇɨɠɟɬ ɛɵɬɶ, ɜɤɥɸɱɟɧ ɪɟɠɢɦ ɩɨɜɬɨɪɚ ɮɪɚɝɦɟɧɬɚ
Ⱥ-ȼ? ȼɷɬɨɦɫɥɭɱɚɟ, ɧɚɠɦɢɬɟ ɤɧɨɩɤɭ Ⱥ-ȼ, ɱɬɨɛɵ
ɜɵɤɥɸɱɢɬɶ ɪɟɠɢɦ ɩɨɜɬɨɪɚ.
- Ɇɨɠɟɬ ɛɵɬɶ, ɞɢɫɤ ɡɚɝɪɹɡɧɟɧ ɢɥɢ ɫɨɝɧɭɬ? ȼɷɬɨɦ
ɫɥɭɱɚɟ ɩɪɨɜɟɞɢɬɟ ɱɢɫɬɤɭ ɞɢɫɤɚ ɢɥɢ ɡɚɦɟɧɢɬɟ ɞɢɫɤ.
- Ɇɨɠɟɬ ɛɵɬɶ, ɦɟɠɞɭ ɩɭɥɶɬɨɦ Ⱦɍ ɢ
ɩɪɨɢɝɪɵɜɚɬɟɥɟɦ ɟɫɬɶ ɩɪɟɝɪɚɞɚ?
- ɇɚɩɪɚɜɥɟɧ ɥɢ ɩɭɥɶɬ Ⱦɍ ɧɚ ɩɪɨɢɝɪɵɜɚɬɟɥɶ?
- ɉɪɚɜɢɥɶɧɨ ɥɢ ɭɫɬɚɧɨɜɥɟɧɵ ɛɚɬɚɪɟɢ ɩɢɬɚɧɢɹ?
ɋɨɛɥɸɞɚɟɬɫɹ ɩɨɥɹɪɧɨɫɬɶ ɭɫɬɚɧɨɜɤɢ?
- Ɇɨɠɟɬ ɛɵɬɶ, ɛɚɬɚɪɟɢ ɩɢɬɚɧɢɹ ɪɚɡɪɹɠɟɧɵ? ȼɷɬɨɦ
ɫɥɭɱɚɟ ɡɚɦɟɧɢɬɟ ɛɚɬɚɪɟɢ ɩɢɬɚɧɢɹ.
ɉɟɪɟɦɟɫɬɢɬɟ ɦɢɤɪɨɮɨɧ ɩɨɞɚɥɶɲɟ ɨɬ ɬɟɥɟɜɢɡɨɪɚ
ɢɥɢ ɚɤɭɫɬɢɱɟɫɤɢɯ ɫɢɫɬɟɦ.
lower the volume of player, TV and amplifier.
ɉɪɨɱɟɟ: ɋɬɚɬɢɱɟɫɤɨɟ ɷɥɟɤɬɪɢɱɟɫɬɜɨ ɢɥɢ ɩɪɨɱɢɟ ɜɧɟɲɧɢɟ ɜɨɡɞɟɣɫɬɜɢɹ ɦɨɝɭɬ
ɩɪɢɜɟɫɬɢ ɤ ɫɛɨɹɦ ɜ ɪɚɛɨɬɟ ɩɪɨɢɝɪɵɜɚɬɟɥɹ. ȼ ɷɬɨɦ ɫɥɭɱɚɟ ɨɬɤɥɸɱɢɬɟ ɫɟɬɟɜɨɣ ɲɧɭɪ, ɚ
ɡɚɬɟɦ ɜɧɨɜɶ ɩɨɞɤɥɸɱɢɬɟ ɟɝɨ, ɱɬɨɛɵ ɜɨɫɫɬɚɧɨɜɢɬɶ ɪɚɛɨɱɟɟ ɫɨɫɬɨɹɧɢɟ ɩɪɨɢɝɪɵɜɚɬɟɥɹ.
ȿɫɥɢ ɬɚɤɢɦ ɨɛɪɚɡɨɦ ɩɪɨɛɥɟɦɚ ɧɟ ɦɨɠɟɬ ɛɵɬɶ ɭɫɬɪɚɧɟɧɚ, ɨɬɤɥɸɱɢɬɟ ɫɟɬɟɜɨɣ ɲɧɭɪ ɢ
ɩɪɨɤɨɧɫɭɥɶɬɢɪɭɣɬɟɫɶ ɫɨ ɫɩɟɰɢɚɥɢɫɬɚɦɢ ɫɟɪɜɢɫɧɨɝɨ ɰɟɧɬɪɚ ɢɥɢ ɤɜɚɥɢɮɢɰɢɪɨɜɚɧɧɵɦ
ɬɟɯɧɢɤɨɦ.
44
Page 45

ɌȿɏɇɂɑȿɋɄɂȿ ɏȺɊȺɄɌȿɊɂɋɌɂɄɂ
Ⱦɥɢɧɚ ɜɨɥɧɵ ɥɚɡɟɪɚ Ⱦɥɢɧɚ ɜɨɥɧɵ: 780/650 ɧɦ
ɋɢɫɬɟɦɚ ɤɨɞɢɪɨɜɚɧɢɹ ɰɜɟɬɚ AUTO/NTSC/PAL
Ⱦɢɚɩɚɡɨɧ ɜɨɫɩɪɨɢɡɜɨɞɢɦɵɯ ɱɚɫɬɨɬ 20 Ƚɰ - 20 ɤȽɰ, ±2.5 ɞȻ
ɋɨɨɬɧɨɲɟɧɢɟ ɫɢɝɧɚɥ/ɲɭɦ (ɡɜɭɤ) 85dB
ɂɫɤɚɠɟɧɢɹ ɡɜɭɤɚ
-70 ɞȻ, 1 ɤȽɰ
Ɋɚɡɞɟɥɟɧɢɟ ɤɚɧɚɥɨɜ 70 ɞȻ, 1 ɤȽɰ
Ⱦɢɧɚɦɢɱɟɫɤɢɣ ɞɢɚɩɚɡɨɧ 80 ɞȻ, 1 ɤȽɰ
0.2
1.0
Ⱥɭɞɢɨ
ɜɵɯɨɞ
Ⱥɧɚɥɨɝɨɜɵɣ ɚɭɞɢɨɜɵɯɨɞ ȼɵɯɨɞ.ɭɪɨɜɟɧɶ: 2 ȼ ±
Ʉɨɚɤɫɢɚɥɶɧɵɣ: ɜɵɯ.ɭɪɨɜɟɧɶ 0.5 ȼ
ɐɢɮɪɨɜɨɣ ɚɭɞɢɨɜɵɯɨɞ
ɧɚɝɪɭɡɤɚ - 75 Ɉɦ
Ɉɩɬɢɱɟɫɤɢɣ: -21 ɞȻm . -15 ɞȻ
ȼɢɞɟɨɜɵɯɨɞ
ȼɵɯ.ɭɪɨɜɟɧɶ 1 ȼ
±0.2, ɇɚɝɪɭɡɤɚ: 75 Ɉɦ,
P-P
ɧɟɫɛɚɥɚɧɫɢɪɨɜɚɧɧɵɣ
ȼɢɞɟɨ
ɜɵɯɨɞ
ȼɵɯɨɞ S-Video
Ʉɨɦɩɨ-
ɧɟɧɬɧɵɣ
ɑɟɪɟɫɫɬɪɨɱɧ.Y:1.0ȼ
ɉɪɨɝɪɟɫɫɢɜɧ.Y:1.0ȼ
ȼɵɯ.ɭɪɨɜɟɧɶ Y: 1 ȼ
, Cb/Cr: 0.7 ȼ
P-P
, Pb/Pr: 0.7 ȼ
P-P
; C: 0.286 ȼ
P-P
P-P
P-P
ɇɚɩɪɹɠɟɧɢɟ ɩɢɬɚɧɢɹ AC 100-240 ȼ, 50/60 Ƚɰ
ɉɨɬɪɟɛɥɹɟɦɚɹ ɦɨɳɧɨɫɬɶ 14 ȼɬ
Ɋɚɡɦɟɪɵ 410 ɦɦ × 270 ɦɦ × 44.5 ɦɦ
ȼɟɫ 2.15 ɤɝ
ɇɚɝɪɭɡɤɚ: 10 ɤɈɦ
,
P-P
m
P-P
, ɇɚɝɪɭɡɤɚ: 75 Ɉɦ
, ɇɚɝɪɭɡɤɚ: 75 Ɉɦ
ȼɯɨɞ
MIC
(ɦɢɤɪɨɮɨɧɧɵɣ)
Ɍɢɩ ɝɧɟɡɞɚ: ɝɧɟɡɞɨ MIC, ɞɢɚɦɟɬɪ 6.35 ɦɦ;
Ɇɚɤɫɢɦɚɥɶɧɨɟ ɧɚɩɪɹɠɟɧɢɟ: 100 ɦȼ,
ɋɨɩɪɨɬɢɜɥɟɧɢɟ: 600 Ɉɦ
45
Page 46

Page 47

DVD-player DVDP-2448/2450
INSTRUCTION MANUAL
47
Page 48

CATALOG
Safety Information……………………………………………………………………………….2
Features………………………...…………………………………………………………………4
Discs Information………………………………………………………………………………..5
Parts Introduction...…………………………………………………………….……………….7
System Connection……………………………………………………………………………12
Play Operation………………………………………………………………….………………17
System Setup…………………………………………………………………………………..23
Troubleshooting……………………………………………………………………………….42
Specifications…………………………………………………………………………………..43
48
Page 49

IMPORTANT SAFETY INSTRUCTIONS
WARNING: To reduce the risk of fire
or electric shock , DO NOT expose
this product to rain or moisture.
The lighting flash with arrowhead symbol, within an triangle, alerts the user to
“dangerous voltage” which could cause electric shock.
The exclamation point within a triangle indicates to the user to read important
operating and maintenance instructions in the manual.
NOTES
1) Read these instructions.
2) Keep these instructions.
3) Heed all warnings.
4) Follow all instructions.
5) Do not use this apparatus near
water.
6) Clean only with dry cloth.
7) Do not block any ventilation
openings. Install in accordance with
the manufacturer’s instructions.
8) Do not install near any heat sources such as radiators, heat registers, stoves, or
other apparatus (including amplifiers) that produce heat.
9) Do not defeat the safety purpose of the polarized or grounding-type plug. A polarized
plug has two blades with one wider than the other. A grounding type plug has two blades
and a third grounding prong. The wide blade or the third prong are provided for your safety.
If the provided plug does not fit into your outlet, consult an electrician for replacement of
the obsolete outlet.
IMPORTANT FOR LASER PRODUCTS
1 .CLASS 1 LASER PRODUCT
2 .DANGER: Visible laser radiation when
open and interlock failed or defeated.
Avoid direct exposure to beam.
3 CAUTION: Do not open the top cover.
There are no user service-able parts
inside the unit, leave all servicing to
qualified service personnel.
49
Page 50

IMPORTANT SAFETY INSTRUCTIONS
10) Protect the power cord from being walked on or pinched particularly at plugs,
convenience receptacles, and the point where they exit from the apparatus.
11) Only use attachments/accessories specified by the manufacturer.
13) Use only with the cart, stand, tripod, bracket, or table specified by the manufacturer,
or sold with the apparatus. When a cart is used, use caution when moving the
cart/apparatus combination to avoid injury from tip-over.
14) Unplug this apparatus during lightning storms or when unused for long periods of
time.
15) Refer all servicing to qualified service personnel. Servicing is required when the
apparatus has been damaged in any way, such as power supply cord or plug is
damaged, liquid has been spilled or objects have fallen into the apparatus, the
apparatus has been exposed to rain or moisture, does not operate normally, or has
been dropped.
16) Apparatus shall not be exposed to dripping or splashing and no objects filled with
liquids, such as vases, shall be placed on the apparatus.
50
Page 51

FEATURES
DIVX function
DivX is a patent-pending MPEG-4
digital video technology created by
DivXNetworks, Inc
with DivX technology, as the
compress technology of Mp3 digital
˿˼˸˷˼˴ˁ
HIGH QUALITY PROPERTIES
1. HIGH RESOLUTION
Adopt an MPEG2 decoding format to
achieve horizontal resolution more
than 500 lines.
2. EXCELLENT TIMBRE
Can output Dolby AC-3 digital audio
signal and realize high quality sound
effects, DTS decoder.
3. SCREEN
Support the picture of normal screen
(4:3) and wide screen (16:9).
4. SPECIAL FUNCTION
Support multi-angle, multi-language
and multi-subtitle playback so you can
enjoy unique DVD features.
5. VIDEO OUT
Standard Video, S-Video, Y/Pb/Pr,
Y/Cb/Cr and VGA video output.
6. AUDIO OUT
5.1CH or 2CH analog audio output,
optical and coaxial digital audio output
can be connected to any amplifying
equipment.
. Videos encoded
Progressive Scan
Built-in functional decode COMS chip
which supplies both interlace and
progressive scan.
FEATURES
1. COMPATIBILITY
DVD (video/audio), CD, VCD,MP-3
CD-RW, CD-R,WMA,PICTURE-CD
JPEG and MP4 discs compatible.
2. ZOOM FUNCTION
You can view scenes close-up.
3. ALL PLAYBACK FUNCTIONS
Fast forward and reverse, slow
playback, step playback, repeat
playback and program playback.
4. SEARCH BY TIME CODE
Ability to search DVD contents via
time code.
5. Special memory function
When playing the DVD pess the
POWER button to let the player be
on stand-by mode.Once you turn on
the POWER again,thr player can
continue to play from where you stop.
6. Karaoke Function
One speaker input with separate
sound tuner and the digital
reverberation control for your
pleasure enjoying Karaoke singing
7. Function of changing screen
You can change the display screen
as you like
51
Page 52

DISCS INFORMATION
DISC FORMATS SUPPORTED BY THIS PLAYER
DISC SORT DISCLOGO CONTENTS SIZE
DVD
(Active Picture)
12cm
12cm
Audio + Video
CD Audio
8cm
MP3 Audio 12cm
JPEG
VCD
MPEG4
ƹ Software maker specifies the operation method of some DVD discs. Please refer to
the instruction manual of disc.
Video
(Static Picture)
Audio+Video 12cm
Audio+Video 12cm
12cm
NOTES
1. Using of Discs
Do not touch the playing surface of the
compact disc.
Do not stick paper and label on the disc.
Do not expose discs to direct sunlight.
Do not place discs near water or in dusty
place.
2. Cleaning of Discs
If a disc has fingerprints or dust on it,
lightly wipe the disc with soft cloth (or
similar) from the cPlay of the disc outward
in a radial manner.
Never use record cleaning sprays,
benzene, thinner, static electricity
prevention liquids or any other solvents to
clean your discs.
52
Page 53

DISCS INFORMATION
About Disc Terms
Title
Generally, pictures or music compressed on a DVD are divided into
several sections that is “TITLE”
Chapter
The smaller section unit of picture or music in a DVD under the title, usually
one title is comprised of one or more chapters and each of them is numbered
for easy searching. But some discs may not have a recording chapter.
Track
A segment of picture or music on a SVCD ǃVCD or CD. Each track is
numbered for searching
Scene
VCD with playback control function, on which active and stillness picture
divided into certain portion is called scene, and every scene will be showed
on screen menu with a scene number, that can be easily found while on
playing. A scene usually is formed with one or several tracks
PBC function ( SVCD,VCD)
If a SVCD or a VCD is playedˈa content menu may be showed on screen,
this is what we Called “Play back control “ viz. PBC function.
Disc sort
VCD without PBC
function (1.1
version)
SVCD/VCD with
PBC function (2.0
version)
Exhibiting both music and images.
Besides VCD picture playingˈon screen menu can be
used for PBC playback, and if stillness function is made
in a disc it also can be played with high definition.
53
Functions
Page 54

Parts Introduction
Front panel drawing
DVDP-2448
DVDP-2450
1. Power
Press to turn on/off power.
2. Eject
Press to open/close the disc tray
3. Disc tray
For disc to be loaded.
4. Power indicator
5. Display screen
Displaying the unit’s operation
status.
6. Remote signal receiving window
Point the remote control at this window
7. MIC Jacks
Use for Karaoke singing.
8. Play
Press to play
9.Pause
Press to pause the playback.
10.Stop
Press to stop playback.
54
Page 55

Parts Introduction
Display screen drawing
2ˊ DVD disc indicator.
3ˊ CD/VCD/SVCD disc indicator.
4ˊ Play status indicator.
5ˊ Pause status indicator.
6ˊ MP3 disc indicator.
7ˊ Current Title Indicator
Rear panel drawing
1. 5.1CH Audio Output Jacks
2. Left/ Right Audio Output jacks
3. Component video output jack
4. YPbPr/YCbCr Video output
5. S-video Output jack
8ˊ Current Chapter/Track
indicator.
9ˊ Playing Time indicator.
10ˊ Dolby
double “D” symbol.
Optical Digital Output jack
6.
7. Coaxial Digital Output jack
8. VGA Output Jack
9. SCART Output Jack
10. Power-supply cord
55
Page 56

REMOTE CONTROL
BATTERY USAGE
Open the battery case cover, and insert two “AAA” batteries in accordance with the
+/- indicators inside the compartment.
Point the remote control at the remote sensor, within an angle of 60eand a distance
Of 7m.
Normally the batteries can last for around six months. If the remote control does not
work, replace the batteries.
If the player is not used for a long time, take out the batteries to prevent leakage and
possible damage to the remote control.
56
Page 57

REMOTE CONTROL
Remote control drawing
1. POWER -Press to turn the DVD
player on or off
2. NUMBER BUTTONS -Select
numbers by pressing these buttons.
3. -/-- BUTTON -Press to select track
numbers past 10.
4. ANGLE -Press to access various
camera angles (if the DVD disc
contains multiple camera angles).
5. AUDIO -Press to access various
audio languages (if the DVD disc
contains multiple audio languages)
6. TITLE -Press to display titles if
present on the disc.
7. VOLUME UP -Press to raise the DVD
volume level slightly. The volume
range is smaller compared to your
57
Page 58

TV’s range.
8. MENU -Press to display the disc
menu on the TV screen in Play mode.
9. FORWARD SCAN -Press to search
forward.
10. REVERSE SCAN -Press to search
backward.
11. DIRECTION BUTTONS(Ż/ŹŸ/ź/)
-Use to select menu items or settings.
12. SETUP -Press to access the DVD
player’s setup menu.
13. REPEAT -Press to repeat a chapter,
18. GOTO -Allows you to select the
desired disc starting time, track or
title.
19. SUBTITLE -When a DVD is playing,
press to select a subtitle language.
20. P/N -Press to shift PAL \ AUTO or
NTSC Mode
21. VOLUME DOWN -Press to lower the
DVD volume level slightly. The
volume range is smaller compared to
your TV’s range.
22. VIDEO -Press to switch Interlace
and Progressive Mode.
23. PREVIOUS Skip -Press to skip to
the previous chapter.
track, title, or all content.
14. PAUSE/STEP -Press to pause
playback or step frame by frame.
15. A-B REPEAT -Press to mark a
segment to repeat between A and B.
16. DISPLAY -Press to show the elapsed
playback time or the track number.
Press to cancel onscreen text.
17. EJECT -Press to open or close the
disc tray.
24. Next SKIP -Press to skip to the next
chapter.
25. PLAY/PLAY -Press to Play DVD or
use to ensure your select menu items
or settings
26. PROG -Press to setup the track
programmed and to play the
programmed track.
27. SLOW -Press to activate slow
forward or slow rewind.
28. STOP -Press to stop playback.
29. ZOOM -When a DVD is playing,
press this button to activate zoom.
30. MUTE -Press to turn on/off the
speaker output
58
Page 59

System CONNECTIONS
- Do not connect the power cord until all other connections have been done.
- In audio aspect, there are 2ch analog audio output, optical, coaxial digital audio output; In
video aspect, there are Video, S-video output, and component output. You can choose
anyone to connect.
CONNECTING to a TV
In this figure, there are VIDEO OUT, S-VIDEO OUT and COMPONENT OUTPUT. If the TV
has S-VIDEO IN and COMPONENT IN jacks, you can achieve a more vivid picture by
using these connections.
Setup of the DVD Player
You can select the corresponding TV system depending on your TV connected.
If TV system is PAL, press the P/N button on remoter control to select PAL.
If TV system is NTSC, press the P/N button on remoter control to select NTSC.
If TV system is AUTO, press the P/N button on remoter control to select AUTO.
If a wide screen TV is connected, set the “TV TYPE” to “16:9” in system setup
menu.
If a normal TV is connected, set the “TV TYPE” to “4:3 PS” or “4:3 LB”.
59
Page 60

System CONNECTIONS
S-Video connection setting
If your TV has an S-Video jack, plug a S-Video cable into the S-Video out jack on the DVD
Player and the other end to the S-Video In jack on your TV. There is no need to do the
setting in the setup menu.
Y/Cb/Cr video connection setting
If a display device with Y/Cb/Cr jacks is connected, then you should connect the jacks with
these Y/Cb/Cr cables:
Press theǏVIDEOǐbutton to shift the video output to be YUV interlace signal output. Shift
the TV input mode to Y/Cb/Cr.
Y/Pb/Pr video connection setting
If a display device with Y/Pb/Pr jacks is connected, then you should connect the jacks with
these Y/Pb/Pr cables:
- Press theǏVIDEOǐbutton to shift the video output to YUV Progressive signal. Then shift
the TV input to the relevant mode.
- Press theǏVIDEOǐ button, the screen will be black when shifting from interlace to
progressive mode, repress theǏVIDEOǐ, It can work normally.
VGA connection setting
If the DVD Player’s video output is in interlaced mode. Select ‘VGA’ in the
‘COMPONENT’ menu, then press the Play button.
Restart the player, then video out is shifted to VGA output automatically.
If the DVD Player’s video output is Y Pb Pr. Select ‘VGA’ in the
‘COMPONENT’ menu, then press the Play button to shift to VGA output.
SCART connection setting
If the DVD Player’s video output is in interlaced mode. Select ‘VGA’ in the
‘COMPONENT’ menu, then press the Play button.
Restart the player, then video out is shifted to VGA output automatically.
If the DVD Player’s video output is Y Pb Pr. Select ‘VGA’ in the ‘COMPONENT’
menu, then press the Play button to shift to VGA output.
60
Page 61

System Connection
Connecting To An Common Amplifier
- When selecting the 2ch audio output mode set the “DOWNMIX” to “LT/RT”.
61
Page 62

System Connection
Connecting To An Amplifier With 5.1 CH Audio Output
- When selecting the 5.1ch audio output mode, set the “DOWNMIX” to “5.1ch” in
“SPEAKER SETUP” menu.
- The default audio output is Stereo.
62
Page 63

System Connection
Connecting To An Amplifier With Dolby Digital Decoder
The player has optical, coaxial digital audio output. You can connect any one of
them to the corresponding jack of amplifier with digital signal input.
Connect the player optical digital output jack to the amplifier optical digital Output
jack. Connect the player coaxial digital output jack to the amplifier coaxial digital
output jack.
- When selecting the optical or coaxial digital audio output, set the ĀSPDIF Outputā to
ĀSPDIF/RAWā.
63
Page 64

NORMAL OPERATION
r
Preparation웛After connection, turn on the power of relevant equipment and select video input.
1. Turn on the player’s power
Press the POWER button on front
panel to turn on the power and the
player will search for the disc
automatically. If there is a disc in, the
player will automatically play it.
2. Press the EJECT button on the
front panel or on the remote control to
open the disc tray.
NOTE: Do not play bad quality or damaged discs as this may damage the lens inside the player.
3. Load the disc into the disc tray
Load the disc as
shown in the
figure in orde
not to damage
the player or the
disc.
4. Press the EJECT button to close
the disc tray and begin playback.
DVD PLAYBACK
MENU
Normally there is a selecting menu in a DVD disc. You can use the MENU button to
Play the selecting menu directly, and use the direction buttons to highlight the item you
would like and press the PLAY button to select it.
TITLE & CHAPTER
Normally there are several titles in a DVD disc, and also there are several chapters in a
title. You can select any one of titles or chapters quickly by using the Number buttons to
Play the number of the chapter.
64
Page 65

NORMAL OPERATION
A
V
LANGUAGE
There are up to 8 kinds of audio languages in a DVD disc. When you play a
multi-language DVD disc, press the AUDIO button on remote control to select a
different audio language.
NOTE: This function is only available for discs that have several audio bitstreams.
SUBTITLE
he DVD player can support up to 32 kinds of subtitles. When you play a multi-subtitle
isc, press the SUBTITLE button on remote control to select different subtitle.
OTE: This function is only available for discs that several audio bitstreams have been
ecorded onto.
NGLE
The DVD player supports multi-angle function. Multi-angle means that a scene is shot
from more than one angle so that audience can watch from any angle. If there are
multiples in a scene, you can use the ANGLE button to select the angle you like to
enjoy. Press the ANGLE button continuously to view different angles.
OLUME
During playback, press the VOL+ button to increase the volume and press the VOL-
button to decrease the volume.
65
Page 66

NORMAL OPERATION
r
MP3 PLAYBACK
MP3 is the third audio compression format of international standard MPEG, which
compresses the audio signal at the rate of 12:1. Using MP3 format, one disc can record
more than 600 minutes music, the timbre of which is similar with that of CD discs.
here are many different formats for storing MP3 songs. Usually, one MP3 disc includes
any folders (directories) and every folder includes several files (songs).
In stop status, use the LEFT/RIGHT directional navigation arrows to move cursor to
“PLAY MODE” column, and use the UP/DOWN directional navigation arrows to select
the play mode. Press the LEFT/RIGHT directional navigation arrows to confirm.
Similarly, use the UP/DOWN directional navigation arrows to select the directory you
want and press the PLAY button to Play it. Press the PLAY button to play the song you
selected.
HDCD/CD PLAYBACK
The player will play all tracks for HDCD or CD discs continuously in default status. You can
press the
and (PREV/NEXT SKIP) buttons or number buttons to select a certain track.
Karaoke operation
. Operation steps:
1. Loading the Karaoke disc and play. Turn volumes to the least.
2. Input mikes into the mike jack 1 or 2. Turn on the power on the mike
3. Adjust volumes on the front panel of the unit. Adjust the reverberation
volume on the front panel of the unit
4. Press numbers buttons and choose tracks you are going to play.
5. Press ǏCHǐto avoid voice sound and sing.
6. Upon end singing turn off the power switch and unplug the mike.
If howl happens during singing, put the mike away as possible or lowe
volumes of the mike.
66
Page 67

NORMAL OPERATION
PICTURE CD PLAYBACK
JPEG playback operation
1. Normal Playback
Place a disc with ‘JPEG’ in the player. After reading the disc, “SMART NAVI” and
“ROOT” will be displayed on the screen. The left column is the menu for last
level, and the right is the menu for next level. Use the PLAY button and the
Left/Right direction button to select submenu with picture. Use the Up/Down
button to select the contents in the menu.
For example: Use direction buttons to select the name of the picture, and then
press the PLAY button to confirm to play. Many discs have other contents
besides pictures.
2. Picture Rotation
It can be operated when the picture is displayed. Once another picture is
selected, it will be cancelled automatically.
There are two kinds of rotational modes: Rotate left & Rotate right. You can use
direction buttons to select:
“LEFT” ----- Rotate left UP-----Rotate up
“RIGHT” ----- Rotate right DOWN----Rotate down
3. Zoom
ZOOM button is used to turn on/off zoom and move function.
When this function is turned on, use the and buttons to control zoom
proportion and TV screen will display relevant proportion. Then you can use
directional navigation arrows to move the picture.
When this function is turned off, the picture will resume back to normal size. and
then press the MENU button to return to root menu.
ƹ Depending on how the disc was made, a JPEG disc may allow playback, but not
rotation or zooming of the images.
67
Page 68

PLAYBACK FUNCTIONS
STOP
During playback, press the STOP button on remote control to stop playback. For DVD
discs, after pressing the STOP button once, if you press the PLAY button, then the
player will play from the stopped point.
PAUSE
Press the PAUSE/STEP button on remote control to pause, and press it repeatedly to
achieve frame-by-frame playback.
REPEAT
1. Use the REPEAT button to repeat a title, a chapter, a track and a disc respectively
according to different discs, and also to cancel repeat.
2. Use the A-B button to repeat section A to B. Press it once to set the starting point A,
twice to set the ending point B, and the third time to cancel repeat.
ƹSome discs do not support repeat
function.
SEARCH BY TIME
You can use the SEARCH button to search by time, namely to play from a specific time.
During DVD playback, press the SEARCH button once and TV screen will display the
title or chapter, then you can use number buttons to select any one of them. Press the
SEARCH button twice, then you can use number buttons to input the time you desired
(hour, minute, second), and the player will play from the inputted time.
68
Page 69

PLAYBACK FUNCTIONS
K
Y
FAST FORWARD & REWIND
Press the and buttons to activate fast forward or rewind
SLOW FORWARD & REWIND
Press the SLOW button to activate slow forward or rewind.
ƹ There is no slow playback function for CD and MP3 discs.
DISC INFORMATION DISPLAY
Press the DISPLAY button on remote control to display the relevant disc information.
PLAY
Press the PLAY button to start playback. Press the POWER button on remote control to
Play standby status, and press it again to resume playback status. If there is no
operation for a long time, the player will automatically Play screen saver status and
then Play standby status.
PROGRAM PLAYBAC
Use the PROGRAM button to activate program playback of DVD and CD discs.
Operation steps:
1. In stop status, press the PROGRAM button to Play program status.
2. Use the number buttons to input contents according to prompts.
3. Repeat step 2 to program more contents.
4. Use the direction buttons to move cursor to “START” and then press the PLA
button or the PLAY button to begin the program playback.
69
Page 70

System Setup
ZOOM
To enlarge or reduce the picture, press the ZOOM button on the remote control.
Continually pressing the zoom button will change the mode accordingly:
Enlarge x2, enlarge x3 and enlarge x4 or reduction x1/2, reduction x1/3 and reduction
1/4 repeat press the ZOOM button on the remote control to resume normal playback.
SETUP MENU
In stop status, press the SETUP button on the remote control and the TV screen will
display a main menu. It includes GENERAL SETUP, AUDIO SETUP, VIDEO SETU,
Dolby Setup and PREFERENCE SETUP.
Operation steps:
1. Press the SETUP button to Play the setup menu.
2. Use the Left/Right direction buttons to select the item you want to set.
3. Press the PLAY button to Play the submenu.
4. Use the UP/DOWN direction button to select the item in submenu, and then press
the RIGHT direction button Play it.
5. Use the UP/DOWN direction button to select the item you like and press the PLAY
button to confirm. Press the LEFT directional navigation arrows to return to the
submenu and then select “MAIN PAGE” to return to the main menu.
6. Press the SETUP button to exit from the setup menu.
ƹ PREFERENCE SETUP will be only effective in stop status.
Main menu setting
Set up language, TV mode, picture scale or parent control, or digital output,
audio output, dynamic, speakers types and so on according to your fancy or
disc played type.
Press the ǏSETUPǐon the remoteˈTV shows the main menu as bellow, and
press Ź to select setting up page. PressǏSETUPǐto exit the main menu.
70
Page 71

System Setup
A
- - General Setup Page - -
TV Display
Angle Mark
OSD Lang
Captions
Screen Saver
Last Memory
Logo Type
SHOW KEY LED
Go to General Setup Page
General Setup Page
press Ÿǃź to chooseĀTV Displayā, and skip a right menu as shows bellow, then pressŹ
to Play.
General Audio Dolby Video Preference
- - General Setup Page - -
TVDisplay LB Normal/ PS
ngleMark On Normal/LB
OSD Lang ENG Wide
Captions On
Screen Saver On
Last memory setup On
Display Screen Blue
LB
On
ENG
On
On
On
DEF
On
Set TV Display Mode
71
Page 72

System Setup
GENERAL SETUP
The general setup is shown as following:
1. TV DISPLAY
Supports NORMAL/PS, NORMAL/LB and WIDE aspect ratios.
2. ANGLE MARK
Some chapters in some DVD discs include many different angles. If the angle
mark is set to be “ON”, then there will be a multi-angle mark displaying on the
screen when playing the contents with multi-angle. Here, you can use ANGLE
button to enjoy different angles. If the angle mark is set to be “OFF”, then there
will be no angle mark on the screen.
3. OSD LANG
There are two kinds of different OSD languages for selection. You can select it
according to your preference.
4. CAPTIONS
Some DVD discs have hidden captions. You can turn on or off the hidden captions
by using this item.
5. SCREEN SAVER
Choose on and the unit will Play the mode of screen saver automatically if there
has been no operation for a period of time.
6. LAST MEMORY
This setting allows you to select ‘ON’ or ‘OFF’. If you select ‘ON’, then in power on
status, the player can continue playing from place that had stopped last.
7. LOGO TYPE
“Default ”ˈa initial picture will be viewed.
“Jacket”, if with on selection, the cover picture will be used as the initial picture.
some DVD is made with cover picture.
“Captured”, used as individuals fancy picture.
72
Page 73

System Setup
Audio Setup Page
As the general setting is finished, pressŻ buttonˈand back to the main menu, and press
Źto select audio settingsˈpressǏPlayǐ orź button to Play into audio settings page menu
as showed bellow:
- - Audio Setup Page - -
Speaker Setup
SPDIF Setup
Dolby Digital Setup
Channel Delay
Equalizer
3D Processing
HDCD
Karaoke Setup
Go To Audio Setup Page
Speaker Setup Page
MoveŸǃź direction buttons in the audio setting page to select “Speaker
Setup”ˈpressǏPlayǐto go into the page of speaker setting page, pressŸǃ
ź direction buttons to choose audio output mode, front speaker, cPlay
speaker, rear speaker, sub-woofer, sound or output dynamic compress and
others.
73
Page 74

System Setup
Select Downmix
- - Speaker Setup Page - -
Downmix
Front Speaker
CPlay Speaker
Rear Speaker
Subwoofer
Tes t To ne
Dialog
Post DRC
Set Downmix Mode
LT/RT
big
small
small
On
off
00
Auto
LT/ RT
Stereo
V SURR
5.1ch
“LT/RT”ˈmeans with left and right CH audio effect.
“Stereo”ˈindicates the normal stereo sound.
“V SURR”ˈshows the audio output is of surround signal.
“5.1ch”ˈ present 5.1CH output. Change 5.1 to OFF
¡ If an amplifier allows 2 CH signal inputˈ“LT/RT” mode could be chosenˈ
that means to pass the 2 CH signal through to amplifier for late processing.
Select Front Speaker
To choose “Large/Small” for the front speaker.
Select CPlay Speaker
With “Domnmix” offˈcan choose “Large/Small or off” items for the “CPlay
speaker”
74
Page 75

System Setup
Select Rear Speaker
With “Downmix” offˈcan choose “Large/Small or off” items for the “Rear
Speaker”.
¡ “Large” means complete frequency audio speaker˗“ Small” means high
frequency speaker. Use actual speakers configuring to adjust supper low
frequency. If small speaker is connected, don’t choose “Large” setting,
otherwise a high volume will damage the speaker.
¡ “CPlay speaker”, “Rear speaker ” setting must be done under the condition
of “Downmix” being with 5.1CH”. change 5.1 to OFF
Select Subwoofer
To choose “On/off” for the subwoofer means: “On “, the woofer is used.
Select Test Tone
With 5.1 operating ˈchoose “On”, will check 5 CHs in turn.
¡ The checking must be done with no disc in the unit and under the condition
of “Downmix” being with “5.1CH”. change 5.1 to OFF
¡ Using this function can check all CHs if their linkage with sound box is
correct or wrong.
Select Dialog
With “Audio output mode”, and choose “LT/RTǃstereo ”ˈthen under the
“Speaker Setup Page ”
you can select “Dialog ” item and adjust volumes.
¡ While playing 5.1CH disc, can adjust speakers volumes via “dialog”.
Select Post DRC
Dynamic compress output can lower volumes processing sound effect under
the conditions of within speakers max output. The item is divided into “On offǃ
auto”.
75
Page 76

System Setup
SPDIF Setup Page
MoveŸǃźdirection buttons in the audio setting menu page to choose
“ SPDIF Setup Page” and pressǏPlayǐto Play the digital audio setting
page, and pressŸǃź direction buttons to choose SPDIF Output, CD, Dolby
digital, DTS, MPEG, LPCM output and so on.
- - SPDIF Setup Page - -
SPDIF Output
CD
Dolby Digital
MPEG
LPCM output
Setup SPDIF
RAW
RAW
RAW
RAW
96K
Select digital audio out
“Off”˖the amplifier digital signal input off˗
Off
RAW
PCM
Manual
“RAW”˖no decoding on the amplifier digital signal input˗
“PCM”˖the amplifier must be supported by PCM decoding or Dolby digital
decoding function˗
“Manual” can self-choose Title’s output deploy.
Select CD
Under “SPDIF Output” status, and selecting “Manual”ˈin the “CD disc” item,
choose “SPDIF Off ǃSPDIF RAWǃSPDIF/PCM”.
Select Dolby Digital
Under “SPDIF Output” status, and selecting “Manual”, in “Dolby Digital” item,
choose “SPDIF off ǃSPDIF RAW, SPDIF/PCM”.
Select MPEG
Under “SPDIF Output,” and selecting “Manual “, choose VCD item, and
selecting “SPDIF OffǃSPDIF RAW,SPDIF/PCM”.
76
Page 77

System Setup
Select LPCM Output
Can select LPCM output with frequency out of 48K, 96K or 192k.
Dolby Digital Setup
Press “W” to back to the audio setting pageˈin the audio setting page menu,
moveŸǃź
direction buttons to choose “ Dolby digital setting”ˈpress ǏPlayǐto Play the
Dolby Setup
page menuˈand pressŸǃź to choose Dual Mono, Dynamic item.
- - Dolby Digital Setup - -
Dual Mono
Dynamic
Dual Mono (1 + 1)
Stereo
L-Mono
R-Mono
Mix-Mono
Select Dual Mono
“Stereo”˖stereo output signal˗
“L-Mono”˖ left output signal˗
“R-Mono”˖ right output signal˗
“Mix-Mono” :left and right output average signal.
Select Dynamic Compression
In “Dolby Digital Setup”, select “Dynamic” itemˈpress “Play” to Play the
selection, moveŸǃź to do the settingˈthe compression ratio more great, the
less difference between high sound and woof. This item is only available to
the Dolby sound source.
Channel Delay Setup Page
77
Page 78

Press “W” to back to the audio setting page menuˈin which moveŸǃź button
to choose
“Channel Delay ”, skipping a right menu and press “Play” to go in.
- - Audio setting pate - -
Speaker setup
SPDIF Setup
Dolby Digital Setup
Channel Delay
Equalizer
Sub
Sub
woofer
Su
b
woofer
10
0cm
0CM
0CM
10
3D processing
Karaoke Setup
Go to CH delay setting
At the “Channel Delay”, you can do the settings on the positions of all
speakers, choosing a suitable data and enjoy more real sound effect.
Equalizer Setup Page
Press “W” to back to the audio setting page menu and move Ÿǃź to choose
“Equalizer Page”, press ǏPlayǐto Play the page and press Ÿǃź to go
to the EQ Type, Bass Boost, Super Bass and Treble Boost selection of the
equalizer.
78
Page 79

System Setup
- - Equalizer Page - -
ÅAdd Classic and soft
EQ Type
Bass Boost
Super Bass
Treble Boost
Select Equalizer Type
None
Off
Off
Off
None
Rock
Pop
Live
Dance
Techno
Classic
Soft
Select EQ Type
To get more music effectˈby music style, you can at the “Equalizer EQ
Type” choose among
“None, Rock, Pop, Live, Dance, Techno, Classic and soft “.
Select Bass Boost, Super Bass or Treble Boost
“On” means strengthen the corresponding audio.
3D Processing Page
PressĀWāto back to the audio setting pageˈand move Ÿǃź to choose
Ā3D Processing Page”, press ǏPlayǐto go into 3D processing menu,
Ÿ,ź to choose PRO LogicΤor Reverb Mode.
press
79
Page 80

System Setup
- - PRO Logic Config - -
PRO Logic Ċ
Mode
Panorama
Dimension
PRO Logic
Off
MUS
Off
00
03
On
Off
Auto
Select PRO Logic
“On” means 2CH music switch into 5.1CH musicˈand can by played with
multi CHs speakersˈwhile in “Off” status, no effect, if a disc does not
support the function, suggesting to put to the “ Auto” position, when
playing with Dolby digital DVD, the function setting must be put on or put in
auto.
Select Mode
Music˖All sound arrive stimulatingly, without delay˗
Film˖At the surrounding CH plus 10ms delay. PRO LOGIC mode imitate PRO
LOGIC I adopting logic 2˗
Auto˖means auto selecting mode according to a disc type.
Only under audio out status, and Ā5.1CH” being chosenˈcan “PRO
Logic be set.
While in “PRO Logic”, and choosing “On”ˈcan go into next “Mode”
menu.
Select Panorama
On˖means the front stereo extends to both sides, with a better surrounding
sense.
Select Dimension
Similar as front and rear balance control, adjusting gradually the front and
rear sound field, there are all 7 musical scale to be chosen.
80
Page 81

System Setup
Select CPlay width
Adjusting cPlay CH signal and dividing left /right CH, to let the signal emit
from 3 front Speakers at different degree.
3D Processing Page
In “Audio Setup Page ” menu use Ÿǃź button to move cursor choosing “3D
Processing ” and press ǏPlayǐto go into “3D processing Page” as the
picture aboveˈto do the settings on the “Reverb Mode”.
- - 3D Processing Page - -
PRO Logic
Reverb Mode Off
Off
Concert
Living Room
Hall
Bathroom
Reverb Mode
Cave
Arena
Church
81
Page 82

System Setup
HDCD Setup Page
Press “W ” to back to the audio setting page menuˈand move Ÿǃź button to
choose “HDCD”, pressǏPlayǐto go into HDCD Setup Page menuˈthen
press “X” button to go into the right submenu.
- - HDCD Setup Page - -
Filter 2X Off
1X
2X
Filter
Select Filter
In “ Audio Setup Page” menu, useŸ,ź button to move cursor choosing
“HDCD”ˈand press
“Play” to go into “HDCD Processing Page”˗Where you can choose the
corresponding frequency on the digital filterˈ“Off ” means CD format is
used.
82
Page 83

System Setup
KARAOKE Setup Page
In “Audio Setup Page ” menu use Ÿ,ź button to move cursor choosing
“KARAOKE SETUP ” and press ǏPlayǐto go into then press “X”button to set
the volume and mix of the karaoke.
- - Karaoke Setup Page - -
Microphone setup
Microphone prearrange
Video Setup Page
As the audio setting page is finishedˈpressŻ button to back to the main
menu, and press Ź to select” Video Setup Page” , pressǏPlayǐorź button to go into video
setting page menuˈand pressŸ,ź button to choose video output mode, picture setting
noise, filter and so on. Choose “Component”,
pressŸ,ź button to select VGA,YUV or RGB Press ǏPlayǐ to confirm.
General Audio Dolby Video Preference
- - Video Setup Page - -
Component YUV OFF
TV mode YUV
Quality RGB
Denoise Off VGA
WarmthFilter 00
Component
83
Page 84

System Setup
Quality
Press“W” button to back to the root menuˈand pressŸ,ź direction button to
select “Quality”, pressǏPlayǐto confirm.
- - Video Quality Setup - -
In the video setting page menu, move Ÿǃ źdirection button to select
“Quality” pressǏPlayǐ
to go into the picture character setting menu, where you can set
“ SharpnessǃBrightness,
Contrast, Gamma, Hue, Saturation and Luma Delay
Sharpness High High
Brightness 00 Medium
Contrast 00 Low
Gamma
Hue 00
Saturation 00
LumaDelay 0T
Sharpness
None
System Setup
Select Component
To choose YUV, means to output YUV signal; to select RGB, means to
output RGB signal; to select OFF, means component video output. The
player is always with signal output under all conditions, and if it is
connected to a component video display equipment, suggesting the
linkage be set on “OFF”.
Select TV Mode
84
Page 85

f
f
t
Brightness ……….0
To display and change with difference choice o
brightness, contrast and so on.
PressŻ ᄽ Ź adjusting the value o
brightnessᄽsharpnessᄽhueᄽsaturation, and
press ᅌPlayᅍ to confirm and back to las
menu. PressᅌPlayᅍto exit the menu.
85
Page 86

System Setup
Preference Page
Under full stop playing status,(Press twice “ Stop” button), and press “Setup”
button to Play the root menuˈpressŹ button to select ”Initial setting page”ˈ
pressǏPlayǐbutton orź direction button to Play into initial setting page menuˈ
and pressŸǃźdirection button to choose TV Type, Audio, Subtitle, Disc
Menu, ParentalǃPassword and Default items. In Preference Page menu,
moveŸǃź direction button to choose all items menu. Press Źbutton to Play.
General Audio Dolby Video Preference
- - Preference Page - -
TVType Auto PAL
Audio ENG Multi
Subtitle ENG NTSC
Disc Menu ENG
Parental
Password
Default
Set TV standard
86
Page 87

System Setup
PREFERENCE SETUP
When Playing PREFERENCE you can change initial settings. This function is onl
available when
disc has stopped.
TV Mode
PBC
function.
Audio˖Supported by disc, difference language can be selected as “EngǃFranceǃ
SpanishǃChinese and Japan and others”.
Subtitle˖Supported by disc, difference language can be selected as “EngǃFrance,
Spanish , Chinese and Japan and others”.
Disc Menu˖Before playing can choose difference language as “EngǃFranceǃ
Spanish, Chinese and Japan and others”.
Parental˖In the pass word setting page , with “Pass word setting” being “Off”ˈyou
can do the settings in the “age control”, of which the level is the same as USA film
level˗upon finished setting, please back to the “Pass word setting page” and set
this item with “On”.
Country Region웛Considering all country’s control on DVD disc age levelˈyou can
choose a corresponding age as “China, France, Hong Kong, Japan, Taiwan, Eng,
USA and so on.
Default웛If choose “Default value” ˈthe system will back to the default status
웛In the “TV Mode”, you can choose “PALǃMulti, NTSC” mode.
웛To set PBC with “Onǃoff”, PBC ”On”, means the function is available, ”Off”, n
Password Setup Page
As video setting finishedˈpressŻ to back to the setting menuˈpress Źto
choose password setting menu, press “Play” orź direction button to Play the
password setting page menu, and press
password setting, and password item. In the password setting page menu,
move
Ʒ, direction buttons to choose ĀPassword Setupāand skip a menu
on the right, presŹ to Play.
87
Ʒ, direction button to select
Page 88

System Setup
¡ While the password is set as off, then you can Play into the age control.
In the password setting page, move Ÿǃź direction button to choose
ĀPassword āand skip a right menu, pressĀŹā first then press ǏPlayǐ
button to Play into to change the password.
- - Password Setup Page - -
Password Mode On
Password Change
Change Password
Press the Play button to access the Password change menu. The screen
display show as below:
Change Password
The initial factory default password is 136900. You can change the password.
Operation Steps:
Play the old six-digit password in the Old Password field. When the correct
password is Played, the cursor will move to the New Password field.
Play a new six-digital password.
The cursor will move to the COMFIRM PASSWORD field. Play the new
password again to confirm.
Press the PLAY button to confirm and exit the Password change submenu.
PressǏOFFǐ to exit
the setting menu.
Old Password
New Password
Confirm PWD
88
OK
Page 89

TROUBLESHOOTING
SYMPTOM WHAT TO CHECK
-If disc is loaded in.
-If disc is loaded upside down.
-If disc is dirty or warped.
The player cannot play.
There is no sound.
There is no picture.
Poor AV performance. -If disc is dirty, warped or damaged.
Cannot continue to play and
play a section repeatedly.
The remote control does not
work.
Howling(feedback)occurs.
Others: Static or other external interfere may cause the abnormity of the player. In this
circumstance, unplug the power-supply cord from the outlet and plug it in again to reset
the player so that the normal operation will be resumed. If you are still having problems,
then please disconnect the power and consult your service cPlay or a qualified technician.
-If the player’s region code is the same as region code
of DVD disc.
-If water condensation has occurred.
-If it occurs, take out disc and leave the player on for at
least hours.
-If system connection is correct.
-If the power of speakers is turned on.
-If the sound setup of DVD disc is correct.
-If disc is dirty or warped.
-If it occurs, clean it or press it.
-If TV is turned on and is in correct video mode.
-If system connection is correct.
-If it is in A-B repeat status.
-If it is true, press A-B button to cancel it.
-If disc is dirty or damaged.
-If it is true, clean it or skip the section.
-If there are obstructions between the remote control
and the player.
-If the remote control is pointing at the player.
-If batteries are inserted or the polarity is correct.
-If batteries are weak.
-If it is true, replace them.
move the microphone away from TV or speakers.
lower the volume of player, TV and amplifier.
89
Page 90

SPECIFICATIONS
Laser Wavelength Wavelength: 780/650nm
Video System AUTO/NTSC/PAL
Frequency Response 20Hz20kHz ±2.5 dB
Audio Signal-to-noise Rate 85dB
Audio distortion + noise
-70dB˄1kHz˅
Channel Separation 70dB ˄1kHz˅
Dynamic Range 80dB ˄1kHz˅
0.2
Load: 10kȍ
1.0
±0.2, Load˖75ȍUnbalanced
P-P
ˈ C: 0.286V
P-P
, Cb/Cr˖0.7V
, Pb/Pr˖0.7V
Audio
Out
Video
Output
Analog Audio Out
Digital Audio Out
Video Output
S-Video Output
Component
Video
Interlace Y˖1.0V
Progressive Y˖1.0V
Out Level: 2V±
Coaxial˖Out Level 0.5V
Optical˖-21 dBm-15 dB
Out Level˖1V
Out Level˖Y: 1V
P-P
P-P
Power AC100240Vˈ50/60Hz
Power Consumption 14W
Dimension 410mm×270mm×44.5mm
Weight 2.15kg
Jack type: MIC jack of 6.35mm diameter;
Input MIC
Maximum voltage: 100mV, Impedance:
600ȍ
,Load˖75ȍ
P-P
m
, Load˖75ȍ
P-P
, Load˖75ȍ
P-P
P-P
90
Page 91

SPECIFICATIONS
A
DESIGN AND SPECIFICATIONS ARE SUBJECT TO CHANGE WITHOUT NOTICE
Manufactured under license from Dolby Laboratories.
“Dolby” and the double-D symbol are trademarks of Dolby Laboratories.
Confidential unpublished works.
ll rights reserved.
This product incorporates copyright protection technology that is protected by
method claims of certain U.S. patents and other intellectual property rights owned by
Macrovision Corporation and other rights owners. Use of this copyright protection
technology must be authorized by Macrovision Corporation, and is intended for
home and other limited viewing uses only unless otherwise authorized by
Macrovision Corporation. Reverse engineering or disassembly is prohibited.
© 1992 -1997 Dolby Laboratories.
91
 Loading...