

Page 1

DVD ПЛЕЕР DVDP-2402
РУКОВОДСТВО ПОЛЬЗОВАТЕЛЯ
Page 2

CONTENT
ВВЕДЕНИЕ
Меры предосторожности 3
Функции 3
Форматы и режимы поддерживаемые плеером 3
ОПИСАНИЕ ПРИБОРА
Передняя панель 5
Задняя панель 5
Пульт дистанционного управления (ПДУ) 6
ПОДКЛЮЧЕНИЕ
Подключение к телевизору 7
Подключение к 5.1 усилителю с аналоговым аудио
входом 8
ОСНОВНЫЕ ДЕЙСТВИЯ
Предварительная подготовка 9
УПРАВЛЕНИЕ ПЛЕЕРОМ
Настройка системы 9
Кнопки ПДУ 12
Воспроизведение MP3 дисков 17
Просмотр Kodak Picture CD 17
ОБСЛУЖИВАНИЕ 19
УСТРАНЕНИЕ НЕПОЛАДОК 20
СПЕЦИФИКАЦИЯ 21
КОМПЛЕКТАЦИЯ 21
2
Page 3

ВВЕДЕНИЕ
Меры предосторожности
1. Полностью прочтите данное руководство.
2. Сохраните данное руководство.
3. Следуйте всем предупреждениям.
4. Следуйте всем инструкциям.
5. Не используйте прибор вблизи от воды.
6. Чистите прибор только сухой тряпочкой.
7. Не блокируйте вентиляционные отверстия. Устанавливайте
прибор в соответствии с данным руководством.
8. Не ставьте прибор рядом с источниками тепла, включая
усилители с высоким тепловыделением.
9. Не оставляйте шнур питания лежать на проходе, не допускайте
его зажимания, особенно в районе розетки.
10. Используйте только те приспособления, которые одобрены
производителем.
11. Отключайте прибор от электросети, если не собираетесь
использовать его в течении длительного времени, и во время
грозы.
12. При необходимости ремонта, обращайтесь в сервисный центр.
Обязательно обратитесь в сервисный центр, если: поврежден
шнур питания; жидкость попала на прибор и внутрь него; на
плеер упал тяжелый предмет; прибор попал под дождь; плеер
не работает нормально; прибор упал.
Функции
• Двойной декодер: Dolby Digital AC-3 и DTS Digital
• Полностью совместим с DVD, VCD, CD, MP3 и Kodak Picture CD
на CD-R & CD-RW (финализированных)
• Скринсейвер
• Режимы воспроизведения: Повтор, Программа, Память.
• Аудио выход: 2-х канальный
• Видео выходы: Композитный и S-Video
Форматы и режимы поддерживаемые плеером
Цифровой
кинотеатр
МР3 файлы
Dolby Digital Разные углы обзора
Kodak Picture CD Субтитры
3
Page 4

Аудио CD
Видео CD
DVD видео
Родительский контроль
ПРЕДУПРЕЖДЕНИЕ:
НЕ ОТКРЫВАЙТЕ КРЫШКУ ПРИБОРА,
ОПАСНОСТЬ УДАРА ТОКОМ!
Данный значок предупреждает, что в приборе присутствуют
неизолированные части с опасным напряжением, контакт с
ними может привести к удару током.
Данный значок предупреждает о существовании особых
инструкций по использованию и ремонту прибора.
ЛАЗЕР 1-го КЛАССА
Данный продукт соответствует 1-ому классу
лазерной безопасности. Ремонт такого прибора
может осуществляться только квалифицированным специалистом.
Несколько языков
субтитров
Несколько языков
озвучивания
Три режима
развертки экрана
4
Page 5
ОПИСАНИЕ ПРИБОРА
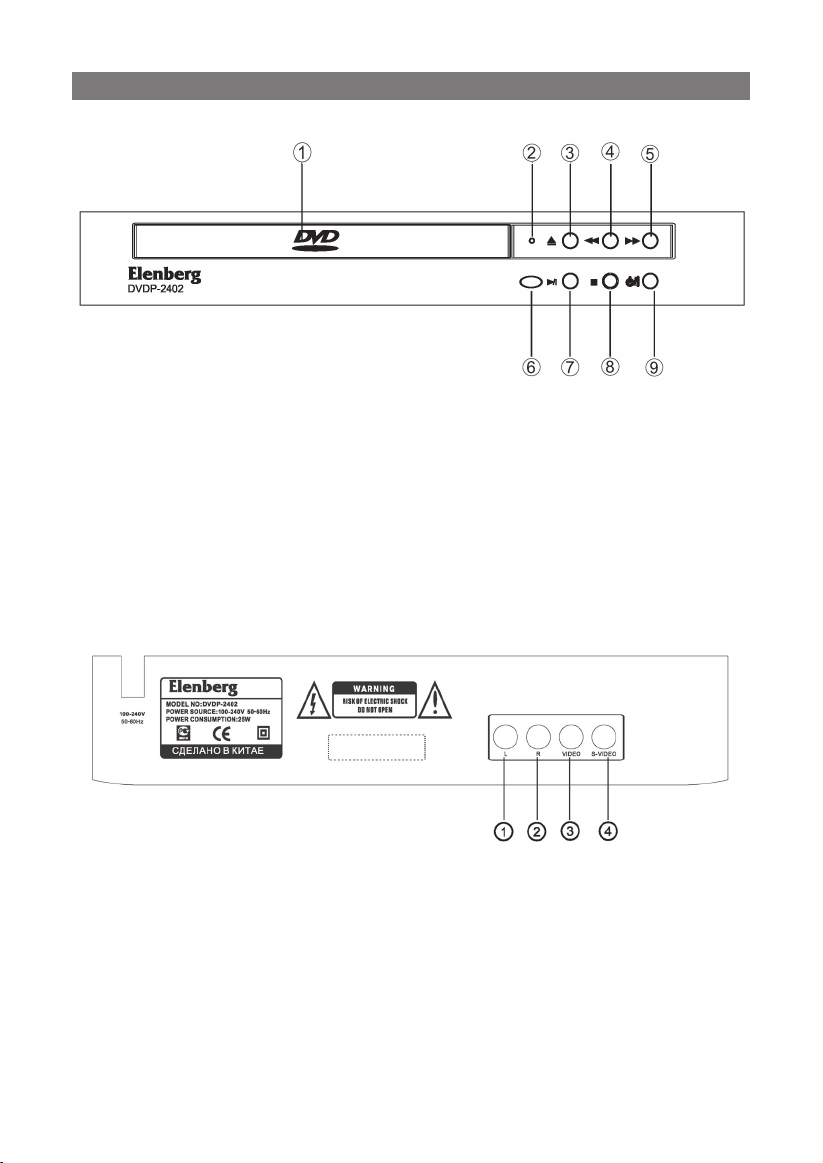
Передняя панель:
1. ЛОТОК ДЛЯ ДИСКОВ
2. ИНДИКАТОР
3. КНОПКА ОТКРЫВАНИЯ/ЗАКРЫВАНИЯ ЛОТКА ДЛЯ ДИСКОВ
4. КНОПКА БЫСТРОЙ ПЕРЕМОТКИ НАЗАД
5. КНОПКА БЫСТРОЙ ПЕРЕМОТКИ ВПЕРЕД
6. СЕНСОР
7. КНОПКА ВОСПРОИЗВЕДЕНИЕ/ПАУЗА
8. КНОПКА СТОП
9. КНОПКА ПИТАНИЕ ВКЛ./ВЫКЛ.
Задняя панель:
1. Левый аудио выход (2.1CH L)
2. Правый аудио выход (2.1CH R)
3. Видео выход
4. S-Video выход
5
Page 6

Пульт дистанционного управления (ПДУ)
1. ОТКРЫТЬ/ЗАКРЫТЬ ЛОТОК (OPEN/CLOSE)
2. КНОПКИ С ЦИФРАМИ
3. НАСТРОЙКИ (SETUP)
4. СУБТИТРЫ (SUBTITLE)
5. БЫСТРАЯ ПЕРЕ-
МОТКА НАЗАД (FW)
6. БЫСТРАЯ ПЕРЕ-
МОТКА ВПЕРЕД (FF)
7. ВОСПР./ПАУЗА (PLAY/PAUSE)
8. СТОП (STOP)
9. ВВЕРХ
10. ВЛЕВО
11. ВВОД (ENTER)
12. ЭКРАННОЕ МЕНЮ (OSD)
13. КОНТРОЛЬ ВОСПР. (PBC)
14. ЛЕВЫЙ/ПРАВЫЙ (L/R)
15. ПРОГРАММА (PROGRAM)
16. ЗАМЕДЛЕНИЕ (SLOW)
17. ШАГ (STEP)
18. ПОВТОР (REPEAT)
19. ОЧИСТИТЬ (CLEAR)
20. ПРИГЛУШЕНИЕ (MUTE)
21. ПИТАНИЕ (POWER)
22. ПЕРЕХОД (GOTO)
23. УГОЛ ОБЗОРА (ANGLE)
24. ЯЗЫК (LANGUAGE)
25. СЛЕДУЮЩИЙ (NEXT)
26. ПРЕДЫДУЩИЙ (PREV)
27. ОГЛАВЛЕНИЕ (TITLE)
28. МЕНЮ (MENU)
29. ВПРАВО
30. ВНИЗ
31. ВИДЕО (VIDEO)
32. МАСШТАБ (ZOOM)
33. N/P (ТВ системы)
34. ВОЗВРАТ (RETURN)
35. A-B ПОВТОР
36. ГРОМКОСТЬ ВВЕРХ (VOL+)
37. ПРОИЗВОЛЬНО (RAN)
38. ГРОМКОСТЬ ВНИЗ (VOL-)
• Направляйте ПДУ непосредственно на сенсор.
• Не оставляйте плеер в жарком или влажном помещении.
• При установке батарей соблюдайте полярность.
• Если ПДУ стал плохо работать или сократился радиус его
действия, замените все батареи.
6
Page 7
ПОДКЛЮЧЕНИЕ
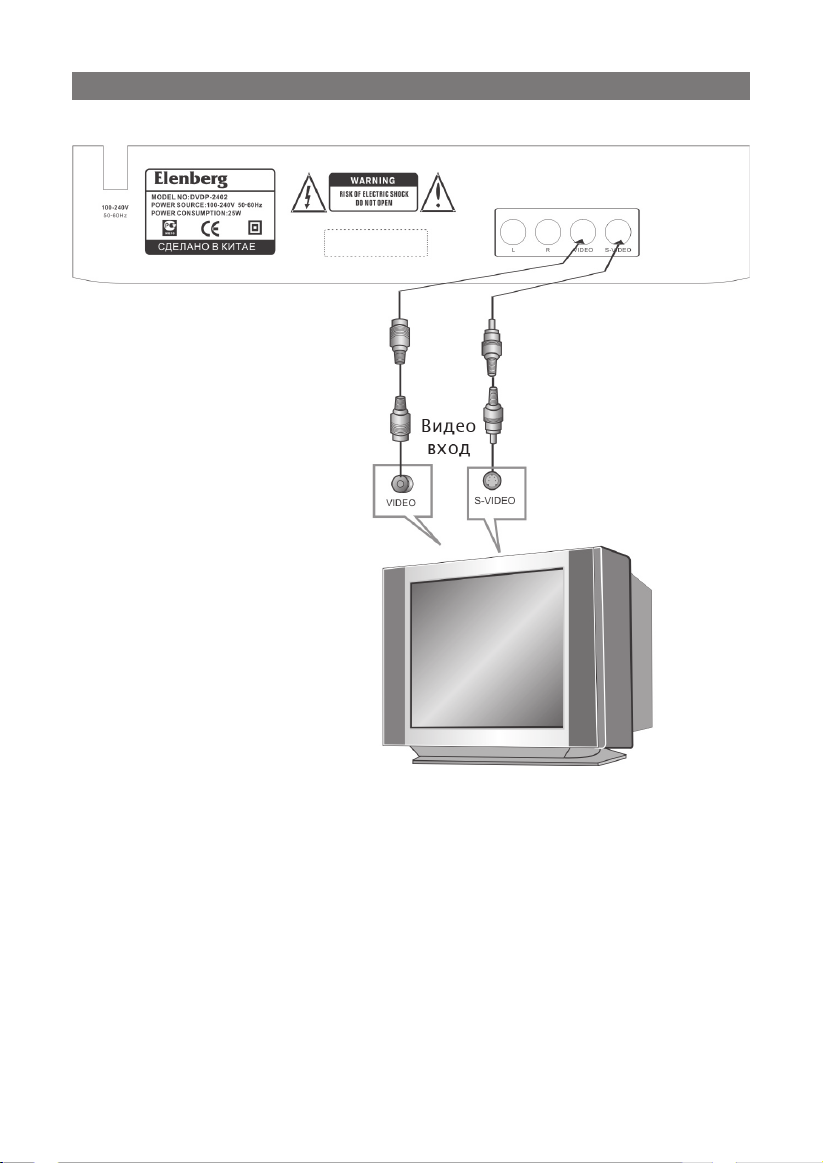
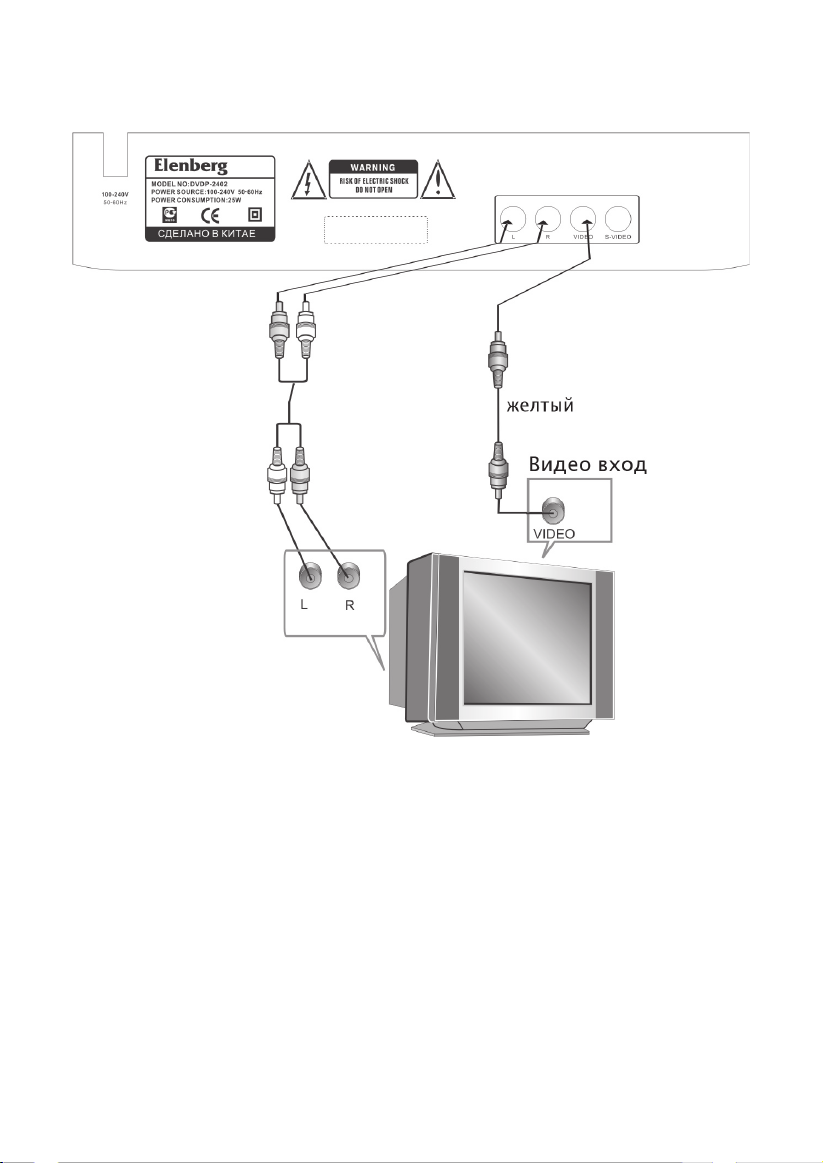
Подключение к телевизору
В пункте “Digital Out” (Цифровой выход) подменю настроек “Audio”
(Аудио) выберите пункт “OFF” (Выключить).
Существует два способа подключения телевизора:
1. Используя кабель S-video и двухканальный аудио кабель. (В
пункте “Video output” меню “Video” (Видео) выберите “S-Video”)
2. Используя видео кабель и двухканальный аудио кабель. (Данный
способ подключения доступен без изменения настроек плеера)
7
Page 8
Подключение к 5.1 усилителю с аналоговым аудио
входом
Замечания:
В пункте “Digital Out” (Цифровой выход) меню настроек “Audio”
(Аудио) выберите пункт “OFF” (Выключить).
8
Page 9
ОСНОВНЫЕ ДЕЙСТВИЯ
Предварительная подготовка:
1. Подключите плеер к телевизору и/или усилителю.
2. Включите телевизор.
3. Переключите телевизор на AV выход.
4. Убавьте громкость усилителя до минимума и включите его.
5. Переключите усилитель на подключенный плеер.
6. Нажмите кнопку OPEN/CLOSE, чтобы открыть лоток для дисков.
На жк-экране появится надпись “OPEN” (Открыто).
Вставьте диск обложкой вверх и снова нажмите кнопку OPEN/
CLOSE, чтобы закрыть лоток для дисков.
УПРАВЛЕНИЕ ПЛЕЕРОМ
Настройка системы
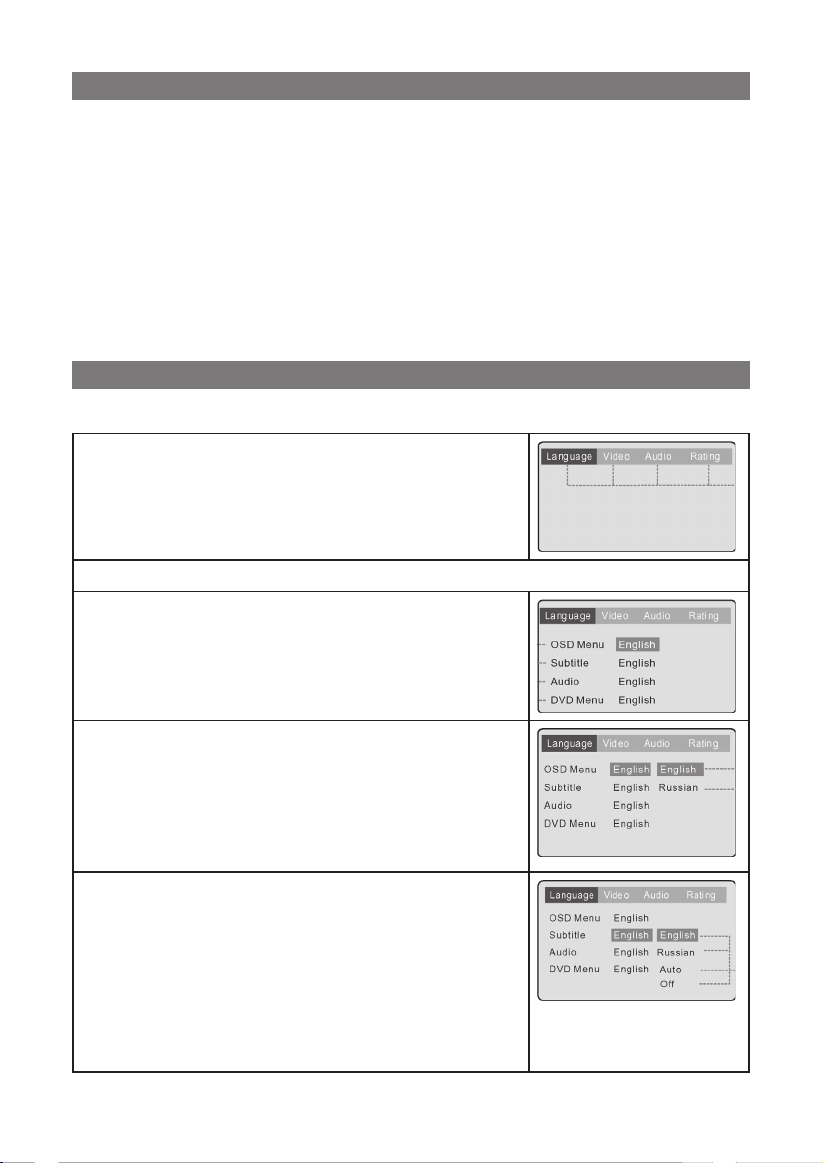
МЕНЮ НАСТРОЕК
В состоянии остановки нажмите кнопку
SETUP, и на экране телевизора появится
основное меню настроек плеера.
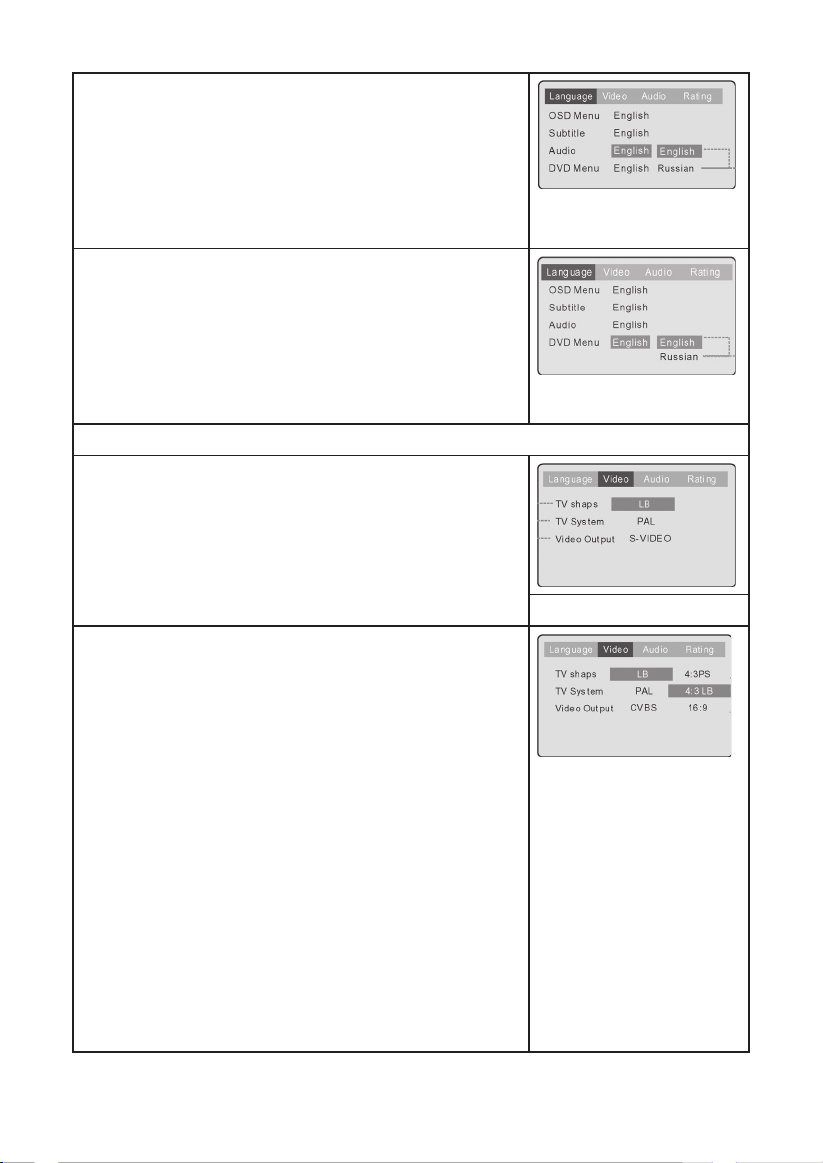
НАСТРОЙК ЯЗЫКА (LANGUAGE)
A. Нажмите ⇦/⇨,
guage] (Язык).
B. Нажмите ENTER для подтверждения.
C. Нажмите SETUP, чтобы выйти из основно-
го меню.
Выберите пункт [OSD Menu] (Экранное
меню) и нажмите ENTER:
A. Для выбора используйте кнопки ⇧/⇩.
B. Нажмите ENTER для подтверждения.
C. Нажмите ⇧, чтобы выйти в основное меню.
D. Нажмите SETUP, чтобы выйти из меню.
Выберите пункт [DVD Subtitle] (Субтитры) и
нажмите ENTER:
A. Для выбора используйте кнопки ⇧/⇩.
B. Нажмите ENTER для подтверждения.
C. Нажмите ⇧, чтобы выйти в основное меню.
D. Нажмите SETUP, чтобы выйти из меню.
Замечание: язык субтитров должен поддерживаться диском.
чтобы выбрать меню [Lan-
9
Page 10
Выберите пункт [DVD Audio] (DVD
озвучивание) и нажмите ENTER:
A. Для выбора используйте кнопки ⇧/⇩.
B. Нажмите ENTER для подтверждения.
C. Нажмите ⇧, чтобы выйти в основное меню.
D. Нажмите SETUP, чтобы выйти из меню.
Замечание: зависит от диска.
Выберите пункт [DVD Menu] (язык меню
DVD) и нажмите ENTER:
A. Для выбора используйте кнопки ⇧/⇩.
B. Нажмите ENTER для подтверждения.
C. Нажмите ⇧, чтобы выйти в основное меню.
D. Нажмите SETUP, чтобы выйти из меню.
Замечание: зависит от диска.
ВИДЕО НАСТРОЙКИ (VIDEO)
Нажмите ⇦/⇨,
и нажмите ENTER для подтверждения.
A. Для выбора используйте кнопки ⇧/⇩.
B. Нажмите ENTER для подтверждения.
C. Нажмите ⇧, чтобы выйти в основное меню.
D. Нажмите SETUP, чтобы выйти из меню.
[4:3 PS] - При развертке телевизора 4:3
на экране отображается полная высота
кадра, левый и правый края изображения
обрезаются.
[4:3 LB] -
экране отображается полная ширина
кадра, но сверху и снизу добавляются
черные полосы
[16:9] - Полное заполнение экрана для
телевизоров с разверткой 16:9.
Замечание: Не все диски поддерживают
развертку 4:3 PS. Если диск не имеет
подобной поддержки, то изображение
будет передаваться в формате 4:3 LB.
чтобы выбрать меню [Video],
При развертке телевизора 4:3 на
.
10
Page 11
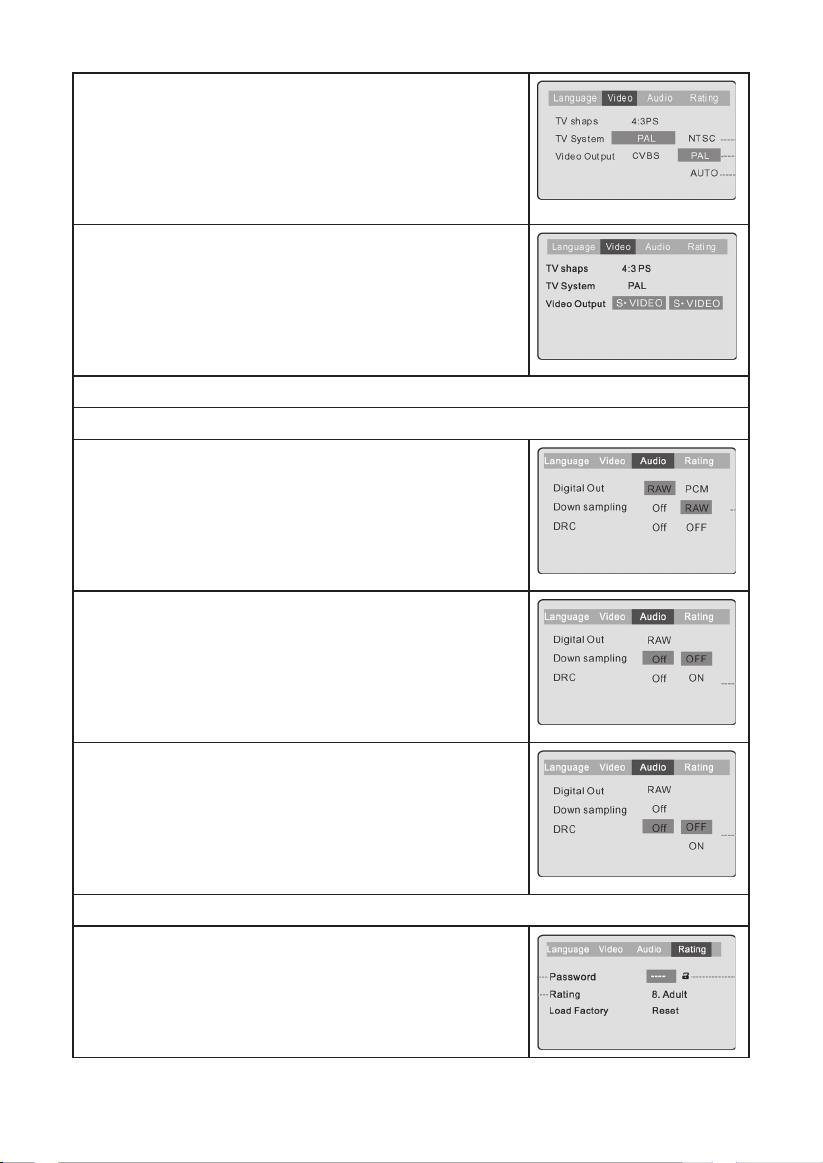
Выберите пункт [TV System] (ТВ система) и
нажмите ENTER:
A. Для выбора используйте кнопки ⇧/⇩.
B. Нажмите ENTER для подтверждения.
C. Нажмите ⇧, чтобы выйти в основное меню.
D. Нажмите SETUP, чтобы выйти из меню.
Выберите пункт [Video Output] (Видео
выход) и нажмите ENTER.
[ S-VIDEO] - выберите эту опцию, чтобы
передавать сигнал по S-Video;
Замечание: композитный видео выход
всегда активен.
АУДИО НАСТРОЙКИ (AUDIO)
Нажмите ⇦/⇨,
Выберите пункт [Digital Out] (Цифровой
выход) и нажмите ENTER
A. Для выбора используйте кнопки ⇧/⇩/⇦/⇨.
B. Нажмите ENTER для подтверждения.
C. Нажмите ⇧, чтобы выйти в основное меню.
D. Нажмите SETUP, чтобы выйти из меню.
Выберите пункт [Down sampling] (Снижение
качества сэмплов) и нажмите ENTER:
A.
Для выбора используйте кнопки ⇧/⇩/⇦/⇨.
B. Нажмите ENTER для подтверждения.
C. Нажмите ⇧, чтобы выйти в основное меню.
D. Нажмите SETUP, чтобы выйти из меню.
Выберите пункт [DRC] (Улучшение звучания)
и нажмите ENTER:
A. Для выбора используйте кнопки ⇧/⇩/⇦/⇨.
B. Нажмите ENTER для подтверждения.
C. Нажмите ⇧, чтобы выйти в основное меню.
D. Нажмите SETUP чтобы выйти из меню.
СИСТЕМА ОГРАНИЧЕНИЙ (RATING)
Нажмите ⇦/⇨,
и нажмите ENTER.
чтобы выбрать меню [Audio], и нажмите ENTER.
:
чтобы выбрать меню [Rating],
11
Page 12
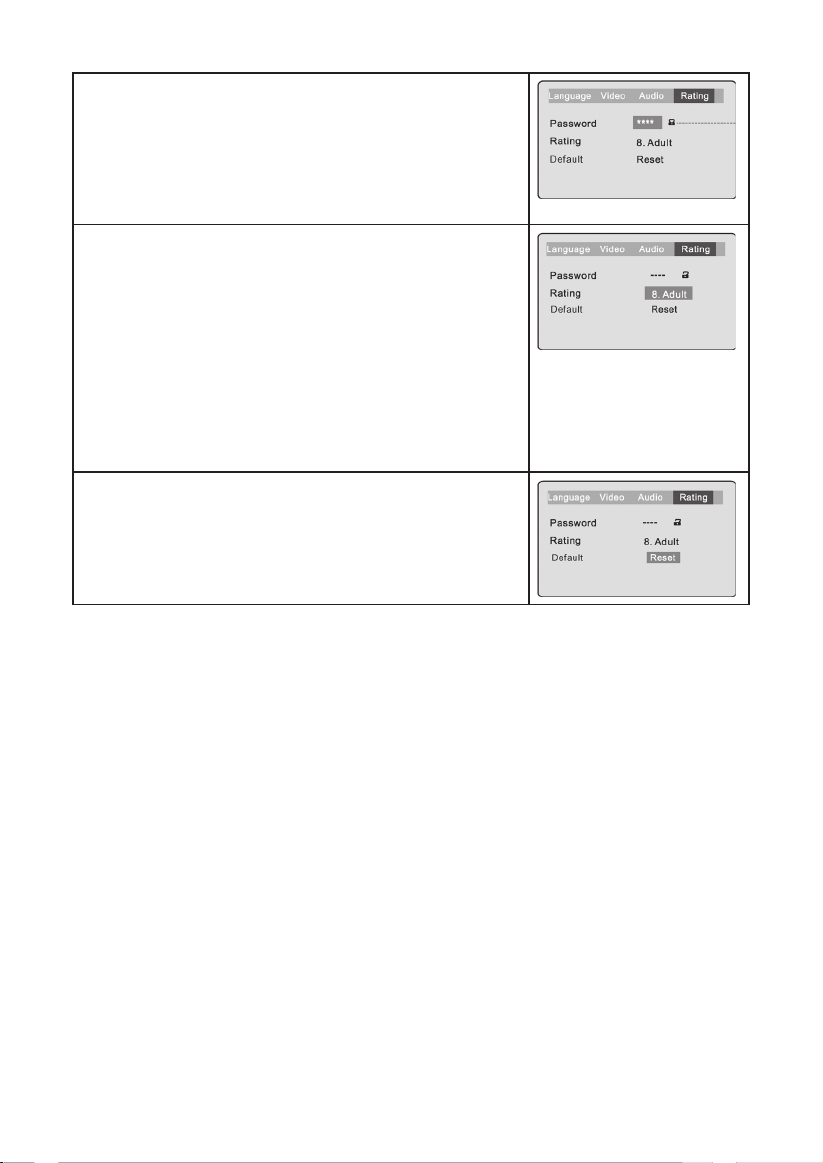
Введите пароль, чтобы заблокировать или
разблокировать это меню:
Для набора пароля используйте кнопку 0-9,
после чего нажмите ENTER.
Замечание: Если Вы забыли пароль, используйте универсальный пароль: 8888.
Выберите пункт [Rating] (Степень) и нажмите
ENTER:
A. Последовательно нажимайте ENTER,
чтобы выбрать степень ограничения:
1) Kid Safe (Для детей); 2) G; 3) PG; 4)
PG-13; 5) PG-R; 6) R; 7) NC-17; 8) Adult
(Совершеннолетний).
B. Нажмите SETUP чтобы выйти из меню.
Замечание: для изменения этого пункта
нужно ввести пароль.
Выберите пункт [Default] и нажмите ENTER.
A. После нажатия кнопки ENTER
восстановятся изначальные настройки
плеера.
B.
Нажмите ⇧, чтобы выйти в основное меню.
Кнопки ПДУ
POWER (Питание)
• Во время воспроизведения нажмите кнопку POWER, чтобы
остановить плеер и перевести его в режим ожидания.
• Если плеер находится в режиме ожидания, нажмите кнопку
POWER, чтобы включить его.
TITLE (Оглавление)
• Во время воспроизведения DVD нажмите кнопку TITLE, чтобы
просмотреть оглавление диска.
Замечание: эта функция должна поддерживаться диском.
PBC (Контроль воспроизведения)
• Во время воспроизведения DVD нажмите кнопку PBC, чтобы
увидеть содержимое текущего оглавления.
• Используйте кнопку PBC, чтобы включать (ON) или выключать
(OFF) контроль воспроизведения VCD/SVCD дисков.
Замечание: 1) эта функция позволяет контролировать воспроиз-
ведение VCD; 2) эта функция должна поддерживаться диском.
OPEN/CLOSE (Открыть/Закрыть)
• Чтобы открыть лоток для дисков нажмите OPEN/CLOSE
• Чтобы закрыть лоток для дисков снова нажмите OPEN/CLOSE.
12
Page 13
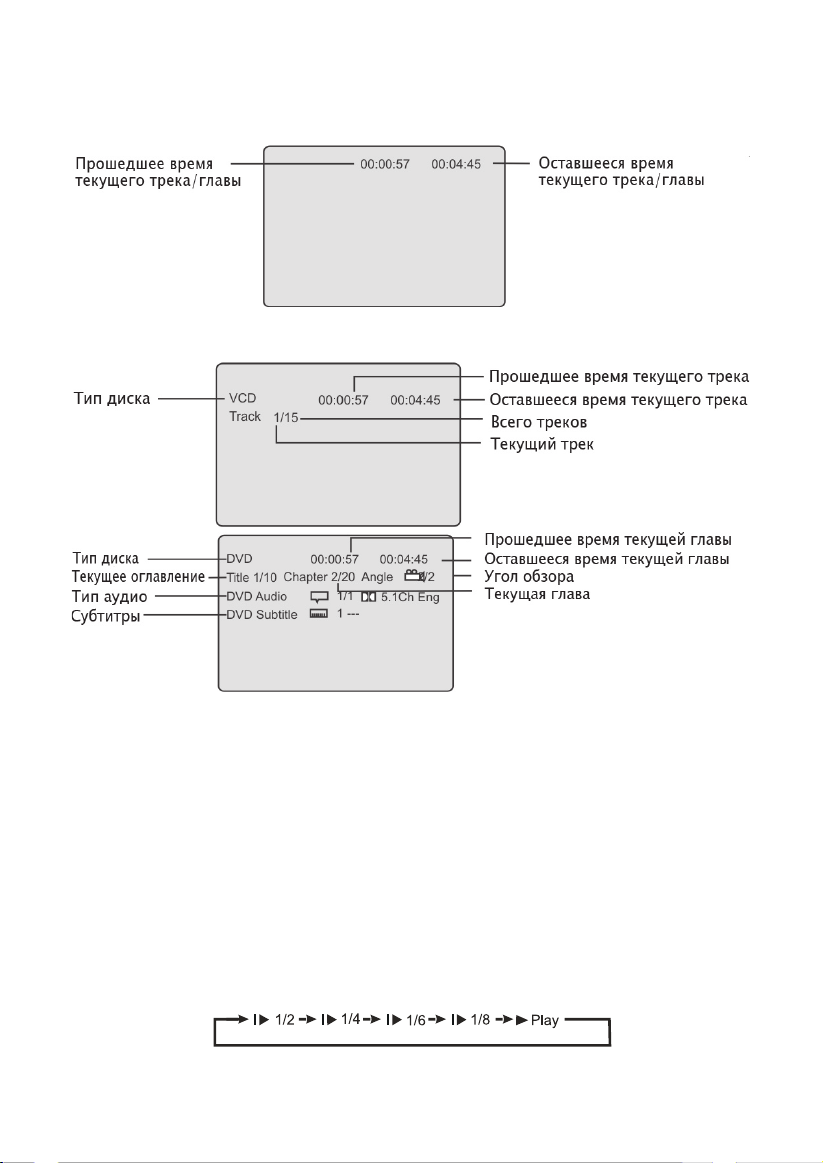
OSD (Экранное меню)
• Во время воспроизведения нажмите кнопку DISPLAY, чтобы
увидеть информационное экранное меню.
• Снова нажмите DISPLAY, чтобы просмотреть дополнительную
информацию о диске.
“0 - 10+” (Кнопки с цифрами)
• Эти кнопки используются для введения значений времени,
номеров оглавлений, глав и треков.
• Когда на экране отображается цифровой параметр - введите его
значение, используя кнопки 0-9, и нажмите кнопку ENTER.
• При воспроизведении CD или VCD используйте кнопки 0-9 и EN
TER, чтобы перейти к треку с набранным Вами номером (PBC =
“OFF”).
SLOW (Замедление)
• Во время воспроизведения DVD, VCD или SVCD нажмите SLOW,
чтобы запустить замедленное воспроизведение.
• При каждом нажатии SLOW включается следующий коэффициент
замедления 1/2, 1/4, 1/6 и 1/8:
• Нажмите PLAY для воспроизведения с обычной скоростью.
-
13
Page 14

PREV (Предыдущий)
• Во время воспроизведения DVD, CD или VCD нажмите PREV,
чтобы перейти к предыдущим: главе, оглавлению, треку.
NEXT (Следующий)
• Во время воспроизведения DVD, CD или VCD нажмите NEXT,
чтобы перейти к следующим: главе, оглавлению, треку.
FW (Быстрая перемотка назад)
• Во время воспроизведения DVD, CD или VCD нажмите FW, чтобы
переместиться по треку назад со скоростью, увеличенной в 2, 4,
8 и 20 раз:
• Нажмите PLAY для воспроизведения с обычной скоростью.
FF (Быстрая перемотка вперед)
• Во время воспроизведения DVD, CD или VCD нажмите FF, чтобы
переместиться по треку вперед со скоростью, увеличенной в 2,
4, 8 и 20 раз:
• Нажмите PLAY для воспроизведения с обычной скоростью.
MUTE (Приглушение - быстрое снижение уровня громкости)
• Нажмите кнопку MUTE, чтобы выключить звук, нажмите MUTE
снова, чтобы включить звук.
R/L (Переключение каналов вывода звука)
• Во время воспроизведения VCD/SVCD нажмите кнопку R/L, чтобы
выбрать канал для вывода звука: Стерео/Левый/Правый.
REPEAT (Повтор)
• Каждое нажатие этой кнопки будет переключать режим повтора.
Для DVD: повторить главу→оглавление→обычный режим.
Для SVCD/VCD/CD: повторить трек→весь диск→обычный режим.
A-B (Повтор отрезка А-В)
• Во время воспроизведения нажмите A-B, чтобы задать точку A.
• Второе нажатие задаст точку B и запустит повторяющееся
воспроизведение отрезка от точки А до точки В.
• Третье нажатие кнопки A-B - отменит повтор отрезка А-В.
Замечание: Для CD/VCD/SVCD, A и B являются точками одного
трека. Для DVD, A и B могут быть точками разных глав.
RAN (Произвольно - воспроизведение в случайном порядке)
• Если диск содержит больше 2-х треков, нажмите кнопку RAN,
чтобы включить произвольное воспроизведение.
• Второй нажмите кнопку RAN, чтобы выключить режим
произвольного воспроизведения.
14
Page 15

SETUP (Настройки)
• Нажмите кнопку SETUP, чтобы войти в меню установок плеера.
CLEAR (Очистить)
• Нажмите кнопку CLEAR, чтобы стереть не нужное значение.
• Одно нажатие - одна цифра. Нажмите и удержите эту кнопку,
чтобы удалить все цифры.
PAUSE (Пауза)
• Нажмите кнопку PAUSE, чтобы приостановить воспроизведение.
• Нажмите PLAY, чтобы продолжить воспроизведение.
PLAY (Воспроизведение)
• Нажмите кнопку PLAY, чтобы начать воспроизведение.
STOP (Стоп)
• Нажмите STOP один раз, чтобы остановить воспроизведение.
• Нажмите PLAY, чтобы продолжить воспроизведение с того места,
на котором было остановлено воспроизведение.
• Нажмите STOP дважды, чтобы не запоминать место остановки.
Замечание: через 5 минут после нажатия кнопки STOP включает-
ся скринсейвер.
MENU (Меню)
• Нажмите кнопку MENU, чтобы переключиться на основное меню.
STEP (Шаг)
•
Нажмите кнопку
перейти на один кадр вперед.
Эта функция не работает с CD дисками.
ZOOM (Масштаб)
• При воспроизведении VCD/SVCD/DVD используйте кнопку ZOOM,
чтобы увеличить изображение:
N/P (ТВ системы)
• Используйте эту кнопку в режиме остановки, чтобы переключаться между телевизионными системами DVD плеера (AUTO/PAL/
NTSC). Система меняется при каждом нажатии кнопки N/P.
VOL (Громкость)
• Нажмите VOL+, чтобы увеличить уровень громкости;
Нажмите VOL-, чтобы уменьшить уровень громкости.
ANGLE (Угол обзора)
• Нажмите ANGLE, чтобы сменить угол обзора.
• Угол обзора меняется при каждом нажатии кнопки ANGLE.
Эта функция должна поддерживаться диском.
SUBTITLE (Субтитры)
• Во время воспроизведения DVD используйте кнопку SUBT, чтобы
выбрать один из 32 доступных языков субтитров.
Количество активных языков зависит от диска.
STEP, чтобы остановить воспроизведение и
15
Page 16

GOTO (Переход)
• Во время воспроизведения VCD нажмите GOTO, и на экране
появится меню, представленное справа:
- Кнопками ⇧/⇩ выберите TIME (Время),
TRACK (Трек).
- Кнопками с цифрами введите нужные
значения этих параметров и нажмите
ENTER для подтверждения.
• Во время воспроизведения DVD нажмите
GOTO, и на экране появится меню,
представленное справа:
- Кнопками ⇧/⇩ выберите TIME (Время),
TITLE (Оглавление) или CHAPTER (Главу).
- Кнопками с цифрами введите нужные
значения этих параметров и нажмите ENTER для подтверждения.
Замечания:
1) TIME - перейти на указанное время.
2) TRACK/CHAPTER/TITLE - перейти на указанный трек/главу/
оглавление.
3) Эта функция не работает с некоторыми DVD дисками.
PROGRAM (Программа)
• Во время воспроизведения VCD нажмите кнопку PROGRAM, и на
экране появится меню:
Введите номера треков в нужном
Вам порядке. По окончании
выберите пункт “play program”
(воспроизвести) и нажмите ENTER,
чтобы начать воспроизведение в
заданном Вами порядке. Выберите пункт “clear all” (стереть все)
и нажмите ENTER, чтобы стереть программу.
• Во время воспроизведения DVD
нажмите кнопку PROGRAM, и на
экране появится меню:
Введите номера оглавлений и
глав в выбранном Вами порядке.
По окончании выберите пункт
“play program” (воспроизвести) и нажмите ENTER, чтобы начать
воспроизведение в заданном Вами порядке. Выберите пункт
“clear all” (стереть все) и нажмите ENTER, чтобы стереть
программу.
16
Page 17

Воспроизведение MP3 дисков
Поддерживаемые форматы:
• Формат диска: ISO 9660, Joliet
• Формат файлов: MP3
• МР3 битрейт: 32--320 Кбит/сек
• Максимальное число файлов и папок на диске: 350
• Частота сэмплов: 32/44.1/48 КГц
Замечание:
Плеер не сможет воспроизвести следующие диски:
записанные в неподдерживаемом формате, поцарапанные или
деформированные, не финализированные CD-R или CD-RW,
испачканные диски.
При загрузке МР3 диска на экране появляется следующее:
Плеер автоматически начинает воспроизведение первого трека.
Для выбора треков Вы можете использовать кнопки с цифрами.
Используйте кнопки со стрелками для выбора треков и кнопку
ENTER для начала воспроизведения выбранного трека.
Просмотр Kodak Picture CD
• Kodak Picture CD обладает размером и формой обычного CD.
• Максимальный размер JPEG картинки: 3840x3840 pixels.
• JPEG является универсальным форматом передачи изображения
и отвечает международным требованиям качества ISO 10918-1.
• Изображения на Kodak Picture CD хранятся в формате JPEG.
DVD-плеер может воспроизводить подобные изображения в
различных режимах.
В плеере предусмотрено несколько режимов для просмотра
изображений (слайд-шоу). Нажмите кнопку SETUP во время
просмотра изображений, чтобы выбрать режим слайд-шоу:
17
Page 18

1/6 - сверху вниз ( )
2/6 - снизу вверх ( )
3/6 - сверху и снизу к центру ( )
4/6 - из центра вверх и вниз ( )
5/6 - вертикальное затемнение ( )
6/6 - случайный порядок
ОСНОВНЫЕ ФУНКЦИИ:
• Вы можете установить режим слайд-шоу для любых
изображений.
• Нажмите PLAY, чтобы продолжить воспроизведение.
• Для выбора изображений Вы можете использовать кнопки с
цифрами.
• Нажмите кнопку STOP, чтобы остановить просмотр.
• Чтобы приостановить слайд-шоу, используйте кнопку PAUSE.
• Для выбора изображений используйте кнопки PREV/NEXT.
Для выбора изображения используйте кнопки со стрелками, а
для просмотра - кнопку PLAY или ENTER.
ВРАЩЕНИЕ ИЗОБРАЖЕНИЯ
Вы можете повернуть изображения по часовой стрелке на
90°, 180°, 270°. Вы можете использовать эту функцию во время
просмотра или перед загрузкой изображения.
Последовательно нажимая кнопку ANGLE, Вы можете выбирать
различные углы поворота: 90°, 180°, 270°, как в оригинале.
МАСШТАБ
Вы можете увеличить или уменьшить масштаб изображения.
Q1, Q2, Q3: увеличить; Q4, Q5: уменьшить; Q off: выключить.
• Нажмите кнопку PLAY, чтобы продолжить слайд-шоу.
• Используйте кнопки со стрелками, чтобы перемещать
изображение.
• При нажатии кнопки ZOOM слайд-шоу приостанавливается, а
вращение изображения становится невозможным.
ФУНКЦИЯ ОБЗОРА
Нажмите кнопку PBC и на экране отобразится 9 изображений;
18
Page 19

Используйте кнопки со стрелками, чтобы выбрать нужное
изображение и нажмите PLAY, чтобы запустить слайд-шоу
начиная с этого изображения.
ОБСЛУЖИВАНИЕ
• Отключите плеер от электросети, когда поврежден шнур
питания или штепсель, и обратитесь в сервисный центр.
• Не подключайте несколько электроприборов к одной розетке
- это может привести к возгоранию или удару током.
• Ничего не ставьте на шнур питания, не используйте шнур пита-
ния от другого устройства - это может привести к возгоранию
или удару током.
• Если плеер упал или повреждена панель управления - обратитесь
в сервисный центр для осуществления ремонта.
• Не вставляйте никаких предметов в корпус прибора - это может
привести к возгоранию или удару электрическим током.
• Не снимайте корпус и заднюю стенку плеера. Подобные действия
могут проводиться только квалифицированным персоналом.
• Ставьте плеер только на устойчивую поверхность, иначе он
может упасть, травмировав кого-либо, или сломаться.
• Не оставляйте плеер во влажных и пыльных помещениях.
Запыленность может привести к поломке привода дисков.
• Не ставьте плеер рядом с водой.
• Не заслоняйте вентиляционные отверстия.
• Не ставьте прибор на мягкие поверхности (кровать, ковер) - это
может привести к перекрыванию вентиляционных отверстий.
• Не ставьте плеер рядом с источниками тепла.
• Не позволяйте прибору лежать на боку.
• Не ставьте на прибор сосуды с жидкостью.
• Не пытайтесь самостоятельно починить плеер. При необходи-
мости обратитесь в сервисный центр, предварительно просмот-
рев раздел “Устранение неполадок” данного руководства.
• Пожалуйста, эксплуатируйте плеер в соответствии с данным
руководством.
• Отключите шнур питания, подключенное оборудование и
антенну, если не используете плеер в течение длительного
времени.
• Если Вы почувствовали посторонний запах или задымление,
немедленно отключите прибор и обратитесь в сервисный
центр.
• Не ставьте рядом с плеером свечи и прочие предметы с откры-
тым пламенем - это может привести к пожару.
• Берегите плеер от ударов.
19
Page 20

УСТРАНЕНИЕ НЕПОЛАДОК
Пожалуйста
началом использования плеера. Если у Вас возникли проблемы
с эксплуатацией данного плеера, попробуйте устранить их
приведенными ниже способами. Если самостоятельно решить
проблему не удалось, обратитесь в сервисный центр. Пожалуйста,
не открывайте корпус прибора и не пытайтесь самостоятельно
починить прибор.
НЕТ ИЗОБРАЖЕНИЯ, ЗВУКА
• Проверьте, подключен ли шнур
питания.
• Проверьте сетевую розетку.
• Убедитесь, что шнур питания
не поврежден.
• Убедитесь, что плотно вставили
штепсель в розетку.
НЕТ ЗВУКА
• Проверьте подключение аудио
кабеля.
• Убедитесь, что аудио кабель не
поврежден.
• Убедитесь, что звук включен.
• Проверьте аудио настройки
плеера.
• Убедитесь, что подключили
аудио кабель к плееру.
• Поверьте, не была ли нажата
кнопка MUTE.
НЕТ ИЗОБРАЖЕНИЯ
• Проверьте правильность
подключения видео кабеля.
• Убедитесь, что телевизор
включен.
• Убедитесь, что видео кабель не
поврежден.
• Проверьте настройки видео.
ЧЕРНО-БЕЛОЕ ИЗОБРАЖЕНИЕ/
ИЗОБРАЖЕНИЕ МИГАЕТ
• Убедитесь, что выбрали верную
телевизионную систему (PAL,
NTSC).
, полностью прочитайте данное руководство перед
ИЗОБРАЖЕНИЕ И ЗВУК НЕ
СТАБИЛЬНЫ
• Проверьте аудио настройки.
• Убедитесь, что диск не испачкан
и не поцарапан.
• Проверьте состояние контактов
подключения.
НЕ РАБОТАЕТ ПДУ
• Проверьте батареи в ПДУ.
• Направьте ПДУ непосредственно на сенсор.
• Убедитесь, что между ПДУ и
плеером нет препятствия.
ПЛЕЕР НЕВЕРНО РЕАГИРУЕТ НА
ВАШИ ДЕЙСТВИЯ
• Выключите и включите плеер.
НЕ ФИНАЛИЗИРОВАННЫЙ CD-R
ИЛИ CD-RW ДИСК ЗАСТРЯЛ В
ПЛЕЕРЕ
• Выключите плеер и включите
его снова. Сразу после
включения нажмите кнопку
OPEN/CLOSE, чтобы открыть
лоток для дисков.
20
Page 21

СПЕЦИФИКАЦИЯ
Питание от сети: 220В, 50Гц
Потребляемая мощность: 25Вт
Видео стандарт: PAL
Вес: 3.0 кг
Размеры: 430 x 260 x 43 мм
Видео выход
Выход: 1.0В(p-p)/75Ω - синхронный, негативный
S-video выход (разделенный):
Y выход: 1.0В(p-p)/75Ω - синхронный, негативный
C выход: 0.286В(p-p)/75Ω, 4 пин, мини-DIN x 1
Аудио выход
Аналоговый: 1.85В(rms)/10КОм, RCA pin Jack (L,R) x 1
Коаксиальный: 0.5В(p-p)/75Ω, RCA pin Jack x 1
Оптический: Оптоволоконный передатчик
Диапазон частот: 20Гц - 20000Гц
Сигнал/шум: >90dB
Коэффициент
нелинейного
искажения: < 0.05%
КОМПЛЕКТАЦИЯ
Аудио/Видео кабель 1
Пульт дистанционного управления 1
Руководство пользователя 1
По истечении срока службы товара, необходимо обратиться в
сервисный центр за консультацией по дальнейшей эксплуатации
товара. В противном случае дальнейшая эксплуатация может
повлечь невозможность нормального использования товара.
Срок службы данного изделия - 3 года с момента продажи
Изготовитель “ЭЛЕНБЕРГ ЛИМИТЕД”, Великобритания
Адрес: 35 Бромптон Роад, Кнайтсбридж Лондон СВ3 ИДЕ
Сделано в Китае. ”ЭЛЕНБЕРГ ЭЛЕКТРИК КОМПАНИ ЛТД”
А08 Р2-Б4 билдинг, Кеджинан 2 Роад, С энд Т Индастри Парк,
Шензень, Гуандонг Провинс, Китай.
21
Page 22

DVD PLAYER DVDP-2402
INSTRUCTION MANUAL
Page 23

CONTENT
INTRODUCTION
Important Safety Instructions 24
Features 24
Disc formats and functions supported by this player 24
BRIEF INSTRUCTION OF CONTROLS
Front panel function 26
Back panel function 26
Remote comtrol 27
CONNECTIONS
Connecting to a TV set 28
Connecting to an AV amplifier with 5.1 channels analog
audio input 29
BASIC OPERATOIN
Preparation before playing 30
ADVANCED FEATURES
Modes and Features Setup 30
Remote Control Operation 33
MP3 Playing 38
Kodak Picture CD Playback 38
MAINTENANCE 40
TROUBLESHOOTING 41
SPECIFICATION 43
ACCESSORIES 43
23
Page 24

INTRODUCTION
Important Safety Instructions
1. Read these instructions.
2. Keep these instructions.
3. Heed all warnings.
4. Follow all instructions.
5. Do not use this apparatus near water.
6. Clean only with dry cloth.
7. Do not block any ventilation openings. Install in accordance with
the manufacturer’s instructions.
8. Do not install near any heat sources such as radiators, heat registers, stoves, or other apparatus (including amplifiers) that produce
heat.
9. Protect the power cord from being walked on or pinched particularly at plugs, convenience receptacles, and the point where they
exit from the apparatus.
10. Only use attachments/accessories specified by the manufacturer.
11. Unplug this apparatus during lightning storms or when unused for
a long periods of time.
12. Refer all servicing to qualified service personnel.
Servicing is required when the apparatus has been damaged in
any way, such as power-supply cord or plug is damaged, liquid
has been spilled or objects have fallen into the apparatus, the apparatus has been exposed to rain or moisture, does not operate
normally, or has been dropped.
Features
• Dual Decoding: Dolby Digital AC-3 and DTS Digital decoding
• Full compatibility with DVD, VCD, CD, MP3 and Kodak Picture CD on
CD-R & CD-RW (finalized)
• Screensaver
• Multiple playback modes: Memory, Program, Search, Repeat
• Audio output: 2-CH output
• Video output: Composite Video, S-Video
Disc formats and functions supported by this player
Digital Theater
System
MP3 files on CD-R/
CD-RW
Dolby Digital Multi-angle
Kodak Picture CDs Closed Caption
24
Page 25

Audio CDs Subtitle choices
Video CDs Audio choices
DVD video
Parental Lock
CAUTION: To reduce the risk of fire and electric shock, do not remove the cover(or back) of
the unit. Refer servicing only to qualified service
personnel.
This lightening flash arrowhead symbol, within an equilateral
triangle, is intended to alert user to the presence of uninsulated “dangerous voltage” within the product’s enclosure that
may be of sufficient magnitude to constitute a risk of electric shock to
persons.
The exclamation point within an equilateral triangle is intended to alert use to the presence of important operating and
maintenance (servicing) instructions in the literature accom-
panying the appliance.
The marking of products using lasers. The marking
will be shown at the rear panel of the unit, means
that the unit have been classified as Class 1, and is
utilizing laser beams that are of weaker class. There
is no danger of hazardous radiation outside the unit.
TV Aspect Ratio
modes
25
Page 26

BRIEF INSTRUCTION OF CONTROLS
Front panel function:
1. Disk tray
2. Light
3. OPEN/CLOSE button
4. FW button
5. FF button
6. Sensor
7. PLAY/PAUSE button
8. STOP button
9. POWER button
Back panel function:
1. 2.1CH L output jack
2. 2.1CH R output jack
3. Video output jack
4. S-Video output jack
26
Page 27

Remote comtrol
1. OPEN/CLOSE
2. 0-9,10+NUMBER KEY
3. SETUP
4. SUBTITLE
5. FW
6. FF
7. PLAY/PAUSE
8. STOP
9. UP
10. LEFT
11. ENTER
12. OSD
13. PBC
14. L/R
15. PROGRAM
16. SLOW
17. STEP
18. REPEAT
19. CLEAR
20. MUTE
21. POWER
22. GOTO
23. ANGLE
24. LANGUAGE
25. NEXT
26. PREV
27. TITLE
28. MENU
29. RIGHT
30. DOWN
31. VIDEO
32. ZOOM
33. N/P
34. RETURN
35. A-B
36. VOL UP
37. RAN
38. VOL DOWN
• Point the remote control directly at the player’s remote sensor.
• Do not leave the remote control in an extremely hot or humid place.
• Do not insert the batteries in the wrong direction
• If the remote control does not function correctly or the operating
range becomes reduced, replace all batteries with new ones.
27
Page 28

Connecting to a TV set
CONNECTIONS
Set player’s Digital Out mode to “OFF” in the audio setup page. There
are two ways of connecting the player’s AV output to the TV set:
1. S-video cable and left/right audio cable. (Set the [Video output] to
[S-Video])
2. Composite video cable and left/right audio cable. (Always avail-
able)
28
Page 29

Connecting to an AV amplifier with 5.1 channels analog
audio input
Notes:
1. Set player’s Digital Out mode to “OFF” in the audio setup page.
2. Set the TV set’s AV input to the channel you have connected.
3. Set the amplifier’s audio input to the channel you have connected.
29
Page 30

BASIC OPERATION
Preparation before playing:
1. Connect the DVD player to your TV
2. Turn on the TV
3. Set the TV to the AV input connected to the DVD player.
4. Turn down the volume on your amplifier, and then power it on.
5. Set the amplifier to the AV input connected to the DVD player.
6. Press OPEN/CLOSE either on the front panel or remote control.
The player displays “OPEN” on the display.
When the tray is open, please the disc on the tray with the label
side up. Press OPEN/CLOSE again to close the disc tray.
ADVANCED FEATURES
Modes and Features Setup
SETUP
In stop mode, press SETUP, and the TV screen
will display the setup menu as shown on the
right.
LANGUAGE SETUP
A. Press ⇦/
menu
B. Press ENTER to confirm
C. Press SETUP to exit the Setup Menu
⇨ to select the [Language] sub-
Select [OSD Menu], and press ENTER to display the [OSD Menu] submenu:
A. Press ⇧/⇩ to select the menu item
B. Press ENTER to confirm
C. Press ⇧ to return to the Setup Menu
D. Press SETUP to exit the Setup Menu
Select [DVD Subtitle], and press ENTER to display the [DVD Subtitle] submenu:
A. Press ⇧/⇩ to select the menu item
B. Press ENTER to confirm
C. Press ⇧ to return to the Setup Menu
D. Press SETUP to exit the Setup Menu
Note: Subtitle languages vary by disc.
30
Page 31

Select [DVD Audio],and press ENTER to display the [DVD Audio] submenu:
A. Press ⇧/⇩ to select the menu item
B. Press ENTER to confirm
C. Press ⇧ to return to the Setup Menu
D. Press SETUP to exit the Setup Menu
Note: Audio languages vary by disc.
Select [DVD Menu], and press ENTER to display the [DVD Menu] submenu:
A. Press ⇧/⇩ to select the menu item
B. Press ENTER to confirm
C. Press ⇧ to return to the Setup Menu
D. Press SETUP to exit the Setup Menu
Note: Menu languages vary by disc.
VIDEO SETUP
Select [Video] in the Setup Menu, and press
ENTER to display the [Video] submenu.
A. Press ⇧/⇩ to select the menu item
B. Press ENTER to confirm
C. Press ⇧ to return to the Setup Menu
D. Press SETUP to exit the Setup Menu
[4:3 Pan Scan] - The full height of the picture
is displayed on a standard 4:3 television,
but some left/right detail is lost as the
movie “pans and scans” to keep the most
important action on the screen.
[4:3 Letter Box] - The full width of the picture
is displayed on a standard 4:3 television,
but black bars appear above and below the
picture.
[16:9] - The picture fills the screen of a wide-
screen (16:9) television.
Note: Not all DVDs offer movies in 4:3 Pan
Scan format. If not, the disc will override
your TV Display setting and the movie will
be displayed in 4:3 Letter Box format.
31
Page 32

Select [TV System], and press ENTERto display
the [TV System] submenu:
A. Press ⇧/⇩ to select the menu item
B. Press ENTER to confirm
C. Press ⇧ to return to the Setup Menu
D. Press SETUP to exit the Setup Menu
Select [Video Output], and press ENTER to
display the [Video Output] submenu.
[ S-VIDEO] - S-video output;
Note: The Composite video output is always
available.
AUDIO SETUP
Select [Audio], and press ENTER to display the [Audio] submenu.
Select [Digital Out], and press ENTER to dis
play the [Digital Out] submenu:
A. Press ⇧/⇩/⇦/⇨ to select the menu item
B. Press ENTER to confirm
C. Press ⇧ to return to the Setup Menu
D. Press SETUP to exit the Setup Menu
Select [Downsampling], and press ENTER to
display the [Downsampling] submenu:
A. Press ⇧/⇩/⇦/⇨ to select the menu item
B. Press ENTER to confirm
C. Press ⇧ to return to the Setup Menu
D. Press SETUP to exit the Setup Menu
Select [DRC], and press ENTER to display the
[DRC] submenu:
A. Press ⇧/⇩/⇦/⇨ to select the menu item
B. Press ENTER to confirm
C. Press ⇧ to return to the Setup Menu
D. Press SETUP to exit the Setup Menu
RATING SETUP
Select [Rating] in the Setup Menu, and press
ENTER to display the [Rating] submenu.
-
32
Page 33

Enter the password to lock or unlock the [Rating] submenu:
Use the 0-9 keys to input four digits, then
press ENTER to confirm.
Note: If you forget your password, please use
the universal password “8888” to unlock.
Select [Rating], and press ENTER to change
[Rating] mode:
A. Press ENTER repeatedly to select: 1) Kid
Safe; 2) G; 3) PG; 4) PG-13; 5) PG-R; 6) R;
7) NC-17; 8) Adult
B. Press SETUP to exit the Setup Menu
Note: Unlock the password before setting
[Rating].
Select [Default], and press ENTER to set <RESTORE DEFAULT>.
A. Press Enter to restore default setup mode
automatically.
B. Press ⇧ to return to the Setup Menu
Remote Control Operation
POWER
• During playback, press POWER to stop the player and return to
standby mode.
• While the player is in standby, press POWER to resume normal operation.
TITLE
• During DVD playback, press TITLE to display the DVD title menu or
play the first title.
Note: This function is subject to the disc.
PBC
• During DVD playback, press PBC to display the disc menu of the
current title.
• During VCD/SVCD playback, press PBC to select the mode of playback PBC ON ,PBC OFF.
Note: 1) PBC is : play back control used to navigate VCDs; 2)Th is
function is subject to the disc.
OPEN/CLOSE
• To open the disc tray, press OPEN/CLOSE
• To close the disc tray, press OPEN/CLOSE again.
33
Page 34

OSD
• During playback, press DISPLAY to display the current time counter
position.
• Press DISPLAY again to display additional information about the
playing disc.
“0 - 10+”
• These keys are used to input the time, as well as title, chapter and
track numbers.
• When a numeric item is displayed on the screen, press the 0-9 keys
to select the desired entry, and press ENTER to confirm.
• When a CD or VCD is playing (with PBC off), press the 0-9 keys to
select a track directly, then press ENTER to confirm.
SLOW
• During DVD, VCD or SVCD playback, press SLOW for slow motion
playback.
• Once you press SLOW, the disc will play at 1/2, 1/4, 1/6 and 1/8
normal speed as follows:
• Press PLAY to resume normal playback.
34
Page 35

PREV
• During DVD, CD or VCD playback, press PREV to play the previous
chapter, title or track.
NEXT
• During DVD, CD or VCD playback, press NEXT to play the next
chapter, title or track.
FW
• During DVD, CD or VCD playback, press FW to scan in reverse. The
player will review the disc at 2, 4, 8 and 20 times normal speed as
follows:
• Press PLAY to resume normal playback.
FF
• During DVD, CD or VCD playback, press FF to scan in forward. The
player will cue the disc at 2, 4, 8 and 20 times normal speed as fol
lows:
• Press PLAY to resume normal playback.
MUTE
• Press MUTE to turn off the audio, Press MUTE again resume normal
sound.
R/L
• During VCD/SVCD playback press R/L repeatedly to select the chan
nel of audio-output: Stereo/Left/Right.
REPEAT
• Each press of the REPEAT button will change the repeat mode.
• There are three modes, repeat the chapter, repeat the title, return
to normal play.
A-B
• During playback, press A-B to select point A.
• Press it again to select point B. The player will repeat the section
from A to B automatically.
• Press A-B a third time to cancel A-B repeat and clear points A and B.
Note: During CD/VCD/SVCD playback, points A and B must be with-
in the same track. During DVD playback, points A and B can be
selected from different chapters.
RAN
• When a playing disc include many tracks, press RAN, the player will
play randomly, not play sequentially.
• During playback, presses RAN to select the mode of RANDOM: ran-
-
-
35
Page 36

dom on, random off.
SETUP
• Press SETUP to get into SETUP menu.
CLEAR
• Press CLEAR to delete numbers you have entered.
• Press once to delete one digit, press and hold to delete all digits.
PAUSE
• Press PAUSE during playback to pause playback.
• Press PLAY to resume normal playback.
PLAY
• Press PLAY from stop mode to start playback.
STOP
• Press STOP once during playback to stop and hold playback.
• Press PLAY to resume playback from the point you have pressed
STOP.
• Press STOP twice to stop playback completely.
Note: The screen saver will automatically turn on if playback is
stopped for more than 5 minutes.
MENU
• Press MENU to turn to main menu.
REPEAT
• Press this key to play selected item repeatedly. When playing a DVD,
press REPEAT 1/ALL once, the screen shows the following:
REP: [OFF] REP: [CHAPTER] REP: [TITLE]
• When playing a SVCD/VCD/CD, the screen shows as below:
(The function is only valid when PBC is OFF.)
REP: [Repeat off] REP: [ Repeat single] REP: [Repeat all]
STEP
• Press STEP to stop normal playback, and step forward one frame.
Note: The step function is not available during CD playback.
ZOOM
• During VCD/SVCD/DVD playback, press ZOOM to magnify the image as follows:
N/P
• In stop mode, press this button to switch the system of the DVD
player (AUTO, PAL or NTSC). Each time when press this button, the
system will switch to another one.
VOL
• Press VOL+ to enlarge the volume;
Press VOL- to reduce the volume.
ANGLE
• Press ANGLE to view scenes from different camera angles.
36
Page 37

• Press ANGLE repeatedly to change from one camera angle to another.
Note: This function is disc specific.
SUBT
• During DVD playback press SUBT repeatedly to select from up to 32
subtitle languages.
Note: This function is disc specific (languages will vary).
GOTO
• During VCD playback, press GOTO, and the menu will display as
follow:
- Use ⇧/⇩ to select TIME, TRACK.
- Use the number keys to input the desired
Time or track, then press ENTER to confirm.
• During DVD playback, press GOTO, and the menu will display as
follow:
- Use ⇧/⇩ to select TIME, TITLE or CHAPTER.
- Use the number keys to input the desired
Time, Title or Chapter, then press ENTER
to confirm.
Note:
1) TIME searches for an exact time in the track.
2) TRACK searches for an desired title or chapter.
3) For some DVD discs, the search function is unavailable.
PROGRAM
• During VCD playback, press PROGRAM and the [program] menu will
display as follow:
Input the track numbers in the de-
sired order. When finished, select
[play program] and then press ENTER to play the tracks in the new
programmed order. Select [clear all]
and press ENTER to clear all the numbers you have input.
• During DVD playback, press PROGRAM and the [program] menu will
display as follow:
Input the title numbers and the
chapter numbers in the desired order. Then select [play program] and
press ENTER to play the chapters in
the order you have set. Select [clear
all] and press ENTER to clear all the numbers you have input.
37
Page 38

MP3 Playing
Supported formats:
• Disc format: ISO 9660, Joliet
• Music file formats: MP3
• MP3 bit rate (data rate): 32--320kbps
• Total number of music files and albums: around 350 per disc
• Sampling rate: 32kHz/44.1kHz/48kHz
Note:
The player will not identify or play MP3 discs under the following
conditions: recording format is not supported, badly scratched or
deformed disc, MP3 recorded in CD-R or CD-RW which is not finalized, or a dirty pickup.
When an MP3 disc is loaded, the screen will display as follows:
The player will automatically play the first song (file)in the menu. You
can use number keys to select a special song(file).
Press arrow keys to select the file, and the cursor will move at time,
press ENTER to confirm, the player will play this song selected by cursor in the file window.
Kodak Picture CD Playback
• A Kodak Picture CD has the size and shape of a regular CD.
• The Max size of JPEG Picture can be supported: 3840x3840 pixels.
• JPEG stands for Joint Picture Experts Group. It is the first Interna-
tional Standard on Still Picture Compressing: ISO 10918-1, constituted by the Committee on Still Picture Compressing Standard Of
ISO.
• The picture on Kodak Picture CD are stored in this format (JPEG).
This player can decode the JPEG picture in Kodak Picture CD and
playback the picture in different modes.
38
Page 39

This player provides 6 different slideshow transition modes. Press
SETUP key in play mode to select the slideshow transition models in
turn as following:
1/6 - wipe from top to bottom ( )
2/6 - wipe from bottom to top( )
3/6 - wipe from top/bottom to center( )
4/6 - wipe from center to top/bottom ( )
5/6 - vertical blind ( )
6/6 - random play
GENERAL FUNCTION:
• You can set slide show transition modes for any pictures.
• Press PLAY key to continue slideshow transition.
• You can use number keys to select a special picture.
• Press STOP key to stop playing, and the screen will display as fol
low.
• Press PAUSE key to stop playing.
• Press PREV or NEXT key to select.
-
In this window, you can use arrow keys to select a special picture,
then use PLAY or ENTER to confirm and display this picture.
IMAGE ROTATION
There are three modes to rotate a picture: 90°cw, 180°cw, 270°cw.
These operations are allowed only when a picture is being dis
played normally and will be can celled automatically when an new
picture is displayed.
Press ANGLE repeatedly, you can select the different rotation
modes: original, 90°cw, 180°cw, 270°cw.
ZOOM FUNCTION
The player provides both Zoom in/out and pan function.
Q1, Q2, Q3: zoom in; Q4, Q5: zoom out; Q off: close zoom.
• Press PLAY key to resume slideshow transitions.
• Press arrow keys to pan the picture.
• During the ZOOM function, slideshow transitions and image rota
tion are disabled.
-
-
39
Page 40

DIGEST FUNCTION
Press the PBC key to display 9 pictures at a time; Press the arrow
keys to select any picture displayed on the screen, then press the
PLAY key, the selected picture will zoom in and start slideshow
transitions.
MAINTENANCE
• Please put off the plug of the DVD player when the plug or the
power enable damaged and send to fix by the technician
• Don’t connect too much electronic appliance on the electrical out
let or lengthen the cable, because it will result in fire or electrical
shock
• Don’t place anything on the power cable of DVD player, don’t con
nect the power cable random, because it will result fire or electrical
shock
• If DVD player dropped or player panel damaged, please put off the
power plug of DVD player and send to fix by technician
• Do not insert anything into the DVD cabinet, or else you may touch
the high voltage and course the fire or electric shock
• To reduce the risk of fire and electric shock, don’t remove the
cover(or back) of the unit. Refer servicing only to qualified service
personnel.
• Don’t place DVD player on unstable cabinet, bracket and desk, in
case dropped, it will hurt the people and damage the DVD player
too
• Don’t place DVD on the multi-dusts place, if the air wet too high,
The gathered dust may creates the breakdown on the DVD chassis
• Do not use the DVD near the places that have the water such as
bathtub, dishwasher or basement
• Do not let the cloth or other goods covers the DVD radiation hole
• Do not let DVD to place on the bed, sofa and so on, or else it is easy
to block the ventilate
• Do not place DVD to the radiator, nearby the heat source, or places
near it
• Do not let DVD to lay aside inventilates fixed cabinet.
• Don’t swash any liquid, on the DVD player, or don’t place any load-
ing liquid thing on the DVD player
• Don’t open the unit by yourself, Please ask professional technician
to repair it, if the DVD player still can’t work after operating ac-
cording to the TROUBLESHOOTING
• Please operate the DVD player according to the User Manual, If the
DVD player be damaged under your incorrect operation, please ask
-
40
Page 41

professional technician
• Please take out the plug, antenna and cable system for protecting
the DVD player if you don’t use it.
• Please switch it, take out plug and ask professional technician
when the DVD player has special sound and smell.
• Do not put the candle or flame upon or near the DVD, or else it may
cause the fire
• Don’t impact the DVD, especially the screen.
• Please power off the DVD and take of the switch if long time no use
it.
TROUBLESHOOTING
Please read the user’s manual carefully before using the DVD player. If
you have any troubles in using this player, try to solve the problems by
the suggestions mentioned below. If you can not remove the trouble
after using all the suggestions, please contact our company or the
technical service center authorized by US. For the sake of your safety,
please do not open the cover and repair the player by yourself, if that,
it may cause electric shock.
NO PICTURE, SOUND AND
INDICATION
• Ensure that the power switch is on.
• Ensure that the wall inlet is ok.
• Ensure that the power cord is not
damaged.
• Ensure that the power plug is
connected to the inlet tightly.
NO SOUND BUT HAVE PICTURE
• Ensure that the player’s audio
output has a good connection
with TV’s audio input.
• Check whether the audio con-
nector is damaged.
• Check whether you have turned
down the volume.
• Ensure that you have set the
right AUDIO setup of the player.
• Ensure that you have turn your
TV to the AV input channel connecting to your player.
• Ensure that the Audio is not out
mute.
NO PICTURE BUT HAVE SOUND
• Ensure that the player’s video
output has a good connection
with TV’s video input.
• Ensure that you have turn your
TV to the AV input channel connecting to your player.
• Check whether the video connector is damaged.
• Ensure that you have set the right
VIDEO settings of the player.
BLACK AND WHITE PICTURE OR
SCREEN ROLLING
• Ensure that you have set the
right TV SYSTEM (e.g. PAL, NTSC)
setting.
FLAWS OF PICTURE OR SOUND
• Check whether the setting of
AUDIO is right.
• Check whether the disc is
scratched or stained.
• Check whether the AV connector and the output terminal is
41
Page 42

stained.
DISPLAY NO DISC
• Ensure that you have put the
disc on the tray.
• Check whether the disc is put in
the reverse side.
• Check whether the disc is distorted.
• Check whether the disc is
stained or scratched badly.
DISPLAY BAD DISC
• Check whether the disc has bad
quality.
• Ensure that the disc is not
stained or damaged badly.
• Ensure that the disc format is
compatible to the player.
• Ensure that the disc is not deformed.
REMOTER IS INSENSITIVE OR
DOES NOT WORK
• Check the batteries of remoter
and make sure that they are to
be powerful and good conductivity.
• Direct the remote controller to
the IR sensor of the player.
• Check whether there are some
obstacles between the remoter
and IR sensor.
ABNORMAL FUNCTION
OPERATION
• Turn off the power, and then
turn on again.
UNFINALIZED CD-R OR CD-RW IS
LOCKED IN THE TRAY
• Unfinalized CD-R or CD-RW is
not supported. The disc can not
be taken out of the tray when
the player is reading. So you
have to turn off the power, and
turn on again, and press OPEN/
CLOSE key immediately to open
the tray.
42
Page 43

SPECIFICATION
Power requirements: 220V, 50Hz
Power consumption: 25W
Video standard: PAL
Unit Weight: 3.0 kg
Unit Dimensions: 430mm(W) x 260mm(D) x 43mm(H)
Video out
Video out: 1.0V(p-p)/75Ω - sync, negative polarity
S-video output connector
(separate Y/C signal output connector):
Y output: 1.0V(p-p)/75Ω - sync, negative polarity
C output: 0.286V(p-p)/75Ω, 4 pin mini DIN x 1
Audio out
Analog out: 1.85V(rms)/10kΩ, RCA pin Jack (L,R) x 1
Coaxial out: 0.5V(p-p)/75Ω, RCA pin Jack x 1
Optical out: Optical Fiber Transmitter
Frequency
response: 20Hz to 20kHz
S/N ratio: >90dB
Total harmonic
distortion: < 0.05%
ACCESSORIES
Audio/Video cord 1
Remote Control 1
User’s manual 1
Address to service center for consultation, when the service life of
product has expired. Otherwise the further operation can entail impossibility of normal use of the product.
Service life of the given product - 3 years from the moment of sale
43
 Loading...