

Page 1
PERFEKT IN FORM UND FUNKTION
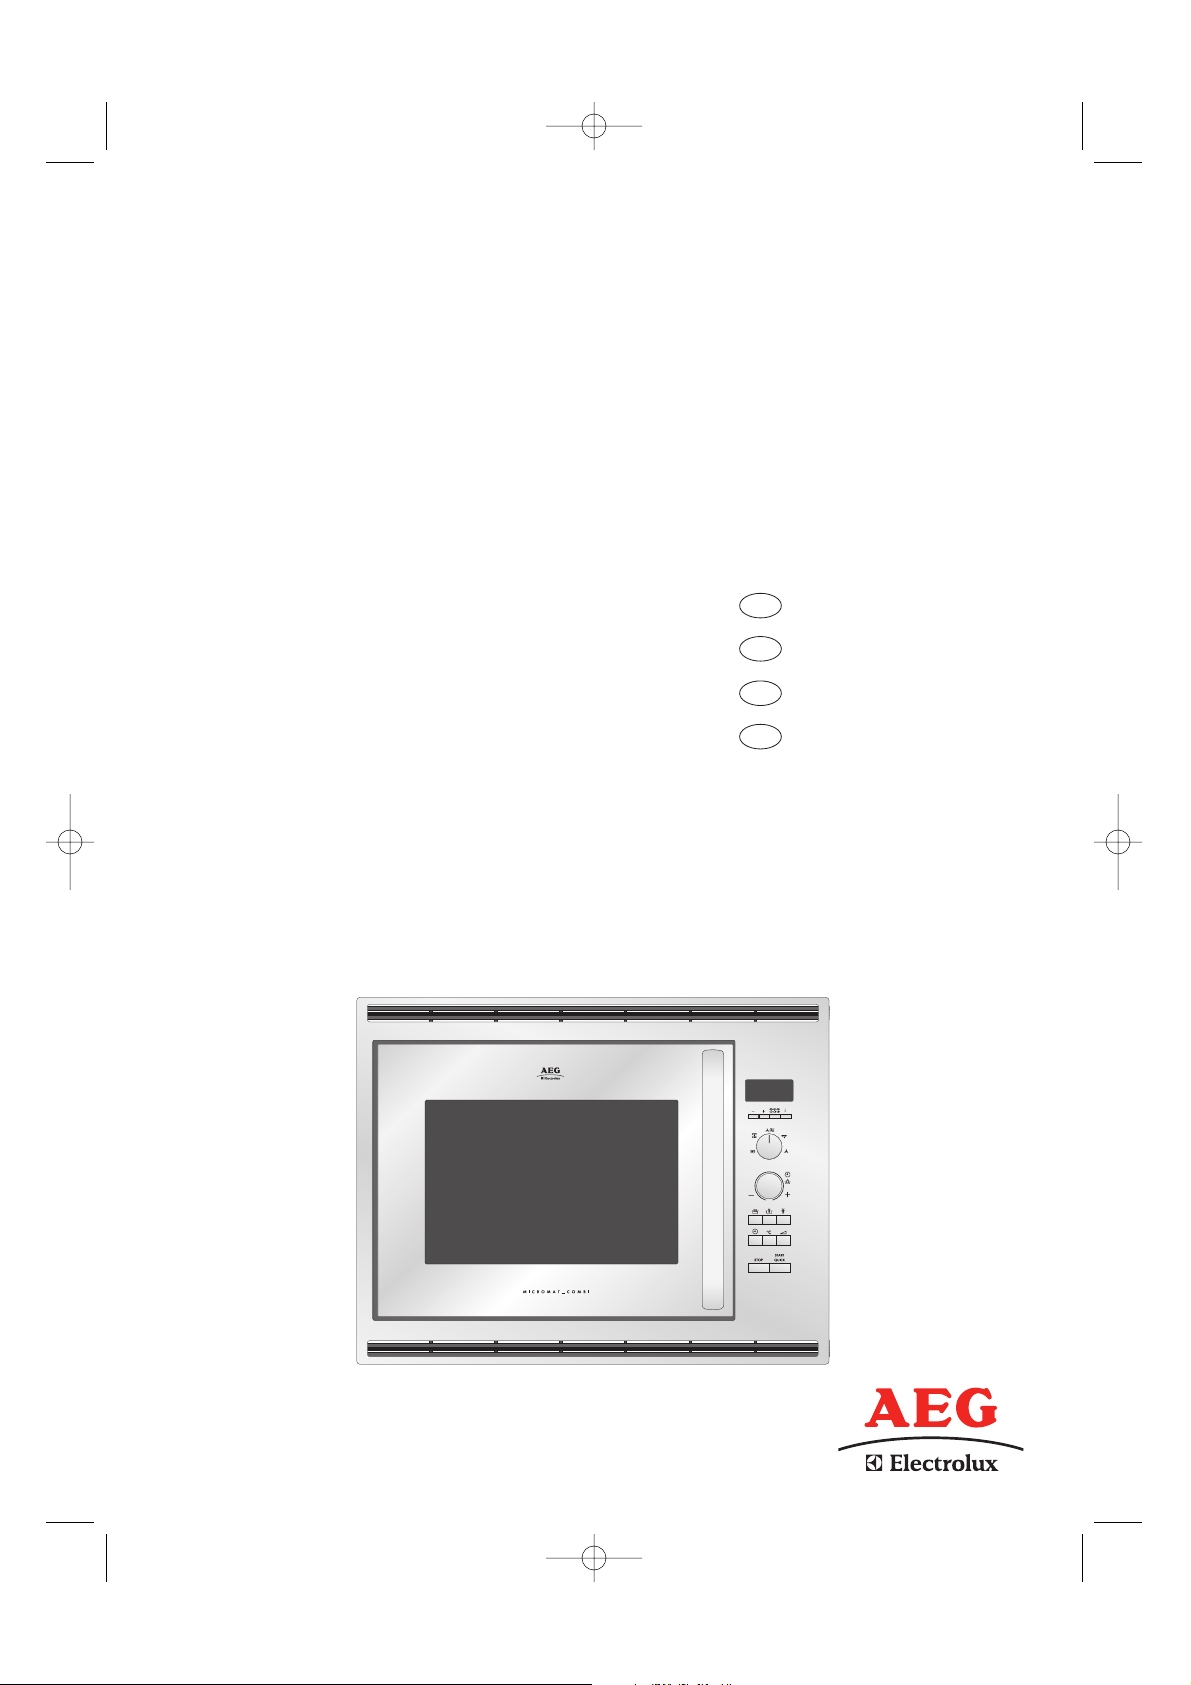
Microwave oven with grill and convection
Mikrowellengerät mit grill und heissluft
Four à micro-ondes avec gril et convection
Magnetronoven met grill en hetelucht
Operating instructions
Gebrauchsanweisung
Notice d’utilisation
Gebruiksaanwijzing
MCC4060E
UK
D
F
NL
AG-91D-EU COVER 21/02/2005 16:20 Page A
Page 2
Dear Customer,
Thank you for buying an AEG-Electrolux microwave oven and putting your
trust in the AEG-Electrolux brand name.
Before using your AEG-Electrolux microwave oven for the first time, please
read the instruction book thoroughly. This will enable you to take advantage
of all the features that the appliance offers. It will also ensure trouble-free
operation and minimize unnecessary service calls.
Important information concerning your safety or the operation of your
appliance is noted by this symbol and/or mentions words such as «Warning»,
«Take care». Be sure to follow all instructions carefully.
Throughout the manual, this symbol guides you step by step when operating
the appliance.
This symbol indicates further information concerning the use of the
appliance.
The clover indicates energy-saving tips and hints for environmentally friendly
use of your appliance.
In the event of malfunctioning, please follow the instructions given in the
section «What to do if...»
1. AG-91D-EU ENGLISH 21/02/2005 16:23 Page B
Page 3

1
UK
Contents
Important safety instructions . . . . . . . . . . . . . . . . . . . . . . . . . . . . . . . . . . . . . . . . . . . . . . . . . .2 - 3
Oven & accessories . . . . . . . . . . . . . . . . . . . . . . . . . . . . . . . . . . . . . . . . . . . . . . . . . . . . . . . . . . . . . .4
Control panel . . . . . . . . . . . . . . . . . . . . . . . . . . . . . . . . . . . . . . . . . . . . . . . . . . . . . . . . . . . . . . . . . . .5
Before operation . . . . . . . . . . . . . . . . . . . . . . . . . . . . . . . . . . . . . . . . . . . . . . . . . . . . . . . . . . . . . . . .6
Selecting the language . . . . . . . . . . . . . . . . . . . . . . . . . . . . . . . . . . . . . . . . . . . . . . . . . . . . . . . . . . .6
Using the STOP button . . . . . . . . . . . . . . . . . . . . . . . . . . . . . . . . . . . . . . . . . . . . . . . . . . . . . . . . . . .7
Setting the clock . . . . . . . . . . . . . . . . . . . . . . . . . . . . . . . . . . . . . . . . . . . . . . . . . . . . . . . . . . . . . . . .7
Energy save mode . . . . . . . . . . . . . . . . . . . . . . . . . . . . . . . . . . . . . . . . . . . . . . . . . . . . . . . . . . . . . . .8
Microwave power levels . . . . . . . . . . . . . . . . . . . . . . . . . . . . . . . . . . . . . . . . . . . . . . . . . . . . . . . . . .8
What are microwaves? . . . . . . . . . . . . . . . . . . . . . . . . . . . . . . . . . . . . . . . . . . . . . . . . . . . . . . . . . . .9
This is what your new combination microwave oven can do . . . . . . . . . . . . . . . . . . . . . . . . . . . .9
Microwave cooking . . . . . . . . . . . . . . . . . . . . . . . . . . . . . . . . . . . . . . . . . . . . . . . . . . . . . . . . . . . . .10
Grill cooking . . . . . . . . . . . . . . . . . . . . . . . . . . . . . . . . . . . . . . . . . . . . . . . . . . . . . . . . . . . . . . . . . . .11
Heating without food . . . . . . . . . . . . . . . . . . . . . . . . . . . . . . . . . . . . . . . . . . . . . . . . . . . . . . . . . . .11
Convection cooking . . . . . . . . . . . . . . . . . . . . . . . . . . . . . . . . . . . . . . . . . . . . . . . . . . . . . . . .12 - 13
Dual cooking . . . . . . . . . . . . . . . . . . . . . . . . . . . . . . . . . . . . . . . . . . . . . . . . . . . . . . . . . . . . . .14 - 15
Other convenient functions . . . . . . . . . . . . . . . . . . . . . . . . . . . . . . . . . . . . . . . . . . . . . . . . . .16 - 18
Suitable ovenware . . . . . . . . . . . . . . . . . . . . . . . . . . . . . . . . . . . . . . . . . . . . . . . . . . . . . . . . . . . . . 19
Cooking charts . . . . . . . . . . . . . . . . . . . . . . . . . . . . . . . . . . . . . . . . . . . . . . . . . . . . . . . . . . . . . . . .20
Recipes for glass tray and convection . . . . . . . . . . . . . . . . . . . . . . . . . . . . . . . . . . . . . . . . . .21 - 22
Recipes for glass tray and grill . . . . . . . . . . . . . . . . . . . . . . . . . . . . . . . . . . . . . . . . . . . . . . . . . . . .23
Automatic operations . . . . . . . . . . . . . . . . . . . . . . . . . . . . . . . . . . . . . . . . . . . . . . . . . . . . . .24 - 25
Auto cook chart . . . . . . . . . . . . . . . . . . . . . . . . . . . . . . . . . . . . . . . . . . . . . . . . . . . . . . . . . . . . . . . .26
Auto cook from frozen chart . . . . . . . . . . . . . . . . . . . . . . . . . . . . . . . . . . . . . . . . . . . . . . . . . . . . .27
Auto defrost chart . . . . . . . . . . . . . . . . . . . . . . . . . . . . . . . . . . . . . . . . . . . . . . . . . . . . . . . . . .28 - 29
Recipes for auto cook AC-4 . . . . . . . . . . . . . . . . . . . . . . . . . . . . . . . . . . . . . . . . . . . . . . . . . . . . . .30
Recipes for auto cook AC-5 . . . . . . . . . . . . . . . . . . . . . . . . . . . . . . . . . . . . . . . . . . . . . . . . . .31 - 32
Care and cleaning . . . . . . . . . . . . . . . . . . . . . . . . . . . . . . . . . . . . . . . . . . . . . . . . . . . . . . . . . . . . . .33
What to do if... . . . . . . . . . . . . . . . . . . . . . . . . . . . . . . . . . . . . . . . . . . . . . . . . . . . . . . . . . . . . . . . . .34
Service & spare parts . . . . . . . . . . . . . . . . . . . . . . . . . . . . . . . . . . . . . . . . . . . . . . . . . . . . . . . . . . . .35
Guarantee conditions . . . . . . . . . . . . . . . . . . . . . . . . . . . . . . . . . . . . . . . . . . . . . . . . . . . . . . . . . . .35
Specifications . . . . . . . . . . . . . . . . . . . . . . . . . . . . . . . . . . . . . . . . . . . . . . . . . . . . . . . . . . . . . . . . . .36
Important information . . . . . . . . . . . . . . . . . . . . . . . . . . . . . . . . . . . . . . . . . . . . . . . . . . . . . . . . . .37
Installation . . . . . . . . . . . . . . . . . . . . . . . . . . . . . . . . . . . . . . . . . . . . . . . . . . . . . . . . . . . . . . . .38 - 39
The symbol on the product or on its packaging indicates that this product may not be treated as household
waste. Instead it shall be handed over to the applicable collection point for the recycling of electrical and
electronic equipment. By ensuring this product is disposed of correctly, you will help prevent potential negative
consequences for the environment and human health, which could otherwise be caused by inappropriate waste
handling of this product. For more detailed information about recycling of this product, please contact your
local city office, your household waste disposal service or the shop where you purchased the product.
1. AG-91D-EU ENGLISH 21/02/2005 16:23 Page 1
Page 4

2
Important safety instructions
IMPORTANT SAFETY INSTRUCTIONS: READ CAREFULLY AND KEEP FOR FUTURE REFERENCE
To avoid the danger of fire
The microwave oven should not be left unattended
during operation. Power levels that are too high or
cooking times that are too long may overheat
foods resulting in a fire.
The electrical outlet must be readily accessible so that
the unit can be unplugged easily in an emergency.
The AC power supply must be 230 V, 50 Hz, with a
minimum 16 A distribution line fuse, or a minimum
16 A distribution circuit breaker.
It is recommended that a separate circuit serving only
this appliance be provided.
Do not store or use the oven outdoors.
If food being heated begins to smoke, DO NOT
OPEN THE DOOR. Turn off and unplug the oven
and wait until the food has stopped smoking.
Opening the door while food is smoking may cause
a fire.
Only use microwave-safe containers and utensils.
See Page 19.
Do not leave the oven unattended when using
disposable plastic, paper or other combustible food
containers.
Clean the waveguide cover, the oven cavity and
the turntable after use. These must be dry and free
from grease. Built-up grease may overheat and
begin to smoke or catch fire.
Do not place flammable materials near the oven or
ventilation openings. Do not block the ventilation openings.
Remove all metallic seals, wire twists, etc., from food
and food packages. Arcing on metallic surfaces may
cause a fire.
Do not use the microwave oven to heat oil for deep
frying. The temperature cannot be controlled and the
oil may catch fire.
To make popcorn, only use special microwave popcorn
makers.
Do not store food or any other items inside the oven.
Check the settings after you start the oven to ensure
the oven is operating as desired.
See the corresponding hints in the cookery book section.
To avoid the possibility of injury
WARNING:
Do not operate the oven if it is damaged or
malfunctioning. Check the following before use:
a) The door; make sure the door closes properly and
ensure it is not misaligned or warped.
b) The hinges and door safety latches; check to make
sure they are not broken or loose.
c) The door seals and sealing surfaces; ensure that
they have not been damaged.
d) Inside the oven cavity or on the door; make sure
there are no dents.
e) The power supply cord and plug; ensure that they
are not damaged.
Never adjust , repair or modify the oven yourself.
It is hazardous for anyone other than a competent
person to carry out any service or repair operation
which involves the removal of a cover which gives
protection against exposure to microwave energy.
Do not operate the oven with the door open or alter
the door safety latches in any way.
Do not operate the oven if there is an object between
the door seals and sealing surfaces.
Do not allow grease or dirt to build up on the door
seals and adjacent parts. Follow the instructions
for “Care and Cleaning” on page 33. Failure to
maintain the oven in a clean condition could lead
to a deterioration of the surface that could
adversely affect the life of the appliance and
possibly result in a hazardous situation.
Individuals with PACEMAKERS should check with their
doctor or the manufacturer of the pacemaker for
precautions regarding microwave ovens.
To avoid the possibility of electric shock
Under no circumstances should you remove the outer
cabinet.
Never spill or insert any objects into the door lock
openings or ventilation openings. In the event of a spill,
turn off and unplug the oven immediately and call your
local AEG-Electrolux service agent.
Do not immerse the power supply cord or plug in water
or any other liquid.
Do not allow the power supply cord to run over any hot
or sharp surfaces, such as the hot air vent area at the
top rear of the oven.
Do not attempt to replace the oven lamp yourself or allow
anyone who is not authorised by AEG-Electrolux to do so.
If the oven lamp fails, please consult your dealer or
contact your local AEG-Electrolux service agent.
If the power supply cord of this appliance is damaged, it
must be replaced with a special cord. The exchange must
be made by an authorised AEG-Electrolux service agent.
1. AG-91D-EU ENGLISH 21/02/2005 16:23 Page 2
Page 5
3
UK
To avoid the possibility of explosion and sudden
boiling:
WARNING: Liquids and other foods must not be
heated in sealed containers since they are liable to
explode.
Never use sealed containers. Remove seals and lids before
use. Sealed containers can explode due to a build up of
pressure even after the oven has been turned off.
Take care when microwaving liquids. Use a widemouthed container to allow bubbles to escape.
Microwave heating of beverages can result in
delayed eruptive boiling, therefore care has to be
taken when handling the container.
To prevent sudden eruption of boiling liquid and possible
scalding:
1. Stir liquid prior to heating/reheating.
2. It is advisable to insert a glass rod or similar utensil
into the liquid whilst reheating.
3. Let liquid stand in the oven at the end of cooking
time to prevent delayed eruptive boiling.
Do not cook eggs in their shells, and whole hard
boiled eggs should not be heated in microwave
ovens since they may explode even after
microwave cooking has ended. To cook or reheat
eggs which have not been scrambled or mixed,
pierce the yolks and the whites, or the eggs may
explode. Shell and slice hard boiled eggs before
reheating them in the microwave oven.
Pierce the skin of such foods as potatoes, sausages and
fruit before cooking, or they may explode.
To avoid the possibility of burns
Use pot holders or oven gloves when removing food
from the oven to prevent burns.
Always open containers, popcorn makers, oven cooking bags,
etc., away from the face and hands to avoid steam burns.
To avoid burns, always test food temperature and
stir before serving and pay special attention to the
temperature of food and drink given to babies,
children or the elderly.
Temperature of the container is not a true indication of
the temperature of the food or drink; always check the
food temperature.
Always stand back from the oven door when opening,
to avoid burns from escaping steam and heat.
Slice stuffed baked foods after heating to release steam
and avoid burns.
Keep children away from the door to prevent them
burning themselves.
Do not touch the oven door, outer cabinet, rear cabinet,
oven cavity, ventilation openings, accessories and dishes
during GRILL mode, CONVECTION mode, DUAL mode,
AUTO COOK and AUTO COOK FROM FROZEN
operation as they will become hot. Before cleaning make
sure they are not hot.
To avoid misuse by children
Warning: Only allow children to use the oven
without supervision when adequate instructions
have been given so that the child is able to use the
oven in a safe way and understands the hazards of
improper use.
Do not lean or swing on the oven door. Do not play
with the oven or use it as a toy.
Children should be taught all important safety
instructions: use of pot holders, careful removal of food
coverings; paying special attention to packaging (e.g. selfheating materials) designed to make food crisp, as they
may be extra hot.
Other warnings
Never modify the oven in any way.
Do not move the oven while it is in operation.
This oven is for home food preparation only and may
only be used for cooking food. It is not suitable for
commercial or laboratory use.
To promote trouble-free use of your oven and avoid
damage.
Never operate the oven when it is empty except where
recommended in the operation manual, see Page 11.
Doing so may damage the oven.
When using a browning dish or self-heating material,
always place a heat-resistant insulator such as a
porcelain plate under it to prevent damage to the
turntable due to heat stress. The preheating time
specified in the dish’s instructions must not be exceeded.
Do not use metal utensils, which reflect microwaves and
may cause electrical arcing. Do not put cans in the oven.
Use only the turntable designed for this oven.
Do not place anything on the outer cabinet during
operation.
Do not use plastic containers for microwaving if the oven is
still hot from using the GRILL mode, CONVECTION mode,
DUAL mode, AUTO COOK and AUTO COOK FROM
FROZEN, because they may melt. Plastic containers must
not be used during above modes unless the container
manufacturer says they are suitable.
NOTE:
If you are unsure how to connect your oven, please
consult an authorised, qualified electrician.
Neither the manufacturer nor the dealer can accept any
liability for damage to the oven or personal injury
resulting from failure to observe the correct electrical
connection procedure.
Water vapour or drops may occasionally form on the
oven walls or around the door seals and sealing
surfaces. This is a normal occurrence and is not an
indication of microwave leakage or a malfunction.
Important safety instructions
1. AG-91D-EU ENGLISH 21/02/2005 16:23 Page 3
Page 6

4
Oven & accessories
16
17
Coupling
18
19
These racks are used for cooking in Convection,
Dual or Grill mode.
ACCESSORIES:
Check to make sure the following accessories are supplied:
16 Turntable 17 Turntable support 18 Low Rack.
19 High rack 20 Rack for glass tray 21 Glass tray.
• Place the turntable support into the coupling in the
centre of the oven floor, ensuring you place it
TOP side up, (TOP is engraved on one side).
It should be able to freely rotate around the
coupling.
• Place the turntable on to the turntable support.
• Place the high/low racks onto the turntable if necessary
• Slide the glass tray into the shelf runners. You may cook
dishes directly in the tray or set the rack inside the tray when
roasting in order to catch drippings. (See page 20.)
NOTES:
• Always operate the oven with the turntable and support fitted
correctly. This promotes thorough even cooking. A badly fitted
turntable may rattle, may not rotate properly and damage the
oven.
• The turntable rotates clockwise or counter clockwise.
The rotary direction may change each time you start the oven.
This does not affect cooking performance.
• When you order accessories, please mention two
details: part name and model name to your dealer or
AEG-
Electrolux service agent
.
21
20
14
13
12
1 Fixing points (4 points)
2 Grill heating element
3 Convection heating element
4 Oven lamp
5 Control panel
6 Shelf runners
7 Waveguide cover
8 Oven cavity
9 Coupling
10 Door seals and sealing surfaces
11 Door opening handle
12 Air-vent openings
13 Outer cabinet
14 Power cord
15 Power supply cord support clip
4
10
11
8
7
321 1
9
11
15
6
5
1. AG-91D-EU ENGLISH 21/02/2005 16:23 Page 4
Page 7

UK
5
Control panel
3
4
5
6
7
8
9
10
11
12
13
14
15
16
18
17
2
1
19
Digital display and indicators:
1 COOKING indicator
2 START indicator
3 GRILL indicator
4 CONVECTION indicator
5 MICROWAVE indicator
6 INFORMATION indicator
Operating buttons:
7 INFORMATION button
8 LANGUAGE button
9 COOKING MODE knob
for microwave cooking
for microwave cooking with GRILL
for microwave cooking with CONVECTION
for GRILL
for CONVECTION
10 TIMER/WEIGHT knob
Rotate the knob to enter either the
cooking/defrosting time or weight of food.
11 AUTO COOK button
12 COOK FROM FROZEN button
13 AUTO DEFROST button
14 MICROWAVE POWER LEVEL button
15 START/QUICK button
16 STOP button
17 CONVECTION button
18 CLOCK SETTING button
19 LESS/MORE buttons
1. AG-91D-EU ENGLISH 21/02/2005 16:23 Page 5
Page 8
6
Before operation
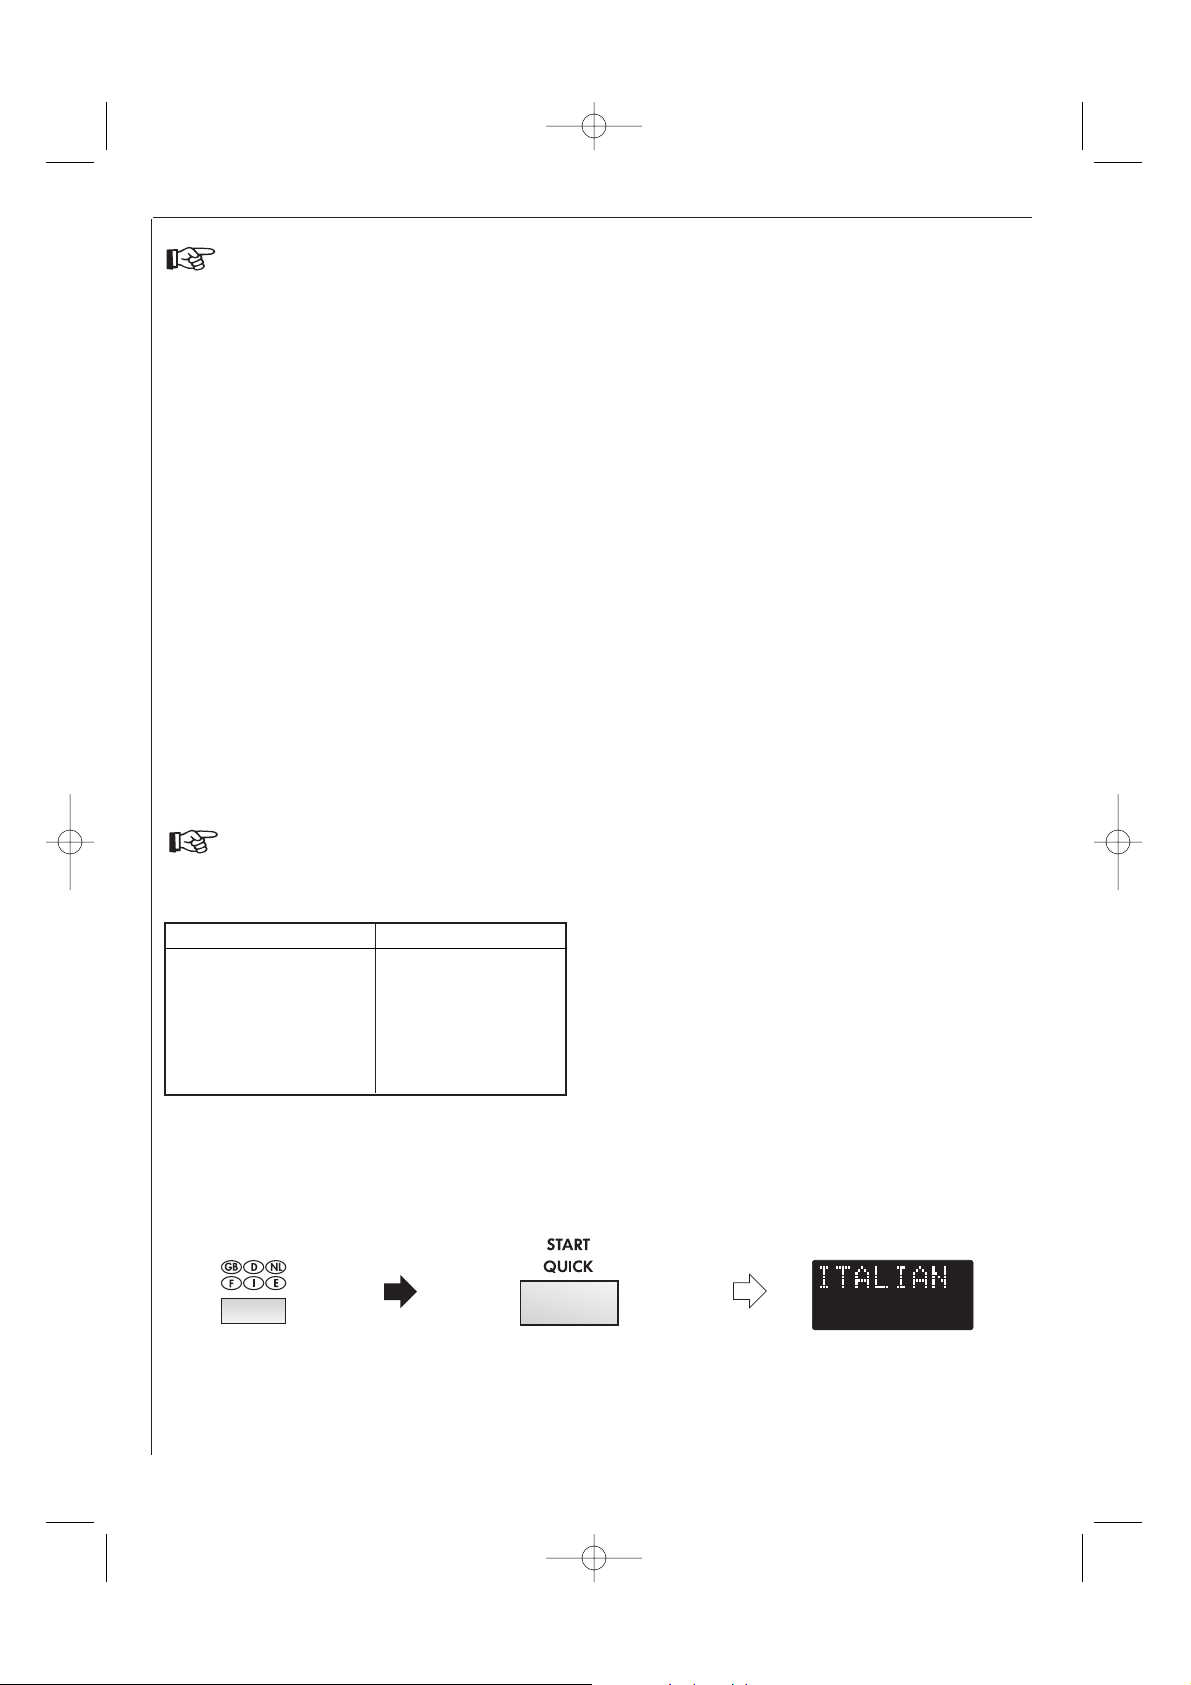
Selecting the Language
The oven comes set for English. You can change the
language. To change, press the LANGUAGE button
until the desired language is displayed. Then press the
START/QUICK button.
Example:
To select Italian:
Press
LANGUAGE
button
once
twice
3 times
4 times
5 times
6 times
LANGUAGE
ENGLISH
DEUTSCH
NEDERLANDS
FRANÇAIS
ITALIAN
ESPAÑOL
1. Choose the desired
language by pressing the
LANGUAGE button.
2. Press the START/QUICK button to
start the setting.
Check the display.
x5
x1
NOTE: The selected language will be memorised even if the electical power supply is interrupted.
Your oven has an energy save mode.
1. Plug in the oven. Nothing will appear on the
display at this time.
2. Open the door.
The oven display will show “SELECT LANGUAGE” in 6
languages.
NOTE: Once you select the language using the
LANGUAGE button, the display will show
“ENERGY SAVE MODE TO GO OUT OF
ENERGY SAVE MODE SET CLOCK” when you
plug the oven in.
3. Close the door.
4. Select a language (See below).
NOTE: If you use the oven in English, you do not have to
select language, simply press the STOP button.
The display will show “.0” and go to step 5.
5. Set the clock (See page 7).
6. Heat the oven without food (See page 11).
COOKING HINTS:
The oven has an ‘Information Display System’ which
offers you step by step instructions to easily guide you
through each feature, and enable you to gain
information in your desired language. The oven has an
INFORMATION button for getting instructions
for each button. Indicators will appear in the display,
after pressing a button, to inform you of the next
operation step.
1. AG-91D-EU ENGLISH 21/02/2005 16:23 Page 6
Page 9
UK
7
Using the STOP button
MODE SET CLOCK”. This information will appear if
you have already set the language with the
LANGUAGE button. If this occurs during cooking,
the programme will be erased. The time of day will
also be erased.
5. When you want to reset the time of day, follow the
above example again.
6. If you do not set the clock, press the STOP button
once. will appear on the display. When the
operation of the oven is finished, will
reappear on the display instead of the time of day.
7. If you set the clock, energy save mode does not
work.
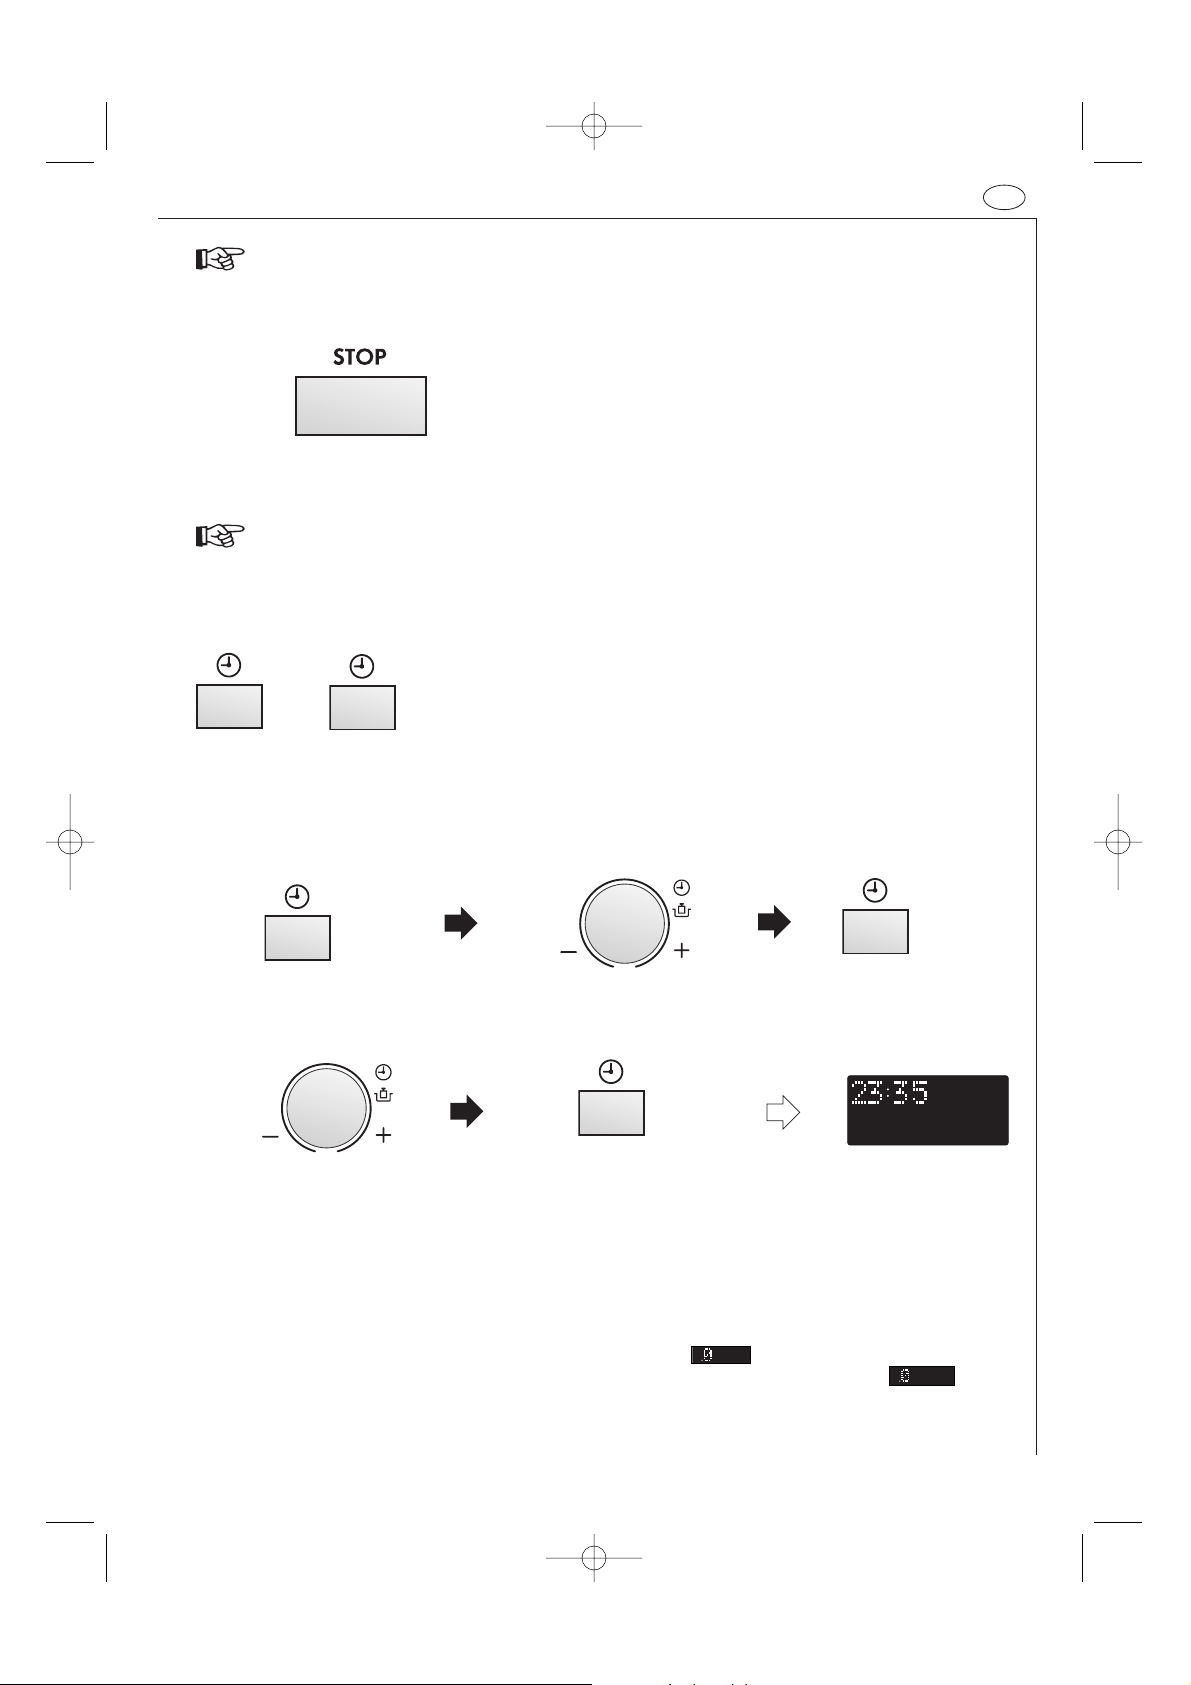
There are two setting modes: 12 hour clock and 24 hour clock.
Step 1
x1
1. To set the 12 hour clock, press the CLOCK SETTING button once as in
Step 1.
2. To set the 24 hour clock, press the CLOCK SETTING button twice as in
Step 2.
Step 2
x2
Example:
To set the 24 hour clock to 23:35.
2. Set the hours. Rotate the TIMER/
WEIGHT knob clockwise until the
correct hour is displayed (23).
Check the display.
4. Set the minutes (35).
NOTES:
1. You can rotate the TIMER/WEIGHT knob clockwise
or counterclockwise.
2. Press the STOP button if you make a mistake during
programming.
3. If the oven is in cooking mode and you wish to
know the time of day, touch the CLOCK SETTING
button. As long as your finger is touching the
button, the time of day will be displayed.
4. If the electrical power supply to your microwave
oven is interrupted, plug in the oven again, then
open and close the door. The display will show
“ENERGY SAVE MODE TO GO OUT OF ENERGY SAVE
1. Choose the 24 hour clock
by pressing the CLOCK
SETTING button twice.
3. Change from hours to minutes
by pressing the CLOCK
SETTING button once.
5. Press the CLOCK SETTING
button to start the clock.
Use the STOP button to:
1. Erase a mistake during programming.
2. Stop the oven temporarily during cooking.
3. Cancel a programme during cooking, press
the STOP button twice.
x2
x1
x1
Setting the clock
1. AG-91D-EU ENGLISH 21/02/2005 16:23 Page 7
Page 10
8
Energy save mode
Your oven comes set for the energy save mode.
If you do nothing for 3 minutes after a preceding operation, i.e. closing the door or at the end of cooking, the
power will go off automatically. To restore power on, open the door.
To start energy save mode, follow the instructions below.
Example:
To start the energy save mode, (the current time is 23:35):
NOTE: You can press the CLOCK SETTING button twice at step 2.
x1
1. Make sure the
correct time
appears on the
display.
3. Adjust the display to
0 by rotating the
TIMER/WEIGHT
knob.
2. Press the CLOCK
SETTING button
once.
4. Press START/QUICK button.
The power will be off and the
display will show nothing.
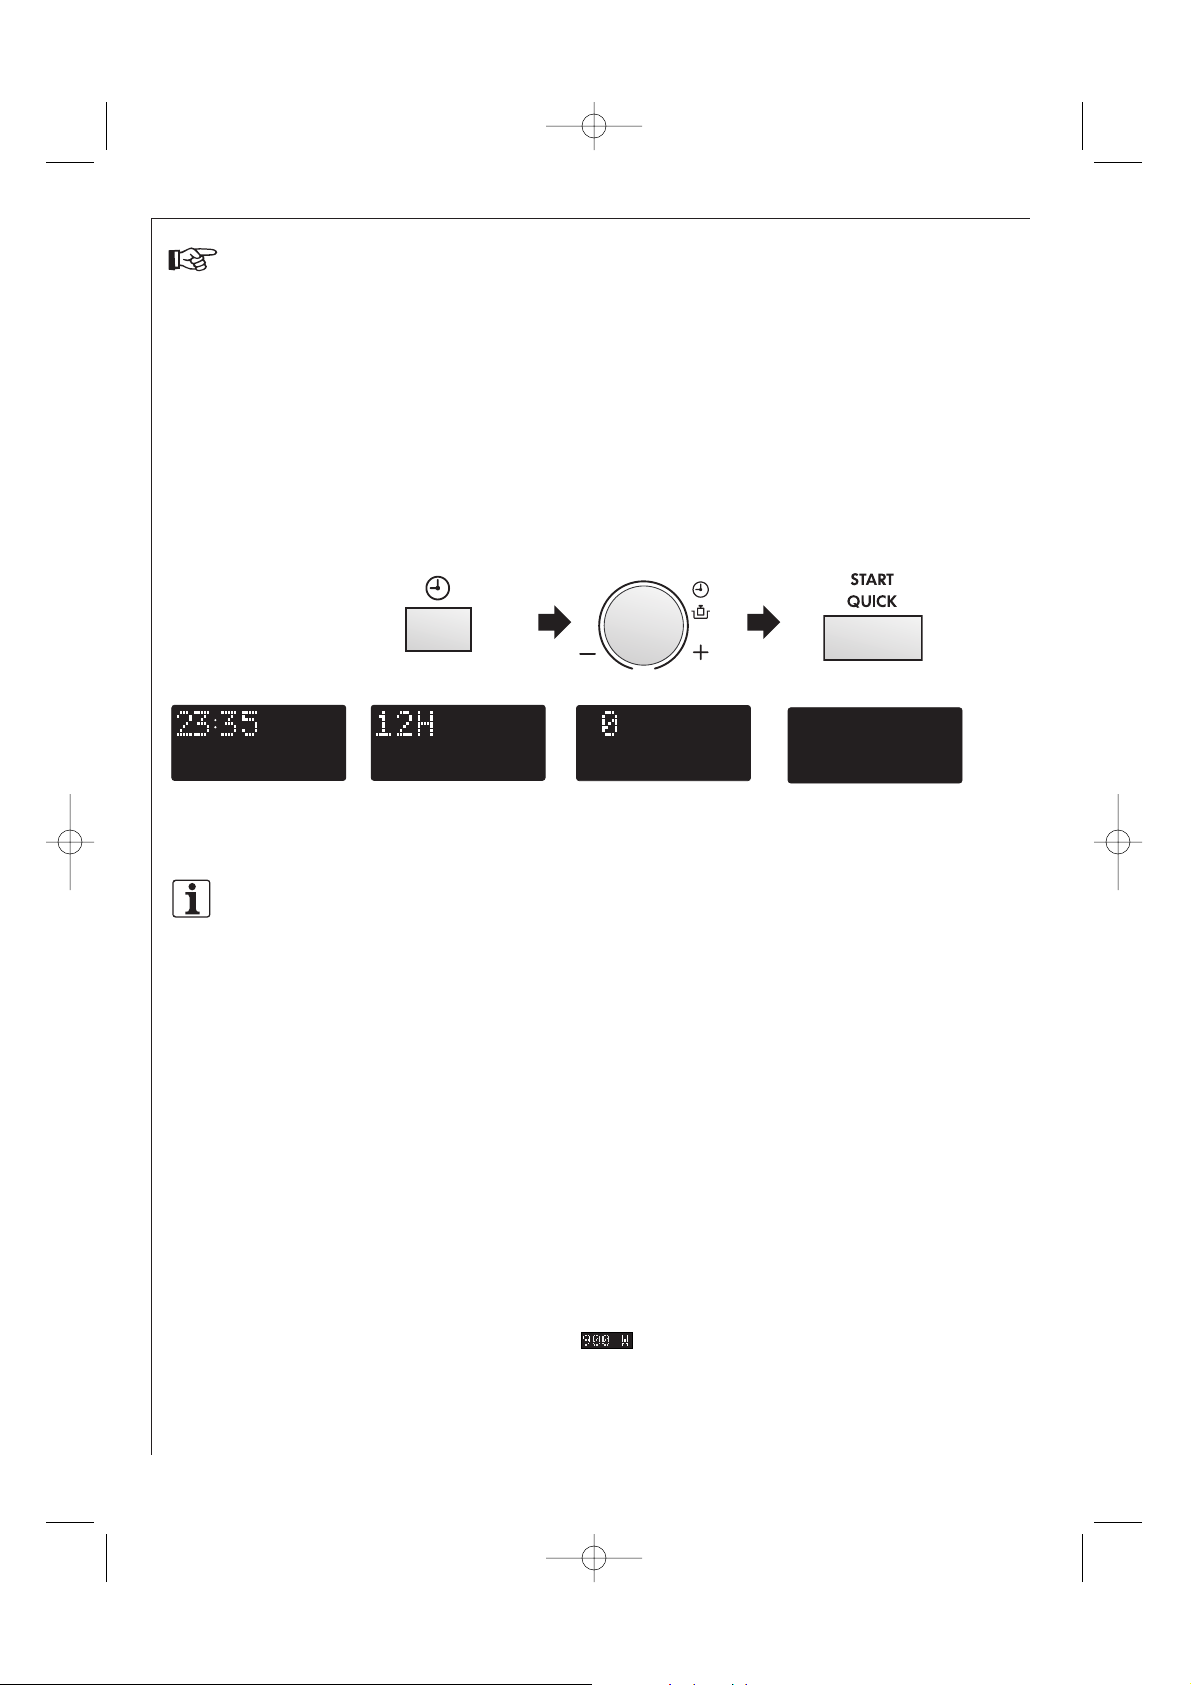
To set the microwave power level :
1. Rotate the COOKING MODE dial to the microwave setting.
2. Rotate the TIMER/WEIGHT knob clockwise or counter-clockwise to select cooking time.
3. Press the MICROWAVE POWER LEVEL button until the desired power level appears on the display. (If the
MICROWAVE POWER LEVEL button is touched once, will be displayed. If you miss your desire level,
continue pressing the MICROWAVE POWER LEVEL button until you reach the level again).
4. Press the START/QUICK button.
NOTE: If the power level is not selected, 900 W is automatically set.
Your oven has 5 power levels. To choose the power level
for cooking, follow the advice given in the recipe
section. Generally the following recommendations
apply:
900 W used for fast cooking or reheating e.g. soup,
casseroles, canned food, hot beverages, vegetables, fish,
etc.
630 W used for longer cooking of dense foods such as
roast joints, meat loaf and plated meals, also for
sensitive dishes such as cheese sauce and sponge cakes.
At this reduced setting, the sauce will not boil over and
food will cook evenly without over cooking at the sides.
450 W for dense foods which require a long cooking
time when cooked conventionally, eg. beef dishes, it is
advisable to use this power setting to ensure the meat
will be tender.
270 W (Defrost setting) to defrost, select this power
setting, to ensure that the dish defrosts evenly. This
setting is also ideal for simmering rice, pasta, dumplings
and cooking egg custard.
90 W for gentle defrosting, eg. cream gateaux or
pastry.
W = WATT
Microwave power levels
x1
1. AG-91D-EU ENGLISH 21/02/2005 16:23 Page 8
Page 11
UK
9
Like radio and television waves, microwaves are
electromagnetic waves.
Microwaves are produced by a magnetron inside the
microwave oven, and these vibrate the molecules of
water present in the food. The friction this causes
produces heat, which ensures that the food is defrosted,
heated or cooked through.
The secret of the reduced cooking times is the fact that
the microwaves penetrate the food from every
direction. Energy is used to the full. In comparison, the
energy from a conventional hob passes from the burner
through the pan and so to the food.
This method wastes a great deal of energy.
THE CHARACTERISTICS OF MICROWAVES
Microwaves penetrate all non-metal objects made of
glass, china, earthenware, plastic, wood or paper. This is
why the microwaves never make these materials hot.
Dishes become hot only because the food inside them is
hot.
The food absorbs the microwaves and is heated.
Microwaves cannot pass through objects made of metal
and so they are deflected. For this reason metal objects
are not normally suitable for microwave cookery.
There are exceptions where you can actually make use
of the fact that the microwaves cannot pass through
metal. If you cover food with aluminium foil at specific
points while it is defrosting or cooking, you can prevent
those parts from getting too warm, too hot, or
overcooked. Please check out the advice given in the
guide.
Microwave operation
By using the microwave facility in your new
combination microwave oven you can, for example,
quickly heat up ready-prepared meals or drinks, or melt
butter or chocolate in no time at all.
The microwave oven is equally good at defrosting food.
Sometimes, however, it is better to combine the
microwave with convection heating or grilling
(combined operation). You can then cook the food
rapidly and brown it at the same time. Cooking times
are generally much shorter than in conventional food
preparation.
COMBINED OPERATION
(MICROWAVE OPERATION WITH
CONVECTION OR GRILL)
By combining two modes of operation the benefits of
your oven are cleverly linked together.
You are able to choose between
• microwave + convection (ideal for joints of meat,
poultry, puddings, bread and cakes) and
• microwave + grill (ideal for pizzas, snacks, quick fryups, joints, poultry, chicken legs, kebabs, Welsh
rarebit and cooking au gratin).
Using the combination facility you can cook and brown
food at the same time.
The advantage is that the convected heat or the heat
from the grill quickly seals the pores in the outer layers
of the food. The microwaves ensure a short and gentle
cooking period. The juices are preserved inside the food
and the outside is crisp.
Convection operation
You can also use convection without microwave. The
result is like using a conventional oven. The circulating
air quickly heats up the external parts of the food
without drying up the meat juices and the foods.
This sealing process means that the meals remain tasty
and cook in a shorter time than with conventional
ovens with upper and lower heaters.
Grill Operation
This appliance comes with a quartz grill above the
cooking area. It can be used as a conventional grill
without microwave. You can quickly bake or grill dishes.
It’s also suitable for steaks, chops and cakes.
What are microwaves?
This is what your new combination
microwave oven can do
1. AG-91D-EU ENGLISH 21/02/2005 16:23 Page 9
Page 12
10
Example:
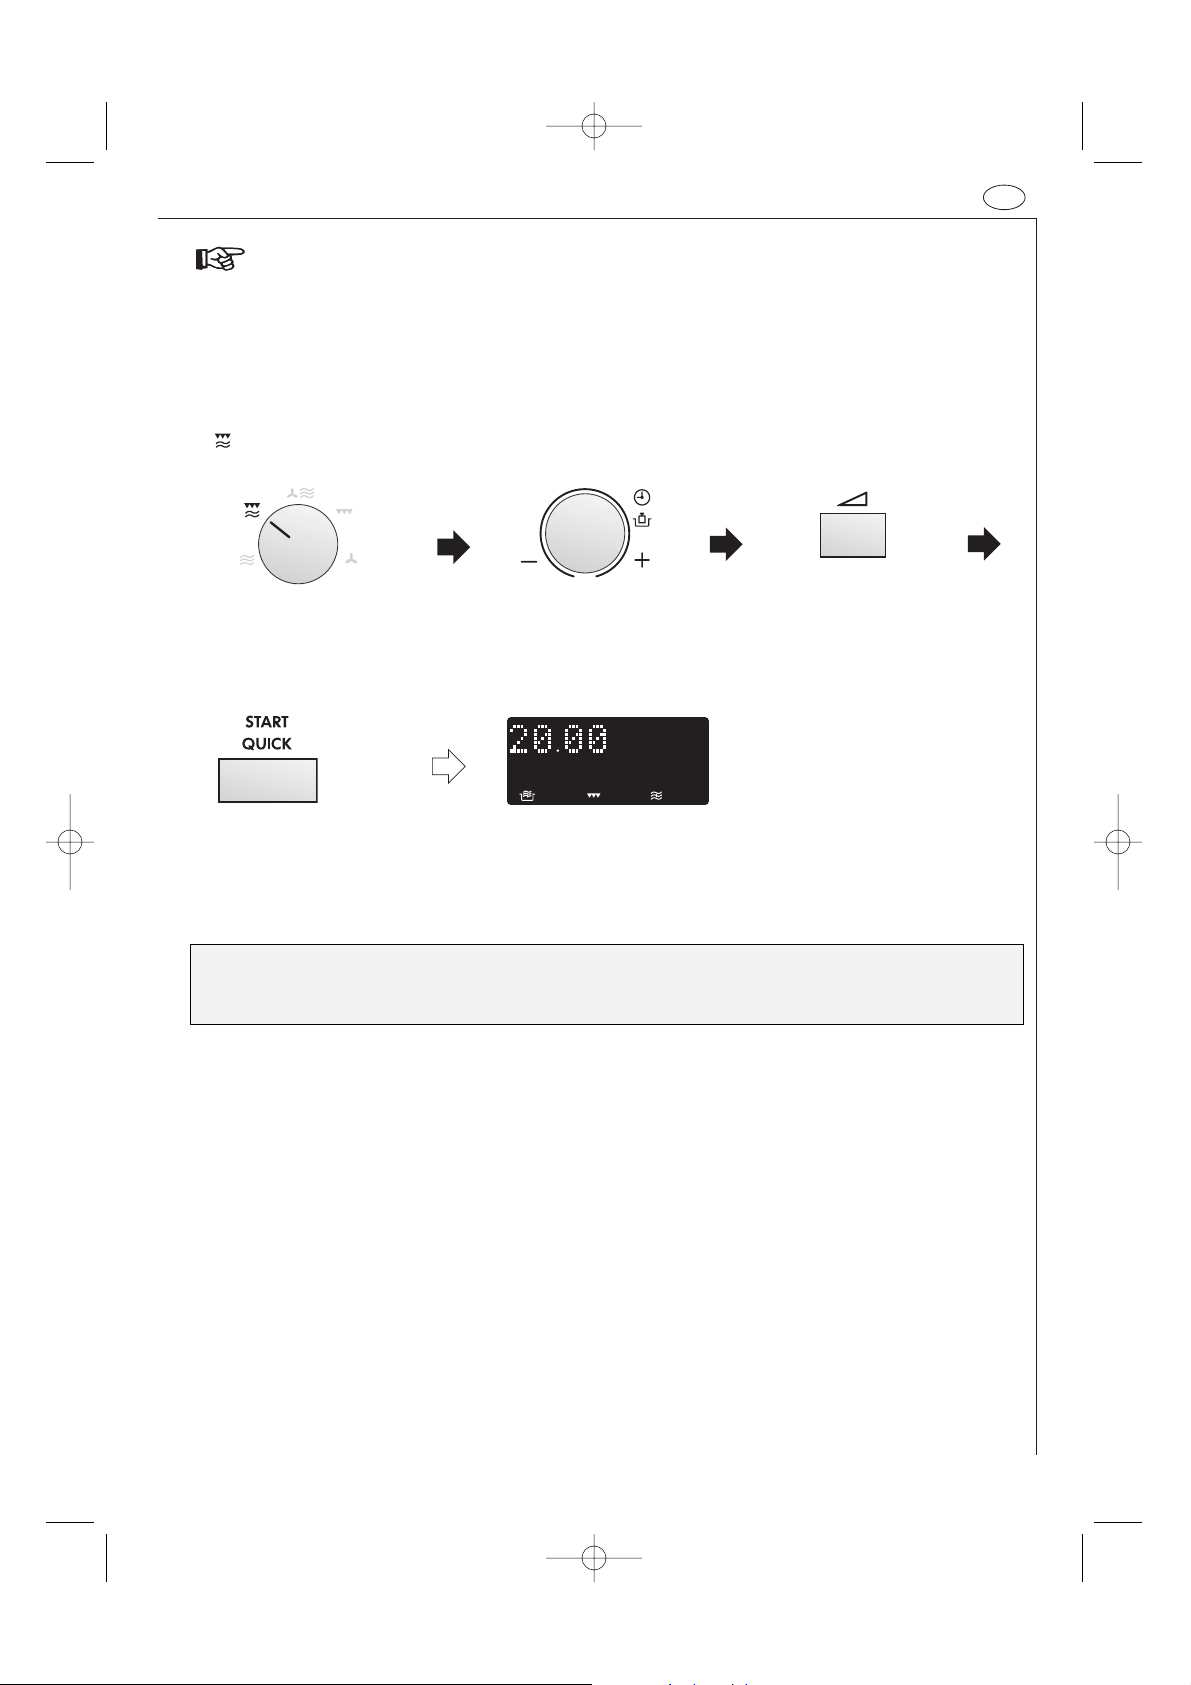
To heat soup for 2 minutes and 30 seconds on 630 W microwave power.
2. Enter desired cooking
time by rotating the
TIMER/WEIGHT knob
clockwise.
3. Press the MICROWAVE
POWER LEVEL button
twice for 630 W
microwave power.
1. Rotate the COOKING
MODE dial to the
microwave setting.
4. Press the START/
QUICK button once to
start cooking.
Cooking Time: Increasing unit:
0-5 minutes 10 seconds
5-10 seconds 30 seconds
10-30 minutes 1 minute
30-90 minutes 5 minutes
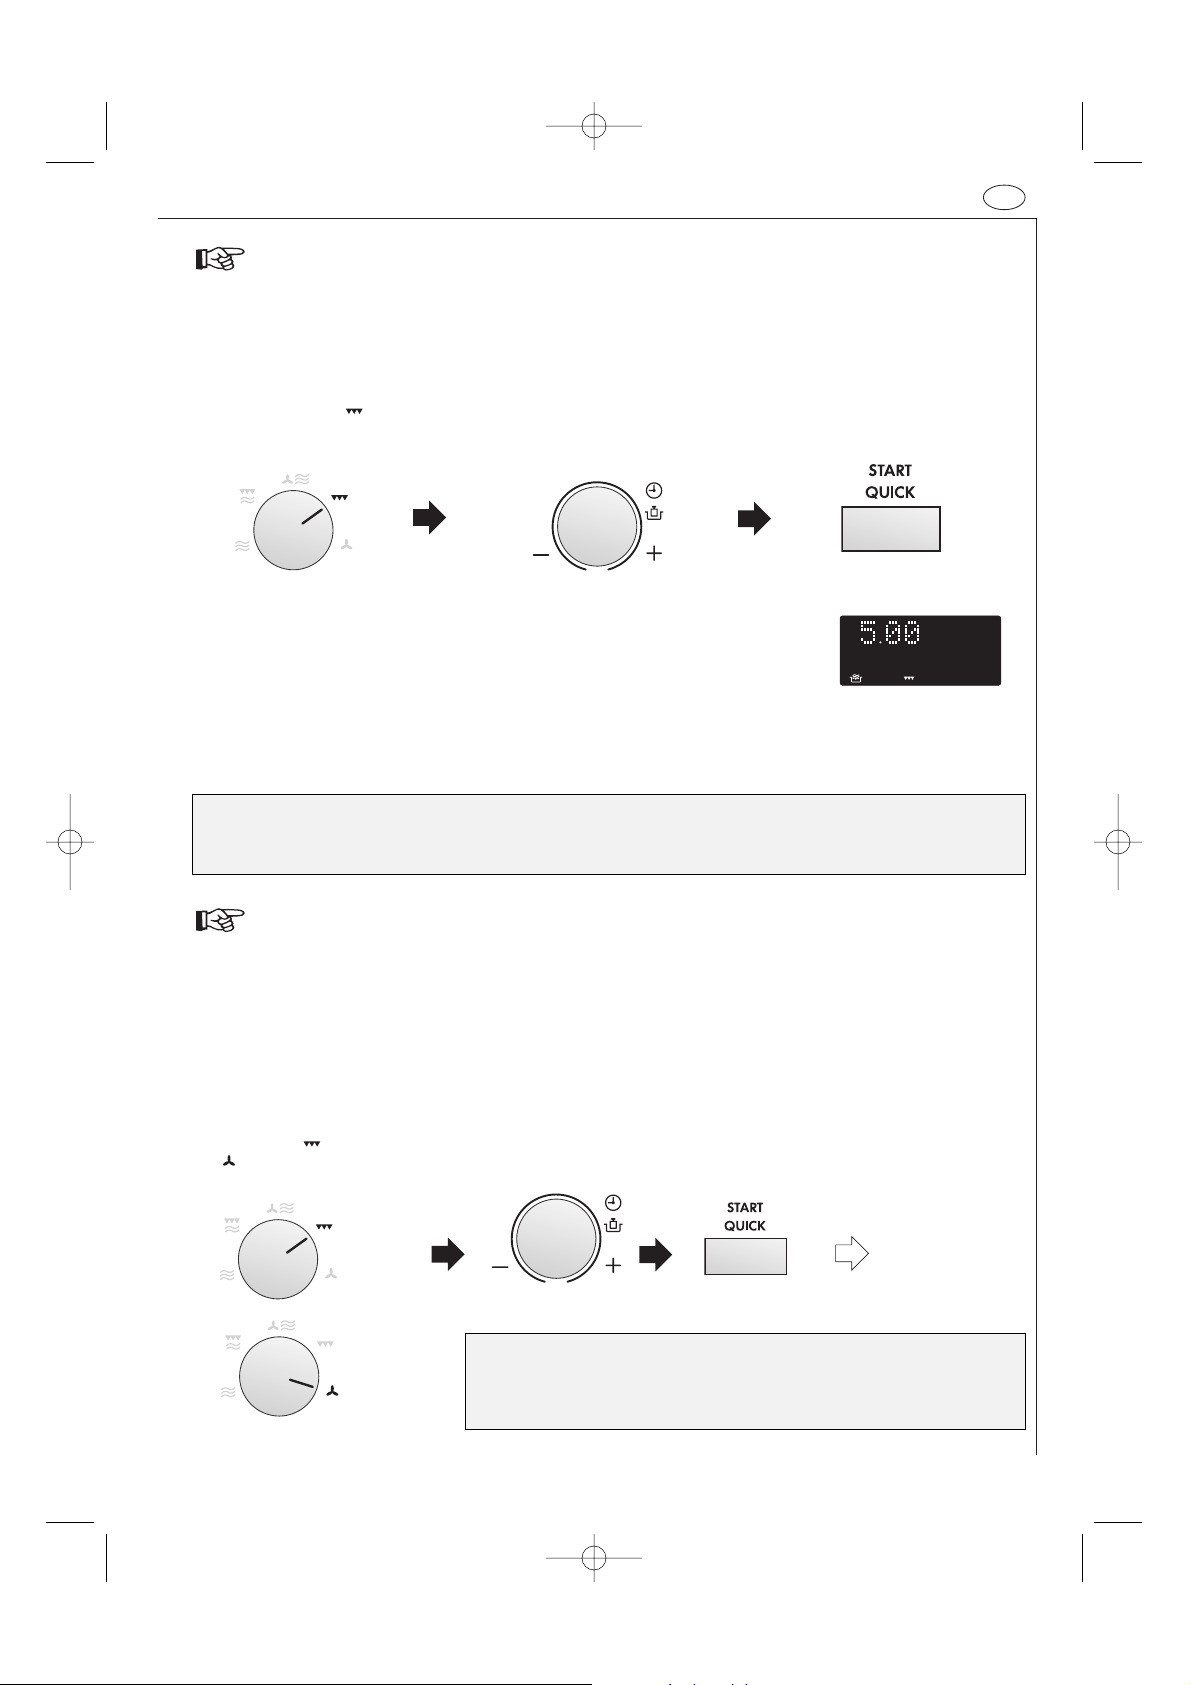
Your oven can be programmed for up to 90 minutes.
(90.00). The input unit of cooking (defrosting) time
varies from 10 seconds to five minutes. It depends on
the total length of the cooking (defrosting) time as
shown on the table opposite:
x1
Check the display.
x2
Microwave cooking
NOTES:
1. When the door is opened during the cooking
process, the cooking time on the digital display stops
automatically. The cooking time starts to count
down again when the door is closed and the
START/QUICK button is pressed.
2. If you wish to know the power level during cooking,
press the MICROWAVE POWER LEVEL button. As
long as your finger is pressing the MICROWAVE
POWER LEVEL button, the power level will be
displayed.
3. You can rotate the TIMER/WEIGHT knob clockwise
or counter-clockwise. If you rotate the dial counterclockwise, the cooking time will decrease from 90
minutes by degrees.
1. AG-91D-EU ENGLISH 21/02/2005 16:23 Page 10
Page 13
UK
11
Grill cooking
Heating without food
The grill heating element at the top of the oven cavity has one power setting only.
Example: To cook cheese on toast for 5 minutes (Place toast on the high rack.)
1. The high or low racks are recommended when grilling.
2. You may detect smoke or a burning smell when using the
grill for the first time, this is normal and not a sign that
the oven is out of order. (Please see heating without food
below.)
3. After cooking the display may show ‘NOW COOLING’.
You may detect smoke or a burning smell when using the grill and convection for the first time. This is normal and not a
sign that the oven is out of order.
To avoid this problem, when first using the oven, heat the oven without food for 20 minutes on grill and then at
convection 250° C.
IMPORTANT: During operation, to allow smoke or smells to disperse open a window or switch the kitchen ventilation
on. Make sure there is no food in the oven.
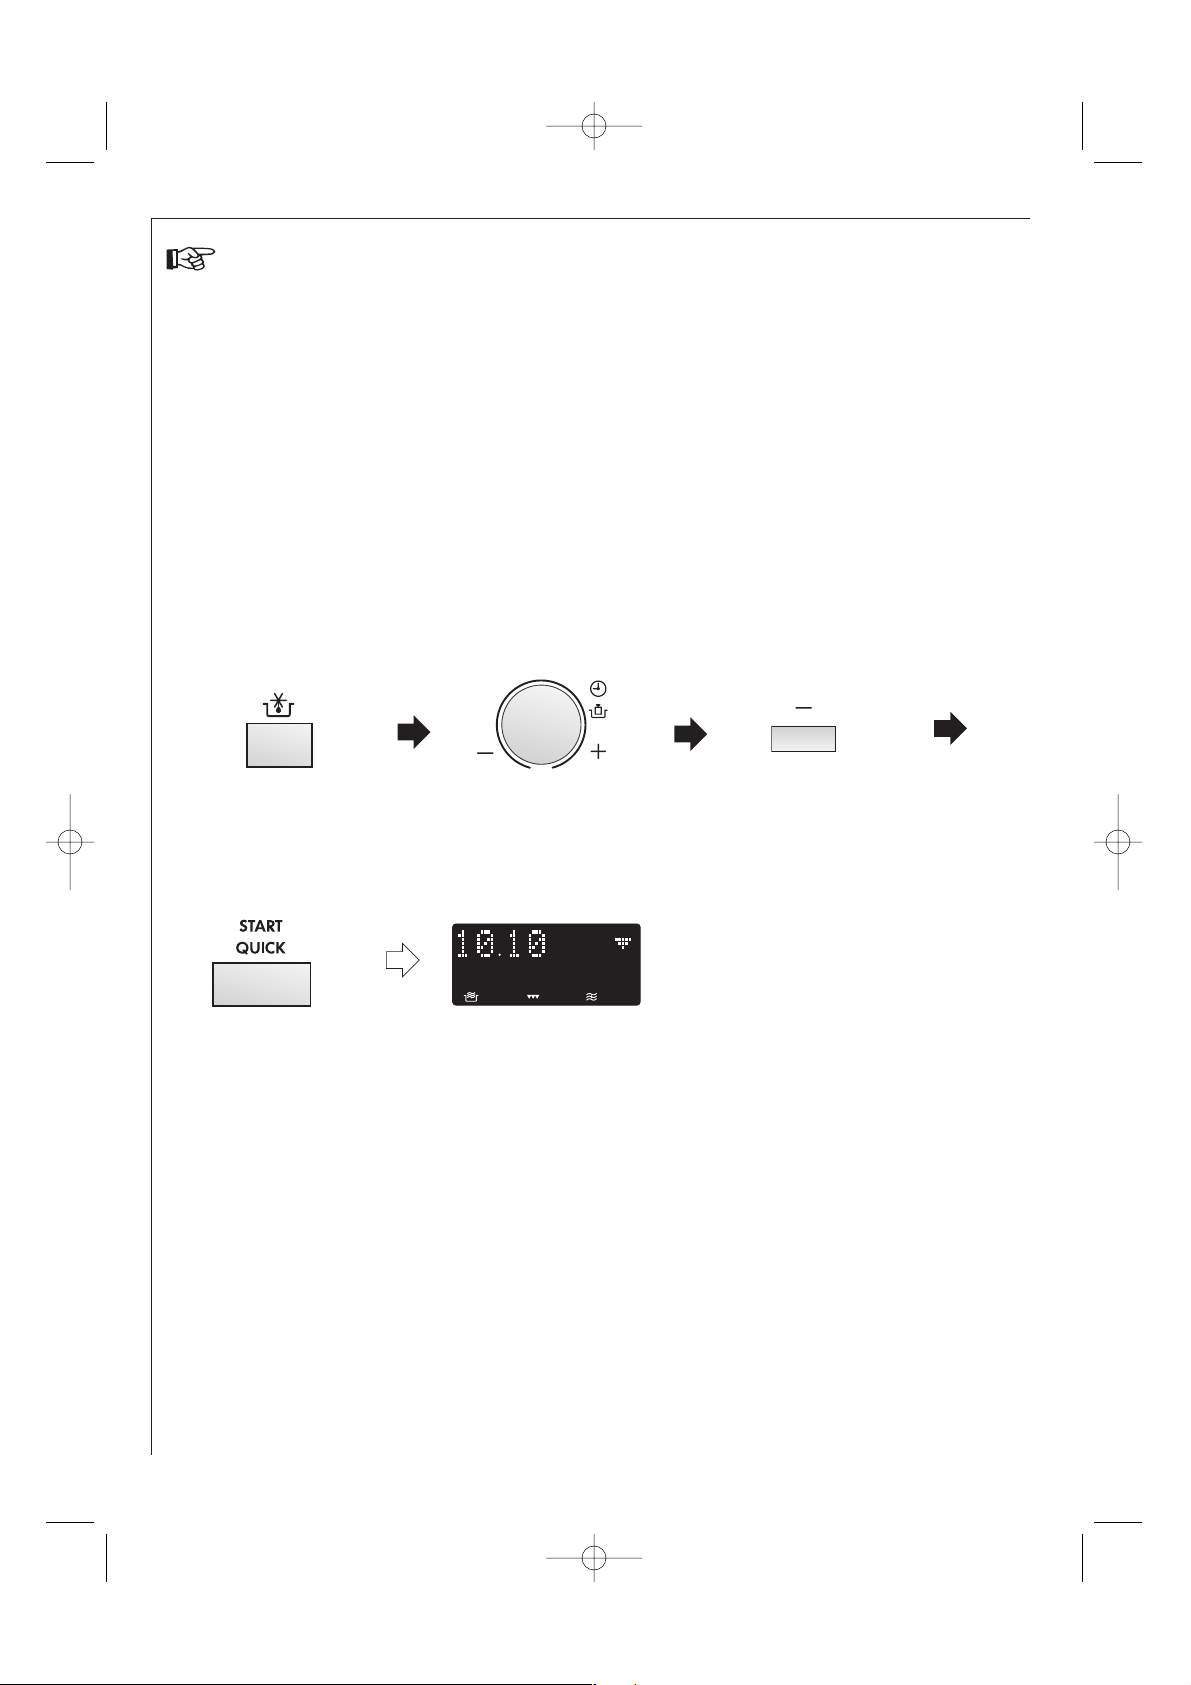
2. Enter the required
heating time. (20 min.)
1. Rotate the COOKING MODE
dial to the GRILL or
CONVECTION setting.
3. Start cooking by pressing
the START/QUICK button.
WARNING:
The oven door, outer cabinet & oven cavity will become hot.
Take care to avoid burns when cooling the oven down after operation.
The oven will count
down. When the
oven has finished
cooking, open the
door to cool the
oven cavity.
Check the display.
2. Enter the desired cooking time by
rotating the TIMER/WEIGHT knob
clockwise.
1. Rotate the COOKING
MODE dial to the
GRILL setting.
3. Press the START/QUICK
button to start cooking.
x1
x1
WARNING: The oven cavity, door, outer cabinet, turntable, racks and dishes will become very hot,
always use thick oven gloves when removing the food or turntable from the oven to prevent
burns.
1. AG-91D-EU ENGLISH 21/02/2005 16:23 Page 11
Page 14
12
Convection cooking
Your oven can be used as a conventional oven using the convection facility and 10 pre-set oven temperatures.
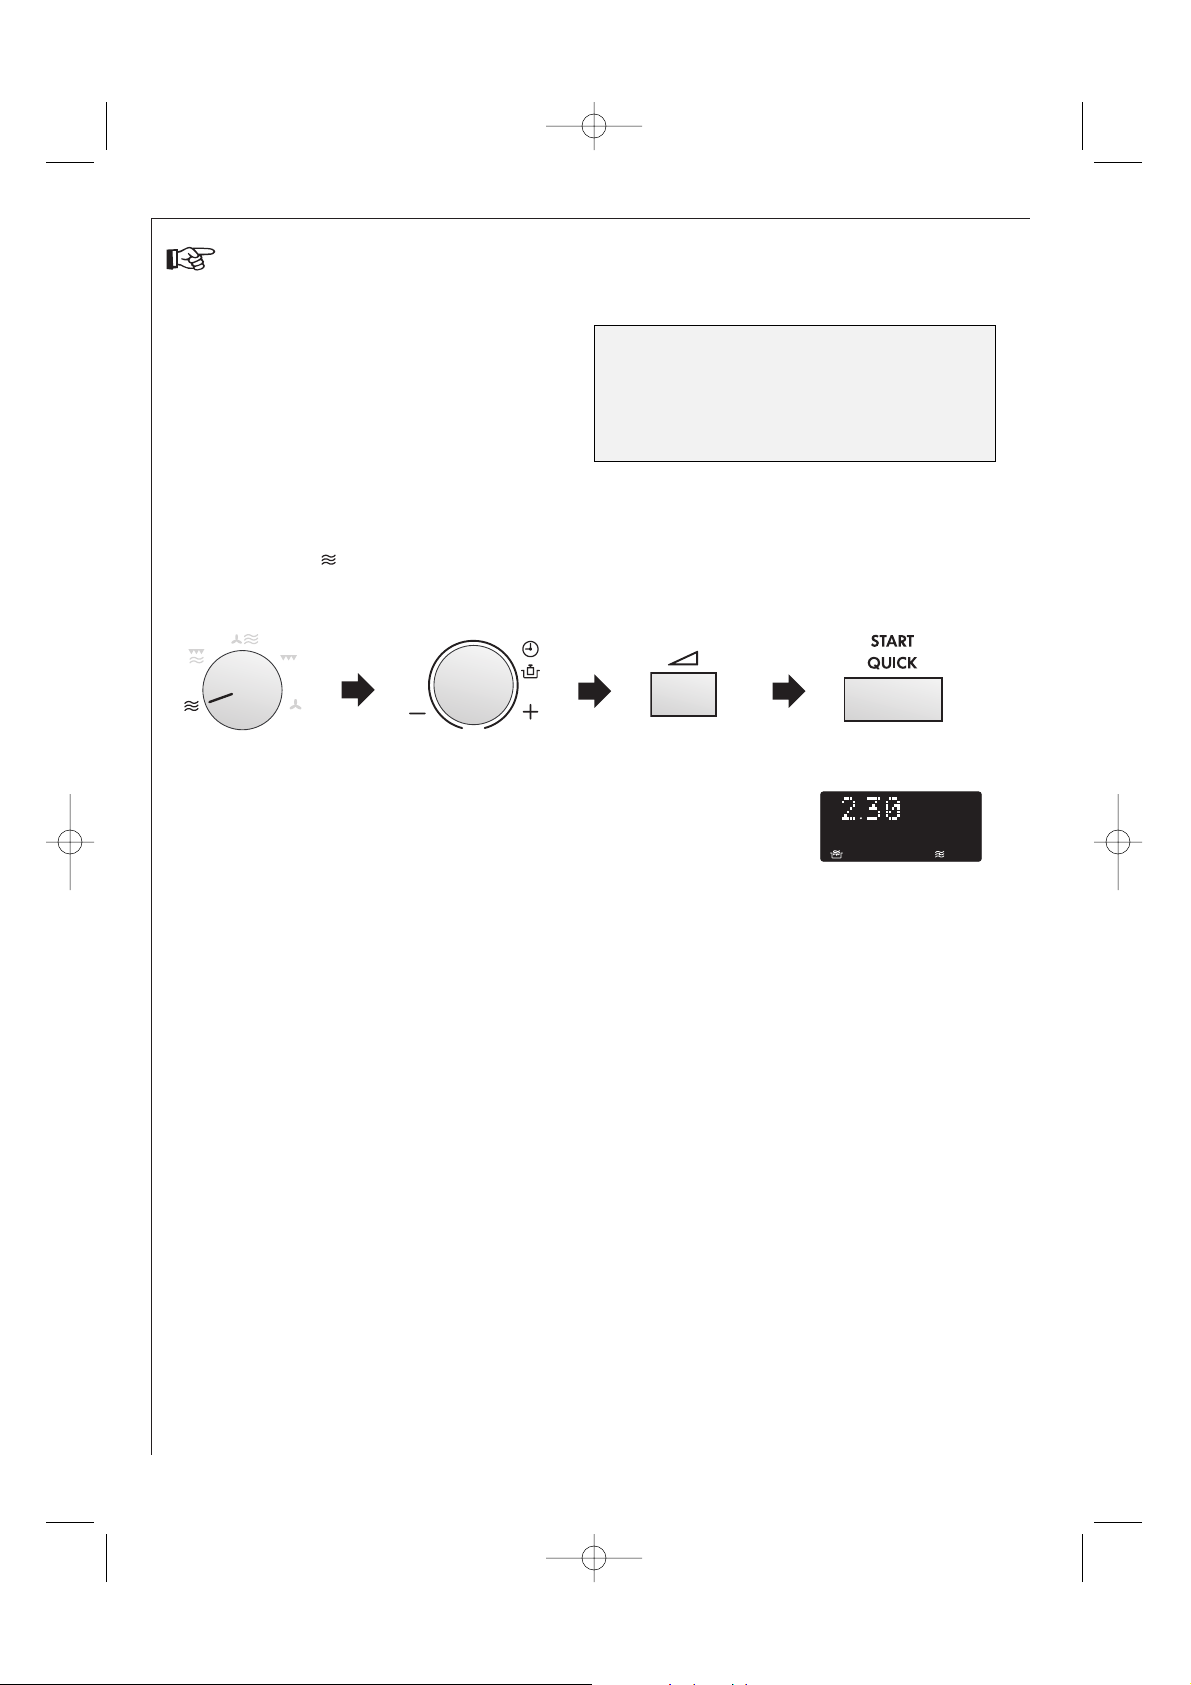
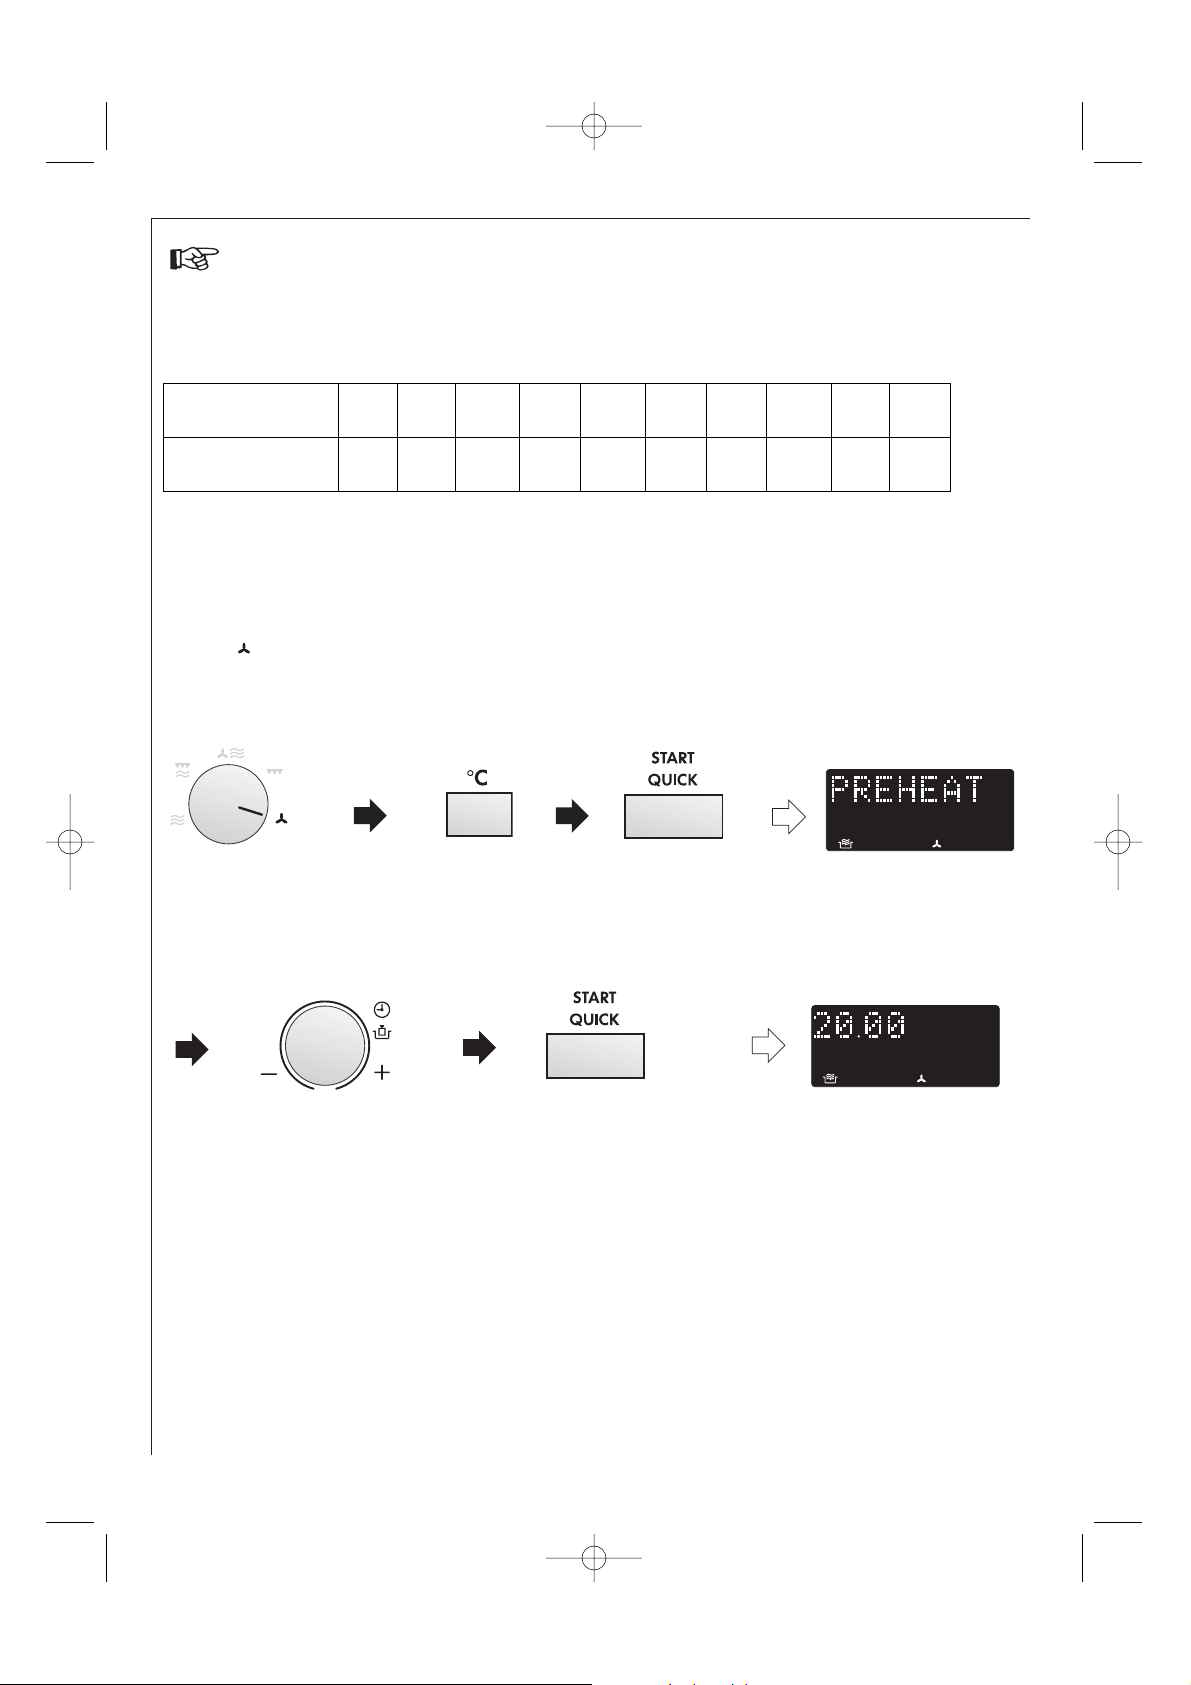
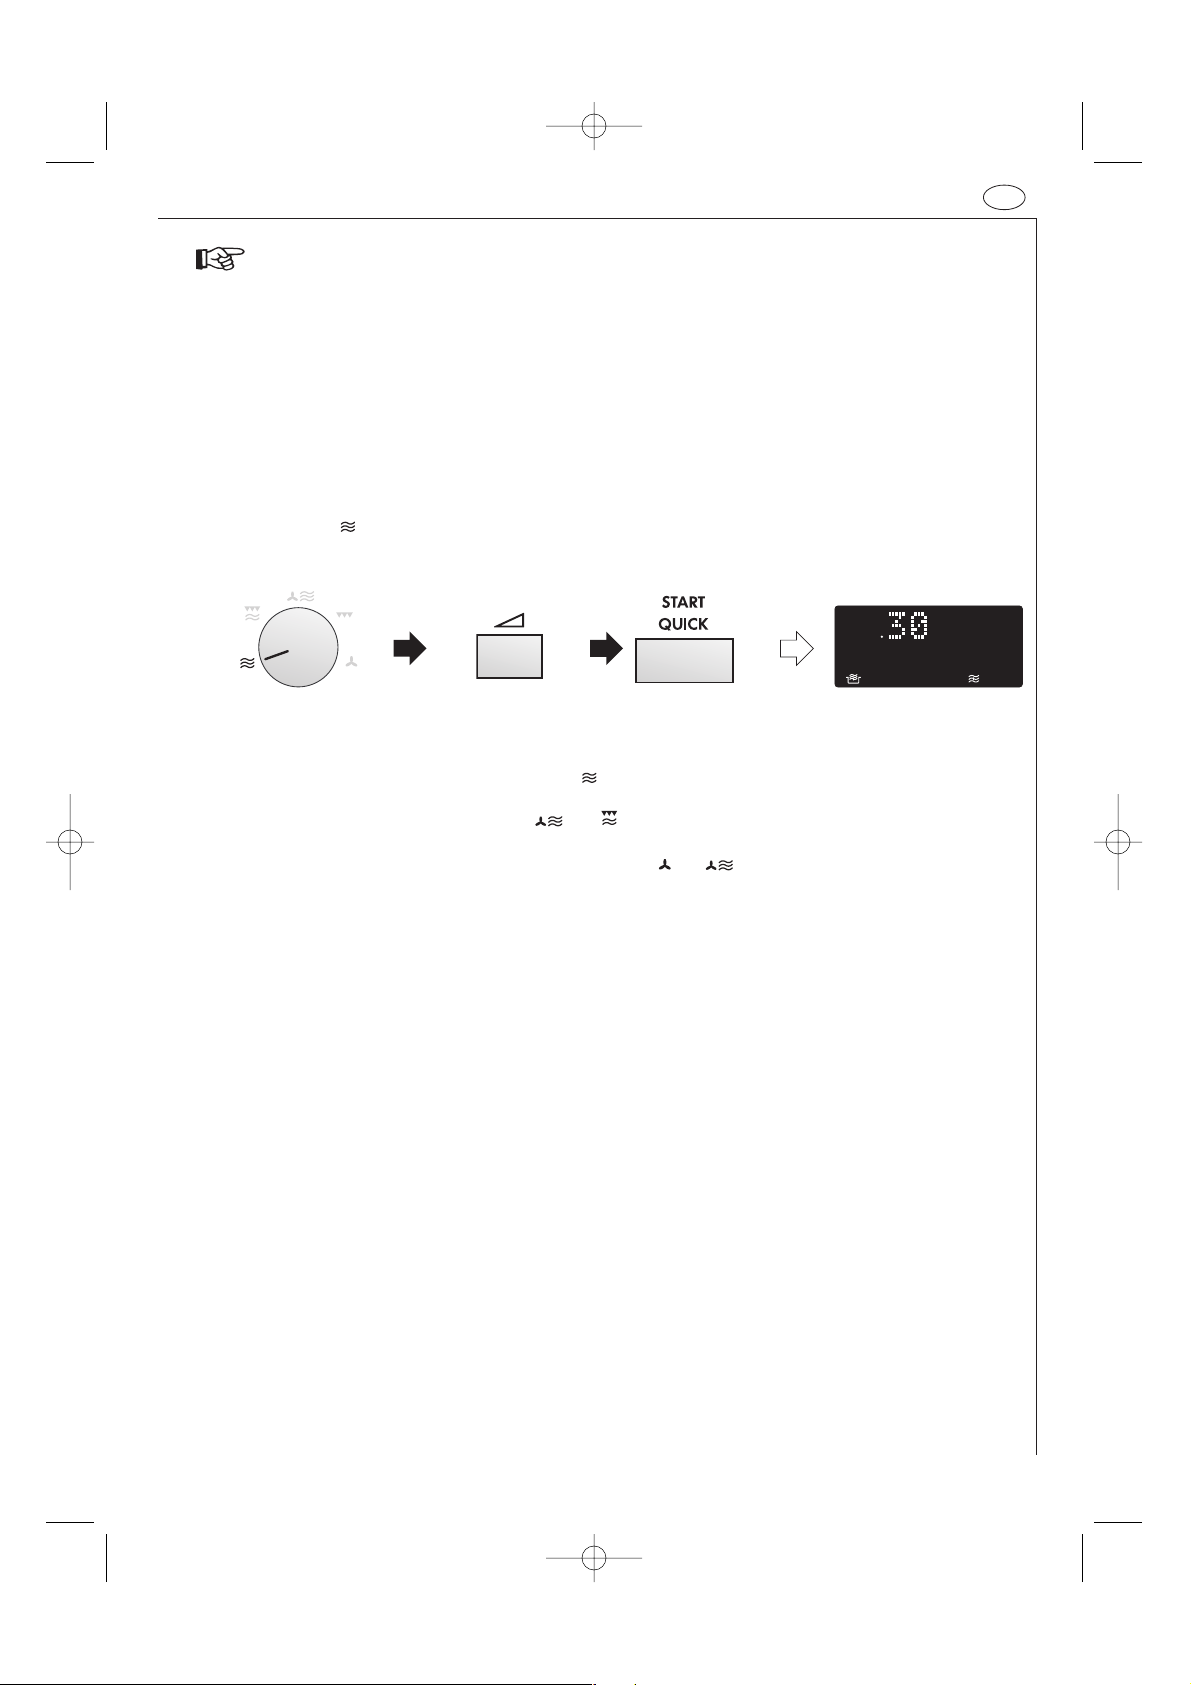
Example 1: To cook with preheating
To pre-heat to 180° C and cook for 20 minutes at 180° C.
4. Use the TIMER/WEIGHT knob to
input the cooking time (20
mins).
Check the display.
x6
x1
x1
1
250
Press Convection
button
Oven Temp (˚ C)
2
2303220420051906180716081309100
10
40
5. Press the START/QUICK
button.
1. When the oven is preheating, the turntable should be in the oven.
2. After preheating, if you want to cook at a different temperature press the CONVECTION button until the
desired setting appears on the display. In the example above, to change the temperature you would press the
CONVECTION button after entering the cooking time.
3. When the oven reaches the programmed preheating temperature, it will automatically hold at the pre-heated
temperature for 30 minutes. After 30 minutes the display will change to time of day, if set.
The selected convection programme will be cancelled.
4. After cooking the oven will automatically cool and the display may show “NOW COOLING”.
5. To get the best results when following pack instructions for convection, please follow the instructions for
“conventional oven”.
NOTES:
2. Enter the desired
preheat temperature
by pressing the
CONVECTION button
six times. The display
will show 180° C.
3. Press the START/
QUICK button to start
pre-heating.
When the pre-heated
temperature has been
reached the audible signal
sounds, the display will
show 180° C, open the door
and place the food inside
the oven. Close the door.
1. Select the cooking
mode by rotating
the cooking mode
dial to .
1. AG-91D-EU ENGLISH 21/02/2005 16:23 Page 12
Page 15
UK
13
Check the display.
x1
x1
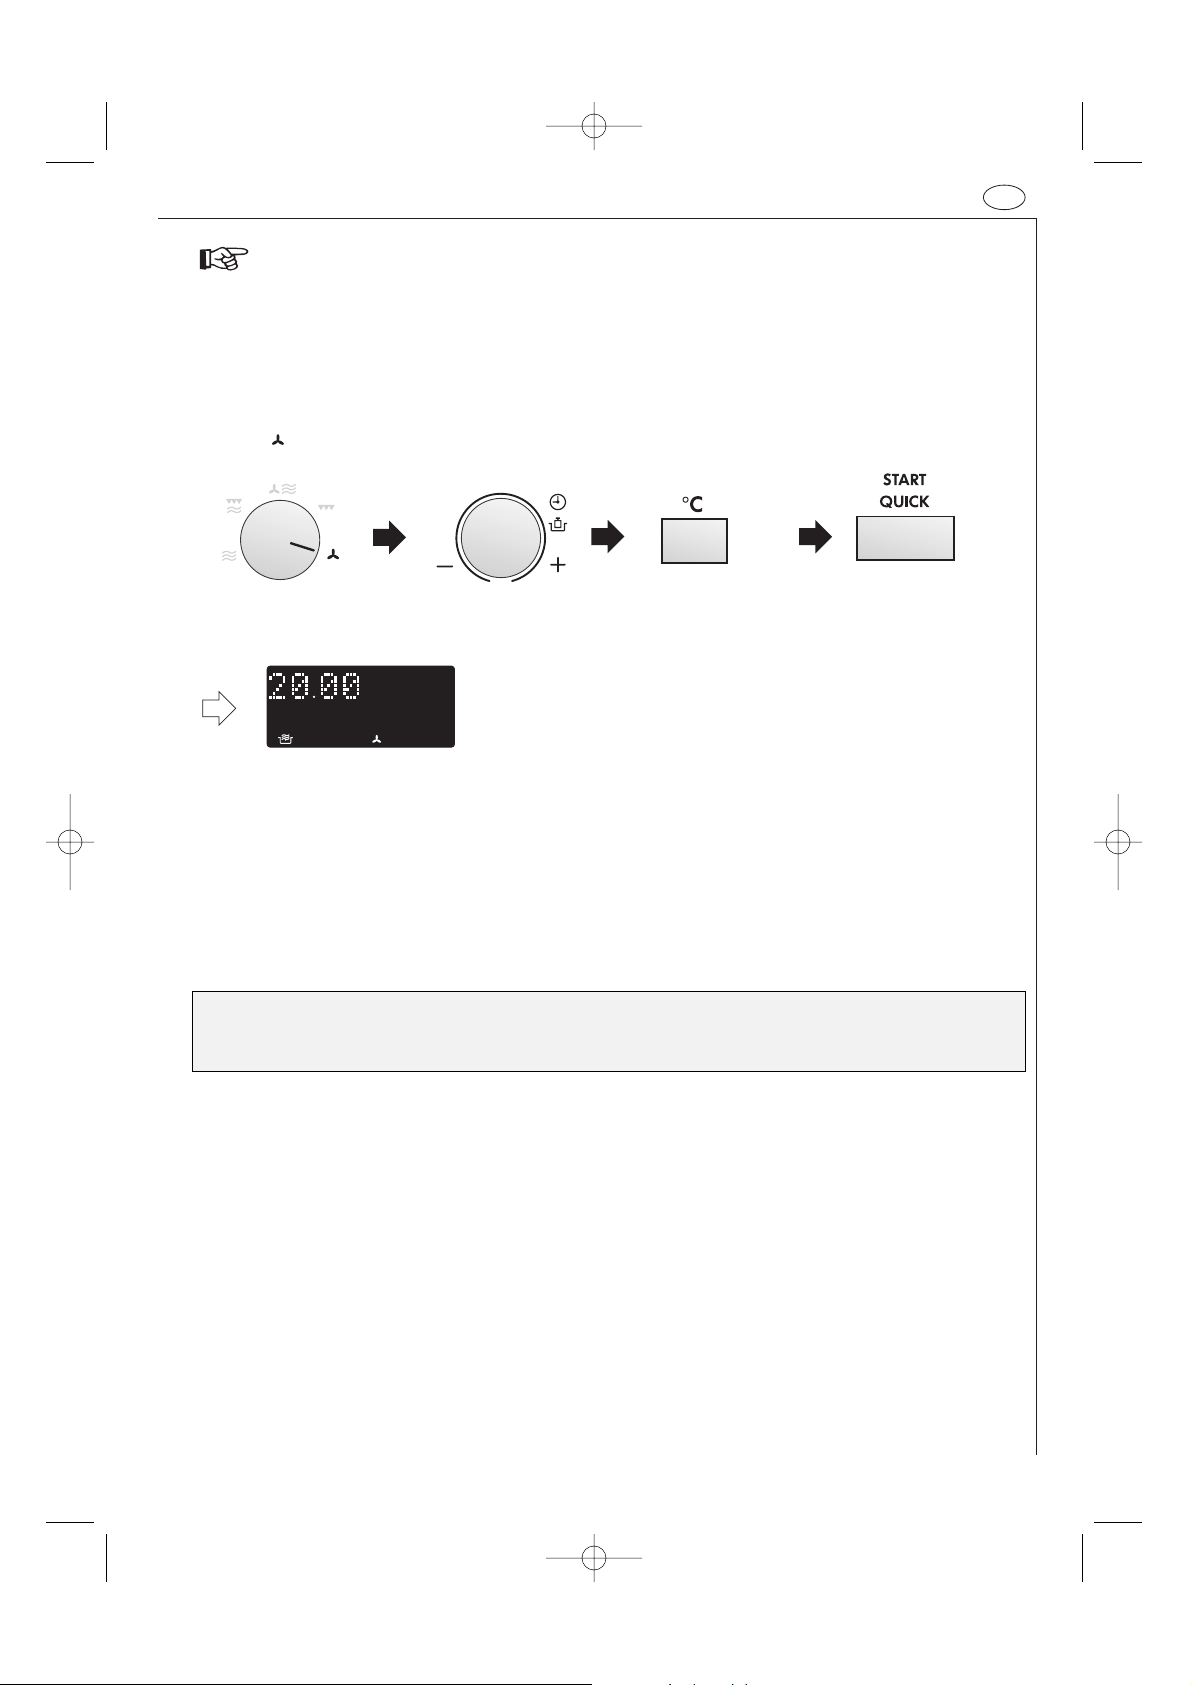
Example 2: To cook without preheating
To cook at 250° C for 20 minutes.
NOTES:
1. After cooking the oven will automatically cool and the display may show “NOW COOLING”.
2. To change the convection temperature, press the CONVECTION button until the desired temperature appears on
the display.
3. You may detect smoke or a burning smell when using convection for the first time. This is normal and is not a
sign that the oven is out of order. (Please see Heating Without Food on page 11).
3. Select the desired
cooking temperature.
(250° C).
4. Press the START/ QUICK
button.
2. Use the TIMER/WEIGHT
knob to input the
cooking time (20 mins).
1. Select the cooking
mode by rotating
the cooking mode
dial to .
Convection cooking
WARNING: The oven cavity, door, outer cabinet, turntable, racks and dishes will become very hot,
always use thick oven gloves when removing the food or turntable from the oven to prevent
burns.
1. AG-91D-EU ENGLISH 21/02/2005 16:23 Page 13
Page 16
14
Dual cooking
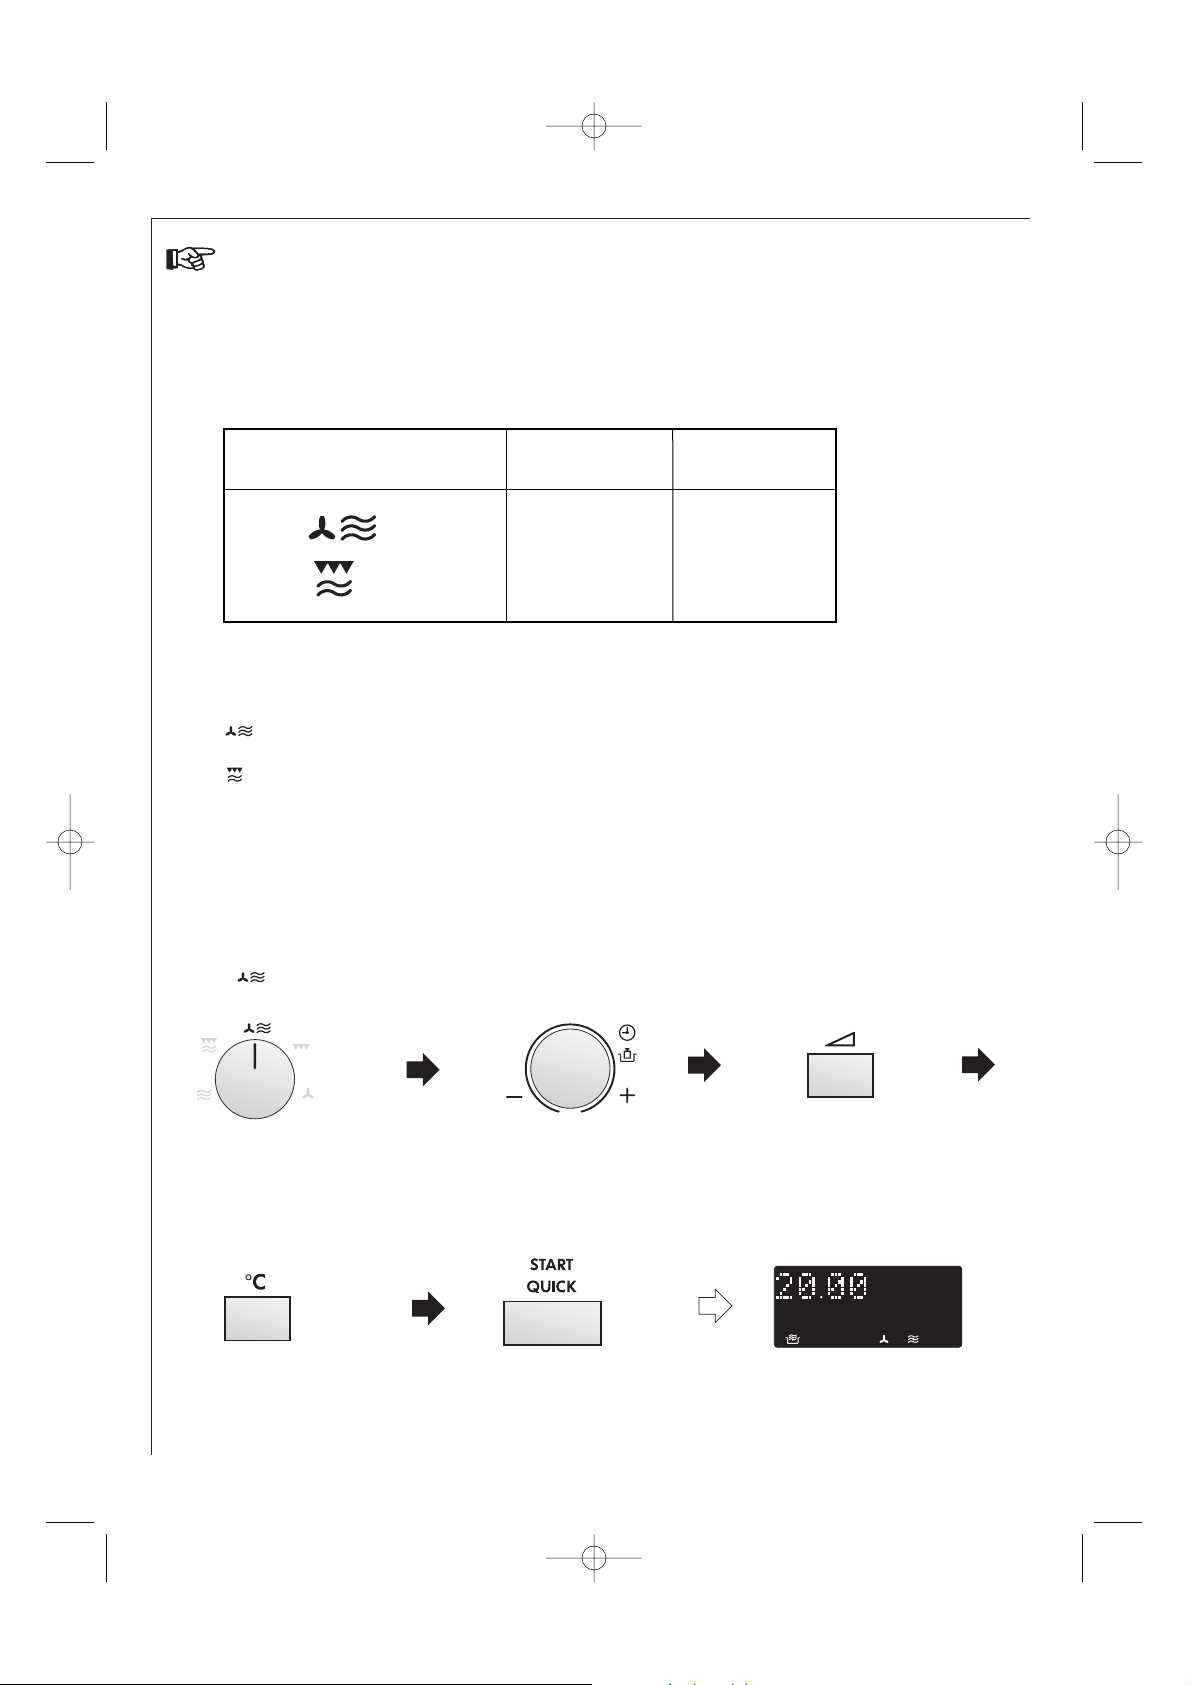
Cooking method
Convection 250° C
Grill
COOKING MODE
DUAL 1
DUAL 2
Initial microwave
power
270 W
270 W
2. Enter the desired
cooking time (20
minutes).
3. Press the microwave
POWER LEVEL button
twice (90 W).
NOTES: The power settings are variable:
DUAL 1 : The oven temperature can be changed from 40° C to 250° C in ten levels.
Microwave power levels can be changed from 90 W - 630 W in four levels.
DUAL 2 : Microwave power levels can be changed from 90 W - 900 W in five levels.
Example 1:
To cook for 20 minutes on DUAL 1 using 90 W microwave power and 200° C convection.
4. Press CONVECTION button
four times (200° C).
5. Press the START/
QUICK button.
x1
Check the display.
Your oven has 2 DUAL cooking modes combining 1) Convection & microwave, 2) Grill with microwave.
To select the DUAL cooking mode rotate the COOKING MODE dial to the desired setting, then choose the cooking
time. Generally, dual cooking time shortens the total cooking time.
x4
1. Select the cooking
mode by rotating
the cooking mode
dial to .
x2
1. AG-91D-EU ENGLISH 21/02/2005 16:23 Page 14
Page 17
UK
15
2. Enter the desired
cooking time (20
minutes).
3. Press the MICROWAVE
POWER LEVEL button
twice (90 W).
Example 2:
To cook for 20 minutes on DUAL 2 using 90 W microwave power and GRILL.
Check the display.
1. Select the cooking
mode by rotating the
cooking mode dial to
.
NOTE: After cooking, the oven will automatically cool and the display may show “NOW COOLING”.
4. Press the START/
QUICK button.
x2
x1
WARNING: The oven cavity, door, outer cabinet, turntable, racks and dishes will become very hot,
always use thick oven gloves when removing the food or turntable from the oven to prevent
burns.
Dual cooking
1. AG-91D-EU ENGLISH 21/02/2005 16:23 Page 15
Page 18
16
1. LESS ( ▼ ) / MORE ( ▲ ) button
The LESS ( ▼ ) and MORE ( ▲ ) buttons allow you to decrease or increase programmed setting times easily, (for
a less well or more well cooked result), when cooking in progress.
a) Choosing Autocook with Less/More:
Press the LESS ( ▼ ) and MORE ( ▲ ) button after entering weight and before pressing the
START/QUICK button. (See cooking for menus that use Less and More.)
1. Choose the AUTO COOK
FROM FROZEN menu for
French Fried Potatoes by
pressing the button four
times.
2. Enter the amount
(0,2 kg).
4. Press the START/QUICK
button.
Check the display.
x4
Example: To cook 0,2 kg French Fried Potatoes using the AUTO COOK FROM FROZEN.
3. Choose the “thin” French
Fried Potatoes by pressing
the LESS ( ▼ ) button
once.
x1
b) Changing the heating time while the oven is operating:
During the manual cooking progress, the cooking time can be decreased or increased in 1 minute steps each
time the LESS ( ▼ ) and MORE ( ▲ ) buttons are pressed.
NOTE: You can use this function for manual cooking only.
NOTES:
To cancel less or more press the same button again.
To change more to less simply press the less ( ▼ ) button.
To change LESS to MORE simply press the MORE ( ▲ ) button.
Other convenient functions
1. AG-91D-EU ENGLISH 21/02/2005 16:23 Page 16
Page 19
UK
17
NOTES:
1. You can use this function for manual cooking only.
2. When the COOKING MODE dial is on microwave ( ) and you press the START/QUICK button, the microwave
power is always 900 W.
When the COOKING MODE dial is on dual ( or ) and you press the START/QUICK button, the
microwave power is always 270 W.
When the COOKING MODE dial is on convection or dual 1 ( or ) and you press the START/QUICK
button, the convection temperature is always 250° C.
3. To avoid misuse by children the add 30 seconds function can be used only within 3 minutes after the preceding
operation, ie closing the door, pressing the STOP button or end of cooking.
b) Extend the cooking time
You can extend the cooking time in multiples of 30 seconds if the START/QUICK button is pressed while the
oven is in operation.
NOTE: You can use this function for manual cooking only.
2.START/QUICK FUNCTION
The START/QUICK button allows you to operate the two following functions:
a) 30 seconds cooking
You can cook on your desired cooking mode for 30 seconds without entering the cooking time.
Example:
To cook for 30 seconds on 630 W microwave power.
2. Change the power
by pressing the
MICROWAVE
POWER LEVEL
button.
1. Select the cooking mode
by rotating the COOKING
MODE dial to
(Microwave).
3. Press the START/
QUICK button once to
begin cooking.
x2
x1
Check the display.
Other convenient functions
1. AG-91D-EU ENGLISH 21/02/2005 16:23 Page 17
Page 20
18
3. TO CHECK SETTINGS WHILE THE OVEN IS OPERATING
You can check the power level and the actual oven temperatures ie: when pre-heating.
TO CHECK THE POWER LEVEL:
To check the microwave power level during cooking
press the MICROWAVE POWER LEVEL button.
The oven continues to count down, although the
display shows the power level.
As long as your finger is
pressing the button, the
power level will be
displayed.
TO CHECK THE CONVECTION TEMPERATURE:
To check the convection temperature during cooking
press the CONVECTION button.
When the oven is pre-heating, you can check the actual
oven temperature.
As long as your finger is
pressing the button, the
convection temperature in ° C
will be displayed.
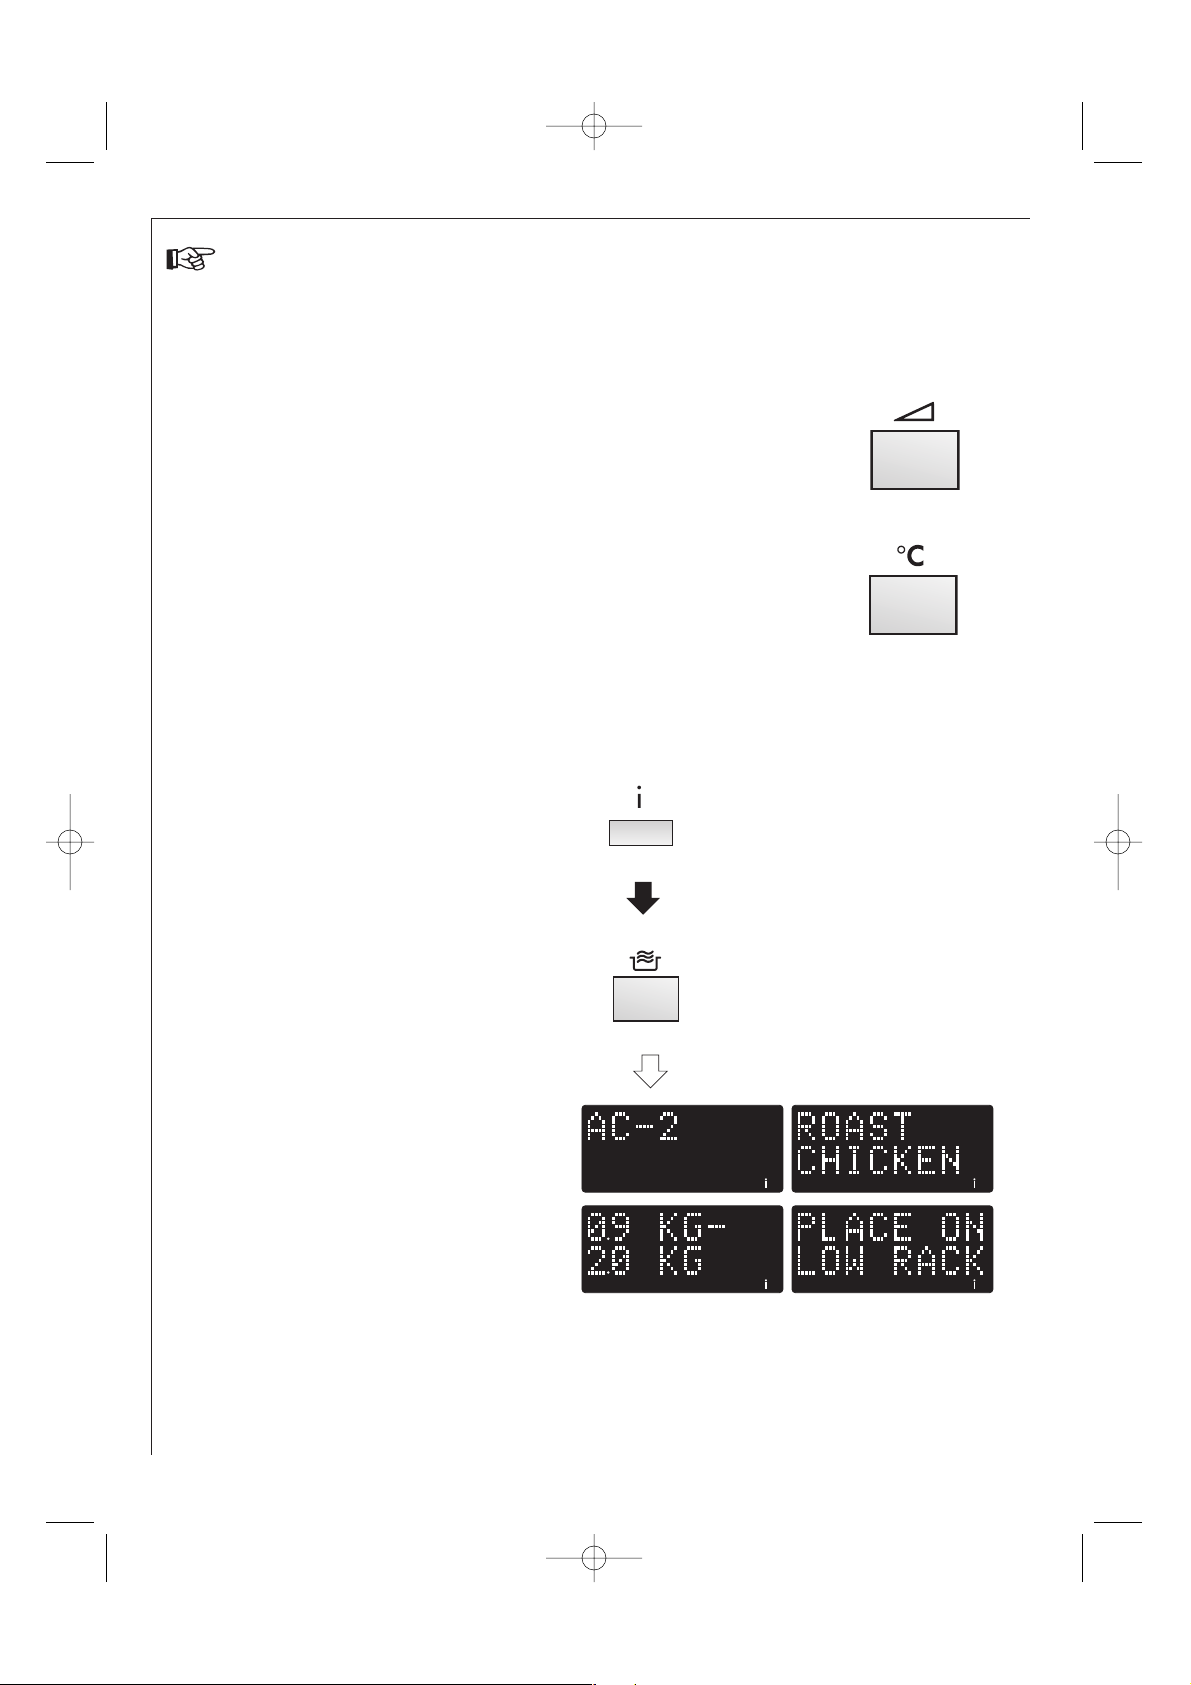
1. Choose the
INFORMATION button
function.
2. Press the AUTO COOK
button 2 times to select
Roast Chicken.
4.INFORMATION button
Each button carries useful information. If you
wish to get the information, press the
INFORMATION button before pressing the
desired button.
Example:
To get information about AUTO COOK menu
number 2, Roast chicken:
NOTE:
1. The information message will be repeated
twice, and then the display will show the
time of day, if set.
2. If you want to cancel the information press
the STOP button.
x1
x2
Other convenient functions
1. AG-91D-EU ENGLISH 21/02/2005 16:23 Page 18
Page 21
UK
19
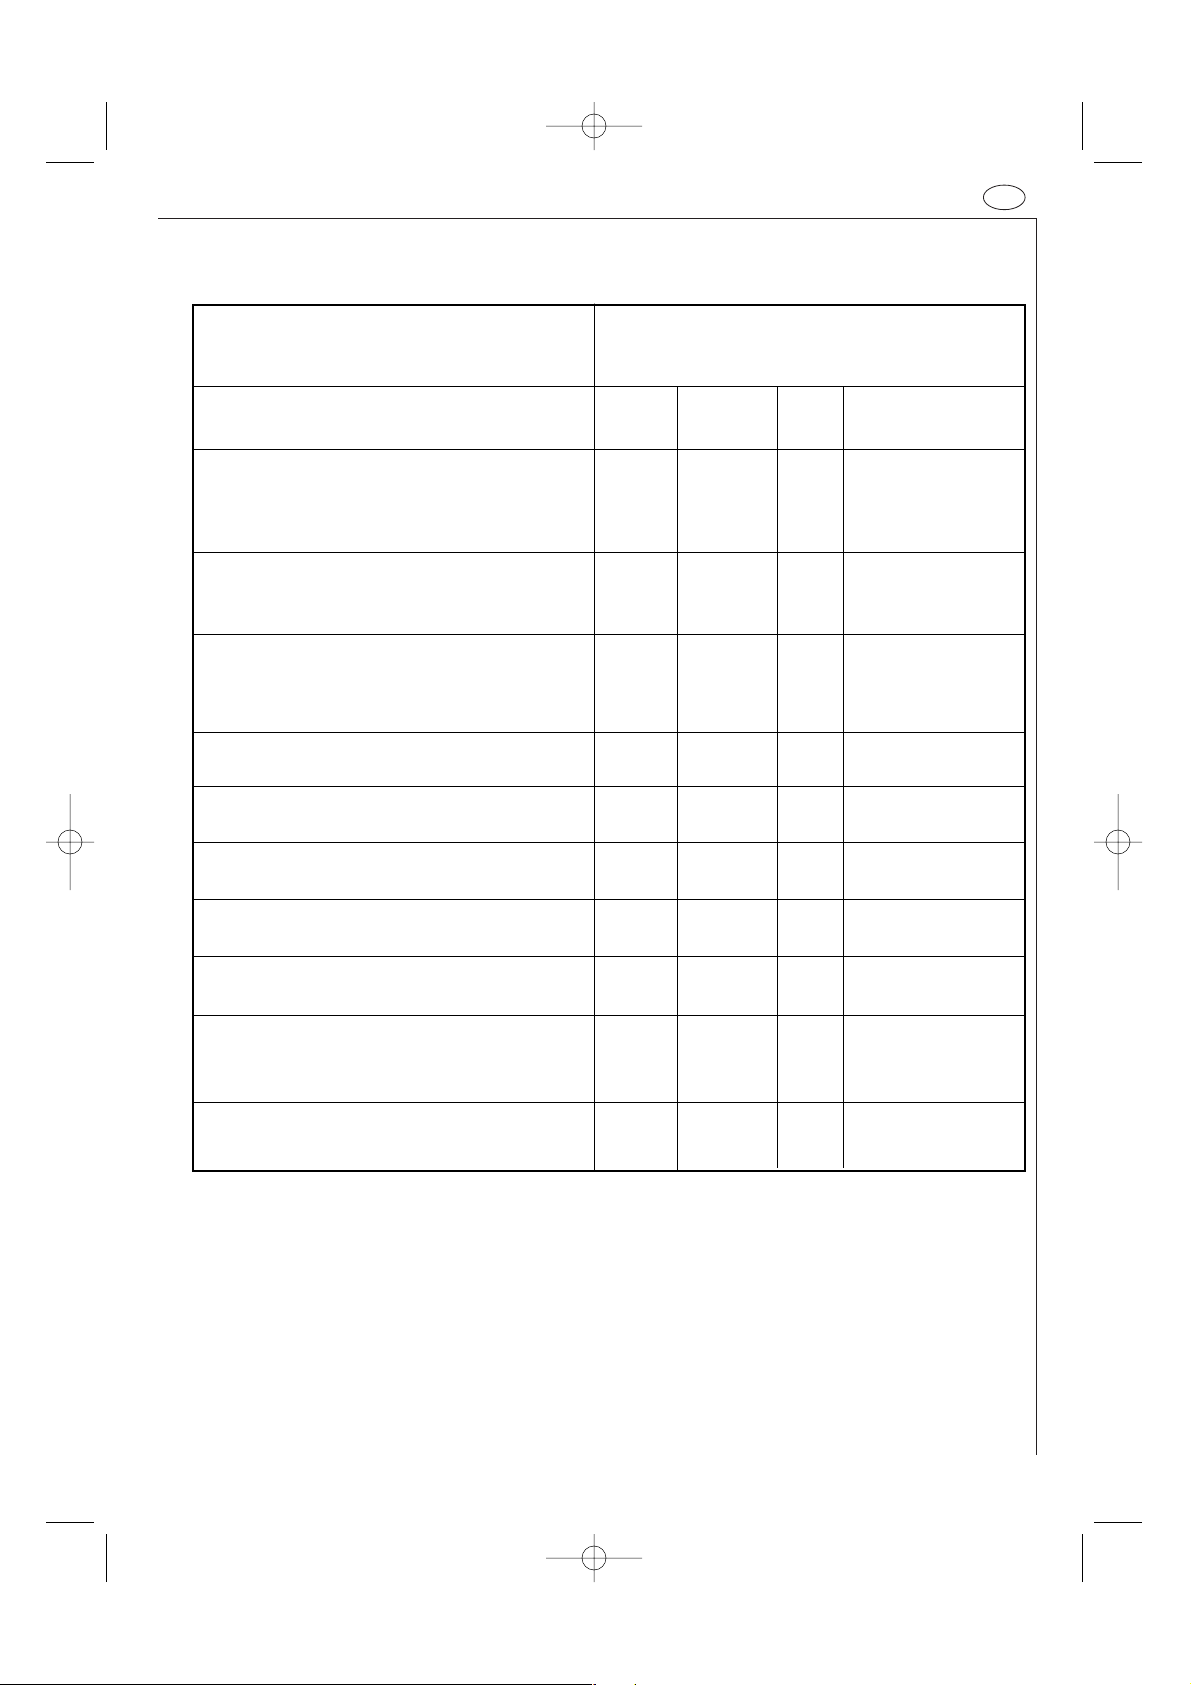
Suitable ovenware
Mode of operation
Micro- Convec- Grill Combination
wave tion
XXX X
X-- -
XXX X
XX- X
XX
3)
-X
3)
X- - -
X-- -
XX- X
4)
-XX -
-X- -
Ovenware material
Ovenproof glass and ceramic dishes
(without any metal parts, e.g. Pyrex,
oven-to-tableware, glass tray).
Non ovenproof glass and porcelain
(e.g table crockery
1).
Glass ceramic and vitroceramic made
of fire / frostproof material (e,g. Arcoflam).
Ovenproof earthware
2).
Plastic heat-resistant up to 2000C
3).
Paper, cardboard
Cling film
Microwaveable roasting bag
4).
Metal roasting pans, e.g. enamel or
cast-iron dishes.
Black-lacqued or silcone-coated baking tins.
X = suitable - = non suitable
1).
excluding silver, gold, platinum or metal decoration
2).
does not include glaze containing metal
3).
please note the maximum temperature stated by the manufacturer
4).
convection + microwave combined function
1. AG-91D-EU ENGLISH 21/02/2005 16:23 Page 19
Page 22
2020
Cooking charts
The above infomation should be used as a guideline.
Adjust cooking times/power levels as required to give the best result.
The times given are for guidance only, as they are dependent upon the type and quality of the meat.
Grilling is ideal for flat, pieces of meat and fish.
Unless otherwise stated, the settings given in the table are for use in a cold oven.
Flat foods should be turned only once. Thicker pieces should be turned more often.
Fish are best place head to tail on the wire tray.
BAKING USING THE GLASS TRAY WITH THE CONVECTION FUNCTION
Quiche Preheat 200 ˚C Cook base for 15‘00, directly in glass tray, lower
1) 20’00 200 ˚C position, rotate after 1)
2) 12’00 200 ˚C
Banana Loaf Cake Preheat 180 ˚C Place loaf tin in glass tray, lower position
60’00 180 ˚C
Apricot & Pecan Loaf Preheat 180 ˚C Place loaf tin in glass tray, lower position
35’00 90 W & 180 ˚C
Cherry & Almond Cake Preheat 180 ˚C Place loaf tin in glass tray, lower position
40’00 90 W & 180 ˚C
Cheese Cake Preheat 160 ˚C Place on the rack in glass tray, lower position
54’00 160 ˚C
Frozen Pizza Preheat 220 ˚C Place on the rack in glass tray, lower position
12’00 220 ˚C
Garlic Baguette Preheat 200 ˚C Place directly in glass tray, lower position
15’00 90 W & 200 ˚C
Frozen Lasagne Preheat 200 ˚C Place directly in glass tray, lower position
25’00 270 W & 200 ˚C
Small Pastries (from dough) Preheat 160 ˚C Place directly in glass tray lower position
(e.g. Croissants) 35’00 160 ˚C
MENU TIME MODE POSITION
USING THE GLASS TRAY WITH THE GRILL FUNCTION
Gratin 1) 6’00 900 W Place dish in glass tray, lower position
2) 14’00 450 W & grill Rotate after 2)
3) 5’00 450 W & grill
Kebabs 1) 10’00 270 W & grill Place on the rack in glass tray, upper position
2) 10’00 270 W & grill
Onion Soup 1) 8’00 900 W Place the soup bowls into the glass tray, lower
2) 7’30 270 W & grill position, add cheese & croutons after 1).
Chicken Noodle Casserole 1) 3’00 900 W Place dish in glass tray, lower position
2) 10’00 450 W & grill
Steak 1) 9’00 Grill Place on the rack in glass tray, lower position
2) 4’00 Grill
Thick sausages 1) 14’00 Grill Place on the rack in glass tray, lower position
2) 5’00 Grill Turnover after 1)
Thin sausages 1) 12’00 Grill Place on the rack in glass tray, lower position
2) 6’00 Grill Turnover after 1)
Toast 1) 4’30 Grill Place on the rack in glass tray, lower position
2) 1’30 Grill Turnover after 1).
Cheese on Toast 1) Preheat 2’00 Grill Place on the rack in glass tray, lower position
2) 5’00 Grill turn over and add cheese after 2).
3) 4’30 Grill
Mackeral 1) 6’00 90 W & Grill Place on the rack in glass tray, lower position
2) 6’00 90 W & Grill Turnover after 1).
Sardines 1) 5’00 90 W & Grill Place on the rack in glass tray, lower position
2) 3’00 90 W & Grill Turnover after 1).
MENU TIME MODE POSITION
1. AG-91D-EU ENGLISH 21/02/2005 16:23 Page 20
Page 23
UK
21
Recipes for glass tray & convection
Banana loaf
Ingredients
120 g butter
170 g caster suger
1 tsp coffee essence
2 ripe bananas
225 g flour
1 tsp bicarbonate of soda
1
/4 tsp baking powder
1 medium egg
100 ml milk
Preheat the oven.
1. Grease and line loaf tin.
2. Cream butter and sugar together.
3. Add egg and coffee essence and beat again.
4. Peel and mash bananas and add to the mix, beat well.
5. Mix in the flour, bicarbonate of soda baking powder
and milk until smooth.
6. Place in tin and smooth the surface.
7. Place loaf tin in glass tray, lower position.
60 min. 180 ˚C
8. Stand for 5 mins in tin before turning onto a cooling
rack.
Apricot & pecan loaf
Ingredients
pinch of salt
1
1
/2 tsp baking powder
2 tsp cinnamon
110 g plain flour
110 g wholemeal flour
110 g butter
175 g soft brown sugar
2 beaten eggs
3 tbsp milk
175 g ready to eat apricots, chopped
175 g toasted pecans, chopped
Preheat the oven.
1. Grease and line loaf tin.
2. Mix the salt, baking powder, cinnamon and flour.
3. Add the rest of the ingredients, except the fruit and
nuts, mix well.
4. Fold in the fruit and nuts.
5. Place in tin and smooth the surface.
6. Place loaf tin in glass tray, lower position.
35 min. 90 W / 180 ˚C
Baked cheesecake
Ingredients
Base:
100 g butter
4 tsp brown sugar
200 g plain flour
110 g crushed disgestive biscuits
Filling:
450 g soft cheese
150 g double cream
100 g caster sugar
2 egg yolk
1 juice and zest of lemon
1. Line the base of the springform tin with greaseproof
paper.
2. Melt the butter, add the sugar and crushed biscuits.
3. Push into base of the tin, then chill until set.
4. Put all the filling ingredients in a bowl and whisk until
smooth.
5. Pour the filling onto the chilled base.
6. Place tin in glass tray, lower position.
54 min. 160 ˚C
7. Allow to cool, decorate with fruit to serve.
1. AG-91D-EU ENGLISH 21/02/2005 16:23 Page 21
Page 24
22
Recipes for glass tray & convection
Red onion quiche
Ingredients
500 g shotcrust pastry
45 g butter
300 g red onions, sliced
3 eggs
150 ml double cream
50 ml milk
100 g grated gouda
1
/4
tsp dijon mustard
black pepper
1
/4 tsp salt
Preheat the oven.
1. Roll out the pastry and line the square dish.
2. Prick the pastry all over with a fork.
3. Line the pastry with baking paper.
4. Bake in lower position
15 min. 200 ˚C
5. Remove from the over and allow to cool.
6. Cook the onions in the butter for
5 min. 900 W
drain off the butter then cool.
7. Beat the eggs, cream, milk, mustard, salt and pepper
together.
8. Add the onions and cheese, mix well.
9. Pour mixture into the pastry case and cook.
1. 20 min. 200 ˚C, rotate, then
2. 12 min. 200 ˚C
Cherry almond cake
Ingredients
175 g margarine
175 g caster sugar
3 medium eggs
175 g plain flour
1 tsp baking powder
100 g glace cherries
75 g ground almonds
1 tsp almond essence
1 tbsp milk
1. Grease and line the springform.
2. Cream the margarine and sugar until light and fluffy.
3. Beat in the eggs one at a time.
4. Fold in the flour and baking powder, stir in the cherries,
ground almonds, almond essence and milk.
5. Spoon in the mixture and smooth the surface.
6. Place tin in glass tray, lower position.
40 min. 90 W / 180 ˚C
1. AG-91D-EU ENGLISH 21/02/2005 16:23 Page 22
Page 25
UK
23
Recipes for glass tray & grill
Onion soup
Ingredients
20 g butter
250 g onions
500 ml stock
salt & pepper
2 slices of toast
80 g emmental cheese
1. Slice the onions, place in a bowl with the stock,
salt and pepper, cook for
8 min. 900 W
2. Put the soup in to 4 soup bowls.
3. Cut the toast into cubes and put on top of the soup
and place the cheese on the toast.
4. Place soup bowls in the glass tray, lower position and cook
7
1
/2 min. 270 W / GRILL
Gratin
Ingredients
450 g potatoes, sliced thinly
150 g sliced onion,
200 g grated gouda
salt & pepper
250 ml cream
3 eggs
1. Grease a gratin dish.
2. Put a layer of potatoes, a layer of onions and 1/2 the
cheese in to the dish.
3. Repeat, finishing with a top layer of potato.
4. Mix together cream and eggs, add salt & pepper. Pour
over the potatoes.
5. Sprinkle the remaining cheese over the top.
6. Place dish in the glass tray, lower position, cook
1. 6 min. 900 W
2. 14 min. 450 W / GRILL, rotate, then
3. 5 min. 450 W / GRILL
Chicken noodle casserole
Ingredients
30 g butter
100 g sliced mushrooms
100 g diced onion
100 g diced peppers
25 g plain flour
175 ml milk
300 ml stock
150 g sweetcorn
salt & black pepper
250 g diced, cooked chicken
150 g cooked noodles
75 g freshly grated gouda cheese
1. Place butter, onion, pepper and mushroom in a bowl
and cook
2 min. 900 W
2. Blend the flour with the milk until smooth, add the
stock, sweetcorrn, salt & pepper, mix well.
3. Add the chicken and noodles to the sauce.
4. Sprinkle the cheese over the top.
5. Place dish in the glass tray, lower position, cook
1. 3 min. 900 W
2. 10 min. 450 W / GRILL
Grilled sardines/mackeral
Ingredients
6 headless sardines/mackeral
Marinade
4 tbs olive oil
1 tsp garlic puree
1 tbsp balsamic vinegar
1 tsp lemon juice
salt & pepper
1 tsp fennel
1. Mix all ingredients for marinade and spread on the
fish, chill for one hour.
2. Place on the rack in the glass tray, lower position.
Cook Sardines:
1. 5 min. 90 W / GRILL turn over
2. 3 min. 90 W / GRILL
Cook Mackeral:
1. 6 min. 90 W / GRILL, turn over
2. 6 min. 90 W / GRILL
1. AG-91D-EU ENGLISH 21/02/2005 16:23 Page 23
Page 26
24
Automatic operations
The AUTOMATIC OPERATIONS automatically work out
the correct cooking mode and cooking time. You can
choose from 5 AUTO COOK menus, 4 AUTO COOK
FROM FROZEN menus and 7 AUTO DEFROST menus.
Warning:
For AUTO COOK and AUTO COOK FROM FROZEN:
The oven cavity, door, outer cabinet, turntable,
racks and dishes will become very hot. Use thick
oven gloves when removing food or the turntable
from the oven to prevent burns.
What you need to know when using this automatic
function:
1. Enter the menu by pressing the AUTO COOK, AUTO
COOK FROM FROZEN or AUTO DEFROST button
until the desired menu number appears in the display.
(See pages 26 - 28)
2. The weight or quantity of the food can be input by
rotating the TIMER/WEIGHT knob until the desired
weight/quantity is displayed.
• Enter the weight of the food only. Do not include the
weight of the container.
• For food weighing more or less than
weights/quantities given in the cooking chart, cook
using manual programmes.
3. The programmed cooking times are average times. If
you want to alter cooking times pre-programmed in
the automatic operations, use the LESS ( ▼ ) or
MORE ( ▲ ) buttons. See page 16 for details. For best
results, follow cooking chart instructions.
4. To start cooking press START/QUICK button.
When action is required (e.g. to turn food over) the
oven stops and the audible signals sound, the display
shows the necessary action. To continue cooking,
press the START/QUICK button.
The final temperature will vary according to the
initial temperature. Check food is piping hot after
cooking. If necessary, you can extend the cooking
time and change the power level.
TIMER/WEIGHT knob
AUTOMATIC buttons
Menu Number
NOTE: Please refer to the menu label for list of AUTOMATIC menus and weight ranges.
START/QUICK button
1.
2.
4.
3.
x1
LESS/MORE buttons
1. AG-91D-EU ENGLISH 21/02/2005 16:23 Page 24
Page 27
UK
25
Example: To cook 300 g of Rice using AUTO COOK (AC-1)
Check the display.
3. Press the START/QUICK button to
start cooking.
2. Enter the weight by rotating the
TIMER/WEIGHT knob until the
desired weight is displayed.
1. Press the AUTO COOK
button once to select Rice.
x1
x1
Automatic operations
1. AG-91D-EU ENGLISH 21/02/2005 16:23 Page 25
Page 28
26
Auto cook chart
MENU NO.
AC-1
Rice (par-boiled)
(initial temp rice 20° C)
AC-2
Roast Chicken
(initial temp 5° C)
AC-3
Roast Pork
(initial temp 5° C)
AC-4
Gratin
(initial temp 20° C)
e.g. Courgette pasta
gratin and BroccoliMushroom-Potato gratin
AC-5
Cake
(initial temp 20° C)
e.g. Carrot cake,
Gugelhupf, Apple cake
with Calvados
WEIGHT (Increasing
Unit) / UTENSILS
0,1 - 0,3 kg (100 g)
Big bowl & lid
0,9 - 2,0 kg (100 g)
Low Rack
0,6 - 2,0 kg (100 g)
Low Rack
0,5 - 2,0 kg (100 g)
Shallow, oval or round
gratin dish
Low Rack
0,5 - 1,5 kg (100 g)
Baking tin, Saucer
Low rack
PROCEDURE
• Place in a big bowl and add boiling water.
• Cover with a lid.
• Place the dish in the centre of the turntable.
• When the audible signals sound, stir and recover.
• When the audible signals sound again, stir and recover,
replace into the oven and press start.
• Stand for approx. 10 mins after cooking.
• Mix the ingredients and spread on the chicken.
• Pierce the skin of the chicken.
• Put chicken breast side down on the low rack.
• When audible signals sound, turn the chicken over.
• After cooking, let the food stand for 3 minutes in the
oven.
• Lean roast pork is recommended.
• Mix all ingredients and spread them onto the pork.
• Place the pork on the low rack and cook.
• When audible signals sound, turn the food over.
• After cooking, let the food stand wrapped in aluminium
foil for approx. 10 minutes.
• Prepare the gratin referring to the page 30.
• Place the gratin dish on the low rack.
• After cooking, let the food stand covered for approx.
5-10 minutes.
• Prepare the cake referring to pages 31-32.
• Put a saucer upside down on the low rack and place the
baking tin on it.
• Let the cake stand for approximately 10 minutes after
baking.
• Remove the cake from the baking tin.
Rice Boiling Water
100 g 250 ml
200 g 450 ml
300 g 650 ml
Ingredients for 1,2 kg Roast chicken:
Salt and Pepper, 1 tsp sweet paprika, 2 tbsp oil
Ingredients for 1 kg rolled lean pork:
1 garlic clove, crushed, 2 tbsp oil, 1 tbsp sweet
paprika, a little cumin powder, 1 tsp salt
1. AG-91D-EU ENGLISH 21/02/2005 16:23 Page 26
Page 29
UK
27
Auto cook from frozen chart
MENU NO.
ACF-1 Cook
Frozen Ready Meals
(initial temp -18° C)
Stirrable type (e.g.
Noodles Bolognese,
Chinese Menus.)
ACF-2 Cook
Frozen Vegetables
(initial temp -18° C)
e.g. Brussel sprouts,
cauliflower, peas, mixed
vegetables, broccoli
ACF-3 Cook
Frozen Gratin
(initial temp -18° C)
e.g. Frozen lasagne,
Potato gratin
ACF-4 Cook
Frozen French Fried
Potato (recommended
for conventional ovens)
(initial temp -18° C)
WEIGHT (Increasing
Unit) / UTENSILS
0,3 - 1,0 kg* (100 g)
Casserole dish & lid
0,1 - 0,8 kg (100 g)
Casserole dish & lid
0,2 - 0,6 kg (100 g)
Gratin dish
Low rack
0,20 - 0,40 kg (50 g)
Flan Dish
High Rack
* If the manufacturer instructs to
add water, please calculate the
total amount for the program
with additional liquid.
PROCEDURE
• Transfer meal to suitable casserole dish.
• Add some liquid if recommended by the manufacturer.
• Cover with a lid.
• When the audible signals sound, stir and re-cover.
•
After cooking, stir and let stand for approx. 1-2 minutes.
• Add 1tbsp water per 100 g. (For mushrooms no
additional water is necessary).
• Cover with a lid.
• When the oven stops and the audible signals sound, stir
and re-cover.
• After cooking, let stand for approx. 1-2 minutes.
NOTE: If frozen vegetables are compacted together, cook
manually.
• Remove the gratin from original container and place in
a suitable gratin dish.
• Add 3-4 tbsp water if necessary.
• Do not cover.
• Place on the low rack.
• After cooking, let stand, covered in aluminium foil for
approximately 5 minutes.
• Remove the frozen french fried potatoes from the package
and place them on a flan dish.
• Place the dish on the high rack in the oven.
• When the audible signals sound, turn over.
• After cooking, remove from the dish and put on a plate for
serving. (No standing time is necessary).
• Add salt to taste.
NOTE: For thin type of French fried potatoes, cook with
the LESS ( ▼ ) button.
1. AG-91D-EU ENGLISH 21/02/2005 16:23 Page 27
Page 30
28
Auto defrost chart
MENU NO.
AD-1 Defrost
Steaks, Chops
(initial temp -18° C)
AD-2 Defrost
Meat Joint
(initial temp -18° C)
AD-3 Defrost
Minced Meat
(initial temp -18° C)
AD-4 Defrost
Chicken Legs
(initial temp -18° C)
AD-5 Defrost
Poultry
(initial temp -18° C)
AD-6 Defrost
Cake
(initial temp -18° C)
AD-7 Defrost
Bread
(initial temp -18° C)
WEIGHT (Increasing
Unit) / UTENSILS
0,2 - 1,0 kg (100 g)
(see note on page 29)
0,6 - 2,0 kg (100 g)
(see note on page 29)
0,2 - 1,0 kg (100 g)
Cling film
(see note on page 29)
0,20 - 1,00 kg (50 g)
(see note on page 29)
0,9 - 2,0 kg (100 g)
(see note on page 29)
0,1 - 1,4 kg (100 g)
Plate
0,1 - 1,0 kg (100 g)
Plate
PROCEDURE
• Place the food on a plate in the centre of the turntable.
• When the oven stops and the audible signals sound, turn
the food over, rearrange and separate. Shield the thin parts
and warm spots with aluminium foil.
• After defrosting, wrap in aluminium foil for 10-15 minutes,
until thoroughly defrosted.
• Place a plate upside down on the turntable and put the
meat on it.
• When the oven stops and the audible signals sound, turn
the food over. Shield the defrosted parts with aluminium
foil.
• If audible signals sound, turn the food over and shield
again (for 1,1 kg - 2,0 kg).
• After defrosting, cover with aluminium foil and stand for
15-30 minutes until thoroughly defrosted.
• Cover the turntable with cling film.
• Place the block of minced meat onto the turntable.
• When the oven stops and the audible signals sound, turn the
food over. Remove the defrosted parts if possible.
• After defrosting, cover in aluminium foil for 5-10 minutes,
until thoroughly defrosted.
• Place the food on a plate in the centre of the turntable.
• When the oven stops and the audible signals sound, turn
the food over, rearrange and separate. Shield the thin parts
and warm spots with aluminium foil.
• After defrosting, wrap in aluminium foil for 10-15 minutes,
until thoroughly defrosted.
• Place a plate upside down on the turntable and put the
poultry breast side down on the plate.
• When the oven stops and the audible signal sounds,
turnover and shield the thin parts and warm spots with
aluminium foil.
• After defrosting, cover with aluminium foil and stand for
15-30 minutes until thoroughly defrosted.
• Finally clean the poultry under running water.
• Remove all packaging from the cake.
• Place on a plate in the centre of the turntable.
• After defrosting, cut the cake into similar sized pieces. Keep
space between each piece and let stand for 15-30 minutes
until thoroughly defrosted.
• Distribute on a plate in the centre of the turntable. Only
sliced bread is recommended for this programme.
• When the audible signals sound rearrange, and remove
defrosted slices.
• After defrosting separate all slices and distribute on a large
plate. Cover the bread with aluminium foil and let stand for
5-10 minutes until thoroughly defrosted.
1. AG-91D-EU ENGLISH 21/02/2005 16:23 Page 28
Page 31

UK
29
Auto defrost chart
NOTES:
1. Steaks, Chops and Chicken legs should be frozen in one layer.
2. Minced meat should be frozen in the thin shape.
3. After turning over, shield the defrosted portions with small, flat pieces of aluminium foil.
4. The poultry should be processed immediately after defrosting.
5. Gateaux topped and coated with cream are very sensitive to microwave energy.
For the best result, if the cream begins to soften rapidly, it is best to remove it from the oven immediately and
stand for 10 - 30 minutes at room temperature.
6. For AD-1, AD-2, AD-4 and AD-5 arrange the food in the oven as shown:
Food
Dish
Turntable
Chicken legs, Steaks and Chops.
Poultry and Meat Joint
1. AG-91D-EU ENGLISH 21/02/2005 16:23 Page 29
Page 32

30
Recipes for auto cook AC-4
Baked courgettes and pasta
(This recipe makes approx. 1,5 kg).
Ingredients
500 ml water
1
/2 tsp oil
salt
80 g Macaroni
400 g tinned tomatoes, chopped
3 onion (150 g), finely chopped
basil, thyme
salt & pepper
1 tbsp oil to grease the dish
450 g courgette, sliced
150 g sour cream
2 eggs
100g grated cheddar
1. Put the water, oil and salt in the bowl, cover and bring
to the boil.
3-5 min. 900 W
2. Break the macaroni into pieces and add them to the
dish. Stir and allow to soak.
9-11 min. 270 W
Drain the pasta and allow to cool.
3. Mix the tomatoes with the onions and season well.
Grease the ovenproof dish. Add the macaroni and pour
the tomato sauce over. Arrange the courgette slices on
top.
4. Beat the sour cream and the eggs and pour over the
dish. Sprinkle the grated cheese.
Cook on the low rack using
AUTO COOK AC-4
Allow the dish to stand for approx. 5-10 minutes after
cooking.
Baked broccoli and potato with
mushrooms
(The recipe makes approx. 1,5 kg.)
Ingredients
400 g potatoes, peeled and optionally halved
400 g broccoli florets
6 tbsp water (60 ml)
1 tsp butter or margarine to grease the dish
400 g mushrooms, sliced
1 tbsp parsley, finely chopped
salt & pepper
3 eggs
125 ml cream
125 ml milk
salt & pepper
nutmeg
100 g grated gouda cheese
1. Put the potatoes and broccoli in the bowl.
Add the water, cover and cook.
Stir once during cooking.
9-12 min. 900 W
2. Slice the potatoes into discs.
3. Grease the oven-proof dish. Put in the broccoli, the
mushrooms and the potatoes alternately in layers.
Sprinkle over parsley and season with salt and pepper.
4. Combine the eggs with the liquid and seasoning, pour
over the vegetables, then sprinkle the cheese over the
dish.
Cook on the low rack using
AUTO COOK AC-4
Allow the dish to stand for approx. 10 minutes after
cooking.
1. AG-91D-EU ENGLISH 21/02/2005 16:23 Page 30
Page 33

UK
31
Recipes for auto cook AC-5
Carrot cake
(This recipe makes approx. 1,1 kg)
Ingredients
1 tsp butter or margarine to grease the dish
5 egg yolks
250 g sugar
250 g carrot, finely grated
juice of one lemon
250 g ground almonds
80 g flour
1 tbsp baking powder
5 egg white
1. Grease the dish.
2. Cream the egg yolks and sugar with a hand mixer.
3. Add the carrots, lemon juice and almonds.
4. Combine the flour and the baking powder, add to the
rest and mix well.
5. Beat the egg white until stiff and carefully fold it in.
Put the mixture in the baking tin, place it on the low
rack and bake using.
AUTO COOK AC-5
6. Allow to cool in the tin for 5 minutes after baking.
Gugelhupf
(Dough will weigh approx. 0,9 kg)
Ingredients
1 tsp butter or margarine to grease the dish
170 g butter or margarine
140 g icing suger
4 egg yolks
40 g slivered almonds
40 g raisins, washed, some finely
grated lemon peel
4 egg whites
280 g flour
1 Pck. baking powder (15 g)
1. Grease the gugelhupf mould.
2. Beat the butter with the icing sugar with a mixer until
smooth. Add the egg yolks one at a time.
3. Gradually stir in slivered almonds, raisins and the finely
grated lemon peel. Mix well.
4. Beat the egg whites until stiff and fold into the
mixture. Mix baking powder and flour, sift and
carefully fold it into the mixture.
5. Transfer the dough to the mould and bake on the low
rack using
AUTO COOK AC-5
1. AG-91D-EU ENGLISH 21/02/2005 16:23 Page 31
Page 34

32
Recipes for auto cook AC-5
Apple tart with calvados
(This recipe makes approx. 1,3 kg)
Ingredients
200 g flour
1 tsp baking powder
100 g sugar
1 Pck. vanilla sugar
1 pinch salt
1 egg
3-4 drop bitter almond oil
125 g butter
1 tsp butter or margarine to grease the dish
50 g ground hazelnuts
600 g apple (russets approx. 3-4)
cinnamon
2 eggs
1 pinch salt
4 tbsp sugar
4 tbsp calvados (apple liqueur)
11/2 tbsp cornflour
125 g double cream
icing sugar for dusting
1. Mix the flour with the baking powder. Add the sugar,
vanilla sugar, salt, the egg, bitter almond oil and
butter and knead to a paste with the kneading hook of
a hand mixer.
2. Cover the pastry dough and leave in a cool place for
about 30 minutes.
3. Grease the dish. Roll out the pastry dough between
two sheets of foil and place it in the tin. Form an edge
to the pastry dough approx. 3 cm high.
4. Distribute the hazel nuts over the pastry shell.
5. Peel the apples, cut them in quarters, remove the core
and cut them in slices. Arrange the slices to overlap
each other on top of the hazel nuts and lightly dust
them with cinnamon.
6. Separate the eggs. Beat the egg whites until stiff,
gradually trickling in a pinch of salt and 1 tbsp sugar.
7. Stir the egg yolk, the remaining sugar and the vanilla
sugar until creamy.
8. Add Calvados, cornflour and double cream and mix
them in. Fold in the beaten egg whites and spread the
mixture evenly over the apple slice.
9. Place on the low rack and bake using.
AUTO COOK AC-5
Tip: Allow the tart to cool in the tin and dust it with icing
sugar.
1. AG-91D-EU ENGLISH 21/02/2005 16:23 Page 32
Page 35

33
UK
Care & cleaning
CAUTION: DO NOT USE COMMERCIAL OVEN
CLEANERS, STEAM CLEANERS, ABRASIVE, HARSH
CLEANERS, ANY THAT CONTAIN SODIUM
HYDROXIDE OR SCOURING PADS ON ANY PART OF
YOUR MICROWAVE OVEN.
WARNING!
After GRILL, DUAL, CONVECTION, AUTO COOK, AUTO
COOK FROM FROZEN modes, the oven cavity, door,
oven cabinet and accessories will become very hot.
Before cleaning, make sure they are completely cool.
Oven exterior
The outside of your oven can be cleaned easily with
mild soap and water. Make sure the soap is wiped off
with a moist cloth, and dry the exterior with a soft
towel.
Oven controls
Open the door before cleaning to de-activate the oven
controls. Care should be taken when cleaning the oven
control. Using a cloth dampened with water only,
gently wipe the panel until it becomes clean. Avoid
using excessive amounts of water. Do not use any sort
of chemical or abrasive cleaner.
Oven Interior
1. For cleaning, wipe any splatters or spills with a soft
damp cloth or sponge after each use while the oven
is still warm. For heavier spills, use a mild soap and
wipe several times with a damp cloth until all residues
are removed. Do not remove the waveguide cover.
2. Make sure that mild soap or water does not
penetrate the small vents in the walls which may
cause damage to the oven.
3. Do not use spray type cleaners on the oven interior.
4. Heat up your oven regularly by using the convection
and grill, refer to “Heating without food” on page 11.
Remaining food or fat splashed can cause smoke or bad
smell.
Turntable and turntable support
Remove the turntable and turntable support from the
oven. Wash the turntable and turntable support in mild
soapy water. Dry with a soft cloth. Both the turntable
and the turntable support are dishwasher safe.
Door
To remove all trace of dirt, regularly clean both sides of
the door, the door seals and sealing surfaces with a
soft, damp cloth.
NOTE: Keep the waveguide cover and accessories clean
at all times. If you leave grease or fat in the cavity or
accessories, it may overheat, cause arcing, smoke or
even catch fire when next using the oven.
NOTE: A steam cleaner should not be used.
1. AG-91D-EU ENGLISH 21/02/2005 16:23 Page 33
Page 36

34
What to do if...
Standard time
20 min.
15 min.
Micro - 40 min.
Micro - 15 min.
Grill - 15 min.
Micro - 40 min.
Grill - 15 min
Cooking mode
Microwave 900 W cooking
Grill cooking
Dual 1
Dual 2
(900 W microwave power)
Dual 2
(630 W microwave power)
IMPORTANT: If the display shows nothing even if the power plug is properly connected, the energy save mode
should carry on. To release it, open and then close the oven door. See page 8.
2. After GRILL, DUAL, CONVECTION, AUTO COOK, AUTO COOK FROM FROZEN, the cooling fan will run and
“NOW COOLING” may appear on the display. Also, when you press the STOP button and open the door during
these cooking modes, the cooling fan will run; you may, therefore, feel air blowing from the ventilation
openings.
NOTES:
1. If you cook the food over the standard time with only 900 W, the power of the oven will lower automatically to
avoid overheating. (The microwave power level will be reduced).
... the microwave appliance is not working
properly ?
Check that
- the fuses in the fuse box are working,
- there has not been a power outage.
- If the fuses continue to blow, please contact
an authorised AEG-Electrolux service agent.
... the microwave mode is not working ?
Check that
- the door is properly closed,
- the door seals and their surfaces are clean,
- the START-button has been pressed
... the turntable is not turning ?
Check that
- the turntable support is correctly connected
to the drive,
- the ovenware does not extend beyond the
turntable,
- food does not extend beyond the edge of
the turntable preventing it from rotating.
- there is nothing in the well beneath the
turntable.
... the microwave will not switch off ?
- Isolate the appliance from the fuse box.
- Contact an authorised AEG-Electrolux
service agent.
... the interior light is not working ?
- Call an authorised AEG-Electrolux service
agent. The interior light bulb can be
exchanged only by an authorised AEGElectrolux service agent.
... the food is taking longer to heat through
and cook than before ?
- Set a longer cooking time (double quantity
= nearly double time) or
- if the food is colder than usual, rotate or
turn from time to time or
- set a higher power setting.
1. AG-91D-EU ENGLISH 21/02/2005 16:23 Page 34
Page 37

35
UK
Guarantee conditions
Service & spare parts
Standard guarantee conditions
We, AEG-Electrolux, undertake that if within 24 months of the date of the purchase this AEG-Electrolux appliance or any
part thereof is proved to be defective by reason only of faulty workmanship or materials, we will, at our discretion repair or
replace the same FREE OF CHARGE for labour, materials or carriage on condition that:
• The appliance has been correctly installed and used only on the electricity or gas supply stated on the rating plate.
• The appliance has been used for normal domestic purposes only, and in accordance with the manufacturer's operating
and maintenance instructions.
• The appliance has not been serviced, maintained, repaired, taken apart or tampered with by any person not authorised
by us.
• All service work under this guarantee must be undertaken by an authorised AEG-Electrolux service agent.
Any appliance or defective part replaced shall become the Company's property.
• This guarantee is in addition to your statutory and other legal rights.
• Home visits are made between 8.30am and 5.30pm Monday to Friday.
Visits may be available outside these hours in which case a premium will be charged.
Exclusions
This guarantee does not cover:
• Damage or calls resulting from transportation, improper use or neglect, the replacement of any light bulbs or
removable parts of glass or plastic.
• Costs incurred for calls to put right an appliance which is improperly installed or calls to appliances outside your
country of residence.
• Appliances found to be in use within a commercial environment, plus those which are subject to rental agreements.
• Products of AEG-Electrolux manufacture which are not marketed by AEG-Electrolux.
European Guarantee
If you should move to another country within Europe then your guarantee moves with you to your new home subject to
the following qualifications:
• The guarantee starts from the date you first purchased your product.
• The guarantee is for the same period and to the same extent for labour and parts as exists in the new country of use
for this brand or range of products.
• This guarantee relates to you and cannot be transferred to another user.
• Your new home is within the European Community (EC) or European Free Trade Area.
• The product is installed and used in accordance with our instructions and is only used domestically, i.e. a normal
household.
• The product is installed taking into account regulations in your new country.
Before you move please contact your nearest Customer Care centre, listed below, to give them details of your new home.
They will then ensure that the local Service Organisation is aware of your move and able to look after you and your
appliances.
France Senlis +33 (0) 3 44 62 29 29
Germany Nürnberg +49 (0) 800 234 7378
Italy Pordenone +39 (0) 800 117511
Sweden Stockholm +46 (0) 8 672 5360
UK Slough +44 (0) 1753 219899
If you wish to purchase spare parts or require an engineer, contact your local authorised service agent.
The telephone number can be obtained from the operator.
1. AG-91D-EU ENGLISH 21/02/2005 16:23 Page 35
Page 38

36
AC Line Voltage
Distribution line fuse/circuit breaker
AC Power required: Microwave
Grill
Grill/Microwave
Convection
Convection/Microwave
Output power: Microwave
Grill heating elements
Convection
Microwave Frequency
Outside Dimensions
Cavity Dimensions
Oven Capacity
Turntable
Weight
Oven lamp
: 230 V, 50 Hz, single phase
: Minimum 16 A
: 1.5 kW
: 2.8 kW
: 2.8 kW
: 2.8 kW
: 2.95 kW
: 900 W (IEC 60705)
: 1300 W (650 W x 2)
: 1450 W
: 2450 MHz * (Group 2/Class B)
: 592 mm (W) x 462 mm (H) x 537 mm (D)
: 375 mm (W) x 272 mm (H) x 395 mm (D) **
: 40 litres **
: ø362 mm, ceramic
: 30 kg
: 25 W/240 - 250 V
* This Product fulfils the requirement of the European standard EN55011.
In conformity with this standard, this product is classified as group 2 class B equipment.
Group 2 means that the equipment intentionally generates radio-frequency energy in the form of
electromagnetic radiation for the heat treatment of food.
Class B equipment means that the equipment is suitable to be used in domestic establishments.
This equipment complies with the requirements of directives 89/336/EEC and 73/23/EEC as
amended by 93/68/EEC.
As part of a policy of continuous improvement, we reserve the right to alter design and
specifications without notice.
** Internal capacity is calculated by measuring maximum width, depth and height.
Actual capacity for holding food is less.
Specifications
1. AG-91D-EU ENGLISH 21/02/2005 16:23 Page 36
Page 39

37
UK
Important information
Ecologically responsible disposal of packaging materials and old
appliances
Packaging materials
AEG-Electrolux microwave ovens require effective packaging to protect them during
transportation.
Only the minimum packaging necessary is used.
Packaging materials (e.g. foil or styrofoam) can place children at risk.
Danger of suffocation. Keep packaging material away from children.
All packaging materials used are environment friendly and can be recycled. The cardboard is
made from recycled paper and the wooden parts are untreated. Plastic items are marked as
follows:
«PE» polyethylene eg packaging film
«PS» polystyrene eg packaging (CFC-free)
«PP» polypropylene eg packaging straps
By using and re-using the packaging, raw materials are saved and waste volume is reduced.
Packaging should be taken to your nearest recycling centre.
Contact your local council for information.
Disposal of old appliances
Old appliances should be made safe before disposal by removing the plug, and cutting off and
disposing of the power cable.
It should then be taken to the nearest recycling centre. Check with your local Council or
Environmental Health Office to see if there are facilities in your area for recycling the appliance.
1. AG-91D-EU ENGLISH 21/02/2005 16:23 Page 37
Page 40

38
Installation
INSTALLING THE APPLIANCE
1. Remove all packaging and check carefully for any
signs of damage.
2. If the microwave is fitted in position C, ensure that
the minimum air gaps are maintained as shown in
the diagram.
3. Secure four cupboard retention blocks in position
using the setting template (TMAPTA004URR0).
4. Fit the appliance into the kitchen cupboard, lift over
the bottom/front blocks then push slowly, and
without force, until the front frame of the oven
seals against the front opening of the cupboard.
5. Ensure the appliance is stable and not leaning.
6. Fix the oven in position with the screws provided.
The fixing points are located within the louvre areas
at the top and bottom of the oven (see diagram,
item 1, on page 4).
7. Fit the frame fastner caps to the four fixing
positions (2 spare caps are provided).
8. It is important to ensure that the installation of this
product conforms to the instructions in this
operation manual and the conventional oven or hob
manufacturer’s installation instructions.
Position A
Position C
Position B
Conventional
oven
The microwave can be fitted in position A, B or C:
POSITION NICHE SIZE CHIMNEY Gap Between
W D H (min) Cupboard & Ceiling
A 560 x 550 x 450 20 50
B 560 x 550 x 450 20 50
C 560 x 550 x 460 20 Not Applicable
Measurements in (mm)
Chimney
Cable clip
Conventional
oven
Position A
Position C
Position B
Chimney
Cable clip
1. AG-91D-EU ENGLISH 21/02/2005 16:23 Page 38
min. 20 mm
450 mm
5 mm
min. 20 mm
450 mm
65 mm
460 mm
20 mm
D
Page 41

39
UK
Installation
• The electrical outlet should be readily accessible so that the unit can
be unplugged easily in an emergency.
• The socket should not be positioned behind the cupboard.
• The best position is above the cupboard, see (A).
If connection is to be made to position (A), remove the clip from position
15 on the rear of the oven (see page 4) and use the clip to secure the
power supply cord to the top of the housing unit (see page 39).
When not connecting the power supply cord to position (A), the power
supply cord should be routed under the oven.
• Connect the appliance to a single phase 230 V/50 Hz alternating current
via a correctly installed earth socket.
The socket must be fused with a 16 A fuse.
• The power supply cord may only be replaced by an electrician.
• Before installing, tie a piece of string to the power supply cord to facilitate connection to point (A) when the
appliance is being installed.
• When inserting the appliance into the high-sided cupboard, DO NOT crush the power supply cord.
• Do not immerse the power supply cord or plug in water or any other liquid.
CONNECTING THE APPLIANCE TO THE POWER SUPPLY
(A)
ELECTRICAL CONNECTIONS
WARNING:
THIS APPLIANCE MUST BE EARTHED
The manufacturer declines any liability
should this safety measure not be observed.
If the plug that is fitted to your appliance is not
suitable for your socket outlet, you must call your local
authorised AEG-Electrolux service agent.
1. AG-91D-EU ENGLISH 21/02/2005 16:23 Page 39
Page 42

40
Sehr geehrte Kundin, sehr geehrter Kunde,
Wir bedanken uns für den Kauf dieses Mikrowellengerätes und das damit der
Marke AEG-ELECTROLUX entgegengebrachte Vertrauen.
Zur Nutzung aller Vorteile dieses Gerätes lesen Sie bitte die
Gebrauchsanweisung sorgfältig durch. Danach bewahren Sie diese bitte zum
Nachlesen gut auf. Ihr neues Mikowellengerät belohnt Sie für diese kleine
Mühe mit einer tadellosen Leistung. Ferner vermeiden Sie unnötige
Servicekosten.
Mit diesem Warndreieck und/oder durch Signalwörter (Warnung!, Vorsicht!,
Achtung!) sind Hinweise hervorgehoben, die für Ihre Sicherheit oder für die
Funktionsfähigkeit des Gerätes wichtig sind. Bitte unbedingt beachten.
Dieses Zeichen leitet Sie Schritt für Schritt beim Bedienen des Gerätes.
Nach diesem Zeichen erhalten Sie ergänzende Informationen zur Bedienung
und praktischen Anwendung des Gerätes.
Mit dem Kleeblatt sind Tipps und Hinweise zum wirtschaftlichen und
umweltschonenden Einsatz des Gerätes gekennzeichnet.
Für eventuell auftretende Störungen enthält die Gebrauchsanweisung
Hinweise zur selbständigen Behebung, siehe Abschnitt ‘Was tun, wenn...’
2. AG-91D-EU German 21/02/2005 16:22 Page 40
Page 43

41
D
Inhalt
Wichtige Sicherheitshinweise . . . . . . . . . . . . . . . . . . . . . . . . . . . . . . . . . . . . . . . . . . . . . . . .42 - 44
Gerät & Zubehör . . . . . . . . . . . . . . . . . . . . . . . . . . . . . . . . . . . . . . . . . . . . . . . . . . . . . . . . . . . . . . .45
Bedienblende . . . . . . . . . . . . . . . . . . . . . . . . . . . . . . . . . . . . . . . . . . . . . . . . . . . . . . . . . . . . . . . . . .46
Vor Inbetriebnahme . . . . . . . . . . . . . . . . . . . . . . . . . . . . . . . . . . . . . . . . . . . . . . . . . . . . . . . . . . . . .47
Auswählen der Sprache . . . . . . . . . . . . . . . . . . . . . . . . . . . . . . . . . . . . . . . . . . . . . . . . . . . . . . . . . .47
Verwendung der STOP-taste . . . . . . . . . . . . . . . . . . . . . . . . . . . . . . . . . . . . . . . . . . . . . . . . . . . . . .48
Einstellen der Uhr . . . . . . . . . . . . . . . . . . . . . . . . . . . . . . . . . . . . . . . . . . . . . . . . . . . . . . . . . . . . . .48
Energiesparmodus . . . . . . . . . . . . . . . . . . . . . . . . . . . . . . . . . . . . . . . . . . . . . . . . . . . . . . . . . . . . . .49
Hinweis zur Leistungseinstellen . . . . . . . . . . . . . . . . . . . . . . . . . . . . . . . . . . . . . . . . . . . . . . . . . . .49
Was sind Mikrowellen? . . . . . . . . . . . . . . . . . . . . . . . . . . . . . . . . . . . . . . . . . . . . . . . . . . . . . . . . . .50
Das kann Ihr neues Kombi-Mikrowellengerät . . . . . . . . . . . . . . . . . . . . . . . . . . . . . . . . . . . . . . .50
Garen mit der Mikrowelle . . . . . . . . . . . . . . . . . . . . . . . . . . . . . . . . . . . . . . . . . . . . . . . . . . . . . . . .51
Grillbetrieb . . . . . . . . . . . . . . . . . . . . . . . . . . . . . . . . . . . . . . . . . . . . . . . . . . . . . . . . . . . . . . . . . . . .52
Heizen ohne Speisen . . . . . . . . . . . . . . . . . . . . . . . . . . . . . . . . . . . . . . . . . . . . . . . . . . . . . . . . . . . .52
Heissluftbetrieb . . . . . . . . . . . . . . . . . . . . . . . . . . . . . . . . . . . . . . . . . . . . . . . . . . . . . . . . . . . .53 - 54
Kombi-Betrieb . . . . . . . . . . . . . . . . . . . . . . . . . . . . . . . . . . . . . . . . . . . . . . . . . . . . . . . . . . . . .55 - 56
Andere nützliche Funktionen . . . . . . . . . . . . . . . . . . . . . . . . . . . . . . . . . . . . . . . . . . . . . . . . .57 - 59
Geeignetes Geschirr . . . . . . . . . . . . . . . . . . . . . . . . . . . . . . . . . . . . . . . . . . . . . . . . . . . . . . . . . . . . 60
Gartabelle . . . . . . . . . . . . . . . . . . . . . . . . . . . . . . . . . . . . . . . . . . . . . . . . . . . . . . . . . . . . . . . . . . . . .61
Rezepte für Glastablett & Heißluft . . . . . . . . . . . . . . . . . . . . . . . . . . . . . . . . . . . . . . . . . . . .62 - 63
Rezepte für Glastablett & grill . . . . . . . . . . . . . . . . . . . . . . . . . . . . . . . . . . . . . . . . . . . . . . . . . . . .64
Automatikbetrieb . . . . . . . . . . . . . . . . . . . . . . . . . . . . . . . . . . . . . . . . . . . . . . . . . . . . . . . . . .65 - 66
Tabelle: Auto-Garen . . . . . . . . . . . . . . . . . . . . . . . . . . . . . . . . . . . . . . . . . . . . . . . . . . . . . . . . . . . .67
Tabelle: Auto-Garen von TK . . . . . . . . . . . . . . . . . . . . . . . . . . . . . . . . . . . . . . . . . . . . . . . . . . . . . .68
Tabelle: Auto-Auftauen . . . . . . . . . . . . . . . . . . . . . . . . . . . . . . . . . . . . . . . . . . . . . . . . . . . . .69 - 70
Rezepte für Auto-Garen AC-4 . . . . . . . . . . . . . . . . . . . . . . . . . . . . . . . . . . . . . . . . . . . . . . . . . . . .71
Rezepte für Auto-Garen AC-5 . . . . . . . . . . . . . . . . . . . . . . . . . . . . . . . . . . . . . . . . . . . . . . . .72 - 73
Reinigung und Pflege . . . . . . . . . . . . . . . . . . . . . . . . . . . . . . . . . . . . . . . . . . . . . . . . . . . . . . . . . . .74
Was tun, wenn... . . . . . . . . . . . . . . . . . . . . . . . . . . . . . . . . . . . . . . . . . . . . . . . . . . . . . . . . . . . . . . . .75
Kundendienst . . . . . . . . . . . . . . . . . . . . . . . . . . . . . . . . . . . . . . . . . . . . . . . . . . . . . . . . . . . . . . . . . .76
Garantiebedingungen . . . . . . . . . . . . . . . . . . . . . . . . . . . . . . . . . . . . . . . . . . . . . . . . . . . . . . . . . . .77
Kundendienst & Ersatzteile (Belgien) . . . . . . . . . . . . . . . . . . . . . . . . . . . . . . . . . . . . . . . . . . . . . .78
Garantiebedingungen (Belgien) . . . . . . . . . . . . . . . . . . . . . . . . . . . . . . . . . . . . . . . . . . . . . . . . . . .79
Technische Daten . . . . . . . . . . . . . . . . . . . . . . . . . . . . . . . . . . . . . . . . . . . . . . . . . . . . . . . . . . . . . . .80
Wichtige Hinweise . . . . . . . . . . . . . . . . . . . . . . . . . . . . . . . . . . . . . . . . . . . . . . . . . . . . . . . . . . . . . .81
Aufstellanweisungen . . . . . . . . . . . . . . . . . . . . . . . . . . . . . . . . . . . . . . . . . . . . . . . . . . . . . . . .82 - 83
Das Symbol auf dem Produkt oder seiner Verpackung weist darauf hin, dass dieses Produkt nicht als
normaler Haushaltsabfall zu behandeln ist, sondern an einem Sammelpunkt für das Recycling von elektrischen
und elektronischen Geräten abgegeben werden muss. Durch Ihren Beitrag zum korrekten Entsorgen dieses
Produkts schützen Sie die Umwelt und die Gesundheit Ihrer Mitmenschen. Umwelt und Gesundheit werden
durch falsches Entsorgen gefährdet. Weitere Informationen über das Recycling dieses Produkts erhalten Sie
von Ihrem Rathaus, Ihrer Müllabfuhr oder dem Geschäft, in dem Sie das Produkt gekauft haben.
2. AG-91D-EU German 21/02/2005 16:22 Page 41
Page 44

42
Die Einstellungen nach dem Starten des Gerätes
überprüfen um sicherzustellen, dass das Gerät wie
gewünscht arbeitet. Diese Bedienungsanleitung und das
Kochbuch zusammen verwenden.
Zur Vermeidung von Verletzungen
WARNUNG:
Das Gerät nicht betreiben, wenn es beschädigt ist oder
Fehlfunktionen aufweist. Überprüfen Sie vor dem
Betrieb die folgenden Punkte:
a) Die Tür muss einwandfrei schließen und darf nicht
schlecht ausgerichtet oder verzogen sein.
b) Die Scharniere und Türsicherheitsverriegelungen
dürfen nicht gebrochen oder lose sein.
c) Die Türdichtungen und Dichtungsoberflächen
dürfen nicht beschädigt sein.
d) Im Garraum und an der Tür dürfen keine Dellen
oder andere Beschädigungen vorhanden sein.
e) Das Netzkabel und der Netzstecker dürfen nicht
beschädigt sein.
Nehmen Sie unter keinen Umständen Reparaturen
oder Änderungen an Ihrem Mikrowellengerät
selbst vor. Reparaturen, insbesondere solche, bei
denen die Abdeckung des Geräts entfernt werden
muss, dürfen ausschließlich von entsprechend
qualifizierten Technikern vorgenommen werden.
Das Gerät nicht bei geöffneter Tür oder mit auf
irgendeine Weise veränderter Türsicherheitsverriegelung betreiben.
Niemals das Gerät betreiben, wenn sich Gegenstände
zwischen den Türdichtungen und den abdichtenden
Oberflächen befinden.
Darauf achten, dass sich weder Fett noch Schmutz
auf den Türdichtungen bzw. den benachbarten
Geräteteilen ansammeln. Befolgen Sie die Hinweise
unter "Reinigung und Pflege" auf Seite 74. Wird
das Gerät nicht saubergehalten, kann dies die
Oberfläche beeinträchtigen und sich negativ auf
die Lebensdauer des Geräts auswirken.
Schlimmstenfalls kann die Sicherheit des Geräts
beeinträchtigt werden.
Personen mit HERZSCHRITTMACHERN sollten ihren Arzt
oder den Hersteller des Herzschrittmachers nach
Vorsichtsmaßnahmen beim Umgang mit
Mikrowellengeräten befragen.
Zur Vermeidung von Feuer
Mikrowellengeräte sollten während des Betriebs
nicht unbeaufsichtigt gelassen werden. Zu hohe
Leistungsstufen oder zu lange Garzeiten können
das Gargut überhitzen und Feuer verursachen.
Die Steckdose muss ständig zugänglich sein, so daß der
Netzstecker im Notfall einfach abgezogen werden kann.
Die Netzspannung muss 230 V Wechselstrom, 50 Hz
betragen und sollte mit einer Sicherung von mindestens
16 A oder einem Sicherungsautomaten von mindestens
16 A ausgestattet sein.
Es wird empfohlen das Gerät an einen separaten
Stromkreis anzuschließen.
Das Gerät nicht im Freien lagern oder aufstellen.
NIEMALS DIE TÜR ÖFFNEN, wenn im Gerät
erwärmte Lebensmittel zu rauchen beginnen. Das
Gerät ausschalten, den Netzstecker ziehen und
warten, bis die Lebensmittel nicht mehr rauchen.
Öffnen der Tür während der Rauchentwicklung
kann Feuer verursachen.
Benutzen Sie nur Behälter und Geschirr, das für
Mikrowellen geeignet ist. Siehe Seite 60.
Niemals das Gerät unbeaufsichtigt lassen, wenn
Kunststoff-, Papier- oder andere brennbare
Lebensmittelbehälter verwendet werden.
Den Spritzschutz für den Hohlleiter, den Garraum
und den Drehteller nach der Verwendung des
Gerätes reinigen. Diese Bauteile sollten trocken
und fettfrei sein. Zurückbleibende Fettspritzer
können überhitzen, zu rauchen beginnen oder sich
entzünden.
Keine brennbaren Materialien in der Nähe des Gerätes
oder den Lüftungsöffnungen lagern.
Niemals die Lüftungsöffnungen blockieren.
Alle Metallverschlüsse, Drähte usw. von Lebensmitteln
und Verpackungen entfernen. Funkenbildung auf
Metalloberflächen kann zu Feuer führen.
Das Mikrowellengerät nicht zum Frittieren von
Lebensmitteln in Öl oder Fett verwenden. Temperaturen
können nicht kontrolliert werden und das Fett kann
sich entzünden.
Zum Herstellen von Popcorn sollte nur für
Mikrowellengeräte vorgesehenes Popcorn-Geschirr
verwendet werden.
Keine Lebensmittel oder andere Gegenstände im Gerät
lagern.
WICHTIG FÜR IHRE SICHERHEIT: LESEN SIE DIE FOLGENDEN HINWEISE AUFMERKSAM DURCH, UND
BEWAHREN SIE DIE BEDIENUNGSANLEITUNG AUF
Wichtige Sicherheitshinweise
2. AG-91D-EU German 21/02/2005 16:22 Page 42
Page 45

43
D
3. Nach dem Erhitzen die Flüssigkeit noch kurze Zeit im
Gerät stehen lassen, um verspätetes Aufwallen durch
Siedeverzug zu verhindern.
Eier nicht in der Schale kochen. Hartgekochte Eier
dürfen nicht in Mikrowellengeräten erwärmt
werden, da sie selbst nach der Erwärmung
explodieren können. Zum Kochen oder Aufwärmen
von Eiern, die nicht verquirlt oder verrührt wurden,
das Eigelb und Eiweiß anstechen, damit es nicht
explodiert. Vor dem Aufwärmen im
Mikrowellengerät die Schale von gekochten Eiern
entfernen und die Eier in Scheiben schneiden.
Die Schale von Lebensmitteln, z.B. Kartoffeln,
Würstchen oder Obst, vor dem Garen anstechen, damit
der Dampf entweichen kann.
Zur Vermeidung von Verbrennungen
Beim Entnehmen von Gargut aus dem Garraum sollten
Topflappen o.ä. verwendet werden.
Behälter, Popcorngeschirr, Kochbeutel, usw. immer vom
Gesicht und den Händen abgewandt öffnen, um
Verbrennungen durch Dampf zu vermeiden.
Um Verbrennungen zu vermeiden, immer die
Lebensmitteltemperatur prüfen und umrühren,
bevor Sie das Gargut servieren. Besondere Vorsicht
ist geboten, wenn die Lebensmittel oder Getränke
an Babys, Kinder oder ältere Personen
weitergereicht werden.
Die Temperatur des Behälters ist kein echter Hinweis
auf die tatsächliche Temperatur des Lebensmittels oder
Getränks; immer die Temperatur prüfen.
Halten Sie beim Öffnen der Gerätetür ausreichenden
Abstand, um Verbrennungen durch austretende Hitze
oder Dampf zu vermeiden.
Schneiden Sie gefüllte, gebackene Speisen nach dem
Garen in Scheiben, um den Dampf entweichen zu lassen
und Verbrennungen zu vermeiden.
Kinder vom Türglas fernhalten, um Verbrennungen zu
vermeiden.
Die Gerätetür, die Geräteaußenflächen, die
Geräterückseite, der Geräteinnenraum
Lüftungsöffnungen, Zubehörteile und das Geschirr im
GRILL, HEISSLUFFT-, KOMBI-, AUTO-GAREN und in
der AUTO-GAREN von TK-Betriebsart nicht berühren,
da sie heiß werden. Vor der Reinigung sicherstellen, daß
alle Geräteteile abgekühlt sind.
Zur Vermeidung von elektrischem Schlag
Unter keinen Umständen sollte das äußere Gehäuse
entfernt werden.
Niemals Flüssigkeiten in die Öffnungen der
Türsicherheitsverriegelung oder Lüftungsöffnungen
kommen lassen oder Gegenstände in diese Öffnungen
stecken. Wenn größere Mengen Flüssigkeiten
verschüttet werden, müssen Sie sofort das Gerät
ausschalten, den Netzstecker ziehen und den AEGElectrolux-Kundendienst anfordern.
Niemals das Netzkabel bzw. den Netzstecker in Wasser
oder andere Flüssigkeiten legen.
Das Netzkabel nicht über die scharfe Kante eines
Tisches oder einer Arbeitsplatte führen.
Das Netzkabel von erwärmten Oberflächen fernhalten,
einschließlich Geräterückseite.
Auf keinen Fall versuchen, die Garraumlampe selbst
auszuwechseln, sondern nur vom AEG-Electrolux
Kundendienst auswechseln lassen! Wenn die
Garraumlampe ausfallen sollte, wenden Sie sich bitte an
Ihren Elektrohändler oder eine von AEG-Electrolux
autorisierte Kundendienststelle!
Wenn das Netzkabel beschädigt ist, muss es durch ein
neues Spezialkabel ersetzt werden.
Bitte das Auswechseln durch einen von AEG-Electrolux
autorisierten Kundendienst vornehmen lassen.
Zur Vermeidung von Explosionen und plötzlichem
Sieden:
WARNUNG: Speisen in flüssiger und anderer Form
dürfen nicht in verschlossenen Gefäßen erhitzt
werden, da sie explodieren könnten.
Niemals verschlossene Behälter verwenden. Verschlüsse
und Abdeckungen entfernen. Verschlossene Behälter
können durch den Druckanstieg selbst nach dem
Ausschalten des Gerätes noch explodieren.
Beim Erhitzen von Flüssigkeiten vorsichtig sein. Behälter
mit großer Öffnung verwenden, damit entstehende
Blasen entweichen können.
Beim Erhitzen von Flüssigkeiten in
Mikrowellengeräten beim Entnehmen des
Behälters vorsichtig sein, da es zu einem
verspätetem Aufwallen durch Siedeverzug kommen
kann.
Um Verbrennungen durch plötzliches Überkochen
(Siedeverzug) zu vermeiden:
1. Die Flüssigkeiten vor dem Kochen/Erhitzen
umrühren.
2. Es wird empfohlen, während des Erhitzens einen
Glasstab oder ähnlichen Gegenstand in den Behälter
zu stecken.
Wichtige Sicherheitshinweise
2. AG-91D-EU German 21/02/2005 16:22 Page 43
Page 46

44
Zur Vermeidung von Fehlbedienung durch Kinder
WARNUNG: Kinder dürfen das Gerät nur unter
Aufsicht benutzen oder wenn sie ausreichende
Anweisungen zur sicheren Benutzung erhalten
haben und die Gefahren eines unsachgemäßen
Gebrauchs verstehen.
Nicht an die Gerätetür lehnen oder an der Tür hängend
schwingen. Das Mikrowellengerät ist kein Spielzeug!
Kinder sollten mit allen wichtigen Sicherheitshinweisen
vertraut gemacht werden: z.B. Verwendung von
Topflappen und vorsichtiges Abnehmen von Deckeln.
Beachten Sie besonders Verpackungen, die Lebensmittel
knusprig machen (z.B. selbstbräunende Materialien),
indem sie besonders heiß werden.
Sonstige Hinweise
Niemals das Gerät auf irgendeine Weise verändern.
Das Gerät während des Betriebs nicht bewegen.
Dieses Gerät ist nur für den Hausgebrauch vorgesehen
und darf nur zum Garen von Lebensmitteln verwendet
werden. Es eignet sich nicht für gewerbliche Zwecke
oder den Gebrauch in einem Labor.
Zur Vermeidung von Fehlfunktionen und
Beschädigungen dieses Gerätes
Das Gerät niemals leer in Betrieb nehmen, es sei denn,
dies wird in der Bedienungsanleitung ausdrücklich
empfohlen (siehe Seite 52). Durch Inbetriebnahme des
Gerätes ohne Gargut kann das Gerät beschädigt
werden.
Bei der Verwendung von Bräunungsgeschirr oder
selbsterwärmenden Materialien muss eine
hitzebeständige Isolierung (z.B. ein Porzellanteller)
zwischen Geschirr und Drehteller gestellt werden.
Dadurch werden Beschädigungen des Drehtellers durch
Wärme vermieden. Die angegebene Aufheizzeit für das
Geschirr sollte nicht überschritten werden.
Kein Metallgeschirr verwenden, da Mikrowellen
reflektiert werden und dies zu Funkenbildung führt.
Keine Konserven in das Gerät stellen.
Nur den für dieses Gerät vorgesehenen Drehteller
verwenden.
Während das Gerät arbeitet, keine Gegenstände auf das
äußere Gehäuse stellen.
Keine Kunststoffbehälter für den Mikrowellenbetrieb
verwenden, wenn das Gerät nach dem Gebrauch der
GRILL, HEISSLUFFT-, KOMBI-, AUTO-GAREN und in
der AUTO-GAREN von TK-Betriebsart noch heiß ist, da
diese sonst schmelzen könnten. In diesen Betriebsarten
dürfen keine Kunststoffbehälter verwendet werden, es
sei denn, der Hersteller weist auf deren Eignung zu
diesem Zweck hin.
HINWEISE:
Bei Fragen zum Anschluss des Gerätes wenden Sie sich
bitte an einen autorisierten Elektrofachmann.
Sowohl der Hersteller als auch der Händler können
keine Verantwortung für Beschädigungen des Gerätes
oder Verletzungen von Personen übernehmen, die als
Folge eines falschen elektrischen Anschlusses entstehen.
Wasserdampf und Tropfen können sich auf den Wänden
im Innenraum bzw. um die Türdichtungen und
Dichtungsoberflächen bilden. Dies ist normal und ist
kein Anzeichen für den Austritt von Mikrowellen oder
einer sonstigen Fehlfunktion.
Wichtige Sicherheitshinweise
2. AG-91D-EU German 21/02/2005 16:22 Page 44
Page 47
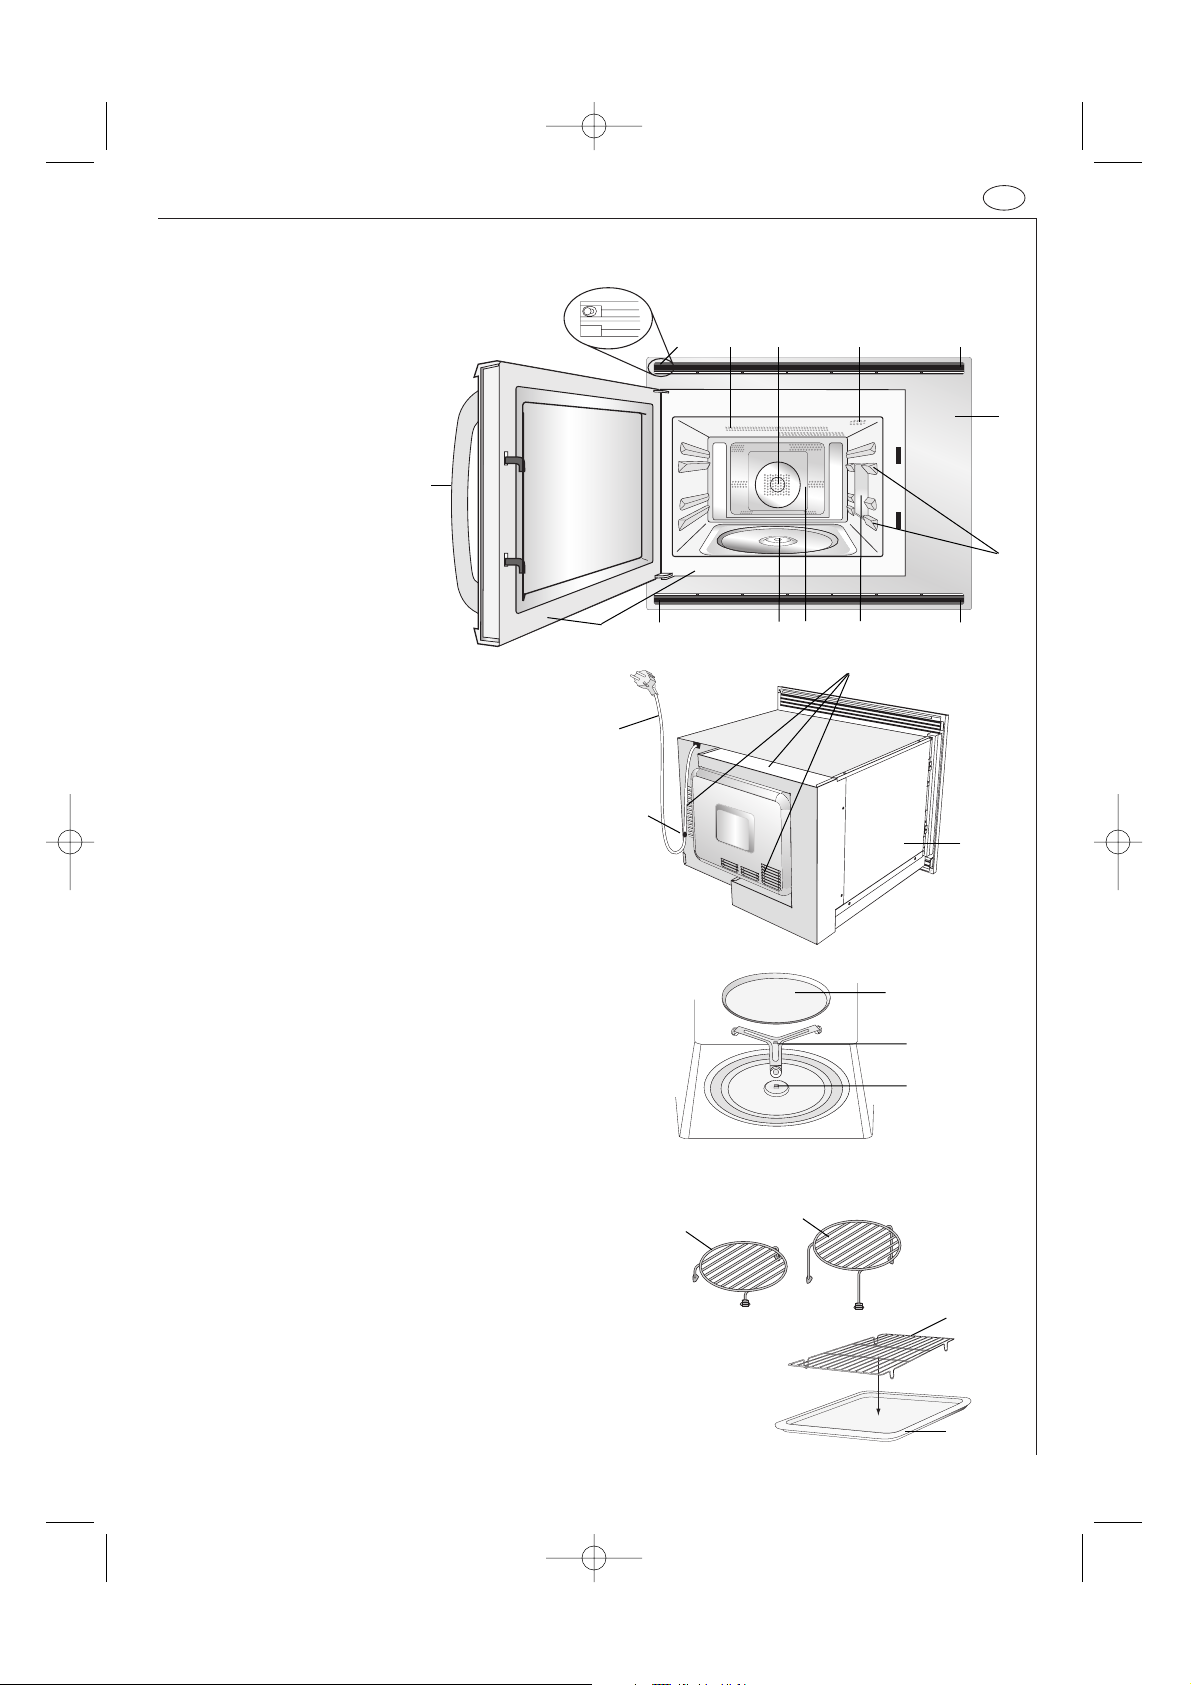
45
D
Gerät & Zubehör
ZUBEHÖR:
Überprüfen, ob die Zubehörteile vorhanden sind:
16 Drehteller 17 Drehteller-Träger 18 Niedriger Rost,
19 Hoher Rost 20 Rost für Glastablett 21 Glastablett.
• Den Drehteller-Träger auf die Antriebswelle in die
Mitte des Gerätebodens legen. Stellen Sie bitte
dabei sicher, dass die TOP markierte Oberseite nach
oben weist. Der Drehteller-Träger sollte sich nun
reibungslos um die Antriebswelle drehen lassen.
• Platzieren Sie nun den Drehteller auf den
Drehteller-Träger.
• Bei Bedarf das hohe/niedrige Rost auf den
Drehteller stellen.
• Schieben Sie das Glastablett in die Laufschienen.
Sie können Speisen direkt auf dem Glastablett
zubereiten oder den Rost beim Braten auf das
Tablett setzen, um tropfendes Fett aufzufangen.
(Siehe Seite 61.)
HINWEIS:
• Das Gerät nur betreiben, wenn der Drehteller und
der Drehteller-Träger korrekt installiert worden
sind. Dies fördert ein gleichmäßiges Garergebnis.
Ein schlecht installierter Drehteller kann klappern,
sich nicht richtig drehen und dadurch das Gerät
beschädigen.
• Der Drehteller dreht sich sowohl im als auch gegen
den Uhrzeigersinn. Die Drehrichtung kann sich bei
jedem erneuten Starten des Geräts ändern. Dies
hat keine Auswirkungen auf das Garergebnis.
• Bei der Bestellung von Zubehör teilen Sie Ihrem
Händler oder dem AEG-Electrolux-Kundendienst
bitte folgende Angaben mit: Name des
Zubehörteils und Bezeichnung des Modells.
1 Befestigungspunkte (4 Stellen)
2 Grill-Heizelement
3 Heißluft-Heizelement
4 Garraumlampe
5 Bedienfeld
6 Laufschienen
7 Spritzschutz für den Hohlleiter
8 Garraum
9 Antriebswelle
10 Türdichtungen und
Dichtungsoberflächen
11 Türgriff
12 Lüftungsöffnungen
13 Außenseite
14 Netzanschlusskabel
15 Netzkabel-Träger
16
17
Antriebswelle
18
19
Diese Roste werden zum Garen im Heißluft-,
Kombi- und Grillbetrieb verwendet.
21
20
14
13
12
4
10
11
8
7
321 1
9
11
15
6
5
2. AG-91D-EU German 21/02/2005 16:22 Page 45
Page 48

46
Bedienblende
Anzeigen und Symbole:
1 Symbol für GARVORGANG
2 Symbol für START
3 Symbol für GRILL
4 Symbol für HEISSLUFT
5 Symbol für MIKROWELLE
6 Symbol für INFORMATION
Bedienungstasten
7 INFORMATIONS-Taste
8 SPRACHEN-Taste
9 Drehknopf für die Wahl der BETRIEBSART
für Mikrowellengaren
für Mikrowellengaren mit GRILL
für Mikrowellengaren mit HEISSLUFT
für GRILL
für HEISSLUFT
10 ZEIT/GEWICHTS-Knopf
Geben Sie mit diesem Knopf entweder die Garoder Auftauzeit bzw. das Gewicht der Speise ein.
11 AUTO-GAREN-Taste
12 AUTO-GAREN VON TK-Taste
(TK = TIEFGEFRORENEM)
13 AUTO-AUFTAUEN-Taste
14 MIKROWELLEN-LEISTUNGSSTUFEN-Taste
15 START/QUICK-Taste
16 STOP-Taste
17 HEIßLUFT-Taste
18 UHREINSTELL-Taste
19 KÜRZER/LÄNGER-Tasten
3
4
5
6
7
8
9
10
11
12
13
14
15
16
18
17
2
1
19
2. AG-91D-EU German 21/02/2005 16:22 Page 46
Page 49

47
D
Das Gerät ist zunächst auf Deutsch eingestellt.
Sie können jedoch eine andere Sprache wählen.
Drücken Sie die SPRACHEN-Taste, bis die gewünschte
Sprache angezeigt wird. Dann die START/QUICK-Taste
drücken.
SPRACHEN-Taste drücken
einmal
zweimal
dreimal
viermal
fünfmal
sechsmal
SPRACHE
ENGLISCH
DEUTSCH
NEDERLANDS
FRANCAIS
ITALIAN
ESPANOL
1. Wählen Sie durch
fünfmaliges Drücken der
SPRACHEN-Taste die
gewünschte Sprache.
2. Starten Sie den Einstellung
durch einmaliges Drücken der
START/QUICK-Taste.
Überprüfen Sie das Display.
Ihr Gerät verfügt über einen Energiesparmodus.
1. Verbinden Sie das Gerät mit der Steckdose. Die
Anzeige zeigt dabei noch nichts an.
2. Öffnen Sie die Tür. Auf der Anzeige erscheint
"SPRACHE WÄHLEN" in 6 Sprachen.
HINWEIS: Nach Wahl der Sprache mit Hilfe der
SPRACHEN-Taste erscheint bei Einschalten des
Herdes “ENERGIESPARMODUS UM DEN
ENERGIESPARMODUS ZU VERLASSEN UHRZEIT
EINSTELLEN” auf der Anzeige.
3. Schließen Sie die Tür.
4. Die gewünschte Sprache wählen (siehe unten).
HINWEIS: Wenn Sie deutschsprachige Anzeigen
wünschen, brauchen Sie die SPRACHEN-Taste nicht
betätigen. Drücken Sie einfach die STOP-Taste.
Daraufhin erscheint die Anzeige “.0” und gehen Sie
zu Schritt 5.
5. Stellen Sie die Uhrzeit ein (siehe Seite 48).
6. Heizen Sie den Grill des Gerätes ohne Speisen auf
(siehe Seite 52).
HINWEISE ZUM GAREN:
Das Gerät verfügt über ein "Informationsanzeigesystem", das Ihnen schrittweise Anleitungen für
die verschiedenen Funktionen in einer gewünschten
Sprache gibt. über die INFORMATIONS-Taste, können
Sie sich die Hinweise über jede Taste des Bedienfeldes
abrufen. Nach dem Drücken einer Taste erscheinen im
Display Anzeigensymbole, die Sie auf den nächsten
Schritt hinweisen.
Beispiel: So wählen Sie Italienisch:
x5
x1
HINWEIS: Die Wahl der Sprache wird gespeichert und durch Stromausfälle nicht gelöscht.
Vor Inbetriebnahme
Auswählen der Sprache
2. AG-91D-EU German 21/02/2005 16:22 Page 47
Page 50

48
Verwendung der Stop-Taste
Verwendung der STOP-Taste:
1. Löschen eines Eingabefehlers während des Programmierens.
2. Unterbrechen des Gerätes während des Betriebs.
3. Zum Löschen eines Programms während des Betriebs die STOP-Taste
zweimal drücken.
EINSTELLEN”. Diese Information erscheint, wenn Sie
die Sprache bereits mit der SPRACHEN-Taste
eingestellt haben. Bei Stromausfall während des
Garens, geht das Bedienungsprogramm und auch die
Uhrzeit verloren.
5. Wenn Sie die Uhrzeit neu einstellen möchten,
verfahren Sie wie im obigen Beispiel.
6. Wenn Sie die Uhr nicht einstellen, drücken Sie
einmal die STOP-Taste erscheint auf dem
Display. Wenn der Betrieb des Gerätes beendet ist,
erscheint anstelle der Uhrzeit wieder auf
dem Display.
7. Bei Einstellung der Uhr wird der “Energiesparmodus”
abgeschaltet.
Die Uhr läuft im 12 Stunden- oder im 24 Stunden-Format.
Schritt 1
1. Um die Uhr auf das 12 Stunden-Format einzustellen, die UHREINSTELL-
Taste entsprechend Schritt 1 einmal drücken.
2. Um die Uhr auf das 24 Stunden-Format einzustellen, die UHREINSTELL-
Taste entsprechend Schritt 2 zweimal drücken.
Schritt 2
Beispiel:
Einstellen der Uhr auf 23 Uhr 35 Min.
2. Stellen Sie die Stunden ein. Den
ZEIT/GEWICHTS-Knopf im
Uhrzeigersinn drehen, bis die richtige
Stunde angezeigt wird (23).
Überprüfen Sie das Display.4. Die Minuten einstellen (35).
HINWEISE:
1. Sie können den ZEIT/GEWICHTS-Knopf im oder
gegen den Uhrzeigersinn drehen.
2. Drücken Sie die STOP-Taste, wenn Sie beim
Programmieren einen Fehler gemacht haben.
3. Wenn sich das Gerät im Garprozess befindet und Sie
die Uhrzeit wissen möchten, drücken Sie die
UHREINSTELL-Taste. Solange Ihr Finger die Taste
berührt, wird die Uhrzeit angezeigt.
4. Falls die Stromversorgung Ihres Mikrowellengerätes
unterbrochen wird, öffnen und schließen Sie die Tür,
sobald die Spannung wieder hergestellt ist. Auf der
Anzeige erscheint “ENERGIESPARMODUS UM DEN
ENERGIESPARMODUS ZU VERLASSEN UHRZEIT
1. Wählen Sie die 24 Stunden-Uhr
durch zweimaliges Drücken der
UHREINSTELL-Taste.
3. Durch einmaliges Drücken
der UHREINSTELL-Taste
von den Stunden zu den
Minuten wechseln.
5. Drücken Sie die UHREINSTELL-
Taste um die Uhr zu starten.
x1
x2
x2
x1
x1
Einstellen der Uhr
2. AG-91D-EU German 21/02/2005 16:22 Page 48
Page 51

49
D
Energiesparmodus
Das Gerät wird mit eingestelltem “Energiesparmodus” geliefert, d.h. die Stromversorgung wird abgeschaltet
Falls Sie 3 Minuten nach einer vorangegangenen Bedienung, der Beendigung des Garvorgangs oder nach dem
Anschließen des Mikrowellengerätes, nichts weiter unternehmen, schaltet das Gerät automatisch in den
Energiesparmodus. Öffnen Sie die Tür, um das Gerät wieder in Betrieb zu nehmen.
Um den Energiesparmodus einzuschalten, gehen Sie wie folgt vor:
Beispiel:
So starten Sie den Energiesparmodus (die aktuelle Zeit ist 23:35 Uhr):
1. Prüfen Sie, ob die
richtige Zeit auf der
Anzeige erscheint.
3. Drehen Sie den
ZEIT/GEWICHTS-
Knopf auf 0.
2. Drücken Sie einmal
die UHREINSTELLTaste.
4. Drücken Sie die START/QUICK-
Taste. Die Stromversorgung wird
abgeschaltet und die Anzeige
erlischt.
HINWEIS: Sie können die UHREINSTELL-Taste während des Schritts 2 zweimal drücken.
x1
x1
Ihr Mikrowellengerät hat 5 Leistungsstufen. Zur
Auswahl der erforderlichen Leistungsstufe zum Garen
befolgen Sie bitte die Hinweise im Abschnitt Rezepte.
Im allgemeinen gelten folgende Empfehlungen:
900 W: für schnelles Garen oder Aufwärmen, z.B. für
Suppen, Eintöpfe, Dosengerichte, heiße Getränke,
Gemüse, Fisch usw.
630 W: zum längeren Garen von kompakteren Speisen
wie Braten, Hackbraten und Tellergerichten, auch für
empfindliche Gerichte wie Käsesoßen oder Rührkuchen.
Mit dieser niedrigeren Einstellung kochen Soßen nicht
über und die Speisen garen gleichmäßig, ohne am Rand
hart zu werden oder überzulaufen.
Um die Mikrowellen-Leistungsstufe einzustellen:
1. Drehen Sie den Drehknopf für die Wahl der Betriebsart in die Mikrowellen-Einstellung.
2. Den ZEIT/GEWICHTS-Knopf im oder gegen den Uhrzeigersinn drehen, um die Garzeit auszuwählen.
3. Die MIKROWELLEN-LEISTUNGSSTUFEN-Taste drücken, bis die gewünschte Leistungsstufe auf dem Display
angezeigt wird. (Wird die MIKROWELLEN-LEISTUNGSSTUFEN-Taste einmal gedrückt, wird angezeigt.)
Wenn Sie die gewünschte Stufe übersehen haben, drücken Sie weiter die MIKROWELLEN-LEISTUNGSSTUFENTaste, bis die Leistungsstufe erneut angezeigt wird.
4. Die Taste START/QUICK drücken.
450 W: für kompaktere Speisen, die beim Garen mit
herkömmlichen Methoden eine lange Garzeit erfordern,
z.B. für Rindfleischgerichte, wird diese Leistungsstufe
empfohlen, damit das Fleisch zart bleibt.
270 W (Auftau-Einstellung): wählen Sie diese Stufe
zum Auftauen, damit Speisen gleichmäßig auftauen.
Diese Stufe ist auch bestens geeignet, um Reis, Nudeln
und Klöße garzuziehen und gebackenen Eierpudding zu
garen.
90 W: zum sanften Auftauen, z.B. für Sahnetorten oder
Blätterteig.
W = WATT
HINWEIS: Wenn keine Auswahl der Leistungsstufe erfolgt, wird automatisch die volle Leistung (900 W) eingestellt.
Hinweis zur Leistungseinstellen
2. AG-91D-EU German 21/02/2005 16:22 Page 49
Page 52

50
Mikrowellen sind wie Radio- und Fernsehwellen,
elektromagnetische Wellen.
Mikrowellen werden im Mikrowellengerät vom
Magnetron erzeugt und versetzen die Wassermoleküle
im Lebensmittel in Schwingungen. Durch die
verursachte Reibung entsteht Wärme, die dafür sorgt,
dass die Speisen aufgetaut, erhitzt oder gegart werden.
Das Geheimnis der kurzen Garzeiten liegt darin, dass die
Mikrowellen von allen Seiten direkt in das Gargut
eindringen. Die Energie wird optimal ausgenutzt. Im
Vergleich dazu gelangt die Energie beim Kochen mit
dem Elektroherd über Umwege von der Herdplatte an
den Kochtopf und dann erst zum Lebensmittel. Auf
diesem Umweg geht viel Energie verloren.
Eigenschaften der Mikrowellen
Mikrowellen durchdringen alle nichtmetallischen
Gegenstände aus Glas, Porzellan, Keramik, Kunststoff,
Holz und Papier. Das ist der Grund dafür, warum diese
Materialien in der Mikrowelle nicht erhitzt werden. Das
Geschirr wird nur indirekt über die Speise erwärmt.
Speisen nehmen Mikrowellen auf (absorbieren) und
werden dadurch erhitzt.
Materialien aus Metall werden von der Mikrowelle nicht
durchdrungen, die Mikrowellen werden zurückgeworfen
(reflektiert). Deshalb sind Gegenstände aus Metall für
die Mikrowelle in der Regel nicht geeignet. Es gibt
jedoch Ausnahmen, wo Sie genau diese Eigenschaften
ausnutzen können. So werden Speisen an bestimmten
Stellen während des Auftauens oder Garens mit etwas
Aluminiumfolie abgedeckt. Dadurch vermeiden Sie zu
warme oder zu heiße bzw. übergarte
Bereiche bei unregelmäßigen Teilen. Beachten Sie
hierzu die folgenden Hinweise.
Mikrowellenbetrieb
Sie können in lhrem neuen Kombi-Mikrowellengerät
durch Einsatz des Mikrowellenbetriebes zum Beispiel
Tellergerichte oder Getränke schnell erhitzen oder in
kürzester Zeit Butter oder Schokolade schmelzen. Für
das Auftauen von Lebensmitteln ist die Mikrowelle
ebenfalls hervorragend geeignet. In vielen Fällen ist es
jedoch vorteilhaft, Mikrowelle mit Heißluft oder Grill zu
kombinieren (Kombibetrieb).
Dann können Sie sowohl in kürzester Zeit garen als
auch gleichzeitig bräunen. Im Vergleich zum
konventionellen Braten ist die Garzeit in der Regel
erheblich kürzer.
Kombibetrieb (Mikrowellenbetrieb mit
Heißluft oder Grill)
Durch die Kombination zweier Betriebsarten werden die
Vorteile Ihres Gerätes sinnvoll miteinander kombiniert.
Sie haben die Möglichkeit zu wählen zwischen
• Mikrowelle + Heißluft (ideal für Braten, Geflügel,
Aufläufe, Pizzen, Brot und Kuchen) und
• Mikrowelle + Grill (ideal für Kurzgebratenes, Braten,
Geflügel, Hähnchenschenkel, Grillspieße, Käsetoasts
und zum Gratinieren).
Durch den Einsatz des Kombibetriebs können Sie
gleichzeitig garen und bräunen. Der Vorteil liegt darin,
dass die Heißluft oder die Hitze des Grills die Poren der
Gargutrandschichten schnell versiegelt. Die Mikrowellen
sorgen für eine kurze schonende Garzeit. Das
Lebensmittel bleibt innen saftig und wird außen
knusprig.
Heißluftbetrieb
Sie können die Heißluft auch ohne Mikrowellenbetrieb
einsetzen. Die Ergebnisse entsprechen denen eines
konventionellen Backofens.
Zirkulierende Luft erhitzt sehr schnell die äußeren Teile
der Lebensmittel, so dass beispielsweise bei Fleisch der
Fleischsaft nicht austreten kann und das Gargut nicht
austrocknet.
Dieser Versiegelungsprozeß führt dazu, dass die Speisen
schmackhaft bleiben und in kürzerer Zeit garen als bei
konventionellen Geräten mit Ober- und Unterhitze.
Grillbetrieb
Ihr Gerät ist mit einem Quarzgrill an der Garraumdecke
ausgestattet. Er kann wie jeder konventionelle Grill
ohne Mikrowellenbetrieb benutzt werden. Sie können
Gerichte schnell überbacken oder grillen. Besonders
geeignet sind Steaks, Koteletts und Gerichte zum
Überbacken.
Was sind Mikrowellen?
Das kann ihr neues Kombi-Mikrowellengerät
2. AG-91D-EU German 21/02/2005 16:22 Page 50
Page 53

51
D
HINWEISE:
1. Wenn die Tür während der Garzeit geöffnet wird,
wird die Garzeit auf dem Display automatisch
gestoppt. Sie läuft weiter, sobald die Tür geschlossen
und die START/QUICK-Taste gedrückt wurde.
2. Wenn Sie während der Garzeit die Leistungsstufe
überprüfen wollen, drücken Sie die
MIKROWELLEN-LEISTUNGSSTUFEN-Taste. Solange
Ihr Finger die MIKROWELLEN-LEISTUNGSSTUFENTaste berührt, wird die Leistungsstufe angezeigt.
3. Sie können den ZEIT/GEWICHTS-Knopf im oder
entgegen dem Uhrzeigersinn drehen. Wenn Sie den
Knopf entgegen dem Uhrzeigersinn drehen,
verringert sich die Garzeit allmählich von 90
Minuten.
Garzeit: Zeiteinheiten:
0-5 Minuten 10 Sekunden
5-10 Minuten 30 Sekunden
10-30 Minuten 1 Minute
30-90 Minuten 5 Minuten
Ihr Gerät lässt sich bis zu 90 Minuten programmieren.
(90.00). Die Zeiteinheiten zum Garen (Auftauen)
variieren von 10 Sekunden bis fünf Minuten, in
Abhängigkeit von der Gesamtgar- oder Auftauzeit, wie
in der Tabelle aufgeführt:
Beispiel:
So wärmen Sie Suppe für 2 Minuten und 30 Sekunden bei 630 W Mikrowellenleistung auf.
2. Drehen Sie den
ZEIT/GEWICHTS-Knopf
nach rechts, um die
Garzeit einzustellen.
3. Drücken Sie die
MIKROWELLENLEISTUNGSSTUFEN-
Taste, bis die gewünschte
Leistungsstufe erreicht
ist.
4. Drücken Sie die
START/QUICK-
Taste, um mit dem
Erhitzungsvorgang
zu starten.
1. Drehen Sie den
Drehknopf für die Wahl
der BETRIEBSART in
die MikrowellenEinstellung.
Überprüfen Sie das Display.
Garen mit der Mikrowelle
x1
x2
2. AG-91D-EU German 21/02/2005 16:22 Page 51
Page 54

52
Grillbetrieb
2. Geben Sie durch Drehen des
ZEIT/GEWICHTS-Knopfes im
Uhrzeigersinn die gewünschte
Garzeit ein.
1. Stellen Sie den Drehknopf für die
Wahl der BETRIEBSART in die
Einstellung GRILL.
1. Stellen Sie den Drehknopf für
die Wahl der BETRIEBSART in
die Einstellung GRILL
oder Heissluft.
3. Drücken Sie die START/QUICK-
Taste, um den Garvorgang zu
starten.
3. Drücken Sie die
START/QUICK-Taste, um
den Garvorgang zu starten.
Die Leistung des oben an der Garraumdecke befindlichen Grillheizelements ist nicht regulierbar.
Beispiel: So backen Sie Käsetoast in 5 Minuten (legen Sie das Toast auf den hohen Rost).
x1
1. Zum Grillen wird die Verwendung des hohen bzw. niedrigen Rosts empfohlen.
2. Bei der ersten Benutzung des Grills kann es zu Rauch- und Geruchsentwicklung kommen. Das ist normal und
kein Anzeichen dafür, dass das Gerät funktionsuntüchtig ist. (Siehe unten ‘Heizen ohne Speisen’.)
3. Nach dem Garen erscheint in der Anzeige “KÜHLUNG”.
Überprüfen Sie das Display.
Bei der ersten Benutzung des Grills und der Heißluft kann es zu Rauch- oder Geruchsentwicklung kommen. Das ist
normal und kein Anzeichen dafür, dass das Gerät funktionsuntüchtig ist.
Um dieses Problem beim erstmaligen Gebrauch des Gerätes zu vermeiden, betreiben Sie den Grill und die Heißluft
(250° C) 20 Minuten lang ohne Speisen.
WICHTIG: Damit während des Grillbetriebs entstehender Rauch oder Gerüche abziehen können, öffnen Sie ein
Fenster oder schalten Sie die Abzugshaube/den Ventilator ein.
2. Geben Sie die
gewünschte Heizzeit
ein. (20 Min).
x1
WARNUNG: Die Gerätetür, die Außenflächen und der Garraum werden
heiß. Achten Sie darauf, dass Sie sich keine Verbrennungen
zuziehen, während das Gerät abkühlt.
Das Gerät zählt nun
die Zeit zurück. Nach
dem Aufheizen die
Gerätetür öffnen und
den Garraum
auskühlen lassen.
WARNUNG: Garraum, Gerätetür, Außenseiten, Drehteller, Roste und Geschirr werden sehr heiß. Beim
Entnehmen der Speisen oder des Drehtellers aus dem Gerät dicke Ofenhandschuhe tragen,
um Verbrennungen zu verhindern.
Heizen ohne Speisen
2. AG-91D-EU German 21/02/2005 16:22 Page 52
Page 55

53
D
HEISSLUFT-Taste drücken
Gerätetemperatur (° C)
Beispiel 1: Garen mit Vorheizen
So heizen Sie auf 180° C vor und garen für 20 Minuten bei 180° C.
12345678910
250 230 220 200 190 180 160 130 100 40
HINWEISE:
1. Wenn das Gerät vorgeheizt wird, den Drehteller im Gerät lassen.
2. Wenn Sie nach dem Vorheizen bei unterschiedlichen Temperaturen garen wollen, drücken Sie die HEISSLUFT-
Taste, bis die gewünschte Einstellung auf dem Display angezeigt wird. In dem obigen Beispiel würden Sie zur
Änderung der Temperatur die HEISSLUFT-Taste nach der Eingabe der Garzeit drücken.
3. Wenn das Gerät die programmierte Vorheiztemperatur erreicht hat, wird diese automatisch 30 Minuten lang
beibehalten. Nach 30 Minuten wechselt das Display zur Uhrzeit, falls eingestellt.
Das ausgewählte HEISSLUFT-Programm wird gelöscht.
4. Nach dem Garen kühlt das Gerät automatisch ab und auf dem Display erscheint “KÜHLUNG”.
5. Die besten Resultate werden erzielt, wenn bei den Packungsanweisungen die Empfehlungen für Ober- und
Unterhitze befolgt werden.
Sie können Ihr Gerät mit Hilfe der Heißluftfunktion und den 10 voreingestellten Temperaturstufen wie einen
konventionellen Herd benutzen.
4. Mit dem ZEIT/GEWICHTS-Knopf
die Garzeit (20 Min.) eingeben.
Überprüfen Sie das
Display.
x6
x1
x1
5. Die START/QUICK-Taste
drücken.
2. Die gewünschte Vorheiz-
temperatur durch
sechsmaliges Drücken
der HEISSLUFT-Taste
eingeben. Auf dem
Display wird 180° C
angezeigt.
3. Die START/QUICK-
Taste drücken, um
das Vorheizen zu
starten.
Wenn die Vorheiztemperatur erreicht ist,
ertönt das akustische
Signal, auf dem Display
wird 180° C angezeigt. Die
Gerätetür öffnen und die
Speisen in das Gerät
geben. Die Tür schließen.
1. Stellen Sie den
Drehknopf für die Wahl
der BETRIEBSART in
die Einstellung
HEISSLUFT.
Heissluftbetrieb
2. AG-91D-EU German 21/02/2005 16:22 Page 53
Page 56

54
3. Die gewünschte
Gartemperatur
eingeben. (250° C).
Beispiel 2: Garen ohne Vorheizen
So garen Sie für 20 Minuten bei 250° C.
2. Mit dem ZEIT/
GEWICHTS-Knopf
die Garzeit eingeben
(20 Min.).
WARNUNG: Garraum, Gerätetür, Außenseiten, Drehteller, Roste und Geschirr werden sehr heiß. Beim
Entnehmen der Speisen oder des Drehtellers aus dem Gerät dicke Ofenhandschuhe tragen,
um Verbrennungen zu verhindern.
HINWEISE:
1. Nach dem Garen kühlt das Gerät automatisch ab und auf dem Display erscheint “KÜHLUNG”.
2. Um die Heißlufttemperatur zu ändern, die HEISSLUFT-Taste drücken, bis die gewünschte Temperatur auf dem
Display angezeigt wird.
3. Bei der ersten Benutzung Heißluft kann es zu Rauch- und Geruchsentwicklung kommen. Das ist normal und kein
Anzeichen dafür, dass das Gerät funktionsuntüchtig ist. (Siehe Seite 52 ‘Heizen ohne Speisen’.)
Überprüfen Sie das Display.
4. Die START/QUICK-
Taste drücken.
1. Stellen Sie den
Drehknopf für die Wahl
der BETRIEBSART in
die Einstellung
HEISSLUFT.
x1
x1
Heissluftbetrieb
2. AG-91D-EU German 21/02/2005 16:22 Page 54
Page 57

55
D
1. Stellen Sie den Drehknopf für die
Wahl der BETRIEBSART in die
Einstellung KOMBI 1.
2. Die gewünschte Garzeit
eingeben (20 Minuten).
3. Drücken Sie die
MIKROWELLENLEISTUNGSSTUFEN-
Taste zweimal (90 W).
HINWEISE: Die Leistungseinstellungen sind variabel:
KOMBI 1 : Die Heissluftemperatur kann in zehn Stufen von 40° C bis 250°C eingestellt werden.
Die Mikrowellenleistungsstufen können in vier Stufen von 90 W bis 630 W eingestellt werden.
KOMBI 2 : Die Mikrowellenleistungsstufen können in fünf Stufen von 90 W bis 900 W eingestellt werden.
Beispiel 1:
So garen Sie für 20 Minuten im KOMBIBETRIEB 1 mit 90 W Mikrowellenleistung und 200°C Heißluft.
4. Die HEISSLUFT-Taste viermal
drücken (200°C).
5. Die START/QUICK-Taste
drücken.
Überprüfen Sie das Display.
Ihr Mikrowellengerät verfügt über 2 KOMBI-Betriebsarten, bei denen die Mikrowelle entweder mit der Heissluft
oder mit dem Grill kombiniert werden. Um einen KOMBI-Betrieb zu wählen, drehen Sie zuerst den Drehknopf für
die Wahl der BETRIEBSART in die gewünschte Einstellung und dann stellen Sie die Garzeit ein. Im allgemeinen
verkürzt die KOMBI-Betriebsart die Gesamtgarzeit.
Garmethode
Heissluft 250°C
Grill
BETRIEBSART
KOMBI 1
KOMBI 2
Grundeinstellung der
Mikrowellenleistung
270 W
270 W
x1
x4
x2
Kombi-Betrieb
2. AG-91D-EU German 21/02/2005 16:22 Page 55
Page 58

56
WARNUNG: Garraum, Gerätetür, Außenseiten, Drehteller, Roste und Geschirr werden sehr heiß. Beim
Entnehmen der Speisen oder des Drehtellers aus dem Gerät dicke Ofenhandschuhe tragen,
um Verbrennungen zu verhindern.
HINWEIS: Nach dem Garen kühlt das Gerät automatisch ab und auf dem Display erscheint “KÜHLUNG”.
2. Die gewünschte
Garzeit eingeben
(20 Minuten).
3. Drücken Sie die
MIKROWELLENLEISTUNGSSTUFEN-
Taste zweimal (90 W).
Beispiel 2:
So garen Sie für 20 Minuten im KOMBIBETRIEB 2 mit 90 W Mikrowellenleistung und GRILL.
Überprüfen Sie das Display.
1. Stellen Sie den Drehknopf für
die Wahl der BETRIEBSART in
die Einstellung KOMBI 2.
4. Die START/QUICK-Taste
drücken.
x2
x1
Kombi-Betrieb
2. AG-91D-EU German 21/02/2005 16:22 Page 56
Page 59

57
D
1. KÜRZER ( ▼ )/LÄNGER ( ▲ )-Taste
Mit den KÜRZER ( ▼ ) und LÄNGER ( ▲ ) -Tasten können Sie die programmierten Zeiteinstellungen
problemlos verkürzen oder verlängern (um die Speisen mehr oder weniger durchzugaren).
a) Ändern der vorprogrammierten Zeiteinstellung:
Drücken Sie die KÜRZER ( ▼ ) und LÄNGER ( ▲ )-Tasten nach Eingabe des Gewichts und vor dem
Drücken der START/QUICK-Taste. (Für Menüs mit KÜRZER und LÄNGER, sehen Sie Seiten 68 - 69.)
1. Wählen Sie das AUTO-GAREN VON TK
Menü für Pommes Frites durch
viermaliges Drücken der AUTO-
GAREN VON TK-Taste.
2. Das Gewicht
eingeben (0,2 kg).
4. Die START/QUICK-Taste
drücken
Überprüfen Sie das Display.
x4
x1
Beispiel: So backen Sie 0,2 kg Pommes Frittes mit der AUTO-GAREN VON TK-Taste.
3. Wählen Sie das gewünschte Garergebnis
(dünne Sorte) durch einmaliges Drücken
der KÜRZER ( ▼ )-Taste.
x1
b) Ändern der Garzeit bei laufendem Garvorgang:
Sie können die Garzeit um je 1 Minute vermindern oder erhöhen, indem Sie die KÜRZER ( ▼ ) - oder
LÄNGER ( ▲ ) -Taste drücken.
HINWEIS: Diese Funktion können Sie nur für manuelles Garen verwenden.
HINWEISE:
Zum Abbrechen von KÜRZER oder LÄNGER drücken Sie die gleiche Taste noch einmal.
Um von LÄNGER zu KÜRZER zu wechseln, drücken Sie einfach die KÜRZER ( ▼ ) -Taste.
Um von KÜRZER zu LÄNGER zu wechseln, drücken Sie einfach die LÄNGER ( ▲ ) -Taste.
Andere nützliche Funktionen
2. AG-91D-EU German 21/02/2005 16:22 Page 57
Page 60

58
b) Verlängerung der Garzeit
Sie können die Garzeit je 1 Minute verlängern, wenn Sie während des Betriebs die START/QUICK-Taste drücken.
HINWEIS: Diese Funktion können Sie nur für manuelles Garen verwenden.
2.START/QUICK FUNKTION
Mit der START/QUICK-Taste können Sie die folgenden beiden Funktionen ausführen:
a) 30 Sekunden kochen
Sie können die gewünschte Betriebsart 30 Sekunden lang direkt einschalten, ohne die Garzeit einzugeben.
Beispiel: So garen Sie für 30 Sekunden bei 630 W Mikrowellenleistung.
2. Um die Leistungsstufe
zu ändern, drücken Sie
die MIKROWELLEN-
LEISTUNGSSTUFENTaste zweimal.
3. Drücken Sie die
START/QUICK-Taste,
um mit dem
Erhitzungsvorgang zu
starten.
1. Drehen Sie den
Drehknopf für die Wahl
der BETRIEBSART in die
Mikrowellen- Einstellung
.
x2 x1
Überprüfen Sie
das Display.
HINWEIS:
1. Diese Funktion können Sie nur für manuelles Garen verwenden.
2. Wenn der Drehknopf für die Wahl der BETRIEBSART auf Mikrowellengaren ( ) eingestellt ist und Sie die
START/QUICK-Taste drücken, beträgt die Leistung für Mikrowelle immer 900 W.
Steht der Drehknopf für die Wahl der BETRIEBSART auf der Stellung ( oder ) und Sie die
START/QUICK-Taste drücken, beträgt die Leistung für Mikrowelle immer 270 W.
Steht der Drehknopf für die Wahl der BETRIEBSART auf der Stellung ( oder ) und Sie die
START/QUICK-Taste drücken, beträgt die Heißlufttemperatur immer 250° C.
3. Um eine Fehlbedienung durch Kinder zu verhindern, kann die START/QUICK-Taste nur 3 Minuten nach der
vorhergehenden Bedienung genutzt werden, z.B. nach dem Schließen der Tür oder dem Betätigen der STOP-Taste.
Andere nützliche Funktionen
2. AG-91D-EU German 21/02/2005 16:22 Page 58
Page 61

59
D
3. ÜBERPRÜFEN DER EINSTELLUNG WÄHREND DES BETRIEBS
Sie können die Leistungsstufe und die Gerätetemperatur überprüfen z.B. beim Vorheizen.
ÜBERPRÜFEN DER LEISTUNGSSTUFE:
Um während des Garvorgangs die Mikrowellenleistung
zu überprüfen, drücken Sie die MIKROWELLEN-
LEISTUNGSSTUFEN-Taste.
Solange Sie die Taste mit
dem Finger drücken,
wird die Leistungsstufe
angezeigt.
ÜBERPRÜFEN DER HEISSLUFTTEMPERATUR:
Um während des Garens die Heißlufttemperatur zu
überprüfen, die HEISSLUFT-Taste drücken.
Während der Gerät vorgeheizt wird, die
Gerätetemperatur überprüfen.
Solange Sie die Taste mit
dem Finger drücken, wird
die Heißlufttemperatur in
° C angezeigt.
1. Wählen Sie die
INFORMATIONS-
Funktion.
2. Das AUTO-GAREN-Menü
für Brathähnchen durch
dreimaliges Drücken der
AUTO-GAREN-Taste
wählen.
4.INFORMATIONS-Taste
Jede Taste bietet nützliche Informationen. Wenn Sie die
Informationen sehen wollen, drücken Sie die
INFORMATIONS-Taste, bevor Sie die gewünschte Taste
betätigen.
Beispiel:
So rufen Sie Informationen über das AUTO-GARENMenü 2 für Grillhähnchen ab:
HINWEIS:
1. Die Informationsmeldung wird zweimal
wiederholt, anschließend wird auf dem Display
die Uhrzeit angezeigt.
2. Wenn Sie die Informationen abbrechen wollen,
drücken Sie die STOP-Taste.
x1
x3
Andere nützliche Funktionen
2. AG-91D-EU German 21/02/2005 16:22 Page 59
Page 62

60
Geeignetes Geschirr
Betriebsart
Mikrowelle Heißluft Grill
Kombination
XXXX
X---
XXXX
XX-X
XX 3)-X
3)
X---
X---
XX-X
4)
-XX-
-X--
Ofenfestes Material
Ofenfestes Glas- und Keramikgeschirr (ohne
Metallteile, z.B. Pyrex, Koch- und
Serviergeschirr, Glastablett).
Nicht-ofenfestes Glas und Porzellan
(z.B. Tischgeschirr 1).
Glaskeramik aus feuerfestem
/kältebeständigem Material (z.B. Arcoflam).
Ofenfestes Steingut 2).
Kunststoff, hitzebeständig bis zu 200° C 3).
Papier, Pappe
Klarsichtfolie
Mikrowellen-geeignete Bratbeutel 4).
Metallpfanne, z.B. aus Emaille oder
Gußeisen.
Schwarz lackierte oder silikonbeschichtete
Backformen.
X = geeignet - = ungeeignet
1). Ohne Silber-, Gold-, Platin- oder Metallverzierungen.
2). Gilt nicht für Glasur mit Metallbestandteilen.
3). Bitte beachten Sie die vom Hersteller angegebene Höchsttemperatur.
4). Kombibetrieb mit Heißluft + Mikrowelle.
2. AG-91D-EU German 21/02/2005 16:22 Page 60
Page 63

61
D
Gartabellen
Die obigen Angaben dienen lediglich zu Ihrer Information.
Für optimale Ergebnisse passen Sie die Garzeiten/Leistungsstufen Ihren Anforderungen an.
Die angegebenen Zeiten dienen lediglich als Anhaltspunkt, da sie von der Art und Qualität des Fleisches abhängen.
Grillen eignet sich besonders für dünne Fleischstücke und Fisch.
Sofern nicht anders angegeben, gelten die Einstellungen in dieser Tabelle für kalte (nicht vorgeheizte) Geräte.
Dünne Stücke nur einmal wenden. Dickere Stücke bitte mehrmals wenden.
Fisch wenn möglich von Kopf bis Schwanz auf den Gitterrost legen.
BACKEN MIT DEM GLASTABLETT UND HEISSLUFT
Quiche Vorheizen 200 ˚C Boden für 15’00 backen, direkt auf dem Glastablett,
1) 20’00 200 ˚C unterer Einschub, nach 1) drehen
2) 12’00 200 ˚C
Bananenbrot Vorheizen 180 ˚C Kastenform auf Glastablett stellen, unterer Einschub
60’00 180 ˚C
Aprikosen-Pecan-brot Vorheizen 180 ˚C Kastenform auf Glastablett stellen, unterer Einschub
35’00 90 W & 180 ˚C
Kirsch-Mandel-Kuchen Vorheizen 180 ˚C Kastenform auf Glastablett stellen, unterer Einschub
40’00 90 W & 180 ˚C
Käsekuchen Vorheizen 160 ˚C Auf dem Rost auf das Glastablett stellen, unterer Einschub
54’00 160 ˚C
Tiefkühlpizza Vorheizen 220 ˚C Auf dem Rost auf das Glastablett stellen, unterer Einschub
12’00 220 ˚C
Knoblauchbrot Vorheizen 200 ˚C Direkt auf das Glastablett legen, unterer Einschub
15’00 90 W & 200 ˚C
Tiefkühl-Lasagne Vorheizen 200 ˚C Direkt auf das Glastablett legen, unterer Einschub
25’00 270 W & 200 ˚C
Kleine Blätterteigteile Vorheizen 160 ˚C Direkt auf das Glastablett legen, unterer Einschub
(aus Teig) (z.B. Croissant) 35’00 160 ˚C
MENU ZEIT BETRIEBSART POSITION
VERWENDUNG DES GLASTABLETTS MIT DEM GRILL
Auflauf 1) 6’00 900 W Auflaufform auf das Glastablett stellen, unterer Einschub,
2) 14’00 450 W & grill nach 2) drehen
3) 5’00 450 W & grill
Grillspieße 1) 10’00 270 W & grill Auf dem Rost auf das Glastablett stellen, oberer Einschub
2) 10’00 270 W & grill
Zwiebelsuppe 1) 8’00 900 W Suppentassen auf das Glastablett stellen, unterer
2) 7’30 270 W & grill Einschub, nach (1) Käse & Croutons zufügen
Hähnchen-Nudel Kasserolle 1) 3’00 900 W Form auf das Glastablett stellen, unterer Einschub
2) 10’00 450 W & grill
Steak 1) 9’00 Grill Auf dem Rost auf das Glastablett legen, unterer Einschub
2) 4’00 Grill
Dicke Würstchen 1) 14’00 Grill Auf dem Rost auf das Glastablett legen, unterer Einschub,
2) 5’00 Grill nach 1) wenden
Dünne Würstchen 1) 12’00 Grill Auf dem Rost auf das Glastablett legen, unterer Einschub,
2) 6’00 Grill nach 1) wenden
Toast 1) 4’30 Grill Auf dem Rost auf das Glastablett legen, unterer Einschub,
2) 1’30 Grill nach 1) wenden
Käse auf Toast 1) Vorheizen 2’00 Grill Auf dem Rost auf das Glastablett legen, unterer Einschub,
2) 5’00 Grill nach 2) wenden und mit Käse belegen.
3) 4’30 Grill
Makrele 1) 6’00 90 W & Grill Auf dem Rost auf das Glastablett legen, unterer Einschub,
2) 6’00 90 W & Grill nach 1) wenden
Sardinen 1) 5’00 90 W & Grill Auf dem Rost auf das Glastablett legen, unterer Einschub,
2) 3’00 90 W & Grill nach 1) wenden
MENU ZEIT BETRIEBSART POSITION
2. AG-91D-EU German 21/02/2005 16:22 Page 61
Page 64

62
Rezepte für Glastablett & Heißluft
Bananenbrot
Zutaten
120 g Butter
170 g Zucker
1 TL Kaffeeessenz
2 reife Bananen
225 g Mehl
1 TL doppelt kohlensaures Natron
1
/4 TL Backpulver
1 mittelgroßes Ei
100 ml Milch
Den Ofen vorheizen.
1. Die Kastenform einfetten und mit Backpapier auslegen.
2. Butter und Zucker schaumig schlagen.
3. Ei und Kaffeeessenz hinzufügen und wieder verrühren.
4. Bananen abschälen und zerdrücken, zur Mischung
hinzufügen, gut rühren.
5. Mehl, Natron, Backpulver und Milch hinzufügen und
rühren, bis der Teig glatt ist.
6. Den Teig in die Kastenform füllen und die Oberfläche
glätten.
7. Die Kastenform auf das Glastablett stellen, unterer
Einschub.
60 Min. 180 ˚C
8. 5 Minuten lang in der Form ruhen lassen, anschließend
auf einem Gitterrost abkühlen lassen.
Aprikosen-Pecan-Brot
Zutaten
Prise Salz
1
1
/2 TL Backpulver
2 TL Zimt
110 g weißes Mehl
110g Vollkornmehl
110 g Butter
175 g brauner Zucker
2 verrührte Eier
3 EL Milch
175 g verzehrfertige Aprikosen, gehackt
175g getoastete Pecan-Nüsse, gehackt
Den Ofen vorheizen.
1. Die Kastenform einfetten und mit Backpapier auslegen.
2. Salz, Backpulver, Zimt und Mehl vermischen.
3. Die restlichen Zutaten hinzufügen, außer Früchten und
Nüssen und gut verrühren.
4. Früchte und Nüssen unterheben.
5. Den Teig in die Kastenform füllen und die Oberfläche
glätten.
6. Die Kastenform auf das Glastablett stellen, unterer
Einschub.
35 Min. 90 W / 180 ˚C
Gebackener Käsekuchen
Zutaten
Boden:
100 g Butter
4 TL brauner Zucker
200 g weißes Mehl
110 g zerdrückte Roggenmehl-Kekse
Füllung:
450 g Weichkäse
150 g Double Cream (Sahne mit 48 % Fettgehalt)
100 g Zucker
2 Eigelb
Saft und Schale 1 Zitrone
1. Den Boden der Springform mit Backpapier auslegen.
2. Die Butter schmelzen, Zucker und zerdrückte Kekse
hinzufügen.
3. Auf den Boden der Springform drücken und kaltstellen,
bis die Masse sich gefestigt hat.
4. Alle Zutaten für die Füllung in eine Schüssel geben und
verrühren, bis die Masse glatt ist.
5. Die Füllung auf den gekühlten Boden geben.
6. Die Kuchenform auf das Glastablett stellen, unterer
Einschub.
54 Min. 160 ˚C
7. Abkühlen lassen, vor dem Servieren mit Obst verzieren.
2. AG-91D-EU German 21/02/2005 16:22 Page 62
Page 65

63
D
Rezepte für Glastablett & Heißluft
Zweibelquiche
Zutaten
500 g Mürbeteig
45 g Butter
300 g rote Zwiebeln, in Scheiben
3 mittelgroße Eier
150 g Double Cream (Sahne mit 48% Fettgehalt)
50 g Milch
100 g geriebenen Gouda
1
/4 TL Dijon-Senf
Schwarzer Pfeffer
1
/4 TL Salz
Den Ofen vorheizen.
1. Den Mürbteig ausrollen und das rechteckige Blech mit
Backpapier auslegen.
2. Den Teig mit einer Gabel mehrfach einstechen.
3. Den Mürbteig mit Backpapier abdecken.
4. Auf unterer Stufe backen
15 Min. 200 ˚C
5. Aus dem Ofen nehmen und abkühlen lassen.
6. Die Zwiebeln in Butter anbraten:
5 Min. 900 W
Die Butter abgießen und abkühlen lassen.
7. Eier, Sahne, Milch, Senf, Salz und Pfeffer verrühren.
8. Zwiebeln und Käse hinzufügen und gut verrühren.
9. Die Mischung auf den Teigboden geben und backen.
1. 20 Min. 200 ˚C, drehen, dann
2. 12 Min. 200 ˚C
Kirsch-Mandel-Kuchen
Zutaten
175 g Margarine
175 g Zucker
3 mittelgroße Eier
175 g weißes Mehl
1 TL Backpulver
100g kandierte Kirschen
75 g gemahlene Mandeln
1 TL Mandelessenz
1 EL Milch
1. Die Springform einfetten und mit Backpapier auslegen.
2. Margarine und Zucker rühren, bis sie leicht und
schaumig sind.
3. Die Eier nacheinander einrühren.
4. Mehl und Backpulver unterheben, Kirschen, gemahlene
Mandeln, Mandelessenz und Milch einrühren.
5. Die Teigmischung in die Kuchenform geben und die
Oberfläche glätten.
6. Die Kuchenform auf das Glastablett stellen, unterer
Einschub.
40 Min. 90 W / 180 ˚C
2. AG-91D-EU German 21/02/2005 16:22 Page 63
Page 66

64
Rezepte für Glastablett & Grill
Zwiebelsuppe
Zutaten
20 g Butter
250 g Zwiebeln
500 ml Brühe
Salz & Pfeffer
2 Scheiben Toast
80 g Emmentaler
1. Die Zwiebeln schneiden, mit der Brühe in eine Schüssel
geben, Salz und Pfeffer hinzufügen,
8 Min. 900 W
2. Die Suppe auf 4 Suppentassen verteilen.
3. Toast würfeln und auf die Suppe geben, Käse über die
Toaststückchen verteilen.
4. Die Suppentassen auf das Glastablett stellen, unterer
Einschub, garen.
7
1
/2 Min. 270 W / GRILL
Gratin
Zutaten
450 g Kartoffeln, dünn geschnitten
150 g Zwiebelscheiben
200 g geriebenen Gouda
Salz & Pfeffer
250 ml Sahne
3 Eier
1. Die Auflaufform einfetten.
2. Eine Lage Kartoffeln, eine Lage Zwiebeln und die Hälfte
vom Käse in die Form geben.
3. Wiederholen, mit einer Lage Kartoffeln abschließen.
4. Sahne und Eier verrühren, Salz und Pfeffer hinzufügen.
Über die Kartoffeln gießen.
5. Den restlichen Käse darüber streuen.
6. Die Form auf das Glastablett stellen, unterer Einschub,
backen.
1. 6 Min. 900 W
2. 14 Min. 450 W / GRILL, drehen, dann
3. 5 Min. 450 W / GRILL
Hähnchen-Gratin
Zutaten
30 g Butter
100 g Champignons in Scheiben
100 g Zwiebel, gewürfelt
100 g Paprika, gewürfelt
25 g weißes Mehl
175 ml Milch
300 ml Brühe
150 g Mais
Salz & Pfeffer
250 g gekochtes Hühnchen, in Würfel geschnitten
150 g gekochte Nudeln
75 g frisch geriebener Gouda
1. Butter, Zwiebeln, Pfeffer und Champignons in eine
Schale geben und garen
2 Min. 900 W
2. Mehl mit Milch glatt rühren, Brühe, Mais, Salz &
Pfeffer hinzufügen und gut verrühren.
3. Hühnchen und Nudeln zur Soße hinzufügen.
4. Den Käse darüber streuen.
5. Die Form auf das Glastablett stellen, unterer Einschub,
backen.
1. 3 Min. 900 W
2. 10 Min. 450 W / GRILL
Gegrillte Sardinen/Makrelen
Zutaten
6 Sardinen/Makrelen ohne Kopf
Marinade:
4 TL Olivenöl
1 TL Knoblauchpüree
1 TL Balsamessig
1 TL Zitronensaft
Salz & Pfeffer
1 TL Fenchel
1. Alle Zutaten zu einer Marinade vermischen, auf den
Fisch streichen, eine Stunde kaltstellen.
2. Auf dem Rost auf das Glastablett stellen, unterer
Einschub.
Sardinen garen:
1. 5 Min. 90 W / GRILL wenden
2. 3 Min. 90 W / GRILL
Makrelen garen:
1. 6 Min. 90 W / GRILL, wenden
2. 6 Min. 90 W / GRILL
2. AG-91D-EU German 21/02/2005 16:22 Page 64
Page 67

65
D
Automatik-Betrieb
Bei Benutzung eines AUTOMATIKPROGRAMMS erfolgt die
Einstellung der Leistungsstufe und Garzeit automatisch. Sie
können 5 AUTO-GAREN Menüs, 4 AUTO-GAREN VON TK
Menüs und 7 AUTO-AUFTAUEN-Menüs auswählen.
Warnung:
Für AUTO-GAREN und AUTO-GAREN VON TK:
Garraum, Tür, Außenseiten, Drehteller, Roste und Geschirr
werden besonders heiß. Beim Entnehmen der Speisen
oder des Drehtellers aus dem Gerät dicke
Ofenhandschuhe tragen, um Verbrennungen zu
verhindern.
Was Sie bei der Verwendung dieser Automatik-Funktion wissen
sollten:
1. Die Menüs werden eingegeben, indem Sie die AUTOGAREN, AUTO-GAREN VON TK oder AUTO-AUFTAUEN-
Tasten drücken, bis die gewünschte Menünummer auf dem
Display angezeigt wird.
2. Das Gewicht/Menge der Speisen wird über den
ZEIT/GEWICHTS-Knopf eingestellt, bis das gewünschte
Gewicht/Menge angezeigt wird.
• Nur das Gewicht der Speisen eingeben. Das Gewicht des
Behälters nicht einbeziehen.
• Speisen, deren Gewicht/Menge die Angaben in der Tabelle
über- oder unterschreitet, garen Sie bitte in manuellem
Betrieb.
3. Die programmierten Garzeiten sind Mittelwerte. Falls Sie die
Lebensmittel stärker oder schwächer garen möchten als
vom Programm vorgesehen, kann die Garzeit mit der Taste
für KÜRZER ( ▼ ) bzw. LÄNGER ( ▲ ) entsprechend
abgeändert werden. Einzelheiten siehe Seite 57.
Die besten Ergebnisse erzielen Sie, wenn Sie den
Anleitungen in der Tabelle und im Kochbuch folgen.
4. Um den Garvorgang zu starten, die START/QUICK-Taste
drücken.
Wenn ein Bedienungsschritt erforderlich ist (z.B. zum
Wenden der Speisen), stoppt das Gerät und das akustische
Signal ertönt. Im Anzeigefeld sehen Sie die notwendige
Aktion. Um den Garvorgang fortzusetzen, START/QUICKTaste.
Die Temperatur am Ende der Garzeit hängt von der
Ausgangstemperatur ab. Vergewissern Sie sich, daß die
Speisen nach dem Garen ausreichend gegart sind. Falls
erforderlich, können Sie die Garzeit verlängern und eine
höhere Leistungsstufe einstellen.
HINWEIS: Eine Liste der AUTOMATIK-Menüs und Gewichtsangaben finden Sie auf dem Menü-Aufkleber.
ZEIT/GEWICHTS-Knopf
KÜRZER/LÄNGER-Tasten
START/QUICK-Taste
Menünummer
1.
2.
3.
4.
x1
AUTOMATIK-Tasten
2. AG-91D-EU German 21/02/2005 16:22 Page 65
Page 68

66
Beispiel: So kochen Sie 300 g Reis mit der AUTO-GAREN (AC-1):
Überprüfen Sie das Display.
3. Drücken Sie die START/QUICK-
Taste, um mit dem
Erhitzungsvorgang zu starten.
2. Geben Sie durch Drehen des
ZEIT/GEWICHTS-Knopfes im
Uhrzeigersinn die gewünschte
Gewicht ein.
1. Drücken Sie die
AUTO-GAREN-Taste
einmal für Reis.
x1
x1
Automatik-Betrieb
2. AG-91D-EU German 21/02/2005 16:22 Page 66
Page 69

67
D
Tabelle: Auto-Garen
MENÜ Nr.
AC-1
Reis
(Ausgangstemp.:
Reis 20° C)
AC-2
Brathähnchen
(Ausgangstemp.: 5°C)
AC-3
Schweinebraten
(Ausgangstemp.: 5° C)
AC-4
Auflauf
(Ausgangstemp.: 20° C)
z.B. Zucchini-NudelAuflauf, KartoffelAuflauf mit
Champignons
AC-5
Kuchen
(Ausgangstemp.: 20° C)
z.B. Möhrentorte,
Gugelhupf, Apfelkuchen mit Calvados
MENGE (Gewichtseinheit)
/ GESCHIRR
0,1 - 0,3 kg (100 g)
Große Schüssel mit Deckel
0,9 - 2,0 kg (100 g)
Niedriger Rost
0,6 - 2,0 kg (100 g)
Niedriger Rost
0,5 - 2,0 kg (100 g)
Flache, ovale, Auflaufform,
Niedriger Rost
0,5 - 1,5 kg (100 g)
Kuchenform,
Untertasse,
Niedriger Rost
VERFAHREN
• In eine große Schüssel geben und kochendes Wasser
hinzufügen.
• Mit einem Deckel abdecken.
• Schüssel in die Mitte des Drehtellers stellen.
• Wenn der Signalton ertönt, umrühren und wieder abdecken.
• Wenn der Signalton wieder ertönt, umrühren und
wieder abdecken.
• Nach dem Garen ca. 10 Minuten stehen lassen.
• Die Zutaten mischen und das Hähnchen damit
bestreichen.
• Die Haut des Hähnchens anstechen.
• Das Hähnchen mit der Brustseite nach unten auf den
niedrigen Rost legen.
• Wenn das akustische Signal ertönt, das Hähnchen
wenden.
• Das Hähnchen nach dem Garen für ca. 3 Minuten im
Gerät stehen lassen.
• Magerer Schweinerollbraten wird empfohlen.
• Alle Zutaten vermischen und auf dem Fleisch verteilen.
• Das Fleisch auf den niedrigen Rost legen und garen.
• Wenn das akustische Signal ertönt, das Fleisch wenden.
• Das Gericht nach dem Garen ca. 10 Minuten lang in
Aluminiumfolie eingewickelt stehen lassen.
• Den Auflauf entsprechend dem beiliegendem Seite 71
vorbereiten.
• Die Auflaufform auf den niedrigen Rost stellen.
• Nach dem Garen ca. 5-10 Minuten abgedeckt stehen
lassen.
• Den Kuchen entsprechend dem beiliegendem Seite 72 73 vorbereiten.
• Eine flache Untertasse mit dem Boden nach oben auf
den niedrigen Rost legen und die Kuchenform
daraufstellen.
• Nach dem Backen etwa 10 Min. stehen lassen.
• Den Kuchen aus der Form entnehmen.
Zutaten für 1,2 kg Grillhähnchen:
Salz und Pfeffer, 1 TL Paprika edelsüß, 2 EL Öl
Zutaten für 1,0 kg mageren Schweinerollbraten:
1 zerdrückte Knoblauchzehe, 2 EL Öl, 1 EL Paprika
edelsüß, 1 Prise Kreuzkümmel, 1 TL Salz
Reis Kochendes Wasser
100 g 250 ml
200 g 450 ml
300 g 650 ml
2. AG-91D-EU German 21/02/2005 16:22 Page 67
Page 70

68
Tabelle: Auto-Garen von TK
MENÜ Nr.
ACF-1 Garen
TiefkühlFertiggerichte
(Ausgangstemp.: -18° C)
Speisen zum Umrühren
wie Nudeln Bolognese,
Chili con carne etc.
ACF-2 Garen
Tiefkühl-Gemüse
(Ausgangstemp.: -18° C)
z.B. Rosenkohl,
Blumenkohl, Erbsen,
Mischgemüse, Brokkoli
ACF-3 Garen
Tiefkühl-Auflauf
(Ausgangstemp.: -18° C)
z.B. Tiefgefrorene
Lasagne, KartoffelAuflauf
ACF-4 Garen
Pommes frites
(Ausgangstemp.: -18° C)
(Empfohlen für die
Verwendung in
herkömmlichen
Backöfen)
MENGE (Gewichtseinheit)
/ GESCHIRR
0,3 - 1,0 kg* (100 g)
Schüssel mit Deckel
0,1 - 0,8 kg (100 g)
Schüssel mit Deckel
0,2 - 0,6 kg (100 g)
Auflaufform
Niedriger Rost
0,20 - 0,40 kg (50 g)
Runde Auflaufform,
Hoher Rost
* Wenn der Hersteller die
Zugabe von Wasser empfiehlt,
die Gesamtmenge für das
Programm unter Einbeziehung
der zusätzlichen Flüssigkeit
berechnen.
VERFAHREN
• Die Speise in ein geeignetes Mikrowellen-Gefäß geben.
• Falls vom Hersteller empfohlen, etwas Flüssigkeit
zugeben.
• Mit einem Deckel abdecken.
• Wenn das akustische Signal ertönt, umrühren und
wieder abdecken.
• Nach dem Garen umrühren und ca. 1-2 Minuten stehen
lassen.
• 1 EL Wasser pro 100 g. (Für Pilze ist kein zusätzliches
Wasser erforderlich).
• Mit dem Deckel abdecken.
• Wenn das Gerät stoppt und das akustische Signal ertönt,
umrühren und wieder abdecken.
• Nach dem Garen 1-2 Minuten stehen lassen.
HINWEIS: Kompakt gefrorenes Gemüse im manuellen
Betrieb garen.
• Den Auflauf aus der Originalverpackung nehmen und in
eine geeignete Auflaufform geben.
• 3-4 EL Wasser zugeben.
• Nicht abdecken.
• Auf den niedrigen Rost stellen.
• Nach dem Garen mit Aluminiumfolie abgedeckt
ca. 5 Minuten stehen lassen.
• Die Pommes frites in eine flache Form aus Porzellan
geben. Die Form auf den hohen Rost ins Gerät stellen.
• Wenn das akustische Signal ertönt, wenden.
• Nach dem Garen auf einem Servierteller anrichten. (Es
ist keine Standzeit erforderlich.)
• Nach Geschmack salzen.
HINWEIS: Wenn dünne Pommes frites gegart werden
sollen, die KÜRZER-Taste ( ▼ ) drücken.
2. AG-91D-EU German 21/02/2005 16:22 Page 68
Page 71

69
DD
Tabelle: Auto-Auftauen
MENÜ Nr.
AD-1 Auftauen
Steaks und
Koteletts
(Ausgangstemp.: -18° C)
AD-2 Auftauen
Bratenfleisch
(Ausgangstemp.: -18° C)
AD-3 Auftauen
Hackfleisch
(Ausgangstemp.: -18° C)
AD-4 Auftauen
Hähnchenschenkel
(Ausgangstemp.: -18° C)
AD-5 Auftauen
Geflügel
(Ausgangstemp.: -18° C)
AD-6 Auftauen
Torte
(Ausgangstemp.: -18° C)
AD-7 Auftauen
Brot
(Ausgangstemp.: -18° C)
MENGE (Gewichtseinheit)
/ GESCHIRR
0,2 - 1,0 kg (100 g)
(Siehe HINWEIS Seite 70)
0,6 - 2,0 kg (100 g)
(Siehe HINWEIS Seite 70)
0,2 - 1,0 kg (100 g)
(Siehe HINWEIS Seite 70)
Frischhaltefolie
0,20 - 1,00 kg (50 g)
(Siehe HINWEIS Seite 70)
0,9 - 2,0 kg (100 g)
(Siehe HINWEIS Seite 70)
0,1 - 1,4 kg (100 g)
Flache Platte
0,1 - 1,0 kg (100 g)
Flache Platte
VERFAHREN
• Die Speise auf einem Teller in die Mitte des Drehtellers
stellen.
• Wenn das Gerät stoppt und das Signal ertönt, die Speise
wenden, neu anordnen und ggf. trennen. Decken Sie
dünne Teile und warme Stellen mit Aluminiumfolie ab.
• Nach dem Auftauen mit Aluminiumfolie abgedeckt 10-15
Minuten stehen lassen, bis alles vollständig aufgetaut ist.
• Einen Teller umgekehrt auf den Drehteller legen und das
Fleisch darauf legen.
• Wenn das Gerät stoppt und das Signal ertönt, wenden.
Aufgetaute Teile gegebenenfalls mit Aluminiumfolie
abdecken.
• Wenn das akustische Signal ertönt, noch einmal wenden
und abdecken (für 1,1 kg - 2,0 kg).
• Nach dem Auftauen mit Aluminiumfolie abgedeckt 15-30
Minuten stehen lassen, bis alles vollständig aufgetaut ist.
• Decken Sie den Drehteller mit Frischhaltefolie ab.
• Legen Sie den Block Hackfleisch auf den Drehteller.
• Wenn das Mikrowellengerät stoppt und das Signal
ertönt, drehen Sie das Hackfleisch um. Entfernen Sie die
aufgetauten Teile, sofern möglich.
• Nach dem Auftauen 5-10 Minuten stehen lassen, bis
alles vollständig aufgetaut ist.
• Die Speise auf einem Teller in die Mitte des Drehtellers
stellen.
• Wenn das Gerät stoppt und das Signal ertönt, die Speise
wenden, neu anordnen und ggf. trennen. Decken Sie
dünne Teile und warme Stellen mit Aluminiumfolie ab.
• Nach dem Auftauen mit Aluminiumfolie abgedeckt 10-15
Minuten stehen lassen, bis alles vollständig aufgetaut ist.
• Einen Teller umgekehrt auf den Drehteller legen und das
Geflügel mit der Brustseite nach unten darauf legen.
• Wenn das Gerät stoppt und das Signal ertönt, wenden.
Decken Sie dünne Teile und warme Stellen mit
Aluminiumfolie ab.
• Nach dem Auftauen mit Aluminiumfolie abgedeckt 15-30
Minuten stehen lassen, bis alles vollständig aufgetaut ist.
•
Zum Abschluß das Geflügel unter laufendem Wasser säubern.
• Die Torte von jeglicher Verpackung befreien.
• Auf einen flache Platte in die Mitte des Drehtellers stehen.
• Die Torte nach dem Auftauen in möglichst gleichgroße
Stücke schneiden, zwischen den Stücken etwas Abstand
lassen und 15-30 Minuten stehen lassen, bis sie
gleichmäßig aufgetaut ist.
• Auf einen flache Platte in die Mitte des Drehteller stellen.
Für dieses Programm nur Brotschreiben verwenden.
• Wenn das Signal ertönt, die Scheiben neu anordnen und
aufgetaute Scheiben abnehmen.
• Nach dem Auftauen alle Scheiben voneinander trennen
und auf einem großen Teller verteilen.
Das Brot mit Aluminiumfolie abdecken und 5-10
Minuten stehen lassen, bis es gründlich aufgetaut ist.
2. AG-91D-EU German 21/02/2005 16:22 Page 69
Page 72

70
HINWEIS:
1. Steaks, Koteletts und Hähnchenschenkel sollten nebeneinander (einlagig) eingefroren werden.
2. Hackfleisch sollte flach eingefroren werden.
3. Nach dem Wenden die aufgetauten Portionen mit dünnen Aluminiumstreifen abdecken.
4. Das Geflügel und das Hackfleisch sollten sofort nach dem Auftauen weiterverarbeitet werden.
5. Torte, die aus Sahne/Creme hergestellt oder damit verziert wurde, reagiert sehr empfindlich auf Mikrowellen-
Energie. Sobald sich die Creme schnell verflüssigt, nehmen Sie die Torte am besten sofort aus dem Ofen und
lassen Sie bei Raumtemperatur 10 bis 30 Minuten stehen.
6. Für AD-1, AD-2, AD-4 und AD-5, die Speisen wie in der Abbildung gezeigt in das Gerät stellen:
Speise
Geschirr
Drehteller
Hähnchenschenkel,
Steaks und Kotelettes
Geflügel und Bratenfleisch
Tabelle: Auto-Auftauen
2. AG-91D-EU German 21/02/2005 16:22 Page 70
Page 73

71
D
Rezepte für Auto-Garen AC-4
Gebackene Zucchini und Nudeln
(Dieses Rezept ergibt ca. 1,5 kg)
Zutaten
500 ml Wasser
1
/2 TL Öl
Salz
80 g Makkaroni
400 g Dosentomaten, in Stücken
3 Zwiebeln (150 g), fein gewürfelt
Basilikum, Thymian
Salz & Pfeffer
1 TL Öl zum Einfetten der Form
450 g Zucchini, in Scheiben
150 g saure Sahne
2 Eier
100 g geriebenen Käse (Cheddar)
1. Wasser, Öl und Salz in eine Schale geben, bedecken und
hochkochen lassen.
3-5 Min. 900 W
2. Die Makkaroni in kleine Stücke brechen und in die
Schale geben. Umrühren und einziehen lassen.
9-11 Min. 270 W
Die Nudeln abgießen und abkühlen lassen.
3. Die Tomaten mit den Zwiebeln verrühren und gut
würzen. Die ofenfeste Schale einfetten. Makkaroni in
die Schale geben und die Tomatensoße darüber
verteilen. Mit Zucchinischeiben belegen.
4. Saure Sahne mit Eiern verrühren und über die Nudeln
und Zucchini verteilen. Den geriebenen Käse drüber
streuen. Auf dem unterem Rost mit
GAR-AUTOMATIK AC-4 garen.
Nach der Zubereitung 5-10 Minuten ruhen lassen.
Gebackener Broccoli und Kartoffeln
mit Champignons
(Dieses Rezept ergibt ca. 1,5 kg)
Zutaten
400 g Kartoffeln, geschält und auf Wunsch halbiert
400 g Broccoliröschen
6 TL Wasser (60 ml)
1 TL Butter oder Margarine zum Einfetten der Form
400 g Champignons, in Scheiben
1 EL Petersilie, fein gehackt
Salz & Pfeffer
3 Eier
125 ml Sahne
125 ml Milch
Salz & Pfeffer
Muskatnuss
100 g geriebenen Gouda
1. Kartoffeln und Broccoli in eine Schale geben.
Wasser hinzufügen, bedecken und garen.
Während des Garens einmal umrühren.
9-12 Min. 900 W
2. Die Kartoffeln in Scheiben schneiden.
3. Die ofenfeste Form einfetten. Broccoli, Champignons
und Kartoffeln abwechselnd in Schichten anordnen.
Mit Petersilie bestreuen und mit Salz und Pfeffer
abschmecken.
4. Eier mit Flüssigkeit und Gewürzen verrühren, über das
Gemüse geben, anschließend Käse über das Gericht
streuen. Auf dem unterem Rost mit
GAR-AUTOMATIK AC-4 garen.
Nach der Zubereitung ca.10 Minuten ruhen lassen.
2. AG-91D-EU German 21/02/2005 16:22 Page 71
Page 74

72
Rezepte für Auto-Garen AC-5
Möhrenkuchen
(Dieses Rezept ergibt ca. 1,1 kg)
Zutaten
1 TL Butter oder Margarine zum Einfetten der Form
5 Eigelb
250 g Zucker
250 g Mohrrüben, fein gerieben
Saft einer Zitrone
250 g gemahlene Mandeln
80 g Mehl
1 EL Backpulver
5 Eiweiß
1. Die Backform einfetten.
2. Eigelb und Zucker mit einem Handrührgerät
vermischen.
3. Die Mohrrüben, Zitronensaft und Mandeln hinzugeben.
4. Mehl und Backpulver verrühren, zur restlichen
Mischung zugeben und gut unterrühren.
5. Eiweiß steif schlagen und vorsichtig unterheben.
Mischung in die Backform geben, auf dem unteren
Rost platzieren und mit AUTO-GAREN AC-5 backen.
6. Nach dem Backen 5 Minuten lang in der Backform
abkühlen lassen..
Gugelhupf
(Der Teig wiegt ca. 0,9 kg)
Zutaten
1 TL Butter oder Margarine zum Einfetten der Form
170 g Butter oder Margarine
140 g Puderzucker
4 Eigelb
40 g Mandelsplitter
40 g Rosinen, gewaschen
etwas fein geriebene Zitronenschale
4 Eiweiß
280 g Mehl
1 Päckchen Backpulver (15 g)
1. Gugelhupf-Form einfetten.
2. Butter und Puderzucker mit einem Handrührgerät glatt
rühren. Eigelb nacheinander einrühren.
3. Mandelstifte, Rosinen und fein geriebene
Zitronenschale nach und nach unterrühren.
Gut vermischen.
4. Eiweiß steif schlagen und unter die Mischung heben.
Backpulver und Mehl verrühren, sieben und vorsichtig
unter die Mischung rühren.
5. Den Teig in die Backform geben und auf dem unteren
Rost mit AUTO-GAREN AC-5 backen.
2. AG-91D-EU German 21/02/2005 16:22 Page 72
Page 75

73
D
Rezepte für Auto-Garen AC-5
Apfel-Tarte mit Calvados
(Dieses Rezept ergibt ca. 1,3 kg)
Zutaten
200 g Mehl
1 TL Backpulver
100 g Zucker
1 Päckchen Vanillezucker
1 Prise Salz
1Ei
3-4 Tropfen Bittermandelöl
125 g Butter
1 TL Butter oder Margarine zum Einfetten der Form
50 g gemahlene Haselnüsse
600 g Äpfel (Boskop, ca. 3-4)
Zimt
2 Eier
1 Prise Salz
4 EL Zucker
4 EL Calvados (Apfelschnaps)
1
1
/2 EL Stärkemehl
125 g Double Cream (Sahne mit 48% Fettgehalt)
Puderzucker zum Bestäuben
1. Mehl und Backpulver mischen. Zucker, Vanillezucker,
Salz, Ei, Bittermandelöl und Butter hinzugeben und mit
dem Knethaken eines Handrührgeräts zu einem Teig
verrühren.
2. Den Mürbteig abdecken und ca. 30 Minuten an einen
kalten Ort stellen.
3. Die Backform einfetten. Den Mürbteig zwischen 2
Lagen Folie ausrollen und in die Backform geben. Einen
ca. 3 cm hohen Rand hochziehen.
4. Haselnüsse über den Mürbteig verstreuen.
5. Die Äpfel schälen, vierteln, entkernen und in Scheiben
schneiden. Die Scheiben auf der Haselnussschicht so
anordnen, dass sie einander überlappen und leicht mit
Zimt bestreuen.
6. Die Eier trennen. Das Eiweiß steif schlagen, nach und
nach eine Prise Salz und 1 EL Zucker dazugeben.
7. Eigelb, restlichen Zucker und Vanillezucker schaumig
rühren.
8. Calvados, Stärkemehl und Double Cream hinzugeben
und verrühren. Das geschlagene Eiweiß unterheben
und die Mischung gleichmäßig über die Apfelscheiben
verteilen.
9. Auf unterem Rost mit AUTO-GAREN AC-5 backen.
Tipp: Die Tarte in der Form abkühlen lassen und mit
Puderzucker bestäuben.
2. AG-91D-EU German 21/02/2005 16:22 Page 73
Page 76

74
Reinigung und Pflege
VORSICHT: ZUR REINIGUNG DÜRFEN KEINESFALLS
OFENREINIGER, DAMPFREINIGER, SCHEUERMITTEL,
SCHARFE REINIGUNGSMITTEL, NATRIUMHYDROXID
ENTHALTENDE REINIGUNGSMITTEL ODER
SCHEUERSCHWÄMME VERWENDET WERDEN. DIES
GILT FÜR ALLE TEILE DES GERÄTS.
WARNUNG!
Nach dem GRILL-, HEISSLUFT-, KOMBI-, AUTOGAREN und AUTO-GAREN VON TK werden der
Garraum, die Tür, die Außenflächen und Zubehörteile
sehr heiß. Vor dem Reinigen vollständig abkühlen lassen.
Außen
Die Außenseiten des Gerätes mit einer milden
Seifenlauge reinigen. Die Seifenlauge gründlich mit
einem feuchten Tuch abwischen und mit einem
Handtuch nachtrocknen.
Bedienfeld
Vor dem Reinigen die Tür öffnen, um das Bedienfeld zu
inaktivieren. Das Bedienfeld vorsichtig reinigen.
Verwenden Sie ein nur mit Wasser befeuchtetes Tuch
und wischen Sie das Bedienfeld vorsichtig sauber.
Niemals zuviel Wasser und keine chemischen oder
scheuernden Reiniger verwenden, da das Bedienfeld
dadurch beschädigt werden kann.
Garraum
1. Nach jedem Gebrauch das noch warme Gerät zur
Reinigung mit einem weichen, feuchten Tuch oder
Schwamm abwischen, um leichte Verschmutzungen
zu entfernen. Für starke Verschmutzungen eine
milde Seifenlauge verwenden und mehrmals mit
einem weichen, feuchten Tuch oder Schwamm
gründlich nachwischen, bis alle Rückstände
vollständig entfernt sind.
Akkumuliertes Fett und andere Spritzer können zum
Überhitzen des Herdes führen, was Rauch, Feuer und
Funkenüberschlag verursachen kann.
Die Hohlleiterabdeckung nicht entfernen.
2. Sicherstellen, dass weder Seifenlauge noch Wasser
durch die kleinen Öffnungen an der Wand
eindringen, da dies das Gerät beschädigen kann.
3. Verwenden Sie keine Sprühreiniger im Garraum.
4. Erhitzen Sie Ihr Gerät regelmäßig unter Verwendung
der Heißluft und Grill, siehe “Heizen ohne Speisen“
auf Seite 52. Speisereste oder Fettspritzer können
Rauch oder unangenehme Gerüche verursachen.
Zubehör
Zubehör mit einem milden Spülmittel reinigen und
nachtrocknen. Die Roste sind spülmaschinenfest.
Gerätetür
Die Tür auf beiden Seiten, die Türdichtung und die
Dichtungsoberflächen des öfteren mit einem feuchten
Tuch abwischen, um Verschmutzungen zu entfernen.
HINWEIS: Die Hohlleiterabdeckung und das Zubehör
sauber halten. Fett und andere Rückstände
in Garraum oder an Zubehörteilen kann
Rauch, Feuer und Funkenüberschlag
verursachen.
HINWEIS: Dampfreiniger dürfen nicht verwendet
werden.
2. AG-91D-EU German 21/02/2005 16:22 Page 74
Page 77

75
D
Standardzeit
20 Minuten
15 Minuten
Mikro - 40 Minuten
Mikro - 15 Minuten
Grill - 15 Minuten
Mikro - 40 Minuten
Grill - 15 Minuten
Kochmodus
Mikrowelle 900 W garen
Grillbetrieb
Kombi 1
Kombi 2
(900 W Mikrowellenleistung)
Kombi 2
(630 W Mikrowellenleistung)
2. Nach dem GRILL-, KOMBI-, HEISSLUFT-, AUTO-GAREN und AUTO-GAREN VON TK läuft der Lüfter, und auf
dem Display wird “KÜHLUNG” angezeigt. Auch wenn Sie während dieser Betriebsarten die STOP-Taste drücken
und die Gerätetür öffnen, läuft der Lüfter, und Sie können fühlen, wie die Luft aus den Lüftungsöffnungen
ausströmt.
ACHTUNG: Wenn auf der Anzeige nichts angezeigt wird, obwohl der Stecker richtig angeschlossen ist, ist
wahrscheinlich der Energiesparmodus aktiviert. Öffnen und schließen Sie die Tür, um den
Energiesparmodus zu verlassen. Siehe Seite 49.
HINWEISE:
1. Wenn Sie die Speisen in der Standardgarzeit in nur einer Betriebsart garen 900 W, wird die Leistung des Gerätes
automatisch reduziert, um eine Überhitzung zu vermeiden. (Die Mikrowellenleistung wird vermindert und die
Grillheizelement werden ein- und ausgeschaltet.)
Was tun, wenn…
... das Mikrowellengerät nicht arbeitet?
Überprüfen Sie, ob
– der Netzstecker eingesteckt ist,
– die Sicherungen in der Installation in
Ordnung sind,
– eventuell der Strom ausgefallen ist, Sollten
die Sicherungen mehrfach auslösen, rufen
Sie bitte einen zugelassenen
Elektroinstallateur.
– die Kindersicherung programmiert ist.
... die Mikrowelle nicht arbeitet?
Überprüfen Sie, ob
– die Tür richtig geschlossen ist,
– Speisereste oder Fremdkörper in der Tür
klemmen,
– die Türdichtungen und Türdichtungsflächen
sauber sind,
– die START/QUICK-Taste gedrückt wurde.
... sich der Drehteller nicht dreht?
Überprüfen Sie ob
- das Drehkreuz richtig auf dem Antrieb sitzt,
– der Drehteller ausgeschaltet ist,
– Geschirr verwendet wird, das über den
Drehteller herausragt oder
– Lebensmittel über den Drehteller ragen und
ihn somit blockieren,
– sich Speisereste unter dem Drehteller
befinden.
... die Mikrowelle nicht abschaltet?
– Ziehen Sie den Netzstecker oder schalten Sie
die Sicherung aus.
– Rufen Sie den AEG-ELECTROLUX-
Kundendienst oder Ihren Fachhändler.
... die Garraumlampe ausfällt?
- Rufen Sie den AEG-ELECTROLUXKundendienst oder eine durch AEGELECTROLUX geschulte Elektro-Fachkraft an.
Der Austausch der Garraumbeleuchtung darf
nur durch diese durchgeführt werden.
... die Speisen langsamer heiß und gar
werden als bisher?
- Stellen Sie eine längere Garzeit ein (doppelte
Menge = fast doppelte Zeit) oder,
– wenn die Speisen kälter waren als sonst,
drehen Sie diese zwischendurch um oder
wenden Sie sie oder
– stellen Sie eine höhere Leistung ein.
2. AG-91D-EU German 21/02/2005 16:22 Page 75
Page 78

76
Kundendienst
Sehr geehrter Kunde,
der Werkskundendienst von AEG-ELECTROLUX Hausgeräte ist ezentral organisiert. Damit bieten wir Ihnen überall
einen zuverlässigen Service. Unter der für Sie kostengünstigen Rufnummer
0180 322 66 22 (EUR 0.09 /Minute)
können Sie im Bedarfsfall einen unserer Spezialisten oder Service-Partner anfordern.
Ihre Ersatzteil-Bestellung geben Sie bitte unter der zentralen Rufnummer
0180 5 00 10 76 auf.
(EUR 0.12 /Minute)
Mit freundlichen Grüßen
Ihr AEG-ELECTROLUX Werkskundendienst
Sie können sich auch persönlich an unsere Service-Stellen wenden.
PLZ Adresse
01099 Dresden Industriegelände,
W. Hartmann-Straße
04299 Leipzig* Holzhäuser Str. 120
04357 Leipzig* W.-Busch-Str. 38
07548 Gera* Südstraße 11
14482 Potsdam-Babelsberg Wetzlarer Straße 14-16
16866 Kyrik* Hamburger Str. 31
18069 Rostock* Gewerbestr. 1
22525 Hamburg-Bahrenfeld Holstenkamp 40
24113 Kiel* v. d. Goltz-Allee 2
25770 Hemmingstedt* Kösliner Str. 18
27721 Ritterhude* Stader Landstr. 4
28208 Bremen* Emil-von-Behring-Straße 3
30179 Hannover Wiesenauer Straße 13
34123 Kassel-Bettenhausen* Lilienthalstraße 5
35745 Herborn-Burg* Junostraße 1
41541 Dormagen-St. Peter Sachtlebenstraße 1
46562 Voerde* Friedrich-Wilhelm-Straße 22
48165 Münster* Zum Kaiserbusch 1
49084 Osnabrück* Pferdestraße 23
52068 Aachen* Auf der Hüls 197
56068 Koblenz* Rheinstraße 17
56070 Koblenz* A.-Hosch-Str. 14
57076 Siegen* Weidenauer Straße 239
PLZ Adresse
59071 Hamm Ostwennemarstr. 1
60326 Frankfurt Mainzer Landstraße 349
66115 Saarbrücken-Malstatt* Ludwigstraße 55-57
67663 Kaiserslautern* Pariser Straße 200
71034 Böblingen-Hulb Dornierstraße 7
74743 Seckach Bergstr. 9F
76185 Karlsruhe-Mühlburg* Neureuther Straße 5-7
78054 Villingen-Schwenningen* Alleenstr. 28/1
79108 Freiburg* Tullastraße 84
82401 Rottenbuch Solder 13
84307 Eggenfelden Dorfzellhub 32
85598 Baldham/Vaterstetten Neue Poststr. 23
86159 Augsburg* Piccardstraße 15a
87437 Kempten* Brodkorbweg 22
88213 Ravensburg* Henri-Dunant-Straße 6
90429 Nürnberg Muggenhofer Straße 135
92260 Ammerthal* Nikolausstraße 2
93059 Regensburg* Im Gewerbepark B54
94032 Passau* Kühberg 1
95038 Hof* Pinzigweg 49
97078 Würzburg* Versbacher Straße 22a
99096 Erfurt* Arnstädter Straße 28
(*) Hier steht Ihnen ein Service-Partner zur Verfügung
Weitere Service-Stellen sind in:
03222 Groß Klessow
06896 Wittenberg-Reinsdorf
15517 Fürstenwalde
16515 Oranienburg
17039 Ihlenfeld
18069 Rostock
19057 Schwerin
24354 Rieseby
25980 Westerland/Sylt
26639 Wiesmoor
27726 Worpswede
30900 Wedemark
32825 Blomberg
34497 Korbach
36043 Fulda
39114 Magdeburg
49377 Vechta
63906 Erlenbach
78244 Bietingen
84307 Eggenfelden
87549 Rettenberg
99819 Ettenhausen
2. AG-91D-EU German 21/02/2005 16:22 Page 76
Page 79

77
D
Garantiebedingungen
Der Endabnehmer dieses Gerätes (Verbraucher) hat bei einem Kauf dieses Gerätes von einem Unternehmer (Händler)
in Deutschland im Rahmen der Vorschriften über den Verbrauchsgüterkauf gesetzliche Rechte, die durch diese
Garantie nicht eingeschränkt werden. Diese Garantie räumt dem Verbraucher also zusätzliche Rechte ein. Dies
vorausgeschickt, leisten wir, AEG-ELECTROLUX Hausgeräte GmbH, gegenüber dem Verbraucher Garantie für dieses
Gerät für den Zeitraum von 24 Monaten ab Übergabe zu den folgenden Bedingungen:
1. Mit dieser Garantie haften wir dafür, daß dieses neu hergestellte Gerät im Zeitpunkt der Übergabe vom Händler
an den Verbraucher die in unserer Produktbeschreibung für dieses Gerät aufgeführten Eigenschaften aufweist.
Ein Mangel liegt nur dann vor, wenn der Wert oder die Gebrauchstauglichkeit dieses Gerätes erheblich gemindert
ist. Zeigt sich der Mangel nach Ablauf von sechs (6) Monaten ab dem Übergabezeitpunkt, so hat der Verbraucher
nachzuweisen, daß das Gerät bereits im Übergabezeitpunkt mangelhaft war. Nicht unter diese Garantie fallen
Schäden oder Mängel aus nicht vorschriftsmäßiger Handhabung sowie Nichtbeachtung der Einbauvorschriften
und Gebrauchsanweisungen.
2. Dieses Gerät fällt nur dann unter diese Garantie, wenn es von einem Unternehmer in einem der Mitgliedstaaten
der Europäischen Union gekauft wurde, es bei Auftreten des Mangels in Deutschland betrieben wird und
Garantieleistungen auch in Deutschland erbracht werden können. Mängel müssen uns innerhalb von zwei (2)
Monaten nach dessen Kenntnis angezeigt werden.
3. Mängel dieses Gerätes werden wir innerhalb angemessener Frist nach Mitteilung des Mangels unentgeltlich
beseitigen; die zu diesem Zweck erforderlichen Aufwendungen, insbesondere Transport-, Wege-, Arbeits- und
Materialkosten werden von uns getragen. Über diese Nachbesserung hinausgehende Ansprüche werden durch
diese Garantie dem Verbraucher nicht eingeräumt.
4. Bei Großgeräten (stationär betriebene Geräte) ist im Garantiefall unter der für den Endabnehmer
kostengünstigen Rufnummer 0180 322 66 22 * die nächstgelegene Kundendienststelle zu benachrichtigen,
von der Ort, Art und Weise der Garantieleistungen festgelegt werden. Nachbesserungsarbeiten werden, soweit
möglich, am Aufstellungsort, sonst in unserer Kundendienstwerkstatt durchgeführt.
5. Garantieleistungen bewirken weder eine Verlängerung noch einen Neubeginn der Garantiezeit für dieses Gerät;
ausgewechselte Teile gehen in unser Eigentum über.
6. Mängelansprüche aus dieser Garantie verjähren in zwei (2) Jahren ab dem Zeitpunkt der Übergabe des Gerätes
vom Händler an den Verbraucher, der durch Original-Kaufbeleg (Kassenzettel, Rechnung) zu belegen ist; wenn
dieses Gerät gewerblich oder - bei Waschgeräten und Wäschetrocknern - in Gemeinschaftsanlagen genutzt wird,
beträgt die Verjährungsfrist sechs (6) Monate.
AEG-ELECTROLUX Hausgeräte GmbH
Markenvertrieb AEG
Muggenhofer Straße 135
90429 Nürnberg
* Deutsche Telekom
EUR 0,09 / Minute
Stand Jan. 2002
2. AG-91D-EU German 21/02/2005 16:22 Page 77
Page 80

78
Kundendienst & Ersatzteile (Belgien)
Sollte das Gerät nicht richtig funktionieren, vor dem
Anruf beim örtlichen Kundendienstzentrum folgende
Punkte überprüfen:
Wenn der Ofen nicht einsetzt:
• Prüfen, ob das Gerät richtig angeschlossen ist.
• Prüfen, ob der Ofenstecker richtig eingesteckt ist.
• Gegebenenfalls die Stöpselsicherung durch eine
andere der gleichen Stärke austauschen und prüfen,
ob der Stecker richtig verkabelt wurde.
• Prüfen, ob der Steckdosenschalter bzw. der Schalter
vom Netzanschluss zum Ofen auf EIN steht.
• Prüfen, ob die Steckdose Strom bekommt. Hierfür
ein Gerät anschließen, das mit Sicherheit
funktioniert.
• Prüfen, ob die Sicherung im Sicherungskasten in
Ordnung ist.
Wenn die Mikrowelle nicht funktioniert:
• Kann die Kindersicherung eingeschaltet sein.
• Prüfen, ob die Bedienungselemente richtig
eingestellt sind.
• Einstellungen/Verfahren mit Hilfe des Handbuches
überprüfen.
• Prüfen, ob die Tür sauber schließt. (Wenn
Lebensmittelreste oder sonstige Gegenstände in der
Tür hängen geblieben sind, schließt diese nicht mehr
richtig, und der Mikrowellenofen funktioniert nicht.)
• Prüfen, ob der Startknopf gedrückt wurde.
Wenn der Ofen nach obigen Prüfungen immer noch
nicht richtig funktioniert, das örtliche AEG-ELECTROLUX
Kundendienstzentrum anrufen, dessen Anschrift auf
den folgenden Seiten dieses Bedienungshandbuchs zu
finden ist.
WICHTIG:
Wenn ein Techniker für einen der oben
aufgeführten Fehler oder für die Reparatur eines
Fehlers gerufen wird, der auf einen unsachgemäßen
Gebrauch bzw. eine falsche Installation
zurückzuführen ist, wird der Einsatz berechnet,
selbst wenn das Gerät noch unter Garantie ist.
Wenn Sie im Kundendienstzentrum anrufen, benötigt
dieses folgende Informationen:
1. Ihren Namen, Anschrift und Postleitzahl
2. Ihre Telefonnummer
3. Eine klare, kurze Beschreibung des Fehlers
4. Das Modell
5. Die Seriennummer
6. Das Kaufdatum
Wir empfehlen Ihnen, sich nachstehend Notizen zu
machen, um diese Daten griffbereit zu haben.
Modell: . . . . . . . . . . . . . . . . . . . . . . . . . . . . . . . . . . . . . . . .
Seriennummer: . . . . . . . . . . . . . . . . . . . . . . . . . . . . . . . . .
Kaufdatum: . . . . . . . . . . . . . . . . . . . . . . . . . . . . . . . . . . . .
Kunden, die während der Garantiedauer anrufen,
müssen zuvor unbedingt die oben genannten
Überprüfungen durchführen, da der Techniker
seinen Einsatz berechnet, wenn das Problem nicht
auf einen mechanischen oder elektrischen Defekt
zurückzuführen ist.
Es wird darauf hingewiesen, dass bei
Kundendienstbesuchen während der Garantiedauer
der Einkaufsnachweis gefordert wird.
Ersatzteile
Ersatzteile können über das örtliche Kundendienstzentrum bezogen werden.
Kundenbetreuung
Für allgemeine Fragen zu diesem AEG-ELECTROLUXGerät oder für weitere Informationen über AEGELECTROLUX-Produkte kann die Kundenbetreuung per
Post oder per Telefon kontaktiert werden.
2. AG-91D-EU German 21/02/2005 16:22 Page 78
Page 81

79
D
Garantiebedingungen (Belgien)
Unsere Geräte werden mit größter Sorgfalt hergestellt.
Trotzdem kann es einmal zu einem Defekt kommen. Unser
Kundendienst übernimmt auf Anfrage gerne die Reparatur,
und zwar sowohl während des Garantiezeitraums als auch
danach. So ist gewährleistet, dass ein Defekt nicht zu einer
Verkürzung der Lebensdauer des Geräts führt.
Die vorliegenden Garantiebedingungen beruhen auf der
Richtlinie der Europäischen Union 99/44/EG sowie den
Bestimmungen des Bürgerlichen Gesetzbuches. Die dem
Kunden aufgrund dieser Gesetze zustehenden Rechte
können durch die vorliegenden Garantiebedingungen nicht
geändert werden.
Diese Garantiebedingungen ziehen keine Einschränkung der
Garantieverpflichtungen des Verkäufers gegenüber dem
Endbenutzer nach sich. Die Garantie für das Gerät erfolgt
im Rahmen und unter Beachtung folgender Bedingungen:
1. Bei Beachtung der in den Absätzen 2 bis 15
niedergelegten Bestimmungen beheben wir kostenlos
jeden Defekt, der während eines Zeitraums von 24
Monaten ab dem Datum der Übergabe des Geräts an
den ersten Endkunden auftritt. Diese Garantiebedingungen gelten nicht im Falle einer Nutzung des
Geräts zu gewerblichen oder vergleichbaren Zwecken.
2. Die Garantieleistung zielt auf eine Wiederherstellung
des Gerätezustands vor dem Auftreten des Defekts ab.
Die defekten Bestandteile werden ausgetauscht oder
repariert. Kostenlos ausgetauschte Bestandteile gehen
in unser Eigentum über.
3. Um schwereren Schäden vorzubeugen, müssen wir
über den Defekt unverzüglich in Kenntnis gesetzt
werden.
4. Bedingung für die Gewährung der Garantieleistung ist,
dass der Kunde die Kaufbelege mit dem Kauf- und/
oder Übergabedatum vorlegt.
5. Die Garantie greift nicht, wenn Schäden an
empfindlichen Bestandteilen, wie z.B. Glas
(Glaskeramik), Kunststoffen oder Gummi, auf
unsachgemäßen Gebrauch zurückzuführen sind.
6. Eine Inanspruchnahme der Garantie ist nicht möglich
bei kleinen Veränderungen ohne Auswirkungen auf
Gesamtwert und -stabilität des Geräts.
7. Die Garantieverpflichtung erlischt, wenn der Defekt
auf eine der folgenden Ursachen zurückzuführen ist:
• eine chemische oder elektrochemische Reaktion
infolge von Wassereinwirkung,
• allgemein anomale Umweltbedingungen,
• unsachgemäße Betriebsbedingungen,
• Kontakt mit aggressiven Substanzen.
8. Die Garantie erstreckt sich nicht auf außerhalb unseres
Verantwortungsbereichs auftretende Transportschäden.
Auch Schäden infolge unsachgemäßer Aufstellung
oder Installation, mangelnder Wartung, oder NichtBeachtung der Aufstellungs- und Installationshinweise
sind durch die Garantie nicht gedeckt.
9. Durch die Garantie nicht gedeckt sind ferner Defekte
infolge von Reparaturen oder Eingriffen durch nicht-
qualifizierte oder nicht-kompetente Personen, oder
infolge des Einbaus von nicht-originalen Zubehöroder Ersatzteilen.
10. Leicht zu transportierende Geräte müssen beim
Kundendienst abgegeben bzw. dorthin geschickt
werden. Heimkundendienst kommt nur bei großen
Geräten oder bei Einbaugeräten in Frage.
11. Bei Einbau- oder Unterbaugeräten sowie bei Geräten,
die derart befestigt oder aufgehängt sind, dass für den
Aus- und Wiedereinbau in die betreffende Einbaunische
mehr als eine halbe Stunde erforderlich ist, werden die
anfallenden Zusatzleistungen in Rechnung gestellt.
Etwaige Schäden infolge derartiger Aus- und
Wiedereinbauarbeiten gehen zu Lasten des Kunden.
12. Wenn während des Garantiezeitraums eine wiederholte
Reparatur ein und desselben Defekts zu keinem
befriedigenden Ergebnis führt, oder bei
unverhältnismäßig hohen Reparaturkosten kann, in
Abstimmung mit dem Kunden, ein Austausch des
defekten Geräts durch ein gleichwertiges anderes
erfolgen.
In diesem Fall behalten wir uns das Recht vor, vom
Kunden eine finanzielle Beteiligung zu verlangen, die
anteilig zum verstrichenen Nutzungszeitraum
berechnet wird.
13. Eine Reparatur im Rahmen der Garantie zieht weder
eine Verlängerung des normalen Garantiezeitraums
noch den Beginn eines neuen Garantiezyklus nach sich.
14. Auf Reparaturen gewähren wir eine Garantie von 12
Monaten, unter Beschränkung auf das Wiederauftreten
desselben Defekts.
15. Mit Ausnahme der Fälle, in denen eine Haftung
gesetzlich vorgeschrieben ist, wird durch die
vorliegenden Garantiebedingungen jede durch den
Kunden u.U. geforderte Entschädigung für über das
Gerät hinausgehende Schäden ausgeschlossen. Im Falle
der gesetzlich niedergelegten Haftung erfolgt maximal
eine Entschädigung in Höhe des Kaufpreises des Geräts.
Diese Garantiebedingungen gelten ausschließlich für in
Belgien gekaufte und benutzte Geräte. Bei Geräten, die
exportiert werden, muss sich der Kunde zunächst
vergewissern, dass sämtliche technischen Vorgaben (z.B.
Netzspannung und -frequenz, Anschlussvorschriften,
Gasart usw.) für das betreffende Land erfüllt sind und dass
das Gerät sich für die Klima- und Umweltbedingungen vor
Ort eignet. Bei im Ausland gekauften Geräten muss der
Kunde sich zunächst vergewissern, dass sie die Vorschriften
und Anforderungen für Belgien erfüllen.
Etwaige erforderliche oder gewünschte Änderungen sind
durch die Garantie nicht abgedeckt und sind nicht in allen
Fällen möglich.
Der Kundendienst steht auch nach Ablauf des
Garantiezeitraums jederzeit gerne zu Ihrer Verfügung.
Adresse unseres Kundendiensts:
ELECTROLUX HOME PRODUCTS BELGIUM
Bergensesteenweg, 719 – B-1502 LEMBEEK
Tel. 02.3630444
2. AG-91D-EU German 21/02/2005 16:22 Page 79
Page 82

80
Technische Daten
Stromversorgung
Sicherung/Sicherungsautomat
Leistungsaufnahme: Mikrowelle
Grill
Grill/Mikrowelle
Heißluftt
Heißluft/Mikrowlle
Leistungsabgabe: Mikrowelle
Grill Heizelemente
Heißluf
Mikrowellenfrequenz
Außenabmessungen
Garraumabmessungen
Garrauminhalt
Drehteller
Gewicht
Garraumlampe
: 230 V, 50 Hz, Einphasenstrom
: Mindestens 16A
: 1.5 kW
: 2.8 kW
: 2.8 kW
: 2.8 kW
: 2.95 kW
: 900 W (IEC 60705)
: 1300 W (650 W x 2)
: 1450 W
: 2450 MHz * ((Gruppe 2/Klasse B)
: 592 mm (B) x 462 mm (H) x 537 mm (T)
: 375 mm (B) x 272 mm (H) x 395 mm (T) **
: 40 Liter **
: ø362 mm, Keramik
: 30 kg
: 25 W/240 - 250 V
* Dieses Produkt erfüllt die Anforderungen des europäischen Standards EN55011.
Das Produkt wird standardkonform als Gerät der Gruppe 2, Klasse B eingestuft.
Gruppe 2 bedeutet, dass das Gerät zweckbestimmt hochfrequente Energie in Form elektromagnetischer Strahlen
zur Wärmebehandlung von Lebensmitteln erzeugt.
Gerät der Klasse B bedeutet, dass das Gerät für den Einsatz im häuslichen Bereich geeignet ist.
** Der Garrauminhalt wird aus der max. gemessenen Breite, Tiefe und Höhe errechnet.
Die tatsächliche Aufnahmekapazität von Lebensmitteln ist jedoch geringer.
Dieses Gerät entspricht den Anforderungen der EG-Richtlinien 89/336/EEC und
73/23/EEC mit Änderung 93/68/EEC.
DIE TECHNISCHEN DATEN KÖNNEN JEDERZEIT OHNE ANGABE VON GRÜNDEN
GEÄNDERT WERDEN, UM DEM TECHNISCHEN FORTSCHRITT RECHNUNG ZU TRAGEN.
2. AG-91D-EU German 21/02/2005 16:22 Page 80
Page 83

81
D
Wichtige Hinweise
Umweltfreundliche Entsorgung von Verpackung
und Altgerät
Verpackung
Unsere Mikrowellengeräte benötigen für den Transportweg eine wirksame Schutzverpackung. Dabei
beschränken wir uns auf das unbedingt Notwendige. Verpackungsteile (z.B. Folien, Styropor) können für
Kinder gefährlich sein.
Erstickungsgefahr! Verpackungsteile von Kindern fernhalten.
Alle verwendeten Verpackungsmaterialien sind umweltverträglich und wiederverwertbar.
Die Kartonteile sind aus Altpapier hergestellt, die Holzteile unbehandelt. Die
Kunststoffe sind folgendermaßen gekennzeichnet:
«PE» für Polyethylen, z.B. Verpackungsfolien
«PS» für Polystyrol, z.B. Polsterteile (grundsätzlich FCKW-frei)
«PP» für Polypropylen, z.B. Umbänderung.
Durch die Verwertung und Wiederverwendung der Verpackung können Rohstoffe gespart und das
Müllvolumen verringert werden.
Geben Sie die Verpackung zur Verwertung zum nächsten Recyclingcenter.
Die Anschrift erfahren Sie bei Ihrer Stadt- bzw. Gemeindeverwaltung.
Altgerät
Bevor Sie Ihr Gerät entsorgen, machen Sie es vorher unbrauchbar. Dazu Netzstecker ziehen, Netzkabel
abschneiden und beseitigen.
Bringen Sie das ausgediente Gerät zum nächsten Recyclingcenter oder zu Ihrem Fachhändler, der es gegen
einen geringen Kostenbeitrag zurücknimmt.
2. AG-91D-EU German 21/02/2005 16:22 Page 81
Page 84

82
Aufstellanweisungen
INSTALLIERUNG DES GERÄTES
1. Entfernen Sie das Verpackungsmaterial und überprüfen Sie
das Gerät sorgfältig auf Beschädigungen.
2. Bei Installation des Geräts in Position C müssen unbedingt
die im Diagramm angegebenen Lüftungsabstände gewahrt
werden.
3. Bringen Sie unter Verwendung der Einstellschablone
(TMAPTA004URR0) vier Befestigungsblöcke im Schrank an.
4. Setzen Sie das Gerät in den Schrank ein. Heben Sie es dazu
unten über die vorderen Blöcke und schieben Sie es sanft
nach hinten, bis der Rahmen der Mikrowelle vorne dicht
auf der Schranköffnung aufliegt.
5. Stellen Sie sicher, dass das Gerät stabil und gerade steht.
6. Befestigen Sie das Gerät mit den beiliegenden Schrauben.
Die Befestigungspunkte liegen bei den Lüftungsschlitzen
an der Ober- und Unterkante des Geräts (siehe Diagramm
Nr. 1 auf Seite 45).
7. Bringen Sie die Rahmenbefestigungskappen an den vier
Befestigungspunkten an (2 zusätzliche Kappen werden
mitgeliefert).
8. Es muss unbedingt sichergestellt werden, dass dieses
Produkt gemäß den Anleitungen in diesem Handbuch
sowie den Anleitungen für den herkömmlichen Ofen bzw.
Herd installiert wird.
Position A
Position C
Position B
Backofen
Die Mikrowelle kann in Position A, B oder C gepaßt werden:
Position Nischengröße Rauchabzug Abstand zwischen
W D H (Minimum) Schrank & Decke
A 560 x 550 x 450 20 50
B 560 x 550 x 450 20 50
C 560 x 550 x 460 20 Nicht zutreffend
Abmessungen in (mm)
Rauchabzug
Kabelklemme
Backofen
Position A
Position C
Position B
Rauchabzug
Kabelklemme
2. AG-91D-EU German 21/02/2005 16:22 Page 82
min. 20 mm
450 mm
5 mm
min. 20 mm
450 mm
65 mm
460 mm
20 mm
D
Page 85

83
D
• Die Steckdose sollte sich in einer leicht zugänglichen Position
befinden, damit der Stecker des Geräts im Notfall leicht
herausgezogen werden kann.
• Die Steckdose sollte nicht hinter dem Einbauschrank angebracht sein.
• Die beste Position ist über dem Schrank, siehe (A). Entfernen Sie bei
Anschluss in Position (A) die Klemme von Position 15 hinten am Gerät
(siehe Seite 45) und befestigen Sie das Netzkabel mithilfe dieser Klemme
oben am Einbauschrank (siehe Seite 82).
Wenn das Netzkabel nicht in Position (A) angeschlossen wird, sollte es
unter dem Gerät entlanggeführt werden.
• Schließen Sie das Gerät über eine korrekt installierte, geerdete Steckdose
an ein 230 V/50 Hz Einphasen-Wechselstromnetz an.
Die Steckdose muss mit einer 16 A Sicherung ausgestattet sein.
• Das Stromversorgungskabel darf nur durch einen Elektriker ausgewechselt werden.
• Befestigen Sie vor der Installation ein Stück Seil am Stromversorgungskabel, um den Anschluss an Punkt (A) bei
der Installation zu erleichtern.
• Beim Einbau des Geräts in einen hochseitigen Schrank darf das Stromversorgungskabel NICHT zerdrückt werden.
• Netzkabel oder Stecker nicht in Wasser oder eine andere Flüssigkeit eintauchen.
NETZANSCHLUSS
(A)
Aufstellanweisungen
ELEKTRISCHE ANSCHLÜSSE
Wenn der an Ihrem Gerät befindliche Stecker nicht auf
Ihre Steckdose passt, müssen Sie Ihren örtlichen
autorisierten AEG-Electrolux-Kundendienstvertreter
herbei rufen.
WARNUNG:
DIESES GERÄT MUSS GEERDET SEIN
Bei Nichteinhaltung dieser
Sicherheitsmaßnahme lehnt der Hersteller
jegliche Haftung ab.
2. AG-91D-EU German 21/02/2005 16:22 Page 83
Page 86

84
Lors de sa fabrication, cet appareil a été construit selon des normes. directives at/ou décrets pour une
utilisation sur le territoire français.
Pour la sécurité des biens et des personnes ainsi que pour le respect de l’environnement, vous
devez d’abord lire impérativement les préconisations suivantes avant toute utilisation de votre
appareil.
Pour éviter tout risque de détérioration de l’appareil, transportez-le dans sa position d’utilisation
muni de ses cales de transport (selon modèle). Au déballage de celui-ci, et pour empêcher des risques
d’asphyxie et corporel, tenez les matériaux d’emballage hors de la portée des enfants.
Pour éviter tout risque (mobilier, immobilier, corporel, ...), l’installation, les raccordements (eau, gaz,
électricité, évacuation selon modèle), la mise en service et la maintenance de votre appareil doivent être
effectués par un professionnel qualifié.
Votre appareil a été conçu pour être utilisé par des adultes. Il est destiné à un usage domestique
normal. Ne l’utilisez pas à des fins commerciales ou industrielles ou pour d’autres buts que ceux pour
lesquels il a été conçu. Vous éviterez ainsi des risques matériel et corporel.
Débranchez votre appareil avant tout opération de nettoyage manuel. N’utilisez que des produits du
commerce non corrosifs ou non inflammables. Tout projection d’eau ou de vapeur est proscrite pour
écarter le risque d’électrocution.
Si votre appareil est équipé d’un éclairage, débranchez l’appareil avant de procéder au changement
de l’ampoule (ou du néon, etc.) pour éviter de s’électrocuter.
Afin d’empêcher des risques d’explosion et d’incendie, ne placez pas de produits inflammables ou
d’éléments imbibés de produits inflammables à l’intérieur, à proximité ou sur l’appareil.
Lors de la mise au rebut de votre appareil, et pour écarter tout risque corporel, mettez hors d’usage
ce qui pourrait présenter un danger : coupez le câble d’alimentation au ras de l’appareil. Informez-vous
auprès des services de votre commune des endroits autorisés pour la mise au rebut de l’appareil.
Attention : l’aliment cuit ou réchauffé au micro-ondes est beaucoup plus chaud que le récipient.
remuez et testez la température de l’aliment avant de le consommer pour empêcher de se brûler.
Veuillez maintenant lire attentivement cette notice pour une utilisation optimale de votre
appareil.
3. AG-91D-EU French 21/02/2005 16:21 Page 84
Page 87

85
Cher Client,
F
Merci d’avoir acheté un four à micro-ondes AEG-Electrolux et d’avoir fait
confiance à la marque AEG-Electrolux.
Avant d’utiliser votre four à micro-ondes AEG-Electrolux pour la première
fois, veuillez lire attentivement la notice d’utilisation. Cela vous permettra de
profiter pleinement de tous les avantages offerts par votre appareil. Cela
vous donnera également une utilisation sans problème et vous épargnera des
appels inutiles au service technique.
Les informations importantes concernant votre sécurité ou le
fonctionnement de votre appareil sont indiquées par ce symbole et/ou par
des mises en gardes telles que «Avertissement», ou «Prendre soin». Veillez à
appliquer ces instructions soigneusement.
Dans toute la notice d’utilisation ce symbole vous guide étape par étape dans
l’utilisation de votre appareil.
Ce symbole indique des informations supplémentaires concernant
l’utilisation de votre appareil.
Le trèfle indique des conseils et astuces économisant l’énergie pour une
utilisation de votre appareil respectueuse de l’environnement.
En cas de fonctionnement incorrect, veuillez suivre les instructions fournies
dans la section « Que faire si… »
3. AG-91D-EU French 21/02/2005 16:21 Page 85
Page 88

86
Sommaire
Avertissements importants de sécurité . . . . . . . . . . . . . . . . . . . . . . . . . . . . . . . . . . . . . . . . .87 - 90
Four et accessoires . . . . . . . . . . . . . . . . . . . . . . . . . . . . . . . . . . . . . . . . . . . . . . . . . . . . . . . . . . . . . .91
Bandeau de commande . . . . . . . . . . . . . . . . . . . . . . . . . . . . . . . . . . . . . . . . . . . . . . . . . . . . . . . . .92
Avant la mise en service . . . . . . . . . . . . . . . . . . . . . . . . . . . . . . . . . . . . . . . . . . . . . . . . . . . . . . . . .93
Choix d’une langue . . . . . . . . . . . . . . . . . . . . . . . . . . . . . . . . . . . . . . . . . . . . . . . . . . . . . . . . . . . . .93
Touche STOP (ARRET) . . . . . . . . . . . . . . . . . . . . . . . . . . . . . . . . . . . . . . . . . . . . . . . . . . . . . . . . . . .94
Réglage de l’horloge . . . . . . . . . . . . . . . . . . . . . . . . . . . . . . . . . . . . . . . . . . . . . . . . . . . . . . . . . . . .94
Mode d’economie d’énergie . . . . . . . . . . . . . . . . . . . . . . . . . . . . . . . . . . . . . . . . . . . . . . . . . . . . . .95
Niveau de puissance du micro-ondes . . . . . . . . . . . . . . . . . . . . . . . . . . . . . . . . . . . . . . . . . . . . . .95
Que sont les micro-ondes? . . . . . . . . . . . . . . . . . . . . . . . . . . . . . . . . . . . . . . . . . . . . . . . . . . . . . . .96
Voici ce que vous pourrez faire avec votre nouveau four micro-ondes . . . . . . . . . . . . . . . . . .96
Fonctionnement manuel . . . . . . . . . . . . . . . . . . . . . . . . . . . . . . . . . . . . . . . . . . . . . . . . . . . . . . . . .97
Cuisson au gril . . . . . . . . . . . . . . . . . . . . . . . . . . . . . . . . . . . . . . . . . . . . . . . . . . . . . . . . . . . . . . . . .98
Fonctionnement à vide . . . . . . . . . . . . . . . . . . . . . . . . . . . . . . . . . . . . . . . . . . . . . . . . . . . . . . . . . .98
Cuisson par convection . . . . . . . . . . . . . . . . . . . . . . . . . . . . . . . . . . . . . . . . . . . . . . . . . . . . .99 - 100
Cuisson combinée . . . . . . . . . . . . . . . . . . . . . . . . . . . . . . . . . . . . . . . . . . . . . . . . . . . . . . . .101 - 102
Autres fonctions pratiques . . . . . . . . . . . . . . . . . . . . . . . . . . . . . . . . . . . . . . . . . . . . . . . . .103 - 105
Bien choisir la vaisselle . . . . . . . . . . . . . . . . . . . . . . . . . . . . . . . . . . . . . . . . . . . . . . . . . . . . . . . . 106
Tableaux de cuisson . . . . . . . . . . . . . . . . . . . . . . . . . . . . . . . . . . . . . . . . . . . . . . . . . . . . . . . . . . . .107
Recettes avec le plateau en verre en mode convection . . . . . . . . . . . . . . . . . . . . . . . . .108 - 109
Recettes avec le plateau en verre en mode gril . . . . . . . . . . . . . . . . . . . . . . . . . . . . . . . . . . . . .110
Fonctionnement automatique . . . . . . . . . . . . . . . . . . . . . . . . . . . . . . . . . . . . . . . . . . . . . .111 - 112
Tableaux de cuisson automatique . . . . . . . . . . . . . . . . . . . . . . . . . . . . . . . . . . . . . . . . . . . . . . . .113
Tableaux de cuisson depuis l’état congelé . . . . . . . . . . . . . . . . . . . . . . . . . . . . . . . . . . . . . . . . .114
Tableaux de décongélation automatique . . . . . . . . . . . . . . . . . . . . . . . . . . . . . . . . . . . . . .115- 116
Recettes pour cuisson automatique AC-4 . . . . . . . . . . . . . . . . . . . . . . . . . . . . . . . . . . . . . . . . . .117
Recettes pour cuisson automatique AC-5 . . . . . . . . . . . . . . . . . . . . . . . . . . . . . . . . . . . . .118 - 119
Entretien et nettoyage . . . . . . . . . . . . . . . . . . . . . . . . . . . . . . . . . . . . . . . . . . . . . . . . . . . . . . . . .120
Que faire si... . . . . . . . . . . . . . . . . . . . . . . . . . . . . . . . . . . . . . . . . . . . . . . . . . . . . . . . . . . . . . . . . . .121
Service et garantie (France) . . . . . . . . . . . . . . . . . . . . . . . . . . . . . . . . . . . . . . . . . . . . . . . . . . . . .122
Service après-vente et pièces de rechange (belgique) . . . . . . . . . . . . . . . . . . . . . . . . . . . . . . .123
Déclaration de conditions de garantie (Belgique) . . . . . . . . . . . . . . . . . . . . . . . . . . . . . . . . . . . . .124
Fiche technique . . . . . . . . . . . . . . . . . . . . . . . . . . . . . . . . . . . . . . . . . . . . . . . . . . . . . . . . . . . . . . .125
Information importante . . . . . . . . . . . . . . . . . . . . . . . . . . . . . . . . . . . . . . . . . . . . . . . . . . . . . . . .126
Installation . . . . . . . . . . . . . . . . . . . . . . . . . . . . . . . . . . . . . . . . . . . . . . . . . . . . . . . . . . . . . .127 - 128
Le symbole sur le produit ou son emballage indique que ce produit ne peut être traité comme déchet
ménager. Il doit plutôt être remis au point de ramassage concerné, se chargeant du recyclage du matériel
électrique et électronique. En vous assurant que ce produit est éliminé correctement, vous favorisez la
prévention des conséquences négatives pour l’environnement et la santé humaine qui, sinon, seraient le
résultat d’un traitement inapproprié des déchets de ce produit. Pour obtenir plus de détails sur le recyclage
de ce produit, veuillez prendre contact avec le bureau municipal de votre région, votre service d’élimination
des déchets ménagers ou le magasin où vous avez acheté le produit.
3. AG-91D-EU French 21/02/2005 16:21 Page 86
Page 89

87
Avertissements importants de sécurité
F
N’employez pas de récipients en matière plastique,
papier, carton et tous matériaux qui ne supporteraient
pas l’effet de la chaleur de la résistance.
Ne faites rien sécher dans le four à micro-onde.
Des objets peuvent s’enflammer (papier journal,
vêtements,...).
Pour faire des popcorns, n’utilisez que les ustensiles
conçus pour les fours à micro-ondes.
Ne conservez aucun aliment ou produit à l’intérieur du
four. Vérifiez les réglages après mise en service du four
et assurez-vous que le four fonctionne correctement.
Lisez et utilisez cette notice d’utilisation.
Pour éviter toute blessure
AVERTISSEMENT:
N’utilisez pas le four s’il est endommagé ou ne
fonctionne pas normalement. Vérifiez les points
suivants avant tout emploi du four:
a) La porte: assurez-vous qu’elle ferme correctement,
qu’elle ne présente pas de défaut d’alignement et
qu’elle n’est pas voilée.
b) Les charnières et les loquets de sécurité: assurez-
vous qu’ils ne sont ni endommagés ni desserrés.
c) Le joint de porte et la surface de contact: assurez-
vous qu’ils ne sont pas endommagés.
d) L’intérieur de la cavité et la porte: assurez-vous
qu’ils ne sont pas cabossés.
e) Le cordon d’alimentation et sa prise: assurez-vous
qu’ils ne sont pas endommagés.
Vous ne devez rien réparer ou remplacer vousmême dans le four. Faites appel à un personnel
qualifié. N'essayez pas de démonter l'appareil ni
d'enlever le dispositif de protection contre
l'énergie micro-onde, vous risqueriez
d'endommager le four et de vous blesser.
Ne faites pas fonctionner le four porte ouverte et ne
modifier pas les loquets de sécurité de la porte.
N’utilisez pas le four si un objet est interposé entre le
joint de porte et la surface de contact du joint.
Ne laissez pas les dépôts de graisse ou de saleté
s'incruster sur les joints de porte et les surfaces
voisines. Reportez-vous aux instructions de la
section “Entretien et Nettoyage” page 120. Le
non-respect des consignes de nettoyage du four
entraînera une détérioration de la surface
susceptible d'affecter le bon fonctionnement de
l'appareil et de présenter des risques.
Pour éviter tout danger d’incendie
Vous devez surveiller le four lorsqu’il est en
fonctionnement. Un niveau de puissance trop
élevé, ou un temps de cuisson trop long, peuvent
entraîner une augmentation de la température des
aliments conduisant à leur enflammation.
La prise secteur doit être facilement accessible de
manière à ce que la fiche du cordon d’alimentation
puisse être aisément débranchée en cas d’urgence.
La tension d’alimentation doit être égale à 230 V, 50 Hz
avec un fusible de distribution de 16 A minimum, ou un
disjoncteur de 16 A minimum.
Nous conseillons d’alimenter ce four à partir d’un
circuit électrique indépendant.
Ne rangez pas et n’utilisez pas le four à l’extérieur.
Si les aliments que chauffe le four viennent à
fumer, N’OUVREZ PAS LA PORTE. Mettez le four
hors tension, débranchez la prise du cordon
d’alimentation et attendez que la fumée se soit
dissipée. Ouvrir le four alors que les aliments
fument peut entraîner leur enflammation.
N’utilisez jamais d’eau.
N’utilisez que des récipients et des ustensiles
conçus pour les fours à micro-ondes. Reportezvous aux conseils qui sont donnés dans le guide de
recette. Voir la page 106.
Surveillez le four lorsque vous utiliser des
récipients en matière plastique à jeter, des
récipients en papier ou tout autre récipient
pouvant s’enflammer.
Nettoyez le cadre du répartiteur d’ondes, la cavité
du four et le plateau tournant après chaque
utilisation du four. Ces pièces doivent être toujours
sèches et dépourvues de graisse. Les accumulations
de graisse peuvent s’échauffer au point de fumer
ou de s’enflammer.
Ne placez pas des produits susceptibles de s’enflammer
au voisinage du four ou de ses ouvertures de
ventilation.
N’obstruez pas les ouvertures de ventilation.
Retirez toutes les étiquettes, fils, etc. métalliques qui
peuvent se trouver sur l’emballage des aliments. Ces
éléments métalliques peuvent entraîner la formation
d’un arc électrique qui à son tour peut produire un
incendie. N’utilisez pas ce four pour faire de la friture.
La température de l’huile ne peut pas être contrôlée et
l’huile peut s’enflammer.
AVERTISSEMENTS DE SECURITE IMPORTANTS : LES LIRE ATTENTIVEMENT ET LES CONSERVER
SOIGNEUSEMENT POUR CONSULTATIONS ULTERIEURES
3. AG-91D-EU French 21/02/2005 16:21 Page 87
Page 90

88
Avertissements importants de sécurité
Le chauffage par micro-ondes des boissons peut
avoir comme conséquence l'ébullition éruptive
retardée, donc le soin doit être pris en manipulant
le récipient.
Pour éviter toute ébullition soudaine et tout risque:
1. Remuez le liquide avant de le chauffer ou de le
réchauffer.
2. Placez une tige de verre ou un objet similaire dans le
récipient contenant le liquide.
3. Conservez le liquide quelque temps dans le four à la
fin de la période de chauffage de manière à éviter
toute ébullition soudaine différée.
N’utilisez pas de produits chimiques corrosifs dans cet
appareil.
Ne pas cuire les oeufs dans leur coquille et ne pas
réchauffer les oeufs durs entiers dans le four
micro-ondes car ils risquent d'exploser même après
que le four ait fini de chauffer. Pour cuire ou
réchauffer des œufs qui n’ont pas été brouillés ou
mélangés, percez le jaune et le blanc pour afin
d’éviter qu’ils n’explosent. Retirer la coquille des
œufs durs et coupez-les en tranches avant de les
réchauffer dans un four à micro-ondes.
Percez la peau des aliments tels que les pommes de
terre et les saucisses avant de les cuire, car ils peuvent
exploser.
Pour éviter toute brûlure
Utilisez un porte-récipient ou des gants de protection
lorsque vous retirez les aliments du four de façon à
éviter toute brûlure.
Ouvrez les récipients, les plats à popcorn, les sacs de
cuisson, etc. de telle manière que la vapeur qui peut
s’en échapper ne puisse vous brûler les mains ou le
visage.
Pour éviter toute brûlure, contrôlez la température
des aliments et remuez-les avant de les servir, en
particulier lorsqu’ils sont destinés à des bébés, des
enfants ou des personnes âgées. Réchauffez les
biberons sans la tétine.
La température du récipient est trompeuse et ne reflète
pas celle des aliments que vous devez vérifier.
Tenez-vous éloigné du four au moment où vous ouvrez
sa porte de manière à éviter toute brûlure due à la
vapeur ou à la chaleur.
Coupez en tranches les plats cuisinés farcis après
chauffage afin de laisser s’échapper la vapeur et
d’éviter les brûlures.
Veillez à ce que les enfants ne touchent pas la porte du
four pour éviter les brûlures.
Si vous avez un STIMULATEUR CARDIAQUE, consultez
votre médecin ou le fabricant du stimulateur afin de
connaître les précautions que vous devez prendre lors
de l’utilisation du four.
Dans le cas de petites quantités (une saucisse, un
croissant, etc.) posez un verre d’eau à côté de aliment.
Pour éviter toute secousse électrique
Dans aucun cas vous ne devez déposer la carrosserie
extérieure du four.
N’introduisez aucun objet ou liquide dans les ouvertures
des verrous de la porte ou dans les ouïes d’aération. Si un
liquide pénètre dans le four, mettez-le immédiatement
hors tension, débranchez la prise du cordon
d’alimentation et adressez-vous à un service après vente.
Ne plongez pas la prise du cordon d’alimentation dans
l’eau ou tout autre liquide.
Veillez à ce que le cordon d’alimentation ne pende pas à
l’extérieur de la table ou du meuble sur lequel est posé
le four.
Veillez à ce que le cordon d’alimentation soit éloigné
des surfaces chauffées, y compris l'arrière du four.
Ne tentez pas de remplacer vous-même la lampe du
four et ne laissez personne d'autre qu’un professionnel
qualifié faire ce travail.
Si la lampe du four grille, adressez-vous au revendeur
ou à un service après vente AEG-Electrolux.
Si le cordon d’alimentation de cet appareil est
endommagé, faites-le remplacer par un professionnel
qualifié.
Les interrupteurs de verrouillage de sécurité incorporés
empêchent le four à micro-ondes de fonctionner
lorsque la porte est ouverte.
N’installez pas et n’utilisez pas votre appareil si celui-ci
présente une anomalie lors du déballage. Installez ou
positionnez ce four uniquement selon les instrctions
d’installation contenues dans cette notice.
si l’installation électrique nécessite une modification
pour le branchement de votre appareil, faites appel à
un électricien qualifié.
Pour éviter toute explosion ou ébullition soudaine
AVERTISSEMENT: Les liquides ou autres aliments
ne doivent pas être réchauffés dans des récipients
fermés car ils risquent d'exploser.
N’utilisez jamais aucun récipient scellé. Retirer les
rubans d’étanchéité et le couvercle avant tout
utilisation d’un tel récipient. Un récipient scellé peut
exploser en raison de l’augmentation de pression et ce,
même après que le four a été mis hors service.
Prenez des précautions lorsque vous employez les
micro-ondes pour chauffer des liquides. Utilisez des
récipients à large ouverture de manière que les bulles
puissent s’échapper.
3. AG-91D-EU French 21/02/2005 16:21 Page 88
Page 91

89
Avertissements importants de sécurité
F
Pour éviter une anomalie de fonctionnement et pour
éviter d’endommager le four.
Ne jamais faire fonctionner le four sans plateau
tournant ou à vide, sauf recommendation du mode
d’emploi, voir page 98. Sinon vous risquez
d’endommager le four.
Si vous utilisez un plat brunisseur ou un plat en matière
autochauffante, interposez une protection contre la
chaleur (par exemple, un plat en porcelaine) de manière
à ne pas endommager le plateau tournant. Le temps de
préchauffage précisé dans le livre de recette ne doit pas
être dépassé.
Assurez-vous que la porte est bien fermée, que ses
surfaces sont propres. Nettoyez-les régulièrement avec
une éponge humide, pour éviter l’accumulation de
toutes graisses, salissures, éclaboussures. Ces dépôts
absorbent l’énergie et réduisent d’autant l’efficacité du
four.
N’utilisez pas la cavité du four pour stocker. Ne laissez
pas de produits en papier, des ustensiles de cuisine ou
des aliments dans la cavité lorsque l‘appareil n’est pas
utilisé.
Ne faites jamais chauffer de bouillote à l’intérieur du
four à micro-ondes.
N’utilisez pas une sonde thermique d’un four
traditionnel dans votre four à micro-ondes.
Cependant, afin de connaître la température de cuisson
à cœur, vous pouvez mesurer le degré de cuisson de
l’aliment avec un thermomètre <spécial viande>. Ne
laissez pas ce thermomètre dans le four en
fonctionnement. Débranchez l’appareil s’il n’est pas
utilisé pendant un certain temps (vacances, ...).
N’utilisez aucun ustensile métallique car ils
réfléchissent les micro-ondes et peuvent provoquer un
arc électrique. N’oubliez pas d’enlever les liens et les
agrafes métalliques. Ne tentez pas de cuire ou de
réchauffer les aliments dans une boîte de conserve et
n’utilisez pas de bouteilles capsulées.
N’utilisez que le plateau tournant conçu pour ce four.
N’utilisez aucun récipient en matière plastique prévu
pour les fours à micro-ondes si le four est encore
chaud du fait d’une cuisson précédente au GRIL,
CONVECTION, en mode COMBINEE,
CUISSON AUTOMATIQUE ou en mode CUISSON
DEPUIS L’ÉTAT CONGELÉ ces récipients peuvent
fondre. Les récipients en matière plastique sont à
proscrire pour ces modes de cuisson, sauf si leur
fabricant a précisé qu’ils conviennent à cet usage.
Ne posez aucun objet sur la carrosserie du four pendant
son fonctionnement.
Ne touchez pas la porte du four, le compartiment
extérieur, le compartiment arrière, la cavité du four, les
ouvertures de ventilation, les accessoires et les plats en
GRIL mode, CONVECTION, en mode COMBINEE,
CUISSON AUTOMATIQUE ou en mode CUISSON
DEPUIS L’ÉTAT CONGELÉ car ils s’échauffent. Avant
nettoyage, s’assurer qu’ils ne soient pas chauds.
Pour éviter toute mauvaise utilisation par les
enfants
AVERTISSEMENT: Ne laisser les enfants utiliser le
four sans surveillance que si des instructions
appropriées ont été données de manière à ce que
les enfants puissent utiliser le four en toute
sécurité et comprennent les dangers encourus en
cas d'utilisation incorrecte.
Le verre à feu, la porcelaine, la fïence, la céramique, la
terre cuite non poreuse résistent aux températures
élevées et peuvent satisfaire à toutes les utilisations. Les
récipients de cuisson peuvent devenir brûlants par
conduction de la chaleur des aliments vers le récipient.
Portez des gants de protection pour les retirer du four.
Lors d’utilisation en fonction fril (seul ou en
combinaison avec les micro-ondes), l’appareil devient
très chaud. Eloignez les enfants en bas âge de la porte
de l‘appareil.
Il est recommandé de couvrir les aliments dans la
plupart des cas; ils seront plus savoureux et votre
appareil restera propre. Cependant, avant de cuire des
aliments ou de réchauffer des liquides dans une
bouteille ou un récipient hernétique, retirez le bouchon
ou le couvercle. Faites attention en retirant les
couvercles ou les films de protection des plats car une
vapeur brûlante est soudainement libérée.
Les enfants ne doivent se servir du four que sous la
surveillance d’un adulte.
Empêchez qu’ils ne s’appuient sur la porte du four. Ne
les laissez pas jouer avec le four qui n’est pas un jouet.
Vous devez enseigner aux enfants les consignes de
sécurité telles: l’usage d’un porte-récipient, le retrait
avec précaution des produits d’emballage des aliments.
Vous devez leur dire de porter une attention
particulière aux emballages (par exemple, ceux qui sont
destinés à griller un aliment) dont la température peut
être très élevée.
Autres avertissement.
Ne modifiez pas ou n’essayez pas de modifier le four.
Vous ne devez pas déplacer le four pendant son
fonctionnement.
Votre appareil est destiné à un usage domestique
normal. Ce four a été conçu pour la préparation
d'aliments et ne doit être utilisé que pour leur cuisson.
Il n’a pas été étudié pour un usage commercial ou
scientifique.
3. AG-91D-EU French 21/02/2005 16:21 Page 89
Page 92

90
Avertissements importants de sécurité
REMARQUES:
Si vous avez des doutes quant à la manière de brancher
le four, consulter un technicien qualifié.
Ni le fabricant ni le distributeur ne peuvent être tenus
pour responsable des dommages causés au four ou des
blessures personnelles qui résulteraient de
l’inobservation des consignes de branchement
électrique.
Des gouttes d’eau peuvent se former sur les parois de la
cavité du four, autour des joints et des portées
d’étanchéité. Cela ne traduit pas un défaut de
fonctionnement ni des fuites de micro-ondes.
Assurez-vous également que les décors ne sont pas à
base d’éléments métalliques. Dans le doute, n’hésitez
pas à procéder au test du verre d’eau.
• Test du verre d’eau Ce test très simple vous permet de
juger si un récipient est apte à la cuisson par microondes Placez dans le four le récipient à tester vide et
posez à ;intérieur ou à côté de clui-ci un verre rempli
d’eau qui absorbera l’énergie micro-ondes. Faites
fonctionner le four pendant 1 minute à la puissance
maximum. Si le récipient à tester reste froid, il
convient à la cuisson par micro-ondes.
• Le papier absorbant vous rendra de grands services,
vous l’utiliserez par exemple pour envelopper le pain,
les brioches, les cakes...à décongler, pour griller le
bacon dont il absorbera l’excès de matières grasses.
Evitez l’emploi des serviettes en papier de couleur qui
porraient déteindre. Le papier sulfurisé et le papier
paraffiné conviennent parfaitement pour les cuissons
en papillotes et pour couvrir les plats. les assiettes et
les gobelets en carton seront réservé pour réchauffer
à faible température.
• Les matières plastiques (plats, tasses, boîtes de
congélation et emballages en plastique) de qualité
alimentaire réagissent plus ou moins bien aux
températures élevées et aux matières grasses
chaudes. Réservez plutôt ces récipients aux
utilisations à faibles températures et à la
décongélation. Respectez les instructions du
fabricant en utilisant du plastique dans le four. Evitez
d’utiliser des matières plastiques avec des aliments
ayant une forte teneur en matières grasses ou en
sucre, (ou des boissons) car ceux-ci atteignent des
températures élevées et pourraient faire fondre
certains plastiques.
Certaines formes de récipients favorisent une
pénétration plus homogènes des micro-ondes dans les
aliments.
Préférez les récipients peu profonds aux angles arrondis
(plats ronds ou ovales), adaptez au mieux les
dimensions du plat au volume des préparations,
choisissez un plat de forme circulaire du genre moule à
savarin chaque fois que la nature de la préparation le
permet.
Récipients en aluminium
Les barquettes en aluminium peuvent être utilisées en
toute sécurité pour réchauffer des aliments dans le four
à micro-ondes, dans les conditions suivantes :
1. Les barquettes en aluminium ne doivent pas dépasser
4 cm de profondeur.
2. N’utilisez pas de couvercles en film d’aluminium.
3. Les barquettes en aluminium doivent être remplis
d’aliments au moins aux deux tiers. N’utilisez jamais
de récipients vides.
4. Les barquettes en aluminium ne doivent pas être en
contact ou proche des parois du four (distance
minimum 1 cm). La barquette en aluminium devra
être placée sur un plat retourné allant au four.
5. Les barquettes en aluminium ne doivent jamais être
réutilisées dans le four à micro-ondes.
6. Si le four à micro-ondes a été utilisé pendant 15
minutes ou plus, laissez-le refroidir avant de le
réutiliser.
7. Le récipient et le plateau tournant peuvent devenir
très chauds pendant leur utilisation.
Utilisez des gants de protection.
8. Les durées de réchauffage ou de cuisson peuvent être
prolongées avec un récipient en film d’aluminium.
Assurez-vous que les aliments sont chauds avant de
servir.
3. AG-91D-EU French 21/02/2005 16:21 Page 90
Page 93

91
F
Four et accessoires
ACCESSOIRES:
Vérifier que les accessoires suivants sont fournis:
16 Plateau tournant 17 Support d'entraînement
18 Trépied bas 19 Trépied haut 20 Grille de plateau
21 Plateau en verre
• Positionnez le support de plateau tournant sur le
manchon situé au centre de la base inférieure du four
en veillant à tourner la PARTIE superieure (comportant
le mot “TOP” gravé) du support vers le haut. Le support
doit tourner librement autour du manchon.
• Placez le plateau tournant sur le support de plateau.
• Placez les supports supérieurs/inférieurs sur le plateau
tournant si nécessaire.
• Faites glisser le plateau en verre dans les rails de grille.
Vous pouvez faire cuire les plats directement sur le
plateau ou placer la grille à l’intérieur du plateau pour
récupérer le jus de cuisson des rôtis. (Voir page 105.)
AVERTISSEMENT:
• Veillez toujours à ce que le plateau tournant et le
support soient correctement montés afin de permettre
une cuisson bien répartie. Un plateau tournant mal
posé pourra cogner, ne pas tourner correctement et
endommager le four.
• Le plateau tournant tourne dans le sens des aiguilles
d’une montre et dans le sens inverse des aiguilles d’une
montre. Le sens de rotation peut changer chaque fois
que l’on met le four en marche. Cela n’affecte en rien
la cuisson.
• Lorsque vous commandez des accessoires, veuillez
mentionner deux éléments: le nom de la pièce et le
nom du modèle à votre revendeur ou à votre
dépanneur agréé AEG-Electrolux.
1 Points de fixation (x4)
2 Elément chauffant du gril
3 Convection Elément chauffant
4 Eclairage du four
5 Bandeau de commande
6 Rails de grille
7 Cadre du répartiteur
d'ondes
8 Entraînement
9 couplage
10 Cadre d'ouverture de la porte
11 Poignée d'ouverture de porte
12Ouvertures de ventilation
13Enveloppe extérieure
14Cordon d'alimentation
15Cordon d'alimentation clip de support
16
17
Couplage
18
19
Ces éléments sont utilisés pour faire cuire dans le
mode de convection, combinee ou de gril.
21
20
14
13
12
4
10
11
8
7
321 1
9
11
15
6
5
3. AG-91D-EU French 21/02/2005 16:21 Page 91
Page 94

92
Bandeau de commande
Affichage numérique et symboles
1 Symbole CUISSON EN MARCHE
2 Symbole START
3 Symbole GRIL
4 Symbole CONVECTION
5 Symbole MICRO-ONDES
6 Symbole INFORMATION
Touches de fonctionnement:
7 Touche INFORMATION
8 Touche LANGUE
9 Touche mode CUISSON
pour une cuisson micro-ondes
pour une cuisson micro-ondes avec
GRIL
pour une cuisson CONVECTION
pour GRIL
pour CONVECTION
10 Bouton rotatif DUREE/POIDS
Tournez le bouton rotatif pour sélectionner le
temps de cuisson/décongélation ou le poids
des aliments.
11 Touche CUISSON AUTOMATIQUE
12 Touche CUISSON DEPUIS
L’ETAT CONGELE
13 Bouton DECONGELATION
AUTOMATIQUE
14 Touche niveau de puissance
micro-ondes.
15 Touche START/QUICK
16 Touche ARRET (STOP)
17 Touche CONVECTION
18 Touche REGLAGE DE L’HORLOGE
19 Touche MOINS/PLUS
3
4
5
6
7
8
9
10
11
12
13
14
15
16
18
17
2
1
19
3. AG-91D-EU French 21/02/2005 16:21 Page 92
Page 95

93
F
Le four dispose d'un mode d'économie d'énergie
1. Branchez le four, aucune donnée ne s'affiche.
2. Ouvrez la porte “CHOISIR LA LANGUE” clignote dans
6 langues.
REMARQUE : une fois la langue sélectionnée à
l’aide de la touche LANGUE, l’écran affichera le
message “MODE D’ECONOMIE D’ENERGIE POUR
SORTIR DU MODE D’ECONOMIE D’ENERGIE REGLER
HORLOGE” lorsque vous brancherez le four sur la
prise secteur.
3. Fermez la porte.
4. Sélectionnez la langue (Voir ci-dessous).
REMARQUE: si vous choisissez d’utiliser le four en
allemand, il sera inutile de sélectionner la langue.
Appuyez simplement sur le bouton STOP (ARRET).
L’écran affichera “.0” et passera à l’étape 5.
5. Réglez l’horloge (Voir page 94).
6. Faites chauffer le four sans aliments (voir page 98).
GUIDE DE CUISSON INTEGRE:
Ce four dispose d’un système d’affichage des
informations vous donnant accès à des instructions
étape par étape pour une utilisation facile de chaque
fonction, et ceci dans la langue de votre choix. La
touche INFORMATION permet d’obtenir des
instructions sur chaque touche. Des voyants s’affichent
lorsque vous appuyez sur une touche pour vous
indiquer l’étape suivante.
Le four est préréglé sur l’ allemand mais il est possible
de changer la langue. Pour choisir une autre langue,
appuyez sur la touche LANGUE jusqu’à l’affichage de la
langue désirée. Appuyez ensuite sur la touche
START/QUICK.
Appuyez sur LANGUE
1 fois
2 fois
3 fois
4 fois
5 fois
6 fois
LANGUE
ANGLAIS
DEUTSCH
NEDERLANDS
FRANCAIS
ITALIAN
ESPANOL
1. Choisissez la langue désirée.
Appuyez sur la touche
LANGUE cinq fois.
2. Appuyez une fois sur le touche
START/QUICK pour démarrer le
réglage.
Vérifier l’affichage:
REMARQUE: La langue sélectionnée sera mémorisée, même si l’alimentation électrique est coupée.
Exemple: Pour sélectionner l’italien.
Avant la mise en service
Choix d’une langue
x5
x1
3. AG-91D-EU French 21/02/2005 16:21 Page 93
Page 96

94
Touche STOP (ARRET)
Utilisez la touche STOP (ARRET) pour:
1. Effacer une erreur lors de la programmation.
2. Faire une pause en cours de cuisson.
3. Annuler un programme en cours de cuisson (appuyez sur la
touche STOP (ARRET) deux fois).
Il existe deux modes de réglage: horloge sur 12 heures et horloge sur 24 heures.
Etape 1
1. Pour sélectionner l’horloge sur 12 heures, appuyez une fois sur la touche
REGLAGE DE L’HORLOGE, comme indiqué à l’étape 1.
2. Pour sélectionner l’horloge sur 24 heures, appuyez deux fois sur la touche
REGLAGE DE L’HORLOGE, comme indiqué à l’étape 2.
Etape 2
Exemple: Pour régler l’horloge en mode 24 heures sur 23:35:
2. Réglez les heures. Tournez le
bouton rotatif DUREE/POIDS dans
le sens des aiguilles d’une montre
jusqu’à l’affichage de l’heure
correcte (23).
Vérifier l’affichage.
4. Réglez les minutes (35).
1. Choisissez l’horloge 24 heures
en appuyant deux fois sur la
touche REGLAGE DE
L’HORLOGE.
3. Passez des heures aux minutes
en appuyant une fois sur la
touche REGLAGE DE
L’HORLOGE.
5. Appuyez deux fois sur la touche
REGLAGE DE L’HORLOGE
Démarrez l’horloge.
x1
x2
Ce message s’affichera si vous avez déjà sélectionné
la langue à l’aide de la touche LANGUE. Si cela se
produit lorsque le four est en fonctionnement, le
programme est effacé, l’horloge est déréglée et vous
devez la régler de nouveau.
5. Pour régler l’heure à nouveau, suivre l’exemple
ci–dessous.
6. Si vous ne réglez pas l’horloge, appuyez une fois sur
la touche ARRET (STOP). apparaît à
l’affichage. A la fin du fonctionnement du four,
réapparaît sur l’affichage au lieu de
l’heure.
7. Si vous réglez l’horloge, le mode d’économie
d’énergie est hors service.
REMARQUES:
1. Vous pouvez tourner le bouton rotatif
DUREE/POIDS dans le sens des aiguilles d’une
montre ou dans le sens contraire.
2. Appuyez sur la touche ARRET (STOP) en cas d’erreur
de programmation.
3. Si le four est en mode cuisson ou minuterie et si
vous voulez connaître l’heure, appuyez sur la touche
REGLAGE HORLOGE. Tant que la touche reste
enfoncée, l’heure s’affiche.
4. S’il y a une coupure de courant, débranchez le four,
rebranchez-le, ouvrez la porte puis refermez-la,
l’écran indique “MODE D’ECONOMIE D’ENERGIE
POUR SORTIR DU MODE D’ECONOMIE D’ENERGIE
REGLER HORLOGE”.
Réglage de l’horloge
x2
x1
x1
3. AG-91D-EU French 21/02/2005 16:21 Page 94
Page 97

95
F
Mode d’économie d’énergie
1. Vérifiez
l’exactitude de
l’heure affichée.
3. Affichez la valeur 0 en
tournant le cadran
DUREE/POIDS.
2. Appuyez sur le
bouton REGLAGE
DE L’HORLOGE.
4. Appuyez sur le bouton
START/QUICK.
L’alimentation est coupée et
aucune donnée n’est
affichée.
Vérifier l’affichage:
Votre four est livré préréglé en mode d’économie d’énergie. Si vous n’utilisez pas le four pendant 3 minutes, par
exemple après son branchement ou à la fin d’une cuisson, l’alimentation électrique est coupée automatiquement.
Pour remettre le four sous tension, ouvrez la porte, puis refermez-la.
Pour activer le mode d’économie d’énergie, procédez comme suit:
Exemple:
Pour activer le mode d’économie d’énergie: (il est actuellement 23:35)
REMARQUE: il est possible d’appuyer sur le bouton REGLAGE HORLOGE à deux reprises à l’étape 2.
Votre four offre 5 niveaux de puissance. Afin de choisir
le niveau de puissance pour la cuisson, suivez les
conseils donnés dans la section des recettes. En général,
les recommandations suivantes s’appliquent :
900 W: pour une cuisson rapide ou pour réchauffer un
plat (par ex. soupes, ragoûts, conserves, boissons
chaudes, légumes, poisson, etc.).
630 W: pour cuire plus longtemps les aliments plus
denses, tels que les rôtis, les viandes, les plats sur
assiettes et les plats délicats tels que les sauces au
fromage et les gâteaux de Savoie. Ce niveau de
puissance réduit évitera de faire déborder vos sauces et
assurera une cuisson uniforme de vos aliments (les
côtés ne seront pas trop cuites).
450 W: convient aux aliments denses nécessitant une
cuisson traditionnelle prolongée (les plats de bœuf par
exemple). Ce niveau de puissance est recommandé pour
obtenir une viande tendre.
270 W (décongélation): utilisez ce niveau de puissance
pour décongeler vos plats de manière uniforme. Idéal
pour faire mijoter le riz, les pâtes, les boulettes de pâte
et cuire la crème renversée.
90 W: pour décongeler délicatement les aliments tels
que les gâteaux à la crème ou les pâtisseries.
W = Watt
Pour régler le niveau de puissance du micro-ondes :
1. Sélectionnez le mode de cuisson en tournant le bouton sur Micro-ondes.
2. Tournez le bouton rotatif DUREE/POIDS dans le sens des aiguilles d’une montre pour sélectionner le temps de
cuisson.
3. Appuyez sur la touche NIVEAU DE PUISSANCE MICRO-ONDES jusqu'à l'affichage du niveau de puissance
voulu. Si vous appuyez une fois sur la touche NIVEAU DE PUISSANCE MICRO-ONDES, s'affiche.
Si vous souhaitez modifier le niveau de puissance, continuez à appuyer sur la touche NIVEAU DE PUISSANCE
MICRO-ONDES jusqu'à atteindre de nouveau le niveau voulu.
4. Appuyez sur la touche START/QUICK.
REMARQUE: Si le niveau de puissance n’est pas sélectionné, il est mis automatiquement à pleine puissance 900 W.
Niveau de puissance du micro-ondes
x1
x1
3. AG-91D-EU French 21/02/2005 16:21 Page 95
Page 98

96
Les micro-ondes sont, tout comme les ondes radio et
télévision, des ondes électromagnétiques.
Dans le micro-ondes, les ondes sont générées par le
magnéton et font vibrer les molécules d’eau des
aliments. La friction qui en résulte dégage de la chaleur
qui décongèle, réchauffe ou cuit les aliments.
Le secret des temps de cuisson courts tient au fait que
les micro-ondes pénètrent de tous les côtés dans les
aliments. L’énergie est donc utilisée avec un
rendement optimal. En comparaison, l’énergie utilisée
pour la cuisson avec une cuisinière électrique doit
d’abord passer de la plaque chauffante à la casserole
puis de la casserole aux aliments. Ces “détours”
entraînent d’importantes pertes d’énergie.
Aliments - Ils absorbent les micro-ondes.
Métaux - Ils réfléchissent les micro-ondes.
Mode micro-ondes
Vous pouvez utiliser votre nouveau four micro-ondes/ gril
en mode micro-ondes par exemple pour réchauffer
rapidement des plats garnis ou des boissons ou faire fondre
presque instantanément du beurre ou du chocolat.
Le micro-ondes est également idéal pour décongeler les
aliments.
Il est souvent conseillé de combiner les micro-ondes
avec l’air chaud ou le gril (cuisson mixte). Vous pouvez
ainsi cuire très rapidement les aliments tout en les
brunissant. Le temps de cuisson est en règle générale
bien inférieur à la cuisson traditionnelle.
Cuisson mixte (micro-ondes avec air
chaud ou gril)
L’utilisation combinée de deux modes de
fonctionnement vous permet d’utiliser de façon idéale
tous les avantages de votre appareil.
Vous avez le choix entre deux utilisations combinées:
• Micro-ondes + air chaud (idéal pour les rôtis, les
volailles, les gratins et soufflés, les pizzas, le pain et les
gâteaux) et
• Micro-ondes + gril (idéale pour les pizzas, les pièces
rôties à cuisson rapide, les rôtis, les volailles, les cuisses
de poulet, les brochettes, les croûtes au fromage et
pour les casse-croûtes, gratiner).
Les propriétés des micro-ondes
Les micro-ondes traversent tous les objets non
métalliques, le verre, la porcelaine, la céramique,
la matière plastique, le bois et le papier. C’est la raison
pour laquelle ces matériaux ne chauffent pas dans le
micro-ondes. La vaisselle n’est réchauffée que de façon
indirecte par la chaleur des aliments.
Les mets absorbent les micro-ondes et sont donc
réchauffés.
Les matériaux métalliques ne sont pas traversés par les
micro-ondes, ils les réfléchissent. C’est pourquoi, en
règle générale, il ne faut pas utiliser d’objets
métalliques dans le micro-ondes. Il existe toutefois des
exceptions qui vous permettent d’utiliser les propriétés
des métaux. On recouvre par exemple de feuille
d’aluminium certaines parties des mets pendant la
décongélation ou la cuisson, empêchant ainsi une
cuisson exagérée de certaines parties aux formes
irrégulières. Suivez à ce propos les indications du guide.
Verre, porcelaine, céramique, matières plastiques,
papier, etc. Ils laissent passer les micro-ondes.
La cuisson combinée vous permet en même temps de
cuire et de brunir. L’avantage réside dans le fait que
l’air chaud ou la chaleur du gril ferment rapidement les
pores des couches extérieures des aliments. Les microondes assurent une cuisson douce et rapide. Les
aliments seront croustillants tout en restant juteux à
l’intérieur.
Cuisson à l’air chaud
Vous pouvez utiliser l’air chaud sans les micro-ondes.
Les résultats obtenus sont les mêmes qu’avec un four
conventionnel.
Lors de la cuisson à l’air chaud, un ventilateur situé derrière
la paroi arrière du four souffle de l’air chaud dans le four.
L’air ainsi pulsé chauffe très rapidement l’extérieur des
aliments, ce qui empêche par exemple la viande de perdre
son jus et de sécher. Grâce à ce phénomène de fermeture
des pores, les mets restent savoureux et cuisent plus
rapidement qu’avec les méthodes de cuisson traditionnelles.
Cuisson au gril
Votre appareil est équipé d’un gril au quartz que vous
pouvez utiliser sans les micro-ondes comme un gril
traditionnel. Vous pouvez gratiner ou griller rapidement les
aliments. Votre four dispose de plus d’un deuxième gril
sous le plateau tournant. Ce dernier sert à brunir les
aliments par dessous.
Que sont les micro-ondes?
Voici ce que vous pourrez faire avec
votre nouveau four micro-ondes
3. AG-91D-EU French 21/02/2005 16:21 Page 96
Page 99

97
F
Fonctionnement manuel
REMARQUES:
1. Si l’on ouvre la porte pendant la cuisson, le temps de
cuisson affiché s’arrête automatiquement. Le
compte à rebours reprend lorsque l’on referme la
porte et que l’on appuie sur la touche
START/QUICK.
2. Pour connaître la puissance utilisée en cours de
cuisson, appuyez sur la touche NIVEAU DE
PUISSANCE MICRO-ONDES. La puissance
s’affiche tant que la touche NIVEAU DE PUISSANCE
MICRO-ONDES reste enfoncée.
3. Il est possible de tourner le bouton DUREE/POIDS
dans le sens ou dans le sens inverse des aiguilles
d’une montre. Si l’on tourne le bouton dans le sens
inverse des aiguilles d’une montre, le temps de
cuisson diminue progressivement à partir de la
valeur de 90 minutes.
Exemple:
Pour réchauffer une soupe pendant 2 minutes et 30 secondes à mi-puissance 630 W.
2. Saisissez le temps de
cuisson voulu en tournant
le bouton rotatif DUREE/
POIDS dans le sens des
aiguilles d’une montre. (2
min et 30 s).
3. Modifiez la puissance
en appuyant sur la
touche NIVEAU DE
PUISSANCE.
Vérifiez l’affichage.
Cuisson: Palier de:
0-5 minutes 10 secondes
5-10 minutes 30 secondes
10-30 minutes 1 minute
30-90 minutes 5 minutes
Le four peut être programmé pour un temps de cuisson
maximal de 90 minutes. L’augmentation du temps de
cuisson (décongélation) varie de 10 secondes à cinq
minutes. Elle dépend de la durée totale de cuisson
(décongélation) indiquée dans le tableau.
4. Appuyez une fois sur
le touche
START/QUICK pour
démarrer la cuisson.
1. Sélectionnez le mode de
cuisson en tournant le
bouton sur (Microondes).
x1
x2
3. AG-91D-EU French 21/02/2005 16:21 Page 97
Page 100

98
Cuisson au gril
AVERTISSEMENT:
La porte du four, les parois extérieures et l’intérieur du four seront
chauds. prenez soin d’éviter les risques de brûlures pendant que le
four refroidit.
Il est possible que de la fumée et des odeurs se dégagent lors de la première utilisation du mode gril ou convection,
mais cela ne signifie pas que le four est inutilisable.
Pour éviter ceci, faites fonctionner à vide en mode gril et convection (250 ˚C) pendant 20 minutes avant la
première utilisation du four.
IMPORTANT: De la fumée et des odeurs se dégagent pendant cette opération. Ouvrez les fenêtres et faites
fonctionner le ventilateur d’aération de la pièce.
2. Entrez le temps de
chauffage (20 min).
3. Appuyez une fois sur la touche
START/QUICK pour démarrer la
cuisson.
1. Sélectionnez le mode de
cuisson en tournant le
bouton sur GRIL
ou CONVECTION.
L’élément chauffant du gril situé en haut de la cavité du four ne comporte qu’un seul niveau de puissance.
Exemple:
Pour faire cuire du pain grillé au fromage pendant 5 minutes. Placez le pain sur le trépied haut.
1. Les trépieds haut ou bas sont recommandés pour la
cuisson au gril.
2. Il est possible que de la fumée et des odeurs se
dégagent lors de la première utilisation du gril, mais
cela ne signifie pas que le four est inutilisable. Voir
la partie Fonctionnement à vide à la page
précédente.
3. Après le fonctionnement du gril, le four refroidit
automatiquement et l’affichage est le suivant
“REFROIDISSEMENT EN COURS”.
Vérifier l’affichage.
1. Choisissez la fonction GRIL
en tournant le bouton
MODE CUISSON sur .
2. Entrez le temps de cuisson
souhaité en tournant le bouton
rotatif DUREE/POIDS dans le sens
des aiguilles d’une montre.
3. Appuyez une fois sur la
touche START/QUICK
pour démarrer la cuisson.
Le four commence à
décompter. A la fin du
fonctionnement à vide,
ouvrez la porte pour
laisser refroidir le four.
Fonctionnement à vide
x1
AVERTISSEMENT: L’intérieur du four, la porte, le partie extérieure, le plateau tournant, les trépieds et les
plats risquent de devenir très chauds, utilisez des gants de cuisine épais lorsque vous
retirez les aliments ou le plateau tournant du four pour éviter les brûlures.
x1
3. AG-91D-EU French 21/02/2005 16:21 Page 98
 Loading...