

Page 1
Kühlschrank integrierbar Réfrigérateur intégrables Frigorifero integrabili Refrigerator for integrated use
GEBRAUCHSANWEISUNG
MODE D'EMPLOI
ISTRUZIONE D'USO
OPERATING INSTRUCTIONS
7083 459-00
IK 205 Z 10 RE
IK 205 Z 10 LI
IK 257 Z 20 RE
IK 257 Z 20 LI
D
F
I
GB
Page 2
Entsorgungshinweis
Das Gerät enthält noch wertvolle Materialien und ist einer
vom unsortierten Siedlungsabfall getrennten Erfassung
zuzuführen. Die Entsorgung von ausgedienten Geräten
muss fach- und sachgerecht nach den örtlich geltenden
Vorschriften und Gesetzen erfolgen.
Das ausgediente Gerät beim Abtransport am Kältekreislauf nicht
beschädigen, damit das enthaltene Kältemittel (Angaben auf dem
Typenschild) und das Öl nicht unkontrolliert entweichen können.
• Gerät unbrauchbar machen.
• Netzstecker ziehen.
• Anschlusskabel durchtrennen.
WARNUNG
Erstickungsgefahr durch Verpackungsmaterial und Folien!
Kinder nicht mit Verpackungsmaterial spielen lassen. Das Verpackungsmaterial zu einer offiziellen Sammelstelle bringen.
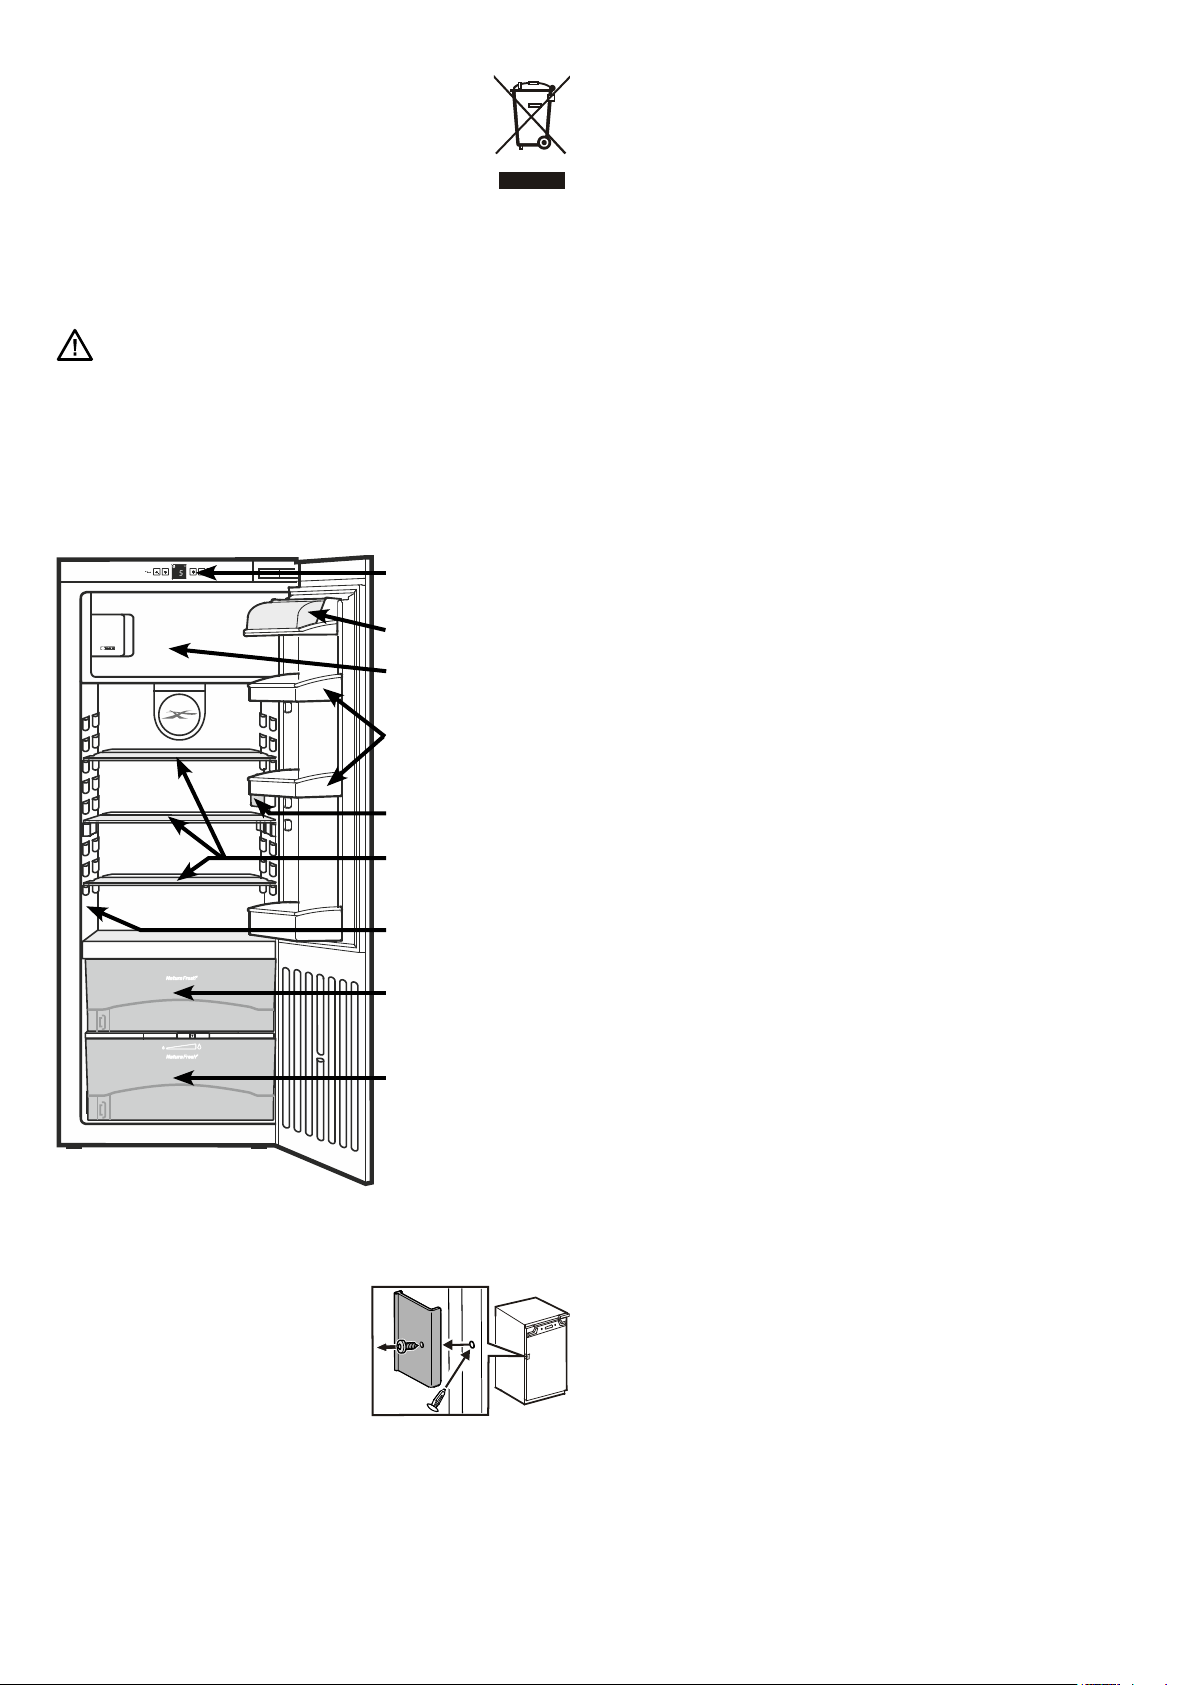
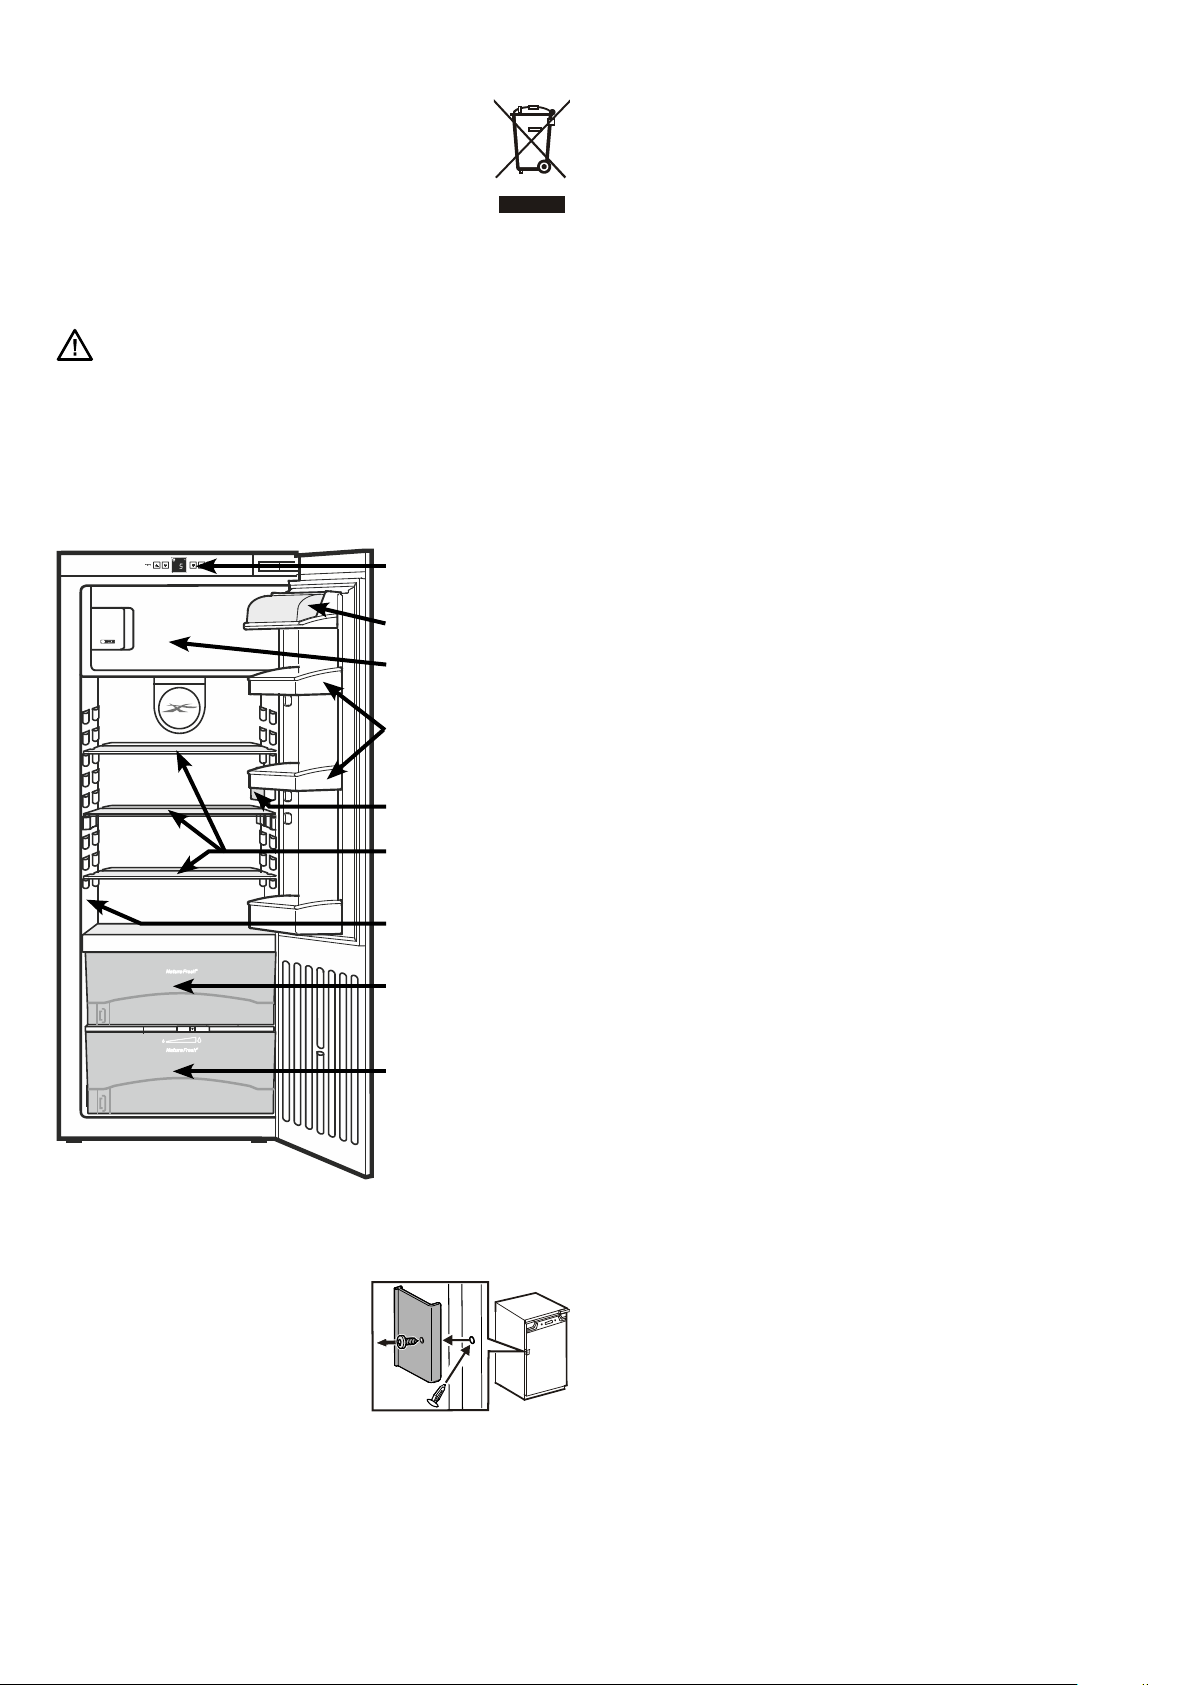
Gerätebeschreibung
Bedien- und
Kontrollelemente
Butter- und Käsefach
Gefrierfach
versetzbarer
Türabsteller
Innenbeleuchtung
(LED-Lichtleiste)
versetzbare
Abstellächen
Typenschild
Schubfach für trockene oder abgepackte
Lebensmittel
Schubfach mit regelbarer Luftfeuchtigkeit
Sicherheits- und Warnhinweise
• Um Personen- und Sachschäden zu vermeiden,
sollte das Gerät von zwei Personen ausgepackt
und aufgestellt werden.
• Bei Schäden am Gerät umgehend - vor dem
Anschließen - beim Lieferanten rückfragen.
• Zur Gewährleistung eines sicheren Betriebes
Gerät nur nach Angaben der Gebrauchsanleitung
montieren und anschließen.
• Im Fehlerfall Gerät vom Netz trennen. Netzstecker
ziehen oder Sicherung auslösen bzw. herausdre-
hen.
• Nicht am Anschlusskabel, sondern am Stecker
ziehen, um das Gerät vom Netz zu trennen.
• Reparaturen und Eingriffe an dem Gerät nur vom
Kundendienst ausführen lassen, sonst können
erhebliche Gefahren für den Benutzer entstehen.
Gleiches gilt für das Wechseln der Netzanschluss-
leitung.
• Im Geräteinnenraum nicht mit offenem Feuer
oder Zündquellen hantieren. Beim Transport und
beim Reinigen des Gerätes darauf achten, dass
der Kältekreislauf nicht beschädigt wird. Bei Beschädigungen Zündquellen fernhalten und den
Raum gut durchlüften.
• Sockel, Schubfächer, Türen usw. nicht als Trittbrett
oder zum Aufstützen missbrauchen.
• Dieses Gerät ist nicht bestimmt für Personen
(auch Kinder) mit physischen, sensorischen oder
mentalen Beeinträchtigungen oder Personen, die
nicht über ausreichende Erfahrung und Kenntnisse verfügen, es sei denn, sie wurden durch eine
Person, die für ihre Sicherheit verantwortlich ist,
in der Benutzung des Gerätes unterwiesen oder
anfänglich beaufsichtigt. Kinder sollten nicht unbeaufsichtigt bleiben, um sicherzustellen, dass
sie nicht mit dem Gerät spielen.
Transportsicherungsteile entfernen
Rote Transportsicherung abschrauben.
Freigewordenes Befestigungsloch mit
Stopfen verschließen.
2
• Vermeiden Sie dauernden Hautkontakt mit kalten
Oberflächen oder Kühl-/Gefriergut. Es kann zu
Schmerzen, Taubheitsgefühl und Erfrierungen
führen. Bei länger dauerndem Hautkontakt
Schutzmaßnahmen vorsehen, z. B. Handschuhe
verwenden.
• Speiseeis, besonders Wassereis oder Eiswürfel,
nach dem Entnehmen nicht sofort und nicht zu
kalt verzehren. Durch die tiefen Temperaturen
besteht eine "Verbrennungsgefahr".
• Verzehren Sie keine überlagerten Lebensmittel,
sie können zu einer Lebensmittelvergiftung führen.
Page 3
• Lagern Sie keine explosiven Stoffe oder Sprühdosen mit brennbaren Treibmitteln, wie z. B.
Propan, Butan, Pentan usw., im Gerät. Eventuell
austretende Gase könnten durch elektrische
Bauteile entzündet werden. Sie erkennen solche
Sprühdosen an der aufgedruckten Inhaltsangabe
oder einem Flammensymbol.
• Keine elektrischen Geräte innerhalb des Gerätes
benutzen.
• Die LED-Lichtleiste im Gerät dient der Beleuchtung des Geräteinnenraumes. Sie ist nicht zur
Raumbeleuchtung geeignet.
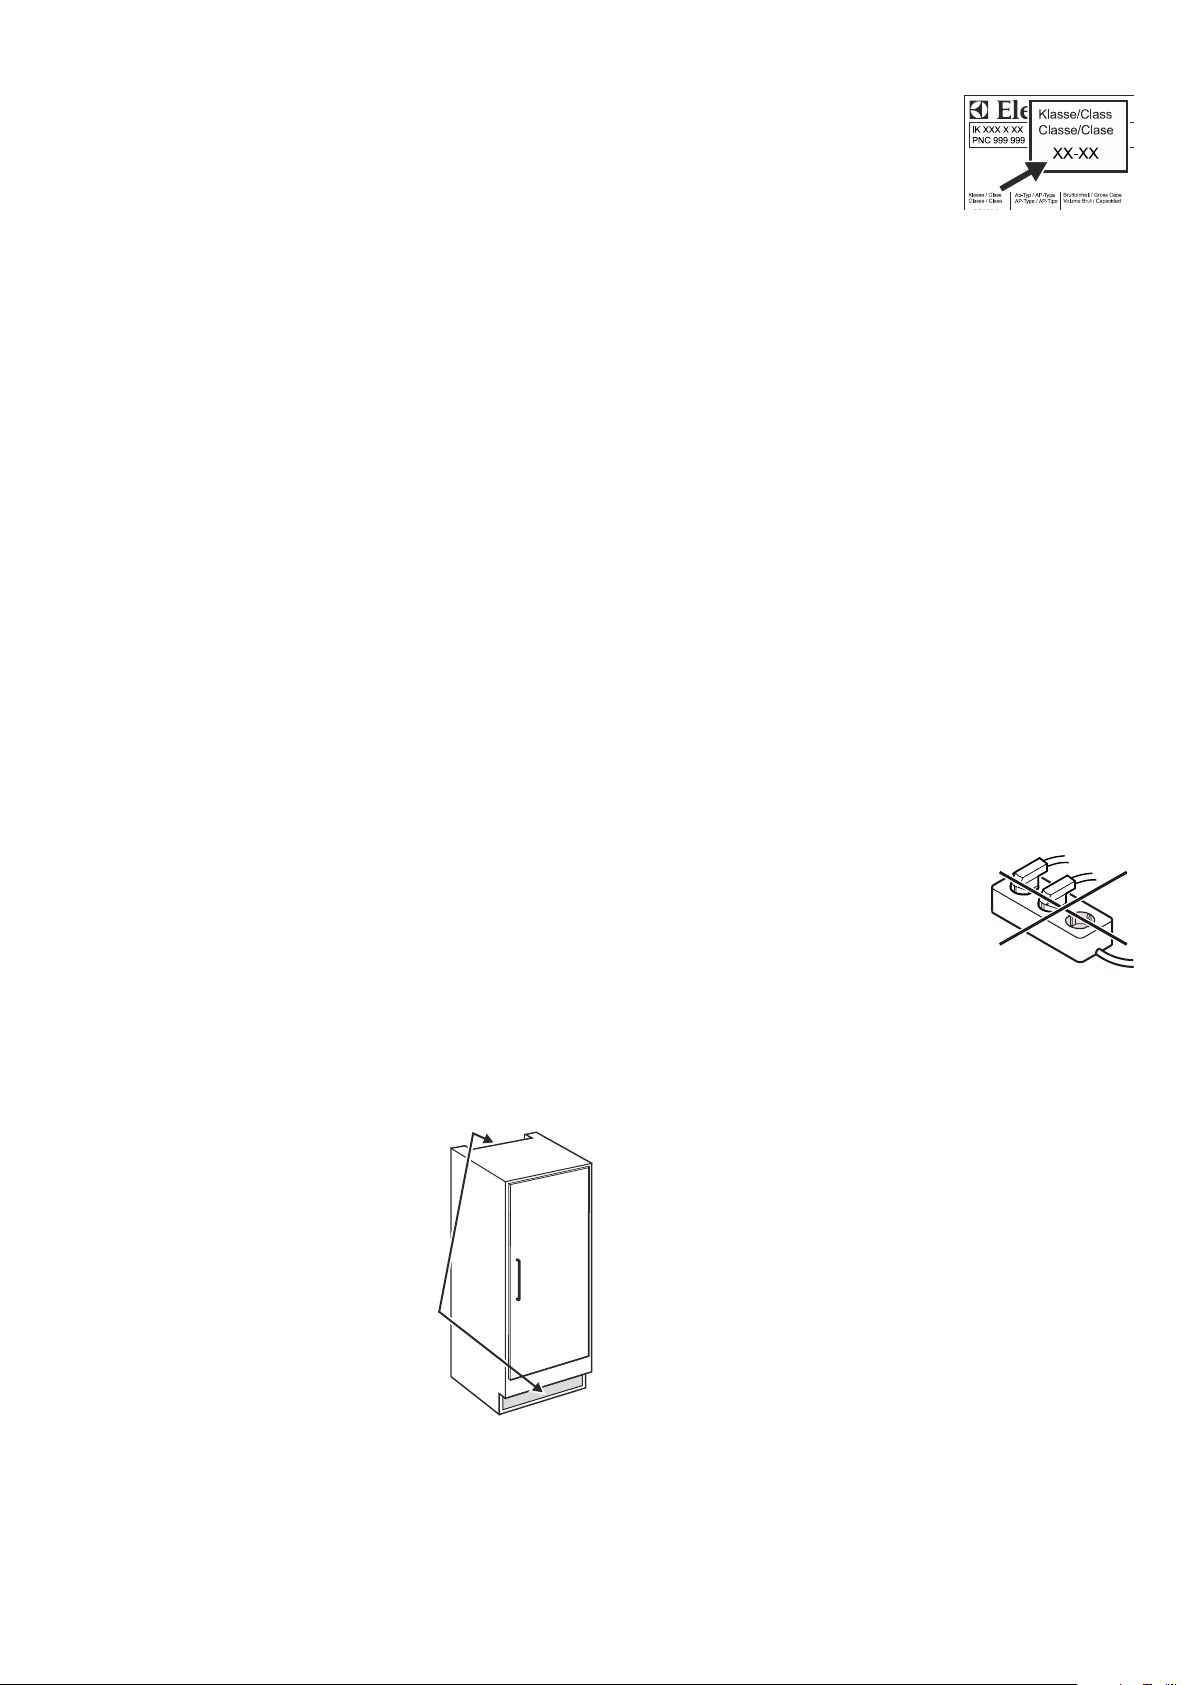
Einsatzbereich des Gerätes
D
Klimaklasse
Di e Kli mak las se gi bt a n, be i we lc h er Ra umtemperatur das Gerät betrieben werden
darf, um die volle Kälteleistung zu erreichen.
Die Klimaklasse ist am Typenschild aufgedruckt.
Die Position des Typenschildes ist im
Kapitel Gerätebeschreibung ersichtlich.
Klimaklasse Raumtemperatur
SN +10 °C bis +32 °C
N +16 °C bis +32 °C
ST +16 °C bis +38 °C
T +16 °C bis +43 °C
SN-ST +10 °C bis +38 °C
SN-T +10 °C bis +43 °C
Das Gerät nicht außerhalb der angegebenen
Raumtemperaturen betreiben!
Das Gerät eignet sich ausschließlich zum Kühlen
von Lebensmitteln im häuslichen oder haushaltsähnlichen Umfeld. Hierzu zählt z. B. die Nutzung
- in Personalküchen, Frühstückspensionen,
- durch Gäste in Landhäusern, Hotels, Motels und
anderen Unterkünften,
- beim Catering und ähnlichem Service im Groß-
handel.
Benutzen Sie das Gerät ausschließlich im haushaltsüblichen
Rahmen. Alle anderen Anwendungsarten sind unzulässig. Das
Gerät ist nicht geeignet für die Lagerung und Kühlung von Medikamenten, Blutplasma, Laborpräparaten oder ähnlichen der
Medizinprodukterichtlinie 2007/47/EG zu Grunde liegenden Stoffen
und Produkten. Eine missbräuchliche Verwendung des Gerätes
kann zu Schädigungen an der eingelagerten Ware oder deren
Verderb führen. Im Weiteren ist das Gerät nicht geeignet für den
Betrieb in explosionsgefährdeten Bereichen.
Aufstellen
• Der Aufstellungsraum Ihres Gerätes muss laut der Norm EN 378
pro 8 g Kältemittelfüllmenge R 600a ein Volumen von 1 m
weisen, damit im Falle einer Leckage des
Kältemittelkreislaufes kein zündfähiges
Gas-Luft-Gemisch im Aufstellungsraum
des Gerätes entstehen kann. Die Angabe
der Kältemittelmenge finden Sie auf dem
Typenschild im Geräteinnenraum.
• Das Gerät nur in eingebautem Zustand
betreiben.
3
auf-
Elektrischer Anschluss
Das Gerät nur mit Wechselstrom betreiben.
Die zulässige Spannung und Frequenz ist am Typenschild aufge-
druckt. Die Position des Typenschildes ist im Kapitel Gerätebe-
schreibung ersichtlich.
Die Steckdose muss vorschriftsmäßig geerdet und elektrisch
abgesichert sein.
Der Auslösestrom der Sicherung muss zwischen 10 A und 16 A
liegen.
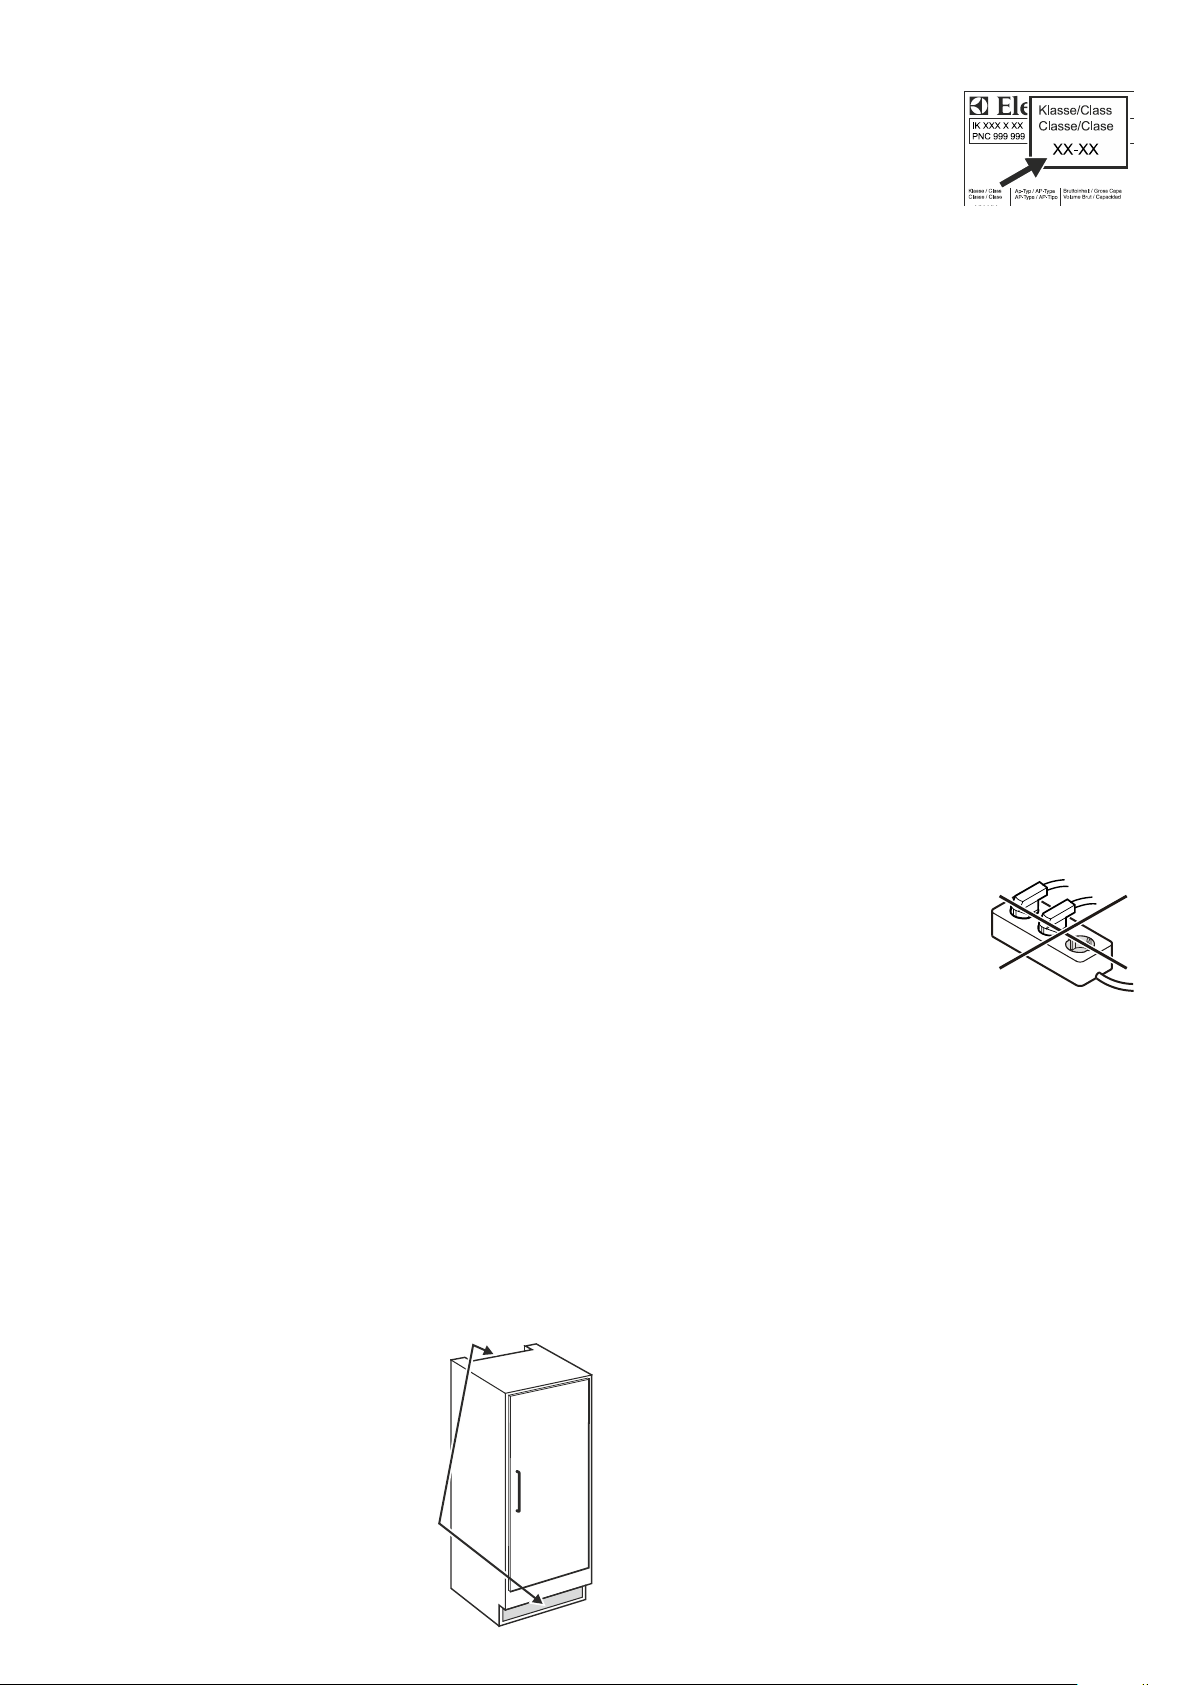
Die Steckdose darf sich nicht hinter dem Gerät
befinden und muss leicht erreichbar sein.
Das Gerät nicht über Verlängerungskabel oder
Verteilersteckdosen anschließen.
Keine Inselwechselrichter (Umwandeln von
Gleichstrom in Wechsel- bzw. Drehstrom) oder
Energiesparstecker verwenden. Beschädigungsgefahr für die Elektronik!
• Lüftungsöffnungen bzw. -gitter
nicht abdecken.
3
Page 4
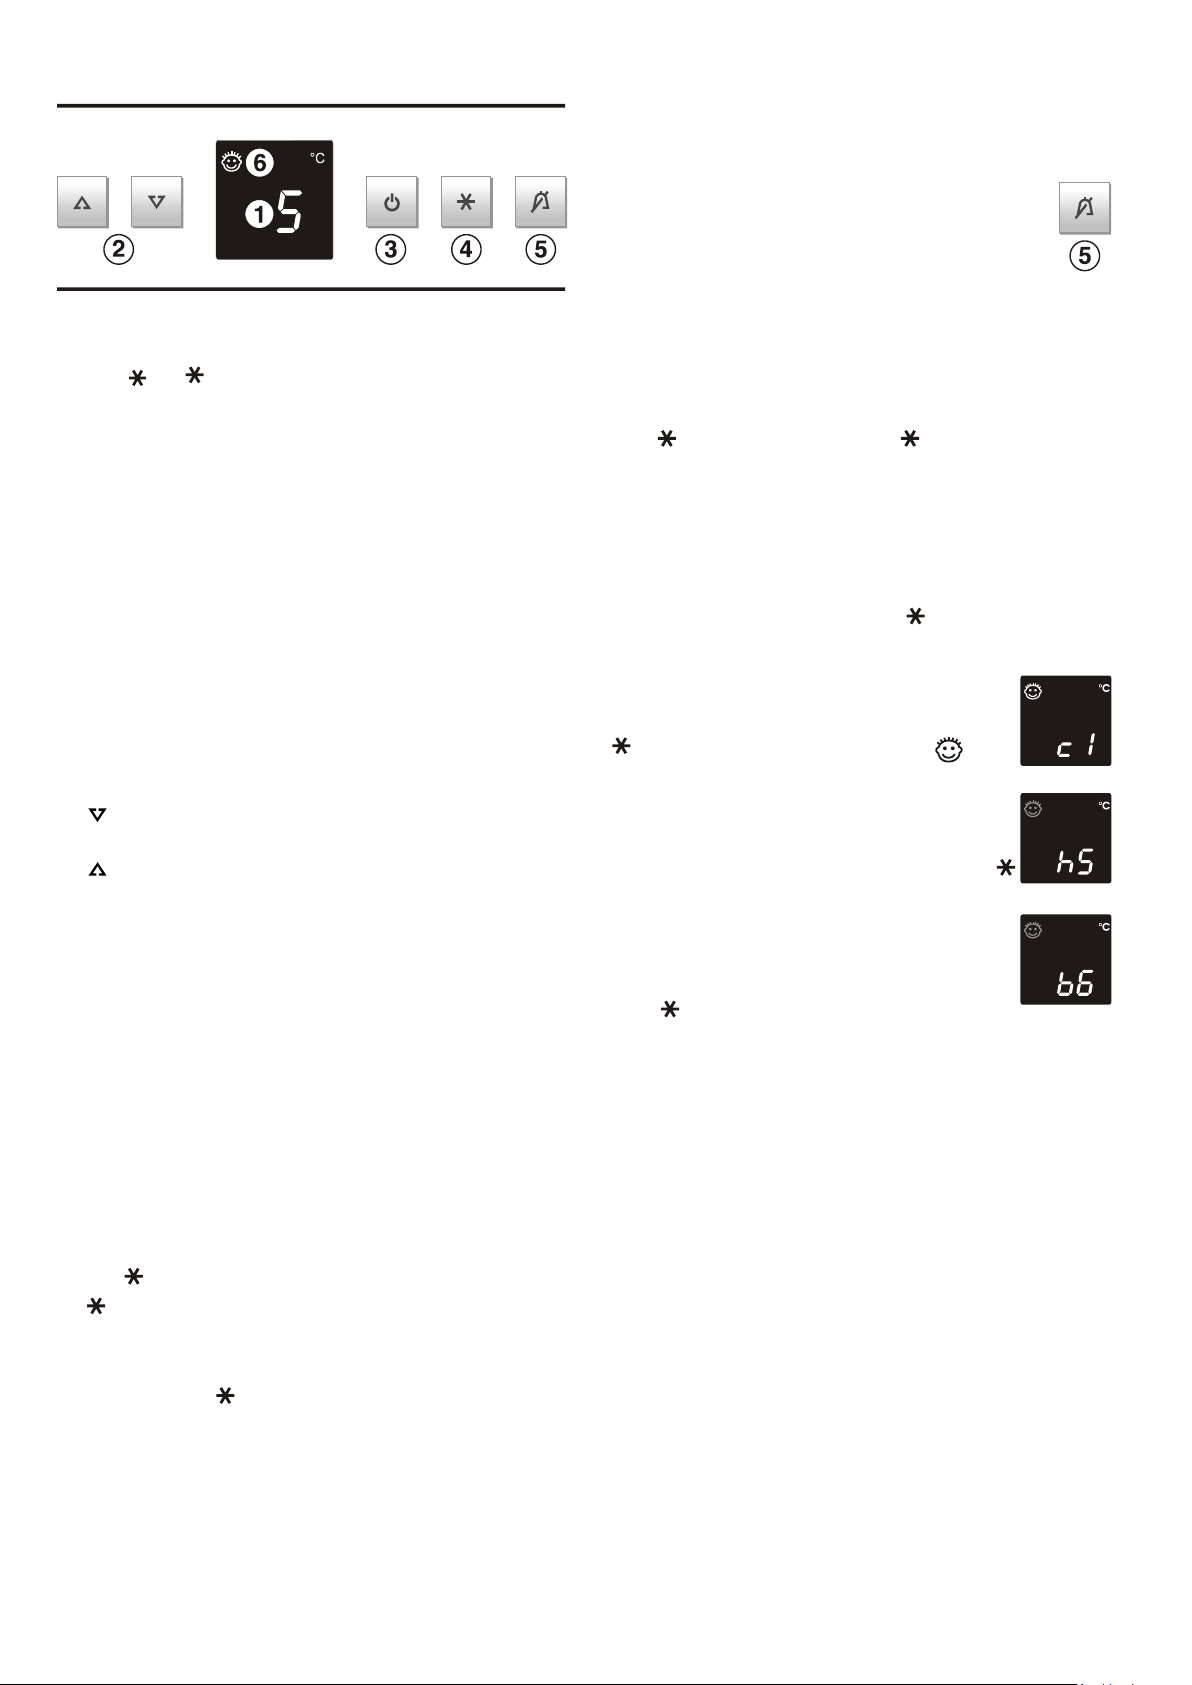
Bedien- und Kontrollelemente
Alarm - Tonwarner
Der Tonwarner hilft Ihnen, eingelagertes Kühlgut zu schützen und
Energie zu sparen.
- Er ertönt immer, wenn die Tür länger als ca. 1 min. geöffnet ist.
• Der Ton verstummt durch Drücken der Alarm-Aus-
taste
5 oder automatisch, wenn die Tür geschlossen
wird.
5
1 Temperaturanzeige
2 Temperatureinstelltasten
3 Ein/Austaste
4 Taste (Mit schalten Sie das Kühlteil auf höchste Abkühl-
leistung)
5 Alarm-Austaste
6 Kindersicherung
Gerät ein- und ausschalten
Es empfiehlt sich das Gerät vor Inbetriebnahme innen zu reinigen
(Näheres unter "Reinigen").
• Einschalten: Ein/Austaste
turanzeige leuchtet/blinkt.
• Ausschalten: Ein/Austaste ca. zwei Sekunden lang drücken,
so dass die Temperaturanzeige dunkel ist.
Temperatur einstellen
Temperatur senken/kälter
Die
-Einstelltaste drücken.
Temperatur erhöhen/wärmer
-Einstelltaste drücken.
Die
- Während dem Einstellen blinkt der Einstellwert.
- Durch weiteres kurzes Drücken verändert sich der Einstellwert
in 1 °C Schritten.
- Ca. 5 sec nach dem letzten Tastendruck schaltet die Elektronik
automatisch um und die tatsächliche Temperatur wird angezeigt.
- Die Temperatur ist im Kühlteil von 9 bis 4 °C einstellbar.
• Im NaturaFresh-Teil wird die Temperatur automatisch geregelt,
zwischen 0 und 3 °C. Wenn Sie es wärmer oder kälter wünschen,
z. B. zur Lagerung von Fisch, dann können Sie die Einstelltemperatur im NaturaFresh-Teil verändern. Informationen dazu im
Absatz "Zusatzfunktionen".
Sollte in der Anzeige ein
am Gerät vor. Wenden Sie sich dann bitte an Ihren Kundendienst.
3 drücken, so dass die Tempera-
2
F 0 bis F 5 erscheinen, so liegt ein Fehler
3
Zusatzfunktionen
Über den Einstellmodus können Sie die Kindersicherung nutzen,
die Leuchtkraft der Anzeige verändern und die Temperatur im
NaturaFresh-Teil geringfügig kälter oder wärmer einstellen.
Einstellmodus aktivieren:
• Taste
c für Kindersicherung.
Hinweis: Der jeweilige zu verändernde Wert blinkt.
• Durch Drücken der Up/Down-Taste die gewünschte Funktion
auswählen:
c = Kindersicherung,
h = Leuchtkraft oder
b = NaturaFresh-Temperatur.
• Jetzt durch kurzes Drücken der Taste
bestätigen:
> Bei c = Kindersicherung
durch Drücken der Up/Down-Taste
c1 = Kindersicherung ein oder
c0 = Kindersicherung aus wählen und mit der Taste
Kindersicherung aktiv.
> Bei h = Leuchtkraft
durch Drücken der Up/Down-Taste
h1= minimale bis
h5 = maximale Leuchtkraft wählen und mit Taste
bestätigen.
> Bei b = NaturaFresh-Temperatur
durch Drücken der Up/Down-Taste zwischen
b1 = kältesten bis
b9 = wärmsten Stufenwert wählen und mit der
Taste
Temperatur stellt sich langsam auf den neuen Wert ein.
Hinweis: b5 = Voreinstellung. Beim Verändern in Richtung kälter,
b4 bis b1, können Minustemperaturen erreicht werden und die
Lebensmittel im NaturaFresh-Teil leicht gefrieren.
Einstellmodus verlassen:
• Durch Drücken der On/Off-Taste
modus; nach 2 min. schaltet die Elektronik automatisch um. Der
normale Regelbetrieb ist wieder aktiv.
ca. 5 sec drücken - die Taste blinkt - das Display zeigt
die Funktion anwählen/
bestätigen. Bei leuchtendem Symbol ist die
bestätigen. Die veränderte NaturaFresh-
3 beenden Sie den Einstell-
Taste
Mit schalten Sie das Kühlteil auf höchste Abkühlleistung. Es
empfiehlt sich besonders, wenn Sie große Mengen von Lebensmitteln schnellstmöglich abkühlen möchten. Die Kühltemperatur
sinkt auf den kältesten Wert.
Einschalten: Tas te
LED leuchtet.
4
4
kurz drücken, so dass die dazugehörende
Page 5
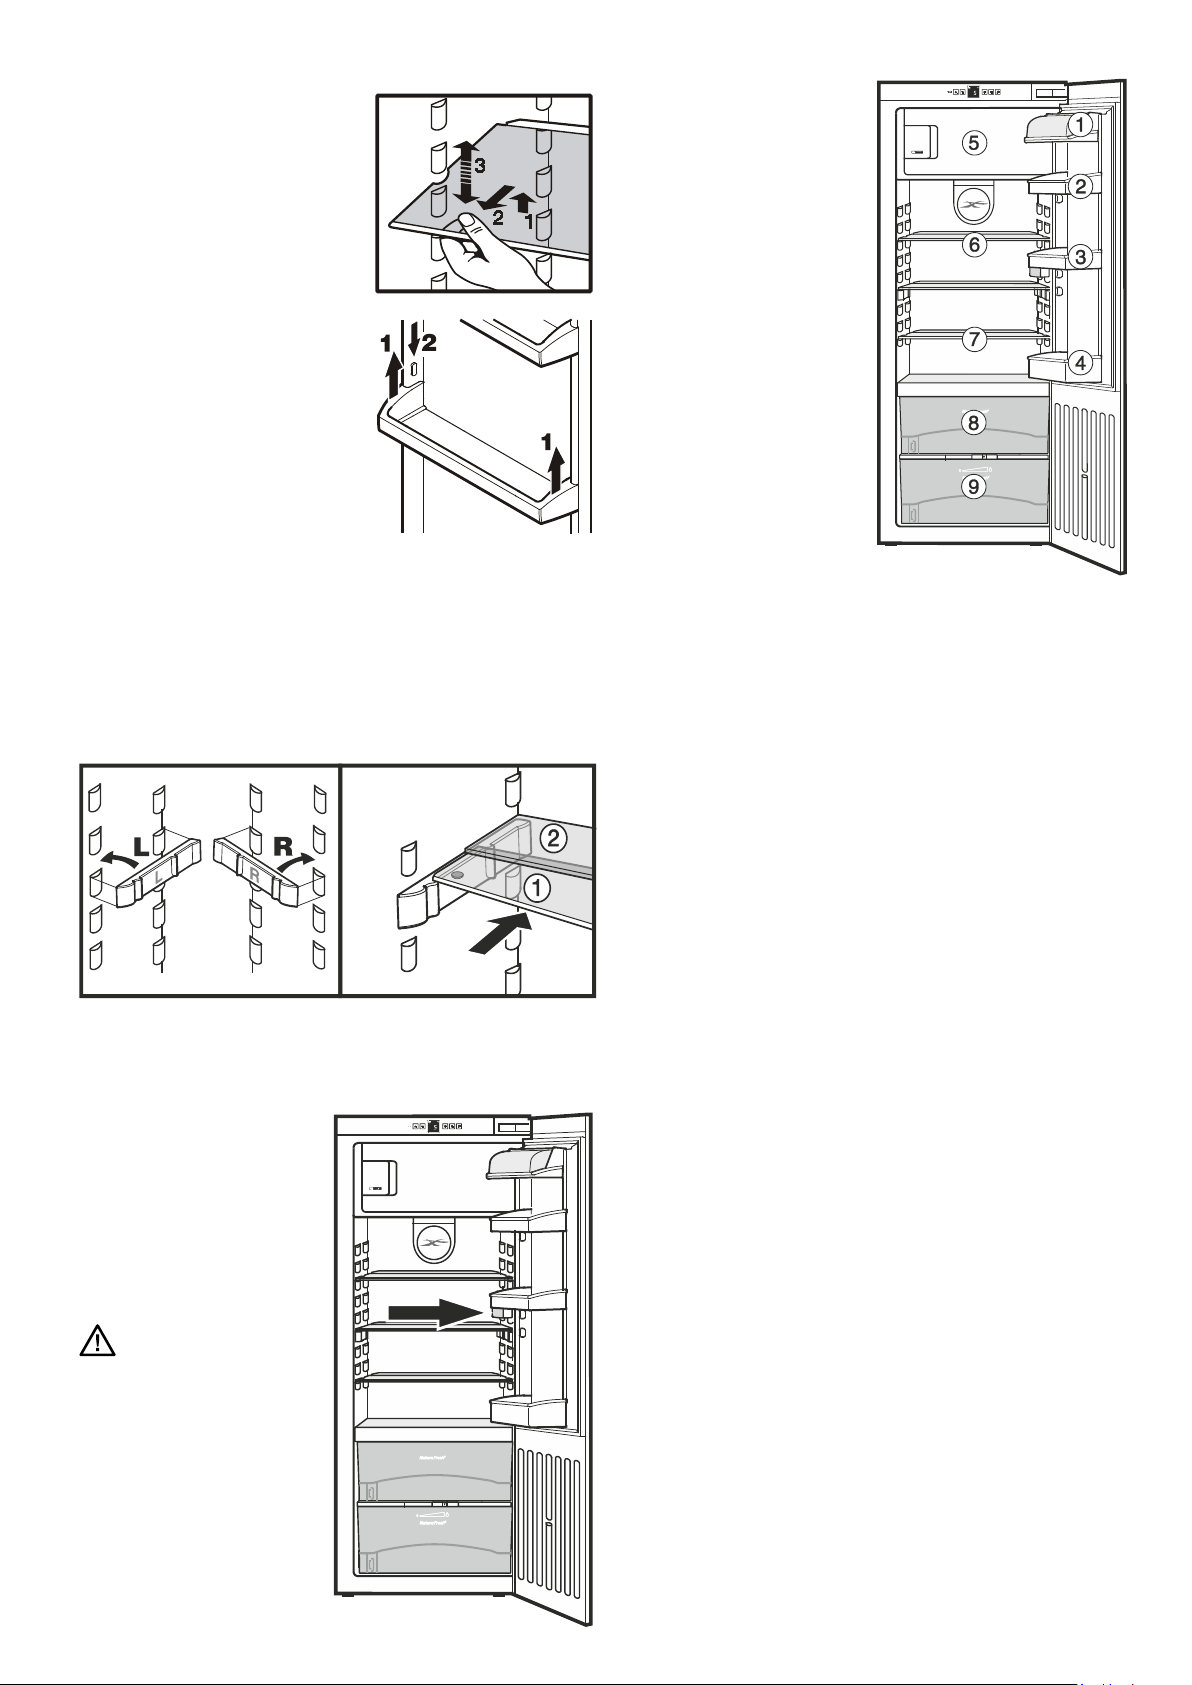
Ausstattung
Die Abstellflächen sind je nach
Kühlguthöhe versetzbar.
Glasplatte anheben, Aussparung
über Auflage ziehen und höher oder
tiefer einsetzen
Die Türabsteller versetzen
- Absteller senkrecht nach oben
heben, nach vorne herausnehmen
und in anderer Höhe in umgekehrter
Reihenfolge wieder einsetzen.
Platz für hohe Gefäße ermögli-
chen die halben Glasplatten.
Beiliegende Auflageschienen,
Abb. 1, in gewünschter Höhe
rechts und links auf die Auflagenoppen aufstecken.
Abb. 1 Abb. 2
Die Glasplatten
Abb. 2 einschieben. Die Glas-
platte
muss hinten liegen!
Wenn Sie Platz für hohe Gefäße
benötigen, dann einfach die
vordere halbe Glasplatte vor-
sichtig unter die hintere Platte
schieben, Abb. 2.
1/2 nach
2mit Anschlagrand
D
Kühlen
Einordnungsbeispiel
1Butter, Käse
2Eier
3Dosen, Tuben
4Flaschen
5Tiefkühlkost, Eiswürfel
6Backwaren, fertige Speisen,
Getränke
7Fleisch, Wurst, Molkereipro-
dukte
NaturaFreshteil:
8Fleisch-, Wurstwaren, Fisch,
Molkereiprodukte
9Salat, Obst, Gemüse
Hinweis
• Lebensmittel, die leicht Geruch oder Geschmack abgeben oder annehmen,so
wie Flüssigkeiten, immer
in geschlossenen Gefä ßen
oder abgedeckt aufbewahren;
hochprozentigen Alkohol nur
dicht verschlossen und stehend lagern.
• Als Verpackungsmaterial eignen sich wiederverwendbare
Kunststoff-, Metall-, Aluminium- und Glasbehälter.
Energie sparen
- Immer auf gute Be- und Entlüftung achten. Lüftungsöffnungen
bzw. -gitter nicht abdecken.
- Ventilatorluftschlitze immer frei halten.
- Gerät nicht im Bereich direkter Sonnenbestrahlung, neben Herd,
Heizung und dergleichen aufstellen.
- Der Energieverbrauch ist abhängig von den Aufstellbedingungen
z.B. der Umgebungstemperatur.
- Gerät möglichst kurz öffnen.
- Lebensmittel sortiert einordnen.
- Alle Lebensmittel gut verpackt und abgedeckt aufbewahren.
Reifbildung wird vermieden.
- Warme Speisen einlegen: erst auf Zimmertemperatur abkühlen
lassen.
- Tiefkühlgut im Kühlraum auftauen.
Gefrierfach
- Wenn im Gerät eine dicke Reifschicht ist: Gerät abtauen.
LED-Innenbeleuchtung
Die Innenbeleuchtung schaltet
sich nach ca. 15 Minuten geöffneter Tür automatisch aus.
Leuchtet sie bei kurz geöffneter
Tür nicht, jedoch die Temperaturanzeige, ist sie evtl. defekt.
Die Lichtintensität der LEDBeleuchtung entspricht der
Laserklasse 1/1M.
Achtung
Die Licht abdeckung da rf nur
vom Kundendienst entfernt
werden. Wenn die Abdeckung entfernt wird, nicht
mit optischen Linsen aus
unmittelbarer Nähe direkt
in die Beleuchtung blicken.
Die Augen können dabei
geschädigt werden.
5
Page 6
NaturaFreshteil
Das NaturaFreshteil ermöglicht für verschiedene frische Lebensmittel eine bis zu dreimal so lange Lagerzeit bei gleichbleibender
Qualität wie beim herkömmlichen Kühlen.
Die automatisch geregelte Lagertemperatur konstant knapp über
0 °C und die sich einstellende Luftfeuchtigkeit ermöglichen für die
verschiedenen Lebensmittel optimale Lagerbedingungen.
Gefrierfach
Im Gefrierfach können Sie bei einer Temperatur von -18 °C und
tiefer Tiefkühlkost und Gefriergut mehrere Monate lagern, Eiswürfel
bereiten und frische Lebensmittel einfrieren.
Die Lufttemperatur im Fach, gemessen mit Thermometer oder
anderen Messgeräten, kann schwanken.
Das obere Schubfach 8
eignet sich zur Lagerung von trockenen oder verpackten Lebensmitteln (z. B. Molkereiprodukte, Fleisch, Fisch, Wurst). Hier stellt
sich ein relativ trockenes Lagerklima ein.
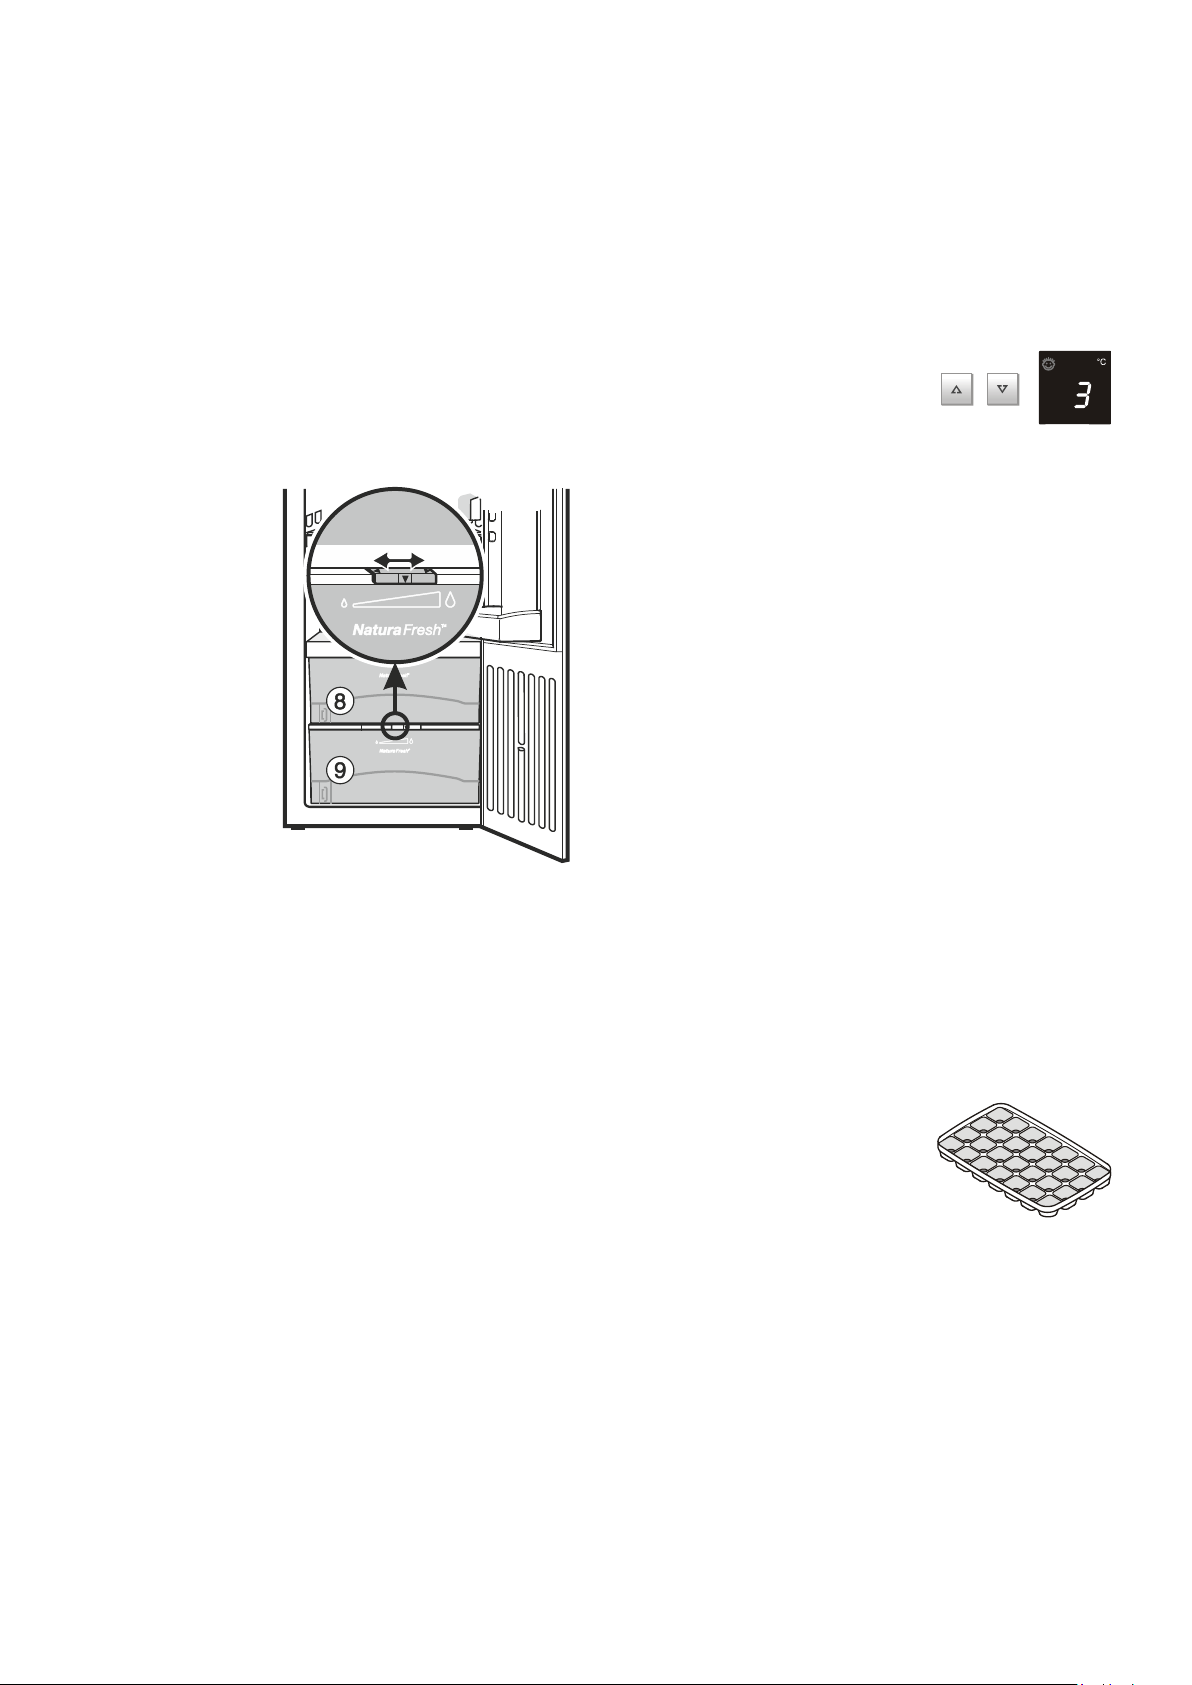
Das regelbare Schubfach 9
eignet sich bei "feucht"-Einstellung zur Lagerung von Salat, Gemüse, Obst. Bei gut gefülltem Schubfach stellt sich ein taufrisches
Klima ein, mit einer Luftfeuchtigkeit bis zu max. 90 %.
Je nach Bedarf können Sie dieses Fach wahlweise mit trockenem
oder feuchtem Klima nutzen.
Feuchte einstellen:
• "trocken": kleines
Feuchtesymbol - Schie-
beteil nach links schieben.
Für trockene Lagerung
geeignete Lebensmittel
einlegen.
• "feucht": hohe relative
Luftfeuchtigkeit von max.
90 %, großes Feuch-
tesymbol - Schiebe-
teil ganz nach rechts
schieben. Günstig für
unverpackt eingelagerte
Lebensmittel mit hoher
Eigenfeuchte, z. B. frische
Blattsalate.
Hinweise
• Die Luftfeuchtigkeit im Fach ist abhängig vom Feuchtegehalt des
eingelegten Kühlgutes sowie von der Häufigkeit des Öffnens.
• Achten Sie beim Einkaufen auf die "Frische" der Lebensmittel.
Der Frischegrad und die Qualität sind entscheidend für die La-
gerdauer.
• Unverpackte tierische und pflanzliche Lebensmittel getrennt
lagern, sortiert in die Schubfächer einordnen. Wenn sie aus
Platzgründen zusammen gelagert werden müssen, dann verpackt
einlagern! Verschiedene Fleischsorten nicht direkt miteinander
in Berührung bringen, immer durch Verpackung trennen; ein
vorzeitiges Verderben durch Keimübertragung wird vermieden.
• Beachten Sie, dass eiweißreichere Lebensmittel schneller verderben. D. h. Schalen- und Krustentiere verderben schneller als
Fisch, Fisch schneller als Fleisch.
• Lebensmittel ca. 30-60 Minuten vor dem Verzehr aus den Fächern
herausnehmen. Erst bei Raumtemperatur entfalten sich Aroma
und Geschmack, der Genusswert erhöht sich.
• Nicht ins NaturaFreshteil gehören: Hartkäse, Kartoffeln, kälteempfindliches Gemüse wie Gurken, Paprika, Auberginen,
Avocados, halbreife Tomaten, Bohnen, Zucchini, alle kälteempfindlichen Südfrüchte wie Ananas, Bananen, Grapefruit, Melonen,
Mango, Papaya usw.
Einfrieren
Die frischen Lebensmittel sollen möglichst schnell bis auf den Kern
durchgefroren werden.
Es können bis zu max. 2 kg / 24 Stunden eingefroren werden.
• Die Temperatur auf 5 °C oder kälter
(z. B. 3 °C) einstellen.
• 24 Stunden warten.
• Die frischen Lebensmittel einlegen.
• Ca. 24 Stunden nach dem Einlegen sind die frischen Lebensmittel
durchgefroren.
• Die Temperatur auf die übliche Einstellung (z. B. 5 °C) zurück-
stellen.
Tiefkühlkost (bereits gefrorene Ware) kann sofort ins kalte Fach
eingelagert werden.
Hinweise zum Einfrieren
• Zum Verpacken gefriergeeignetes Material oder Gefäße ver-
wenden.
• Die Packungen immer mit Datum und Inhalt beschriften und die
empfohlene Lagerdauer des Gefrierguts nicht überschreiten.
• Flaschen und Dosen mit kohlensäurehaltigen Getränken nicht
gefrieren lassen. Sie können sonst platzen. Beim Schnellkühlen
von Getränken die Flaschen spätestens nach einer Stunde wieder
aus dem Gefrierbereich nehmen!
• Zum Auftauen immer nur so viel entnehmen, wie unmittelbar
benötigt wird. Aufgetaute Lebensmittel möglichst schnell zu
einem Fertiggericht weiterverarbeiten.
Die eingefrorenen Lebensmittel können folgendermaßen
aufgetaut werden:
- im Heißluftherd
- im Mikrowellengerät
- bei Raumtemperatur
- im Kühlschrank; die abgegebene Kälte des Gefrierguts wird zum
Kühlen der Lebensmittel genutzt.
Eiswürfel bereiten
• Eisschale mit Wasser füllen.
• Eisschale in das Gerät stellen und gefrie-
ren lassen.
• Die Eiswürfel lösen sich aus der Schale
durch Verwinden, oder wenn die Eisschale kurz
unter fließendes Wasser gehalten wird.
6
Page 7
Abtauen
Kühlteil
Der Kühlraum taut automatisch ab. Das Tauwasser verdunstet durch
die Kompressorwärme.
Gefrierfach
Im Gefrierfach bildet sich nach längerer Betriebszeit eine dickere
Reif- bzw. Eisschicht. Sie erhöht den Energieverbrauch. Deshalb
regelmäßig abtauen.
• Netzstecker ziehen oder Sicherung ausschalten!
• Gefriergut in Papier oder Decken einschlagen und an einem
kühlen Ort aufbewahren.
• Zum Beschleunigen des Abtauvorgangs ein Gefäß mit heißem,
nicht kochendem Wasser in das Fach stellen.
• Gerätetür während des Abtauvorgangs offen lassen. Restliches
Tauwasser mit einem Tuch aufnehmen und das Gerät reinigen.
Zum Abtauen keine mechanischen Vorrichtungen oder andere künstliche Hilfsmittel
verwenden, außer denen, die vom Hersteller
empfohlen werden.
Reinigen
Vor dem Reinigen grundsätzlich das Gerät außer Betrieb
setzen. Netzstecker ziehen oder die vorgeschaltete Sicherung auslösen bzw. herausschrauben.
• Innenraum und Ausstattungsteile mit lauwarmem Wasser und
etwas Spülmittel reinigen. Verwenden Sie keinesfalls sand- oder
säurehaltige Putz- bzw. chemische Lösungsmittel.
• Achten Sie darauf, dass kein Reinigungswasser in die elektrischen
Teile und in das Lüftungsgitter dringt.
• Alles mit einem Tuch gut trocknen.
• Das Typenschild an der Geräteinnenseite nicht beschädigen
oder entfernen - es ist wichtig für den Kundendienst.
Nicht mit Dampfreinigungsgeräten arbeiten!
Beschädigungs- und Verletzungsgefahr.
D
Störung
Folgende Störungen können Sie durch Prüfen der möglichen
Ursachen selbst beheben:
• Das Gerät arbeitet nicht,
– Prüfen Sie, ob das Gerät eingeschaltet ist,
– ob der Netzstecker richtig in der Steckdose ist,
– die Sicherung der Steckdose in Ordnung ist.
• Die Geräusche sind zu laut, prüfen Sie, ob
– das Gerät fest auf dem Boden steht,
– nebenstehende Möbel oder Gegenstände vom laufenden Kühl-
aggregat in Vibrationen gesetzt werden. Beachten Sie, dass
Strömungsgeräusche im Kältekreislauf nicht zu vermeiden sind.
• Die Temperatur ist nicht ausreichend tief, prüfen Sie
– die Einstellung nach Abschnitt "Temperatur einstellen", wurde
der richtige Wert eingestellt?
– ob evtl. zu große Mengen frischer Lebensmittel eingelegt wurden;
– ob das separat eingelegte Thermometer den richtigen Wert
anzeigt.
– Ist die Entlüftung in Ordnung?
– Ist der Aufstellort zu dicht an einer Wärmequelle?
• Gerät fühlt sich an den Innenflächen teilweise warm an
– Das ist völlig in Ordnung. Die abgegebene Wärme ist für die
einwandfreie Funktion des Gerätes erforderlich.
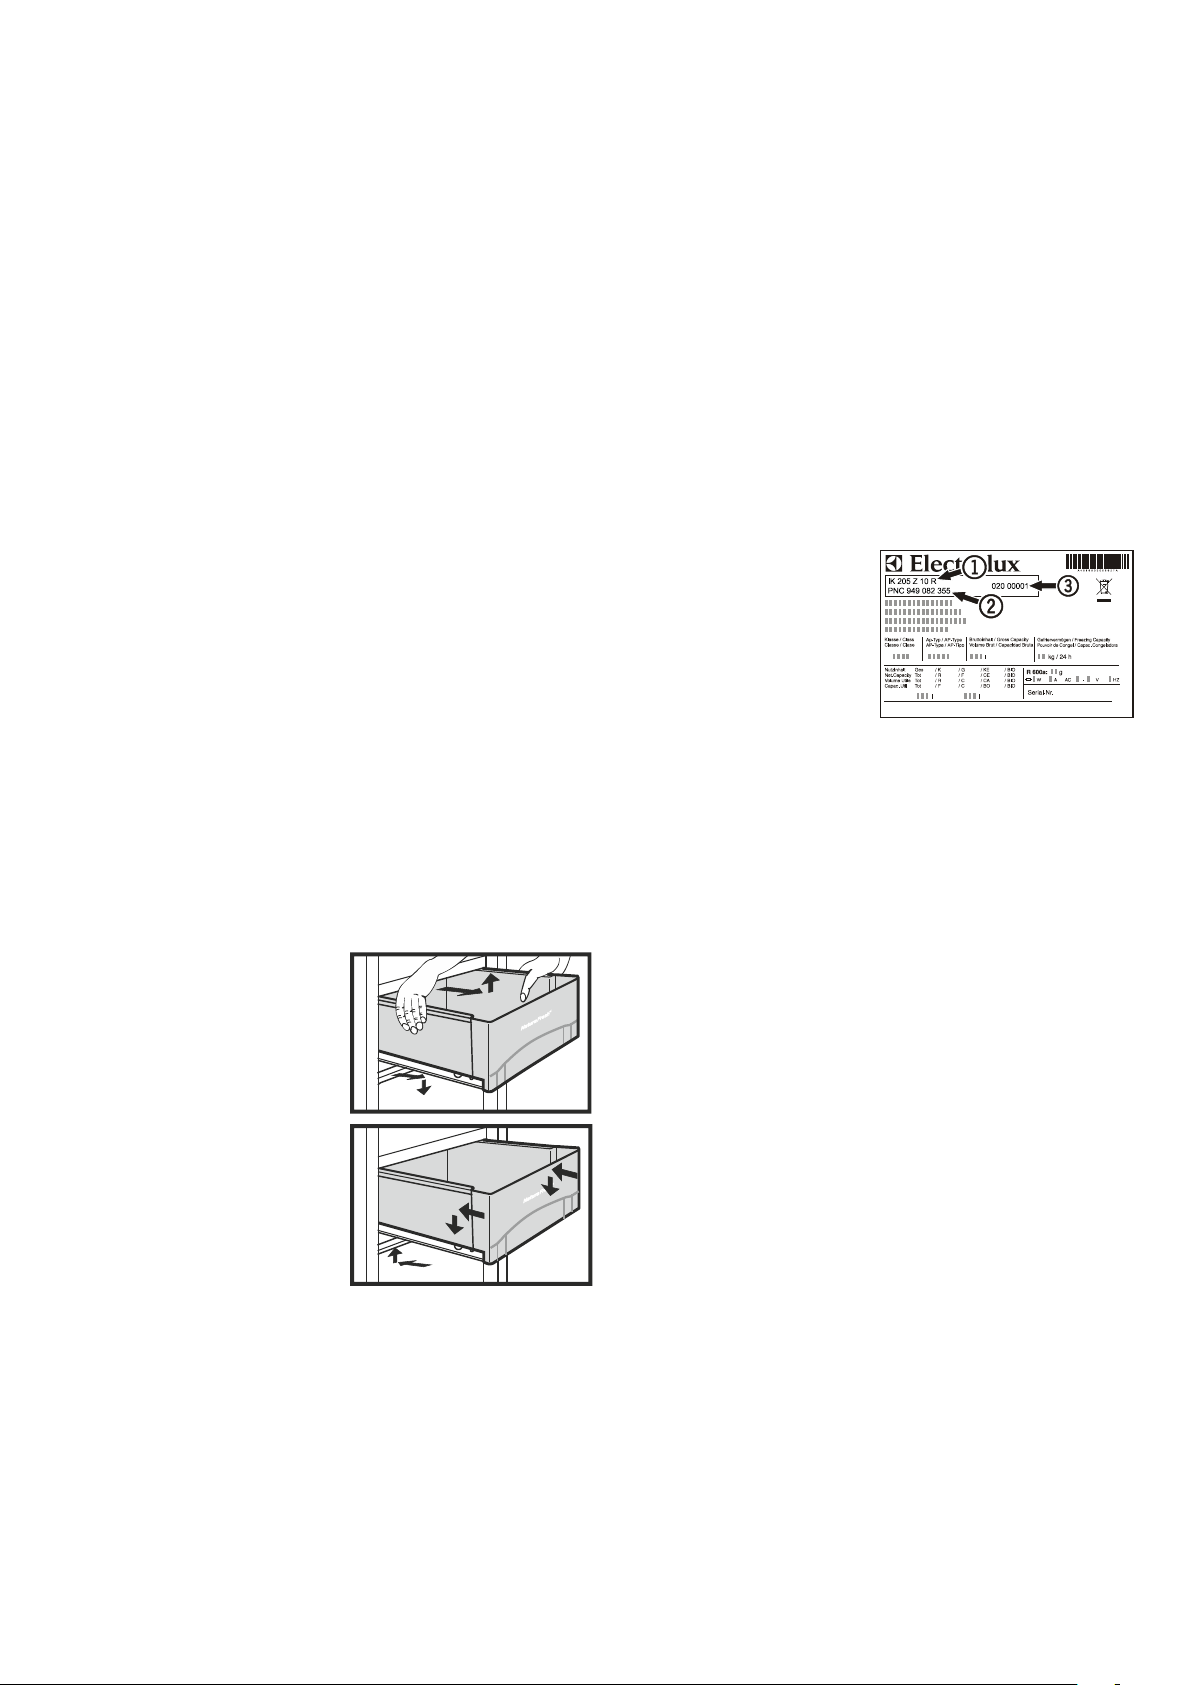
Wenn keine der o. g. Ursachen
vorliegt und Sie die Störung nicht
selbst beseitigen konnten, wenden Sie sich bitte an die nächste
Kundendienststelle. Teilen Sie
die Typenbezeichnung ➊, PNC
➋ und Serienummer ➌ des Typenschildes mit.
Die Position des Typenschildes
ist im Kapitel Gerätebeschreibung ersichtlich.
Außer Betrieb setzen
Wenn das Gerät längere Zeit außer Betrieb gesetzt wird: Gerät
ausschalten, Netzstecker ziehen oder die vorgeschalteten Sicherungen auslösen bzw. herausschrauben. Gerät reinigen und die
Tür geöffnet lassen, um Geruchsbildung zu vermeiden.
• Die NaturaFresh-Fächer zum
Reinigen ganz herausziehen,
hinten fassen und nach oben
abheben.
- Zum Einsetzen: Schubfächer
jeweils dicht zur Griffseite hin,
auf die ganz herausgezogenen
Schienen aufsetzen - Schienen
müssen an der Schubfachfront
anschlagen - und einschieben.
Das Gerät entspricht den einschlägigen Sicherheitsbestimmungen
sowie den EG-Richtlinien 2004/108/EG und 2006/95/EG.
Der Hersteller arbeitet ständig an der Weiterentwicklung aller
Typen und Modelle. Bitte haben Sie deshalb Verständnis dafür,
dass wir uns Änderungen in Form, Ausstattung und Technik vor-
behalten müssen.
7
Page 8
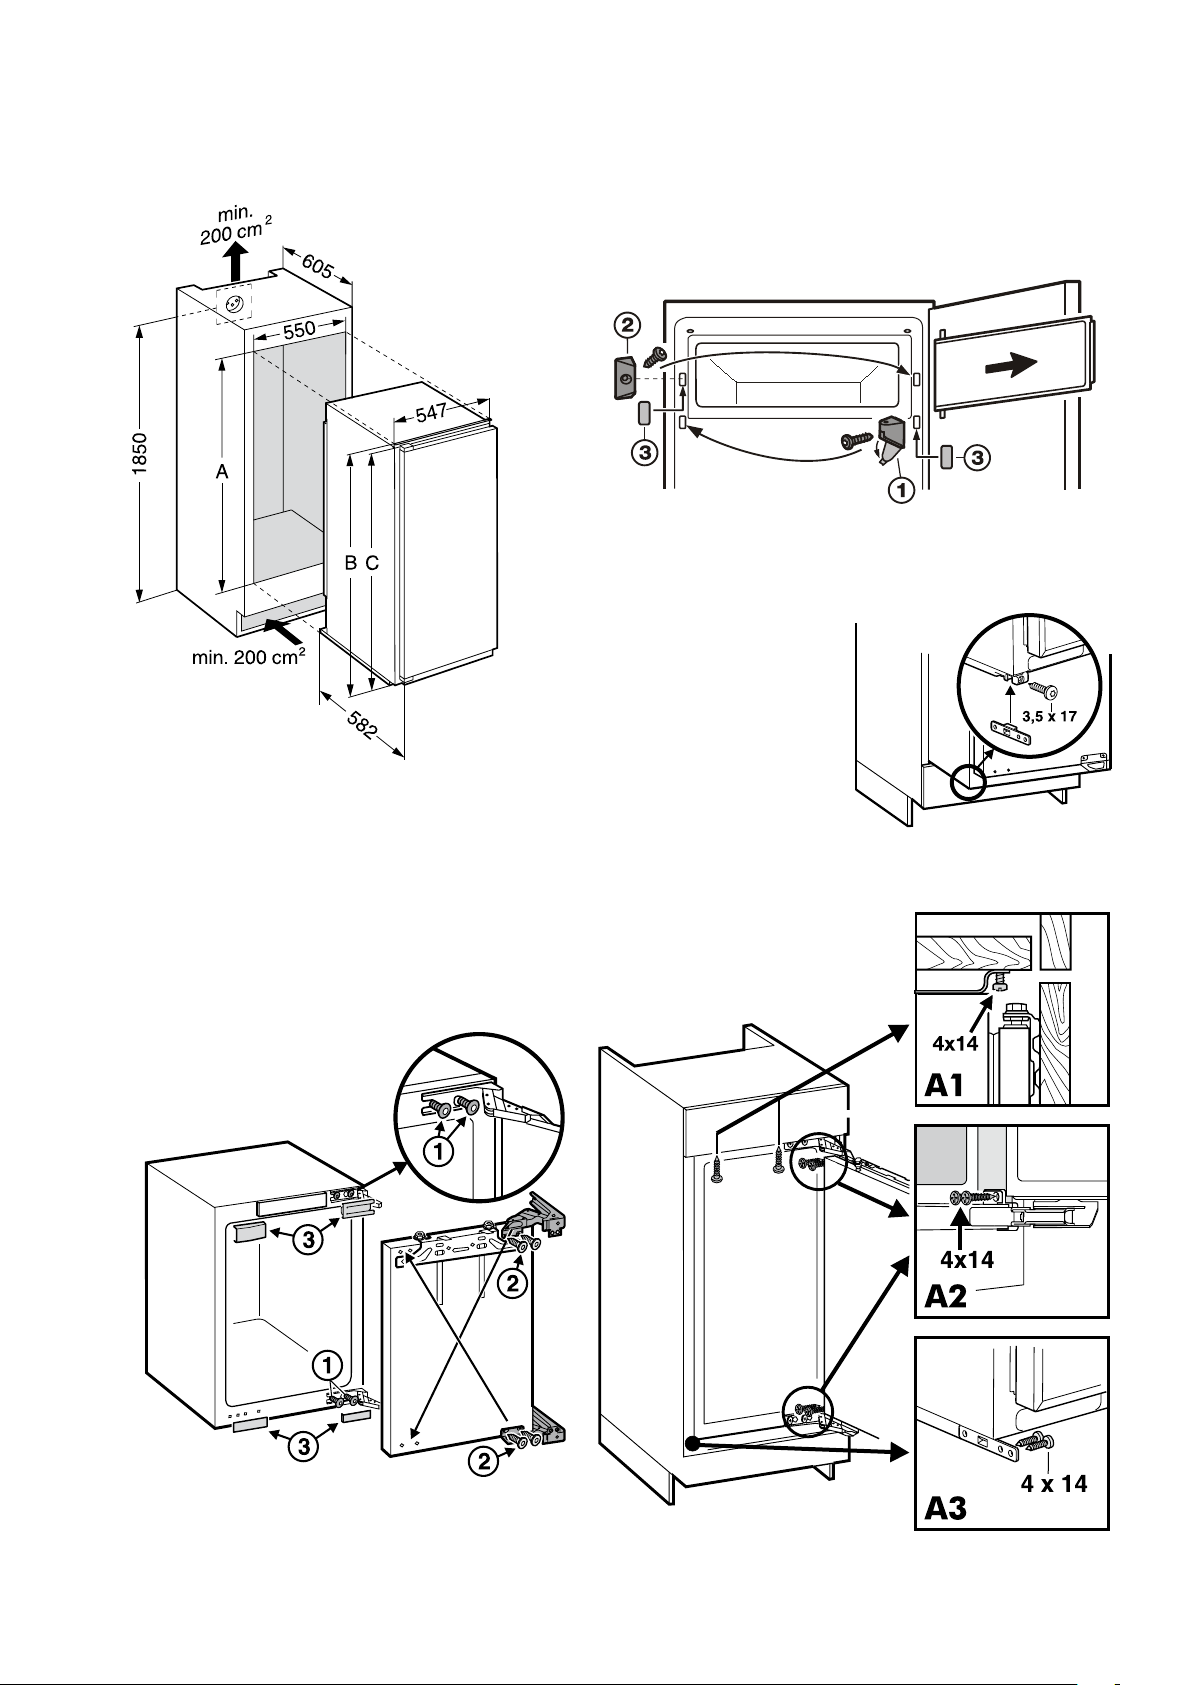
Einbaumaße (mm)
A B C
IK 205 1270 1269 1260
IK 257 1524 1523 1514
Maximales Gewicht der
Möbeltür = 17,5 kg
Fachtür wechseln
• Am Lagerbock 1 die Abdeckung wegklappen.
• Den Lagerbock
abnehmen.
• Verschlussstück
• Die freigewordenen Löcher mit den Stopfen
• Tür und Verschlussstück um 180° gedreht auf der Gegenseite
wieder montieren: Die Fachtür oben einsetzen, Lagerbock
unten aufsetzen, wieder anschrauben, die Abdeckung zuklappen.
1 a bs ch rau be n, di e Fa cht ür m it d em L ag erb oc k
2 abschrauben.
3 verschließen.
1
Einbau in den Küchenschrank
• Je nach Griffseite das Befestigungsteil, links oder rechts,
griffseitig in die Bodenschiene
einschieben. Mit der Schraube 3,5 x 17 festschrauben.
• Gerät in die Nische einschie-
ben.
Türanschlag wechseln
1. Abdeckteile 3 abheben.
2. Befestigungsschrauben
3. Tür aushängen.
4. Alle Befestigungsschrauben
kurz einschrauben.
5. Türbefestigungsschrauben
niere diagonal umschlagen.
6. Gerätetür in vormontierte Schrauben
einhängen und Schrauben festziehen.
7. Mit den Abdeckteilen
Befestigungslöcher verschließen.
1 am Gerätekörper nur lösen.
1 auf Gegenseite umsetzen und
2 herausdrehen und die Schar-
3 alle freien
Befestigung im Küchenschrank
Gerät in der Nische befestigen.
- oben durch Befestigungsprofil A1,
- seitlich durch Scharniere A2,
- unten durch Befestigungsteil A3.
1
8
Page 9
1
4
4
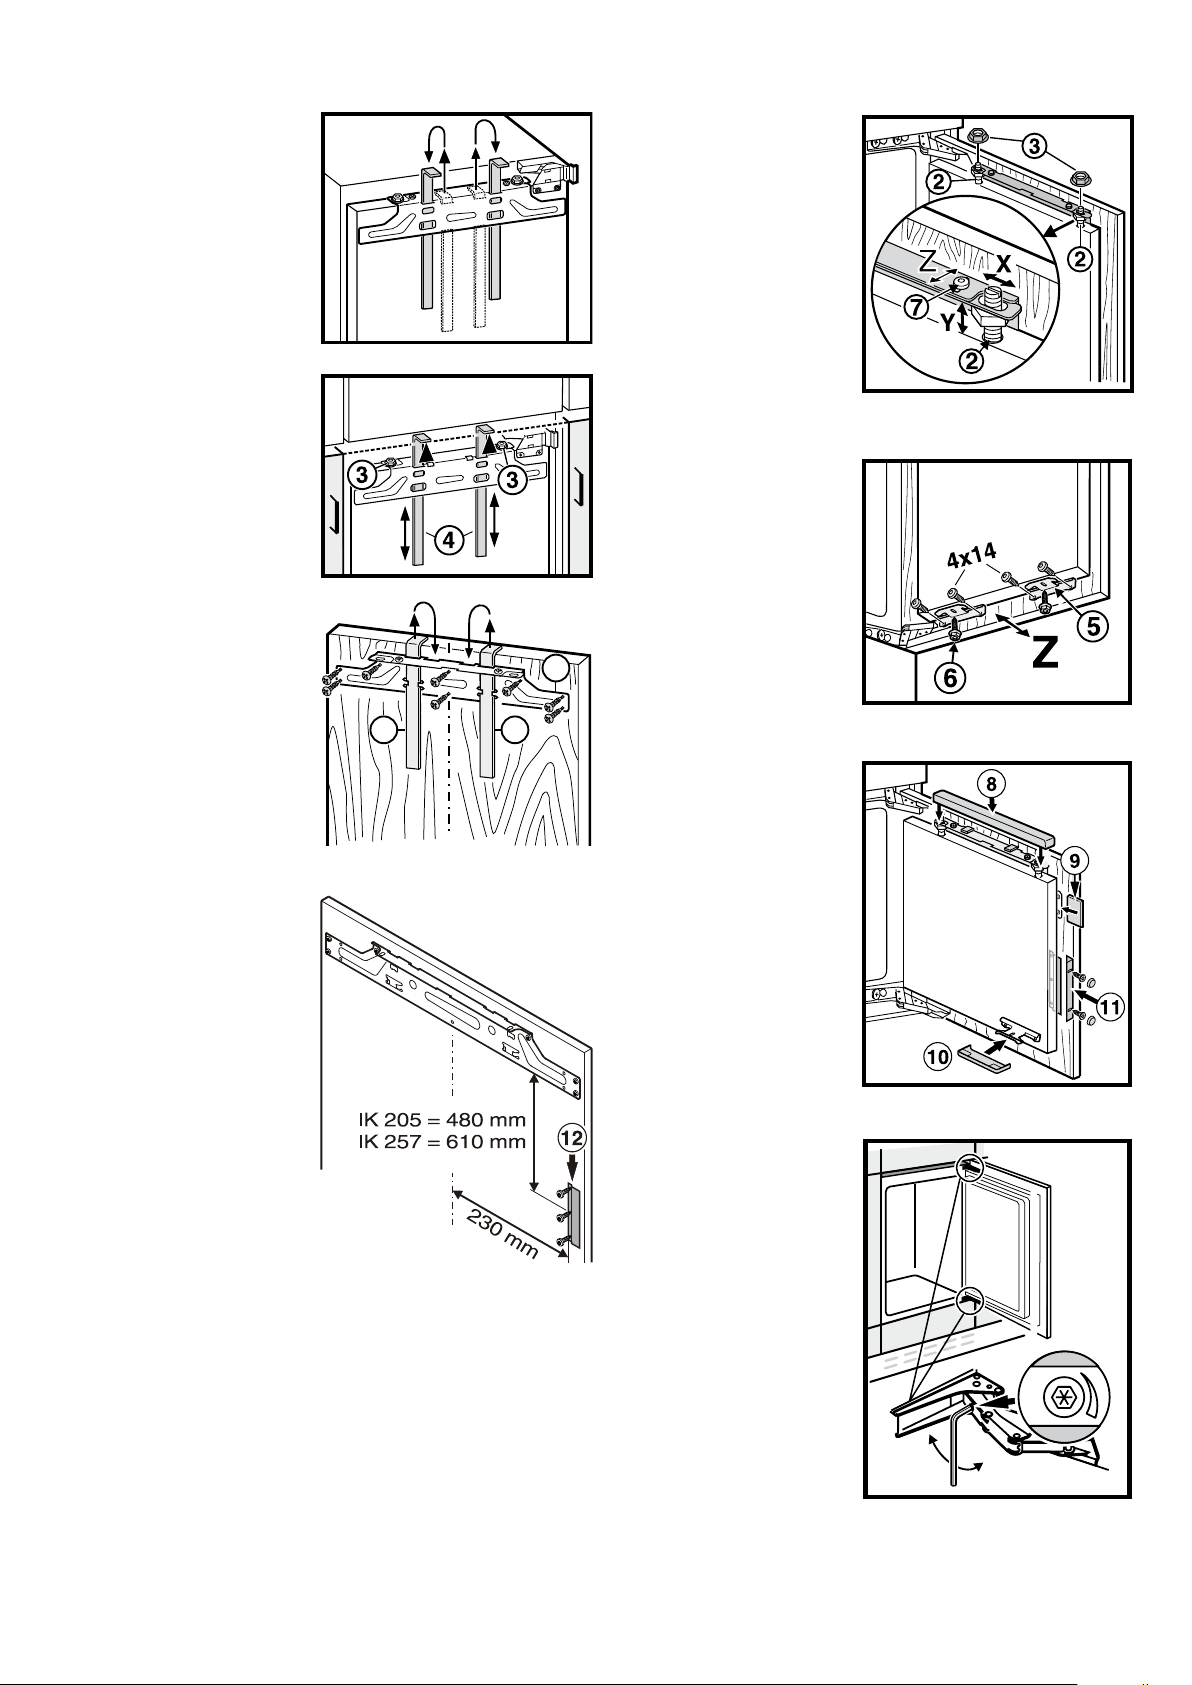
Möbeltür montieren
D
1. Montagehilfen nach oben
herausziehen und in die
danebenliegenden Aufnahmeöffnungen gedreht
einschieben.
2. Montagehilfen 4 auf Möbeltürhöhe hochschieben.
Unterkante der Montagehilfe = Oberkante der
Möbeltür.
3. Kontermuttern 3 abschrauben.
4. Befestigungstraverse
auf die Möbeltür hängen.
5. Befestigungstraverse
festschrauben.
6. Montagehilfen
oben herausziehen und in
die danebenliegenden Aufnahmeöffnungen gedreht
einschieben.
1
1
4 nach
8. Möbeltür auf die Gerätetür/
Justagebolzen
gen, Kontermuttern
cker auf die Justagebolzen
aufschrauben.
9. Die Möbeltür bündig und
fluchtend zu den umliegenden Möbelfronten
ausrichten.Kontermuttern
2 einhän-
3 lo-
3 anziehen.
10. Möbeltür in der Tiefe Z
ausrichten:die Schrauben
7 lösen.
11. Befestigungswinkel
Sechskantschraube
auf die vorgebohrten
Löcher der Gerätetür
schrauben.
12. Gerätetür durch die Befestigungswinkel
Möbeltür verschrauben:
(Schrauben 4x14).
13.
Möbeltür in der Tiefe Z
ausrichten.
14. Alle Abdeckungen 8, 9,
5 mit
6
mit der
bl montieren.
15. Mitnahmewinkel
reich des Schleppwinkels
montieren.
bm im Be-
7. Schleppwinkel
die Möbeltür schrauben
(Schrauben 4 x 14).
• Im Bereich des Griffes
der Möbeltür muss ein
Schleppwinkel montiert
sein.
• Bei Bedarf können mehrere
Winkel montiert werden.
• Um sicherzustellen, dass
der Schleppwinkel zum
Mitnahmewinkel der Kühlschranktür passt, sind
nebenstehende Maße zu
verwenden.
bn auf
16. Die Endanschlag-Federung der Tür kann justiert
werden. Je nach Bedarf
mit beiliegendem Inbus-
schlüssel einstellen:
- drehen im Uhrzeigersinn
= stärkere Federkraft,
- drehen entgegen dem
Uhrzeigersinn = geringere
Federkraft (Auslieferungs-
zustand).
9
Page 10
Protection de l'environnement
L’appareil contient encore des matériaux précieux et
est à amener à un lieu de recyclage spécial. L’élimination d’anciens appareils est à réaliser correctement en
respectant les prescriptions et lois en vigueur.
Veiller à ne pas endommager le circuit frigorifique
de l’appareil pour empêcher au réfrigérant y contenu
(indications sur la plaque signalétique) et à l’huile de
s’échapper accidentellement.
• Rendre l’appareil inopérant.
• Débrancher l’appareil.
• Sectionner le câble de raccord.
AVERTISSEMENT
Risque d‘étouffement avec les films et matériaux d‘emballage !
Ne pas laisser les enfants jouer avec les matériaux d‘emballage.
Déposer les matériaux d‘emballage à un centre officiel de collecte
des déchets.
Description de l'appareil
Eléments de commande et de controle
Compartiment
fromage et beurre
Compartiment
congélation
Balconnet de
porte modulable
Éclairage intérieur
(Barre d'éclairage
LED)
Surfaces de range-
ment modulables
Plaquette signalétique
Recommandations et consignes de sécurité
• Afin d'éviter tout accident matériel ou corporel,
nous vous recommandons de faire appel à une
deuxième personne pour déballer et mettre en
place l'appareil.
• Si l'appareil est endommagé avant l'installation,
prendre immédiatement contact avec le fournis-
seur.
• Pour garantir la sécurité de fonctionnement de
l'appareil, respecter scrupuleusement les instruc-
tions de la notice concernant la mise en place et
le raccordement électrique.
• En cas de panne, débrancher l'appareil ou ôter
le fusible.
• Pour débrancher l'appareil, saisir directement la
prise, ne pas tirer sur le câble.
• Afin d'éviter tout risque pour les utilisateurs de
l'appareil, les réparations et interventions ne
doivent être effectuées que par un Service Après
Vente agréé. Cette consigne s'applique également
au remplacement du câble d'alimentation.
• Ne pas manipuler de flammes vives ou de sources
d'allumage à l'intérieur de l'appareil. Lors du transport et du nettoyage de l'appareil, il convient de
veiller à ne pas endommager le circuit frigorifique.
En cas de dommages, tenir l'appareil éloigné de
toute source d'allumage et bien aérer la pièce.
• Ne pas utiliser le socle, les tiroirs, les portes etc.
comme marchepied ou comme support.
Tiroir pour denrées
sèches ou emballées
Tiroir à hygrométrie
réglable
Enlever tous les auxiliaires de transport
Dévisser la xation de transport rouge.
Boucher le trou de xation vide avec
un bouchon.
• Cet appareil ne convient pas aux personnes (et
enfants) présentant des handicaps physiques,
sensoriels ou mentaux ou aux personnes ne
disposant pas d'une expérience et de connaissances suffisantes, sauf si ces dernières ont
bénéficié d'une surveillance initiale ou ont reçu
des instructions relatives à l'utilisation de l'appareil
de la part d'une personne responsable de leur
sécurité. Les enfants ne doivent pas être laissés
sans surveillance afin de s'assurer qu'ils ne jouent
pas avec l'appareil.
•
Éviter le contact permanent de la peau avec des sur-
faces froides ou des produits réfrigérés/surgelés.
Cela est susceptible de provoquer des douleurs,
une sensation d'engourdissement et des gelures.
En cas de contact prolongé de la peau, prévoir les
mesures de protection nécessaires, comme par
ex. l'usage de gants.
• Ne pas consommer la glace alimentaire, plus
particulièrement la glace à l'eau et les glaçons,
à la sortie du congélateur, afin d'éviter tout risque
de brûlures pouvant être provoquées par les températures très basses.
10
Page 11
• Pour éviter tout risque d'intoxication alimentaire,
ne pas consommer d'aliments stockés au-delà
de leur date limite de conser vation.
• Ne pas conserver de matières explosives ni de
produits en bombe à gaz propulseur inflammable
(butane, propane, pentane, etc.) dans votre appareil. En cas de fuite éventuelle, ces gaz risquent
en effet de s'enflammer au contact d'éléments
électriques de votre appareil. Les produits en
bombe concernés sont identifiés par l'étiquette
indiquant leur composition ou un symbole repré-
sentant une flamme.
F
Classe climatique
La classe climatique indique la température
ambiante à laquelle l'appareil doit être utilisé
pour atteindre la performance frigorifique
maximale.
La classe climatique est indiquée sur la
plaquette signalétique.
L'emplacement de la plaquette signalétique figure dans le chapitre
Description de l'appareil.
Classe climatique Température ambiante
SN +10 °C à +32 °C
N +16 °C à +32 °C
ST +16 °C à +38 °C
T +16 °C à +43 °C
SN-ST +10 °C à +38 °C
SN-T +10 °C à +43 °C
• Ne pas utiliser d'appareils électriques à l'intérieur
de l'appareil.
• La barre d'éclairage LED située dans l'appareil
sert d'éclairage à l'intérieur de l'appareil. Elle n'est
pas destinée à l'éclairage de pièces.
Domaine d'utilisation de l'appareil
L'appareil est exclusivement adapté à la réfrigération
d'aliments dans un environnement domestique ou
un environnement semblable. Est prise en compte,
par exemple, l'utilisation
- dans les cuisines du personnel, les pensions de
famille,
- par les clients de maisons de campagne, hôtels,
motels et autres hébergements,
- par les traiteurs et services semblables dans le
commerce de gros.
N'utiliser l'appareil que dans un cadre domestique. Tout autre
type d'utilisation est interdite. L'appareil n'est pas conçu pour le
stockage et la réfrigération de médicaments, de plasma sanguin,
de préparations de laboratoire ou autres produits ou substances
semblables concernés par la directive 2007/47/CE relative aux
dispositifs médicaux. Une utilisation abusive de l'appareil peut
entraîner l'endommagement des produits stockés ou leur altération.
De plus, l'appareil n'est pas adapté pour le fonctionnement dans
les zones à risque d'explosion.
Ne pas utiliser l'appareil en dehors de la plage
de température indiquée.
Raccordement électrique
Seul le courant alterna tif doit être utilisé pour alimenter l'appareil.
La tension et la fréquence admissibles sont indiquées sur la pla-
quette signalétique. L'emplacement de la plaquette signalétique
figure dans le chapitre Description de l'appareil.
La prise doit être mise à la terre conformément aux normes électriques et protégée par un fusible.
Le courant de déclenchement du fusible doit être situé entre 10 A
et 16 A.
La prise ne doit pas se trouver derrière l'appareil
et doit être facilement accessible.
Ne pas brancher l'appareil à une rallonge ou
à une multiprise.
Ne pas utiliser d'onduleurs (conversion du courant continu en courant alternatif ou triphasé)
ou de "fiches économie d'énergie". Risque
d'endommagement du système électronique !
Mise en place
• Le site d'installation de votre appareil doit impérativement être
conforme à la norme EN 378, à savoir un volume de 1 m
8 g de fluide réfrigérant type R 600a, pour éviter toute formation
de mélange gaz-air inflammable en cas de
fuite dans le circuit frigorifique. Les données
relatives à la masse de réfrigérant sont
indiquées sur la plaquette signalétique à
l'intérieur de l'appareil.
• Uniquement exploiter l'appareil à l'état
monté.
3
pour
• Ne pas recouvrir ou obstruer les
orifices et les grilles de ventilation.
11
Page 12

Eléments de commande et de controle
1 Achage température
2 Touches de réglage température
3 Touche Marche-Arrêt
4 Touche (La fonction vous permet de régler votre appareil
sur la puissance de réfrigération maximale)
5 Touche d'arrêt alarme
6 Sécurité enfants
Mise en marche et arrêt de l'appareil
Il est recommandé de nettoyer l'intérieur de l'appareil avant la mise
en s e rv ice (v o i r ch api tre " Nettoyage" pour de plus amples détails).
• Mise en marche : appuyer sur la touche Marche-Arrêt
que l'affichage de température s'allume/clignote.
• Arrêt : appuyer pendant env. deux secondes sur l'interrupteur
Marche-Arrêt pour que l'affichage de température s'éteigne.
Réglage de la température
Abaisser la température
Appuyer sur la touche de réglage
Elever la température
Appuyer sur la touche de réglage
- Lors du réglage de température, la valeur de réglage clignote à
l'affichage.
- Par de brèves pressions répétées sur la touche, le réglage change
par paliers de 1 °C.
- Environ 5 secondes après toute dernière pression sur une touche,
l'electronique de l'appareil passe automatiquement à l'affichage
de la température instantanée.
- La plage de réglage de la température s'étend de 9°C à 4°C.
• Dans le compartiment NaturaFresh, la régulation de la température est automatique, entre 0 et 3°C.
Si vous souhaitez baisser ou augmenter la température, par ex.
pour conserver du poisson, vous pouvez modifier la température
assignée au compartiment NaturaFresh. Pour de plus amples
informations, voir le chapitre "Fonctions supplémentaires".
Si l'affichage indique
vous alors à votre Service Après Vente.
F 0 à F 5 l'appareil est en panne. Adressez-
2
.
.
3
3 pour
Alarme sonore
L'alarme sonore vous aide à préserver vos denrées réfrigérées et
à faire des économies d'énergie.
- Elle retentira systématiquement si la porte reste ouverte pendant
plus de 1 mn.
• L'alarme sonore s'arrête en appuyant sur la touche
d'arrêt alarme
porte.
5
5 ou automatiquement en fermant la
Fonctions supplémentaires
Le mode de réglage vous permet d’utiliser la sécurité enfants, de
modifier la luminosité de l’affichage et d’augmenter ou de diminuer
légèrement la température du compartiment NaturaFresh.
Activer le mode de réglage :
• Appuyer pendant env. 5 sec. sur la touche
gnote - l’écran affiche c pour sécurité enfants. Note : la valeur à
modifier clignote.
• En appuyant sur la touche Up/Down, sélectionner la fonction
désirée :
c = sécurité enfants,
h = luminosité ou
b = température NaturaFresh.
• En appuyant brièvement sur la touche
la fonction :
> Pour c = sécurité enfants
en appuyant sur la touche Up/Down, sélectionner
c1 = sécurité enfants ON ou
c0 = sécurité enfants OFF et c o nf i rm e r av ec l a t o uc he
. Lorsque le symbole luit, la sécurité enfants
est active.
> Pour h = luminosité
en appuyant sur la touche Up/Down, sélectionner la
luminosité souhaitée (de h1= luminosité minimale à
h5 = luminosité maximale) et confirmer à l’aide de
la touche
> Pour b = température NaturaFresh
en appuyant sur la touche Up/Down, sélectionner le
niveau souhaité (de b1 = température la plus basse
à b9 = température la plus élevée) et confirmer à
l’aide de la touche
se stabilise à la nouvelle valeur sélectionnée.
Remarque : b5 = valeur préréglée. En diminuant la tempéra-
ture, de b4 à b1, il est possible d’atteindre des températures
inférieures à 0 et de congeler légèrement les aliments stockés
dans le compartiment NaturaFresh.
Quitter le mode de réglage :
• En appuyant sur la touche On/Off
de réglage. Après 2 min. le système électronique commute automatiquement. Le service de réglage standard est de nouveau
actif.
.
. La température NaturaFresh
3, vous terminez le mode
- la touche cli-
, sélectionner/confirmer
Touche
La fonction vous permet de régler votre appareil sur la puissance
de réfrigération maximale. Il est particulièrement recommandé
d'utiliser
possible une grande quantité d'aliments. La température de réfri-
gération baisse alors à la plus basse température du thermostat.
Mise en marche : appuyer un court instant sur la touche
manière à ce que la LED correspondante s'allume.
12
4
lorsque vous désirez réfrigérer le plus rapidement
de
Page 13

Equipement
Les surfaces de rangement
peuvent être déplacées suivant la
place nécessaire. Soulever la tablette
en verre, tirer la découpe au-dessus
du support et la placer plus haut ou
plus bas.
Pour changer de place les
balconnets de porte
- soulever verticalement les bal-
connets, les retirer vers l'avant et
les replacer à la hauteur voulue en
procédant dans le sens inverse.
Les demi-tablettes en verre
offrent de la place pour les récipients hauts. Placer les glissières
fournies (fig. 1) à la hauteur sou-
haitée sur les boutons de support
à droite et à gauche.
g. 1 g. 2
Introduire les tablettes en verre
1/2selon la fig. 2. La tablette
en verre
trouver à l'arrière ! S'il vous faut
de la place pour des récipients
hauts, il suffit de pousser délicatement la partie avant de la
tablette en verre sous la partie
arrière, voir fig. 2.
Eclairage intérieur LED
Si la porte est restée ouverte,
l'éclairage intérieur s'éteint
automatiquement au bout
d'environ 15 mn.
Si l'éclairage intérieur ne s'allume pas lors d'une courte
ouverture de porte, alors que
l'affichage de la température
fonctionne, il est probable qu'il
soit défectueux.
2avec butée doit se
F
Réfrigération
Exemple de rangement
1Beurre, fromage
2Oeufs
3Conserves, tubes
4Bouteilles
5Produits surgelés, glaçons
6Pâtisseries, plats cuisinés,
boissons
7Viandes, charcuterie, pro-
duits laitiers
Compartiment NaturaFresh:
8Viandes, charcuterie, pois-
son, produits laitiers
9Salades, fruits, légumes
Conseils
• Les aliments qui ont tendance
à dégager ou à absorber
les odeurs ou les saveurs
d'autres aliments, ainsi que
les liquides, doivent toujours
être conservés dans des
récipients hermétiques ou
recouverts d'une protection.
Stocker les alcools forts uni-
quement en position verticale
et dans des bouteilles bien fermées.
• N'utiliser que des emballages réutilisables et convenant à la
conservation (plastique, métal, aluminium, verre).
Economiser l'énergie
- Toujours veiller à une bonne ventilation de l'appareil. Ne pas
recouvrir ou obstruer les orifices et les grilles de ventilation.
- Dégager les fentes de ventilation.
- Ne pas placer l'appareil dans une zone à ensoleillement direct,
à côté d'une cuisinière, d'un chauffage ou équivalents.
- La consommation en énergie dépend des conditions d’installation
comme la température ambiante.
- Ouvrir l'appareil aussi brièvement que possible.
- Classer vos aliments par groupes de produits.
- Conserver toutes les denrées dans leur emballage ou avec une
protection. Toute génération de givre est ainsi empêchée.
- Entreposer des aliments chauds : les laisser refroidir d'abord à
température ambiante.
- Décongeler des aliments dans le réfrigérateur.
Compartiment congélation
- Lorsque l'appareil présente une couche épaisse de givre : dégivrer l'appareil.
L'intensité lumineuse de
l'éclairage LED correspond
à la classe laser 1/1M.
Attention
Le cache de l'éclairage ne
peut être retiré que par le
S.A.V.
Lorsque le cache est retiré,
ne jamais regarder directement l'éclairage à travers de
lentilles optiques. La vision
risque en e ffet d'être abîmé e.
13
Page 14

Compartiment NaturaFresh
Le compartiment NaturaFresh permet de conserver certains
produits frais trois fois plus longtemps que dans un réfrigérateur
traditionnel et à qualité égale.
La température de stockage maintenue constante à peine au-dessus de 0°C et l'humidité résultante offrent des con-ditions idéales
pour la conservation de différentes denrées.
Le tiroir du haut 8
est idéal pour la conservation de denrées sèches ou emballées
(produits laitiers, viande, poisson, charcuterie par ex.). Les produits
sont conservés dans une atmosphère relativement sèche.
Le tiroir réglable 9
est destiné, en réglage "humide", à conserver des salades,
légumes, fruits. Une fois le tiroir bien rempli, la température de
conservation se stabilise et présente une humidité relative allant
jusqu‘à 90% maximum.
Si nécessaire, vous pouvez utiliser ce tiroir au choix (atmosphère
sèche ou humide).
Réglage du degré hygrométrique :
• Positionnement sur "Sec"
(petit symbole d'humi-
dité) - pousser le curseur
vers la gauche. Introduire
des aliments adaptables
au stockage en climat sec.
• Positionnement sur
"Humide" (grand symbole d'humidité) pour
un degré hygrométrique
élevé de 90% maximum
- pousser le curseur tout
à fait vers la droite. Ce
positionnement est idéal
pour les aliments à haut
degré d‘humidité interne
comme la laitue fraîche,
stockés sans emballage.
Remarques
• Le degré hygrométrique élevé dans le compartiment NaturaFresh
dépend de l'humidité initiale contenue dans les aliments et de
la fréquence d'ouverture de la porte.
• Lors de vos achats, veiller à la fraîcheur initiale des aliments à
conserver. En effet, c'est la qualité et le degré de fraîcheur qui
déterminent la durée de conservation des denrées.
• Les viandes, les fruits et légumes sans emballage devront être
rangés séparément dans les tiroirs. Lorsque pour des raisons de
place, vous devez les ranger ensemble, il faudra les emballer !
Ne pas mettre en contact différentes sortes de viandes ; toujours
les séparer par un emballage. Vous éviterez ainsi toute altération
prématurée.
• Les denrées à forte teneur en albumine s'altèrent plus rapidement (les coquillages et les crustacés s'altèrent plus vite que le
poisson et le poisson plus vite que la viande).
• Avant de consommer les aliments du compartiment, les garder
durant 30 à 60 minutes à température ambiante. Ceci pour res-
tituer toute leur saveur et leur valeur nutritive.
• Les fromages, les pommes de terre, les légumes délicats tels
que les concombres, les poivrons, les aubergines, les avocats,
les tomates, les haricots, les courgettes ainsi que tous les fruits
exotiques tels que les ananas, les bananes, les pamplemousses,
les melons, les mangues, les papayes. etc. ne doivent pas être
conservés dans le compartiment NaturaFresh.
Compartiment congélateur
Vous pouvez congeler des produits surgelés pendant plusieurs
mois, préparer des glaçons et congeler des aliments frais dans le
compartiment congélateur à une température égale ou inférieure
à -18 °C.
La température ambiante dans le compartiment, mesurée avec un
thermomètre ou un autre appareil de mesure peut osciller.
Congélation
Les produits frais doivent être congelés en profondeur le plus
rapidement possible.
Introduireles produits frais à congeler à raison de 2 kg / 24 heures
au maximum.
• Régler la température sur 5°C ou moins (par ex. 3°C).
• Attendre 24 heures.
• Introduire ensuite les produits frais à
congeler.
• Au bout de 24 heures environ, les produits
frais seront congelés.
• Régler la température sur la valeur habituelle (par ex. sur 5°C).
Les surgelés (produits déjà congelés) peuvent être placés directement dans le compartiment froid.
Conseils pour la congélation
• N'utiliser que des emballages ou récipients spécialement
prévus pour la congélation.
• Indiquer le contenu et la date sur les paquets à congeler et respecter scrupuleusement la date limite de conservation.
• Ne jamais placer de bouteilles ou canettes contenant une boisson gazeuse dans le congélateur, car elles pourraient exploser.
Dans le cas d'une réfrigération rapide de boissons, retirer les
bouteilles au bout d'une heure maximum.
• Les soins apportés à la décongélation sont aussi importants
que lors de la congélation. En règle générale, ne décongeler
que la quantité nécessaire à votre consommation. Cuisiner ou
utiliser aussi rapidement que possible les aliments venant d'être
décongelés.
Les aliments congelés peuvent être décongelés de la manière
suivante :
- dans le four à chaleur tournante,
- dans le four à micro-ondes,
- à température ambiante,
- dans le réfrigérateur ; le froid dissipé est utilisé pour la réfrigé-
ration des autres aliments.
Préparation de glaçons
• Remplir d'eau le bac à glaçons.
• Placer le bac à glaçons dans l'appareil et
laisse geler.
• Les glaçons se détachent lorsqu'on tord
légèrement le bac ou lorsqu'on le passe un
court instant sous l'eau courante.
14
Page 15

Dégivrage
Compartiment réfrigérateur
Le compartiment réfrigérateur de votre appareil est à dégivrage
automatique. L'eau de dégivrage s'évapore sous l'effet de la chaleur
dissipée par le compresseur.
Compartiment congélateur
Après un certain temps, une couche de givre ou de glace se forme
dans le compartiment. Si cette couche devient trop épaisse, elle
augmente la consommation d'énergie. Il convient donc de procéder
régulièrement au dégivrage du compartiment.
• Débrancher l'appareil ou désactiver le fusible !
• Envelopper les denrées congelées dans du papier journal ou
des couvertures et les placer ensuite dans un endroit aussi frais
que possible.
• Pour accélérer le dégivrage, placer dans le compartiment un
récipient contenant de l'eau chaude, mais non bouillante.
• Laisser la porte ouverte pendant le dégivrage. Éponger l'eau
restante avec un linge et nettoyer ensuite l'intérieur de l'appareil.
Pour le dégivrage, n'utiliser aucun système
mécanique ou d'autres moyens artificiels que
ceux qui sont recommandés par le fabricant.
Nettoyage
Avant de procéder au nettoyage, arrêter impérativement
l'appareil. Pour cela, débrancher la prise ou mettre hors
circuit les protections électriques situées en amont.
• Nettoyer l'intérieur ainsi que les équipements intérieurs de
l'appareil avec de l'eau tiède mélangée à de faibles quantités de
produit à vaisselle. N'utiliser ni détergents sableux ou acides, ni
solvants chimiques.
• Éviter que l'eau de nettoyage ne s'infiltre dans les parties électriques et par la grille de ventilation.
• Essuyer soigneusement tous les éléments avec un chiffon sec.
• Ne pas détériorer ou enlever la plaquette signalétique située à
l'intérieur de l'appareil - elle est importante pour le S.A.V.
Ne pas employer d'appareils de nettoyage à
vapeur. Risque de dommages matériels et de
blessures.
• Pour le nettoyage des tiroirs
NaturaFresh, les tirer complè-
tement, les saisir à l'arrière et
les sortir en les soulevant.
F
Pannes éventuelles
Vous pouvez remédier vous-même aux pannes suivantes en
contrôlant les causes possibles.
• L'appareil ne fonctionne pas :
– L'appareil est-il en position marche ?
– La prise de courant est-elle bien enfoncée ?
– Le fusible de la prise est-il en bon état ?
• L'appareil est trop bruyant :
– L'appareil est peut-être mal calé.
– Les meubles ou les objets se trouvant à proximité sont peut-être
soumis aux vibrations du groupe compresseur. Sachez que les
bruits dûs à l'arrivée du réfrigérant dans le circuit frigorifique ne
peuvent être évités.
• La température n'est pas assez basse :
– Le réglage de la température est-il correct ? (voir chapitre "Ré-
glage de la température")
– Une quantité excessive de produits frais a peut-être été intro duite
dans l'appareil ?
– Le thermomètre supplémentaire placé dans l'appareil indique-t-il
la bonne température ?
– La ventilation est-elle correctement assurée ?
– L'appareil a-t-il été installé trop près d'une source de chaleur ?
• Par endroits, les surfaces de l'inté-rieur de l'appareil peu-
vent être chaudes
– Ce phénomène est tout à fait normal. La chaleur dissipée est
nécessaire au bon fonctionnement de l'appareil.
Si aucune des raisons men-
tionnées ci-dessus n'aide à
résoudre le problème et que
vous ne pouvez remédier vous-
même à la panne, veuillez alors
consulter votre S.A.V. le plus
proche en lui indiquant la désignation ➊, le numéro PNC ➋ et
le numéro de l'appareil ➌ figurant
sur la plaquette signalétique.
L'emplacement de la plaquette signalétique figure dans le chapitre
Description de l'appareil.
Arrêt prolongé
Lorsque votre appareil doit rester longtemps sans fonctionner,
débrancher la prise ou retirer/dévisser les fusibles situés en
amont. Nettoyer l'appareil et laisser la porte ouverte afin d'éviter
la formation d'odeurs.
Cet appareil est conforme aux prescriptions de sécurité applicables
et satisfait ainsi aux prescriptions définies par les directives CE
2004/108/CE et 2006/95/CE.
- Mise en place : poser chacun
des tiroirs sur ses glissières
complètement sorties en butée
contre le côté poignée (les
glissières doivent arriver en
butée de la façade du tiroir) et
le pousser.
Le fabricant de cet appareil s'efforce d'améliorer tous les types et
modèles de sa gamme. Il se réserve donc le droit d'apporter des
modifications concernant la forme, l'équipement et les caracté-
ristiques techniques de ses appareils.
15
Page 16

Dimensions d'encastrement (mm)
A B C
IK 205 1270 1269 1260
IK 257 1524 1523 1514
Poids maximal de la porte
du meuble = 17,5 kg
Porte du compartiment réversible
• Retirer le cache du support 1 en le rabattant.
• Dévisser le support
support.
• Dévisser le taquet de fermeture
• Enfoncer les caches
• Remonter la porte et le taquet de fermeture sur le côté opposé en
les tournant de 180°. Placer la porte du compartiment au dessus,
mettre le support
1, retirer la porte du compartiment avec le
2.
3 dans les orifices ainsi libérés.
1 en bas, revisser, rabattre le cache.
Encastrement dans l'élément de cuisine
• Selon le côté poignée choisi
(dr oit e ou g au che ), en ga g er la
pièce d'accouplement dans le
rail du bas côté poignée et la
visser au moyen d'une vis 3,5
x 17.
• Pousser l'appareil dans la
niche.
Inversion du sens d'ouverture de la porte
1. Enlever les caches 3.
2. Dévisser légèrement les vis de fixation
3. Décrocher la porte.
4. Revisser légèrement toutes les vis de fixation
opposé.
5. Dévisser les vis de fixation de la porte
des charnières en diagonale.
6. Accrocher la porte de l'appareil sur les vis
prémontées
7. Boucher tous les orifices de fixation
restés libres à l'aide des caches
1 et serrer les vis.
1 de la carrosserie.
1 sur le côté
2 et échanger la position
3.
Fixation dans l'élément de cuisine
Fixation de l'appareil dans la niche:
- en haut par le profilé de fixation (A1),
- sur le côté par les charnières (A2),
- en bas par la pièce de fixation (A3).
16
Page 17

Montage de la porte du meuble
1
4
4
F
1. Tirer les aides de montage
vers le haut, les tourner de
180° et les enfoncer dans
les logements qui se trou-
vent à côté.
2. Monter les aides de mon-
tage
4 au niveau du haut de
la porte: arêtes inférieures
des aides de montage =
arête supérieure de la porte
à monter.
3. Dévisser les contre-écrous
3.
4. Accrocher la traverse de
fixation
meuble.
5. Visser la traverse de fixation
1 sur la porte du
1.
6. Tirer les aides de montage
4 vers le haut, les tourner
de 180° et les enfoncer dans
les logements qui se trouvent
à côté.
8. Accrocher la porte du
meuble sur la porte de
l'appareil et sur les pièces
d'ajustement
légèrement les contreécrous
d'ajustement.
9. Aligner la porte du meuble
et la mettre d'équerre par
rapport aux autres panneaux de façade. Visser
les contre-écrous
10. Régler le jeu de la porte
du meuble en profondeur
Z: Dévisser les vis
11. Visser l’équerre de fixation
2, visser
3 sur les pièces
3.
7.
5 avec la vis à 6 pans 6
dans les trous pré-percés
de la porte de l’appareil.
12. Visser la porte de l'appareil
sur la porte du meuble à
travers les équerres de
fixation (vis 4 x 14).
13. Régler le jeu de la porte du
meuble en profondeur Z.
14. Monter tous les caches
8,
9, bl.
15. Monter l'équerre entraî-
bm dans la zone de
née
l'équerre d'entraînement.
7. Visser l'équerre d'entraî-
nement
meuble (vis 4 x 14).
• Une équerre d'entraîne-
ment doit être montée dans
la zone de la poignée de la
porte du meuble.
• En cas de besoin, il est possible de monter plusieurs
équerres.
• Afin de s'assurer que
l'équerre d'entraînement
corresponde à l'équerre
entraînée de la porte du
réfrigérateur, les mesures
ci-contre doivent être appliquées.
bn sur la porte du
Le ressort de butée de fin
16.
de course de l a porte peu t
être ajusté. Faites le réglage qui vous convient
avec la clef pour vis à 6
pans creux livrée :
- tournez dans le sens des
aiguilles d'une montre =
pour resserrer le ressort,
- tournez dans le sens in-
verse des aiguilles d'une
montre = pour relâcher le
ressort (réglage d'origine).
17
Page 18

Indicazioni per lo smaltimento
L’apparecchio contiene ancora materiali preziosi e
deve essere smaltito in un centro diverso dalla raccolta
indifferenziata dei rifiuti urbani. Gli apparecchi fuori uso
devono essere smaltiti a regola d’arte in conformità alle
norme e leggi locali.
Non danneggiare il circuito refrigerante dell‘apparecchio fuori uso
durante il trasporto per evitare che il refrigerante in esso contenuto (dati riportati sulla targhetta identificativa) e l’olio possano
fuoriuscire senza controllo.
• Mettere fuori uso l’apparecchio.
• Estrarre la spina di rete.
• Staccare il cavo di alimentazione.
AVVERTENZA
Pericolo di soffocamento a causa del materiale d’imballaggio e
di film! Non lasciare giocare i bambini con il materiale d’imballaggio.
Conferire il materiale di imballaggio presso un centro di raccolta
autorizzato.
Descrizione dell'apparecchio
Elementi di controllo
e d'uso
Mensola per
formaggio e burro
Scomparto
congelatore
Indicazioni ed avvertenze per la sicu rez za
• L'apparecchio dovrebbe venire sballato ed installato da due persone allo scopo di evitare danni a
persone o a cose!
• In caso di danni all'apparecchio, informare immediatamente la ditta fornitrice, prima di procedere
all'allacciamento.
• Per garantire il sicuro funzionamento, installare e
collegare l'apparecchio solo secondo le indicazioni riportate nella presente istruzione d'uso.
• In caso di guasti, staccare l'apparecchio dalla
rete di alimen tazione. Estrarre la spina oppure
staccare/svitare il fusibile.
• Per staccare l'apparecchio dalla rete di alimentazione, estrarre la spina, non tirare il cavo di
alimentazione.
• Far eseguire le riparazioni dell'apparecchio solo
dal servizio di assistenza tecnica. In caso contrario
l'utente potrà incorrere in seri pericoli. Lo stesso
vale per la sostituzione dei cavi di allacciamento
alla rete.
Mensola sulla controporta, spostabile
Illuminazione interna
(Barra luminosa a
LED)
Ripiani spostabili
Targhetta dati
Cassetto scorrevole
per alimenti secchi o
confezionati
Cassetto scorrevole
dall'umidità regolabile
Rimuovere tutti gli elementi di protezione durante il trasporto
Svitare la protezione rossa per il trasporto.
Chiudere con il tappo il foro di ssaggio
ora libero.
• Evitare fuochi o scintille all'interno dell'apparecchio. Assicurarsi che il circuito raffreddante non
venga danneggiato durante il trasporto o la pulizia
dell'apparecchio. Evitare assolutamente la formazione di scintille in caso di guasti ed arieggiare
bene i locali.
• Non usare come predellino o come appoggio gli
zoccoli, i cassetti e gli sportelli.
• Questo apparecchio non è concepito per persone
(anche bambini) con menomazioni fisiche, senso-
riali o mentali o per persone che non dispongono
di esperienza e conoscenze sufficienti, a meno
che non vengano istruiti all'utilizzo dell'apparecchio o controllati nelle prime fasi da persone che
rispondono della loro sicurezza. Sorvegliare i
bambini, per assicurarsi che non giochino con
l'apparecchio.
• Evitare il contatto prolungato con superfici fredde
o prodotti refrigerati/congelati. Ciò può causare
dolori, insensibilità e assideramento. In caso
di contatto prolungato prendere provvedimenti
adeguati, p. es. utilizzare dei guanti.
• Non consumare il gelato troppo freddo o appena
tolto dall'apparecchio, soprattutto i ghiaccioli o i
cubetti di ghiaccio. Le basse temperature possono
causare lesioni da freddo.
18
• Non consumare generi alimentari la cui data di
conservazione sia scaduta, potrebbero causare
intossicazione.
Page 19

• Non conservare nell'apparecchio materiali
esplosivi o bombolette spray a base di sostan-
ze infiammabili come p. es. butano, propano,
pentano ecc. A contatto con le parti elettriche, le
eventuali perdite di gas possono infiammarsi. Le
bombolette spray contenenti tali sostanze sono
riconoscibili dal simbolo della fiamma o dai dati
riportati sull'etichetta del prodotto.
• Non utilizzare apparecchi elettrici all'interno
dell'apparecchio.
• La barra luminosa a LED nell'apparecchio serve
per illuminarne il vano interno e non è idonea
all'illuminazione della stanza.
I
Classe climatica
La classe climatica indica la temperatura
ambiente a cui può funzionare l'apparecchio per raggiungere la potenza di raffred-
damento totale.
La classe climatica è indicata sulla tar-
ghetta dati.
La posizi one della targ hetta dati è in dicata nel ca pitolo Descrizione
dell'apparecchio.
Classe climatica Temperatura ambiente
SN da +10 °C a +32 °C
N da +16 °C a +32 °C
ST da +16 °C a +38 °C
T da +16 °C a +43 °C
SN-ST da +10 °C a +38 °C
SN-T da +10 °C a +43 °C
Non far funzionare l'apparecchio a temperature
ambiente diverse da quelle indicate!
Campo d'impiego dell'apparecchio
L'apparecchio è indicato esclusivamente per la
refrigerazione di alimenti in ambiente domestico
o analogo. Si intende ad esempio l'utilizzo
- in angoli cucina di aziende, pensioni con prima
colazione,
- da parte di ospiti in case di campagna, hotel,
motel e altri alloggi,
- in caso di catering e servizi simili nella grande
distribuzione.
Utilizzare l'apparecchio esclusivamente in un contesto domestico.
Tutti gli altri tipi di utilizzo non sono ammessi. L'apparecchio non è
idoneo alla conservazione e alla refrigerazione di medicinali, plasma sanguigno, preparazioni di laboratorio o sostanze e prodotti
simili in base alla Direttiva sui Dispositivi Medici 2007/47/CE. Un
uso improprio dell'apparecchio può provocare danni ai prodotti
conservati o il loro deterioramento. Inoltre l'apparecchio non è
idoneo all'esercizio in aree a rischio di esplosione.
Posizionamento
• In conformità alla norma EN 378, il locale di installazione dell'apparecchio deve avere un volume di 1 m
R 600a, affinché in caso di perdita del circuito raffreddante non possa avere origine
una miscela infiammabile di gas e aria nei
locali di installazione dell'apparecchio.
L'indicazione della quantità del liquido
refrigerante è riportata sulla targhetta dati
nel vano interno dell'apparecchio.
• Mettere in funzione l'apparecchio solo in
mobili stabili.
3
per 8 g di refrigerante
Collegamento elettrico
L'apparecchio funziona solo a corrente alternata.
La tensione e la frequenza ammesse sono indicate sulla targhetta
dati. La posizione della targhetta dati è indicata nel capitolo Descrizione dell'apparecchio.
La presa deve essere sia messa a terra in modo regolamentare
che protetta elettricamente.
La corrente di azionamento del fusibile deve essere compresa
tra 10 A e 16 A.
La presa non deve trovarsi dietro all'apparecchio
e deve essere facilmente raggiungibile.
Non collegare l'apparecchio con una prolunga
o una presa multipla.
Non utilizzare invertitori per impianti ad isola
(conversione di corrente continua in corrente
alternata o corrente trifase) o connettori a
risparmio energetico. Pericolo di danni per
l'elettronica!
• Non coprire le griglie o i fori di
ventilazione.
19
Page 20

Elementi di controllo e d'uso
Allarme - segnale acustico
Il segnale acustico vi serve per proteggere il prodotto depositato
e risparmiare energia.
- Suona sempre, se lo sportello resta aperto per più di 1 minuto
ca.
• Il suono sparisce se si preme il tasto dell'allarme 5
o automaticamente se lo sportello è chiuso.
5
1 Display temperatura
2 Tasti di regolazione per temperatura
3 Tasto avvio/arresto
4 Tasto ( consente di impostare la temperatura nel vano
frigorifero sulla massima potenza raffreddante)
5 Tasto di spegnimento allarme
6 Sicurezza bambini
Inserire e disinserire l'apparecchio
Si consiglia di pulire l'apparecchio prima di metterlo in funzione
(vedi capitolo "Pulizia").
• Inserimento: premere il tasto di avvio/arresto
temperatura si accende/lampeggia.
• Disinserimento: premere il tasto di avvio/arresto per circa due
secondi, in modo che il display della temperatura si spegne.
Impostare la temperatura
Abbassare la temperatura/più freddo
Premere il tasto d'impostazione
Aumentare la temperatura/più caldo
Premere il tasto d'impostazione
- Il valore d'impostazione lampeggia nel display durante l'impo-
stazione della temperatura.
- La temperatura impostata si modifica di 1 °C ad ogni breve
pressione del tasto.
- Ca. 5 sec. dopo aver premuto il tasto per l'ultima volta, l'elettronica
commuta automaticamente e viene indicata la reale temperatura.
- Le temperature possono venire impostate nel frigorifero tra 9 °C
e 4 °C.
• Nel vano NaturaFresh la temperatura viene regolata auto-
maticamente, tra 0 e 3 °C. Se si desidera una temperatura più
calda o più fredda, p. es. per la conservazione di pesce, si può
modificare la temperatura d'impostazione nel vano NaturaFresh.
Per ulteriori informazioni vedasi al paragrafo "Funzioni supple-
mentari".
Se nel display appare un simbolo compreso tra
di un guasto all'apparecchio. Rivolgersi in tal caso al più vicino
centro di assistenza tecnica.
2
.
.
3
3, il display della
F 0 e F 5, si tratta
Funzioni supplementari
Attraverso il modo di programmazione potete utilizzare la sicurez-
za bambini, modificare la luminosità del display e impostare una
temperatura più fredda o più calda nel vano NaturaFresh.
Attivare il modo di programmazione:
• premere il tasto
display visualizza c per la sicurezza bambini.
Indicazione: il valore rispettivamente da modificare lampeggia.
• Selezionare la funzione desiderata premendo il tasto UP/DOWN:
c = sicurezza bambini,
h = luminosità oppure
b = temperatura NaturaFresh.
• Adesso selezionare/confermare la funzione premendo brevemente il tasto
> Se si ha c = sicurezza bambini,
premendo il tasto UP/Down selezionare
c1 = inserimento sicurezza bambini oppure
c0 = disinserimento sicurezza bambini e confer-
mare mediante il tasto
attivata, quando il simbolo
> Se si ha h = luminosità,
premendo il tasto UP/DOWN selezionare
h1 = luminosità minima fino a
h5 = luminosità massima e confermare mediante il
tasto
> Se si ha b = temperatura NaturaFresh,
premendo il tasto UP/DOWN selezionare
b1 = grado di temperatura più freddo fino a
b9 = grado di temperatura più caldo e confermare
mediante il tasto
modificata si regola lentamente sul nuovo valore
impostato.
Indicazione: b5 = preimpostazione. Modificando in direzione
più freddo b4 fino b1, possono essere raggiunte temperature
sotto lo zero e così congelare leggermente gli alimenti nel vano
NaturaFresh.
Uscire dal modo di programmazione:
• premendo il tasto ON/OFF
zione; l’elettronica commuta automaticamente dopo 2 minuti.
Il normale funzionamento regolare è riattivato.
.
per circa 5 secondi – il tasto lampeggia – il
:
. La sicurezza bambini è
è acceso.
. La temperatura NaturaFresh
3 terminate il modo di programma-
Tasto
consente di impostare la temperatura nel vano frigorifero sulla
massima potenza raffreddante.
quando si desiderano raffreddare rapidamente grandi quantità di
generi alimentari. La temperatura si abbassa fino al valore minimo
indicato sul regolatore temperatura.
Inserimento: premere brevemente il tasto , il LED corrispon-
dente si illumina.
20
4
si raccomanda particolarmente
Page 21

Dotazioni
I ripiani possono essere spostati a
seconda delle necessità. Sollevare
la lastra di vetro, sfilare i fori dagli
appoggi e infilarla più in alto o più
in basso.
Modificare la posizione delle
mensole nello sportello
- Sollevare la mensola, estrarla e
rimetterla seguendo la successione
contraria.
Le mezze lastre di vetro ga-
rantiscono spazio ai recipienti
alti. Infilare le guide di supporto
annesse, fig. 1, sugli appoggi,
a destra e a sinistra, all'altezza
desiderata.
g. 1 g. 2
Inserire le lastre di vetro
come da fig. 2. La lastra di
vetro
deve stare dietro!
Se si neces sita di spazio p er i recipienti alti, spingere semplicemente e con cautela la mezza
lastra di vetro anteriore sotto
alla lastra posteriore, fig. 2.
1/2
2con bordo di arresto
I
Raffreddamento
Esempio di sistemazione
degli alimenti
1burro, formaggi
2uova
3conserve, tubetti
4bottiglie
5surgelati, cubetti di ghiaccio
6dolci, cibi precotti, bibite
7carni, salumi, latticini
Vano NaturaFresh:
8carni, salumi, pesci, latticini
9insalata, frutta, verdura
Indicazioni
• Gli alimenti che cedono, ovvero assorbono facilmente odori
e sapori ed i liquidi devono
sempre essere conservati in
recipienti chiusi o coperti; i
prodotti ad alta gradazione
alcoolica devono essere conservati sempre ben chiusi ed
in piedi.
• I materiali più adatti per la
conservazione sono i recipienti riutilizzabili di plastica, metallo,
alluminio e vetro.
Risparmio energetico
- Assicurare sempre una buona ventilazione. Non coprire le griglie
o i fori di ventilazione.
- Tenere sempre libere le fessure per l’aria del ventilatore.
- Non installare l'apparecchio in luogo esposto alle radiazioni solari
dirette, accanto a una cucina, calorifero e simili fonti di calore.
- Il consumo di energia dipende dalle condizioni di installazione,
ad es. dalla temperatura ambiente.
- Aprire la porta dell’apparecchio per lo stretto tempo necessario.
- Conservare gli alimenti suddivisi con ordine.
- Conservare tutti gli alimenti correttamente confezionati e coperti.
Si evita così la formazione di brina.
- Inserire cibi caldi: facendoli dapprima raffreddare a temperatura
ambiente.
- Scongelare i cibi surgelati nel vano frigorifero.
Scomparto congelatore
- Se nell'apparecchio si forma uno spesso strato di brina: sbrinare
l'apparecchio.
Illuminazione interna LED
L'illuminazione interna si spegne automaticamente dopo
15 minuti se lo sportello rimane
aperto.
Se invece l'illuminazione non si
accende aprendo brevemente
lo sportello, ma il display della
temperatura funziona, significa
che l'illuminazione è probabilmente difettosa..
L'intensità della luce dell'illu minazione a LED corrisponde alla classe laser 1/1M.
Attenzione
Il diffu sore può esser e rimosso solo dal Servizio di assistenza t ecnica. Se il d iffusore
viene rimosso, non guardare
direttamente l'illuminazione
da vicino c on lenti otti che: ne
potrebbero derivare lesioni
agli occhi.
21
Page 22

Vano NaturaFresh
Il vano NaturaFresh consente di conservare vari alimenti freschi
per un periodo ca. 3 volte più lungo rispetto al raffreddamento
tradizionale, naturalmente mantenendo inalterata la qualità.
La temperatura di conservazione a costante regolazione auto-
matica appena al di sopra di 0 °C e l'umidità dell'aria risultante
consentono di conservare i vari alimenti a condizioni ottimali.
Il cassetto superiore 8
si adatta alla conservazione di alimenti secchi o confezionati (p.
es. latticini, carne, pesce, salumi). Qui si forma un clima di conservazione con un'umidità relativamente bassa.
Il cassetto regolabile 9
se regolato su "umido", è indicato per la conservazione di insalata,
verdura e frutta. Se il cassetto è ben pieno, si forma un clima umido,
con un'umidità fino al 90% max.
Questo cassetto può essere utilizzato a seconda della necessità,
selezionando tra un clima secco ed un clima umido.
RegoIazione dell'umidità:
Su "asciutto", piccolo
simbolo di umidità - far
scorrere il cursore verso
sinistra. Introdurre gli
alimenti adatti alla conservazione in un clima
asciutto.
• Su "umido" si ottiene
un'umidità relativamente
elevata del 90% max.,
grande simbolo di
umidità - far scorrere il
cursore completamente
verso destra. E' un clima
favorevole per alimenti
senza imballaggio con
alto contenuto di umidità
come insalata fresca.
Indicazione
• L'umidità nel vano dipende dal contenuto di umidità degli alimenti
riposti e dalla frequenza con cui il vano viene aperto.
• All'acquisto, fare attenzione alla "freschezza" degli alimenti.
Il grado di freschezza e la qualità dei prodotti alimentari sono
fattori decisivi per la durata di conservazione.
• Conservare gli alimenti non confezionati di origine animale se-
parati da quelli di origine vegetale e riporli ben divisi in cassetti
diversi. Devono venire impacchettati se, per ragioni di spazio,
vengono conservati insieme. Non mettere a contatto diretto vari
tipi di carne, essi vanno sempre divisi dal loro imballagio, si evita
in tal modo che la trasmissione dei batteri li faccia deteriorare
anzitempo.
• Si noti che prodotti ad alto contenuto proteico si guastano più
rapidamente. Vale a dire che crostacei e molluschi si guastano
più in fretta del pesce ed il pesce più in fretta della carne.
• Prelevare gli alimenti dal cassetto ca. 30-60 minuti prima di
consumarli! Aroma e sapore si esaltano solo a temperatura
ambiente.
• I prodotti seguenti non vanno conservati nello vano NaturaFresh:
formaggio stagionato, patate, verdura sensibile al freddo come
cetrioli, peperoni, melanzane, avocado, pomodori mezzo maturi,
fagiolini, zucchini e tutti i frutti esotici sensibili al freddo come
ananas, banane, pompelmi, meloni, mango, papaya ecc.
Vano congelatore
Il vano congelatore consente di conservare ad una temperatura
di -18 °C e a temperature inferiori prodotti surgelati e congelati
per parecchi mesi, fabbricare cubetti di ghiaccio e congelare gli
alimenti freschi.
La temperatura dell'aria nello scomparto, misurata con un termometro o con altri strumenti di misura, può oscillare.
Congelazione
I prodotti alimentari freschi devono essere congelati integralmente
il più presto possibile.
Introdurre quindi gli alimenti freschi. Si possono congelare fino a
max. 2 kg / 24 ore.
• Impostare la temperatura sui 5 °C o più bassa (p. es. 3 °C).
• Attendre 24 ore.
• Introdurre gli alimenti freschi.
• Dopo ca. 24 ore gli alimenti freschi sono
integralmente congelati.
• Reimpostare la temperatura abituale
(p. es. 5 °C).
I surgelati (prodotti già congelati) possono essere introdotti subito
nello scomparto congelatore.
Indicazioni per la congelazione
• Utilizzare materiali e recipienti adatti per impacchettare le
confezioni.
• Evidenziare sempre sulle confezioni la data ed il contenuto, non
superare la data di conservazione consigliata per i surgelati.
• Non congelare bottiglie o lattine con bevande contenenti acido
carbonico. Queste potrebbero esplodere. Se si introducono
bottiglie nel congelatore per il raffreddamento rapido, ricordarsi
di estrarle al più tardi dopo un'ora!
• Per scongelare, prelevare solo il quantitativo veramente necessario. Cuocere il più rapidamente possibile gli alimenti scongelati.
I prodotti alimentari congelati possono venire scongelati
nel modo seguente:
– nel forno ad aria calda
– nel forno a microonde
– a temperatura ambiente
– in frigorifero; il freddo ceduto dai surgelati viene usato per raf-
freddare gli altri alimenti.
Preparazione dei cubetti di ghiaccio
• Riempire d'acqua la bacinella del ghiaccio.
• Sistemare la bacinella del ghiaccio
nell'apparecchio e lasciare ghiacciare.
• I cu bet ti di g h iac ci o s i s ta cc a no fa ci lm e nte
dalla bacinella, tenendola sotto l'acqua cor-
rente o torcendola.
22
Page 23

Sbrinamento
Vano frigorifero
Il vano frigorifero si scongela automaticamente. L'acqua di sbrinamento evapora grazie al calore sviluppato dal compressore.
Vano congelatore
Nello vano congelatore, dopo un funzionamento prolungato, si
forma uno spesso strato di brina o di ghiaccio che fa aumentare
il consumo energetico. Sbrinarlo pertanto ad intervalli regolari.
• Estrarre la spina di rete o disinserire il fusibile!
• Avvolgere i surgelati nella carta o in coperte e conservarli in
luogo fresco.
• Per accelerare il processo di sbrinamento, mettere una pentola
contenente acqua molto calda, ma non bollente, su un generatore
di freddo.
• Lasciare aperto lo sportello durante il processo di sbrinamento.
Raccogliere l'acqua di sbrinamento restante con un panno e
pulire infine l'apparecchio.
Non utilizzare dispositivi meccanici o altri
artefatti per lo sbrina mento oltre a quelli raccomandati dal costrut tore.
Pulizia
Disinserire in ogni caso l'apparecchio prima di procedere
alla sua pulizia. Estrarre la spina oppure staccare o svitare
i fusibili inseriti a monte.
• Pulire l'interno e le parti in dotazione con acqua tiepida, alla quale
è stata aggiunta una piccola dose di detergente. Non impiegare
assolutamente detergenti abrasivi o acidi o solventi chimici.
• Aver cura che durante la pulizia l'acqua non penetri nelle griglie
di aerazione o nelle parti elettriche.
• Pulire il tutto con un panno.
• Non togliere o danneggiare la targhetta dati sulla parte interna
dell'apparecchio - importante per il Servizio di Assistenza Tecnica.
Non usare umidificatori!
Pericolo per l'incolumità di cose e persone.
• Per la pulizia, estrarre completamente i cassetti NaturaFresh,
afferrarli sul retro e sollevarli.
I
Guasti
I guasti seguenti possono venire eliminati, semplicemente
controllandone le possibili cause.
• L'apparecchio non funziona:
– controllare se l'apparecchio è stato inserito correttamente,
– se la spina è regolarmente inserita nella presa,
– se i fusibili della presa sono in ordine.
• Rumori troppo forti: controllare se
– l'apparecchio è stato posizionato saldamente sul pavimento,
– il compressore in esercizio fa vibrare i mobili o le suppellettili
adiacenti. Si noti che non sono del tutto evitabili i rumori prodotti
dal circuito raffreddante.
• La temperatura non è sufficientemente bassa, controllare
– la regolazione in base al capitolo "Impostare la tempera tura", e
se è stato impostato il giusto valore;
– se sono state eventualmente introdotte quantità troppo grandi
di alimenti freschi;
– se il termometro introdotto separatamente indica il valore giusto.
– l'aerazione è sufficiente?
– l'apparecchio è troppo vicino ad una fonte di calore?
• Sulle superfici interne l'apparecchio è caldo in certi punti
– Questo è perfettamente in ordine. Questo calore è necessario
per il funzionamento normale dell'appa-recchio.
Se non è data nessuna delle
cause sopra descritte, se non è
stato possibile eliminare da soli i
guasti, mettersi in contatto con il
Centro di Assistenza Tecnica più
vicino. Comunicare il modello ➊,
PNC ➋ ed il numero dell'appa-
recchio ➌.
La posizione della targhetta dati
è indicata nel capitolo Descrizione dell'apparecchio.
Mettere fuori servizio
Se l'apparecchio viene messo fuori servizio per lungo tempo:
disinserire l'apparecchio ed estrarre la spina o svitare/disinserire
i fusibili inseriti a monte. Pulire l'apparecchio lasciando lo sportello
aperto per evitare la formazione di odori sgradevoli.
L'apparecchio risponde alle norme di sicurezza pertinenti e alle
direttive CE 2004/108/CE e 2006/95/CE.
La casa costruttrice lavora continuamente al miglioramento di tutti
i tipi e modelli. Contiamo pertanto sulla comprensione dell'utente
per le modifiche tecniche che ci riserviamo di apportare alla forma
e alle dotazioni dell'apparecchio.
- Per l'inserimento: posare i cas-
setti rivolti verso il lato impugnatura sulle guide completamente
estratte - le guide devono bat-
tere contro la parte frontale del
cassetto - ed infilarli.
23
Page 24

Dimensioni d'incasso (mm)
A B C
IK 205 1270 1269 1260
IK 257 1524 1523 1514
Peso massimo della porta
del mobile = 17,5 kg
Modificare l'incernieratura dello sportello interno
• Ribaltare la copertura del supporto cerniera 1.
• Svitare il supporto cerniera
parto con il supporto cerniera.
• Svitare la serratura
• Ricoprire con i tappi
• Rimontare sul lato opposto lo sportello e la serratura facendoli
ruotare di 180°: montare lo sportello sul lato superiore, mettere il
supporto cerniera
1 in basso, riavvitare, chiudere la copertura.
1 e togliere lo sportello dello scom-
2.
3 i fori liberatisi.
Incasso nel mobile da cucina
• Infilare il pezzo di fissaggio
nella guida sul fondo dalla
parte dell'impugnatura, a
sinistra o a destra a seconda
della posizione di quest'ultima. Fissare saldamente con
la vite 3,5 x 17.
• Spingere l'apparecchio nella
nicchia.
Modificare l'incernieratura sportello
1. Sollevare i coperchietti 3.
2. Allentare le viti di fissaggio
sopra e sotto.
3. Sfilare lo sportello.
4. Rimettere tutte le viti di fissaggio
in modo lento.
5. Svitare le viti di fissaggio dello sportello
niere sul lato diagonalmente opposto.
6. Appendere il sportello sulle viti premontate
7. Chiudere i fori liberi con i coperchietti
1 e stringere tutte le viti.
1 sul corpo dell'apparecchio,
1 sul lato opposto, avvitare
2 e montare le cer-
3.
Fissaggio nel mobile di cucina
Avvitare/fissare l'apparecchio nella
nicchia
• in alto attraverso la lamierina di fissaggio (A1),
• di lato attraverso le cerniere (A2),
• in ba ss o a t tr av er so il p e zzo di fi ss ag gio
(A3).
24
Page 25

Montaggio dello sportello del mobile
1
4
4
I
1. Estrarre gli elementi di mon-
taggio ed inserirli quindi,
opportunamente girati,
nelle aperture accanto.
2. Spingere lungo lo sportello
del mobile gli elementi di
montaggio
battuta inferiore dell'elemento = spigolo superiore
dello sportello del mobile da
montare.
3. Svitare i controdadi 3.
4. Appendere sullo sportello
del mobile la traversina di
fissaggio
5. Fissare saldamente la tra-
versina di fissaggio
sportello.
6. Estrarre gli elementi di montaggio
opportunamente girati, nelle
aperture accanto.
4: spigolo di
1.
1 dello
4 ed inserirli quindi,
8. Appendere lo sportello del
mobile sui perni di registrazione dello sportello dell'apparecchio
modo lento i controdadi
sui perni di registrazione.
9. Allineare lo sportello del
mobile a filo ed in linea con
il fr ont e d ei mo bil i a dia cen ti.
Serrare i controdadi 3.
10. Allineare lo spor tello del mo-
bile in profondità Z: allentare
le viti
11. Avvitare il cantonale di fissaggio
esagonale
foro predisposto sullo sportello dell‘apparecchio.
12. Avvitare con i cantonali
di fissaggio lo sportello
dell'apparecchio a quello
del mobile (viti 4 x 14).
Allineare lo sportello del
13.
mobile in profondità Z.
14. Montare tutte le coperture
2. Avvitare in
3
7.
5 con la vite a testa
6 nell‘apposito
8, 9, bl.
15. Montare l'angolare a inca-
bm vicino all'angolare
stro
di trascinamento.
7. Avvitare l'angolare di trascinamento
del mobile (viti 4 x 14).
• L'angolare di trascinamento
va montato vicino all'impu-
gnatura dello sportello del
mobile.
• Se necessario, si possono
montare più angolari.
• Per assicurarsi che l'angolare di trascinamento
sia adatto all'angolare a
incastro dello sportello del
frigorifero, utilizzare le unità
di misura a lato.
bn sullo sportello
16.
Si può regolare l'elasticità dell'arresto di fine
corsa dello sportello. La
regolazione si effettua
con la chiave a brugola
annessa:
- rotazione in senso orario
= maggiore elasticità,
- rotazione in senso antiorario =
scarsa elasticità (condizioni alla consegna).
25
Page 26

Disposal notes
The appliance contains some reusable materials
and should be disposed of properly - not simply with
unsorted household refuse. Appliances which are no
longer needed must be disposed of in a professional
and appropriate way, in accordance with the current
local regulations and laws.
When disposing of the appliance, ensure that the refrigeration circuit
is not damaged to prevent uncontrolled escape of the refrigerant
it contains (data on type plate) and oil.
• Disable the appliance.
• Pull out the plug.
• Cut through the connecting cable.
WARNING
Danger of suffocation due to packing material and plastic film!
Do not allow children to play with packing material. Take the packaging material to an official collecting point.
Description of the appliance
Safety instructions and warnings
• To prevent injury or damage to the unit, the appliance should be unpacked and set up by two
people.
• In the event that the appliance is damaged on
delivery, contact the supplier immediately before
connecting to the mains.
• To guarantee safe operation, ensure that the appliance is set up and connected as described in
these operating instructions.
• Disconnect the appliance from the mains if any
fault occurs. Pull out the plug, switch off or remove
the fuse.
• When disconnecting the appliance, pull on the
plug, not on the cable.
Operating and control
elements
Butter and cheese compartment
Freezer compartment
Adjustable door rack
Interior light
(LED light strip)
Adjustable shelves
Type plate
Drawer for dry or
wrapped food
Drawer with adjust-
able humidity
• Any repairs and work on the appliance should
only be carried out by the customer service
department, as unauthor ised work could prove
highly dangerous for the user. The same applies
to changing the mains power cable.
• Do not allow naked flames or ignition sources
to enter the appliance. When transporting and
cleaning the appliance, ensure that the refrigerant
circuit is not damaged. In the event of damage,
make sure that there are no ignition sources nearby
and keep the room well ventilated.
• Do not stand on the plinth, drawers or doors or
use them to support anything else.
• This appliance is not intended for use by persons
(including children) with reduced physical, sensory
or mental capabilities or lack of experience and
knowledge unless they have been given initial
supervision or instruction concerning use of the
appliance by a person responsible for their safety.
Children should be supervised to ensure that they
do not play with the appliance.
Remove all transit supports
Unscrew the red transport lock.
Close the vacated retaining hole using
the plug.
26
• Avoid prolonged skin contact with cold surfaces or
chilled/frozen food. This could cause pain, numbness and frostbite. In the case of prolonged skin
contact, protective measures should be taken,
e.g. gloves should be worn.
• Do not eat ice cream, particulary ice lollies or ice
cubes, immediately after taking them from the
freezer compartment as there is a risk of "burning"
because of the very cold temperatures.
• Do not consume food which has been stored for
too long, as it could cause food poisoning.
Page 27

• Do not store explosives or sprays using combustible propellants such as butane, propane, pentane,
etc. in the appliance. Electrical components might
cause leaking gas to ignite. You may identify such
sprays by the printed contents or a flame symbol.
• Do not use electrical appliances inside the appli-
ance.
• The LED light strip illuminates the interior of the
appliance. It is not suitable for lighting a room.
GBD
Climate rating
The climate rating indicates the room temperature at which the appliance may be
operated in order to achieve full refrigeration
performance.
The climate rating is indicated on the type
plate.
The position of the type plate is shown in the section entitled
Description of the appliance.
Climate rating Room temperature
SN +10°C to +32°C
N +16°C to +32°C
ST +16°C to +38°C
T +16°C to +43°C
SN-ST +10°C to +38°C
SN-T +10°C to +43°C
Range of appliance use
The appliance is suitable solely for cooling food in
a domestic environment or similar. This includes,
for example, use
- in staff kitchenettes, bed and breakfast establishments,
- by guests in cottages, hotels, motels and other
forms of accommodation,
- in catering and similar services in the wholesale
trade.
Use the appliance solely as is customary within a domestic environment. All other types of use are inadmissible. The appliance
is not suitable for storing and cooling medicines, blood plasma,
laboratory preparations or similar substances and products cov-
ered by the 2007/47/EC Medical Devices Directive. Any misuse
of the appliance may result in damage to or spoilage of stored
goods. Furthermore, the appliance is not suitable for operation in
potentially explosive atmospheres.
Setting up
• Standard EN 378 specifies that the room in which you install
your appliance must have a volume of 1 m
refrigerant used in the appliance, so as to avoid the formation
of inflammable gas/air mixtures in the room
where the appliance is located in the event
of a leak in the refrig e rant circuit. Th e quantity of refrigerant used in your appliance is
indicated on the type plate on the inside of
the appliance.
• Only use the appliance when it is installed.
3
per 8 g of R 600a
Do not operate the appliance outside the specified room temperature range.
Electrical connection
Only operate the appliance with alternating current (AC).
The permissible voltage and frequency are indicated on the type
plate. The position of the type plate is shown in the section entitled
Description of the appliance.
The socket must be properly earthed and protected by a fuse.
The tripping current of the fuse must be between 10 A and 16 A.
The socket must not be situated behind the appli-
ance and must be easily accessible.
Do not connect the appliance using an extension cable or extension socket.
Do not use stand-alone inverters (conversion
of direct current to alternating/three-phase current) or energy-saving plugs. Risk of damage
to the electronic control system!
• Do not cover ventilation openings
or grille.
27
Page 28

Operating and control elements
Audible warning signal
The audible warning signal helps you to protect the food in your
refrigerator and save energy.
- It will sound when the door has been open for longer than about
1 minute.
• The signal will stop when you press the Alarm but-
5 or automatically when you close the door.
ton
5
1 Temperature display
2 Temperature buttons
3 On/O button
4 button (The button switches the refrigerator compartment
to maximum cooling)
5 Audible warning on/o button
6 Child lock
Switching the appliance on and off
You are recommended to clean the appliance before switching it
on for the first time (see „Cleaning“).
Switching on: Press the On / Off button
display lights up/flashes.
Switching off: Press the On / Off button for approx. two seconds
so that the temperature display goes out.
Setting the temperature
To reduce the temperature
Press the
To increase the temperature/warmer
Press the
- While you are entering the temperature, the set temperature will
flash on the display.
- You can change the settings in increments of 1°C briefly pressing
the button again.
- The electronic controls will switch over automatically about
5 seconds after the last time you pressed the button, and the
actual temperature will be displayed.
- You can change the temperatures in the refrigerator between
9°C and 4°C.
• The temperature in the NaturaFresh compartment is controlled
automatically, between 0 and 3°C. If you want to increase or decrease the temperature, e.g. for storing fish, you can change the
NaturaFresh temperature yourself. See "Additional functions"
for more information.
F 0 to F 5 appears in the display, the appliance has a fault.
If
Consult the customer service department.
button.
button.
3 so that the temperature
2
3
Additional functions
In set-up mode you can set the child-proof lock, adjust the brightness of the display and set the temperature in the NaturaFresh
compartment slightly lower or higher.
Activating set-up mode:
• Press the
- The
- The display shows c for child-proof lock.
Note: The value to be altered flashes.
• Select the required function by pressing the Up/Down button:
c = child-proof lock,
h = display brightness or
b = NaturaFresh temperature.
• Now select/acknowledge the function by pressing the
briefly:
> For c = child-proof lock,
press the Up/Down button to select
c1 = child-proof lock on or
c0 = child-proof lock off and acknowledge with the
button. When the symbol is lit, the child-proof
lock is activated.
> For h = brightness,
press the Up/Down button to select
h1 = minimum to
h5 = maximum brightness and acknowledge with
the
> For b = NaturaFresh temperature,
press the Up/Down button to select from
b1 = lowest to
b9 = highest setting and acknowledge with the
button. The altered NaturaFresh temperature adjusts
slowly to the new value.
Note: b5 = factory setting. By decreasing the temperature, b4
to b1, minus temperatures can be reached and the food in the
NaturaFresh compartment will freeze slightly.
Exiting set-up mode:
• Exit the set-up mode by pressing the On/Off button
2 min. the electronic system switches over automatically. The
normal operating mode is activated again.
button 4 for approx. 5 seconds.
button flashes.
button
button.
3; after
Button
The button switches the refrigerator compartment to maximum
cooling. This is recommended particulary if you wish to cool large
quantities of fresh food as fast as possible. The refrigeration temperature drops to the level of the coldest temperature control setting.
Switching on: Pr es s th e
28
4
button briefly so that the LED comes on.
Page 29

Equipment
You can re-arrange the storage
shelves as required.
Lift the glass shelf, align the recess
over the support and replace the shelf
in a higher or lower position.
Repositioning the door racks
- Lift door rack vertically, lift out to
the front and re-insert at a different
height, following these steps in the
reverse order.
The sectioned glass shelves
can be moved to make space for
tall containers. Place the shelf
rails provided, fig. 1, on the sup-
ports on the left and right at the
desired height.
g. 1 g. 2
Insert the glass shelves
2 as sh own in fi g. 2. The glass
shelf
must go at the back.
If you need to make space for
tall containers, simply slide
the front half of the sectioned
glass shelf carefully underneath the back half, fig. 2.
1 and
2 with the raised edge
GB
Cooling
Storage example
1butter, cheese
2eggs
3cans, tubes
4bottles
5frozen food, ice cubes
6baked goods, pre-cooked
meals, drinks
7meat, sausage products, dairy
products
NaturaFresh compartment:
8meat, sausage products, sh,
dairy products
9salad, fruit, vegetables
Note
• Food which gives off or absorbs odours and flavours as
well as liquids should always
be stored covere d or in closed
containers. High- percentage
alcohols should be tightly
sealed and stored upright.
• Reuseable plastic, metal, aluminium and glass containers
can be used for packaging.
Saving energy
- Always ensure good ventilation. Do not cover ventilation openings or grille.
- Do not place appliance in areas of direct sunlight or next to a
stove, heater or similar object.
- The energy consumption depends on the installation conditions,
e.g. the ambient temperature.
- Keep the time the appliance is open to a minimum.
- Store food logically.
- Ensure that all food is well packed and covered for storage. This
will prevent frost from forming.
- First cool warm food to room temperature before storing it.
- Defrost frozen food in the refrigerator.
Freezer compartment
- If there is a thick layer of frost in the appliance: defrost the appliance.
D
Interior LED light
The interior light switches off
automatically after the door
has been opened for approx.
15 minutes.
If the interior light does not
switch on when the door is
opened briefly, but the temperature display is working, the light
may be defective.
The light intensit y of the LED
light corresponds to laser
class 1/1M.
Important
The light cover may only
be removed by customer
service staff. If the cover is
removed, do n ot look directly
at the light through optical
lenses from close distance.
This can damage your eyes.
29
Page 30

NaturaFresh compartment
The NaturaFresh compartment enables you to keep a range of
fresh food fresh for up to approximately three times as long as you
would in a standard refrigerator, thus making your stocks last longer.
The automatically controlled storage temperature, which is kept
constantly at just above 0°C, and the resultant humidity provide
the ideal storage conditions for different types of food.
Freezer compartment
You can store frozen food for several months, make ice cubes and
freeze fresh food in the freezer compartment at a temperature of
-18 °C and lower.
The air temperature in the compartment, measured by thermometer
or other instruments, may fluctuate.
The top drawer 8
is suitable for storing dry or wrapped food (e.g. dairy products, meat,
fish, cold meats). The storage climate in this drawer is relatively dry.
The drawer with humidity control 9
When set to "humid" this drawer can be used for storing salad,
vegetables and fruit. When the drawer is full, the climate will be
"dew-fresh", with approximately 90% humidity.
You can set the humidity in this drawer to dry or moist as required.
Humidity selection:
• "dry" setting: small
humidity symbol slide
control to left. Insert food
that is suitable for being
stored in a dry climate.
• "humid" setting: high
relative humidity of max.
90%, large humidity
symbol - slide control
to right. This setting is
suitable for storing unwrapped food with a high
moisture content such as
fresh lettuce.
Notes
• The humidity in the compartment depends on the moisture content
of the food in it, and the frequency with which the compartment
is opened.
• When buying food, check that it is fresh - the fresher the product
and the higher its quality, the longer it will keep.
• Unwrapped animal and vegetable foods should be stored separately in the drawers. If there is not enough space for them to be
stored separately, make sure that they are wrapped. Do not allow
different types of meat to come into contact with one another
but keep them packaged separately so as to avoid premature
bacterial spoilage.
• Please note that protein-rich food spoils more quickly, i.e. crustaceans and shellfish spoil faster than fish, and fish faster than
meat.
• Remove food from the drawers 30 to 60 minutes before consumption. Enjoyment will be enhanced in this way as the aroma and
flavour develop best at room temper-ature.
• The following products should not be stored in the NaturaFresh
compartment: hard cheese, potatoes, cold-sensitive vegetables
such as cucumber, peppers, aubergines, avocados, semi-ripe
tomatoes, beans, zucchini, and all cold-sensitive tropical fruits
such as pineapple, bananas, grapefruit, melons, mangoes,
papaya, etc.
Freezing
Fresh food should be frozen to core as quickly as possible.
You can freeze up to 2 kg/24 hours.
Set the temperature to 5°C or lower.
•
• Wait 24 hours.
• Place the fresh food in the freezer.
• After approx. 24 hours the fresh food will
be frozen.
• Now set the temperature to the normal setting.
Deep frozen food can be placed into the cold freezer compartment
straight away.
Notes on freezing
• Pack frozen food in standard freezer bags or reuseable plastic,
metal or aluminium containers.
• Al w ay s wr ite t he d a te a nd c on te nts o n t he p ac k an d do n o t ex ce ed
the stated storage time for the food.
• Do not freeze bottles and cans which contain carbonated drinks
as they might burst. Drinks can be placed in the freezer to cool
them down quickly, but take the bottles out again after an hour
at the most.
• Only take out as much food as is immediately required for
thawing. Use food which has been thawed in prepared meals
as quickly as possible.
Frozen food can be thawed in the following ways:
– in a fan oven
– in a microwave oven
– at room temperature
– in the refrigerator: the cold given off by the frozen food is used
for cooling.
Making ice cubes
• Fill the ice cube tray with water.
• Place the ice cube tray in the appliance
and leave it to freeze.
• The ice cubes can be removed from the
tray by twisting or by holding upside down
for a short time under running water.
30
Page 31

Defrosting
Refrigerator compartment
The refrigerator compartment defrosts automatically. The condensate evaporates automatically through the compressor heat.
Freezer compartment
After a long period of operation, a layer of frost or ice can build up
inside the freezer compartment. This increases energy consumption. You should therefore defrost the freezer compartment regularly.
• Pull out the plug or switch off the fuse.
• Wrap the frozen food in paper or blankets and store in a cool
place.
• To speed up the defrosting process, put a saucepan of hot but
not boiling water in the compartment.
• Leave the door of the appliance open while defrosting. After
defrosting, mop up the remaining water and clean the appliance.
Do not use any mechanical devices or other
artificial aids for defrosting other than those
recommended by the manufactur er.
Cleaning
Before cleaning, always switch o the appliance. Disconnect
from the mains or unscrew or switch o the fuse.
• Clean the inside, equipment and outer walls with lukewarm water
and a little detergent. Do not use abrasive or acid cleaners or
chemical solvents.
• Ensure that no cleaning water penetrates into the electrical
components or ventilation grille.
• Dry all parts well with a cloth.
• Do not damage or remove the type plate on the inside of the
appliance. It is very important for servicing purposes.
GBD
Malfunctions
You may be able to rectify the following faults by checking
the possible causes yourself:
• Appliance does not function:
– Is the appliance switched on?
– Is the plug correctly fitted in the mains socket?
– Is the socket fuse intact?
• Loud running noise:
– Is the appliance set up firmly on the floor?
– Does the appliance cause nearby items of furniture or objects to
vibrate? Please note that noises caused by the refrigerant circuit
cannot be avoided.
• The temperature is not low enough:
– Is the temperature setting correct (see "Setting the temperature")?
– Have excessive amounts of fresh food been placed in the appli-
ance?
– Does the separately installed thermometer show the correct
reading?
– Is the ventilation system working properly?
– Is the appliance set up too close to a heat source?
• The inside of the appliance may feel warm in places
– That is quite normal. The dissipated heat is necessary for normal
operation of the appliance.
If none of the above causes apply
and you cannot rectify the fault
yourself, contact the nearest
customer service department
stating the type of appliance ➊,
PNC number ➋ and appliance
number ➌ as indicated on the
type plate.
The position of the type plate
is shown in the section entitled Description of the appliance.
Do not use steam cleaners because of the risk
of injury and damage.
• To clean the NaturaFresh
drawers, pull the drawers right
out, grip at back and lift out.
- To insert: place drawers on
the fully extended rails closest
to the door handle side of the
appliance - the rails must align
with the front of the drawer - and
slide in.
Shutting your appliance down
If your appliance is to be shut down for any length of time, switch
it off and disconnect the plug or switch off or unscrew the fuse.
Clean the appliance and leave the door open in order to prevent
unpleasant smells.
The appliance complies with the relevant safety regulations and
EC Directives 2004/108/EC and 2006/95/EC.
All types and models are subject to continuous improvement and
the manufacturer therefore reserves the right to make modifications to the shape, equipment and technology.
31
Page 32

Installation dimensions (mm)
A B C
IK 205 1270 1269 1260
IK 257 1524 1523 1514
Max. weight of unit
door = 17,5 kg
Changing the compartment door
• At hinge 1 fold away the cover.
• Unscrew hinge
hinge.
• Unscrew the closure
• Close the holes with the plugs
• Rotate the door and closure by 180° and replace on the other
side: Insert the compartment door at the top, put the hinge
in place at the bottom, screw down again and close the cover.
1 and remove the compartment door with the
2.
3.
1
Installing in a kitchen unit
• Slide the attachment element
into the rail underneath the
appliance on the handle side
on the left or right, depending
on which side the handle is.
Screw into place with screw
3.5 x 11.
• Slide the appliance into the
recess.
Changing over door hinges
1. Lift off covers 3.
2. Loosen attachment screws
3. Remove the door.
4. Replace all attachment screws
in a little way.
5. Unscrew door attachment screws
to the diagonally opposite corner.
6. Suspend the appliance door on the
screws
the screws.
7. Cover all open attachment holes with
covers
1inserted previously and tighten
3.
1 on the appliance.
1 on the other side and screw
2 and transfer the hinges
Fastening in the recess
Fasten the appliance in the recess
- with the attachment profile at the
top A1,
- with the hinges at the side A2,
- with the attachment element at the
bottom A3.
32
Page 33

Fitting a unit door
GB
D
1. Lift the fitting aids out to the
top, turn round and insert
into the adjacent openings.
2. Slide the fitting aids 4 up
level with the unit door:
underside of stop edge of
fitting aid = upper edge of
unit door.
3. Unscrew the
counternuts
4. Suspend the attachment strut
3.
1 on the unit door.
5. Fas ten the attach ment strut
6. Lift the fitting aids
top, turn round and insert into
the adjacent openings.
4 out to the
1.
8. Suspend the unit door on
the door of the appliance/
adjusting pins
the counternuts
onto the adjusting pins.
9. Align the unit door ush with
the surrounding unit fronts.
Tighten counternuts
10. Adjust the depth of the unit
door Z: loosen the screws
2. Screw
3 loosely
3.
7.
11. Screw the attachment
bracket
predrilled holes on the
appliance door using the
hexagonal screw
12. Screw the appliance door
onto the unit door through
the attachment brackets
(screws 4x14).
13.
Adjust the depth of the
unit door Z.
14. Attach all the covers 8, 9,
5 into the
6 .
:
bl.
15. Screw on the attachment
bracket
the towing bracket.
bm in the area of
7. Screw the towing bracket
bn on the unit do o r (screws
4 x 14).
• In the area of the unit door
handle a towing bracket
must be mounted.
• If required several brackets
can be mounted.
• To en su r e th e to wi ng br ack et is in a suitable position
with the attachment bracket, the adjacent measures
must be used.
16. The opening resilience of
the door can be adjusted.
Adjust using the Allen key
provided:
- Turn clockwise for stronger
resilience.
- Turn anticlockwise for
weaker resilience (factory
setting).
33
Page 34

34
Page 35

35
Page 36

 Loading...