

Page 1
WASHING MACHINE
INSTRUCTION BOOK
EWT 1069
146 4984 01 - 01/04
GB
Page 2

2
FOR THE USER
WARNINGS ...................................................3
Usage ............................................................3
Precautions against frost ...............................3
Scrapping ......................................................3
Protection of the environment ........................3
WASHING MACHINE DESCRIPTION ..........4
The detergents dispenser ..............................4
The control panel ...........................................4
How to do a wash ? .......................................5
Loading the washing ...................................... 5
Proportioning of detergents ...........................5
Choice of the required program .....................5
Choice of the spinning speed ........................5
Choice of the required option ........................5
«Daily wash / Quick wash» pushbutton .........5
«Prewash» pushbutton ..................................5
«Super rinse» pushbutton .............................5
«Delayed start» pushbutton ...........................5
Starting the program ......................................6
Action during a program ................................6
Adding of laundry ...........................................6
Modifying the current program .......................6
Cancelling the program .................................6
End of program ..............................................6
PROGRAMS TABLE ....................................7
WASHING GUIDE .........................................8
Sorting and preparing your washing ..............8
Washing load depending on the nature
of the material ................................................8
Detergents and additives ...............................8
International symbols for care of textiles ....... 9
CARE AND CLEANING ..............................10
Descaling the washing machine ..................10
The surface.................................................. 10
The detergents dispenser ............................10
The drain filter ..............................................10
OPERATING PROBLEMS ..........................11
AFTER SALES SERVICE ...........................12
Protection against pests ..............................12
FOR THE INSTALLER
WARNINGS .................................................13
Technical characteristics .............................13
INSTALLATION ..........................................14
Unpacking ...................................................14
Position ........................................................14
Moving your washing machine ....................14
Leveling .......................................................14
Water inlet ...................................................14
Drain ............................................................15
Electrical connection .................................... 15
CONTENTS
Page 3

3
A. FOR THE USER
1. WARNINGS
Keep this user’s manual with your washing machine. If you sell your washing machine or give it away, make sure that it is
accompanied by its user’s manual. The new user can then be informed of how the washing machine operates and read relevant warnings.
These warnings have been written for your safety and for the safety of others. Please read these comments carefully before installing and using your washing machine. Thank you for your attention.
1.1. Usage
• When you receive your washing machine, unpack it or
have it unpacked immediately. Check its general
appearance. Make any reserves in writing on the delivery form and keep a copy.
• Your washing machine was designed for use by adults.
Make sure that children do not touch it or use it as a
toy.
• Do not modify or attempt to modify the characteristics
of this washing machine. This could be dangerous for
you.
• Your washing machine is intended for normal domestic
use. Do not use it for commercial or industrial purposes or for any purpose other than that for which it was
designed : to wash, to rinse and to spin.
• Unplug the power suplly plug and close the water supply tap every time after using your washing machine.
• Only wash articles that can resist machine washing.
Refer to the instructions on the label for each article.
• Do not wash underwear with bones, or any material
without hems, or torn materials in your washing
machine.
• Remember to remove all coins, safety pins, boraches,
screws, etc., before each wash. They can cause
serious damage if they are left in your washing.
• Do not put articles in your washing machine if you have
used a solvent, alcohol, trichloroethylene, etc., to
remove stains from them. If you must use these stain
removers, wait until the product has evaporated before
putting the articles in the drum.
• Collect all small articles such as socks, belts, etc., in a
small cloth bag or pillow case.
• Use the quantity of detergent indicated in the «proportioning of detergents» section.
• Always unplug the washing machine before cleaning it
and doing any maintenance.
1.2. Precautions against frost
If your washing machine is exposed to temperatures below
0°C, take the following precautions :
• Close the tap and disconnect the water supply pipe.
• Put the end of this pipe and the drain pipe into a bowl
on the floor.
• Select the «Drain» programme and make sure it works
until it is complete.
• Switch the washing machine off by putting the program
selector to the «Off»
*
position or pressing on the «On/
Off»* key.
• Unplug the washing machine.
• Screw in the water inlet pipe and install the drain pipe.
Water that remained in the pipes will then be evacuated,
thus preventing the formation of frost or ice that can damage your washing machine.
The next time you want to use your washing machine,
make sure that it is installed in a room in which the temperature is above 0°C.
1.3. Scrapping
All materials marked with the symbol can be recycled.
Put them in a waste tip (ask for information from your municipal offices) so that they can be recovered and recycled.
When you take your washing machine to the tip, make sure
that everything that could be dangerous is out of service ;
cut the power supply cable flush with the surface of your
washing machine.
1.4. Protection of the environment
We recommend that the following instructions should be
followed to achieve savings in water and energy and therefore to contribute to protection of the environment:
• If possible, use the washing machine at full capacity
rather than with partial loads (however, do not overload
the drum).
• Only use the Prewash or Soak function for very dirty
washing.
• Use a detergent dose adapted to the water hardness
(see «proportioning of detergents» section) and to the
amount of washing and how dirty it is.
*depending on model
Page 4
4
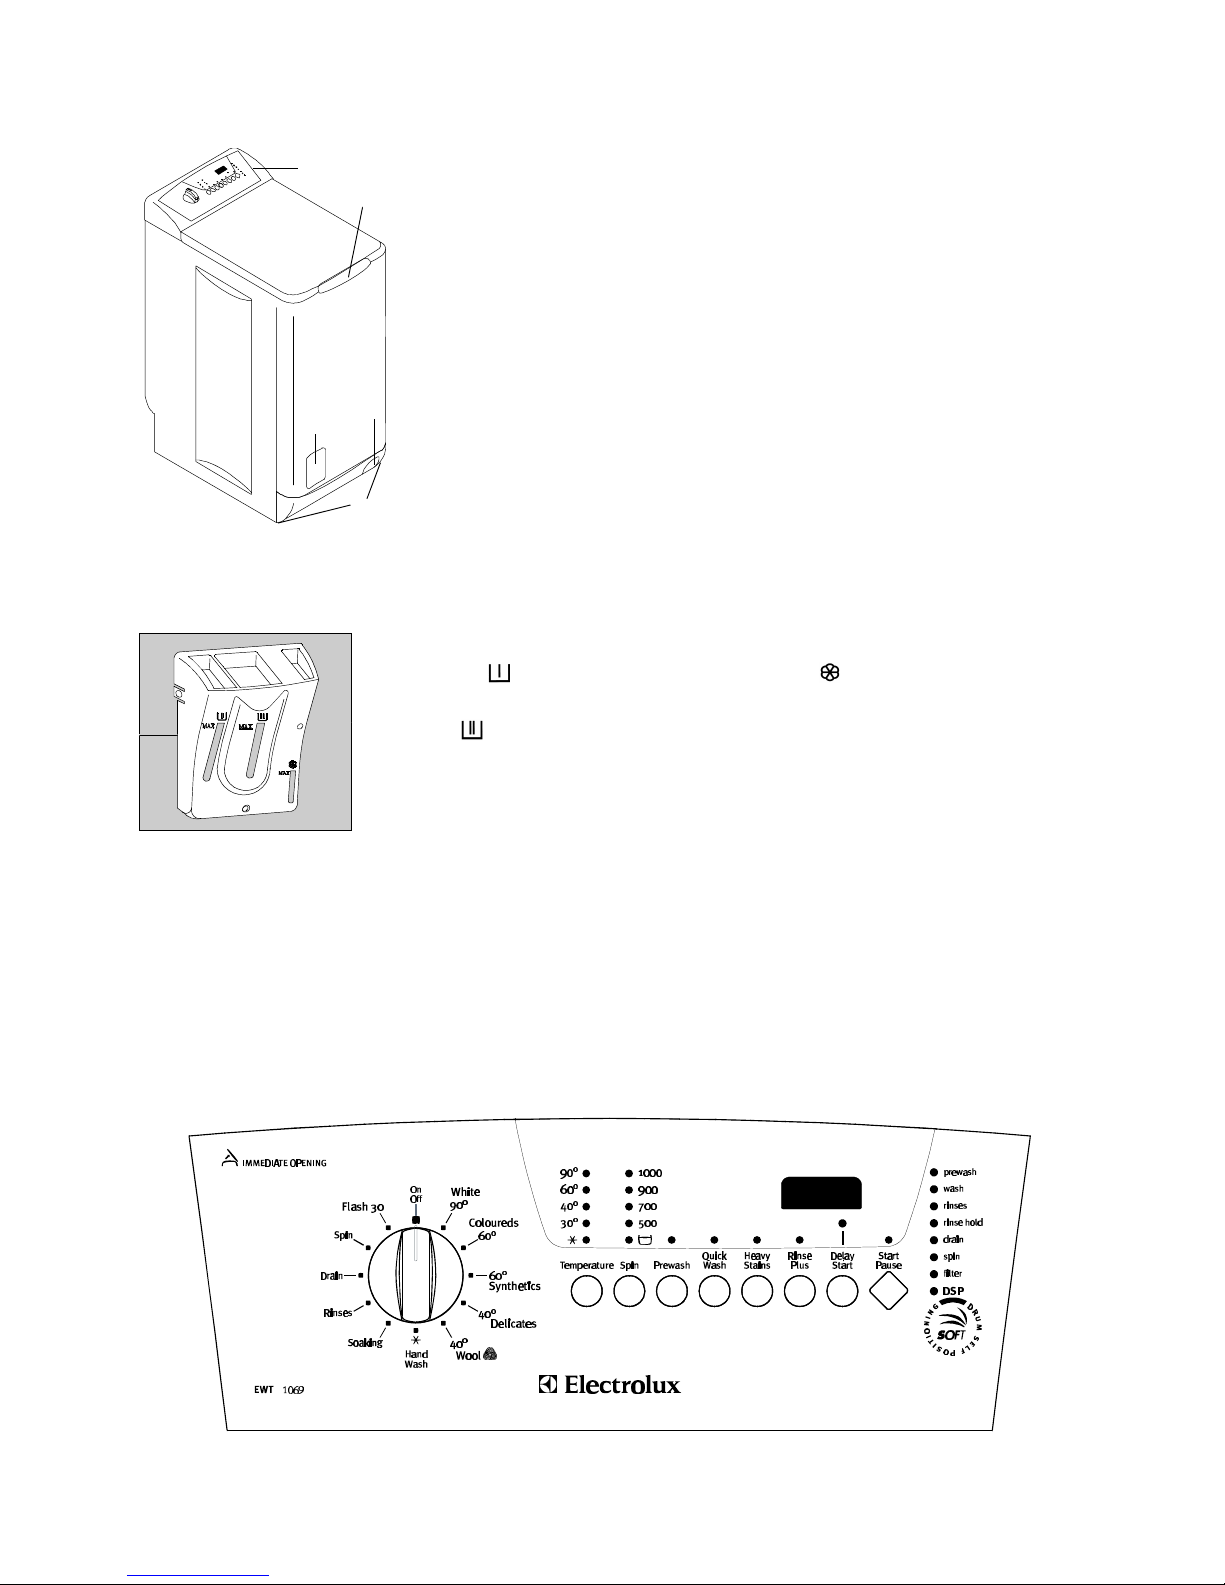
2. WASHING MACHINE DESCRIPTION
1 - Control panel
2 - Lid opening handle
3 - Leveling screws
4 - Filter door
5 - Lever for moving the washing machine
2.1. The detergents dispenser
Symbols
1 - prewash 3 - softener
(do not exceed the MAX mark)
2 - wash 4 - softener overflow (if overfilled)
2.2. The control panel
1 - Program selector 7 - «Rinse Plus» pushbutton
2 - «Temperature» pushbutton 8 - «Delay Start» pushbutton
3 - «Spin» pushbutton 9 - Display window
4 - «Prewash» pushbutton 10 - «Start/pause» pushbutton
5 - «Quick Wash» pushbutton 11 - Program and information display lights
6 - «Heavy Stains» pushbutton
3
1
2
4
5
3
1
4
2
1
3
4
5
6
7
8
10
9
2
11
Page 5
5
3. HOW TO DO A WASH ?
Before the first wash in your washing machine, we recommend that you should do a preliminary wash at
90°C with detergent but without any washing to clean
the tub.
3.1. Loading the washing
• Lift the machine cover.
• Open the drum by pressing on the locking button A;
the two flaps automatically separate.
• Insert the washing, close the drum and the cover of
your washing machine.
Warning : before you close
the cover of your washing
machine, make sure that the
drum door is properly closed:
• the two flaps latched
together,
• the locking button A extended.
3.2. Proportioning of detergents
Your washing machine was designed to reduce water
and detergent consumption, therefore reduce the doses recommended by detergent manufacturers.
Pour the powder detergent dose into the wash compartment and into the prewash compartment if
you chose the «prewash» option. Pour in the softener
into the compartment if you wish.
If you are using a different type of detergent, refer to the
«detergents and additives» section in the washing guide.
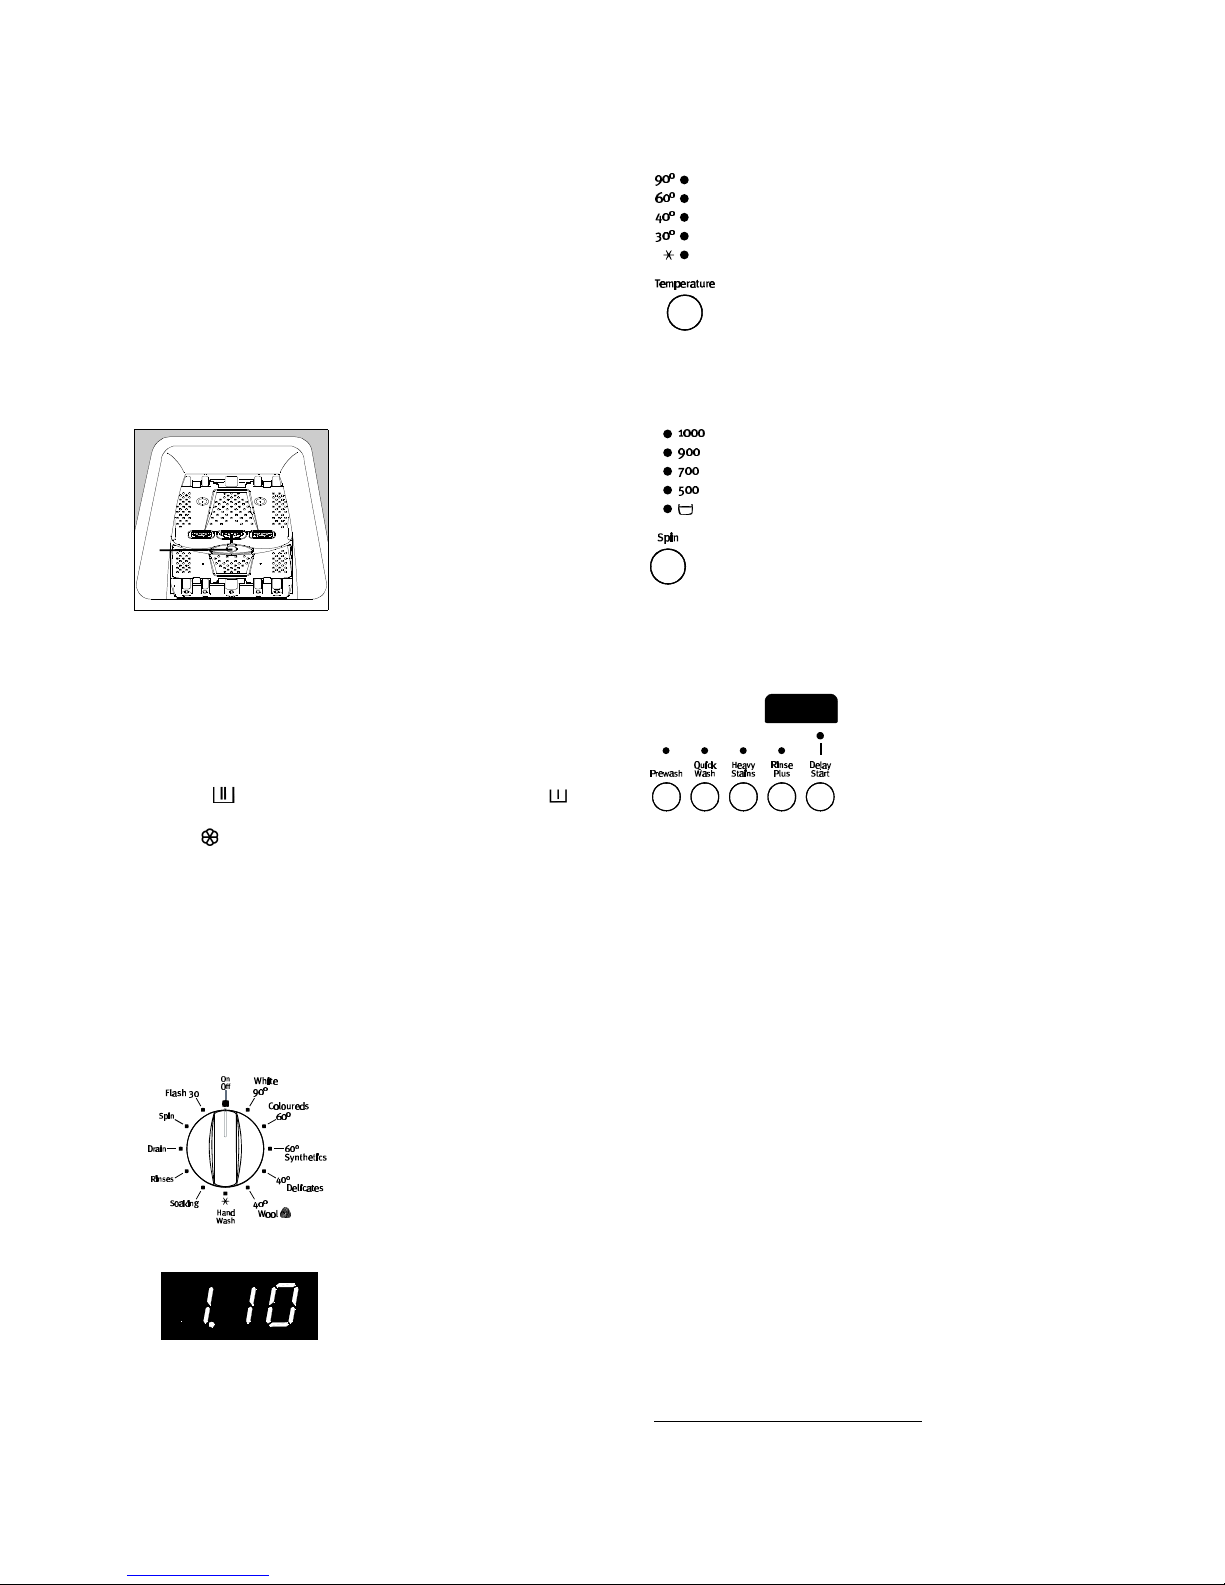
3.3. Choice of the required program
The programs table will tell you which is the appropriate
program for your washing type (see § 4).
Put the program selector
onto the required program;
the lights corresponding to
the phases making up the
program will light up.
The display window displays the probable duration
of the selected program
(ex: 1 hour and 10 minutes).
The display duration is
automatically readjusted
during the washing cycle.
3.4. Choice of the temperature and
spin drying speed
The recommended temperature is displayed when you make the selection. You
can modulate the temperature using the
temperature pushbutton. When choosing
the washing temperature, take account of
the selected program (using the information given in the programs table) and comply with the temperature shown on the care
label for each article to be washed (see the
washing guide).
The maximum speed (corresponding to the
nature of the washing) will be displayed
when selecting the program, and in pause
mode. However, when you press the
"Spin" pushbutton you can reduce the
speed or choose the positions «rinse
hold»* or «no spin»* (drain only).
3.5. Choice of the required option
The various options should
be chosen after the program
has been displayed and before pressing the "start/pause" pushbutton.
Press the required pushbutton(s) ; the corresponding lights come on. When you press again, the lights go off.
When one of these options is not compatible with the
chosen program, the corresponding light will flash for a
few seconds and the "Err" message will appear in the
display window (see the programs table).
3.5.1. «Prewash» pushbutton
The washing machine does a prewash at 30°C
maximum. The prewash finishes with a brief spinning
for cotton and synthetic programs, and by a draining for
delicates programs.
3.5.2. «Quick wash» pushbutton
If you select this function, the wash time is reduced
depending on which program you chose.
3.5.3. «Heavy Stains» pushbutton
This option gives priority to actions of enzymes in detergents, and is useful for removing organic stains (food,
blood, etc.).
3.5.4. «Rinse plus» pushbutton
This option adds two rinses on Cotton, Synthetics and
A
*depending on model
Page 6

6
Delicates programmes. It is advised for allergic people
to detergent products and in areas with fresh water.
3.5.5. «Delay start» pushbutton
This option delays start of the program for 30 minutes
to 23 hours. Select the number of hours after which you
want the program to begin by pressing on the pushbutton several times. This function is also valid to extend
the soaking time (from 30 minutes to 10 hours).
3.6. Starting the program
After you chose the washing program, press
the "start/pause" pushbutton to start the cycle; the corresponding light comes on continuously.
It is normal that the program selector does
not turn during the cycle.
The current program light is on.
If you selected a delayed start, the
count-down will begin. The "Remaining
time" display window displays either the
program duration or the delayed start time.
3.7. Action during a program
3.7.1. Adding of laundry
Press the Start/Pause pushbutton : the corresponding
light flashes as long as the program is paused. You will
then hear a double "click" in the locking device when
the cover opens. Press the same pushbutton again to
resume the program.
For reasons of safety, you cannot open the cover if the
temperature of the washing water is too high.
3.7.2. Modifying the current program
Before modifying the current program, you must put the
washing machine to pause by pressing on the "START/
PAUSE" pushbutton. If it is impossible to make the modification, the display window indicates "Err" and the
corresponding light flashes for a few seconds. If you
decide to change the program in any case, you will
need to cancel the current program (see below).
3.7.3. Cancelling the programme
If you want to cancel a programme, turn the programme
selector knob to the «off» position of the programme
selector.
You can then select a new programme after cancelling
the previous one.
3.8. End of program
The washing machine stops automatically. "0" flashes
in the display window. You will hear a double "click" in
the locking device when the cover opens.
If you choose the "rinse hold" position on the spinning
speed variator, the light «rinse hold» in the information
display is on and "0" flashes in the display window to inform you that water has to be drained before you can
open the cover. To terminate the cycle, turn the program selector knob to the "off" position, you can then
spin the washing by choosing the spin program or drain
it by choosing the drain program and then press the
"start/pause" pushbutton
Turn the program selector knob to the "off" position.
Take out the washing. Pull out the power supply plug
and close the water supply tap.
Note: we recommend that you should leave the cover
and the drum open after use to air the washing drum.
Page 7
7
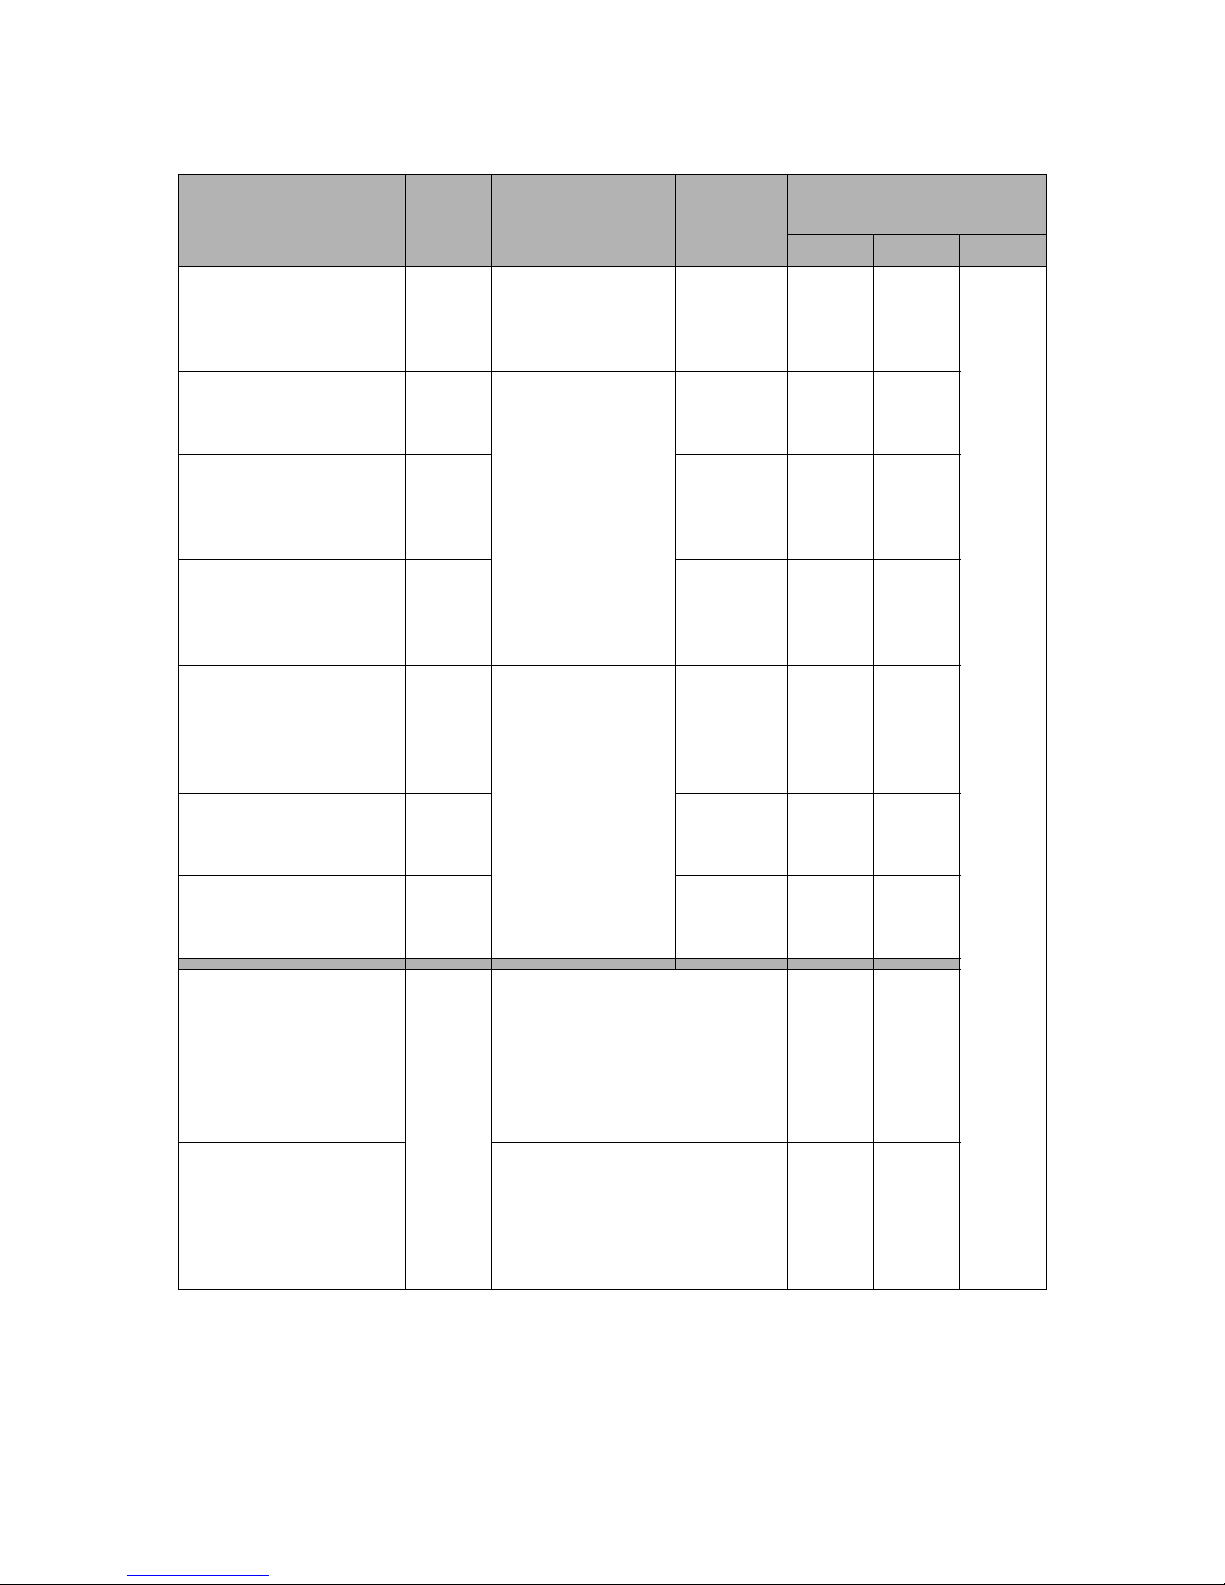
4. PROGRAMS TABLE
The following does not show all possibilities, but simply the most frequent settings.
Program
Washing type
Load Possible
options
Tempera-
tures
Approximate
consumptions
°C liters kWh min
White
White, for example bed
linen, table linen,
underwear, towels.
5 kg Prewash
Quick wash
Heavy stains
Rinse plus
90 59 2,00
Coloureds
Colors, for example normally dirty work clothes.
5 kg
Prewash
Quick wash
Rinse plus
60
*
42 0,95
Synthetics
Synthetic fabrics, underwear, color fabrics, noniron shirts, blouses.
2,5 kg 60 52 1,10
Delicates
For all delicate materials, for example curtains.
2,5 kg 40 53 0,55
Wool
Machine washable wool
marked «pure wool,
washable in machine,
non shrinking».
1,0 kg 40 50 0,40
Hand Wash
Very delicate washing
marked «wash by hand».
1,0 kg
Ý 44 0,10
Flash 30
For only slightly dirty materials, except for wool.
2,5 kg 30 40 0,30
Soaking
**
For very dirty materials
except for wool.
Depending on the nature of textiles.
Soak at 30°C, rinse hold. To
drain, programme selector on
OFF position. Choose a spinning
or a draining programme and
press the Start/Pause pushbutton.
22 0,25
Rinses
Hand washed washing
may be rinsed with this
program.
3 rinsings with liquid additive.
Spin drying.
45 0,15
*Reference program for tests according to standard IEC 456 (60° Cotton prog.) : 0,95kWh/42l/135min
**Not possible with delayed start : the indicated time in the display window is the additional soaking time.
(
D
a
t
a
p
r
o
v
i
d
e
d
f
o
r
g
u
i
d
a
n
c
e
a
n
d
s
u
b
j
e
c
t
t
o
c
h
a
n
g
e
d
e
p
e
n
d
i
n
g
o
n
u
s
a
g
e
c
o
n
d
i
t
i
o
n
s
)
.
S
e
e
t
h
e
d
i
s
p
l
a
y
w
i
n
d
o
w
o
f
y
o
u
r
a
p
p
l
i
a
n
c
e
.
Page 8

8
5. WASHING GUIDE
5.1. Sorting and preparing your
washing
• Sort the washing by type and care symbol (see chapter 6.4: International symbols for care of textiles): normal wash for strong washing that can resist energetic
wash and spin; delicate wash for delicate washing that
should be treated more carefully. For mixed loads
composed of articles of different types of fibers,
choose a program and temperature suitable for the
most fragile fiber.
• Wash white washing and color washing separately.
Otherwise, the white washing may be colored or look
gray.
• New clothes very often have too much color. Preferably wash new clothes separately for the first time. Respect "wash separately" and "wash several times
separately" care instructions.
• Empty pockets and spread out the washing.
• Take off all loose buttons, pins and hooks and eyes.
Close zip fasteners, tie knots in laces and straps.
• Turn clothes made of several layers of textiles (sleeping bags, anoraks, etc.), colored hosiery and wool
and textiles with add-on decorations, inside out.
• Wash small delicate items (socks, tights, bras, etc) in a
washing net.
• Treat curtains with special care. Remove curtain hooks
and put net curtains in a net bag or a sachet.
5.2. Washing load depending on the
nature of the material
The quantity of washing that you put in your drum must not
exceed the maximum capacity of your washing machine.
This capacity may vary depending on the nature of your
textiles. Reduce the quantity of washing if it is very dirty or
if you have terry cloth type materials.
Not all textiles have the same volume and the same water
retention capacity. This is why in general the drum should
be filled:
• completely, but without excessive pressure for cotton
and linen, and for mixed washe,
• half full for treated cottons and synthetic fibers,
• about one third full for very delicate articles such as
net curtains and wool.
For a mixed wash, fill the drum as required for the most delicate material.
5.3. Detergents and additives
Only use detergents and additives suitable for use in a
washing machine. Read the manufacturer's instructions
and respect sections 2 and 4.2.
Powder detergents can be used without restriction; liquid
detergents should be poured either in the proportioning
bowl directly in the drum, or in the wash compartment provided that the washing machine is started immediately;
detergents in tablets or doses must be put into the wash
compartment of the detergents dispenser in your washing
machine.
The quantity of detergent to be used depends on the
amount of washing to be washed, the hardness of the water and how dirty the washing is.
If the water is soft, you can reduce the doses slightly. Increase the doses slightly if the water is hard (it is recommended to use a water softener) or if the washing is very
dirty or stained.
You can ask the water distribution company in your region
or any other competent authority to find out the degree of
hardness of your water.
Page 9
9
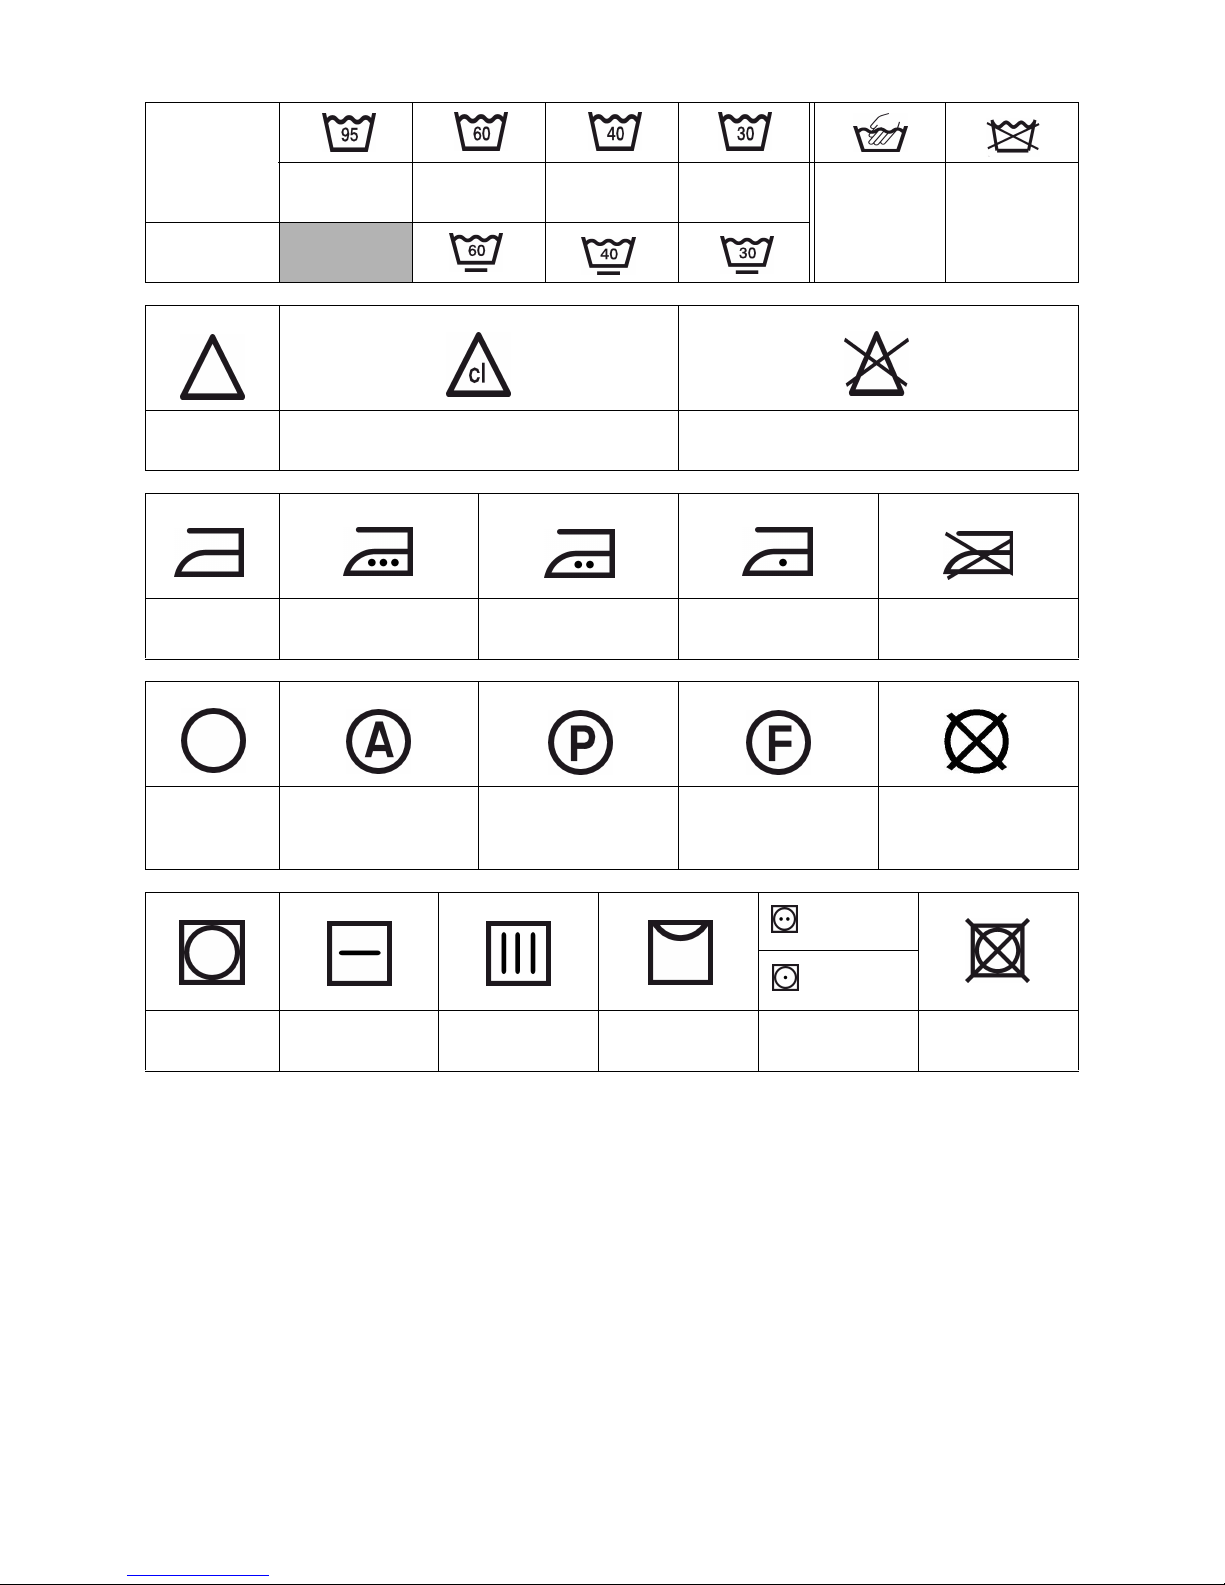
5.4. International symbols for care of textiles
NORMAL
WASH
Wash at
95°C
Wash at
60°C
Wash at
40°C
Wash at
30°C Delicate
wash by
hand
Do not wash
DELICATE
WASH
JAVEL WATER
Bleaching with chlorine (Javel water) allowed
(only cold and with a dilute solution)
Do not bleach with chlorine (Javel water)
IRONING High temperature
(max 200°C)
Average temperature
(max 150°C)
Low temperature
(max 100°C)
Do not iron
DRY
CLEANING
Dry cleaning
(all usual solvents)
Dry cleaning
(all solvents except
trichloroethylene)
Dry cleaning
(only oil solvents
and R113)
Do not dry clean
High
temperature
Moderate
Temperature
DRYING Dry washing
spread out
Dry washing
hung up
Dry washing
on hanger
Drying in drum
allowed
Do not dry
in drum
Page 10
10
6. CARE AND CLEANING
Do not do any cleaning operation until you have unplugged
the washing machine.
6.1. Descaling the washing machine
Normally there is no need to descale the washing machine
if the detergent was correctly proportioned.
If descaling is necessary, use a special non-corrosive product specially designed for washing machines that you can
find in the shops. Respect the proportion and frequency of
descaling shown on your packaging.
6.2. The surface
Clean the surface of your washing machine using lukewarm water and a mild detergent. Never use alcohol,
solvents or similar products.
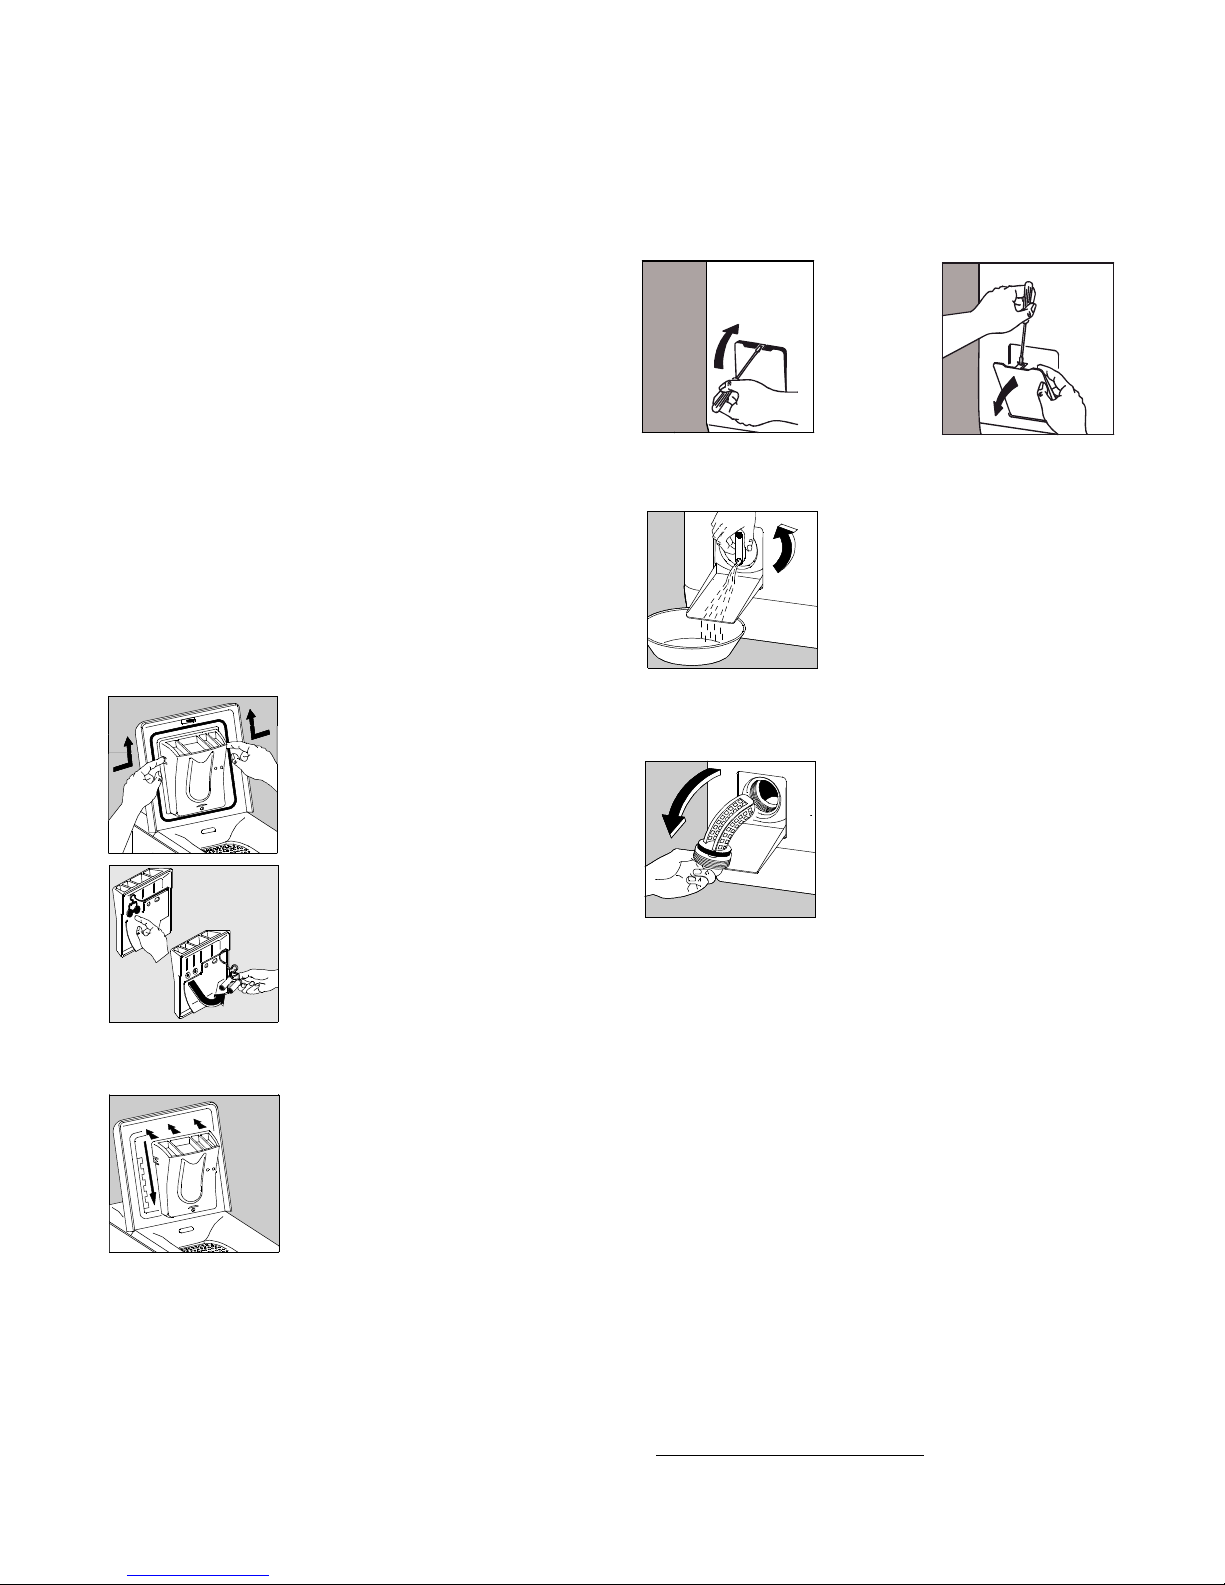
6.3. The detergents dispenser
From time to time, you must clean the detergents dispenser in order to eliminate the possible wastes of the detergents and then to avoid an operating problem.
The detergent dispenser is very easy to remove for a light
cleaning.
Disassembly:
Press the clips on each side of the
detergents dispenser and pull it
upwards.
You can thus clean it using running water and a brush or a twisted cloth. Check that the siphons
at the back of the detergents dispenser are not blocked.
Reassembly :
Put the detergents dispenser in the
notches until they lock.
6.4. The drain filter
Clean the filter at the bottom of the washing machine regularly. The "filter"
*
light comes on if the filter is blo-cked. In
this case clean it immediately. If you wash washing that is
very fluffy, clean it after each wash.
• Open the door, with a screwdriver for example:
• Drain residual water:
Put a receptacle under the drain.
Turn the cap in the anti-clockwise
direction until it is vertical to release residual water.
• Remove the filter:
Unscrew the cap all the way and
take it off. Clean it tho-roughly
with running water. Put the assembly back and screw it in the
clockwise direction.
After cleaning the filter, you are required to closed the
door. In fact, for reasons of safety, the door must be closed
when the appliance is working.
6.5.
*depending on model
Page 11
11
7. OPERATING PROBLEMS
Many checks have been carried out during the manufacture of your washing machine. However, if you face a problem
with its operation, please read the following sections before calling the After Sales service.
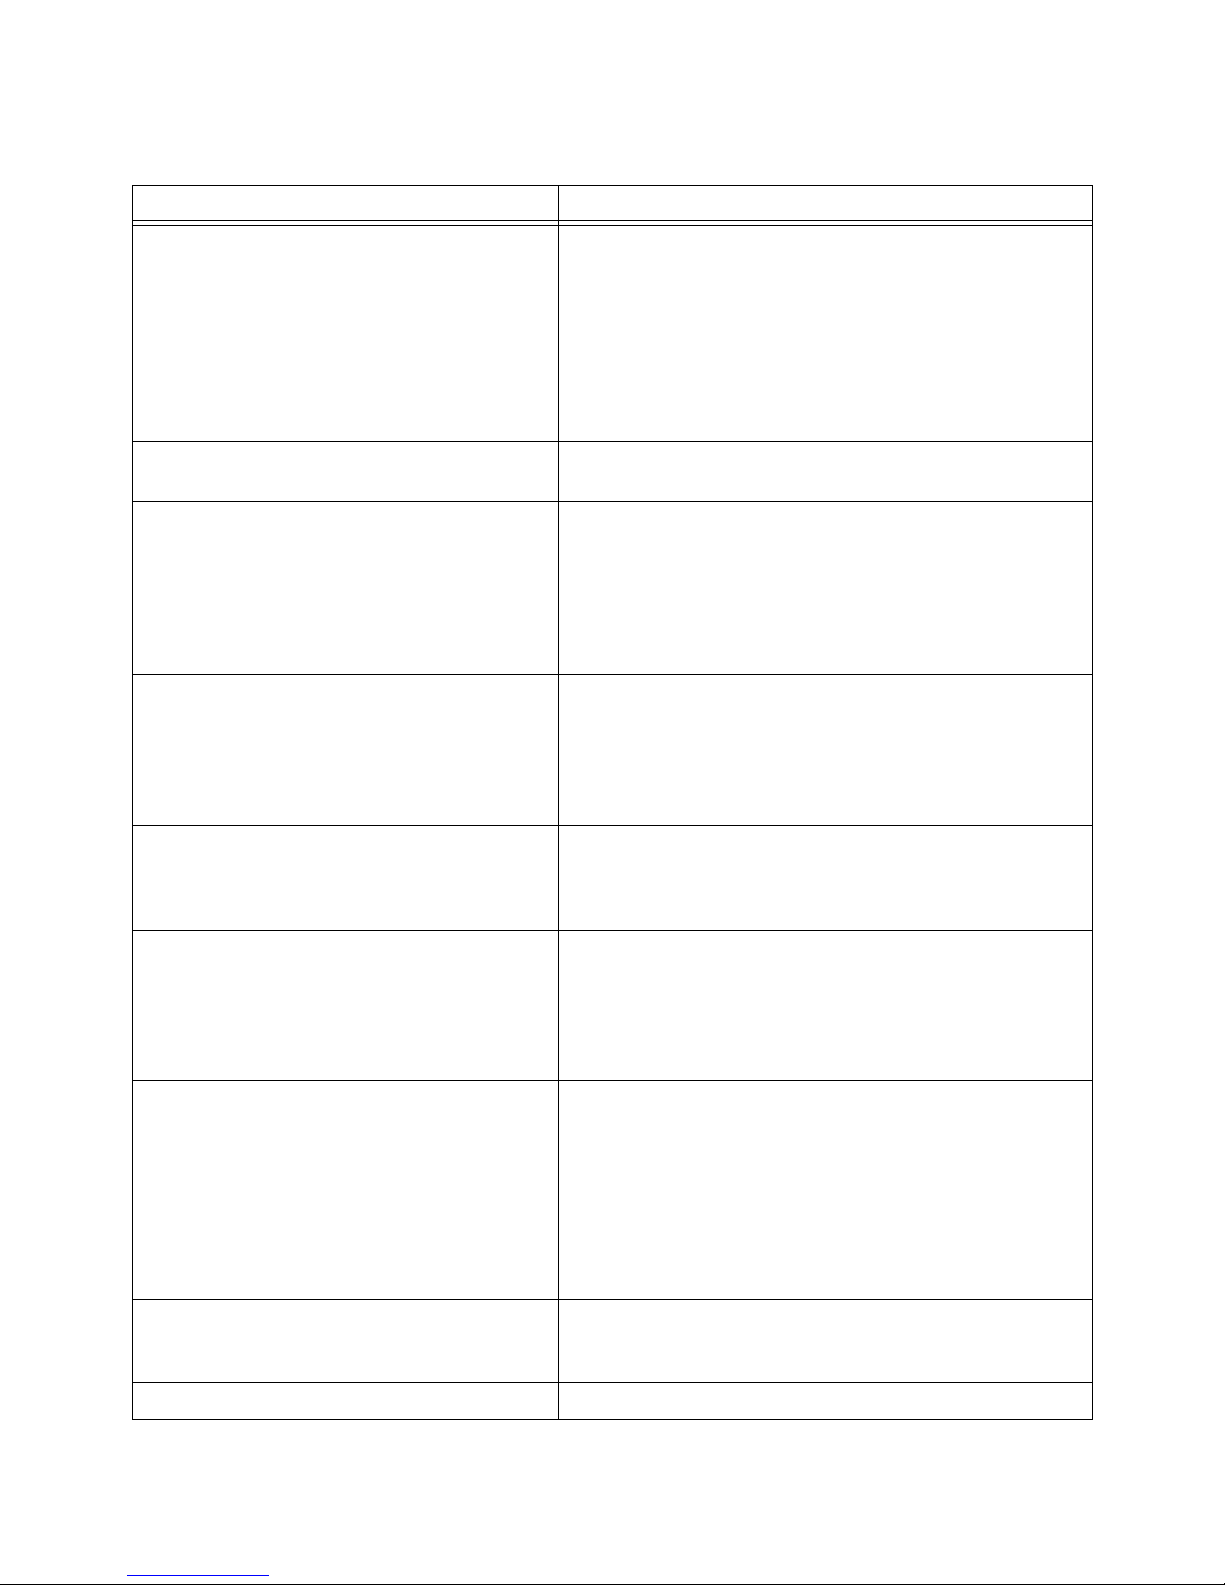
Symptom Cause
The washing machine will not start or will not fill: • the washing machine is not correctly connected, the elec-
trical installation is not working,
• the cover of your washing machine and the drum flaps are
not correctly closed,
• you did not control the program start correctly,
• there is a power failure,
• the water supply is closed off,
• the water tap is closed,
• the water inlet is blocked.
The washing machine fills up but empties again
immediately:
• the drain siphon is attached too low (see installation section).
The washing machine will not spin or will not
empty:
• the drain pipe is blocked or kinked,
• the drain filter is blocked,
• the anti-unbalance mass safety device has tripped; bad
distribution of washing in the drum,
• the «Drain» program or the «Rinse hold» option is selected,
• the height of the drain siphon is wrong.
There is water on the floor around the washing
machine:
• excess detergent has made too much foam that overflowed,
• the detergent is not suitable for washing machine,
• the drain siphon is not hooked on properly,
• the drain filter was not put back into place,
• the water inlet pipe is leaking.
Washing results are not satisfactory: • the detergent is not suitable for machine washing,
• there is too much washing in the drum,
• the washing program is not appropriate,
• there is not enough detergent.
The machine is vibrating or noisy: • not all the packing was removed from the machine (see
unpacking section),
• the washing machine is not leveled and properly packed,
• the washing machine is too close to the wall or furniture,
• the washing is not well distributed in the drum,
• the load is not sufficient.
The washing cycle is much too long : • the water inlet is blocked,
• there was a power supply failure or the water was cut off,
• the motor temperature safety device tripped,
• the water inlet temperature is lower than normal,
• the foam detection safety system tripped (too much detergent) and the washing machine evacuated the foam,
• the anti-unbalance mass safety device tripped, an additional phase was added to distribute the washing in the drum
better.
The washing machine stops during a washing cycle :
• the water or electricity supply is defective,
• a rinse hold was programmed.
• the flaps of the drum door are opened
The cover does not open during the cycle : • the lid light** is off.
Page 12
12
8. AFTER SALES SERVICE
If you have an operating problem, refer to the "Operating problems" section. If any work is necessary after you have
made all your checks, your washing machine dealer is the first person authorized to take action. Otherwise, you can
always call Consumers Help that will inform you of the address of an After Sales Service.
When you call the After Sales Service, mention the model and product number of your washing machine, and its serial
number. This information is given on the inside of the filter door and on the name plate at the back of the washing
machine.
If any work is done on your washing machine, insist that your After Sales Service uses manufacturer certified spare
parts.
The «
DRUM POSITIONNING» light is not on at the
end of the cycle:
• the drum could not reach the right position due to a persistent unbalanced mass; turn the drum manually.
Error code
E40* is displayed in the display win-
dow :
• the cover is not correctly closed.
Error code
E20* is displayed in the display win-
dow :
• the drain filter is blocked,
• the drain pipe is blocked or kinked,
• the drain pipe is too high (see «installation»),
• the drain pump is blocked,
• the installation siphon is blocked.
Error code
E10* is displayed in the display win-
dow :
• the water tap is closed,
• the water network has been cut off.
Error code EA0
**
is displayed in the display win-
dow :
• The flaps of the drum door are opened.
Error code EF0** is displayed in the display window
• There is an internal water leak in the appliance, so :
- close the inlet water tap,
- let’s the washing machine draining during two minutes before
stopping the appliance (unplug it).
- call the After Sales Service
The washing machine’s drain pump runs constantly, even when the appliance is switched off.
The «filter» light** comes on : • the drain filter is blocked.
Softener or Javel water flows through the over-
flow orifice when filling :
• you did not put in the right amount,
• the siphons at the back of the detergents dispenser are
blocked.
* Eliminate the causes of the failure if you find them, and then press on the «start/pause» pusbutton to restart the
interrupted program.
**Depending on the model.
Symptom Cause
Page 13
13
B. FOR THE INSTALLER
1. WARNINGS
• This washing machine is heavy. Take care when
moving it.
• You must remove the packing on the washing machine
before use. Failure to remove all transport protection
devices can cause damage to the washing machine or
nearby furniture. The washing machine must be
unplugged while packing is being removed.
• Do not allow any one other than a qualified plumber to
make the hydraulic connections necessary to install
your washing machine.
• The washing machine must be plugged in to a power
outlet with a conform earth.
• Call a qualified electrician if the electrical installation in
your residence is such that you have to modify it before
you can connect your washing machine.
• Please read the instructions in the "electrical connections" chapter carefully before connecting your
washing machine.
• After installing your washing machine, make sure that
it is not standing on its electrical power supply cable.
• When your machine is installed on a carpeted floor,
make sure that the carpet does not close off the ventilation openings near the bottom of the machine.
• The power supply cable may be only replaced by the
After Sales Service.
• Your manufacturer cannot be held responsible for any
damage resulting from a nonconform installation.
2. TECHNICAL CHARACTERISTICS
DIMENSIONS Height
Width
Depth
850 mm
400 mm
600 mm
VOLTAGE / FREQUENCY
TOTAL POWER
230 V / 50 Hz
2300 W
WATER PRESSURE
Connection to the water network
Minimum
Maximum
0,05 MPa (0,5 bar)
0,8 MPa (8 bars)
Type 20x27
This washing machine complies with CEE directive 89-336 about the limitation of radioelectric disturbances
and directive CEE 73-23 for electrical safety.
Page 14
14
3. INSTALLATION
3.1. Unpacking
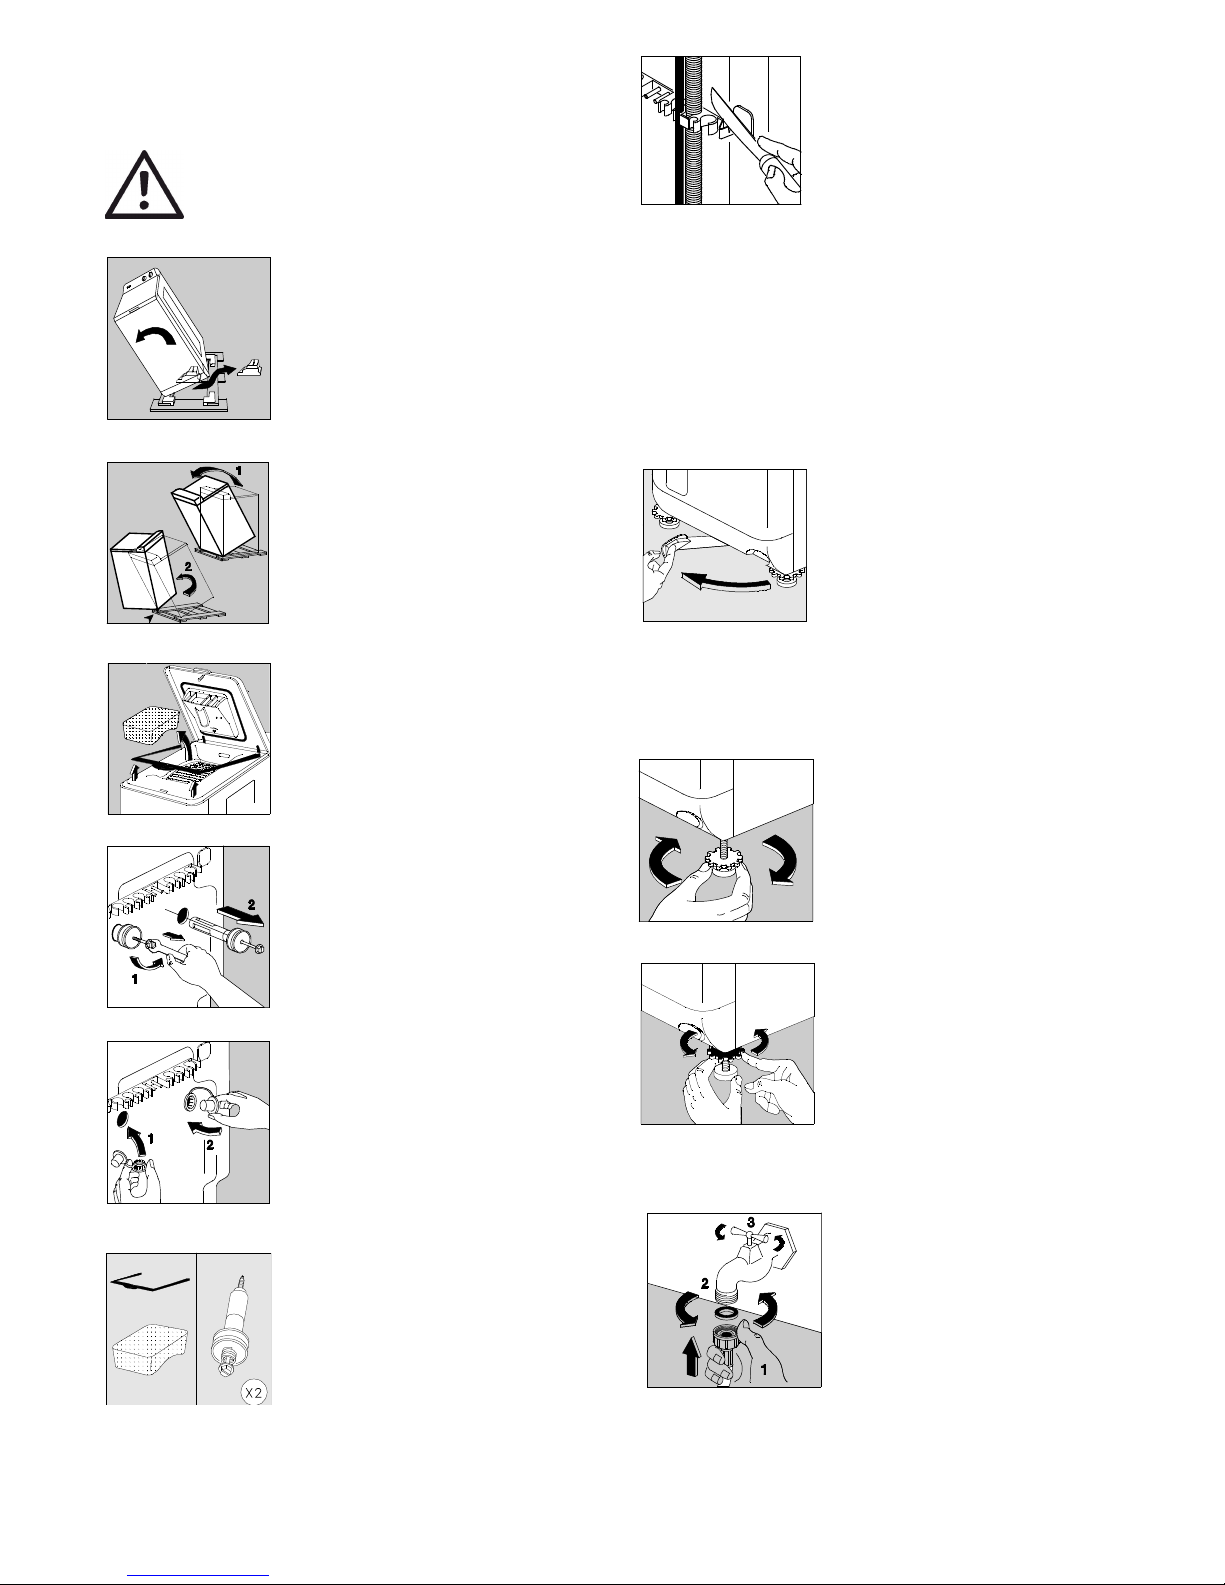
Packing used to protect internal parts of the
washing machine during transport must be
removed before the washing machine is put
into service for the first time.
Remove all packing from the
washing machine. Tilt the washing
machine sideways and then remove the packing under the motor,
and straighten the washing machine.
Tilt the washing machine backwards, rotate it by a quarter of a
turn on one of its corner to remove
the transport base.
Open the washing machine lid and
remove the immobilization packing
and plastic films.
Close the lid.
Use a 10 mm spanner to remove
the two screws and spacers at the
back.
You can now see the openings that
must be closed with the caches in
the pack attached to the washing
machine; do not forget to fold down
the central capsule.
Make sure that you have removed
all these parts from your washing
machine and keep them so that you
can use them again if you need
them for future transport.
If you want to keep your washing
machine aligned with the adjacent
furniture, you can cut the pipe support strip at the back of your
washing machine. Leave the two
side closers in place.
3.2. Position
Put the washing machine on a flat hard floor in a well ventilated room.
Make sure that your washing machine does not touch the
wall or any other furniture in the room.
3.3. Moving your washing machine
If you want to move your washing
machine, lift it onto its rollers by
pulling the lever at the bottom of the
washing machine all the way to the
left. When you have put your
washing machine into the required
location, put the lever back into its
initial position.
3.4. Leveling
Precise leveling will prevent vibrations, noise and movements of the washing machine during operation.
Make the washing machine level
by adjusting the leveling screw that
is too short.
Unscrew the stand and locking collar assembly (lift the washing machine if necessary).
When the washing machine is stable, maintain the stand on the
ground and turn the locking collar
as far as posible.
3.5. Water inlet
Screw the supply ppe con-nector
onto the water inlet tap (20x27
mm), remembering to use the
washer provided with the
washing machine.
Open the water inlet tap.
You cannot prolong the water inlet pipe. If it is too short, buy a longer pipe provided for this
purpose.
Page 15

15
3.6. Drain
The drain siphon must be placed
inside a drain pipe (or in a washbasin) at a height of between 70 and
100 cm. Make sure that it cannot
fall.
• Important: the drain pipe must never be prolonged. If
it is too short, call a professional.
3.7. Electrical connection
You can only connect this washing machine to 230 V single phase power supply.
Check rating of the fuse line: 10 A at 230V.
The washing machine must not be connected through an
extension cable or a power bar.
Check that the earthing connection is conform with the re-
gulations in force.
Page 16

The Electrolux Group. The world’s No.1 Choice.
The Electrolux Group is the world largest producer of powered appliances for kitchen, cleaning and outdoor use. More than 55 million Electrolux Group products (such
as refrigerators, cookers, washing machines, vaccum cleaners, chain saws and lawn mowers) are sold each year to a value of approx. USD 14 billion in more than
150 countries around the world.
 Loading...