

Page 1
EVE611SA built in ovens 1
EVE611SA
EVEP611SB
EVE613SA
EVEP613SB
EVE614BA
EVEP614BB
EVEP615SB
EVE616BA
EVEP616BB
EVEP618BB
EVE623SA
EVEP623SB
EVEP626BB
EVE633SA
Cooker User manual
Page 2

2
3
3 Before using your appliance
3 Important safety instructions
4 General cautions
5 Identifying the appliance
6 EVE611SA, EVE614BA
7 - Before using the appliance
9 - Cooking functions
10 - Op erating sequence
11 - Usin g the appliance
13 - Get ting to know the oven
14 EVEP611SB, EVEP614BB
15 - Before using the appliance
17 - Cooking functions
18 - Operating sequence
19 - Using the appliance
21 - Getting to know the oven
22 - Cleani ng the oven
23 EVE613SA, EVE 616BA
24 EVE623SA, EVE633SA
25 - B efore using the appliance
27 - Co oking functions
28 - Operating sequence
29 - Using the appl iance
32 - Getting to kn ow the oven
33 E VEP613S B, EVEP 615SB,
EVEP616BB, EVEP618BB
34 EVEP623 SB, EVEP626BB
35 - Before using the appli ance
37 - Cooking functions
39 - Operating sequence
40 - Using the applia nce
45 - Cleaning the oven
47 - Getting to know the oven
48 Cooking gu ide
53 Dealing with cooking problems
54 Cleaning the appliance
55 - Cleaning the accessories
57 - Cl eaning the oven door
61 Tips and troubleshooting
63 Installation of the appliance
65 Technical specifications
67 Warranty
WE’RE THINKING OF YOU
Thank you for purchasing an Electrolux a ppliance.
You’ve chosen a product that brings with it decades
of professional experience and innovation. Ingenious
and stylish, it has been de signed with you in mind. So
whenever you use it, you can be safe in the knowledge
that you’ll get great results every time.
Welcome to Electrolux.
LEGEND
The symbols you will see in this book let have
these meanings:
WARNING!
This symbol indicates information concerning your
personal safety
CAUTION!
This symbol indicates information on how to avoid
damaging the cooker or cabinet
IMPORTANT!
This symbol indicates tips and information about use
of the cooker
ENVIRONMENT!
This symbol indicates tips and information about
economical and ecological use of the cooker
CONDITIONS OF USE
This appliance is intended to be used in ho usehold and
similar applications such as:
• Staff kitchen areas in shops, offices an d other
working envi ronments
• Farm houses
• By clients in hotels, motels and other residential
type environments
• Bed and break fast type environments.
• Catering and similar no n-retail applications
RECORD MODEL AND SERIAL
NUMBER HERE:
Model:
Serial No:
CONTENTS BEFORE USING YOUR APPLIANCE
Before you use the appliance, we recommend that you
read through the relevant sections of this manual, which
provides the description of your applianc e and
its functions.
To avoid the risks that are always present when you use
an appliance, it is importa nt that the appliance is installed
correctly and that you read the safety instruc tions carefully
to avoid misuse and hazards.
We recommend that you keep this instruction bookl et for
future reference and pass it on to any future owner s.
This appliance complies with the requirements of
Australian Standards AS/NZS 60335.2.6
IMPORTANT!
Check for any damage or marks
If you find the appliance is damag ed or marked, you
must report it wit hin 7 days if you wish to claim for
damage/marks under the ma nufacturer’s warranty.
This does not affect your s tatutory rights.
INFORMATION ON DISPOSAL
FOR USERS
ENVIRONMENT!
• Most of the packing materia ls are recyclable. Please
dispose of those materials through your local rec ycling
depot or by placing them in appropriate collection
containers.
• If you wish to discard this applia nce, please contact
your local authorities and ask for the c orrect method
of disposal.
IMPORTANT SAFETY INSTRUCTIONS
WARNING!
These warnings have been provided in the interest
of safety. You MUST read them carefully before
installing or using the appliance.
• An authorised p erson must install this appliance.
(Certificate of Compliance to be retained)
• Before using the applia nce, ensure that all packing
materials are removed from the appliance.
• In order to avoid any potential hazard, the encl osed
installation instructions must be followed.
• Ensure that all specifi ed vents, openings and air
spaces are not blocked.
• Where the applian ce is built into a cabinet, the cabinet
material must be capable of withstandi ng 70°C. If
adjacent to vinyl-wrapped surface s, use installation kit
from vinyl wrap supplier.
• Only authorised personnel should carr y out servicing.
(Certificate of Compliance to be retained)
• Always ensure the applia nce is switched off before
cleaning or replacing parts.
• Do not open the oven door dur ing steam cooking.
Steam can be released. There is a ris k of skin burns.
There is a risk that steam causes moisture d amage
to cabi nets.
• Allow the oven to cool down for 30 minutes before you
drain the water tank in a steam oven. Scalding water
may be released.
• In order to avoid fire, the appliance must be kept cle an
and vents kept unobstructed
• Do not spray flammable mater ials in or under the
appliance, e.g. aerosols.
• Always use gloves when han dling hot items inside
the oven.
• Always turn the grill of f immediately after use as fat left
behind may catch fire.
• Do not cover the grill inser t with foil, as fat left there
may catch fire.
• Always keep the grill dish cl ean as any fat residue may
catch fir e.
• Do not leave the grill on unat tended.
• To avoid fire, ensure that the grill trays and fittings are
always inserted into the appliance in accord ance with
the instructions.
• Switch the appliance of f before removing the oven light
glass for globe replacement.
• To avoid an accident, ensure that the oven shelves
and fittings are always inserted into the appli ance in
accordance with the instructions.
• This applianc e must be earthed.
Page 3
4
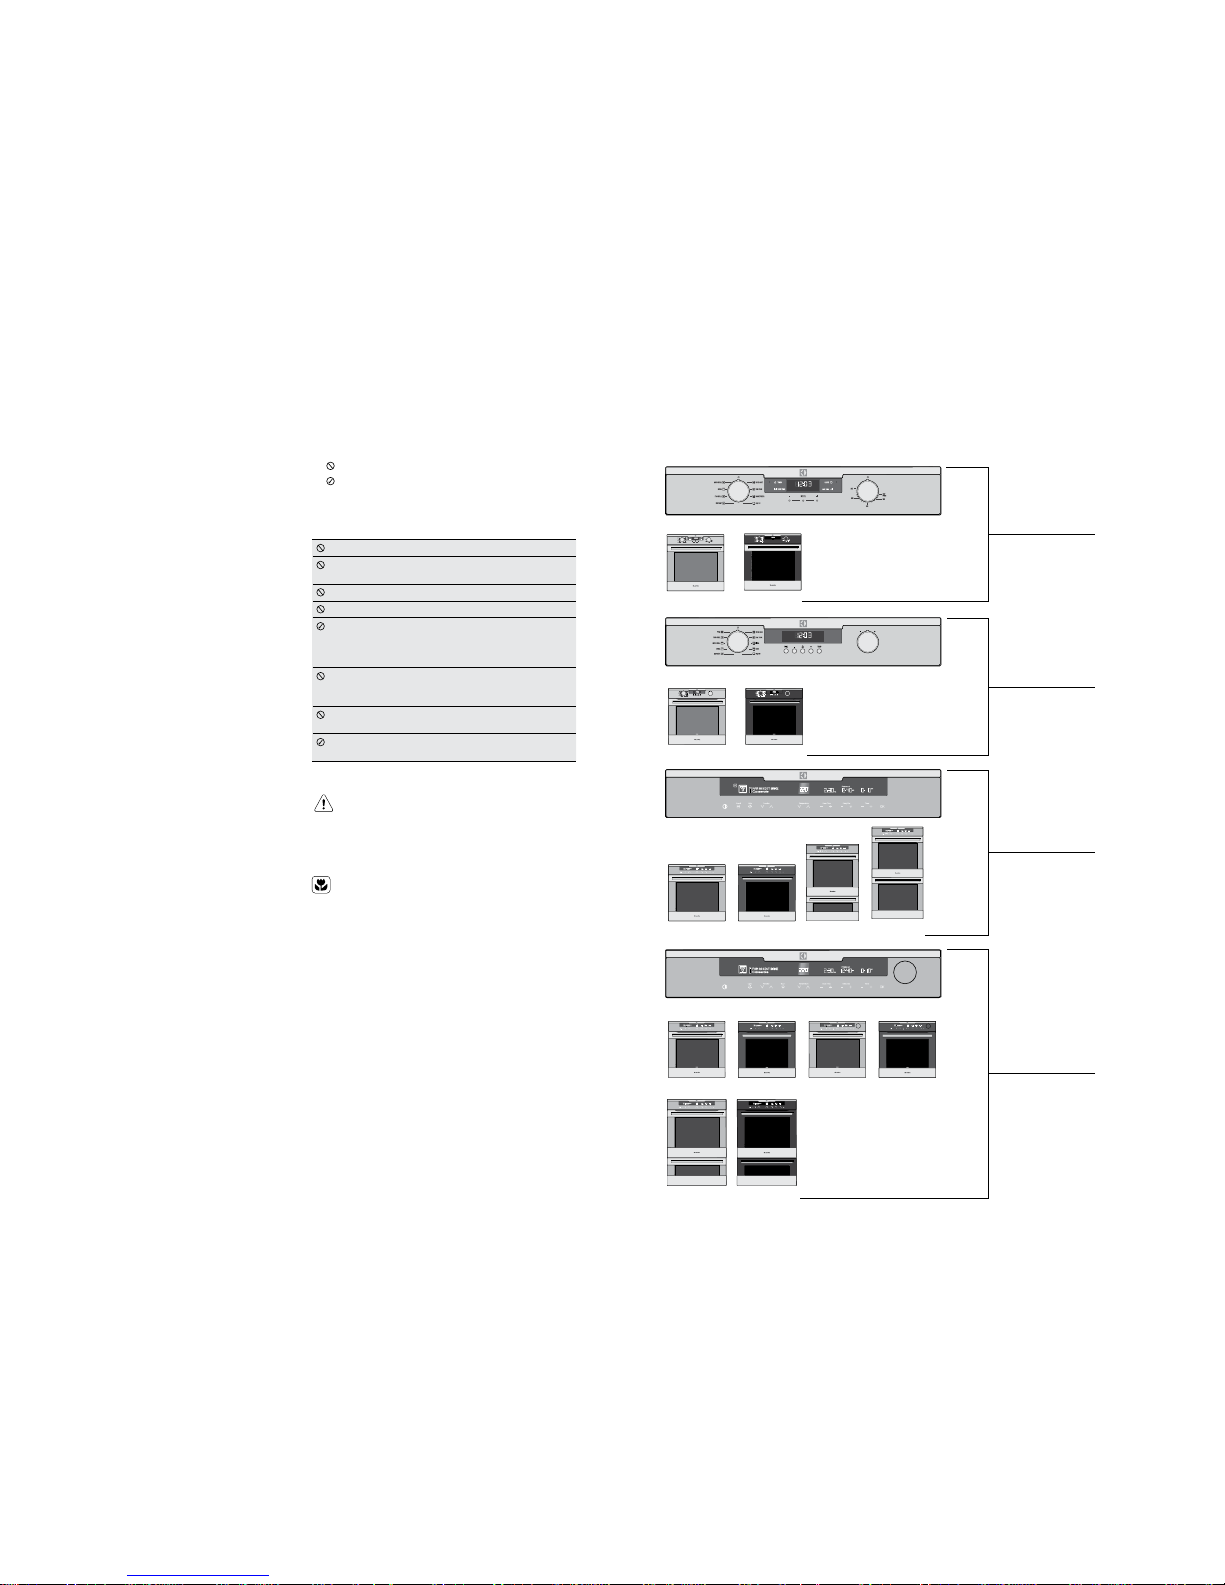
GENERAL CAUTIONSIMPORTANT SAFETY INSTRUCTIONS
Read the following carefully to avoid damage or injur y
This symbol in dicates never to do t his
This symbol in dicates always do this
It is important to use the appliance s afely.
Check these safety points before using the a ppliance.
This appliance must not be used as a space heater.
Do not place thick portions of food under the grill. Foods
may curl, catch and ignite.
Do not use the door as a shelf.
Do not push down on the open oven door.
New appliances can have an odour during the first
operation. It is recommended to ‘run in’ the oven before
you cook. Run the oven(s) at 180°C for 30 minutes and
ensure the room is well ventilated.
Do not use harsh abrasive cleaners or sharp metal scrapers
to clean the oven door glass since they can scratch the
surface, and may result in shattering of the glass.
Do not use steam cleaners, as this may cause moisture
build-up.
Always clean the appliance immediately after any
food spills.
WARNING!
To maintain safe operation, it is recom mended that
the product be inspec ted every five years by an
authorised service person.
ENVIRONMENT!
To save energy and to help protect the environment ,
we recommend these hints:
• Use the oven efficientl y, by cooking many trays of food
at the same time. Cook 2 trays of scones, small cakes
or sausage rolls at the same time.
• Select the corre ct shelf location for food being cooked.
• Do not open the oven door more tha n necessary.
Note: You must read these warnings carefully before
installing or using the appliance. If you need assistance,
contact your Customer Care Centre. The manufacturer
will not accept liability, should these instructions or any
other safety instructions incorporated
in this book be ignored.
Child safety
• This applianc e is not intended for use by persons
(including children) with reduced physical, sensory
or mental capabilities, or lack of expe rience and
knowledge, unless they have been given supervision
or instruction concerning use of the a ppliance by a
person responsible for their safety.
• Children should b e supervised to ensure that they do
not play with the appliance.
• During use this app liance becomes hot. Care should
be taken to avoid touching hot surfaces, e.g. oven
door, heating elements.
• Accessible pa rts will also become hot when in use. To
avoid burns and scalds children should be kept away.
5
IDENTIFYING THE APPLIANCE
Select
Select
Control panel used on:
Confirm the model number. The model number is sh own on the data plate which is visible when th e oven or grill door is open.
Control panel used on:
Control panel used on:
Control panel used on:
E VE 611S A
E VE P6 11S B
EV E613SA
EVEP613SB
EVEP623SB
EV E614B A
EV EP614 BB
EVE616BA
EVEP616BB
EVEP626BB
EVE623SA
EV EP615S B
EVE633SA
EVEP618BB
See page 6
See page 14
See page 23
See page 33
Page 4
6 EVE611SA, EV E614B A EVE611SA, EV E614B A 7
Preparing the oven
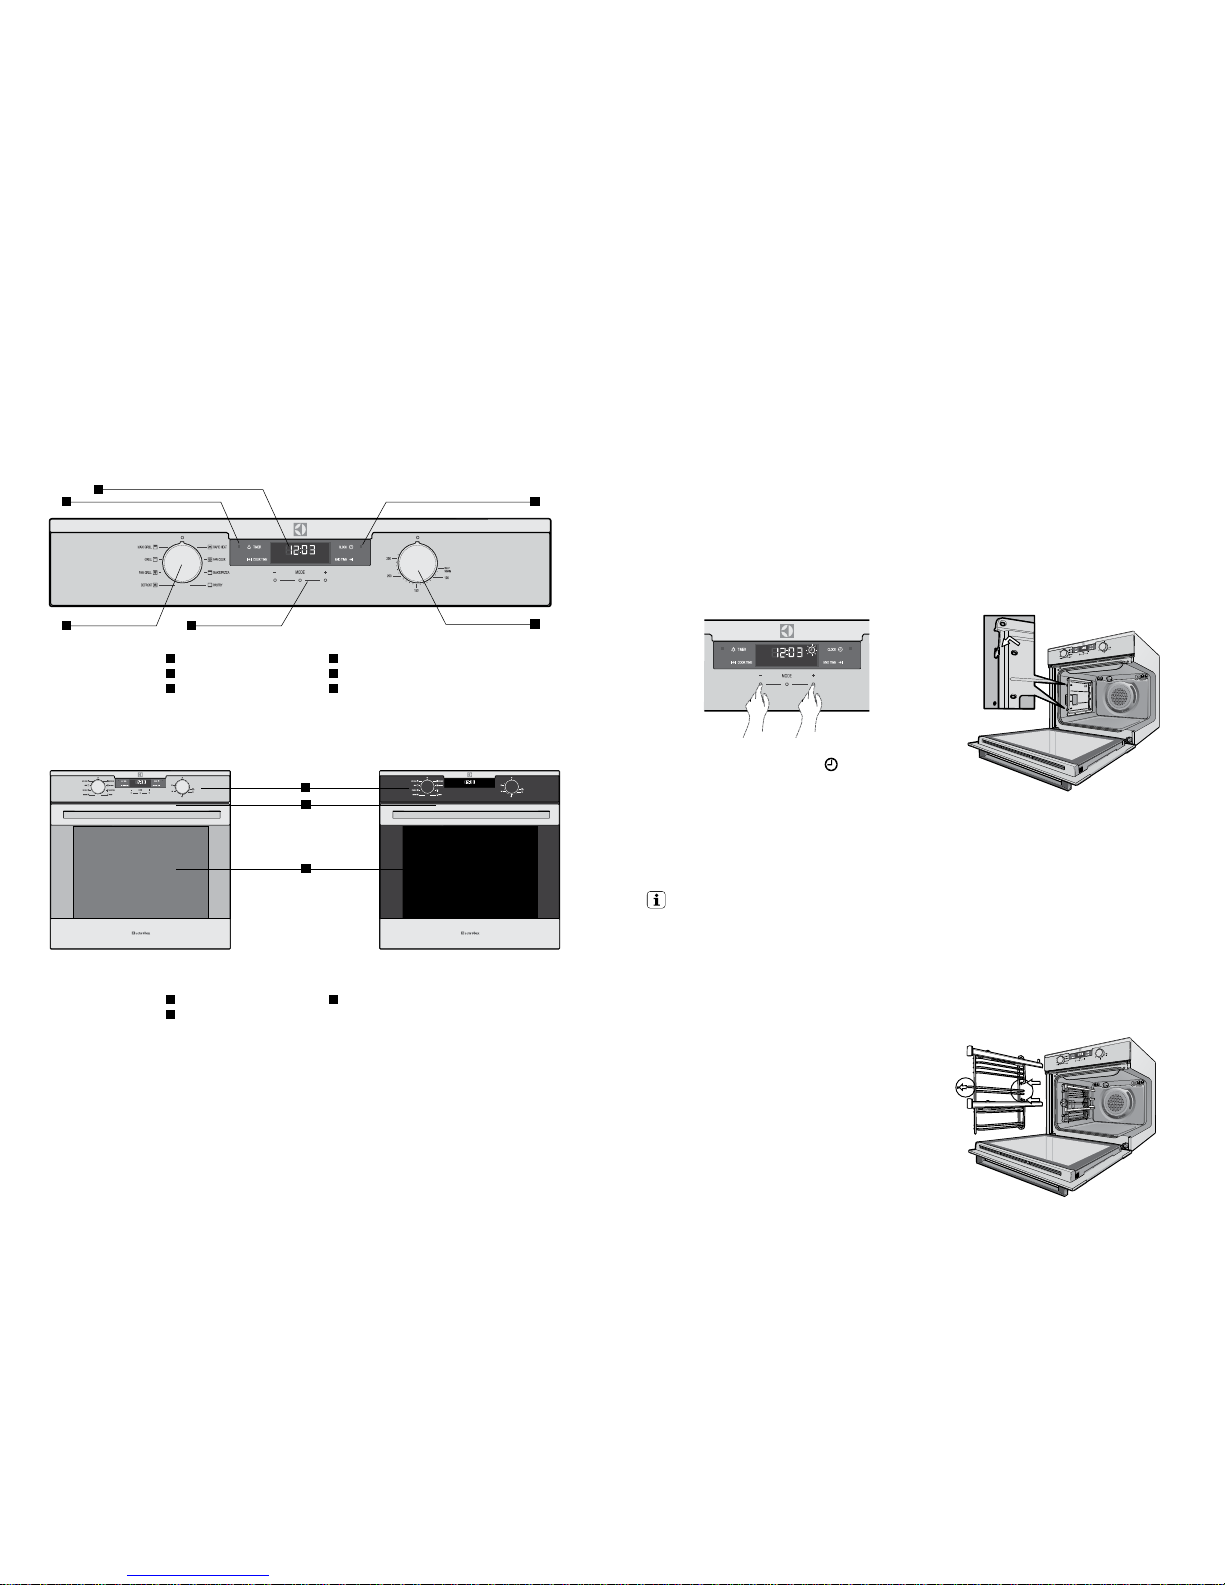
1. Please remove all stickers, leaflets and boxes from the
door and from the floor of the oven before operation.
2. Please wipe out the oven interior prior to operation
with warm soapy water and polish dry with a sof t
clean cloth. Do not close the oven door until the oven
is completely dry.
3. Do not line the oven with foil. It will damage the
enamel.
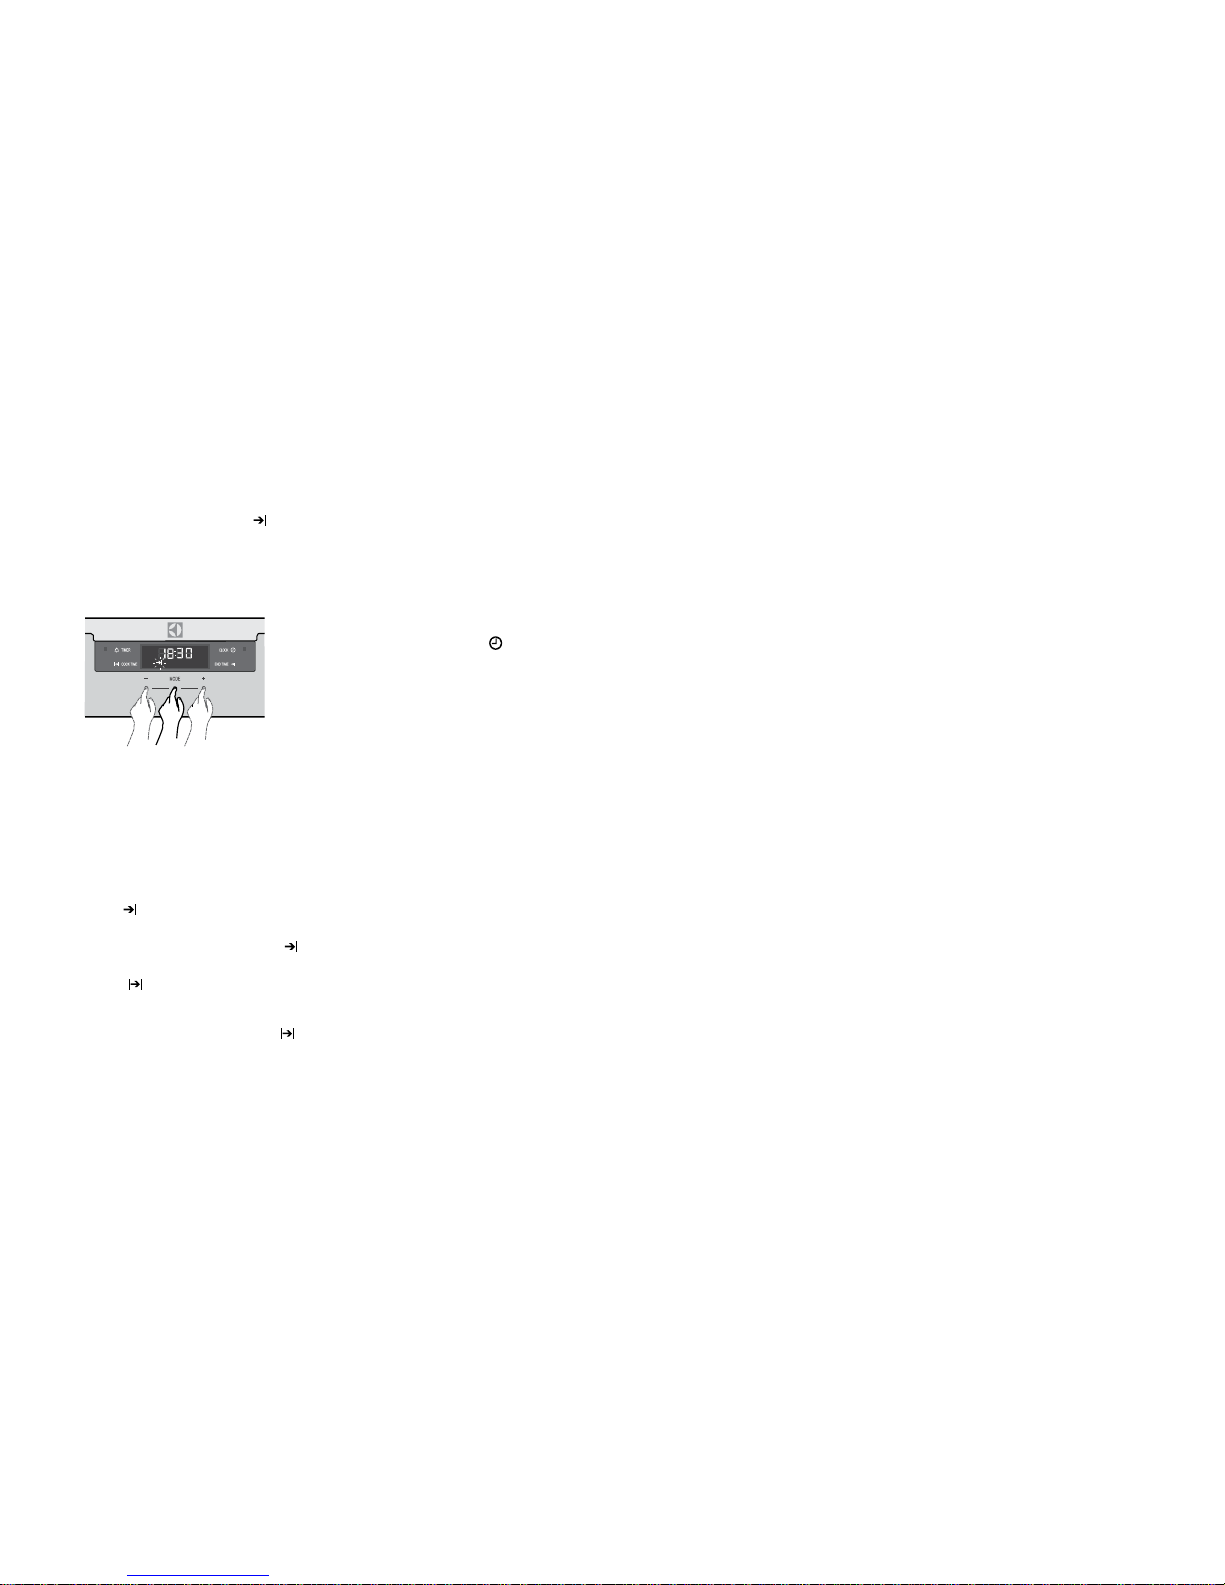
Setting t he time
Before the appliance, can be used, the time must be set.
• After the appliance h as been electrically co nnected
‘12:00’ will be displayed and the
clock icon
will flash.
• To set the time of day in hours and minutes touch the
+ or – symbols. Refer to the diagram above.
• 5 seconds af ter the last change, the clock ‘symbol
will disappear, confirming the time has been set.
Once the time has been entered, the clock adva nces
minute by minute.
Note: The clock has a 24 hour display.
IMPORTANT!
New appliances can have a smell du ring first use.
It is recommended to ‘run in’ the oven befor e
cooking for the first time. O perate the oven, empty,
at a temperature of 180° C for approx imately
30 minutes.
Please ensure the room is wel l ventilated during
this process.
BEFORE USING THE APPLIANCE
Installing the oven accessories
• Catalytic liners
The oven will arrive with a cataly tic fan baffle and top
panel already fitted. Optional side pa nels are also
supplied and may be fitted before installin g the side
racks. The sole purpose of the side pane ls is to make
cleaning the oven easier. Omitting them will have no
effect on the cooking pe rformance of the oven. They
can be fitted at any time by removing the side racks.
The catalytic liners su pplied attach to the left and right
sides of the oven. Please note that there is a different
version for each side. They are marked ‘LH’ or ‘RH’.
1. Position the first liner as per the diagram. The black,
shiny side of the liner should be facing the oven wall
with the hooks pointing down. Note that the diagram
shows the left hand liner. The right hand side will b e a
mirror image of this.
2. Line the hooks up with the slots provided in the oven
wall, push them in and then allow the liner to slide
down to its final position. All four hooks MUST be
engaged in the slots.
3. T he access hole for the side racks should be visible
when the liner is correctly positioned – see diagram.
• Side racks
1. Inser t the twin pegged side into the rear access holes
provided, ensuring pegs are fully in serted.
2. Then locate the front peg into the front access hol e
and push in firmly.
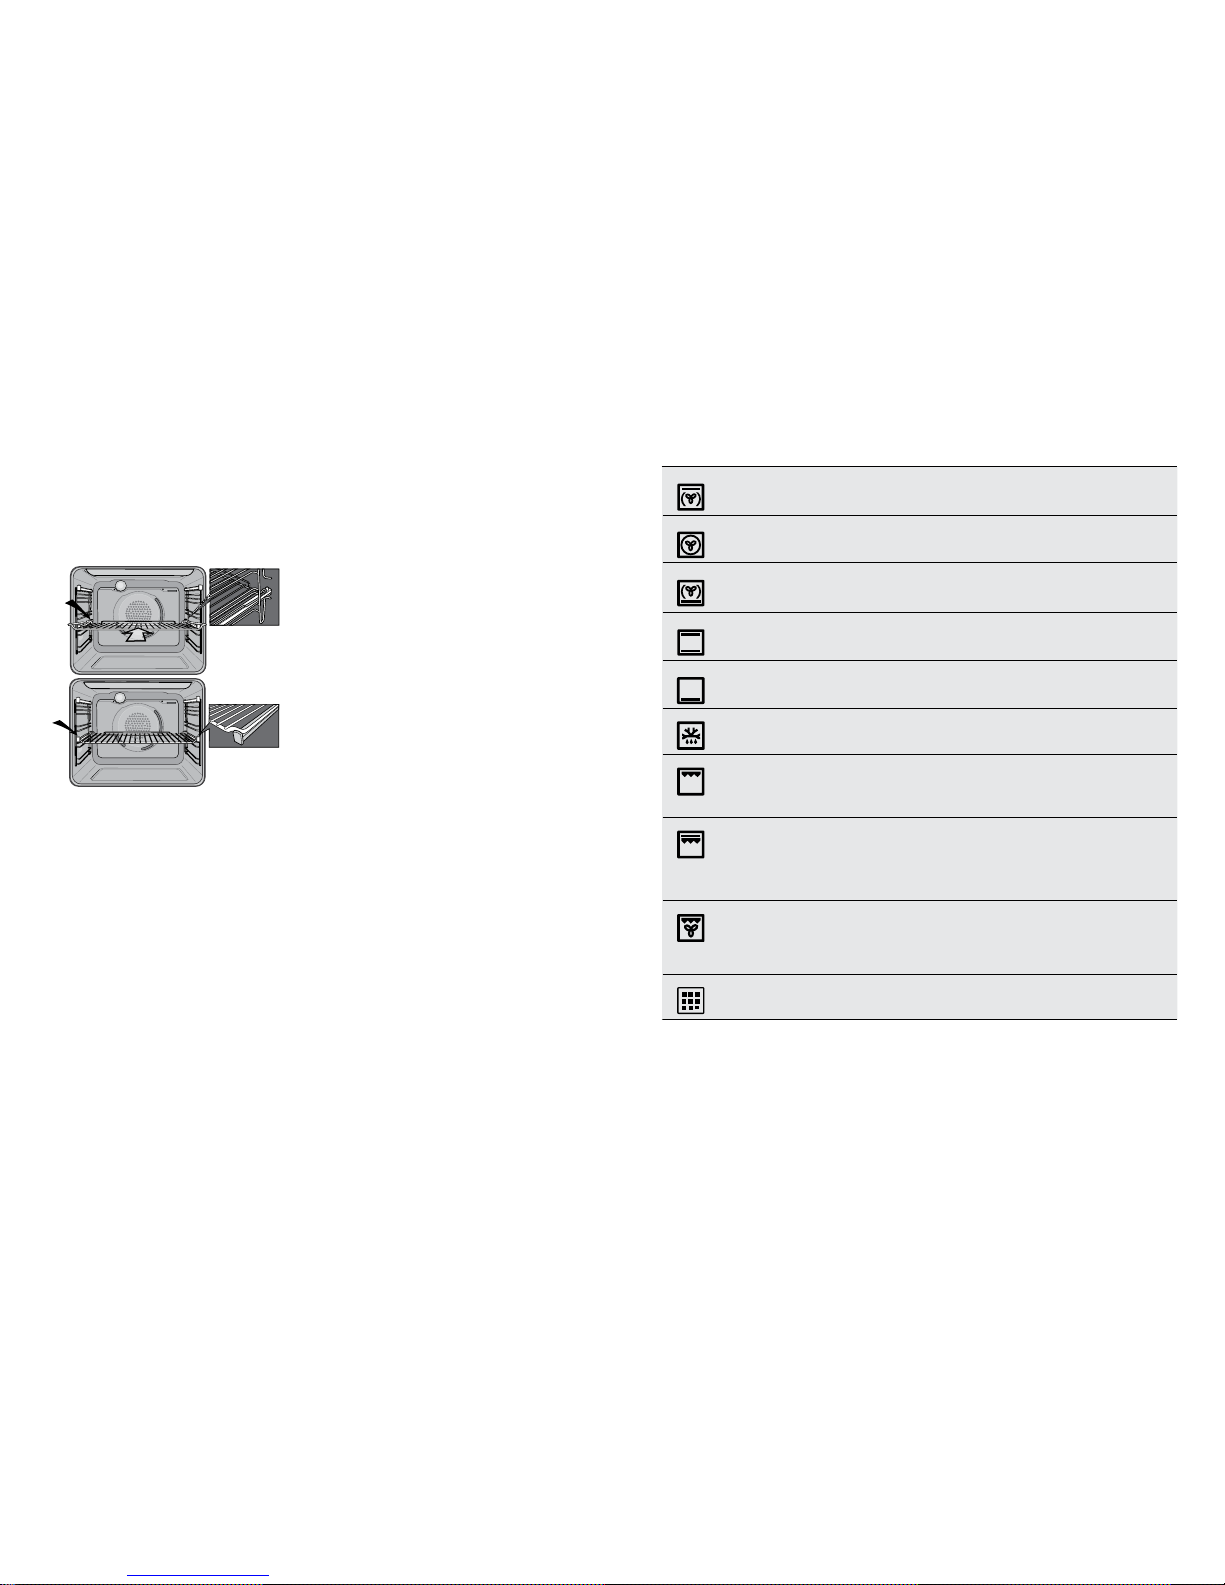
1
Oven ‘ON’ light
2
Timer display
3
‘Heating’ light
4
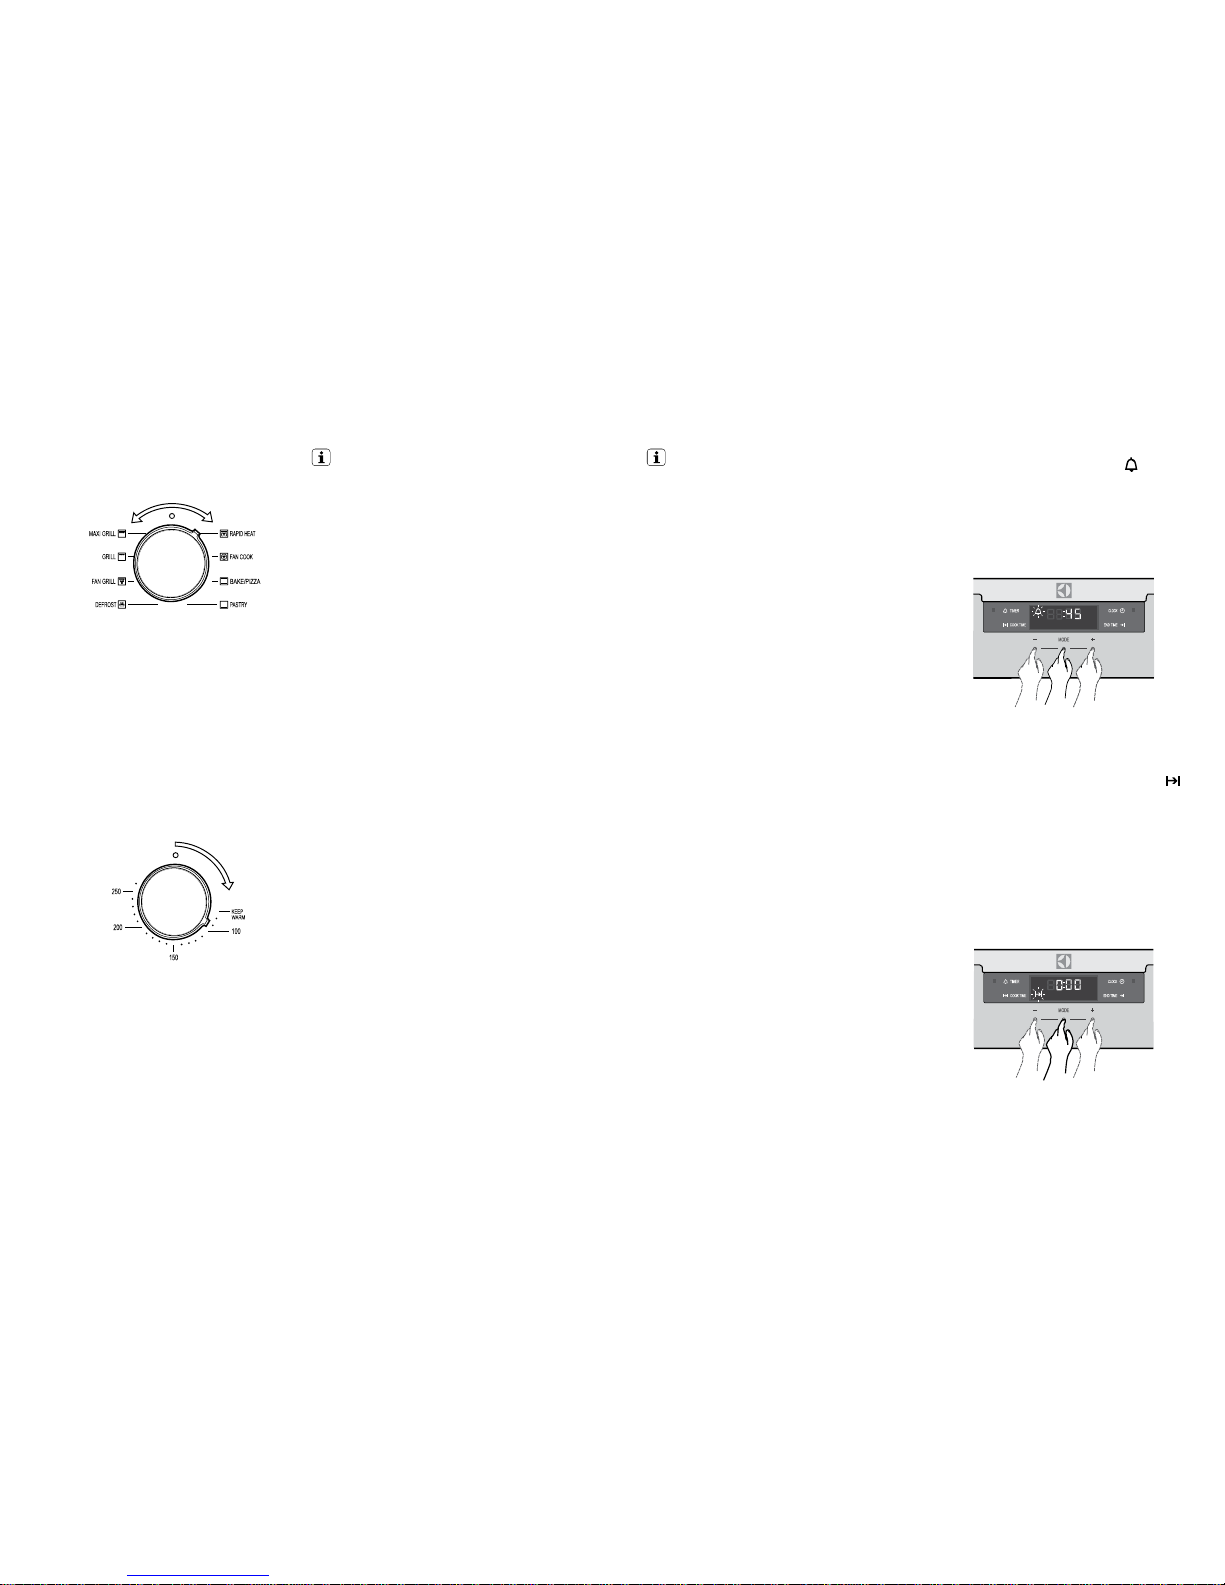
Function selector knob
5
Tou ch p ad
6
Temperature selector knob
1
4 5
3
6
2
EVE611SA, EVE614BA COMPONENTS
7
Control panel
8
Warm air exhaust
9
Triple glazed door
8
9
7
E VE 611S A
stainless steel model
EV E614B A
black model
Page 5
8 EVE611SA, EV E614B A EVE611SA, EV E614B A 9
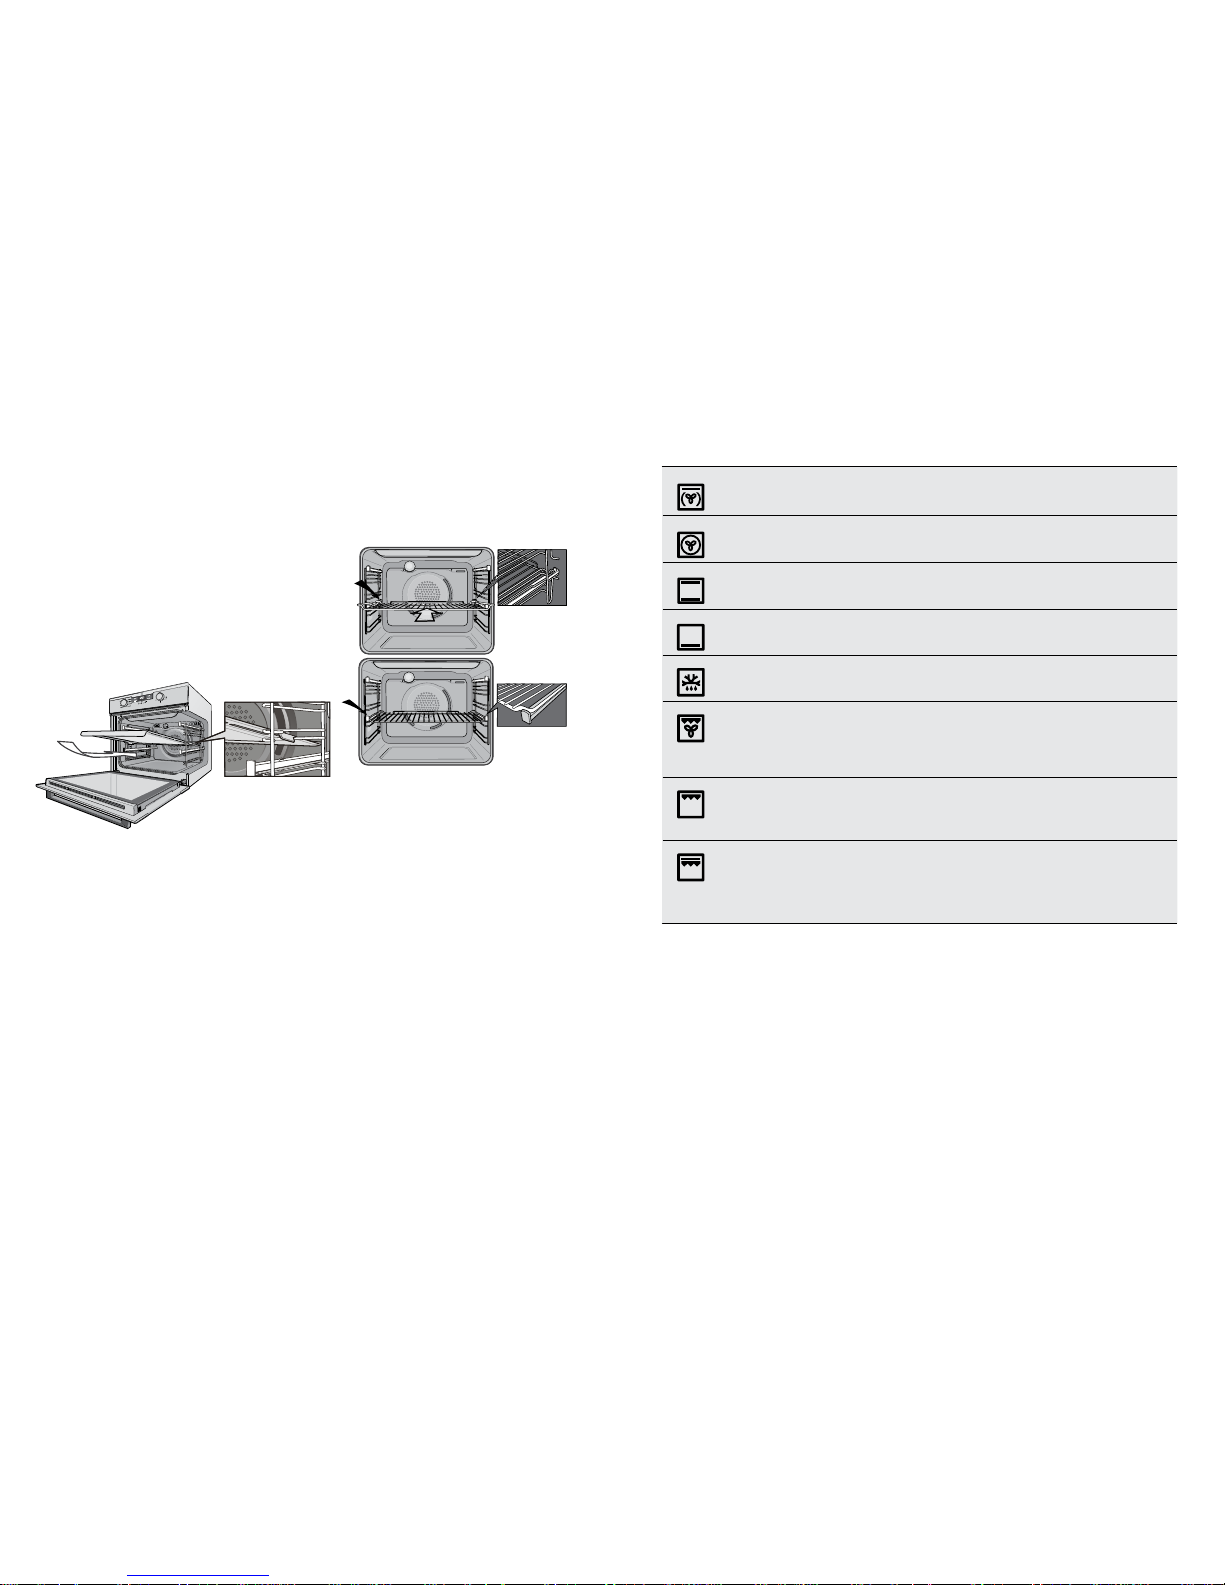
Symbol Function description
Rapid heat
Heat comes from the element surrounding the fan as well as the smaller element above the food. This allows
you to preheat your oven 30% quicker than on standard ‘Bake/Pizza’. ‘Rapid Heat’ is ideal for cooking frozen
pre-cooked foods such as savoury pastries, pizzas, mini meals (TV dinners), meat pies and fruit pies. Simply
place the food in the oven straight from the freezer and heat. Cook in the upper half of the oven for best results.
Fan cook
Heat comes from the element surrounding the fan. This fan circulates the hot air around the oven cavity so that
you can put your food in different places in the oven and still cook them at the same time. You can use ‘Fan
cook’ function for multi-shelf cooking, reheating cooked foods, pastries and complete oven meals. It will cook at
a lower temperature and be faster than baking. Please note that some variation in browning is normal.
Bake/pizza
Heat comes from two elements, one above and one below the food. The bottom element is a clean heat element
and is below the floor of the oven. Both elements are controlled by the thermostat and will turn on and off to
maintain set temperature. You can use the ‘Bake/pizza’ function for single trays of biscuits, scones, muffins,
cakes, slices, casseroles, baked puddings, roasts and delicate egg dishes.
Pastry
Heat comes from the clean heat element below the food. The element is controlled by the thermostat and will
turn on and off to maintain the set temperature. The ‘Pastry’ function can be used to add extra browning to the
bases of pizzas, pies, and pastries. Cook in the lower half of the oven when you are using only one shelf.
Defrost
The ‘Defrost’ function uses low temperature air that is circulated by the fan. You can defrost (thaw) your food
before you cook it. You can also use ‘Defrost’ to raise your yeast dough and to dry fruit, vegetables and herbs.
Fan Grill
‘Fan Grill’ offers you the benefits of both ‘Fan Cook’ and traditional ‘Grill’ functions. The grill element turns on and
off to maintain set temperature while the fan circulates the heated air.
Fan grill with the oven door closed.
You can use ‘Fan Grill’ for large cuts of meat, which gives you a result that is similar to ‘rotisserie’ cooked meat.
Put your food on a shelf in the second lowest shelf position. Put you grill dish on the lowest shelf to catch any spills.
When using ‘Fan Grill’ it is not necessary to turn food over during the cooking cycle. Set temperature to 180°C.
Grill
‘Grill’ function directs radiant heat from the powerful upper element onto the food. You can use the ‘Grill’ function
for tender cuts of meat steak, chops, sausages, fish, cheese toasties and other quick cooking foods.
Grill with the oven door closed.
Preheat your grill for 3 minutes to get the best results. This will help seal in the natural juices of steak, chops etc
for better flavour. You can slide your grill dish into either of the 2 spaces within the uppers pairs of support rails.
Maxi Grill
‘Maxi Grill’ directs radiant heat from 2 powerful upper elements onto the food. You can use the ‘Maxi Grill’ function
for tender cuts of meat, steak, chops, sausages, fish, cheese toasties and other quick cooking foods.
Grill with the oven door closed.
‘Maxi Grill’ allows you to take full advantage of the large grill dish area and will cook faster than normal ‘Grill’.
For best results it is recommended to preheat your grill for 3 minutes. This will help seal in the natural juices of
steak, chops etc for a better flavour. You can slide your grill dish into either of the 2 spaces within the upper pairs
of support rails.
COOKING FUNCTIONSBEFORE USING THE APPLIANCE
• Shelves and trays
The shelves are designed s o that they have maximum
extension but cannot be accident ally pulled right out.
The trays are designed the same way and slot straig ht
into the side racks.
To fit a shelf or tray to side racks:
1. Locate the rear edge of the sh elf/tray in between
the guide rails of the side rack – see diagram.
Ensure the same rail positions on both sides of the
oven are being engaged.
2. With the front edge raised, begin to slide the she lf into
the oven.
3. O nce the detents have passed the front edge of the
side rack, the shelf can be pushe d completely in.
4. When fully inserted the shel f/tray should not interfere
with the closed oven door.
To fit a shelf or tray to telescopic slides:
1. With the slide s fully pushed in, push the shelf or tray
along the top of the slide until it hits the back post.
2. Drop the front of the shelf or tray onto the slide
ensuring it sits behind the front post of the s lide.
3. W hen fully inserted the shelf/tray should not interfere
with the closed oven door.
Page 6
10 EVE611SA, EV E614B A EVE611SA, EV E614B A 11
IMPORTANT!
Cooling / Vent fan
The built-in appliance is fitted with a cool ing fan. This
prevents the kitchen cabinet from overheating and re duces
the condensation inside the oven. It will operate whe never
the oven is in use and blow warm air across the top of the
oven door.
Note: If the oven is still hot from cooking, the cooling fan
will keep running to cool the oven down and will switch
off by itself once cool.
Condensation
• Excess cond ensation may fog the oven door. This may
happen when cooking la rge quantities of food from a
cold start. Minimise conde nsation by:
– Keeping the amount of water used whilst cooking to
a minimum.
– Making sure the oven door is firmly close d.
– Baking custard in a baking dish that is s lightly
smaller than the water container.
– Cooking casseroles with the l id on.
Note: If using water in cooking, this will turn to steam
and may condense outside your appliance. This is not a
problem or fault with your oven.
Cooking with the timer
The appliance is equippe d with a timer that has the
following features:
• Timer – sets a countdown time that will b eep when
the set time has elapsed.
• Cook time – sets cookin g duration. A timer will count
down the preset cooking time, beep whe n the time
has elapsed and turn the applia nce off.
• End time – instead of setting a cook ing duration, a
cooking finish time can be set. When the fi nish time
has been reached the timer will b eep and turn the
appliance off.
• Delayed star t cooking time – combines the cooking
time and end cooking time to switch oven on and off
at a specific time during the day.
USING THE APPLIANCE
Selecting the timer
• Touch the MODE symbol until the timer
icon
begins flashing.
• Set the countdown time you want by using the
+ and – symbols. 5 seconds after the last change
the timer ‘icon will stop flashing and the countdown
will start in minutes.
• To stop the beeper, touch any symbol.
• Maximum c ountdown time is 2hrs 30mins.
Setting the cooking duration
• Select the desired oven function and temperature.
• The oven indicator light will gl ow and the heating
source will come on.
• Touch the MODE symbol until the cook time icon
begins flashing.
• Set the cooking duratio n you want by using the
+
and – symbols. Five seconds after the last chang e the
cook time icon will stop flashing, and the time of day
will be displayed. The oven will automatically shut of f
once the set duration is reached. To check how much
time remains, press MODE until the cook time ic on is
lit. The remaining time will be displayed.
• When the oven shuts off an alarm will beep. To stop
the beeper, touch any symbol.
Note: Remember to add pre-heating time if necessary.
OPERATING SEQUENCE
Select the cooking function
• Turn the function selector in any direction to the
desired cooking function. Th e oven cavity light will
come on.
Select the temperature
• To set the temperature, turn the temperature
selector in a clockwise dire ction to the desired setting.
An indicator light in the display will come on.
• A thermostat controls the tempe rature in your oven.
When the temperature is reached, the heating source
switches itself off and the indicator light go es out.
When the oven temperature falls below the desired
setting, the heating source switches on and the
indicator light comes on again.
• Once the food is cooked, turn the temp erature
selector back in an anti-clock wise direction. Do not
force it right round in a clockwise d irection as this will
result in damage to the thermostat.
Note: The desired cooking function must be selected
before the oven will operate.
IMPORTANT!
Pre-heating
For best cooking results pre-he at the oven. Pre-heating
allows the oven to reach the required temperature
quickly and efficie ntly as well as cook food at the
correct temperature for the entire cook time.
1. With ‘Rapid Heat’ function
This function allows the oven to reach preset
temperature quicker than any other cooking fu nction.
Turn the function selector to ‘Rapid Heat’, then set
the desired temperature, by rotating the oven
temperature selector.
When the heating light goes out, the oven has reach ed
the desired temperature. Select the oven function
required and place the food in the oven.
2. With other oven functions
Set the desired temperature by rotating your oven
temperature selector. When the indicator light goes out
the oven has reached the desired preset tempe rature,
place your food in the oven, close the door and set the
timer if you desire.
3. With ‘Grill’ function
Pre-heat the grill for at least 3 minutes to obtain best
results. This will help to seal the natural juic es of steak,
chops and other meats for a better flavour.
Page 7
12 EVE611SA, EV E614B A EVE611SA, EV E614B A 13
Get to know your new oven with this
‘Simple Test Cake’
Although we strive for a perfect pe rforming oven, it’s
possible that there will be some variation i n colour when
baking. Therefore, we suggest this simple, easy and
delicious to make Simple Test Cake, it can help you
understand your new oven. All ovens do sometimes have
hot or cold spots, therefore it is important to judge with
your eye as you may require to rotate during baking.
‘Simple Test Cake’
125g butter, softened to room temperature
1 cup caster sugar
1 teaspoon pure vanilla essence
4 large eggs
2 cups self-raising flour
pinch of salt
4 tablespoons (80mL) full-c ream milk
Method:
1. Butter bas e and sides of two, 20cm straight-sided
round or square cake pans. Then line the base w ith
grease proof or baking paper.
2. Preheat oven to moderate ‘180ºC’ (170ºC fan forced)
and ensure oven shelf is in the centre position of oven.
3. Cre am softened butter and sugar until light in colour.
4. Add vanilla essence.
5. Then eggs one at a time, beating well after each
addition.
6. Si ft flour and salt into the mixture and beat until
well combined.
7. Add milk and beat or stir to combine.
8. Spo on mixture equally between prepared cake pans.
9. Bake in preheated oven, middle shelf for about
25 to 35 minutes or until when tested with a fine
cake skewer it comes out clean or the edge s of
the cakes have come away slightly from the sides
of the cake pans.
10. Remove from oven to wire cake rack and rest for
5 minutes before removing from cake pans.
Cool completely.
To Serve: sandwich together with your favourite jam
or conserve, and dust top with pure icing sug ar.
Note: if desired substitute butter for either margarine
or olive oil spread. Recipe is based on the Australian
standard metric 250mL cup and 20mL tablespoon sets.
GETTING TO KNOW THE OVENUSING THE APPLIANCE
On completion of cooking
• The heat source wil l turn off, the timer will beep and
the end time and/or cook time ‘icons’ will flash.
• Even though the heating ele ment turns off the oven
will still retain substantial heat. This will continue to
cook the food until it is removed or the oven cools
down. If you do not plan on being present when the
oven turns off, you should take this extra heating time
into account.
• Turn the function and temperature controls to the
off position.
• Touch any button to stop the timer beeping.
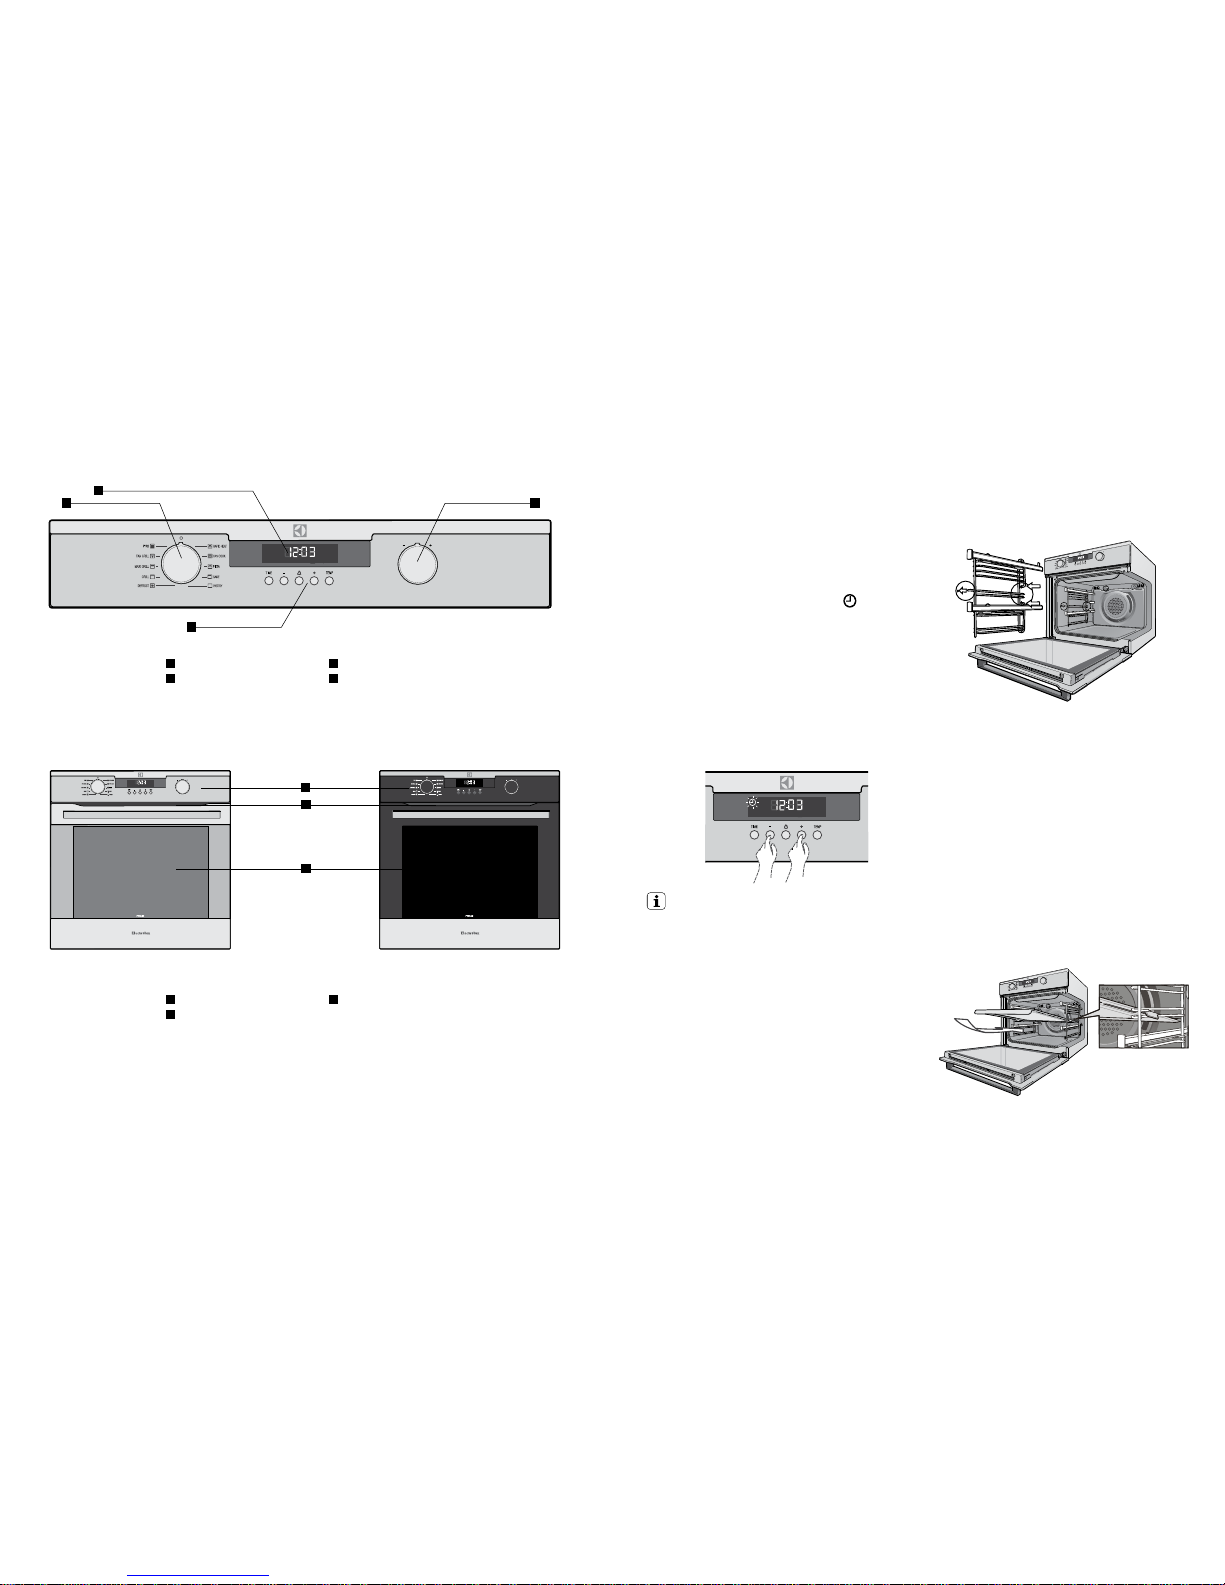
Adjusting the clock
• Touch the MODE symbol until the
clock icon
begins flashing.
• Touch the
+ and – symbols to change the time of day.
5 seconds after the last chang e, the clock icon will
disappear, confirming the time has been adjusted.
Setting the cooking end time
• Check that the clock di splays the correct time of day.
• Select the desired oven function and temperature.
The oven indicator light will glow and the heating
source will come on.
• Touch the MODE Symbol until the end time
icon
begins flashing.
• Enter the time of day you want the cooking to finish by
using the
+ and – symbols. Five seconds after the last
change, the end time icon will stop flashing and th e
current time will be displayed.
• To stop the beeper, touch any symbol.
Setting the delayed start cooking time
• Set the cook time and end tim e as described in the
previous sections.
• Once both the cook time and e nd time have been set,
both icons will stop flashing and the current time wil l
be displayed.
• To check or cancel settings:
To check settings, touch the MODE symbol until
the desired setting is displayed. The relevant i con
will flash.
To cancel ‘delayed start’ touch the MODE symbol until
the end time
icon flashes. Touch and hold the –
symbol until the clock no longer reverse s (a beep will
be heard). If temperature and function knobs are still
at a setting, the oven will start once the end time
icon stops flashing.
• To cancel ‘auto shut off’ touch the MODE symbol until
the cook time icon flashes. Touch and hold the
– button until the clock no longer reverses (at 0:00 a
beep will be heard). This automatically ca ncels ‘auto
shut off’. If the temperature and function knobs are still
at a setting, the oven will start once the coo k time
icon stops flashing. Because ‘auto off’ is cance lled the
oven will continue to heat until it is manually turne d off.
Page 8
14 EVEP611SB, EVEP614BB EVEP611SB, EVEP614BB 15
EVEP611SB, EVEP614BB COMPONENTS
1
Function selector knob
2
Timer display
3
Temperature selector knob
4
5 Button controller
5
Control panel
6
Warm air exhaust
7
Quad glazed door
1
4
3
2
6
7
5
E VE P6 11S B
stainless steel model
EV EP614 BB
black model
Preparing your oven
1. Please remove all stickers, leaflets and boxes from the
door and from the floor of the oven before operation.
2. Please wipe out the oven interior prior to operation
with warm soapy water and polish dry with a sof t
clean cloth. Do not close the oven door until the oven
is completely dry.
3. Do not line the oven with foil. It will damage
the enamel.
Setting t he time
When power is supplied to the oven the
clock icon
will be displayed. Along with the clock symb ol the ‘12’
will be flashing. This indicates that ‘hour’ por tion of the
time is ready to be changed.
• Press
+ or – , then press ‘TIME’ when you have the
right hour.
• The minutes will flas h and can be set in the same
manner.
• 5 seconds af ter the last change, the clock display will
stop flashing, confirming that the time has been set.
Note: The clock has a 24 hour display.
IMPORTANT!
New appliances can have a smell du ring first use.
It is recommended to ‘run in’ the oven befor e
cooking for the first time. O perate the oven, empty,
at a temperature of 180° C for approx imately
30 minutes.
Please ensure the room is wel l ventilated during
this process.
BEFORE USING THE APPLIANCE
Installing your oven accessories
• Side racks
1. Inser t the twin pegged side into the rear access holes
provided, ensuring pegs are fully in serted.
2. Then locate the front peg into the front access hol e
and push in firmly.
• Shelves and trays
The shelves are designed s o that they have maximum
extension but cannot be accident ally pulled right out.
The trays are designed the same way and slot straig ht
into the side racks.
To fit a shelf or tray to side racks:
1. Locate the rear edge of the shelf/tray in between the
guide rails of the side rack – see diagram. Ensure
the same rail positions on both sides of the oven are
being engaged.
2. With the front edge raised, begin to slide the shelf
into the oven.
3. Once the detents have passed the front edge of the
side rack, the shelf can be pushed completely in.
4. When fully inserted the shelf/tray should not interfere
with the closed oven door.
Page 9
EVEP611SB, EVEP614BB 1716 EVEP611SB, EVEP614BB
BEFORE USING THE APPLIANCE
To fit a shelf or tray to telescopic slides:
1. With the slides fully pushed in, pus h the shelf or tray
along the top of the slide until it hits the back post.
2. Drop the front of the shelf or tray onto the slide
ensuring it sits behind the front post of the s lide.
3. When fully inserted the shelf/tray should not
interfere with the closed oven door
Symbol Function description
Rapid heat
Heat comes from the element surrounding the fan as well as the smaller element above the food. This allows you
to preheat your oven 30% quicker than on standard ‘Bake’. ‘Rapid Heat’ is ideal for cooking frozen pre-cooked
foods such as savoury pastries, pizzas, mini meals (TV dinners), meat pies and fruit pies. Simply place the food in
the oven straight from the freezer and heat. Cook in the upper half of the oven for best results.
Fan cook
Heat comes from the element surrounding the fan. This fan circulates the hot air around the oven cavity so that
you can put your food in different places in the oven and still cook them at the same time. You can use ‘Fan
cook’ function for multi-shelf cooking, reheating cooked foods, pastries and complete oven meals. It will cook at
a lower temperature and be faster than baking. Please note that some variation in browning is normal.
Pizza
‘Pizza’ is a combination of ‘Pastry’ and ‘Fan Cook’ and offers you the combined benefits of both functions. Heat
comes from the element surrounding the fan as well as the clean heat element below the oven floor. The ‘pizza’
function is ideal for foods that require cooking and browning of the base. It is great for foods such as pizzas,
quiches, meat pies and fruit pies. Simply put the food in the middle of the oven and select the desired temperature.
Bake
Heat comes from two elements, one above and one below the food. The bottom element is a clean heat element
and is below the floor of the oven. Both elements are controlled by the thermostat and will turn on and off to
maintain set temperature. You can use the ‘Bake’ function for single trays of biscuits, scones, muffins,
cakes, slices, casseroles, baked puddings, roasts and delicate egg dishes.
Pastry
Heat comes from the clean heat element below the food. The element is controlled by the thermostat and will
turn on and off to maintain the set temperature. The ‘Pastry’ function can be used to add extra browning to the
bases of pizzas, pies, and pastries. Cook in the lower half of the oven when you are using only one shelf.
Defrost
The ‘Defrost’ function uses low temperature air that is circulated by the fan. You can defrost (thaw) your food
before you cook it. You can also use ‘Defrost’ to raise your yeast dough and to dry fruit, vegetables and herbs.
Grill
‘Grill’ function directs radiant heat from the powerful upper element onto the food. You can use the ‘Grill’ function
for tender cuts of meat steak, chops, sausages, fish, cheese toasties and other quick cooking foods.
Grill with the oven door closed.
Preheat your grill for 3 minutes to get the best results. This will help seal in the natural juices of steak, chops etc
for better flavour. You can slide your grill dish into either of the 2 spaces within the uppers pairs of support rails.
Maxi Grill
‘Maxi Grill’ directs radiant heat from 2 powerful upper elements onto the food. You can use the ‘Maxi Grill’ function
for tender cuts of meat, steak, chops, sausages, fish, cheese toasties and other quick cooking foods.
Grill with the oven door closed.
‘Maxi Grill’ allows you to take full advantage of the large grill dish area and will cook faster than normal ‘Grill’.
For best results it is recommended to preheat your grill for 3 minutes. This will help seal in the natural juices of
steak, chops etc for a better flavour. You can slide your grill dish into either of the 2 spaces within the upper pairs
of support rails.
Fan Grill
‘Fan Grill’ offers you the benefits of both ‘Bake’ and traditional ‘Grill’ functions. The grill element turns on and off to
maintain set temperature while the fan circulates the heated air.
Fan grill with the oven door closed.
You can use ‘Fan Grill’ for large cuts of meat, which gives you a result that is similar to ‘rotisserie’ cooked meat.
Put your food on a shelf in the second lowest shelf position. Put you grill dish on the lowest shelf to catch any spills.
When using ‘Fan Grill’ it is not necessary to turn food over during the cooking cycle. Set temperature to 180°C.
Pyro
The ‘pyrolytic cleaning’ function cleans by burning off the spatters and accumulated dirt and grease from the
oven liner, at high temperature. This process produces ash which can be wiped out of the oven cavity.
COOKING FUNCTIONS
Page 10
18 EVEP611SB, EVEP614BB EVEP611SB, EVEP614BB 19
OPERATING SEQUENCE
Select the oven function
• Turn the oven function selector clockwise to select the
desired oven function.
Note: each oven function has a default temperature
which can then be adjusted as outlined below.
Selecting the oven temperature
• Toggle the temperature selector (left
– or right +) as
required to set the desired cooking temperatu re in °C.
Note: the temperature can be adjusted at any time
throughout the cooking time.
IMPORTANT!
Pre-heating
For best cooking results , pre-he at the oven. Pre-heating
allows the oven to reach the required temperature
quickly and efficie ntly as well as cook food at the correct
temperature for the entire cook time.
1. With ‘Rapid Heat’ function
This function allows the oven to reach preset
temperature quicker than any other cooking fu nction.
Turn the function selector to ‘Rapid Heat’, then set the
desired temperature, by rotating the oven temperature
selector. When the heating light goes out, the oven
has reached the desired temperature. Select the oven
function required and place the food in the oven.
2. With other oven functions
Set the desired temperature by rotating the oven
temperature selector. When the indicator light
goes out the oven has reached the desire d preset
temperature, place the food in the oven, close the
door and set the timer if you desire.
3. With ‘Grill’ function
Pre-heat the grill for at least 3 minutes to obtain best
results. This will help to seal the natural juic es of steak,
chops and other meats for a better flavour.
IMPORTANT!
Cooling / Vent fan
The appliance is fitted with a co oling fan. This prevents
the kitchen cabinet from overheating and re duces the
condensation inside the oven. It will operate when ever
the oven is in use and blow warm air across the top of the
oven door.
Note: If the oven is still hot from cooking, the cooling fan
will keep running to cool the oven down and will switch
off by itself once cool.
Condensation
Excess condensation may fog the oven door. This may
happen when cooking la rge quantities of food from a
cold start. Minimise conde nsation by:
– Keeping the amount of water used whilst cookin g to
a minimum.
– Making sure the oven door is firmly clos ed.
– Baking custard in a baking dish that is s lightly
smaller than the water container.
– Cooking casseroles wi th the lid on.
Note: If using water in cooking, this will turn to steam
and may condense outside the appliance. This is not
a problem or fault with the oven.
Cooking with the timer
1 2
3
4
25
678910
11
12
13
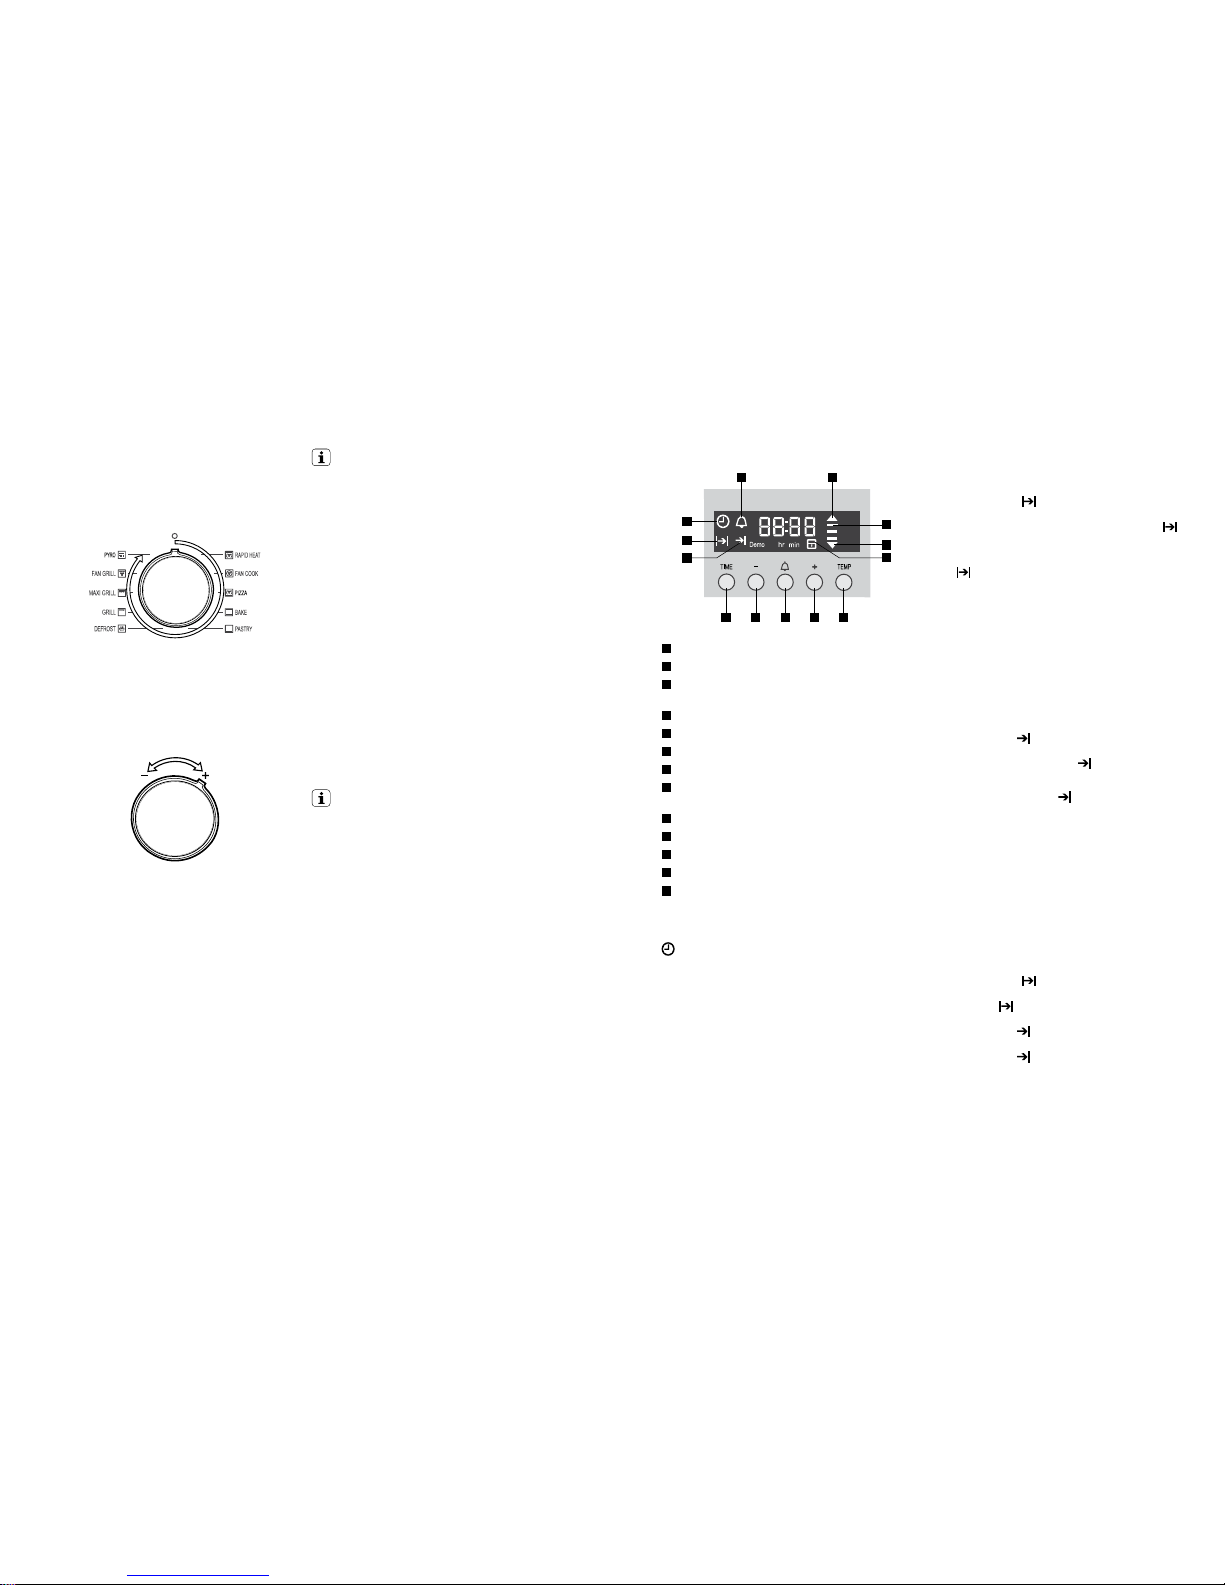
1
On when the timer is set
2
On when oven warming up
3
3 bars displayed when oven reaches set
temperature
4
On when oven cooling down
5
Oven door locked
6
Press to display current oven temperature
7
Press to increase hours/minutes
8
Press to start timer mode.
Hold to turn oven light on/off
9
Press to decrease hours/minutes
10
Press to toggle through the timer modes
11
End time icon
12
Cook time icon
13
Time of day icon
Adjusting t he clock
To change the time, press and hold the ‘TIME’ button
until the clock symbol begins to flash. The hour
display will be ready to change.
• Press
+ or – , then press ‘TIME’ when you have the
right hour.
• The minutes will flas h and can be set in the same
manner.
• 5 seconds af ter the last change, the clock display will
stop flashing, confirming that the time has been set.
Note: The clock has a 24 hour display.
The timer can be used to
turn the oven off in two ways by
setting the cooking time (duration) or by setting the end
time (time of day you want the oven off).
USING THE APPLIANCE
Setting the cook time
1. Use the knobs to select the desired oven function and
cooking temperature.
2. Press the ‘TIME’ button as often as necessar y, until
the ‘cook time’
symbol appears.
3. Set the desired cooking time commencing with
minutes by using the
+ or – buttons, whilst the
symbol is flashing, then press the ‘TIME’ button
again and set the hours by using the + or – but tons.
After 5 seconds from the last time adju stment the
symbol will stop flashing. The applianc e is now
programmed and the display will countdown to zero.
4. When the set time has elapsed, a signal will sound
and the appliance will turn of f. To stop the signal,
press any button on the clock and then tur n the oven
function selector to OFF.
Note: Cooking time cannot be set for the Rapid Heat
function. The feature can be cancelled at any time by
returning the function selector to off.
Setting the end time
1. Use the knobs to select the desired oven function and
cooking temperature.
2. Press the ‘TIME’ button as often as necessar y, until
the ‘end time’
symbol appears.
3. Set the desired end time commencing with hours using
the
+ or – buttons whilst the
symbol is flashing,
then press the ‘TIME’ button again and set the minutes
by using the + or – buttons. After 5 seconds from the
last time adjustment the symbol will stop flashing
and the appliance is now programmed.
4. When the set time has elapsed, a signal will sound
and the appliance will turn of f. To stop the signal,
press any button on the clock and then tur n the oven
function selector to OFF.
Note: Stop time cannot be set for the Rapid Heat function.
Setting the delayed start cooking time
The ‘cook time’ and ‘end time’ functions can be
combined to switch the oven on and off at a specific
time during the day.
1. Select the desired oven function and cooking
temperature.
2. Press the ‘TIME’ button as often as necessar y, until
the ‘cook time’
symbol appears.
3. Set the desired cooking time by using
+ or – buttons,
whilst the
symbol is flashing.
4. Press the ‘TIME’ button as often as necessar y, until
the ‘end time’
symbol appears flashing.
5. Set the desired switch-off time using the
+ or – whilst
the ‘end time’ symbol is flashing.
6. 5 se conds after the last change the ‘cook time’ and
‘end time’ arrows are lit to confirm that the oven has
been programmed.
7. When the delayed star t cooking time has elapsed,
a signal will sound and the applia nce will turn off. To
stop the signal, press any button on the clock and
then turn the oven function selector to OFF.
Note: Delayed start cooking time cannot be set for the
Rapid Heat function. The feature can be cancelled at
any time by returning the function selector to off.
Page 11

20 EVEP611SB, EVEP614BB EVEP611SB, EVEP614BB 21
USING THE APPLIANCE
Releasing the child-proof lock
Press and hold the TIME and
+ buttons at the
same time until a double beep is sound ed. This will
commence to unlock the door and af ter 5 seconds the
oven is ready for use.
Switching the clock display ON a nd OFF
1. Press togethe r
+ and – for 2 seconds to switch ‘off’
the display.
2. Press together
+ and – for 2 seconds to switch the
clock display ‘on’ again.
3. When the display is set to the ‘off’ state pressing the
+ and – button momentarily will display the time for 5
seconds then turn off the disp lay.
4. When the display is set to the ‘off’ state, turning on the
oven will turn the display ‘on’ for the duration of oven
operation. Once the function is turned ‘off’ the display
will turn off after 5 second s.
Note: if a timer mode is set or the oven is operating,
then it is not possible to switch the display off.
Safety Cut-out feature
The oven automatically switches itself off if the temperature
is not adjusted or the appliance is lef t operating after a
period of time. The oven switches itself off af ter:
• 12.5 hours when the temperature is set less
th an 120 °C.
• 8.5 hours when the temperature is set to 120°C
or above, and below 200°C.
• 5.5 hours when the temperature is set to 200°C
or above, and below 250°C
• 3.0 hours when the temperature is set at 250°C.
DEMO Mode
The oven can be set to operate in a demo mode (eg in a
retail store). In this mode the display works and functions
can be set but the oven does not actually heat. Whe n
in this mode the text ‘DEMO’ will be lit. The following
instructions show how to enter and exit ‘Demo’ mode.
1. Ensure the oven is in the off state. Press and hold the
+ button until a beep sounds. The ‘Demo’ text will
begin to flash.
2. While holding the
+ button turn the function selector
to the first oven function until another beep is heard.
3. Then turn the function selector to the ‘off’ position.
4. Release the
+ button.
5. Toggle and hold the temperature selector to the right
(
+) until 3 beeps sound.
Additional Functionality
Setting the countdown timer
Use this for timing any activit y. For example boiling eg gs.
1. Press the button, the display will flash.
2. Set the countdown time you want by using
+ and
–. Commence with setting the number of seconds
first. The minutes and hours can then be s et by
subsequently pressing the button again and
adjusting using the + or – buttons. 5 seconds after
the last change the timer will stop flashing, confir ming
the timer has been set.
3. To cancel the timer press the
button, the display
will flash. Then press and hold + and – buttons until
the timer is cleared.
4. To stop the beeper, press any button.
Note: The clock display cannot be selected when the
timer is operating.
Elapsed Time
When an oven function is selected (other than pyroly tic
clean) an elapsed timer commences on the display.
To reset this timer press and hold both the
+ and –
buttons until the timer is reset.
Displaying the cavity temperature
During operation of the oven the current oven
temperature during pre-heating of the oven can be
displayed by pressing the TEMP button. During no rmal
operation the set temperature can be reviewed by
pressing the TEMP button.
Note: this temperature will only be displayed for
approximately 5 seconds.
Light operation
During operation of the oven the light can be switched of f
by pressing and holding the
button until the light turns
off. Also the light can be turned on from the sta ndby
state by pressing and holding the button until the light
comes on.
Activating the child-proof lock
When the child lock is engaged, the oven ca nnot be
operated and the door cannot be opene d
1. Switch off the appliance using the function selector
switch.
2. Press and hold the TIME and
+ buttons at the same
time until the word ‘SAFE’ is displayed and a double
beep is sounded. The word safe will be repl aced by a
padlock symbol on the display after 5 se conds.
Get to know your new oven with this
‘Simple Test Cake’
Although we strive for a perfect pe rforming oven, it’s
possible that there will be some variation i n colour when
baking. Therefore, we suggest this simple, easy and
delicious to make Simple Test Cake, it can help you
understand your new oven. All ovens do sometimes have
hot or cold spots, therefore it is important to judge with
your eye as you may require to rotate during baking.
‘Simple Test Cake’
125g butter, softened to room temperature
1 cup caster sugar
1 teaspoon pure vanilla essence
4 large eggs
2 cups self-raising flour
pinch of salt
4 tablespoons (80mL) full-c ream milk
Method:
1. Butter bas e and sides of two, 20cm straight-sided
round or square cake pans. Then line the base w ith
grease proof or baking paper.
2. Preheat oven to moderate ‘180ºC’ (170ºC fan forced)
and ensure oven shelf is in the centre position of oven.
3. Cre am softened butter and sugar until light in colour.
4. Add vanilla essence.
5. Then eggs one at a time, beating well after
each addition.
6. Si ft flour and salt into the mixture and beat until
well combined.
7. Add milk and beat or stir to combine.
8. Spo on mixture equally between prepared cake pans.
9. Bake in preheated oven, middle shelf for about
25 to 35 minutes or until when tested with a fine
cake skewer it comes out clean or the edge s of
the cakes have come away slightly from the sides
of the cake pans.
10. Remove from oven to wire cake rack and rest for
5 minutes before removing from cake pans.
Cool completely.
To Serve: sandwich together with your favourite jam or
conserve, and dust top with pure icing suga r.
Note: if desired substitute butter for either margarine
or olive oil spread. Recipe is based on the Australian
standard metric 250mL cup and 20mL tablespoon sets.
GETTING TO KNOW THE OVEN
Page 12
EVE613SA, EVE616BA, EVE623SA, EVE633SA 2322 EVEP611SB, EVEP614BB
Pyrolytic cleaning of the oven cavity
The oven has the Pyrolytic self-cleaning function, it
cleans by burning off the spat ters and accumulated dirt
and grease from the oven liner, at high temperature.
This process produces ash w hich can then be wiped
out of the oven cavity.
WARNING!
During the pyrolytic cleaning process the oven
becomes extremely hot.
• Please keep small children at a safe dista nce.
• Never clean non-stick baking trays and tins in the
oven during the pyrolytic cycle. High temperatures
damage the non-stick coating and poisonous gas
is released
• To prevent damage, do not use acids, sprays or
similar cleaning agents.
CAUTION!
• During pyrolytic cleani ng the air outlet exhaust
above the door must be kept clear of any
obstruction (eg bulky tea towels).
• Do not use the oven to clean miscellaneous items
(eg c ook ware).
Before carrying out the Pyrolytic function
1. All accessories must be removed from the oven,
including shelves, trays and side racks.
2. Clean large de posits, spills or grease from the
oven cavity.
3. Choose the Pyrolytic cleaning cycle from the
following:
soiling duration
light clean 1hr 30mins
normal clean 2hr 30mins
Note: Duration includes heat-up time, excluding
cool-down time.
• Light clean
This is an energy saving cycle that can b e used on a
regular basis if the oven is lightly soiled. Possibl y after
every 2nd or 3rd roast.
• Normal clean
Use this as the regular cycle about once ever y
2-3 mo nths.
CLEANING THE OVEN
Pyrolytic Cleaning Operation
The pyrolytic cleaning function can be selected by
turning the function selector switch clockwise to
the pyrolytic position. Use the
+ or – buttons on the
electronic clock to toggle between a pyroly tic cleaning
time of 1:30 hours or 2:30 hours. The pyrolytic function
can be stopped at any time by turning the function
selector counterclockwise to the OFF position.
IMPORTANT!
During Pyrolytic cleaning the door will automatically
lock when the temperatur e in the oven approaches
300˚C.
will appear on the display. During the
pyrolytic cleaning cycle there may be some burn
off odours. It is advi sed to keep the room well
ventilated during this cycle.
When the pyrolytic cleaning function is on, it is advisable
not to use a cooktop if it is fitted above the oven. This
could cause overheating and damag e to both appliances.
The door will only unlock wh en the oven has cooled to a
safe temperature. Turning the function off will not unlock
the door. This will only happen when safe temperatures
are reached.
Note: The cooling fan will operate at an increased speed
for Pyrolytic cleaning and will continue to run until the
oven has cooled down. This is normal.
It is recommended to clean the oven regularly to keep it
in its best condition.
After Pyrolytic cleaning
After cool-down, wipe the ash out of the oven with a
soft damp cloth and warm water.
To restore the enamel shine to more difficult areas, use
a damp cloth with vinegar and detergent.
CAUTION!
Do not turn off the mains p ower supply to the oven
during the pyrolytic cycle. This could damage the
appliance.
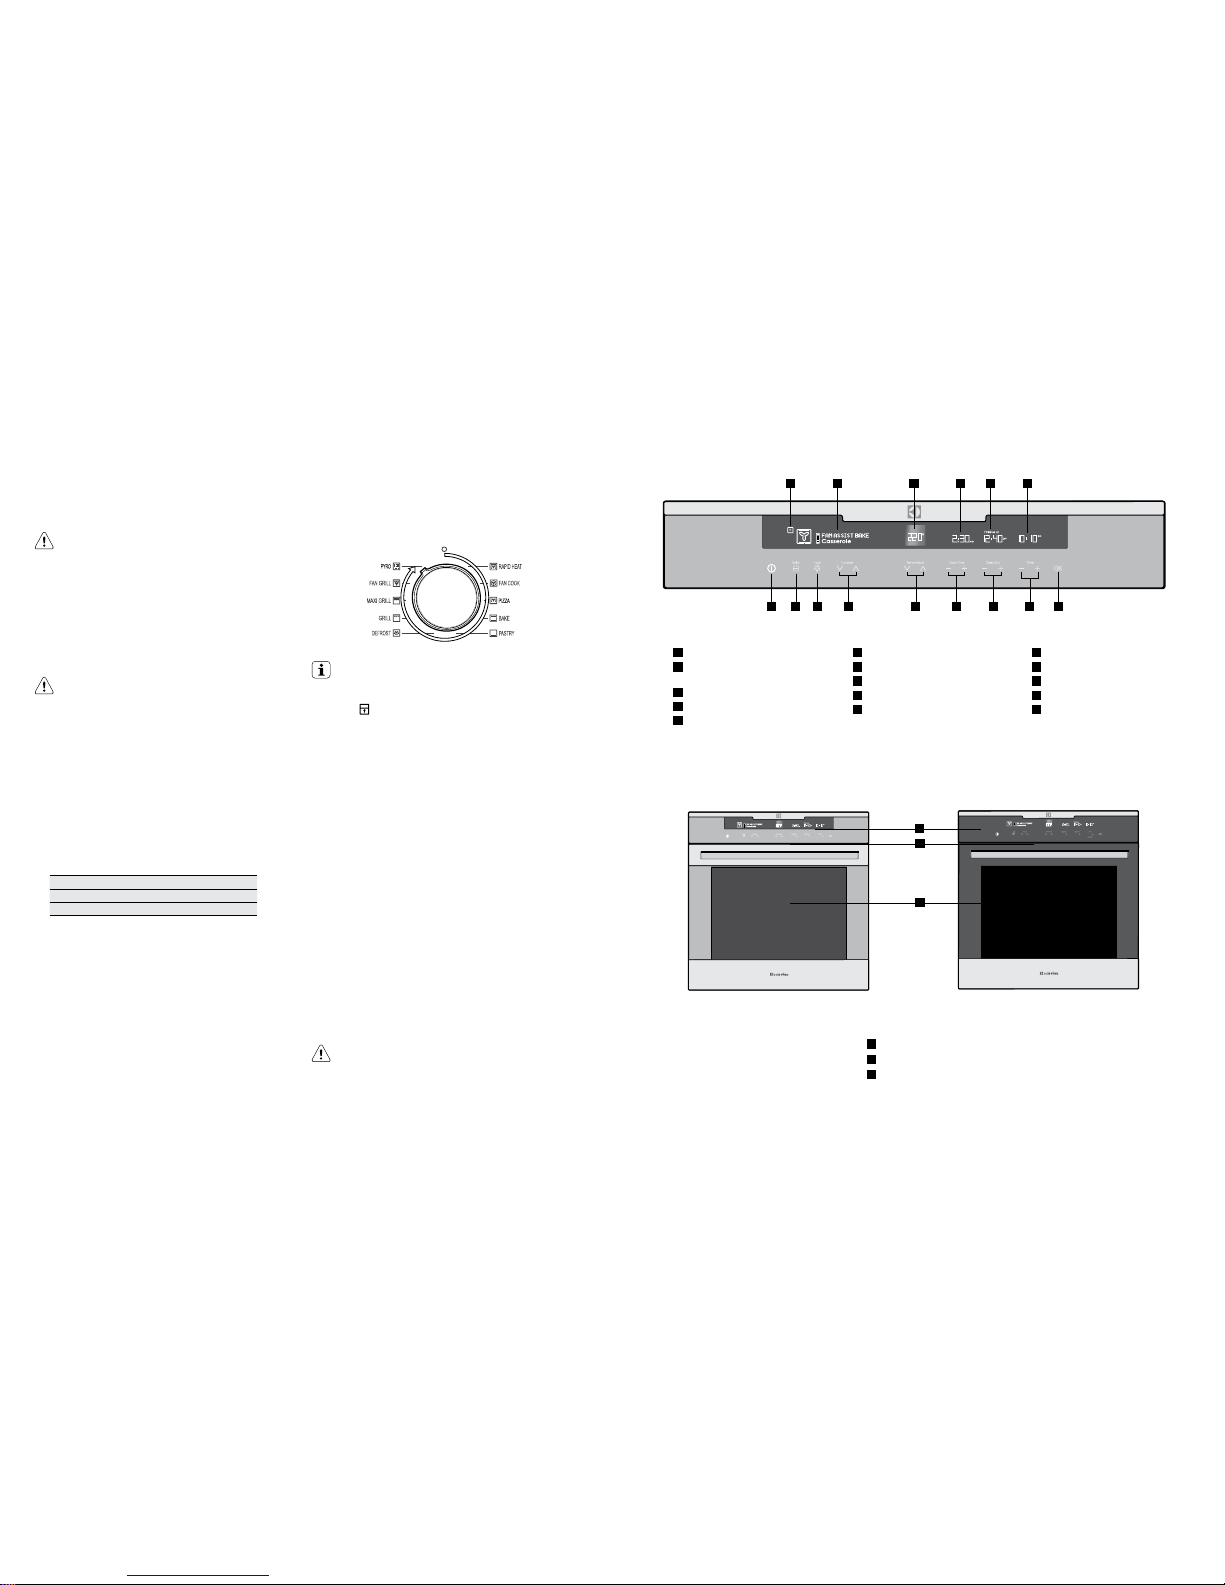
EVE613SA, EVE616BA COMPONENTS
1
ON/OFF
2
Upper/Lower oven selector
(E VE623SA and EVE633SA only)
3
Light on/off
4
Cooking function selector
5
Temperature control
6
Cook time control
7
Delay end control
8
Set clock and timer control
9
Instant confirm
10
Oven cavity ico n
(EVE623SA an d EVE633SA only)
11
Cooking function display
12
Temperature display
13
Cook time display
14
Delay en d display
15
Clock/timer display
16
Control panel
17
Warm air exhaust
18
Triple glazed door
17
16
EVE613SA - single cavity s tainless steel model EVE616BA - single cavit y black model
1
10 11 12 13 14 15
92 3 4 5 6 7 8
18
Page 13
24 EVE613SA, EVE616BA, EVE623SA, EVE633SA EVE613SA, EVE616BA, EVE623SA, EVE633SA 25
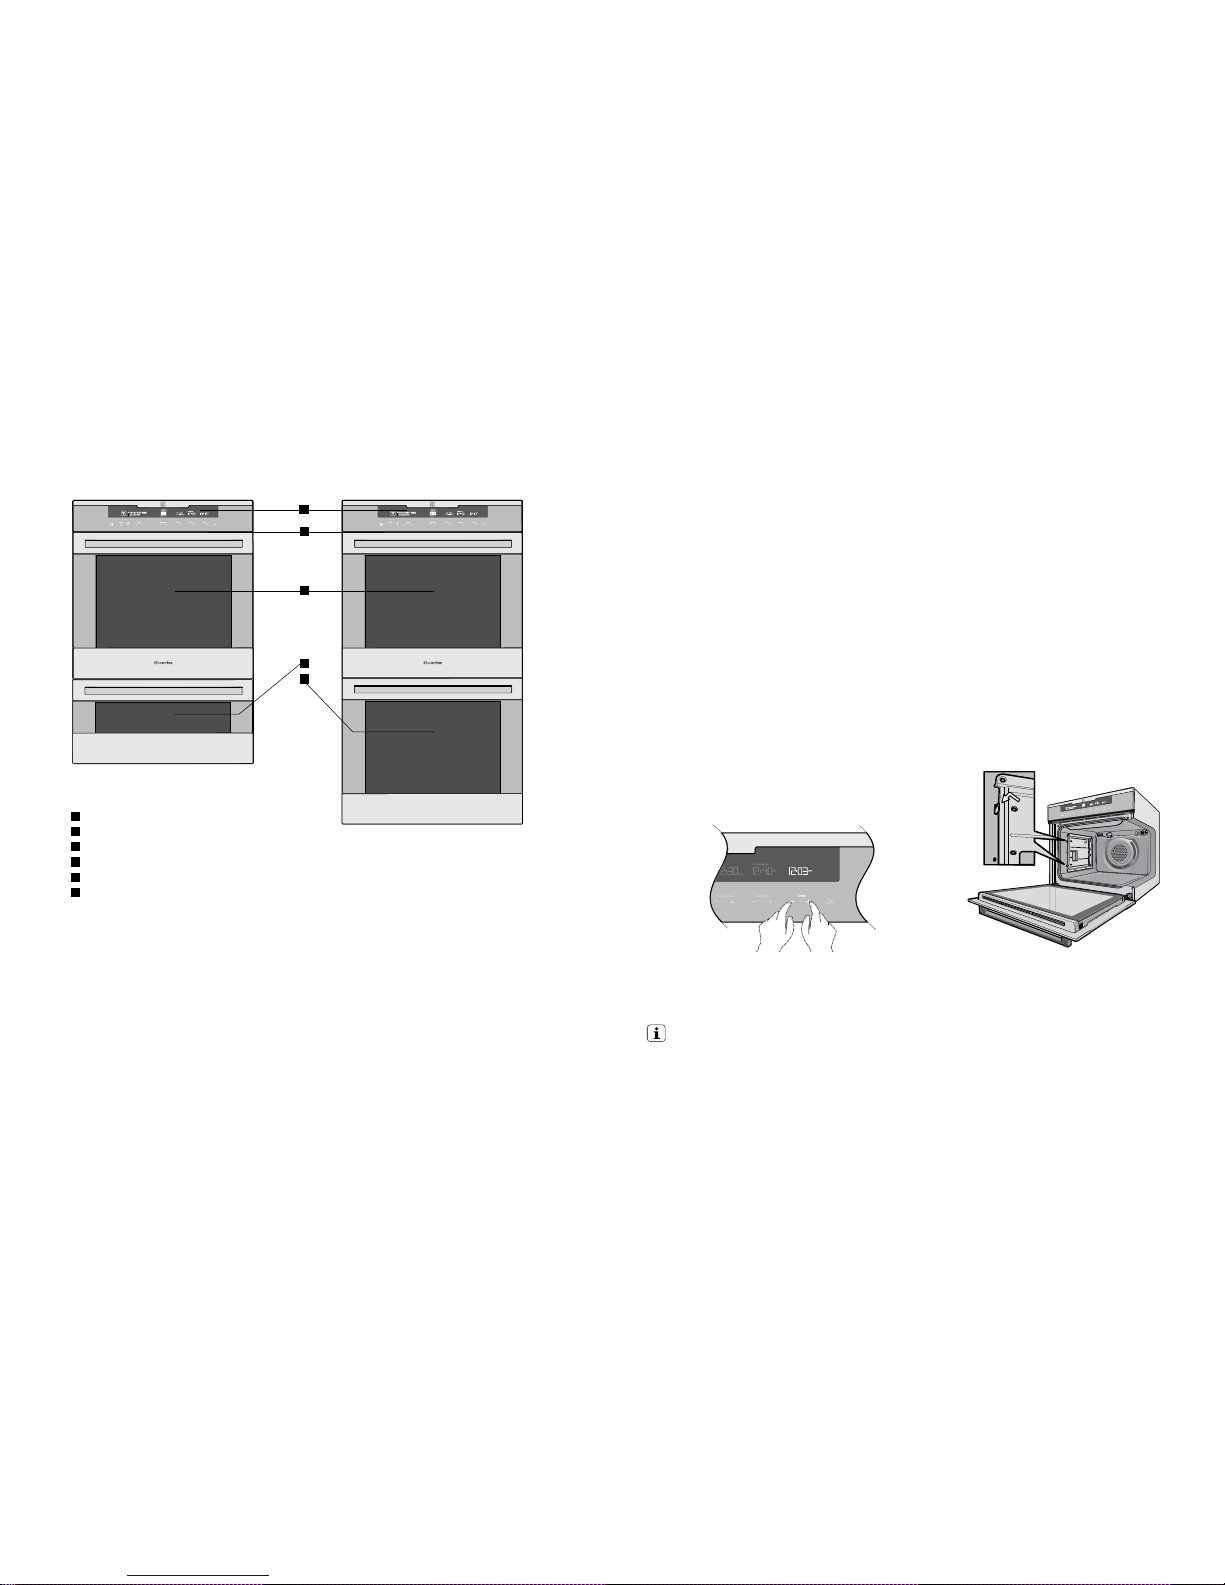
EVE623SA, EVE633SA COMPONENTS
16
Control panel
17
Warm air exhaust
18
Triple glazed door
18
Upper main oven with triple gla zed door
19
Lower (half sized) oven with triple gla zed door
20
Lower (full sized) oven with triple glazed do or
17
19
20
16
EVE623SA - double cavity model (duo)
EVE633SA - double cavity oven
(double wall oven)
18
Preparing the appliance
1. Please remove all stickers, leaflets and boxes from the
door and from the floor of the oven before operation.
2. Please wipe out the oven interior prior to operation
with warm soapy water and polish dry with a sof t
clean cloth. Do not close the oven door until the oven
is completely dry.
3. Do not line the oven with foil. It will damage
the enamel.
Setting t he time
The time of day must be set before the appliance
can ope rate.
After the appliance has been electrically connected the
display will cycle through the welcome screen, the n ‘Set
Clock’ will illuminate under the clock d isplay and the Hour
digits will flash.
1. Use the timer
+ and – to set the hour portion of the
current time (including AM/PM).
2. Press OK when the hours are set correctly. The
Minute digits will flash.
3. Use the timer
+ and – to set the minutes portion of
the current time.
4. Press OK when the minutes are set correctly. You can
turn the off the oven or it will do so after 8 se conds.
Once the time has been entered, the clock adva nces
minute by minute.
Note: The clock has a 12 hour display and will
remember the time for 3 days without power.
IMPORTANT!
New appliances can have a smell du ring first use.
It is recommended to ‘run in’ the oven befor e
cooking for the first time. O perate the oven, empty,
at a temperature of 180° C for approx imately
30 minutes.
Please ensure the room is wel l ventilated during
this process.
BEFORE USING THE APPLIANCE
Installing your oven accessories
• Catalytic liners
The oven will arrive with a cataly tic fan baffle and top panel
already fitted. Optional side panels a re also supplied and
may be fitted before installing the side racks. The so le
purpose of the side panels is to make cleaning the oven
easier. Omitting them will have no effect on the coo king
performance of the oven. They can be fi tted at any time
by removing the side racks. The cataly tic liners supplied
attach to the left and right sides of the oven. Plea se note
that there is a different version for ea ch side. They are
marked ‘LH’ or ‘RH’
1. Position the first lin er as per the diagram. The black,
shiny side of the liner should be facing the oven wall
with the hooks pointing down. Note that the diagram
shows the left hand liner. The right hand side will b e a
mirror image of this.
2. Line the hooks up with the slots provided in the oven
wall, push them in and then allow the liner to slide
down to its final position. All four hooks MUST be
engaged in the slots.
3. T he access hole for the side racks should be visible
when the liner is correctly positioned – see diagram.
Note: If you have purchased an EVE623SA OR
EVE633SA you will have additional catalytic liners
for the extra oven cavity.
Page 14
26 EVE613SA, EVE616BA, EVE623SA, EVE633SA EVE613SA, EVE616BA, EVE623SA, EVE633SA 27
BEFORE USING THE APPLIANCE
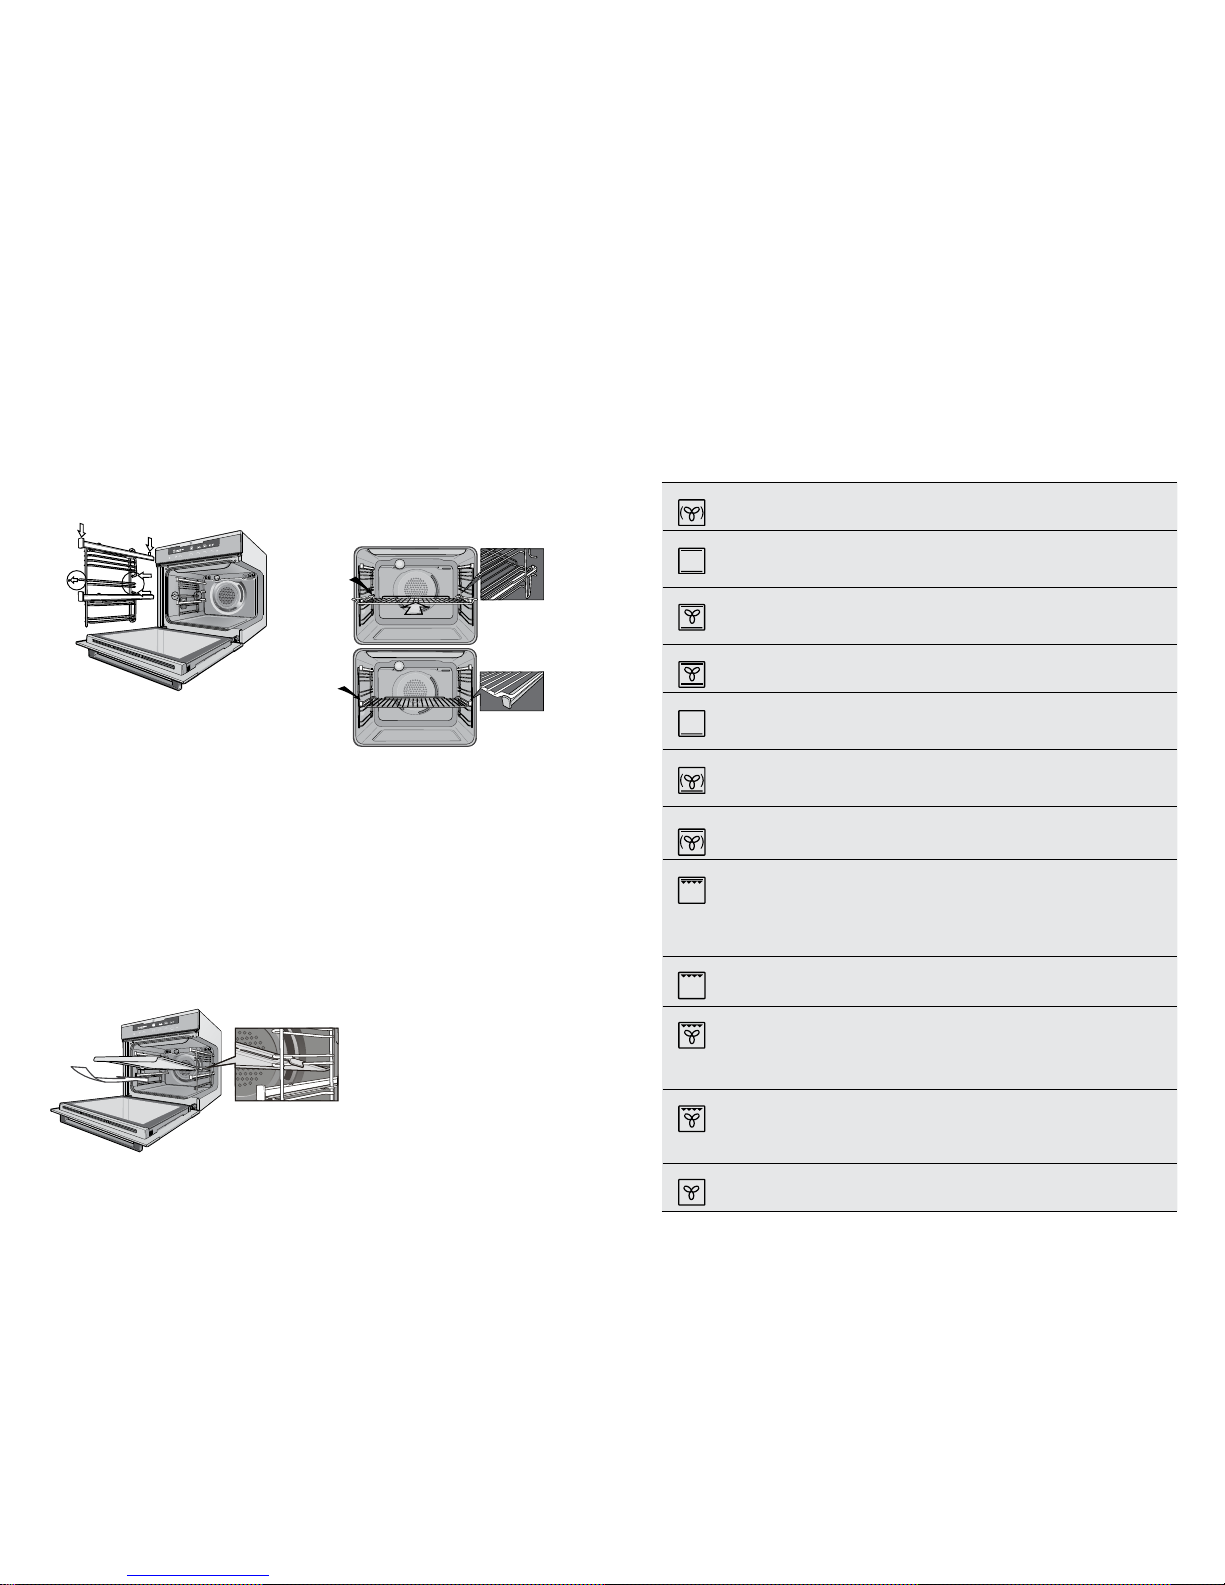
• Side racks
1. Inser t the twin pegged side into the rear access holes
provided, ensuring pegs are fully in serted.
2. Then locate the front peg into the front access hol e
and push in firmly.
Note: If you have purchased an EVE623SA you will have
additional side racks for the lower oven/grill. These are
fitted in a similar manner, however the left hand side rack
must be fitted to the lower two holes of the half cavity.
• Shelves and trays
The shelves are designed s o that they have maximum
extension but cannot be accident ally pulled right out.
The trays are designed the same way and slot straig ht
into the side racks.
To fit a shelf or tray to side racks:
1. Locate the rear edge of the sh elf/tray in between the
guide rails of the side rack – see diagram. Ensure
the same rail positions on both sides of the oven are
being engaged.
2. With the front edge raised, begin to slide the she lf into
the oven.
3. O nce the detents have passed the front edge of the
side rack, the shelf can be pushe d completely in.
4. When fully inserted the shel f/tray should not interfere
with the closed oven door.
To fit a shelf or tray to telescopic slides:
1. With the slide s fully pushed in, push the shelf or tray
along the top of the slide until it hits the back post.
2. Drop the front of the shelf or tray onto the slide
ensuring it sits behind the front post of the s lide.
3. W hen fully inserted the shelf/tray should not interfere
with the closed oven door.
Symbol Function description
Fan cooking
Heat comes from the element surrounding the fan. This fan circulates the hot air around the oven cavity so that
you can put your food in different places in the oven and still cook them at the same time. You can use the ‘Fan
Cooking’ function for multi-shelf cooking, reheating cooked foods, pastries and complete oven meals. It will cook
at a lower temperature and be faster than baking. Please note that some variation in browning is normal.
Traditional bake
Heat comes from two elements, one above and one below the food. The bottom element is a clean heat element
and is below the floor of the oven. Both elements are controlled by the thermostat and will turn on and off to
maintain set temperature. You can use the ‘Traditional Bake’ function for single shelf cooking, single trays of
biscuits, scones, muffins, cakes, slices, casseroles, baked puddings, roasts and delicate egg dishes. This is a
general function that can be used for most cooking.
Fan assist bake
Heat comes from two elements, one above and one below the food. The fan circulates the hot air around the
oven cavity so that you can put the food in different places in the oven and still cook them at the same time.
You should only use a maximum of two shelves with ‘Fan Assist Bake’.
Do not use the bottom shelf. If the two shelves are used, food on the shelf in the higher position will cook first
and should then be removed to allow the food on the lower shelf to finish cooking.
Roast
This function starts at a higher temperature to seal the meat. The oven will then automatically reduce to the
selected temperature to cook the meat for as long as desired. For example, if you use the default 200°C the
‘Roast’ cycle will start at 240°C and then lower to 200°C.
Pastry
The ‘Pastry’ function is specially designed for food that require extra browning such as the bases of pastries and
pies. Heat comes from the element below the food. If you choose the default setting, the oven will heat up to
230°C in order to brown the food.
You should then lower the temperature as required. Cook in the lower half of the oven when you are using only
one shelf.
Pizza
‘Pizza’ is a combination of ‘Pastry’ and ‘Fan Assist Bake’ and offers you the combined benefits of both functions.
Heat switches between the element surrounding the fan and the clean heat element below the oven floor.
The ‘Pizza’ function is ideal for foods that require cooking and browning on the base. It is for foods such as
pizzas, quiches, meat pies and fruit pies. Simply place the food in the middle of the oven and set the desired
temperature.
Cook from
frozen
The ‘Cook from Frozen’ function is ideal for cooking frozen precooked foods such as savoury pastries, pizzas,
mini meals (TV dinners), meat pies and fruit pies. Heat comes from the element surrounding the fan as well as a
smaller element above the food. Simply place the food in the oven straight from the freezer and heat. Cook in the
upper half of the oven for best results.
Full grill
‘Full Grill’ direct radiant heat from two powerful upper elements onto the food. You can use ‘Full Grill’ function for
tender cuts of meat, steak, chops, sausages, fish, cheese toasties and other quick cooking foods.
Grill with the oven door closed.
‘Full Grill’ allows you to take full advantage of the large grill dish area and will cook faster than the ‘Half Grill’
function. For best results it is recommended to preheat your grill for three minutes. This will help seal in the
natural juices of steak, chops etc for a better flavour.
You can slide your grill dish into either of the two spaces within the upper pairs of support rails. Full Grill has 2
temperature settings, ‘LO’ and ‘HI’.
Half grill
The ‘Half Grill’ directs radiant heat from only one of the powerful upper elements onto the food. The ‘Half Grill’
function is used instead of ‘Full Grill’ when only half the amount of heat is needed. Half Grill has 2 temperature
settings, ‘LO’ and ‘HI’.
Grill with the oven door closed.
Fan grill
‘Fan Grill’ offers you the benefits of both traditional bake and traditional grill functions. The grill element turns on
and off to maintain set temperature while the fan circulates the heated oven air.
Grill with the oven door closed.
You can use ‘Fan Grill’ for large cuts of meat, which gives you a result similar to ‘rotisserie’ cooked meat. Put
your food on a shelf in the second lowest shelf position. Put the grill dish on the lowest shelf position to catch any
spills. When using ‘Fan Grill’ it is not necessary to turn the food over during the cooking cycle. Set temperature
to 180°C.
Keep warm
The ‘Keep Warm’ function is a low temperature oven function designed to keep your food at a perfect eating
temperature without cooking it further. Heat comes from the smaller elements above the food and is circulated by
the fan. Use ‘Keep Warm’ to keep your food warm while you prepare the rest of the meal or afterwards while you
wait for the late arrival.
Note: After cooking, the oven retains enough heat to continue to cook food even if the elements are turned off. The
‘Keep warm’ function recognises this by giving you a warning message. If this happens the function will not start.
Defrost
The ‘Defrost’ function uses low temperature air that is circulated by the fan. You can defrost (thaw) your food
before you cook it. You can also use ‘defrost’ to raise your yeast dough and to dry fruit, vegetables and herbs.
The ‘Defrost’ function does not have a suggested temperature but uses the ambient heat in the oven cavity.
COOKING FUNCTIONS
Page 15
28 EVE613SA, EVE616BA, EVE623SA, EVE633SA EVE613SA, EVE616BA, EVE623SA, EVE633SA 29
OPERATING SEQUENCE
Turning the oven on
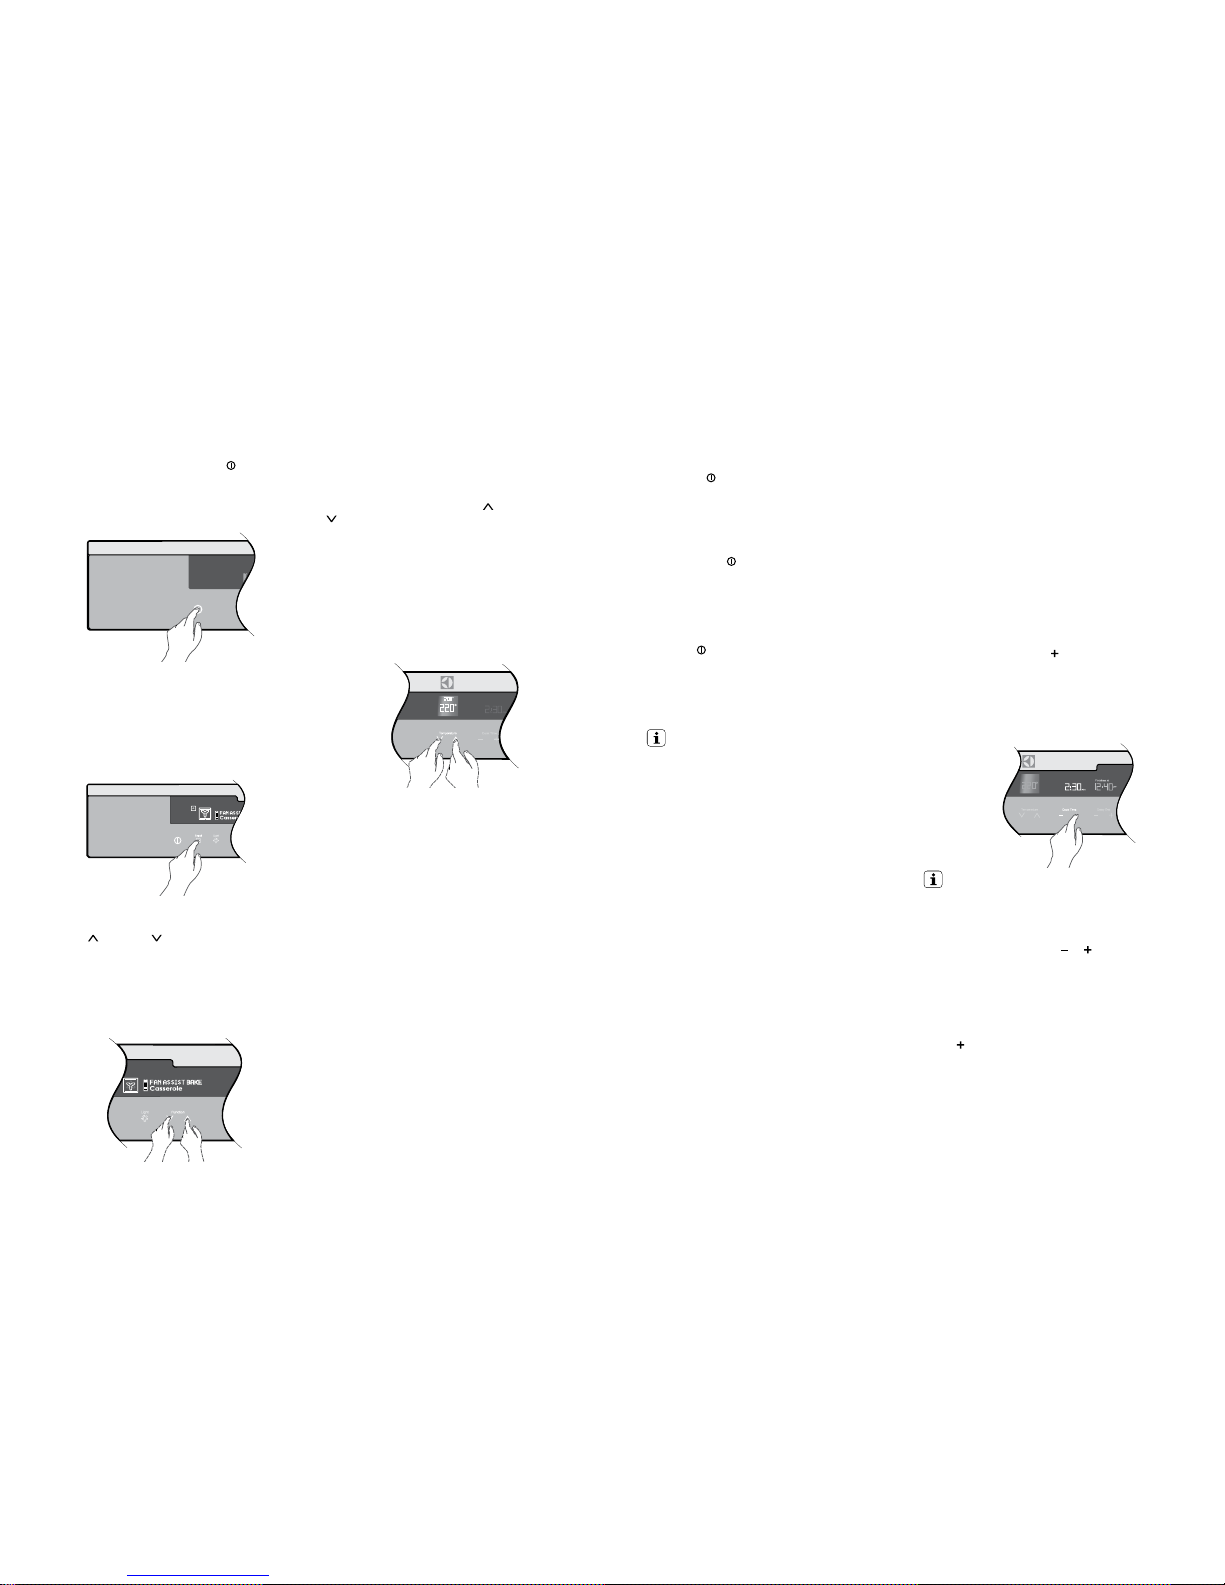
• Switch on the oven by touching the
ON/OFF
symbol. The control panel will come on a nd inform
you that you need to select a cooking functio n.
• If you do not select a function wi thin 20 seconds the
oven will turn off.
Selecting the Upper or Lower oven
(EVE623SA, EVE633SA)
These models are
equipped with two ovens. Use the
oven selector symbol to toggle between the upper a nd
lower ovens.
The oven cavity icon on the control pane l will show which
oven is currently active.
Select a cooking function
The oven will have a selection of functions. Press the
function
or function symbols as m any times as
necessary until the desired function appears.
Cooking suggestions will ap pear under the function
name and suggested cooking temp eratures will appear
above the temperature selector.
If no other symbol is touched within 8 seconds th e oven
will switch on and begin to heat up to the displayed
temperature.
Selecting a temperature
The temperature is electronically controlled.
The temperature can be selected within th e range of 30°C
to 250°C and can be adjusted at any time. To set the
temperature, press the temperature
and temperature
symbols to reach the desired setting.
Tou ch
OK, or if no further change s are made within
8 seconds the oven begins to heat up to the set
temperature. The current oven temperature will appear
above set temperature. This will change as the oven heats
up and the background colour will change f rom grey
to red.
When the temperature is reached, ‘Set temperature
reached’
will appear and only the target temperature w ill
be displayed.
Turning the oven off
Single cavity models:
Touch the
ON/OFF symbol to switch off the oven.
As the appliance cools down, ‘cooling’ will be displayed
until the oven is below 100°C
Double cavity models:
1. Touch the upper/lower oven selector symbol to
toggle to the desired oven.
2. Touch the
ON/OFF symbol to switch off the
desired oven. The control panel will turn of f to
confirm that the oven is now switched off.
3. If the other oven is still active, after 1 second, the
control panel will automatically revert to show the
setting of that oven.
4. To turn off both ovens at once, touch and hold
the
ON/OFF symbol for 1 second. All elements,
cavity light and the control panel wi ll then switch off
at the same time.
5. If both ovens are off as the appliance co ols down,
‘cooling’ will be displayed until both ovens are below
approximately 100°C.
IMPORTANT!
Pre-heating
Pre-heating the oven is recommended in several c ooking and
grilling functions. Pre-heating the oven allows it to reach
the required temperature quickly and ef ficiently as well as
cook foo d at the correct temperature for the entire cook time.
These models are equippe d with a built-in rapid heat up
mode that activates each time you start an oven fun ction.
During the rapid heat-up mode the heat comes f rom the
element surrounding the fan as well as the smaller element
above the food. This combination will heat up the oven
30% quicker than it would on standard ‘Bake’ function.
The oven will automatically revert to the set cooki ng
function once the preset temperature is reached.
Cooling / Vent fan
The appliance is fitted with a co oling fan. This prevents
the kitchen cabinet from overheating and re duces the
condensation inside the oven. It will operate when ever
the oven is in use and blow warm air across the top of the
oven door.
Note: If the oven is still hot from cooking, the cooling fan
will keep running to cool the oven down and will switch off
by itself once cool.
Condensation
Excess condensation may fog the oven door. This may
happen when cooking la rge quantities of food from a cold
start. Minimise condensation by:
• Keeping the amount of water used whi lst cooking to a
minimum.
• Making sure the oven door i s firmly closed.
• Baking custard in a ba king dish that is slightly smaller
than the water container.
• Cooking cas seroles with the lid on.
USING THE APPLIANCE
Note: If using water in cooking, this will turn to steam
and may condense outside your appliance. This is not a
problem or fault with your oven.
Cooking with the timer
The oven is equipped with a programma ble controller that
can be used to turn the oven on and off automaticall y. The
‘cook time’ controls are used to automatically turn the oven
off after a set amount of time. The ‘Delay End’ controls are
used to set the time of day you want the cooking cycle
to finish .
Setting the cook time
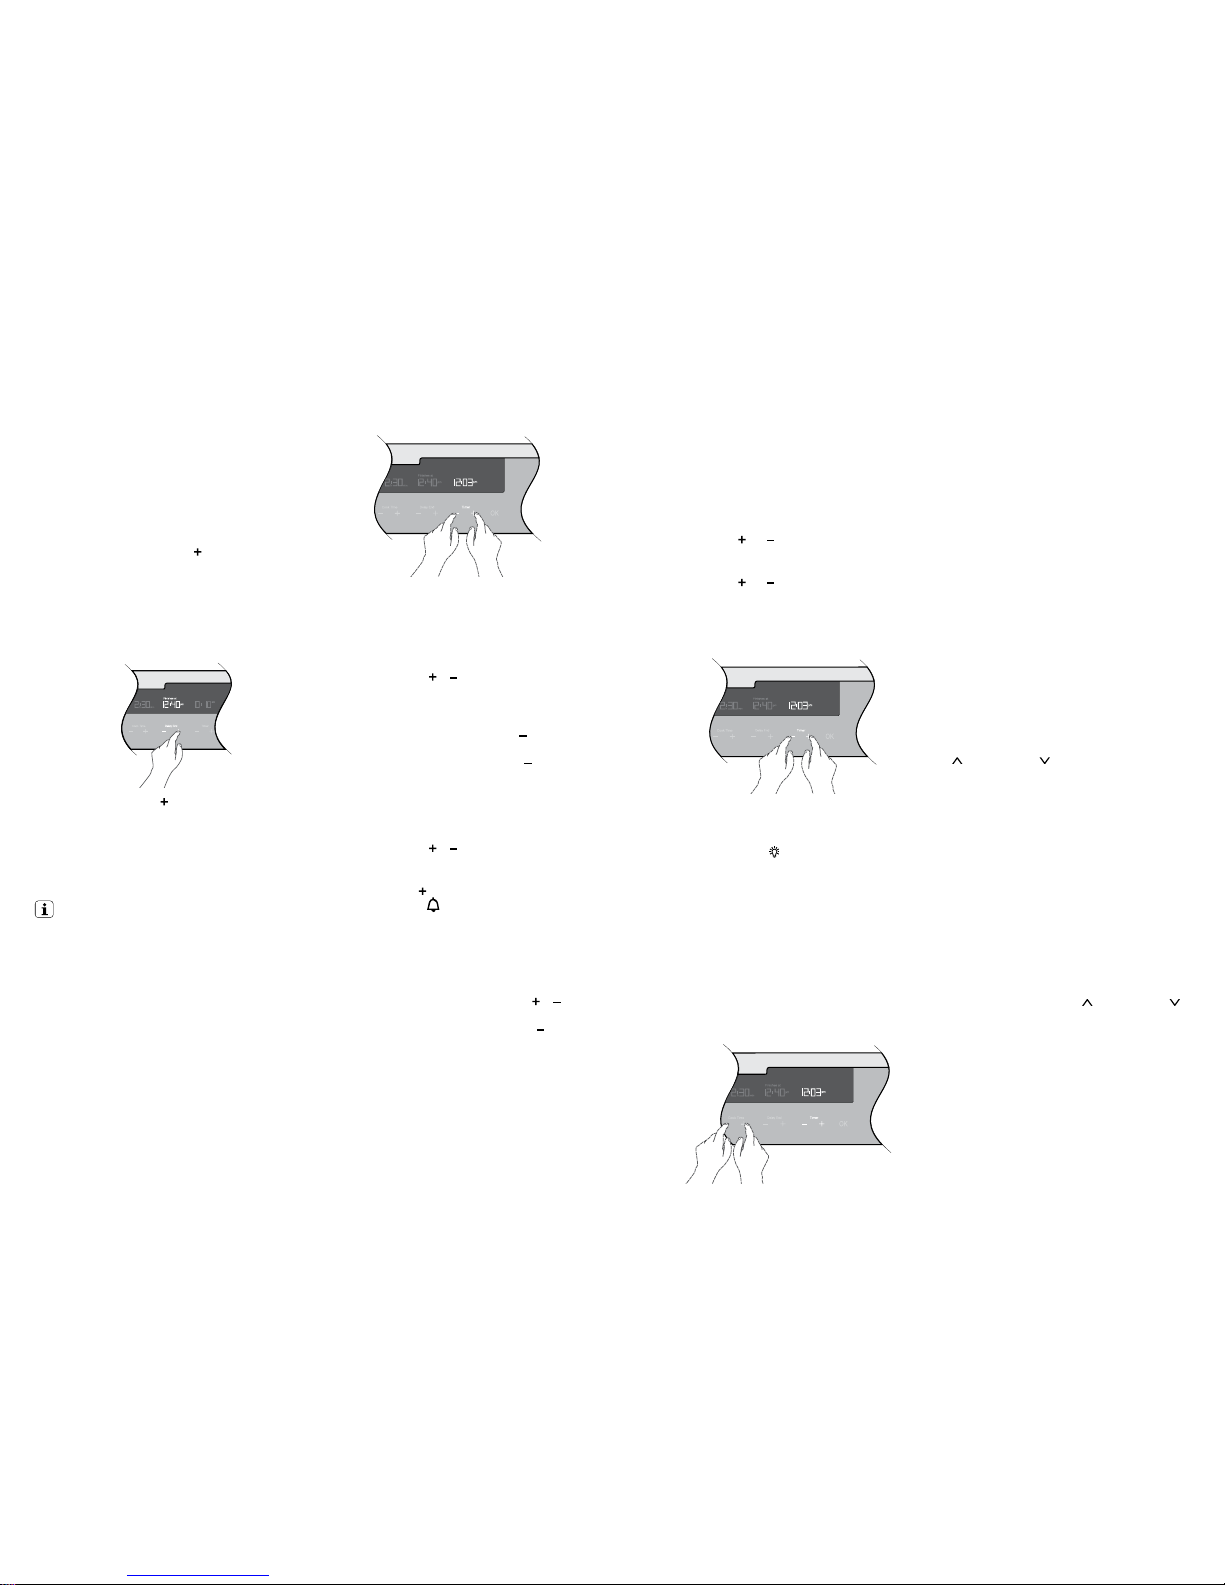
1. Select the desired oven function and cooking
temperature.
2. Touch the ‘cook time’
symbol as often as necessa ry
(or hold), until the desired cook time has been set.
3. Touch ‘OK’ or after 8 seconds f rom the last time
adjustment the oven will start cook ing and the ‘cook
time’ display will countdown to zero.
4. The oven will turn off and beep whe n the ‘cook time’
display reac hes zero.
IMPORTANT!
• When you use the ‘cook time’ function, the ‘Finishes
at’ display activates and tells you what time of day the
oven will turn off (based on the set cook tim e).
• The cook time can be changed in the first 30 seconds
by using the ‘cook time’
or symbols.
• When the cook time has elapsed, an audible signal
will sound for 2 minutes, the oven will switch off and
COOKING FINISHED will be displayed.
• To stop the audible signal, press any of the symbols
on the control panel.
• If you wish to cook a bit longer, press the ‘cook time’
symbol for each additional minute you require.
The oven automatically reverts to the function and
temperature previously programmed. This feature is
available for 5 minutes after cooking h as finished.
After that, the oven automatically switches off.
Page 16
30 EVE613SA, EVE616BA, EVE623SA, EVE633SA EVE613SA, EVE616BA, EVE623SA, EVE633SA 31
USING THE APPLIANCE
Setting the count up timer
The timer can be used indepe ndently of the oven for
measuring a count up period. T here is no alert provided
with this timer.
1. Touch either ‘timer’
or
2. 00min will be displayed along with a be ll and the up
arrow will flash.
3. To begin the count up timer press OK.
4. To reset the count up timer, press ‘timer’
once to
show 00min. Press OK to restart.
5. To cancel the count up timer press ‘ timer’
twice.
Setting the count down timer
The timer can be used indepe ndently of the oven for
setting a count down period. When the p eriod of time has
elapsed, an audible signal sounds.
1. Touch either ‘timer’
or .
2. 00min will be displayed along with a be ll and the up
arrow will flash.
3. Touch the ‘timer’
to set the countdown period.
4. The timer bell icon
will flash.
5. To begin the count down timer press OK or wait 8
seconds. When the timer star ts, the bell will stop
flashing and the timer will begin to count down.
6. W hen the set time has elapsed, an audible signal will
sound for 2 minutes. The time indication ‘00mi n’ and
the timer bell will flash on the display.
7. To stop the signal, touch either of the ‘timer’
or
symbols.
8. To cancel the count down time r touch ‘timer’
until
the normal time of day is displayed.
Setting the delay end time
The delay end function can be us ed to switch the oven on
and off at a specific time during th e day.
1. Check the clock displays the correct time of day.
2. Select the desired oven function and cooking
temperature.
3. Set th e required cook time.
4. Touch the ‘delay end’ symbol
to move the end time.
5. Touch ‘OK’ or after 8 seconds from the last time
adjustment the SET icon will light a nd the oven is now
programmed. The oven will start i ts cooking cycle to
finish at the set ‘end time’.
6. When the oven has finished cooking, cook time ca n
be extended or the beeper turn ed off just as in ‘cook
time’ mode.
7. Touch the ‘delay end’ symbol to move the end time
forward.
8. Touch ‘OK’ or after 8 seconds from th e last time
adjustment the SET icon will light a nd the oven is now
programmed.
The oven will commence its cooki ng cycle to finish at the
set ‘end time’.
IMPORTANT!
• 30 seconds af ter a cooking function has sta rted, it is
no longer possible to delay the end time.
• In order to delay a cooking f unction that has already
started, the oven needs to be switched off then
switched on again and re-programmed.
• Even though the heating eleme nt turns off the oven
will still retain substantial heat. This will contin ue to
cook the food until it is removed or the oven cools
down. If you do not plan on being present when the
oven turns off, you should take this extra heating
time into account.
Timers
The appliance has two timer s which can be used one at a
time. The count up timer can be used to measu re a period
of time. The count down timer beeps at the end of a
preset time.
Adjusting the clock
1. Switch on the oven by touching ‘ON/OFF’ symbol.
2. Select ‘SETTINGS’ from the fu nction list and touch
OK.
3. Se lect ‘SET CLOCK’ from the list and touch OK
4. ‘Set Clock’ will illuminate under the clock display.
5. Use the timer
and to set the hour portion of the
current time (including AM/PM).
6. Touch ‘OK’ when the hours are set cor rectly.
7. Use the timer
and to set the minutes portion of the
current time.
8. Touch ‘OK’ when the minutes are set corre ctly. TIME
SAVED will be displayed and then the function display
will revert to the ‘set clock’ menu. Turn the oven off or
it will do so after 8 seconds.
Additional Functionality
Light on/off
Turn the oven light off and on in any cooking mode by
simply touching the light
symbol.
DEMO Mode
This mode is intended to be used in retail shops to
demonstrate the oven functionality without any power
consumption except to the oven lights.
The following instructions show how to enter and exit
‘DEMO’ mode.
1. Ensure the oven is off by touching the ON/OFF
symbol.
2. Touch and hold the ON/OFF symbol until the display
turns ON then OFF. Immediately after, touch both the
cooktime symbols simultaneously. Hold until a triple
beep sounds.
Activating the child-proof lock
When the child lock is engaged, the oven ca nnot be
switched on.
1. Switch on the oven by touching the ‘ON/OFF’ symbol.
2. Select ‘SETTINGS’ from the fu nction list and touch
‘O K’.
3. Se lect ‘ACTIVATE LOCK’ from the list and touch ‘OK’.
4. The word ‘LOCKED’ will momentarily appear and a
single beep will sound to confirm the ope ration. The
child lock is now engaged.
De-activating the child lock
1. Touch any symbol on the control panel (including the
on/off symbol). ‘Locked’ will appear on the display.
2. Touch any symbol again. The display will instruct you
to touch both ‘cook time’ symbols for 2 seconds.
3. Ho ld until a beep sounds. The child lock is now
released and the oven is ready to use.
Other settings.
The ‘Settings’ function gives the opportunity to change
oven functionality. Scroll through the list by using function
up
or function down .
1. Switch on the oven by touching the ‘ON/OFF’ symbol.
2. Select ‘SETT INGS’ from the function list and touch OK.
3. Se lect ‘SET CLOCK’ to change the time of day.
4. Select ‘TIME INDICATION’ to have the time
permanently displayed or not.
5. Select ‘BUZZER VOLUME’ to adjust the ‘beep on
touch’ and alarm loudness.
6. Select ‘KEY TONE’ to turn the ‘beep on touch’ on or off.
7. Select ‘SCREEN BRIGHTNESS’ to adjust the
brightness of the display.
8. Se lect ‘SCREEN CONTRAST’ to adjust the contrast of
the display.
9. Select ‘TEMPERATURE UNITS’ to change between
Celsius and Fahrenheit units.
10. Select ‘ACTIVATE LOCK’ to turn child lock on.
11. Touch ‘OK’ to go into each selection to change its
settings by using function up
or function down .
Safety Cut-out feature
The oven automatically switches itself off if the temperature
is not adjusted or the appliance is lef t operating after a
period of time. The oven switches itself off af ter:
• 12.5 hours when the temperature is set between 30°C
an d 120° C.
• 8.5 hours when the temperature is set between 120°C
and 20 0°C.
• 5.5 hours when the temperature is set between 200°C
and 250 °C.
USING THE APPLIANCE
Page 17
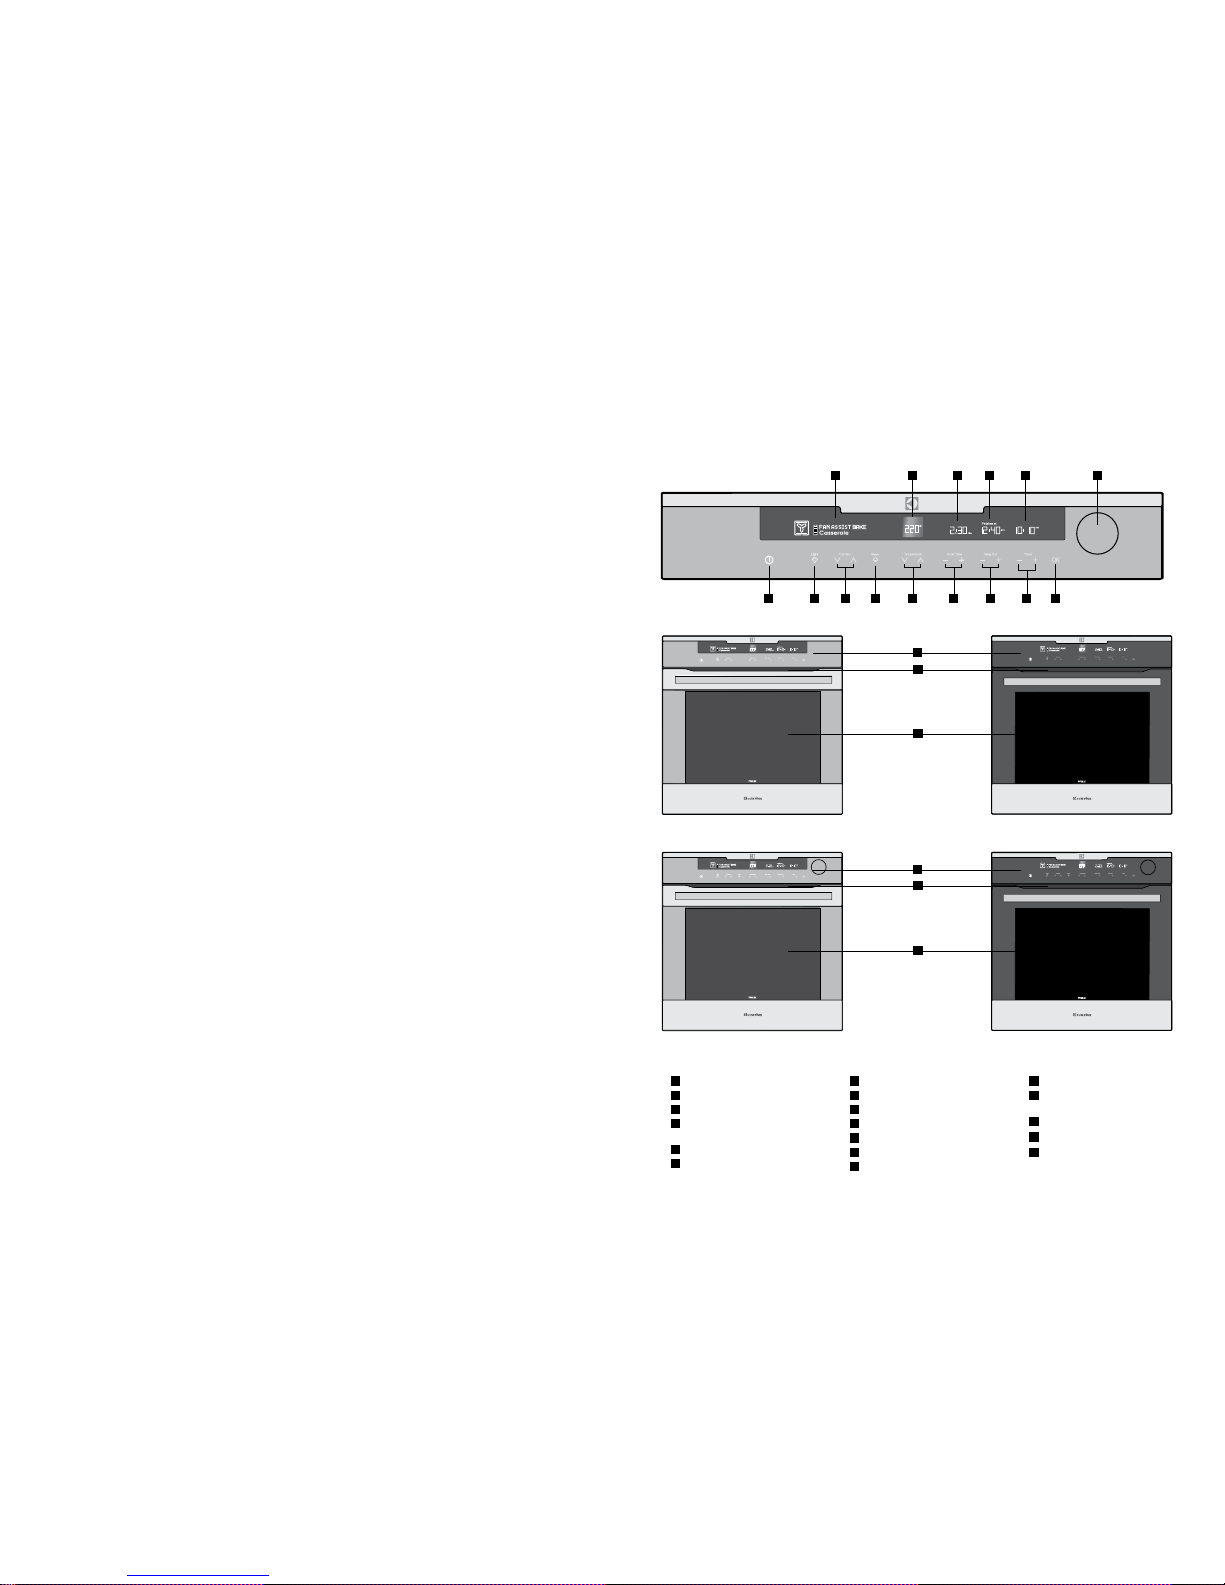
EVEP613SB, EVEP615SB, EVEP616BB, EVEP618BB, EVEP623SB, EVEP626BB 3332 EVE613SA, EVE616BA, EVE623SA, EVE633SA
Get to know your new oven with this
‘Simple Test Cake’
Although we strive for a perfect pe rforming oven, it’s
possible that there will be some variation i n colour when
baking. Therefore, we suggest this simple, easy and
delicious to make Simple Test Cake, it can help you
understand your new oven. All ovens do sometimes have
hot or cold spots, therefore it is important to judge with
your eye as you may require to rotate during baking.
‘Simple Test Cake’
125g butter, softened to room temperature
1 cup caster sugar
1 teaspoon pure vanilla essence
4 large eggs
2 cups self-raising flour
pinch of salt
4 tablespoons (80mL) full-c ream milk
Method:
1. Butter bas e and sides of two, 20cm straight-sided
round or square cake pans. Then line the base w ith
grease proof or baking paper.
2. Preheat oven to moderate ‘180ºC’ (170ºC fan forced)
and ensure oven shelf is in the centre position of oven.
3. Cre am softened butter and sugar until light in colour.
4. Add vanilla essence.
5. Then eggs one at a time, beating well after each
addition.
6. Si ft flour and salt into the mixture and beat until well
combined.
7. Add milk and beat or stir to combine.
8. Spo on mixture equally between prepared cake pans.
9. Bake in preheated oven, middle shelf for about
25 to 35 minutes or until when tested with a fine
cake skewer it comes out clean or the edge s of the
cakes have come away slightly from the sides of
the cake pans.
10. Remove from oven to wire cake rack and rest for
5 minutes before removing from cake pans.
Cool completely.
To Serve: sandwich together with your favourite jam or
conserve, and dust top with pure icing suga r.
Note: if desired substitute butter for either margarine
or olive oil spread. Recipe is based on the Australian
standard metric 250mL cup and 20mL tablespoon sets.
GETTING TO KNOW THE OVEN EVEP613SB, EVEP615SB, EVEP616BB, EVEP618BB COMPONENTS
17
17
18
18
16
16
EVEP613SB single cavity stainless steel model
EVEP615SB single cavity stainless steel model
(with ste am cooking)
EVEP616BB single cavity black model
EVEP618BB single cavity black model
(with ste am cooking)
1
ON/OFF
2
Light on/off
3
Cooking function selector
4
Steam Cooking option
(EVEP615SB and EV EP618BB only)
5
Temperature control
6
Cook time control
7
Delay end control
8
Set clock and timer control
9
Instant confirm
10
Cooking function display
11
Temperature display
12
Cook time display
13
Delay en d display
14
Clock/timer display
15
Water Drawer
(EVEP615SB and EV EP618BB only)
16
Control panel
17
Warm air exhaust
18
Quad glazed door
1
10 11 12 13 14 15
92 43 5 6 7 8
Page 18
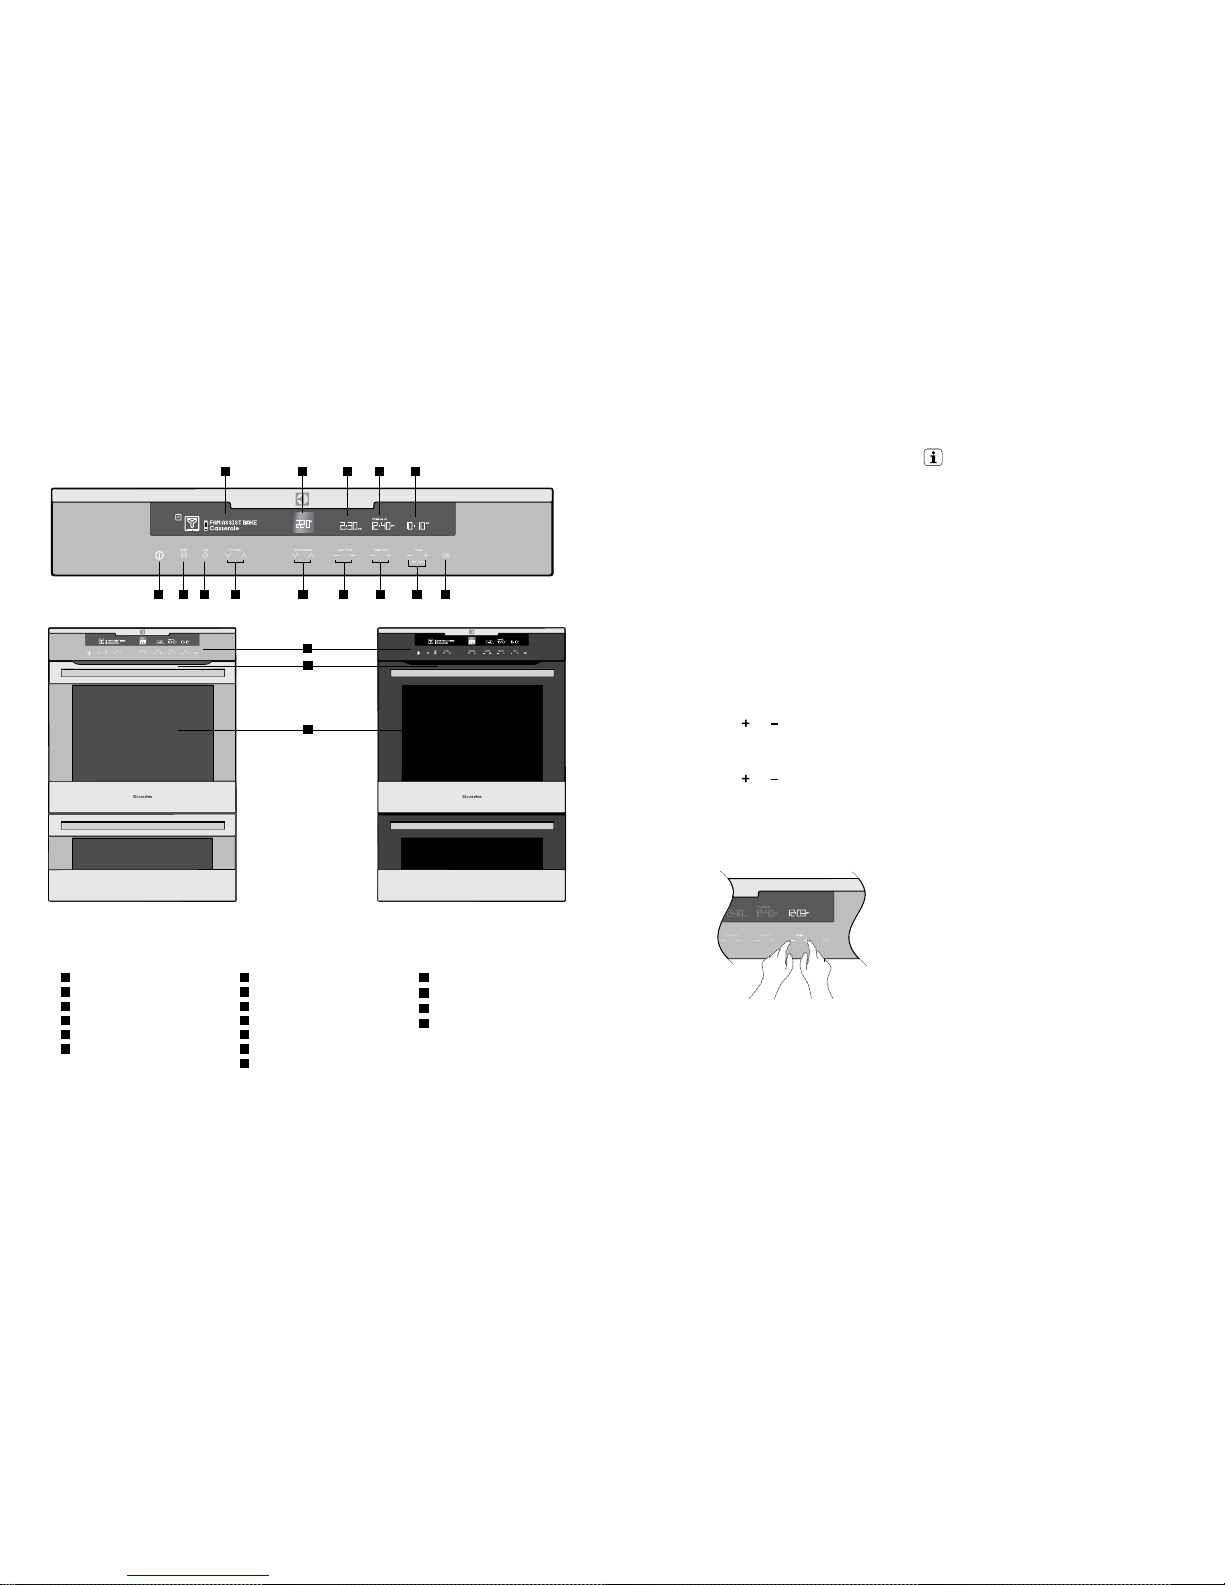
EVEP613SB, EVEP615SB, EVEP616BB, EVEP618BB, EVEP623SB, EVEP626BB 3534 EVEP613SB, EVEP615SB, EVEP616BB, EVEP618BB, EVEP623SB, EVEP626BB
EVEP623SB, E VEP626BB COMPONENTS
16
17
Select
Select
15
EVEP623SB double cavity stainless
steel model (duo)
EVEP626BB double cavity
black model (duo)
1
ON/OFF
2
Upper/Lower oven selector
3
Light on/off
4
Cooking function selector
5
Temperature control
6
Cook time control
7
Delay end control
8
Set clock and timer control
9
Instant confirm
10
Cooking function display
11
Temperature display
12
Cook time display
13
Delay en d display
14
Clock/timer display
15
Control panel
16
Warm air exhaust
17
Quad glazed door
1
10 11 12 13 14
932 4 5 6 7 8
Preparing the appliance
1. Please remove all stickers, leaflets and boxes from the
door and from the floor of the oven before operation.
2. Please wipe out the oven interior prior to operation
with warm soapy water and polish dry with a sof t
clean cloth. Do not close the oven door until the oven
is completely dry.
3. Do not line the oven with foil. It will damage
the enamel.
4. For the E VEP615SB or EVEP618BB, check the water
drawer interior for dust or contaminates. Wipe clean
with a damp cloth if necessary.
Setting t he time
The time of day must be set before the appliance ca n
operate.
After the appliance has bee n electrically connected the
display will cycle through the welcome screen, the n ‘Set
Clock’ will illuminate under the clock di splay and the
Hour digits will flash.
1. Use the timer
and to set the hour portion of the
current time (including AM/PM)
2. Press OK when the hou rs are set correctly. The
Minute digits will flash
3. Use the timer
and to set the minutes portion of
the current time
4. Press OK when the minutes are set c orrectly.
You can turn off the oven or it will do so
automatically after 8 seconds.
Once the time has been entered, the clock adva nces
minute by minute.
Note: The clock has a 12 hour display and will
remember the time for 3 days without power.
BEFORE USING THE APPLIANCE
IMPORTANT!
New appliances can have a smell du ring first use.
It is recommended to ‘run in’ the oven befor e
cooking for the first time. O perate the oven, empty,
at a temperature of 180° C for approx imately
30 minutes.
Please ensure the room is wel l ventilated during
this process.
Page 19
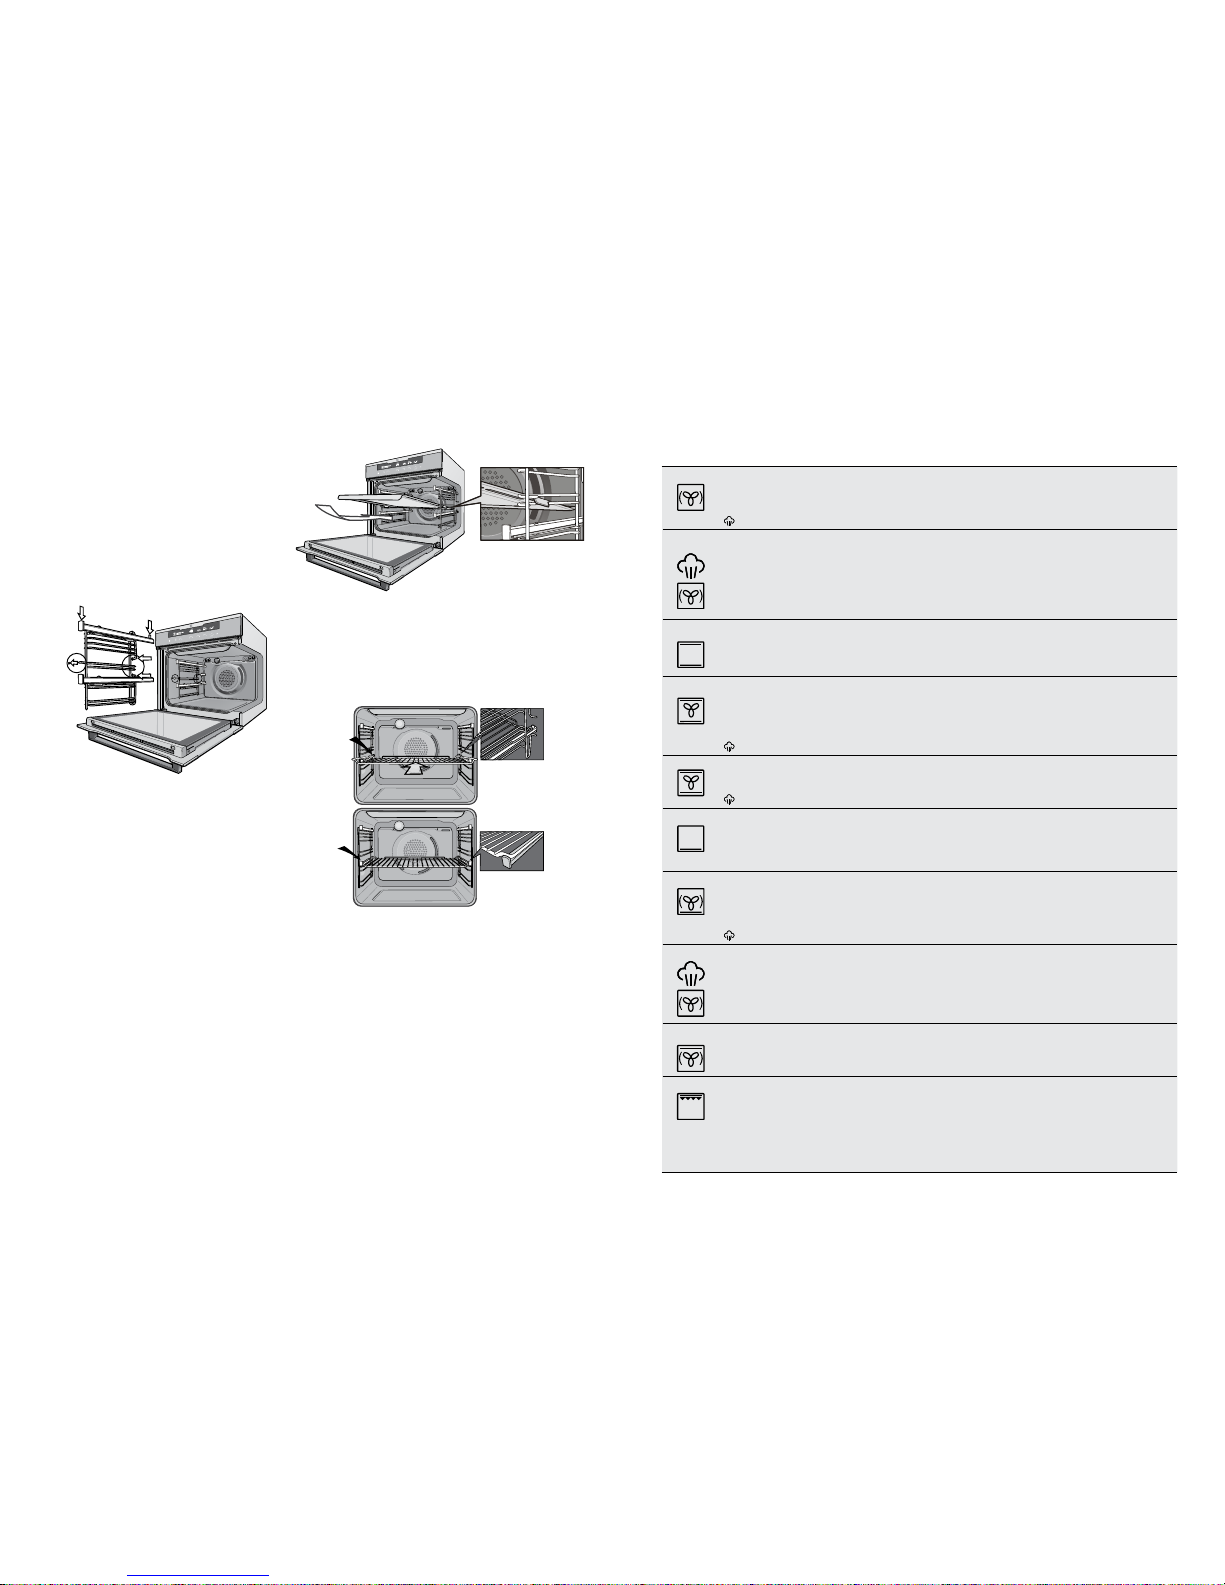
36 EVEP613SB, EVEP615SB, EVEP616BB, EVEP618BB, EVEP623SB, EVEP626BB EVEP613SB, EVEP615SB, EVEP616BB, EVEP618BB, EVEP623SB, EVEP626BB 37
BEFORE USING THE APPLIANCE
Installing your oven accessories
• Side racks
1. Inser t the twin pegged side into the rear access holes
provided, ensuring pegs are fully in serted.
2. Then locate the front peg into the front access hol e
and push in firmly.
Note: For models with steam function (EVEP615SB &
EVEP618BB) the side racks have the telescopic slides
fitted to lower positions than shown in the illustration due
to steam outlet location.
• Shelves and trays
The shelves are designed s o that they have maximum
extension but cannot be accident ally pulled right out.
The trays are designed the same way and slot straig ht
into the side racks.
To fit a shelf or tray to side racks:
1. Locate the rear edge of the shelf/tray in between the
guide rails of the side rack – see diagram. Ensure
the same rail positions on both sides of the oven are
being engaged.
2. With the front edge raised, begin to slide the shelf
into the oven.
3. Once the detents have passed the front edge of the
side rack, the shelf can be pushe d completely in.
4. When fully inserted the shelf/tray should n ot interfere
with the closed oven door.
To fit a shelf or tray to telescopic slides:
1. With the slides fully pushed in, push the shelf or tray
along the top of the slide until it hits the back post.
2. Drop the front of the shelf or tray onto the slide
ensuring it sits behind the front post of the s lide.
3. When fully inserted the shelf/tray shoul d not interfere
with the closed oven door.
Symbol Function description
Fan cooking
Heat comes from the element surrounding the fan. This fan circulates the hot air around the oven cavity so that
you can put your food in different places in the oven and still cook them at the same time. You can use the ‘Fan
Cooking’ function for multi-shelf cooking, reheating cooked foods, pastries and complete oven meals. It will cook
at a lower temperature and be faster than baking. Please note that some variation in browning is normal.
Note: Models EVEP615SB and EVEP618BB give you the option to introduce steam into this cooking cycle.
Steam
cooking
Models EVEP615SB and EVEP618BB only
Steam comes from the outlet pipe and heat comes from the element surrounding the fan. This fan circulates
the hot air and steam around the oven cavity so that you can put your food in different places in the oven. This
combination of steam and hot air together cooks food with a tender interior and crisp exterior. Browning of meat
or fish will be perfect with the best cooking result at the core. The shape will be always be preserved and evenly
firm. Vegetables will benefit with a high retention of nutrients.
Steam will only start if the water tank has been filled and the oven temperature is over 130°C.
Traditional
bake
Heat comes from two elements, one above and one below the food. The bottom element is a clean heat element
and is below the floor of the oven. Both elements are controlled by the thermostat and will turn on and off to
maintain set temperature. You can use the ‘Traditional Bake’ function for single shelf cooking, single trays of
biscuits, scones, muffins, cakes, slices, casseroles, baked puddings, roasts and delicate egg dishes. This is a
general function that can be used for most cooking.
Fan assist
bake
Heat comes from two elements, one above and one below the food. The fan circulates the hot air around the
oven cavity so that you can put the food in different places in the oven and still cook them at the same time. You
should only use a maximum of two shelves with ‘Fan Assist Bake’.
Do not use the bottom shelf. If the two shelves are used, food on the shelf in the higher position will cook first
and should then be removed to allow the food on the lower shelf to finish cooking.
Note: Models EVEP615SB and EVEP618BB give you the option to introduce steam into this cooking cycle.
Roast
This function starts at a higher temperature to seal the meat. The oven will then automatically reduce to the
selected temperature to cook the meat for as long as desired. For example, if you use the default 200°C the
‘Roast’ cycle will start at 240°C and then lower to 200°C.
Note: Models EVEP615SB and EVEP618BB give you the option to introduce steam into this cooking cycle.
Pastry
The ‘Pastry’ function is specially designed for food that require extra browning such as the bases of pastries and
pies. Heat comes from the element below the food. If you choose the default setting, the oven will heat up to
230°C in order to brown the food.
You should then lower the temperature as required. Cook in the lower half of the oven when you are using only
one shelf.
Pizza
‘Pizza’ is a combination of ‘Pastry’ and ‘Fan Assist Bake’ and offers you the combined benefits of both functions.
Heat switches between the element surrounding the fan and the clean heat element below the oven floor.
The ‘Pizza’ function is ideal for foods that require cooking and browning on the base. It is for foods such as
pizzas, quiches, meat pies and fruit pies. Simply place the food in the middle of the oven and set the desired
temperature.
Note: Models EVEP615SB and EVEP618BB give you the option to introduce steam into this cooking cycle.
Bread baking
Models EVEP615SB and EVEP618BB only
Steam comes from the outlet pipe and heat comes from the element surrounding the fan. This fan circulates the
hot air and steam around the oven cavity so that you can put your food in different places in the oven. The bread
baking function creates a great loaf in terms of shape, colour of the top, uniform browning and texture. This
function is suggested for baking bread or in general bakery products.
Steam will only start if the water tank has been filled and the oven temperature is over 130°C.
Cook from
frozen
The ‘Cook from Frozen’ function is ideal for cooking frozen precooked foods such as savoury pastries, pizzas,
mini meals (TV dinners), meat pies and fruit pies. Heat comes from the element surrounding the fan as well as a
smaller element above the food. Simply place the food in the oven straight from the freezer and heat. Cook in the
upper half of the oven for best results.
Full grill
‘Full Grill’ direct radiant heat from two powerful upper elements onto the food. You can use ‘Full Grill’ function for
tender cuts of meat, steak, chops, sausages, fish, cheese toasties and other quick cooking foods.
Grill with the oven door closed.
‘Full Grill’ allows you to take full advantage of the large grill dish area and will cook faster than the ‘Half Grill’
function. For best results it is recommended to preheat your grill for three minutes. This will help seal in the
natural juices of steak, chops etc for a better flavour.
You can slide your grill dish into either of the two spaces within the upper pairs of support rails. Full Grill has 2
temperature settings, ‘LO’ and ‘HI’.
COOKING FUNCTIONS
Page 20
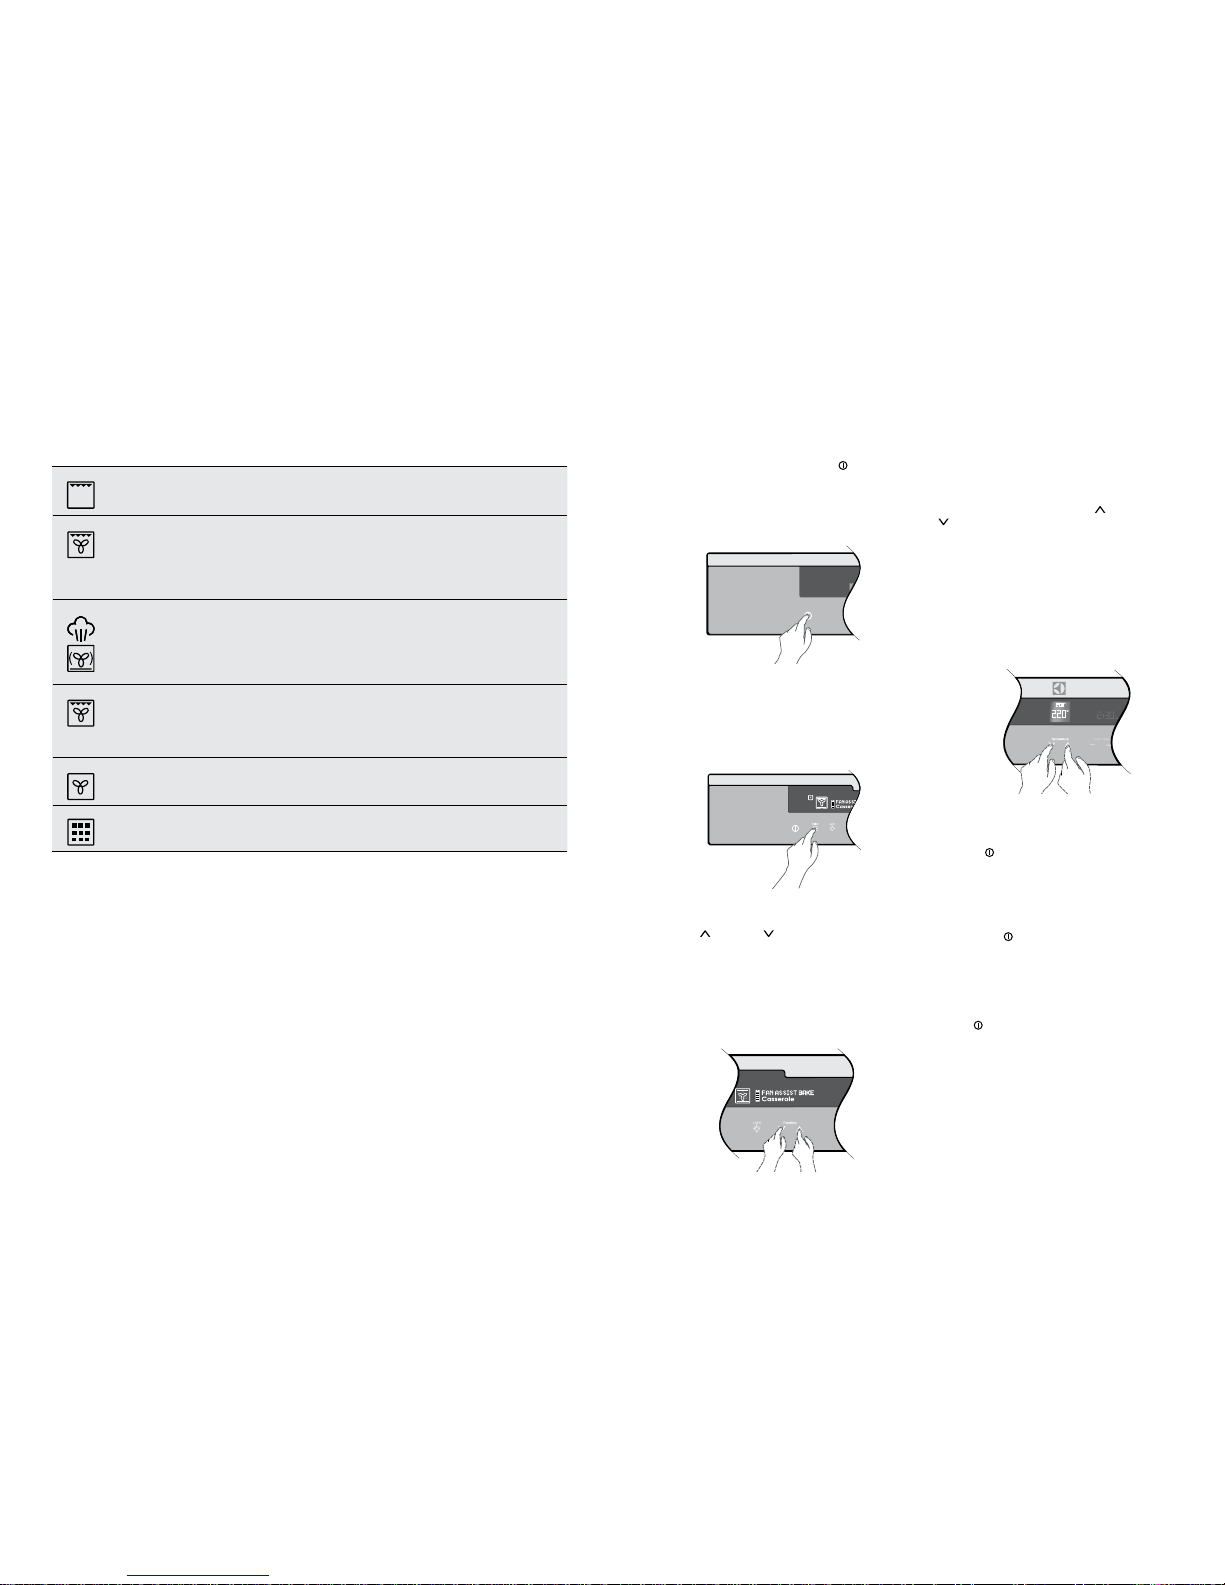
38 EVEP613SB, EVEP615SB, EVEP616BB, EVEP618BB, EVEP623SB, EVEP626BB EVEP613SB, EVEP615SB, EVEP616BB, EVEP618BB, EVEP623SB, EVEP626BB 39
Half grill
The ‘Half Grill’ directs radiant heat from only one of the powerful upper elements onto the food. The ‘Half Grill’
function is used instead of ‘Full Gril’ when only half the amount of heat is needed. Half Grill has 2 temperature
settings, ‘LO’ and ‘HI’.
Grill with the oven door closed.
Fan grill
‘Fan Grill’ offers you the benefits of both traditional bake and traditional grill functions. The grill element turns on
and off to maintain set temperature while the fan circulates the heated oven air.
Grill with the oven door closed.
You can use ‘Fan Grill’ for large cuts of meat, which gives you a result similar to ‘rotisserie’ cooked meat. Put
your food on a shelf in the second lowest shelf position. Put the grill dish on the lowest shelf position to catch any
spills. When using ‘Fan Grill’ it is not necessary to turn the food over during the cooking cycle. Set temperature
to 180°C.
Steam reheat
Models EVEP615SB and EVEP618BB only
Steam comes from the outlet pipe and heat switches between the element surrounding the fan and the clean
heat element below the oven floor. It’s not possible to set the temperature for this function. It is fixed at 130°C.
To reheat already cooked food (rise, pasta, pizza, vegetables) directly on a plate without drying it out or
leaving it soggy.
Steam will only start if the water tank has been filled and the oven temperature is over 130°C.
Keep warm
The ‘Keep Warm’ function is a low temperature oven function designed to keep your food at a perfect eating
temperature without cooking it further. Heat comes from the smaller elements above the food and is circulated by
the fan. Use ‘Keep Warm’ to keep your food warm while you prepare the rest of the meal or afterwards while you
wait for the late arrival.
Note: After cooking, the oven retains enough heat to continue to cook food even if the elements are turned off. The
‘Keep warm’ function recognises this by giving you a warning message. If this happens the function will not start.
Defrost
The ‘Defrost’ function uses low temperature air that is circulated by the fan. You can defrost (thaw) your food
before you cook it. You can also use ‘defrost’ to raise your yeast dough and to dry fruit, vegetables and herbs.
The ‘Defrost’ function does not have a suggested temperature but uses the ambient heat in the oven cavity.
Pyro clean
The ‘pyrolytic cleaning’ function cleans by burning off the spatters and accumulated dirt and grease from the
oven liner, at high temperature. This process produces ash which can be wiped out of the oven cavity.
Symbol Function description
COOKING FUNCTIONS OPERATING SEQUENCE
Turning the oven on
• Switch on the oven by touching the
ON/OFF
symbol. The LCD control panel will come on and
inform you that you need to select a cooking
function.
• If you do not select a function wi thin 20 seconds the
oven will turn off.
Selecting the upper and lower oven
(EVEP623SB, EVEP626BB)
These models are equippe d with two ovens. Use the
oven selector symbol to toggle between the upper a nd
lower ovens.
The oven cavity icon on the control pane l will show
which oven is currently active.
Select a cooking function
The oven will have a selection of functions. Press the
function
or function symbols as m any times as
necessary until the desired function appears.
Cooking suggestions will ap pear under the function
name and suggested cooking temp eratures will appear
above the temperature selector.
If no other symbol is touched within 8 seconds th e oven
will switch on and begin to heat up to the displayed
temperature.
Selecting a temperature
The temperature is electronically controlled.
The temperature can be selected within th e range of 30°C
to 250°C and can be adjusted at any time. To set the
temperature, press the temperature
and temperature
symbols to reach the desired setting.
Tou ch
OK, or if no further change s are made within
8 seconds the oven begins to heat up to the set
temperature. The current oven temperature will appear
above set temperature. This will change as the oven heats
up and the background colour will change f rom grey
to red.
When the temperature is reached, ‘Set temperature
reached’
will appear and only the target temperature w ill
be displayed.
Turning the oven off
Single cavity models:
Touch the
ON/OFF symbol to switch off the oven.
As the appliance cools down ‘cooling’ will be disp layed
until the oven reaches approximately 100°C.
Double cavity models:
1. Touch the upper/lower oven selector symbol to
toggle to the desired oven.
2. Touch the
ON/OFF symbol to switch off the
desired oven. The control panel will turn of f to
confirm that the oven is now switched off.
3. If the other oven is still active, after 1 second, the
control panel will automatically revert to show the
setting of that oven.
4. To turn off both ovens at once, touch and hold
the
ON/OFF symbol for 1 second. All elements,
cavity light and the control panel wi ll then switch off
at the same time.
5. If both ovens are off as the appliance co ols down,
‘cooling’ will be displayed until both ovens are below
approximately 100°C.
Page 21
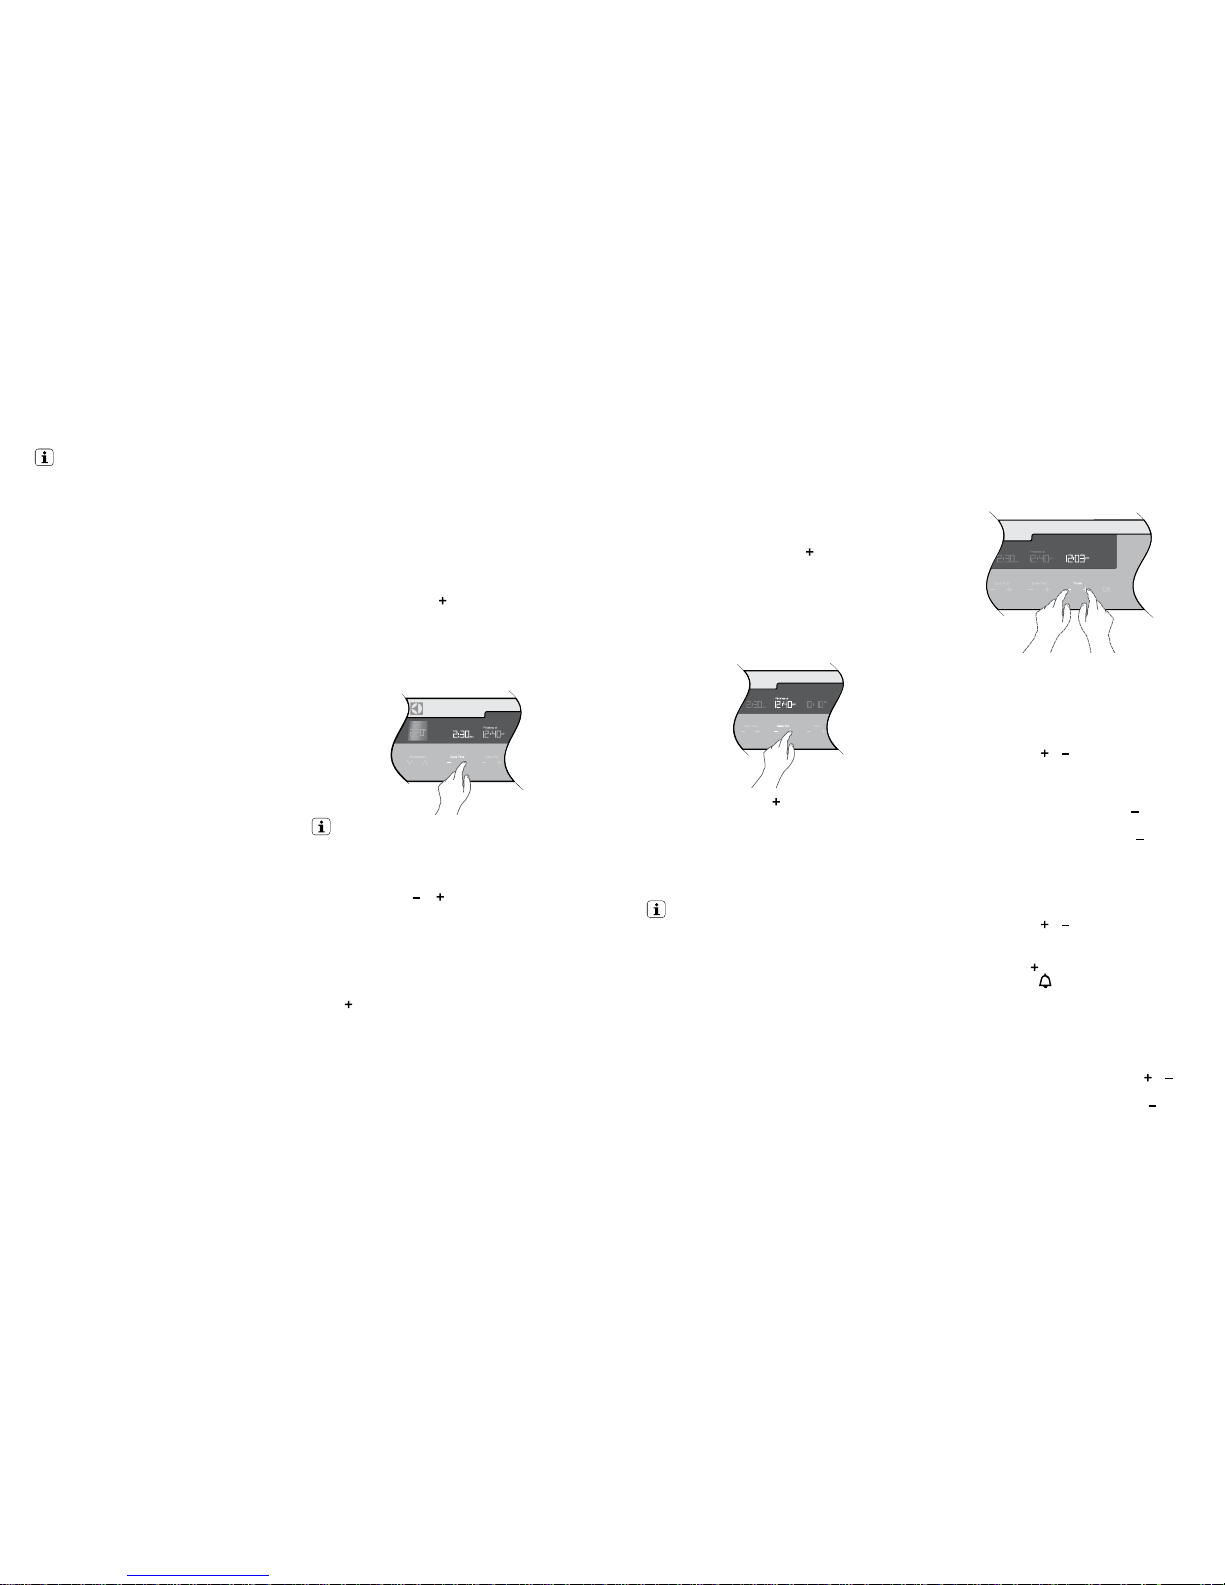
40 EVEP613SB, EVEP615SB, EVEP616BB, EVEP618BB, EVEP623SB, EVEP626BB EVEP613SB, EVEP615SB, EVEP616BB, EVEP618BB, EVEP623SB, EVEP626BB 41
IMPORTANT!
Pre-heating
Pre-heating the oven is recommended in several c ooking
and grilling functions. Pre-heating the oven all ows it to
reach the required temperature quickly a nd efficiently as
well as cook food at the correct temperature for the entire
cook time.
These models are equippe d with a built-in rapid heat up
mode that activates each time you start an oven fun ction.
During the rapid heat-up mode the heat comes f rom the
element surrounding the fan as well as the smaller element
above the food. This combination will heat up the oven
30% quicker than it would on standard ‘Bake’ function.
The oven will automatically revert to the set cooki ng
function once the preset temperature is reached.
Cooling / Vent fan
The appliance is fitted with a co oling fan. This prevents
the kitchen cabinet from overheating and re duces the
condensation inside the oven. It will operate when ever
the oven is in use and blow warm air across the top of the
oven door.
Note: If the oven is still hot from cooking, the cooling fan
will keep running to cool the oven down and will switch off
by itself once cool.
Condensation
Excess condensation may fog the oven door. This may
happen when cooking la rge quantities of food from a cold
start. Minimise condensation by:
• Keeping the amount of water used whi lst cooking to a
minimum.
• Making sure the oven door i s firmly closed.
• Baking custard in a ba king dish that is slightly smaller
than the water container.
• Cooking cas seroles with the lid on.
Note: If using water in cooking, this will turn to steam
and may condense outside your appliance. This is not a
problem or fault with your oven.
USING THE APPLIANCE
Cooking with the timer
The oven is equipped with a programma ble controller that
can be used to turn the oven on and off automaticall y. The
‘cook time’ controls are used to automatically turn the oven
off after a set amount of time. The ‘Delay End’ controls are
used to set the time of day you want the cooking cycle
to finish .
Setting the cook time
1. Select the desired oven function and cooking
temperature.
2. Touch the ‘cook time’
symbol as often as necessa ry
(or hold), until the desired cook time has been set.
3. Touch ‘OK’ or after 8 seconds f rom the last time
adjustment the oven will start cook ing and the ‘cook
time’ display will countdown to zero.
4. The oven will turn off and beep whe n the ‘cook time’
display reac hes zero.
IMPORTANT!
• When you use the ‘cook time’ function, the ‘Finishes
at’ display activates and tells you what time of day the
oven will turn off (based on the set cook tim e)
• During cook ing, you can adjust the cook time with
the ‘cook time’
or symbols for better cooking
perfor mance.
• When the cook time has elapsed, an audible signal
will sound for 2 minutes, the oven will switch off and
COOKING FINISHED will be displayed.
• To stop the audible signal, press any of the symbols
on the control panel.
• If you wish to cook a bit longer, press the ‘cook time’
symbol for each additional minute you require.
The oven automatically reverts to the function and
temperature previously programmed. This feature is
available for 5 minutes after cooking h as finished.
After that, the oven automatically switches off.
USING THE APPLIANCE
Timers
The appliance has two timer s which can be used one at a
time. The count up timer can be used to measu re a period
of time. The count down timer beeps at the end of a
preset time.
Setting the count up timer
The timer can be used indepe ndently of the oven for
measuring a count up period. T here is no alert provided
with this timer.
1. Touch either ‘timer’
or
2. 00min will be displayed along with a be ll and the up
arrow will flash.
3. To begin the count up timer press OK.
4. To reset the count up timer, press ‘timer’
once to
show 00min. Press OK to restart.
5. To cancel the count up timer press ‘ timer’
twice.
Setting the count down timer
The timer can be used indepe ndently of the oven for
setting a count down period. When the p eriod of time has
elapsed, an audible signal sounds.
1. Touch either ‘timer’
or .
2. 00min will be displayed along with a be ll and the up
arrow will flash.
3. Touch the ‘timer’
to set the countdown period.
4. The timer bell icon
will flash.
5. To begin the count down timer press OK or wait 8
seconds. When the timer star ts, the bell will stop
flashing and the timer will begin to count down.
6. W hen the set time has elapsed, an audible signal will
sound for 2 minutes. The time indication ‘00mi n’ and
the timer bell will flash on the display.
7. To stop the signal, touch either of the ‘timer’
or
symbols .
8. To cancel the count down time r touch ‘timer’
until
the normal time of day is displayed.
Setting the delay end time
The delay end function can be us ed to switch the oven on
and off at a specific time during th e day.
1. Check the clock displays the correct time of day.
2. Select the desired oven function and cooking
temperature.
3. Set th e required cook time.
4. Touch the ‘delay end’ symbol
to move the end time.
5. Touch ‘OK’ or after 8 seconds from the last time
adjustment the SET icon will light a nd the oven is now
programmed. The oven will start i ts cooking cycle to
finish at the set ‘end time’.
6. When the oven has finished cooking, cook time ca n
be extended or the beeper turn ed off just as in ‘cook
time’ mode.
7. Touch the ‘delay end’ symbol to move the end time
forward.
8. Touch ‘OK’ or after 8 seconds from th e last time
adjustment the SET icon will light a nd the oven is now
programmed.
The oven will commence its cooki ng cycle to finish at the
set ‘end time’
IMPORTANT!
• 30 seconds af ter a cooking function has sta rted, it is
no longer possible to delay the end time.
• In order to delay a cooking f unction that has already
started, the oven needs to be switched off then
switched on again and re-programmed.
• Even though the heating eleme nt turns off the oven
will still retain substantial heat. This will contin ue to
cook the food until it is removed or the oven cools
down. If you do not plan on being present when the
oven turns off, you should take this extra heating
time into account.
Page 22
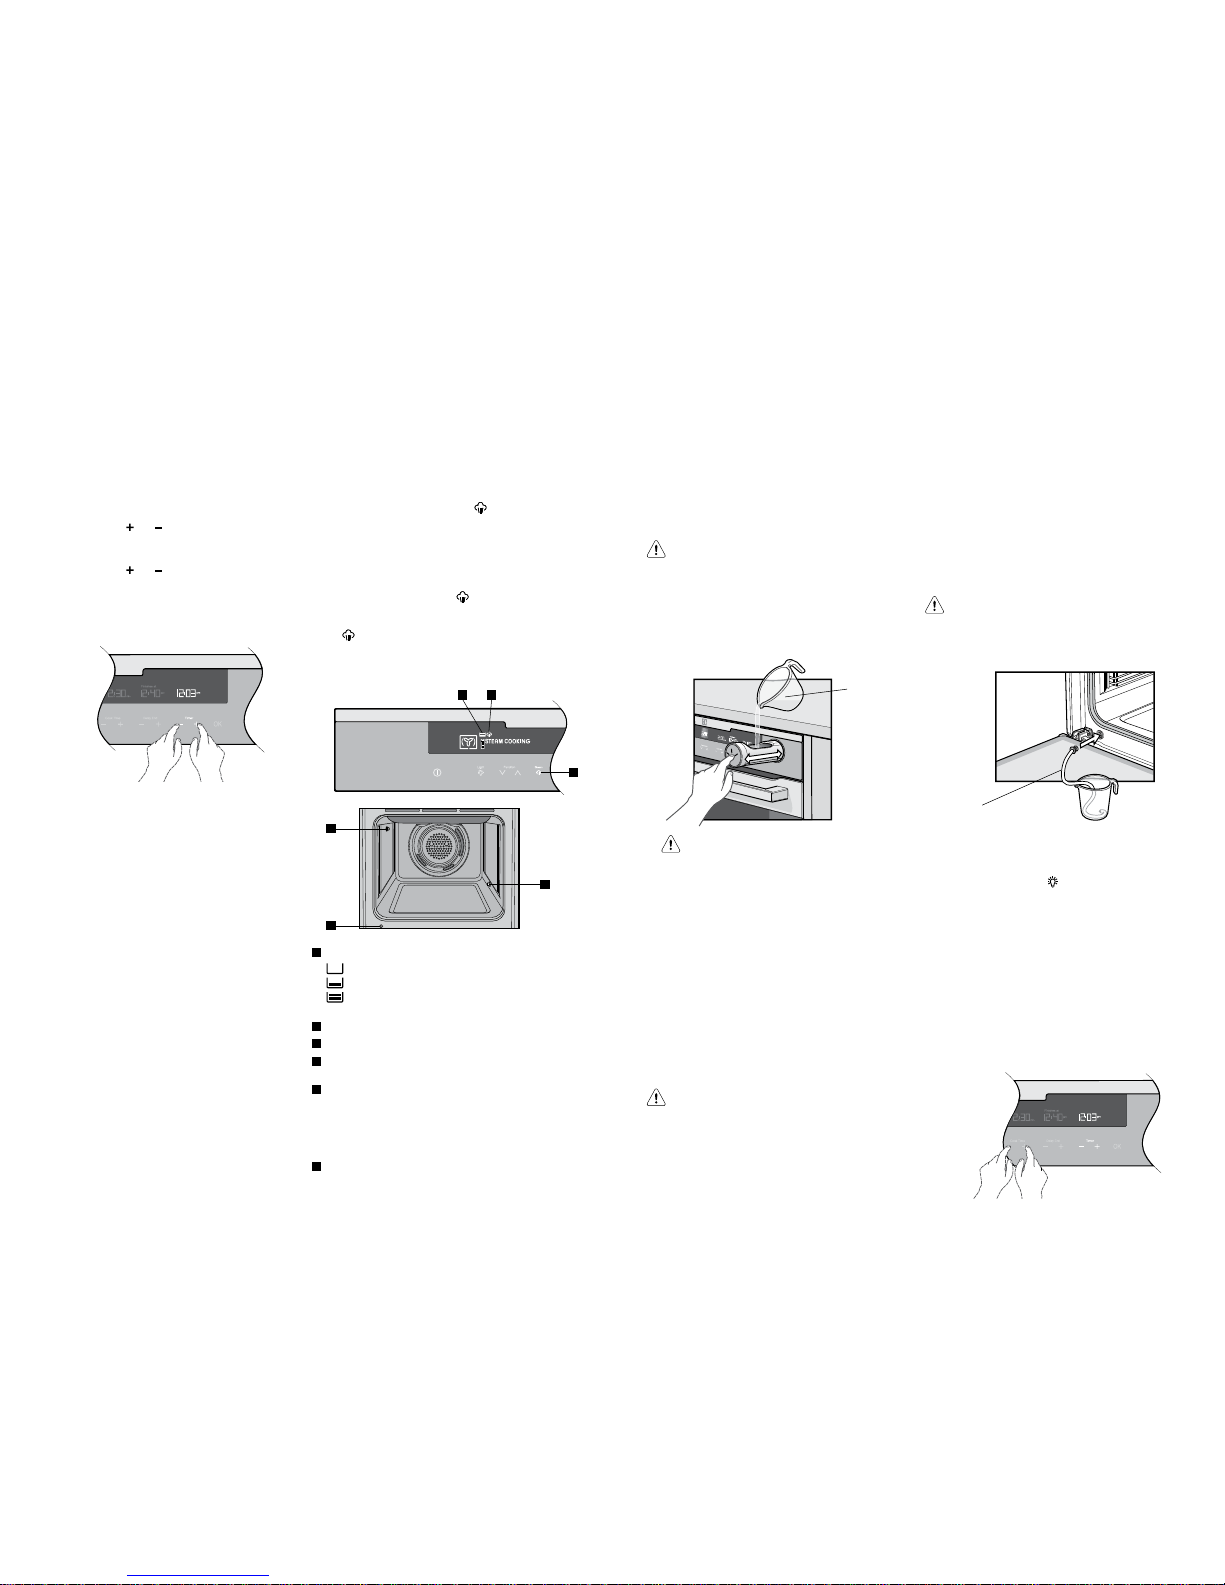
42 EVEP613SB, EVEP615SB, EVEP616BB, EVEP618BB, EVEP623SB, EVEP626BB EVEP613SB, EVEP615SB, EVEP616BB, EVEP618BB, EVEP623SB, EVEP626BB 43
Adjusting the clock
1. Switch on the oven by touching ‘ON/OFF’ symbol.
2. Select ‘SETT INGS’ from the function list and touch OK.
3. Se lect ‘SET CLOCK’ from the list and touch OK.
4. ‘Set Clock’ will illuminate under the clock display.
5. Use the timer
and to set the hour portion of the
current time (including AM/PM).
6. Touch ‘OK’ when the hours are set cor rectly.
7. Use the timer
and to set the minutes portion of the
current time.
8. Touch ‘OK’ when the minutes are set corre ctly. TIME
SAVED will be displayed and then the function display
will revert to the ‘set clock’ menu. Turn the oven off or
it will do so after 8 seconds.
Steam assisted cooking
EVEP615SB and EVEP618BB models only,
Cooking with steam is a great addition to straight ‘hot
air’ cooking. Steam brings out all the natura l flavours
and goodness in the food, cooks evenly from s urface to
centre and retains more nutrients and vita mins. Steam
assisted cooking consistently produces juicy, succulent
interiors with crisp, golden exteriors.
These models have three dedicated steam functions
that have been individually tuned to produce th e best
result with a combination of steam and heat ap plication.
They are-
Steam cooking.
Perfect for all kinds meat, poultr y and fish dishes. The
hot air ensures the outside is sealed w hilst the steam
keeps the inside tender.
Steam reheat.
Rejuvenates food like it was just cooked. Great for
reheating dishes like rice, pasta and piz za that can
suffer from dryn ess in normal ovens or sogginess i n
microwave ovens.
Bread baking.
Specially programmed for bun s and loaves of bread.
This function gives per fect, fluffy insides w ith crisp
golden crusts. See ‘getting to know your oven’ on
page 47 for directions of use.
Steam on demand
During the cooking proces s some functions will allow
the user to switch between standard cookin g and steam
assisted cooking. This is useful if the fo od is drying out or
the meal requires a higher retention of moisture. Steam
can be introduced by pressing the
symbol. This option
is available for the following functions:
- Fan cooking
- Fan assist bake
- Roast
- Pizza
- Cook from frozen
It will always be possible to switch back to standard
cooking by again pressing the
symbol.
Note: the ability to switch between steam and standard
cooking is only available on the above functions. Pressi ng
the
symbol on any other function will have no effect.
Steam can only be generated if the re is water in the tank
and the oven temperature is over 130°C.
Steam product description
3
1 2
4
6
5
1
Water tank Level Indicator
– Tank empty.
– Water pre sent.
– Tank full. Overfill alarm will sound.
Press ‘OK’ to continue.
2
Steam function in progress.
3
Steam On Demand. Available for certain fun ctions only.
4
Steam outlet. This is where steam is injected into
the oven.
5
Water overflow pipe. If the water tank is over filled,
water will be dispensed into the oven from here. This is
not a fault with the appliance. It prevents water spilling
out of the water drawer which could create a hazard. If
this occurs mop up the overflow with a cle an cloth and
continue with the cooking function.
6
Water outlet valve. To be used with the draining pipe
(supplied). Any water left in the tank is to be drained
after the appliance has cool ed down.
USING THE APPLIANCE
Steam operating sequence
1. Open the water drawer in the control panel by
pressing it.
2. Pour approximately 850mL of water into the drawer.
The water level indicator on the display will show one
to two bars. Close the water drawer.
WARNING!
Take care when filling the water drawer. Spillage could
create a slipping haza rd. Immediately clean up any
spills on the product, ca binet or floor. If the overfill
alarm sounds immediately stop pouring water into
the water drawer. If the tank is overfilled the excess
will flow into the oven. This prevents leakage on to
cabinets and is not a fault. S ponge up overflows if
they occur.
Use measuring
jug supplied
CAUTION!
Do not use any liquid other than no rmal tap water.
Do not use demineralise d or distilled water. Doing
so could affect the normal operation of the steam
generator. Do not put solid matter into th e
water drawer.
3. Turn on the oven and select the stea m cooking
function and temperature as per normal operation.
Set timer functions if desired.
4. Once the oven has reached the desired tempe rature
put the food in and cook as planned. A ful l water tank
will last approximately 30 minutes. It may have to be
refilled during a long cooking cycle, for examp le, a roast.
5. On ce cooking is complete remove the food and turn
off the oven. Leave the oven door ajar to aid drying of
the oven.
6. Drain water tank once the appliance is cool.
WARNING!
The steam is not visible insid e the oven but it is there.
Opening the oven door to place, remove or insp ect
food will release it. St and back when opening the door
to avoid the risk of burns.
Emptying the water tank.
The water tank must be emptied after ever y steam
assisted cooking cycle. This is done by:
1. Open the oven door to reveal the water outlet valve.
2. Insert the valve end of the supplied drai n pipe into
the water outlet valve. Ensure the other end is in a
container that can take up to 1 litre.
3. Remove the drain pipe only when the water
stops flowing.
4. Soak up any leakages with a sponge or cl oth.
WARNING!
Water in the tank can still be hot. Wait un til the
appliance is cool before t he water tank is drained.
Do not use the drained water to fill th e water
tank again.
Drain pipe (supplied)
Additional Functionality
Light on/off
Turn the oven light off and on in any cooking mode by
simply touching the light
symbol.
DEMO Mode
This mode is intended to be used in retail shops to
demonstrate the oven functionality without any power
consumption except to the oven lights.
The following instructions show how to enter and exit
‘DEMO’ mode.
1. Ensure the oven is off by touching the ON/OFF
symbol.
2. Touch and hold the ON/OFF symbol until the display
turns ON then OFF. Immediately after, touch both the
cooktime symbols simultaneously. Hold until a triple
beep sounds.
USING THE APPLIANCE
Page 23

44 EVEP613SB, EVEP615SB, EVEP616BB, EVEP618BB, EVEP623SB, EVEP626BB EVEP613SB, EVEP615SB, EVEP616BB, EVEP618BB, EVEP623SB, EVEP626BB 45
Activating the child-proof lock
When the child lock is engaged, the oven ca nnot be
switched on.
1. Switch on the oven by touching the ‘ON/OFF’ symbol.
2. Select ‘SETTINGS’ from the fu nction list and touch
‘O K’.
3. Se lect ‘ACTIVATE LOCK’ from the list and touch ‘OK’.
4. The word ‘LOCKED’ will momentarily appear and a
single beep will sound to confirm the ope ration. The
child lock is now engaged.
De-activating the child lock
1. Touch any symbol on the control panel (including the
on/off symbol). ‘Locked’ will appear on the display.
2. Touch any symbol again. The display will instruct you
to touch both ‘cook time’ symbols for 2 seconds.
3. Ho ld until a beep sounds. The child lock is now
released and the oven is ready to use.
Other settings.
The ‘Settings’ function gives the opportunity to change
oven functionality. Scroll through the list by using function
up
or function down .
1. Switch on the oven by touching the ‘ON/OFF’ symbol.
2. Select ‘SETT INGS’ from the function list and touch OK.
3. Se lect ‘SET CLOCK’ to change the time of day.
4. Select ‘TIME INDICATION’ to have the time
permanently displayed or not.
5. Select ‘BUZZER VOLUME’ to adjust the ‘beep on
touch’ and alarm loudness.
6. Select ‘KEY TONE’ to turn the ‘beep on touch’ on or off.
7. Select ‘SCREEN BRIGHTNESS’ to adjust the
brightness of the display.
8. Se lect ‘SCREEN CONTRAST’ to adjust the contrast of
the display.
9. Select ‘TEMPERATURE UNITS’ to change between
Celsius and Fahrenheit units.
10. Select ‘ACTIVATE LOCK’ to turn child lock on.
11. Touch ‘OK’ to go into each selection to change
its settings by using function up
and function
down .
USING THE APPLIANCE
Safety Cut-out feature
The oven automatically switches itself off if the temperature
is not adjusted or the appliance is lef t operating after a
period of time. The oven switches itself off af ter:
• 12.5 hours when the temperature is set between 30°C
an d 120° C.
• 8.5 hours when the temperature is set between 120°C
and 20 0°C.
• 5.5 hours when the temperature is set between 200°C
and 250 °C.
Cleaning steam parts
Models EVEP615SB and EVEP618BB only.
After some time, the water tank can accumulate minera l
deposits. To prevent this from occurring, empty the
water tank after each steam cooking se ssion and clean
the water tank every two to three months using the
following proc ess.
IMPORTANT!
During the cleaning procedure, some water can drip
from the steam outlet onto the c avity of the oven.
Put a dripping pan on the shelf l evel directly below
the steam inlet to prevent water from fa lling onto the
bottom of the oven cavity.
Cleaning procedure
1. With oven turned off, fill the water tank with a
cleaning solution of 850mL of water and 50mL of
citric acid. Let sit for approximately 60 minutes.
2. Turn on the oven and set to ‘steam cooking’. Set the
temperature to 230°C. After 25 minutes, turn off the
oven and let it cool for 15 minutes.
3. Turn on the oven again and set to ‘steam cooking’.
Set the temperature to 180°C. After 10 minutes, turn
off the oven and let it cool for 15 minutes. Insert the
supplied drain pipe and empt y the tank of remaining
water. When tank is empty, remove the drain pipe.
4. To flush cleaning solution from water tank, refill the
water tank with 850mL fresh water and empty via
the drain pipe.
5. Remove the drain pipe again and cle an by hand in
warm water with soap.
6. To prevent build up of calcium deposits it is
recommended to use this procedure ever y
2 – 3 months.
Pyrolytic cleaning of the oven cavity
The oven has the Pyrolytic self-cleaning function, it
cleans by burning off the spat ters and accumulated dirt
and grease from the oven liner, at high temperature.
This process produces ash w hich can then be wiped
out of the oven cavity.
WARNING!
During the pyrolytic cleaning process the oven
becomes extremely hot.
• Please keep small children at a safe dista nce.
• Never clean non-stick bakin g trays and tins in the oven
during the pyrolytic cycle. High temperatures damage
the non-stick coating and poisonous gas is released.
• Do not put water into the water tank during the cleaning
procedure.
• To prevent damage, do not use acids, sprays or similar
cleaning agents.
CAUTION!
• During pyrolytic cleani ng the air outlet exhaust
above the door must be kept clear of any
obstruction (e.g. bulky tea towels).
• Do not use your oven to clean miscellaneous items
(e.g. cookwar e).
• If you have a steam oven, do not cause the water
tank to overflow during the cleaning cycle. Th is
could damage the enamel
Before carrying out the Pyrolytic function
1. All accessories must be removed from the oven,
including shelves, trays and side racks.
2. Clean large de posits, spills or grease from the
oven cavity.
3. If you have a steam oven ensure the water
tank is empty.
4. Choose your Pyrolytic cleaning cycle from the
following:
soiling duration
light clean 1hr 30mins
medium clean 2hrs
heavy clean 2hr 30mins
Note: Duration includes heat-up time, excluding
cool-down time.
• Light clean
This is an energy saving cycle that can b e used on a
regular basis if the oven is lightly soiled. Possibl y after
every 2nd or 3rd roast.
• Medium clean
Use this as the regular cycle about once ever y
2-3 mo nths.
• Heavy clean
When the oven is very dirt y it may need a longer cycle
to clean it thoroughly. This cycle will clean the dirtiest
of ovens.
CLEANING THE OVEN
Page 24
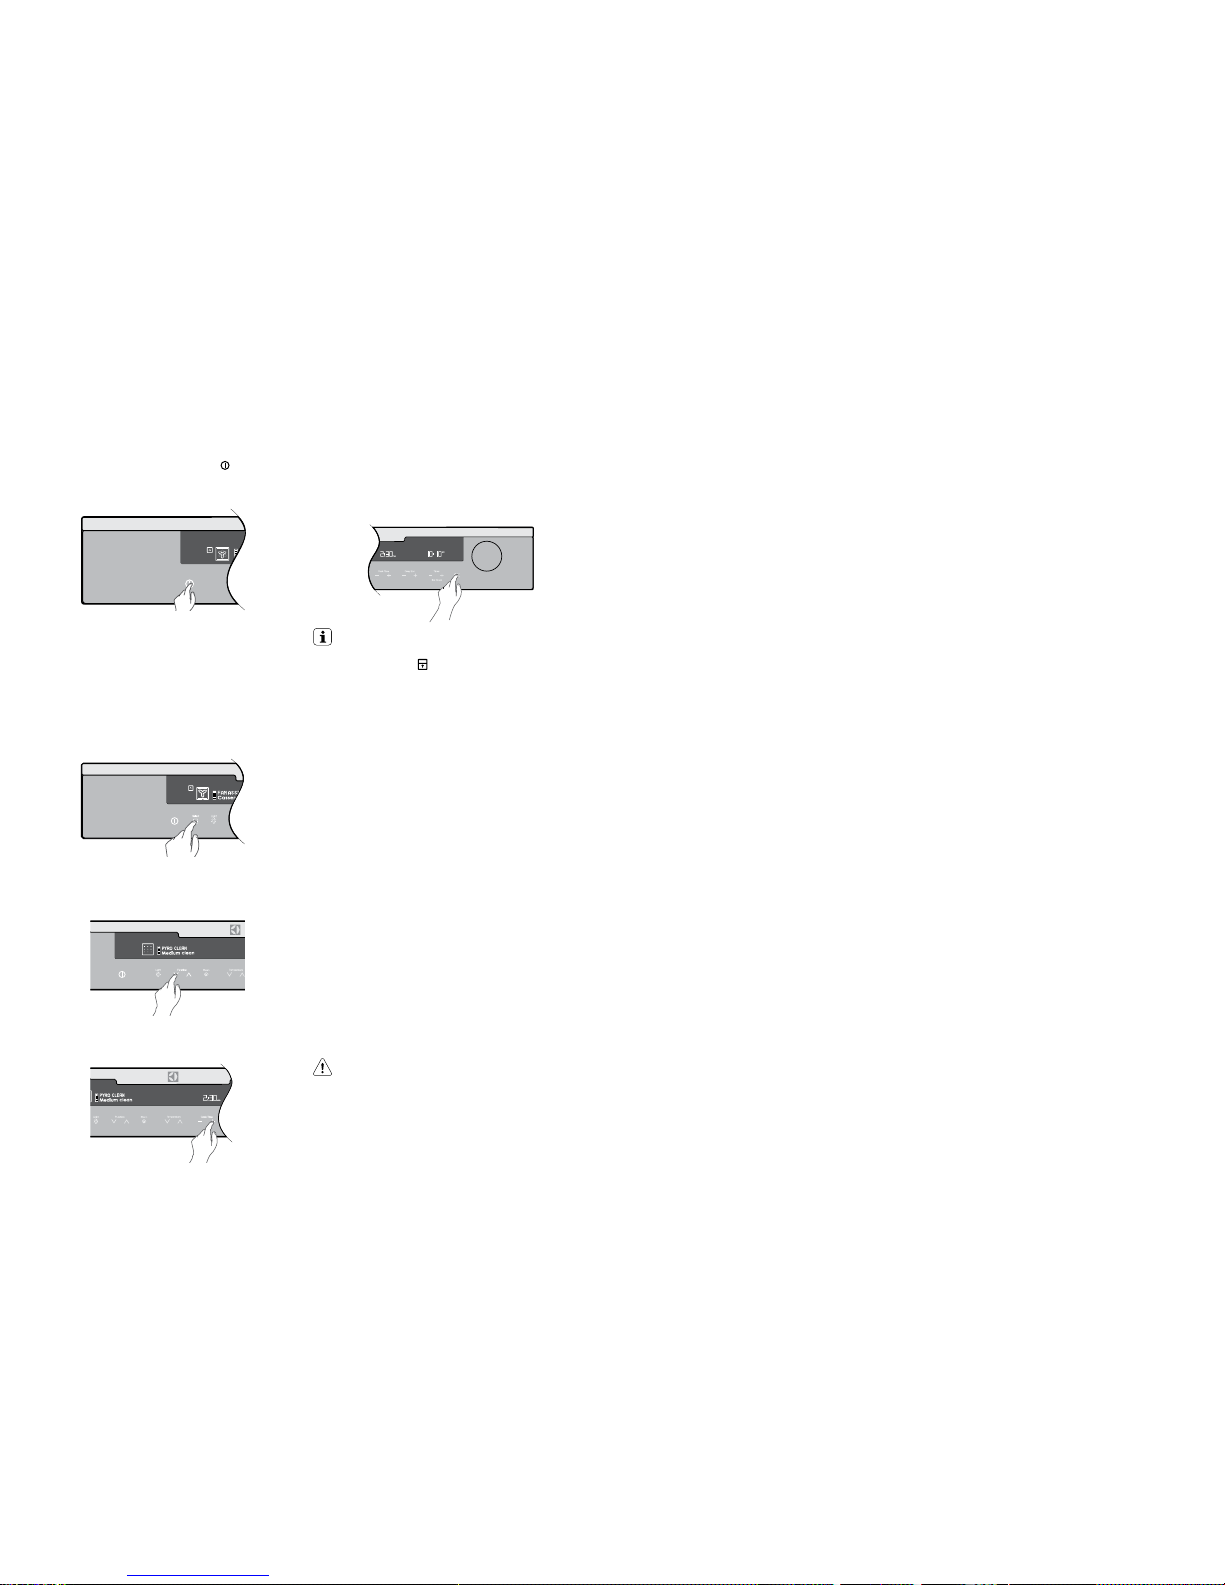
46 EVEP613SB, EVEP615SB, EVEP616BB, EVEP618BB, EVEP623SB, EVEP626BB EVEP613SB, EVEP615SB, EVEP616BB, EVEP618BB, EVEP623SB, EVEP626BB 47
Turning the oven on
• Switch on the oven by touching the
ON/OFF
symbol. The control panel will come on a nd inform
you that you need to select a cooking functio n.
Selecting the upper or lower oven
(EVEP623SB, EVEP626BB)
These models are
equipped with two ovens. Use the
oven selector symbol to toggle between the upper a nd
lower ovens.
The oven cavity icon on the control pane l will show
which
oven is currently active.
Only one cavity can be cle aned at a time.
Select the pyrolytic clean function.
Use cooking function selec tor to pick the ‘pyro clean’
function.
Selecting the required cleaning cycle
Use the ‘cook time’ control to select Light, Medium or
Heavy depending on the so iling of the oven.
Start Pyrolytic
Unlike other cooking functions, you MUST touch ‘OK’
for the pyrolytic cycle to start. The display wil l prompt
you to remove all shelves and trays. You must touch’
OK’ again to start. The oven light will then go out a nd
the Pyrolytic function will start.
IMPORTANT!
At the beginning of pyrolytic cleaning the door will
automatically lock
will appear on the display.
During the pyrolytic cleaning cycle there may be
some burn off odour s. It is advised to keep the
room well ventilated during this cycle.
(EVEP623SB, EVEP626BB)
For these models with two ovens, both doors will loc k
automatically at the beginning of the pyroly tic cleaning.
Cooking is not permitted in ei ther oven during the
pyrolytic clean function.
The door(s) will only unlock when the oven has co oled
to a safe temperature. Turning the function off will not
unlock the door(s). This will only happen when safe
temperatures are reache d.
When the pyrolytic cleaning function is on, it is advisable
not to use a cooktop if it is fitted above the oven. This
could cause overheating and damag e to both appliances.
Note: The cooling fan will operate at an increased speed
for Pyrolytic cleaning and will continue to run until the
oven has cooled down. This is normal.
It is recommended to clean the oven regularly to keep it
in its best condition.
After Pyrolytic cleaning
After cool-down wipe the ash out of the oven with a s oft
damp cloth and warm water.
To restore the enamel shine to more difficult areas, use
a damp cloth with vinegar and detergent.
CAUTION!
Do not turn off the mains p ower supply to the
oven during the pyrolytic cycle. This could damage
the appliance
CLEANING THE OVEN
Get to know the oven with this
‘Simple Test Cake’
Although we strive for a perfect pe rforming oven, it’s
possible that there will be some variation i n colour when
baking. Therefore, we suggest this simple, easy and
delicious to make Simple Test Cake, it can help you
understand your new oven. All ovens do sometimes have
hot or cold spots, therefore it is important to judge with
your eye as you may require to rotate during baking.
‘Simple Test Cake’
125g butter, softened to room temperature
1 cup caster sugar
1 teaspoon pure vanilla essence
4 large eggs
2 cups self-raising flour
pinch of salt
4 tablespoons (80mL) full-c ream milk
Method:
1. Butter bas e and sides of two, 20cm straight-sided
round or square cake pans. Then line the base w ith
grease proof or baking paper.
2. Preheat oven to moderate ‘180ºC’ (170ºC fan forced)
and ensure oven shelf is in the centre position of oven.
3. Cre am softened butter and sugar until light in colour.
4. Add vanilla essence.
5. Then eggs one at a time, beating well after each
addition.
6. Si ft flour and salt into the mixture and beat until well
combined.
7. Add milk and beat or stir to combine.
8. Spo on mixture equally between prepared cake pans.
9. Bake in preheated oven, middle shelf for about
25 to 35 minutes or until when tested with a fine
cake skewer it comes out clean or the edge s of the
cakes have come away slightly from the sides of the
cake pans.
10. Remove from oven to wire cake rack and rest for
5 minutes before removing from cake pans.
Cool completely.
To Serve: sandwich together with your favourite jam or
conserve, and dust top with pure icing suga r.
NOTE: if desired substitute butter for either margarine
or olive oil spread. Recipe is based on the Australian
standard metric 250mL cup and 20mL tablespoon sets.
GETTING TO KNOW THE OVEN
Using the bread baking function
(EVEP615SB and EVEP618BB models only)
To aid you in baking bread here is basic recipe to
understand and experime nt with the bread baking
function.
‘Test loaf from base ingredients’
500 g wheat flour
10 g salt
10 g butter at room temperature
280 +/- 20 g water at 37 °C +/- 2 °C
3 g sugar
20 g fresh yeast
Method
1. Weigh wheat flour, salt and butter in mixing bowl of
the food processor.
2. Dissolve su gar and yeast in the warm water and add
to the flour.
3. If using a mixing machine, mix o n slow speed for 2
minutes. Then mix on medium for 8 minutes or u ntil
dough is smooth.
4. Shape round ball of 750g of the dough, put in a bowl,
cover with cling film and let it rise for 45 minutes in
the oven at 30°C (or in defrost mode).
5. Shape a longish loaf, cover with a towel and let it
rise for 45 minutes in the oven at 30°C (or in defrost
mode).
6. Carve the surfac e of the bread with a serrated knife,
depth of the cuts around 5 mm.
7. Choose ‘bread baking’ function, ensure water is
in the tank and pre-heat the oven to 180°C for 10
minutes .
8. Place the dough in shelf level 2 and c ook for
40-45 m inutes.
9. Refill the water tank if it becom es empty before the
end of the cycle.
10. Remove loaf and allow to cool.
11. Drain any lef t over water from the tank once the
appliance is cool.
Page 25

48 cooking guide cooking guide 49
• Select the correct shelf location for food being cooked.
• Make sure dishes will fit into the oven before it is
switched on
• Keep edges of non Elec trolux baking dishes at lea st
40mm from the side of the oven. This allows free
circulation of heat and ensures even cooki ng.
• Do not open the oven door more tha n necessary.
• Do not place foods with a lot of liquid i nto the oven
with other foods. This will cause food to steam and
not brown.
• After the oven is turned of f it retains the heat for some
time. Use this heat to finish custards or to dry bread.
• Do not use a lot of cooking oil w hen roasting. This will
prevent splattering oil on the sides of the oven and the
oven door.
• When cookin g items that require a high heat (e.g.
tarts), place the cooking dish on a scone tray in the
desired shelf position.
• For sponges and cakes use aluminium, bright finished
or non-stick cookware.
Condensation
Excess condensation may fog the oven door. This may
happen when you are cooking la rge quantities of food
from a cold start. Minimise cond ensation by:
• Keeping the amount of water used whi lst cooking to a
minimum.
• Making sure the oven door i s firmly closed.
• Baking custard in a ba king dish that is slightly smaller
than the water container.
• Cooking cas seroles with the lid on.
• If water is being used in cook ing, it will turn to steam
and may condense outside your applia nce. This is not
a problem or fault with the appliance.
Oven shelf location
The oven has 8 positions for shelves (as shown in the
example below). To give maximum space above and
below the shelves, load them in this way:
• When cookin g with 1 shelf, position at 1 or 2.
• When cook ing with 2 shelves, position them at 2 and 6.
For more detailed shelf locations. Refer to cook ing tables
for individual cooking functions.
COOKING GUIDE
ENVIRONMENT!
To save energy and to help protect the environment ,
we recommend these hints:
Use the oven efficiently by cooking many trays of food at
the same time. For example:
• Cook 2 trays of scones, small c akes or sausage rolls.
• Cook a roast dinner at the s ame time as you cook
chips or vegetables.
Roasting meat (use roasting tray & insert)
• Place the meat in the oven and set the tempe rature
between 180°C and 200°C. (It is recommended to
wrap your meats in an oven roasting bag or foil to
prevent fats and oils from splattering. This will m ake it
easier to clean the oven.)
• Use the grill/oven dish and anti spatter gr ill inserts.
Place the meat on the inserts.
• Do not pierce the meat.
• When the meat is coo ked, take the roast out of the
oven, wrap in aluminium foil and leave to stand for
about 10 minutes. This will help retain the juices
when the meat is carved. The ta ble below shows
temperatures and cooking times for di fferent kinds of
meat. These may vary dependi ng on the thickness
and bone content of the meat.
Roasting poultry and fish
• Place the poultr y or fish in an oven set at a moderate
temperature of 180°C - 200°C.
• Place a layer of foil over the fish for about thre e quarters
of the cooking time The table shows the temper atures
and the cooking times for dif ferent kinds of fish and
poultry. These may vary dependi ng on the thickness
and bone content of the meat.
8
7
6
5
4
3
2
1
COOKING GUIDE
Cooking guide
meat
recommended
temperature °C
minutes per kg
beef 200
rare: 35 -40
medium: 45-50
well done 55-60
lamb 200
medium: 40
well done 60
veal 180 well done 60
pork 200 well done 60
poultry
& fish
recommended
temperature °C
minutes per kg
chicken 200 45-50
duck 200 6 0-70
turkey 18 0
40- 45 (<10k g)
35 -4 0 (>1 0kg )
fish 180 20
IMPORTANT!
For best cooking results p re-heat your oven and grill.
Pre-heating reaches the required temperature quickly
and efficiently as well a s cook your food at the correct
temperature for the entir e cook time. For best baking
results preheat oven for 30 min utes.
Temperature estimations
If a recipe calls for Farenheit (°F) or no a ctual temperatures,
use the following table to determine the temperature (°C).
oven temp. °C temp. °F
low heat
cool 80 175
very slow 10 0-110 210-23 0
slow 130 -140 265 -285
moderate
heat
moderately slow 150-1 60 300-320
moderate 170 -180 340-355
moderately hot 190-200 375-3 90
high heat
hot 200-210 390 -410
very hot 220-230 430- 450
extremely hot 240- 250 465-480
Page 26

Traditional baking
food temperature °c oven shelf position* time in minutes
scones – plain or fruit 220 1 10
biscuits – rolled 170 2 10 -15
– spooned 190 2 12-1 5
– shortbread biscuits 160 1 or 2 30-35
meringues – hard – individual 110 2 90
– soft – individual 180 2 15 -20
– pavlova – 4 egg whites 110 1 75
cakes – patty cakes 190 2 15 -20
– sponge – 4 eggs 18 0 2 20-30
– shallow butter cake 180 2 30-40
– boiled fruit cake 18 0 1 60-70
pastry – shortcrust – cor nish pasties 200 2 40 -45
– custard tart 200/180 1 10/30-30
pastry – choux – cream puffs 2 10 2 25 -30
yeast goods – bread 210 1 25-30
– pizza 220 2 18
*Counting from the bottom position up
Fan cooking
food temperature °c oven shelf position* time in minutes
scones – plain or fruit 210 2 and 6 10 -15
biscuits – rolled 150 any 1 0-15
– spooned 180 any 1 0-15
– shortbread biscuits 150 any 10-15
meringues – hard – individual 100 any 90
– soft – individual 16 5 any 15-2 0
– pavlova – 4 egg whites 100 2 and 6 75
cakes – patty cakes 180 2 and 6 15-2 0
– sponge – 4 eggs 170 2 and 6 20-30
– shallow butter cake 170 any 30-40
– boiled fruit cake 170 1 60-70
pastry – shortcrust – cor nish pasties 18 0 any 40-45
– custard tart 19 0/17 0 a ny 20-30
pastry – choux – cream puffs 200 a ny 25-30
yeast goods – bread 210 1 25-30
– pizza 220 2 18
COOKING GUIDE
Steam cooking
(EVEP615SB and EVEP618BB models only)
food temperature °C oven shelf position* time in minutes
cakes and pastries – apple cakes in a 20cm cake tin 140 2 60-80
– biscuits on a baking tray 150 3 (2 and 4) 20 -40
– sweet buns on a baking tray 180-200 2 10 -20
flan – vegetable in a dish 17 0-180 1 20-40
– lasagne in a dish 170 -180 2 40- 50
– potato gratin in a dish 1 60-17 0 2 50-60
meat – roast pork 180-200 2 9 0-11 0/k g
– veal 180 2 35-45/kg
– roast beef
• rare 210 2 35-40/kg
• medium 200 2 40-45/ kg
• well done 190 2 50 -55/kg
– whole chicken 200 2 50-55/kg
fish and seafood – snapper 1-1.5kg 14 0-150 2 15-25
– barramundi 4 fillets 18 0 2 10-15
miscellaneous tray of vegetables 500g 130 2 20-25
pizza (fresh) 210 2 14 -18
*Counting from the bottom position up
Bread baking
food temperature °c oven shelf position* time in minutes
bread – rolls 200 2 20-25
– loaves 180 2 35 -45
– foccacia 200-210 2 15 -25
COOKING GUIDE
50 cooking guide cooking guide 51
Page 27

Grilling hints
As a method of cooking, grilling can be used to:
• Enhance the flavours of vegetable s, fish, poultry
and me at.
• Seal the sur face of the food and retain natural juices.
• Grill with the door cl osed.
This table shows how to grill different types of meat:
food grilling method
beef – tenderloin, rump
and sirloin.
brush with oil or melted butter,
especially if the meat is very lean
lamb – loin chops, shortloin
chops, chump chops and
forequarter chops.
remove skin or cut at intervals
to avoid curling. brush with oil
or melted butter
sausages
prick sausages to stop skin
from bursting
poultry
divide into serving pieces.
brush with oil
fish
brush with oil or melted butter
and lemon juice
bacon
remove rind, grill flat and make
into rolls
WARNING!
Always clean the grill/oven dish after ever y use.
Excessive fat build up may cause a fir e.
Guide to better grilling
No definite times can be given for grilling b ecause
this depends on your own tastes and the size of the
food. These times should only be use d as a guide and
remember to turn the food over half way through the
cooking process.
food time in minutes
Steak 15-20
Chops 20-30
Fish 8-10
Bacon 4-5
For better grilling results, follow these easy ins tructions:
• Remove oven/grill dish and grill inse rt and preheat grill
for about 5 minutes.
• Choose only prim e cuts of meat or fish. If the cut is
less than 5mm thick it will dr y out. If the cut is more
than 40mm thick, the outside may burn whils t the
inside remains raw.
• Do not place aluminiu m foil under food as this prevents
fats and oils from draining away, which could result in
a fire.
• Baste the food during grilli ng with butter, olive oil or
marinade. Grilled food is better if m arinated before
cooking.
• Use tongs to turn food as a fork pierces the s urface
and will let juices escape.
Fan grill
The ‘fan grill’ function will ass ist the grilling process
by circulating the heat evenly around the food. The
recommended temperature setting i s 180°C for all fan
grilling functions.
• Use the anti spatter inser t and grill dish for all
fan grilling.
Position the dish in the lower half of the
oven, for best results.
• Wipe off any oil or f at which splatters while the oven
is still warm.
• There is no need to turn me at as both sides are
cooked at the same time which means the food
is succulent.
GRILLING GUIDE DEALING WITH COOKING PROBLEMS
problem possible causes remedies
Uneven cooking Incorrect shelf position • Select shelf suitable for cooking function. See cooking
function tables in cooking guide
Oven tray too large • Experiment with other trays or dishes
Trays not centralised • Centre trays
Air flow in oven uneven • Rotate food during cooking
Grill dish affecting thermostat • Remove grill dish from oven on bake modes
Baked products too
brown on top
Oven not preheated • Preheat oven
Baking tins too large for the recipe • Use correct size tins
Baking tins not evenly spaced • Stagger baking tins at least 3cm between tins and oven walls
Products not evenly sized or spaced on trays • Make into same size and shape, and spread evenly over trays
Baking temperature too high • Lower the temperature
Baked products too
brown on bottom
Baking tins too large for the recipe • Use correct size tins
Baking tins are a dark metal or glass • Change to shiny, light tins or lower the temp by 10°C
Food too low in the oven • Cook one shelf higher
Oven door opened too frequently during
baking
• Don’t open the door until at least half the cooking time
has passed
Baking temperature too high • Lower the temperature
Grill dish affecting thermostat • Remove grill dish from oven on bake modes
Cakes have a
cracked thin crust
Baking temperature too high • Lower the temperature
Food too high in oven • Cook one shelf lower
Cake batter over mixed • Mix just long enough to combine ingredients
Pan too deep • Check size of pan
Baking pans dark • Change to shiny pans
Baked products are
pale, flat and
undercooked
Baking temperature too low • Raise the temperature
Food too low in oven • Cook one shelf higher
Baking time too short • Increase the cooking time
Incorrect size tin • Use the correct size tin
Cakes fallen in the
centre
Baking temperature too low • Raise the temperature
Baking time too short • Increase the cooking time
Proportions of ingredients incorrect • Check recipe
Door opened too early in baking • Do not open door until the last quarter of cooking time
Roast meat, potatoes
not browning in fan
oven
Poor air circulation • Elevate food onto a rack to allow air circulation
Grill dish affecting thermostat • Remove grill dish from oven on bake modes
Juices running out of meat • Do not pierce meat with a fork
Grilled meats outside
is overcooked and
centre is raw
• Grill at lower insert position
Grilled chops and
steaks curling
• Cut into fat every 2cm
The steam cooking
does not operate
There is no water in the tank • Fill the water tank
Limescale is obstructing the hole • Check the steam outlet opening and re move the lime
It takes more than
three minutes to
empty the water tank
or the water tank leaks
from the steam outlet
There are lime deposits in the appliance
• Check the water tank and refer to the ch apter on
Cleaning the water tank.
Steam and
condensation settle
on the food and in the
appliance
The dish has been left in the oven for too long
• Do not keep the dishes in the ap pliance for longer than
15-20 minutes after the cooking ends
52 grilling guide dealing with cooking problems 53
Page 28
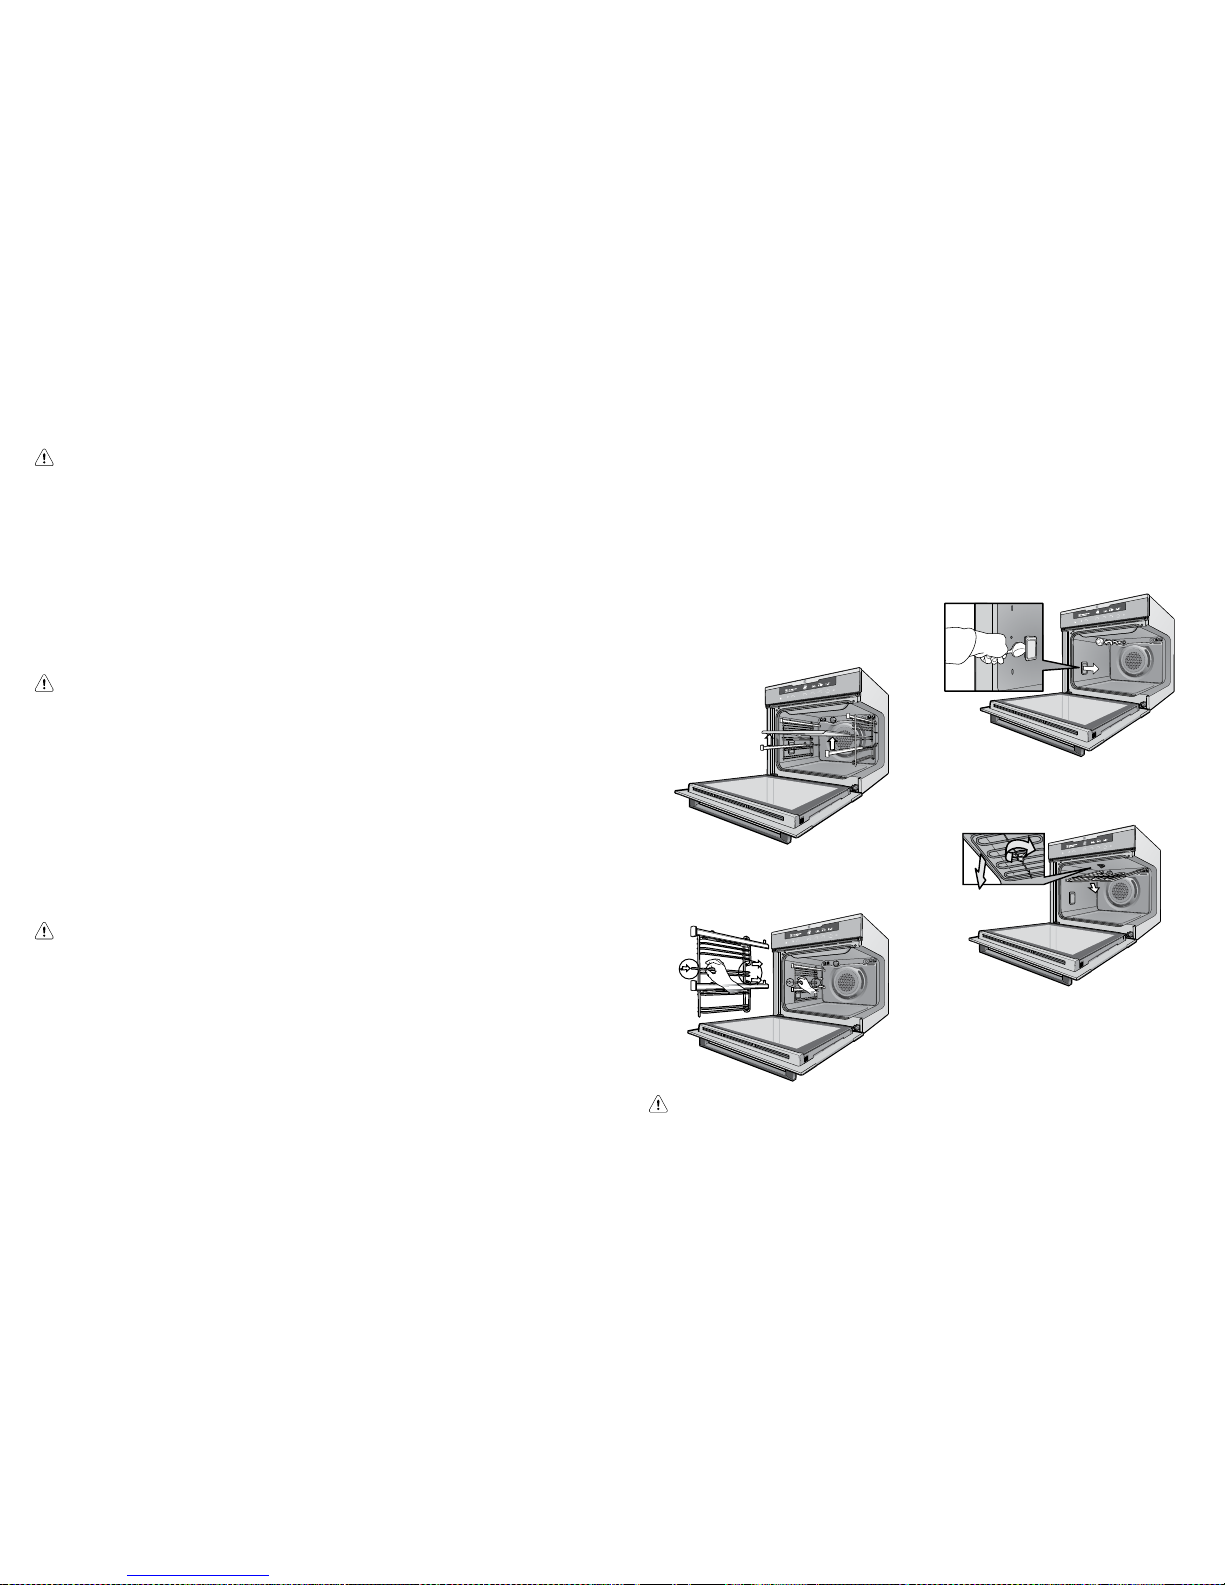
54 maintenance and cleaning maintenance and cleaning 55
WARNING!
• Do not use steam c leaners.
• Do not line the bo ttom of the oven with foil
or cookware.
Stainless steel
• All grades of stainle ss steel can stain, discolour or
become greasy. You must clean these areas regularly
by following the procedures below, if you want your
appliance to look its best, perfor m well and have a
long life.
• Care mus t be taken when wiping exposed
stainless steel edges, they can be sharp!
• A suitable cleaner can be purchased from Electrolux
Customer Care Centres.
CAUTION!
• The oven door and control pa nel are decorated with
a special stainless steel that res ists finger marks and
should only be cleaned with war m water and a mild
detergent.
• DO NOT use stainless steel cleaners, abrasive
cleaners or harsh solvents.
Note: Make sure you follow the polish or brushing lines
in the steel.
Glass
• Glass sur faces on doors and control panels are best
cleaned immediately after soiling.
• A damp cloth may help remove baked on food
deposits.
• Oven cleaners can be used to remove stubborn
marks and stains.
WARNING!
• The door glass o n this appliance is made from a
tough, durable material that withstands heating
and cooling without breaking. However, it must be
remembered that it is GLAS S, it may break. Treat it
accordingly! Should you have any questions about
the glass in your new appliance, please contact the
customer care centre by dialling 1300 363 640.
• Do not use harsh abra sive cleaners or sharp metal
scrapers to clean the oven door since they ca n
scratch the surface, which may result in shat tering of
the glass.
CLEANING THE APPLIANCE
Oven
• Always keep the applianc e clean. Ensure fats and oils
do not accumulate around elements, burner s or fans.
• Always keep oven dish, bake trays and grill dish ins erts
clean, as any fat deposits may catch fire.
• It is recommended to wrap meats in foil or an oven
roasting bag to minimise cleaning.
• Any polyunsaturated fats can leave a varnish-like
residue which is very dif ficult to remove.
Grill
• Always keep grill dish and g rill insert clean, as any fat
deposits may catch fire.
Removing the trays and shelves from the appliance
1. Slide the dish and shelves towards you until they reach
the front stop.
2. Tilt them up at the front to clear the side suppor ts,
taking care not to spill the contents.
3. Lift them clear.
4. Wash the dish and insert the shelves in hot soapy
wa te r.
5. Reverse the above steps to put the grill dish and
shelves back again.
6. Ensure that they are placed between two suppor t
wires.
7. To remove a tray from a sliding position:
– Pull tray towards you until it stops.
– Lift the tray clear.
Removing the side racks
1. Grasp the mid dle wire at the front.
2. Pull firmly inwards.
WARNING!
Make sure the ap pliance is turned off b efore you
remove or replac e parts, to avoid the possib ility of
electric shock.
CLEANING THE ACCESSORIES
Removing and replacing the oven back light and
side light (if fitted)
• Turn oven light glass anticlockwise to remove it for
globe replacement.
• To remove side light, place a spoon under the light
glass and lever off. Replace globe an d snap glass
cover back into position.
• A special high temperature resistant globe should
be used. This can be purchased from El ectrolux
Customer Care Centre.
Releasing the grill element
To clean the oven roof rotate latch until the element drops
down freely.
Page 29
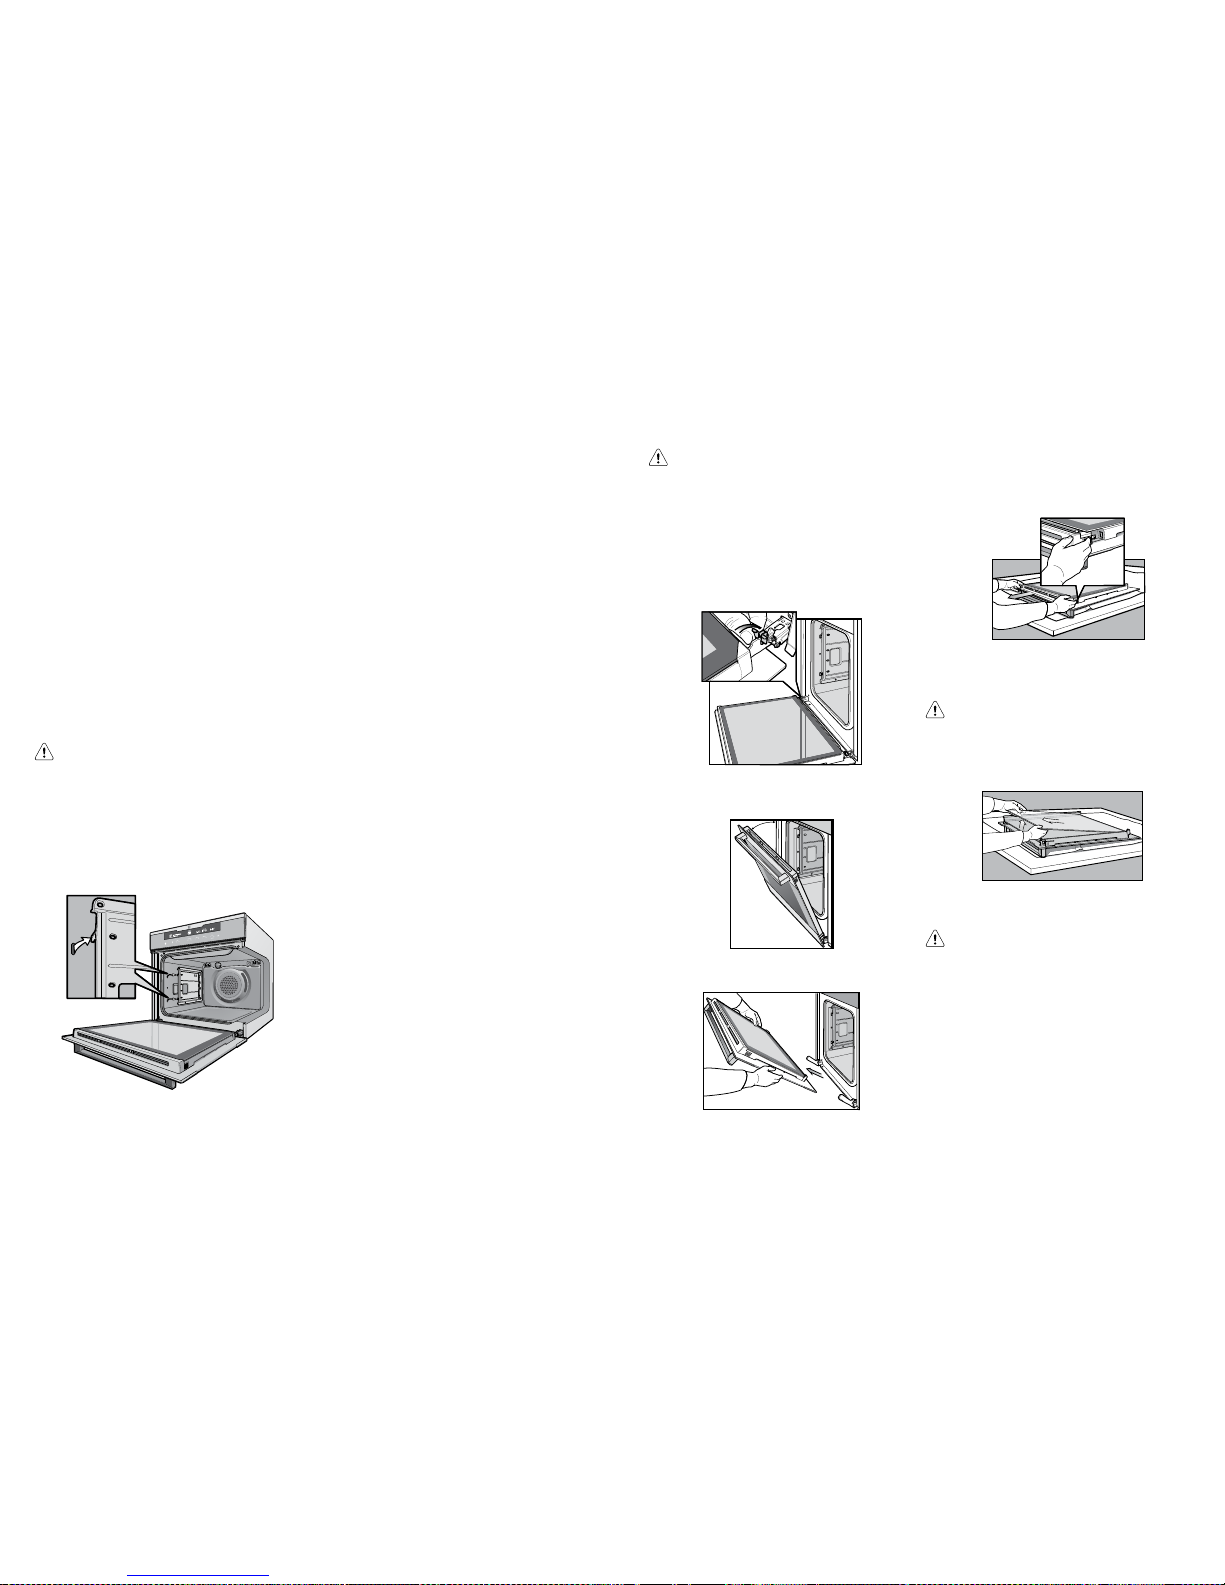
56 maintenance and cleaning maintenance and cleaning 57
Catalytic self cleaning panels (if fitted)
Operation
Catalytic self clean pan els are coated with a specially
formulated enamel coating, over a base of regular en amel.
This enamel coating has a rough sur face which is also
porous. During normal cooki ng, fats and other food
splatter is partially abso rbed into the surface and then
oxidises away.
This oxidisation of the fat works best if the oven is set at
high temperatures. You will find that if you do a lot of lower
temperature baking, say around the normal 180°C, then
the cleaning process may not be compl ete. Every now and
then you should turn the oven on to 250°C for around one
hour to completely remove the soil.
Cleaning
Should the panels become heavily soiled, they will need
to be taken out of the oven and cleaned by hand. They
should be soaked in warm, soapy water for at least 2
hours and then wiped clean w ith a soft cloth.
Note: It is not recommended that the catalytic liner in the
top of the oven be removed.
CAUTION!
Solid cleaning powders, creamy cleansers, caustic
oven cleaners, steel wool or oth er scourers will ruin
the catalytic sur face and must NEVER BE USED.
Removing catalytic liners
• Remove the side racks (see previous pag e)
• Lift the lin er up to disengage the hooks.
• The liners sho uld now be free to be pulled in towards
the centre of the oven.
CLEANING THE ACCESSORIES
WARNING!
Do not lift the door by the hand le. Rough handling will
cause glass to break.
Removing the oven door
The oven is equipped with a door that can b e
disassembled in order to clean a ll the panes of glass.
Remove the door before cleaning.
• Open the door fu lly to access the hinges then rotate
the ‘stirrups’ (highlighted in the image) on both hinges
fully towards the oven.
• Slowly close the oven door until it is stops against the
‘stirrups’ (about 45°).
• Grasp the oven door with a hand each side of the door
and remove it from the oven by pulling it towards you.
• Lay the oven door with the outer side facing
downwards on something soft and flat (for example a
blanket on a kitchen table) to prevent scratches.
CLEANING THE TRIPLE GLAZED DOOR
Removing the oven door top trim
• Take hold of the grid embossed sections of the door
trim at each end and press inwards to release the
clips. Remove the door trim by pulling it towards you.
Removing door glass panels
WARNING!
Rough handling, especially around the edges can
cause the glass to break .
• Lift the bla ck bordered glass panel out of the guide.
• Repeat this for the small er clear glass panel.
Cleaning the door glass panels
CAUTION!
• Do not to use harsh abrasives on the glass panes as
the reflective surface plays a role in the function of
the oven.
• Do not place glass in dishwasher. Hand wash only
with a soft cloth and warm soapy water. When dry
polish with a soft cloth and ensure the gla ss is dry
before reassembly.
Page 30
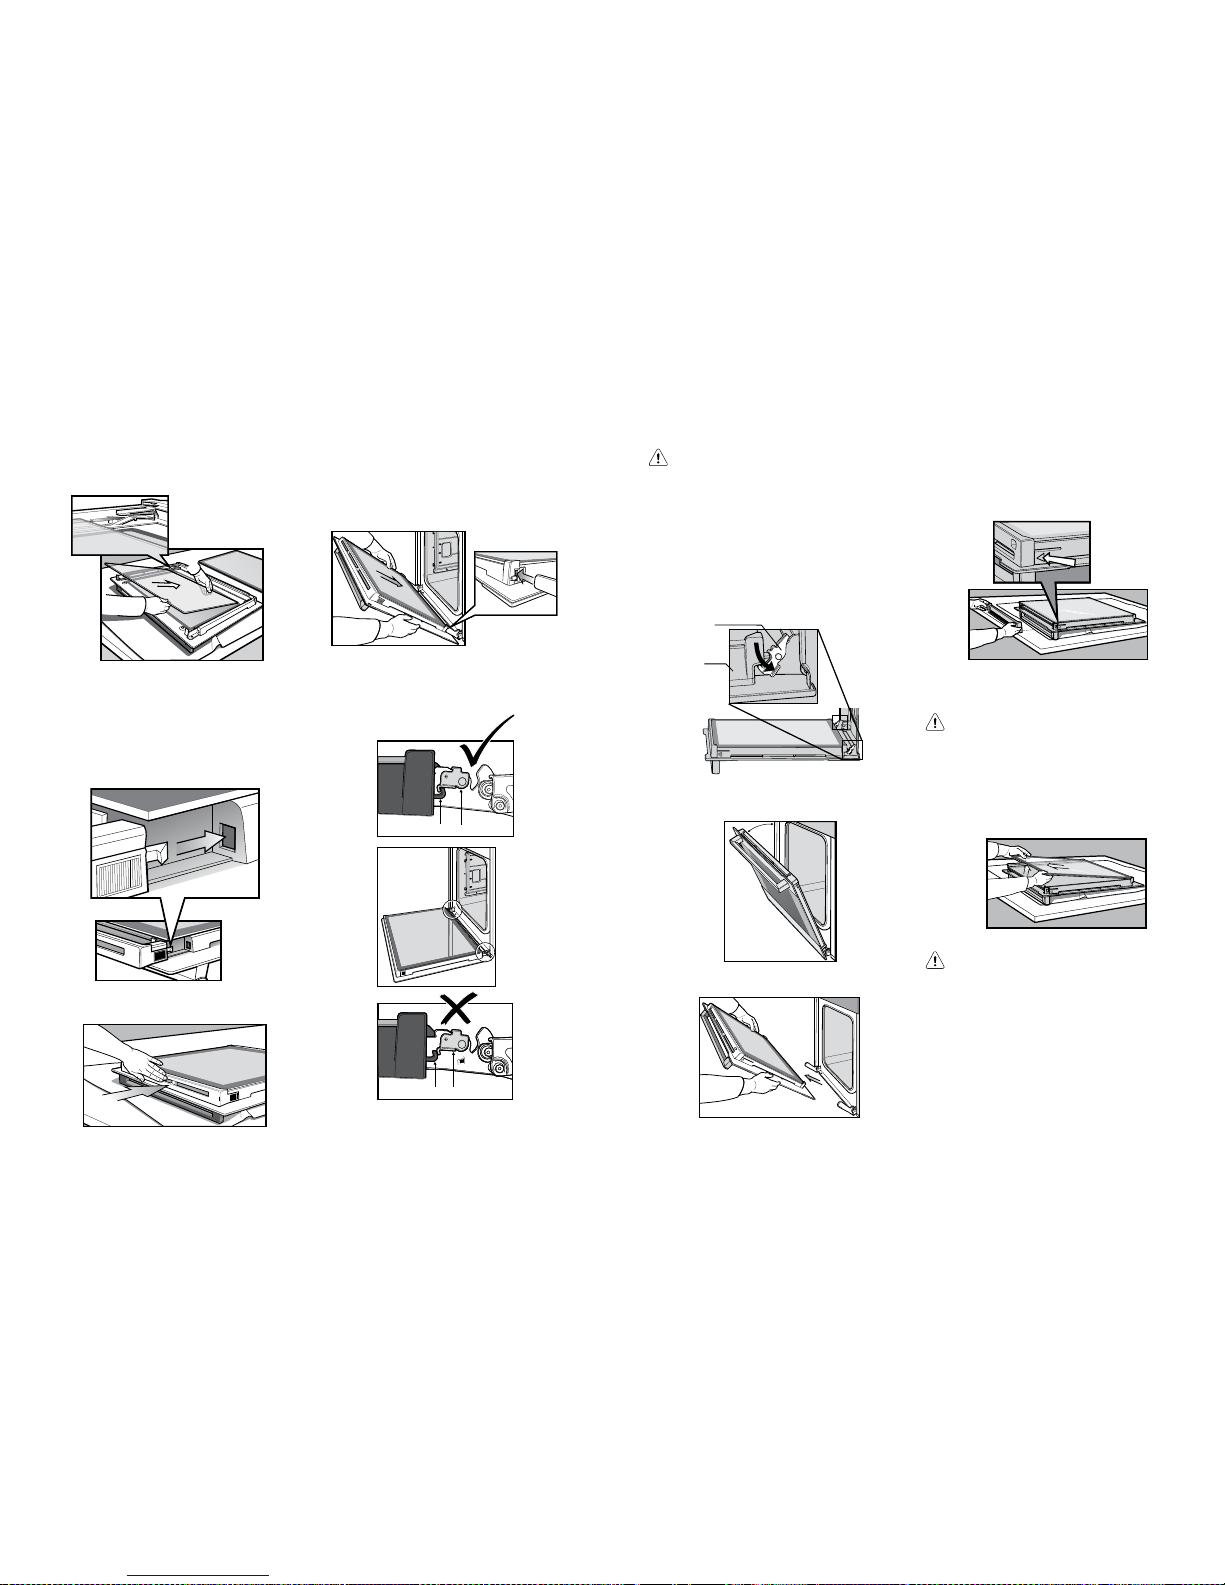
58 maintenance and cleaning maintenance and cleaning 59
Replacing the door glass panels
• Insert the smaller clear glass panel first f rom above
and at an angle to the profile of the door.
• Repeat for the black bo rdered glass panel ensur ing
the painted surface is facing to the downside.
Replacing the top door trim
• Take hold of the top door trim at each side and
position it to the inside edge of the glass.
• Push the trim down with its top edge over gla ss panel
until the clip snaps in on each side of the trim.
• Push the middle of the trim down to ensure it is
straight and firm against the glass pan el.
CLEANING THE TRIPLE GLAZED DOOR
Fitting the oven door
• Take hold of the oven door with a hand on each side
and with the door at an angle of 45º, position the
recesses at the bottom of the door onto the hinge
arms of the oven. Let the door slide down the hinge
arms as far as it will go.
• Open the door fu lly to access the hinges.
• Rotate the ‘stirrups’ (see the image below) until they
lock into the hook. The oven door may now be closed.
Hook Stirrup
Hook Stirrup
WARNING!
Do not lift the door by the hand le. Rough handling will
cause glass to break.
Removing the oven door
The oven is equipped with a door that can b e
disassembled in order to clean a ll the panes of glass.
Remove the door before cleaning.
• Open the door fu lly to access the hinges then rotate
the ‘stirrups’ (highlighted in the image) on both hinges
fully to open position.
• Slowly close the oven door until it is stops against the
‘stirrups’ (about 30°).
• Hold the oven door with a hand each side and
remove it from the oven by pulling it towards you.
• Lay the oven door with the outer side facing
downwards on something soft and flat (for example a
blanket on a kitchen table) to prevent scratches.
CLEANING THE QUAD GLAZED DOOR
Removing the oven door top trim
• Hold the embossed sections of the door columns
at each end and press inwards to release
the clips. Remove the upper door trim by pulling it
towards yo u.
Removing door glass panels
WARNING!
Rough handling, especially around the edges can
cause the glass to break .
• Lift the bla ck bordered glass panel out of the guide.
• Repeat this for the small er clear glass panels.
• When removing pan el 3, ensure that the two
rubber spacers are removed before cle aning.
Do not misplace them!
CAUTION!
• Do not to use harsh abrasives on the glass panes as
the reflective surface plays a role in the function of
the oven
• Do not place glass in di shwasher. Hand wash only
with a soft cloth and warm soapy water. When dry,
polish with a soft cloth and ensure the gla ss is dry
before reassembly.
Door
column
Stirrup in the
open position
Page 31
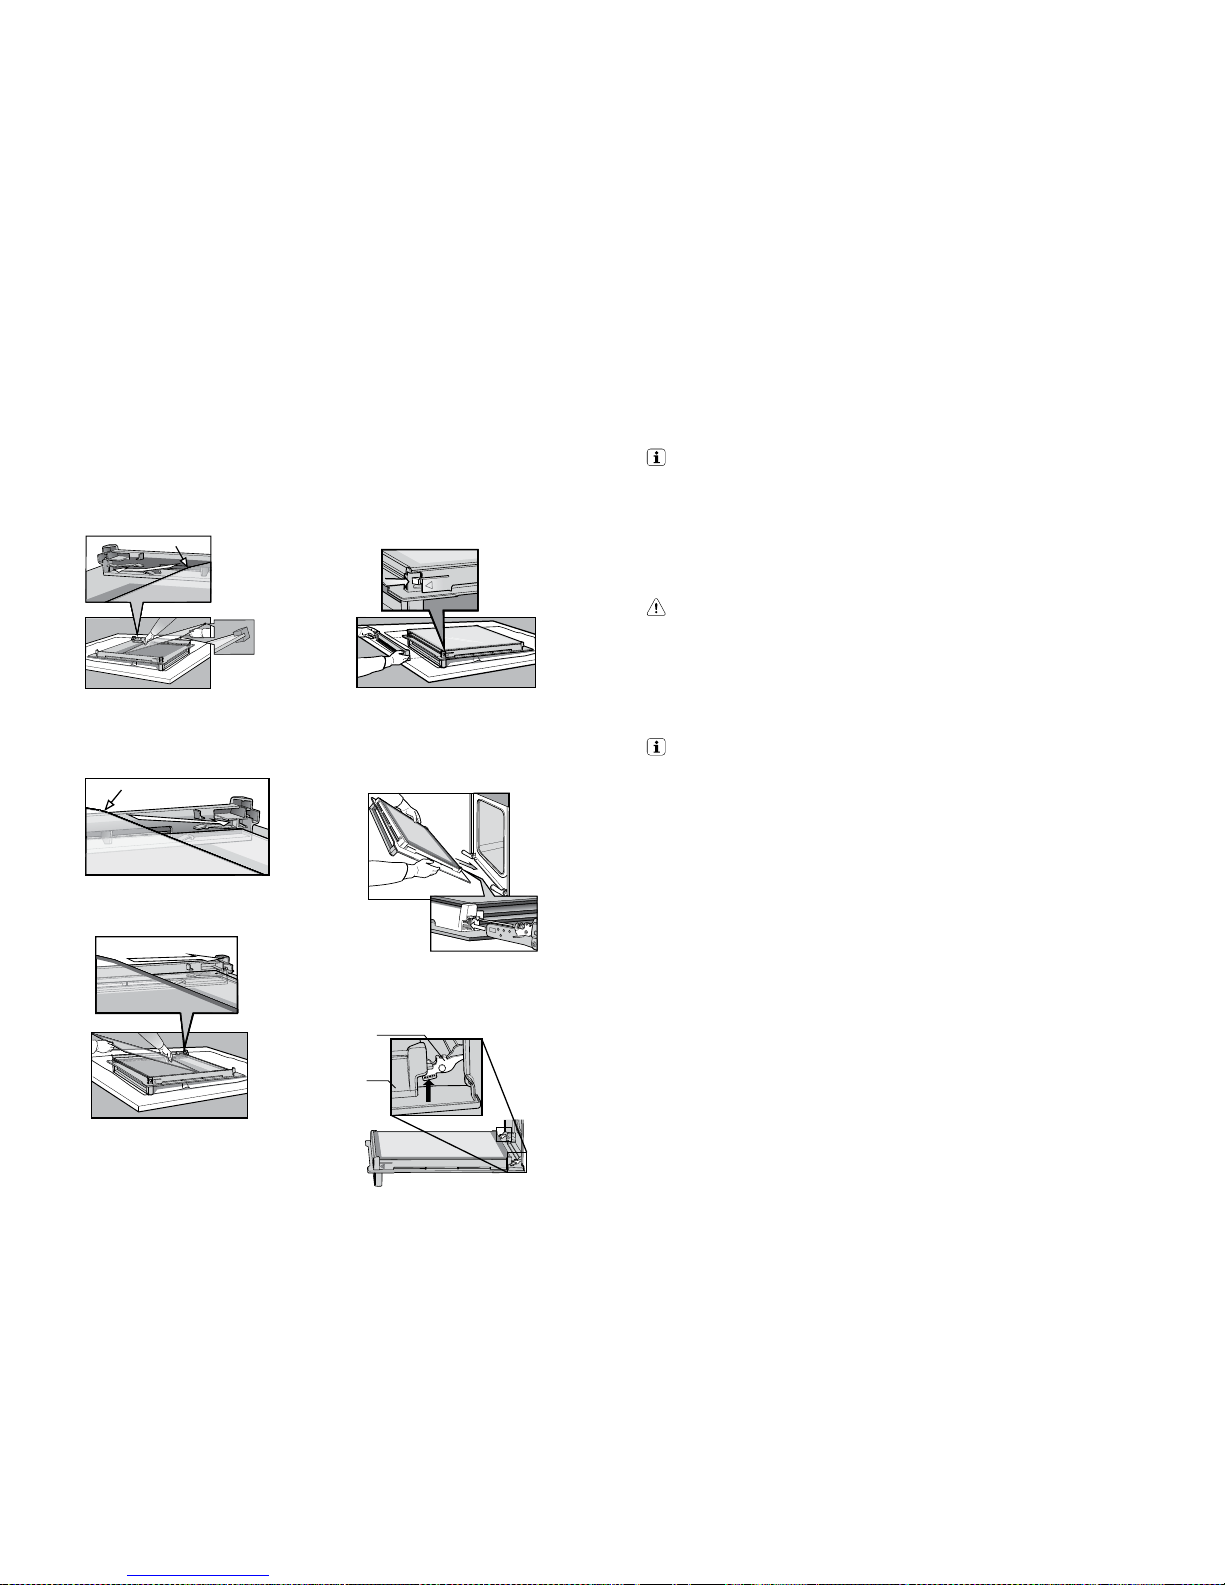
60 maintenance and cleaning tips and troubleshooting 61
IMPORTANT!
Cooling/vent fan
This appliance is fitted with a co oling fan. This prevents
your kitchen cabinet from overheating and re duces the
condensation inside the oven. It will operate when ever you
are using the oven and blow warm air across the top of the
oven door.
Note: If the oven is still hot from cooking, the cooling fan
will keep running to cool the oven down and will switch
off by itself once cool.
CAUTION!
Using the oven
• Always cook with the oven door clo sed.
• Stand clear wh en opening the drop down oven door.
Do not allow it to fall open. Always support the doo r
using the door handle until it is fully o pen.
• Do not lean on an ope n oven door, or place heavy
items on it. This could damage the applia nce. Take
care in the region of the hinges.
IMPORTANT!
Condensation and steam
This appliance is supplie d with an exclusive system which
produces a natural circulation of air and the con stant
recycling of steam.
This steam makes it possible to cook in a steamy
environment ensuring that dishe s are soft inside and crusty
on the outside. This process also redu ces cooking time
and energy consumption. During co oking steam may be
produced and released whe n the door is opened. This is
absolutely normal.
When food is heated it produces steam in the sa me way a
boiling kettle does. When steam come s into contact with
the oven door glass it will condense a nd produce water
droplets. To reduce condensation, ensure that the oven is
well heated before placing food in the oven cavity.
Oven pre-heating is necessa ry before any cooking.
It is recommended that condens ation is wiped away after
each use of the oven.
TIPS AND TROUBLESHOOTING
The effects of dishe s on cooking results
Dishes and tins vary in their thickness, conductivity, colour
etc. which affects the way they transfer heat to the food
inside them.
• Aluminium, ear thenware, oven glassware and bright
shiny utensils reduce cooking and ba se browning.
• Enamelled cast iron, anodized aluminium, aluminium
with non-stick interior and coloured exter ior and dark,
heavy utensils increase cooking and base browning.
• To increase base browning simply lower the shelf
position. To increase top browning, raise the shelf
position.
• Always place dishes c entrally on the shelf to ensure
even browning.
• Single level cook ing gives best results in conventional
modes. If cooking on more than one level us e the fan
cooking function.
Replacing door glass panels
• Assemble the silicone spacers to the upper corners of
one of the clear glass panels. Position the panel into
the lower position of the door, ensuring the chamfered
corner of the panel is placed in the co rrect location as
shown in the image below.
• Insert the remaining smaller clear glass panel into the
middle position, ensuring the chamfered corner of the
panel is placed in the correct lo cation as shown in the
image below.
• Insert the black bordered glass panel into the upper
position, ensuring the painted surface is facing the
downside as per the image below.
CLEANING THE QUAD GLAZED DOOR
Replacing the top door trim
• Hold the top door trim at each sid e and position it to
the inside edge of the glass.
• Push the trim down with its top edge over the gla ss
panel until the clip snap in on each sid e of the trim.
• Push the middle of the trim down to ensure it i s
straight and firm against the glass pan el.
Fitting the oven door
• Take hold of the oven door with a hand on each side
and with the door at an angle of 30˚, position the
recesses at the bottom of the door onto the hinge
arms of the oven. Let the door slide down the hinge
arms as far as it will go.
• Open the door fully to access the hinges.
• Rotate the ‘stirrups’ (see the image below) until they
lock into the hook. The oven door may now be closed
Chamfer to be loca ted in this corner
Chamfer to be loca ted in this corner
Silicone
spacers
Door
column
Stirrup in
locked position
Page 32
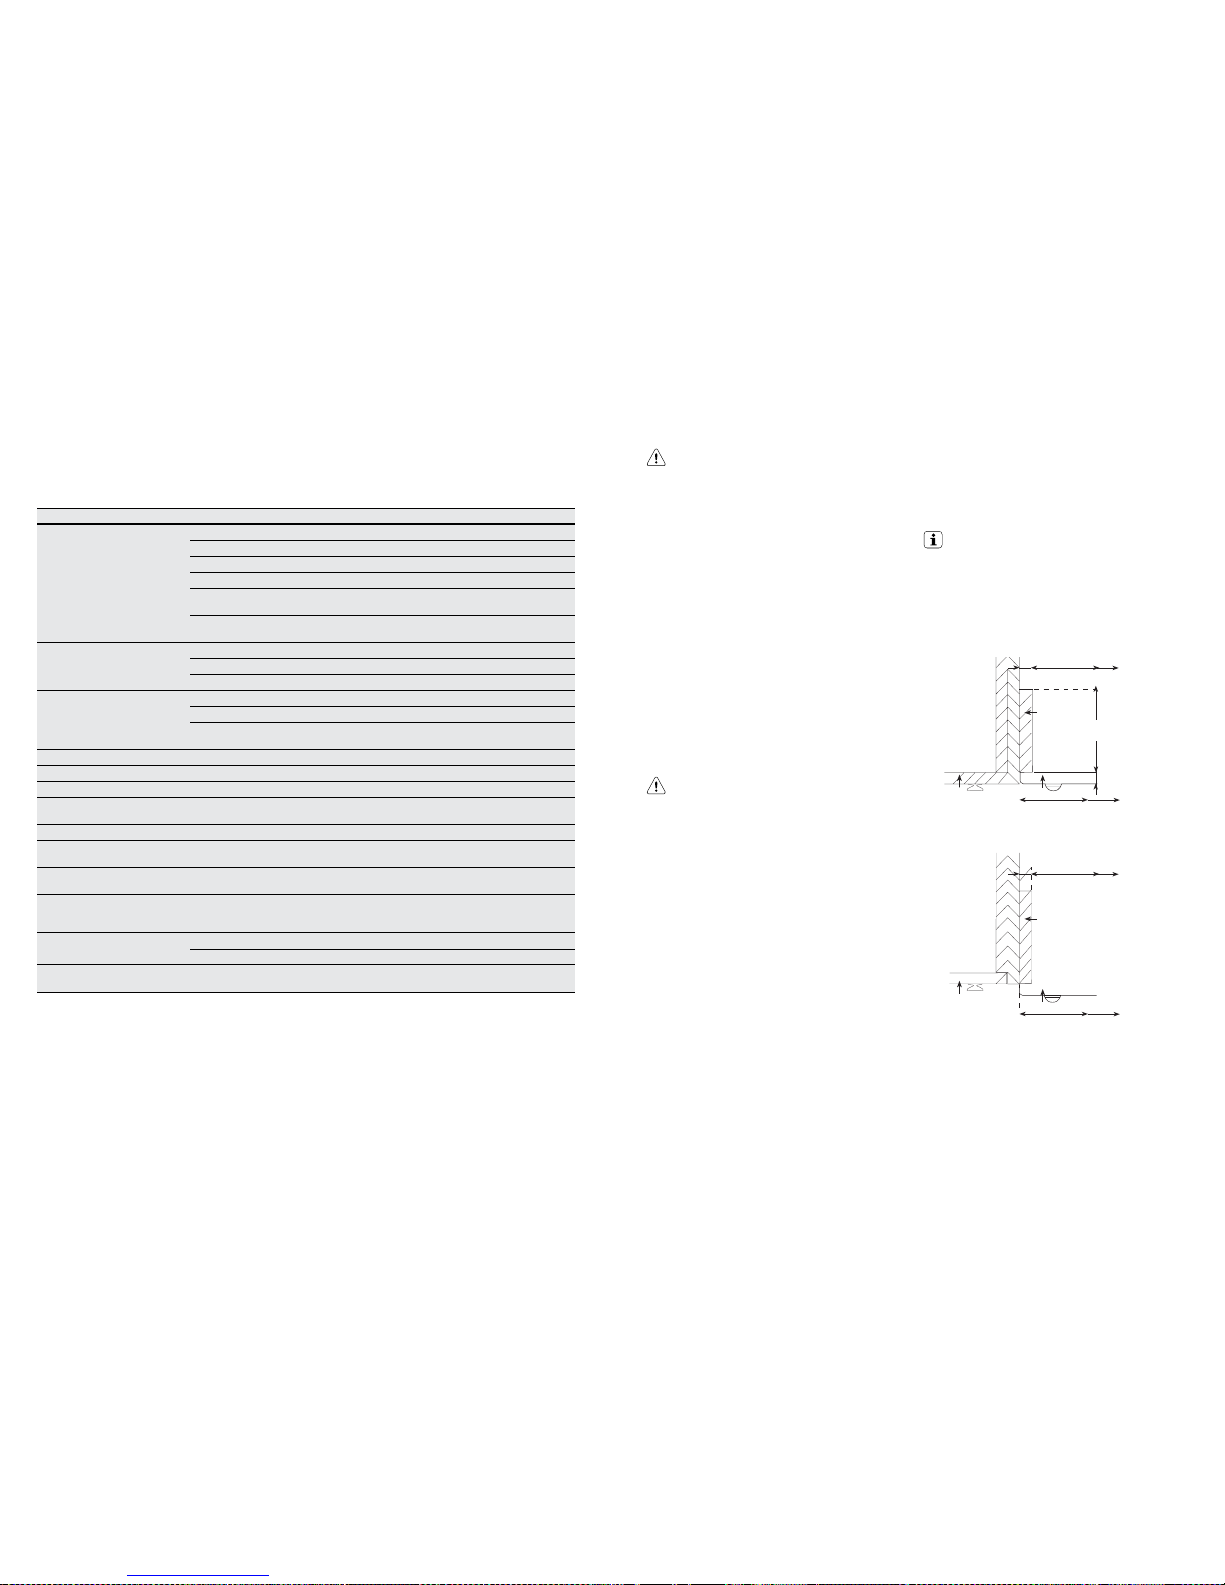
62 maintenance and cleaning
Faults
If there is a problem with the oven or grill, please che ck the points listed below before calling for service. It may be possible
to avoid a call by fixing the problem yourself - and so continu e cooking.
Note: We may charge for service even in the guarantee period if your problem is due to the causes listed below.
problem possible cause
Oven or grill not working • Time of day is not set
• Power is not turned on
• Controls are incorrectly set
• Oven is in ‘Demo’ mode, refer to Additional Functionality
• Household fuse has blown or power supply is off. (If the household fuse continues to blow,
call the Service Centre)
• Child-proof oven lock is activated. ‘LOCKED’ is displayed when control is touched.
(Refer to operating instructions)
Oven light not working • Light may be turne d off at control panel
• Lamp blown or loose socket
• Household fuse has blown. (If the household fuse continues to blow, call the Service Centre)
Oven not heating enough • Foil trays on bottom of oven
• Timer is in ‘AUTO’ mode. (Refer to operating instructions)
• Household fuse has blown or power supply is off. (If the household fuse continues to blow,
call the Service Centre)
Clock flashing on display • Reset time of day and any cooking functions you were using.
Unit smoking when first used • Protective oils being removed
Condensation build up • Reduce the amount of water used in cooking. (Sometimes condensation is normal)
Door cannot be replaced after
removal
• Stirrup not engaged properly
Pyrolytic cycle not working • All accessories must be removed from the ovens.
Functions and temperature appear
on display but oven does not work
• Oven is in ‘Demo’ mode, refer to Additional Functionality
When the door is open the fan
stops (underbench only)
• This is a function of the power board to help reduce the blast of air when opening the door.
When a non fan mode is selected
the fan starts
• Most oven modes have a fast heat up function that uses the fan, fan element and top
(boost) elements. Auto fast heat up can be overridden by selecting a temperature of 120°C
or less, allowing the function to start, then increasing the temperature to the desired level
The light stays on when the door
is closed
• An oven function has been s elected.
• The light has b een turned on at the control panel
The light does not turn *ON* when
the door is opened
• Oven light may need replacing.
TROUBLESHOOTING
Data plate
When you need information, ser vice or spare parts please
be prepared to tell us the:
• Model number
• Serial number
These are shown on the data plate. The data plate is
visible when the oven or grill door is op en.
Customer Care Centre
If you need more information, please contact the Customer
Care Centre:
Australia – 1300 363 640, 8am – 5pm EST Mon – Fri.
New Zealand – +649 573 2384, 8am – 5pm EST Mon – Fri.
If you have a warranty or spare parts enqu iry, you should
call the number listed on the back page.
installation 63
WARNING!
To avoid any potential hazard, you must follow our
instructions when you install your appliance. Failure
to install the appliance correctly could invalidate any
warranty or liability claims and lead to prosecution.
Use an authorised person
• As stated in the local municipal building codes and
other relevant statutory regulations:
• Wiring connections must be in accordance with AS/
NZS 3000 Wiring Rules and a ny particular conditions
of the local authority.
• Refer to data plate for rating information. The data
plate is positioned behind the bottom of the oven door.
The circuit diagram is positioned on the top panel of
the appliance.
• For appliances with open cooking surfaces, a n all pole
disconnect functional switch should be provided near
the appliance in an accessib le position. Refer to AS/
NZS 3000 clause 4.7.1
• Wiring should be protected against mechanical failure.
Refer to AS/NZS3000 clauses 3.3.2.6, 3.9, 3.10
• A means of disconnection with a contact separation of
at least 3mm must be supplied in the fixed w iring.
WARNING!
This appliance must be properly earthed.
• Do not lift the appliance by the door handles.
• Prepare the cupboard opening to match your
appliance measurements. (See diagrams)
• Slide appliance into the cupboard, ensuring that the
supply cable (where fitted) doe s not kink.
• To prevent tipping, use the screws supplied to secure
your oven into the cupboard by fastening through the
2 holes to the front panel.
• Where the appliance is built into a cabinet, the cabinet
must be capable of withstanding 70°C. Installation into
low temperature tolerant cabinetry (e.g. Vinyl coated)
may result in deterioration of the low temperature
coating by discolouring or bubbling.
• If the appliance is to be installed adjacent to vinyl
wrapped surfaces, use a n installation kit available from
the vinyl-wrap supplier.
• Electrolux Home Products cannot accept
responsibility for damage caused by installation into
low temperature tolerant cabinets.
• After installation, test and ensure that the appliance
operates correctly before handing it over to the
customer.
Note: If a powerpoint is fitted it must be accessible with
the appliance installed, as the plug must be accessible
after installation.
INSTALLATION OF THE APPLIANCE
Cabinet construction for your appliance
For the best integration within a kitchen, install this
appliance in a standard 600 mm wide cupboard that gives
a flush fit (Figure A) with the surrounding cup board fronts.
Non-pyrolytic appliance s can also be installed using a
proud fit (Figure B).
IMPORTANT!
For all Pyrolitic clean m odels, the oven must be
installed as a flush fit (Fi gure A) to the surrounding
cupboards and the “infill panel” MUST not exceed
100mm in length. This ensures a 16mm gap is
maintained betwee n the cabinet and oven side to
prevent the cupboard overheating.
Note: Your appliance must be mounted on a flat surface
for the full width and depth of the product
Figure A – Flush Fit
568mm
568mm
Cupboard
door
Cupboard
door
20mm
600mm
600mm
Oven
Oven
16mm
16mm
Infill
panel
Infill
panel
100mm max
for pyro oven
Figure B – Proud Fit
Page 33
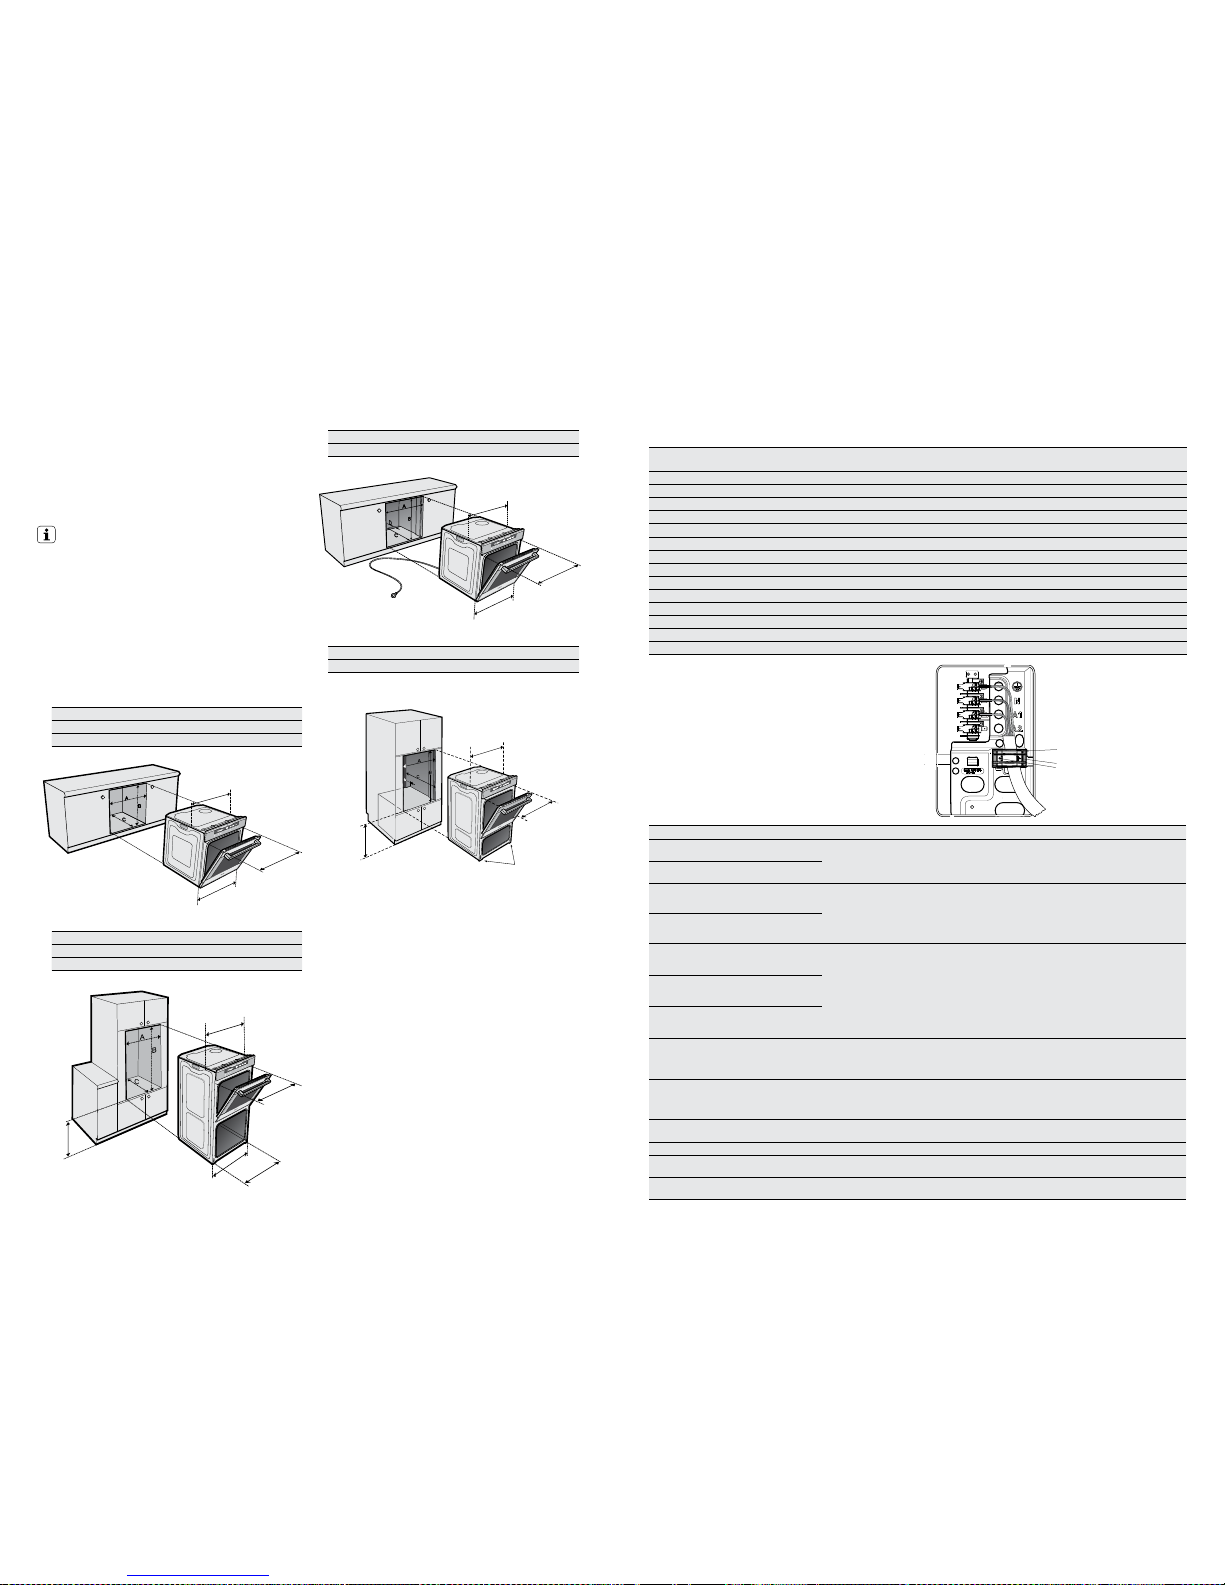
64 installation
Underbench oven
Your underbench oven looks best when the control panel
is directly under the benchtop. An upper infill pa nel may
be added if the cooktop placed a bove the benchtop is too
deep. Refer to cooktop installation instructions for re quired
clearance between coo ktop and oven.
IMPORTANT!
Note: Dimension’D’*
A requirement for all EVEPx xxx pyrolytic clean ovens and
Duo ovens – for proper ventilation there must be a gap
at the bottom rear of the cabinet. This can be a full width
opening 20mm deep.
Power point connection for the EVEP615SB and
EVEP618BB must be accessible with the appliance fully
installed. If the supply cord is damaged it must be replaced
by the manufacturer, its service agent or similarly qualified
persons in order to avoid a hazard.
Cut-out dimensions
type of fit A (width) B (height) C (depth)
Flush fit (mm) 600 600 581 min.
Proud fit (mm) 568 590 560 min.
Double oven Cut-out dimensions
type of fit A (width) B (height) C (depth)
Flush fit (mm) 600 1086 581 min.
Proud fit (mm) 568 1078 560 min.
INSTALLATION OF THE APPLIANCE
Pyrolytic underbench cut-out dimensions
type of fit A (width) B (height) C (depth) D*
Flush fit (mm) 600 600 581 min. 20
Duo oven cut-out dimensions
type of fit A (width) B (height) C (depth) D*
Flush fit (mm) 600 893 581 min. 20
596mm
561mm
561mm
561mm
mounting
holes 582mm
mounting holes
582mm
fit long screws
provided
mounting holes
fit countersunk screws
with plastic spacers
provided
mounting
holes 582mm
596mm
650mm
min.
min. 650mm
561mm
mounting
holes
A
B
C
mounting holes
596mm
456mm
Plastic clips
Plastic clip
securing points
installation 65
Hard wiring details
1. Remove terminal cover pl ate from rear panel of
appliance.
2. Fit wires through hole in cover plate and make
connections to terminals.
3. Eng age wires into plastic clip. Secure plastic clip with
two long silver screws (supplied in separate bag).
4. Replace cover plate onto rear panel.
Error codes
TECHNICAL SPECIFICATIONS
model
product dimensions
(h x w x d) mm
electrical
connection
min. fuse rating max. power rating max. current rating
EVE611SA 597 x 596 x 573 230-240V/50Hz 16A 3.1kW 12.9A
EVE613SA 597 x 596 x 573 230-240V/50Hz 16A 3.1kW 12.9A
EVE614BA 597 x 596 x 573 230-240V/50Hz 16A 3.1kW 12.9A
EVE616BA 597 x 596 x 573 230-240V/50Hz 16A 3.1kW 12.9A
EVEP611SB 597 x 596 x 573 230-240V/50Hz 16A 3.1kW 12.9A
EVEP614BB 597 x 596 x 573 230-240V/50Hz 16A 3.1kW 12.9A
EVEP613SB 597 x 596 x 573 230-240V/50Hz 16A 3.1kW 12.9A
EVEP616BB 597 x 596 x 573 230-240V/50Hz 16A 3.1kW 12.9A
EVEP615SB 597 x 596 x 573 230-240V/50Hz 16A 3.5kW 12.9A
EVEP618BB 597 x 596 x 573 230-240V/50Hz 16A 3.5kW 12.9A
EVE623SA 890 x 596 x 573 230-240V/50Hz 25A 5.3kW 22.1A
EVEP623SB 890 x 596 x 573 230-240V/50Hz 25A 5.3kW 22.1A
EVEP626BB 890 x 596 x 573 230-240V/50Hz 25A 5.3kW 22.1A
EVE633SA 1083 x 596 x 573 230-240V/50Hz 25A 6.2kW 24.2A
error code description comment fix
F01 or 01 Door lock sensor alarm
This relates to a door lock failure which is only
associated with the Pyrolytic product
Check wiring/plugs or replace door lock
F02 or 02 Door lock actuator alarm
F04 or 04 Oven Probe (PT500) out
This relates to the temperature sensing probe
which may be out of tolerance, of range alarm
or have open/short circuit connections
Replace probe
F05 or 05
Oven Probe (PT500) too
high temperature alarm
25
Board Temperature
Sensor (NTC) too high
temperature alarm
This relates to the temperature of the
powerboard and/or the (NTC)
on the powerboard
Cooling fan not working or replace
powerboard
26
Board Temperature
Sensor (NTC) out of
range warning
6
Board Temperature
Sensor (NTC) out of
range alarm
F08 or 08 Communication alarm
This relates to an error in communication
between the powerboard and the IOI
controller. This can occur if the IOI controller is
connected while the powerboard is energised
Reset power. (Minimum of 20 sec.) or
check or replace data cable
F09 or 09
Software compatibility
code alarm
This relates to a mismatch between
powerboard firmware version and the IOI
controller firmware version. Most likely caused
by an un-programmed powerboard
Replace Powerboard
C1 Telescopic runners fitted Only applies to Pyrolytic product
Remove both side racks and re-start
pyrolytic cycle
C3 Door open Only applies to Pyrolytic product Close door and restart pyrolytic cycle
F03 or 03
EEPROM check sum
alarm
Relates to the controller Replace Controller
F14 or 14
EEPROM compatibility
code alarm
Relates to the controller Replace Controller
D
561mm
650mm
min.
596mm
mounting
holes 582mm
mounting
holes 582mm
Page 34

66 spare warranty 67
This document sets out the terms and conditions of the product
warranties for Electrolux Appliances. It is an important document.
Please keep it with your proof of purchase documents in a safe place
for future reference should you require service for your Appliance.
1. In this warranty:
(a) ‘acceptable quality’ as referred to in clause 10 of this warranty has
the same meaning referred to in the ACL;
(b) ‘ACL’ means Schedule 2 to the Competition and Consumer Act 2010;
(c) ‘Appliance’ means any Electrolux product purchased by you and
accompanied by this document;
(d) ‘ASC’ means Electrolux authorised service centres;
(e) ‘Electrolux’ means Electrolux Home Products Pty Ltd of 163
O’Riordan Street, Mascot NSW 2020, ABN 51 004 762 341 in
respect of Appliances purchased in Australia and Electrolux (NZ)
Limited (collectively ‘Electrolux’) of 3-5 Niall Burgess Road, Mount
Wellington, in respect of Appliances purchased in New Zealand;
(f) ‘major failure’ as referred to in clause 10 of this warranty has the
same meaning referred to in the ACL and includes a situation when
an Appliance cannot be repaired or it is uneconomic for Electrolux, at
its discretion, to repair an Appliance during the Warranty Period;
(g) ‘Warranty Period’ means the Appliance is warranted against
manufacturing defects in Australia for 24 months and in New Zealand
for 24 months, following the date of original purchase of the Appliance;
(h) ‘you’ means the purchaser of the Appliance not having purchased
the Appliance for re-sale, and ‘your’ has a corresponding meaning.
2. This warranty only applies to Appliances purchased and used in Australia
or New Zealand and used in normal domestic applications and is in
addition to (and does not exclude, restrict, or modify in any way) any
non-excludable statutory warranties in Australia or New Zealand.
3. During the Warranty Period Electrolux or its ASC will, at no extra charge
if your Appliance is readily accessible for service, without special
equipment and subject to these terms and conditions, repair or replace
any parts which it considers to be defective. Electrolux or its ASC may
use remanufactured parts to repair your Appliance. You agree that
any replaced Appliances or parts become the property of Electrolux.
This warranty does not apply to light globes, batteries, lters or similar
perishable parts.
4. Parts and Appliances not supplied by Electrolux are not covered by
this warranty.
5. To the extent permitted by law, you will bear the cost of transportation,
travel and delivery of the Appliance to and from Electrolux or its ASC. If
you reside outside of the service area, you will bear the cost of:
(a) travel of an authorised representative;
(b) transportation and delivery of the Appliance to and from Electrolux or
its ASC.
In all instances, unless the Appliance is transported by Electrolux or an
Electrolux authorised representative, the Appliance is transported at the
owner’s cost and risk while in transit to and from Electrolux or its ASC.
6. Proof of purchase is required before you can make a claim under
this warranty.
7. You may not make a claim under this warranty unless the defect claimed
is due to faulty or defective parts or workmanship. Electrolux is not liable
in the following situations (which are not exhaustive):
(a) the Appliance is damaged by:
(i) accident
(ii) misuse or abuse, including failure to properly maintain or service
(iii) normal wear and tear
(iv) power surges, electrical storm damage or incorrect power supply
(v) incomplete or improper installation
(vi) incorrect, improper or inappropriate operation
(vii) insect or vermin infestation
(viii) failure to comply with any additional instructions supplied with
the Appliance;
(b) the Appliance is modied without authority from Electrolux in writing;
(c) the Appliance’s serial number or warranty seal has been removed
or defaced;
(d) the Appliance was serviced or repaired by anyone other than
Electrolux, an authorised repairer or ASC.
8. This warranty, the contract to which it relates and the relationship
between you and Electrolux are governed by the law applicable where
the Appliance was purchased. Where the Appliance was purchased in
New Zealand for commercial purposes the Consumer Guarantee Act
does not apply.
9. To the extent permitted by law and subject to your non-excludable
statutory rights and warranties, Electrolux excludes all warranties and
liabilities (other than as contained in this document) including liability for
any loss or damage whether direct or indirect arising from your purchase,
use or non use of the Appliance.
10. For Appliances and services provided by Electrolux in Australia,
the Appliances come with a guarantee by Electrolux that cannot be
excluded under the ACL. You are entitled to a replacement or refund
for a major failure and for compensation for any other reasonably
foreseeable loss or damage. You are also entitled to have the Appliance
repaired or replaced if the Appliance fails to be of acceptable quality and
the failure does not amount to a major failure.
The benets to you given by this warranty are in addition to your other
rights and remedies under a law in relation to the Appliances or services
to which the warranty relates.
11. At all times during the Warranty Period, Electrolux shall, at its discretion,
determine whether repair, replacement or refund will apply if an
Appliance has a valid warranty claim applicable to it.
12. For Appliances and services provided by Electrolux in New Zealand,
the Appliances come with a guarantee by Electrolux pursuant to the
provisions of the Consumer Guarantees Act, the Sale of Goods Act and
the Fair Trading Act.
13. To enquire about claiming under this warranty, please follow these steps:
(a) carefully check the operating instructions, user manual and the terms
of this warranty;
(b) have the model and serial number of the Appliance available;
(c) have the proof of purchase (e.g. an invoice) available;
(d) telephone the numbers shown below.
14. You accept that if you make a warranty claim, Electrolux and its ASC
may exchange information in relation to you to enable Electrolux to meet
its obligations under this warranty.
Warranty
FOR SALES IN AUSTRALIA AND NEW ZEALAND
APPLIANCE: BUILT-IN OVEN, COOKTOP
AND FREESTANDING COOKERS
Important Notice
Before calling for service, please ensure that the steps listed in clause 13 above have been followed.
FOR SERVICE
or to nd the address of your nearest
state service centre in Australia
PLEASE CALL 13 13 49
For the cost of a local call (Australia only)
SERVICE AUSTRALIA
ELECTROLUX HOME PRODUCTS
www.electrolux.com.au
FOR SPARE PARTS
or to nd the address of your nearest
state spare parts centre in Australia
PLEASE CALL 13 13 50
For the cost of a local call (Australia only)
FOR SERVICE
or to nd the address of your nearest
authorised service centre in New Zealand
FREE CALL 0800 10 66 10
(New Zealand only)
SERVICE NEW ZEALAND
ELECTROLUX (NZ) Limited
www.electrolux.co.nz
FOR SPARE PARTS
or to nd the address of your nearest
state spare parts centre in New Zealand
FREE CALL 0800 10 66 20
(New Zealand only)
GOV_Warr_Aug13
Page 35

68 EVE611SA built in ovens EVE611SA built in ovens 68
P/No. 0342 001 626 14A099A
© 2015 Electrolux Home Products Pty Ltd.
ABN 51 004 762 341
EMAN_Ovens_Jan15
Electrolux Home Products Australia
telephone: 1300 363 640
fax: 1800 350 067
email: [email protected]
web: electrolux.com.au
Electrolux Home Products New Zealand
telephone: 0800 436 245
fax: 0800 225 088
email: [email protected]
web: electrolux.co.nz
The Thoughtful Design Innovator.
Do you remember the last time you opened a gift that made you say
‘Oh! How did you know? That’s exactly what I wanted!’ That’s the kind
of feeling that the designers at Electrolux seek to evoke in everyone who
chooses or uses one of our products. We devote time, knowledge, and
a great deal of thought to anticipating and creating the kind of appliances
that our customers really need and want.
This kind of thoughtful care means innovating with insight. Not design for design’s
sake, but design for the user’s sake. For us, thoughtful design means making
appliances easier to use and tasks more enjoyable to perform, freeing our
customers to experience that ultimate 21st century luxury, ease of mind. Our aim
is to make this ease of mind more available to more people in more parts of their
everyday lives, all over the world. So when we say we’re thinking
of you, you know we mean just that.
The ‘Thinking of you’ promise from Electrolux goes beyond meeting the needs of
today’s consumers. It also means we’re committed to making appliances safe for
the environment—now and for future generations.
Electrolux. Thinking of you.
Share more of our thinking at electrolux.com.au or electrolux.co.nz
 Loading...