

Page 1
Page 2

- 2 -
Contents
For the user
Safety information 3
Description of the appliance 4-5
- Spray arm
- Coarse strainer/microfilter
- Fine filter
- Detergent dispenser
- Rinse aid dispenser
- Water softener
The control panel 6
- How to set the delayed start
Adjusting the water softener 7
Programme chart 8
Using the appliance 9
- Starting the programme
- Stopping the programme temporarily
- Cancelling the programme
- Pause function
- Cancelling the drying phase
- Switching the dishwasher off
- Cleaning the dishwasher
Loading and unloading 10
In the event of a fault 11
Service 12
- Service and spare parts
- Customer care
Information for test centres 12
For the installer
Technical specifications 13
Unpacking 14
- Damages
- Use
- Protecting the dishwasher against freezing
- Positioning
Installation 15
- Water inlet
- Water drainage
- Electrical connection
Rukowodstwo po \kspluatacii 16
Guide to use the instruction book
The following symbols will be found in the text to guide you throughout the instructions:
Safety information
Step by step instructions
Hints and tips
Environmental information
Page 3

Before installing and first using the dishwasher, read this instruction booklet carefully, including its
hints and warnings. To avoid unnecessary mistakes and accidents, it is important to ensure that all
people using the dishwasher are thoroughly familiar with its operation and safety features.
Save these instructions and make sure they remain with the dishwasher if it is moved or sold, so
that everyone using it through its life can be properly informed on appliance use and safety.
Installation and servicing
● All installation and service work done on the product
must be carried out by a qualified technician. Work
performed by persons with inadequate knowledge may
adversely affect the satisfactory functioning of the
product and may cause personal injury or damage.
Before any work is carried out on the dishwasher, it
must be isolated from the electrical supply. To do this
the power plug must be removed from the wall socket.
● Water connection shall be made via an easily accessible
stopcock.
● The power cord must be plugged into an earthed
socket, which need to be easily accessible. Permanent
installation must only be carried out by an authorized
electrician.
● Make sure that the power cord is not nipped or other-
wise damaged and that the hoses do not get crushed
or kinked when moving the dishwasher in connection
with installation or cleaning etc.
● Servicing and possible repairs must be carried out by
a service company authorized by the supplier. Use only
spare parts supplied by these. Never try to repair the
dishwasher yourself.
Child Safety
● The dishwasher should be used by adults only. Do not
let children play with the controls or other parts of it.
● Remember that the plastic bags included in the
packaging can be fatal playthings for small children.
● Keep all detergents in safe place out of children´s
reach.
● Prevent children from sitting, swinging or standing
on the open door.
During Use
● This dishwasher is designed solely for washing house-
hold utensils suitable for machine washing. Using it for
other purposes could lead to physical injury or damage
to property and invalidate the guarantee.
● Avoid opening the door while the dishwasher is running,
since hot steam may escape.
● Only use detergent specifically designed for use in
dishwashers.
● Do not place sharp knives with their points upwards.
It is much safer to lay them horizontally in the basket.
● If you take any dishes out of the dishwasher before the
end of the dishwashing cycle, it is extremely important
to rinse them thoroughly under running water to remove
any remaining detergent.
● The water safety system protects against water damages.
The following requirements must be fulfilled:
- The dishwasher must be electrically connected when
it is shut off.
- The dishwasher must be correctly installed.
- Always shut off the water supply whenever the dishwasher is left unattended for an extended period.
● In the event of flooding or leakage, shut off the water
supply immediately by closing the stopcock and disconnect the power supply by unplugging the power cord
or removing the fuse. When removing the electrical
plug, grip the plug, not the lead.
Conservation
- packaging:
All materials used in packaging this appliance are
environmentally-friendly. The various plastics used
are identified and can be recycled:
● PE stands for polyethylene, which is used for the
bag around the appliance and the bag in which these
instructions were supplied.
● PS stands for polystyrene (moulded), which is used
for the sections of packaging needed to cushion the
appliance.
The cardboard components of the packaging are made
from recyclable paper and should be taken to a collection
point for recycling.
The appliance contains plastic and rubber components.
These have identifying marks to show what they are
made from, so they can be recycled or disposed of
properly at the end of the appliance's life cycle.
The materials are identified according to international
standards.
- old apparatus:
At the end of the appliance's useful life, disconnect the
electrical plug from the power supply, then cut the electrical
lead at the point where it enters the appliance. Make quite
sure that children will not be able to play with it.
Safety information
- 3 -
822 90 11-99
Page 4
Description of the appliance
- 4 -
4 5
Page 5
- 5 -
Description of the appliance
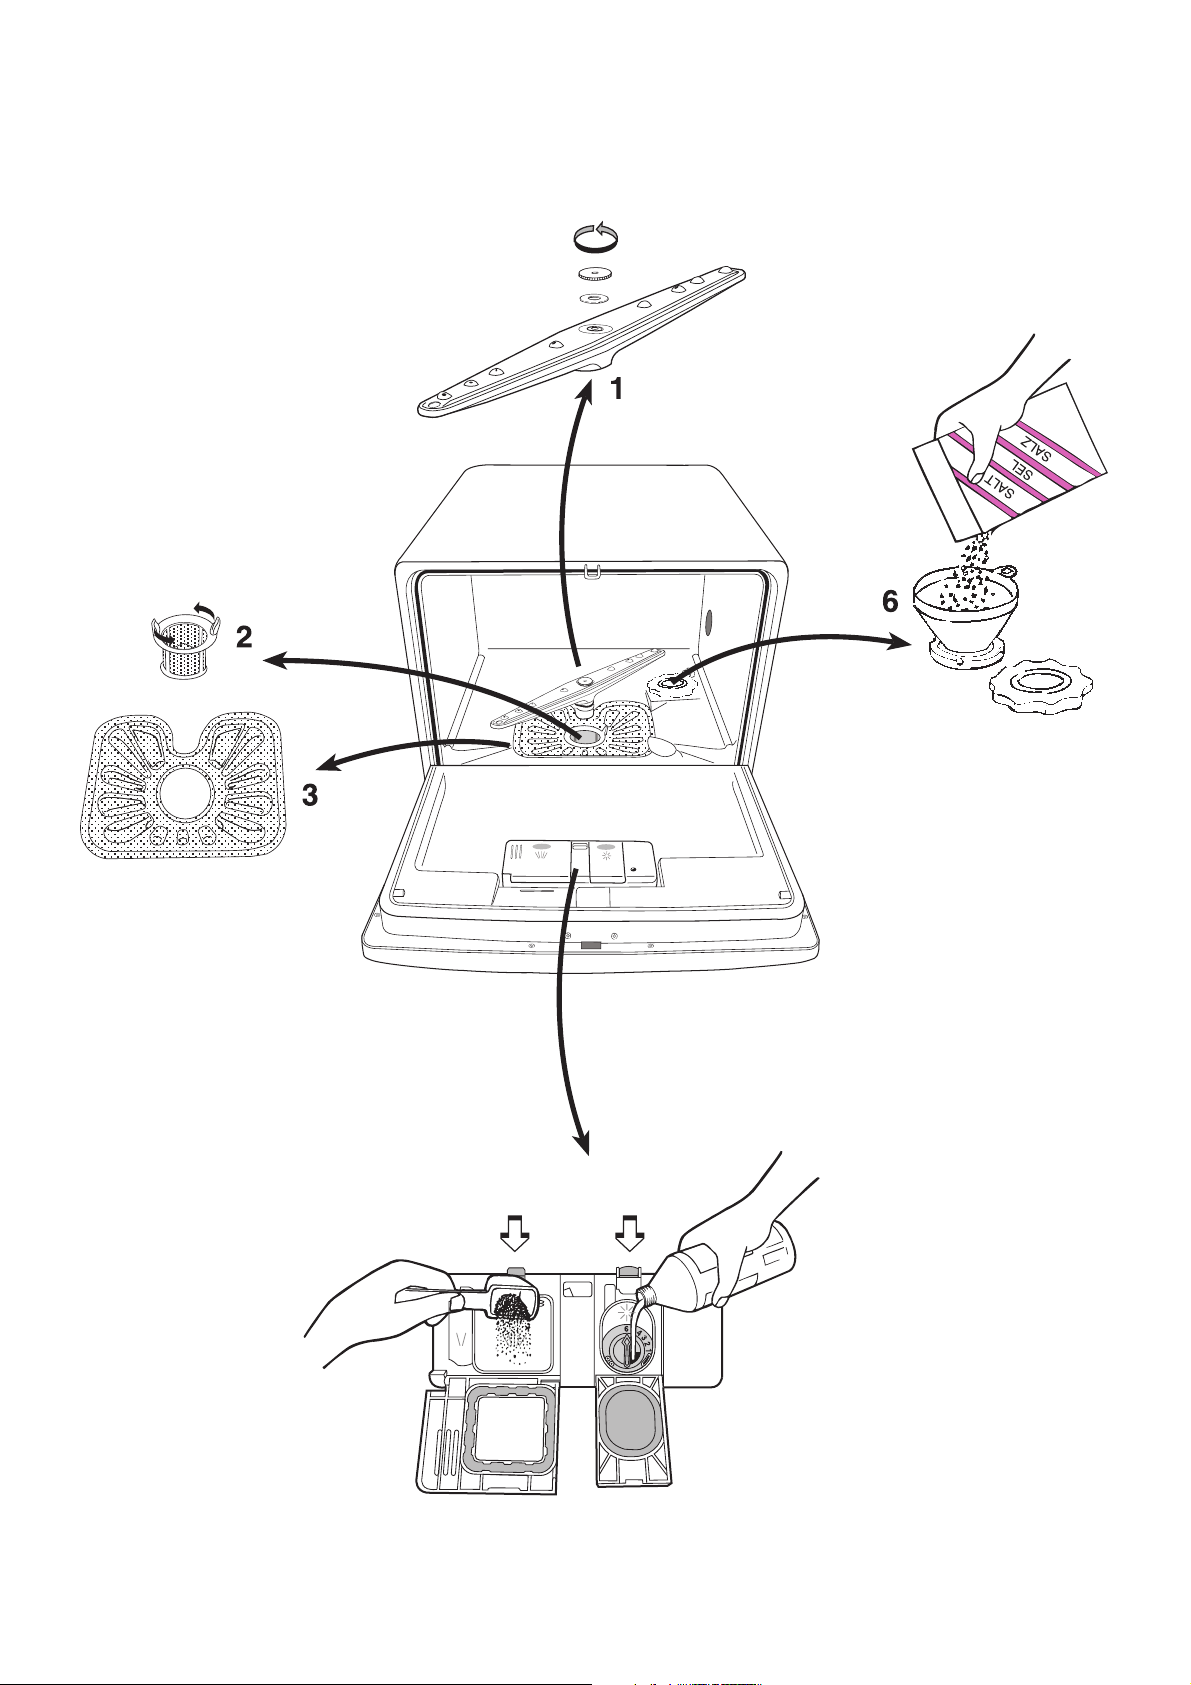
Spray arm (1)
It is important to keep all the holes in the spray arm clear.
A clogged hole can seriously affect washing efficiency.
If the spray arm needs cleaning, unscrew the nut anticlockwise, remove the washer and lift off the spray arm.
Clear the holes and shake out any food remnants.
Coarse strainer/microfilter (2)
The purpose of the coarse strainer is to catch large objects
such as toothpicks and pieces of eggshell. Make sure
that the strainer is always clean. Turn the coarse strainer
anti-clockwise. Lift it out and rinse it under running water
whenever necessary.
Fine filter (3)
It is just as important to keep this filter clean. A dirty or
clogged filter will always impair washing efficiency.
The fine filter can easily be lifted out for cleaning when
you have removed the coarse strainer.
Detergent dispenser (4)
Open the lid to the dispenser by pressing the lid catch
towards the compartment. Consult the instructions on the
detergent packet, fill the compartment accordingly and
close the lid. Pre-wash detergent is poured into the smaller
compartment to the left when needed. This detergent is
active allready at pre-rinsing. Make sure that there is no
items that prevents the lid from opening.
Only use detergents specially designed for dishwashers.
Avoid frequent use of liquid detergents, as the
long term effects of such detergents create a
potential risk of increasing pump noise.
Rinse aid dispenser (5)
Use of rinse aid will result in cleaner and faster drying of
the load, since it helps water and soil to run off.
Too much rinse aid may result in streakiness, too little
may cause white spots. The dispenser holds about 150 ml.
This is enough for approx. 60 wash cycles, depending
on the dosage setting. Adjust the dosage setting according
to the hardness of the water.
You can set the dosage between 1 - 6, equivalent
to 1 - 6 cm3rinse aid. Factory setting is 1.
Begin at the lowest dosage setting and increase
if necessary by turning the setting arrow with e.g.
the handle of a spoon.
The indicator light on the control panel is lit when the
dispenser requires refilling.
1. Open the lid to the dispenser by pressing the lid
catch towards the compartment and lift the lid.
2. Fill up with rinse aid; do not overfill.
3. Wipe off any spillage carefully to prevent excessive
foaming during the next wash programme.
4. Close the lid and press until it locks again.
Do not fill the rinse aid dispenser with liquid
detergent.
Water softener (6)
This dishwasher is equipped with a water softener for hard
water, therefore shall the rinse aid dispenser be set for a
low dosage. The lime in hard water causes white deposits
to occur on dishes and to the interior of the dishwasher.
To prevent this, the water has to pass through a special
container where the hardness is removed.
Since the water softener uses coarse dishwasher salt,
you will have to refill the salt container after a certain
number of dishwashing cycles.
It is extremely important, that the salt container
is filled up with the coarse dishwasher salt before
using the dishwasher for the first time.
The indicator light on the control panel is lit when the
container requires refilling.
1. Unscrew the filler cap to the salt container anti-
clockwise.
2. Fill the salt container with water (only the first
time).
3. Fill the container with coarse salt, using the
funnel supplied.
4. Remove the funnel and wipe off any spillage
around the filler opening.
5. Screw the filler cap back properly in place.
The water softener is now ready for the first load of dishes.
Always make sure that there is coarse grained salt in the
container, which holds about 1 litre.
See also the section ”Adjusting the water softener”.
Use only special salt for dishwashing machines,
ordinary domestic salt can damage the water
softener.
Page 6
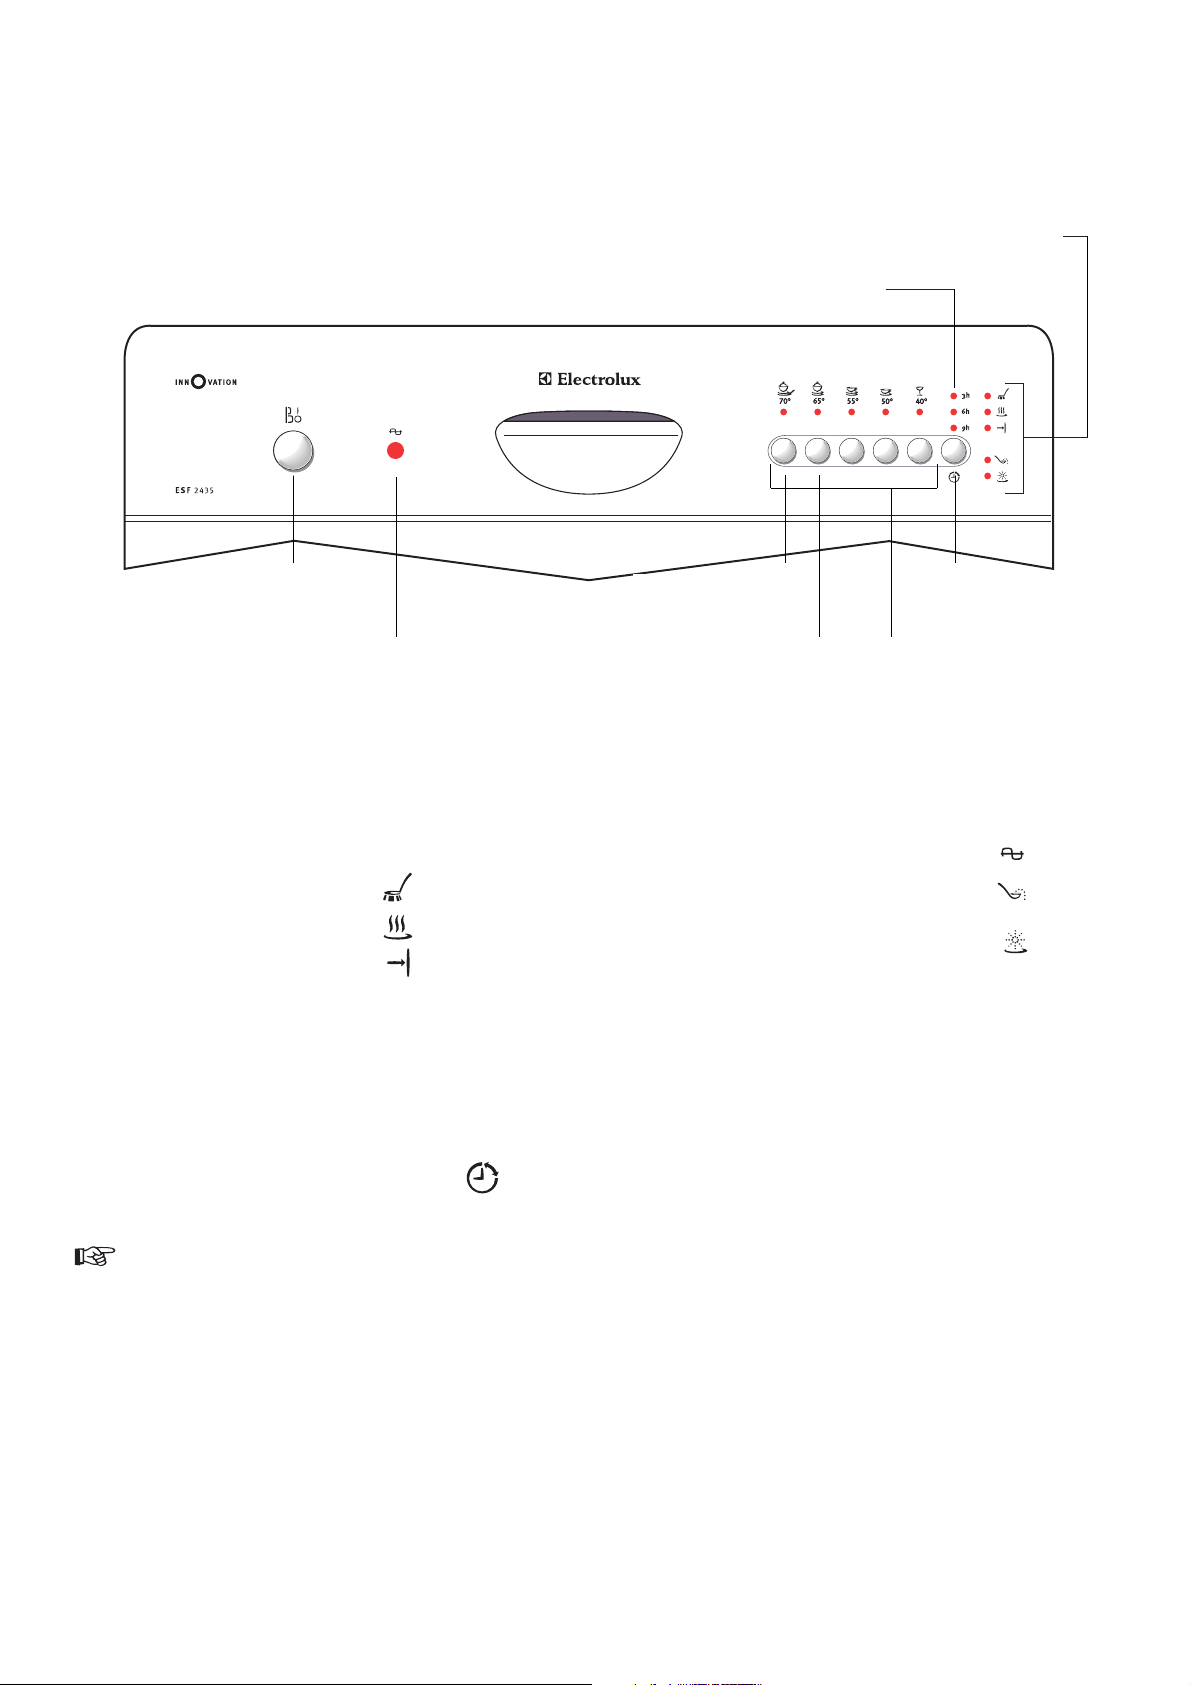
The control panel
- 6 -
Programme
buttons
Water softener
button
On/Off button
Control lamp
Functions
button
Delay start
button
Indicator lamps
delayed start
Indicator and
control lamps
How to set the delayed start
The programme start can be delayed by 3, 6 or 9 hours.
1. Press in the On/Off button.
2. Press the delay start button repeatedly, until the
lamp next to the required hours of delay is lit.
3. Press the button for the required programme.
4. After the set delayed start time has elapsed,
the programme starts.
Reset the delayed start:
If the programme has not started, you can change
the set time with the delayed start button.
Cancelling the delayed start:
If the programme has not started, the delayed start
can be cancelled. Press the delay start button repeatedly, until none of the lamps next to the hours are lit.
The required programme starts immediately.
Water softener and functions button:
In addition to selecting a programme, you can press these
two buttons to adjust the setting of the water softener.
Indicator lamps:
Shows • Current phase of the selected programme.
• Wash cycle in progress top lamp
• Drying in progress middle lamp
• Programme cycle lowest lamp
ended
Control lamps:
Shows that • On/Off button is pushed in
• Refilling of salt is necessary
• Refilling of the rinse aid
is necessary
Page 7
- 7 -
Water hardness level
i °d
1)
i mmol/l
2)
Setting on the
water softener
Number of
light flashes
> 24 > 4,2
18 - 24 3,2 - 4,2
12 - 18 2,1 - 3,2
4 - 12 0,7 - 2,1
below 4 below 0,7
5
4
3
2*
1
5
4
3
2
1
no salt is needed
1. Press the water softener and functions buttons
simultaneously and hold them pressed in, then
also press in the On/Off button.
2. When the lamps for the water softener and
functions buttons starts to flash, you can let go
of the buttons.
3. Press the water softener button once. At first the
lamp will be solid, then it starts to flash.
- The number of flashes are equivalent with the
set water hardness level.
- This sequence of flashes is repeated several
times after a few seconds pause.
4. The water hardness level is raised by 1 step
every time you press the water softener button.
After hardness level 5 comes hardness level 1.
5. Press out the On/Off button when required water
hardness level is adjusted to complete the setting.
If the setting 1 is chosen, the salt indicator lamp
is not lit.
1) german degree of measurement for the water
hardness
2) millimol, internationel unit for water hardness
*) factory setting
If dishwasher detergent with rinse aid is used,
you can switch off the lamp that indicates that
the rinse aid dispenser is empty.
1. Press the water softener and functions buttons
simultaneously and hold them pressed in, then
also press in the On/Off button.
2. When the lamps for the water softener and
functions buttons starts to flash, you can let go
of the buttons.
3. Press the functions button once. The lamps for
the functions button and ended programme cycle
starts to flash. Press the button once more and
the light for the ended programme cycle goes out.
Now the function for the rinse aid control light
is off.
4. Press out the On/Off button to complete the setting.
To reset the function, follow steps 1 and 2 above
and then press the functions button twice, until
the lights for the functions button and for ended
programme cycle begins to flash again.
Adjusting the water softener
To prevent limescaling on the dishes and to the interior of the
dishwasher, the dishes must be washed with soft i.e. water
with low lime content.
This dishwasher is equipped with a water softener, where tapwater which is harder then 4 °d (german degree) is descaled
with special salt.
Adjust the water softener according to the table below for the
water hardness level for your area.
Contact your local Water Authority to find the
exact water hardness level for your area.
The water softener has 5 settings:
In both of the following settings the dishwasher must be switched off and all programmes completed.
See the section ”Using the appliance”, how to complete the programme.
Page 8
12 minutes
- 8 -
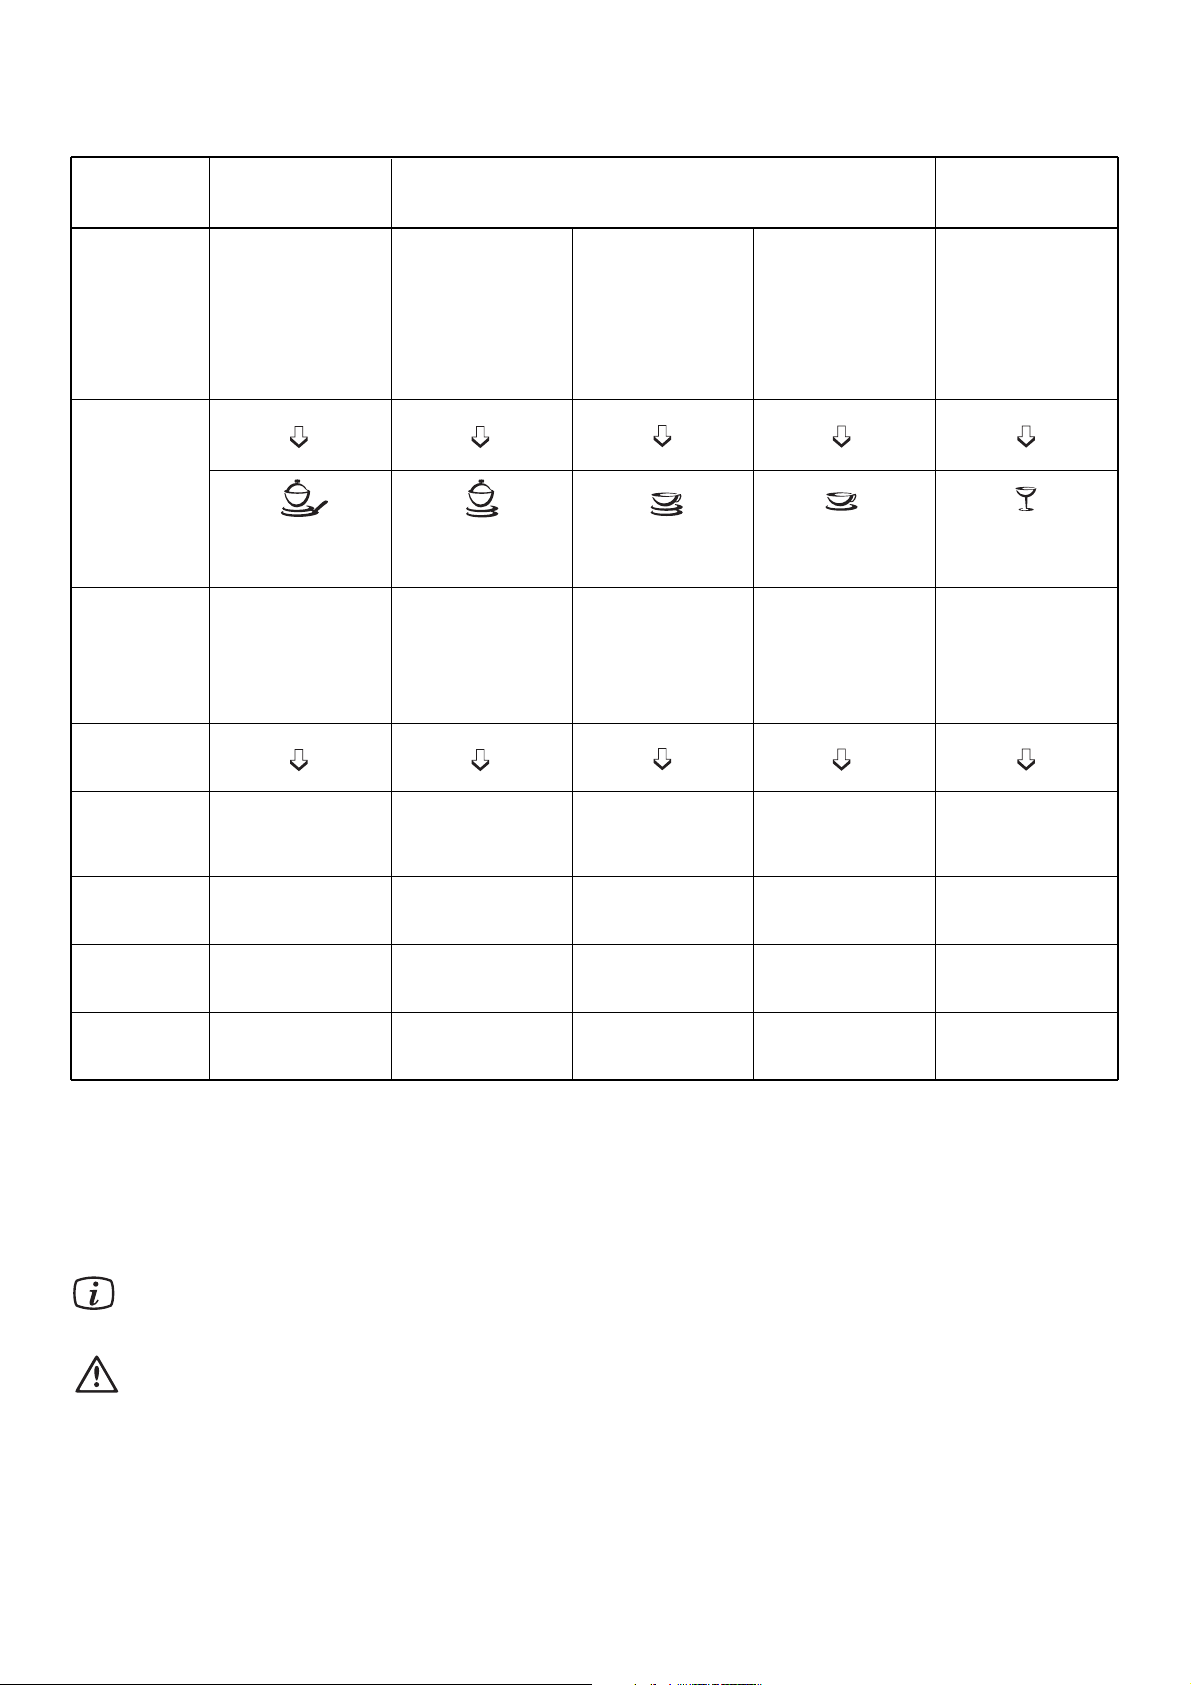
Programme chart
Type of
dishes
Type of soil:
• normaly
soiled
• dried-on food
remnants
• heavily
soiled
• dried-on food
remnants
especially eggwhite and starch
• normaly
soiled
• lightly
soiled
• lightly
soiled
Washing
time with
drying:
92 minutes112 minutes 150 minutes 35 minutes 30 minutes
Programmecycle:
1)
Pre-rinse
Washing
Rinse
Final rinse
Drying
Pre-wash
Washing
2 x rinses
Final rinse
Drying
Pre-rinse
Washing
Rinse
Final rinse
Drying
Washing
Rinse
Final rinse
-
-
Washing
Rinse
Final rinse
-
Suitable
programme:
NORMAL
65° C
INTENSIVE
70° C
Plates and
cooking pots
Coffee cups,
delicate items
All types of
dishes
Energy:
0,85 kWh 0,63 kWh 0,48 kWh 0,41 kWh
Water:
7 litres
1,15 kWh
Drying time: 50 minutes — —12 minutes
9 litres
7 litres 6 litres 6 litres
ENERGY SAVE
55° C
3)
QUICK
50° C
GLASS
40° C
Consumption
figures:
2)
1) Different parts of the wash programme may not sound the same, because the wash action is more intensive
at some stages.
2) Consumption figures have been calculated for nominal conditions. The figures can vary depending on inlet
water temperature and how full the main and cutlery basket are.
3) Consumption figures and performance is according to the Energy Save programme cycle.
All programme cycles begins with a drainage.
Dishwashing detergent in tablet form is not suitable
for use in the Quick- and Glass programme cycles.
Page 9
- 9 -
Starting the programme
1. Scrape or rinse off solid food remnants.
2. Load the dishwasher.
(See the section of basket and loading).
3. Put the correct amount of detergent into the
detergent dispenser and close the dispenser lid.
4. Close the door.
5. Press in the On/Off button.
6. Press in the required programme button (see programme chart). Programme indicator lamp is lit.
During the six seconds the two top indicator lamps
are flashing, you can select another programme
cycle. If not, the selected programme starts.
The lamp allways indicates which part of the
selected cycle the dishwasher is in.
7. Check the strainers/filters to see if they need to
be cleaned when the dishwasher has finished
the programme.
If both the top and middle indicator lights are
flashing, first check that the door is properly closed,
otherwise read the section ”In the event of a fault”.
Stopping the programme temporarily
1. Open the door. The programme stops.
2. Top or middle indicator lamp is flashing depending
on how far the programme cycle has gone.
3. Close the door and the programme continues
after about 6 seconds.
Open the door carefully when the dishwasher is
running, since hot steam may escape.
Cancelling the programme
1. Press and hold in the button for the programme
in progress until the indicator light for the programme goes out.
2. Release the programme button. The programme
is now cancelled and a new programme can be
selected.
If you switch the dishwasher off, the selected
programme is not finished, it is only disrupted.
When you start the dishwasher again, the programme will continue.
Pause function
With the paus function the programme can be temporarily
disrupted for a short period of time.
1. Press in the On/Off button. The programme stops.
2. All lamps goes out.
3. When you want the programme to continue again,
you press the On/Off button.
The programme continues.
The programme should not be paused for any
longer than necessary, because the water inside
the dishwasher has cooled down and must be
heated again which increases the power
consumption.
Cancelling the drying phase
In case you do not want to wait until the drying phase is
completed, you can cancel it.
1. Press in the On/Off button. The control lamp for
the On/Off button goes out.
2. Open the door. The drying phase is cancelled.
Switching the dishwasher off
Do not switch the dishwasher off until the indicator lamp
for the programme cycle end is lit.
1. Press in the On/Off button. The control lamp for
the On/Off button goes out.
Be careful if you open the door immediately
after the programme is finished, since hot steam
may escape.
This dishwasher has a new feature called
”IMPULSE WASHING”. This washing system
varies both the revolutions of the pump and the
water pressure for more intensive cleaning of the
dishes during a programme. That is why different
sections of the programme cycle do not sounds
the same.
Cleaning the dishwasher
Clean the outside surfaces of the appliance using a mild
(non-abrasive) household cleaning product. Finish by
removing remaining traces of the product with a damp cloth.
Do not use cleaning products which contain
alcohol (spirits), thinners and similar substances.
Using the appliance
Page 10
- 10 -
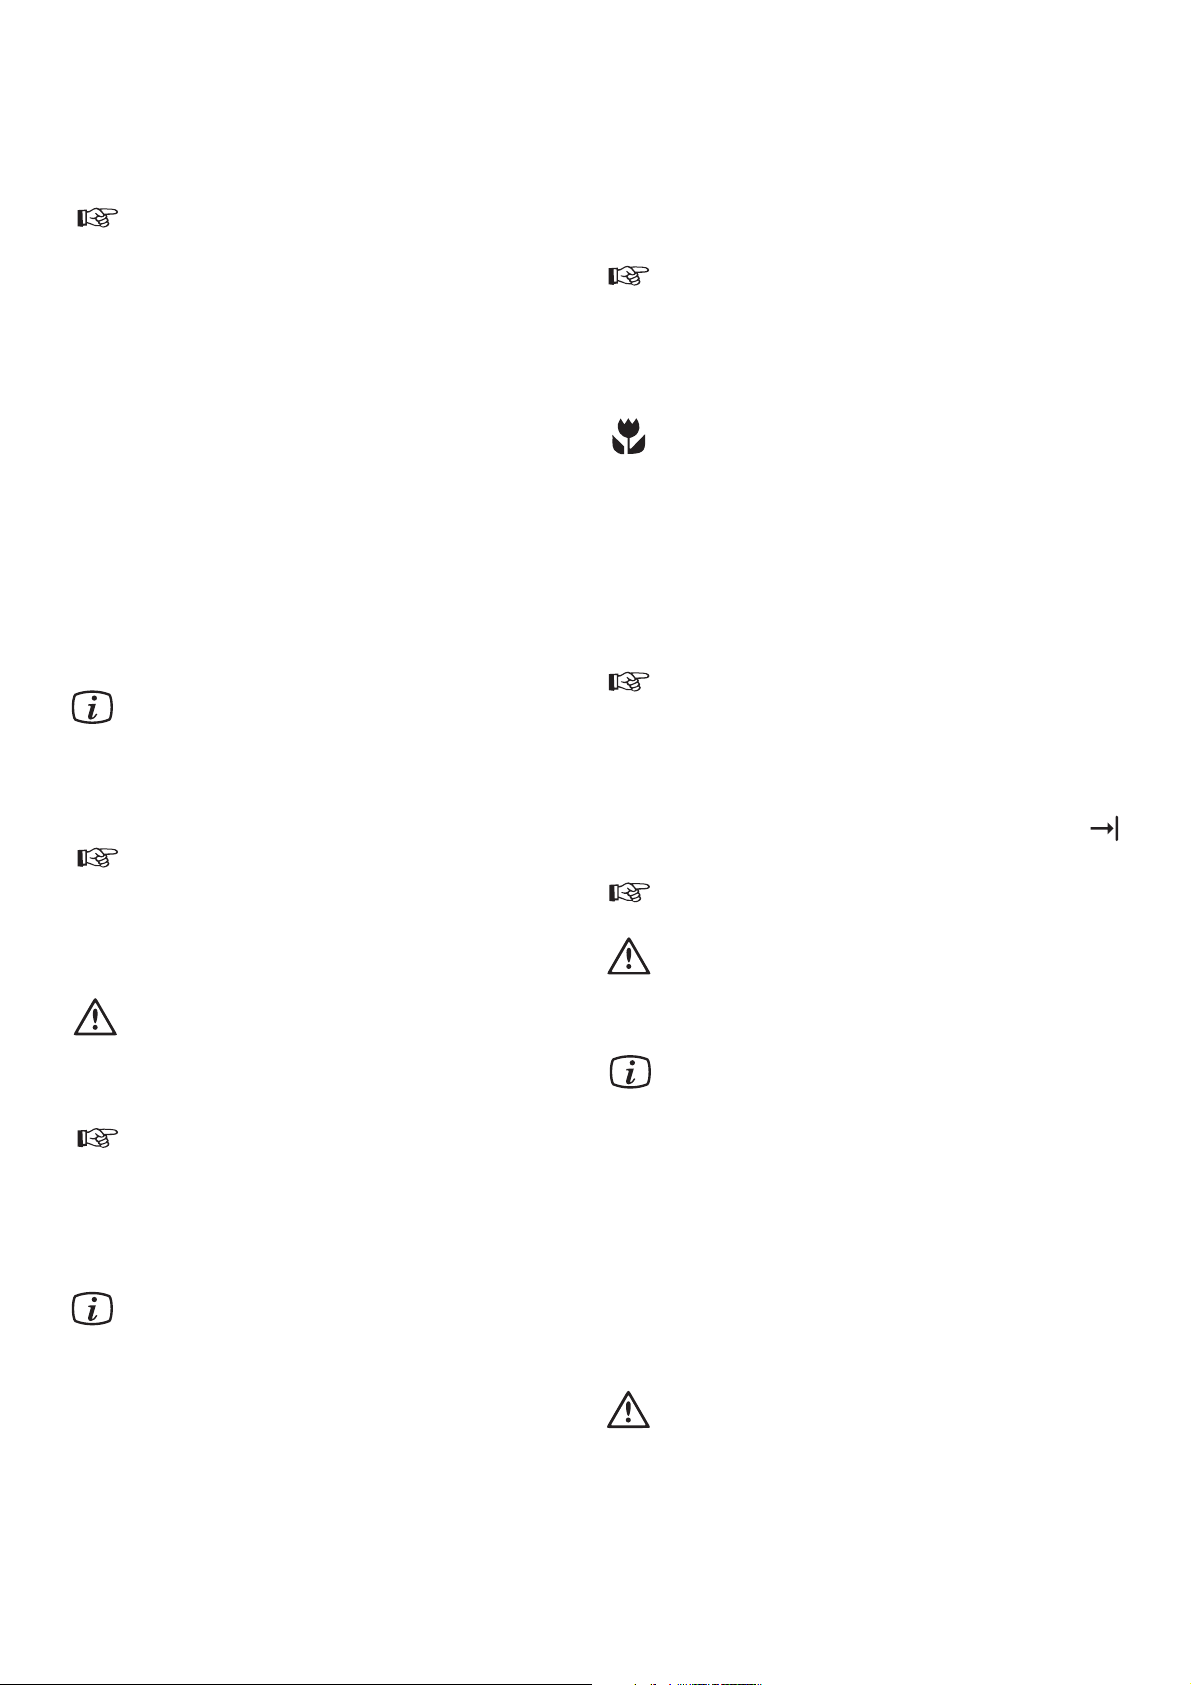
Loadind and unloading the dishwasher
How to load the dishes
The illustration shows the dishwasher loaded with six
place settings. Your own dishes are not likely to be
identical to this load, but if you follow the advice below
we are sure you will be pleased with the results.
● Always place glasses, cups and bowls upside down.
● Incline deep dishes (soup plates etc.) so that the
water can run off when drying.
● Make sure that the dishes do not rest against each
other. This is particularly important in regard to the
cutlery basket - nested spoons, etc. simply cannot be
properly washed. The water must get at all the soiled
surfaces.
● Make sure that cutlery with slender handles and other
items do not protrude through the openings in the
basket and prevent the spray arm from rotating.
● Never put silver and stainless steel objects together.
When these metals come into contact with each other
a chemical reaction occurs which stains the silver.
● China with a pattern applied on top of the glaze may
not be suitable for machine washing as the colours
may fade and lose their lustre. The same applies to
cutlery with wooden or plastic handles.
Make sure you always buy articles that are
dishwasher proof.
● Silver and aluminum items tend to be discolour when
washed. Food remnants from egg and mustard often
causes discolourations and stains on silver. Make sure
to rinse off and remove food remnants on silver if it is
not washed immediately after it has been used.
● Not all plastic articles are machine washable. If you
are in doubt as to whether your plasticware can be
machine washed, we suggest you check by washing
a single item or else wash them by hand.
● When washing delicate items, select the programme
with the lower wash temperature.
● Substances such as ketchup containing strong colouring
agents can cause temporary discolouration to the
interior of the dishwasher.
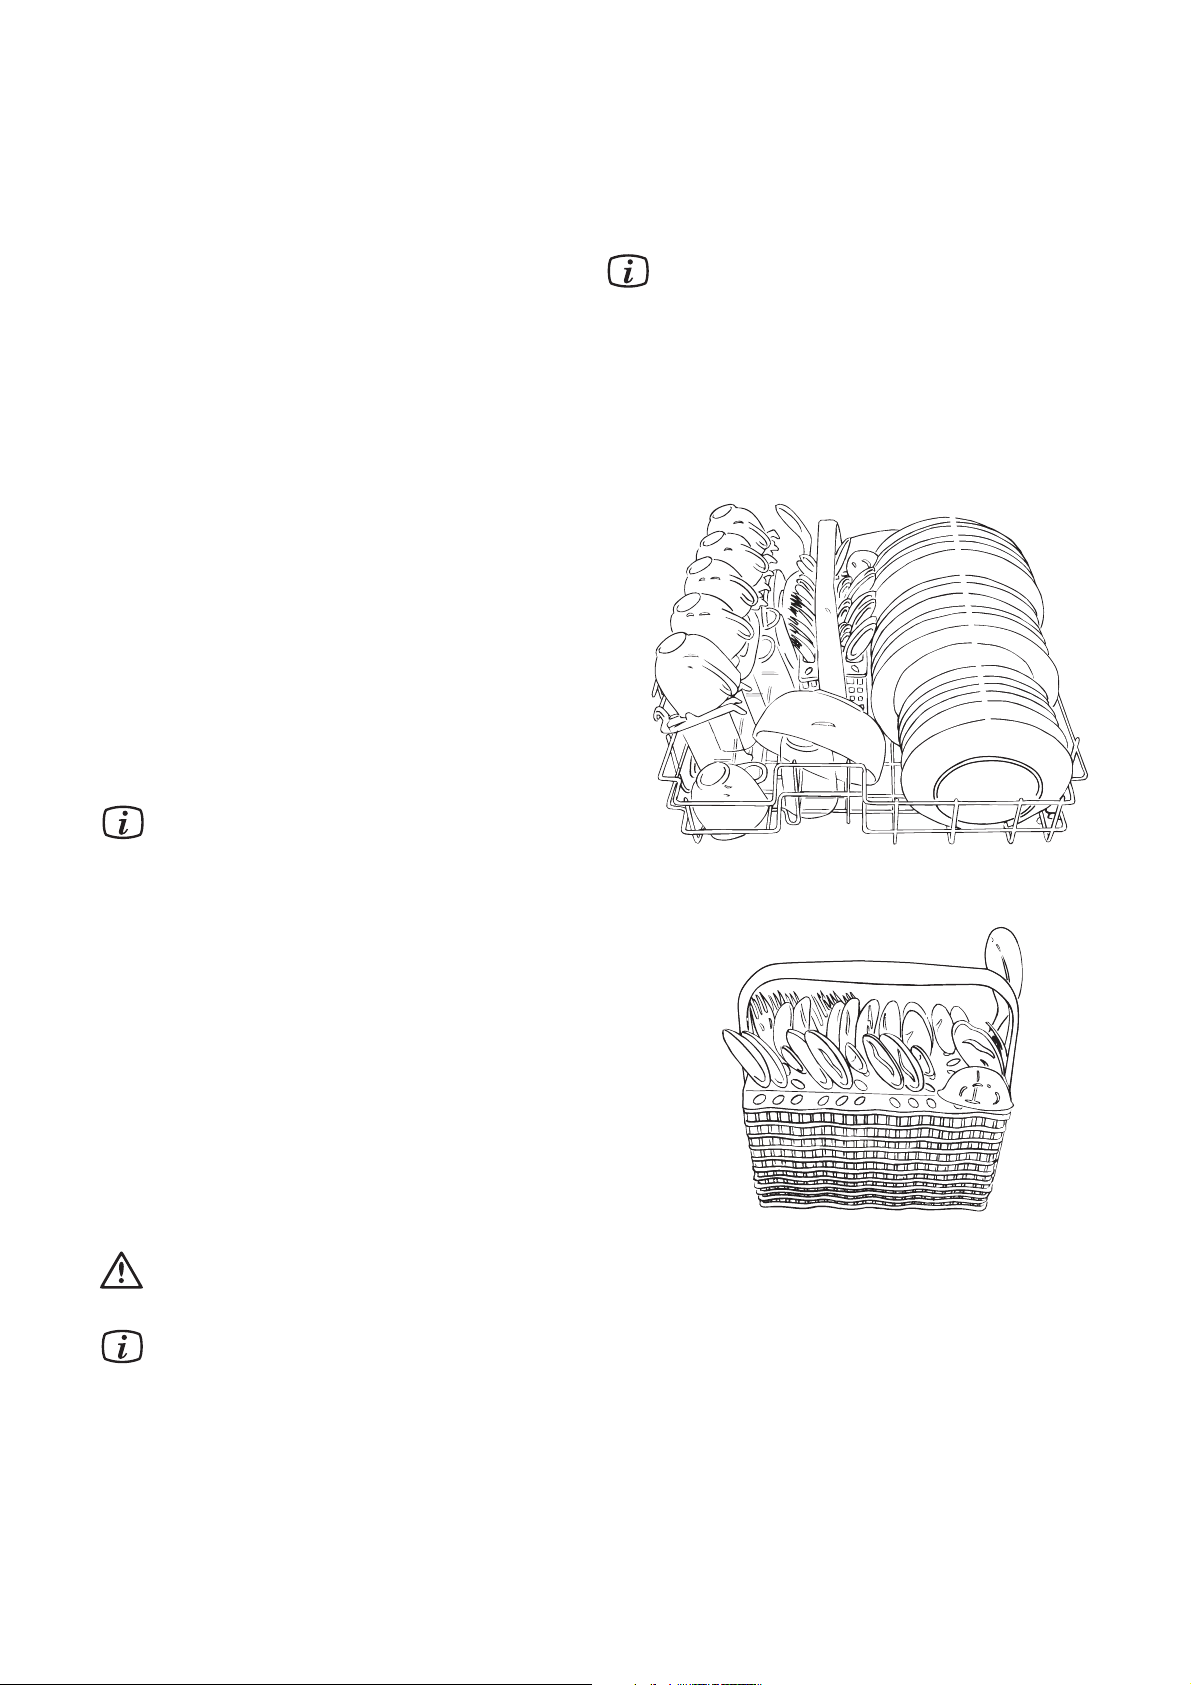
Do not place sharp knives with their points upwards. It is much safer to lay them horizontally
in the main basket.
If required, the top and the handle to the cutlery
basket are removable.
Unloading
Hot dishes are sensitive to mechanical shocks. Always let
the dishes cool down before unloading.
The dishes dry faster if the door for a short
moment is opened completely when the dishprogramme is finished and then left ajar.
Baskets
Main basket
Cutlery basket
Page 11

- 11 -
In the event of a fault
The programme will not start.
The dishwasher is not filling with water .
Water not discharged at end of cycle.
Dishes not washed satisfactorily.
Visible lime deposits or white film
on the dishes.
The dishwasher is noisy.
The dishes are not quite dry and are
not shiny.
• Is the door closed properly?
• Have you pressed the On/Off button?
• Is the water tap turned on?
• Is the dishwasher plugged in?
• Has the fuse blown?
• Is the delayed start-button pressed in?
• Is the previous programme finished?
(See ”Using the appliance”).
• Is the water tap turned on?
• Has your domestic water supply been cut off temporarily?
• Is the water inlet hose kinked or blocked?
• Is the filter inside the inlet hose blocked?
• Is the water pressure too low?
• Did you open the door before the indicator light
is lit and the programme cycle finished?
• Is the previous programme finished?
(See ”Using the appliance”).
• Are the filters clogged?
• Has anything prevented the spray arm from rotating?
• Are the spray arm holes clogged?
• Were the dishes packed too close together?
• Are the filters clogged?
• Are the filters fitted correctly in place?
• Did you use enough detergent?
• Is the salt container cap properly closed?
• Did you select a programme with too low temperature?
• Is the rinse aid dispenser empty?
• Is the salt container empty or is the water softener not
correctly adjusted?
• Is the rinse aid dispenser adjusted to too low dosage?
• Are the dishes rattling against each other?
• Is the spray arm knocking against the dishes?
Whistling sound when washing.
• This is not a fault, try another brand of detergent.
• Is the rinse aid dispenser empty?
• Have the dishes been left too long inside the dishwasher?
Fault Check
The door is difficult to close.
• Is the dishwasher level?
Before calling out an engineer, please check through the details below because some faults can be rectified easily
without the need to call out an engineer. If an engineer is called to resolve a problem listed below or to repair a
fault caused by incorrect installation or mis-use a charge will be made, even if the appliance is under guarantee.
The top indicator lamp flashes.
The middle indicator lamp flashes.
• Is the water tap turned on?
• Is the filter inside the inlet hose blocked?
• Is the water inlet hose kinked or blocked?
• Is your domestic sewer system blocked?
Fault Check
If the top or middle indicator lamp is flashing, it is possible that you can solve the problem your self. When the problem is
solved, press in the On/Off button and the programme continues. If the problem occurs again, contact your local
service centre. If any other lamps flash contact and inform your local service centre.
Page 12

The salt container and rinse aid dispenser shall be filled in accordance with this instruction manual.
Before conducting the measurements the dishwasher shall be operated for one or two complete cycles using
detergent and a clean load.
Test standard: EN 50242 and EN 60704
Rated capacity: 6 place settings accordance EN 50242
Loading of basket: accordance figure on section of basket and loading
Test program: energy saving 55° C
Detergent (IEC type B): 15 gram in the dispenser + 3 gram in the pre-wash dispenser
Rinse aid (type III): setting 3
Feed water pressure: minimum 0,8 bar, maximum 10 bar
- 12 -
Information for test centres
Service
Service and spare parts
Servicing and repairs must be carried out by a service
company authorized by the supplier. Use only spare
parts supplied by these.
Before calling service, use the trouble shooting table
”In the event of a fault” to try to attend to the fault yourself.
Note that electrical faults shall always be rectified by a
certified electrician.
Give the appliance’s model designation, product- and
serial numbers according to the data plate affixed to the
rear of the dishwasher.
You can record these details here:
TYPE. ............................................................
MOD. ............................................................
PROD.NO. ............................................................
SER.NO. ............................................................
Purchase date............................................................
Never attempt to repair the dishwasher yourself.
Repairs carried out by unauthorized or inexperienced
persons can cause injury or serious malfunctioning.
Page 13

- 13 -
Installation instructions
Any electrical work required to install this appliance,
should be carried out by a qualified electrician or
competent person.
Any plumbing work required to install this appliance,
should be carried out by a qualified plumber or
competent person.
Technical specifications
Capacity: 6 place settings accordance EN 50242
Dimensions: Height 447 mm
Width 546 mm
Depth (to the edge of the door) 480 mm
Depth (to the middle of the door) 507 mm
Weight: Net 22 kg
Water pressures: Minimum 80 kPa (0,8 bar)
Maximum 1000 kPa (10 bar)
Water temperature: Maximum 65° C
Electrical data: Power supply 230 V - 50 Hz
Fuse 10 A
Heating element 1100 W
Power rating 1180 W
This appliance complies with the following E.E.C. directives:
– 73/23/EEC, dated 19.02.1973 – low-voltage directive.
– 89/336/EEC, dated 03.05.1989 (incl. amendment
– 92/31/EEC) – directive on electromagnetic compatibility.
Page 14

- 14 -
Unpacking
3
4
5
1
Damages
If the dishwasher has been damaged during transport,
you should immediately notify the company responsible
for delivering it.
Check that the dishwasher is undamaged. If you discover
any damage, faults or that anything is missing, you should
notify the dealer immediately.
Never leave packaging material in a place where
children may play with it.
Check that the following accessories are supplied with the
dishwasher when you unpack it:
– A funnel for filling salt (1)
– Elbow for discharge hose (2)
– Rubber seal (3)
– Restrictor 1/2” (4)
– Washer/filter for inlet hose (5)
Use
This dishwasher is designed solely for washing household
utensils suitable for washing in a dishwasher. Using it for
other purposes may damage it and invalidate the guarantee.
Positioning
The dishwasher is intended to be installed on a kitchen
sink, worktop or built-in. To function properly, make sure
that the appliance is level. Its height can be adjusted with
the adjustable feets (5 mm each). See the illustration for
built-in measurements.
Protecting the dishwasher against
freezing
If the dishwasher is placed in an environment where
the temperature sometimes fall below 0° C, there is
a risk that the small amount of water which remains
inside the parts of the dishwasher will freeze and
damage it. To prevent this you should:
1. Turn off the water supply to the dishwasher.
2. Remove the water inlet and discharge hoses.
3. Make sure that there is coarse-grained salt in the
salt container for the water softener.
The appliance is only to be used and stored indoors
at normal room temperature. The manufacture is
not responsible for any frost damage.
2
Page 15

- 15 -
Installation
Water inlet
The dishwasher is equipped with safety features
which are to prevent the water from going back
to the fresh water system. These features are according to current water technical safety regulations.
The temperature of the water supply should not exceed
65° C and the pressure should be between 80-1000 kPa
(0,8 - 10 bar).
It is important to have a tap or stopcock, positioned close
to the dishwasher and with easy access. Special mixer
taps with dishwasher connections are available, as well
as adaptors for older mixer taps. Insert the combination
rubber washer/filter and connect the inlet hose to a tap
with a 3/4" pipe thread. If necessary, use the restrictor
(1/2”) supplied.
The inlet hose must not be joined onto any form of extension hose. If it is too short, the entire hose must be replaced with a longer high-pressure hose, specially designed
for the purpose. The end of the hose, which is connected
to the dishwasher can be turned in any direction. Loosen
the retaining nut, turn the hose, then retighten the nut.
Water drainage
To protect the dishwasher against water damage
it is equipped with a water safety system. In the
event of a fault the drain-pump starts automatically
and the remaining water inside the dishwasher is
pumped out.
The water safety system also works when the
dishwasher is switched off. However the dishwasher must be connected electrically.
Place the discharge hose over the sink as illustrated.
It must not at any point be higher up than 75 cm over the
surface which the dishwasher is standing on. If it runs
higher, operation of the dishwasher might be impaired.
It is also important to ensure that the inside diameter of the
hose is not less than 13 mm at any point. If the discharge
hose is too long, it can easily be cut to the right length.
1. Cut the hose to a suitable length, using a
sharp knife.
2. Fit the elbow supplied onto the end of the hose.
Electrical connection
The dishwasher is supplied with a lead and electrical plug
for connection to a 230 V earthed wall socket, which should
be easily accessible and protected by a 10 A fuse.
Before any work is carried out on the dishwasher,
it must be isolated from the electric mains supply,
for example by removing the plug from the wall
socket.
Permanent electrical installation must be carried
out by an authorized electrician or competent
person.
Page 16

- 16 -
Sodervanie
Dlq polxzowatelq
Informaciq po tehnike
bezopasnosti 17
Opisanie pribora 18-19
- Raspylitelx
- Filxtr gruboj o^istki / mikrofilxtr
- Filxtr tonkoj o^istki
- Dozator mo@]ego sredstwa
- Dozator dlq opolaskiwatelq
- Ustrojstwo dlq smqg^eniq wody
Panelx uprawleniq 20
- Kak polxzowatxsq funkciej otlovennogo
zapuska
Nastrojka ustrojstwa dlq
smqg^eniq wody 21
Tablica programm 22
|kspluataciq pribora 23
- Zapusk programmy
- Wremennaq ostanowka programmy
- Otmena programmy
- Funkciq pauzy
- Otmena fazy su[ki
- Wykl@^enie posudomoe^noj ma[iny
- ~istka posudomoe^noj ma[iny
Zagruzka i razgruzka ma[iny 24
W slu^ae wozniknoweniq sboq w
rabote 25
Tehni^eskoe obsluviwanie 26
- Tehni^eskoe obsluviwanie i zap^asti
Informaciq dlq testiru@]ih
organizacij 26
Dlq ustanow]ika
Tehni^eskaq specifikaciq 27
Raspakowka 28
- Powrevdeniq
- Ispolxzowanie
- Raspolovenie
- Za]ita posudomoe^noj ma[iny ot zamerzaniq
Ustanowka 29-30
- Poda^a wody
- Sliw
- Podkl@^enie k seti
Uslownye obozna^eniq, ispolxzuemye w rukowodstwe po \kspluatacii
Wy wstretite w tekste sledu@]ie obozna^eniq, kotorye budut westi was po instrukcii:
Informaciq po bezopasnosti
Posledowatelxnostx wypolneniq instrukcij
Poleznye sowety
Informaciq po za]ite okruva@]ej sredy
Page 17

Prevde ^em pristupitx k ustanowke i \kspluatacii posudomoe^noj ma[iny oznakomxtesx s nastoq]im
rukowodstwom, obra]aq osoboe wnimanie na rekomendacii, sowety i preduprevdeniq. Wo izbevanie
o[ibo^nyh dejstwij i nes^astnyh slu^aew neobhodimo, ^toby wse lica, polxzu@]iesq posudomoe^noj
ma[inoj, polnostx@ oznakomilisx s prawilami \kspluatacii i tehniki bezopasnosti. Sohranite nastoq]ee
rukowodstwo i pri prodave ili pereda^e pribora drugomu licu obqzatelxno peredajte ego wmeste s
priborom, ^toby wse polxzowateli smogli w l@boe wremq oznakomitxsq s prawilami \kspluatacii i
tehnikoj bezopasnosti.
Ustanowka i tehni^eskoe
obsluviwanie
● Wse raboty po ustanowke i tehni^eskomu obsluviwani@
pribora dolvny osu]estwlqtxsq kwalificirowannym
specialistom. Remont, proizwedennyj licami bez
sootwetstwu@]ej podgotowki, movet serxezno powreditx
pribor i priwesti k trawmam l@dej ili por^e imu]estwa.
Prevde ^em pristupitx k kakim-libo manipulqciqm s
posudomoe^noj ma[inoj, ee obqzatelxno sleduet
otkl@^itx ot seti.
● Sistema wodosnabveniq posudomoe^noj ma[iny dolvna
imetx wentilx w legkodostupnom meste.
● Wilku setewogo [nura nuvno wkl@^atx w zazemlennu@
rozetku \lektroseti, raspolovennu@ w legkodostupnom
meste. Fiksirowannoe podkl@^enie pribora dolvno
osu]estwlqtxsq tolxko upolnomo^ennym na \to \lektrikom.
● Pri podkl@^enii ili o^istke ma[iny ubeditesx w tom,
^to prowod pitaniq ne perevat i ne powrevden kakimlibo obrazom, i ^to [langi ne razorwany ili ne
perekru^eny.
● Tehni^eskoe obsluviwanie i wozmovnyj remont dolvny
osu]estwlqtxsq specialistami awtorizowannogo serwisnogo
centra. Nikogda ne pytajtesx otremontirowatx posudomoe^nu@ ma[inu samostoqtelxno.
Bezopasnostx detej
● Posudomoe^naq ma[ina prednazna^ena dlq ispolxzowaniq
tolxko wzroslymi l@dxmi. Ne razre[ajte detqm igratx
s regulqtorami i drugimi ^astqmi ma[iny.
● Pomnite o tom, ^to plastikowye me[ki, whodq]ie w
upakowku pribora, predstawlq@t soboj smertelxnu@
opasnostx dlq igra@]ih s nimi malenxkih detej.
● Dervite wse mo@]ie sredstwa w meste, nedostupnom
dlq detej.
● Ne pozwolqjte detqm wstawatx, saditxsq i ka^atxsq na
otkrytoj dwerce posudomoe^noj ma[iny.
Wo wremq ispolxzowaniq
● Posudomoe^naq ma[ina prednazna^ena tolxko dlq mojki
doma[nej posudy, prigodnoj dlq ma[innoj mojki.
Ispolxzowanie pribora w kakih-libo drugih celqh movet
priwesti k trawmam l@dej i powrevdeni@ imu]estwa,
a takve k annulirowani@ garantii.
● Starajtesx ne otkrywatx dwercu posudomoe^noj ma[iny
wo wremq ee raboty, tak kak gorq^ij par movet wyrwatxsq
naruvu i obve^x was.
● Ispolxzujte tolxko specialxnye mo@]ie sredstwa dlq
posudomoe^nyh ma[in.
● Ne stawxte ostrye novi w korzinu ostriem wwerh.
Zna^itelxno bezopasnee razmestitx ih w gorizontalxnom
polovenii.
● Pri izwle^enii kakoj-libo posudy iz posudomoe^noj
ma[iny do okon^aniq polnogo cikla mojki, \tu posudu
obqzatelxno sleduet t]atelxno opolosnutx proto^noj
wodoj dlq udaleniq ostatkow mo@]ego sredstwa.
● Sistema bezopasnosti wodosnabveniq predotwra]aet
ute^ku wody. Neobhodimo wypolnqtx sledu@]ie trebowaniq:
- Pri wykl@^enii ma[iny ona wse rawno dolvna
ostawatxsq podkl@^ennoj k \lektri^eskoj seti.
- Posudomoe^naq ma[ina dolvna bytx prawilxno
podkl@^ena.
- Kogda wy ostawlqete ma[inu w bezdejstwii na
dlitelxnoe wremq, wsegda perekrywajte poda^u wody.
● W slu^ae pereliwa ili ute^ki wody nemedlenno
perekrojte poda^u wody w posudomoe^nu@ ma[inu,
zakryw kran, i otkl@^ite ee ot \lektroseti, wynuw
wilku iz rozetki, ili udalite predohranitelx. Kogda
wy wynimaete wilku iz \lektrorozetki, beritesx za
wilku, a ne za prowod.
Utilizaciq
- Upakowka:
Upakowka dannogo pribora sostoit iz \kologi^eski
bezopasnyh materialow. Plastikowye ^asti ime@t
sledu@]ie obozna^eniq i mogut bytx pererabotany
dlq wtori^nogo ispolxzowaniq:
● PE ozna^aet poli\tilen, iz nego izgotowlen me[ok,
nadetyj na pribor, i paket, w kotorom levit instrukciq.
● PS ozna^aet polistirol (pressowannyj), ispolxzuetsq
dlq sekcij upakowki, neobhodimyh dlq amortizacii
pribora pri transportirowke.
Kartonnye ^asti upakowki izgotowleny iz bumagi,
prigodnoj dlq pererabotki, i ih sleduet sdatx na
specialxnyj punkt sbora wtorsyrxq. W pribore ime@tsq
plastikowye i rezinowye ^asti. |ti ^asti pome^eny
specialxnymi simwolami, ukazywa@]imi, iz ^ego oni
sdelany, tak ^to \ti ^asti movno utilizirowatx w
sootwetstwii s markirowkoj po okon^anii sroka
\kspluatacii pribora. Materialy pome^eny w
sootwetstwii s mevdunarodnymi standartami.
- Otsluviw[ij swoj srok pribor:
Po okon^anii sroka \kspluatacii pribora otkl@^ite ego
ot seti, zatem obrevxte \lektroprowod w meste ego soedineniq
s priborom. Udostowerxtesx w tom, ^to deti ne smogut
ispolxzowatx pribor w ka^estwe igru[ki.
Informaciq po tehnike bezopasnosti
- 17 -
Page 18

Opisanie pribora
- 18 -
4 5
Page 19

- 19 -
Opisanie pribora
Raspylitelx (1)
Neobhodimo, ^toby wse otwerstiq raspylitelq byli ^istymi,
w protiwnom slu^ae \ffektiwnostx mojki movet su]estwenno
snizitxsq. Esli raspylitelx nuvdaetsq w o^istke, otwernite
gajku protiw ^asowoj strelki, wynxte prokladku i snimite
raspylitelx. Pro^istite otwerstiq i udalite wse ostatki
pi]i.
Filxtr gruboj o^istki /
mikrofilxtr (2)
Filxtr gruboj o^istki prednazna^en dlq zahwata krupnyh
predmetow, takih kak zubo^istki i kuso^ki qi^noj skorlupy.
Sledite za tem, ^toby filxtr ne zasorqlsq. Pri neobhodimosti
powernite ego protiw ^asowoj strelki, wynxte i promojte
w proto^noj wode.
Filxtr tonkoj o^istki (3)
O^enx wavno, ^toby \tot filxtr wsegda byl ^istym.
Zagrqznenie ili zasorenie filxtra obqzatelxno priwedet
k su]estwennomu uhud[eni@ \ffektiwnosti mojki.
Filxtr tonkoj o^istki movno legko wynutx i promytx
posle togo, kak wy snimite filxtr gruboj o^istki.
Dozator mo@]ego sredstwa (4)
Nadawite na za]elku kry[ki dozatora i otkrojte dozator.
Swerxtesx s instrukciej na upakowke mo@]ego sredstwa,
zapolnite dozator w sootwetstwii s rekomendaciqmi i
zakrojte kry[ku. Mo@]ee sredstwo dlq predwaritelxnoj
mojki pri neobhodimosti zasypaetsq w nebolx[oe otdelenie
slewa. |to mo@]ee sredstwo na^inaet dejstwowatx uve na
stadii predwaritelxnogo opolaskiwaniq posudy. Sledite
za tem, ^toby ni^to ne me[alo kry[ke dozatora swobodno
otkrywatxsq.
Ispolxzujte tolxko specialxnye mo@]ie
sredstwa dlq posudomoe^nyh ma[in.
Starajtesx ne polxzowatxsq vidkimi mo@]imi
sredstwami sli[kom ^asto, tak kak pri
dlitelxnom ispolxzowanii vidkih mo@]ih
sredstw woznikaet potencialxnyj risk usileniq
[uma pri rabote nasosa.
Dozator dlq opolaskiwatelq (5)
Esli wy budete ispolxzowatx opolaskiwatelx, to posuda
budet ^i]e i budet bystree wysyhatx, tak kak opolaskiwatelx
obleg^aet stekanie wody i zagrqznenij s posudy.
Peredozirowka opolaskiwatelq priwedet k poqwleni@
razwodow, a nedostatok - k belesomu naletu na posude.
Dozator wme]aet okolo 150 ml opolaskiwatelq. |togo
koli^estwa dostato^no primerno dlq 60 ciklow mojki, w
zawisimosti ot ustanowlennoj dozirowki. Dozirowka
proizwoditsq w zawisimosti ot vestkosti wody.
Wy movete wybratx dozirowku ot 1 do 6, ^to
ozna^aet 1-6 sm3opolaskiwatelq. Fabri^naq
dozirowka rawna 1.
Na^nite s naimenx[ej dozy i po mere
neobhodimosti uweli^iwajte dozu - dlq \togo
powora^iwajte regulqtor-strelku, naprimer, s
pomo]x@ ru^ki lovki.
Indikator na paneli uprawleniq zagoraetsq, kogda
dozator neobhodimo zapolnitx opolaskiwatelem.
1. Navmite na za]elku kry[ki dozatora i
podnimite kry[ku.
2. Zapolnite dozator opolaskiwatelem; ne
pereliwajte wy[e otmetki.
3. Akkuratno wytrite prolityj opolaskiwatelx,
^toby izbevatx izli[nego penoobrazowaniq wo
wremq sledu@]ego cikla mojki.
4. Zakrojte kry[ku i navimajte na nee, poka ona
ne za]elknetsq snowa.
Ne zapolnqjte dozator opolaskiwatelq vidkim
mo@]im sredstwom.
Ustrojstwo dlq smqg^eniq wody (6)
Dannaq posudomoe^naq ma[ina osna]ena ustrojstwom dlq
smqg^eniq vestkoj wody, po\tomu dozator opolaskiwatelq
sleduet ustanowitx na nizku@ dozirowku. Izwestx w vestkoj
wode wyzywaet poqwlenie belowatyh otlovenij na posude i
wnutrennej powerhnosti posudomoe^noj ma[iny. Wo izbevanie
\togo woda propuskaetsq ^erez specialxnyj kontejner, gde
ee vestkostx umenx[aetsq.
Poskolxku w ustrojstwe dlq smqg^eniq wody ispolxzuetsq
specialxnaq krupnozernistaq solx, to posle opredelennogo
koli^estwa ciklow mojki wam neobhodimo popolnqtx
sodervimoe kontejnera dlq soli.
O^enx wavno, ^toby wo wremq perwogo ispolxzowaniq
posudomoe^noj ma[iny kontejner uve byl
zapolnen specialxnoj krupnozernistoj solx@
dlq posudomoe^nyh ma[in.
Kogda na paneli uprawleniq zagoraetsq indikator ,
kontejner neobhodimo zapolnitx krupnozernistoj solx@.
1. Otwintite kry[ku kontejnera, powora^iwaq ee
protiw ^asowoj strelki.
2. Zapolnite kontejner dlq soli wodoj (\to nuvno
sdelatx tolxko w perwyj raz).
3. S pomo]x@ prilagaemoj woronki zapolnite
kontejner krupnozernistoj solx@.
4. Wynxte woronku i wytrite wodu wokrug otwerstiq
dlq zapolneniq.
5. T]atelxno zawintite kry[ku.
Teperx ustrojstwo dlq smqg^eniq wody gotowo k mojke
perwoj partii posudy. Wsegda sledite za tem, ^toby w
kontejnere byla krupnozernistaq solx (wmestimostx
kontejnera primerno 1 litr).
Informaci@ po nastrojke ustrojstwa dlq smqg^eniq wody
sm. nive.
Ispolxzujte tolxko specialxnu@ solx dlq
posudomoe^nyh ma[in, oby^naq stolowaq solx
movet powreditx ustrojstwo dlq smqg^eniq wody.
Page 20

Panelx uprawleniq
- 20 -
Knopki wybora
programm
Knopka ustrojstwa
dlq smqg^eniq wody
Knopka Wkl./Wykl.
Kontrolxnyj indikator
wkl@^eniq
Knopka
funkcij
Knopka otlovennogo
zapuska
Indikatory
otlovennogo zapuska
Indikatory stadij mojki i
kontrolxnye indikatory
Kak polxzowatxsq funkciej otlovennogo zapuska
Zapusk programmy movno otlovitx na 3, 6 ili 9 ^asow.
1. Navmite knopku Wkl./Wykl.
2. Neskolxko raz navmite na knopku otlovennogo
zapuska, poka ne zagoritsq indikator rqdom s
wybrannym wremenem otsro^ki.
3. Navmite knopku velaemoj programmy.
4. Po iste^enii zadannogo wremeni wybrannaq
programma budet zapu]ena.
Izmenenie wremeni otlovennogo zapuska:
Esli programma e]e ne na^alasx, wy movete izmenitx
interwal wremeni s pomo]x@ knopki otsro^ki wkl@^eniq.
Otmena funkcii otlovennogo zapuska:
Esli programma e]e ne na^alasx, wy movete otmenitx
funkci@ otlovennogo zapuska. Neskolxko raz navmite na
knopku otsro^ki wkl@^eniq, poka ne budet goretx ni odna
iz indikatornyh lamp, obozna^a@]ih wremq otsro^ki.
Wybrannaq programma na^netsq srazu ve.
Knopka ustrojstwa dlq smqg^eniq wody i knopka funkcij:
Pomimo wybora programmy navatiem \tih knopok wy movete otregulirowatx nastrojku ustrojstwa dlq smqg^eniq wody.
Indikatory stadij mojki:
Pokazywa@t: teku]u@ stadi@ wybrannoj programmy
• wypolnenie mojki werhnij indikator
• wypolnenie su[ki srednij indikator
• okon^anie programmnogo cikla nivnij indikator
Kontrolxnye indikatory:
Ukazywa@t, ^to:
• navata knopka Wkl./Wykl.
• neobhodimo zapolnitx kontejner solx@
• neobhodimo zapolnitx dozator opolaskiwatelem
Page 21

- 21 -
Stepenx vestkosti wody
i °d
1)
i mmol/l
2)
Ustanowka
ustrojstwa dlq
smqg^eniq wody
Koli^estwo miganij
indikatora
> 24 > 4,2
18 - 24 3,2 - 4,2
12 - 18 2,1 - 3,2
4 - 12 0,7 - 2,1
Nive 4 Nive 0,7
5
4
3
2*
1
5
4
3
2
1
solx ne trebuetsq
1. Odnowremenno navmite na knopku ustrojstwa dlq
smqg^eniq wody i knopku funkcij i dervite ih w
navatom sostoqnii, zatem navmite na knopku
Wkl./Wykl.
2. Kogda na^nut migatx indikatory knopki ustrojstwa
dlq smqg^eniq wody i knopki funkcij, wy movete
otpustitx knopki.
3. Navmite odin raz na knopku ustrojstwa dlq
smqg^eniq wody. Sna^ala indikator budet goretx
rowno, a zatem na^net migatx.
- ^islo miganij sootwetstwuet ustanowlennomu
urown@ vestkosti wody.
- seriq miganij budet powtorqtxsq s promevutkom
w neskolxko sekund.
4. Pri kavdom navatii na knopku ustrojstwa dlq
smqg^eniq wody stepenx vestkosti wody
uweli^iwaetsq na 1.
Posle 5 stepeni vestkosti sledu@]aq stepenx
vestkosti - 1.
5. ~toby zawer[itx process ustanowki, navmite
knopku Wkl./Wykl., kogda nastroen nuvnyj
urowenx vestkosti wody
Esli wy wybrali zna^enie 1, to indikator
nali^iq soli ne zagoraetsq.
1) nemeckie gradusy izmereniq vestkosti wody
2) millimolx/litr, mevdunarodnaq edinica
vestkosti wody
*) zawodskaq ustanowka
Esli wy ispolxzuete mo@]ee sredstwo, uve
soderva]ee opolaskiwatelx, wy movete wykl@^itx
indikator, ukazywa@]ij na neobhodimostx
popolneniq dozatora opolaskiwatelq.
1. Odnowremenno navmite na knopku ustrojstwa dlq
smqg^eniq wody i na knopku funkcij i dervite ih
w navatom sostoqnii, zatem navmite na knopku
Wkl./Wykl.
2. Kogda na^nut migatx indikatory knopki ustrojstwa
dlq smqg^eniq wody i knopki funkcij, wy movete
otpustitx \ti knopki.
3. Navmite e]e raz na knopku funkcij. Na^nut
migatx indikatory knopok funkcij i okon^aniq
programmnogo cikla. Navmite na \tu knopku e]e
raz, i indikator okon^aniq programmnogo cikla
pogasnet. Teperx funkciq wkl@^eniq indikatora
neobhodimosti popolneniq dozatora opolaskiwatelq
otkl@^ena.
4. Navmite knopku Wkl./Wykl. dlq zawer[eniq
ustanowki.
~toby wnowx aktiwirowatx \tu funkci@, sledujte
wy[eizlovennym punktam 1 i 2 i zatem dwavdy
navmite na knopku funkcij, poka indikatory
knopki funkcij i okon^aniq programmnogo cikla
snowa ne na^nut migatx.
Nastrojka ustrojstwa dlq smqg^eniq wody
~toby predotwratitx obrazowanie izwestkowogo naleta na
posude i wnutrennih stenkah posudomoe^noj ma[iny posudu
nuvno mytx mqgkoj wodoj, t.e. wodoj s nizkim sodervaniem
izwesti.
Dannaq ma[ina osna]ena ustrojstwom dlq smqg^eniq wody, w
kotorom s pomo]x@ specialxnoj soli wodoprowodnaq woda s
vestkostx@ bolee 4 °d (nemeckie gradusy) oswobovdaetsq ot
izwesti.
Nastrojte ustrojstwo dlq smqg^eniq wody, rukowodstwuqsx
dannymi w nivepriwedennoj tablice w sootwetstwii so
stepenx@ vestkosti wody w wa[em rajone.
Obratitesx w mestnye organy wodosnabveniq
i wyqsnite stepenx vestkosti wody w wa[em
rajone.
Ustrojstwo dlq smqg^eniq wody imeet 5
urownej ustanowki:
Dlq obeih opisannyh nive ustanowok posudomoe^naq ma[ina dolvna bytx otkl@^ena i wse programmy dolvny
bytx zakon^eny (sm. nive o tom, kak zawer[itx programmu).
Page 22

12 min
- 22 -
Tablica programm
Tip
posudy
Tip
zagrqzneniq:
• Normalxnoe
zagrqznenie
• Prisoh[ie
ostatki pi]i
• Silxnoe
zagrqznenie
• Prisoh[ie
ostatki pi]i,
osobenno qi^nyj
belok i krahmal
• Normalxnoe
zagrqznenie
• legkoe
zagrqznenie
• legkoe
zagrqznenie
Wremq mojki
s su[koj:
92 min112 min 150 min 35 min 30 min
Programmnyj
cikl:
1)
Predwaritelxnaq
mojka
Mojka
Promevuto^noe
poloskanie
Finalxnoe
poloskanie
Su[ka
Predwaritelxnaq
mojka
Mojka
2 promevuto^nyh
poloskaniq
Finalxnoe
poloskanie
Su[ka
Predwaritelxnaq
mojka
Mojka
Promevuto^noe
poloskanie
Finalxnoe
poloskanie
Su[ka
Mojka
Promevuto^noe
poloskanie
Finalxnoe
poloskanie
-
Mojka
Promevuto^noe
poloskanie
Finalxnoe
poloskanie
-
Podhodq]aq
programma:
Normalxnaq
65° C
Intensiwnaq
70° C
Tarelki i
kastr@li
Kofejnye
^a[ki,
hrupkie
predmety
Wse tipy posudy
|nergiq:
0,85 kWt^ 0,63 kWt^ 0,48 kWt^ 0,41 kWt^
Woda:
7 litrow
1,15 kWt^
Wremq
su[ki:
50 min
— —
12 min
9 litrow
7 litrow 6 litrow 6 litrow
|nergosberega@]aq
55° C
3)
Bystraq
50° C
Steklo
40° C
Dannye po
rashodu:
2)
1) Na raznyh stadiqh programmy ma[ina movet izdawatx razli^nye zwuki, tak kak na nekotoryh stadiqh mojka
prohodit bolee intensiwno.
2) Dannye po \nergopotrebleni@ osnowany na rabote ma[iny w normalxnyh uslowiqh. |ti dannye mogut
warxirowatxsq w zawisimosti ot temperatury podawaemoj wody i stepeni zapolnennosti korziny dlq
posudy i korziny dlq stolowyh priborow.
3) Cikl \nergosberega@]ej programmy ispolxzowan dlq opredeleniq dannyh po \nergopotrebleni@ i
proizwoditelxnosti ma[iny.
Cikly wseh programm na^ina@tsq so sliwa.
Dlq programm "Bystraq mojka" i "Steklo" ne sleduet
ispolxzowatx mo@]ee sredstwo w tabletkah.
Page 23

- 23 -
Zapusk programmy
1. Udalite s posudy twerdye ostatki pi]i.
2. Zagruzite posudomoe^nu@ ma[inu
(sm. nive primery zagruzki korziny)
3. Wnesite nuvnu@ porci@ mo@]ego sredstwa w
dozator i zakrojte ego kry[ku.
4. Zakrojte dwercu.
5. Navmite knopku Wkl./Wykl.
6. Navmite knopku nuvnoj programmy (sm. tablicu
programm). Zagoritsq indikator programmy. W
te^enie 6 sekund budut migatx dwa werhnih
indikatora, i w \to wremq wy e]e movete wybratx
drugu@ programmu. Esli wy \togo ne delaete, to
na^inaetsq wybrannaq programma. Indikator
budet wsegda ukazywatx teku]u@ fazu programmy.
7. Po okon^anii programmy mojki prowerxte
filxtry, wozmovno, ih sleduet po^istitx.
Esli miga@t werhnij i srednij indikatory,
sna^ala prowerxte, t]atelxno li zakryta dwerca,
a esli delo ne w dwerce, to pro^itajte razdel
"W slu^ae wozniknoweniq sboq w rabote".
Wremennaq ostanowka programmy
1. Otkrojte dwercu. Programma ostanowitsq.
2. Migaet werhnij ili srednij indikator, w
zawisimosti ot togo, na kakoj stadii nahoditsq
programma.
3. Zakrojte dwercu, i wypolnenie programmy
prodolvitsq primerno ^erez 6 sekund.
Wo wremq raboty ma[iny otkrywajte dwercu
o^enx ostorovno, tak kak iz ma[iny movet
wyrwatxsq gorq^ij par i o[paritx was.
Otmena programmy
1. Navmite i uderviwajte knopku teku]ej
programmy do teh por, poka ne pogasnet ee
indikator.
2. Otpustite knopku. Teperx \ta programma
otmenena, i wy movete wybratx nowu@ programmu.
Esli wy otkl@^ili posudomoe^nu@ ma[inu,
wybrannaq programma ne zakon^ena, a tolxko
prerwana. Kogda wy wkl@^ite ma[inu snowa,
\ta programma prodolvitsq.
Funkciq pauzy
S pomo]x@ funkcii pauzy programma movet bytx
wremenno prerwana na korotkoe wremq.
1. Navmite na knopku Wkl./Wykl. Programma
ostanowitsq.
2. Wse indikatory pogasnut.
3. Esli wy hotite, ^toby programma snowa
prodolvilasx, navmite na knopku Wkl./Wykl.
Programma prodolvitsq.
Ne sleduet prerywatx programmu na dlitelxnoe
wremq, tak kak woda w posudomoe^noj ma[ine
ostynet, i ee nuvno budet nagrewatx wnowx, a \to
priwedet k li[nemu rashodu \nergii.
Otmena fazy su[ki
Esli wy ne hotite vdatx, poka zakon^itsq faza su[ki, wy
movete ee otmenitx.
1. Navmite na knopku Wkl./Wykl. Indikator \toj
knopki pogasnet.
2. Otkrojte dwercu. Faza su[ki otmenena.
Wykl@^enie posudomoe^noj
ma[iny
Ne otkl@^ajte ma[inu do teh por, poka ne zagoritsq
indikator okon^aniq programmnogo cikla .
1. Navmite na knopku Wkl./Wykl. Indikator \toj
knopki pogasnet.
Budxte ostorovny, esli wy otkrywaete dwercu
srazu ve po okon^anii programmy, tak kak gorq^ij
par wyrwetsq naruvu i movet o[paritx was.
Dannaq posudomoe^naq posuda imeet nowu@
funkci@ "Impulxsnaq mojka". Pri mojke posudy
s ispolxzowaniem \toj funkcii wo wremq
programmnogo cikla menqetsq ^astota wra]eniq
nasosa i dawlenie wody, ^em obespe^iwaetsq bolee
intensiwnaq o^istka posudy pri mojke. Imenno
po\tomu na razli^nyh stadiqh programmy ma[ina
izdaet raznyj [um.
~istka posudomoe^noj ma[iny
Wne[nie powerhnosti ma[iny movno wymytx mqgkim
(neabraziwnym) bytowym mo@]im sredstwom. Zatem
udalite ostatki mo@]ego sredstwa wlavnoj tkanx@.
Ne ispolxzujte ^istq]ie sredstwa, soderva]ie
spirt, rastworiteli i podobnye we]estwa.
|kspluataciq pribora
Page 24

- 24 -
Zagruzka i razgruzka ma[iny
Kak zagruvatx posudu
Na ill@stracii pokazan primer zagruzki posudy na 6
^elowek. U was movet bytx sower[enno drugaq posuda,
no esli wy budete sobl@datx prawila, to wy obqzatelxno
ostanetesx dowolxny rezulxtatom.
● Wsegda perewora^iwajte ^a[ki, stakany i miski wwerh
dnom.
● Naklonqjte glubokie bl@da (naprimer, supowye
tarelki) tak, ^toby s nih swobodno stekala woda wo
wremq su[ki
● Udostowerxtesx w tom, ^to posuda ne soprikasaetsq
drug s drugom. |to osobenno wavno dlq stolowyh
priborow - slovennye wmeste lovki i podobnye
predmety prosto newozmovno wymytx tak, kak sleduet.
Woda dolvna popadatx na wse zagrqznennye powerhnosti.
● Sledite za tem, ^toby stolowye pribory s tonkimi
ru^kami i drugie tonkie predmety ne wystupali skwozx
otwerstiq w korzine i ne me[ali raspylitel@ wra]atxsq.
● Nikogda ne stawxte wmeste serebrqnye izdeliq i
predmety iz nervawe@]ej stali. Kogda \ti metally
wstupa@t w kontakt, proishodit himi^eskaq reakciq, w
rezulxtate ^ego na serebre osta@tsq pqtna.
● Farforowye izdeliq s risunkom na powerhnosti
glazuri mogut okazatxsq neprigodnymi dlq mojki w
posudomoe^noj ma[ine, tak kak cwetnoj risunok
movet poterqtx qrkostx i pobleknutx. |to kasaetsq
takve stolowyh priborow s derewqnnymi i
plastikowymi ru^kami.
Pri pokupke posudy ubeditesx w tom, ^to ona
prigodna dlq mojki w posudomoe^noj ma[ine.
● Serebrqnye i al@miniewye izdeliq wo wremq mojki w
posudomoe^noj ma[ine tuskne@t i terq@t blesk.
Ostatki qjca i gor^icy ^asto ostawlq@t pqtna na
serebre. Obqzatelxno smojte wse ostatki pi]i s
serebrqnoj posudy, esli wy ne namereny mytx ee
srazu ve posle ispolxzowaniq.
● Ne wse plastikowye izdeliq prigodny dlq mojki w
posudomoe^noj ma[ine. Esli wy somnewaetesx, movno
li mytx w ma[ine kaku@-libo plastikowu@ posudu,
rekomenduetsq proweritx \to, zagruziw w ma[inu
tolxko odin plastikowyj predmet, ili mytx taku@
posudu wru^nu@.
● Pri mojke hrupkoj posudy ustanawliwajte bolee
nizku@ temperaturu.
● We]estwa, soderva]ie stojkie krasiteli (naprimer,
ket^up), mogut wyzwatx obrazowanie pqten w posudomoe^noj
ma[ine, kotorye ^erez nekotoroe wremq is^eznut.
Ne stawxte ostrye novi w korzinu dlq priborow
ostriem wwerh. Namnogo bezopasnee polovitx ih
pla[mq w korzinu dlq posudy.
Pri neobhodimosti wy movete snqtx werh i ru^ku
korziny dlq stolowyh priborow.
Razgruzka posudy
Gorq^aq posuda ^uwstwitelxna k mehani^eskim udaram,
po\tomu wsegda dawajte posude ostytx pered razgruzkoj.
Posuda wysohnet bystree, esli srazu po
okon^anii programmy polnostx@ otkrytx dwercu
na korotkoe wremq, a zatem ostawitx ee
priotkrytoj.
Korziny
Osnownaq korzina
Korzina dlq stolowyh priborow
Page 25

- 25 -
W slu^ae wozniknoweniq sboq w rabote
Programma ne na^inaetsq.
W posudomoe^nu@ ma[inu ne
postupaet woda.
W konce cikla woda iz ma[iny ne
sliwaetsq.
Ka^estwo mojki posudy
neudowletworitelxnoe.
Qwnyj izwestkowyj nalet ili
belaq plenka na posude.
Posudomoe^naq ma[ina o^enx [umit.
Posuda nedostato^no suhaq i ne
siqet.
• Plotno li zakryta dwerx?
• Navali li wy na knopku Wkl./Wykl.?
• Otkryt li wodoprowodnyj kran?
• Wkl@^ena li ma[ina w setx?
• Ne peregorel li predohranitelx?
• Ne navata li knopka otlovennogo zapuska?
• Zakon^ilasx li predydu]aq programma? (sm. sootw. razdel)
• Otkryt li wodoprowodnyj kran?
• Ne otkl@^ili li wodu?
• Ne zablokirowan li i ne perekru^en li [lang poda^i wody?
• Ne zablokirowan li filxtr [langa poda^i wody?
• Dawlenie wody ne sli[kom slaboe?
• Wy otkryli dwerx do togo, kak zagorelsq indikator okon^aniq
programmy i programmnyj cikl zawer[ilsq?
• Okon^ilasx li predydu]aq programma? (sm. sootw. razdel)
• Ne zasorilisx li filxtry?
• Ne opustel li kontejner dlq soli ili ustrojstwo dlq
smqg^eniq wody nastroeno newerno?
• Dozator opolaskiwatelq nastroen na o^enx malenxku@ dozu?
• Predmety w ma[ine stuka@tsq drug o druga?
• Ne udarqet li raspylitelx po posude?
Pri mojke razdaetsq swist.
• Ne opustel li dozator opolaskiwatelq?
• Posuda byla nadolgo ostawlena w posudomoe^noj ma[ine?
Neisprawnostx Proweritx
Dwerca s trudom zakrywaetsq.
• Rowno li stoit posudomoe^naq ma[ina?
Prevde ^em wyzywatx tehni^eskogo specialista, prowedite prowerku po niveizlovennym punktam, poskolxku nekotorye
neisprawnosti legko ustranitx samostoqtelxno bez neobhodimosti wyzywatx specialista. Esli wy wyzowite ego dlq
isprawleniq pri^iny, ukazannoj w nivepriwedennom spiske, ili ustraneniq posledstwij neprawilxnoj ustanowki ili
neprawilxnogo ispolxzowaniq, to wam pridetsq oplatitx ego wizit, dave esli garantiq na wa[ pribor e]e ne istekla.
Migaet werhnij indikator.
Migaet srednij indikator.
• Otkryt li wodoprowodnyj kran?
• Ne zasoren li filxtr [langa poda^i wody?
• Ne zasoren i ne perekru^en li [lang poda^i wody?
• Ne zasorena li kanalizacionnaq sistema?
Neisprawnostx Proweritx
Esli migaet werhnij ili srednij indikator, wpolne weroqtno, ^to wy movete re[itx problemu samostoqtelxno. Kak tolxko
problema budet re[ena, navmite knopku Wkl./Wykl., i programma prodolvitsq. Esli neisprawnostx wozniknet wnowx,
obratitesx w awtorizowannyj serwisnyj centr. Esli migaet kakoj-libo e]e indikator, obra]ajtesx w awtorizowannyj
izgotowitelem serwisnyj centr.
• ~to-nibudx me[aet raspylitel@ wra]atxsq?
• Ne zasorilisx li otwerstiq raspylitelq?
• Predmety posudy stoqt sli[kom blizko drug k drugu?
• Ne zasorilisx li filxtry?
• Prawilxno li ustanowleny filxtry?
• Dostato^no li mo@]ego sredstwa wy ispolxzuete?
• T]atelxno li zakryta kry[ka solewogo kontejnera?
• Wy wybrali programmu so sli[kom nizkoj temperaturoj wody?
• Ne opustel li dozator opolaskiwatelq?
• |to ne nepoladka, poprobujte ispolxzowatx drugoe mo@]ee
sredstwo.
Page 26

Kontejner dlq soli i dozator opolaskiwatelq dolvny bytx zapolneny w sootwetstwii s instrukciej po \kspluatacii.
Pered prowedeniem izmerenij posudomoe^naq ma[ina dolvna projti odin-dwa polnyh cikla s mo@]im sredstwom i
^istoj posudoj.
Standart: EN 50242 ili EN 60704
Nominalxnaq zagruzka: serwiz na 6 person w sootwetstwii s EN 50242
Zagruzka korziny: W sootwetstwii s risunkom w razdele "Zagruzka i razgruzka ma[iny"
Testowaq programma: |nergosberega@]aq 55° C
Mo@]ee sredstwo (IEC tip W):15g w dozator + 3 g w dozator predwaritelxnoj mojki
Opolaskiwatelx (tip III): Ustanowka 3
Dawlenie podawaemoj wody: Minimum 0,8 bar, maksimum 10 bar
- 26 -
Informaciq dlq testiru@]ih organizacij
Tehni^eskoe obsluviwanie
Tehni^eskoe obsluviwanie i
zap^asti
Tehni^eskoe obsluviwanie i remont dolvny osu]estwlqtxsq
serwisnym centrom, awtorizowannym izgotowitelem.
Ispolxzujte tolxko firmennye zap^asti, predostawlennye
firmennymi serwisnymi centrami.
Prevde ^em obratitxsq za tehpomo]x@, izu^ite tablicu
samostoqtelxnogo ustraneniq neisprawnostej i popytajtesx
isprawitx polovenie swoimi silami. Imejte w widu, ^to
nepoladki s \lektri^estwom dolven ustranqtx \lektrik,
upolnomo^ennyj na podobnye operacii.
Pri obra]enii w serwisnyj centr ukavite modelx pribora,
serijnyj i produktowyj nomer w sootwetstwii s tehni^eskoj
tabli^koj, raspolovennoj na zadnej stenke
posudomoe^noj ma[iny.
Wy movete wpisatx \ti dannye w instrukci@:
TYPE. ............................................................
MOD. ............................................................
PROD.NO. ............................................................
SER.NO. ............................................................
Data pokupki ............................................................
Ne pytajtesx otremontirowatx posudomoe^nu@ ma[inu
samostoqtelxno. Nekwalificirowannyj remont movet
priwesti k trawmam l@dej i serxeznomu powrevdeni@
pribora.
Page 27

- 27 -
Instrukcii po ustanowke
L@bye \lektri^eskie raboty po ustanowke dannogo
pribora dolvny prowoditxsq kwalificirowannym
\lektrikom ili kompetentnym licom.
L@bye raboty po podkl@^eni@ pribora k wodoprowodu
dolvny prowoditxsq kwalificirowannym
wodoprowod^ikom ili kompetentnym licom.
Tehni^eskaq specifikaciq
Zagruzka: serwiz na 6 person w sootwetstwii s EN 50242
Razmery: Wysota 447 mm
{irina 546 mm
Glubina (do kraq dwercy) 480 mm
Glubina (do serediny dwercy) 507 mm
Wes: Netto 22 kg
Dawlenie wody: Minimum 80 kPa (0,8 bar)
Maksimum 1000 kPa (10 bar)
Temperatura wody: Maksimum 65° C
|lektri^eskie dannye: Isto^nik pitaniq 230 W - 50 Gc
Predohranitelx 10 A
Nagrewatelxnyj \lement 1100 Wt
Mo]nostx podkl@^eniq 1180 Wt
Dannyj pribor sootwetstwuet sledu@]im direktiwam E.E.S.:
– 73/23/EEC ot 19.02.1973 – direktiwa po nizkomu naprqveni@.
– 89/336/EEC ot 03.05.1989 (wkl. poprawku
– 92/31/EEC) – direktiwa po \lektromagnitnoj sowmestimosti.
Page 28

- 28 -
Raspakowka
3
4
5
1
Powrevdeniq
Esli posudomoe^naq ma[ina byla powrevdena wo wremq
transportirowki, wam sleduet nemedlenno izwestitx ob
\tom kompani@, otwetstwennu@ za ee dostawku.
Udostowerxtesx w tom, ^to posudomoe^naq ma[ina ne imeet
powrevdenij. Esli wy obnaruvili kakoe-libo powrevdenie,
neisprawnostx ili otsutstwie komplektu@]ih, wy dolvny
nemedlenno izwestitx postaw]ika.
Nikogda ne ostawlqjte upakowo^nyj material w
mestah, gde deti mogut wospolxzowatxsq im kak
igru[koj.
Pri raspakowke udostowerxtesx w tom, ^to w komplekt k
ma[ine whodqt:
– woronka dlq zapolneniq soli (1)
– kolen^atyj patrubok dlq sliwnogo [langa (2)
– rezinowaq prokladka (3)
– perehodnik1/2” (4)
– prokladka/filxtr dlq [langa poda^i wody (5)
Ispolxzowanie
Dannaq posudomoe^naq ma[ina prednazna^ena iskl@^itelxno
dlq mojki bytowoj utwari, prigodnoj dlq mojki w posudomoe^noj ma[ine. Ispolxzowanie w kakih-libo drugih celqh
movet priwesti k powrevdeni@ pribora i potere garantii
na nego.
Raspolovenie
Posudomoe^naq ma[ina movet bytx ustanowlena na kuhonnu@
rakowinu, na stole[nicu ili wstroena. ~toby posudomoe^naq
ma[ina rabotala normalxno, ona dolvna bytx ustanowlena
rowno. Wysotu pribora movno izmenitx s pomo]x@ reguliruemyh novek (5 mm kavdaq). Sm. ill@stracii s razmerami
dlq wstraiwaniq.
Za]ita posudomoe^noj ma[iny ot
zamerzaniq
Esli posudomoe^naq ma[ina ustanowlena w
pome]enii, temperatura w kotorom inogda movet
padatx nive 0° C, su]estwuet risk, ^to nebolx[oe
koli^estwo wody, ostaw[eesq w otdelxnyh ^astqh
posudomoe^noj ma[iny, movet zamerznutx i
powreditx tem samym pribor. Dlq predotwra]eniq
\togo sdelajte sledu@]ee:
1. Otkl@^ite poda^u wody w posudomoe^nu@ ma[inu.
2. Snimite [langi poda^i i sliwa wody.
3. Udostowerxtesx, ^to kontejner dlq soli zapolnen
krupnozernistoj solx@ dlq smqg^eniq wody.
Pribor prednazna^en dlq ispolxzowaniq i hraneniq
w pome]enii pri normalxnoj komnatnoj temperature.
Izgotowitelx ne neset otwetstwennosti za u]erb,
woznik[ij w rezulxtate zamerzaniq pribora.
2
Page 29

- 29 -
Ustanowka
Poda^a wody
Posudomoe^naq ma[ina imeet predohranitelxnye
funkcii, neobhodimye dlq predotwra]eniq ute^ki
ispolxzowannoj wody obratno w wodoprowod. Dannaq
funkciq sootwetstwuet dejstwu@]im prawilam
bezopasnosti wodnyh tehni^eskih sooruvenij.
Temperatura podawaemoj w posudomoe^nu@ ma[inu wody
ne dolvna prewy[atx 65° C, a dawlenie dolvno bytx w
diapazone 80-1000 kPa (0,8-10 bar).
O^enx wavno, ^toby wodoprowodnyj kran ili wentilx
raspolagalisx rqdom s posudomoe^noj ma[inoj w
legkodostupnom meste. Wy movete priobresti kak
specialxnye smesiteli, rass^itannye na podkl@^enie
posudomoe^noj ma[iny, tak i adaptery dlq smesitelej
starogo tipa. Wstawxte kombinirowannu@ rezinowu@
prokladku/ filxtr i podsoedinite zaliwnoj [lang k
wodoprowodnomu kranu s rezxboj 3/4 d@jma. Pri
neobhodimosti ispolxzujte perehodnik (1/2 d@jma),
whodq]ij w komplekt postawki.
Ni w koem slu^ae ne sleduet kakim-libo obrazom nara]iwatx
ili nadstawlqtx zaliwnoj [lang dlq uweli^eniq ego dliny.
Sli[kom korotkij [lang zamenqetsq polnostx@ na bolee
dlinnyj [lang wysokogo dawleniq i sootwetstwu@]ej
konstrukcii. Soedinennyj s ma[inoj konec [langa movno
powernutx w l@bu@ storonu. Dlq \togo neobhodimo oslabitx
kontrgajku, izmenitx polovenie [langa i wnowx zatqnutx
kontrgajku.
Sliw
Dlq za]ity pribora ot powrevdenij, nanosimyh
wodoj, ego osnastili sistemoj wodnoj
bezopasnosti. W slu^ae wozniknoweniq sboq
sliwnoj nasos awtomati^eski wkl@^aetsq i
otka^iwaet ws@ ostaw[u@sq w ma[ine wodu.
Sistema wodnoj bezopasnosti dejstwuet i togda,
kogda ma[ina wykl@^ena. Tem ne menee, pri \tom
ona dolvna bytx podkl@^ena k seti.
Raspolovite sliwnoj [lang nad rakowinoj tak, kak
pokazano na risunke. Sliwnoj [lang ni w odnoj to^ke ne
dolven podnimatxsq wy[e 75 sm nad powerhnostx@, na
kotoroj ustanowlena posudomoe^naq ma[ina. Esli on
raspolagaetsq wy[e 75 sm, \to movet skazatxsq na rabote
ma[iny.
Takve o^enx wavno sobl@sti wnutrennij diametr [langa
- on dolven bytx ne menee 13 mm w l@boj iz ego to^ek.
Esli sliwnoj [lang sli[kom dlinnyj, to ego legko
obrezatx do nuvnoj dliny.
1. Obrevxte [lang do nuvnoj dliny ostrym
novom.
2. Na konec [langa nadenxte prilagaemyj k
ma[ine kolen^atyj patrubok.
Page 30

- 30 -
Ustanowka
Podkl@^enie k seti
Posudomoe^naq ma[ina osna]ena kabelem s
\lektri^eskoj wilkoj dlq podkl@^eniq k zazemlennoj
rozetke \lektroseti s naprqveniem 220-230 W,
raspolovennoj w legkodostupnom meste i za]i]ennoj
predohranitelem s nominalom 10 A.
Prevde ^em pristupitx k kakim-libo
manipulqciqm s posudomoe^noj ma[inoj ee
neobhodimo otkl@^itx ot \lektri^eskoj seti,
wynuw wilku iz rozetki.
Fiksirowannoe \lektri^eskoe podkl@^enie
dolvno osu]estwlqtxsq tolxko upolnomo^ennym
na \to \lektrikom ili kompetentnym licom.
Page 31

 Loading...