

Page 1

EHM6532IOW
.................................................. ...............................................
EN INDUCTION HOB USER MANUAL 2
DE INDUKTIONS-KOCHFELD BENUTZERINFORMATION 18
IT PIANO COTTURA A
INDUZIONE
ES PLACA DE INDUCCIÓN MANUAL DE
ISTRUZIONI PER L’USO 36
INSTRUCCIONES
54
Page 2

www.electrolux.com
2
CONTENTS
SAFETY INFORMATION . . . . . . . . . . . . . . . . . . . . . . . . . . . . . . . . . . . . . . . . . . . . . . . . . . . . . . . . . 3
PRODUCT DESCRIPTION . . . . . . . . . . . . . . . . . . . . . . . . . . . . . . . . . . . . . . . . . . . . . . . . . . . . . . . 5
DAILY USE . . . . . . . . . . . . . . . . . . . . . . . . . . . . . . . . . . . . . . . . . . . . . . . . . . . . . . . . . . . . . . . . . . . 7
HELPFUL HINTS AND TIPS . . . . . . . . . . . . . . . . . . . . . . . . . . . . . . . . . . . . . . . . . . . . . . . . . . . . . 10
CARE AND CLEANING . . . . . . . . . . . . . . . . . . . . . . . . . . . . . . . . . . . . . . . . . . . . . . . . . . . . . . . . 12
TROUBLESHOOTING . . . . . . . . . . . . . . . . . . . . . . . . . . . . . . . . . . . . . . . . . . . . . . . . . . . . . . . . . 13
INSTALLATION . . . . . . . . . . . . . . . . . . . . . . . . . . . . . . . . . . . . . . . . . . . . . . . . . . . . . . . . . . . . . . 15
TECHNICAL INFORMATION . . . . . . . . . . . . . . . . . . . . . . . . . . . . . . . . . . . . . . . . . . . . . . . . . . . . 16
ENVIRONMENT CONCERNS . . . . . . . . . . . . . . . . . . . . . . . . . . . . . . . . . . . . . . . . . . . . . . . . . . . . 17
WE’RE THINKING OF YOU
Thank you for purchasing an Electrolux appliance. You’ve chosen a product that brings with it
decades of professional experience and innovation. Ingenious and stylish, it has been designed with
you in mind. So whenever you use it, you can be safe in the knowledge that you’ll get great results
every time.
Welcome to Electrolux.
Visit our website for:
Get usage advice, brochures, trouble shooter, service information:
www.electrolux.com
Register your product for better service:
www.electrolux.com/productregistration
Buy Accessories, Consumables and Original spare parts for your appliance:
www.electrolux.com/shop
CUSTOMER CARE AND SERVICE
We recommend the use of original spare parts.
When contacting Service, ensure that you have the following data available.
The information can be found on the rating plate. Model, PNC, Serial Number.
Warning / Caution-Safety information
General information and tips
Environmental information
Subject to change without notice.
Page 3
SAFETY INFORMATION
ENGLISH 3
Before the installation and use of the appliance, carefully read the supplied instructions. The manufacturer is not responsible
if an incorrect installation and use causes
injuries and damages. Always keep the instructions with the appliance for future reference.
CHILDREN AND VULNERABLE
PEOPLE SAFETY
WARNING!
Risk of suffocation, injury or permanent disability.
• Do not let persons, children included,
with reduced physical sensory, reduced
mental functions or lack of experience
and knowledge use the appliance. They
must have supervision or instruction for
the operation of the appliance by a person who is responsible for their safety.
• Do not let children play with the appliance.
• Keep all packaging away from children.
• Keep children and pets away from the
appliance when it operates or when it
cools down. Accessible parts are hot.
• If the appliance has a child safety device,
we recommend that you activate it.
INSTALLATION
WARNING!
Only a qualified person must install
this appliance.
• Remove all the packaging.
• Do not install or use a damaged appliance.
• Obey the installation instruction supplied
with the appliance.
• Keep the minimum distance from the
other appliances and units.
• Always be careful when you move the
appliance because it is heavy. Always
wear safety gloves.
• Seal the cut surfaces with a sealant to
prevent moisture to cause swelling.
• Protect the bottom of the appliance from
steam and moisture.
• Do not install the appliance adjacent to a
door or under a window. This prevents
hot cookware to fall from the appliance
when the door or the window is opened.
• If the appliance is installed above drawers make sure that the space, between
the bottom of the appliance and the upper drawer, is sufficient for air circulation.
• Make sure that the ventilation space of 5
mm, between the worktop and the front
of the below unit, is free. The warranty
does not cover damages caused by the
lack of an adequate ventilation space.
• The bottom of the appliance can get hot.
We recommend to install a non-combustile separation panel under the appliance
to prevent access to the bottom.
Electrical connection
WARNING!
Risk of fire and electrical shock.
• All electrical connections must be made
by a qualified electrician.
• Before every wiring make sure the main
terminal of the appliance is not live.
• Make sure the appliance is installed correctly. Loose and incorrect plug and
socket can make the terminal become
too hot.
• Make sure that a shock protection is installed.
• Do not let the electricity bonds touch the
appliance or hot cookware, when you
connect the appliance to the near sockets.
• Do not let the electricity bonds tangle.
• Use a strain relief clamp on cable.
• Use the correct mains cable.
• Make sure not to cause damage to the
mains plug and to the mains cable. Contact the Service or an electrician to
change a damaged mains cable.
• The electrical installation must have an
isolation device which lets you disconnect the appliance from the mains at all
poles. The isolation device must have a
contact opening width of minimum 3
mm.
Page 4

www.electrolux.com
4
• Use only correct isolation devices: line
USE
• Use this appliance in a household envi-
• Do not change the specification of this
• Do not use an external timer or a sepa-
• Do not let the appliance stay unattended
• Do not operate the appliance with wet
• Do not put cutlery or saucepan lids on
• Set the cooking zone to “off” after each
• Do not use the appliance as a work sur-
• If there is a crack on the surface, discon-
• Users with a pacemaker must keep a
• Fats and oil when heated can release
• The vapours that very hot oil releases
• Used oil, that can contain food rem-
• Do not put flammable products or items
• Do not try to extinguish a fire with water.
protecting cut-outs, fuses (screw type
fuses removed from the holder), earth
leakage trips and contractors.
WARNING!
Risk of injury, burns or electric
shock.
ronment.
appliance.
rate remote-control system to operate
the appliance.
during operation.
hands or when it has contact with water.
the cooking zones. They can become
hot.
use. Do not rely on the pan detector.
face or as a storage surface.
nect power supply to prevent the electrical shock.
distance of minimum 30 cm from the induction cooking zones when the appliance is in operation.
WARNING!
Risk of fire or explosion.
flammable vapours. Keep flames or
heated objects away from fats and oils
when you cook with them.
can cause spontaneous combustion.
nants, can cause fire at a lower temperature than oil used for the first time.
that are wet with flammable products in,
near or on the appliance.
Disconnect the appliance and cover the
flame with a lid or a fire blanket.
WARNING!
Risk of damage to the appliance.
• Do not keep hot cookware on the control panel.
• Do not let cookware to boil dry.
• Be careful not let objects or cookware
fall on the appliance. The surface can be
damaged.
• Do not activate the cooking zones with
empty cookware or without cookware.
• Do not put aluminium foil on the appliance.
• Cookware made of cast iron, aluminium
or with a damaged bottom can cause
scratches on the glass ceramic. Always
lift these objects up when you have to
move them on the cooking surface.
CARE AND CLEANING
WARNING!
Risk of damage to the appliance.
• Clean regularly the appliance to prevent
the deterioration of the surface material.
• Do not use water spray and steam to
clean the appliance.
• Clean the appliance with a moist soft
cloth. Only use neutral detergents. Do
not use abrasive products, abrasive
cleaning pads, solvents or metal objects.
DISPOSAL
WARNING!
Risk of injury or suffocation.
• Disconnect the appliance from the mains
supply.
• Cut off the mains cable and discard it.
Page 5

PRODUCT DESCRIPTION
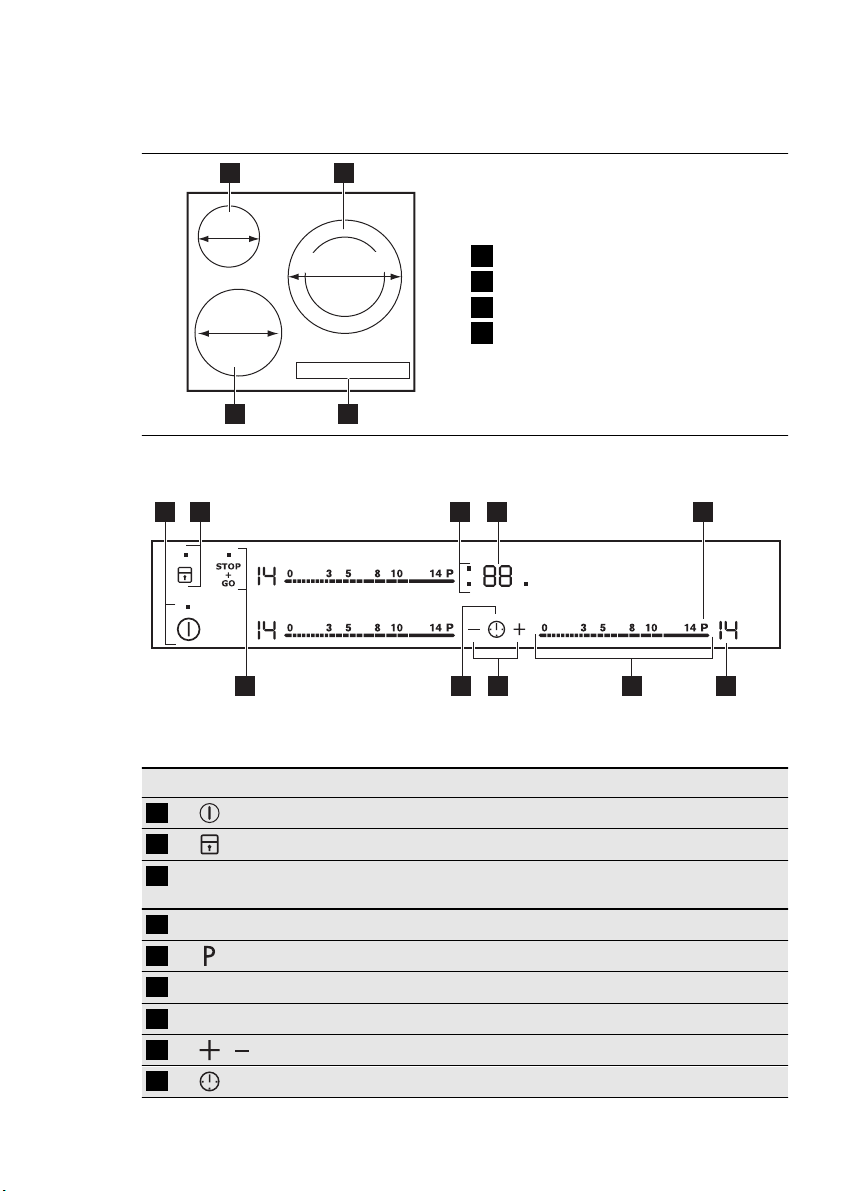
GENERAL OVERVIEW
1 2
145 mm
180/280 mm
210 mm
34
CONTROL PANEL LAYOUT
Induction cooking zone
1
Double induction cooking zone
2
Control panel
3
Induction cooking zone
4
ENGLISH 5
51 2
6
10
4
3
89 7
Use the sensor fields to operate the appliance. The displays, indicators and
sounds tell which functions operate.
sensor field function
1
2
Timer indicators of cooking
3
zones.
The timer display To show the time in minutes.
4
5
A heat setting display To show the heat setting.
6
A control bar To set the heat setting.
7
8
9
/
To activate and deactivate the appliance.
To lock/unlock the control panel.
To show for which of the cooking zones
you set the time.
To activate the Power function.
To increase or decrease the time.
To set the cooking zone.
Page 6

www.electrolux.com
6
sensor field function
10
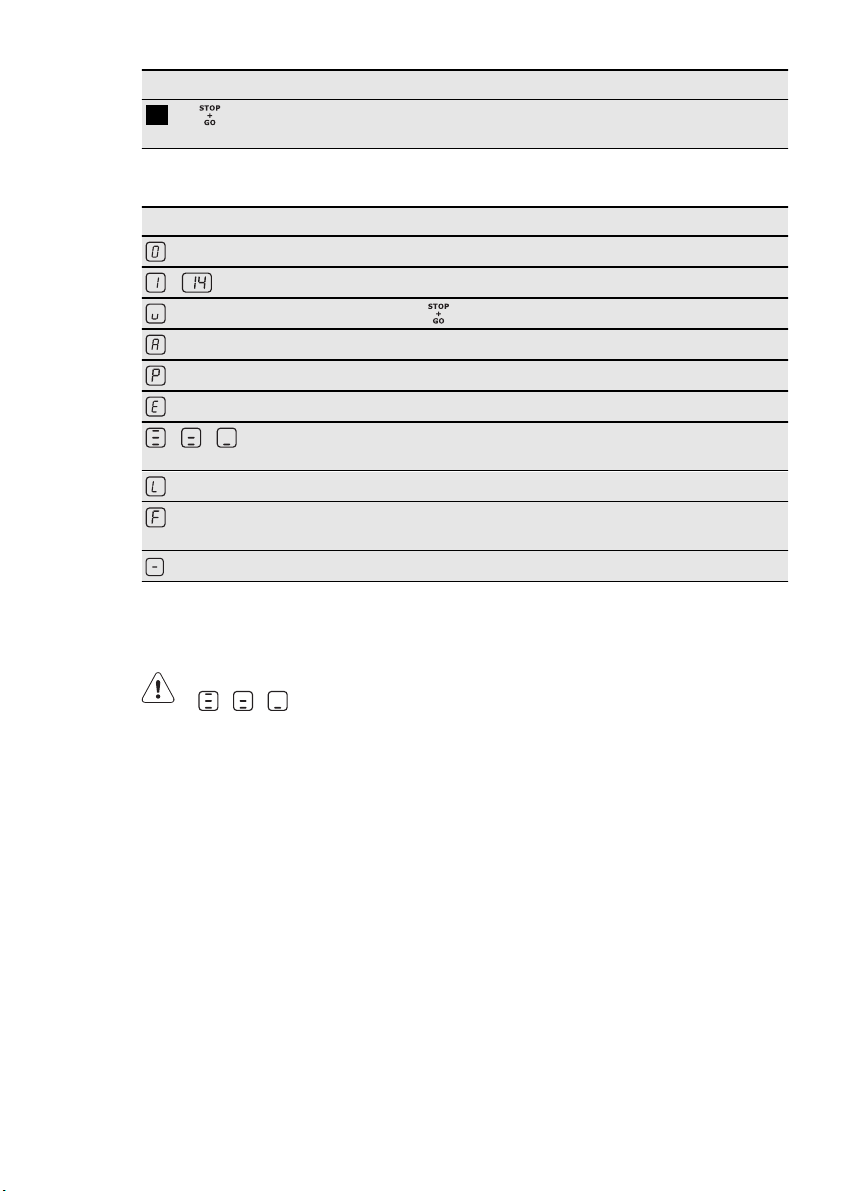
HEAT SETTING DISPLAYS
OPTIHEAT CONTROL (3 STEP
RESIDUAL HEAT INDICATOR)
To activate and deactivate the STOP+GO
function.
Display Description
The cooking zone is deactivated.
-
The cooking zone operates.
The function operates.
The Automatic Heat Up function operates.
Power function operates.
+ digit
/ /
There is a malfunction.
OptiHeat Control (3 step Residual heat indicator) : continue
cook / stay warm / residual heat.
Lock/The Child Safety functions operates.
Not correct cookware or too small or no cookware on the
cooking zone.
The Automatic Switch Off function operates.
WARNING!
\ \ The risk of burns from
residual heat!
OptiHeat Control shows the level of the residual heat. The induction cooking zones
make the heat necessary for cooking directly in the bottom of the cookware. The
glass ceramic is hot from the heat of the
cookware.
Page 7
DAILY USE
ACTIVATION AND
DEACTIVATION
Touch for 1 second to activate or deactivate the appliance.
ENGLISH 7
AUTOMATIC SWITCH OFF
The function deactivates the appliance
automatically if:
•
All cooking zones are deactivated (
).
• You do not set the heat setting after you
activate the appliance.
• You spill something or put something on
the control panel for more than 10 seconds, (a pan, a cloth, etc.). An acoustic
signal sounds some time and the appliance deactivates. Remove the object or
clean the control panel.
• The appliance becomes too hot (e.g.
when, a saucepan boils dry). Before you
use the appliance again, wait for the
cooking zone to cool down.
• You use incorrect cookware. The symbol
comes on and the cooking zone de-
activates automatically after 2 minutes.
• You do not deactivate a cooking zone or
change the heat setting. After some time
comes on and the appliance deacti-
vates. See below.
• The relation between heat setting and
times of the Automatic Switch Off function:
•
, - — 6 hours
•
- — 5 hours
•
- — 4 hours
•
- — 1.5 hours
THE HEAT SETTING
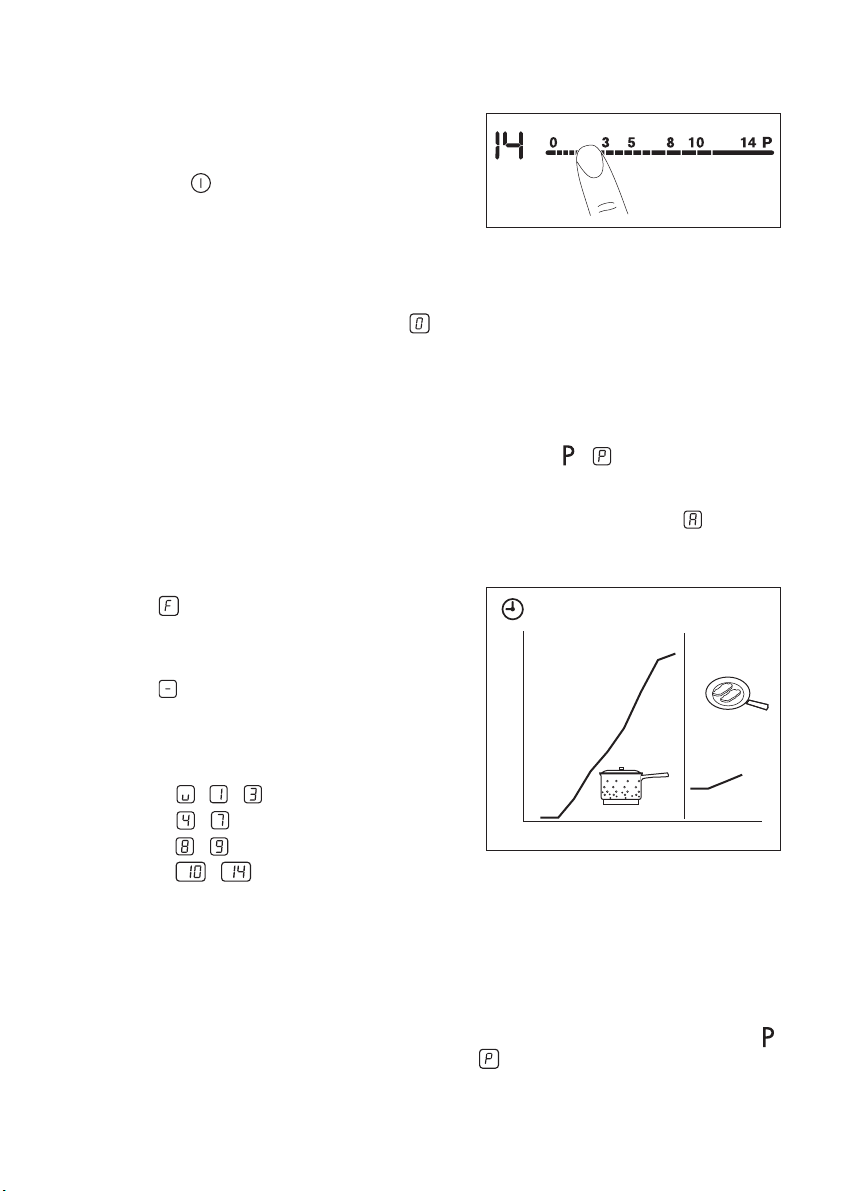
Touch the control bar at the heat setting.
Change to the left or the right, if it is necessary. Do not release before you have a correct heat setting. The display shows the
heat setting.
AUTOMATIC HEAT UP
You can get a necessary heat setting in a
shorter time if you activate the Automatic
Heat Up function. This function sets the
highest heat setting for some time (see the
diagram), and then decreases to the necessary heat setting.
To start the Automatic Heat Up function for
a cooking zone:
1.
Touch ( comes on in the display).
2.
Immediately touch the necessary heat
setting. After 3 seconds
comes on
in the display.
To stop the function change the heat setting.
12
11
10
9
8
7
6
5
4
3
2
1
0
1 2 3 4 5 6 7 8 9 101112 1314
POWER FUNCTION
The Power function makes more power
available to the induction cooking zones.
The Power function can be activated for a
limited period of time ( see Technical information chapter). After that, the induction
cooking zone automatically sets back to
highest heat setting. To activate, touch
comes on. To deactivate, change the
heat setting.
,
Page 8
www.electrolux.com
8
POWER FUNCTION OF THE
DOUBLE RING COOKING ZONE
Power function of the inner ring starts when
the appliance senses the cookware with a
smaller diameter than the inner ring. Power
function of the outer ring starts when the
appliance senses the cookware with a larger diameter than the inner ring.
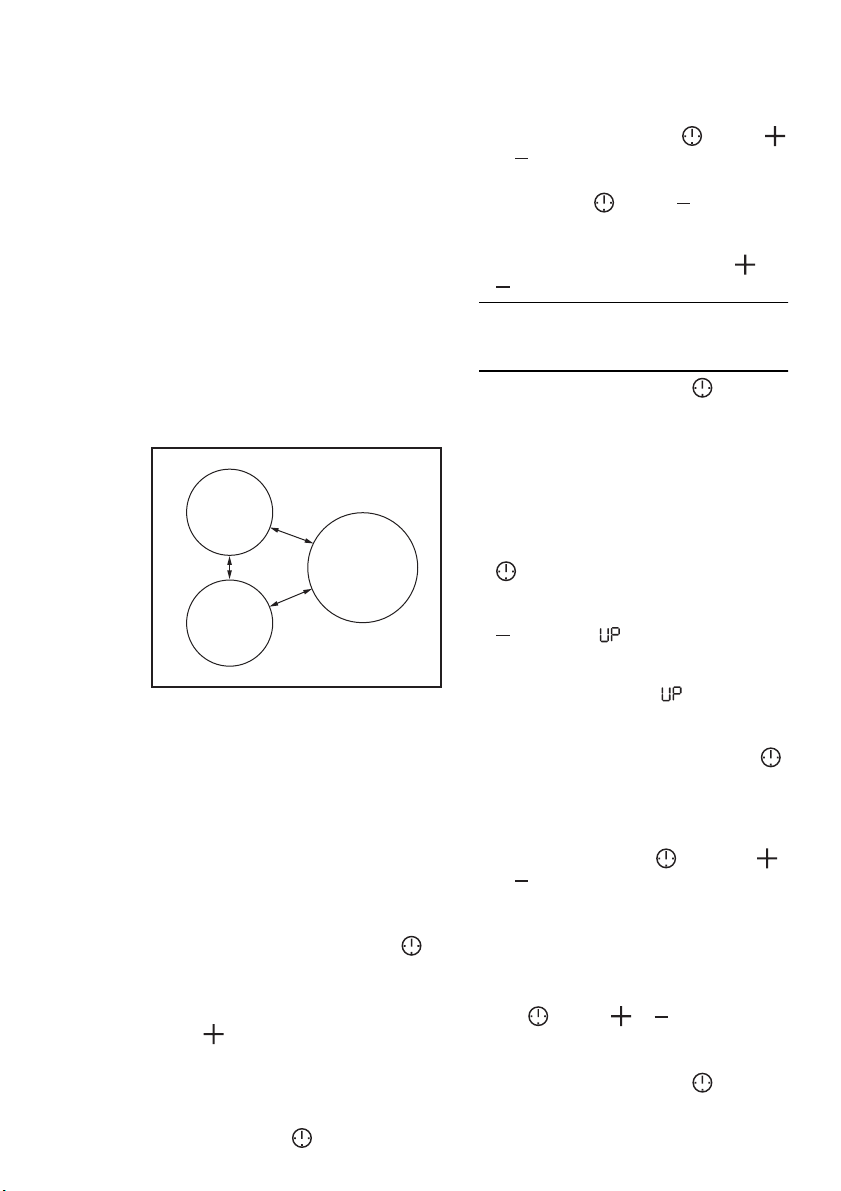
POWER MANAGEMENT
The power management divides the power
between two cooking zones in a pair (see
the illustration). The power function increases the power to the maximum level for
one cooking zone in the pair. The power in
the second cooking zone automatically decreases. The heat setting display for the reduced zone changes between two levels.
TIMER
Count Down Timer
Use the Count Down Timer to set how long
the cooking zone operates for only this one
time.
Set the Count Down Timer after the selection of the cooking zone.
You can set the heat setting before or after
you set the timer.
•
•
• To see the remaining time: set the
To set the cooking zone: touch
again and again until the indicator of a
necessary cooking zone comes on.
To activate the Count Down Timer:
touch
00
of the cooking zone start to flash slow,
the time counts down.
cooking zone with
of the timer to set the time (
- 99 minutes). When the indicator
. The indicator of
the cooking zone starts to flash quickly.
The display shows the remaining time.
To change the Count Down Timer:
•
set the cooking zone with
or .
• To deactivate the timer: set the cook-
ing zone with
maining time counts back to
indicator of the cooking zone goes out.
To deactivate you can also touch
at the same time.
When the countdown comes to an end,
the sound operates and
cooking zone deactivates.
•
To stop the sound: touch
. Touch . The re-
. Touch
00
flashes. The
00
. The
and
CountUp Timer ( The count up
timer)
Use the CountUp Timer to monitor how
long the cooking zone operates.
To set the cooking zone (if more
•
than 1 cooking zone operate ) : touch
again and again until the indicator of
a necessary cooking zone comes on.
• To activate the CountUp Timer: touch
of the timer comes on. When the
indicator of the cooking zone starts to
flash slow, the time counts up. The dis-
play switches between
time (minutes).
To see how long the cooking zone
•
operates: set the cooking zone with
. The indicator of the cooking zone starts
to flash quickly. The display shows the
time that the cooking zone operates.
• To deactivate the CountUp Timer: set
the cooking zone with
or to deactivate the timer. The indica-
tor of the cooking zone goes out.
and counted
and touch
Minute Minder
You can use the timer as a Minute Minder
while the cooking zones do not operate.
Touch
set the time. When the time comes to an
end, the sound operates and
•
. Touch or of the timer to
To stop the sound: touch
00
flashes.
Page 9
STOP+GO
The function sets all cooking zones that
operate to the lowest heat setting (
When
heat setting.
The
function.
•
•
operates, you cannot change the
function does not stop the timer
To activate this function touch
symbol
To deactivate this function touch
The heat setting that you set before
comes on.
comes on.
).
. The
.
LOCK
When the cooking zones operate, you can
lock the control panel, but not
vents an accidental change of the heat setting.
First set the heat setting.
To start this function touch
bol
comes on for 4 seconds.
The Timer stays on.
To stop this function touch
setting that you set before comes on.
When you stop the appliance, you also
stop this function.
. It pre-
. The sym-
. The heat
THE CHILD SAFETY DEVICE
This function prevents an accidental operation of the appliance.
To activate the child safety device
•
Activate the appliance with
set the heat settings.
•
Touch
comes on.
•
Deactivate the appliance with
To deactivate the child safety device
•
Activate the appliance with
set the heat settings. Touch
seconds. The symbol
•
Deactivate the appliance with .
To override the child safety device for
only one cooking time
•
Activate the appliance with
symbol
•
Touch for 4 seconds. Set the heat
setting in 10 seconds. You can operate the appliance.
for 4 seconds. The symbol
comes on.
. Do not
.
. Do not
for 4
comes on.
. The
ENGLISH 9
• When you deactivate the appliance with
, the child safety device operates
again.
OFFSOUND CONTROL
(DEACTIVATION AND
ACTIVATION OF THE SOUNDS)
Deactivation of the sounds
Deactivate the appliance.
Touch
come on and go out. Touch
onds.
Touch
When this function operates, you can hear
the sounds only when:
•
• the Minute Minder comes down
• the Count Down Timer comes down
• you put something on the control panel.
for 3 seconds. The displays
for 3 sec-
comes on, the sound is on.
, comes on, the sound is off.
you touch
Activation of the sounds
Deactivate the appliance.
Touch
come on and go out. Touch
onds.
off. Touch
on.
for 3 seconds. The displays
for 3 sec-
comes on, because the sound is
, comes on. The sound is
Page 10
www.electrolux.com
10
HELPFUL HINTS AND TIPS
INDUCTION COOKING ZONES
For induction cooking zones a strong electro-magnetic field creates the heat in the
cookware very quickly.
COOKWARE FOR INDUCTION
COOKING ZONES
Use the induction cooking zones
with correct cookware.
Cookware material
• correct: cast iron, steel, enamelled
steel, stainless steel, the bottom made of
multi-layer (with correct mark from a
manufacturer).
• not correct: aluminium, copper, brass,
glass, ceramic, porcelain.
Cookware is correct for an induction
hob if …
• ... some water boils very quickly on a
zone set to the highest heat setting.
• ... a magnet pulls on to the bottom of the
cookware.
The bottom of the cookware
must be as thick and flat as possible.
Cookware dimensions: induction cooking zones adapt to the dimension of the
bottom of the cookware automatically to
some limit.
THE NOISES DURING
OPERATION
If you can hear
• crack noise: cookware is made of different materials (Sandwich construction).
• whistle sound: you use one or more
cooking zones with high power levels
and the cookware is made of different
materials (Sandwich construction).
• humming: you use high power levels.
• clicking: electric switching occurs.
• hissing, buzzing: the fan operates.
The noises are normal and do not refer
to appliance malfunction.
ENERGY SAVING
How to save energy
• If it is possible, always put the lids on the
cookware.
• Put cookware on a cooking zone before
you start it.
• Use the residual heat to keep the food
warm or to melt it.
The cooking zone efficiency
The cooking zone efficiency is related to
the diameter of the cookware . The cookware with a smaller diameter than the minimum receives only a part of the power
generated by the cooking zone. For the
minimum diameters see the Technical data
chapter.
ÖKO TIMER (ECO TIMER)
To save energy, the heater of the
cooking zone deactivates before
the count down timer sounds. The
difference in the operation time depends on the heat setting level and
the length of the cooking operation.
THE EXAMPLES OF COOKING
APPLICATIONS
The relation between the heat setting and
the cooking zone consumption of power is
not linear.
When you increase the heat setting it is not
proportional to the increase of the cooking
zone consumption of power.
It means that the cooking zone with the
medium heat setting uses less than a half
of its power.
The data in the table is for guidance only.
Page 11
He
Use to: Time Hints Nominal
at
set
tin
g
Keep warm the food
you cooked
1
1 -3Hollandaise sauce,
as required Put a lid on a cook-
ware
5 - 25 min Mix from time to time 3 – 8 %
melt: butter, chocolate,
gelatine
1 -3Solidify: fluffy omelettes,
10 - 40 min Cook with a lid on 3 – 8 %
baked eggs
3 -5Simmer rice and milk-
based dishes, heating
up ready-cooked meals
25 - 50 min Add the minimum
twice as much liquid
as rice, mix milk
dishes part procedure
through
5 -7Steam vegetables, fish,
meat
20 - 45 min Add some table-
spoons of liquid
7 -9Steam potatoes 20 - 60 min Use max. ¼ l water for
750 g of potatoes
7 -9Cook larger quantities
of food, stews and
60 - 150
min
Up to 3 l liquid plus ingredients
soups
9 -12Gentle fry: escalope,
as necessa-ryTurn halfway through 25 – 45 %
veal cordon bleu, cutlets, rissoles, sausages,
liver, roux, eggs, pancakes, doughnuts
12
Heavy fry, hash browns,
-
loin steaks, steaks
5 - 15 min Turn halfway through 45 – 64 %
13
14 Boil water, cook pasta, sear meat (goulash, pot roast), deep-fry
chips
Boil large quantities of water. Power management is activated.
ENGLISH 11
power consumption
3 %
8 – 13 %
13 – 18 %
18 – 25 %
18 – 25 %
100 %
Information on acrylamides
Important! According to the newest
scientific knowledge, if you brown food
(specially the one which contains starch),
acrylamides can pose a health risk. Thus,
we recommend that you cook at the lowest
temperatures and do not brown food too
much.
Page 12

www.electrolux.com
12
CARE AND CLEANING
Clean the appliance after each use.
Always use cookware with clean bottom.
Scratches or dark stains on the
glass-ceramic cause no effect on
how the appliance operates.
To remove the dirt:
1.
– Remove immediately: melted
plastic, plastic foil, and food with
sugar. If not, the dirt can cause
damage to the appliance. Use a
special scraper for the glass . Put
the scraper on the glass surface at
an acute angle and move the blade
on the surface .
Remove after the appliance is
–
sufficiently cool: limescale rings ,
water rings, fat stains, shiny metallic
discolorations. Use a special cleaning agent for glass ceramic or stainless steel.
2.
Clean the appliance with a moist cloth
and some detergent.
3.
At the end rub the appliance dry
with a clean cloth.
Page 13
TROUBLESHOOTING
Problem Possible Remedy
You cannot activate the
appliance or operate it.
You touched 2 or more
The Stop+Go function op-
There is water or fat stains
An acoustic signal sounds
and the appliance deactivates.
An acoustic signal sounds
when the appliance is deactivated.
The appliance deactivates. You put something on the
The residual heat indicator
does not come on.
The Automatic Heat Up
function does not operate.
The highest heat setting is
The heat setting changes
between two levels.
The sensor fields become
hot.
There is no signal when
you touch the panel sensor fields.
comes on
comes on
ENGLISH 13
Activate the appliance
sensor fields at the same
time.
erates.
on the control panel.
You put something on one
or more sensor fields.
sensor field
The cooking zone is not
hot because it operated
only for a short time.
The cooking zone is hot. Let the cooking zone be-
set.
The Power management
is activated.
The cookware is too large
or you put it too near to
the controls.
The signals are deactivated.
The Automatic Switch Off
operates.
The Child Safety Device or
the Lock function operates.
.
again and set the heat setting in less than 10 seconds.
Touch only one sensor
field.
Refer to the chapter “Operating instructions”.
Clean the control panel.
Remove the object from
the sensor fields.
Remove the object from
the sensor field.
If the cooking zone operated sufficiently long to be
hot, speak to the service
centre.
come sufficiently cool.
The highest heat setting
has the same power as
the Automatic Heat Up
function.
Refer to “Power management”.
Put large cookware on the
rear cooking zones if necessary.
Activate the signals (refer
to “OffSound control”).
Deactivate the appliance
and activate it again.
Refer to the chapter “Operating instructions”.
Page 14

www.electrolux.com
14
Incorrect cookware. Use the correct cookware.
The diameter of the bot-
If you tried the above solutions and cannot
repair the problem, speak to your dealer or
the customer service. Give the data from
the rating plate, three digit letter code for
the glass ceramic (it is in the corner of the
glass surface) and an error message that
comes on.
Make sure, you operated the appliance
correctly. If not the servicing by a customer
service technician or dealer will not be free
of charge, also during the warranty period.
The instructions about the customer service and conditions of guarantee are in the
guarantee booklet.
Problem Possible Remedy
comes on
No cookware is on the
cooking zone.
Put cookware on the
cooking zone.
Move cookware to a
tom of the cookware is
smaller cooking zone.
too small for the cooking
zone.
and number comes on.
There is an error in the appliance.
Disconnect the appliance
from the electrical supply
for some time. Disconnect
the fuse from the electrical
system of the house. Con-
nect it again. If
on again, speak to the
service centre.
comes on
There is an error in the appliance because a cookware boils dry. The overheating protection for the
cooking zones and the
Automatic Switch Off operate.
Deactivate the appliance.
Remove the hot cook-
ware. After approximately
30 seconds, activate the
cooking zone again. If the
cookware was the prob-
lem, the error message
goes out of the display,
but the residual heat indi-
cator can stay. Let the
cookware become suffi-
ciently cool and refer to
“Cookware for the induc-
tion cooking zone” to see
if your cookware is com-
patible with the appliance.
comes
Page 15

INSTALLATION
ENGLISH 15
WARNING!
Refer to "Safety information" chapter.
Before the installation
Before the installation of the appliance, record the information below from the rating
plate. The rating plate is on the bottom of
the appliance casing.
• Model ...........................
• PNC .............................
• Serial number ....................
BUILT-IN APPLIANCES
• Only use the built-in appliances after you
assemble the appliance into correct
ASSEMBLY
built-in units and work surfaces that align
to the standards.
CONNECTION CABLE
• The appliance is supplied with the connection cable.
• Replace the damaged mains cable with
a special cable (type H05BB-F Tmax
90°C; or higher). Speak to your local
Service Centre.
min.
min.
500mm
50mm
min.
50mm
=
R 5mm
490
min.
5mm
600mm
mm
560
+1
mm
+1
=
Page 16
www.electrolux.com
16
min.
20 mm
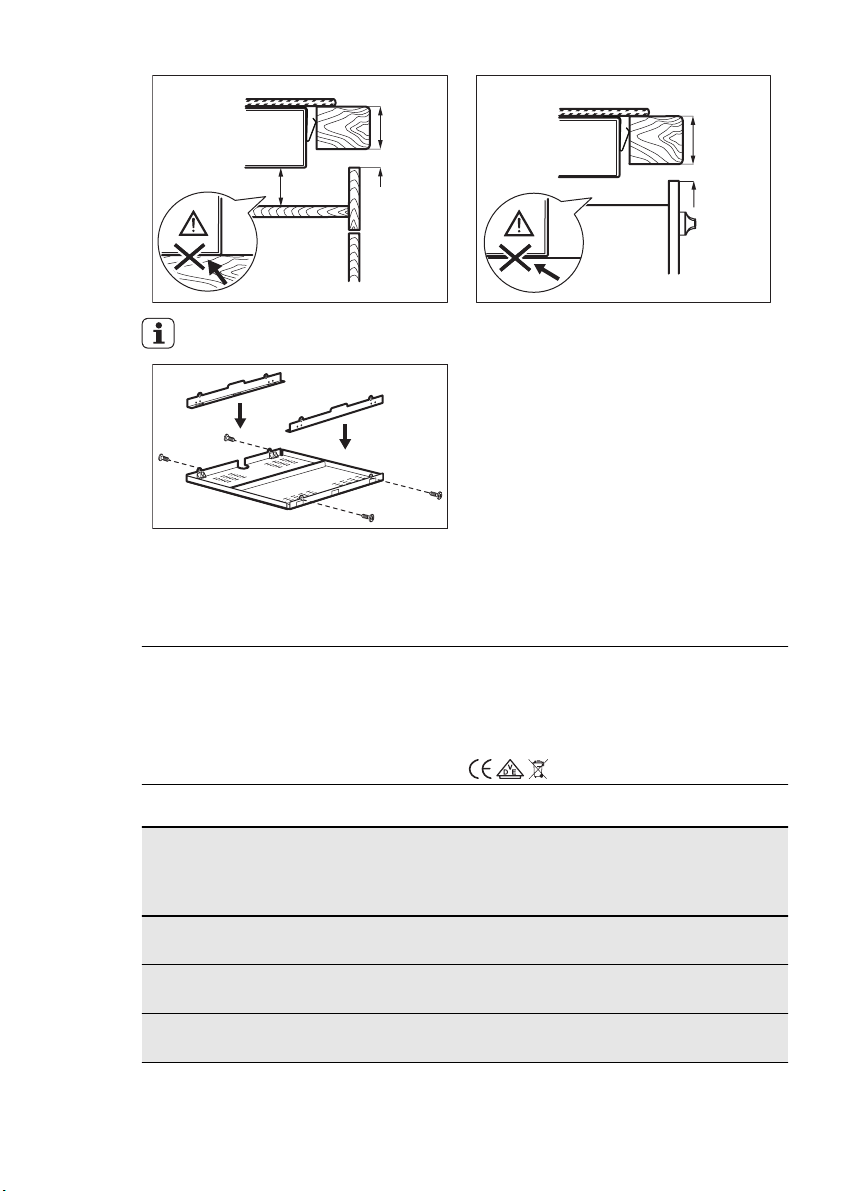
1)
The protection box accessory may not be available in some countries. Please contact your
local supplier.
TECHNICAL INFORMATION
Modell EHM6532IOW Prod.Nr. 949 596 038 00
Typ 58 GAD DB AU 220-240 V 50-60 Hz
Induction 7.4 kW Made in Germany
Ser.Nr. .......... 7.4 kW
ELECTROLUX
min.
25 mm
min.
5 mm
min.
38 mm
min.
5 mm
If you use a protection box (an additional
accessory
mm and protective floor directly below the
appliance are not necessary.
You can not use the protection box if you
install the appliance above an oven.
1)
), the front airflow space of 5
Cooking zones power
Cooking zone Nominal
Power (Max
heat setting)
Power Function activated
[W]
[W]
Right rear —
1800/3500 W 2800/5200 W 5 145
180/280 mm
Left rear —
1400 W 2500 W 4 125
145 mm
Left front —
2300 W 3700 W 10 180
210 mm
The power of the cooking zones can be different in some small range from the data in
Power function maximum dura-
Minimum
cookware diameter [mm]
tion [min]
the table. It changes with the material and
dimensions of the cookware.
Page 17

ENVIRONMENT CONCERNS
Recycle the materials with the symbol
Put the packaging in applicable containers
to recycle it.
Help protect the environment and human
health and to recycle waste of electrical
and electronic appliances. Do not dispose
.
appliances marked with the symbol
the household waste. Return the product
to your local recycling facility or contact
your municipal office.
ENGLISH 17
with
Page 18
www.electrolux.com
18
INHALT
SICHERHEITSHINWEISE . . . . . . . . . . . . . . . . . . . . . . . . . . . . . . . . . . . . . . . . . . . . . . . . . . . . . . . 19
GERÄTEBESCHREIBUNG . . . . . . . . . . . . . . . . . . . . . . . . . . . . . . . . . . . . . . . . . . . . . . . . . . . . . . 22
TÄGLICHER GEBRAUCH . . . . . . . . . . . . . . . . . . . . . . . . . . . . . . . . . . . . . . . . . . . . . . . . . . . . . . . 24
PRAKTISCHE TIPPS UND HINWEISE . . . . . . . . . . . . . . . . . . . . . . . . . . . . . . . . . . . . . . . . . . . . . 28
REINIGUNG UND PFLEGE . . . . . . . . . . . . . . . . . . . . . . . . . . . . . . . . . . . . . . . . . . . . . . . . . . . . . . 30
FEHLERSUCHE . . . . . . . . . . . . . . . . . . . . . . . . . . . . . . . . . . . . . . . . . . . . . . . . . . . . . . . . . . . . . . 31
MONTAGE . . . . . . . . . . . . . . . . . . . . . . . . . . . . . . . . . . . . . . . . . . . . . . . . . . . . . . . . . . . . . . . . . . 33
TECHNISCHE DATEN . . . . . . . . . . . . . . . . . . . . . . . . . . . . . . . . . . . . . . . . . . . . . . . . . . . . . . . . . 34
UMWELTTIPPS . . . . . . . . . . . . . . . . . . . . . . . . . . . . . . . . . . . . . . . . . . . . . . . . . . . . . . . . . . . . . . 35
WIR DENKEN AN SIE
Vielen Dank, dass Sie sich für ein Electrolux Gerät entschieden haben. Sie haben ein Produkt
gewählt, hinter dem eine jahrzehntelange professionelle Erfahrung und Innovation steht. Bei der
Entwicklung dieses großartigen und eleganten Geräts haben wir an Sie gedacht. So haben Sie bei
jedem Gebrauch die Gewissheit, dass Sie stets großartige Ergebnisse erzielen werden.
Willkommen bei Electrolux.
Besuchen Sie uns auf unserer Website, um:
Anwendungshinweise, Prospekte, Fehlerbehebungs- und Service-Informationen zu
erhalten:
www.electrolux.com
Ihr erworbenes Produkt zu registrieren, um den besten Service dafür zu gewährleisten:
www.electrolux.com/productregistration
Zubehör, Verbrauchsmaterial und Original-Ersatzteile für Ihr Gerät zu erwerben:
www.electrolux.com/shop
KUNDENDIENST UND -BETREUUNG
Bitte verwenden Sie ausschließlich Original-Ersatzteile für Ihre Produkte.
Halten Sie folgende Angaben bereit, wenn Sie sich an den Kundendienst wenden
(diese Informationen finden Sie auf dem Typenschild): Modell, Produktnummer (PNC),
Seriennummer.
Warnungs-/ Sicherheitshinweise.
Allgemeine Hinweise und Ratschläge
Hinweise zum Umweltschutz
Änderungen vorbehalten.
Page 19
SICHERHEITSHINWEISE
DEUTSCH 19
Lesen Sie die mitgelieferte Anleitung sorgfältig vor der Montage und dem ersten Gebrauch des Geräts durch. Der Hersteller ist
nicht dafür verantwortlich, wenn eine fehlerhafte Montage oder Verwendung Verletzungen und Schäden verursacht. Bewahren Sie die Anleitung zusammen mit dem
Gerät für den zukünftigen Gebrauch auf.
SICHERHEIT VON KINDERN
UND SCHUTZBEDÜRFTIGEN
PERSONEN
WARNUNG!
Erstickungs- und Verletzungsgefahr
oder Gefahr einer dauerhaften Behinderung.
• Lassen Sie keine Personen (einschließlich Kinder) mit eingeschränkten physischen, sensorischen oder geistigen Fähigkeiten, mangelnder Erfahrung oder
mangelndem Wissen dieses Gerät benutzen. Solche Personen müssen bei
Betrieb des Gerätes unter Aufsicht einer
Person sein, die für Ihre Sicherheit verantwortlich ist, oder bei der Bedienung
des Gerätes angeleitet werden.
• Lassen Sie Kinder nicht mit dem Gerät
spielen.
• Halten Sie sämtliches Verpackungsmaterial von Kindern fern.
• Halten Sie Kinder und Haustiere von
dem Gerät fern während es in Betrieb ist
oder abkühlt. Zugängliche Teile sind
heiss.
• Falls Ihr Gerät mit einer Kindersicherung
ausgestattet ist, empfehlen wir, diese
einzuschalten.
MONTAGE
WARNUNG!
Nur eine qualifizierte Fachkraft darf
den Elektroanschluss des Geräts
vornehmen.
• Entfernen Sie das Verpackungsmaterial.
• Stellen Sie ein beschädigtes Gerät nicht
auf und benutzen Sie es nicht.
• Halten Sie sich an die mitgelieferte Montageanleitung.
• Die Mindestabstände zu anderen Geräten und Küchenmöbeln sind einzuhalten.
• Seien Sie beim Umsetzen des Geräts
vorsichtig, denn es ist schwer. Tragen
Sie stets Sicherheitshandschuhe.
• Dichten Sie die Ausschnittskanten mit einem Dichtungsmittel ab, um ein Aufquellen durch Feuchtigkeit zu verhindern.
• Schützen Sie die Geräteunterseite vor
Dampf und Feuchtigkeit.
• Installieren Sie das Gerät nicht direkt neben einer Tür oder unter einem Fenster.
So kann heißes Kochgeschirr nicht herunterfallen, wenn die Tür oder das Fenster geöffnet wird.
• Wird das Gerät über Schubladen eingebaut, achten Sie darauf, dass zwischen
dem Geräteboden und der oberen
Schublade ein ausreichender Abstand
für die Luftzirkulation vorhanden ist.
• Achten Sie darauf, dass zwischen der
Arbeitsplatte und der Gerätefrontseite ein
Abstand von 5 mm zur Belüftung frei gelassen wird. Schäden, die durch das
Fehlen eines Belüftungsabstands entstehen, sind von der Garantie ausgenommen.
• Der Boden des Geräts kann heiß werden. Wir empfehlen eine feuerfeste
Trennplatte unter dem Gerät anzubringen, damit der Boden nicht zugänglich
ist.
Elektrischer Anschluss
WARNUNG!
Brand- und Stromschlaggefahr.
• Die elektrischen Anschlüsse müssen von
einem qualifizierten Elektriker ausgeführt
werden.
• Stellen Sie vor der Montage sicher, dass
die Hauptklemme des Geräts nicht an
die Spannungsversorgung angeschlossen ist.
• Achten Sie darauf, dass das Gerät korrekt montiert wird. Lockere und unsachgemäße Steckverbindungen können die
Klemme überhitzen.
• Sorgen Sie dafür, dass ein Berührungsschutz installiert wird.
Page 20
www.electrolux.com
20
• Achten Sie beim Anschluss des Geräts
• Achten Sie darauf, dass elektrische Lei-
• Verwenden Sie eine Zugentlastung für
• Benutzen Sie das richtige Netzkabel.
• Achten Sie darauf, Netzstecker und
• Die elektrische Installation muss eine
• Verwenden Sie nur geeignete Trennvor-
GEBRAUCH
• Das Gerät ist für die Verwendung im
• Nehmen Sie keine technischen Änderun-
• Schalten Sie das Gerät nicht über eine
• Lassen Sie das Gerät bei Betrieb nicht
•Bedienen Sie das Gerät nicht mit feuch-
• Legen Sie kein Besteck und keine Topf-
• Schalten Sie die Kochzonen nach jedem
• Benutzen Sie das Gerät nicht als Arbeits-
an die Steckdose darauf, dass die elektrische Leitungen weder das Gerät noch
heißes Kochgeschirr berühren.
tungen nicht lose hängen oder sich verheddern.
das Kabel.
Netzkabel nicht zu beschädigen. Wenden Sie sich zum Austausch des beschädigten Netzkabels an den Kundendienst oder einen Elektriker.
Trenneinrichtung aufweisen, mit der Sie
das Gerät allpolig von der Stromversorgung trennen können. Die Trenneinrichtung muss mit einer Kontaktöffnungsbreite von mindestens 3 mm ausgeführt
sein.
richtungen: Überlastschalter, Sicherungen (Schraubsicherungen müssen aus
dem Halter entfernt werden können), FISchutzschalter und Schütze.
WARNUNG!
Es besteht Verletzungs-, Verbrennungs- und Stromschlaggefahr.
Haushalt vorgesehen.
gen am Gerät vor.
externe Zeitschaltuhr oder eine separate
Fernsteuerung ein.
unbeaufsichtigt.
ten oder nassen Händen oder wenn es
mit Wasser in Kontakt gekommen ist.
deckel auf die Kochzonen. Sie werden
heiß.
Gebrauch aus. Verlassen Sie sich nicht
auf die Topferkennung.
oder Abstellfläche.
• Bei Sprüngen in der Oberfläche des
Kochfelds schalten Sie die Stromversorgung aus, um einen Stromschlag zu vermeiden.
• Benutzer mit einem Schrittmacher müssen einen Mindestabstand von 30 cm zu
den Induktionskochzonen einhalten,
wenn das Gerät in Betrieb ist.
WARNUNG!
Es besteht Explosions- und Brandgefahr.
• Erhitzte Öle und Fette können brennbare
Dämpfe freisetzen. Halten Sie Flammen
oder erhitzte Gegenstände beim Kochen
mit Fetten und Ölen von diesen fern.
• Die von sehr heißem Öl freigesetzten
Dämpfe können eine Selbstzündung verursachen.
• Bereits verwendetes Öl kann Lebensmittelreste enthalten und einen Brand bei
niedrigeren Temperaturen als frisches Öl
verursachen.
• Platzieren Sie keine entflammbaren Produkte oder Gegenstände, die mit entflammbaren Produkten benetzt sind, im
Gerät, auf dem Gerät oder in der Nähe
des Geräts.
• Löschen Sie eine Flamme nicht mit Wasser. Schalten Sie das Gerät aus und bedecken Sie die Flamme mit einem Deckel oder einer Feuerlöschdecke.
WARNUNG!
Das Gerät könnte beschädigt werden.
• Stellen Sie kein heißes Kochgeschirr auf
das Bedienfeld.
• Lassen Sie das Kochgeschirr nicht leerkochen.
• Lassen Sie keine Gegenstände oder
Kochgeschirr auf das Gerät fallen. Die
Oberfläche könnte beschädigt werden.
• Schalten Sie die Kochzonen nicht mit
leerem oder ohne Kochgeschirr ein.
• Legen Sie keine Alufolie auf das Gerät.
• Kochgeschirr aus Gusseisen oder Aluminiumguss oder mit beschädigten Böden
kann die Glaskeramikoberfläche verkratzen. Heben Sie das Kochgeschirr stets
an, wenn Sie es auf dem Kochfeld umsetzen möchten.
Page 21

REINIGUNG UND PFLEGE
WARNUNG!
Das Gerät könnte beschädigt werden.
• Reinigen Sie das Gerät regelmäßig, um
eine Abnutzung des Oberflächenmaterials zu verhindern.
• Reinigen Sie das Gerät nicht mit einem
Wasser- oder Dampfstrahl.
• Reinigen Sie das Geräts mit einem weichen, feuchten Tuch. Verwenden Sie
ausschließlich Neutralreiniger. Benutzen
Sie keine Scheuermittel, scheuernde Reinigungsschwämmchen, Lösungsmittel
oder Metallgegenstände.
ENTSORGUNG
WARNUNG!
Verletzungs- oder Erstickungsgefahr.
• Trennen Sie das Gerät von der Stromversorgung.
• Schneiden Sie das Netzkabel ab und
entsorgen Sie es.
DEUTSCH 21
Page 22
www.electrolux.com
22
GERÄTEBESCHREIBUNG
ALLGEMEINE ÜBERSICHT
1 2
145 mm
180/280 mm
210 mm
34
BEDIENFELDANORDNUNG
Induktionskochzone
1
Zweikreis-Induktionskochzone
2
Bedienfeld
3
Induktionskochzone
4
51 2
6
10
4
3
89 7
Bedienen Sie das Gerät über die Sensorfelder. Die Anzeigen, Kontrolllampen
und akustischen Signale informieren Sie über die aktiven Funktionen.
Sensorfeld Funktion
1
2
Kochzonen-Anzeigen des
3
Timers.
Timer-Anzeige Anzeige der Zeit in Minuten.
4
5
Anzeige der Kochstufe Zeigt die Kochstufe an.
6
Einstellskala Einstellen der Kochstufe.
7
8
9
/
Ein- und Ausschalten des Geräts.
Verriegelung/Entriegelung des Bedienfelds.
Zeigen an, für welche Kochzonen der Ti-
mer eingestellt wurde.
So schalten Sie die Power-Funktion ein:
Erhöhen oder Verringern der Zeit.
Auswählen der Kochzone.
Page 23
Sensorfeld Funktion
10
Ein- und Ausschalten der Funktion STOP
+GO.
ANZEIGE DER KOCHSTUFEN
Anzeige Beschreibung
Die Kochzone ist ausgeschaltet.
-
+ Zahl
/ /
Die Kochzone ist eingeschaltet.
Die Funktion ist eingeschaltet.
Die Ankochautomatik ist in Betrieb.
Die Power-Funktion ist eingeschaltet.
Eine Fehlfunktion ist aufgetreten.
OptiHeat Control (Restwärmeanzeige, 3-stufig): Weiterga-
ren/Warmhalten/Restwärme.
Die Sperre/Kindersicherung ist aktiviert.
Das Kochgeschirr ist ungeeignet oder zu klein bzw. es be-
findet sich kein Kochgeschirr auf der Kochzone.
Die Abschaltautomatik ist in Betrieb.
OPTIHEAT CONTROL
(RESTWÄRMEANZEIGE, 3STUFIG)
WARNUNG!
\ \ Es besteht Verbren-
nungsgefahr durch Restwärme!
DEUTSCH 23
OptiHeat Control zeigt die Restwärmestufe
an. Die Induktionskochzonen erzeugen die
erforderliche Hitze zum Kochen direkt im
Boden des Kochgeschirrs. Die Glaskeramik
wird nur durch die Wärme des Kochgeschirrs erhitzt.
Page 24

www.electrolux.com
24
TÄGLICHER GEBRAUCH
EIN- UND AUSSCHALTEN
Berühren Sie 1 Sekunde lang , um das
Gerät ein- oder auszuschalten.
ABSCHALTAUTOMATIK
Mit dieser Funktion wird das Gerät in
folgenden Fällen automatisch
ausgeschaltet:
•
Alle Kochzonen sind ausgeschaltet (
).
• Nach dem Einschalten des Geräts wird
keine Kochstufe gewählt.
• Das Bedienfeld ist mehr als 10 Sekunden mit verschütteten Lebensmitteln
oder einem Gegenstand bedeckt (Topf,
Tuch usw.). Ein akustisches Signal ertönt
einige Male und das Gerät schaltet ab.
Entfernen Sie den Gegenstand oder reinigen Sie das Bedienfeld.
• Das Gerät wird zu heiß (z. B. durch einen
leergekochten Topf). Bevor Sie das Gerät erneut verwenden können, muss die
Kochzone abgekühlt sein.
• Sie verwenden ungeeignetes Kochgeschirr. Das Symbol
Kochzone wird automatisch nach 2 Minuten ausgeschaltet.
• Eine Kochzone wurde nicht ausgeschaltet bzw. die Kochstufe wurde nicht geändert. Nach einer gewissen Zeit leuch-
tet das Symbol
wird ausgeschaltet. Siehe unten.
• Verhältnis zwischen der Kochstufe und
den Zeiten der Abschaltautomatik:
•
, - — 6 Stunden
•
- — 5 Stunden
•
- — 4 Stunden
•
- — 1,5 Stunden
KOCHSTUFE
Berühren Sie auf der Einstellskala die gewünschte Kochstufe. Möchten Sie eine andere Kochstufe einstellen, berühren Sie die
Skala weiter links oder rechts. Nehmen Sie
den Finger erst von der Skala, wenn die
richtige Kochstufe eingestellt ist. Das Display zeigt die eingestellte Kochstufe an.
leuchtet und die
auf und das Gerät
ANKOCHAUTOMATIK
Bei Verwendung der Ankochautomatik
lässt sich die erforderliche Kochstufeneinstellung in kürzerer Zeit erzielen. Bei Verwendung dieser Funktion wird eine gewisse
Zeit lang die höchste Kochstufe (siehe Diagramm) eingestellt und anschließend auf
die erforderliche Stufe zurückgeschaltet.
So schalten Sie die Ankochautomatik für
eine Kochzone ein:
1.
Berühren Sie ( erscheint auf
dem Display).
2.
Berühren Sie dann gleich danach die
gewünschte Kochstufe. Nach 3 Se-
kunden leuchtet
auf dem Display.
Ändern Sie die Kochstufe, um die Funktion
abzuschalten.
12
11
10
9
8
7
6
5
4
3
2
1
0
1 2 3 4 5 6 7 8 9 101112 1314
POWER-FUNKTION
Die Power-Funktion stellt den Induktionskochzonen zusätzliche Leistung zur Verfügung. Die Power-Funktion kann für einen
begrenzten Zeitraum eingeschaltet werden
(siehe Abschnitt „Technische Daten“). Danach schaltet die Induktionskochzone automatisch auf die höchste Kochstufe um.
Berühren Sie zum Einschalten
leuchtet auf. Zum Abschalten ändern Sie
die Kochstufe.
.
Page 25

POWER-FUNKTION DER
ZWEIKREIS-KOCHZONE
Die Power-Funktion des inneren Kreises
wird eingeschaltet, wenn das Gerät erkennt, dass das Kochgeschirr kleiner als
der innere Kreis ist. Die Power-Funktion
des äußeren Kreises wird eingeschaltet,
wenn das Gerät erkennt, dass das Kochgeschirr größer als der innere Kreis ist.
POWER-MANAGEMENT
Das Power-Management verteilt die verfügbare Leistung zwischen zwei Kochzonen,
die ein Paar bilden (siehe Abbildung). Mit
der Power-Funktion wird die Leistung für
eine Kochzone des Paares auf das Maximum erhöht. Die Leistung der zweiten
Kochzone wird automatisch verringert. Die
Anzeige der reduzierten Kochzone wechselt zwischen den beiden Kochstufen.
TIMER
Kurzzeitmesser
Mit dem Kurzzeitmesser stellen Sie ein, wie
lange eine Kochzone für einen einzelnen
Kochvorgang eingeschaltet bleiben soll.
Wählen Sie erst die Kochzone aus und
stellen Sie dann den Kurzzeitmesser
ein.
Sie können die Kochstufe einstellen, bevor
Sie den Timer einstellen oder umgekehrt.
• Auswahl der Kochzone: Berühren Sie
wiederholt, bis die Anzeige der ge-
wünschten Kochzone leuchtet.
• Einschalten des Kurzzeitmessers:
Berühren Sie
einzustellen (
am Timer, um die Zeit
- 99 Minuten). Wenn
00
DEUTSCH 25
die Anzeige der Kochzone langsamer
blinkt, wird die Zeit heruntergezählt.
• So wird die Restzeit angezeigt: Wählen Sie die Kochzone mit
zeige der Kochzone blinkt schneller. Das
Display zeigt die Restzeit an.
• Ändern des Kurzzeitmessers:Wählen
Sie die Kochzone mit
Sie
oder .
• So schalten Sie den Timer aus: Wählen Sie die Kochzone mit dem Symbol
aus. Berühren Sie . Die Restzeit
wird auf
ge der Kochzone erlischt. Zum Aus-
schalten können Sie auch
gleichzeitig berühren.
Nach Ablauf der eingestellten Zeit ertönt
ein Signalton und
ne wird ausgeschaltet.
• So stellen Sie den Signalton ab: Berühren Sie
heruntergezählt. Die Anzei-
00
00
aus. Die An-
aus. Berühren
und
blinkt. Die Kochzo-
CountUp Timer
(Garzeitmesser)
Benutzen Sie die Funktion CountUp Timer,
um festzustellen wie lange die Kochzone
bereits in Betrieb ist.
Um die Kochzone zu wählen (wenn
•
mehr als 1 Kochzone in Betrieb ist):
Berühren Sie
der gewünschten Kochzone leuchtet.
Um den CountUp Timer einzuschal-
•
ten: Berühren Sie
leuchtet. Wenn die Anzeige der Kochzone langsamer blinkt, wird die Zeit hochgezählt. Das Display schaltet um zwi-
schen
nuten).
So können Sie feststellen, wie lange
•
die Kochzone bereits in Betrieb ist:
Wählen Sie die Kochzone mit dem Sym-
aus. Die Kochzonenanzeige blinkt
bol
schneller. Das Display zeigt die Einschaltdauer der Kochzone an.
• So schalten Sie denCountUp Timer
aus: Wählen Sie die Kochzone mit
aus und berühren Sie oder , um
den Timer zu deaktivieren. Die Anzeige
der Kochzone erlischt.
so oft, bis die Anzeige
des Timers,
und der abgelaufenen Zeit (Mi-
Page 26

www.electrolux.com
26
Kurzzeit-Wecker
Wenn die Kochzonen nicht in Betrieb sind,
können Sie den Timer als Kurzzeitwecker
verwenden. Berühren Sie
das Symbol
Dauer einzustellen. Nach Ablauf der eingestellten Zeit ertönt ein Signalton und
blinkt.
• So stellen Sie den Signalton ab: Be-
STOP+GO
Mit der Funktion werden alle eingeschalteten Kochzonen auf die niedrigste
Kochstufe (
Ist
nicht ändern.
Die Funktion
mer-Funktion.
• Berühren Sie zur Aktivierung dieser
• Berühren Sie zur Deaktivierung dieser
TASTENSPERRE
Wenn die Kochzonen in Betrieb sind, können Sie zwar das Bedienfeld verriegeln, je-
doch nicht das Sensorfeld
verhindert, dass die Kochstufe versehentlich geändert wird.
Stellen Sie erst die Kochstufe ein.
Berühren Sie
on. Das Symbol
angezeigt.
Die Uhr läuft weiter.
Berühren Sie
Funktion. Die zuvor ausgewählte Kochstufe
wird eingestellt.
Diese Funktion wird deaktiviert, sobald das
Gerät ausgeschaltet wird.
KINDERSICHERUNG
Diese Funktion verhindert eine versehentliche Bedienung des Geräts.
Aktivieren der Kindersicherung:
•
. Berühren Sie
oder des Timers, um die
rühren Sie
) geschaltet.
aktiviert, lässt sich die Kochstufe
unterbricht nicht die Ti-
Funktion
Funktion
Kochstufe wird eingestellt.
Schalten Sie das Gerät mit
len Sie keine Kochstufe ein.
. Das Symbol leuchtet.
. Die zuvor ausgewählte
. So wird
zur Aktivierung der Funkti-
wird 4 Sekunden lang
zur Deaktivierung der
00
ein. Stel-
•
Berühren Sie
Symbol
•
Schalten Sie das Gerät mit
Deaktivieren der Kindersicherung
•
Schalten Sie das Gerät mit
len Sie keine Kochstufe ein. Berühren
4 Sekunden lang. Das Symbol
Sie
leuchtet.
•
Schalten Sie das Gerät mit
Deaktivieren der Kindersicherung für
einen einzelnen Kochvorgang
•
Schalten Sie das Gerät mit
Symbol
•
Berühren Sie
len Sie die Kochstufe innerhalb von
10 Sekunden ein. Das Gerät kann jetzt
benutzt werden.
•
Nachdem das Gerät mit
tet wurde, ist die Kindersicherung wieder
aktiv.
4 Sekunden lang. Das
leuchtet.
aus.
ein. Stel-
aus.
ein. Das
leuchtet.
4 Sekunden lang. Stel-
ausgeschal-
OFFSOUND CONTROL
(AKTIVIERUNG UND
DEAKTIVIERUNG DES
SIGNALTONS)
Deaktivieren des Signaltons
Schalten Sie das Gerät aus.
Berühren Sie
zeigen leuchten auf und erlöschen. Berühren Sie
und der Signalton ist aktiviert. Berühren Sie
, leuchtet auf, der Signalton ist
deaktiviert.
Haben Sie den Signalton deaktiviert, ertönt
er nur in folgenden Fällen:
•
Bei der Berührung von
• Bei Ablauf des Kurzzeitweckers
• Bei Ablauf des Kurzzeitmessers
• Wenn das Bedienfeld bedeckt ist.
3 Sekunden lang. Die An-
3 Sekunden lang. leuchtet
Aktivieren des Signaltons
Schalten Sie das Gerät aus.
Berühren Sie
zeigen leuchten auf und erlöschen. Berühren Sie
da der Signalton deaktiviert ist. Berühren
3 Sekunden lang. Die An-
3 Sekunden lang. leuchtet ,
Page 27

Sie , leuchtet. Der Signalton ist aktiviert.
DEUTSCH 27
Page 28

www.electrolux.com
28
PRAKTISCHE TIPPS UND HINWEISE
INDUKTIONSKOCHZONEN
Das Kochgeschirr wird bei Induktionskochzonen durch ein starkes Magnetfeld sehr
schnell erhitzt.
KOCHGESCHIRR FÜR
INDUKTIONSKOCHZONEN
Benutzen Sie für die Induktionskochzonen nur geeignetes Kochgeschirr.
Kochgeschirrmaterial
• Geeignet: Gusseisen, Stahl, emaillierter
Stahl, Edelstahl, ein mehrlagiger Topfboden (wenn vom Hersteller als geeignet
markiert).
• Nicht geeignet: Aluminium, Kupfer,
Messing, Glas, Keramik, Porzellan.
Kochgeschirr eignet sich für
Induktionskochfelder, wenn…
• ... Eine geringe Wassermenge kocht sehr
schnell auf einer Kochzone, die auf die
höchste Stufe geschaltet ist.
• ... Ein Magnet vom Geschirrboden angezogen wird.
Der Boden des Kochgeschirrs
muss so dick und so flach wie
möglich sein.
Abmessungen des Kochgeschirrs: Induktionskochzonen passen sich bis zu einem gewissen Grad automatisch an die
Größe des Kochgeschirrbodens an.
• Klicken: Bei elektronischen Schaltvorgängen.
• Zischen, Surren: Das Gebläse läuft.
Die beschriebenen Geräusche sind
normal und weisen nicht auf einen Defekt hin.
ENERGIESPAREN
So sparen Sie Energie
• Decken Sie Kochgeschirr, wenn möglich,
mit einem Deckel ab.
• Setzen Sie das Kochgeschirr vor dem
Einschalten der Kochzone auf.
• Nutzen Sie die Restwärme, um die Speisen warm zu halten oder zu schmelzen.
Kochzoneneffizienz
Die Kochzoneneffizienz hängt vom Durchmesser des Kochgeschirrs ab. An Kochgeschirr mit einem kleineren Durchmesser als
der Mindestdurchmesser gelangt nur ein
Teil der von der Kochzone erzeugten Hitze.
Die Mindestdurchmesser sind im Abschnitt
„Technische Daten“ aufgeführt.
ÖKO TIMER (ÖKO-TIMER)
Um Energie zu sparen, schaltet
sich die Kochzonenheizung vor
dem Signal des Kurzzeitmessers
ab. Die Abschaltzeit hängt von der
eingestellten Kochstufe und der
Gardauer ab.
BETRIEBSGERÄUSCHE
Es gibt verschiedene
Betriebsgeräusche.
• Prasseln: Das Kochgeschirr besteht aus
unterschiedlichen Materialien (Sandwichkonstruktion).
• Pfeifen: Sie haben eine oder mehrere
Kochzonen auf eine hohe Stufe geschaltet und das Kochgeschirr besteht aus
unterschiedlichen Materialien (Sandwichkonstruktion).
• Summen: Sie haben Kochzonen auf eine
hohe Stufe geschaltet.
ANWENDUNGSBEISPIELE ZUM
KOCHEN
Das Verhältnis zwischen der Kochstufe und
dem Energieverbrauch der Kochzone ist
nicht linear.
Bei einer höheren Kochstufe steigt der
Energieverbrauch der Kochzone nicht proportional an.
Das bedeutet, dass die Kochzone, die auf
eine mittlere Kochstufe eingestellt ist, weniger als die Hälfte ihrer maximalen Leistung
verbraucht.
Page 29

Bei den Angaben in der folgenden
Tabelle handelt es sich um Richtwerte.
Ko
Verwendung: Zeit Tipps Nennleischs
tufe
Zum Warmhalten von
Speisen
1
1 -3Sauce Hollandaise,
Nach Bedarf Benutzen Sie einen
Deckel
5 - 25 Min. Ab und zu umrühren 3 – 8 %
schmelzen: Butter,
Schokolade, Gelatine
1 -3Stocken: Luftiges Ome-
10 - 40 Min. Mit Deckel garen 3 – 8 %
lett, gebackene Eier
3 -5Köcheln von Reis und
Milchgerichten, Erhitzen
von Fertiggerichten
25 - 50 Min. Mindestens doppelte
Menge Flüssigkeit
zum Reis geben,
Milchgerichte zwischendurch umrühren
5 -7Dünsten von Gemüse,
Fisch, Fleisch
7 -9Dampfgaren von Kartof-
feln
20 - 45 Min. Einige Esslöffel Flüs-
sigkeit hinzugeben
20 - 60 Min. Max. ¼ l Wasser für
750 g Kartoffeln verwenden
7 -9Kochen größerer Spei-
semengen, Eintopfge-
60 - 150
Min.
Bis zu 3 l Flüssigkeit
plus Zutaten
richte und Suppen
9 -12Bei geringer Hitze an-
braten: Schnitzel, Cor-
Nach Bedarf Nach der Hälfte der
Zeit wenden
don bleu, Koteletts, Frikadellen, Bratwürste,
Leber, Mehlschwitze,
Eier, Pfannkuchen, Donuts
12
Bei starker Hitze anbra-
-
ten: Rösti, Lendenstü-
13
cke, Steaks
5 - 15 Min. Nach der Hälfte der
Zeit wenden
14 Aufkochen von Wasser, Nudeln kochen, Anbraten von Fleisch
(Gulasch, Schmorbraten), Frittieren von Pommes frites
Aufkochen großer Mengen Wasser. Die Power-Management-
Funktion ist eingeschaltet.
Informationen zu Acrylamiden
Wichtig! Nach neuesten
wissenschaftlichen Erkenntnissen kann die
Bräunung von Lebensmitteln, speziell bei
stärkehaltigen Produkten, eine
gesundheitliche Gefährdung durch
Acrylamid verursachen. Daher empfehlen
wir, bei möglichst niedrigen Temperaturen
zu garen und die Speisen nicht zu stark zu
bräunen.
DEUTSCH 29
tungsaufnahme
3 %
8 – 13 %
13 – 18 %
18 – 25 %
18 – 25 %
25 – 45 %
45 – 64 %
100 %
Page 30

www.electrolux.com
30
REINIGUNG UND PFLEGE
Reinigen Sie das Gerät nach jedem Gebrauch.
Achten Sie immer darauf, dass der Boden
des Kochgeschirrs sauber ist.
Kratzer oder dunkle Flecken in der
Glaskeramik beeinträchtigen die
Funktionsfähigkeit des Geräts
nicht.
So entfernen Sie Verschmutzungen:
1.
– Sofort entfernen: geschmolzener
Kunststoff, Plastikfolie sowie zuckerhaltige Lebensmittel. Andernfalls
können die Verschmutzungen das
Gerät beschädigen. Verwenden Sie
einen speziellen Reinigungsschaber
für Glas. Den Reinigungsschaber
schräg zur Glasfläche ansetzen und
über die Oberfläche bewegen.
– Zu entfernen, wenn das Gerät
ausreichend abgekühlt ist: Kalkund Wasserablagerungen, Fettflecken, glänzende metallische Verfärbungen. Verwenden Sie hierfür einen
speziellen Reiniger für Glaskeramik
oder Edelstahl.
2.
Reinigen Sie das Gerät mit einem
feuchten Tuch und etwas Spülmittel.
3.
Am Ende das Gerät mit einem trockenen Tuch abreiben.
Page 31

FEHLERSUCHE
Problem Mögliche Abhilfe
Das Gerät kann nicht eingeschaltet oder bedient
werden.
Zwei oder mehr Sensorfel-
Die Funktion Stop+Go ist
Wasser- oder Fettspritzer
Ein akustisches Signal ertönt und das Gerät schaltet ab.
Wenn das Gerät ausgeschaltet wird, ertönt ein
akustisches Signal.
Das Gerät wird ausgeschaltet.
Die Restwärmeanzeige
funktioniert nicht.
Die Ankochautomatik startet nicht.
Die höchste Kochstufe ist
Die Kochstufe schaltet
zwischen zwei Kochstufen
um.
Die Sensorfelder werden
heiß.
Es ertönt kein Signalton,
wenn Sie die Sensorfelder
des Bedienfelds berühren.
leuchtet auf.
DEUTSCH 31
Schalten Sie das Gerät er-
der wurden gleichzeitig
berührt.
eingeschaltet.
befinden sich auf dem Bedienfeld.
Mindestens ein Sensorfeld
wurde bedeckt.
Sie haben etwas auf das
Sensorfeld
Die Kochzone ist nicht
heiß, da sie nur kurze Zeit
in Betrieb war.
Die Kochzone ist heiß. Lassen Sie die Kochzone
eingestellt.
Die Power-ManagementFunktion ist eingeschaltet.
Das Kochgeschirr ist zu
groß, oder Sie haben es
zu nahe an die Bedienelemente gestellt.
Der Signalton ist ausgeschaltet.
Die Abschaltautomatik hat
ausgelöst.
gestellt.
neut ein und stellen Sie innerhalb von 10 Sekunden
die Kochstufe ein.
Berühren Sie nur ein Sensorfeld.
Siehe Abschnitt „Gebrauchsanleitung“.
Wischen Sie das Bedienfeld ab.
Entfernen Sie den Gegenstand von den Sensorfeldern.
Entfernen Sie den Gegenstand vom Sensorfeld.
War die Kochzone lange
genug eingeschaltet, um
heiß zu sein, wenden Sie
sich bitte an den Kundendienst.
abkühlen.
Die höchste Kochstufe hat
die gleiche Leistung wie
die Ankochautomatik.
Siehe „Power-Management“.
Stellen Sie großes Kochgeschirr nötigenfalls auf
die hinteren Kochzonen.
Schalten Sie den Signalton ein (siehe „Einschalten
des Signaltons“).
Schalten Sie das Gerät
aus und wieder ein.
Page 32

www.electrolux.com
32
Ungeeignetes Kochge-
Der Durchmesser des
auf.
Wenn Sie das Problem mit der oben angegebenen Abhilfemaßnahme nicht beheben
können, wenden Sie sich bitte an Ihren
Fachhändler oder den Kundendienst. Geben Sie dabei die Daten auf dem Typenschild, den dreistelligen Buchstaben-Code
für die Glaskeramik (befindet sich in der
Ecke der Glasfläche) und die angezeigte
Fehlermeldung an.
Vergewissern Sie sich, dass Sie das Gerät
korrekt bedient haben. Wenn Sie das Gerät
Problem Mögliche Abhilfe
leuchtet auf.
Die Kindersicherung oder
die Tastenverriegelung ist
Siehe Abschnitt „Gebrauchsanleitung“.
eingeschaltet.
leuchtet auf.
Es befindet sich kein
Kochgeschirr auf der
Stellen Sie Kochgeschirr
auf die Kochzone.
Kochzone.
Verwenden Sie geeignetes
schirr.
Kochgeschirr.
Benutzen Sie eine kleinere
Kochgeschirrbodens ist
Kochzone.
für die Kochzone zu klein.
und eine Zahl leuchten
Im Gerät ist ein Fehler aufgetreten.
Trennen Sie das Gerät eine Zeit lang vom Stromnetz. Schalten Sie die Sicherung im Sicherungskasten der Hausinstallation aus. Schalten Sie die
Sicherung wieder ein.
Wenn
tet, benachrichtigen Sie
den Kundendienst.
leuchtet auf.
Im Gerät ist ein Fehler aufgetreten, da ein Kochgeschirr leer gekocht ist. Der
Überhitzungsschutz der
Kochzonen und die Abschaltautomatik sind eingeschaltet.
Schalten Sie das Gerät
aus. Entfernen Sie das
heiße Kochgeschirr.
Schalten Sie die Kochzone
nach etwa 30 Sekunden
wieder ein. Lag das Problem am Kochgeschirr, erlischt die Fehlermeldung
auf dem Display, aber die
Restwärmeanzeige kann
weiterhin leuchten. Lassen
Sie das Kochgeschirr abkühlen und überprüfen Sie
anhand der Angaben im
Abschnitt „Kochgeschirr
für Induktionskochzonen“,
ob es für das Gerät geeignet ist.
falsch bedient haben, fällt auch während
der Garantiezeit für den Besuch eines Kundendiensttechnikers oder Händlers eine
Gebühr an. Die Anweisungen zum Kundendienst und die Garantiebedingungen finden
Sie im Garantieheft.
erneut aufleuch-
Page 33

MONTAGE
DEUTSCH 33
WARNUNG!
Siehe Kapitel „Sicherheitshinweise“.
Vor der Montage
Notieren Sie vor der Montage des Geräts
alle Daten, die Sie unten auf dem Typenschild finden. Das Typenschild befindet
sich unten am Gerätegehäuse.
• Modell ...........................
• Produktnummer
(PNC) ........................................
• Seriennummer ............
EINBAUGERÄTE
• Einbaugeräte dürfen nur nach dem Einbau in bzw. unter normgerechte, pas-
MONTAGE
sende Einbauschränke und Arbeitsplatten betrieben werden.
ANSCHLUSSKABEL
• Das Gerät wird mit dem Anschlusskabel
geliefert.
• Ein beschädigtes Netzkabel muss durch
ein entsprechendes Spezialkabel (Typ
H05BB-F Tmax 90 °C oder höher) ersetzt werden. Wenden Sie sich an den
Kundendienst.
min.
min.
500mm
50mm
min.
50mm
=
R 5mm
490
min.
5mm
600mm
mm
560
+1
mm
+1
=
Page 34

www.electrolux.com
34
min.
20 mm
1)
Der Schutzboden ist möglicherweise in einigen Ländern nicht erhältlich. Wenden Sie sich an
Ihren Händler vor Ort.
TECHNISCHE DATEN
Modell EHM6532IOW Prod.Nr. 949 596 038 00
Typ 58 GAD DB AU 220-240 V 50-60 Hz
Induction 7.4 kW Made in Germany
Ser.Nr. .......... 7.4 kW
ELECTROLUX
min.
25 mm
min.
5 mm
min.
38 mm
min.
5 mm
Falls Sie einen Schutzboden verwenden
(zusätzliches Zubehör)
des vorderen Belüftungsabstands von 5
mm unter dem Gerät nicht nötig.
Wenn Sie das Gerät über einem Backofen
einsetzen, können Sie den Schutzboden
nicht verwenden.
1)
, ist die Einhaltung
Kochzonenleistung
Kochzone Nennleistung
(höchste
Kochstufe)
Power-Funktion eingeschaltet [W]
[W]
Hinten rechts
1800/3500 W 2800/5200 W 5 145
—180/280
mm
Hinten links —
1400 W 2500 W 4 125
145 mm
Vorne links —
2300 W 3700 W 10 180
210 mm
Die Leistung der Kochzonen kann geringfügig von den Daten in der Tabelle abwei-
Max. Einschaltdauer
der Power-
Min. Kochgeschirrdurch-
messer [mm]
Funktion
[Min.]
chen. Sie ändert sich je nach Material und
Abmessungen des Kochgeschirrs.
Page 35

UMWELTTIPPS
DEUTSCH 35
Recyceln Sie Materialien mit dem Symbol
. Entsorgen Sie die Verpackung in den
entsprechenden Recyclingbehältern.
Recyceln Sie zum Umwelt- und
Gesundheitsschutz elektrische und
elektronische Geräte. Entsorgen Sie Geräte
mit diesem Symbol
Hausmüll. Bringen Sie das Gerät zu Ihrer
örtlichen Sammelstelle oder wenden Sie
sich an Ihr Gemeindeamt.
nicht mit dem
Page 36

www.electrolux.com
36
INDICE
INFORMAZIONI PER LA SICUREZZA . . . . . . . . . . . . . . . . . . . . . . . . . . . . . . . . . . . . . . . . . . . . . . 37
DESCRIZIONE DEL PRODOTTO . . . . . . . . . . . . . . . . . . . . . . . . . . . . . . . . . . . . . . . . . . . . . . . . . 40
UTILIZZO QUOTIDIANO . . . . . . . . . . . . . . . . . . . . . . . . . . . . . . . . . . . . . . . . . . . . . . . . . . . . . . . . 42
CONSIGLI E SUGGERIMENTI UTILI . . . . . . . . . . . . . . . . . . . . . . . . . . . . . . . . . . . . . . . . . . . . . . . 46
PULIZIA E CURA . . . . . . . . . . . . . . . . . . . . . . . . . . . . . . . . . . . . . . . . . . . . . . . . . . . . . . . . . . . . . 48
RISOLUZIONE DEI PROBLEMI . . . . . . . . . . . . . . . . . . . . . . . . . . . . . . . . . . . . . . . . . . . . . . . . . . . 49
INSTALLAZIONE . . . . . . . . . . . . . . . . . . . . . . . . . . . . . . . . . . . . . . . . . . . . . . . . . . . . . . . . . . . . . 51
DATI TECNICI . . . . . . . . . . . . . . . . . . . . . . . . . . . . . . . . . . . . . . . . . . . . . . . . . . . . . . . . . . . . . . . 52
CONSIDERAZIONI AMBIENTALI . . . . . . . . . . . . . . . . . . . . . . . . . . . . . . . . . . . . . . . . . . . . . . . . . 53
PENSATI PER VOI
Grazie per aver acquistato un'apparecchiatura Electrolux. Avete scelto un prodotto che ha alle spalle
decenni di esperienza professionale e innovazione. Ingegnoso ed elegante, è stato progettato
pensando a voi. Quindi, in qualsiasi momento desiderate utilizzarlo, potete esser certi di ottenere
sempre i migliori risultati.
Benvenuti in Electrolux.
Visitate il nostro sito web per:
ricevere consigli, scaricare i nostri opuscoli, eliminare eventuali anomalie, ottenere
informazioni sull'assistenza.
www.electrolux.com
registrare il vostro prodotto e ricevere un servizio migliore:
www.electrolux.com/productregistration
acquistare accessori, materiali di consumo e ricambi originali per la vostra apparecchiatura:
www.electrolux.com/shop
SERVIZIO CLIENTI E MANUTENZIONE
Consigliamo sempre l’impiego di ricambi originali.
Quando si contatta l'Assistenza, accertarsi di disporre dei seguenti dati.
Le informazioni si trovano sulla targhetta di identificazione. Modello, numero dell'apparecchio (PNC),
numero di serie.
Avvertenza / Attenzione - Importanti Informazioni di Sicurezza
Informazioni e consigli generali
Informazioni in materia di sicurezza ambientale
Con riserva di modifiche.
Page 37

INFORMAZIONI PER LA SICUREZZA
ITALIANO 37
Leggere attentamente le istruzioni fornite
prima di installare e utilizzare l'apparecchiatura. Il produttore non è responsabile se
un'installazione ed un uso non corretto dell'apparecchiatura provocano lesioni e danni. Tenere sempre le istruzioni a portata di
mano in caso di necessità durante l'utilizzo.
SICUREZZA DEI BAMBINI E
DELLE PERSONE VULNERABILI
AVVERTENZA!
Rischio di soffocamento, lesioni o
invalidità permanente.
• Non permettere alle persone, compresi i
bambini, con capacità fisiche, sensoriali
o mentali ridotte, o con mancanza di
esperienza e conoscenza, di utilizzare il
forno; a meno che tale utilizzo non avvenga sotto la supervisione o la guida di
una persona responsabile della loro sicurezza.
• Non consentire ai bambini di giocare con
l'apparecchiatura.
• Tenere i materiali di imballaggio fuori dalla portata dei bambini.
• Tenere i bambini e gli animali domestici
lontano dall'apparecchiatura durante il
funzionamento o raffreddamento. Le
parti accessibili sono incandescenti.
• Se l’apparecchiatura dispone di un dispositivo di sicurezza per i bambini, consigliamo di attivarlo.
INSTALLAZIONE
AVVERTENZA!
L’installazione dell'apparecchiatura
deve essere eseguita da personale
qualificato.
• Rimuovere tutti i materiali di imballaggio.
• Non installare o utilizzare l'apparecchiatura se è danneggiata.
• Attenersi alle istruzioni fornite insieme all'apparecchiatura.
• È necessario rispettare la distanza minima dalle altre apparecchiature.
• Fare sempre attenzione quando si sposta l'apparecchiatura, perché è pesante.
Indossare sempre guanti di sicurezza.
• Proteggere le superfici di taglio con un
materiale di tenuta per evitare che l'umidità causi dei rigonfiamenti.
• Proteggere la base dell'apparecchiatura
da vapore e umidità.
• Non installare l'apparecchiatura accanto
ad una porta o sotto una finestra, per
evitare che pentole calde cadano dall'apparecchiatura quando la porta o la finestra sono aperte.
• Se l'apparecchiatura viene installata sopra dei cassetti, assicurarsi che lo spazio, tra la base dell'apparecchiatura e il
cassetto superiore, sia sufficiente per il
ricircolo d'aria.
• Assicurarsi che lo spazio per il ricircolo
d'aria di 5 mm, tra il piano di lavoro e la
parte anteriore dell'unità sottostante sia
libero. La garanzia non copre danni dovuti all'assenza di uno spazio di ventilazione adeguato.
• La base dell'apparecchiatura può surriscaldarsi. Si consiglia di prevedere un
pannello divisorio in materiale non infiammabile al di sotto dell'apparecchiatura
per rendere inaccessibile la base.
Collegamento elettrico
AVVERTENZA!
Rischio di incendio e scossa elettrica.
• Tutti i collegamenti elettrici devono essere eseguiti da un elettricista qualificato.
• Prima di qualsiasi collegamento, assicurarsi che la presa dell'apparecchiatura
non sia sotto tensione.
• Verificare che l'apparecchiatura sia installata correttamente. Connessioni allentate e non appropriate possono causare un surriscaldamento dei connettori.
• Assicurarsi che la protezione da scosse
elettriche sia installata.
• I collegamenti elettrici non devono toccare l'apparecchiatura o pentole calde
quando si collega l'apparecchiatura alle
prese vicine.
• Evitare che i collegamenti elettrici si aggroviglino.
• Sul cavo utilizzare un serracavo specifico.
Page 38

www.electrolux.com
38
• Utilizzare il cavo di alimentazione appro-
• Accertarsi di non danneggiare la spina e
• L'impianto elettrico deve essere dotato
• Utilizzare esclusivamente dispositivi di
USO DELL’APPARECCHIATURA
• Utilizzare l’apparecchiatura in un ambien-
• Non apportare modifiche alle specifiche
• Non utilizzare un timer esterno o un si-
• Non lasciare mai l'apparecchiatura incu-
• Non accendere l'apparecchiatura con le
• Non appoggiare posate o coperchi sulle
• Spegnere la zona di cottura dopo ogni
• Non utilizzare l'apparecchiatura come
• In caso di crepe sulla superficie, scolle-
• I portatori di pacemaker, devono mante-
priato.
il cavo di alimentazione. Contattare il
Centro di Assistenza o un elettricista
qualificato per sostituire un cavo danneggiato.
di un dispositivo di isolamento che consenta di scollegare l'apparecchiatura dalla presa di corrente a tutti i poli. Il dispositivo di isolamento deve avere una larghezza dell'apertura di contatto non inferiore ai 3 mm.
isolamento appropriati: interruttori automatici, fusibili (quelli a tappo devono essere rimossi dal portafusibile), sganciatori
per correnti di guasto a terra e contattori.
AVVERTENZA!
Rischio di lesioni, scottature o
scosse elettriche.
te domestico.
di questa apparecchiatura.
stema di controllo remoto distinto per
mettere in funzione l'apparecchiatura.
stodita durante il funzionamento.
mani bagnate o se entra a contatto con
dell'acqua.
zone di cottura. Possono diventare roventi.
utilizzo. Non fare affidamento sul rilevatore di pentole.
superficie di lavoro o come piano di appoggio.
gare l'alimentazione elettrica per evitare
scosse elettriche.
nere una distanza di almeno 30 cm dalle
zone di cottura a induzione quando l'apparecchiatura è in funzione.
AVVERTENZA!
Si può verificare un'esplosione o un
incendio.
• Grassi e olio caldi possono rilasciare vapori infiammabili. Mantenere fiamme o
oggetti caldi lontani da grassi e olio
quando li si utilizza per cucinare.
• I vapori rilasciati da un olio molto caldo
possono provocare una combustione
spontanea.
• Olio usato, che può contenere residui di
cibo, può liberare delle fiamme ad una
temperatura inferiore rispetto ad un olio
utilizzato per la prima volta.
• Non appoggiare o tenere liquidi o materiali infiammabili, né oggetti facilmente incendiabili sull'apparecchiatura, al suo interno o nelle immediate vicinanze.
• Non tentare di spegnere l’incendio con
l’acqua. Scollegare l’apparecchiatura e
coprire la fiamma con un coperchio o
una coperta di protezione dal fuoco.
AVVERTENZA!
Vi è il rischio di danneggiare l'apparecchiatura.
• Non poggiare pentole calde sul pannello
dei comandi.
• Non esporre al calore pentole vuote.
• Fare attenzione a non lasciar cadere oggetti o pentole sull'apparecchiatura. La
superficie si potrebbe danneggiare.
• Non mettere in funzione le zone di cottura in assenza di pentole o con pentole
vuote.
• Non appoggiare la pellicola di alluminio
direttamente sull'apparecchiatura.
• Lo spostamento di pentole in ghisa, in alluminio o con fondi danneggiati può graffiare la vetroceramica. Per spostare questi oggetti sollevarli sempre dalla superficie di cottura.
PULIZIA E MANUTENZIONE
AVVERTENZA!
Vi è il rischio di danneggiare l'apparecchiatura.
• Pulire regolarmente l'apparecchiatura
per evitare il deterioramento del materiale
della superficie.
• Non usare acqua spray né vapore per
pulire l'apparecchiatura.
Page 39

• Pulire l'apparecchiatura con un panno
inumidito e morbido. Utilizzare solo detergenti neutri. Non usare prodotti abrasivi, spugnette abrasive, solventi o oggetti metallici.
SMALTIMENTO
AVVERTENZA!
Rischio di lesioni o soffocamento.
• Staccare la spina dall'alimentazione elettrica.
• Tagliare il cavo di rete e smaltirlo.
ITALIANO 39
Page 40

www.electrolux.com
40
DESCRIZIONE DEL PRODOTTO
PANORAMICA
1 2
145 mm
180/280 mm
210 mm
34
DISPOSIZIONE DEL PANNELLO DEI COMANDI
Zona di cottura a induzione
1
Zona di cottura a induzione doppia
2
Pannello dei comandi
3
Zona di cottura a induzione
4
51 2
6
10
4
3
89 7
Utilizzare i tasti sensore per mettere in funzione l'apparecchiatura. I display,
gli indicatori ed i segnali acustici mostrano quali funzioni sono attive.
tasto sensore funzione
1
2
Indicatori timer delle zone di
3
cottura.
Display timer Indica il tempo in minuti.
4
5
Display livello di potenza Imposta il livello di potenza.
6
Barra dei comandi Imposta il livello di potenza.
7
8
9
10
/
Attiva e disattiva l'apparecchiatura.
Blocca/sblocca il pannello dei comandi.
Indica per quali zone di cottura è imposta-
to il tempo.
Seleziona la funzione Power.
Aumenta o riduce il tempo.
Imposta la zona di cottura.
Attiva e disattiva la funzione STOP+GO.
Page 41

DISPLAY DEL LIVELLO DI POTENZA
Display Descrizione
La zona di cottura è disattivata.
-
+ numero
/ /
La zona di cottura è in funzione.
La funzione è attiva.
Viene eseguita la funzione di riscaldamento automatico.
La funzione Power è attiva.
È presente un malfunzionamento.
OptiHeat Control (indicatore di calore residuo su 3 livelli) :
proseguire la cottura / tenere in caldo / calore residuo.
Il blocco/sicurezza bambini è inserito.
Pentola non adeguata o troppo piccola; oppure manca la
pentola sulla zona di cottura.
Viene eseguita la funzione di spegnimento automatico.
OPTIHEAT CONTROL
(INDICATORE DI CALORE
RESIDUO SU 3 LIVELLI)
AVVERTENZA!
\ \ Il calore residuo può
essere causa di ustioni!
ITALIANO 41
OptiHeat Control indica il livello di calore residuo. Le zone di cottura a induzione generano il calore richiesto per la cottura direttamente sul fondo della pentola. Il piano in
vetroceramica viene riscaldato dal calore
della pentola.
Page 42

www.electrolux.com
42
UTILIZZO QUOTIDIANO
ATTIVAZIONE E
DISATTIVAZIONE
Sfiorare per 1 secondo per accendere o
spegnere l'apparecchiatura.
SPEGNIMENTO AUTOMATICO
La funzione spegne automaticamente
l'apparecchiatura se:
•
Tutte le zone di cottura sono spente (
).
• Non è stato impostato il livello di potenza
dopo l'accensione dell'apparecchiatura.
• È stato versato qualcosa o appoggiato
un oggetto sul pannello dei comandi per
più di 10 secondi (un tegame, uno straccio, ecc.). Il segnale acustico è attivo per
un po' di tempo e l'apparecchiatura si
spegne. Rimuovere l'oggetto o pulire il
pannello dei comandi.
• L'apparecchiatura è surriscaldata (ad es.
se si esaurisce l'acqua in ebollizione nella
pentola). Prima di un nuovo utilizzo, la
zona di cottura deve essere lasciata raffreddare.
• Sono state utilizzate una pentole non
idonee. Il simbolo
si accende e la zona di cottura si spegne automaticamente
dopo 2 minuti.
• Non è stata spenta una zona di cottura o
non è stato modificato il livello di potenza. Dopo un tempo prestabilito, si ac-
cende
e l'apparecchiatura si spegne.
Vedi sotto.
• Rapporto tra livello di potenza e tempi
della funzione di spegnimento automatico:
•
, - — 6 ore
•
- — 5 ore
•
- — 4 ore
•
- — 1,5 ore
LIVELLO DI POTENZA
Sfiorare la barra dei comandi per impostare
il livello di potenza desiderato. Eventualmente correggere verso sinistra o destra.
Non interrompere il contatto con la barra,
fino al raggiungimento del livello di potenza
desiderato. Il display indica il livello di potenza.
PRERISCALDAMENTO
AUTOMATICO
Attivando la funzione di preriscaldamento
automatico sarà possibile ottenere l'impostazione del livello di potenza necessario in
minor tempo. Questa funzione imposta il livello di potenza più elevato per un po' di
tempo (consultare il grafico), per poi diminuire fino a raggiungere il livello necessario.
Per avviare la funzione di preriscaldamento
automatico per una zona di cottura:
1.
Premere ( compare sul display).
2.
Selezionare immediatamente il livello di
potenza necessario. Dopo 3 secondi
compare sul display.
Per interrompere la funzione, modificare il
livello di potenza.
12
11
10
9
8
7
6
5
4
3
2
1
0
1 2 3 4 5 6 7 8 9 101112 1314
FUNZIONE POWER
La funzione Power aumenta la potenza fornita alle zone di cottura a induzione. La funzione Power può essere attivata per un
tempo limitato (consultare il capitolo Dati
tecnici), dopodichè la zona di cottura a induzione passa automaticamente al livello di
potenza massimo impostato. Per attivare la
funzione, sfiorare
: si accende . Per
Page 43

disattivare la funzione, modificare il livello di
00
00
potenza.
FUNZIONE POWER DELLA
ZONA DI COTTURA A DUE
CIRCUITI
Max potenza del circuito interno si attiva
quando l'apparecchiatura rileva una pentola con un diametro inferiore al circuito interno. Max potenza del circuito esterno si attiva quando l'apparecchiatura rileva una
pentola con un diametro maggiore del circuito interno.
SISTEMA POWER
MANAGEMENT
Il sistema Power Management ripartisce la
potenza disponibile tra le zone di cottura
disposte a coppie (vedere l'illustrazione),
fornendo la potenza massima a una zona
di cottura. La potenza nella seconda zona
di cottura si riduce automaticamente. Il display del livello di potenza per la zona a ridotta potenza, passa da un livello all'altro.
ITALIANO 43
• Per impostare la zona di cottura:sfio-
rare ripetutamente
cende la spia della zona di cottura desiderata.
• Per attivare il timer per il conto alla
rovescia: sfiorare il tasto
per impostare il tempo (
ti). Quando la spia della zona di cottura
lampeggia lentamente, inizia il conto alla
rovescia.
• Per visualizzare il tempo residuo: se-
lezionare la zona di cottura con
spia della zona di cottura comincia a
lampeggiare rapidamente. Sul display
compare il tempo residuo.
Per cambiare il timer per il conto alla
•
rovescia: selezionare la zona di cottura
con
. Premere o .
• Per disattivare il timer: selezionare la
zona di cottura con
ne visualizzato il tempo residuo fino a
. L'indicatore della zona di cottura si
spegne. Per disattivarlo è anche possibile sfiorare
Quando il conto alla rovescia termina,
viene emesso un segnale acustico e
lampeggia. La zona di cottura si disattiva.
Per arrestare il segnale acustico:
•
sfiorare
e contemporaneamente.
finché non si ac-
del timer
- 99 minu-
00
. La
. Sfiorare . Vie-
TIMER
Timer per il conto alla
rovescia
Il timer per il conto alla rovescia consente di
impostare la durata di funzionamento di
una zona di cottura per la preparazione di
una pietanza.
Impostare il timer del conto alla rovescia dopo aver selezionato la zona di
cottura.
Il livello di potenza può essere impostato
prima o dopo l'impostazione del timer.
CountUp Timer (Timer per il
conto alla rovescia)
Utilizzare CountUp Timer per controllare
per quanto tempo funziona la zona di cottura.
• Per impostare la zona di cottura (se
è in funzione più di una zona):sfiorare
ripetutamente
la spia della zona di cottura desiderata.
• Per attivare CountUp Timer:sfiorare il
del timer, si accende . Quan-
tasto
do la spia della zona di cottura lampeggia lentamente, inizia il conteggio. Il di-
splay passa da
• Per controllare per quanto tempo
funziona la zona di cottura: selezionare la zona di cottura con
della zona di cottura comincia a lampeggiare rapidamente. Il display indica per
quanto tempo funziona la zona di cottura.
finché non si accende
ai minuti.
. La spia
Page 44

www.electrolux.com
44
• Per disattivare CountUp Timer: sele-
Contaminuti
Il timer può essere utilizzato come contaminuti quando le zone di cottura non sono
in funzione. Sfiorare
o del timer per selezionare la durata. Allo
scadere del tempo stabilito, viene emesso
un segnale acustico e
• Per arrestare il segnale acustico:
STOP+GO
La funzione pone tutte le zone di cottura accese al livello di potenza più basso (
Quando
dificare il livello di potenza.
La funzione
timer.
•
• Per disattivare questa funzione sfiorare
BLOCCO
È possibile bloccare il pannello dei comandi, ma non
di modificare inavvertitamente il livello di
potenza.
Come prima cosa impostare il livello di potenza.
Per avviare questa funzione sfiorare
simbolo
Il Timer rimane acceso.
Per interrompere questa funzione sfiorare
dentemente impostato.
Quando si spegne l'apparecchiatura, si interrompe anche questa funzione.
SICUREZZA BAMBINI
Questa funzione impedisce l'azionamento
accidentale dell'apparecchiatura.
zionare la zona di cottura con
rare
o per disattivare il timer. L'in-
dicatore della zona di cottura si spegne.
. Sfiorare il tasto
lampeggia.
00
sfiorare
).
è attivo, non sarà possibile mo-
non interrompe la funzione
Per attivare questa funzione sfiorare
. Si accende il simbolo .
. Si accende il livello di potenza pre-
cedentemente impostato.
. Questa funzione impedisce
si accende per 4 secondi.
. Si accende il livello di potenza prece-
e sfio-
. Il
Per attivare il dispositivo di sicurezza
dei bambini
•
Attivare l'apparecchiatura con
impostare alcun livello di potenza.
•
Sfiorare il tasto
cende il simbolo
•
Disattivare l'apparecchiatura con .
Per disattivare il dispositivo di
sicurezza dei bambini
•
Attivare l'apparecchiatura con
impostare alcun livello di potenza.
Sfiorare il tasto
cende il simbolo
•
Disattivare l'apparecchiatura con .
Per escludere la sicurezza bambini per
un'operazione di cottura
•
Attivare l'apparecchiatura con
cende il simbolo
•
Sfiorare il tasto per 4 secondi. Impo-
stare il livello di potenza entro 10 secondi. È possibile mettere in funzione
l'apparecchiatura.
• Quando si spegne l'apparecchiatura con
, la sicurezza bambini rimane attiva.
per 4 secondi. Si ac-
.
per 4 secondi. Si ac-
.
.
. Non
. Non
. Si ac-
OFFSOUND CONTROL
(DISATTIVAZIONE E
ATTIVAZIONE DEI SEGNALI
ACUSTICI)
Disattivazione dei segnali
acustici
Disattivare l'apparecchiatura.
Sfiorare il tasto
si accende e si spegne. Sfiorare
secondi.
è attivo. Sfiorare
gnale acustico non è attivo.
Quando questa funzione è attiva, i segnali
acustici saranno udibili soltanto quando:
•
si sfiora
• diminuisce il valore del contaminuti
• diminuisce il valore del timer del conto al-
la rovescia
• si appoggia un oggetto sul pannello dei
comandi.
per 3 secondi. Il display
per 3
si accende, il segnale acustico
: si accende, il se-
Page 45

Attivazione dei segnali
acustici
Disattivare l'apparecchiatura.
Sfiorare il tasto
si accende e si spegne. Sfiorare
secondi.
acustico è spento. Sfiorare
cende. Il segnale acustico è attivato.
per 3 secondi. Il display
si accende, poiché il segnale
: si ac-
ITALIANO 45
per 3
Page 46

www.electrolux.com
46
CONSIGLI E SUGGERIMENTI UTILI
ZONE DI COTTURA A INDUZIONE
Per le zone cottura a induzione, un forte
campo elettromagnetico crea calore nelle
pentole molto rapidamente.
PENTOLE PER ZONE DI
COTTURA A INDUZIONE
Utilizzare le zone di cottura a induzione con pentole idonee.
Materiale delle pentole
• materiali idonei: ghisa, acciaio, acciaio
smaltato, acciaio inox, fondi multistrato
(se specificati come idonei dal produttore).
• materiali non idonei: alluminio, rame,
ottone, vetro, ceramica, porcellana.
Una pentola è idonea per la cottura a
induzione se …
• ... una piccola quantità d'acqua su una
zona di cottura a induzione impostata sul
livello di cottura massimo si riscalda in
breve tempo.
• ... una calamita si attacca al fondo delle
pentole.
Il fondo della pentola dovrebbe
essere il più possibile spesso e piano.
Dimensioni delle pentole: le zone di cottura a induzione si adattano automaticamente alle dimensioni del fondo delle pentole entro determinati limiti.
I RUMORI DURANTE L'USO
Se si avverte
• crepitio: sono utilizzate pentole di materiali diversi (costruzione a sandwich).
• fischio: una o più zone di cottura sono
utilizzate a livelli di potenza elevati con
pentole di materiali diversi (costruzione a
sandwich).
• ronzio: sono utilizzati livelli di potenza
elevati.
• scatto: sono state accese parti elettriche.
• sibilo, ronzio: è in funzione la ventola.
I rumori descritti sono normali e non
sono da ricondurre a un guasto dell'apparecchiatura.
RISPARMIO ENERGETICO
Come risparmiare energia
• Se possibile, coprire sempre le pentole
con il coperchio.
• Posizionare la pentola prima di accendere la zona di cottura.
• Utilizzare il calore residuo per mantenere
caldi i cibi o fonderli.
Efficienza della zona di cottura
L'efficienza della zona di cottura dipende
dal diametro delle pentole. Una pentola con
un diametro inferiore alla zona più piccola
riceve solo una parte della potenza generata dalla zona di cottura. Per i diametri minimi consultare il capitolo Dati tecnici.
ÖKO TIMER (TIMER ECO)
Per risparmiare energia, il riscaldatore della zona di cottura si disattiva prima che il timer per il conto alla rovescia emetta un segnale acustico. La differenza nel tempo di
funzionamento dipende dal livello di
potenza e dalla durata dell'utilizzo
dell'apparecchiatura.
ESEMPI DI IMPIEGO PER LA
COTTURA
Il rapporto tra il livello di potenza e il consumo di energia della zona di cottura non è
regolare.
L'aumento del livello di potenza non è proporzionale all'aumento del consumo di
energia della zona di cottura.
Ciò significa che la zona di cottura con un
livello di potenza medio impiega meno della
metà della propria energia.
I dati della tabella seguente sono
da intendersi come indicativi.
Page 47

Li-
Usare per: Tempo Suggerimenti Consumo
vello
di
potenza
Mantenere in caldo le
pietanze cotte
1
1 -3Salse, per sciogliere:
burro, cioccolata, gelati-
secondo necessità
Mettere un coperchio
sulla pentola
5 - 25 min Mescolare di tanto in
tanto
na
1 -3Rassodamento: omelet-
te, uova strapazzate
3 -5Cuocere riso e pietanze
a base di latte, riscalda-
re pietanze pronte
10 - 40 min Coprire con un coper-
chio
25 - 50 min Aggiungere al riso al-
meno una doppia
quantità di liquido,
mescolare di tanto in
tanto i preparati a base di latte
5 -7Cuocere a vapore ver-
dure, pesce, carne
7 -9Cuocere a vapore le pa-
tate
20 - 45 min Aggiungere alcuni
cucchiai di liquido
20 - 60 min Usare al max. ¼ l di
acqua per 750 g di
patate
7 -9Cuocere grandi quantità
di alimenti, stufati e
60 - 150
min
Fino a 3 l di liquido più
gli ingredienti
zuppe
9 -12Cottura delicata: coto-
lette, cordon bleu, co-
secondo necessità
Girare il piatto a metà
tempo
stolette, polpette, salsicce, fegato, besciamella, uova, frittelle,
krapfen
12
Frittura, frittelle di pata-
-
te, lombate, bistecche
5 - 15 min Girare il piatto a metà
tempo
13
14 Portare a ebollizione l'acqua, cuocere la pasta, rosolare la car-
ne (gulasch, stufati), friggere patatine
Portare a ebollizione grandi quantità d'acqua. Il sistema Power
Management è attivo.
Informazioni sulle acrilamidi
Importante Secondo le più recenti
scoperte scientifiche, se si rosolano
alimenti (in particolari quelli contenenti
amido), le acrilamidi possono
rappresentare un rischio per la salute.
Raccomandiamo pertanto di cuocere alle
temperature più basse e di non rosolare
eccessivamente gli alimenti.
ITALIANO 47
di energia
nominale
3 %
3 – 8 %
3 – 8 %
8 – 13 %
13 – 18 %
18 – 25 %
18 – 25 %
25 – 45 %
45 – 64 %
100 %
Page 48

www.electrolux.com
48
PULIZIA E CURA
Pulire l'apparecchiatura dopo ogni utilizzo.
Usare sempre pentole con il fondo pulito.
I graffi o le macchie scure sul vetroceramica non compromettono il
funzionamento dell'apparecchiatura.
Per eliminare lo sporco:
1.
– Rimuovere immediatamente:pla-
stica fusa, pellicola di plastica e alimenti contenenti zucchero. Se non
vengono eliminati, potrebbero danneggiare l'apparecchiatura. Il vetro
richiede l'uso di un raschietto speciale. Appoggiare il raschietto sulla
superficie in vetro, formando un angolo acuto, e spostare la lama sulla
superficie.
– Quando l'apparecchiatura è suf-
ficientemente raffreddata, è possibile rimuovere:i segni di calcare e
d'acqua, le macchie di grasso e le
macchie opalescenti. Usare un detergente specifico per vetroceramica
o acciaio inossidabile.
2.
Pulire l'apparecchiatura con un panno
umido e una piccola quantità di detergente.
3.
Al termine asciugare l'apparecchiatura con un panno pulito.
Page 49

RISOLUZIONE DEI PROBLEMI
Problema Possibile causa Soluzione
Non è possibile attivare
l'apparecchiatura o metterla in funzione.
Sono stati sfiorati 2 o più
La funzione Stop+Go è at-
Il pannello dei comandi è
Il segnale acustico è attivo
e l'apparecchiatura si spegne.
Quando l'apparecchiatura
si spegne, viene emesso
un segnale acustico.
L'apparecchiatura si spegne.
L'indicatore di calore residuo non si accende.
La funzione di preriscaldamento automatico non si
accende.
È impostato il livello di po-
Il livello di potenza passa
da un livello ad un altro.
I tasti sensore si surriscaldano.
Assenza di segnale quando si toccano i tasti sensore del pannello.
si accende
Accendere di nuovo l'ap-
tasti sensore contemporaneamente.
tiva.
bagnato o presenta macchie di unto.
Uno o più tasti sensore
sono stati coperti.
È stato appoggiato un oggetto sul tasto sensore
.
La zona di cottura non è
calda perché è rimasta in
funzione solo per brevissimo tempo.
La zona di cottura è calda. Lasciar raffreddare suffi-
tenza massimo.
Il sistema Power Management è attivo.
La pentola è troppo grande oppure è stata collocata troppo vicino ai comandi.
I segnali acustici sono disattivati.
Lo spegnimento automatico è attivo.
ITALIANO 49
parecchiatura ed impostare il livello di potenza entro
10 secondi.
Sfiorare un tasto sensore
alla volta.
Vedere il capitolo sulle
Istruzioni d'uso.
Pulire il pannello dei comandi.
Rimuovere gli oggetti dai
tasti sensore.
Rimuovere gli oggetti dal
tasto sensore.
Se la zona di cottura è rimasta accesa a sufficienza per essere calda, contattare il Centro di Assistenza.
cientemente la zona di
cottura.
Il livello di potenza massimo ha la stessa potenza
della funzione di preriscaldamento automatico.
Consultare "Sistema Power management".
Se necessario, collocare le
pentole grandi sulle zone
di cottura posteriori.
Attivare i segnali acustici
(vedere OffSound Control).
Spegnere e riaccendere
l'apparecchiatura.
Page 50

www.electrolux.com
50
Pentole non idonee. Utilizzare pentole idonee.
Il diametro del fondo delle
dono.
Se non si riesce a risolvere il problema con
i rimedi sopra indicati, rivolgersi al proprio
rivenditore di fiducia o al servizio assistenza. Fornire i dati riportati sulla targhetta
identificativa, il codice a tre lettere per il piano in vetroceramica (si trova nell'angolo del
piano cottura) e il messaggio di errore visualizzato.
Verificare di aver azionato correttamente
l'apparecchiatura. In caso di azionamento
errato dell'apparecchiatura, l'intervento del
tecnico del centro di assistenza o del rivenditore potrà essere effettuato a pagamento
anche durante il periodo di garanzia. Le
istruzioni relative al servizio di assistenza e
Problema Possibile causa Soluzione
si accende
si accende
La sicurezza bambini o il
blocco tasti si attivano.
Non vi sono pentole sulla
zona di cottura.
Vedere il capitolo sulle
Istruzioni d'uso.
Collocare le pentole sulla
zona di cottura.
Spostare le pentole su una
pentole è troppo piccolo
rispetto alla zona di cottu-
zona di cottura più picco-
la.
ra.
e un numero si accen-
L'apparecchiatura presenta un errore.
Scollegare per un certo
periodo di tempo l'appa-
recchiatura dall'alimenta-
zione elettrica. Scollegare
il fusibile dall'impianto elet-
trico domestico. Ricollega-
re. Se
nuovo, rivolgersi al centro
assistenza.
si accende
Nell'apparecchiatura è
presente un errore dovuto
all'esaurimento del liquido
in ebollizione nella pentola.
La protezione contro il
surriscaldamento delle zone di cottura e l'interruttore dello spegnimento automatico sono attivi.
Spegnere l'apparecchiatu-
ra. Togliere le pentole cal-
de. Dopo circa 30 secon-
di, riaccendere la zona di
cottura. Se il problema era
collegato alle pentole, il
messaggio di errore do-
vrebbe spegnersi, mentre
l'indicatore di calore resi-
duo continua ad essere vi-
sualizzato. Lasciare raf-
freddare le pentole e con-
sultare la sezione Pentole
per zona di cottura a indu-
zione per vedere se il tipo
di pentole è compatibile
con l'apparecchiatura.
alle condizioni di garanzia sono contenute
nel libretto della garanzia.
si accende di
Page 51

INSTALLAZIONE
ITALIANO 51
AVVERTENZA!
Fare riferimento al capitolo "Informazioni per la sicurezza".
Prima dell'installazione
Prima di installare l'apparecchiatura, scrivere i dati seguenti, riportati sulla targhetta
identificativa. La targhetta si trova sulla parte posteriore dell'alloggiamento dell'apparecchiatura.
• Modello ...........................
• Numero di prodotto (PNC).................
• Numero di serie (S.N.).................
APPARECCHIATURE DA
INCASSO
• Utilizzare apparecchiature da incasso solo dopo l'installazione in idonei piani di la-
MONTAGGIO
voro e mobili da incasso conformi alle
norme.
CAVO DI COLLEGAMENTO
• L'apparecchiatura è fornita con un cavo
di collegamento.
• Sostituire il cavo di allacciamento alla rete danneggiato con un cavo speciale (tipo H05BB-F Tmax 90°C o superiore).
Contattare il Centro di Assistenza locale.
min.
min.
500mm
50mm
min.
50mm
=
R 5mm
490
min.
5mm
600mm
mm
560
+1
mm
+1
=
Page 52

www.electrolux.com
52
1)
Il protettore da sovratensioni accessorio potrebbe non essere disponibile in alcuni paesi.
Contattare il proprio fornitore locale.
DATI TECNICI
Modell EHM6532IOW Prod.Nr. 949 596 038 00
Typ 58 GAD DB AU 220-240 V 50-60 Hz
Induction 7.4 kW Made in Germany
Ser.Nr. .......... 7.4 kW
ELECTROLUX
min.
20 mm
min.
25 mm
min.
5 mm
min.
38 mm
min.
5 mm
Nel caso in cui si stia utilizzando un protettore da sovratensioni (accessorio aggiunti-
1)
), lo spazio di ventilazione anteriore di 5
vo
mm e il pavimento protettivo appena sotto
all'apparecchiatura non sono necessari.
Non è consentito utilizzare il protettore da
sovratensioni qualora l'apparecchiatura
venga installata sopra un forno.
Potenza delle zone di cottura
Zona di cottura
Potenza nominale (livello
di potenza
massimo) [W]
Posteriore de-
1800/3500 W 2800/5200 W 5 145
stra —180/280
mm
Posteriore sini-
1400 W 2500 W 4 125
stra — 145
mm
Anteriore sini-
2300 W 3700 W 10 180
stra — 210
mm
Funzione Power attiva [W]
Durata massima della
funzione Power [in min]
Diametro minimo delle
pentole [mm]
Page 53

La potenza delle zone di cottura può differire in alcune gamme di piccole dimensioni
dai dati riportati nella tabella. Cambia in ba-
CONSIDERAZIONI AMBIENTALI
ITALIANO 53
se al materiale e alle dimensioni delle pentole.
Riciclare i materiali con il simbolo
Buttare l'imballaggio negli appositi
contenitori per il riciclaggio.
Aiutare a proteggere l’ambiente e la salute
umana e a riciclare rifiuti derivanti da
apparecchiature elettriche ed elettroniche.
.
Non smaltire le apparecchiature che
riportano il simbolo
rifiuti domestici. Portare il prodotto al punto
di riciclaggio più vicino o contattare il
comune di residenza.
insieme ai normali
Page 54

www.electrolux.com
54
ÍNDICE DE MATERIAS
INFORMACIÓN SOBRE SEGURIDAD . . . . . . . . . . . . . . . . . . . . . . . . . . . . . . . . . . . . . . . . . . . . . 55
DESCRIPCIÓN DEL PRODUCTO . . . . . . . . . . . . . . . . . . . . . . . . . . . . . . . . . . . . . . . . . . . . . . . . . 58
USO DIARIO . . . . . . . . . . . . . . . . . . . . . . . . . . . . . . . . . . . . . . . . . . . . . . . . . . . . . . . . . . . . . . . . . 60
CONSEJOS ÚTILES . . . . . . . . . . . . . . . . . . . . . . . . . . . . . . . . . . . . . . . . . . . . . . . . . . . . . . . . . . . 64
MANTENIMIENTO Y LIMPIEZA . . . . . . . . . . . . . . . . . . . . . . . . . . . . . . . . . . . . . . . . . . . . . . . . . . 67
SOLUCIÓN DE PROBLEMAS . . . . . . . . . . . . . . . . . . . . . . . . . . . . . . . . . . . . . . . . . . . . . . . . . . . . 68
INSTALACIÓN . . . . . . . . . . . . . . . . . . . . . . . . . . . . . . . . . . . . . . . . . . . . . . . . . . . . . . . . . . . . . . . 70
INFORMACIÓN TÉCNICA . . . . . . . . . . . . . . . . . . . . . . . . . . . . . . . . . . . . . . . . . . . . . . . . . . . . . . 71
ASPECTOS MEDIOAMBIENTALES . . . . . . . . . . . . . . . . . . . . . . . . . . . . . . . . . . . . . . . . . . . . . . . 72
PENSAMOS EN USTED
Gracias por adquirir un producto Electrolux. Ha escogido un producto que contiene décadas de
experiencia e innovación profesionales. Ingenioso y elegante, se ha diseñado pensando en usted.
Así que, siempre que lo utilice puede tener la seguridad de que conseguirá excelentes resultados.
Bienvenido a Electrolux.
Visite nuestro sitio web para:
Obtener consejos, folletos, soluciones a problemas e información de servicio:
www.electrolux.com
Registrar su producto para recibir un mejor servicio:
www.electrolux.com/productregistration
Adquirir accesorios, artículos de consumo y recambios originales para su aparato:
www.electrolux.com/shop
ATENCIÓN Y SERVICIO AL CLIENTE
Le recomendamos que utilice recambios originales.
Al contactar con el Servicio, cerciórese de tener la siguiente información a mano.
La información se puede encontrar en la placa de características. Modelo, PNC, Número de serie.
Advertencia - Precaución-Información sobre seguridad.
Datos y recomendaciones generales
Información medioambiental
Salvo modificaciones.
Page 55

INFORMACIÓN SOBRE SEGURIDAD
ESPAÑOL 55
Antes de instalar y utilizar el aparato, lea
atentamente las instrucciones facilitadas. El
fabricante no se hace responsable de los
daños y lesiones causados por una instalación y uso incorrectos. Guarde siempre las
instrucciones junto con el aparato para futuras consultas.
SEGURIDAD DE NIÑOS Y
PERSONAS VULNERABLES
ADVERTENCIA
Existe riesgo de sufrir asfixia, lesiones o incapacidad permanente.
• Este aparato no debe ser usado por niños, ni por personas con capacidades físicas o mentales reducidas, ni por personas sin experiencia en el manejo del
aparato, a menos que lo hagan bajo las
instrucciones o la supervisión de la persona responsable de su seguridad.
• No deje que los niños jueguen con el
aparato.
• Mantenga los materiales de embalaje
alejados de los niños.
• Mantenga a los niños y mascotas alejados del aparato cuando esté funcionando o enfriándose. Las piezas de fácil acceso están calientes.
• Si el aparato dispone de dispositivo de
seguridad para niños, se recomienda activarlo.
INSTALACIÓN
ADVERTENCIA
Sólo una persona cualificada puede instalar el aparato.
• Retire todo el embalaje.
• No instale ni utilice un aparato dañado.
• Siga las instrucciones de instalación suministradas con el aparato.
• Respete siempre la distancia mínima entre el aparato y los demás electrodomésticos y mobiliario.
• El aparato es pesado, tenga cuidado
siempre cuando lo mueva. Utilice siempre guantes de protección.
• Proteja las superficies cortadas con un
material sellante para evitar que la humedad las hinche.
• Proteja la parte inferior del aparato del
vapor y la humedad.
• No instale el aparato junto a una puerta
o debajo de una ventana. De esta forma
se evita que los recipientes calientes caigan del aparato cuando la puerta o la
ventana estén abiertas.
• Cuando instale el aparato encima de cajones, asegúrese de que hay suficiente
espacio entre la parte inferior del aparato
y el cajón superior para que circule el aire.
• Deje un espacio de ventilación de 5 mm
entre la encimera y el frente de la unidad
situada bajo ella. La garantía no cubre
los daños causados por la falta de una
ventilación adecuada.
• La base del aparato se puede calentar.
Se recomienda colocar un panel de separación no combustible bajo el aparato
para evitar acceder a la base.
Conexión eléctrica
ADVERTENCIA
Riesgo de incendios y descargas
eléctricas.
• Todas las conexiones eléctricas deben
realizarse por electricistas cualificados.
• Antes de realizar cualquier cableado,
asegúrese de que la regleta de conexión
no tiene tensión.
• Asegúrese de que el aparato está instalado correctamente. Las conexiones de
enchufe y tomas flojas e inadecuadas
pueden sobrecalentar el borne.
• Asegúrese de que hay instalada una protección contra descargas eléctricas.
• No permita que los cables eléctricos entren en contacto con el aparato ni con
utensilios de cocina calientes cuando
conecte el aparato a las tomas cercanas.
• Coloque los cables eléctricos de forma
que no se puedan enredar.
• Utilice una abrazadera para cable en el
cable.
• Utilice el cable de red adecuado.
Page 56

www.electrolux.com
56
• Asegúrese de no provocar daños en el
• La instalación eléctrica debe tener un
• Use únicamente dispositivos de aisla-
USO
• Utilice este aparato en entornos domés-
• No cambie las especificaciones de este
• No utilice un temporizador externo ni un
• No deje nunca el aparato desatendido
• No utilice el aparato con las manos mo-
• No coloque cubiertos ni tapaderas sobre
• Apague las zonas de cocción después
• No utilice el aparato como superficie de
• Si la superficie llegara a agrietarse, de-
• Los usuarios que tengan marcapasos
enchufe ni en el cable de red. Póngase
en contacto con un electricista o con el
servicio técnico para cambiar un cable
de red dañado.
dispositivo de aislamiento que permita
desconectar el aparato de todos los polos de la red. El dispositivo de aislamiento debe tener una apertura de contacto
con una anchura mínima de 3 mm.
miento correctos: línea con protección
ante cortocircuitos, fusibles (tipo tornillo
que puedan retirarse del soporte), dispositivos de fuga a tierra y contactores.
ADVERTENCIA
Riesgo de lesiones, quemaduras o
descargas eléctricas.
ticos.
aparato.
sistema de mando a distancia separado
para utilizar el aparato.
mientras está en funcionamiento.
jadas o cuando esté en contacto con el
agua.
las zonas de cocción. Pueden alcanzar
temperaturas elevadas.
de cada uso. No preste atención al detector de tamaño.
trabajo o almacenamiento.
senchufe el aparato de la corriente para
evitar posibles descargas eléctricas.
implantados deberán mantener una distancia mínima de 30 cm de las zonas de
inducción cuando el aparato esté funcionando.
ADVERTENCIA
Existe peligro de explosión o incendio.
• Las grasas o aceites calientes pueden
generar vapores inflamables. Mantenga
las llamas u objetos calientes alejados de
grasas y aceites cuando cocine con
ellos.
• Los vapores que liberan los aceites muy
calientes pueden provocar combustiones imprevistas.
• El aceite usado, que puede contener
restos de alimentos, puede provocar incendios a temperaturas más bajas que
el aceite utilizado por primera vez.
• No coloque productos inflamables ni objetos mojados con productos inflamables, dentro, cerca o encima del aparato.
• No intente apagar un fuego con agua.
Desconecte el aparato y cubra la llama
con una tapa o manta para el fuego.
ADVERTENCIA
Podría dañar el aparato.
• No coloque ningún utensilio de cocina
caliente en el panel de control.
• No deje que el contenido de los utensilios de cocina hierva hasta evaporarse.
• Evite la caída de objetos o utensilios de
cocina en el aparato. La superficie puede dañarse.
• No encienda las zonas de cocción sin
utensilios de cocina o con éstos vacíos.
• No coloque papel de aluminio sobre el
aparato.
• Los utensilios de cocina de hierro o aluminio fundido, o que tengan la base dañada, pueden arañar la vitrocerámica.
Levante siempre estos objetos cuando
tenga que moverlos sobre la superficie
de cocción.
MANTENIMIENTO Y LIMPIEZA
ADVERTENCIA
Podría dañar el aparato.
• Limpie periódicamente el aparato para
evitar el deterioro del material de la superficie.
• No utilice pulverizadores ni vapor de
agua para limpiar el aparato.
• Limpie el aparato con un paño suave humedecido. Utilice sólo detergentes neutros. No utilice productos abrasivos, estropajos duros, disolventes ni objetos de
metal.
Page 57

ELIMINACIÓN
ADVERTENCIA
Existe riesgo de lesiones o asfixia.
• Desconecte el aparato de la red.
• Corte el cable de conexión a la red y deséchelo.
ESPAÑOL 57
Page 58

www.electrolux.com
58
DESCRIPCIÓN DEL PRODUCTO
DESCRIPCIÓN GENERAL
1 2
145 mm
180/280 mm
210 mm
34
DISPOSICIÓN PANEL DE CONTROL
Zona de cocción por inducción
1
Zona de inducción de dos circuitos
2
Panel de control
3
Zona de cocción por inducción
4
51 2
6
10
4
3
89 7
Utilice el aparato con los sensores. Las pantallas, indicadores y señales
acústicas anuncian qué funciones se han iniciado.
sensor función
1
2
Indicadores de tiempo de las
3
zonas de cocción.
Indicador del temporizador Muestra la hora en minutos.
4
5
Indicador del nivel de calor Muestra el nivel de calor elegido.
6
Barra de control Para ajustar la temperatura.
7
8
9
10
/
Activación y desactivación del aparato.
Bloquea y desbloquea el panel de control.
Para mostrar las zonas de cocción para
las que se ha ajustado el tiempo.
Para activar la función Power.
Aumenta o disminuye el tiempo.
Para seleccionar la zona de cocción.
Activa y desactiva la función STOP+GO.
Page 59

INDICACIÓN DE LA TEMPERATURA EN PANTALLA
Indicador Descripción
La zona de cocción está apagada.
-
+ número
/ /
La zona de cocción está en funcionamiento
La función está activada.
Se usa la función de calentamiento automático.
La función Power está activa.
Hay un fallo de funcionamiento.
OptiHeat Control (indicador de calor residual de 3 pasos):
seguir cocinando / mantener caliente / calor residual.
Las funciones de bloqueo / bloqueo de seguridad para ni-
ños están activas.
El recipiente es inadecuado o demasiado pequeño, o no se
ha colocado ningún recipiente sobre la zona de cocción.
Se usa la función de desconexión automática.
OPTIHEAT CONTROL
(INDICADOR DE CALOR
RESIDUAL DE 3 PASOS)
ADVERTENCIA
\ \ ¡Riesgo de quemadu-
ras por calor residual!
ESPAÑOL 59
OptiHeat Control muestra el nivel de calor
residual. Las zonas de cocción por inducción generan el calor necesario para cocinar directamente en la base del recipiente,
lo que hace que la superficie vitrocerámica
se caliente por el calor residual del mismo.
Page 60

www.electrolux.com
60
USO DIARIO
ACTIVACIÓN Y
DESACTIVACIÓN
Toque durante 1 segundo para encender o apagar el aparato.
DESCONEXIÓN AUTOMÁTICA
La función desconecta
automáticamente el aparato siempre
que:
• Todas las zonas de cocción estén apagadas (
).
• no se ajusta un nivel de calor después
de encender el aparato
• Se vierte algo o se coloca algún objeto
sobre el panel de control durante más
de 10 segundos (un recipiente, un trapo,
etc.). Se emite una señal acústica durante un momento y el aparato se apaga.
Retire el objeto o limpie el panel de control.
• El aparato está demasiado caliente (por
ejemplo, el contenido de un recipiente ha
hervido hasta agotarse el líquido). Espere
a que la zona de cocción se enfríe antes
de utilizar el aparato de nuevo.
• Se utiliza un utensilio inadecuado. Se ilumina el símbolo
y la zona de cocción
se apaga automáticamente después de
2 minutos.
• No apague una zona de cocción ni cambie la temperatura. Al cabo de un cierto
tiempo, se enciende el símbolo
y se
apaga el aparato. Véase a continuación.
• La relación entre el ajuste de temperatura y las horas de la función de Desconexión automática:
•
, - — 6 horas
•
- — 5 horas
•
- — 4 horas
•
- — 1,5 horas
AJUSTE DE TEMPERATURA
Toque el nivel de calor en la barra de control. Dado el caso, cambie hacia la izquierda o la derecha. No suelte la barra hasta
que tenga el nivel de calor correcto. El indicador muestra el ajuste de temperatura.
CALENTAMIENTO
AUTOMÁTICO
Puede ajustar el calor necesario de forma
más rápida si activa la función Calentamiento automático. Esta función ajusta el
calor más alto durante un tiempo (consulte
el gráfico) y a continuación lo reduce hasta
el ajuste adecuado.
Para iniciar la función de Calentamiento automático para una zona de cocción:
1.
Toque ( aparece en la pantalla).
2.
Toque inmediatamente el ajuste de calor necesario. Transcurridos 3 segun-
dos,
aparece en la pantalla.
Para detener la función cambie el ajuste de
temperatura.
12
11
10
9
8
7
6
5
4
3
2
1
0
1 2 3 4 5 6 7 8 9 101112 1314
LA FUNCIÓN POWER
La función Power suministra potencia adicional a las zonas de cocción por inducción, La función Power se puede activar
durante un periodo de tiempo limitado
(consulte el capítulo sobre la Información
técnica). Transcurrido ese tiempo, la zona
de cocción adopta automáticamente el nivel de temperatura más alto. Si desea acti-
var la función, pulse
cerá
. Para apagar, cambie el ajuste de
temperatura.
, tras lo que apare-
Page 61

FUNCIÓN POWER DE LA ZONA
DE COCCIÓN DE CIRCUITO
DOBLE
La función Power del anillo interior se activa cuando el aparato detecta que el diámetro del recipiente es inferior al del anillo.
La función Power del anillo exterior se activa cuando el aparato detecta que el diámetro del recipiente es superior al del anillo.
ADMINISTRADOR DE ENERGÍA
La función de gestión de la energía divide
la potencia entre las dos zonas de cocción
que forman un par (consulte la figura). La
función de potencia incrementa ésta al máximo para una de las zonas de cocción del
par. L apotencia disminuye automáticamente en la segunda zona de cocción. La
pantalla de ajuste de calor para la zona reducida cambia entre dos niveles.
TEMPORIZADOR
Temporizador
Utilice el temporizador para regular el tiempo que desee mantener encendida una zona de cocción sólo por esta vez.
Ajuste el temporizador después de seleccionar la zona de cocción.
Elija el nivel de calor antes o después de
ajustar el temporizador.
• Si desea seleccionar la zona de coc-
ción:pulse
se encienda el indicador de la zona pertinente.
• Para activar el temporizador: toque la
parte
mar el tiempo (
repetidamente hasta que
del temporizador para progra-
- 99 minutos). La
00
ESPAÑOL 61
cuenta atrás comenzará en cuanto el indicador de la zona de cocción parpadee
más lentamente.
Para comprobar el tiempo restante:
•
seleccione la zona de cocción con
El indicador de la zona de cocción comienza a parpadear rápidamente. La
pantalla muestra el tiempo que queda.
• Para cambiar el temporizador: seleccione la zona de cocción con
o .
• Para desactivar el temporizador: seleccione la zona de cocción con el sen-
sor
. Toque . El tiempo restante se
sigue descontando hasta llegar a
indicador de la zona de cocción se apaga. Para desactivar, también puede to-
y a la vez.
car
Al finalizar la cuenta atrás, suena la señal
acústica y
cocción se apaga.
• Para detener la señal acústica: toque
parpadea. La zona de
00
.
. Toque
. El
00
CountUp Timer (temporizador
de cronometraje)
Utilice CountUp Timer para supervisar el
tiempo de funcionamiento de la zona de
cocción.
Si desea seleccionar la zona de coc-
•
ción (cuando funciona más de
una):toque
se encienda el indicador de la zona pertinente.
•
Para activar CountUp Timer:pulse
del temporizador, se enciende. La
cuenta de cronómetro comienza cuando
el indicador de la zona de cocción parpadea más lentamente. La pantalla alter-
na entre
nutos).
• Para ver el tiempo de funcionamien-
to de la zona de cocción: seleccione
la zona de cocción con el sensor
indicador de la zona de cocción comienza a parpadear rápidamente. La pantalla
muestra el tiempo de funcionamiento de
la zona de cocción.
• Para desactivar el temporizador
CountUp Timer: seleccione la zona de
cocción con
repetidamente hasta que
y el tiempo transcurrido (mi-
. El
y pulse o para de-
Page 62

www.electrolux.com
62
Minutero
Puede utilizar el temporizador como Minutero mientras no funcionen las zonas de
cocción. Toque
temporizador para ajustar el tiempo. Al finalizar el tiempo, suena la señal acústica y
00
• Para detener la señal acústica: toque
STOP+GO
La función ajusta todas las zonas de
cocción en funcionamiento al nivel de calor
más bajo (
Cuando
puede cambiar el ajuste de temperatura.
La función
temporizador.
•
•
BLOQUEO
Con las zonas de cocción en funcionamiento, se puede bloquear el panel de
control, pero no
dental del nivel de calor.
Ajuste primero la temperatura.
Para activar esta función, toque
encenderá el símbolo
dos.
El temporizador se mantiene activo.
Para detener esta función, toque
activará la temperatura que se haya seleccionado anteriormente.
La función también se desactiva cuando se
apaga el aparato.
DISPOSITIVO DE SEGURIDAD
PARA NIÑOS
Esta función impide el uso accidental del
aparato.
sactivar el temporizador. El indicador de
la zona de cocción se apaga.
. Toque o del
parpadea.
).
está en funcionamiento, no se
no detiene la función del
Para activar esta función, toque
Se encenderá el símbolo
Para desactivar esta función, toque
. Se activará la temperatura que se haya
seleccionado anteriormente.
. Evita el cambio acci-
.
durante 4 segun-
.
. Se
. Se
Para activar el dispositivo de
seguridad para niños
•
Encienda el aparato con
los niveles de calor.
•
Toque
cenderá el símbolo
•
Apague el aparato con .
Para desactivar el dispositivo de
seguridad para niños
•
Encienda el aparato con
los niveles de calor. Toque
4 segundos. Se encenderá el símbolo
•
Apague el aparato con .
Para anular el dispositivo de seguridad
para niños una sola vez
•
Encienda el aparato con
derá el símbolo
•
Toque durante 4 segundos. Ajuste
la temperatura antes de que transcurran 10 segundos. Ya puede utilizar
el aparato.
• El dispositivo de seguridad para niños se
activará de nuevo en cuanto apague la
placa con
durante 4 segundos. Se en-
.
.
.
. No ajuste
.
. No ajuste
durante
. Se encen-
OFFSOUND CONTROL
(ACTIVACIÓN Y
DESACTIVACIÓN DE LOS
SONIDOS)
Desactivación de los sonidos
Apague el aparato.
Toque
dores se encienden y se apagan. Toque
sonido está activado. Toque
ciende y la señal acústica se desactiva.
Cuando está activa esta función, sólo se
oye el sonido cuando:
•
• el minutero se apaga
• el temporizador se apaga
• se coloca algo en el panel de mandos.
durante 3 segundos. Los indica-
durante 3 segundos. se enciende; el
; se en-
se toca
Activación de los sonidos
Apague el aparato.
Page 63

Toque durante 3 segundos. Los indicadores se encienden y se apagan. Toque
durante 3 segundos. se enciende
porque el sonido está desactivado. Toque
, se enciende. El sonido está activa-
do.
ESPAÑOL 63
Page 64

www.electrolux.com
64
CONSEJOS ÚTILES
ZONAS DE COCCIÓN POR INDUCCIÓN
En las zonas de cocción por inducción, la
presencia de un fuerte campo magnético
calienta los recipientes muy rápidamente.
RECIPIENTES PARA LAS
ZONAS DE COCCIÓN POR
INDUCCIÓN
Utilice las zonas de cocción con
los utensilios de cocina adecuados.
Material de los recipientes
• correcto: hierro fundido, acero, acero
esmaltado y acero inoxidable con bases
formadas por varias capas (indicados
por el fabricante como aptos para inducción).
• incorrecto: aluminio, cobre, latón, cristal, cerámica, porcelana.
El recipiente es indicado para cocinar
por inducción si...
• ... puede calentar en poco tiempo una
cantidad pequeña de agua con el ajuste
de calor máximo.
• ... el imán se adhiere a la base del recipiente.
Utilice recipientes con la base
más gruesa y plana posible.
Medidas de los recipientes: las zonas de
cocción por inducción se adaptan automáticamente al tamaño de la base de los
utensilios de cocina, pero hasta un cierto límite.
RUIDOS DURANTE LA
UTILIZACIÓN
Es posible que escuche los ruidos
siguientes:
• crujido: el utensilio de cocina está fabricado con distintos tipos de materiales
(construcción por capas).
• silbido: utiliza una o varias zonas de cocción a temperaturas muy altas y con
utensilios de cocina cuya base está hecha de distintos materiales (construcción
por capas).
• zumbido: el nivel de calor utilizado es alto.
• chasquido: cambios en el suministro
eléctrico.
• siseo, zumbido: el ventilador está en funcionamiento.
Los ruidos descritos son normales y
no indican fallo alguno del aparato.
AHORRO ENERGÉTICO
Cómo ahorrar energía
• En la medida de lo posible, cocine siempre con los recipientes tapados.
• Coloque el recipiente sobre una zona de
cocción antes de encenderla.
• Utilice el calor residual para mantener
calientes los alimentos o derretirlos.
Eficacia de la zona de cocción
La eficacia de la zona de cocción está relacionada con el diámetro del recipiente. Un
recipiente con un diámetro inferior al mínimo solo recibe una parte de la potencia
generada por la zona de cocción. Consulte
los diámetros mínimos en el capítulo sobre
los Datos técnicos.
ÖKO TIMER (TEMPORIZADOR
ECOLÓGICO)
Con el fin de ahorrar energía, la resistencia de la zona de cocción se
apaga antes de que suene la señal
del temporizador de cuenta atrás.
La diferencia en el tiempo de utilización depende de la temperatura
de calentamiento y de la duración
de la cocción.
EJEMPLOS DE APLICACIONES
DE COCCIÓN
La relación entre el ajuste de calor y el consumo de potencia de la zona de cocción
no es lineal.
Cuando se aumenta el ajuste de calor, no
es proporcional al aumento del consumo
de potencia de la zona de cocción.
Page 65

Significa que la zona de cocción con el
ajuste de calor medio usa menos de la mitad de su potencia.
Aju
Utilícelo para: Tiempo Sugerencias Consumo
Los datos de la tabla son sólo
orientativos.
ste
del
nivel
de
calor
Mantener calientes los
alimentos cocinados
1
1 -3Salsa holandesa, derre-
tir: mantequilla, choco-
según sea
Tapar los recipientes 3 %
necesario
5 - 25 min Remover periódica-
mente
late, gelatina
1 -3Cuajar: tortilla, huevos
10 - 40 min Cocinar con tapa 3 – 8 %
revueltos
3 -5Arroces y platos a base
de leche, calentar comidas preparadas
25 - 50 min Añadir al menos el do-
ble de líquido que de
arroz; los platos lácteos deben removerse
entremedias
5 -7Cocinar al vapor verdu-
ras, pescados o carnes
7 -9Cocinar patatas al va-
por
20 - 45 min Añadir varias cuchara-
das de líquido
20 - 60 min Utilice como máximo
¼ l de agua para 750
g de patatas
7 -9Grandes cantidades de
alimentos, estofados y
sopas
9 -12Freír ligeramente: esca-
lopes, ternera “cordon
bleu”, chuletas, ham-
60 - 150
min
como estime necesario
Hasta 3 l de líquido
además de los ingredientes
Dar la vuelta a media
cocción
burguesas, salchichas,
hígado, filetes rusos,
huevos, tortitas, rosquillas
12
Freír a temperatura
-
fuerte, bolas de patata,
13
filetes de lomo, filetes
5 - 15 min Dar la vuelta a media
cocción
14 Hervir agua, cocer pasta, dorar carne (gulash, asado), freír pa-
tatas
Hervir grandes cantidades de agua. La gestión de energía está
activada.
ESPAÑOL 65
de potencia nominal
3 – 8 %
8 – 13 %
13 – 18 %
18 – 25 %
18 – 25 %
25 – 45 %
45 – 64 %
100 %
Page 66

www.electrolux.com
66
Información sobre
acrilamidas
Importante Según los nuevos
descubrimientos científicos, el tostado
intensivo de los alimentos, especialmente
de los productos que contienen almidón,
puede ser un riesgo para la salud. Por esta
razón, se recomienda cocinar a bajas
temperaturas y no tostar excesivamente
los alimentos.
Page 67

MANTENIMIENTO Y LIMPIEZA
Limpie el aparato después de cada uso.
Utilice siempre recipientes cuya base esté
limpia.
Los arañazos o las marcas oscuras
de la superficie vitrocerámica no
afectan al funcionamiento normal
del aparato.
Para eliminar la suciedad:
1.
– Quite inmediatamente: restos fun-
didos de plástico, papel aluminio y
alimentos que contengan azúcar. De
lo contrario la suciedad dañará el
aparato. Utilice un rascador especial
para el cristal. Coloque el rascador
sobre la superficie del cristal formando un ángulo agudo y arrastre la hoja para eliminar la suciedad.
– Elimine cuando el aparato se ha-
ya enfriado: restos de cal, marcas
de agua, manchas de grasa y decoloraciones metálicas. Utilice un limpiador especial para vitrocerámicas
o acero inoxidable.
2.
Limpie el aparato con un paño suave
humedecido con agua y detergente.
3.
Termine la limpieza secando a fondo
el aparato con un paño limpio.
ESPAÑOL 67
Page 68

www.electrolux.com
68
SOLUCIÓN DE PROBLEMAS
Problema Posible Solución
El aparato no se enciende
o no funciona.
Ha pulsado 2 o más sen-
La función Stop+Go está
Hay agua o salpicaduras
Se emite una señal acústica y el aparato se apaga.
Se emite una señal acústica cuando el aparato se
apaga.
El aparato se para. Ha puesto algo sobre el
El indicador de calor residual no se enciende.
La función de calentamiento automático no se
activa.
Se ha ajustado el nivel de
El valor de la temperatura
varía entre dos ajustes.
Los sensores se calientan. El recipiente es demasia-
No hay señal alguna al
pulsar los sensores del
panel.
Se enciende el símbolo
Vuelva a encender el apa-
sores al mismo tiempo.
activada.
de grasa en el panel de
control.
Hay uno o más sensores
cubiertos.
sensor
La zona de cocción no es-
tá caliente al no haber estado encendida el tiempo
suficiente.
La zona de cocción está
caliente.
calor más alto.
El regulador de la gestión
de energía está activo.
do grande o está colocado demasiado cerca de
los mandos.
Las señales están desactivadas.
La función de desconexión automática está activada.
rato y ajuste el nivel de calor en menos de 10 segundos.
Toque sólo un sensor.
Consulte el capítulo "Instrucciones de uso".
Limpie el panel de control.
Quite el objeto que cubre
los sensores.
Retire el objeto del sensor.
.
Si la zona de cocción ha
funcionado el tiempo suficiente como para estar
caliente, consulte al centro
de servicio.
Deje que la zona de cocción se enfríe lo suficiente.
El nivel de temperatura
máximo tiene la misma
potencia que la función de
calentamiento automático.
Consulte “Gestión de
energía”.
Coloque los recipientes de
gran tamaño en las zonas
de cocción traseras si fuera necesario.
Active las señales (consulte "Control OffSound").
Apague el aparato y vuelva a encenderlo.
Page 69

Problema Posible Solución
Se enciende el símbolo
Están activados el bloqueo de seguridad para
niños o el bloqueo.
Se enciende el símbolo
No hay ningún recipiente
en la zona de cocción.
Utensilios de cocina inco-
rrectos.
El diámetro de la base del
utensilio de cocina es demasiado pequeño para la
zona de cocción.
Se enciende el símbolo
seguido de un número.
Se ha producido un fallo
de funcionamiento en el
aparato.
Se enciende el símbolo Se ha producido un fallo
de funcionamiento en el
aparato porque el utensilio
de cocina ha hervido hasta agotar el líquido. Se ha
activado la protección
contra sobrecalentamiento
de las zonas de cocción y
la desconexión automática.
Si después de aplicar las soluciones anteriores no ha conseguido resolver el problema, póngase en contacto con el distribuidor o con el servicio de atención al cliente.
Facilite la información de la placa de características, el código de tres dígitos de la
placa vitrocerámica (se encuentra en la esquina de la superficie vitrocerámica) y el
mensaje de error que aparezca.
Asegúrese de que maneja el aparato adecuadamente. De lo contrario, el personal
técnico de servicio del cliente o del distribuidor facturará la reparación efectuada,
incluso en el caso de que el aparato se encuentre en periodo de garantía. Las instrucciones sobre servicio técnico y condiciones de garantía se encuentran en el folleto de garantía que se suministra con el
aparato.
ESPAÑOL 69
Consulte el capítulo "Instrucciones de uso".
Ponga un utensilio de cocina sobre la zona de cocción.
Utilice el utensilio de cocina adecuado.
Traslade el utensilio de cocina a una zona de cocción más pequeña.
Desenchufe el aparato del
suministro eléctrico durante unos minutos. Desconecte el fusible del sistema eléctrico. Vuelva a conectarlo. Si vuelve a apa-
recer el símbolo
, póngase en contacto con el
Centro de servicio técnico.
Apague el aparato. Retire
el utensilio de cocina caliente. Espere unos 30 segundos antes de encender de nuevo la zona de
cocción. Si el utensilio de
cocina era el problema, el
mensaje de error desaparece de la pantalla, pero el
indicador de calor residual
permanece. Deje enfriar el
utensilio de cocina lo suficiente y compruebe que
es compatible con el aparato consultando "Utensilios de cocina para la zona
de cocción por inducción".
Page 70

www.electrolux.com
70
INSTALACIÓN
ADVERTENCIA
Consulte el capítulo "Información
sobre seguridad".
Antes de la instalación
Antes de instalar el aparato, anote esta información de la placa de características. La
placa de características se encuentra en el
fondo de la caja del aparato.
• Modelo ...........................
• PNC .............................
• Número de serie ....................
APARATOS INTEGRADOS
• Los aparatos que han de ir integrados
en la cocina sólo deben utilizarse una
MONTAJE
vez encastrados en los muebles adecuados y con las encimeras y superficies de
trabajo apropiadas.
CABLE DE CONEXIÓN
• El electrodoméstico se suministra con el
cable de conexión.
• Sustituya el cable de alimentación de red
dañado por uno especial (tipo H05BB-F
Tmáx 90 °C o superior). Póngase en
contacto con el servicio técnico local.
min.
min.
500mm
50mm
min.
50mm
=
R 5mm
490
min.
5mm
600mm
mm
560
+1
mm
+1
=
Page 71

ESPAÑOL 71
min.
20 mm
1)
El accesorio de la caja de protección puede no estar disponible en algunos países. Póngase
en contacto con el proveedor local.
INFORMACIÓN TÉCNICA
Modell EHM6532IOW Prod.Nr. 949 596 038 00
Typ 58 GAD DB AU 220-240 V 50-60 Hz
Induction 7.4 kW Made in Germany
Ser.Nr. .......... 7.4 kW
ELECTROLUX
min.
25 mm
min.
5 mm
min.
38 mm
min.
5 mm
Si utiliza una caja de protección (accesorio
adicional
de ventilación frontal de 5 mm y el suelo
protector directamente por debajo del aparato.
No se puede utilizar la caja de protección si
se instala el aparato encima de un horno.
1)
), no son necesarios el espacio
Potencia de las zonas de cocción
Zona de cocción
Potencia nominal (ajuste
de calor má-
Función Power activada
[W]
ximo) [W]
Posterior dere-
1800/3500 W 2800/5200 W 5 145
cha —180/280
mm
Posterior iz-
1400 W 2500 W 4 125
quierda — 145
mm
Anterior iz-
2300 W 3700 W 10 180
quierda — 210
mm
Duración máxima de la
función Power [min]
Diámetro mínimo del recipiente [mm]
Page 72

www.electrolux.com
72
La potencia de las zonas de cocción puede variar ligeramente de los datos de la ta-
ASPECTOS MEDIOAMBIENTALES
Recicle los materiales con el símbolo
Coloque el material de embalaje en los
contenedores adecuados para su reciclaje.
Ayude a proteger el medio ambiente y la
salud pública, así como a reciclar residuos
de aparatos eléctricos y electrónicos. No
.
bla. Cambia con el material y las dimensiones del utensilio de cocina.
deseche los aparatos marcados con el
símbolo
domésticos. Lleve el producto a su centro
de reciclaje local o póngase en contacto
con su oficina municipal.
junto con los residuos
Page 73

ESPAÑOL 73
Page 74

www.electrolux.com
74
Page 75

ESPAÑOL 75
Page 76

www.electrolux.com/shop 892947884-B-502011
 Loading...