

Page 1

Ceramic glass hob
Keraaminen keittotaso
Стеклокерамическая
поверхность
Installation and Operating
Instructions
Asennus- ja käyttöohjehje
Инструкция по монтажу и
эксплуатации
319 618 000-A-270302-03
EHL6650P
g
q
u
Page 2

Dear customer,
Please read these operating instructions carefully.
Pay particular attention to the section “Safety information” on the first
few pages. Please retain these operating instructions for later reference. Pass them on to possible new owners of the appliance.
The following symbols are used in the text:
Safety instructions
1
Warning: Information concerning your personal safety.
Important: Information on how to avoid damaging the appliance.
Information and practical tips
3
Environmental information
2
1. These numbers indicate step by step how to use the appliance.
2. ...
3. ...
Printed on environmentally friendly paper.
Thinking ecologically means acting ecologically ...
2
Page 3

Contents
Operating Instructions . . . . . . . . . . . . . . . . . . . . . . . . . . . . . . 4
Safety . . . . . . . . . . . . . . . . . . . . . . . . . . . . . . . . . . . . . . . . . . . . . . . . . . . 4
Disposal . . . . . . . . . . . . . . . . . . . . . . . . . . . . . . . . . . . . . . . . . . . . . . . . . 6
The Key Features of Your Appliance . . . . . . . . . . . . . . . . . . . . . . . . . . 7
Description of the hob . . . . . . . . . . . . . . . . . . . . . . . . . . . . . . . . . . . . . 7
Cooking surface layout . . . . . . . . . . . . . . . . . . . . . . . . . . . . . . . . . . . . . . 7
Before Using for the First Time . . . . . . . . . . . . . . . . . . . . . . . . . . . . . . 8
Initial Cleaning . . . . . . . . . . . . . . . . . . . . . . . . . . . . . . . . . . . . . . . . . . . . . 8
Operating the Hob . . . . . . . . . . . . . . . . . . . . . . . . . . . . . . . . . . . . . . . . . 9
Residual heat indicator . . . . . . . . . . . . . . . . . . . . . . . . . . . . . . . . . . . . . . 9
Uses, Tables and Tips . . . . . . . . . . . . . . . . . . . . . . . . . . . . . . . . . . . . . . 10
Pans . . . . . . . . . . . . . . . . . . . . . . . . . . . . . . . . . . . . . . . . . . . . . . . . . . . . 10
Cleaning and Care . . . . . . . . . . . . . . . . . . . . . . . . . . . . . . . . . . . . . . . . . 12
Hob . . . . . . . . . . . . . . . . . . . . . . . . . . . . . . . . . . . . . . . . . . . . . . . . . . . . . 12
What to do if ... . . . . . . . . . . . . . . . . . . . . . . . . . . . . . . . . . . . . . . . . . . . . 14
Rectifying faults . . . . . . . . . . . . . . . . . . . . . . . . . . . . . . . . . . . . . . . . . 14
Installation Instructions . . . . . . . . . . . . . . . . . . . . . . . . . . . . . 15
Technical Data . . . . . . . . . . . . . . . . . . . . . . . . . . . . . . . . . . . . . . . . . . . . . 15
Regulations, Standards, Directives . . . . . . . . . . . . . . . . . . . . . . . . . . . . . 16
Safety Instructions for the Installer . . . . . . . . . . . . . . . . . . . . . . . . . . . . . 17
Electrical Connection . . . . . . . . . . . . . . . . . . . . . . . . . . . . . . . . . . . . . . . 18
Rating Plate . . . . . . . . . . . . . . . . . . . . . . . . . . . . . . . . . . . . . . . . . . . . . . . 18
Service . . . . . . . . . . . . . . . . . . . . . . . . . . . . . . . . . . . . . . . . . . . . . . . . 19
Assembly . . . . . . . . . . . . . . . . . . . . . . . . . . . . . . . . . . . . . . . . . . . . . 58
3
Page 4

Operating Instructions
1 Safety
The safety aspects of this appliance comply with accepted technical
standards and the German Appliance Safety Law. However, as manufacturers we also believe it is our responsibility to familiarise you with
the following safety instructions.
Electrical Safety
• The installation and connection of the new appliance must only be
carried out by qualified personnel.
• Repairs to the appliance are only to be carried out by approved
service engineers. Repairs carried out by inexperienced persons
may cause injury or serious malfunctioning. If your appliance needs
repairing, please contact your local customer center or your dealer.
Please follow these instructions, otherwise the warranty is void in the
3
event of damages.
• Flush-mounted appliances may only be operated following installation in suitable installation cabinets and workplaces which conform
to the relevant standards. This ensures sufficient protection against
contact for electrical units as required by the VDE [Association of
German Electrical Engineers].
• If your appliance malfunctions or if fractures, cracks or splits appear:
– switch off all cooking zones,
– disconnect the hob from the electricity supply.
Child Safety
The cooking zones will become hot when you cook. Therefore, always
keep small children away from the appliance.
Safety During Use
• This appliance may only be used for normal cooking and frying in
the home. It is not designed for commercial or industrial purposes.
• Do not use the hob to heat the room.
• Take care when plugging electric appliances into mains sockets
near the hob. Connection leads must not come into contact with the
hot surface.
• Overheated fats and oils catch fire quickly. You should supervise
cooking when preparing foods in fat or oil (e.g. chips).
• Switch off the cooking zones after use.
4
Page 5

Safety When Cleaning
• For safety reasons do not clean the appliance with a steam jet or
high pressure cleaner.
• Clean the hob in accordance with the maintenance and cleaning instructions in this manual.
How to avoid damage to the appliance
• Do not use the cooking area as a worktop or storage space.
• The frameless edge of the glass ceramic surface is susceptible to
knocks. Please be careful when moving pots and pans around.
• Do not have the cook zones on with empty pans, or with no pots or
pans on them.
• Ceramic glass is very tough, and impervious to sharp temperature
changes, but is not unbreakable. It can be damaged if particularly
hard or sharp objects fall on to it.
• Do not use pots made of cast iron, or which have damaged bases
with rough edges or burrs. Moving these around may cause
scratches.
• If sugar or a mixture containing sugar falls onto a hot cooking zone
and melts, remove immediately, while still hot, using a kitchen
scraper. If left to cool down, it may damage the surface when removed.
• Keep objects or materials liable to melt away from the ceramic glass
surface, for example, artificial materials, aluminium foil, or cooking
wraps. If any other materials or foodstuffs are melting on the ceramic glass surface, these should also be cleaned away immediately, using a kitchen scraper.
5
Page 6

2 Disposal
Disposing of the packaging material
• All parts of the packaging can be fully recycled; foil and expanded
polyurethane parts are appropriately identified. Please dispose of
packaging material and, if appropriate, your old appliance properly.
• Please follow the national and regional regulations and material
identification (material separation, refuse collection, waste disposal
sites).
Information on disposal
• The appliance must not be disposed of with household rubbish.
• You can obtain information about collection dates or public refuse
disposal sites from your local refuse department or council.
• Warning! Before disposing of old appliances make them inoperable.
Remove the mains lead.
6
Page 7
The Key Features of Your Appliance
• Ceramic glass cooking surface: The appliance has a ceramic
glass cooking surface and 4 rapid response cooking zones. The particularly powerful radiant heater elements significantly shorten the
amount of time taken for the zones to heat up.
• Cleaning: The advantage of the glass ceramic cooking surface is its
easy cleaning. The smooth surface is easy to keep clean (see section: “Cleaning and care”).
• Double-ring cooking zone: The cooking surface possesses a dou-
ble-ring cooking zone. This provides the appliance with a cooking
zone with a variable size, for instance for smaller pots. This is a saving in energy.
• Frying zone: The hob has a special frying zone. This can be set to
either the round or the oval shape, for example when using a fryer.
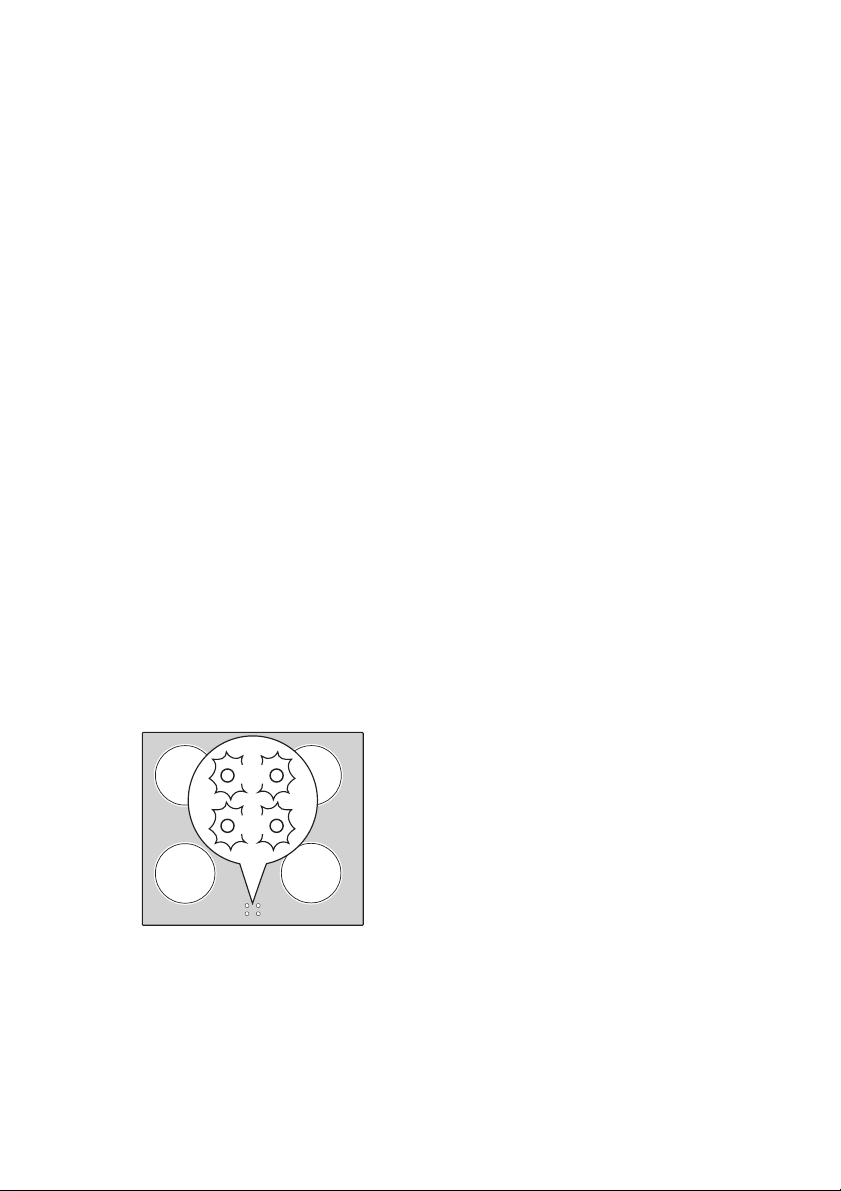
• Residual heat indicator: The residual heat indicator lights up if the
cooking zone becomes so hot that there is a risk of burning.
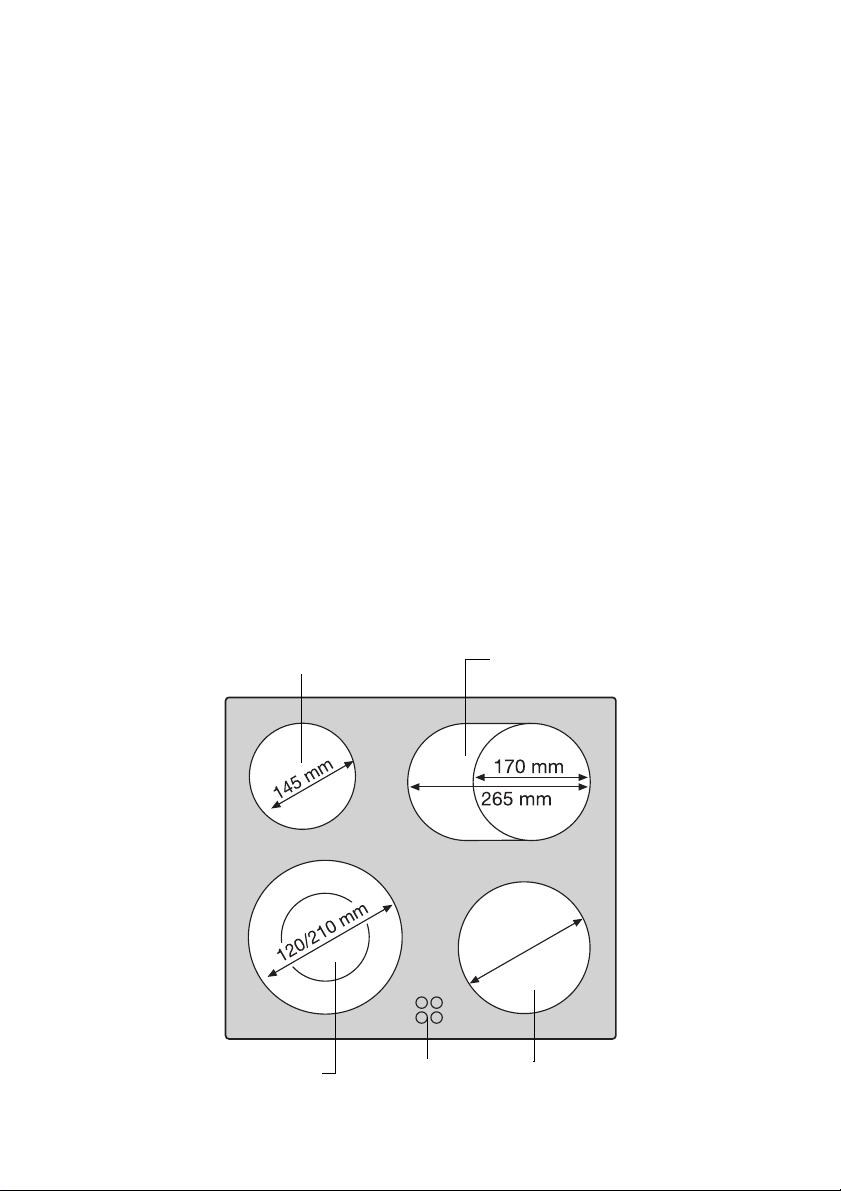
Description of the hob
Cooking surface layout
Single ring cooking zone
1200 W
Double ring cooking zone
2200 W
Residual heat
display
Casserole zone
2400 W
180 mm
Single ring cooking zone
1800 W
7
Page 8

Before Using for the First Time
Initial Cleaning
Wipe the ceramic glass surface with a damp cloth.
Important: Do not use any caustic, abrasive cleaners! The surface
1
could be damaged.
8
Page 9
Operating the Hob
When a cooking zone is switched on, it may hum briefly. This is a
3
characteristic of all glass ceramic cooking zones and does not impair
either the function or the life of the appliance.
The cooking zones are operated and multiple ring zones activated
3
using the ring switches on the cooker or switch box as described
in the relevant set of instructions.
Residual heat indicator
The ceramic glass hob is equipped with a residual heat indicator, a
control lamp is allocated to each cooking zone. This lights up as soon
the corresponding cooking zone is hot and warns against inadvertant
contact.
The remaining heat lamp only goes out when the cooking zone has
cooled down even when the cooking zone is switched Off.
You can use the residual heat for melting and keeping food warm.
2
Important! As long as the residual heat indicator is illuminated, there
1
is a risk of burns.
Important! If the power supply is interrupted the residual heat indica-
1
tor also go out and information about residual heat will no longer be
available. However, it is still possible to burn yourself. This can be
avoided by being particularly attentive.
9
Page 10
Uses, Tables and Tips
Pans
The better the pan, the better the results.
• You can recognise good pans by their bases. The base should be as
thick and flat as possible.
• Pay particular attention when buying new pans to the diameter of
the base. Manufacturers often give only the diameter of the upper
rim.
• Pots with aluminium or copper bases can cause metallic discolouring on the ceramic glass surface, which is very difficult or impossible
to remove.
• Do not use cast iron pans or pans with a rough, burred or damaged
base. This can produce permanent scratching if the pan is slid
across the surface.
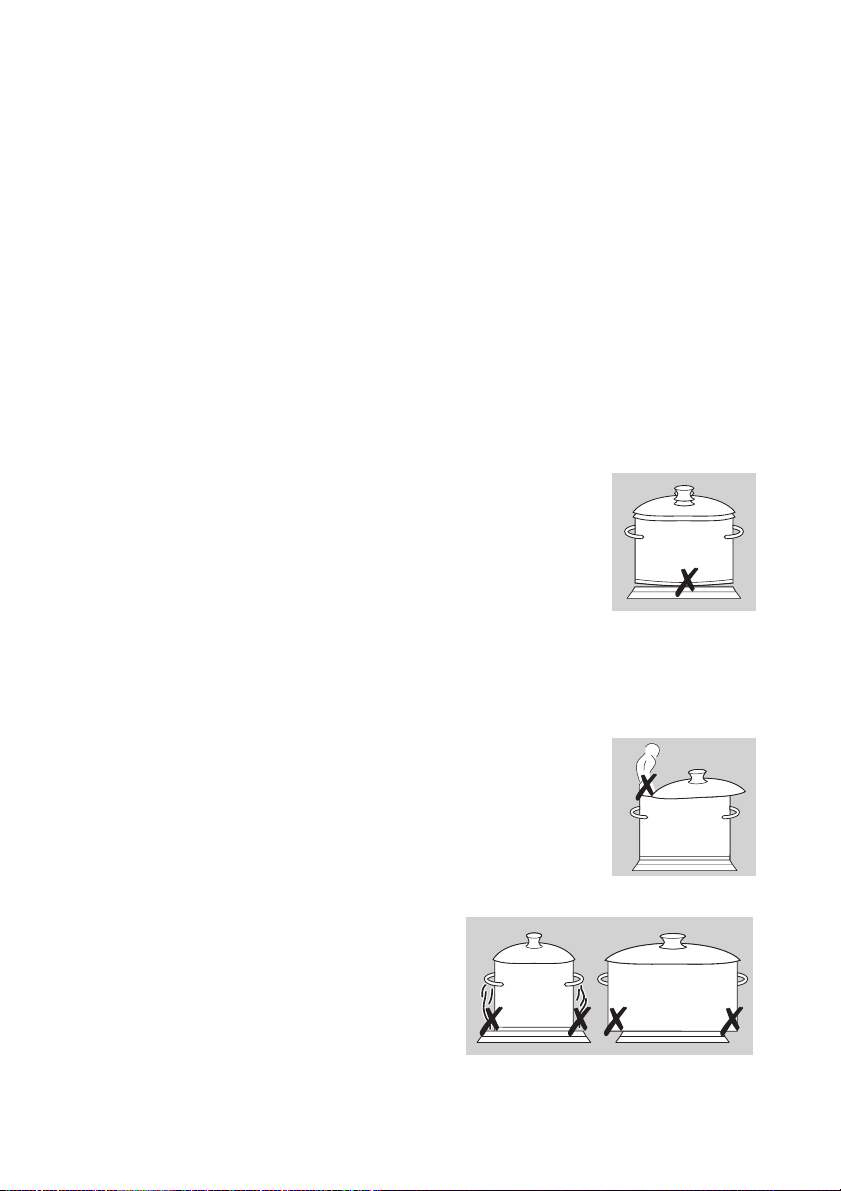
• When cold, pan bases are normally bowed slightly
inwards (concave). They should never be bowed
outwards (convex).
• If you wish to use special types of pan (e.g. a
pressure cooker, simmering pan, wok, etc.),
please observe the manufacturer's instructions.
Energy saving tips
2
You can save valuable energy by observing the following points:
• Always position pots and pans before switching on the cooking
zone.
• Dirty cooking zones and pan bases increase
power consumption.
• Whenever possible always position the lids firmly
on pots and pans to cover completely.
• Switch off the cooking zones before the end of the
cooking time to use the residual heat such as to
keep foods warm or for melting.
• The base of the pan should be
the same size as the cooking
zone.
• Using a pressure cooker reduces
cooking times by up to 50%.
10
Page 11
Settings for Cooking on the Rings
The setting position required for cooking processes is dependent on
the quality of the pots and on the type and amount of the food.
Switch
position
9 Parboiling
7-9
6-7
4-5
3-4
2-3
1-2 Melting
0 Residual heat, OFF-position
When heating up or frying, we recommend heat setting “9", and then
3
continue cooking foods at an appropriate lower heat setting.
Cooking method Examples
Starting of cooking and roasting, cooking of large
Frying
Quick frying
Roasting
Frying without
crust
Boiling
Braising
Simmering
Stewing
Gentle
simmering
quantities of liquid, then switch-back to appropri-
Fillet of pork and beef, steaks goulash
Frying of meat, schnitzel, cutlets, meat-balls,
sausages, liver, fish-fillet in deep fat, Frying eggs
Boiled potatoes, stews, soups, hot-pot, sauces in
Simmering of vegetables, braising of meat, lightly
small amount of fruit with little liquid
Simmering of rice and food with milk (sometimes
stirring), Stewing of smaller amount of potatoes or
vegetables, Warming up of prepared meal
Omelette, fried eggs, Hollandaise sauce, Keeping
warm a meal or small amount of hot-pot
Melting of butter, chocolate, gelatine.
ate setting
French fries, pan-cakes
or chops
large quantities
cooking
11
Page 12

Cleaning and Care
Hob
Important: Cleaning agents must not come into contact with the hot
1
ceramic glass surface! All cleaning agents must be removed with
plenty of clean water after cleaning because they can have a caustic
effect when the rings are next heated!
Do not use any aggressive cleaners such as grill or oven sprays,
coarse scourers or abrasive pan cleaners.
Clean the ceramic glass surface after each use when it is warm to the
3
touch or cold. This will avoid spillages becoming burnt on.
Remove scale and water marks, fat spots and discolouration with
a metallic shimmer using a commercially available glass ceramic or
stainless steel cleaner such as “Hob Brite”.
Light Soiling
1. Wipe the ceramic glass surface with a damp cloth and a little washing
up liquid.
2. Then rub dry with a clean cloth. Remnants of cleaner must not be
left on the surface.
3. Thoroughly clean the entire ceramic glass cooking surface once a
week with a commercially available glass ceramic or stainless steel
cleaner.
4. Then wipe the ceramic glass surface using plenty of clean water
and rub dry with a clean fluff-free cloth.
Stubborn Soiling
1. To remove food that has boiled
over or stubborn splashes, use a
glass scraper.
2. Place the glass scraper at an angle
to the glass ceramic surface.
3. Remove soiling by sliding the
blade.
You can obtain glass scrapers and
3
glass ceramic cleaners from specialist retailers.
12
Page 13
1 Problem Dirt
1. Remove burnt-on sugar, melted
plastic, aluminium foil or other meltable materials with a glass scraper
immediately and while still hot.
Important: There is a risk of burning
1
yourself when the glass scraper is
used on a hot cooking zone!
2. Then clean the hob normally when it
has cooled down.
If the cooking zone on which
3
something has melted has already
cooled down, warm it up again for cleaning.
Scratches or dark marks on the ceramic glass surface, caused for example by a pan base with sharp edges, cannot be removed. However,
they do not impair the function of the hob.
13
Page 14

What to do if ...
Rectifying faults
It is possible that faults have been caused by a minor error, which you
can correct yourself with the help of the following instructions. Do not
attempt any further repairs if the following instructions do not help in
each specific case.
Warning! Repairs to the appliance are only to be carried out by ap-
1
proved service engineers. Improperly effected repairs may result in
considerable risk to the user. If your appliance needs repairing, please
contact your specialist dealer or customer service.
What to do when …
.... the cooking zone does not function?
Check whether
– the fuses in the house installation (fuse box) are intact. If the fuses
switch off, or blow, several times, please call an authorized electrical
technician.
– the corresponding cooking zone is switched ON and the desired de-
gree of heat has been set.
– for cooking zones with several rings, whether the heating circle has
been switched On.
If it is desired to contact the customer services because of incorrect
operation, then the visit of the customer service technician during the
guarantee time will not be free of charge.
14
Page 15

Installation Instructions
Important! The new appliance may only be installed and connected
1
by qualified personnel.
Please observe this instruction, otherwise the warranty will not cover
any damage that may occur.
Technical Data
Appliance dimensions
Width 590 mm
Depth 520 mm
Height 49 mm
Worktop cut-out dimensions
Width 560 mm
Depth 490 mm
Corner radius R5
Power consumption
Front left dual-ring cooking zone ø 120/210 mm 1000/2200 W
Rear left cooking zone ø 145 mm 1200 W
Rear right multipurpose cooking zone ø 170/
265 mm
Front right cooking zone ø 180 mm 1800 W
Heating element voltage 230 V ~
Tot al l o a d 7,6 kW
1500/2400 W
15
Page 16

Regulations, Standards, Directives
This appliance meets the following standards:
• EN 60 335-1 and EN 60 335-2-6
relating to the safety of electrical appliances for household use and
similar purposes and
• EN 60350, or DIN 44546 / 44547 / 44548
relating to the operating features of electric cookers, hobs, ovens,
and grills for household use.
• EN 55014-2 / VDE 0875 part 14-2
• EN 55014 / VDE 0875 part 14/1999-10
• EN 61000-3-2 / VDE 0838 part 2
• EN 61000-3-3 / VDE 0838 part 3
relating to basic requirements for electro-magnetic compatibility
protection (EMC).
This appliance complies with the following EU Directives:
;
• 93/68/EWG CE Labelling Directive
• 73/23/EWG dated 19.02.1973 (Low Voltage Directive) including
Amending Directive 90/683/EWG
• 89/336/EWG dated 03./05.1989 (EMC Directive
including Amending Directive 92/31/EWG).
16
Page 17

1 Safety Instructions for the Installer
• A device must be provided in the electrical installation which allows
the appliance to be disconnected from the mains at all poles with a
contact opening width of at least 3 mm.
Suitable isolation devices include line protecting cut-outs, fuses
(screw type fuses are to be removed from the holder), earth leakage
trips and contactors.
• In respect of fire protection, this appliance corresponds to type Y
(EN 60 335-2-6). Only this type of appliance may be installed with a
high cupboard or wall on one side.
• Drawers may not be fitted underneath the hob.
• The installation must guarantee shock protection.
• The kitchen unit in which the appliance is fitted must satisfy the sta-
bility requirements of DIN 68930.
• For protection against moisture, all cut surfaces are to be sealed
with a suitable sealant.
• On tiled work surfaces, the joints in the area where the hob sits must
be completely filled with grout.
• On natural, artificial stone, or ceramic tops, the snap action springs
must be bonded in place with a suitable artificial resin or mixed adhesive.
• Ensure that the seal is correctly seated in the frame and that it is
seated against the work surface without leaving any gaps. Additional silicon sealant must not be applied; this will make removal
more difficult when servicing.
• The hob must be pressed out from below when removed.
• Clean the worktop around the cut-out area.
• Attach the supplied one-sided adhesive liner tape around the cut-
out on the top surface of the worktop. The joining point of the two
ends should be in the middle of one of the sides. After cutting the
correct length (allow a few millimetres) simply press the two ends
against each other.
17
Page 18
Electrical Connection
• Before connection, check whether the nominal voltage of the appli-
ance, the voltage stamped on the nameplate, is in agreement with
the available supply voltage and the nominal voltage of the combination appliance. The nameplate is situated on the under-covering
of the cooking surface.
• Bring the connection plug of the cooking unit together with the cor-
responding parts of the built-in stove or switchbox and connect
them tightly. Press the connection cable into the side of the oven
door.
• Following connection to the mains supply, all cooking zones must
1
be switched on, at the maximum setting, one after the other for approx. 30 seconds to check that they function correctly.
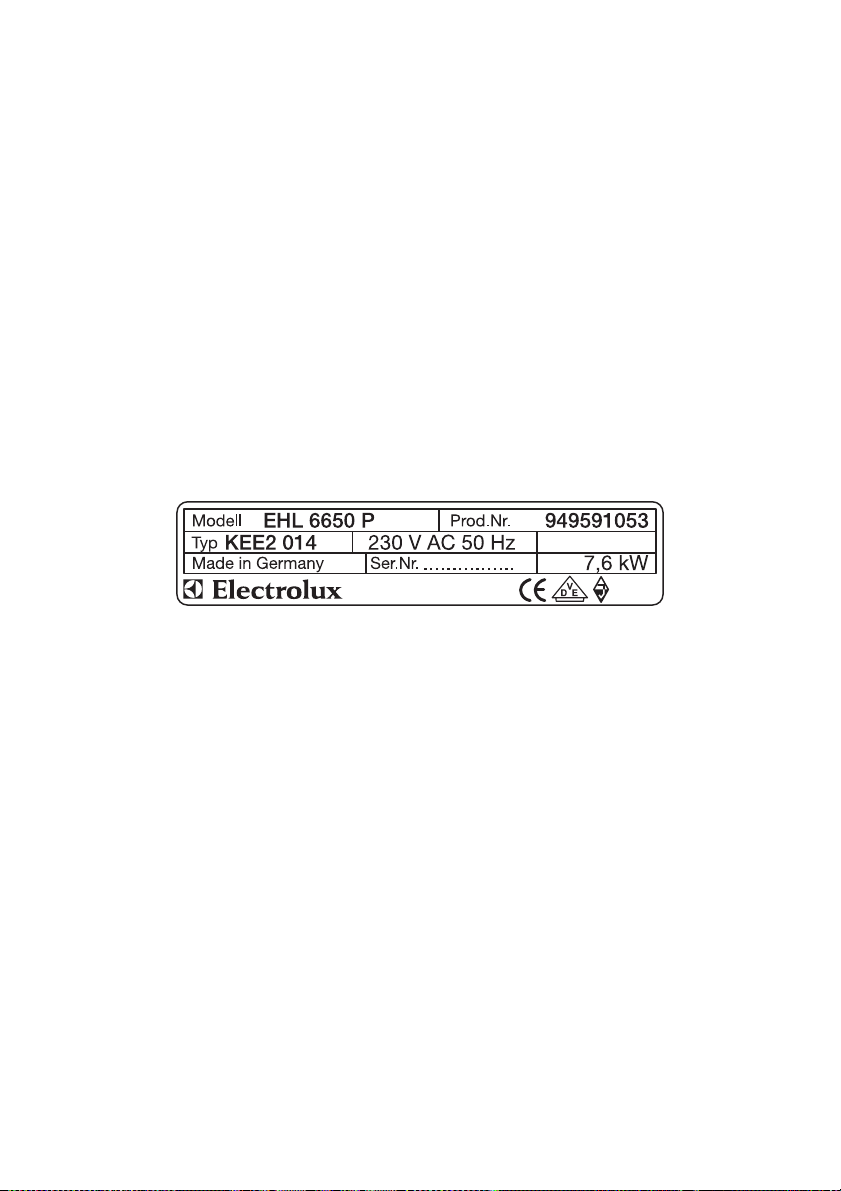
Rating Plate
18
Page 19

Service
In the “What to do if …” section a number of malfunctions are listed
that you can rectify yourself Look there first if a fault occurs.
Is it a technical fault?
If so, please contact your customer service centre. (You will find addresses and telephone numbers in the section “Customer Service
Centres”.)
Always prepare in advance for the discussion. This will make diagnosis of the problem easier and also make it easier to decide if a customer service visit is necessary:
Please make a note of the following
information as accurately as possible:
• What form does the fault take?
• Under what circumstances does
the fault occur?
Prior to the telephone call it is important that you make a note of the following appliance code numbers that
are given on the rating plate:
• PNC code (9 digits),
• S No code (9 digits).
We recommend that you record the code numbers here so that you always have them to hand:
PNC . . . . . . . . .
S No . . . . . . . . .
When do you incur costs even during the warranty period?
• if you could have remedied the fault yourself using the fault table
(see section “What do I do if ...”),
• if the customer service technician has to make several journeys be-
cause he was not provided with all the relevant information before
his visit and therefore, forexample, has to fetch spare parts. These
multiple trips can be avoided if you prepare your phone call as described above.
19
Page 20

Arvoisa asiakas,
Lue tämä käyttöohje huolellisesti läpi.
Kiinnitä erityistä huomiota ensimmäisillä sivuilla olevaan “Turvallisuusohjeita” -kappaleeseen. Säilytä tämä käyttöohje myöhempää käyttöä
varten. Anna käyttöohje laitteen mukana mahdolliselle uudelle omistajalle.
Tekstissä käytetään seuraavia symboleita:
Turv al li su us oh je et
1
Varoitus: Oman turvallisuutesi kannalta tärkeät ohjeet.
Huomautus: Ohjeet, jotka auttavat välttämään laitteen vioittumista.
Ohjeita ja käytännön vinkkejä
3
Ympäristöä koskevia tietoja
2
1. Nämä numerot ohjaavat sinua vaiheittain laitteen käytössä.
2. ...
3. ...
Painettu ympäristöystävällisesti valmistetulle paperille.
Ekologisesti ajatteleva toimii myös ekologisesti ...
20
Page 21

Sisällys
Käyttöohje . . . . . . . . . . . . . . . . . . . . . . . . . . . . . . . . . . . . . . . . . . . . 22
Turvallisuus . . . . . . . . . . . . . . . . . . . . . . . . . . . . . . . . . . . . . . . . . . . . . . 22
Hävittäminen . . . . . . . . . . . . . . . . . . . . . . . . . . . . . . . . . . . . . . . . . . . . . 24
Laitteesi tärkeimmät ominaisuudet . . . . . . . . . . . . . . . . . . . . . . . . . . . 25
Laitteen rakenne . . . . . . . . . . . . . . . . . . . . . . . . . . . . . . . . . . . . . . . . . . 26
Keittotason kuvaus . . . . . . . . . . . . . . . . . . . . . . . . . . . . . . . . . . . . . . . . . 26
Ennen ensimmäistä käyttöä . . . . . . . . . . . . . . . . . . . . . . . . . . . . . . . . . 26
Ensimmäinen puhdistus . . . . . . . . . . . . . . . . . . . . . . . . . . . . . . . . . . . . . 26
Keittoalueen käyttö . . . . . . . . . . . . . . . . . . . . . . . . . . . . . . . . . . . . . . . . 27
Jälkilämmön merkkivalot . . . . . . . . . . . . . . . . . . . . . . . . . . . . . . . . . . . . . 27
Käyttö, taulukot, vihjeet . . . . . . . . . . . . . . . . . . . . . . . . . . . . . . . . . . . . 28
Keittoastiat . . . . . . . . . . . . . . . . . . . . . . . . . . . . . . . . . . . . . . . . . . . . . . . 28
Puhdistus ja hoito . . . . . . . . . . . . . . . . . . . . . . . . . . . . . . . . . . . . . . . . . 30
Keittotaso . . . . . . . . . . . . . . . . . . . . . . . . . . . . . . . . . . . . . . . . . . . . . . . . 30
Mitä tehdä, jos ... . . . . . . . . . . . . . . . . . . . . . . . . . . . . . . . . . . . . . . . . . . 32
Häiriöiden poisto . . . . . . . . . . . . . . . . . . . . . . . . . . . . . . . . . . . . . . . . 32
Asennusohjeet . . . . . . . . . . . . . . . . . . . . . . . . . . . . . . . . . . . . . . . 33
Tekniset tiedot . . . . . . . . . . . . . . . . . . . . . . . . . . . . . . . . . . . . . . . . . . . . . 33
Säädökset, standardit, direktiivit . . . . . . . . . . . . . . . . . . . . . . . . . . . . . . . 34
Asentajaa koskevat turvallisuusohjeet . . . . . . . . . . . . . . . . . . . . . . . . . . 35
Sähköliitännät . . . . . . . . . . . . . . . . . . . . . . . . . . . . . . . . . . . . . . . . . . . . . 36
Arvokilpi . . . . . . . . . . . . . . . . . . . . . . . . . . . . . . . . . . . . . . . . . . . . . . . . . . 36
Huolto ja varaosat . . . . . . . . . . . . . . . . . . . . . . . . . . . . . . . . . . . 37
Laitteen asentaminen . . . . . . . . . . . . . . . . . . . . . . . . . . . . . . . 58
21
Page 22

Käyttöohje
1 Turvallisuus
Tämän laitteen turvallisuus täyttää yleisesti hyväksytyt tekniset säännöt ja laiteturvamääräykset. Lisäksi vastuullisena valmistajana haluamme tiedottaa seuraavista turvallisuusohjeista.
Sähköturvallisuus
• Vain valtuutettu asentaja saa suorittaa uuden laitteen asennuksen ja
liitännät.
• Ainoastaan koulutettu ammattihenkilö saa suorittaa korjauksia lait-
teeseen. Asiaankuulumattomat korjaustyöt saattavat aiheuttaa vakavia vaaratilanteita. Käänny korjausasioissa valtuutetun
huoltoliikkeen tai alan erikoisliikkeen puoleen.
Noudata näitä ohjeita. Muussa tapauksessa vahingon sattuessa takuu
3
ei ole voimassa.
• Kalusteisiin asennettavia laitteita saa käyttää vain, jos ne on kiinni-
tetty normien mukaisiin, sopiviin asennuskaappeihin ja työtasoihin.
Näin varmistetaan VDE-määräysten mukainen sähkölaitteiden kosketussuoja.
• Mikäli laitteeseen tulee toimintahäiriöitä, halkeamia, säröjä tai repeä-
miä:
– kytke kaikkien keittoalueiden virta pois,
– kytke keittotason sulake pois päältä tai irrota se.
Lasten turvallisuus
Keitettäessä tai paistettaessa keittoalueet kuumenevat. Pitäkää sen
takia pikkulapset loitolla käytettäessä laitetta.
Turvallisuus laitetta käytettäessä
• Laitetta saa käyttää vain kotitalouksissa tavalliseen ruuanlaittoon.
• Älä käytä keittotasoa huoneen lämmitykseen.
• Liitettäessä sähkölaitteita niiden läheisyydessä oleviin pistorasioihin
on noudatettava varovaisuutta. Liitinjohdot eivät saa joutua laitteen
kuumille osille.
• Ylikuumentuneet rasvat ja öljyt ovat helposti syttyviä. Jos valmistat
ruokia rasvassa tai öljyssä (esimerkiksi ranskanperunoita), valvo
kypsennystä.
• Käännä keittoalueet pois päältä aina käytön jälkeen.
22
Page 23

Turvallisuus laitetta puhdistettaessa
Puhdistettaessa laitetta sen pitää olla pois päältä. Laitetta ei turvallisuussyistä saa puhdistaa höyrysuihkulaitteella tai painepuhdistimella.
Näin vältät aiheuttamasta vaurioita laitteelle
• Älä käytä keittotasoa työpöytänä äläkä astioiden sijoittelupaikkana.
• Lasikeraamisen levyn kehyksetön reuna kolhiutuu helposti. Toimi siis
varovasti käsitellessäsi kattiloita ja pannuja.
• Älä käytä keittoalueita tyhjien keittoastioiden kanssa tai ilman keitto-
astiaa.
• Lasikeraaminen materiaali kestää kuumentamista ja on hyvin lujaa,
muttei rikkoutumatonta. Erityisesti terävät ja kovat esineet, jotka putoavat keittolevylle, voivat aiheuttaa vaurioita.
• Älä käytä valurauta-astioita äläkä pohjastaan vaurioituneita, karkeita
ja huonopohjaisia kattiloita. Astian siirtäminen voi aiheuttaa naarmuja.
• Jos kuumalle keittoalueelle joutuu sokeria tai sokeripitoista ruokala-
jia, se on poistettava kaapimella kun se on vielä kuumaa. Jäähtyneen sokerimassan irrottaminen voi vaurioittaa pintaa.
• Kaikki kiinnisulavat esineet ja materiaalit, kuten muovit, alumiinifoliot
ja uunifoliot, on pidettävä poissa lasikeraamiselta pinnalta. Jos lasikeraamiselle pinnalle kuitenkin joutuu jotain tällaista, se on poistettava heti kaapimella.
23
Page 24

2 Hävittäminen
Pakkausmateriaalin hävittäminen
• Kaikki pakkauksen osat ovat kierrätettävistä materiaaleista, foliot ja
vaahtomuoviosat on merkitty kierrätystä varten. Huolehdi pakkausmateriaalin ja mahdollisen vanhan laitteen asianmukaisesta hävittämisestä.
• Noudata kansallisia ja alueellisia säädöksistä ja materiaalimerkintöjä
(materiaalin erotteleminen, jätteen ja hyötyjätteen keräys).
Hävitysohjeita
• Laitetta ei saa hävittää tavallisen kotitalousjätteen mukana.
• Tietoja laitteiden keräysajoista ja -paikoista voit kysyä omasta kun-
nastasi tai kaupungistasi.
• Varoitus! Tee poistettavista kodinkoneista ennen hävitystä käyttökel-
vottomia irrottamalla verkkojohto.
24
Page 25

Laitteesi tärkeimmät ominaisuudet
• Keraaminen keittotaso: Laitteessa on keraaminen keittotaso ja no-
peasti kuumenevat keittoalueet. Lämpöalueiden kuumenemisaika
on olennaisesti lyhyempi erityisen tehokkaiden säteilylämmittimien
ansiosta.
• Puhdistus: Keraamisen keittotason etuna tavanomaisiin keittotasoi-
hin verrattuna on sen helppo puhtaanapito. Tasainen pinta on
helppo puhdistaa (katso Kappale: “Puhdistus ja hoito”).
• Kaksoiskeittoalue: Keittotasossa on myös yksi kaksoiskeittoalue.
Tämä keittoalue sisältää kaksi erikokoista kuumenevaa aluetta, jolloin esimerkiksi pienempien kattiloiden käyttö on mahdollista energiaa säästäen.
• Paistoalue: Keittotasossa on myös paistoalue. Valinnan mukaisesti
tätä aluetta voidaan käyttää pyöreänä tai soikeana esimerkiksi erimuotoisille paistoastioille.
• Jälkilämmön merkkivalo: Jälkilämmön merkkivalo palaa, kun keit-
toalueen lämpötila on niin korkea, että palovammojen vaara
on olemassa.
25
Page 26

Laitteen rakenne
Keittotason kuvaus
Kiinteä lämpöalue
1200 W
Muuntuva keittoalue
2200 W
Jälkilämmön
merkkivalot
Kiinteä lämpöalue
1800 W
Ennen ensimmäistä käyttöä
Ensimmäinen puhdistus
Paistialue
2400 W
180 mm
Pyyhi keraaminen keittotaso kostealla liinalla.
Huomautus: Älä käytä voimakkaita, hankaavia puhdistusaineita, jotta
1
pinta ei vahingoittuisi!
26
Page 27

Keittoalueen käyttö
Keittoalue voi surista lyhyesti käynnistämisen jälkeen. Se on kaikkien
3
keramiikkakeittoalueiden tyyppiominaisuus, eikä se vaikuta laitteen
toimintaan eikä kestoon.
Keittoalueita säädetään tai muuntuvat keittoalueet kytketään
3
päälle uunissa tai kytkentäkotelossa olevilla keittoaluekytkimillä,
ja niiden toiminta on kuvattu tämän laitteen käyttöohjeessa.
Jälkilämmön merkkivalot
Keraamisessa keittotasossa on jälkilämmön merkkivalot. Jokaiselle
keittoalueelle on oma merkkivalonsa. Merkkivalo syttyy, kun vastaava
keittoalue on kuumentunut, jotta käyttäjä ei vahingossa koske kuumaan pintaan.
Keittoalueen poiskytkennän jälkeen jälkilämmön merkkivalo sammuu
vasta sen jälkeen, kun keittoalue on jäähtynyt.
Jälkilämpöä voi hyödyntää sulattamiseen ja ruokien lämpimänäpitoon.
2
Huomio! Palovammavaara on olemassa niin kauan kuin jälkilämmön
1
merkkivalo palaa.
Huomio! Sähkökatkon sattuessa myös jälkilämmön merkkivalo sam-
1
muu eikä jälkilämpöä siis tällöin ilmaista millään tavalla. Palovammojen vaara on kuitenkin edelleen olemassa. Tällaisen vaaran voi välttää
olemalla huolellinen ja tarkkaavainen.
27
Page 28

Käyttö, taulukot, vihjeet
Keittoastiat
Mitä parempaa kattilaa käytät, sitä parempi on tulos.
• Hyvän keittoastian tunnistaa pohjasta. Pohjan tulisi olla mahdolli-
simman paksu ja tasainen.
• Huomioi ostaessasi kattiloita ja pannuja pohjan läpimitta. Valmistajat
ilmoittavat usein astian yläreunan läpimitan.
• Alumiini- tai kuparipohjaiset astiat saattavat jättää keraamiseen ta-
soon metallivärjäytymiä, jotka on vaikea tai mahdoton poistaa.
• Älä käytä valurautaisia tai pohjaltaan vaurioituneita kattiloita, jotka
ovat karkeita tai niissä on valupurseita. Kattilaa siirrettäessä saattaa
syntyä naarmuja.
• Kylminä ovat kattiloiden pohjat yleensä hieman
taipuneita sisäänpäin (koveria). Na eivät saa olla
missään tapauksessa taipuneita ulospäin (kuperia).
• Jos käytät erikoiskäyttöön tarkoitettuja keittoasti-
oita (esim. painekattilaa, haudutuskattilaa, wokkipannua jne.), noudata niiden valmistajien
käyttöohjeita.
Energiansäästövinkkejä
2
Säästät arvokasta energiaa, kun otat huomioon seuraavat kohdat:
• Pane kattilat ja pannut keittoalueelle, ennen kuin kytket virran.
• Likaiset keittoalueet ja astioiden pohjat lisäävät
virrankulutusta.
• Käytä kattiloissa ja pannuissa kantta aina, kun se
on mahdollista.
• Käytä jälkilämpö hyväksi, esim. ruokien lämpi-
mänä pitämiseen tai sulattamiseen. Kytke virta
pois keittoalueista ennen kypsennysajan loppumista.
• Keittoastian ja -alueen tulisi olla
yhtä suuria.
• Kun käytetään pika-keittokatti-
loita, lyhenee kypsennysaika jopa
50%.
28
Page 29

Keittotason käyttöasetusten keskiarvoja
Seuraavan taulukon tiedot ovat suuntaa antavia. Kytkimen tarvittava
asento riippuu kattiloiden laadusta ja elintarvikkeiden tyypistä ja määrästä.
Kytkimen
asento
9
7-9
6-7
4-5 keittäminen
3-4
2-3 hauduttaminen
1-2 sulattaminen
0 jälkilämpö, virta pois
Kypsennys,
Jatkokypsen-
nysteho
alkukuumenta-
minen
voimakas
paistaminen
varovainen
paistaminen
höyryttäminen,
haihduttaminen
Soveltuu seuraaviin tarkoituksiin
suurien vesimäärien kuumennus, tuorepastan
keittäminen
ranskanperunoiden friteeraus,
lihan ruskistaminen, esim. gulassi,
paistaminen, esim. perunaohukkaat,
pihvien paistaminen
lihan, leikkeiden, Cordon bleu –pihvien
paistaminen
kyljykset, jauhelihapihvit, braatvursti, maksa
jauhosuurus, varovainen paistaminen
munat, munakas, friteeraus
suurempien ruokamäärien,
pataruokien ja keittojen keittäminen,
perunoiden höyryttäminen,
lihaliemen keittäminen
vihannesten tai,
lihan hauduttaminen
riisipuuron keittäminen
riisin tai maitoruokien hauduttaminen
(sekoita välillä),
pienempien peruna- tai vihannesmäärien
hauduttaminen,
valmisruokien lämmittäminen
munakkaat, muut munaruoat,
hollandaise-kastike,
ruokien lämpimänä pitäminen,
voin, suklaan, liivatteen sulattaminen
Suosittelemme, että käytät alkukuumennuksen tai -ruskistuksen yhte-
3
ydessä tehoa “9” ja jatkat sitten pitemmän valmistusajan vaativien
ruokien kypsennystä vastaavalla jatkoteholla.
29
Page 30

Puhdistus ja hoito
Keittotaso
Huomautus: Puhdistusaineet eivät saa joutua kuumille keraamisille
1
tasoille! Kaikki puhdistusaineet pitää poistaa riittävällä määrällä puhdasta vettä, sillä muuten niillä voi olla syövyttävä vaikutus uudelleen
lämmitettäessä!
Älä käytä voimakkaita puhdistusaineita, kuten esim. grillin tai uunin
puhdistukseen tarkoitettuja sumutteita, karheita hankausaineita tai
naarmuttavia kattiloiden puhdistusaineita.
Puhdista keraaminen keittotaso jokaisen käytön jälkeen, kun se on
3
korkeintaan kädenlämmin. Näin vältät lian kiinnipalamisen.
Poista kalkki-, vesi- rasva- ja metallivärjäymätahrat tavallisilla keramiikan tai jaloteräksen puhdistukseen tarkoitetuilla aineilla (esim.
“Toprens”).
Keittotaso vain vähän likainen
1. Pyyhi kostealla pyyhkeellä, jossa on hieman käsitiskiainetta.
2. Kuivaa lopuksi puhtaalla pyyhkeellä. Tason pinnalle ei saa jäädä
puhdistusaineen jäämiä.
3. Puhdista koko keraaminen taso kerran viikossa perusteellisesti tavalli-
sella keramiikan tai jaloteräksen puhdistukseen tarkoitetulla aineella.
4. Pyyhi keraaminen keittotaso runsaalla puhtaalla vedellä ja kuivaa
puhtaalla nukkaamattomalla pyyhkeellä.
Kiinnitarttunut lika
1. Poista keittotasolle kuohuneet tai
roiskuneet, kiinnitarttuneet ruuat lasiteräkaapimella.
2. Aseta lasiteräkaavin vinosti keraamista tasoa vasten.
3. Irrota lika työntelemällä kaapimen
terää tason pinnalla.
Kaapimia ja keraamisen keittotason
3
puhdistukseen tarkoitettuja puhdistusainetta on saatavana alan liikkeistä.
30
Page 31

1 Erityinen lika
1. Poista kiinnipalanut sokeri, sulanut
muovi, alumiinikelmu tai muut sulavat materiaalit lasiteräkaapimella vä-
littömästi niiden vielä ollessa
kuumia.
Huomautus: Huomio: Varo, ettet
1
polta itseäsi, kun puhdistat kuumaa
keittoaluetta lasiteräkaapimella!
2. Puhdista jäähtynyt keittotaso vielä
lopuksi tavallisesti.
Mikäli keittotaso on ehtinyt jäähtyä,
3
ennen kuin olet ehtinyt poistamaan siihen sulaneet materiaalit, kuumenna se uudelleen ennen puhdistusta.
Keraamisen tason naarmuja tai tummia tahroja, jotka ovat tulleet esim.
teräväreunaisista kattiloista, ei pysty poistamaan. Ne eivät kuitenkaan
vaikuta keittotason toimintakykyyn.
31
Page 32

Mitä tehdä, jos ...
Häiriöiden poisto
Mahdollisesti kyseessä on vain pieni virhe, jonka voit itse korjata seuraavien ohjeiden avulla. Älkää suorittako mitään muita kuin allaolevan
ohjeiden mukaisia korjaustoimenpiteitä.
Varoitus! Ainoastaan koulutettu ammattihenkilö saa suorittaa korjauk-
1
sia laitteeseen. Asiaankuulumattomat korjaukset saattavat aiheuttaa
käyttäjälle vakavia vaaratilanteita. Käänny korjaustarpeen ilmetessä
valtuutetun huoltoliikkeen puoleen.
Mitä teen, jos ...
.... keittoalueet eivät toimi?
Kokeile
– ovatko asuntosi sulakkeet kunnossa (sulaketaulu). Jos sulake palaa
useita kertoja, ota yhteys ammattitaitoiseen sähköasentajaan.
– onko kyseinen keittoalue kytketty toimintaan ja onko tehotaso va-
littu.
– jos kyseessä on kaksoiskeittoalue: onko kyseinen keittoalueen osa
kytketty toimintaan.
Jos otat yhteyttä valtuutettuun huoltoliikkeeseen oman virhetoimintasi
vuoksi, huoltoteknikon käynnistä aiheutuvat kustannukset joudutaan
mahdollisesti veloittamaan myös takuuaikana.
32
Page 33

Asennusohjeet
Huomautus! Vain valtuutettu asentaja saa suorittaa uuden laitteen
1
asennuksen ja liitännät.
Ole hyvä ja noudata tätä ohjetta; muutoin takuu raukeaa, jos laitteeseen ilmaantuu vaurioita.
Tekniset tiedot
Laitteen mitat
Leveys 590 mm
Syvyys 520 mm
Korkeus 49 mm
Asennusmitat
Leveys 560 mm
Syvyys 490 mm
Kulman säde R5
Te ho
Muuntuva keittoalue etuvasemmalla ø 120/
210 mm
Takavasen keittoalue ø 145 mm 1200 W
Takaoikea monitoimikeittoalue ø 170/265 mm 1500/2400 W
Etuoikea keittoalue ø 180 mm 1800 W
Jännite 230 V ~
Kokonaisliitäntäteho maks. 7,6 kW
1000/2200 W
33
Page 34

Säädökset, standardit, direktiivit
Tämä laite vastaa seuraavia standardeja:
• EN 60 335-1 ja EN 60 335-2-6
koskien kotitalouskäyttöön tai vastaavaan tarkoitettujen laitteiden
sähköturvallisuutta ja
• EN 60350 tai DIN 44546 / 44547 / 44548
koskien kotitalouksien sähköliesien, keittotasojen, uunien ja grillien
käyttöominaisuuksia.
• EN 55014-2 / VDE 0875 osa 14-2
• EN 55014 / VDE 0875 osa 14/1999-10
• EN 61000-3-2 / VDE 0838 osa 2
• EN 61000-3-3 / VDE 0838 osa 3
koskien perustavanlaatuisia elektromagnettisien laitteiden yhteensopivuutta (EMV).
Tämä laite vastaa seuraavia EY-direktiivejä
;
• 93/68/ETY CE-merkintädirektiivi
• 73/23/ETY, 19.02.1973 (pienjännitedirektiivi) sekä muutosdirektiivi
90/683 ETY.
• 89/336/ETY, 3.5.1989 ("Sähkömagneettista yhteensopivuutta kos-
keva direktiivi", mukaanluettuna muutosdirektiivi 92/31/ETY)
34
Page 35

1 Asentajaa koskevat turvallisuusohjeet
• Sähköasennuksessa on tarpeen varusteet, jotka mahdollistavat lait-
teen kosketusväliksi vähintään 3 mm kaikkinapaisen verkosta erottamisen.
Tarkoitukseen soveltuvia erottimia ovat esimerkiksi LS-kytkimet, sulakkeet (ruuvisulakkeet ovat kannasta irrotettavia), FI-kytkimet ja releet.
• Tämä laite vastaa paloturvallisuussuojan osalta tyyppiä Y (EN 60 335-
2-6). Vain tämäntyyppisiä laitteita saa asentaa yksipuolisesti viereisiin
seiniin tai kaappeihin.
• Keittotason alle ei saa asentaa vetolaatikkoja.
• Asennuksessa on varmistettava kosketussuoja.
• Asennuskaapin tukevuuden on oltava DIN 68930 -määräysten mu-
kainen.
• Työtason sahauspinnat on suojattava kosteudelta tiivistämällä ne
tarkoitukseen sopivalla tiivistysaineella.
• Jos työtaso on laatoitettu, keittotason alustan saumat on täytettävä
kokonaan saumausaineella.
• Luonnon-, tekokivi- tai keramiikkalevyjen yhteydessä salpajouset on
liimattava tarkoitukseen soveltuvalla keinohartsi- tai kaksikomponenttiliimalla.
• Varmista, että alustan kehyksen tiiviste on kunnolla paikoillaan ja
että alustassa ei ole aukkoja. Ylimääräistä silikonitiivistemassaa ei
saa käyttää; se vaikeuttaa purkamista huollon yhteydessä.
• Purettaessa kouru nostetaan ylös painamalla alhaalta ylöspäin.
• Puhdista asennusaukon leikkauspinnat.
• Liimaa laitteen mukana toimitettu toiselta puolelta liimautuva tiivis-
tysnauha asennusaukon yläreunalle leikkauspintaa pitkin. Leikkauskohdan tulee olla sivun keskellä. Katkaisun jälkeen (varaa muutama
millimetri ylimääräistä) työnnä molemmat päät toisiaan vasten.
35
Page 36

Sähköliitännät
• Tarkista ennen sähköliitäntöjen suorittamista, että laitteen nimellis-
jännite (tyyppikilvessä mainittu jännite) vastaa asuntosi verkkojännitettä ja yhdistelmälaitteen nimellisjännitettä. Tyyppikilpi on kiinnitetty
uunin pinnoitteeseen alapuolelle.
• Liitä keittotason liittimet uunin tai kytkentäkotelon vastaaviin tuloliit-
timiin varmistaen, että ne ovat tiukasti kiinni. Työnnä liitäntäjohtoa sivulle päin uunin kannen päälle.
• Kun laite on liitetty sähköverkkoon, kaikkien keittolevyjen toiminta
1
on tarkístettava kääntämällä ne vuorotellen niiden suurimpaan asentoon noin 30 sekunnin ajaksi.
Arvokilpi
36
Page 37

Huolto ja varaosat
Huollot, varaosatilaukset ja mahdolliset korjaukset on annettava valtuutetun huoltoliikkeen tehtäväksi. Lähimmän valtuutetun huoltoliikkeen numeron löydät soittamalla numeroon 0200-2662 (0,1597
min(0,95 mk/min)+pvm) .*
Varmistaaksesi laitteesi moitteettoman toiminnan, vaadi aina käytettäväksi sopivinta, siis alkuperäistä varaosaa. Huollosta vastaa Oy Electrolux Kotitalouskoneet Ab - HUOLTOLUX, Porissa, puh. (02) 622 3300.
* Mainitse soittaessasi tuotteen merkki. Kopioi arvokilvestä tuotteen
tiedot alla olevaan kohtaan, niin ne löytyvät helposti, jos sinun pitää
ottaa yhteys huoltoliikkeeseen.
Malli
..............................................................................................................
Tuotenumero
...........................................................................................
Sarjanumero
.............................................................................................
Ostopäivä
....................................................................................................
g/
Kuluttajaneuvonta
Tuotettasi tai sen käyttöä koskeviin kysymyksiin saat vastauksen kuluttajaneuvonnastamme soittamalla numeroon 0200-2662 (0,1597
min (0,95mk/min)+pvm).
g/
37
Page 38

Ta k u ue hdot
Suomi
Ta ku u
Tuotteella on kahden (2) vuoden takuu. Takuuehdot noudattavat alan yleisiä
ehtoja ja niitä on saatavissa myyjäliikkeestä tai maahantuojalta. Ostokuitti säilytetään, koska takuun alkaminen määritetään ostopäivän mukaan.
Korvaus huollosta voidaan periä myös takuuaikana:
* aiheettomasta valituksesta
* ellei käyttöohjetta ole noudatettu
EU-maat
Laitteella on käyttömaan lainsäädännön mukainen takuu.
Kuljetusvauriot
Tarkista pakkauksen purkamisen yhteydessä, ettei laite ole vaurioitunut kuljetuksessa. Mahdollisista kuljetusvaurioista on heti ilmoitettava myyjäliikkeelle.
38
Page 39

39
Page 40

Уважаемая покупательница, уважаемый покупатель !
Пожалуйста, прочитайте внимательно настоящую “Инструкция по
эксплуатации”.
Прежде всего обратите, пожалуйста, внимание на раздел “Указания по
технике безопасности” на первых страницахц Пожалуйста, сохраните
эту “Инструкция” для того, чтобы в дальнейшем к ней при
необходимости обращаться. Если прибор перейдет к другому хозяину,
передайте ему, пожалуйста, также и эту “Инструкция”.
Следующие символы помогут Вам при чтении “Инструкции”:
Указания по технике безопасности
1
Предупреждение: примечания, важные для Вашей безопасности или
для работы прибора.
Внимание! примечания, помогающие избежать повреждений прибора.
Практические советы и рекомендации
3
Информация по экологичному использованию прибора
2
1. Эти цифры ведут Вас шаг за шагом при обслуживании прибора.
2. ...
3. ...
Напечатано на бумаге, изготовленной с учетом экологических
требований.
От экологического мышления к экологическим поступкам...
40
Page 41

Содержание
Инструкция по эксплуатации . . . . . . . . . . . . . . . . . . . . . . . . . 42
Техника безопасности . . . . . . . . . . . . . . . . . . . . . . . . . . . . . . . . . . . . . . . . 42
Утилизация отходов . . . . . . . . . . . . . . . . . . . . . . . . . . . . . . . . . . . . . . . . . . 44
Важнейшие особенности Вашего прибора . . . . . . . . . . . . . . . . . . . . . . 45
Устройство прибора . . . . . . . . . . . . . . . . . . . . . . . . . . . . . . . . . . . . . . . . . . 46
Оборудование варочной поверхности . . . . . . . . . . . . . . . . . . . . . . . . . . . . 46
Перед первым использованием . . . . . . . . . . . . . . . . . . . . . . . . . . . . . . . . 46
Первая чистка от загрязнений . . . . . . . . . . . . . . . . . . . . . . . . . . . . . . . . . . . 46
Управление варочной поверхностью . . . . . . . . . . . . . . . . . . . . . . . . . . . 47
Индикация остаточного тепла . . . . . . . . . . . . . . . . . . . . . . . . . . . . . . . . . . . 47
Практические советы и таблицы . . . . . . . . . . . . . . . . . . . . . . . . . . . . . . . 48
Посуда для варки . . . . . . . . . . . . . . . . . . . . . . . . . . . . . . . . . . . . . . . . . . . . 48
Мытье и уход . . . . . . . . . . . . . . . . . . . . . . . . . . . . . . . . . . . . . . . . . . . . . . . . 50
Варочная поверхность . . . . . . . . . . . . . . . . . . . . . . . . . . . . . . . . . . . . . . . . . 50
Что делать, если ... . . . . . . . . . . . . . . . . . . . . . . . . . . . . . . . . . . . . . . . . . . 52
Устранение неполадок . . . . . . . . . . . . . . . . . . . . . . . . . . . . . . . . . . . . . . 52
Инструкция по монтажу . . . . . . . . . . . . . . . . . . . . . . . . . . . . . . . 53
Технические характеристики . . . . . . . . . . . . . . . . . . . . . . . . . . . . . . . . . . . . 53
Требования, стандарты, предписания . . . . . . . . . . . . . . . . . . . . . . . . . . . . . 54
Указания по безопасности при установке . . . . . . . . . . . . . . . . . . . . . . . . . 55
Электрическое подключение . . . . . . . . . . . . . . . . . . . . . . . . . . . . . . . . . . . 56
Фирменная табличка . . . . . . . . . . . . . . . . . . . . . . . . . . . . . . . . . . . . . . . . . . 56
Сервисная поддержка . . . . . . . . . . . . . . . . . . . . . . . . . . . . . . . . 57
Монтаж . . . . . . . . . . . . . . . . . . . . . . . . . . . . . . . . . . . . . . . . . . . . . . . . . . 58
41
Page 42

Инструкция по эксплуатации
1 Техника безопасности
Техника безопасности в обращении с данным прибором соответствует
принятым правилам техники безопасности в обращении с
электроприборами. Однако мы считаем, что, будучи изготовителем
данного оборудования, мы должны дополнительно ознакомить Вас со
следующими указаниями по технике безопасности.
Электробезопасность
• Монтаж и подключение нового прибора могут производить только
специалисты, имеющие соответствующий допуск.
• Ремонт прибора может производить только специалист.
Неквалифицированный ремонт может представлять большую
опасность. В случае необходимости ремонта обращайтесь в
сервисную службу.
Соблюдайте данные указания, т.к. в противном случае гарантийные
3
обязательства по возмещению ущерба теряют силу.
• Встроенные приборы можно пускать в действие только после того,
как они будут встроены в соответствующие шкафы и рабочие
поверхности. Таким образом обеспечивается безопасное
расстояние между электроприборами в соответствии с
требованиями Союза немецких электротехников.
• В случае повреждения прибора, а также появления на нем трещин,
вздутий или разрывов поверхности следует:
— выключить все конфорки,
— выключить, либо извлечь все предохранители варочной
поверхности.
Меры безопасности для детей
Во время приготовления пищи конфорки становятся горячими.
Поэтому всегда удаляйте маленьких детей от плиты.
Меры безопасности пользователя
• Этот прибор можно использовать для приготовления пищи только в
домашних условиях.
• Не используйте варочную поверхность для обогрева помещений.
• Будьте осторожны при подключении электроприборов к розеткам,
находящимся вблизи прибора. Проводка не должна касаться горячих
конфорок.
42
Page 43

Перегретые жир и масло быстро воспламеняются. Когда Вы
•
готовите пищу на жире или на масле (напр. картофель фри),
необходимо следить за процессом е¸ приготовления.
• После каждого использования отключайте конфорки.
Техника безопасности при мытье и очистке
Перед тем, как мыть прибор, его надо выключить. По соображениям
безопасности недопустима очистка прибора с помощью
приспособлений для чистки паром или моющих средств, распыляемых
при высоком давлении.
Как избежать повреждений прибора
• Не используйте варочную поверхность как рабочий стол или
подставку для различных предметов.
• Необрамленный край стеклокерамической плиты уязвим для
повреждений, вызванных толчком или ударом. Будьте, пожалуйста,
осторожны при обращении с кастрюлями и сковородами.
• Не эксплуатируйте конфорки с пустой посудой или без посуды.
• Несмотря на то, что стеклокерамика нечувствительна к резким
перепадам температуры и очень прочна, она вс¸-таки не является
небьющейся. Особо острые и тв¸рдые предметы при падении на
варочную панель могут е¸ повредить.
• Не пользуйтесь чугунными котлами и кастрюлями с поврежд¸нным
днищем, имеющим шершавую поверхность и заусенцы.
При перемещении такая посуда может оставлять царапины.
• В случае попадания на горячую конфорку и расплавления на ней
сахара или продукта, приготавливаемого с сахаром, удалите их
сразу, ещ¸ в горячем состоянии, с помощью скребка. Если такая
масса остынет, е¸ удаление может привести к повреждениям
поверхности варочной панели.
• Удаляйте подальше от стеклокерамической панели все плавкие
предметы и материалы, такие как пластмасса, алюминиевая фольга и
пл¸нка для кухонных плит. Если же на стеклокерамической панели
вс¸-таки что-либо расплавилось, расплавленный продукт следует
также сразу удалить скребком.
43
Page 44

2 Утилизация отходов
Утилизация упаковочных материалов
• Все упаковочные материалы могут быть переработаны и вторично
использованы, фольга и пенопласт помечены соответствующими
знаками. Пожалуйста, выбрасывайте упаковочный материал и старые
отслужившие приборы в соответствии с существующими
предписаниями.
• Соблюдайте действующие в Вашей стране и в Вашем населенном
пункте указания по утилизации (выбрасывайте упаковочный материал
в соответствующие контейнеры и т.д.).
Указания по утилизации
• Прибор нельзя выбрасывать вместе с обычным бытовым мусором.
• Информацию о датах забора подобного особого мусора или о
местах его складирования Вы можете получить в местном
управлении коммунального хозяйства или в районной
администрации.
• Предупреждение! Перед выбрасыванием старого отслужившего
прибора позаботьтесь, пожалуйста, о том, чтобы он был приведен в
состояние невозможности дальнейшего использования. Отрежьте
сетевой провод.
44
Page 45

Важнейшие особенности Вашего прибора
• Стеклокерамическая варочная панель: Прибор имеет одну
стеклокерамическую варочную панель и 4 быстро нагревающиеся
конфорки. Таким образом, благодаря особо мощным
нагревательным элементам значительно сокращается время
нагрева.
• Чистка: Преимуществом стеклокерамической поверхности является
простота удаления с не¸ загрязнений. Гладкая поверхность легко
чистится (смотри раздел: “Чистка и уход”).
• Двухконтурная конфорка: Поверхность плиты оборудована
двухконтурной конфоркой. Это дает возможность изменять размер
конфорки на поверхности плиты, напр., для небольших кастрюль.
Таким образом обеспечивается экономия электроэнергии.
• Конфорка для жаренья: Варочная поверхность оборудована
конфоркой для жаренья. В зависимости от установки, можно
использовать круглую или овальную конфорку, например для
гусятниц.
• Индикация остаточного тепла: Индикатор остаточного тепла
загорается, когда температура конфорки достигает значений, при
которых можно получить ожог.
45
Page 46

Устройство прибора
Оборудование варочной поверхности
Одноконтурная конфорка
1200 Вт
Двухконтурная
конфорка 2200 Вт
Индикация
остаточного тепла
Конфорка для
жаренья 2400 Вт
180 mm
Одноконтурная
конфорка 1800 Вт
Перед первым использованием
Первая чистка от загрязнений
Протереть стеклокерамическую варочную поверхность влажной
тканью.
Внимание: Не пользуйтесь острыми и царапающими чистящими
1
средствами! Так можно повредить поверхность.
46
Page 47

Управление варочной поверхностью
При включении конфорки может раздаться короткое жужжание. Это
3
специфическая особенность всех стеклокерамических конфорок,
которая не влияет ни на функции, ни на срок службы плиты.
Управление конфорками или подключение многоконтурных
3
конфорок производится с помощью переключателя конфорок на
плите или на панели управления, описание этого дано в инструкции
по эксплуатации прибора.
Индикация остаточного тепла
Стеклокерамическая поверхность Вашей плиты оборудована
индикатором остаточного тепла, каждой конфорке соответствует своя
контрольная лампа. Она включается сразу после нагрева
соответствующей конфорки и предупреждает об опасности ожога при
соприкосновении.
При отключении конфорки индикатор остаточного тепла выключается
только после остывания конфорки.
Вы можете использовать остаточное тепло для растапливания жира и
2
сохранения температуры готовой пищи.
Внимание! Пока светится индикатор остаточного тепла, можно
1
получить ожог.
Внимание! При отключении электроэнергии гаснет также индикатор
1
остаточного тепла и, соответственно, данные об имеющемся
остаточном тепле не отображаются. Однако, возможность получить
ожог по-прежнему остается. Проявляя осторожность, Вы можете
этого избежать.
47
Page 48

Практические советы и таблицы
Посуда для варки
Чем лучше кастрюля, тем лучше результат варки.
• Хорошую посуду определяют по дну кастрюли. Дно должно быть как
можно более толстым и ровным.
• При покупке кастрюль и сковород обращайте внимание на диаметр
дна. Производители часто указывают верхний диаметр края посуды.
• Посуда с алюминиевым или медным дном может оставить на
стеклокерамической панели след с металлическим блеском,
который очень трудно или вообще не поддается удалению.
• Не пользуйтесь кастрюлями из чугуна или с поврежденным дном,
имеющим грубую поверхность или заусенцы. При передвижении они
могут оставить неустранимые царапины.
• В холодном состоянии дно кастрюль, как правило,
слегка вогнуто. Оно ни в коем случае не должно
быть выпуклым.
• Если Вы пользуетесь специальной посудой (напр.
пароваркой, сотейником, высокой сковородой и
т.д.), то соблюдайте рекомендации изготовителя.
Советы по энергосбережению
2
Соблюдая следующие рекомендации, Вы сэкономите ценную
электроэнергию:
• Ставьте кастрюли и сковороды на плиту
обязательно до включения конфорки.
• Загрязненные конфорки и посуда увеличивают
расход электроэнергии.
• Кастрюли и сковороды, по возможности, всегда
накрывайте крышкой.
• Отключайте конфорки до
окончательной готовности пищи,
чтобы использовать остаточное
тепло, например для сохранения
приготовленных блюд в горячем
виде или для того, чтобы
растопить жир.
• Дно кастрюли и конфорка должны быть одного размера.
• При использовании скороварки время приготовления пищи
сокращается почти на 50%.
48
Page 49

Примеры для приготовления пищи на конфорке
Данные нижеследующей таблицы являются ориентировочными. Какое
положение выключателя необходимо для приготовления того или
иного блюда зависит от качества кастрюли и от вида и количества
продуктов.
Способ
Ступень
нагрева
приготовления/
ступень
продолжитель-
ной варки
Предназначено для
9 Кипячение
7-9
6-7
4-5 Варка
3-4
2-3 Томление
1-2 Растапливание
0 Oстаточное тепло, положение “выкл”
Сильное
обжаривание
Легкое
обжаривание
Тушение,
варка на пару
кипячения большого количества воды,
варки лапши
приготовления картофеля фри,
обжаривания мяса, напр.,
для гуляша, прожаривания, напр., картофельных
оладий
жарки филе, бифштексов
Поджаривания мяса, шницелей, различных
котлет, биточков, сосисок, печенки,
мучной подливки, легкого поджаривания
яиц, омлетов, жарки в масле (фритирования)
пышек
Варки в больших кастрюлях,
варки борщей и супов,
тушения картофеля,
приготовления мясных бульонов
Томления овощей,
тушения мяса
варки рисовой каши
Томления риса и молочных блюд
(время от времени перемешивать),
тушения небольших количеств картофеля или
овощей,
разогревания готовых блюд
Приготовления взбитого омлета, яичного соуса,
белого соуса “Голондез”,
поддержания блюд горячими,
растапливания масла, шоколада, желатина
Мы рекомендуем устанавливать ступень кипения/обжаривания “9”,
3
если Вам надо что-нибудь вскипятить или обжарить, а если блюдо
требует долгого времени доведения до готовности, установить потом
соответствующую ступень продолжительной варки.
49
Page 50

Мытье и уход
Варочная поверхность
Внимание: Чистящие средства не должны попадать на горячую
1
стеклокерамическую панель! По окончании чистки необходимо удалить
все чистящие средства достаточным количеством чистой воды,
поскольку после повторного нагрева они могут приобрести
разъедающие свойства!
Не применяйте агрессивные чистящие средства, например, аэрозоли
для грилей и духовок, грубые абразивные и царапающие средства для
чистки кастрюль.
Очищайте стеклокерамическую панель от загрязнений после каждого
3
использования, когда она уже не слишком горячая для рук, или остыла.
Такими образом Вы избежите пригорания загрязнений.
Следы от извести и воды, брызги жира и пятна с металлическим
блеском, изменяющие цвет поверхности, удаляйте обычными
средствами для чистки стеклокерамики или средствами для чистки
изделий из высококачественной стали, такими как “SidolEdelstahlglanz”, “Stahl-Fix”, “WK-Top” или “Cillit”.
Л¸гкие загрязнения
1. Протрите стеклокерамическую панель влажной тканью с небольшим
количеством средства для мытья рук.
2. После этого насухо протрите панель чистой тканью. На поверхности
панели не должно оставаться никаких следов чистящего средства.
3. Один раз в неделю основательно очищайте всю стеклокерамическую
панель от загрязнений с помощью обычных средств для чистки
стеклокерамики или средств для чистки поверхностей из
высококачественной стали.
4. Затем протрите стеклокерамическую панель достаточным количеством
чистой воды и вытрите е¸ насухо чистой тканью, не оставляющей нитей
или ворса.
50
Page 51

Плотно приставшие загрязнения
1. Для удаления выкипевших блюд и
плотно приставших брызг
применяйте специальный скребок.
2. Приставляйте скребок под углом к
плоскости стеклокерамической
панели.
3. Удаляйте загрязнения скользящими
движениями рабочей части
скребка.
Скребок и средство для чистки
3
стеклокерамической панели Вы
можете приобрести в
специализированных магазинах.
Специфические загрязнения
1
1. Пригоревший сахар, расплавленную
пластмассу, алюминиевую фольгу и
другие плавкие материалы удаляйте
сразу, когда они ещ¸ горячие с
помощью скребка.
Внимание: Работая скребком на
1
горячей конфорке Вы подвергаете
себя опасности получить ожог!
2. Затем очистите остывшую варочную
зону от загрязнений обычным
способом.
Если конфорка с расплавившимися на ней материалами уже успела
3
остыть, перед началом чистки нагрейте е¸ снова.
Брызги и т¸мные пятна, оставленные на стеклокерамической панели
кастрюлями с ребристым днищем, удалить невозможно. Однако они
не ухудшают функциональную способность варочной зоны.
51
Page 52

Что делать, если ...
Устранение неполадок
Возможно, что возникшая неполадка является незначительной и Вы
можете устранить ее самостоятельно с помощью следующих указаний.
Не производите никаких дальнейших попыток отремонтировать
прибор, если не удастся устранить неполадку с помощью
нижеследующей информации.
Предупреждение! Ремонт прибора может производиться только
1
специалистами. Неквалифицированный ремонт может подвергнуть
владельца прибора существенной опасности. В случае необходимости
произвести ремонт обращайтесь в авторизованный изготовителем
сервисный центр.
Что делать, если ...
.... конфорки не работают?
Проверьте,
— действуют ли предохранители домашней электропроводки
(электрошкафа). Если предохранители срабатывают много раз,
вызовите электромонтера, имеющего специальный допуск.
— включены ли соответствующие конфорки и установлена ли
необходимая ступень мощности.
— для многоконтурных конфорок: подключен ли нужный контур
нагрева.
Если Вы воспользуетесь услугами сервисной службы на ошибочных
основаниях, то вызов техника будет платным даже в течение
гарантийного срока.
52
Page 53

Инструкция по монтажу
Внимание! Монтаж и подключение нового прибора должны
1
производиться только уполномоченным на это специалистом.
Пожалуйста, соблюдайте это правило, так как в противном случае Вы
теряете право на гарантийное обслуживание.
Технические характеристики
Размеры прибора
Ширина 590 мм
Глубина 520 мм
Высота 49 ìì
Размеры монтажного проема
Ширина 560 мм
Глубина 490 мм
Угловой радиус R5
Потребляемая мощность
Двухкруговая конфорка впереди слева
ø 120/210 ìì 1000/2200 Âàòò
Конфорка задняя левая ø 145 ìì 1200 Âàòò
Многоцелевая конфорка сзади справа
ø 170/265 ìì 1500/2400 Âàòò
Конфорка передняя правая ø 180 ìì 1800 Âàòò
Напряжение нагревательного элемента 230 Вольт ~ 50 Гц
Общая потребляемая мощность, макс. 7,6 кВатт
53
Page 54

Требования, стандарты, предписания
Данный прибор соответствует следующим нормам:
• EN 60 335-1 è EN 60 335-2-6
по безопасности электроприборов бытового и сходного
пользования, а также
• EN 60350 èëè DIN 44546 / 44547 / 44548
по потребительским свойствам электроплит, варочных панелей,
духовок и грилей для дома.
• EN 55014-2 / VDE 0875 часть 14-2
• EN 55014 / VDE 0875 часть 14/1999-10
• EN 61000-3-2 / VDE 0838 часть 2
• EN 61000-3-3 / VDE 0838 часть 3
по основным требованиям электро магнитной совместимости.
Данный прибор соответствует следующим предписаниям ЕС:
;
• 93/68/ EWG CE Предписания по условным обозначениям
• 73/23/EWG от 19.2.1973 (по низкому напряжению, включая
изменения в предписаниях 90/683/EWG)
• 89/336/EWG от 03./05.1989 (Предписания по электромагнитной
совместимости включая поправки к Предписаниям 92/31/EWG)
54
Page 55

1 Указания по безопасности при установке
• При электроустановке необходимо предусмотреть устройство,
позволяющее отключать от сети прибор с шириной размыкания
контактов не менее 3 мм по всем полюсам.
Пригодными для этой цели устройствами размыкания могут служить,
напр., аварийные выключатели, предохранители (винтовые
предохранители необходимо извлечь из патрона), автоматические
предохранительные переключатели и контакторы.
• Пожаробезопасность данного прибора соответствует классу Y (EN
60 335-2-6). Приборы только этого класса можно устанавливать
рядом с примыкающими высокими шкафами или стенами.
• Нельзя устанавливать выдвижные ящики под варочной
поверхностью.
• Возможность соприкосновения с варочной поверхностью снизу
необходимо исключить, применив встроенную конструкцию.
• Степень устойчивости встроенного шкафа должна отвечать
требованиям DIN 68930.
• Для защиты от влаги все выпиленные поверхности должны быть
уплотнены соответствующим уплотняющим материалом.
• На покрытых кафельной плиткой поверхностях все зазоры на
площади установки варочной части плиты должны быть полностью
заполнены материалом-наполнителем.
• Соединения плит из натурального, искусственного или
керамического материалов должны быть проклеены подходящей
искусственной смолой или двухкомпонентным клеем.
• Проверить уплотнения установочной рамы на безупречную
стабильность и отсутствие зазоров. Нельзя наносить дополнительное
количество уплотнительной силиконовой массы, т.к. это может
затруднить демонтаж при сервисном обслуживании.
• При демонтаже варочную поверхность необходимо выдавливать
снизу.
• Очистите от загрязнений столешницу в монтажном про¸ме.
• Наклейте на верхнюю сторону столешницы вдоль монтажного
про¸ма герметизирующую ленту с односторонним самоклеящимся
слоем, входящую в комплект поставки. Место разреза ленты должно
находиться посредине одной из сторон монтажного про¸ма. В месте
разреза (оставить припуск в несколько мм) оба конца ленты прижать
встык.
55
Page 56

Электрическое подключение
• Перед подключением необходимо проверить, соответствует ли
номинальное, то есть указанное на фирменной табличке, напряжение
прибора имеющемуся напряжению сети и номинальному
напряжению комбинированного прибора. Фирменная табличка
находится на нижней обшивке варочной поверхности.
• Разъемы для подключения варочной поверхности прочно соединить
с соответствующими элементами встраиваемой плиты или шкафа
для подключения. Прижмите соединительный кабель к верхней
боковой поверхности духового шкафа.
• Для проверки готовности к эксплуатации после подключения к
1
электросети следует приблизительно на 30 секунд включить по
очереди все рабочие зоны на максимальную мощность.
Фирменная табличка
56
Page 57

Сервисная поддержка
В разделе “Что делать, если ...” перечислены некоторые неполадки,
которые Вы можете устранить самостоятельно.
В случае неполадки сначала обратитесь к этому разделу.
Речь идет о какой-либо технической неисправности?
В этом случае обращайтесь, пожалуйста, в наш сервисный центр
(адреса и телефоны Вы найдете в “ перечне сервисных центров”).
В любом случае Вам следует хорошо подготовиться к разговору.
Таким образом Вы поможете сотруднику сервисного центра решить,
что произошло с Вашим прибором и действительно ли необходимо
посещение сотрудника сервисного центра:
Вы должны по возможности точно
установить:
• В чем выражена неисправность?
• При каких условиях неисправность
проявляется?
Готовясь к разговору обязательно
перепишите с фирменной таблички
следующие обозначения Вашего
прибора:
• номер PNC (9 знаков),
• номер S-No (9 знаков).
Чтобы Вы всегда могли быстро найти эти данные, мы рекомендуем
вписать их на эту страницу:
PNC . . . . . . . . .
S-No . . . . . . . . .
В каких случаях Вы платите за обслуживание прибора также и во
время гарантийного срока?
• если окажется, что Вы могли и самостоятельно устранить возникшую
неисправность с помощью таблицы неполадок (см. раздел “Что
делать, если ...”),
• если сотруднику сервисного центра понадобится приезжать
несколько раз из-за того, что Вы не предоставили ему
предварительно необходимую информацию и он должен поэтому,
напр. eeсъездить за запчастями. Эти дополнительные поездки Вы
можете предотвратить, если хорошо, как это описано выше,
подготовитесь к телефонному разговору.
57
Page 58

Assembly / Laitteen asentaminen /
Монтаж
58
Page 59

Removal/Purkaminen/
Демонтаж
59
Page 60

 Loading...