

Page 1

EHF8748FOK
.................................................. ...............................................
EN HOB USER MANUAL 2
FR TABLE DE CUISSON NOTICE D'UTILISATION 17
DE KOCHFELD BENUTZERINFORMATION 33
SV INBYGGNADSHÄLL BRUKSANVISNING 49
Page 2
www.electrolux.com
2
CONTENTS
SAFETY INFORMATION . . . . . . . . . . . . . . . . . . . . . . . . . . . . . . . . . . . . . . . . . . . . . . . . . . . . . . . . . 3
PRODUCT DESCRIPTION . . . . . . . . . . . . . . . . . . . . . . . . . . . . . . . . . . . . . . . . . . . . . . . . . . . . . . . 5
DAILY USE . . . . . . . . . . . . . . . . . . . . . . . . . . . . . . . . . . . . . . . . . . . . . . . . . . . . . . . . . . . . . . . . . . . 7
HELPFUL HINTS AND TIPS . . . . . . . . . . . . . . . . . . . . . . . . . . . . . . . . . . . . . . . . . . . . . . . . . . . . . 10
CARE AND CLEANING . . . . . . . . . . . . . . . . . . . . . . . . . . . . . . . . . . . . . . . . . . . . . . . . . . . . . . . . 12
TROUBLESHOOTING . . . . . . . . . . . . . . . . . . . . . . . . . . . . . . . . . . . . . . . . . . . . . . . . . . . . . . . . . 13
INSTALLATION . . . . . . . . . . . . . . . . . . . . . . . . . . . . . . . . . . . . . . . . . . . . . . . . . . . . . . . . . . . . . . 15
TECHNICAL INFORMATION . . . . . . . . . . . . . . . . . . . . . . . . . . . . . . . . . . . . . . . . . . . . . . . . . . . . 16
ENVIRONMENT CONCERNS . . . . . . . . . . . . . . . . . . . . . . . . . . . . . . . . . . . . . . . . . . . . . . . . . . . . 16
WE’RE THINKING OF YOU
Thank you for purchasing an Electrolux appliance. You’ve chosen a product that brings with it
decades of professional experience and innovation. Ingenious and stylish, it has been designed with
you in mind. So whenever you use it, you can be safe in the knowledge that you’ll get great results
every time.
Welcome to Electrolux.
Visit our website for:
Get usage advice, brochures, trouble shooter, service information:
www.electrolux.com
Register your product for better service:
www.electrolux.com/productregistration
Buy Accessories, Consumables and Original spare parts for your appliance:
www.electrolux.com/shop
CUSTOMER CARE AND SERVICE
We recommend the use of original spare parts.
When contacting Service, ensure that you have the following data available.
The information can be found on the rating plate. Model, PNC, Serial Number.
Warning / Caution-Safety information
General information and tips
Environmental information
Subject to change without notice.
Page 3
SAFETY INFORMATION
ENGLISH 3
Before the installation and use of the appliance, carefully read the supplied instructions. The manufacturer is not responsible
if an incorrect installation and use causes
injuries and damages. Always keep the instructions with the appliance for future reference.
CHILDREN AND VULNERABLE
PEOPLE SAFETY
WARNING!
Risk of suffocation, injury or permanent disability.
• Do not let persons, children included,
with reduced physical sensory, reduced
mental functions or lack of experience
and knowledge use the appliance. They
must have supervision or instruction for
the operation of the appliance by a person who is responsible for their safety.
• Do not let children play with the appliance.
• Keep all packaging away from children.
• Keep children and pets away from the
appliance when it operates or when it
cools down. Accessible parts are hot.
• If the appliance has a child safety device,
we recommend that you activate it.
INSTALLATION
WARNING!
Only a qualified person must install
this appliance.
• Remove all the packaging.
• Do not install or use a damaged appliance.
• Obey the installation instruction supplied
with the appliance.
• Keep the minimum distance from the
other appliances and units.
• Always be careful when you move the
appliance because it is heavy. Always
wear safety gloves.
• Seal the cut surfaces with a sealant to
prevent moisture to cause swelling.
• Protect the bottom of the appliance from
steam and moisture.
• Do not install the appliance adjacent to a
door or under a window. This prevents
hot cookware to fall from the appliance
when the door or the window is opened.
• If the appliance is installed above drawers make sure that the space, between
the bottom of the appliance and the upper drawer, is sufficient for air circulation.
• The bottom of the appliance can get hot.
We recommend to install a non-combustile separation panel under the appliance
to prevent access to the bottom.
Electrical connection
WARNING!
Risk of fire and electrical shock.
• All electrical connections must be made
by a qualified electrician.
• Before every wiring make sure the main
terminal of the appliance is not live.
• Make sure the appliance is installed correctly. Loose and incorrect plug and
socket can make the terminal become
too hot.
• Make sure that a shock protection is installed.
• Do not let the electricity bonds touch the
appliance or hot cookware, when you
connect the appliance to the near sockets.
• Do not let the electricity bonds tangle.
• Use a strain relief clamp on cable.
• Use the correct mains cable.
• Make sure not to cause damage to the
mains plug and to the mains cable. Contact the Service or an electrician to
change a damaged mains cable.
• The electrical installation must have an
isolation device which lets you disconnect the appliance from the mains at all
poles. The isolation device must have a
contact opening width of minimum 3
mm.
• Use only correct isolation devices: line
protecting cut-outs, fuses (screw type
fuses removed from the holder), earth
leakage trips and contractors.
Page 4
www.electrolux.com
4
USE
• Use this appliance in a household envi-
• Do not change the specification of this
• Do not use an external timer or a sepa-
• Do not let the appliance stay unattended
• Do not operate the appliance with wet
• Do not put cutlery or saucepan lids on
• Set the cooking zone to “off” after use.
• Do not use the appliance as a work sur-
• If the surface of the appliance is cracked,
• Fats and oil when heated can release
• The vapours that very hot oil releases
• Used oil, that can contain food rem-
• Do not put flammable products or items
• Do not try to extinguish a fire with water.
WARNING!
Risk of injury, burns or electric
shock.
ronment.
appliance.
rate remote-control system to operate
the appliance.
during operation.
hands or when it has contact with water.
the cooking zones. They become hot.
face or as a storage surface.
disconnect immediately the appliance
from the power supply. This to prevent
an electrical shock.
WARNING!
Risk of fire or explosion.
flammable vapours. Keep flames or
heated objects away from fats and oils
when you cook with them.
can cause spontaneous combustion.
nants, can cause fire at a lower temperature than oil used for the first time.
that are wet with flammable products in,
near or on the appliance.
Disconnect the appliance and cover the
flame with a lid or a fire blanket.
WARNING!
Risk of damage to the appliance.
• Do not activate the cooking zones with
empty cookware or without cookware.
• Do not put aluminium foil on the appliance.
• Cookware made of cast iron, aluminium
or with a damaged bottom can cause
scratches on the glass ceramic. Always
lift these objects up when you have to
move them on the cooking surface.
CARE AND CLEANING
WARNING!
Risk of damage to the appliance.
• Clean regularly the appliance to prevent
the deterioration of the surface material.
• Do not use water spray and steam to
clean the appliance.
• Clean the appliance with a moist soft
cloth. Only use neutral detergents. Do
not use abrasive products, abrasive
cleaning pads, solvents or metal objects.
DISPOSAL
WARNING!
Risk of injury or suffocation.
• Disconnect the appliance from the mains
supply.
• Cut off the mains cable and discard it.
• Do not keep hot cookware on the control panel.
• Do not let cookware to boil dry.
• Be careful not to let objects or cookware
fall on the appliance. The surface can be
damaged.
Page 5
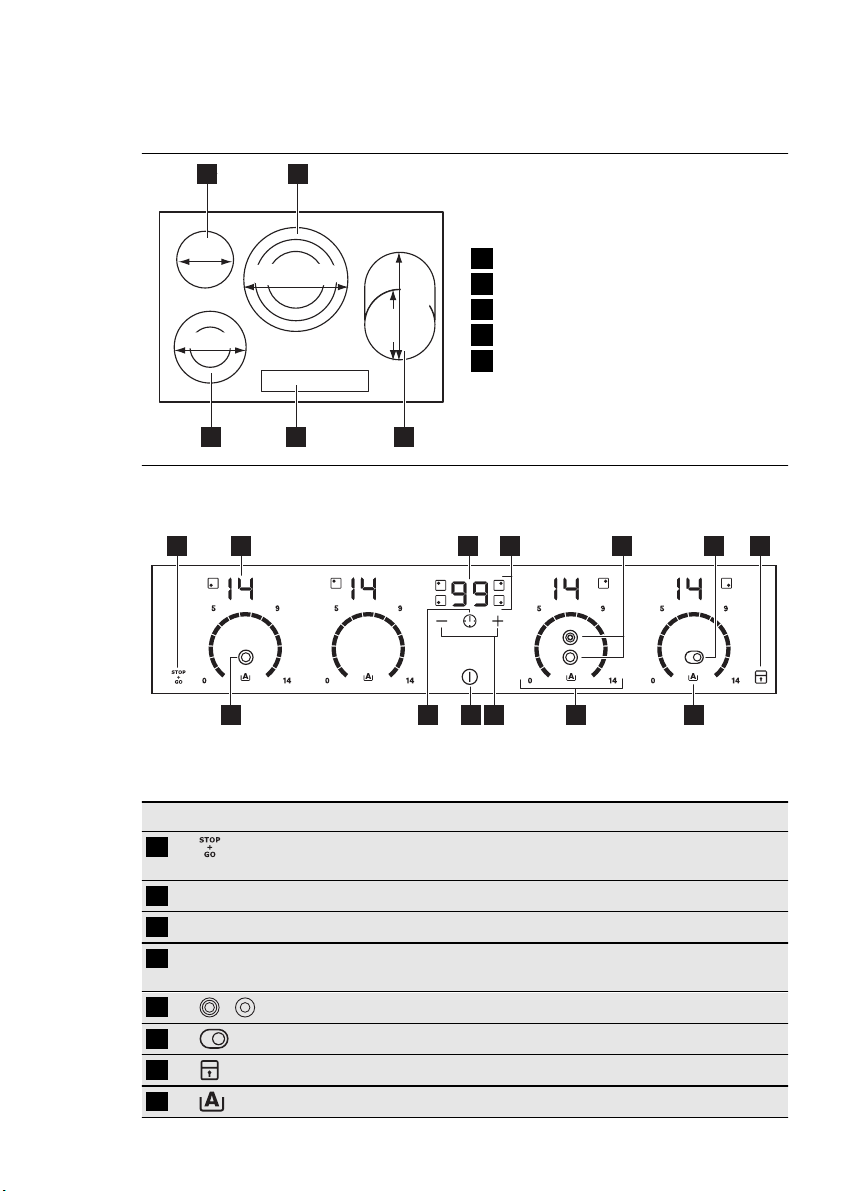
PRODUCT DESCRIPTION
GENERAL OVERVIEW
1 2
ENGLISH 5
145
mm
120/180
mm
145/210/270
mm
4
170
mm
265
35
mm
Cooking zone
1
Cooking zone
2
Cooking zone
3
Control panel
4
Cooking zone
5
CONTROL PANEL LAYOUT
4 5 6
3
1012 9
Use the sensor fields to operate the appliance. The displays, indicators and
sounds tell which functions operate.
sensor field function
1
To activate and deactivate the STOP+GO
function.
A heat setting display To show the heat setting.
2
The timer display To show the time in minutes.
3
Timer indicators of cooking
4
To show for which zone you set the time.
zones
5
6
7
8
/
To activate and deactivate the outer rings.
To activate and deactivate the outer ring.
To lock / unlock the control panel.
To activate Automatic Heat Up function.
81113
71 2
Page 6
www.electrolux.com
6
sensor field function
10
11
12
13
HEAT SETTING DISPLAYS
A control bar To set a heat setting.
9
/
To increase or decrease the time.
To activate and deactivate the appliance.
To set a cooking zone.
To activate and deactivate the outer ring.
Display Description
The cooking zone is deactivated.
-
The cooking zone operates.
The function operates.
The Automatic Heat Up function operates.
+ digit
/ /
There is a malfunction.
OptiHeat Control (3 step Residual heat indicator) : continue
cook / stay warm / residual heat.
Lock / The Child Safety function operates.
The Automatic Switch Off function operates.
OPTIHEAT CONTROL (3 STEP
RESIDUAL HEAT INDICATOR)
WARNING!
/ / The risk of burns from
residual heat!
OptiHeat Control shows the level of the residual heat.
Page 7
DAILY USE
ENGLISH 7
ACTIVATION AND
DEACTIVATION
Touch for 1 second to activate or deactivate the appliance.
AUTOMATIC SWITCH OFF
The function deactivates the appliance
automatically if:
•
All cooking zones are deactivated (
).
• You do not set the heat setting after you
activate the appliance.
• You spill something or put something on
the control panel for more than 10 seconds, (a pan, a cloth, etc.). An acoustic
signal sound some time and the appliance deactivates. Remove the object or
clean the control panel.
• You do not deactivate a cooking zone or
change the heat setting. After some time
comes on and the appliance deacti-
vates. See below.
• The relation between heat setting and
times of the Automatic Switch Off function:
•
, - — 6 hours
•
- — 5 hours
•
- — 4 hours
•
- — 1.5 hours
THE HEAT SETTING
Touch the control bar at the heat setting.
Change to the left or the right, if it is necessary. Do not release before you have a correct heat setting. The display shows the
heat setting.
ACTIVATION AND
DEACTIVATION OF THE OUTER
RINGS
You can adjust the surface you cook to the
dimension of the cookware.
To activate the outer rings touch the sensor
/ / . The indicator comes
field
on.
Do the procedure again to deactivate the
outer rings. The indicator goes out.
AUTOMATIC HEAT UP
You can get a necessary heat setting in a
shorter time if you activate the Automatic
Heat Up function. This function sets the
highest heat setting for some time (see the
diagram), and then decreases to the necessary heat setting.
To start the Automatic Heat Up function for
a cooking zone:
1.
Touch ( comes on in the display).
2.
Immediately touch the necessary heat
setting. After 5 seconds
in the display.
To stop the function change the heat setting.
12
11
10
9
8
7
6
5
4
3
2
1
0
1 2 3 4 5 6 7 8 9 101112 1314
comes on
TIMER
Count Down Timer
Use the Count Down Timer to set how long
the cooking zone operates for only this one
time.
Page 8
00
00
www.electrolux.com
8
Set the Count Down Timer after the selection of the cooking zone.
You can set the heat setting before or after
you set the timer.
•
• To activate the Count Down Timer:
• To see the remaining time: set the
•
• To deactivate the timer: set the cook-
When the countdown comes to an end,
the sound operates and
cooking zone deactivates.
•
CountUp Timer ( The count up
timer)
Use the CountUp Timer to monitor how
long the cooking zone operates.
•
• To activate the CountUp Timer: touch
•
• To deactivate the CountUp Timer: set
To set the cooking zone: touch
again and again until the indicator of a
necessary cooking zone comes on.
touch
00
of the cooking zone start to flash slow,
the time counts down.
cooking zone with
the cooking zone starts to flash quickly.
The display shows the remaining time.
To change the Count Down Timer:
set the cooking zone with
or .
ing zone with
maining time counts back to
indicator of the cooking zone goes out.
To stop the sound: touch
To set the cooking zone (if more
than 1 cooking zone operate ) : touch
a necessary cooking zone comes on.
indicator of the cooking zone starts to
flash slow, the time counts up. The dis-
play switches between
time (minutes).
To see how long the cooking zone
operates: set the cooking zone with
. The indicator of the cooking zone starts
to flash quickly. The display shows the
time that the cooking zone operates.
the cooking zone with
of the timer to set the time (
- 99 minutes). When the indicator
. The indicator of
. Touch
. Touch . The re-
. The
flashes. The
again and again until the indicator of
of the timer comes on. When the
and counted
and touch
or to deactivate the timer. The indicator of the cooking zone goes out.
Minute Minder
You can use the timer as a Minute Minder
while the cooking zones do not operate.
Touch
set the time. When the time comes to an
end, the sound operates and
•
. Touch or of the timer to
To stop the sound: touch
00
flashes.
STOP+GO
The function sets all cooking zones that
operate to the lowest heat setting (
When
heat setting.
The
function.
•
•
operates, you cannot change the
function does not stop the timer
To activate this function touch
symbol
To deactivate this function touch .
The heat setting that you set before
comes on.
comes on.
).
. The
LOCK
When the cooking zones operate, you can
lock the control panel, but not
vents an accidental change of the heat setting.
First set the heat setting.
To start this function touch
bol
comes on for 4 seconds.
The Timer stays on.
To stop this function touch
setting that you set before comes on.
When you stop the appliance, you also
stop this function.
. It pre-
. The sym-
. The heat
THE CHILD SAFETY DEVICE
This function prevents an accidental operation of the appliance.
To activate the child safety device
•
Activate the appliance with
set the heat settings.
•
Touch
comes on.
•
Deactivate the appliance with
for 4 seconds. The symbol
. Do not
.
Page 9
To deactivate the child safety device
•
Activate the appliance with . Do not
set the heat settings. Touch
seconds. The symbol
•
Deactivate the appliance with
To override the child safety device for
only one cooking time
•
Activate the appliance with
symbol
•
Touch for 4 seconds. Set the heat
setting in 10 seconds. You can operate the appliance.
• When you deactivate the appliance with
again.
comes on.
, the child safety device operates
comes on.
for 4
.
. The
OFFSOUND CONTROL
(DEACTIVATION AND
ACTIVATION OF THE SOUNDS)
Deactivation of the sounds
Deactivate the appliance.
Touch
come on and go out. Touch
onds.
Touch
When this function operates, you can hear
the sounds only when:
•
• the Minute Minder comes down
• the Count Down Timer comes down
• you put something on the control panel.
for 3 seconds. The displays
for 3 sec-
comes on, the sound is on.
, comes on, the sound is off.
you touch
ENGLISH 9
Activation of the sounds
Deactivate the appliance.
Touch
come on and go out. Touch
onds.
off. Touch
on.
for 3 seconds. The displays
for 3 sec-
comes on, because the sound is
, comes on. The sound is
Page 10

www.electrolux.com
10
HELPFUL HINTS AND TIPS
COOKWARE
Information about the cookware
• The bottom of the cookware must be as
thick and flat as possible.
• Cookware made of enamelled steel and
with aluminium or copper bottoms can
cause the colour change on the glassceramic surface.
ENERGY SAVING
How to save energy
• If it is possible, always put the lids on the
cookware.
• Put cookware on a cooking zone before
you start it.
Heat
Application: Time Hints
• Stop the cooking zones before the end
of the cooking time to use residual heat.
• The bottom of pans and cooking zones
must have the same dimension.
ÖKO TIMER (ECO TIMER)
To save energy, the heater of the
cooking zone deactivates before
the count down timer sounds. The
difference in the operation time depends on the heat setting level and
the length of the cooking operation.
THE EXAMPLES OF COOKING
APPLICATIONS
The data in the table is for guidance only.
setting
To keep cooked food warm as necessary Put a lid on the cookware
1
1 - 3 To make Hollandaise sauce
5 - 25 min Mix at intervals
and to melt butter, chocolate
and gelatine
1 - 3 To make fluffy omelettes and
10 - 40 min Cook with a lid on
baked eggs solid
3 - 5 To simmer rice and milk-
based dishes and to heat up
ready-cooked meals
25 - 50 min Add a minimum of two
times as much liquid as
rice. Mix milk dishes halfway through
5 - 7 To steam vegetables, fish
and meat
20 - 45 min Add some tablespoons of
liquid
7 - 9 To steam potatoes 20 - 60 min Use maximum of. ¼ l of
water for 750 g of potatoes
7 - 9 To cook larger quantities of
food, stews and soups
9 -12To lightly fry escalopes, veal
60 - 150 min Add a maximum of 3 l of a
liquid to the ingredients
as necessary Turn halfway through
cordon bleu, cutlets, rissoles,
sausages, liver, eggs, pancakes and doughnuts and to
cook roux
12 -13To fry hash browns, loin
5 - 15 min Turn halfway through
steaks and steaks
Page 11

ENGLISH 11
Heat
Application: Time Hints
setting
14 To boil large quantity of water, cook pasta, sear meat (goulash, pot, roast)
and to deep-fry chips
Information on acrylamides
Important! According to the newest
scientific knowledge, if you brown food
(specially the one which contains starch),
acrylamides can pose a health risk. Thus,
we recommend that you cook at the lowest
temperatures and do not brown food too
much.
Page 12

www.electrolux.com
12
CARE AND CLEANING
Clean the appliance after each use.
Always use cookware with clean bottom.
Scratches or dark stains on the
glass-ceramic cause no effect on
how the appliance operates.
To remove the dirt:
1.
– Remove immediately: melted
plastic, plastic foil, and food with
sugar. If not, the dirt can cause
damage to the appliance. Use a
special scraper for the glass . Put
the scraper on the glass surface at
an acute angle and move the blade
on the surface .
Remove after the appliance is
–
sufficiently cool: limescale rings ,
water rings, fat stains, shiny metallic
discolorations. Use a special cleaning agent for glass ceramic or stainless steel.
2.
Clean the appliance with a moist cloth
and some detergent.
3.
At the end rub the appliance dry
with a clean cloth.
Page 13
TROUBLESHOOTING
Problem Possible cause Remedy
You cannot activate the
appliance or operate it.
You touched 2 or more
The Stop+Go function op-
There is water or fat stains
An acoustic signal sounds
and the appliance deactivates.
An acoustic signal sounds
when the appliance is deactivated.
The appliance deactivates.
The residual heat indicator
does not come on.
The Automatic Heat Up
function does not operate.
The highest heat setting is
You cannot activate the
outer ring.
The sensor fields become
hot.
There is no acoustic signal when you touch the
panel sensor fields.
comes on.
comes on.
ENGLISH 13
Activate the appliance
sensor fields at the same
time.
erates.
on the control panel.
You put something on
one or more sensor fields.
You put something on the
sensor field
The cooking zone is not
hot because it operated
only for a short time.
The cooking zone is hot. Let the cooking zone be-
set.
Activate the inner ring first.
The cookware is too large
or you put it too near to
the controls.
The signals are deactivated.
The Automatic Switch Off
operates.
The Child Safety Device or
the Lock function operates.
.
again and set the heat setting in less than 10 seconds.
Touch only one sensor
field.
Refer to the chapter “Operating instructions”.
Clean the control panel.
Remove the object from
the sensor fields.
Remove the object from
the sensor field.
If the cooking zone operated sufficiently long to be
hot, speak to the service
centre.
come sufficiently cool.
The highest heat setting
has the same power as the
Automatic Heat Up function.
Put large cookware on the
rear cooking zones if necessary.
Activate the signals (refer to
“OffSound control”).
Deactivate the appliance
and activate it again.
Refer to the chapter “Operating instructions”.
Page 14

www.electrolux.com
14
on.
If you tried the above solutions and cannot
repair the problem, speak to your dealer or
the customer service. Give the data from
the rating plate, three digit letter code for
the glass ceramic (it is in the corner of the
glass surface) and an error message that
comes on.
Make sure, you operated the appliance
correctly. If not the servicing by a customer
service technician or dealer will not be free
of charge, also during the warranty period.
The instructions about the customer service and conditions of guarantee are in the
guarantee booklet.
Problem Possible cause Remedy
and a number come
There is an error in the
appliance.
Disconnect the appliance
from the electrical supply
for some time. Disconnect
the fuse from the electrical
system of the house. Con-
nect it again. If
on again, speak to the
service centre.
comes
Page 15
INSTALLATION
ENGLISH 15
WARNING!
Refer to "Safety information" chapter.
Before the installation
Before the installation of the appliance, record the information below from the rating
plate. The rating plate is on the bottom of
the appliance casing.
• Model ...........................
• PNC .............................
• Serial number ....................
BUILT-IN APPLIANCES
• Only use the built-in appliances after you
assemble the appliance into correct
ASSEMBLY
min.
min.
500mm
50mm
min.
50mm
built-in units and work surfaces that align
to the standards.
CONNECTION CABLE
• The appliance is supplied with the connection cable.
• Replace the damaged mains cable with
a special cable (type H05BB-F Tmax
90°C; or higher). Speak to your local
Service Centre.
=
R 5mm
490+1mm
750+1mm
600mm
=
min.
20 mm
min.
25 mm
Page 16
www.electrolux.com
16
min.
28 mm
If you use a protection box (an additional accessory
floor directly below the appliance is
not necessary.
You can not use the protection box
if you install the appliance above an
oven.
1)
), the protective
TECHNICAL INFORMATION
Modell EHF8748FOK Prod.Nr. 949 596 058 00
Typ 58 HBD 68 AO 220-240 V 50-60 Hz
Made in Germany
Ser.Nr. .......... 7.8 kW
ELECTROLUX
Cooking zones power
Cooking zone Nominal Power (Max heat setting)
Right rear —170 / 265 mm 1400 / 2200 W
Middle rear — 145 / 210 / 270 mm 1050 / 1950 / 2700 W
Left rear — 145 mm 1200 W
Left front — 120 / 180 mm 700 / 1700 W
[W]
ENVIRONMENT CONCERNS
Recycle the materials with the symbol
Put the packaging in applicable containers
to recycle it.
Help protect the environment and human
health and to recycle waste of electrical
1)
The protection box accessory may not be available in some countries. Please contact your
local supplier.
and electronic appliances. Do not dispose
.
appliances marked with the symbol
the household waste. Return the product
to your local recycling facility or contact
your municipal office.
with
Page 17

FRANÇAIS 17
SOMMAIRE
CONSIGNES DE SÉCURITÉ . . . . . . . . . . . . . . . . . . . . . . . . . . . . . . . . . . . . . . . . . . . . . . . . . . . . . 18
DESCRIPTION DE L'APPAREIL . . . . . . . . . . . . . . . . . . . . . . . . . . . . . . . . . . . . . . . . . . . . . . . . . . 21
UTILISATION QUOTIDIENNE . . . . . . . . . . . . . . . . . . . . . . . . . . . . . . . . . . . . . . . . . . . . . . . . . . . . 23
CONSEILS UTILES . . . . . . . . . . . . . . . . . . . . . . . . . . . . . . . . . . . . . . . . . . . . . . . . . . . . . . . . . . . . 26
ENTRETIEN ET NETTOYAGE . . . . . . . . . . . . . . . . . . . . . . . . . . . . . . . . . . . . . . . . . . . . . . . . . . . . 28
EN CAS D'ANOMALIE DE FONCTIONNEMENT . . . . . . . . . . . . . . . . . . . . . . . . . . . . . . . . . . . . . . 29
INSTALLATION . . . . . . . . . . . . . . . . . . . . . . . . . . . . . . . . . . . . . . . . . . . . . . . . . . . . . . . . . . . . . . 31
CARACTERISTIQUES TECHNIQUES . . . . . . . . . . . . . . . . . . . . . . . . . . . . . . . . . . . . . . . . . . . . . . 32
EN MATIÈRE DE PROTECTION DE L'ENVIRONNEMENT . . . . . . . . . . . . . . . . . . . . . . . . . . . . . . 32
NOUS PENSONS À VOUS
Merci d'avoir choisi ce produit Electrolux. Avec ce produit, vous bénéficiez de dizaines d'années
d'expérience professionnelle et d'innovation. Ingénieux et élégant, il a été conçu sur mesure pour
vous. Grâce à cet appareil, vous savez que chaque utilisation vous apportera satisfaction.
Bienvenue chez Electrolux.
Visitez notre site Internet pour :
Obtenir des conseils d'utilisation, des brochures, de l'aide, des informations :
www.electrolux.com
Enregistrer votre produit pour obtenir un meilleur service :
www.electrolux.com/productregistration
Acheter des accessoires, consommables et pièces de rechange d'origine pour votre
appareil :
www.electrolux.com/shop
SERVICE APRÈS-VENTE
N'utilisez que des pièces de rechange d'origine.
Avant de contacter le service, assurez-vous de disposer des informations suivantes :
Vous trouverez ces informations sur la plaque signalétique. Modèle, PNC, numéro de série.
Avertissement/Attention : consignes de sécurité.
Informations générales et conseils
Informations écologiques
Sous réserve de modifications.
Page 18
www.electrolux.com
18
CONSIGNES DE SÉCURITÉ
Avant d'installer et d'utiliser cet appareil, lisez soigneusement les instructions fournies. Le fabricant ne peut être tenu pour
responsable des dommages et blessures
liés à une mauvaise installation ou utilisation. Conservez toujours cette notice avec
votre appareil pour vous y référer ultérieurement.
SÉCURITÉ DES ENFANTS ET
DES PERSONNES
VULNÉRABLES
AVERTISSEMENT
Risque d'asphyxie, de blessure ou
d'invalidité permanente.
• Cet appareil n'est pas destiné à être utilisé par des enfants ou des personnes
dont les capacités physiques, sensorielles ou mentales, ou le manque d'expérience et de connaissance les empêchent d'utiliser l'appareil sans risque
lorsqu'ils sont sans surveillance à moins
qu'une personne responsable de leur sécurité ne les supervise ou leur donne des
instructions sur la manière de l'utiliser.
• Ne laissez pas les enfants jouer avec
l'appareil.
• Ne laissez pas les emballages à la portée
des enfants.
• Tenez les enfants et les animaux éloignés de l’appareil lorsqu'il est en cours
de fonctionnement ou lorsqu'il refroidit.
Les parties accessibles sont chaudes.
• Si l'appareil est équipé d'un dispositif de
sécurité enfants, nous vous recommandons de l'activer.
INSTALLATION
AVERTISSEMENT
L'appareil doit être installé uniquement par un professionnel qualifié.
• Retirez l'intégralité de l'emballage.
• N'installez pas et ne branchez pas un
appareil endommagé.
• Suivez scrupuleusement les instructions
d'installation fournies avec l'appareil.
• Respectez l'espacement minimal requis
par rapport aux autres appareils.
• L'appareil est lourd, prenez toujours des
précautions lorsque vous le déplacez.
Portez toujours des gants de sécurité.
• Isolez les surfaces découpées à l'aide
d'un matériau d'étanchéité pour éviter
que la moisissure ne provoque de gonflements.
• Protégez la partie inférieure de l'appareil
de la vapeur et de l'humidité.
• N'installez pas l'appareil près d'une porte ou sous une fenêtre. Les récipients
chauds risqueraient de tomber de l'appareil lors de l'ouverture de celles-ci.
• Si l'appareil est installé au-dessus de tiroirs, assurez-vous qu'il y a suffisamment d'espace entre le fond de l'appareil
et le tiroir supérieur pour que l'air puisse
circuler.
• Le dessous de l'appareil peut devenir
très chaud. Nous vous recommandons
d'installer un panneau de séparation
ignifuge sous l'appareil pour en bloquer
l'accès.
Branchement électrique
AVERTISSEMENT
Risque d'incendie ou d'électrocution.
• L'ensemble des branchements électriques doit être effectué par un technicien
qualifié.
• Avant chaque raccordement, assurezvous que la borne principale de l'appareil
est hors tension.
• Assurez-vous que l'appareil est bien installé. Des connexions desserrées ou incorrectes peuvent être à l'origine d'une
surchauffe des bornes.
• Assurez-vous qu'une protection antichocs est installée.
• Contrôlez que les câbles d'alimentation
n'entrent pas en contact avec les surfaces brûlantes de l'appareil ou les récipients brûlants lorsque vous branchez
l'appareil électrique à des prises électriques situées à proximité.
• Ne laissez pas les connexions s'emmêler.
• Utilisez une pince pour détendre le câble.
Page 19
• Utilisez le câble d'alimentation approprié.
• Veillez à ne pas endommager la fiche
secteur ni le câble d'alimentation. Contactez le service après-vente ou un électricien pour remplacer le câble d'alimentation s'il est endommagé.
• L'installation électrique doit être équipée
d'un dispositif d'isolement à coupure
omnipolaire. Le dispositif d'isolement
doit présenter une distance d'ouverture
des contacts d'au moins 3 mm.
• N'utilisez que des systèmes d'isolation
appropriés : des coupe-circuits, des fusibles (les fusibles à visser doivent être retirés du support), un disjoncteur différentiel et des contacteurs.
UTILISATION
AVERTISSEMENT
Risque de blessures, de brûlures
ou d'électrocution.
• Utilisez cet appareil dans un environnement domestique.
• Ne modifiez pas les caractéristiques de
cet appareil.
• Ne faites pas fonctionner l'appareil avec
un minuteur externe ou un système de
commande à distance.
• Ne laissez jamais l'appareil sans surveillance pendant son fonctionnement.
• N'utilisez jamais cet appareil avec les
mains mouillées ou lorsqu'il est en contact avec de l'eau.
• Ne posez pas de couverts ou de couvercles sur les zones de cuisson. Elles sont
chaudes.
• Éteignez les zones de cuisson après
chaque utilisation.
• N'utilisez jamais l'appareil comme plan
de travail ou comme plan de stockage.
• Si la surface de l'appareil présente des
fêlures, débranchez immédiatement l'appareil pour éviter tout risque d'électrocution.
AVERTISSEMENT
Risque d'explosion ou d'incendie.
• Les graisses et l'huile chaude peuvent
dégager des vapeurs inflammables. Tenez les flammes ou les objets chauds
éloignés des graisses et de l'huile lorsque vous vous en servez pour cuisiner.
FRANÇAIS 19
• Les vapeurs dégagées par l'huile très
chaude peuvent provoquer une combustion spontanée.
• L'huile qui a servi contient des restes
d'aliments qui peuvent provoquer un incendie à température plus faible que
l'huile n'ayant jamais servi.
• Ne placez pas de produits inflammables
ou d'éléments imbibés de produits inflammables à l'intérieur, à proximité ou
sur l'appareil.
• Ne tentez pas d'éteindre un incendie
avec de l'eau. Débranchez l'appareil et
couvrez les flammes à l'aide d'un couvercle ou d'une couverture à incendie.
AVERTISSEMENT
Risque de dommage de l'appareil.
• Ne laissez pas de récipients chauds sur
le bandeau de commande.
• Ne laissez pas le contenu des récipients
de cuisson s'évaporer.
• Prenez soin de ne pas laisser tomber
d'objets ou de récipients sur l'appareil.
Sa surface risque d'être endommagée.
• Ne faites jamais fonctionner les zones de
cuisson avec des récipients de cuisson
vides ou sans aucun récipient de cuisson.
• Ne placez jamais de papier aluminium
sur l'appareil.
• N'utilisez pas de récipients en fonte ou
en aluminium, ni de récipients dont le
fond est endommagé et rugueux. Ils risqueraient de rayer la surface vitrocéramique. Soulevez toujours ces objets lorsque vous devez les déplacer sur la surface de cuisson.
ENTRETIEN ET NETTOYAGE
AVERTISSEMENT
Risque de dommage de l'appareil.
• Nettoyez régulièrement l'appareil afin de
maintenir le revêtement en bon état.
• Ne pulvérisez pas d'eau ni de vapeur
pour nettoyer l'appareil.
• Nettoyez l'appareil avec un chiffon doux
humide. Utilisez uniquement des produits de lavage neutres. N'utilisez pas de
produits abrasifs, de tampons à récurer,
de solvants ou d'objets métalliques.
Page 20

www.electrolux.com
20
MISE AU REBUT
• Débranchez l'appareil de l'alimentation
• Coupez le câble d'alimentation au ras de
AVERTISSEMENT
Risque de blessure ou d'asphyxie.
électrique.
l'appareil et mettez-le au rebut.
Page 21

DESCRIPTION DE L'APPAREIL
VUE D'ENSEMBLE
1 2
FRANÇAIS 21
145
mm
120/180
mm
145/210/270
mm
4
170
mm
265
35
mm
Zone de cuisson
1
Zone de cuisson
2
Zone de cuisson
3
Bandeau de commande
4
Zone de cuisson
5
DESCRIPTION DU BANDEAU DE COMMANDE
4 5 6
3
1012 9
Appuyez sur les touches sensitives pour faire fonctionner l'appareil. Les
affichages, les voyants et les signaux sonores indiquent quelles fonctions
sont activées.
touche sensitive fonction
1
Pour activer et désactiver la fonction STOP
+GO.
Affichage du niveau de cuisson Pour indiquer le niveau de cuisson.
2
Affichage du minuteur Pour indiquer la durée, en minutes.
3
Voyants du minuteur des zones
4
de cuisson
5
/
Pour indiquer la zone à laquelle se réfère la
durée sélectionnée.
Pour activer et désactiver les circuits extérieurs
6
Pour activer ou désactiver le circuit extérieur de la zone de cuisson.
81113
71 2
Page 22

www.electrolux.com
22
touche sensitive fonction
10
11
12
13
INDICATEURS DU NIVEAU DE CUISSON
7
Pour verrouiller ou déverrouiller le bandeau
de commande.
8
Pour activer la fonction de démarrage automatique de la cuisson.
Barre de commande Pour sélectionner un niveau de cuisson.
9
/
Pour augmenter ou diminuer la durée.
Pour allumer et éteindre l'appareil.
Pour choisir une zone de cuisson.
Pour activer ou désactiver le circuit exté-
rieur de la zone de cuisson.
Indicateur Description
La zone de cuisson est à l'arrêt
-
La zone de cuisson est en fonctionnement
La fonction est activée.
La fonction de démarrage automatique de la cuisson est
activée.
+ chiffre
/ /
Il y a une anomalie.
OptiHeat Control (Voyant de chaleur résiduelle à trois ni-
veaux) : continuer la cuisson / maintien au chaud / chaleur
résiduelle
La fonction Verrouillage/Sécurité Enfant fonctionne.
La fonction d'arrêt automatique est activée.
OPTIHEAT CONTROL (3
NIVEAUX DE CHALEUR
RÉSIDUELLE)
AVERTISSEMENT
\ \ La chaleur résiduelle
peut être source de brûlures !
OptiHeat Control indique le niveau de chaleur résiduelle.
Page 23

UTILISATION QUOTIDIENNE
ACTIVATION ET
DÉSACTIVATION
Appuyez sur pendant 1 seconde pour
activer ou désactiver l'appareil.
ARRÊT AUTOMATIQUE
Cette fonction arrête l'appareil
automatiquement si :
• Toutes les zones de cuisson sont désactivées (
• Vous ne réglez pas le niveau de cuisson
après avoir allumé l'appareil.
• Vous avez renversé quelque chose ou
placé un objet sur le bandeau de commande pendant plus de 10 secondes
(une casserole, un torchon, etc.). Un signal sonore retentit pendant quelques
instants et l'appareil s'éteint. Retirez l'objet du bandeau de commande ou nettoyez celui-ci.
• Vous ne désactivez pas la zone de cuisson ou ne modifiez pas le niveau de
cuisson. Au bout de quelques instants,
dessous.
• La relation entre le niveau de cuisson et
les durées de la fonction d'arrêt automatique :
•
•
•
•
NIVEAU DE CUISSON
Appuyez sur le bandeau de sélection sur le
niveau de cuisson souhaité. Modifiez-le au
besoin en appuyant sur une autre position,
à droite ou à gauche. Ne relâchez pas la
pression tant que le niveau de cuisson souhaité n'est pas atteint. L'affichage indique
le niveau de cuisson.
).
s'allume et l'appareil s'éteint. Voir ci-
, - : 6 heures
- : 5 heures
- : 4 heures
- : 1,5 heure
FRANÇAIS 23
ACTIVATION ET
DÉSACTIVATION DES CIRCUITS
EXTÉRIEURS
Vous pouvez ajuster la surface de cuisson
à la dimension de vos récipients.
Pour activer les circuits extérieurs, appuyez
sur la touche sensitive
voyant s'allume.
Répétez la procédure ci-dessus pour désactiver les circuits extérieurs. Le voyant
s'éteint.
/ / . Le
DÉMARRAGE AUTOMATIQUE
DE LA CUISSON
La fonction de démarrage automatique de
la cuisson permet d'atteindre plus rapidement le niveau de cuisson souhaité. Cette
fonction active le niveau de cuisson le plus
élevé pendant un certain temps (voir le
schéma) puis redescend au niveau sélectionné.
Pour activer la fonction de démarrage automatique de la cuisson pour une zone de
cuisson :
1.
Appuyez sur la touche ( s'affiche).
2.
Réglez immédiatement le niveau de
cuisson souhaité. Au bout de 5 secon-
des,
Pour désactiver cette fonction, modifiez le
niveau de cuisson.
s'affiche.
Page 24

00
00
www.electrolux.com
24
MINUTEUR
Minuteur dégressif
Utilisez le minuteur dégressif pour régler la
durée de fonctionnement de la zone de
cuisson.
Réglez le minuteur dégressif après
avoir sélectionné la zone de cuisson.
Vous pouvez régler le niveau de cuisson
avant ou après avoir réglé le minuteur.
• Pour choisir la zone de cuisson : ap-
•
• Pour vérifier la durée restante : choi-
• Pour modifier le minuteur dégressif :
• Pour désactiver le minuteur : choisis-
Lorsque le compte à rebours touche à sa
fin, un signal sonore retentit et
gnote. La zone de cuisson se désactive.
12
11
10
9
8
7
6
5
4
3
2
1
0
1 2 3 4 5 6 7 8 9 101112 1314
puyez sur
à plusieurs reprises jusqu'à
ce que l'indicateur de la zone de cuisson
correspondante s'affiche.
Pour activer le minuteur dégressif :
appuyez sur la touche
pour régler la durée (de
du minuteur
à 99 minutes). Lorsque le voyant de la zone de
cuisson clignote lentement, le compte à
rebours démarre.
sissez la zone de cuisson à l'aide de
Le voyant de la zone de cuisson clignote
rapidement. L'affichage indique la durée
restante.
choisissez la zone de cuisson à l'aide de
. Appuyez sur ou .
sez la zone de cuisson à l'aide de
Appuyez sur
décompté jusqu'à
. Le temps restant est
. Le voyant de la
00
.
zone de cuisson s'éteint.
cli-
• Pour arrêter le signal sonore : appuyez sur
CountUp Timer (Minuteur
progressif)
Utilisez le CountUp Timer pour contrôler la
durée de fonctionnement de la zone de
cuisson sélectionnée.
Pour sélectionner la zone de cuisson
•
(si plusieurs zones sont en cours
d'utilisation) : appuyez sur
sieurs reprises jusqu'à ce que l'indicateur de la zone de cuisson correspondante s'affiche.
Pour activer la fonction CountUp Ti-
•
mer : appuyez sur
jusqu'à ce que
s'allume. Lorsque le voyant de la zone
de cuisson clignote lentement, le minuteur démarre. L'affichage indique, en al-
ternance,
et le nombre de minutes
écoulées.
• Pour contrôler la durée de fonction-
nement de la zone de cuisson sélectionnée : choisissez la zone de cuisson
à l'aide de
. Le voyant de la zone de
cuisson clignote rapidement. L'affichage
indique la durée de fonctionnement de la
zone de cuisson.
• Pour désactiver le CountUp Timer :
choisissez la zone de cuisson à l'aide de
et appuyez sur ou pour désactiver le minuteur. Le voyant de la zone de
cuisson s'éteint.
Minuterie
Vous pouvez utiliser le minuteur comme
.
minuterie lorsque vous n'utilisez pas les
zones de cuisson. Appuyez sur
puyez sur la touche
ou du minuteur
pour régler la durée. Lorsque la durée s'est
écoulée, un signal sonore retentit et
gnote.
• Pour arrêter le signal sonore : appuyez sur
STOP+GO
La fonction permet de basculer simultanément toutes les zones de cuisson actives
en position de maintien au chaud (
Il n'est désormais plus possible de modifier
le niveau de cuisson en cours
à plu-
. Ap-
00
.
cli-
).
Page 25

La fonction n’interrompt pas le minuteur.
• Pour activer cette fonction, appuyez
sur
. Le symbole s'allume.
• Pour désactiver cette fonction, appuyez sur
cédent s'allume.
. Le niveau de cuisson pré-
VERROUILLAGE
Pendant l'utilisation des zones de cuisson,
vous pouvez verrouiller le bandeau de
commande, à l'exception de la touche
Ceci empêchera une modification involontaire du niveau de cuisson.
Réglez tout d'abord le niveau de cuisson.
Pour démarrer cette fonction, appuyez sur
. Le symbole s'allume pendant 4 secondes.
Le minuteur reste allumé.
Pour mettre à l'arrêt cette fonction, ap-
puyez sur
dent s'allume.
Lorsque vous mettez l'appareil à l'arrêt,
vous désactivez également cette fonction.
. Le niveau de cuisson précé-
SÉCURITÉ ENFANTS
Ce dispositif permet d'éviter une utilisation
involontaire de l'appareil.
Pour activer le dispositif de sécurité
enfants :
•
Activez l'appareil avec
tionnez aucun niveau de cuisson.
•
Appuyez sur
symbole
•
Désactivez l'appareil avec
Pour désactiver le dispositif de
sécurité enfants
•
Activez l'appareil avec
tionnez aucun niveau de cuisson. Ap-
puyez sur
symbole
•
Désactivez l'appareil avec
Pour désactiver le dispositif de
sécurité enfants pour une seule
session de cuisson
•
Activez l'appareil avec
s'allume.
•
Appuyez sur
Réglez le niveau de cuisson dans les
pendant 4 secondes. Le
s'allume.
pendant 4 secondes. Le
s'allume.
pendant 4 secondes.
. Ne sélec-
.
. Ne sélec-
.
. Le symbole
FRANÇAIS 25
10 secondes qui suivent Vous pouvez
utiliser l'appareil.
• Lorsque vous désactivez l'appareil avec
, la sécurité enfants est à nouveau
activée.
OFFSOUND CONTROL
(DÉSACTIVATION ET
ACTIVATION DES SIGNAUX
SONORES)
Désactivation des signaux
.
sonores
Mettez l'appareil à l'arrêt.
Appuyez sur
les indicateurs s'allument et s'éteignent.
Appuyez sur
s'allume, le signal sonore est activé. Appuyez sur
re est désactivé.
Lorsque cette fonction est activée, l'appareil émet des signaux sonores uniquement
dans les circonstances suivantes :
•
quand vous appuyez sur
• quand le minuteur arrive en fin de course
• quand le décompte se termine
• quand vous posez un objet sur le ban-
deau de commande.
pendant 3 secondes. Tous
pendant 3 secondes.
, s'allume, le signal sono-
Activation des signaux
sonores
Mettez l'appareil à l'arrêt.
Appuyez sur
les indicateurs s'allument et s'éteignent.
Appuyez sur
s'allume, le signal sonore est désactivé.
Appuyez sur
sonores sont activés.
pendant 3 secondes. Tous
pendant 3 secondes.
, s'allume. Les signaux
Page 26

www.electrolux.com
26
CONSEILS UTILES
USTENSILES DE CUISSON
Informations concernant les ustensiles de cuisson
• Le fond de l'ustensile de cuisson doit
être aussi plat et épais que possible.
• Les récipients de cuisson avec un fond
en émail, en aluminium ou en cuivre peuvent laisser des traces sur la surface vitrocéramique.
• Désactivez les zones de cuisson avant la
fin du temps de cuisson pour utiliser la
chaleur résiduelle.
• Veillez à ce que le fond du plat de cuisson corresponde à la dimension de la
zone de cuisson.
ÖKO TIMER (MINUTEUR ECO)
ÉCONOMIES D'ÉNERGIE
Comment réaliser des économies
d'énergie
• Si possible, couvrez toujours les récipients de cuisson avec un couvercle
pendant la cuisson.
• Déposez toujours le récipient sur la zone
de cuisson avant de mettre celle-ci en
fonctionnement.
Ni-
Utilisation : Durée Conseils
veau
de
cuis
son
Pour maintenir les plats cuisi-
1
nés au chaud
1 - 3 Pour préparer de la sauce
hollandaise, faire fondre du
beurre, du chocolat, de la gé-
latine
1 - 3 Pour faire des omelettes et
des œufs au four.
3 - 5 Pour cuire du riz et des plats
à base de lait à feu doux et
réchauffer des plats cuisinés
5 - 7 Pour cuire à la vapeur des lé-
gumes, du poisson et de la
viande
7 - 9 Pour cuire des pommes de
terre à la vapeur
EXEMPLES DE CUISSON
au besoin Placez un couvercle sur le
5 - 25 min Remuez régulièrement
10 - 40 min Couvrez pendant la cuis-
25 - 50 min Ajoutez au minimum deux
20 - 45 min Ajoutez quelques cuillerées
20 - 60 min Utilisez au maximum ¼ l
Pour réaliser des économies
d'énergie, la zone de cuisson se
désactive automatiquement avant
le signal du minuteur. La différence
de temps de fonctionnement dépend du niveau et de la durée de
cuisson.
Les valeurs figurant dans le tableau
suivant sont fournies à titre indicatif.
récipient
son.
fois plus de liquide que de
riz. Remuez les plats à base de lait à la moitié de la
durée
à soupe de liquide
d'eau pour 750 g de pommes de terre
Page 27

FRANÇAIS 27
Ni-
Utilisation : Durée Conseils
veau
de
cuis
son
7 - 9 Pour cuire de grandes quan-
tités d'aliments, des ragoûts
60 - 150 min Ajoutez au minimum 3 l de
liquide aux ingrédients
et des soupes
9 -12Pour cuire des escalopes,
des cordons bleus de veau,
au besoin Retournez à la moitié du
temps
des côtelettes, des rissoles,
des saucisses, du foie, du
roux, des œufs, des crêpes,
des beignets
12 -13Pour cuire des galettes de
pommes de terre rissolées,
5 - 15 min Retournez à la moitié du
temps
des filets et des steaks
14 Pour faire bouillir de grandes quantités d'eau, cuire des pâtes, saisir de la
viande (goulasch, bœuf braisé), et cuire des frites
Page 28

www.electrolux.com
28
ENTRETIEN ET NETTOYAGE
Nettoyez l'appareil après chaque utilisation.
Utilisez toujours des récipients de cuisson
dont le fond est propre.
Les égratignures ou les taches
sombres sur la vitrocéramique
n'ont aucune influence sur le fonctionnement de l'appareil.
Pour enlever les salissures :
1.
– Retirez immédiatement : plastique
fondu, films plastiques et aliments
contenant du sucre. Sinon, la saleté
pourrait endommager l'appareil. Utilisez un racloir spécial pour la vitre.
Tenez le racloir incliné sur la surface
vitrée et faites glisser la lame du racloir pour enlever les salissures.
– Une fois que l'appareil a suffi-
samment refroidi, enlevez : traces
de calcaire et d'eau, projections de
graisse, décolorations métalliques
luisantes. Utilisez un agent de nettoyage pour vitrocéramique ou acier
inoxydable.
2.
Nettoyez l'appareil à l'aide d'un chiffon
humide et d'un peu de détergent.
3.
Et enfin, essuyez l'appareil à l'aide
d'un chiffon propre.
Page 29

EN CAS D'ANOMALIE DE FONCTIONNEMENT
Problème Cause possible Solution
Vous ne pouvez pas allumer l'appareil ou le faire
fonctionner.
Vous avez appuyé sur
La fonction Stop+Go est
Il y a de l'eau ou des ta-
Un signal sonore retentit
et l'appareil s'éteint.
Un signal sonore retentit
lorsque l'appareil est
éteint.
L'appareil s'éteint. Vous avez posé quelque
Le voyant de chaleur résiduelle ne s'allume pas.
La fonction de démarrage
automatique de la cuisson
ne fonctionne pas.
Le niveau de cuisson le
Impossible d'activer le circuit externe.
Les touches sensitives
sont chaudes.
Aucun signal sonore ne se
fait entendre lorsque vous
appuyez sur les touches
sensitives du bandeau.
s'allume.
Allumez de nouveau l'ap-
plusieurs touches sensitives en même temps.
activée.
ches de graisse sur le
bandeau de commande.
Vous avez posé quelque
chose sur une ou plusieurs touches sensitives.
chose sur la touche sensi-
.
tive
La zone de cuisson n'est
pas chaude parce qu'elle
n'a fonctionné que peu de
temps.
La zone de cuisson est
chaude.
plus élevé est réglé.
Activez d'abord le circuit
Le récipient est trop grand
ou vous l'avez placé trop
près des commandes.
Les signaux sonores sont
désactivés.
La fonction d'arrêt automatique est activée.
pareil et réglez le niveau de
cuisson sous 10 secondes.
N'appuyez que sur une
seule touche sensitive à la
fois.
Reportez-vous au chapitre
« Notice d'utilisation ».
Nettoyez le bandeau de
commande.
Retirez l'objet des touches
sensitives.
Retirez l'objet de la touche
sensitive.
Si la zone de cuisson a eu
assez de temps pour
chauffer, faites appel à votre service après-vente.
Laissez la zone de cuisson
refroidir.
Le niveau de cuisson le
plus élevé est identique à la
fonction de démarrage automatique de la cuisson.
interne.
Placez les récipients de
grande taille sur les zones
de cuisson arrière, si nécessaire.
Activez les signaux (reportez-vous au chapitre
« Commande sans son »).
Éteignez l'appareil puis allumez-le de nouveau.
FRANÇAIS 29
Page 30

www.electrolux.com
30
chent.
Si les indications ci-dessus ne vous permettent pas de remédier au problème,
veuillez vous adresser à votre revendeur ou
au service après-vente. Veuillez lui fournir
les informations figurant sur la plaque signalétique, la combinaison à 3 lettres et
chiffres pour la vitrocéramique (située dans
un des coins de la table de cuisson) et le
type de message d'erreur qui s'affiche.
Veillez à faire fonctionner l'appareil correctement. En cas d'erreur de manipulation de
la part de l'utilisateur, le déplacement du
technicien du service après-vente ou du
magasin vendeur peut être facturé même
en cours de garantie. Les instructions relatives au service après-vente et aux conditions de garantie figurent dans le livret de
garantie.
Problème Cause possible Solution
s'allume.
La fonction Sécurité enfants ou Verrouillage est
Reportez-vous au chapitre
« Notice d'utilisation ».
activée.
et un chiffre s'affi-
Une erreur s'est produite
dans l'appareil.
Débranchez l'appareil de
l'alimentation électrique
pendant quelques minutes.
Déconnectez le fusible de
l'installation domestique.
Rebranchez l'appareil. Si
s'allume à nouveau,
contactez votre service
après-vente.
Page 31

INSTALLATION
FRANÇAIS 31
AVERTISSEMENT
Reportez-vous au chapitre « Consignes de sécurité ».
Avant l'installation
Avant l'installation de l'appareil, notez cidessous les informations figurant sur la plaque signalétique. La plaque signalétique se
trouve au bas de l'enveloppe extérieure de
l'appareil.
• Modèle ...........................
• PNC .............................
• Numéro de série ....................
APPAREILS ENCASTRABLES
• Les appareils encastrables ne peuvent
être mis en fonctionnement qu'après
MONTAGE
min.
min.
500mm
50mm
min.
50mm
avoir été installés dans des meubles et
sur des plans de travail homologués et
adaptés.
CÂBLE D'ALIMENTATION
• L'appareil est fourni avec le câble d'alimentation.
• Si le câble d'alimentation est endommagé, il doit être remplacé par un câble
spécial (type H05BB-F Tmax 90 °C ou
de calibre supérieur). Contactez votre
service après-vente.
=
R 5mm
490+1mm
750+1mm
600mm
=
min.
20 mm
min.
25 mm
Page 32

www.electrolux.com
32
min.
28 mm
Si vous utilisez une enceinte de
protection (accessoire en option
le fond de protection installé directement sous l'appareil n'est plus
nécessaire.
Vous ne pouvez pas utiliser le boîtier de protection si vous installez
l'appareil au-dessus d'un four.
2)
),
CARACTERISTIQUES TECHNIQUES
Modell EHF8748FOK Prod.Nr. 949 596 058 00
Typ 58 HBD 68 AO 220-240 V 50-60 Hz
Made in Germany
Ser.Nr. .......... 7.8 kW
ELECTROLUX
Puissance des zones de cuisson
Zone de cuisson Puissance nominale (niveau de cuis-
Arrière droite — 170 / 265 mm 1400 / 2200 W
Arrière centrale — 145 / 210 / 270 mm 1050 / 1950 / 2700 W
Arrière gauche — 145 mm 1200 W
Avant gauche — 120 / 180 mm 700 / 1700 W
son max.) [W]
EN MATIÈRE DE PROTECTION DE L'ENVIRONNEMENT
Recyclez les matériaux portant le symbole
. Déposez les emballages dans les
conteneurs prévus à cet effet.
Contribuez à la protection de
l'environnement et à votre sécurité,
recyclez vos produits électriques et
2)
L'enceinte de protection n'est pas disponible dans tous les pays. Veuillez contacter votre revendeur local.
électroniques. Ne jetez pas les appareils
portant le symbole
ménagères. Emmenez un tel produit dans
votre centre local de recyclage ou
contactez vos services municipaux.
avec les ordures
Page 33

DEUTSCH 33
INHALT
SICHERHEITSHINWEISE . . . . . . . . . . . . . . . . . . . . . . . . . . . . . . . . . . . . . . . . . . . . . . . . . . . . . . . 34
GERÄTEBESCHREIBUNG . . . . . . . . . . . . . . . . . . . . . . . . . . . . . . . . . . . . . . . . . . . . . . . . . . . . . . 37
TÄGLICHER GEBRAUCH . . . . . . . . . . . . . . . . . . . . . . . . . . . . . . . . . . . . . . . . . . . . . . . . . . . . . . . 39
PRAKTISCHE TIPPS UND HINWEISE . . . . . . . . . . . . . . . . . . . . . . . . . . . . . . . . . . . . . . . . . . . . . 42
REINIGUNG UND PFLEGE . . . . . . . . . . . . . . . . . . . . . . . . . . . . . . . . . . . . . . . . . . . . . . . . . . . . . . 44
FEHLERSUCHE . . . . . . . . . . . . . . . . . . . . . . . . . . . . . . . . . . . . . . . . . . . . . . . . . . . . . . . . . . . . . . 45
MONTAGE . . . . . . . . . . . . . . . . . . . . . . . . . . . . . . . . . . . . . . . . . . . . . . . . . . . . . . . . . . . . . . . . . . 47
TECHNISCHE DATEN . . . . . . . . . . . . . . . . . . . . . . . . . . . . . . . . . . . . . . . . . . . . . . . . . . . . . . . . . 48
UMWELTTIPPS . . . . . . . . . . . . . . . . . . . . . . . . . . . . . . . . . . . . . . . . . . . . . . . . . . . . . . . . . . . . . . 48
WIR DENKEN AN SIE
Vielen Dank, dass Sie sich für ein Electrolux Gerät entschieden haben. Sie haben ein Produkt
gewählt, hinter dem eine jahrzehntelange professionelle Erfahrung und Innovation steht. Bei der
Entwicklung dieses großartigen und eleganten Geräts haben wir an Sie gedacht. So haben Sie bei
jedem Gebrauch die Gewissheit, dass Sie stets großartige Ergebnisse erzielen werden.
Willkommen bei Electrolux.
Besuchen Sie uns auf unserer Website, um:
Anwendungshinweise, Prospekte, Fehlerbehebungs- und Service-Informationen zu
erhalten:
www.electrolux.com
Ihr erworbenes Produkt zu registrieren, um den besten Service dafür zu gewährleisten:
www.electrolux.com/productregistration
Zubehör, Verbrauchsmaterial und Original-Ersatzteile für Ihr Gerät zu erwerben:
www.electrolux.com/shop
KUNDENDIENST UND -BETREUUNG
Bitte verwenden Sie ausschließlich Original-Ersatzteile für Ihre Produkte.
Halten Sie folgende Angaben bereit, wenn Sie sich an den Kundendienst wenden
(diese Informationen finden Sie auf dem Typenschild): Modell, Produktnummer (PNC),
Seriennummer.
Warnungs-/ Sicherheitshinweise.
Allgemeine Hinweise und Ratschläge
Hinweise zum Umweltschutz
Änderungen vorbehalten.
Page 34

www.electrolux.com
34
SICHERHEITSHINWEISE
Lesen Sie die mitgelieferte Anleitung sorgfältig vor der Montage und dem ersten Gebrauch des Geräts durch. Der Hersteller ist
nicht dafür verantwortlich, wenn eine fehlerhafte Montage oder Verwendung Verletzungen und Schäden verursacht. Bewahren Sie die Anleitung zusammen mit dem
Gerät für den zukünftigen Gebrauch auf.
SICHERHEIT VON KINDERN
UND SCHUTZBEDÜRFTIGEN
PERSONEN
WARNUNG!
Erstickungs- und Verletzungsgefahr
oder Gefahr einer dauerhaften Behinderung.
• Lassen Sie keine Personen (einschließlich Kinder) mit eingeschränkten physischen, sensorischen oder geistigen Fähigkeiten, mangelnder Erfahrung oder
mangelndem Wissen dieses Gerät benutzen. Solche Personen müssen bei
Betrieb des Gerätes unter Aufsicht einer
Person sein, die für Ihre Sicherheit verantwortlich ist, oder bei der Bedienung
des Gerätes angeleitet werden.
• Lassen Sie Kinder nicht mit dem Gerät
spielen.
• Halten Sie sämtliches Verpackungsmaterial von Kindern fern.
• Halten Sie Kinder und Haustiere von
dem Gerät fern während es in Betrieb ist
oder abkühlt. Zugängliche Teile sind
heiss.
• Falls Ihr Gerät mit einer Kindersicherung
ausgestattet ist, empfehlen wir, diese
einzuschalten.
MONTAGE
WARNUNG!
Nur eine qualifizierte Fachkraft darf
den Elektroanschluss des Geräts
vornehmen.
• Entfernen Sie das Verpackungsmaterial.
• Stellen Sie ein beschädigtes Gerät nicht
auf und benutzen Sie es nicht.
• Halten Sie sich an die mitgelieferte Montageanleitung.
• Die Mindestabstände zu anderen Geräten und Küchenmöbeln sind einzuhalten.
• Seien Sie beim Umsetzen des Geräts
vorsichtig, denn es ist schwer. Tragen
Sie stets Sicherheitshandschuhe.
• Dichten Sie die Ausschnittskanten mit einem Dichtungsmittel ab, um ein Aufquellen durch Feuchtigkeit zu verhindern.
• Schützen Sie die Geräteunterseite vor
Dampf und Feuchtigkeit.
• Installieren Sie das Gerät nicht direkt neben einer Tür oder unter einem Fenster.
So kann heißes Kochgeschirr nicht herunterfallen, wenn die Tür oder das Fenster geöffnet wird.
• Wird das Gerät über Schubladen eingebaut, achten Sie darauf, dass zwischen
dem Geräteboden und der oberen
Schublade ein ausreichender Abstand
für die Luftzirkulation vorhanden ist.
• Der Boden des Geräts kann heiß werden. Wir empfehlen eine feuerfeste
Trennplatte unter dem Gerät anzubringen, damit der Boden nicht zugänglich
ist.
Elektrischer Anschluss
WARNUNG!
Brand- und Stromschlaggefahr.
• Die elektrischen Anschlüsse müssen von
einem qualifizierten Elektriker ausgeführt
werden.
• Stellen Sie vor der Montage sicher, dass
die Hauptklemme des Geräts nicht an
die Spannungsversorgung angeschlossen ist.
• Achten Sie darauf, dass das Gerät korrekt montiert wird. Lockere und unsachgemäße Steckverbindungen können die
Klemme überhitzen.
• Sorgen Sie dafür, dass ein Berührungsschutz installiert wird.
• Achten Sie beim Anschluss des Geräts
an die Steckdose darauf, dass die elektrische Leitungen weder das Gerät noch
heißes Kochgeschirr berühren.
• Achten Sie darauf, dass elektrische Leitungen nicht lose hängen oder sich verheddern.
Page 35

• Verwenden Sie eine Zugentlastung für
das Kabel.
• Benutzen Sie das richtige Netzkabel.
• Achten Sie darauf, Netzstecker und
Netzkabel nicht zu beschädigen. Wenden Sie sich zum Austausch des beschädigten Netzkabels an den Kundendienst oder einen Elektriker.
• Die elektrische Installation muss eine
Trenneinrichtung aufweisen, mit der Sie
das Gerät allpolig von der Stromversorgung trennen können. Die Trenneinrichtung muss mit einer Kontaktöffnungsbreite von mindestens 3 mm ausgeführt
sein.
• Verwenden Sie nur geeignete Trennvorrichtungen: Überlastschalter, Sicherungen (Schraubsicherungen müssen aus
dem Halter entfernt werden können), FISchutzschalter und Schütze.
GEBRAUCH
WARNUNG!
Es besteht Verletzungs-, Verbrennungs- und Stromschlaggefahr.
• Das Gerät ist für die Verwendung im
Haushalt vorgesehen.
• Nehmen Sie keine technischen Änderungen am Gerät vor.
• Schalten Sie das Gerät nicht über eine
externe Zeitschaltuhr oder eine separate
Fernsteuerung ein.
• Lassen Sie das Gerät bei Betrieb nicht
unbeaufsichtigt.
•Bedienen Sie das Gerät nicht mit feuchten oder nassen Händen oder wenn es
mit Wasser in Kontakt gekommen ist.
• Legen Sie kein Besteck und keine Topfdeckel auf die Kochzonen. Sie werden
heiß.
• Schalten Sie die Kochzonen nach jedem
Gebrauch aus.
• Benutzen Sie das Gerät nicht als Arbeitsoder Abstellfläche.
• Hat die Geräteoberfläche einen Sprung,
trennen Sie das Gerät umgehend von
der Spannungsversorgung. Dies dient
zur Vermeidung eines Stromschlags.
WARNUNG!
Es besteht Explosions- und Brandgefahr.
DEUTSCH 35
• Erhitzte Öle und Fette können brennbare
Dämpfe freisetzen. Halten Sie Flammen
oder erhitzte Gegenstände beim Kochen
mit Fetten und Ölen von diesen fern.
• Die von sehr heißem Öl freigesetzten
Dämpfe können eine Selbstzündung verursachen.
• Bereits verwendetes Öl kann Lebensmittelreste enthalten und einen Brand bei
niedrigeren Temperaturen als frisches Öl
verursachen.
• Platzieren Sie keine entflammbaren Produkte oder Gegenstände, die mit entflammbaren Produkten benetzt sind, im
Gerät, auf dem Gerät oder in der Nähe
des Geräts.
• Löschen Sie eine Flamme nicht mit Wasser. Schalten Sie das Gerät aus und bedecken Sie die Flamme mit einem Deckel oder einer Feuerlöschdecke.
WARNUNG!
Das Gerät könnte beschädigt werden.
• Stellen Sie kein heißes Kochgeschirr auf
das Bedienfeld.
• Lassen Sie das Kochgeschirr nicht leerkochen.
• Lassen Sie keine Gegenstände oder
Kochgeschirr auf das Bedienfeld fallen.
Die Oberfläche könnte beschädigt werden.
• Schalten Sie die Kochzonen nicht mit
leerem oder ohne Kochgeschirr ein.
• Legen Sie keine Alufolie auf das Gerät.
• Kochgeschirr aus Gusseisen oder Aluminiumguss oder mit beschädigten Böden
kann die Glaskeramikoberfläche verkratzen. Heben Sie das Kochgeschirr stets
an, wenn Sie es auf dem Kochfeld umsetzen möchten.
REINIGUNG UND PFLEGE
WARNUNG!
Das Gerät könnte beschädigt werden.
• Reinigen Sie das Gerät regelmäßig, um
eine Abnutzung des Oberflächenmaterials zu verhindern.
• Reinigen Sie das Gerät nicht mit einem
Wasser- oder Dampfstrahl.
Page 36

www.electrolux.com
36
• Reinigen Sie das Geräts mit einem wei-
ENTSORGUNG
• Trennen Sie das Gerät von der Strom-
• Schneiden Sie das Netzkabel ab und
chen, feuchten Tuch. Verwenden Sie
ausschließlich Neutralreiniger. Benutzen
Sie keine Scheuermittel, scheuernde Reinigungsschwämmchen, Lösungsmittel
oder Metallgegenstände.
WARNUNG!
Verletzungs- oder Erstickungsgefahr.
versorgung.
entsorgen Sie es.
Page 37

GERÄTEBESCHREIBUNG
ALLGEMEINE ÜBERSICHT
1 2
DEUTSCH 37
145
mm
120/180
mm
145/210/270
mm
4
170
mm
265
35
mm
Kochzone
1
Kochzone
2
Kochzone
3
Bedienfeld
4
Kochzone
5
BEDIENFELDANORDNUNG
4 5 6
3
1012 9
81113
Bedienen Sie das Gerät über die Sensorfelder. Die Anzeigen, Kontrolllampen
und akustischen Signale informieren Sie über die aktiven Funktionen.
Sensorfeld Funktion
1
Ein- und Ausschalten der Funktion STOP
+GO.
Anzeige der Kochstufe Zeigt die Kochstufe an.
2
Timer-Anzeige Zeigt die Zeit in Minuten an.
3
Kochzonen-Anzeigen des
4
Timers
5
6
7
8
/
Zeigt an, für welche Kochzone die Zeit eingestellt wurde.
Ein- und Ausschalten der äußeren Kreise.
Ein- und Ausschalten des äußeren Kreises.
Verriegelung/Entriegelung des Bedienfelds.
Einschalten der Ankochautomatik.
71 2
Page 38

www.electrolux.com
38
Sensorfeld Funktion
10
11
12
13
ANZEIGE DER KOCHSTUFEN
Einstellskala Einstellen der Kochstufe.
9
/
Zum Erhöhen oder Verringern der Zeit.
Ein- und Ausschalten des Geräts.
Auswählen der Kochzone.
Ein- und Ausschalten des äußeren Kreises.
Anzeige Beschreibung
Die Kochzone ist ausgeschaltet.
-
Die Kochzone ist eingeschaltet.
Die Funktion ist eingeschaltet.
Die Ankochautomatik ist in Betrieb.
+ Zahl
/ /
Eine Fehlfunktion ist aufgetreten.
OptiHeat Control (3-stufige Restwärmeanzeige): Weiterga-
ren/Warmhalten/Restwärme
Die Sperre/Kindersicherung ist eingeschaltet.
Die Abschaltautomatik ist in Betrieb.
OPTIHEAT CONTROL
(RESTWÄRMEANZEIGE, 3STUFIG)
WARNUNG!
/ / Es besteht Verbren-
nungsgefahr durch Restwärme!
OptiHeat Control zeigt die Restwärmestufe
an.
Page 39

TÄGLICHER GEBRAUCH
EIN- UND AUSSCHALTEN
Berühren Sie 1 Sekunde lang , um das
Gerät ein- oder auszuschalten.
ABSCHALTAUTOMATIK
Mit dieser Funktion wird das Gerät in
folgenden Fällen automatisch
ausgeschaltet:
•
Alle Kochzonen sind ausgeschaltet (
).
• Nach dem Einschalten des Geräts wird
keine Kochstufe gewählt.
• Das Bedienfeld ist mehr als 10 Sekunden mit verschütteten Lebensmitteln
oder einem Gegenstand bedeckt (Topf,
Tuch usw.). Ein akustisches Signal ertönt
einige Male und das Gerät schaltet ab.
Entfernen Sie den Gegenstand oder reinigen Sie das Bedienfeld.
• Eine Kochzone wurde nicht ausgeschaltet bzw. die Kochstufe wurde nicht geändert. Nach einer gewissen Zeit leuch-
tet das Symbol
wird ausgeschaltet. Siehe unten.
• Verhältnis zwischen der Kochstufe und
den Zeiten der Abschaltautomatik:
•
, - — 6 Stunden
•
- — 5 Stunden
•
- — 4 Stunden
•
- — 1,5 Stunden
KOCHSTUFE
Berühren Sie auf der Einstellskala die gewünschte Kochstufe. Möchten Sie eine andere Kochstufe einstellen, berühren Sie die
Skala weiter links oder rechts. Nehmen Sie
den Finger erst von der Skala, wenn die
richtige Kochstufe eingestellt ist. Das Display zeigt die eingestellte Kochstufe an.
auf und das Gerät
DEUTSCH 39
EIN- UND AUSSCHALTEN DER
ÄUSSEREN HEIZKREISE
Die Kochflächen können an die Größe des
Kochgeschirrs angepasst werden.
Berühren Sie das Sensorfeld
, um die äußeren Kreise einzuschalten. Die
Anzeige leuchtet auf.
Wiederholen Sie den Vorgang, um die äußeren Heizkreise auszuschalten. Die Kontrolllampe erlischt.
/ /
ANKOCHAUTOMATIK
Bei Verwendung der Ankochautomatik
lässt sich die erforderliche Kochstufeneinstellung in kürzerer Zeit erzielen. Bei Verwendung dieser Funktion wird eine gewisse
Zeit lang die höchste Kochstufe (siehe Diagramm) eingestellt und anschließend auf
die erforderliche Stufe zurückgeschaltet.
So schalten Sie die Ankochautomatik für
eine Kochzone ein:
1.
Berühren Sie ( erscheint auf
dem Display).
2.
Berühren Sie dann gleich danach die
gewünschte Kochstufe. Nach 5 Se-
kunden leuchtet
Ändern Sie die Kochstufe, um die Funktion
abzuschalten.
auf dem Display.
Page 40

www.electrolux.com
40
UHR
Kurzzeitmesser
Mit dem Kurzzeitmesser stellen Sie ein, wie
lange eine Kochzone für einen einzelnen
Kochvorgang eingeschaltet bleiben soll.
Wählen Sie erst die Kochzone aus und
stellen Sie dann den Kurzzeitmesser
ein.
Sie können die Kochstufe einstellen, bevor
Sie den Kurzzeitmesser einstellen oder umgekehrt.
• Auswählen der Kochzone: Berühren
•
• So wird die Restzeit angezeigt: Wäh-
• Ändern des Kurzzeitmessers: Wählen
• So schalten Sie den Kurzzeitmesser
Nach Ablauf der eingestellten Zeit ertönt
ein Signalton und
ne wird ausgeschaltet.
12
11
10
9
8
7
6
5
4
3
2
1
0
1 2 3 4 5 6 7 8 9 101112 1314
so oft, bis die Anzeige der ge-
Sie
wünschten Kochzone aufleuchtet.
Einschalten des Kurzzeitmessers:
Berühren Sie
einzustellen (
des Timers, um die Zeit
- 99 Minuten). Wenn
00
die Anzeige der Kochzone langsamer
blinkt, wird die Zeit heruntergezählt.
len Sie die Kochzone mit
aus. Die Anzeige der Kochzone blinkt schneller. Das
Display zeigt die Restzeit an.
Sie die Kochzone mit
Sie
oder .
aus. Berühren
aus: Wählen Sie die Kochzone mit
aus. Berühren Sie . Die Restzeit wird
auf
heruntergezählt. Die Anzeige der
00
Kochzone erlischt.
blinkt. Die Kochzo-
00
• Ausschalten des Signaltons: Berühren
Sie
CountUp Timer
(Garzeitmesser)
Benutzen Sie die Funktion CountUp Timer,
um festzustellen, wie lange die Kochzone
bereits in Betrieb ist.
Auswählen der Kochzone (wenn
•
mehr als 1 Kochzone in Betrieb ist):
Berühren Sie
so oft, bis die Anzeige
der gewünschten Kochzone aufleuchtet.
So schalten Sie den CountUp Timer
•
ein: Berühren Sie
des Timers.
leuchtet auf. Wenn die Anzeige der
Kochzone langsamer blinkt, wird die Zeit
hochgezählt. Das Display schaltet um
zwischen
und der hochgezählten Zeit
(Minuten).
So können Sie feststellen, wie lange
•
die Kochzone bereits in Betrieb ist:
Wählen Sie die Kochzone mit
aus.
Die Anzeige der Kochzone blinkt schneller. Das Display zeigt die Einschaltdauer
der Kochzone an.
So schalten Sie den CountUp Timer
•
aus: Wählen Sie die Kochzone mit
aus und berühren Sie oder , um
den Garzeitmesser auszuschalten. Die
Anzeige der Kochzone erlischt.
Kurzzeitwecker
Wenn die Kochzonen nicht in Betrieb sind,
können Sie den Timer als Kurzzeitwecker
verwenden. Berühren Sie
. Berühren Sie
oder des Timers, um die Zeit einzu-
stellen. Wenn die eingestellte Zeit abgelaufen ist, ertönt ein Signal und
00
blinkt.
• Ausschalten des Signaltons: Berühren
Sie
STOP+GO
Mit der Funktion werden alle eingeschalteten Kochzonen auf die niedrigste
Kochstufe (
Ist
aktiviert, lässt sich die Kochstufe
nicht ändern.
Die Funktion
mer-Funktion.
) geschaltet.
unterbricht nicht die Ti-
Page 41

• Berühren Sie zur Aktivierung dieser
Funktion
• Berühren Sie zur Deaktivierung dieser
Funktion
Kochstufe wird eingestellt.
. Das Symbol leuchtet.
. Die zuvor ausgewählte
DEUTSCH 41
OFFSOUND CONTROL
(AKTIVIERUNG UND
DEAKTIVIERUNG DES
SIGNALTONS)
TASTENSPERRE
Wenn die Kochzonen in Betrieb sind, können Sie zwar das Bedienfeld verriegeln, je-
doch nicht das Sensorfeld
verhindert, dass die Kochstufe versehentlich geändert wird.
Stellen Sie erst die Kochstufe ein.
Berühren Sie
on. Das Symbol
angezeigt.
Die Uhr läuft weiter.
Berühren Sie
Funktion. Die zuvor ausgewählte Kochstufe
wird eingestellt.
Diese Funktion wird deaktiviert, sobald das
Gerät ausgeschaltet wird.
zur Aktivierung der Funkti-
wird 4 Sekunden lang
zur Deaktivierung der
. So wird
KINDERSICHERUNG
Diese Funktion verhindert eine versehentliche Bedienung des Geräts.
Aktivieren der Kindersicherung:
•
Schalten Sie das Gerät mit
len Sie keine Kochstufe ein.
•
Berühren Sie
Symbol
•
Schalten Sie das Gerät mit
Deaktivieren der Kindersicherung
•
Schalten Sie das Gerät mit
len Sie keine Kochstufe ein. Berühren
Sie
4 Sekunden lang. Das Symbol
leuchtet.
•
Schalten Sie das Gerät mit
Deaktivieren der Kindersicherung für
einen einzelnen Kochvorgang
•
Schalten Sie das Gerät mit
Symbol
•
Berühren Sie
len Sie die Kochstufe innerhalb von
10 Sekunden ein. Das Gerät kann jetzt
benutzt werden.
•
Nachdem das Gerät mit
tet wurde, ist die Kindersicherung wieder
aktiv.
4 Sekunden lang. Das
leuchtet.
leuchtet.
4 Sekunden lang. Stel-
ein. Stel-
aus.
ein. Stel-
aus.
ein. Das
ausgeschal-
Deaktivieren des Signaltons
Schalten Sie das Gerät aus.
Berühren Sie
zeigen leuchten auf und erlöschen. Berühren Sie
und der Signalton ist aktiviert. Berühren Sie
, leuchtet auf, der Signalton ist
deaktiviert.
Haben Sie den Signalton deaktiviert, ertönt
er nur in folgenden Fällen:
•
Bei der Berührung von
• Bei Ablauf des Kurzzeitweckers
• Bei Ablauf des Kurzzeitmessers
• Wenn das Bedienfeld bedeckt ist.
3 Sekunden lang. Die An-
3 Sekunden lang. leuchtet
Aktivieren des Signaltons
Schalten Sie das Gerät aus.
Berühren Sie
zeigen leuchten auf und erlöschen. Berühren Sie
da der Signalton deaktiviert ist. Berühren
Sie
, leuchtet. Der Signalton ist akti-
viert.
3 Sekunden lang. Die An-
3 Sekunden lang. leuchtet ,
Page 42

www.electrolux.com
42
PRAKTISCHE TIPPS UND HINWEISE
KOCHGESCHIRR
Informationen zum Kochgeschirr
• Der Boden des Kochgeschirrs sollte so
dick und flach wie möglich sein.
• Kochgeschirr aus Stahlemaille oder mit
Aluminium- oder Kupferböden kann Verfärbungen der Glaskeramikoberfläche
verursachen.
• Der Boden des Kochgeschirrs und die
verwendete Kochzone sollten gleich groß
sein.
ÖKO TIMER (ÖKO-TIMER)
Um Energie zu sparen, schaltet
sich die Kochzonenheizung vor
dem Signal des Kurzzeitmessers
ab. Die Abschaltzeit hängt von der
eingestellten Kochstufe und der
Gardauer ab.
ENERGIESPAREN
So sparen Sie Energie
• Decken Sie Kochgeschirr, wenn möglich,
mit einem Deckel ab.
• Setzen Sie das Kochgeschirr vor dem
Einschalten der Kochzone auf.
• Schalten Sie die Kochzonen bereits vor
dem Ende des Garvorgangs aus und
nutzen Sie die Restwärme.
Koc
Anwendung: Zeit Tipps
hstu
fe
Zum Warmhalten von bereits
1
gekochten Gerichten.
1 - 3 Für Hollandaisesauce, zum
Schmelzen von Butter, Scho-
kolade und Gelatine.
1 - 3 Zum Stocken von lockeren
Omeletts und gebackenen
Eiern.
3 - 5 Köcheln von Reis und Milch-
gerichten, Erhitzen von Fer-
tiggerichten.
5 - 7 Dünsten von Gemüse, Fisch
und Fleisch.
7 - 9 Dünsten von Kartoffeln. 20 - 60 Min. Maximal ¼ l Wasser für
7 - 9 Kochen größerer Speisemen-
gen, Eintopfgerichte und
Suppen.
ANWENDUNGSBEISPIELE ZUM
KOCHEN
Bei den Angaben in der folgenden
Tabelle handelt es sich um Richtwerte.
Nach Bedarf Legen Sie einen Deckel auf
das Kochgeschirr.
5 - 25 Min. Zwischendurch umrühren.
10 - 40 Min. Mit Deckel garen
25 - 50 Min. Mindestens doppelte Men-
ge Flüssigkeit zum Reis geben. Milchgerichte nach
der Hälfte der Zeit umrühren.
20 - 45 Min. Einige Esslöffel Flüssigkeit
hinzugeben
750 g Kartoffeln verwenden
60 - 150 Min. Maximal 3 l Flüssigkeit den
Zutaten hinzufügen.
Page 43

DEUTSCH 43
Koc
Anwendung: Zeit Tipps
hstu
fe
9 -12Schnitzel, Cordon bleu vom
Kalb, Kotelett, Frikadellen,
Nach Bedarf Nach der Hälfte der Zeit
wenden.
Bratwürste, Leber, Eier, Eierkuchen, Krapfen frittieren und
Mehlschwitze zubereiten.
12 -13Braten von Rösti, Lendenstü-
cken und Steaks.
5 - 15 Min. Nach der Hälfte der Zeit
wenden.
14 Aufkochen großer Mengen Wasser, Nudeln kochen, Anbraten von Fleisch
(Gulasch, Schmorbraten) und Frittieren von Pommes frites.
Informationen zu Acrylamiden
Wichtig! Nach neuesten
wissenschaftlichen Erkenntnissen kann die
Bräunung von Lebensmitteln, speziell bei
stärkehaltigen Produkten, eine
gesundheitliche Gefährdung durch
Acrylamid verursachen. Daher empfehlen
wir, bei möglichst niedrigen Temperaturen
zu garen und die Speisen nicht zu stark zu
bräunen.
Page 44

www.electrolux.com
44
REINIGUNG UND PFLEGE
Reinigen Sie das Gerät nach jedem Gebrauch.
Achten Sie immer darauf, dass der Boden
des Kochgeschirrs sauber ist.
Kratzer oder dunkle Flecken in der
Glaskeramik beeinträchtigen die
Funktionsfähigkeit des Geräts
nicht.
So entfernen Sie Verschmutzungen:
1.
– Sofort entfernen: geschmolzener
Kunststoff, Plastikfolie sowie zuckerhaltige Lebensmittel. Andernfalls
können die Verschmutzungen das
Gerät beschädigen. Verwenden Sie
einen speziellen Reinigungsschaber
für Glas. Den Reinigungsschaber
schräg zur Glasfläche ansetzen und
über die Oberfläche bewegen.
– Zu entfernen, wenn das Gerät
ausreichend abgekühlt ist: Kalkund Wasserablagerungen, Fettflecken, glänzende metallische Verfärbungen. Verwenden Sie hierfür einen
speziellen Reiniger für Glaskeramik
oder Edelstahl.
2.
Reinigen Sie das Gerät mit einem
feuchten Tuch und etwas Spülmittel.
3.
Am Ende das Gerät mit einem trockenen Tuch abreiben.
Page 45

FEHLERSUCHE
Problem Mögliche Ursache Abhilfe
Das Gerät kann nicht eingeschaltet oder bedient
werden.
Zwei oder mehr Sensor-
Die Funktion Stop+Go ist
Wasser- oder Fettspritzer
Ein akustisches Signal ertönt und das Gerät schaltet ab.
Wenn das Gerät ausgeschaltet wird, ertönt ein
akustisches Signal.
Das Gerät wird ausgeschaltet.
Die Restwärmeanzeige
funktioniert nicht.
Die Ankochautomatik
startet nicht.
Die höchste Kochstufe ist
Der äußere Heizkreis lässt
sich nicht einschalten.
Die Sensorfelder werden
heiß.
Es ertönt kein Signalton,
wenn Sie die Sensorfelder
des Bedienfelds berühren.
leuchtet auf.
leuchtet auf.
DEUTSCH 45
Schalten Sie das Gerät er-
felder wurden gleichzeitig
berührt.
eingeschaltet.
befinden sich auf dem Bedienfeld.
Mindestens ein Sensorfeld
wurde bedeckt.
Sie haben etwas auf das
Sensorfeld
Die Kochzone ist nicht
heiß, da sie nur kurze Zeit
in Betrieb war.
Die Kochzone ist heiß. Lassen Sie die Kochzone
eingestellt.
Schalten Sie zuerst den in-
Das Kochgeschirr ist zu
groß, oder Sie haben es
zu nahe an die Bedienelemente gestellt.
Der Signalton ist ausgeschaltet.
Die Abschaltautomatik hat
ausgelöst.
Die Kindersicherung oder
die Tastenverriegelung ist
eingeschaltet.
gestellt.
neut ein und stellen Sie innerhalb von 10 Sekunden
die Kochstufe ein.
Berühren Sie nur ein Sensorfeld.
Siehe Abschnitt „Gebrauchsanleitung“.
Wischen Sie das Bedienfeld ab.
Entfernen Sie den Gegenstand von den Sensorfeldern.
Entfernen Sie den Gegenstand vom Sensorfeld.
War die Kochzone lange
genug eingeschaltet, um
heiß zu sein, wenden Sie
sich bitte an den Kundendienst.
abkühlen.
Die höchste Kochstufe hat
die gleiche Leistung wie die
Ankochautomatik.
neren Heizkreis ein.
Stellen Sie großes Kochge-
schirr nötigenfalls auf die
hinteren Kochzonen.
Schalten Sie den Signalton
ein (siehe „Einschalten des
Signaltons“).
Schalten Sie das Gerät aus
und wieder ein.
Siehe Abschnitt „Gebrauchsanleitung“.
Page 46

www.electrolux.com
46
angezeigt.
Wenn Sie das Problem mit der oben angegebenen Abhilfemaßnahme nicht beheben
können, wenden Sie sich bitte an Ihren
Fachhändler oder den Kundendienst. Geben Sie dabei die Daten auf dem Typenschild, den dreistelligen Buchstaben-Code
für die Glaskeramik (befindet sich in der
Ecke der Glasfläche) und die angezeigte
Fehlermeldung an.
Vergewissern Sie sich, dass Sie das Gerät
korrekt bedient haben. Wenn Sie das Gerät
falsch bedient haben, fällt auch während
der Garantiezeit für den Besuch eines Kundendiensttechnikers oder Händlers eine
Gebühr an. Die Anweisungen zum Kundendienst und die Garantiebedingungen finden
Sie im Garantieheft.
Problem Mögliche Ursache Abhilfe
und eine Zahl werden
Im Gerät ist ein Fehler aufgetreten.
Trennen Sie das Gerät eine
Zeit lang vom Stromnetz.
Schalten Sie die Sicherung
im Sicherungskasten der
Hausinstallation aus. Schalten Sie die Sicherung wie-
der ein. Wenn
aufleuchtet, benachrichtigen Sie den Kundendienst.
erneut
Page 47

MONTAGE
DEUTSCH 47
WARNUNG!
Siehe Kapitel „Sicherheitshinweise“.
Vor der Montage
Notieren Sie vor der Montage des Geräts
alle Daten, die Sie unten auf dem Typenschild finden. Das Typenschild befindet
sich unten am Gerätegehäuse.
• Modell ...........................
• Produktnummer
(PNC) ........................................
• Seriennummer ............
EINBAUGERÄTE
• Einbaugeräte dürfen nur nach dem Einbau in bzw. unter normgerechte, pas-
MONTAGE
min.
min.
500mm
50mm
min.
50mm
sende Einbauschränke und Arbeitsplatten betrieben werden.
ANSCHLUSSKABEL
• Das Gerät wird mit dem Anschlusskabel
geliefert.
• Ein beschädigtes Netzkabel muss durch
ein entsprechendes Spezialkabel (Typ
H05BB-F Tmax 90 °C oder höher) ersetzt werden. Wenden Sie sich an den
Kundendienst.
=
R 5mm
490+1mm
750+1mm
600mm
=
min.
20 mm
min.
25 mm
Page 48

www.electrolux.com
48
min.
28 mm
Falls Sie einen Schutzboden verwenden (zusätzliches Zubehör
ist der Bodenschutz direkt unter
dem Gerät nicht erforderlich.
Wenn Sie das Gerät über einem
Backofen einsetzen, können Sie
den Schutzboden nicht verwenden.
TECHNISCHE DATEN
Modell EHF8748FOK Prod.Nr. 949 596 058 00
Typ 58 HBD 68 AO 220-240 V 50-60 Hz
Made in Germany
Ser.Nr. .......... 7.8 kW
ELECTROLUX
Kochzonenleistung
Kochzone Nennleistung (höchste Kochstufe)
Hinten rechts —170 / 265 mm 1400 / 2200 W
Hinten Mitte — 145 / 210 / 270 mm 1050 / 1950 / 2700 W
Hinten links —145 mm 1200 W
Vorne links —120 / 180 mm 700 / 1700 W
3)
),
[W]
UMWELTTIPPS
Recyceln Sie Materialien mit dem Symbol
. Entsorgen Sie die Verpackung in den
entsprechenden Recyclingbehältern.
Recyceln Sie zum Umwelt- und
Gesundheitsschutz elektrische und
3)
Der Schutzboden ist möglicherweise in einigen Ländern nicht erhältlich. Wenden Sie sich an
Ihren Händler vor Ort.
elektronische Geräte. Entsorgen Sie Geräte
mit diesem Symbol
Hausmüll. Bringen Sie das Gerät zu Ihrer
örtlichen Sammelstelle oder wenden Sie
sich an Ihr Gemeindeamt.
nicht mit dem
Page 49

SVENSKA 49
INNEHÅLL
SÄKERHETSINFORMATION . . . . . . . . . . . . . . . . . . . . . . . . . . . . . . . . . . . . . . . . . . . . . . . . . . . . 50
PRODUKTBESKRIVNING . . . . . . . . . . . . . . . . . . . . . . . . . . . . . . . . . . . . . . . . . . . . . . . . . . . . . . . 52
DAGLIG ANVÄNDNING . . . . . . . . . . . . . . . . . . . . . . . . . . . . . . . . . . . . . . . . . . . . . . . . . . . . . . . . 54
RÅD OCH TIPS . . . . . . . . . . . . . . . . . . . . . . . . . . . . . . . . . . . . . . . . . . . . . . . . . . . . . . . . . . . . . . 57
UNDERHÅLL OCH RENGÖRING . . . . . . . . . . . . . . . . . . . . . . . . . . . . . . . . . . . . . . . . . . . . . . . . . 59
FELSÖKNING . . . . . . . . . . . . . . . . . . . . . . . . . . . . . . . . . . . . . . . . . . . . . . . . . . . . . . . . . . . . . . . . 60
INSTALLATION . . . . . . . . . . . . . . . . . . . . . . . . . . . . . . . . . . . . . . . . . . . . . . . . . . . . . . . . . . . . . . 62
TEKNISK INFORMATION . . . . . . . . . . . . . . . . . . . . . . . . . . . . . . . . . . . . . . . . . . . . . . . . . . . . . . . 63
MILJÖSKYDD . . . . . . . . . . . . . . . . . . . . . . . . . . . . . . . . . . . . . . . . . . . . . . . . . . . . . . . . . . . . . . . 63
WE’RE THINKING OF YOU
Tack för att du köpt en Electrolux-produkt. Du har valt en produkt som för med sig årtionden av
yrkeserfarenhet och innovation. Genial och snygg har den utformats med dig i åtanke. Så när du än
använder den kan du känna dig trygg med att veta att du får fantastiska resultat varje gång.
Välkommen till Electrolux.
Besök vår webbplats för att:
Få tips om användning, broschyrer, felsökare, serviceinformation:
www.electrolux.com
Registrera din produkt för bättre service:
www.electrolux.com/productregistration
Köp tillbehör, förbrukningsvaror och originalreservdelar till din produkt:
www.electrolux.com/shop
KUNDTJÄNST OCH SERVICE
Vi rekommenderar att originalreservdelar används.
Ha följande uppgifter till hands när du kontaktar serviceavdelningen.
Informationen finns på typskylten. Modell, PNC, serienummer.
Varnings-/viktig säkerhetsinformation.
Allmän information och tips
Miljöinformation
Med reservation för ändringar.
Page 50

www.electrolux.com
50
SÄKERHETSINFORMATION
Läs noga de bifogade instruktionerna före
installation och användning av produkten.
Tillverkaren kan inte hållas ansvarig för personskador eller skador på egendom som
orsakats av felaktig installation eller användning. Förvara alltid instruktionerna tillsammans med produkten för framtida
bruk.
SÄKERHET FÖR BARN OCH
HANDIKAPPADE
VARNING
Risk för kvävning, skador eller permanent invaliditet.
• Tillåt inte användning av produkten av
någon med reducerad fysisk förmåga,
reducerad mental förmåga eller avsaknad av kunskap om hur produkten används (detta omfattar även barn). De ska
övervakas eller instrueras vid användning
av produkten av en person som ansvarar
för deras säkerhet.
• Låt inte barnen leka med produkten.
• Förvara allt förpackningsmaterial utom
räckhåll för barn.
• Håll barn och husdjur borta från produkten när den är igång eller när den svalnar. Åtkomliga delar är mycket varma.
• Om produkten har ett barnlås rekommenderar vi att du aktiverar det.
INSTALLATION
VARNING
Endast en behörig person får installera den här produkten.
• Avlägsna all paketering.
• Installera och använd inte produkten om
den är skadad.
• Följ de installationsinstruktioner som följer med produkten.
• Minsta avstånd till andra produkter ska
beaktas.
• Produkten är tung, så var alltid försiktig
när du flyttar den. Använd alltid skyddshandskar.
• Täta skurna ytor med tätningsmedel för
att förhindra att fukt får den att svälla.
• Skydda produktens botten mot ånga
och fukt.
• Installera inte produkten nära en dörr eller under ett fönster. Detta förhindrar att
heta kokkärl faller ned från produkten när
dörren eller fönstret är öppet.
• Om produkten är installerad ovanför lådor måste utrymmet mellan produktens
botten och den övre lådan var tillräckligt
så att luft kan cirkulera.
• Produktens undersida kan bli het. Vi rekommenderar att en icke-brännbar separationspanel monteras under produkten så att man inte kommer åt undersidan.
Elektrisk anslutning
VARNING
Risk för brand och elektriska stötar.
• Alla elektriska anslutningar måste göras
av en behörig elektriker.
• Se till att produktens nätanslutningsplint
inte är strömförande när kabeldragning
ska göras.
• Kontrollera att produkten är rätt installerad. Lösa och ej fackmässigt monterade
kontakter kan orsaka överhettning i
kopplingsplinten.
• Kontrollera att ett skydd mot elektriska
stötar är installerat.
• Låt inte elektriska ledningar komma i
kontakt med produkten eller heta kokkärl
när du ansluter produkten till närliggande
kontakter.
• Låt inte elektriska ledningar trassla in sig.
• Använd en dragavlastande klämma för
att skydda kabeln mot dragpåkänningar.
• Använd rätt nätkabel.
• Kontrollera så att du inte skadar stickkontakten och nätkabeln. Kontakta service eller en elektriker för att ersätta en
skadad nätkabel.
• Den elektriska installationen måste ha en
isolationsenhet så att du kan koppla från
produkten från nätet vid alla poler. Kontaktöppningen på isolationsenheten
måste vara minst 3 mm bred.
• Använd endast rätt isoleringsenheter:
strömbrytare, säkringar (säkringar av
Page 51

skruvtyp skall tas ur hållaren), jordfelsbrytare och kontaktorer.
ANVÄND
VARNING
Risk för skador, brännskador eller
elstötar föreligger.
• Använd denna produkt i en hushållsmiljö.
• Ändra inte produktens specifikationer.
• Använd inte produkten med en extern timer eller ett separat fjärrkontrollsystem.
• Lämna inte produkten utan tillsyn under
användning.
• Använd inte produkten med våta händer
eller när den är i kontakt med vatten.
• Lägg inte bestick eller kastrullock på
kokzonerna. De blir heta.
• Stäng av kokzonen efter användning.
• Använd inte produkten som arbets- eller
avlastningsyta.
• Om produktens yta är sprucken ska du
omedelbart koppla loss den från eluttaget. Detta för att förhindra elstötar.
VARNING
Det finns risk för eldsvåda eller explosion.
• Fetter och olja kan frigöra lättantändliga
ångor när de värms upp. Håll flammor eller uppvärmda föremål borta från fetter
och oljor när du lagar mat med dem.
• Ångorna som frigörs i mycket het olja
kan orsaka spontan förbränning.
• Använd olja, som kan innehålla matrester, kan orsaka brand vi lägre temperatur
än olja som används för första gången.
• Placera inga lättantändliga produkter eller föremål som är fuktiga med lättantändliga produkter i, nära eller på produkten.
• Försök inte släcka eld med vatten.
Koppla från produkten och täck över
flamman med ett lock eller en brandfilt.
VARNING
Risk för skador på produkten föreligger.
SVENSKA 51
• Var försiktig så att inte föremål eller kokkärl faller på produkten. Ytan kan skadas.
• Aktivera inte kokzonerna med tomma
kokkärl eller utan kokkärl.
• Lägg inte aluminiumfolie på produkten.
• Kokkärl av gjutjärn, aluminium eller med
skadad botten kan repa glaskeramiken.
Lyft alltid upp dessa föremål när du måste flytta dem på kokhällen.
SKÖTSEL OCH RENGÖRING
VARNING
Risk för skador på produkten föreligger.
• Rengör produkten regelbundet för att
förhindra att ytmaterialet försämras.
• Spruta inte vatten eller ånga för att rengöra produkten.
• Rengör produkten med en fuktig, mjuk
trasa. Använd bara neutrala rengöringsmedel. Använd inte produkter med slipeffekt, skursvampar, lösningsmedel eller
metallföremål.
AVFALLSHANTERING
VARNING
Risk för kvävning eller skador.
• Koppla loss produkten från eluttaget.
• Klipp av nätkabeln och kassera den.
• Placera inga heta kokkärl på kontrollpanelen.
• Låt inte kokkärl torrkoka.
Page 52

www.electrolux.com
52
PRODUKTBESKRIVNING
ALLMÄN ÖVERSIKT
1 2
145
mm
120/180
mm
145/210/270
mm
4
170
mm
265
35
mm
Kokzon
1
Kokzon
2
Kokzon
3
Kontrollpanelen
4
Kokzon
5
BESKRIVNING AV KONTROLLPANELEN
4 5 6
3
1012 9
Använd touch-kontrollerna för att manövrera produkten. Displayerna,
indikeringarna och ljudsignalerna markerar vilka funktioner som är
aktiverade.
touch-kontroll funktion
1
För att aktivera och inaktivera STOP+GOfunktionen.
Värmelägesdisplay För att visa det inställda värmeläget.
2
Timerdisplay För att visa tiden i minuter.
3
Timerindikatorer för kokzonerna För att visa för vilken kokzon tiden är in-
4
ställd.
5
6
7
8
/
För att aktivera och inaktivera ytterringarna.
För att aktivera och inaktivera ytterringen.
För att låsa/låsa upp kontrollpanelen.
För att aktivera funktionen Automax.
81113
71 2
Page 53

touch-kontroll funktion
Inställningslist För inställning av värmeläge.
9
10
11
12
13
/
För att öka eller minska tiden.
För att aktivera och inaktivera produkten.
För att ställa in kokzonen.
För att aktivera och inaktivera ytterringen.
VISNINGAR AV VÄRMELÄGEN
Display beskrivning
Kokzonen är avstängd.
-
+ siffra
/ /
Kokzonen är på.
Funktionen är påslagen.
Funktionen Automax är aktiverad.
Ett fel har uppstått.
OptiHeat Control (3-stegs restvärmeindikering): tillagar fort-
farande / varmhållning / restvärme.
Funktionslåset/Barnlåset är aktiverat.
Den automatiska avstängningen är aktiverad.
SVENSKA 53
OPTIHEAT CONTROL (3-STEGS
RESTVÄRMEINDIKERING)
VARNING
/ / Risk för brännskador
från restvärme!
OptiHeat Control visar restvärmenivån.
Page 54

www.electrolux.com
54
DAGLIG ANVÄNDNING
AKTIVERING OCH
INAKTIVERING
Tryck på i 1 sekund för att sätta på eller
stänga av produkten.
AUTOMATISK AVSTÄNGNING
Funktionen stänger av produkten
automatiskt om:
•
Alla kokzoner är inaktiverade (
).
• Du inte ställer in värmeläge efter produkten har aktiverats.
• Du spiller något eller sätter något på
kontrollpanelen längre än 10 sekunder
(en kastrull, en handduk osv.). En ljudsignal ljuder ett tag och produkten stängs
av. Ta bort föremålet eller rengör kontrollpanelen.
• Du inaktiverar inte en kokzon eller ändrar
värmeläget. Efter en viss tid tänds
och produkten stängs av. Se nedan.
• Förhållandet mellan värmeläget och tiderna för funktionen Automatisk avstängning:
•
, - - 6 timmar
•
- - 5 timmar
•
- - 4 timmar
•
- - 1,5 timmar
VÄRMELÄGE
Tryck på det önskade värmeläget på kontrollpanelen. Korrigera åt vänster eller höger
vid behov Släpp inte förrän det rätta värmeläget är inställt. Displayen visar värmeläget.
AKTIVERING OCH
INAKTIVERING AV DE YTTRE
RINGARNA
Du kan justera den yta som du tillagar på
efter storleken på kokkärlet.
För att aktivera ytterringarna, tryck på
touch-kontrollen
/ / . Kontrollampan tänds.
Gör på samma sätt igen för att stänga av
ytterringarna. Indikeringen slocknar.
AUTOMAX
Du kan uppnå önskat värmeläge snabbare
om du aktiverar funktionen Automax. Funktionen ställer in det högsta värmeläget under en viss tid (se diagrammet) och sänker
sedan värmen till valt läge.
Starta funktionen Automax för en kokzon:
1.
Tryck på ( syns på displayen).
2.
Tryck direkt på önskat värmeläge. Efter
5 sekunder syns
Stoppa funktionen genom att ändra värmeläge.
12
11
10
9
8
7
6
5
4
3
2
1
0
1 2 3 4 5 6 7 8 9 101112 1314
på displayen.
TIMER
Timer
Använd Timern för att ställa in hur länge
kokzonen ska vara igång vid enbart detta
tillagningstillfälle.
Ställ in Timern efter valet av kokzon.
Du kan ställa in värmeläget innan eller efter
att du har ställt in timern.
Page 55

• Ställa in kokzonen:Tryck upprepade
gånger på
önskade kokzonen tänds.
• Så här aktiverar du Timern: Tryck på
på timern för att ställa in tiden ( 00 -
minuter). När kontrollampan för kok-
99
zonen börjar blinka långsamt räknas tiden ned.
• För att se återstående tid: välj kokzonen med
jar blinka snabbt. På displayen visas den
återstående tiden.
• Aktivera Nedräkningstimern: välj kokzonen med
• Avaktivera timern: välj kokzonen med
. Tryck på . Den återstående tiden
räknas ner till
slocknar.
När tiden gått ut ljuder en signal och
blinkar. Kokzonen inaktiveras.
• Så här stänger du av ljudet: tryck på
tills indikeringen för den
. Kokzonens indikering bör-
. Tryck på eller .
. Kokzonens indikering
00
00
SVENSKA 55
Signalur
Timern kan användas som signalur när
kokzoner inte används. Tryck på
på
eller på timern för att ställa in ti-
den. När tiden gått ut ljuder en signal och
blinkar.
00
• Så här stänger du av ljudet: tryck på
. Tryck
STOP+GO
Funktionen ställer in alla påslagna kokzoner på det lägsta värmeläget (
När
är igång kan du inte ändra värmelä-
get.
Funktionen
nen.
• För att aktivera denna funktion, tryck
på
• För att inaktivera denna funktion, tryck
på
tänds.
stoppar inte timerfunktio-
. Symbolen tänds.
. Det tidigare inställda värmeläget
).
CountUp Timer
(Uppräkningstimer)
Använd CountUp Timer för att kontrollera
hur länge kokzonen är igång.
För att ställa in kokzonen (om mer
•
än en kokzon är i drift):Tryck upprepa-
de gånger på
önskade kokzonen tänds.
•
Aktivera CountUp Timer: tryck på
på timern varpå tänds. När indiker-
ingen för kokzonen börjar blinka långsammare räknas tiden upp. Displayen
växlar mellan
ter).
För att se hur länge kokzonen är
•
igång: välj kokzonen med
nens indikering börjar blinka snabbt. På
displayen visas tiden som kokzonen är
igång.
• Avaktivera CountUp Timer: välj kokzon med
att inaktivera timern. Kokzonens indikering slocknar.
tills indikeringen för den
och räknad tid (minu-
. Kokzo-
och tryck på eller för
LÅS
När kokzonen är aktiverad kan du låsa kontrollpanelen men inte
hindrar oavsiktliga ändringar av värmeläget.
Ställ först in värmeläget.
För att starta denna funktion, tryck på
Symbolen
Timern förblir på.
För att stoppa denna funktion, tryck på
. Det tidigare inställda värmeläget tänds.
När du stänger av produkten stängs även
denna funktion av.
tänds i 4 sekunder.
. Funktionen för-
.
BARNLÅS
Denna funktion förhindrar oavsiktlig användning av produkten.
För att aktivera/inaktivera barnlåset
•
Aktivera produkten med
in något värmeläge.
•
Tryck på
tänds.
•
Inaktivera produkten med
För att inaktivera barnlåset
•
Aktivera produkten med
in något värmeläge. Tryck på
sekunder. Symbolen
i 4 sekunder. Symbolen
. Ställ inte
.
. Ställ inte
i 4
tänds.
Page 56

www.electrolux.com
56
•
För att kringgå barnlåset för ett enskilt
tillagningstillfälle
•
•
•
OFFSOUND CONTROL
(AVAKTIVERING OCH
AKTIVERING AV LJUD)
Avaktivering av ljuden
Stäng av produkten.
Tryck på
tänds och släcks. Tryck på
der.
När denna funktion är igång hör du endast
ljuden när:
•
• Signaluret ringer
• nedräkningstimern ringer
• Du ställer något på kontrollpanelen.
Inaktivera produkten med
Aktivera produkten med
tänds.
Tryck på i 4 sekunder. Ställ in vär-
meläge inom 10 sekunder. Produkten
kan nu användas.
När du inaktiverar produkten med
tiveras barnlåset igen.
i 3 sekunder. Displayerna
tänds, och ljudet är nu på. Tryck på
. tänds, och ljudet är nu avstängt.
du trycker på
.
. Symbolen
ak-
i 3 sekun-
Aktivering av ljuden
Stäng av produkten.
Tryck på
tänds och släcks. Tryck på
der.
Tryck på
i 3 sekunder. Displayerna
tänds, eftersom ljudet är avstängt.
. tänds. Ljudet är nu på.
i 3 sekun-
Page 57

RÅD OCH TIPS
SVENSKA 57
KOKKÄRL
Information om kokkärlen
• Kokkärlens botten skall vara så tjock och
så plan som möjligt.
• Kokkärl av emaljerat stål med aluminiumeller kopparbotten kan orsaka färgskiftning på glaskeramiken.
SPARA ENERGI
Så här sparar du energi
• Stäng av kokzonen innan tillagningen är
klar för att utnyttja restvärmen.
• Botten på pannor och kokkärl måste
vara lika stor som kokzonen.
ÖKO TIMER (EKO-TIMER)
För att spara energi inaktiveras
kokzonen före signalen från nedräkningstimern. Skillnaden i användningstiden beror på den inställda värmenivån och tillagningstiden.
EXEMPEL PÅ OLIKA TYPER AV
• Sätt om möjligt alltid ett lock på kokkärlet.
• Sätt kokkärl på kokzonen innan den slås
på.
Vär-
Tillämpning: Tid Tips
meläge
För varmhållning av maträtter efter behov Lägg ett lock på ett kokkärl
1
1 - 3 För att laga hollandaisesås
och smälta smör, choklad
och gelatin
1 - 3 För att få fluffiga omeletter
och äggstanning att stelna
3 - 5 För att sjuda ris och mjölkba-
serade rätter och för att vär-
ma upp färdiglagad mat
5 - 7 För att ångkoka grönsaker,
fisk och kött
7 - 9 För att ångkoka potatis 20 - 60 min Använgd max ¼ l vatten till
7 - 9 För att tillaga större mängder
mat, stuvningar och soppor
9 -12För att lätt steka schnitzel,
kalv cordon bleu, kotletter,
kroketter, korv, lever, ägg,
pannkakor och munkar och
för att tillaga en redning
12 -13För att kraftigt steka potatisk-
roketter, biff och stekar
TILLAGNING
Uppgifterna i tabellen är endast avsedda som vägledning.
5 - 25 min Blanda med jämna mellan-
rum.
10 - 40 min Tillaga med lock
25 - 50 min Tillsätt minst två gånger så
mycket vätska som ris. Rör
om mjölkrätter efter halva
tiden
20 - 45 min Tillsätt några matskedar
vätska
750 g potatis
60 - 150 min Tillsätt max 3 l vätska till in-
gredienserna
efter behov Vänd efter halva tiden
5 - 15 min Vänd efter halva tiden
Page 58

www.electrolux.com
58
Värmeläge
14 För att koka stora mängder vatten, koka pasta, bryna kött (gulasch, grytstek)
Information om akrylamid
Viktigt Enligt de senaste vetenskapliga
rönen kan akrylamid bildas om livsmedel
bryns hårt (speciellt om de innehåller
stärkelse), vilket kan utgöra en hälsorisk. Vi
rekommenderar därför tillagning vid låga
temperaturer och att inte bryna mat för
hårt.
Tillämpning: Tid Tips
och fritera pommes frites
Page 59

UNDERHÅLL OCH RENGÖRING
Rengör produkten efter varje användningstillfälle.
Använd alltid kokkärl med ren botten.
Repor eller mörka fläckor på glas-
keramiken har ingen inverkan på
hur produkten fungerar.
För att ta bort smuts:
1.
– Ta omedelbart bort: smält plast,
plastfolie och mat med socker.
Smutsen kan skada produkten om
du inte gör detta. Använd en speciell
skrapa för glaset. Sätt skrapan snett
mot glasytan och för bladet över
ytan.
Ta bort när produkten svalnat
–
tillräckligt: kalkringar, vattenringar,
fettstänk, glänsande metalliska missfärgningar. Använd ett speciellt rengöringsmedel för glaskeramik eller
rostfritt stål.
2.
Rengör produkten med en fuktig duk
och lite rengöringsmedel.
3.
Torka sedan produkten torr med en
ren duk.
SVENSKA 59
Page 60

www.electrolux.com
60
FELSÖKNING
Det går inte att aktivera eller använda produkten.
Du har tryckt på 2 eller fle-
Funktionen Stop+Go är
Det finns vatten eller fett-
En ljudsignal ljuder och
produkten stängs av.
En ljudsignal ljuder när
produkten slår ifrån.
Produkten stängs av. Du satte något på touch-
Restvärmeindikatorn
tänds inte.
Den automatiska uppvärmningsfunktionen, Automax, aktiveras inte.
Det högsta värmeläget är
Det går inte att aktivera
den yttre värmezonen.
Touch-kontrollerna blir
varma.
Det hörs inget ljud när du
trycker på touch-kontrollerna.
tänds.
tänds.
Problem Möjlig orsak Lösning
Sätt på hällen igen och ställ
ra touch-kontroller samtidigt.
påslagen.
stänk på kontrollpanelen.
Du har satt något på en
eller flera touch-kontroller.
kontrollen
Kokzonen är inte varm ef-
tersom den bara har varit
påslagen en kort stund.
Kokzonen är het. Låt kokzonen bli tillräckligt
inställt.
Aktivera den inre värmezo-
Kokkärlet är för stort eller
står för nära kontrollerna.
Ljudsignalerna är avaktiverade.
Den automatiska avstängningen har aktiverats.
Funktionslåset/Barnlåset
är aktiverat.
.
in värmeläget inom 10 sekunder.
Tryck bara på en touchkontroll.
Se kapitlet "Instruktioner för
användning".
Rengör kontrollpanelen.
Ta bort föremålet från
touch-kontrollerna.
Ta bort föremålet från
touch-kontrollen.
Kontakta vår serviceavdelning om kokzonen varit på
tillräckligt länge för att vara
varm.
sval.
Det högsta värmeläget har
samma effekt som den automatiska uppvärmningsfunktionen.
nen först.
Placera stora kokkärl på de
bakre kokzonerna vid behov.
Aktivera ljudsignalerna (se
"Slå på och av ljudsignaler").
Avaktivera produkten och
aktivera den igen.
Se kapitlet "Instruktioner för
användning".
Page 61

Problem Möjlig orsak Lösning
och en siffra tänds.
Det har uppstått ett fel på
produkten.
Kontakta återförsäljaren eller kundtjänst om
du inte kan avhjälpa problemet med ovanstående förslag. Meddela data från typskylten, den tresiffriga koden och koden för
glaskeramiken (den sitter i hörnet på hällen)
och felmeddelande som visas.
Säkerställ att du har använt produkten på
rätt sätt. Annars kommer besök från servicetekniker eller fackhandlare inte att vara
kostnadsfritt, inte ens under garantitiden.
Anvisningar för kundservice och garantibestämmelser finns i garantihäftet.
SVENSKA 61
Koppla bort produkten från
elnätet några minuter. Ta ur
eller koppla från säkringen i
husets/lägenhetens säkringsskåp. Anslut igen. Om
tänds igen ber vi dig
kontakta vår serviceavdelning.
Page 62

www.electrolux.com
62
INSTALLATION
VARNING
Se kapitlet "Säkerhetsinformation".
Före installationen
Anteckna informationen nedan på typskylten innan produkten installeras. Typskylten
sitter på undersidan av produktens hölje.
• Modell ...........................
• PNC (produktnr) .............................
• Serienummer ....................
INBYGGNADSPRODUKTER
• Inbyggnadsprodukter får endast användas efter installation i lämpliga inbygg-
MONTERING
min.
min.
500mm
50mm
min.
50mm
nadsenheter och arbetsbänkar enligt gällande standarder.
NÄTKABEL
• Produkten är försedd med en nätkabel.
• Om nätkabeln skadats måste den bytas
ut mot en specialkabel (typ H05BB-F
Tmax 90 °C; eller högre). Kontakta din
lokala servicestation.
=
R 5mm
490+1mm
=
750+1mm
600mm
min.
20 mm
min.
25 mm
Page 63

min.
28 mm
SVENSKA 63
Om du använder en skyddslåda,
Probox, (extra tillbehör
plåten direkt under produkten behövs inte.
Du kan inte använda skyddslådan
om du installerar produkten ovanför
en inbyggnadsugn.
TEKNISK INFORMATION
Modell EHF8748FOK Prod.Nr. 949 596 058 00
Typ 58 HBD 68 AO 220-240 V 50-60 Hz
Made in Germany
Ser.Nr. .......... 7.8 kW
ELECTROLUX
Effekt för kokzonerna
Kokzon Nominell effekt (max värmeläge) [W]
Höger bak -170 / 265 mm 1400 / 2200 W
Mitten bak - 145 / 210 / 270 mm 1050 / 1950 / 2700 W
Vänster bak -145 mm 1200 W
Vänster fram -120 / 180 mm 700 / 1700 W
4)
), skydds-
MILJÖSKYDD
Återvinn material med symbolen
Återvinn förpackningen genom att placera
den i lämpligt kärl.
Bidra till att skydda vår miljö och vår hälsa
genom att återvinna avfall från elektriska
4)
Skyddslådan (tillbehör) finns inte i alla länder. Kontakta din lokala återförsäljare.
.
och elektroniska produkter. Släng inte
produkter märkta med symbolen
hushållsavfallet. Lämna in produkten på
närmaste återvinningsstation eller kontakta
kommunkontoret.
med
Page 64

www.electrolux.com/shop 892951622-B-052012
 Loading...