

Electrolux E36EC70FSS2, E36EC70FSS1, E30EC70FSS3, E30EC70FSS2, E30EC70FSS1 Owner’s Manual
...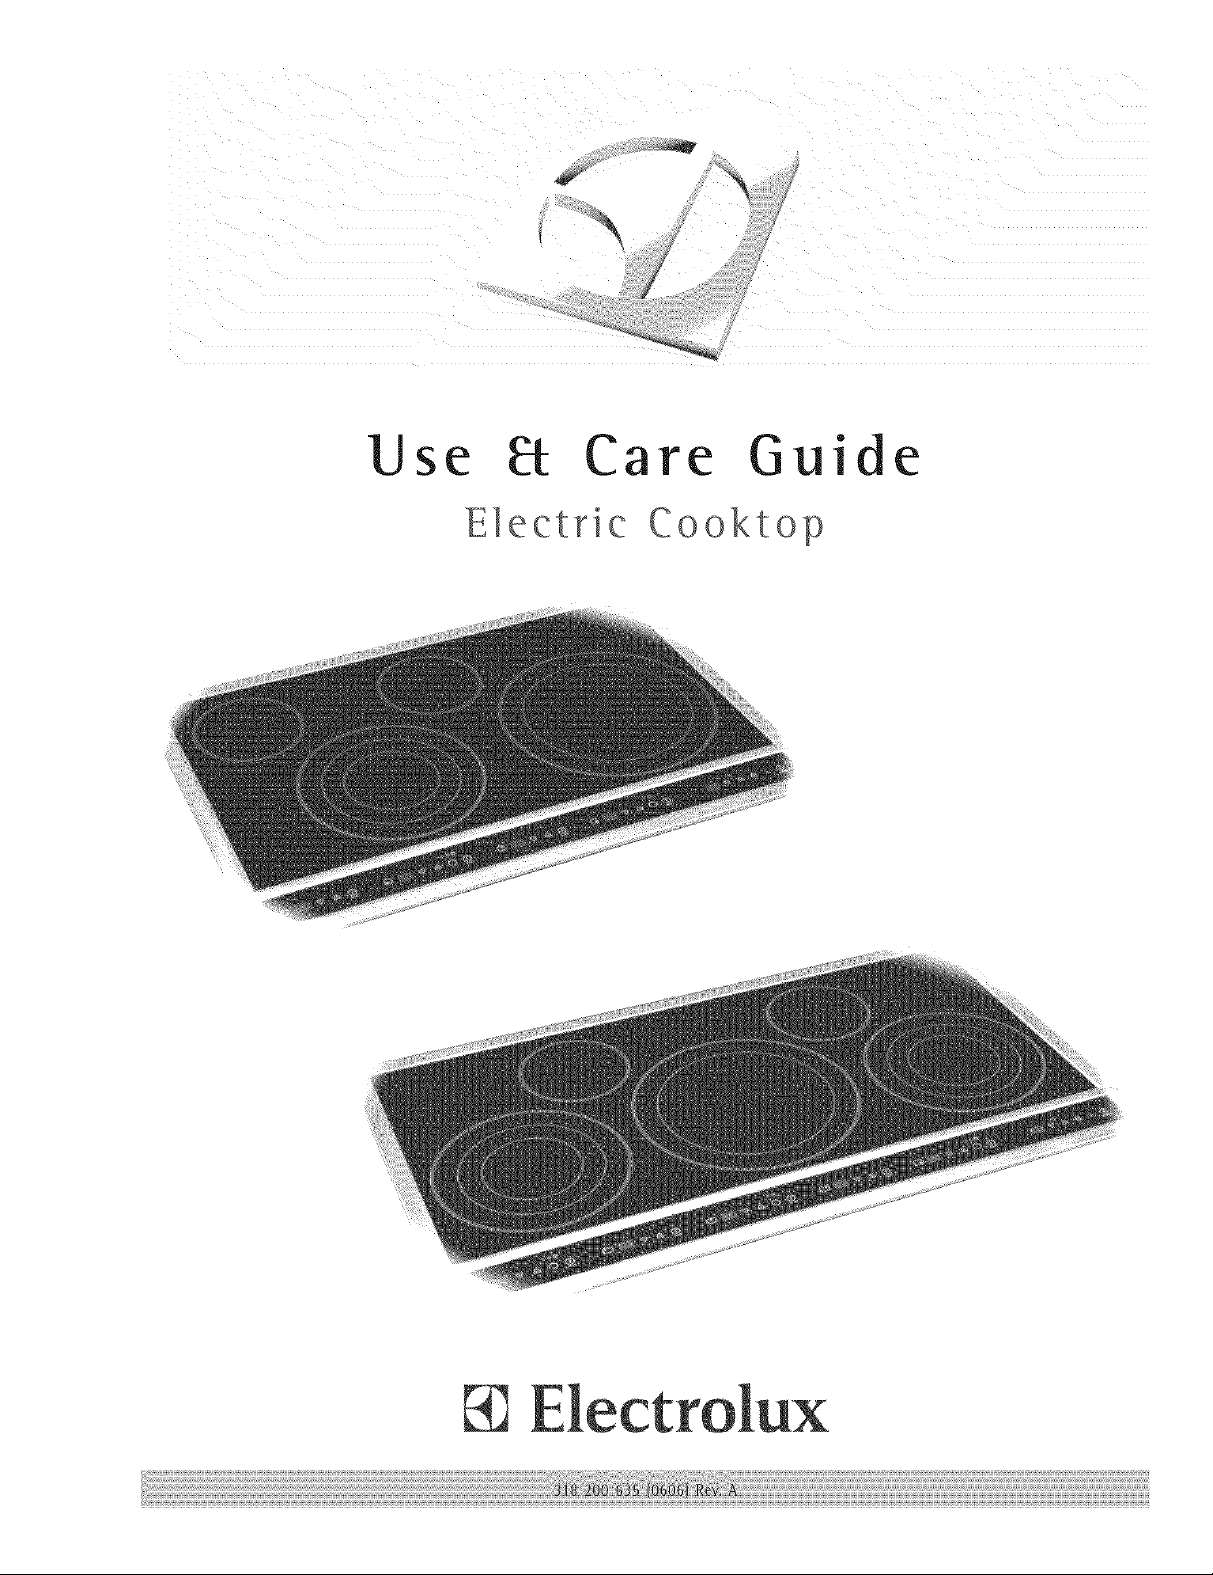
Use _ Care Guide
Electric Cooktop
Electrolu×
Finding Information
MAKEA RECORDFORFUTUREUSE
[] [] [] [] [] [] [] [] [] [] [] [] [] [] [] [] [] [] [] [] [] []
Brand
Purchase Date
Model Number
Serial Number
[] [] [] [] [] [] [] [] [] [] [] [] [] [] [] [] [] [] [] [] [] []
For toll-free telephone support in the U.S. and Canada:
1-877-4ELECTROLUX (1-877-435-3287)
For online support and internet product information:
www.electrolux.com
@2006 Electrolux Home Products, inc.
Post Office Box 212378, Augusta, Georgia 30917, USA
All rights reserved. Printed in the USA
Finding information..........................................2-3
MakeaRecordfor Futureuse .................................2
Questions?...............................................................2
Safety ..................................................................4-6
ImportantSafetyInstructions.....................................4
Cooktop Features..............................................7-8
Setting Surface Controls ................................9-18
AbouttheCeramicGlassCooktop............................9
AbouttheRadiantSurfaceElements.........................g
LocationsoftheSurfaceRadiantElements.............10
UsingtheTouchControl.........................................10
LEDMessagesorLightindicators
DisplayedbyMainControl......................................11
LEDMessagesorLightIndicators
DisplayedbyCookingElementControls............11-12
TheRecommendedSurfaceCookingSettings........ 12
OperatingtheSingleSurfaceRadiantElements......I3
OperatingtheDualSurfaceRadiantElement..........14
OperatingtheTripleSurfaceRadiantElements.......15
KeepWarmFeature...............................................16
MinuteTimer..........................................................16
SabbathFeatureMode..........................................17
SurfaceCookingutensils........................................18
CookwareMaterialTypes......................................18
GeneralCare& Cleaning...............................19-2!
Care&CleaningTable...........................................19
CooktopCleaningandMaintenance.......................20
CleaningRecommendationsforthe
CeramicGlassCooktop.....................................20-2I
Care&CleaningofStainlessSteel .........................21
Solutions to Common Problems..................22-23
EntireCooktopDoesNotOperate..........................22
SurfaceElementDoesNotHeat .............................22
SurfaceElementTooHotorNotHotEnough..........22
FoodNotHeatingEvenly.......................................23
PoorCookingResults............................................23
ScratchesorAbrasionsonCeramic
GlassCooktopSurface...........................................23
MetalMarksonCeramicGlass
CooktopSurface....................................................23
BrownStreaksandSpecksonCeramic
GlassCooktopSurface...........................................24
AreasofDiscolorationonCeramic
GlassCooktopSurface...........................................24
Notes....................................................................25
Warranty information.........................................26
Safety
IMPORTANTSAFE INSTRUCTIONS
[] [] [] [] [] [] [] [] [] [] [] [] [] [] [] [] [] [] [] [] [] []
Readaii instructionsbefore using this appliance.Savethese instructionsfor future reference.
Thismanual contains importantsafetysymbols and instructions.Pleasepay attentionto these
symbols and follow all instructionsgiven.
Remove all tape and packaging wrap before using the appliance. Destroy the carton
and plastic bags after unpacking the appliance. Never allow children to play with
packaging material.
• Proper Installation. Be sure your appliance is properly installed and grounded by a
qualified technician in accordance with the National Electrical Code No. 70 - latest
edition in the United States, or CSA C22.1, Part 1 in Canada, and local code
requirements. Install only per installation instructions provided in the literature package for
this appliance.
Ask your dealer to recommend a qualified technician and an authorized repair service. Know
how to disconnect the electrical power to the appliance at the circuit breaker or fuse box in
case of an emergency.
• User Servicing. Do not repair or replace any part of the appliance unless specifically
recommended in the manuals. All other servicing should be done only by a qualified
technician to reduce the risk of personal injury and damage to the appliance.
Never modify or alter the construction of an appliance such as removal of panels, wire
covers or any other permanent part of the appliance.
Storage on Appliance. Flammable materials should not be stored near surface units.
This includes paper, plastic and cloth items, such as cookbooks, plasticware and towels, as
well as flammable liquids. Do not store explosives, such as aerosol cans, on or near the
appliance. Flammable materials may explode and result infire or property damage.

- Do not leave children alone, Children should not be left alone or unattended in the
area where an appliance is in use, They should never be allowed to sit or stand on any
part of the appliance.
* DO NOT TOUCH SURFACE UNITS OR AREAS NEAR THESE UNITS. Surface units may
be hot even though they are dark incolor. Areas near surface units may become hot enough
to cause bums. During and after use, do not touch, orlet clothing orother flammable materials
touch these areas until they have had sufficient time to cool. Among these areas are the
cooktop and areas facing the cooktop,
* Wear Proper Apparel, Loose-fitting or hanging garments should never be worn while
using the appliance. Donot let clothing orotherflammable materials contact hotsurfaces.
• Do Not Use Water or Flour on Grease Fires. Smother the fire with a pan lid. or use
baking soda, a dry chemical or foam-type extinguisher.
* When heating fat or grease, watch it closely. Fat or grease may catch fire if allowed to
become too hot.
• Use Only Dry Pot holders, Moist or damp pot holders on hot surfaces may result in
burns from steam. Do not let the pot holders touch hot surface units, Do not use a towel or
other bulky cloth instead of a potholder,
• Do Not Heat Unopened Food Containers, Buildup ofpressure may cause the container
to burst and result in injury,
iMPORTANT. Do not attempt to operate the cooktop during a power failure, If the power
falls, always turn offthe cooktop. Ifthe cooktop Jsnot turned off and the power resumes, the
cooktop will notoperate and an error message will be displayed.
IMPORTANT SAFETY INSTRUCTIONS FOR USING YOUR COOKTOP
• Know which touch key pads controls each surface unit.
• Clean the appliance regularly to keep all parts free of grease that could catch fire.
Exhaust fan ventilation hoods and grease filters should be kept clean. Do not allow grease to
accumulate on hood or filter. Greasy deposits in the fan could catch fire. When flaming food
under the hood, turn fan on. Refer to hood manufacturer's instructions for cleaning.
* Use Proper Pan Size. This appliance isequipped with one or more surface units of different
sizes, Select utensils having flat bottoms large enough to cover the surface unit. The use of
undersized utensils willexpose a portion of the surface heating unit to direct contact and may
result in ignition of clothing. Proper relationship of utensil to element will also improve
efficiency,
• UtensilHandlesShouldBeTurned inward and Not Extend Over Adjacent Surface
Units. To reduce the risk of burns, ignition of flammable materials, and spillage due to
unintentional contact with the utensil.
• Never Leave Surface Units Unattended. Boilovers cause smoking and greasy spillovers
that may ignite, or a pan that has boiled dry may melt.
• Protective Liners. Do not use aluminum foil to line any part of the appliance. Only use
aluminum foil as recommended for baking if used as a cover placed on the food. Any other use
of protective liners or aluminum foil may result in a risk of electric shock orfire or short circuit.
Glazed Cooking Utensils. Only certain types of glass, glass/ceramic, ceramic,
earthenware, orother glazed utensils are suitable for range top service without breaking due
to the sudden change in temperature. Check the manufacturer's recommendations for
cooktop use.
• Do Not Use Decorative Surface Element Covers. If an element is accidentally turned on,
the decorative cover will become hot and possibly melt. Burns will occur ifthe hot covers are
touched. Damage may also be done to the appliance.
, Ventilating hood. The ventilating hood above your cooking surface should be cleaned
frequently, so the grease from cooking vapors does not accumulate on the hood or filter.
FOR CERAMIC-GLASS COOKTOP ONLY
• Do Not Clean or Operate a Broken Cooktop. Ifcooktop should break, cleaning solutions
and spillovers may penetrate the broken cooktop and create a risk ofelectric shock. Contact
a qualified technician immediately.
• Clean Cooktop with Caution. Ifa wet sponge or cloth is used towipe spills on a hot cooking
area, be careful to avoid a steam burn. Some cleaners can produce harmful fumes ifapplied
to a hot surface.
• Do Not Place Hot Cookware on Cold Cooktop Glass. This could cause glass to break.
• Do not slide pan across the cooktop surface. They may scratch the cooktop surface.
• Do Not Let Pans Boil Dry. This may cause permanent damage in the form of breakage,
fusion, or marking that can affect the ceramic-glass cooktop. (This type of damage is not
covered by your warranty).

#
#
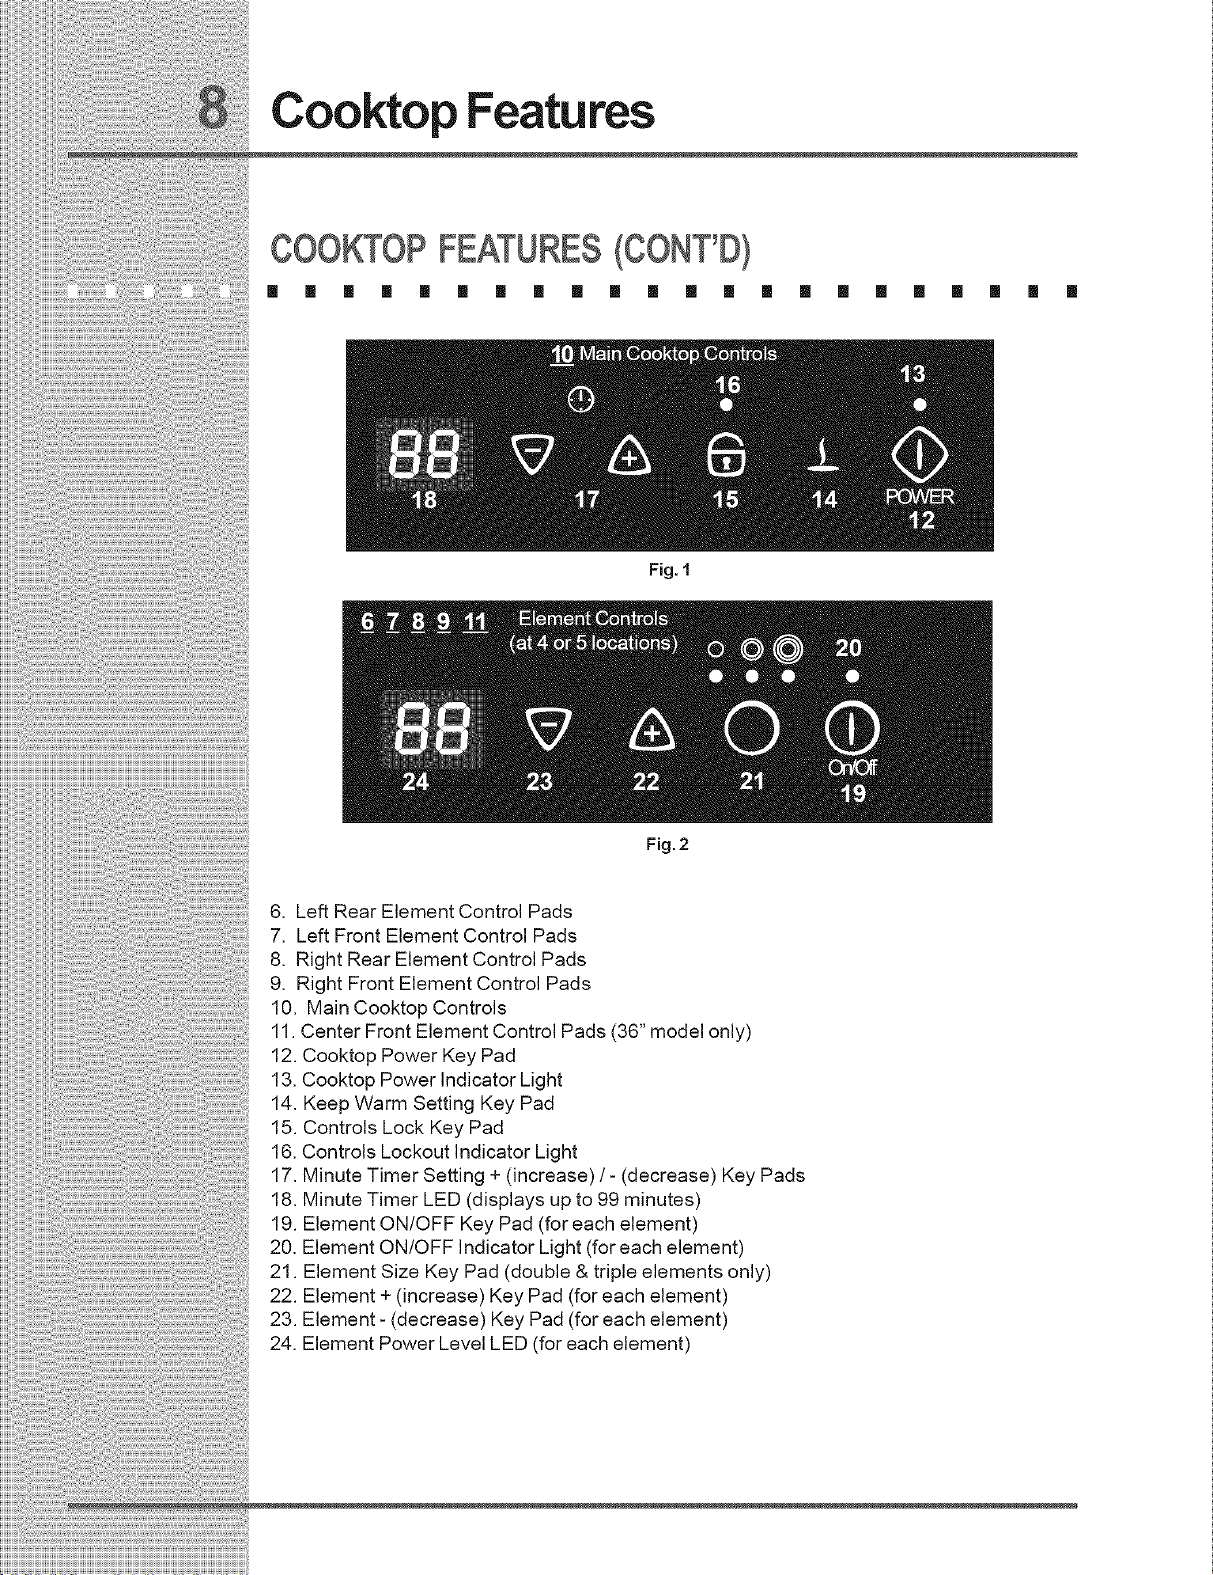
Cooktop Features
COOKTOP FEATURES(CONT'D)
[] [] [] [] [] [] [] [] [] [] [] [] [] [] [] [] [] [] [] [] [] []
Fig. 1
Fig. 2
6. Left Rear Element Control Pads
7. Left Front Element Control Pads
8. Right Rear Element Control Pads
9. Right Front Element Control Pads
10. Main Cooktop Controls
11. Center Front Element Control Pads (36" model only)
12. Cooktop Power Key Pad
13. Cooktop Power Indicator Light
14. Keep Warm Setting Key Pad
15. Controls Lock Key Pad
16. Controls Lockout Indicator Light
17. Minute Timer Setting + (increase) / - (decrease) Key Pads
18. Minute Timer LED (displays up to 99 minutes)
19. Element ON/OFF Key Pad (for each element)
20. Element ON/OFF Indicator Light (for each element)
21. Element Size Key Pad (double & triple elements only)
22. Element + (increase) Key Pad (for each element)
23. Element - (decrease) Key Pad (for each element)
24. Element Power Level LED (for each element)

SettingSurfaceControls
ABOUT THE CE M(C G SS COOKTOP
[] [] [] [] [] [] [] [] [] [] [] [] [] [] [] [] []
The ceramic cooktop has radiant surface elements located below the
surface of the glass. The design of the ceramic cooktop outlines the area
of the surface element underneath. Make sure the diameter of the pan
matches the diameter of the element outline on the cooktop (See Figs. 1
&2).
Heat istransferred up through the surface of the cooktop to the cookware.
Only flat-bottom cookware should be used. The type and size of cookware,
the number of surface elements in use and their settings areall factors that
will affect the amount of heat that will spread to areas beyond the surface
elements. The areas surrounding the elements may become hot enough
to cause burns.
[] [] [] [] []
Fig.1 - 30" Model - Cooktop Appearance
ABOUT THE D(ANT SURFACE
[] [] [] [] [] [] [] [] [] [] [] [] [] [] [] [] [] [] [] [] [] []
The element temperature rises gradually and evenly. As the temperature rises, the element will
glow red. To maintain the selected setting, the element will cycle ON and OFF. The heating
element retains enough heat to provide a uniform and consistent heat during the OFF cycle. For
efficient cooking, turn OFF the element several minutes before cooking is complete. This will
allow residual heat to complete the cooking process.
Fig. 2 - 36" Model - C00kt0p Appearance

SettingSurfaceControls
LOCATIONSOFTHESURFACERADIANTELEMENTS
[] [] [] [] [] [] [] [] [] [] [] [] [] [] [] [] [] [] [] [] [] []
Fig. 1 - 30" cooktop
Your cooktop is equipped with radiant surface burners with different wattage
ratings, The ability to heat food quicker and in larger volumes increases as the
element wattage increases,
The radiant surface elements are located on the 30" cooktop as follows:
2 small radiant elements located at the right and left rear positions;
1 dual radiant element located at the right front position;
1 triple radiant element located at the left front position;
The radiant surface elements are located on the 36" cooktop as follows:
2 small radiant elements located at the right and left rear positions;
1 dual radiant element located at the center front position;
2 triple radiant elements located at the right and left front positions;
Fig. 2 - 36" cooktop
iiiiiiiiiiiiiiiiiiiiiiiiiiiiiiiiiiiiiiiiiiiiiiiiiiiiiiiiiiiiiiiiiiiiiiiiiiiiiiiiiiiiiiiiiiiiiiiiiiiiiiiiiiiiiiiiiiiiiiiiiiiiiiiiiiiiiiiiiiiiiiiiiiiiiiiiiiiiiiiiiiiiiiiiiiiiiiiiiiiiiiiiiiiiiiiiiiiiiiiiiiiiiiiiiiiiiiiiiiiiiiiiiiiiiiiiiiiiiiiiiiiiiiiiiiiiiiiiiiiiiiiiiiiiiiiiiiiiiiiiiiiii! i
USMNGTHETOUCHCONTROL
[] [] [] [] [] [] [] [] [] [] [] [] [] [] [] [] [] [] [] [] [] []
The recommended way to use the touch pads on the cooktop is shown in
Fig. 3. Be sure that your finger is placed in the center of the touch pad as
shown. If the finger is not placed on the center of a pad, the cooktop may
not respond to the selection made.
Lightly contact the pad with the flat part of your entire fingertip. Do not just
use the narrow end of your fingertip.
Fig. 3

LED MESSAGES OR UGNT iNDiCATORSD SPLAYED
BY MAIN CONTROL
[] [] [] [] [] 1 [] [] [] [] [] [] [] 1 [] [] [] [] [] []
CONTROLS LOCK - This feature allows the cooktop to be locked at anytime. Touch
and hold the LOCK key pad for few seconds. If the cooktop is in use it will automati-
cally shut offthe cooktop to enter in the lock mode, A beep will sound and the Lock
indicator light will glow (Fig. 2). Once locked, no other displays will glow and no
Cooking Zones will activate. To turn the Controls Lock OFF, touch and hold the
LOCK key pad for few seconds. A beep will sound, the Lock indicator light will turn
OFF (Fig. 1) and the cooktop may be used normally.
COOKTOP POWER - The Cooktop POWER key pad activates the entire Cooktop.
To power the cooktop, touch and hold the POWER key pad. Abeep will sound and
the Power LED will glow (See Fig. 4). The cooktop will be in a ready mode. If no
other key pads are touched the Cooktop Main POWER will turn OFF automatically.
Toturn the Main Power OFF touch and hold the Main POWER key pad. A beep will
sound and the Power Indicator Light will turn OFF (See Fig. 3).
Errors Codes F XX- The control displays Fin Cooking Elements LEDs (Fig. 5) and
digits in Main Control LED (Fig. 6) together showing an error code.
Fig. 5 Fig. 6
LEDMESSAGESORUGNTiNDiCATORSDISP YED
BYCOOKINGELEMENTCONTROLS
[] [] [] [] [] [] [] [] [] [] [] [] [] [] [] [] [] [] [] [] [] []
COOKING ZONE ON/OFF PAD - Each Cooking Elements have separate ON/OFF
key pads, Once the Main Power key pad has been touched to activate the cooktop,
touch the corresponding Cooking Element ON/OFF key pad once to active the
Cooking Zone needed. "- -" will appear in the LED display and the indicator light
located above the key pad will glow (Fig. 8). If the corresponding + (increase) / -
(decrease) key pad is not touched, the request to turn the Cooking Element ON will
cancel and the Cooktop Main Power will turn OFF. To set a Cooking Element power
level touch the corresponding Cooking Element + (increase) or - (decrease) key
pad once. To turn OFF a Cooking Element, touch the Cooking Element ON/OFF
key pad once. The Cooking Element Indicator Light will turn OFF (Fig. 7).

Figure1
Figure3
Figure5
iiiiiiiiiiiiiiiiiiii
Setting Surface Controls
LED MESSAGESOR LIGHTINDICATORSDISPLAYED
BY ELEMENTCONTROLS(CONT}
[] [] [] [] [] [] [] [] [] [] [] [] [] [] [] [] [] [] [] [] [] []
The available ESEC Window Display Settings
The ESEC control will display heat levels ranging from Hi (Figure 1)to Lo
(Figure 6) and OFF (Figure 7). The settings between 9.0 (Figure 2) and 3.0
(Figure 3) decrease or increase in increment of .5 (1/2). The settings
Figure 2
Figure 4
Figure 6
between 3.0 (Figures 3 & 4) and 1.0 (Figure 5) are Simmer settings which
decrease or increase in increment of .2 (1/5) to Lo (Figure 6; lowest
Simmer setting) for more precise settings at lower heat levels. Use the
Recommended Surface Setting Chart to determine the correct setting for
the kind of food you are preparing.
Hot Element Indicator Message (HE)
After using any of the single, dual or triple radiant element positions the cooktop
will become very hot. Even after turning the control knob to OFF, the cooktop
will remain hot for some time. The ESEC control monitors the temperature of
the cooktop and displays the message "HE" (hot element; See Fig. 8) warning
when the cooktop is still too hot to touch. If the HE message appears in the
window, the control can still be turned ON again for use.
ESEC Lockout Feature ( =- )
Whenever the Cooktop Lockout feature is active," - -"
will appear in each element display windows (See
Figure 9).
Figure 7 Figure 8 Figure 9
THERECOMMENDEDSURFACECOOKmNGSE NGS
[] [] [] [] [] [] [] [] [] [] [] [] [] [] [] [] [] [] [] [] []
Use the chart to determine the correct setting for the type of food you are preparing.
Recommended Surface Settings Chart
Setting
HIGH(HI)
MEDIUM HIGH (8-10)
MEDIUM (6)
MEDIUM LOW (2-4)
LOW (LO) (LH)
Note: The size and type of cookware used will influence the setting needed for best cooking
results.
Type of Cooking
Start most foods; bring water to a boil and pan broiling.
Continue a rapid boil; frying, deep fat frying.
Maintain a slow boil; thicken sauces and gravies; steaming
vegetables.
Keep foods cooking; poaching and stewing.
Keep warm, melting and simmering.

SettingSurface Controls
OPE TING THESMNGLESURFACE D[ANT
ELEMENTS
I I B ! I B | ! I E I ! B a B B [] i [] [] ! []
The cooktop has single radiant surface elements at 2 locations; the right and left
rear (Figs. 1 & 2) element positions,
To Operate the Single Surface Element
Place correctly sized cookware on the radiant surface e}ement.
2.
Touch and hold the (_) key pad unti}a beep sound. The power indicator light
above the (_ will turn ON. Note: If no other key pad is touched within 20
FOYER
seconds the request to Power ON the cooktop will clear.
,
Touch and hold the (_ pad for the desired element position until a
beep is heard, The display will show" -- ".
Note: if no further pads are touched within 10 seconds the request
to power the element ON will clear.
.
Touch _ pad once to turn ON the power level to HI, Touch
pad once for Lo.
5.
Each touch of the _ or _ pad wi}l decrease or increase the
power level from 9.0 through 3.0 by .5 increment, Simmer power
levels between 3.0 and 1,0 will decrease or increase by .2
increment. Lo is the lowest power level available.
Note: The power level may be adjusted at any time while the element is ON.
,
When cooking has been completed touch the O pad once to turn the element OFF
POWER
Fig. 2
Fig, 1
and if no other surface element is used touch the (_ key pad to turn off the cooktop,
R:_ER
Each surface element provides a constant amount of heat at each setting. A g}owing
red surface heating area extending beyond the bottom edge of the cookware indicates
the cookware is too small for the surface heating area.
Note: The HE message will remain ON if the cooktop is still hot and will remain ON until
the heating surface area has cooled sufficiently.
t_Ja ur ace
ess, wi ,I tul
veL _igJass
_|c_ li_ ht
em_ ,sm
ON i_v_
aJ ear
c_ _nu
til erk
F.
i
c_ ss_
S_ he_
ted )¢1_
tc esu

Fig, 1
Setting Surface Controls
OPERAT(NGTHE DUAL SURFACERAD(ANTELEMENT
[] [] [] [] [] [] [] [] [] [] [] [] [] [] [] [] [] [] [] [] [] []
Both the 30" and 36" cooktops are equipped with dual radiant surface element
located as shown in Figs. 1 & 2. A touch key pad on the element controls is used
to select one of the 2 positions of the element. Symbols and indicator lights on
the control panel are used to indicate which coil of the dual radiant element will
heat. The e symbol indicates that only the INNER coil will heat (Fig, 3). The ®
symbol indicates that both INNER and OUTER coils will heat (Fig, 4). You may
switch from either coil setting at any time during cooking.
To Operate the Dual Surface Element:
1. Place correctly sized cookware on the radiant surface element,
2. Touch and hold the (_ key pad until a beep sound, The power
indicator light above the (_ will turn ON. Note: If no other key pad is
touched within 20 seconds the request to Power ON the cooktop will
clear,
POV_R
POWER
Fig. 3
Fig. 4
Fig. 2
3. Touch and hold the C) pad for the dual element position until a beep
QvO_f
is heard, The display will show" =="
Note: If no further pads are touched within 10 seconds the request
to power the element ON will clear,
,
Select the INNER (Fig, 3) or INNER and OUTER (Fig, 5)to heat by touching the 0 key
pad.
5.
Touch _ pad once to turn ON the power level to HL Touch _ pad once for Lo.
6.
Each touch of the _ or _ pad will decrease or increase the power level from 9.0
through 3.0 by .5 increments. Simmer power levels between 3.0 and 1.0 will decrease
or increase by .2 increments, Lo is the lowest power level available,
Note: The power level may be adjusted at any time while the element is ON.
,
Start most cooking operations on a higher setting and then turn to a lower setting tofinish
cooking, Each surface element provides a constant amount of heat at each setting. A
glowing red surface heating area extending beyond the bottom edge of the cookware
indicates the cookware is too small for the surface heating area,
,
When cooking has been completed touch the .(_, pad once to turn the element 0 FFand
if no other surface element is used touch the (_) key pad to turn off the cooktop.
POWER
Note: The HE message will appear in the display after turning the control knob to OFF if
the cooktop is still hot and remain on until the heating surface area has cooled
sufficiently.
oO

OPEP3 TINGTHETRIPLESURFACEP DJANT ELEW]ENT
Ill II I I II ill ii m I II II II E II II m a II ill il ! I
Both the 30" and 36" cooktops are equipped with "Triple" surface radiant elements
located as shown in Figs. 1& 2. A touch key pad on the element controls isused
to select one of the 3positions of the element. Symbols and indicator lights on
the control panel are used toindicate which coil of the triple radiant element will
heat. The • symbol indicates that only the inner element (See Fig. 3) will heat.
The @symbol indicates thatboth inner and middle elements (See Fig. 4)will heat
together. The • symbol indicates that all 3 portions of the element (See Fig. 5)
will heat. You mayswitch from either ofthese settings atanytime during cooking.
To Operate the Triple Surface Element:
1. Place correctly sized cookware on the radiant surface element.
2. Touch and hold the (_ key pad until abeep sound. The powerindicator
light above the <_ will turn ON. Note: If no other key pad is touched
within 20 seconds the request to Power ON the cooktop will clear.
3. Touch and hold the O padforthe desirede triple element position until
a beep is heard. The display will show" --"
Note: If no further pads are touched within 10 seconds the request to
power the element ON will clear.
4. Select the INNER (Fig. 3), MIDDLE (Fig. 4)orALL 3element (Fig. 5) to heat bytouching the
"6" key pad,
5. Touch _ pad once to turn ON the power level to HI. Touch _ pad once for Lo.
6. Each touch of the _ or _ pad will decrease or increase the power level from 9.0
through 3.0 by .5 increments. Simmer power levels between 3.0 and 1.0 will decrease or
increase by .2 increments. Lo is the lowest power level available.
Note: The power level may be adjusted at any time while the element is ON.
7. Start most cooking operations on a higher setting and then turn to a lower setting to
finish cooking. Each surface element provides a constant amount of heat at each
setting. A glowing red surface heating area extending beyond the bottom edge of the
cookware indicates the cookware is too small for the surface heating area.
8. When cooking has been completed touch the Q pad once to turn the element OFF and
if no other surface element is used touch the _ key pad toturn off the cooktop.
Note: The HE message will appear in the display after turning the control knob to OFF if the
cooktop is still hot and remain on until the heating surface area has cooled sufficiently.
_R
O_30_f
Fig, 1
Fig. 2
17 , i _ _ ,_
Fig. 3
....................... /
Fig. 4
Fig. 5
l!t ' /:!i/ttl
J: iI
: .... 'j_N

SettingSurfaceControls
KEEPWARMFEATURE
Ill [] [] [] [] [] [] [] [] [] [] [] [] [] [] [] [] [] [] [] [] []
The Warm feature may be used with any of the Cooking Elements.
To Turn the Keep Warm Feature ON:
1. To select the Keep Warm feature for any Cooking Element touch the (_) key pad for
the corresponding Cooking Element.
2. Touch the _.Lkey pad located in the main control area. The associate display will show
LH(low heat - Fig. 1) indicating that the Cooking Element is properly set to Keep
Warm. If no other key pads are pressed the control will activate the desired Cooking
Element at the Keep Warm setting.
MINUTETIMER
On/Off
[] [] [] [] [] [] [] [] [] [] [] [] [] [] [] [] [] [] [] [] [] []
The Minute Timer feature may be useful in the kitchen if a recipe calls for keeping track of
time. This feature will keep track of time from 1 to 99 minutes. The LED display located to
the left of the Timer UP/DOWN arrow key pads will begin to count down minutes once set.
To Set the Minute Timer:
1. TouchtheZ_listedunderthesymbol®. Touchingandreleasingthe& ortheW
key pads will increase or decrease the Minute Timer setting by 1 minute with each key
press (up to 99 minutes).
2. Once the Timer LED displays the desired amount of time, release the UP or DOWN
Arrow key pads to allow the minute timer to begin the countdown. Once the Minute
Timer reaches 00 long beeps will sound indicating that the time is up. To stop the
control from beeping, touch the _ and W key pads at the same time.
To Cancel the Minute Timer:
1. Touch the _ and _ key pads at the same time or touch and hold either the _ or
key pad and scroll to 00.
2. If cancelling the Minute Timer using the scrolling method, once the Main Control LED
reaches 00, release the Arrow key pad.
3. The set time will disappear from the LED indicating that the MinuteTimer is no longer
active.

LOCK(NGTHE CONTROLS
[] [] [] [] [] [] [] [] [] [] [] [] [] [] [] [] [] [] [] [] [] []
The Cooktop Controls may be locked in order to prevent the cooktop from accidentally being
turned ON. This feature can be activated at any time.
To Turn ON the Controls Lock Feature:
Touch and holf the _ key pad. After 5 seconds a beep will sound. The Lock Indicator Light
above the _ key pad will turn ON indicating the cooktop is locked. This will keep any
Cooking Element or Cooktop functions from being accidentally turned ON.
Note: If the cooktop is in used when the Control Lock Feature is turn on, the cooktop will
automatically turn OFF and enter in Control Lock Feature Mode.
To Turn OFF the Controls Lock Feature:
Touch and hold the _ key pad. After 5 seconds a beep will sound. The Lock Indicator Light
above the _ key pad will turn OFF indicating the cooktop is unlocked. The Cooking
Elements or any of the other Cooktop functions may now be used.
SABBATHFEATUREMODE
[] [] [] [] [] [] [] [] [] [] [] [] [] [] [] [] [] [] [] [] [] []
When the Sabbath feature is ON, all electronic surface element control displays show "Sb"
(Fig. 1).The surface elements can be used even if the Sabbath Feature is on.
To activate the Sabbath Feature Mode:
Touch and hold for few seconds the _ pad of the left rear element (for 30"model) or _ of
the left front element (for 36" model) and the _ of the right front element at the same time,
After few seconds, "Sb" will appear in all element control displays.
To turn ON a Surface Element when the Sabbath Feature is active:
If you turn on asurface element when the oven Sabbath feature is on, the electronic surface
element control will record that request and execute it with a 15-30 seconds delay. So the
element will start heating 15-30 seconds after the surface element control was turned on. The
surface element display will not show the setting because "Sb" is on in the displays. When
necessary, it is possible to adjust the power of the surface element but you have to
remember that the surface element control will adjust the temperature with the same delay.
To turn OFF the Surface Element when the Oven Sabbath Mode is active:
To shut off the surface element while the Sabbath feature is ON, proceed as usual but take
note that the element will immediately turn off without any delay.
To deactivate the Sabbath Feature Mode:
Touch and hold for few seconds the _ pad of the left rear element (for 30"model) or _ of
the left front element (for 36" model) and the _ of the right front element at the same time.
"Sb" will disappear from element control displays.

SettingSurface Controls
SURFACECOOKINGUTENSILS
[] [] [] [] [] [] [] [] [] [] [] [] [] [] [] [] [] [] [] [] [] []
GOOD POOR
W W
iii!iiii iiiii!ili
t 1_ • Curved and warped pan bot-
• Flat bottom and straight
sides.
• Tight fitting lids.
• Weight of handle does not tilt
pan. Pan iswell balanced, * Pan overhangs unit by more
• Pan sizes match the amount of than 2.5 cm (1").
Cookware should have flat bottoms
that make good contact with the entire
surface heating element. Check for
flatness by rotating a ruler across the
bottom of cookware. Be sure to follow
the recommendations for using cook-
ware that has shown in the illustration
at right.
Note: Always use a cooking utensil for its intended purpose. Follow manufacturer's instructions. Some utensils were
not made to be used in the oven or on the cooktop.
Specialty pans such as lobster pots, griddles and pressure cookers may be used but must conform to the above
recommended cookware requirements.
Note:The size and type of cookware used will influence the setting needed for best cooking results,
food to be prepared and the size
of the surface element,
• Made of material that conducts * Heavy handle tilts pan.
heat well.
• Easy to clean.
• Always match pot diameter to
element surface diameter.
toms.
• Pan is smaller than element.
COOKWAREMATERIALTYPES
[] [] [] [] [] [] [] [] [] [] [] [] [] [] [] [] [] [] [] [] [] []
The cookwa rematerial determines how evenly and quickly heat istransferred from the surface
element to the pan bottom. The most popular materials avalaible are:
ALUMINUM - Excellent heat conductor. Some types of food will cause it to darken (Anodized
aluminum cookware resists staining & pitting). Ifaluminum pans slide across the ceramic glass
cooktop, they may leave metal marks which will resemble scatches. Remove these marks
immediately.
COPPER - Excellent heat conductor but discolors easily. May leave metal marks on ceramic
glass (see Aluminum above).
STAINLESS STEEL - Slow heat conductor with uneven cooking results. Is durable, easy to
clean and resists staining.
CAST iRON - A poor heat conductor however will retain heat very well. Cooks evenly once
cooking temperature is reached. Not recommended for use on ceramic cooktops.
PORCELAiN-ENAMEL on METAL - Heating characteristics will vary depending on base
material, Porcelain-enamel coating must be smooth to avoid scratching ceramic cooktops.
GLASS - Slow heat conductor. Not recommended for ceramic cooktop surfaces because it may
scratch the glass.

CARE& CLEANINGTABLE
[] [] [] [] [] [] [] [] [] [] [] [] [] [] [] [] [] [] [] [] [] []
Surfaces
Aluminum & Vinyl
Painted and Plastic
Control Knobs
Stainless Steel, Chrome
Control Panel, Decorative
Trim
Howto Clean
Use hot, soapy water and a cloth. Dry with a clean cloth.
Using a soft cloth, clean with mild dish detergent and water or a 50/50 solution of
vinegar and water. Follow by rinsing the area with clean water; dry and polish with
a soft cloth. Glass cleaners may be used if sprayed on a soft cloth first. DO
NOT spray liquids directly on the control pad and display area. Do not use large
amounts of water on the control panel - excess water on the control area may
cause damage to the appliance. Do not use other liquid cleaners, abrasive
cleaners, scouring pads, or some paper towels - they will damage the finish.To
remove control knobs, turn to the OFF position; grasp firmly and pull straight off
the shaft. To replace knobs after cleaning, line up the flat sides of both the knob
and the shaft; then push the knob into place.
Clean stainless steel with hot, soapy water and a dishcloth. Rinse with clean water
and a cloth. Do not use cleaners with high concentrations of chlorides or
chlodnes. Do not use harsh scrubbing cleaners. Only use kitchen cleaners that are
especially made for cleaning stainless steel. Always be sure to rinse the cleaners
from the surface as bluish stains may occur during heating that cannot be removed.

General Care & Cleani
COOKTOP CLEANING AND MAINTENANCE
[] [] [] [] [] [] [] [] [] [] [] [] [] [] [] [] [] [] [] [] [] []
Prior to using your cooktop for the first time, apply the recommended
Cleaning Creme to the ceramic surface. A sample of that cleaning creme
is supplied with your cooktop and it is available in most hardware stores.
Clean and buff with a paper towel. This will make cleaning easier when
soiled from cooking. The special cooktop cleaning cream leaves a
protective finish on the glass to help prevent scratches and abrasions.
Sliding aluminum or copper clad bottom pans on the cooktop can cause
metal markings on the cooktop surface. These marks should be removed
immediately after the cooktop has cooled using the cooktop cleaning
cream. Metal marks can become permanent ifnot removed prior to future
use.
Cookware (cast iron, metal, ceramic or glass) with rough bottoms can mark or scratch the
cooktop surface. Do not slide anything metal or glass across the cooktop. Do not use your
cooktop as a cutting board or work surface in the kitchen. Do not cook foods directly on the
cooktop surface without a pan. Do not drop heavy or hard objects on the glass cooktop, they
may cause it to crack or break.
CLEANINGRECOMMENDATIONSFORTHECE MIC G SS
[] [] [] [] [] [] [] [] [] [] [] [] [] [] [] [] [] [] [] [] [] []
For light to moderate soil:
Apply a few drops of CookTop® Cleaning Creme directly to the cooktop.
Use a paper towel to clean the entire cooktop surface. Make sure the
cooktop is cleaned thoroughly, leaving no residue. Do not use the towel
you use to clean the cooktop for any other purpose.
For heavy, burned on soil:
First, clean the surface as described above. Then, ifsoils remain, carefully
scrape soils with a metal razor blade scraper, holding scraper at a 30
degree angle to the surface. Remove loosened soils with cooktop cleaning
cream and buffsurface clean.

CLEANINGRECOMMENDATIONSFORTHECE MIC G SS
[] I [] [] [] [] i [] [] [] [] m [] [] [] [] J [] [] [] [] []
Plastic or foods with a high sugar content:
These types of soils must be removed immediately if spilled or melted onto the ceramic
cooktop surface. Permanent damage (such as pitting of the cooktop surface) may occur if not
removed immediately. After turning the surface elements OFF, use a razor blade scraper or a
metal spatula with a mitt and scrape the soil from the hot surface (as illustrated on previous
page). Allow the cooktop to cool, and use the same method for heavy or burned on soils.
Do not use the following on the ceramic glass cooktop:
* Do not use abrasive cleaners and scouring pads, such as metal
and some nylon pads. They may scratch the cooktop, making it
more difficult to clean.
* Do not use harsh cleaners, such as chlorine bleach, ammonia or
oven cleaners, as they may etch or discolor the cooktop.
* Do not use dirty sponges, cloths or paper towels, as they can
leave soil or lint on the cooktop which can burn and cause
discoloration.
Special Caution for Aluminum Foil and Aluminum Cooking Utensils
Aluminum foil - Use of aluminum foil will damage the cooktop. Do not use thin aluminum
cooking utensils or allow foil to touch the ceramic cooktop under ANY circumstances.
• Aluminum utensils - The melting point of aluminum is much lower than that of other metals.
Care must be taken when aluminum pots or pans are used on the cooktop. If allowed to boil
dry, not only will the utensil be destroyed, but it may fuse to, break or mark the ceramic
glass surface, permanently damaging the cooktop surface.
CARE& CLEANINGOFSTAINLESSSTEEL
[] [] [] [] [] [] [] [] [] [] [] [] [] [] [] [] [] [] [] [] [] []
Special care and cleaning are required for maintaining the appearance of stainless parts.
Please refer to the table provided at the beginning of the General Care & Cleaning section in
this Use & Care Manual.

Solutionsto Common Problems
ENT(RECOOKTOPDOESNOTOPE_TE
[]
[] [] [] [] [] [] [] [] [] [] [] [] [] [] [] [] [] [] [] []
e
House fuse has blown or circuit breaker has tripped. Check/reset breaker or replace
fuse, If the problem is a circuit overload, have this situation corrected by a qualified
electrician,
Service wiring not complete, Contact installation agent or dealer,
, Power outage. Check house lights to be sure. Call local electric company,
SURFACEELEMENTDOESNOTNEAT
[] [] [] [] [] [] [] [] [] [] [] [] [] [] [] [] [] [] [] [] [] []
* No power to appliance. Check/reset breaker or replace fuse. If the problem is a circuit
overload, or improper connection of the armored cable supplied with the appliance, have
this situation corrected by a qualified electrician.
* Too low heat setting. Turn control to a slightly higher setting until element comes on.
* Incorrect control is ON. Be sure to use correct control for the element needed.
SURFACEELEMENTTOOHOTORNOTHOTENOUGH
[] [] [] [] [] [] [] [] [] [] [] [] [] [] [] [] [] [] [] [] [] []
Incorrect control setting. Raise or lower setting until proper amount of heat is obtained.
Dial markings are an indicator of relative heat settings and will vary slightly,
Lightweight or warped pans being used. Use only flat, evenly balanced, medium or
heavyweight cookware.
Voltage is incorrect, Be sure appliance is properly connected to the specified power
source.
Use only flat bottom, evenly balanced, medium or heavyweight cookware. Pans having a
flat bottom heat better than warped pans. Cookware material affects heating. Heavy and
medium weight pans heat evenly. Because lightweight pans heat unevenly, foods may
burn easily.

FOODNOTHEATINGEVENLY
Ill I I ! I m n ! I E J I I IS Ill U iN ! IS a IS U
• Improper cookware. Select flat-bottomed cookware of a proper size to fit element.
• incorrect control setting, Raise or lower setting until proper amount of heat is obtained.
POORCOOKmNGRESULTS
U g I il g I IS | m E S m IS IS | g ! a m ! | ml
• Many factors affect cooking results. Adjust the recipe's recommended power levels or
cooking times.
• Cookware is too lightweight or warped. Use heavier quality cookware so foods being
prepared may cook more evenly.
SCRATCHESORAB SJONS ONCEPhalICG SS
COOKTOPSURFACE
B ! IS III I IS Ill IS IS IS am I m I! Hi IS IS I I ! IS B
• Coarse particles (such as salt or sand) are between cooktop and utensil. Be sure cooktop
surface and bottom of utensils are clean before use, Small scratches do not affect
cooking and will become less visible with use.
• Cleaning materials not recommended for glass ceramic cooktop have been used, See
Ceramic.Glass Cooktop section in this Owner's Guide.
° Cookware with rough bottom has been used. Use flat-bottomed, smooth utensils. See
Selecting Surface Cooking Utensils in this Owner's Guide.
METALMARKSONCE_MJC GLASSCOOKTOPSURFACE
li IS IS i g IS IS IS IS IS IS g g IS IS IS I I I IS | HI
° Sliding or scraping of metal utensils on cooktop surface. Do not slide metal utensils on
cooktop surface. Use a mildly abrasive cleanser to remove marks.

SolutionstoCommon Problems
BROWNSTREAKSAND SPECKSON CERAMmCGLASS
COOKTOPSURFACE
[]
[] [] [] [] [] [] [] [] [] [] [] [] [] [] [] [] [] [] [] []
®
Boilovers have cooked onto surface. Use razor blade scraper to remove soil. See
instructions under General Care & Cleaning.
Cleaning materials not recommended for ceramic-glass cooktop have been used. Use
recommended cleaners and cleaning method. See Ceramic-Glass Cooktop section in
this Owner's Guide.
AREAS OFDISCOLORATIONON CERAMICGLASS
COOKTOPSURFACE
[] [] [] [] [] [] [] [] [] [] [] [] [] [] [] [] [] [] [] [] [] []
Mineral deposits from water and food. Wet surface with water and sprinkle on a cooktop
cleaning creme. Scrub with a clean damp paper towel until the stain disappears. Wipe
remaining paste away, then apply a small amount of cooktop cleaning creme and polish
with a clean paper towel. Use cookware with clean, dry bottoms. See Ceramic-Glass
Cooktop section in this Owner's Guide.


Warranty information
COOKTOPWARRANTYYourcooktopis protectedby this warranty
In the U.S.A.,your appliance is warranted by ElectroluxHome Products NorthAmerica, a division of White Consolidatedindustries, Inc. We
authorizeno personto changeor addto anyof ourobligationsunderthiswarranty.Ourobligationsfor serviceandparts under this warrantymust
be performedby us or an authorized ElectroluxHome ProductsNorth America servicer.In Canada, your applianceis warrantedby Electrolux
Canada Corp.
FULLONE-YEAR
WARRANTY
WARRANTYPERIOD
Oneyearfromoriginal
)urchesedate
THROUGHOURAUTHORIZEDSERVICERS,
WEWILL:
Payell costsfor repairingor replacingany
partsof thisappliancewhichproveto be
defectivein materialsorworkmanship
THECONSUMERWILLBERESPONSIBLEFOR:
Costsofservicecellsthat arelistedunderNORMAL
RESPONSiBILiTiESOF THECONSUMER"
LIMITED2"D-5TM
YEAR
WARRANTY
(GlassSmoothtop,
Seal&Elements)
LIMtTED
WARRANTY
(Applicabletothe
StateofAlaska)
*NORMAL
RESPONSIBILITIES
OF THE CONSUMER
EXCLUSIONS
IF YOU NEED
SERVICE
USA Canada
1.800,944.9044 1.866.294.9911
ElectroluxHome Products Electrolux Home Products
North America North America
RO. Box 212378 802, boul. L'Ange-Gardien
Augusta,GA 30917 L'Assomption, Qu6bec
Secondthroughfifth
/earsfromodginel
)urchasedate
Timeperiodsfisted
above
This warranty applies only to products in ordinary household use, and the consumer is responsible
for the items listed below:
1.Proper use of the appliance in accordancewith instructionsprovidedwith the product.
2.Properinstallationby an authorizedservicer in accordancewith instructionsprovidedwith the applianceand
in accordancewith all local plumbing,electrical and/or gas codes.
3.Proper connectionto a grounded power supply of sufficient voltage, replacementof blown fuses, repair of
looseconnections or defects in house wiring.
4.Expensesfor making the applianceaccessiblefor servicing,such as removalof trim, cupboards,shelves,etc.,
which are not a part of the appliancewhen it was shipped from the factory.
5.Damagesto finish after installation.
6.Replacementof light bulbsand/or fluorescenttubes (on models with these features).
This warranty does not cover the following:
1.CONSEQUENTIAL OR INCIDENTAL DAMAGES SUCH AS PROPERTY DAMAGE AND INCIDENTAL
EXPENSESRESULTINGFROM ANY BREACH OF THIS WRITTEN OR ANY IMPLIED VVARRANTY.
NOTE: Some states do not a!low the exclusionor limitation d incidentalor consequentialdamages, so this
limitationor exclusion may not apply to you.
2.Service calls which do not involve malfunction or defects in workmanshipor material,or for appliances not
in ordinary household use. The consumershall pay for such service calls.
3.Damages caused by services performed by servicers other than Electrolux Home Products North America
or its authorizedservicers; use of parts other than genuine Electrolux Home Products parts; obtainedfrom
personsother than such servicers; or external causes such as abuse, misuse, inadequate power supply or
actsof God.
4.Productswith original serial numbersthat havebeen removed or altered andcannot be readily determined.
Keepyour bill of sale, deliveryslip, or someother appropriatepaymentrecord. The date on the bill establishes
thewarranty period should service be required.If service is performed,it is in your best interestto obtain and
keep all receipts. This written warrantygives you specific legal rights.You mayalso have otherrights thatvary
from state to state. Service under this warranty must be obtained by contacting ElectroluxHome Products:
J5W 1T6
Providea replacementfor any defective
surfaceheatingelement,deteriorated
rubberized-sdiconeseal (upsweptmodels
only),orglasssmeothtopthatcraksdueto
thermalbreakage(not customerabuse).
All of the provisionsof thefull end limited
warrantiesaboveend theexclusionlisted
belowapply.
Diagnosticandanytransportationandlaborcostswhich
arerequiredbecauseofservice
Costsof thetechnician'stravelto the homeandany
costsfor pickupanddeliveryof the appliancerequired
becauseofservice
Thiswarrantyonlyapplies in the 50 statesof the U.S.A.,PuertoRico,and Canada.
Productfeaturesor specificationsas describedor illustratedaresubjectto change
without notice. All warranties are made by Electrolux Home Products North
America,a divisiond White ConsolidatedIndustries,Inc.In Canada,yourappliance
is warranted by ElectroluxCanada Corp.
 Loading...