

Page 1
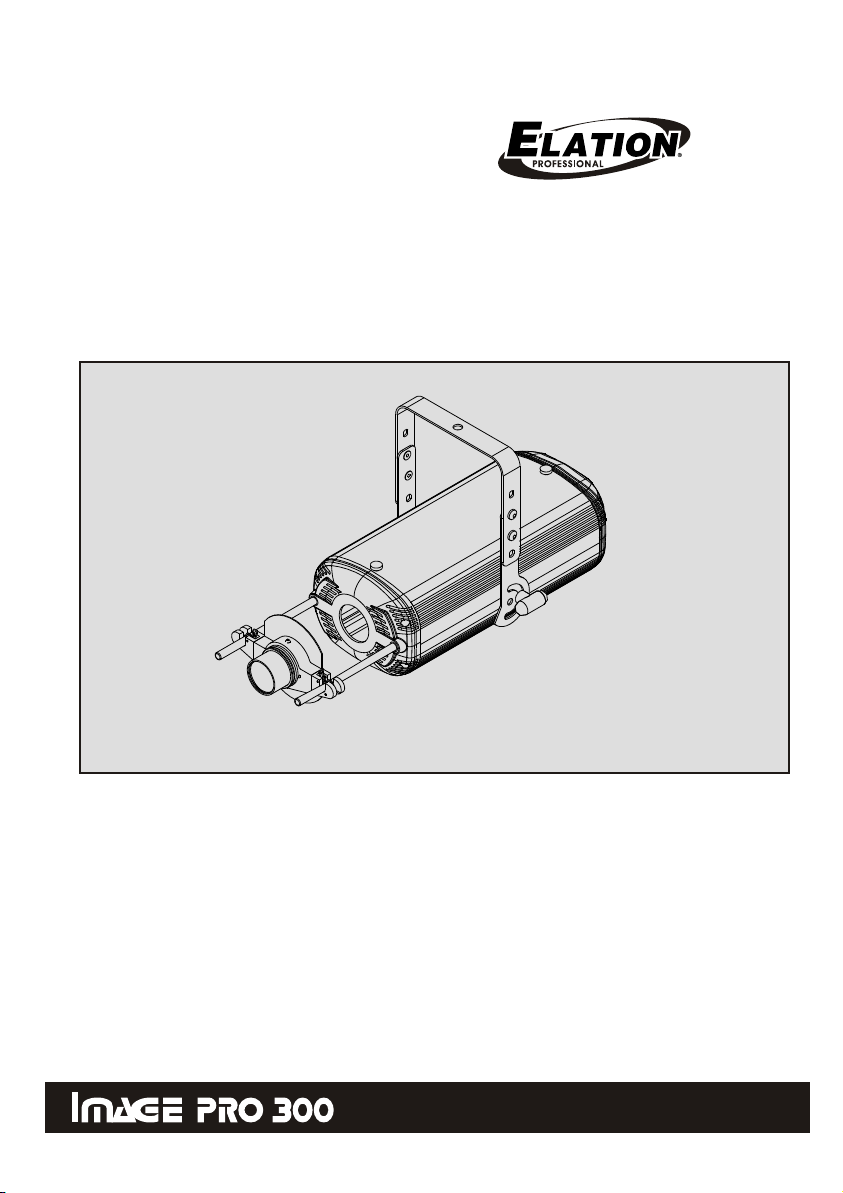
IMAGE PRO 300
OWNER'S GUIDE
English Version 2.0
Page 2

Page 3

General Information
Unpacking:
Thank you for your purchase of this product. Every product has been
thoroughly tested and carefully packed before delivery. Unpack the
shipping carton carefully, saving the carton and all packaging materials
for possible later use.
Check carefully for sure your product is not damaged and all accessories
not missing. If your product appears to be damaged or missing, please do
not use it and contact your authorized dealer immediately.
Pack Accessory List:
! 300 Watt HTI 300 metal halide lamp
! 1.5 m 3-pin American Plug mains cable with female IEC plug
! Support for lens and effects, standard
! Standard lens (1:2.4 / 100 mm)
! Two electrified guides
! Two bakelite screws
! User's guide
Safety Instructions:
[ This product must be earthed.
[ Do not make any inflammable liquids, water or metal objects
enter this unit.
[ Very hot lamp. Disconnect the power and wait for at least 10
minutes before you can replace the lamp.
[ Make sure the fan and the air inlets are clean and not blocked by
anything before usung.
[ Do not operate this unit if the ambient temperature(Ta) exceeds
40 C(104 F).
[ Do not stare directly into the light, as may do harm to your eyes.
[ Keep all flammable meterials at least 1 meter away from this unit.
[ Never operate this unit when its cover is removed.
[ Keep this unit out of children.
[ Do not dismantle or modify the unit.
[ Unplug the fixture from the AC outlet and allow the fixture to cool
before any service.
1
Page 4

I.S.P. 300I.S.P. 300
Main Features
[ Powerful communication tool to create maximum and
lasting visual image
[ Die-cast and extruded aluminum finish
[ Forced fan cooling system
[ Twin lens condenser, spherical reflector and external
[ standard lens(1:2.4/100 mm)
[ Two electrified guides carry a 24V supply and can
accommodate a lens andhousings for gobos and colors
[ Different diameters gobos and filters are optional for static
or motorized effects
[ Thermal cut-out
[ Micro switch cuts off electricity supply when cover is
opened
[ Provides a wide range of optional effects on request
[ Wide applications: Shop-fittings, Discotheques, Fashion
parades, Fairs, Event-marketing, and etc.
[
2
Page 5

Introduction
ImagePro300 is a modular system designed specially
for image spot. This spot is fitted with a 300 Watt
HTI 300 arc lamp which has a light output
of 20,000 lumens at lens.
Two low voltage electrified
guides(24 V) with short-circuit
protection are equipped
with this fixture to
accept the user's
choice of lens unit
and optional accessories
for different effects and
various combinations. The effects can be either static or motorized for
stationary and moving images.
[ Simple.
Optional Accessories
This spot is compact, easy to use
and entertaining, and the electrified
guides makes it extraordinarily simple
to mount the effects system.
( Image-IP3)
( Image-IP2)
[ Safe.
The low voltage used for the effects
eliminates the risk of electric shock.
Forced cooling design reduces operating and surface temperature.
[ Styling.
The spot is elegantly styled, fit in
anywhere and runs quietly over long
periods with low operating costs.
3
Page 6

First time setup
1. Unpack the shipping container carefully, assemble the accessories
to fit in their right positions for proper attachment.
2. This unit can be hung or placed in any safe, secure surface by means
of its adjustable mounting bracket.
3. When you are sure this unit is ready for operation, plug this unit into
the appropriate AC outlet.
Warning!
The installation should be done by qualified staff only.
Lens Focusing
1. Hang the fixture in your final desired position.
2. Loosen the thumb screw fitted in the lens support that hold the lens
in place.
3. Adjust the lens by turning it in a clockwise or counter-clockwise
direction until you reach proper focus.
4. Tighten the thumb screw after you achieve your desired focus.
Cleaning
1. Disconnect the fixture from AC power and allow the fixture to cool
down completely.
2. Use normal glass cleaner and a soft cloth to wipe down the outside
casing and external lens.
3. Use only soft cloth to clean the internal optics.
4. Always be sure to dry all parts completely before plugging in.
4
Page 7

Lamp ReplacementPreparation
Metal Halide Lamp Warning!
This fixture is fitted with a metal halide lamp which is highly susceptible
to damage if impro[erly handled. Do not touch the bulb of the lamp with
bare fingers(this can cause damages). The lamp contains small quantities
of materials that will be harmful to the envionment, please dispose of the
damaged lamp properly.
To replace the lamp
1. Disconnect the fixture from power and allow the lamp to cool.
2. Loosen the two knurled screws and remove the top cover.
3. Loosen the 2 thump screws from the lamp socket.
4. Gently take the old lamp out.
5. Replace the new lamp and refit the 2 thumb screws.
6. Put in the new lamp securely into the socket. Please note the
protuberance of bulb shall be upward orientation to obtain equal
intensity distribution(see figure).
7. Tighten the 2 thumb screws and reassemble in reverse order.
Remember always replace with the
same type lamp and fuse.
Fuse Replacement
1. Disconnect the fixture from power.
2. With a flat screwdriver wedge the fuse holder out of its housing.
3. Remove the old fuse from the holder and replace with the exact
same type fuse.
4. Replace the fuse holder in to the fuse holder housing.
5. Reconnect main power.
5
Page 8

Operation Guide
This is a High-Tech product. When you are sure you have set
up this unit properly, you can operate this unit freely.
1. Always be sure to mount this unit in the area that will allow
proper ventilation.
2. Check that the local power outlet match that of the required
voltage of your unit.
3. Plug this unit into the AC power outlet, turn the switch on.
4. The lamp will be lit and the cooling fan will start immediately.
Important!
Never disconnect or reconnect the power frequently during operation,
this will shorten the lamp life.
Wait at least 10 minutes to cool down the lamp completely before
restarting this unit. (the warm lamp will cause the igniter holding the
lamp in a glow state.)
6
Page 9

Fixed Gobo Holder & 6 Metal Gobos
The ImagePro-300 comes with a fixed gobo holder and 6 metal gobos.
These 6 metal gobos are illustrated as follows:
(Dia. 51.5 mm)
fixing plate
supporting plate
metal gobo
mounting
Gobo pattern & Image
The mirror on the wall, floor etc. is subject to the gobo pattern.
Please note the gobo pattern should be inverted so that the image
can be acceptable.
7
Page 10

Accessories and Effects
The ImagePro-300 is specially designed to meet the demand for clarity of
images in a wide variety of applications including exhibitions, retail
environments, leisure, promotions and entertainment venues.
Model No.: Image-IP3
Adjustable pivoting mirror
(Sold separately)
Rotating gobo:
dichroic/photographic
(diam. 51.8 mm)
Rotating gobo: metal
(diam. 66 mm)
Model No.: Image-IP2
Rotating/ Static gobo holder
(Sold separately)
The Image-IP2 is a delicate design , it can use a single rotating gobo or the combination
of rotating gobo with static gobo for different effects. Thanks to the use of standardsized gobos, customer can also purchase gobos from other manufactures.
Static gobo: metal
(diam. 66 mm)
By using several accessories together, you can create more special
effects. Image-IP2 and Image-IP3 are standard accessories for your options,
compatible with variety of projectors by different companies. Upon
your request, we can provide more accessories for more effects.
8
Page 11

Technical Specifications
Overall Size:
Net Weight:
Standard Lens:
Lamp Type:
Lamp Base:
Norminal Lamp Life:
Total Lumen Output:
Color Temperature:
Mains Supply:
Power Outlet:
Power Consumption:
Fuse(fast acting)
Cooling:
Accessories(optional):
600x240x290mm
(Dimensions with bars and brackets)
10.3Kg
1:2.4 / 100 mm
300 Watt HTI 300 metal halide lamp
SFc 10-4
750 hours
Approximately 20,000
6500 K
AC 100-120V~50/60Hz
Chassis male IEC socket
450 Watts maximum
F6A 250V 5x20mm
Forced air ventilation with axial fan
Adjustable pivoting mirror(ISP-1)
Rotating /Static gobo holder(ISP-2)
*******
All rights reserved. Improvement and changes to specifications, design and
this user's manual, may be made at any time without prior notice.
9
Page 12

24-004-0779
Rev 2.0 April 2003
E-mail: support @ elationlighting.com
Http: www.elationlighting.com
 Loading...