

Page 1

中文
English Deutsch
Color LCD Monitor
User’s Manual
Important
Please read this User’s Manual, and the Setup Manual (separate
volume) carefully to familiarize yourself with safe and effective usage.
Please retain this manual for future reference.
• Please refer to the Setup Manual for information ranging from the
connection of network cameras to the display of camera images.
• The latest User’s Manual is available for download from our site:
http://www.eizoglobal.com
Wichtig
Lesen Sie dieses Benutzerhandbuch und das Installationshandbuch
(separater Band) aufmerksam durch, um sich mit der sicheren und
efzienten Bedienung vertraut zu machen.
• Bitte beachten Sie das Installationshandbuch für eine Vielzahl von
Informationen, von der Verbindung von Netzwerkkameras bis zur
Anzeige der Kamerabilder.
• Das aktuelle Benutzerhandbuch steht auf unserer Website zum
Herunterladen zur Verfügung:
http://www.eizoglobal.com
重要事项
请仔细阅读用户手册和设定手册(分册),掌握如何安全、有效地使用本产品。
请保留本手册,以备日后参考。
• 请参阅使用说明书的信息,了解关于从与网络摄影机的连接再到摄影机图
像的显示。
• 最新的用户手册可从我们的网站下载:
http://www.eizoglobal.com
Page 2

Page 3
English
Color LCD Monitor
User’s Manual
Page 4
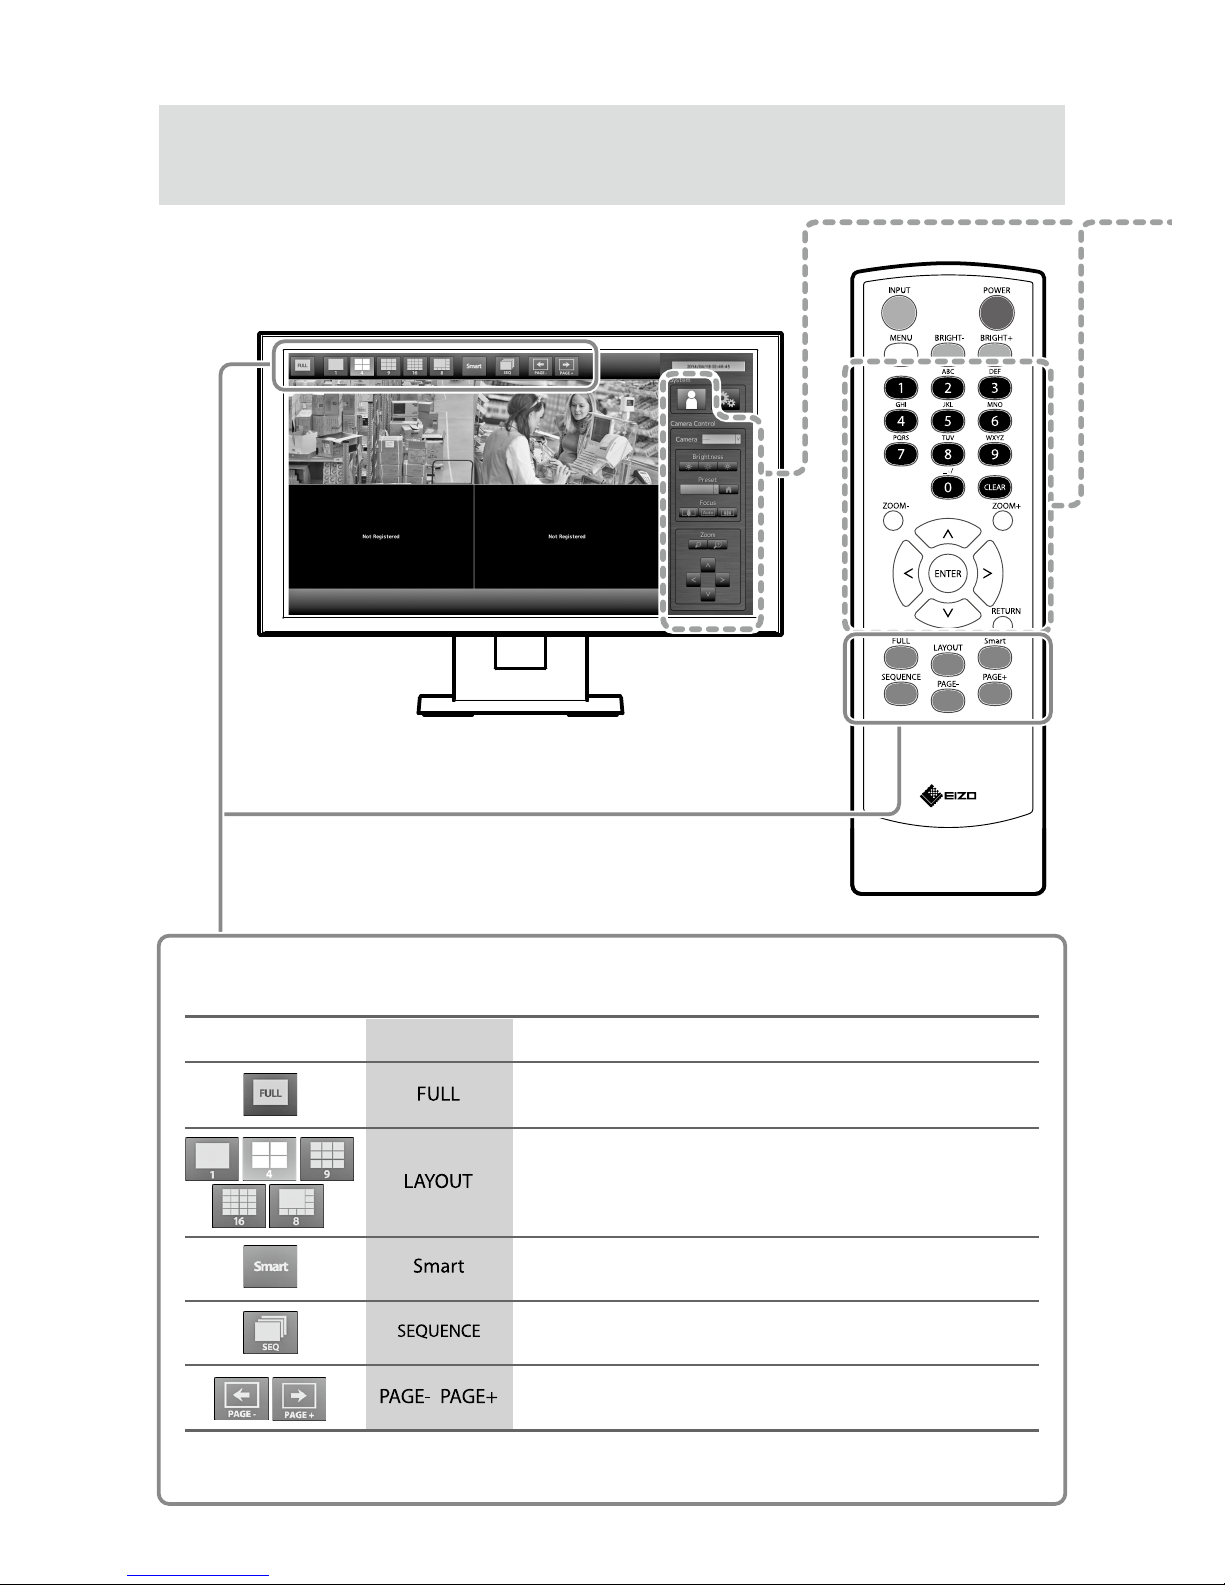
Displays/hides the menu of the live image display screen.
Turns Smart Functions
*1
on or off.
*1 Improves the image visibility.
Turns the sequential display*2 of camera images on or off.
*2 Changes over the displayed page at a set interval.
Changes over the page of camera images to display on the
monitor.
Changes the monitor screen layout.
Each time the button is pressed, the layout changes in the
following order: 1 Screen → 4 Screens → 9 Screens → 16
Screens → 8 Screens → 1 Screen.
(Live image screen)
Menu Operation details
Operating the monitor display screen
Display mode menu
Camera control menu
/
Remote control
button
Operation Guide
<Menu Operations on the
Live Image Screen>
The menu on the live image screen is operated using the remote control.
(For details, see “Chapter 3 Operating the System” (page 12).)
Page 5

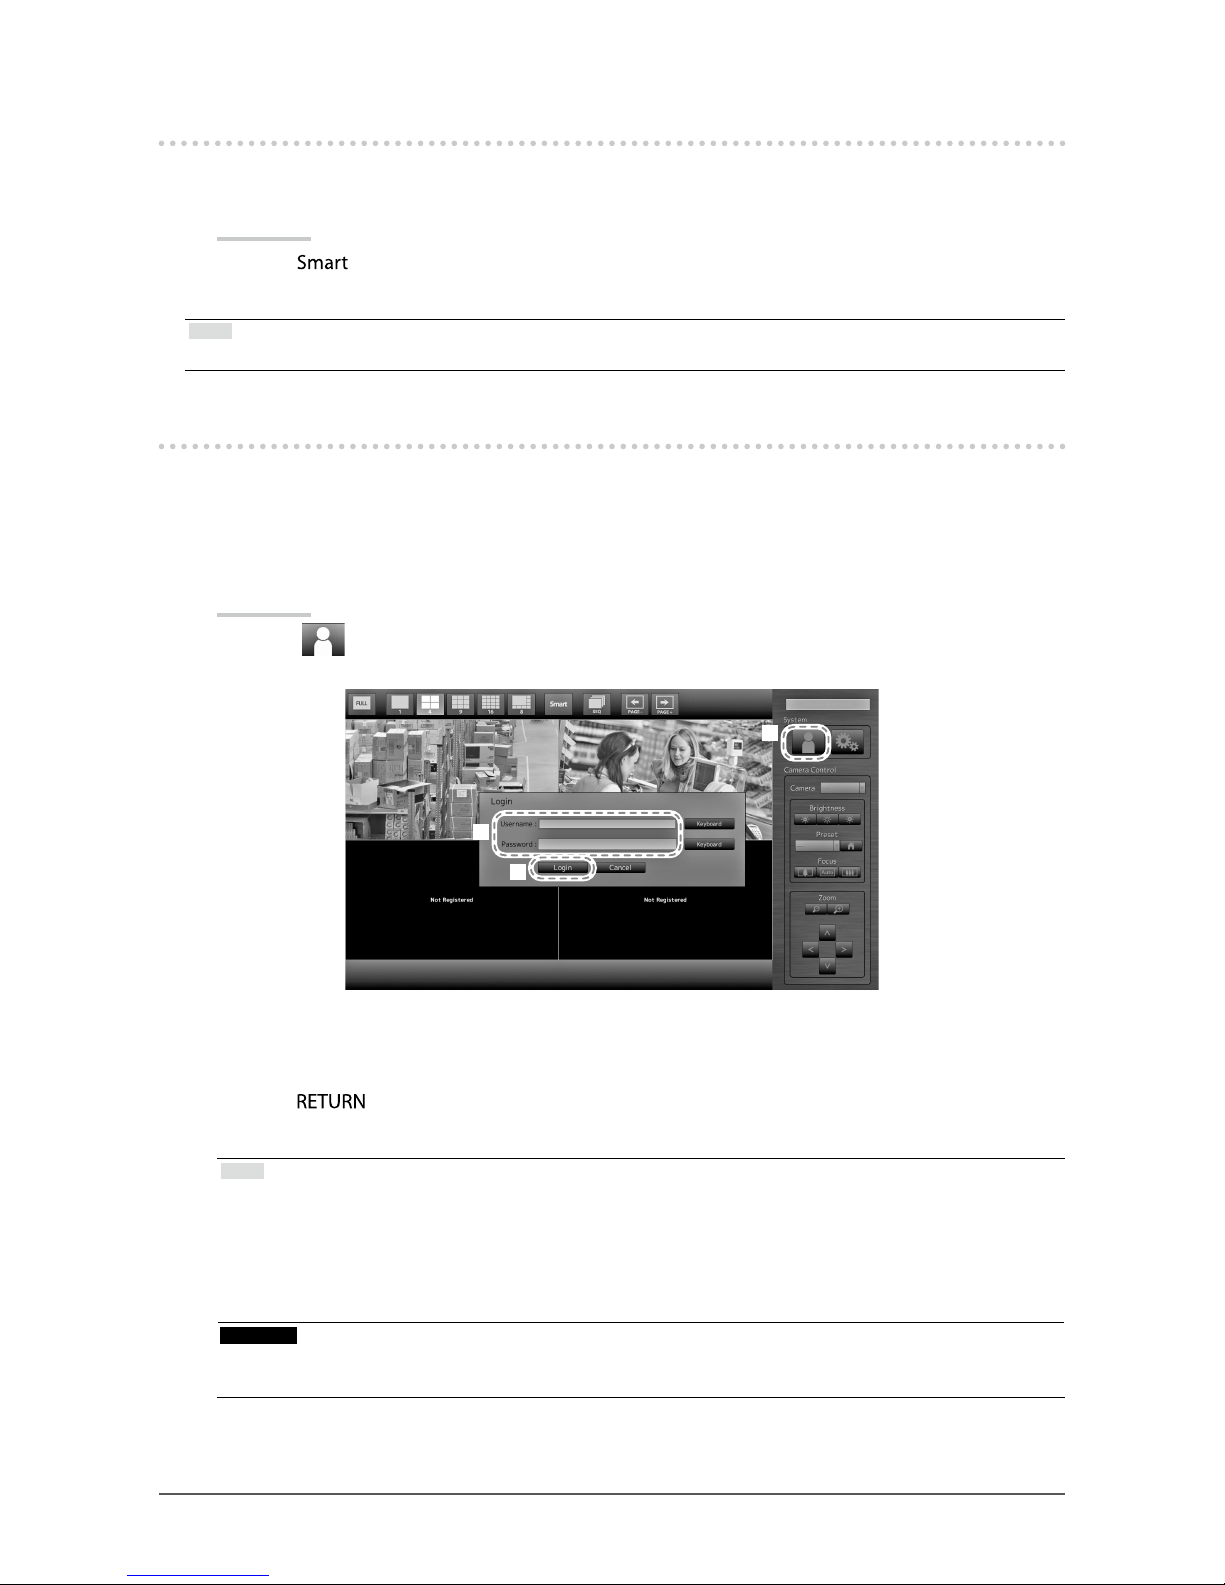
● Before operation
Log in to the system with a user level that has privileges for controlling network cameras.
(Please contact your system administrator for user information.)
1. Select (Login) with or and press .
2. Enter a username and a password.
(1) Select the text field with or and press .
(2) Enter respective values with to and press .
3. Select “Login” with or and press .
4. Press .
Procedure
1. Select “Camera Control” or and press .
2. Select the network camera to operate.
(1) Check that “Camera” is selected and press .
(2) Select the network camera or and press .
(3) Press .
3. Select the menu frame that includes the function you wish to
use with or and press .
4. Operate the functions.
* Depending on the type of the network camera
you are using, some functions may not be
available.
Zoom
Adjusts the network camera display magnification.
Press / .
Each time the button is pressed,
the camera zooms out/in.
Controlling Network Cameras
Brightness
Adjusts the brightness of the network camera.
Select a setting button with or and press .
Each time the button is pressed, the
display becomes darker/brighter.
Returns to the default setting.
*1
Preset
Moves the camera orientation to the position
registered in advance.
(1) Select the list box and
press .
(2) Select the preset number with
or and press
.
Moves the camera to the home position.
Select the setting button
or and
press .
Focus
Adjusts the network camera focus.
Each time the button is pressed, the
focus point moves closer/farther away
.*2
Adjusts automatically.*
3
Position
Adjusts the filming position of the network camera.
Press .
Shooting position moves in the
horizontal/vertical direction (pan/tilt).
*1 Cannot be set if using a network camera compatible with the
"ONVIF" protocol.
*2 If using a network camera compatible with the "ONVIF" protocol, the
mode is switched to manual adjustment mode.
*3 If using a network camera compatible with the "ONVIF" protocol, the
mode is switched to automatic adjustment mode.
Page 6

4
About Setup Manual and User’s Manual
Setup Manual
Describes precautions and setup processes from network camera
connection to camera image display.
User’s Manual
(this manual)
Describes network camera control/setup, monitor setup,
specications, etc.
This product has been adjusted specically for use in the region to which it was originally shipped. If
operated outside this region, the product may not perform as stated in the specications.
No part of this manual may be reproduced, stored in a retrieval system, or transmitted, in any form or by
any means, electronic, mechanical, or otherwise, without the prior written permission of EIZO Corporation.
EIZO Corporation is under no obligation to hold any submitted material or information condential unless
prior arrangements are made pursuant to EIZO Corporation’s receipt of said information. Although every
effort has been made to ensure that this manual provides up-to-date information, please note that EIZO
monitor specications are subject to change without notice.
Page 7

5
Notice for this monitor
Notice for this monitor
This product is suited for displaying surveillance camera images.
This product has been adjusted specically for use in the region to which it was originally shipped. If the
product is used outside the region, it may not operate as specied in the specications.
This product may not be covered by warranty for uses other than those described in this manual.
The specications noted in this manual are only applicable when the following are used:
· Signal cables specied by us
Only use optional products manufactured or specied by us with this product.
Monitors should be set to a lower brightness to reduce changes in luminosity caused by long-term use and
maintain a stable display.
Otherwise, parts (such as the LCD panel or the fan) may deteriorate in the long-term. Periodically check that
they are operating normally.
When the screen image is changed after displaying the same image for extended periods of time, an
afterimage may appear. Use the screen saver or power save function to avoid displaying the same image for
extended periods of time.
Periodic cleaning is recommended to keep the monitor looking new and to prolong its operation lifetime (refer
to “Cleaning” (page 6)).
The LCD panel is manufactured using high-precision technology. Although, missing pixels or lit pixels may
appear on the LCD panel, this is not a malfunction. Percentage of effective dots: 99.9994% or higher.
The backlight of the LCD panel has a xed lifetime. When the screen becomes dark or begins to icker,
please contact your local EIZO representative.
Do not press on the panel or edge of the frame strongly, as this may result in display malfunctions, such
as interference patterns, etc. If pressure is continually applied to the panel, it may deteriorate or damage
your panel. (If the pressure marks remain on the panel, leave the monitor with a black or white screen. The
symptom may disappear.)
Do not scratch or press on the panel with any sharp objects, as this may result in damage to the panel. Do
not attempt to brush with tissues as this may scratch the panel.
When the monitor is cold and brought into a room or the room temperature goes up quickly, dew
condensation may occur on the interior and exterior surfaces of the monitor. In that case, do not turn the
monitor on. Instead wait until the dew condensation disappears, otherwise it may cause some damage to the
monitor.
Page 8

6
Notice for this monitor
Disclaimer
EIZO shall not be liable in any way to any person whatsoever for the occurrences described below.
1. Any incidental, special or consequential disruption or damage directly or indirectly arising in
connection with this product.
2. Any loss, damage or cost resulting from misuse or neglect.
3. Any malfunction or failure occurring after unauthorized disassembly, repair or alteration regardless
of its cause.
4. Any inconvenience, loss or damage caused by the inability to display images due to any reason or
cause including malfunctions or failures in this product.
5. Any failure or consequential inconvenience, loss or damage due to malfunction or failure of a
combined system that comprises this product and any third party products.
6. Any consequential claim for compensation or complaint based on privacy violation or any other
reason by individuals or entities recorded in the surveillance images which are made public for/by
whatever cause or used.
7. Any loss of registered data for whatever cause.
While this product displays camera surveillance images, the use of this product alone does not directly
prevent crime.
Cautions for Network Use
Because this product is used by connecting to networks, the following risks apply
1. Leakage of information through this product.
2. Unauthorized operation of this product by a malicious third party.
3. Interference or suspension of the use of this product by a malicious third party.
In order to prevent the above described damages, under user responsibility, implement sufcient network
security measures including measures described below.
• Use this product with a safety-ensured network by using a rewall or other network security
systems.
• Change the administrator password periodically.
Cleaning
Attention
• Chemicals such as alcohol and antiseptic solution may cause gloss variation, tarnishing, and fading of the cabinet
or panel, and also quality deterioration of the image.
• Never use any thinner, benzene, wax, and abrasive cleaner, which may damage the cabinet or panel.
Note
• The optional ScreenCleaner is recommended for cleaning the cabinet and panel surface.
The stains on the cabinet and panel surface can be removed by moistening part of a soft cloth with water.
To use the monitor comfortably
• An excessively dark or bright screen may affect your eyes. Adjust the brightness of the monitor
according to the environmental conditions.
• Staring at the monitor for a long time tires your eyes. Take a 10-minute rest every hour.
Page 9
7
CONTENTS
Operation Guide <Menu Operations on the
Live Image Screen> .......................... 2
Notice for this monitor ......................................... 5
Disclaimer ................................................................. 6
Cautions for Network Use ....................................... 6
Cleaning .................................................................... 6
To use the monitor comfortably ............................. 6
CONTENTS ............................................................. 7
Chapter 1 Product Overview ............................. 8
1-1. Features ......................................................... 8
1-2. System Conguration .................................. 9
1-3. Supported Network Cameras ...................... 9
Chapter 2 Controls and Functions ................. 10
2-1. Monitor ..........................................................10
2-2. Remote Control ............................................11
Chapter 3 Operating the System .................... 12
3-1. Turning On/Off the Power ...........................12
●
To turn on the power ......................................12
●
To turn off the power ......................................12
3-2. Live Image Screen .......................................13
●
Basic menu operations...................................13
3-3. Changing Over Screen Layout and
Displayed Pages...........................................16
●
To change over the screen layout ..................16
●
To change over the page displayed on
the screen.......................................................17
3-4. Turning Smart Functions On/Off ................18
3-5. Controlling Network Cameras ....................18
●
Before operation .............................................18
●
To Operate network cameras .........................19
3-6. Adjusting Screen Brightness .................... 20
Chapter 4 Conguring the System ................. 21
4-1. Before Conguration ...................................21
4-2. Setting Screen ............................................. 22
●
Basic operations ............................................ 22
4-3. Setting Network Cameras .......................... 24
●
To automatically discover network cameras ..24
●
To manually register network cameras ......... 25
●
To set network camera functions .................. 27
4-4. Setting Display Positions of Camera
Images ...........................................................31
4-5. Setting Smart Functions ............................ 32
4-6. Conguring System Settings .................... 33
4-7. Setting User Information .............................41
●
To register new user information ....................41
●
To change user information ...........................42
●
To delete user information ..............................42
4-8. Displaying Operation Logs ........................ 43
●
To display log data ........................................ 43
●
To save log data ............................................ 44
Chapter 5 Troubleshooting .............................. 45
5-1. No picture .................................................... 45
5-2. Imaging problems ....................................... 45
5-3. Setting Problems ........................................ 46
5-4. Other problems ............................................47
Chapter 6 Reference ........................................ 48
6-1. How to Attach the Optional Arm ............... 48
6-2. Connecting HDMI Devices ......................... 49
●
Compatible Resolutions/Formats .................. 49
●
To switch among input signals ...................... 50
●
Adjusting screen brightness .......................... 50
●
Specifying color space .................................. 50
6-3. Specications ..............................................51
●
Display capability ...........................................52
●
Outside Dimensions .......................................52
6-4. List of setting items .................................... 53
Chapter 7 Glossary .......................................... 57
Appendix .............................................................. 59
Trademark ............................................................... 59
License / Copyright ................................................ 60
FCC Declaration of Conformity ............................ i
LIMITED WARRANTY ........................................... ii
Recycling Information .......................................xi
CONTENTS
Page 10

8
Chapter 1 Product Overview
Chapter 1 Product Overview
Thank you very much for choosing an EIZO color LCD monitor.
This color LCD monitor can display images from up to 16 network cameras*1.
*1 A type of camera which converts images into network signals and transmits the signals.
1-1. Features
• 23.0″ wide format LCD
• Supports a resolution of 1920 × 1080
• Panel with a wide eld of view adopted
IPS panel with 178 º horizontal and vertical viewing angles.
• LED backlight LCD panel
No mercury, a hazardous substance, is used.
• Receives input video signals from network cameras.
- Compatible with video compression formats H.264 and MJPEG.
- Up to 16 network cameras can be registered and displayed.
- Images from multiple network cameras can be displayed simultaneously (1-/4-/8-/9-/16-screen
display).
- Network cameras can be controlled from the monitor.
• Equipped with Easy Setup function
Necessary settings for setup can be performed with a wizard.
• Provides display modes suitable for images lmed by surveillance cameras.
See “4-5. Setting Smart Functions” (page 32).
• Compatible with ONVIF Prole S
• EIZO’s unique “Smart” technology
- Smart Resolution function
This function adjusts the perceived resolution of the images so that the blurs are reduced and images are
displayed vividly and clearly.
- Smart Insight function
This function analyzes the image and corrects the brightness for each pixel to make dark area of images
visible.
- Noise Reduction function
This function reduces the amount of block noise that occurs due to video compression.
See “4-5. Setting Smart Functions” (page 32).
• Can be operated remotely with the remote control.
• You can save the settings to a USB storage device and load the settings.
• A 2-year long-term warranty for 24-hour continuous use
Page 11

9
Chapter 1 Product Overview
1-2. System Conguration
FDF2304W-IP
HDMI
Ethernet
Network camera
*1
Network hub
HDMI device
(Network video recorder etc.)
*1 Up to 16 network cameras can be connected.
1-3. Supported Network Cameras
This product supports the following network cameras:
• Panasonic i-PRO series network cameras
• ONVIF Prole S-compatible network cameras
Attention
• For details on supported network cameras, refer to our website: http://www.eizoglobal.com
• For installation and settings of network cameras, also check the network camera’s manual.
Page 12

10
Chapter 2 Controls and Functions
Chapter 2 Controls and Functions
2-1. Monitor
10
11
1 2 3 4
7
5 a b
6
8 9
1. Remote control detector Receives signals from the remote control.
2.
button Switches input signals for display.
3.
button Turns the power on or off.
4. Power Indicator
Indicates the monitor’s operation status.
Blue: Operating
Flashing blue: Shutting off the system
Red: Power off (With “Quick Start ” set to “On”
*1
)
OFF: Power off (With “Quick Start” set to “Off”
*1
)
5. USB downstream port Connects a USB mouse or storage devices such as a USB ash drive.
*2
6. LAN port
Connects the network cable.
a) Link LED
Green: Network connection established.
OFF: Network connection disabled.
b) Status LED
Flashing orange: Data transfer is in progress.
7. HDMI connector Connects external devices that support HDMI.
8. Power connector Connects the power cord.
9. Main power switch Turns the main power on or off.
10. Security lock slot Complies with Kensington’s MicroSaver security system.
11. Stand
*3
Used to adjust the angle of the monitor screen.
*1 The power-off status can be set with “Quick Start” (see “Other” (page 36)).
*2 Other USB devices (such as USB hubs) cannot be connected.
*3 An optional arm (or an optional stand) can be attached by removing the stand section (see “6-1. How to Attach the
Optional Arm” (page 48)).
Page 13

11
Chapter 2 Controls and Functions
2-2. Remote Control
7
2
4
11
13
6
1
3
10
12
9
5
8
1.
Switches input signals for display.
2.
Turns the power on or off.
3.
Used to display/exit the monitor’s Adjustment menu.
4.
/
Adjusts the brightness of the monitor screen.
5. Number Buttons (
to )
/
Used to enter numbers and letters.
6. /
Adjusts the network camera display magnication.
7.
/ / / ,
Used to set and control (pan/tilt) network cameras, and congure system settings of
the monitor.
8.
Returns to the previous menu status in menu operation.
9.
Changes the monitor screen layout.
Each time the button is pressed, the layout changes in the following order: 1 Screen
→ 4 Screens → 9 Screens → 16 Screens → 8 Screens → 1 Screen.
10.
Displays/hides the menu of the live image screen.
11.
Turns Smart Functions on or off.
12.
Turns the sequential display of camera images on or off.
13.
/
Changes over the page of camera images to display on the monitor.
Attention
• Use the remote control within the range illustrated in
the diagram below.
5m
5m
20°
20°
7m
5m
30°
30°
7m
5m
• When installing multiple monitors, leave sufcient space between each monitor so that only the intended monitor will be
operated by the remote control. Otherwise, all monitors that receive the remote control signal will operate accordingly.
Page 14

12
Chapter 3 Operating the System
Chapter 3 Operating the System
3-1. Turning On/Off the Power
●
To turn on the power
1.
Turn on the main power switch on the back of the monitor.
The main power switch is turned by factory settings.
2.
Press on the front of the monitor or on the remote control.
The power indicator lights up blue and the live image screen is displayed.
(For details on the live image screen, see “3-2. Live Image Screen” (page 13).)
Attention
• By default, it takes approximately one minute for the live image screen to be displayed after the power is turned
on. (A rotating bar indicating startup is displayed.)
• Do not turn off the monitor during startup.
Note
• The time required to display the live image screen can be reduced (Quick Start) by changing the power-off status.
For details, see “Other” (page 36).
●
To turn off the power
1.
Press on the front of the monitor or on the remote control.
Attention
• The power indicator ashes blue while the system is shutting down.
• The power-off status differs depending on the “Quick Start” setting (see “Other” (page 36)).
- When set to “On”: Part of the system remains running. (Power Indicator: Red)
- When set to “Off”: The system is shut down completely (default setting). (Power Indicator: OFF)
• When turning off the main power of the monitor, follow the procedure below.
1. If “Quick Start” is set to “On”, change the setting to “Off”.
2. Press
on the front of the monitor or on the remote control to turn off the power.
The system is shut down and the power indicator turns off.
3. Turn off the main power switch.
• Turning off the main power of the monitor before the system completely shuts down may cause equipment
damage.
Note
• Turn off the monitor after use.
• Turning off the main power switch or unplugging the power cord completely shuts off power supply to the monitor.
However, if the main power switch is turned off or the power cord is unplugged for one week or longer, the
monitor’s date and time display will become inaccurate. In such a case, set the date and time again.
Page 15

13
Chapter 3 Operating the System
3-2. Live Image Screen
The live image screen is displayed when the monitor is turned on.
There are two states to the live image screen:
• Camera images and the menu are displayed.
• Only the camera images are displayed.
Live image screen
(camera images and menu)
Live image screen
(camera images only)
Press
on the
remote control to change
over the display.
●
Basic menu operations
The menu is used for operation and setting of network cameras and the monitor.
The menu is operated using the remote control.
Network camera image display area
- When no camera is registered, a “Not registered ” message is displayed.
- When an input signal is not supported, a “Communication Error” message is
displayed.
Message display area
(Error messages such as on camera operations are displayed.)
Current
time
(1)
(2)
(1) Display mode menu
The display mode menu is used for operations on camera images which are displayed on the monitor.
●
Operation method
Press a function button ( , , , , , ) which corresponds to a
menu item.
Note
• Operations using function buttons are valid even when the menu is not displayed.
Page 16

14
Chapter 3 Operating the System
(2) System setup menu / Camera control menu
The system settings menu is used for logging into and conguring the system.
The camera control menu is used for controlling network cameras from the monitor.
●
Operation method
To select an item
Press the
/ / / /buttons.
Note
• The currently selected item is lit up in green.
To conrm a selected item
Press
.
To change a setting
• With setting buttons Press
. (Excluding zoom in/out and position adjustment)
• With list box 1. Press
.
The list box is highlighted in green.
2. Select the setting with or .
3. Press
.
Note
• When canceling a setting change in process, press .
To return to the previous menu level
Press
.
To enter characters
1. Press
.
The text eld is highlighted in green.
2. Press the number buttons ( to ).
Press a button consecutively to change over to the character next in order. For the order of character entry,
refer to the table shown below.
Button Input characters
0 - _ : / (sp ace)
1
A B C a b c 2
D E F d e f 3
G H I g h i 4
J K L j k l 5
M N O m n o 6
P Q R S p q r s 7
T U V t u v 8
W X Y Z w x y z 9
To enter a new character, press
.
To delete a character, press
.
3. Press .
Note
• Entering network addresses
Network address text boxes are separated by [.] (a period mark).
- When a three-digit number is entered, the cursor automatically moves to the next entry position.
- When entering a two-digit or one-digit number, press
to move to the next entry position.
- When using a mouse, enter [.] (a period mark) to move to the next entry position.
Page 17

15
Chapter 3 Operating the System
Attention
• The operable range of the menu differs according to the level of the user accessing this product.
There are three user levels: LIVE, CAMERA CONTROL and ADMIN. The range of operation for each level is
shown below.
(√: Operable, -: Inoperable)
Operation
Level
Display mode
menu
System setup menu Camera control
menu
Login operation System settings
LIVE √ √ - CAMERA CONTROL √ √ - √
ADMIN √ √ √ √
• When the power is turned on, the user level is “LIVE”.
• For information on user settings, see “4-7. Setting User Information” (page 41).
Note
• When the remote control cannot be used, the monitor can be operated by a USB mouse. Connect a mouse to the
USB downstream port on the back of the monitor.
- Operation method: Click relevant buttons to select.
- Character entry method: Click “Keyboard” on the character entry screen. Then click the keys on the displayed
keyboard to enter characters.
Page 18

16
Chapter 3 Operating the System
3-3. Changing Over Screen Layout and Displayed Pages
●
To change over the screen layout
Change the number of camera images displayed on one screen.
Procedure
1. Press
on the remote control.
Each time the button is pressed, the screen layout changes over.
1 Screen 4 Screens
8 Screens 16 Screens
9 Screens
Note
• Select a network camera, and then press on the remote control. The selected camera image is
displayed as single-image display.
• If you select a network camera and use the mouse to change over the screen layout, the display page
switches to that of the selected camera image.
• You can select the network camera that you want to operate by pressing the number buttons on the remote
control.
• The position at which images are displayed can also be changed (see “4-4. Setting Display Positions of
Camera Images” (page 31)).
Page 19

17
Chapter 3 Operating the System
●
To change over the page displayed on the screen
Except for when the screen layout is 16 Screens, camera images are displayed by changing over
pages.
Pages can be changed over either manually or automatically at a set interval (sequential display).
Changing pages manually
Procedure
1. Press
or on the remote control.
Each time the button is pressed, the page displayed on the screen changes over.
Camera 1 Camera 2
Camera 3 Camera 4
Camera 5 Camera 6
Camera 7 Camera 8
Camera 13 Camera 14
Camera 15 Camera 16
Camera 9 Camera 10
Camera 11 Camera 12
Example: 4 Screens layout
Changing pages automatically (Sequential display)
Procedure
1. Press
on the remote control.
Pages displayed on the screen are changed over automatically at a specied interval.
Note
• The interval for page changeover can be changed (default setting: 5 sec.). For details on changing the display
interval, see “4-4. Setting Display Positions of Camera Images” (page 31).
• To stop sequential display, press
again.
Attention
• During sequential display, camera control is disabled and the setting screen (page 22) cannot be displayed.
The sequential display must be stopped in order to operate cameras or display the setting screen.
Page 20
18
Chapter 3 Operating the System
3-4. Turning Smart Functions On/Off
Enable or disable settings of Smart Functions. Using Smart Functions improves the camera image
visibility.
Procedure
1. Press
on the remote control.
Each time the button is pressed, Smart Functions are turned on or off.
Note
• For information on Smart Function settings, see “4-5. Setting Smart Functions” (page 32).
3-5. Controlling Network Cameras
●
Before operation
Network camera control is allowed only when the level of the user accessing this product is CAMERA
CONTROL or ADMIN.
Be sure to log in to the system with a user account of either of these levels.
Procedure
1. Select
(Login) under “System”.
The login screen is displayed.
1
2
3
2. Enter a username and a password.
3. Select “Login”.
The display returns to the live image screen.
4. Press on the remote control.
The system frame is selected (highlighted in green).
Note
• See page 14 for the character entry method.
• The following user information is set by default:
- Username: “admin”
- Password: “admin”
- User Level: “ADMIN”
• For information on user settings, see “4-7. Setting User Information” (page 41).
Attention
• When the monitor is turned off while the user is logged in, the user is logged out from the system
automatically.
Page 21

19
Chapter 3 Operating the System
●
To Operate network cameras
Procedure
1. Select “Camera Control”.
2. Select the network camera to operate at “Camera”.
The line of the frame where the selected network camera’s image is displayed becomes thick.
3. Select the menu frame (see the gure below) that includes the operation function you wish to use.
1
Menu frame
- Brightness
- Preset
- Focus
Menu frame
- Zoom
- Position
2
3
3
4. Operate the functions.
Attention
• Depending on the type of the network camera you are using, some functions may not be available.
Brightness / Preset / Focus
Function Detail
Brightness Adjusts the brightness of the network camera.
1. Select the setting button and press
.
:
Each time is pressed, the image becomes darker.
:
Returns the brightness to the default setting.*
1
:
Each time is pressed, the image becomes brighter.
Preset Moves the camera orientation to the position registered in advance.
1. Select the “Preset” list box and press ENTER.
2. Select the preset number with
or and press .
Note
• For information on registering the shooting position, see”Preset” (page 29).
• To move the network camera orientation to the home position, select .
Focus Adjusts the network camera focus.
1. Select the setting button and press
.
:
Each time is pressed, the focus point moves closer.*
2
:
Focuses automatically.*
3
:
Each time is pressed, the focus point moves farther
away.*
2
*1 Cannot be set if using a network camera compatible with the “ONVIF” protocol.
*2 If using a network camera compatible with the “ONVIF” protocol, the mode is switched to manual
adjustment mode.
*3 If using a network camera compatible with the “ONVIF” protocol, the mode is switched to automatic
adjustment mode.
Page 22

20
Chapter 3 Operating the System
Zoom / Position
Function Detail
Zoom Adjusts the network camera display magnication.
1. Press
/ .
:
Zooms out each time is pressed.
:
Zooms in each time is pressed.
Position Adjusts the shooting position of the network camera.
1. Press
/ / / .
:
Adjusts the horizontal position (pan).
:
Adjusts the vertical position (tilt).
Note
• When operating with a USB mouse, the network camera position can be adjusted automatically by clicking
on a position in the image where you wish to set as the center of the image display (only when Panasonic
network camera is equipped with pan, tilt and zoom functions).
3-6. Adjusting Screen Brightness
Adjust the brightness of the monitor screen by changing the brightness of the backlight (light source at
the back of the LCD panel).
Adjustable range
0 to 100
Procedure
1. Press
or on the remote control.
The brightness adjustment menu is displayed.
2. Set the brightness with or .
The menu disappears automatically after approximately ve seconds.
Page 23

21
Chapter 4 Conguring the System
Chapter 4 Conguring the System
4-1. Before Conguration
Conguration of this product is allowed only when the level of the user accessing the product is
ADMIN.
Be sure to log in to the system with a user account of this level.
Procedure
1. Select
(Login) under “System”.
The login screen is displayed.
41
2
3
2. Enter a username and a password.
3. Select “Login”.
The display changes back to the live image screen.
4. Select (Setting).
The setting screen is displayed.
(For information on the setting screen, see “4-2. Setting Screen” (page 22).
Note
• See page 23 for the character entry method.
• The following user information is set by default:
- Username: “admin”
- Password: “admin”
- User Level: “ADMIN”
• For information on user settings, see “4-7. Setting User Information” (page 41).
Attention
• When the monitor power is turned off while the user is logged in, the user is logged out from the system
automatically.
Page 24

22
Chapter 4 Conguring the System
4-2. Setting Screen
The setting screen is used for various settings such as network camera registration and monitor system
settings.
●
Basic operations
List of setting items The setting screen of the selected item is displayed.
To select an item
Press the
/ / / buttons.
Note
• The currently selected item is lit up in green.
To conrm a selected item
Press
.
To change a setting
• With setting buttons Press
.
• With list box 1. Press
.
The list box is highlighted in green.
2. Select the setting with or .
3. Press .
Note
• When canceling a setting change in process, press .
To return to the previous menu level
Press
.
Page 25

23
Chapter 4 Conguring the System
To enter characters
1. Press
.
The text eld is highlighted in green.
2. Press the number buttons ( to ).
Press a button consecutively to change over to the character next in order. For the order of character entry,
refer to the table shown below.
Button Input characters
0 - _ : / (space)
1
A B C a b c 2
D E F d e f 3
G H I g h i 4
J K L j k l 5
M N O m n o 6
P Q R S p q r s 7
T U V t u v 8
W X Y Z w x y z 9
To enter a new character, press
.
To delete a character, press
.
3. Press .
Note
• Entering network addresses
Network address text boxes are separated by [.] (a period mark).
- When a three-digit number is entered, the cursor automatically moves to the next entry position.
- When entering a two-digit or one-digit number, press
to move to the next entry position.
- When using a mouse, enter [.] (a period mark) to move to the next entry position.
To exit the setting screen
1. Select “Exit” from the list of setting items with
.
2. Press
.
Attention
• While settings are being applied (registered) to the system, a “Setting” (“Registering”) message is displayed. Do
not turn off the monitor while the message is displayed. Otherwise, setting information may be lost.
Page 26

24
Chapter 4 Conguring the System
4-3. Setting Network Cameras
●
To automatically discover network cameras
Discover network cameras on the network automatically and register them to the system.
This procedure is for setting network cameras connected after performing “Easy Setup” upon initial
startup of the monitor.
Attention
• Only the network cameras installed in the same subnet as the monitor are detected. If a network camera is
installed in a different subnet, the camera must be registered manually (see “To manually register network
cameras” (page 25)).
• For information on “Easy Setup”, refer to the Setup Manual.
Procedure
1. Select “Auto Discovery”.
Displays
registered
cameras.
1
2. Select “Start” at “Camera Discovery”.
The user authentication screen is displayed.
3. Enter the “Username” and the “Password”.
The username “admin” and password “12345” are entered automatically.
If the username and password have not been changed for the Panasonic network camera, they can be used
as is.
If using a network camera compatible with the “ONVIF” protocol, conrm your username and password with
your administrator, and enter them.
4. Select “OK” and press .
Automatic discovery is started and a “Searching” message is displayed.
When the search is completed, the discovered network cameras are added to the list.
5. Select “Apply”.
The setting complete screen is displayed. Select “OK”.
2
3
5
4
Page 27

25
Chapter 4 Conguring the System
Attention
• When network cameras are not detected by automatic discovery, see “Chapter 5 Troubleshooting” (page
45).
Note
• If using a Panasonic network camera, the settings of the newly detected network camera can be changed.
The settings of the newly detected network camera can be changed. Select the network camera to make
setting changes at “Camera Name” and then select “Settings”. Congure the items on the displayed setting
screen. The items that can be set differ depending on the camera.
• When a Panasonic network camera is registered automatically, the username, password and stream name
for accessing the camera are set to the following values automatically.
- Username: “admin”
- Password: “12345”
- Stream: “2”
- Channel: “1”
If using a network camera compatible with the “ONVIF” protocol, conrm your username and password for
access to the camera with your administrator.
(These settings can be changed on the Manual Setting screen (see “To manually register network
cameras” (page 25).)
●
To manually register network cameras
Register network cameras manually for cases described below.
• When a network camera is installed in a subnet differing from the subnet of the monitor.
• When settings such as network settings of a registered network camera have been changed.
• When registering a video encoder which supports multiple channels
Procedure
1. Select “Manual Registration”.
A list of network cameras currently registered is displayed.
Registered
cameras are
displayed.
1
2 3
2. Select the network camera to congure at “Camera Name”.
When registering a network camera installed in a subnet differing from the subnet of the monitor, select an
available number (with no network camera registered). For a network camera that is already registered,
select the network camera of which to change settings.
3. Select “Settings”.
The network camera setting screen is displayed.
Page 28

26
Chapter 4 Conguring the System
4
5
4. Congure the items.
For setting details, contact your system administrator.
Item Detail Setting range
Camera Name Enter the camera name. When you select "Execute"
for Obtain Camera Name, the camera automatically
obtains the camera name.
• Panasonic network camera: Camera title
• Network camera compatible with the “ONVIF”
protocol: Camera model number, manufacturer
name, etc.
Alphanumeric characters
(up to 24 characters)
IP Address Enter the network camera IP address. 0.0.0.0 to 255.255.255.255
HTTP Port Enter the network camera HTTP port number. 1 to 65535
Protocol Select the protocol for controlling the camera. ONVIF/Panasonic
Stream
*1
Set the number of the stream for delivering
camera images. Select a stream supported by the
connected network camera.
1 to 4
Channel
*1
Select the channel of the analog encoder. Set to "1"
if the network camera does not support the channel
function.
1 to 4
Username, Password Enter the username and password to use when
accessing network cameras.
Alphanumeric characters
and symbols
(up to 32 characters)
*1 Cannot be set if using a network camera compatible with the “ONVIF” protocol.
5. Select “Apply”.
The setting complete screen is displayed. Select “OK”.
Attention
• Depending on the network camera type, the “Model No.” displayed on the setting screen may differ from
when the camera is discovered automatically and when it is registered manually.
Note
• With manual registration, or for other than Panasonic network cameras, network settings of a camera cannot
be changed. When changing the network settings of a camera, check the camera’s manual.
Page 29

27
Chapter 4 Conguring the System
●
To set network camera functions
Set the network camera functions from the monitor.
Procedure
1. Select “Function Settings”.
Displays current
settings.
1
2
3
2. Select the network camera to congure at “Camera Name”.
3. Select a function.
The setting screen for the selected function is displayed.
Camera Information Display
Select to display or not display the camera information and time of the network camera settings on
the camera images.
Attention
• Cannot be set if using a network camera compatible with the “ONVIF” protocol.
2
1
1. Congure the items.
Item Detail Setting range
Camera Information Display Set whether or not to display camera information. On/Off
Time Display Set whether or not to display the time. 12h/24h/Off
Display Position Set the display position of the camera information
and time.
Upper Left/Upper Right/
Lower Left/Lower Right
2. Select “Apply”.
The setting complete screen is displayed. Select “OK”.
Clock Settings
1. Synchronizes the time of the network camera with the time of the monitor.
Select “Execute” to synchronize the clock.
Page 30

28
Chapter 4 Conguring the System
Video Settings
Set the quality of the images delivered from network cameras.
Note
• This product supports H.264 and MJPEG (ONVIF only) video compression formats.
Attention
• When devices such as recorders are connected to a network camera, the display and recording of such
devices may be affected.
1. Congure the items.
When using a Panasonic network camera
2
1
Item Detail Setting range
Aspect Ratio Set the H.264 aspect ratio.
*1
Camera imaging mode
Resolution Set the H.264 resolution. Camera settings
Refresh Interval Set the refresh interval
*2
of H.264 images.
0.2s/0.33s/0.5s/1s/2s/3s/4s/5s
Transmission Priority Set the transmission mode of H.264 images.
Constant Bit Rate/Frame Rate/Best
Effort
Frame Rate (When the mode is set to “Frame Rate” at
“Transmission Priority”.)
Set the frame rate (image update interval) of
H.264 images.
*3
1fps/3fps/5fps/7.5fps/10fps/12fps/
15fps/20fps/30fps
Bit Rate (Max.) Set the maximum H.264 image bit rate.
64kbps/128kbps/256kbps/384kbps/
512kbps/768kbps/1024kbps/
1536kbps/2048kbps/3072kbps/
4096kbps/8192kbps/
Bit Rate (Min.) (When the mode is set to “Best Effort” for
“Transmission Priority”.)
Set the minimum H.264 image bit rate.
64kbps/128kbps/256kbps/384kbps/
512kbps/768kbps/1024kbps/
1536kbps/2048kbps/3072kbps/
4096kbps/8192kbps/
Image Quality (When the mode is set to “Constant Bit Rate”
or “Best Effort” for “Transmission Priority”.)
Set the H.264 image quality.
Low (prioritize motion)/Normal/Fine
(prioritize image quality)
*1 When “1920” is selected for “Resolution”, the aspect ratio is xed to 16:9. The aspect ratio cannot be set
when the network camera “Stream” is set to a value other than “1”.
*2 The network camera transmits the difference between the preceding frame and the current frame as data.
However, because the image quality gradually drops if only the difference is transmitted, the full screen
data must be transmitted periodically. “Refresh Interval” refers to the interval at which the full screen data is
transmitted. Shortening this interval improves the image quality but also increases the load on the network.
*3 The shorter the interval, the shorter the update interval and the smoother the display, but also the larger the
load on the network.
Page 31

29
Chapter 4 Conguring the System
ONVIF Prole S-compatible network cameras
2
1
Item Detail Setting range
Media Prole*
1
Select the ONVIF image prole. EIZO_Prole/camera prole
Encoder Select the encoder settings of ONVIF images. Camera settings
Compression Format Select compression format of ONVIF images. H.264/MJPEG
Resolution Set the resolution of ONVIF images. Camera settings
Video Quality Set the ONVIF image quality. The higher the
value, the higher the image quality.
Camera settings
Frame Rate Set the frame rate (image update interval) of
ONVIF images.
1 to 30
Encoding Interval Set the encoder interval of ONVIF images. Camera settings
Bit Rate (Max.) Set the maximum ONVIF image bit rate. 0 to 8192
GOV Length*
2
Set the I-frame interval of ONVIF images. Camera settings
H.264 Prole*
2
Select a H.264 standard prole. Baseline/Main/Extended/High
*1 Each item can be set only when EIZO_Prole is selected.
*2 Can be set if all of the following conditions are satised.
- Select “EIZO_Prole” as the media prole
- Select “H.264” as the compression format
2. Select “Apply”.
The setting complete screen is displayed. Select “OK”.
Attention
• Depending on the network camera type, some set values may not be reected. Check the specications of
the camera.
Preset
Preset the shooting position and adjustment status of the network camera.
2
1
3
Displays images of the selected camera.
1. Select the number (1 to 256) to set for “Preset No”.
Page 32

30
Chapter 4 Conguring the System
2. Congure the items.
Item Detail Setting range
Brightness Adjust the network camera brightness. -
Focus Adjust the network camera focus. -
Zoom Adjust the network camera display magnication. Position Adjust the network camera shooting position (pan/
tilt).
-
3. Select “Register (Home)” for registering the selected number as the home position. For all other
registrations, select “Register”.
The setting complete screen is displayed. Select “OK”.
Attention
• Depending on the type of the network camera you are using, some functions may not be available.
• Depending on the network camera type, it may not be possible to register the brightness and focus settings.
Note
• After the setting is registered, the number displayed at “Preset No.” changes from “Not Registered” to “Home”
or “Registered”.
• To clear a setting, select the number to clear at “Preset No.” and then select “Delete”. The data set for the
number is deleted and the number status returns to the unregistered state.
Other
Attention
• Cannot be set if using a network camera compatible with the “ONVIF” protocol.
2
1
1. Congure the items.
Item Detail Setting range
Pan/Tilt-ip Turn on/off the pan/tilt-ip function*1. On/Off
Upside-down
*2
Turn on/off the network camera upside down
function.
On/Off
Indicator Turn on/off the network camera Indicator. On/Off
*1 The pan/tilt-ip function reverses the pan/tilt direction automatically at high-speed when the network
camera reaches the movement endpoint. This function allows the user to make pan/tilt operations without
paying attention to movement endpoints.
*2 Check the network camera installation specications before using the upside down function. Depending
on the network camera type, it may not be possible to install the camera upside down even when the
camera supports the upside down function.
2. Select “Apply”.
The setting complete screen is displayed. Select “OK”.
Page 33

31
Chapter 4 Conguring the System
4-4. Setting Display Positions of Camera Images
Set the display position for images from the network camera.
Procedure
1. Select “Position”.
Indicates the
display positions
on the monitor
screen.
1
2
3
2. Congure the items.
Item Detail Setting range
Position Select a position to display a camera image.
Set the network camera to the number of the
desired position for display.
-
Camera Name Display Select to display or not display the camera name
and time set on the monitor. (The camera name is
displayed on the upper left of the image.)
On/Off
Sequence Interval Set the interval for changing over the screen during
sequential display.
5s to 60s
Aspect Ratio Mode Set which aspect ratio to apply when the aspect
ratio of the video delivered from the network camera
and the aspect ratio of the monitor image display
area differ.
Full/Aspect
3. Select “Apply”.
The setting complete screen is displayed. Select “OK”.
Attention
• All registered cameras must be set. A network camera can only be set for one display position. When there are
incorrect settings, “Apply” cannot be selected.
Note
• If it takes a while for images to be displayed during sequential display, set a higher value for “Sequence Interval”.
Page 34

32
Chapter 4 Conguring the System
4-5. Setting Smart Functions
Set Smart Functions for images from each camera.
Procedure
1. Select “Smart Functions”.
Displays current
settings.
1
2
4
3
Displays images of the selected camera.
2. Select the network camera to congure at “Camera Name”.
Attention
• For layouts 1 Screen or 4 Screens, select the camera name to set. For layouts 8 Screens, 9 Screens or
16 Screens, the settings are applied to the entire screen and cannot be set for each separate network
camera. Select “17_Full Screen”.
3. Congure the items.
Item Detail Setting range
Mode Select the display mode to apply to the images of
the selected network camera.
Set to “DAY” to apply a mode suitable for general
images.
Set to “NIGHT” to apply a mode suitable for
monochrome images such as images taken at night.
DAY/NIGHT/Off
Smart Resolution Adjusts the perceived resolution of the images so
that the blurs are reduced and images are displayed
vividly and clearly.
1 to 5/Off
Smart Insight Makes dark areas of images visible by analyzing the
image and correcting the brightness for each pixel.
It is effective for images with dark area that are less
visible and for bright environments.
1 to 5/Off
Noise Reduction Reduces the amount of block noise that occurs due
to video compression.
On/Off
4. Select “Apply”.
The setting complete screen is displayed. Select “OK”.
3
Page 35

33
Chapter 4 Conguring the System
4-6. Conguring System Settings
Set the date, time and network information for this product.
Procedure
1. Select “System”.
Displays current
settings.
1
2
2. Select a setting.
The setting screen for the selected setting is displayed.
Date and Time
Set the current date and time.
1
2
1
2
3
1. Select “Date/Time Display Setting” or “Clock Setting”.
2. Congure the items.
Item Detail Setting range
Date/Time Display Settings Set the date display format,
time display format, and time
zone (time difference between
GMT
*1
).
Date Format yyyy/mm/dd, Mmm/dd/yyyy, dd/
Mmm/yyyy, mm/dd/yyyy, dd/
mm/yyyy
Time Format 24h/12h
Time Zone GMT-12:00 to GMT+14:00
Clock Setting Set the current time. 2010/1/1 0:00 to 2035/12/31 23:59
*1 Greenwich Mean Time
3. Select “Apply”.
The setting complete screen is displayed. Select “OK”.
Note
• If the main power switch is turned off or the power cord is unplugged for one week or longer, the monitor’s
date and time display will become inaccurate. In such a case, set the date and time again.
Page 36

34
Chapter 4 Conguring the System
Summer Time (DST)
Apply or cancel the summer time setting (DST).
1
2
1. Congure the items.
Item Detail Setting range
Summer Time (DST) Applies or cancels the summer time setting.
Set to “On” to apply to summer time immediately.
Set to “Off” to not apply to summer time.
Set to “Auto” to apply to summer time automatically
during the period designated by the start/end dates
and times.
On/Off/Auto
2. Select “Apply”.
The setting complete screen is displayed. Select “OK”.
Page 37

35
Chapter 4 Conguring the System
Network
Set network information.
2
3
1
1
1
2
2
1. Select “Network Settings”, “DNS Settings” or “NTP Settings”.
2. Congure the items.
Item Detail Setting range
Network Settings Select the IP address setting method. IP Setting
Method
DHCP/Manual
Setting
If you selected “Manual Setting”, set the IP
address, subnet mask and default gateway.
IP Address,
Subnet Mask,
Gateway
*1
0.0.0.0 to
255.255.255.255
DNS Settings (When “IP Address” of “Network Settings” is set
to “Manual”.)
Set the DNS.
DNS Auto/Manual
If you selected “Manual”, set the primary server
address and the secondary server address.
Primary
Server
Address,
Secondary
Server
Address
0.0.0.0 to
255.255.255.255
NTP Settings Set whether or not to use an NTP server. NTP On/Off
If you selected “On”, set the NTP server
address.
Server
Address
Alphanumeric
characters and
symbols
*1 If your network environment does not include a gateway, you do not need to set the “Gateway” address.
Leave the address unchanged at “0.0.0.0.”
3. Select “Apply”.
The setting complete screen is displayed. Select “OK”.
Page 38

36
Chapter 4 Conguring the System
Other
1
2
1. Congure the items.
Item Detail Setting range
Language Set the display language of the menu and the setting
screen.
日本語
/English/Deutsch
Quick Start Set the status of the system when turned off.
When set to “On”, part of the system remains running.
When set to “Off”, the system is shut down completely.
By setting to “On”, the startup time for this product can be
reduced (approx. 10 seconds). However, do not turn off
the main power of the monitor when Quick Start is set to
“On” because part of the system remains running.
On/Off
Key Lock Locks operations by the buttons on the front of the
monitor.
On/Off
Logo Set whether to display/hide the EIZO logo when the power
is turned on
*1
.
On/Off
Power Indicator Set whether to turn of or off the power indicator (blue)
while the monitor is on.
On/Off
*1 The rotating bar indicating that the system is starting up cannot be hidden.
2. Select “Apply”.
The setting complete screen is displayed. Select “OK”.
Initialization
Initialize the system.
1
1. Select “Execute” for “Initialization”.
All settings are returned to default except for system logs, operation logs, the current time, time zone and
summer time settings.
Restart
Restart the system.
1. Select “Execute” at “Restart”.
Page 39

37
Chapter 4 Conguring the System
Settings Data Migration
You can save the settings data to a USB storage device and load the data.
Load Settings Data
4
3
2
5
1. Connect a USB storage device to the USB downstream port of the monitor.
2. Select the settings data le.
3. Enter the password.
The password is blank by default. Set the password as necessary.
4. Select “Execute”.
The settings data are loaded.
5. Select “Execute” for “Remove USB Storage”.
When the Removing Complete screen is displayed, select “OK”.
6. Remove the USB storage device.
Attention
• The settings data include the IP address of the monitor. Change the IP address of the monitor if loading
settings data from another monitor.
Save Settings Data
4
3
2
1. Connect a USB storage device to the USB downstream port of the monitor.
2. Enter the password.
The password is blank by default. Set the password as necessary.
3. Select “Execute”.
The settings data are saved.
4. Select “Execute” for “Remove USB Storage”.
When the Removing Complete screen is displayed, select “OK”.
5. Remove the USB storage device.
Attention
• Some of the settings cannot be saved.
• If you forget the password that you specied when saving the data, you will no longer be able to load the settings.
Note
• Saved le name: Backupyyyymmdd.duraconf (yyyymmdd is the save date)
Page 40

38
Chapter 4 Conguring the System
Software Update
You can use the latest update le to update the software.
3
4
1. Download the update le from the EIZO website (http://www.eizoglobal.com), and save it to a USB
storage device.
2. Connect a USB storage device to the USB downstream port of the monitor.
The File Selection screen is displayed.
3. Select the update le.
4. Select “Execute”.
5. The message saying “You must restart the system to update the software. Remove the USB
storage and restart.” appears.
Remove the USB storage device.
6. Select “Restart” to restart the system.
The software is updated.
Attention
• Do not turn off the power while the software is being updated.
• You cannot operate the remote control and
and buttons on the front of the monitor while the
software is being updated.
• The following USB storage devices can be used with this product.
- USB 2.0 standard ash drives
- Supported format: FAT32
• Do not connect multiple USB storage devices simultaneously.
Page 41

39
Chapter 4 Conguring the System
Troubleshooting
Use this function when this product does not operate normally, such as when a connection cannot be
established with a network camera or a communication error occurs. The network status can be
checked using communication commands and past error contents can be checked by displaying the
system log. In addition, system log data can be saved to a USB storage device.
●
Checking network connection status
1
2
3
Displays the
connection check
results.
1. Select “Connection Conrmation”.
2. Select the network camera to check the network connection of for “Camera Name”.
3. Select “Run” for “ping” or “traceroute”.
Results are displayed in the area on the right side of the screen.
●
Displaying the system log
Note
• The following data are recorded on the log:
- PHY communication errors
- Network communication errors
- Fan failures
• Logs older than two months are automatically deleted at 04:00:00 AM on the rst day of every month.
1
2
3
Displays the log.
1. Select “System Log”.
2. Select the date (year/month/day) to display the log data of.
3. Select “Run” for “Display”.
The log data is displayed in the area on the right side of the screen.
Page 42

40
Chapter 4 Conguring the System
●
Saving system log data
1. Connect a USB storage device to the USB downstream port on the back of the monitor.
USB downstream port
2
3
4
Displays the data
storage status.
5
2. Select “System Log”.
3. Select the date (year/month/day) of the log data to display.
4. Select “Run” for “Save to USB Storage”.
Data saving starts and a “Saving” message is displayed in the display area on the right side of the screen.
When the saving complete screen is displayed, select “OK”.
5. Select “Run” for “Remove USB Storage”.
When the removing complete screen is displayed, select “OK”.
6. Remove the USB storage device.
Attention
• The following USB storage devices can be used with this product.
- USB 2.0 standard ash drives
- Supported format: FAT32
• Do not connect multiple USB storage devices simultaneously.
Page 43

41
Chapter 4 Conguring the System
4-7. Setting User Information
Register, change or delete information (username, user level and password) on users that access this
product.
Attention
• User information can be registered for up to 10 users. User information for a new user cannot be registered when
there are already 10 users registered.
• Duplicate usernames cannot be registered.
• At least one user with a user level of ADMIN must be registered.
Note
• There are three user levels: LIVE, CAMERA CONTROL and ADMIN. The operable range of this product differs
by each level.
(√: Operable, -: Inoperable)
Operation
Level
Menu
display
Layout
change
over
Page
change
over
Smart
Functions
on/of f
Login
operation
Camera
control
System
settings
LIVE √ √ √ √ √ - CAMERA CONTROL √ √ √ √ √ √ ADMIN √ √ √ √ √ √ √
• The following user information is set by default:
- Username: “admin”
- Password: “admin”
- User Level: “ADMIN”
• User information settings can be returned to default settings by the following procedure. Use this feature, for
example, when you have forgotten the registered user information.
1. Press
on the remote control to turn off the monitor.
2. Press the buttons on the remote control in the following order (press the next button within ve seconds).
→ → → → → →
When the reset conrmation screen is displayed, select “Execute”.
User information is cleared and the settings are returned to the default settings.
●
To register new user information
Procedure
1. Select “User”.
1
2
4
3
2. Select “New User Registration”.
3. Set user information.
4. Select “Register”.
The setting complete screen is displayed. Select “OK”.
Page 44

42
Chapter 4 Conguring the System
●
To change user information
Procedure
1. Select “User”.
1
2
4
3
2. Select “Change/Delete User Information”.
3. Set user information.
4. Select “Change”.
The setting complete screen is displayed. Select “OK”.
●
To delete user information
Procedure
1. Select “User”.
1
2
4
3
2. Select “Change/Delete User Information”.
3. Select the user to delete at “Username”.
4. Select “Delete”.
The setting complete screen is displayed. Select “OK”.
Page 45

43
Chapter 4 Conguring the System
4-8. Displaying Operation Logs
Operations of this product are recorded on logs. Past operation results can be checked by displaying the
log. Also, log data can be saved to a USB storage device.
Note
• The following data are recorded on the log:
- Login information: The names of users who logged in to the system
- Camera operation results: Name of operated camera, operation details, operation results
- Date, time and details of changes conrmed by selecting “Apply” on setting screens
• Logs older than two months are automatically deleted at 04:00:00 AM on the rst day of every month.
●
To display log data
Procedure
1. Select “Log Display”.
1
2
3
Displays the log.
2. Select the date (year/month/day) to display the log data of.
3. Select “Run” for “Display”.
The log data is displayed in the area on the right side of the screen.
Page 46

44
Chapter 4 Conguring the System
●
To save log data
Procedure
1. Connect a USB storage device to the USB downstream port on the back of the monitor.
USB downstream port
2. Select “Log Display”.
2
3
4
Displays the data
storage status.
5
3. Select the date (year/month/day) of the data to save.
4. Select “Run” for “Save to USB Storage”.
Data saving starts and a “Saving” message is displayed in the display area on the right side of the screen.
When the saving complete screen is displayed, select “OK”.
5. Select “Run” for “Remove USB Storage”.
When the removing complete screen is displayed, select “OK”.
6. Remove the USB storage device.
Attention
• The following USB storage devices can be used with this product. (This does not guarantee operation of the
USB storage devices given below.)
- USB 2.0 standard ash drives
- Supported format: FAT32
• Do not connect multiple USB storage devices simultaneously.
Page 47

45
Chapter 5 Troubleshooting
Chapter 5 Troubleshooting
If a problem still remains after applying the suggested remedies, contact your local EIZO representative.
5-1. No picture
Problem Possible cause and remedy
1. No picture
• Power indicator does not light.
• Check whether the power cord is connected properly.
• Turn the main power switch on.
• Press
on the front of the monitor or on the
remote control.
• Turn off the main power, and then turn it on again a few
minutes later.
• Power indicator is lighting blue. • Adjust the screen brightness. (see “3-6. Adjusting Screen
Brightness” (page 20)).
• Power indicator is lighting blue. (for HDMI
input)
• Check whether the HDMI cable is connected properly.
• Check whether the connected device is turned on.
• Pull out the HDMI cable and connect it again.
5-2. Imaging problems
Problem Possible cause and remedy
1. The screen is too bright or too dark. • Adjust the screen brightness. (see “3-6. Adjusting Screen
Brightness” (page 20)). (The LCD monitor backlight
has a limited life span. When the screen becomes dark or
begins to icker, contact your local EIZO representative.)
2. Afterimages appear. • Afterimages are particular to LCD monitors. Avoid
displaying the same image for a long time.
• Use the screen saver or power save function to avoid
displaying the same image for extended periods of time.
3. Green/red/blue/white dots or defective
dots remain on the screen.
• This is due to LCD panel characteristics and is not a
failure.
4. Interference patterns or pressure marks
remain on the screen.
• Leave the monitor with a white or black screen. The
symptom may disappear.
5. The displayed images are not smooth
(when camera images are being displayed).
• Reduce the resolution and/or bit rate set for the network
camera (see “Video Settings” (page 28)).
• Check whether the used hubs and network cables are
appropriate for handling the amount of information
transmitted.
6. The camera images are not displayed
properly for about one or two minutes
after the monitor power is turned on. (when
camera images are being displayed)
• When the main power is turned off and immediately back
on, images may not be displayed properly for the rst few
minutes. However, the display will normalize after a few
minutes.
7. The time of the network camera and the
time of the monitor do not match. (when
camera images are being displayed)
• Synchronize the time of the camera and the monitor
through the setting screen (see “Clock Settings” (page
27)).
8. Images are displayed upside down. (when
camera images are being displayed)
• Turn the network camera upside down through the setting
screen (see “Other” (page 30)).
9. When the orientation of the network
camera is changed to the horizontal
direction (pan motion), the camera moves
in the opposite direction.
• Turn the network camera upside down through the setting
screen (see “Other” (page 30)).
Page 48

46
Chapter 5 Troubleshooting
Problem Possible cause and remedy
10. The settings set on the setting screen are
not reected on the camera images.
• Check whether the setting details are within the setting
range of the network camera.
11. An error message “E**-**” is displayed at
the camera image display area.
• When “E00-00” is displayed:
- Check whether a network cable is connected properly.
- Check whether the network camera is turned on.
• When “E00-01” is displayed:
- A number of devices exceeding the allowable number of
devices for simultaneous connection may be connected
to the network camera. Disconnect other network
devices accessing the camera or reduce the resolution
of the camera (see “Video Settings” (page 28)).
- The network camera may not be transmitting H.264
images. Check the settings of the camera.
• When “E00-02” is displayed:
- Network bandwidth may be overwhelmed or the display
capability of this product may have been exceeded.
Reduce the resolution and/or bit rate set for the network
camera (see “Video Settings” (page 28)).
• When a system error (E00-03) is displayed:
- Restart the system.
12. A “** Camera Control Error” message is
displayed at the message display area.
• The network camera may not be equipped with the
function operated. Check the specications of the camera.
13. The screen is whitish or blackish (for HDMI
input).
• Change the “Color Space” setting (see “Specifying color
space” (page 50)).
5-3. Setting Problems
Problem Possible cause and remedy
1. Network camera is not detected automatically.
• In some cases, automatic discovery and camera IP
address setting become inoperable when 20 or more
minutes have passed since the network camera was
started up. Restart the camera or register manually (see
“To manually register network cameras” (page 25)).
• Network cameras installed in subnets other than the
monitor subnet cannot be discovered automatically.
Register the camera manually.
• Auto discovery and camera operation may fail when the
date and time of the network camera and monitor are not
aligned. Use the software provided with the camera to
adjust the date and time.
• If using a network camera that is compatible with the
“ONVIF” protocol, auto discovery cannot be performed if
the ONVIF function is disabled on the camera. Check the
settings of the camera.
2. An IP address of an automatically
discovered network camera cannot be
changed.
• In some cases, automatic discovery and camera IP
address setting become inoperable when 20 or more
minutes have passed since the network camera was
started up. Restart the camera or register manually (see
“To manually register network cameras” (page 25)).
• If using anything other than a Panasonic network camera,
network settings cannot be changed from this monitor.
3. Only one camera is recognized when using
a video encoder that supports multiple
channels.
• Manually register the number of channels that will be
used. (see “To manually register network cameras” (page
25)).
Page 49

47
Chapter 5 Troubleshooting
Problem Possible cause and remedy
4. A communication error message is
displayed when “Apply” is selected for
network camera manual registration.
• There may be a problem with network camera
communication. Check the network connection status and
camera registration details.
5. Network camera does not respond to pan/
tilt/zoom operations.
• The network camera may not support pan/tilt/zoom
functions. Check the specications of the camera.
6. Cannot register a new user. • Duplicate usernames cannot be registered.
• Only up to 10 users can be registered. Check whether 10
users have already been registered (see “4-7. Setting User
Information” (page 41)).
7. Cannot delete a user. • There must be at least one user with a level of ADMIN.
A user cannot be deleted if the user is the only one
registered with a level of ADMIN. Check the registered
user information (see “4-7. Setting User Information” (page
41)).
8. Forgot username and password. • The information of usernames and passwords can be
returned to default settings by pressing a combination
of buttons on the remote control (see “4-7. Setting User
Information” (page 41)).
9. Cannot communicate with the camera. • Check the settings of the network camera and the monitor
system. For details, contact your system administrator.
10. Cannot save log data to a USB storage
device.
• Check the data format of the USB storage device. This
product supports only FAT32 format.
11. The date and time are not displayed
correctly.
• If the main power switch is turned off or the power cord
is unplugged for one week or longer, the monitor’s date
and time display will become inaccurate. In such a case,
set the date and time again (see “4-6. Conguring System
Settings” (page 33)).
5-4. Other problems
Problem Possible cause and remedy
1. Operation buttons on the front of the
monitor do not work.
• Check whether the operation lock function is active (see
“Other” (page 36)).
2. Buttons on the remote control do not work. • Check whether the remote control is pointed to the signal
receiving part.
• Check for obstacles between the remote control and the
signal receiving part.
• Batteries are dead.
• Check whether batteries are inser ted correctly.
3. The mouse does not work. • Check whether the USB cable is connected properly.
• Pull out the USB cable and connect it again.
• Check whether the mouse is directly connected to the
monitor.
4. Remote control or mouse responses lag. • Reduce the resolution and/or bit rate set for the network
camera (see “Video Settings” (page 28)).
5. Network camera cannot be operated. • The system is not logged in by a user with a camera
operable level (see “4-7. Setting User Information” (page
41)).
• Network camera is inoperable during sequential display
(see “Changing pages automatically (Sequential display)”
(page 17)).
6. USB ash drive is not recognized. • Check whether the USB ash drive is inserted properly.
• Take out the USB ash drive and insert it again.
• Check whether the USB ash drive is directly connected
to the monitor.
Page 50

48
Chapter 6 Reference
Chapter 6 Reference
6-1. How to Attach the Optional Arm
An optional arm (or an optional stand) can be attached by removing the stand section. Please refer to our
web site for the corresponding optional arm (or optional stand). http://www.eizoglobal.com
Attention
• When attaching an arm or stand, follow the instructions of their user’s manual.
• When using another manufacturer’s arm or stand, conrm the following in advance and select one conforming to
the VESA standard. Use the screws securing the unit and the stand.
- Clearance between the screw holes: 100 mm × 100 mm
- Thickness of plate: 2.6 mm
- Strong enough to support weight of the monitor unit (except the stand) and attachments such as cables.
• When using an arm or stand, attach it to meet the following tilt angles of the monitor.
- Up 45°, down 45°
• Do not turn the monitor in the vertical direction.
• Connect the cables after attaching an arm or stand.
• The monitor and arm or stand are heavy. Dropping them may result in injury or equipment damage.
Procedure
1.
Lay the LCD monitor on a soft cloth spread over on a stable surface with the
panel surface facing down.
2.
Remove the stand.
Prepare a screwdriver. Loosen the screws (four) securing the unit and the stand with the screwdriver.
3.
Attach the arm or stand to the monitor.
Secure the monitor to the arm or stand using the screws specied in the user’s manual of the arm or
stand.
Page 51

49
Chapter 6 Reference
6-2. Connecting HDMI Devices
Connect an HDMI device to this product and switch over the display to the HDMI device.
Connection examples
HDMI cable
(supplied HH20 0HS)
HDMI device
(Network video recorder etc.)
●
Compatible Resolutions/Formats
The monitor supports the following resolutions and signal format.
PC Signal
Resolution Applicable Signals
Vertical Scan
Frequency
Dot Clock
640 × 480 VGA, CEA-861 60 Hz
148.5 MHz
(M ax .)
720 × 400 VGA TEXT 70 Hz
720 × 480 (4 : 3) CEA-861 60 Hz
720 × 480 (16 : 9) CEA-861 60 Hz
720 × 576 (4 : 3) CEA-861 50 Hz
720 × 576 (16 : 9) CEA-861 50 Hz
800 × 600 VESA 60 Hz
1024 × 768 VESA 60 Hz
1280 × 720 CEA-861 60 Hz
1280 × 960 VESA 60 Hz
1280 × 1024 VESA 60 Hz
1680 × 1050 VESA CVT, VESA CVT RB 60 Hz
1920 × 1080
*1
CEA-861 60 Hz
*1 Recommended resolution
Video Signal
- 480p / 720p / 1080p: 60 Hz
- 576p / 720p / 1080p: 50Hz
Page 52

50
Chapter 6 Reference
●
To switch among input signals
Press on the remote control to change over the input signal.
When the signal is switched, the active input port name appears at the top right corner of the screen.
Note
• on the monitor also can change the input.
●
Adjusting screen brightness
Adjust the brightness of the monitor screen by changing the brightness of the backlight (light source
at the back of the LCD panel).
Adjustable range
0 to 100
Procedure
1. Press
or on the remote control.
The brightness adjustment menu is displayed.
2. Set the brightness with or .
The menu disappears automatically after approximately ve seconds.
●
Specifying color space
The color space of the input signal can be specied. Change the settings when colors are not
displayed accurately.
Attention
• “Auto” cannot be selected during PC signal input.
Adjustable range
Auto, YUV 4:2:2, YUV 4:4:4, RGB Full Range, RGB Limited Range
Procedure
1. Press
on the remote control.
The Adjustment menu is displayed.
2. Select “Color Space” with or and press .
3. Use
or for adjustment.
4. Press .
5. Press
to exit the Adjustment menu.
Page 53

51
Chapter 6 Reference
6-3. Specications
LCD Panel Type IPS
Backlight LED
Size 58 cm (23.0 inch) (58.4 cm diagonal)
Native Resolution 1920 dots × 1080 lines
Display Size (H x V) 509.1 mm × 286.4 mm
Pixel Pitch 0.2652 mm
Display Colors 8-bit colors : 16.77 million colors
Viewing Angles
(H / V, typical)
178˚ / 178˚
Contrast ratio
(typical)
1000 : 1
Response Time
(typical)
Approx. 16 ms (Black - white - black)
Approx. 8 ms (gray-to-gray)
LAN Standard IEEE802.3ab (1000BASE-T), IEEE802.3u (100BASE-TX)
Communication
speed
1000 Mbps, 100 Mbps
Protocols TCP/IP
IP version 4
Video signal
(net work)
Terminal RJ-45
Video compression
format
H.264, MJPEG
Max. number
of connectable
network cameras
16 units
Video signal
(HDMI)
Input Terminals HDMI
Digital signal
transmission system
TMDS (Single Link)
Digital Scanning
Frequency (H / V)
31 kHz to 68 kHz / 49 Hz to 61 Hz
(VGA TEXT : 69 Hz to 71 Hz)
Applicable video
signal formats
480 p / 720 p / 1080 p : 60 Hz
576 p / 720 p / 1080 p : 50 Hz
USB Port Downstream port × 2
Standard USB Specication Revision 2.0
Communication
Speed
480 Mbps (high), 12 Mbps (full), 1.5 Mbps (low)
Supply current Max. 500mA / 1 port
Power supply Input 100-120 VAC ± 10%, 50 / 60 Hz 0.65 A
200-240 VAC ± 10%, 50 / 60 Hz 0.4 A
Maximum Power
Consumption
61 W or less
Standby Mode 33 W or less (With “Quick Start” set to “On”)
3.0 W or less (With “Quick Start” set to “Off”)
Physical
Specications
Dimensions 563.5 mm × 411.5 mm × 157 mm (W × H × D) (Tilt : 0˚)
563.5 mm × 425.0 mm × 200.0 mm (W × H × D) (Tilt : 30˚)
Dimensions
(Without Stand)
563.5 mm × 325 mm × 63 mm (W × H × D)
Net Weight Approx. 7.9 kg
Net Weight
(Without Stand)
Approx. 5.5 kg
Tilt Up 30˚, down 0˚
Page 54

52
Chapter 6 Reference
Operating
Environmental
Specications
Temperature 0°C to 35°C (32°F to 95°F)
Humidity 20 % to 80% R.H. (no condensation)
Air Pressure 540 hPa to 1,060 hPa
Transportation/
Storage
Environmental
Specications
Temperature -20°C to 60°C (-4°F to 140°F)
Humidity 10% to 90% R.H. (no condensation)
Air Pressure 200 hPa to 1,060 hPa
●
Display capability
The table below shows the display capability of this product
H.264 (when the “Bit rate” (page 28) is set at “4096kbps”).
At 1-screen display 1920 × 1080 / 30 fps
At 4-screen display 1920 × 1080 / 20 fps
At 8-screen display 1280 × 720 / 20 fps
At 9-screen display 1280 × 720 / 20 fps
At 16-screen display 640 × 480 / 30 fps
MJPEG
640 x 480 / 30 fps
Attention
• The above values are provided for reference purposes. Images are not displayed properly when display
capability is exceeded because of network camera settings, network installation environment or other
reasons. When images are not displayed properly, reduce the network camera resolution and bit rate. Set
network camera settings in accordance with the camera’s manual.
●
Outside Dimensions
Unit: mm
°
220
453
63
289 17.5
325
411.5
249
86.5
15
12
157
200
425
131.5
30
14
100
(VESA)
100
(VESA)
113
25
563.5
512
Page 55

53
Chapter 6 Reference
6-4. List of setting items
Note
• The setting items and values differ according to the camera.
Setting item Setting Default setting
Easy
Setup
Easy Setup Date and Time Date/Time Display
Settings
Date Format yyyy/mm/dd
Mmm/dd/yyyy
dd/Mmm/yyyy
mm/dd/yyyy
dd/mm/yyyy
yyyy/mm/dd
Time For mat 24h
12h
24h
Time Zone GMT-12:00
GMT-11:00
GMT-10:00
GMT-09:30
GMT-09:00
GMT-08:00
GMT-07:00
GMT-06:00
GMT-05:00
GMT-04:30
GMT-04:00
GMT-03:30
GMT-03:00
GMT-02:00
GMT-01:00
GMT
GMT+01: 00
GMT+02:0 0
GMT+03:0 0
GMT+03:30
GMT+04:0 0
GMT+04:30
GMT+05:0 0
GMT+05:30
GMT+05:45
GMT+06 :0 0
GMT+06 :3 0
GMT+07: 00
GMT+08:0 0
GMT+08:45
GMT+09 :0 0
GMT+09 :3 0
GMT+10:00
GMT+11:00
GMT+11:30
GMT+12:00
GMT+12:45
GMT+13:00
GMT+14:00
(Depends on sales
region)
Date and Time Settings Ye ar 2010 to 2035
Month 1 to 12
Day 1 to 31
1 to 30
1 to 28
1 to 29
Hour AM/PM
(24h) 0 to 23
(12h) 1 to 12
Minute 0 to 59
Network Settings IP Setting Method DHCP
Manual Setting
Manual Setting
IP Address 0.0.0.0 to
255.255.255.255
19 2.168 .0.150
Subnet Mask 0.0.0.0 to
255.255.255.255
255.255.255.0
Gateway 0.0.0.0 to
255.255.255.255
19 2.168 .0.1
Camera Auto
Discovery
Camera Discovery
Display Position Settings
Page 56

54
Chapter 6 Reference
Setting item Setting Default setting
Camera Auto
Discovery
Camera Discovery
Manual
Registration
Camera Name Alphanumeric
characters (0 to 16
characters)
(None)
IP Address 0.0.0.0 to
255.255.255.255
(None)
HTTP Por t 1 to 65535 ( Non e)
Protocol
Panasonic/ONVIF
(None)
Channel 1 to 4 (None)
Stream 1 to 4 (None)
Username Alphanumeric
characters and symbols
(0 to 32 characters)
admin
Password Alphanumeric
characters and symbols
(0 to 32 characters)
12345
Function
Settings
Camera Info.
Display/Clock
Settings
Camera Information Display On/Off (Camera settings)
Time Display 12h/24h/Off (Camera settings)
Display Position Upper Left/Upper
Right/Lower Left/Lower
Right
(Camera settings)
Synchronize with Monitor Time
Video Settings
(When using
a Panasonic
network camera)
Aspect Ratio Camera imaging mode (Camera settings)
Resolution Camera settings (Camera settings)
Refresh Interval 0.2s/0.33s/0.5s/1s/2s/
3s/4s/5s
(Camera settings)
Transmission Priority Constant Bit Rate/
Frame Rate/Best Effort
(Camera settings)
Frame Rate 1fps/3fps/5fps/7.5fps/
10fps/12fps/15fps/
20fps/30fps
(Camera settings)
Bit Rate (Max.) 64kbps/128kbps/
256kbps/384kbps/
512kbps/768kbps/
1024kbps/1536kbps/
2048kbps/3072kbps/
4096kbps/8192kbps/
(Camera settings)
Bit Rate (Min.) 64kbps/128kbps/
256kbps/384kbps/
512kbps/768kbps/
1024kbps/1536kbps/
2048kbps/3072kbps/
4096kbps/8192kbps/
(Camera settings)
Image Quality Low (prioritize motion)/
Normal/Fine (prioritize
image quality)
(Camera settings)
Video Settings
(ONVIF Prole
S-compatible
network cameras)
Media Prole EIZO_Prole/camera
prole
(Camera settings)
Encoder Camera settings (Camera settings)
Compression Format H.264/MJPEG (Camera settings)
Resolution Camera settings (Camera settings)
Video Quality Camera settings (Camera settings)
Frame Rate 1 to 30 (Camera settings)
Encoding Interval Camera settings (Camera settings)
Bit Rate (Max.) 0 to 8192 (Camera settings)
GOV Length Camera settings (Camera settings)
H.264 Prole Baseline/Main/
Extended/High
(Camera settings)
Preset Preset No. 1 to 256 (None)
Brightness
Focus
Zoom
Pan/Tilt
Other Pan/Tilt-ip On/Off (Camera settings)
Upside-down On/Off (Camera settings)
Indicator On/Off (Camera settings)
Page 57

55
Chapter 6 Reference
Setting item Setting Default setting
Display Position Position 1 to 16 (Current)
Camera Name Display On/Off Off
Sequence Interval 5s to 60s 5s
Aspect Ratio Mode Full
Aspect
Full
Smart
Functions
Mode DAY/NIGHT/Off D AY
Smart Resolution 1 to 5/Off 3
Smart Insight 1 to 5/Off 3
Noise Reduction On/Off On
System System Date and Time Date/Time Display
Settings
Date Format yyyy/mm/dd
Mmm/dd/yyyy
dd/Mmm/yyyy
mm/dd/yyyy
dd/mm/yyyy
yyyy/mm/dd
Time For mat 24h
12h
24h
Time Zone GMT-12:00
GMT-11:00
GMT-10:00
GMT-09:30
GMT-09:00
GMT-08:00
GMT-07:00
GMT-06:00
GMT-05:00
GMT-04:30
GMT-04:00
GMT-03:30
GMT-03:00
GMT-02:00
GMT-01:00
GMT
GMT+01: 00
GMT+02:0 0
GMT+03:0 0
GMT+03:30
GMT+04:0 0
GMT+04:30
GMT+05:0 0
GMT+05:30
GMT+05:45
GMT+06 :0 0
GMT+06 :3 0
GMT+07: 00
GMT+08:0 0
GMT+08:45
GMT+09 :0 0
GMT+09 :3 0
GMT+10:00
GMT+11:00
GMT+11:30
GMT+12:00
GMT+12:45
GMT+13:00
GMT+14:00
(Depends on sales
region)
Clock Setting Ye ar 2010 to 2035
Month 1 to 12
Day 1 to 31
1 to 30
1 to 28
1 to 29
Hour AM/PM
(24h) 0 to 23
(12h) 1 to 12
Minute 0 to 59
Summer Time
(DST)
Summer Time (DST) On/Off/Auto Off
Start Month, Week, Day,
Hour
(None)
End Month, Week, Day,
Hour
(None)
Page 58

56
Chapter 6 Reference
Setting item Setting Default setting
System System Network Network Settings IP Setting
Method
DHCP/Manual Setting Manual Setting
IP Address 0.0.0.0 to
255.255.255.255
19 2.168 .0.150
Subnet Mask 0.0.0.0 to
255.255.255.255
255.255.255.0
Gateway 0.0.0.0 to
255.255.255.255
19 2.168 .0.1
DNS Settings DNS Auto/Manual Manual
Primary Server
Address
0.0.0.0 to
255.255.255.255
(None)
Secondary
Server Address
0.0.0.0 to
255.255.255.255
(None)
NTP Settings NTP On/Off Off
Server Address Alphanumeric
characters and
symbols
(None)
Other Language
日本語
/English/
Deutsch
(Depends on sales
region)
Quick Start On/Off Off
Key Lock On/Off Off
Logo On/Off On
Power Indicator On/Off On
Initialization
Settings Data
Migration
Load Settings Data
Save Settings Data
Software Update
Restart
Troubleshooting Connection
Conrmation
Camera Name
ping
traceroute
System Log Date (GMT)
Display
Save to USB Storage
Remove USB Storage
User
*1
New User
Registration
Username Alphanumeric
characters
(1 to 16 characters)
(None)
User Level ADMIN/CAMERA
CONTROL/LIVE
(None)
Password Alphanumeric
characters
(1 to 16 characters)
(None)
Conrm Password Alphanumeric
characters
(1 to 16 characters)
(None)
Change/Delete
User Information
Username (Registered user)
New Username Alphanumeric
characters
(1 to 16 characters)
(None)
New User Level ADMIN/CAMERA
CONTROL/LIVE
(None)
New Password Alphanumeric
characters
(0 to 16 characters)
(None)
Conrm New Password Alphanumeric
characters
(0 to 16 characters)
(None)
Log Display Date (GMT)
Display
Save to USB Storage
Remove USB Storage
*1 The following user information is set as the default setting:
Username: “admin”, Password: “admin”, User Level: “ADMIN”
Page 59

57
Chapter 7 Glossary
Chapter 7 Glossary
Bit Rate
Displays the volume of data owing across the network. Generally, the volume is expressed with
the unit “bps” (bits per second) which indicates the number of data bits transmitted per second.
DNS (Domain Name Server)
A server used to convert addresses such as “www.eizoglobal.com” into IP addresses.
Firewall
A system to prevent invasion from external networks.
H.264
A format for compressing images. This method is widely used for image remote transmission and
recording. The portion with movement is predicted based on the data of the frame immediately
before and after, and only the differential data between frames is used. This enables efcient
reduction of data, and is therefore widely used.
IP Address
An address that is allocated to a network device. Each network device is given an address. Unlike
MAC addresses, IP addresses change according to the installation environment.
MAC (Media Access Control) Address
A Mac address is a 48bit identication number assigned to a network device. It is assigned
statically, not duplicated, and uses a unique number for each network device.
MJPEG
This is a method for compressing images. It is used for remote transmission and recording of
images. Due to compression and decompression being performed for each frame, subsequent
frames are not impacted even when data are missing from some frames. Therefore, this method is
sometimes used in environments with poor signal quality. However, a downside is that the data
volume is larger than that for the H.264 format.
NTP (Network Time Protocol)
A protocol for synchronizing the time and the network server.
ONVIF (Open Network Video Interface Forum)
This is a standard that allows interconnection between network cameras and network recorder
equipment from different manufacturers.
ping
A command used to check the connection status with other network devices. Generally, it is judged
that there is a problem in the network route when there is no response to ping requests, and the
ping command is used for nding out the cause of the problem.
Page 60

58
Chapter 7 Glossary
PoE (Power over Ethernet)
A technology to supply electricity using an Ethernet cable.
Port
A communication contact number for network communication. When multiple services are provided
by one network device, allotting an individual port number for each service allows the device to
provide multiple services simultaneously.
Resolution
The LCD panel consists of numerous pixels of specied size, which are illuminated to form images.
This monitor consists of 1920 horizontal pixels and 1080 vertical pixels. At a resolution of 1920 ×
1080, all pixels are illuminated as a full screen (1:1).
Subnet Musk
A subnet mask is a numeric value where the network address part identifying the subnet can be
specied in an IP address.
(Subnet: a divided network when controlling a large network by dividing into multiple networks)
TCP/IP (Transmission Control Protocol/Internet Protocol)
The TCP/IP is one of the network protocols for network communication. Using the TCP/IP protocols
allows communication in various OSes.
traceroute
A command used to check the routes used to connect with other network devices.
Page 61

59
Appendix
Appendix
Trademark
SD Logo is a trademark of SD-3C, LLC.
The terms HDMI and HDMI High-Denition Multimedia Interface, and the HDMI Logo are trademarks or
registered trademarks of HDMI Licensing, LLC in the United States and other countries.
VESA is a registered trademark of Video Electronics Standards Association.
Acrobat, Adobe, Adobe AIR, and Photoshop are registered trademarks of Adobe Systems Incorporated
in the United States and other countries.
AMD Athlon and AMD Opteron are trademarks of Advanced Micro Devices, Inc.
Apple, ColorSync, eMac, iBook, iMac, iPad, Mac, MacBook, Macintosh, Mac OS, PowerBook, and
QuickTime are registered trademarks of Apple Inc.
ColorMunki, Eye-One, and X-Rite are registered trademarks or trademarks of X-Rite Incorporated in the
United States and/or other countries.
ColorVision and ColorVision Spyder2 are registered trademarks of DataColor Holding AG in the United
States.
Spyder3 and Spyder4 are trademarks of DataColor Holding AG.
ENERGY STAR is a registered trademark of the United States Environmental Protection Agency in the
United States and other countries.
GRACoL and IDEAlliance are registered trademarks of International Digital Enterprise Alliance.
NEC is a registered trademark of NEC Corporation.
PC-9801 and PC-9821 are trademarks of NEC Corporation.
NextWindow is a registered trademark of NextWindow Ltd.
Intel, Intel Core, Pentium and Thunderbolt are trademarks of Intel Corporation in the United States and
other countries.
PowerPC is a registered trademark of International Business Machines Corporation.
PlayStation is a registered trademark of Sony Computer Entertainment Inc.
PSP and PS3 are trademarks of Sony Computer Entertainment Inc.
RealPlayer is a registered trademark of RealNetworks, Inc.
TouchWare is a trademark of 3M Touch Systems, Inc.
Windows, Windows Media, Windows Vista, SQL Server, Xbox 360, and Internet Explorer are registered
trademarks of Microsoft Corporation in the United States and other countries.
YouTube is a registered trademark of Google Inc.
Firefox is a registered trademark of the Mozilla Foundation.
Kensington and MicroSaver are trademarks of ACCO Brands Corporation.
Panasonic is a registered trademark of Panasonic Corporation.
ONVIF is a trademark of ONVIF Inc.
EIZO, the EIZO Logo, ColorEdge, DuraVision, FlexScan, FORIS, RadiCS, RadiForce, RadiNET, Raptor,
and ScreenManager are registered trademarks of EIZO Corporation in Japan and other countries.
ColorNavigator, EcoView NET, EIZO EasyPIX, EIZO ScreenSlicer, i • Sound, Screen Administrator,
UniColor Pro, ColorEdge Tablet Controller, and Re/Vue are trademarks of EIZO Corporation.
All other company and product names are trademarks or registered trademarks of their respective
owners.
Page 62

60
Appendix
License / Copyright
A round gothic bold bit map font designed by Ricoh is used for the characters displayed on this product.
This product includes open source software.
We will provide the source code for corresponding GPL (GNU GENERAL PUBLIC LICENSE) software
via a medium, such as CD-ROM, at a cost to individuals and organizations who make contact via the
following contact information for a minimum period of three years after purchase of products that include
GPL software licensed under the GPL.
We will also provide the source code for corresponding LGPL (GNU LESSER GENERAL PUBLIC
LICENSE) software of products that include LGPL software licensed under the LGPL in the same
manner as stated above.
Contact information
http://www.eizoglobal.com/contact/index.html
*Contact your local EIZO representative.
Except for open source software licensed under GPL, LPGL or other licenses, any transferring, copying,
reverse assembly, reverse compiling or reverse engineering of any software included with this product is
strictly prohibited. Further, exporting of any software included with this product in violation of applicable
export laws is strictly prohibited.
This product is equipped with a built-in SD card slot. However, this SD card slot is for
maintenance use only.
Page 63

中文
English Deutsch
i
FCC Declaration of Conformity
FCC Declaration of Conformity
For U.S.A. , Canada, etc. (rated 100-120 Vac) Only
FCC Declaration of Conformity
We, the Responsible Party
EIZO Inc.
5710 Warland Drive, Cypress, CA 90630
Phone: (562) 431-5011
declare that the product
Trade name: EIZO
Model: DuraVision FDF2304W-IP
is in conformity with Part 15 of the FCC Rules. Operation of this product is subject to the following
two conditions: (1) this device may not cause harmful interference, and (2) this device must accept any
interference received, including interference that may cause undesired operation.
This equipment has been tested and found to comply with the limits for a Class B digital device, pursuant
to Part 15 of the FCC Rules. These limits are designed to provide reasonable protection against
harmful interference in a residential installation. This equipment generates, uses, and can radiate radio
frequency energy and, if not installed and used in accordance with the instructions, may cause harmful
interference to radio communications. However, there is no guarantee that interference will not occur in
a particular installation. If this equipment does cause harmful interference to radio or television reception,
which can be determined by turning the equipment off and on, the user is encouraged to try to correct
the interference by one or more of the following measures.
* Reorient or relocate the receiving antenna.
* Increase the separation between the equipment and receiver.
* Connect the equipment into an outlet on a circuit different from that to which the receiver is connected.
* Consult the dealer or an experienced radio/TV technician for help.
Changes or modi cations not expressly approved by the party responsible for compliance could void the
user’s authority to operate the equipment.
Note
Use the attached speci ed cable below or EIZO signal cable with this monitor so as to keep interference
within the limits of a Class B digital device.
- AC Cord
- Shielded Signal Cable (enclosed)
Canadian Notice
This Class B digital apparatus complies with Canadian ICES-003.
Cet appareil numérique de le classe B est comforme à la norme NMB-003 du Canada.
Page 64

ii
LIMITED WARRANTY / BEGRENZTE GARANTIE /
有限责任保证书
LIMITED WARRANTY /
BEGRENZTE GARANTIE /
有限责任保证书
LIMITED WARRANTY
EIZO Corporation (hereinafter referred to as “EIZO”) and distributors authorized by EIZO (hereinafter referred to as the
“Distributors”) warrant, subject to and in accordance with the terms of this limited warranty (hereinafter referred to as the
“Warranty”), to the original purchaser (hereinafter referred to as the “Original Purchaser”) who purchased the product
speci ed in this document (hereinafter referred to as the “Product”) from EIZO or Distributors, that EIZO and Distributors
shall, at their sole discretion, either repair or replace the Product at no charge if the Original Purchaser becomes aware
within the Warranty Period (de ned below) that the Product malfunctions or is damaged in the course of normal use of
the Product in accordance with the description in the instruction manual attached to the Product (hereinafter referred to
as the “User’s Manual”).
The period of this Warranty is two (2) years from the date of purchase of the Product (hereinafter referred to as the
“Warranty Period”). EIZO and Distributors shall bear no liability or obligation with regard to the Product in relation to the
Original Purchaser or any third parties other than as provided under this Warranty.
EIZO and Distributors will cease to hold or store any parts of the Product upon expiration of seven (7) years after the
production of such parts is discontinued. In repairing the monitor, EIZO and Distributors will use renewal parts which
comply with our QC standards.
The Warranty is valid only in the countries or territories where the Distributors are located. The Warranty does not restrict
any legal rights of the Original Purchaser.
Notwithstanding any other provision of this Warranty, EIZO and Distributors shall have no obligation under this Warranty
whatsoever in any of the cases as set forth below:
(a) Any defect of the Product caused by freight damage, modi cation, alteration, abuse, misuse, accident, incorrect
installation, disaster, faulty maintenance and/or improper repair by third party other than EIZO and Distributors;
(b) Any incompatibility of the Product due to possible technical innovations and/or regulations;
(c) Any deterioration of the sensor;
(d) Any deterioration of display performance caused by the deterioration of expendable parts such as the LCD panel
and/or backlight, etc. (e.g. changes in brightness, changes in brightness uniformity, changes in color, changes in
color uniformity, defects in pixels including burnt pixels, etc.);
(e) Any defect of the Product caused by external equipment;
(f) Any defect of the Product on which the original serial number has been altered or removed;
(g) Any defect of the Product caused by liquid leaking from battery;
(h) Any normal deterioration of the product, particularly that of consumables, accessories, and/or attachments (e.g.
batteries, buttons, rotating parts, remote control, cables, User’s Manual, etc.); and
(i) Any deformation, discoloration, and/or warp of the exterior of the product including that of the surface of the LCD
panel.
To obtain service under the Warranty, the Original Purchaser must deliver the Product, freight prepaid, in its original
package or other adequate package affording an equal degree of protection, assuming the risk of damage and/or loss
in transit, to the local Distributor. The Original Purchaser must present proof of purchase of the Product and the date of
such purchase when requesting services under the Warranty.
The Warranty Period for any replaced and/or repaired product under this Warranty shall expire at the end of the original
Warranty Period.
EIZO OR DISTRIBUTORS ARE NOT RESPONSIBLE FOR ANY DAMAGE TO, OR LOSS OF, DATA OR OTHER
INFORMATION STORED IN ANY MEDIA OR ANY PART OF ANY PRODUCT RETURNED TO EIZO OR DISTRIBUTORS
FOR REPAIR.
EIZO AND DISTRIBUTORS MAKE NO FURTHER WARRANTIES, EXPRESSED OR IMPLIED, WITH RESPECT TO
THE PRODUCT AND ITS QUALITY, PERFORMANCE, MERCHANTABILITY OR FITNESS FOR ANY PARTICULAR
USE. IN NO EVENT SHALL EIZO OR DISTRIBUTORS BE LIABLE FOR ANY INCIDENTAL, INDIRECT, SPECIAL,
CONSEQUENTIAL OR OTHER DAMAGE WHATSOEVER (INCLUDING, WITHOUT LIMITATION, DAMAGES FOR
LOSS OF PROFIT, BUSINESS INTERRUPTION, LOSS OF BUSINESS INFORMATION, OR ANY OTHER PECUNIARY
LOSS) ARISING OUT OF THE USE OR INABILITY TO USE THE PRODUCT OR IN ANY CONNECTION WITH THE
PRODUCT, WHETHER BASED ON CONTRACT, TORT, NEGLIGENCE, STRICT LIABILITY OR OTHERWISE, EVEN
IF EIZO OR DISTRIBUTORS HAVE BEEN ADVISED OF THE POSSIBILITY OF SUCH DAMAGES. THIS EXCLUSION
ALSO INCLUDES ANY LIABILITY WHICH MAY ARISE OUT OF THIRD PARTY CLAIMS AGAINST THE ORIGINAL
PURCHASER. THE ESSENCE OF THIS PROVISION IS TO LIMIT THE POTENTIAL LIABILITY OF EIZO AND
DISTRIBUTORS ARISING OUT OF THIS LIMITED WARRANTY AND/OR SALES.
Page 65

中文
English Deutsch
iii
LIMITED WARRANTY / BEGRENZTE GARANTIE /
有限责任保证书
BEGRENZTE GARANTIE
EIZO Corporation (im Weiteren als „
EIZO
“ bezeichnet) und die Vertragsimporteure von EIZO (im Weiteren als
„
Vertrieb(e)“ bezeichnet) garantieren dem ursprünglichen Käufer (im Weiteren als „Erstkäufer
“ bezeichnet), der das in
diesem Dokument vorgegebene Produkt (im Weiteren als „
Produkt
“ bezeichnet) von EIZO oder einem Vertrieb erworben
hat, gemäß den Bedingungen dieser beschränkten Garantie (im Weiteren als „
Garantie
“ bezeichnet), dass EIZO und
der Vertrieb nach eigenem Ermessen das Produkt entweder kostenlos reparieren oder austauschen, falls der Erstkäufer
innerhalb der Garantiefrist (weiter unten festgelegt) eine Fehlfunktion bzw. Beschädigung des Produkts feststellt,
die während des normalen Gebrauchs des Produkts gemäß den Anweisungen des zum Lieferumfang des Produkts
gehörenden Benutzerhandbuchs (im Weiteren als „
Benutzerhandbuch“ bezeichnet) aufgetreten ist.
Die Dauer der Garantieleistung (im Weiteren als „Garantiefrist" bezeichnet) beträgt zwei (2) Jahre ab dem Kaufdatum
des Produkts. EIZO und die Vertriebe übernehmen über den Rahmen dieser Garantie hinaus hinsichtlich des Produkts
keinerlei Haftung oder Verp ichtung dem Erstkäufer oder Dritten gegenüber.
EIZO und die Vertriebe verp ichten sich, Ersatzteile für das Produkt über einen Zeitraum von sieben (7) Jahren nach
Einstellung der Produktion der Ersatzteile zu lagern bzw. anzubieten. EIZO und seine Vertriebspartner verp ichten sich,
bei einer etwaigen Reparatur des Monitors ausschließlich Produkte gemäß den EIZO-Qualitätssicherungsstandards zu
verwenden.
Diese Garantie gilt nur in Ländern oder Gebieten, in denen sich Vertriebe befinden. Die gesetzlichen
Gewährleistungsrechte des Erstkäufers gegenüber dem Verkäufer werden durch diese Garantie nicht berührt.
EIZO und die Vertriebe besitzen im Rahmen dieser Garantie keinerlei Verp ichtung in den folgenden Fällen:
(a) Produktdefekte, die auf Frachtschäden, Modifikation, Nachgestaltung, Missbrauch, Fehlbedienung, Unfälle,
unsachgemäße Installation, Naturkatastrophen, fehlerhafte Wartung und/oder unsachgemäße Reparatur durch eine
andere Partei als EIZO und die Vertriebe zurückzuführen sind.
(b) Eine Inkompatibilität des Produkts aufgrund von technischen Neuerungen und/oder neuen Bestimmungen, die
nach dem Kauf in Kraft treten.
(c) Jegliche Verschlechterung des Sensors.
(d) Jegliche Verschlechterung der Bildschirmleistung, die durch Verschleißteile wie das LCD-Panel und/oder die
Hintergrundbeleuchtung usw. hervorgerufen werden (z.B. Veränderungen von Helligkeit oder Helligkeitsverteilung,
Veränderungen von Farbe oder Farbverteilung, Pixeldefekte einschließlich von durchgebrannten Pixeln usw.).
(e) Produktdefekte, die durch externe Geräte verursacht werden.
(f) Jeglicher Defekt eines Produkts, dessen ursprüngliche Seriennummer geändert oder entfernt wurde.
(g) Produktdefekte, die durch Austritt von Batterie üssigkeit verursacht werden.
(h) Normale Abnutzung des Produkts, insbesondere von Verbrauchsteilen, Zubehörteilen und/oder Beilagen (z.B.
Batterien, Tasten, drehbare Teile, Fernbedienung, Kabel, Benutzerhandbuch usw.); sowie
(i) Verformungen, Verfärbungen und/oder Verziehungen am Produktäußeren, einschließlich der Ober äche des LCD-
Panels.
Bei Inanspruchnahme der Garantieleistung ist der Erstkäufer verpflichtet, das Produkt auf eigene Kosten und
in der Originalverpackung bzw. einer anderen geeigneten Verpackung, die einen gleichwertigen Schutz gegen
Transportschäden bietet, an den örtlichen Vertrieb zu übersenden, wobei der Erstkäufer das Transportrisiko gegenüber
Schäden und/oder Verlust trägt. Zum Zeitpunkt der Inanspruchnahme der Garantieleistung muss der Erstkäufer einen
Verkaufsbeleg vorweisen, auf dem das Kaufdatum angegeben ist.
Die Garantiefrist für ein im Rahmen dieser Garantie ausgetauschtes und/oder repariertes Produkt erlischt nach Ablauf
der ursprünglichen Garantiefrist.
EIZO ODER DIE EIZO-VERTRAGSIMPORTEURE HAFTEN NICHT FÜR ZERSTÖRTE DATENBESTÄNDE ODER DIE
KOSTEN DER WIEDERBESCHAFFUNG DIESER DATENBESTÄNDE AUF JEGLICHEN DATENTRÄGERN ODER
TEILEN DES PRODUKTS, DIE IM RAHMEN DER GARANTIE BEI EIZO ODER DEN EIZO-VERTRAGSIMPORTEUREN
ZUR REPARATUR EINGEREICHT WURDEN.
EIZO UND DIE EIZO-VERTRAGSIMPORTEURE GEBEN WEDER EXPLIZITE NOCH IMPLIZITE GARANTIEN
IN BEZUG AUF DIESES PRODUKT UND SEINE QUALITÄT, LEISTUNG, VERKÄUFLICHKEIT ODER EIGNUNG
FÜR EINEN BESTIMMTEN ZWECK. AUF KEINEN FALL SIND EIZO ODER DIE EIZO-VERTRAGSIMPORTEURE
VERANTWORTLICH FÜR JEGLICHE ZUFÄLLIGE, INDIREKTE, SPEZIELLE, FOLGE- ODER ANDERE SCHÄDEN
JEGLICHER ART (EINSCHLIESSLICH OHNE JEDE BEGRENZUNG SCHÄDEN BEZÜGLICH PROFITVERLUST,
GESCHÄFTSUNTERBRECHUNG, VERLUST VON GESCHÄFTSINFORMATION ODER JEGLICHE ANDEREN
FINANZIELLEN EINBUSSEN), DIE DURCH DIE VERWENDUNG DES PRODUKTES ODER DIE UNFÄHIGKEIT
ZUR VERWENDUNG DES PRODUKTES ODER IN JEGLICHER BEZIEHUNG MIT DEM PRODUKT, SEI ES
BASIEREND AUF VERTRAG, SCHADENSERSATZ, NACHLAESSIGKEIT, STRIKTE HAFTPFLICHT ODER ANDEREN
FORDERUNGEN ENTSTEHEN, AUCH WENN EIZO UND DIE EIZO-VERTRAGSIMPORTEURE IM VORAUS ÜBER
DIE MÖGLICHKEIT SOLCHER SCHÄDEN INFORMIERT WURDEN. DIESER AUSSCHLUSS ENTHÄLT AUCH JEDE
HAFTPFLICHT, DIE AUS FORDERUNGEN DRITTER GEGEN DEN ERSTKÄUFER ENTSTEHEN KANN. ZWECK
DIESER KLAUSEL IST ES, DIE HAFTUNG VON EIZO UND DEN VERTRIEBEN GEGENÜBER FORDERUNGEN ZU
BEGRENZEN, DIE AUS DIESER BESCHRÄNKTEN GARANTIE UND/ODER DEM VERKAUF ENTSTEHEN KÖNNEN.
Page 66

iv
LIMITED WARRANTY / BEGRENZTE GARANTIE /
有限责任保证书
GARANTIE LIMITÉE
EIZO Corporation (ci-après dénommé «
EIZO
») et les distributeurs autorisés par EIZO (ci-après dénommés
«
Distributeurs
»), sous réserve et conformément aux termes de cette garantie limitée (ci-après dénommée
«
Garantie »), garantissent à l’acheteur initial (ci-après dénommé « Acheteur initial
») du produit
spécifié dans la présente (ci-après dénommé «
Produit
») acheté auprès d’EIZO ou de Distributeurs
agréés EIZO, que EIZO et ses Distributeurs auront pour option de réparer ou remplacer gratuitement
le Produit si l’Acheteur initial constate, pendant la Période de garantie (définie ci-dessous), qu’il y a un
dysfonctionnement ou que le Produit a subi un dommage dans le cadre d’une utilisation normale du
Produit conformément à la description du mode d’emploi qui accompagne le Produit (ci-après dénommé
«
Manuel d’utilisation »).
La période de cette Garantie est de deux (2) ans à partir de la date d’achat du Produit (ci-après dénommée « Période de
Garantie »). EIZO et ses Distributeurs déclinent toute responsabilité ou obligation concernant ce Produit face à l’Acheteur
initial ou à toute autre personne à l’exception de celles stipulées dans la présente Garantie.
EIZO et ses Distributeurs cesseront de tenir ou conserver en stock toute pièce de ce Produit après l’expiration de
la période de sept (7) ans suivant l’arrêt de la production de telles pièces. Pour réparer le moniteur, EIZO et ses
distributeurs utiliseront des pièces de rechange conformes à nos normes de contrôle qualité.
La Garantie est valable uniquement dans les pays ou les territoires où se trouvent les Distributeurs. La Garantie ne limite
aucun des droits reconnus par la loi à l’Acheteur initial.
Nonobstant toute autre clause de cette Garantie, EIZO et ses Distributeurs n’auront d’obligation dans le cadre de cette
Garantie pour aucun des cas énumérés ci-dessous :
(a) Tout défaut du Produit résultant de dommages occasionnés lors du transport, d’une modi cation, d’une altération,
d’un abus, d’une mauvaise utilisation, d’un accident, d’une installation incorrecte, d’un désastre, d’un entretien et/
ou d’une réparation incorrects effectués par une personne autre que EIZO ou ses Distributeurs ;
(b) Toute incompatibilité du Produit résultant d’améliorations techniques et/ou réglementations possibles ;
(c) Toute détérioration du capteur ;
(d) Toute détérioration des performances d’affichage causée par la détérioration des éléments consommables tels
que le panneau LCD et/ou le rétroéclairage, etc. (par exemple des changements de luminosité, des changements
de l’uniformité de la luminosité, des modi cations de couleur, des changements de l’uniformité des couleurs, des
défectuosités de pixels y compris des pixels brûlés, etc.);
(e) Tout défaut du Produit causé par un appareil externe ;
(f) Tout défaut d’un Produit sur lequel le numéro de série original a été altéré ou supprimé ;
(g) Tout défaut du Produit causé par un écoulement du liquide contenu dans les piles ;
(h) Toute détérioration normale du Produit, particulièrement celle des consommables, des accessoires et/ou des
pièces reliées au Produit (piles, touches, éléments pivotants, télécommande, câbles, Manuel d’utilisation etc.), et
(i) Toute déformation, décoloration, et/ou gondolage de l’extérieur du Produit, y compris celle de la surface du
panneau LCD.
Pour béné cier d’un service dans le cadre de cette Garantie, l’Acheteur initial doit renvoyer le Produit port payé, dans
son emballage d’origine ou tout autre emballage approprié offrant un degré de protection équivalent, au Distributeur local,
et assumera la responsabilité des dommages et/ou perte possibles lors du transport. L’Acheteur initial doit présenter une
preuve d’achat du Produit comprenant sa date d’achat pour béné cier de ce service dans le cadre de la Garantie.
La Période de garantie pour tout Produit remplacé et/ou réparé dans le cadre de cette Garantie expirera à la n de la
Période de garantie initiale.
EIZO OU SES DISTRIBUTEURS NE SAURAIENT ÊTRE TENUS RESPONSABLES DES DOMMAGES OU PERTES DE
DONNÉES OU D’AUTRES INFORMATIONS STOCKÉES DANS UN MÉDIA QUELCONQUE OU UNE AUTRE PARTIE
DU PRODUIT RENVOYÉ À EIZO OU AUX DISTRIBUTEURS POUR RÉPARATION.
AUCUNE AUTRE GARANTIE, EXPLICITE OU TACITE, N’EST OFFERTE PAR EIZO ET SES DISTRIBUTEURS
CONCERNANT LE PRODUIT ET SES QUALITÉS, PERFORMANCES, QUALITÉ MARCHANDE OU ADAPTATION
À UN USAGE PARTICULIER. EN AUCUN CAS, EIZO OU SES DISTRIBUTEURS NE SERONT RESPONSABLES
DES DOMMAGES FORTUITS, INDIRECTS, SPÉCIAUX, INDUITS, OU DE TOUT AUTRE DOMMAGE QUEL
QU’IL SOIT (Y COMPRIS, SANS LIMITATION, LES DOMMAGES RÉSULTANT D’UNE PERTE DE PROFIT, D’UNE
INTERRUPTION D’ACTIVITÉS, D’UNE PERTE DE DONNÉES COMMERCIALES, OU DE TOUT AUTRE MANQUE
À GAGNER) RÉSULTANT DE L’UTILISATION OU DE L’INCAPACITÉ D’UTILISER LE PRODUIT OU AYANT UN
RAPPORT QUELCONQUE AVEC LE PRODUIT, QUE CE SOIT SUR LA BASE D’UN CONTRAT, D’UN TORT, D’UNE
NÉGLIGENCE, D’UNE RESPONSABILITÉ STRICTE OU AUTRE, MÊME SI EIZO OU SES DISTRIBUTEURS ONT ÉTÉ
AVERTIS DE LA POSSIBILITÉ DE TELS DOMMAGES. CETTE LIMITATION INCLUT AUSSI TOUTE RESPONSABILITÉ
QUI POURRAIT ÊTRE SOULEVÉE LORS DES RÉCLAMATIONS D’UN TIERS CONTRE L’ACHETEUR INITIAL.
L’ESSENCE DE CETTE CLAUSE EST DE LIMITER LA RESPONSABILITÉ POTENTIELLE DE EIZO ET DE SES
DISTRIBUTEURS RÉSULTANT DE CETTE GARANTIE LIMITÉE ET/OU DES VENTES.
Page 67

中文
English Deutsch
v
LIMITED WARRANTY / BEGRENZTE GARANTIE /
有限责任保证书
EIZO Corporation (a cui si farà riferimento da qui in poi con “EIZO”) ed i Distributori autorizzati da EIZO (a cui si farà
riferimento da qui in poi con “Distributori”) garantiscono, secondo i termini di questa garanzia limitata (a cui si farà
riferimento da qui in poi con “Garanzia”) all’acquirente originale (a cui si farà riferimento da qui in poi con “Acquirente
originale”) che ha acquistato il prodotto specificato in questo documento (a cui si farà riferimento da qui in poi con
“Prodotto”) da EIZO o dai suoi Distributori, che EIZO e i distributori, a loro discrezione, ripareranno o sostituiranno il
Prodotto senza addebito se l’Acquirente originale trova, entro il periodo della Garanzia (de nito sotto), che il Prodotto
malfunziona e si è danneggiato nel corso del suo normale utilizzo osservando le indicazioni del manuale di istruzioni
allegato al Prodotto (a cui si farà riferimento da qui in poi con “Manuale utente”).
Il periodo di questa Garanzia è di due (2) anni dalla data di acquisto del Prodotto (a cui si farà riferimento da qui in poi
con “Periodo di Garanzia”). EIZO e i suoi Distributori non si assumono alcuna responsabilità e non hanno alcun obbligo
riguardo al Prodotto verso l’Acquirente originale o terzi diversi da quelli relativi a questa Garanzia.
EIZO e i suoi Distributori cesseranno di tenere o di conservare qualsiasi ricambio del Prodotto allo scadere di sette
(7) anni dopo che la produzione di tali ricambi è stata terminata. Per la riparazione del monitor, EIZO e i Distributori
utilizzeranno parti di ricambio conformi ai nostri standard di controllo della qualità.
La Garanzia è valida soltanto nei paesi dove ci sono i Distributori EIZO. La Garanzia non limita alcun diritto legale
dell’Acquirente originale.
Indipendentemente da qualsiasi altra condizione di questa Garanzia, EIZO e i suoi Distributori non avranno alcun obbligo
derivante da questa Garanzia in ognuno dei casi elencati di seguito:
(a) Qualsiasi difetto del Prodotto causato da danni di trasporto, modi che, alterazioni, abusi, usi impropri, incidenti,
installazione errata, calamità, manutenzione errata e/o riparazioni improprie eseguite da terze parti che non siano
EIZO o i suoi Distributori.
(b) Qualsiasi incompatibilità del Prodotto dovuta a possibili innovazioni tecniche e/o normative.
(c) Qualsiasi deterioramento del sensore.
(d) Qualsiasi deterioramento delle prestazioni dello schermo causato dal deterioramento delle parti consumabili, come
il pannello LCD e/o la retroilluminazione, ecc. (per esempio: i cambiamenti di luminosità, cambiamenti di uniformità
della luminosità, i cambiamenti di colore, i cambiamenti di uniformità del colore, i difetti dei pixel, inclusi i pixel
bruciati, ecc.).
(e) Qualsiasi difetto del Prodotto causato da apparecchiature esterne.
(f) Qualsiasi difetto del Prodotto in cui il numero di serie originale sia stato alterato o rimosso.
(g) Qualsiasi difetto del Prodotto causato dalla fuoriuscita di liquido dalle pile.
(h) Qualsiasi normale deterioramento del Prodotto, in particolar modo nelle sue parti di consumo, accessori, e/o
attacchi (per esempio: pile, tasti, parti rotanti, telecomando, cavi, Manuale dell’utente, ecc.).
(i) Qualsiasi tipo di deformazione, scolorimento, e/o di involucro esterno del Prodotto inclusa la super cie del pannello
LCD.
Per ricevere assistenza tecnica con questa Garanzia, l’Acquirente originale deve inviare il Prodotto, con trasporto
pre-pagato, nella sua confezione originale o altra confezione adeguata che fornisce un livello analogo di protezione,
assumendosi il rischio di danni e/o perdita in transito, al Distributore locale. L’Acquirente originale deve presentare la
prova di acquisto che stabilisce la data di acquisto del Prodotto quando richiede servizio sotto Garanzia.
Il Periodo di garanzia per qualsiasi Prodotto sostituito e/o riparato sotto questa Garanzia scade alla ne del Periodo di
garanzia originale.
EIZO O I SUOI DISTRIBUTORI NON SONO RESPONSABILI PER QUALSIASI DANNO O PERDITA DI DATI O ALTRE
INFORMAZIONI MEMORIZZATI SU QUALSIASI SUPPORTO O QUALSIASI PARTE DI QUALSIASI PRODOTTO
INVIATO A EIZO O I SUOI DISTRIBUTORI PER RIPARAZIONI.
EIZO E I SUOI DISTRIBUTORI NON OFFRONO ALCUNA GARANZIA ADDIZIONALE, IMPLICITA O ESPLICITA,
RIGUARDO IL PRODOTTO E LA SUA QUALITÀ, PRESTAZIONI, VENDIBILITÀ O APPROPRIATEZZA PER
QUALSIASI USO PARTICOLARE. IN NESSUN CASO EIZO O I DISTRIBUTORI EIZO AUTORIZZATI SARANNO
RESPONSABILI PER QUALSIASI DANNO ACCIDENTALE, INDIRETTO, SPECIALE, CONSEGUENTE O DI
QUALSIASI ALTRA NATURA (INCLUSI, SENZA LIMITI, DANNI PER PERDITA DI PROFITTI, INTERRUZIONE DELLE
ATTIVITÀ, PERDITA DI INFORMAZIONI D’AFFARI O QUALSIASI ALTRA PERDITA PECUNIARIA) DERIVANTI
DALL’USO O DALL’IMPOSSIBILITÀ DI USARE IL PRODOTTO O IN QUALSIASI RELAZIONE AL PRODOTTO,
SIA SU BASE DI CONTRATTO, TORTO, NEGLIGENZA, STRETTA RESPONSABILITÀ O ALTRIMENTI, ANCHE
SE EIZO O I DISTRIBUTORI EIZO AUTORIZZATI SONO STATI AVVERTITI DELLA POSSIBILITÀ DI TALI DANNI.
QUESTA ESCLUSIONE INCLUDE ANCHE QUALSIASI RESPONSABILITÀ CHE POSSA INSORGERE DA RECLAMI
DI TERZI CONTRO L’ACQUIRENTE ORIGINALE. L’ESSENZA DI QUESTO PROVVEDIMENTO È LIMITARE LA
RESPONSABILITÀ POTENZIALE DI EIZO E DEI DISTRIBUTORI DERIVANTE DA QUESTA GARANZIA LIMITATA E/O
DALLE VENDITE.
GARANTÍA LIMITADA
EIZO Corporation (en lo sucesivo “
EIZO”) y sus distribuidores autorizados (en lo sucesivo los “Distribuidores
”),
con arreglo y de conformidad con los términos de esta garantía limitada (en lo sucesivo la “
Garantía
”), garantizan al
comprador original (en lo sucesivo el “
Comprador original
”) que compró el producto especi cado en este documento (en
lo sucesivo el “
Producto”) a EIZO o a sus Distribuidores, que EIZO y sus Distribuidores, a su propio criterio, repararán
o sustituirán el Producto de forma gratuita si el Comprador original detecta dentro del periodo de la Garantía (indicado
posteriormente) que el Producto no funciona correctamente o que se ha averiado durante el uso normal del mismo de
acuerdo con las indicaciones del manual de instrucciones suministrado con el Producto (en lo sucesivo el “Manual del
usuario
”).
El periodo de esta Garantía es de dos (2) años a partir de la fecha de compra del Producto (en adelante designado como
el “Periodo de Garantía”). EIZO y sus Distribuidores no tendrán ninguna responsabilidad ni obligación con respecto al
Producto para con el Comprador original ni con terceros que no sean las estipuladas en la presente Garantía.
EIZO y sus Distribuidores no estarán obligados a suministrar cualquier recambio del Producto una vez pasados siete
(7) años desde que se deje de fabricar el mismo. Para la reparación del monitor, EIZO y los distribuidores utilizarán
repuestos que cumplan con nuestros estándares de control de calidad.
La Garantía es válida sólo en los países y territorios donde están ubicados los Distribuidores. La Garantía no restringe
ningún derecho legal del Comprador original.
A pesar de las estipulaciones de esta Garantía, EIZO y sus Distribuidores no tendrán obligación alguna bajo esta
Garantía en ninguno de los casos expuestos a continuación:
(a) Cualquier defecto del Producto causado por daños en el transporte, modi cación, alteración, abuso, uso incorrecto,
accidente, instalación incorrecta, desastre, mantenimiento incorrecto y/o reparación indebida realizada por un
tercero que no sea EIZO o sus Distribuidores.
(b) Cualquier incompatibilidad del Producto debida a posibles innovaciones técnicas y/o reglamentaciones.
(c) Cualquier deterioro del sensor.
(d) Cualquier deterioro en el rendimiento de la visualización causado por fallos en las piezas consumibles como el
panel LCD y/o la "Backlight", etc. (p. ej. cambios de brillo, cambios de uniformidad del brillo, cambios de color,
cambios de uniformidad del color, defectos de píxeles, incluyendo píxeles muertos, etc.).
(e) Cualquier defecto del Producto causado por un equipo externo.
(f) Cualquier defecto del Producto en el que haya sido alterado o borrado el número de serie original.
(g) Cualquier defecto del Producto casusado por fugas de líquido de las pilas.
(h) Cualquier deterioro normal del Producto, y en particular de las piezas consumibles, accesorios y demás (p. ej.
pilas, botones, piezas giratorias, mando a distancia, cables, Manual del usuario, etc.).
(i) Cualquier deformación, decoloración y/o alabeo del exterior del Producto incluida la super cie del panel LCD.
Para obtener servicio en los términos de esta Garantía, el Producto deberá ser enviado por el Comprador original,
a su Distribuidor local, con el transporte previamente pagado, en el embalaje original u otro embalaje adecuado que
ofrezca el mismo grado de protección, asumiendo el riesgo de daños y/o pérdida del Producto durante el transporte. El
Comprador original deberá presentar un comprobante de compra del Producto en el que se re eje la fecha de compra
del mismo cuando lo solicite el servicio de Garantía.
El Periodo de garantía para cualquier Producto reemplazado y/o reparado en los términos de esta Garantía expirará al
vencer el Periodo de garantía original.
EIZO O LOS DISTRIBUIDORES AUTORIZADOS DE EIZO NO SE RESPONSABILIZAN DE NINGÚN DAÑO O
PÉRDIDA QUE PUEDAN SUFRIR LOS DATOS U OTRA INFORMACIÓN ALMACENADA EN CUALQUIER MEDIO O
CUALQUIER PARTE DE CUALQUIER PRODUCTO DEVUELTO A EIZO O A LOS DISTRIBUIDORES DE EIZO PARA
SU REPARACIÓN.
EIZO Y LOS DISTRIBUIDORES AUTORIZADOS DE EIZO NO OFRECEN NINGUNA OTRA GARANTÍA, IMPLÍCITA
NI EXPLÍCITA, CON RESPECTO AL PRODUCTO Y A SU CALIDAD, RENDIMIENTO, COMERCIABILIDAD E
IDONEIDAD PARA CUALQUIER USO EN PARTICULAR. EN NINGÚN CASO SERÁN EIZO O LOS DISTRIBUIDORES
AUTORIZADOS DE EIZO RESPONSABLES DE NINGÚN DAÑO EMERGENTE, INDIRECTO, ESPECIAL, INHERENTE
O CUALQUIERA QUE SEA (INCLUYENDO, SIN LIMITACIÓN, DAÑOS POR LUCRO CESANTE, INTERRUPCIÓN
DE LA ACTIVIDAD COMERCIAL, PÉRDIDA DE INFORMACIÓN COMERCIAL O CUALQUIER OTRA PÉRDIDA
PECUNIARIA) QUE SE DERIVE DEL USO O IMPOSIBILIDAD DE USO DEL PRODUCTO O EN RELACIÓN CON EL
PRODUCTO, YA SEA BASADO EN CONTRATO, POR AGRAVIO, NEGLIGENCIA, ESTRICTA RESPONSABILIDAD
O CUALQUIERA QUE SEA, AUN CUANDO SE HAYA ADVERTIDO A EIZO O A LOS DISTRIBUIDORES DE EIZO
DE LA POSIBILIDAD DE TALES DAÑOS. ESTA EXCLUSIÓN TAMBIÉN ABARCA CUALQUIER RESPONSABILIDAD
QUE PUEDA DERIVARSE DE RECLAMACIONES HECHAS POR UN TERCERO CONTRA EL COMPRADOR
ORIGINAL. LA ESENCIA DE ESTA ESTIPULACIÓN ES LIMITAR LA RESPONSABILIDAD POTENCIAL DE EIZO Y LOS
DISTRIBUIDORES QUE PUDIERA DERIVARSE DE ESTA GARANTÍA LIMITADA Y/O VENTAS.
Page 68

vi
LIMITED WARRANTY / BEGRENZTE GARANTIE /
有限责任保证书
GARANZIA LIMITATA
EIZO Corporation (a cui si farà riferimento da qui in poi con “
EIZO
”) ed i Distributori autorizzati da EIZO (a cui si farà
riferimento da qui in poi con “
Distributori
”) garantiscono, secondo i termini di questa garanzia limitata (a cui si farà
riferimento da qui in poi con “
Garanzia”) all’acquirente originale (a cui si farà riferimento da qui in poi con “
Acquirente
originale”) che ha acquistato il prodotto specificato in questo documento (a cui si farà riferimento da qui in poi con
“
Prodotto
”) da EIZO o dai suoi Distributori, che EIZO e i distributori, a loro discrezione, ripareranno o sostituiranno il
Prodotto senza addebito se l’Acquirente originale trova, entro il periodo della Garanzia (de nito sotto), che il Prodotto
malfunziona e si è danneggiato nel corso del suo normale utilizzo osservando le indicazioni del manuale di istruzioni
allegato al Prodotto (a cui si farà riferimento da qui in poi con “
Manuale utente”).
Il periodo di questa Garanzia è di due (2) anni dalla data di acquisto del Prodotto (a cui si farà riferimento da qui in poi
con “Periodo di Garanzia”). EIZO e i suoi Distributori non si assumono alcuna responsabilità e non hanno alcun obbligo
riguardo al Prodotto verso l’Acquirente originale o terzi diversi da quelli relativi a questa Garanzia.
EIZO e i suoi Distributori cesseranno di tenere o di conservare qualsiasi ricambio del Prodotto allo scadere di sette
(7) anni dopo che la produzione di tali ricambi è stata terminata. Per la riparazione del monitor, EIZO e i Distributori
utilizzeranno parti di ricambio conformi ai nostri standard di controllo della qualità.
La Garanzia è valida soltanto nei paesi dove ci sono i Distributori EIZO. La Garanzia non limita alcun diritto legale
dell’Acquirente originale.
Indipendentemente da qualsiasi altra condizione di questa Garanzia, EIZO e i suoi Distributori non avranno alcun obbligo
derivante da questa Garanzia in ognuno dei casi elencati di seguito:
(a) Qualsiasi difetto del Prodotto causato da danni di trasporto, modi che, alterazioni, abusi, usi impropri, incidenti,
installazione errata, calamità, manutenzione errata e/o riparazioni improprie eseguite da terze parti che non siano
EIZO o i suoi Distributori.
(b) Qualsiasi incompatibilità del Prodotto dovuta a possibili innovazioni tecniche e/o normative.
(c) Qualsiasi deterioramento del sensore.
(d) Qualsiasi deterioramento delle prestazioni dello schermo causato dal deterioramento delle parti consumabili, come
il pannello LCD e/o la retroilluminazione, ecc. (per esempio: i cambiamenti di luminosità, cambiamenti di uniformità
della luminosità, i cambiamenti di colore, i cambiamenti di uniformità del colore, i difetti dei pixel, inclusi i pixel
bruciati, ecc.).
(e) Qualsiasi difetto del Prodotto causato da apparecchiature esterne.
(f) Qualsiasi difetto del Prodotto in cui il numero di serie originale sia stato alterato o rimosso.
(g) Qualsiasi difetto del Prodotto causato dalla fuoriuscita di liquido dalle pile.
(h) Qualsiasi normale deterioramento del Prodotto, in particolar modo nelle sue parti di consumo, accessori, e/o
attacchi (per esempio: pile, tasti, parti rotanti, telecomando, cavi, Manuale dell’utente, ecc.).
(i) Qualsiasi tipo di deformazione, scolorimento, e/o di involucro esterno del Prodotto inclusa la super cie del pannello
LCD.
Per ricevere assistenza tecnica con questa Garanzia, l’Acquirente originale deve inviare il Prodotto, con trasporto
pre-pagato, nella sua confezione originale o altra confezione adeguata che fornisce un livello analogo di protezione,
assumendosi il rischio di danni e/o perdita in transito, al Distributore locale. L’Acquirente originale deve presentare la
prova di acquisto che stabilisce la data di acquisto del Prodotto quando richiede servizio sotto Garanzia.
Il Periodo di garanzia per qualsiasi Prodotto sostituito e/o riparato sotto questa Garanzia scade alla ne del Periodo di
garanzia originale.
EIZO O I SUOI DISTRIBUTORI NON SONO RESPONSABILI PER QUALSIASI DANNO O PERDITA DI DATI O ALTRE
INFORMAZIONI MEMORIZZATI SU QUALSIASI SUPPORTO O QUALSIASI PARTE DI QUALSIASI PRODOTTO
INVIATO A EIZO O I SUOI DISTRIBUTORI PER RIPARAZIONI.
EIZO E I SUOI DISTRIBUTORI NON OFFRONO ALCUNA GARANZIA ADDIZIONALE, IMPLICITA O ESPLICITA,
RIGUARDO IL PRODOTTO E LA SUA QUALITÀ, PRESTAZIONI, VENDIBILITÀ O APPROPRIATEZZA PER
QUALSIASI USO PARTICOLARE. IN NESSUN CASO EIZO O I DISTRIBUTORI EIZO AUTORIZZATI SARANNO
RESPONSABILI PER QUALSIASI DANNO ACCIDENTALE, INDIRETTO, SPECIALE, CONSEGUENTE O DI
QUALSIASI ALTRA NATURA (INCLUSI, SENZA LIMITI, DANNI PER PERDITA DI PROFITTI, INTERRUZIONE DELLE
ATTIVITÀ, PERDITA DI INFORMAZIONI D’AFFARI O QUALSIASI ALTRA PERDITA PECUNIARIA) DERIVANTI
DALL’USO O DALL’IMPOSSIBILITÀ DI USARE IL PRODOTTO O IN QUALSIASI RELAZIONE AL PRODOTTO,
SIA SU BASE DI CONTRATTO, TORTO, NEGLIGENZA, STRETTA RESPONSABILITÀ O ALTRIMENTI, ANCHE
SE EIZO O I DISTRIBUTORI EIZO AUTORIZZATI SONO STATI AVVERTITI DELLA POSSIBILITÀ DI TALI DANNI.
QUESTA ESCLUSIONE INCLUDE ANCHE QUALSIASI RESPONSABILITÀ CHE POSSA INSORGERE DA RECLAMI
DI TERZI CONTRO L’ACQUIRENTE ORIGINALE. L’ESSENZA DI QUESTO PROVVEDIMENTO È LIMITARE LA
RESPONSABILITÀ POTENZIALE DI EIZO E DEI DISTRIBUTORI DERIVANTE DA QUESTA GARANZIA LIMITATA E/O
DALLE VENDITE.
Page 69

中文
English Deutsch
vii
LIMITED WARRANTY / BEGRENZTE GARANTIE /
有限责任保证书
BEGRÄNSAD GARANTI
EIZO Corporation (nedan kallat “
EIZO”) och EIZOs auktoriserade distributörer (nedan kallade “Distributörer
”) garanterar
i enlighet med villkoren i denna begränsade garanti (nedan kallad “
Garantin
”) den ursprunglige köparen (nedan kallad
den “
Ursprunglige köparen”) som köpte den i dokumentet speci cerade produkten (nedan kallad “Produkten
”) från
EIZO eller Distributörer, att EIZO eller Distributörer enligt eget gott nnande kostnadsfritt antingen reparera eller byta ut
den defekta Produkten om den Ursprunglige köparen inom Garantiperioden (de nieras nedan) upptäcker att Produkten
fungerar felaktigt eller skadas under normal användning av Produkten i enlighet med beskrivningen i bruksanvisningen
(nedan kallad “
Bruksanvisning”).
Garantiperioden är begränsad till två (2) år från datumet för Produktens inköp (här kallad ”Garantiperioden”). EIZO och
Distributörer ska inte under några villkor ha något annat ansvar än vad som anges i denna garanti gällande Produkten i
relation till den Ursprunglige köparen eller tredje part.
EIZO och Distributörer kommer att upphöra med lagerhållning av Produktens delar efter sju (7) år efter att produktionen
av dessa delar upphört. Nät skärmen repareras använder EIZO och distributörer reservdelar som uppfyller våra
kvalitetsstandarder.
Garantin är endast giltig i de länder där det finns Distributörer. Garantin begränsar inte några av den Ursprunglige
köparens lagstadgade rättigheter.
Oavsett andra villkor i denna garanti ska inte EIZO Distributörer under några villkor ha något ansvar i något av de fall
som beskrivs nedan:
(a) När någon bristfällighet hos Produkten kan härledas till att ha uppstått vid frakt, modifiering, ändring, felaktigt
handhavande, olycka, felaktig installation, katastrof, felaktigt underhåll och/eller felaktig reparation utförd av tredje
part annan än EIZO och Distributörer.
(b) Alla former av inkompatibilitet hos Produkten på grund av möjliga tekniska innovationer och/eller bestämmelser.
(c) Alla försämringar av sensorn.
(d) Alla försämringar av bildens prestanda beroende på förbrukningsdelar så som LCD-panel och/eller
bakgrundsbelysning etc. (t.ex. ändringar i ljusstyrka, jämnhet i ljusstyrka, färg, färgjämnhet, defekta pixlar och/eller
fast lysande pixlar etc.).
(e) Alla defekter hos Produkten som orsakats av extern utrustning.
(f) Alla defekter hos Produkten på vilken det ursprungliga serienumret har ändrats eller avlägsnats.
(g) Alla produktfel som orsakas av vätska som läcker från batteriet.
(h) All normal försämring av Produkten, speciellt förbrukningsartiklar, tillbehör och/eller yttre delar (t.ex. batterier,
knappar, roterande delar, fjärrkontroll, kablar, Bruksanvisningen etc.).
(i) Varje deformation, missfärgning och/eller skevhet av Produktens yttre inklusive ytan på LCD-panelen.
För att erhålla service under denna garanti måste den Ursprunglige köparen (med hänseende till risken för skada
och/eller förlust under transport) leverera Produkten till närmaste Distributör med förebetald frakt, i dess ursprungliga
förpackning eller annan fullgod förpackning som ger likvärdigt skydd. Den Ursprunglige köparen måste kunna visa
inköpsbevis för Produkten som klargör Produktens inköpsdatum vid begäran av garantiservice.
Garantiperioden för alla utbytta och/eller reparerade produkter under denna garanti skall upphöra vid utgången av den
ursprungliga Garantiperioden.
EIZO ELLER DISTRIBUTÖRER ÄR INTE ANSVARIGA FÖR NÅGON FORM AV SKADA ELLER FÖRLUST AV DATA
ELLER ANNAN INFORMATION SOM HAR LAGRATS I NÅGON FORM AV MEDIA ELLER ANNAN DEL AV NÅGON
PRODUKT SOM HAR RETURNERATS TILL EIZO ELLER DISTRIBUTÖRER FÖR REPARATION.
EIZO OCH DISTRIBUTÖRERNA GARANTERAR INGET, UTTRYCKLIGEN ELLER UNDERFÖRSTÅTT, VAD
BETRÄFFAR PRODUKTEN OCH DESS KVALITET, PRESTANDA, SÄLJBARHET ELLER LÄMPLIGHET FÖR NÅGON
FORM AV SPECIELL ANVÄNDNING. UNDER INGA OMSTÄNDIGHETER SKALL EIZO ELLER DISTRIBUTÖRERNA
HÅLLAS ANSVARIGA FÖR NÅGRA SOM HELST UNDERORDNADE, INDIREKTA, SPECIELLA, DÄRAV FÖLJANDE
ELLER ÖVRIGA SKADOR (INKLUSIVE, UTAN BEGRÄNSNING TILL, SKADOR FÖR FÖRLUST AV INKOMST,
AVBRUTEN AFFÄRSRÖRELSE, FÖRLUST AV AFFÄRSINFORMATION ELLER ANNAN SÄRSKILD FÖRLUST) SOM
UPPSTÅTT SOM ETT RESULTAT AV ANVÄNDNING ELLER OFÖRMÅGA ATT ANVÄNDA PRODUKTEN ELLER I
NÅGON FORM AV ANSLUTNING TILL PRODUKTERNA, VARE SIG DETTA GRUNDAS PÅ KONTRAKT, ÅTALBAR
HANDLING, FÖRSUMLIGHET, ANSVARSSKYLDIGHET ELLER ANNAT, ÄVEN OM EIZO ELLER DISTRIBUTÖRERNA
HAR INFORMERATS BETRÄFFANDE MÖJLIGHET ATT SÅDANA SKADOR FÖRELIGGER. DETTA UNDANTAG
OMFATTAR ÄVEN ALL FORM AV ANSVARSSKYLDIGHET SOM KAN UPPSTÅ GENOM EN TREDJE PARTS ANSPRÅK
GENTEMOT DEN URSPRUNGLIGE KÖPAREN. GRUNDBESTÅNDSDELEN I BESTÄMMELSEN ÄR ATT BEGRÄNSA
DET EVENTUELLA ANSVARSTAGANDET FÖR EIZO OCH DISTRIBUTÖRERNA SOM KAN UPPSTÅ GENOM DENNA
BEGRÄNSADE GARANTI OCH/ELLER FÖRSÄLJNING.
Page 70

viii
LIMITED WARRANTY / BEGRENZTE GARANTIE /
有限责任保证书
ΠΕΡΙΟΡΙΣΜΕΝΗ ΕΓΓΥΗΣΗ
Η EIZO Corporation (στο εξής «
EIZO») και οι διανομείς που εξουσιοδοτεί η EIZO (στο εξής «Διανομείς
»)
παρέχουν εγγύηση, υποκείμενη και σύμφωνα με τους όρους της παρούσας περιορισμένης εγγύησης (στο εξής
«
Εγγύηση»), στον αρχικό αγοραστή (στο εξής «Αρχικός Αγοραστής
») ο οποίος αγόρασε το προϊόν που καθορίζεται στο
παρόν έγγραφο (στο εξής «
Προϊόν») από την EIZO ή τους Διανομείς, η οποία εξασφαλίζει ότι η EIZO και οι Διανομείς,
σύμφωνα με τη διακριτή ευχέρειά τους, είτε θα επισκευάσουν είτε θα αντικαταστήσουν το Προϊόν χωρίς χρέωση εάν ο
Αρχικός Αγοραστής αντιληφθεί εντός της Περιόδου Εγγύησης (ορίζεται κατωτέρω) ότι το Προϊόν δυσλειτουργεί ή έχει
υποστεί βλάβη κατά τη διάρκεια κανονικής χρήσης του Προϊόντος σύμφωνα με την περιγραφή στο εγχειρίδιο χρήσης που
συνοδεύει το Προϊόν (στο εξής «
Εγχειρίδιο Χρήστη»).
Η περίοδος της παρούσας Εγγύησης είναι δύο (2) έτη από την ημερομηνία αγοράς του Προϊόντος (στο εξής «Περίοδος
Εγγύησης»). Η EIZO και οι Διανομείς δεν φέρουν καμία ευθύνη ή υποχρέωση όσον αφορά το Προϊόν σε σχέση με τον
Αρχικό Αγοραστή ή οποιοδήποτε τρίτο μέρος, ούτε άλλη ευθύνη διαφορετική από αυτήν που παρέχεται στην παρούσα
Εγγύηση.
Η EIZO και οι Διανομείς θα παύσουν να διατηρούν ή να αποθηκεύουν τυχόν εξαρτήματα του Προϊόντος κατόπιν της λήξης
των επτά (7) ετών μετά τη διακοπή της παραγωγής τέτοιων εξαρτημάτων. Κατά την επισκευή της οθόνης, η EIZO και οι
Διανομείς θα χρησιμοποιήσουν ανταλλακτικά επισκευής που συμμορφώνονται με τα πρότυπά μας για τη Διασφάλιση
Ποιότητας.
Η Εγγύηση ισχύει μόνο σε χώρες ή περιοχές όπου βρίσκονται οι Διανομείς. Η Εγγύηση δεν περιορίζει οποιαδήποτε
νόμιμα δικαιώματα του Αρχικού Αγοραστή.
Λαμβανομένης υπόψη κάθε διάταξης της παρούσας Εγγύησης, η EIZO και οι Διανομείς δεν θα έχουν καμία απολύτως
υποχρέωση σύμφωνα με την παρούσα Εγγύηση σε οποιαδήποτε από τις περιπτώσεις που διατυπώνονται κατωτέρω:
(α) Τυχόν ελάττωμα του Προϊόντος που προκαλείται από ζημιά κατά τη μεταφορά, τροποποίηση, αλλαγή, κατάχρηση,
λανθασμένη χρήση, ατύχημα, λανθασμένη εγκατάσταση, καταστροφή, εσφαλμένη συντήρηση ή/και λανθασμένη
επισκευή από τρίτο μέρος εκτός της EIZO και των Διανομέων,
(β) Τυχόν ασυμβατότητα του Προϊόντος λόγω πιθανών τεχνικών καινοτομιών ή/και κανονισμών,
(γ) Τυχόν επιδείνωση του αισθητήρα,
(δ) Τυχόν επιδείνωση της απόδοσης οθόνης που προκαλείται από τη φθορά αναλώσιμων εξαρτημάτων όπως
της οθόνης LCD ή/και του φωτός υποβάθρου, κτλ. (π.χ. αλλαγές στη φωτεινότητα, αλλαγές στην ομοιομορφία
φωτεινότητας, αλλαγές στο χρώμα, αλλαγές στην ομοιομορφία χρώματος, ελαττώματα σε pixel περιλαμβανομένων
των καμένων pixel, κτλ.),
(ε) Τυχόν ελάττωμα του Προϊόντος που προκαλείται από εξωτερικό εξοπλισμό,
(στ) Τυχόν ελάττωμα του Προϊόντος στο οποίο έχει τροποποιηθεί ή αφαιρεθεί ο γνήσιος αριθμός σειράς,
(ζ) Τυχόν ελάττωμα του Προϊόντος που προκαλείται από διαρροή υγρού από την μπαταρία,
(η) Τυχόν φυσιολογική φθορά του προϊόντος, ιδιαίτερα αυτής των αναλώσιµων, των αξεσουάρ ή/και των
προσαρτηµάτων (π.χ. μπαταρίες, κουµπιά, περιστρεφόµενα µέρη, τηλεχειριστήριο, καλώδια, Εγχειρίδιο Χρήστη,
κτλ.), και
(θ) Τυχόν παραμόρφωση, αποχρωματισμό ή/και διαστρέβλωση του εξωτερικού μέρους του προϊόντος,
περιλαμβανομένης της επιφάνειας της οθόνης LCD.
Ο Αρχικός Αγοραστής για να δικαιούται υπηρεσίες επισκευής σύμφωνα με την Εγγύηση, θα πρέπει να παραδώσει το
Προϊόν, με πληρωμένα τα μεταφορικά έξοδα, στην αρχική του συσκευασία ή σε άλλη επαρκή συσκευασία με ισότιμο
βαθμό προστασίας, αναλαμβάνοντας τον κίνδυνο βλάβης ή/και απώλειας κατά τη μεταφορά, στον τοπικό Διανομέα. Ο
Αρχικός Αγοραστής όταν ζητά υπηρεσίες επισκευής σύμφωνα με την Εγγύηση, θα πρέπει να προσκομίζει την απόδειξη
αγοράς του Προϊόντος και την ημερομηνία της αγοράς.
Η Περίοδος Εγγύησης για οποιοδήποτε αντικατεστημένο ή/και επισκευασμένο προϊόν σύμφωνα με την παρούσα
Εγγύηση λήγει στο τέλος της αρχικής Περιόδου Εγγύησης.
Η EIZO Ή ΟΙ ΔΙΑΝΟΜΕΙΣ ΔΕΝ ΕΥΘΥΝΟΝΤΑΙ ΓΙΑ ΟΠΟΙΑΔΗΠΟΤΕ ΒΛΑΒΗ Ή ΑΠΩΛΕΙΑ ΔΕΔΟΜΕΝΩΝ Ή ΑΛΛΩΝ
ΠΛΗΡΟΦΟΡΙΩΝ ΠΟΥ ΑΠΟΘΗΚΕΥΟΝΤΑΙ ΣΕ ΟΠΟΙΟΔΗΠΟΤΕ ΜΕΣΟ Ή ΟΠΟΙΟΔΗΠΟΤΕ ΑΛΛΟ ΜΕΡΟΣ ΣΕ
ΟΠΟΙΟΔΗΠΟΤΕ ΠΡΟΪΟΝ ΠΟΥ ΕΠΙΣΤΡΕΦΕΤΑΙ ΣΤΗΝ EIZO Ή ΣΕ ΔΙΑΝΟΜΕΑ ΓΙΑ ΕΠΙΣΚΕΥΗ.
Η EIZO ΚΑΙ ΟΙ ΔΙΑΝΟΜΕΙΣ ΔΕΝ ΠΑΡΕΧΟΥΝ ΚΑΜΙΑ ΠΕΡΑΙΤΕΡΩ ΕΓΓΥΗΣΗ, ΡΗΤΗ Ή ΣΥΝΕΠΑΓΟΜΕΝΗ, ΟΣΟΝ
ΑΦΟΡΑ ΤΟ ΠΡΟΪΟΝ ΚΑΙ ΤΗΝ ΠΟΙΟΤΗΤΑ, ΤΗΝ ΑΠΟΔΟΣΗ, ΤΗΝ ΕΜΠΟΡΕΥΣΙΜΟΤΗΤΑ Ή ΤΗΝ ΚΑΤΑΛΛΗΛΟΤΗΤΑ
ΤΟΥ ΓΙΑ ΟΠΟΙΑΔΗΠΟΤΕ ΣΥΓΚΕΚΡΙΜΕΝΗ ΧΡΗΣΗ. ΣΕ ΚΑΜΙΑ ΠΕΡΙΠΤΩΣΗ Η EIZO Ή ΟΙ ΔΙΑΝΟΜΕΙΣ ΔΕΝ
ΘΑ ΕΥΘΥΝΟΝΤΑΙ ΓΙΑ ΚΑΜΙΑ ΑΠΟΛΥΤΩΣ ΤΥΧΑΙΑ, ΕΜΜΕΣΗ, ΕΙΔΙΚΗ, ΣΥΝΕΠΑΓΟΜΕΝΗ Ή ΑΛΛΗ ΒΛΑΒΗ
(ΠΕΡΙΛΑΜΒΑΝΟΜΕΝΩΝ, ΜΕΤΑΞΥ ΑΛΛΩΝ, ΒΛΑΒΩΝ Ή ΑΠΩΛΕΙΑΣ ΚΕΡΔΩΝ, ΔΙΑΚΟΠΗΣ ΕΠΙΧΕΙΡΗΜΑΤΙΚΩΝ
ΔΡΑΣΤΗΡΙΟΤΗΤΩΝ, ΑΠΩΛΕΙΑΣ ΕΠΙΧΕΙΡΗΜΑΤΙΚΩΝ ΠΛΗΡΟΦΟΡΙΩΝ Ή ΤΥΧΟΝ ΑΛΛΗΣ ΧΡΗΜΑΤΙΚΗΣ ΑΠΩΛΕΙΑΣ)
ΠΟΥ ΠΡΟΚΥΠΤΕΙ ΑΠΟ ΤΗ ΧΡΗΣΗ Ή ΤΗΝ ΑΝΙΚΑΝΟΤΗΤΑ ΧΡΗΣΗΣ ΤΟΥ ΠΡΟΪΟΝΤΟΣ Ή ΤΥΧΟΝ ΑΛΛΗΣ ΣΥΝΔΕΣΗΣ
ΜΕ ΤΟ ΠΡΟΪΟΝ, ΕΙΤΕ ΒΑΣΙΖΕΤΑΙ ΣΕ ΣΥΜΒΟΛΑΙΟ, ΒΛΑΒΗ, ΑΜΕΛΕΙΑ, ΑΥΣΤΗΡΗ ΕΥΘΥΝΗ Ή ΕΙΔΑΛΛΩΣ, ΑΚΟΜΗ
ΚΙ ΕΑΝ Η EIZO Ή ΟΙ ΔΙΑΝΟΜΕΙΣ ΕΝΗΜΕΡΩΘΟΥΝ ΓΙΑ ΤΗΝ ΠΙΘΑΝΟΤΗΤΑ ΤΕΤΟΙΩΝ ΖΗΜΙΩΝ. Η ΕΞΑΙΡΕΣΗ ΑΥΤΗ
ΠΕΡΙΛΑΜΒΑΝΕΙ ΕΠΙΣΗΣ ΟΠΟΙΑΔΗΠΟΤΕ ΕΥΘΥΝΗ ΕΝΔΕΧΕΤΑΙ ΝΑ ΠΡΟΚΥΨΕΙ ΑΠΟ ΑΞΙΩΣΕΙΣ ΤΡΙΤΟΥ ΜΕΡΟΥΣ
ΚΑΤΑ ΤΟΥ ΑΡΧΙΚΟΥ ΑΓΟΡΑΣΤΗ. Η ΟΥΣΙΑ ΤΟΥ ΟΡΟΥ ΑΥΤΟΥ ΕΙΝΑΙ ΝΑ ΠΕΡΙΟΡΙΣΕΙ ΤΗΝ ΠΙΘΑΝΗ ΕΥΘΥΝΗ ΤΗΣ
EIZO ΚΑΙ ΤΩΝ ΔΙΑΝΟΜΕΩΝ ΠΟΥ ΠΡΟΚΥΠΤΕΙ ΑΠΟ ΤΗΝ ΠΑΡΟΥΣΑ ΕΓΓΥΗΣΗ Ή/ΚΑΙ ΤΙΣ ΠΩΛΗΣΕΙΣ.
Page 71

中文
English Deutsch
ix
LIMITED WARRANTY / BEGRENZTE GARANTIE /
有限责任保证书
ОГРАНИЧЕННАЯ ГАРАНТИЯ
EIZO Corporation (называемая в дальнейшем “
EIZO
”) и авторизированные EIZO дистрибуторы (называемые в
дальнейшем “
Дистрибуторы
”) гарантируют, в соответствии с условиями и пунктами этой ограниченной гарантии
(называемой в дальнейшем “
Гарантия”), первичному покупателю (называемому в дальнейшем “
Первоначальный
покупатель”), который приобрел у EIZO или Дистрибуторов продукт, указанный в этом документе (называемый
в дальнейшем “
Продукт
”), что EIZO или Дистрибуторы на свое усмотрение либо бесплатно отремонтируют,
либо бесплатно заменят Продукт, если Первоначальный покупатель признает в пределах Гарантийного срока
(определенного ниже), что Продукт неисправен или он поврежден процессе нормального использования продукта
в соответствии с описанием в инструкции по эксплуатации, прилагаемой к Продукту (называемой в дальнейшем
“
Руководство пользователя”).
Гарантийный период ограничен сроком два (2) года от даты приобретения Продукта (называемый в дальнейшем
“Гарантийный период”). EIZO и Дистрибуторы не несут никакой ответственности и не берут обязательств
относительно Продукта по отношению к Первоначальному покупателю или по отношению к любым третьим
сторонам, кроме обязательств, оговоренных в этой Гарантии.
EIZO и Дистрибуторы прекратят хранение или складирование любых деталей Продукта по истечении семи (7)
лет после прекращения производства таких деталей. В случае ремонта монитора EIZO и Дистрибьюторы будут
использовать запчасти, которые соответствуют нашим стандартам QC (контроль качества).
Гарантия действительна только в странах или регионах, где расположены Дистрибуторы. Гарантия не
ограничивает никакие законные права Первоначального покупателя.
Несмотря на другие условия этой Гарантии EIZO и Дистрибуторы не несут никаких обязательств согласно этой
Гарантии в любом из перечисленных ниже случаев:
(а) Любые дефекты Продукта, вызванные повреждениями при перевозке, модификацией, изменением,
неправильным обращением, неправильным использованием, авариями, неправильной установкой,
стихийными бедствиями, неправильным уходом и/или неправильным ремонтом третьей стороной, отличной
от EIZO или Дистрибуторов;
(б) Любые несовместимости Продукта из-за технических усовершенствований и/или изменения технических
норм;
(в) Любое повреждение датчика;
(г) Любые ухудшения работы дисплея, вызванные изнашиванием невосстановимых частей, таких как
панель ЖКД и/или подсветка и т.д. (например, изменение в яркости, изменение в равномерности яркости,
изменение в цветности, изменение в равномерности цветности, изменение в пикселах, включая выгоревшие
пикселы и т.д.);
(д) Любые дефекты Продукта, вызванные внешним оборудованием;
(е) Любые дефекты Продукта, при которых оригинальный серийный номер был изменен или удален;
(ж) Любые дефекты Продукта, вызванные протеканием батарейки;
(з) Любые естественные ухудшения продукта, в частности, вызванные износом расходных частей,
принадлежностей и/или приспособлений (например, батареек, кнопок, вращающихся частей, пульта
дистанционного управления, кабелей, Руководства пользователя и т.д.); и
(и
) Любые деформации, изменения цвета и/или коробления внешней поверхности продукта, включая
поверхность панели ЖКД.
Чтобы получить техническое обслуживание в рамках Гарантии, Первоначальный покупатель должен доставить
Продукт местному Дистрибутору, оплатив перевозку, в его оригинальной упаковке или в другой соответствующей
упаковке, обеспечивающей равноценную степень защиты, принимая во внимание риск повреждения и/или утерю
при транспортировке. При запросе технического обслуживания в рамках Гарантии Первоначальный покупатель
должен предоставить свидетельство покупки продукта и даты покупки.
Гарантийный период для любого замененного и/или отремонтированного продукта в рамках Гарантии истекает в
конце завершения срока действия оригинального Гарантийного периода.
EIZO ИЛИ ДИСТРИБУТОРЫ НЕ НЕСУТ ОТВЕТСТВЕННОСТИ ЗА ЛЮБЫЕ ПОВРЕЖДЕНИЯ ИЛИ УТЕРЮ
ДАННЫХ ИЛИ ДРУГОЙ ИНФОРМАЦИИ, ХРАНЯЩИХСЯ НА КАКИХ-ЛИБО НОСИТЕЛЯХ ИНФОРМАЦИИ ИЛИ НА
ЛЮБЫХ ДРУГИХ ЧАСТЯХ ПРОДУКТА, КОТОРЫЙ ВОЗВРАЩЕН EIZO ИЛИ ДИСТРИБУТОРАМ ДЛЯ РЕМОНТА.
EIZO И ДИСТРИБУТОРЫ НЕ ДАЮТ НИКАКОЙ ДАЛЬНЕЙШЕЙ ГАРАНТИИ, ВЫРАЖЕННОЙ ИЛИ
ПОДРАЗУМЕВАЕМОЙ, ОТНОСИТЕЛЬНО ПРОДУКТА И ЕГО КАЧЕСТВА, ТЕХНИЧЕСКИХ ХАРАКТЕРИСТИК,
ТОВАРНОСТИ ИЛИ СООТВЕТСТВИЯ ДЛЯ КАКОГО-ЛИБО ОПРЕДЕЛЕННОГО ИСПОЛЬЗОВАНИЯ. НИ ПРИ
КАКИХ УСЛОВИЯХ EIZO ИЛИ ДИСТРИБУТОРЫ НЕ НЕСУТ ОТВЕТСТВЕННОСТИ ЗА ЛЮБОЙ СЛУЧАЙНЫЙ,
КОСВЕННЫЙ, СПЕЦИАЛЬНЫЙ, ПОБОЧНЫЙ ИЛИ ИНОЙ УЩЕРБ (ВКЛЮЧАЯ, БЕЗ ОГРАНИЧЕНИЙ, УЩЕРБ ИЗЗА НЕПОЛУЧЕННОЙ ПРИБЫЛИ, ПРЕРЫВАНИЯ БИЗНЕСА, ПОТЕРИ КОММЕРЧЕСКОЙ ИНФОРМАЦИИ ИЛИ
ЛЮБЫЕ ДРУГИЕ ФИНАНСОВЫЕ ПОТЕРИ), ВОЗНИКШИЙ ИЗ-ЗА ИСПОЛЬЗОВАНИЯ ИЛИ НЕВОЗМОЖНОСТИ
ИСПОЛЬЗОВАТЬ ПРОДУКТ ИЛИ В ЛЮБОЙ ДРУГОЙ СВЯЗИ С ПРОДУКТОМ, ЛИБО ОСНОВАННЫЙ НА
КОНТРАКТНЫХ ОТНОШЕНИЯХ, ГРАЖДАНСКИХ ПРАВОНАРУШЕНИЯХ, НЕБРЕЖНОСТИ, ПРИЧИНЕНИЯ
УЩЕРБА ТРЕТЬЕЙ СТОРОНЕ ИЛИ ЧЕМ-ЛИБО ЕЩЕ, ДАЖЕ ЕСЛИ EIZO ИЛИ ДИСТРИБУТОРЫ БЫЛИ
УВЕДОМЛЕНЫ О ВОЗМОЖНОСТИ ТАКОГО УЩЕРБА. ЭТО ИСКЛЮЧЕНИЕ ТАКЖЕ ВКЛЮЧАЕТ ЛЮБЫЕ
ОБЯЗАТЕЛЬСТВА, КОТОРЫЕ МОГУТ ВОЗНИКНУТЬ В РЕЗУЛЬТАТЕ ТРЕБОВАНИЙ ТРЕТЬЕЙ СТОРОНЫ
В ОТНОШЕНИИ ПЕРВОНАЧАЛЬНОГО ПОКУПАТЕЛЯ. СУЩЕСТВОМ ЭТОГО ПОЛОЖЕНИЯ ЯВЛЯЕТСЯ
ОГРАНИЧЕНИЕ ПОТЕНЦИАЛЬНОЙ ОТВЕТСТВЕННОСТИ EIZO И ДИСТРИБУТОРОВ, ВОЗНИКАЮЩЕЙ ИЗ-ЗА
ЭТОЙ ОГРАНИЧЕННОЙ ГАРАНТИИ И/ИЛИ ПРОДАЖ.
Page 72

x
LIMITED WARRANTY / BEGRENZTE GARANTIE /
有限责任保证书
有限责任保证书
EIZO Corporation
(
以下简称
“
EIZO”)和 EIZO 授权的经销商(以下简称“经销商
” ),
接受并依照本有限责任保证书
(
以
下简称
“
保证书”)之条款,向从 EIZO 和经销商购买本文中所规定产品(以下简称“产品”)的原买方(以下称“原买方
”)
提供保证
:
在保证期内(规定如下),如果原买方发现按本产品所附使用说明书(以下简称
“
用户手册
”)
所述方式正常使
用本产品过程中
,
本产品出现故障或损坏,EIZO 和经销商根据其独自的判断免费修理或更换该产品
。
本保证期限定为本产品自购买本产品之日起的二
(2)年(
以下简称“保证期限
” )。
EIZO
和经销商将不向原买方或任何第
三方承担本保证书所规定之外的与本产品有关任何责任或义务
。
本产品的任何部件停产七
(7)年后,
EIZO 和经销商将不再保留或保管任何这类部件。维修显示器时,EIZO
与经销商将
使用符合我方质量控制标准的替换零件
。
本保证书仅对于设有经销商的国家或地区有效
。
本保证书并不限定原买方的任何法律权利
。
无论本保证书的任何其他条款如何规定
,
对于任何下列情况之一,EIZO 和经销商将不承担本保证书规定责任
:
(a) 由于运输损害、改装、改动、滥用、误用、意外事故、错误安装、灾害、维护不善和 / 或由除 EIZO
和经销商以外的
第三方进行不适当的修理造成本产品的任何故障
。
(b) 由于可能发生的技术变更和 / 或调整造成本产品的任何不兼容性
。
(c) 传感器的任何劣化
。
(d) 由于诸如液晶显示屏(LCD)和 / 或背灯等消耗品部件的老化造成的任何显示性能低劣(如亮度变化、亮度均一性变化
、
色彩变化、色彩均一性变化、如烧伤像素等像素缺陷
)。
(e) 因外部设备造成本产品的任何故障
。
(f) 因本产品的原序号被改变或消除造成本产品的任何故障
。
(g) 因电池液体泄漏造成本产品的任何故障
。
(h) 本产品的任何正常老化,尤其是消耗品、附件和 / 或附加装置(如电池、按钮、旋转部件、遥控器、电缆、用户手册等
)、
以及
(i) 本产品表面包括液晶显示屏(LCD)表面的任何变形、变色和 / 翘曲
。
为了获得本保证书规定的服务
,
原买方必须使用原包装或其他具有同等保护程度的适当包装将本产品运送到当地的经销商
,
并且预付运费
,
承担运输中的损坏和 / 或损失的风险。要求提供本保证书规定的服务时
,
原买方必须提交购买本产品和标
明此购买日期的证明
。
按本保证书规定进行了更换和
/ 或修理的任何产品的保证期限,将在原保证期限结束时终止
。
在返回给
EIZO 和经销商进行修理后,任何产品的任何媒体或任何部件中储存的数据或其他信息发生任何损坏或损失
,
对
此
EIZO 和经销商将不承担责任
。
对于本产品及其质量
、性能、
可销售性以及对于特殊用途的适合性,EIZO 和经销商不提供其他任何明示或暗示的保证
。
因
使用本产品或无法使用本产品或因与本产品有任何关系
(
无论是否根据合同)而造成 : 任何附带的、间接的、特殊的
、
随
之发生的或其他的损害
(
包括但不仅限于:利润损失、业务中断、业务信息丢失或其他任何金钱损失)以及侵权行为、过失
、
严格赔偿责任或其他责任
,
即使已经向 EIZO 和经销商提出了发生这些损害的可能性,对此 EIZO 和经销商概不承担责任
。
本免责条款还包括因第三方向原买方提出索赔而可能发生的任何责任
。
本条款的本质是限定由于本有限责任保证书和 /
或
销售本产品所发生的
EIZO 和经销商的潜在责任
。
Page 73

English Deutsch
xi
Recycling Information / Informationen zum Thema Recycling
Recycling Information /
Informationen zum Thema Recycling
Recycling Information
This product, when disposed of, is supposed to be collected and recycled according to your country’s
legislation to reduce environmental burden. When you dispose of this product, please contact a distributor or
an af liate in your country.
The contact addressees are listed on the EIZO website below.
http://www.eizoglobal.com
For recycling information for customers in Switzerland, please refer to the following website.
http://www.swico.ch
Informationen zum Thema Recycling
Dieses Produkt muss gemäß den Vorschriften Ihres Landes zur Entlastung der Umwelt recyclet werden.
Wenden Sie sich bei der Entsorgung dieses Produkts an einen Verteiler oder eine Tochtergesellschaft in
Ihrem Land.
Die Adressen zur Kontaktaufnahme sind auf der unten angegebenen Website von EIZO aufgeführt.
http://www.eizoglobal.com
Kunden in der Schweiz entnehmen Informationen zum Recycling der folgenden Website:
http://www.swico.ch
Informations sur le recyclage
Ce produit doit être jeté aux points de collecte prévus à cet effet et recyclé conformément à la législation de
votre pays, a n de réduire l’impact sur l’environnement. Lorsque vous jetez ce produit, veuillez contacter un
distributeur ou une société af liée de votre pays.
Les adresses des distributeurs sont répertoriées sur le site Web EIZO ci-dessous.
http://www.eizoglobal.com
Pour les clients en Suisse, veuillez consulter le site Web suivant afin d’obtenir des informations sur le
recyclage.
http://www.swico.ch
Información sobre reciclaje
Este producto debe desecharse y reciclarse según la legislación del país para reducir el impacto
medioambiental. Cuando desee deshacerse de este producto, póngase en contacto con un distribuidor o
una lial de su país.
Encontrará las direcciones de contacto en el sitio web de EIZO que se indica a continuación.
http://www.eizoglobal.com
Informazioni sul riciclaggio
Per lo smaltimento e il riciclaggio del presente prodotto, attenersi alle normative vigenti nel proprio paese per
ridurre l’impatto ambientale. Per lo smaltimento, rivolgersi ad un distributore o un af liato presenti nel proprio
paese.
Gli indirizzi sono elencati nel sito Web EIZO riportato di seguito.
http://www.eizoglobal.com
Per informazioni sul riciclaggio per i clienti in Svizzera, consultare il sito Web riportato di seguito.
http://www.swico.ch
Page 74

xii
LIMITED WARRANTY / BEGRENZTE GARANTIE /
有限责任保证书
Återvinningsinformation
När denna produkt kasseras ska den hanteras och återvinnas enligt landets föreskrifter för att reducera
miljöpåverkan. När du kasserar produkten ska du kontakta en distributör eller representant i ditt land.
Kontaktadresserna listas på EIZO-webbplatsen nedan.
http://www.eizoglobal.com
Πληροφορίες ανακύκλωσης
Το προϊόν αυτό, όταν απορρίπτεται, πρέπει να συλλέγεται και να ανακυκλώνεται σύμφωνα με τη νομοθεσία
της χώρας σας έτσι ώστε να μην επιβαρύνει το περιβάλλον. Για να απορρίψετε το προϊόν, επικοινωνήστε με
έναν αντιπρόσωπο ή μια θυγατρική εταιρεία στη χώρα σας.
Οι διευθύνσεις επικοινωνίας αναγράφονται στην τοποθεσία web της EIZO παρακάτω.
http://www.eizoglobal.com
Сведения по утилизации
По истечении срока службы данного продукта его следует принести на сборный пункт и
утилизировать в соответствии с действующими предписаниями в вашей стране, чтобы уменьшить
вредное воздействие на окружающую среду. Прежде чем выбросить данный продукт, обратитесь к
дистрибьютору или в местное представительство компании в вашей стране.
Контактные адреса можно найти на веб-узле EIZO.
http://www.eizoglobal.com
Informatie over recycling
Wanneer u dit product wilt weggooien, moet het uit milieu-overwegingen worden verzameld en gerecycled
volgens de betreffende wetgeving van uw land. Wanneer u dit product wilt weggooien, moet u contact
opnemen met een distributeur of een partner in uw land.
De contactadressen worden vermeld op de volgende EIZO-website.
http://www.eizoglobal.com
Informação sobre reciclagem
Este produto, quando o deitar fora, deve ser recolhido e reciclado de acordo com a legislação do seu país
para reduzir a poluição. Quando deitar fora este produto, contacte um distribuidor ou uma lial no seu país.
Os endereços de contacto estão listados no website do EIZO, abaixo.
http://www.eizoglobal.com
Oplysninger om genbrug
Dette produkt forventes ved bortskaffelse at blive indsamlet og genbrugt i overensstemmelse med
lovgivningen i dit land for at reducere belastningen af miljøet. Når du bortskaffer denne produkt, skal du
kontakte en distributør eller et tilknyttet selskab i dit land.
Adresserne på kontaktpersonerne er angivet på EIZO’s websted nedenfor.
http://www.eizoglobal.com
Kierrätystä koskevia tietoja
Tuote tulee hävittää kierrättämällä maan lainsäädännön mukaisesti ympäristön kuormittumisen
vähentämiseksi. Kun hävität tuotteen, ota yhteyttä jälleenmyyjään tai tytäryhtiöön maassasi.
Yhteystiedot löytyvät EIZOn Internet-sivustolta.
http://www.eizoglobal.com
Page 75

English Deutsch
xiii
Recycling Information / Informationen zum Thema Recycling
Wykorzystanie surowców wtórnych
Ten produkt po zużyciu powinien być zbierany i przetwarzany zgodnie z krajowymi przepisami dotyczącymi
ochrony środowiska. Wyrzucając ten produkt, należy skontaktować się z lokalnym dystrybutorem lub
partnerem. Adresy kontaktowe można znaleźć we wskazanej poniżej witrynie internetowej rmy EIZO.
http://www.eizoglobal.com
Informace o recyklaci
Při likvidaci produktu musí být produkt vyzvednut a recyklován podle zákonů příslušné země, aby
nedocházelo k zatěžování životního prostředí. Zbavujete-li se produktu, kontaktujte distributora nebo
pobočku ve své zemi.
Kontaktní adresy jsou uvedeny na následující webové stránce společnosti EIZO.
http://www.eizoglobal.com
Ringlussevõtu alane teave
Keskkonnakoormuse vähendamiseks tuleks kasutatud tooted kokku koguda ja võtta ringlusse vastavalt teie
riigi seadustele. Kui kõrvaldate käesoleva toote, võtke palun ühendust turustaja või liaaliga oma riigis.
Kontaktisikud on toodud EIZO veebilehel järgmisel aadressil:
http://www.eizoglobal.com
Újrahasznosítási információ
Jelen terméket, amikor eldobjuk, az illető ország törvényei alapján kell összegyűjteni és újrahasznosítani,
hogy csökkentsük a környezet terhelését. Amikor ezt a terméket eldobja, kérjük lépjen kapcsolatba egy
országon belüli forgalmazóval vagy társvállalkozással.
A kapcsolat címei az EIZO alábbi weboldalán találhatók felsorolva:
http://www.eizoglobal.com
Podatki o recikliranju
Ob koncu uporabe odslužen izdelek izročite na zbirno mesto za recikliranje v skladu z okoljevarstveno
zakonodajo vaše države. Prosimo, da se pri odstranjevanju izdelka obrnete na lokalnega distributerja ali
podružnico.
Kontaktni naslovi so objavljeni na spodaj navedenih spletnih straneh EIZO:
http://www.eizoglobal.com
Informácie o recyklácii
Pri likvidácii musí byť tento výrobok recyklovaný v súlade s legislatívou vašej krajiny, aby sa znížilo zaťaženie
životného prostredia. Keď sa chcete zbaviť tohto výrobku, kontaktujte prosím distribútora alebo pobočku vo
vašej krajine.
Zoznam kontaktných adries je uvedený na nasledovnej webovej stránke rmy EIZO:
http://www.eizoglobal.com
Pārstrādes informācija
Utilizējot šo produktu, tā savākšana un pārstrāde veicama atbilstoši jūsu valsts likumdošanas prasībām
attiecībā uz slodzes uz vidi samazināšanu. Lai veiktu šī produkta utilizāciju, sazinieties ar izplatītāju vai
pārstāvniecību jūsu valstī.
Kontaktadreses ir norādītas zemāk minētajā EIZO tīmekļa vietnē.
http://www.eizoglobal.com
Page 76

xiv
Recycling Information / Informationen zum Thema Recycling
关于电子信息产品污染控制标识
本标识根据「电子信息产品污染控制管理办法」,适用于在中华人民共和国销售的电子信息产品。标识中央的
数字为环保使用期限的年数。只要您遵守该产品相关的安全及使用注意事项,在自制造日起算的年限内,不会
产生对环境污染或人体及财产的影响。上述标识粘贴在机器背面。
•
有毒有害物质或元素的名称及含量
部件名称 有毒有害物质或元素
铅
(Pb)
汞
(Hg)
镉
(Cd)
六价铬
(Cr(VI))
多溴联苯
(PBB)
多溴二苯醚
(PBDE)
印刷电路板 × ○ ○ ○ ○ ○
机箱 ○ ○ ○ ○ ○ ○
液晶显示器 × ○ ○ ○ ○ ○
其他 × ○ ○ ○ ○ ○
○:表示该有毒有害物质在该部件所有均质材料中的含量均在 SJ/T 11363-2006 规定的限量要求以下。
×:表示该有毒有害物质至少在该部件的某一均质材料中的含量超出 SJ/T 11363-2006 规定的限量要求。
( 企业可在此处 , 根据实际情況对上表中打“×”的技术原因进行进一步说明 )
Page 77

Page 78

Printed in Japan.
http://www.eizoglobal.com
2nd Edition-December 2014
00N0L855B1
(U.M-FDF2304WIP-3)
Copyright © 2014 EIZO Corporation All rights reserved.
中国苏州市苏州工业园区展业路8号中新科技工业坊5B
Phone: +86 512 6252 0100 Fax: +86 512 6252 1508
153 Shimokashiwano, Hakusan, Ishikawa 924-8566 Japan
Phone: +81 76 277 6792 Fax: +81 76 277 6793
Helmut-Grashoff-Strasse 18, 41179 Mönchengladbach, Germany
Phone: +49 2161 8210210 Fax: +49 2161 8210150
 Loading...