

Page 1
I/B Version
Fax +32 2 359 95 50
081223
Copies of the I/B. Please reproduce them without any
changes except under special instruction from Team
International BELGIUM. The pages must be reproduced and
folded in order to obtain a booklet A5 (+/- 148.5 mm width x
210 mm height). When folding, make sure you keep the good
numbering when you turn the pages of the I/B. Don’t change
the page numbering. Keep the language integrity.
Bodenstaubsauger
Vacuum cleaner
Aspirateur
Stofzuiger
Aspirador
Aspirador
Aspirapolvere
Porszívó
Odkurzacz
Art. Nr. BSS 3000
230 V ~ 2700 W max
Front cover page (first page)
Assembly page 1/1
Page 2
Fax +32 2 359 95 50
Copies of the I/B. Please reproduce them without any
changes except under special instruction from Team
International BELGIUM. The pages must be reproduced and
folded in order to obtain a booklet A5 (+/- 148.5 mm width x
210 mm height). When folding, make sure you keep the good
numbering when you turn the pages of the I/B. Don’t change
the page numbering. Keep the language integrity.
2
SC BSS 3000 - 081223
Assembly page 2/2
Page 3

Fax +32 2 359 95 50
Copies of the I/B. Please reproduce them without any
changes except under special instruction from Team
International BELGIUM. The pages must be reproduced and
folded in order to obtain a booklet A5 (+/- 148.5 mm width x
210 mm height). When folding, make sure you keep the good
numbering when you turn the pages of the I/B. Don’t change
the page numbering. Keep the language integrity.
D
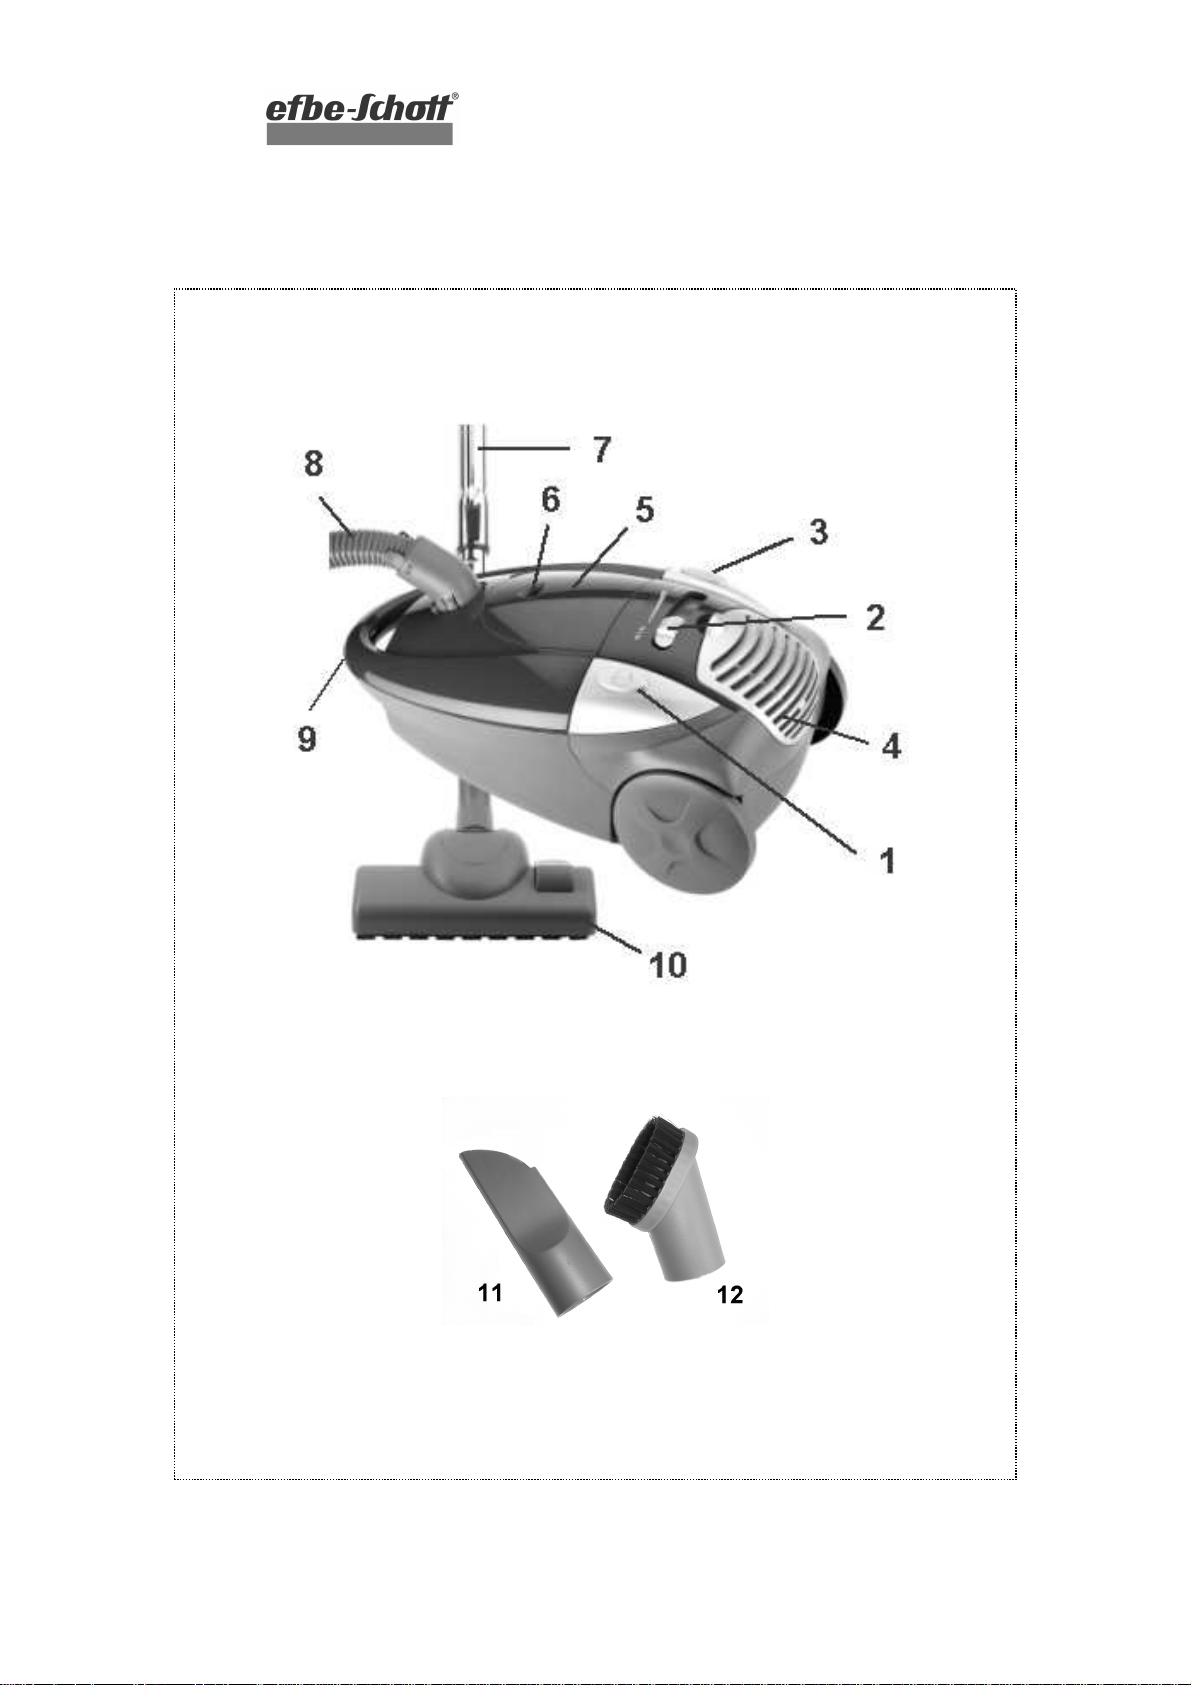
1. Ein-/Aus-Schalter
2. elektronischer Leistungswähler
3. Kabelaufrollung
4. Ausblasgitter mit HEPA-Filter
5. Deckel für Zubehörfach
6. Staubbeutel-Füllstandsanzeige
7. Teleskoprohr
8. Saugschlauch
9. Tragegriff
10. Fußbodendüse
11. schmale Fugendüse
12. Polsterdüse
UK
1. ON/OFF switch
2. Electronic speed control
3. Cord rewind mechanism
4. Air outlet grid with HEPA-filter
5. Lid of the accessory compartment
6. Dust bag level indicator
7. Telescopic tube
8. Flexible hose
9. Handle
10. Floor brush
11. Small crevice tool
12. Upholstery brush
FR
1. Interrupteur Marche/Arrêt
2. Variateur de puissance d'aspiration
3. Bouton de l'enrouleur de câble
4. Grille de sortie d'air avec filtre HEPA
5. Couvercle du compartiment à
accessoires
6. Indicateur de remplissage du sac
7. Tube télescopique
8. Flexible
9. Poignée de transport
10. Suceur combiné
11. Petit suceur plat
12. Brosse pour meubles rembourrés
NL
1. Aan-/uitschakelaar
2. Elektronische zuigkrachtregeling
3. Snoeropwikkelingsknop
4. Luchtuitlaatrooster met HEPA-filter
5. Deksel van het
accessoirecompartiment
6. Aanduiding van de vulling van de
stofzak
7. Telescopische buis
8. Flexibele buis
9. Handvat
10. Vloerborstel
11. Plat zuigstuk
12. Meubelmondstuk
SP
1. Pedal ON/Off
2. Regulador de potencia
3. Pedal recogecables
4. Rejilla de salida de aire con filtro HEPA
5. Tapa del compartimiento de
accesorios
6. Testigo de llenado de la bolsa
7. Tubo telescopico
8. Tubo flexible
9. Asa
10. Cepillo universal
11. Tubo aspiración plano
12. Cepillo para tapicería
P
1. Botão de ligar/desligar (ON/Off)
2. Controlo electrónico da potência
3. Botão do enrolador
4. Grelha da saída do ar com filtro HEPA
5. Compartimento dos acessórios
6. Indicador do saco cheio
7. Tubo telescópico
8. Mangueira
9. Punho
10. Escova universal
11. Tubo para cantos
12. Pequena escova
3
SC BSS 3000 - 081223
Assembly page 3/3
Page 4
Fax +32 2 359 95 50
Copies of the I/B. Please reproduce them without any
changes except under special instruction from Team
International BELGIUM. The pages must be reproduced and
folded in order to obtain a booklet A5 (+/- 148.5 mm width x
210 mm height). When folding, make sure you keep the good
numbering when you turn the pages of the I/B. Don’t change
the page numbering. Keep the language integrity.
I
1. Interruttore ON/OFF
2. Cursore di regolazione elettronica
della potenza aspirante
3. Avvolgicavo
4. Griglia contenente il filtro d’aria HEPA
5. Cofano del scomparto accessori
6. Indicatore di riempimento del sacco
7. Tubo telescopico
8. Tubo flessibile
9. Maniglia di trasporto
10. Spazzola
11. Bocchetta aspirapolvere a lancia per
fessure
12. Spazzolina per imbottiti
HU
1. Be/kikapcsoló
2. Elektronikus teljesítményszabályozó
3. Kábelfeltekercselés
4. Kieresztı rács HEPA-szőrıvel
5. Tetı a tartozéktartóhoz
6. Porzsák telítettség kijelzı
7. Teleszkópos csı
8. Szívócsı
9. Hordófül
10. Padlószívóka
11. Keskeny fúgaszívóka, (rések,
mélyedések tisztítására)
12. Kárpittisztító kefe
PL
1. Włącznik
2. Regulator siły ssania
3. Przycisk zwijania kabla
4. Pokrywa filtra
5. Pokrywa przednia
6. Wskaźnik poziomu zapełnienia
worka
7. Rura teleskopowa
8. WąŜ ssący
9. Uchwyt przenośny
10. Szczotka podłogowa
11. Szczelinówka
12. Szczotka mała
4
SC BSS 3000 - 081223
Assembly page 4/4
Page 5

Copies of the I/B. Please reproduce them without any
changes except under special instruction from Team
International BELGIUM. The pages must be reproduced and
folded in order to obtain a booklet A5 (+/- 148.5 mm width x
210 mm height). When folding, make sure you keep the good
Fax +32 2 359 95 50
WICHTIGE SICHERHEITSVORSCHRIFTEN
Lesen Sie aufmerksam die Gebrauchsanleitung bevor Sie Ihr Gerät benutzen.
Alle Tätigkeiten, an und mit diesem Gerät dürfen nur insoweit ausgeführt werden, wie sie in
dieser Gebrauchsanleitung beschrieben sind.
Falls Sie das Produkt einmal an eine andere Person weitergeben möchten, legen Sie bitte
diese Gebrauchsanleitung immer mit dazu.
Kontrollieren Sie, ob die Netzspannung mit der auf dem Gerät vermerkten
Spannung übereinstimmt bevor Sie das Gerät benutzen.
Lassen Sie Ihr Gerät niemals beim Gebrauch unbeaufsichtigt.
Personen (einschließlich Kinder), die aufgrund ihrer physischen,
sensorischen oder geistigen Fähigkeiten oder ihrer Unerfahrenheit oder
Unkenntnis nicht in der Lage sind, das Gerät sicher zu benutzen, sollten
dieses Gerät nicht ohne Aufsicht oder Anweisung durch eine verantwortliche
Personbenutzen.
Kinder sollten beaufsichtigt werden, um sicherzustellen, das sie nicht mit dem Gerät
spielen.
Überprüfen Sie regelmäßig, ob die Anschlussleitung nicht beschädigt ist. Bei Beschädigung
der Anschlussleitung oder des Gerätes letzteres nicht benutzen. Für Reparaturen wenden
Sie sich an einen Fachmann
bzw. erkennbare Beschädigungen aufweist.
Benutzen Sie das Gerät nur zu Haushaltszwecken, wie in der Bedienungsanleitung
angegeben.
Tauchen Sie das Gerät niemals in Wasser oder andere Flüssigkeiten, weder zum Reinigen,
noch zu anderen Zwecken.
Benutzen Sie das Gerät nicht in der Nähe einer Wärmequelle.
Wenn die Anschlussleitung dieses Gerätes beschädigt wird, muss sie durch den Hersteller
oder seinen Kundendienst
Gefährdungen zu vermeiden.
Entfernen Sie den Stecker aus der Steckdose, bevor Sie das Gerät reinigen.
Für Reparaturen wenden Sie sich an einen Fachmann
Benutzen Sie das Gerät nicht im Freien und bewahren Sie es an einem trockenen Platz auf.
Benutzen Sie nur Zubehör, welches vom Lieferanten empfohlen wurde. Anderes Zubehör
stellt eine Gefahr für den Benutzer dar und das Gerät könnte dadurch beschädigt
werden.
Ziehen Sie niemals an der Anschlussleitung, um das Gerät zu bewegen. Achten Sie darauf,
dass die Anschlussleitung nicht irgendwo hängen bleibt und dies zum Fall des Gerätes
führen könnte. Wickeln Sie die Anschlussleitung nicht um das Gerät oder knicken Sie diese
nicht.
Überprüfen Sie, dass der elektronische Leistungsschalter auf «min» gestellt ist, bevor Sie das
Gerät an das Stromnetz anschließen.
Ziehen Sie den Stecker aus der Steckdose, wenn Ihr Gerät nicht benutzt wird oder Sie den
Staubsaugerbeutel oder den Luftfilter ersetzen.
Dieses Gerät ist kein Spielzeug. Achten Sie darauf, dass sich niemand auf das Gerät setzt.
Benutzen Sie Ihr Gerät nicht um Streichhölzer, spitze Gegenstände, Zigaretten,
Zigarettenstummel oder andere brennende Gegenstände aufzusaugen. Benutzen Sie Ihr
Gerät auch nicht auf nassen, mit Zement, feinen oder giftigen Stoffen bedeckten
Oberflächen. Saugen Sie auf keinen Fall Flüssigkeiten mit diesem Gerät auf.
Versuchen Sie nicht die Kabelaufrollautomatik zu reparieren, sondern wenden Sie sich an
einen Fachmann.
(*)
numbering when you turn the pages of the I/B. Don’t change
the page numbering. Keep the language integrity.
(*)
. Benutzen Sie das Gerät auf keinen Fall, wenn es sichtbare
(*)
oder eine ähnlich qualifizierte Person ersetzt werden, um
(*)
.
Back cover page (last page)
Assembly page 5/5
Page 6
Copies of the I/B. Please reproduce them without any
changes except under special instruction from Team
International BELGIUM. The pages must be reproduced and
folded in order to obtain a booklet A5 (+/- 148.5 mm width x
210 mm height). When folding, make sure you keep the good
Fax +32 2 359 95 50
Achten Sie darauf, dass die Saugrohre nicht verstopft sind. Sollte dies nun doch
geschehen, dann schalten Sie erst Ihr Gerät aus, bevor Sie die Saugrohre frei machen.
Achten Sie darauf, dass Sie die Saugöffnung nicht auf Personen oder Tiere richten, und vor
allem nicht in Richtung der Augen oder Ohren.
Benutzen Sie einen defekten Staubsaugerbeutel oder Luftfilter, so kann dies zur
Beschädigungen des Gerätes führen. Überprüfen Sie daher die Qualität und den
korrekten Gebrauch des Staubsaugerbeutels bzw. des Luftfilters.
Benutzen Sie den Staubsauger niemals ohne Staubbeutel!
Saugt Ihr Gerät nicht mehr richtig oder geht die rote Kontrollanzeige an, wechseln Sie den
Staubbeutel, damit das Gerät nicht überhitzt.
(*)
Fachmann: anerkannter Kundendienst des Lieferanten oder des Importeurs, der für derartige
Reparaturen zuständig ist. Für eventuelle Reparaturen wenden Sie sich bitte an diesen
Kundendienst.
HINWEIS
Um eine unnötige Überhitzung des Motors zu vermeiden, schalten Sie das Gerät nach etwa
30 Minuten Dauergebrauch aus und lassen Sie es für ca. 20 min abkühlen. Zwischenzeitlich
können Sie die Filter reinigen (eventuell auswaschen), aber nehmen Sie den Betrieb stets nur
mit trocken Filtern wieder auf! Bitte halten Sie sich an diese Richtlinien und Sie werden lange
Freude an diesem Gerät haben.
ZUSAMMENBAUEN DES STAUBSAUGERS
• Packen Sie das Gerät und alle Zubehörteile aus.
• Stecken Sie das Schlauchende [8]in den Ansaugschacht auf der Oberseite des Gerätes.
Drücken Sie es hinein, bis es einrastet. (Um den Schlauch zu entfernen, drücken Sie die
beiden Rastnasen zusammen und ziehen Sie dann den Schlauch heraus.
• Stecken Sie den Griff vom Schlauch in das Teleskoprohr [7].
• Stecken Sie die gewünschte Bürste oder Düse auf das andere Ende des Teleskoprohres.
• Das Teleskoprohr können Sie Ihrer Größe entsprechend einstellen. Durch Betätigen der
Schiebetaste/Schiebemanschette in Pfeilrichtung Teleskoprohr entriegeln und gewünschte
Länge einstellen. Das Rohr rastet in der gewählten Stellung ein.
• Die Fußbodendüse [10] verfügt über 2 Einstellungsstufen. Sie eignet sich zum täglichen
Reinigen von großen Flächen, harten Böden, glatten Böden oder Teppichböden.
- Stufe mit Bürste drinnen, zum Reinigen von Teppichen
• Geliefert mit folgendem Zubehör (befindet sich unter dem Deckel [5]am Gerät):
GEBRAUCH
• Wenn Ihr Gerät zusammengebaut ist, brauchen Sie nur noch das Kabel heraus zu ziehen,
• Die Saugkraft kann anhand des elektronischen Leistungswählers [2] geregelt werden, aber
- Stufe mit Bürste draußen, zum Reinigen von harten Böden
- Schmale Fugendüse
- Polsterdüse
bis es die gewünschte Länge erreicht hat. Eine gelbe Markierung zeigt die ideale Länge
an. Überschreiten Sie niemals die rote Markierung, da die Kabelaufwicklung Schaden
nehmen kann. Solche Schäden fallen nicht in den Garantieanspruch. Stecken Sie den
Stecker in die Steckdose und schalten Sie das Gerät ein, indem Sie leicht mit Ihrem Fuß
den EIN-/AUS-Schalter [1] drücken.
auch anhand der Saugstärkeregelung am Griff. In diesem Fall können Sie die schwache
Saugkrafteinstellung für Möbel und andere empfindliche Oberflächen benutzen und die
starke Saugkraft für Teppichböden und andere Fußböden.
numbering when you turn the pages of the I/B. Don’t change
the page numbering. Keep the language integrity.
Back cover page (last page)
Assembly page 6/6
Page 7

Copies of the I/B. Please reproduce them without any
changes except under special instruction from Team
International BELGIUM. The pages must be reproduced and
folded in order to obtain a booklet A5 (+/- 148.5 mm width x
210 mm height). When folding, make sure you keep the good
Fax +32 2 359 95 50
NACH DEM GEBRAUCH
• Schalten Sie das Gerät mit der EIN-/AUS-Taste aus.
• Ziehen Sie den Stecker aus der Steckdose.
• Betätigen Sie den Schalter [3] um die Kabelaufrollung in Gang zu setzen und das Kabel so
automatisch aufzuwickeln. Um ein Herumschleudern der Anschlussleitung zu vermeiden,
führen Sie diese nach.
WECHSEL DES STAUBBEUTELS UND REINIGUNG DER FILTER
Das Filtersystem besteht aus: 1 doppelter Motorschutzfilter
Es ist notwendig, die Filter regelmäßig zu reinigen, um Probleme der Betriebsfähigkeit zu
vermeiden.
Staubbeutel
• Die Staubbeutelwechselanzeige gibt Ihnen an, wenn das Auswechseln des Staubbeutels
notwendig ist. Es kann vorkommen, dass der Saugschacht durch einen größeren
Gegenstand blockiert wird, in diesem Fall leuchtet die Staubbeutelwechselanzeige rot
auf. Dies heißt nicht, dass Sie den Staubbeutel wechseln müssen, aber dass Sie einfach
das Teil, das den Saugschacht blockiert, entfernen müssen.
• Schalten Sie das Gerät aus und wechseln Sie den Staubbeutel, wenn die
Staubbeutelwechselanzeige vollständig rot ist.
• Öffnen Sie dazu das Gehäuseoberteil, indem Sie auf die Verriegelungstaste drücken, die
sich zwischen der Ansaugöffnung und dem Tragegriff befindet.
• Entnehmen Sie den Beutel und werfen Sie ihn in den Abfalleimer.
• Gehen Sie umgekehrt vor um einen neuen Staubbeutel in das Fach zu setzen. Beachten
Sie dabei die auf dem Staubbeutel angegebene Pfeilrichtung.
• Achten Sie auf einen korrekten Sitz, dass heißt, dass das Loch im Staubbeutel (Pappe)
deckungsgleich mit dem vom Schlauchanschluss sein muss.
• Schließen Sie den Deckel, indem Sie diesen leicht andrücken.
Motorschutzfilter
Um den Motorschutzfilter zu reinigen, entfernen Sie ihn aus dem Gerät und waschen Sie ihn in
Seifenwasser (ungefähr alle 3 Monate). Bevor Sie ihn erneut einsetzen, lassen Sie ihn vollständig
trocken.
Ausblasfilter
• Der HEPA-Filter garantiert Ihnen saubere Luft während des Saugens. Der Filter ist ungefähr 3
Monate leistungsstark (in Abhängigkeit von der Häufigkeit der Benutzung und des
Verschmutzungsgrades).
• Schalten Sie ihr Gerät aus, öffnen Sie das Gitter an der Hinterseite des Staubsaugers,
indem Sie das Gitter mit leichtem Druck nach hinten schieben und dann anheben. Ziehen
Sie den HEPA-Filter nach oben heraus.
• Reinigen Sie ihn in Seifenwasser.
• Geben Sie ihn nicht in die Spülmaschine und verwenden Sie keinen Haartrockner um ihn
zu trocknen.
• Vergewissern Sie sich, dass der Filter völlig trocken ist, bevor Sie ihn wieder in das Gerät
schieben. Die Gummidichtung zeigt dabei in Richtung des Motors.
• Schließen Sie das Gitter nachdem Sie den Filter wieder in das Gerät gesteckt haben.
numbering when you turn the pages of the I/B. Don’t change
the page numbering. Keep the language integrity.
1 Ausblas-HEPA-Filter, um feine Staubpartikel aufzusaugen.
Back cover page (last page)
Assembly page 7/7
Page 8
Copies of the I/B. Please reproduce them without any
changes except under special instruction from Team
International BELGIUM. The pages must be reproduced and
folded in order to obtain a booklet A5 (+/- 148.5 mm width x
210 mm height). When folding, make sure you keep the good
Fax +32 2 359 95 50
PRAKTISCHE HINWEISE
• Säubern von Treppen und Stufen: Stellen Sie das Gerät in eine vertikale Position.
• Das Gerät bedarf keiner speziellen Instandhaltung, außer dem Wechseln der Filter und des
Staubbeutels.
• Am unteren Teil des Gerätes gibt es eine Parkstation für das Teleskoprohr. Stellen Sie das
Gerät senkrecht um die Halterung vom Teleskoprohr an der Parkstation befestigen zu
können.
• Falls Sie eine Beeinträchtigung beim Saugen feststellen sollten, könnte das an einer
Blockierung im Schlauch oder in dem Saugschacht liegen. Überprüfen Sie dies also als
erstes. Ansonsten sollten Sie das Gerät zur Überprüfung zu einem Fachmann bringen.
STAUBBEUTEL / ERSATZFILTER
Bezüglich des Nachkaufs von Staubbeuteln bzw. Motorschutzfiltern wenden Sie sich bitte an
den Händler, bei dem Sie den Staubsauger gekauft haben oder nehmen Sie Kontakt mit
unserem Kundendienst auf. Ersatz-HEPA-Filter können Sie bei unserem Kundendienst
nachbestellen.
STAUBSAUGERBEUTEL REFERENZ
Swirl (MELITTA): Y 50
UMWELTSCHUTZ – RICHTLINIE 2002/96/EG
Zum Schutz unserer Umwelt und unserer Gesundheit sind Elektro- und Elektronik-Altgeräte nach
bestimmten Regeln zu entsorgen. Dies fordert den Einsatz sowohl des Herstellers bzw.
Lieferanten als auch des Verbrauchers.
numbering when you turn the pages of the I/B. Don’t change
the page numbering. Keep the language integrity.
Aus diesem Grund darf dieses Gerät, wie das Symbol auf dem Typenschild bzw. auf der
Verpackung zeigt, nicht in den unsortierten Restmüll gegeben werden. Der Verbraucher hat
das Recht, dieses Gerät kostenfrei über kommunale Sammelstellen zu entsorgen; von dort aus
wird die spezifische Behandlung, Verwertung bzw. das Recycling gem. den Erfordernissen der
Richtlinie sichergestellt.
GEWÄHRLEISTUNGS- UND GARANTIEBEDINGUNGEN
Für unsere Produkte gelten die gesetzlichen Bestimmungen für Gewährleistungsansprüche.
Innerhalb dieser Zeit werden Mängel, welche auf Material- oder Herstellungsfehlern beruhen,
behoben. Davon ausgeschlossen sind Beschädigungen an zerbrechlichen Teilen, Schäden, die
durch übermäßige Beanspruchung, unsachgemäße Behandlung und Wartung sowie durch
Nichtbeachtung der Gebrauchsanweisung entstehen, Schäden, welche durch Verschleiß oder
infolge normaler Abnützung entstanden sind. Ebenso weisen wir darauf hin, dass die
Gewährleistung bei Fremdeingriff erlischt. Hierbei wird der Verkäufer im Fall eines Schadens
keine Haftung übernehmen.
Sollten Sie einen Mangel feststellen, geben Sie bitte das vollständige Gerät an ihren Händler
bzw. Verkaufsstelle. Gewährleistungsansprüche gelten nur in Verbindung mit dem zugehörigen
Kassenbon bzw. der Kopie einer eventuellen Reparaturrechnung, die bei Inanspruchnahme
der Serviceleistung unbedingt mit vorzulegen sind/ist.
Back cover page (last page)
Assembly page 8/8
Page 9

Copies of the I/B. Please reproduce them without any
changes except under special instruction from Team
International BELGIUM. The pages must be reproduced and
folded in order to obtain a booklet A5 (+/- 148.5 mm width x
210 mm height). When folding, make sure you keep the good
Fax +32 2 359 95 50
Sie haben auch die Möglichkeit, das gesäuberte Gerät mit einer kurzen, gut lesbaren
Fehlerbeschreibung zusammen mit dem Kassenbon in einer frankierten Sendung an unseren
Kundendienst in unserer Firma in Bad Blankenburg zu senden.
Defekte Zubehörteile führen nicht zum Umtausch des Gerätes, sondern werden kostenlos im
Austausch zugesandt. In diesem Fall bitte nicht das Gerät einschicken, sondern nur das defekte
Zubehörteil bestellen! Glasbruchschäden sind grundsätzlich kostenpflichtig.
Sowohl Defekte an Verbrauchszubehör bzw. Verschleißteilen, als auch Reinigung, Wartung
oder der Austausch von Verschleißteilen, fallen nicht unter die Gewährleistung und sind
deshalb kostenpflichtig!
NACH ABLAUF DER GESETZLICHEN GEWÄHRLEISTUNGSFRIST
Reparaturen können kostenpflichtig von entsprechendem Fachpersonal oder Reparaturservice
ausgeführt werden.
numbering when you turn the pages of the I/B. Don’t change
the page numbering. Keep the language integrity.
Back cover page (last page)
Assembly page 9/9
Page 10
Copies of the I/B. Please reproduce them without any
changes except under special instruction from Team
International BELGIUM. The pages must be reproduced and
folded in order to obtain a booklet A5 (+/- 148.5 mm width x
210 mm height). When folding, make sure you keep the good
Fax +32 2 359 95 50
IMPORTANT SAFEGUARDS
Please read these instructions carefully before using the appliance.
Only use the appliance in the way indicated in this instruction manual.
Should you hand over the appliance to another user, make sure to hand over the
instruction manual together with the appliance.
Check that your mains voltage corresponds to that stated on the rating
plate of the appliance before using the appliance.
Never leave the appliance unsupervised when it is being used.
People (including children) who are not able to use the appliance in a
safe way, due to their physical, sensorial or mental capacity or their lack
of experience or knowledge, must never use the appliance without
supervision or instructions of a responsible person.
Close supervision is necessary if children are near the appliance in order to avoid that they
use it as a toy.
From time to time check the appliance and its cord for damages. Never use the
appliance if cord or appliance shows any signs of damage. In that case, all repairs should
be made by a competent qualified electrician(*). Never use the appliance if it shows
visible damage.
Only use the appliance for domestic purposes and in the way indicated in these
instructions.
Never immerse the appliance in water or any other liquid for any reason whatsoever.
Never use the appliance near hot surfaces.
Before cleaning, always unplug the appliance from the power supply.
Never use the appliance outside and always place it in a dry environment.
Never use accessories which are not recommended by the producer. They could constitute
a danger to the user and risk to damage the appliance.
Never move the appliance by pulling the cord. Make sure the cord cannot get caught in
any way. Do not wind the cord around the appliance and do not bend it.
Before plugging in the cord, make sure the electronic speed control is set to the "min"
position.
Unplug the appliance when not in use or when changing the bag or air filter.
This appliance is not a toy, it is not supposed to be sat on.
Never use the appliance to vacuum matches, pointed objects, cigarettes, butts or other
glowing things. Do not use it on wet surfaces or surfaces covered with cement or other
substances that are too fine or even toxic when inhaled. Never vacuum any kind of liquid
with this appliance.
Do not try to repair the winding-on spool yourself. Make sure it is repaired by a competent
qualified electrician
Do not block the vacuum passage. If this should happen by accident, unplug the
appliance before unblocking it.
Make sure not to point the vacuum cleaner at persons or animals, and especially stay
clear of eyes and ears.
If you use the appliance with a damaged dust bag or air filter the appliance might get
damaged. Make sure to check the good quality and placement of the dust bag and/or
filter.
Never use the appliance without dust bag!
If your appliance no longer vacuums correctly or if the dust bag level indicator becomes
red, change the bag or empty the compartment (model with filter) before the appliance
overheats.
numbering when you turn the pages of the I/B. Don’t change
the page numbering. Keep the language integrity.
(*)
.
Back cover page (last page)
Assembly page 10/10
Page 11
Copies of the I/B. Please reproduce them without any
changes except under special instruction from Team
International BELGIUM. The pages must be reproduced and
folded in order to obtain a booklet A5 (+/- 148.5 mm width x
210 mm height). When folding, make sure you keep the good
Fax +32 2 359 95 50
(*)
Competent qualified electrician: after sales department of the producer or importer or any
person who is qualified, approved and competent to perform this kind of repairs in order to
avoid all danger. In any case you should return the appliance to this electrician.
IMPORTANT INFORMATION
To avoid unnecessary overheating of the engine, switch off the appliance after 30 minutes and
let it cool off for appr. 20 minutes. In the meantime you can clean (or wash out) the filters, but
be careful not to use the appliance when the filters are not dry! If you respect these directions,
you will enjoy the use of this appliance for a long time.
ASSEMBLING THE VACUUM CLEANER
• Always remove the plug from the power socket before fitting or removing accessories!
• Insert the connection piece [8] of the flexible hose into hose connection inlet on top the
appliance. Press until it clicks. To remove the flexible hose, press on the two release buttons
of the connection piece and pull it out of the appliance.
• Attach handle of the hose to the telescopic tube [7].
• Fit the desired brush or accessory to the other end of the telescopic tube.
• You can adjust the length of telescopic tube according to your own size. To do so, slide
the release button in the direction of the telescopic tube and set the desired length. The
tube will then block itself automatically in the desired position.
• The floor brush [10] is ideal for the daily cleaning of carpets and hard floors. There are two
settings on the floor brush.
• The vacuum cleaner is delivered with the following accessories:
OPERATIONS
• When your appliance is assembled, you just need to pull out the power cord up to the
desired length. A yellow mark on the power cable shows the ideal cable length. Do not
extend the cable beyond the red mark, as this would damage the cord rewind
mechanism. Should you exceed the red mark, no guarantee claims will be accepted. Put
the plug in the power socket and switch on the appliance by pressing the ON/OFF switch
[1] with your foot.
• You can adjust the suction power with the electronic power regulator [2]or you can also
adjust the suction power by using the wind-force adjuster on the handle. Use a low suction
power for furniture and other delicate surfaces and use high suction power for fitted
carpet and other floors.
AFTER USE
• Stop the vacuum cleaner by pressing the ON/OFF switch.
• Unplug the appliance from the power supply.
• Simply press the cord rewind button [3] down to activate the cable rewind mechanism.
Guide the power word in order to prevent it from becoming entangled.
REPLACING THE DUST BAG AND CLEANING THE FILTERS
The filter system consists of: 1 double Motor filter
Setting with the bristles inside for cleaning carpets.
Setting with the bristles outside for cleaning hard floors.
- Crevice tool
- Upholstery brush.
numbering when you turn the pages of the I/B. Don’t change
the page numbering. Keep the language integrity.
Back cover page (last page)
Assembly page 11/11
Page 12

Copies of the I/B. Please reproduce them without any
changes except under special instruction from Team
International BELGIUM. The pages must be reproduced and
folded in order to obtain a booklet A5 (+/- 148.5 mm width x
210 mm height). When folding, make sure you keep the good
Fax +32 2 359 95 50
1 HEPA air filter, to vacuum the smallest particles
It is necessary to clean the filters regularly to avoid operating problems.
Paper dust bag
• The dust bag level indicator indicates when the dust bag should be replaced.
• The hose might get blocked by a larger object. In this case the dust bag level indicator
will be red. However this does not mean that you have to replace the dust bag. Just
remove the object, which blocks your tube or flexible hose, and your appliance will
function properly again. Do not forget to unplug the appliance before removing the
blocking object. Replace the dust bag when the dust bag level indicator is completely
red.
• Open the front cover by pressing the release button situated between the hose
connection inlet and the handle.
• Remove the dust bag and throw it in the dustbin.
• To put a new dust bag in the appliance, proceed the other way around, taking the
direction indicated on the dust bag into consideration.
• Make sure to put it correctly in the appliance, i.e. make sure that the hole in the dust bag
carton is right across the hose connection inlet.
• Close the front cover by pressing it slightly.
Motor filter
To clean the motor filter, remove it and wash it in soapsuds. (approximately every 3 months).
Let it dry completely before putting it back in the appliance.
Air Filter
• This HEPA-filter guarantees fresh air during cleaning. It should be rinsed clean at least three
times a year or when it becomes visibly solid. Always operate the cleaner with filter
installed, otherwise, reduced suction or motor damage may result.
• Unplug the appliance, open the filter supporting grate situated at the back of the
appliance (apply light pressure to pull the grate backwards and then lift it) and pull the
HEPA-filter upwards.
• Rinse filter in lukewarm water.
• Do not use a dishwasher for rinsing filter nor use hair dryer for drying it.
• Allow the filter to dry completely before replacing it. The rubber seal must face the motor.
• Close the grate back after having replaced the filter.
PRACTICAL HINTS
•
When cleaning stairs, we advise you to keep the unit in a vertical orientation.
•
The vacuum cleaner requires no other regular maintenance other than the filter cleaning
and bag replacement tasks as detailed elsewhere.
•
On the bottom of this appliance, there is a holder on which you can attach the telescopic
tube. Put the appliance in vertical position to be able to attach the tube to the holder.
•
If you notice a loss of suction power, it is probably due to one or a combination of the
following events: blocked filter, full or punctured bag or blockage in tubes. If your
appliance still does not work properly after you have checked those problems, please ask
a qualified electrician for advice.
numbering when you turn the pages of the I/B. Don’t change
the page numbering. Keep the language integrity.
Back cover page (last page)
Assembly page 12/12
Page 13

Copies of the I/B. Please reproduce them without any
changes except under special instruction from Team
International BELGIUM. The pages must be reproduced and
folded in order to obtain a booklet A5 (+/- 148.5 mm width x
210 mm height). When folding, make sure you keep the good
Fax +32 2 359 95 50
SPARE DUST BAGS / FILTERS
In order to get new dust bags or motor filters, please contact first of all the shop where you
bought your vacuum cleaner, or, our customer service. You can order new HEPA filters from our
customer service.
DUST BAG REFERENCE
Swirl (MELITTA): Y 50
PROTECTION OF THE ENVIRONMENT– DIRECTIVE 2002/96/EC
In order to preserve our environment and protect human health, the waste electrical and
electronic equipment should be disposed of in accordance with specific rules with the
implication of both suppliers and users. For this reason, as indicated by the symbol on the
rating label or on the packaging, your appliance should not be disposed of as unsorted
municipal waste. The user has the right to bring it free of charge to a municipal collection point
performing waste recovery by means of reuse, recycling or use for other applications in
accordance with the directive.
TERMS OF GUARANTEE
For our products, the legal terms concerning claims under guarantee are valid. During the
legal period, all material and manufacturing defects are covered. No claims will be accepted
for broken accessories, defects resulting from inappropriate use or care, excessive wear due to
intensive use, wrong use due to the non-observance of the instruction manual, or normal wear
and tear. No guarantee claims will be accepted if the appliance has been modified or if
attempts have been made to repair the appliance. In such case, the vendor cannot be held
responsible in case of accidents.
If you detect a defect, please contact your vendor or shop and return your complete appliance
in its original packaging together with the receipt. Claims under guarantee will only be valid if
the receipt or a copy of a repair bill is handed over with the appliance that needs repair.
Or send the appliance cleaned, well packed and with a short, easily readable description of
the default as well as the receipt freight prepaid to our customer service in our firm in Bad
Blankenburg.
In case of a defective accessory, the complete appliance will not be exchanged, but only the
accessory will be sent free of charge. In such case, do not return the complete appliance but
only order the accessory! In case of glass damages, glass spare parts will be charged.
Pieces undergoing wear and tear as well as cleaning and maintenance or the exchange of
worn out pieces are not covered by the guarantee and will thus be charged!
AFTER THE LEGAL PERIOD OF GUARANTEE
Repairs after the guarantee period can be performed at a charge by a competent qualified
technician or a repair service.
numbering when you turn the pages of the I/B. Don’t change
the page numbering. Keep the language integrity.
Back cover page (last page)
Assembly page 13/13
Page 14

Copies of the I/B. Please reproduce them without any
changes except under special instruction from Team
International BELGIUM. The pages must be reproduced and
folded in order to obtain a booklet A5 (+/- 148.5 mm width x
210 mm height). When folding, make sure you keep the good
Fax +32 2 359 95 50
POUR VOTRE SECURITE
Lisez attentivement la notice avant l’utilisation de votre appareil.
Utilisez l'appareil uniquement pour les usages décrits dans ce manuel.
Si vous transmettez l'appareil à un autre utilisateur, assurez-vous de joindre la notice à
l'appareil.
Avant d’utiliser l’appareil, vérifiez que la tension du réseau correspond
bien à celle inscrite sur la plaque signalétique de l’appareil.
Ne laissez pas l’appareil sans surveillance lorsqu’il est en fonctionnement.
Les personnes (y compris les enfants) qui ne sont pas aptes à utiliser
l'appareil en toute sécurité, soit à cause de leurs capacités physiques,
sensorielles ou mentales, soit à cause de leur manque d'expérience ou de
connaissances, ne peuvent en aucun cas utiliser l'appareil sans surveillance ou les
instructions d'une personne responsable.
Surveillez les enfants afin qu'ils n'utilisent pas l'appareil comme jouet.
Vérifiez régulièrement l’état du cordon d'alimentation et de la fiche. Si le cordon, la fiche
ou l'appareil est endommagé de quelque façon que ce soit, n'utilisez pas l'appareil pas
mais faites-le vérifier et réparer par un service qualifié compétent
l'appareil s'il présente des dommages visibles.
Utilisez l'appareil uniquement pour des usages domestiques et de la manière indiquée dans la
notice.
Ne plongez jamais l'appareil dans l'eau ou dans tout autre liquide ni pour son nettoyage ni
pour toute autre raison.
N'utilisez pas l'appareil près de sources de chaleur.
La prise doit être retirée avant de nettoyer l'appareil.
Veillez à ne pas utiliser l'appareil à l'extérieur et entreposez-le dans un endroit sec.
Ne pas utiliser des accessoires non recommandés par le fabricant, cela peut présenter un
danger pour l’utilisateur et risque d’endommager l’appareil.
Ne déplacez jamais l’appareil en tirant sur le câble. Veillez à ce que le cordon
d’alimentation ne puisse être accidentellement accroché et ce, afin d’éviter toute chute
de l’appareil. Évitez d’enrouler le cordon autour de l’appareil et ne le tordez pas.
Avant de brancher le cordon secteur, vérifiez que le régulateur électronique est bien sur
la position «min».
Débranchez l’appareil lorsqu’il n’est pas en utilisation ou avant de procéder au
changement du sac ou du filtre à air.
Cet appareil n’est pas un jouet, veillez à ce que personne ne se mette dessus.
N’utilisez pas l’appareil pour aspirer des allumettes, des objets pointus, cigarettes, mégots
ou tout autre corps incandescent. Ne l’utilisez pas non plus sur des surfaces mouillées ou
couvertes de ciment ou autres substances trop fines et/ou toxiques à l’inhalation.
N’aspirez aucun liquide avec cet appareil.
Ne tentez pas de réparer vous-même l’enrouleur, faites-le réparer par un service qualifié
compétent
Ne bouchez pas le conduit d’aspiration. Si cela arrive accidentellement, éteignez
d’abord l’appareil avant de le déboucher.
Veillez à ne pas diriger l’embout d’aspiration en direction de personnes ou animaux tout
particulièrement en direction des yeux ou des oreilles.
Toute utilisation avec un sac à poussières ou filtre d’air défectueux peut endommager
l’appareil. Veuillez donc vérifier la bonne qualité et le bon positionnement du sac à
poussières et/ou du filtre.
N'utilisez jamais l'appareil sans sac à poussière!
(*)
.
numbering when you turn the pages of the I/B. Don’t change
the page numbering. Keep the language integrity.
(*)
. N'utilisez jamais
Back cover page (last page)
Assembly page 14/14
Page 15

Copies of the I/B. Please reproduce them without any
changes except under special instruction from Team
International BELGIUM. The pages must be reproduced and
folded in order to obtain a booklet A5 (+/- 148.5 mm width x
210 mm height). When folding, make sure you keep the good
Fax +32 2 359 95 50
Si votre appareil n’aspire plus correctement ou que le témoin rouge s’allume, veuillez
procéder au changement du sac afin de ne pas provoquer une surchauffe de l’appareil.
(*)
Service qualifié compétent: Service après-vente du fabricant ou de l'importateur ou une
personne qualifiée, reconnue et habilitée à faire ce genre de réparation afin d'éviter tout
danger. Dans tous les cas, veuillez retourner l'appareil auprès de ce service.
INFORMATION IMPORTANTE
Pour éviter que le moteur ne surchauffe, éteignez l’appareil après 30 minutes d’utilisation et
laissez-le refroidir pendant environs 20 minutes. Entre temps, vous pouvez nettoyer (ou rincer)
les filtres, mais n’utilisez pas l’appareil si les filtres ne sont pas secs ! Si vous respectez ces
instructions, vous pourrez utiliser votre appareil pendant longtemps.
MONTAGE DE L'APPAREIL
• Déballez votre appareil et tous ses accessoires.
• Connectez l’embout (8) du flexible dans l'orifice situé sur le capot jusqu'au déclic vous
indiquant le blocage. (Pour retirer le flexible, appuyez sur les boutons de déverrouillage de
l'embout de connexion puis tirez).
• Assemblez la crosse du flexible sur le tube télescopique [7].
• Montez la brosse choisie à l'extrémité du tube télescopique.
• La longueur du tube télescopique est réglable en fonction de la taille de l’usager. Pour
cela, faites coulisser sur le bouton de verrouillage en direction du tube télescopique et
ajustez la longueur. Le tube se bloquera à la longueur choisie.
• Le suceur combiné [10] à 2 positions vous permet de nettoyer toutes les surfaces avec une
grande facilité, surfaces lisses ou tapis, moquettes, simplement en changeant la position
de la brosse:
• Livré avec les accessoires suivants :
- un suceur plat
- une brosse pour les meubles rembourrés
UTILISATION
• Lorsque votre appareil est assemblé, tirez sur la prise pour obtenir la longueur de cordon
désirée. Une marque jaune vous indique que vous avez pratiquement déroulé la totalité du
cordon. La marque rouge est la limite maximale à ne pas dépasser. Si vous la dépassez,
cela risque d'endommager l'enrouleur et dans ce cas, la garantie sera caduque. Branchez
votre appareil. Mettez en marche en appuyant légèrement avec votre pied sur
l'interrupteur MARCHE/ARRET [1].
• La puissance d'aspiration peut être ajustée électroniquement à l’aide du bouton de
réglage [2] mais aussi manuellement à la poignée. Vous pouvez utiliser une puissance basse
pour les voilages, les meubles et autres surfaces délicates et un maximum de puissance
pour les tapis et sols.
APRES UTILISATION
• Arrêtez l'appareil en appuyant sur la pédale MARCHE/ARRET.
• Débranchez l'aspirateur.
• Appuyez sur le bouton de l'enrouleur [3] pour activer l'enrouleur de câble qui enroulera le
cordon automatiquement. Guidez le cordon afin qu'il ne s'emmêle pas.
Position brosse rentrée pour tapis et moquettes
Position brosse sortie pour carrelages ou parquets (sols lisses)
numbering when you turn the pages of the I/B. Don’t change
the page numbering. Keep the language integrity.
Back cover page (last page)
Assembly page 15/15
Page 16

Copies of the I/B. Please reproduce them without any
changes except under special instruction from Team
International BELGIUM. The pages must be reproduced and
folded in order to obtain a booklet A5 (+/- 148.5 mm width x
210 mm height). When folding, make sure you keep the good
Fax +32 2 359 95 50
REMPLACEMENT DU SAC EN PAPIER ET NETTOYAGE DES FILTRES
Le système de filtration comprend : un double filtre de protection moteur (dans le bac
Il est nécessaire de changer ces filtres de façon régulière afin d'éviter tout problème de
fonctionnement.
Sac à poussières
• Le témoin de remplissage du sac vous indique quand le remplacement du sac est
nécessaire (il devient rouge). Attention si l'aspiration est bloquée par une grosse pièce ou
autre déchet, ce témoin peut devenir rouge, ne changez pas le sac papier, dégagez la
pièce bloquant l'aspiration. Il est aussi possible que cet indicateur passe au rouge sur une
moquette épaisse par exemple. Par conséquent, il suffit de décoller la brosse de la
surface aspirée et si l’indicateur reste rouge, cela signifie que le sac est plein. Sinon vous
pouvez continuer à travailler.
• Débranchez l'appareil et remplacez le sac papier quand le témoin du remplissage du sac
est complètement rouge.
• Ouvrez le capot de l'appareil en appuyant sur son bouton de déverrouillage qui se trouve
entre l'orifice de connexion du flexible et la poignée de transport.
• Retirez le sac à poussière et mettez-le à la poubelle.
• Pour remettre un sac papier dans l'appareil, procédez inversement en tenant compte
de la direction indiquée sur le sac à poussière.
• Assurez-vous que le sac soit correctement positionné, c'est à dire que l'orifice de sa
cartonnette se trouve en face de l'orifice de connexion du flexible.
• Refermez le capot et appuyez légèrement pour le bloquer.
Filtre moteur
Nettoyage du filtre anti-poussières (tous les 3 mois environ). Sortez le filtre de son logement et
nettoyez-le dans de l'eau savonneuse. Avant de le remettre dans l'appareil, assurez-vous qu'il
soit totalement sec.
Filtre à air
•
Votre filtre HEPA vous garantit un air parfaitement propre lors de l'utilisation de votre
aspirateur. Il reste efficace pendant environ 3 mois (cette période varie selon les utilisations
et il est conseillé de le vérifier régulièrement).
• Débranchez votre appareil, ouvrez la grille contenant le filtre à l'arrière de l'appareil
(appuyez doucement sur la grille pour la tirer en arrière et soulevez-la) et sortez le filtre
HEPA en le tirant vers le haut.
• Nettoyez-le à l'eau tiède savonneuse.
• Ne le mettez jamais au lave-vaisselle et n'utilisez pas de sèche-cheveux pour le sécher.
• Assurez-vous que le filtre soit entièrement sec avant de le remettre dans l'appareil. Le joint
en caoutchouc doit être orienté vers le moteur.
• Refermez la grille dès que vous avez remis le filtre.
CONSEILS PRATIQUES
• Nettoyage des escaliers et marches: mettez votre appareil en position verticale.
• Votre appareil ne demande pas d'entretien particulier outre le changement des filtres et
sacs papier.
numbering when you turn the pages of the I/B. Don’t change
the page numbering. Keep the language integrity.
poussières)
un filtre à air HEPA pour retenir les particules de poussière
(à l'arrière de l'appareil).
Back cover page (last page)
Assembly page 16/16
Page 17

Copies of the I/B. Please reproduce them without any
changes except under special instruction from Team
International BELGIUM. The pages must be reproduced and
folded in order to obtain a booklet A5 (+/- 148.5 mm width x
210 mm height). When folding, make sure you keep the good
Fax +32 2 359 95 50
• Pour un gain de place et pour faciliter son rangement, un logement est prévu sous votre
appareil pour recevoir la tubulure de votre suceur combiné. Par conséquent, placez votre
aspirateur verticalement et faites glisser la tubulure dans le logement prévu à cet effet.
• Dans le cas où vous remarqueriez un mauvais fonctionnement (diminution de puissance,
bruit anormal, arrêt complet de l'appareil), vérifiez d'abord qu'il n'y a pas de blocage
dans l'aspiration au niveau du tube ou du flexible et sinon apportez votre appareil pour
vérification ou réparation dans un centre agréé.
SACS / FILTRES DE RECHANGE
Pour tout renouvellement du sac ou du filtre moteur, veuillez vous adresser en premier lieu dans
le magasin où vous avez acheté votre aspirateur ou, à défaut, à notre service clientèle. Pour
commander de nouveaux filtres HEPA, adressez-vous également à notre service-clientèle.
REFERENCE DES SACS
Swirl (MELITTA): Y 50
PROTECTION DE L’ENVIRONNEMENT – DIRECTIVE 2002/96/CE
Afin de préserver notre environnement et notre santé, l’élimination en fin de vie des appareils
électriques et électroniques doit se faire selon des règles bien précises et nécessite l’implication
de chacun, qu’il soit fournisseur ou utilisateur. C’est pour cette raison que votre appareil, tel que
numbering when you turn the pages of the I/B. Don’t change
the page numbering. Keep the language integrity.
le signale le symbole apposé sur sa plaque signalétique ou sur l'emballage, ne doit en
aucun cas être jeté dans une poubelle publique ou privée destinée aux ordures ménagères.
L'utilisateur a le droit de déposer l'appareil gratuitement dans des lieux publics de collecte
procédant à un tri sélectif des déchets pour être soit recyclé, soit réutilisé pour d’autres
applications conformément à la directive.
CONDITIONS DE GARANTIE
Pour nos produits, les conditions légales concernant les réclamations dans le cadre de la
période de garantie sont d’application.
Pendant la période légale, les vices de fabrication et de matériaux sont couverts. Ne sont pas
couverts par la garantie : les bris de pièces ou d’accessoires, les défauts liés à un usage ou
entretien détourné de l’appareil, à des usures excessives résultant d’usages intensifs et à tout
autre usage contraire aux instructions fournies. La garantie devient caduque lorsque le produit
a été modifié ou des tentatives de réparation ont visiblement été faites. Ces manipulations
dégagent dans le même temps la responsabilité du vendeur en cas d’accidents.
Si vous constatez un défaut, adressez-vous à votre revendeur ou au magasin et retournez
l'appareil complet dans son emballage d'origine ainsi que le ticket de caisse. Les réclamations
introduites dans le cadre de la garantie sont uniquement valables si le ticket de caisse ou la
copie d’une facture de réparation éventuelle est joint(e).
Ou envoyez l'appareil nettoyé, bien emballé et dûment affranchi avec une courte description
du défaut en majuscules à notre service après-vente dans notre firme à Bad Blankenburg en
joignant également votre ticket de caisse.
Si des accessoires sont défectueux, l'appareil complet ne sera pas remplacé, mais les
accessoires seront échangés gratuitement. Dans ce cas, ne renvoyez donc pas l'appareil
Back cover page (last page)
Assembly page 17/17
Page 18

Copies of the I/B. Please reproduce them without any
changes except under special instruction from Team
International BELGIUM. The pages must be reproduced and
folded in order to obtain a booklet A5 (+/- 148.5 mm width x
210 mm height). When folding, make sure you keep the good
Fax +32 2 359 95 50
complet mais commandez seulement l'accessoire défectueux! En cas de verre cassé, le
remplacement de l'accessoire concerné est payant. L'échange des accessoires soumis à
l'usure ainsi que le nettoyage et l'entretien ou l'échange de pièces usées ne sont pas couverts
par la garantie et l'échange de ces pièces sera donc payant!
APRES LA PERIODE LEGALE DE GARANTIE
numbering when you turn the pages of the I/B. Don’t change
the page numbering. Keep the language integrity.
LES REPARATIONS APRES LA PERIODE DE GARANTIE PEUVENT ETRE EFFECTUEES PAR UN SERVICE
QUALIFIE COMPETENT OU PAR UN SERVICE DE REPARATION MOYENNANT PAYEMENT.
Back cover page (last page)
Assembly page 18/18
Page 19

Copies of the I/B. Please reproduce them without any
changes except under special instruction from Team
International BELGIUM. The pages must be reproduced and
folded in order to obtain a booklet A5 (+/- 148.5 mm width x
210 mm height). When folding, make sure you keep the good
Fax +32 2 359 95 50
BELANGRIJKE VEILIGHEIDSVOORSCHRIFTEN
Lees de gebruiksaanwijzing aandachtig vooraleer u uw toestel gebruikt.
Het toestel mag enkel gebruikt worden zoals in deze gebruiksaanwijzing beschreven is.
Wanneer u dit toestel aan een andere gebruiker overhandigt, gelieve altijd deze
gebruiksaanwijzing bij te sluiten.
Controleer of de netspanning overeenkomt met deze van het toestel
vooraleer u het gebruikt.
Laat het toestel nooit onbeheerd achter bij gebruik.
Personen (kinderen inbegrepen) die wegens hun fysieke, sensoriële of
mentale capaciteiten, of wegens hun gebrek aan ervaring of kennis, het
toestel niet veilig kunnen gebruiken, mogen dit toestel niet zonder toezicht
of instructies van een verantwoordelijke persoon gebruiken.
Hou kinderen goed in het oog om te vermijden dat ze met het toestel spelen.
Controleer regelmatig of het toestel niet beschadigd is en gebruik het niet indien het
snoer of het toestel zelf enige beschadiging zouden vertonen maar laat het nakijken en
herstellen door een bekwame gekwalificeerde dienst
zichtbare schade vertoont.
Gebruik het toestel enkel voor huishoudelijk gebruik en op de wijze zoals vermeld in de
gebruiksaanwijzing.
Dompel het toestel nooit onder in water of in enige andere vloeistof, noch om het te
reinigen, noch om welke andere reden ook.
Gebruik het toestel niet in de nabijheid van warmtebronnen.
Trek de stekker uit het stopcontact vooraleer u het toestel reinigt.
Gebruik het toestel niet buiten en berg het op in een droge plaats.
Gebruik geen toebehoren die niet door de fabrikant aanbevolen werden. Dit kan
gevaarlijk voor de gebruiker zijn en het toestel beschadigen.
Trek nooit aan het snoer om het toestel te verplaatsen. Zorg dat het elektriciteitssnoer
nergens kan achterhaken en daardoor de val van het toestel veroorzaken. Draai het
snoer niet rond het toestel en plooi het niet.
Controleer of de elektronische zuigkrachtregelaar op de positie «min» staat vooraleer de
stekker in het stopcontact te steken.
Trek de stekker uit het stopcontact indien het toestel niet in werking is of vooraleer de zak
of de luchtfilter te vervangen.
Dit toestel is geen speelgoed. Zorg ervoor dat niemand er zich op neerzet.
Gebruik het toestel niet om lucifers, scherpe voorwerpen, sigaretten, peukjes of andere
brandbare voorwerpen op te zuigen. Gebruik het evenmin voor natte oppervlakken, voor
oppervlakken bedekt met cement of andere zeer fijne of giftige stoffen. Zuig geen
vloeistoffen op met dit toestel.
Tracht het oprolmechanisme niet zelf te herstellen, laat dit door een bekwame
gekwalificeerde dienst repareren.
Zorg dat de zuigslang niet verstopt geraakt. Indien dit per ongeluk toch gebeurt, schakel
dan het toestel uit alvorens hem te ontstoppen.
Let erop dat u de zuigopening niet op personen of dieren richt, vooral niet in de richting
van de ogen of oren.
Ieder gebruik van een defecte stofzuigzak of luchtfilter kan het toestel beschadigen.
Controleer dus de kwaliteit en de juiste plaatsing van de stofzuigzak en/of de luchtfilter.
Als uw toestel niet meer correct zuigt of als het verklikkerlampje rood oplicht, vervang dan
de zak of ledig het vak (filtermodel) om oververhitting van het toestel te voorkomen.
numbering when you turn the pages of the I/B. Don’t change
the page numbering. Keep the language integrity.
(*)
. Gebruik het toestel niet indien het
(*)
Back cover page (last page)
Assembly page 19/19
Page 20

Copies of the I/B. Please reproduce them without any
changes except under special instruction from Team
International BELGIUM. The pages must be reproduced and
folded in order to obtain a booklet A5 (+/- 148.5 mm width x
210 mm height). When folding, make sure you keep the good
Fax +32 2 359 95 50
(*)
Bekwame gekwalificeerde dienst: klantendienst van de fabrikant of de invoerder, die erkend
en bevoegd is om dergelijke herstellingen te doen zodat elk gevaar vermeden wordt. Gelieve
het toestel bij problemen naar deze dienst terug te brengen.
GEBRUIKSINTERVAL
Om een onnodige oververhitting van de motor te vermijden, dient u het apparaat na
ongeveer 30 minuten gebruik uit te schakelen en het gedurende ca. 20 minuten af te laten
koelen. Intussen kunt u de filters schoonmaken (en eventueel uitwassen), maar herneem nooit
het gebruik als de filters niet droog zijn! Als u zich aan deze richtlijnen houdt, zult u lang
vreugde beleven aan dit apparaat.
MONTAGE VAN HET APPARAAT
• Pak het apparaat en alle toebehoren uit.
• Klik het aansluitstuk [8] van de flexibele buis vast in het aansluitpunt op het deksel van het
toestel, tot het vastklemt. (Om de flexibele buis te verwijderen, druk eerst op de
ontgrendelingsknoppen en trek vervolgens aan de buis).
• Steek de handgreep van de flexibele buis in de telescopische buis[7].
• Monteer een borstel naar keuze aan het uiteinde van de buis.
• De lengte van de telescopische buis kunt u voor meer gebruikscomfort aanpassen aan
uw grootte. Schuif daartoe de ontgrendelingsknop in de richting van de telescopische
buis. Schuif dan de buis tot de gewenste lengte; de buis zal zich op de gewenste lengte
blokkeren.
• De vloerborstel [10] heeft 2 standen. Daarmee kan U heel gemakkelijk alle oppervlakken
reinigen door eenvoudigweg de stand van de borstel te wijzigen: effen oppervlakken,
vaste vloerbedekkingen of tapijten.
Stand met borstel buiten voor stenen vloeren of parket (effen vloeren)
• Het apparaat is voorzien van de volgende accessoires:
GEBRUIK
• Zodra het toestel gemonteerd is, moet u enkel nog op de gewenste lengte uittrekken. Een
• De zuigkracht kan elektronisch geregeld worden door middel van de elektronische
NA GEBRUIK
• Stop het apparaat door op het pedaal AAN/UIT te drukken.
• Trek de stekker uit het stopcontact.
• Druk op de knop van het snoeropwikkelingssysteem [3] zodat het snoer automatisch
Stand met borstel buiten voor tapijten en vaste vloerbedekkingen
- een plat zuigstuk
- een meubelmondstuk
gele markering duidt de ideale lengte aan. Nooit verder trekken dan de rode markering,
daar dit het snoeropwikkelingssysteem zou kunnen beschadigen. Indien u de rode
markering overschrijdt, vervalt de garantie. Steek de stekker in het stopcontact. Schakel
het toestel in door met de voet lichtjes op de AAN/UIT-schakelaar [1]te drukken.
zuigkrachtregelaar [2] maar ook via de zuigkrachtregelaar dat zich op de handgreep
bevindt. U kan een laag vermogen gebruiken voor delicate stoffen en meubels en een
maximum vermogen voor tapijten en vloeren.
opgerold wordt. Leid het snoer om te vermijden dat het in de knoop raakt.
numbering when you turn the pages of the I/B. Don’t change
the page numbering. Keep the language integrity.
Back cover page (last page)
Assembly page 20/20
Page 21

Copies of the I/B. Please reproduce them without any
changes except under special instruction from Team
International BELGIUM. The pages must be reproduced and
folded in order to obtain a booklet A5 (+/- 148.5 mm width x
210 mm height). When folding, make sure you keep the good
Fax +32 2 359 95 50
VERVANGING VAN DE STOFZAK EN REINIGING VAN DE FILTERS
Het filtersysteem omvat : Een dubbele beschermingsfilter voor de motor
Het is noodzakelijk dat de filters regelmatig gereinigd of vervangen worden om
werkingsproblemen te vermijden.
Stofzak
• Een kijkspleet zal aanduiden dat de stofzak vol is en dient vervangen te worden.
Opgepast: indien de zuigkracht wordt geblokkeerd door een groot voorwerp of door
afval, kan de kijkspleet rood kleuren. Vervang de zak dan niet, maar verwijder het stuk dat
de zuigkracht blokkeert. Zet de motor af, wanneer de kijkspleet helemaal rood gekleurd is.
• Open het deksel van het toestel door op de ontgrendelingstoets, die zich tussen het
aansluitpunt van de flexibele buis en het handvat bevindt, te drukken.
• Verwijder de stofzak en doe hem in de vuilbak.
• Plaats een nieuwe papieren stofzak in het toestel door omgekeerd te werk te gaan en
hou hierbij rekening met de richting die op de stofzak aangeduid is.
• Zorg ervoor dat de stofzak goed geplaatst is, i.e. dat de opening in het karton van de
stofzak zich rechtover de aansluiting van de flexibele buis bevindt.
• Sluit het deksel en duw even om het te blokkeren.
Beschermingsfilter voor de motor
Om deze beschermingsfilter te reinigen (ongeveer alle 3 maanden) dient u hem uit het toestel
te verwijderen en in een zeepsop onder te dompelen. Zorg ervoor dat de filter volledig droog is
vooraleer u hem weer in het toestel plaatst.
Luchtfilter
• De HEPA-filter garandeert U volkomen zuivere lucht bij het gebruik van uw stofzuiger. Hij
blijft doeltreffend gedurende ongeveer 3 maanden.
• Om de filter te vervangen of te reinigen, zet dan de motor van het toestel af, open het
roostertje dat de filter bevat (aan de achterkant van de stofzuiger) door het voorzichtig
achterwaarts te trekken en het op te heffen. Trek dan de HEPA-filter omhoog.
• Reinig de filter in een lauwwarme zeepsop.
• Plaats hem nooit in de vaatwasmachine en droog hem nooit af met een haardroger.
• Zorg ervoor dat de filter volledig droog is vooraleer u hem weer in het toestel plaatst. De
rubberen dichting moet naar de motor gericht zijn.
• Sluit het roostertje nadat u de filter teruggeplaatst hebt.
PRAKTISCHE TIPS
• Reiniging van trappen: plaats uw apparaat verticaal.
• Uw apparaat vraagt geen bijzonder onderhoud buiten de vervanging van de stofzakken
en de reiniging van de filters.
• Uw apparaat is met een parkeersysteem voor de buis uitgerust dat zich aan de onderkant
van de stofzuiger bevindt. Om dit systeem te gebruiken dient u het apparaat verticaal te
plaatsen.
• Ingeval U een slechte werking opmerkt (vermindering van zuigkracht, abnormaal geluid,
compleet stoppen van het apparaat), kijk dan eerst of er geen blokkering in de buis of in de
flexibele buis is. Zoniet, breng uw apparaat dan voor onderzoek of herstelling naar een
erkend technicus.
numbering when you turn the pages of the I/B. Don’t change
the page numbering. Keep the language integrity.
Een HEPA- luchtfilter om de kleinste stofdeeltjes tegen te houden.
Back cover page (last page)
Assembly page 21/21
Page 22

Copies of the I/B. Please reproduce them without any
changes except under special instruction from Team
International BELGIUM. The pages must be reproduced and
folded in order to obtain a booklet A5 (+/- 148.5 mm width x
210 mm height). When folding, make sure you keep the good
Fax +32 2 359 95 50
NIEUWE STOFZAKKEN / FILTERS
Om nieuwe stofzakken of motorfilters te verkrijgen, gelieve u tot de winkel te wenden waar u
uw stofzuiger gekocht hebt of tot onze klantendienst. Om nieuwe HEPA filters te bestellen,
gelieve zich te wenden tot onze klantendienst.
REFERENTIE VAN DE STOFZAKKEN
Swirl (MELITTA): Y 50
MILIEUBESCHERMING – RICHTLIJN 2002/96/EG
Om ons milieu en onze gezondheid te beschermen, moet afgedankte elektrische en
elektronische apparatuur in overeenstemming met welbepaalde regels weggegooid worden.
Dit vergt zowel de inzet van de leveranciers als van de gebruikers. Om deze reden mag uw
numbering when you turn the pages of the I/B. Don’t change
the page numbering. Keep the language integrity.
apparaat, zoals op het typeplaatje of op de verpakking aangegeven door het symbool ,
niet met het gewone huisvuil weggegooid worden. De gebruiker heeft het recht het toestel
gratis naar een gemeentelijk centrum van gescheiden inzameling te brengen waar het
overeenkomstig de richtlijn hergebruikt, gerecycleerd of voor andere doeleinden gebruikt zal
worden.
GARANTIEVOORWAARDEN
Voor onze producten gelden de wettelijke bepalingen wat betreft aanspraken op de
waarborg. Tijdens de wettelijke periode worden materiaal- of fabrieksfouten gedekt. Op de
waarborg kan geen aanspraak worden gemaakt voor breekbare onderdelen, of voor
defecten ten gevolge van gebruik voor verkeerde doeleinden of van slecht onderhoud, van
overmatige slijtage door intensief gebruik, of van foutief gebruik wegens de niet-naleving van
de gebruiksaanwijzing, of voor defecten ten gevolge van normale slijtage. Op de waarborg
kan ook geen aanspraak worden gemaakt indien het toestel gewijzigd werd of indien er
pogingen tot herstelling werden uitgevoerd. In dit geval kan de verkoper ook niet
aansprakelijk worden gehouden in geval van ongevallen.
Indien u een defect vaststelt, gelieve contact op te nemen met de verkoper of winkel waar u
het toestel gekocht hebt en overhandig het volledige toestel in zijn oorspronkelijke verpakking
samen met uw kasticket. Aanspraken op de garantie gelden enkel indien het kasticket of een
kopie van een eventuele herstelfactuur bijgesloten wordt.
Of stuur uw toestel gereinigd, goed verpakt en gefrankeerd met een korte, duidelijk leesbare
beschrijving van de defecten samen met het kasticket naar onze klantendienst in onze fabriek
in Bad Blankenburg.
Defecte accessoires leiden niet tot het omruilen van het toestel, maar worden gratis
vervangen. Gelieve in dit geval niet het toestel terug te sturen, maar enkel de defecte
accessoires. Gebroken glas kan mits betaling vervangen worden.
Accessoires die defect zijn wegens slijtage evenals reiniging, onderhoud of het vervangen van
onderdelen die aan slijtage onderhevig zijn, worden niet door de waarborg gedekt en moeten
dus betaald worden!
NA AFLOOP VAN DE WETTELIJKE GARANTIEPERIODE
Herstellingen na afloop van de garantieperiode kunnen mits betaling door bekwame
gekwalificeerde vaklui of herstellingsdiensten uitgevoerd worden.
Back cover page (last page)
Assembly page 22/22
Page 23

Copies of the I/B. Please reproduce them without any
changes except under special instruction from Team
International BELGIUM. The pages must be reproduced and
folded in order to obtain a booklet A5 (+/- 148.5 mm width x
210 mm height). When folding, make sure you keep the good
Fax +32 2 359 95 50
numbering when you turn the pages of the I/B. Don’t change
the page numbering. Keep the language integrity.
CONSEJOS DE SEGURIDAD
Lea detenidamente el modo de empleo antes de utilizar de su aparato.
Antes de utilizar el aparato, compruebe que el voltaje de la red eléctrica coincide con el
del aparato.
No deje nunca su aparato sin vigilancia cuando esté en marcha. No lo deje
al alcance de los niños ni al de personas no responsables.
Compruebe de vez en cuando que el cable no esté dañado. No utilice su
aparato sí el cable o el aparato están dañados por el motivo que sea.
Utilice el aparato solamente para usos domésticos y de la manera indicada
en el modo de empleo.
No sumerja nunca el aparato en el agua o en cualquier otro líquido ni para su limpieza ni
por cualquier otra razón.
No utilice el aparato cerca de fuentes de calor.
Si el cable está dañado, debe ser reemplazado por un servicio cualificado competente(∗)o
por una persona similarmente cualificada para evitar todo peligro.
La clavija eléctrica debe ser desenchufada antes de limpiar el aparato.
Cualquier reparación debe ser realizada por un servicio técnico cualificado(∗).
Procure no utilizar el aparato en el exterior y colóquelo en un sitio seco.
No utilice accesorios no recomendados por el fabricante, ello puede entrañar un riesgo
para el usuario y puede dañar el aparato.
No mueva nunca el aparato estirando del cable. Procure que el cable no se enganche
en algún saliente, a fin de evitar posibles caídas del mismo. Evite enrollar el cable
alrededor del aparato y no lo tuerza.
Antes de enchufar el aparato compruebe que el selector de potencia está en la posición
“min”.
Desenchufe el aparato cuando no lo utilice o antes de proceder al cambio de la bolsa o
del filtro de aire.
Este aparato no es un juguete, procure que nadie se suba encima.
No utilice el aparato para aspirar cerillas, objetos puntiagudos, cigarrillos, colillas u otros
cuerpos incandescentes. No lo utilice asimismo sobre superficies mojadas o cubiertas de
cemento u otras substancias muy finas y/o tóxicas para su inhalación. No aspire ningún
liquido con ese aparato.
No intente reparar por su cuenta el enrolla-cables, hágalo verificar por un servicio técnico
cualificado(*).
No obstruya el conducto de aspiración, si ocurriera accidentalmente, apague el aparato
antes de desobstruirlo.
No dirija nunca el tubo de aspiración hacia las personas o animales, particularmente en
dirección a los ojos u orejas.
Cualquier utilización con una bolsa de aspiración o filtro defectuoso puede dañar el
aparato. Compruebe por lo tanto la calidad de la bolsa y su correcta colocación.
No utilice nunca su aparato sin bolsa.
Si su aspirador no aspira correctamente o el testigo luminoso rojo se enciende, proceda al
cambio de la bolsa o vaciado del compartimiento (modelos con filtro) para no provocar
una sobrecarga en el aparato.
(∗)
Servicio técnico cualificado. Servicio técnico del fabricante o importador o de una persona
cualificada, reconocida y habilitada a fin de evitar cualquier peligro. En cualquier caso
devuelva el aparato al servicio técnico.
Back cover page (last page)
Assembly page 23/23
Page 24

Copies of the I/B. Please reproduce them without any
changes except under special instruction from Team
International BELGIUM. The pages must be reproduced and
folded in order to obtain a booklet A5 (+/- 148.5 mm width x
210 mm height). When folding, make sure you keep the good
Fax +32 2 359 95 50
INFORMACIÓN IMPORTANTE
Para evitar el sobrecalentamiento del motor, apague el aparato después de 30 minutos de
uso y déjelo enfriar durante unos 20 minutos. Entretanto puede limpiar (o pasar por agua) los
filtros. ¡ Pero no utilice el aparato si los filtros no están secos! Si respeta esas instrucciones, la
vida útil de su aparato será prolongada.
MONTAJE DEL APARATO
• Desembalar el aparato y todos sus accesorios.
• Insertar el tubo flexible [8] en el orificio de conexión hasta que haga clic. (Para retirar el
flexible, presione sobre el botón de bloqueo situado en el tubo y tire).
• Conecte el tubo telescópico [7] a la empuñadura del tubo flexible.
• Monte el cepillo elegido en la extremidad del tubo.
• Puede ajustar la longitud del tubo telescópico, para ello haga deslizar su botón de
bloqueo en dirección del tubo y deslice este hasta la posición deseada. El tubo se
bloqueara en el lugar escogido.
• El cepillo universal [10] tiene dos posiciones que le permiten limpiar todas las superficies con
una gran facilidad, superficies lisas, alfombras, etc. Simplemente cambiando la posición del
cepillo.
Posición cepillo sacado para suelos lisos
Posición cepillo metido para alfombras y moquetas
• Este aparato contiene los siguientes accesorios:
- aspirador rincones / muebles
- cepillo se recomienda para colchones, muebles forrados, sofás, tapicerías
MODO DE EMPLEO
• Cuando su aparato este completamente montado, estire del cable hasta obtener la
longitud deseada. Una señal amarilla indica la longitud ideal. Una señal roja indica la
longitud limite, no estire nunca mas allá de esta señal. Si depasa esta señal, el
recogecables puede estropearse y en ese caso el arreglo no entra dentro d la garantía.
Conecte su aparato a la red. Ponerlo en marta presionando con el pie sobre el pedal
/Interruptor de OFF/ON [1].
• La potencia de aspiración se regula electrónicamente con el regulador de potencia [2]
pero también manualmente desde el asa. Puede utilizar una potencia suave para aspirar
tejidos delicados y muebles tapizados y una potencia superior o fuerte para aspirar el
suelo.
DESPUES DEL USO
• Pare el aparato presionando el pedal de OFF/ON.
• Desconecte el aspirador.
• Presione el botón recogecables [3] para enrollarlo automáticamente. Ayude al cordón
pare evitar que se enrolle mal.
EMPLAZAMIENTO DE LA BOLSA Y SISTEMAS DE FILTRADO
El sistema de filtración contiene: Un filtro protector del motor
Es necesario cambiar los filtros de manera regular a fin de evitar fallos de funcionamiento.
numbering when you turn the pages of the I/B. Don’t change
the page numbering. Keep the language integrity.
Un filtro HEPA para retener las partículas de polvo
Back cover page (last page)
Assembly page 24/24
Page 25

Copies of the I/B. Please reproduce them without any
changes except under special instruction from Team
International BELGIUM. The pages must be reproduced and
folded in order to obtain a booklet A5 (+/- 148.5 mm width x
210 mm height). When folding, make sure you keep the good
Fax +32 2 359 95 50
Bolsa de residuos
• Cuando la bolsa de residuos esta llena, la potencia de su aspirador disminuye, esto indica
que debe cambiar la bolsa. Compruebe que su aparato no este bloqueado por un objeto
grande, esto también provocaría que la potencia disminuyese fuertemente, en este caso
no reemplace la bolsa, quite el objeto que lo bloquea.
• Desconectar el aparato de la red, y reemplace la bolsa.
• Abra la tapa del compartimento de residuos pulsando en el botón de bloqueo que se
encuentra ente el orificio de conexión del flexible y del asa de transporte.
• Saque la bolsa del soporte y tírela sin plegarla a la basura
• Para colocar una bolsa en el aparato proceda a la inversa, teniendo en cuenta
indicando la dirección indicada en la bolsa.
• Compruebe que la bolsa esta colocada correctamente, es decir, que le orificio de su
cartón se encuentre delante del orificio de conexión del flexible.
• Cierre la tapa y presione ligeramente para bloquearla.
Filtro protector del motor
Es necesario limpiar el filtro de manera regular a fin de evitar fallos de funcionamiento.
Saque el filtro y lávelo en agua jabonosa. Antes de volverlo a poner en el aparato asegúrese
de que esta totalmente seco.
Filtro HEPA
•
El filtro HEPA le garantiza un aire perfectamente limpio durante la utilización de su
aspirador, reteniendo las partículas de polvo. Su eficacia dura aproximadamente 3
meses.
•
Desenchufe el aparato, abra el compartimiento del filtro HEPA que se encuentra en la
parte trasera del aparato (presione ligeramente la rejilla, tirela hacia atrás y levántela) y
sáquelo tirando hacia arriba.
• Con el aparato desenchufado, abra el compartimento que contiene el filtro y saquelo
tirando hacia arriba.
• Lávelo con agua jabonosa templada.
• No lo meta ni el lavavajillas ni en la lavadora y no utilice el secador para secarlo.
• Compruebe que el filtro esta completamente seco antes de ponerlo en el aparato. La
juntura en caucho tiene que estar orientada hacia el motor .
• Cierre la rejilla en cuanto haya puesto el filtro.
CONSEJOS PRÁCTICOS
• Limpieza de la escalera: ponga su aparato en posición vertical.
• Para un buen mantenimiento de su aparato, cambie a tiempo el filtro y la bolsa.
• Para facilitar su recogida y ganar sitio, su aparato esta provisto de un sujeta tubo.
Coloque el aspirador verticalmente y posicione el tubo en el lugar previsto para ello.
• Si su aspirador no funciona correctamente (potencia baja, ruido anormal, parada
repentina), compruebe que el tubo o el flexible no están obstruidos. En cualquier otro
caso devuelva el aparato al servicio técnico.
BOLSAS / FILTROS DE RECAMBIO
Para la compra de bolsas y de filtros protectores del motor, diríjase en primer lugar al
establecimiento donde compró su aspirador, o diríjase a nuestro servicio técnico. Para la
compra de filtros HEPA, diríjase a nuestro servicio técnico.
numbering when you turn the pages of the I/B. Don’t change
the page numbering. Keep the language integrity.
Back cover page (last page)
Assembly page 25/25
Page 26

Copies of the I/B. Please reproduce them without any
changes except under special instruction from Team
International BELGIUM. The pages must be reproduced and
folded in order to obtain a booklet A5 (+/- 148.5 mm width x
210 mm height). When folding, make sure you keep the good
Fax +32 2 359 95 50
REFERENCIA DE LAS BOLSAS
Swirl (MELITTA): Y 50
PROTECCIÓN DEL MEDIO AMBIENTE –DIRECTIVA 2002/96/CE
Para poder preservar nuestro medio ambiente y proteger la salud humana, los residuos
eléctricos y equipos electrónicos deberían ser destruidos de acuerdo con unas normas
especificas con la implicación de ambos proveedores y consumidores. Por esta razón, como
indica el símbolo en la placa de datos técnicos, su aparato no debería ser tirado en un
contenedor municipal sino que debería ser devuelto a la tienda, o dejado en un punto de
recolección para ser reciclado o usado para otras aplicaciones conforme a la directiva.
PENSANDO NA VOSSA SEGURANÇA
Antes de utilizar o aparelho leia com sentido de responsabilidade as instruções de
funcionamento.
Antes de ligar o cabo da alimentação à tomada da corrente eléctrica,
certifique-se que esta é igual à indicada na placa sinalética do aparelho.
O aparelho quando em funcionamento não pode ser abandonado e muito
menos quando se tem crianças ou pessoas que necessitem de ser vigidas.
O aparelho nunca deve funcionar com o cabo de alimentação danificado.
O aparelho destina-se ao uso doméstico e tem de respeitar as instruções de
utilização.
O aparelho nunca deve ser mergulhado em líquidos.
numbering when you turn the pages of the I/B. Don’t change
the page numbering. Keep the language integrity.
Back cover page (last page)
Assembly page 26/26
Page 27

Copies of the I/B. Please reproduce them without any
changes except under special instruction from Team
International BELGIUM. The pages must be reproduced and
folded in order to obtain a booklet A5 (+/- 148.5 mm width x
210 mm height). When folding, make sure you keep the good
Fax +32 2 359 95 50
Nunca ponha o aparelho próximo de fontes de calor.
Quando o cabo da alimentação se encontrar danificado, a sua substituição tem de ser
feita por técnicos habilitados(*) ou pessoas qualificados a fim de evitar perigos.
O aparelho ao ser limpo tem de ter o cabo da alimentação retirado da tomada
fornecedora da corrente eléctrica.
Todas as reparações têm de ser feitas em serviços técnicos habilitados, i.e., do fabricante,
do importador ou por pessoas credenciadas(*).
O aparelho não deve ser utilizado no exterior da casa e deve ser guardado em locais
secos.
Use sempre os acessórios recomendados pelo fabricante.
Não retire o cabo da alimentação da tomada, puxando pelo mesmo, pois danifica o
aparelho e pode provocar a sua queda. Verifique se o cabo da alimentação se encontra
preso em alguma coisa. Nunca enrole o cabo à volta do aparelho.
Antes de desenrolar o cabo da alimentação verifique se o botão de controlo da potência
se encontra na posição "min".
Tenha o cabo da alimentação retirado da tomada da corrente eléctrica sempre que não
o esteja a utilizar ou quando proceda à substituição do saco do pó ou do filtro do ar.
Nunca permita que se ponham em cima do aparelho.
O aparelho nunca deve aspirar materiais incandescentes. Nunca utilize o aparelho em
superfícies húmidas, cobertas de cimento ou outras substâncias finas ou tóxicas à inalação.
Nunca aspire líquidos com o aparelho.
O enrolador do cabo da alimentação dever ser sempre arranjado por pessoal habilitado
(*).
Se o tubo de aspiração bloquear com a sujidade, desligue de imediato o aparelho e retire
da tomada o cabo da alimentação, e proceda à desobstrução dos tubos.
Nunca dirija a ponteira da aspiração para pessoas ou animais e muito menos para os olhos
e orelhas.
A utilização do aparelho com o saco do pó ou o filtro estragados provocam danos no
aparelho não cobertos pela garantia. Aconselhamos à verificação permanente do estado
saco e da sua boa colocação bem como do filtro.
Nunca utilize o aparelho sem saco do pó.
Caso o aparelho deixe de aspirar ou a luz vermelha do sinalizador do saco cheio se
acender, desligue de imediato o aparelho, retire o cabo da alimentação da tomada e
proceda à substituição do saco do pó. Se o não fizer pode queimar o motor e outros danos
não cobertos pela garantia.
(*)
Serviço técnico habilitado. Serviço técnico do fabricante, do importador ou de pessoas
qualificadas para efectuarem as reparações sem criarem qualquer perigo. Em caso de
avaria contacte o estabelecimento onde comprou o aparelho.
numbering when you turn the pages of the I/B. Don’t change
the page numbering. Keep the language integrity.
Back cover page (last page)
Assembly page 27/27
Page 28

Copies of the I/B. Please reproduce them without any
changes except under special instruction from Team
International BELGIUM. The pages must be reproduced and
folded in order to obtain a booklet A5 (+/- 148.5 mm width x
210 mm height). When folding, make sure you keep the good
Fax +32 2 359 95 50
INFORMAÇÃO IMPORTANTE
Para evitar o sobreaquecimento do motor, desligue o aparelho depois de o utilizar durante 30
minutos e deixe-o arrefecer durante uns 20 minutos. Entretanto pode limpar (ou enxaguar) os
filtros mas nunca utilize o aparelho se os filtros não estiverem secos! Se respeitar estas
instruções, poderá utilizar o seu aparelho durante muito tempo.
MONTAGEM DO ASPIRADOR
• Retire o aparelho da caixa e os acessórios.
• Introduza a ponta da mangueira [8] no orifício e faça a sua fixação através de ligeira
rotação e pressão. (Para retirar o tubo comprima os botões de libertação do encaixe).
• Una o punho ao tubo telescópico [7].
• Coloque a escova ou o acessório pretendido na extremedade do tubo telescópico.
• O comprimento do tubo é ajustável. Para tal, liberte o botão de fixação na direcção do
tubo e ajuste o comprimento para o desejado. O tubo ficará bloqueado no
comprimento escolhido.
• A escova universal [10] com 2 posições, permite limpar fácilmente todo o tipo de
superfícies :
• O aparelho trás:
- um tubo para aspirar cantos
- uma pequena escova
UTILIZAÇÃO
• Assim que o aparelho esteja montado, puxe pelo cabo da alimentação até o
comprimento desejado.A marca amarela do cabo informa que o cabo está todo
desenrolado e a marca vermelha que não pode puxar mais pelo cabo. Se ultrapssar, o
risco é de danificar o enrolador de cabo nesse caso, a garantia não será mais válida. Ligue
o cabo a uma tomada. Ponha o aparelho a funcionar através do interruptor
ligar/desligar”ON/OFF”[1].
• Ajuste a potência da aspiração deslizando o regulador da potência [2]. Pode usar uma
potência baixa para os móveis e outras superfícies delicadas e uma maior potência de
aspiração para o chão e os tapetes.
NA UTILIZAÇÃO
• Para desligar o aparelho comprima ligeiramente o botão ON/OFF.
• Retire o cabo da aliemntação da tomada.
• Para enrolar o cabo da aliemntação, comprima o botão do enrolador [3]. Bem dirigir o
cabo com fim de não emaranhar-o.
SUBSTITUIÇÃO DOS SACOS E FILTROS
O sistema de filtragem é composto por:
O bom funcionamento do aparelho exige que os filtros sejam substituídos com regularidade.
Posição escova saída para o chão
Posição escova recolhida para tapetes
- um duplo filtro que protege o motor( na cavidade da recolha do pó);
-
um filtro HEPA para reter as particulas do pó( na traseira do aparelho).
numbering when you turn the pages of the I/B. Don’t change
the page numbering. Keep the language integrity.
Back cover page (last page)
Assembly page 28/28
Page 29

Copies of the I/B. Please reproduce them without any
changes except under special instruction from Team
International BELGIUM. The pages must be reproduced and
folded in order to obtain a booklet A5 (+/- 148.5 mm width x
210 mm height). When folding, make sure you keep the good
Fax +32 2 359 95 50
Relativamente ao saco do pó
• O indicador do saco cheio informa da necessidade de substituição do saco mas a
aspiração de objectos pode bloquear ou enfraquecer a potência de aspiração. Nesta
situação o sinal de saco cheio pode estar no vermelho e tratar-se do tubo de aspiração
entupido.
• Coloque o botão ON/OFF em OFF/DESLIGADO. Retire o cabo da alimentação da
tomada sempre que substitua os sacos ou os filtros.
• Abra a tampa do aspirador comprimindo ligeiramente o botão de libertação que se
encontra entre o encaixe da mangueira e o punho para o transporte do aparelho.
• Retire o saco sem o dobrar ponha-o no lixo.
• Proceda inversamente para colocar um saco do pó no aparelho tomando em conta a
direcção indicada no saco do pó.
• Verifique que o saco está bem colocado, isto é que o orifício do saco se ajusta ao
orifício do encaixe da mangueira.
• Feche a tampa e comprima ligeiramente para a bloquear.
Filtro de protecção do motor
A limpeza do filtro tem de ser feita com regularidade. Para tal retire-o e após ser limpo volte a
colocá-lo no lugar. Atenção que o filtro tem de estar totalmente seco.
Filtro do ar
•
O filtro HEPA garante a purificação do ar na aspiração. Durante 3 meses manter-se-á eficaz
(este tempo varia com a intensidade da utilização do aparelho). Verifique-o com
regularidade.
•
Retire a ficha do cabo da alimentação da tomada eléctrica, abra a grelha da traseira do
aparelho onde se encontra o filtro HEPA (carregue ligeiramente na grelha para a puxar
para trás e levante-a), e retire-o puxando-o para cima.
•
Lave o filtro em sabonária com água morna.
•
Nunca o coloque em máquinas de lavar ou o seque com o secador.
•
Antes d colocar o filtro de novo no aparelho verifique que este se encontra bem seco. A
junta em borracha fica junto ao motor.
•
Assim que tenha colocado o filtro, feche a grelha.
CONSELHOS PRÁTICOS
• Na limpeza da casa e dos degraus o aspirador deve estar na posição vertical. Cuidado
com as quedas do aparelho.
• A manutenção do aparelho resume-se á substituição dos filtros e sacos de papel.
• Para economia de espaço e facilitar a guarda do aparelho, este tem um compartimento
para guardar a tubagem. Assim mantenha o aparelho na vertical e coloque a tubagem
no local existente no aparelho.
• No caso de perda de potência de aspiração, de barulho estranho ou o aparelho deixar
de funcionar, verifique se o tubo de aspiração está bloqueado ou o saco cheio. Se não
encontrar a razão da anomalia dirija-se ao serviço de assistência técnica.
SUBSTITUIÇÃO DOS SACOS / FILTROS
Para a compra de saco do pó e de filtro de protecção do motor, rogo se dirigir à loja onde
comprou o seu aspirador ou à seu serviço técnico habilitado. Para a compra de novos filtros
HEPA, se dirigir à nosso serviço técnico.
numbering when you turn the pages of the I/B. Don’t change
the page numbering. Keep the language integrity.
Back cover page (last page)
Assembly page 29/29
Page 30

Copies of the I/B. Please reproduce them without any
changes except under special instruction from Team
International BELGIUM. The pages must be reproduced and
folded in order to obtain a booklet A5 (+/- 148.5 mm width x
210 mm height). When folding, make sure you keep the good
Fax +32 2 359 95 50
REFERÊNCIA DOS SACOS
Swirl (MELITTA): Y 50
PROTECÇÃO DO MEIO AMBIENTE – DIRECTIVA 2002/96/CE
Para a preservação do ambiente e da nossa saúde, a eliminação no fim da vida útil dos
aparelhos eléctricos e electrónicos, deve-se efectuar no cumprimento das legislações em
vigor e pela participação de todos quer sejam produtores ou utilizadores. É por esta razão
que o vosso aparelho tem na placa sinalética o símbolo , informando que em caso
algum o aparelho deve ser colocado no caixote do lixo camarário ou privado para que não
vá para as lixeiras comuns mas sim devolvido ao revendedor ou depositado nos locais
apropriados e identificados para a recolha destes aparelhos para que uma vez recolhidos
sejam reciclados, reutilizados ou lhe sejam dados outras aplicações.
numbering when you turn the pages of the I/B. Don’t change
the page numbering. Keep the language integrity.
Back cover page (last page)
Assembly page 30/30
Page 31

Copies of the I/B. Please reproduce them without any
changes except under special instruction from Team
International BELGIUM. The pages must be reproduced and
folded in order to obtain a booklet A5 (+/- 148.5 mm width x
210 mm height). When folding, make sure you keep the good
Fax +32 2 359 95 50
AVVERTENZE
Leggere attentamente queste istruzioni prima dell’uso dell’apparecchio e conservarle.
Non utilizzare l’apparecchio per usi diversi di quelli descriti in questo manuale.
Se si dà l’apparecchio a un altro utilizzatore, bisogna allegare anche le
istruzioni.
Controllare che la tensione di rete corrisponda a quella dell’apparecchio.
Le persone (inclusi i bambini) che non sono capaci di utilizzare
l’apparecchio, sia per incapacità fisiche, sensoriali o mentali, sia per
mancanza di esperienza o di conoscenze, non possono per niente utilizzare
l’apparecchio fuori dal controllo o dalle istruzioni di una persona responsabile.
Sorvegliare i bambini perché non utilizzino l’apparecchio come un giocatolo.
Controllare regolarmente lo stato dell’apparecchio, se è danneggiato in qualsiasi modo,
deve essere controllato e riparato da un servizio qualificato (*). Se il cavo di alimentazione
è danneggiato, deve per forza essere sostituito da un servizio qualificato
Questo apparecchio dovrà essere destinato solo all’uso domestico e secondo le
indicazioni riportate nel presente libretto istruzioni.
Non immergere l'apparecchio in acqua o in qualsiasi altro liquido, né per pulirlo né per
qualsiasi altra ragione.
Non usare l’apparecchio in prossimità di sorgenti di calore.
Prima di pulire l’apparecchio togliere la spina dalla presa corrente.
Non usare l’apparecchio all'aperto e dopo l’uso riporlo in un luogo asciutto.
Utilizzare solo accessori forniti in dotazione: l’impiego di altri tipi può essere pericoloso per
l’utente e danneggiare l’apparecchio.
Non tirare il cavo per spostare l’apparecchio e assicurarsi che questo non si possa
impigliare per evitare eventuali cadute dell’apparecchio. Non avvolgere il cavo intorno
all’apparecchio e non torcerlo.
Prima di collegare la spina del cordone assicurarsi che l’interruttore di regolazione
elettronica sia in posizione “min”.
Se l'apparecchio non funziona o prima di cambiare il sacco o il filtro, togliere la spina
dalla presa di corrente.
Non sedersi sull'apparecchio.
Non utilizzare l’apparecchio per aspirare fiammiferi, oggetti appuntiti, sigarette, mozziconi
o altri oggetti incandescenti. Non utilizzarlo su superfici umide o cosparse di cemento o
altre polveri troppo fini e/o agglomeranti e/o tossiche (se inalate). Non aspirare liquidi.
Non cercare di riparare l’automatismo di avvolgimento. Consultare un servizio
qualificato
Non tappare il condotto di aspirazione: se accidentalmente si occlude, spegnere
l'apparecchio prima di sturare il condotto.
Non dirigere il condotto d’aspirazione verso persone o animali, soprattutto in prossimità di
occhi, orecchie, o altre parti del corpo.
Verificare che il sacco ed il filtro siano in buono stato e correttamente inseriti, per non
danneggiare l’apparecchio.
Non usare l’aspirapolvere senza sacchetti.
Se l'apparecchio non aspira più correttamente o la lampada spia rossa si accende,
cambiare il sacchetto per evitare il surriscaldamento dell’apparecchio.
(*)
Servizio qualificato : servizio assistenza tecnica del fabbricante o dell’importatore o una
persona qualificata, riconosciuta ed autorizzata ad effettuare riparazioni, cui inviare
l’apparecchio per la riparazione o il controllo.
(*)
.
numbering when you turn the pages of the I/B. Don’t change
the page numbering. Keep the language integrity.
(*)
.
Back cover page (last page)
Assembly page 31/31
Page 32

Copies of the I/B. Please reproduce them without any
changes except under special instruction from Team
International BELGIUM. The pages must be reproduced and
folded in order to obtain a booklet A5 (+/- 148.5 mm width x
210 mm height). When folding, make sure you keep the good
Fax +32 2 359 95 50
INSTALLAZIONE DELL’APPARECCHIO
• Togliere dall’imballo l’apparecchio e tutti i suoi accessori.
• Inserire il tubo flessibile [8] nel bocchettone alla parte superiore dell’apparecchio e
premerlo fino al bloccaggio. (Per togliere il tubo flessibile premere i due pulsanti di
sblocco e tirare fuori il tubo flessibile.)
• Connettere la maniglia del tubo flessibile al tubo telescopico [7].
• Montare la spazzola o la bocchetta scelta all’estremità del tubo telescopico.
• E' possibile regolare la lunghezza del tubo telescopico secondo le Vs. esigenze. Spostando
il cursore/ il contatto scorrevole nel senso della freccia sbloccare il tubo telescopico e
regolarlo alla lunghezza desiderata. Il tubo si bloccherà nella posizione scelta.
• La spazzola [10] universale a 2 posizioni consente di pulire con facilità superfici grandi,
lisce, pavimenti/’parquet’ oppure tappeti/ ‘moquette’ semplicemente cambiandone la
posizione:
- Posizione di spazzola retratta per pulire pavimenti o ‘parquet’ (superfici lisce)
- Posizione di spazzola estratta per pulire tappeti e ‘moquette’
• Accessori in dotazione, che si trovano sotto il cofano dell’apparecchio [5]:
- una bocchetta aspirapolvere a lancia per fessure
- una spazzolina per imbottiti
USO
• Una volta assemblato l’apparecchio, tirare fuori la spina per sfilare il cavo fino alla
lunghezza desiderata. Un segno giallo indica la lunghezza ideale, ma non superare mai il
segno rosso. Altrimenti l’avvolgicavo può essere danneggiato. In questo caso non si può
esigere garanzia. Inserire la spina nella presa di corrente e, per azionare l’apparecchio,
premere lievemente col piede sul pulsante di accensione ON/OFF [1].
• La potenza d’aspirazione può essere modificata tramite il cursore di regolazione
elettronica [2], ma anche manualmente alla maniglia. In questo caso, si può usare una
potenza bassa per i tessuti delicati e i mobili ed una potenza massima per tappeti e
pavimenti.
DOPO L’USO
• Spegnere l’apparecchio premendo sul pulsante di accensione ON/OFF.
• Scollegare la spina dalla presa di corrente.
• Premere sul pulsante [3] per avvolgere il cavo automaticamente. Per evitare uno
sbatacchiamento del cavo Vi preghiamo di tirarlo dietro di sè.
SOSTITUZIONE DEL SACCHETTO DI RACCOLTA DELLA POLVERE E PULIZIA DEI FILTRI
Il sistema filtrante comprende: un filtro doppio di protezione motore
un filtro dell’aria HEPA per trattenere le particelle di polvere
È necessario pulire i filtri regolarmente per evitare problemi di funzionamento.
Sacchetto di raccolta della polvere
• L’indicatore di riempimento del sacchetto Vi segnala quando è necessario sostituire il
sacco; ma l’aspirazione potrebbe essere ostacolata da un oggetto o altri residui
accumulatisi all’interno del tubo di aspirazione: in questo caso è necessario liberare il
tubo. Assicurarsi che la forza di aspirazione non diminuisca per evitare che l’apparecchio
si surriscaldi.
• Scollegare la spina dalla presa di corrente e sostituire il sacchetto, quando l’indicatore di
riempimento è completamente rossa.
numbering when you turn the pages of the I/B. Don’t change
the page numbering. Keep the language integrity.
Back cover page (last page)
Assembly page 32/32
Page 33

Copies of the I/B. Please reproduce them without any
changes except under special instruction from Team
International BELGIUM. The pages must be reproduced and
folded in order to obtain a booklet A5 (+/- 148.5 mm width x
210 mm height). When folding, make sure you keep the good
Fax +32 2 359 95 50
• Aprire il cofano premendo sul bottone di sblocco che si trova fra il bocchettone e la
maniglia.
• Estrarre il sacco e gettarlo nel cestino dei rifiuti.
• Rimettere il nuovo sacchetto di raccolta della polvere procedendo inversamente. Fare
attenzione alla direzione della freccia indicata sul sacchetto.
• Assicurarsi che il sacco sia correttamente inserito nella propria sede, significa il buca del
sacchetto (carta) deve essere congruente a quello della bocchetta di connessione del
tubo flessibile.
• Chiudere il cofano premendolo lievemente.
Filtro di protezione motore
Per pulire il filtro di protezione motore sfilarlo dall’apparecchio e lavarlo con cura in acqua
saponata (circa ogni tre mesi). Prima di riporlo nella propria sede farlo asciugare
completamente.
Filtro dell’aria
• Il filtro HEPA garantisce un’aria perfettamente pulita durante l’uso dell’aspirapolvere.
Rimane efficace per circa tre mesi (dipendente dalla frequenza dell’uso e dal grado
d’imbrattamento).
• Scollegare la spina dalla presa di corrente, aprire la griglia alla parte posteriore
dell’aspirapolvere e tirare fuori verticalmente il filtro.
• Pulirlo in acqua saponata.
• Non inserirlo in lavastoviglie e non usare asciugapelli per asciugarlo.
• Prima di riporre il filtro nell’apparecchio, assicurarsi che sia completamente asciutto. La
guarnizione di gomma indica alla direzione del motore.
• Dopo aver inserito il filtro nella propria sede richiudere la griglia.
SUGGERIMENTI PRATICI
• Per la pulizia di scale: mettere l’apparecchio in posizione verticale.
• L’apparecchio non richiede manutenzione particolare tranne il cambiamento dei filtri e del
sacchetto.
• Alla parte inferiore dell’apparecchio c’è una scanalatura per il tubo telescopico. Per poter
attaccare il tubo telescopico alla scanalatura riporre l’apparecchio in posizione verticale.
• Nel caso in cui si notasse un cattivo funzionamento (diminuzione della potenza, rumore
anormale, arresto completo dell’apparecchio) verificare in primo luogo che non ci sia un
bloccaggio nell’aspirazione al livello del tubo, oppure portare l’apparecchio per controllo o
riparazione in un centro qualificato.
SACCHETTO DI RACCOLTA DELLA POLVERE/ FILTRO DI RICAMBIO
Per l'approvvigionamento dei sacchetti risp. dei filtri di protezione motore, Vi preghiamo voler
contattare il rivenditore dal quale avete acquistato l'apparecchio, oppure rivolgetevi al nostro
servizio assistenza. Per ordinare successivamente i filtri HEPA di ricambio è possibile contattare il
nostro servizio assistenza clienti.
RIFERIMENTO DEI SACCHETTI
Swirl (MELITTA): Y 50
numbering when you turn the pages of the I/B. Don’t change
the page numbering. Keep the language integrity.
Back cover page (last page)
Assembly page 33/33
Page 34

Copies of the I/B. Please reproduce them without any
changes except under special instruction from Team
International BELGIUM. The pages must be reproduced and
folded in order to obtain a booklet A5 (+/- 148.5 mm width x
210 mm height). When folding, make sure you keep the good
Fax +32 2 359 95 50
DIRETTIVA 2002/96/CE PER LO SMALTIMENTO DELLE APPARECCHIATURE ELETTRICHE ED
ELETTRONICHE
Per preservare l'ambiente e la nostra salute, l'eliminazione dei vecchi apparecchi elettrici e
elettronici non più utilizzati, va fatta secondo la direttiva sopra citata che impone l'obbligo al
costruttore, al commerciante e a l'utilizzatore di consegnare gli apparecchi ai centri di
raccolta specializzati, i quali saranno in grado di smaltire e riciclare i vecchi prodotti come la
legge prescrive.
Per questa ragione troverete apposto sulla etichetta segnaletica il simbolo che indica di
non gettare il vecchio apparecchio non più utilizzato, in pattumiera o nel cassonetto delle
immondizie.
Per eliminare il vecchio apparecchio non più utilizzato, potete consegnarlo al rivenditore il
cambio di quello nuovo acquistato, o direttamente nei centri di raccolta specializzati messi a
disposizione dal vostro comune di residenza.
numbering when you turn the pages of the I/B. Don’t change
the page numbering. Keep the language integrity.
Back cover page (last page)
Assembly page 34/34
Page 35

Copies of the I/B. Please reproduce them without any
changes except under special instruction from Team
International BELGIUM. The pages must be reproduced and
folded in order to obtain a booklet A5 (+/- 148.5 mm width x
210 mm height). When folding, make sure you keep the good
Fax +32 2 359 95 50
numbering when you turn the pages of the I/B. Don’t change
the page numbering. Keep the language integrity.
Back cover page (last page)
Assembly page 35/35
Page 36

Copies of the I/B. Please reproduce them without any
changes except under special instruction from Team
International BELGIUM. The pages must be reproduced and
folded in order to obtain a booklet A5 (+/- 148.5 mm width x
210 mm height). When folding, make sure you keep the good
Fax +32 2 359 95 50
FONTOS BIZTONSÁGI ELİÍRÁSOK
Gondosan olvassa el a használati utasítást, mielıtt a készüléket használja.
Ellenırizze, hogy a hálózati feszültség megfelel-e a készüléken megjelölt feszültséggel,
mielıtt a készüléket használja.
Sohase hagyja a készüléket használat során ırizetlenül. Tartsa távol a gyerekeket és a
segítségre szoruló személyeket a készüléktıl.
Rendszeresen ellenırizze, hogy a csatlakozó vezeték nem sérült-e. A csatlakozó vezeték
vagy a készülék sérülésekor a készüléket tilos használni.
Csak olyan háztartási célokra használja a készüléket, amelyek a használati utasításban
szerepelnek.
Sohase merítse a készüléket vízbe vagy más folyadékba, se a tisztításhoz, se más célokra.
Ne használja a készüléket vízforrás közelében.
A csatlakozó vezeték sérülése esetén, a veszélyek elkerülése érdekében, kérjük a gyártót,
vagy a vevıszolgálatot vagy szakembert értesíteni szíveskedjen.
Húzza ki a csatlakozót a konnektorból, mielıtt a készüléket tisztítja.
Javításokhoz forduljon szakemberhez.
Ne használja a készüléket szabadban és száraz helyen ırizze.
Csak olyan tartozékot használjon, amelyet a szállítók ajánlottak. Más tartozék veszélyt
jelent a használóra és a készüléket károsíthatja.
Sohase húzza meg a csatlakozó vezetéket ahhoz, hogy a készüléket mozgassa. Ügyeljen
arra, hogy a csatlakozó vezeték ne maradjon sehol lógva és ez a készülék leeséséhez
vezessen. Ne tekerje át a csatlakozó vezetéket körbe a készüléken vagy ne hajlítsa meg.
Ellenırizze, hogy az elektromos teljesítménykapcsoló “Min” állásba állított, mielıtt a
készüléket az áramhálózathoz csatlakoztatja.
Húzza ki a dugaljt a konnektorból, ha a készüléket nem használja vagy a porszívózsákot
vagy a légszőrıt cseréli.
Ez a készülék nem gyerekjáték. Ügyeljen arra, hogy senki se üljön rá a készülékre.
Ne használja a készüléket gyufák, éles tárgyak, cigaretták, cigarettacsikkek vagy más
éghetı tárgyak felszívására. Ne használja a készüléket vizes, cementtel, finom vagy
mérgezı anyaggal fedett felületen. Ezzel a készülékkel tilos folyadékot felszívni.
A kábelfeltekercselı automatikát ne próbálja megjavítani, hanem forduljon egy
szakemberhez. *
Ügyeljen arra, hogy a szívócsövek ne legyenek eldugulva. Ha mégis csak ez történne, úgy
elıször kapcsolja ki a készüléket, mielıtt a szívócsöveket kitisztítaná.
Ügyeljen arra, hogy a szívónyílás ne irányuljon emberek vagy állatok felé, különösen ne
azok szemének vagy orrának irányába.
Ha hibás porszívózsákot vagy légszőrıt használ, akkor az a készülék sérüléseihez vezethet.
Ezért ellenırizze a porszívózsák ill. a légszőrı minıségét és megfelelı használatát.
A porszívót tilos porzsák nélkül használni!
Ha a készülék már nem szív megfelelıen, vagy a piros ellenırzı lámpa ég, akkor cserélje ki
a porzsákot, hogy a készülék ne melegedjen túl.
(*) Szakember: a szállító vagy az importır által elismert ügyfélszolgálat, aki az ilyen javításokra
illetékes. Esetleges javításokhoz kérjük jelentkezzen ezeknél az ügyfélszolgálatoknál.
numbering when you turn the pages of the I/B. Don’t change
the page numbering. Keep the language integrity.
Back cover page (last page)
Assembly page 36/36
Page 37

Copies of the I/B. Please reproduce them without any
changes except under special instruction from Team
International BELGIUM. The pages must be reproduced and
folded in order to obtain a booklet A5 (+/- 148.5 mm width x
210 mm height). When folding, make sure you keep the good
Fax +32 2 359 95 50
A PORSZÍVÓ ÖSSZESZERELÉSE
• Csomagolja ki a készüléket és valamennyi tartozékot.
• Dugja be a tömlıvéget (8) a készülék felsı részén lévı szívótokba. Nyomja be, amíg az
bekattan. (A tömlı eltávolításához nyomja össze a két fület és húzza ki ezután a tömlıt).
• Dugja be a tömlı fogantyúját a teleszkópcsıbe (7).
• Dugja rá a kívánt kefét vagy szívókát a teleszkópcsı másik végére.
• A teleszkópcsövet saját magasságának megfelelıen be tudja állítani. A teleszkópcsı
hosszának megváltoztatásához nyomja meg a teleszkópcsı lezáró gombját a nyíl
irányába. Tolja a csövet most a kívánt hosszig és engedje el újra a gombot. A csı a kívánt
helyzetbe bekattan.
• A padlószívóka (10) 2 beállítási fokozattal rendelkezik. Nagy felületek, kemény padlók,
sima padlók vagy padlószınyegek napi tisztítására alkalmas.
Kefe belül fokozat: szınyegek tisztításához
• Az alábbi tartozékokkal szállítva (A készülék teteje (5) alatt található):
HASZNÁLAT
• Ha összeszerelte készülékét, már csak a kábelt kell addig kihúznia, amíg a kívánt hosszt el
• A szívóerı az elektronikus teljesítményválasztó (2) által szabályozható, de a fogantyún lévı
HASZNÁLAT UTÁN
• Kapcsolja ki a készüléket a Be/Kikapcsolóval.
• Húzza ki a dugaljt a konnektorból.
• Használja a kapcsolót (3) a kábeltekercselés beindításához és automatikusan tekerje fel a
A PORZSÁK CSERÉJE ÉS A SZŐRİ TISZTÍTÁSA
A szőrırendszer az alábbiakból áll: 1 kettıs motorvédı szőrı
Szükséges a szőrı rendszeres tisztítása az üzemképesség problémáinak elkerülése érdekében.
Porzsák
• A porzsák csere kijelzés megmutatja Önnek, hogy mikor szükséges a porzsák cseréje.
Kefe kívül fokozat: kemény padlók tisztításához.
- keskeny fúgaszívóka
- kárpitszívóka
nem érte. Sárga megjelölés mutatja az ideális hosszat. Soha ne lépje túl a piros
megjelölést, mert az a kábelfeltekercselı sérüléséhez vezethet. A nem rendeltetésszerő
használat esetén felmerülı károkért garanciát nem tudunk vállalni. Dugja be a dugaljt a
konnektorba és kapcsolja be a készüléket, miközben enyhén lábával rálép a
BE/Kikapcsoló gombra (1).
szívóerı szabályozóval is. Ebben az esetben a gyenge szívóerı beállítást használhatja
bútoroknál és más érzékeny tárgyaknál és az erıs szívóerıt pedig szınyegpadlóknál és
más padlóknál.
kábelt. Kézzel segítse a kábel útját az esetleges megakadás, összeakadás elkerülése
végett.
Elıfordulhat, hogy a szívótartály egy nagyobb tárgy által blokkolt, ebben az esetben a
porzsák csere kijelzés pirosan kigyullad. Ez nem jelenti azt, hogy ki kell cserélnie a porzsákot,
hanem csak azt, hogy azt a tárgyat, ami a szívótartályt blokkolja, el kell távolítsa.
numbering when you turn the pages of the I/B. Don’t change
the page numbering. Keep the language integrity.
1 kifúvó HEPA-szőrı, a finom porrészecskék felszívásához.
Back cover page (last page)
Assembly page 37/37
Page 38

Copies of the I/B. Please reproduce them without any
changes except under special instruction from Team
International BELGIUM. The pages must be reproduced and
folded in order to obtain a booklet A5 (+/- 148.5 mm width x
210 mm height). When folding, make sure you keep the good
Fax +32 2 359 95 50
• Kapcsolja ki a készüléket és cserélje ki a porzsákot, ha a porzsák csere kijelzés teljesen
piros.
• Nyissa ki a ehhez a készülék tetejét, miközben a lezáró gombot megnyomja, amely a
szívónyílás és a fogantyú között található.
• Vegye ki a zsákot és dobja be a szemetesbe.
• Fordítva járjon el az új porzsák a tokba való behelyezéséhez. Vegye figyelembe a
porzsákon jelzett nyíl irányát.
• Ügyeljen a pontos helyzetre, azaz hogy a lyuk a porzsákon a tömlıcsatlakozással fedett
helyzetben legyen.
• Csukja be a tetıt, miközben egy kicsit benyomja.
Motor védıszőrı
A motor védıszőrı tisztításához távolítsa el azt a készülékbıl és mossa meg szappanos vízben
(kb. 3 havonta). Mielıtt újra behelyezi, hagyja teljesen megszáradni.
Kiáramló szőrı
• A HEPA-szőrı garantálja Önnek a friss levegıt a porszívózás során. A szőrı kb. 3 hónapig jó
teljesítményő (A használat gyakoriságától és a szennyezıdés fokától függıen).
• Kapcsolja ki a készüléket, nyissa ki a rácsot a porszívó hátsó részén és húzza ki felfelé a
szőrıt.
• Tisztítsa meg szappanos vízben.
• Ne tegye mosogatógépbe és ne használjon hajszárítót a szárításhoz.
• Gyızıdjön meg arról, hogy a szőrı teljesen száraz, mielıtt visszatolná a készülékbe. A
gumitömítés eközben a motor irányába mutat.
• Zárja be a rácsot, miután a szőrıt újra bedugta a készülékbe.
GYAKORLATI UTASÍTÁSOK
• Lépcsık tisztítása: Állítsa a készüléket függıleges helyzetbe.
• A készüléknek nincs szüksége speciális karbantartásra, a szőrı és a porzsák cseréjén kívül.
• A készülék alsó részén van egy tároló hely a teleszkópcsınek. Állítsa a készüléket
függılegesen ahhoz, hogy a teleszkópcsövet alapállásba, az erre a célra kialakított
tartóba rögzíteni tudja.
• Ha a szívásnál teljesítménycsökkenést állapít meg, akkor az egy blokkolás lehet a
tömlıben vagy a szívótartályban. Elsıként ezt ellenırizze. Egyébként vigye a készüléket
átvizsgálásra szakemberhez.
PORZSÁK
Porzsák, illetve a motor védıszőrı utánrendelésénél, kérjük, forduljon ahhoz a kereskedıhöz,
ahol a porszívót vásárolta vagy vegye fel a kapcsolatot ügyfélszolgálatunkkal.
HEPA-szőrı utánrendelést az ügyfélszolgálaton veszünk fel.
Porzsák típusa
Swirl (MELITTA): Y 50
numbering when you turn the pages of the I/B. Don’t change
the page numbering. Keep the language integrity.
Back cover page (last page)
Assembly page 38/38
Page 39

Copies of the I/B. Please reproduce them without any
changes except under special instruction from Team
International BELGIUM. The pages must be reproduced and
folded in order to obtain a booklet A5 (+/- 148.5 mm width x
210 mm height). When folding, make sure you keep the good
Fax +32 2 359 95 50
numbering when you turn the pages of the I/B. Don’t change
the page numbering. Keep the language integrity.
Back cover page (last page)
Assembly page 39/39
Page 40

Copies of the I/B. Please reproduce them without any
changes except under special instruction from Team
International BELGIUM. The pages must be reproduced and
folded in order to obtain a booklet A5 (+/- 148.5 mm width x
210 mm height). When folding, make sure you keep the good
Fax +32 2 359 95 50
ZASADY BEZPIECZNEGO UśYTKOWANIA
Przed uŜyciem przeczytaj uwaŜnie instrukcję i zachowaj ją dla przyszłych potrzeb.
Zanim włączysz urządzenie do kontaktu sprawdź czy napięcie sieciowe zgadza się z
parametrami podanymi na tabliczce znamionowej urządzenia.
Nigdy nie zostawiaj włączonego urządzenia bez opieki. Trzymaj z dala od dzieci i osób
niepowołanych.
Staraj się regularnie sprawdzać czy kabel sieciowy nie jest uszkodzony. Nie uŜywaj
urządzenia jeśli przewód jest uszkodzony.
Urządzenie naleŜy uŜywać zgodnie z przeznaczeniem I zgodnie ze wskazówkami niniejszej
instrukcji.
Nigdy nie zanuŜaj urządzenia w wodzie lub jakimkolwiek innym płynie.
Przechowuj i uŜytkuj urządzenie z dala od źródeł wysokich temperatur.
WaŜne przepisy bezpieczeństwa.
JeŜeli uszkodzony został sznur elektryczny odkurzacza musi zostać wymieniony przez
producenta , serwis lub inną wykwalifikowaną osobę , by uniknąć zagroŜeń.
Przed czyszczeniem wyjmij kabel zasilający z gniazda sieciowego.
Wszelkie naprawy powinny być dokonywane przez wykwalikowanego elektryka
Nie uŜywaj urządzenia na zewnątrz, dbaj aby zawsze było suche.
Nigdy nie uzywaj części nie rekomendowanych przez wytwórcę., moŜe to stanowić
niebezpieczeństwo i ryzyko nieprawidłowego funkcjonowania urządzenia.
Nigdy nie ciągnij, nie podnoś itp. urządzenia za kabel ani nie wyłączaj wtyczki z sieci w ten
sposób. Nie owijaj kabla wokół urządzenia, nie zginaj go, nie skręcaj.
Zanim włączysz przewód zasilający do gniazda sieciowego upewnij się ,Ŝe włącznik jest w
pozycji "0".
Wyłącz urządzenie z sieci w przypadku gdy nie jest uŜywane, zmieniasz worek lub filtr.
Urządzenie nie jest zabawką i nie powinno być uŜywane w ten sposób.
Nie stosuj urządzenia do odkurzania wody, materiałów łatwopalnych ani tlącego się
popiołu, cementu, klejów i innych materiałów mogących wpłynąć na nieprawidłowe
funkcjonowanie urządzenia.
Pamiętaj aby wszelkie naprawy były dokonywane przez wykwalifikowanego elektryk
NaleŜy pilnować aby wylot powietrza nie był przysłonięty.
Nie kieruj źródła ciągu powietrza w stronę ludzi (szczególnie w stronę oczu i uszu) lub
zwierząt.
Jeśli uŜywasz urządzenia z uszkodzonym workiem lub filtrem powietrza moŜe prowadzić to
do uszkodzenia całego urządzenia.
Jeśli urzadzenie nie odkurza prawidłowo lub gdy wskaźnik pojemności worka wskazuje
kolor czerwony, wymień worek na nowy. Praca z pełnym workiem moŜe prowadzić do
przegrzania urządzenia.
(*)
Wykwalifikowany elektryk: Osoba wskazana przez dział sprzedaŜy producenta lub importera
lub kaŜda osoba posiadająca niezbędne kwalifikacje umoŜliwiające dokonywanie tego typu
napraw bez stwarzania zagroŜenia. W kaŜdym przypadku urządzenie naleŜy przekazywać tym
osobom.
numbering when you turn the pages of the I/B. Don’t change
the page numbering. Keep the language integrity.
(*)
.
(*)
.
Back cover page (last page)
Assembly page 40/40
Page 41

Copies of the I/B. Please reproduce them without any
changes except under special instruction from Team
International BELGIUM. The pages must be reproduced and
folded in order to obtain a booklet A5 (+/- 148.5 mm width x
210 mm height). When folding, make sure you keep the good
Fax +32 2 359 95 50
MONTAś ODKURZACZA
• Zanim rozpoczniesz montaŜ akcesoriów upewnij się ,Ŝe przewód zasilający nie jest
podłączony do gniazda sieciowego.
• WłóŜ rurę ssącą do otworu wlotowego I przesuwając przycisk zablokuj go aby był
nieruchomy (Rys. 1). (
• Połącz rurę ssącą z rączką przedłuŜającą (Rys. 2).
• ZałóŜ wybraną szczotkę (Rys. 3).
• Długość rury teleskopowej moŜna ustawić w zaleŜności od potrzeb. Przez uŜycie przycisku
słuŜącego do przesuwania zgodnie z kierunkiem strzałki naleŜy rurę odblokować i ustawić
Ŝadaną długość. Rura zatrzymuje się w wybranym ustawieniu..
• Szczotka podłogowa jest przeznaczona do czyszczenia dywanów lub twardych podłóg.
Posiada ona dwie opcje:
Ze schowanym włosiem do czyszczenia dywanów.
Z wyciągniętym włosiem do czeszczenia podłóg.
• Urządzenie jest wyposaŜone w następujące akcesoria:
- Szczelinówka: do odkurzania kaloryferów, szczelin, naroŜników i innych trudno
dostępnych miejsc.
- Mała szczotka: do mebli , ksiąŜek , kloszy lamp itd.
- Szczotka tapicerska : do poduszek, zasłon itd.
DZIAŁANIE URZĄDZENIA
• Wyciągnij kabel zasilający I włącz go do gniazda zasilającego. Optymalna długość kabla
jest zaznaczona kolorem Ŝółtym . Nie wyciągaj kabla poza oznaczenie w kolorze
czerwonym. Nie wolno przekraczać nigdy czerwonych oznaczeń ( chodzi o kable przyp.
Tłum.) bo moŜe to uszkodzić moŜliwość zwijania kabla. Takie szkody nie będą objęte
gwarancją.
• Wskazane jest włączenie urządzenia w pozycji MIN . Przy pomocy regulatora moc
urządzenia moŜe być zwiększona. MoŜna teŜ regulować siłę ssania przy pomocy
przełącznika na rurze ssącej (Rys. 4). Do odkurzania mebli i innych delikatnych powierzchni
uŜywaj słabego ssania. Do odkurzania podług i dywanów moŜesz uŜyć silniejszego ciągu
powietrza.
PO UśYCIU
• Wyłącz urządzenie za pomocą wyłącznika..
• Odłącz urządzenie z gniazda sieciowego, nie ciągnij za kabel.
• Delikatnie naciśnij przycisk zwijania kabla (Rys. 5) UŜywać włącznika/przycisku 3 by
zatrzymać zwijanie kabla lub zwinąć go automatycznie.
• Aby nie powodować niepotrzebnego ponownego nawijania naleŜy postępować jak
wyŜej.
WYMIANA WORKA NA KURZ I CZYSZCZENIE FILTRA POWIETRZA
Urządzenie posiada dwa rodzaje filtrów: Filtr silnika
Filtr powietrza
Dbaj o to aby filtry były zawsze czyste!
numbering when you turn the pages of the I/B. Don’t change
the page numbering. Keep the language integrity.
Back cover page (last page)
Assembly page 41/41
Page 42

Copies of the I/B. Please reproduce them without any
changes except under special instruction from Team
International BELGIUM. The pages must be reproduced and
folded in order to obtain a booklet A5 (+/- 148.5 mm width x
210 mm height). When folding, make sure you keep the good
Fax +32 2 359 95 50
Papierowy worek na kurz
• Specjalny wskaźnik pokazuje kiedy worek jest pełny I powinien być wymieniony.
• Jeśli rura zostanie zblokowana przez większy przedmiot wskaźnik będzie wskazywał kolor
czerwony, podobnie jak przy zapełniony worku. Postaraj się usunąć za duŜy przedmiot z
rury. Zanim przystąpisz do odblokowania rury ssącej odłącz urządzenie z sieci.
• Otwórz przednią pokrywę(Rys. 6).
• Wyjmij rurę ssącą z otworu wlotowego (Rys. 7), delikatnie wyjmij zapełniony worek.
• ZałóŜ nowy worek. Zwracać uwagę na zaznaczone na worku kierunki
• Zamknij pokrywę.
Filtr silnika
Aby wyczyścić filtr silnika wyjmij go i wyczyść przy uŜyciu wody z mydłem. Staraj się to robić raz
na 3 miesiące (Rys. 8).
Filtr powietrza
• Filtr ten gwarantuje, Ŝe pod czas odkurzania z urządzenia wydobywa się czyste powietrze.
Powinien być czyszczony przynajmniej 3 razy w roku. UŜywaj urządzenia wyłącznie z
załoŜonym i czystym filtrem powietrza.
• Odłącz urządzenie z sieci. Otwórz tylną pokrywę I wyjmij filtr (Rys. 9).
• Wyczyść filtr pod bieŜącą wodą.
• Nie pierz filtra w pralce, nie susz go przy uŜyciu suszarki do włosów.
• Wysusz filtr I dopiero gdy upewnisz się ,Ŝe jest suchy załóŜ go.
• Zamknij pokrywę.
RADY PRAKTYCZNE
•
Odkurzając schody pamiętaj aby ustawić urządzenie w pozycji poziomej ( prostopadle do
schodów) aby zapobiec zsunięciu się urządzenia w dół.
•
Odkurzacz nie wymaga Ŝadnych innych zabiegów do prawidłowego działania poza
wymianą worków i zachowaniem czystości filtrów.
•
Na dolnej części odkurzacza jest miejsce do ustawienia rury teleskopowej. NaleŜy
postawić urządzenie pionowo by umocować rurę w oznaczonym miejscu Aby
zamontować rurę ssącą do wlotu powietrza ustaw urządzenie w pozycji poziomej
(wertykalnej).
•
Staraj się aby na kablu zasilającym nie tworzyły się węzły i aby się nie plątał. Jeśli się to
zdarzy pamiętaj aby przd rozplatywaniem kabla odłączyć go z gniazda sieciowego.
•
Jeśli zauwaŜysz słabsze działanie urządzenia moŜe to być przyczyną: zanieczyszczenia
filtra, zapełnienia worka lub zablokowania rury ssącej. Jeśli mimo usunięcia ewentualnych
przyczyn urzadzenie nie działa prawidłowo skontaktuj sie z serwisem.
ZAPASOWE WORKI
JeŜeli chodzi o kupno wymiennych worków lub filtrów do silnika naleŜy zwrócić się o pomoc do
sprzedawcy u którego zakupiono odkurzacz lub skontaktować się z naszym serwisem.
Zapasowe filtry HEPA moŜna zamówić w naszym serwisie.
Rodzaj Worka
Swirl (MELITTA): Y 50
numbering when you turn the pages of the I/B. Don’t change
the page numbering. Keep the language integrity.
Back cover page (last page)
Assembly page 42/42
Page 43

Copies of the I/B. Please reproduce them without any
changes except under special instruction from Team
International BELGIUM. The pages must be reproduced and
folded in order to obtain a booklet A5 (+/- 148.5 mm width x
210 mm height). When folding, make sure you keep the good
Fax +32 2 359 95 50
numbering when you turn the pages of the I/B. Don’t change
the page numbering. Keep the language integrity.
Swirl
and Y 50 are registered trademarks of a company of the Melitta Group.
Back cover page (last page)
Assembly page 43/43
 Loading...