

Page 1
S149-01-880
Issue F Original
Instruction Manual
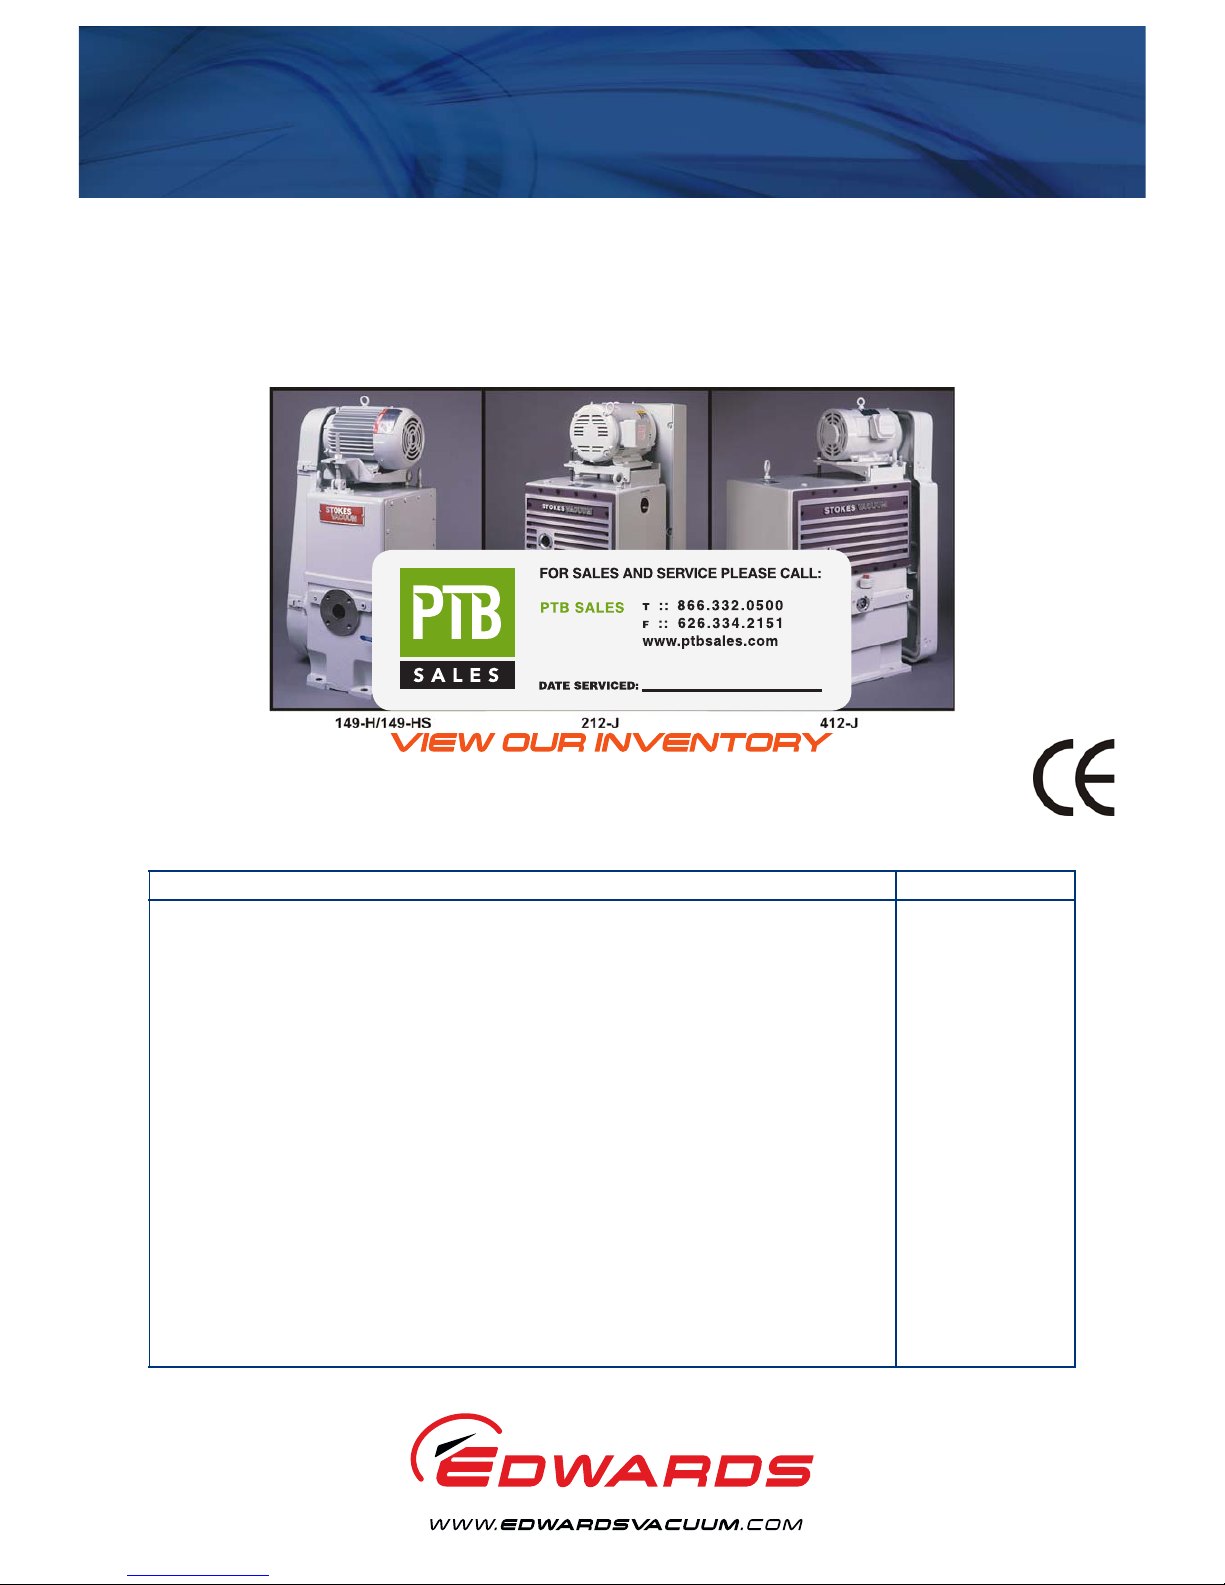
149-H/149-HS/212-J/412-J Microvac® Pumps
Description Item Number
149H Microvac Rotary Piston Pump 230/460 V, 3 Ø, 60 Hz with 230/460 V Coil 900-149-011
149H Microvac Rotary Piston Pump 400 V, 3 Ø, 60 Hz with 380 V Coil 900149011501
149H Microvac Rotary Piston Pump 400 V, 3 Ø , 60 Hz with 415 V Coil 900149011502
149H Microvac Rotary Piston Pump 400 V, 3 Ø, 60 Hz with 380 V Coil with Water Miser 900149011503
149H Microvac Rotary Piston Pump 400 V, 3 Ø, 60 Hz with 415 V Coil with Water Miser 900149011504
149HS Microvac Rotary Piston Pump 230/460 V, 3 Ø, 60 Hz with 230/460 V Coil 930-149-011
212J Microvac Rotary Piston Pump 230/460 V, 3 Ø, 60 Hz with 230/460 V Coil 900-212-014
212J Microvac Rotary Piston Pump 400 V, 3 Ø, 60 Hz with 380 V Coil 900212014501
212J Microvac Rotary Piston Pump 400 V, 3 Ø, 60 Hz with 415 V Coil 900212014502
212J Microvac Rotary Piston Pump 400 V, 3 Ø, 60 Hz with 380 V Coil with Water Miser 900212014503
212J Microvac Rotary Piston Pump 400 V, 3 Ø, 60 Hz with 415 V Coil with Water Miser 900212014504
412J Microvac Rotary Piston Pump 230/460 V, 3 Ø, 60 Hz with 230/460 V Coil 900-412-014
412J Microvac Rotary Piston Pump 400 V, 3 Ø, 50 Hz with 380 V Coil 900412014501
412J Microvac Rotary Piston Pump 400 V, 3 Ø, 50 Hz with 415 V Coil 900412014502
412J Microvac Rotary Piston Pump 400 V, 3 Ø, 50 Hz with 380 V Coil with Water Miser 900412014503
412J Microvac Rotary Piston Pump 40 0V, 3 Ø, 50 Hz with 415 V Coil with Water Miser 900412014504
Page 2
This product has been manufactured under a quality system registered to ISO9001
Declaration of Conformity
We, Edwards,
Manor Royal,
Crawley,
West Sussex, RH10 9LW, UK
declare under our sole responsibility, as manufacturer and person within the EU authorised
to assemble the technical file, that the product(s)
900 YYYYYY 50 Z
Pump Model Voltage/TCV Option
YYYYYY Z
149011 = 149-H Pump 1 = 400 V, 3 Ph, 50 Hz/380 V, 3 Ph, 50 Hz
212014 = 212-J Pump 2 = 400 V, 3 Ph, 50 Hz/415 V, 3 Ph, 50 Hz
412014 = 412-J Pump 3 = 400 V, 3 Ph, 50 Hz/380 V, 3 Ph, 50 Hz with TCV
4 = 400 V, 3 Ph, 50 Hz/415 V, 3 Ph, 50 Hz with TCV
930 14901150 Z
Pump Model Voltage/TCV Option
Z
149-HR Pump 1 = 400 V, 3 Ph, 50 Hz/380 V, 3 Ph, 50 Hz
2 = 400 V, 3 Ph, 50 Hz/415 V, 3 Ph, 50 Hz
3 = 400 V, 3 Ph, 50 Hz/380 V, 3 Ph, 50 Hz with TCV
4 = 400 V, 3 Ph, 50 Hz/415 V, 3 Ph, 50 Hz with TCV
to which this declaration relates is in conformity with the following standard(s) or other
normative document(s)
EN1012-2:1996, A1: 2009 Compressors and Vacuum Pumps. Safety Requirements.
Vacuum Pumps
EN60034-1: 2004 Rotating electrical machines. Rating and performance
and fulfils all the relevant provisions of
2006/42/EC Machinery Directive
2006/95/EC Low Voltage Directive
2004/108/EC Electromagnetic Compatibility (EMC) Directive
Note: This declaration covers all product serial numbers from the date this Declaration was
signed onwards.
Peter Meares, Technical Support Manager – Industrial & Chemical
Date and Place
P200-04-280 Issue A
9 December 2009
Page 3

© Edwards Limited 2011. All rights reserved. Page i
Edwards and the Edwards logo are trademarks of Edwards Limited.
Contents
S149-01-880 Issue F
Contents
Section Page
1 Introduction .......................................................................................1
1.1 Scope ...................................................................................................................... 1
1.2 ATEX directive implications ............................................................................................ 2
1.3 Description ................................................................................................................ 2
1.3.1 Gas ballast ................................................................................................................ 2
1.3.2 Water system ............................................................................................................. 2
1.3.3 Electrical system .........................................................................................................6
1.3.4 Lubricants ................................................................................................................. 6
1.3.5 Guards ..................................................................................................................... 6
1.3.6 Vacuum access ports .................................................................................................... 6
1.3.7 Oil temperature sensor/heater access ports (412-J pump only) ................................................. 6
1.3.8 Oil drain port (412-J pump only) ...................................................................................... 6
2 Technical data ....................................................................................7
2.1 Operating and storage conditions ..................................................................................... 7
2.2 Pump specifications ..................................................................................................... 7
2.3 Materials in contact with process gases .............................................................................. 8
2.4 Electrical data ............................................................................................................ 8
3 Installation .................................................... ................................... 13
3.1 Safety ..................................................................................................................... 13
3.2 System design considerations .........................................................................................14
3.3 Unpack and inspect .....................................................................................................14
3.4 Locate the pump ........................................................................................................14
3.5 Inlet piping ...............................................................................................................15
3.5.1 Vacuum access port locations ........................................................................................16
3.6 Exhaust piping ...........................................................................................................17
3.7 Electrical connections ..................................................................................................18
3.8 Cooling ...................................................................................................................20
3.9 Pump lubrication ........................................................................................................20
3.9.1 Initial oil fill .............................................................................................................21
4 Operation ........................................................................................ 23
4.1 Pre-start check ..........................................................................................................23
4.2 Pump start ...............................................................................................................23
4.3 Gas ballast operation ...................................................................................................24
4.4 Pump stop ................................................................................................................25
4.5 Operating notes .........................................................................................................25
5 Maintenance ..................................................................................... 27
5.1 Safety information ......................................................................................................27
5.2 Leak detection ..........................................................................................................27
5.3 Maintenance plan .......................................................................................................28
5.4 Oil change ................................................................................................................29
5.5 Oil level check ..........................................................................................................29
5.6 Valve deck maintenance ...............................................................................................29
5.7 Belt maintenance .......................................................................................................30
5.8 Drive belt tension .......................................................................................................30
5.9 Gas ballast check valve replacement ................................................................................30
5.10 Fitment or replacement of the motor (412J models only) .......................................................31
dcs/8822/11/11
Page 4

S149-01-880 Issue F
Page ii © Edwards Limited 2011. All rights reserved.
Edwards and the Edwards logo are trademarks of Edwards Limited.
Contents
5.11 Fault finding .............................................................................................................32
6 Storage and disposal ...... .... ..... ............................................................ 35
6.1 Storage ...................................................................................................................35
6.2 Disposal ...................................................................................................................35
7 Spares and accessories ......................................................................... 37
7.1 Introduction .............................................................................................................37
7.2 Service ....................................................................................................................37
7.3 Spares .....................................................................................................................37
7.4 Accessories ...............................................................................................................37
8 PFPE-prepared Microvac pumps .............................................................. 39
8.1 Summary .................................................................................................................39
8.2 Installation ............................................................................................................... 39
8.3 Operation ................................................................................................................39
8.4 Maintenance ............................................................................................................. 39
For return of equipment, complete the HS Forms at the end of this manual.
Illustrations
Figure Page
1 Theory of operation ..................................................................................................... 2
2 149-H/149-HS pump general arrangement ........................................................................... 3
3 212-J pump general arrangement ..................................................................................... 4
4 412-J pump general arrangement ..................................................................................... 5
5 149-H/149-HS pump dimensions ....................................................................................... 8
6 212-J pump dimensions .................................................................................................9
7 412-J pump dimensions ................................................................................................10
8 Pump speed curves .....................................................................................................11
9 Inlet piping configurations ............................................................................................16
10 Exhaust piping ...........................................................................................................18
11 Electrical schematic .................................................................................................... 19
12 Gas ballast setting ......................................................................................................24
13 Typical vacuum system piping ........................................................................................28
14 Collar bolt positions and motor frame sizes ........................................................................31
Page 5

© Edwards Limited 2011. All rights reserved. Page iii
Edwards and the Edwards logo are trademarks of Edwards Limited.
Contents
S149-01-880 Issue F
Tables
Table Page
1 General data .............................................................................................................. 7
2 Pump technical specifications ......................................................................................... 7
3 Motor specifications, IEC motors (CE pumps) ....................................................................... 9
4 Motor specifications, NEMA motors ..................................................................................10
5 Maintenance plan .......................................................................................................28
6 Belt tension ..............................................................................................................30
7 Motors the can be fitted to 412J pump models ....................................................................31
8 Fault finding guide ......................................................................................................32
Associated publications
Publication title Publication number
Vacuum pump and vacuum system safety P300-20-000
Trademark credits
Fomblin® is a registered trademark of Ausimont SpA.
Page 6

This page has been intentionally left blank.
S149-01-880 Issue F
Page iv © Edwards Limited 2011. All rights reserved.
Edwards and the Edwards logo are trademarks of Edwards Limited.
Page 7

© Edwards Limited 2011. All rights reserved. Page 1
Edwards and the Edwards logo are trademarks of Edwards Limited.
Introduction
S149-01-880 Issue F
1Introduction
1.1 Scope
This manual provides installation, operation and maintenance instructions for Model 149-H, 149-HS, 212-J and 412-J
Microvac pumps (referenced as ‘Microvac pump’ throughout the remainder of the manual). The Microvac pump must
be used as specified in this manual. Read this manual before installing and operating the pump.
Important safety information is highlighted as WARNING and/or CAUTION instructions which must be followed. The
use of WARNINGS and/or CAUTIONS is defined below.
CAUTION
Cautions are given where failure to observe the instruction could result in damage to the equipment, associated
equipment and process.
The units used throughout this manual conform to SI international system of measurement followed by imperial units
in parenthesis; SI (imperial).
The following warning symbols are on the pump:
WARNING
Warnings are given where failure to observe the instruction could result in injury or death to
people.
Warning - refer to accompanying
documentation.
Warning - risk of electric shock.
Warning - hot surfaces. Warning - risk of explosion
Warning - use protective equipment Warning - moving parts
Page 8
S149-01-880 Issue F
Page 2 © Edwards Limited 2 0 11. All rights reserved.
Edwards and the Edwards logo are trademarks of Edwards Limited.
Introduction
1.2 ATEX directive implications
The Microvac pump is not designed to meet European ATEX requirements.
1.3 Description
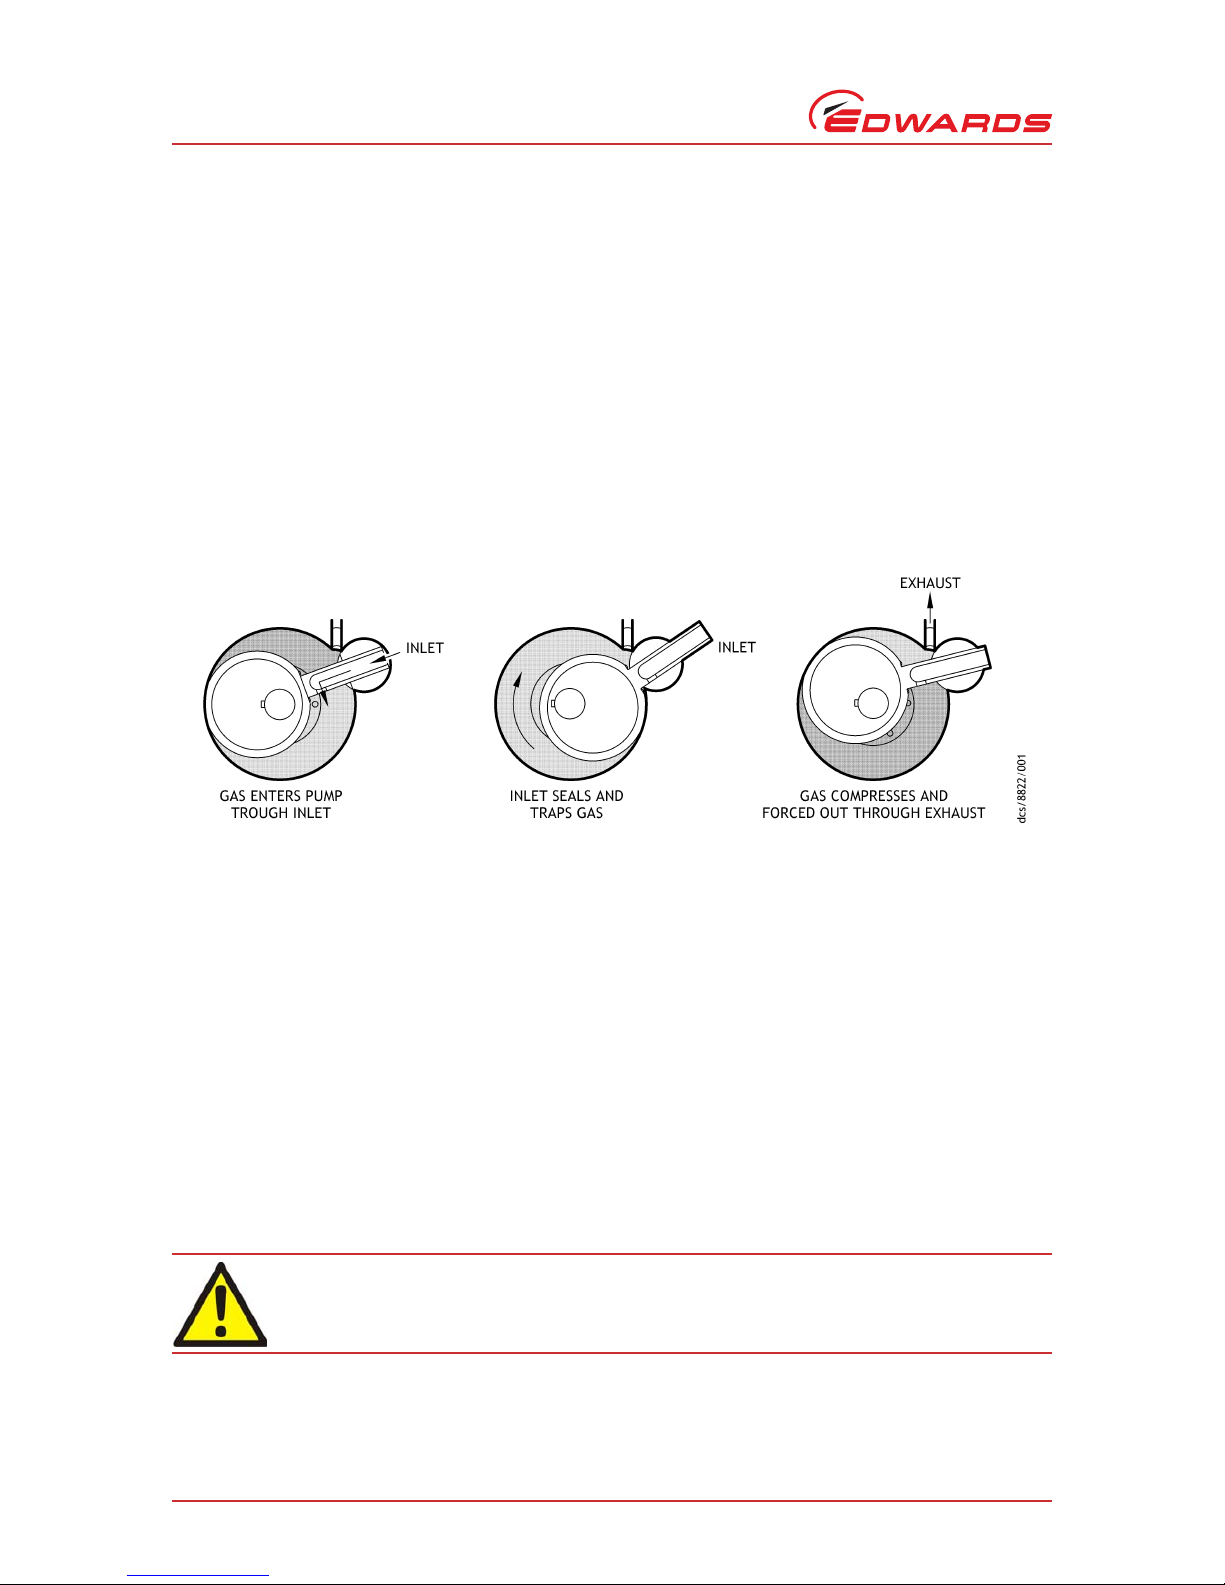
The Microvac pumps are self-contained, rotary, oil sealed piston type units. An eccentric mounted on the drive shaft
drives the piston. Two free-oscillating floating hinge bars in the pump housing guide the piston slide. The piston
assembly rotates clockwise when facing the drive end. Air enters the pump through the intake and passes through
the piston slide as the piston performs its in take stroke. As the piston nears the top center position the intake port
is closed, separating the system from the pump (see Figure 1). The air is entrapped on the front side of the piston as
it begins the next stroke. As the piston continues to rotate, the entrapped air is compressed and discharged through
the exhaust valves and out the reservoir exhaust outlet. The exhaust valves are a corrosion-resistant, heavy duty,
poppet type.
Figure 1 - Theory of operation
When the pump is in operation, lubrication of the internal parts is completely automatic. Oil is forced by atmospheric
pressure from the reservoir thro ugh int er nal oil pa ssa ge s to the shaft bearings. The oil is then fed into the pump to
provide the necessary piston-to-cylinder oil seal. The oil in the pumping chamber is forced out throu gh the exha ust
valves with the compressed air and returns to the reservoir. A solenoid valve prevents oil from flooding the pump in
the event of a power failure or when the pump is shutdown without vacuum being broken.
The pump general arrangements are provided in Figures 2 through 4.
1.3.1 Gas ballast
To pump high vapor loads, gas ballast is delivered into the pump to prevent condensation of the vapor carried by the
pump gases.
Air can be introduced to the low vacuum stage. Alternatively, an inert gas such as nitrogen can be supplied through
a suitable external valve.
1.3.2 Water system
A cooling water supply rated at 30 °C (85 °F) and 3.8 LPM (1 GPM) for the 149-H/149-HS, 5.7 LPM (1.5 GPM) for the
212-J, and 7.6 LPM (2 GPM) for the 412-J maximum is required for efficient pump performance. Internal pump water
pressure should not exceed 35 psig (Refer to Section 3.8 for information).
WARNING
Cooling lines must be installed as to not create a trip hazard which can result in injury to
personnel.
Page 9

© Edwards Limited 2011. All rights reserved. Page 3
Edwards and the Edwards logo are trademarks of Edwards Limited.
Introduction
S149-01-880 Issue F
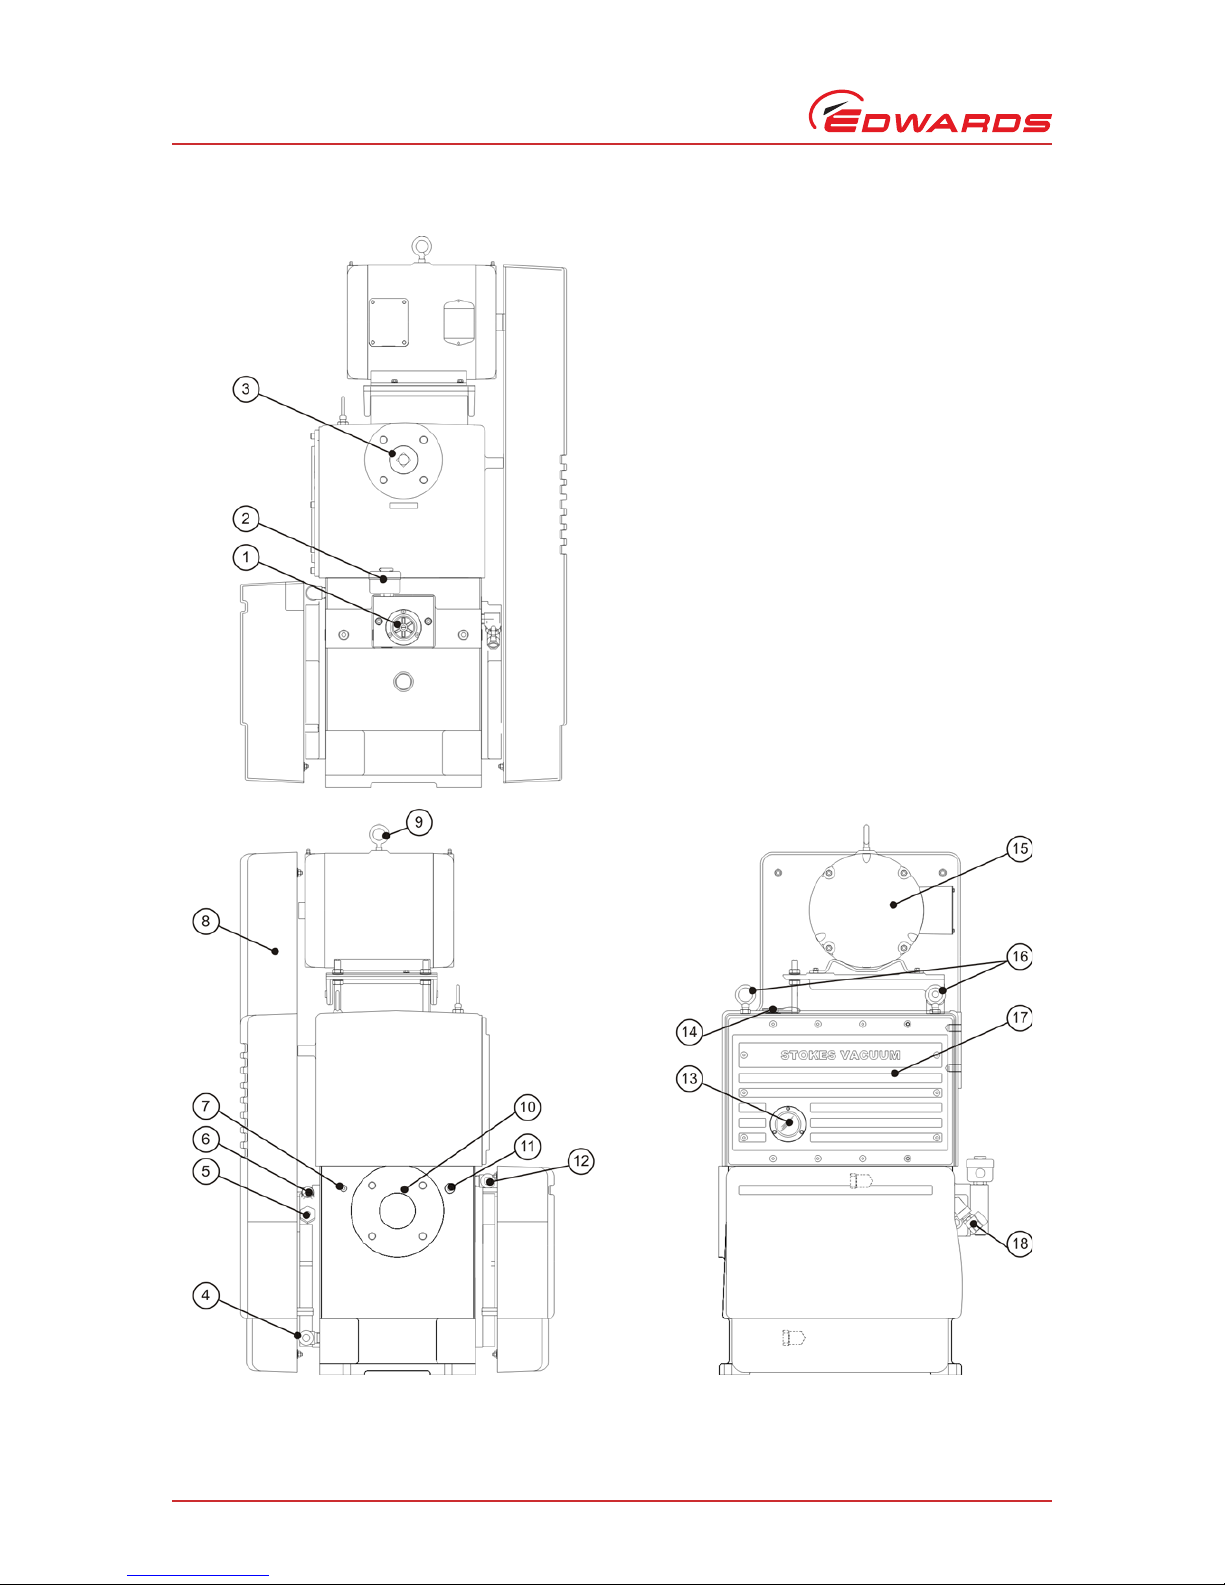
Figure 2 - 149-H/149-HS pump general arrangement
1. Check valve
2. Ball valve, gas ballast
3. Oil level sight glass
4. System lift eye-bolt
5. Water outlet conne ction
6. Water inlet connection
7. 1/4 inch vacuum access port
8. Motor lift eye-bolt
9. Motor
10.Oil fill port
11.Vacuum inlet connection
12.1/2 inch vacuum access port
13.Oil drain valve
14.Oil flow indicator
15.Vacuum exhaust connection
16.Belt guard
17.Solenoid valve
Page 10
S149-01-880 Issue F
Page 4 © Edwards Limited 2 0 11. All rights reserved.
Edwards and the Edwards logo are trademarks of Edwards Limited.
Introduction
Figure 3 - 212-J pump general arrangement
1. Oil flow indicator
2. Solenoid valve
3. Vacuum exhaust connection
4. Water inlet connection
5. Gas ballast purge connection
6. Gas ballast adjustment
7. 1/4 inch vacuum access port
8. Belt guard
9. Motor lift eye-bolt
10.Vacuum inlet connection
11.1/2 inch vacuum access port
12.Water outlet connection
13.Oil level sight glass
14.Oil fill port
15.Motor
16.System lift eye-bolt
17.Reservoir cover
18.Oil drain valve
Page 11
© Edwards Limited 2011. All rights reserved. Page 5
Edwards and the Edwards logo are trademarks of Edwards Limited.
Introduction
S149-01-880 Issue F
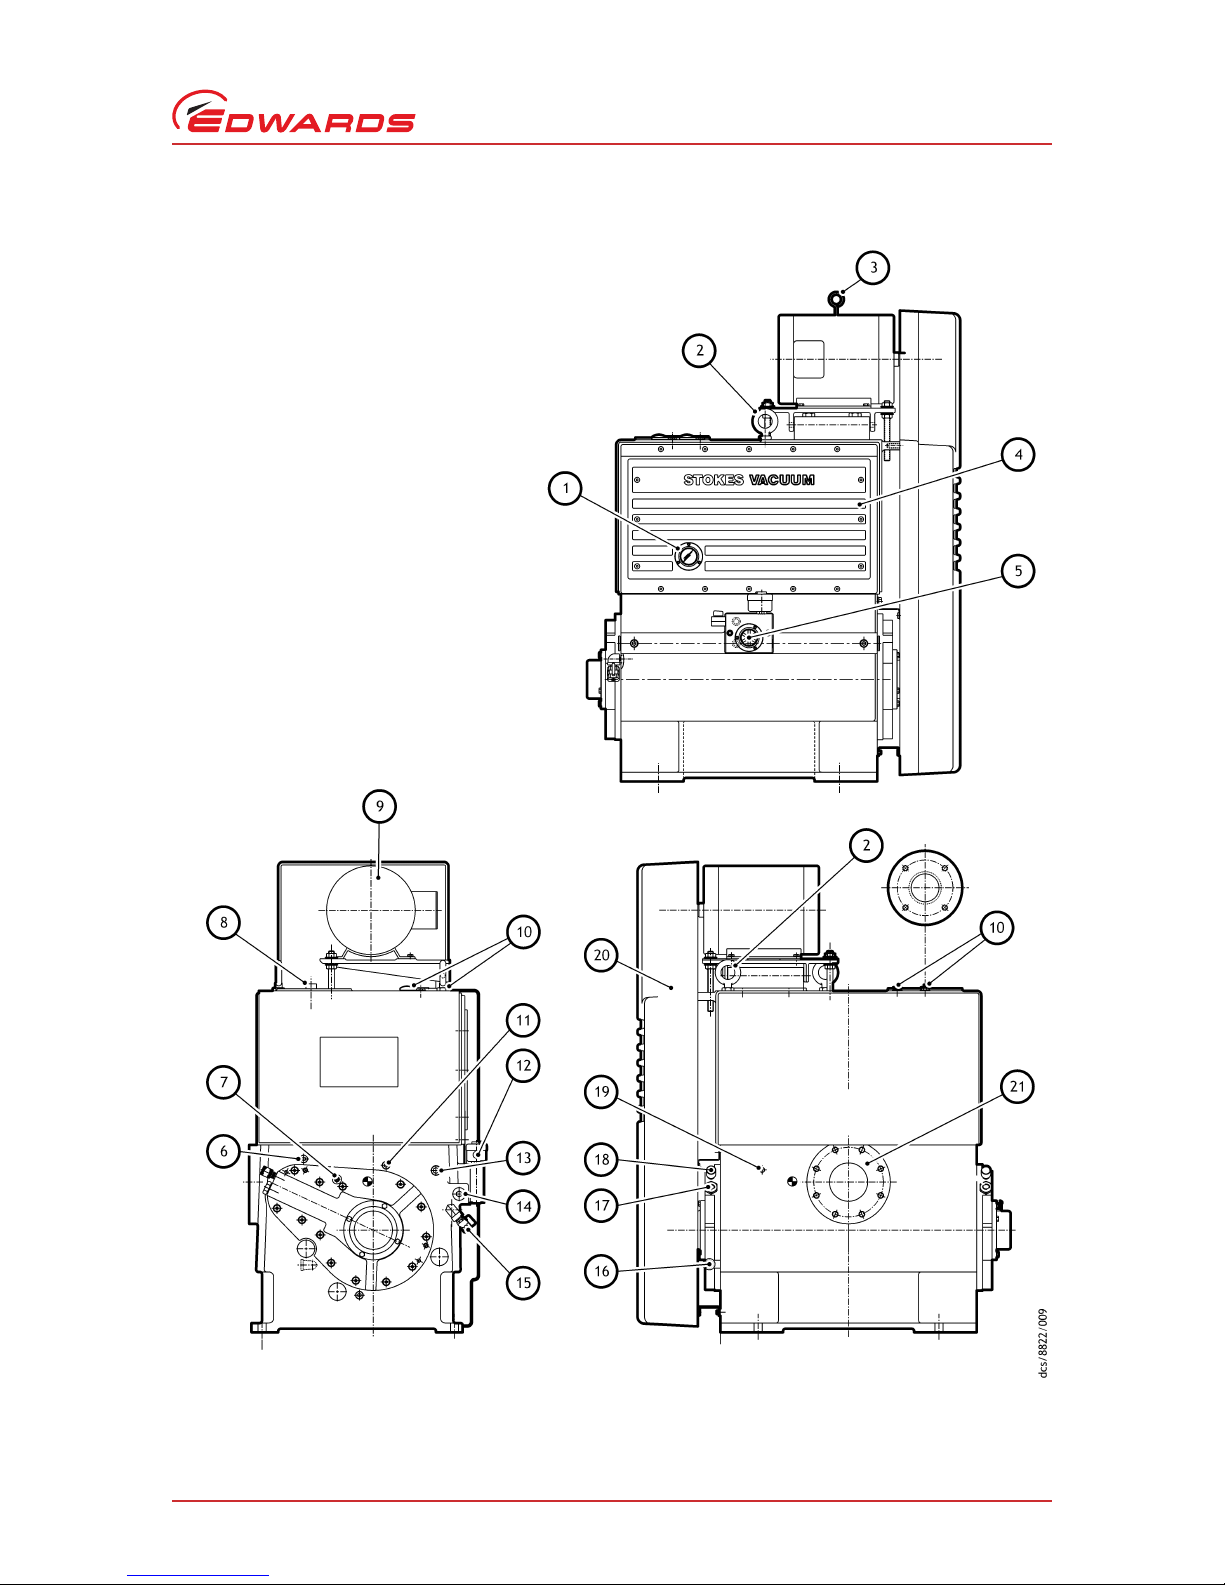
Figure 4 - 412-J pump general arrangement
1. Oil level sight glass
2. System lift eye-bolt
3. Motor lift eye-bolt
4. Reservoir cover
5. Oil flow indicator
6. 1/2 inch vacuum access port
7. Oil drain port, dead end
8. Vacuum exhaust connection
9. Motor
10.Oil fill port/pressure relief
11.Water outlet connection
12.Solenoid valve
13.Oil temperature sensor port
14.Oil temperature heater port
15.Oil drain valve
16.Water inlet connection
17.Gas ballast purge connection
18.Gas ballast adjustment
19.1/4 inch vacuum access port
20.Belt guard
21.Vacuum inlet connection
Page 12
S149-01-880 Issue F
Page 6 © Edwards Limited 2 0 11. All rights reserved.
Edwards and the Edwards logo are trademarks of Edwards Limited.
Introduction
1.3.3 Electrical system
The main power supply is 400 VAC/3 Ph/ 50 Hz and should be wire d through a suitable fused motor starter. Power
for the oil solenoid is taken from any two motor leads. Check both motor and solenoid na meplates to insure prop er
voltage (Refer to Section 3.7 for information).
1.3.4 Lubricants
Refer to Section 2 for recommended pump fluids.
1.3.5 Guards
The motor pulley, pump pulley, belts and flywheel are enclosed by guards to prevent accidental contact with these
parts. The pump should never be operated with guards removed.
1.3.6 Vacuum access ports
CAUTION
When connecting a gauge to one of the ports, it is necessary to provide a 90° elbow and a minimum of 305 mm
(12 inches) of vertical pipe to the gauge sensor to reduce the chance of contaminating the gauge with pump
lubricants.
The pump is provided with 1/4 inch and 1/2 inch NPT vacuum access ports. These ports are provided for customer
convenience. The ports can be used for gauges to monitor the pump performance or access for introducing purge
gases to the pump.
1.3.7 Oil temperature sensor/heater access ports (412-J pump only)
Oil temperature sensor/heater ports have been added to the 412-J pump to provide a means to monitor and heat the
pump oil. The sensor monitors the oil temperature in the pump and can be used a s an indicator for service. The heater
can be used to heat the oil if it is below minimum starting temperature to reduce the amount of condensables in the
oil (Refer to Figure 4 Items 13 and 14).
1.3.8 Oil drain port (412-J pump only)
A 1/4 inch oil drain access port has been added to provide a means of removing oil that pools above the valve decks
(Refer to Figure 4 Item 7).
WARNING
Electrical lines must be installed as to not create a trip hazard which can result in injury to
personnel.
Page 13
© Edwards Limited 2011. All rights reserved. Page 7
Edwards and the Edwards logo are trademarks of Edwards Limited.
Technical data
S149-01-880 Issue F
2Technical data
2.1 Operating and storage conditions
2.2 Pump specifications
Technical specifications for Microvac pumps are provided in Table 2. Pump dimensions are shown in Figures 6, 7
and 8.
Table 1 - General data
General items Reference data
Ambient temperature range (operation) 12 to 40 °C (54 to 104 °F)
Normal surface temperature of the pump body at ultimate vacuum
(operation), ambient temperature of 20 °C (68 °F)
50 to 70 °C (122 to 158 °F)
Maximum humidity (operation) 90 % RH
Ambient temperature range (storage) -30 to 70 °C (-22 to 158 °F)
Table 2 - Pump technical specifications
Specification Unit 149-H 149-HS 212-J 412-J
Ultimate vacuum microns Hg < 25 < 25 < 25 < 25
Displacement cfm 80 100 150 300
m
3h-1
135 170 255 510
Pump speed rpm 490 612 500 490
Vacuum inlet inch 2 ANSI 2 ANSI 3 ANSI 4 ANSI
Vacuum exhaust inch 1-1/2 NPT 1-1/2 NPT 2 NPT/FLG 3 NPT/FLG
Pipe connections
Water inlet inch 1/2 NPT 1/2 NPT 1/2 NPT 1/2 NPT
mm 13 13 13 13
Water outlet inch 1/2 NPT 1/2 NPT 1/2 NPT 1/2 NPT
mm 13 13 13 13
Oil capacity gal 2-1/2 2-1/2 4 12
liters 10 10 15 46
Weight
Net lb 686 686 950 1875
kg 311 311 431 850
Shipping lb 800 800 1075 1975
kg 363 363 488 896
Height inch 39-3/4 39-3/4 46 55
mm 1009 1009 1171 1395
Floor space inch 23-1/2 x 20-1/8 23-1/2 x 20-1/8 26-1/4 x 24 40-1/4 x 25-5/8
mm 597 x 511 597 x 511 667 x 610 1022 x 651
Cooling water
consumption (maximum)
gpm 1 1 1.5 2
lpm 3.8 3.8 5.7 7.6
Page 14
S149-01-880 Issue F
Page 8 © Edwards Limited 2 0 11. All rights reserved.
Edwards and the Edwards logo are trademarks of Edwards Limited.
Technical data
2.3 Materials in contact with process gases
The following material will come in contact with process gases. A safety review should be performed considering the
effect of process gases on the following materials: Aluminum; Buna N; Brass; Cast Iron; Ductile Iron; Fluoroelastomer;
Steel; Stainless Steel; Hydrocarbon Oil, and; Atmosphere.
2.4 Electrical data
The motor specifications are provided in Table 2 and Table 3. Motor speed curves are provided in Figure 6.
Items ending with 501 or 503 utilize a 380 VAC, 50 Hz solenoid. Items ending with 502 or 504 utilize a 415 VAC, 5 0 Hz
solenoid.
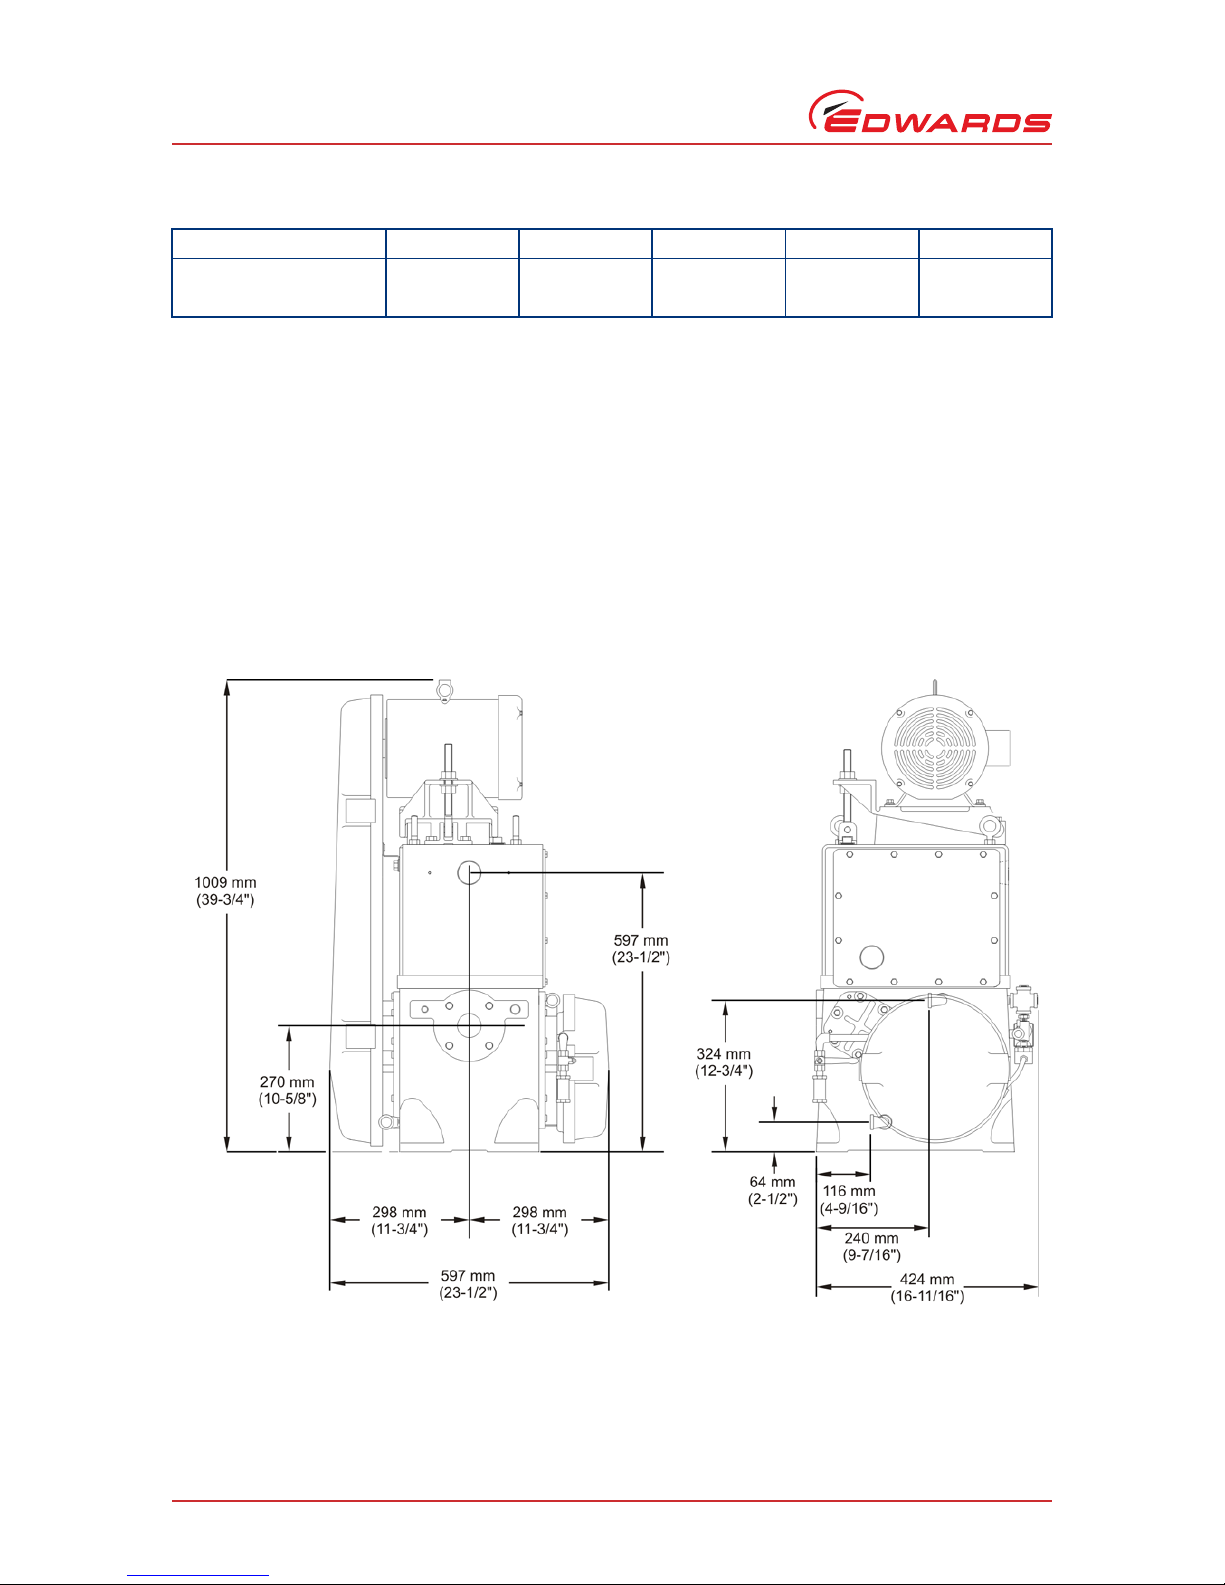
Figure 5 - 149-H/149-HS pump dimensions
Inlet cooling water
temperature (maximum)
°F 85 85 85 85
°C 30 30 30 30
Table 2 - Pump technical specifications (continued)
Specification Unit 149-H 149-HS 212-J 412-J
Page 15

© Edwards Limited 2011. All rights reserved. Page 9
Edwards and the Edwards logo are trademarks of Edwards Limited.
Technical data
S149-01-880 Issue F
Figure 6 - 212-J pump dimensions
Note: Refer to motor rating nameplate for weight, efficiency, motor speed, and full load amperage values.
Table 3 - Motor specifications, IEC motors (CE pumps)
Specification
900149011501
/2/3/4
930149011501
/2/3/4
900212014501
/2/3/4
900412014501
/2/3/4
Enclosure IP55 IP55 IP55 IP55
Ambient temperature 40 °C (104 °F) 40 °C (104 °F) 40 °C (104 °F) 40 °C (104 °F)
Frame DF100L DF112M DF132S DF160M
Insulation class F3F3F3F3
Electrical supply 200/400 200/400 200/400 200/400
Service factor 1.15 1.15 1.15 1.15
Duty Continuous Continuous Continuous Continuous
Mounting B3/B5 B3 B3 B3
Phase/frequency 3/50 Hz 3/50 Hz 3/50 Hz 3/50 Hz
kW 2.2 4.0 5.5 11.0
1111 m m
(43-3/4")
79 mm
(3-1/8")
667 mm
(26-1/4")
333 mm
(13-1/8")
333 mm
(13-1/8")
139 mm
(5-1/2")
141 mm
(5-15/16")
695 mm
(27-3/8")
413 mm
(16-1/4")
349 mm
(13-3/4")
581 mm
22-7/8"()
11 1 mm7
(46")
507
(19-15/16 )mm"
Page 16

S149-01-880 Issue F
Page 10 © Edwards Limited 2011. All rights reserved.
Edwards and the Edwards logo are trademarks of Edwards Limited.
Technical data
Figure 7 - 412-J pump dimensions
Table 4 - Motor specifications, NEMA motors
Specification 900-149-011 930-149-011 900-212-014 900-412-014
Enclosure TEFC TEFC TEFC TEFC
Ambient temperature 40 °C (104 °F) 40 °C (104 °F) 40 °C (104 °F) 40 °C (104 °F)
Frame 182T 184T 213T 215T
Insulation class F4 F4 F F
Electrical supply 230/460 230/460 230/460 230/460
Service factor 1.15 1.15 1.15 1.15
Duty Continuous Continuous Continuous Continuous
Mounting F1F1F1F1
Page 17

© Edwards Limited 2011. All rights reserved. Page 11
Edwards and the Edwards logo are trademarks of Edwards Limited.
Technical data
S149-01-880 Issue F
Note: Refer to motor rating nameplate for weight, efficiency, motor speed, and full load amperage values.
Figure 8 - Pump speed curves
Phase/frequency 3/60 Hz 3/60 Hz 3/60 Hz 3/60 Hz
HP 3.0 5.0 7.5 10.0
Table 4 - Motor specifications, NEMA motors (continued)
Specification 900-149-011 930-149-011 900-212-014 900-412-014
Page 18

S149-01-880 Issue F
Page 12 © Edwards Limited 2011. All rights reserved.
Edwards and the Edwards logo are trademarks of Edwards Limited.
This page has been intentionally left blank.
Page 19

© Edwards Limited 2011. All rights reserved. Page 13
Edwards and the Edwards logo are trademarks of Edwards Limited.
Installation
S149-01-880 Issue F
3 Installation
3.1 Safety
Ensure that the Microvac pump is suitable for the application. Refer to the Edwards guidelines on vacuum pump and
vacuum system safety (see the associated publications at the end of the Contents list at the front of this manual).
Installation of the Microvac pump must be performed by a suitably trained and supervised technician. Obey the safety
instructions listed below when the pump is installed, especially when connecting the pump into an existing system.
Details of specific safety precautions are provided at the appropriate point in the instructions.
z Wear appropriate safety clothing when there is potential for contact with contaminated components.
z Vent and purge the vacuum system before installation work is started.
z Ensure that the installation technician is familiar with the safety procedures which relate to the pump oil
and other products handled by the pumping system. Take suitable precautions to avoid the inhalation of oil
mist and excessive skin contact with pump oil, as prolonged exposure can be harmful.
z Disconnect the other components in the pumping system from the electrical supply to prevent accidental
operation.
WARNING
If you use a hydrocarbon oil in this pump, you must not use the pump to process oxygen in
concentrations greater than 25% in volume. If you do, there is a risk of fire or explosion in the
oilbox of the pump.
WARNING
We do not recommend that you use the Microvac pumps to pump hazardous substances.
WARNING
Ensure that the exhaust pipeline cannot become blocked. If an exhaust isolation valve has been
installed, ensure that the pump cannot be operated with the valve closed.
WARNING
The Microvac pumps are only approved for use on applications using air, nitrogen and other inert
gases.
Do not pump oxygen, hydrogen, chemically active, corrosive or flammable gases or gas mixtures,
the presence of which can result in an explosion.
Refer to the Mechanical Pump and Pumping System Safety Chemical and Industrial Vacuum Systems
Safety Manual (supplied with the pump), Edwards Publication Number P400-40-100 for
recommendations.
Consult Edwards for specific applications assistance prior to operating the pump for hazardous
applications.
Page 20

S149-01-880 Issue F
Page 14 © Edwards Limited 2011. All rights reserved.
Edwards and the Edwards logo are trademarks of Edwards Limited.
Installation
3.2 System design considerations
Consider the following points when designing the pumping system:
z Use a suitable valve to isolate the pump from the vacuum system if there is a need for the pump to warm up
before pumping condensable vapors, or to provide additional system protection when the pump is switched
off.
z Avoid high levels of heat input to the pump from the process gases, otherwise the pump may overheat and
seize.
z If the pump is used in a high ambient temperature and has a high gas throughput, the temperature of the
pump body may exceed 70 °C (158 °F) and must be fitted with suitable guards to prevent contact with hot
surfaces.
z Ensure that the exhaust pipeline cannot become blocked. If an exhaust isolation valve has been installed,
ensure that the pump cannot be operated with the valve closed.
z Provide for a purge of inert gas when the pumping system is shutdown to dilute dangerous gases to safe
concentrations.
3.3 Unpack and inspect
Remove all packing materials, remove the pump from its packing box, remove the protective covers from the inlet
and exhaust ports and inspect the pump. If the pump is damaged, notify the supplier and carrier in writing within
three days; state the item number of the pump together with the order number and supplier's invoice number. Retain
all packing materials for inspecti on. Do not use the pump if damaged.
If the pump is not used immediately, replace the protective covers. Store the pump in suitable conditions as
described in Section 6 of this manual.
3.4 Locate the pump
Locate the pump close to the equipment being evacuated so that the vacuum, water and exhaust connections can
be conveniently made without creating a hazard to personnel safety. Provide adequate space around the pump for
servicing and maintenance.
Mount the pump on a rigid foundation, such as a concrete floor, and level with shims or by grouting. Mount the pump
to the foundation ensuring not to put strain or twist in the pump housing. See Figures 6, 7 and 8 for foundation
mounting dimensions. The pump should be mounted to the floor using the four (4) pre-drilled mounting holes in the
pump base.
Remove the protective caps/covers from the inlet and exhaust flanges just prior to installing piping. If the pump is
to be used in temperatures below freezing, drain the water jacket to prevent cracking the housing; blow out the
water jacket. If the unit will be stored for a period of time before commissioning, follow the same procedure.
WARNING
When positioning the pump use suitable lifting equipment t o p revent injury to personnel. Ensure
that the system is not lifted by the motor eye-bolt, as the motor eye-bolt is not intended to lift the
suspended weight of the system. Injury to personnel and/or damage to equipment can result. Refer
to Section 2 for pump mass information.
WARNING
Use suitable lifting equipment to move the pump. Refer to Section 2 for pump mass information.
Page 21

© Edwards Limited 2011. All rights reserved. Page 15
Edwards and the Edwards logo are trademarks of Edwards Limited.
Installation
S149-01-880 Issue F
3.5 Inlet piping
CAUTION
Ensure the system to be evacuated and connecting lines are clean and free of weld splatter, dirt or grit. Foreign
debris entering the pump can cause failure and possibly damage the internal parts. Adequate traps, filters or
screens should be permanently installed if the potential for particles greater than 0.25 mm (10 microns) are
anticipated on entering the pump. Oil purification is required if a significant amount of particles greater then
0.25 mm (10 microns) are pumped. The inlet pressure must not exceed 1.013 bar (760 Torr).
All pipe lines should be as short as possible and be no smaller than the inlet to the pump. If long lines can not be
avoided, increase the pipe diameter by 50 % or more over the pump inlet diameter. Conductance of long lines must
be checked and the line sized large enough, or pumping speed of the system will be negatively impacted. When
connecting the pump to the system, provide a vertical pipe at least 610 mm (24.0 inch) long between the pump and
the system if the pump inlet is located below the system inlet. If the pump is located above or level with the system
inlet, provide an inverted “U” pipe to serve as a trap for system dirt and prevent migration of pump oil toward the
system inlet. Ensure all vacuum piping connections are tight. If an inline filter is being used, install according to
Figure 9. It is advisable to install a flexible connection between pump inlet and vacuum piping to reduce vibration
(See Figure 10).
A full-opening high vacuum valve is recommended to facilitate start-up and for checking the pump blank off pressure.
WARNING
Inlet vacuum piping should be adequately supported. Ensure the piping is secured and will not
cause a trip hazard.
Page 22

S149-01-880 Issue F
Page 16 © Edwards Limited 2011. All rights reserved.
Edwards and the Edwards logo are trademarks of Edwards Limited.
Installation
Figure 9 - Inlet piping configurations
3.5.1 Vacuum access port locations
Vacuum access ports are conveniently located on the pu mp and provide 6.4 mm (1/4 inch) or 12.7 mm (1/2 inch)
access (Refer to Figure 2 items 7 and 11, Figure 3 items 7 and 12, and Figure 4 items 6 and 19). The pipe plugs can
be replaced with a small vacuum ball valve to which a gauge can be connected. If a McLeod gauge is used, a synthetic,
thick-wall, smooth-bore tubing such as Tygon should be used for a flexible conn ection. The gauge shou ld be loca ted
approximately 610 mm (24.0 inch) above the port to prevent oil from entering the gauge.
1. Microvac pump
2. Close/long radius elbow
3. Flexible connector
4. In-line filter
5. V acuum break valve
6. System
Page 23

© Edwards Limited 2011. All rights reserved. Page 17
Edwards and the Edwards logo are trademarks of Edwards Limited.
Installation
S149-01-880 Issue F
3.6 Exhaust piping
CAUTION
Do not place a valve in the exhaust line. If a valve must be installed in the line, a relief valve must also be
inserted between the reservoir and the valve. The relief valve should be equal in size to the line, and set to
open at 138 mbar (2 psig).
The pumps emit tiny oil droplets into the exhaust of the pump. Edwards recommends the use of exhaust filters to
prevent these droplets from accumulating in the exhaust piping of the system or where the piping terminates. The
oil and condensables will coalesce inside the piping and return to the pump reservoir or be collected inside the filter
housing.
For all 149-H/149-HS and those 212-J and 412-J pumps that do not use an exhaust filter, it is recommended that the
exhaust be piped horizontally a short distance and tied into a vertical exhaust pipe. The lower vertical exhaust pipe
must be at least 305 mm (12 inch) long and terminated with a plug or drain cock to allow removal of moisture and/
or contaminated oil before it can sufficiently accumulate and drain back into the pump oil reservoir (See Figure 10).
For 212-J and 412-J pumps with an exhaust filter, the vertical collection pipe is not required. These filters collect
the coalesced oil and condensables inside the filter housing. The housing must be drained of fluids using the drain
cocks. Failure to drain the oil from exhaust filters will result in decreased pump performance and significantly
increased back pressure.
The exhaust pipe should be no smaller than the pump exhaust outlet and sized as short as possible. Pump exhaust
will contain a small amount of oil and should be handled in a manner consistent with applicable federal and local
regulations. If exhausted outside the building, point the end of the exhaust pipe downward to prevent the entrance
of rain water.
Oil mist separators are available from Edwards which can eliminate oil fog in the majority of applications. The
separator will not remove noxious or toxic gases and must be run to a suitable trap. Consult Edwards for
recommendations.
WARNING
Do not block the exhaust of the pump. If this happens, damage to the equipment and injury to
personnel can result.
WARNING
Vacuum piping should be adequately supported. Ensure the piping is secured and will not cause a
trip hazard.
WARNING
The pump exhaust pressure must not exceed 483 mbar (7 psig). If this happens, damage to
equipment and injury to personnel can result.
WARNING
Remove the plastic plug from the exhaust port prior to operating the pump. The pump must not
be operated unless it is installed in an appropriate vacuum system.
WARNING
Exhaust filters fitted to 212-J and 412-J pumps must be drained to prevent hazardous back
pressure from developing. Increased back pressure can result in damage to the pump and injury
to people.
Page 24

S149-01-880 Issue F
Page 18 © Edwards Limited 2011. All rights reserved.
Edwards and the Edwards logo are trademarks of Edwards Limited.
Installation
Figure 10 - Exhaust piping
3.7 Electrical connections
CAUTION
Ensure proper voltage, starters and overloads are supplied to the motor, and proper voltage supplied to the
solenoid coil. The pump and/or solenoid may fail to operate if voltage is less than 90 % of rated.
The pump electrical schematic is shown in Figure 11.
Install a motor starter with safety device within easy reach of the operator.
Connect the solenoid valve(s).
Connect the motor so that the pump shaft rotates clockwise when viewed from the drive end. See Section 4.1 for
pre-start check procedures.
WARNING
Install electrical cables while ensuring not to create a trip hazard that could result in injury to
personnel.
WARNING
Installation of the electrical connections should be performed by a competent technician familiar
with vacuum systems, pumps and controls. The system should be wired as to not create a hazard
due to power loss or re-initializing the pump after a power loss. If a power loss occurs, the system
should have a manual reset for controls before restart.
1. Microvac pump
2. Vent pipe
3. Drain cock
Page 25

© Edwards Limited 2011. All rights reserved. Page 19
Edwards and the Edwards logo are trademarks of Edwards Limited.
Installation
S149-01-880 Issue F
Figure 11 - Electrical schematic
LLeg
FFuse
MMotor contactor
M Aux In-line filter
OL Overload
CV Solenoid valve
Page 26

S149-01-880 Issue F
Page 20 © Edwards Limited 2011. All rights reserved.
Edwards and the Edwards logo are trademarks of Edwards Limited.
Installation
3.8 Cooling
CAUTION
Do not start the pump if the oil temperature is below 13 °C (55 °F).
The Microvac pump is water cooled and must be connected to a water supply.
The 1/2 inch NPT water inlet connection is located in the pump housing on the drive side near the bottom (Refer to
Figure 2 item 4, Figure 3 item 6, and Figure 4 item 16).
Insert a valve in the water inlet line to regulate water flow so that the temperature of the oil in the reservoir is 6071°C (140-160°F). Oil temperature kits are available that automatically control the water flow to maintain the proper
oil temperature (Contact Edwards for additional information). If the pump is located outside a building and subjected
to freezing temperatures, the pump water jacket should be drained or filled with anti-freeze.
The 1/2 inch NPT water outlet is located in the pump housing (Refer to Figure 2 item 12, Figure 3 item 5, and Figure 4
item 11).
The water outlet should be connected to an open drain to permit the operator to check the flow and temperature of
the outlet water periodically. There should not be a valve or back pressu re in the d ra in lin e. I n some cas es, co olin g
water must be discharged to a pressure drain. In such cases , discharge pressure must not exceed 2.41 bar (35 psig)
and no block valve should be placed in discharge line unless a 2.41 bar (35 psig) relief valve is provided to protect
pump from high inlet pressure.
Note: If condensables are present in the pr ocess gas and gas ballast is operating, the cooling water supp ly should
be adjusted to raise the operating temperature to the level for gas ballast (Refer to Section 4).
3.9 Pump lubrication
The performance of this pump depends largely on the type of oil used. An initial charge of oil is included with each
pump. This standard oil is V-Lube F which is recommended for general operating conditions in a relatively clean
environment. V-Lube F is a multi-grade petroleum oil fortified for oxidation protection, containing detergent
dispersants with excellent flow characteristics at low temperature.
If the pump is to be operated at vacuum levels that cause the oil temp erature to exceed 71 °C (160 °F) for extended
periods of time, a heavier grade oil should be used. Stokes V-Lube G is available for oil temperatures up to 94 °C
(200 °F).
Special operating conditions may require the use of special oils. Consult Edwards for specific recommendations when
other than regular petroleum oils are being used.
WARNING
The temperature of the external pump surfaces can exceed 70 °C (160 °F) and cause injury to
personnel. Hot surfaces can be found where the pump lubricant is located.
Page 27

© Edwards Limited 2011. All rights reserved. Page 21
Edwards and the Edwards logo are trademarks of Edwards Limited.
Installation
S149-01-880 Issue F
3.9.1 Initial oil fill
CAUTION
Starting the Microvac pump when the oil temperature is below 13 °C (55 °F) can result in excessive wear and
galling damage to the moving parts.
The Microvac pump is shipped with an initial charge of oil; 10 liters (2.5 gallons) for the 149-H/149-HS, 15 liters (4.0
gallons) for the 212-J; and, 45 liters (12 gallons) for the 412-J. Before connecting the suction manifold, slowly rotate
the pump through two (2) revolutions. This will distribute the oil throughout the pump interior.
WARNING
The oil fill plug on the top of the pump serves a dual purpose. It is an oil fill port and an overpressure device that opens at between 8 and 14 psig. This device is to protect the pump from oil
box over-pressure and possible side cover fracture. The 412J pumps are fitted with two oil fill
plugs, ensure at least one of these is free from obstruction i.e. not connected to anything.
Page 28

S149-01-880 Issue F
Page 22 © Edwards Limited 2011. All rights reserved.
Edwards and the Edwards logo are trademarks of Edwards Limited.
This page has been intentionally left blank.
Page 29

© Edwards Limited 2011. All rights reserved. Page 23
Edwards and the Edwards logo are trademarks of Edwards Limited.
Operation
S149-01-880 Issue F
4 Operation
4.1 Pre-start check
CAUTION
If the paddle wheel does not rotate, stop the pump immediately. Check the operation of the solenoid. If the
solenoid is operating correctly, check the oil lines for blockage.
Note: Momentarily jog the pump for at least two revolutions.
Jog the motor momentarily while observing pump rotation. If the pump does not rotate in a clockwise direction,
interchange any two of the three-phase leads.
Ensure the oil solenoid valve operates properly by checking the oil flow indicator. The paddle wheel should rotate
after system pressure is below 600 mm Hg (6 inch Hg at inlet). Solenoid operation is also apparent as it will create a
magnetic field and become warm.
The oil solenoid valve is normally closed and must be energized when the pump starts.
The pressure differential between the oil reservoir (atmospheric press ure) and the pump cavity (vacuum) forces th e
oil to the bearings and into the pump cavity. The oil lubricates the moving parts and al so creates an oil seal.
Oil starts to flow at 800 mbar (600 Torr). At 533 mbar (400 Torr) the flow is approximately 50 %. From 133 mbar (100
Torr) to blank-off, flow is 100 %.
Note: 533 mbar (400 Torr) must be reached within 10 minutes or a force-feed lubrication system is required to
provide adequate oil flow to the pump cavity.
4.2 Pump start
CAUTION
Do not start the pump if the oil temperature is below 13 °C (55 °F).
Note: New belts usually lose some tension during initial operation and should be re-checked during the first few
days of operation. Always tension the belts according to the specifications of the belt manufacturer.
Excessive tension can induce unnecessary loading on the blower bearings, while extrem e over-tensioning
may cause the shaft to break as a result of fatigue.
1. Turn on the cooling water supply.
2. Ensure the equipment being evacuated is properly cleaned and all vacuum breaks are closed.
3. Depress the START button and check the solenoid valve for proper operation.
4. Open the pump inlet valve.
WARNING
Solenoid may become hot during operation.
Page 30

S149-01-880 Issue F
Page 24 © Edwards Limited 2011. All rights reserved.
Edwards and the Edwards logo are trademarks of Edwards Limited.
Operation
4.3 Gas ballast operation
CAUTION
When opening gas ballast valve, do not open past third marking on valve stem (See Figure 12).
Open the gas ballast valve for maximum efficiency. Adjust the ballast by turning the valve for desired rate. Full gas
ballast will cause pump temperature to rise and is normal. For maximum effe ct of gas ballast, pump should operate
at approximately 71 °C (160 °F). The operating temperature can be raised by throttling the cooling water. Consult
Edwards for available oil temperature control kits.
If pumping water vapor in excessive quantities, the oil may become contaminated. The oil can be puri fied by running
the pump with full gas ballast while the pump is is olated from the system. When excessive contaminants are present,
indicated by high oil level, or thinning, formation of varnish, etc., the oil should be replaced.
Note: For dirty applications where condensable contaminants (asphalt, pitch, epoxies, etc.) other than water
vapor are present, the pump should be operated near 71 °C (160 °F).
Switch on inert gas purge to remove air from the pump and exhaust pipeline before the process starts.
Note: Edwards recommends obtaining and reading the Vacuum Pump and Vacuum System Safety manual
(publication number P300-20-000), available from Edwards or the supplier.
z The gas ballast check valve should be inspected every six months for wear or a broken spring when operating
on an eight (8) hour a day basis; 3 months for twenty-four (24) hour a day operation.
z The gas ballast valve should be closed when the pump is stopped. If the valve is open, gas will be drawn into
the pump through the check valve and the vacuum manifold will be pressurized with atmospheric air. If
desired, a solenoid valve attached to the gas ballast inlet and electrically connected to the motor leads can
be used to turn off the gas ballast automatically on pump shutdown. Contact Edwards for additional
information.
Figure 12 - Gas ballast setting
z When a pressurized gas is used to ballast the pump, the pressure must be reduced to 2 psi maximum. The use
of higher pressures may damage the pump.
z Opening the gas ballast slightly will quiet discharge valve noise when the pump is blanked off, but will
prevent reaching the lowest ultimate pressure.
Page 31

© Edwards Limited 2011. All rights reserved. Page 25
Edwards and the Edwards logo are trademarks of Edwards Limited.
Operation
S149-01-880 Issue F
z To maintai n a low blank-off noise level on a continuous basis, the valve se al washer can be removed from the
valve stem. This will provide a small amount of ballast at all times even when the valve is fully closed. It will
also break vacuum when the pump is stopped. If the vacuum break is not permissible, solenoid valves may be
installed. With the washer removed and with the gas ballast valve close d, blank-off pressure will be
approximately 200 microns. The seal washer can be reinstalled when b allast on a continuous basis is no
longer required. Care should be taken not to damage the seal washer if reinstallation is anticipated.
4.4 Pump stop
z Close the inlet valve to system.
z Stop the motor and break vacuum unless system dictates otherwise.
Note: The oil solenoid valve closes automatically when the pump is stopped or a power failure occurs. This will
prevent the pump and vacuum system from being flooded with oil.
4.5 Operating notes
If large amounts of air pass t hrough the pump, it may become warm and, under severe conditions, hot. This is not an
indication of malfunction. The pump is designed for high vacuum work and should not be operated at pressures
greater than 533 mbar (400 Torr) for more than 10 minutes or at intermediate vacuums for periods which cause oil
temperature to exceed 93 °C (200 °F).
For optimum pump operation, the oil temperature in the oil reservoir shou ld be 60-71 °C (140-160 °F) with the pump
operating on the system or process. Oil temperature can be measured by in sert ing a the rmome ter in t he fill ho le or
by contact pyrometer on oil block n ear the solenoid. If the pump is to be operated with oil temperature in excess of
71 °C (160 °F), the use of a heavier viscosity oil is recommended (Refer to Section 3.9).
When starting the pump or handling large amounts of air, oil vapor in the form of smoke will be released from the
exhaust. This is not an indication of trouble. The volume of smoke will decrease as the pressure in the system
decreases.
Note: Edwards offers a closed type oil mist separator that will eliminate exhaust oil smog but still requires
exhausting to outside. Contact a Edwards representative for information.
If the pump has been shut down for an extended period of time, it will be necessary to turn the pump over at least
two (2) revolutions by momentarily jogging before starting to insure the free movement of parts.
Low oil temperature can cause overloading when starting the pump and possibly prevent the pump from sealing.
Microvac pumps should not be started when the oil temperature is below 13 °C (55 °F). Optimum operating oil
temperature after starting is between 60-71 °C (140-160 °F). Opening the gas ballast valve will help to warm the oil.
A water miser (Refer to Section 7.4) is recommended to automatically control the oil temperature. Contact a
Edwards representative for information.
WARNING
The oil fill plug on the top of the pump serves a dual purpose. It is an oil fill port and an overpressure device that opens at between 8 and 14 psig. This device is to protect the pump from oil
box over-pressure and possible side cover fracture. The 412J pumps are fitted with two oil fill
plugs, ensure at least one of these is free from obstruction i.e. not connected to anything.
Page 32

S149-01-880 Issue F
Page 26 © Edwards Limited 2011. All rights reserved.
Edwards and the Edwards logo are trademarks of Edwards Limited.
This page has been intentionally left blank.
Page 33

© Edwards Limited 2011. All rights reserved. Page 27
Edwards and the Edwards logo are trademarks of Edwards Limited.
Maintenance
S149-01-880 Issue F
5Maintenance
5.1 Safety information
z Ensure that maintenance is performed by a suitably trained and supervised technician. Obey local and
national safety requirements.
z Ensure that the maintenance technician is familiar with the safety procedures which relate to the pump oil
and the products processed by the pumping system.
z Check that all the required parts are available and of the correct type before work is started.
z Isolate the pump and other components from the electrical supply so that they cannot be operated
accidentally.
z Allow the pump to cool (so that it is a safe temperature for skin contact) before maintenance work is
started.
z Do not reuse O-rings and seals if damaged.
z After maintenance is complete, recheck the direction of pump rotation if the electrical supply has been
disconnected.
z The pump and pump oil will be contaminated with the process chemicals that have been pumped during
operation. Ensure that the pump is decontaminated before maintenance and that adequate precautions to
protect personnel from the effects of dangerous substances if contamination has occurred.
z Do not touch or inhale the thermal breakdown products of fluorinated materials which may be present if the
pump has been heated to 310 °C (590 °F) and above. Fluorinated materials are safe in normal use but can
decompose into very dangerous substances (which may include hydrofluoric acid) if heated to 310 °C
(590 °F) and above. The pump may have overheated if it was misused or if it was in a fire. Health and Safety
Data sheets for fluorinated materials used in the pump are available on request: contact Edwards or the
supplier.
z If necessary, maintain the motor as specified in the manufacturers information supplied with the motor.
5.2 Leak detection
A leak test should be performed if ultimate vacuum cannot be achieved. A proper leak test will isolate sections of
the piping until the leak-source is found. The standard vacuum piping is shown in Figure 13. The use of a leak detector
will speed the process for detecting leaks. Contact a Edwards representative for information.
WARNING
Obey the safety instructions given below and take note of appropriate precautions. If not, injury
to people and damage to equipment can occur.
Page 34

S149-01-880 Issue F
Page 28 © Edwards Limited 2011. All rights reserved.
Edwards and the Edwards logo are trademarks of Edwards Limited.
Maintenance
5.3 Maintenance plan
A typical maintenance plan for the Microvac pump is provided in Table 5.
Figure 13 - Typical vacuum system piping
Table 5 - Maintenance plan
Operation Frequency
Inspect oil level Daily
Check operating temperature 60-71 °C (140-160 °F) Daily
Replace oil Application dependent
Inspect valve decks 6 months
Inspect pulleys and belts 6 months
Inspect gas ballast valve 6 months
Inspect bearing condition 12 months
Clean the motor and drive 12 months
Inspect taper lock bushings on pulleys After break in and 12 months
1. Vacuum chamber
2. Roughing valve
3. Roughing line
4. Air inlet valve
5. Gauge port
6. Mechanical fore pump
7. Optional foreline valve connection location
8. Optional hold pump connection location
9. Gauge port
10.Vapour pump
11.Valve
12.Alternate chamber gauge port location
Page 35

© Edwards Limited 2011. All rights reserved. Page 29
Edwards and the Edwards logo are trademarks of Edwards Limited.
Maintenance
S149-01-880 Issue F
5.4 Oil change
z Lockout all energy sources connected to the pump and vent to atmosphere.
z Review the process contaminants and select proper personal protective equipment (PPE) to protect against
media contact.
z Using the drain valve, drain the oil into a suitable container for disposal. Use on ly Edwards recommend ed oils
when refilling the pump. Refer to Section 2 for fluid type and quantities. Fill the pump until the sight glass
reaches the 3/4 mark.
z Check the pump and system for potential hazardous conditions. Restore energy sources.
5.5 Oil level check
z Check oil level daily. The oil level should be at center of sight glass when the pump is off or in lower half
while pump is operating at high vacuum. The level will change depending on inlet pressure. In most cases, oil
is added after operating the pump for a short period of time.
z To avoid the loss of oil out the fill hole, do not add oil to the pump when in operation.
Note: When pumping gases that contain water vapor, it may be necessary to remove the water that condenses in
the pump reservoir sump. Stop the pump and wait at least 1/2 hour for the oil and water to separate. Open
the oil drain valve and drain water; clos e the valve whe n oil flow starts. The interval is p rocess depend ent
and varies with the amount of water vapor and oil temperature. Operating the pump with the oil
temperature near 71 °C (160 °F) will minimize formation of water but not eliminate it.
Water entrapped in the oil will decrease ultimate vacuum and increase pumpdown times. The pre se nce of wa te r i n
the oil is evident by a milky appearance of the oil when running.
5.6 Valve deck maintenance
z Lockout all energy sources connected to the pump.
z Drain the oil as described in Section 5.4.
z Remove the reservoir cover, oil baffle, and each valve deck while being very careful not to drop any
hardware inside the pump.
z Replace worn valve deck or valve deck parts. Reinstall valve decks with new gaskets. Reinstall oil baffle with
new gasket.
z Reinstall oil reservoir cover.
z Refill the oil as described in Section 5.4.
z Check the pump and system for potential hazardous conditions. Restore energy sources.
WARNING
Oil will be hot if pump was just operating. Allow sufficient time for the pump to cool prior to
changing oil.
WARNING
The oil fill plug on the top of the pump serves a dual purpose. It is an oil fill port and an overpressure device that opens at between 8 and 14 psig. This device is to protect the pump from oil
box over-pressure and possible side cover fracture. The 412J pumps are fitted with two oil fill
plugs, ensure at least one of these is free from obstruction i.e. not connected to anything.
Page 36

S149-01-880 Issue F
Page 30 © Edwards Limited 2011. All rights reserved.
Edwards and the Edwards logo are trademarks of Edwards Limited.
Maintenance
5.7 Belt maintenance
z Lockout all energy sources connected to the pump and vent to atmosphere.
z Remove the belt guard cover.
z Test the belt tension with proper tester.
Note: New belts usually lose some tension during initial operation and should be re-checked during the first few
days of operation. Always tension the belts according to the specifications of the belt manufacturer.
excessive tension can induce unnecessary loading on the pump and motor bearings, while extreme overtensioning may cause the shaft to break as a result of fatigue.
z Replace worn pulleys.
z Replace all belts at one time when any one requires changing. Check tension frequently during the first few
days of operation. Never apply belt dressing. If customer supplied belt or pulleys are used, follow the
manufacturer's recommended installation procedures.
z Reinstall belt guard cover.
z Check the pump and system for potential hazardous conditions. Restore energy sources.
5.8 Drive belt tension
Remove the belt guard. At approximately the center of the span between drive and driven pulleys, apply force to the
belt and ensure the resulting deflection provided in Table 6.
If necessary, adjust the tension by raising or lowering the nuts on the motor support jack screws. Tighten the
jackscrew nuts securely after adjustment is complete.
Note: Maintenance of proper belt tension is important. Excessive over-tightening of the belts is harmful to the
shaft bearings, while under-tightening will allow the belts to slip.
5.9 Gas ballast check valve replacement
z Replace the gas ballast valve(s) every two (2) years, if gas ballast is used on a regular basis.
z Lockout all energy sources connected to the pump.
z Remove the stem valve.
z Use an O-ring pick or suitable tool to pull out the gas ballast check valve. Replace the valve if the spring is
damaged or broken.
z Reinstall the stem valve.
z Check the pump and system for potential hazardous conditions. Restore energy sources.
Table 6 - Belt tension
Pump Force Deflection
NPoundsmmInches
149-H/149-HS 13.3 - 22.2 3 - 5 11.0 7/16
212-J 13.3 - 22.2 3 - 5 11.0 7/16
412-J 22.2 - 31.2 5 - 7 13.0 1/2
Page 37

© Edwards Limited 2011. All rights reserved. Page 31
Edwards and the Edwards logo are trademarks of Edwards Limited.
Maintenance
S149-01-880 Issue F
5.10 Fitment or replacement of the motor (412J models only)
The following motors can be fitted to 412J Pump Modules with the Universal Motor Mounting Platform attached.
Note: This is valid for pump modules with a serial number above 076227658.
Figure 14 - Collar bolt positions and motor frame sizes
WARNING
A new safety review may be required following fitment of any motor. Particular attention should
be made to the effectiveness of the drive guard to restrict finger access to the motor shaft and all
other rotating parts.
Table 7 - Motors the can be fitted to 412J pump models
Motor Frame
Size
Line
frequency
Motor
Pulley
Collar Bolt
Position
Platform
Nominal
Inclination
Drive Belt Size
Standard Pump
Article Codes
IEC D160M 50 Hz 6 inch A -0.5 º B105 (L=2720) 900412014501
60 Hz 5 inch B -4.1 º B105 (L=2720)
NEMA 215T 50 Hz 6 inch C -7.7 º B105 (L=2720)
60 Hz 5 inch C -3.0 º B105 (L=2720) 900-412-014
NEMA 254T 60 Hz 5 inch B -4.0 º B105 (L=2720)
Page 38

S149-01-880 Issue F
Page 32 © Edwards Limited 2011. All rights reserved.
Edwards and the Edwards logo are trademarks of Edwards Limited.
Maintenance
5.11 Fault finding
A list of fault conditions and possible causes is provided in Table 8. If unable to rectify the fault using the table, call
your nearest Edwards Service Center for help.
Table 8 - Fault finding guide
Symptom Probable Cause Recommended Solution
Unsatisfactory V acuum at Pump Inlet Contaminated or insufficient oil. Check oil level; utilize gas ballast.
Drain and wipe out reservoir and
valve chamber. Refill with proper oil.
Solenoid oil valve not operating
properly or inoperative.
Check and if necessary, clean and/or
replace solenoid valve or coil.
Intake flange or cover bolts are
loose.
Tighten flange and side cover bolts
at regular intervals.
Oil manifold or integral oil
distribution leaking.
Tighten plugs and manifold screws.
Oil level sight glass leaking. Carefully tighten screws.
Exhaust valve not sealing. Disassemble, clean and check all
parts thoroughly.
Replace any damaged or worn parts.
Pump seizes or knocks excessively;
internal parts severely worn or
broken.
Disassemble piston assembly.
Replace broken or worn parts.
Leakage in vacuum system. Check system as described in
Section 4.
Excessive Pump Noise Pump knocking abnormally. Knocking is normal at blank-off.
Excessive Pump Noise Check oil level and oil solenoid valve
for proper operation.
Broken parts or foreign material in
the pump.
Disassemble and remove foreign
material in the pump.
Replace broken parts as required.
Pump seizure resulting from
insufficient lubrication or presence
of foreign material.
Check solenoid valve for proper
operation.
Disassemble and remove foreign
material. Ensure oil lines are not
clogged.
Smooth minor scoring with #500
emery cloth and wash thoroughly
then oil before installing. Note: a
certain amount of scoring to the
piston, cylinder and other parts
usually will not seriously affect the
vacuum obtainable so long as scoring
is not in a continuous gouge around
the circumference of the piston
surface.
Page 39

© Edwards Limited 2011. All rights reserved. Page 33
Edwards and the Edwards logo are trademarks of Edwards Limited.
Maintenance
S149-01-880 Issue F
Motor stops or will not start. Thermal overload units in motor
starter fail.
Check Capacity of thermal overload
units by comparing ampere rating on
motor nameplate with overload
table inside starter box. If necessary ,
use one (1) size larger than
standard.
Possible internal seizure. Disassemble and correct.
Pump does not turn when motor
starts.
V-belts too loose. Tighten V-belts (see Section 5.8).
Cylinder flooded with excessive oil
due to defective solenoid valve
(Valve stuck in open position from
previous shutdown, or foreign
material in valve seat).
Turn pump over by hand to remove
excess oil. Disassemble valve, clean
and replace any worn parts. Check
solenoid.
Oil viscosity too high or oil
temperature too low.
Change to lighter grade oil or warm
oil before filling pump (espec ially
with low ambient temperatures).
Pump should not be started when oil
temperature is less then 13 °C
(55 °F) (When using V-lube F).
Turn pump over by hand before
starting.
Pulley(s) not keyed to shaft. Ensure keys are in place and
pulley(s) properly tightened.
Pump turns in reverse direction
when motor is turned off.
Gas ballast valve in open position on
pump shut down.
Close gas ballast valve prior to pump
shut down. Atmospheric air prevents
reversing direction of pump piston
on pump shutdown. Oil will also be
prevented from back-streaming into
inlet piping.
Table 8 - Fault finding guide (continued)
Symptom Probable Cause Recommended Solution
Page 40

S149-01-880 Issue F
Page 34 © Edwards Limited 2011. All rights reserved.
Edwards and the Edwards logo are trademarks of Edwards Limited.
This page has been intentionally left blank.
Page 41

© Edwards Limited 2011. All rights reserved. Page 35
Edwards and the Edwards logo are trademarks of Edwards Limited.
Storage and disposal
S149-01-880 Issue F
6 Storage and disposal
6.1 Storage
CAUTION
Observe the storage temperature limits stated in Section 2. Storage below -30 °C (-22 °F) will permanently
damage the pump seals.
Use the following procedure to store the pump:
z Purge the vacuum system and the pump with dry nitrogen and disconnect the pump from the vacuum system.
z Shut down the pump as described in Section 4.
z Disconnect the pump from the electrical supply.
z Disassemble, clean and reassemble the pump. If the pump is to be stored for long periods, loosen the drive
belts and change the oil.
z Place and secure protective covers on the inlet and exhaust ports.
z Store the pump in cool, dry conditions until it is required for use. When required, prepare and install the
pump as described in Section 3. If the pump will be subjected to temperatures below freezing, drain or add
anti-freeze to the water jacket. If the pump will be stored for more than a year, the pump must be cle aned
and overhauled before re-installation.
6.2 Disposal
Dispose of the pump or any components removed from it safely in accordance with local and national safety and
environmental requirements.
Particular care should be taken with components and waste oil which have been contaminated with dangerous
process substances.
Do not incinerate fluoroelastomer seals and O-rings.
Page 42

S149-01-880 Issue F
Page 36 © Edwards Limited 2011. All rights reserved.
Edwards and the Edwards logo are trademarks of Edwards Limited.
This page has been intentionally left blank.
Page 43

© Edwards Limited 2011. All rights reserved. Page 37
Edwards and the Edwards logo are trademarks of Edwards Limited.
Spares and accessories
S149-01-880 Issue F
7 Spares and accessories
7.1 Introduction
Edwards products, spares and accessories are available from Edwards companies i n Belgium, Brazil, Canada, France,
Germany, Hong Kong, Italy, Japan, Korea, Switzerland, United Kingdom, USA, and a worldwide network of
distributors. The majority of these centers employ Service Engineers who have undergone comprehensive Edwards
training courses.
Order spare parts and accessories from the nearest Edwards company or distributor. When ordering, provide the
following information:
z Model and Item Number of equipment.
z Serial number.
z Item number and description of part.
7.2 Service
Edwards products are supported by a worldwide network of Edwards Service Centers. Each Service Center offers a
wide range of options including: equipment decontamination; service exchange; repair; rebuild and testing to factory
specifications. Equipment which has been serviced, repaired or rebuilt is returned with a full warranty.
The local Service Center can also provide Edwards engineers to support on-site maintenance, service or repair of your
equipment.
For more information about service options, contact the nearest Service Center or other Edwards company.
7.3 Spares
Refer to the Parts manual.
7.4 Accessories
The following is a list of accessories that can be purchased by cont acting Edwards.
Table 9 - Accessories
Accessories Item number
Oil mist separator (212-J) 900-291-J24
Oil mist separator (412-J) 900-291-J25
Water miser 900-412-124
Portable oil purifier Application dependant
Page 44

S149-01-880 Issue F
Page 38 © Edwards Limited 2011. All rights reserved.
Edwards and the Edwards logo are trademarks of Edwards Limited.
This page has been intentionally left blank.
Page 45

© Edwards Limited 2011. All rights reserved. Page 39
Edwards and the Edwards logo are trademarks of Edwards Limited.
PFPE-prepared Microvac pumps
S149-01-880 Issue F
8 PFPE-prepared Microvac pumps
8.1 Summary
PFPE-prepared Microvac pumps are supplied prepared for use with Edwards PFPE mechanical pump oils, such as
Fomblin YVAC 06/6 or Krytox 1506.
PFPE-prepared Microvac pumps are suitable for pumping high concentrations of oxygen.
Edwards recommends referencing publication P300-20-000 (Vacuum Pump and Vacuum System Safety) before
installing and using a PFPE-prepared Microvac pump.
8.2 Installation
CAUTION
Never use hydrocarbon lubricants in a PFPE-prepared pump.
When filling the Microvac pump with oil (as described in Section 3), a suitable Edwards PFPE oil must be used.
Hydrocarbon oil cannot be used.
8.3 Operation
Operation of a PFPE-prepared Microvac pump is as specified in Section 4, but take note of the warning above.
8.4 Maintenance
Take additional care if the pump (hence the PFPE oil) is suspected of overheating.
Do not touch or inhale the thermal breakdown products of PFPE oil which may be present if the pump has been heated
to 260 °C (500 °F) and above. PFPE oils are safe in normal use but can decompose into very dangerous substances if
heated to 260 °C (500 °F) and above. The pump may ha ve overheated if it w as mi sus ed, if it malfunctioned, or if it
was in a fire. Material Safety Data Sheets for PFPE oils used in the pump are available on request: contact the supplier
or Edwards.
Fomblin oil has different properties from other pu mp oils, therefore:
If filling the PFPE-prepared Microvac pump wit h Fomblin oil, Edwards recommends to check for oil leaks, particularly
around the shaft seals.
If an oil leak is detected, contact the supplier or Edwards for advice.
WARNING
PFPE-prepared Microvac pumps are suitable for pumping high concentrations of oxygen, but
Edwards recommends that PFPE-prepared Microvac pumps not be used for the pumping of
hazardous materials.
WARNING
Obey the safety instructions given below and take note of appropriate precautions. If not, injury
to people can occur.
Page 46

S149-01-880 Issue F
Page 40 © Edwards Limited 2011. All rights reserved.
Edwards and the Edwards logo are trademarks of Edwards Limited.
This page has been intentionally left blank.
 Loading...