

Page 1

Instruction Manual
GV Gate Valves
B650-01-880
Issue G
View our inventory
Page 2

This page has been intentionally left blank.
Page 3

B650-01-880 Issue G
Contents
Section Page
1 Introduction ....................................................................................... 1
1.1 Scope and definitions ................................................................................................... 1
1.2 Description ................................................................................................................ 1
2 Technical data .................................................................................... 3
2.1 Performance .............................................................................................................. 3
2.2 Mechanical data .......................................................................................................... 3
2.3 Pneumatically operated GV valves ...................................................................................10
2.4 Maximum baking temperatures .......................................................................................10
2.5 Construction materials .................................................................................................10
2.6 Item numbers ............................................................................................................ 10
2.6.1 ISO GV valves ............................................................................................................10
2.6.2 ANSI GV valves .......................................................................................................... 11
2.6.3 CF GV valves .............................................................................................................11
Contents
3 Installation ....................................................................................... 13
3.1 Unpack and inspect ..................................................................................................... 13
3.2 Installation requirements .............................................................................................. 13
3.3 Fit the GV valve ......................................................................................................... 14
3.4 Pneumatic connections (pneumatic GV valves only) ..............................................................14
3.5 Position indicator connections (pneumatic valves only) ..........................................................17
3.5.1 Valves with microswitches ............................................................................................17
3.5.2 GV valves with reed switches ......................................................................................... 17
4 Operation ........................................................................................ 19
4.1 Manual GV valves .......................................................................................................19
4.2 Pneumatic GV valves ...................................................................................................19
5 Maintenance ..................................................................................... 21
6 Storage and disposal ........................................................................... 23
6.1 Storage ...................................................................................................................23
6.2 Disposal ...................................................................................................................23
7 Service, spares and accessories .............................................................. 25
7.1 Introduction ............................................................................................................. 25
7.2 Service ....................................................................................................................25
7.3 Spares .....................................................................................................................25
7.4 Accessories ...............................................................................................................28
For return of equipment, complete the HS Forms at the end of this manual.
dcs/7867/01/08
© Edwards Limited 2008. All rights reserved. Page i
Edwards and the Edwards logo are trademarks of Edwards Limited.
Page 4

B650-01-880 Issue G
Contents
Illustrations
Figure Page
1 Dimensions of manual GV valves (see Table 2) ..................................................................... 4
2 Dimensions of pneumatic GV valves with microswitches (see Table 2) ......................................... 5
3 Dimensions of pneumatic GV valves with reed switches (see Table 2) .......................................... 8
4 Flange dimensions (see Table 3) ...................................................................................... 9
5 Typical pneumatic circuit .............................................................................................16
6 Wiring diagram for pneumatic GV valves with reed switches ....................................................20
Tables
Table Page
1 Technical data ........................................................................................................... 3
2 GV valve body and flange dimensions (mm) ......................................................................... 6
3 GV valve body and flange dimensions (mm) ......................................................................... 6
4 Spares for GV valves manufactured in 1996 and later ............................................................ 25
5 Spares for GV valves manufactured in 1993 to 1995 ..............................................................27
Trademark credits
ConFlat® is a trademark of the Varian Corporation
Page ii © Edwards Limited 2008. All rights reserved.
Edwards and the Edwards logo are trademarks of Edwards Limited.
Page 5

B650-01-880 Issue G
CAUTION
WARNING
1 Introduction
1.1 Scope and definitions
This manual provides installation, operation and maintenance instructions for the Edwards GV Gate Valves (referred
to as GV Valves throughout the remainder of this manual). You must use the GV Valves as specified in this manual.
Read this manual before you install and operate the GV Valve. Important safety information is highlighted as
WARNING and CAUTION instructions; you must obey these instructions. The use of WARNINGS and CAUTIONS is defined
below.
Warnings are given where failure to observe the instruction could result in injury or death to
people.
Cautions are given where failure to observe the instruction could result in damage to the equipment, associated
equipment and process.
Introduction
The units used throughout this manual conform to the SI international system of units of measurement.
1.2 Description
The GV Valves are bellows sealed gate valves for use in applications which require high leak tightness and a minimum
of hydrocarbons in the vacuum system.
The GV Valves have stainless steel bodies of vacuum brazed construction. The valve bodies have been electropolished
both inside and out and have been baked to 1100 °C during manufacture; this eliminates the possibility of virtual
leaks in the GV Valve and ensures that the GV Valve has low outgassing characteristics.
GV Valves are available with ISO flanges, ANSI flanges and CF (ConFlat®) metal sealed flanges; use CF flanged
GV Valves for applications which require ultra high vacuum and very high baking temperatures. ISO and ANSI valves
are supplied with fluoroelastomer bonnet seals; CF GV Valves have metal bonnet seals. All GV Valves have
fluoroelastomer valve plate seals.
Manual and pneumatically actuated GV Valves are available. The pneumatically actuated GV Valves have position
indicators which can be used by your control equipment to determine when the valve is open or closed:
! GVI*P pneumatically actuated ISO valves have reed switch position indicators (see Section 3.5.2).
! Other pneumatically actuated ISO GV Valves and all pneumatically actuated CF GV Valves have microswitch
position indicators (see Section 3.5.1).
© Edwards Limited 2008. All rights reserved. Page 1
Edwards and the Edwards logo are trademarks of Edwards Limited.
Page 6

B650-01-880 Issue G
This page has been intentionally left blank.
Page 2 © Edwards Limited 2008. All rights reserved.
Edwards and the Edwards logo are trademarks of Edwards Limited.
Page 7
B650-01-880 Issue G
2 Technical data
2.1 Performance
Operating pressure range < 1 x 10⁻⁹ mbar to 1 bar (absolute)
(1 x 10⁻⁷ to 1 x 10⁵ Pa)
Leak tightness < 1 x 10⁻⁹ mbar l s-1 (1 x 10⁻⁷ Pa l s-1)
Maximum pressure differential across
3
the valve plate (opening) 30 mbar (3 x 10
Molecular conductance See Table 1
Average life before first service 100,000 open/close cycles (dependent on the application)
2.2 Mechanical data
Dimensions See Figure 1 to 3 and Table 2
Flange sizes See Table 2
Mass See Table 1
Mounting position Any orientation
Pa)
Technical data
Table 1 - Technical data
Manual GV
Molecular
GV Valve
GVI040, GVC015 130 5 5 0.033 0.5
GVI050, GVA/GVC020 250 6 5 0.033 0.5
GVI063, GVI063P,
GVA/GVC025
GVI100, GVI100P,
GVA/GVC040
GVI160, GVI160P,
GVA/GVC060
GVI200, GVA/GVC080 15000 34 10 0.416 2 (close)
GVI250, GVA/GVC100 23000 73 14 0.520 3 (close)
GVI320, GVA/GVC120 39000 77 15 0.520 3 (close)
conductance
-1
)
(l s
520 8 6 0.112 1.0
2000 15 10 0.233 1.5
6300 23 10 0.233 1.5
Approximate
mass (kg)
Valves
No of turns of
handle to
open/ close the
valve
Pneumatic GV Valves
Pneumatic
cylinder
capacity (l)
Minimum closing
and opening
time (s) at 70 psi
(4.8 x 10
5
3 (open)
4 (open)
4 (open)
Pa)
© Edwards Limited 2008. All rights reserved. Page 3
Edwards and the Edwards logo are trademarks of Edwards Limited.
Page 8
B650-01-880 Issue G
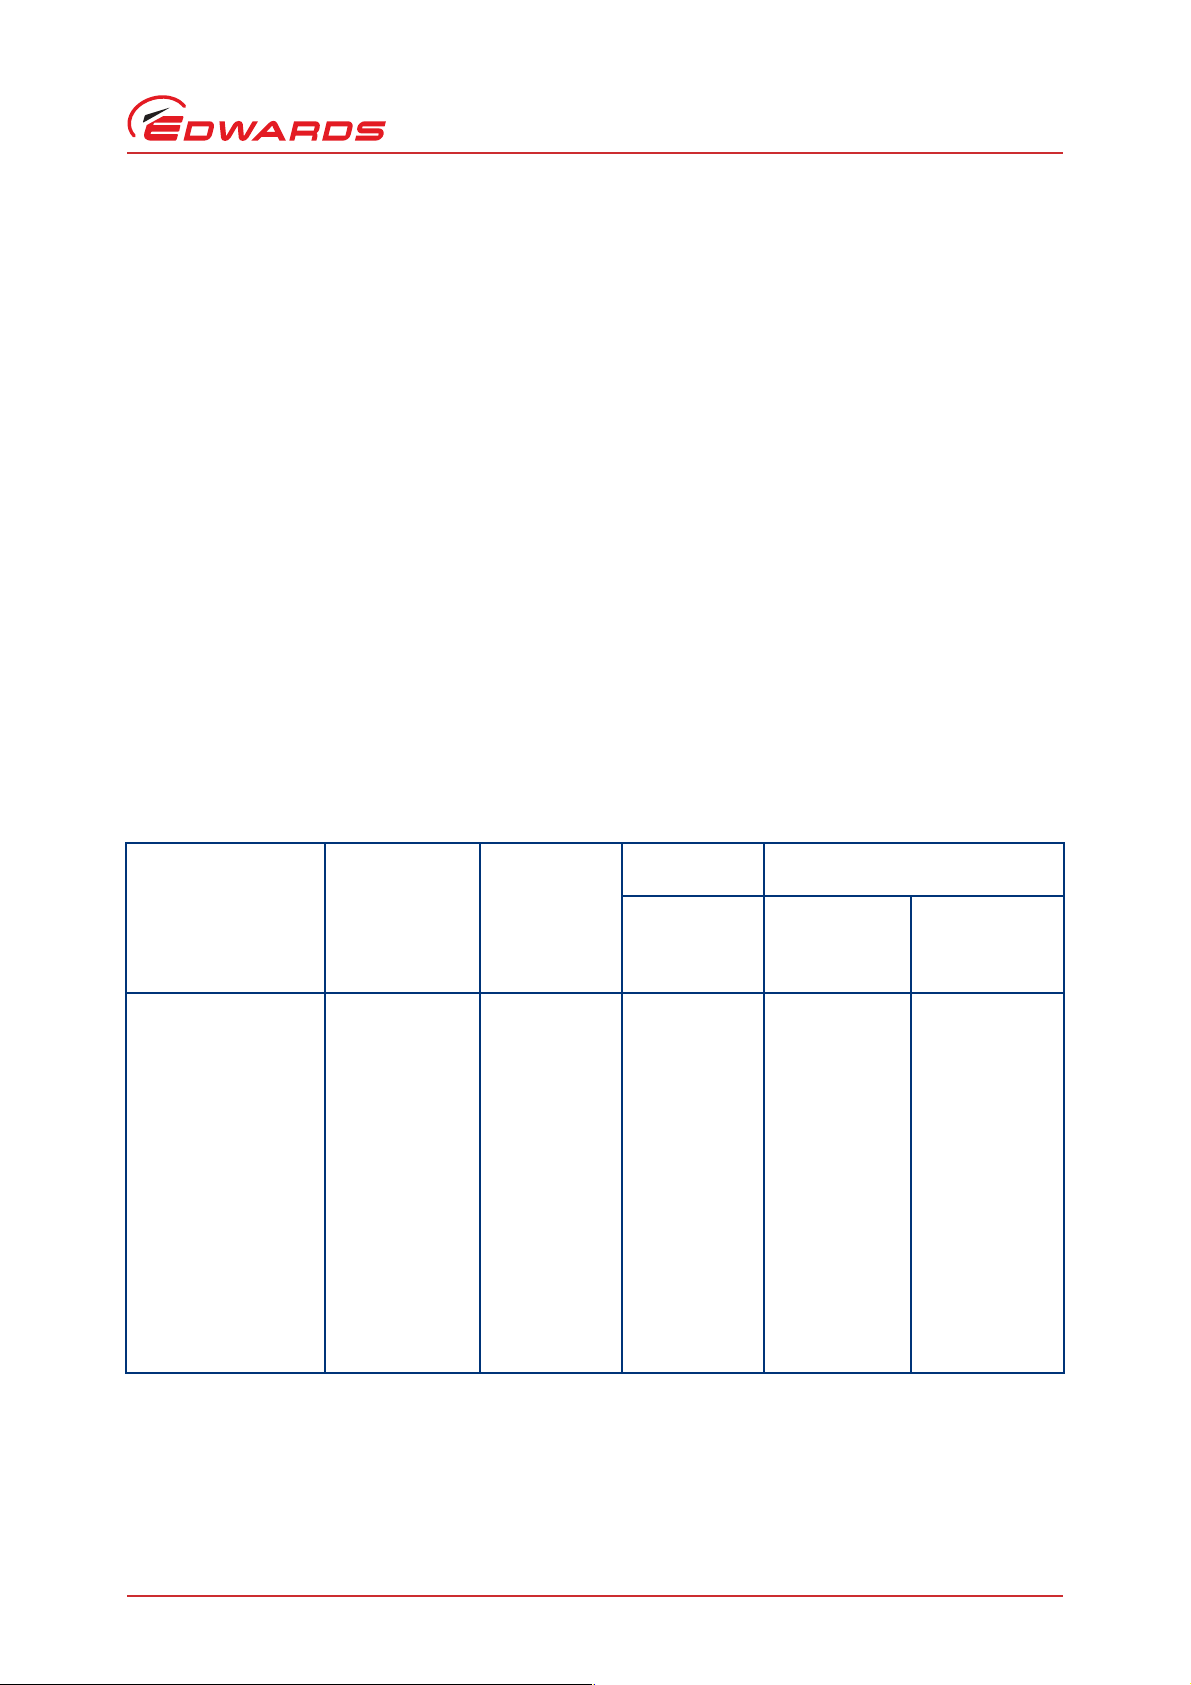
1. Grasp type valve handle: GV Valves with flanges 100 mm (4 inches) and larger
2. Knurled valve handle: GV Valves with flanges up to 75 mm (3 inches)
3. Carriage side
4. Seal side
Technical data
Figure 1 - Dimensions of manual GV valves (see Table 2)
Page 4 © Edwards Limited 2008. All rights reserved.
Edwards and the Edwards logo are trademarks of Edwards Limited.
Page 9
B650-01-880 Issue G
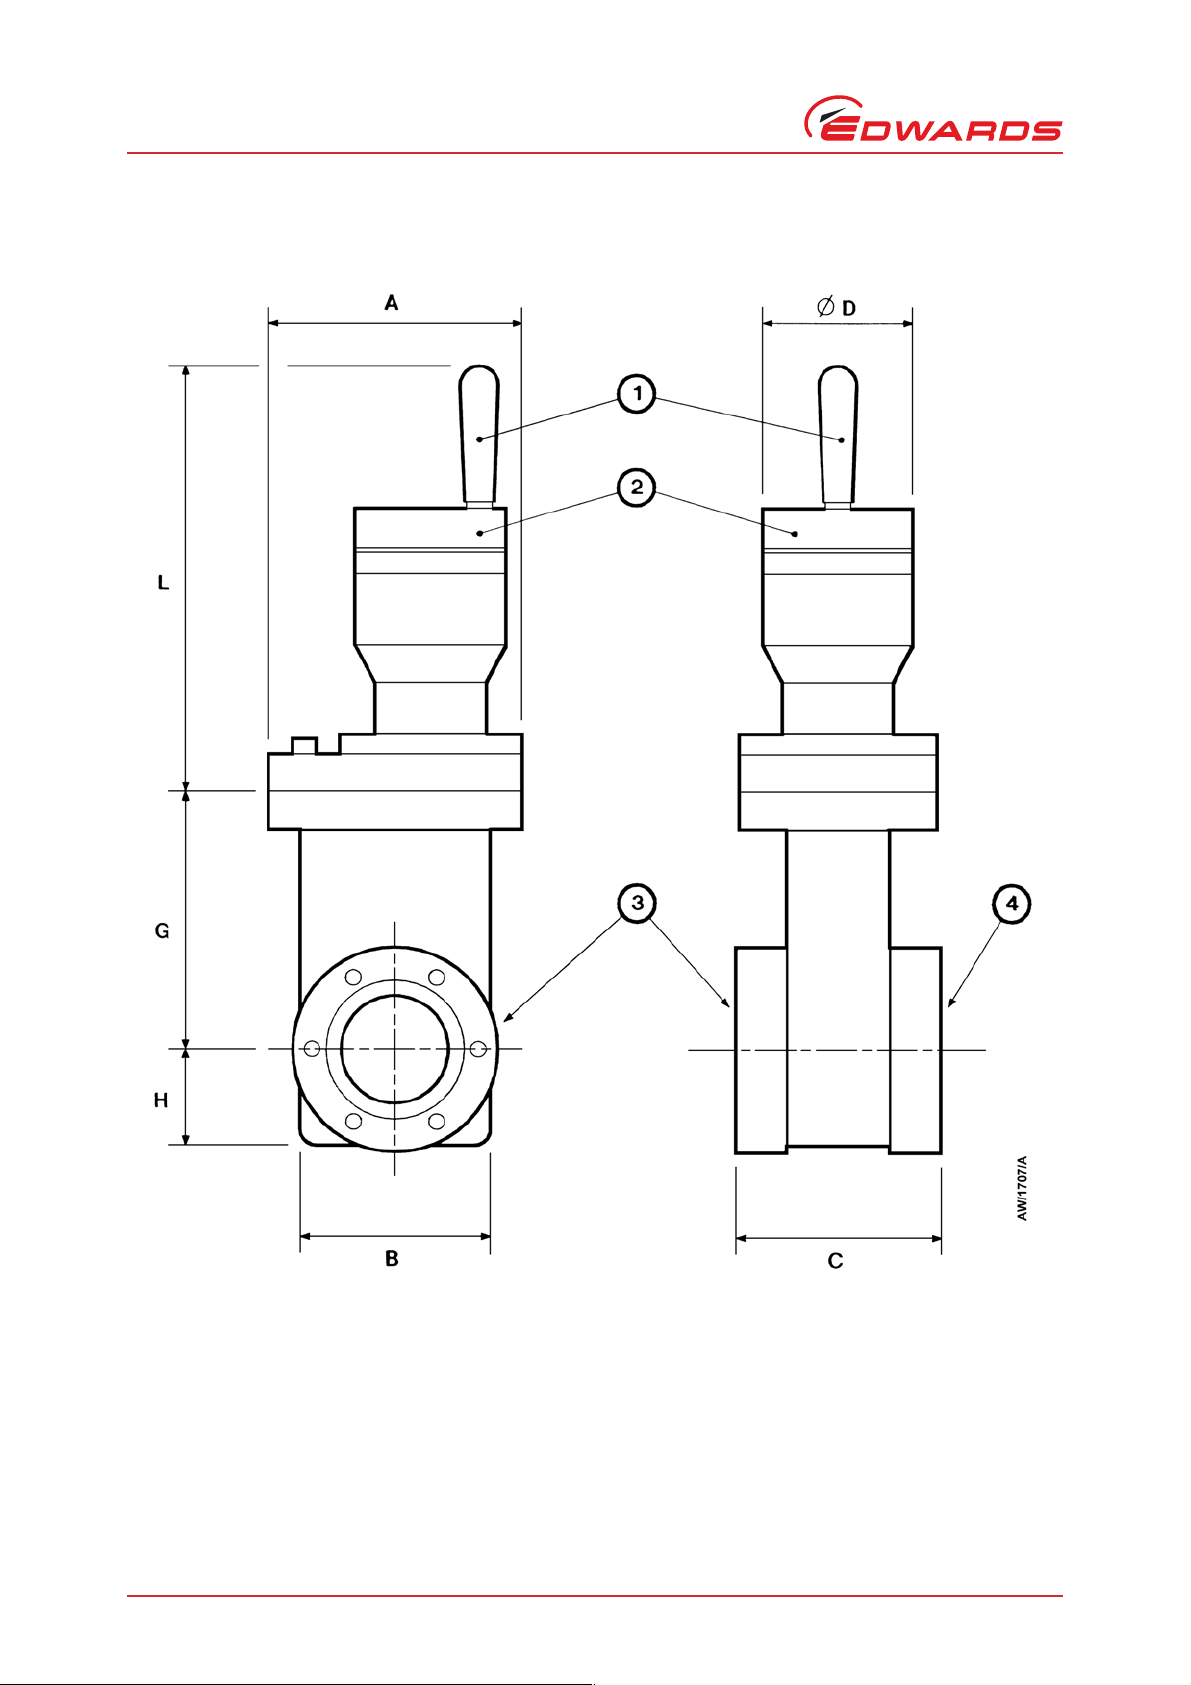
1. Position indicator wires
2. 1/8 inch NPT ports
3. Carriage side
4. Seal side
Figure 2 - Dimensions of pneumatic GV valves with microswitches (see Table 2)
Technical data
© Edwards Limited 2008. All rights reserved. Page 5
Edwards and the Edwards logo are trademarks of Edwards Limited.
Page 10
B650-01-880 Issue G
Technical data
Table 2 - GV valve body and flange dimensions (mm)
Valve
GVI040 40 mm 84.1 26.2 51.6 50.8 69.3 50.7 86.1 33.0 134.9
GVI050 50 mm 96.8 75.2 57.9 50.8 69.3 50.7 104.5 37.6 134.9
GVI063/P 63 mm 111.0 89.4 51.6 50.8 69.3 50.7 122.1 43.1 134.9
GVI100/P 100 mm 177.8 143.5 61.2 75.5 93.5 76.2 206.4 66.9 175.6
GVI160/P 160 mm 222.3 191.8 67.0 75.5 93.5 76.2 270.5 87.6 175.6
GVI200 200 mm 285.8 254.5 67.6 75.5 93.5 76.2 353.4 114.6 175.6
GVI250 250 mm 341.1 303.5 80.0 88.9 120.4 120.4 460.6 146.6 240.7
GVI320 320 mm 408.2 362.7 80.0 88.9 120.4 120.4 560.5 174.9 240.7
GVA020 2 inches 96.8 75.2 51.6 50.8 69.3 50.7 104.5 37.6 134.9
GVA025 2.5 inches 111.0 89.4 51.6 50.8 69.3 50.7 122.1 43.1 134.9
GVA040 4 inches 177.8 143.5 61.2 75.9 93.5 76.2 206.4 66.9 175.6
GVA060 6 inches 222.3 191.8 61.2 75.9 93.5 76.2 270.5 87.6 175.6
GVA080 8 inches 285.8 254.5 70.3 75.9 93.5 76.2 353.4 114.6 175.6
GVA100 10 inches 341.4 303.5 80.0 88.9 120.4 101.6 460.6 146.6 240.7
GVA120 12 inches 403.2 362.7 80.0 88.9 120.4 101.6 560.5 174.9 240.7
GVC015 1.5 inches 84.1 62.5 51.6 50.8 69.3 50.7 86.1 33.0 134.9
GVC020 2 inches 96.8 75.2 57.9 50.8 69.3 50.7 104.5 37.6 134.9
GVC025 2.5 inches 111.0 89.4 61.2 50.8 69.3 50.7 122.1 43.1 134.9
GVC040 4 inches 177.8 143.5 75.4 75.9 93.5 76.2 206.4 66.9 175.6
GVC060 6 inches 222.3 191.8 80.5 75.9 93.5 76.2 270.5 87.6 175.6
GVC080 8 inches 285.8 254.5 85.1 75.9 93.5 76.2 353.4 114.6 175.6
GVC100 10 inches 341.4 303.5 98.8 88.9 120.4 101.6 460.6 146.6 240.7
GVC120 12 inches 403.2 362.7 98.8 88.9 120.4 101.6 560.5 174.9 240.7
Nominal
bore size
A B C D E F G H K
Table 3 - GV valve body and flange dimensions (mm)
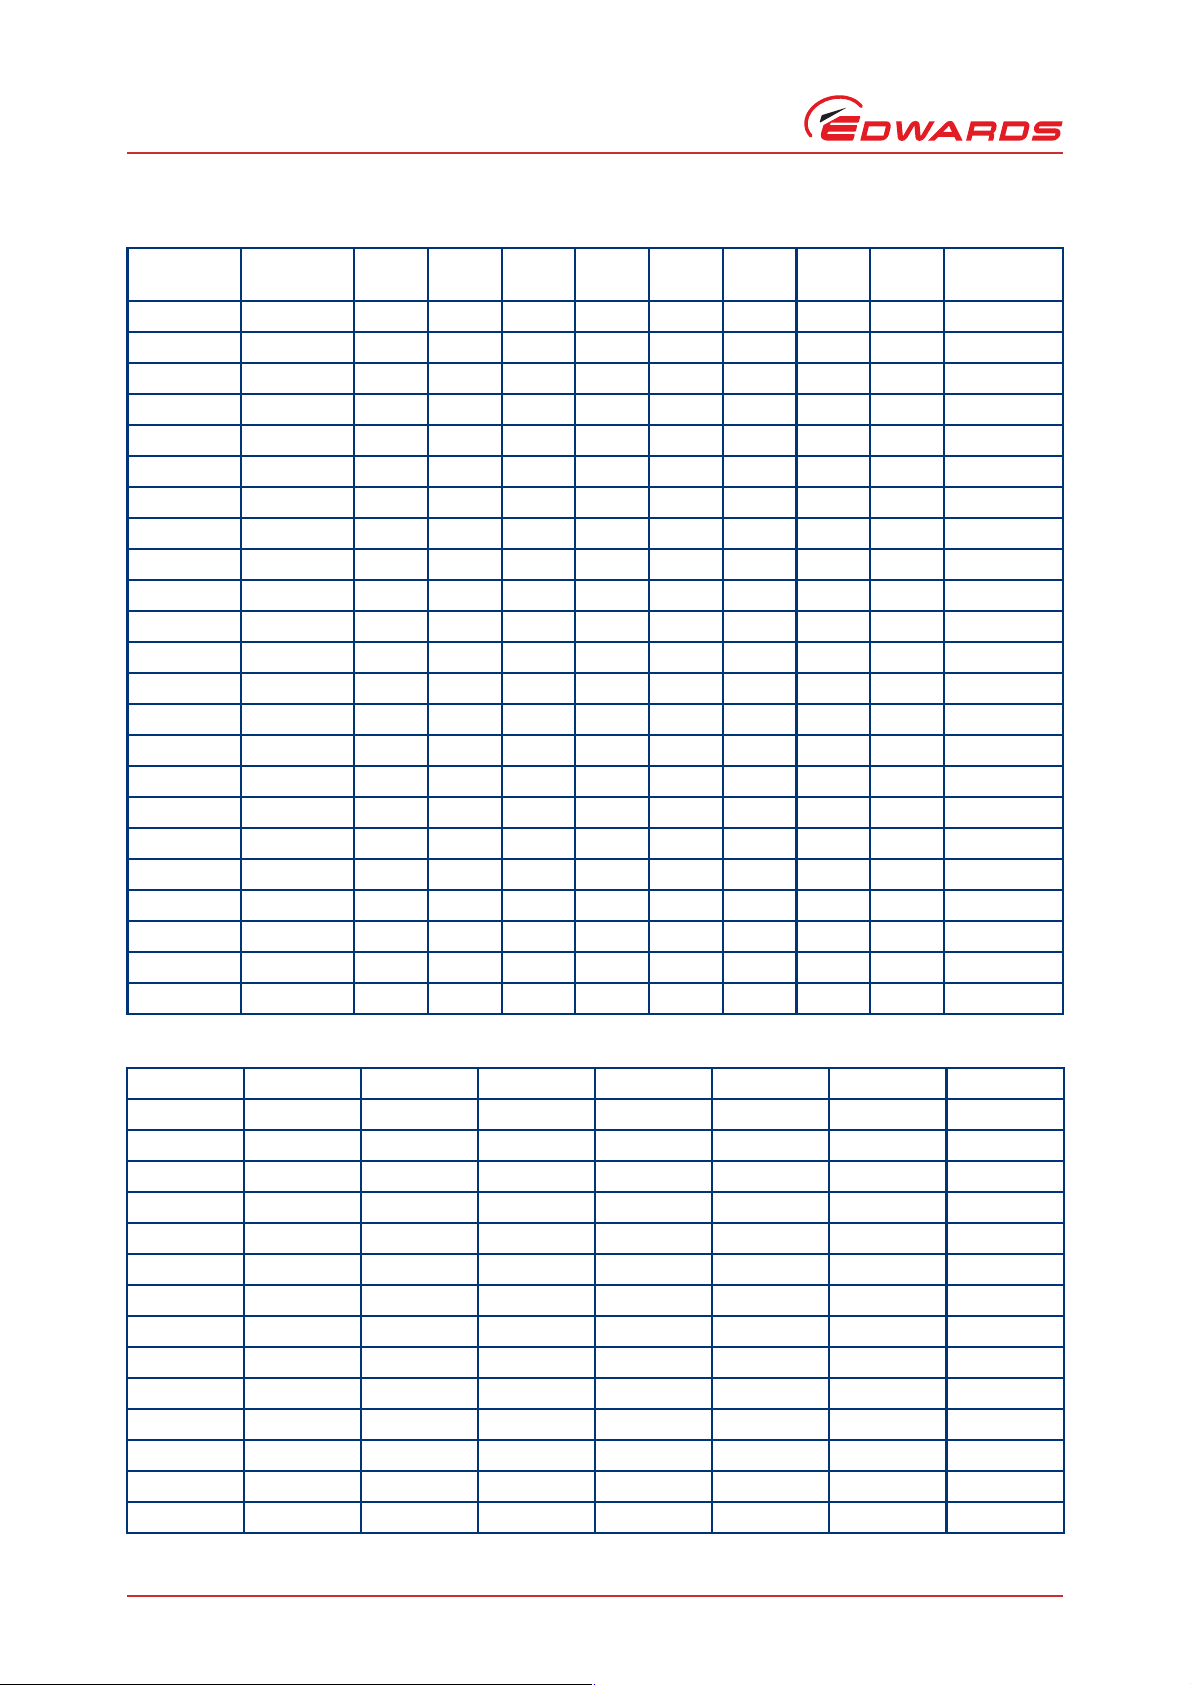
Valve L M N P S T V
GVI040 91.7 69.9 38.1 - 41.2 - 12.7
GVI050 91.7 74.9 50.8 - 52.2 - 12.7
GVI063/P 91.7 130.1 63.5 4 110.0 M8 12.7
GVI100/P 201.3 165.1 101.6 8 145.0 M8 12.7
GVI160/P 201.3 225.0 152.4 8 200.0 M10 12.1
GVI200 201.3 258.8 203.2 12 260.0 M10 15.9
GVI250 231.7 335.0 254.0 12 310.0 M10 19.0
GVI320 231.7 425.0 304.8 12 395.0 M12 19.0
GVA020 91.7 151.6 50.8 4 120.7 3/8-16 12.7
GVA025 91.7 151.6 63.5 4 120.7 3/8-16 12.7
GVA040 190.6 228.4 101.9 8 192.8 3/8-16 12.7
GVA060 200.2 279.4 152.4 8 241.3 3/4-10 12.7
GVA080 200.2 279.4 203.3 8 241.3 3/4-10 17.2
GVA100 231.7 406.4 254.0 12 362.0 3/4-10 19.1
Page 6 © Edwards Limited 2008. All rights reserved.
Edwards and the Edwards logo are trademarks of Edwards Limited.
Page 11

B650-01-880 Issue G
Table 3 - GV valve body and flange dimensions (mm) (continued)
Valve L M N P S T V
GVA120 231.7 406.4 304.8 12 362.0 3/4-10 19.1
GVC015 91.7 69.3 38.1 6 58.7 M6 12.7
GVC020 91.7 85.7 50.8 8 72.4 M8 15.9
GVC025 91.7 113.5 63.5 8 92.2 M8 17.5
GVC040 190.6 151.6 101.9 16 130.3 M8 19.8
GVC060 200.2 202.4 152.4 20 181.1 M8 22.4
GVC080 200.2 253.2 203.2 24 231.9 M8 24.6
GVC100 231.7 304.8 254.0 32 284.0 M8 28.5
GVC120 231.7 354.6 304.8 30 325.4 M10 28.5
Technical data
© Edwards Limited 2008. All rights reserved. Page 7
Edwards and the Edwards logo are trademarks of Edwards Limited.
Page 12

B650-01-880 Issue G
1. Electrical connector (refer to Section 3.5.2)
2. 1/8 inch NPT ports
3. Carriage side
4. Seal side
Technical data
Figure 3 - Dimensions of pneumatic GV valves with reed switches (see Table 2)
Page 8 © Edwards Limited 2008. All rights reserved.
Edwards and the Edwards logo are trademarks of Edwards Limited.
Page 13

Figure 4 - Flange dimensions (see Table 3)
A. NW flange
B. ISO flange
C. ANSI flange
D. CF flange
P = number of holes of diameter T
B650-01-880 Issue G
Technical data
© Edwards Limited 2008. All rights reserved. Page 9
Edwards and the Edwards logo are trademarks of Edwards Limited.
Page 14

B650-01-880 Issue G
Technical data
2.3 Pneumatically operated GV valves
The pneumatic supply should be dry and filtered. Lubricated or non-lubricated air may be used.
Pneumatic supply
Minimum supply pressure 65 psig (4.5 bar gauge, 5.5 bar absolute, 5.5 x 10
Maximum supply pressure 80 psig (5.5 bar gauge, 6.5 bar absolute, 6.5 x 10⁵ Pa)
Pneumatic connections 1/8 inch NPT
Position indicator switch contact rating 28 V, 20 mA a.c. and d.c.
2.4 Maximum baking temperatures
Valve body
Fluoroelastomer sealed bonnet 150 °C
Metal sealed bonnet 250 °C
Valve closed 200 °C
Manual actuator 200 °C
Pneumatic actuator 100 °C
5
Pa)
2.5 Construction materials
The GV Valves are manufactured from the following materials:
Valve body AISI 304 stainless steel
Valve plate AISI 304 stainless steel
Mechanism AISI 304 stainless steel
Bearings Hardened high carbon chrome steel
Circlips SS PH 15-7 Mo
Bellows AISI 304 stainless steel
Seals, valve plate Fluoroelastomer
2.6 Item numbers
2.6.1 ISO GV valves
Valve Flange Manual valve Pneumatic valve
GVI040 NW40 B650-01-000 B650-51-000
GVI050 NW50 B651-01-000 B651-51-000
GVI063 ISO63 B652-01-000 B652-51-000
GVI100 ISO100 B653-01-000 B653-51-000
GVI160 ISO160 B654-01-000 B654-51-000
GVI200 ISO200 B655-01-000 B655-51-000
GVI250 ISO250 B656-01-000 B656-51-000
Item Number
Page 10 © Edwards Limited 2008. All rights reserved.
Edwards and the Edwards logo are trademarks of Edwards Limited.
Page 15

Valve Flange Manual valve Pneumatic valve
GVI320 ISO320 B657-01-000 B657-51-000
GVI063P ISO63 - B652-54-000
GVI100P ISO100 - B653-54-000
GVI160P ISO160 - B654-54-000
2.6.2 ANSI GV valves
Valve Flange Manual valve Pneumatic valve
GVA020 ANSI2 B651-02-000 B651-52-000
GVA025 ANSI2 B652-02-000 B652-52-000
GVA040 ANSI4 B653-02-000 B653-52-000
GVA060 ANSI6 B654-02-000 B654-52-000
GVA080 ANSI6 B655-02-000 B655-52-000
GVA100 ANSI10 B656-02-000 B656-52-000
GVA120 ANSI10 B657-02-000 B657-52-000
B650-01-880 Issue G
Technical data
Item Number
Item Number
2.6.3 CF GV valves
Valve Flange Manual valve Pneumatic valve
GVC015 2.73 inch o.d. CF B650-03-000 B650-53-000
GVC020 3.37 inch o.d. CF B651-03-000 B651-53-000
GVC025 4.47 inch o.d. CF B652-03-000 B652-53-000
GVC040 6.00 inch o.d. CF B653-03-000 B653-53-000
GVC063 8.00 inch o.d. CF B654-03-000 B654-53-000
GVC080 10.00 inch o.d. CF B655-03-000 B655-53-000
GVC100 12.00 inch o.d. CF B656-03-000 B656-53-000
GVC120 14.00 inch o.d. CF B657-03-000 B657-53-000
Item Number
© Edwards Limited 2008. All rights reserved. Page 11
Edwards and the Edwards logo are trademarks of Edwards Limited.
Page 16

B650-01-880 Issue G
This page has been intentionally left blank.
Page 12 © Edwards Limited 2008. All rights reserved.
Edwards and the Edwards logo are trademarks of Edwards Limited.
Page 17

B650-01-880 Issue G
WARNING
WARNING
3 Installation
Where necessary, use suitable lifting equipment to move the valve. Refer to Table 1 for the mass
of the valves.
3.1 Unpack and inspect
Remove all the packing materials and check the GV Valve; do not remove the protective covers from the valve flanges
yet.
If the GV Valve is damaged, notify your supplier and the carrier in writing within three days; state the Item Number
of the GV Valve together with your order number and your supplier’s invoice number. Retain the packing materials
for inspection. Do not use the GV Valve if it is damaged.
If the GV Valve is not to be used immediately, store the GV Valve in suitable conditions as described in Section 6.
3.2 Installation requirements
Installation
Take appropriate precautions when you install the GV Valve in a system in which dangerous
process substances have been pumped.
The GV Valve can be fitted in any orientation. However, we recommend that you install the GV Valve with the
carriage side of the valve plate on the high vacuum side of the vacuum system. This ensures that the valve body is
under vacuum at all times and prevents the need to pump down the valve body.
The GV Valve is supported by the pipeline it is fitted to. You must:
! Ensure that the GV Valve and the adjacent pipelines are adequately supported.
! Ensure that the pipeline flanges are in-line, parallel and the correct distance apart, to prevent stress on the
valve body.
! Ensure that the installation design and configuration is suitable for the GV Valve. If it is not, the GV Valve
may leak.
! Install flexible bellows in the pipeline to prevent the transmission of stress to the valve body during baking or
from the mass of the other components in your vacuum system.
For CF GV Valves, use copper gaskets to seal the valve.
For ISO and ANSI GV Valves, we recommend that you use trapped O-rings to seal a GV Valve with a flange size greater
than 50 mm (2 inches), unless you will use the GV Valve in an application where there must be no trapped volumes.
In these applications you can use Co-Seals, as long as:
! The valve body and the pipelines are supported so that there is even loading of the Co-Seal faces.
! The securing bolts are evenly tightened to a maximum torque of 5 Nm.
When you install a manual GV Valve, ensure that you can access the valve handle.
© Edwards Limited 2008. All rights reserved. Page 13
Edwards and the Edwards logo are trademarks of Edwards Limited.
Page 18

B650-01-880 Issue G
WARNING
WARNING
Installation
3.3 Fit the GV valve
Install the GV Valve so that fingers or other parts of the body cannot get trapped by exposed parts
of the valve mechanism.
Install the GV Valve in clean conditions and wear clean lint-free gloves to touch the GV Valve. If you do not, the
GV Valve may be contaminated and may outgas when it is installed.
Use suitable clamps to fit GVI040 and GVI050 Valves, which have NW flanges.
All other GV Valves have two flanges, each of which has tapped holes. You must use bolts of the correct length to fit
the GV Valve. We recommend that you use bolts which are at least 6 mm (1/4 inch) shorter than the thickness of
both mating flanges and seal. If you use longer bolts, you will damage the body panels and the sealing surface of the
gate O-ring and the GV Valve may leak. Use the following procedure:
1. Remove the flange covers from the GV Valve and wipe the flanges and the gaskets with a clean, dry lint-free
cloth.
2. If you have O-ring seal flanges, apply a light wipe of high vacuum grease (such as Fomblin RT15) to the O-ring,
then fit the O-ring in the groove in the flange.
3. Place the GV Valve between the pipeline flanges and in the required orientation (refer to Section 3.2).
4. If you will bake the GV Valve, lightly grease the securing bolts with a suitable high temperature, anti-seize
compound.
5. Fit the securing bolts, then tighten them progressively and alternately (that is, tighten one bolt by a few turns,
then tighten the bolt on the opposite side of the valve, then tighten the bolt adjacent to the first bolt, and so
on) to the following maximum torques:
! Co-Seals: 5 Nm
! O-ring seals: 7 to 14 Nm
! CF flanges up to 63 mm (21/2 inch) outside diameter: 22 Nm.
If you do not tighten the bolts correctly, the GV Valve may leak.
3.4 Pneumatic connections (pneumatic GV valves only)
Ensure that you control the release of compressed air when you connect or disconnect the
pneumatic supply, and unscrew and remove the check- valve. If you do, the sudden release of high
pressure air may cause injury.
The GV Valve is supplied with the pneumatic cylinder pressurised to secure the valve plate during transit:
! GV Valves with nominal flange size less than 200 mm (8 inches) are supplied with the GV Valve secured in the
open position; a check-valve is fitted to the pneumatic connection closest to the valve body to maintain the
pressure in the pneumatic cylinder.
! GV Valves with nominal flange size greater than or equal to 200 mm (8 inches) are supplied with the GV Valve
secured in the closed position; a check-valve is fitted to the pneumatic connection furthest from the valve
body to maintain the pressure in the pneumatic cylinder.
Page 14 © Edwards Limited 2008. All rights reserved.
Edwards and the Edwards logo are trademarks of Edwards Limited.
Page 19

B650-01-880 Issue G
1. Slowly unscrew the check-valve to release the pressure in the pneumatic cylinder. Do not fully unscrew the
check-valve.
2. When the pneumatic cylinder is at atmospheric pressure, remove the check- valve.
3. Use suitable components (refer to Section 2) to connect your pneumatic supply to the two pneumatic
connections on the double acting actuating cylinder on the GV Valve. Ensure that the connections comply with
all local pneumatic regulations, and that your pneumatic supply complies with the requirements of Section 2.3.
If it does not, you can damage the GV Valve. A typical pneumatic circuit is shown in Figure 5.
4. We recommend that you fit an electropneumatic control-valve accessory (refer to Section 7), to allow you to
adjust the opening and closing times of the GV Valve. Fit the electropneumatic control-valve as described in the
instruction manual supplied with the control-valve. If you fit a control-valve, you can fit the check-valve
(removed in Step 1 and 2) to the inlet of the control-valve, to maintain the GV Valve position if the pneumatic
supply fails (see Figure 5).
5. When you have connected the pneumatic supply to the GV Valve to the times shown in Table 1. If you do not, you
may damage the GV Valve when you operate it and it may leak. Refer to the instruction manual supplied with
your electropneumatic control-valve to adjust the opening and closing times.
Installation
© Edwards Limited 2008. All rights reserved. Page 15
Edwards and the Edwards logo are trademarks of Edwards Limited.
Page 20
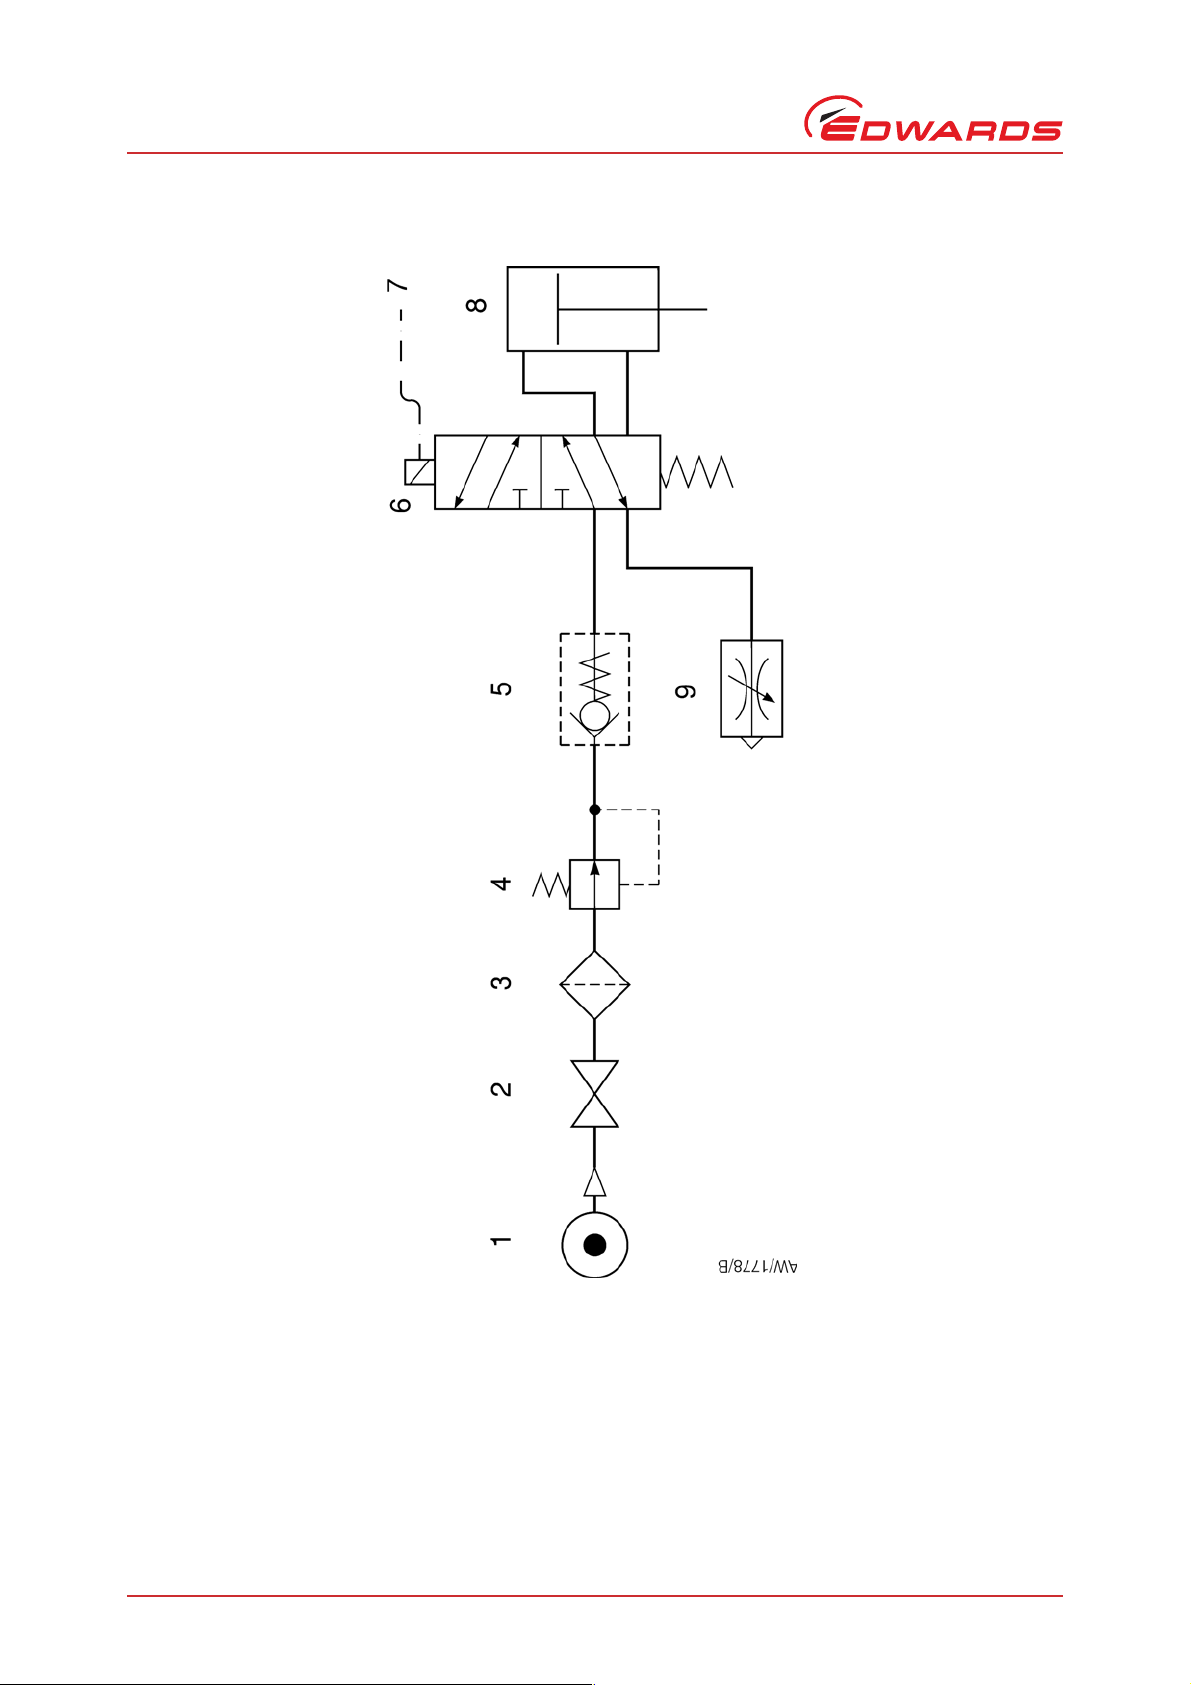
B650-01-880 Issue G
6. Control valve
7. Electrical connections
8. GV Valve
9. Flow controller
1. Compressed air supply
2. Shut-off valve
3. Filter
4. Pressure regulator
5. Check-valve (optional)
Installation
Figure 5 - Typical pneumatic circuit
Page 16 © Edwards Limited 2008. All rights reserved.
Edwards and the Edwards logo are trademarks of Edwards Limited.
Page 21

B650-01-880 Issue G
3.5 Position indicator connections (pneumatic valves only)
Note: GVI***P pneumatic GV Valves have reed switches (see Section 3.5.2); all other pneumatic GV Valves have
microswitches (see Section 3.5.1).
3.5.1 Valves with microswitches
The pneumatic GV Valve has two microswitches: a fully-open microswitch which operates when the GV Valve is fully
open, and a fully-closed microswitch which operates when the GV Valve is fully closed. Two black wires are
connected to the outputs of the fully-open microswitch and two white wires are connected to the outputs of the fully
closed microswitch. Connect these wires (Figure 2, item 1) to your control equipment. The signals on the wires are
used as follows:
! The signal on the white wires is normally open and closes when the GV Valve is fully closed.
! The signal on the black wires is normally open and closes when the GV Valve is fully open.
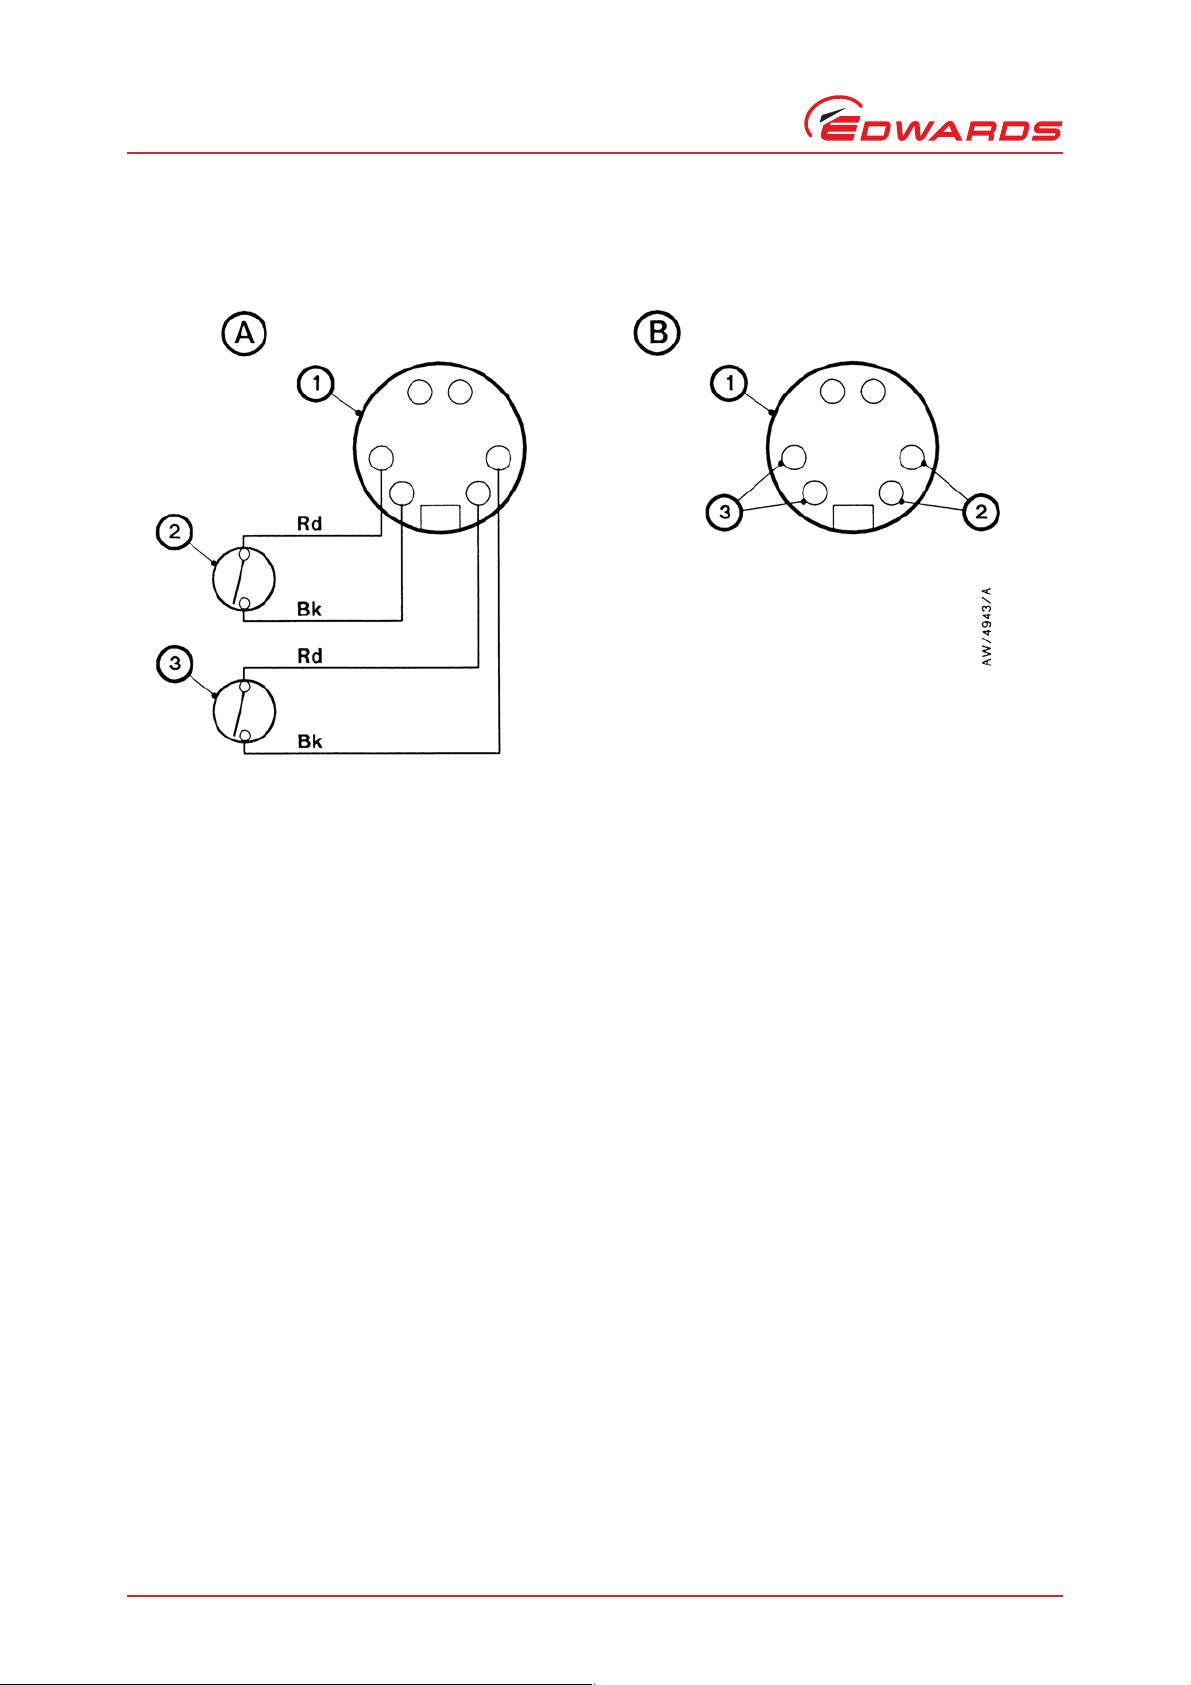
3.5.2 GV valves with reed switches
The pneumatic GV Valve has two reed switches: a fully-open reed switch which operates when the GV Valve is fully
open, and a fully-closed reed switch which operates when the GV Valve is fully closed. A red and a black wire are
connected to each of these switches and to the electrical connector on the GV Valve (Figure 3, item 1). Use the
connector mating-half supplied to connect the outputs of the reed switches to your control equipment: refer to the
wiring diagram shown in Figure 6.
Installation
© Edwards Limited 2008. All rights reserved. Page 17
Edwards and the Edwards logo are trademarks of Edwards Limited.
Page 22

B650-01-880 Issue G
This page has been intentionally left blank.
Page 18 © Edwards Limited 2008. All rights reserved.
Edwards and the Edwards logo are trademarks of Edwards Limited.
Page 23

B650-01-880 Issue G
4 Operation
4.1 Manual GV valves
Note: There are two types of valve handle: a grasp type handle (Figure 1, item 1) fitted to 100 mm (4 inch) and
larger GV Valves, and a knurled handle (Figure 1, item 2) fitted to 75 mm (3 inch) and smaller GV Valves.
To open the GV Valve, turn the valve handle anticlockwise until you cannot turn it any more.
To close the GV Valve, turn the valve handle clockwise until you hear the GV Valve lock ‘over-centre’ in the fully
closed position. If you think that there is a leak across the valve plate seal, do not overtighten the valve handle to
stop the leak. When the gate mechanism has gone ‘over-centre’ to seal the GV Valve, any further tightening will
increase the leak rate across the plate seal and will damage the valve mechanism.
4.2 Pneumatic GV valves
Operation
To close the GV Valve, slowly increase the pneumatic supply pressure to the valve from 0 psig
(1 bar absolute, 1 x 10
To open the GV Valve, slowly decrease the pneumatic supply pressure to the GV Valve to 0 psig
(1 bar absolute, 1 x 10
If you have not fitted a check-valve as described in Step 4 of Section 3.4, when the pneumatic supply fails or is vented
to atmosphere:
! A closed GV Valve will remain fully closed
! An open GV Valve will start to close but will not lock ‘over-centre’and fully close.
The outputs of the GV Valve position indicator microswitches can be used at all times to identify if the GV Valve is
fully open, fully closed or partly open (see Section 3.5).
5
Pa) until you hear the GV Valve lock ‘over-centre’ in the fully closed position.
5
Pa).
© Edwards Limited 2008. All rights reserved. Page 19
Edwards and the Edwards logo are trademarks of Edwards Limited.
Page 24
B650-01-880 Issue G
1. Electrical connector
2. Valve open switch
3. Valve closed switch
A. Connector viewed from wiring end
B. Connector viewed from exterior
Rd Red
Bk Black
Operation
Figure 6 - Wiring diagram for pneumatic GV valves with reed switches
Page 20 © Edwards Limited 2008. All rights reserved.
Edwards and the Edwards logo are trademarks of Edwards Limited.
Page 25

B650-01-880 Issue G
5 Maintenance
Check the following items as appropriate when you maintain your vacuum system:
! Inspect the GV Valve vacuum connections and check that they are tight. Tighten any loose connections.
! Inspect all pneumatic connections and check that they are tight. Tighten any loose connections.
! Inspect all pneumatic pipes and check that they are not damaged. Replace any damaged pipes.
! Inspect the valve position indicator electrical connections and check that they are tight. Tighten any loose
connections.
! Check that the valve plate opens and closes smoothly when the valve is operated.
! Check that the valve plate and other seals are leak tight.
Maintenance
© Edwards Limited 2008. All rights reserved. Page 21
Edwards and the Edwards logo are trademarks of Edwards Limited.
Page 26

B650-01-880 Issue G
This page has been intentionally left blank.
Page 22 © Edwards Limited 2008. All rights reserved.
Edwards and the Edwards logo are trademarks of Edwards Limited.
Page 27

B650-01-880 Issue G
6 Storage and disposal
6.1 Storage
Place protective covers over the valve flanges (and pneumatic ports, if applicable) and store the GV Valve in cool,
dry conditions until required for use.
When required, prepare and install the GV Valve as described in Section 3.
6.2 Disposal
Dispose of the GV Valve and any components removed from it safely in accordance with all local and national safety
and environmental requirements.
Storage and disposal
© Edwards Limited 2008. All rights reserved. Page 23
Edwards and the Edwards logo are trademarks of Edwards Limited.
Page 28

B650-01-880 Issue G
This page has been intentionally left blank.
Page 24 © Edwards Limited 2008. All rights reserved.
Edwards and the Edwards logo are trademarks of Edwards Limited.
Page 29

B650-01-880 Issue G
7 Service, spares and accessories
7.1 Introduction
Edwards products, spares and accessories are available from Edwards companies in Belgium, Brazil, China, France,
Germany, Israel, Italy, Japan, Korea, Singapore, United Kingdom, U.S.A. and a world-wide network of distributors.
The majority of these centres employ Service Engineers who have undergone comprehensive Edwards training
courses.
Order spare parts and accessories from your nearest Edwards company or distributor. When you order, please state
for each part required:
! Model and Item Number of your equipment
! Serial number (if any)
! Item Number and description of the part
7.2 Service
Edwards products are supported by a world-wide network of Edwards Service Centres. Each Service Centre offers a
wide range of options including: equipment decontamination; service exchange; repair; rebuild and testing to factory
specifications. Equipment which has been serviced, repaired or rebuilt is returned with a full warranty.
Service, spares and accessories
Your local Service Centre can also provide Edwards engineers to support on-site maintenance, service or repair of
your equipment.
For more information about service options, contact your nearest Service Centre or other Edwards company.
7.3 Spares
Refer to Table 4 and 5 for the spares kits available for the GV Valves:
! Seals Kits contain gate O-ring, bonnet seal and pneumatic actuator O-rings.
! Bellows Kits contain bonnet/bellows/actuator link welded assembly, and circlip (as required).
! Pins and Bearings Kits contain pins, washers, bearings, springs and wheels (as required).
Table 4 - Spares for GV valves manufactured in 1996 and later
Flange size
NW40 40 (1 1/2) GVI040 B650-01-020 B650-01-030 B650-01-040
NW50 50 (2) GVI050 B651-01-020 B650-01-030 B651-01-040
ISO63 63 (2 1/2) GVI063 B652-01-020 B650-01-030 B652-01-040
ISO100 100 (4) GVI100 B653-01-020 B653-01-030 B653-01-040
ISO160 160 (6) GVI160 B654-01-020 B653-01-030 B654-01-040
ISO200 200 (8) GVI200 B655-01-020 B653-01-030 B655-01-040
ISO250 250 (10) GVI250 B656-01-020 B656-01-030 B656-01-040
ISO320 320 (12) GVI320 B657-01-020 B656-01-030 B657-01-040
NW40 40 (1 1/2) GVI040P B650-01-020 B650-01-030 B650-01-040
NW50 50 (2) GVI050P B651-01-020 B650-01-030 B651-01-040
Nominal bore: mm
(inches)
Valve model Seals Kits Bellows Kits
Pins and
bearings Kits
© Edwards Limited 2008. All rights reserved. Page 25
Edwards and the Edwards logo are trademarks of Edwards Limited.
Page 30

B650-01-880 Issue G
Service, spares and accessories
Table 4 - Spares for GV valves manufactured in 1996 and later (continued)
Flange size
ISO63 63 (2 1/2) GVI063P B652-01-020 B650-01-030 B652-01-040
ISO100 100 (4) GVI100P B653-01-020 B653-01-030 B653-01-040
ISO160 160 (6) GVI160P B654-01-020 B653-01-030 B654-01-040
ISO200 200 (8) GVI200P B655-01-020 B653-01-030 B655-01-040
ISO250 250 (10) GVI250P B656-01-020 B656-01-030 B656-01-040
ISO320 320 (12) GVI320P B657-01-020 B656-01-030 B657-01-040
2 inch ANSI 50 (2) GVA020 B651-01-020 B650-01-030 B651-01-040
2 inch ANSI 63 (2 1/2) GVA025 B652-01-020 B650-01-030 B652-01-040
4 inch ANSI 100 (4) GVA040 B653-01-020 B653-01-030 B653-01-040
6 inch ANSI 160 (6) GVA060 B654-01-020 B653-01-030 B654-01-040
6 inch ANSI 200 (8) GVA080 B655-01-020 B653-01-030 B655-01-040
10 inch ANSI 250 (10) GVA100 B656-01-020 B656-01-030 B656-01-040
10 inch ANSI 320 (12) GVA120 B657-01-020 B656-01-030 B657-01-040
2 inch ANSI 50 (2) GVA020P B651-01-020 B650-01-030 B651-01-040
2 inch ANSI 63 (2 1/2) GVA025P B652-01-020 B650-01-030 B652-01-040
4 inch ANSI 100 (4) GVA040P B653-01-020 B653-01-030 B653-01-040
6 inch ANSI 160 (6) GVA060P B654-01-020 B653-01-030 B654-01-040
6 inch ANSI 200 (8) GVA080P B655-01-020 B653-01-030 B655-01-040
10 inch ANSI 250 (10) GVA100P B656-01-020 B656-01-030 B656-01-040
10 inch ANSI 320 (12) GVA120P B657-01-020 B656-01-030 B657-01-040
2.37 inch o.d. CF 40 (1 1/2) GVC015 B650-03-020 B650-03-030 B650-01-040
3.37 inch o.d. CF 50 (2) GVC020 B651-03-020 B651-03-030 B651-01-040
4.47 inch o.d. CF 63 (2 1/2) GVC025 B652-03-020 B652-03-030 B652-01-040
6.00 inch o.d. CF 100 (4) GVC040 B653-03-020 B653-03-030 B653-03-040
8.00 inch o.d. CF 160 (6) GVC060 B654-03-020 B654-03-030 B654-03-040
10.00 inch o.d. CF 200 (8) GVC080 B655-03-020 B655-03-030 B655-03-040
12.00 inch o.d. CF 250 (10) GVC100 B656-03-020 B656-03-030 B656-03-040
14.00 inch o.d. CF 320 (12) GVC120 B657-03-020 B657-03-030 B657-03-040
2.37 inch o.d. CF 40 (1 1/2) GVC015P B650-03-020 B650-03-030 B650-01-040
3.37 inch o.d. CF 50 (2) GVC020P B651-03-020 B651-03-030 B651-01-040
4.47 inch o.d. CF 63 (2 1/2) GVC025P B652-03-020 B652-03-030 B652-01-040
6.00 inch o.d. CF 100 (4) GVC040P B653-03-020 B653-03-030 B653-03-040
8.00 inch o.d. CF 160 (6) GVC060P B654-03-020 B654-03-030 B654-03-040
10.00 inch o.d. CF 200 (8) GVC080P B655-03-020 B655-03-030 B655-03-040
12.00 inch o.d. CF 250 (10) GVC100P B656-03-020 B656-03-030 B656-03-040
14.00 inch o.d. CF 320 (12) GVC120P B657-03-020 B657-03-030 B657-03-040
Nominal bore: mm
(inches)
Valve model Seals Kits Bellows Kits
Pins and
bearings Kits
Page 26 © Edwards Limited 2008. All rights reserved.
Edwards and the Edwards logo are trademarks of Edwards Limited.
Page 31

Table 5 - Spares for GV valves manufactured in 1993 to 1995
B650-01-880 Issue G
Service, spares and accessories
Flange size
NW40 40 (1 1/2) GVI040 B650-01-050 B650-01-060 B650-01-070
NW50 50 (2) GVI050 B651-01-050 B650-01-060 B651-01-070
ISO63 63 (2 1/2) GVI063 B652-01-050 B650-01-060 B652-01-070
ISO100 100 (4) GVI100 B653-01-050 B653-03-060 B653-01-070
ISO160 160 (6) GVI160 B654-01-050 B653-01-060 B654-01-070
ISO200 200 (8) GVI200 B655-01-050 B653-01-060 B655-01-070
ISO250 250 (10) GVI250 B656-01-050 B656-01-060 B656-01-070
ISO320 320 (12) GVI320 B657-01-050 B656-01-060 B657-01-070
NW40 40 (1 1/2) GVI040P B650-01-050 B650-01-060 B650-01-070
NW50 50 (2) GVI050P B651-01-050 B650-01-060 B651-01-070
ISO63 63 (2 1/2) GVI063P B652-01-050 B650-01-060 B652-01-070
ISO100 100 (4) GVI100P B653-01-050 B653-01-060 B653-01-070
ISO160 160 (6) GVI160P B654-01-050 B653-01-060 B654-01-070
ISO200 200 (8) GVI200P B655-01-050 B653-01-060 B655-01-070
ISO250 250 (10) GVI250P B656-01-050 B656-01-060 B656-01-070
ISO320 320 (12) GVI320P B657-01-050 B656-01-060 B657-01-070
2 inch ANSI 50 (2) GVA020 B651-01-050 B650-01-060 B651-01-070
2 inch ANSI 63 (2 1/2) GVA025 B652-01-050 B650-01-060 B652-01-070
4 inch ANSI 100 (4) GVA040 B653-01-050 B653-01-060 B653-01-070
6 inch ANSI 160 (6) GVA060 B654-01-050 B653-01-060 B654-01-070
6 inch ANSI 200 (8) GVA080 B655-01-050 B653-01-060 B655-01-070
10 inch ANSI 250 (10) GVA100 B656-01-050 B656-01-060 B656-01-070
10 inch ANSI 320 (12) GVA120 B657-01-050 B656-01-060 B657-01-070
2 inch ANSI 50 (2) GVA020P B651-01-050 B650-01-060 B651-01-070
2 inch ANSI 63 (2 1/2) GVA025P B652-01-050 B650-01-060 B652-01-070
4 inch ANSI 100 (4) GVA040P B653-01-050 B653-01-060 B653-01-070
6 inch ANSI 160 (6) GVA060P B654-01-050 B653-01-060 B654-01-070
6 inch ANSI 200 (8) GVA080P B655-01-050 B653-01-060 B655-01-070
10 inch ANSI 250 (10) GVA100P B656-01-050 B656-01-060 B656-01-070
10 inch ANSI 320 (12) GVA120P B657-01-050 B656-01-060 B657-01-070
2.37 inch o.d. CF 40 (1 1/2) GVC015 B650-03-050 B650-03-060 B650-01-070
3.37 inch o.d. CF 50 (2) GVC020 B651-03-050 B651-03-060 B651-01-070
4.47 inch o.d. CF 63 (2 1/2) GVC025 B652-03-050 B652-03-060 B652-01-070
6.00 inch o.d. CF 100 (4) GVC040 B653-03-050 B653-03-060 B653-03-070
8.00 inch o.d. CF 160 (6) GVC060 B654-03-050 B654-03-060 B654-03-070
10.00 inch o.d. CF 200 (8) GVC080 B655-03-050 B655-03-060 B655-03-070
12.00 inch o.d. CF 250 (10) GVC100 B656-03-050 B656-03-060 B656-03-070
14.00 inch o.d. CF 320 (12) GVC120 B657-03-050 B657-03-060 B657-03-070
2.37 inch o.d. CF 40 (1 1/2) GVC015P B650-03-050 B650-03-060 B650-01-070
Nominal bore: mm
(inches)
Valve model Seals Kits Bellows Kits
Pins and
bearings Kits
© Edwards Limited 2008. All rights reserved. Page 27
Edwards and the Edwards logo are trademarks of Edwards Limited.
Page 32

B650-01-880 Issue G
Service, spares and accessories
Table 5 - Spares for GV valves manufactured in 1993 to 1995 (continued)
Flange size
3.37 inch o.d. CF 50 (2) GVC020P B651-03-050 B651-03-060 B651-01-070
4.47 inch o.d. CF 63 (2 1/2) GVC025P B652-03-050 B652-03-060 B652-01-070
6.00 inch o.d. CF 100 (4) GVC040P B653-03-050 B653-03-060 B653-03-070
8.00 inch o.d. CF 160 (6) GVC060P B654-03-050 B654-03-060 B654-03-070
10.00 inch o.d. CF 200 (8) GVC080P B655-03-050 B655-03-060 B655-03-070
12.00 inch o.d. CF 250 (10) GVC100P B656-03-050 B656-03-060 B656-03-070
14.00 inch o.d. CF 320 (12) GVC120P B657-03-050 B657-03-060 B657-03-070
Nominal bore: mm
(inches)
Valve model Seals Kits Bellows Kits
Pins and
bearings Kits
7.4 Accessories
Note: The fittings on the following accessories are suitable for 6 mm diameter tube.
Accessory Item Number
Lightweight 5-port electropneumatic
control valve kits
24 V a.c., 1-phase, 50/60 Hz B287-03-030
110 V a.c., 1-phase, 50/60 Hz B287-03-031
230 V a.c., 1-phase, 50/60 Hz B287-03-032
24 V d.c. B287-03-055
Page 28 © Edwards Limited 2008. All rights reserved.
Edwards and the Edwards logo are trademarks of Edwards Limited.
 Loading...