

Page 1
Echo MiniTech T
®
TM
Portable Personal Listener
Product Code: 751
Page 2

CONTENT
1. Safety Instructions and Precautions
2. Accessories Picture
3. Installation Instructions
4. Installation Diagrams
5. Installation Diagrams
6. Installation Instructions continued
7. Television Set Up Procedure
8. Technical Specification
9. Replacement Parts
Echo MiniTech T
®
Portable Personal Listener.
Please read and follow the safety
instructions before using the product.
TM
Page 3

Safety Instructions and Precautions:
● Using this product inappropriately could adversely affect your
Hearing so please follow the step-by-step instructions carefully!
● The MiniTech T is a personal listener that amplifies sound.
Listening to uncomfortable sound levels for prolonged periods
could adversely affect your hearing.
● The supplied stubby microphone (or approved line input) MUST
be fully inserted into the microphone socket before turning the
unit on. Failure to do so can result in high sound levels that could
adversely affect your hearing.
● The supplied headset or neck loop MUST be fully inserted into
the headset socket before turning the unit on. Failure to do so
can result in high sound levels that could adversely affect your
hearing.
● Following use as a Loop Listener, always switch the MiniTechT
to the off position prior to reinserting the microphone. Failure to do
so can result in high sound levels that could adversely affect your hearing.
● Do not use in an environment that is damp, wet, very hot or very
cold.
™
● To clean the MiniTech T and its accessories, use only a soft cloth
™
and an inorganic cleaner.
● Always use the correct dry cells (commonly known as batteries)
1.5v Type AA, (LR6).
● Never use old and new dry cells together, as the old one will make
the new one discharge quickly.
● Dispose of the old dry cells in an environmentally friendly way.
1
Page 4

Accessories Picture:
a) 1 x Amplifier
d) 1 x Pouch
f) 1 x Ext Lead g) 1 x Stubby Mic
b) 1 x NeckLoop
e) 1 x 202M – Including Velcro & clip
2
c) 1 x Headset
h) 2 x Batteries
Page 5

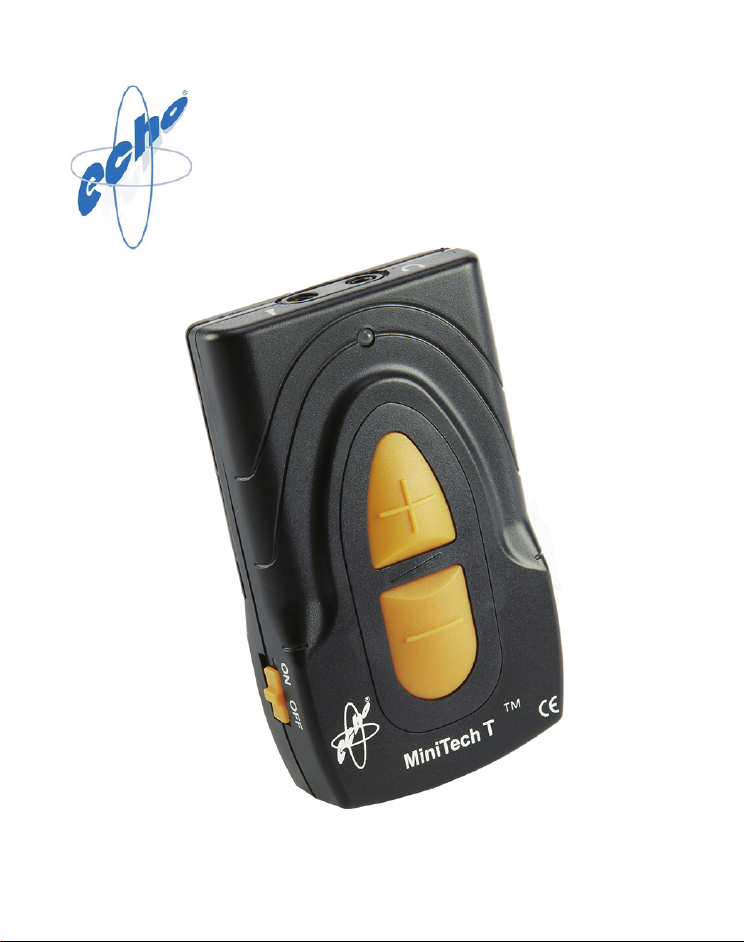
Installation Instructions:
1. Make sure the ON/OFF (4) switch is in the OFF position (figure1).
Remove battery cover (1) and insert dry cells, ensuring they
are placed the correct way round, as illustrated on diagram inside
battery compartment (figure 3).
2. Replace battery cover securely (figure 2).
3. Fully insert the “stubby” microphone (g) or the microphone on
lead (e) into socket (3) (figure 1). Use the “stubby” microphone
for one to one conversation meetings and taking out & about. Or
you can use the microphone on lead to pick up sound from a TV
or radio by placing the microphone head by the speaker. It can
be kept in position by using the Velcro pad provided (figure 3).
To increase the distance the user can be from the sound source,
the 3 metre extension lead (f) can be connected between the
MiniTechT™ unit and the microphone. Up to 2 extension leads
can be used to extend the distance between the MiniTech T™
unit and the sound source (1 ext lead included). Care must be taken in
positioning the leads to avoid the danger of tripping etc.
4. Fully insert headset or neck loop into socket (2) (figure 1).
5. If using neck loop, switch hearing aid to “T” position.
6. Set ON/OFF switch (4) to ON position, the LED Light (8) will show
green (figure 1).
7. Increase volume by gently pressing on pad (5). To reduce volume
press pad (6). Press and hold to increase/ reduce quickly, or press one
click at a time to increase/ reduce slowly.
IMPORTANT – If the volume does not increase,switch the MiniTechT™
OFF and check that microphone and headset or neck loop is inserted fully
in the correct sockets before switching on again (figure 1).
8. To adjust tone, turn wheel (7) anti-clockwise for treble boost. Clockwise
for bass boost (figure 1).
9. Echo MiniTech T™ has the addition of a built in telecoil allowing it to
be used to listen to loop systems through the headphones supplied.
To use the MiniTech T™ as a loop listener, simply remove the microphone.
The telecoil inside the MiniTech T™ will automatically tune into
any loop system, for example at a church or theatre. The
volume and tone can be adjusted to the right levels.
3
Page 6

Installation Diagrams
1
2
3
8
5
7
4
FIG1
6
1
FIG2
4
Page 7

Installation Diagrams
Minitech
T
FIG3
FIG4
5
Page 8

Important:
When the unit is switched on, the power indicator light (8) will show
GREEN if dry cells are okay.
If power indicator shows RED when switched on, or changes to
RED when in use, then the dry cells are running low and will need
to be replaced within approximately 4 hours.
If there is no ligh t when the unit is switched on, this normally
indicates the dry cells are completely discharged and should be
replaced.
Optional Combination Audio Lead
The combination lead can be used to connect the Echo MiniTech T
directly to the SCART, Phono/Phono or headphone sockets on a TV,
CD, and radio etc. instead of using a microphone. Care must be
taken in positioning the leads to avoid the danger of tripping
etc.
(purchased separately):
6
TM
Page 9

Television Set Up Procedure
7
Page 10

Technical Specifications
Frequency response: 65Hz-6.5KHz
Maximum gain: 45dB
Maximum power output: 110 dB
Tone control:
Current consumption:
AGC: Attack time 0.3ms, release time 3ms
EC conformity: EN 50081-1 and EN 50082-1
10 dB range 300Hz, 10 db range
5KHz
30mA with 32ohm headphones and
no signal
Physical size:
Overall weight:
Dry cells: 2 x AA size (LR6)
Power supply:
Microphone: Electret condenser
Headset socket:
95mm x 55mm x 22mm
95gms (including dry cells)
+3v DC
3.5mm stereo
8
Page 11

Replacement Parts
P/ N Qty Descr i pti on
1003
105
101
104
103MEG Extension lead
910-1010-01 neck loop with patch lead 1
1
1
2
1
1
1
1
1
1
1
Echo MiniTech
New Black pouch with belt clip
Dry Cell
Echo MiniTech Color Carton490-1000-01
Echo MiniTech Instruction940-1000-01
Headset under chin
Stubby mic
New microphone on lead 202/M
Microphone on a 1.5m lead 202/C
9
Page 12

Hearing Products International Limited declares that the Echo®
MiniTechT™ complies with all relevant EU directives.
The full EU declaration of conformance for the Echo® MiniTechT™
is available from Hearing Products International Ltd.
Hearing Products International Limited
Echo House, 26/27 Haigh Park, Stockport, SK4 1QR, England
Tel. +44 (0) 161 480 8003
Fax +44 (0) 161 480 8006
www.hear4you.com
Hearing Products International Ltd. reserve sole right to alter prices, design and/ or
technical specifications or colours without prior notice. MiniTechT™ Instructions ©
Copyright Hearing Products International Limited. E&OE 06/10/16. Version 3.
UK: Waste electrical products and batteries should not be disposed of with household
waste. Separate disposal facilities exist, for your nearest facilities see www.recycle-more.
co.uk or Hearing Products International Limited for full details www.hear4you.com.
RoHS
 Loading...