

Page 1

Echo MegaLoop DAC™
®
nstructions
I
INDUCTION LOOP SYSTEM WITH DIGITAL CONVERTER
Product Code: 901-1010 -02
Page 2

CONTENT
2 Content
3 Safety Instructions and Precautions
4 Contents Picture
5 Installation Instructions
6 Installation Instructions Continued
7 Installation Instructions Continued
8 Connection Advice Analogue
9 Connection Advice Digital/ Optical Audio Output
10 Important Information
11 Replacement Parts/ Technical Specification
12 Conformity
®
Echo
Induction loop amplifier system with built in digital to analogue converter.
MegaLoop DAC
TM
2
Page 3

Please read and follow the safety instructions below
before using the product:
Safety Instructions and Precautions
1. Listening to uncomfortable sound levels for prolonged periods could
adversely affect your hearing.
2. Using this product inappropriately could adversely affect your
hearing. Please follow the step-by-step instructions carefully!
3. To clean the MegaLoop DAC™ and its accessories, use only a soft
cloth and an inorganic cleaner.
4. Only use the Hearing Products approved mains adapter. Do not
use any other type of mains adapter.
5. When using this unit, basic safety precautions as below should always
be followed to avoid the risk of electrical shock or personal injury.
6. Read and understand the instructions and follow all warnings and
markings on the unit.
7. Do not use in an environment that is damp, wet, very hot or very cold.
8. Install the unit securely on a stable surface and install the unit where
the power cord will not be subject to damage or cause a tripping hazard.
9. The unit may get warm when being used. Ensure the unithas
adequate ventilation.
10. Please refer all servicing to qualified personnel ONLY! Note:
if the serial number is removed your warranty is invalid.
3
Page 4
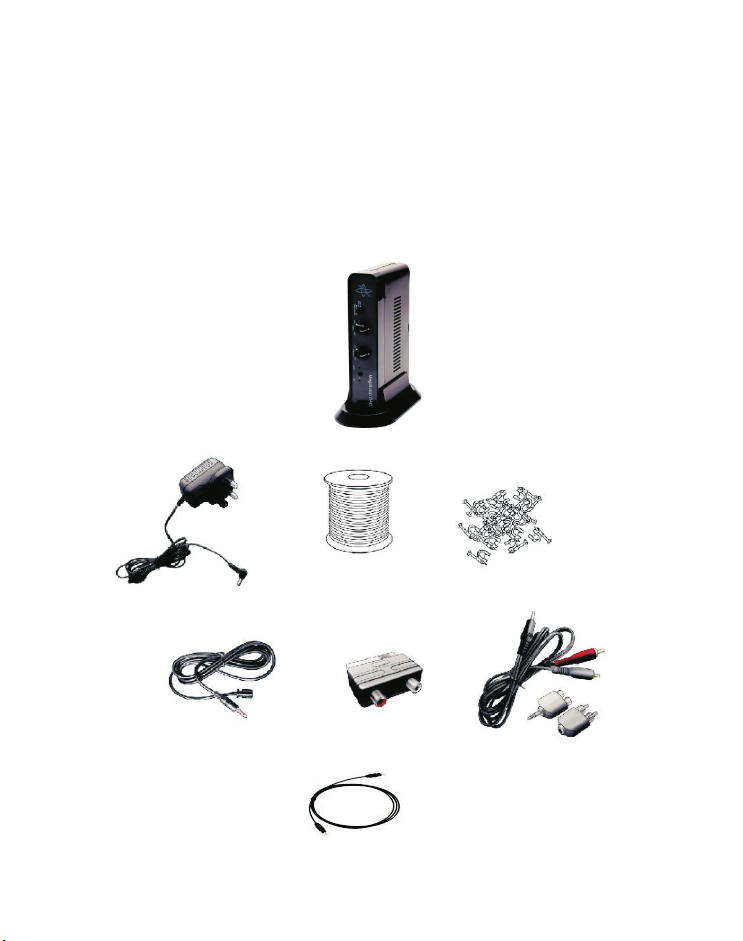
A. MegaLoop DAC Amplifier with Stand B. Mains Power Adapter C. Loop wire
D. Clips E. Microphone
G. Phono Phono Lead H. Toslink Cable
Contents Picture:
F. SCART Plug
A
B C
D
E F G
H
4
Page 5

Installation Instructions:
1. Position the MegaLoop DAC™ amplifier on shelf under TV or
beside the TV.
2. Plug the MegaLoop DAC™ mains power adapter (B) into a
standard electrical power socket, then plug the power lead
into socket1(Fig. 2).
3. Starting from the amplifier, run the loop wire (C) around the
edge of the room. The wire can be tacked up and over door
frames if necessary. The wire can be tucked under the carpet
or clipped to the skirting board (Fig. 3). Make sure you leave
enough wire to reach the amplifier.
4. Once a complete loop of the room has been formed, cut
away any surplus wire making sure to cut away the insulation
from the wire ends. Clip each end of the wire into terminals (2)
(Fig. 2).
5.
If you are using a loop pad (Optional), clip the end of the lead
into terminals (2) (Fig. 2). Make sure the lead is placed
carefully, so as not to cause a tripping hazard. Never run
the lead across the floor unless fully under the carpet.
Always remember that loose wires are a tripping hazard.
6. When connecting to a TV which has digital optical audio
output (see page 8/ 9 ) use the Toslink cable (H) to connect
from the TV digital output socket to the MegaLoop DAC™
digital socket (4) (Fig. 2).
*NOTE if no sound signal is going into the MegaLoop DAC™
the no signal LED (5) (Fig. 2) will be illuminated.
7. When connecting to a TV that has analogue audio output
sockets (see page 8) connect the lead (G) to the phono audio
output sockets on the TV and connect the other end to the
line socket (6) (Fig 2).
5
Page 6

8. If using the microphone, plug the 3.5mm jack on the
microphone E into one of the microphone sockets on the
MegaLoop™ DAC into one of the microphone sockets on the
MegaLoop DAC (7&8) (Fig 2), then fix the microphone to the
speaker of the TV (Fig 4) for an explanation.
9. How to test your installation: Switch the MegaLoop DAC™
on and the green LED (6) (Fig 1) should be lit, set the
volume to max position 3 (Fig 1). Switch your TV on. The red
loop LED should start to flash this indicates that the system is
working. Turn the volume to mid position then set your
hearing aid to the T position to start using the system.
Figure 1
Mega lo op DA C
Figure 2
PART Nr.100 7
8
6
Page 7

Figure 3
Figure 4
7
Page 8

Advice for connecting to TV with analogue audio output.
Audio out
When connecting to a TV the first thing to look for is red
and white audio out sockets, these are usually at the back of the TV,
and usually indicated by a circle with an arrow pointing out of it.
Connecting from audio out will always provide the correct sound for
the program that is being watched. Note the red white and yellow or
red white and blue sockets are for sound and picture in and do
not give sound out.
Headphone socket
If the TV has no audio out sockets or they are not working,
the next thing to try is the headphone socket. Simply switch the
TV on and insert the 3.5mm jack plug into the headphone
socket, if the sound is not cut from the speakers then connectfrom
this and into the line in on the MegaLoop DAC™. You willthen have
to adjust the headphone volume level on the TV, this
is done by pressing the menu button on the TV remote,
selecting sound and then moving the headphone volume to
about two thirds full.
Microphone pick up
If the TV has no audio out and the headphone connection
cuts the sound from the TV speakers, simply pick up sound by
fixing the microphone provided to the speaker of the TV.
L
R
Aerial Audio out SCART sockets
8
Page 9

Advice for connecting to a TV with Digital Optical Audio Output
The Toslink cable should be connected to the digital audio
output as shown above.
9
Page 10

ADDITIONAL INFORMATION:
The MegaLoop DAC™ microphone is very sensitive, and too much
volume out of the TV speaker can distort the sound in your hearing
aid, when in the
set at a level comfortable for a person with average hearing.
"T"
position. The TV
speaker's
volume should be
Microphone Priority Function
The microphone sockets (7 & 8) (Fig 2) can both be used. Socket (8) is the
standard socket to use, when connecting the microphone to a TV with
speakers. Socket (P) stands for priority, it gives a louder signal than socket (7),
this is very useful when using a second microphone for environmental sounds
that must be heard over and above the TV or other sound source.
Background noise Function
The background noise button (1) (Fig 1) can be used to boost the microphone
sound level; this can be very useful when using a microphone to pick up
environmental sound over and above the TV.
Tone Control (2) (Fig 1)
Adjust to suit your own hearing loss. Turning the control in an anticlockwise direction tones become lower. Turning clockwise the
tones become higher.
Gain Control (3) (Fig 2)
The factory setting for gain control knob (3) (Fig 2) is mid position.
This position is pre-set for most TV Scart and audio output signals. For some
TV sets this may have to be increased to compensate for a low output signal,
especially if using the digital optical output.
No Signal (5) (Fig 2)
This LED will be lit if no audio signal is being received.
10
Page 11

Replacement Parts:
Code Item
1007 MegaLoop DAC Amplifier Only
1008 MegaLoop DAC Stand
207 Loop wire – 38m
208 Cable clips (pack of 50)
306/B Phono leads
201/B Scart plug
202/M Microphone on lead
209 Toslink cable
570-1010-01 12V DC2A with UK plug
940-1012-01 MegaLoop DAC instructions
490-1019-01 DAC colour sleeve cover
490-1018-01 Brown cardboard carton box
Technical Specifications:
Power Supply
Output Output current > 4amp peak current, loop
Frequency Response 100Hz to 5.2khz (v/c mid)
Tone Control Effect 20dB range max-min (v/c middle)
Microphone 2 microphone inputs 3.5mm mono/ electret
Line Input 1 line-level input, 3.5mm ste reo connector
Digital Output 1 line-level optical input, Toslink connector
AGC Attack time > 30 dB range
Dimensions 190mm(W) x 45mm(H) x 112mm(D)
12V DC, min. 1.5amp Output Positive + Centre
resistance less than 1 ohm
condenser
with gain control
with gain control
11
Page 12

Conformity
®
Echo
is a trademark of Hearing Products International
Limited.
Hearing Products International Limited declares that the
®
Echo
MegaLoop DAC™ complies with all relevant EU
directives. The full EU declaration of conformancefor
the Echo
Products International Ltd.
Hearing Products International Limited
Echo House, 26/27 Haigh Park, Stockport, SK4 1QR, England.
Tel. +44 (0) 161 480 8003 Fax +44 (0) 161 480 8006
www.hear4you.com
Hearing Products International Ltd. reserve sole right to alter
prices, design and/or technical specifications or colours without
prior notice. E & O.E. 06/12/16. 940-1012-01 MegaLoop DAC™
Instructions. Version
International limited 2016.
UK: Waste electrical products and batteries should not be disposed of
with household waste. Separate disposal facilities exist, for your
nearest facilities see www.recycle-more.co.uk or Hearing Products
International Limited for full details www.hear4you.com.
®
MegaLoop DAC™ is available from Hearing
2.©
Copyright Hearing Products
12
 Loading...