

Page 1

1Top cover
ENGLISH
(Original instructions )
FRANÇAIS
DEUTSCH
ITALIANO
ESPAÑOL
OPERATOR'S MANUAL
CHAIN SAW
WARNING
This chain saw is designed especially for tree service by a
trained operator.
Read the instructions carefully and follow the rules for safe
operation.
Failure to do so could result in serious injury.
Page 2

Introduction
2Introduction
This chain saw is designed for cutting wood or wood products.
Do not cut solid metal, sheet metal, plastic or any non-wood materials.
It is important for you to understand all safety precautions correctly before using your chain saw.
Misuse of the chain saw can cause serious bodily injury.
Never let children operate the saw.
This manual shows rules of safe operation, proper use, servicing, and maintenance of your ECHO chain saw.
Follow these instructions in order to maintain a good operating condition and a long service life.
For future reference, you should keep this operator's manual.
If this operator's manual has become illegible through impairment or is lost, please purchase a new one from your ECHO dealer.
When renting or lending this machine to a person who will operate it, always include this operator's manual, which provides
explanation and instructions.
When transferring a product, please deliver it attaching the operator's manual.
Specifications, descriptions and illustrative material in this literature are as accurate as known at the time of publication, but are
subject to change without notice.
Illustrations may include optional equipment and accessories, and may not include all standard equipment.
The unit is delivered with guide bar and saw chain separated.
Install guide bar and chain.
If there is any clause in this manual that is hard to be understood, please contact your ECHO dealer.
Feature of this model: "ES" START
"ES" START generates enough revolving power to rotate crankshaft up to a speed to ignite the engine and bring almost no
kickback.
"ES" START makes engine start far easier than you ever expect.
Manufacturer
YAMABIKO CORPORATION
7-2 SUEHIROCHO 1-CHOME, OHME, TOKYO 198-8760, JAPAN
Authorized Representative in Europe
Atlantic Bridge Limited
Atlantic House, PO Box 4800, Earley, Reading RG5 4GB, United Kingdom
2
Page 3

Contents
Decals and symbols............................................................................................................4
Rules for safe operation .. ....... ...... ....... ...... ....... ...... ....... ...... ...... ....... ...... ....... ...... ....... ...... ...5
0. Tree service chain saw..............................................................................................5
1. General precautions ..................................................................................................8
2. Kickback safety precautions....................................................................................11
3. Other safety precautions..........................................................................................12
Description........................................................................................................................14
Assembly ..........................................................................................................................15
Mounting guide bar and chain .....................................................................................15
Operation..........................................................................................................................17
Fuel and lubricant........................................................................................................17
Chain lubricant.............................................................................................................17
Cap indication...... ...... ....... ...... ....... ...................................... ....... ...... ....... ...... ....... ...... . 17
Winter operation ..........................................................................................................18
Starting the cold engine...............................................................................................18
Starting the warm engine.............................................................................................19
Running .......................................................................................................................19
Stopping the engine............................................................. ....... ...... ....... ...... ....... ...... .20
Checking chain tension................................................................................................20
Chain lubrication test ...................................................................................................20
Pre cutting test.............................................................................................................20
Correct use of chain brake................................................................................................21
Chain brake .................................................................................................................21
Checking the brake function of the brake....................................................................22
Release the chain brake..............................................................................................22
Non-manual chain brake..............................................................................................22
Cutting instruction............................... ...... ....... ...... ....... ...................................... ....... .......23
General........................................................................................................................23
Felling a tree................................................................................................................24
Limbing........................................................................................................................25
Bucking........................................................................................................................25
Tension and compression in timber.............................................................................26
Service maintenance guide ..............................................................................................27
Troubleshooting................................................................................................................28
Saw chain maintenance....................................................................................................29
Service..............................................................................................................................31
Air filter ............................. ...... ....... ...... ....... ...... ....... ...... ...... ....... .................................31
Check fuel system .......................................................................................................31
Fuel filter......................................................................................................................31
Oil filter ............................. ...... ....... ...... ....... ...... ....................................... ...... ....... .......31
Spark plug ...................................................................................................................31
Cylinder fins (Cooling system).....................................................................................32
Guide bar.....................................................................................................................32
Sprocket / Clutch drum ................................................................................................32
Carburettor ..................................................................................................................32
Automatic oiler.............................................................................................................32
Spark plug cover..........................................................................................................33
Silencer........................................................................................................................33
Replacement guide bar and chain...............................................................................33
Storage .............................................................................................................................34
Long term storage (Over 30 days)...............................................................................34
Disposal procedure...........................................................................................................35
Specifications....................................................................................................................36
Declaration of conformity..................................................................................................37
3
Page 4

Decals and symbols
DANGER WARNING CAUTION
This symbol accompanied by the
word "DANGER" calls attentions to
an act or a condition which will
lead to serious personal injury or
death of operators and bystanders.
Circle and slash symbol
means whatever is
shown is prohibited.
Symbol form / shape Symbol description / application Symbol form / shape Symbol description / application
Carefully read the operator's manual Chain brake operation
This symbol accompanied by the
word "WARNING" calls attentions
to an act or a condition which can
lead to serious personal injury or
death of operators a nd bystanders.
NOTE
This enclosed message provide tips
for use, care and m ai nte nan ce of the
unit.
"CAUTION" indicates a potentiall y
hazardous situation which, if not
avoided, may result in minor or
moderate injury.
This chain-saw is for trained tree
service operators only.
One handed operation of the saw can
be dangerous.
Appropriate ear, eye, an d head
protection must be worn.
Use appropriate protection for footleg and hand-arm.
Warning!
Kickback may occur!
Beware of high-temperature areas Guaranteed sound power level
Emergency stop
Oil and pe trol mixture
Chain oil fill
Chain oiler adjustment
Purge bulb (Primer)
Carburettor adjustment
- Idle speed
Locate this safety decal on your unit.
The complete unit illustration found in the "Description"
section will help you locate them.
Make sure the decal is legible and that you understand and
follow the instructions on it.
If a decal cannot be read, a new one can be ordered from
your ECHO dealer.
4
Page 5

Rules for safe operation
0. Tree servi ce chain saw
NOTE
When replacing guide bar or saw chain, ask your ECHO dealer.
The saw is specially designed for tree service, i.e. for off-ground working in trees, and
when being used as such should only be used be trained operators.
One handed operation of the saw can be dangerous.
Be alert for the phenomena "skating" and "bouncing", greater risk from kickback.
Be cautious not to lose balance of your body due to "drop" at the end of a cut.
If working off the ground the operator must be trained in safe climbing techniques and
use of all recommended safety equipment such as harness, loops, strops, ropes and
karabiners for himself and for the saw.
When hoisting a chain sa w usin g a rope tied to a lifting hook f or oper ation on a tree, e nsure
that the lifting hook is not strained by excessive force.
General requirements
Operators of tree service chai n-saws wor king at h eight fro m a rope and harn ess s hould ne ver
work alone.
A ground worker trained in appropriate emergency procedures should assist them.
Operators of tree service chain-saws for this work should be trained in general safe climbing
and work positioning techniques and be properly equipped with harnesses, ropes, strops,
carabiners and other equipment for maintaining secure and safe working positions for both
themselves and the saw.
Preparing to use the saw in the tree
The chain-saw should be checked, fuelled, started and warmed up by the ground worker and
then switched off before it is sent up to the operator in the tree.
The chain-saw should be fitted with a suitable strop for attachment to the operator's harness:
Example of attachment of chain-saw to operator's harness
secure the strop around the attachment point on the rear of the saw;
provide suitable k arabiners to allow in direct (i.e. via the strop) and direc t attachment (i.e. at
the attachment point on the saw) of the saw to the operator's harness;
ensure the saw is securely attached when it is being sent up to the operator;
ensure the saw is secured to the harness before it is disconnected from the means of
ascent.
The ability to directly attach the saw to the harness reduces the risk of damage to equipment
when moving around the tree.
Always switch the saw off when it is directly attached to the harness.
Example of attachment of chain-saw to centre rear mid-point on harness
The saw should only be attached to the recommended attachment points on the harness.
These may be at mid-point (front or rear) or at the sides.
Where possible, attach the saw to centre rear mid-point to keep it clear of climbing lines and
to support its weight centrally down the operator's spine.
When moving the saw from any one attachment point to another, operators should ensure it
is secured in the new position before releasing it from the previous attachment point.
5
Page 6

Using the chain-saw in the tree
An analysis of accidents with these saws during tree service operations shows the primary
cause as being inappropriate one-handed use of the saw.
In the vast majority of accid ents, operators f ail to adopt a secure work position that allows them
to hold both handles of the saw.
This results in an increased risk of injury due to
not having a firm grip on the saw if it kicks back,
a lack of contro l of the sa w such that it is m ore like ly to come into conta ct with cl imbing lin es
and the operator's body (particularly the left hand and arm), and
loss of control owing to an insecure work position and resulting in contact with the saw
(unexpected movement during operation of the saw).
1. Securing the work position for two-ha nded use
In order to allow the saw to be held with both hands, as a general rule operators should aim
for a secure work position in which they operate the saw at
hip level, when cutting horizontal sections, and
solar plexus level, when cutting vertical sections.
Example of redirection of the main line via supplementary anchor point
Where the operator is working close into vertical stems with low lateral forces on the work
position, then a good footing could be all that is needed to maintain a secure work position.
However, as operators move away from the stem, they will need to take steps to remove or
counteract the increasing lateral forces by, for example, a redirect of the main line via a
supplementary anchor point or using an adjustable strop direct from the harness to a
supplementary anchor point.
Example of temporary foot stirrup created from endless sling
Gaining a good footing at the work in g pos iti on c an be as si sted by the use of a temporary foot
stirrup created from an endless sling.
2. Starting the saw in the tree
When starting the saw in the tree, the operator should
apply the chain brake before star ting ,
hold the saw on either the left or right of the body when starting,
1. on the left side, hold the s aw with the left hand on th e front handle and thrust th e saw away
from the body while holding the pull starter cord in the right hand, or
2. on the right side, hold the saw with the right hand on either handle and thrust the saw
away from the body while holding the pull starter cord in the left hand.
The chain brake should always be engaged before lowering a running saw onto its strop.
Operators should alw ays check th at the saw has sufficient fu el before unde rtaking criti cal cuts.
6
Page 7

3. One-hand use of the chain-saw
Operators should not use tre e service chain-saws one-handed when work pos ition is unsta ble
or in preference to a handsaw when cutting small diameter wood at the branch tips.
Tree service chain-saws should only be used one-handed where
operators cannot gain a work position enabling two-handed use, and
they need to support their working position with one hand, and
the saw is being used at full stretch, at right angles to and out of line with the operator's
body.
Example of one-handed chain-saw use
Operators should never
cut with the kickback zone at the tip of the chain-saw guide bar,
"hold and cut" sections, or
attempt to catch falling section s.
4. Freeing a trapped saw
It the saw become trapped during cutting, operators should
switch off the saw and att ac h it s ecurely to the tree inboard (i.e. towards the trunk side)
of the cut or to a separate tool line,
pull the saw from the kerf whilst lifting the branch as necessary,
if necessary, use a handsaw or second chain saw to release the trapped saw by cutting a
minimum of 30 cm away from the trapped saw.
Whether a handsaw or a chain-saw is used to free a trapped saw, the release cuts should
always be outboard (toward the tips of the branch), in order to prevent the saw being taken
with the section and further complicating the situation.
7
Page 8

1. General precautions
Operator's manual
Read the operator's manual for your chain saw carefully.
Be thoroughly fa milia r wit h the chai n saw' s c ontrols and how to us e the cha in sa w pr operly .
Failure to follow instructions could lead to personal injury.
If you have any questions or problems, please contact your ECHO dealer.
Physical condition
Do not operate a chain saw when you are fatigued or under the influence of al cohol or
drugs.
You should be in good phys ical and mental health in order to ha ndle your chain saw safe ly.
Errors in judgement or execution can be serious or fatal.
If you have any physical condition which strenuous work could worsen, check with your
physician before using a chain saw.
Do not operate when ill or fatig ued , or under the influence of any substance or medicatio n
which could affect your vision, dexterity or judgement.
Personal equipment
CAUTION
Stuffing ears with cotton is not recommended.
Always wear approved goggles to protect your eyes.
Wood chips, dust, sn app ing branches and other debris can be thrown by t he c utting chain
into the operator's facial area.
Goggles may also offer limited protection in the event of the cutting chain hitting the
operator in the eye area.
If conditions warrant that a ventilated face shield be worn, goggles must be worn
underneath it.
ECHO advises wearing hearing protection at all times.
If not followed, heari ng loss can occur.
You should reduce th e risk of he aring da ma ge by wea ring eit her "hea dset" type pro tectors
or ear plugs which are approved by an authorized organization.
All persons who make part of thei r living using cha in saws sh ould be tes ted peri odical ly
for hearing deterioration.
Always wear a cap or hat when working with a chain saw.
A safety hard hat is highly recommended when felling or working under trees, or when
objects can fall on you.
Wear heavy duty, non -sl ip glo ves fo r impro ved g rip, and also for p rotect ion aga inst c old
and vibration.
Safety tip shoes or boots with non-slip sole should be worn.
Never wear loose clothing, unbuttoned jackets, flared sleeves and cuffs, scarves,
tie-strings, neckties, cords, chains, jewellery, etc. which could snag the saw chain or
underbrush.
Clothing should be of sturdy, protective material.
It should be snug-fitting to resist snagging, but roomy enough for freedom of movement.
Trouser legs should not be flared or cu ffed, and should be either tucked into the boot tops
or trimmed short.
Safety vests, leg chaps and logger's pants of ballistic material are available.
It is the operator's responsibility to wear such additional protection if conditions warrant it.
Never operate a chain saw when you are alone.
Arrange to have someone remain within calling distance in case you need help.
8
Page 9

Fuel
DANGER
Petrol and fuel are extremely flammable.
If spilled or ignited by ignition source, it can cause fire and serious injury or
property damage.
Extreme caution is required when handling petrol or fuel.
After refuelling, tighten fuel cap firmly and check for leakage.
In case of fuel leakage, repair before starting operation since there is a danger of
fire.
1. Oil tank cap
2. Fuel tank cap
A: Loosening direction
B: Tightening direction
Use an appropriate type of fuel container.
Bring an extinguisher or shovel in case of fire.
Despite the precautions which can be taken, operating a chain saw, or just working in the
forest, presents dangers.
Do not smoke or bring flame or sparks near to fuel supplies.
The fuel tank may be under pressure.
Always loosen the fuel cap and wa it for pres sure to be equalized before removing the cap.
When fuel tank cap o r o il ta nk c ap is dif ficult to re mo ve b y fin gers, put the s tarter h andle
into the groove of cap and turn it anticlockwise.
Fill the fuel tank outdoors over bare ground and install the fuel cap securely.
Do not pour fuel indoors.
Wipe any spilled fuel off the unit.
Never refuel while the engine is still hot, or fuel a running engine.
Do not store the unit with fuel in its tank, because a fuel leak could start a fire.
9
Page 10

Starting engine
DANGER
Do not drop start the chain saw, drop s tart puts chain saw in an i nsecure pos ition and
can result in injury.
Start the chain saw in a correct ma nner.
Move the chain saw at least 3 m from the fuelling point before starting the engine.
Do not allow other pe rsons to be near the ch ain saw when you are starting or cutti ng with
the chain saw.
Keep bystanders and animal s out of the work area.
Do not let anyone hold wood for you to cut.
Do not start cutting until you ha ve a clear wor k area, secure footi ng and a plan ned retreat
path from the falling tree.
Before you start the engine, make sure that the saw chain is not contacting anything.
Keep the handles dry, clean, and free of oil or fuel mi xture.
Operate the chain saw only in well-ventilated areas.
Exhaust gas, oil mist (from chain saw lubrication) or saw dust is harmful to health.
When starting the chain saw pl ace the unit on a flat ground and hold the front handle with
left hand and hold firm ly the rear end of rea r handle with right kne e and pull starter ha ndle
with right hand.
Transportation
1. Guide bar cover
When transporting your chain saw, use the appropriate guide bar cover.
Carry the chain saw with the engine st opped, the guide ba r and saw chain to the rear, and
the silencer away from your body.
10
Page 11

2. Kickback safety precautions
DANGER
Kickback safety precaution for cha in saw use r s: kick bac k may occu r when the nose
or tip of the guide bar tou ches an object or when the wood cl oses in and pinch es t he
saw chain in the cut.
In some cases, ti p contact may ca use a lightni ng-fast revers e reaction, ki cking the gui de
bar up and back toward the operator (this is called a rotational kickback).
Pinching the saw chai n along the top of the guid e bar may push th e guide bar rapidl y back
toward the operator (this is called a linear kickback).
Either or these react ions may cause you to lose control of the saw and come in contact
with the moving chain, which could result in serious personal injury.
As a chain saw user, you should take several steps to keep your cutting jobs free from
accident or injury.
With a basic understanding of kickback, you can reduce or eliminate the element of
surprise.
Sudden surprise contributes to accidents.
Understand that rota tional kic kback is preventable by keeping an unshiel ded bar nose fro m
touching an object or the ground.
Do not operate a chain saw with one hand!
Serious injury to the operator, helpers or bystanders may result from one-handed
operation.
For proper control, always use two hands when operating a chain saw, one of which
operates the trigger.
Otherwise, this can result in the chain saw "skating" or skidding, which can result in
personal injury due to loss of control.
Keep a good firm grip on the saw which both hands, with the right hand on the rear
handle and the left hand on the front handle, when the engine is running.
Use a firm grip with thumbs and fingers encircling the chain saw handles.
A firm grip will help you reduce kickback and maintain control of the saw.
Two hands must be used to control the saw at all times.
Do not overreach or cut above chest height.
Make sure that the area in which you are cutting is free from obstructions.
Do not let the bar nose contact a log, branch, or any other obstruction which could be hit
while you are operating the saw.
Cutting at high engine speeds may reduce the likelihood of kickback.
But cutting at part-thro ttle or low en gine spe eds may b e preferabl e to co ntrol the ch ain saw
in tight situations and may als o reduc e the lik el iho od of kic kb ac k.
Follow manufacturer's sharpening and maintenance instructions for the saw chain.
Use only replacement guide bars and chains specified by the manufacturer, or the
acceptable equivalents of these guide bars and chains.
11
Page 12

3. Other safety precautions
Vibration and cold
It is believed that a condition called Raynaud's Phenomenon, which affects the fingers of
certain individuals, may be brought about by exposure to cold and vibration.
Accordingly, your ECHO chain saw has shock mounts designed to reduce the intensity of
vibration received through the handles.
Exposure to cold and vibration may cause tingling and burning followed by loss of colour and
numbness in the fingers.
We strongly recommend you take the following precautions because the minimum exposure
which might trigger the ailment is unknown.
Keep your body warm, especially the head and neck, feet and ankles, and hands and
wrists.
Maintain good blood circulation by performing vigorous arm exercises during frequent
work breaks and also by not smoking.
Limit the number of hours of chain saw operation.
Try to fill a part of each work day with jobs other than chain sawing.
If you experience disco mfort, re dness and s well ing of th e finge rs, foll owed by white ning
and loss of feeling, consult your physician before further exposing yourself to cold and
vibration.
Repetitive stress injuries
It is believed that over-using the muscles and tendons of the fingers, hands, arms and
shoulders may cause soreness, swelling, numbness, weakness and extreme pain to the
areas just mentioned.
To reduce the risk of repetitive stress injury, do the following:
Avoid using your wrist in a bent, extended or twisted position.
Instead, try to maintain a straight wrist position.
Also, when grasping, use your whole hand, not just the thumb and index finger.
Take periodic breaks to minimize repetition and rest your hands.
Reduce the speed and force in which you do the repetitive movement.
Do exercises to strengthen the han d and arm muscles.
See a doctor if you feel tingling, numbness or pain in the fingers, hands, wrists or arms.
Relative to EU directive "Vibration"
EU Directive "Vibration" (2002/44/EC) was designed to protect people from safety and health
risks arising from mechanical vibration of a machine by enforcing employers to limit a
standardized 8 hour daily vibration exposure level, A(8).
Any person or organization that employs a person to operate a machine has to take the A(8)
value into account whe n letting the person us e it.
Mechanical vibration values (equivalent vibration value) of this machine, which shall be used
as a guide to simplify the calculation of A(8) value, are as follows:
MODEL Type
Front / Left handle (m/s
Rear / Right handle (m/s
2
)2.1
2
)1.9
12
Page 13

Machine conditions
WARNING
Do not modify a chain saw in any way.
Only attachments and parts supplied by ECHO or expressly appr oved by ECHO for
use with the specific ECHO chain saw models are authorized.
Although certain unauthorized attachments are useable with the ECHO powerhead,
their use may, in fact, be extremely dangerous.
Do not operate a ch ain saw that is damaged, imp roperly adjus ted, or not comple tely and
securely assembled.
Do not operate the chain saw with a loose or defective silencer.
Be sure that the saw chain stops moving when the throttle control trigger is released.
Cutting
CAUTION
Do not touch h ot surfaces of cylinder cover and sil encer after you used the chain saw .
Do not operate a chain s aw in a tree u nle ss you have been specifically trained to do s o.
Keep all parts of your body away from the saw chain when the engine is running.
Use extreme caution when cutting smal l-size brush and saplings because slender
material may catch the saw chain and be whipped toward you or pull you off balance.
Stay on the uphill side when bucking or limbing logs which might roll when cut.
When cutting a limb that is under tens ion, be alert for spri ng-back so that you will no t be
struck by the limb or chain saw when the tension in the wood fibres is released.
Cutting while on a ladder is extremely dangerous because the ladder can slip and your
control of the chain saw is limited.
Working aloft should be left to professionals.
Keep both feet on the ground.
Do not work from off-the-ground positions.
Stop the engine before setting the chain saw down.
Wood practices
Operating a chain sa w safely requires a chain saw in proper working order, sound
judgement, and knowledge of the methods which should be applied in each cutting
situation.
Do not let any person use your saw unl ess he has read this op erator' s manua l and fully
understands its instructions.
Use your saw only to cut wood or wood products.
Do not cut solid metal, sheet metal, plastics or any non-wood materials.
Services
All chain saw service operations, other than items listed in the operator's manual
maintenance instructi ons , sho uld be perform ed by co mpe t en t servic e personnel.
(For example, if an i mprop er tool is us ed to hold th e f lywheel in ord er to remo ve the clutch,
structural damage to the flywheel could occur and subsequently could cause the flywheel
to burst.)
13
Page 14

Description
1. Front hand guard - Guard betw een the front handl e and
the saw chain for protecting the hand from injuries and
aiding in cont rol of the chain saw if the hand sli ps o ff the
handle.
This guard is use d to act ivate the chain brake w hich is to
stop the saw chain rotation.
2. Rear handle (for the right hand) - Support handle
located on the top of the engine housing.
3. Choke control knob - Device for enriching the fuel / air
mixture in the carburettor to aid cold starting.
4. Silencer cover - Cover the silencer not to make operator
touch to hot surface of silencer.
5. Safety decal - Part number X505-007710
6. Chain tension adjuster - D evice to a djust chain t ension.
7. Clutch cover - Protective cover to the guide bar, saw
chain, clutch and sprocket when the chain saw is in use.
8. Chain catcher - A projecti on designed to reduce the risk
of the operator's right hand from being hit by a chain
which has broken or derailed from the guide bar during
cutting.
9. Guide bar - The part that supports and guides the saw
chain.
10. Chain - Chain, serving as a cutting tool.
11. Front handle (for the left hand) - Support handle
located at the left side of the engine housing.
12. Fuel tank cap - For closing the fuel tank.
13. Oil tank cap - For closing the oil tank.
14. Starter handle - The grip of the starter, for starting the
engine. "ES" START
15. Spark plug cover - Covers spark plug.
16. Spark plug cover latch - Device for installing the spark
plug cover.
17. Cleaner cover latch - Device for installing the air clea ner
cover.
18. Air cleaner cover - Covers air filter.
19. Purge bulb (primer pump) - When starting engine, push
primer pump 3 or 4 times.
20. Safety decal - Part number X505-008600
21. Throttle trigger - Device activated by the operator's
finger, for controlling the engine speed.
22. Throttle trigger lockout - A safety lever which must be
depressed before the throttle trigger can be activated in
order to prevent the accidental operation of the throttle
trigger.
23. Ignition switch - Device for connecting and
disconnecting the ignition system and thus allowing the
engine to be started or stopped.
24. Lifting hook - If working off t he ground the opera tor must
be trained in safe climbing techniques and use of all
recommended safety equipment.
25. Operator's manual - Included with unit.
Read before operation and keep for future reference to
learn proper, safe operating techniques.
Tools - 13 x 16 mm T-wrench (combination screwd riv er
26.
/ spark plug socket) and L-wrench.
27. Guide bar cover - Device for covering the guide bar and
saw chain during transport and other times when the
chain saw is not in use.
14
Page 15

Assembly
Mounting guide bar and chain
WARNING
For your own safety, always stop the engine before performing any of the following
operations.
CAUTION
1. All adjustments should be made cold.
2. Always wear gloves when working on chain.
3. Do not operate with a loose chain.
NOTE
Move the chain brake l ever (Front han d guard, Brake connector) fully rearward to re move or
install the clutch cover to the chain saw.
1. Release chain brake
2. A nut
3. Clutch cover
4. Spiked bumper; option (Part number C304-000000)
Install guide bar and chain as follows.
Loosen a nut and remove clutch cover.
Mount the bar and slide toward clutch to make saw chain installation easier.
5. Guide bar
6. Clutch
7. Bar hole
8. Tension adjuster pin
9. Brake connector
Install saw chain as shown.
(Ensure cutters are pointing in the right direction)
10. Tension adjuster
11. Direction to tension the chain
Release the chain brake, and install the clutch cover over the guide bar stud.
Tighten a nut finger tight.
Ensure that chain tension adjuster fits into bar hole.
12. Front hand guard (Brake lever)
Align the brake conne ctor of the clutch cover to the gro ove on the side of the front ha nd
guard.
15
Page 16

Hold the bar nose up and turn the adjuster clockwise until the chain fits snugly against
the underside of the bar.
A: Proper tension
B: Improper tension
Tighten the nut with the bar nose held up.
Pull the chain around the bar by hand.
Loosen the adjustment if you feel tight spots.
16
Page 17

Operation
Fuel and lubricant
CAUTION
Whenever opening up the fuel tank, always loosen the cap very slowly and wait for
the tank pressure to be equalized before removing the cap.
Fuel is a mixture of re gular grade petrol and an air-cooled 2-stroke e ngine oil of reputabl e
brand name.
Minimum 89 Octane unleaded petrol is recommended.
Do not use fuel containing methyl alcohol or more than 10 % of ethyl alcohol.
Recommended mixture ratio; 50 : 1 (2%) for ISO-L-EGD Standard (ISO/CD13738),
JASO FC, FD grade and ECHO Premium 50 : 1 oil.
- Do not mix directly in engine fuel tank.
- Avoid spilling petrol or oil.
Spilled fuel should always be wiped up.
- Handle petrol with care, it is highly inflamma ble.
- Always store fuel in approved container.
Chain lubricant
Proper lubrication of the chain while in operation minimizes friction between the chain,
the guide bar and sprocket and also clutch components such as needle bearing and
clutch assembly.
Use ECHO genuine chain oil or ECHO recommended chain oil sp ecially formulated for ba rs
and chains for proper lubrication.
These oils contain tackifiers, anti-aging and anti-oxidizing agents.
Consult your ECHO dealer for the proper chain oil.
Never use waste or reclaimed oil to avoid various malfunctions on oil system, clutch
system, chain and guide bar.
Lubrication problems caused by the use of improper oil will void the warranty.
Especially, vegetable based chain oil quickly turns to resin and adheres to oil pump,
chain, guide bar, clutch needle bearing and clutch assembly.
It causes malfunctions and shorten product life.
Flush chain oil sy stem wit h miner al or chem ical based c hain oi l after us e, if it is requ ired to
use vegetable oil due to local / municipal rule or any other reason.
For a short time emergency operation, fresh SAE 10W-30 motor oil can be used.
Cap indication
Fuel and oil tanks are indicated by the following illustrations.
Fuel tank cap
(Orange)
Chain oil tank cap
(Black)
17
Page 18

Winter operation
NOTE
Push down the air shutter to cold positi on (snowman ma rk appea rs) when the outsid e
air temperature is 5 ºC or lower.
For operation above 5 ºC, return the air shutter to its original place.
Failing to do so will cause the engine to be overheated.
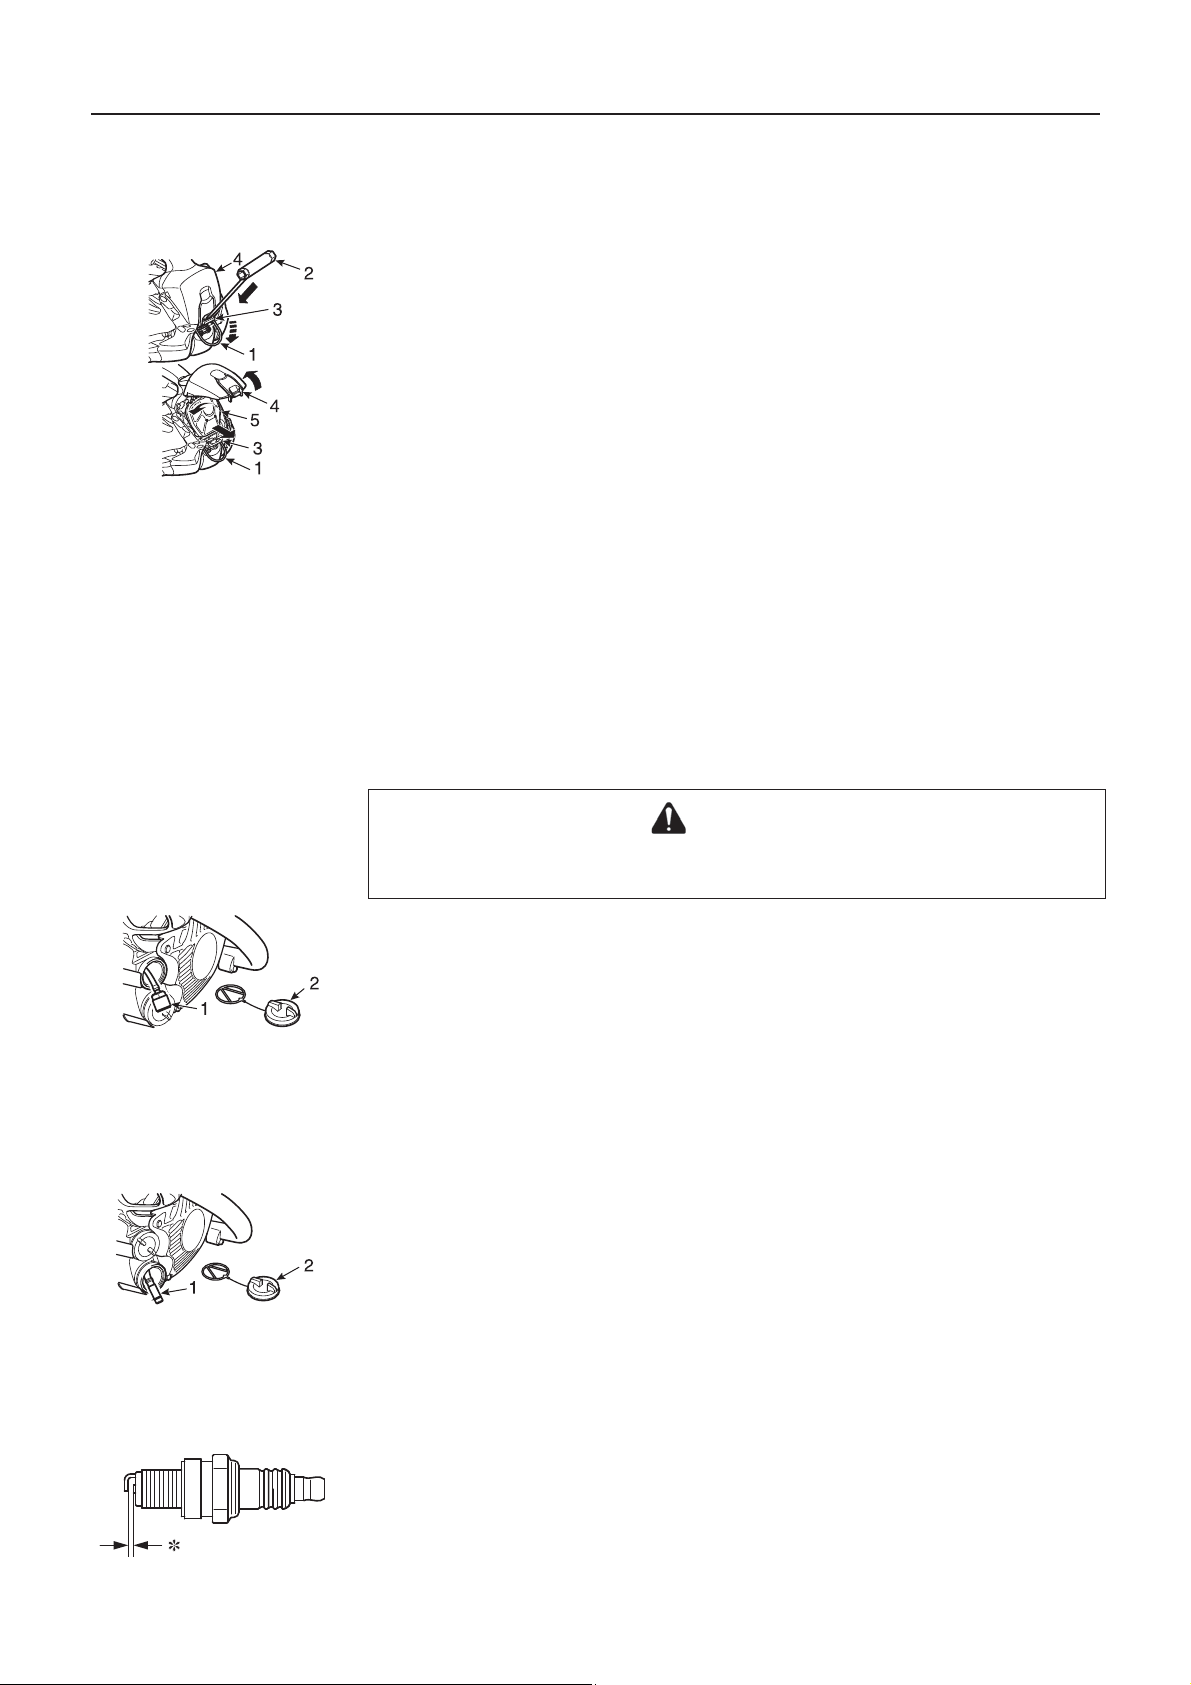
1. Spark plug cover
2. Air shutter
3. Cold weather position (push down; snowman mark)
4. Warm weather position (pull up; sun mark)
Use the air shutter to prevent carburettor troubles in winter.
Open the spark plug cover (see page 33 "Spark plug cover").
Push down the air shutter to cold weather position.
For operation above 5 ºC, return (pull up) the air shutter to its original place (sun mark
appears).
Starting the cold engine
WARNING
After choke control knob is turned and then knob is returned to original posit ion,
throttle remains a little open (latch condition).
If engine is started in this latch condition, chain starts to turn.
Do not start engine before chain brake is activated.
CAUTION
1. After starting the engine, immediately squeeze and release thr ottle trigger for
disengaging throttle latch and retur ning engine to idle, a nd pull front h and guar d
towards the operator immediately. (Chain brake RELEASED position)
2. Do not increase engine speed while chain brake is engaged.
3. Use the chain brake only in starting the engine or in emergencies.
4. Never use throttle latch for cutting.
Use it only when starting the engine.
NOTE
Do not pull starter rope out to the maximum position.
Do not allow starter handle to snap back against the casing.
A: Starter handle "ES" START
Fill the fuel tank with fuel mixture.
It is not permitted to fill fuel above the shoulder level of fuel tank.
Fill the chain oil tank with lubricant.
1. Chain brake ACTIVA TED positio n
Press hand guard forward.
(Chain brake ACTIVATED position)
2. Ignition switch (Run)
3. Choke control knob (Close)
4. Purge bulb (Primer pump)
Place ignition switch in run position.
18
Page 19

Turn choke control knob anticlockwise (close).
Push primer pump until fuel is visible in primer pump.
Securely hold the chain saw.
When starting the chain saw place the unit on a flat ground and hold the front handle with
left hand and hold firmly the rear e nd o f rear handle with right knee an d pul l s tarte r han dl e
with right hand.
Make sure guide bar and saw chain are not touching anything when starting the saw.
Pull starter handle several times until first firing sound is heard.
5. Choke control knob (Open)
Turn choke control knob clockwise (open).
Pull starter handle until engine starts.
Pull throttle lever and the throttle latch will be released.
Starting the warm engine
1. Chain brake ACTIVA TED positio n
Confirm there is fuel and chain oi l in the tanks.
Press hand guard forward.
(Chain brake ACTIVATED position)
Place ignition switch in run position.
Securely hold the chain saw.
Pull starter handle.
Choke may be used if nec es sar y, bu t after first firing sound pull throttle trigger a little to
release throttle latch and choke.
After choke control knob is turned and then knob is returned to original position, throttle
remains a little open (latch condition).
Running
1. Chain brake RELEASED position
2. Throttle trigger lockout
3. Throttle trigger
After engine starts, allow it to idle for a few minutes.
Pull front hand guard towards the operator immediately.
(Chain brake RELEASED position)
Squeeze throttle trigger gradually to increase engine revolution.
The chain starts moving when the engine reaches 4400 r/min approximately.
Ensure proper acceleration and lubrication of saw chain and guide bar.
Do not run the engine at high speed unnecessarily.
Be sure that saw chain stops moving when throttle trigger is released.
19
Page 20

Stopping the engine
NOTE
If engine does not stop, turn choke control knob anticlockwise to stop engine.
Return the unit to your authorized ECHO dealer to check and repair ignition switch before
starting the engine again.
1. Throttle trigger
2. Ignition switch
Release throttle trigger and allow engine to idle.
Place ignition switch in STOP position.
Checking chain tension
WARNING
Make sure that the engine is shut off when checking chain tension.
NOTE
Always loosen clutch cover nut before turning the chain tension adjuster, otherwise the
clutch cover and tensioner will be damaged.
Chain tension should be checked frequently during work and corrected if necessary.
Tension the chain as tight as possible, but so it can still be pulled easily along the bar by
hand.
Chain lubrication test
Hold the chain just above a dry surface and open the throttle to half speed for 30
seconds.
A thin line of "thrown" oil should be seen on the dry surface.
Pre cutting test
Familiarize yourself with your chain saw before you start actual cutting.
For this purpose it may be wise to practice by cutting some small logs or limbs several
times.
Do not allow either people or animals into the work area.
Multiple operators - Keep a safe distance between two or more operators when working
together simultaneo usl y.
20
Page 21

Correct use of chain brake
DANGER
Kickback motion is very hazardous.
If the tip of the bar touches wood or the like, the guide bar kicks back in an instant.
The chain brake reduces the possibility of injury due to kickback.
Always check that chain brake works properly before use.
NOTE
For practice, while cutting a small tree, push the front guard forward to engage the
brake.
At all times, confirm whether the brake works properly before each task.
If the chain brake is clogged with wood chips, function of the brake deteriorates a little.
Always keep the device clean.
Do not increase engine revolutions while the chain brake is engaged.
Chain brake is used in emergencies.
Do not use it unless absolutely necessary.
When using throttle latch at starting, keep the chain brake in position.
And after starting the engine, release the brake immediately.
Never test the brake in an area where petrol fumes are present.
Chain brake
The chain brake's function is to stop chain rotation after a kickback.
It neither prevents nor reduces kickback.
Do not depend on the chain brake for protection against kickba ck.
Even with a chain brake, depen d on your own go od sens e and prop er cut ting met hods ju st as
though there were no chain brake.
Even with normal use and p roper mai ntenan ce, the re spons e time o f the b rake ma y lengt hen.
The following may interfere with the brake's ability to protect the operator:
Saw wrongly held too close to operator's body.
Kickback time may be too fast even for a perfectly maintained brake to work in time.
The operator's hand may not be in position to contact the hand guard.
Brake will not be tripped.
Lack of proper mainte nance length ens the brake's s topping time, ma king it less ef fective.
Dirt, grease, oil, pitch, etc. getting into the working parts of the mechanism may lengthen
the stopping time.
Wear and fatigue of the activating brake spring, and wear of the brake / clutch drum and
pivot points may lengthen the brake's stopping time.
A damaged hand guard and lever may render the brake inoperative.
21
Page 22

Checking the brake function of the brake
1. Place the chain saw on the ground.
2. Hold the handle with both hands and accelerate the engine to high speed by using the
throttle trigger.
3. Operate the chain brake by turning your left wrist against the front hand guard whilst
gripping the front handle.
4. The chain stop immediately.
5. Release the throttle trigger.
If the chain does not stop immediately, take the saw to your ECHO dealer to repair.
Release the chain brake
When front hand guard is fully pulled towards the operator, chain brake is released.
Non-manual chain brake
IMPORTANT
When checking the ope rati on of the non-manual chain brake, use a s oft su rfac e s ubstance
like wood to provide the impact so the saw chain is not damaged.
1). End of the guide bar may be placed at the height about 40 cm.
2). Rear handle should be gripped lightly with the right handle.
The non-manual chain brake stops the operation of the saw chain in such a manner that the
kickback action produced at the end of the guide bar non-manually actuates the chain brake.
To make sure that the non-manual chain brake operates properly, proceed as follows:
1. Stop the engine of th e chain saw.
2. Operate the front and rear handles with hands (grip them lightly), so that the guide bar
may be placed at the height of about 40 cm as shown in Fig.
3. Softly detach the left hand from the front handle, and touch the end of the guide bar
against the wood or the like placed below so that the machine receives an impact.
(* at this time the rear handle should be gripped lightly with right hand)
4. The impact is transferred to the brake lever, which actuates the chain brake.
22
Page 23

Cutting instruction
DANGER
Do not let the nose or tip of the guide bar touch anything while engine is running to
avoid kick back.
General
In all circumstances the operation of the chain saw is a one-man job.
It is difficult at times to take care of your own safety, so don't assume the responsibility for a
helper as well.
After you have learned the basic techniques of using the saw, your best aid will be your own
good common sense.
The accepted way to hold the saw is to stand to the left of the saw with your left hand on the
front handle so you can operate the throttle trigger with your right index finger.
Before attempting to fell a tree, cut some small logs or limbs.
Be thoroughly familiar with the controls and the responses of the saw.
Start the engine, see that is running properly.
Squeeze the trigger to open the throttle wide open, then start the cut.
It is not necessary to press down hard to make the sa w cut.
If the chain is properly sharpened, the cutting should be relatively effortless.
Pushing the saw too hard will slow the engine and cutting will actually be more difficult.
Some material may adversely affect the housing of your chain saw.
(Example: palm tree acid, fertilizer etc.)
To avoid housing deterioration carefully remove all packed saw dust around clutch and guide
bar area and wash with water.
23
Page 24

Felling a tree
A falling tree can seriously damage anything it may hit - a car, a house, a fence, a power-line
or another tree.
There are ways to make a tree fall where you want it, so first decide where that is!
Before cutting, clear the area around the tree.
You will need good footing while working and you should be able to work the saw without
hitting any obstacles.
Next select a path of retreat.
When the tree begins to fall you should retreat away from the direction of fall at a 45-degree
angle and at least 3 m from the trunk to avoid the trunk kicking back over the stump.
Begin the cut on the side to which the tree is to fall.
o
Notch: 1/3 of diameter and 30
Back cut: 2.5 to 5 cm higher
Uncut hinge wood: 1/10 of diameter
Cut a notch approximately 1/3 of the way into the tree.
The position of this notch is important since the tree will try to fall "into" the notch.
The felling cut is made on the side opposite the notch.
Make the felling cut by placing spiked bumper 2.5 cm to 5 cm above the bottom of the notch
and stop cutting at approximately 1/10 of diameter to the inner edge of the notch in order to
leave the uncut portion of the wood as a hing e.
1. Notch cuts
2. Back cut
3. Wedges (when room)
4. Fall
A: Leave 1/10 of diameter hinge
Do not try to cut through to the notch with the felling cut.
The remaining wood between the notch cut and felling cut will act as a hinge when the tree
falls, guiding it in the desired direction.
When the tree starts to fall, stop the engine, pla ce the saw on t he ground and m ake your retrea t
quickly.
to 45o angle
Fell big tree.
1. Notching cuts
2. Draw-across method
3. Back cut
4. Draw-across method
5. Felling cuts
A: Wedges
To fell big trees with a diameter exceeding twice the bar length, start the notching cuts from
one side and draw the saw through to the other side of the notch.
Start the back cut on one side of the tree with the spiked bumper engaged, pivoting the saw
through to form the desired hinge on that side.
Then remove the saw for the second cut.
Insert the saw in the first cut very carefully so as not to cause kickback.
The final cut is made by drawing the saw forward in the cut to reach the hinge.
24
Page 25

Limbing
WARNING
Limbing in the proximity of power line can result in electrocution.
Always switch off power supply before starting operation.
CAUTION
Don't saw above chest height.
Limbing a fallen tree is much the same as bucking.
Never remove a limb from a tree while it is supporting your weight.
Be careful of the tip touching other limbs.
Always use both hands.
Don't cut with the saw overhead or the bar in a vertical position.
If the saw should kickback, you may not have good enough control to prevent possible injury .
Know how limb is stressed
1. Leave supporting limbs till last.
2. Slide support logs under trunk.
Even when limbing, use of the spiked bumper makes it easy to control the chain saw and
lessens kickback.
Bucking
CAUTION
Stay on the uphill side of logs.
Bucking is the sawing of a log or fallen tree into smaller pieces.
There are a few basic rules which apply to all bucking operations.
Keep both hands on the handles at all times.
Support logs if possible.
When cutting on a slope or hillside, always stand uphill.
No standing on log.
25
Page 26

Tension and compression in timber
WARNING
Never use throttle latch for cutting jobs.
CAUTION
If you have misjudge d the effects of tens ion and compression , and cut from the w rong
side, the timber will pinch the guide bar and chain, trapping it.
Racing the engine with the chain jammed will burn out your clutch.
If the chain should become jam me d and the saw can not be removed from the cut do
not force it out.
Stop the saw, force a wedge into the cut to open it up.
Never force the saw when it is jammed.
Do not force the saw into the cut.
A dull chain is unsafe and will cause excessive wear to the cutting attachments.
A good way to tell when the chain is dull is when fine saw dust comes out instead of
chips.
1. Hinge
2. Opened
3. Closed
A length of timber lying on the ground will be subject to tension and compression, depending
at which points the major support is.
When timber is supported at its ends the compression side is at the top and the tension side
is at the bottom.
To cut between these support points, make the first cut downwards approximately 1/3rd the
timber diameter.
The second cut is made upwards and should meet the first cut.
Heavy stress
4. 1/3 diameter. To avoid split.
5. Weakening cut to finish.
When the timber i s su pported at one end o nly, make the f irst cut upw ards appro xima tely 1 /3rd
the timber diameter.
The second cut is made downwards and should meet the first cut.
Overbuck
6. Down
7. Unsupported end
Underbuck
8. Up
9. Wedge
Make angled cut when one section may settle against the other.
26
Page 27

Service maintenance guide
Area Maintenance Page Before use Monthly
Air filter Clean / Replace 31 •
Fuel system Inspect 31 •
Fuel filter Inspect / Clean / Replace 31 •
Oil filter Inspect / Clean / Replace 31 •
Spark plug Inspect / Clean / Adjust / Replace 31 •
Cooling system Inspect / Clean 32 •
Guide bar Inspect / Clean 32 •
Sprocket / Clutch drum Inspect / Replace 3 2 ••
Carburettor Adjust / Replace and adjust 32 •
Silencer Inspect / Tighten / Clean 33 •O
Chain brake Inspect / Replace 21 •O
Starter Inspect 28 •
Screws, bolts and nuts Inspect, Tighten / Replace - •O
WARNING
If not maintained properly, the product may pose a serious risk to physical health.
CAUTION
Before and after using the product, ch eck the antivibration rub ber or spring for making s ure that it is not worn, cracke d,
or deformed.
NOTE
If not maintained properly, the product's performance may deteriorate.
IMPORTANT
Time intervals shown are maximum.
Actual use and your experience will determine the frequency of required maintenance.
If you continuously use vegetable based chain oil, inspect and do maintenance often.
When you find anything wrong, ask your ECHO dealer for repair.
27
Page 28

Trouble
Engine - hard to start
- does not start
Troubleshooting
Cause Remedy
Engine
cranks
Engine
does not
crank
Engine runs Dies or accelerates poorly Air filter dirty
Fuel at carburettor Not fuel at carburettor Fuel filter clogged
Fuel line clogged
Carburettor
Fuel at cylinder No fuel at cylinder Carburettor Ask your ECHO dealer
Silencer wet with fuel Fuel mixture is too rich Open choke
Spark at end of
plug wire
Spark at plug No spark at plug Spark gap incorrect
No spark at end of plug
wire
Ignition switch off
Electrical problem
Covered with carbon
Fouled with fuel
Spark plug defective
Internal engine problem Ask your ECHO dealer
Fuel filter dirty
Fuel vent plugged
Spark plug
Carburettor
Cooling system plu gged
Exhaust port / si le ncer p lugged
Clean or replace
Clean
Ask your ECHO dealer
Clean / replace air filter
Adjust carburettor
Ask your ECHO dealer
Turn switch on
Ask your ECHO dealer
Adjust 0.6 to 0.7 mm
Clean or replace
Clean or replace
Replace plug
Clean or replace
Clean or replace
Clean
Clean and adjust / replace
Adjust
Clean
Clean
Rotating saw chain at idling speed
Carburettor
Clutch damaged or binded
Ask your ECHO dealer
Ask your ECHO dealer
WARNING
All chain saw service operations, other than items listed in the Operator's Manual, should be performed by
competent service personnel .
Fuel vapors are extremely flammable and may cause fire and / or explosion.
Never test for ignition sp ark by grounding spark plug near cylinder plug hol e, otherwise serious perso nal injury may
result.
NOTE
"ES" START (See page 2)
When starter grip cannot be pulled lightly, the trouble is diagnosed as failure of engine inside.
Please consult your dealer.
If disassembled inadvertently, it can cause injury.
28
Page 29

Saw chain maintenance
WARNING
Switch off the engine before sharpening the chain.
Always wear gloves when working on chain.
CAUTION
The following faults will increase the risk of kickback considerably.
1) Top plate angle too large
2) File diameter too small
3) Depth gauge too large
NOTE
These angles are referred to as Oregon 25AP, 91PX and Carlton N1C-BL saw chains.
For other branded saw chain, follow it's chain manufacturer's instruction.
Properly filed cutters are shown below.
A: Top plate angle N1C-BL; 35°, 25AP and 91PX; 30°
B: Top plate cutting angle N1C-BL; 60°, 25AP and 91PX; 55°
C: Depth gauge N1C-BL; 0.56 mm, 25AP and 91PX; 0.65 mm
D: Parallel
1. Left hand cutter
2. Tie strap
3. Right hand cutter
4. Depth gauge
5. Drive link
6. Rivet
Never operate a chain saw with a dull or damaged chain.
If the chain requires excessive pressure to cut or produces dust instead of wood chips then
inspect the cutters for damage.
When sharpening the chain the objective will be to maintain the same angles and profiles
throughout its life as when it was new.
Inspect th e chain for damage or wear every time you refuel your chain saw.
29
Page 30

Sharpening
In order to file the chain correctly you need: round file and file holder, flat file and a depth
gauge tool.
By using the correct file size (4.0 mm Round file) and a file holder, it is easier to receive a
good result.
Consult your ECHO dealer for correct sharpening tools and sizes.
1. Lock the chain - push the front hand guard forward.
To rotate the chain - pull the front hand guard against front handle.
2. Your chain will have alternative left and right hand cutters.
Always sharpen from the inside out.
3. Keep the angle lines of the file holder parallel to the line of the chain and file the cutter
back until the damaged area (side plate and top plate) has been removed.
4. Hold the file horizontally.
5. Avoid touching the tie straps with the file.
6. Sharpen the most dama ged cutter first and th en take all the othe r cutters back to the same
length.
7. The depth control determines the thickness of wood chip produced and must be
maintained correctly throughout the chain life.
8. As the cutter length is reduced, the depth control height is altered and must be reduced.
9. Position the depth gauge, and file off any of the depth control which protrudes.
10. Round off the front of the depth control to allow smooth cutting.
11. Drive link serves to remove sawdust from the groove of the guide bar.
Therefore, keep the lower edge of the drive link sharp.
When setting of the chain is finished, soak it in oil and wash away filings completely before
using.
When the chain has been fi led on the ba r, suppl y suffic ient oi l to it, and rotate the cha in sl owly
to wash away the filings before using again.
If the chain saw is operate d with filing s clogged in the groove , the saw chai n and the guid e bar
will be damaged prematurely.
If the saw chain b ecomes soil ed with res in for inst ance, clean it with kero sene and s oak it in o il.
30
Page 31
Service
If you have any questions or problems, please contact your ECHO dealer.
Air filter
1. Lifting hook
2. T-wrench
3. Cleaner cover latch
4. Air cleaner cover
5. Air filter
Check before every use.
Close choke.
Raise the lifting hook, and towards the lower end.
Release the cleaner co ver latch with T-wrench, and rem ove the air cleaner cover and the
air filter.
Brush off dust lightly, or wash it in a non-inflammable solvent if necessary, or replace the
air filter.
Dry it completely before installation.
Reinstall the air filter and cover, engage latch and return the lifting hook.
Check fuel system
Check before every use.
After refuelling, make s ure fuel do es not leak o r exude from around fue l pipe, fue l grommet
or fuel tan k cap.
In case of fuel leakage or exudation there is a danger of fire.
Stop using he machine immediately and request your dealer to inspect or replace.
Fuel filter
DANGER
Petrol and fuel are extremely flammable.
Extreme caution is required when handling petrol or fuel.
1. Fuel filter
2. Fuel tank cap
Check periodically.
- Do not allow dust to enter fuel tank.
- A clogged filter will cause difficulty in starting engine or abnormalities in engine
performance.
- Pick up the fuel filter through fuel inlet port with a piece of steel wire or the like.
- When the filter is dirty, replace it.
- When the inside of the fuel tank is dirty, it can be cleaned by rinsing the tank out with
petrol.
Oil filter
1. Oil filter
2. Oil tank cap
Check periodically.
- Do not allow dust to enter oil tank.
- A clogged oil filter will affect the normal lubricating system.
- Pick it up through oil filling hole with a piece of steel wire or the like.
- If the filter is dirty, wash it in petrol or replace it.
- When the inside of the oil tank gets dirty, it can be cleaned by rinsing the tank out with
petrol.
Spark plug
∗ Spark plug gap: 0.6 to 0.7 mm
Check periodically.
- The standard spark gap is 0.6 to 0.7 mm.
- Correct the spark gap if it is wider or narrower than the standard gap.
Fastening torque: 10 to 15 N•m (100 to 150 kgf•cm)
31
Page 32

Cylinder fins (Cooling system)
Check periodically.
Clogged fins will result in poor engine cooling.
Remove dirt and dust from between fins to let cooling air pass easily.
Guide bar
NOTE
When replacing guide bar or saw chain, ask your ECHO dealer.
1. Groove 2. Oil hole 3. Guide bar 4. Sprocket
Clean before using.
- Clean the groove of the guide bar with a small screw driver, for example.
- Clean oil holes with a wire.
Reverse guide bar periodically.
Check sprocket and the clutch and clean the bar mou nt area before installatio n of the guide
bar.
Replace either or both if worn.
Sprocket / Clutch drum
∗ Worn out: 0.5 mm
The damaged sprocket will cause prem ature damage or wear of saw chain.
- When the sprocket has worn out 0.5 mm or more, replace it.
Check sprocket when you install new chain.
Replace it if worn.
Check clutch drum, if it rotates freely and smoothly.
If not, ask your dealer for repair.
Carburettor
CAUTION
When starting, idle speed adjuster (T ) should be adjusted not to rotate the saw chain.
When there is some trouble with the carburettor, contact your dealer.
T: Idle speed adjuster
Do not adjust the carburettor unless necessary.
To adjust the carburettor proceed as follows:
- Start engine and allow it to run at high idle until warm.
- Turn the idle speed adjuster (T) anticlockwise until the saw chain stops moving.
- Turn idle speed adjuster (T) anticlockwise an additional 1/2 turn.
- Accelerate to full throttle to check for smooth transition from idle to full throttle.
Automatic oiler
1. Oil adjusting screw 2. Decrease 3. Increase
The discharge volume of the automatic oiler is adjusted to 7 mL/min approximately at
7000 r/min, prior to shipment from factory.
- To increase the delivery volume, turn the adjusting screw anticlockwise.
When the adjusting screw touches stopper and stops, this position indicates maximum
discharge volume. (13 mL/min at 7000 r/min)
- Do not turn the adjusting screw beyond the maximum or minimum limit of volume
adjustment.
32
Page 33

Spark plug cover
1. Spark plug cover
2. Spark plug cover latch
3. T-wrench
Release the spark plug cover latch with T-wrench.
Inspect the spark plug, clean or replace if damaged.
Reinstall the spark plug and cover, engage latch with T-wrench.
Silencer
NOTE
Carbon deposits in silencer will cause drop in engine output.
The spark arrester screen must be checked periodically.
1. Silencer cover
2. Two bolts
Remove two bolts and the silencer cover.
3. Silencer
4. Spark arrester screen
Remove the spark plug lead.
Remove the spark arrester screen from the silencer body.
Clean carbon deposits from the silencer components.
Replace the screen if it is cracked, or has holes burned thro ugh.
Assemble the components in reverse order.
Replacement guide bar and chain
Length cm Guide bar Chain Clutch drum (Part number)
20 C20S91-35SA-ET 91PX-35E
(A556-001720)25 C25S91-40SL-ET 91PX-40E
30 C30S91-47ML-ET 91PX-47E
20 C20H25-52CL-ED 25AP-52E
25 C25H25-60CL-ET 25AP-60E
(A556-001710)
33
Page 34

Storage
Long term storage (Over 30 days)
WARNING
Do not store in an enclosure where fuel fumes may accumulate or reach an open
flame or spark.
NOTE
For future reference, you should keep this operator's manual.
Do not store your unit for a prolonged period of time (30 days of longer) without performing
protective storage maintenance which includes the following:
1. Drain the fuel tank completely and pull the recoil starter handle several times to remove
fuel from the carburettor.
2. Always store fuel in approved container.
3. Place the ignition switch in the "STOP" position.
4. Remove accumulation of grease, oil, dirt and debris from exterior of unit.
5. Perform all periodic lubrication and services that are required.
6. Tighten all the screws, bolts and nuts.
7. Remove the spark plug and pour 10 mL of fresh, clean, two-stroke engine oil into the
cylinder through the spark plug hole.
A. Place a clean cloth ov er the spark plug hole.
B. Pull the recoil starter handle 2 or 3 times to distribute the oil inside the cylinder.
C. Observe the piston location through the spark plug hole.
Pull the recoil starter han dle slowly unti l the piston reache s the top of its trav el and leave
it there.
8. Install the spark plug (Do not connect ignition cable).
9. Cover the chain and the guide ba r with the guide bar cover bef ore putting them in stor age.
10. Store unit in a dry, dust free place, out of the reach of children and other unauthorized
persons.
34
Page 35

Disposal procedure
Dispose of waste oil in accordance with local regulations.
Major plastic parts making up the product have codes showing their materials.
The codes refer t o the followin g materials ; dispose o f those pla stic parts in a ccordance w ith
local regulations.
Mark Material
>PA6-GF< Nylon 6 - Glass fibre
>PA66-GF< Nylon 66 - Glass fibre
>PP-GF< Polypropylene - Glass fibre
>PE-HD< Polyethylene
Please contact your ECHO dealer in case you do not know how you should dispose of
waste oil / plastic parts.
35
Page 36

Specifications
Model
External dimensions: Length × Width × Height mm 243 × 201 × 196
Mass: Saw without guide bar and chain, empty tanks kg 2.3
Volume:
Fuel tank
Tank for chain lubrication oil
Fuel (Mixture ratio)
Oil (Chain oil)
Guide bar: Sprocket nose bar Carving bar
Cutting length:
All specified usable cutting lengths of guide bar mm 200, 250, 300 200, 250
Chain:
Specified pitch
Specified gauge (thickness of drive links)
Type of guide bar
Guide bar gauge
Type of chain
Chain speed at maximum engine speed
mL
mL
mm
mm
cm
mm
m/s
190
140
Regular grade petrol.
Minimum 89 Octane unleaded petrol is recommended.
Do not use fuel containing methyl alcohol or more than
10 % of ethyl alcohol.
50 : 1 (2%) for ISO-L-EGD Standard (ISO/CD13738),
JASO FC, FD grade and ECHO Premium 50 : 1 oil.
Special chain oil or motor oil
9.53 (3/8 inch)
1.27 (0.050 inch)
20, 25, 30 (ECHO)
1.27 (0.050 inch)
6.35 (1/4 inch)
1.27 (0.050 inch)
20, 25 (ECHO)
1.27 (0.050 inch)
Carlton N1C-BL
Oregon 91PX
24.2
Oregon 25AP
21.5
Lubrication Adjustable automatic oil pump
Sprocket: Specified number of teeth 6 8
Engine:
Type
Carburettor
Magneto
Spark plug
Starter
Power transmission
Engine displacement
Maximum shaft brake power (ISO 7293)
Recommended maximum speed with cutting attachment
Recommended speed at idling
Sound pressure level: (ISO 22868) Lp
Aeq
=
Uncertainty
Guaranteed sound power level: (2000/14/EC) L
Vibration: (ISO 22867) Declared values a
WAav
hveq
Front handle
Rear handle
Uncertainty
mL (cm
kW
r/min
r/min
dB(A)
dB(A)991.5
= dB(A) 112
m/s
m/s
m/s
Air cooled 2-stroke single cylinder
Diaphragm type
Flywheel magneto, CDI system
NGK CMR7H
Recoil starter "ES" START (See page 2)
Automatic centrifugal clutch
3
)
25.0
1.11
12700
3200 (2800 - 3400)
2
3.9
2
3.4
2
1.3
Other devices: Front hand guard, Throttle trigger lockout,
Chain catcher, Chain brake, Anti-vibration device,
Spark arrester screen
Option: Spiked bumper
36
Page 37

Declaration of conformity
The undersigned manufacturer:
YAMABIKO CORPORATION
7-2 SUEHIROCHO 1-CHOME
OHME ; TOKYO 198-8760
JAPAN
This declaration of conformity is issued under the sole responsibility of the manufacturer.
declares that the hereunder specified new unit:
PORTABLE CHAIN SAW
Brand: ECHO
Type:
complies with:
* the requirements of Machinery Directive 2006/42/EC
(use of harmonized standard ISO 11681-2 (2011))
and has been granted "CE Type Approval"
Certificate No.: TI(E)/MD(2) - ECTE/234/06072015
Technical File Reference: TCF 1-79-1
by the hereunder listed Notified Body Number: 0673
Technology International (Europe) Limited
56 Shrivenham Hundred Business Park
Shrivenham, Swindon, SN6 8TY, United Kingdom
* the requirements of Directive 2014/30/EU
(use of harmonized standard EN ISO 14982 (2009))
* the requirements of Directive 2000/14/EC
Conformity assessment procedure followed ANNEX V
Measured sound power level: 109 dB(A)
Guaranteed sound power level: 112 dB(A)
Serial Number 37001001 and up
Tokyo,
January 1st 2016
YAMABIKO CORPORATION
M. Kimura
General Manager
Quality Assurance Dept.
The authoriz ed repr e sent at i ve in E uro pe who is au tho rized to
compile the technica l file:
Company: Atlantic Bridge Limited
Address: Atlantic House, PO Box 4800, Earley,
Reading RG5 4GB, United Kingdom
Mr. Philip Wicks
37
Page 38

1Memorandum and back cover
7-2 SUEHIROCHO 1-CHOME, OHME, TOKYO 198-8760, JAPAN
PHONE: 81-428-32-6118. FAX: 81-428-32-6145.
©
2015
X750 - 026 24 0
X750 333-000 2
Printed in Japan
38
Page 39

1Couvercle supérie ur
FRANÇAIS
(Notice originale)
MANUEL D'UTILISATION
TRONÇONNEUSE
AVERTISSEMENT
Cette tronçonneuse est conçue spécialement pour être utilisée
par un professionnel de l'entretien des arbres.
Lire attentivement les instructions et suivre les règles de
sécurité.
Le non-respect des règles de sécurité peut entraîner un risque
de blessure grave.
Page 40

Introduction
2Introduction
Cette tronçonneuse a été conçue pour couper du bois ou des produits en bois.
Ne pas couper d'objets métalliques, de tôle, de plastique ou de matériaux autres que du bois.
Il est important de bien comprendre toutes les précautions de sécurité avant d'utiliser la tronçonneuse.
Une mauvaise utilisation de la tronçonneuse peut entraîner des blessures corporelles graves.
Ne jamais laisser des enfants se servir de la tronçonneuse.
Ce manuel présente les instructions à suivre pour garantir une utilisation sûre, ainsi qu'un fonctionnement, un entretien et une
maintenance coorects de votre tronçonneuse ECHO.
Il est recommandé de suivre ces instructions pour maintenir l'appareil dans un état de fonctionnement optimal et pour maximiser
sa longévité.
Nous vous recommadons de conserver ce manuel pour pouvoir vous y référer en cas de besoin.
Si ce manuel d'utilisation est devenu illisible ou si vous l'avez perdu, vous pouvez en acheter un nouveau auprès de votre
revendeur ECHO.
En cas de location ou de prêt de la tronçonneuse à un tiers, toujours inclure le manuel d'utilisation qui contient les explications et
les instruct ions à suivre.
En cas de revente du produit, il convient de remettre le manuel d'utilisation à l'acquéreur.
Les caractéristiques, descriptions et illustrations qui figurent dans cette documentation correspondent aux données disponibles
au moment de la publication.
Elles peuvent cependant être modifiées sans préavis.
Les illustrations peuvent inclure des équipements et des accessoires disponibles en option, et peuvent par ailleurs ne pas
présenter tous les équipements standard.
L'appareil est fourni avec sa chaîne et son guide-chaîne non montés.
Veuillez monter la chaîne et le guide-chaîne.
Ne pas hésiter à contacter le revendeur ECHO si un point n'était pas clair dans ce manuel.
Caractéristique spécifique à ce modèle : DEMARRAGE « ES »
La fonction DEMARRAGE « ES » génère une puissance de rotation qui permet de faire tourner le vilebrequin à un régime
suffisamment élevé pour allumer le moteur pratiquement sans provoquer de rebond.
Avec la fonction DEMARRAGE « ES », démarrer le moteur devient un jeu d'enfant.
Fabricant
YAMABIKO CORPORATION
7-2 SUEHIROCHO 1-CHOME, OHME, TOKYO 198-8760, JAPON
Représentant autorisé en Europe
Atlantic Bridge Limited
Atlantic House, PO Box 4800, Earley, Reading RG5 4GB, Royaume-Uni
2
Page 41

Table des matières
Étiquettes et symboles........................................................................................................4
Règles à observer pour une utilisation sans danger...........................................................5
0. Tronçonneuse pour l'entretien des arbres.................................................................5
1. Mesures de précaution générales .............................................................................8
2. Précautions de sécurité contre les rebonds.............................................................11
3. Autres précautions de sécurité................................................................................12
Description........................................................................................................................14
Assemblage......................................................................................................................15
Montage du guide-chaîne et de la chaîne ...................................................................15
Fonctionnement................................................................................................................17
Carburant et lubrifiant ..................................................................................................17
Lubrifiant de chaîne .....................................................................................................17
Symboles d'identification sur les bouchons.................................................................17
Fonctionnement d'hiver ...............................................................................................18
Démarrage du moteur à froid.......................................................................................18
Démarrage du moteur à chaud....................................................................................19
Fonctionnement...........................................................................................................19
Arrêt du moteur............................................................................................................20
Vérification de la tension de la chaîne.........................................................................20
Test de lubrification de la chaîne.................................................................................20
Test préalable à la coupe ............................................................................................20
Utilisation correcte du frein de chaîne ..............................................................................21
Frein de chaîne.... ...... ....... ...... ....... ...... ....... ...... ....... ...... ...... ....... ...... ....... ...... ....... ...... .21
Contrôle du fonctionnement du frein de chaîne...........................................................22
Relâcher le frein de chaîne..........................................................................................22
Frein de chaîne automatique...................................................... ...... ....... ...... ....... .......22
Instructions pour la coupe.................................................................................................23
Généralités ..................................................................................................................23
Abattage d'un arbre .....................................................................................................24
Élagage .......................................................................................................................25
Tronçonnage ...............................................................................................................25
Tension et compression dans un tronçon....................................................................26
Guide de maintenance et d’entretien................................................................................27
Dépannage .......................................................................................................................28
Entretien de la chaîne.......................................................................................................29
Entretien ...........................................................................................................................31
Filtre à air.....................................................................................................................31
Vérifier le circuit d'alimentation................... ...... ....... ...... ...... ....... ...... ....... ...... ....... ...... .31
Filtre à carburant..........................................................................................................31
Filtre à huile.................................................................................................................31
Bougie d'allumage .......................................................................................................31
Ailettes de cylindre (Circuit de refroidissement) ..........................................................32
Guide-chaîne...............................................................................................................32
Pignon / tambour d'embrayage....................................................................................32
Carburateur .................................................................................................................32
Graissage automatique................................................................................................32
Cache de bougie d'allumage ...................................................... ...... ....... ...... ....... ...... .33
Silencieux ....................................................................................................................33
Guide-chaîne et chaîne de rechange ..........................................................................33
Remisage..........................................................................................................................34
Remisage à long terme (plus de 30 jours)...................................................................34
Procédure d'élimination des déchets................................................................................35
Caractéristiques................................................................................................................36
Déclaration de conformité.................................................................................................37
3
Page 42

Étiquettes et symboles
DANGER AVERTISSEMENT ATTENTION
Ce symbole associé au mot
« DANGER » signale une action ou
une situation présentant un risque
de blessure corporelle grave ou
d'accident mortel pour l'utilisateur
et les personnes à proximité.
Un cercle barré indique
une interdiction.
Forme des symboles Description / application des symboles Forme des symboles Description / application des symboles
Lire attentivement le manuel
d'utilisation
Ce symbole associé au mot
« AVERTISSEMENT » signale une
action ou une situation présentant
un risque de blessure corporelle
grave ou d'accident mortel pour
l'utilisateur et les personnes à
proximité.
REMARQUE
Ce type de message fournit des
conseils relatifs à l'utilisation, à
l'entretien et à la maintenance de
l'appareil.
« ATTENTION » signale une
situation potentiellement
dangereuse qui, si elle n'est pas
évitée, peut entraîner une blessure
légère à modérée.
Fonctionnement du frein de chaîne
Cette tronçonneuse est uniquement
réservée aux opérateurs formés pour
l'élagage des arbres.
L'utilisation de la tronçonneuse d'une
seule main peut être dangereuse.
Le port d'une protection appropriée
pour les oreilles, les yeux et la tête est
indispensable.
Utilisation des protections adéquates
pour les membres inférieurs et
supérieurs.
Avertissement !
Risque de rebond !
Attention aux températures élevées Niveau de puissance sonore garanti
Arrêt d'urgence
Mélange huile et essence
Remplissage d'huile pour chaîne
Réglage du graissage de la chaîne
Pompe d'amorçage
(charge d'amorçage)
Réglage du carburateur
- Régime de ralenti
Repérer ces étiquettes su r l'appareil.
L'illustration complète de l'appareil, dans la section
« Description », vous aidera à les localiser .
S'assurer que les étiquettes sont lisibles.
Il est nécessaire de bien comprendre et de suivre les
instructions qu'elles contiennent.
Si une étiquette est illisibl e, vous pouvez en co mmander une
nouvelle auprès de votre revendeur ECHO.
4
Page 43

Règles à observer pour une utilisation sans danger
0. Tronçonneuse pour l'entretien des arbres
REMARQUE
Pour le remplacement du guide-chaîne ou de la chaîne, consulter un revendeur ECHO.
La tronçonneuse a été conçue spécialement pour l'entretien des arbres, c'est-à-dire pour
des travaux effectués dans les arbres.
Elle ne doit donc être utilisée que par des professionnels.
L'utilisation de la tronçonneuse d'une seule main peut être dangereuse.
Prévoir les phénomè nes de gl is se et de dérapage, le risque de rebond est plus important.
Veiller à ne pas perdre l'équilibre à la fin d'une coupe (chute).
Si l'utilisateur est amené à travailler dans les arbres, il doit recevoir une formation aux
techniques d'escalade et utiliser l'équipement de sécurité recommandé : un harnais, des
anneaux, des estropes, des cordes et des mousquetons pour lui et la tronçonneuse.
Lors du levage d'une tronçonneuse à l'aide d'une corde attachée à un crochet de levage,
s'assurer que le crochet n'est pas tendu de manière excessive.
Prescriptions gé né ra le s
Les utilisateurs de tronçonneuses dédiées à l'entretien des arbres travaillant avec corde et
harnais ne doivent jamais travailler seuls.
Un travailleur au sol formé aux procédures d'urgence doit l'accompagner.
Les utilisateurs de tronçonneuse s doivent être fo rmés aux techniques d' escalade géné rales et
de travaux en élévation, être équipés de harnais, cordes, estropes, mousquetons et de tout
équipement permettant de conserver des positions de travail sécurisées pour eux et la
tronçonneuse.
Préparation à l'utilisation de la tronçonneuse dans un arbre
Le travailleur au sol doit vérifier la tronçonneuse, la ravitailler, la démarrer, la mettre en
température et l'éteindre avant de la transmettre à l'utilisateur qui se trouve dans l'arbre.
La tronçonneuse doit être équipée d'une estrope appropriée pour ensuite être accrochée au
harnais de l'utilisateur :
Exemple d'accrochage de la tronçonneuse au harnais de l'utilisateur
fixer l'estrope autour du point d'accrochage à l'arrière de la tronçonneuse ;
utiliser des mousquetons adaptés pour permettre un accrochage indirect (via l'estrope) et
direct (sur le point d'accrochage de la tronçonneuse) de la tronçonneuse au harnais de
l'utilisateur ;
s'assurer que la tronçonneuse est correctement accrochée avant de la transmettre à
l'utilisateur ;
s'assurer que la tronçonn euse est correctemen t accrochée au harn ais avant de la déta cher
du dispositif de montée.
La possibilité d'accrocher directement la tronçonneuse au harnais réduit le risque
d'endommagement de l'équipement lors des déplacements autour de l'arbre.
Toujours éteindre la tronçonneuse lorsqu'elle est accrochée au harnais.
Exemple d'accrochage de la tronçonneuse au point d'ancrage dorsal du harnais
La tronçonneuse doit être accrochée uniquement aux points d'accrochage recommandés du
harnais.
Ils se trouvent au centre (à l'avant ou à l'arrière) ou sur les côtés.
Lorsque cela est possible, accrocher la tronçonneuse au point d'ancrage dorsal pour la tenir
hors de portée des cordes et pour que le poids soit supporté par la colonne vertébrale de
l'utilisateur.
Lors de l'accrochage de la tronçonneuse à un nouveau point d'accrochage, l'utilisateur doit
s'assurer qu'elle est correctement attachée au nouveau point avant de la décrocher du
précédent.
5
Page 44

Utilisation de la tronçonneuse dans l'arbre
Une analyse des accidents survenus avec ces tronçonneuses lors d'opérations d'entretien
montre que la cause première en est l'utilisation inappropriée à une seule main.
Dans la plupart des accidents, les utilisateurs n'avaient pas adopté une position de travail
sécurisée leur permettant de tenir la tronçonneuse à deux mains.
Les éléments suivants augmentent les risques de blessures :
une mauvaise prise de la tronçonneuse en cas de rebond,
un manque de contrôle de la tronçonneuse entraînant un contact avec les cordes et le
corps de l'utilisateur (en particulier le bras et la main gauches) et
une perte de contrôle due à une position de travail non sécu risée se traduisant par un
contact avec la tronçonneuse (mouvement inattendu lors de l'utilisation de la
tronçonneuse).
1. Position de travail sûre pour une utilisation avec les deux mains
Pour pouvo ir te nir la t ronç onneus e avec les de ux mai ns, l' utili sateu r doit touj ours op ter po ur
une position de trav ail sécurisée lorsqu'il utilise la tronçonneuse
au niveau des hanches, lors de la coupe de sections horizontales et
au niveau du plexus lors de la coupe de sections verticales.
Exemple de déplacement de la corde principale via un point d'accrochage
supplémentaire
Lorsque l'utilisateur travaille près d'un tronc offrant de faibles forces latérales sur la position
de travail, de bons appuis peuvent suffire pour maintenir une position de travail sûre.
Toutefois, lorsque l'utilisateur s'éloigne du tronc, il doit se déplacer pour supprimer ou
neutraliser les force s latérales qui augmentent en modifiant par e xemple la po sition de la c orde
principale via un point d'accrochage supplémentaire ou à l'aide d'une estrope réglable
directement depuis le harnais vers un point d'accrochage supplémentaire.
Exemple d'étrier temporaire créé à partir d'une élingue sans fin
L'obtention d'un bon appui pour la position de travail peut être favorisée par l'utilisation d'un
étrier temporaire créé à partir d'une élingue sans fin.
2. Démarrage de la tronçonneuse dans l'arbre
Lors du démarrage de la tronçonneuse, l'utilisateur doit
appliquer le frein de chaîne avant de commencer,
tenir la tronçonneuse à sa gauche ou à sa droite lors du démarrage,
1. à sa gauche : il doit maintenir la tronçonn euse avec la ma in ga uche s ur la poign ée avant
et maintenir la tronçon neuse loin du corps tout en tenant la corde de lance ur dans la main
droite ou
2. à sa droite : il doit maintenir la tronçonneuse avec la main droite sur l'une des poignées
et maintenir la tronçon neuse loin du corps tout en tenant la corde de lance ur dans la main
gauche.
Le frein de chaîne doit toujours être engagé avant de baisser une tronçonneuse en marche
sur son estrope.
L'utilisateur doit toujours vérifier que la tronçonneuse contient suffisamment de carburant
avant d'effectuer des coupes dangereuses.
6
Page 45

3. Utilisation de la tronçonneuse d'une seule main
L'utilisateur ne doit pas utiliser la tronçonneuse avec une seule main lorsque sa position de
travail est instable ou à la place d'u ne scie pour la co upe de bo is de pet it diamèt re au bo ut des
branches.
Les tronçonneuse s des tinées à l'entretien des arbres ne do iv ent être utilisées avec une seule
main que lorsque
l'utilisateur ne peut maintenir une position de travail permettant une utilisation à deux
mains
le maintien de la position de travail requiert l'utilisation d'une main
la tronçonneuse est utilisée à bout de bras, de manière perpendiculaire et loin de
l'utilisateur.
Exemple d'utilisation de tronçonneuse d'une seule main
L'utilisateur ne doit jamais
couper avec la zone de rebond à l'extrémité du guide-chaîne,
« tenir et couper » des sections ou
essayer de rattraper des sections coupées.
4. Libération d'une tronçonneuse coincée
Si la tronçonneuse se coince lors de la coupe, l'utilisateur doit
couper le moteur de la tronçonneuse et l'accrocher solidement du côté tronc ou à une
corde séparée,
tirer la tronçonneuse de l'entaille tout en soulevant la branche,
le cas échéant, u tiliser une scie ou une deuxième tro nç onn eus e pour dégager la première
en effectuant une coupe à environ 30cm de celle-ci.
Qu'une scie ou une tronçonneuse soit utilisée pour libérer une tronçonneuse coincée, les
dégagements doiven t toujours être effe ctués d u côté b ranche po ur éviter que la tronçon neuse
ne soit prise avec la sect ion, ce qui compliquerait davantage la situati on.
7
Page 46

1. Mesures de précaution généra les
Manuel d'utilisation
Lire attentivement le manuel d'utilisation de la tronçonneuse.
Il convient de se familiariser avec les commandes de la tronçonneuse, et de savoir
comment l'utiliser correctement.
Le non-respect de ces instructions peut entraîner des blessures corporelles.
En cas de questions ou de problèmes, contacter un revendeur ECHO.
Condition physique
Ne pas se servir de la tronçonneuse lorsque vous êtes fatigué, ou sous l'influence de
l'alcool ou de médicaments.
Il convient d'être en bonn e condition physique et mentale pour manipule r la tro nço nneuse
sans danger.
Les erreurs de jugement ou les fausses manœuvres peuvent av oir des conséquences
graves, voire fatales.
Si votre état de san té risque d e se déteri orer en rais on d'un t ravail ph ysiquem ent exige ant,
veuillez consulter votre médecin avant d'utiliser la tronçonneuse.
N'utilisez pas la tronçonneuse si vous êtes fatigué ou ma lad e, o u s ous l'influence de toute
substance ou médicam ent pouv ant af fecter vo tre visi on, votre de xtér ité ou vos facu lté s de
jugement.
Équipement personnel
ATTENTION
Il n'est pas conseillé de se mettre du coton dans les oreilles.
Toujours porter des lunettes appropriées pour se protéger les yeux.
Des copeaux de bois, de la poussière, des branchages et autres débris peuvent être
projetés par la chaîne de la tronçonneuse vers le visage de l'utilisateur.
Les lunettes offrent également une protection limitée en cas de contact de la chaîne
avec la zone oculaire de l'opérateur.
Si les conditions de travail nécessitent le port d'un masque ventilé, toujours porter des
lunettes en-dessous.
ECHO recommande de porter des protections d'oreilles en permanence.
Si cette instruction n'est pas respectée, il existe des risques de perte d'audition.
Pour réduire le risque de perte d'au dition, porter des protecti ons de type « casque » ou des
bouchons d'oreille homologués par un organisme officiel.
Toutes les personnes utilisant une tronçonneuse dans le cadre de leur profession doivent
faire l'objet d'examens réguliers de l'audition.
Toujours porter une casquette ou un chapeau lors de l'utilisation d'une tronçonneuse.
Le port du casque de chantier est vivement recommandé pour l'abattage d'arbres, ou
lorsque l'opérateur doit travaill er sous des arbres, ou dan s des circo nstances entraîn ant un
risque de ch ute d'objets.
Porter des gants antidérap ants et rési stants pour améliorer la prise, et pour une meilleure
protection contre le froid et les vibrations.
Porter des chaussures ou des bottes de sécurité à bouts renforcés avec semelle
antidérapante.
Ne jamais porter de vête ments amp les, de ve stes débou ton nées, de m anche s év asées
ni de boutons de ma nchette, d'écharpe , de cravate, de co rdon, de chaîne, de bijoux, etc.
qui pourraient se prendre dans la chaîne de la tronçonneuse ou dans les broussailles.
Porter des vêtements résistants, offrant une certaine protection.
Ils doivent être près du corps, sans pour autant gêner les mouvements.
Les jambes des pantalons ne doivent pas être évasées ou ni présenter d'ourlets.
Elles doivent être rentrées dans les bottes ou coupées court.
Des gilets de sécurité, des jambières et des pantalons de bûcheron fabirqués en tissu
balistique sont disponibles.
L'opérateur peut décider de porter des protections supplémentaires si nécessaire.
Ne jamais utiliser de tronçonneuse sans personne alentour.
S'assurer qu'une tierce personne reste à proximité en cas de problème.
8
Page 47

Carburant
DANGER
L'essence est extrêmement inflammable.
Si elle se renverse ou si elle est enflammée par une source de chaleur , un incendie
peut se déclarer et provoque r des bless ures graves ainsi q ue d'imp ortant s dé gâts
matériels.
Les plus grandes précautions sont indispensables pour manipuler du carburant.
Après avoir fait le plein de carburant, refermer soigneusement le bouchon et
vérifier qu'il n'y a pas de fuite.
En cas de fuite, réparer avant toute nouvelle utilisation pour éviter les risques
d'incendie.
1. Bouchon du réservoir d'huile
2. Bouchon du réservoir de carburant
A : Sens de desserrage
B : Sens de serrage
Utiliser un récipient de carbura nt d'u n type adapt é.
Se munir d'un extinc teur ou d'une pelle en cas d'incendie.
En dépit de toutes les précautions que l'on peut prendre, l'utilisation d'une tronçonneuse,
et le travail en forêt en général, présentent des dangers.
Ne pas fumer. Ne pas mettre le carburant à proximité de flammes ou d'étincelles.
Le réservoir de carburant peut être sous pression.
Dévisser d'abord le bou chon d u réser voir de carbur ant p our dét endre l a press ion av ant de
le retirer.
Si le bouchon du réservoir de carburant ou du réservoir d'huile est difficile à reti rer à la
main, poser la poignée de lan ceur dans la rainure du bou chon et la tourner dan s le sens
inverse des aiguilles d'une montre.
Remplir le réservoir à l'extérieur, sur un sol nu, et bien revisser le bouchon.
Ne jamais effectuer le ravitaillement dans un endroit fermé.
Essuyer le carburant qui a coulé sur l'appareil.
Ne jamais faire le plein lorsque le moteur est chaud ou en marche.
Ne jamais entreposer la tronçonneuse avec du carburant dans son réservoir.
Une fuite de carburant pourrait provoquer un incendie.
9
Page 48
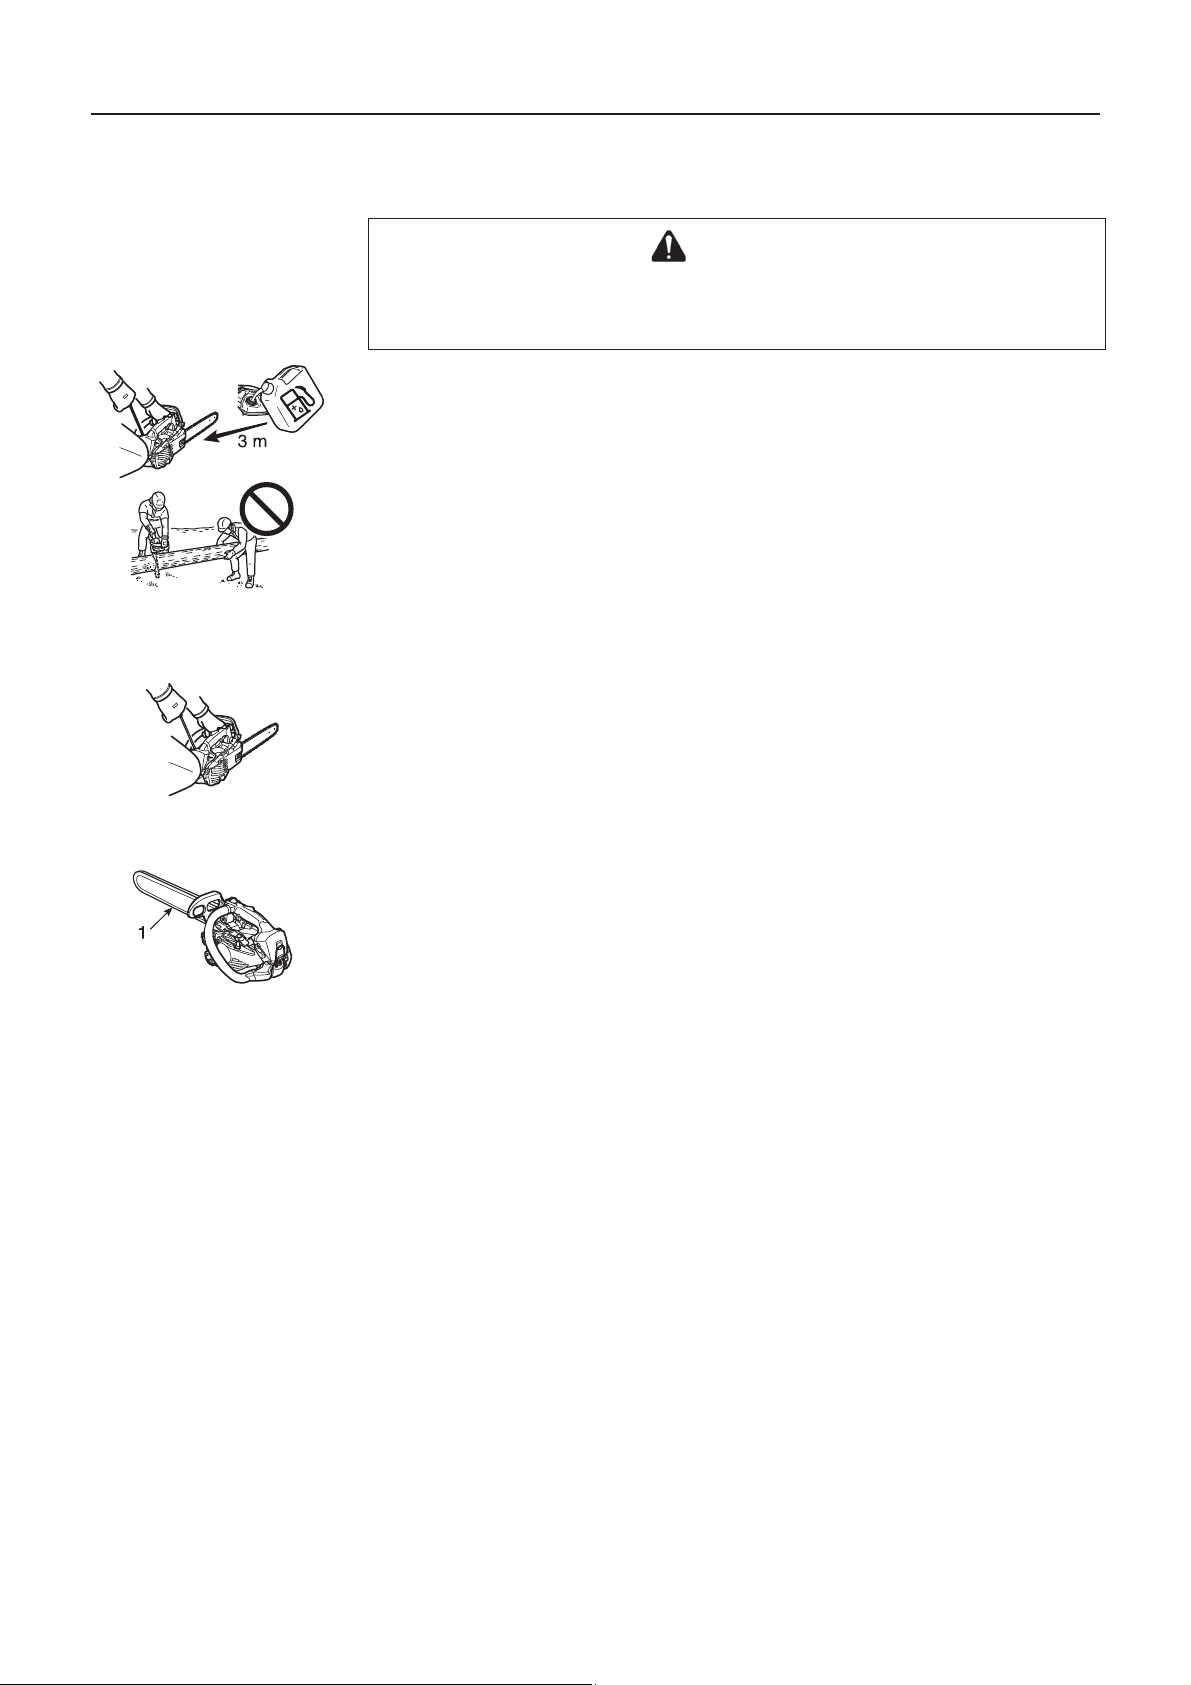
Démarrage du moteur
DANGER
Ne pas démarrer la tronçonneuse en la laissant descendre au bout du cordon, sa
position n'est plus sécurisée ce qui peut entraîner des blessures.
Démarrer la tronçonneuse de manière appropriée.
Éloigner la tronçonneuse à au moins 3 mètres du point de ravitaillement avant de
démarrer le moteur.
Personne ne doit se trouver à proximité de la tronçonneuse lors du démarrage ou de
l'utilisation.
Éloigner toute personne et tout animal de la zone de travail.
Ne jamais demander à qui que ce soit de tenir le bois pendant la coupe.
Ne jamais commencer à couper avant d'avoir une zone de travail dégagée, une bonne
assise, ainsi qu'une zone de retrait pour s'écarter lorsque l'arbre tombe.
Avant de faire déma rrer le moteur, veiller à ce que la tronçon neuse ne soit en c ontact avec
aucun objet .
Les poignées doiv en t toujours rester propres, sèches, et ex em pte s d'huile et de carburant.
Utiliser la tronçonneuse uniquement dans des endroits bien ventilés.
Les gaz d'échappement, les projections d'huile (provenant du système de lubrification de
la chaîne) et la sciure sont dangereux pour la santé.
Lors du démarrage, placer la tronçonneuse sur un sol plat et tenir la poignée avant de
la main gauche et tenir fe rmement l'extrémit é arrière de la poignée arri ère avec le genou
droit et tirer sur la poignée de lanceur avec la main droite.
Transport
1. Protecteur de guide-chaîne
Pour transporter la tronçonneuse, toujours utiliser le protecteur de guide-chaîne.
Transporter la tronçonneuse moteur arrêté, chaîne et guide-chaîne vers l'arrière, et
silencieux éloigné du corps.
10
Page 49

2. Précautions de sécurité contre le s rebonds
DANGER
Précautions de sécurité à respecter par les utilisateurs de tronçonneuse contre les
rebonds : il y a un risque de rebond lorsque le nez ou l'extrémité du guide-chaîne
touche un objet, ou lorsque le bois coince et pince la tronçonneuse dans l'entaille.
Dans certains cas, un contact avec l'extrémité peut provoquer un mouvement vers
l'arrière brutal, poussant le guide-chaîne vers le haut et vers l'arrière en direction de
l'utilisateur (ce phénomène est appelé rebond rotatif).
En cas de pincement de la chaîne le long de la partie supérieure du guide-chaîne, ce
dernier risque d'être b rusqueme nt repouss é vers l'uti lisateur ( ce phénom ène est ap pelé
rebond linéaire).
Ces réactions peu vent vous faire perdre le contrôle de la tronçonne use, et pr ovoquer un
contact avec la chaîne en mouvement, de nature à causer de graves blessures.
En tant qu'utilisateur de tronçonneuse, il c onvient de prendre ce rtaines précautions pour
que les travaux de coupe se déroul ent sa ns ac cid en t s ni bles s ures .
La compréhension du princip e de base du rebond pe rmet de rédu ire ou de s upprimer l'ef fet
de surprise.
L'effet de surprise contribue à provoquer des accidents.
Ainsi, il est possible d'éviter le rebond rotatif en évitant de toucher un objet ou le sol avec
le nez du guide-chaîne sans protection.
Ne pas utiliser la tronçonneuse en la tenant d'une seule main !
Utiliser une tronçonneuse d'une seule main entraîne un risque de blessure grave pour
l'utilisateur et pour toute person ne se ten ant à proxi mi té.
Pour bien contrôler l'appareil, il faut toujours se servir des deux mains, une main
actionnant la gâchette de commande.
Autrement, la tronçonneus e ris qu e de «glisser » ou de déraper, et donc de blesser les
gens.
Bien tenir la tronçonneuse des deux mains, main droite sur la poignée arrière, main
gauche sur la poignée avant, lorsque le moteur tourne.
Enserrer fermement les poignées de la tronçonneuse entre le pouce et les doigts.
Une prise ferme permet de réduire les rebonds et de mieux contrôler la tronçonneuse.
Garder les deux mains sur la tronçonneuse en permanence pour la contrôler.
Ne pas tenir la tronçonneuse à bout de bras ou plus haut que la poitrine.
Veiller à ce que la zone de coupe soit bien dégagée.
Eviter que le nez d u g uid e-c haîne n'entre pas en contact avec u ne bûche, une branche
ou tout autre obstacle au cours de l'utilisation de la tronçonneuse.
Une coupe effectuée à régimes élevés permet de réduire les risques de rebond.
Mais il est préférable de couper à bas régimes ou à régimes intermédiaires pour mieux
contrôler la tronçonneuse dans des situations délicates, ce qui permet également de
réduire le risque de rebond.
Respecter les instructions du fabricant en matière d'affûtage et d'entretien de la
tronçonneuse.
N'utiliser que les guide-c haînes et l es chaînes s pécifiés p ar le fabr icant, ou d es équival ents
autorisés de ces guide-chaînes et de ces chaînes.
11
Page 50

3. Autres précautions de sécurité
Exposition aux vibrations et au froid
L'exposition au froid et aux vibrations peut entraîner chez certaines personnes l'apparition
d'une maladie connue sous le nom de phénomène de Raynaud, qui affecte les doigts.
C'est la raison pour laquel le la tronçon neuse EC HO est équip ée de dispo sitifs vi sant à réduire
l'intensité des vibrations passant par les poignées.
L'exposition à des vibrations et au froid peut provoquer une sensation de picotement et de
brûlure, suivie d'une cyanose et d'un engourdissement des doigts.
Nous conseillons vivement de prendre les précautions suivantes dans la mesure où le seuil
minimum d'exposition de nature à déclencher ce phénomène reste inconnu.
Limiter la perte de chal eur c orpor elle, en pro tégean t en p riorité la tê te, le cou, le s pie ds,
les chevilles, les mains et les poignets.
Stimuler la circulation sanguine en faisant régulièrement des pauses pour remuer
énergiquement les bras, et en évitant de fumer.
Limiter le nombre d'heures d'utilisation de la tronçonneuse.
Essayer d'intégrer à l'emploi du temps de la journée des tâches ne nécessitant pas
l'utilisation de la tronçonneuse.
En cas d'inconfort, de rougeur et de gonflement au niveau des doigts, suivis d'un
blanchiment et d'une perte de sensibilité, consulter un médecin avant de s'exposer à
nouveau au froid et aux vibrations.
Lésions attribuables au travail répétitif
Il apparaît que la sollicitation excessive des muscles et des tendons des doigts, des mains,
des bras et des épaules peut provoquer une irritation, un gonflement, un engourdissement,
une faiblesse et de fortes douleurs au niveau des membres mentionnés ci-dessus.
Pour réduire le risque d'apparition de LATR, respecter les précautions suivantes :
Eviter de plier, d'étirer ou de tordre le poignet pendant le travail.
Garder le poignet en position droite.
De même, pour sais ir la tronçonneuse, il faut la prendre à pleine main, pas seulement
entre le pouce et l'index.
Faire des pauses régulières pour réduire l'effet répétitif et pour reposer ses mains.
Effectuer le mouvement répétitif plus lentement et en faisant moins d'effort.
Faire des exercices de musculation des mains et des bras.
En cas de picotements, d'engourdissement ou de douleur dans les doigts, les mains, les
poignets ou les bras, consulter un médecin.
A propos de la directive européenne « Vibration »
La directive européenne «Vibration » (2002/44 /CE) a pour but de pro téger les travaille urs des
risques provenant des vibrations mécaniques, en obligeant les employeurs à limiter
l'exposition journalière aux vibrations à une valeur standard A(8).
Tout employeur, qu'il s'agisse d'une personne ou d'une société, doit veiller au respect de la
valeur A(8) lors de l'utilisation de machines par ses employés.
Les valeurs de vibration mécanique (valeur de vibration équivalente) de cet appareil, qui
peuvent servir de référence pour vous aider à calculer la valeur A(8), sont les suivantes :
Type du MODÈLE
Avant / Poignée gauche (m/s
Arrière / Poignée droite (m/s
2
)2,1
2
)1,9
12
Page 51

États de l'appareil
AVERTISSEMENT
Ne jamais modifier la tronçonneuse.
Seuls les accessoires et pièces fournis par ECHO ou expressément approuvés par
ECHO pour une utilisation spécifique avec les tronçonneuses fabriquées par ECHO
sont autorisés.
Bien que certains accessoires non approuvés par ECHO puissent être utilisés avec
l'appareil, leur utilisation peut être extrêmement dangereuse.
Ne pas utiliser une tronçonneuse endommagée, mal réglée ou assemblée de façon
incomplète ou peu sûre.
Ne pas utiliser la tronçonneuse avec un silencieux d'échappement mal fixé ou
défectueux.
Veiller à ce que la chaîne s'arrête lorsque la gâchette de l'accélérateur est relâchée.
Coupe
ATTENTION
Ne pas toucher les s urfaces brûlantes du couvercle de cy lindre et du sile ncieux après
avoir utilisé la tronçonneuse.
Ne pas utiliser de tronçonneuse dans un arbre sans avoir suivi une formation
particulière.
Garder toutes les parti es du c orps à d istan ce de la tronço nneus e lorsq ue le m oteur tou rne .
Faire extrêmement a ttention lo rs de la cou pe de buiss ons et de j eunes arbre s ; en effet,
des brindilles risquent de se coincer dans la tronçonneuse et de fouetter ou de
déstabiliser l'utilisateur.
Lors du tronçonnage ou de l' ébr anc hag e de troncs d'arbres, toujours se t eni r en amont
du tronc au cas où il roulerait une fois coupé.
Lors de la coup e d'une branc he sous te nsion, pr évoir le mo uvement de recul néce ssaire
afin d'éviter tout cho c avec la branch e ou la tronçonneuse l orsque la tensio n exercée sur
les fibres du bois sera dissipée.
Il est extrêmement dangereux de couper des branchages en se tenant sur une échelle
car l'utilisateur n e peut pas contr ôler correctem ent la tronço nneuse et l' échelle risqu e de
glisser.
Les travaux en équilibre doivent être confiés aux professionnels.
Garder les deux pieds au sol.
Ne pas travailler sans être en appui au sol.
Couper le moteur avant de reposer la tronçonneuse.
Règles d'utilisation
L'utilisation d'u ne tronço nneuse n écessit e un appa reil en pa rfait état d e marche et, pour
l'utilisateur, de bonnes capacités d'appréciation et une bonne connaissance des
différentes méthodes à utiliser face aux diverses possibilités de coupe.
Ne laisser personne utiliser la tronçonneuse sans avoir préalablement lu le manuel
d'utilisation et parfaitement compris les instructions qu'il contient.
Utiliser la tronçonneuse uniquement pour couper du bois ou des objets en bois.
Ne pas couper d'objet métallique, de tôle, de plastique ou de matériaux autres que du
bois.
Entretien
Toutes les opérations d'entretien, autres que celles figurant dans les instructions de
maintenance du manuel d'utilisation, doivent être effectuées par un personnel qualifié.
(Par exemple, en cas d'ut ilisa tion d 'outils inada pté s pour ma int enir le vola nt mot eur lors
de la dépose de l'embrayage, des dommages structurels peuvent être causés sur le
volant moteur, entraînant un risque d'éclatement de ce dernier.)
13
Page 52

Description
1. Protège-main avant - Protection placée entre la
poignée avant et la chaîne pour protéger la main contre
les blessures et conserver la m aîtrise de la tron çonneuse
si la main glisse de la poignée.
Cette protection sert également à activer le frein de
chaîne qui arrête la rotation de la chaîne.
2. Poignée arrière (pour la main droite) - Poignée de
support située au-dessus du bloc moteur.
3. Bouton de commande du starter - Dispo sitif se rvant à
enrichir le mélange carburant / air dans le carburateur
pour faciliter le démarrage à froid.
4. Couvercle de silencieux - Protection empêchant tout
contact avec la surface brûlante du silencieux.
5. Autocollant de sécurité - Numéro de pièce X505007710
6. Tendeur de chaîne - Dispositif servant à régler la
tension de la chaîne.
7. Carter d'embrayage - Couv ercle de protection du guidechaîne, de la chaîne, de l'em brayage et du pignon de la
chaîne lorsque la tronçonneuse est en marche.
8. Attrape-chaîne - Disposit if conçu pour limit er les risques
de contact avec l a cha îne e n cas de ru ptur e ou de so rtie
de la gorge du guide-chaîne pendant la coupe, afin de
protéger la main droite de l'utilisateur.
9. Guide-chaîne - Soutient et guide la chaîne de la
tronçonneuse.
10. Chaîne - Chaîne servant d'outil de coupe.
11. Poignée avant (pour la main gauche) - Poignée de
support située sur le côté gauche du bloc moteur.
12. Bouchon du réservoir de carburant - Assure la
fermeture du réservoir de carburant.
13. Bouchon du réservoir d'huile - Assure la fermeture du
réservoir d'huile.
14. Poignée de lanceur - Poignée servant à démarrer le
moteur. DÉMARRAGE « ES »
15. Cache de bougie d'allumage - Couvre la bougie
d'allumage.
16. Loquet de cache de bougie d'allumage - Dispositif de
fixation du cache de bougie d'allumage.
17. Loquet de couvercle de filtre à air - Dispositif de
fixation du couvercle de filtre à air.
18. Couvercle de filtre à a ir - Couvre le filtre à air.
19. Pompe d'amorçage (charge d'amorçage) - Lors du
démarrage du moteur, appuyer 3 ou 4 foi s sur la pom pe
d'amorçage.
20. Autocollant de sécurité - Numéro de pi èce X505008600
21. Gâchette d'accélérateur - Dispositif que l'utilisateur
actionne avec le doigt pour contrôler le régime moteur.
22. Blocage de la gâchette d'accélérateur - Dispositif qui
doit être enfoncé avant de pouvo ir action ner la gâche tte
d'accélérateur, afin d'empêcher le fonctionnement
accidentel de celle-ci.
23. Interrupteur marche/arrêt - Dispositif servant à
connecter et déconnecter le circuit d'allumage de
manière à démarrer ou arrêter le moteur.
Crochet de levage - Si l 'utilisateur est amen é à travailler
24.
dans les arbres, il doit recevoir une formation aux
techniques d'escal ade et utiliser tous les é quipements de
sécurité recommandés.
25. Manuel d'utilisation - Fourni avec l'appareil.
Lire attentivement ce manuel avant utilisation et le
conserver pour s'y référer ultérieurement. Il décrit les
techniques à suivre pour une utilisation adaptée et sa ns
danger.
26. Outils - Clé en T 13 x 16 mm (combinaison tournevis /
douille de bougie), et clé en L.
27. Protecteur de guide-chaîne - Dispositif servant à
protéger le guide-chaîne et la chaîne lorsque l'appareil
est transporté ou inutilisé.
14
Page 53

Assemblage
Montage du guide-chaîne et de la chaîne
AVERTISSEMENT
Pour votre sécurité, toujours arrêter le moteur avant d'effectuer les opérations
suivantes.
ATTENTION
1. Tous les réglages doivent êtr e effectués à froid.
2. Toujours porter des gants pour travailler sur la chaîne.
3. Ne pas utiliser de chaîne desserrée.
REMARQUE
Amener le levier de frein de chaîne (protège-main avant, connecteur de frein) à fond vers
l'arrière avant de retirer le carter d'embrayage ou de l'installer sur la tronçonneuse.
1. Desserrer le frein de chaîne.
2. Écrou
3. Carter d'embrayage
4. Griffe d'abattage ; option (référence C304-000000)
Monter la chaîne et le guide-chaîne comme suit.
Desserrer l'écrou et enlever le carter d'embrayage.
Monter le guide-chaîne et le faire glisser vers l'embrayage pour faciliter l'installation de
la chaîne.
5. Guide-chaîne
6. Embrayage
7. Trou du guide-chaîne
8. Axe de réglage de tension
9. Connecteur de frein
Monter la chaîne comme indiqué.
(S'assurer que les dents sont orientées dans le bon sens.)
10. Tendeur
11. Sens de tension de la chaîne
Desserrer le frein de chaîne, puis installer le carter d'embrayage en le positionnant sur
le goujon du guide-chaîne.
Serrer l'écrou à la main.
S'assurer que le tendeur de cha îne est correctement en plac e dans le trou du guide-cha îne.
12. Protège-main avant (levier de frein)
Aligner le connecteur de frein du carter d'embrayage sur la rainure située du côté du pro-
tège-main avant.
15
Page 54

Tenir le nez du gu ide ve rs le haut et tourner le tendeur dans le sens des aiguilles d'une
montre jusqu'à ce que la chaîne soit bien au contact du dessous du guide.
A : Tension correcte
B : Tension incorrecte
Serrer l'écrou tout en tenant le nez du guide vers le haut.
Faire tourner la chaîne autour du guide à la main.
Relâcher la tension si des points de tension sont constatés.
16
Page 55
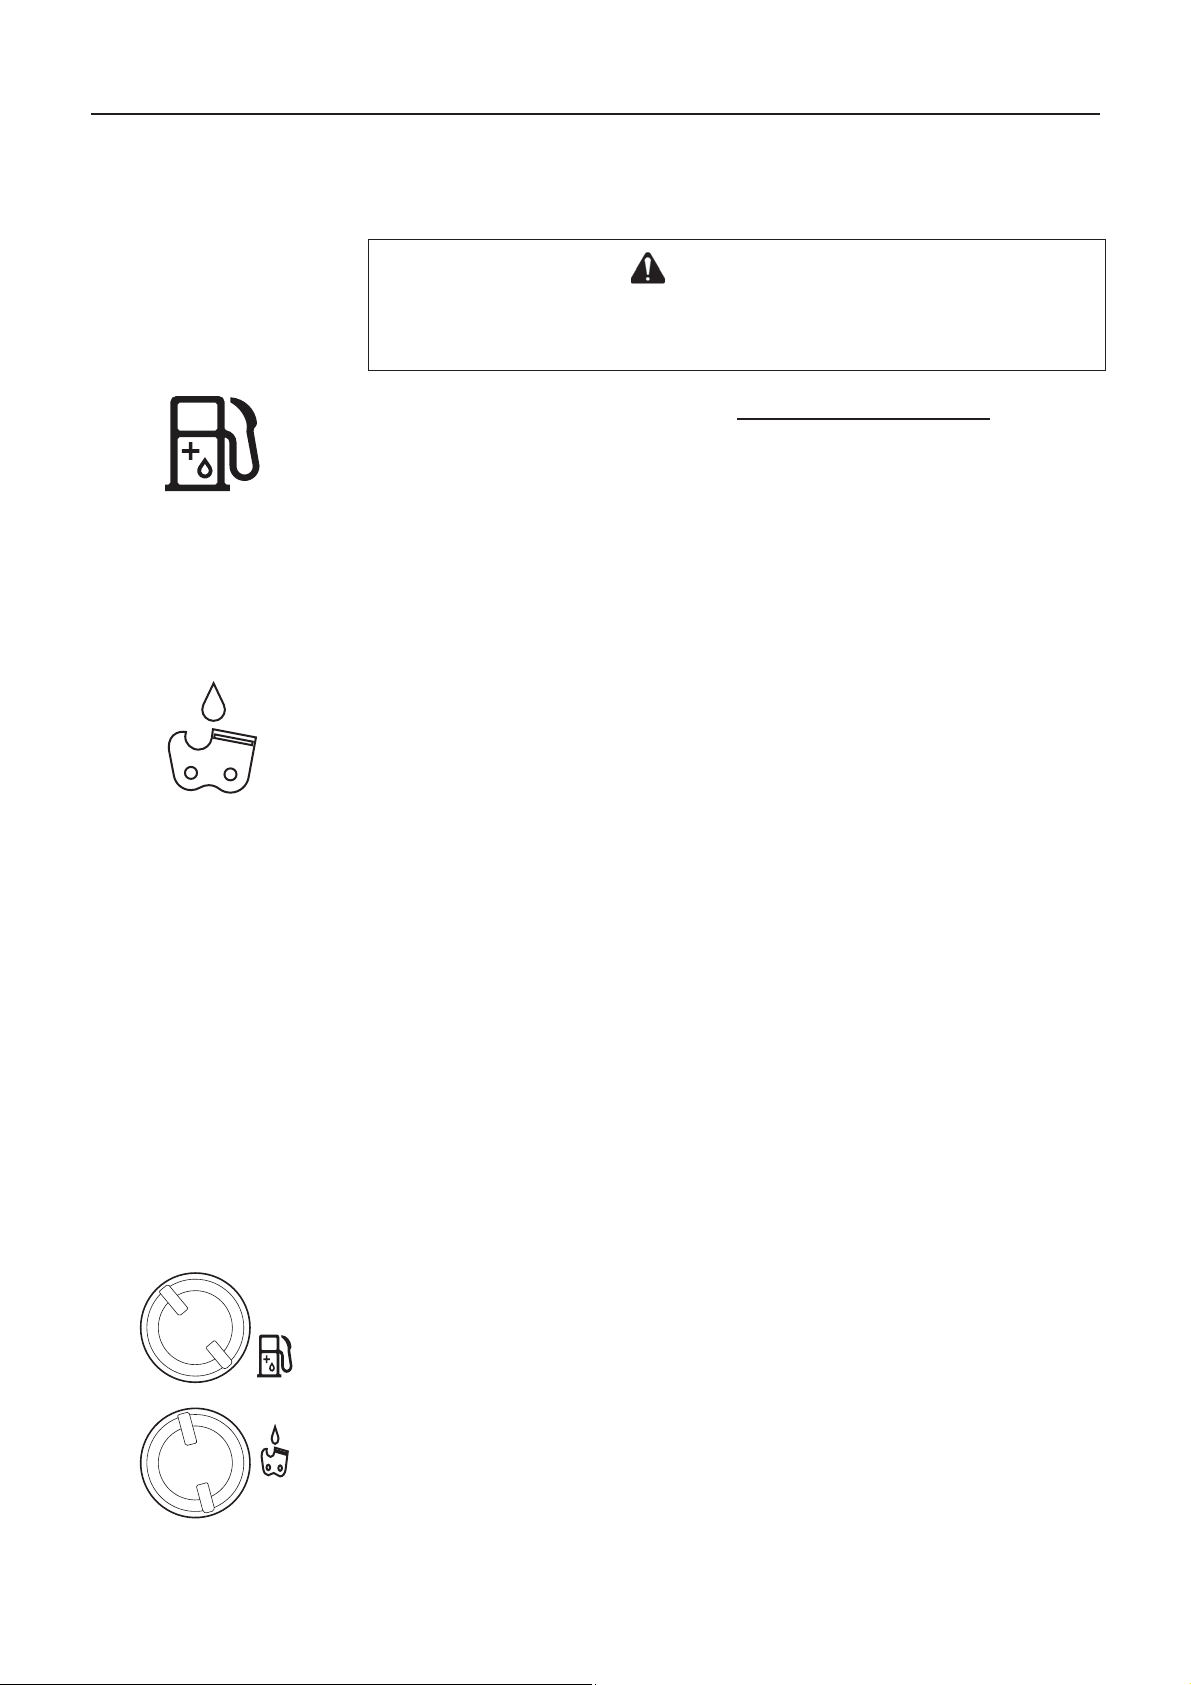
Fonctionnement
Carburant et lubrifiant
ATTENTION
Au moment de l'ouverture du réservoir de carburant, il faut toujours dévisser
lentement le bouchon de réservoir et laisser la pression du réservoir s'équilibrer
avant d'enlever le bouchon.
Le carburant est un mélange de Super sans plomb 95 (exclusivement), et d'huile
minérale ou semi-synthétique spéciale pour moteurs 2 temps refroidis par air
marque.
Ne pas utiliser de carburant contenant du méthanol ou plus de 10 % d'éthanol.
Richesse du mélange recommandée; 50 : 1 (2%) selon la norme ISO-L-EGD (ISO/
CD13738), la norme JASO FC, FD et l'huile ECHO Premium 50 : 1.
- Ne pas faire le mélange directement dans le réservoir de carburant.
- Éviter de renverser du carburant ou de l'huile.
Toujours essuyer les projections de carburant.
- Manipuler le carburant avec précaution : il est hautement inflam mable.
- Toujours stocker le carburant dans un récipient approprié.
Lubrifiant de chaîne
Une lubrification adéq uate de la chaî ne en fonctionne ment limitera le frottement entre la
chaîne, le guide-chaîne et le pignon ainsi qu'entre les composants de l'embrayage tels
que le roulement à aiguilles et l'ensemble embrayage.
Utilisez une huile pour chaîne ECHO d'origine ou une huile pour chaîne recommandée
ECHO spécialement fo rmulée pour les gui des et les chaînes afi n d'assurer une lub rification
adéquate.
Ces huiles contiennent des additifs d'adhésivité, des agents de protection contre le
vieillissement et des agents anti-oxydants.
Consultez votre revendeur ECHO afin d'obtenir l'huile pour chaîne adéquate.
Ne jamais utiliser d'huiles usagées ou de récupération afin d'éviter divers
dysfonctionnements du système d'huile, du système d'embrayage, de la chaîne et du
guide-chaîne.
Les problèmes de lubrification provoqués par l'utilisation d'une huile inappropriée
annuleront la garantie.
En particulier, l'hu ile pour chaîne végétale se transforme rapid ement en résine et adhère
à la pompe à huile, à la chaîne, au guide -chaîne et au roulement à aig uilles d'embrayage
ainsi qu'à l'ensemble emb rayage.
Ceci entraîne des dysfonctionnements et réduit la durée de vie du produit.
Rincer le système d 'huile de chaîne à l'aide d'une huile pour chaîne minérale ou chimique
après l'utilisation si le recours à une huile végétale est exigé du fait d'une réglementation
locale/municipale ou pour toute autre raison.
Pour une utilisation d'urgence à court terme, il est possible d'utiliser une huile moteur
SAE 10W-30 neuve.
, de grande
Symboles d'identification sur les bouchons
Les réservoirs de carburant et d'huile sont identifiés par les illustrations suivantes.
Bouchon du réservoir de carburant
(Orange)
Bouchon du réservoir d'huile pour chaîne
(Noir)
17
Page 56

Fonctionnement d'hiver
REMARQUE
Pousser l'obturateur d'air vers le bas en position « temps froid » (le symbole du
bonhomme de neige apparaît) lorsque la température extérieure est égale ou
inférieure à 5 °C.
Pour un fonctionneme nt à u ne t em péra ture supérieure à 5 °C, replacer l'obturateur d'air
dans sa position d'origine.
Le non-respect de cette consigne entraînerait la surchauffe du moteur.
1. Cache de bougie d'allumage
2. Obturateur d'air
3. Position « temps froid » (pousser vers le bas ; symbole du bonhomme de neige)
4. Position « temps chaud » (tirer vers le haut ; symbole du soleil)
Utiliser l'obturateur d'air pour empêcher les problèmes de carburateur en hiver.
Ouvrir le cache de bougie d' allumage (voir en pa ge 33 « Cache de bougie d'allumage »).
Pousser l'obturateur d'air vers le bas pour le placer en position « temps froid ».
Pour un fonctionnement à une température supérieure à 5 °C, replacer (tirer vers le haut)
l'obturateur d'air dans sa position d'origine (le symbole du soleil apparaît).
Démarrage du moteur à froid
AVERTISSEMENT
Lorsque le bouton de commande du starter revient dans sa position initiale
après avoir été tourné, l'accélérateur reste légèrement ouvert (position de
verrouillage).
Si le moteur est démarré avec la gâch ette dans cette position, la chaî ne commence
à tourner.
Ne pas démarrer le moteur avant que le frein de chaîne n'ait été enclenché.
ATTENTION
1. Après avoir démarré le moteur, appuyer immédiatement sur la gâchette
d'accélérateur puis relâcher la pression pour libérer la gâchette de sécurité et
ramener le moteur au ralenti et tirer immédiatement le protège-main avant vers
soi. (Frein de chaîne en position RELÂCHÉ)
2. Ne pas augmenter le régime moteur tant que le frein de chaîne est enclenché.
3. Utiliser le frein de chaîne uniquement lors du démarrage du moteur ou en cas
d'urgence.
4. Ne jamais utiliser la gâchette de sécurité pour la coupe.
L'utiliser uniquement pour démarrer le moteur.
REMARQUE
Ne pas tirer à fond sur la corde du lanceur.
Ne pas laisser la poignée du lanceur revenir cogner contre le carter.
A : Poignée de lanceur DÉMARRAGE « ES »
Remplir le réservoir de carburant du mélange de carburant.
Il est interdit de remplir le ré servoir de carburant au-de ssus de l'épaulem ent du réservoir de
carburant.
Remplir le réservoir d'huile pour chaîne de lubrifiant.
1. Frein de chaîne en position ACTIVÉ
Pousser le protège-main ver s l'a vant.
(Frein de chaîne en position ACTIVÉ)
18
Page 57

2. Interrupteur marche/arrêt (marche)
3. Bouton de commande du starter (fermé)
4. Pompe d'amorçage (charge d'amorçage)
Placer l'interrupteur marche/arrêt en position de marche.
Tourner le bouton de commande du starter dans le sens inverse des aiguilles d'une
montre (fermé).
Appuyer sur la p ompe d' amorç age ju squ' à ce que d u carb urant a pparai sse d ans la pompe .
Tenir fermement la tronçonneuse.
Lors du démarrage, pla cer la tron çonne use sur un s ol plat en tenant la p oignée av ant de la
main gauche et teni r fermement l'e xtrémité arriè re de la poign ée arrière ave c le genou dr oit
puis tirer sur la poignée de lanceur avec la main droite.
Vérifier que le guide-chaîne et la chaîne sont bien dégagés au moment du démarrage.
Tirer sur la poignée de démarreur plusieurs fois jusqu'à ce que le premier bruit
d'allumage se fasse entendre.
5. Bouton de commande du starter (ouvert)
Tourner le bouton de commande du starter dans le sens des aiguilles d'une montre
(ouvert).
Tirer la poignée du lanceur jusqu'à ce que le moteur démarre.
Tirer le levier de commande pour relâcher la gâchette de sécurité.
Démarrage du moteur à chaud
1. Frein de chaîne en position ACTIVÉ
Vérifier qu'il y a bien du carburant et de l'huile pour chaîne dans les réservoirs.
Pousser le protège-main ver s l'ava nt.
(Frein de chaîne en position ACTIVÉ)
Placer l'interrupteur en position de marche.
Tenir fermement la tronçonneuse.
Tirer la poignée de lanceur.
Le starter peut être utilisé si nécessaire mais, après le premier bruit d'allumage,
actionner légèrement la gâchette d' accéléra teur afin de relâ cher la gâ chette de sé curité
et le starter.
Lorsque le bouton de commande du starter revient dans sa position initiale après avoir
été tourné, l'accélérateur reste légèrement ouvert (position de verrouillage).
Fonctionnement
1. Frein de chaîne en position RELÂCHÉ
2. Blocage de la gâchette d'accélérateur
3. Gâchette d'accélérateur
Une fois le moteur démarré, le laisser tourner au ralenti pendant quelques minutes.
Ramener immédiatement le protège-main avant vers l'utilisateur.
(Frein de chaîne en position RELÂCHÉ)
Actionner progressiv ement la gâch ette d'accél érateur pour a ugmenter le régime moteur.
La chaîne commence à bouger lorsque le moteur atteint environ 4400 tr/min.
Surveiller l'accélération et la lubrification de la chaîne et du guide-chaîne.
Ne pas faire tourner le moteur à régime élevé inutilement.
Vérifier que la chaîne s'arrête lorsque la gâchette d'accélérateur est relâchée.
19
Page 58
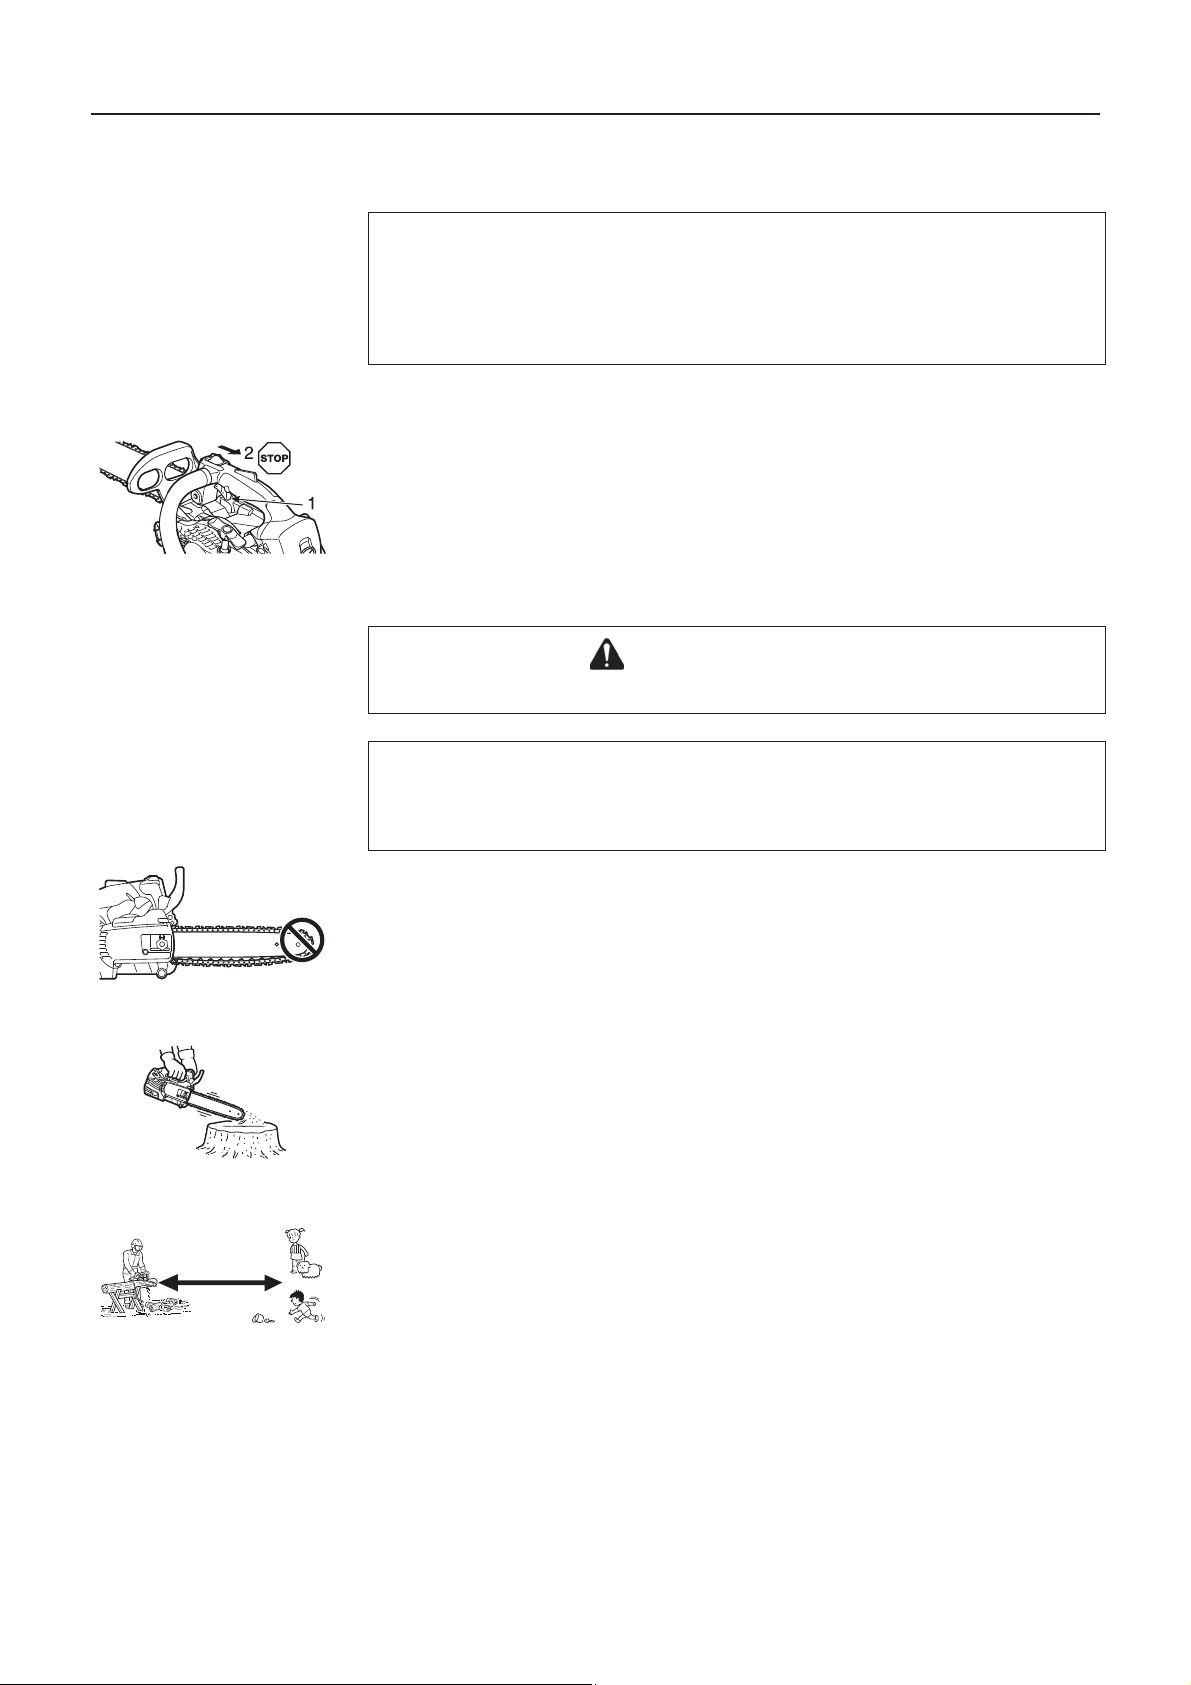
Arrêt du moteur
REMARQUE
Si le moteur ne s'arrête p as, tourner le bouton d e comman de du starte r dans le sens inve rse
des aiguilles d'une montre pour couper le moteur.
Ramener la tronçonneuse chez un revendeur agréé ECHO pour faire vérifier et réparer
l'interrupteur marche / arrêt avant de redémarrer le moteur.
1. Gâchette d'accélérateur
2. Interrupteur marche / arrêt
Relâcher la gâchette d'accélérateur et laisser le moteur tourner au ralenti.
Placer l'interrupteur marche / arrêt en position ARRÊT.
Vérification de la tension de la chaîne
AVERTISSEMENT
Avant de vérifier la tension de la chaîne, s'assurer que le moteur est bien coupé.
REMARQUE
Toujours desserre r l'écrou d u carter d ’embra yage a vant de tourner le régleu r de tens ion de
la chaîne, sinon le carter d’embrayage et le tendeur de chaîne seront endommagés.
La tension de chaîne doit être vérifiée fréquemment durant le travail et corrigée si
nécessaire.
Tendre la chaîne aut ant que possi ble, mais de t elle façon qu' elle puiss e tout de même tirée
facilement à la main autour du guide-chaîne.
Test de lubrification de la chaîne
Tenir la tronçonneuse juste au-dessus d'une surface sèche, et actionner l'accélérateur
au régime intermédiaire pendant 30 secondes.
Un mince filet d'huile «projetée » doit alors appara ître sur la surface sèc he en questio n.
Test préalable à la coupe
Bien se familiariser avec l'utilisation de la tronçonneuse avant de commencer à
tronçonner.
Pour ce faire, il es t recomman dé de s'exer cer en coup ant plusieurs bûches ou branches de
petite taille.
Ne laisser aucune personne ou animal pénétrer dans la zone de travail.
Utilisateurs multiples : garder une distance de sécurité suffisante entre chacun des
utilisateurs travaillant en même temps.
20
Page 59
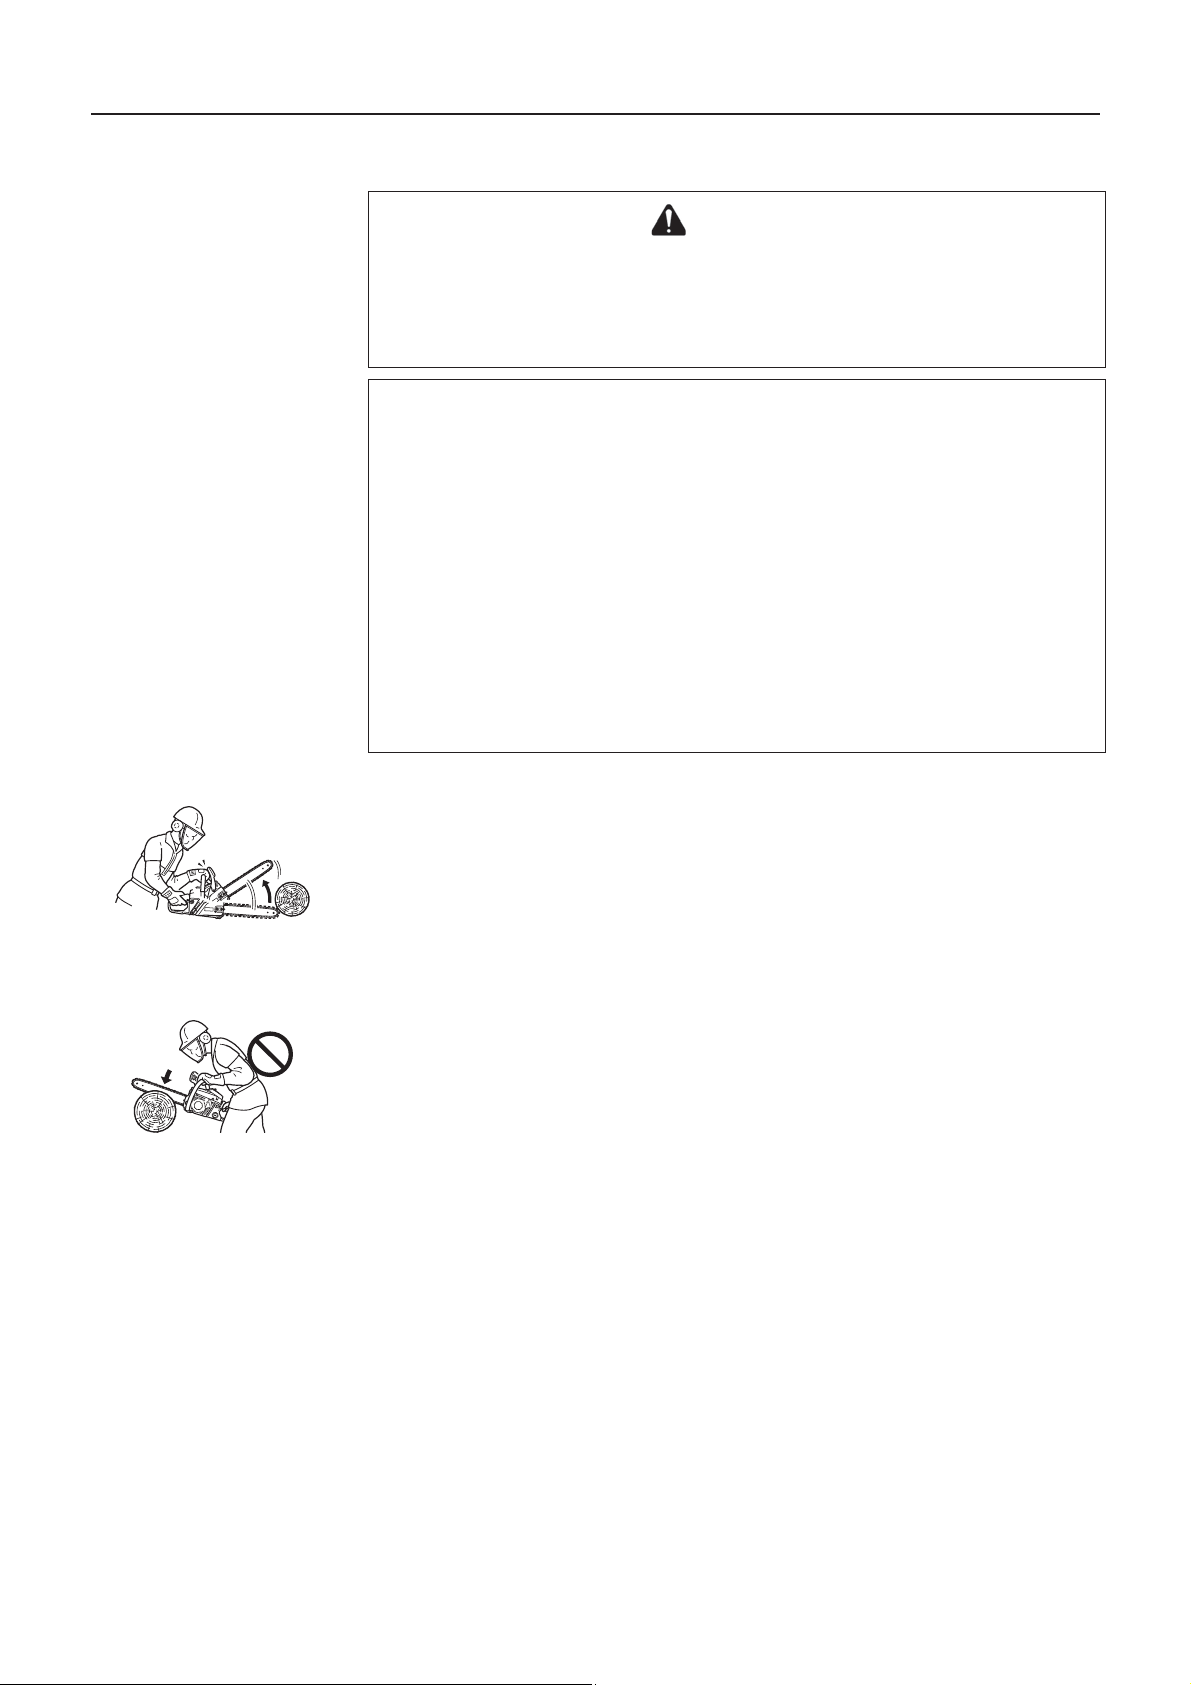
Utilisation correcte du frein de chaîne
DANGER
Le phénomène de rebond est très dangereux.
Si l'extrémité du guide-chaîne touche du bois ou un autre obstacle, le guide-chaîne
est instantanément repoussé vers l'arrière.
Le frein de chaîne réduit les risques de blessures dues au rebond.
Toujours vérifier que le frein de chaîne fonctionne correctement avant utilisation.
REMARQUE
En s'exerçant sur un petit arbre, pousser le protège-main avant vers l'avant pour
enclencher le frein.
Vérifier toujours que le frein fonctionne correctement avant toute utilisation.
Si le frein de chaîne est obstrué par de s co pea ux de bois, le fonctionnement du frein se
détériore légèrement.
Il doit donc toujours rester propre.
Ne pas augmenter le régime moteur lorsque le frein de chaîne est enclenché.
Le frein de chaîne est utilisé en cas d'urgence.
Ne pas l'utiliser sauf en cas de nécessité absolue.
Au démarrage, en ca s d'utilisati on de la gâc hette de sécurité , maintenir l e frein de ch aîne
en position.
Relâcher immédiatement le frein de chaîne après le démarrage du moteur.
Ne jamais tester le frein de chaîne dans un endroit où des vapeurs d'essence sont
présentes.
Frein de chaîne
La fonction du frein de chaîne consiste à stopper la rotation de la chaîne en cas de rebond.
En aucun cas il n'empêche ni ne diminue le phénomène de rebond.
Ne vous en remettez donc pas au frein de chaîne pour prévenir le rebond.
Même si votre appareil est équipé d'un frein de chaîne, utilisez votre bon sens et les
techniques de coupe appropriées pour travailler, comme si votre appareil n'avait pas de frein
de chaîne.
Même si le frein de chaîne est correctement utilisé et entretenu, son temps de réponse peut
s'allonger au fil des heures d'utilisation.
Les éléments suivants peuvent interférer avec le bon fonctionnement du frein de chaîne :
Tronçonneuse tenue trop près du corps de l'utilisateur.
Le rebond risque d'être trop rapide, même avec un frein de chaîne parfaitement
entretenu.
Main de l'utilisateur en mauvaise position pour entrer en contact avec le protège-main.
Le frein de chaîne ne sera pas actionné.
L'entretien inco rrect du frein de chaîne augmente le temps de fr einage et rend le fre in moins
efficace.
Si des saletés, de la graisse, de l'huile, etc. pénètrent à l'intérieur du mécanisme du frein
de chaîne, le temps de freinage sera accru.
L'usure du ressort de décl enche me nt du frein de chaîne , l'usu re de la ban de du frein et du
pignon de chaîne, l'usure des ergots de fixation peuvent augmenter le temps d'arrêt de la
chaîne.
Si le protège-main et le levier de déclenchement du frein de chaîne sont endommagés, le
déclenchement du frein de chaîne risque d'être impossible.
21
Page 60

Contrôle du fonctionnement du frein de chaîne
1. Poser la tronçonneuse sur le sol.
2. Bien tenir la poignée avec les deux mains et faire tourner le moteur à régime élevé en
utilisant la gâchette d'accélérateur.
3. Actionnez le frein de chaîne en faisant tournant votre poignet gauche contre le
protège-main avant tout en tenant la poignée avant.
4. La chaîne s'arrête immédiatement.
5. Relâcher la gâchette de l'accélérateur.
Si la chaîne ne s'arrête pas immédiatement, ramener la tronçonneuse au revendeur ECHO
pour réparation.
Relâcher le frein de chaîne
Pour relâcher le frein, ramener complètement le protège-main avant vers l'utilisateur.
Frein de chaîne automatique
IMPORTANT
Pour vérifier le fonctionnement du frein de chaîne automatique, utiliser une surface tendre
telle que du bois pour que le choc produit n’endommage pas la chaîne de la tronçonneuse.
1). L'extrémité du guide-chaîne do it être placé à une hauteur d'environ 40 cm.
2). La poignée arrière doit être tenue légèrement par la main droite.
Le frein de chaîne stoppe la chaîne de telle sorte que le phénomène de rebond provoqué à
l'extrémité du guide-chaîne active automatiquement le frein de chaîne.
Vérifier le bon fonctionnement du frein de chaîne automatique comme suit :
1. Arrêter le moteur de la tronçonneuse.
2. Saisir les deux poignées avant et arrière (les tenir légèrement) pour soulever le guidechaîne à une hauteur de 40 cm environ, comme indiqué sur la figure.
3. Soulever doucement la main gauche de la poignée avant.
Le guide-chaîne tom be ainsi sur le bois ou sur u n autre matér iau équiva lent si tué sous la
machine pour produire ensuite un choc.
(* à ce moment-là, il faut tenir légèrement la poignée arrière avec la main droite)
4. Le choc se propage vers le levier de frein, qui se met alors à fonctionner.
22
Page 61

Instructions pour la coupe
DANGER
Ne pas laisser le bout du guide-chaîne toucher qu oi que ce so it lorsque le mo teur est
en marche pour éviter tout phénomène de rebond.
Généralités
En toutes circonstances, l'utilisation de la tronçonneuse doit être confiée à une seule
personne.
Il n'est pas toujours facile de garantir sa propre sécurité, il ne faut donc pas faire courir de
risques à celui qui vous aide, par exemple.
Une fois que l'on a acquis les connaissances de base pour l'utilisation de la tronçonneuse, le
mieux est de se fier à son bon sens.
La façon la plus classiqu e de tenir la tronçonneu se consiste à se ten ir à gauche de la scie avec
la main gauche sur la poignée avant et la main droite sur la poignée arrière pour actionner la
gâchette d'accélérateur avec l'index droi t.
S'exercer avec des bûches ou des branchages avant de tronçonner un arbre.
Vous devez avoir une connaissance parfaite des commandes et des réactions de l'appareil.
Faire démarrer le moteur, vérifier qu'il fonctionne correctement.
Actionner la gâchette d'accélérateur pour ouvrir l'accélérateur à fond, et commencer à
tronçonner.
Il n'est pas nécessaire d'appuyer fort pour que la tronçonneuse coupe.
Si la chaîne est bien affûtée, la coupe devrait se faire sans effort.
Appuyer sur la tronçonneuse a pour effet de ralentir le moteur et la coupe sera en fait plus
difficile.
Certaines matières p euvent attaquer le c arter de la tronçon neuse (Exemple: acide de palmier,
engrais, etc.).
Pour éviter la détériora tion du carter, re tirer toute la s ciure autour de l' embrayage et de l a zone
du guide-chaîne, puis laver à l'eau.
23
Page 62
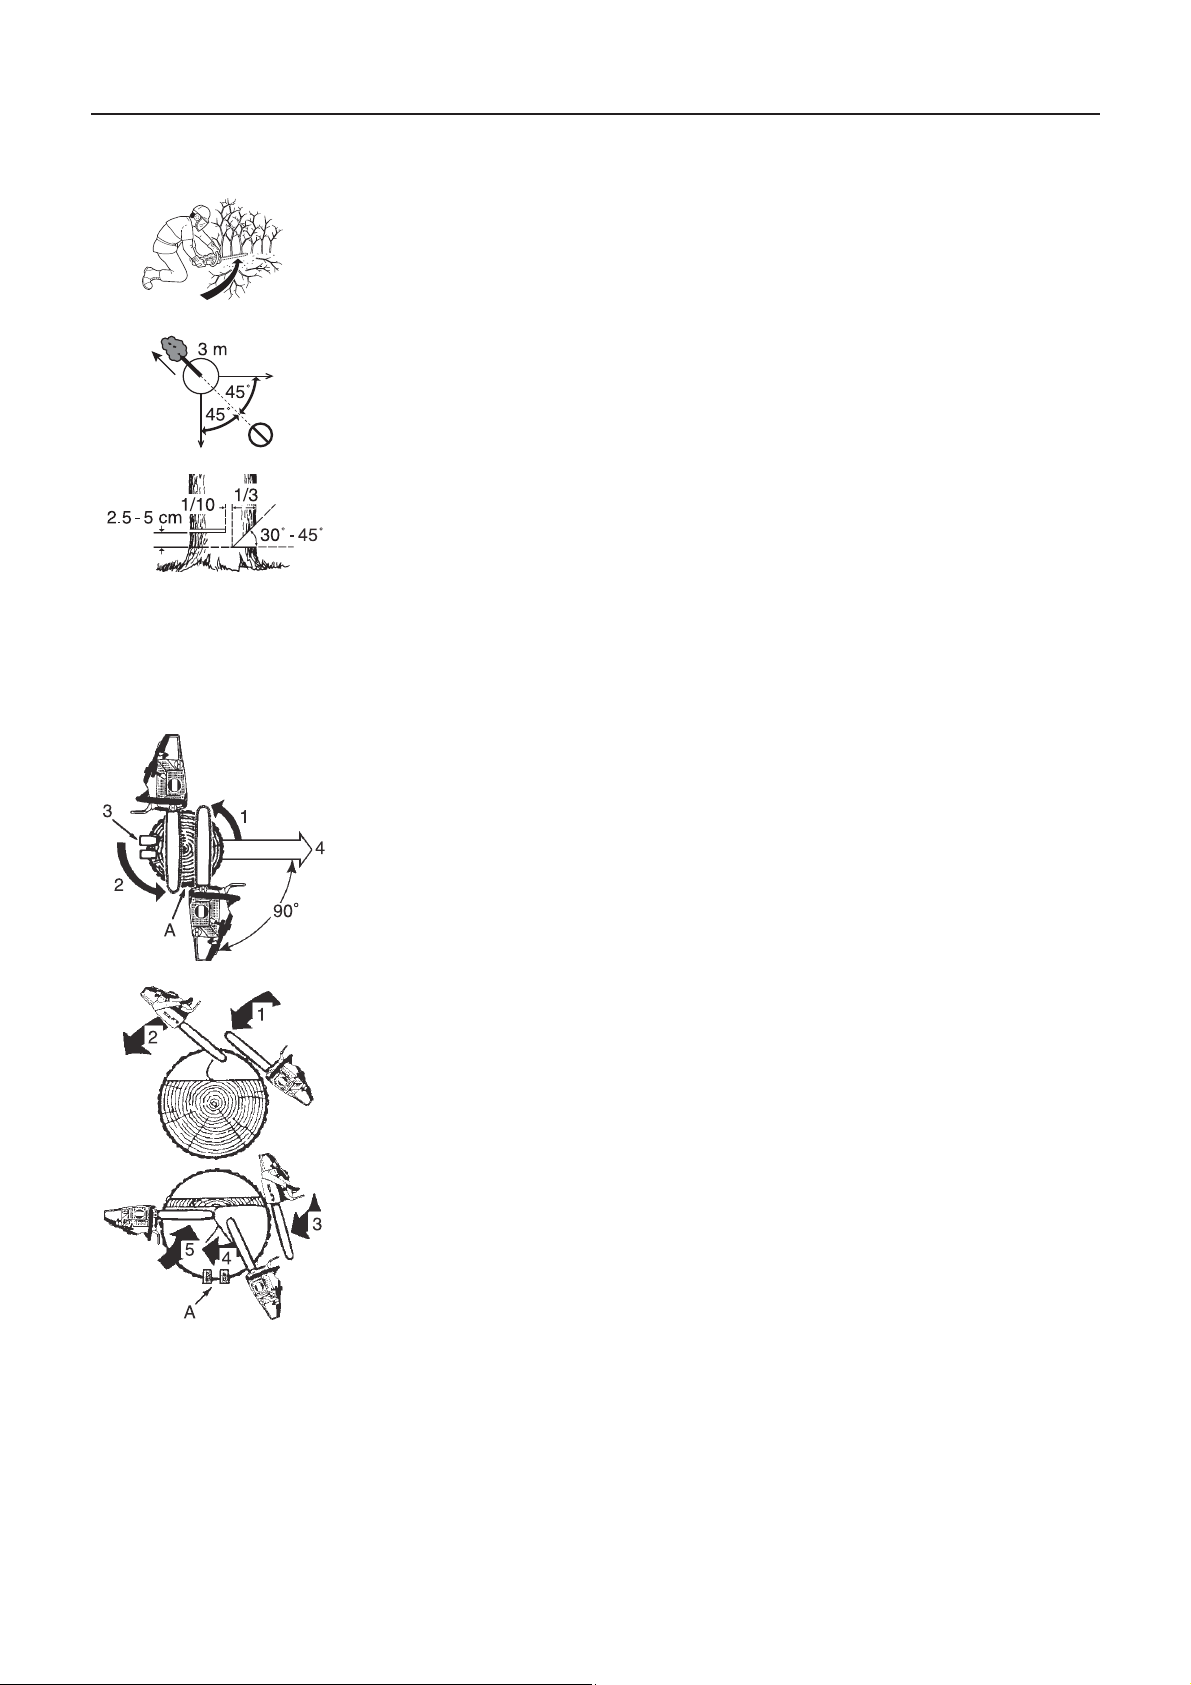
Abattage d'un arbre
En tombant, un arbre peut gravem ent endomm ager une aut omobile, une maison , une clôture,
une ligne haute tension ou un autre arbre.
On peut faire tomber un arbre à l'endroit désiré, le tout est de le choisir avant !
Avant de couper, dégager la zone autour de l'arbre.
Le terrain doit être stable et il faut pouvoir utiliser la tronçonneuse sans heurter le moindre
obstacle.
Prévoir ensuite un chemin de repli.
Lorsque l'arbre commence à s'incliner, il convient de se reculer de la direction de la chute
selon un angle de 45° et d'au moins 3 m pour se dégager du rebond du tronc sur la souc he.
Commencer la coupe du côté ve rs lequel l'arbre doit tomber.
o
o
Encoche : 1/3 du diamètre et angle de 30
Trait d'abattage : 2,5 à 5 cm plus haut
Charnière : 1/10 du diamètre
Découper une entaille correspondant au tiers du diamètre.
La position de cette entaille est importante car l'arbre va avoir tendance à s'abattre « vers »
cette entaille.
Le trait d'abattage se fait à l'aide de la griffe d'abattage, du côté opposé à l'entaille.
Faire le trait d'abattage en plaçant la griffe d'abattage de 2,5 cm à 5 cm au-dessus du niveau
du bas de l'entaille et en laissant, horizontalement, environ 1/10 du diamètre entre le trait
d'abattage et l'entaille.
1. Coupes d'entaille
2. Trait d'abattage
3. Coins (lorsqu'il y a de la place)
4. Chute
A: Laisser 1/10 du diamètre
Il ne faut pas amener le trait d'abattage jusqu'au niveau de l'entaille.
La partie de l'arbre restant entre le trait d'abattage et l'entaille agira comme une charnière
lorsque l'arbre tombera et le guidera dans la direction voulue.
Lorsque l'arbre commence sa chute, arrêter le moteur, déposer la tronçonneuse sur le sol et
s'écarter rapidement.
à 45
Abattage de gros arbres.
1. Coupes d'entaille
2. Méthode de coupe transversale
3. Trait d'abattage
4. Méthode de coupe transversale
5. Sciage final
A: Coins
Pour couper de gros arbres dont le diamètre dépasse le double de la longueur du guide-
chaîne, commencer les coupes d'entaille sur un côté et ramener la scie vers l'autre côté de
l'entaille.
Commencer le trait d'abattage sur un côté de l'arbr e, la griffe d'abattage pl antée dans l' arbre,
et faire pivoter la mach ine afin de former la charnière d'abattage.
Puis retirer la tronçonneuse pour la deuxième coupe.
Réintroduire la tronçonneuse dans le trait de scie en prenant bien soin de ne pas provoquer
de rebond.
Le sciage final est effectué en poussant la machine vers l'avant afin d'atteindre l'autre
extrémité de la charnière.
24
Page 63
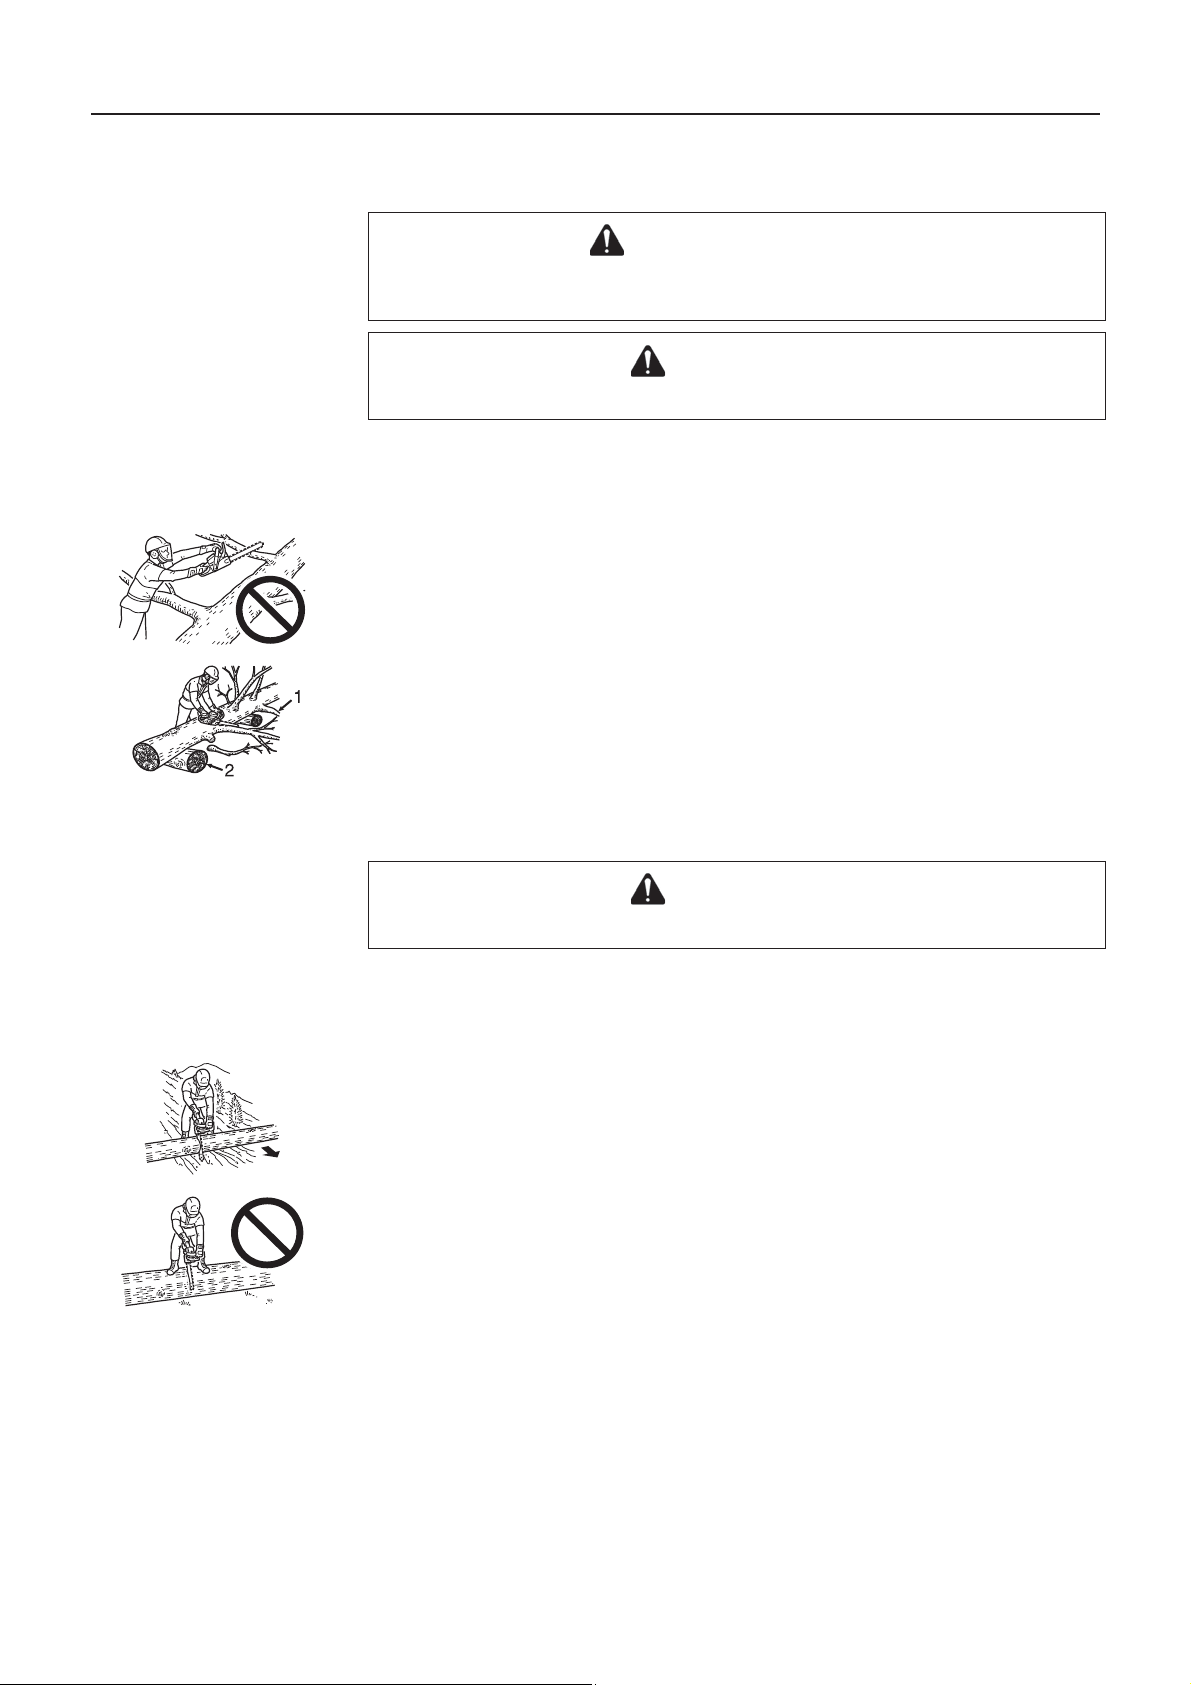
Élagage
AVERTISSEMENT
L'élagage à proximité d'une ligne haute tension peut entraîner une électrocution.
Toujours couper le courant avant de commencer à travailler.
ATTENTION
Ne pas tenir la tronçonneuse au-dessus de la poitrine.
L'élagage d'un arbre coupé ressemble beaucoup au tronçonnage de bûches.
Ne jamais élaguer un arbre sur lequel on se trouve.
Faire attention à ne pas touche r d'au tres branch es en ram enant la tronç onneus e vers le haut .
Toujours tenir la tronçonneuse des deux mains.
Ne pas couper avec la tronçonneuse au-dessus de la tête ou le guide-chaîne en position
verticale.
En cas de rebond, le contrôle ne serait pas suffisant pour se protéger.
Il faut savoir apprécier les phénomènes de tension à l'intérieur du tronc
1. Couper les branches de support en dernier.
2. Glisser des bûches de support sous le tronc.
Même lors de l'élagage, l'utilisation de la griffe d'abattage facilite le contrôle de la
tronçonneuse et réduit le rebond.
Tronçonnage
ATTENTION
Toujours couper en amont d’un tronc.
Le tronçonnage est la découpe d'une bûche ou d'un tronc d'arbre en plus petits morceaux.
Cette opération obéit à certaines règles de base.
Toujours garder les deux mains sur les poignées.
Supporter les troncs, si possible.
Si l’on coupe sur une pente, toujours se tenir en amont.
Ne pas se tenir debout sur le tronc.
25
Page 64
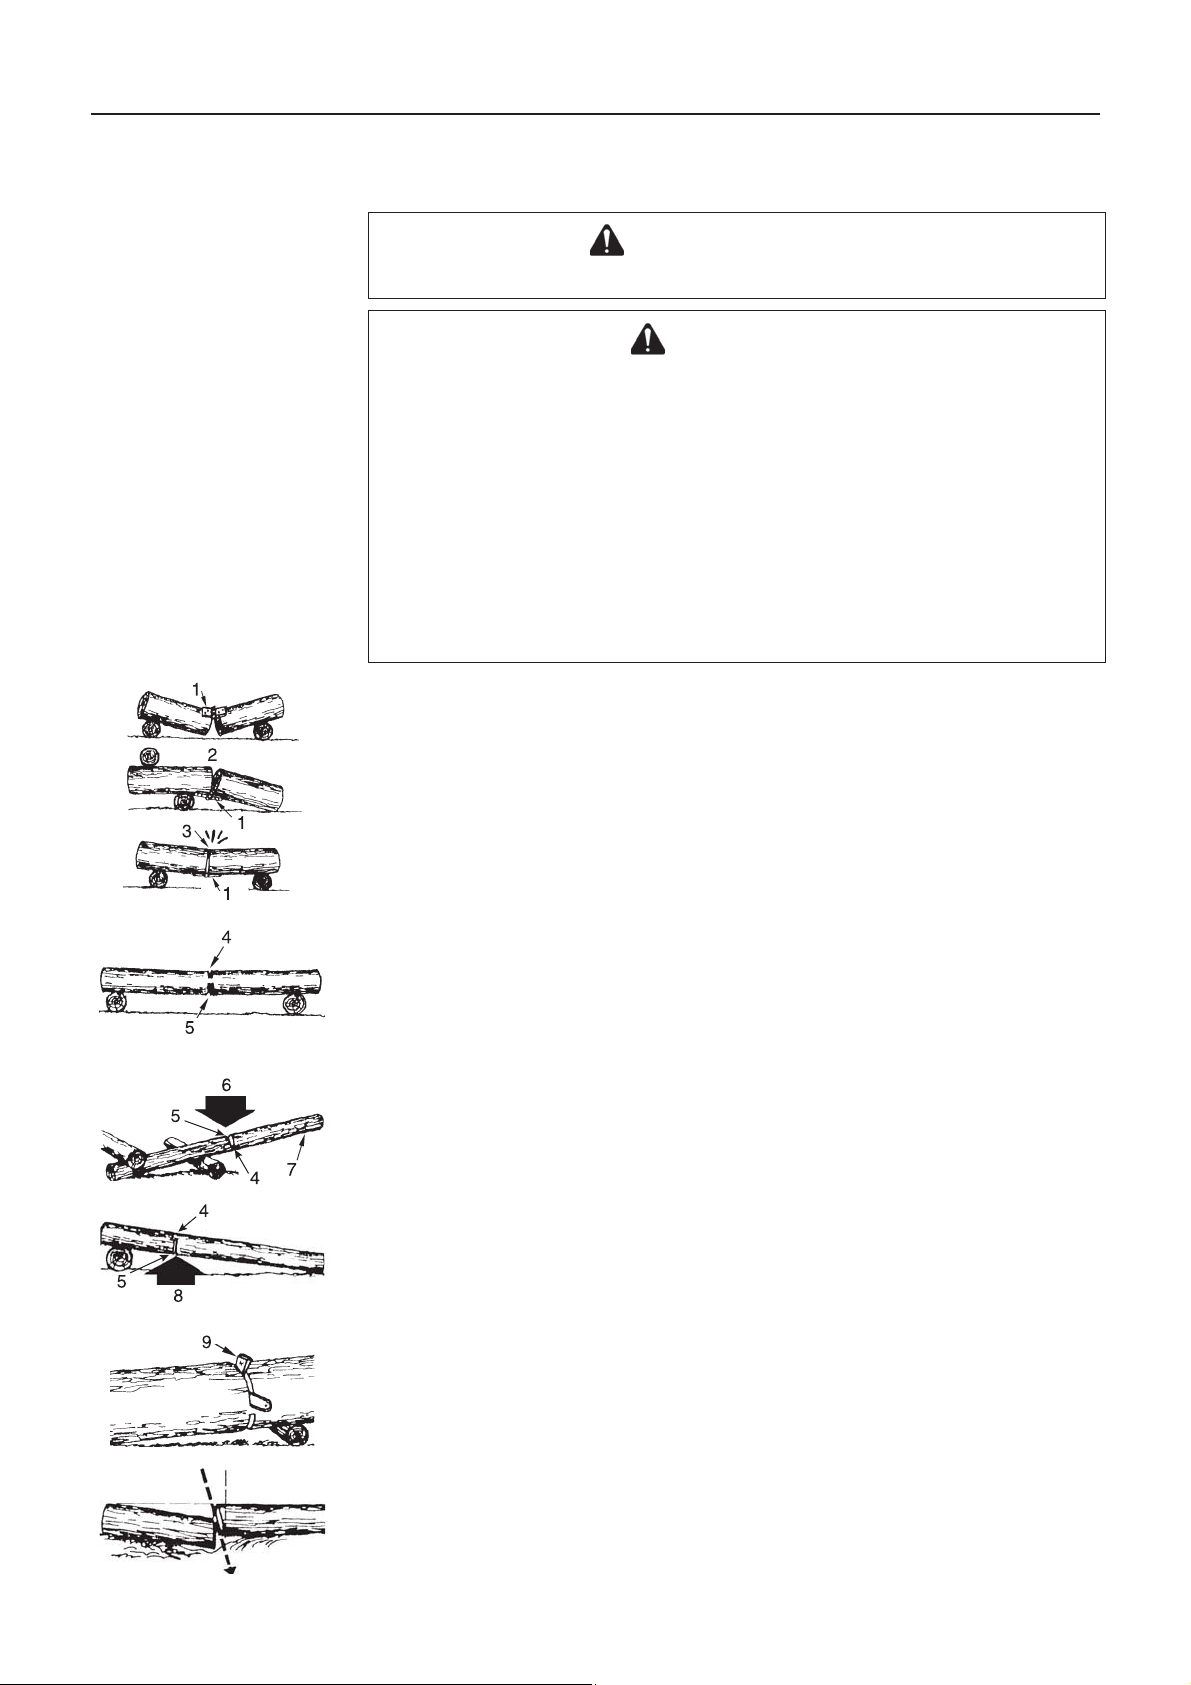
Tension et compression dans un tronçon
AVERTISSEMENT
Ne jamais utiliser la gâchette de sécurité pour les travaux de coupe.
ATTENTION
Si vous avez mal jugé l es effets de tension e t de compres sion et si v ous avez a ttaqué
la coupe du mauvais côté, le tr onc c oinc era et bloquera le guide-chaîne et la chaîne.
Emballer le moteur avec votre chaîne coincée provoquera une surchauffe de
l'embrayage.
Si la chaîne est coincée et que vous ne pouvez pas retirer l'appareil de l'entaille,
n'essayez pas de l'en retirer en forçant.
Arrêter le moteur, intro duire un coin d'aba ttage dans l'entaille p our la forcer à s' ouvrir.
Ne pas forcer l'appareil lorsqu'il est bloqué.
Ne pas forcer pour insérer la tronçonneuse dans l'entaille.
Une chaîne émoussée est dangereuse et provoquera une usure anormale et
excessive des autres organes de coupe.
Un bon indicateur de la qualité d'affûtage de la chaîne est la production de fine
poussière de bois au lieu de copeaux.
1. Charnière
2. Ouverte
3. Fermée
Un tronçon posé sur le sol sera soumis à des phénomènes de tension et de compression,
selon l'endroit où se trouve le support principal.
Lorsqu'un tronçon est supporté en ses extrémités, le côté soumis à la compression est en
haut, celui soumis à la tension est en bas.
Pour découper entre ces points de support, effectuer la première coupe vers le bas, sur
environ le tiers du diamètre du tronçon.
Effectuer la seconde coupe vers le haut, pour rejoindre la première.
Contrainte élevée
4. 1/3 du diamètre. Pour év iter tout fendillement.
5. Coupe d'affaiblissement pour terminer.
Lorsque le tronçon est supporté en une seule extrémité, effectuer la première coupe vers le
haut, sur environ un tiers du diamètre.
Effectuer la seconde coupe vers le bas, pour rejoindre la première.
Tronçonnage par le haut
6. Vers le bas
7. Extrémité non supportée
Tronçonnage par le bas
8. Vers le haut
9. Coin
Effectuer une coupe angulaire lorsqu'une section risque de heurter l'autre.
26
Page 65

Guide de maintenance et d’entretien
Pièce Entretien Page Avant utilisation Tous les mois
Filtre à air Nettoyer / remplacer 31 •
Circuit d'alimentation Contrôler 31 •
Filtre à carburant Contrôler / nettoyer / remplacer 31 •
Filtre à huile Contrôler / nettoyer / remplacer 31 •
Bougie d'allumage Contrôler / nettoyer / régler / remplacer 31 •
Circuit de refroidissement Contrôler / nettoyer 32 •
Guide-chaîne Contrôler / nettoyer 32 •
Pignon / Tambour d'embrayage Contrôler / remplacer 32 ••
Carburateur Régler / remplacer et régler 32 •
Silencieux Contrôler / serrer / nettoyer 33 •O
Frein de chaîne Contrôler / remplacer 21 •O
Lanceur Contrôler 28 •
Vis, boulons et écrous Contrôler, serrer / remplacer - •O
AVERTISSEMENT
S'il n'est pas entretenu correctement, le produit peut présenter un risque sérieux pour la santé physique.
ATTENTION
Avant et après l'utilisation du produit, con trôler que la pièce antivibration en caoutchouc ou le ressort ne sont pas usés,
fendillés ou déformés.
REMARQUE
Si le produit n'est pas entretenu convenablement, ses performances peuvent se détériorer.
IMPORTANT
Les intervalles indiqués ne doivent pas être dépassés.
La fréquence des opérations d'entretien varie en fonction de l'utilisation réelle de l'appareil et de l'expérience de l'utilisateur.
En cas d'utilisation continue d'huile pour chaîne à base végétale, procéder aux contrôles et aux interventions d'entretien plus
souvent.
En cas d'anomalie, confier la réparation au revendeur ECHO.
27
Page 66

Problème
Moteur - Démarrage difficile
- Démarrage impossible
Dépannage
Cause Solution
Le moteur
démarre
Le moteur
ne démarre
pas
Le moteur
tourne
Chaîne tournant au ralenti Carburateur
Essence dans
le carburateur
Essence dans
le cylindre
Étincelle à
l'extrémité du
fil de la bougie
Étincelle au
niveau de la
bougie
Le moteur cale ou accélère peu Filtre à air sale
Pas d'essence dans le
carburateur
Pas d'essence dans le
cylindre
Présence de
carburant sur le
silencieux
Aucune étincelle à
l'extrémité du fil de la
bougie
Aucune étincelle au niveau de la bougie
Filtre à essence bou ché
Conduite de carburant
bouchée
Carburateur
Carburateur Consulter votre revendeur ECHO
Mélange de carburant
trop riche
Interrupteur sur Arrêt
Problème électrique
Entrefer incorrect
Bougie encrassée
Bougie noyée
Bougie défectueuse
Problème interne au
moteur
Filtre à essence sale
Évent d'essence bouché
Bougie d'allumage
Carburateur
Circuit de refroidissement
bouché
Pot d'
Embrayage endommagé
échappement /
silencieux bouché
ou coincé
Nettoyer ou remplacer
Nettoyer
Consulter votre reven deur ECHO
Ouvrir le starter
Nettoyer / remplacer le filtre à air
Régler le carburateur
Consulter votre revendeur ECHO
Mettre l'interrupteur sur Marche
Consulter votre revendeur ECHO
Régler 0,6 à 0,7mm
Nettoyer ou remplacer
Nettoyer ou remplacer
Remplacer la bougie
Consulter votre reven deur ECHO
Nettoyer ou remplacer
Nettoyer ou remplacer
Nettoyer
Nettoyer et régler / remplacer
Régler
Nettoyer
Nettoyer
Consulter votre reven deur ECHO
Consulter votre revendeur ECHO
AVERTISSEMENT
Toutes les opérations d'entretien autres que celles mentionnées dans le manuel d'utilisation doivent être
effectuées par un personnel d'entretien qualifié.
Les vapeurs d'essence sont extrêmement inflammables et peuvent provoquer un incendie ou une explosion.
Ne jamais vérifier l'étincelle de bougie à proximité du trou de bougie du cylindre, risque de blessure grave.
REMARQUE
DEMARRAGE « ES » (voir page2)
Lorsqu'il est impossible de tirer doucement sur la poignée de lanceur, il s'agit d'une défaillance interne du moteur.
Consulter le revendeur.
Démonter la poignée pourrait entraîner un risque de blessure.
28
Page 67

Entretien de la chaîne
AVERTISSEMENT
Couper le moteur avant de procéder à l’affûtage de la chaîne.
Toujours porter des gants pour travailler sur la chaîne.
ATTENTION
Les anomalies suivantes augmentent considérablement les risques de rebond.
1) Angle de plaque supérieure trop important
2) Diamètre de lime trop petit
3) Jauge de profondeur trop grande
REMARQUE
Ces angles sont ceux des chaînes de référenc e Oregon 25AP, 91PX et Carlton N1C-BL.
Pour une tronçonneuse d'une autre marque, suivre les instructions du fabricant.
Des dents correctement affûtées sont illustrées ci-dessous.
A :Angle de plaque supérieure, N1C-BL; 35°, 25AP et 91PX; 30°
B :Angle de découpe supérieure N1C-BL; 60°, 25AP et 91PX; 55°
C :Limiteur de profondeur N1C-BL; 0,56 mm, 25AP et 91PX; 0,65 mm
D:Parallèle
1. Dent gauche
2. Maillon intermédiaire
3. Dent droite
4. Jauge de profondeur
5. Maillon d'entraînement
6. Rivet
Ne jamais utiliser une tronçonneuse présentant une chaîne émoussée ou endommagée.
Si la chaîne demande une pression excessive pour couper ou si elle dégage de la sciure au
lieu de copeaux, vérifier l'état des dents.
Lors de l'affûtage de la chaîne, garder les mêmes angles et profils qu'une chaîne neuve.
Vérifier l'état et l'usure de la chaîne à chaque remplissage du réservoir.
29
Page 68

Affûtage
Pour un affûtage correct, il vou s faut: une lime ronde et un por te-li me, une l ime pl ate et
une jauge de profondeur.
L'utilisation d'une lime de dimension correc te (lime ronde de 4,0 mm de diamètre) et d'un
porte-lime permet d'obtenir de meilleurs résultats.
Consulter un revendeur ECHO pour se procurer les bons outils et les bonnes dimensions
d'affûtage.
1. Immobiliser la chaîne en poussant le protège-main vers l'avant.
Pour faire tourner la chaîne - ramener le protège-main avant vers la poignée avant.
2. Votre chaîne présentera alternativement des dents droites et gauches.
Toujours affûter de l'intérieur vers l'extérieur.
3. Maintenir les indications d'angle du porte-lime parallèles aux angles de la chaîne, et
affûter la dent jusqu'à ce que la partie endommagée ait été enlevée.
4. Tenir la lime à l'horizontale.
5. Ne pas toucher les maillons intermédiaires avec la lime.
6. Affûter tout d'abord les dents les plus endommagées, puis ramener toutes les autres
dents à la même longueu r.
7. Le limiteur détermine l'épaisseur du c opeau, et il faut l' entretenir soig neusement pen dant
toute la du rée de vie de la chaîne.
8. Au fur et à mesure que la longu eur de la dent dimi nue, la h auteur du l imiteur e st modifi ée
et doit êtr e réduite.
9. Placer la jauge de profondeur et limer toute partie du limiteur qui dépasse.
10. Arrondir la face avant du limiteur pour assurer une coupe plus douce.
11. Le maillon d'entraînement permet de retirer la sciure de la rainure du guide-chaîne.
C'est la raison pour laquelle il faut maintenir affûté le bord inférieur du maillon.
Une fois l'affûtage de la chaîne terminé, la tremper dans l'huile et nettoyer les dépôts de
limaille d'affûtage avant uti lis ati on.
Si la chaîne a été affûtée sans la démon ter du guide-c haîne, la grais ser abondam ment puis la
faire tourner lentement afin d'éliminer la limaille d'affûtage avant de reprendre le travail.
Si l'on utilise la tronçonneuse avec des dépôts de limaille d'affûtage obstruant la rainure du
guide- chaîne, la chaîne et le guide-chaîne s'useront plus vite que dans des conditions
normales d'utilisation.
Si la chaîne est salie par de l a rési ne p ar exempl e, la n ettoye r au kér osè ne et l a tremp er dans
l'huile.
30
Page 69

Entretien
En cas de questions ou de problèmes, contacter un revendeur ECHO.
Filtre à air
1. Crochet de levage
2. Clé en T
3. Loquet de couvercle de filtre à air
4. Couvercle de filtre à air
5. Filtre à air
Vérifier avant chaque utilisation.
Couper le starter.
Soulever le crochet de levage et le déplacer vers l'extrémité inférieure.
Détacher le loquet de couvercle de filtre à air avec la clé en T et retirer le couvercle de
filtre à air ainsi que le filtre à air.
Brosser soigneusemen t le filtre à air pour éli miner les im puretés accum ulées, le ne ttoyer à
l'aide d'un solvant non inflammable si nécessaire ou le remplacer.
Le faire complètement sécher avant de l'installer.
Remettre en place le filt re à air e t le couverc le, enga ger le crochet e t ramener le croche t
de levage.
Vérifier le circuit d'alimentation
Vérifier avant chaque utilisation.
Après le ravitaillement, vérifier qu'il n'y a pas de fuite ou d'écoulement de carburant au
niveau du tuyau, du passe-tuyau de carburant ou du bouchon du réservoir de carburant.
Toute fuite ou écoulement de carburant constitue un risque d'incendie.
Arrêter d'utiliser l'app are il i mm édi ate me nt, e t dem an der à votre rev end eur d e co ntrô ler o u
de remplacer le système.
Filtre à carburant
DANGER
Le carburant et l'essence sont hautement inflammables.
Observer les plus grandes précautions lors de leur manipulation.
1. Filtre à carburant
2. Bouchon du réservoir de carburant
Contrôler régulièrement.
- Empêcher la poussière de pénétrer dans le réservoir de carburant.
- Un filtre encrassé provoquera des problèmes de démarrage du moteur ou des
dysfonctionnements.
- Sortir le filtre par le trou de remplissage du réservoir avec un crochet en fil de fer ou
quelque chose de semblable.
- Remplacer le filtre s'il est encrassé.
- Si l'intérieur du réservoir de carburant est s ale, on peut le nettoyer en rin çant le rés ervoir
à l'essenc e.
Filtre à huile
1. Filtre à huile
2. Bouchon du réservoir d'huile
Contrôler régulièrement.
- Empêcher la poussière de pénétrer dans le réservoir d'huile.
- Un filtre à huile encrassé affectera le bon fonctionnement du circuit de lubrification.
- Le sortir par le trou de remplissage d'huile avec un morceau de fil de fer ou équivalent.
- Si le filtre est sale, le laver à l'essence, ou le remplacer.
- Si l'intérieur du réservoir d'huile est sale, on peut le nettoyer en rinçant le réservoir à
l'essence.
Bougie d'allumage
∗ Entrefer : 0,6 à 0,7 mm
Contrôler régulièrement.
- L’entrefer standard est de 0,6 à 0,7 mm.
- Corriger la position si la dist ance standa rd n’est pas respectée.
Couple de serrage : 10 à 15 N•m (100 à 150kgf•cm)
31
Page 70

Ailettes de cylindre (Circuit de refroidissement)
Contrôler régulièrement.
Des ailettes bouchées perturberont le refroidissement du moteur.
Retirer la saleté et la poussière déposées entre les ailettes pour laisser passer l'air de
refroidissement san s entra ve s.
Guide-chaîne
REMARQUE
Pour le remplacement du guide-chaîne ou de la chaîne, consulter un revendeur ECHO.
1. Rainure 2. Trou de graissage 3. Guide-chaîne 4. Pignon
Nettoyer avant utilisation.
- Nettoyer la rainure du guide-chaîne avec un petit tournevis, par exemple.
- Nettoyer les trous de graissage avec un fil de fer.
Inverser le guide-chaîne périodiquement.
Contrôler le pignon de chaîn e, l'embraya ge et nettoyer la face d'appui du gui de-chaîne sur
les carters avant de remonter le guide-chaîne.
Le (les) changer en cas d'usure.
Pignon / tambour d'embrayage
∗ Usure: 0,5 mm
Un pignon endomma gé p r ov oqu era la d été rioration ou l'usure prématurée de la chaîn e.
- Dès que le pignon présente une usure de 0,5 mm ou plus, il faut le remplacer.
Contrôler l'état du pignon lors du montage d'une chaîne neuve.
Le changer s'il est usé.
Vérifier que le tambour d'embrayage tourne librement et de façon régu lière.
Si ce n'est pas le cas, confier la réparation au revendeur.
Carburateur
ATTENTION
Au démarrage, le dispos itif de r é glag e d u r égi me de ra len ti (T) doit être réglé de telle
sorte que l'outil d e coupe ne tourne pas.
En cas de problème avec le carburateur, contacter le revendeur.
T: Dispositif de réglage du régime de ralenti
Ne pas régler le carburateur sauf si cela est nécessaire.
Pour régler le carburateur, procéder comme suit :
- Démarrez le moteur et laissez-le tourner en ralenti accéléré jusqu'à ce qu'il soit
réchauffé.
- Tourner la vis de régla ge de ral enti (T) da ns le s ens antihora ire ju squ'à ce que la c haîne
s'immobilise.
- Tourner la vis (T) dans le sens inverse des aiguilles d'une montre d'un demi-tour
supplémentaire.
- Accélérer à fond pour vérifier si le passage du mode ralenti au mode plein gaz s'effectue
correctement.
Graissage automatique
1. Vis de réglage 2. Diminuer 3. Augmenter
Le volume de décharge du graissage automatique se règle à 7 mL/min environ à 7000
tr/min, avant expéd ition de l'usine.
- Pour augmenter le volume de décharge, tourner la vis de réglage dans le sens inverse
des aiguilles d'une montre.
Lorsque la vis heurte la butée et s'arrête, le volume de décharge est au maximum.
(13 mL/min à 7000 tr/min)
- Ne pas tourner la vis de réglage au-delà des tolérances maximum ou minimum.
32
Page 71

Cache de bougie d'allumage
1. Cache de bougie d'allumage
2. Loquet de cache de bougie d'allumage
3. Clé en T
Détacher le loquet de cache de bougie d'allumage avec la clé en T.
Vérifier la bougie d'allumage, la nettoyer ou la remplacer si elle est endommagée.
Remettre en place l a bougie d' allumage et le cache et e ngager le loq uet avec la clé en T.
Silencieux
REMARQUE
Les dépôts de carbone présents dans le silencieux entraînent une perte de puissance du
moteur.
L'écran pare-étincelles doit être contrôlé régulièrement.
1. Couvercle de silen c ieux
2. Deux boulons
Retirer les deux boulons et le couvercle de silencieux.
3. Silencieux
4. Écran pare-étincelles
Déposer le câble de bougie d'allumage.
Retirer l'écran pare-étincelles du corps du silencieux.
Nettoyer les dépôts de carbone sur les composants du silencieux.
Remplacer l'écran s'il présente des fissures ou des trous dus à des brûlures.
Remonter les composants dans l'ordre inverse.
Guide-chaîne et chaîne de rechange
Longueur
cm
20 C20S91-35SA-ET 91PX-35E
30 C30S91-47ML-ET 91PX-47E
20 C20H25-52CL-ED 25AP-52E
25 C25H25-60CL-ET 25AP-60E
Guide-chaîne Chaîne Tambour d'embrayage (Nu méro de pièce)
(A556-001720)25 C25S91-40SL-ET 91PX-40E
(A556-001710)
33
Page 72

Remisage
Remisage à long terme (plus de 30 jours)
AVERTISSEMENT
Ne pas remiser l'appareil dans un endroit où les vapeurs de carburant risquent de
s'accumuler ou d'entrer en contact avec une flamme ou une étincelle.
REMARQUE
Gardez ce manuel pour pouvoir vous y référer en cas de besoin.
Ne pas remiser l'appareil pendant une période prolongée (30 jours ou plus) sans avoir
préalablement effectué les opérations d'entretien préventives spécifiques au remisage, qui
comprennent les mesures suivantes :
1. Vidanger complètement le réservoir de carburant, et tirer plusieurs fois la poignée du
lanceur à rappel automatique afin de vidanger le carburant présent dans le carburateur.
2. Toujours stocker le carburant dans un récipient approprié.
3. Placer l'interrupteur en position « ARRÊT ».
4. Éliminer la graisse, l'huile, les i mpuretés et les d ébris accumul és à l'extérieur de l'appareil.
5. Effectuer régulièrement toutes les opérations de lubrification et d'entretien nécessaires.
6. Serrer tous les écrous, boulons et vis.
7. Retirer la bougie d'all um age et verser dans le cylindre 10 mL d'huile propre pour moteur
2 temps, via le trou de bougie .
A. Placer un chiffon propre sur le trou de bougie.
B. Tirer 2 à 3 fois la poignée du lanceur à rappel automatique pour répartir l'huile dans le
cylindre.
C. Observer l'emplacement du piston à travers le trou de bougie.
Tirer la poignée de lanceur à rappel automatique jusqu'à ce que le piston atteigne le
sommet de sa course et le laisser dans cette position.
8. Remonter la bougie (ne pas connecter le câble d'allumage).
9. Couvrir le protège-guid e sur le guide et la chaî ne avec le couvercle de guide-chaîne avant
d'entreposer la machine.
10. Entreposer l'appareil dans un endroit sec, à l'abri de la poussière, hors de portée des
enfants et de toute personne non autorisée.
34
Page 73

Procédure d'élimination des déchets
Procéder à l'élimination de l'huile usagée conformément à la législation locale en
vigueur.
Les pièces pla sti que s p r in ci pales de l'appareil portent des codes i ndiquant la nature de
leurs matériaux de composition.
Ces codes font référence aux matériaux suivants ; procéder à l'élimination de ces pièces
plastiques conformément à la législation locale en vigueur.
Code Matériau
>PA6-GF< Nylon 6 - fibre de verre
>PA66-GF< Nylon 66 - fibre de verre
>PP-GF< Polypropylène - fibre de verre
>PE-HD< Polyéthylène
Si vous ne connaissez pas la procédure à suivre pour vous débarrasser de l'huile
usagée ou des pièces plastiques, adressez-vous à votre revendeur ECHO.
35
Page 74

Caractéristiques
Modèle
Dimensi ons externes : Longueur × Largeur × Hauteur mm 243 × 201 × 196
Masse : Tronçonneuse sans guide-chaîne et chaîne,
réservoirs vides kg 2,3
Volume :
Réservoir de carburant
Réservoir pour huile de lubrification de chaîne
Carburant (rapport de mélange)
Huile (pour chaîne)
Guide-chaîne : Bout à pignon Barre de sculptage
Longueur de coupe :
Toutes les longueurs utiles de guide-chaîne mm 200, 250, 300 200, 250
Chaîne :
Pas spécifié
Jauge spécifiée (ép aisseur des mai llons d'entr aînement)
Type de guide-chaîne
Jauge du guide-chaîne
Type de chaîne
Vitesse de chaîne au régime moteur maximum
Lubrification Pompe à huile automatique réglable
mL
mL
mm
mm
cm
mm
m/s
190
140
Essence ordinaire.
Il est conseillé d'utilis er de l'essence sans pl omb avec un
indice d'octane 89 au minimum.
Ne pas utiliser de carburant contenant du méthanol ou
plus de 10 % d'é thanol.
50 : 1 (2%) selon la norme ISO-L-EG D (ISO/CD 13738),
grade JASO FC, FD et huile ECHO Premium 50 : 1.
Huile pour chaîne ou huile pour moteur
9,53 (3/8 pouce)
1,27 (0,050 pouce)
20, 25, 30 (ECHO)
1,27 (0,050 pouce)
6,35 (1/4 pouce)
1,27 (0,050 pouce)
20, 25 (ECHO)
1,27 (0,050 pouce)
Carlton N1C-BL
Oregon 91PX
24,2
Oregon 25AP
21,5
Pignon : Nombre de dents spécifié 6 8
Moteur :
Type
Carburateur
Magnéto
Bougie d'allumage
Lanceur
Monocylindre 2 temps à refroidissement par air
Type à mem brane
Volant magnétique - système CDI
NGK CMR7H
Lanceur à rappel automatique ;
DEMARRAGE « ES » (voir page 2)
Transmission
Cylindrée
Puissance maximum mesurée au frein (ISO 7293)
Vitesse maximum recommandée avec outil de coupe
Vitesse recommandée au ralenti
Niveau de pression sonore : (ISO 22868) Lp
Aeq
=
Incertitude
mL (cm
kW
r/min
r/min
dB(A)
dB(A)991,5
Embrayage centrifuge automatique
3
)
25,0
1,11
12700
3200 (280 0 - 3400)
Niveau de puissance sonore garanti :
(2000/14/CE) L
Vibrations : (ISO 22867) Valeurs déclarées a
Poignée avant
Poignée arrière
Incertitude
= dB(A) 112
WAav
hveq
m/s
m/s
m/s
2
3,9
2
3,4
2
1,3
Autres dispositifs : Protège-main avant,
blocage de la gâchette d'accélérateur, attrape-chaîne,
frein de chaîne, dispos itif antivibration,
écran pare-étincelles
Option : Griffe d'abattage
36
Page 75

Déclaration de conformité
Le fabricant soussigné:
YAMABIKO CORPORATION
7-2 SUEHIROCHO 1-CHOME
OHME ; TOKYO 198-8760
JAPON
Cette déclaration de conformité est délivrée sous la seule responsabilité du fabricant.
déclare que l'appareil neuf désigné ci-après :
TRONÇONNEUSE PORTATIVE
Marque : ECHO
Type :
est conforme aux :
* spécifications de la directive machines 2006/42/CE
(utilisation de la norme harmonisée ISO 11681-2 (2011))
et a reçu l'agrément de type CE
Certificat n° : TI(E)/MD(2) - ECTE/234/06072015
Référence du dossier technique : TCF 1-79-1
délivré par l'organisme notifié ci-après, dont le numéro est le suivant : 0673
Technology International (Europe) Limited
56 Shrivenham Hundred Business Park
Shrivenham, Swindon, SN6 8TY, Royaume-Uni
* spécifications de la directive 2014/30/UE
(utilisation de la norme harmonisée EN ISO 14982 (2009))
* spécifications de la directive 2000/14/CE
Procédure d'évaluation de la conformité suivant l'ANNEXE V
Niveau de puissance sonore mesuré : 109 dB(A)
Niveau de puissance sonore garanti: 112 dB(A)
Numéro de série 37001001 et suivants
Tokyo,
le 1er janvier 2016
YAMABIKO CORPORATION
M. Kimura
Directeur général
Service Assurance qualité
Représentant autorisé en Europe, autorisé à constituer le
dossier technique :
Société : Atlantic Bridge Limited
Adresse : Atlantic House, PO Box 4800, Earley,
Reading RG5 4GB, Royaume-Uni
M. Philip Wicks
37
Page 76

1Mémorandum et verso
7-2 SUEHIROCHO 1-CHOME, OHME, TOKYO 198-8760 JAPON
TÉLÉPHONE : 81-428-32-6118 . FAX : 81-428-32-6145.
©
2015
X750 - 026 24 0
X750 333-000 2
Imprimé au Japon
38
Page 77

1Buchdeckel
DEUTSCH
(Original-Anleitung)
BEDIENUNGSANLEITUNG
MOTORSÄGE
WARNUNG
Diese Motorsäge ist speziell für die Baumpflege durch einen
geschulten Bediener ausgelegt.
Lesen Sie die Bedienungsanleitung sorgfältig durch, und
befolgen Sie die Sicherheitsregeln.
Andernfalls besteht das Risiko schwerer Verletzungen.
Page 78

Einführung
2Einführung
Diese Motorsäge dient zum Schneiden von Holz oder Holzprodukten.
Schneiden Sie nie Festmetall, Blech, Kunststoff oder anderes Material, das nicht aus Holz ist.
Es ist wichtig, dass Ihnen vor Inbetriebnahme der Motorsäge alle Vorsichtsmaßnahmen geläufig sind.
Die falsche Handhabung der Motorsäge kann zu schweren Körperverletzungen führen.
Lassen Sie nie Kinder mit der Säge arbeiten.
Das vorliegende Handbuch en thält die erforderlic hen Hinweise für siche ren Betrieb, zur korre kten Verwendung sowie zur Wartung
und Instandhaltung Ihrer ECHO-Motorsäge.
Befolgen Sie diese Anweisungen, um sicherzustellen, dass die Motorsäge in gutem Zustand ist und eine lange Nutzungsdauer
erreicht.
Bewahren Sie diese Bedienungsanleitung gut auf, damit Sie auch zu einem späteren Zeitpunkt etwas nachlesen können.
Sollte diese Bedienungsanleitung nicht mehr verfügbar o der ve rlore n gegangen sein, besorgen Sie sich bitte eine neue Anleitung
von Ihrem ECHO-Händler.
Wenn Sie dieses Gerät mieten oder es ei ner Person zur Bedienung überlassen, übergeb en Sie immer diese Bedienun gsanleitung,
die Erläuterungen und Anweisungen enthält.
Wenn Sie ein Produkt bzw. Gerät weitergeben, übergeben Sie unbedingt auch die Bedienungsanleitung.
Die in den vorliegenden Unterlagen enthaltenen Spezifikationen, Beschreibungen und Illustrationen entsprechen den zum
Zeitpunkt der Veröffentlichung vorliegenden Kenntnissen, können jedoch jederzeit und ohne Vorankündigung geändert werden.
Die Illustrationen enthalten unter Umständen optionale Ausrüstung und Zubehör, welche(s) nicht unbedingt zur serienmäßigen
Ausrüstung gehört.
Dieses Gerät wird mit nicht angebrachter Führungsschiene (Schwert) und Sägekette ausgeliefert.
Bringen Sie Führungsschiene und Kette an.
Wenn dieses Handbuch Anweisungen enthält, die Ihnen unklar erscheinen, wenden Sie sich an Ihren ECHO-Händler.
Sonderfunktion dieses Modells: „ES-Start"
Der „ES-Start" erzeugt ausreichend Drehmoment, um die Kurbelwelle auf die für die Zündung erforderliche Drehzahl zu
beschleunigen, wobei kaum Rückschlag entsteht.
Der „ES"-Start erleichtert das Starten des Motors erheblich.
Hersteller
YAMABIKO CORPORATION
7-2 SUEHIROCHO 1-CHOME, OHME, TOKIO 198-8760, JAPAN
Autorisierter Repräsentant in Europa
Atlantic Bridge Limited
Atlantic House, PO Box 4800, Earley, Reading RG5 4GB, Vereingtes Königreich
2
Page 79

Inhalt
Sicherheitsaufkleber und Symbole .....................................................................................4
Richtlinien zur Betriebssicherheit........................................................................................5
0. Motorsäge für die Baumpflege...................................................................................5
1. Allgemeine Sicherheitsregeln....................................................................................8
2. Vorsichtsmaßnahmen gegen Rückschlag ...............................................................11
3. Allgemeine Sicherheitshinweise..............................................................................12
Beschreibung....................................................................................................................14
Zusammenbau..................................................................................................................15
Montage der Führungsschiene und Kette....................................................................15
Betrieb ..............................................................................................................................17
Kraftstoff und Schmiermittel.........................................................................................17
Kettenschmierung........................................................................................................17
Deckelsymbole ............................................................................................................17
Winterbetrieb ...............................................................................................................18
Kaltstart .......................................................................................................................18
Warmstart....................................................................................................................19
Laufender Motor ..........................................................................................................19
Stoppen des Motors ....................................................................................................20
Überprüfen der Kettenspannung .................................................................................20
Überprüfung der Kettenschmierung.............................................................................20
Arbeitsvorbereitung......................................................................................................20
Richtige Verwendung der Kettenbremse..........................................................................21
Kettenbremse ..............................................................................................................21
Überprüfung der Bremsfunktion...................................................................................22
Lösen der Kettenbremse. ............................................................................................22
Automatische Kettenbremse........................................................................................22
Anweisungen zum Sägen .................................................................................................23
Allgemeines.................................................................................................................23
Fällen eines Baums................ ....... ...... ....... ...... ....... ...... ...... ....... ...... ....... ...... ....... ...... .24
Entasten ......................................................................................................................25
Zerkleinern...................................................................................................................25
Zug und Druck bei Holz ...............................................................................................26
Anweisungen zu Pflege und Wartung...............................................................................27
Behebung von Betriebsstörungen ....................................................................................28
Schärfen der Sägekette....................................................................................................29
Wartung ............................................................................................................................31
Luftfilter........................................................................................................................31
Überprüfen des Kraftstoffsystems ...............................................................................31
Kraftstofffilter ...............................................................................................................31
Ölfilter ..........................................................................................................................31
Zündkerze....................................................................................................................31
Zylinderrippen (Kühlsystem)........................................................................................32
Führungsschiene.........................................................................................................32
Kettenrad / Kupplungsglocke.......................................................................................32
Vergaser......................................................................................................................32
Automatische Ölpumpe ...............................................................................................32
Zündkerzenabdeckung................................................................................................33
Schalldämpfer..............................................................................................................33
Ersetzen von Führungsschiene und Kette...................................................................33
Lagerung...........................................................................................................................34
Langfristige Lagerung (über 30 Tage).........................................................................34
Entsorgungshinweise........................................................................................................35
Technische Daten..... ...... ....... ...... ....... ...... ....... ...... ....... ...... ...... ....... ...... ....... ...... ....... ...... .36
Konformitätserklärung.......................................................................................................37
3
Page 80

Sicherheitsaufkleber und Symbole
GEFAHR WARNUNG VORSICHT
Dieses Symbol macht in
Verbindung mit dem Wort
„GEFAHR" auf Handlungen oder
Bedingungen aufmerksam, die zu
schweren Verletzungen oder zum
Tod von Bedienpersonal und
umstehenden Personen führen.
Ein Kreis mit
umgekehrtem
Schrägstrich bedeutet,
dass das Dargestellte
unzulässig ist.
Symbol Beschreibung des Symbols Symbol Beschreibung des Symbols
Lesen Sie die Bedienungsanleitung
sorgfältig durch
Dieses Symbol macht in
Verbindung mit dem Wort
„WARNUNG" auf Handlungen oder
Bedingungen aufmerksam, die zu
schweren Verletzung en oder zum
Tod von Bedienpersonal und
umstehenden Personen führe n
können.
HINWEIS
Hinweise dieser Art enthalten Tipps
zur Verwendung, Pflege und Wartu ng
des Produkts.
„VORSICHT" warnt vor einer
Gefahrensituation, in der es zu
leichten bis mäßigen Verletzu ngen
kommen kann.
Kettenbremsenbetätigung
Diese Motorsäge ist nur für routinierte
Sägenanwender vorgesehen.
Einhandbetrieb der Säge kann
gefährlich sein.
Es muss geeigneter Gehör-, Augenund Kopfschutz benutzt werden.
Verwenden Sie geeigneten Fuß-/
Bein- und Hand-/ Armschutz.
Warnung!
Rückschlag möglich!
Achtung, heiße Bereiche Garantierter Schallleistungspegel
NOTAUS
Öl- und Benzingemisch
Kettenölnachfüllung
Kettenöl - Mengenregulierung
Kraftstoffpumpe
Justieren des Vergasers
- Leerlaufdrehzahl
Beachten Sie diesen Sicherheitsaufkleber am Gerät.
Die Gerätedarstellung im Abschnitt „Beschreibung" zeigt
Ihnen, an welcher Stelle er sich befindet.
Vergewissern Sie sich, dass der Sicherheitsaufkleber
leserlich und verständlich ist, und befolgen Sie die
entsprechenden Sicherheitshinweise.
Falls ein Aufklebe r unleserlich geworden ist, bestellen Sie be i
Ihrem ECHO-Händler einen neuen.
4
Page 81
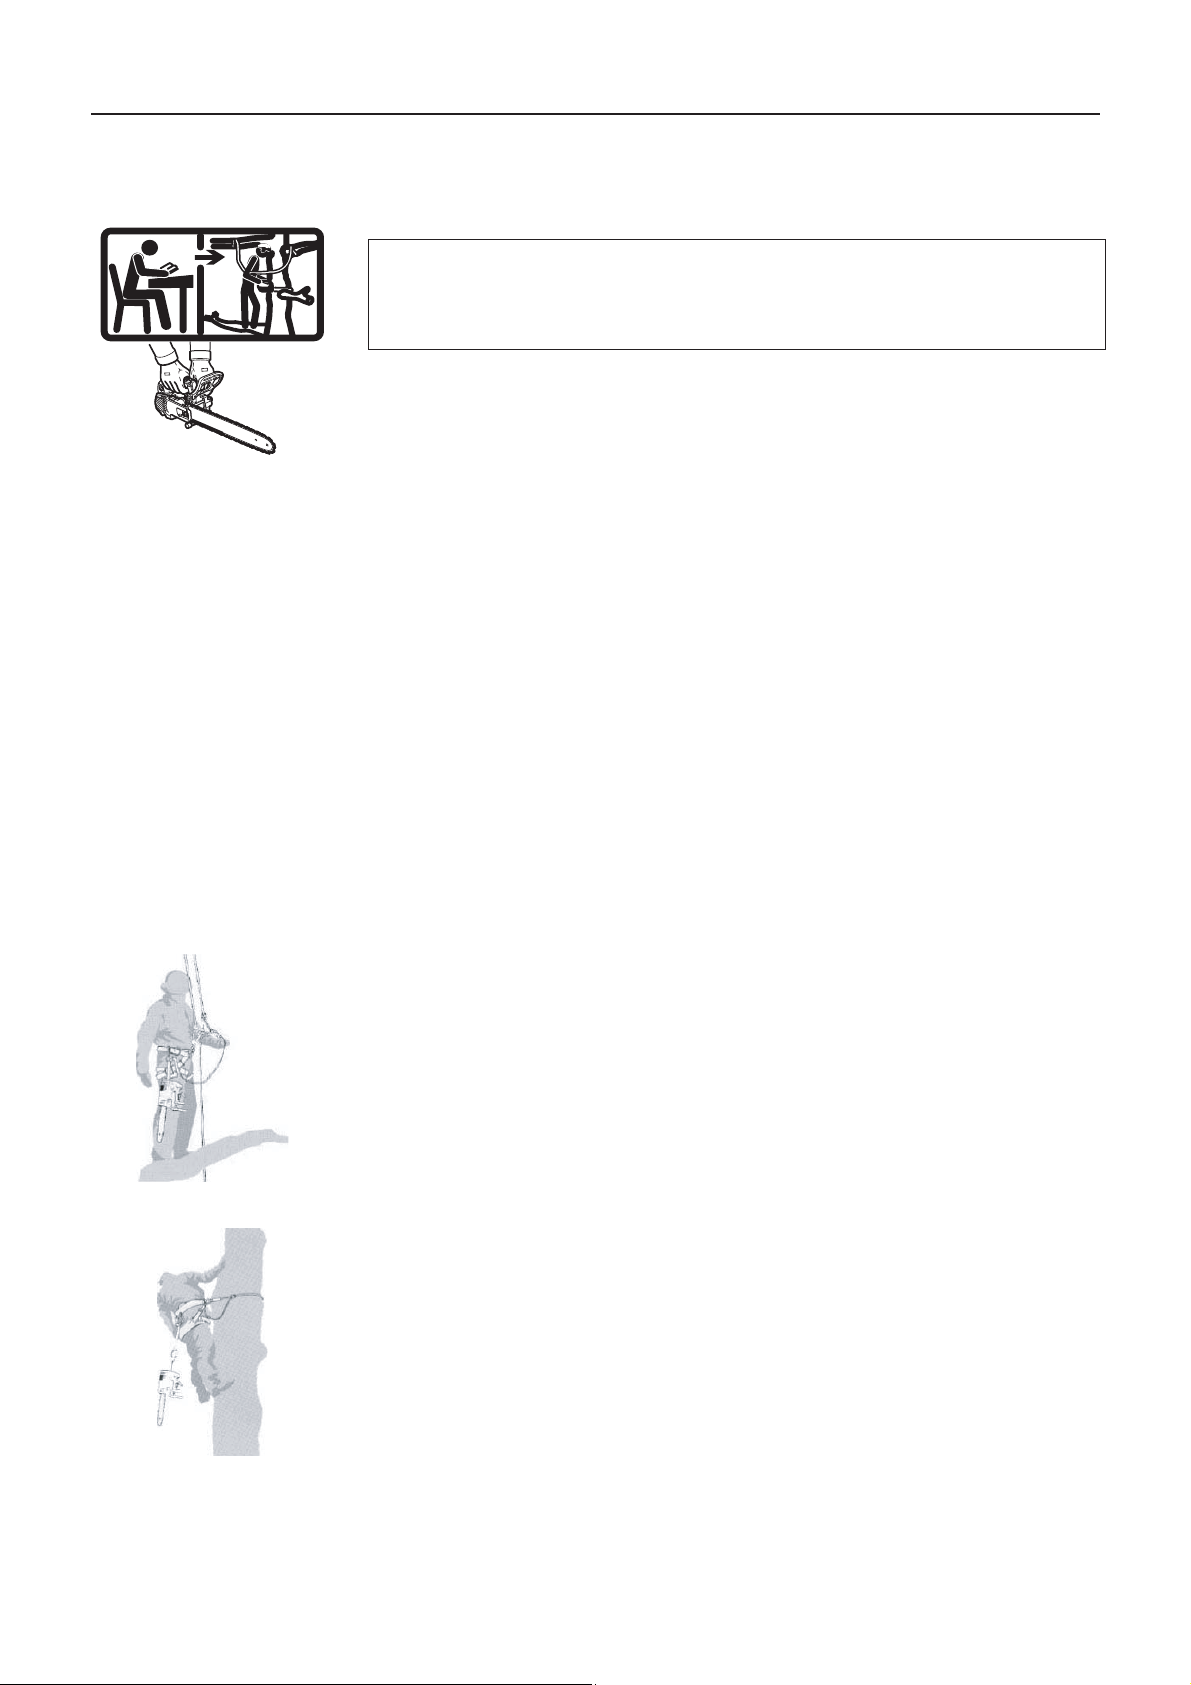
Richtlinien zur Betriebssicherheit
0. Motorsäge für die Baumpflege
HINWEIS
Ersetzen Sie die Führungsschiene oder die Sägekette nur durch Teile, die von ECHO
zugelassen sind.
Die Säge ist speziel l für die Baumpf lege au sgele gt, d. h. fü r die Arbe it oben i n Bäume n,
und darf bei solchen Arbeiten nur von geschulten Bedienern verwendet werden.
Einhandbetrieb der Säge kann gefährlich sein.
Seien Sie vorsichtig, da die Säge abrutschen und zurückprallen kann.
Größere Gefahr entsteht durch Zurüc ksc hla gen .
Verlieren Sie nicht das Gleichgewicht, wenn am Ende des Schnitts die Säge „fällt".
Bei Arbeiten in der Höhe m uss d er Bedie ner siche re Kl ettertechn iken b ehersc hen un d alle
empfohlene Sicherheitsausrüstung wie Sicherheitsgurt, Schlingen, Riemen, Seile und
Karabiner für sich sowie für die Säge verwenden.
Wenn eine Motorsäge mithil fe eine s an ein em Las thaken befesti gten Sei ls für den Einsatz
im Baum hochgezogen wird, stellen Sie si cher, dass der Lasthaken nicht überlastet wird.
Allgemeine Anforderungen
Wer mit Seil und Sicherheitsgurt gesichert in der Höhe eine Motorsäge für Baumpflege
bedient, darf nie allein arbeiten.
Er muss von einem Arbeiter am Boden unterstützt werden, der für entsprechende Notfallhilfe
geschult ist.
Bediener von Baumpflege-Motorsägen müssen für solche Arbeiten allgemeine sichere
Klettertechniken und die Methoden der richtigen Arbeitspositionierung beherrschen und
ordnungsgemäß mit S icherheits gurten, Seilen, Riemen, Ka rabinern und sonstig er Ausrüs tung
versehen sein, die sowohl für sie selbst als auch für die Säge sichere Arbeitspositionen
gewährleistet.
Vorbereitung für den Einsatz der Säge im Baum
Der Arbeiter am Boden muss die Moto rsäge prüfen, be tanken, starten und wa rmlaufen lassen .
Dann muss er sie ausschalten, bevor sie zum Bediener in den Baum hochgezogen wird.
Die Motorsäge muss mit einem passe nden Riemen für di e Befestigung am Sicherheitsgurt des
Bedieners versehen werden.
Beispiel für die Befestigung einer Motorsäge am Sicherheitsgurt des Bedieners
Sichern Sie den Riemen um den Befestigungspunkt hinten an der Säge.
Stellen Sie passende Karabiner bereit, damit die Säge indirekt (d. h. über einen Riemen)
oder direkt (d. h. am Befestigungspunkt auf der Säge) am Sicherheitsgurt des Bedieners
befestigt werden kann.
Stellen Sie sicher, dass die Sä ge sicher befes tigt ist, wenn sie zum Bediener hochg ezogen
wird.
Stellen Sie sicher, dass die Säge am Sicherheitsgurt befestigt ist, bevor sie vom
Hebewerkzeug gelöst wird.
Die Möglichkeit, die Säge direkt am Sicherheitsgurt zu befestigen, reduziert die Gefahr von
Beschädigungen bei Bewegungen im Baum.
Schalten Sie die Säge immer aus, wenn sie direkt am Sicherheitsgurt befestigt ist.
Beispiel für die Befestigung einer Motorsäge am hinteren Mittelpunkt des
Sicherheitsgurts
Die Säge darf nur an den empfohlenen Befestigungspunkten des Sicherheitsgurts befestigt
werden.
Diese können sich an den Mittelpunkten (vorn oder hinten) oder an den Seiten befinden.
Wenn möglich, befestigen Sie die Säge am hinteren Mittelpunkt, damit sie sich nicht in den
Kletterseilen verfängt und ihr Gewicht in Verlängerung der Wirbelsäul e des Bedieners wirkt.
Bei jedem Wechsel von einem Befestigungspunkt zu einem anderen muss der Bediener sich
vergewissern, dass die Säge in der neuen Position gesichert ist, bevor er sie vom bisherigen
Befestigungspunkt löst.
5
Page 82

Verwendung der Motorsäge im Baum
Eine Untersuchung von Unfällen mit diesen Sägen bei Baumpflegeeinsätzen zeigt als
Hauptursache, dass sie unsachgemäß im Einhandbetrieb verwendet wurden.
Bei der überwiegenden Meh rheit der Unfälle hat ten die Bedien er keine sicher e Arbeitsposition
eingenommen, in der sie beide Griffe der Säge halten konnten.
Dies führt zu einer erhöhten Verletzungsgefahr, da der Bediener
die Säge nicht fest im Griff hat, falls sie zurückschlägt,
die Säge nicht unter Kontrol le hat, s o dass diese leichter mi t Kletters eilen und dem Körper
des Bedieners (insb es ond ere mit der linken Hand und dem lin ke n Arm ) i n Konta kt kommt,
und
wegen einer unsicheren Arbeitsposition die Kontrolle verliert, was zum Kontakt mit der
Säge führt (unvorhergesehene Bewegung während des Betriebs der Säge).
1. Sicherung der Arbeitsposition für Zweihandbetrieb
Um die Säge mit beiden Händen halten zu können, muss der Bediener als allgemeine Regel
eine sichere Arbeitsposition einnehmen, in der er die Säge
bei Horizontalschnitten in Hüfthöhe und
bei Vertikalschnitten in Magenhöhe betreibt.
Beispiel für die Umlenkung des Hauptseils über einen zusätzlichen Ankerpunkt
Wenn ein Bediener aus der Nähe in vertikale Stämme hineinschneidet, bei geringen auf die
Arbeitsposition einwirk enden Seite nkräften, b rauch t er normalerw eise nur e inen fest en Stand,
um in einer sicheren Arbeitsposition zu bleiben.
Wenn er sich jedoch vom Stamm entfernt, muss er Maßnahmen ergreifen, um die
zunehmenden Seiten kräfte zu bes eitigen o der zu ko mpensie ren, indem e r beispi elsweise das
Hauptseil über einen zusätzlichen Ankerpunkt umlenkt oder indem er mit einem verstellbaren
Riemen den Sicherheitsgurt direkt mit einem zusätzlichen Ankerpunkt verbindet.
Beispiel für einen behelfsmäßigen Fußbügel aus einer Endlosschlinge
Ein fester Stand in der Arbeitsposition kann durch die Verwendung eines behelfsmäßigen
Fußbügels aus einer Endlosschlinge unterstützt werden.
2. Starten der Säge im Baum
Beim Starten der Säge im Baum muss der Bediener
vor dem Start die Kettenbremse einlegen,
die Säge beim Starten links oder rechts vom Körper halten,
1. auf der linken Seite die Säge mit der linke n Hand am Vordergriff ha lten und di e Säge vom
Körper wegdrücken, während er die Schnur des Zugstarters in der rechten Hand hält,
oder
2. auf der rechten Seite die Säge mit der rechten Hand an einem der Griffe halten und die
Säge vom Körper weg drücken, während er die Schnur des Zugstarters in de r linken Hand
hält.
Die Kettenbremse muss immer eingelegt sein, bevor eine laufende Säge an ihrem Riemen
herunter gelassen wird.
Bediener müssen vor der Inan griffnah me kritis cher Schnitt e immer prüfe n, ob die Säge ge nug
Kraftstoff hat.
6
Page 83

3. Einhandbetrieb der Motorsäge
Bediener dürfen Baumpflege-Motorsägen nicht im Einhandbetrieb verwenden, wenn die
Arbeitsposition instabil ist, oder anstelle einer Handsäge beim Schneiden von Holz geringen
Durchmessers an den Astend en.
Baumpflege-Motorsägen dürfen nur dann im Einhandbetrieb verwendet werden, wenn
der Bediener keine si chere Arbeitsp osition einne hmen kann, in der ei n Zweihandb etrieb
möglich ist, und
er seine Arbeitsposition mit einer Hand unterstützen muss und
die Säge bei voll ausgestrecktem Arm, im rechten Winkel zum Körper des Bedieners und
von diesem weggerich tet verwendet wird.
Beispiel für die Verwendung einer Motorsäge im Einhandbetrieb
Der Bediener darf nie
mit dem Rückschlagsbereich an der Spitze der Führungsschiene der Säge schneiden,
Schnittgut "festhalten und schneiden" oder
herabfallendes Schnittgut aufzufangen versuchen.
4. Lösen einer im Geäst verfangenen Säge
Wenn sich die Säge beim Schneiden verfängt, muss der Bediener
die Säge ausschalte n und sie sich er am Baum zwisc hen Stamm und Schit tstelle oder a n
einem separaten Werkzeugseil befestigen,
die Säge aus dem Einschnitt ziehen und dabei den Ast bei Bedarf hochheben,
falls erforderlich, mithilfe einer Handsäge oder einer zweiten Motorsäge die verfangene
Säge aus dem Astwerk lösen , indem er dieses im Abstan d von min deste ns 30cm von der
verfangenen Säge absc hneidet.
Wenn eine Handsäge oder Motorsäge verwendet wird, um die verfangene Säge aus dem
Astwerk lösen, müssen immer die Befreiungsschnitte weiter außen (zu den Astenden hin)
erfolgen, damit die Säg e nicht vom Sch nittgut mitgezogen w ird und si ch das Probl em dadurch
vergrößert.
7
Page 84

1. Allgemeine Sicherheitsregeln
Bedienungsanleitung
Lesen Sie die Bedienungsanleitung für Ihre Motorsäge sorgfältig.
Machen Sie sich genauestens mit den Bedienelementen der Motorsäge und deren
Handhabung vertraut .
Das Nichtbefolgen dieser Anweisungen kann zu schweren Körperverletzungen führen.
Bei Fragen oder Problemen wenden Sie sich bitte an Ihren ECHO-Händler.
Körperliche Verfassung
Arbeiten Sie nie mit einer Motorsä ge, wenn Sie müde s ind oder unt er dem Einfl uss von
Alkohol oder Drogen stehen.
Sie müssen in guter körperlicher und geistiger Verfassung sein, um die Motorsäge sicher
benutzen zu können.
Fehler bei der Beurteilung oder Ausführung können schwer wiegend oder tödlich sein.
Wenn anstrengende Arbeit Ihre körperliche Verfa ssung verschlechte rn könnte, wenden Sie
sich an Ihren Arzt, bevor Sie mit der Motorsäge arbeiten.
Arbeiten Sie nicht mit de m Ge rät, wenn Sie k rank b zw. m üde sin d oder unt er dem Einflus s
von Medikamenten oder Substanzen stehen, die Ihr Sehvermögen, Ihre Geschicklichkeit
oder Ihr Beurteilungsvermögen beeinträchtigen könnten.
Arbeits- und Schutzkleidung (für sicheres Arbeiten)
VORSICHT
Gehörschutz aus Watte ist nicht zu empfehlen.
Tragen Sie immer zugelassene Schutzbrillen, um Ihre Augen zu schützen.
Sägespäne, Staub, a bgerissene Z weige un d sonstige M aterialie n können bei der Arbe it
mit der Motorsäge in den Gesichtsbereich des Bedieners gelangen.
Schutzbrillen bieten unter Umständen auch nur einen begrenzten Schutz der Augen,
wenn die Säge an den Augenbereich des Bedieners gelangt.
Wenn eine belüftete Schutzmaske verwendet wird, muss die Schutzbrille darunter
getragen werden.
ECHO empfiehlt, immer Gehörschutz zu tragen.
Andernfalls kann es zu Hörschäden kommen.
Sie sollten das Risiko von Hörschäden verringern, indem Sie Gehörschutz in Form eines
Kopfhörers oder Ohrenstöpsel nach den Vorschriften der Berufsgenossenschaft tragen.
Bei allen Personen, die haupt- oder nebenbe ruflich mit Motorsä gen arbeiten, sollte v on Zeit
zu Zeit überprüft werden, ob sich das Gehör verschlechtert hat.
Während der Arbeit mit der Motorsäge ist stets eine Kopfbedeckung zu tragen.
Wenn Gegenstände auf Sie herabfallen können sowie beim Fällen von Bäumen und
Arbeiten unter Bäumen wird das Tr agen eines Schutzhelms nachdrücklich empfohlen.
Tragen Sie stets robuste, rutschfeste Spezialhandschuhe bei der Arbeit mit Motorsägen,
insbesondere für verbessertes Greifen und als Schutz vor Kälte und Vibrationen.
Tragen Sie stets Waldarbeiterschuhe oder -stiefel mit Schutzkappen, die rutschfeste
Sohlen aufweisen.
Tragen Sie stets eng am Oberkörper anliegende Kleidung, d. h. keine Schals,
Halstücher, Krawa tten , Sc hm uc k ode r of fen e J ac ke n, d ie si ch in der Sägekette oder im
Unterholz verwickeln könnten.
Tragen Sie Schutzkleidung, welche speziell für das Arbeiten mit Motorsägen entwickelt
wurde.
Sie sollte eng anliegen, jedoch Ihre Bewegungsfreiheit nicht einschränken.
Stecken Sie die Hosenbeine in die Sicherheitsstiefel bzw. tragen Sie sie eng am Stiefel.
Sicherheitswesten und sonstige Schutzkleidung aus ballistischem Material sind erhältlich.
Es liegt in der Verantwortung des Bedieners, zusätzliche Schutzkleidung zu tragen, wenn
es die Umstände erfordern.
Arbeiten Sie niemals allein e.
Es sollte sich, falls Sie Hilfe benötigen, immer jemand in Rufweite aufhalten.
8
Page 85

Kraftstoff
GEFAHR
Kraftstoff ist höchst entflammbar.
Falls Kraftstoff verschüttet wird od er sic h durch eine n Funk en entzündet, besteht
Brandgefahr, und es k ann zu gesundh eitlichen oder ma teriellen Schä den kommen.
Gehen Sie besonders vorsichtig mi t Kraftstoff um.
Drehen Sie nach der Tankbefüllung den Deckel fest und entfernen Sie
verschüttetes Benzin.
Sollte Kraftstoff auslaufen, darf die Motorsäg e wegen Brandge fahr nicht gestar tet
werden, solange die Schadensstelle nicht repariert ist.
1. Öltankdeckel
2. Kraftstofftankdeckel
A: Drehrichtung zum Lösen
B: Anzugs-Drehrichtung
Nur zugelassene Kraftstoffbehälter verwenden.
Sorgen Sie für einen Feuerlöscher oder eine Decke für den Brandfall.
Ungeachtet der getroffenen Vorsichtsmaßnahmen birgt das Arbeiten mit der Motorsäge
bzw. das Arbeiten im Wald Gefahren.
In der Nähe von Kraftstoffvo rräten da rf nicht g eraucht werden, und e s dürfen dort kei ne
offenen Flammen oder Funken auftre ten .
Der Kraftstofftank kann unter Druck stehen.
Schrauben Sie den Kraftstoffdeckel stets etwas los, und warten Sie ab, bis ein
Druckausgleich hergestellt ist, bevor Sie den Deckel abnehmen.
Wenn sich der Tankdeckel oder Öltankdeckel von Hand schwer lösen lässt, legen Sie
den beigefügten Steckschlüssel in die Kerbe des Deckels und drehen Sie gegen den
Uhrzeigersinn.
Füllen Sie den Kraftstofftank im Freien auf (wobei darauf zu achten ist, dass keine
feuergefährlichen Gegenstände in der Nähe herumliegen) und schrauben Sie den
Tankdeckel wieder fest zu.
Füllen Sie Kraftstoff niemals in Innenräumen ein oder um.
Wischen Sie verschütteten Kraftstoff vom Ge rät ab.
Füllen Sie nie Kraftstoff nach, wenn der Motor noch heiß ist oder gar läuft.
Lagern Sie das Gerät nich t mit Kraftstoff im Tank, da durch ausla ufendes Benzi n ein Brand
ausgelöst werden könnte.
9
Page 86

Starten des Motors
GEFAHR
Starten Sie die Motorsäge nicht hängend, da ein Start im Hängen die Säge in eine
unsichere Position bringt und zu Verletzungen führen kann.
Starten Sie die Motorsäge vorschriftsmäßig.
Gehen Sie mind. 3 m von dort weg, wo Sie get ank t hab en, bevor Sie den Motor starten.
Lassen Sie es nicht zu, dass ande re Pers onen in der Nähe der Motorsäge sind, wenn Sie
sie starten oder damit arbeiten.
Achten Sie darauf, dass sich keine Zuschauer oder Tiere im Arbeitsbereich befinden.
Lassen Sie niemanden das Holz halten, an dem Sie sägen.
Beginnen Sie erst mit dem Sägen, wenn Sie einen freien Arbeitsbereich, sicheren Stand
und einen Rückzugsweg vom fallenden Baum haben.
Bevor Sie den Motor s tarten, ve rgewissern Si e sich, dass die Sägekett e keinen Kontak t mit
Gegenständen hat.
Sorgen Sie dafür, dass die Handgriffe frei von Schmutz, Öl- oder Benzinrückständen sind.
Die Motorsäge darf nur in gut durchlüfteten Bereichen betrieben werden.
Auspuffgase, Ölnebel (von der Schmierung der Motorsäge) oder Sägestaub schaden der
Gesundheit.
Legen Sie die Motorsäge beim Starten auf einen flachen Boden und halten Sie den
Vordergriff in der linken Hand.
Halten Sie das H interen de des hint eren G riffs m it de m rec hten Kn ie fes t und ziehe n Sie
den Startergriff mit der rechten Hand.
Transport
1. Schwertschutz
Wenn Sie die Motorsäge transportieren, verwenden Sie immer den entsprechenden
Schwertschutz.
Tragen Sie die Motorsäge nur mit abgeschaltetem Motor, wobei Schwert und Kette nach
hinten und der Schalldämpfer vom Körper wegweisen müssen.
10
Page 87

2. Vorsichtsmaßnahmen gegen Rückschlag
GEFAHR
Vorsichtsmaßnahmen gegen Rückschlag für Bediener der Motorsäge: Zu einem
Rückschlag der Säge kann es kommen, wenn die Spitze des Schwerts einen
Gegenstand berührt oder wenn das Holz beim Schnitt zusammenfällt und die
Sägekette einklemmt.
Die Spitzenberührung kann in manchen Fällen zu einem blitzschnellen Rückschlag
führen, der das Schwert nach oben und in Richtung des Bedieners schleudert
(Rotationsrückschlag).
Verklemmt s ich die Sägekette entlang der oberen Seite de s Schwerts, kann es sein ,
dass die Motorsäge sehr schnell in Richtung des Bedieners zurückgedrückt wird
(linearer Rückschlag).
Jede dieser Reakti onen kann zur Folge haben, dass Sie die Kontrolle über die
Motorsäge verlieren und mit der laufenden Sägekette in Berührung kommen, was zu
schweren Körperverletzungen führen kann.
Als Bediener sollten Sie verschiedene Dinge beachten, um unfallfrei zu arbeiten.
Mit Grundlagenkenntn isse n über den Rüc ksch lag können Sie das Üb errasc hungs eleme nt
verringern oder ausschalten.
Plötzliche, unerwartet auftretende Ereignisse begünstigen Unfälle.
Wenn Sie wissen, wie ein Rotationsrückschlag entsteht (durch Berührung der
Schwertspitze mit einem Gegenstand oder dem Boden bzw. durch Verklemmen im Holz),
können Sie sich davor schützen.
Bedienen Sie eine Motorsäge niemals nur mit einer Hand!
Für Bediener, Helfer und Zuschauer kann das einhändige Arbeiten zu schwersten
Verletzungen führen.
Für sicheres Arbeite n halten Sie d as G erät imm er mi t beid en Händen, wob ei ei ne H and
immer am Gas hebel ist.
Die Motorsäge kann Ihnen sonst aus der Hand gleiten, was zum Verlust der Kontrolle
und damit zu Verletzungen führen kan n.
Halten Sie bei lau fendem Motor d ie Säge immer mi t beiden Händ en, die rechte Hand am
hinteren Handgriff und die linke Hand am vorderen Handgriff.
Halten Sie die Griffe der Motorsäge mit der ganzen Hand fest.
Ein fester Griff hilft, Rückschläge zu verringern und die Motorsäge unter Kontrolle zu
halten.
Halten Sie die Motorsäge immer mit beiden Händen fest.
Schneiden Sie nie über Brusthöhe bzw. Gegenstände, zu dessen Erreichen Sie sich
strecken müssen.
Vergewissern Sie sich, dass Ihr Arbeitsbereich frei von Hindernissen ist.
Vermeiden Sie, dass die Schwertspitze einen anderen Stamm, Ast oder ein anderes
Hindernis berührt, während Sie mit der Motorsäge arbeiten.
Das Sägen mit hoher Drehzahl verringert die Wahrscheinlichkeit eines Rückschlags.
Das Sägen mit Halbgas oder niedriger Motordrehzahl kann in schwierigen Situationen
besser für die Kontrolle sein und dadurch ebenso die Wahrscheinlichkeit eines
Rückschlags verringern.
Beachten Sie die Hinweise zum Schärfen und Warten der Motorsäge.
Benutzen Sie nur Austauschschwerter und -ketten, die vom Hersteller angegeben.
11
Page 88

3. Allgemeine Sicherheitshinweise
Vibration und Kälte
Es wird vermutet, dass e ine Bes chwerde name ns Ray naud-Sy ndrom, die di e Fing er manche r
Menschen befällt, durch Arbeit bei Kälter und Vibration herbeigeführt wird.
Ihre ECHO-Motorsäge ist daher mit stoßdämpfenden Halterungen ausgerüstet, die die über
die Griffe übertragenen Vibrationen verringern sollen.
Durch Arbeiten bei Kälte und Vibration kann sich ein Prickeln und Brennen bemerkbar
machen, dem sich Farblosigkeit und Gefühllosigkeit der Finger anschließen.
Die nachstehend aufgeführten Vorkehrungen werden nachdrücklich empfohlen, da die
Mindestwerte, bei denen diese Krankheit ausgelöst wird, nicht bekannt sind.
Halten Sie Ihren Körper warm, insbesondere Kopf und Nacken, Füße und Fußgelenke
sowie Hände und Handgelenke.
Legen Sie häufige Pausen ein, in deren Verlauf Sie den Kreislauf durch intensive
Armübungen anregen, und rauchen Sie nicht.
Begrenzen Sie die Arbeitsstunden mit der Säge.
Teilen Sie jeden Arbeitstag so ein, dass zwischendurch auch Arbeiten ohne Motorsäge
verrichtet werden.
Wenn Ihre Finger schmerzen, rot und angeschwollen sind und schließlich bleich und
gefühllos werden, müssen Sie einen Arzt aufsuchen, bevor Sie sich weiterhin Kälte und
Vibrationen aussetzen.
Tendoperiostosen (Ermüdungserscheinungen von Sehnen und
Knochenhaut)
Es wird angenommen, dass eine Überanstrengung der Muskeln und Sehnen der Finger,
Hände, Arme und Schultern in den betreffenden Körperteilen Schmerz, Schwellungen,
Gefühllosigkeit, Schwäche und auch akuten Schmerz verursachen kann.
Auf folgende Art mindern Sie das Risiko von Tendoperiostosen / Karpaltunnelsyndrom:
Achten Sie darauf, dass Sie Ihr Handgelenk nich t zu sehr beugen, strecken oder
verdrehen.
Versuchen Sie, Ihr Handgelenk gerade zu halten.
Benutzen Sie beim Grei fen nicht nur D aumen und Zeigefi nger, sondern d ie ganze Han d.
Legen Sie von Zeit zu Zeit Pausen ein, um Wiederholu ngsbewegunge n zu minimieren, und
lassen Sie Ihre Hände ruhen.
Reduzieren Sie die G eschwindigkeit und den Kraftaufwand, mit der Sie die
Wiederholungsbewegung ausführen.
Führen Sie geeignete Übungen zur Stärkung der Hand- und Armmuskulatur durch.
Suchen Sie einen Arzt auf, wenn Sie ein Prickeln, Gefühllosigkeit oder Schmerzen in den
Fingern, Händen, Handgelenken oder Armen bemerken.
EU-Richtlinie "Vibration"
Die EU-Richtlinie „Vibration" (2002/44/EG) dient dem Schutz von Personen vor Sicherheitsund Gesundheitsri siken, die durch mechanische Vibrati onen eines Gerät s verursacht werden .
Danach dürfen Arbeitskräfte höchstens 8 Stunden täglich einer bestimmten Vibration
ausgesetzt werden (Tages-Schwingungsexposition A(8)).
Jeder Arbeitgeber, der eine Arbeitskraft ein Gerät bedienen lässt, muss den Wert A(8)
berücksichtigen.
Folgende mechanische Vibrationswerte können bei diesem Gerät zur leichteren Berechnung
des A(8)-Werts als Richtwerte verwendet werden:
MODELL
Vorderer / Linker Handgriff (m/s2)2,1
Hinterer / Rechter Handgriff (m/s
2
)1,9
12
Page 89

Gerätezustand
WARNUNG
Nehmen Sie an der Motorsäge keinerlei Veränderungen vor.
Verwenden Sie ausschließlich Ersatzteile und Zubehör, welche von ECHO für dieses
Gerät zugelassen sind.
Der Einsatz von ungeeignetem Zubehör kann sehr gefährlich sein und zu
Gesundheitsschädigungen führen.
Arbeiten Sie nie mit einer beschädigten, schlecht eingestellten oder nicht vollständig
zusammengebauten Maschine.
Arbeiten Sie niemals mit einer Motorsäge mit lockerem oder defektem Schalldämpfer.
Vergewissern Sie sich, dass die Sägekette stoppt, wenn Sie den Gashebel loslassen.
Sägen
VORSICHT
Berühren Sie nach Gebrauch der Kettensäge nicht die heißen Oberflächen der
Zylinderabdeckung und des Schalldämpfers.
Arbeiten Sie nie mit einer Motors äge an ei nem Baum, wenn Sie nicht da für ausge bilde t
sind.
Halten Sie bei laufendem Motor Ihren Körper von der Motorsäge fern.
Seien Sie extrem vorsichtig, wenn Sie dünne Äste und Büsche schneiden, denn
Kleingeäst kann sich in de r Sägek ette v erfang en, in Ihre Richtun g ges chle udert w erden
oder Sie aus dem Gleichgewicht bringen.
Stellen Sie sich immer auf die Bergseite, wenn Sie ausasten oder einen Stamm
zersägen.
Der Stamm könnte beim Bearbeiten ins Rollen kommen.
Wenn Sie an einem Stamm sä gen, der unter Spann un g steht, b ereiten Sie sich auf das
Zurückspringen vor, u m nicht vom Stamm oder der Säge ge troffen zu werden, wenn der
abgeschnittene Stamm umfällt.
Das Sägen auf einer Leiter ist sehr gefährlich, da die Leiter rutschen kann und die
Kontrolle über die Motorsäge eingeschränkt ist.
Arbeiten ohne festen Boden unter den Füßen sollten den Profis überlassen werden.
Stehen Sie immer mit beiden Beinen fest auf dem Boden.
Arbeiten Sie nie in einer Position ohne Bodenkontakt.
Stellen Sie den Motor ab, bevor Sie die Motorsäge absetzen.
Praktischer Einsatz
Sicheres Arbeiten mit einer Motorsäge erfordert eine Maschine in technisch
einwandfreiem Z ust and , ge sundes Urteilsvermögen und Kenntnis de r Arbei ts verfahren
für die jeweilige Aufgabe.
Lassen Sie niemanden mit der Motorsäge arbeiten, der die Bedienungsanleitung nicht
genau durchgelesen und verstanden hat.
Benutzen Sie die Säge nur, um Holz oder Holzprodukte zu bearbeiten.
Schneiden Sie nie Festmetall, Blech, Kunststoff oder anderes Material, das nicht aus
Holz ist.
Wartung
Servicearbeiten auß er den in der Wartungsanleitung bes chriebenen Arbeiten sollten von
ausgebildetem Werkstattpersonal durchgeführt werden.
(Beispiel: Wenn beim Ausb au der Kupplung ein ungeei gnetes Werkzeug zum Halten des
Schwungrads verwendet wird, kann es zu einer Beschädigung des Schwungrads
kommen und es kann infolgedessen zersprengen.)
13
Page 90
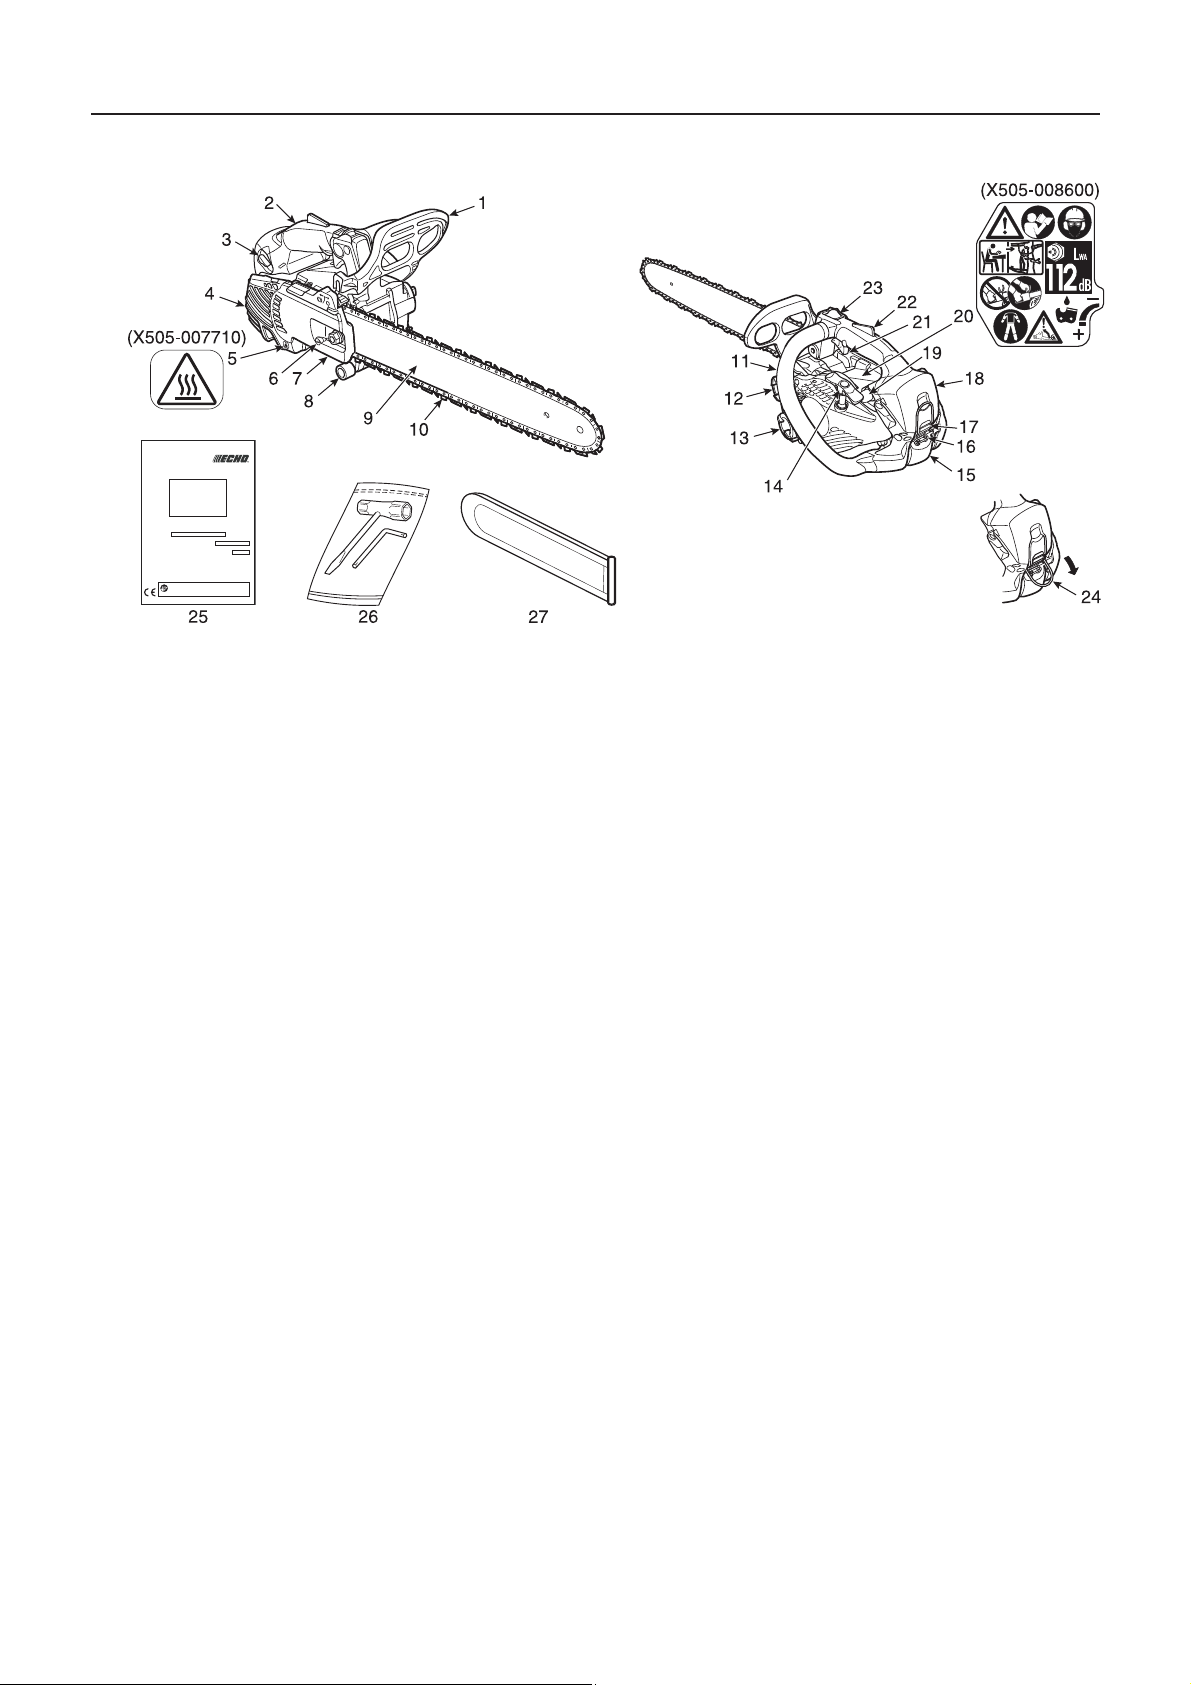
Beschreibung
1. Vorderer Handschutz - Schutz zwischen vorderem
Handgriff und der Sägekette, um die Hand vor
Verletzungen zu schützen und die Maschine zu
kontrollieren, wenn die Hand vom Griff abrutscht.
Dieser Schutz wird verwen det, um die Kettenbremse zu
aktivieren und die Kettenrotation zu stoppen.
2. Hinterer Griff (für die rechte Hand) - Zusatzgriff oben
am Motorgehäuse
3. Choke-Knopf - Einrichtung zum Anreichern des
Kraftstoff-Luft-Gemischs im Vergaser, um den Kaltstart
zu erleichtern.
4. Auspuffabdeckung - Dient zum Schutz vor
versehentlicher Berührung mit dem heißen
Schalldämpfer.
5. Sicherheitsaufkleber - Teilenummer X505-007710
6. Kettenspannschraube - Zum Einstellen der
Kettenspannung.
7. Kupplungsabdeckung - Sc hutzabdeckung für Sc hwert,
Sägekette, Kupplung und Kettenrad, wenn die
Motorsäge in Betrieb ist.
8. Kettenfangbolzen - Vorrichtung zum Auffangen der
Kette und Verhindern von Verletzungen der rechten
Hand des Bedieners, falls die Kette beim Sägen reißt
oder vom Schwert abrutscht.
9. Führungsschiene - Der Teil, der zur Abstützung und
Führung der Kettensäge dient (wird auch "Schwert"
genannt).
10. Sägekette - Die Sägekette dient als Schneidwerkzeug.
11. Vorderer Griff (für die linke Hand) - Zusatzgriff an der
linken Seite des Motorgehäuses.
12. Kraftstofftankdeckel - Verschließt den Kraftstofftank.
13. Öltankdeckel - Verschließt den Öltank.
14. Startergriff - Der Griff des Starters zum Starten des
Motors. "ES" START
15. Zündkerzenabdeckung - Deckt die Zündkerze ab.
16. Verriegelung Zündkerzenabdeckung - Wird zur
Befestigung der Zündkerzenabdeckung verwendet.
17. Verriegelung Luftfilterabdeckung - Wird zur
Befestigung der Luftfilterabdeckung verwendet.
18. Luftfilterabdeckung - Deckt den Luftfilter ab.
19. Kraftstoffpumpe - Drücken Sie beim Starten des Motors
die Kraftstoffpumpe 3 oder 4 Mal.
20. Sicherheitsaufkleber - Teilenummer X505-008600
21. Gashebel - Zur Regelung der Motordrehzahl mit dem
Zeigefinger.
22. Gashebelsperre - Einrichtung zur Verhinderung de s
versehentlichen Betriebs des Gashebels, die gedrückt
werden muss, bevor der Gashebel akti viert werden kann .
23. Zündschalter - Zum Einschalten und Ausschalten der
Zündanlage, ermögli cht somi t das Starten od er Stoppen
des Motors.
24. Hebehaken - Bei Arbeiten in der Höhe muss der
Bediener sichere Kletterte ch nik en behe rrsc hen und al le
empfohlenen Sicherheitsausrüstungen verwenden.
25. Bedienungsanleitung - Gehört zum Lieferumfang des
Geräts.
Sie ist vor Inbetriebnahme zu lesen und als
Nachschlagewerk für die Betriebssicherheit sorgsam
aufzubewahren.
26. Werkzeuge - 13 x 16 mm Kombi-Schlüsse l
(Schraubendreher / Zündkerzenschlüssel) und LSchlüssel.
27. Schwertschutzabdeckung - Abnehmb are Verkleid ung,
die die Führungsschiene und Kette während des
Transports oder in Arbeitspausen schützt.
14
Page 91
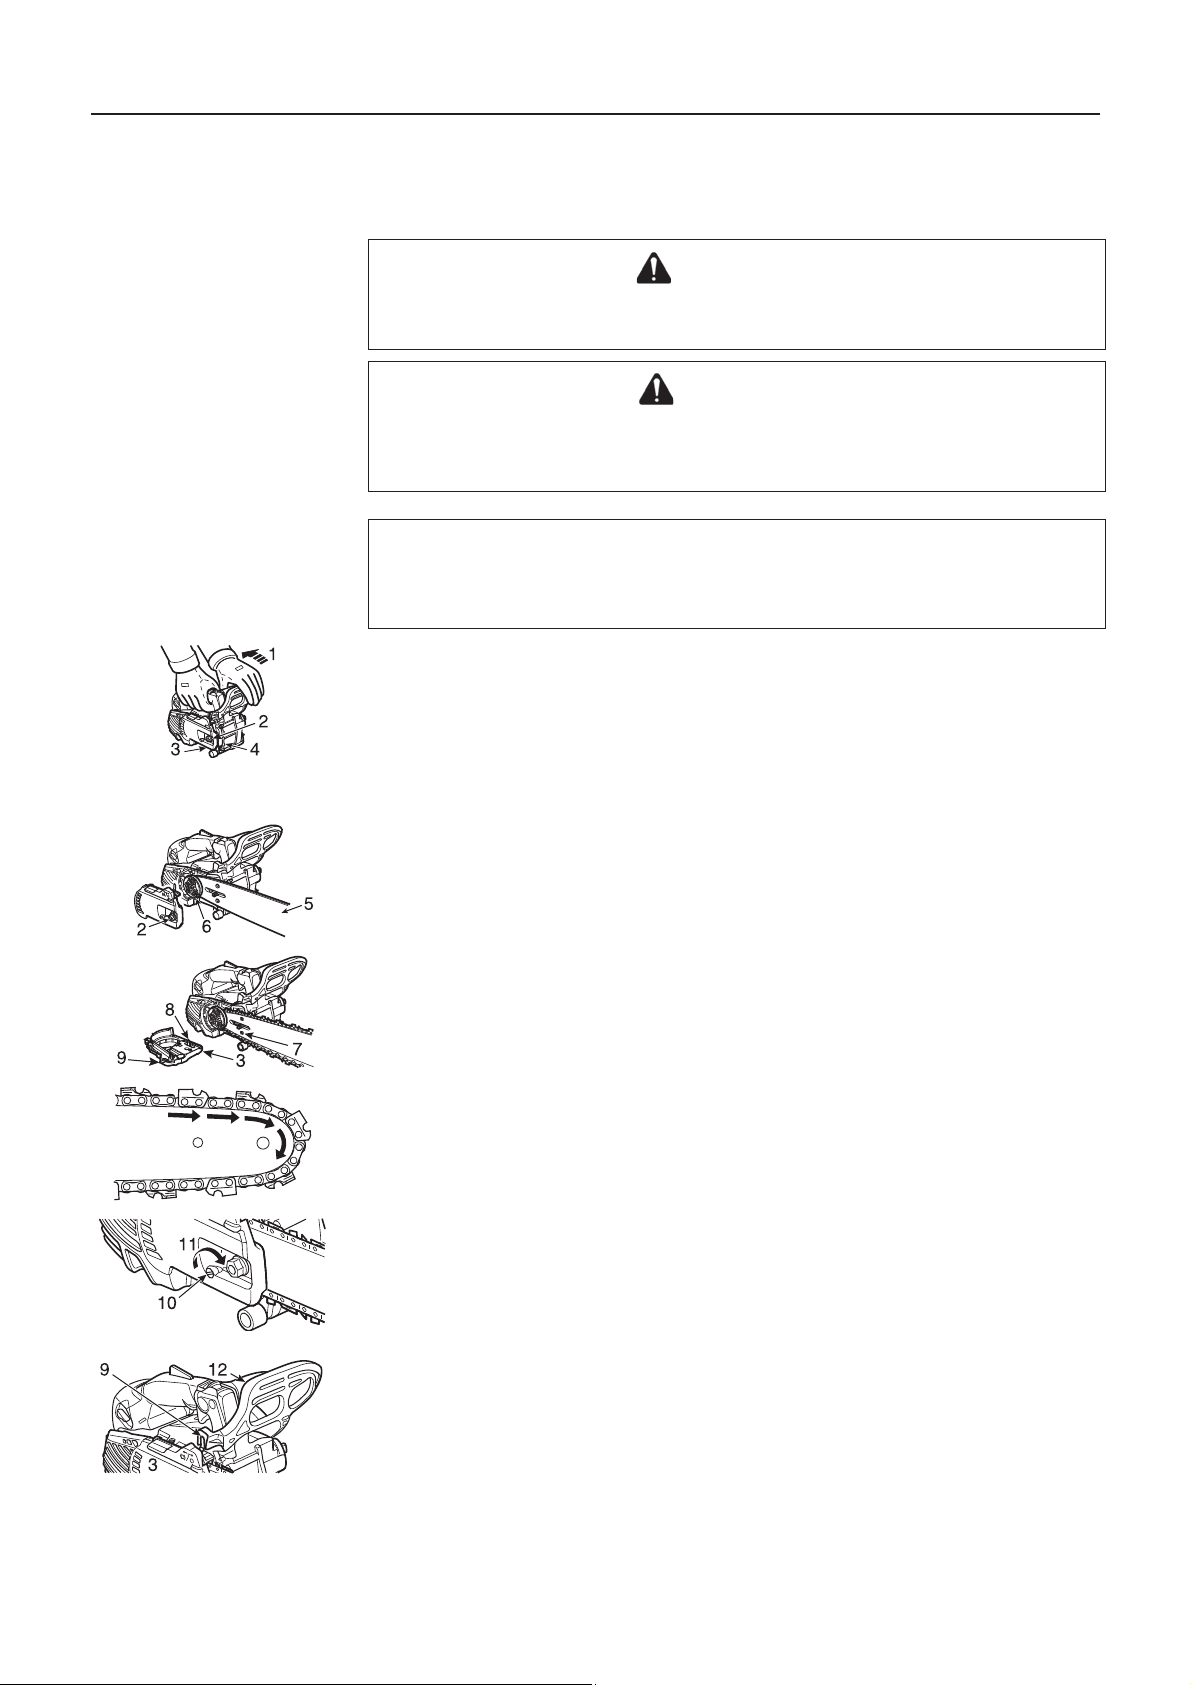
Zusammenbau
Montage der Führungsschiene und Kette
WARNUNG
Stoppen Sie zu Ihrer eigenen Sicherheit den Motor, bevor Sie die nachfolgenden
Arbeiten ausführen.
VORSICHT
1. Führen Sie alle Einstellungen bei kaltem Motor durch.
2. Tragen Sie immer Handschuhe, wenn Sie an der Kette arbeiten.
3. Arbeiten Sie nie mit einer schlecht gespannten Kette.
HINWEIS
Ziehen Sie den Kettenbrems hebel (vorderer Handschutz , Bremse nverbinde r) ganz zu rück,
um die Kupplungsabdeckung der Motorsäge ein- oder auszubauen.
1. Lösen der Kettenb remse
2. Eine Schraubenmutter
3. Kupplungsabdeckung
4. Krallenanschlag; Option (Teilenummer C304-000000)
Bringen Sie Führungsschiene und K ette wie folgt an:
Lösen Sie eine Mutter und nehmen Sie die Kupplungsabdeckung ab.
Montieren Sie die Schiene, und schieben Sie sie in Richtung Kupplung, um die
Kettenmontage zu erleichtern.
5. Schwert
6. Kupplung
7. Bohrung der Schiene
8. Kettenspannerstift
9. Bremsenverbinder
Montieren Sie die Sägekette wie abgebildet.
(Stellen Sie dabei die richtige Laufrichtung der Schneidelemente sicher.)
10. Kettenspanner
11. Richtung zum Spannen der Kette
Lösen Sie die Kettenbremse, und montieren Sie die Kupplungsabdeckung über die
Bolzen der Führungsschiene.
Ziehen Sie die Mutter mit der Hand fest.
Vergewissern Sie sich, dass die Kettenspannschraube in die Bohrung der Schiene passt.
12. Vorderer Handschutz (Bremshebel)
Richten Sie den Verb inder der B remse am Kupplu ngsgehäuse mit der seit lichen Nut am
vorderen Handschutz aus.
15
Page 92

Heben Sie die Spitze der Schiene an, und drehen Sie die Kettenspannschraube im
Uhrzeigersinn, bis die Kette eng an der Unterseite der Führungsschiene anliegt.
A: Korrekte Spannung
B: Fals che Spannung
Heben Sie die Spitze der Führungsschiene an und ziehen Sie die Mutter fest.
Stellen Si e sicher, dass sich die Kette von Hand bewegen lässt.
Lockern Sie die Kettens pannung etwas, wenn Sie das Gefühl haben, dass die Kette zu
stramm sitzt.
16
Page 93
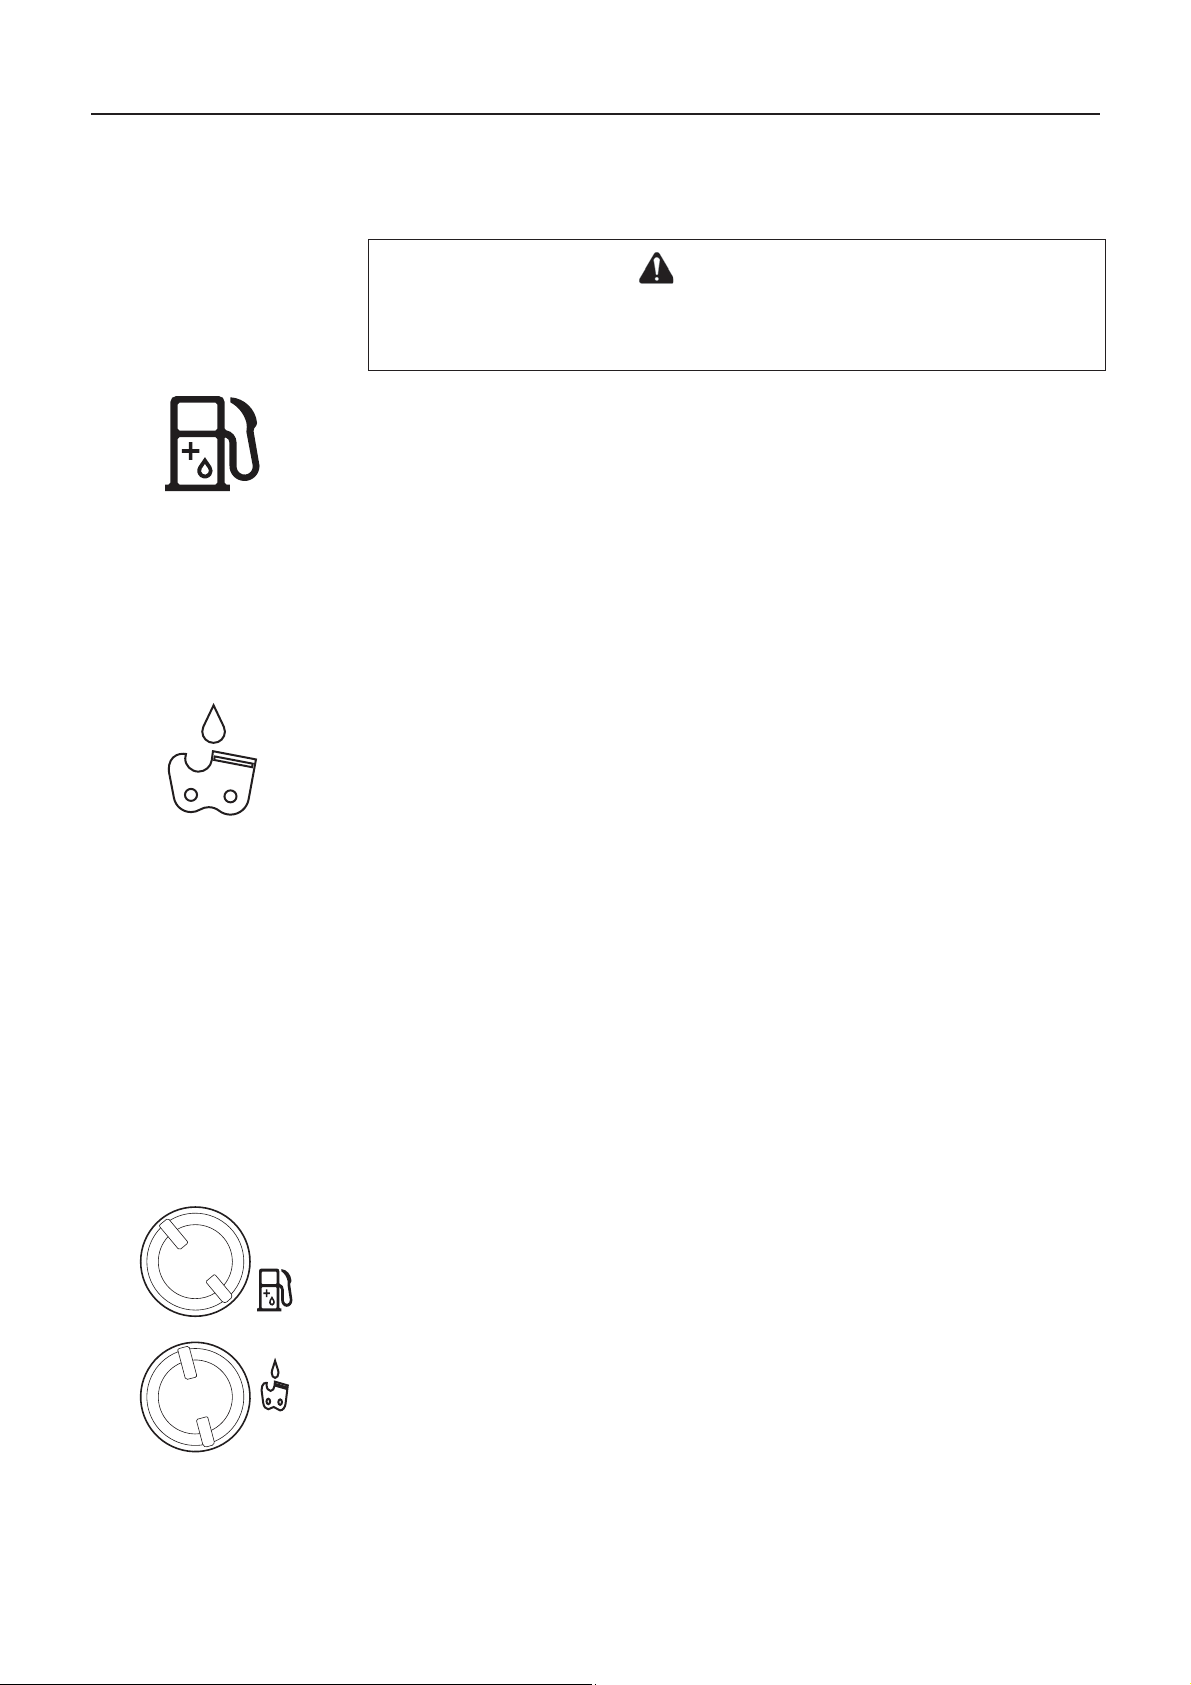
Betrieb
Kraftstoff und Schmiermittel
VORSICHT
Schrauben Sie beim Öffnen des Kraftstofftanks den Kraftstoffdeckel stets seh r
langsam los und warten Sie ab, bis Druckausgleich besteht, bevor Sie den Deckel
abnehmen.
Der Kraftstoff ist ein Gemisch aus Normalbenzin und hochwertigem Ma rkenöl für
luftgekühlte Zweitaktmotoren.
Verwenden Sie unverbleites Benzin mit min de ste ns 89Oktan.
Verwenden Sie keinen Kraftstoff mit Methylalkohol oder mehr als 10 % Ethylalkohol.
Empfohlenes Mischv erhältn is: 50 : 1 (2%) Öl nach ISO-L-EGD Standard (ISO/CD1373 8),
JASO FC, FD und ECHO Premium 50: 1 Öl.
- Mischen Sie den Kraftstoff nicht direkt im Motor-Kraftstofftank.
- Achten Sie darauf, dass kein Benzin oder Öl verschüttet wird.
Wischen Sie verschütteten Kraftstoff stets auf.
- Gehen Sie mit Benzin vorsichtig um.
Es ist äußerst leicht entzündlich.
- Lagern Sie Benzin nur in zugelassenen Behältern.
Kettenschmierung
Korrekte Schmierung der Kette im Betrieb minimiert die Reibung zwischen Kette,
Schwert und Kettenrad sowie den Kupplungsbauteilen wie Nadellager und
Kupplungsbaugruppe.
Verwenden Sie ECHO echtes Kettenöl oder ein anderes empfohlendes Kettenöl von
ECHO, das speziell für die korrekte Schmierung von Schienen und Ketten ausgelegt ist.
Diese Öle enthalten Fixiermittel sowie Anti-Aging- und Antioxidationsmittel.
Fragen Sie Ihren ECHO-Händler nach einem geeigneten Kettenöl.
Verwenden Sie nie Altöl oder zurückge wonnenes Öl, dies kann zu verschiedenen
Funktionsstörungen des Ölsystems, des Kupplungssystems, der Kette und des
Schwerts führen.
Schmierprobleme, die entstehen, weil das falsche Öl verwendet wurde, machen alle
Garantieansprüche nic hti g.
Besonders Kettenöl auf Pflanzenbasis verharzt schnell, haftet an der Ölpumpe, der
Kette, dem Kupplungsnadellager und der Kupplungsbaugruppe an.
Es verursacht Funktionsstörungen und verkürzt die Lebensdauer des Geräts.
Nach der Verwendu ng das Kettenölsy stem mit Kettenöl a uf Mineral- oder c hemischer Basis
durchspülen; Kettenöl auf Pflanzenbasis gegebenenfalls verwenden, wenn dies aufgrund
örtlicher / kommunaler Vorschriften oder wegen anderer Gründe erforderlich ist.
In einer Notsituation ka nn kurzfristig frisches SAE 10W-30 Motoröl verwendet werden.
Deckelsymbole
Kraftstoff- und Öltankdeckel werden durch die nachstehenden Symbole dargestellt.
Kraftstofftankdeckel
(Orange)
Kettenöltankdeckel
(Schwarz)
17
Page 94
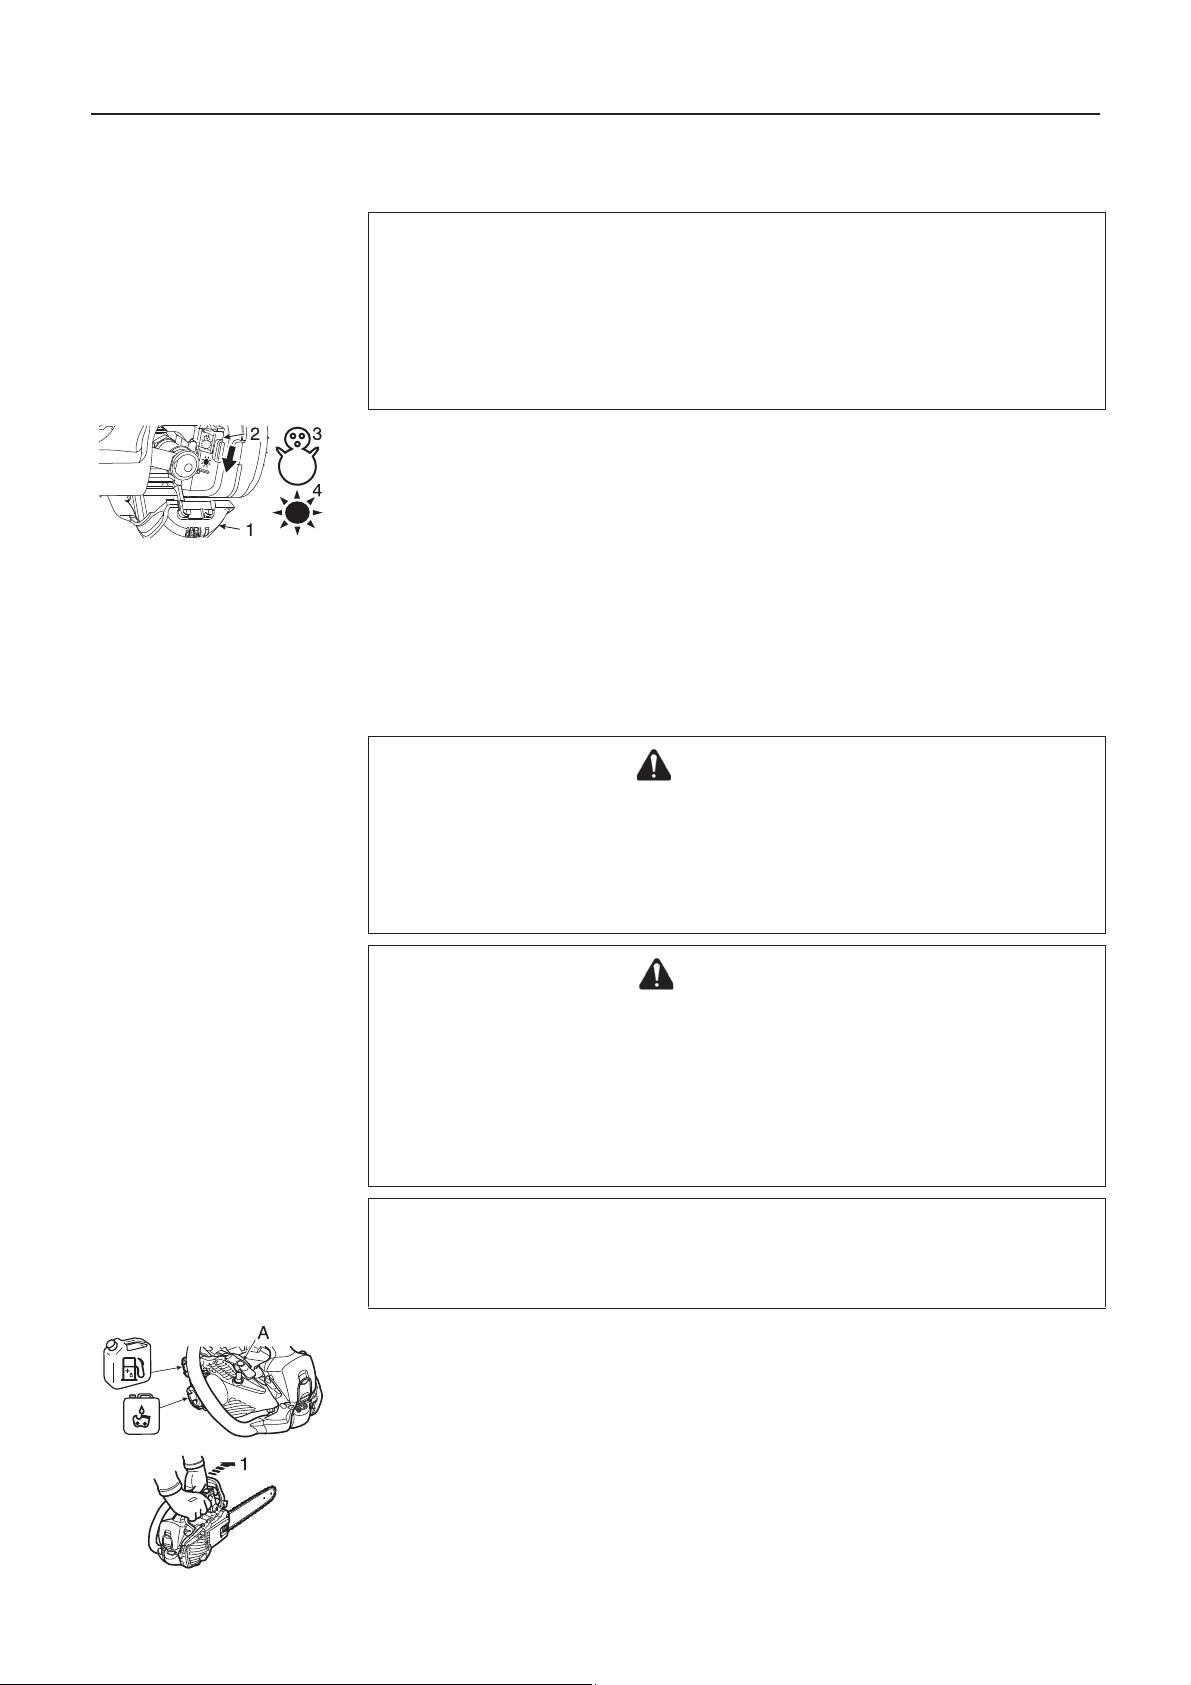
Winterbetrieb
HINWEIS
Drücken Sie den Luftregler nach unten in die Position für Betrieb bei niedrigen
Außentemperaturen (Schneemannzeichen erscheint), wenn das Gerät bei
Außentem peraturen von weniger als 5 °C verw endet wird.
Bringen Sie den Luftregler wieder in seiner ursprünglichen Position an, wenn Sie das
Gerät bei Temperaturen über 5 °C verwenden.
Nichtbeachtung dieser Anweisung führt zu einer Überhitzung des Motors.
1. Zündkerzenabdeckung
2. Luftregler
3. Position für Betrieb bei niedrigen Außentemperaturen (nach unten drücken,
Schneemannzeichen)
4. Position für Betrieb bei hohen Außentemperaturen (nach oben ziehen, Sonnenzeichen)
Verwenden Sie den Luftreg ler, um im Winterbetrieb Vergaserprobleme zu vermeiden.
Öffnen Sie die Zündkerzenabdeckung (siehe Seite 33 „Zündkerzenabdeckung").
Drücken Sie den Luftregler nach unten in die Position für Betrieb bei niedrigen
Außentemperaturen.
Bringen Sie den Lu ftregler w ieder in seiner urs prünglichen Position an (hoch ziehen), we nn
Sie das Gerät bei Temperaturen über 5 °C verwenden (Sonnenzeichen erscheint).
Kaltstart
WARNUNG
Nachdem der Choke-Knopf gedreht und der Knopf anschließend in die
ursprüngliche Position zurückgestellt wurde, verbleibt der Gashebel in einer
erhöhten Leerlaufeinste llung.
Wird der Motor in dieser erhöhten Leerlaufeinstellung gestartet, beginnt sich die
Sägekette zu drehen.
Starten Sie den Motor erst bei aktivierter Kettenbremse.
VORSICHT
1. Nach dem Anspringen des Motors sofort den Gashebel eindrücken und
loslassen, um die Gashebelsperre zu entsperren und zur Leerlaufdrehzahl
zurückzukehren, dann den vorderen Handschutz sofort in Richtung zum
Bediener ziehen. (Position der Kettenbremse: GELÖST)
2. Geben Sie bei aktivierter Kettenbremse kein Gas.
3. Verwenden Sie die Kettenbremse nur zum Starten des Motors oder in Notfällen.
4. Verwenden Sie den Halbgasknopf niemals zum Säg en, sonde rn nur zum Starten
des Motors.
HINWEIS
Ziehen Sie das Starterseil nicht bis zum Anschlag heraus.
Lassen Sie den Startergriff nicht zum G ehäuse zurückschnappen.
A: Starte rgriff "ES" START
Füllen Sie den Kraftstofftank mit Kraftstoff.
Es ist nicht zulässig, Kraftstoff bis über den Ansatz des Einfüllstutzens zu füllen.
Füllen Sie den Kettenöltank mit Schmiermittel.
1. Position der Kettenbrems e: AKTIVIERT
Drücken Sie den Handschutz nac h vorn .
(Position der Kettenbremse: AKTIVIERT)
18
Page 95
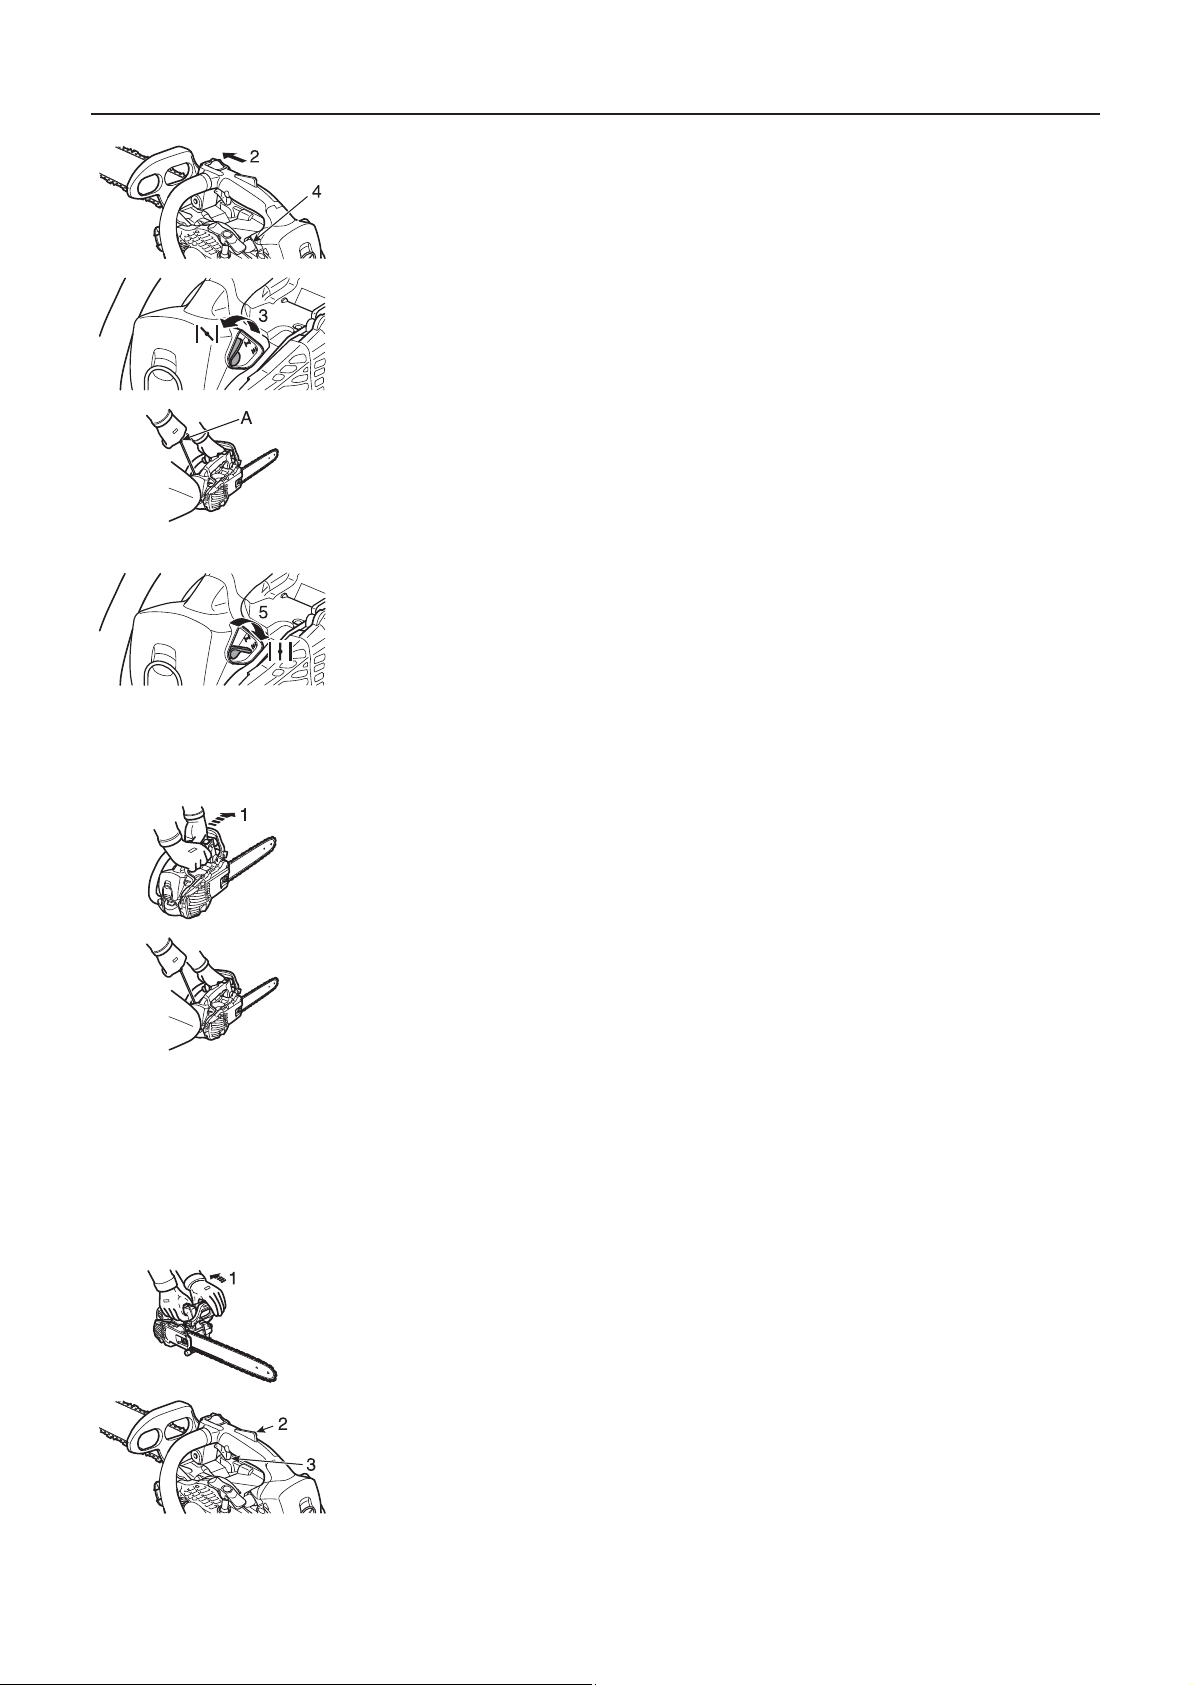
2. Zündschalter (Betrieb)
3. Choke-Knopf (GESCHLOSSEN)
4. Kraftstoffpumpe
Schalten Sie den Zündschalter ein (Betrieb).
Drehen Sie den Choke-Knopf gegen den Uhrzeigersinn (schließen).
Drücken Sie auf die Kraftstoffpumpe, bis Kraftstoff in der Pumpe zu sehen ist.
Halten Sie die Motorsäge sicher in der Hand.
Legen Sie die Motorsäge beim Starten auf einen flachen Boden und halten Sie den
Vordergriff in der linken Hand. Halten Sie das Hinterende des hinteren Griffs mit dem
rechten Knie fest und ziehen Sie den Startergriff mit der rechten Hand.
Beim Anlassen der Säge dürfen Führungsschiene und Sägekette mit nichts in
Berührung sein.
Ziehen Sie bis zum ersten Zündgeräusch mehrmals am Startergriff.
5. Choke-Knopf (OFFEN)
Drehen Sie den Choke-Knopf im Uhrzeigersinn (öffnen).
Ziehen Sie am Startergriff, bis der Motor startet.
Ziehen Sie am Gashebel, um den Halbgasknopf zu lösen.
Warmstart
1. Position der Kettenbremse: Aktiviert
Vergewissern Sie sich, dass sich Kraftstoff und Kettenöl in den Tanks befindet.
Drücken Sie den Handschutz nac h vorn .
(Position der Kettenbremse: Aktiviert)
Stellen Sie den Stoppschalter in Startposition.
Halten Sie die Motorsäge sicher in der Hand.
Ziehen Sie den Startergriff.
Bei Bedarf kann der Choke verw en de t we rde n: na ch d em erste n Zü ndgeräusch sollten
Sie jedoch kurz den Gashebel betätigen, um den Halbgasknopf und den Choke
auszurasten.
Nachdem der Choke-Knopf gedreht und der Knopf anschließend in die ursprüngliche
Position zurückgestellt wurde, verbleibt der Gashebel in einer erhöhten
Leerlaufeinstellung.
Laufender Motor
1. Position der Kettenbremse: Gelöst
2. Gashebelsperre
3. Gashebel
Sobald der Motor anspringt, sollte er einige Minuten im Leerlauf drehen.
Ziehen Sie den vorderen Handschutz sofort zum Bediener.
(Position der Kettenbremse: Gelöst)
Drücken Sie langsam den Gashebel, um die Motordrehzahl zu erhöhen.
Die Kette setzt sich in Bewegung, wenn der Motor ca. 4400 U/Min. erreicht.
Achten Sie auf die richtige Beschleunigung und die Schmierung von Sägekette und
Führungsschiene.
Lassen Sie den Motor nicht unnötig mit hoher Drehzahl laufen.
Vergewissern Sie sich, dass die Motorsäge stoppt, wenn Sie den Gashebel loslassen.
19
Page 96

Stoppen des Motors
HINWEIS
Falls der Motor nicht anhäl t, drehen Sie den Choke-Knopf gegen den Uhrzeigersinn, um den
Motor anzuh alten.
Lassen Sie vor einem Neustart des Motors den Stoppschalter von einem zugelassenen
ECHO-Händler prüfen und ggf. reaparieren.
1. Gashebel
2. Stoppschalter
Lassen Sie den Gashebel los und den Motor im Leerlauf drehen.
Stellen Sie den Stoppschalter in STOP-Position.
Überprüfen der Kettenspannung
WARNUNG
Stellen Sie sicher, dass de r Motor beim Überprüfen der Kettensp annung abgeschaltet
ist.
HINWEIS
Lösen Sie immer die Mutte r der Kupplun gsabdec kung, bev or Sie die Kett enspannsch raube
verstellen, sonst besc hädigen Sie die Abdeckung und den Kettenspanner.
Die Kettenspannung sollte während der Arbeit regelmäßig geprüft und bei Bedarf
korrigiert werden.
Spannen Sie die Kette so stramm wie möglich.
Die Kette muss sich jedoch immer noch leicht von Hand durchziehen lassen.
Überprüfung der Kettenschmierung
Halten Sie die Mo tors äg e über trockenem Untergrund, und lass en Sie die Maschine 30
Sekunden mit Halbgas laufen.
Ein dünner Film von „ausgespritztem" Öl sollte auf dem Untergrund sichtbar sein.
Arbeitsvorbereitung
Machen Sie sich vor den Sägearbeiten mit der Motorsäge vertraut.
Es ist von Vorteil, wenn Sie zur Übung mehrmals etwas Holz bzw. einige Äste zersägen.
Lassen Sie keine Personen oder Tiere in den Arbeitsbereich.
Sollten mehrere Personen gleichzeitig sägen, halten Sie immer einen Sicherheitsabstand
ein.
20
Page 97

Richtige Verwendung der Kettenbremse
GEFAHR
Eine Rückschlagbewegung ist sehr gefährlich.
Rückschlag tritt auf, sobald die Spitze der Führungsschiene mit Holz oder einem
anderen Gegenstand in Berührung kommt.
Durch die Kettenbremse wird die Wahrscheinlichkeit einer Verletzung durch
Rückschlag verringert.
Überprüfen Sie vor jedem Einsatz die Kettenbremse auf optimale Funktion.
HINWEIS
Zur Übung: Schieben Sie beim Fällen eines kle inen Baums den vor deren Handsc hutz
(Kettenbremshebel) nach vorn, um die Bremse einzurasten.
Stellen Sie vor jedem Arbeitsgang sicher, dass die Kettenbremse richtig funktioniert.
Wenn die Kettenbremse mit Holzspänen verstopft ist, wird ihre Funktionsweise etwas
beeinträchtigt.
Halten Sie deshalb das Gerät immer sauber.
Geben Sie bei aktivierter Kettenbremse kein Gas.
Die Kettenbremse wird in Notfällen verwendet.
Verwenden Sie sie nur, wenn es absolut erforderlich ist.
Wenn Sie beim Anlassen den Halbgasknopf benutzen, lassen Sie die Kettenbremse
eingeschaltet.
Lösen Sie die Bremse sofort nach dem Starten des Motors.
Testen Sie die Bremse niemals in einem Bereich, wo Benzindämpfe vorhanden sind.
Kettenbremse
Die Aufgabe der Kettenbremse ist es, nach einem Rückschlag die Kette zu stoppen.
Sie kann den Rückschlag nicht verhindern und nicht verringern.
Verlassen Sie sich zum Schutz vor einem Rückschlag nicht auf die Kettenbremse.
Selbst mit einer Kettenbremse ist es unerlässlich, sich auf seine gute Wahrnehmung und
korrekte Sägemethoden zu verlassen, als ob keine Kettenbremse vorhanden wäre.
Auch bei normalem Einsatz und korrekter Wartung kann sich die Ansprechzeit der Bremse
verlängern.
Die folgenden Fehler können den Schutz, den die Kettenbremse bietet, beeinträchtigen:
Die Motorsäge wird zu nah am Körper gehalten.
Die Rückschlaggeschwindigkeit kann selbst für eine perfekt gewartete Bremse zu
schnell sein.
Die Hand des Bedieners ist nicht am Handschutz.
Dadurch kann die Kettenbremse nicht ausgelöst werden.
Mangelnde Pflege und Wartung verlängert die Bremszeit und sorgt für eine geringere
Wirksamkeit.
Schmutz, Fett, Öl, Späne usw. befinden sich in den beweglichen Teilen der Bremsanlage
und können dadurch die Bremszeit verlängern.
Verschleiß und Beanspruchung der aktivierten Bremsfeder und Verschleiß der Brems- /
Kupplungstrommel und Drehpunkte kann die Bremszeit verlängern.
Ein beschädigter Handschutz und Kettenbremshebel kann die Bremse ganz außer Kraft
setzen.
21
Page 98

Überprüfung der Bremsfunktion
1. Stellen Sie die Motorsäge auf festem Untergrund ab.
2. Halten Sie den Griff mit beiden Händen und geben Sie Vollgas.
3. Betätigen Sie die Kettenbremse, indem Sie das linke Handgelenk gegen den vorderen
Handschutz bewegen, ohne dabei den vorderen Griff loszulassen.
4. Die Kette muss sofort stoppen.
5. Lassen Sie den Gashebel los.
Wenn die Kette nicht sofort stoppt , lassen Sie die Säge von Ihre m ECHO -Händler rep arieren .
Lösen der Kettenbremse.
Sobald der vordere Handschutz vollständig zum Bediener gezogen wird, ist die
Kettenbremse gelöst.
Automatische Kettenbremse
WICHTIG
Beim Überprüfen de r Funktion der automat ischen Kettenbremse verwenden Sie ein Material
mit ähnlicher Oberfläche wie Holz, damit die Sägekette nicht beschädigt wird.
1). Schienenspitze ca. 40 cm hoch halten.
2). Hinteren Handgriff mit der rechten Hand nur locker umfassen.
Die automatische Kettenbremse stoppt den Betrieb der Motorsäge derart, dass die am Ende
der Kettenschiene erzeugte Rückschlagwi rkung automatisch die Kettenbremse betätigt.
Gehen Sie auf folgende Weis e vor, um sicherzustellen , das s di e automatische Kettenbremse
richtig funktioniert:
1. Stellen Sie den Motor der Säge ab.
2. Greifen Sie den vorderen und hinteren Handgriff locker mit den Händen, dass die
Kettenschiene wie in der Abbildung dargestellt auf einer Höhe von ca. 40 cm gehalten
wird.
3. Lassen Sie den vorderen Handgriff mit der linken Hand langsam los.
Das Ende der Kettenschiene schlägt auf das Holz bzw. den Untergrund auf und erhält
dadurch einen Stoß.
(* Dabei den hinteren Handgriff mit der rechten Hand nur locker umfassen.)
4. Dieser Stoß wird zum Bremshebel übertragen und betätigt die Kettenbremse.
22
Page 99

Anweisungen zum Sägen
GEFAHR
Achten Sie darauf, dass die Spitze der Führungsschiene bei laufendem Motor keine
Gegenstände berührt, um einen Rückschlag zu vermeiden.
Allgemeines
Eine Motorsäge darf immer nur von einer Person bedient werden.
Es ist zeitweise schon schwer genug, die eigene Sicherh eit zu gewährleisten.
Deshalb sollten Sie nicht auch noch die Verantwortung für eine Hilfskraft übernehmen.
Sobald Sie die Grundlagen im Umgang mit der Säge erlernt haben, ist der gesunde
Menschenverstand Ihr bester Helfer.
Stehen Sie links von der Säge mit der linken Hand am vorderen Ha ndgriff und der rechten
Hand am hinteren Handgriff, damit Sie den Gashebel mit dem rechten Zeigefinger betätigen
können.
Bevor Sie einen Baum zu fällen versuchen, zersägen Sie zunächst einmal kleinere Stämme
oder Zweige.
Machen Sie sich mit den Bedienungselementen und der Reaktionsweise der Säge vertraut.
Lassen Sie den Motor an, und achten Sie darauf, dass er richtig läuft.
Betätigen Sie den Gashebel, damit sich die Drosselklappe ganz öffnet, und beginnen Sie mit
dem Sägen.
Es ist nicht erforderlich, fest nach unten zu drücken, damit das Sägen beginnt.
Wenn die Kette richtig geschärft ist, müsste das Sägen relativ leichtgängig ablaufen.
Wenn Sie zu fest auf die Säge drüc k en, l äuft der M oto r lang sa mer, und das Sägen wird dann
schwieriger.
Bestimmte Substanzen können das Gehäuse Ihrer Motorsäge angreifen.
(Beispiel: Baumsäure, Düngemittel usw.)
Um eine Beschädigung des Gehäuses zu vermeiden, sind die Sägespäne, die sich an der
Kupplung und an der Führung sschiene an gesammelt h aben, zu entferne n und diese Berei che
gründlich mit Wasser zu reinigen.
23
Page 100
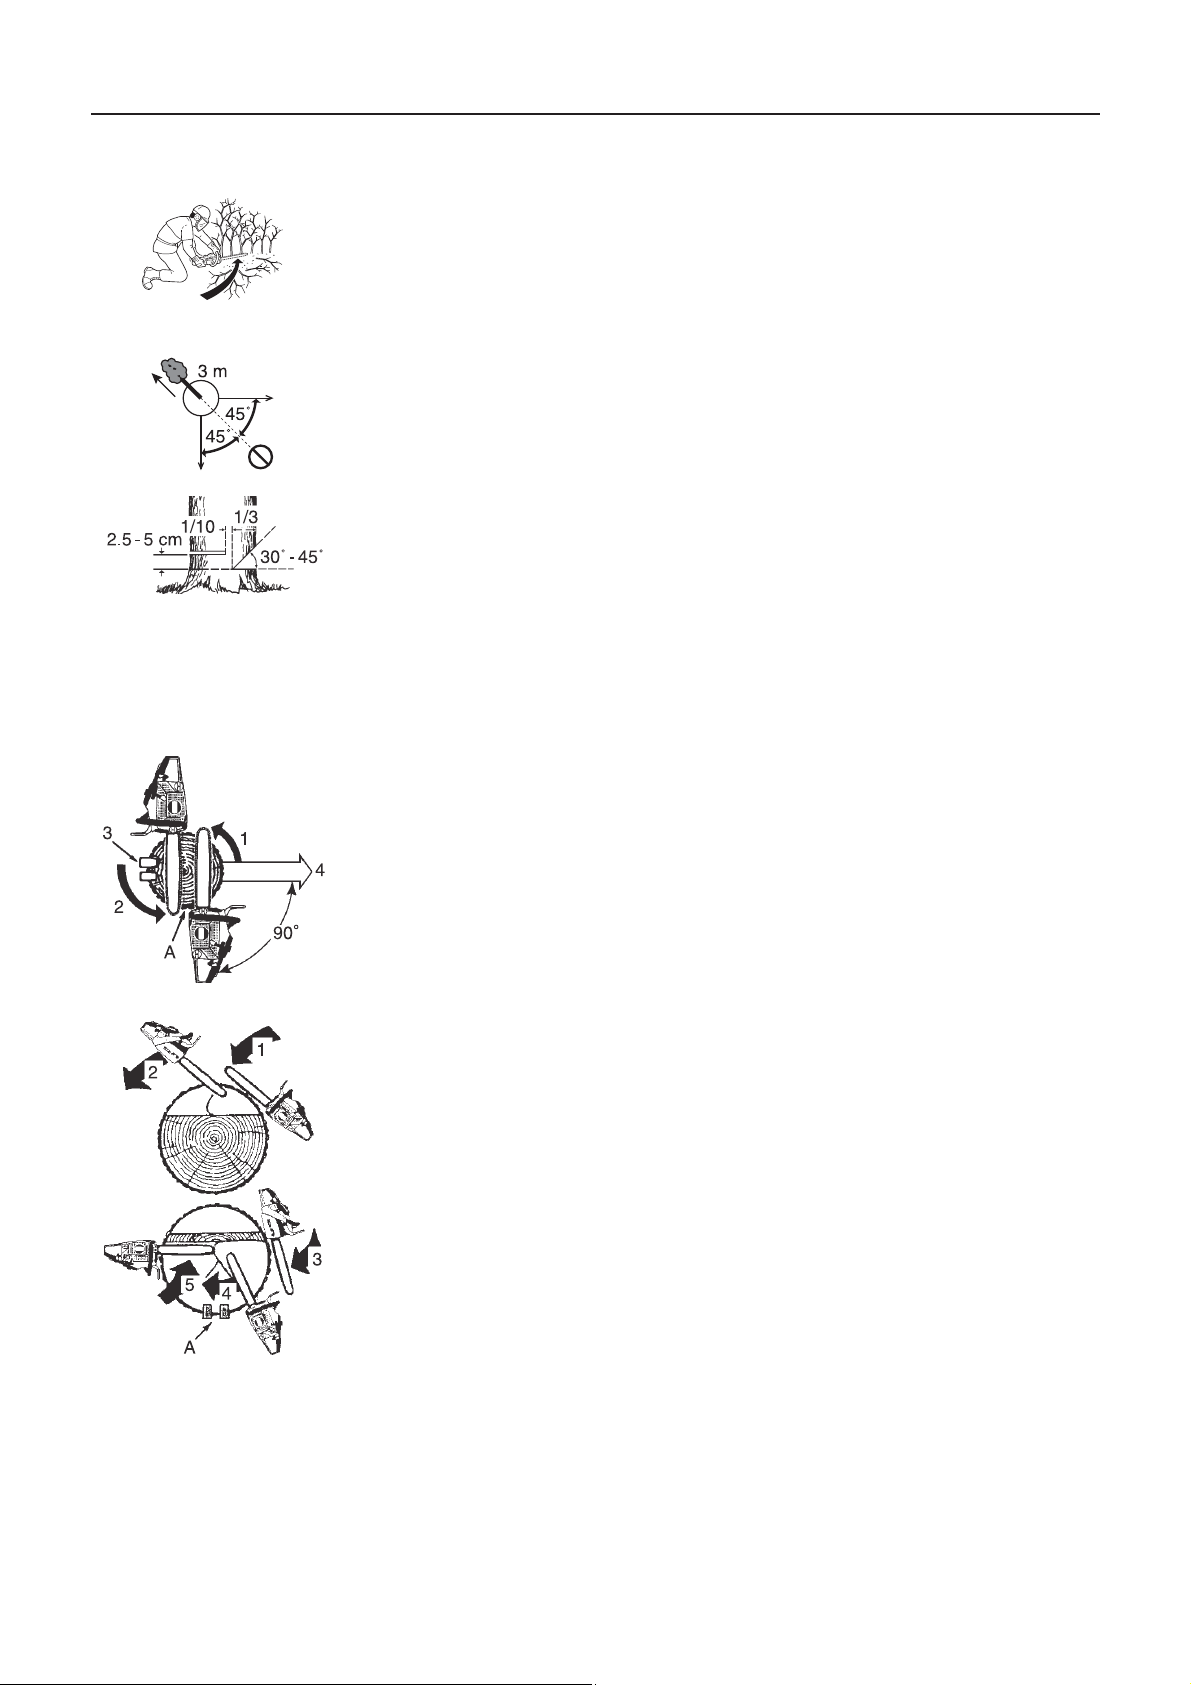
Fällen eines Baums
Ein fallender Baum kann schwere Schäden verursachen, wenn er auf ein Fahrzeug, ein
Gebäude, einen Zaun, eine Stromleitung oder einen anderen Baum fällt.
Ein Baum kann so gefällt werden, dass er dorthin fällt, wo er später liegen soll.
Zuerst müssen Sie also festlegen, wohin er fallen soll!
Vor dem Sägen müssen Sie alle Hindernisse um den Baum herum aus dem Weg räumen.
Beim Arbeiten brauche n Ihre Füße si cheren Halt. Auße rdem müssen Si e so arbeiten, dass die
Säge keine Hindernisse berührt.
Danach stellen Sie sicher, dass Sie freie Bahn haben, um si ch in Sicher heit zu bringen.
Sobald der Baum zu fallen beginnt, müssen Sie sich in einem Winkel von 45 Grad aus der
Fallrichtung und m in des te ns 3Meter vom Baum entfernen, damit Sie geschützt sind, falls de r
Baum beim Fallen über den Baumstumpf hinweg zurückschnellt.
Beginnen Sie mit dem Einschnitt auf der Seite, auf die der Baum fallen soll.
Kerbe: 1/3 vom Durchmesser und im Winkel von 30
Fällschnitt: 2,5 bis 5 cm höher
Bruchleis te: 1/10 vom Durchmesser
Sägen Sie eine Kerbe auf ca. 1/3 der Höhe des Baumstamms.
Die Position dieser Kerbe ist wichtig, da der Baum versucht, „in die Kerbe" zu fallen.
Der Fällschnitt erfolgt an der der Kerbe gegenüberliegenden Seite.
Er wird angesetzt, indem ein Krallenanschlag an der gegenüberliegenden Seite ca. 2,5 bis 5
cm oberhalb des unteren Kerbenrands angebracht wird, und endet bei ca. 1/10 des
Durchmessers zur Innenkante der Kerbe, damit der Teil des Baums ohne Einschnitt als
Bruchleiste fungiert.
o
bis 45
o
1. Kerbschnitte
2. Fällschnitt
3. Keile (falls Platz vorhanden ist)
4. Fällen
A: 1/10 vom Durchmesser bleibt als Bruchleiste stehen
Versuchen Sie nicht, über den Fällschnitt die Kerbe zu erreichen.
Das verbleibende Holz zwischen Kerbe und Fällschnitt, die so genannte Bruchleiste, wirkt
beim Fallen des Baums wie ein „Scharnier" und lenkt den Baum in die gewünschte
Fallrichtung.
Wenn der Baum zu fallen beginnt, halt en Sie den Motor an, legen Sie die Säge auf den Boden,
und bringen Sie sich schnell in Sicherheit.
Fällen großer Bäume
1. Kerbschnitte
2. Rundum-Methode
3. Fällschnitt
4. Rundum-Methode
5. Fällschnitte
A: Keile
Beim Fällen großer Bäu me mit eine m Durchmess er, der zweimal so groß ist wie die Länge de r
Führungsschiene, beginnen Sie mit den Kerbschnitte n auf einer Seite un d ziehen Sie die Säge
bis zur anderen Seite der Kerbe durch.
Beginnen Sie bei angesetztem Krallenanschlag mit dem hinteren Einschnitt auf der einen
Seite des Baums, wobei die Säge als Drehzapfen fun giert, um auf di eser Seite die gew ünschte
Bruchleiste herzustellen.
Anschließend nehmen Sie die Säge für den zweiten Schnitt heraus.
Setzen Sie die Sä ge sehr vorsich tig in d en er sten Eins chnitt e in, so dass s ich ke in Rücks chlag
ergibt.
Der letzte Einschnitt erfo lgt, indem die Säge nach vorn in den Einsc hnitt gezog en wird, um die
Bruchleiste zu erreichen.
24
 Loading...