

Wärmebildkamera
Thermal Imaging Camera
Caméra thermique
TIC 100

TIC 100 Deutsch
Inhalt
Übersicht . . . . . . . . . . . . . . . . . . . . . . . . . . . . . . 4
Sicherheitshinweise . . . . . . . . . . . . . . . . . . . . 6
Auspacken / Lieferumfang. . . . . . . . . . . . . . 8
Lieferumfang. . . . . . . . . . . . . . . . . . . . . . . . . . . . 8
Display . . . . . . . . . . . . . . . . . . . . . . . . . . . . . . 10
Gerätemenü . . . . . . . . . . . . . . . . . . . . . . . . . 12
Emisionsgrad. . . . . . . . . . . . . . . . . . . . . . . . . . . 14
oberer Grenzwert . . . . . . . . . . . . . . . . . . . . . . 14
unterer Grenzwert. . . . . . . . . . . . . . . . . . . . . . 16
automatische Abschaltfunktion. . . . . . . . . 16
Hintergrundbeleuchtung . . . . . . . . . . . . . . . 16
Datum um Uhrzeit. . . . . . . . . . . . . . . . . . . . . . 18
Einstellung des Zeitstempels. . . . . . . . . . . . 18
Daten löschen. . . . . . . . . . . . . . . . . . . . . . . . . . 18
Dateityp Einstellung . . . . . . . . . . . . . . . . . . . . 18
Rauschfilter . . . . . . . . . . . . . . . . . . . . . . . . . . . . 20
Spracheinstellung . . . . . . . . . . . . . . . . . . . . . . 20
Batterie wechseln . . . . . . . . . . . . . . . . . . . . 22
Einlegen der Speicherkarte . . . . . . . . . . . 24
Reinigung und Pflege . . . . . . . . . . . . . . . . 24
Kalibrierservice. . . . . . . . . . . . . . . . . . . . . . . 26
Entsorgung . . . . . . . . . . . . . . . . . . . . . . . . . . 26
Technische Daten . . . . . . . . . . . . . . . . . . . . 28
2 Bedienungsanleitung

English Français
Contents
Overview . . . . . . . . . . . . . . . . . . . . . . . . . . . . . . 5
Safety instructions . . . . . . . . . . . . . . . . . . . . . 7
Unpacking / scope of delivery . . . . . . . . . . 9
Scope of delivery . . . . . . . . . . . . . . . . . . . . . . . . 9
Display . . . . . . . . . . . . . . . . . . . . . . . . . . . . . . 11
Device menu. . . . . . . . . . . . . . . . . . . . . . . . . 13
Emission factor . . . . . . . . . . . . . . . . . . . . . . . . . 15
upper limit . . . . . . . . . . . . . . . . . . . . . . . . . . . . . 15
lower limit . . . . . . . . . . . . . . . . . . . . . . . . . . . . . 17
auto shut-off . . . . . . . . . . . . . . . . . . . . . . . . . . . 17
Backlight. . . . . . . . . . . . . . . . . . . . . . . . . . . . . . . 17
Date at Time . . . . . . . . . . . . . . . . . . . . . . . . . . . 19
Setting the timestamp. . . . . . . . . . . . . . . . . . 19
Delete data. . . . . . . . . . . . . . . . . . . . . . . . . . . . . 19
File Type setting. . . . . . . . . . . . . . . . . . . . . . . . 19
noise filter. . . . . . . . . . . . . . . . . . . . . . . . . . . . . . 21
language setting . . . . . . . . . . . . . . . . . . . . . . . 21
Sommaire
Vue d‘ensemble. . . . . . . . . . . . . . . . . . . . . . . . 5
Consignes de sécurité . . . . . . . . . . . . . . . . . . 7
Déballage / pièces livrées. . . . . . . . . . . . . . . 9
Eléments contenus dans l’emballage. . . . . 9
Affichage . . . . . . . . . . . . . . . . . . . . . . . . . . . . 11
Menu de l’appareil . . . . . . . . . . . . . . . . . . . 13
Facteur d‘emissivité . . . . . . . . . . . . . . . . . . . . 15
limite supérieure . . . . . . . . . . . . . . . . . . . . . . . 15
limite inférieure . . . . . . . . . . . . . . . . . . . . . . . . 17
arrêt automatique . . . . . . . . . . . . . . . . . . . . . . 17
Rétro-éclairage . . . . . . . . . . . . . . . . . . . . . . . . . 17
Date et heure . . . . . . . . . . . . . . . . . . . . . . . . . . 19
Réglage de l'horodatage. . . . . . . . . . . . . . . . 19
Effacer les données . . . . . . . . . . . . . . . . . . . . . 19
Paramétrage type de fichier . . . . . . . . . . . . 19
filtre de bruit . . . . . . . . . . . . . . . . . . . . . . . . . . . 21
réglage de la langue. . . . . . . . . . . . . . . . . . . . 21
Battery replacement . . . . . . . . . . . . . . . . . 23
Inserting the memory card . . . . . . . . . . . 25
Cleaning and care . . . . . . . . . . . . . . . . . . . . 25
Calibration service . . . . . . . . . . . . . . . . . . . 27
Disposal . . . . . . . . . . . . . . . . . . . . . . . . . . . . . 27
Technical data . . . . . . . . . . . . . . . . . . . . . . . 29
08/2016 ba80053def03_TIC100 3
Changer les piles . . . . . . . . . . . . . . . . . . . . . 23
Insertion de la carte mémoire. . . . . . . . . 25
Nettoyage et entretien . . . . . . . . . . . . . . . 25
Service d’étalonnage . . . . . . . . . . . . . . . . . 27
Elimination . . . . . . . . . . . . . . . . . . . . . . . . . . 27
Données techniques . . . . . . . . . . . . . . . . . 29
TIC 100 Deutsch
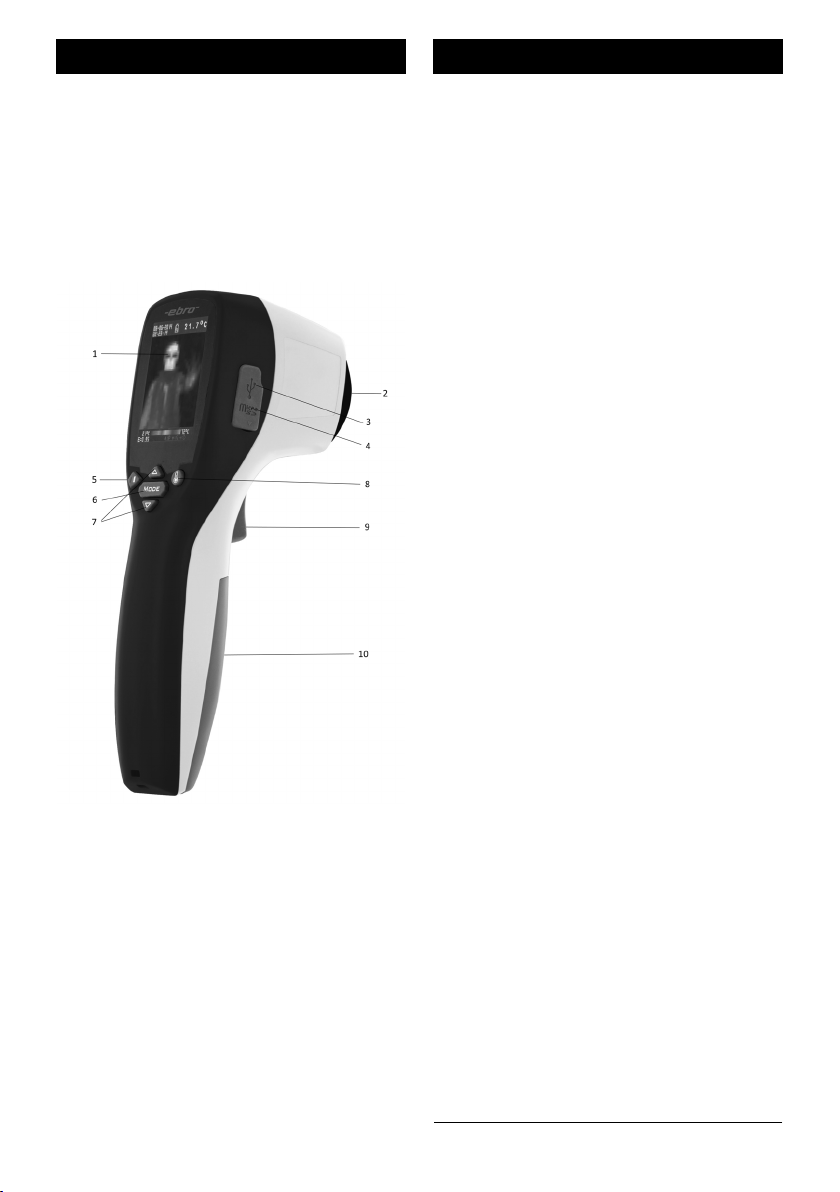
Übersicht
Mit der Wärmebildkamera erhalten Sie
sofortige und gemeine Wärmebilder und
radiometrische Messwerte von Messobjekten die max. 5m entfernt sind. Die einfach zu bedienende Wärmebildkamera
kann bis zu 25.000 Bilder auf der mitbelieferten SD-Karte speichern.
Die Wärmebildkamera TIC 100 ist ein batteriebetriebenes Messgerät.
1 Display
2 Infrarotlinse
3 micro SD-Kartenleser
4 Mini USB Anschluss
5 Taste zum Wechsel der Farbskala
6 Menü-Taste
7 Kursortasten (auf bzw. ab)
8 Taste zur Auswahl der
Temperatureinheit
9 Messtaste
10 Batteriefach
4 Bedienungsanleitung

English Français
Overview
With the thermal imaging camera you get
instant and common thermal images and
radiometric readings from measurement
objects the max. 5m away. The easy to use
thermal imaging camera can store up to
25,000 images on the SD card supplied
silent.
The thermal imager TIC 100 is a batterypowered instrument.
1 Display
2 infrared lens
3 SD-card reader
4 USB- port
5 Color selection button
6 Menu button
7 Cursor buttons
8 Temperature unit button
9 Trigger
10 Battery compartment
Vue d‘ensemble
Avec la caméra d'imagerie thermique,
vous obtenez des images thermique avec
une vue d'ensemble et des lectures radiométriques de mesure des objets éloignés
au maximum de 5m. Cette caméra thermique, facile à utiliser, peut stocker
jusqu'à 25 000 images sur la carte SD fournie avec l'appareil.
La camera thermique TIC 100 est un
appareil alimenté par piles.
1 Écran
2 lentille infrarouge
3 Lecteur de carte Micro SD
4 Mini port USB
5 Bouton pour changer l'échelle des
couleurs
6 Bouton Menu
7 Touches de curseur
8 Bouton pour sélectionner l'unité de
température
9 Gachette de prise de mesure
10 Compartiment piles
08/2016 ba80053def03_TIC100 5

TIC 100 Deutsch
Sicherheitshinweise
Verwenden Sie das Gerät nicht in explosionsgefährdeten Bereichen.
Lebensgefahr!
Bringen Sie das Gerät nicht in eine Umgebung, die heißer ist als 60°C. Die Batterie
kann explodieren!
Setzen Sie das Gerät keiner MikrowellenStrahlung aus. Explosionsgefahr der Batterie!
Wenn das Gerät für längere Zeit nicht
benutzt wird, schalten Sie es aus und
lagern die Batterien an einem kühlen und
trockenen Ort.
6 Bedienungsanleitung

English Français
Safety instructions
Do not use the device in explosive areas.
Danger of death!
Do not use the device in an environment
hotter than 60°C! The battery may
explode!
Do not subject the device to microwave
radiation. The lithium battery may
explode!
If the device is not to be used for a long
time, turn the power of, remove and store
the batteries in a cool, dry place.
Consignes de sécurité
N’utilisez pas l’appareil dans des zones
explosives. Danger de mort!
N’utilisez pas l’appareil dans un environnement dépassant 60°C. Risque d'explosion de la batterie!
N'exposez pas l'appareil à un rayonnement à micro-ondes. Risque d'explosion
de la batterie au lithium!
Si l‘appareil n‘est pas utilisé pour une longue période, éteignez l‘appareil et stockez
les piles dans un endroit frais et sec.
08/2016 ba80053def03_TIC100 7

TIC 100 Deutsch
Auspacken / Lieferumfang
Überprüfen Sie nach dem Erhalt die Geräteverpackung und den Inhalt auf Unversehrtheit. Überprüfen Sie außerdem, ob
der Inhalt der Geräteverpackung Ihrer
Bestellung entspricht.
Lieferumfang
Im Lieferumfang sind folgende Teile enthalten:
Wärmebildkamera TIC 100
USB-Kabel
8GB micro SD Karte
4 x AABatterie, 1,5 Volt
Transportkoffer
Kalibrierzertifikat
Bedienungsanleitung
Daneben können in der Lieferung verschiedene Zubehörteile enthalten sein.
Sollten Sie Grund zu einer Beanstandung
haben, nehmen Sie bitte mit uns Kontakt
auf. Unsere Kontaktdaten finden Sie auf
der Rückseite dieser Anleitung.
8 Bedienungsanleitung

English Français
Unpacking / scope of delivery
Check the device packaging and contents
to ensure it is complete and undamaged.
You must also check that the contents of
the packaging match your order.
Scope of delivery
The delivery includes these parts:
Thermal Imaging Camera TIC 100
USB cable
8GB micro SD memory Card
4 pcs. batteries, type AA 1,5V
Carrying case
Calibration Certificate
User manual
The delivery may also include various
accessories.
If you have any reason for complaint, do
not hesitate to contact us. You will find
our contact data on the back of this manual.
Déballage / pièces livrées
A réception des appareils, vérifiez que
l’emballage et le contenu sont intacts.
Vérifiez également si le contenu de
l’emballage correspond bien à votre commande.
Eléments contenus dans
l’emballage
Les éléments suivants sont fournis dans
l’emballage:
Caméra thermique TIC 100
Câble USB
8GB micro carte SD
4 x pile AA, 1,5V
mallette de transport
Certificat d‘étalonnage
Le présent manuel d’utilisation
Différents accessoires peuvent en outre
être fournis.
En cas de réclamation, n’hésitez pas à
nous contacter. Vous trouverez les renseignements correspondants au dos de ce
manuel.
08/2016 ba80053def03_TIC100 9
TIC 100 Deutsch
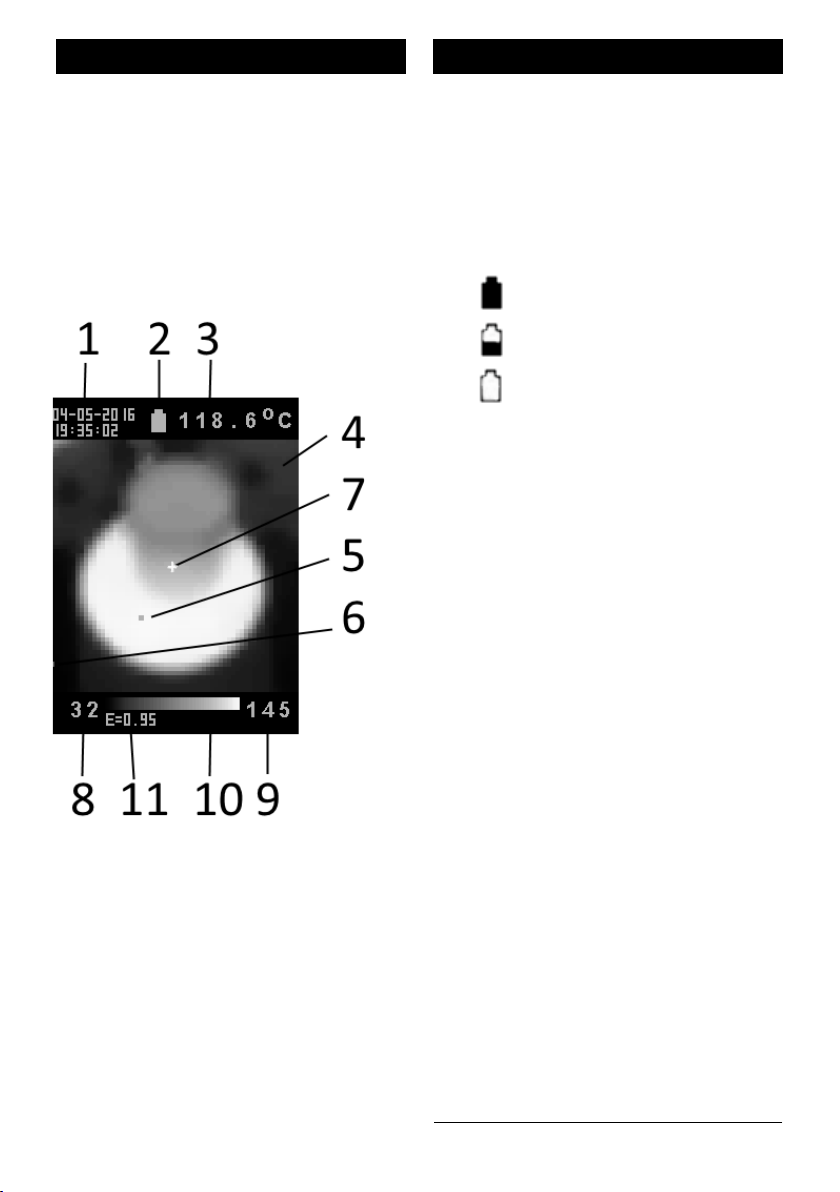
Display
1 Datum und Uhrzeit
2 Batterieanzeige
3 Temperaturanzeige in der Mitte des
Messfeldes
4 Anzeige
5 Markierung des höchsten
Temperaturwertes (Cursor weiß)
Batterie in Ordnung
Batterie bald aufgebraucht
Batteriewechsel notwendig
6 Markierung des niedrigsten
Temperaturwertes (Cursor rosa)
7 Markierung (Kreuz) der in der Mitte
gemessenen Temperatur
8 kleinster Temperaturmesswert
9 größter Temperaturmesswert
10 Temperaturfarbskala
11 eingestellter Emisionsgrad
10 Bedienungsanleitung

English Français
Display
1 Date and Time
2 Battery symbole
3 Temperature display in the center of
the field
4 Display
5 Marking the highest temperature
value (white cross)
6 Marking the lowest temperature value
(pink cross)
7 Mark (cross) the measured
temperature in the middle
8 lowest temperature value
Affichage
1 Date et heure
2 Affichage du niveau de charge de la
pile
3 Affichage de la température au centre
du champ
4 Afficher
5 Indicateur (croix) de la valeur de
température la plus élevée (croix
blanche)
6 Indicateur (croix) de la valeur de
température la plus basse (croix rose)
7 Mark (croix), la température mesurée
au milieu
9 highes temperature value
10 temperature scale
11 emissions factor
08/2016 ba80053def03_TIC100 11
8 lecture la plus basse température
9 la plus grande mesure de la
température
10 échelle de température
11 Facteur d'émissivité

TIC 100 Deutsch
Gerätemenü
Durch Drücken der Menü-Taste wird das
Gerätemenü ausgeführt.
Das Menü beinhaltet 11 Funktionen:
1 Einstellen des Emissionsgrads
2 Festlegung des oberen Grenzwertes
3 Festlegung des unteren Grenzwertes
4 automatische Abschaltfunktion
5 Einstellung der
Hintergrundbeleuchtung
6 Einstellung von Datum und Uhrzeit
7 Zeitstempel
8 Löschen von Dateien
9 Als Bild oder Video speichern
10 Rauschfilter
11 Spracheinstellung
Jeder Menüpunkt kann mit Hilfe der
Kursortasten angewählt und durch
Bestätigung der Messtaste aktiviert
werden.
Der ausgewählte Menüpunkt wird mit
roten Zeichen dargestellt.
Durch erneute Betätigung der Menü-Taste
gelangen Sie wieder in den normalen
Messmodus.
12 Bedienungsanleitung

English Français
Device menu
Please press menu button to access the
device menu.
The menu contains 11 functions:
1 Setup of emissivity
2 Setting the upper limit value
3 Setting the lower limit value
4 auto shut-off
5 Setting th ebacklight
6 Setting of Date and Time
7 Timestamp
8 Deleting Files
9 save picture or movie
10 noise filter
11 language settings
Each menu item can use the cursor keys
are selected and activated by confirming
the trigger.
The selected menu item is displayed with
red characters.
Menu de l’appareil
S'il vous plaît appuyez sur le bouton de
menu pour accéder au menu de l'appareil.
Le menu contient 11 fonctions:
1 Configuration de l'émissivité
2 Réglage de la valeur limite supérieure
3 Réglage de la valeur limite inférieure
4 arrêt automatique
5 Réglage du rétro-éclairage
6 Réglage de la date et de l'heure
7 Horodatage
8 Suppression de fichiers
9 Enregistrer l'image ou de la vidéo
10 filtre de bruit
11 réglage de la langue
Chaque élément de menu peut être utilisé
par les touches du curseur et en confirmant avec le bouton de mesure
L'élément de menu sélectionné est affiché
avec des caractères rouges.
By renewed actuation of the menu button
will return you to the normal measurement mode.
08/2016 ba80053def03_TIC100 13
Un nouvel appui sur le bouton menu vous
permet de revenir au mode de mesure
normal.

TIC 100 Deutsch
Emisionsgrad
Viele Produkte können mit einem eingestellten Emisionsgrad von 0,95 gemessen
werden. Deshalb wird dieser Wert als
Standardwert benutzt.
Manchmal kann es aber erforderlich sein,
den Emisionsgrad zu ändern.
Bei dieser Messung ist darauf zu achten,
dass die Beschaffenheit der Oberfläche
einen großen Einfluss auf das Messergebnis hat. Deshalb können Sie mit der Einstellung des Emisionsgrades das Ergebnis
der Messung beeinflussen. Um Ihnen die
Einstellung zu erleichtern haben wir folgende Auswahlmöglichkeiten matt, größtenteils matt, etwas glänzend, glänzend
vorbereitet.
oberer Grenzwert
Im Menü können Sie den oberen Grenzwert einstellen.
Sie haben die Möglichkeit einen der 5 voreingestellten Werte durch betätigen der
Messtaste auszuwählen.
Durch bestätigen des Menüpunktes „Set
HAL value“ können Sie den Grenzwert in
Einerschritten durch Betätigung der Kursortasten einstellen. Bestätigen Sie den
Grenzwert dann durch drücken der Messtaste.
14 Bedienungsanleitung

English Français
Emission factor
Many products can be measured with a
set emission factor of 0.95. Therefore, this
value is used as the default.
Sometimes it may be necessary to change
the emission factor.
In this measurement, it must be ensured
that the quality of the surface has a great
influence on the measurement result.
Therefore, you can change the setting of
the emission factor the result of measurement. To simplify the adjustment we have
the choice between matt, mostly dull,
slightly glossy, shiny prepared.
upper limit
Facteur d‘emissivité
De nombreux produits peuvent être
mesurées avec un facteur d'émissivité fixe
de 0,95.
Parfois, il peut être nécessaire de modifier
le facteur d'émissivité.
Dans cette mesure, il faut prendre en
considération que la qualité de la surface
a une grande influence sur le résultat de la
mesure. Par conséquent, le réglage
d'émissivité peut modifier le résultat. Poru
simplifier le réglage, nous avons le choix
entre mat, terne, légèrement brillant et
brillant.
limite supérieure
In the menu you can set the upper limit.
You have the option to select one of 5 preset values by pressing the test button.
Through the menu item "Set HAL value"
Confirm You can set the threshold level at
a time by pressing the cursor keys. Confirm the limit then by pressing the test
button.
08/2016 ba80053def03_TIC100 15
Dans le menu, vous pouvez définir la
limite supérieure.
Vous avez la possibilité de sélectionner
l'une des 5 valeurs prédéfinies en
appuyant sur le bouton de test.
Grâce à l'élément de menu "Réglage de la
valeur HAL" Confirmer Vous pouvez régler
le niveau de seuil à la fois en appuyant sur
les touches de curseur. Confirmer la limite
puis en appuyant sur le bouton de test.

TIC 100 Deutsch
unterer Grenzwert
Im Menü können Sie den unteren Grenzwert einstellen.
Sie haben die Möglichkeit einen der 5 voreingestellten Werte durch betätigen der
Messtaste auszuwählen.
Durch bestätigen des Menüpunktes „Set
LAL value“ können Sie den Grenzwert in
Einerschritten durch Betätigung der Kursortasten einstellen. Bestätigen Sie den
Grenzwert dann durch drücken der Messtaste.
automatische Abschaltfunktion
Sie können das Gerät mit dieser Funktion
so einstellen, dass sich die Wärmebildkamera bei Nichtbenutzung nach einer auszuwählenden Zeit von allein abschaltet.
Hintergrundbeleuchtung
Sie können in diesem Menü die Stärke der
Hintergrundbeleuchtung einstellen.
16 Bedienungsanleitung

English Français
lower limit
In the menu you can adjust the unterren
limit.
You have the option to select one of 5 preset values by pressing the test button.
Through the menu item "Set LAL value"
Confirm You can set the threshold level at
a time by pressing the cursor keys. Confirm the limit then by pressing the test
button.
auto shut-off
You can set the device to this function so
that the thermal imaging camera turns off
by itself when not in use for a time to be
selected.
limite inférieure
Dans le menu, vous pouvez régler la
mimite inférieure.
Vous pouvez configurer l'appareil pour
activer cette fonction afin que la caméra
thermique s'éteigne toute seule lors d'une
non-utilisation prolongée.
Grâce à l'élément de menu "Réglage de la
valeur LAL" Confirmer Vous pouvez régler
le niveau de seuil à la fois en appuyant sur
les touches de curseur. Confirmer la limite
puis en appuyant sur le bouton de test.
arrêt automatique
Vous pouvez configurer l'appareil pour
cette fonction afin que la caméra d'imagerie thermique éteint par lui-même
lorsqu'ils ne sont pas utilisés pendant un
temps pour être sélectionné.
Backlight
You can adjust the intensity of the backlight in this menu.
08/2016 ba80053def03_TIC100 17
Rétro-éclairage
Vous pouvez régler l'intensité du rétroéclairage dans ce menu.

TIC 100 Deutsch
Datum um Uhrzeit
Hier können Sie aktuelles Datum und Uhrzeit einstellen.
Durch betätigen der Kursortasten sowie
der Farbskala-Taste und der Taste zur Wahl
der Temperatureinheit können Sie Datum
und Uhrzeit einstellen. Bestätigen Sie die
Ihre Eingaben mit der Messtaste.
Einstellung des Zeitstempels
Im Menü Zeitstempel können Sie einstellen ob Datum und Uhrzeit, aber auch
Messwert, Temperaturskala sowie Emissionsgrad und Batteriekapazität auf dem
Bild dargestellt werden sollen.
Daten löschen
Im Menü Löschen haben Sie die Möglichkeit die Bilddateien bzw. Videodateien
von der SD-Karte zu löschen.
Dateityp Einstellung
Hier haben Sie die Möglichkeit einzustellen, ob die Wärmebildkamera ein Foto
oder ein Video aufzeichnen soll.
18 Bedienungsanleitung

English Français
Date at Time
Here you can set current date and time.
By pressing the cursor keys and the color
gamut of the key and to select the temperature unit Press to change the date
and time. Confirm your entries with the
measuring button.
Setting the timestamp
In time stamp menu to set to be the date
and time, as well as readings, temperature
scale and emissivity and battery capacity
shown in the picture.
Delete data
In Delete menu gives you the option to
delete the image files or video files from
the SD card.
Date et heure
Ici, vous pouvez régler la date et l'heure.
En appuyant sur les touches de curseurs
et la touche d'échelle de couleur et la
touche de sélection d'unité de température, vous pouvez paramétrer la date et
l'heure.
Réglage de l'horodatage
Dans le menu horodatage, vous pouvez
paramétrie si la date, l'heure, mais aussi
l'échelle de température ou bien l'émissivité doivent être affichés à l'écran.
Effacer les données
Dans le menu Supprimer vous donne la
possibilité de supprimer les fichiers
d'images ou de fichiers vidéo à partir de la
carte SD.
File Type setting
Here you have the ability to choose
whether the thermal imaging camera to
capture a photo or a video.
08/2016 ba80053def03_TIC100 19
Paramétrage type de fichier
Ici vous avez la possibilité de choisir si la
caméra d'imagerie thermique pour
prendre une photo ou une vidéo.

TIC 100 Deutsch
Rauschfilter
Hier können Sie den Rauschfilter ein- bzw.
ausschalten.
Spracheinstellung
Sie können das Menü der Wärmebildkamera in 4 verschiedenen Sprachen angezeigt bekommen. Bitte wählen Sie dazu
eine Sprache aus. Im Auslieferzustand ist
Englisch eingestellt.
20 Bedienungsanleitung

English Français
noise filter
You can filter the noise on or off.
language setting
You can get the thermal imager in 4 different languages menu. Please select to
select a language. On delivery, English is
set.
filtre de bruit
Vous pouvez activer le filtre de bruit ou le
désactiver.
réglage de la langue
Vous pouvez accéder à la caméra thermique dans 4 menus de langues différentes. Veuillez sélectionner une langue.
Par défaut, l'anglais est défini.
08/2016 ba80053def03_TIC100 21

TIC 100 Deutsch
Batterie wechseln
Wenn die Batterie verbraucht ist, muss sie
ausgetauscht werden. Gehen Sie wie folgt
vor, um die Batterie zu wechseln:
Beugen Sie durch geeignete Vorsichtsmaßnahmen wie z.B. durch
ein geerdetes Handgelenkband
elektrostatischen Entladungen während
des Batteriewechsels vor! Elektrostatische
Entladungen können das Gerät zerstören!
Öffnen Sie das Batteriefach durch
schieben und entfernen des Batteriefachdeckels
Entnehmen Sie die verbrauchten Batte-
rien und ersetzen Sie sie durch neue
Batterien.
Schließen Sie das Batteriefach
Nach dem Einlegen der Batterie kann es
bis zu einer Stunde dauern, bis die Batterieanzeige aktualisiert wird.
Beim Batteriewechsel gehen alle Einstellungen verloren.
Gespeicherte Bilder bzw. Videos sind auf
der mirco SD-Karte gespeichert und vom
Batteriewechsel nicht betroffen.
Entsorgen Sie die verbrauchte Batterie
umweltgerecht an den dafür vorgesehenen Sammelstellen!
22 Bedienungsanleitung

English Français
Battery replacement
If the battery has been used, it must be
replaced. Proceed as follows to replace
the battery:
Bow by taking proper precautions
such as by a grounded wrist strap
ESD during battery replacement
before! Electrostatic discharges can
destroy the device!
Open the battery compartment push
through and remove the battery cover
Remove the used batteries and replace
them with new ones.
Close the battery compartment
After inserting the battery, it may take up
to an hour, until the battery display is
updated.
lost when battery change all settings.
Stored images or videos are stored on the
mirco SD card and not affected by the battery replacement.
Changer les piles
Si les piles sont usées, elles doivent être
remplacées. Procédez comme suit pour
remplacer les piles :
Prendre des précautions appropriées telles que l'utilisation d'un
bracelet antistatique ! Les
décharges électrostatiques peuvent
détruire l'appareil.
Ouvrez le couvercle du compartiment des
piles et retirez les piles et les remplacez
par de nouvelles.
Retirez les piles usagées et les remplacer
par de nouveaux.
Fermez le compartiment de la pile
Après avoir inséré les piles, cela peut
prendre une heure jusqu'à ce que l'affichage du niveau de pile soit mis à jour.
Le changement de piles annule toutes les
configurations et paramétrages.
Les images et videos stockées sur la carte
SD ne sont pas affectées par le changement de piles.
Dispose of the used battery in a manner at
the designated collection!
08/2016 ba80053def03_TIC100 23
Eliminer les piles d'une manière appropriée dans le respect de l'environnement.

TIC 100 Deutsch
Einlegen der Speicherkarte
Zum einlegen der Speicherkarte ziehen
Sie vorsichtig die Abdeckung auf der
rechten Seite nach oben.
Legen Sie nun die mitgelieferte SD-Card
mit der Schrift nach oben, den Kontakten
nach unten und der schmalen Seite nach
vorn in den Leser. Schieben Sie die
Speicherkarte vorsichtig in den Leser, bis
die Karte einrastet.
Reinigung und Pflege
Vorsicht! Die Linse kann bei unsachgemäßer Reinigung zerkratzt und dadurch die
Qualität der Messung beeinträchtigen.
Reinigen Sie das Gerät mit einem weichen
leicht feuchten Tuch.
Verwenden Sie KEINE Lösungsmittel (wie
z.B. Aceton), damit Sie die Linse sowie den
Kunststoff nicht beschädigen.
Das Gerät darf NICHT in Wasser einge-
taucht werden.
24 Bedienungsanleitung

English Français
Inserting the memory card
To insert the memory card, gently pull the
cover on the right side up.
Now insert the supplied SD card with the
face up, the contacts facing down and the
narrow side forward in the reader. Push
the memory card into the reader until the
card engages.
Cleaning and care
Caution! The lens may be scratched in
improper cleaning, thereby directly affecting the quality of the measurement.
Clean the unit with a soft damp cloth.
DO NOT use solvents (such as acetone),
so you do not damage the lens and the
plastic.
The device may NOT be immersed in
water.
Insertion de la carte mémoire
Pour insérer la carte mémoire, retirez délicatement le couvercle sur le côté droit
vers le haut.
Maintenant, insérez la carte SD fournie
avec la face vers le haut, les contacts vers
le bas et le côté étroit vers l'avant dans le
lecteur. Poussez la carte mémoire dans le
lecteur jusqu'à l'engagement de la carte.
Nettoyage et entretien
Attention ! La lentille peut être rayée lors
d'un mauvais nettoyage, ce qui affecte
directement la qualité de la mesure.
Nettoyez l'appareil avec un chiffon doux
et humide.
NE PAS utiliser des solvants (comme l'acétone), afin de ne pas endommager la lentille et le plastique.
Le dispositif ne peut PAS être immergé
dans l'eau.
08/2016 ba80053def03_TIC100 25

TIC 100 Deutsch
Kalibrierservice
Das Gerät besitzt eine hohe Messgenauigkeit. Um diese zu erhalten, sollten Sie das
Gerät jährlich kalibrieren lassen. Dazu bieten wir einen Kalibrierservice an.
Um diesen Service in Anspruch zu neh-
men, füllen Sie bitte die beiliegende
Servicekarte aus und senden Sie sie an
ebro (Adresse auf der Rückseite dieser
Bedienungsanleitung).
Im jährlichen Abstand rufen wir dann Ihr
Gerät zur Kalibrierung ab.
Nach erfolgter Kalibrierung senden wir
Ihnen das Gerät kalibriert zurück.
Entsorgung
Sollte das Gerät gebrauchsuntauglich
geworden sein, müssen sie es fach- und
umweltgerecht entsorgen.
Entsorgen Sie das Gerät keinesfalls über
den Hausmüll, sondern geben Sie es an
den Hersteller zurück.
Entsorgen Sie die Batterie an den dafür
vorgesehen Sammelstellen.
26 Bedienungsanleitung

English Français
Calibration service
The device takes extremely accurate measurements. To ensure it continues to work
to this high standard, it should be calibrated annually. For this reason, we offer a
calibration service.
To take advantage of this service,
please complete the accompanying
service card and send it to ebro Electronic (address on the back of this user
manual).
Every year we shall then recall your device
for calibration.
After calibration, we will send you the
device calibrated back.
Service d’étalonnage
L’appareil présente un haut niveau de précision de mesure. Pour continuer d’en
bénéficier, nous vous recommandons de
faire étalonner l’appareil tous les ans. Pour
ce faire, nous offrons un service d’étalonnage à nos clients.
Si vous souhaitez profiter de cette offre,
veuillez remplir la fiche de service cijointe et l’envoyer à ebro Electronic
(adresse au verso de cette manuel
d'utilisation).
Nous rappellerons votre appareil tous les
ans pour procéder à son étalonnage.
Après étalonnage, nous vous retournerons l'appareil étalonné.
Disposal
If the device becomes no longer fit for
purpose, it must be disposed of in a suitable, environmentally-friendly manner.
Do not, under any circumstances, simply
dispose of it in domestic garbage. You
must return it to the manufacturer.
Dispose of the battery at the appropriate
recycling point.
08/2016 ba80053def03_TIC100 27
Elimination
Lorsque votre appareil sera hors d’usage,
il vous faudra l’éliminer selon la réglementation en vigueur et de manière écologique.
Ne jetez surtout pas votre appareil avec
les ordures ménagères; renvoyez-le au
fabricant.
Jetez la batterie dans la poubelle de tri
sélectif prévue à cet effet.

TIC 100 Deutsch
Technische Daten
Messbereich -20 °C … +250 °C
Genauigkeit ±2 % vom Messwert oder
Auflösung 0,1 °C
Betriebsbedingungen
Betriebstemperatur 0 … +50 °C
Betriebsfeuchte kleiner 85 % RH nicht kondensierend
Lagertemperatur -10 … +60 °C
Batterie 4 x AA Batterie, 1,5 Volt
Batterielaufzeit ca. 6 Stunden bei Dauerbetrieb
Abschaltfunktion wählbar zwischen 1 Minute, 5
Speicher ca. 25.000 Bilder auf mitgelieferte
Bildformat BMP
optische Auflösung 32 x 31
Sichtfeld 33° x 33°
Spektralbereich 8 … 14µm
Emissionwert 0,1 … 1,0
Display 2.8“ farbig
Beleuchtung Intensität einstellbar
Schnittstelle mini USB
Alarm Management
Akustischer Alarm Ja
unterer Grenzwert einstellbar in Schritten zu 1°C
oberer Grenzwert einstellbar in Schritten zu 1°C
(-4°F … +482°F)
±2 °C (4°F) welcher Wert größer ist
Minuten, 10 Minuten ,20 Minuten,
Aus
8 GB micro SD
Karteba80053def03_TIC100
Standardwert: 0,95
Allgemein
Abmessungen 234 x 74 x 95 mm
Gewicht 411g
Schutzklasse IP 54
Gehäusematerial Polycarbonat
28 Bedienungsanleitung

English Français
Technical data
measurement range -20°C … +250 °C
(-4°F … +482°F)
Accurancy ±2% from measured value or
±2°C (4°F) withever is greater
Resolution 0.1 °C
Operation conditions
Operating temp. 0°C … +50°C
Operating humidity less than 85%RH not condensing
Storage temperature -10°C … +60°C
Battery 4 pcs. AA battery, 1.5V
Battery lifetime app. 6 hours at continuous operation
auto shut-off selectable between 1 minute, 5
minutes, 10 minutes, 20 minutes and
off
Memory app. 25,000 images stored on 8GB
micro SD card supplied.
picture format Bitmap
optical resolution 32 x 31
field of view (FOV) 33° x 33°
Spectral range 8 … 14µm
Emission factor 0.1 … 1.0
default 0.95
Display 2.8“ colored
Backlight intensity setable
Interface mini USB
Données techniques
Plage de mesure -20°C … +250 °C
(-4°F … +482°F)
Exactitude ±2% de la valeur mesurée ou
±2°C (4°F) de la valeur la plus élevée
Résolution 0,1 °C
Conditions de fonctionnement
d'exploitation 0°C … +50°C
Humidité en utilisationmoins de 85%RH sans condensation
temp. de stockage -10°C … +60°C
Pile 4 pcs. Les piles AA, 1.5V
Durée de vie (pile) environ 6 heures en continu
arrêt automatique sélectionnable entre 1 minute, 5
minutes, 10 minutes, 20 minutes et
off
mémoire environ 25.000 photos stockées sur la
micro carte SD fournie 8GB
format d‘image bitmap
résolution optique 32 x 31
champ de vision 33° x 33°
gamme spactrale 8 … 14µm
Facteur d’emission 0,1 … 1,0
défault 0,95
Afficher 2.8“ coloré
rétro-éclairage Intensité réglable
Interface mini USB
Alarm Management
acustic alert Yes
lower limit setable in steps of 1°C
higher limit setable in steps of 1°C
General Information
Dimensions
(L x W x H) 234 x 74x 95mm
Weight 411g
Protection class IP54
Housing material Polycarbonat
Gestion des alarmes
alarme sonore Oui
limite inférieure réglable en incréments de 1 ° C
limite supérieure réglable en incréments de 1 ° C
Généralement
Dimensions
(L x l x H) 234 x 74x 95mm
Poids 411g
Classe protection IP54
Matériau du boîtier Polycarbonate
08/2016 ba80053def03_TIC100 29

Notizen / Notes / Note
30 Bedienungsanleitung

Notizen / Notes / Note
08/2016 ba80053def03_TIC100 31

Service-Adresse / Service Address / Adress du Service
Xylem Analy tics Germany Sales GmbH & Co. KG
ebro
Dr.-Karl-Slevogt-Str. 1
82362 Weilheim
Germany
Phone: +49.(0)841.954.78.0
Fax: +49.(0)841.954.78.80
Internet: www.ebro.com
E-Mail: ebro@xyleminc.com
…………………………………………………………………………………….
Hersteller / Producer / Fabricant
Xylem Analy tics Germany GmbH
Dr.-Karl-Slevogt-Str. 1
82362 Weilheim
Germany
 Loading...