

Page 1
[ET-CSIU2J-BK]
Eagle | Consus I-Series
External Dual-Bay Storage for
3.5” Dual SATA to USB 2.0
User Manual
www.eagle-techusa.com
(JBOD)
Index
1 Getting Started
Kit Contents …………………………..…………………………………… 02
System Requirements ……………………..…………………….............. 03
Updating Your Operating System …………………………….............. 03
Handling Precautions 03
2 Setting Up
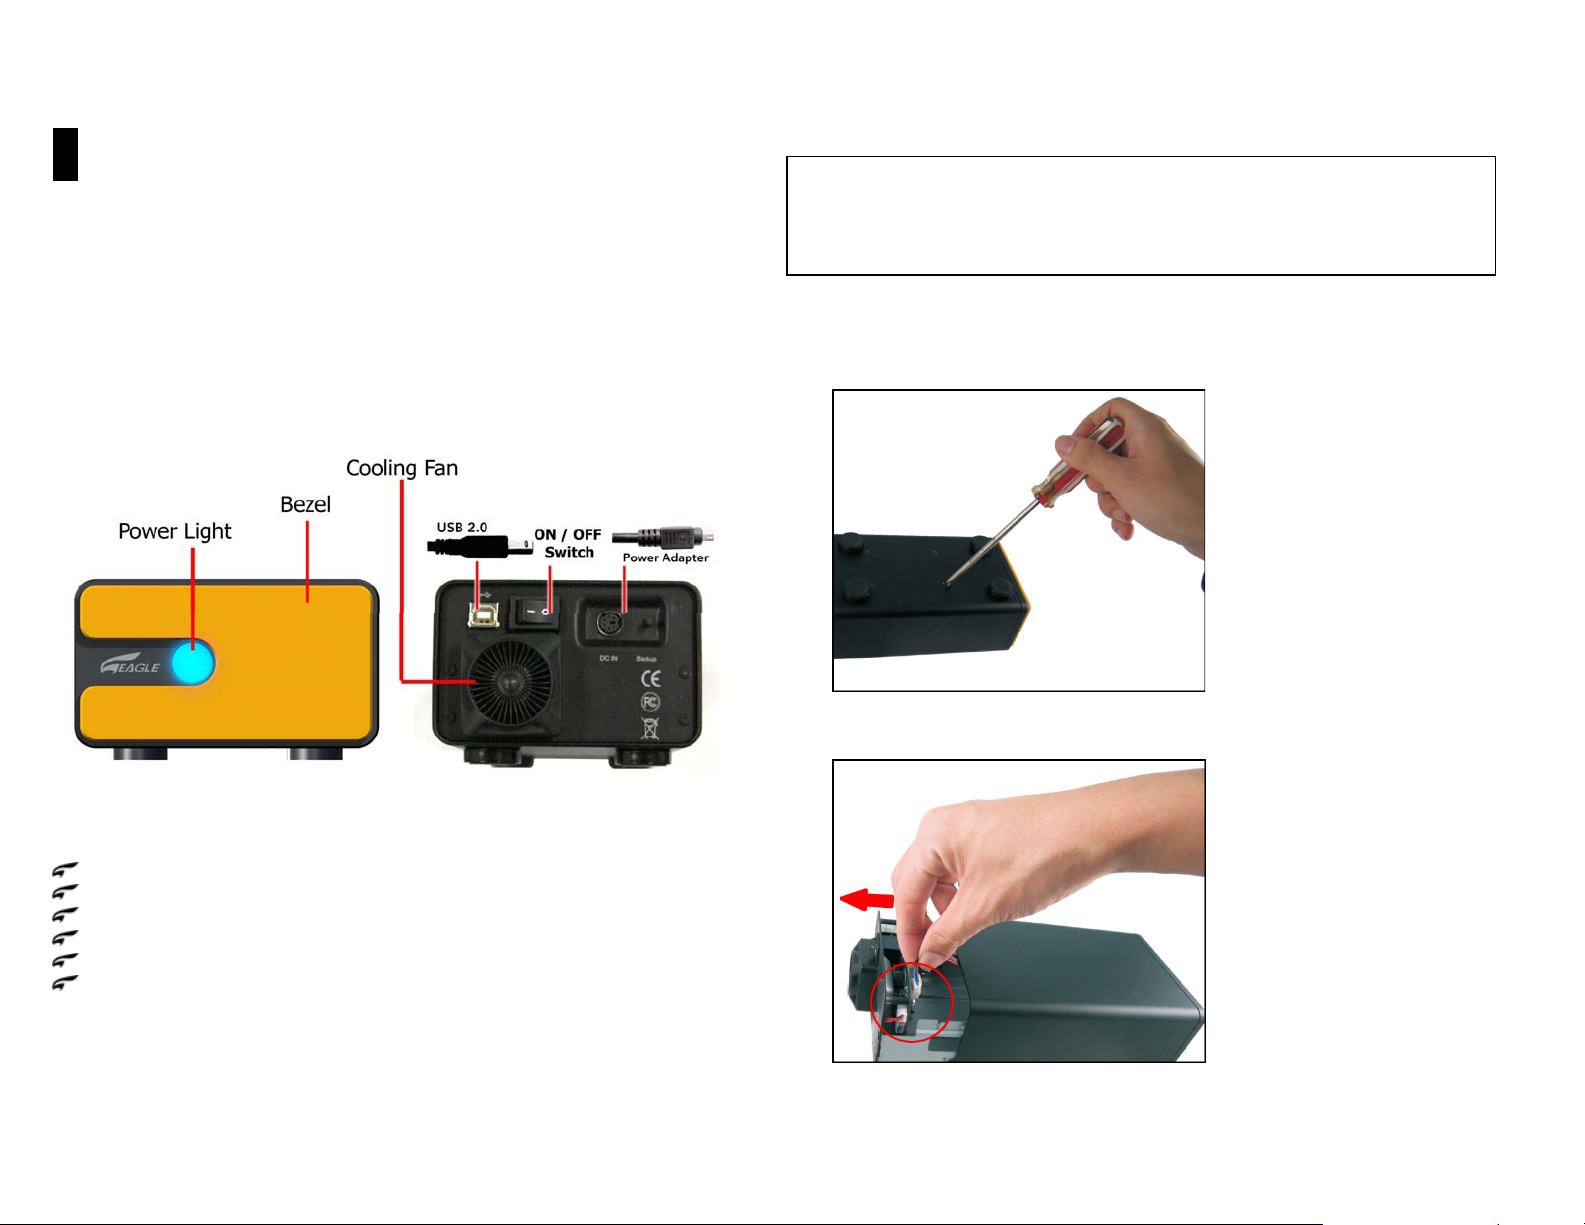
Enclosure Components ………………………………………….......... 04
Disk Installation ……………………………….………………………… 05
Bezel Installation ……..……………………………………........ 10
3 Connecting the Drive
Connecting the Cables ………………………………………….......... 11
Powering Up the Drive ………………………………………….......... 12
4 Formatting the Drive
Windows ………………………………………………………….…………….. 13
Mac OS v.10.2 + …………………………………………………......... 17
5 Disconnecting the Drive
Windows …………………………………………………………….………….. 20
Mac ………………………………………………………………………... 21
6 Troubleshooting
FAQ – Latest firmware, tutorials and more …………………………. 22
7 Appendix
Regulatory Compliance ……………………………………………....... 30
Warranty Information …………………………………………………. 31
EAGLE | CONSUS Service and Support ……...………………….. 33
Understand EAGLE TECH Sub-Brand ……...………………… 34
1
Page 2
1 Getting Started
Thank you for purchasing this EAGLE | CONSUS I-SERIES product. Its dual SATA to
USB interface allows you to easily combine any two 3.5” hard drives into a single
large volume by means of JBOD (Spanning) technology. This user manual provides
step-by-step installation instructions and other important information regarding
your EAGLE | CONSUS product. For the latest EAGLE | CONSUS product
informat i on, reviews, FAQ and other events, visit our Web Site at
www.eagle-techusa.com
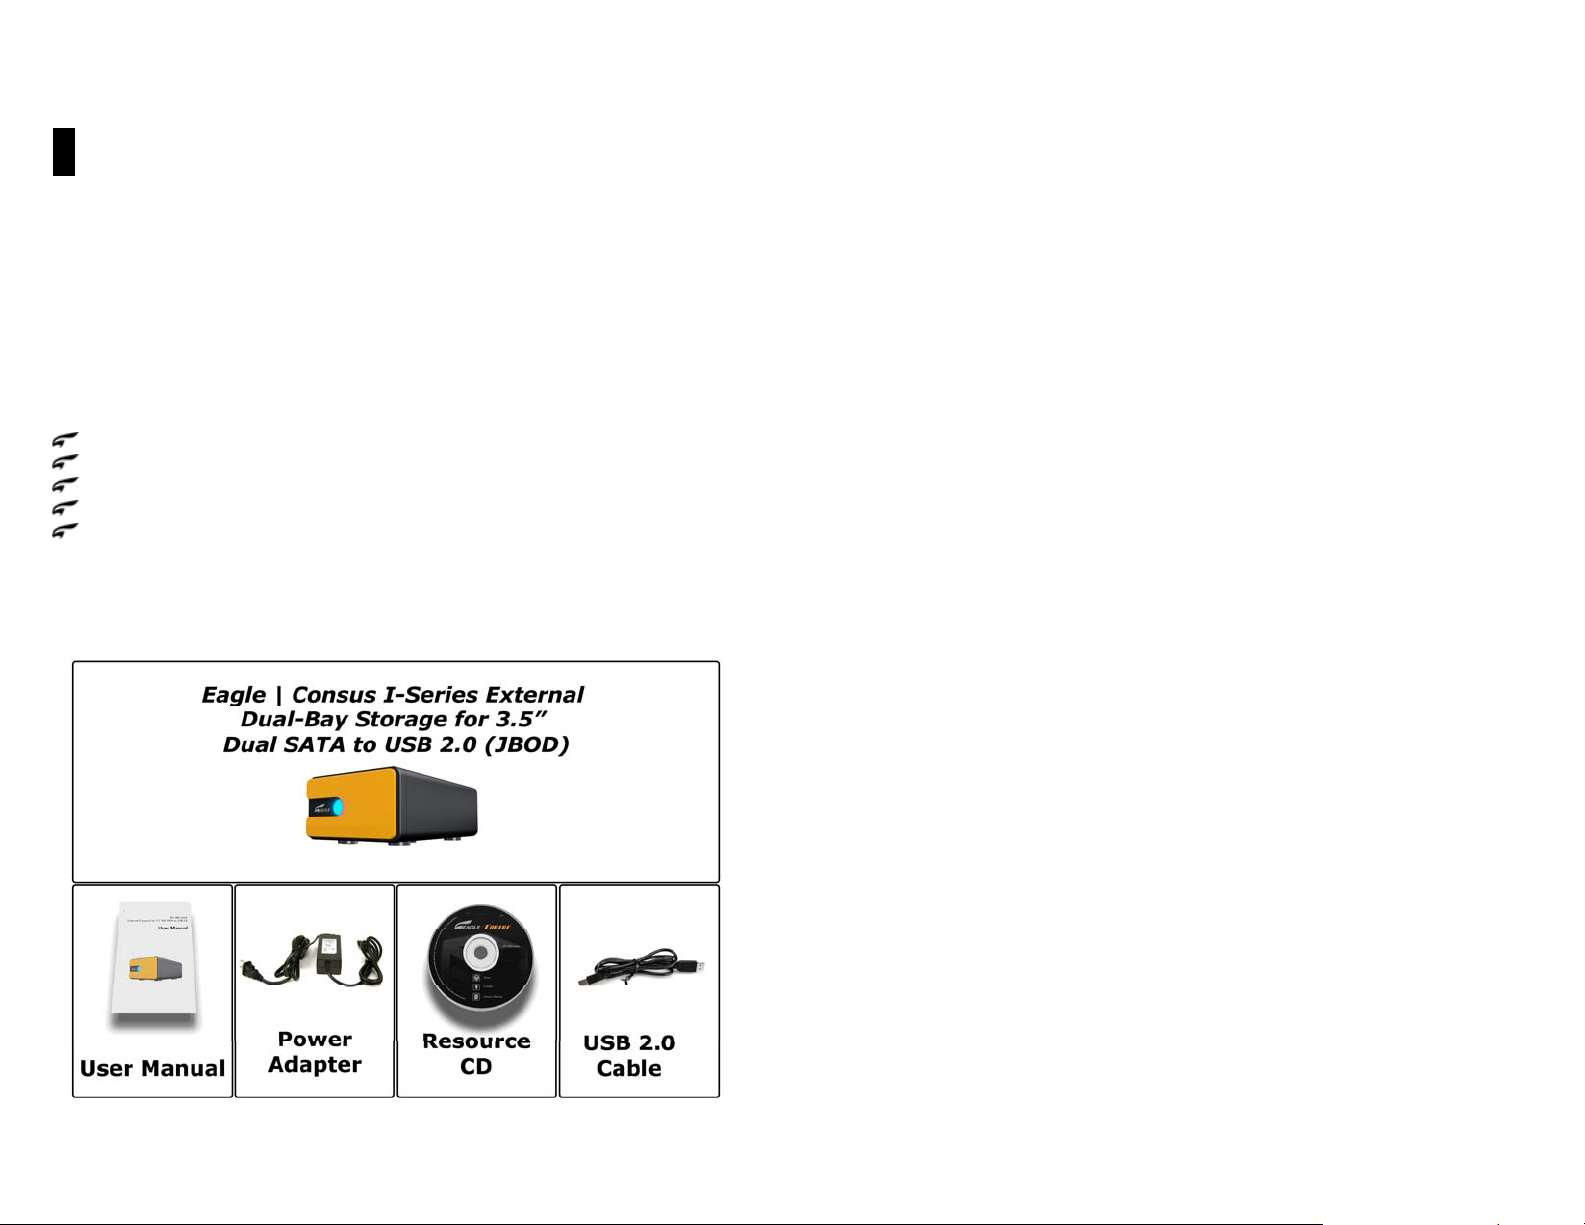
Kit Contents
EAGLE | CONSUS I-SERIES USB 2.0 external storage system
USB 2.0 certified cable
Resource CD
AC power adapter
User Manual
*
USB 2.0 host required for Hi-Speed USB 2.0 performance. USB 2.0 is highly
recommended because of the significant reduction in file transfer time compared
to USB 1.1. To determine if your system supports USB 2.0, refer to your USB
controller card documentation or contact your USB card manufacturer.
System Requirements
Hardware
Pentium
PowerPC G4, 350 MHz or newer for PowerPC-based Apple Computer
Core
Available USB and/or OHCI-compliant FireWire port
SATA Hard Drive(s)
Software
Windows
Windows 2000 Pro / Server 2000 / Server 2003 / XP / Vista
Macintosh
Mac
Note:
you install the latest service pack (SP) and updates.
Updating Your Operating System
Windows
Go to the Start menu and select Windows upda tes. F o r more i nform ation rega rding
updating your system, visit
Macintosh
Go to the Apple menu and select So ftw are U pdate. For more information rega rdi ng
updating your system, visit
Handling Precautions
EAGLE | CONSUS products are precisio n instruments and must be handled with care
during unpacking and installation. Drives may be damaged by rough handling,
shock, or vibration. Be aware of the following precautions when unpacking your
Eagle | Consus I-SERIES external storage kit:
®
II, 200 MHz equivalent or newer for IBM compatible PC
®
or newer for Intel-bas e d A p p le Computer
®
®
®
OS X v.10.2+
For highest performance and rel i abi lit y, EAGLE | CONSUS recommends that
windowsupdate.microsoft.com
.
apple.com/macosx.
Do not unpack the Eagle | Consus I -S ERIES unti l yo u are re ady to instal l it.
Do not drop or jolt the Eagle | Consus I-SERIES.
Do not move t he Eagle | Consus I-SERIES when it is powered up.
2
3
Page 3
2 Setting Up
You will need a 3.5 inch SATA Hard Drive. Carefully follow these procedures to
install the hard drive into the enclosure.
Note:
For pre-installed Hard Drive EAGLE | CONSUS enclosure, please skip this
chapter and proceed to
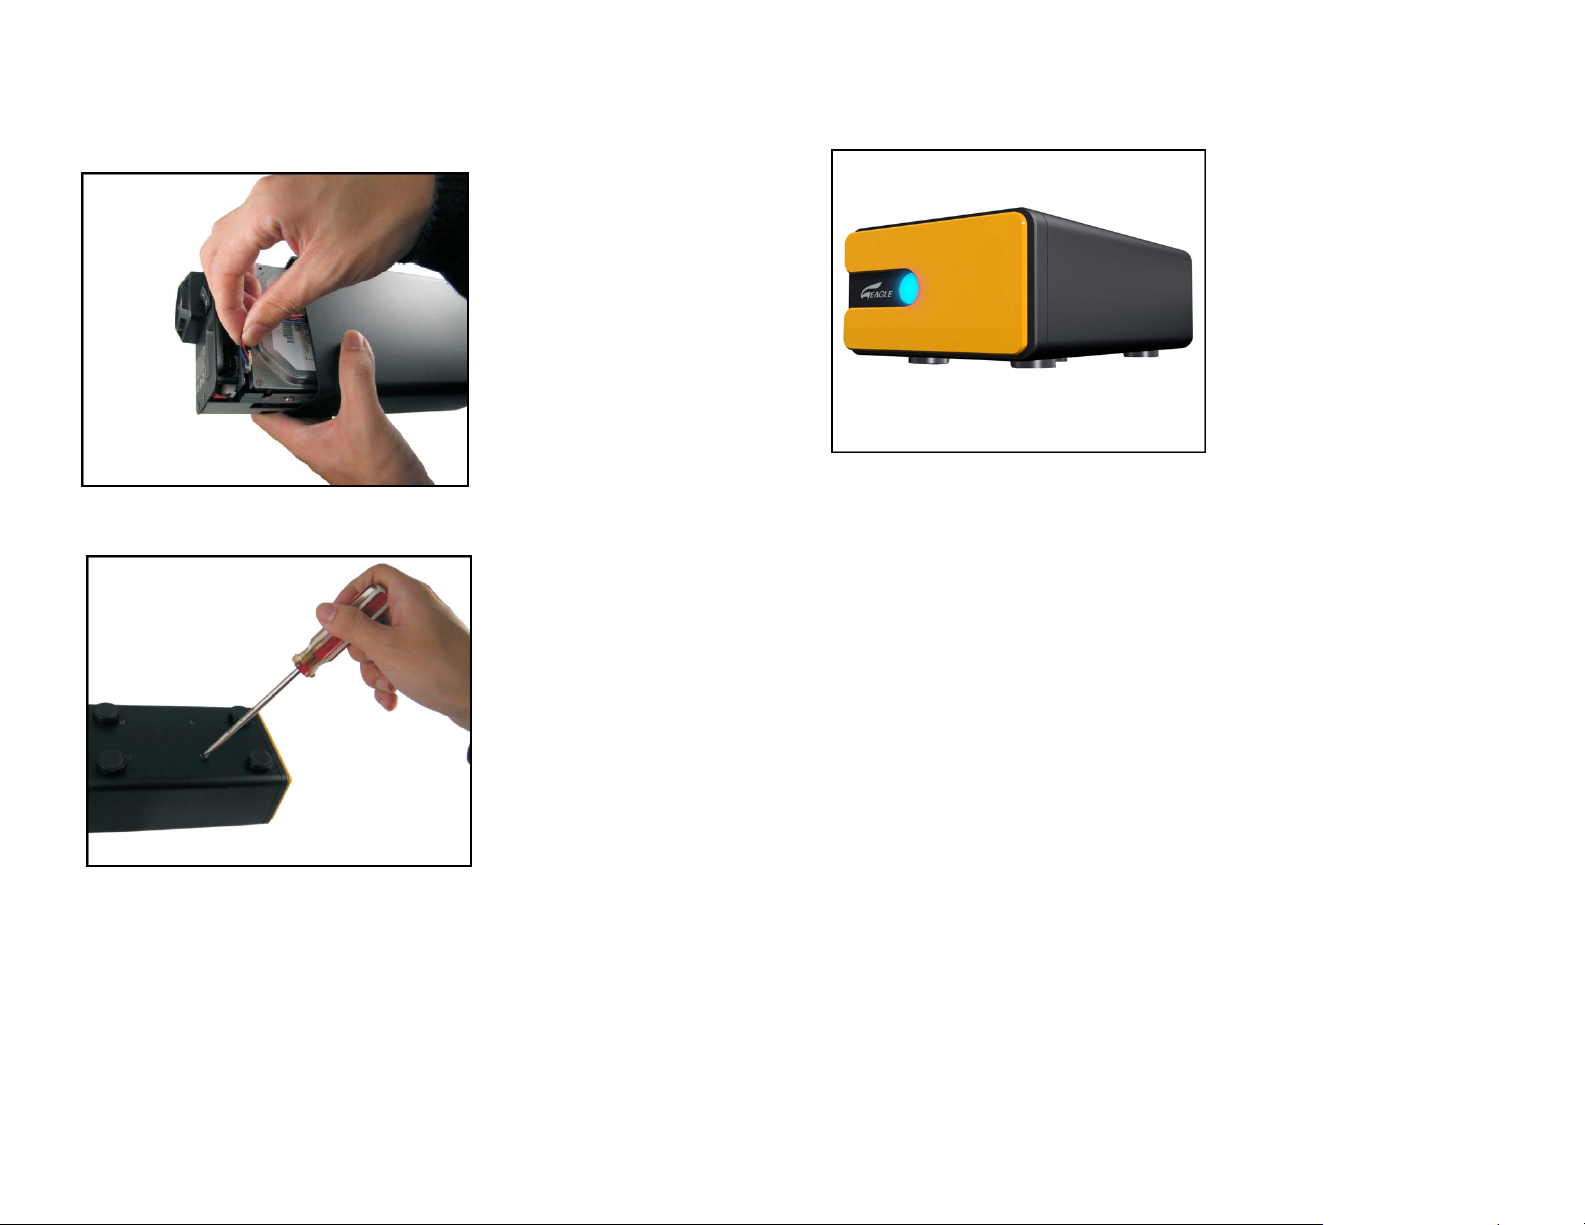
EAGLE | CONSUS I-SERIES Front and Rear View
Chapter 3:
Connecting the Drive.
Disk Installation
Attention:
Eagle T ech Computers, Inc. is not responsible for consequential damages, including
loss or recovery of data fro m y o ur har d d rive. If y ou a re i nstal ling with a har d driv e
that has data inside, we suggest you backup your data before proceeding to
installation process.
NOTE: Please skip this section if you are purchasing an Eagle | Consus External
Hard Drive System with pre-installed Hard Drives. Do NOT attempt to open the
external storage system. You will VOID warranty if the warranty seal is damaged.
1. Remove 4 screws from the bottom.
Power Switch – Turns the I-SERIES on or off
Hard Drive access light – Indicates drive activity
Power light – Indicates enclosure is on
RAID Indication – Indicates RAID mode is enabled
USB 2.0 port – Connects to a computer USB port or USB hub
Power supply socket – Connects to power adapter
2. Slightly rem ov e the Disk Mou nting Try and disco nnec t the pow er ca ble f rom the
socket.
4
5
Page 4
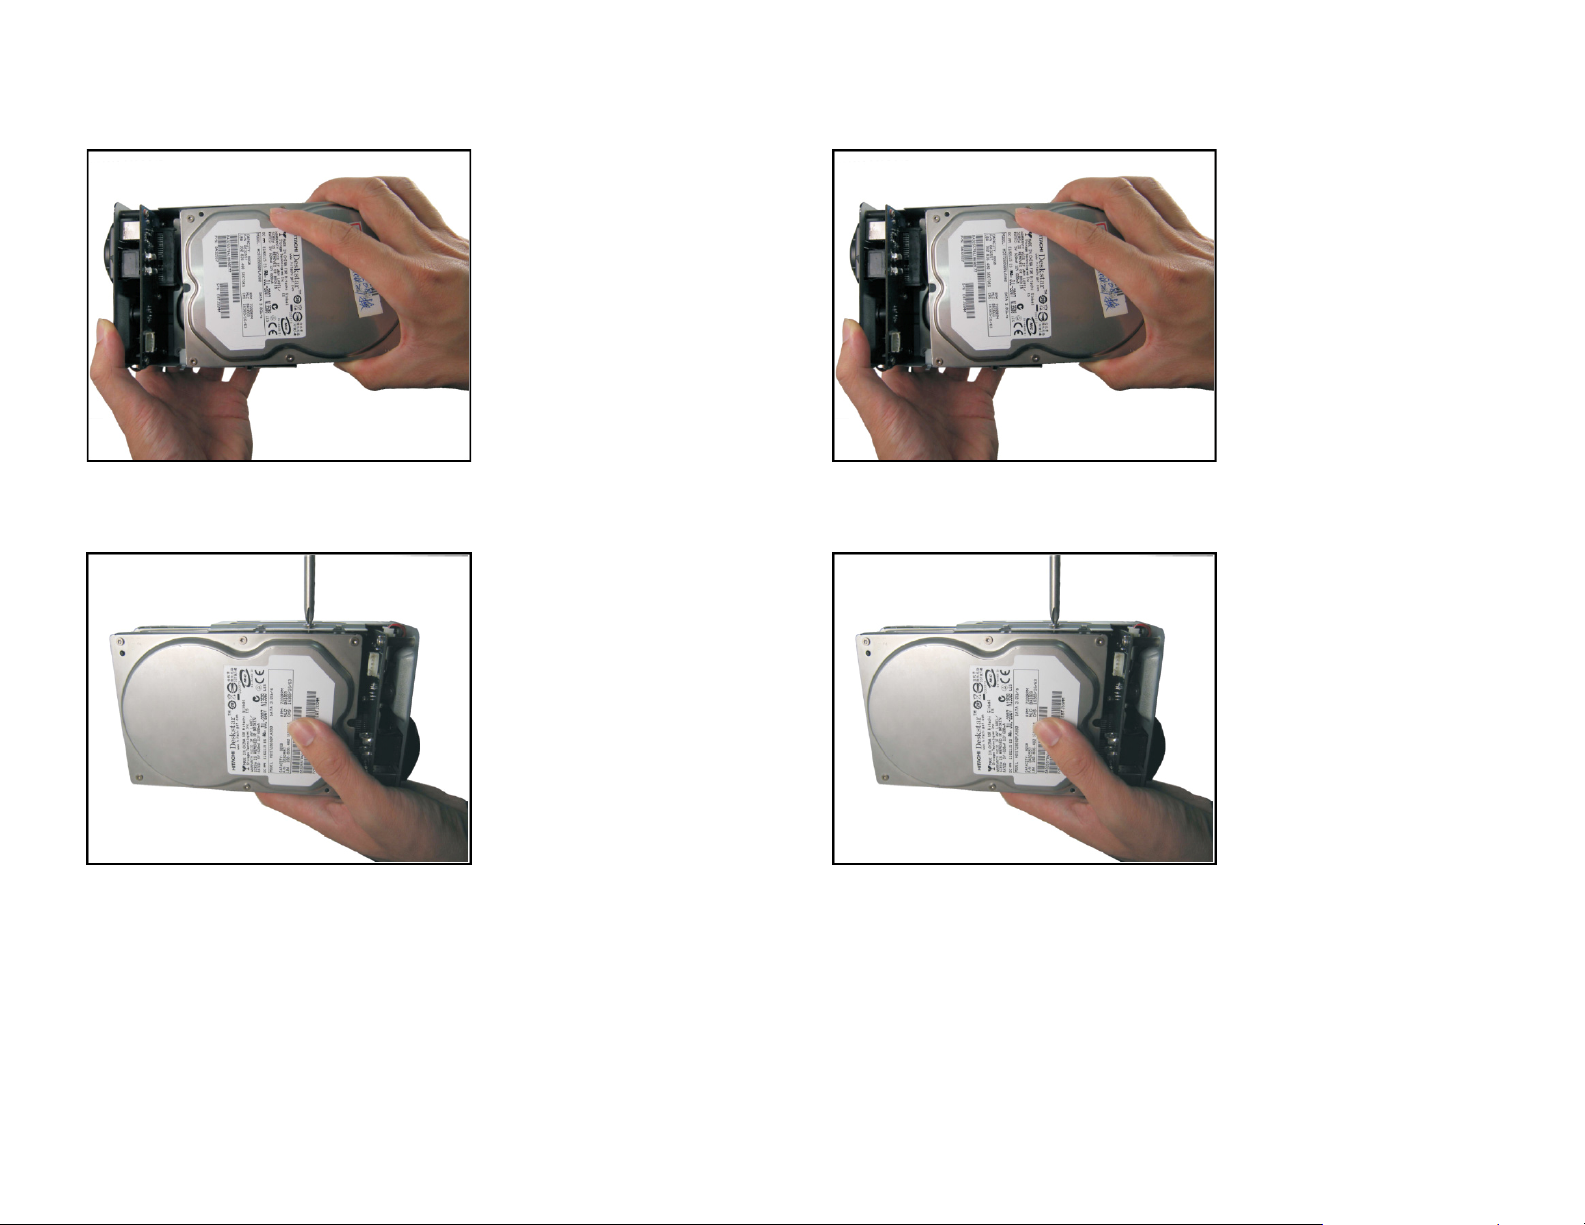
3. Slide the first SATA Hard Drive into the Disk Mounting Tray, and connect to the
SATA connector on the board.
5. Place the second SATA Hard Drive into the Disk Mounting Tray, and connect to
the SATA connector on the board.
4. Tighten up hard drive with 4 screws.
6. Tighten up hard drive with 4 screws.
6
7
Page 5
7. Slide the disk mounting tray back into the case carefully , and connect the power
cable into socket.
9. Congratulation! You have completed the installation process.
8. Tighten up 4 screws at the bottom of the external storage system.
8
9
Page 6
Bezel Installation
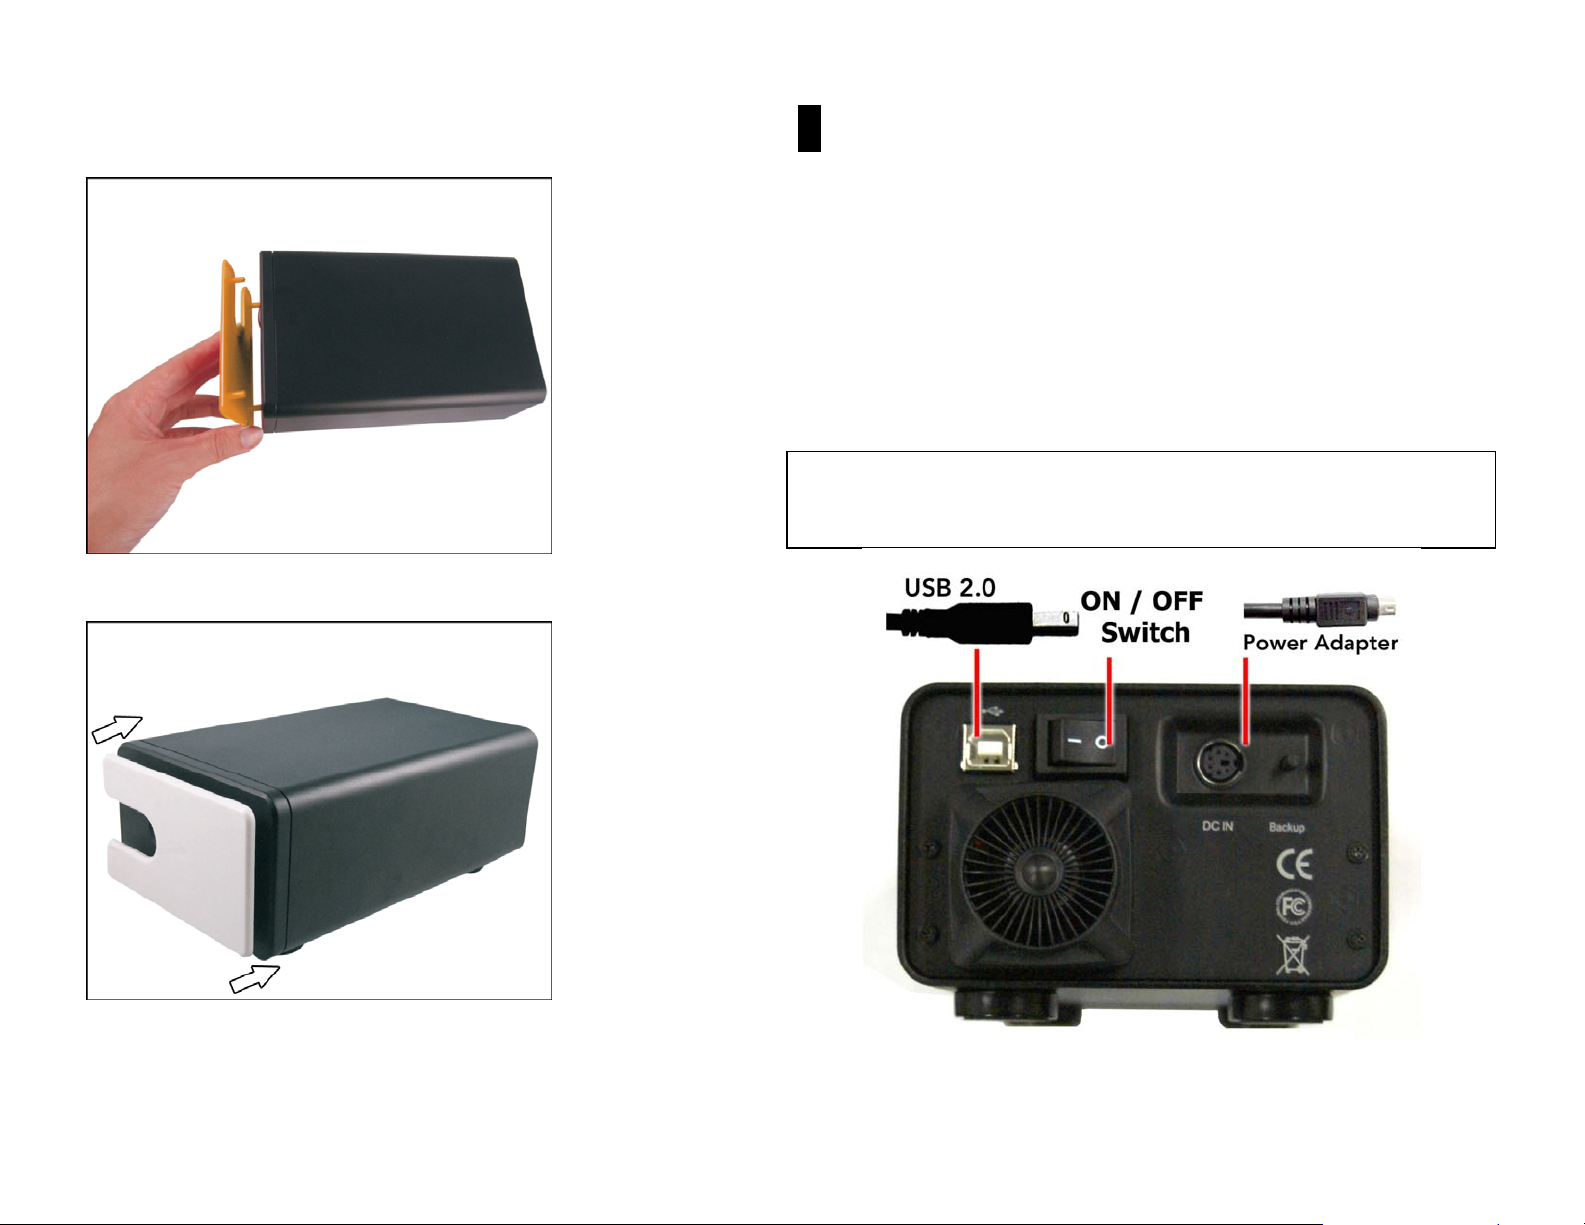
1. Detach the bezel gently from the external storage system.
2. Replace the bezel and attach to t he exte rnal stor a ge s ystem acco rdin g to the 4
pin on the angle of bezel.
3 Connecting the Drive
Connecting the Cable
1. Connect the AC adapter cord to the DC power supply socket on the back of the
drive.
2. Connect one end of the power cord to the AC adapter.
3. Connect the other end of the power cord to an electric outlet.
4. Connect one end of the USB 2.0 cable to the USB 2.0 port on the back of the
device.
5. Connect the other end of the USB 2.0 cable to an available USB port on your
computer.
Attention: Eagle Tech Computers, Inc. is not responsible for consequential
damages, including loss or recovery of data from your hard drive. Please ma ke sure
your power adapter and power ca ble a re properly connected to preve nt damage
to device.
10
11
Page 7

Powering Up the Drive
Press the power button to turn on the unit. Wait 3 seconds after blue light
illuminates.
Windows 2000/XP/2003/Vista
Your operating system will automatically detect the external drive after a “Found
New Hardware” message pop up.
Windows 98SE/ME
Note: Eagle | Consus does not provide any tech supports for Windows98
platform since Microsoft has discontinued Windows 98SE.
1. Connect Eagle | Consus I-SERIES Enclosure to your Computer. Turn on the
power.
2. Windows 98SE will detect a new device and activate Hardware Wizard, then
Click Next.
3. Select Search for the Best Driver for your Device. Click “Next” to continue
4. Insert the CD Driver in your CD ROM, then Browse the CD Driver Contain and
chose Win Folder. Click Next.
5. After installation Click Finish to restart your computer.
6. Once installation completes, you‘ll find USB Safe Remove icon in icon tray. If the
new hard drive doesn't appear in My Computer, it means the USB hard drive
is a brand new hard disk, which does not contain any partition, please format
your Hard disk before using this device.
Mac OS X
Your operating system will automatically detect the external drive. Once formatted
the Hard Drive, the Hard Drive icon will appear on the desktop.
4 Formatting the Drive
Windows XP/2000/2003/Vista
Note: For formatted Hard Drive, proceed to step 2.
1. Click the Start button and click on Control Panel, double-click the
Administrative Tools, and then double-click the Computer Management.
and
Online
, skip this step.
2. Click the Disk Management under Storage. Your new Hard Drive should
have the right capa city shown. (E.g. figure above Disk 1 is showing
approximately 160GB). Right click the Disk 1, and choose Initialize Disk.
Note: If your
Disk 1
is shown as
Basic
12
13
Page 8

3. After New Partition Wizard launched, then click Next.
6. To format a Hard Drive. Choose the NTFS as File System. Leave the
Allocation unit size as default. Assign a name in Volume label. Check the
Perform a quick format to reduce format time. Click Next.
4. On the next page, choose your partition size then click Next.
5. After that, please assign a drive letter for the new Hard Drive, and go to Next.
7. Confirm your setting and cli c k Finish.
8. It would show the status as Formatting.
14
15
Page 9

9. When the status change to Healthy, your new Hard Drive is ready to use.
Mac OS X
Note: If the warning does not show up, start at step 2.
1. A warning window will pop up for new and unformatted hard drive. Click
Initialize. Skip Step 2 and continue at Step 3.
10. Go to My Computer, your new drive should be listed there and ready to use.
2. Click Go on the desk bar and choose Utilities, click Disk Utility.
16
17
Page 10

3. Under the Disk Utilities,
a. Highlight the new har d drive
b. Click Partition
c. Click Options to choose format other than Mac Extended
d. Refer to Figure 1 at page 18. Choose the number of partition you want
by clicking on the scroll bar
e. Name the new hard drive
f. Choose the Format
g. Refer to Figure 2 at page 18. Define the Size if you want more than one
partition or else, leave it as default
h. Make sure the configuration is right and click Partition (8).
Figure 1: d Options… Choose the partition for you hard drive.
Click OK.
Figure 2: g Format: Choose the format for your hard drive.
4. After the partitioning is done, an icon with the Name you assigned should
appear on your Desktop. Just double click the icon to access the hard drive.
18
19
Page 11

5 Disconnecting the Drive
CAUTION: T o prev ent data loss, be sure to close all activ e applications
before shutting down the drive.
Windows XP/2000/2003/Vista
1. Double-click the Safely Remove Hardware icon in your system tray (typically
located on the bottom right corner of your desktop).
2. Select USB Mass Storage Device from the list and click Stop.
4. Click Close and press the Power but ton to turn off the enclosure.
5. Now you can safely disconnect the USB or FireWire cable from your computer
and the power cord from the electric outlet.
Windows 98SE
1. Be sure the drive isn’t running, pres s Power button to shutdown the enclo s ure.
2. Disconnect the USB or FireWire cable from your computer.
Mac
1. Find the Removable Disk icon associated with drive you to disconnect, and drag
it to the Trash icon on your desktop (it would turn to Eject icon).
3. The following window is display ed. Select the drive to be disconnected and click
OK.
Important: If other USB devices (such as a portable flash drive) are
connected to your computer , there may be multiple for USB Mass Storage
Device. Be sure to select the Eagle | Consus device!
20
2. After the disk icon disappears from the desktop, press the Power button to turn
off your drive. Now you can safely disconnect the USB or FireWire cable from
your computer and the power cord from the electric outlet.
21
Page 12

6 Troubleshooting
Tip: You can always access the latest firmware, tutorial and Frequently
Asked Questions via http://www.eagletechusa.com/support_faq.asp
1. Nothing happens when I plug in my USB drive
2. My USB drive is powered on but nothing shows up in My Computer
3. My “safely remove hardware” icon is gone
4. Error deleting files or folders
5. HI-speed device is plugged into a LO-speed USB port
6. Dual bay JBOD enclosure sees two separate drives instead of one big volume
7. Delayed write failure
8. What are the benefits of a truly hot swappable, hot pluggable drive enclosure
9. What is F.I.T.?
10. What are the benefits of a 2-in-1 drive enclosure docking station
11. How to setup NAS (Network Attached Storage)
12. How to find IP address of my NAS on the network
13. How to update NAS firmware
14. NAS drive spin down (power management)
15. NAS file system supported (LAN vs. USB mode)
16. Mac OS problem with SMB
17. Mac OS problem with FTP
18. Product installation video
1. Nothing happens when I plug in my USB drive
Surge protectors You may wish to temporarily remove any surge protector and
plug the drive into the wall outlet for troubleshooting purposes. Make sure all the
connections are tight: power cable to wall, power cable to power supply, power
supply to drive.
Cabling system Make sure you are using certified HI-speed USB 2.0 cable,
included with all Eagle Tech external hard drives and external drive enclosures, for
improved data signal integrity. Low quality USB cables may not be properly shielded
and may lose data during high speed transfers or at longer lengths.
Powered USB hub Make sure you are using US B hub with adequate power s upply .
22
Low quality USB hubs usually draw po wer from the computer’ s USB po rt and do not
provide adequate power. Certain notebooks (mostly older notebooks) have
underpowered USB ports and may require that you plug in additional USB cable to
provide adequate power supply (the U SB Y splitter cable is incl uded with all portable
2.5” drive enclosures).
USB hub controller To confirm that you r USB host controller is working properly
under Windows XP, right click on My Computer > click on Manage > click on Device
Manager on the left panel. If you see any yellow exclamation marks or red circles
under "Universal Serial Bus controllers" that means your USB host controller is not
working properly or missing a driver. Please contact your motherboard
manufacturer for the appropriate driver software.
BIOS If the host controller is not seen in De vice Manager then it is probably
disabled in the computer’s BIOS. You can usually press “Del” or “F2” to enter BIOS
setup when the computer starts. Please consult your motherboard user manual for
details on how to enable USB 2.0 ports.
Service Pack Certain USB 2.0 host controllers may need Service Packs to operate
properly. Windows XP added support for USB 2.0 in Service Pack 2, Windows 2000
added support for USB 2.0 in Service Pack 3 and improved the support in Service
Pack 4. Please download the latest service packs from Microsoft for your operating
system.
2. My USB drive is powered on but nothing shows up in My Computer
Caution: partitioning & formatting a drive will erase all data!
Brand new drive If you just received a brand new external drive, you may need to
partition & format the drive to the recognizable format of the operating system. To
partition and format a new disk under Windows XP, right click on My Computer >
click on Manage > click on Disk Management on the left panel. On the right hand
side you should see a list of all drives connected to your computer. Find the new
unallocated drive in black color, it should say for example "74.53 GB unallocated".
Right click on it > click on New Partition > a new partition wizard window will pop
up, click on Next > select Primary Partition and click Next > select partition size in
MB or GB and click Next > Assign new drive letter and click Next > format this
partition using default values and click Next > click Finish. Windows will now
partition and format your new disk so it can be reco gnized by the oper ating system
23
Page 13

(i.e. shows up as usable drive in My Computer). It may take up to 45 minutes to
format a 500 GB or larger drive.
3. My “safely remove hardware” icon is gone
Caution: To prevent file corruption, please always click on the “safely remove
hardware” icon in the taskbar’s notification area before unplugging external USB
drives.
Re-register DLL Sometimes the “safely remove hardware” icon in the taskbar
disappears. To re-register and re-activate the “safely remove hardware” window,
please click on Start > click on Run > type in “RunDll32.exe
shell32.dll,Control_RunDLL hotplug.dll” and hit Enter. Now you can click on the
device you want to stop.
4. Error deleting file or folder
Drive busy This is usually caused by progr ams that are still acces sing the drive and
its contents. Common causes are open files such as Word document or open
Explorer showing the directory content of the drive. Close them all and try again.
File handles If you are still unable to delete files or folder, there are third party
software that “unlocks” operating system file handles to let you delete “lock ed” files
and folders. We recomme nd "U nlock e r 1.8 .7".
5. HI-speed device is plugged into a LO-speed USB port
Cabling system Make sure you are using certified HI-speed USB 2.0 cable,
included with all Eagle Tech external hard drives and external drive enclosures, for
improved data signal integrity. Low quality USB cables may not be properly shielded
and may lose data during high speed transfers or at longer lengths.
Service Pack Certain USB 2.0 host controllers may need Service Packs to operate
properly. Windows XP added support for USB 2.0 in Service Pack 2, Windows 2000
added support for USB 2.0 in Service Pack 3 and improved the support in Service
Pack 4. Please download the latest service packs from Microsoft for your operating
system.
6. Dual bay JBOD enclosure sees two separate drives instead of one big
volume
Jumpers Please make sure to set the hardware JBOD or RAID 0 jumpers in
appropriate position.
Caution: partitioning & formatting a drive will erase all data!
Drives with existing partitions In order for the JBOD and RAID 0 drive
enclosures to combine two hard drives into one big volume, the two hard drives
must not
and power cycle the drive enclo sure. Only then can the drive enclosure combine
both drives into one big volume and recognizable to the operating system as one
big volume.
Delete partitions To delete partition under Windows XP, right click on My
Computer > click on Manage > click on Disk Management on the left panel. On the
right hand side you should see a list of all drives connected to your computer. Find
the two partitioned drive in black color, it should say for example "250 GB Healthy"
and “500 GB Healthy”. Right click on it > click on Delete Partition > click on Yes to
continue. Repeat for the second hard drive. When finished deleting partitions,
power cycle the drive enclosure and follow the steps in Question # 2 to partition
and format the new drive.
7. Delayed write failure
Cabling system Make sure you are using certified HI-speed USB 2.0 cable,
included with all Eagle Tech external hard drives and external drive enclosures, for
improved data signal integrity. Low quality USB cables may not be properly shielded
and may lose data during high speed transfers or at longer lengths.
Powered USB hub Make sure you are using US B hub with adequate power s upply .
Low quality USB hubs usually draw po wer from the computer’ s USB po rt and do not
provide adequate power. Certain notebooks (mostly older notebooks) have
underpowered USB ports and may require that you plug in additional USB cable to
provide adequate power supply (the U SB Y splitter cable is incl uded with all portable
2.5” drive enclosures).
Service Pack Certain USB 2.0 host controllers may need Service Packs to operate
properly. Windows XP added support for USB 2.0 in Service Pack 2, Windows 2000
added support for USB 2.0 in Service Pack 3 and improved the support in Service
Pack 4. Please download the latest service packs from Microsoft for your operating
system.
be “partitioned”. You must prepare both drives by deleting their partitions
24
25
Page 14

Media errors Essentially drive hardware failure. We recommend that you run Disk
Doctors’ data recovery programs included in select external hard drives and drive
enclosures (limited time offer) or visit our Service sectio n for more details a nd -$200
discount coupon applicable towards Disk Doctors’ data recovery service when you
submit a ticket via our website.
Write cache Windows file system may cache write operations and perform those
writes when the system is idle in order to improve system performance. This is
usually turned off by default for external drives. You can see if your drive has
cache/delayed writing enabled by right clicking on th e i co n for the driv e i n t h e D is k
Drive subtree of the Device Manager and selecting the Policies tab. Make sure you
have selected “Optimize for quick remo val” so that ever y bit of data is written to the
external drive immediately.
8. What are the benefits of a truly hot swappable, hot pluggable drive
enclosure?
Quickly access different drives Traditional PC storage components such as ATA
drives (internal or external) do not allow surprise removals fr om the machi ne while
the operating system is running. Doing so causes operating system hang ups,
instability and data loses. Certain models of our drive enclosure we re designed to
tackle this problem, giving professional users the flexibilit y to exchange hard drives
on the fly (without rebooting the system).
9. What is F.I.T.?
Fast Installation Technology This patented mechanical design allows you to
snap-in hard drives without using tools. Works like a hard drive reader without the
bare disk risks. Great for IT users looking to quickly hot swap, backup or image
multiple hard drives.
The following items feature F.I.T.:
Single bay drive enclosures > ET-CSMESU2-BK, ET-CSMSU2-BK, I-NA203U,
I-NA204UE, I-NA304U E and I- NA306U E.
Dual bay drive enclosures > I-NA305J.
HDD docking station > I-NA307.
10. What are the benefits of a 2-in-1 drive enclosure docking station?
Highly mobile and synchronized Take the hassle out of keeping multiple copies
of the same data across multiple PCs and notebooks. All you need is this portable
drive enclosure while on the road, and simply insert it to the docking station at
home or of fice. Thi s wa y yo u r da t a s ta y s ync h ro ni ze d . If y o u ar e a m ob i le use r a nd
work between home and office, you will appreciate the convenience our 2-in-1 d rive
enclosure docking station brings.
The following items features 2-in-1 solution:
2.5"/3.5" form factor > I-NA205UE
3.5"/5.25" form factor > I-NA303US
11. How to setup NAS (Network Attached Storage)
PDF file Download NAS quick setup guide. It contains information on how to find
your NAS on network, configure IP address, SMB and FTP servers, Power
management, update firmware, format new drives under LAN mode, and more.
Applicable on T-series and W-series NAS only.
12. How to find IP address of my NAS on the network
LanDisk Tool Click here to download LanDisk Tool. Make sure your NAS is
connected to the local area network, switch o r ro uter. Wait fo r abo ut 5 s econd s, yo u
should see an “Orange” and “Green” LED on the RJ-45 port at rear of the NAS is
blinking. Run the "LanDisk T o ol" software. Click on "Search" to scan the NAS system
on the network. After it finishes, you will see the IP address, Host Na me, Group
Name, Firmware Version that belongs to the NAS. Highlight the IP address. Use
“Login RCD Target” and enter “User Name” and “Password” to log in.
13. How to update NAS firmware
Via web browser Download the latest NAS firmware version 48. Ente r URL
"http://storage-xxxx" ( xxxx is large 4-digit of the MAC address, check the label next
to the RJ-45 Jack at the rear of the NAS system) or IP address of the NAS system.
(If you don’t know the IP address, run the “LanDisk Tools” software.) Enter "User
Name" and "Password" to log in. Click on “Maintenance” > “Firmware Upload” >
Browse. Locate the NAS Firmware that you downloaded, click “Upload” to start
updating the firmware and wait about 3~5 minutes. Once finished, click on the
“Reboot” to power cycle the NAS.
26
27
Page 15

Via update patch Download firmware update software. Download the latest NAS
firmware version 48. Run the “FW_quick_upgrade.exe” software, click on “Scan”
and the software should locate the NAS information. Click on the IP address and
click on “Browse…” to locate the firmware that you downloaded. Click “Update” to
start uploading firmware to the NAS. Once finished, please manually reboot the
NAS by turn it off and on after 5 seconds.
14. NAS drive spin down (power management)
Drive spin down Yes, when there isn’t any hard drive activity within fifteen
minutes, the Eagle Tech NAS will power down to reduce power cons um ption. The
sleep time can be configured via the web control panel after you log in.
15. NAS file system supported (LAN vs. USB mode)
Recommendation: Format T-series and W-series simple NAS using LAN connection
and FAT32 for broadest compatibility and accessibility by all types of OS and users.
NTFS file system limits your connection type to USB mode only and is not
recommended.
LAN vs. USB mode Before you start using the NAS, please decide if you want to
format the drive using LAN connection or USB connection. A NAS drive formatted to
FAT32 file system using LAN connection is accessible under LAN mode and USB
mode. A NAS drive formatted to NTFS file system using USB connection is
accessible only under USB mode and is not
FA T32 limitation is comm on to all simple NAS on the market right now (regardless of
brand) and includes our T-series and W-series simple NAS. This does not apply to
upcoming high-end NAS by Eagle Tech.
16. Mac OS problem with SMB
Mac OS 10.4 With earlier versions of Mac OS 10.4, the NAS drive can not be
accessed through SMB. Please upgrade to Mac OS 10.4.3 or later to resolve this
problem.
17. Mac OS problem with FTP
Read only The FTP utility on the Mac will be able to read the data on the NAS drive
but you can not write new data to it. To do that, you will need to install a dedica ted
be visible when connected to LAN. This
FTP application, which can either be a free utility or professional shareware
program.
18. Product installation video
Consus-series You can now access detailed 360 degrees product rotation and
installation video on all Consus series drive enclosures. Stay tuned for more on
upcoming iNeo-series of professional drive enclosures.
Tip: You can always access the latest firmware, tutorial and Frequently
Asked Questions via http://www.eagletechusa.com/support_faq.asp
28
29
Page 16

7 Appendix
Regulatory Compliance
FCC Class B Information
This equipment has been tested and found to comply with the limits for a Class B
digital device, pursuant to Part 15 of FCC Rules. T hese limits are designed to
provide reasonable protection against harmful interference in a residential
installation. This equipment generates ‘uses’ and can radiate radio frequency
energy and, if not installed and used in accordance with the instruction, may cause
harmful interference to radio communicati ons. However , there is no guarantee t hat
interference will not occur in a particular installation. If this equipment does cause
harmful interference to radio or television reception, which can be determined by
turning the equipment off and on, the user is encouraged to try to correct the
interference by one or more of the following measures:
1. Reorient or relocate the receiving antenna.
2. Increase the separation between the equipment and receiver.
3. Connect the equipment into an outlet on a circuit different from that to which the
receiver is connected.
4. Consult the dealer or an experienced radio/television technician for help.
Notice 1:
The changes or modifications not expressly approved by the party responsible for
compliance could void the user’s authority to operate the Equipment.
Notice 2:
Shielded interface cables, if any, must be used in order to comply with the emission
limit.
CE Compliance for Europe
This equipment has been tested and fo und to comply with the limits for European
Council Directive on the approximation of the law of the member states relating to
electromagnetic compatibility (89/336/EEC) according to EN55022 Class B.
Warranty Information
This product contains no user-serviceable parts. Refer servicing only to Eagle Tech
personnel.
Obtaining Service
Eagle Tech values your business and always attempts to provide you the very best
of service. If the Product requires maintenance, either contact the detailer from
whom you originally purchased the Produc t or visit our product support Web site at
www.eagle-techusa.com
Material Authorization (RMA). If it is determined that the Product ma y be defective ,
you will be given an RMA number and instructions for Product return. An
unauthoriz ed ret urn (i.e. one fo r which an R MA numbe r has not be en issued ) will be
returned to you at your expense. Authorized returns must be shipp ed in appropriate
shipping container prepaid and insured, to the address provided on your return
paperwork. Y our orig inal bo x and pa ckaging mate rials should b e k ept f or storing or
shipping Eagle Tech product. Your warranty will be void if your returned Product is
shipped in anything other than the original packaging or Eagle Tech approved
materials. To conclusively establish the period of warranty, check the warranty
expiration (serial number required ) via
liable lost data, regardless of the cause, recovery of lost data, or data contained in
any Product placed in its possession.
One Year Limited Warranty
Eagle Tech warrants that the Product, in the course of its normal use, will be free
from defects in material and workmanship for a period of one (1) year and will
conform to Eagle Tech specification therefore. This limited warranty period shall
commence on the purchase date appearing on your purchase receipt. Eagle Tech
shall have no liability for any Product returned if Eagle Tech determines that the
Product was stolen from Eagle T ech or that the assert ed defect a) is not present, b)
cannot reasonably be rectified because of damage occurring before Eagle Tech
receives the Product, or c) is attributable to misuse, improper installation, alteration
(including removing or obliterating labels and opening or removing external
enclosures, unless authorized to do so by Eagle Tech), accident or mishandling
while in the possession of someone other than Ea gle T ech. S ubject to the limitations
specified above, your sole and exclusive warranty shall be, during the period of
warranty specified above and at Eagle Tech’s option, the repair or replacement of
the Product. The foregoing warranty shall extend to repaired or replaced Products
for the balance of the applicable period of the original warr a nt y or ninet y (90 ) da ys
for information on how to obtain a service or, a Return
www.eagle-techusa.com.
Eagle Tech is not
30
31
Page 17

from the date of shipment of a repaired or replaced Product, whichever is longer.
The foregoing limited warranty is Eagle Tech’s sole warranty and is applicable only
to products sold as new. The reme dies provided herein are in lieu of a) any and all
other remedies and warranties, whether expressed, implied or statutory, including
but not limited to, any implied warr anty of merchantabil ity or fitness for a particular
purpose, and b) any and all obligations and liabilities of Eagle Tech for damages
including, but not limited to accidental, consequential, or special damages, or any
financial loss, lost profits or expenses, or lost data arising out of or in connection
with the purchase, use or performance of the Product, even if EAGLE | CO NSUS has
been advised of the possibility of such damages. This warranty gives you specific
legal rights, and you may also have other rights which vary from state to state.
Attention: Eagle Tech Computers, Inc. is not responsible for consequential
damages, including loss or recovery of data.
EAGLE TECH COMPUTERS, INC. SHALL HAVE NO LIABILITY TO YOU UNDER THIS
LIITED WARRANT Y IF THE PRODUCT IS INSTALLED AND USED IN A MANNER NOT
SPECIFIED OR DESCRIBED IN THE PRODUCT SPECIFICATIONS OR DESCRIPTION.
THE PRODUCT HAS BEEN MODIFIED OR ALTERED IN ANY WAY BY ANY PARTY
OTHER THAN EAGLE TECH, OTHER THE F AILURE OF THE PRODUCT TO C ONFORM
TO ITS SPECIFICATIONS CAN BE ATTRIBUTED TO CAUSES THAT NOT THE
RESPONSIBILITY OF EAGLE TECH.
EAGLE TECH MAKES NO WARRANTY OR REPRESENTATION, EXPRESSED, IMPLIED,
OR STAT UTORY, WITH RESPECT TO ITS PRODUCTS OR THE CONTENTS OR USE
OF THIS DOCUMENTATION AND ALL ACCOMPANYING SOFTWARE, AND
PARTICULARLY DISCLAIMS ITS QUALITY OR PERFORMANCE FOR ANY
PARTICULAR PURPOSE.
EAGLE TECH MAKES NO GUARANTEE THAT ALL DATA STORED ON EAGLE TECH
PRODUCTS IS ALWAYS SECURE WIHOUT ANY RISKS OF DATA LOSS. EAGLE TECH
REMINDS YOU TO BACK UP THE DATA PERIODICALLY. UNDER NO
CIRCUMSTANCES SHALL EAGLE TECH BE LIABLE IN ANYWAY TO THE USER FOR
DAMAB E S, INCLUDING ANY SAVIN GS, LOST P R O FITS OR OTHER IN CIDENTAL OR
CONSEQUENTIAL DAMAGES ARISPING OUT OF THE USE OF, OR INABILITY TO USE
EAGLE TECH PRODUCTS OR RESULTING LOSS OF DATA FROM SUCH USE.
EAGLE | CONSUS Service and Support
If you need additional information or help during installation or normal use of this
product, visit out product support Web site at
from these topics:
Support - Obtain warranty information, warranty status, RMA status, access
product specifications and technical tips (including updated FAQ’s)
Downloads - Download installation software and drivers.
Contact - Contact a support representative by email or phone.
When contacting Eagle Tech for support, have your Eagle Tech product serial
number, model number, system hardware, and system software version available.
www.eagle-techusa.com
phone 626.956.4040
fax 626.810.4820
Eagle Tech Computers, Inc.
18539 East Gale Avenue
City of Industry, CA 91748 U.S.A
Thank you for choosing Eagle Tech products!
www.eagle-techusa.com
and choose
32
33
Page 18

8 Understand Eagle Tech Brand
34
 Loading...