

Page 1
Owner’s Manual
Please read this guide carefully before using your DCO7
18858_OPS_MANUAL_UPDATE_US.qxd 7/1/08 16:45 Page 1
Page 2

WARNING
TO REDUCE THE RISK OF FIRE, ELECTRIC SHOCK, OR INJURY
:
1 Do not leave appliance when plugged in. Unplug from electrical
outlet when not in use and before servicing.
2 Do not use outdoors or on wet surfaces or to vacuum water or other
liquids – electric shock and personal injury could occur.
3 Do not allow to be used as a toy. Close attention is necessary when
used by or near children.
4 Do not allow use by anyone unable to operate the vacuum properly.
5 Use only as described in this manual. Use only with Dyson-
recommended attachments, accessories, and replacement parts.
6 Check to ensure your electricity supply corresponds to that shown on
the rating plate, which can be found on the base of the machine
between the wheels. The machine must only be used as rated.
7 If the machine is not functioning properly, has been dropped,
damaged, left outdoors, or immersed in liquid, contact the Dyson
Helpline at 1-866-693-9766.
8 Do not use with a damaged cord or plug; do not pull or carry by the
cord; do not use the cord as a handle; do not close a door on the
cord or pull the cord around sharp edges or corners. Do not run the
machine over the cord. Keep the cord away from heated surfaces
and open flames.
9 Do not unplug by pulling on the cord. To unplug, grasp the plug,
not the cord.
10 Do not handle the plug or machine with wet hands.
11 Do not use the machine without the clear bin
TM
and the filters
in place.
12 Do not put any objects into openings in the machine. Do not use
with any opening blocked; keep free of dust, lint, hair, and anything
that may reduce air flow.
13 Keep hair, loose clothing, fingers, and all parts of body away from
openings in the machine and moving parts such as the brushbar.
14 Do not use the machine to pick up sharp hard objects, small toys,
pins, paper clips, etc. They may damage the machine.
15 The use of an extension cord is not recommended.
16 Store the machine indoors. Put the machine away after use with the
cord wrapped safely to prevent tripping accidents.
17 Turn off all controls before unplugging.
18 Take extra care when cleaning on stairs; always work with the
machine at the bottom of the stairs. Keep vacuum on the floor.
Do not put on chairs, tables, etc.
19 Do not pick up anything that is burning or smoking, such as
cigarettes, matches, or hot ashes.
20 Do not use to pick up flammable or combustible liquids, such as
gasoline, or use in areas where they may be present.
21 When vacuuming, certain carpets may generate small static charges
in the clear bin
TM
or wand. These are not associated with the
electricity supply. To minimize any effect from this, do not put your
hand or insert any object into the clear binTMunless you have first
emptied it and rinsed it out with cold water.
22 Do not carry out any maintenance or repair work other than that
shown in this manual or advised by the Dyson Helpline.
23 Consult your flooring manufacturer’s instructions before vacuuming
and caring for your flooring, rugs, and carpets. Some carpets will
fuzz if a rotating brushbar is used when vacuuming. If this happens
we recommend vacuuming in bare floors mode and consulting with
your flooring manufacturer.
Important safety instructions
IMPORTANT
SAFETY
INSTRUCTIONS
When using an electrical
appliance, basic precautions
should always be followed,
including the following:
READ ALL INSTRUCTIONS
BEFORE USING THIS
VACUUM CLEANER
SAVE THESE
INSTRUCTIONS
THIS APPLIANCE IS INTENDED
FOR HOUSEHOLD USE ONLY
2
Polarization instructions
To reduce the risk of electric
shock, this appliance has a
polarized plug (one blade is
wider than the other). This plug
will fit in a polarized outlet only
one way. If the plug does not fit
fully in the outlet, reverse the
plug. If it still does not fit,
contact a qualified electrician to
install the proper outlet. Do not
change the plug in any way.
18858_OPS_MANUAL_UPDATE_US.qxd 7/1/08 16:45 Page 2
Page 3
Important safety instructions Page 2
Assembling 4
Using your DCO7 6
Washing your filter 8
Using the tools 10
Emptying the Clear bin
TM
12
Clearing blockages 14
Using and maintaining optional accessories 16
Troubleshooting tips 18
Limited warranty and Customer care 19
Contents
Owner’s Manual
Please read this guide carefully
before use.
Dyson Helpline contact us at
1-866-693-9766
3
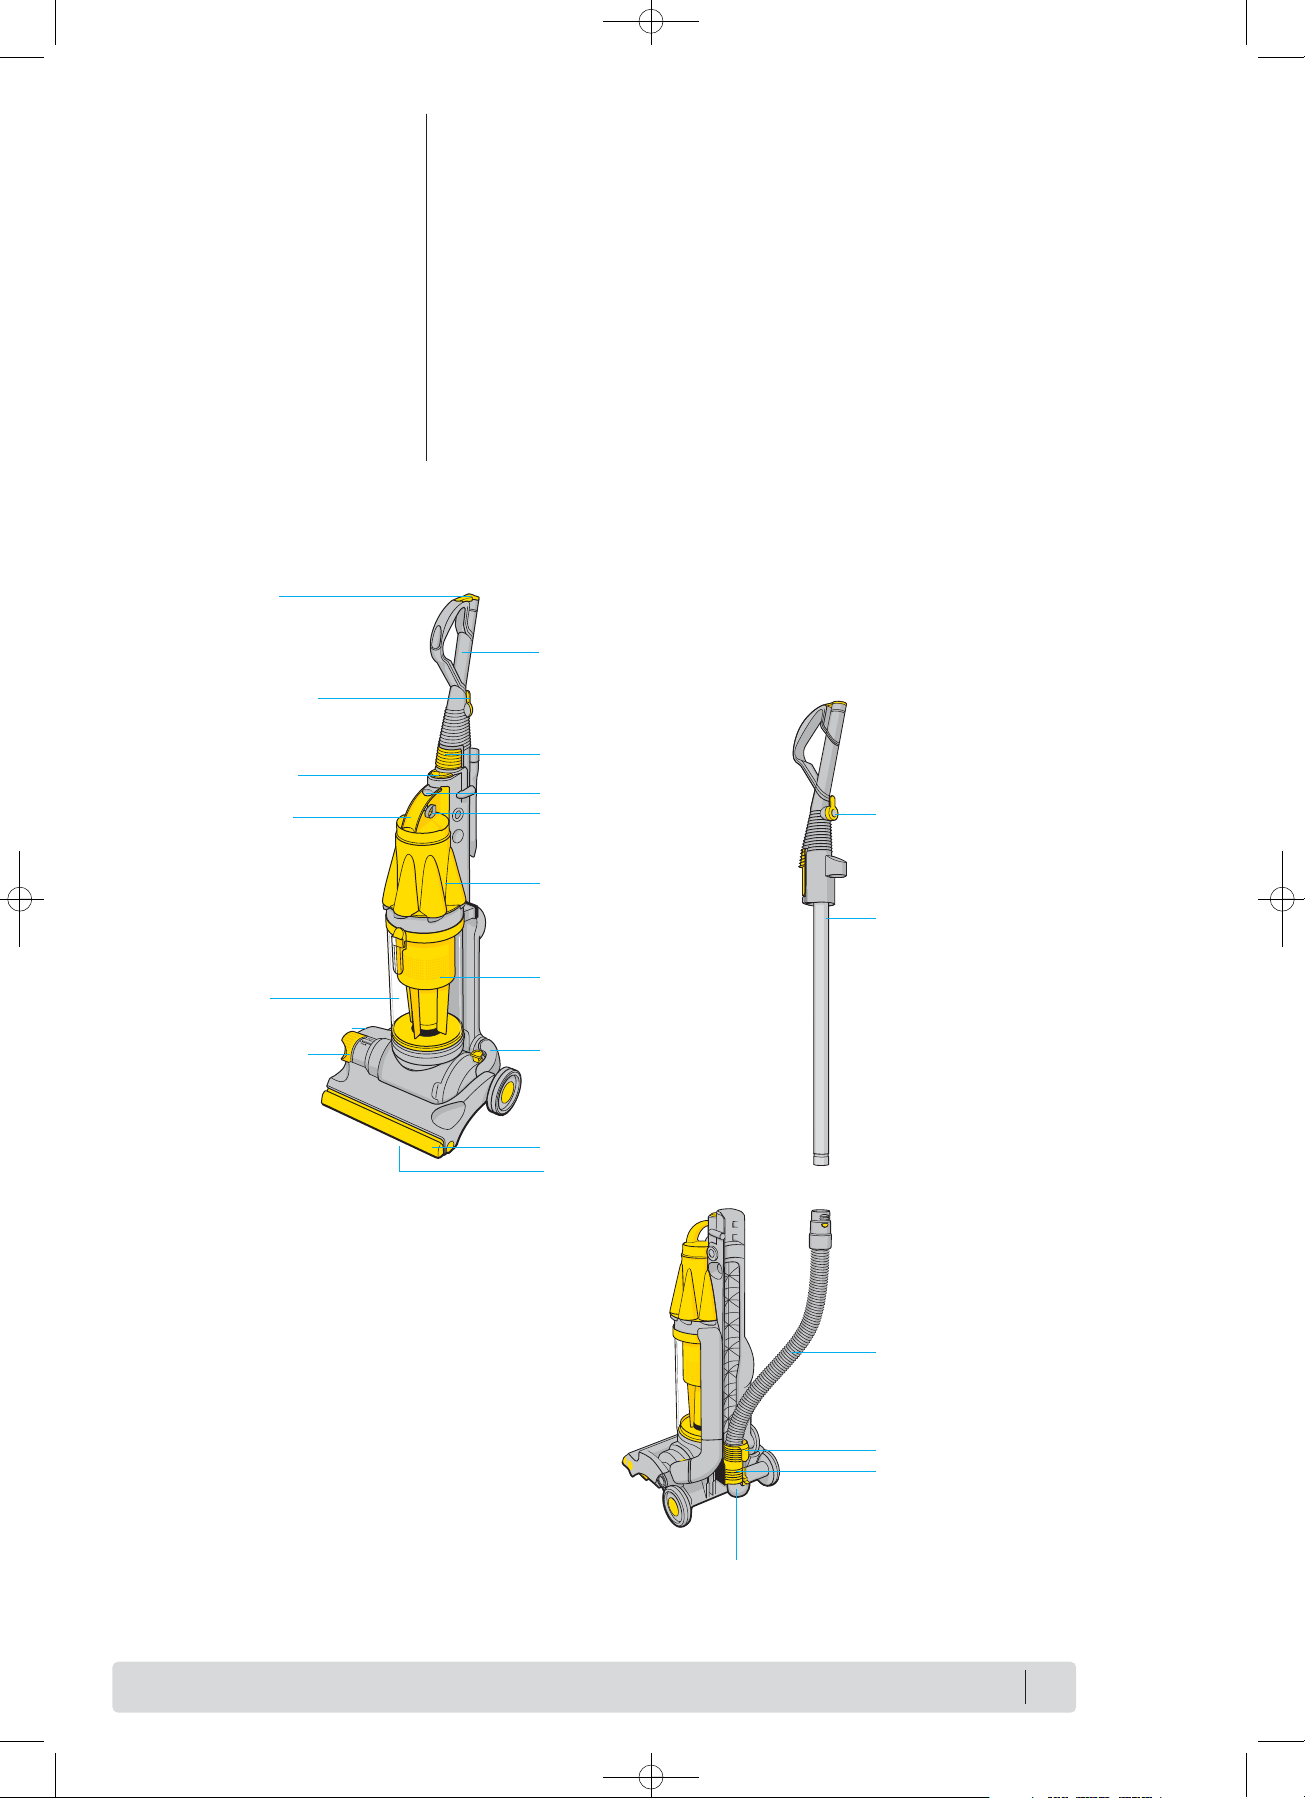
Wand release button
Cyclone release button
Airway inspection valve
Soleplate
Shroud
Wand cap
Upper cord hook
Bin emptying button
On/off switch
Washable lifetime
filter housing
Brushbar housing
Cyclone assembly
Wand
Brushbar on/off
Carry handle
Clear bin
TM
Hose
Lower cord hook
U-bend release button
U-bend
Wand
Upper cord hook
www.dyson.com
18858_OPS_MANUAL_UPDATE_US.qxd 7/1/08 16:45 Page 3
Page 4
Assembling your DCO7
This machine was inspected and
packaged carefully before being
shipped from the factory.
If you need assistance during
assembly or operation, please
call the Dyson Helpline at
1-866-693-9766.
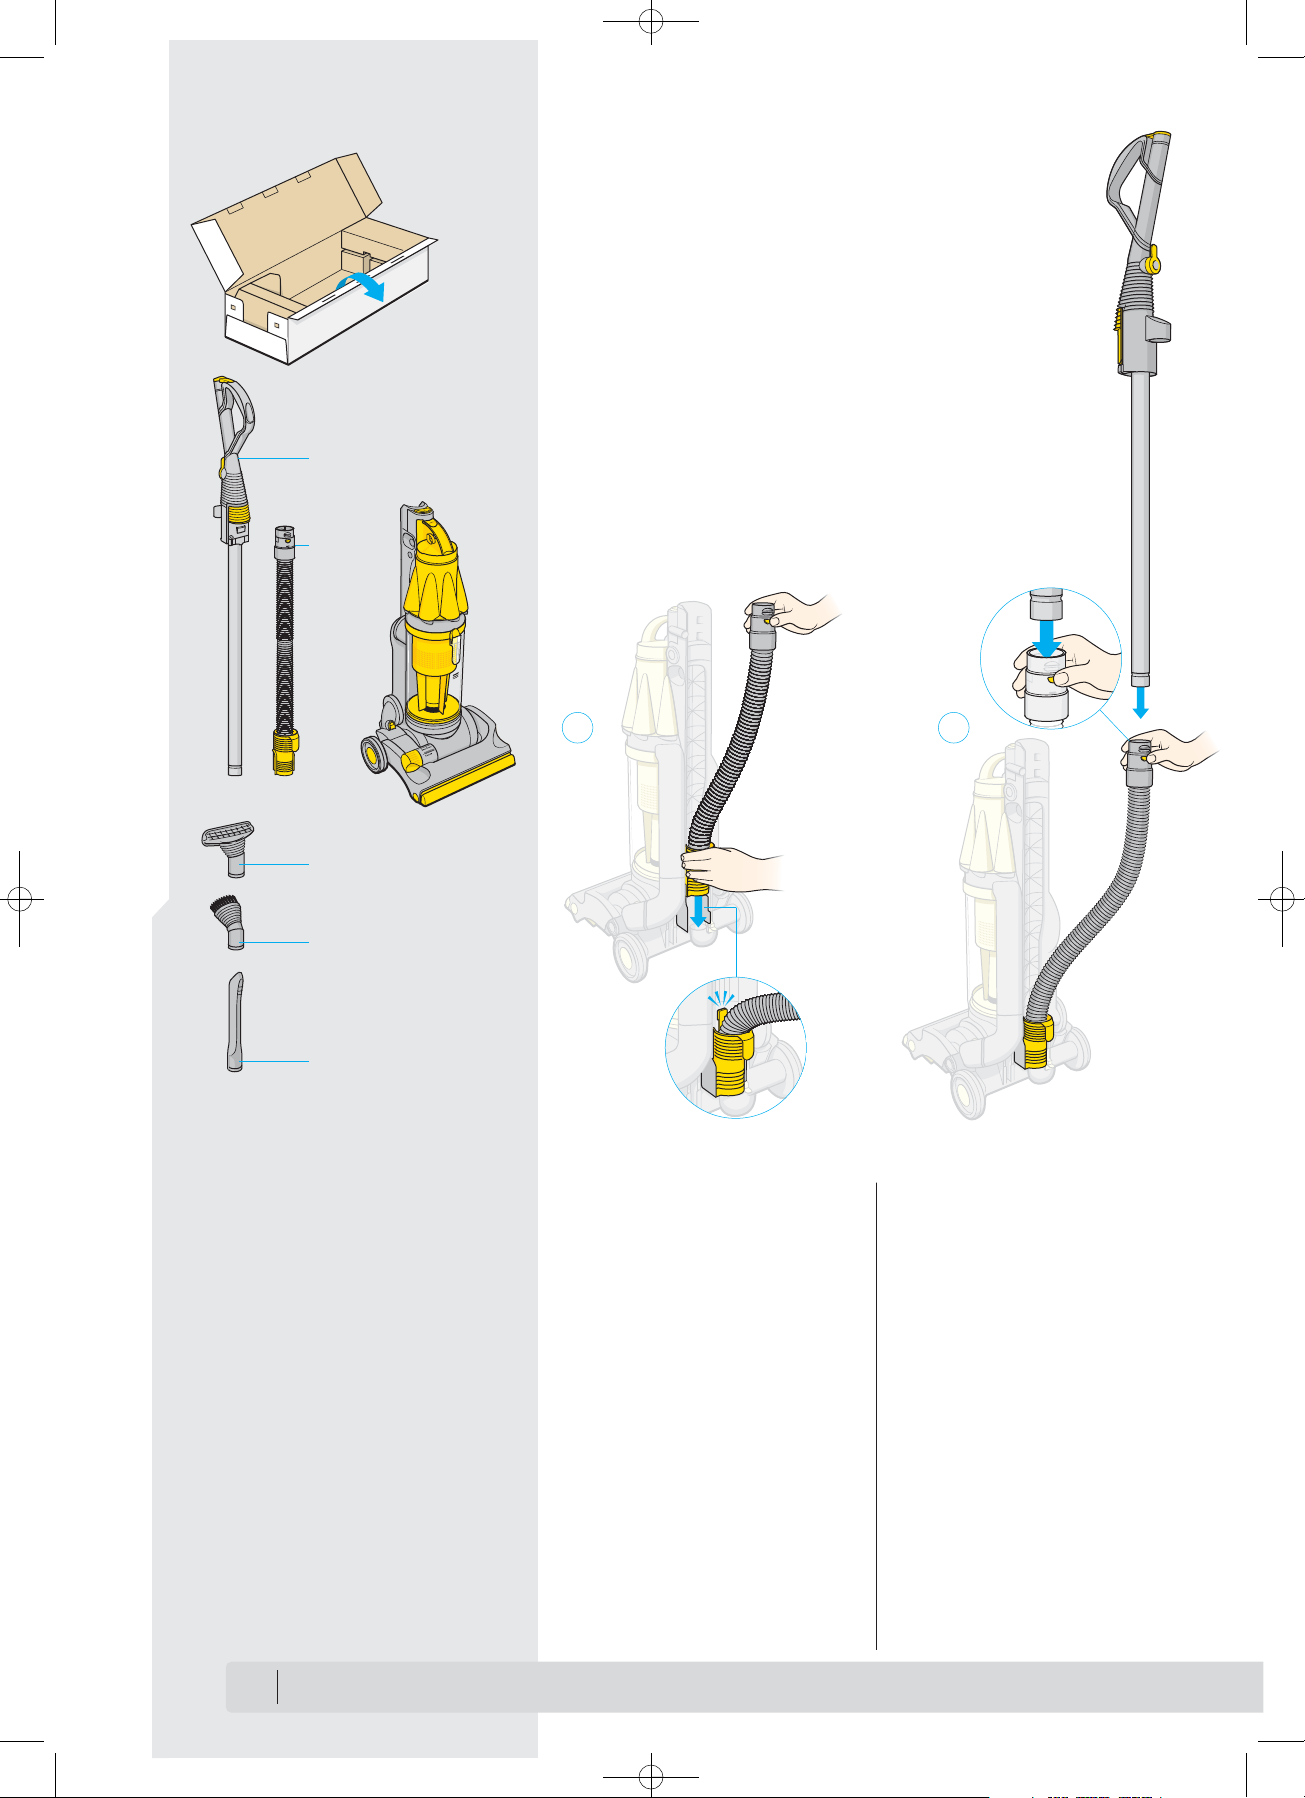
1 Slide the hose into the guides
at the back of the machine,
and click into place.
2 While pressing the hose
release button, slide the
wand down inside the hose.
Box contents
Stair tool
Crevice tool
Brush tool
Wand
Hose
2
Dyson Helpline contact us at
1-866-693-9766
7 days a week
4
Assembling
Additional accessories may be
included with some models.
1
18858_OPS_MANUAL_UPDATE_US.qxd 7/1/08 16:45 Page 4
Page 5

Assembling
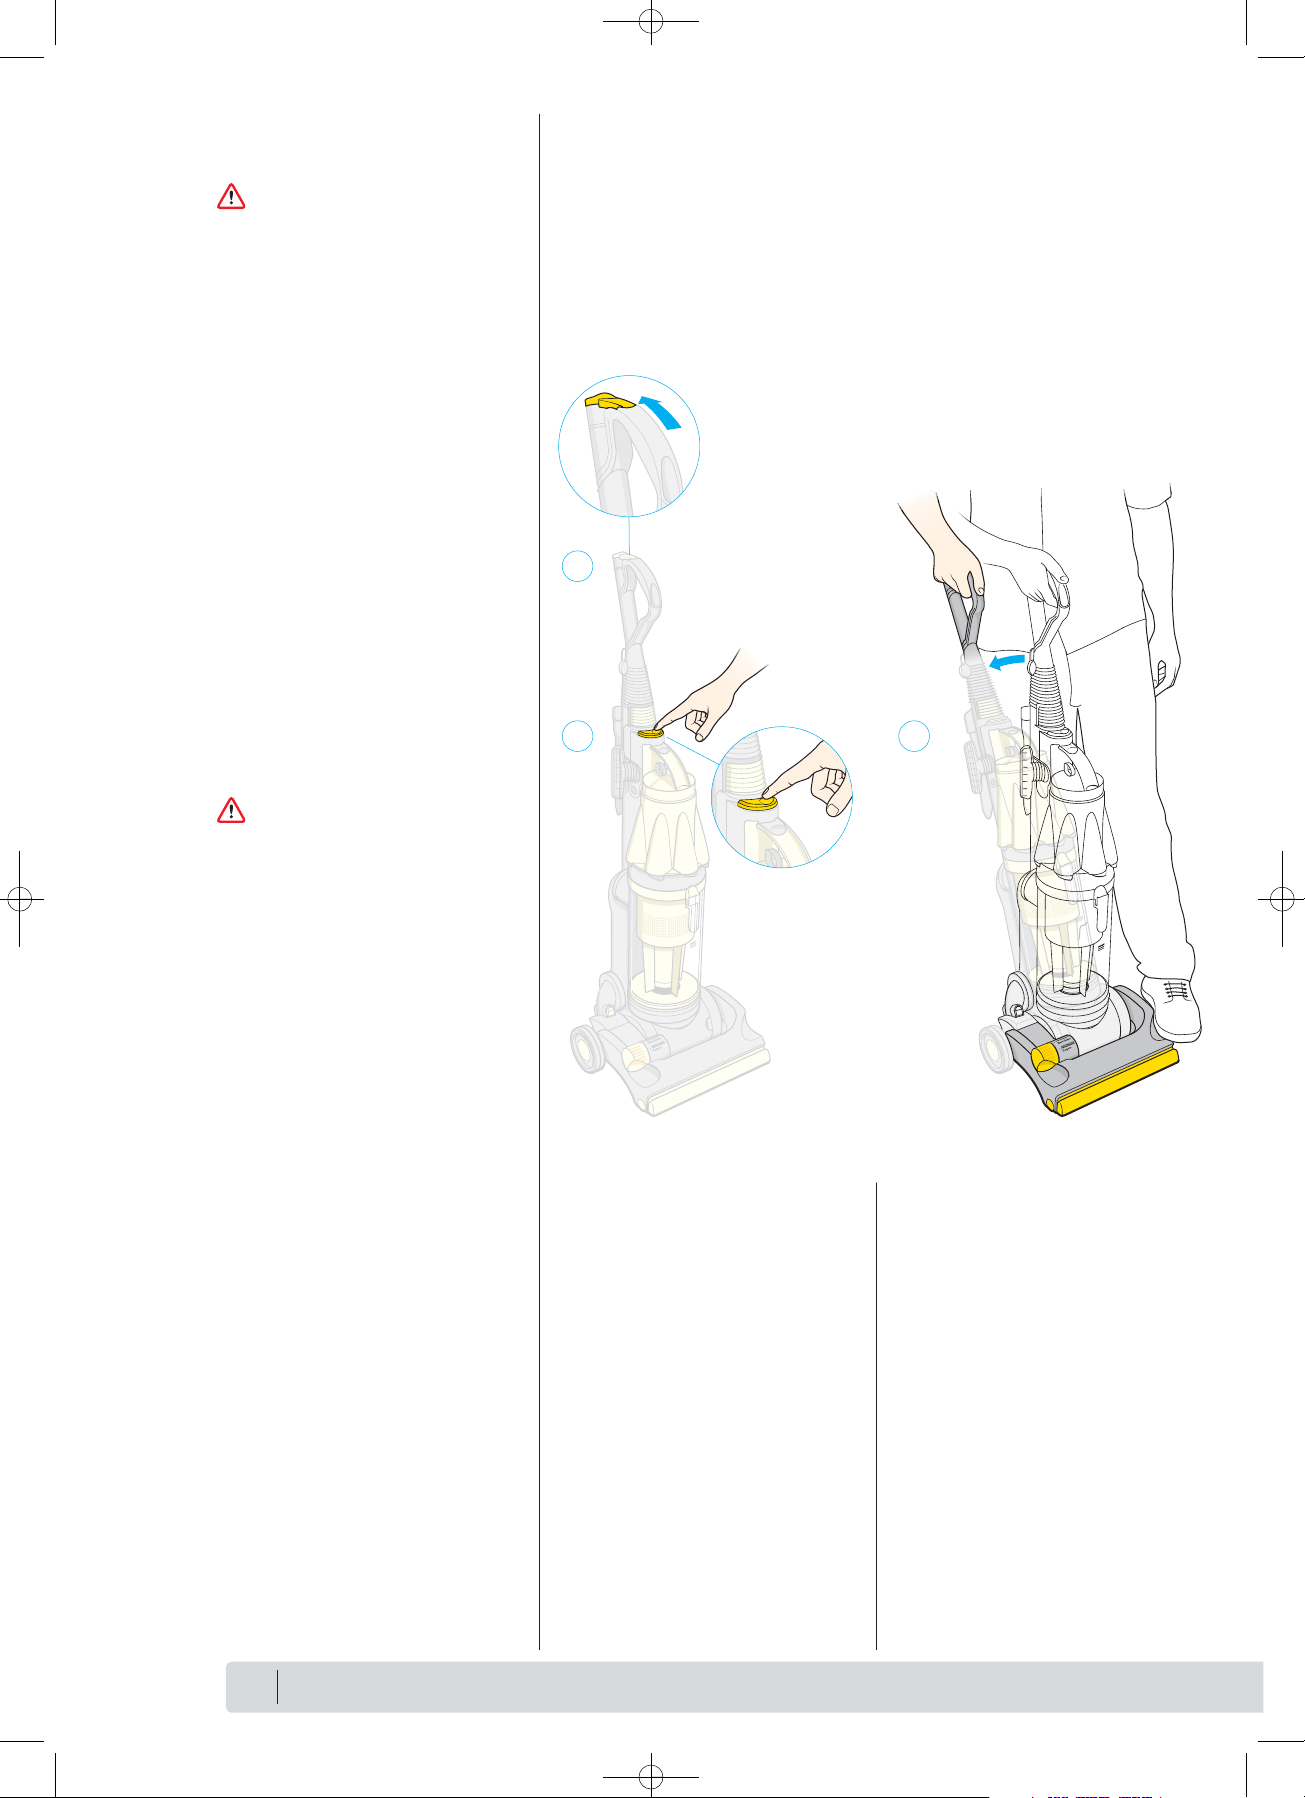
3 Slide the wand into the top
of the machine until it clicks
securely into place. You may
need to press firmly and
should hear a ‘click’ sound.
tip To quickly release cord,
rotate upper cord hook
downward. Twist back up
before rewinding cord.
4 Push the brush and stair tools
securely into the storage holes
on either side of machine.
Fit the crevice tool into the tool
clip on the back of the wand.
3
4
5 Store the cord safely by
winding it counter-clockwise
around the cord winders and
securing with the cord clip.
5
www.dyson.com
5
18858_OPS_MANUAL_UPDATE_US.qxd 7/1/08 16:45 Page 5
Page 6
Using your DCO7
Switching on/off
1 Make sure you have read
and understood all safety
instructions before using the
machine for the first time.
The wand cap should be
closed when not using the
tools.
2 Plug into electrical outlet and
press the on/off switch.
3 To start vacuuming, push the
front of the cleaner head down
with your foot and tilt the
handle backward.
Using your DCO7
WARNING
• This machine is intended for
domestic use only. Fine dust
such as plaster dust or flour
should only be vacuumed in
small amounts.
• Consult your flooring
manufacturer’s instructions
before vacuuming your
flooring, rugs and carpets.
Some carpets will fuzz if a
rotating brushbar is used when
vacuuming. If this happens we
recommend vacuuming in
bare floors mode and
consulting with your flooring
manufacturer.
CAUTION
• Keep hair, loose clothing,
fingers, and all parts of the
body away from openings
and moving parts.
• This machine is fitted with
a belt protection system.
If any item becomes caught
in the brushbar (e.g., rug
fringe), you will hear a loud
“ratcheting” warning noise.
To rectify, turn the machine
off, disconnect from the
electrical outlet, and clear
any obstruction (see page 14),
checking that the brush control
is set to the correct position
for the floor surface before
re-starting the machine.
1
2 3
Dyson Helpline contact us at
1-866-693-9766
7 days a week
6
tip The ratcheting noise may also
occur if your carpet or area
rug is not adequately attached
to the floor. If this happens
you should vacuum in bare
floors mode.
18858_OPS_MANUAL_UPDATE_US.qxd 7/1/08 16:45 Page 6
Page 7

1
2
Using your DCO7
Transporting your Dyson
To move the machine from room
to room, ensure it is upright,
with the cord stored on the cord
winders and the wand securely
in place. Tilt back on the rear
wheels and push forward.
Carrying your DCO7
Your DCO7 should be lifted by
using the carry handle.
CAUTION
• Do not shake the machine
when carrying.
• For your safety do not press
the cyclone release catch
when carrying your machine.
Brush control system
Ensure the machine is in an
upright position before adjusting
the setting.
1 Bare floors
Use this setting to stop brushbar
from turning when vacuuming
bare floors and delicate floors,
rugs, and carpets.
2 Carpets
Use this setting so brushbar
turns when vacuuming nondelicate surfaces.
tip The brushbar will not turn until
you tilt the handle backward
to begin vacuuming.
7
www.dyson.com
18858_OPS_MANUAL_UPDATE_US.qxd 7/1/08 16:45 Page 7
Page 8
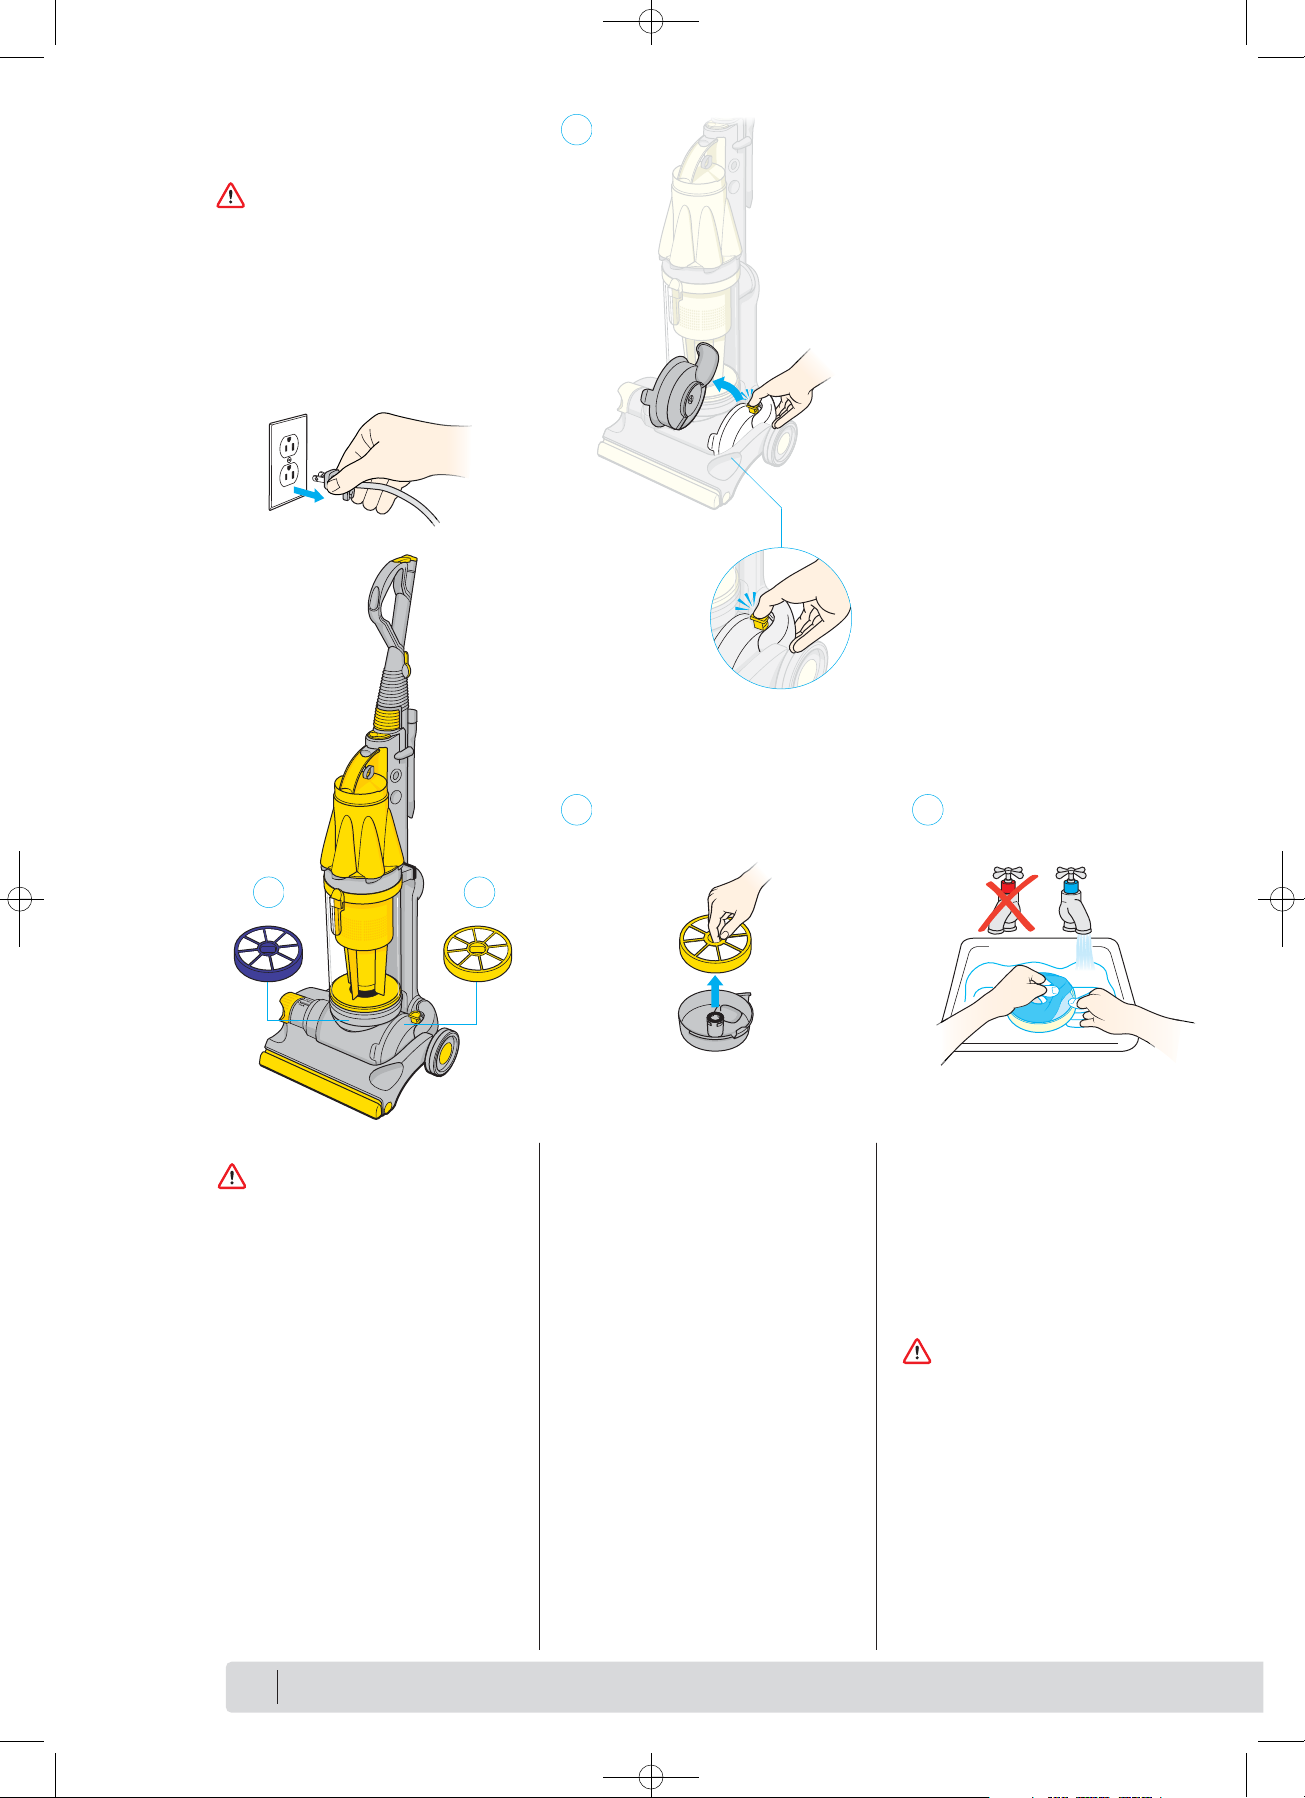
Only the blue foam pad and the
yellow case should be rinsed –
do not wash the filter housing.
3 Submerge the foam pad and
case in cold water and rinse
thoroughly.
CAUTION
• Rinse in cold water only.
• Do not use detergent.
• Do not put in a washing
machine or dishwasher.
Dyson Helpline contact us at
1-866-693-9766
7 days a week
8
Washing your filter
A Lifetime washable filter
IMPORTANT
Check your washable filter
regularly and wash at least
every 6 months according to
instructions to maintain
performance.
B Lifetime HEPA filter
This is a permanent lifetime
filter. Do not remove or
attempt to rinse this filter.
Washing your filter
CAUTION
• Turn power off and unplug
before washing filter. Failure
to do so could result in
electric shock or personal
injury.
Removing washable filter
1 Press the filter release catch
to remove the filter housing
from the machine.
2 Remove the filter from the
housing.
1
2
B A
3
tip The filter may require more
frequent washing based on
individual vacuuming habits,
check regularly.
18858_OPS_MANUAL_UPDATE_US.qxd 7/1/08 16:45 Page 8
Page 9

Washing your filter
6 Leave in a warm place to dry
for 12 hours. Make sure the
filter is completely dry before
replacing in the machine.
CAUTION
• Do not dry in an oven or
microwave.
• Do not dry in a clothes dryer.
• Do not dry near an open flame.
7 When the blue foam pad and
yellow case are completely
dry, place the foam pad in the
case and replace in the filter
housing. Click back into
machine, pressing points 1
and 2 firmly to secure.
CAUTION
• Do not use the machine
without the filter in place.
2
1
9
4
5
6 7
12 hrs
www.dyson.com
4 Rinse the blue foam pad and
squeeze gently, repeating until
the water runs clear.
5 Rinse the yellow case and tap
firmly, repeating until the water
runs clear.
18858_OPS_MANUAL_UPDATE_US.qxd 7/1/08 16:45 Page 9
Page 10

Using the tools
Using the tools
Choosing the right tool
The tools allow you to clean
surfaces above the floor and
to reach hard to clean areas.
Ensure the machine is in an
upright position before
using tools.
A Brush tool – with soft bristles
to dislodge dust and cobwebs.
Can be used to clean vents
and some furniture.
B Stair tool – with velour strips
to pick up hairs and an
agitating edge to lift the
carpet. Can be used to clean
stairs and upholstery.
C Crevice tool – reaches deep
into nooks and crannies.
Can be used to clean
along baseboards and in
tight spaces.
CAUTION
Do not use your vacuum cleaner
outdoors or on wet surfaces.
Vacuum may be used inside a
garage only when used with the
Model 08909 Dyson Car
Cleaning Kit accessories. If used
in a garage, care should be
taken to wipe the soleplate and
wheels with a dry cloth after
vacuuming to clean off any
sand, dirt, or pebbles that could
damage delicate floors.
How to clean your tools
The brush tool, stair tool, and
crevice tool may be washed in
warm water with a detergent.
Rinse and air dry thoroughly
before using. You may wipe the
outside of the floor tool or turbo
tool/mini turbine head with a
damp cloth, but do not
submerge in water. Do not
attempt to clean any tools when
they are attached to the machine.
A
B
C
1
2
Dyson Helpline contact us at
1-866-693-9766
7 days a week
10
Attaching tools
Use tools for easier cleaning in hard
to reach areas.
1 Press the wand release to detach
the wand from the machine.
2 Pull wand up to extend hose, slide
the hose away from the wand
until the metal tube and hose cuff
click into place.
All Dyson tools can be used
in the following ways:
Wand mode
Slide back the wand cap and fit one
of the tools directly on the
wand handle.
18858_OPS_MANUAL_UPDATE_US.qxd 7/1/08 16:45 Page 10
Page 11

Using the tools
Hose mode
Press the hose release button and
remove the wand. Fit one of the
tools directly on to the end of
the hose.
FOR YOUR SAFETY
• When the hose is fully
extended, grasp firmly by
the hose, not the tool.
Reversed wand mode
(for selected models only)
Remove wand as shown for hose
mode. Reverse the wand and
click it into the end of the hose,
pressing the hose release button
to ensure a correct fit. Fit one
of the tools on to the end of
the wand.
tip The vacuum has been
designed to follow you when
used in wand or hose mode.
Stair cleaning
Use the hose and stair tool for
stair cleaning. The hose will
stretch all the way to the top of
an average staircase so you
can leave your machine at
the bottom.
CAUTION
• To avoid personal injury and
to prevent the machine from
falling when cleaning stairs,
always place it at the bottom
of the stairs.
• Powerful suction can cause
the hose to “pull back.”
Please take care using the wand.
11
www.dyson.com
18858_OPS_MANUAL_UPDATE_US.qxd 7/1/08 16:45 Page 11
Page 12
Emptying the Clear bin
TM
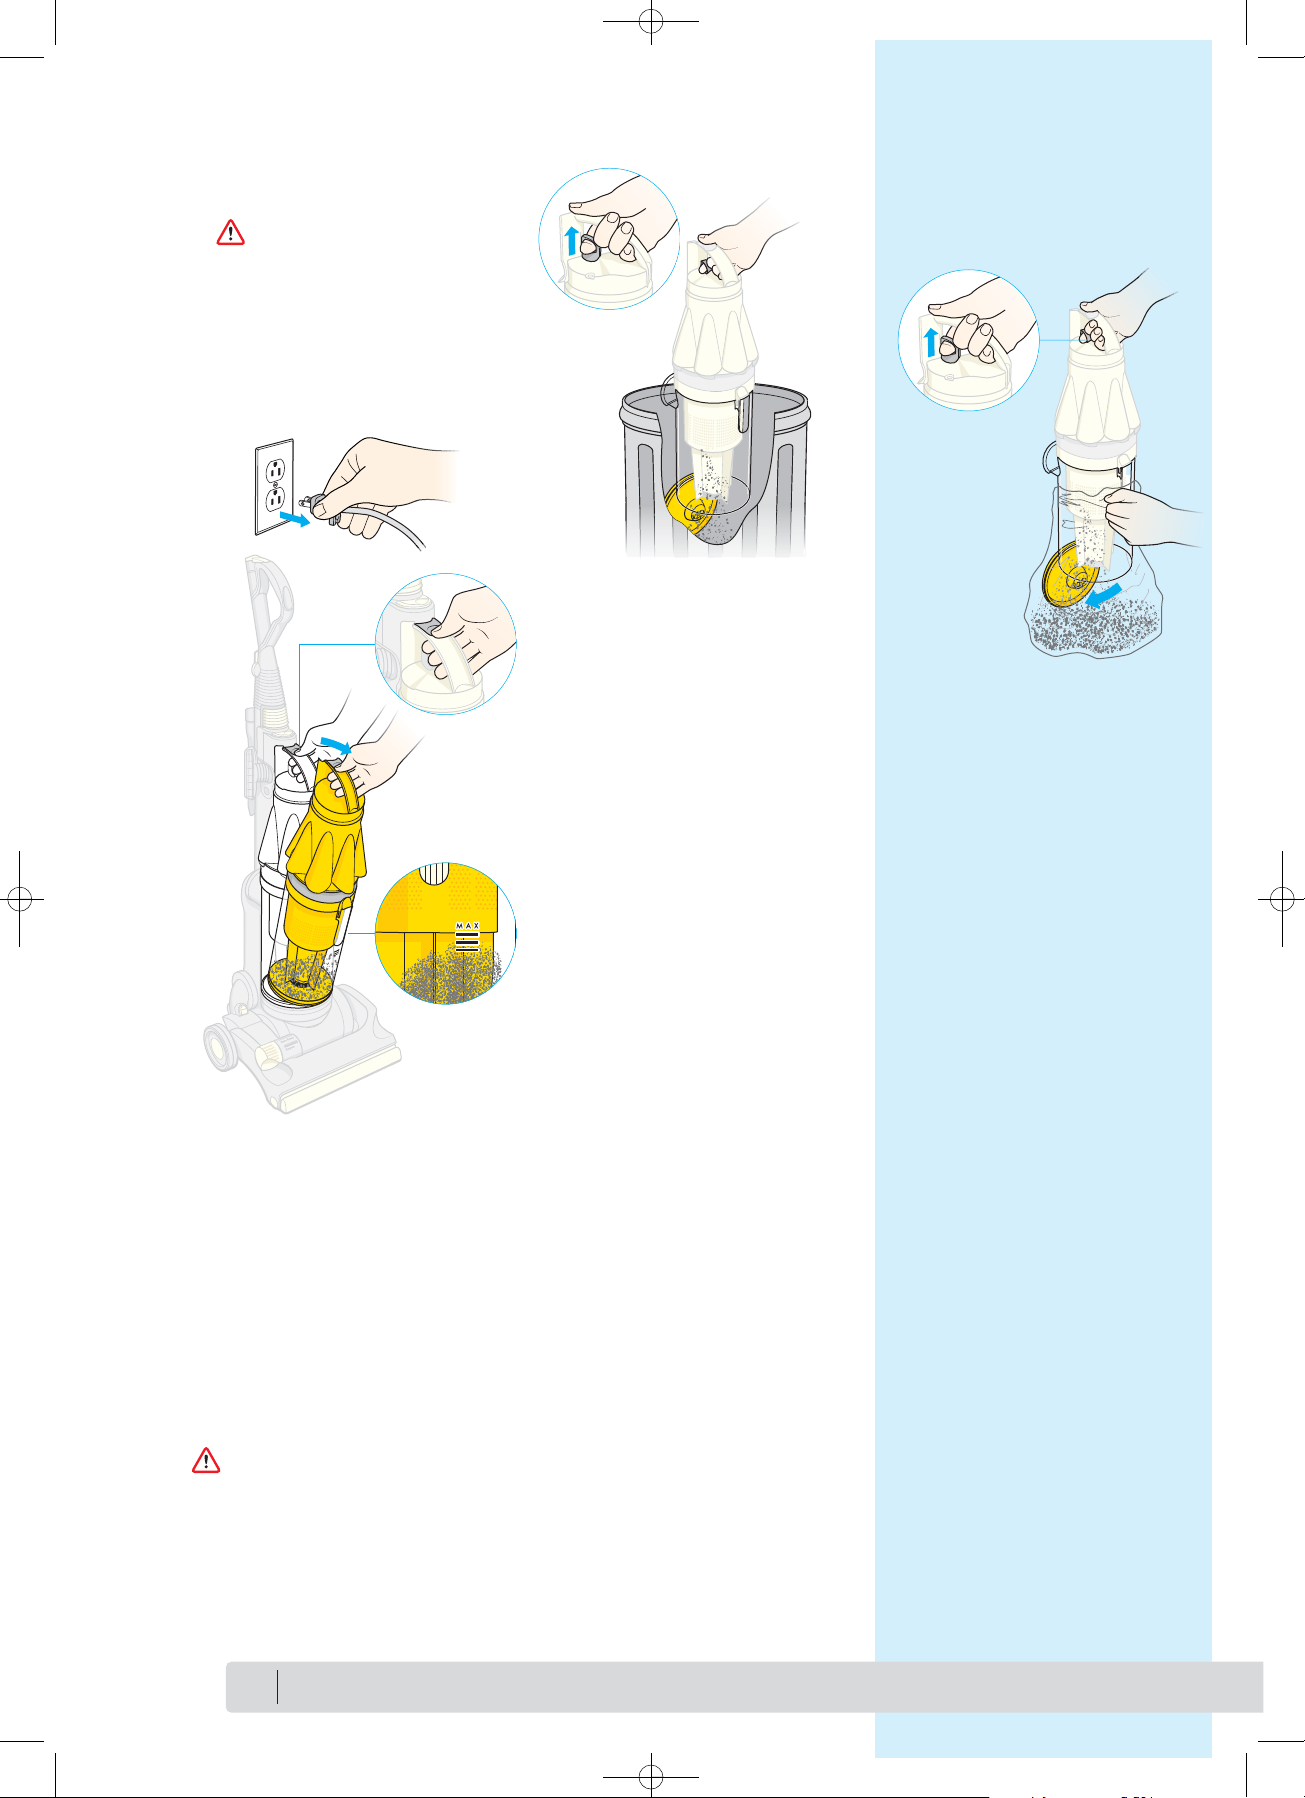
Removing the bin
Press the cyclone release catch
with your thumb to remove the
clear bin
TM
assembly from the
machine.
To ensure your machine continues
to clean effectively, the clear bin
TM
must be emptied when the dust
reaches the level of the MAX
mark.
• When removing bin, do not
pull up on carry handle while
pressing cyclone release catch.
• When replacing the bin,
ensure it clicks back
into place.
Clear bin
TM
emptying option 2
Emptying into a bag is
recommended for allergy
sufferers. Place bin in bag and
pull the trigger to release dust.
Let dust settle and close bin base
securely before removing from
bag and refitting cyclone and bin
on machine.
Clear bin
TM
emptying option 1
Pull the trigger to release dust
directly into a garbage can or
wastebasket. Shake or tap firmly to
remove all dust from inside the
cyclone.
Dyson Helpline contact us at
1-866-693-9766
7 days a week
12
Emptying the
Clear bin
TM
CAUTION
• Turn power off and unplug
before emptying the bin. Failure
to do so could result in electric
shock or personal injury.
• Do not use machine without
clear bin
TM
in place.
18858_OPS_MANUAL_UPDATE_US.qxd 7/1/08 16:45 Page 12
Page 13

Emptying the Clear bin
TM
Shroud cleaning
(when necessary)
To remove any build-up of lint or
large dust particles on the shroud:
A Press the bin release catch to
remove the clear bin
TM
.
B Clean the shroud with a cloth
or dry brush to remove the
lint and dust.
CAUTION
• Do not use the machine
without the clear bin
TM
in place.
tip Clear bin
TM
will not come off
cyclone unless the bin base
is open.
To reassemble the clear bin
TM
,
place on the floor with the clear
binTMbase closed.
C Holding the carry handle, put
the cyclone assembly inside the
clear bin
TM
,line up the front
and rear catches, and push
down to click the catches
into place.
D Ensure the clear bin
TM
is
secure before replacing on
the machine.
Clear binTMcleaning
(optional)
IMPORTANT
• You may rinse the clear bin
TM
with water. Rinse only the
clear binTM– do not rinse the
inner cyclone, shroud, or
cones.
• Do not use detergents.
• Do not immerse any other
part of the machine in water.
• Ensure the clear bin
TM
is
completely dry before
replacing.
A
B
C
D
13
www.dyson.com
18858_OPS_MANUAL_UPDATE_US.qxd 7/1/08 16:45 Page 13
Page 14
Clearing blockages
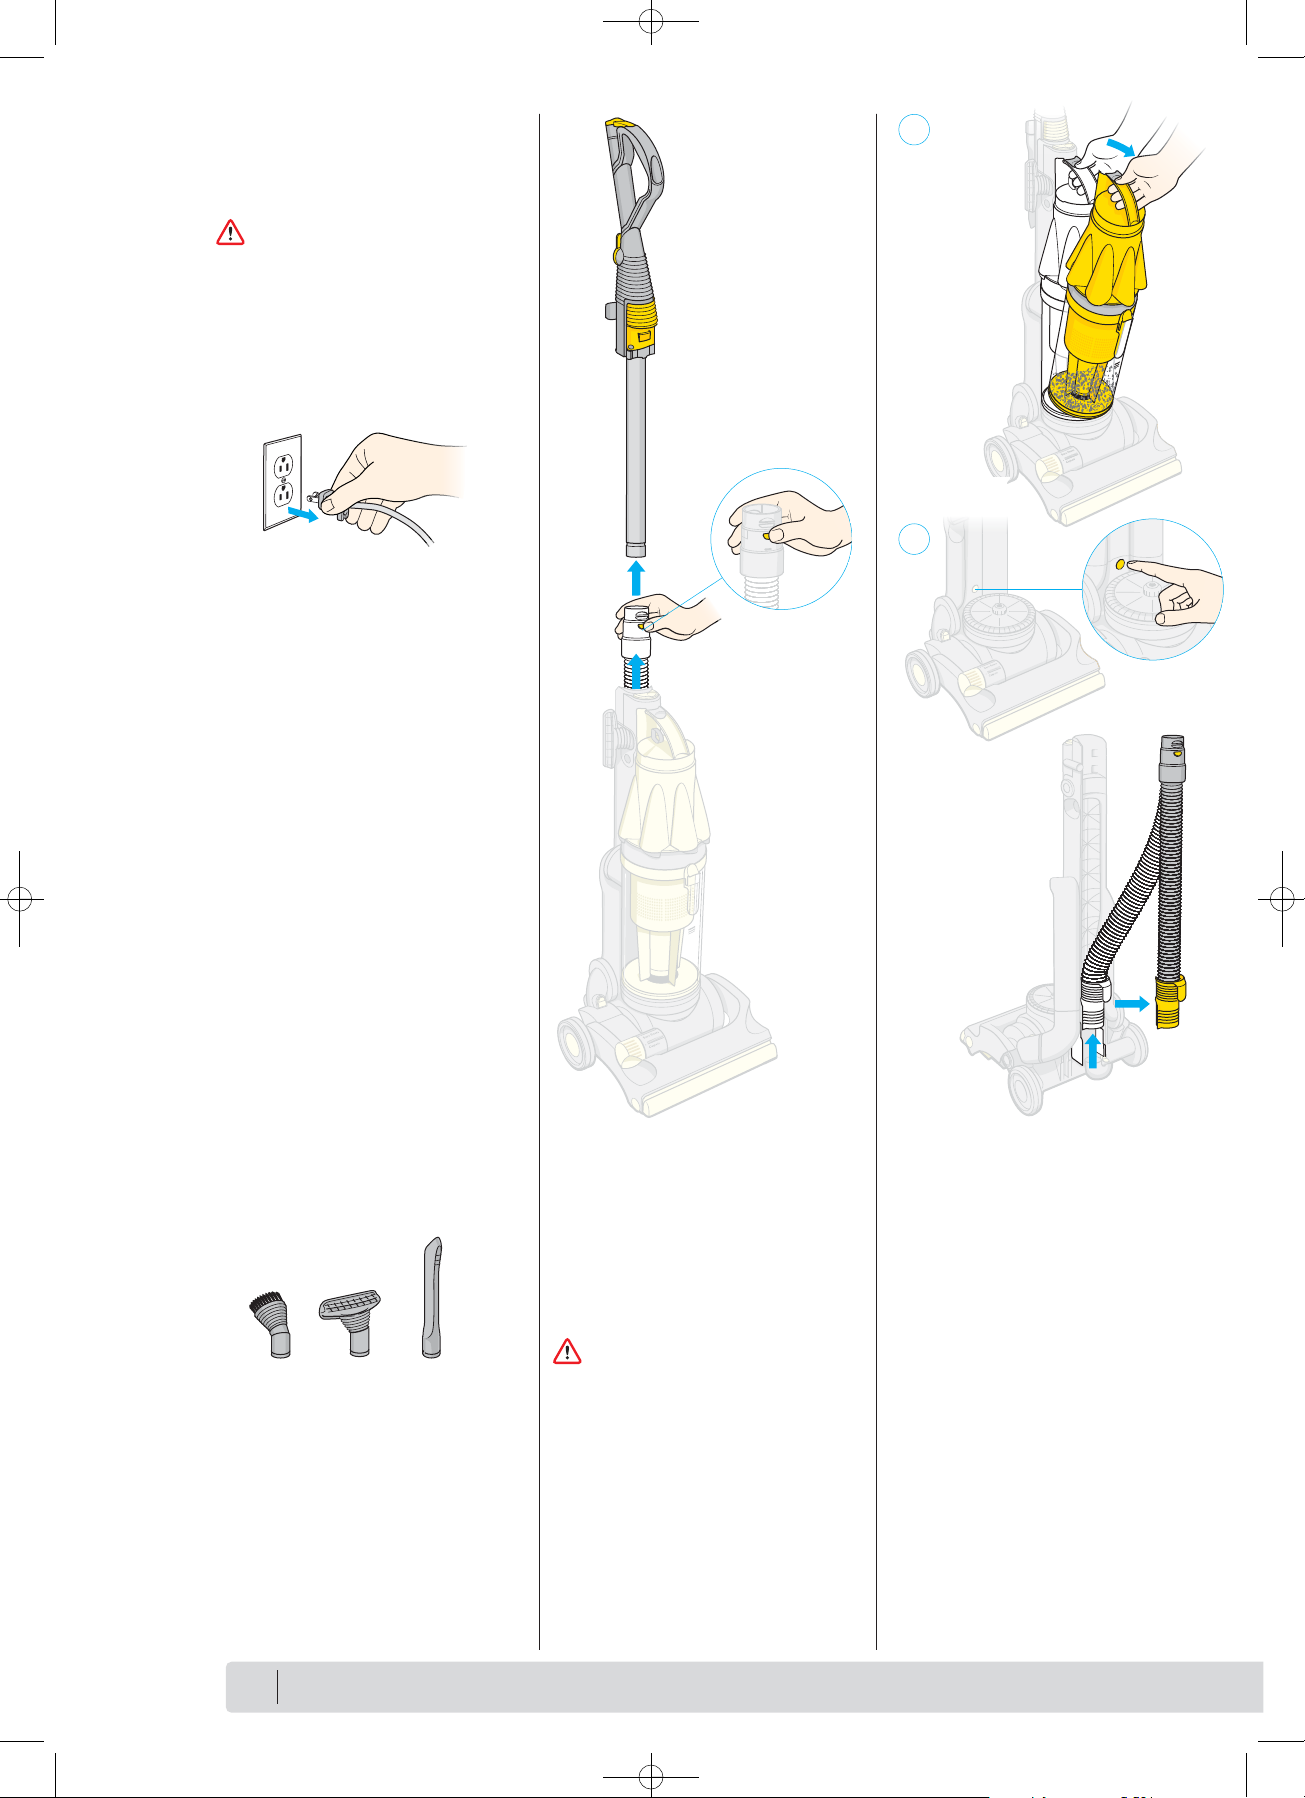
Wand
Remove wand as shown on
page 11, and press the wand
release button to remove the
wand from the hose. Check
inside wand for blockages.
CAUTION
• Beware of sharp objects
when clearing blockages.
Hose
A Press the cyclone release catch
to remove the clear bin
TM
assembly from the machine.
B Press the lower hose release
button from the front of
machine and slide the hose
out from the rear, holding the
lower cord winder. Check
inside the hose for blockages.
Clearing blockages
CAUTION
• Unplug the machine from the
electrical outlet before starting
to look for blockages. Failure
to do so could result in
electric shock or personal
injury.
• If any part of the machine
becomes blocked it may
overheat and then stop
automatically shut off. Unplug
machine and leave to cool
down for at least 60 minutes
before clearing the blockage.
• Regularly wipe the soleplate
and wheels with a dry cloth
after vacuuming to clean off
any sand, dirt, or pebbles that
could damage delicate floors.
• Please note: clearing
blockages is not covered by
your machine’s limited
warranty.
• Refit all parts of the machine
before using it.
A
B
Dyson Helpline contact us at
1-866-693-9766
7 days a week
14
Tools
Check that the tools are clear of
blockages.
18858_OPS_MANUAL_UPDATE_US.qxd 7/1/08 16:45 Page 14
Page 15

Clearing blockages
U-bend
• Tilt the machine forward to
slide out the U-bend.
• Check inside for blockages.
Airway inspection valve
• Squeeze the valve release
buttons to remove the airway
inspection valve.
• Check inside for blockages.
CAUTION
• The ratcheting noise may
warn that the brushbar is
obstructed. If this occurs,
unplug the machine from the
electrical outlet before
removing the obstruction.
1
2
15
www.dyson.com
Brushbar
Lay the machine on its front.
1 Undo the colored soleplate
fasteners using a coin and
remove the soleplate.
2 Clear the brushbar obstruction,
carefully cutting away any
threads with a pair of scissors.
3 Replace the soleplate and
tighten the fasteners.
When replacing the soleplate,
the soleplate must be fitted
securely with the bottom of the
cleanerhead to achieve optimal
performance. Check the
alignment of the soleplate with
front edge of cleanerhead.
3
18858_OPS_MANUAL_UPDATE_US.qxd 7/1/08 16:45 Page 15
Page 16

Usage
Extends and flexes to clean
awkward gaps and spaces
Using and maintaining optional accessories
Using and maintaining
optional accessories
• Not all accessories available
with all models.
• Colors may vary.
CAUTION
• Do not use your vacuum
cleaner outdoors or on wet
surfaces. Vacuum may be used
inside a garage only when used
with the Model 08909 Dyson
Car Cleaning Kit accessories.
If used in a garage, care should
be taken to wipe the soleplate
and wheels with a dry cloth after
vacuuming to clean off any sand,
dirt, or pebbles that could
damage delicate floors.
B
Carpet – Press rear pedal
A
Attach low reach floor tool
to wand and recline handle
C
Bare floors – Press front
pedal
Low reach floor tool
Dyson Helpline contact us at
1-866-693-9766
7 days a week
16
Flexi crevice tool
A
Extend and flex
B
Use with or without brush
A
B
Usage
For easier cleaning under low
furniture
18858_OPS_MANUAL_UPDATE_US.qxd 7/1/08 16:45 Page 16
Page 17

Using and maintaining optional accessories
A
Sprinkle Zorb onto carpet
B
Ensure machine is
turned off
E
Vacuum the carpet
D
Wait 30 minutes
Replace brushbars
Replace soleplate
Remove and clean
brushbars
Remove soleplate
C
Work into carpet pile
Usage
Carpet cleaning
Zorb carpet powder
C
A
D
B
Mini turbine head
Usage
Advanced turbine head removes dirt
from upholstery, stairs, and the car
Mini turbine head
Maintenance
17
A
B
C
D
www.dyson.com
A
Push in to stop brushbar
from spinning
B
Adapter release button
not used on all models
A
B
18858_OPS_MANUAL_UPDATE_US.qxd 7/1/08 16:45 Page 17
Page 18

Troubleshooting your Dyson
Problem Potential solution
Less than normal or no pickup • If vacuuming non-delicate carpeting, ensure brush control is
from cleanerhead or set on carpets mode. Note: brushbar will only spin when the
handle is reclined.
Machine turns off in use
• Remove and check washable filter to see if it is clean (filter
should be blue in color). Wash filter if necessary as shown
on page 8.
• If you removed the soleplate, it must be refitted flush with the
cleanerhead. If it is not, refit soleplate as shown on page 15
and re-check performance.
• Be sure the filter housing, U-bend, and airway inspection valve
are snapped in securely and confirm there are no blockages.
Less than normal or no suction • Confirm the U-bend is in place and that there are no blockages.
from wand or hose
• Remove the wand and check for blockages.
• Confirm the hose has no blockages or holes by stretching it out.
• Be sure the filter housing and airway inspection valve are
snapped in securely and confirm there are no blockages.
• Remove and check washable filter to see if it is clean (filter
should be blue in color). Wash filter if necessary as shown
on page 8.
Brushbar not spinning • Ensure brush control is set on carpets mode.
Note: brushbar will only spin when the handle is reclined.
Loud ‘ratcheting’ noise coming • Ratcheting may indicate there is an obstruction in the brushbar
from cleanerhead when and is meant to protect the belt in the machine. Note: the
vacuuming ratcheting may also occur if your carpet is not adequately
attached to the floor or if your rug has loose tassels. (This noise
does not hurt the machine.)
• Check to see if there is an obstruction in the brushbar as shown
on page 15.
• Note: when refitting the soleplate it must be fitted securely.
Affix as shown on page 15.
• If there is no obstruction, you may want to set brush control
to bare floors mode.
Unit will not stand upright • Stand behind the vacuum holding the handle at a 45
degree angle.
• Locate and remove the airway inspection valve and take note
of the square plastic molding where the airway inspection valve
plugs into. (It should slide up and down.)
• Snap that square plastic piece up toward the ceiling.
• After it snaps into place, the unit will stand upright.
Refer to page 3 for an illustration of DCO7. If this does not help with your problems, please call the
Dyson Helpline at 1-866-693-9766. The Helpline is open 7 days a week to answer your questions.
Dyson Helpline contact us at
1-866-693-9766
7 days a week
18
18858_OPS_MANUAL_UPDATE_US.qxd 7/1/08 16:45 Page 18
Page 19

Limited warranty and Customer care
Thank you for choosing to buy a Dyson.
If you have a question about your Dyson vacuum cleaner, call the Dyson Helpline at
1-866-693-9766 with your serial number and details of where and when you bought
the cleaner. Your serial number can be found on the rating plate, which is on the
base of your machine between the wheels. Most questions can be solved over the
phone by one of our Helpline staff. If your machine needs service, call the Dyson
Helpline. We will discuss with you the options available for service. If your machine is
under warranty and it is a covered repair, your machine will be repaired at no cost.
To reach the Dyson Helpline call at 1-866-693-9766 toll free, or visit Dyson online
at www.dyson.com
To help us ensure you receive prompt and efficient service, please register your
purchase with us. There are two ways to do this:
• by completing and returning the enclosed form to us by mail.
• online at www.dyson.com
This will confirm ownership of your Dyson in the event of an insurance loss and
enable us to contact you if necessary. If you have any questions about your Dyson,
please call our Customer Helpline at 1-866-693-9766, 7 days a week, or log on to
our website at www.dyson.com
What is covered
Your Dyson vacuum cleaner is warranted against original defects in material and
workmanship for a period of five years from the date of purchase, when used for
private household purposes in accordance with the Dyson Owner’s Manual.
This warranty provides, at no extra cost to you, all labor and parts necessary to
ensure your vacuum cleaner is in proper operating condition during the warranty
period. This warranty is subject to the following terms:
What is not covered
Dyson, Inc. shall not be liable for costs incurred as a result of:
• Machines purchased from an unauthorized dealer.
• Clearing blockages from your machine.
• Use of parts not in accordance with the Owner’s Manual.
• Careless operation or handling, misuse, and/or lack of maintenance or use not in
accordance with the Owner’s Manual.
• External sources such as weather.
• Repairs or alterations carried out by unauthorized parties or agents.
• Use of the vacuum cleaner other than for normal domestic household purposes
within the United States, e.g., for commercial or rental purposes.
• Use of parts and accessories other than those produced or recommended by
Dyson, Inc.
Warranty Service
• Please fill out and return the Product Registration Form, or register online at
www.dyson.com
• Before service can take place, the terms of the warranty require that you contact
the Dyson Helpline with your model name/number, serial number, date, and place
of purchase. Please keep your purchase receipt in a safe place to ensure you have
this information.
• All work will be carried out by Dyson, Inc. or its authorized agents.
• Any replaced defective parts will become the property of Dyson, Inc.
• Service under this limited warranty will not extend the period of this warranty.
• If your machine is not functioning properly, please call the Dyson Helpline at
1-866-693-9766. Most issues can be rectified over the telephone by our trained
Customer care staff. If this is not possible Dyson, Inc. will arrange for your vacuum
cleaner to be repaired and returned in full working order at no extra cost to yourself.
Dyson Customer care
19
Limited 5 year
household warranty
Terms and Conditions of the
Dyson 5 year limited warranty
120V 60Hz 10.5A
Note your serial number for
future reference:
Your serial number can be
found on the rating plate,
which is on the base of your
machine between the wheels.
www.dyson.com
18858_OPS_MANUAL_UPDATE_US.qxd 7/1/08 16:45 Page 19
Page 20

Limited warranty and Customer care
This product is protected by the following intellectual property rights:
Patent/Patent Application numbers: CA 1,241,809; US 4,573,236; CA 2,312,827; US 6,526,623; CA 2,313,177; US 6,691,849; CA 2,315,078;
US 6,289,553; CA 2,325,953; US 6,425,931; US 6,461,508; CA 2,351,552; US 6,572,078; US 6,442,791; AU 2001232024; CA 2400404;
EP 1265519; JP 2001-564647; US 2003-0102619; AU 2002231965; CA 2,438,855; EP 1361813; JP 2002-567126; US 2004-0068829; AU 287872;
EP 1320317; JP 2004-509684; US 2003-0163889; AU 2002226556; CA 2,439,250; EP 1370172; JP2004-528876; US 2004-0074213;
AU 2002229966; CA 2,439,032; EP 1361812; JP 2002-567124; US 10/468,870; AU 2002226554; CA 2,438,077; EP 01370173; JP 2002-567131;
US 2004-0144070; AU 2002241151; CA 2442218; EP 1377196; JP 2004-528087; JP 2004-0112018; AU 2002225207; CA 2,438,069; EP 1361814;
JP 2004-520137; US 2004-0112022; AU 2002225232; CA 2,438,079; EP 1361815; JP 2004-520139; US 2004-0068827
Registered Design/Application numbers: CA 97332; US D475,820; CA 86192; US D427,737; US D455,242
Please note: Small details may vary from those shown.
Dyson Helpline contact us at
1-866-693-9766
20
Warranty Limitations and Exclusions
• Any implied warranties relating to your vacuum cleaner, including but not limited
to warranty of merchantability or warranty of fitness for a particular purpose, are
limited to the duration of this warranty. This limitation is not allowed by some states
and so this limitation may not apply to you.
• Your remedy for breach of this warranty is limited to the warranty service described
above. Dyson, Inc. will not be liable for any consequential damages or incidental
damages you may incur in connection with your purchase and use of your vacuum
cleaner. This limitation is not allowed by some states and so this limitation may not
apply to you.
• This warranty gives you specific legal rights. You may also have other rights that
vary by state.
• This warranty is not transferable.
JN.18858 PN. 04482-13-02 07.01.08
Terms and Conditions (continued)
www.dyson.com
18858_OPS_MANUAL_UPDATE_US.qxd 7/1/08 16:45 Page 20
 Loading...