

Page 1

1. Do not leave your Dyson cleaner with the plug
connected to a mains outlet – unplug when not in
use. Turn the cleaner off with the switch button
before removing from the mains outlet.
2. Always remove the plug from a mains outlet
before carrying out any maintenance. Do not
carry out any maintenance work on the cleaner
other than that outlined in this manual,
especially where electrical components are
concerned.
3. Do not use without the clear bin assembly fitted
correctly and both filters in place.
4. Do not fit anything other than Dyson spare parts
(available on the Helpline on 01666 827272).
Use of non-Dyson parts could invalidate your
guarantee.
5. Do not continue to use the cleaner if any part
appears to be faulty, missing or damaged. In
these cases, contact the Dyson Helpline on
01666 827272.
6. Do not put any part of the body, clothes or any
object near or into the openings or moving parts
of the machine. Do not use the machine with any
of the openings blocked with any object that may
restrict the airflow.
7. Do not pull on the supply cord, run over it or pull
it around sharp edges or near/over hot surfaces.
If damaged, call the Dyson Helpline. Do not
handle the cleaner or plug with wet hands.
8. Do not use the cleaner if the cord or plug are
damaged or if the cleaner has been damaged,
dropped or has come into contact with water or
any other liquid. In these cases, contact the
Helpline.
9. Do not use the cleaner to pick up water or any
other liquid. Electrical shocks could occur if used
outdoors or on wet surfaces.
10. Do not use the cleaner to pick up flammable or
combustible substances or hot ashes or burning
objects of any kind. Do not use near such
substances.
11. Do not work below the cleaner on the stairs.
12. Do not immerse the whole cleaner in water for
cleaning. The clear bin alone may be washed out
after emptying. Ensure this is completely dry
before using the cleaner again.
13. Static charge can occur in many ways and, when
vacuuming, certain carpets may generate small
static charges in the clear bin. These are entirely
harmless and are not associated with the mains
supply. To minimise any effect from this, do not
put your hand or insert any object into the clear
bin unless you have first emptied and rinsed out
the clear bin with water.
14. Cleaners with brush bars may mark the surface
of smooth floors.
15. Ensure that hands, feet and fingers, particularly
those of small children, are kept away from the
cleaner and especially from the brush bar.
16. Please note that the brush bar continues to turn
while the hose is in use – ensure that the cable is
clear of the machine during this operation and
that the cleaner is not placed near anything
which may come into contact with the brushbar.
17. Do not use the cleaner directly facing gas fires,
boilers or open fires, whether lit or unlit. Exhaust
air discharged at the front of the cleaner may
extinguish a gas fire or pilot light or disturb
ashes in an open fire. Always avoid directing the
cleaner towards naked flames.
Important safety instructions – please read before use
WHEN USING THE DYSON DCO1 VACUUM CLEANER PLEASE ADHERE TO THESE SIMPLE PRECAUTIONS.
BY DOING SO YOU WILL REDUCE THE RISK OF FIRE, ELECTRICAL SHOCK OR INJURY.
Please read carefully before
assembling or using your
DCO1 vacuum cleaner.
Operating manual
DYSON CUSTOMER CARE
TETBURY HILL
MALMESBURY
WILTSHIRE
ENGLAND
SN16 ORP
Helpline 01666 827272
Facsimile 01666 827298
Contact for all service assistance
00753-01 00746-01 21/11/97 REV 1
Page 2
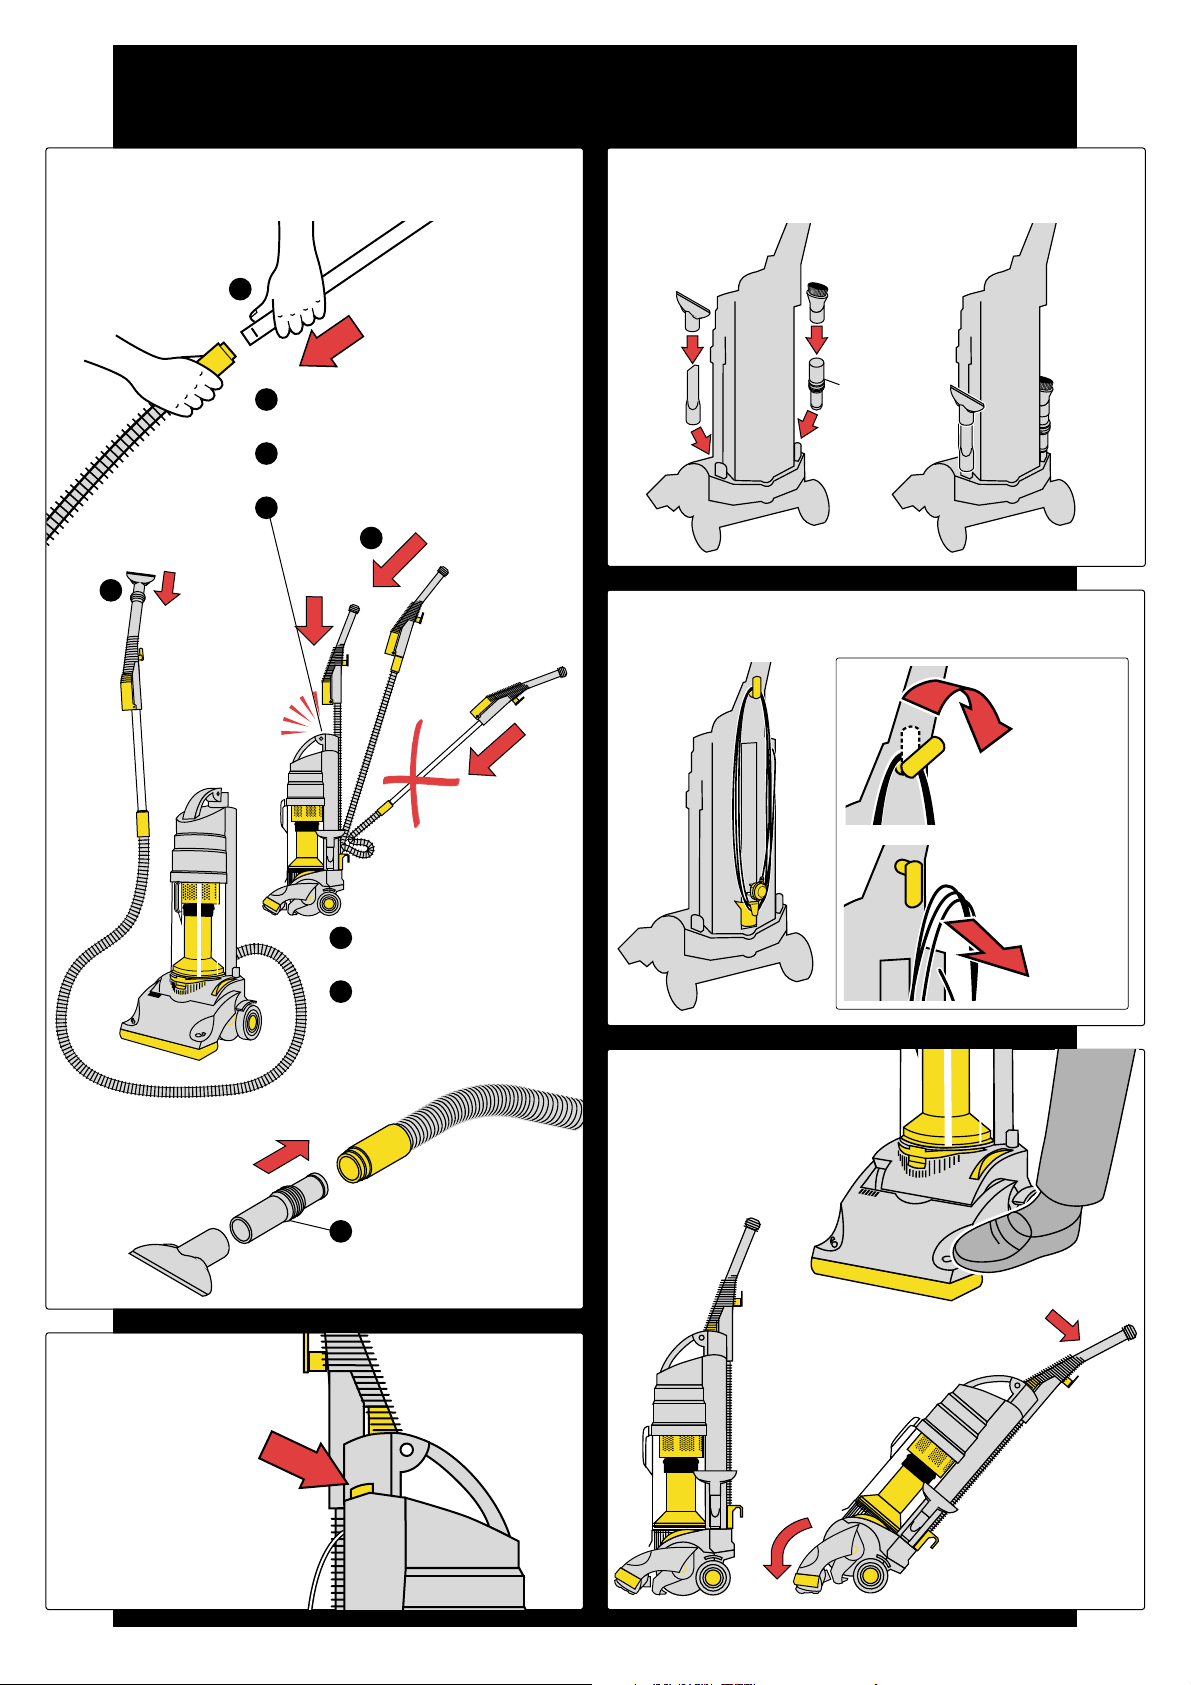
Wand & hose assembly
Push yellow hose cuff firmly over wand end with twisting motion.
1.Getting started
Cleaner head adjustment
Hold the cleaner head down with foot
and tilt machine back.
On/Off switch
Cord storage
Wrap cord around both cable winders.
Accessory tool location
All tools are stored neatly on the tool storage posts.
Cleaner head adjusts
automatically to
correct height.
Guide wand into hose, keeping it
straight.
Locate wand handle into socket from
above.
Push home until it ‘clicks’ into place.
Insert tool on to end of wand
as shown.
For cleaning awkward places
remove wand and insert tool
adaptor into end of hose.
Attach tool as
required.
Tool adaptor
1
1
2
4
3
4
5
5
Rotate top
quick-release
cable winder...
...to release cable.
PLEASE READ ALL INSTRUCTIONS CAREFULLY
BEFORE USING YOUR DYSON VACUUM CLEANER.
Assemble the machine as follows:
2
click
Ensure hose does
not kink when
replacing wand
Tool adaptor
Page 3

Clear bin capacity
Do not fill above this line.
Clear bin removal & emptying
1 2 3
2.How to use
DANGER!
Press yellow bin catch to release bin.
Carrying handle
Ensure clear bin is firmly in place
before lifting.
Remove clear bin and cyclone top from
machine by lifting up until it releases.
Remove clear bin from cyclone top and wrap
a plastic bag around the rim of the clear bin.
4 5 6
Invert clear bin and wait at least 10
seconds before releasing.
Wipe shroud holes free of all dust and
debris.
Replace clear bin and cyclone top ensuring
that they ‘click’ into upright position.
Optional clear bin cleaning
Remove clear bin from machine to wash
in water if desired. After washing ensure
that the yellow bin inner is in place (See
step 7 of ‘Blockage procedure’ in your
instructions).
Do not use strong detergents and ensure
clear bin is fully dry before replacing on
machine
Lift out pre-filter. Unhinge filter cage and
replace old S-level submicro filter at least
every three months.
Lift yellow bin catch for access to second
S-level submicro filter. Also replace at
least every three months.
Also see back page.
1
2
Filter changing
WARNING! For your own safety please
remember to unplug the machine when not
in use and before carrying out maintenance.
Page 4

1. Remove soleplate
Undo three cross-head screws.
Remove soleplate by lifting from the back, and then
remove brush bar.
If cradle becomes detached from soleplate, align
circular ends of cradle with corresponding holes of
soleplate and slot into place, ensuring that ‘front’
edge of cradle faces the right direction.
3. Centralise belt
2. Line up brush bar
Thread removal
After unplugging the cleaner, carefully remove any
entwined cotton, wool or fluff with scissors.
NOTE: Failure to remove these may result in loss of
performance and possible damage to the machine.
3. Changing the belt
Replacement belts are available direct from
Dyson Customer Care (Tel: 01666 827272
)
Fit belt over motor
shaft and domed
section of brush bar.
Pull belt taut and
locate brush bar
in slot.
1
2
1
2
DYSON CUSTOMER CARE
TETBURY HILL
MALMESBURY
WILTSHIRE
ENGLAND
SN16 ORP
1
1
1
2
2
With raised section
on end of brush bar
orientated as
shown, locate brush
bar in slot and
rotate end cap
towards back of
machine until it
comes to a stop.
End cap of brush bar
Raised section
3
Cradle
Soleplate
IMPORTANT
Use only genuine Dyson belts.
Helpline 01666 827272
Facsimile 01666 827298
Contact for all service assistance
3
1
2
Rotate brush bar by
hand to centralise
belt before re-fitting
soleplate to machine.
VERY IMPORTANT
WARNING! For your own safety please
remember to unplug the machine when not
in use and before carrying out maintenance.
Page 5

4. Blockage procedure
1. Check filters
Filter life is dependent on the
amount the vacuum cleaner is
used but they must be replaced
at least every 3 months.
Replace both submicro filters with
DYSON part number DUP 03-33-002.
3. Check wand/hose
2. Clean shroud
4. Check belt & soleplate
5. Check cleaner head & flaps
6. Check yellow bin inner
Wipe shroud holes free
of all dust/debris.
Check air duct behind
bin for debris.
Check that yellow bin
inner is in place,
especially if you have
washed it. (See ‘How to
use’ section in your
instructions).
Do not remove cone seal.
Check cone seal is in
place: failure to do so
could result in clogging
of the pre-filter and
damage to the motor.
The lip of the cone seal
should sit over the rim
of the yellow bin inner.
Remove three screws to
undo soleplate.
Lift soleplate to remove.
Check condition of belt
and replace if necessary.
(See 'Changing the belt'
section in your
instructions).
Check that soleplate
passage is clear and
remove blockages if
necessary.
2
1
2
1
1
1
2
3
3
4
4
1
2
3
1
Remove wand handle
from machine.
Look down wand and
check for daylight.
Remove any blockage
with a stiff wire.
Remove clear bin and
cyclone top, by lifting
up until it releases.
Then gently pull off from
ball socket.
Remove hose from
machine by pressing
yellow button behind
bin cavity.
Check for any
blockages in hose and
remove.
When returning hose,
ensure the yellow button
‘clicks’ into place. (A
tool may be required to
ease re-assembly).
1
2
3
4
5
6
2
5
DYSON CUSTOMER CARE
TETBURY HILL
MALMESBURY
WILTSHIRE
ENGLAND
SN16 ORP
Turn machine upside
down. Remove soleplate.
Raise inspection flap
and look down through
aperture. If you cannot see
daylight, remove any
blockage with a stiff wire.
Rotate cleaner head so that
opening becomes
exposed, keeping
inspection flap raised.
Look through to see if
light is visible and to check
that the passage is clear of
any blockages.
1
2
2
1
If you are still unable to get ‘suction’, call
Dyson Customer Care on
01666 827272.
Cone seal
Cone seal
6
click
4
Please check your DCO1 for blockages if you notice that the vacuum cleaner stops picking up, the sound of the vacuum
cleaner changes pitch, or the suction reduces or stops altogether. Any ‘Blockage only’ repairs will incur a charge of £35.00*, so please
check your machine carefully. *Price correct at time of printing.
IMPORTANT
1
2
WARNING! For your own safety please
remember to unplug the machine when not
in use and before carrying out maintenance.
IMPORTANT
Use only genuine Dyson filters.
S-Level
S
Page 6

Check both electrostatic
filters whenever the bin is
emptied and replace at
least every 3 months.
Please note that if the filters are not checked regularly and changed
as required, the motor may overheat, which will cause the thermal
cut-out to operate.
NOTE: Vacuuming builder’s dust and some carpet fresheners may
cause the filters to require changing more frequently. (Dyson
does not recommend the use of carpet fresheners).
Replacement filters are available from your local retailer or
direct from Dyson. Call or fax the Helpline for orders.
IMPORTANT: Use only genuine Dyson filters, which
have been tested and approved for this cleaner.
Your Dyson has a built-in thermal cut-out to protect it in the
event of a restriction to the airflow and may suddenly stop
working temporarily if you do not change the filters at the
stated time, or if blockages are not cleared immediately.
If the vacuum cleaner suddenly stops working (ie. the motor makes no
sound when switched on) then please check your cleaner for blockages as
detailed in this operating manual. (Remember also to check the fuse in the
plug). Having established that there are no blockages and that the filters
have been replaced within the stated time, leave your vacuum cleaner
unplugged for 60 minutes and then try using it again.
If the vacuum cleaner still does not work, please call Dyson
Customer Care (Tel: 01666 827272).
DYSON CUSTOMER CARE
TETBURY HILL
MALMESBURY
WILTSHIRE
ENGLAND
SN16 ORP
Important
Helpline 01666 827272
Facsimile 01666 827298
Contact for all service assistance
Check that your supply corresponds to that shown on the rating plate. The appliance must
only be used as rated, it should be fitted with an ASTA approved fuse to BS1362.
European conformity information A sample of this product has been tested and found
to be in conformity with the following European Directives: 73/23/EEC Low voltage (safety)
Directive, 93/68/EEC CE Marketing Directive and 89/336/EEC EMC Directive.
For your convenience this appliance is supplied with a plug which is fitted with a 13amp
fuse of the appropriate rating.
Never put the plug into the socket outlet without the fuse cover fitted. Replacement fuse
covers are available from Dyson Customer Care. If the plug supplied is not suitable for
your socket outlet, it should be cut off and destroyed/safely disposed of. Warning: Under
no circumstances should the severed plug be inserted into a 13A socket, serious
danger of electric shock would result from the exposed wires.
The mains lead can then be shortened to the minimum required length, suitably prepared
and the correct style of plug to suit your household wiring system should be fitted. The
following wiring instructions should be followed. If in doubt, consult a qualified
electrician.
Unwanted products and the environment Should you find that your product needs
replacing one day, or is of no further use to you, think of protecting the environment. Dyson
will accept your old products and recycle them in an environmentally friendly way.
The wires in the mains lead are coloured in accordance with the following codes.
Brown – Live
Blue – Neutral
As the colours of the wires in the mains lead may not correspond with the colours or
markings identifying the terminals in your plug, proceed as follows:
The wire which is coloured Blue must be connected to the terminal which is marked with
the letter N or coloured Black.
The wire that is coloured Brown must be connected to the terminal which is marked with
the letter L or coloured Red.
Neither wire should be connected to the earth terminal of a three pin plug which is marked
with the letter E or or coloured Green or Green and Yellow.
Always ensure that the cable clamp is fitted and that it clamps the cable outer and NOT
the coloured wires.
If the supply cord of the appliance is damaged, disconnect the appliance from the socket
outlet immediately. The supply cord must be replaced and only by Dyson Appliances Ltd.
or their appointed agent as special purpose tools and service techniques are required.
IMPORTANTNOTE
IMPORTANT
ALWAYS UNPLUG THE VACUUM CLEANER FROM THE WALL SOCKET BEFORE INSPECTING IT
NOTE
S-Level
S
3
 Loading...