

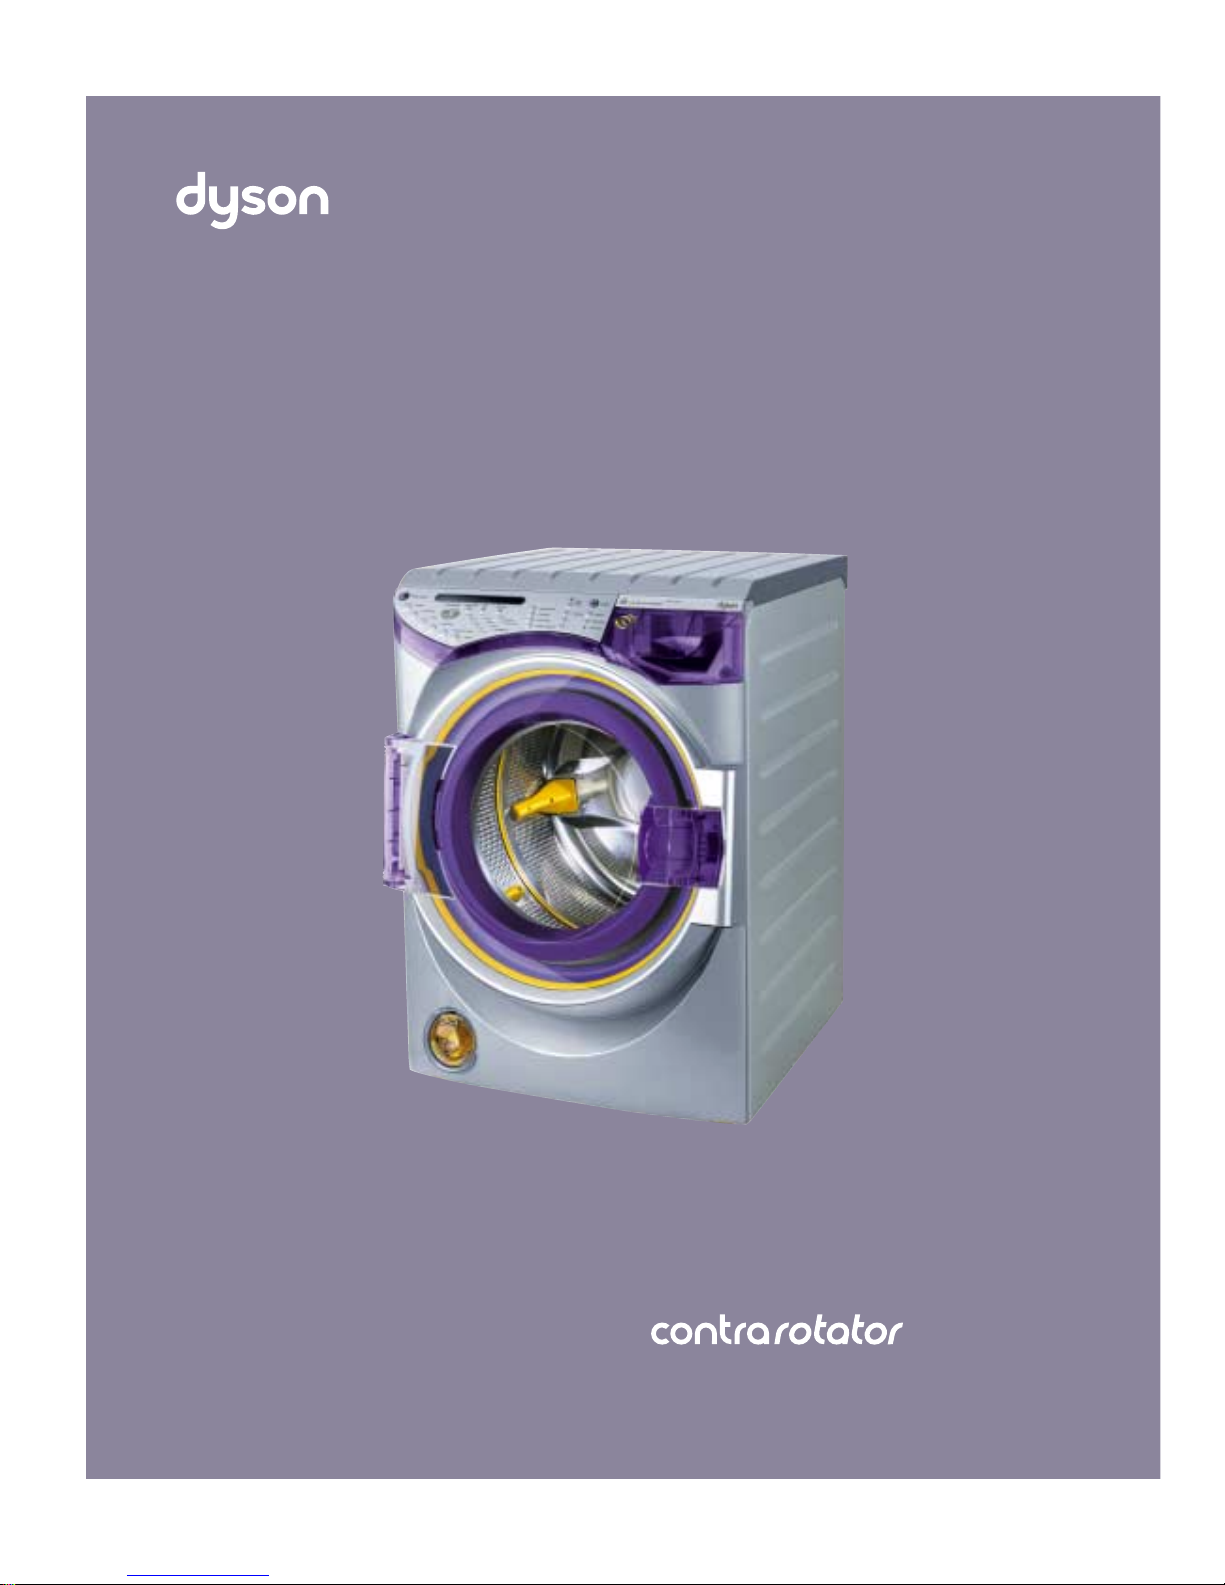
Page 1
This user guide also contains tips on effective
washing and important safety notes.
Please read this user guide carefully before use.
User guide
TM
www.dyson.com
Page 2
Page 3

Contents
Overview of your Dyson Contrarotator
TM
The only 2-drum wash action
Free registration
Important safety notes
Inner transit packaging removal
Moving the Contrarotator
TM
Specification
Location
Drainage, water supply and electricity
Drainage
Water supply
Electrical installation
After installation
Loading the Contrarotator
TM
Detergent use
To start your wash, using default settings
To personalise the default wash programmes
Fabric care
Programme table
Cleaning
Coin trap
Water filter
Emergency door release
Troubleshooting
01
01
01
01
01
02
03
01
01
01
01
02
01
02
03
01
02
03
Overview
Dyson Contrarotator
TM
User Instructions
Before installation
Installation
Operation
Starting your wash
Optional settings
Fabric care and Programme table
Maintenance
Troubleshooting
1
2
3
4
5
6
7
8
9
10
11
Page 4
Overview of your Dyson Contrarotator
TM
1 01Overview
Outer door
Control panel
Soap tray
Hot water inlet
Cold water inlet
Drainage hose hook
Power cable & plug
&
Inner door
Rating plate
Adjustable feet
Drainage hose & adjustable clip
Rollerjack
TM
Coin trap
4 01
6 01
&
5 01
5 02
&
5 01
5 02
5 02
5 03
4 01
10 02
6 01
6 01
6 01
3 01
&
10 017 01&8 01
Hot & cold leak protection
inlet hoses
CRO1 Flowcheck and Memory only
5 01&5 02
5 01&5 02
Dyson guarantee form
Reply envelope
Fabric care leaflet & letter
Dyson spanner
4 01&5 01
Hot & cold inlet hoses
5 01
&
5 02
Page 5
The only 2-drum wash action.
Dyson Contrarotator
TM
Conventional washing machines may seem convenient,
but their poor performance lets you down. So James Dyson
asked his engineers to experiment with every imaginable way
of washing to design a better washing machine.
Along the way, Dyson engineers made a surprising discovery:
washing by hand gave better wash results than single drum
machines. Because the laundry is constantly on the move,
it is manipulated and flexed. This opens the fabric to the
detergent, releasing dirt quickly and effectively.
To replicate the movement of washing by hand, Dyson
engineers designed two aligned drums and engineered them
to rotate in opposite directions at the same time: laundry is
constantly on the move, manipulated and flexed.
Because the Contrarotator
TM
releases dirt more effectively,
it can wash laundry cleaner, faster and in larger loads.
This product is protected by the following:
Patents and Patent Applications:
Registered Designs:
GB 2090907 DE 40008214.4 FR 004914 AU 143433
CH 127265 IT MI 2000 O 000588 JP 1114510 US 29/128,794
Trade Marks:
DYSON
TM
CONTRAROTATOR
TM
DYSON CONTRAROTATORTMCRO1TMROLLERJACK
TM
Equivalent rights exist in other territories.
For patent information please see www.dyson.com
2 01
GB 00 01848.1
GB 01 21535.9
US 09/853,689
WO 01/71086
WO 01/88256
WO 01/71084
WO 01/71085
PCT/GB 01/03730
US 09/956,248
WO 01/71087
WO 01/73939
WO 01/71083
PCT/GB01/03716
PCT/GB01/04324
US 09/956,163
GB 2 337 274
US 6,311,527
EP 1078119
JP 2000-548539
US 09/853,689
WO 00/68490
PCT/GB01/02974
WO 99/58753
CA 2,332,024
AU 39393/99
Page 6

Always:
• use the Rollerjack
TM
to move the machine. Care should be
taken when moving it, as it is very heavy.
• turn off the machine with the ‘Mains on/off’ button and
switch off at the socket when not in use.
• turn off the water supply to the machine and close both the
inner and outer doors when not in use.
• close the soap tray before starting the machine.
• remove all items from pockets.
Do not:
• stack tumble dryers or other appliances on top of the
washing machine.
• alter the machine or modify it in any way, as this will
invalidate your guarantee and could be dangerous.
• carry out any maintenance work on the machine other than
that outlined in this guide.
• use the washing machine if any part appears to be faulty,
missing or damaged.
• overload the washing machine; the maximum loads are
indicated in the programme table in section 9 02.
• use adapters or extension cables.
• use the washing machine for commercial or industrial
purposes, as this will invalidate your guarantee. The machine
is designed for domestic use.
Child safety
The Dyson Contrarotator
TM
has a child lock option.
See section 8 01 for usage instructions.
Always:
• use the ‘child lock’ when the machine is not in use.
• check the drums are empty before loading the machine.
• use the ‘child lock’ when running the machine, if children
are present.
• keep all packaging out of the reach of children.
Do not:
• allow children to play with or use the machine.
Important safety notes
Free registration
User Instructions
3 01
Registering your Dyson Contrarotator
TM
Every Dyson washing machine comes with a complimentary
2 year guarantee, with an option to extend the guarantee for
a further 1 to 3 years. For more details on these options,
please refer to the enclosed guarantee form.
How to register
Please ensure that you register your guarantee as soon as
possible. This can be done by:
• registering your machine at www.dyson.com
• or completing the enclosed guarantee card and returning it
in the envelope provided.
(Please keep your proof of purchase in a safe place to ensure that you
have this information available as it may be required in order for a service
engineer to carry out a repair).
Dyson service
If a problem arises with your Dyson washing machine, or if it
is displaying a fault code, please refer to the troubleshooting
guide section 01 to 11 03.
If the problem is still not resolved, please:
• visit our website at www.dyson.com for on-line help
• or contact the helpline:
UK 0870 600 2701, 7 days a week (8am-8pm)
email service@dyson.com
ROI (01) 475 7109
email irelandservice@dyson.com
Serial number
For future reference, fill in your machine’s details in the space
provided. The serial number is on the rating plate
(see section 01 for location).
Serial number
Date of purchase
Place of purchase
1
11
Page 7
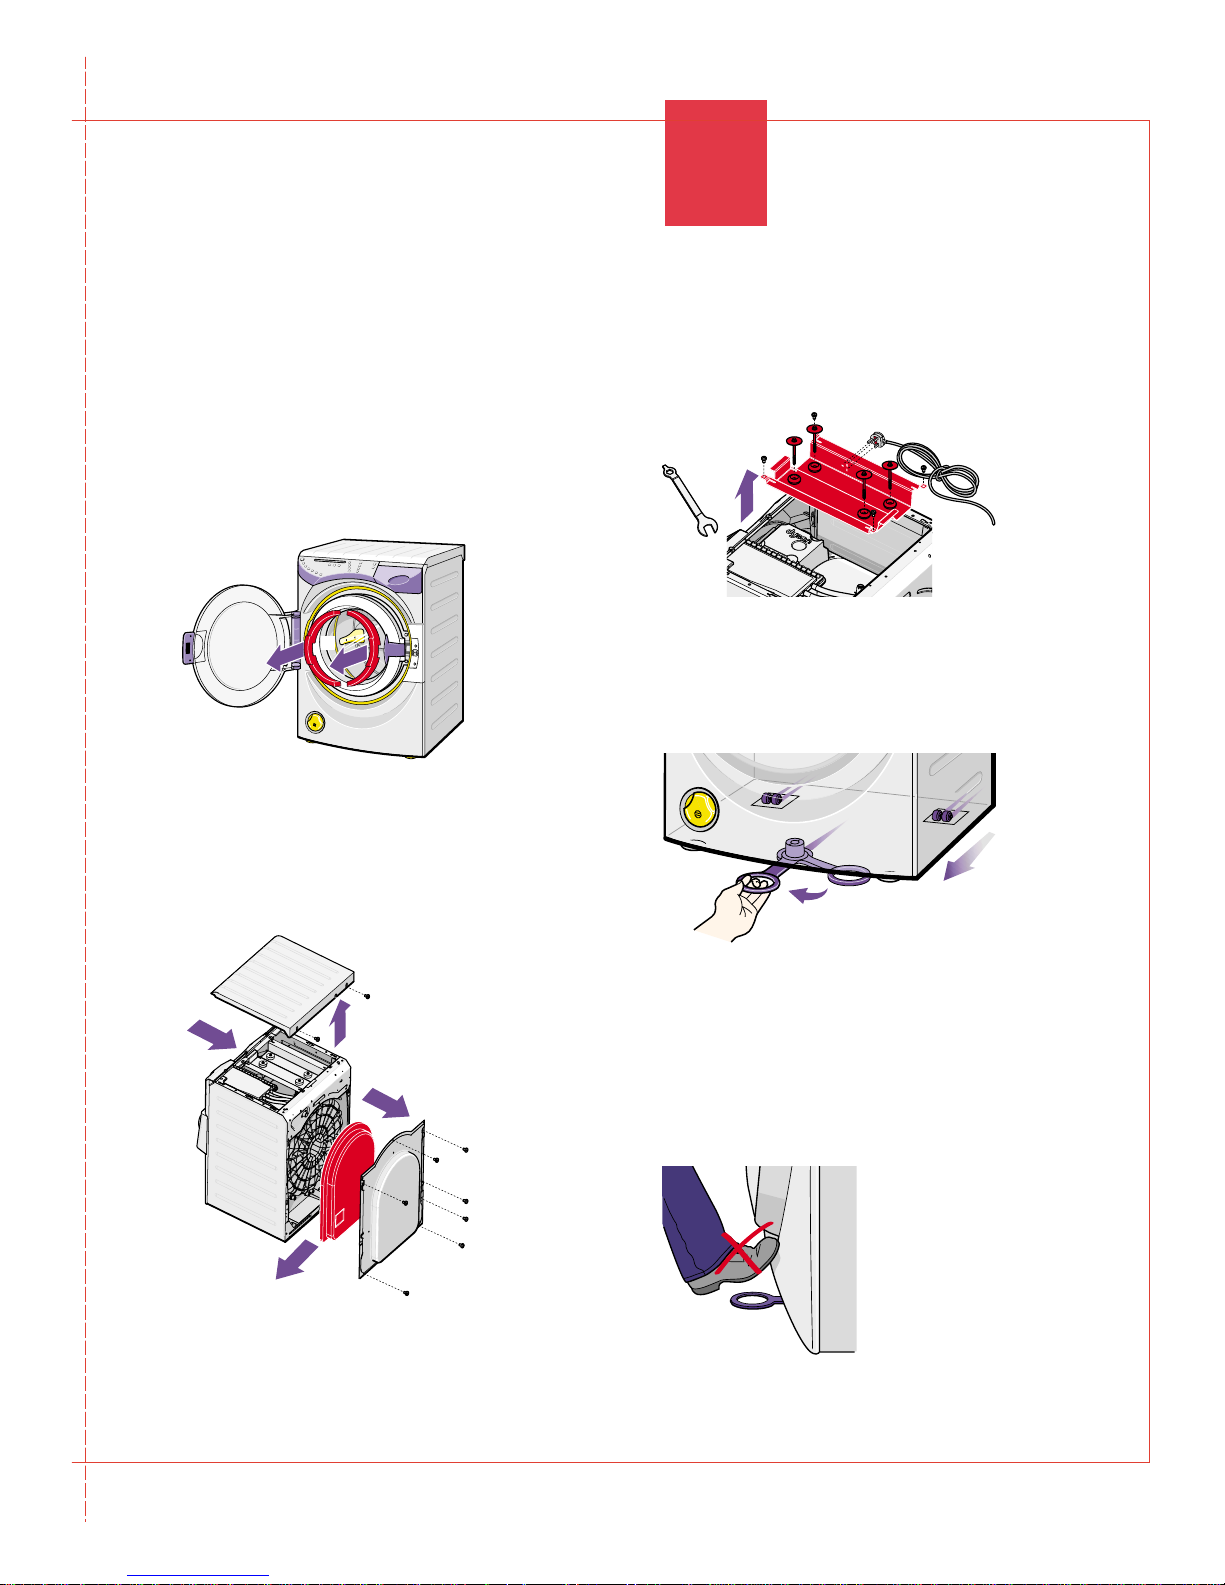
Inner transit packaging removal
Before installation
8 Remove the four screws securing the bracket to the machine
casing and lift out the transit bracket.
• Refit the lid and two screws.
To replace the packaging (eg: for moving house), reverse the
procedure described above.
Please retain the transit packaging for future use, as it
should be used whenever the machine is relocated.
Moving the Contrarotator
TM
• To move the machine, pull out the RollerjackTMhandle from
underneath the machine, which will enable you to manoeuvre
the machine easily into your desired position.
• Replace the Rollerjack
TM
slowly because the handle may return
with force.
NB: The Rollerjack
TM
is designed for final positioning only and
not suitable over long distances. Do not push with your foot.
4 01
Before installation, check the machine for damage.
A qualified person should always carry out installation.
All packaging must be removed before the machine is
connected to power or water supplies.
1 Open the outer door and carefully lift out the foam inserts
from the front of the inner door.
2 Take off the rear panel by removing the seven screws, using
a cross-head screwdriver.
3 Carefully withdraw the foam block and then refit the rear
panel and screws.
4 Remove the two screws from the rear of the lid.
5 Remove the lid by sliding it backwards and upwards.
6 Remove the plug inserted into the transit bracket from inside
the machine.
7 Using the Dyson spanner remove the four bolts securing the
top transit bracket.
2
3
5
4
1
7
8
6
Page 8
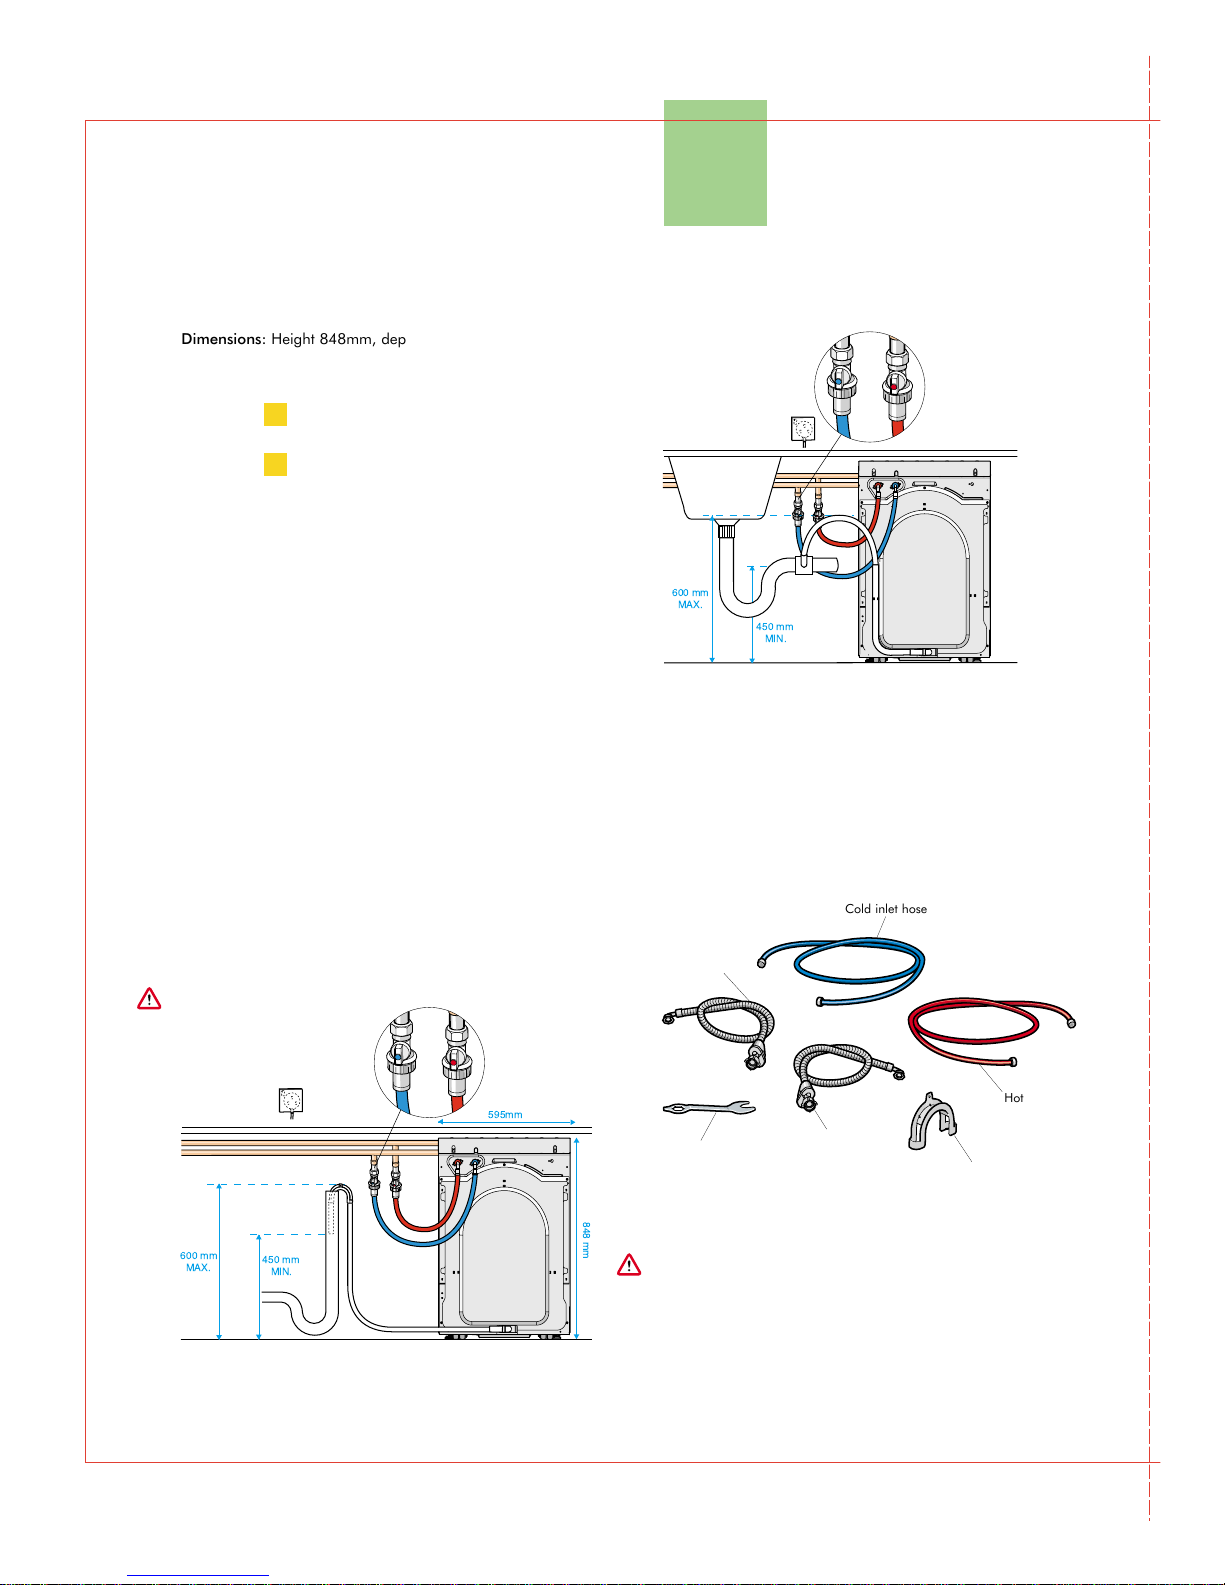
600 mm
MAX.
450 mm
MIN.
848 mm
595mm
Dimensions: Height 848mm, depth 575mm, width 595mm
Weight: 103kg.
Voltage: 220-240V, 50Hz. Please refer to rating plate
(see section 1 01 for location).
Power: 2750W (230V). Please refer to rating plate
(see section 1 01 for location).
Water pressure: 0.4-5 bar.
Capacity: 7kg dry laundry (maximum).
Location
Every Dyson washing machine is tested before it leaves the
factory. As a result, there may be some dampness or water in
the machine.
• The machine should not be installed in a location where the
temperature may drop below freezing.
• The machine should not be installed in a bathroom.
• The machine must be installed on a secure and flat surface.
Soft floors, such as carpet or carpet tiles, are not suitable.
The layout of the drainage taps and power socket and their
distance from the machine are illustrated below. The water
inlet hoses, drainage hose and electrical mains lead must be
positioned carefully to avoid damage or kinks when the
machine is in use. The machine can be connected to a
standpipe, under-sink pipe connection or other drainage
system, but the critical dimensions must be adhered to.
Important
Specification
Installation
Drainage using a sink pipe*
Drainage, water supply and electricity
The washing machine comes with:
2 inlet hoses or
2 leak protection inlet hoses
CRO1 Flowcheck and Memory only
1 drainage hose hook
1 Dyson spanner
1 drainage hose at the back of the machine
The above items are found in the drum unless stated otherwise.
NB: The leak protection hoses can be fitted to either
supply, ensuring that the valve end is attached directly
to the water mains. Take care not to cross the hoses
eg: hot outlet to cold inlet.
5 01
600 mm
MAX.
450 mm
MIN.
Drainage using a stand pipe*
Cold inlet hose
Hot inlet hose
Drainage hose hook
Note: CRO1 Flowcheck and Memory have grey leak protection inlet hoses
*All hoses can be supplied in 2.5m lengths if required. Please contact the helpline to order.
Inlet valve
Dyson spanner
Leak protection
inlet hoses
Page 9

Water supply
Drainage
Installation
Always:
• connect your machine to the water supply by hand, using the
hoses supplied. Do not tighten the plastic hose connections
with a spanner. Do not use old hoses.
* Note: CRO1 Flowcheck and Memory have grey leak protection inlet hoses
• ensure the water pressure is between 0.4 and 5 bar.
Do not:
• connect the machine to a mixer tap.
*Note: CRO1 Flowcheck and Memory have grey leak protection inlet hoses
Hot and cold water supply
• Attach the blue inlet hose/grey leak protection hose to the
cold inlet tap and the red hose/other grey leak protection
hose to the hot inlet tap, and turn on water supply.
5 02
You can alter the direction of the drainage hose to the left
or right.
• To change the direction of the machine’s drainage hose,
squeeze open the retaining clip using a pair of pliers and
hold it open while you rotate the hose.
• Ensure the hose is inserted properly before releasing the clip.
• Thread the drainage hose through the hose hook and adjust
the protruding end to a distance of 30mm. The hose hook
has a small retention hole that can be used to secure the
hose in position.
Do not use the hose hook for under-sink connections.
When installed with a standpipe or under-sink connection,
ensure that the water outlet end of the drainage hose is no
lower than 450mm above ground level. Position the hose so
that none of it lies higher than 600mm above ground level
(refer to section 5 01 for position).
NB: Failure to comply with these dimensions could cause
the machine to malfunction.
*Note: CRO1 Flowcheck and Memory have grey leak protection inlet hoses
Drainage hose hook
Drainage hose
30mm
Stand pipe
Page 10

When all the instructions on the previous pages have been
completed, the machine can be installed into its operating
position using the Rollerjack
TM
handle (see section 4 01).
• Using the Dyson spanner, adjust the two front feet so that the
machine is perfectly stable and will not rock on three of its
four contact points.
• Do not use wood, carpet or other material to stabilise the
washing machine.
After installation
• Run an empty 60ºC cotton cycle with a half measure of
detergent. For the correct dosage, please follow the
manufacturer’s instructions on the detergent packaging.
See sections 7 01 and 8 01 on how to start the machine.
• This will clean any test water out of the machine, and ensure
the machine is installed and levelled correctly.
• Observe it regularly during the first wash and check
connections afterwards and during the first week, to ensure
that they have been fitted correctly.
Cold water only supply
• If there is no hot water supply, attach the cold and hot hoses
to the machine as normal. Then, attach both hoses to a
Y-piece (which can be ordered from the helpline) and finally
connect the Y-piece to the cold inlet tap.
*Note: CRO1 Flowcheck and Memory have grey leak protection inlet hoses
• Once all connections have been made, turn on the tap(s) to
check that there are no leaks.
Electrical installation
Warning: This machine must be earthed
• Any electrical work required to install the washing machine
should be carried out by a qualified electrician.
• Before using your machine, check that the plug and sockets
match, and check that the voltage in your home corresponds
to the machine’s voltage.
This information is on the rating plate (see section 1 01).
• The machine should be plugged into an earthed socket
which can be switched on & off, and that is easily accessible
after installation.
• Do not use an extension cord or plug adapter.
• If the supply cord or plug are damaged disconnect the
machine from the socket outlet immediately. The supply cord
must only be replaced by Dyson or its appointed agents, as
special purpose tools and service techniques are required.
• If the plug supplied needs to be removed it should be cut off
and safely disposed of. Under no circumstances should the
severed plug be inserted into a socket outlet as this will
present an electric shock hazard.
European conformity information
This Contrarotator
TM
has been tested and conforms to the
following European Directives:
73/23/EEC Low Voltage Directive.
93/68/EEC CE Marking Directive.
89/336/EEC EMC Directive.
Installation
5 03
Page 11

Operation
6 01
• Plug the machine into the mains and switch on at the socket.
• Turn on the water supply at the mains.
• Open the outer and inner doors.
• Check the drums are empty before placing the sorted laundry
into the washing machine.
• Close both doors, making sure that both have ‘clicked’ shut.
It is important not to overload the machine. Maximum loads
for each programme are shown in the table section 9 02.
Tests have shown that overloading can reduce the wash
performance and may cause damage to your machine.
Detergent use
• To open the soap tray, press the hand on the soap tray.
Do not try to pull out the soap tray without first pressing it.
• Add detergent to the compartment marked 2 for all the main
wash programmes.
• For a pre-wash option, add detergent to the compartment
marked 1.
• Fabric conditioner can be added to the compartment marked
to the level indicated.
• Push the soap tray to close, ensuring it ‘clicks’.
Loading the Contrarotator
TM
Detergent use
Type of laundry Type of detergent
Brightly coloured/multi coloured Colour care
Whites Conventional biological or non-biological
Wool, silk Non biological wool/silk
Detergent format
Place wash balls and nets directly into the drums of the
washing machine.
Do not:
• place wash balls or tablets in drums when using the start
delay option (CRO1 Memory). This could fade coloured
laundry if the detergent touches the fabric before the water
soaks the laundry.
• place wash balls or tablets in drums when using a pre-wash.
All the detergent will be used in the pre-wash, leaving none
for the main wash. Use the soap tray instead.
• cover wash balls or tablets with laundry, as this can inhibit the
dispersal of detergent.
• stop the wash for long periods of time once it has started.
The detergent may not have had time to disperse and
concentrations may damage the laundry.
Detergent quantity
• CRO1’s drum capacity is 60% larger than other leading ‘AAA’
washing machines.
• This larger load will require a slight increase in detergent, as
there will be more dirt circulating in the wash.
• When using your Dyson washing machine we recommend the
following doses:
CRO1 with a half load CRO1 with a full load
Powder Powder
1 scoop 1
1
/
2
scoops
Liquid Liquid
1 dose 1
1
/
2
doses
Tablets Tablets
2 tablets 3 tablets
*For maximum dosage based on very heavy soil and hard water please refer to
manufacturer’s instructions on detergent pack.
• Use only powder suitable for automatic washing machines.
Page 12

1
2
Switch on the machine
Select the programme
Select Cotton/Synthetics/Wool/
Delicate/Handwash items or Duvet.
Temperature, spin and soil type
settings will automatically adjust to
the default settings to give the best
options for the selected wash.
Please see section 8 01 for
details of how to change the
default settings.
To start your wash cycle using the default settings
7 01
Starting your wash
Page 13

End of wash cycle
The display will show ‘Programme finished’ once the
cycle is complete. Remove the washing and turn off
the machine by pressing the ‘Mains on/off ’ button.
3
Start your wash cycle
Press to start your chosen
programme.
Pause your wash cycle
To pause the wash, press the ‘Start’
button (for example to add a
forgotten item to the wash).
Press ‘Start’ once more to resume
the wash. When a programme is
paused, the door may remain
locked for safety reasons (see
section 8 01 for the door lock).
Cancel your wash cycle
To cancel the wash, press and hold
down the ‘Cancel’ button. The outer
door will unlock once the water has
drained away, and if the inner
door is cool enough (see section
8 01 for the door lock).
Page 14

8 01
Optional settings
To personalise the default wash programmes
Adjust your programme
After selecting the fabric type, press the temperature, spin and soil
type buttons to scroll through the options and select your preferred
settings. Note: on certain programmes some options are not
available (see section 9 02).
Page 15

Start delay
only available on CRO1 Memory
This allows you to programme
the wash to finish when you want
it to. Use the < and > arrows to
adjust the settings (eg: if you want
the wash to start in 10 hours time,
press the > arrow 10 times) and
press ‘Start’ to activate it.
The display will countdown the
delay time to start. Press the
‘Cancel’ button at any time to
cancel the wash.
Memory
Only available on CRO1 Memory
This allows you to store the three
programmes you use the most.
Select the programme with any
additional options, then press
and hold one of the memory
buttons for one second. A beep
will confirm the programme has
been stored.
To select a stored programme,
press the relevant ‘Memory ’
button and then press ‘Start’.
To re-programme a stored cycle,
follow the steps for programming
a memory cycle.
Door lock
The door lock light indicates
that the outer door is locked.
Child lock
This option locks the settings on
the control panel and locks the
outer door. Once a programme
is running, use this option to
prevent it from being altered,
paused or cancelled. You can
also use the Child lock when the
machine is not in use to keep the
outer door locked.
Press and hold the ‘Minimum
iron’ button to activate and cancel
the Child lock, before starting
the cycle.
Additional options
To activate any of the additional
options below after you have
selected your programme,
press your desired option button
once; press it again to cancel
the option.
Minimum iron
This holds your laundry in water
after the final rinse to minimise
creasing. To spin the laundry and
finish the programme, press the
‘Start’ button. Minimum iron is
not suitable on all programmes
but is particularly good for
synthetics and delicates.
(Please refer to section 9 02).
Pre-wash
This removes excess dirt before
the main wash cycle.
Extra rinse
This adds one extra rinse for
people with sensitive skin.
Rinse & spin/Spin only
Press once for ‘Rinse & spin’
option, press twice for ‘Spin’
only option and press a third
time to cancel.
Soil type selection
Soil type can be adjusted on
the Cotton and Synthetic
programmes only, cleaning from
everyday washing to heavily
stained football kits.
Dirt
For lightly soiled laundry.
Dirt & stains
For typical everyday soiling.
Heavy stains
For heavily stained items.
(see section 9 02).
Page 16

Fabric care and advice
9 01
Wash tips
Always:
Care label
• check the wash care label on laundry
to select the most appropriate
programme. If you are unsure of the
care label, use a gentle programme
such as Wool.
Mixed fabric load
• wash a mixed load according to the
most delicate item in it.
• sort laundry according to care label.
Sort laundry according to colours
• wash dark colours separately.
• wash new items separately for their first
few washes as excess dye may run.
Wash bag
• place small items in a wash bag e.g.
bras, stockings etc…
Prepare your laundry
• empty all pockets before loading the
laundry into the machine, fasten zips,
draw strings, tie belts and press studs
before washing. Turn sleeping bags,
duvet covers, jeans, knitted fabrics and
coloured items inside out before
washing, checking the wash care label.
Duvets
• check your duvet is machine washable.
• wash duvets on the Duvet cycle.
• refer to care label for wash temperature
and drying recommendations.
• If the duvet is over 10.5 tog, we do not
recommend spinning. If it is 10.5 tog
or below, we recommend a maximum
spin speed of 500 rpm.
• To load the duvet into the machine,
feed the corner into the rear of the
drum and continue to feed the duvet
along its outer seam.
• CRO1 will wash most machine
washable king size duvets up to 13.5 tog.
Different manufacturers’ duvet sizes can
vary under the same tog rating.
Do not:
wash frayed or torn fabrics.
Care symbol
Washing process
Cotton
A wash tub with no bar underneath
indicates the item is suitable for a
high agitation wash. The maximum
temperature is normally specified in
the wash tub.
Suggested Dyson wash programme - Cotton
Synthetics
A wash tub with one bar underneath
indicates the item is suitable for a
medium agitation wash. The maximum
temperature is normally specified in
the wash tub.
Suggested Dyson wash programme - Synthetics
Wool/Delicate
A wash tub with two bars underneath
indicates the item is suitable for a gentle
agitation wash. The maximum temperature
is normally specified in the wash tub.
Suggested Dyson wash programme Wool/Delicates. Note: Machine washable
wool and wool mixes should only be washed
on the Wool cycle.
Handwash
Wash gently by hand or in a washing
machine with a gentle handwash
programme.
Suggested Dyson wash programme - Handwash
items. Not all handwash items are suitable for a
machine handwash programme. Check care
label or contact garment manufacturer.
Do not wash
Laundry with this symbol should not be
put in a washing machine.
Chlorine-based bleach
may be used.
Do not use bleach
Use a colour care detergent for
best results.
Hot iron
Iron 200ºC
Medium iron
Iron 150ºC
Cool iron
Iron 110ºC
Do not iron
Steaming and steam treatments should
not be used.
May be tumble dried
Normal heat setting.
May be tumble dried
Delicate heat setting.
Do not tumble dry
Tumble drying unsuitable laundry
can result in shrinking and melting.
May be dry cleaned
Letters in the circle indicate the type of
solvent suitable.
Do not dry clean
Dry flat
Care symbol Washing process
Note: If in doubt of correct washing guidelines, please contact the garment manufacturer or retailer.
Page 17

9 02
Programme table
Care label Suggested programme Temperature Spin speed Soil type Options
Maximum load
Cotton
Sturdy cottons
Linen
Synthetics
Cotton mixes
Mixed fibre
Polycottons
Fabrics with special finishes
(eg: ‘non-iron’ treated cotton)
Mixed fabric wash loads
Printed cottons
Polyester
Delicates
Micro fibres
Synthetic laundry that
require careful handling
Printed fabrics
Not for wool
Wool
Machine washable
Wool and wool mixes
Handwash items
Machine washable
Handwash items only,
requiring a very gentle action
Washable silks
Duvet
Please also read the duvet
section in the ‘Wash tips’
30 – 60˚C
30 – 85˚C
30 – 50˚C
30 – 40˚C
30 – 40˚C
20 – 30˚C
30 – 40˚C
0 –1400 rpm
0 –1400 rpm
0 – 800 rpm
0 – 1100 rpm
0 – 800 rpm
0 – 500 rpm
0 – 800 rpm
3.5 kg
7 kg
4 kg
3 kg
2 kg
1.5 kg
*Based on 40OC programmes and will vary according to temperature, hot/cold fill and options selected.
‘AAA’ Energy Label declaration is based on a Cotton, 60
O
C Dirt and Stains cycle. On some machines, cycle selections may differ from those shown.
Pre-wash
Extra rinse
Rinse & spin/Spin
Pre-wash
Extra rinse
Minimum iron
Rinse & spin/Spin
Pre-wash
Extra rinse
Minimum iron
Rinse & spin/Spin
Extra rinse
Rinse & spin/Spin
Extra rinse
Rinse & spin/Spin
Pre-wash
Extra rinse
Rinse & spin/Spin
Pre-wash
Extra rinse
Rinse & spin/Spin
Dirt
For lightly soiled laundry
Dirt & stains
For typical everyday soiling
Heavy stains
For heavily stained items
Dirt
For lightly soiled laundry
Dirt & stains
For typical everyday soiling
Heavy stains
For heavily stained items
No option
No option
No option
No option
40 mins*
67 mins*
85 mins*
40 mins*
77 mins*
85 mins*
77 mins*
45 mins*
45 mins*
100 mins*
Cycle time
Page 18

Cleaning
Maintenance
• The soap tray cavity in the machine should be cleaned out
with a small, soft brush, taking care not to dislodge the
rubber seal.
• Replace the soap tray ensuring it ‘clicks’ into place.
Do not:
• wash the soap tray in a dishwasher.
Maintenance wash
To prevent odours and build-up of deposits within the
washing machine, it is recommended that you run an empty
85ºC cotton cycle with a half measure of detergent 2 or 3
times a year.
If the outer door is dislodged from its safety hinge:
1 Locate the top ring of the outer door into the yellow part of
the flexible safety hinge.
2 Lift the door and push it forward until the lower ring of the
door ‘clicks’ into place.
The outer door is designed to ‘pop’ out of its hinge if leant
on, however it is not designed to support a load.
10 01
Always:
• disconnect the machine from the mains before cleaning or
carrying out any maintenance work.
Do not:
• clean the machine with cleaning solutions. Always use a
clean, soft, damp cloth.
Cleaning the soap tray
• Remove the soap tray by pressing the yellow release button at
the back of the tray, and pulling it out.
• Wash it in warm, soapy water with a small, soft brush, taking
care not to scratch the soap tray front.
Page 19

Coin trap
Maintenance
5 Remove any objects from the coin trap.
6 If any more items seem to be blocking the coin trap,
pull out the flow accelerator.
• Remove any items and firmly push the flow accelerator back
into place.
To replace the coin trap cover:
• Ensuring the seal is in place, lubricate with a drop of washing
up liquid.
• Fit the cover with the plug at the top.
• Turn 1
1
/
2
turns clockwise, ensuring the childproof tab ‘clicks’
back into place.
• Make sure the plug is pushed back into the closed position.
10 02
Never remove any objects from the coin trap while the
washing machine is switched on, still running or paused
during a wash. Always allow the water to cool before
opening the coin trap.
• Empty the coin trap when a blockage has occurred.
1 Place a tray or shallow dish underneath the coin trap.
2 Using the Dyson spanner, lever the plug in the middle of the
coin trap. The water will drain from the plug.
3 If the tray or dish is full, push the plug into its original position
by hand, empty the tray or dish and repeat the process.
4 Once the water has been removed (a small quantity of water
will remain below the level of the plug), lift the childproof tab
using the Dyson spanner. Then turn the window anticlockwise
until it is released.
Childproof tab
Coin trap window
Flow accelerator
Plug
Side view: lever hand and spanner 45
o
Page 20

Emergency door release
Water filter
Maintenance
This should be used in the event of a power cut to
remove laundry.
• Switch off and remove the plug from the socket.
• Ensure the drums have stopped moving.
• If the machine has been running on a hot wash, leave it
to cool down.
• Completely drain the washing machine (see section 1002
under ‘coin trap’).
• Remove the soap tray as described in section 1001.
• Using the Dyson spanner or a coin, turn the door release
screw
1
/
4
of a turn anticlockwise to unlock the door,
hold the screw in this position and open the outer door.
• Open inner door.
• Turn the door release screw clockwise through
1
/
4
of a turn,
to ensure the door will close. (This is automatic on some models).
• Replace the soap tray.
10 03
To access the rear of the machine use the Rollerjack
TM
handle to pull the machine out (see section 4 01
for details).
Cleaning the water inlet filters
The water inlet filters should be checked regularly for debris
or limescale build-up (particularly in a hard water area).
Contact your local water authority to find out your water
composition.
• Turn off the water supply to the machine.
• Unscrew both water inlet hoses by hand.
• Using pliers, grip the coloured filters, pull them out and rinse
them under cold water.
NB: Some water may remain in the hoses.
Note: CRO1 Flowcheck and Memory have grey leak protection inlet hoses
• Replace the filters, red to the hot fill and blue to the cold fill,
and reconnect the water inlet hoses.
10 01.
10 02
Page 21

11 01Troubleshooting
LCD display is blank
Machine displays
“Overload reduced performance”
Machine displays
“Close inner door then press start”
Certain spin speeds, temperatures,
dirt levels cannot be selected
Cancel button does not
work during a wash
Cannot open door
Machine leaks water
Machine shakes during the cycle
Machine displays
“Close outer door then press start”
Machine displays
“Not emptying: check hose/coin trap”
Machine displays
“Not filling: check water supply”
Machine displays
“Uneven load could not spin”
Before calling the helpline, please carefully read the following pages.
Machine displays
“Child lock on”
Page 22

Ensure the
machine
is plugged in and
switched on. Check the fuse and also
that the circuit breaker has not tripped.
See section 9 02 for the programme
options wash table.
Wait for the machine to finish the cycle
before opening the door. To cancel the
wash hold down the
‘Cancel’
button.
Press ‘Start’ to resume the wash.
Hold down the
‘Minimum iron’
button
until
‘Child lock off ’ is shown on LCD.
Follow the ‘Emergency door release’
instructions in section 10 03.
Turn off the water supply to the machine
and ensure that the coin trap cover is
correctly fitted and that the plug is closed,
see section 10 02.
Adjust the feet until the machine is level,
see section 5 03.
Check the drainage hose is draining
into a suitable place (drain, sink or
standpipe), see section 5 02.
Ensure the hoses are fitted correctly, see
section 5 02 .
Close the soap tray.
Adjust feet until the machine is level, see
section 5 03 .
Return the Rollerjack
TM
handle carefully
to its position under the machine, see
section 4 01 .
Remove top, rear and front packaging,
see section 4 01.
Check orientation of hot and cold pipes.
LCD display is blank
Certain spin speeds, temperatures or
soil types cannot be selected
Cannot open outer door
Machine leaks water
Machine shakes during the cycle
Burning smell
Clothes warm at end of cycle
There is no power to the
machine.
There are limits set on these options for
each programme to prevent unsuitable
options being selected.
Machine has not finished the cycle.
Machine has paused and the water level
is too high or the water is too hot.
Child lock is active.
Power cut or any other cause not listed
above.
Coin trap cover is not in place, or the
plug is not closed.
Machine is not level.
Drainage hose is not connected correctly.
Inlet hoses are not positioned or
correctly fitted.
Soap tray is open.
2 adjustable front feet are not level.
Rollerjack
TM
handle has not been replaced
under the machine.
Transit packaging not removed.
Hot and cold pipes reversed.
11 02Troubleshooting
Symptom
Some solutions may require you to disconnect the electricity and water supply.
Possible causes
Solutions
Page 23

11 03Troubleshooting
Child lock on
Overload reduced performance
Uneven load could not spin
Close outer door then press start
Close inner door then press start
Not emptying: check hose and
coin trap
Not filling: check water supply
Fault
The child lock has not been deactivated.
The recommended wash load has been
exceeded or unusual items have been
washed. The wash load is uneven.
The machine sensed that spinning would
be unsafe. Unusual items eg: trainers
may have been washed.
Outer door not closed properly, manual
release still open.
Inner door not closed properly.
Coin trap blocked.
Machine full of suds.
Drainage hose not draining.
Water supply is not connected.
Filter is blocked.
Inlet hoses are blocked or kinked.
Drainage hose is installed incorrectly.
Flood protection hose (Memory only)
There is a technical fault with your
washing machine.
LCD display message
Possible causes
Solutions
www.dyson.com
Dyson Helpline
UK 0870 600 2701
email service@dyson.com
ROI (01) 475 7109
email irelandservice@dyson.com
NOTE: If an engineer is booked and it is found that the fault could
have been rectified using troubleshooting guide, you may be charged.
Hold down the ’Minimum iron’ button
until ‘Child lock off’ is shown on
the LCD.
In future, refer to the programme table
section 9 02 or cease to wash the
particular unusual item(s).
Remove some items or reload the
machine and select ‘Spin only’ option
(see section 8 01).
Close the outer door, ensuring nothing
is trapped. Turn manual release
clockwise (see section 10 03).
Close the inner door, ensuring nothing
is trapped.
Remove blockages (see section 10 02).
Leave suds to settle. In future, refer to
the manufacturer’s dosage instructions.
Check that the drainage hose is installed
according to the installation instructions
(see sections 5 01 & 5 02).
Check that the water supply is connected
and turned on at the tap.
Clean the filters (see section 10 03).
Unblock or straighten the inlet hoses.
Unblock or straighten the drainage hose.
Fitted back to front.
Contact the Dyson Helpline or visit the
website www.dyson.com with the
following information:
• Your machine’s serial number
(see side of machine).
• Where and when you purchased your
washing machine.
• Your address.
• The fault code that appears on the
LCD display, if applicable.
A Dyson service engineer will visit you to
test your machine and repair if necessary.
Page 24

UK 0870 600 2701
Open 7 days a week, 8am – 8pm
ROI (01)475 7109
Dyson Ltd Tetbury Hill Malmesbury
Wiltshire SN16 ORP
www.dyson.com
JN.6596 30.01.02 PN.50351-01-02
 Loading...