

Dyson Bike, Hard Tail User Manual
2014 Dyson Bikes page 1
User Guide - The Hard Tail

2014 Dyson Bikes page 2

2014 Dyson Bikes page 3
Contents
Page Item
______________________________________________________________
4 Acknowledgements and Foreword
5 Symbols and Users‟ information and Responsibility
7 Components Description and Specification
9 Assembly Instruments
12 Mechanical Operation and Adjustment
17 Electric Operation and Adjustment
26 Safety
28 Maintenance and Care
32 Trouble shooting
33 Warranty
34 Maintenance Records

2014 Dyson Bikes page 4
Acknowledgments
This manual has been developed by Dyson Bikes and their supplier. The information contained in
this manual complies with relevant Australian Standards at the time of printing.
Copyright 2014 Dyson Bikes. This manual may not be reproduced in part or whole without the
express and written permission of Dyson Bikes.
Foreword
Thank you for purchasing a Dyson e-bike, we are certain you will enjoy it for many years to come.
Please take the time to read this instruction manual thoroughly before assembly (if required), and
taking your first ride.
There are warnings throughout this manual and these will be highlighted with symbols or words as
detailed on the next page. Please ensure you follow these warning instructions, don‟t risk your
safety or that of others.
Failure to comply with these conditions may also affect your warranty and the long-term reliability of
your e-bike.
Your new e-bike is considered a vehicle and when ridden on public roads you must comply with all
local requirements. Laws vary in Australia from State to State - please refer to the relevant authority
in your State for more information.
YOU SHOULD READ THIS MANUAL
Your e-bike is an electrically power assisted cycle (EPAC),
which uses the same traffic
areas as cars, trucks and motorcycles. You need to know about certain legal and common
sense requirements for the safe and trouble free use of your e-bike.
2014 Dyson Bikes page 5
Symbols used
Important information for your safety is specially marked. Always follow these instructions to avoid
personal injury or e-bike damage.
WARNING
Warns of dangers to your health and implies potential risk of injury.
ATTENTION
Indicates a potential hazard to the equipment or other objects.
Failure to observe could result in voiding of warranty.
NOTE
Suggestions and information.
Users’ information and responsibility
To reduce the risk of serious personal injury, you should read the instructions in this manual
carefully.
This is an electrically power assisted cycle (EPAC or commonly referred to as an e-bike), with a 1:1
pedal assistance system, designed for urban commuting and short distance travel.
The e-bike is intended only for riding on paved roads and trails. Do not use it for off-road purposes.
Do not use it in water, for jumping, stunting or in competitive sports events.
During riding, you should note that the e-bike covers 5 meters per second at a medium speed of
about 18 kilometers per hour in fine dry weather conditions. Keep sufficient distance from other
road users to ensure you can stop safely in case of an emergency and always consider the current
weather and road conditions.
Pay attention to the traffic during your ride and keep both hands on the handlebars at all times.
There are warnings on the e-bike containing
safety instructions. Non-observance of these
instructions may cause injury, failure or damage!

2014 Dyson Bikes page 6
Do not use headphones in road traffic as it blocks other sounds and increases the risk of accidents.
Check the e-bike thoroughly against this manual to ensure correct function of components before
your first ride and rectify any issues before riding. The owner is then responsible for normal
maintenance of the e-bike.
Learn how to operate all standard and accessory equipment on the e-bike.
Ensure that anyone who uses the e-bike has been fully instructed in the operation of its mechanical
and electrical functions.
Your e-bike conforms to relevant Australian standards (AS NZS 1927-2010 Pedal bicycles - Safety
requirements and European Committee for Standardization EN 15194:2009+A1:2011 Cycles –
Electrically power assisted cycles –EPAC Bicycles). Please note other local regulations may apply.
Check our website www.dysonbikes.com.au for additional information or call 0497 357 117 if you
cannot find the answer to your question.
2014 Dyson Bikes page 7
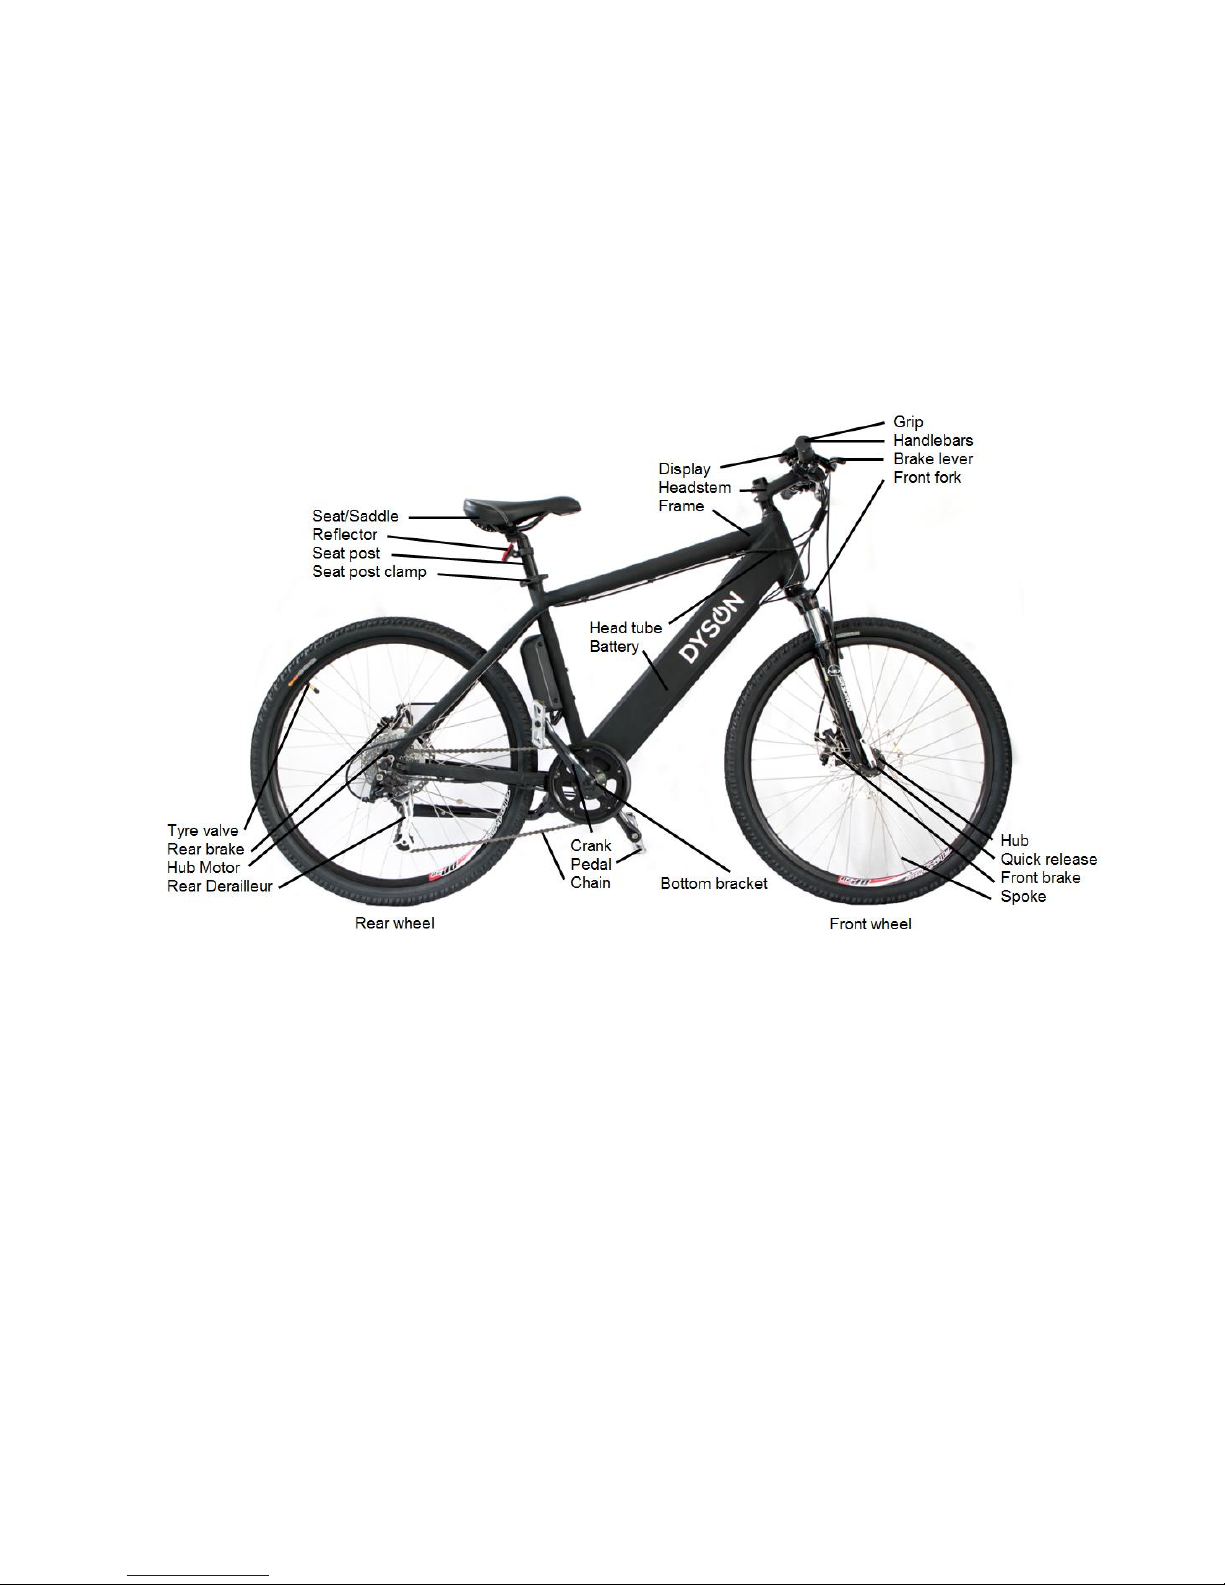
Section-1 Component Description and Specification
An e-bike consists of various mechanical parts such as the frame, wheels, brake, handlebar, saddle
etc.
Please take the time to familiarise yourself with this terminology; it will make basic operation and
maintenance instructions easier to follow.
The e-bike serial number is engraved in the front of the head tube.
NOTE This diagram is for reference only, from time to time changes may be made in the interests of
product improvement.

2014 Dyson Bikes page 8
General
Wheel size
26 inches
Dimension LxWxH
1660x235x850 mm
Tyre Pressure range
280 – 460 kPa
Valve type
Schraeder
Dimension (packing) LxWxH
1840x255x980 mm
Net Weight (battery included)
22 kg
Range on one full charge
Approx. 60~70 km*
Max. load of carrier (if fitted)
25 kg
Permissible total weight
120 kg
Max. speed (with assistance)
25 km/h
Technical specification of the battery
Battery type
Sony - Li(NiCoMn)O2
Capacity
316.8WH – 8.8AH
Nominal voltage
36V
Charging voltage
42V
Max charging current
1830 mA
Discharge current
15000 mA
Operating temperature of discharging
-20 ~ 40℃
Operating temperature of charging mode
0 ~ 45 ℃
Technical specifications of the motor
Motor type
Brushless geared hub motor
Power
250 W
Voltage
36 V
Max. torque
4.5~15 Nm
Max. rotational speed
274 RPM
Control system
Cadence sensor in bottom bracket
Technical specifications of the controller and the charger
Undervoltage protection
29±0.5 V
Overload protection
12±0.5A
Charging mode
3-step “Intelligent”
Charging current
Approx. 1.8 A
Display
By LED red / green
Weight
550 g
Charging time
Approx. 5 hours (2.5 hours, up to 80%)^
*The range on a full charge is affected by many external factors, such as the weight of the rider, the terrain and
winds.
^ Depending on the depth of battery discharge this time may be longer or shorter.

2014 Dyson Bikes page 9
Section 2 - Assembly Instructions
If you have purchased your new e-bike online and had it delivered, you will need to carry out some
minor assembly before your e-bike can be ridden. If you have purchased an assembled e-bike
please continue reading from Section 3 on page 12.
Please follow these instructions carefully to ensure your new e-bike is correctly assembled for safe
operation.
If you are unsure of anything and require further assistance please call Dyson Bikes on
0497 357 117 and we will be happy to talk you through the procedure.
Alternately you may wish to have your e-bike assembled by a trained e-bike mechanic.
Step 1.
Remove e-bike from outer carton and remove packaging material from frame taking care not to
mark or scratch your new e-bike.
Step 2.
Locate included tools, namely 3, 4, 5, 6-mm Allen Keys and 8, 10, 13, 15-mm spanners.
Step 3.
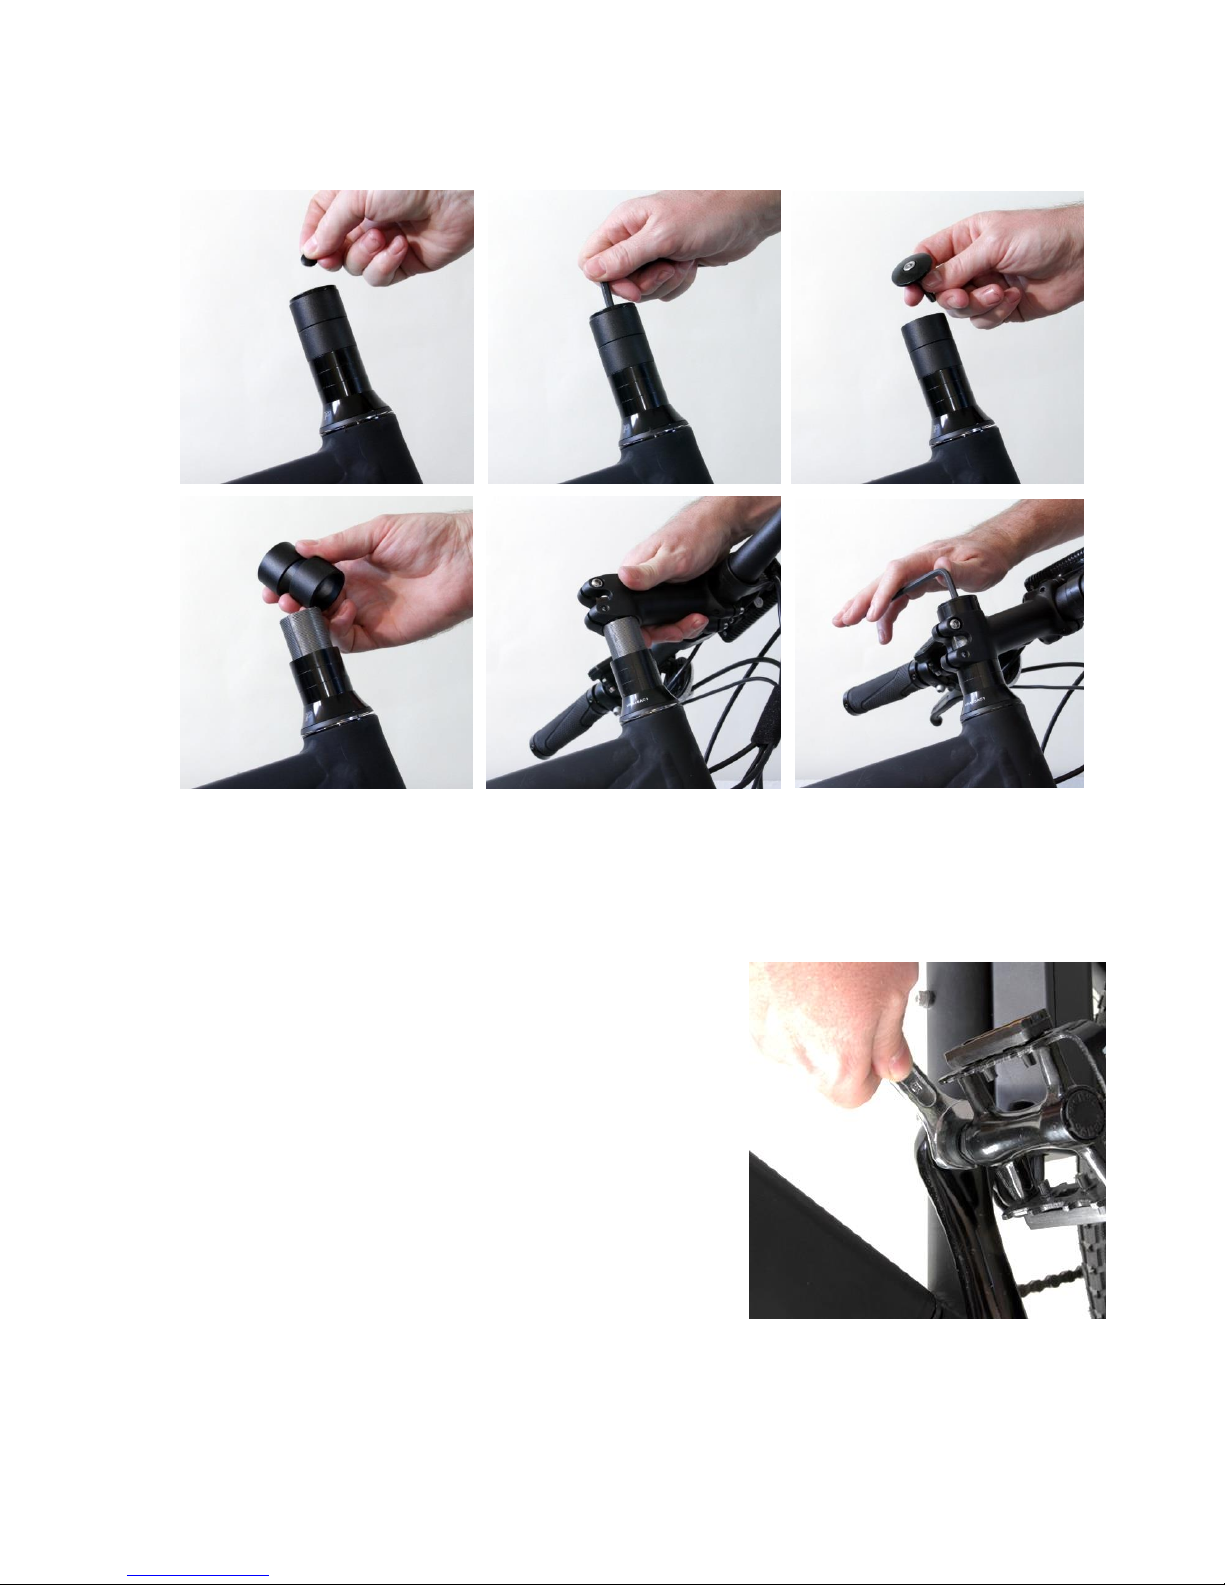
To fit the handlebar to your e-bike, remove the small black rubber cap and hex bolt with the 5mm
Allen Key, then remove the ring spacers and set aside, (refer images on the following page). Please
take care that the controls will not interfere with the correct operation of other components, or
cables.
Now fit two thin rings followed by the head stem, then the last thin ring to the top of the fork. Take
the black cap and hex bolt previously removed and refit. Check that the lower bearing is seated
correctly and tighten, (taking care not to over tighten) it is right when the handlebars turn freely and
there is no free play. Check by holding the front brake on and moving the bike back and forth.
Check for correct alignment of the front wheel in relation to the handlebars, they should be at right
angles. Now tighten the two locking hex bolts to 7~10NM, take care not to over tighten.
2014 Dyson Bikes page 10
More information regarding handlebar adjustment can be found on page 14.
Step 4.
Locate pedals and use 15-mm spanner to attach to crank arms
as shown in the image shown here.
Note that the pedals are marked „L‟ for left and „R‟ for right. The
Left pedal has a left hand thread and needs to be tightened in
an anti-clockwise direction; the right hand pedal tightens in a
regular clockwise direction.
Screw into the crank carefully using your fingers, then tighten
firmly with the 15-mm spanner. We recommend a torque
wrench be used to tighten to ≥35Nm.
2014 Dyson Bikes page 11
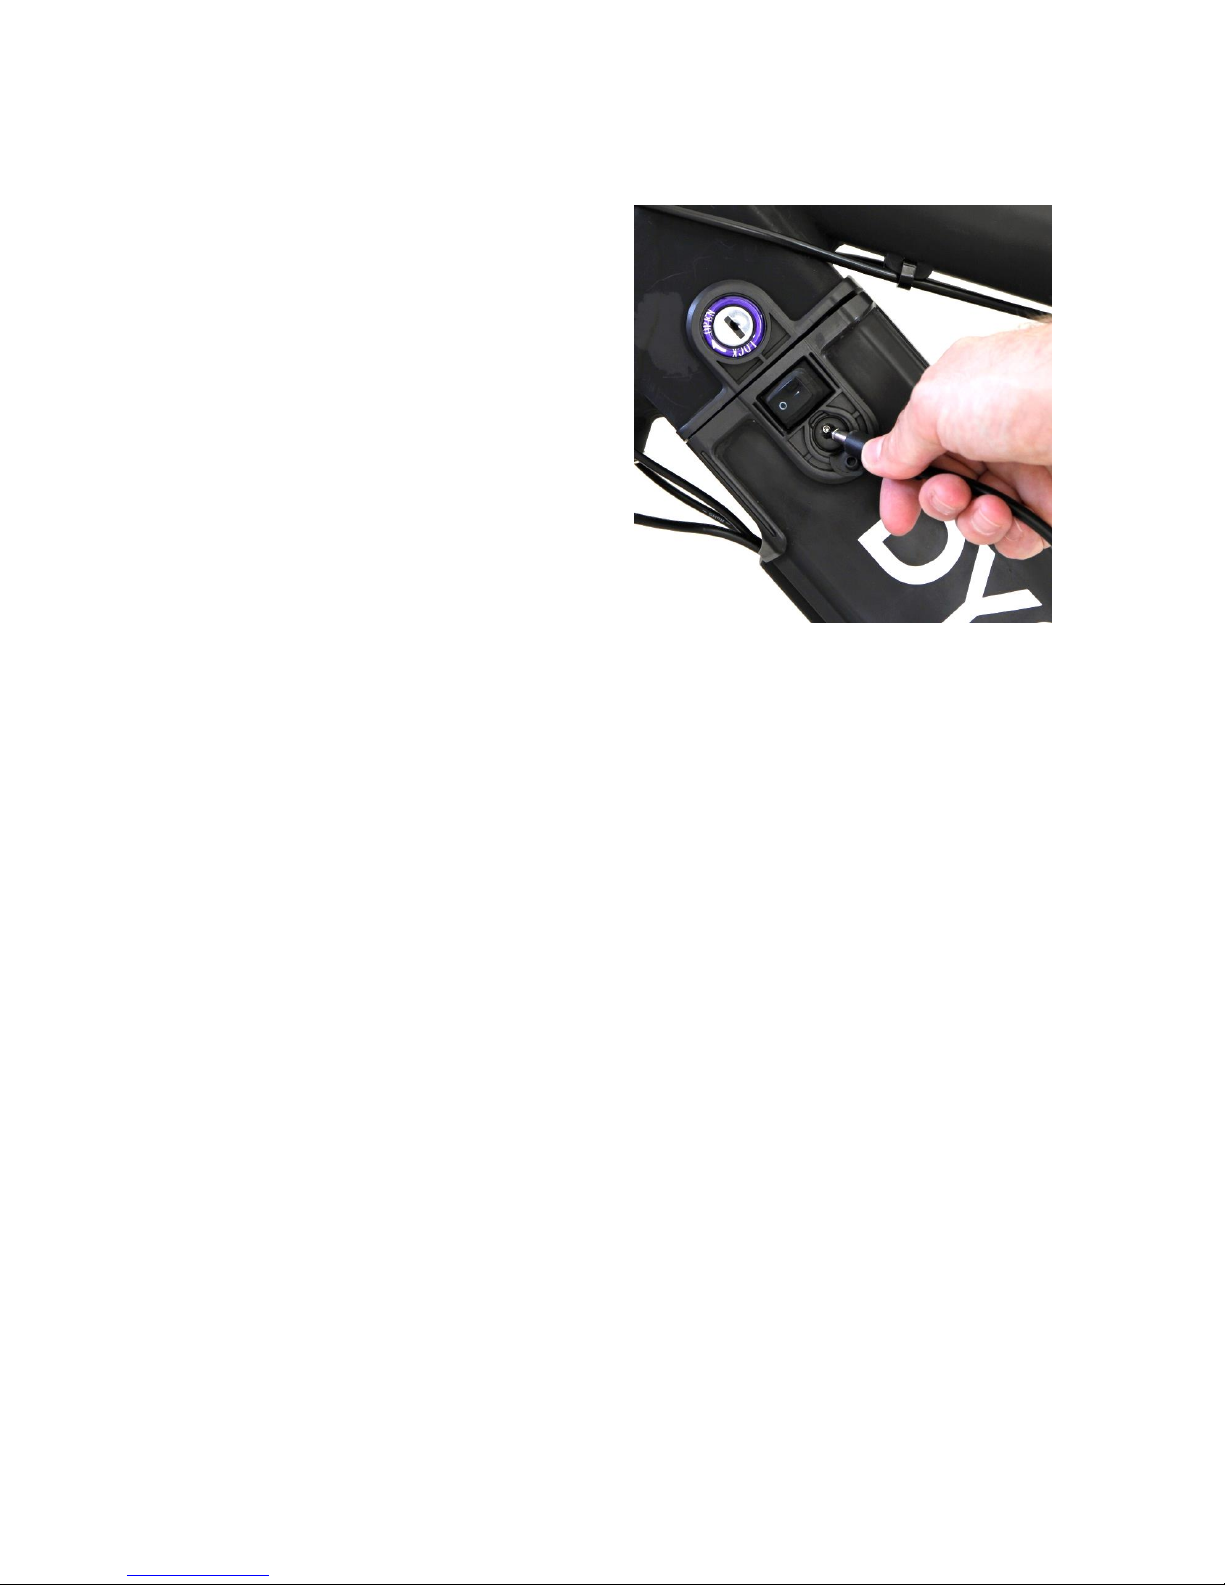
Step 5.
Charging the battery. The battery is held into the
frame with a keyed lock, two keys are supplied
with your e-bike.
We highly recommend that you keep one key in a
safe and secure location in the event the main key
is lost.
Locate the battery charger and plug into a regular
240-Volt wall socket, the other small plug can then
be inserted into the battery as shown below. The
LED light on the charger will glow red to indicate
charging is in progress.
Charging can take place with the battery in the frame, or you can remove and charge separately.
Once fully charged the LED indicator light on the Charger will be green.
Make sure the battery is fully charged before the first ride and charge again for at least 6-hours
after.
Further notes on battery care can be found under Section 4.2 Battery and Charger.
Step 6.
Your e-bike is now assembled, but it is not quite ready for the first ride. Please continue to read
through this manual paying particular attention to Section 3 ensuring that all bolts screws etc. are
firmly tightened to the recommended specification.
 Loading...