

Page 1

VII
V
Hoosstt
H
A
A
Installation Guide
U
S
U
A
A
B 22..00
S
B
d
d--
d
d
Revision 2.5.8
O
O
n
n
P
CII
P
C
Caarr
C
d
d
Page 2

INDEX
Trademarks --------------------------------------------------------------------------------- 3
Introduction -------------------------------------------------------------------------------- 3
System Requirement ---------------------------------------------------------------------- 3
Hardware Inst all at ion -------------------------------------------------------------------- 3
Driver Installation ------------------------------------------------------------------------ 4
Windows 98 & 2000 Installation -------------------------------------------------------- 4
Windows ME & XP SP1 Installation ----------------------------------------------- ----- 7
Uninstall Driver --------------------------------------------------------------------------
10
Revision 2.5.8 - 1 - 2004/5/14
Page 3
Trademarks
All names and products mentioned below are registered trademarks of their respective
companies.
Introduction
Congratulations on your purchase of the VIA USB2.0 hi-speed host add on card, it provides
up to 480Mbps bandwidth that performs 40 times faster than USB1.1 of 12Mbps with
USB2.0 devices. It is also backwards compatible to USB 1.1 peripherals for your PC
system.
System Requirement
This setup program will install the driver for VIA USB 2.0 Host Controller. Before you
start to run the setup program, please make sure your computer is an IBM PC-compatible
system. This driver can be used either the following operating systems:
Windows98
Windows98 Second Edition.
Windows Millennium.
Windows 2000.
Windows XP SP1.
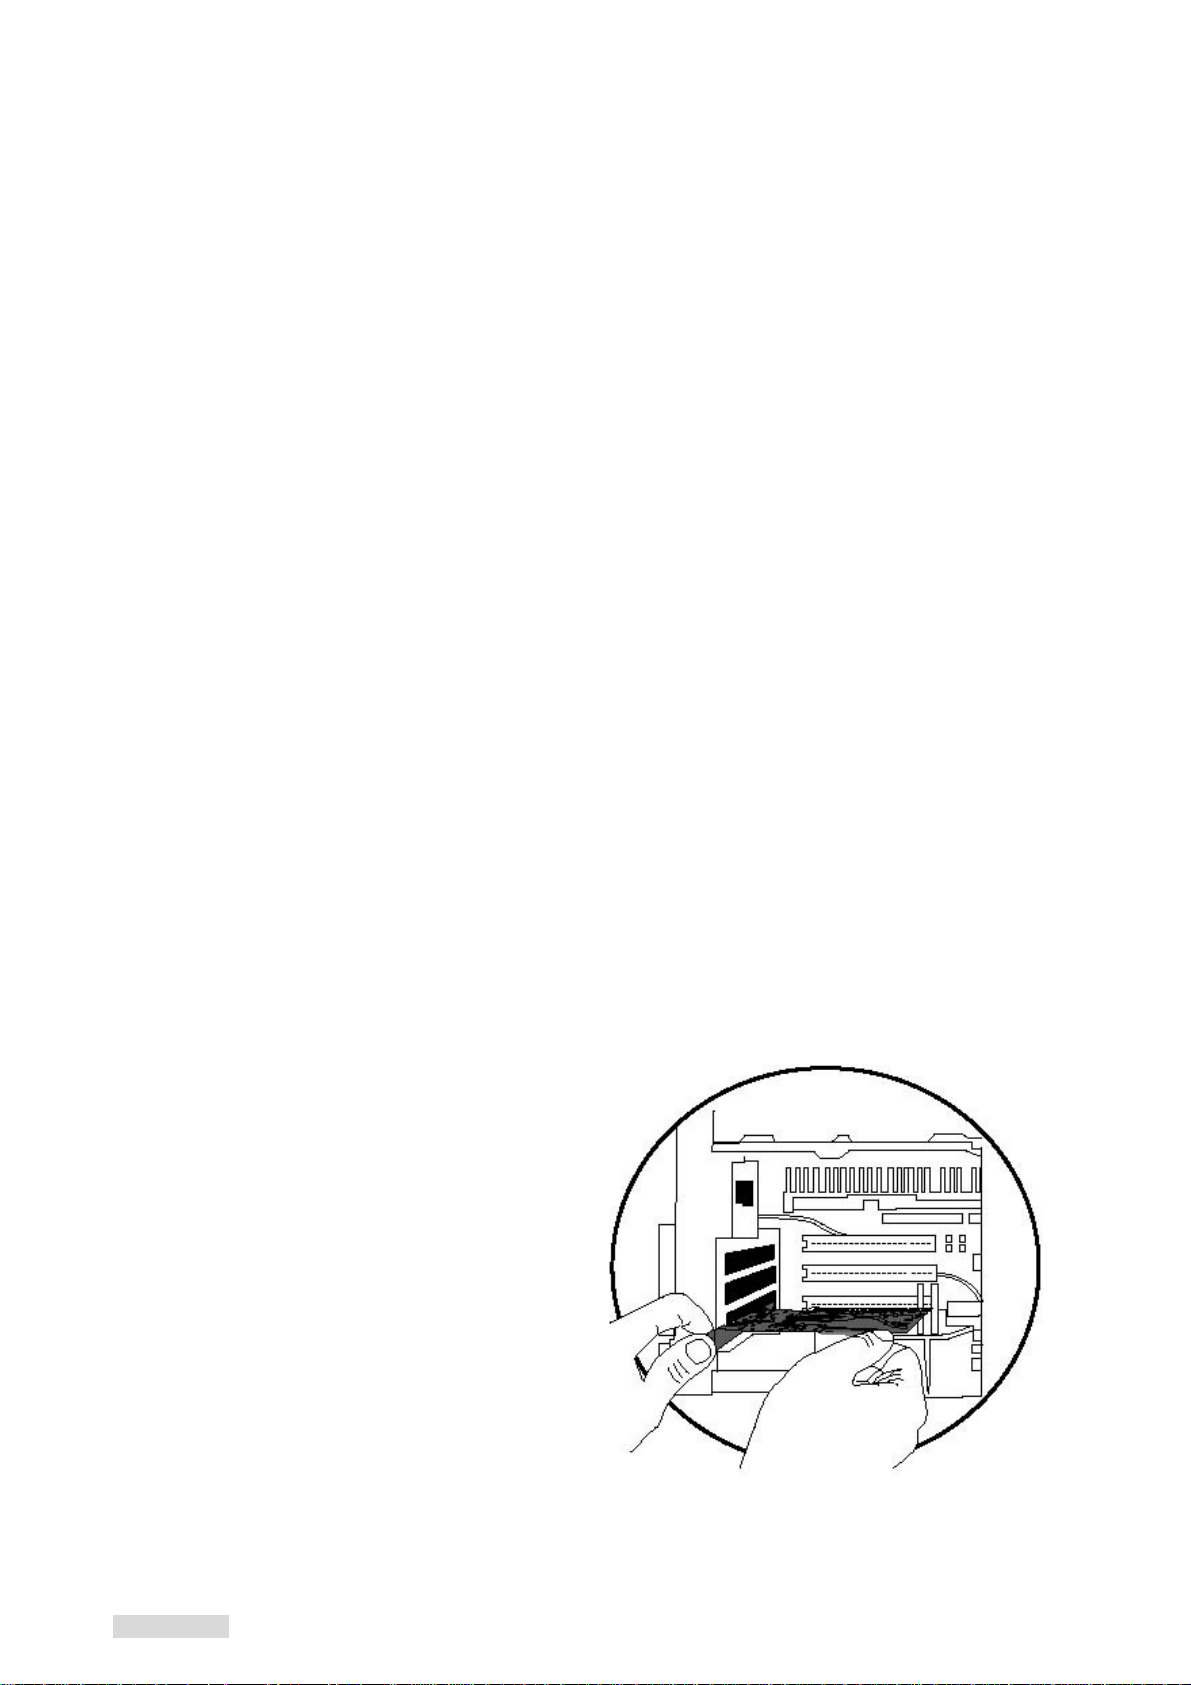
Hardware installation
Before inst allation
Touch the exposed metal casing on your computer's power supply before taking
the card from its anti-static package. This safely discharges any static electricity
that may have built up on your body.
Handle the card by the PCB edge only. Avoid touching the gold-plated PCI bus
connector or the electronic components.
1. Turn your computer off and disconnect the power cord before installing the card.
2. Remove your computer’s cover. (Please
refer to your computer owners manual
for instructions on removing the
cover)
3. Push the host card firmly into a free PCI
slot and ensure the gold-plated
connector is seated evenly in the PCI
slot.
4. Replace the screw in the bracket to
avoid the card falling out accidentally
when plugging in the USB cable.
5. Before replacing your computer's cover,
you must make sure the tool and screw
is clean inside the PC.
6. Connect AC power cord again.
Revision 2.5.8 - 2 - 2004/5/14
Page 4
Driver Installation
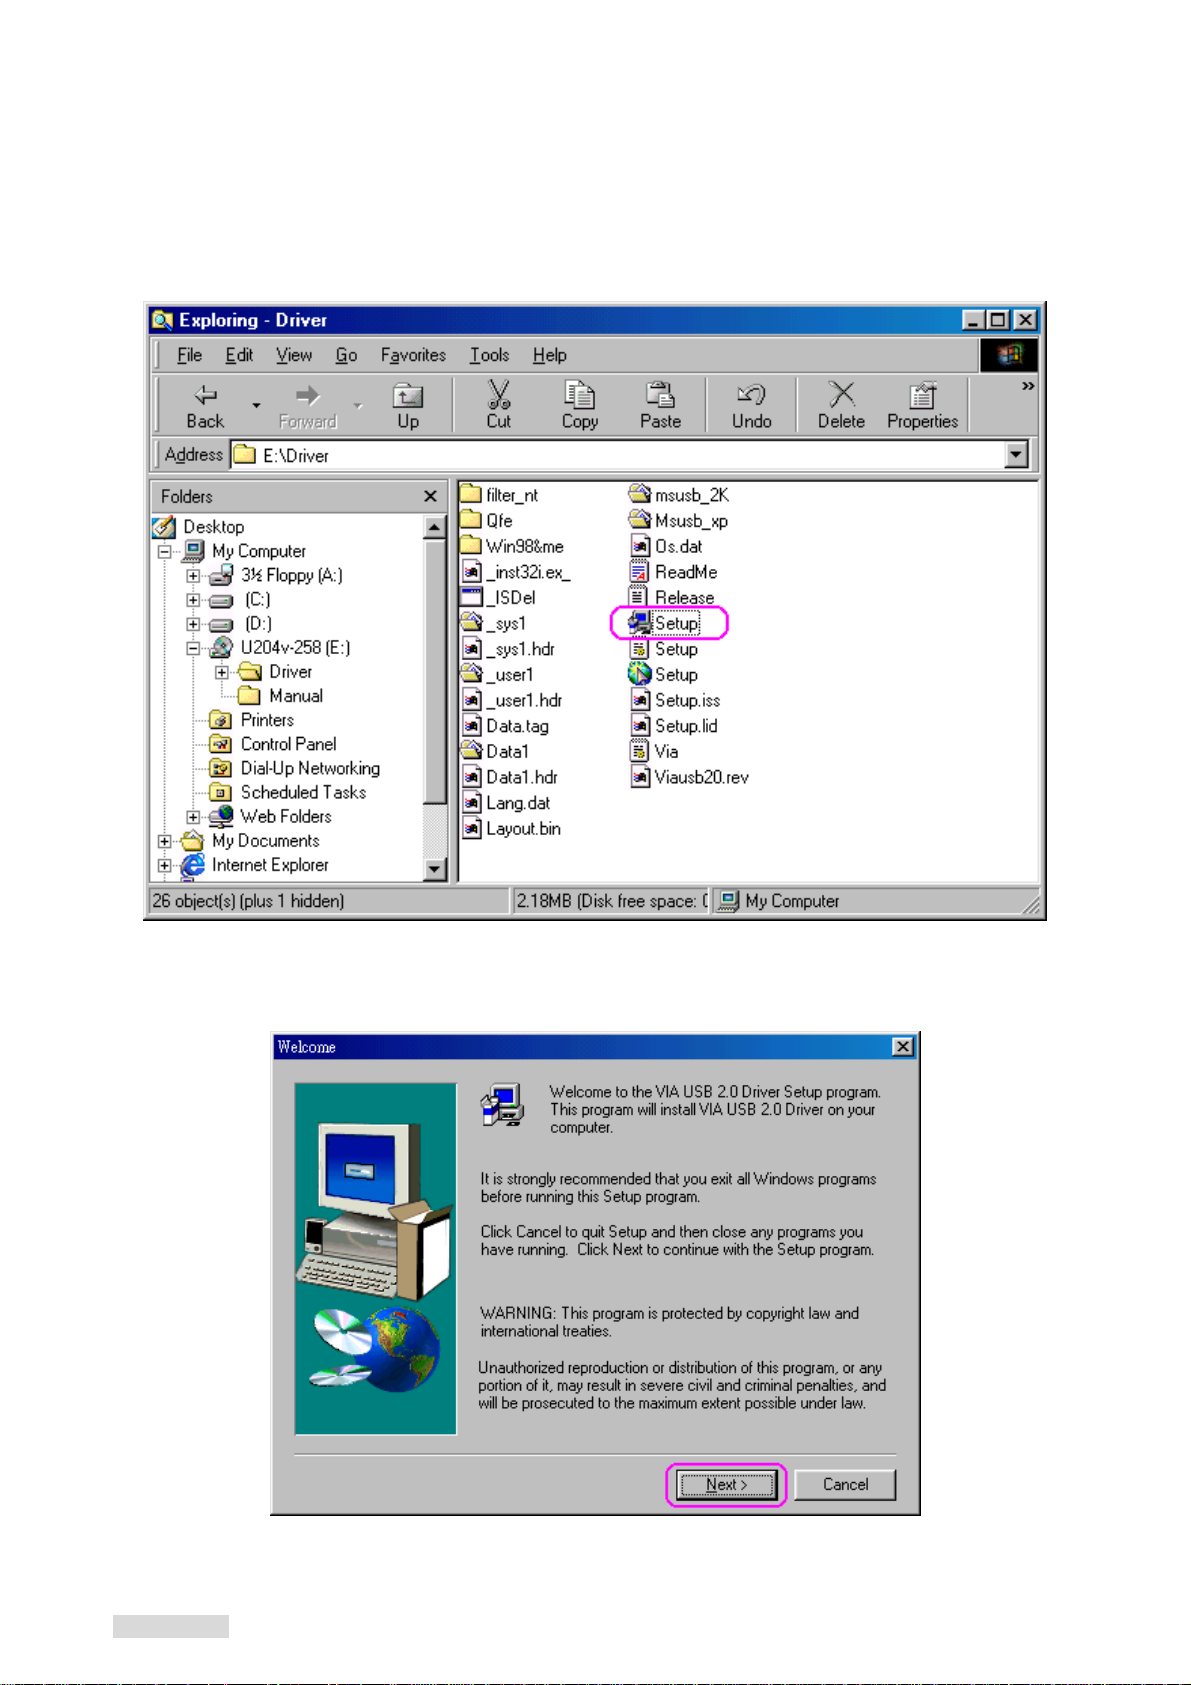
Windows 98 & 2000 Installation
1. Insert the supplied “Setup program CD” and execute the setup program by double clicking on
the “SETUP.exe” file.
2. Click “Next”.
Revision 2.5.8 - 3 - 2004/5/14
Page 5

3. Select “Install USB 2.0 Driver” then Click “Next”.
4. Click “Finish” to install. This will restart your system. Please remember to save your files
before you click the “Finish” button.
Revision 2.5.8 - 4 - 2004/5/14
Page 6

Verify the PCI card has properly installed
To confirm that the USB 2.0 Hi-speed PCI add on card has been correctly installed, check
your Device Manager on the Windows system after restart. You should see an entry titled
“
Universal Serial Bus Controllers”. Clicking on the “+” sign for next sub- entry should
reveal the following added readings:
VIA Tech 3038 PCI to USB Universal Host Controller
VIA Tech 3038 PCI to USB Universal Host Controller
VIA PCI to USB Enhanced Host Controller
USB2.0 Root Hub Device
USB Root Hub
USB Root Hub
Revision 2.5.8 - 5 - 2004/5/14
Page 7

Windows ME & XP SP1 Installation
Insert the supplied “Setup program CD” and execute the setup program by double
1.
clicking on the “SETUP.exe” file.
Press “Next” 2.
Revision 2.5.8 - 6 - 2004/5/14
Page 8

Select “Install USB 2.0 Driver” and click “Next”. 3.
Click “Yes” to continue, the system will restart when the driver has installed completely. 4.
Note: Due to legal issue, Microsoft EHCI drivers for Windows XP are not included inside this
package. If the following window appears, please update your system to Windows XP SP1
then run the setup program again.
Revision 2.5.8 - 7 - 2004/5/14
Page 9

Verify the PCI card has properly installed
To confirm that the USB 2.0 Hi-speed PCI add on card has been correctly installed, check
your Device Manager on the Windows system after restart. You should see an entry titled
“
Universal Serial Bus Controllers”. Clicking on the “+” sign for next sub- entry should
reveal the following added readings:
VIA Rev 5 or later USB Universal Host Companion Controller
VIA Rev 5 or later USB Universal Host Companion Controller
VIA PCI to USB Enhanced Host Controller
USB Root Hub
USB Root Hub
Revision 2.5.8 - 8 - 2004/5/14
Page 10

Uninstall Driver
1. Insert the “Setup program CD” and execute the setup program by double clicking on the
“SETUP.exe” file.
2. Press “Next” to continue.
Revision 2.5.8 - 9 - 2004/5/14
Page 11

3. Select “Uninstall USB 2.0 Driver” then press “Next”.
5. Press “Yes” to uninstall process, then system will restart when driver has been
uninstalled completely.
Note:
All the driver installation steps may be a little different from this guide when you
using a new upgrade version O.S., in this situation please follow the Windows
prompt step to complete the installation procedure.
P/No: DX-UC104
Revision 2.5.8 - 10 - 2004/5/14
 Loading...