


Multimedia Keyboard and Optical Mouse Combo
Ensemble souris optique et clavier multimédia
Combo de teclado y ratón óptico multimedia
DK-KBWM2
USER GUIDE • GUIDE DE L’UTILISATEUR • GUÍA DEL USUARIO
2
Contents
DX-KBWM2 Keyboard and
Optical Mouse
Contents
Package contents ............................................................................. 2
Setting up the keyboard and mouse................................................. 2
Using the keyboard and mouse ........................................................ 2
Legal notices.................................................................................... 3
Français ....................................................... 4
Español ........................................................ 6
Package contents
•Multimedia keyboard
•Wired optical mouse
• USB-PS/2 adapters (2)
• Driver CD
•User Guide
Setting up the keyboard and
mouse
Connecting the keyboard and mouse
To connect the keyboard and mouse:
• If your computer has PS/2 ports, connect the USB-PS/2 adapter
onto the keyboard and mouse’s USB plugs, then plug the keyboard
and mouse into the appropriate PS/2 ports on your computer.
Or, if your computer has only USB ports, plug the keyboard and
mouse into any available USB ports on your computer.
Installing the device drivers
The device drivers for the keyboard and mouse support Windows 2000,
Wind ows ME, and Windows XP.
To install the device drivers:
1 Uninstall any existing keyboard and mouse drivers.
2 Insert the driver CD into your computer’s CD or DVD drive. The
driver setup program opens automatically.
Or, if the driver setup program does not automatically start, run
the Setup.exe file on the CD.
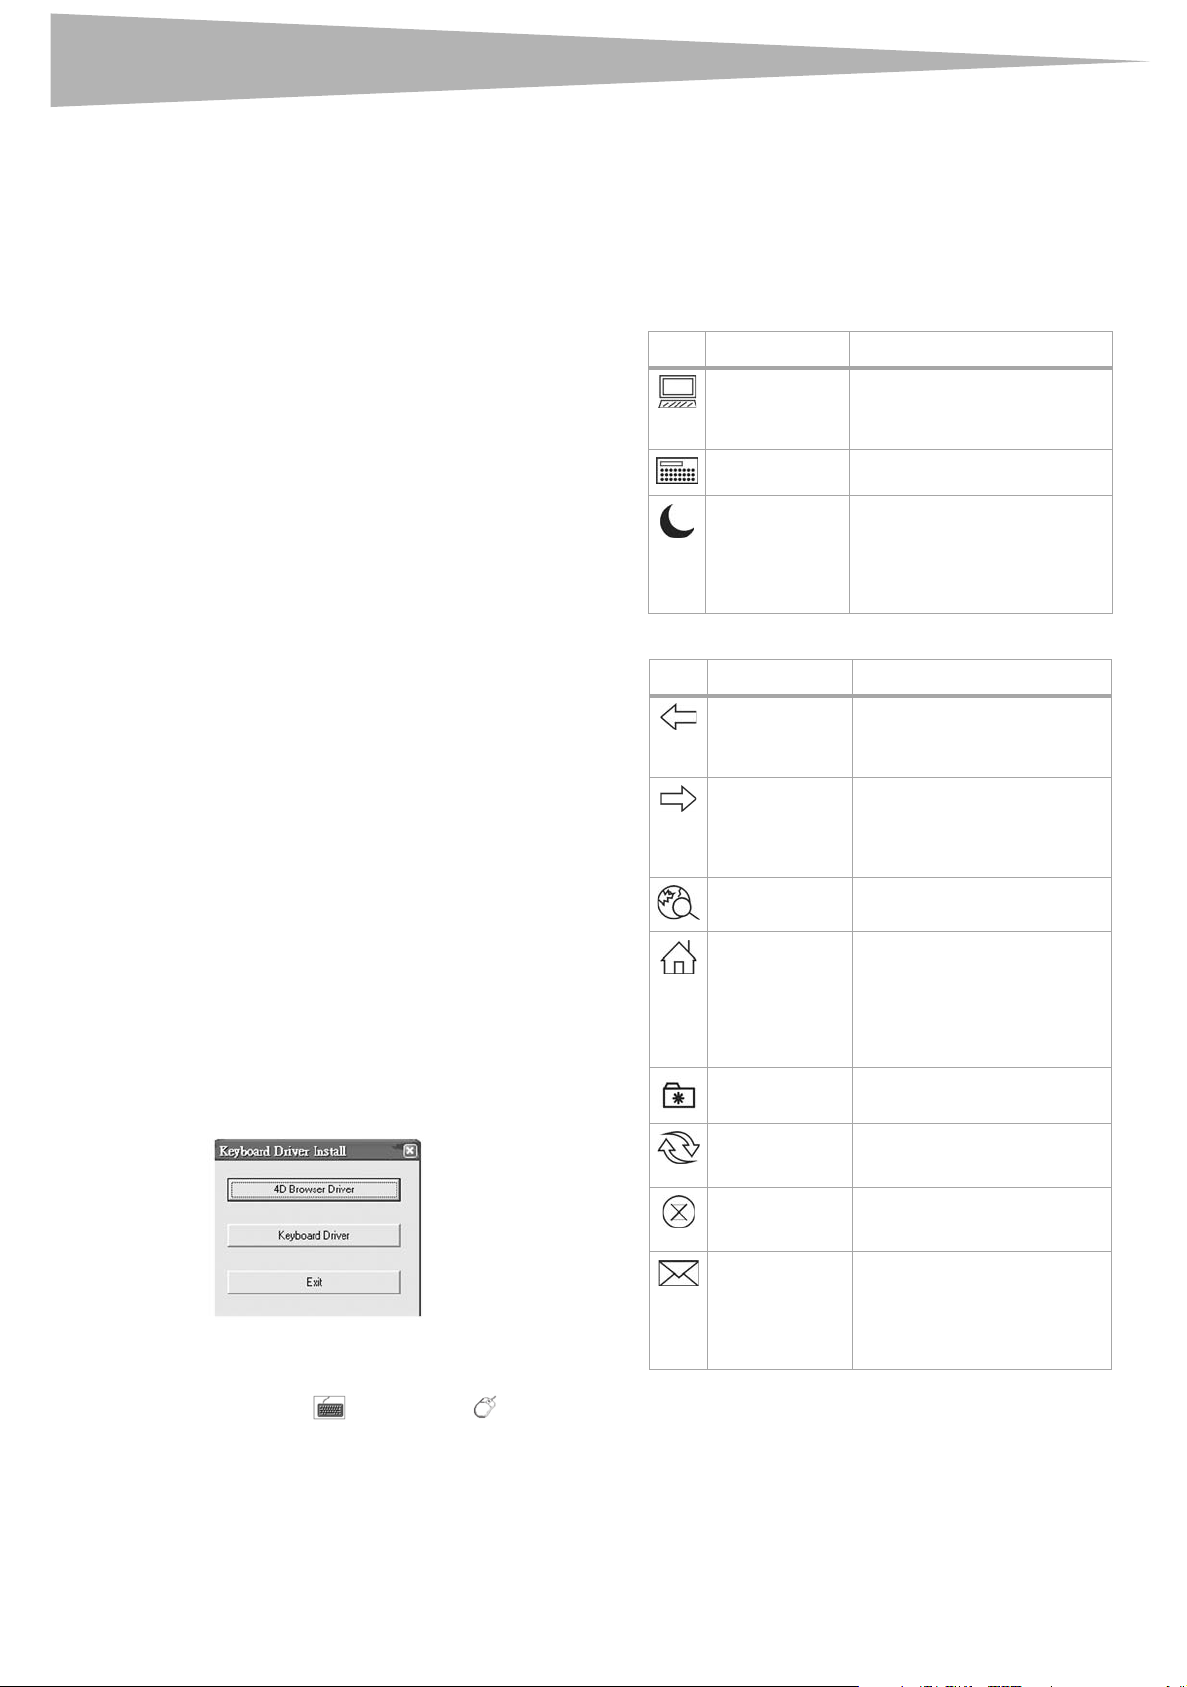
3 To install the keyboard driver, click Keyboard Driver. To install
the mouse driver, click 4D Browser Driver.
4 After installation is done, restart the computer. After Windows
starts, the keyboard icon ( ) and mouse icon ( ) appear on
the taskbar.
Using the keyboard and mouse
Using the keyboard
In addition to standard keyboard keys, your keyboard has many
specialized keys called “hot keys.” Hot keys let you open programs or
perform actions by pressing a single button, instead of opening a
program menu by clicking through the Start menu.
PC hot keys:
Icon Name What it does
My Computer Opens the My Computer window
to display the contents of the
drives connected to your
computer.
Calculator Starts Microsoft Calculator.
PC Sleep Puts your computer into Sleep
mode if your computer supports
power management and has it
turned on. Putting your computer
into Sleep mode conserves power
and can protect your data.
Web and Internet hot keys:
Icon Name What it does
Web Back Go back to the previously viewed
item in programs that support
the “Back” command, such as a
Web browser.
Web Forward Go to the next item (if it was
previously viewed in the same
session) in programs that support
the “Forward” command, such as
a Web browser.
Web Search Open the Internet Explorer
Search pane.
Web Home Start the default Web browser, or
if the browser is already open,
opens the Home Web page. You
can reassign the Home button to
start another Web browser,
another Home Web page, or
another program.
Web Favorites Opens the Internet Explorer
Favorites pa ne.
Web Refresh Updates the information on an
active Web page or the contents
of a window.
Web Stop Stops loading or refreshing a
Web page or the contents of a
window
E-mail Start the default e-mail program.
If you are not sure what the
default e-mail program is, press
this button to find out. You can
reassign the e-mail button to
start another program.

Legal notices
3
Multimedia hot keys:
Icon Name What it does
Media Player Play CDs, DVDs, and media files.
Previous Track Go to the previous media track.
Press once for each preceding
track.
Next Track Go to the next media track.
Press once for each following
track.
Play/Pause Play or pause media. If paused,
press this button again to
resume.
Stop Stop playing media.
Mute Turn off the sound. Press again
to turn the sound back on.
Volume Up Increase the volume. Hold
down to increase the volume
more quickly.
Volume Down Decrease the volume. Hold
down to decrease the volume
more quickly.
Using the mouse
The mouse’s optical technology can precisely detect mouse motion on
most surfaces. Avoid using the mouse on any reflective, transparent,
metallic, or complex-patterned surface.
Programming the mouse Hot Buttons
You can reprogram mouse buttons 3, 4, and 5 to perform additional
actions.
To program the mouse Hot Buttons:
1 Double-click the mouse icon ( ) in the taskbar.
2 Click the drop-down menus to select alternate actions for the
mouse buttons.
You can choose from any of the following actions:
F1 through F10
keys
Close Application Connect to
Control Panel Copy Cut
Delete Double-Click Down
Drag Lock End Enter
Esc Explorer Find Computer
Find File Home Horizontal Wheel
Internet Explorer
Back
Launch Default
E-mail
Middle Button Minimize All
Page Up Paste Redo
Right Run... Shift Lock
Space Start Menu System Help
System Property Tab Undo
Undo Minimize
All Windows
Up
Auto scroll Backspace
Internet
Internet Explorer
Forward (Next)
Left Maximize
Windows
Universal Scroll Universal Zoom
Control Lock
Launch Default
Web Browser
Windows
Page Down
3 Click OK.
Legal notices
This device complies with Part 15 of the FCC Rules. Operation is subject to
the following two conditions: (1) this device may not cause harmful
interference, and (2) this device must accept any interference received,
including interference that may cause undesired operation.
This Class B digital apparatus complies with Canadian ICES-003.
California Proposition 65 warning: This product contains chemicals,
including lead, known to the State of California to cause cancer, birth
defects or reproductive harm.
© 2006 Dynex. DYNEX and the DYNEX logo are trademarks of Best Buy
Enterprise Services, Inc. Other brands and product names are trademarks
or registered trademarks of their respective holders. Specifications and
features are subject to change without notice or obligation.

4
Table des matières
Souris optique et clavier
DX-KBWM2
Table des matières
Contenu de l’emballage ................................................................... 4
Installation du clavier et de la souris ................................................ 4
Utilisation du clavier et de la souris.................................................. 4
Avis juridiques.................................................................................. 5
Contenu de l’emballage
• Clavier multimédia
• Souris optique à fil
• 2 adaptateurs PS/2-USB
•CD avec pilote
• Guide de l’utilisateur
Installation du clavier et de la
souris
Connexion du clavier et de la souris
Pour connecter le clavier et la souris :
• Si l’ordinateur a des ports PS/2, connecter l’adaptateur USB-PS/2
aux prises USB du clavier et de la souris, puis le clavier et la souris
aux ports PS/2 appropriés de l’ordinateur.
Ou, si l’ordinateur n’a que des ports USB, connecter le clavier et la
souris aux ports USB disponibles de l’ordinateur.
Installation des pilotes du périphérique
Les pilotes du clavier et de la souris sont compatibles avec
Windows 2000, Windows ME et Windows XP.
Pour installer les pilotes:
1 Désinstaller complètement tous les pilotes du clavier et de la
souris existants.
2 Insérer le CD avec le pilote dans le lecteur de CD ou DVD de
l’ordinateur. Le programme d’installation du pilote s’ouvre
automatiquement.
Ou, si l’application d’installation du pilote ne démarre pas
automatiquement, exécuter le fichier Setup.exe sur le CD.
Utilisation du clavier et de la
souris
Utilisation du clavier
Outre les touches standard du clavier, celui-ci est doté de plusieurs
touches spécifiques appelées « touches d’accès rapide ». Les touches
d’accès rapide permettent d’ouvrir des programmes ou d’exécuter
certaines actions par appui sur une seule touche, au lieu d’ouvrir un
menu du programme en cliquant sur le menu Démarrer (Start).
Touches d’accès rapide du clavier du PC :
Icône Nom Fonction
Poste de travail Ouvre la fenêtre du Poste de
Calculatrice Lance la calculatrice de Microsoft.
Mise en veille du PCMet l’ordinateur en mode veille si
Touches d’accès rapide pour le Web et l’Internet :
Icône Nom Fonction
Page Web
précédente
Page Web
suivante
Recherche Web Ouvre la fenêtre de recherche
Page Web
d’accueil
Pages Web
favorites
travail pour afficher le contenu
des lecteurs/disques durs
connectés à l’ordinateur.
l’ordinateur prend en charge la
gestion de l’alimentation et
qu’elle est activée. La mise de
l’ordinateur en mode veille
permet d’économiser de l’énergie
et protège les données.
Retourne à la page précédente si
l’application prend en charge la
commande « Page précédente »,
telle qu’un navigateur Web.
Retourne à la page suivante – si
elle s’était affichée au cours de la
même session - si l’application
prend en charge la commande «
Page suivante », telle qu’un
navigateur Web.
d’Internet Explorer.
Lance le navigateur Web par
défaut ou s’il est déjà ouvert,
affiche la Page Web d’accueil. Il
est possible de modifier la touche
Page Web d’accueil pour lancer
un autre navigateur Web, une
autre Page Web d’accueil ou une
autre application.
Ouvre la fenêtre des Favoris
d’Internet Explorer.
3 Pour installer le pilote du clavier, cliquer sur Keyboard Driver
(Pilote du clavier). Pour installer le pilote de la souris, cliquer sur
4D Browser Driver (Pilote du navigateur 4D).
4 Quand l’installation a été effectuée, redémarrer l’ordinateur. Après
le redémarrage de Windows, l’icône du clavier ( ) et de la
souris ( ) s’affichent dans la barre des tâches.
Actualisation de la
page Web
Arrêt d’une page
Web
Courriel Lance l’application de courriel
Actualise l’information d’une
page Web active ou du contenu
d’une fenêtre particulière.
Arrête le chargement ou
l’actualisation d’une page Web
ou du contenu d’une fenêtre en
particulier.
par défaut. En cas d’incertitude
sur l’application de courriel par
défaut, appuyer sur cette touche
pour le savoir. Il est possible de
réaffecter la touche courriel pour
lancer une autre application.

Avis juridiques
5
Touches d’accès rapide pour le multimédia :
Icône Nom Fonction
Lecteur Windows
Media
Piste précédente Revient à la piste multimédia
Piste suivante Va à la piste multimédia
Lecture/Pause Lecture ou pause du média. En
Arrêt Arrête la lecture du média.
Mise en sourdine Mise en sourdine du son.
Hausse du volume Augmenter le volume.
Baisse du volume Diminuer le volume. Maintenir
Reproduit les CD, DVD et les
fichiers multimédias.
précédente Appuyer une fois
pour chaque piste précédente.
suivante. Appuyer une fois pour
chaque piste suivante.
mode pause, appuyer de
nouveau sur cette touche pour
reprendre la lecture.
Appuyer de nouveau sur cette
touche pour rétablir le son.
Maintenir la touche appuyée
pour augmenter le volume plus
rapidement.
la touche appuyée pour
diminuer le volume plus
rapidement.
Utilisation de la souris
La technologie optique permet de détecter avec précision les
mouvements de la souris sur la plupart des surfaces. Éviter d’utiliser la
souris optique sur des surfaces réfléchissantes, transparentes,
métalliques ou à motif complexe.
Programmation des boutons d’accès
rapide de la souris
Il est possible de reprogrammer les boutons 3, 4 et 5 de la souris pour
effectuer des actions supplémentaires.
Pour programmer les boutons d’accès rapide de la souris :
1 Double-cliquer sur l’icône de la souris ( ) dans la barre des
tâches.
2 Cliquer sur les menus déroulants pour sélectionner des actions
alternatives pour les boutons de la souris.
Il est possible de sélectionner l’une des options suivantes :
Touches F1 à F10 Défilement
Fermer
l’application
Panneau de
configuration
Supprimer Double-cliquer Bas
Verrouiller la
fonction faire
glisser
Échap Explorateur Rechercher un
Rechercher un
fichier
Internet Explorer
page précédente
Lancer
l’application de
courriel par
défaut
Bouton central Minimiser toutes
Page précédente Coller Rétablir
Droite Exécuter... Verrouillage maj
Espace Menu Démarrer Aide système
Propriété système Onglet Annuler
Annuler la
commande
Minimiser toutes
les fenêtres
Haut
automatique
Connexion à
l’Internet
Copie Couper
Fin Entrée
Page de
démarrage
Internet Explorer
page suivante
(Suivant)
Gauche Agrandir la
les fenêtres
Défilement
universel
Retour arrière
Verrouillage du
contrôle
ordinateur
Mollette de
défilement
horizontal
Lancer le
navigateur Web
par défaut
fenêtre
Page suivante
Zoom universel
3 Cliquer sur OK.
Avis juridiques
Cet appareil est conforme à l’article 15 du règlement de la FCC. Son
utilisation est soumise aux deux conditions suivantes : (1) Cet appareil ne
doit pas provoquer d’interférence dangereuses et (2) il doit accepter
toute interférence reçue, y compris celles risquant d’engendrer un
fonctionnement indésirable.
Cet appareil numérique de la classe B est conforme à la norme NMB-003
du Canada.
Avertissement de la proposition 65 de Californie : Ce produit
contient des produits chimiques, y compris du plomb, que l’État de
Californie considère comme responsable de cancers, de malformations
congénitales ou de troubles de l’appareil reproducteur.
©2006 Dynex. DYNEX et le logo de DYNEX sont des marques de
commerce de Best Buy Enterprise Services, Inc. Les autres noms de
marques et de produits mentionnés sont des marques de commerce ou
des marques déposées de leurs propriétaires respectifs. Les spécifications
et caractéristiques sont susceptibles d’être modifiées sans préavis.

6
Contenido
Teclado y ratón óptico
modelo DX-KBWM2
Contenido
Contenido de la caja ......................................................................... 6
Instalación del teclado y el ratón...................................................... 6
Uso del teclado y del ratón ............................................................... 6
Avisos legales................................................................................... 7
Contenido de la caja
• Teclado multimedia
• Ratón óptico con cable
• Adaptadores USB-PS/2 (2)
• CD con el controlador
• Guía del usuario
Instalación del teclado y el ratón
Conexión del teclado y del ratón
Para conectar el teclado y el ratón:
• Si su computadora tiene puertos PS/2, conecte el adaptador
USB-PS/2 en los conectores USB del teclado y del ratón, luego
enchufe el teclado y el ratón en los puertos PS/2 apropiados de la
computadora.
O, si su computadora sólo tiene puertos USB, enchufe el teclado y
el ratón en cualquiera de los puertos USB disponibles en la
computadora.
Instalación de los controladores de
dispositivos
Los controladores de dispositivo para el teclado y el ratón son
compatibles con Windows 2000, Windows ME y Windows XP.
Para instalar los controladores de dispositivos:
1 Desinstale cualquier controlador de teclado o ratón instalado.
2 Inserte el CD de controladores en la unidad de CD o DVD de su
computadora. El programa de instalación de controladores se
ejecutará automáticamente.
O, si el programa de instalación de controladores no se inicia
automáticamente, ejecute el archivo Setup.exe del CD.
Uso del teclado y del ratón
Uso del teclado
Además de las teclas del teclado estándar, su teclado tiene muchas teclas
especiales llamadas “teclas de acceso directo”. Las teclas de acceso
directo le permiten abrir programas o realizar acciones presionando un
solo botón, en lugar de abrir un menú del programa y hacer clics a través
del menú Start (Inicio).
Teclas de acceso directo de la PC:
Icono Nombre Función
My Computer (Mi
Equipo)
Calculador
(Calculadora)
PC Sleep
(Suspensión de la
PC)
Teclas de acceso directo para Web e Internet:
Icono Nombre Función
Web Back (Web Atrás)
Web Forward
(Web - Adelante)
Web Search (Web
- Búsqueda)
Web Home (Web Página principal)
Web Favorites
(Web – Favoritos)
Abre la ventana My Computer (Mi
Equipo) para mostrar el contenido
de las unidades conectadas a su
computadora.
Inicia la calculadora de Microsoft
Coloca la computadora en el
modo de suspensión si la
computadora acepta la función
administración de energía y ésta
está activada. Poner la
computadora en el modo de
suspensión conserva energía y
puede proteger sus datos.
Para regresar a la página anterior
en las aplicaciones que aceptan
el comando “Back” (Atrás), tal
como un navegador del Web.
Para ir a la página siguiente (si se
había visualizada en la misma
sesión) en las aplicaciones que
aceptan el comando “Forward"
(Adelante), tal como un
navegador del Web.
Abre la ventana de búsqueda de
Internet Explorer.
Inicia el navegador de Web o, si el
navegador ya está abierto, abre la
Página principal de la Web. Se
puede modificar la acción del
botón Home (Página principal)
para iniciar otro navegador de la
Web u otro programa.
Abre la ventana de los Favoritos
de Internet Explorer.
3 Para instalar el controlador del teclado, haga clic en Keyboard
Driver (Controlador del teclado). Para instalar el controlador del
ratón, haga clic en 4D Browser Driver (Controlador de 4D
Browser).
4 Después de realizar la instalación, reinicie la computadora.
Después que se inicie Windows, el icono del teclado ( ) y el
icono del ratón ( ) aparecerán en la barra de tareas.
Web R efres h ( Web
- Actualizar)
Web Stop (Web Detener)
E-mail (Correo
electrónico)
Actualiza la información de una
página Web activa o el contenido
de una ventana.
Detener la carga o la
actualización de una página Web
o el contenido de una ventana.
Inicia el programa
predeterminado de correo
electrónico. Si no esta seguro
cual es el programa de correo
electrónico predeterminado,
presione este botón para
averiguarlo. Puede reasignar el
botón de correo electrónico para
iniciar otro programa.

Avisos legales
7
Teclas de acceso directo a multimedia:
Icono Nombre Función
Media Player
(Reproductor de
Windows Media)
Previous Track
(Pista Anterior)
Next Track (Pista
siguiente)
Play/Pause
(Reproducir/
Pausar)
Stop (Detener) Detiene la reproducción del
Mute (Silenciar) Desactiva el sonido. Presione
Volume UP
(Aumentar el
volumen)
Volume Down
(Reducir el
volumen)
Reproduce CD, DVD y archivos
de multimedia.
Va a la pista de medio físico
anterior. Presione una vez para
cada pista anterior.
Ir a la pista siguiente del medio
físico. Presione una vez para
cada pista siguiente.
Reproduce o Pausa el medio
físico. En modo de pausa,
presione este botón
nuevamente para continuar.
medio físico.
nuevamente para activar el
sonido.
Aumente el volumen.
Mantenga presionada esta
tecla para aumentar el volumen
de manera más rápida.
Baje el volumen. Mantenga
presionada esta tecla para bajar
el volumen de manera más
rápida.
Uso del ratón
La tecnología óptica del ratón puede detectar precisamente el
movimiento del ratón en la mayoría de superficies. Evite usar el ratón en
una superficie reflectiva, transparente o con un patrón complejo.
Programación de los botones de acceso
directo del ratón
Usted puede reprogramar los botones 3, 4 y 5 del ratón para realizar
acciones adicionales.
Para programar los botones de acceso directo del ratón:
1 Haga doble clic en el icono del ratón ( ) en la barra de tareas.
2 Haga clic en los menús desplegables para seleccionar acciones
alternativas para los botones del ratón.
Puede elegir cualquiera de las siguientes acciones:
Teclas F1 a F10 Auto scroll
Close Application
(Cerrar aplicación)
Control Panel
(Panel de Control)
Delete (Eliminar) Double-Click
Drag Lock
(Bloqueo de
arrastre)
Esc Explorer
Find Fi le (Enc ontrar
archivo)
Internet Explorer
Back (Internet
Explorer – Atrás)
Launch Default
E-mail (Iniciar
correo electrónico
predeterminado)
Botón medio Minimize All
Page Up (Página
arriba)
Derecha Run… (Ejecutar...) Shift Lock (Bloqueo
Space (Espacio) Start Menu (Menú
System Property
(Propiedades del
Sistema)
Undo Minimize All
Windows
(Deshacer
Minimizar todas las
ventanas)
Arriba
(Desplazamiento
automático)
Connect to
Internet (Conectar
a la Internet)
Copy (Copiar) Cut (Cortar)
(Doble clic)
End (Finalizar) Entrar
(Explorador)
Home (Página
principal)
Internet Explorer
Forward (Internet
Explorer –
Adelante
[Siguiente])
Izquierda Maximize
Windows
(Minimizar todas
las ventanas)
Paste (Pegar) Redo (Rehacer)
de Inicio)
Tab Undo (Deshacer)
Universal Scroll
(Desplazamiento
universal)
Backspace
(Retroceso)
Control Lock
(Bloqueo de
control)
Down (Abajo)
Find Computer
(Encontrar
computadora)
Horizontal Wheel
(Rueda horizontal)
Lauch Default Web
Browser (Iniciar el
Navegador de Web
predeterminado)
Windows
(Maximizar
ventanas)
Page Down
(Página abajo)
de Mayúsculas)
System Help
(Ayuda de Sistema)
Universal Zoom
(Zoom universal)
3 Haga clic en OK (Aceptar).
Avisos legales
Este dispositivo satisface la parte 15 del reglamento FCC. Su operación
está sujeta a las dos condiciones siguientes: (1) Este dispositivo no puede
causar interferencia dañina, y (2) este dispositivo debe aceptar cualquier
interferencia recibida incluyendo interferencias que puedan causar una
operación no deseada.
Este aparato de Clase B cumple con el ICES-003 canadiense.
Advertencia de la Propuesta de California 65: Este producto
contiene sustancias químicas, entre ellas plomo, que el Estado de
California reconoce como causante de cáncer, defectos de nacimiento o
daño al sistema reproductivo.
© 2006 Dynex. DYNEX y el logotipo de DYNEX son marcas de comercio de
Best Buy Enterprise Services, Inc. Otras marcas y nombres de productos
son marcas de comercio o marcas registradas de sus respectivos dueños.
Las especificaciones y características están sujetas a cambio sin aviso
previo u obligación.

www.dynexproducts.com (800) 305-2204
Distributed by Best Buy Purchasing, LLC
7601 Penn Ave. South, Richfield, MN 55423 U.S.A.
Distribué par Best Buy Purchasing, LLC
7601 Penn Ave. South, Richfield, MN 55423 É.-U.
Distribuido por Best Buy Purchasing, LLC
7601 Penn Ave. South, Richfield, MN 55423 U.S.A.
R1
 Loading...