

Page 1

iPod®/iPhone® Audio/Video
Dock with Remote Control
DX-IPDR3
USER GUIDE
Page 2

2
iPod®/iPhone® Audio/Video Dock with Remote Control
Dynex DX-IPDR3
iPod®/iPhone® Audio/Video
Dock with Remote Control
Contents
Important safety instructions ...................................2
iPod/iPhone Audio Video dock components .............3
Setting up the iPod/iPhone dock ..............................7
Using the iPod/iPhone dock ....................................12
Specifications .........................................................16
Legal notices ...........................................................16
One-year limited warranty .....................................19
Important safety instructions
• Do not disassemble the dock or remote control. There are no user
serviceable parts inside, and you may damage the dock or
remote control.
• Do not use the dock or AC power adapter in a wet environment.
• Keep the dock away from children.
Page 3
DX-IPDR3
iPod/iPhone Audio Video dock components
Package contents
• iPod/iPhone Audio Video dock
• AC power adapter
•USB sync cable
•AV cable
• Remote control
• iPod/iPhone dock adapters (6)
Jacks and connectors
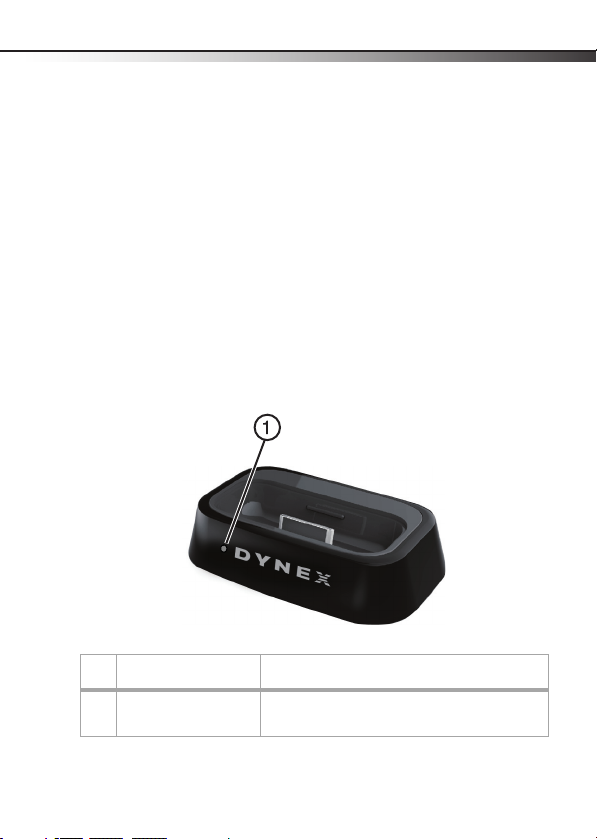
Front
3
# Component Description
1 IR (remote) receiver Receives signals from your remote control. Do not
block.
Page 4
4
iPod®/iPhone® Audio/Video Dock with Remote Control
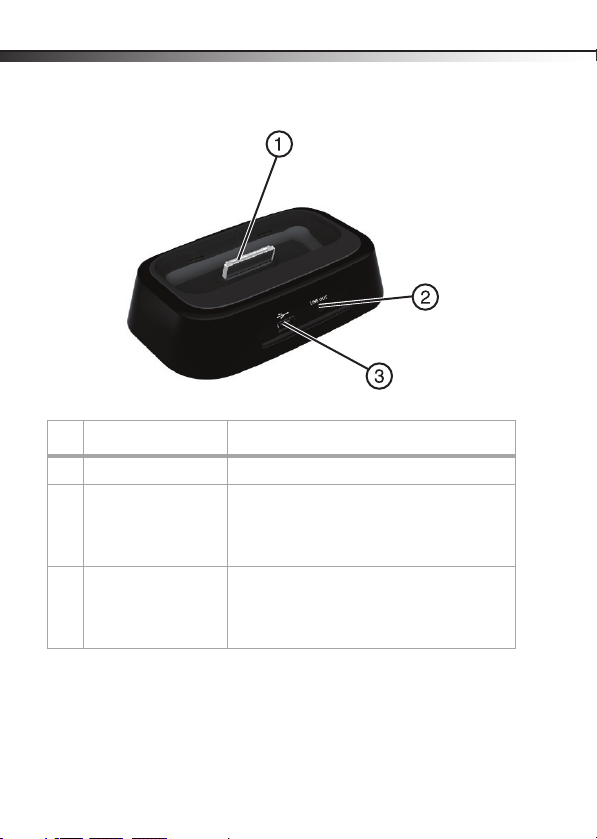
Back
# Component Description
1 30-pin connector Plug your iPod/iPhone into this connector.
2 AV jack Connect the included AV cable to this jack and to
the composite connections on a television or
home theater system. For more information, see
“Connecting to a TV” on page 10.
3 USB mini-B jack Connect the included USB cable to this jack and to
a USB port on a computer or to the included AC
power adapter. For more information, see
“Connecting to a computer” on page 9.
Page 5

DX-IPDR3
iPod/iPhone adapters
The iPod/iPhone dock comes with six adapters. Make sure that you select
the correct adapter for your iPod/iPhone type.
Note: The adapter numbers are near the top of the adapter back.
iPod/iPhone model Adapter
Touch 2G, Touch 3G 16
Touch 4G 20
Nano 4G 17
Nano 5G 18
iPhone 3G, 3GS 15
iPhone 4 19
Insert the correct adapter into the Audio Video dock prior to docking your
iPod or iPhone.
5
Page 6
6
iPod®/iPhone® Audio/Video Dock with Remote Control
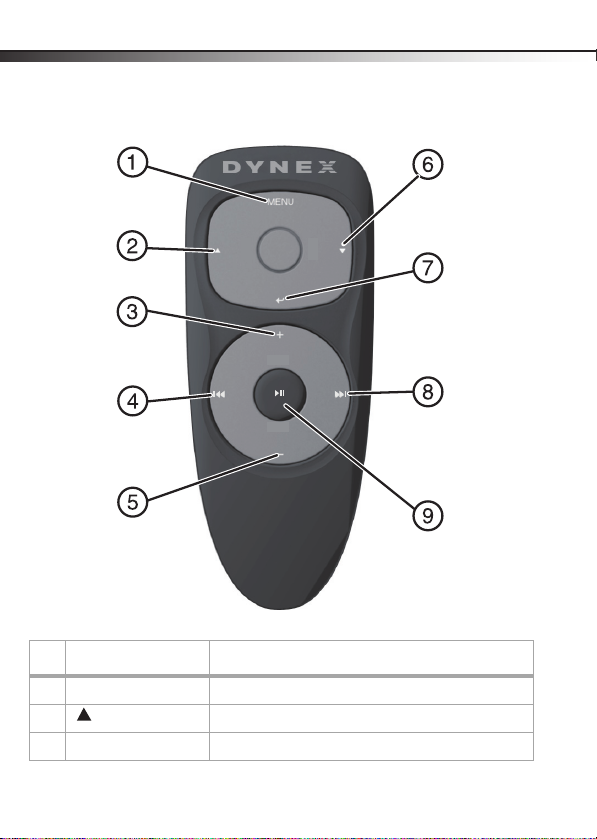
Remote control
#Button Description
1 MENU Press to go to the p revious menu.
2 (List up ) Press to go up in a list of songs, photos, or videos.
3 + (Volume up) Press to increase the volume.
Page 7
DX-IPDR3
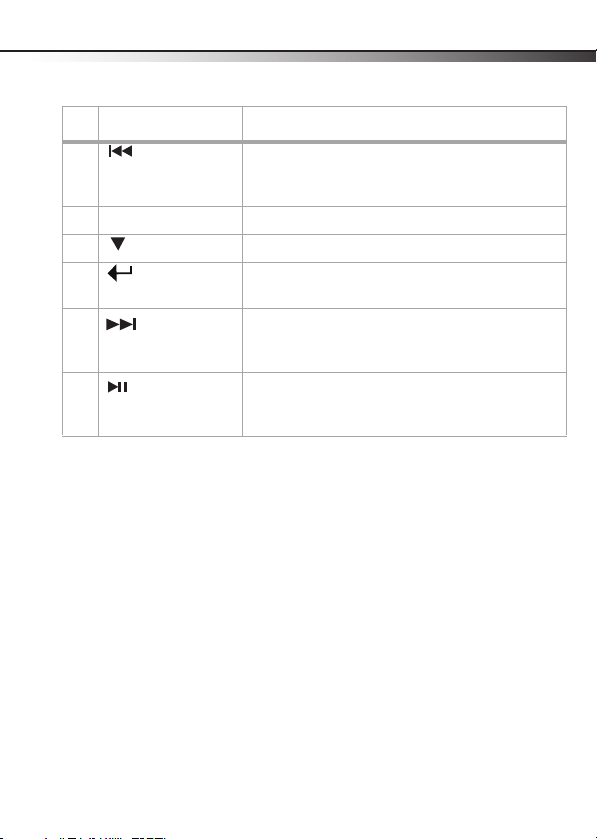
#Button Description
4 (previous) Press to go to the previous song or photo.
Press and hold to fast reverse through the songs or
videos.
5 – (Volume down) Press to decrease the volume.
6 (List down ) Press to go down in a list of songs, photos, or videos.
7 (Enter) Press to select a song, photo, or video that is highlighted
in the list of songs, photos, or videos.
8 (next) Press to go to the next song or photo.
Press and hold to fast forward through the songs or
videos.
9 (play/pause) Press to wake up the iPod/iPhone.
Press to play or pause playback.
Press and hold to switch the iPod/iPhone to sleep mode.
Setting up the iPod/iPhone dock
Activating the remote control battery
The battery comes pre-installed in the remote control.
To activate the battery:
• Pull the plastic insert out of the battery compartment.
7
Insert the correct adapter into the Audio Video dock, then insert your iPod
or iPhone into the dock.
Page 8

8
iPod®/iPhone® Audio/Video Dock with Remote Control
Connecting the AC power adapter and charging your iPod/iPhone
The USB cable is also a charging cable. One side has a USB mini-B
connector. The other side has a standard USB connector.
To connect the AC power adapter:
1 Plug the USB mini-B connector on the USB cable into the USB
mini port on the iPod dock.
AC charger
Standard USB
port on the
charger
Mini-B USB port
USB cable
2 Plug the standard USB connector on the USB cable into the AC
power adapter.
3 Plug the other end of the AC power adapter into an AC power
outlet.
Note: If the iPod/iPhone battery does not completely charge within
eight hours, contact Dynex technical support.
Page 9

DX-IPDR3
Connecting to a computer
You can conn ect the doc k to a computer so you can sync you r iPod/iPhone
with your computer and charge your iPod/iPhone at the same time.
To connect to a computer:
1 Connect the USB cable to the docking jack on the back of the
dock. For the location of the docking jack, see “Jacks and
connectors” on page 3.
2 Connect the other end of the cable to a USB port on a computer.
The dock automatically finds iTunes on the computer.
Mini-B USB port
USB cable
Standard USB
port
9
3 Copy files to and from the computer in the same way you would if
you connected the iPod/iPhone directly to your computer. Your
iPod/iPhone is charging while it is connected to your computer.
Page 10

10
iPod®/iPhone® Audio/Video Dock with Remote Control
Connecting to a TV
You can connect a TV to the dock using the one-to-three composite
audio/video cable.
To c onnec t a T V:
1 Connect the end of the included one-to-three AV cable that has a
single plug to the AV jack on the back of the dock.
Video
L
Audio
R
2 Connect the other end of the video cable to the composite AV
jacks on the TV.
Note: The cables are color coded. Connect the yellow cable connector
to the yellow video jack, the red cable conn ector to the right audi o
jack, and connect the white cable connec tor to the left audio jack .
Page 11

DX-IPDR3
Connecting a sound system
To connect a sound system:
1 Connect the end of the included one-to-three AV cable that has a
single plug to the AV jack on the back of the dock.
2 Connect the red and white plugs on the one-to-three AV cable to
the audio jacks on the sound system. Do not connect the yellow
video plug.
Note: The cables are color coded. Connect the red cable connector to
the right audio jack, and connect the white cable connector to the left
audio jack. Do not connect the yellow cable connector.
11
Page 12

12
iPod®/iPhone® Audio/Video Dock with Remote Control
Using the iPod/iPhone dock
Playing songs through a sound system
To play songs through a sound system:
1 Make sure that you have connected the iPod/iPhone dock to a
sound system. For more information, see “Connecting a sound
system” above.
2 Insert the iPod/iPhone into the docking slot.
3 For iPhone users :
a. Access the music menu by tapping the “iPod” icon using either
your thumb or a stylus.
b. Press or to select a song in the music list, then press
(enter). The iPhone plays the song.
4 For iPod users:
a. Press and hold the center button (play/pause) on the
remote control to wake up the iPod.
b. On the main menu, press or to select Music, then press
(enter).
c. Press or to select a song in the music list, then press
(enter). The iPod plays the song.
Page 13

DX-IPDR3
5 To control playback:
• Press to play or pause playback.
• Press to go to the next song, or press to go to the
previous song.
• Press and hold to fast forward, or press and hold
to fast reverse.
• Press + to increase the volume, or press – to decrease the
volume.
• Press to move up through the list of songs on the iPod
display, or press to move down through the list of
songs. Press (enter) to play the highlighted song.
Viewing photos
To view photos with an iPhone or iPod touch:
• The remote control does not support the iPhone or iPod touch in
photo mode. In order to view photos, please operate directly on
the touch screen of the handset by using either your thumb or a
stylus.
To view photos with an iPod:
1 Make sure that you have connec ted the iPod/iPhone dock to a TV.
For more information, see “Connecting to a TV” on page 10.
2 Press the center button (play/pause) on the remote control
to wake up the iPod.
3 On the main menu, press or to select Photo, then press
(enter).
4 Press or to select a photo in the gallery, then press
(enter). The iPod displays the photo.
5 After the photo appears on the iPod, press (enter) again to
display the selected photo on the TV.
6 To control the slideshow:
• Press the center button (play/pause) to play or pause
playback.
13
Page 14

14
iPod®/iPhone® Audio/Video Dock with Remote Control
• Press (next) to go to the next photo, or press
(previous) to go to the previous photo. The background
music continues to play.
• Press + to increase the volume, or press – to decrease the
volume.
• Press to move up through the list of photos on the
iPod dis play, or press to move down t hrough the li st of
photos. Press (enter) to view the highlighted photo.
Watching video on a TV
Note: For iPod nano/ classics series, select Video > Setting > TV
out > On
To watch video on a TV:
1 Make sure that you have connected the iPod/iPhon e dock to a TV.
For more information, see “Connecting to a TV” on page 10.
2 Press the center button (play/pause) on the remote control
to turn on the iPod.
3 To play video on your i Pod. On the main menu, press or to
select Video or Movie, then press (enter).
4 To play video on your iPhone or iPod touch, access to the video
list menu by operating directly on the touch screen of the
handset using your thumb or a stylus.
5 Press or to select the video or movie list, highlight the
video or movie you want to play, then press (enter). The
iPod plays the video or movie.
6 To c ontrol the v ide o:
• Press the center button (play/pause) to play or pause
playback.
• Press and hold to fast forward the video, or press and
hold to fast reverse the video.
• Press + to increase the volume, or press – to decrease the
volume.
Page 15

DX-IPDR3
Maintaining
Replacing the remote control battery
To replace the battery:
1 Release the battery by inserting the tip of a pen or similar tool
into the small hole at the top right of the battery compartment.
2 Push the pen /tool into the mechanism, then slide it toward left
and hold it.
3 Pull the battery compartment out from the bottom.
4 Take out the used battery and replace it with a new one.
5 Push the battery compartment back into the remote control.
Troubleshooting
No video/ audio/ image
on TV
No audio with speakers • Make sure the AV cable is connected firmly and correctly
The remote control isn't
working
• Make sure that your iPod/iPhone is on the compatible list in
the Specifications on page 11.
• Make sure that your video cable is connected firmly and
correctly between the TV and your iPod dock
• Make sure that your monitor is turned on and the video
channel is correct
• Make sure that the video format is correct - NTSC / PAL
• Make sure you pulled the plastic tab if this is a first use
• The battery could be dead, replace it
• Make sure you are aiming at the remote sensor on the front
of the dock
15
Page 16

16
iPod®/iPhone® Audio/Video Dock with Remote Control
Specifications
AC Ada pter
Voltage input 100-240V AC, 0.5A, 50/60 Hz
Voltage output DC 5V/1A
AV D ock
Vol tage inpu t DC 5V/ 1A
Input interface Mini-B USB port
Output interface Composite audio/video
Avail able Def. NTSC /PAL
Legal notices
FCC Part 15
This device complies with Part 15 of the FCC Rules. Operation of this
product is subject to the following two conditions: (1) this device may not
cause harmful interference, and (2) this device must accept any
interference received, including interference that may cause undesired
operation.
FCC Warning
Changes or modifications not expressly approved by the party responsible
for compliance with the FCC Rules could void the user’s authority to
operate this equipment.
Page 17

DX-IPDR3
FCC Statement:
This equipment has been tested and found to comply with the limits for a
Class B digital device, pursuant to Part 15 of the FCC Rules. These limits
are designed to provide reasonable protection against harmful
interference in a residential installation. This equipment generates, uses
and can radiate radio frequency energy and, if not installed and used in
accordance with the instructions, maybe cause harmful interference to
radio communications. However, there is no guarantee that interference
will not occur in a particular installation. If this equipment does cause
harmful interference to radio or television reception, which can be
determined by turning the equipment off and on, the user is encouraged
to try to correct the interference by one or more of the following
measures:
• Reorient or relocate the receiving antenna.
• Increase the separation between the equipment and receiver.
• Connect the equipment into an outlet on a circuit different form
that to which the receiver is connected.
• Consult the dealer or an experienced radio/TV technician for
help.
Canada ICES-003 statement
This Class B digital apparatus complies with Canadian ICES-003.
Notices
Specifications and features are subject to change without
notice or obligation.
For service and support call (800) 305-2204.
17
Page 18

18
iPod®/iPhone® Audio/Video Dock with Remote Control
Page 19

DX-IPDR3
One-year limited warranty
Dynex Products (“Dynex”) warrants to you, the original purchaser of this new
DX-IPDR3 (“Product”), that the Product shall be free of defects in the original
manufacture of the material or workmanship for a period of one (1) year from the
date of your purchase of the Product (“Warranty Period”). This Product must be
purchased from an authorized dealer of Dynex brand Products and packaged with
this warranty statement. This warranty does not cover refurbished product. If you
notify Dynex during the Warranty Period of a defect covered by this warranty that
requires service, terms of this warranty apply.
How long does the coverage last?
The Warranty Period lasts for one year (365 days) from the date you purchased the
Product. The purchase date is printed on the receipt you received with the
Product.
What does this warranty cover?
During the Warranty Period, if the original manufacture of the material or
workmanship of the Product is determined to be defective by an authorized
Dynex repair center or store personnel, Dynex will (at its sole option): (1) repair
the Product with new or rebuilt par ts; or (2) replace the Product at no charge with
new or rebuilt comparable products or parts. Products and parts replaced under
thi s warra nty be come th e prope rty of Dyne x and a re not r eturne d to you . If se rvice
of products and parts are required after the Warranty Period expires, you must pay
all labor and parts charges. This warranty lasts as long as you own your Dynex
Product during the Warranty Period. Warranty coverage terminates if you sell or
otherwise transfer the Product.
How to obtain warranty service?
If you purchased the Product at a retail store location, take your original receipt
and the Product to the store you purchased it from. Make sure that you place the
Product in its original packaging or packaging that provides the same amount of
protection as the original packaging. If you purchased the Product from an online
web site, mail your original receipt and the Product to the address listed on the
web site. Make sure that you put the Product in its original packaging or
packaging that provides the same amount of protection as the original packaging.
To obtain in-home warranty service for a television with a screen 25 inches or
larger, call 1-888-BESTBUY. Call agents will diagnose and correct the issue over
the phone or will have an Dynex-approved repair person dispatched to your
home.
19
Page 20

20
iPod®/iPhone® Audio/Video Dock with Remote Control
Where is the warranty valid?
This warranty is valid only to the original purchaser of the Product in the United
States and Canada.
What does the warranty not cover?
This warranty does not cover:
• Customer instruction
• Installation
• Set up adjustments
• Cosmetic damage
• Damage due to acts of God, such as lightning strikes
• Accident
• Misuse
• Abuse
• Negligence
• Commercial use
• Modification of any part of the Product
• Plasma display panel damaged by static (non-moving) images
applied for lengthy periods (burn-in).
This warranty also does not cover:
• Damage due to incorrect operation or maintenance
• Connection to an incorrect voltage supply
• Attempted repair by anyone other than a facility authorized by Dynex
to service the Product
• Products sold as is or with all faults
• Consumables, such as fuses or batteries
• Products where the factory applied serial number has been altered or
removed
Page 21

DX-IPDR3
REPAIR REPLACEMENT AS PROVIDED UNDER THIS WARRANTY IS YOUR EXCLUSIVE
REMEDY. DYNEX SHALL NOT BE LIABLE FOR ANY INCIDENTAL OR CONSEQUENTIAL
DAMAGES FOR THE BREACH OF ANY EXPRESS OR IMPLIED WARRANTY ON THIS
PRODUCT, INCLUDING, BUT NOT LIMITED TO, LOST DATA, LOSS OF USE OF YOUR
PRODUCT, LOST BUSINESS OR LOST PROFITS. DYNEX PRODUCTS MAKES NO OTHER
EXPRESS WARRANTIES WITH RESPECT TO THE PRODUCT, ALL EXPRESS AND
IMPLIED WARRANTIES FOR THE PRODUCT, INCLUDING, BUT NOT LIMITED TO, ANY
IMPLIED WARRANTIES OF AND CONDITIONS OF MERCHANTABILITY AND FITNESS
FOR A PARTICULAR PURPOSE, ARE LIMITED IN DURATION TO THE WARRANTY
PERIOD SET FORTH ABOVE AND NO WARRANTIES, WHETHER EXPRESS OR IMPLIED,
WILL APPLY AFTER THE WARRANTY PERIOD. SOME STATES, PROVINCES AND
JURISDICTIONS DO NOT ALLOW LIMITATIONS ON HOW LONG AN IMPLIED
WARRANTY LASTS, SO THE ABOVE LIMITATION MAY NOT APPLY TO YOU. THIS
WARRANTY GIVES YOU SPECIFIC LEGAL RIGHTS, AND YOU MAY ALSO HAVE OTHER
RIGHTS, WHICH VARY FROM STATE TO STATE OR PROVINCE TO PROVINCE.
Contac t Dynex:
For customer service please call 1-800-305-2204
www.dynexproducts.com
Distributed by Best Buy Purchasing, LLC
7601 Penn Avenue South, Richfield, Minnesota, U.S.A. 55423-3645
© 2011 BBY Solutions, Inc.
All rights reserved. DYNEX is a trademark of BBY Solutions, Inc. Registered in some
countries. All other products and brand names are trademarks of their respective
owners.
21
Page 22

www.dynexproducts.com (800) 305-2204
DYNEX is a trademark of BBY Solutions, Inc. Registered in some countries.
All other products and brand names are trademarks of their respective owners.
© 2011 BBY Solutions, Inc. All rights reserved.
Distributed by Best Buy Purchasing, LLC
7601 Penn Ave. South, Richfield, MN 55423 U.S.A.
11-1053
ENGLISH
 Loading...