

Dyna-Glo HA1360RH, HA1360R, HA1360BK, HA2360R, HA2360BK User Manual
HEAT AROUND 360
For Manual
US
RADIANT HEATER
USER'S MANUAL AND OPERATING INSTRUCTIONS
Model #
HA1360RH
HA1360R
HA1360BK
For Product
Registration
READ INSTRUCTIONS CAREFULLY:
Read and follow all instructions. Place
instructions in a safe place for future reference. Do not allow anyone who has
not read these instructions to assemble,
light, adjust or operate the heater.
PORTABLE PROPANE HEATER FOR
RECREATIONAL,
COMMERCIAL AND
EMERGENCY INDOOR USE
FOR US SALE EXCEPT
MASSACHUSETTS
Patent Pending
HA2360R
HA2360BK
WARNING:
If the information in this manual is not followed exactly, a re or
explosion may result causing property damage, personal injury or
loss of life.
– Do not store or use gasoline or other flammable vapors and liquids in the vicinity of this or any
other appliance.
– An LP cylinder not connected for use shall not be stored in the vicinity of this or any other
appliance.
– WHAT TO DO IF YOU SMELL GAS
• Do not try to light appliance.
• Extinguish any open flame.
• Shut off gas to appliance.
– Service must be performed by a qualified service agency.
CSA 4.98 US, GAS-FIRED PORTABLE HEATERS
FOR RECREATIONAL AND COMMERCIAL USE
This is an unvented gas-red portable heater. It uses air (oxygen) from the area in which
it is used.
Adequate combustion and ventilation air must be provided. Refer to page 4.
CONSUMER: Retain this manual for future reference.
Questions, problems, missing parts? Before returning to your retailer, call our customer
service department at 877-447-4768 8:30 a.m. – 4:30 pm CST, Monday – Friday
or email us at customerservice@ghpgroupinc.com
www.ghpgroupinc.com
1
IMHA360 - Rev 03-30-2017
TABLE OF CONTENTS
Service / Parts Ordering Information ....................................................................................1
General Safety Instructions ..................................................................................................2
General Information .............................................................................................................3
Tank Installation Instructions ................................................................................................5
Operating with Disposable Propane Cylinders ......................................................................5
Operating With Hose Connected to Remote Cylinder. ...........................................................5
Lighting Operation Instructions..............................................................................................6
Maintenance ........................................................................................................................8
Troubleshooting ...................................................................................................................9
Parts List ...........................................................................................................................11
Warranty.............................................................................................................................13
WARNING:
Every time hose or tank is connected to unit, connection
must be checked for leaks in one or more ways: Apply
soapy water to connection, look for bubbles, listen for
hiss of escaping gas, feel for extreme cold, smell for
rotten egg odor. Do not use if leaking!
WARNING:
Any changes to this heater or its controls can be
dangerous.
Some people-pregnant women, persons with heart
or lung disease, anemia, those under the inuence of
alcohol, those at high altitudes - are more affected by
carbon monoxide than others.
If the recreational or commercial enclosure does not
have a window or roof vent that is open, DO NOT USE
THIS HEATER inside.
WARNING:
WARNING:
WARNING:
Early signs of carbon monoxide poisoning resemble the
u, with headache, dizziness and/or nausea. If you have
these signs, heater may not be working properly.
Get fresh air at once! Have heater serviced.
WARNING:
Combustion by-products produced when using this product contain carbon monoxide, a chemical know to the state of
California for cause cancer and birth defects (and other reproductive harm).
NOTICE: Not for use in a "dwelling home" in California.
CALIFORNIA PROPOSITION 65: Fuels used in gas or oil red appliances and the products of combustion of such fuels, con-
tain chemicals known to the State of California to cause cancer, birth defects or other reproductive harm. This product contains
chemicals, including lead and lead compounds, known to the State of California to cause cancer, birth defects or other reproductive harm. Wash hands after handling.
NEVER LEAVE THE HEATER
UNATTENDED WHILE BURNING!
2

GENERAL INFORMATION:
• This heater is safe for indoor use in small recreational enclosures, having means for providing combustion air and ventilation, such
as enclosed porches, cabins, shing huts, trailers, tent trailers, tents, truck caps and vans. It may be used for emergency indoor
heating when connected to a disposable 1 lb. propane cylinder and for indoor use in commercial enclosures, having means
for providing combustion air and ventilation, such as construction trailers or temporary work enclosures.
• When the heater is cold or at room temperature, it will take a few minutes for the burner to turn bright orange. This is normal
and the heater is working properly. Also, during the initial lighting, the oil used during manufaturing process needs to burn off. This
can take up to 60 minutes of continuous burning. Some odor and yellow ames may occourr during this time but will diminish after the
burn-in period.
• After a few hours of operation the upper burner plate will discolor due to the heat of normal operation. This is normal and does not
affect the safe operation of the unit.
• It is recommended not to use the heater in windy conditions. The heater may utter reducing the effectiveness of the
appliance and could have excessive pilot outages.
• When the unit is lit, there should be about a quarter inch border that will not turn bright orange. This is normal.
• When operating the heater at altitudes over 7,000 FT. above sea level, the unit may not burn as bright as in lower altitudes.
This is normal. At higher altitudes, the heater may shut-off. If this happens, provide fresh air, wait 5 minutes and re-light.
Due to local atmospheric conditions heater may not re-light.
• When moving heater when lit or bumping heater setting it down, tip over switch may shut off heater. If this happens,
re-light.
• Operating time will vary depending on the heater setting and the supply cylinder size. See chart and "Cold Weather
Operations" section.
• NOTE: This HEATER MAY BE OPERATED WITH (1) OR (2) DISPOSABLE 1 LB. PROPANE CYLINDERS OR WITH (1)
REMOTE REFILLABLE PROPANE CYLINDER MAX. 20 LBS USING BOTH (1) Dyna-Glo Model # HAKITDG 12’ Extension
Hose and (1) Dyna-Glo Model # HAKITDG Fuel Filter (Sold Separately)
COLD WEATHER OPERATION:
• Cold weather is generally dened as ambient temperatures below 32 degrees F.
• 1 lb. propane cylinders have difculty producing sufcient gas at lower temperatures and can “freeze-up”, reducing the time of
operation by as much as 50-70%. For this reason, it is recommended to use only 20 lb. propane tanks under these conditions.
• If a 1 lb. tank is used in cold weather, such as in an ice shing hut, following are some operating suggestions;
1. Expect operating times to be signicantly reduced.
2. Never use only a single 1 lb. tank on the Heat Around Elite unit, Model HA2360.
3. Never set the heater directly on the ice. Set the heater on a rigid piece of ame retardant insulation and make sure the
ventilation slots on the bottom of the heater are not obstructed.
4. Elevate the heater slightly above the ground level. Insure the unit is level and secure and cannot be knocked over.
5. Keep the tank access door open. This provides some additional heat to warm the 1 lb. cylinder.
6. Adequate ventilation and combustion air must be provided.
7. Maintain all clearances as specied on Page 4.
WARNING:
Carefully watch the Heater for signs of the 1 lb. cylinder "freezing-up". If the lower portion of the burner starts to turn from
orange to blue and begins sputtering immediately shut off the heater and remove it from any enclosure.
NEVER LEAVE THE HEATER
UNATTENDED WHILE BURNING!
3
SPECIFICATIONS
MODEL NO..
GAS TYPE ..................................................................PROPANE
INPUT BTU/HR. .......................HA1360 Series - 7,500 - 10,000
HA2360 Series - 13,500 - 18,000
MAX. SUPPLY PRESSURE.......................BOTTLE PRESSURE
CLEARANCE TO COMBUSTIBLES (FROM EDGE OF GUARD)
TOP ..............................................................................17 inches
FRONT .........................................................................15 inches
SIDES ...........................................................................15 inches
REAR ............................................................................15 inches
HA1360RH / HA1360R / HA1360BK / HA2360R / HA2360BK
CAUTION:
•Some linoleum surfaces may discolor if heater is
placed directly on these oor coverings.
•When operating the heater at altitudes over 7,000 FT above sea
level the heater may shut off. (Please read the GENERAL INFORMATION)
Cylinder Size
Operating Time
HeatAround360 HeatAround 360 Elite
One 1 lb. cylinder 2.7 hrs (high) - 3.2 hrs (low) NOT RECOMMENDED
Two 1 lb. cylinders N/A 3 hrs (high) - 3.5 hrs (low)
One 20 lb. cylinder 45 hrs (high) - 58 hrs (low) 25 hrs (high) - 32 hrs (low)
GENERAL SAFETY INSTRUCTIONS
THIS IS A HEATING APPLIANCE. DO NOT OPERATE THIS APPLIANCE WITHOUT THE WIRE GUARD INSTALLED. DO NOT
ATTEMPT TO WARM OR COOK FOOD ON THIS HEATER.
• Do not use non-approved attachments on this heater.
• Due to high temperatures, the appliance should be located out of trafc and away from combustible materials.
• Children and adults should be alerted to the hazard of high surface temperatures and should stay away to avoid burns
or clothing ignition.
• Young children should be carefully supervised when they are near the appliance.
• Do not place clothing or other ammable material on or near the appliance.
• Do not operate heater in any moving vehicle.
• This heater can also be used in a recreational or commercial enclosure with a window or roof vent. It may also be used outdoors.
• This heater requires a vent area of 18 square inches (example 4 1/4" x 4 1/4" opening) minimum for adequate ventilation during
operation. Do not use other fuel burning appliances inside.
• GAS PRESSURE AT HEATER IS REGULATED AND FIXED AT 11" W.C. WHEN USING A REMOTE HOSE CONNECTION TO HEATER
REGULATOR(S), DO NOT REGULATE OR REDUCE PROPANE TANK SUPPLY PRESSURE TO HEATER.
• REGULATOR(S) IN HEATER MUST ALWAYS BE IN PLACE DURING OPERATION.
• Any safety screen or guard removed for servicing the appliance must be replaced prior to operating the heater.
• The appliance should be inspected before each use. Frequent cleaning may be required. The control compartments,
burner(s) and circulating air passageways of the appliance must be kept clean, see MAINTENANCE.
• DO NOT use this heater if any part has been under water. Immediately call a qualied service technician to inspect
the heater and to replace any part of the control system and any gas control, which has been under water.
• When used without adequate combustion and ventilation air, this heater may give off excessive CARBON MONOXIDE,
an odorless, poisonous gas.
• Some people - pregnant women, persons with heart or lung disease, anemia, those under the inuence of alcohol, those at
high altitudes - are more affected by carbon monoxide than others.
• Cylinders must be disconnected when the heater is not in use.
• When heater is placed on the ground, make sure the ground is level and keep any objects at least 15"' from the edge
of the heater. THIS HEATER IS EQUIPPED WITH A TIP OVER SWITCH THAT WILL SHUT THE HEATER OFF IF
THE HEATER TIPS OVER HOWEVER, DO NOT LEAVE HEATER UNATTENDED OR WHERE CHILDREN MAY
CAUSE THE HEATER TO TIP OVER. NEVER OPERATE THE HEATER WHILE SLEEPING!
• Keep remote 20 lb. rellable cylinders at least 6 ft. away from heater at all times.
NEVER LEAVE THE HEATER
UNATTENDED WHILE BURNING!
4
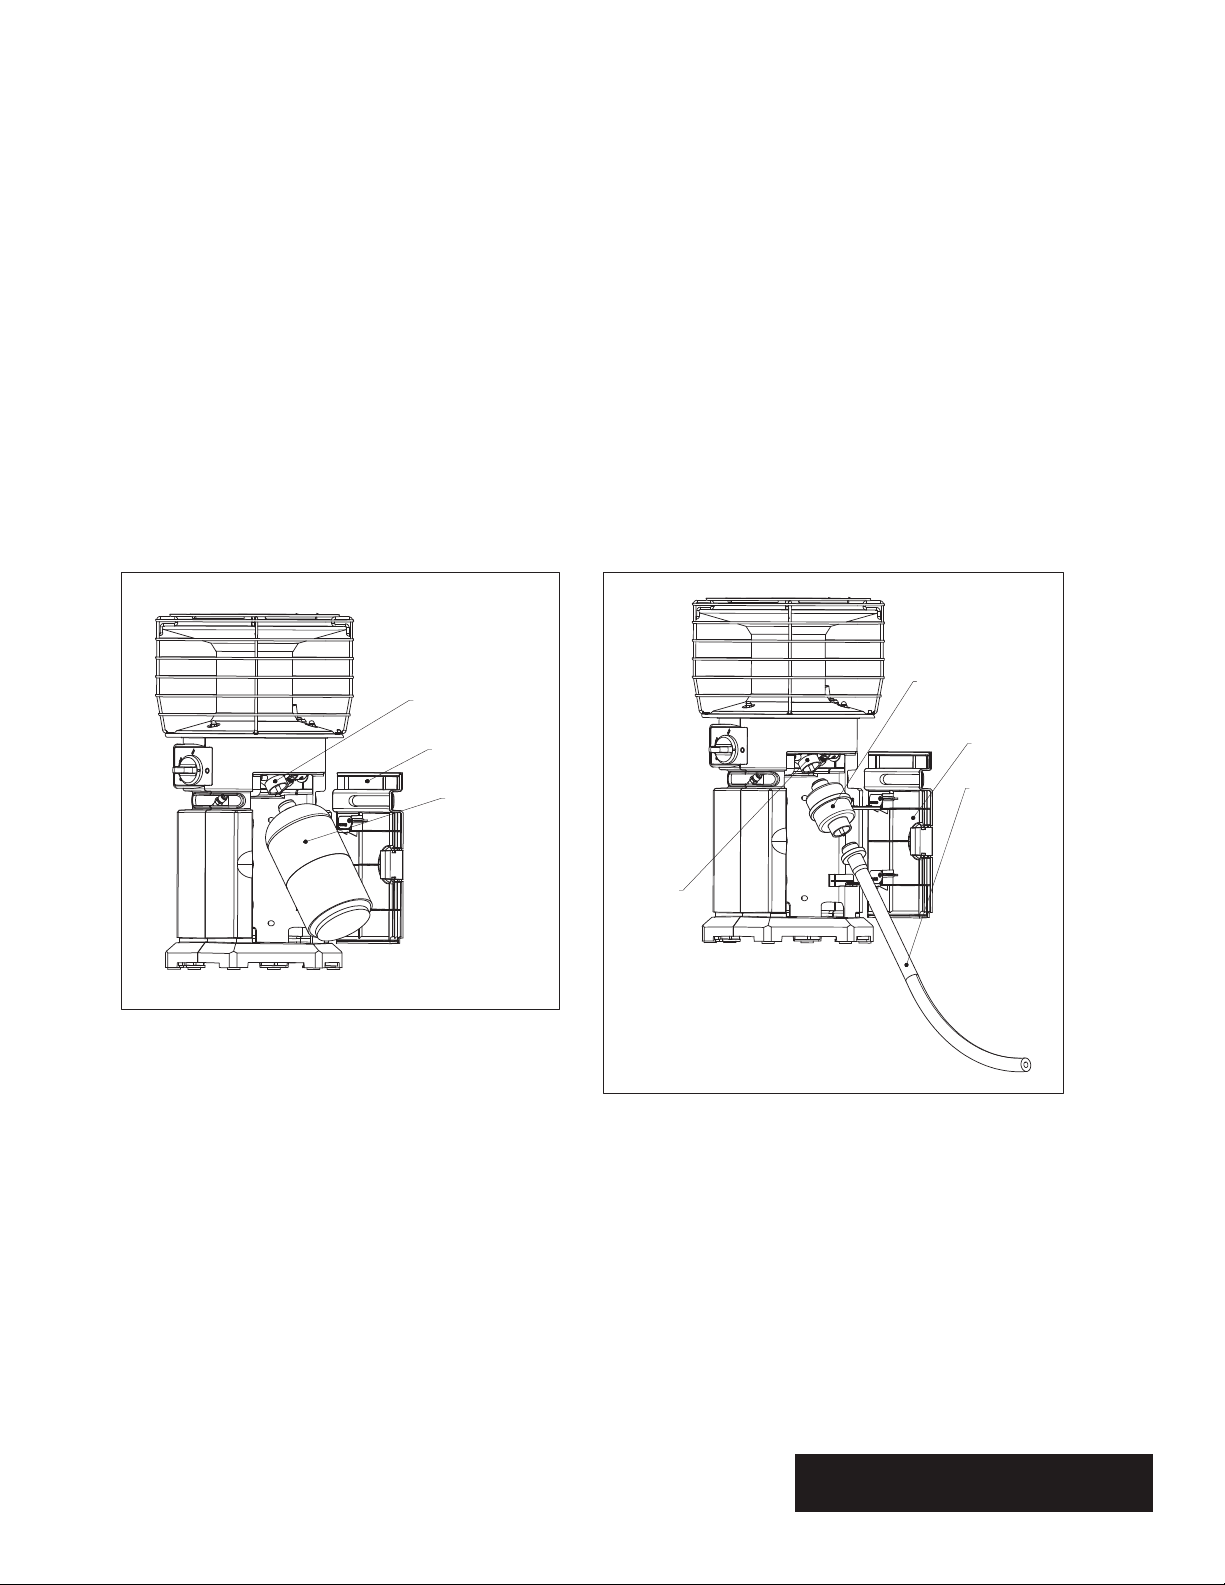
TANK INSTALLATION INSTRUCTIONS
Tank Installation for DOT Certied 1 lb. Propane Cylinder(s) (Fig. 1)
• Open easy access tank compartment door(s).
• Locate regulator and swivel it upward by hand to provide better access for cylinder
• Attach cylinder(s) to swivel mount by gently turning clockwise until it is hand tight. Do not overtighten. Do not use tools to tighten.
• Check for gas leaks by using a 50% soap-water solution at the joint of the regulator and cylinder.
Tank Installation for 20 lb. Propane Cylinder (Fig. 1a)
• Open easy access tank compartment door(s).
• Locate regulator and swivel it upward by hand to provide better access for hose end adapter.
• Attach Fuel Filter, Model HAKITDG to swivel mount by gently turning clockwise until it is hand tight. Do not over tighten. Do not use tools
to tighten.
• Attach GHP hose end adapter (No. HAKITDG ) to fuel lter by gently turning clockwise until it is hand tight. Do not overtighten.
Do not use tools to tighten.
• Check for gas leaks by using a 50% soap-water solution at the joint of the regulator and hose end adapter.
Recommended Fuel Filter
Model
Regulator
Access Door
1 lb. DOT Approved
Cylinder Tank
Regulator
HAKITDG
Access Door
20 lb. Tank Hose
Model HAKITDG
Fig. 1 - 1 lb. Cylinder Tank Installation
Fig. 1a - Remote Tank Installation
EMERGENCY INDOOR USE
• Adequate combustion and ventilation air must be provided when the appliance is in use. Refer to General Safety Instructions on
Page 4 for additional information.
• Only disposable 1 lb. cylinders, marked as PROPANE can be used with this heater.
• NEVER bring a rellable propane cylinder indoors. A re or explosion can occur causing property damage, serious injury, or death.
NEVER LEAVE THE HEATER
UNATTENDED WHILE BURNING!
5
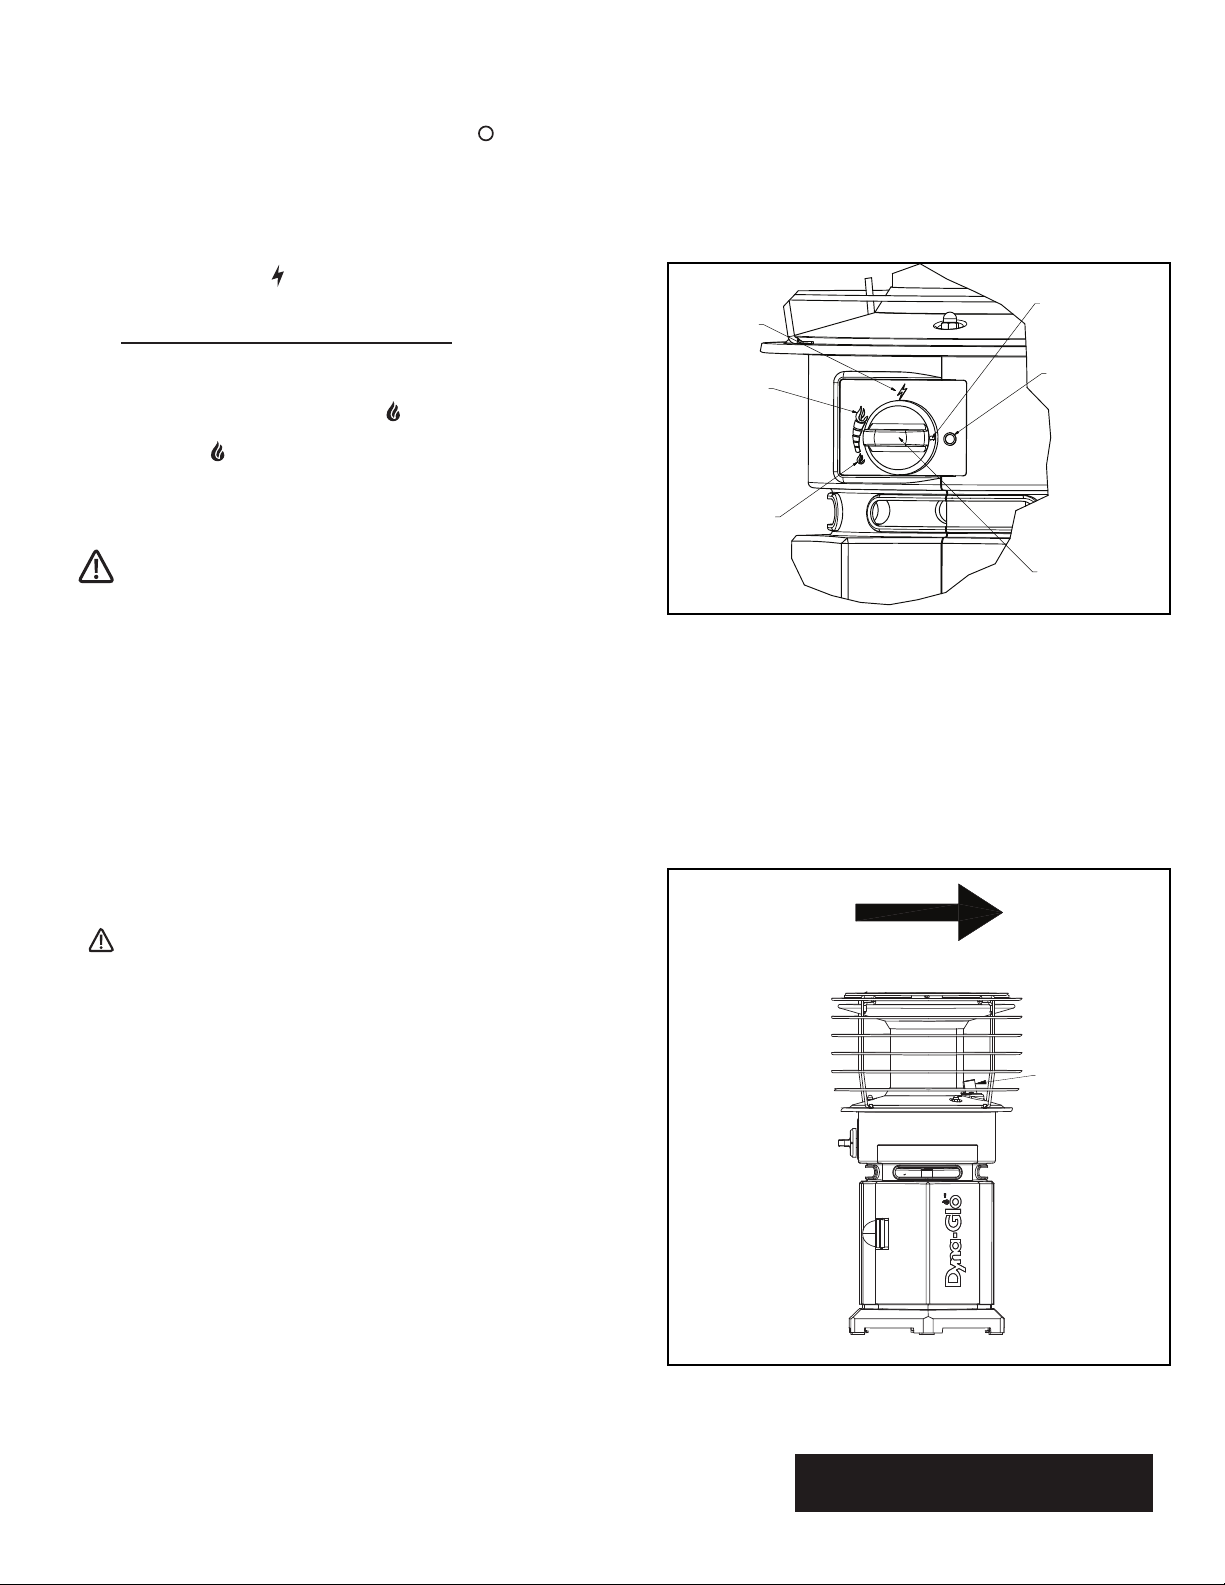
LIGHTING, OPERATION, AND
SHUTDOWN INSTRUCTIONS
1. Make sure the control knob is in the OFF position. " "
2. Open the access door and install the propane fuel source;
a. Install a DOT certied 1 lb. propane cylinder.
b. Install the GHP hose connector model # HAKITDG.
Check for gas leaks by using a 50% soap-water solution at
the joint of the regulator and cylinder.
3. Depress the control knob and turn counter clockwise
to the PILOT position. "
this step is performed. Repeat until the pilot ame lights.
4. Continue holding the knob down in the PILOT position
for
30 seconds or until pilot ame holds.
5. Release the knob. The knob should return to the fully
extended position and the pilot should remain lit.
6. Turn on the burner by depressing the knob slightly and
gently turn the knob to the HI position "
7. Adjust heat output by turning the knob between HI and
LOW position "
8. To shut down the heater turn the knob clockwise to the OFF
position and remove the gas cylinder or close the propane
tank shut off valve and allow the heater to burn off the gas in
the hose, then turn the heater knob to the OFF position.
".
" The Igniter will spark each time
".
Pilot Position
HIGH Position
LOW Position
Knob Indicator Mark
OFF Position
CAUTION
Do not try to adjust heating levels by using the propane tank shutoff valve.
After turning heater off the guard will remain hot. Allow the heater to cool
down before storing the heater.
Do not operate, store, connect or remove cylinder/hose connection near
ammable items or ignition sources.
LIGHTING / OPERATING INSTRUCTIONS
FOR USE WITH HOSE(S) CONNECTED TO A
REMOTE CYLINDER, MAXIMUM SIZE 20 LBS:
• This Heater may be used in a Recreational Enclosure or
Temporary Construction Work Enclosure with a Remote
Rellable Propane Cylinder ONLY when the Cylinder is
Located Outdoors and the Heater is Used with GHP
Hose No. HAKITDG.
• GHP Hose No. HAKITDG includes a hand-tightening tank
connector and a #600 hose connector tting.
• WARNING: NEVER bring a rellable propane cylinder indoors.
A re or explosion can occur causing property damage, serious
injury or death!
• Inspect the hose before each use of the heater. If there is
excessive abrasion or wear, or the hose is cut, replace prior to
using the heater with Dyna-Glo HAKITDG.
• The propane cylinder must include a listed overlling protection
device as well as a collar to protect the cylinder valve.
• Heater must be in an upright position during operation.
• Screw hose connector into tank swivel on heater and screw
opposite end of hose into LP gas tank valve. Tighten all hose
connections. DO NOT use thread sealant on any of these
connections.
• Open valve at LP-gas supply cylinder.
• Check all hose connections for leaks with soapy water at the
threaded connection where the hose connector screws into the
regulator and at LP-gas supply cylinder. SEE WARNING! ON
ATTACHED HANG TAGS.
Control Knob
Fig. 2 - Lighting Instruction
WIND DIRECTION
PILOT POSITION
LIGHTING IN WINDY AREAS
1. Position the heater such that the Pilot is opposite the direction that
the wind is coming from.
2. Position your body behind the heater such that your body blocks the
wind while you are following the instructions for lighting the unit.
6
Fig. 3 - Lighting in Windy Areas
NEVER LEAVE THE HEATER
UNATTENDED WHILE BURNING!

IMPORTANT NOTICE
REGARDING THIRD PARTY ATTACHMENTS TO ALL
DYNA-GLO HEATAROUND360 MODELS
GHP Group, Inc. is a leading manufacturing company specializing in portable heating products. Our products can be found at most
major home centers, hardware stores and internet retailers across North America. In 2016, GHP introduced the HeatAround360 and
HeatAround360 Elite portable heaters into the market. These heaters, which are sold under the Dyna-Glo brand feature an Oxygen
Depletion Sensor (“ODS”), which shuts off the heater if the oxygen in the room gets below a certain point and a tip-over safety switch
that turns it off in the event of it being knocked on its side. These features allow the heater to be safely used during numerous indoor
and outdoor activities.
GHP recognizes the many different third party attachments for the HeatAround360 and is aware of their intended purpose of using
the HeatAround360 to heat or cook food. GHP strongly encourages that these third party attachments NOT be used as they are nei-
ther certied, nor safe to be used to warm or cook food of any kind. HeatAround360 Heaters are not certied as a cooker and are not
designed to operate in this manner. GHP explicitly prohibits the use of any type of non-approved attachments with its HeatAround360
heaters.
WARNING:
This product is a heater. It is certied to CSA International Requirement Section CSA 4.98 U.S.
"Gas Fired Portable Heaters for Recreational or Commercial Use." This product is NEVER to be used for the cooking or warming of
foods as doing so can interfere with the safety systems of the heater, which may result in a re, explosion, the production of deadly
carbon monoxide, and personal injury or death to you or others. NEVER use hand-made or third party accessories or attachments
with this heater; this is extremely dangerous and may result in personal injury or.death to you or others
WARRANTY LANGUAGE
GHP Group, Inc. warrants its heaters and accessories to be free from defects in material and workmanship for a period of 1 year from
date of purchase. GHP Group, Inc. will repair or replacethis product free of charge if it has been proven to be defective within the
1-year period and is returned at customer expense with proof of purchase to GHP Group, Inc. within the warranty period. DISCLAIMER: This warranty does not cover any product that: a) has been subject to misuse or neglect; b) has been used in a manner inconsistent with the warnings and instructions contained in the owner’s manual, including but not limited to using a heater for the cooking or
warming of foods; or c) has been used with hand-made or third party accessories or attachments.
GHP prohibits the HeatAround360 heaters from being used for cooking or warming foods. Third party attachments intended to
change the intended operation of the HeatAround360 are prohibited for use as they could cause serious harm to consumers. Using
such products with GHP heaters will immediately void the product warranty. GHP values the safety of its consumers above all else
and appreciates your continual trust in all GHP products. Please feel free to contact us at customerservice@ghpgroupinc.com with
any questions.
• CAUTION: After turning heater off, wire guard will remain hot.
Allow to thoroughly cool before moving or storing.
• CAUTION: When not in use, the gas must be turned off at the LPgas supply cylinder. As stated before allow heater to use up
propane in supply line until heater shuts off. When the LP-gas supply cylinder is not disconnected from the heater, the heater
and the cylinder must be stored outdoors, in a well ventilated space, out of reach of children, and must not be stored in a
building, garage or any other enclosed area. Disconnect all cylinders when heater is not in use.
• CAUTION: Indoor storage of the heater is permissible only if the cylinder is disconnected and removed from the heater. Cylinders
must be stored outdoors out of the reach of children and must not be stored in a building, garage or any other enclosed area.
Both the 1 lb. and 20 lb. cylinders must be in an upright position during use to insure proper vapor withdraw.
1 lb. cylinders must be Dept. of Transportation (DOT) constructed and approved and have an outlet connection compatible with a
CGA 600 tting.
NEVER LEAVE THE HEATER
UNATTENDED WHILE BURNING!
7
MAINTENANCE:
Always keep the heater area clear and free from combustible
materials, gasoline and other ammable vapors and liquids.
Keep the vent areas (slots in the bottom and the top at the front
of heater) clear at all times so combustion is ventilation air is not
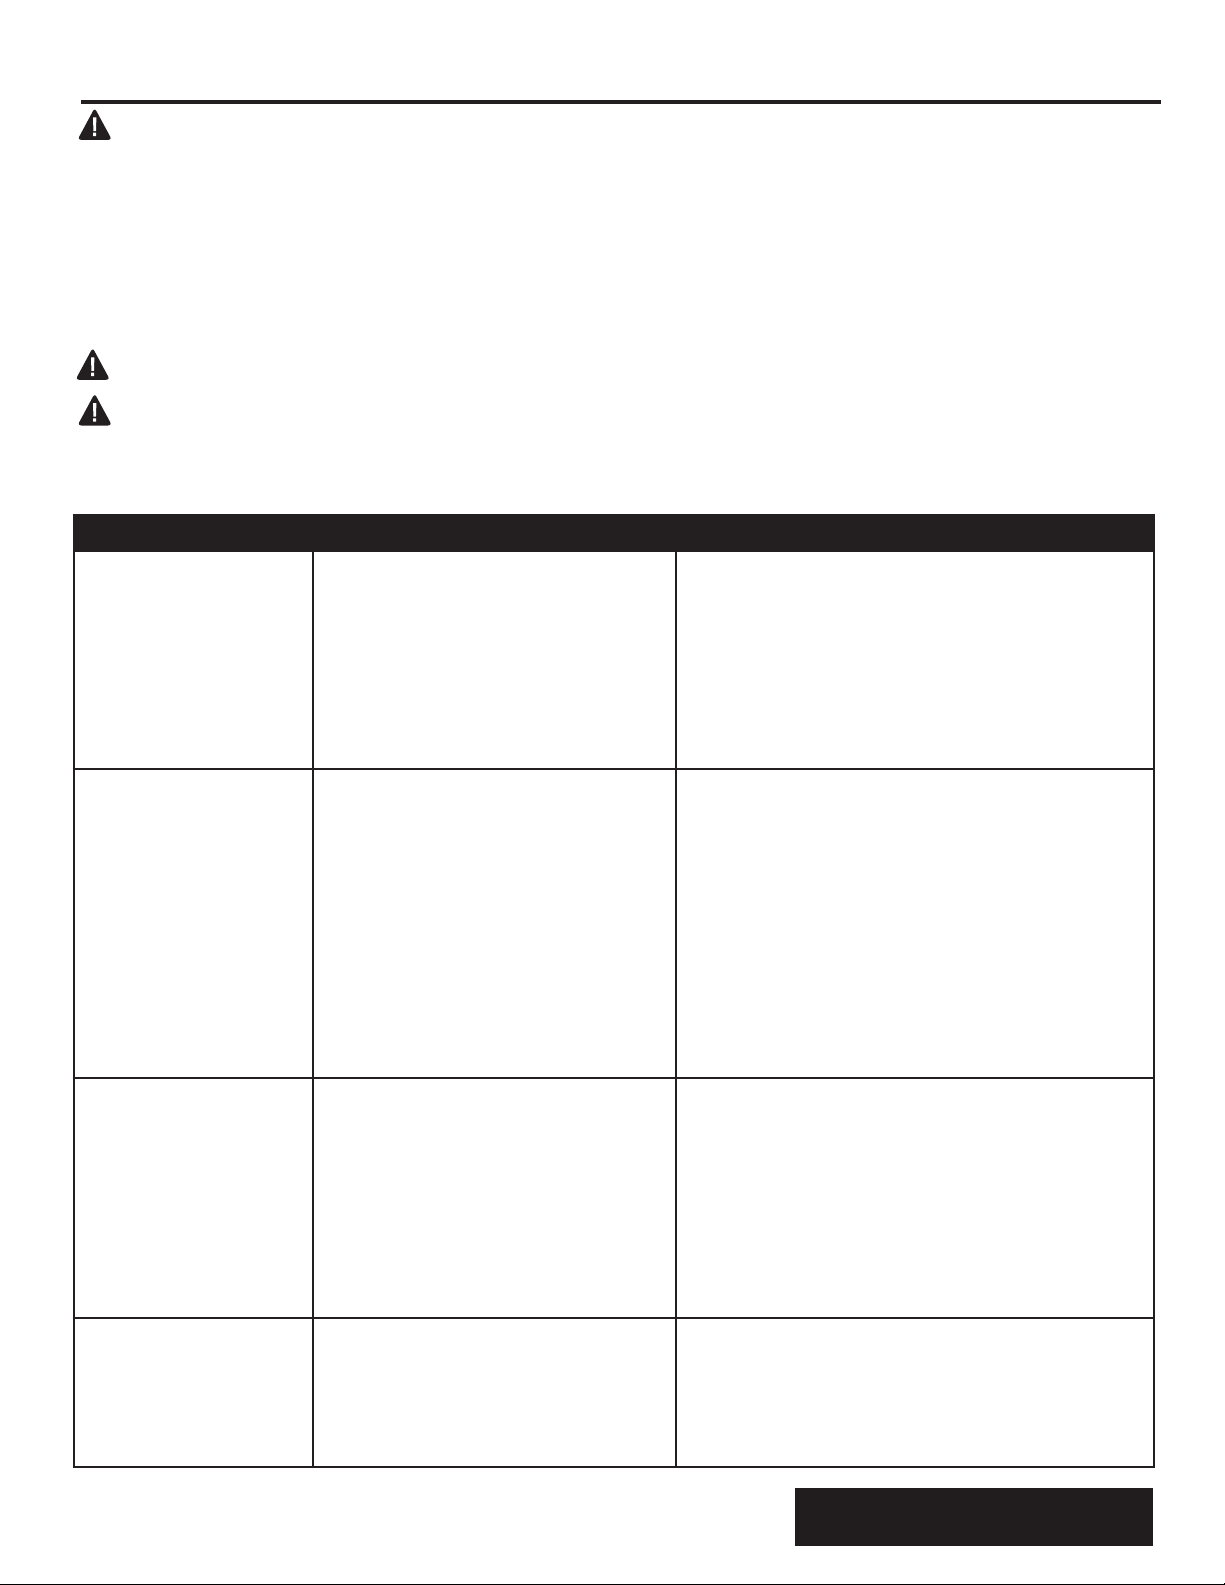
obstructed. Visually inspect the pilot ame and burner periodically during use so combustion and ventilation air is not obstruct-
ed. The pilot ame should be blue in color (not yellow) and will
extend beyond the thermocouple. The ame will surround the
thermocouple just below the tip, see Figure 4. A slight yellow
ame may occur where the pilot ame and main burner ame
meet. The burner(s) should be bright orange (with a slight blue
color around the border, a red-orange haze that is visible on
the burner is acceptable) and without a noticeable ame. A blue
ame that rolls out at the top indicates an accumulation of dust,
lint or spider webs inside the main burner assembly. If the pilot
is yellow or the burner has a noticeable ame, cleaning may be
required. Use the following procedure to inspect main burner
assembly. It is necessary to periodically check the burner(s)
orice and burner venturi tube to make sure they are clear of
insects/nests or spider webs that may accumulate over time. It is
strongly recommended that these maintenance instructions be
performed annually. A clogged tube can lead to a re.
1 Allow heater to thoroughly cool before performing
any maintenance.
2 Remove disposable 1 lb. cylinder(s) from heater or turn OFF
gas supply at remote cylinder valve, and disconnect
hose from heater.
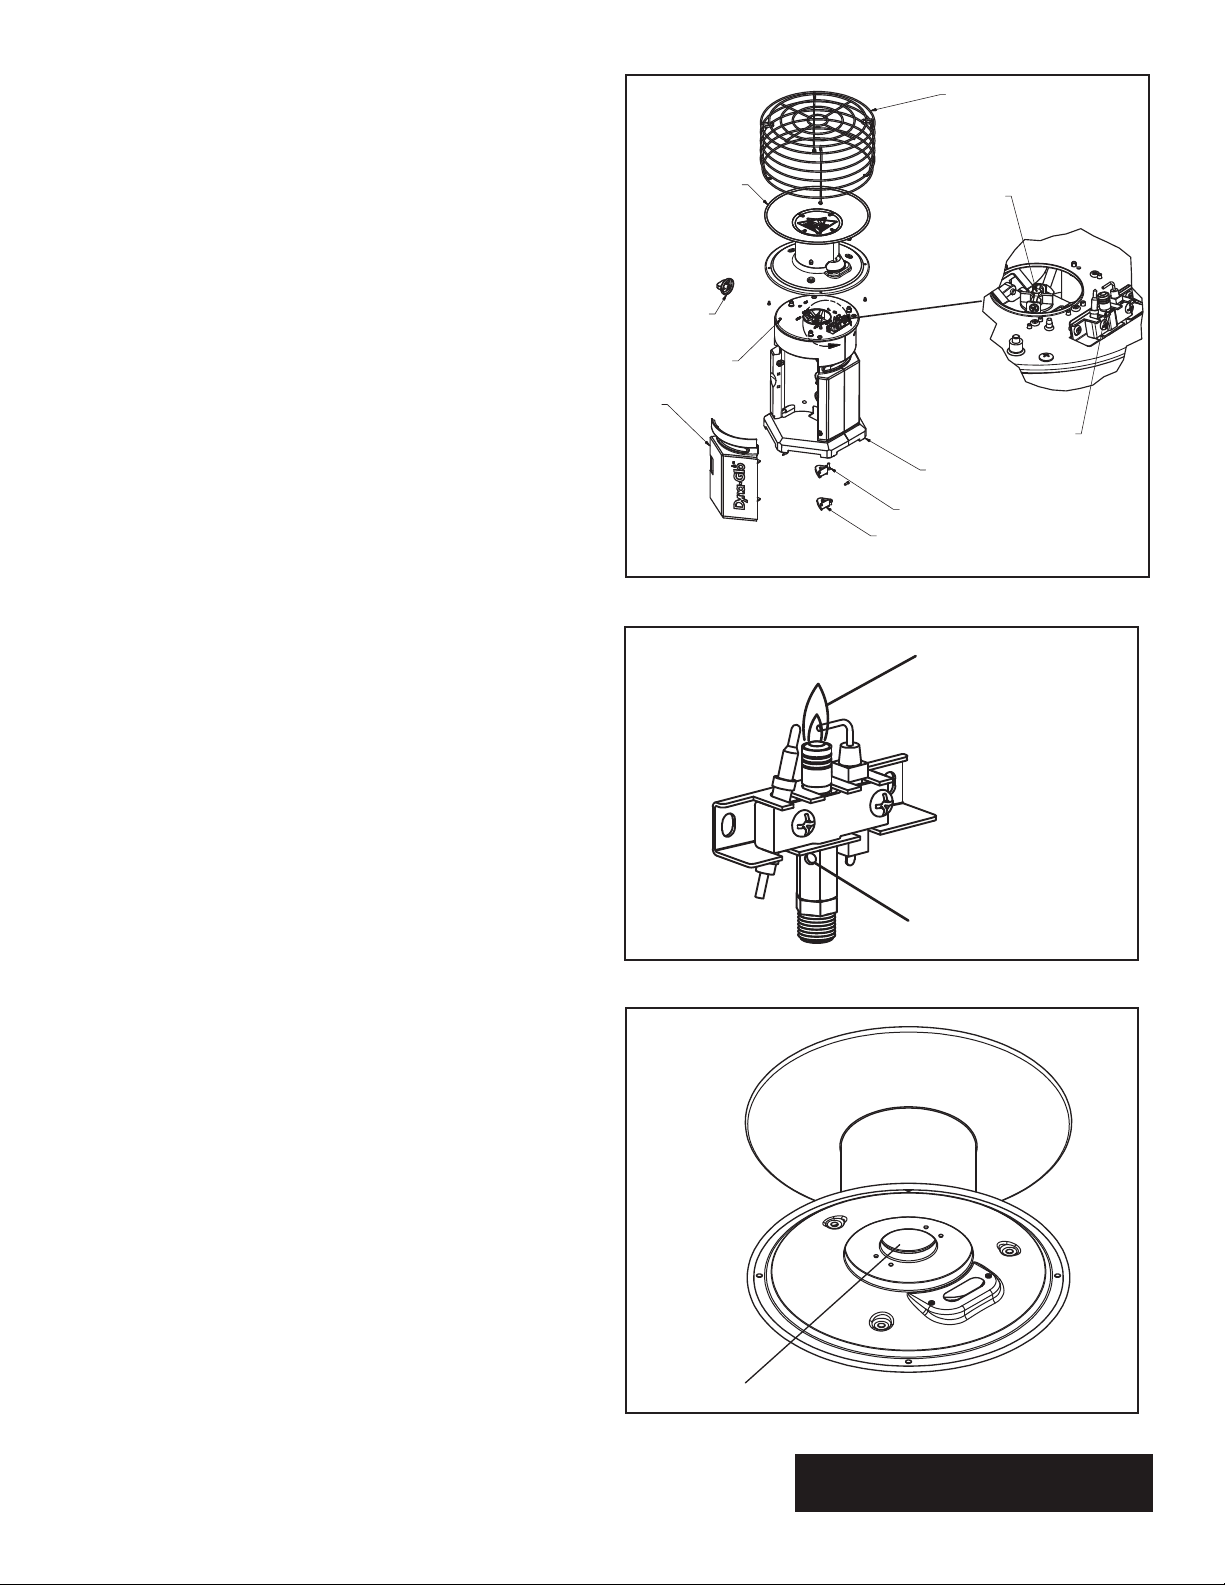
Burner Assembly
Control
Door
Wire Guard
Burner Orifice
Knob
Gas Train
Assembly
A
Upper Hinge
Lower Hinge
Plastic Base
Assembly
Fig. 4 - Burner Orice Location
Pilot Flame
ODS Pilot Assy.
3 Remove wire guard from heater by gently removing the four
screws attaching the wire guard.
4 And then remove the (3) acorn nuts and gently remove the
burner assembly exposing the burner venturi and pilot
assembly
5 Inspect interior of casing assembly for accumulation
of dust, lint or spider webs. If necessary, clean interior
of casing assembly with a vacuum cleaner or apply air
pressure. Do not damage any components within casing
assembly when you are cleaning.
6. Inspect and clean main burner orice located at bottom
of burner venturi tube, by using a vacuum or apply air
pressure at orice opening.
7 Inspect and clean pilot (mounted to bracket) by using a
vacuum or apply air pressure through the holes in the pilot
indicated by the arrows in Figure 5.
WARNING: Never use needles, wires, or similar cylindrical
objects to clean the pilot to avoid damaging the calibrated
orice that controls the gas ow.
8 Apply air pressure into burner assembly to remove
dust, lint or spider webs.
Pilot Air Hole
Fig. 5 - Pilot Assembly
9 Reinstall burner assembly and wire guard.
Venturi Tube
Fig. 6 - Burner Assembly
NEVER LEAVE THE HEATER
UNATTENDED WHILE BURNING!
8
TROUBLESHOOTING
WARNING: If you smell gas:
• Shut off gas supply.
• Do not try to light any appliance.
• Do not touch any electrical switch; do not use any phone in your building.
• Immediately call your gas supplier from a neighbor’s phone. Follow the gas supplier’s instructions.
• If you cannot reach your gas supplier, call the re department.
IMPORTANT: Operating heater where impurities in air exist may create odors. Cleaning supplies, paint, paint
remover, cigarette smoke, cements and glues, new carpet or textiles, etc., create fumes. These fumes may mix
with combustion air and create odors.
WARNING: Turn off and let cool before servicing. Only a qualied service person should service
and repair heater.
CAUTION: Never use a wire, needle, or similar object to clean ODS/pilot. This can damage ODS/ pilot unit.
TROUBLESHOOTING
PROBLEM POSSIBLE CAUSE CORRECTIVE ACTION
When ignitor knob is
turned, there is no
spark at ODS/pilot.
1. Ignitor electrode is
positioned wrong.
2. Ignitor electrode is broken.
3. Ignitor electrode is not
1. Replace electrode.
2. Replace electrode.
3. Replace ignitor cable
connected to ignitor cable.
4. Ignitor cable is pinched or
wet.
5. Damaged ignitor cable.
4. Free ignitor cable if pinched by any metal or tubing. Keep ignitor cable dry.
5. Replace ignitor cable.
When ignitor knob
is turned, there
is a spark at ODS/
pilot but no ignition.
ODS/pilot lights
but ame goes out
when control knob is
released.
Burner(s) does not
light afterODS/pilot
is lit.
1. Tank shutoff valve is
closed.
2. Control knob not fully
pressed in while pressing
ignitor button.
3. Air in gas lines when
installed.
4. ODS / pilot is clogged.
5. Control knob not in PILOT
position.
6. Depleted gas supply (propane)
1. Control knob is not fully
pressed in.
2. Control knob is not pressed
in long enough.
3. Equipment shutoff valve is
not fully open.
4. Thermocouple connection is
loose.
5. Thermocouple damaged.
6. Control valve damaged.
1. Burner orice is clogged.
2. Burner orice diameter is
too small.
3. Inlet gas pressure is too low.
1. Turn on gas supply valve.
2. Fully press in control knob while
pressing ignitor button.
3. Continue holding down control knob.
Repeat igniting operation until air is
removed.
4. Clean ODS/pilot (see Care and
Maintenance, page 8) or replace
ODS/pilot assembly.
5. Turn control knob to PILOT position.
6. Purchase new tank or rell 20 lb tank.
1. Press in control knob fully.
2. After ODS/pilot lights, keep control
knob pressed in 30 seconds.
3. Fully open equipment shutoff valve.
4. Hand tighten until snug, and then
tighten ¼ turn more.
5. Replace thermocouple.
6. Contact customer service.
1. Clean burner orice (see Care and
Maintenance, page 8) or contact
customer service.
2. Contact customer service.
3. Change tanks.
NEVER LEAVE THE HEATER
9
UNATTENDED WHILE BURNING!
 Loading...