


Premium Electric
Digital Smoker
MODEL #DGU732SDE / DGU732SDE-D
Français p. 27
Español p. 53
FOR OUTDOOR
USE ONLY
Use only with Class A GFI (Ground Fault Interrupter)
ATTACH YOUR RECEIPT HERE
Serial Number ________________________________ Purchase Date _________________________________
|
Questions, problems, missing parts? Before returning to your retailer, call our |
|
customer service department at 1-877-447-4768, 8:00 a.m. – 4:30 p.m. CST, |
|
Monday – Friday or e-mail us at customerservice@ghpgroupinc.com. |
70-10-558 |
Rev. 01/28/20 |
1
DYNA-GLO® PREMIUM ELECTRIC DIGITAL SMOKER
STOP!
NO NEED TO RETURN TO THE STORE
Questions with The Assembly?
Require Parts Information?
Product Under Manufacturers Warranty?
Call Toll Free : 1-877-447-4768
8:00 a.m. – 4:30 pm CST, Monday – Friday
Retain This Owner's Manual And Proof Of Purchase For Future Reference
To help us help you
Fill in the information below:
Date of Purchase |
Place of Purchase |
Model Number |
Product Serial No. |
MODEL NUMBER AND PRODUCT SERIAL NUMBER CAN BE FOUND ON
THE RATING LABEL OF YOUR SMOKER.
2

TABLE OF CONTENTS |
|
Safety Information ...................................................................................................................... |
3 |
Package Contents ...................................................................................................................... |
8 |
Hardware Contents ..................................................................................................................... |
9 |
Preparation Before Assembly ....................................................................................................... |
9 |
Assembly Instructions ................................................................................................................ |
10 |
Operating Instructions ................................................................................................................. |
13 |
Tips On Smoking ......................................................................................................................... |
19 |
Care and Maintenance ................................................................................................................ |
21 |
Troubleshooting ........................................................................................................................... |
22 |
Replacement Parts List .............................................................................................................. |
24 |
Warranty ...................................................................................................................................... |
26 |
Assembler/Installer: This instruction manual contains important information necessary for the |
|
proper assembly and safe use of this appliance. Read and follow all warnings and instructions |
|
before assembling and using this appliance. Leave these instructions with the consumer. |
|
Consumer/User: Follow all warnings and instructions when using this appliance. |
|
SAVE THESE INSTRUCTIONS |
|
 SAFETY INFORMATION
Please read and understand this entire manual before attempting to assemble, operate or install the product. If you have any questions regarding the product, call our customer service department at 1-877-447-4768, 8:00 a.m.- 4:30 p.m. CST, Monday - Friday.
 CAUTION
• When using electrical appliances, basic precautions should always be followed to reduce the risk of fire, electrical shock, and injury to persons.
 DANGER
• Failure to follow these instructions could result in fire or burn hazard which could cause property damage, personal injury or death.
3
 SAFETY INFORMATION
IMPORTANT SAFEGUARDS
READ ALL INSTRUCTIONS, PRIOR TO USING THIS SMOKER
• DO NOT use this product for anything other than its intended purpose. It is NOT intended for commercial use. It is NOT intended to be installed or used in or on a recreational vehicle and/or boat.
• DO NOT operate this smoker with a damaged cord or plug or after the smoker malfunctions, has been dropped, or is damaged in any manner. If the supply cord is damaged, it must be replaced by the manufacturer, its service agent or similarly qualified person in order to avoid a hazard.
• DO NOT use smoker within 10 ft. (3 m) of a swimming pool, puddle, pond or other body of water.
• Keep smoker and electric controller dry and out of rain at all times.
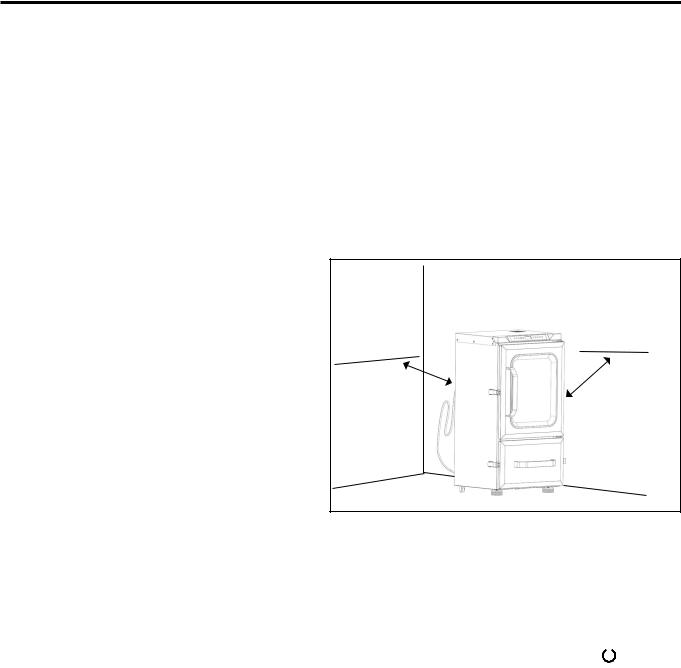
• A minimum clearance of 36 in. (92 cm) to combustible material is required on the front, sides and back. It is very important to always maintain
proper clearances to combustibles.
• When using flavoring wood, add a sufficient amount at the start of the cooking process, in order to avoid re-adding wood during the cooking process. Adding wood while operating may splash hot water and cause serious injury.
•Check the water level at least every 2 hours. A sizzling sound may indicate a low water level.
Follow instructions in this manual for adding water while operating (see Page 17).
•DO NOT use the appliance during an electrical storm.
•The appliance is to be connected to a socket-outlet having an earthing contact.
•The appliance should be supplied through a residual current device (RCD) having a rated residual operating current not exceeding 30 mA. Use only with Class A GFI (Ground Fault Interrupter) protected circuit.
•Arrange the power cord away from traffic areas to ensure that it is not tripped over.
•To disconnect the smoker, turn the smoker off by pressing and holding the Power button 
 and remove the plug from the outlet.
•DO NOT obstruct the flow of ventilated air for the appliance.
•DO NOT use metal foil on the cooking grates. Doing so may result in damage to the smoker.
•DO NOT use this appliance as a heater.
•DO NOT use charcoal or similar combustible fuels with this appliance. This appliance is not designed for use with charcoal and a fire will result if charcoal is used during operation. The fire will create an unsafe condition and damage the smoker.
•Use caution when opening the upper door and lower drawer of the smoker while in operation. Keep hands, face and body safe from hot steam or flare-ups. DO NOT inhale smoke.
•If you must dispose of ashes in less time than it takes for the ashes to completely cool down, then remove the ashes from the appliance using insulated oven mitts or gloves and completely soak the ashes with water before disposing of them in a noncombustible container.
4

 SAFETY INFORMATION
•DO NOT wear loose clothing while operating the smoker. Tie back long hair while operating the smoker.
•ALWAYS wear shoes that fully cover your feet while operating the smoker.
•DO NOT touch hot surfaces. Use handles or knobs.
•To protect against electrical shock do not immerse cord or plugs in water or other liquid.
•This appliance is not intended for use by persons (including children) with reduced physical, sensory or mental capabilities, or lack of experience and knowledge, unless they have been given supervision or instruction concerning use of the appliance by a person responsible for their safety.
•Unplug from outlet when not in use and before cleaning. Allow to cool before putting on or taking off parts.
•DO NOT operate any appliance with a damaged cord or plug or after the appliance malfunctions or has been damaged in any manner.
•The use of accessory attachments not recommended by the appliance manufacturer may cause injuries.
•DO NOT use indoors.
•DO NOT let cord hang over edge of table or counter, or touch hot surfaces.
•Do not place on or near a hot gas or electric burner, or in a heated oven.
•Extreme caution must be used when moving an appliance containing hot oil or other hot liquids.
•Always attach plug to appliance first, then plug cord into the wall outlet. To disconnect, turn any control to “OFF”, then remove plug from wall outlet.
•DO NOT use appliance for other than intended use.
•Use extreme caution when removing trays or disposing of hot grease.
•DO NOT clean with metal scouring pads. Pieces can break off the pad and touch electrical parts, creating a risk of electric shock.
•Fuel, such as charcoal briquettes, is not to be used with appliance.
•Use only on properly grounded outlet.
•Be sure that handles are assembled and fastened properly. See instructions regarding handles on Page 10-11.
•SAVE THESE INSTRUCTIONS.
 WARNING
•DO NOT use 16 or 18 gauge extension cords. Damage to household wiring and/or fire could result.
THE USE OF AN EXTENSION CORD IS NOT RECOMMENDED.
READ ALL INSTRUCTIONS PRIOR TO USING AN EXTENSION CORD WITH THIS SMOKER
•Use only OUTDOOR type with 3 prong grounding plug, rated for 15 amperes or more, approved by
UL, marked with a W-A and a tag stating “Suitable for Use with Outdoor Appliance”.
•Use the shortest length extension cord required. Do not connect 2 or more extension cords together.
•Do not let cord hang over edge of table top or other items where it can be pulled by children or tripped over.
5

 SAFETY INFORMATION
Ground Fault Interrupter
•Since 1971, the National Electric Code (NEC) has required Ground Fault Interrupter devices on all outdoor circuits.
•If your residence was built before 1971, check with a qualified electrician to determine if a Ground Fault Interrupter protector exists.
•Do not use this appliance if the circuit does not have Class A GFI protection.
•Do not plug this appliance into an indoor circuit.
GENERAL SAFETY
READ ALL INSTRUCTIONS PRIOR TO USING THIS SMOKER
•This appliance is for outdoor use only in well-ventilated areas. DO NOT operate it under a roof, in a building, garage or any other enclosed area, or under overhead construction.
•Before each use, check that no dead leaves or debris are under the appliance.
•Keep a fire extinguisher near this product at all times.
•Always unplug the smoker when not in use.
•Allow the smoker and its components to cool completely before conducting any routine cleaning
or maintenance.
•DO NOT use water or other liquid spray to clean the smoker without first unplugging the unit.
•Allow the smoker to cool to 115°F (45°C) before moving or storing. Use caution when lifting and moving the appliance to avoid back strain or back injury.
•DO NOT move the appliance while it is in use.
•When not in use, the smoker should be kept out of the elements or protected with a cover. Allow the smoker to completely cool before placing the cover. Store this appliance in a dry, protected location when possible.
•Use of accessory attachments not recommended by the appliance manufacturer may lead to injury or property damage.
6

 SAFETY INFORMATION
 WARNING
To avoid serious injury:
•While cooking, the smoker must be on a level, stable, noncombustible surface in an area clear of combustible material, including long or dry grass.
•The use of alcohol, prescription or nonprescription drugs may impair the user’s ability to properly assemble and safely operate this appliance.
•DO NOT move the appliance while it is in use.
•DO NOT store and use this appliance near gasoline or other combustible liquids or where other combustible vapors may be present.
•The smoker should only be used in well-ventilated areas.
•DO NOT use this appliance as a heater.
•DO NOT leave the appliance unattended while in use. Keep children and pets away from the appliance at all times.
•This appliance will be hot during and after use. Use insulated oven mitts or gloves for protection from hot surfaces or splatter from cooking liquids.
CALIFORNIA PROPOSITION 65
 WARNING
This product and the fuels used to operate this product (charcoal or wood), and the products of combustion of such fuels, can expose you to chemicals including carbon black, which is known to the State of California to cause cancer, and carbon monoxide, which is known to the State of California to cause birth defects or other reproductive harm.
For more information go to www.p65Warnings.ca.gov
 DANGER
In case of fire, unplug smoker from outlet and allow fire to burn out. Do not use water to put out a fire in this or another electrical appliance.
To avoid electrical shock, disconnect electric cord before cleaning smoker. Never immerse electric controller or heating element in any liquid.
To avoid the possibility of burns, make sure the smoker is completely cooled before removing and/or cleaning electric controller and heating element.
DO NOT use steel wool or wire brushes to clean the inside of the appliance. Pieces can break off and touch electrical parts creating a risk of electric shock.
7
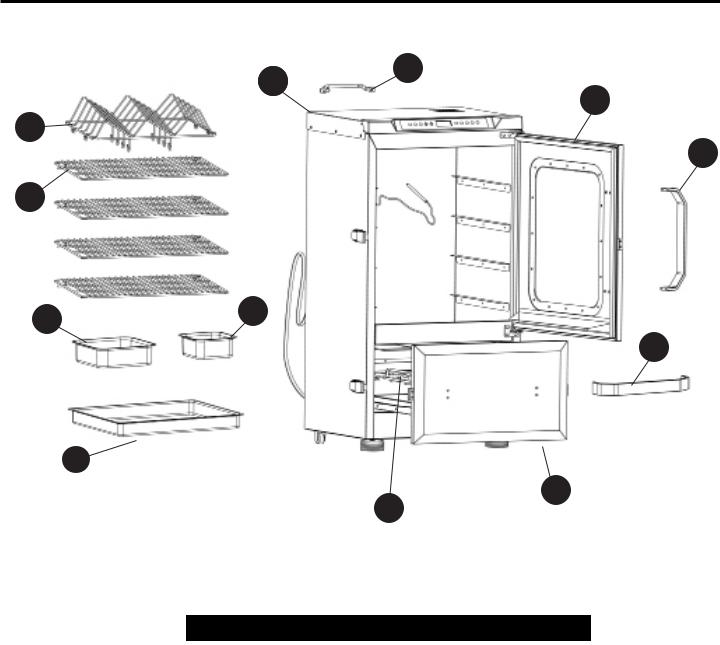
PACKAGE CONTENTS
A B
C
I
E
F
G H
E
J
D
K
PART |
DESCRIPTION |
QUANTITY |
A |
Smoker cabinet assembly |
1 |
B |
Rear handle |
1 |
C |
Upper door assembly |
1 |
D |
Lower door assembly |
1 |
E |
Door handle (upper door/ |
2 |
|
lower door) |
|
F |
Cooking grates |
4 |
G |
Water bowl |
1 |
H |
Wood chip box |
1 |
I |
Rib & Sausage Rack |
1 |
J |
Grease tray |
1 |
K |
Wood chip box support |
1 |
8

HARDWARE CONTENTS (PRE-ASSEMBLED)
AA |
BB |
M5 x 12 mm |
M4 x 35 mm |
Screw |
Screw |
Qty. 2 |
Qty. 8 |
2 M5 x 12 mm |
4 M4 x 35 mm |
screws (AA) are |
screws (BB) are pre- |
pre-assembled in |
assembled in each |
the smoker cabinet |
of the 2 door handles |
assembly (A). |
(upper door/lower |
|
door) (E). |
PREPARATION BEFORE ASSEMBLY
Before beginning assembly of product, make sure all parts are present. Compare parts with package contents list and hardware contents list. If any part is missing or damaged, do not attempt to assemble the product. Please read and understand this entire manual before attempting to assemble, operate or install the product. If you have any questions regarding the product, call our customer service department at 1-877-447-4768, 8:00 a.m.- 4:30 p.m. CST,
Monday - Friday.
Estimated Assembly Time: 15 minutes
Tools Required for Assembly (not included): Phillips Screwdriver
9
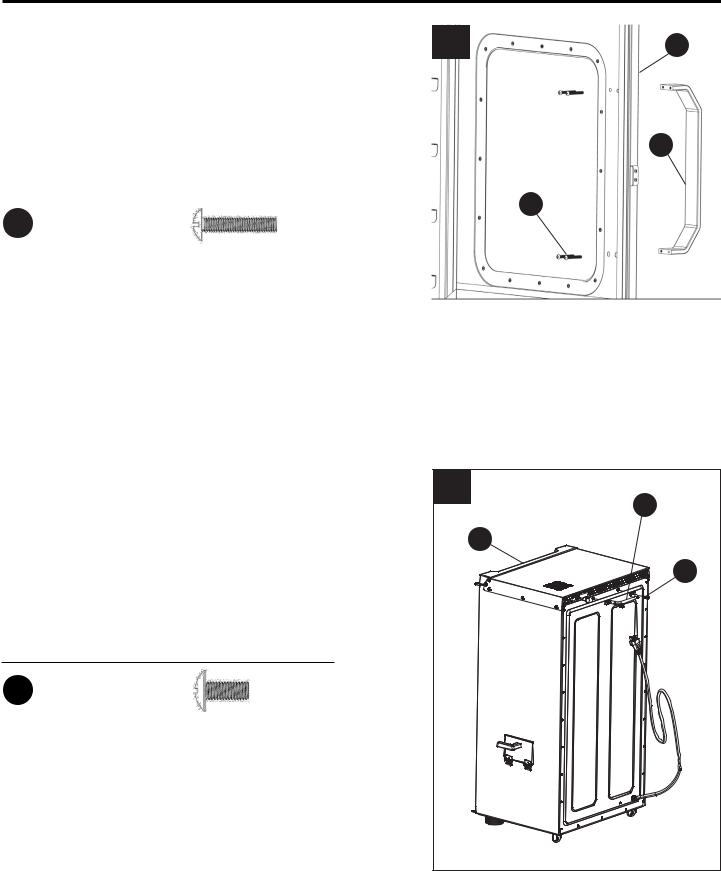
ASSEMBLY INSTRUCTIONS
1. |
Remove the 4 pre-assembled M4 x 35 mm |
|
|
|||
1 |
C |
|||||
|
screws (BB) from the door handle (E) and attach |
|||||
|
the door handle (E) on the upper door assembly |
|
|
|||
|
(C) as shown. Tighten the screws. |
|
|
|
|
|
|
|
|
|
|
E |
|
Hardware Used |
|
|
|
BB |
||
BB |
M4 x 35 mm |
x 4 |
|
|||
|
|
|||||
|
Screw |
|
|
|
|
|
|
|
|
|
|
|
|
2. |
Remove the 2 pre-assembled M5 x 12 mm screws |
2 |
|
(AA) from the smoker cabinet assembly (A). Insert |
|
|
the 2 screws into the rear handle (B), and into the |
B |
|
|
|
|
threaded holes on the back of the smoker cabinet |
A |
|
assembly (A). Tighten the screws. |
|
|
|
AA
Hardware Used
AA |
M5 x 12 mm |
x 2 |
|
Screw |
|
10
ASSEMBLY INSTRUCTIONS
3. |
Remove the lower door assembly (D) from the |
|
|
|
|
3 |
|
||
|
smoker cabinet assembly (A). |
|
||
D
A
4.Remove the 4 pre-assembled M4 x 35 mm screws (BB) from the door handle (E). Insert the 4 screws into the lower door assembly (D), and into the threaded holes in the door handle (E). Tighten the screws.
Hardware Used
BB |
M4 x 35 mm |
x 4 |
|
Screw |
|
4 |
D |
E |
BB |
11
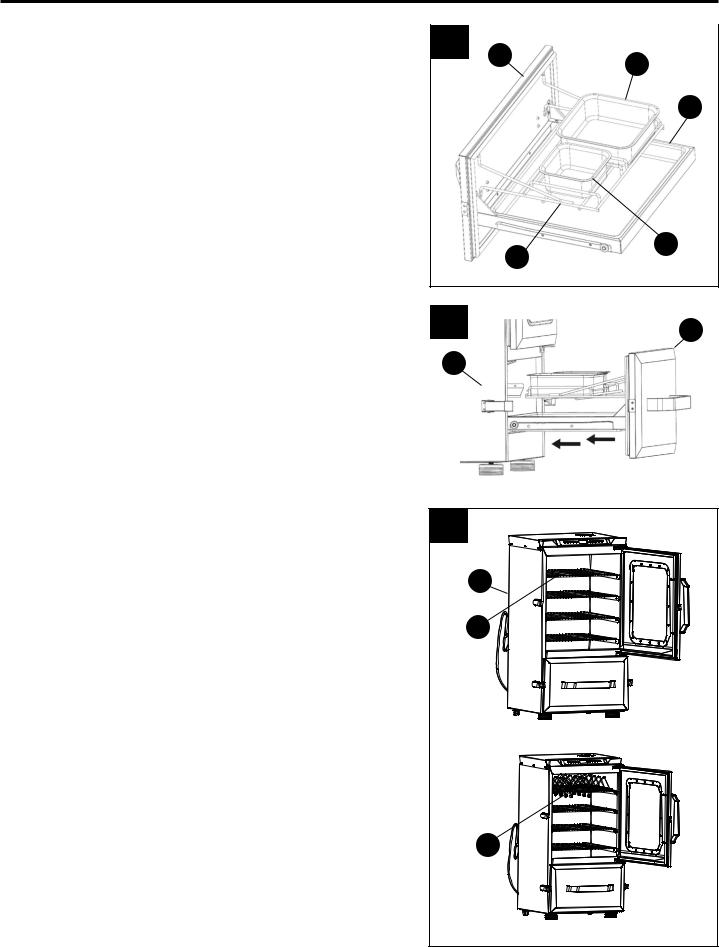
ASSEMBLY INSTRUCTIONS
5. |
Place wood chip box (H) and water bowl (G) |
|
|
|
|
|
5 |
|
|
||
|
on the wood chip box support (K). Insert the |
D |
G |
||
|
grease tray (J) into the lower door assembly (D). |
|
|||
|
|
|
|||
J
H
K
6.Slide the lower door assembly (D) onto the cabinet support rails as shown.
7.Slide the 4 cooking grates (F) onto the support rails of the cabinet (A) as shown.
Installing the Rib and Sausage Rack (Optional): Place the rib and sausage rack (I) directly onto the desired grate before sliding the grate onto the supports.
6 |
D |
A |
|
|
|
7
A
F
I
12

OPERATING INSTRUCTIONS
READ ALL INSTRUCTIONS PRIOR TO USING THE SMOKER FOR THE FIRST TIME
Before Initial Use:
Remove all packaging, hang tags, plastic straps, and sales stickers if present. Do not use sharp tools.
Wash cooking grates with warm, soapy water, rinse and allow to completely dry before placing them back into the smoker.
Prior to initial use, it is important to “season” your smoker. Seasoning helps eliminate potential factory residue that occurs during production and enhances flavoring, durability and overall performance.
Refer to Page 17 for operating the time and cook temperature required for seasoning.
Before Each Use:
READ ALL INSTRUCTIONS PRIOR TO USING THE SMOKER
•The smoker must be on a level, stable, noncombustible surface in an area clear of combustible material, including long or dry grass.
•Avoid moving the smoker over bumpy or uneven surfaces. Damage to the smoker may occur as a result.
•To prevent household circuit breakers from tripping, keep electric smoker controls and cord connections dry and do not use other electrical products on the same circuit.
•Make sure the grease tray, wood chip box and water bowl are clean and empty and placed back into the smoker according to the instructions.
•Lightly coat each cooking grate with vegetable oil or vegetable oil spray, to prevent foods from sticking to the grates during cooking.
•DO NOT cover the cooking grates with metal foil.
 WARNING
Failure to follow all manufacturer’s instructions could result in serious personal injury and/or property damage.
Use care when operating your smoker.
To avoid possible flare-ups or grease fires, clean and empty the water bowl and grease pan before use.
Read and follow all the information and safeguards in this product guide before attempting to assemble or operating this smoker.
 CAUTION
•Do not use sharp or pointed tools to clean smoker.
•Do not use abrasive oven cleaners, steel wool or metal brushes to clean porcelain grates or smoker body. They will damage the finish.
•Replace damaged part(s) only with Dyna-Glo certified replacement parts. Do not attempt to repair damaged parts.
13
OPERATING INSTRUCTIONS
Safety Guidelines
•Refer to the “Troubleshooting Section” on Pages 22 and 23 for operational problems.
•DO NOT open the smoker door while operating, unless it is necessary. Opening the door will allow heat to escape and prolong the cooking time.
•DO NOT USE CHARCOAL. This appliance is not designed for use with charcoal or similar combustible fuels and a fire will result if charcoal is used during operation. The fire will create an unsafe condition and damage the smoker.
•Although wood chips are not required for operating the smoker, they should be used during the cooking process to create the smoke needed for adding flavor.
•In order to maintain optimal performance, cleaning the smoker after each use is highly recommended. Wait until the smoker has completely cooled before cleaning. Refer to the Care and Maintenance section on Page 21.
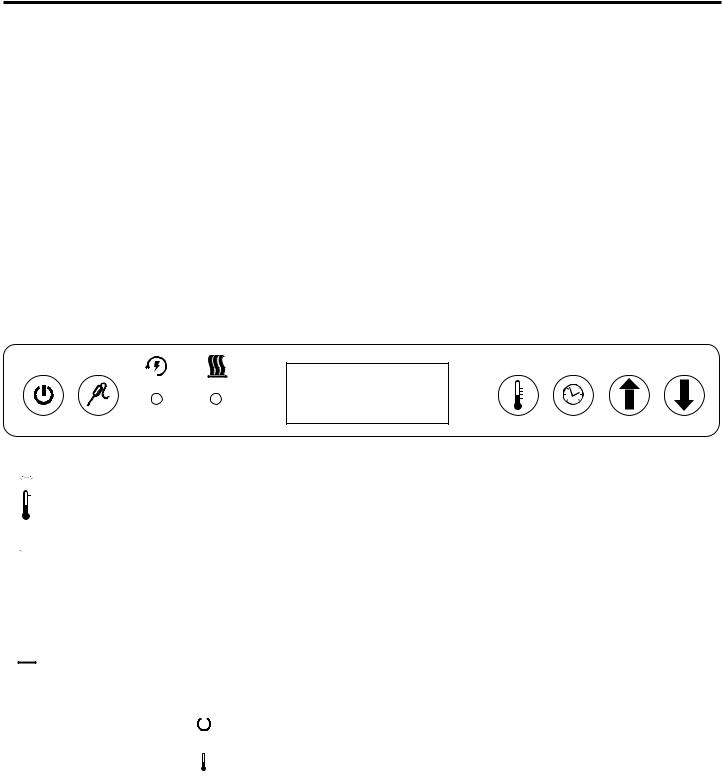
CONTROL PANEL OPERATING INSTRUCTIONS
00:00

 – Turns smoker on and off
 – Switches input to adjust cooking temperature.
 – Switches input to adjust cooking time. Switches between F and C when held for 5 seconds.
 – Displays the meat temperature, when pressed.
 – Indicates that the smoker is plugged in and ready to turn on, when lit.

 – Indicates the burner is ON, when lit.
•Press the Power Button 
 once (a beep should occur). The display will switch between 00:00 and the internal temperature (F or C) every few seconds until the control panel receives the input settings for Temp Button (
 ) and/or Time Button
  .
.
NOTE: Although water is not required during the cooking process, always leave the water bowl in place while operating the smoker. If additional water is needed during the cooking process, carefully pour water into the water bowl. DO NOT remove the water bowl to add water. Avoid splashing water onto the heating element. Serious damage to the heating element could result, along with flare-ups and electrical failure.
14

OPERATING INSTRUCTIONS
Using the Meat Thermometer:
The meat thermometer measures the internal temperature of the meat and is useful for indicating when food has reached the recommended temperature for safe consumption. Refer to the chart on Page 20 for proper food temperatures. For proper placement, remove the probe from the holster and push the end of the thermometer towards the center of the thickest part of the meat. This portion of the meat will require the longest cook time. If your meat has a bone, avoid touching the end of the thermometer to the bone while cooking. If the thermometer is not used during the cooking process, it should be kept inside the holster. For more information on food safety call:USDA Meat and Poultry Hotline at 1-888-MPHOTLINE (888-674-6854) In Washington, DC
Or E-mail: mphotline.fsis@usda.gov
Or visit the USDA website at www.fsis.usda.gov
Meat Probe in the holster |
|
Meat Probe out of the holster |
|
|
|
|
|
|
15

OPERATING INSTRUCTIONS
COOKING WITH THE SMOKER:
A. Using the Time Button 
Display Range: 00:00 – 24:00 hours.
1.Plug in the smoker and press the Power button 
 once (a beep should occur).
2.Press the Time button  to display "00:00". The hour side will blink on and off.
3.Press the "UP" or DOWN" button to raise or lower the hour in 1 hour increments. (The display will continue to blink). Hold down the button to automatically increase or decrease the time and release the button when the desired cooking time setting is reached. NOTE: If the "UP" or "DOWN" buttons are not pushed within 5 seconds, the
time setting will default back to "00:00" and the Time button  must be pushed again to restart the time setting process.
4.Press the Time button  again to complete the hour setting. The minute side will now blink on and off.
5.Press the "UP" or "Down" button to raise or lower the minutes. The display will continue to blink.
6.Press the Time button  again to complete the minute setting. The time display will stop blinking and the "Heating" indicator light will turn on. Cooking temperature is now ready to set.
NOTE: The default temperature is set to 180° F (82° C).
NOTE: To switch between Fahrenheit (F) and Celcius (C), press and hold the Time  button
for 5 seconds. A beep will occur and the display will switch between the new temperature reading and the cook time.
B. Setting the Cooking Temperature (  )
)
1. |
Press the Temp button ( |
). The display will blink to indicate that temperature is ready to set. |
2. |
Press and hold the "UP" or "DOWN" button to automatically increase or decrease |
|
|
the temperature setting and release the button when the desired cooking temperature |
|
|
setting is reached. NOTE: If the "UP" or "DOWN" buttons are not pushed within 5 |
|
|
seconds, the temperature will default back to the original setting of 180° F (82° C). |
|
|
and the Temp button must be pushed again to restart the temperature setting process. |
|
3. |
Press the Temp button ( |
) again to complete the temperature setting. The display |
|
will no longer blink. |
|
NOTE: The heating process will not start until the cook time has been set. The cooking timer will begin counting down, once the desired cooking temperature is set and the "Heating" indicator light will turn off, when the desired internal cooking temperature is reached.
•The display will continue to alternate, every few seconds, between remaining cook time and internal temperature reading.
•The smoker will beep 3 times when the cooking timer reaches "00:00".
•Time and temperature settings can be adjusted any time during the cooking process.
IMPORTANT: Always cook with both the water bowl and wood chip box in place, regardless of whether or not they are filled.
C.Using the Meat Probe Button ( )
)
Insert the meat probe into the meat. Press and hold the Meat Probe button ( to display the temperature of the meat. The display will revert back to the internal temperature of the smoker after the Meat Probe button
  is released.
Refer to Page 20 for suggested smoking and meat temperatures.
16

OPERATING INSTRUCTIONS
NOTE: If appliance is powered on and left unattended for 19 hours, the appliance will automatically turn off.
The control panel temperature reading may fluctuate plus or minus 10-15° F (5-8° C) as the appliance cycles to maintain correct cooking temperature setting.
Seasoning the Smoker (Before Initial Use)
To season your smoker, follow these steps WITHOUT the use of food:
1.Place desired flavoring woods in wood chip box and fill to 3/4 full. DO NOT put water in water bowl.
2.With the smoker door closed, turn the smoker on by pressing the Power button 
 .
.
3.Press the Temperature button (  ) and use the "UP" or "DOWN" to set the cook temperature to 275° F (135° C).
4.Press the Timer button  and use the "UP" or "DOWN" buttons to set the time to 2 hours (02:00)
5.Once seasoning is complete, the smoker’s interior will have a durable, seasoned coating.
6.Allow the ashes to completely cool before cleaning out the wood chip box.
 CAUTION
The smoker becomes HOT during use. Use heat resistant gloves while accessing the inside of the smoker.
Using the Wood Chip Box:
The wood chip box is designed to provide a sustainable amount of smoke and flavor during the cooking process. Fill the box at least 1/2 to 3/4 full with desired wood chips or wood pellets. Anything more or less than this amount may not create the appropriate amount of smoke for adding flavor. Refer to Page 19 for the types of wood chips that are recommended for various foods. To add more wood
chips or pellets during the cooking process, unlatch the bottom drawer and slowly pull out the drawer until the wood chip box is accessible. The amount of new wood chips will depend on cooking time and the amount remaining in the wood chip box. Using heat-resistant gloves, place enough wood chips to fill the box 3/4 full. Do not remove the burnt chips or ashes until after the cooking process is complete. Do not over fill the box. Slowly close the drawer and secure with both latches. Do not use wood chunks or charcoal. NOTE: The use of wood chips or wood pellets is not required during the cooking process.
NOTE: Always operate the smoker with the wood chip box in place – regardless of whether or not wood chips are used.
Using the Water Bowl:
The use of water in the bowl is not required, but the water bowl MUST be in place during operation.
To use the bowl, fill with NO MORE THAN 24 ounces (710ml) of warm water, before turning on the smoker. Cold water may prolong the cooking process. Do not overfill the water bowl. Doing so may cause the water to splash inside the smoker. IMPORTANT: Always cook with both the water bowl and wood chip box in place, regardless of whether or not they are filled.
17

OPERATING INSTRUCTIONS
 CAUTION
•Do not use sharp or pointed tools to clean smoker.
•Do not use abrasive oven cleaners, steel wool or metal brushes to clean porcelain grates or smoker body. They will damage the finish.
•Replace damaged part(s) only with Dyna-Glo certified replacement parts. Do not attempt to repair damaged parts.
•In order to maintain optimal performance, cleaning the smoker after each use is highly recommended.
•Wait until the smoker has completely cooled before cleaning.
•Plastic or bristle brushes may be used for cleaning stubborn stains.
•DO NOT use steel wool or wire brushes. Pieces can break off and touch electrical parts creating a risk of electric shock.
•Clean the controller casing and heating element by wiping with a damp cloth. Use a mild detergent.
•Completely dry the controller casing and heating element before use. Failure to do so, may cause damage to the controller and prevent the smoker from working properly.
•Clean the cooking grates with warm soapy water or with a water & baking soda solution. Nonabrasive scouring powder can be used for stubborn stains.
•Clean the grease tray and water bowl with a damp cloth and warm soapy water. Allow the liquids inside the water bowl and grease tray to cool completely before cleaning.
•Avoid cleaning the cooking surfaces, while the smoker is still hot.
•Follow all warnings and safety precautions before removing meat from smoker or preparing the unit for storage.
18

TIPS ON SMOKING
Pairing wood chips with a specific type of food will depend on the preferences of the user. This page can be used as a general guideline for acquiring the ideal flavor.
•Hardwoods such has hickory, pecan, apple, cherry or mesquite typically burn slower and produce more smoke over longer periods of time.
•To prolong the burn cycle for wood chips, pre-soak them in a separate bowl of water for at least 30 minutes, and/or wrap the chips in perforated aluminum foil.
•Most smoke flavoring occurs within the first hour of cooking. Adding wood chips after the first hour is typically not necessary unless extra smoke flavoring is desired.
Here's a list of the most popular smoking woods and a little information about each.
Type of Wood |
Suggested Food |
Comments |
|
|
|
Mild and sweet flavor with a slight hint of fruity flavor. |
|
Apple |
All meats |
Each species of apple wood should offer a slightly different |
|
|
|
flavor. Apple smoke produces an attractive browning effect. |
|
|
|
|
|
Almond |
All meats |
Produces a sweer smoke with a natural nutty flavor. |
|
|
|
|
|
Ash |
Fish and red meat |
Very light flavor. |
|
|
|
|
|
Citrus |
Pork and chicken |
Lemon and orange wood produce a light but fruity flavor. |
|
|
|
|
|
Cherry |
Pork and Beef |
Light and fruity flavor. |
|
|
|
|
|
Fruitwood |
Pork, poultry and fish |
Woods such as peach, pear and plum produce a mild but |
|
sweet smoke with a hint of fruity flavor. |
|||
|
|
||
|
|
|
|
Grapevine |
Poultry, game and lamb |
Grapevine wood produces a lot of smoke. A little wood goes |
|
a long way. It produces a tart flavor that has a hint of fruit. |
|||
|
|
||
|
|
|
|
Hickory |
Pork and beef |
Hickory is aruably the favorite wood for smoking. Hickory |
|
produces a very strong flavor so we reccomend starting |
|||
|
|
slow with this wood. |
|
Maple |
Pork and Poultry |
Light and sweet. |
|
|
|
|
|
Mesquite |
Beef, chicken and fish |
This wood burns very hot so be aware. Much like hickory, |
|
mesquite produces a strong flavor. |
|||
|
|
||
|
|
|
|
Oak |
Red meats, game, ribs |
Another wood that produces a heavy smoke. Start slow |
|
and fish |
with this wood. |
||
|
|||
|
|
||
|
|
|
|
Pecan |
Ribs and red meat |
Produces a light smoke that offers a sweet and nutty flavor. |
|
|
|
|
19

SUGGESTED SMOKING AND MEAT TEMPERATURES
Suggested Smoking |
Safe Minimum Food |
Temperatures |
Temperatures |
Meat, Poultry, Fish
Beef, veal and lamb (pieces and whole cuts)
|
Medium-rare |
225° F (107.2° C) |
|
145° F (63° C) |
|
|
|
|
|
|
|
|
Medium |
225° F (107.2° C) |
|
160° F (71° C) |
|
|
|
|
|
|
|
|
Well done |
225° F (107.2° C) |
|
170° F (77° C) |
|
|
|
Pork |
|
|
|
|
(ham, pork loin, ribs) |
|
|
||
|
|
|
|
|
|
|
Pork (pieces and |
225 - 240° F |
|
160°F (71° C) |
|
|
whole cuts) |
(107.2 - 115.6° C) |
|
|
|
|
Ground meat and meat mixtures |
|
|
||
|
(burgers, sausages, meatballs, meatloaf, casseroles |
||||
|
and mechanically tenderized beef) |
|
|
||
|
|
|
|
|
|
|
Beef, veal (including |
250 - 275° F |
|
|
|
|
mechanically tenderized), |
(121 - 135° C) |
|
160°F (71° C) |
|
|
lamb and pork |
|
|
|
|
|
Poultry (chicken & turkey) |
250 - 275° F |
|
165°F (74° C) |
|
|
|
(121 -135° C) |
|
|
|
|
|
Poultry |
|
|
|
|
(chicken, turkey, duck) |
|
|
||
|
Pieces |
250° F (121° C) |
|
165° F (74° C) |
|
|
Whole |
250° F (121° C) |
|
165° F (74° C) |
|
|
|
Seafood |
|
|
|
|
Fish |
225 - 240° F |
|
158°F (70° C) |
|
|
|
(107.2 - 115.6° C) |
|
|
|
|
Shellfish (shrimp, lobster, |
225 - 240° F |
|
165°F (74° C) |
|
|
crab, scallops, clams, |
(107.2 - 115.6° C) |
|
||
|
mussels and oysters) |
|
|
|
|
|
|
|
|
|
|
Since it is difficult to use a food thermometer to check the temperature of shellfish, discard any that do not open when cooked.
Suggested Smoking |
Safe Minimum Food |
Temperatures |
Temperatures |
Game
Chops, steaks and roasts
(deer, elk, moose, caribou/reindeer, antelope and pronghorn)
|
Well done |
225° F (107.2° C) |
170° F (77° C) |
||
|
|
Large Game |
|
|
|
|
Bear, bison, musk ox |
250 - 300° F |
165° F (74° C) |
||
|
walrus, etc. |
(121 - 149° C) |
|
|
|
|
|
Small game |
|
|
|
|
Rabbit, muskrat, |
225 - 240° F |
|
|
|
|
beaver, etc. |
(107.2 - 115.6° C) |
165° F (74° C) |
||
|
|
Ground Meat |
|
|
|
|
Ground meat and |
250 - 300° F |
|
|
|
|
meat mixtures |
(121 - 149° C) |
165° F (74° C) |
||
|
Ground venison |
250 - 300° F |
|
|
|
|
and sauage |
(121 - 149° C) |
165° F (74° C) |
||
|
Game birds/waterfowl |
|
|
|
|
|
(wild turkey, duck, goose, partridge and pheasant) |
||||
|
Whole |
250° F (121° C) |
165° F (74° C) |
|
|
|
Breasts and roasts |
250° F (121° C) |
165° F (74° C) |
||
|
|
|
|
|
|
|
Thighs, wings |
250° F (121° C) |
165° F (74° C) |
|
|
|
Stuffing (cooked alone |
250° F (121° C) |
165° F (74° C) |
||
|
or in a bird) |
|
|
|
|
20
CARE AND MAINTENANCE
AFTER USE SAFETY AND MAINTENANCE
 WARNING
•Use caution when lifting and moving the smoker to avoid strain injuries. Two people are recommended to lift or move the smoker.
•DO NOT store the smoker near gasoline or other combustible liquids or where combustible vapors may be present. Keep the area around the smoker clear and free of combustible materials and vapors.
•DO NOT store this smoker in an area accessible to children or pets. Store the smoker in a dry, protected location.
•DO NOT allow anyone to conduct activities around the smoker following use until
it has cooled. It is hot during operation and remains hot for a period of time following use.
•DO NOT leave hot ashes unattended until the smoker cools completely.
•The smoker becomes extremely hot. Allow the smoker to cool completely before handling. Allow the smoker to cool before removing and cleaning the grease pan.
•Dispose of cold ashes by wrapping them in heavy-duty aluminum foil and placing them in a noncombustible container. If you must dispose of the ashes in less time
than it takes for them to completely cool, remove the wood chip box from the smoker with heat resistant gloves, place the ashes in heavy-duty foil and soak them completely with water before disposing of them in a noncombustible container. Always use protective oven mitts or heat resistant gloves when accessing the inside of the smoker during and after use.
 CAUTION
All care and maintenance procedures are to be performed while the smoker is turned off and cooled.
To clean the inside and outside of the smoker cabinet, simply use a damp cloth. Spray-washing with a water hose is not recommended. Moisture should be wiped away and not allowed to stand inside or on top of the smoker. Once cleaned, you may prefer to lightly coat the interior of the smoker cabinet with cooking oil or cooking spray.
If rust is present on the exterior surface of the smoker, clean the area with steel wool or emery cloth and use heavy-duty, heat-resistant paint.
NEVER apply additional paint to the interior of the smoker.
21

TROUBLESHOOTING
If you have any questions regarding the product, please call customer service at 1-877-447-4768, 8:00 a.m. – 4:30 p.m., CST, Monday – Friday.
PROBLEM |
POSSIBLE CAUSE |
CORRECTIVE ACTION |
|
No heat |
• |
Smoker is turned off. |
• Turn on the smoker. |
from smoker. |
• |
No power. |
• Check for any tripped circuit breakers |
|
• Faulty controller or heating |
and reset the breaker, if needed. |
|
|
|
element. |
• Check for faulty or tripped GFI (Ground |
|
|
|
Fault Interrupter) at the outlet. Reset the |
|
|
|
GFI or replace, if needed. |
|
|
|
• If breaker or GFI continues to trip, use |
|
|
|
a different outlet on a separate breaker |
|
|
|
circuit. |
|
|
|
• Try another working appliance in |
|
|
|
the outlet. |
|
|
|
• Replace controller or heating element. |
|
|
|
|
Circuit breaker trips |
• |
Another appliance is |
• Find another outlet on a separate circuit. |
or fuse blows. |
|
plugged into the same circuit |
• Keep all connections dry and free from |
|
|
as the smoker (too many |
moisture. DO NOT use this appliance in |
|
|
appliances using the |
the rain or when snow is falling. |
|
|
same circuit). |
• Turn the smoker off, unplug the smoker |
|
• Moisture or water in the |
and check the cord for damage. Replace, |
|
|
|
controller, cord connection |
if needed. |
|
|
or outlet connection. |
• Replace controller . |
|
• Damaged or frayed cord. |
|
|
|
• |
Damaged electrical connection. |
|
|
|
|
|
Smoker does |
• |
Smoker was not pre-heated |
• Pre-heat for 15-20 minutes. Increase |
not generate |
|
sufficiently or temperature was |
temperature settings via controller. |
enough heat. |
|
set too low. |
• Close the upper door and/or lower drawer |
|
• Upper door or bottom drawer |
and secure with latches. |
|
|
|
open or unlatched. |
• Use cord rated for outdoor use at 15 amps. |
|
• |
Improper extension cord. |
|
|
|
|
|
Very little or no |
• |
Not enough wood chips. |
• Check wood chip level. Wood chip box |
smoke coming |
• |
Wood chips are too small. |
should be at least 3/4 full. |
from smoker. |
|
|
• To generate proper amounts of smoke, |
|
|
|
wood chips should be at least 1 in. - 3 in. |
|
|
|
(2.5 cm - 7.6 cm) and no thicker than 1/4 |
|
|
|
in. (0.6 cm). Wood shavings and wood |
|
|
|
chunks are not recommended. DO NOT |
|
|
|
use charcoal. |
|
|
|
|
22

TROUBLESHOOTING
|
|
|
|
. PROBLEM |
POSSIBLE CAUSE |
CORRECTIVE ACTION |
|
Flare-ups. |
• |
Meat contains excessive |
• Trim the appropriate amount of fat |
|
|
amounts of fat. |
before cooking. |
|
• |
Cooking temperature is |
• Lower the temperature as needed. |
|
|
too high. |
• Clean the smoker, according to |
|
• |
Grease build-up. |
the instructions. |
|
|
|
|
Persistent |
• |
Too much build-up on |
• Turn off the smoker and carefully open the |
grease fire. |
|
grease drip tray and/or |
upper door and carefully remove the |
|
|
grease cup. |
bottom drawer to allow the fire to burn out. |
|
|
|
DO NOT use water to extinguish the |
|
|
|
fire. Personal injury my result. |
|
|
|
Allow the smoker to completely cool |
|
|
|
before cleaning the tray and cup. |
|
|
|
|
Control Panel |
• |
Circuit failure in firebox temp |
• Contact Dyna-Glo customer service for |
Error Code |
|
sensor or meat probe temp |
parts repair or replacement options. |
(E1, E2, E3 or E4). |
|
sensor. |
|
|
|
|
|
23

REPLACEMENT PARTS LIST
For replacement parts, call our customer service department at 1-877-447-4768, 8:00 a.m. - 4:30 p.m. CST, Monday - Friday or e-mail us at customerservice@ghpgroupinc.com.
PART |
DESCRIPTION |
PART # |
1. |
Smoker Cabinet |
70-01-338 |
|
Assembly |
|
2. |
Top Panel for Cabinet |
70-01-343 |
|
Assembly |
|
3. |
Rear Handle |
70-01-341 |
4. |
Control Panel (Housing |
70-01-342 |
|
& PCB/Bluetooth Board) |
|
5. |
Upper Door Assembly |
70-01-345 |
6. |
Door Handle (Upper |
70-01-344 |
|
Door/Lower Drawer) |
|
7. |
Door Latch Bracket |
70-01-352 |
8. |
Door Latch Handle |
70-01-353 |
|
(without Silicon Sleeve) |
|
9. |
Cooking Grates |
70-01-351 |
10. |
Front Cabinet Leg L/R |
70-01-355 |
11. |
Top Door Hinge |
70-01-339 |
12. |
Bottom Door Hinge |
70-01-340 |
13. |
Water Bowl |
70-01-347 |
14. |
Wood Chip Box |
70-01-346 |
15.Wood Chip Box Support 70-01-362
16. |
Rear Casters |
70-01-354 |
17. |
Grease Tray |
70-01-348 |
PART |
DESCRIPTION |
PART # |
18. |
Lower Drawer Panel |
70-01-363 |
19. |
Silicon Sleeve for Latch |
70-01-356 |
|
Handle |
|
20. |
Top Damper Housing |
70-01-357 |
21. |
Top Damper Plate |
70-01-358 |
22. |
Resin Handle for Top |
70-01-359 |
|
Damper |
|
23. |
Top Damper Plate |
70-09-123 |
|
Attachment Bolt |
|
24. |
Front Cabinet Cross Bar |
70-01-360 |
25. |
Lower Drawer Frame |
70-01-350 |
26. |
Heat Shield |
70-01-361 |
27. |
Outer Drawer Hardware |
70-09-124 |
|
- Left Side |
|
28. |
Outer Drawer Hardware |
70-09-125 |
|
- Right Side |
|
29. |
Inner Drawer Hardware |
70-09-126 |
|
- Left Side |
|
30. |
Inner Drawer Hardware |
70-09-127 |
|
- Right Side |
|
31. |
Rib & Sausage Rack |
70-09-128 |
n/a |
Instruction Manual |
70-10-558 |
24
 Loading...