

Drive Hercules Beetle 18016 User Manual
Nebulizador Portátil Ultrasónico Hercules Beetle
Manual del Usuario
Modelo 18016
Por favor lea todo este manual antes de poner en
funcionamiento esta unidad
Nébuliseur Ultrasonique Portable Hercules Beetle
Manuel de l’utilisateur
Modèle 18016
Veuillez lire ce manuel entièrement
avant d’utiliser cet appareil
Hercules Beetle Portable Ultrasonic Nebulizer
User’s Guide
Model 18016
Please read this user manual completely before
operating this unit
2 3
introduction
Introduction
Product Identication
Cautions
Cleaning Procedures
Modes of Medication Delivery
Operating Your Nebulizer
Using the AC adapter or battery pack
AC adapter
Battery pack
Starting, beginning and ending treatments
Troubleshooting
Product Specications
Warranty
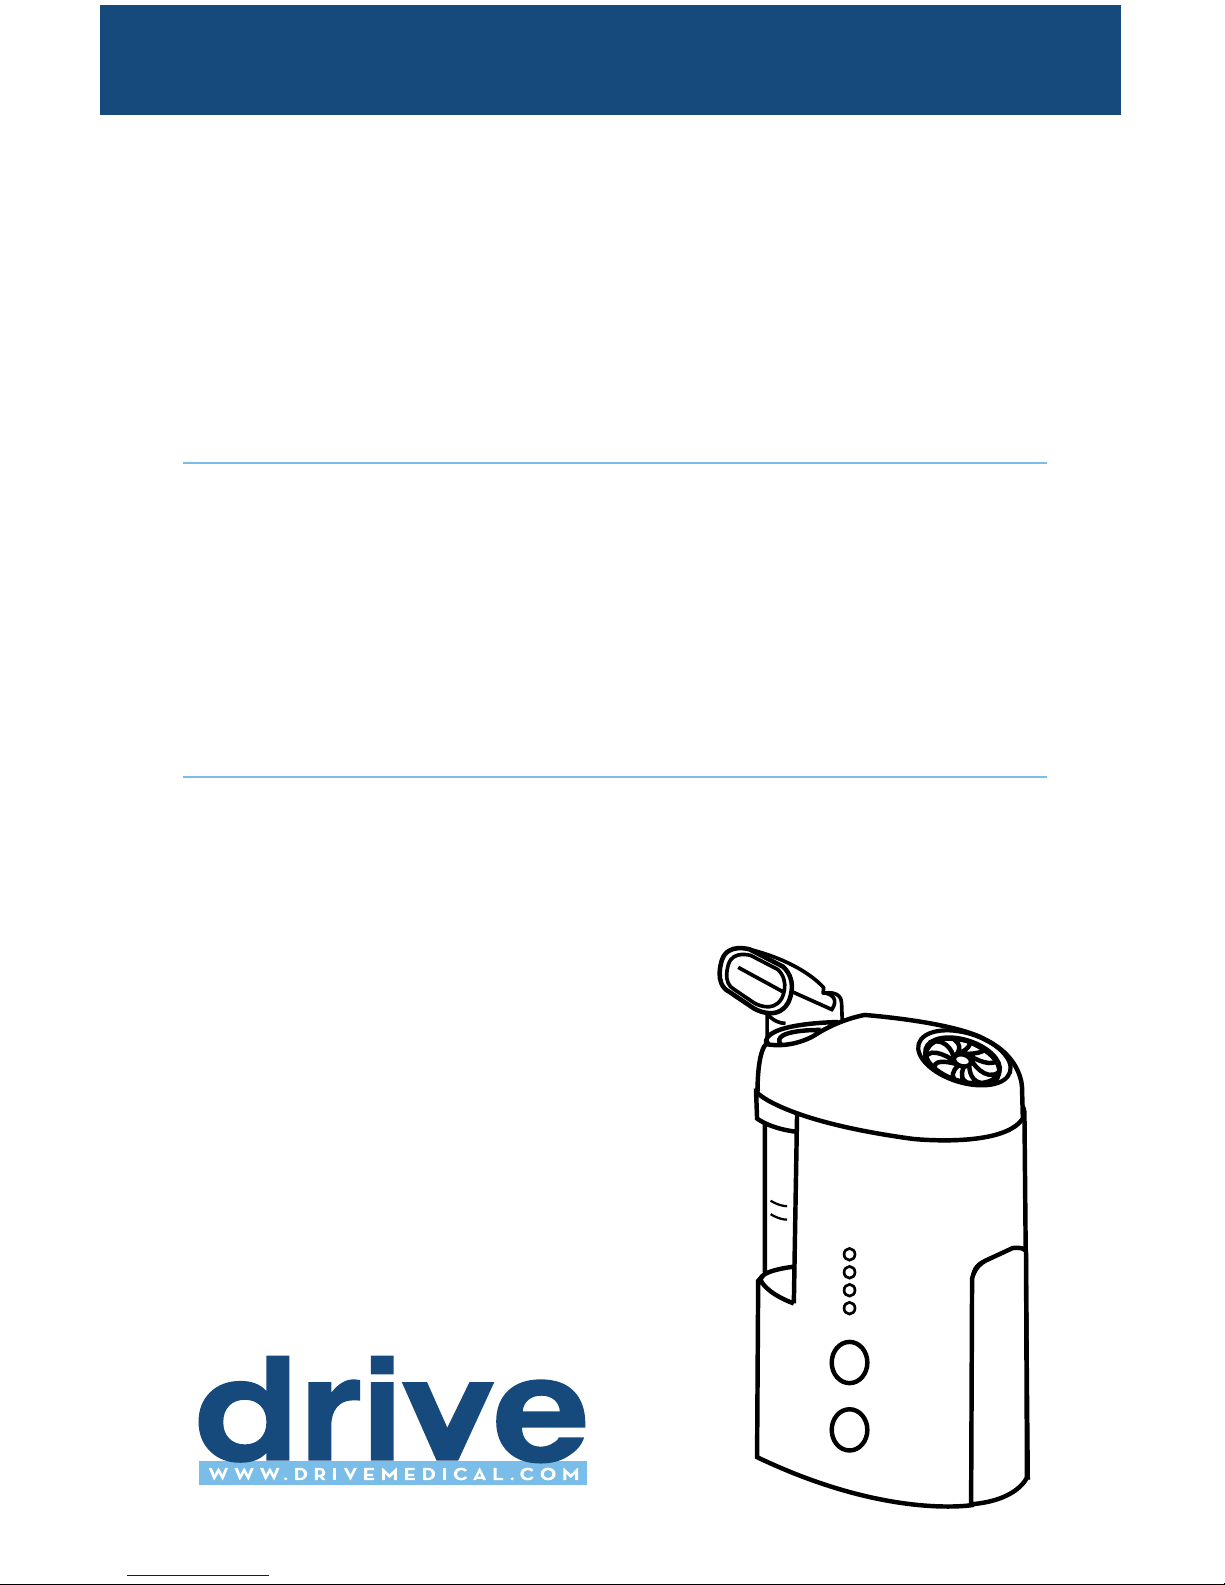
Thank you for purchasing the Drive Ultrasonic Nebulizer. With proper care and
use, your Nebulizer will provide you with many years of reliable treatments.
Your Ultrasonic Nebulizer has been designed to offer compact, portable and
lightweight convenience while receiving inhalation treatments. This unit requires
ordinary tap or distilled water and your physician-prescribed medication to create an effective high frequency mist. Treatments can be administered discreetly
thanks to advanced ultrasonic technology making your Nebulizer virtually silent
during operation. An easy airow volume control with triple settings allows full
control of treatment levels as recommended by your physician and/or respiratory
therapist. This unit operates on standard AC power or battery pack. Treatments
are delivered quickly, safely and conveniently making this unit ideal for all ages.
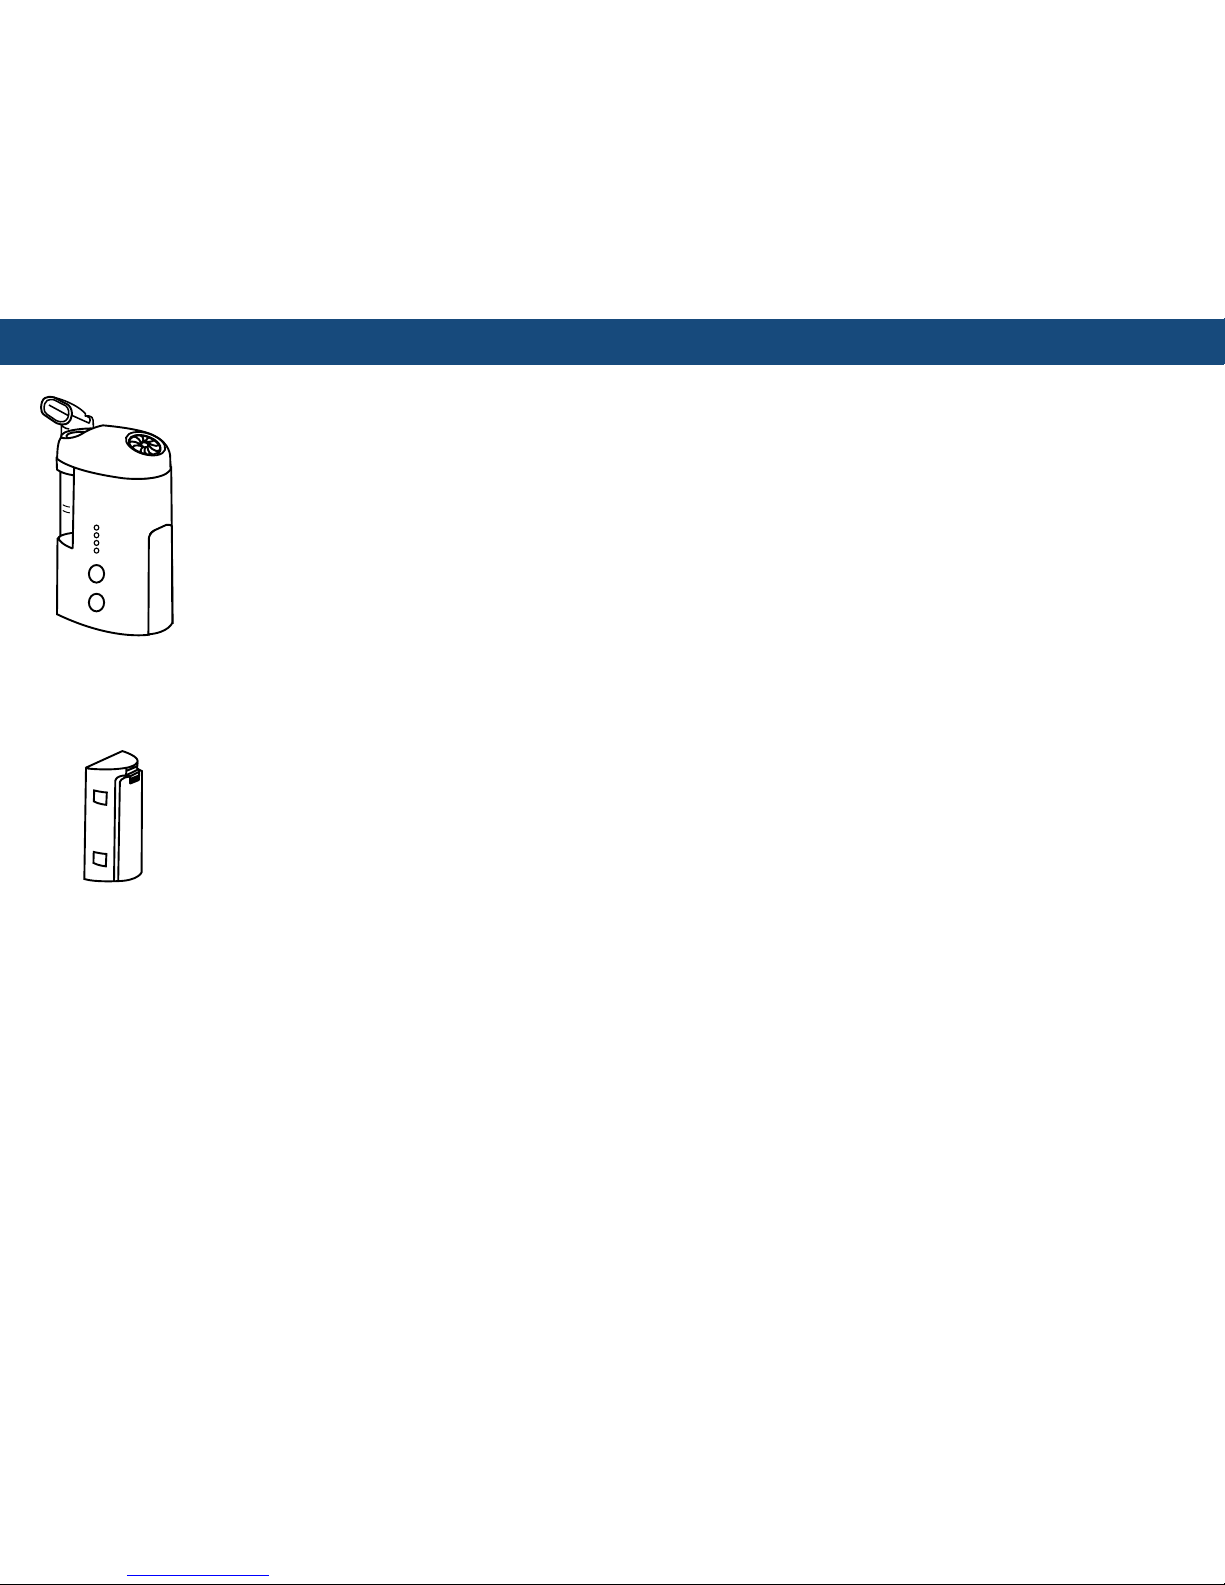
Introduction
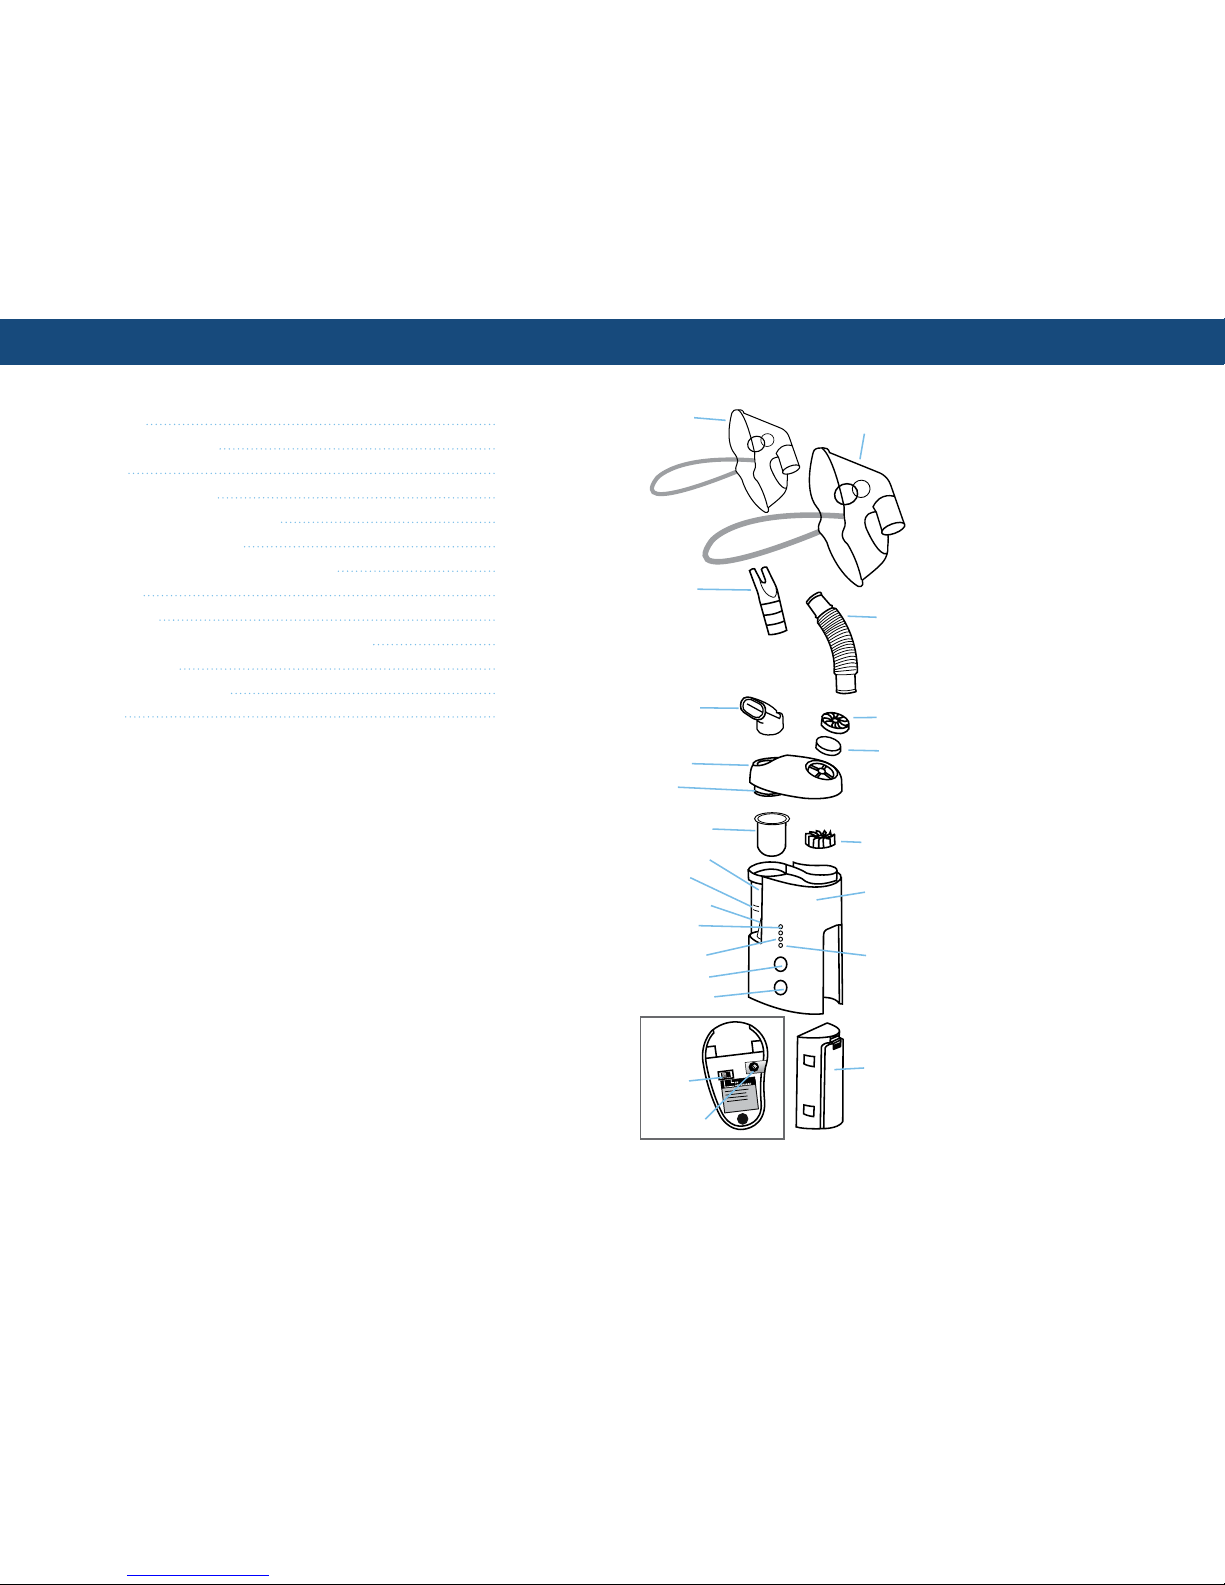
product identication / cautions
Child mask
Adult mask
Nasal Piece
Mouth Piece
Extension
Tube
Filter Cover
Air Filter
Top Cover
Gasket
Medication Cup
Water reservoir
Water level
indicator
Transfer cone
(non removable)
Low-battery
indicator lamp
Airow volume
indicator lamps
POWER button
Nebulization rate
control button
Fan
Main
body
Battery
charging
indicator
lamp
Rechargeable
battery pack
Bottom of
unit view
ON/OFF
CHARGE
Switch
AC port
This unit should be used only for (1) its intended
purpose as described in this user’s guide,and (2)
with medications only under the instruction of your
physician.
READ THE FOLLOWING BEFORE USING
• To avoid electrical shock: Keep unit away
from water
• Do not handle the unit or power cord with wet
hands
• Do not immerse the AC adapter or unit in liquid
• Do not use while bathing
• Do not reach for a unit that has fallen into water—
immediately unplug the unit.
• Do not use the unit if it has any damaged parts
(including power cord or plug), if it has been
submersed in water or dropped, promptly send
the unit for examination and repair.
• The unit should not be used where ammable
gas, oxygen or aerosol spray products are
being used.
• Keep the air vents open. Do not place the unit on a
soft surface where the openings can be blocked.
• If the water reservoir or medicine cup is empty, do
not operate the unit.
• Do not attempt to remove the transfer cone located
in the base of the water reservoir.
• If any abnormality occurs, discontinue use until the
unit has been examined and repaired.
• The unit should not be left unattended while
plugged in.
• Do not use solutions other than water in the
reservoir. It may damage the transducer.
• Do not tilt or shake the unit when in operation.
• Opening the cover during operation may cause a
severe injury.
• Disconnect the unit from the electrical outlet before
cleaning, lling and after each use.
• The unit should not be used for more than 30
minutes at a time.
• Wait 30 minutes before reusing the unit.
Operating Cautions
• Close adult supervision is highlyrecommended
when this unit is used bychildren or individuals
with special needs.
Cautions
Product Cautions
Please use general safety precautions whenoperating
your Nebulizer.
2
3
3-4
4
4
5
5
5
5-6
6
7
8
9
4 5
• Keep your eyes away from the output of
medication mist.
• Change the water after each use.
• The maximum capacity of the medicine cup is 8
ml. and should not be overlled.
• Dilute dense medications or medication volumes
2 ml. or less with distilled water or saline solution to
obtain a volume of at least 4 ml.
• Do not use this unit while operating a vehicle.
• If any discomfort or abnormality occurs, stop using
the unit immediately.
Storage Cautions
• Do not store the unit in direct sunlight, high tem
perature or humidity.
• Keep the unit out of reach of small children.
• Always keep the unit unplugged while not in use.
Cleaning Cautions
• Check the medication cup, air lter, masks, gasket,
extension tube, mouth and nasal pieces and air
lter before each use. Dirty or worn parts should be
replaced.
• Do not immerse the unit in water. It may damage
the unit.
• Disconnect the unit from the electrical outlet before
cleaning.
• Clean all necessary parts after each use as
instructed in this user’s guide.
Battery Cautions
• Do not use the battery with equipment other than
your Drive Ultrasonic Nebulizer, or attempt
to modify it for other uses.
• Do not store the battery in direct sunlight, high
temperature or high humidity.
• Avoid placing the battery on metal or wet surfaces
or inside a metal box. This may short-circuit the
battery’s positive and negative contact causing the
battery to heat up or explode.
Cleaning Procedures
It is important to clean your Nebulizer before the rst
time it is used and after each use. Remember:
Disconnect the unit from the electrical outlet and
never immerse the unit in water.
Cleaning the parts:
The mouth piece, nasal piece, gasket,
masks,extension tube, cover, medicine cap, air
lter cover, air lter, and fan should be cleaned
with a mild detergent or commercially available disinfectant. (Use a non-metal tool to carefully remove the air
lter cover, air lter and fan.) Thoroughly rinse each part
and allow to completely air dry before using.
Cleaning the main body: The main body should be
cleaned with a soft cloth moistened with a non-abrasive
cleanser and water.
cautions / cleaning procedures / modes of medication delivery operation / AC adapter - battery pack
Mouth piece
Connect mouthpiece
to the cover.
Extension tube
with adult mask
Connect one end of the
extension tube to the
adult mask. Connect
the other end to the
cover.
Extension tube with
child mask
Connect one end of the
extension tube to the
child mask. Connect
the other end to the
cover.
Nasal piece
Connect nasal piece to
the cover.
Five modes of medication delivery:
Operating Your Nebulizer
Follow the previous cleaning instructions prior
to using your Nebulizer for the rst time or
after it has been stored for an extended period.
Remember: Always unplug the Nebulizer and
turn off the switch at the bottom before cleaning
and lling and after each use.
To ll the water reservoir,
1. Remove the cover by pulling
straight up, Fig. 1.
Remove the medicine cup
if applicable.
2. Select either tap or distilled
water* that has a temperature
range of 68ºF – 86ºF
(20ºC – 30ºC), Fig. 2
*Distilled water is preferred.
3. Fill the water reservoir with
tap or distilled water to the
indicated level (between the
2 lines located inside the
water reservoir), Fig. 3.
Remember: Do not use solutions other than
water in the reservoir. It may damage the
transducer — Fill to the correct level.
NOTE:
• The use of cool water (below 68ºF or 20ºC)
will result in a lower rate of nebulization.
• The use of warm water (above 86ºF or
30ºC) will result in a higher rate of nebulization.
To ll the medicine cup,
1. Place the medicine cup inside the water
reservoir.
2. Pour the medicine directly into the medicine
cup.
3. Replace the cover.
Remember:
• The maximum capacity of the medicine
cup is 8 ml. and should not be overlled.
• Dilute dense medications or medication
volumes 2 ml. or less with distilled water or
saline solution to obtain a volume of at least
4 ml.
• Only use medications under the instructions
of your physician.
Using the AC adapter or battery pack
Your Nebulizer operates by use of the AC
adapter or battery pack, both included with
your Nebulizer.
Using the AC adapter
1) Insert the adapter plug into
the unit’s AC port, Fig 4.
2) Plug the adapter into a
standard AC outlet.
AC port
(bottom of unit)
Fill
Lines
NOTE: It is not necessary to install the battery pack
when using AC voltage. However, you may wish to
install the batterypack for stability and storage purposes.
Using the battery pack
Your Ultrasonic Nebulizer can operate with the use of
a rechargeable battery when AC power is not available.
The life of the battery is approximately 2 years.
However, battery life will vary depending on usage,
storage and charging conditions.
1) Install the battery pack by
sliding it into the bottom
right side of the Nebulizer,
Fig. 5.
2) Flip the switch at the bottom
to the “OFF/CHARGE” position.
3) Connect the adapter plug
to the unit as described
above, “Using the AC adapter”.
4) To charge the battery, plug the adapter into a
standard AC outlet, based on the following:
Charging Time
1st Time use: 24 hours
Thereafter: 4-12 hours
5) Unplug the adapter after the battery is
fully charged.
IMPORTANT:
• For rst time use or after storing the battery for
a period of time, charge the battery at least
24 hours. Thereafter, it is only necessary to
charge 4 to 12 hours depending on the length
of usage.
• A fully charged battery will last for 20-30
minutes of continuous use.
Fig .1
Fig .2
Fig .3
Fig .4
Fig .5
6 7
• To prolong the life of the battery, only charge the
battery when the low-battery light ashes.
NOTE:
Your Nebulizer is equipped with two battery
lamps. Both are positioned on the front of
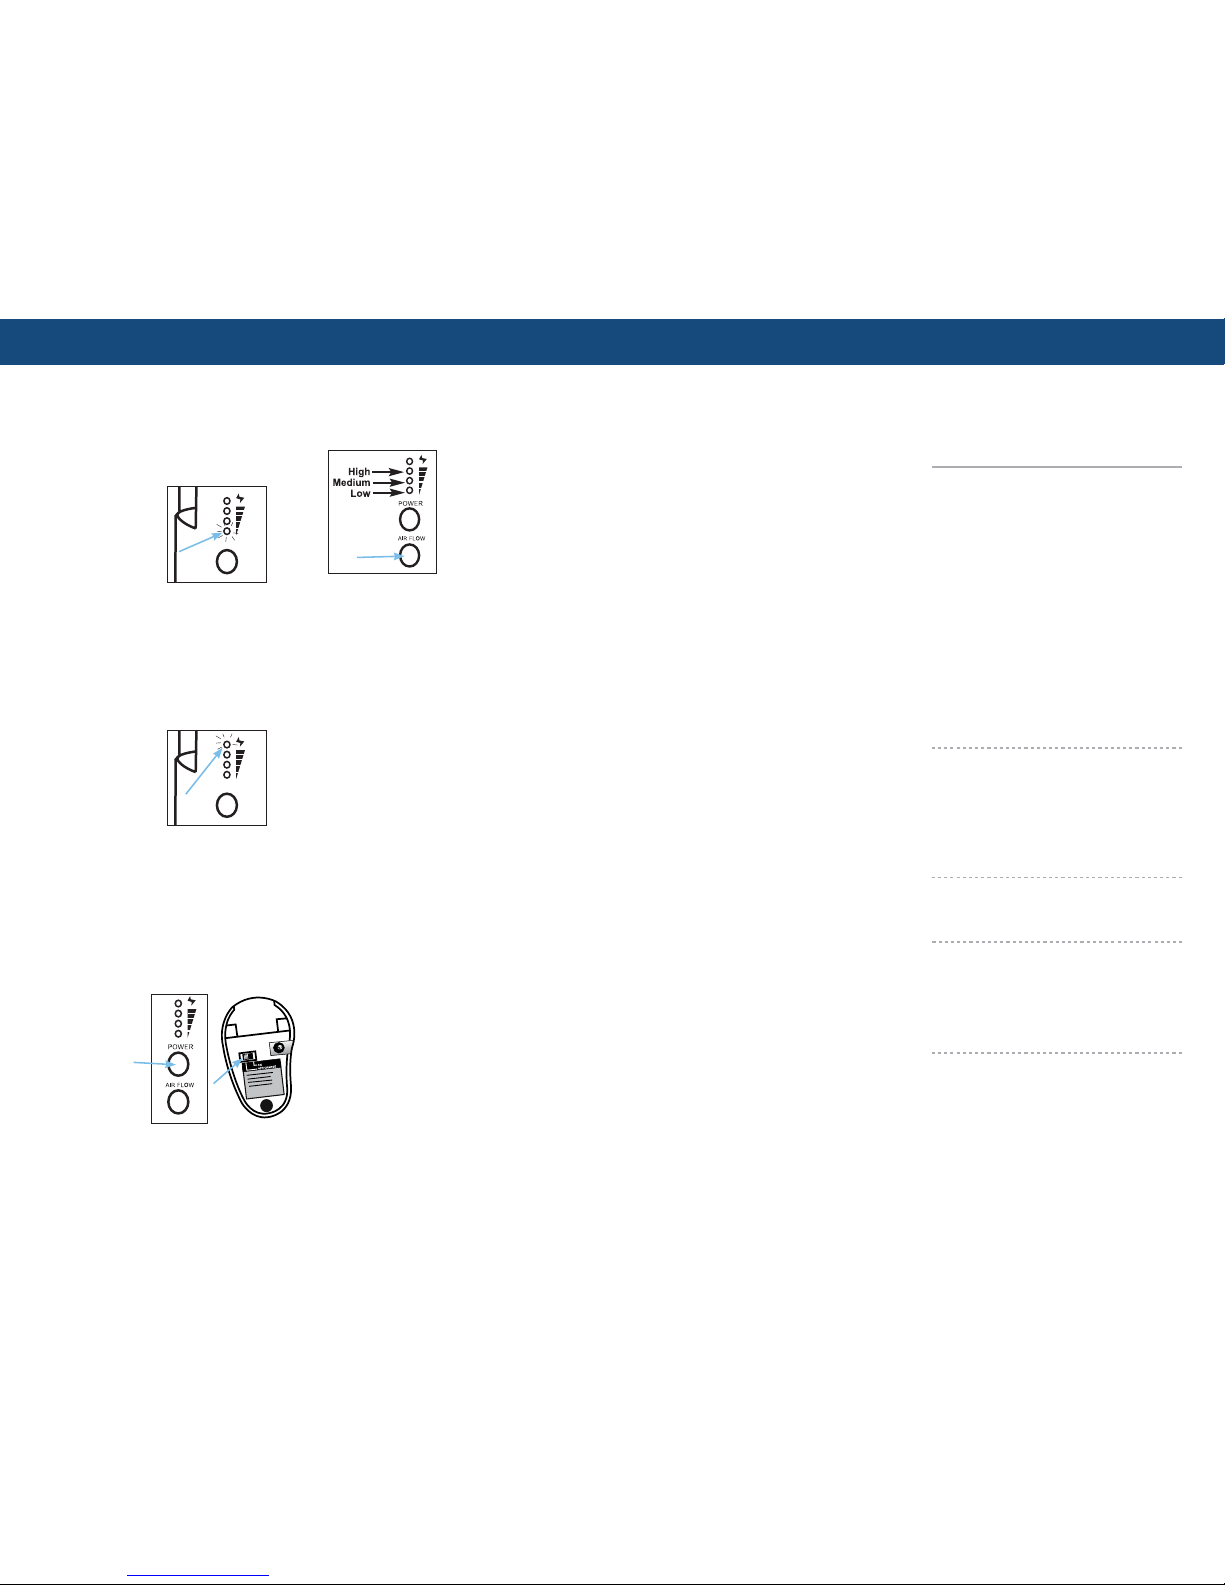
the unit.
1) A ashing red battery
light, Fig. 6, indicates
proper AC connection
and shows that the
battery is being charged.
NOTE: This lamp has a
second function during
operation. It indicates the lowest
nebulization level, Fig. 10.
2) If this lamp, Fig. 7, changes from green to red
during use, the rate of nebulization will decrease,
then cease, indicating thatthe battery needs to be
charged. If this occurs,
(1) Press the POWER button to turn off.
(2) Flip the switch at the
bottom to the
OFF/CHARGE
position.
(3) Replace with a fully
charged battery or
connect to the AC
adapter.
(4) Flip the switch at the bottom to the
ON position.
(5) Press the POWER button and continue treatment.
To start the unit
IMPORTANT! Your unit has two ‘POWER’
switches. One on the
front of the unit, Fig. 8,
and the other on the
bottom, Fig. 9.
1. Place the unit on a
solid, at dry surface
making sure that the
water reservoir and
medicine cup have
been properly lled and the mouth nozzle or other
attachments are properly connected to the cover.
2. Flip the switch at the bottom to the “ON’
position. The LED indicator on the front of
the unit will illuminate.
3. Press the ‘POWER’ button.
To adjust the airow, and nebulizer rate
1. Your Ultrasonic Nebulizer has 3 airow
settings: High, Medium and Low.
2. Based on instructions
from your physician
and/or respiratory
therapist, press the
airow button to adjust
the airow volume. The
Airow Volume Indicator
Lights will show the
level (high, medium or
low) selected, Fig. 10.
To begin a treatment
1. Follow the instructions provided by your
physician and/or respiratory therapist.
2. Your Nebulizer is designed to start at a
lower atomization rate in the beginning and
will become stronger after a few minutes.
NOTE: Although many medications are
delivered within six minutes, thicker medications
will take longer to nebulize. The viscosity
of the medication and airow setting may
result in longer treatment times and reduced
battery life between recharges.
Remember:
• Keep your eyes away from the output of
medication mist.
• If any discomfort or abnormality occurs, stop
using the unit immediately.
• Do not tilt or shake the unit when in operation.
• Opening the cover during operation may cause
a severe injury.
To end a treatment
1. When the treatment has ended, press the
POWER button. Postion the switch at the
bottom to the OFF/CHARAGE position.
Otherwise, your unit will automatically shut
off after approximately 10 minutes
2. Unplug the adapter from the outlet and detach
the adapter plug from the unit’s AC port.
3. Dispose excess medication and water before
disconnecting the battery.
4. Allow the unit to cool — approximately 20-30
minutes.
Remember:
• The unit should not be used for more than
30 minutes at a time.
• Wait 30 minutes before reusing the unit.
After every use
1. Allow the unit to completely cool.
2. Remove the cover.
3. Carefully remove the medicine cup and
pour out remaining medication.
4. Empty the water reservoir.
5. Gently wipe the water reservoir and
transfer cone with a soft, lint-free cloth.
Remember, the transfer cone should not
be removed.
6. Follow the cleaning procedures provided
in this guidebook.
battery pack / treatments
troubleshooting
Troubleshooting
If any abnormality occurs during use,
check and correct the following:
Condition Correction
Unit does not Check the AC adapter
operate when connection to the outlet
POWER button and/or check the AC plug
is pressed. to the unit’s AC port.
Make sure that the switch at
the bottom of the unit is in the
“ON” position.
Check that the water
reservoir is lled to the
correct level.
If using the optional battery
pack, check that the battery
is completely charged.
Check that the battery is
mounted correctly to the unit.
No misting Check that there is medication
or low rate in the medicine cup.
of misting
Check the medication cup
for damage.
Check that the transducer is
clean.
Fan is not Check that the fan is
working rmly and properly
properly mounted to the motor shaft.
A ashing red This is normal. The ashing
light on the light indicates proper AC
bottom lamp connection.
when the AC
adapter is
connected.
The top light The battery needs to be
changed from charged. Nebulization will
green to red decrease and then cease.
during
nebulization.
Replacement Parts
Replacement parts are available through
the dealer who you purchased the nebulizer from.
Fig .6
Fig .7
Fig .8 Fig .9
Fig .10
8 9
Unit Specications
Power 120 VAC
50/60 Hz
Power Consumption Approximately 10W
Ultrasonic Frequency 2.5 MHz
Nebulization: 3 speed adjustable
Partical Size 5 um MMAD
Medicine Cup Capacity Approximately 8 ml. maximum
Automatic Shut-off Approximately 10 minutes
Dimensions 3-7/16” x 2-1/16” x 5-5/8”
Weight Approximately 8.1 oz.
(12.4 oz. with battery pack)
Accessories AC adapter, Carrying Case,
5 Reusable Medicine cups,
Adult and Child Masks,
Extension tube, Nasal piece,
Mouth piece
Rechargeable battery
product specications
Battery Specications
Battery Type Ni-MH
Battery Voltage 12 VDC
Output Voltage 12 VDC
Charging Voltage 12 VDC
Charging Current 40-100 mA
Charging Time Minimum 24 hours rst time;
4-12 hours thereafter
depending on usage
Capacity 480 mAH/12 VDC
(20-30 minutes continuous use)
Operating Temperature 32o F - 112o F (0oC - 45oC)
Storage Temperature 0o F - 112o F (-18oC - 45oC)
Dimensions 1-7/8” x 1-1/16” x 3-5/16”
Weight Approximately 4.3 oz.
Specications are subject to change without notice.
Drive Medical Design & Manufacturing
99 Seaview Boulevard
Port Washington, NY 11050
Phone: 516.998.4600
Fax: 516.998.4601
www.drivemedical.com
Three-Year Limited Warranty
Your Drive brand product is warranted to be free of defects in materials and workmanship for three years
of the original consumer purchaser.
This device was built to exacting standards and carefully inspected prior to shipment. This 3 year Limited
Warranty is an expression of our condence in the materials and workmanship of our products and our
assurance to the consumer of years of dependable service.
This warranty does not cover device failure due to owner misuse or negligence, or normal wear and tear.
The warranty does not extend to non-durable components which are
subject to normal wear and need periodic replacement.
If you have a question about your Drive device or this warranty, please contact an authorized Drive dealer.
 Loading...