

Drift HD User Manual

user manual

contents
Quick Start 5
Overview 7
Precautions
a) General Precautions 8
b) Weather Resistance 8
Mounting the Camera 9
Preparing for Use
a) Battery Installation
• Installing the Camera Battery 11
• Changing the Remote Control Battery 11
b) Powering On and Charging
• Turning the Camera On 11
• Turning the Camera O 11
• Charging the Battery 11
• Battery Life 12
c) Camera Lens Rotation
• Rotating the Lens 12
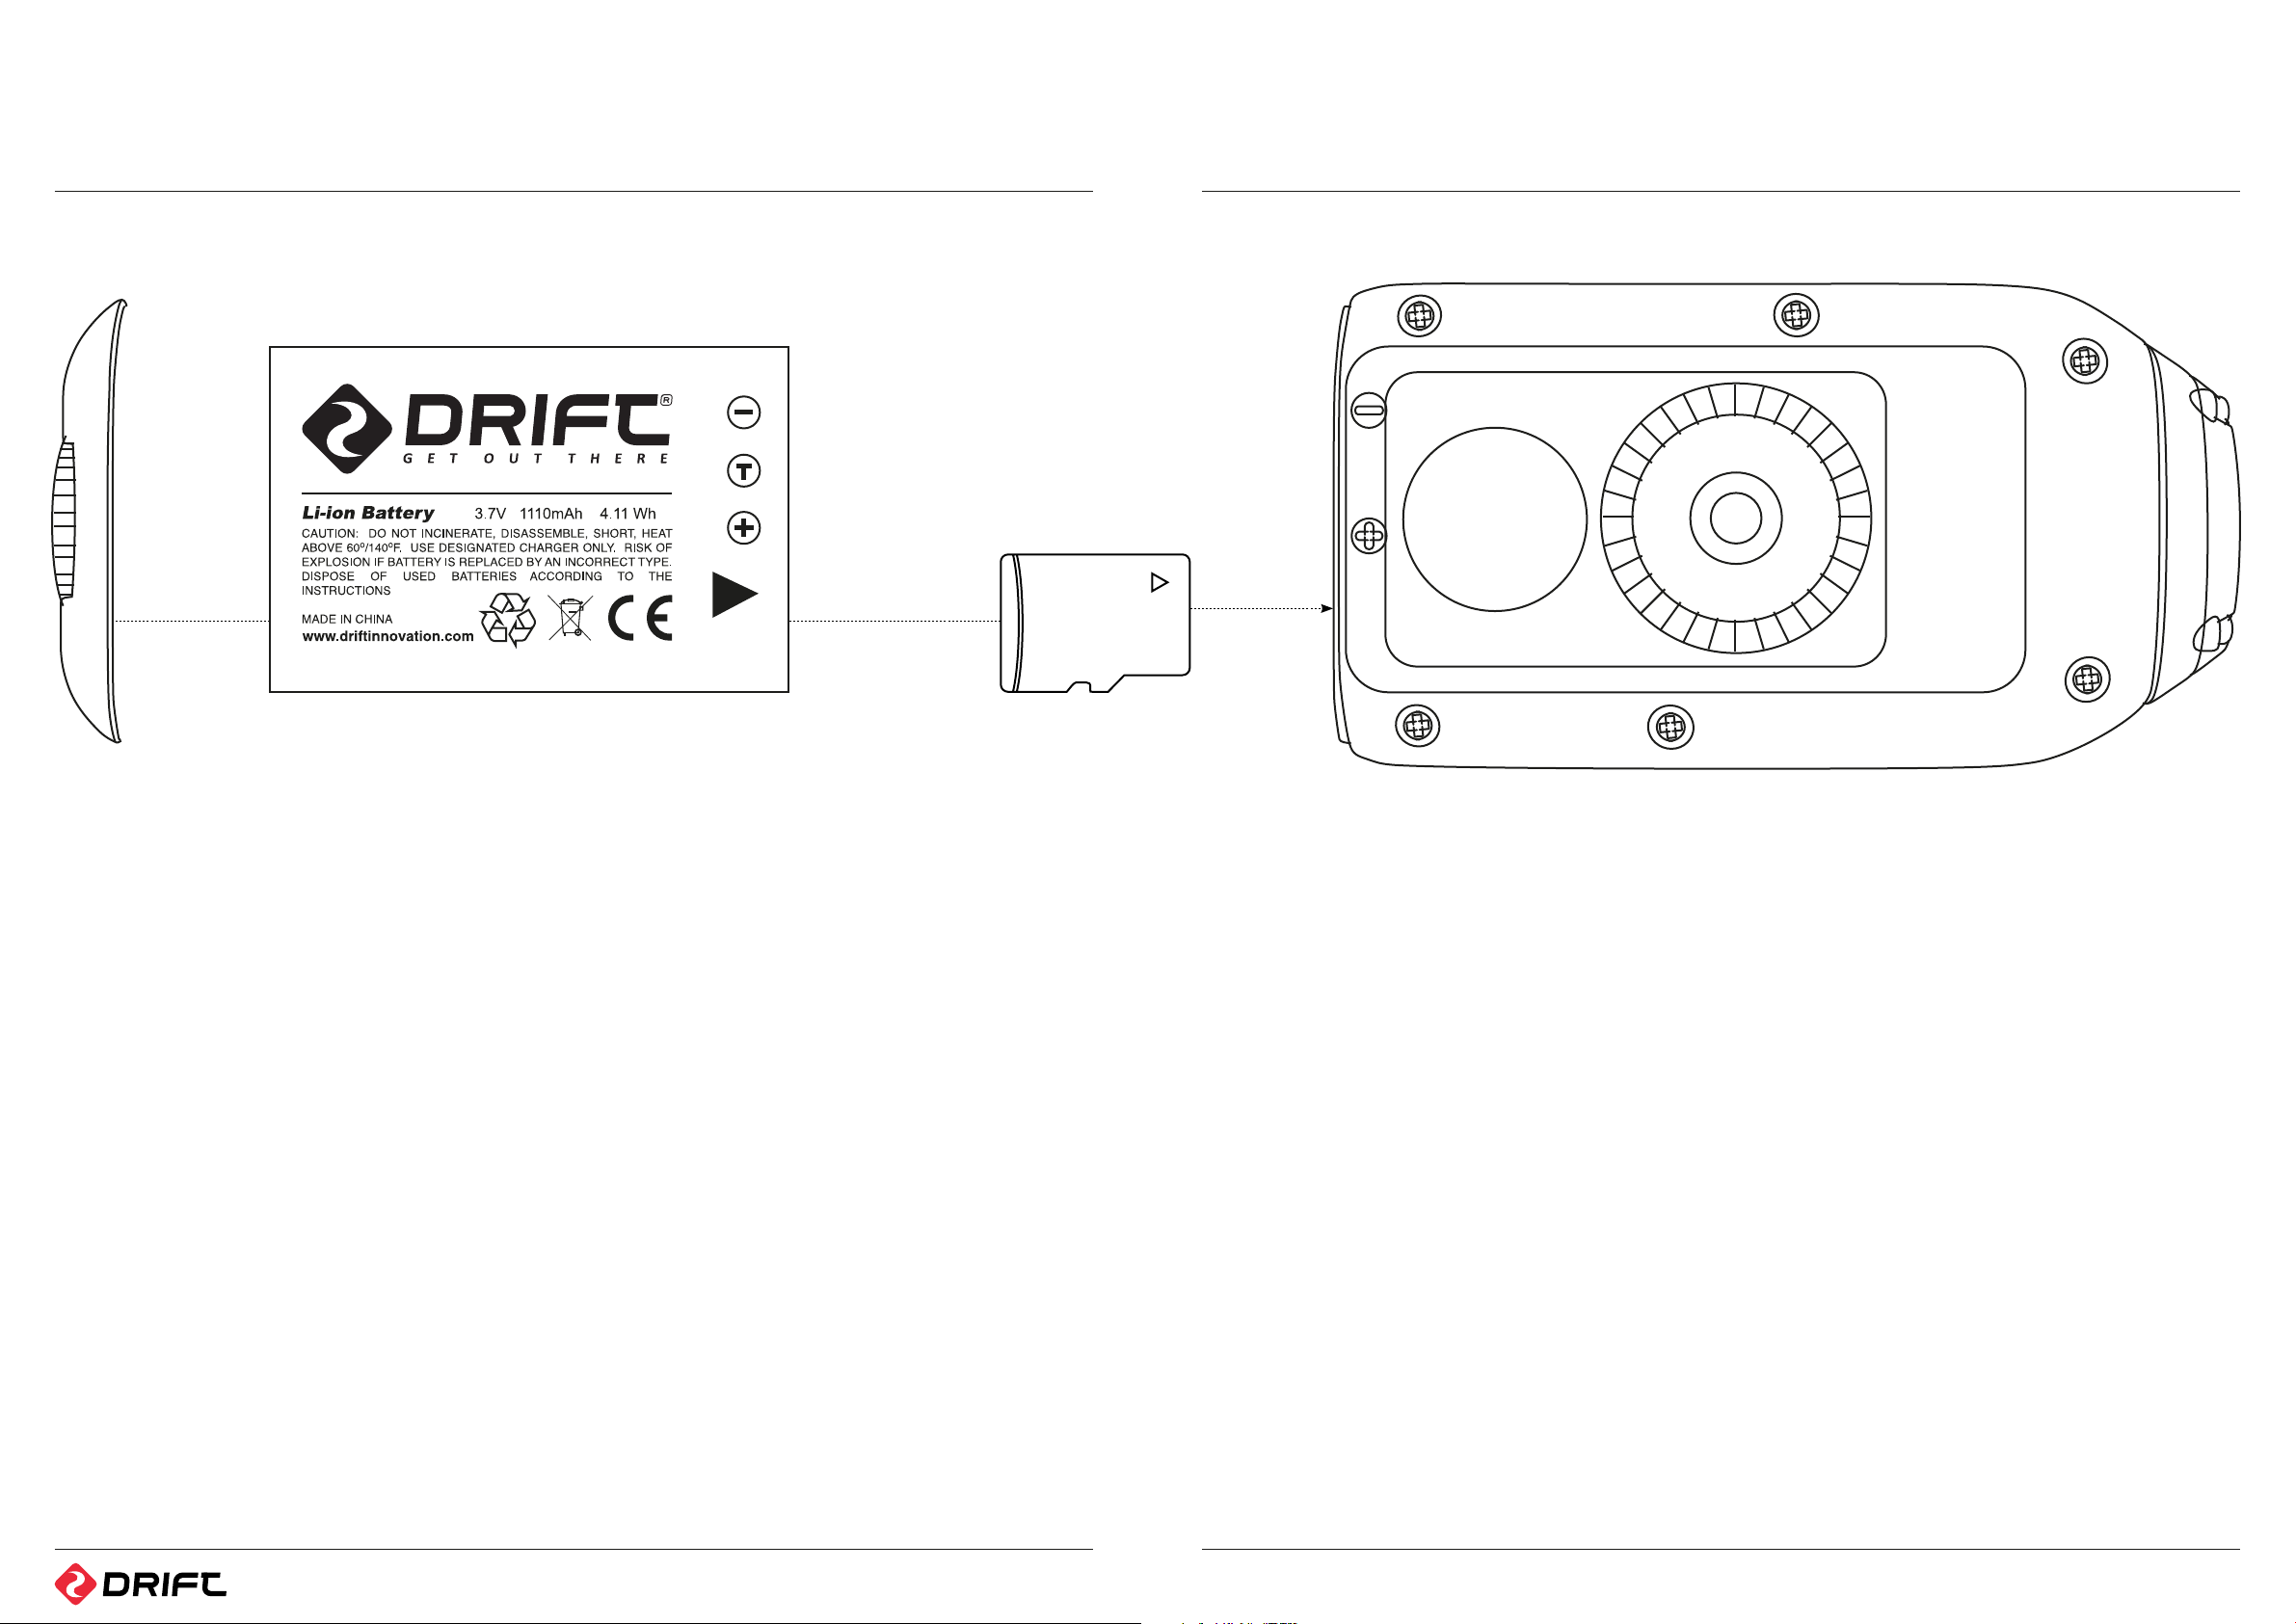
d) Using a SD Card
• Inserting and Removing a SD Card 13
• Formatting a SD Card 13
• Recording Time 13
e) Rear Hatches 14
f) Replacing the Lens 14
Using the Camera
a) Changing the Record Mode 15
b) Video Mode
• Recording Video 15
c) Photo Mode
• Taking Photos 15
d) Time Lapse Mode
• Taking Time-Lapse Photos 16
• Changing the Sequence Interval 16
e) Zoom 16
Using the Remote
a) Basic Remote Use
• Using the Remote Control 17
b) Remote Pairing
• Cancelling a Remote Pairing 17
• Pairing a Remote Control 18
• Pairing Multiple Cameras to a Single Remote 18
Conserving Battery Life 19
Camera Care 20
Menu Options
a) Main Menu 21
b) Video Menu
• Video Playback 21
• Deleting Videos 21
c) Photo Menu
• Viewing Photos 21
• Slideshow Function 21
• Deleting Photos 22
d) Video Conguration Menu 22
e) Setup Menu 23
f) Setting the Time & Date 24
Connecting the Camera to a Computer or TV
a) Connecting the Camera to a Computer 25
• Connecting to a Windows PC 25
• Connecting to a Mac 25
b) Playing and Editing Video Footage on a Computer 26
c) Connecting the Camera to a TV 26
FAQs 27
System Requirements 29
Troubleshooting 30
Technical Specication 31
Further Help 32
Warranty 34
3 4
quick start
We have carefully designed the Drift HD package as an all-in-one solution, allowing
you to shoot in virtually any situation without having to purchase extra equipment
apart from a micro SD card. We want you to be able to start using your camera as
soon as possible. This section contains the basic information you need right away.
The Drift HD has many more features than these described here – please refer to later
sections for more information.
Getting ready to use the camera
Please unscrew the rear hatch of the camera (anti-clockwise movement). Then, gently
insert the battery (more details on page 11) and a micro SD memory card (more details
on page 15) as illustrated above. Securely screw the rear hatch back to its original
position (clockwise movement).
Securely mount the camera. The LCD screen’s live preview allows for accurate
positioning to get the best possible shot. A full description of the various mounting
options can be found on pages 9-10. Do not forget the lens of your camera can be
rotated!
Turning the camera on
Press the SELECT button to turn the camera on. The LCD screen will turn on and the
LED in the SELECT button will turn green. Once switched on, the Drift logo will appear
and the camera will enter the Live Preview mode. In Live Preview Mode, the screen
will display a live image from the camera lens, and a number of icons indicating the
recording options, remaining memory and battery life – an overview of these can be
found on page 15. To turn your camera o, press and hold the Select button for 3
seconds.
Note: The rechargeable battery will need
to be fully charged before its first use.
Please see page 11 for details on how to
proceed in order to charge the battery.
Recording Video
1. To begin recording, press the SELECT button on the camera or the RECORD button
on the remote control. The unit will beep and the LED will turn red.
2. To stop recording, press the SELECT button again, or the STOP button on the
remote. There will be another beep and the LED will turn green.
Capturing Photos
The default recording mode for the camera is Video mode. In order to take photos, the
Photo mode must be selected. Changing the Record Mode is described on page 15.
1. Once the Record Mode has been changed to Photo, return to Live Preview mode by
pressing the MENU button a few times.
2. Use the LCD screen to aim the camera at your subject.
3. Press the SELECT button on the camera or the RECORD button on the remote
control. The unit will beep once and the LED will briey turn red.
4. Once the LED returns to green, the camera is ready to take another photo.
Reviewing Photos and Video
To change any of the camera settings or review / play back videos or photos recorded
with the Drift HD, press the MENU button on the camera. This will bring up the Main
Menu: If the memory card contains any videos or photos taken with the Drift HD,
these will be indicated by a number on the Video or Photo icons. Using the UP and
DOWN buttons, highlight the Video icon or the Photo icon and press the SELECT
button. You can now browse your les using the UP and DOWN buttons. Full details
about the Video & Photo Menus can be found on pages 21-22.
Note: You will need to change the record
mode back to video to be able to record
video again.
65
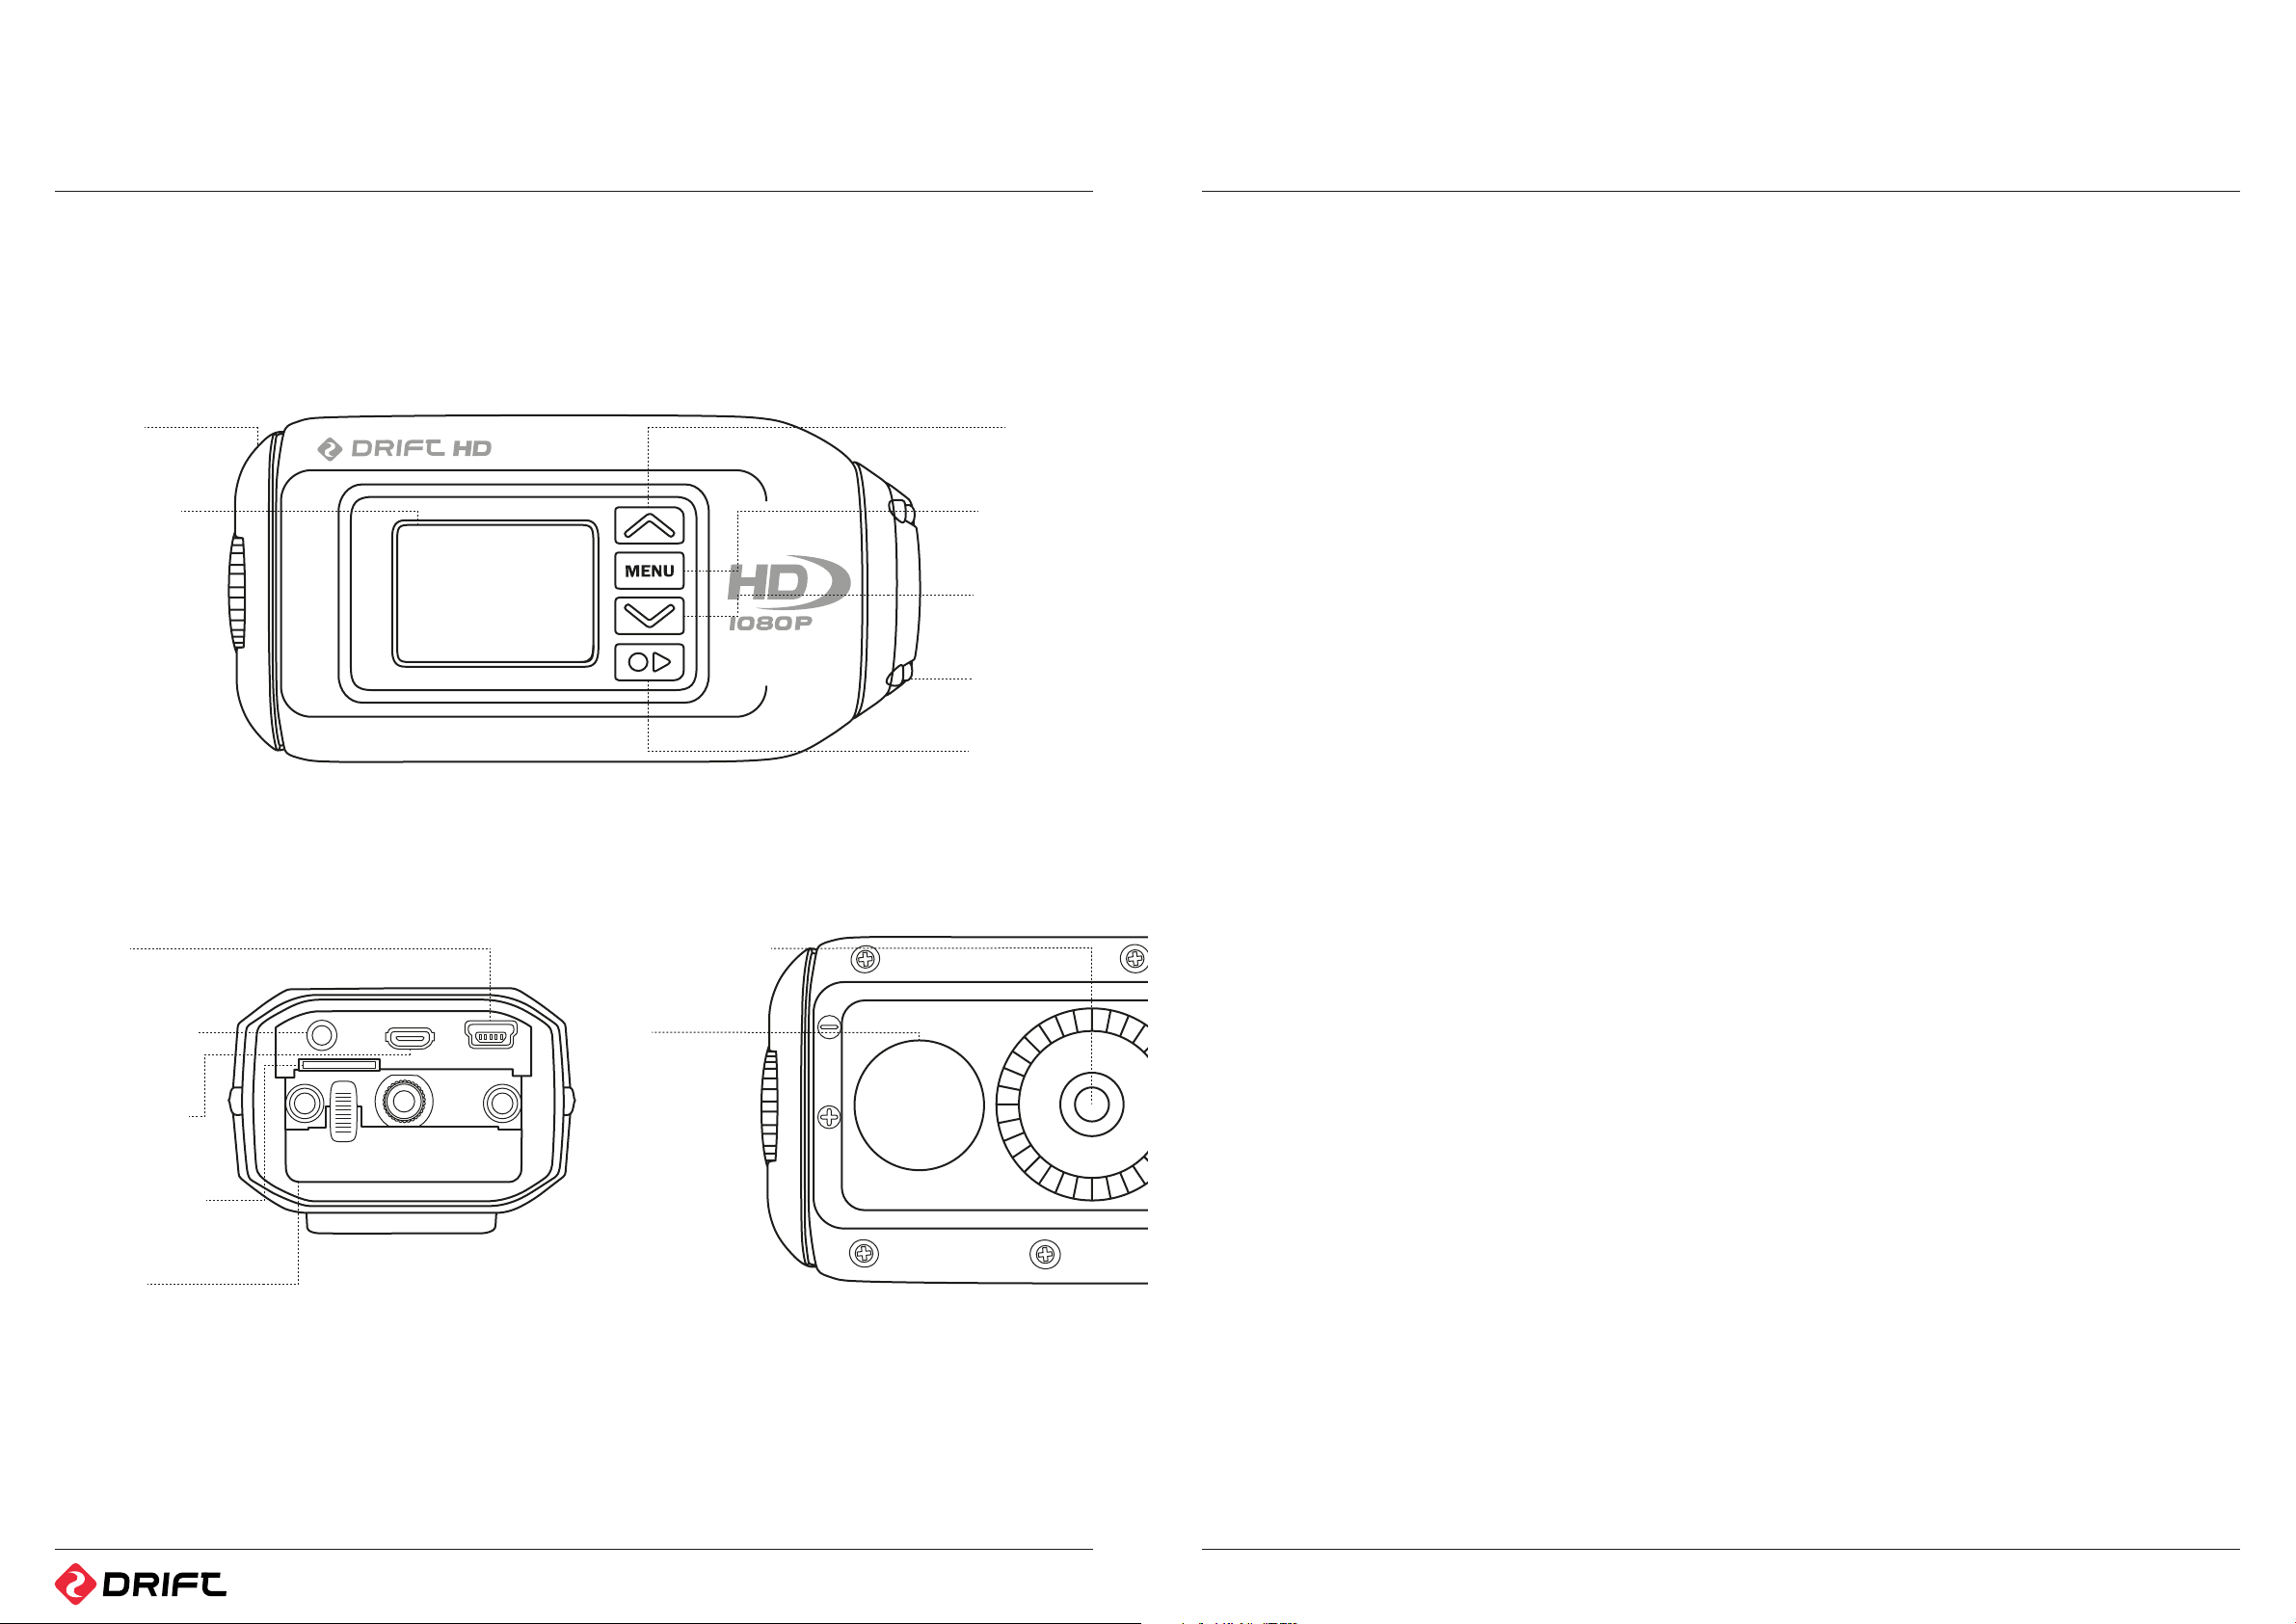
overview
precautions
Rear Hatch
1.5" LCD Screen
USB Port
Microphone Input
AV HDMI Output
¼" -20 Camera Thread
Speaker
UP Button
MENU Button
DOWN Button
Rotatable Lens
SELECT Button
A GENERAL PRECAUTIONS
Please take note of the following guidelines when using your Drift HD:
• The camera is shock resistant, but not shock proof.
• For your safety, do not press the buttons on the camera body during sports
activities.
• Do not place the camera in areas prone to dust or damp for extended periods of
time.
• Do not leave the camera exposed to extremely high temperatures, such as under
direct sunlight, for extended periods of time as this may aect the camera housing
and internal components.
• Clean the lens with a soft cloth to remove ngerprints or dust. Please do not use
chemicals.
• The camera has a working temperature range of -10°C to 40°C (50°F to 104°F).
• Turn the camera o before removing the batteries or memory card. The card and
data may be damaged if the memory card is inserted or removed while the camera
is switched on.
• Remove the batteries and memory card before storing the camera for long periods
of time.
B WEATHER RESISTANCE
The Drift HD action camera was designed to withstand dust, snow, rain, splashes and
even an accidental quick submersion; however it was not designed to stay submerged
while not in its waterproof case. Drift Innovation will not assume any responsibility for
camera malfunction caused by liquid entering the camera as a result of misuse by the
user.
Attention:
• Rechargeable batteries are only to be
charged under adult supervision.
• The battery terminals are not to be
short-circuited.
• Do not open, puncture or otherwise
damage the Lithium-Ion battery, or
dispose of it in fire.
Disclaimer:
Drift Innovation will not, under any
circumstances, be responsible for injuries
or property damage incurred during
participation of any high risk sport/
activity not endorsed or recommended
by Drift Innovation. Remember that the
warranty will only cover manufacturing
defects.
Micro SD Card Slot
Battery Slot
• Liquid may get inside the camera if the hatch is not installed properly, or if a non-
waterproof hatch is used. Always ensure that the hatch you’re employing is securely
locked.
• If the camera gets wet, wipe the liquid o as soon as possible with a dry cloth.
• Other camera accessories may not be waterproof – please read their instructions
carefully.
• The in-built microphone is covered with a rubber seal – this is not to be removed,
changed or punctured in any way, or the camera will no longer be waterproof, and
your warranty will be void.
7 8
mounting the camera
The Drift HD can be mounted in a dierent number of ways using the mounts
provided:
Fixing the Camera onto the Universal Clip
1. Align the screw of the universal clip with the thread on the underside of the camera
body.
2. Twist the screw thread in a clockwise direction.
3. As the universal clip tightens against the body of the camera, rotate the universal
clip to provide the desired angle of attachment.
4. Tighten the screw on the universal clip until the clip ts rmly against the camera
body.
Mounting the Camera on a Goggle Mount
1. Attach the goggle mount to the strap of your goggle.
2. Slide the camera (with universal clip attached) into the goggle mount until the two
arms on the clip ‘click’ into place.
Mounting the Camera on a Helmet
1. Position the helmet mount against your helmet to nd the optimum mounting
position.
2. Ensure the surface you wish to attach the helmet mount to is clean, dry and free of
oil and dust.
3. Adhere the mount to the helmet using the 3M VHB adhesive provided. Allow 24
hours to cure.
4. Slide the camera (with universal clip attached) into the helmet mount until the two
arms on the clip ‘click’ into place.
Mounting the Camera onto a Tripod, Monopod or Suction Cup Mount
1. The camera has a standard tripod thread (¼”-20) embedded into the camera body.
This is the same thread as the one used to attach the universal clip, and used in
many camera accessories available.
2. Thread the camera onto a tripod, camera mount or suction mount (not included), or
any other mount with a standard camera thread.
Tips on Mounting the Camera:
• Great video footage generally features
another person or object. In skiing or
snowboarding this could be the skier in
front, or your own skis. In motorsports,
this can be the fairing of a bike or a car
bonnet. If your object is moving too,
like a wheel or bike pedals, so much
the better. Experiment to find the most
exciting shots.
• Your camera doesn’t necessarily
have to face forward. A classic POV
video technique is the direct user
shot. For example in mountain biking,
try mounting the camera on the
handlebars and pointing it back at the
user - It makes for some great action
footage.
• If your activity allows, mount the
camera in dierent positions between
shots. Then, when editing your video
later you can cut between various
angles to make something truly
special. Some pros use more than one
camera so they can shoot multiple
angles at the same time.
• The lens of the Drift HD can be rotated
to help you align your shots. Please
refer to the lens rotation section on
page 12 for further information.
! However you choose to mount your
camera, ensure that the camera is tted
firmly to reduce the risk of losing it. Give it a
tug before you set out, just to make sure.
9 10
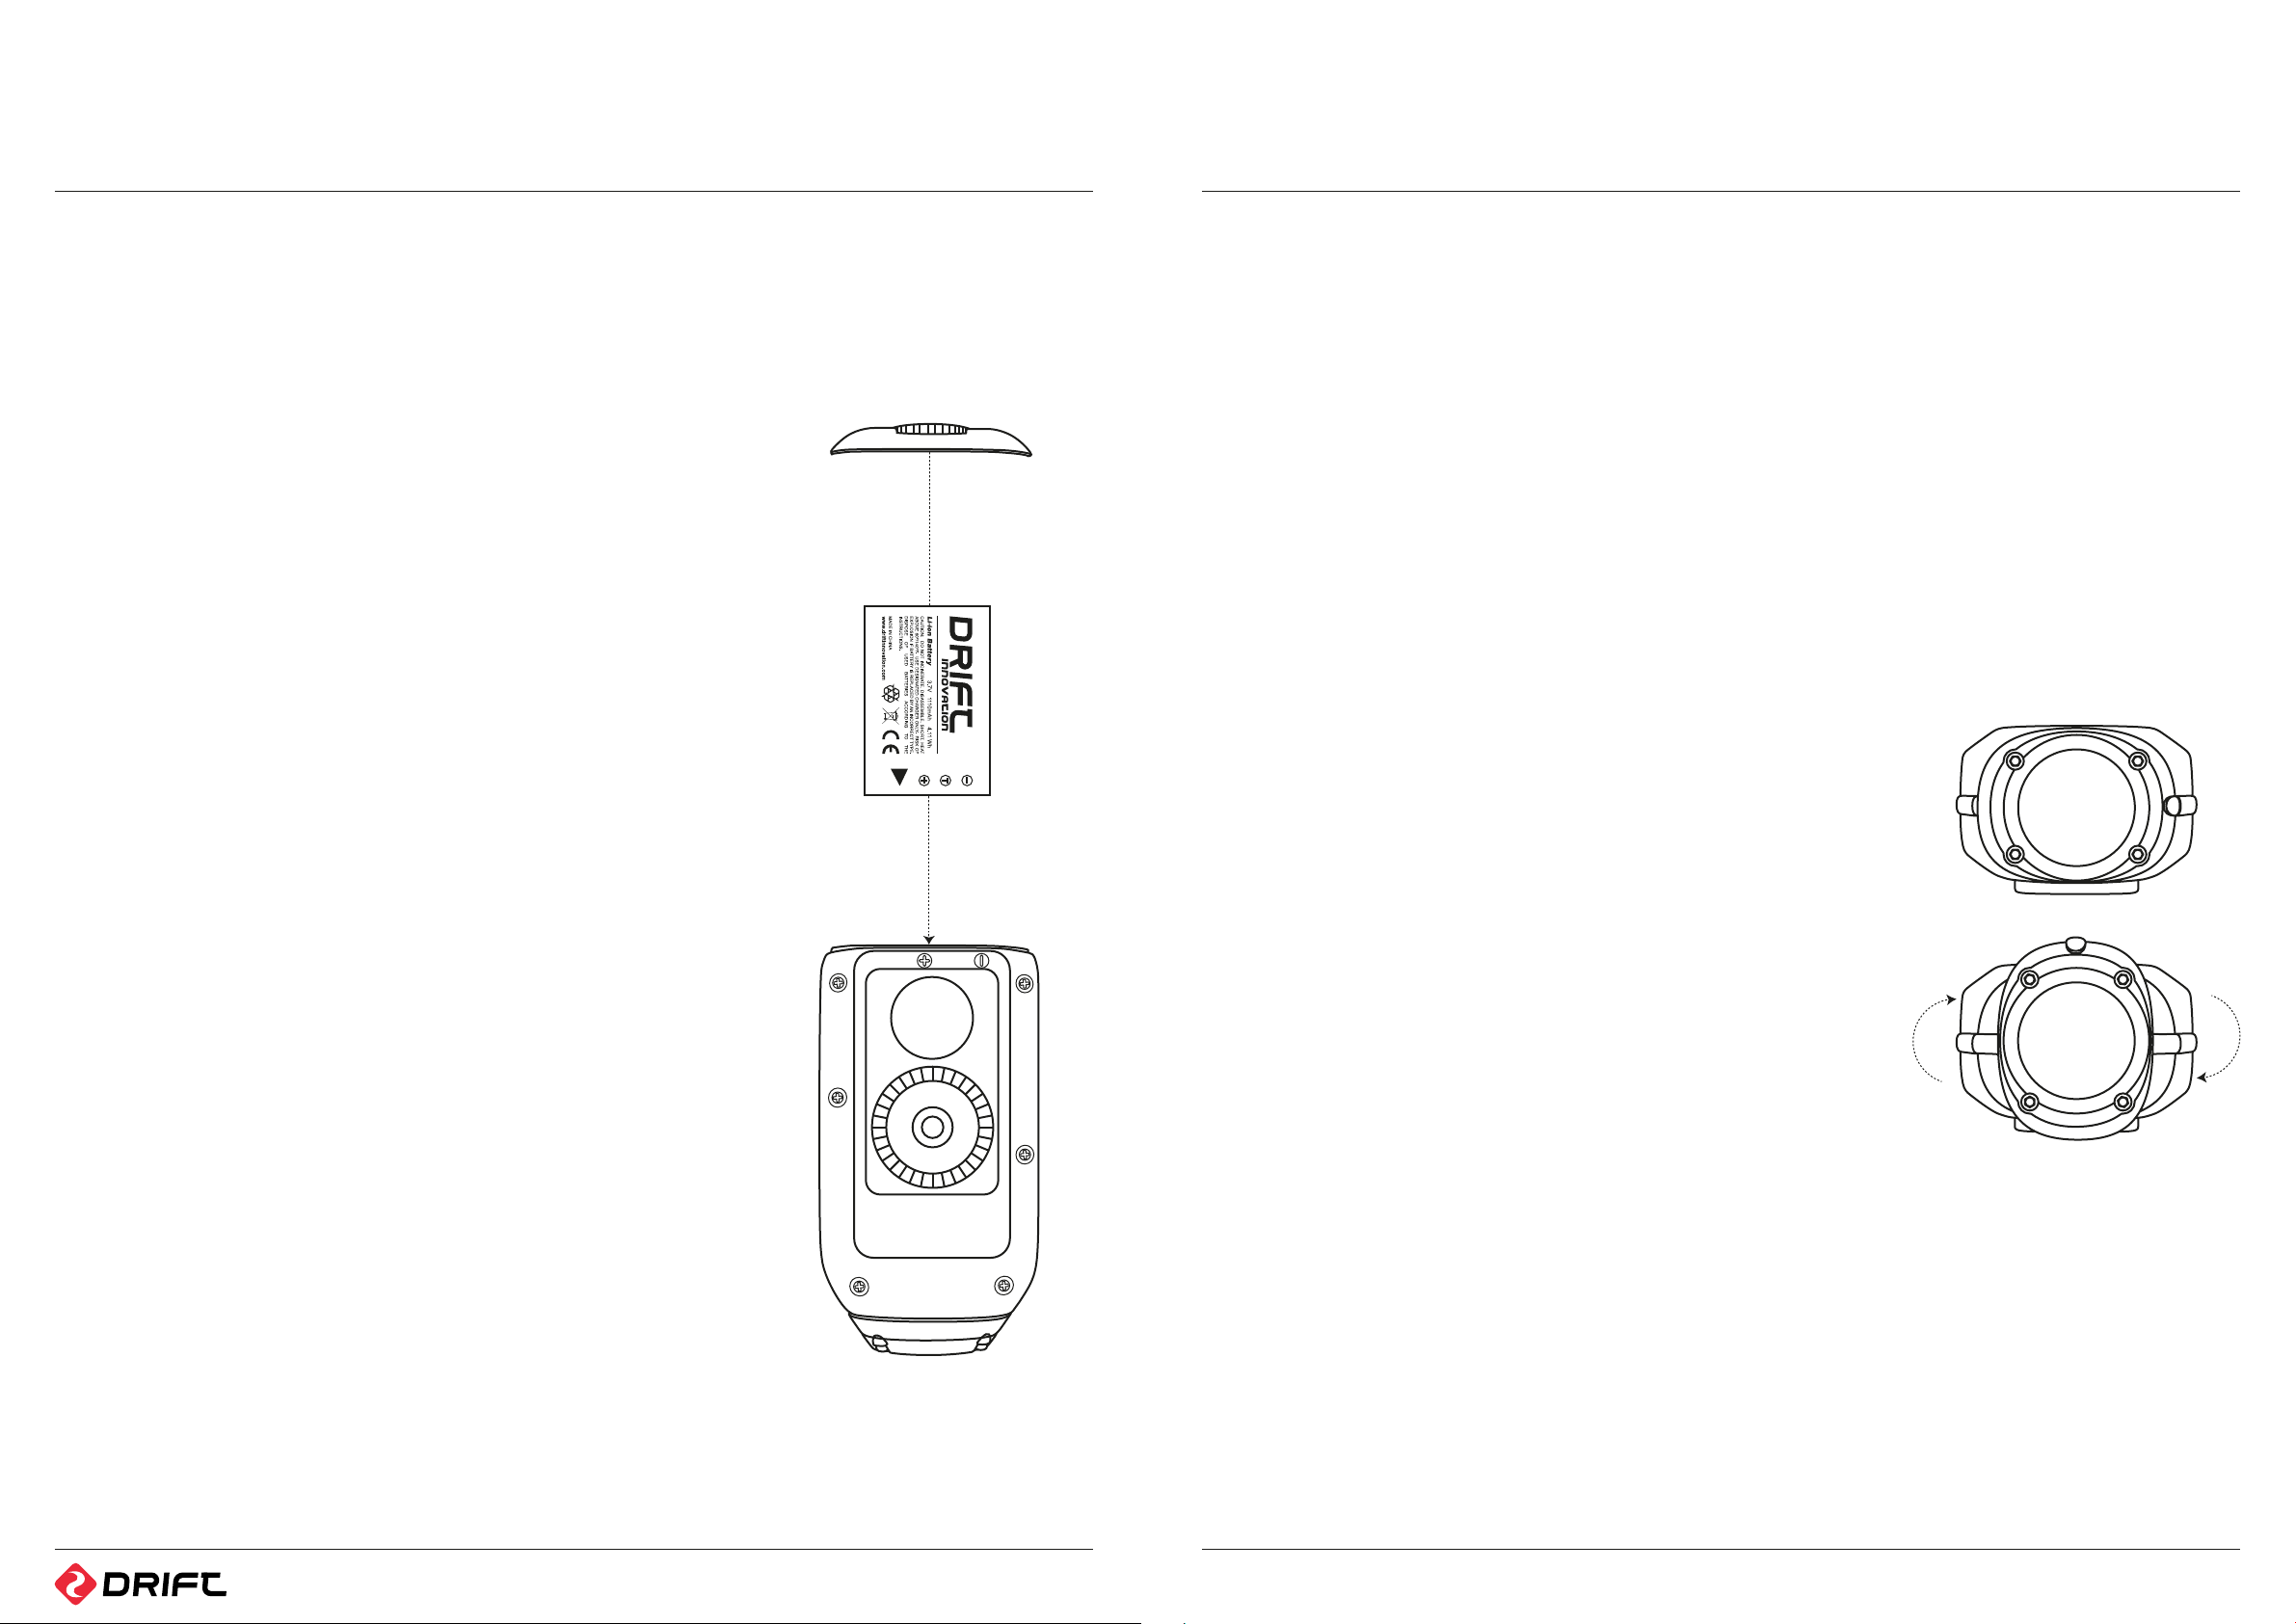
preparing for use
A BATTERY INSTALLATION
Installing the Camera Battery
1. Please unscrew the rear hatch of the camera (anti-clockwise movement).
2. Holding the camera with the LCD screen facing down, insert the battery with the
label facing upwards and the arrow pointing into the slot. Once gently pushed in all
the way, the battery will lock into place.
3. Screw the rear hatch of the camera (clockwise movement) back to its original
position.
4. To remove the battery if needed, push down the lever holding the battery in place.
The battery is spring loaded, and will slide out promptly.
Changing the Remote Control Battery
The remote control is supplied with a battery already installed, and is ready to use out
of the box. If the remote stops working, this battery can be replaced.
1. Using a small screwdriver, remove the four screws xing the remote control battery
cover.
2. Carefully remove the battery and replace it (model CR2032, presented as a coin).
3. Replace the remote control battery cover and the four screws.
B POWERING ON & CHARGING
Turning the Camera On
Press the SELECT button. The LCD screen will turn on and the LED will turn green. The
LCD screen will show the Drift logo, and the camera will enter Live Preview mode.
Turning the Camera O
To turn the camera o, press and hold the SELECT button for 3 seconds.
Note: The camera can be set to turn o automatically in order to conserve battery
power (page 19).
Charging the Battery
The Drift HD comes with a rechargeable Lithium-Ion battery which can be charged
with the included USB cable. Socket-to-USB adaptors can be used as well.
1. Ensure the battery is in the camera and the unit is powered o.
2. Insert the smaller end of the USB cable into the USB mini slot inside the camera.
3. Attach the other end of the USB cable to a USB port in your computer, or to a USB
power adapter (not included).
4. If charging via a computer, the LED will turn blue and the screen will go black. When
charging via a USB power adapter or a USB cigarette lighter adapter, the camera
should be switched o, or the battery will not charge.
5. To charge the camera, press and hold the SELECT button for 3 seconds. The screen
will turn o and the LED will turn blue, to indicate charging is in progress.
Note: Remove the battery if the camera
is not going to be used for an extended
period of time.
Note: Take care not to damage the
waterproof seal when replacing the
remote battery.
6. Once the camera is fully charged, the LED will turn o. Remove the USB cable and
close the rear hatch. It takes around 2½ hours to be battery to be fully charged.
Note: If the LED is does not turn blue, the battery is not charging. Please follow the
above instructions carefully to ensure that the LED turns blue and the battery does
actually charge.
Note: When charging the camera with a USB cable via a Mac, you may get an error
message about an incorrectly removed external device. This error message can be
safely ignored.
Note: The battery needs to be fully charged before its rst use.
Battery Life
At a temperature of 25°C (77°F), with all power saving features switched o, with the
LCD switched on and the camera recording continuously, the battery will last for
about 1h45m on a full charge.
In very cold conditions like -5°C (23°F), with all power saving features switched o,
the LCD switched on and the camera recording continuously, the battery will last for
considerably less time on a full charge.
Note: Please see the Conserving Battery Life section on page 19 for details on how to
make the battery last longer.
Using an external power supply
The Drift HD can be powered by an external power supply such as a USB power
adapter, a battery kit or a cigarette lighter adapter. We do recommend you to power
o your camera before plugging your camera to any external power supply.
Note: Plugging an external power supply into the camera does not recharge the
battery unless you put the camera into charging mode (page 11). The battery will not
charge when the camera is switched on.
If the external power is cut o during recording (e.g. if the cigarette lighter adapter
comes loose), the camera will immediately start drawing power from the rechargeable
battery instead and continue recording, protecting your footage from le corruption.
Note: This feature will only work if the battery is charged. If using your camera with
an external power supply, we recommend charging the battery beforehand to ensure
your files are protected.
C CAMERA LENS ROTATION
A unique feature of the Drift HD is the rotating camera lens. In order to maximise your
mounting options, the lens can rotate through a total of 300°, allowing for an upright
image from even the most awkward positions.
Rotating the Lens
Whilst holding the camera body in one hand, use your index nger and thumb of your
other hand to grab the camera lens rmly. Twist the camera lens to the desired angle.
! When the low battery warning appears,
please recharge the battery. If the battery
runs out while recording video, the data
on the card may become corrupted. In
most situations, the camera will close the
video le and power o automatically,
but we cannot guarantee that the
footage on the card will not be lost
during an abrupt interruption of power.
! The camera lens can only be rotated
through a range of 300°. At either end of
this range, there is a hard stop. Do not
force the camera rotation past this point,
as you risk damaging the components. If
excess resistance is experienced, double-
check that you have not reached the
camera rotation stop.
! The camera is weatherproof and this
is not aected by the rotation of the
camera lens. However, do not rotate the
lens while the camera is wet or covered
in mud, as this may force liquid into the
body of the camera and damage the
components.
11 12
 Loading...