


1
Quick Guide

1
Thank you for purchasing the Drift Ghost XL
CUSTOMER SUPPORT
Check our official website for firmware updates, customer support, and info on all our products. https://driftinnovation.com/
If you have any suggestions, comments or concerns; please contact our customer support team at: support@driftinnovation.com
WARRANTY
Warranty does not apply if the product is damaged due to physical abuse, mishandling, accident, fire, frostbite, water damage, negligence or failure to follow the supplied operating instructions. For more information on warranty, see: https://driftinnovation.com/warranty
CONTENTS |
|
2 |
|
|
|
3-4 PACKAGE CONTENTS | ABOUT YOUR CAMERA
5-6 INITIAL SETUP | GETTING STARTED
7-10 MODE SELECTION & SETTINGS
11 MOUNTING THE CAMERA
12-17 FEATURE OVERVIEW
18-19 ACCESSORY GUIDE
20Wi-Fi & FIRMWARE
21CONNECTING YOUR CAMERA 22-23 SPECIFICATIONS
24-26 DISCLOSURES
|
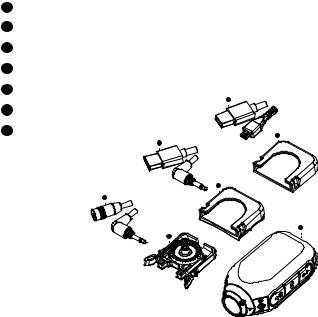
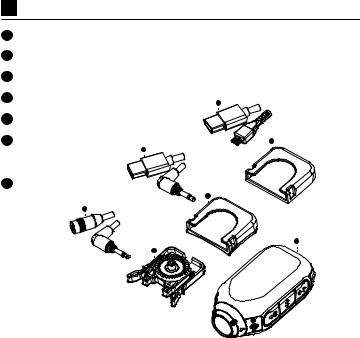
PACKAGE CONTENTS |
3 |
|
|
|
A Ghost XL
B Universal Clip
C Curved Adhesive Mount
D Flat Adhesive Mount
E TRS-Audio Adaptor Cable
F TRS-Power Cable
G USB Cable
G
D
F
C
E
A
B
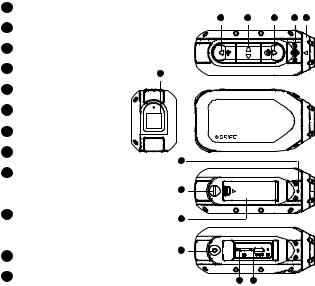
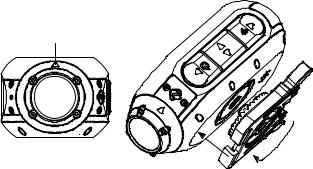
ABOUT YOUR CAMERA |
|
4 |
|
|
|
A  Rear Button
B  Middle Button
C  Front Button
D Status LED
E Rear Screen
F Microphone
G 5 PIN Micro USB Port
H Micro SD Card Slot
I External Mic/Power
Connector
J External Mic/Power
Cover
K Rotating Lens
L Memory Card and
USB Door
A B C D K
E
GHOST XL
F |
J |
L |
I
H G
|
INITIAL SETUP |
5 |
|
|
|
1. Open the Memory Card and USB door.
2. Insert a Class 10 or higher microSD/HC/XC card (up to 128GB). Format before first usage!
3. Connect the camera via a micro USB cable to a powered USB port, and charge the battery for 5 hours before first use.
4. Close the Memory card and USB door, and ensure that the latch is secured. You are ready to go!
GETTING STARTED |
|
6 |
|
|
|
POWER ON/OFF
1. Press and hold the  button to power on.
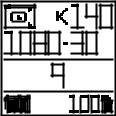
2. The Rear Screen will power on, showing the welcome display. 3. The camera is now ready to record video or take photos.
4. Current camera mode is indicated by the colour of the Status LED and Rear Screen, along with the icon in the top left of the Rear Screen.
5. To power off, press and hold the  button for 3 seconds.
Mode Icon
|
|
|
|
|
|
|
|
|
|
|
|
|
|
|
|
|
|
|
|
|
|
|
|
|
|
|
|
|
|
|
|
|
|
|
|
|
|
|
|
|
|
|
|
|
|
|
|
|
|
|
|
|
|
|
|
|
|
|
|
|
|
|
|
|
|
|
|
|
|
|
|
|
|
|
|
|
|
|
|
|
|
|
|
|
|
|
|
|
|
|
|
|
|
|
|
|
|
|
|
|
|
|
|
|
|
|
|
|
|
|
|
|
|
|
|
|
|
|
|
|
|
|
|
|
|
|
|
|
|
|
|
|
|
|
|
|
|
|
|
|
|
|
|
|
|
|
|
|
|
|
|
|
|
|
|
|
|
|
|
|
|
|
|
|
|
|
|
|
|
|
|
|
|
|
|
|
|
|
|
|
|
|
|
|
|
|
|
|
|
|
|
|
|
|
|
|
|
|
|
|
|
|
|
|
|
|
|
|
|
|
|
|
|
|
|
|
|
|
|
|
|
|
|
|
|
|
|
|
|
2 |
|
4 |
|
|
|
|
|
|
|
|
|
|
|
|
|
|
|
|
|
|
|
|
MODE NAVIGATION
To change the current camera recording mode, press the  button; changing between Video, Photo, Timelapse, Photoburst, and General Settings modes.

7 MODE SELECTION & SETTINGS
MODE SETTINGS
To change the settings of the current mode press the  button, this will move the highlight block from the mode icon onto each setting in turn.
VIDEO MODE
(Green LED) Press the  button to start recording. The Status LED and LCD backlight will flash red to indicate recording. Press the
  button again to stop recording.
VIDEO SETTINGS
●Resolution
●Frame Rate
PHOTO MODE
(Yellow LED) The camera will capture still images when the  button is pressed, and the status LED and LCD screen will flash red each time a photo is
captured.
PHOTO SETTINGS
● Resolution
TIMELAPSE MODE
(Purple LED) Press the  button to capture a series of still images at a specified rate. The Status LED and LCD screen will flash red each time an image is captured. To stop recording, press the
  button once more.

MODE SELECTION & SETTINGS 8
TIMELAPSE SETTINGS
●Resolution
●Timelapse Interval
PHOTOBURST MODE
(Cyan LED) The camera will capture a burst of still images for an allotted duration and at a specified rate, when the  button is pressed. For best results, use a memory card with the highest possible data rate.
PHOTOBURST SETTINGS
●Resolution
●Burst Duration
●Capture Rate
GENERAL SETTINGS
(Red LED) Press the  button to scroll through the available settings, press and hold the
  button to scroll backwards the Settings. and press
  to cycle through the options of a highlighted setting.
|
|
MODE SELECTION & SETTINGS |
|
9 |
|
||
|
|
|
|
● Dash Cam |
ON/OFF |
||
● Dash Cam Interval |
10s/30s/1min/2mins/5mins |
||
● Event Detection |
ON/OFF |
||
● Video Tagging |
ON/OFF |
||
● Tagging Interval |
10s/30s/1min/2mins/5mins/10mins |
||
● Wi-Fi |
|
ON/OFF |
|
● BT |
|
ON/OFF |
|
● RC |
|
Paired/Unpaired |
|
● FOV |
|
140/115/90 |
|
● Exposure |
+2/+1/0/-1/-2 |
||
● Self Timer |
OFF/3s/5s/10s |
||
● Bit Rate |
High/Mid/Low |
||
● Filter |
|
Normal/Vivid/Low Light |
|
● ISO |
|
Auto/100/200/400/800 |
|
● Mic Sensitivity |
0/1/2/3/4/5 |
||
● Speaker Volume |
OFF/Low/Mid/High |
||
● Indicator LED |
ON/OFF |
||
● Vibrate Indication |
ON/OFF |
||
● Default Startup Mode |
Resume/Video/Photo/Timelapse/ |
||
|
|
|
Burst |
MODE SELECTION & SETTINGS 10
● Camera Off |
|
|
|
|
Never/2mins/5mins/10mins/20mins |
● THM Files |
|
|
|
|
ON/OFF |
● Time and Date |
|
|
|
|
|
● Date Stamp |
|
|
|
|
ON/OFF |
● Instant On |
|
|
|
|
ON/OFF |
● Clone Mode |
|
|
|
|
ON/OFF |
● Clone Group |
|
|
|
|
0/1/2/3/4/5 |
● Video-Lapse |
|
|
|
|
ON/OFF |
● Video-Lapse Interval |
|
0.5s/1s/2s/5s/10s/30s |
|||
● Language |
|
|
|
|
EN/DE/FR/IT/ES/CN |
●Restore Default
●Format SD Card
●Serial Number
●Firmware Version
|
MOUNTING THE CAMERA |
11 |
|
|
|
1.Attach the Universal Clip to the camera in any orientation as needed – first position the clip in the desired orientation, then secure by rotating the screw base by hand.
2.Slide the Universal Clip into your chosen mount, ensuring that it ‘clicks’ into place. *Double check it has been fully inserted by pushing out the clips.
3.Align your shot. Rotate the lens by hand until the screen is oriented correctly. Use the lens marker as an ‘up’ reference.
Lens Marker
FEATURE OVERVIEW |
|
12 |
|
|
|
DASH CAM MODE
How Does Dash Cam Mode Work?
Dash Cam Mode allows your Ghost XL to record in a continuous loop. This means that when the memory card becomes full, the camera will record over the oldest footage. If an incident occurs, the Ghost XL Event Detection feature will protect this footage, to prevent it from being overwritten.
In Dash Cam Mode the Ghost XL will power on automatically when it detects a power supply. Connect the camera to a car or motorcycle power supply, and the camera will turn on and start recording when the ignition is turned on. When the ignition is turned off, the camera will save the footage and then power off instantly.
The interval setting is the duration of the loops that the Ghost XL will record. For example, if you select a 2m interval and record for 20 minutes, you’ll find 10 videos saved on your memory card, each two minutes long.
-Press the  button to scroll through the modes and navigate to the settings menu.

|
FEATURE OVERVIEW |
13 |
|
|
|
-Press the  button to scroll through the menu, until your reach the ‘Dash Cam’ option. Press the
  button to toggle Dash Cam Mode On/Off.
-Press the  button to scroll to the next option in the menu, ‘Dash Cam Interval’. Press
  button to scroll through the available options.
Dash Cam Mode can also be toggled On/Off by pressing and holding the  button when camera is in Video mode.
Event Detection can be toggled On/Off in the settings menu if you prefer to protect your videos manually.
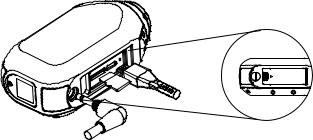
WATERPROOF POWER CONNECTION
The Ghost XL can be connected to a car or motorcycle power supply for hands-free operation in Dash Cam Mode via the included 3.5mm Power cable. 


FEATURE OVERVIEW |
|
14 |
|
|
|
Video-Lapse Mode
Captures a fast-motion video of your trip, allowing you to share a condensed record of your journey. When enabled, video lapse mode will automatically stitch together a timelapse video and save it to your memory card, with no editing required. Simply turn on Video-Lapse mode in the settings menu, select a VideoLapse Interval, and navigate to Video mode.
On the video mode screen a Video-lapse icon will indicate that the mode is enabled. Press the  button to start recording, and press the
  button again to stop the Video-Lapse recording.
Note: The Video-Lapse interval indicates how many frames
|
FEATURE OVERVIEW |
15 |
|
|
|
per second are captured. A longer interval will result in a faster playback speed, and a shorter interval will result in a slower playback speed.
VIDEO TAGGING
‘Video tagging mode can be enabled in the Ghost XL settings menu. When activated, this feature allows the camera to continuously record video, but only save to the memory card when important footage is “Tagged”.
A ‘Tagging Interval’ can be selected in the settings menu, and this will determine the duration of the videos recorded. For example, if a 30s interval is selected and the user presses the  button the last 30s of video will be saved to the memory card. The camera will then continue to record for a further 30s, giving a total video duration of 1 min.
FEATURE OVERVIEW |
|
16 |
|
|
|
The Video Tagging feature requires a class 10 micro SD card with 4GB of free space to function correctly. Please note that video tagging mode cannot be enabled together with Dash Cam Mode.
CLONE MODE
Link two or more Ghost XL, Ghost X or Ghost 4K cameras into a single network wirelessly controlled by one master camera. To set up clone mode:
-Navigate to the ‘Clone Mode’ option in the settings menu, and press the  button to select.
-Select the ‘master’ option, and press the  button to select. The master camera is now set up.
-On a second camera repeat the above, selecting the ‘slave’ option.
-Repeat for each additional slave camera.
-The master camera can now be used to wirelessly start and stop recordings, change settings and change modes on the entire group of cameras.
|
FEATURE OVERVIEW |
17 |
|
|
|
INSTANT ON MODE
Enabling Instant On Mode allows the camera to turn on, and immediately start recording with a single press of the  button.
BIT RATE
Users can choose to keep the normal compression used by the H.264 codec, or if they prefer, allow a higher flow of data for preserving more of the original recording. This will result in a bigger file size.
FILTER
Quickly tailor your cameras settings to the recording conditions with filters. Choose between Normal / Vivid / Low Light.

ACCESSORY GUIDE |
|
18 |
|
|
|
BT REMOTE CONTROL Compatible with Ghost 4K & Ghost XL
The Drift BT Remote places intuitive control at your fingertips. Easily attached to a wrist or pack, the BT remote Control clearly communicates your camera’s current status using Drift’s innovative color system. Use it to stop or start recording, Initiate video tagging or easily switch between Video, Photo, Timelapse and Photoburst modes. All with the touch of a finger.
|
ACCESSORY GUIDE |
19 |
|
|
|
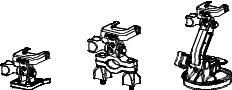
SUCTION CUP MOUNT
The perfect accessory for mounting your Ghost XL to any non-porous flat surface. Ideal for use on car windshields or bodywork, the Suction Cup makes it simple to turn, tilt, and rotate your camera 360°.
PIVOT MOUNT
Mountable anywhere at nearly any angle, the Drift Pivot Mount is your tool to capture the moment from any point of view you can imagine. Includes flat and curved adhesives, and can be used together with any other Drift mount.
HANDLEBAR MOUNT
The Drift handlebar mount is the perfect accessory for riders, whatever your discipline. Compatible with bars between 19mm and 36mm, and capable of pivoting more than 180 degrees, the handlebar mount opens up almost any angle for your action video.
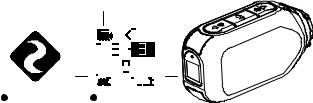
Wi-Fi & FIRMWARE |
|
20 |
|
|
|
To turn on your Ghost XL Wi-Fi, simply press and hold the  button. The LCD screen will show a Wi-Fi icon when the Wi-Fi is enabled.
Wi-Fi can also be turned on via the cameras settings menu, where you’ll also find an option to permanently switch the Wi-Fi network on.
DOWNLOAD THE DRIFT LIFE APP
Setup your shot, capture, playback, edit and live stream on your mobile device.
Download the latest firmware from the Drift website and copy the Ghost_XL.bin file into the root of a formatted micro SD card. Insert the micro SD card into the camera and power on. The camera screen will display ‘Firmware Updating’ as the update is installed. Once complete, the camera will power down.
|
CONNECTING YOUR CAMERA |
21 |
|
|
|
CONNECTING TO A PC
1.Connect the camera using the USB cable (provided); the camera screen will show a USB icon.
2.The camera’s folder may open automatically; if not, open using My Computer.
3.The camera should be recognised as a removable disk; double-click to open.
4.Open the DCIM folder to access your files.
CONNECTING TO A MAC
1.Connect the camera using the USB cable (provided); the camera screen will show a USB icon.
2.The camera’s folder may open automatically; if not, open using Finder.
3.The camera should be recognised as an external device; double-click to open.
4. Open the DCIM folder to access your files.
SPECIFICATIONS |
|
||
22 |
|||
|
|
|
|
1080P (1920 X 1080 16:9) |
@ 25, 30FPS, HDR Mode |
|
|
960P (1280 X 960 4:3) |
@ 25, 30FPS |
|
|
720P (1280 X 720 16:9) |
@ 25, 30, 48, 50, 60FPS |
|
|
WVGA (848 X 480 16:9) |
@ 25, 30,50, 60FPS |
|
|
File Format: |
.MP4 (H.264 Codec) |
|
|
Sensor Type: |
CMOS |
|
|
Field-of-view (diagonal): |
90 / 115 / 140º |
|
|
Lens Focal Range: |
0.5m to infinity |
|
|
Lens Rotation: |
300º |
|
|
Photo mode: |
4 / 8 / 12 megapixels |
|
|
Exposure: |
Auto / Step Manual (Advanced users) |
||
LCD Screen: |
Colour Dot Matrix Backlit LCD |
|
|
Microphones: |
Mono Microphone |
|
|
Wi-Fi: |
|
2.4G |
|
Bluetooth Remote Control: |
Compatible |
|
|
Memory Capacity: |
Micro SD, SDHC, SDXC memory |
|
|
|
|
cards up to 128GB |
|
Inputs: |
Micro USB Port, AUX Jack for external power and Mic |
||
|
|
SPECIFICATIONS |
23 |
|
|
|
|
|
Connectivity: |
USB Plug And Play, Micro USB 5 pin |
|
Compatibility: |
Windows XP and up / Mac OS 10.2 and up |
|
Power: |
3000 mAH internal battery. |
|
Dimensions: |
47(W)* 92(L)*35(D) mm |
|
Weight: |
127g |
|
DISCLOSURES |
|
24 |
|
|
|
FCC Information
This device complies with Part 15 of the FCC Rules.
Operation is subject to the following two conditions:
(1)this device may not cause harmful interference, and
(2)this device must accept interference received, including interference that may cause undesired operation.
WARNING
Changes or modifications to this unit not expressly approved by the party responsible for compliance could void the user’s authority to operate the equipment.
The equipment has been tested and found to comply with the limits for a Class B digital device, pursuant to Part 15 of the FCC Rules. These limits are designed to provide reasonable protection against harmful interference in a residential installation. This equipment generates, uses, and can radiate radio frequency energy and, if not installed and used in accordance with the instructions, may cause harmful interference to radio communications. However, there is no guarantee that interference will not occur in a particular installation. If
|
DISCLOSURES |
25 |
|
|
|
this equipment does cause harmful interference to radio or television reception, which can be determined by powering the equipment on and off, the user is encouraged to try to correct the interference by one or more of the following measures: Reorient or relocate the receiving antenna;
Increase the separation between the equipment and the receiver;
Connect the equipment into an outlet on a circuit different from that which the receiver is connected;
Consult the dealer or an experienced radio / TV technician for help.
This device complies with Industry Canada license-exempt RSS standard(s).
Operation is subject to the following two conditions:
(1)this device may not cause interference, and
(2)this device must accept any interference, including interference that may cause undesired operation of the device. This Class [B] digital apparatus complies with Canadian ICES-003. Son fonctionnement est soumis aux deux conditions suivantes:
(1)cet appareil ne peut pas causer l’intervention, et
DISCLOSURES |
|
26 |
|
|
|
(2) cet appareil doit accepter de l’intervention, y compris l’intervention qui peut causer l’opération non désirée de.
Cet appareil numérique de la classe [B] est conforme à la norme NMB-003 du Canada.
Cet appareil s’accorde avec Industrie Canada licence-exempte RSS standard.
FCC RADIATION EXPOSURE
This equipment complies with FCC radiation exposure limits set forth for an uncontrolled environment. This equipment should be installed and operated with minimum distance 20cm between the radiator & your body. This transmitter must not be co-located or operating in conjunction with any other antenna or transmitter.
MOTORCYCLE DISCLAIMER
Interacting with the camera while riding could cause a crash and you or others may be seriously injured or killed.
•Keep your eyes and mind on the road; •Avoid looking at the camera for too long;
•Stop the vehicle in a safe location before adjusting the camera.

1
Vielen Dank, dass Sie sich für die Drift Ghost XL Kamera entschieden haben.
Kundenservice
Laden Sie das komplette Handbuch herunter und besuchen Sie unsere offizielle Webseite, um sich über Firmware-Updates, Kundensupport und Informationen zu allen unseren Produkten zu informieren.
https://driftinnovation.com/
Wenn Sie Vorschläge oder Kommentare haben, wenden Sie sich bitte an unseren Kundenservice:
support@driftinnovation.com
Garantie
Die Garantie greift nicht, wenn das Produkt aufgrund falscher Handhabung, eines Unfalls, eines Feueroder Wasserschadens oder aufgrund des nicht Beachtens der bereitgestellten Bedienungsanweisungen beschädigt wurde.
Weitere Informationen zur Garantie finden Sie unter: https://driftinnovation.com/warranty
Inhaltsverzeichnis |
|
2 |
|
|
|
3-4 Lieferumfang | Über Ihre Kamera
5-6 Erste Schritte | Inbetriebnahme
7-10 Modusauswahl und Einstellungen
11 Montieren der Kamera
12-18 Funktionsübersicht
19-21 Zubehörübersicht
22WLAN und Firmware-Update
23Verbinden der Kamera
24-25 Produktspezifikationen
3 Lieferumfang
A Ghost XL Kamera |
|
|
B Drift Standard-Halterungsclip |
|
|
C Halterung mit gerader Klebefläche |
|
|
D Halterung mit gebogener Klebefläche G |
|
|
E |
Audioadapterkabel |
|
F |
Kabel für externe |
D |
|
F |
|
|
Stromversorgung |
|
G USB-Kabel |
|
|
|
C |
|
|
E |
|
|
|
A |
|
B |
|
 Loading...