

Drift Ghost-S User manual [ml]

follow us
facebook.com/driftinnovation
vimeo.com/driftinnovation
instagram.com/drift_innovation
twitter.com/driftinnovation
driftinnovation.com
quick guide

Thank you for purchasing the Drift Ghost-S
CUSTOMER SUPPORT
Check our ocial website for firmware updates, customer
support, news about our products and videos from our users.
If you have any suggestions, comments or concerns, please
contact our customer support team at:
support@driftinnovation.com
WARRANTY
To obtain our warranty service, register your product at:
driftinnovation.com/warranty
Contents
about your camera | initial setup 3—4
package contents | getting started 5—6
mode selection & settings 7—8
playback & camera settings | mounting the camera 9—10
feature overview 11—12
using the two-way remote | accessory guide 13—14
wifi & firmware | connecting the camera 15—16
specifications 17—18
disclosures 19—20
2
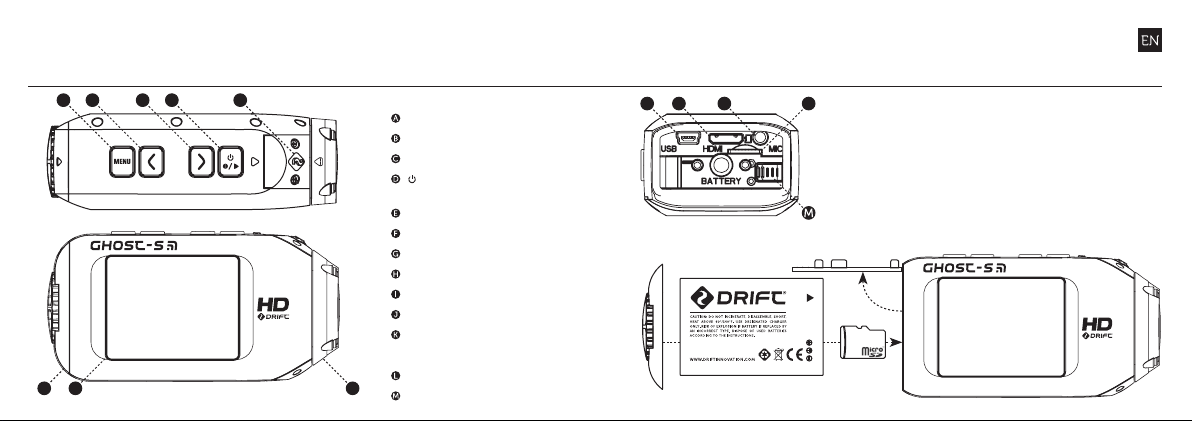
About your camera Initial setup
A
F G
D
CB E
MENU / Tag / Back Button
LEFT Button / Zoom Out
RIGHT Button / Zoom In
ACTION Button
(On/O/Rec/Stop)
Status LED
Rear Hatch
2.0” LCD Screen
300° Rotating Lens
USB Port (Mini-B)
HDMI Port (Mini-C)
3.5mm Microphone Input
-MONO
Micro SD Card Slot
H
Battery Slot Cover
I
J
K L
1. Unscrew and remove the
rear hatch
2. Insert a Class 10 or higher
Micro SD/HC/XC card (up
to 64GB) Format before
first usage!
3. Lif t the hin ged battery
slot cover and inser t the
batter y as shown (below)
4. Connect the camera
via mini USB cable to a
powered USB port and
charge the batter y for 4
hours before first use
5. Charge the remote via
mini USB cable
6. Replace the rear hatch
and screw shut to secure
43
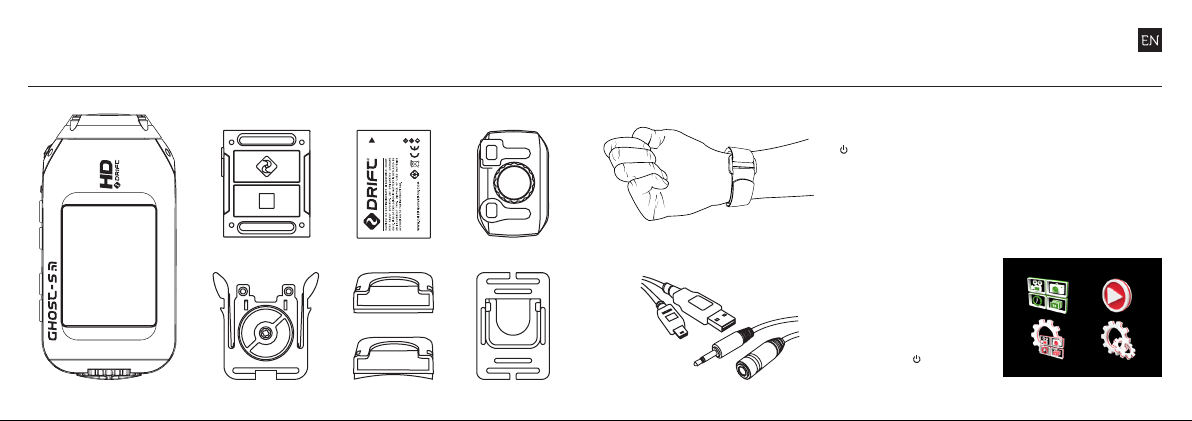
Getting startedPackage contents
Remote Control Rechargeable Battery
Universal Clip Mount Kit Goggle Mount
*Note: The Connector Hatch is NOT waterproof, use the Standard Hatch.
Connector Hatch Wrist Strap
POWER ON AND OFF
1. Press and hold the
ACTION button to
power on
2. T he screen will power
on, show the welcome
display, then Live Preview
3. T he camera is now ready
USB Cable (Mini-B)
Microphone Extension Cable
*Note: The camera will power on in the same mode it powered o in.
to record video, or take
still photos
4. The current camera mode
is indicated by the icon in
the top lef t of the display
and by the LED indicator
(for details, s ee p 7-8)
5. To power o, press
and hold the ACTION
button for 3s.
MAIN MENU
Press the MENU button to
enter the Main Menu. The
screen will display the icons
of the four menu options.
Use the LEF T/RIGHT buttons
to highlight menu options;
press the ACTION button to
select an option.
Mode Selection
Mode Settings
Playback
Settings
65
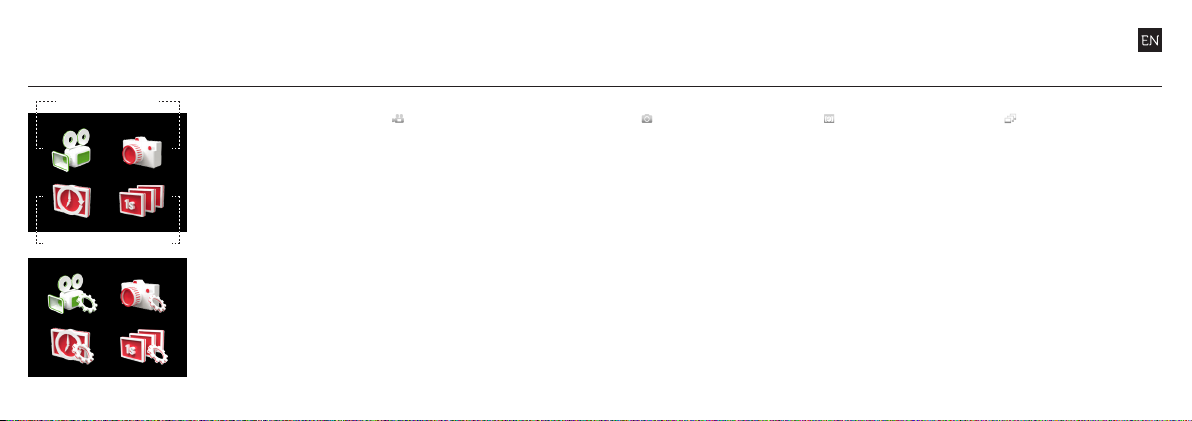
Mode selection & settings
Video
Timelapse
Photo
Photoburst
MODE SELECTION MENU
The Mode Selection menu
displays the icons for the
four camera modes.
Highlight the desired mode
and press ACTION.
The screen will return
to Live Preview and the
camera is ready to record.
MODE SETTINGS
The Mode Settings menu
displays the icons for the
settings of the four camera
modes. Highlight the
desired mode and press
ACTION. The screen will
show the list of settings for
the chosen mode.
VIDEO MODE
(Green LED) The camera
will record video when
ACTION is pressed on the
camera or remote. The
LED will flash red while
recording. Press ACTION on
the camera, or STOP on the
remote, to end recording.
VIDEO SETTINGS
• Video Resolution
• Frame Rate
• Field of View
• Exposure
• Self-Timer
• Video Tagging (see p1 2)
• Car DVR (see p11)
• Bit Rate (see p11)
• Scene Mode (see p1 2)
• Default Settings
PHOTO MODE
(Yellow LED) The camera
will capture still images
when ACTION is pressed
on the camera or remote.
The LED will blink red every
time a photo is taken (this
applies for Timelapse and
Photoburst modes also).
PHOTO SETTINGS
• Photo Resolution
• Field of View
• Exposure
• Self-Timer
• Scene Mode (see p1 2)
• Default Settings
TIMELAPSE MODE
(Purple LED) The camera
will capture a series of still
images at a specified rate
when ACTION is pressed
on the camera or remote.
To stop recording, press
ACTION on the camera or
STOP on the remote.
TIMELAPSE SETTINGS
• Photo Resolution
• Field of View
• Exposure
• Sequence Inter val
• Self-Timer
• Scene Mode (see p1 2)
• Default Settings
PHOTOBURST MODE
(Cyan LED) The camera
will capture a burst of still
images for an allot ted
duration, at a specified
rate, when ACTION on the
camera or remote is pressed
(for best results, use a Class
10 or higher micro SD card).
PHOTOBURST SE TTINGS
• Photo Resolution
• Field of View
• Capture Rate
• Burst Duration
• Exposure
• Self-Timer
• Scene Mode (see p1 2)
• Default Settings
87
Playback & camera settings
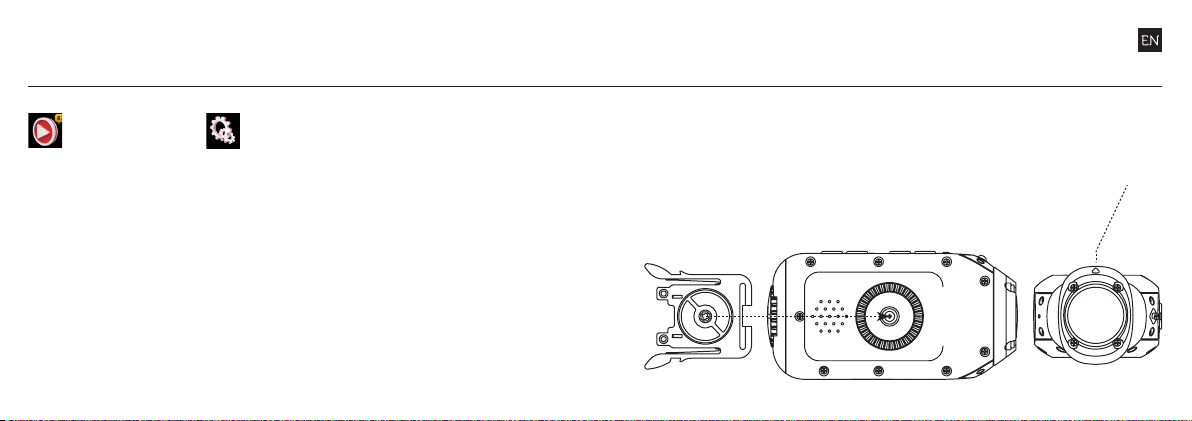
Mounting the camera
PLAYBACK
Select ing the Playback icon
opens th e Mode Selectio n
menu and d isplay the four
camera mode icons.
The number of videos or
photos is displayed b eside
each camera mode i con.
Select ing a mode will dis play
the most re cent video or photo ,
timela pse or photoburs t folder.
Navigate through the files
using LEF T/RIGHT. To play a
video, or open a timelapse or
photoburst sequ ence, pre ss
the ACTI ON button.
Press MENU to go back.
CAMERA SETTINGS
• Wi-Fi ON / OFF
• Wi-Fi Netwo rk Name GHOST-S [000]
• Mic Sensiti vity O FF / LOW / MED / HIGH
• Speaker Volume OFF / LOW / MED / HIGH
• LCD Brightnes s LOW / MED / HIGH
• LCD O OFF / 5S / 10S / 20S / 1MIN / 5M IN
• Remote Contro l YES / NO
• Remote Pairi ng ONE-ONE / ONE-ALL
• Remote LED ON / OFF
• Camera LED ON / OFF
• Digital Zoo m ON / OFF
• Camera O OFF / 1MIN / 2MIN / 5M IN
• HDMI Out Res olution AUTO / 1080p /
1080i / 720p
• HDMI frame R ate 60 / 50 / 30 / 25
• Date YEA R / MONTH / DAY
• Date / Timest amp ON / OFF
• Languag e (list of languag es)
• Save Settin gs A / B / C
• Load Setti ngs A / B / C
• Reset Setti ngs YES / NO
• Format Memory Card YES / NO
• Firmware Vers ion CURRENT VERSION
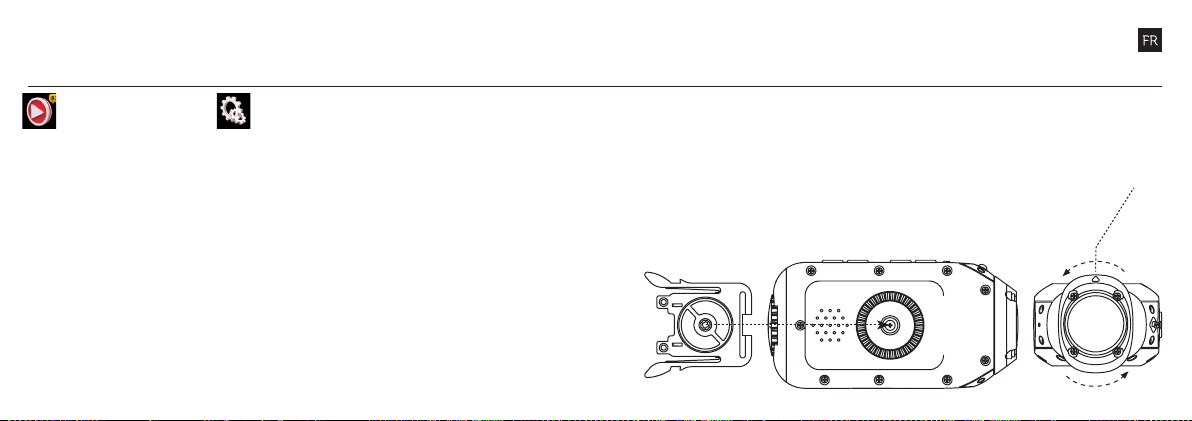
1. Attach the Universal Clip
to the camera in any 360°
orientation as needed—
first position the clip in
the desired orientation,
then secure by rotating
the screw base by hand.
2. Slide the Universal Clip
into your chosen mount,
ensuring that it ‘clicks’
into place.
*Double check it has been
fully inserted by pushing
out the clips
3. Align your shot. Rotate
the lens by hand until
the image is orientated
correctly. Use the
lens marker as an ‘up’
reference.
109

Feature overview
CLONE MODE [NEW]
Connec t to multiple
cameras with the new
Clone mode feature.
Through Wi-Fi all cameras
within 60m of the master
camera will be able to
“see” each other and
communicate their current
settings and recording
modes to each other. The
result is a synchronisation
between cameras, if one
camera starts recording, all
synced cameras will record
- this feature is perfect for
capturing multiple angles.
See Full Manual online for
how to use, found at:
www.driftinnovation.com
SIMULTANEOUS PHOTO
While recording video,
pressing the MENU button
will simultaneously take an
8mp still photo.
When using the two-way
remote control, press the
ACTION button for the
same result.
This feature is not av ailable
when Video Tagging ( right)
is enabled.
CAR DVR MODE
This hands-o mode is ideal
for insurance and securit y
purposes. In this mode the
camera records footage
in a continuous loop style
(DVR Inter vals) recording
loop after loop until it fills
the Micro SD Card. Once
full, the oldest loops will
be deleted as the newest
ones are saved. DVR loop
intervals can be 1min, 3min,
5min or 10min intervals.
BIT RATE [NEW ]
Users can select to keep the
normal compression used
by the H.264 codec, or if
they prefer, allow a higher
flow of data for preserving
more of the original
recording. This will result in
a bigger file size.
MODE INDICATOR
The Drift Ghost-S features
our multi-coloured active
statusTM indicator light
system. There are LED
indicators positioned on
both the t wo-way remote
control an d the front face of
the camera, these change
colour depending on the
current camera mode.
SCENE MODE [NEW]
Choose yo ur recording
conditions with scene
mode select bet ween
Normal / Vivid / Low Light.
SETTING PROFILES
All camera settings can be
saved by selectin g Save
Settings from the Camera
Settings menu and choosing
a save profile: A, B or C .
Profiles can be loaded by
selecting Load Settings from
the menu, then A , B or C.
VIDEO TAGGING
When activated, this
feature allows the camera
to continuously record
video, but only saving
when important footage is
“tagged”.
While recording video,
pressing the MENU button
will tag and save past,
present and future video.
For example, with a video
tagging interval of 30s
selected, on pressing MENU
while recording, the camera
will save the previous 30s,
the current 30s and an
additional 30s—a total of
1m30s of ‘tagged’ footage.
The Video Tagging feature
requires a class 10 micro
SD card with 4GB of
free space to function
correctly.
1211
Using the two-way remote
Accessory guide
A
C
B
The Remote is NOT waterproof.
ACTION button
STOP button
C
USB charging port
(Remove covering before charging)
POWER ON AND OFF
1. Hold the ACTION
button to power on
2. The colour of the remote
control ’s LED indicator
will show the current
camera mode
3. The remote will
automatically power
o if it does not find a
camera after 15s
4. To charge, connect the
remote control via the
mini USB cable provided
to a powered USB port
USING THE REMOTE
While the camera and remote
are on and p aired, pressin g
ACTIO N will begin recording
video, c apture a photo, start
timelapse or ph otoburst
modes, depending on the
camera mode. Pressing S TOP
will end v ideo or timela pse
recording.
Pressing ACTION while
recording video w ill capture a
photo, or star t Video Tagging
(if activated, se e p12). Pressing
STOP wil l end recording.
The LED wi ll blink blue to
confirm a si gnal between
camera and remote.
Pressing STOP wh ile the
camera is in Live Preview
will togg le between cam era
modes , indicated by LED
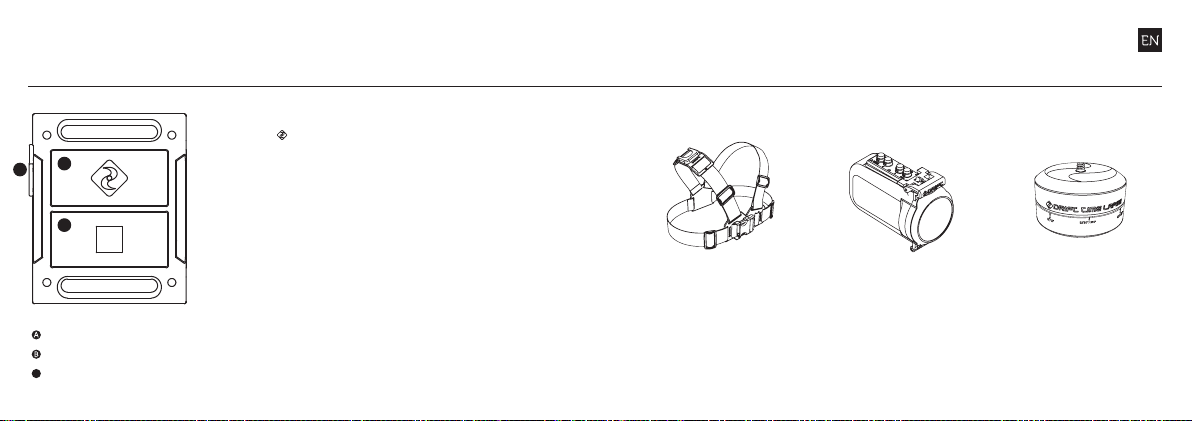
SHOULDER MOUNT
The m ount allows you to
go hands-free while still
capturing all the action. The
harness is fully adjustable
and the detachable shoulder
mount is suitable for both left
and right handed users.
For full accessory list visit driftinnovation.com
HD GHOST
WATERPROOF CASE
The Drift HD Ghost waterproof
case is perfectly suited for all
aquatic activities. The dual
locking system ensures the
Drift HD Ghost is always
securely sealed and dry down
to 60m.
DRIFT TIME LAPSE
The Drift Time Lapse allows
you to capture photo Time
Lapse sequences and is
enabled to rotate 360° in
60 minutes perfect for
capturing all the action,
whether up in the mountains
or down on the beach.
1413
Connecting the cameraWifi Firmware
TURNING ON AND OFF
In the Camera Settings
menu, highlight the ‘WiFi’
option,press AC TION, and
select P and press ACTION.
In Live Preview, wait for the
WiFi indicator icon @ to
show WiFi is enabled then,
on your WiFi device, select
the network:
‘Ghost-S [000]’
The three digit network
name can be changed from
the general settings menu.
A Micro SD card must be
installed to allow WiFi to
work.
DOWNLOAD T HE DRIFT APP
Update coming soon for full
Ghost S compatibility, check
website for up-to-date details.
Shot setup, record,
capture & playback
on your device.
UPDATING THE FIRMWARE
Download the latest firmware
from the Drift website and
copy the Ghost_ S.bin file to a
formatted micro SD card.
Insert the micro SD card
into the camera and power
on. The camera screen will
display ‘Firmware Updating’
as the update is inst alled.
Once complete, the camera
will power down. To check
the firmware has updated
correctly, power the camera
on and, from the Main Menu,
open the Camera Settings
menu and select ‘Ver sion’ to
view the current firmware.
CONNECTING TO A PC
1. Connect the camera
using the USB cable
(provided); the camera
screen will show a USB
icon.
2. The camera’s folder may
open automatically;
if not, open using My
Computer.
3. The camera should
be recognised as a
removable disk; doubleclick to open.
4. Open the DCIM folder to
access your files.
! While charging only (not through a computer), press ACTION to return to Live Preview
CONNECTING TO A MAC
1. Connect the camera
using the USB cable
(provided); the camera
screen will show a USB
icon.
2. The camera’s folder may
open automatically; if
not, open using Finder.
3. The camera should
be recognised as an
external device; doubleclick to open.
4. Open the DCIM folder to
access your files.
CONNECTING TO A TV
1. While the camera is
powered o, connec t
the camera using a mini
HDMI (Type C) to full
HDMI cable, available
from Drift retailers.
2. Power on the camera.
3. The camera’s display will
now show on the TV
and play back of video
or photos will show on
screen; video sound
will come out of the T V
speakers.
1615

Specifications
Video resolution: 1080p, 720p and WVGA (16:9); 960p (4:3)
File format: .MP4 (H. 264 codec)
Sensor type: CMOS
Frame rate:-
1080p: 25 / 30 / 50 / 60 fps
960p: 25 / 30 / 48 / 50 / 60 fps
720p: 25 / 30 / 50 / 60 / 10 0 / 120 fps
WVGA: 25 / 30 / 50 / 60 / 100 / 120 / 200 / 240 fps
Field-of-view (diagonal):-
1080p: 90° / 127 ° / 160°
960p: 160°
720p: 160°
WVGA: 160°
Lens focal range: 0.5m to infinity
Lens rotation: 300°
Zoom: ×10 (digital)
Photo mode: 5 / 8 / 12 megapixels
Exposure: Auto / Step Manual (advanced users)
LCD Screen: 2.0” colour TFT
LCD Screen Cover: Corning® Gorilla® Glass
Waterproof: 3m (9.84ft)
Microphone: Built-in, noise reducing microphone
Memor y capacity: Micro SD, SDHC, SDXC memory cards up to 6 4GB
Inputs: 3.5mm external microphone (extension included)
Output s: HDMI connector type C (cable not include d)
Connec tivit y: USB Plug and Play, mini-B USB connector
Compatibility: Windows Vista or Windows 7 and up / Mac OS X 10.5 and up
Remote range: 10m (32.81ft)
Radio frequency: 2.4GHz
Camera:-
Dimensions: 105 (L) × 52 (W) × 33 (D) mm
Weight: 172g
Power: 1700mAh rechargeable lithium-ion battery (included) (DC 3.7V)
Remote control:-
Dimensions: 59 (L) × 48 (W) × 12 (D) mm
Weight: 22g
Power: 350mAh rechargeable lithium-ion batter y (DC 3.7V)
1817

Disclosures
FCC Information
This device complies with Part
15 of the FCC Rules.
Operation is subject to the
following two conditions:
(1) this device may not cause
harmful interference, and
(2) this device must accept
interference received, including
interference that may cause
undesired operation.
WARNING
Changes or modifications to
this unit not expressly approved
by the party responsible for
compliance could void the
user’s authority to operate the
equipment.
The equipment has been
tested and found to comply
with the limits for a Class B
digital device, pursuant to Part
15 of the FCC Rules. These
limits are designed to provide
reasonable protection against
harmful interference in a
residential installation. This
equipment generates, uses,
and can radiate radio frequency
energy and, if not installed
and used in accordance with
the instructions, may cause
harmful interference to radio
communications. However,
there is no guarantee that
interference will not occur
in a particular installation. If
this equipment does cause
harmful interference to radio or
television reception, which can
be determined by powering the
equipment on and o, the user
is encouraged to try to correct
the interference by one or more
of the following measures:
Reorient or relocate the
receiving antenna;
Increase the separation
between the equipment and the
receiver;
Connect the equipment into
an outlet on a circuit dierent
from that which the receiver is
connected;
Consult the dealer or an
experienced radio / TV
technician for help.
This device complies with
Industry Canada licenseexempt RSS standard(s).
Operation is subject to the
following two conditions:
(1) this device may not cause
interference, and
(2) this device must accept
any interference, including
interference that may cause
undesired operation of the device.
This Class [B] digital apparatus
complies with Canadian
ICES-003.
Son fonctionnement est soumis
aux deux conditions suivantes:
(1) cet appareil ne peut pas
causer l’intervention, et
(2) cet appareil doit accepter
de l’intervention, y compris
l’intervention qui peut causer
l’opération non désirée de.
Cet appareil numérique de la
classe [B] est conforme à la
norme NMB-003 du Canada.
Cet appareil s’accorde avec
Industrie Canada licenceexempte RSS standard.
FCC RADIATION EXPOSURE
This equipment complies with
FCC radiation exposure limits
set forth for an uncontrolled
environment. This equipment
should be installed and
operated with minimum
distance 20cm between the
radiator & your body.
This transmitter must not be
co-located or operating in
conjunction with any other
antenna or transmitter.
MOTORCYCLE DISCLAIMER
Interacting with the camera
while riding could cause a
crash and you or others may be
seriously injured or killed.
• Keep your eyes and mind on
the road;
• Avoid looking at the camera
for too long;
• Stop the vehicle in a safe
location before adjusting the
camera.
2019

Merci d’avoir ache té la Drif t Ghost-S
SERVICE CLIENTÈLE
Consultez notre site Web ociel pour les mises à jour du
firmware, le support client, des informations sur nos produits
et des vidéos de nos utilisateurs.
Si vous avez des suggestions, des commentaires ou des
préoccupations , veuillez contacter notre équipe au ser vice
clientèle à l’adresse :
support@driftinnovation.com
GARANTIE
Pour pouvoir bénéficier de notre service de garantie,
enregistrez votre produit à l’adresse :
driftinnovation.com/warranty
Contenu
À propos de votre appareil photo | Configuration initiale 23—24
Contenu du paquet | Mise en route 25—26
Sélection des modes et paramètres 27—28
Lecture et paramètres de l ’appareil photo | Montage de l ’appareil 29—30
Présentation des fonctionnalités 31—32
Utilisation de la télécommande bidirectionnelle | Guide des accessoires 33—34
WiFi et firmware | Connecter l ’appareil photo 35—36
Caractéristiques 37—38
Spécifications 39—40
22

À propos de votre caméra Configuration initiale
A
F G
D
CB E
Menu / Marquage / Bouton Retour
Bouton gauche / Zoom arrière
Bouton droit / Zoom ava nt
Bouton ACTION
(On/O/Rec/Stop)
LED témoi n d’état
Trappe arrière
Écran LCD 2.0 ”
Objectif rotatif à 300 °
Port US B (Mini-B)
Port HD MI (Mini-C)
Entrée mi crophone 3,5 mm - MONO
Logement de car te Micro SD
Trappe de la b atterie
H
I
J
K L
1. Dé vissez et retirez la trappe
arrière
2. Insérez une Micro carte
SD/HC/XC de Classe 10 o u
supérieure (jus qu’à 64 Go).
Eectuez un formatage avant
sa première utilis ation !
3. Soulevez la trapp e sur
charnière du compartiment
de batter ie et insérez la
batterie comme ind iqué (ci-
dessous)
4. Connectez l ’appareil photo
via un câb le mini-USB à un
port USB alimenté et chargez
la batter ie pendant 4 heures
avant la première utilisation
5. Replace z la trapp e arrière
et vissez p our sécuriser la
fermeture
2423
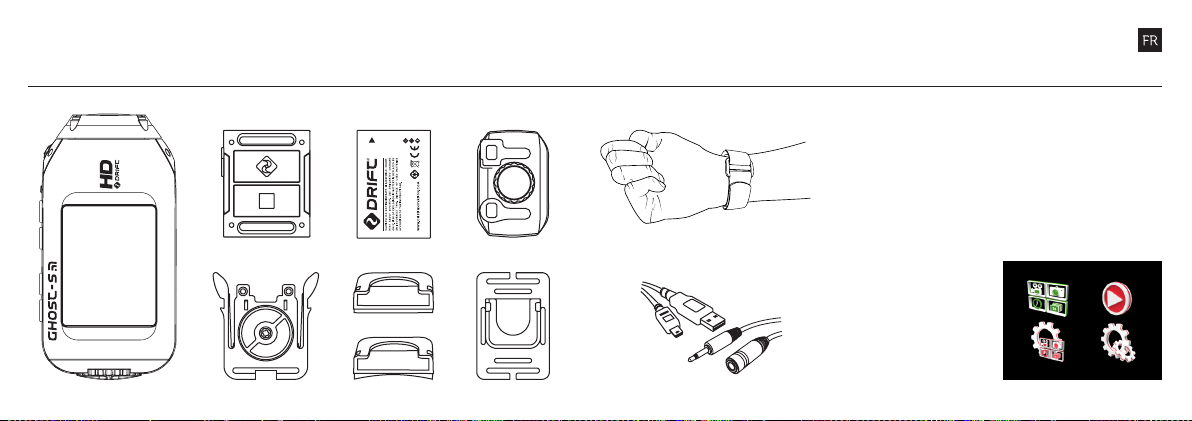
Mise en routeContenu du paquet
Télécommande Batterie Rechargeable
Trappe de connection
Clip Universel Kit de fixation Fixation sur masque
25 26
*Note : La porte arrière avec passages pour connectique est NON étanche,
utilisez la porte standard étanche.
*Remarque : lors de sa mise sous tension, l’appareil photo se placera dans le mode dans lequel
il était lors de sa mise hors tension.
Dragonne
Câble US B (Mini-B)
Câble Rallonge du Microphone
MISE SOU S TENSION ET HO RS
TENSION
1. Appuyez e t maintenez le bo uton
ACTIO N enfoncé pour la m ise sous
tension
2. L’écran s’allumera, achera l’écran de
bienven ue, puis le Live Pr eview
3. L’appareil est mainte nant prêt à
enregistrer des vidéos ou prendre des
photos
4. Le m ode actuel de l ’appareil ph oto est
indiqué par l’icône situ ée dans le coin
supéri eur gauche de l ’écran et par l e
témoin LED ( pour plus de dét ails, voir
p27-28)
5. Pour mettre l’ap pareil hors ten sion,
appuye z et maintenez le bo uton
ACTIO N pendant 3 secon des
MENU PRINCIPAL
Appuye z sur le bouton MENU
pour accéder au menu principal.
L’écran ache ra les icônes des
quatre options de menu.
Utilise z les boutons GAUC HE/
DROITE pour sélectionner les
options de menu, et appuyez
sur le bouto n ACTION pour
sélectionner une option.
Sélection de Mode
Mode Parametres
Lecture
Parametres
Sélection de Mode & Paramètres
Video
Time lapse
27 28
Photo
Rafale
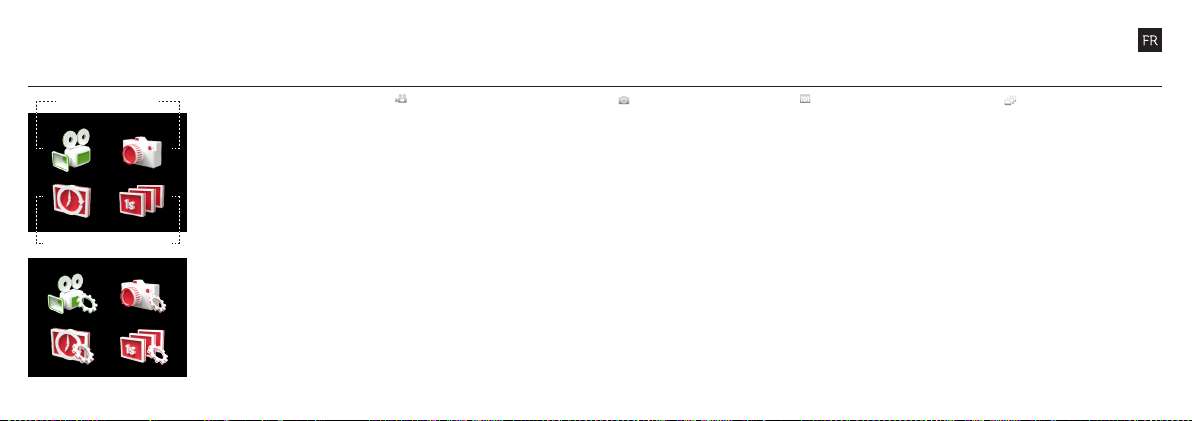
MENU DE SÉLECTION DE
MODE
Le menu de sélection de mode
ache les icônes des quatre
modes de l’appareil. Mettez le
mode désiré en surbrillance et
appuyez sur le bouton ACTION.
L’écran reviendra à l ’aperçu
instantané et l’appareil sera
alors prêt à enregistrer.
PARAMÈTRES DE MODE
Le menu Paramètres de mode
ache les icônes pour les
réglages des quatre modes
de l’appareil. Mettez le mode
désiré en surbrillance et
appuyez sur le bouton ACTION.
L’écran achera la liste des
paramètres pour le mode
choisi.
MODE VIDÉO
(LED verte) L’appareil enregistrera
lorsque le bouton ACTION est
appuyé directement sur l’appareil
ou sur la télécommande. Le
témoin LED clignote en rouge
pendant l’enregistrement.
Appuyez sur le bouton
ACTION sur l’appareil photo,
ou sur le bouton STOP sur la
télécommande, pour terminer
l’enregistrement.
PARAMÈTRES VIDÉO
• Résolution vidéo
• Nombre dimages/sec
• Champs de vision
• Exposition
• Retardateur
• Marquage vidéo (voir p32)
• DVR de voiture (voir p31)
• Débit
• Mode Scène (voir p32)
• Paramètres par défaut
MODE PHOTO
(LED jaune) La caméra
prendra des photos lorsque le
bouton AC TION est appuyé
directement sur l’appareil
ou sur la télécommande. Le
témoin LED rouge clignote
chaque fois qu’une photo est
prise (cela vaut également
pour les modes Retardateur
et Rafa le).
PARAMÈTRES PHOTO
• Résolution image
• Fréquence de trame
• Champs de vision
• Exposition
• Retardateur
• Mode Scène (voir p32)
• Paramètres par défaut
MODE TIME L APSE
(LED Violet) L’appareil prendra
une série de photos déterminés
lorsque le bouton ACTION est
appuyé directement sur l’appareil
ou sur la télécommande. Pour
arrêter l’enregistrement, appuyez
sur le bouton ACTION sur
l’appareil photo ou sur le bouton
STOP sur la télécommande.
PARAMÈTRES RETARDATEUR
• Résolution photo
• Champs de vision
• Intervalles
• Durée de séquence
• Exposition
• Retardateur
• Mode Scène (voir p32)
• Paramètres par défaut
MODE RAFALE
(LED Cyan) L’appareil prend
une rafale de photos pour
une durée impartie et à une
vitesse donnée, lorsque le
bouton AC TION est appuyé
directement sur l ’appareil ou
sur la télécommande (pour
de meilleurs résultats, utilisez
une carte micro SD de classe
10 ou supérieure).
PARAMÈTRES RAFALE
• Résolution photo
• Champs de vision
• Nombre de photos
• Durée de Rafale
• Exposition
• Retardateur
• Mode Scène (voir p32)
• Paramètres par défaut
Lecture & Paramètres de l’appareil
Montage de l’appareil photo
LECTURE
En sélectionnant l ’icône de lecture,
le menu de sélection de mode
s’ouvrira et achera les quatre
icônes de mo de de l’appareil photo.
Le nombre d e vidéos ou de photos
est aché à côté de chaque
icône de mod e. La sélection d’un
mode achera la vidéo, photo, la
séquen ce de prises de vues la plus
récente ou le dernier dossier Rafale.
Naviguez à travers les chiers
à l’aide des boutons GAU CHE/
DROITE. Pour lire une vidéo, ou
ouvrir un e séquence de prises de
vues ou Rafale, appuyez sur le
bouton AC TION. Appuyez sur MENU
pour revenir en arrière.
PARAMÈTRES DE L’APPAREIL PHOTO
• Wi-Fi On / Off
• Nom du réseau W i-Fi GHOST-S (000)
• Sensibil ité Micro Étrient / B as /
Moyen / Haut
• Volume haut-par leur Étrie nt / Bas /
Moyen / Haut
• Luminosité LCD Basse / M oyenne / Haute
• Arrêt LCD Étrient / 5s / 10s / 20 s
/ 1 min / 5min
• Télécommande Oui / No n
• Synchronsa tion télécommand e Une-Une /
Une-Tous
• LED Télécommand e On / Off
• LED Apparei l photo On / Off
• Zoom numéri que On / Off
• Arrêt appar eil Éteint / 1 min / 2min / 5min
• Résolutio n de sortie HDMI Auto / 1080 p /
1080i / 720p
• Nombre ima ges/sec HDMI 60/50/30/25
• Date Année / Mois / Jour
• Date / Heure On / Off
• Langue
• Enregistre r les paramètres A / B / C
• Charger les p aramètres A / B / C
• Réinitial iser les paramètre s Ou i / Non
• Formater la c arte mémoire Oui / Non
• Version de Fir mware Version act uelle
1. Fixerz le clip universel
à l’appareil photo
dans n’importe quelle
orientation désirée
sur 360° - positionnez
d’abord le clip dans
l’orientation désirée, puis
sécurisez la fixation en
vissant la base à la main
2. Faites glisser le clip
universel dans le support
sélectionné, en vous
assurant de bien entendre
le « clic » confirmant sa
bonne mise en place.
*Vérifiez qu’il a été
complètement enfoncé
en faisant ressortir les
picots din clip
3. Alignez votre prise
de vue. Faites pivoter
l’objectif à la main jusqu’à
ce que l’écran soit orienté
correctement. Utilisez
la marque sur l’objectif
comme référence
3029
 Loading...