

Drift Ghost 4K User Manual

Professional HD Action Cameras
DRIFT GHOST 4K
USER MANUAL
www.driftinnovation.com
Version 2.0

Contents
Precautions ................................ 3
General Precautions
Attention
Optimal Camera Storage
Water Resistance
Overview ..................................... 5
Using the Camera ..................... 6
Initial Setup
Powering On and O
Charging
Battery Life
Using an External Power Supply
Selecting a MicroSD Card
Formatting Your Memory Card
Removing a MicroSD Card
Module Docking
Settings Menu (Continued)
Simultaneous Photo
Video Stabilisation
Microphone
Microphone Sensitivity
Speaker Volume
LED Status Indicator
LED Indicator Timer
Instant Record
Video Standard
Date
Date Stamp
Camera O
Thumbnail Files
Language
Reset Settings
Format Card
Serial Number
Firmware
Camera Menu System ............ 10
Mode Navigation
Settings Menu Navigation
Video Mode (Green LED)
Video Mode Selecting Resolution
and Frame Rate
Photo Mode (Yellow LED)
Timelapse Mode (Purple LED)
Photoburst Mode (Blue LED)
Settings Menu ........................... 12
Wi-Fi
Wi-Fi Frequency
BT Mode
Pair Remote
Field of View
Exposure
Self Timer
Bit Rate
Filters
ISO Sensitivity
Video Tagging
Car DVR
Mounting the Camera ............. 20
Initial Setup
Shot Setup
Connectivity ............................. 21
Connecting to a Windows PC
Connecting to a Mac
Connecting to a TV
Connecting to a Wi-Fi Device
Playing Video on a Computer
Compatibility
Camera Care ............................ 24
Cleaning the Camera
Cleaning the Lens
Storage
Updating Firmware ................ 25
Warranty .................................... 26
Disclosures ............................... 27
2EN

Precautions
General Precautions
Please take note of the following guidelines when using your Ghost 4K camera:
• The camera is 2m shock resistant,
but not shock proof — please
take care of your camera and
accessories, mounting and storing
them securely.
• For your safety, do not press the
buttons on the camera during
sports activities.
• Do not store the camera anywhere
prone to dust or damp for extended
periods of time.
• Do not leave the camera exposed
to extremely high temperatures—
such as under direct sunlight—for
extended periods of time as this
may aect the camera housing and
internal components.
• Clean the lens and screen with
a micro fibre, antistatic cloth to
remove fingerprints or dust—no
cleaning chemicals are required.
• The camera has a working
temperature range of -10°C to
40°C (14°F to 104°F).
• Power o the camera before
removing the battery module or
memory card—the memory card
and stored data may be damaged if
it is removed or inserted while the
camera is powered on.
• Remove the memory card before
storing the camera for long periods
of time.
3EN

Precautions
Attention
Rechargeable batteries are only to be charged under adult supervision.
DO NOT short-circuit the battery module terminals.
DO NOT open, puncture or otherwise damage the rechargeable battery
module, or dispose of it in fire.
Optimal Camera Storage
We recommend users to regularly store cameras for a minimum of 6-12 hours
with the battery module removed in a maximum of 30% humidity to help disperse
any moisture.
Avoid removing Ghost 4K modules in damp or humid conditions.
Water Resistance
The Ghost 4K is water resistant, but not waterproof. This means that you can use
your camera in the rain, providing the USB and memory card covers and a Ghost
4K module are securely in place, but the camera cannot be submerged.
For any activities where the camera may be subjected to impact of water or
submersion, the ghost 4K waterproof case (sold separately) is required.
Disclaimer
Drift Innovation will not, under any circumstances, be responsible for injuries or
property damaged incurred during participation of any high-risk sport or activity
not endorsed or recommended by Drift Innovation. Remember that the warranty
will only cover manufacturing defects.
4EN
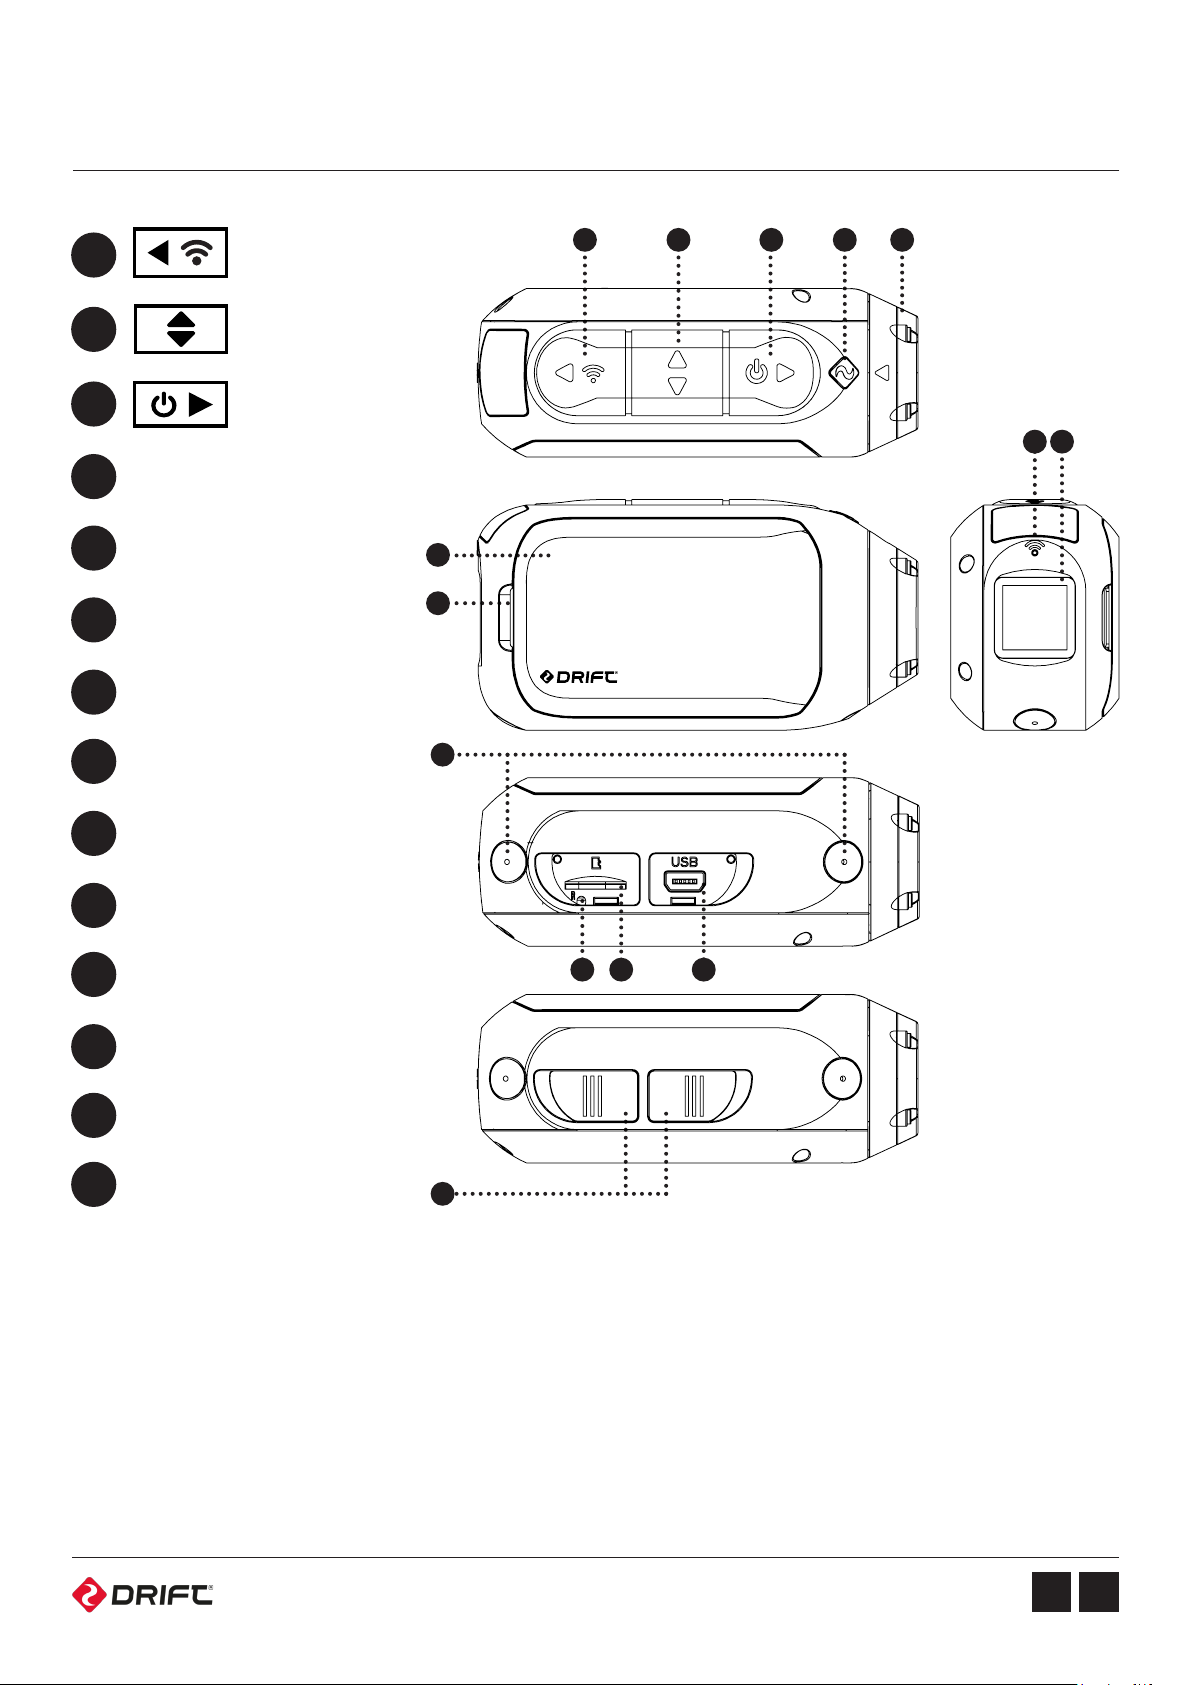
Overview
GHOST 4K
A
B
C
D
Status LED
E
Rotating Lens
F
Battery Module
G
Module Latch
H
Wi-Fi LED
Rear Button
Middle Button
Front Button
A B
F
G
J
C D E
I
H
I
Rear Screen
J
Dual microphones
K
Reset Button
L
MicroSD Card Slot
M
10 Pin Mini USB Port
N
Rubber Cover
MK L
N
5EN
Using the Camera
GHOST 4K
3
4
1 2
5
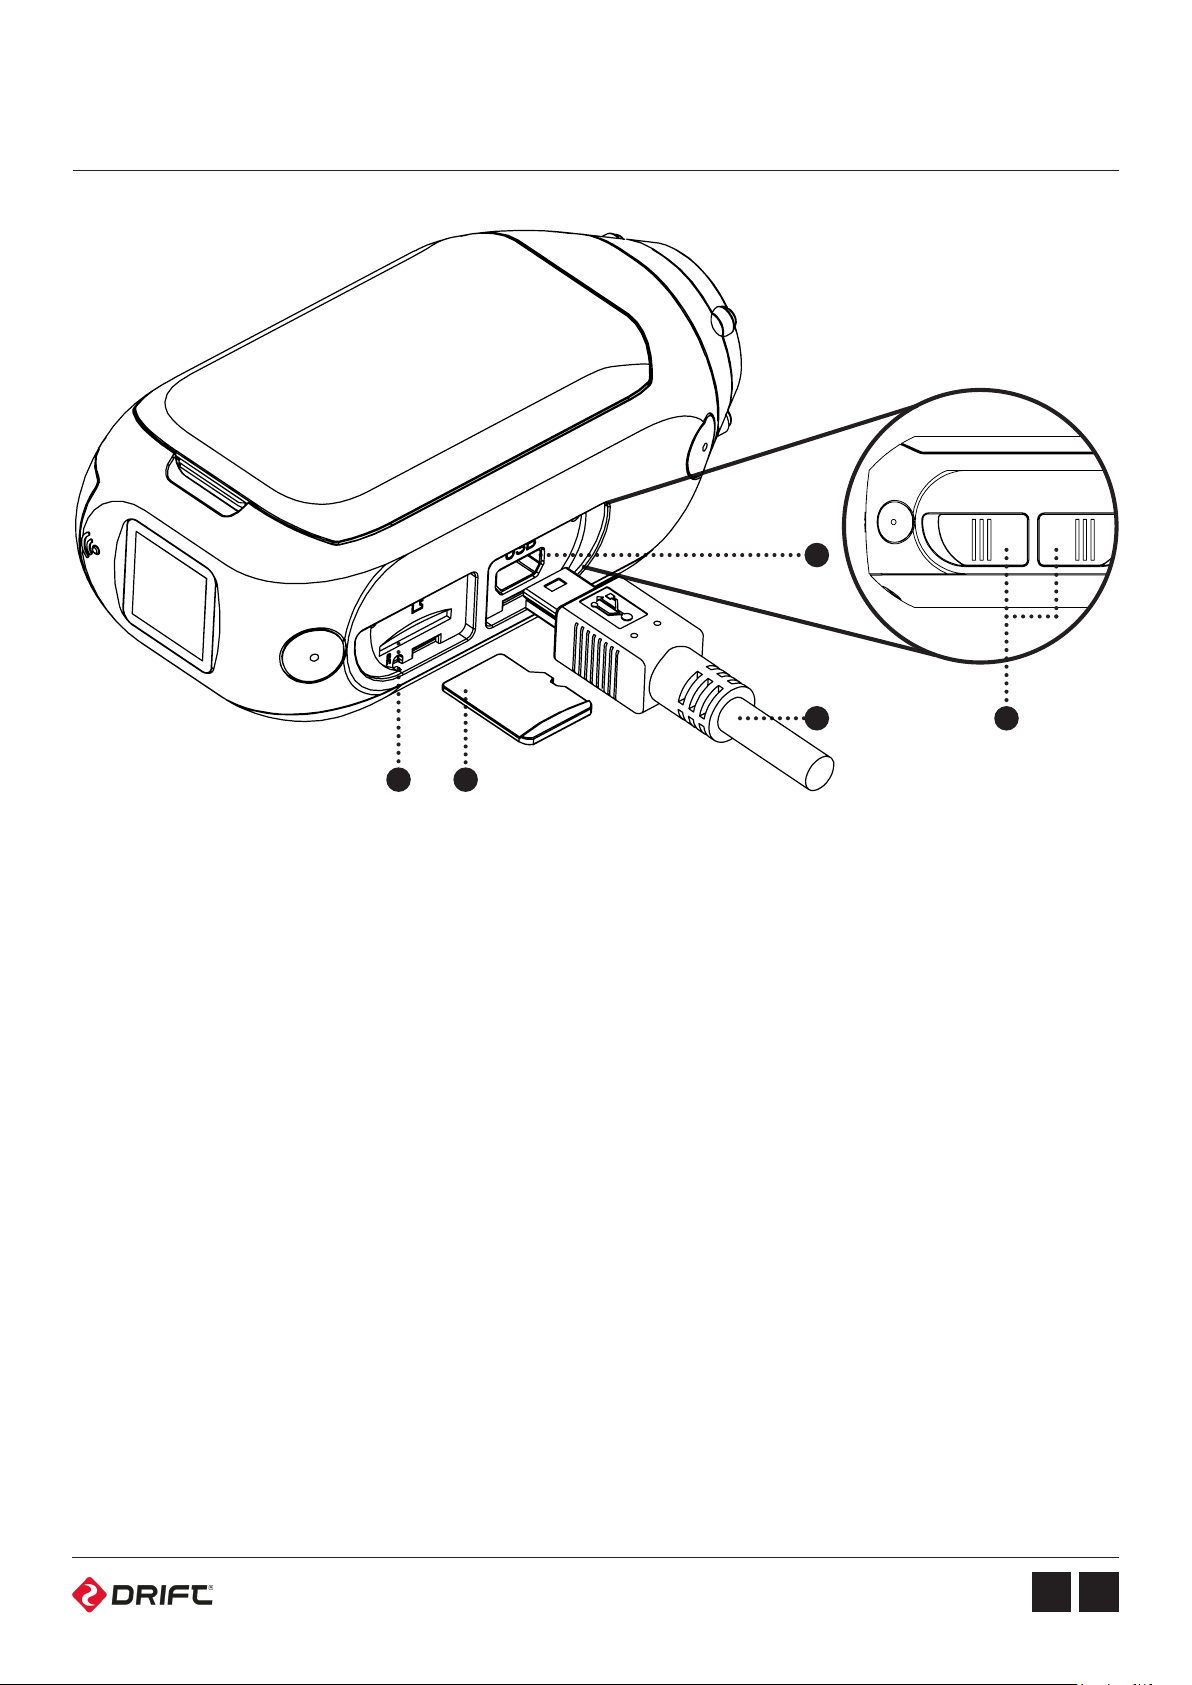
Initial Setup
1. Uncover the microSD slot by lifting its rubber cover.
2. Insert a Class 10 or higher microSD/HC/XC card (up to 128GB).
Format before first usage!
3. Uncover the mini USB port by lifting its rubber cover
4. Connect the camera via a mini USB cable to a powered USB port and charge
the battery for 2.5 hours before first use.
5. Replace the rubber covers securely to cover both the microSD slot and mini
USB port. You are ready to go!
6EN

Using the Camera
Powering On and O
1. Press and hold the button for 2 seconds to power the camera on or o.
2. To power the camera on or o while charging, press and release button.
Charging
• For best results charge your camera and battery module simultaneously.
• Ensure that the Ghost 4K is powered o.
• Lift the front rubber port on the underside of the camera.
• Connect the included mini USB cable to a powered USB port, and then to your
Ghost 4K USB port.
If connected to a
powered USB port the
Ghost 4K screen will
show a charging icon.
• A full charge takes around 2.5 hours (min. 1A USB port). Once the camera is
fully charged, remove the mini USB cable, and replace the rubber port cover.
If connected to a
computer USB port the
Ghost 4K screen will
show a USB icon.
Battery Life
At a temperature of 25°C (77°F), recording continuously with the standard battery
module installed, your Ghost 4K battery will last for 2hrs 30mins on a full charge.
Using an External Power Supply
The camera can be powered by an external power supply such as a USB power
adaptor or power pack. We recommend you to power o your camera before
connecting to any external power supply.
Press the button to begin normal usage when using an external power
supply. If the external power is cut o for any reason during recording, the
camera will immediately start drawing power from the rechargeable battery
instead and continue recording, protecting your footage from file corruption.
7EN
Using the Camera
Selecting a MicroSD Card
The Ghost 4K is compatible with Micro SD, Micro SDHC or Micro SDXC cards up
to 128GB. We recommend class 10/UHS1 memory cards.
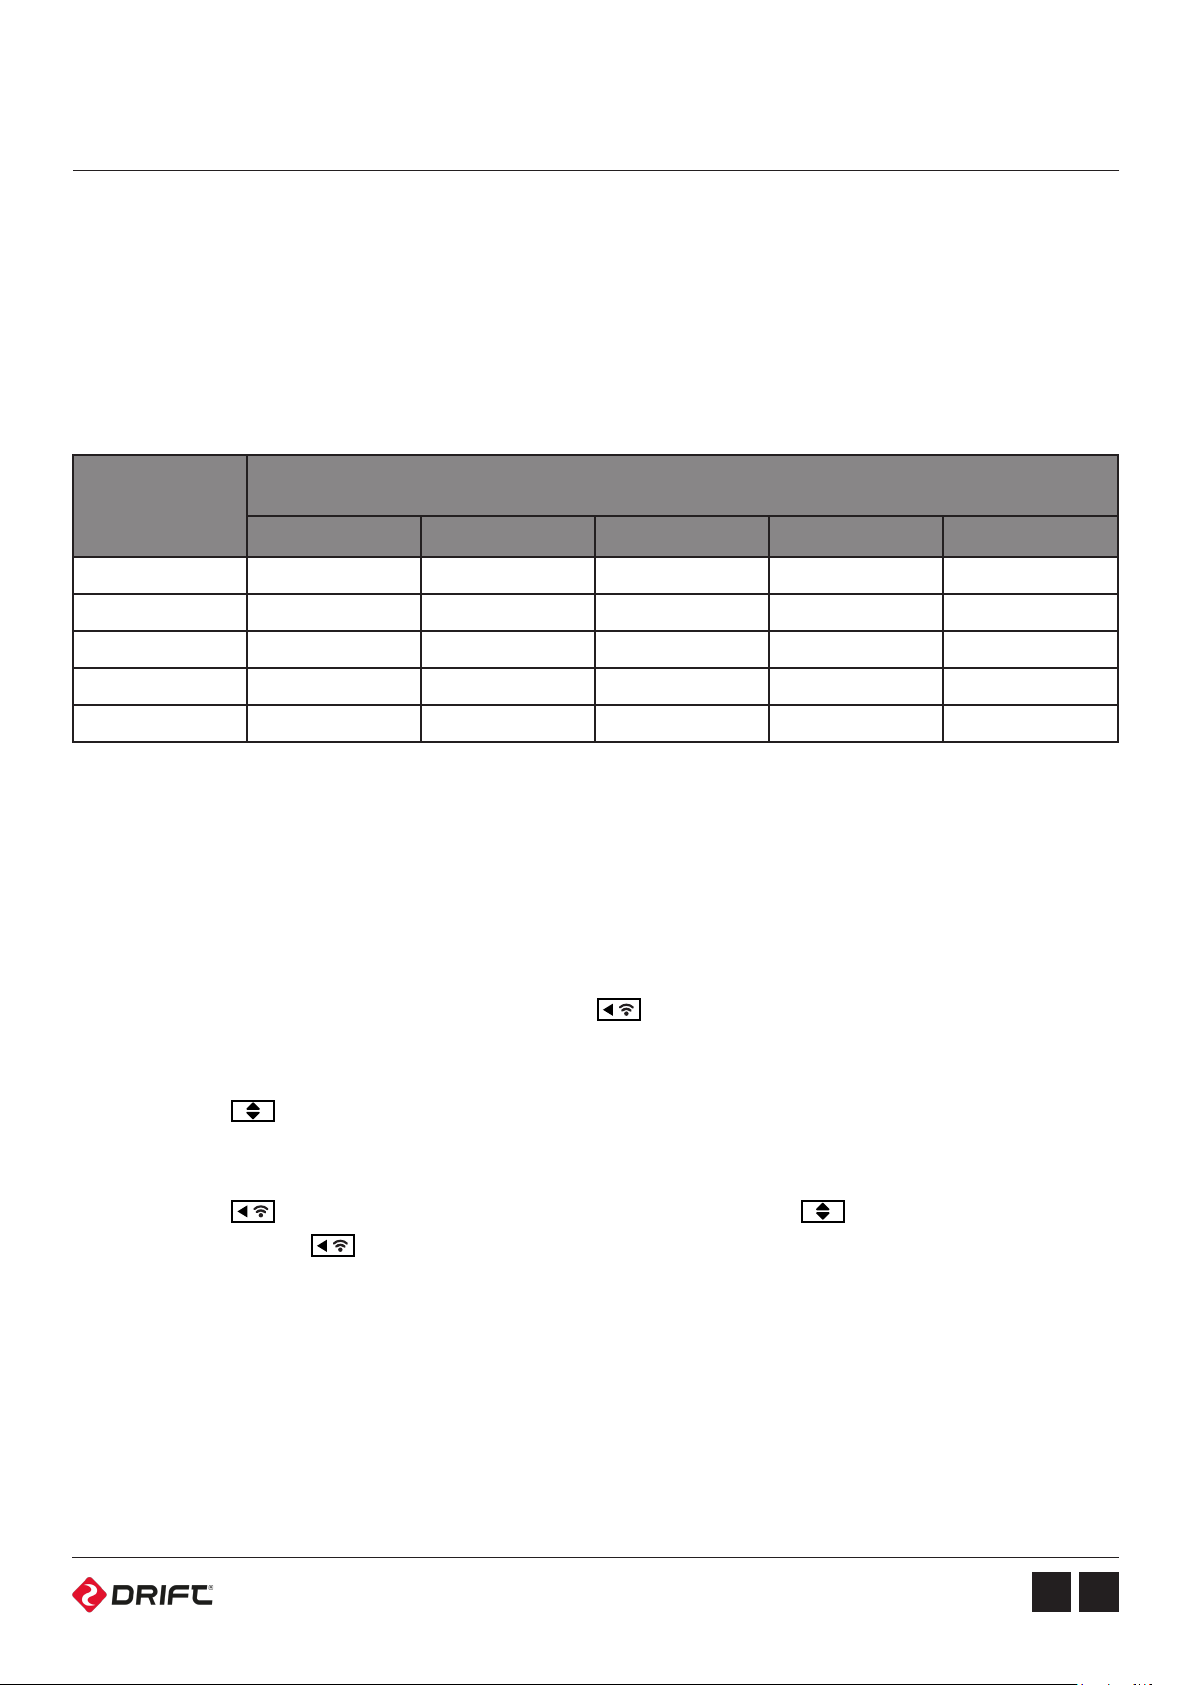
Below is a table of approximate video recording times against card size in normal
bit rate mode.
SD Card
Capacity
8GB 22 min 22 min 28 min 35 min 44 min
16GB 44 min 45 min 56 min 1h 10 min 1h 28 min
32GB 1h 28 min 1h 30 min 1h 52 min 2h 20 min 2h 56 min
64GB 2h 56 min 3h 3h 44 min 4h 40 min 5h 52 min
128GB 5h 52 min 6h 7h 28 min 9h 20 min 11h 44 min
4K 4K UHD 2.7K 1080p 720p
Resolution (25FPS, Normal Bit Rate)
Formatting Your Memory Card
Formatting will remove all files from a memory card. When using a new card for
the first time, always format the memory card using the camera. With the card
inserted in the camera:
1. Power the ghost 4K on, and press the button to scroll through the modes
until you reach the settings menu.
2. Press the button to scroll through the settings until you see the ‘Format SD
Card’ option.
3. Press the button to select this option, and use the button to highlight
‘YES’. Press the button once more to format the memory card.
Removing a MicroSD Card
Life the rubber cover to reveal the Micro SD card, then push down on the card
until you hear a click, then release. The Micro SD card will be ejected from the
spring-loaded card slot.
8EN
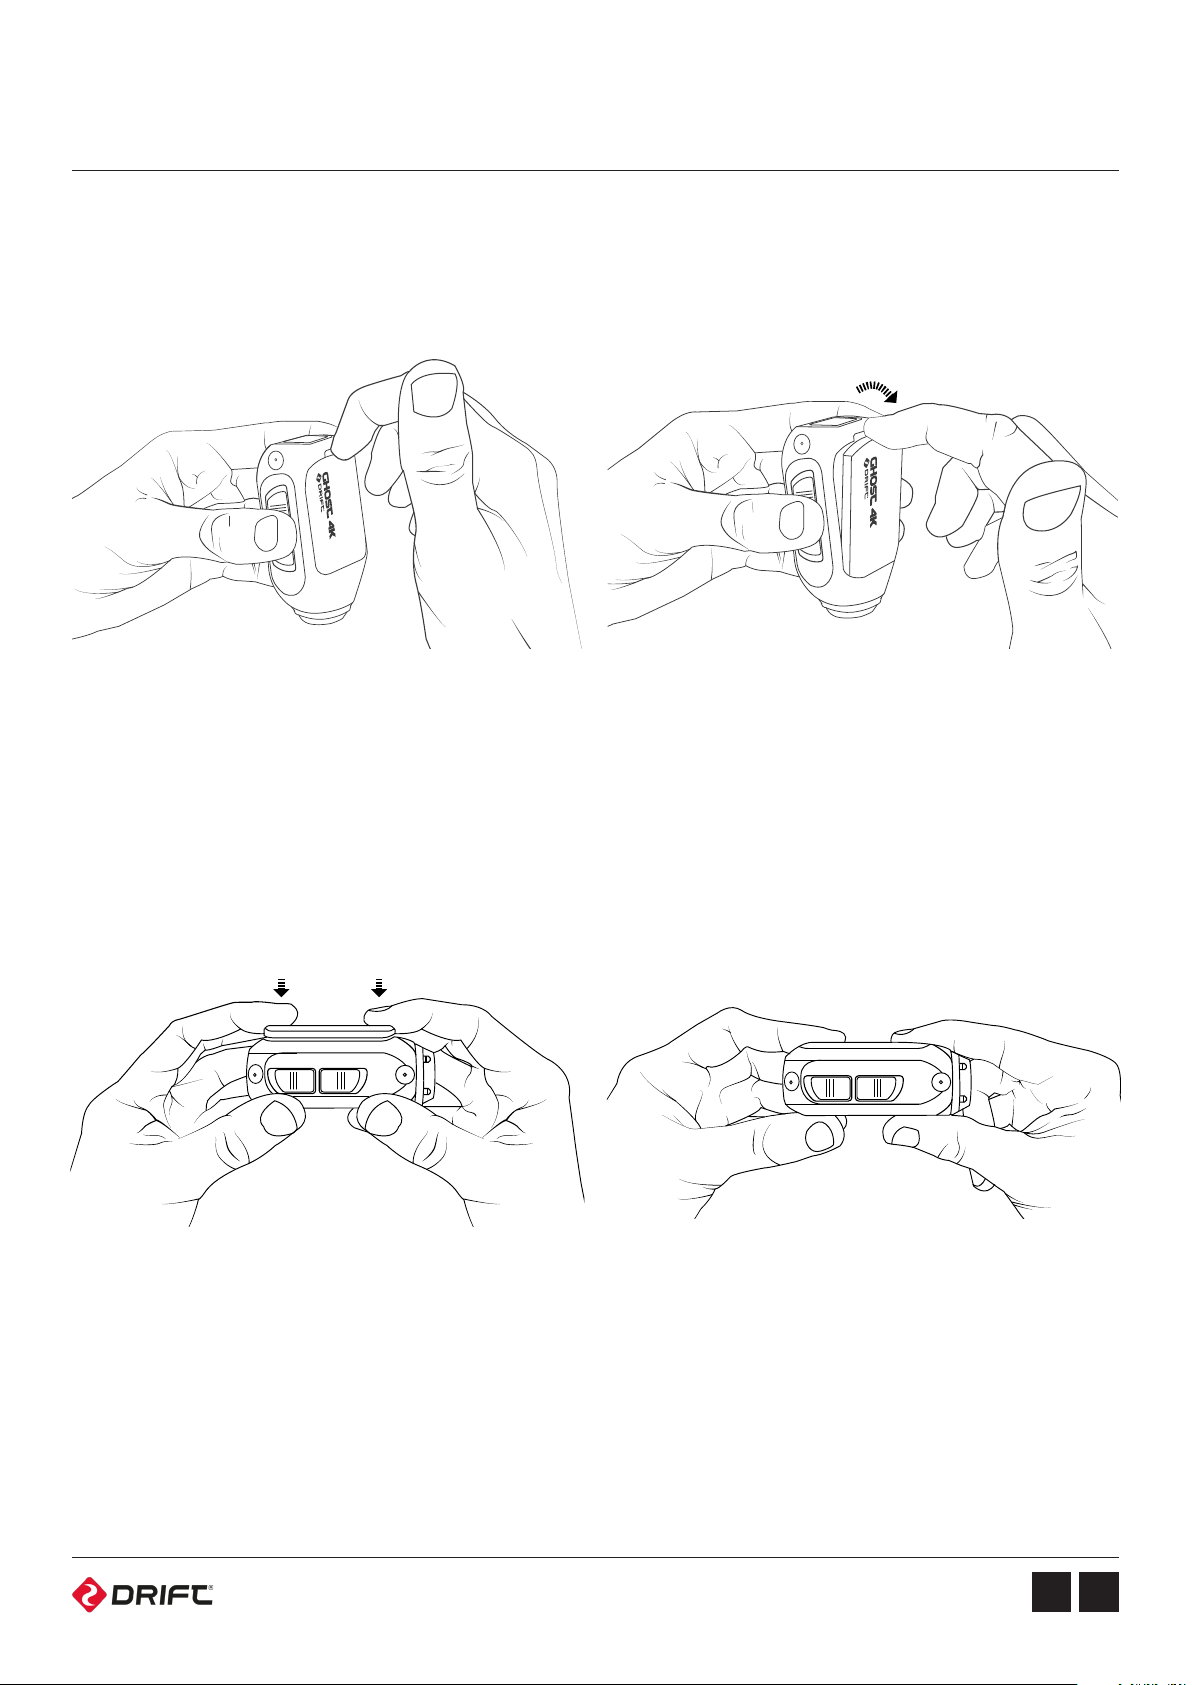
Module Docking
Module Removal
Before removing a module, please ensure that the camera is powered o.
If your camera has a module docked, remove by following these instructions:
1. Place index finger onto
the module notch.
Detaching the module exposes the female connector and module dock area.
A tool may be used alternatively to remove the module.
2. Pull outwards, pivoting
on the module.
Module Attachment
Before installing, please ensure that the camera is powered o.
1. Place the module on the camera,
ensuring that the 30 pin connector is
above the camera’s female connector.
Warning: Please ensure that the connectors are plugged together; if securement pins have
locked into place, but the connector remained undocked; remove the module and repeat
attachment. During step 2, you may press the module firmly on the connector side area, to
ensure connector docking before securement pins locking into place.
2. Press down on both ends
simultaneously, until the module
clicks into place.
9EN
 Loading...